
PTZ-T4215I-D - Security Camera Hikvision - Free user manual and instructions
Find the device manual for free PTZ-T4215I-D Hikvision in PDF.


User questions about PTZ-T4215I-D Hikvision
0 question about this device. Answer the ones you know or ask your own.
Ask a new question about this device
Download the instructions for your Security Camera in PDF format for free! Find your manual PTZ-T4215I-D - Hikvision and take your electronic device back in hand. On this page are published all the documents necessary for the use of your device. PTZ-T4215I-D by Hikvision.
USER MANUAL PTZ-T4215I-D Hikvision
natural_image
Abstract geometric pattern with gray and blue diamond shapes (no text or symbols)
natural_image
Blue background with white globe and hand icon (no text or symbols)HD-TVI Speed Dome
User Manual
User Manual
© 2017 Hangzhou Hikvision Digital Technology Co., Ltd.
This user manual is intended for users of HD-TVI Speed Dome. It includes instrucons on how to use the Product. The soware embodied in the Product is governed by the user license agreement covering that Product.
About this Manual
This Manual is subject to domesc and internaonal copyright protecon. Hangzhou Hikvision Digital Technology Co., Ltd. ("Hikvision") reserves all rights to this manual. This manual cannot be reproduced, changed, translated, or distributed, parally or wholly, by any means, without the prior written permission of Hikvision.
Trademarks
HiLook and other Hikvision marks are the property of Hikvision and are registered trademarks or the subject of applicaons for the same by Hikvision and/or its aliases. Other trademarks menoned in this manual are the properes of their respective owners. No right of license is given to use such trademarks without express permission.
Disclaimer
TO THE MAXIMUM EXTENT PERMITTED BY APPLICABLE LAW, HIKVISION MAKES NO WARRANTIES, EXPRESS OR IMPLIED, INCLUDING WITHOUT LIMITATION THE IMPLIED WARRANTIES OF MERCHANTABILITY AND FITNESS FOR A PARTICULAR PURPOSE, REGARDING THIS MANUAL. HIKVISION DOES NOT WARRANT, GUARANTEE, OR MAKE ANY REPRESENTATIONS REGARDING THE USE OF THE MANUAL, OR THE CORRECTNESS, ACCURACY, OR RELIABILITY OF INFORMATION CONTAINED HEREIN. YOUR USE OF THIS MANUAL AND ANY RELIANCE ON THIS MANUAL SHALL BE WHOLLY AT YOUR OWN RISK AND RESPONSIBILITY.
TO THE MAXIMUM EXTENT PERMITTED BY APPLICABLE LAW, IN NO EVENT WILL HIKVISION, ITS DIRECTORS, OFFICERS, EMPLOYEES, OR AGENTS BE LIABLE TO YOU FOR ANY SPECIAL, CONSEQUENTIAL, INCIDENTAL, OR INDIRECT DAMAGES, INCLUDING, AMONG OTHERS, DAMAGES FOR LOSS OF BUSINESS PROFITS, BUSINESS INTERRUPTION, SECURITY BREACHES, OR LOSS OF DATA OR DOCUMENTATION, IN CONNECTION WITH THE USE OF OR RELIANCE ON THIS MANUAL, EVEN IF HIKVISION HAS BEEN ADVISED OF THE POSSIBILITY OF SUCH DAMAGES.
SOME JURISDICTIONS DO NOT ALLOW THE EXCLUSION OR LIMITATION OF LIABILITY OR CERTAIN DAMAGES, SO SOME OR ALL OF THE ABOVE EXCLUSIONS OR LIMITATIONS MAY NOT APPLY TO YOU.
Support
Should you have any quesons, please do not hesitate to contact your local dealer.
Thank you for purchasing our product. If there are any quesons, or requests, please do not hesitate to contact the dealer.
Regulatory Informaon
FCC Informaon
Please take aenon that changes or modicaon not expressly approved by the party responsible for compliance could void the user's authority to operate the equipment.
FCC compliance: This equipment has been tested and found to comply with the limits for a Class A digital device, pursuant to part 15 of the FCC Rules. These limits are designed to provide reasonable protecon against harmful interference when the equipment is operated in a commercial environment. This equipment generates, uses, and can radiate radio frequency energy and, if not installed and used in accordance with the instrucon manual, may cause harmful interference to radio communicaons. Operaon of this equipment in a residential area is likely to cause harmful interference in which case the user will be required to correct the interference at his own expense.
FCC Conditions
This device complies with part 15 of the FCC Rules. Operation is subject to the following two conditions:
- This device may not cause harmful interference.
- This device must accept any interference received, including interference that may cause undesired operaon.
EU Conformity Statement

This product and - if applicable - the supplied accessories too are marked with "CE" and comply therefore with the applicable harmonized European standards listed under the Low Voltage Direcve 2014/35/EU, the EMC Direcve 2014/30/EU, the RoHS Direcve 2011/65/EU.

2012/19/EU (WEEE direcve): Products marked with this symbol cannot be disposed of as unsorted municipal waste in the European Union. For proper recycling, return this product to your local supplier upon the purchase of equivalent new equipment, or dispose of it at designated collecon points. For more informaon see: www.recyclethis.info.

2006/66/EC (baery direcve): This product contains a baery that cannot be disposed of as unsorted municipal waste in the European Union. See the product documentaon for speci baery informaon. The baery is marked with this symbol, which may include leering to indicate cadmium (Cd), lead (Pb), or mercury (Hg). For proper recycling, return the baery to your supplier or to a designated collecon point. For more informaon see: www.recyclethis.info.
Safety Instrucon
These instrucons are intended to ensure that the user can use the product correctly to avoid danger or property loss.
The precauon measure is divided into 'Warnings' and 'Cauons':
Warnings: Serious injury or death may be caused if any of these warnings are neglected.
Cauons: Injury or equipment damage may be caused if any of these cauons are neglected.
 |  |
| Warnings Follow these safeguards to prevent serious injury or death. | Cauons Follow these precauons to prevent potenal injury or material damage. |

Warnings:
- Adopt the power adapter which can meet the safety extra low voltage (SELV) standard. Refer to the specicaon manual for the standard of power adapter and the power consumpon cannot be less than the required value.
- Do not connect several devices to one power adapter as an adapter overload may cause over-heang and can be a re hazard.
- When the product is installed on a wall or ceiling, the device should be rmly xed.
- To reduce the risk of re or electrical shock, do not expose the indoor used product to rain or moisture.
- This installaon should be made by a qualified service person and should conform to all the local codes.
● Install blackouts equipment into the power supply circuit for convenient supply interrupon. - If the product does not work properly, please contact your dealer or the nearest service center. Never aempt to disassemble the product yourself. (We shall not assume any responsibility for problems caused by unauthorized repair or maintenance.)

Cauons:
● Make sure the power supply voltage is correct before using the product.
- Do not drop the product or subject it to physical shock. Do not install the product on vibratory surface or places.
- Do not expose it to high electromagnec radiang environment.
- Do not aim the lens at the strong light such as sun or incandescent lamp. The strong light can cause fatal damage to the product.
- The sensor may be burned out by a laser beam, so when any laser equipment is being used, make sure that the surface of the sensor not be exposed to the laser beam.
- Do not place the dome in extremely hot, cold, dusty or damp locaons, otherwise re or electrical shock will occur. Refer to the Specicaon for the details of operang temperature.
● To avoid heat accumulaon, good venlaon is required for a proper operating environment.
● While shipping, the product should be packed in its original packing.
- Use the provided glove when open up the product cover. Do not touch the product cover with ngers directly, because the acidic sweat of the ngers may erode the surface coang of the product cover.
- Use a so and dry cloth when clean inside and outside surfaces of the product cover. Do not use alkaline detergents.
- Improper use or replacement of the baery may result in hazard of explosion. Please use the manufacturer recommended baery type.
Table of Contents
Chapter 1 Overview....1
1.1 Descripon....1
1.2 Funcons....1
Chapter 2 Getng Started....4
2.1 Power-up Acon....4
2.2 Basic Operations....5
2.3 System-dened Presets 5
2.4 On-screen Displays 6
Chapter 3 Menu Operaon....7
3.1 Accessing and Operating the Menu 8
3.2 Conguring System Informaon 8
3.2.1 Checking System Informaon 8
3.2.2 Conguring System Parameters....9
3.3 Conguring Image Parameters....13
3.3.1 Conguring Camera Parameters....13
3.3.2 Conguring Privacy Mask 19
3.3.3 Conguring Output Standard 20
3.3.4 Conguring IR Parameters....21
3.4 Conguring PTZ Control Parameters 22
3.4.1 Conguring PTZ Parameters 22
3.4.2 Conguring Presets 24
3.4.3 Conguring Patrols 25
3.4.4 Conguring Patterns....26
3.4.5 Conguring Timing Tasks....28
3.4.6 Conguring Zone....30
3.5 Conguring and Handling Alarms 32
3.5.1 Conguring Alarm Input and Linkage Acons 32
3.5.2 Conguring Alarm Parameters....33
3.5.3 Conguring Alarm Output 34
3.6 Others 35
3.6.1 Restoring Default Dome Sengs....35
3.6.2 Restoring Default Camera Sengs 35
3.6.3 Reboong the Dome 35
Appendix 35
Appendix 1 Lightning & Surge Protecon....36
Appendix 2 RS485 Bus Connecon....37
Appendix 3 24VAC Wire Gauge & Transmission Distance 40
Appendix 4 Wire Gauge Standards .... 41
Chapter 1 Overview
1.1 Descripon
Integrated with the built-in pan/lt unit, the HD-TVI speed dome features highly sensitive response and reliable performance. The speed dome can be adopted in various surveillance elds with its full-integral funcons and features, such as corridor, large venue, meeng room, staon, neighborhoods, etc.
1.2 Funcons

The funcons vary according to the dierent models of the speed dome.
- Coaxial Control
The speed dome with a specied DVR or controller can be sent the control signals via coaxial cable (BNC cable).
● High-Denion Output
The resolution of the output image can be up to 1080p.
- Limits
The speed dome can be programmed to move within the limits (le/right, up/down).
● Self-adapve Protocol
While using RS-485 control, the speed dome is compatible with PELCO-D, PELCO-P and PRIVATE-Code, etc., and is capable of being self-adapve to these protocols without selecng protocol by DIP switch sengs. While using coaxial control, the speed dome is self-adapve to PELCO-D and PRIVATE-Code protocols.
- Keyboard Control
The pan/lt movement and zoom acons of dome can be controlled by the control keyboard, DVR, matrix, etc.
- Scan Modes
The dome provides 5 scan modes: auto scan, lt scan, and panorama scan.
- Preset Freezing
This feature freezes the scene on the monitor when the dome is moving to a preset. This allows for smooth transition from one preset scene to another. It also guarantees that masked area will not be revealed when the dome is moving to a preset.
- Presets
A preset is a predened image posion. When the preset is called, the dome will automacally move to the dened posion. The presets can be added, modified, deleted and called.
- Label Display
The on-screen label of the preset tle, PT display, zoom, and me can be displayed on the monitor.
- Auto Flips
In manual tracking mode, when a target object goes directly beneath the dome, the video will automatically ips 180 degrees in horizontal direcon to maintain connuity of tracking. This funcon can also be realized by auto mirror image depending on dierent camera models.
- Privacy Mask
This funcon allows you to block or mask certain area of a scene, for preventing the personal privacy from recording or live viewing. A masked area will move with pan and it funcons and automatically adjust in size as the lens zooms telephoto and wide.
● 3D Posioning
In the client soware, use the le key of mouse to click on the desired posion in the video image and drag a rectangle area in the lower right direcon, then the dome system will move the posion to the center and allow the rectangle area to zoom in. Use the le key of mouse to drag a rectangle area in the upper le direcon to move the posion to the center and allow the rectangle area to zoom out.
● Proporonal Pan/Tilt
Proporonal pan/lt automacally reduces or increases the pan and lt speeds according to the amount of zoom. At telephoto zoom sengs, the pan and lt speeds will be slower than at wide zoom sengs. This keeps the image from moving too fast on the live view image when there is a large amount of zoom.
- Auto Focus
The auto focus enables the camera to focus automacally to maintain clear video images.
● Day/Night Auto Switch
The speed domes deliver color images during the day. And as light diminishes at night, the speed domes switch to night mode and deliver black and white images with high quality.
- Slow Shuer
In slow shutter mode, the shutter speed will automatically slowdown in low illuminaon conditions to maintain clear video images by extending the exposure me. The feature can be enabled or disabled.
● Backlight Compensaon (BLC)
If you focus on an object against strong backlight, the object will be too dark to be seen clearly. The BLC (Backlight Compensaon) funcon can compensate light to the object in the front to make it clear, but this causes the over-exposure of the background where the light is strong.
● Wide Dynamic Range (WDR)
The wide dynamic range (WDR) funcon helps the camera provide clear images even under back light circumstances. When there are both very bright and very dark areas simultaneously in the eld of view, WDR balances the brightness level of the whole image and provide clear images with details.
● White Balance (WB)
White balance can remove the unrealisc color casts. White balance is the white rendition funcon of the camera to adjust the color temperature according to the environment automacally.
- Patrol
A patrol is a memorized series of pre-dened preset funcon. The scanning speed between two presets and the dwell me at the preset are programmable.
● Paern
A paern is a memorized series of pan, lt, zoom, and preset funcons. By default the focus and iris
are in auto status during the paern is being memorized.
● Power O Memory
The dome supports the power o memory capability with the predened resume me. It allows the dome to resume its previous posion aer power is restored.
- Time Task
A me task is a precongured acon that can be performed automacally at a specic date and me. The programmable acons include: pan scan, patrol 1-8, pattern 1-4, preset 1-8, panorama scan, lt scan, day, night, and none.
- Park Acon
This feature allows the dome to start a predened acon automacally aer a period of inacvity.
Chapter 2 Geng Started
2.1 Power-up Acon
Aer the speed dome is power-on, it will perform a series of self-test acons. It runs the pan checking firstly, then the lt checking and the camera checking at last. After the power-up acons, the system informaon will be displayed for 120 s on the live view screen as shown below.
| XX-XXXXX-XX | |
| SN | XXXXXXXXX |
| ADDRESS | 0 |
| COM FORMAT | 2400,8,1 |
| PROTOCOL | AUTO MATCH |
| FIRMWARE | X.XX |
| HARDWARE | X.XX |
| BUILD DATE | XX XX XX |
| TILT SUCCESS | |
| PAN CHECK ERR | |
Figure 2-1 System Informaon
Table 2-1 Descripons of the System Informaon
| System Info | Descripon |
| SN | The serial No. of the speed dome, which is unique. |
| ADDRESS | The default communicaon address of the speed dome. |
| COM Format | The communicaon sengs of the speed dome, including baudrate (2400 by default), data bit (8 by default) and stop bit (1 by default) |
| PROTOCOL | It is for the communicaon with other devices. |
| FIRMWARE | The version of the rmware. |
| HARDWARE | The version of the hardware. |
| BUILD DATE | The date when the program of the soware is compiled. |

- You have to congregate the address and the baudrate for the speed dome the same as those in the control devices.
● The speed dome is self-adapve to the PELCO-D, PELCO-P, and PRIVATE-Code protocols.
2.2 Basic Operaons
You can operate the speed dome by using a control device, including the control keyboard, DVR, DVS, etc. In this manual, accessing the speed dome via the web browser will be taken as the example.
Panning and Ing:
Click the direcon buons to control the pan and It movement of the speed dome.
Zooming:
Click the ZOOM+ and ZOOM- buttons to control the zooming.
Focusing:
Click the FOCUS+ and FOCUS- buttons to adjust the focus.
Iris:
Click the IRIS+ and IRIS- buons to adjust the iris.
2.3 System-dened Presets
Purpose:
The secon lists the system-dened presets with special funcons. These presets cannot be edited but can be only called through a control device, e.g. a DVS or web browser. To call the system-dened presets remotely, you can choose the preset number from the list in the PTZ control panel. Please refer to table below for details.
For instance, preset 99 is the "Start auto scan". If you call the preset 99, the speed dome starts auto scan funcon.
Table 2-2 System-dened Presets
| Preset NO. | Funcon | Preset NO. | Funcon |
| 33 | Auto-ip | 92 | Enable limits |
| 34 | Return to home posion | 93 | Set manual limits |
| 35 | Patrol 1 | 94 | Remote reboot |
| 36 | Patrol 2 | 95 | Access main menu |
| 37 | Patrol 3 | 96 | Stop scanning |
| 38 | Patrol 4 | 97 | Start Random Scanning |
| 39 | IR cut Iter in | 98 | Start Frame Scanning |
| 40 | IR cut Iter out | 99 | Start auto scanning |
| 41 | Paern 1 | 100 | Start lt scanning |
| 42 | Paern 2 | 101 | Start panorama scanning |
| 43 | Paern 3 | 102 | Patrol 5 |
| 44 | Paern 4 | 103 | Patrol 6 |
| 46 | Enable fast patrol | 104 | Patrol 7 |
| 90 | Enable Wiper | 105 | Patrol 8 |
2.4 On-screen Displays
The speed dome supports following on-screen displays:
Zoom Rao: Idenes the amount of magnicaon. The format is ZXXX. XXX is the zoom amount.
PT Angle: Displays panning and lting direcon, with the format of NEXXX/TXXX. The NE followed with XXX indicates the degrees in north east direcon, while the T followed with XXX indicates the degrees in lt posion.
Alarm: When an alarm is triggered, the corresponding informaon will be displayed.
Time: Displayed as Day/Month/Year/Day of Week/Hour/Minute. It supports 24-hour me system.
Preset Label: Aer you call the congured preset, the preset number is displayed if the lens moves to the certain place where you've set a preset for.
Zone: Display the zone tle.
Address: Display the address of the speed dome.
Error Rate: Display the error rate of the speed dome.
Fan and Heat: Display the heat informaon of the speed dome.
Chapter 3 Menu Operaon

- The operaon interface of the dierent speed domes may dier. Please refer to the actual operaon interface.
- You can click the le and right direction buons in the PTZ control panel via the web browser of the DVR to enter the next page or return to the previous page of the submenu if more than one page is available.
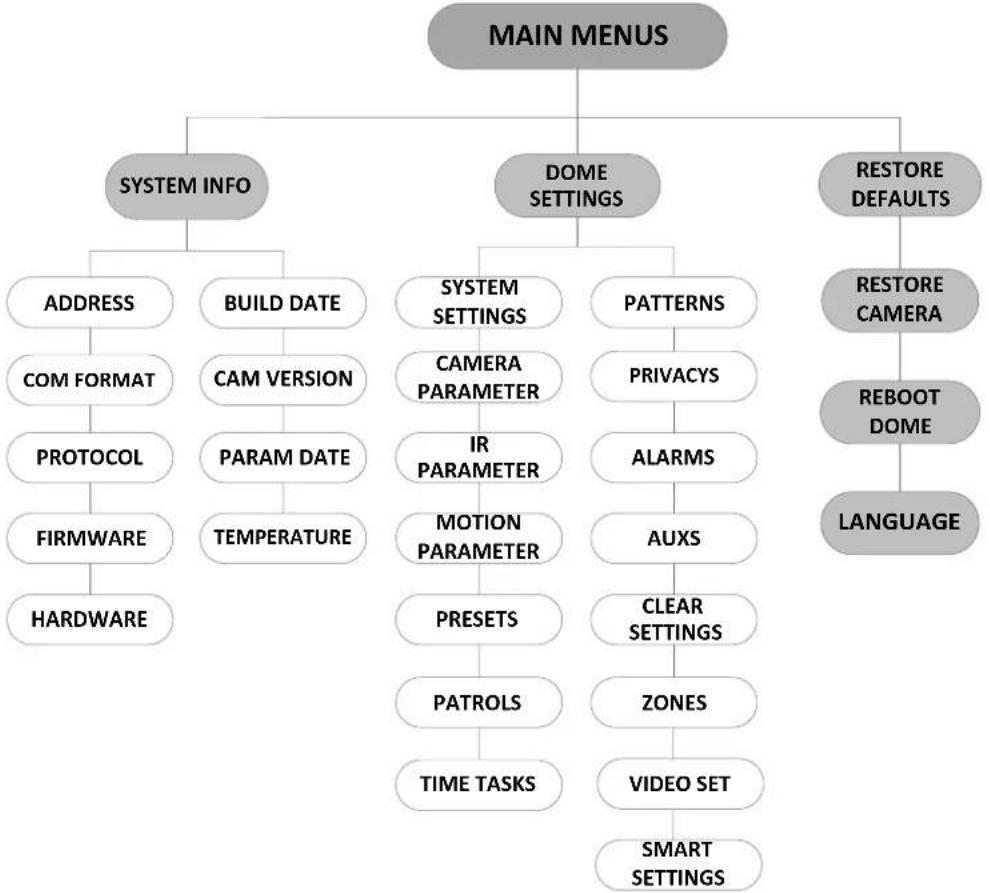
flowchart
graph TD
    A["MAIN MENUS"] --> B["SYSTEM INFO"]
    A --> C["DOME SETTINGS"]
    A --> D["RESTORE DEFAULTS"]
    B --> E["ADDRESS"]
    B --> F["BUILD DATE"]
    E --> G["COM FORMAT"]
    F --> H["CAM VERSION"]
    H --> I["PROTOCOL"]
    I --> J["FIRMWARE"]
    J --> K["HARDWARE"]
    C --> L["SYSTEM SETTINGS"]
    C --> M["PATTERNS"]
    L --> N["CAMERA PARAMETER"]
    M --> O["PRIVACYS"]
    N --> P["IR PARAMETER"]
    P --> Q["MOTION PARAMETER"]
    Q --> R["PRESSETS"]
    R --> S["PATROLS"]
    S --> T["TIME TASKS"]
    M --> U["ALARMS"]
    U --> V["AUXS"]
    V --> W["CLEAR SETTINGS"]
    W --> X["ZONES"]
    X --> Y["VIDEO SET"]
    Y --> Z["SMART SETTINGS"]
    D --> AA["RESTORE CAMERA"]
    AA --> AB["REBOOT DOME"]
    AB --> AC["LANGUAGE"]
Figure 3-1 Menu Structure
Before you start:
You can operate the speed dome by using the on-screen display menu remotely by connecng to a DVR or a DVS (encoder).
Examples of entering speed dome menu are listed as follows:
● Enter the menu by pressing buons: PTZ -> REC -> 9 -> 5 on the front panel of the DVR.
● Enter the menu by pressing buons: CALL -> 9 -> 5 -> ENTER on the keyboard.
- Enter the menu via the web browser of a DVR/DVS.
Menu operaons via the web browser of a DVR will be taken as an example in this chapter.
3.1 Accessing and Operating the Menu
To enter the main menu:
Steps:
- Connect the video and RS-485 cables of speed dome to a DVR.
- Visit the DVR via the web browser.
-
View the live video of the speed dome.
-
For PELCO-P/D and other private PTZ protocols, call preset 95 from the preset list in the PTZ control panel of the DVR.
| MAIN MENUS | |
| ENGLISH | |
| EXIT | |
Figure 3-2 Main Menu
To move the cursor and operate the menu:
- Move the cursor up/down: On the live view page of the web browser, click up/down direction buttons or FOCUS + and FOCUS - buons in the PTZ control panel to move the cursor up and down.
- Enter/Exit: On the live view page of the web browser, click IRIS+ to enter a submenu; move the cursor to Exit and click IRIS+ to exit.
To change the value of a parameter:
Steps:
- Move the cursor to the target item and click IRIS+ buon. You can see the shape of cursor changes.
- Click the up/down or le/right buons in the PTZ control panel to choose the value from the selectable value list.
- Press IRIS+ to conrm the change or click IRIS- to cancel and restore the original value. You can see the shape of cursor changes again.
3.2 Conguring System Informaon
3.2.1 Checking System Informaon
Purpose:
System informaon menu displays the current system informaon of the speed dome, including
model, address, protocol, etc. The informaon shown on this submenu is similar to the system informaon shown aer the power-up acon. Please refer to Secon 2.1 for more details.
Enter the system informaon display menu:
MAIN MENUS > SYSTEM INFO
| SYS INFO | |
| XX-XXXXX-X | |
| ADDRESS | 0 |
| COM FORMAT | 2400,8,1 |
| PROTOCOL | SELF ADAPTIVE |
| VERSION | 1.00 |
| HARDVERSION | 1.00 |
| BUILD DATE | 16 11 04 |
| BACK | EXIT |
text_image
SFigure 3-3 System Informaon

● Informaon on this menu cannot be edited.
● The temperature refers to the internal temperature of the speed dome.
3.2.2 Conguring System Parameters
Purpose:
You can check and also edit the system informaon of soware address, baud rate, system me, etc. on the system informaon sengs menu.
MAIN MENUS > DOME SETTINGS > SYSTEM INFO SETTINGS
| SYSTEM INFO SETTINGS | |
| SOFT ADDRESS | 1 |
| SOFT ADDR ACT | OFF |
| SOFT BAUD | 2400 |
| SOFT BAUD ACT | OFF |
| BROADCAST ADDR | ON |
| PELCO CHECKSUM | ON |
| SYSTEM TIME | |
BACK EXIT
| SYSTEM INFO SETTINGS | |
| ZERO ANGLE | |
| HEAT CONTROL | TEMP |
| FAN CONTROL | TEMP |
| EIS FUNCTION | OFF |
| EIS LEVEL | N/A |
| PRESET FOCUS | OFF |
| BACK | EXIT |
| SYSTEM INFO SETTINGS | |
| PROTOCOL STATUS | OFF |
| PROTOCOL | AUTO MATCH |
| 485 CHECK | AUTO |
| POWER MEMORY | 180S |
| COAXITION ACTIVE | ON |
| PROTOCOL-C | HIK-C |
| BACK | EXIT |
Figure 3-4 System Informaon Sengs

You can click the le and right direcon buons in the PTZ control panel via the web browser of the encoder to enter the next page and return to the previous page of the submenu if more than one page is available.
♦ Dome address sengs
To Set the So Address of the Speed Dome
If the SET SOFT ADDR ACT is set as ON, the so address is the valid address for connecng the speed dome. The selectable so address ranges from 1 to 255;
If the SET SOFT ADDR ACT is set as OFF, the hard address set by the DIP switch is the valid address of the speed dome.

- Before you set the so address of the speed dome, you need to conrm that it is within the control range of the control device (e.g. the DVR).
- Aer you enable/disable the so address, the speed dome will reboot automacally to activate the sengs.
To Set the Broadcast Address of the Speed Dome
When the BROADCAST ADDR is set as ON, the control device with address 0 is capable of controlling all domes connected to it.
So Baud Rate Sengs
If the SOFT BAUD is set as ON, the soft baud rate is the valid baud rate for the speed dome, with 2400, 4800, 9600 and 19200 selectable.
If the SOFT BAUD is set as OFF, the baud rate should be set by the DIP switch.

Aer you enable/disable the so baud rate, the speed dome will reboot automacally to acvate the sengs.
♦ PELCO CHECKSUM
The PELCO CHECKSUM is used for Pelco-P and Pelco-D protocols. If the video turns to slack or uncontrollable, you can set the PELCO CHECKSUM as ON to improve the video quality.
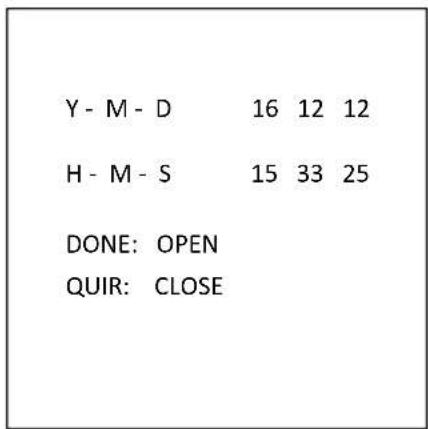
◆ System Time Conguraon
(1) Move the cursor to SYS TIME using the direction buons and click IRIS+ to enter.
(2) Click the le/right direcon buons to posion the cursor on the specic item (year/month/day or hour/minute/second) of which you want to change the value.
(3) Click the up/down direcon buons to increase/decrease the value.
(4) Click IRIS+ buon to conrm the sengs and exit.
text_image
Y - M - D 16 12 12 H - M - S 15 33 25 DONE: OPEN QUIR: CLOSEFigure 3-5 Set the System Time
◆ Zero Angle Conguraon
Purpose:
You can denote the zero angle of the speed dome on the ZERO ANGLE submenu.
Steps:
- Move the cursor to ZERO ANGLE using the direcon buttons and click IRIS+ to enter.
- Click the le/right/up/down direcon buons to adjust the monitor angle of the speed dome.
- Click IRIS+ button to conrm the sengs and exit.
◆ Display Sengs
Purpose:
You can enable or disable the on-screen display of PTZ movements, alarms, me, preset, zone, address, error rate, and fan/heat show, etc.
Steps:
- Move the cursor to DISPLAY SETTINGS using the direcon buons and click IRIS+ to enter.
- Move the cursor to the target item and click IRIS+ and click up/down direction buons to choose each display mode as ON or OFF, and dene each display time as 2 seconds, 5 seconds or 10 seconds.
- Click IRIS+ button to conrm the sengs.

If you enable the OSD for both ZOOM SHOW and P/T ANGLE, while calling a preset, the preset No. will be displayed on the screen II the preset scene passes.
| DISPLAY SETTINGS | |
| ZOOM SHOW | ON |
| P/T SHOW | ON |
| ALARM SHOW | OFF |
| TIME SHOW | ON |
| PRESET SHOW | ON |
| ZONE SHOW | OFF |
| ADDRESS SHOW | OFF |
| BACK | EXIT |
| DISPLAY SETTINGS | |
| ERROR RATE | OFF |
| FAN/HEAT | OFF |
| BACK | EXIT |
Figure 3-6 Display Sengs
The speed dome shows the viewing direcon when you manually control it to rotate.
Table 1-1 Viewing Direcon Display
| Display | N | NE | E | SE | S | SW | W | NW |
| Indicaon | North | Northeast | East | Southeast | South | Southwest | West | Northwest |

The north direcon refers to the angle zero.
● Heat Parameter Conguraon
You can set the HEAT CONTROL as TEMP (controlled by the temperature), ON or OFF.
● Fan Parameter Conguraon
You can set the FAN CONTROL as TEMP (controlled by the temperature), ON or OFF.
● EIS (Electronic Image Stabilizaon) Conguraon
You can set the EIS FUNCTION as ON or OFF; and set the EIS LEVEL as 0 to 3.

The selectable EIS level varies according to the dierent camera models.
- Preset Direct Focus
You can set the preset direct focus funcon ON/OF on PRESET DFOCUS submenu.
● Protocol and RS-485 sengs
◆ Select the protocol.
Choose the protocol on PROTOCOL submenu. You can congregate it as AUTO MATCH, PELCO-P, PELCO-D, or HIKVISION. When you choose AUTO MATCH, it is protocol self-adapve.
◆ Set the protocol status.
Set the PROTOCOL STATUS as ON to enable the user-dened protocol.
◆ Enable the RS-485 conguraon diagnosis.
You can set 485 CHECK as ON or AUTO for automac RS-485 conguraon diagnosis. If the conguraon is incorrect, an alert will be received; if you set the value as AUTO, it will automatically stop the diagnosis when no errors exist.
● Power Memory Sengs
The dome can resume its previous PTZ status aer it restarted from a power-o when it stops at a posion longer than the predened me. You can set the memory me to 10S, 30S, 60S, 180S, and 300S.
- Coaxitron Control
The Coaxial transmission funcon can be enabled to transmit the RS485 signal along with the video signal via the BNC cable. If the connected encoding device supports the Coaxial transmission as well, the RS485 cable will not be necessary.
Steps:
1) Enable the Coaxial control funcon by seng the opon of COAXITRON ACTIVE as ON.
2) Select the Coaxial control protocol, with HIK-C is selectable.

The transmission protocol of the connected encoding device should be set the same as the speed dome to support the coaxial transmission.
3.3 Conguring Image Parameters
3.3.1 Conguring Camera Parameters
Purpose:
You can set the camera parameters including focus, shuer speed, iris, etc. Enter the camera parameters sengs menu:
MAIN MENUS > DOME SETTINGS > CAMERA PARAMETER
| CAMERA | CAMERA | ||
| FOCUS | AF | BLC/WDR | OFF |
| ZOOM LIMIT | 22 | BLC LEVEL | N/A |
| ZOOM SPEED | HIGH | AE MODE | AUTO |
| SLOW SHUTTER | ON | IRIS | 10 |
| IRCUT FILTER | AUTO | SHUTTER | 50 |
| D/N LEVEL | 1 | GAIN | N/A |
| SHARPNESS | 7 | EXPOSURE COMP | 7 |
| BACK | EXIT | BACK | EXIT |
| CAMERA | |
| WHITE BALAN | ATW |
| RED | 64 |
| BLUE | 64 |
| IMAGE FLIP | OFF |
| FOCUS LIMIT | 1M |
| 2D DNR | 1 |
| 3D DNR | 2 |
| BACK | EXIT |
| CAMERA | |
| WIDE LIMIT | 2.0 |
| CHROMA SUPPRESS | 1 |
| SATURATION | 1 |
| CONTRAST | OFF |
| SCENE MODE | INDOOR |
| HLC | ON |
| SHARPNESS COMP | 15 |
| BACK | EXIT |
| CAMERA | |
| GAIN LIMIT | 15 |
| DEFOG | OFF |
| INIT LENS | OFF |
| BACK | EXIT |
Figure 3-7 Camera Sengs
Task 1: Congure the focus sengs.
- Seng the focus mode
Steps:
- Move the cursor to FOCUS using the direcon buons and click IRIS+ to enter.
- Click up/down direcon buons to set the focus mode to AF, MF or HAF.
AF (Auto-focus): The lens remains in focus during PTZ movements.
MF (Manual Focus): You need to adjust the focus with Focus+ and Focus- buons manually.
HAF (Half-auto Focus): The speed dome focuses automatically only once aer panning, Ing and zooming.
- Click IRIS+ buon to save the setngs.
- Seng the focus limit
Purpose:
This funcon is used to limit the minimum focus distance. You can congregate the focus limit longer when the target is at a distance, to avoid the speed dome focusing on the objects close to it; or congregate the focus limit shorter when the target is near the speed dome, and avoid it focuses on the objects father.
You can set FOCUS LIMIT to 1CM, 30 CM, 1M, 3M, 5M, and AUTO to make sure that the speed dome focuses on the target.

The focus limit value varies according to the models of speed dome.
Task 2: Congure the zoom sengs.
- Seng the zoom limit
Purpose:
Zoom limit is a user-dened limitaon of the zoom amount (Zoom amount=opcal zoom×digital zoom). If you set the zoom limit to the minimum value, the digital zoom will be invalid and the opcal zoom will reach the maximum value; if you set the zoom limit smaller, the digital zoom will be enabled.
Steps:
- Move the cursor to ZOOM LIMIT using the direcon buttons and click IRIS+ to enter.
- Click up/down direcon buttons to choose the limit from 23, 46, 92, 184, and 368.
- Click IRIS+ buon to conrm.

If you set the ZOOM LIMIT as the minimum value 22, the digital zoom funcon will be disabled, and the opcal zoom funcon is at its maximum value.
- Congure the zoom speed.
Purpose:
You can denote the speed at which the lens changes from full wide zoom to the opcal zoom.
Steps:
- Move the cursor to ZOOM SPEED using the direcon buttons and click IRIS+ to enter.
- Click up/down direcon buttons to choose the speed from HIGH (default), MEDUIM and LOW.
- Click IRIS+ button to conrm.
Task 3: Congure the IR cut Iter.
There are two parameters available for IR cut Iter conguraon.
- IR cut Iter. It can be set as AUTO, DAY or NIGHT.
AUTO: The speed dome is capable of automacally switching from Black and White mode (NIGHT) and Color mode (DAY) regarding to the lightening conditions. It is the default mode.
NIGHT (B/W): You can switch the IR cutIter into Black and White mode to increase the lens sensitivity in low light conditions
DAY (Color): You can switch it to DAY mode in normal lightng conditions.

-
You can call preset 39 to set the IR cut Iter mode to DAY mode and call preset 40 to set it as NIGHT mode.
● The IRCUT FILTER cannot be congured unless the IR light is turned o. -
D/N LEVEL. The D/N level is the light level for auto D/N mode switch. As a threshold, IR cutIter switches between DAY and NIGHT when the light condion reaches the user-dened D/N level.

D/N level opon varies according to the dierent camera models. Some models do not support user-dened D/N level
Task 4: Congure the sharpness level.
The sharpness funcon can increase the gain of the image and sharpen the edges in the picture to enhance the picture details. You can set the SHARPNESS level from 0 to 15.
Task 5: Congure the BLC and WDR.

BLC/WDR and BLC LEVEL varies according to the dierent camera models. Some models don't support user-dened BLC level.
(1) BLC/WDR. You can set the value as ON or OFF to enable or disable the funcons.
(2) BLC LEVEL. You can manually adjust the backlight compensaon level.
Task 6: Conguring the iris, gain and shuer speed
- Set the Exposure Mode
Purpose:
AE mode denes the priority of iris, shuer and gain while the speed dome adjusts the brightness of the live view. You can change the mode on AE MODE submenu.
AUTO: Auto iris, auto shuer and auto gain. The speed dome adjusts the values automacally responding to the lighng condions. It is the default mode.
IRIS: User-dened iris value, auto shuer and auto gain. It is the iris-priority mode. Please denote the iris value according to related content in this second if you choose IRIS mode.
SHUTTER: User-dened shuer speed, auto iris and auto gain. It is the shuer-priority mode. Please denote the shuer speed according to related content in this second if you choose SHUTTER mode.
MANUAL: User-dened iris, gain and shuer. Please denote the iris value, gain value and shuer speed according to related content in this second if you choose MANUAL mode.
- Set the Iris Value
The IRIS value measures the amount of light entering to the lens. You can set the iris value from 0 to 17 in response to the changing light conditions.

Iris is fully closed at the value 0 and fully open at the value 17.
- Set the Gain
- Gain value. The value of gain indicates the amplicaon degree of the original image signal. You can set the value from 0 to 15.
- Gain limit. The higher gain value you set, the more noises will appear in the image. You can set the maximum user congorable gain value from 0 to 15 to limit the gain range and control the noises in the image.

You need to change the IR CUT FILTER as DAY or NIGHT mode, and set the AE MODE as MANUAL before you adjust the gain value.
- Set the Shuer
Purpose:
The speed of the electronic shuer controls the amount of light entering to the lens in a unit of me (a second). You can manually conjure the shuer speed for the speed dome, and you can also enable the slow shuer funcon for low lighng circumstances.
(1) Shutter speed. The larger you set the SHUTTER value (the faster the shuer speed is), the fewer the amount of entering light per second is, and the darker the image is. You can set the value as 1, 2, 4, 8, 15, 30, 50, 125, 180, 250, 500, 1000, 2000, 4000 or 10000.

The value of X indicates that the shuer speed is 1/X second. If you set the SHUTTER value bigger (shuer speed is faster), the amount of entering light per second is fewer, and the image is darker.
(2) Slow shutter. Set SLOW SHUTTER as ON, the shutter speed can automacally slow down to extend exposure me under low lightng circumstances to obtain clearer image.
Task 7: Congure exposure compensaon.
You can set the EXPOSURE COMP value from 0 to 14. The default value is 7. You can adjust this value to increase the brightness of the image.
Task 8: Congure white balance.
You can set WHITE BALAN as HAUTO, AUTO, INDOOR, OUTDOOR, SELFDEF (self-dened), ATW (auto-tracking) and HAUTO (half-auto).
AUTO:
In Auto mode, the dome retains color balance automacally according to the current color temperature.
INDOOR, OUTDOOR:
These two modes are for indoor use and outdoor use respectively.
SELFDEF:
In this mode, you can adjust the color temperature manually to meet your own demand.

In SELFDEF mode, you need to adjust the RED and BLUE values manually.
ATW:
In auto-tracking mode, white balance is connuously being adjusted in real-me according to the color temperature of the scene illuminaon.
HAUTO:
Selecng this mode, the viewed image retains color balance automacally according to the current color temperature.
Task 9: Congure the image ip.
If you turn the IMAGE FLIP funcon on, the image will be flipped diagonally along its central axis, shown as the mirror reecon of the image.
Task 10 Congure focus limit
AUTO, 1 CM, 1 M, 3 M, 5 M and 20 M are selectable in FOCUS LIMIT. When set it as the AUTO, the focus limit automacally adjusted according to the zoom limit.
Task 11: Congure the noise reducon.
To reduce the image noise, you can set the value of 2D DNR and 3D DNR respectively. The greater the value is, the less the noise will be in the low illuminaon environment. You can also disable the funcon by turning the value as OFF.
Task 12: Congure the image quality.
- Wide Limit
Set the value of WIDE LIMIT to limit the minimum zoom of the lens with 1.0, 1.1, 1.2, 1.3, 1.5, 1.8 and 2.0 available.

The Wide Limit funcon is supported by certain speed dome model series.
- Chroma Suppress
Set the Chroma suppress value from 1 to 3 to suppress the color noise so as to get the clear and high-quality image in the low luminance environment.

The Chroma Suppress funcon is supported by certain speed dome model series.
- Saturaon
Saturaon value from 0 to 7 indicates the brightness of the color. The higher the saturaon, the brighter the color is.

The saturaon funcon is supported by certain speed dome model series.
- Scene Mode
Select the scene mode as INDOOR or OUTDOOR, and the default image sengs will be changed according to the selected scene mode.
- Contrast
Contrast is the degree of dience between the darker and lighter parts of the image.

The contrast funcon is supported by certain camera model series.
HLC
Set the value of HLC to brighten the darker area and weaken the highlight area of the image. The greater the value, the stronger the eect will be.

The HLC funcon is supported by certain camera model series.
● Sharpness Compensaon
Set the value from 0 to 15 of SHARPNESS COMP to automacally adjust the sharpness of the image to get a clear image. The greater the value is, the stronger the eect will be.
Task 13: Congure the defog parameters.
When there is fog in the image, you can enable this funcon to get clear image.
Task 14: Congure the lens inializaon.
You can turn INIT LENS on to trigger a spontaneous lens iniaon to ensure the normal operaon.
3.3.2 Conguring Privacy Mask
Purpose:
Focus limit enables you to cover certain areas on the live video from being live viewed and recorded. The masked areas can move with the panning/Ing movements and automacally adjust the size as the lens zooming in/out.
Steps:
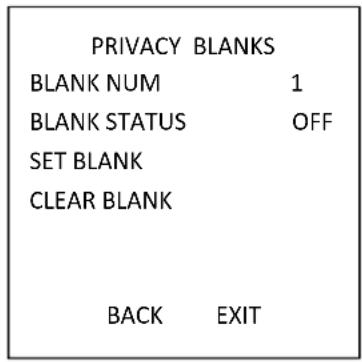
- Move the cursor to enter the privacy mask conguration submenu:
MAIN MENUS > DOME SETTINGS > PRIVACYS
text_image
PRIVACY BLANKS BLANK NUM 1 BLANK STATUS OFF SET BLANK CLEAR BLANK BACK EXITFigure 3-8 Privacy Blank Conguraon Menu
- Choose the privacy blank number:
Steps:
(1) Move the cursor to BLANK NUM. and click IRIS+ to enter the eding mode.
(2) Click the up and down direcon buons to select a mask number for conguraon.
(3) Click IRIS+ again to conrm and exit the eding mode.

The congorable privacy blank number varies according to the camera models.
- Congure the posion and size of the privacy blank.
Steps:
(1) Move the cursor to SET BLANK and click IRIS+ buon to enter the eding mode as shown in the following gure. You can see the privacy blank on the live window.
ADJUST BLANK POS
FOCUS SHIFT STATUS
SAVE: OPEN
QUIT: CLOSE
Figure 3-9 Set the Privacy Mask
(2) You can see ADJUST BLANK POS message on the screen. Click the direcon buons to adjust the posion of the privacy blank to the designed scene.
(3) Click FOCUS+ buon, and you can see ADJUST BLANK SIZE message on the screen. Click the up/down buons to increase/decrease the height of the mask and click right/le buons to increase/decrease the width of the mask. Click IRIS+ buon to save the sengs and return to the previous menu and you can see the mask turn to gray.
(4) To modify the congured mask, click IRIS+ buon to enter the SET BLANK menu and click IRIS+ buon again to edit.

focus limit
The It range for conguring the privacy blanks is from -15^ to 60^ .
- Enable or disable the privacy blank funcon.
Move the cursor to BLANK STATUS. Click IRIS+ buon to enter the editing mode and click the up and down direcon buttons to set it ON or OFF.

If no privacy blank has been congured, you cannot set the status as ON.
- Delete the privacy blank.
You can enter the CLEAR BLANK menu to delete the all the congured privacy blanks.
3.3.3 Conguring Output Standard
Purpose:
The video output standard, including resolution and frame rate, can be changed according to the actual requirement.
Steps:
- Move the cursor to enter the Video Sengs submenu:
MAIN MENUS > DOME SETTINGS > VIDEO SET
- Move the cursor to VIDEO STD and click IRIS+ to enter the eding mode.
- Click the up and down direcon buons to select a desired video standard.
- Click IRIS+ again to conrm and exit the editing mode.
3.3.4 Conguring IR Parameters

The IR parameter sengs are supported by IR speed domes only.
Purpose:
You can congregate the IR parameters including the IR sensitivity, n/m LED current, far LED current, reference zoom, and LED control, fan control, switch delay, smart IR, etc..
Enter the LED parameter submenu:
MAIN MENU > DOME SETTINGS > IR PARAMETER
| IR PARAMETER | |
| IR SENSITIVITY | MEDIUM |
| N/M LED CURRENT | 8 |
| FAR LED CURRENT | 8 |
| REFERENCE ZOOM | 2 |
| LED CONTROL | ICR |
| SWITCH DELAY(S) | 2 |
| SMART IR | 0 |
| BACK | EXIT |
Figure 3-10 IR Sengs
- Set the sensitivity of the IR LED.
You can set the SENSITIVITY as HIGH, MEDIUM, or LOW.
- Set the electricity level of the IR LED.
The N/M LED CURRENT and the FAR LED CURRENT refer to the electricity level of the near/middle IR LED and far IR LED correspondingly. You can set the near/far LED current and the far LED current to 1 to 10.
- Set the parameters for reference zoom.
The value of REFERENCE ZOOM can be adjusted from 2 to 10.
- Set the parameters of LED control.
LED control can be set to ALL ON (enable all the IR LED), FAR ON (enable far-distance IR LED), NEAR ON (enable near/medium-distance IR LED), AUTO (enable IR LED automacally according to the environment illuminaon), ICR (adjust the IR LED working mode according to the ICR), and CLOSE (disable IR LED).
- Set the IR LED switch delay.
The SWITCH DELAY(S) refers to the delay me between the switch of far-distance IR LED and N/M-distance IR LED.
- Set smart IR.
The brightness of IR automacally changes according to the focal length. The greater the value, the more obvious the brightness changed.
3.4 Conguring PTZ Control Parameters
Purpose:
You can congregate panning, lng and zooming movements, and congregate PTZ control funcons including presets, patrols, paerns, etc. for the speed dome.
3.4.1 Conguring PTZ Parameters
Enter PTZ conguraon menu:
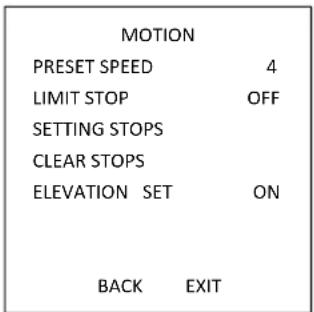
MAIN MENU > DOME SETTINGS > MOTION PARAMETER
| MOTION | |
| AUTO FLIP | ON |
| PROPORTIONAL PAN | ON |
| PARK TIME | 5 |
| PARK ACT | NONE |
| SCAN SPEED | 28 |
| IMAGE FREEZE | OFF |
| DOME SPEED | 6 |
| BACK EXIT | |
text_image
MOTION PRESET SPEED 4 LIMIT STOP OFF SETTING STOPS CLEAR STOPS ELEVATION SET ON BACK EXITFigure 3-11 PTZ Conguraon
- Auto-ip
In manual tracking mode, when a target object goes directly beneath the speed dome, the speed dome automacally rotates 180 degrees horizontally for tracking.

AUTO-FLIP is set as ON for this speed dome by default and it's not user-denable.
● Proporonal Pan
When the speed dome is zooming in/out, you can enable the proporcional pan funcon to automacally reduce or increase the panning and lng speed according to the zooming amount. This funcon enables the speed dome to trace the object at a proper speed when the speed dome is zooming and the monitored scene is narrowed (zoom in) or enlarged (zoom out).
You can set PROPORTIONAL PAN as ON or OFF to enable/disable the funcon.

This funcon is enabled automacally while seng the paerns.
- Park me and acons
Purpose:
This feature allows the speed dome to start a predened acon (park acon: scan, preset, paern, etc.) automacally aer a period of inactivity (park me).
You can set PARK TIME from 5 to 720 seconds and set the park acon (PARK ACT) as preset 1 to 8, paern 1 to 5, patrol 1 to 10, pan scan, lt scan, panoramic scan, day mode, night mode, or none.

If no control signal is received aer the park me under the following circumstances, no park acons will be performed: in the process of performing dome acons by calling special presets; or in the process of performing external alarm linkage acons.
- Image freeze
This feature enables the live view to switch directly from the current scene to another scene that is dened by a preset, without showing the middle areas between these two scenes. It reduces the use of bandwidth in a digital network system and it also provides privacy protecon for the middle areas.
You can set IMAGE FREEZE as ON or OFF to enable or disable this funcon.

The funcon varies according to the dierent camera models.
- PTZ speed
Purpose:
You can dene the speed of the dome movements.
(1) DOME SPEED: The manual movement speed of the dome can be set from level 1 to 10.
(2) SCAN SPEED: The scan speed defines the scan degree per second of pan scan, tilt scan, and panoramic scan. The scan speed is adjustable from level 1 to level 40 and the higher the level is, the faster the scan speed is.
(3) PRESET SPEED: The speed of calling a preset can be set from level 1 to 8. The higher level corresponds to the faster speed to call a preset.
- Seng Limits
Purpose:
The limits are user-congorable posions which limit the panning and lng area of the speed dome. There are le, right, up and down limits to dene an area.
Steps:
- Move the cursor to ENABLE LIMIT and click FOCUS+ to set it ON to enable this feature. Click IRIS+ to conrm the new sengs.
- Move the cursor to SETTING STOPS and click IRIS+. You will see the message SET LEFT LIMIT on the screen.
- Click the direcon buttons in the PTZ panel to conjure the le limit. Click IRIS+ to conrm the new sengs.
- Follow the prompts to congregate the right, up and down limits on the menu.

The new limit will overwrite the existed ones by default.
- You can clear the dened limits. Click IRIS+ to enter CLEAR LIMITS and click IRIS+ again to clear the stops.
- Elevaon set
You can set the SET ELEVATION as ON to increase the elevaon angle range of the speed dome or set it as OFF to disable the funcon.

The range of the elevaon angle varies from dierent speed dome models.
3.4.2 Conguring Presets
Purpose:
A preset is a user-dened monitoring posion/point. You can simply call the preset number to change the monitor scene to the dened posion.
Steps:
- Move the cursor to enter preset conguraon submenu:
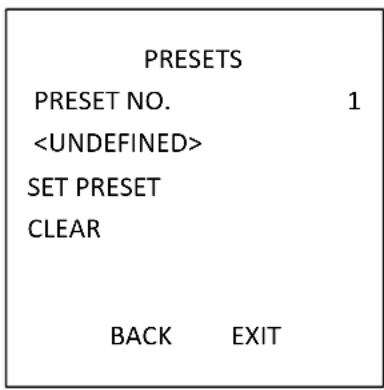
MAIN MENU > DOME SETTINGS > PRESETS
text_image
PRESETS PRESET NO. 1Figure 3-12 Preset Conguraon Menu
- Choose the preset number:
Move the cursor to PRESET NUM. and click IRIS+ to enter. Click the up and down buttons to choose the preset number which needs to be edited. If the preset has been dened, the preset label will be listed under the number; if it has not been dened, you will see the informaon UNDEFINED under the number.

● There are up to 256 presets can be set for the speed dome.
- The system-dened presets will be displayed on this submenu and they are not editable.
- Set the preset posion.
Move the cursor to PRESET PTZ and click IRIS+ to edit the preset posion. Use the direcon buttons to move the speed dome to find the desired scene/position, and then press IRIS+ to conrm the sengs and return to the previous menu, or press IRIS- to cancel.

The preset posion sengs will be restricted by the limits if they are denied.
- Call the presets.
You can select the preset number from the drop-down preset list in the control panel of the encoder through a web browser, and click the arrow to call a user-dened or system-dened preset.
5. Clear the preset sengs.
Move the cursor to CLEAR and click IRIS+ to clear the sengs of the current preset.
3.4.3 Conguring Patrols
Purpose:
A patrol is a scanning track specied by a group of user-dened presets. You can call a patrol to scan the scenes automacally among the user-dened presets in sequence.
Steps:
1. Move the cursor to enter patrol conguraon submenu:
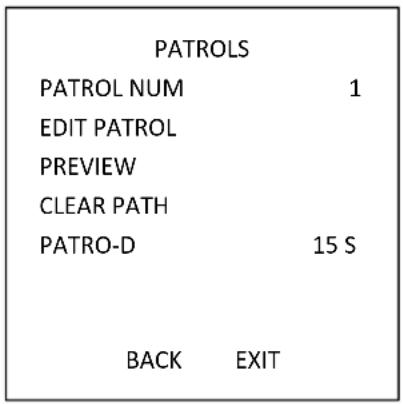
MAIN MENU > DOME SETTINGS > PATROLS
text_image
PATROLS PATROL NUM 1 EDIT PATROL PREVIEW CLEAR PATH PATRO-D 15 S BACK EXITFigure 3-13 Patrol Conguraon Menu
2. Choose the patrol number.
Steps:
(1) Move the cursor to PATROL NUM and click IRIS+ to enter eding mode.
(2) Click the up and down direcon buons to select the number of the patrol which is to be congured.
(3) Click IRIS+ again to conrm the sengs and exit eding mode of this column.

Up to 10 patrols can be congured.
3. Edit the patrol.
Steps:
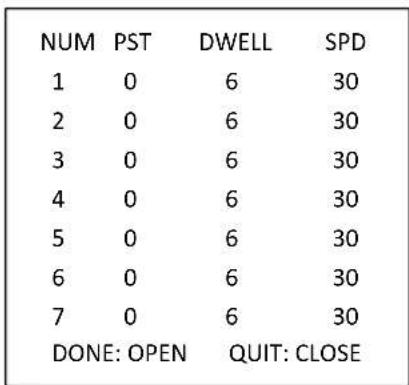
(1) Move the cursor to EDIT PATROL and click IRIS+ to enter eding mode.
text_image
NUM PST DWELL SPD 1 0 6 30 2 0 6 30 3 0 6 30 4 0 6 30 5 0 6 30 6 0 6 30 7 0 6 30 DONE: OPEN QUIT: CLOSEFigure 3-14 Edit the Patrol
(2) Click up/down direcon buons to choose the number and locate the preset to be edited.
(3) Click le/right direcon buons to posion the cursor to the column of PRESET, DWELL and SPEED. You can click the up/down direcon buons to set the value of preset number, dwell me and patrol speed.

The presets you set for a patrol should be the ones that have been pre-dened by users. The dwell me (15 to 800 seconds selectable, which are divided into 30 levels) is the me that the speed dome stays on a certain preset; the patrol speed (level 1 to 40 selectable) is the scanning speed the speed dome switching between the presets.
(4) Follow the above steps to denote the other presets for the selected patrol. You can congregate up to 32 presets in sequence for a patrol. Press IRIS+ to save the new settings or press IRIS- to cancel and return to the previous menu.
- Preview the patrol.
Move the cursor to PREVIEW and click IRIS+ to preview the current patrol. You can click IRS+ again to stop the preview.
- Call the denied patrol.
You can call the special presets to call the dened patrol. E.g. call preset 35 to call patrol 1. Please refer to Secon 2.3 to nd the corresponding preset number for each patrol.
- Delete a patrol.
You can move the cursor to CLEAR PATH and click IRIS+ to delete the current patrol.
- Dene the dwell me when running the fast patrol.
If you call the No.46 preset to enable the fast patrol, the speed dome will run the patrol automacally according to the route consists of the congured preset 1 to preset 32. And you can set the Patrol-D me switches from one preset to the other. 5 s, 10 s, 20 s, 30 s, and 60 s are selectable.
3.4.4 Conguring Paerns
Purpose:
A paern is a memorized, repeatable series of pan, lt, zoom and preset movements that can be recalled by a command or automacally performed by a congured funcon (alarm, park, me task,
and power-up).
Steps:
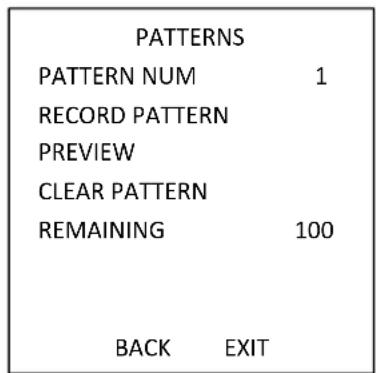
- Move the cursor to enter the PATTERNS submenu:
MAIN MENU > DOME SETTINGS > PATTERNS
text_image
PATTERNS PATTERN NUM 1 RECORD PATTERN PREVIEW CLEAR PATTERN REMAINING 100 BACK EXITFigure 3-15 Paern Conguraon Menu
- Choose the paern number.
(1) Move the cursor to PATTERN NUM and click IRIS+ to enter the eding mode.
(2) Click the up/down direcon buons to select the number of the pattern which is to be congured.
(3) Click IRIS+ again to conrm the sengs.

Up to 5 paerns can be congured.
- Edit the paern.
(1) Move the cursor to RECORD PATTERN and click IRIS+ to enter eding mode.
| REMAIN MEMORY 100 | |
| DONE OPEN | |
| QUIT CLOSE |
Figure 3-16 Edit the Paern
(2) Click the PTZ control buttons and direcon buttons to operate the speed dome to draw a movement path, including pan scan, lt scan, zoom in, zoom out, etc. The speed dome can automatically memorize the path you operated as a paern.
(3) Click IRIS+ again to save the paern and exit editing mode.

- REMAIN MEMORY indicates the remaining memory of the speed dome for conguring the paerns. When it reaches 0, no more paerns can be congured. You can also see the
remaining memory shown under PATTERNS menu as REMAINING.
● The pan/It movements and the lens operaons cannot be memorized simultaneously.
- Preview the paern.
Enter the PREVIEW menu to preview the current paern.
- Call the dened paern.
You can call the special presets to call the dened paern. E.g. call preset 41 to call paern 1.
Please refer to Secon 2.2 to nd the corresponding preset number for each paern.
- Delete the paerns.
To Delete a Chosen Paern
Click IRIS+ to enter RECORD PATTERN and you can see DEL PATH ABOVE. Click IRIS+ to delete the paern.

If you delete the current paern, the following paern will also be deleted. E.g., if paern
2 is deleted, paern 3 and paern 4 will be deleted as well.
To Clear All the Paerns
Enter CLEAR menu and click IRIS+ to delete all the dened patterns.
3.4.5 Conguring Timing Tasks
Purpose:
A ming task is a precongured acon that can be performed automacally at a specic date and me.
Steps:
- Move the cursor to enter the TIMING TASK submenu:
MAIN MENU > DOME SETTINGS > TIMING TASK
| TIMING TASK | |
| TASK NUM | 1 |
| ENABLE STATE | ON |
| TASK ACT | NONE |
| TASK TIME | |
| TASK PREVIEW | |
| TASK CLEAR | |
| BACK | EXIT |
Figure 3-17 Time Task Conguraon Menu
- Choose the task number.
Steps:
(1) Move the cursor to TASK NUM and click IRIS+ to enter the eding mode.
(2) Click the up/down direcon buons to select the number of the task which is to be congured.
(3) Click IRIS+ again to conrm the sengs and exit the editing mode.

Up to 8 me tasks can be congured.
3. Set the task status.
Steps:
(1) Move the cursor to ENABLE TASK and click IRIS+ to enter the eding mode.
(2) Click the up/down direcon buons to set the task status as ON.
(3) Click IRIS+ again to conrm the sengs and exit the eding mode of this column.

If the task acon and task me have not been congured, you cannot set the status as ON.
4. Congure the task acon.
Steps:
(1) Move the cursor to TASK ACT and click the IRIS+ to enter eding mode.
(2) Click the up and down direction buons to select the task acon from preset 1 to 8, paern 1 to 5, patrol 1 to 10, pan scan, lt scan, panoramic scan, day mode, night mode, zero calibrate and none.
(3) Click IRIS+ again to conrm the sengs and exit eding mode of this column.
5. Set the task me.
Steps:
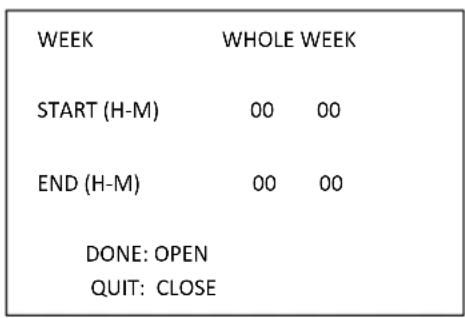
(1) Move the cursor to TASK TIME and click IRIS+ to enter eding mode.
(2) Click the le and right direction buons to posion the cursor to WEEK, START (H-M) and END (H-M).
(3) Click the up and down direcon buons to set the start me and end me to run the me task.
(4) Click IRIS+ to conrm the sengs and exit.

The weekday can be set from Monday to Sunday or Whole Week; the H refers to Hour and the M refers to Minute.
text_image
WEEK WHOLE WEEK START (H-M) 00 00 END (H-M) 00 00 DONE: OPEN QUIT: CLOSEFigure 3-18 Set the Task Time
6. Delete the task.
Move the cursor to TASK CLEAR, click IRIS+ to delete the time and acon of the current task, and click IRIS+ again to conrm the sengs and exit.
3.4.6 Conguring Zone
Purpose:
A zone is a panning and lng area dened by the le/right limits. You can conjure the zones on ZONES submenu. You can dene a zone when the targeted surveillance scene is limited.
Steps:
- Move the cursor to enter the zone conguraon submenu:
MAIN MENU > DOME SETTINGS > ZONES
| ZONES | |
| ZONE NUM | 1 |
| EDIT ZONE | |
| ZONE STATUS | ON |
| SCAN STATUS | ON |
| CLEAR ZONE | |
| BACK | EXIT |
Figure 3-19 Zone Conguraon
- Choose the zone number:
(1) Move the cursor to ZONE NUM. and click IRIS+ buon to enter the eding mode.
(2) Click the up and down buons to select the zone number to be congured.
(3) Click IRIS+ again to conrm the sengs and exit the editing mode of this column.

Up to 8 zones can be congured.
- Congure the zone area.
Steps:
(1) Move the cursor to EDIT ZONE and click IRIS+ button to enter the eding mode.
(2) You can see SET LEFT LIMIT on the screen. Click the direcon buttons to set the le limit.
(3) Follow the prompts on the screen to set the right limit.
(4) Click IRIS+ button to save the setngs and exit.
- Set the zone status and scan status.
ZONE STATUS: The zone status just indicates the current status of the zone.
SCAN STATUS: You can set the scan status to ON/OFF to enable/disable the scanning in the zone.

ZONE STATUS is not editable. Aer you edited the zone, it will switch to ON automacally; if you delete the zone, the ZONE STATUS will switch to OFF.
- Clear the zone sengs.
Move the cursor to CLEAR ZONE, click IRIS+ to clear all the sengs of the current zone, and click IRIS+ again to conrm the sengs and exit.
3.4.7 Conguring Smart Sengs
Purpose:
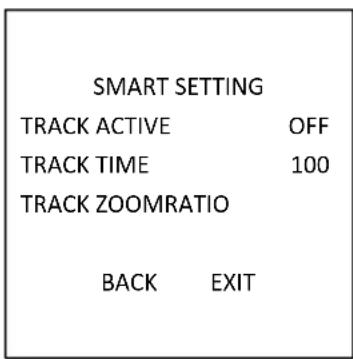
Set the smart sengs as ON to automacally track the moving object, and meanwhile adjusts the focus and the posion to set the target in the center of the eld of view.
Steps:
- Move the cursor to enter the smart seng submenu:
MAIN MENU > DOME SETTINGS > SMART SETTINGS
text_image
SMART SETTING TRACK ACTIVE OFF TRACK TIME 100 TRACK ZOOMRATIO BACK EXITFigure 3-20 Smart Seng
- Set the tracking me.
(1) Move the cursor to TRACK TIME and click IRIS+ buon to enter the eding mode.
(2) Click the up and down buons to set the duraon for tracking.
(3) Click IRIS+ again to conrm the sengs and exit the editing mode of this column.
- Set the track zoom rao. Once the zoom rao is set that the target will be displayed in that rao on the monitor.
(1) Move the cursor to TRACK ZOOM RATIO and click IRIS+ button to enter the eding mode.
(2) Click IRIS+ again to conrm the sengs and exit the eding mode of this column.
- Turn on the tracking.
(1) Move the cursor to TRACK ACTIVE and click IRIS+ buon to enter the eding mode.
(2) Click the up and down buons to set the TRACK ACTIVE as ON.
(3) Click IRIS+ again to conrm the sengs and exit the eding mode of this column.

The funcon varies according to the dierent camera models.
3.4.8 Conguring Clear Sengs
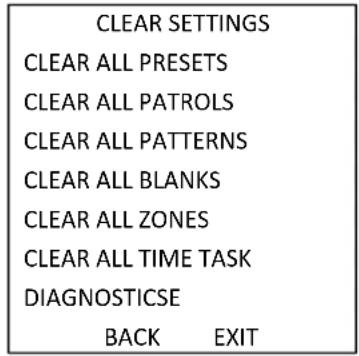
Steps:
- Move the cursor to enter the clear sengs submenu:
MAIN MENU > DOME SETTINGS > CLEAR SETTINGS
text_image
CLEAR SETTINGS CLEAR ALL PRESETS CLEAR ALL PATROLS CLEAR ALL PATTERNS CLEAR ALL BLANKS CLEAR ALL ZONES CLEAR ALL TIME TASK DIAGNOSTICSE BACK EXITFigure 3-21 CLEAR SETTINGS
- Move the cursor to the item you want to clear, and click IRIS+ to validate the sengs.
- Move the cursor to the DIAGNOSTICS and click IRIS+ to diagnose the temperature excepon, video excepon, voltage excepon, etc.

The funcon varies according to the dierent camera models.
3.5 Conguring and Handling Alarms

The alarm related funcon is not supported by the7-inch IR speed dome.
3.5.1 Conguring Alarm Input and Linkage Acons
Purpose:
This secon states how to conjure the speed dome to respond to alarm events with alarm linked acons, such as calling presets, patrols, paerns, scanning, etc..
Steps:
- Move the cursor to enter the alarm conguraon submenu:
MAIN MENUS > DOME SETTINGS > ALARMS
| ALARMS | |
| ALARM RESUME ON | |
| ALARM SEQUENCE 5 | |
| ALARM REST DELAY 5 | |
| ALARM SETTING | |
| BACK EXIT | |
| ALARM SETTING | |
| ALARM NUM 1 | |
| PRIORITY HIGH | |
| ALARM AC NONE | |
| AUX NONE | |
| ALARM INPUT OFF | |
| BACK EXIT | |
Figure 3-22 Alarm Conguraon Menu
2. Choose the alarm number.
Steps:
(1) Move the cursor to ALARM NUM and click the IRIS+ to enter the editing mode.
(2) Click the up and down direcon buons to select the number of the alarm which is to be congured.
(3) Click IRIS+ again to conrm and exit eding mode of this column.

You can congure up to 2 alarm inputs.
3. Move the cursor to ALARM SETTING and click the IRIS+ to enter the seng alarm submenu.
4. Congure the alarm input.
Steps:
(1) Move the cursor to ALARM INPUT and click the IRIS+ to enter the eding mode.
(2) Click the up and down direcon buttons to set the input status. You can congregate it as OPEN (Normally open), CLOSE (Normally closed) or OFF (disable the alarm input).
(3) Click IRIS+ again to conrm.

If you set the status as OPEN, alarm will be triggered by high electricity level; if you set the status as CLOSE, alarm will be triggered by low electricity level; if you set the status as OFF, it will be triggered when this input channel is shut o.
5. Congure the alarm linkage acon.
You can specify the linked acon when an alarm occurs.
(1) Move the cursor to ALARM AC and click the IRIS+ to enter the eding mode.
(2) Click the up and down direcon buons to choose the desired linkage acon. You can set the alarm acon as preset from 1 to 8, paern from 1 to 5, patrol from 1 to 10, panning scan, lng scan, panoramic scan, day mode, night mode or none. You can also set the alarm output for the alarm. Refer to Secon 3.5.3 Conguring Auxiliary Alarm Output for details.
6. Congure alarm priority.
Enter the PRIORITY menu and set the alarm priority as HIGH, MIDUEM or LOW.
If mulple alarms with dierent priories are triggered at the same me, the dome only responds to the alarm with the highest priority. If mulple alarms with the same priority are triggered at the same me, then the dome will respond to each alarm according to the dened alarm sequence.
3.5.2 Conguring Alarm Parameters
Purpose:
You can set the alarm related parameters following below instructions, including linkage acon interval, alarm duraon, and dome acvity resumpon.
Steps:
1. Enter the alarm parameter conguraon menu:
MAIN MENUS > DOME SETTINGS > ALARMS
- Configure the interval of the alarm sequence.
When more than one alarm of the same priority occurs at the same me, the speed dome will respond to one alarm rst and then respond to the next one aer the user-dened interval. You can set the on SEQUENCE submenu from 1 to 200 seconds.
- Congure the alarm rest delay.
If there's a linkage acon has already been triggered by an alarm input, the speed dome will only respond to the input from the same channel again after the user-dened reset delay time. This is the rest me that the speed dome considers an alarm to be acve when it's physically cleared. You can set the DELAY TIME from 0 to 300 seconds.
- Resume the dome acvity.
You can set ALARM RESUME as ON to enable the speed dome to resume its previous activity aer the triggered acons nished.

- If the speed dome is moving when a linkage acon is triggered, it will stop at the current posion and resume from this posion aer the linkage acon is nished.
● The speed dome can be congured to resume the PTZ posions, focus, and iris value.
3.5.3 Conguring Auxiliary Alarm Output
Purpose:
An auxiliary alarm output is a congorable alarm output interface on the speed dome back box which can connect and trigger another alarm device to operate.
Steps:
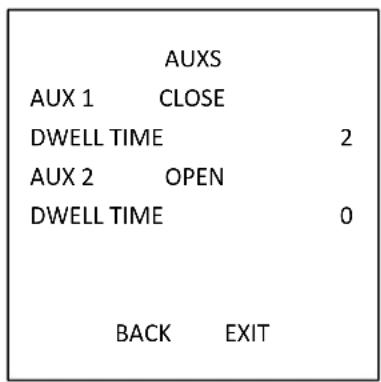
- Enter the alarm output conguraon submenu:
MAIN MENUS > DOME SETTINGS > AUXS
text_image
AUXS AUX 1 CLOSE DWELL TIME 2 AUX 2 OPEN DWELL TIME 0 BACK EXITFigure 3-23 Congure the Alarm Output
- Click IRIS+ to edit the status of the alarm outputs. You can set the auxiliary alarm output type as OPEN (normally open) and CLOSE (normally closed).
- Move the cursor to DWELL TIME to set the duraon of the alarm output signal. The congorable rage is 0 to 60 seconds.
- Link the alarm output to the congured alarm.
Steps:
(1) Enter MAIN MENUS > DOME SETTINGS > ALARMS > ALARM SETTING and choose the alarm number that you want to link the alarm output to.
(2) Move the cursor to AUXS and click IRIS+ to congregate the alarm output to the alarm. You can choose OPEN to acve AUX 1.
3.6 Others
3.6.1 Restoring Default Dome Sengs
Purpose:
You can reset all dome sengs to factory default parameters as shown in below.

Dome sengs are mainly of PTZ parameters and alarm parameters, and also include some system sengs, e.g. dome address.
Enter default dome sengs menu:
MAIN MENUS > RESTORE DEFAULTS
Click IRIS+ to restore the dome sengs to the default value, or click IRIS- to exit.
3.6.2 Restoring Default Camera Sengs
Enter MAIN MENU > RESTORE CAMERA
Click IRIS+ to restore the camera sengs to the default value; or click IRIS- to exit.
3.6.3 Reboong the Dome
Enter MAIN MENU > REBOOT DOME and click IRIS+ to reboot the speed dome.
Appendix
Appendix 1 Lightning & Surge Protecon
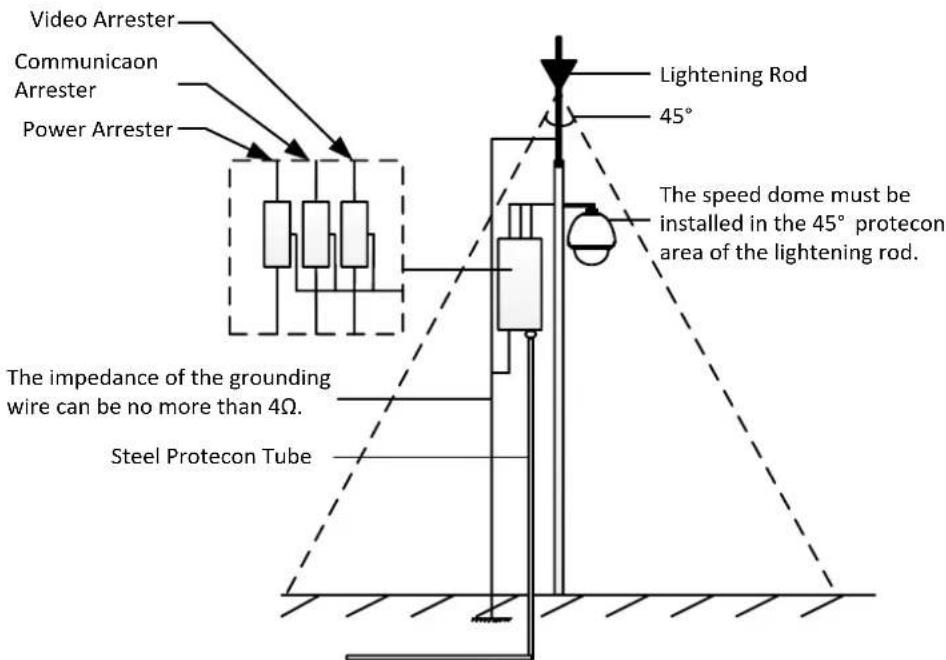
This product adopts TVS plate lightning protecon technology to avoid damage caused by pulse signal that is below 3000W, like instantaneous lighng stroke, surging, etc. According to the actual outdoor situation, necessary protecon measures must be taken, besides ensuring the electrical safety.
- The distance between signal transmission wires and High-voltage equipment or high-voltage cable is at least 50m.
● Outdoor wiring should better be routed under eaves as much as possible. - In the open eld, wiring should be buried underground in sealed steel pipe, and the steel-pipe should be one-point grounding. Overhead round method is forbidden.
- In strong thunderstorm area or high inducon voltage areas (such as high-voltage transformer substaon), high power lightning protecon apparatus and lightning conductor are necessary to be added.
- The design of lightning protecon and grounding of the outdoor devices and cables should be considered together with the lightning protecon demand of buildings. It also must conform to the related naonal standards and industrial standards.
- The system should be equipotenal grounded. The grounding equipment must conform to the demands of system an-jamming and electrical safety both and it must not appear short circuit or mixed circuit with the zero conductor of strong grid. When the system is grounded alone, the resistance should be no more than 4Ω. The seconal area of the grounding cable should be no less than 25mm2. For grounding instrucons, please refer to the Installaon Manual of Speed Dome.
text_image
Video Arrester Communicaon Arrester Power Arrester Lightening Rod 45° The speed dome must be installed in the 45° protecon area of the lightening rod. The impedance of the grounding wire can be no more than 4Ω. Steel Protecon TubeFigure A-1 Lightning & Surge Protecon
Appendix 2 RS485 Bus Connecon
● General Property of RS485 Bus
According to RS485 industry bus standard, RS485 is a half-duplex communicaon bus which has 120Ω characterisc impedance, the maximum load ability is 32 payloads (including controller device and controlled device).
● RS485 Bus Transmission Distance
When using 0.56mm (24AWG) twisted-pair line, according to dierent baudrate, the maximum transmission distance theory table is shown as below:
Table A-1 Max. Distance of RS485 Transmission
| Baudrate | Max Distance |
| 2400BPS | 1800m |
| 4800BPS | 1200m |
| 9600BPS | 800m |
The transmission distance will be decreased if we use the thinner cable, or use this product under the strong electromagnec interference situation, or there are lots of devices are added to the bus; on the contrary, the transmission distance will be increased.
- Connecon Methods
RS485 industry bus standard require daisy-chain conncon method between any devices, both sides have to connect a 120Ω terminal resistance (show as Diagram 1), the simplified conncon method is shown as diagram 2, but the distance of “D” should not be too long.

flowchart
graph TD
    A["120Ω"] --> B["1#"]
    A --> C["2#"]
    A --> D["3#"]
    E[" "] --> F[" "]
    G[" "] --> H[" "]
    I["..."] --> J["32#"]
    K["120Ω"] --> L["32#"]
Figure A-2 RS485 Connecon 1
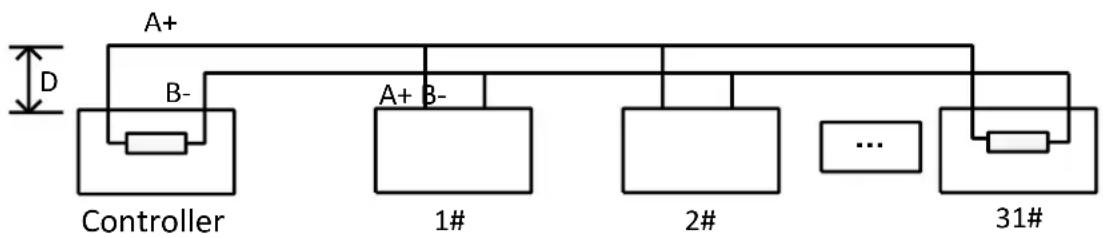
flowchart
graph TD
    A["Controller"] -->|A+| B["1#"]
    A -->|B-| C["2#"]
    A -->|A+ B-| D["31#"]
    B --> E["..."]
    C --> F["..."]
    D --> G["..."]
    style A fill:#f9f,stroke:#333
    style B fill:#ccf,stroke:#333
    style C fill:#cfc,stroke:#333
    style D fill:#fcc,stroke:#333
    note right of A
        D
    end
Figure A-3 RS485 Connecon 2
● Problems in the Praccal Applicaon
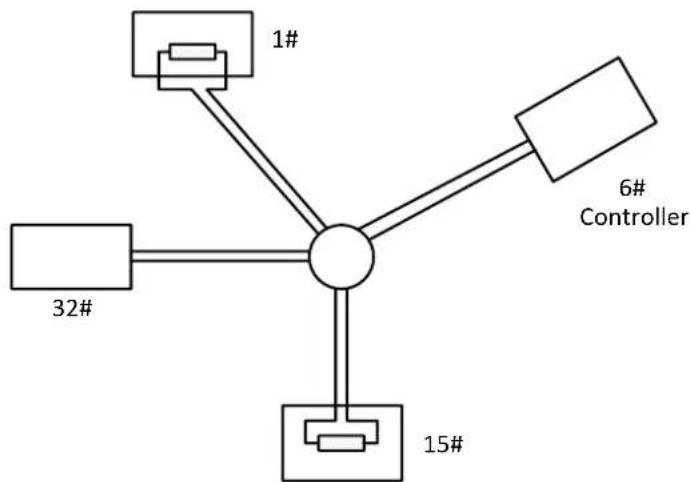
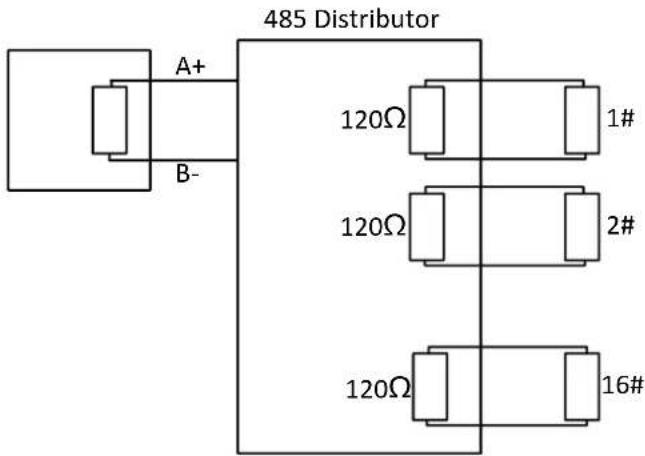
Normally, users adopt star-shape conncon method in construcon, under this situaon, the terminal resistors must be connected between two farthest devices (as Figure 4, 1# and 15#), but this conncon method is not sasy the requirement of the RS485 industry standard so that it will lead to some problems such as signal reecon, an-jamming ability decline when the devices are faraway. At this me, the dome will be uncontrollable, or self-running, etc.
flowchart
graph TD
    A["1#"] --> C((Center))
    B["32#"] --> C
    D["15#"] --> C
    E["6# Controller"] --> C
Figure A-4 Star Shape Connecon
For such case, the best way is adding a RS485 distributor. This product can eecvely change the star-shape conncon to which sases the requirement of RS485 industry standard, in order to avoid those problems and improve the communicaon reliability. Show as gure 5.
text_image
485 Distributor A+ B- 120Ω 1# 120Ω 2# 120Ω 16#Figure A-5 RS485 Distributor
● Troubleshoong of RS485 communicaon
| Problem | Possible Reasons | To Solve the Problem |
| The speed dome does the self-test acon but cannot be controlled remotely. | 1. The address or baudrate of the speed dome does not match with those of remote control device. | 1. Adjust the address and baudrate of the remote control device to match with those of the speed dome. |
| 2. The wire RS485+ connects to the interface RS485- and wire RS485- connects to the interface RS485+. | 2. Connect the wire RS485+ to the interface RS485+ and wire RS485- to the interface RS485-. | |
| 3. The RS485 wire is disconnected. | 3. Reconnect the RS485 wire ghtly. | |
| 4. RS485 wire is broken. | 4. Change a RS485 wire. | |
| The speed | 1. The conncon is loose. | 1. Reconnect the RS485 wire |
| dome can be controlled but not smoothly. | ghtly. | |
| 2. RS485+ or RS485-wire is broken. | 2. Change a RS485 wire. | |
| 3. The speed dome is too far away from the remote control device. | 3. Add a terminal resistor. | |
| 4. Too many speed domes are connected. | 4. Add a RS485 distributor. |
Appendix 3 24VAC Wire Gauge & Transmission Distance
The following table describes the recommended Max. distance adopted for the certain wire gauge when the loss rate of 24VAC voltage is less than 10%. For the AC driven device, the maximum voltage loss rate is 10% allowable. For example, for a device with the rang power of 80VA which is installed at a distance of 35 feet (10m) away from the transformer, then 0.8000mm is required as the minimum wire gauge.
| Distance (feet) / Wire Gauge (mm) Power (va) | 0.8000 | 1.000 | 1.250 | 2.000 |
| 10 | 283(86) | 451(137) | 716(218) | 1811(551) |
| 20 | 141(42) | 225(68) | 358(109) | 905(275) |
| 30 | 94(28) | 150(45) | 238(72) | 603(183) |
| 40 | 70(21) | 112(34) | 179(54) | 452(137) |
| 50 | 56(17) | 90(27) | 143(43) | 362(110) |
| 60 | 47(14) | 75(22) | 119(36) | 301(91) |
| 70 | 40(12) | 64(19) | 102(31) | 258(78) |
| 80 | 35(10) | 56(17) | 89(27) | 226(68) |
| 90 | 31(9) | 50(15) | 79(24) | 201(61) |
| 100 | 28(8) | 45(13) | 71(21) | 181(55) |
| 110 | 25(7) | 41(12) | 65(19) | 164(49) |
| 120 | 23(7) | 37(11) | 59(17) | 150(45) |
| 130 | 21(6) | 34(10) | 55(16) | 139(42) |
| 140 | 20(6) | 32(9) | 51(15) | 129(39) |
| 150 | 18(5) | 30(9) | 47(14) | 120(36) |
| 160 | 17(5) | 28(8) | 44(13) | 113(34) |
| 170 | 16(4) | 26(7) | 42(12) | 106(32) |
| 180 | 15(4) | 25(7) | 39(11) | 100(30) |
| 190 | 14(4) | 23(7) | 37(11) | 95(28) |
| 200 | 14(4) | 22(6) | 35(10) | 90(27) |
Appendix 4 Wire Gauge Standards
| Bare Wire Gauge(mm) | American Wire Gauge AWG | Brish Wire Gauge SWG | Cross-secondal Area of Bare Wire( mm^2 ) |
| 0.750 | 21 | 0.4417 | |
| 0.800 | 20 | 21 | 0.5027 |
| 0.900 | 19 | 20 | 0.6362 |
| 1.000 | 18 | 19 | 0.7854 |
| 1.250 | 16 | 18 | 1.2266 |
| 1.500 | 15 | 17 | 1.7663 |
| 2.000 | 12 | 14 | 3.1420 |
| 2.500 | 4.9080 | ||
| 3.000 | 7.0683 |
First Choice for Security Professionals