
6152 - Système de contrôle d'accès sécurisé HONEYWELL - Free user manual and instructions
Find the device manual for free 6152 HONEYWELL in PDF.

| Product Type | Addressable Fixed English Keypad for Security Control Panel (Models 6152 / 6152V) |
| Brand | Honeywell |
| Model | 6152 (Standard) / 6152V (Voice) |
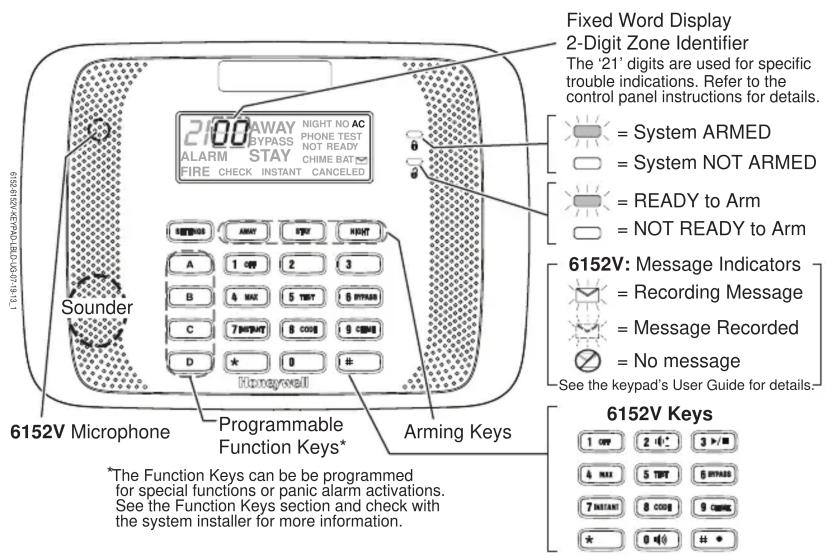
| Display | Fixed Word Display with 2-Digit Zone Identifier |
| Indicators | ARMED (Red), NOT ARMED, READY to Arm, NOT READY to Arm; 6152V: Message indicators |
| Keypad Type | Fixed English keypad with programmable function keys and arming keys |
| Voice Features (6152V) | Voice message recording (up to 2.5 min), playback, volume control, voice chime, voice status |
| Single Button Arming | Supported (enabled/disabled via keypress sequence; user code required per keypad) |
| Function Keys | Programmable for special functions or panic alarm (press and hold 2 seconds; key pairs instant) |
| Commercial Stay Modes | Stay Mode 1, 2, 3 (via key combos; not for VISTA-128/250) |
| Compatibility | Honeywell control panels (e.g., VISTA series) |
| Power Supply | Powered via control panel keypad bus (typical 12VDC, supplied by panel) |
| Dimensions (Approx.) | 130 mm x 90 mm x 25 mm (5.1 x 3.5 x 1.0 inches) |
| Weight (Approx.) | 200 g (7 oz) |
| Environmental | Indoor use only; temperature range 0°C to 49°C (32°F to 120°F) |
| Compliance | FCC Part 15 Class B, Industry Canada ICES-003, RSS210 |
| Maintenance | Clean with a soft dry cloth; do not use liquids or sprays |
| Warranty | Refer to control panel installation instructions for system warranty; keypad covered under system warranty |
| Manual Availability | Free PDF download at notice-facile.com; also available via Honeywell official site |
Frequently Asked Questions - 6152 HONEYWELL
User questions about 6152 HONEYWELL
0 question about this device. Answer the ones you know or ask your own.
Ask a new question about this device
Download the instructions for your Système de contrôle d'accès sécurisé in PDF format for free! Find your manual 6152 - HONEYWELL and take your electronic device back in hand. On this page are published all the documents necessary for the use of your device. 6152 by HONEYWELL.
USER MANUAL 6152 HONEYWELL
Addressable Fixed English & Voice Fixed English Keypads
| 6152V VOICE CONTROL KEYS | ||
| KEY | FUNCTION | DESCRIPTION |
| VOLUME ADJUST | Refer to the 6152V Keypad Voice Features section for details using these keys. | |
| PLAY/STOP RECORD | ||
| VOICE KEY | ||
| FUNCTION/RECORD | ||
SETTINGS KEY
The Settings key provides an easy method to test the keypad display.
To enter Display Test mode, press and hold the SETTINGS key for 2 seconds.
SINGLE BUTTON ARMING
If desired, the Arming Keys can be set for Single Button Arming by following prompts to store a valid user code in the keypad. (See the system User Guide for details on programming user codes.)
When Single Button Arming is disabled, a valid user code is required to arm the system with the Arming keys
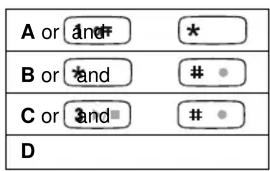
Enabling Single Button Arming
- Press and hold down the and keys at the same time for 3 seconds. The screen displays the keypad's address.
- Press * to move to the User Code entry screen (the screen flashes "u4", "--" and "--.")
- Enter a valid four digit user code between 0000 - 9999 and press * to save and exit.
Recommended: Set a dedicated user code for this feature.
The user code must be entered for each keypad in the system where Single Button Arming is desired.
Disabling Single Button Arming
- Press and hold down the 1 OFF and keys at the same time for 3 seconds. The screen displays the keypad's address.
- Press * to move to the User Code entry screen (the screen flashes "u4", "--" and "--.")
- Enter ☐ and then press *to exit.
FUNCTION KEYS
The Function keys may be programmed by the installer for special functions or alarm activations. Key pairs may also be programmed for alarm activations.
To activate the Function keys, press and hold the key for at least 2 seconds; key pairs are activated immediately.
Check with the system installer for more information.
COMMERCIAL STAY MODES
For commercial controls, if Stay Mode 2 is programmed, refer to the control's manuals and the table below for Stay mode arming.
Commercial Systems Stay Modes
| STAY + 1 = Stay Mode 1 |
| STAY + 2 = Stay Mode 2 |
| NIGHT = Stay Mode 3 (both Stay 1 and Stay 2 modes) |
Note: Not intended for use with the VISTA-128/250 Series.
6152V KEYPAD VOICE FEATURES
Message Center
The keypads feature a voice message center that lets you record and playback one message.
- The message can be up to 2.5-minutes long
- The message remains in the keypad's memory until a new message is recorded.
- The volume control of the message is adjustable.
To record a message: Press # • + 0 - keys. The MESSAGE
ICON (✉) will light, indicating recording is in progress.
Note: A message cannot be recorded during the Exit Delay period.
To end recording: Press 3 ▶/■ key, the keypad will 'ding' twice to indicate recording is ended. The MESSAGE ICON will flash indicating a message is waiting to be played.
To play a message: Press # • + 0 1() + 3 ▶/■. The recorded message plays and the MESSAGE ICON turns off. The recorded message will remain in memory until a new message is recorded.
To adjust the volume: Press # + 0 + 2 to adjust the volume one level. Volume levels are Low, Off, On, High and Medium. With each level adjustment, the keypad announces “CHECK” (at Low, Medium and High volumes), “ON” or “OFF” to verify the current setting.
Note: Adjusting the message volume also adjusts status volume. The volume cannot be adjusted while playing a message.
Voice Mode
When Voice mode is enabled, the keypad announces basic system arming status upon arming or disarming (e.g., “Disarmed, Ready to Arm,” “Armed Away”).
To enable the Voice mode: Adjust the keypad volume to "On" or "Check" (at the desired volume).
To disable the Voice mode: Adjust the keypad volume to "Off."
Voice Chime
Each keypad can be set to announce faulted (opened) entry/exit or perimeter zones when the control panel's Chime mode is on.
To enable the Voice Chime mode: Adjust the keypad volume to "On" or "Check" (at the desired volume) and turn on the keypad Chime mode (Code + 9 CHIME).
When enabled, Voice Chime provides a voice status annunciation, chime and display when any entry/exit or perimeter zone is faulted. When the Voice mode is disabled but Chime mode is enabled, the sounder will still provide Chime annunciations when zones are faulted.
Voice Status
The keypad can be set to announce current system status and display any system and/or zone faults (if they exist).
To enable Voice Status: make sure Voice Chime mode is on, then:
• To Announce Status: Press # • + 0 (●) + * key once.
The respective system status is announced (e.g., “Disarmed, Ready to Arm” or “Disarmed, Not Ready to Arm”).
Note: Status cannot be announced during the Exit Delay period.
• To Announce Faults: Press # • + 0 📋 + * and the
* key a second time within 10 seconds of the first press.
Up to 3 faulted zones are announced with their zone descriptors, if programmed. If zone descriptors are not programmed, the respective zone numbers are announced.
FEDERAL COMMUNICATIONS COMMISSION (FCC) STATEMENTS
The user shall not make any changes or modifications to the equipment unless authorized by the Installation Instructions or User's Manual. Unauthorized changes or modifications could void the user's authority to operate the equipment.
Class B digital device Statement
This equipment has been tested to FCC requirements and has been found acceptable for use. The FCC requires the following statement for your information:
This equipment generates and uses radio frequency energy and if not installed and used properly, that is, in strict accordance with the manufacturer's instructions, may cause interference to radio and television reception. It has been type tested and found to comply with the limits for a Class B computing device in accordance with the specifications in Part 15 of FCC Rules, which are designed to provide reasonable protection against such interference in a residential installation. However, there is no guarantee that interference will not occur in a particular installation. If this equipment does cause interference to radio or television reception, which can be determined by turning the equipment off and on, the user is encouraged to try to correct the interference by one or more of the following measures:
- If using an indoor antenna, have a quality outdoor antenna installed.
- Reorient the receiving antenna until interference is reduced or eliminated.
- Move the radio or television receiver away from the receiver/control.
- Move the antenna leads away from any wire runs to the receiver/control.
- Plug the receiver/control into a different outlet so that it and the radio or television receiver are on different branch circuits.
- Consult the dealer or an experienced radio/TV technician for help.
INDUSTRY CANADA CLASS B STATEMENT
This Class B digital apparatus complies with Canadian ICES-003.
This device complies with Part 15 of the FCC rules and RSS210 of Industry Canada. Operation is subject to the following two conditions: (1) This device may not cause harmful interference, and (2) This device must accept any interference received, including interference that may cause undesired operation.
REFER TO INSTALLATION INSTRUCTIONS FOR THE CONTROL PANEL WITH WHICH THIS DEVICE IS USED FOR WARRANTY INFORMATION AND LIMITATIONS OF THE ENTIRE ALARM SYSTEM.
Honeywell
2 Corporate Center Drive, Suite 100
P.O. Box 9040, Melville, NY 11747
Copyright © 2013 Honeywell International Inc.
www.honeywell.com/security

800-13636V1 7/13 Rev A