
Unite 200 - Camera ClearOne - Free user manual and instructions
Find the device manual for free Unite 200 ClearOne in PDF.


| Product Type | Full-HD Video Conference Camera |
| Brand | ClearOne |
| Model | Unite 200 |
| Dimensions (L x W x H) | 240 mm x 144 mm x 160 mm |
| Weight | 1.65 kg (3.6 lb) |
| Power Supply | DC 12V, 1.5A |
| Power Consumption | 12W (max) |
| Sensor | 1/2.7 inch CMOS, 2.07M effective pixels |
| Lens | 12x optical zoom, f3.5-42.3mm, F1.8-F2.8 |
| Horizontal Field of View | 72.5° (wide) to 6.9° (tele) |
| Video Output | HDMI, USB 3.0, Network (RJ45) |
| Max Video Resolution | 1920 x 1080 (Full HD) at 60 fps |
| Video Compression | H.265, H.264, MJPEG |
| Audio Encoding | AAC (line input) |
| Noise Reduction | 2D and 3D digital noise reduction |
| Control Interface | RS-232, RS-485, IR remote, Web UI |
| Pan Range | ±170° |
| Tilt Range | -30° to +90° |
| Presets | 255 (0-254) |
| Supported OS | Windows 7/8/8.1/10, Mac OS X, Linux |
| Care Instructions | Clean with soft dry cloth; use diluted neutral detergent if necessary; avoid solvents |
| Safety Precautions | Avoid moisture; do not disassemble; use within specified temperature and humidity |
| Spare Parts / Repairability | Contact ClearOne Technical Support for spare parts and repairs |
Frequently Asked Questions - Unite 200 ClearOne
User questions about Unite 200 ClearOne
0 question about this device. Answer the ones you know or ask your own.
Ask a new question about this device
Download the instructions for your Camera in PDF format for free! Find your manual Unite 200 - ClearOne and take your electronic device back in hand. On this page are published all the documents necessary for the use of your device. Unite 200 by ClearOne.
USER MANUAL Unite 200 ClearOne
natural_image
Line drawing of a mechanical component labeled 'ClearOne' with no other text or symbolsNOTE: For the UNITE 200 camera's control, use the COLLABORATE Codec Appliance's remote control. The remote control that comes with this camera is only for advanced configurations, if required.
COPYRIGHT NOTICE
ClearOne
5225 Wiley Post Way
Suite 500
Salt Lake City, UT84116
Telephone
1.800.283.5936
Tech Sales
1.800.705.2103
FAX
1.801.974.3669
collaborate.support@clearone.com
On the Web
www.clearone.com
Unite 200 USER GUIDE
CLEARONE DOCUMENT
© 2016-2017 ClearOne Inc. - All rights reserved. No part of this document may be reproduced in any form or by any means without written permission from ClearOne. Printed in the United States of America. ClearOne reserves specific privileges. Information in this document is subject to change without notice.
NOTICE: This Class A device complies with Part 15 of the FCC rules and Canadian ICES-003. Operation is subject to the following two conditions:
(1) this device may not cause harmful interference, and (2) this device must accept any interference received, including interference that may cause undesired operation.
CONTENTS
PREFACE .... 1
PRECAUTIONS 1
SUPPLIED ACCESSORIES....2
QUICK START....3
FEATURES 5
PRODUCT SPECIFICATION....6
MAIN UNIT 8
SIZE 9
IR REMOTE CONTROL 10
SERIAL COMMUNICATION CONTROL 13
MENU SETTING....15
IP FUNCTION....20
USB 3.0....28
MAINTENANCE AND TROUBLESHOOTING....28
PREFACE
This manual introduces the function, installation, and operation of the UNITE 200 camera. Prior to installation and usage, please read the manual thoroughly.
PRECAUTIONS
This product can be used only under the specified conditions in order to avoid any damage to the camera:
- Don’t subject the camera to rain or moisture.
- Don't remove the cover; otherwise, you may get an electric shock. In case of abnormal operation, contact ClearOne Technical Support.
- Never operate outside the specified temperature, humidity, and power supply recommendations.
- Use a soft dry cloth to clean the camera. If the camera is very dirty, clean it with diluted neutral detergent; do not use any type of solvents, which may damage the surface.
Caution to transport
Avoid stress, vibration, and moisture in transport, storage and installation.
During installation, take the following precautions:
- Do not grasp the camera by the head when carrying the camera.
- Don't turn camera head manually. Doing so may result in mechanical damage.
- Don't apply corrosive liquid, gas or solid, to avoid damaging the cover which is made up of plastic material.
- Make sure there are no obstacles within the camera's rotation range.
● Never power on before installation has been completed.
Don't dismantle the camera
ClearOne is not responsible for any unauthorized modification or dismantling.
SUPPLIED ACCESSORIES
When you unpack, check that all the supplied accessories are included:
- Camera
- AC power adapter
- Power cord
- RS232 cable
- Remote controller
- User manual
- USB3.0 Cable
QUICK START
Step 1. Please ensure connections are correct before starting
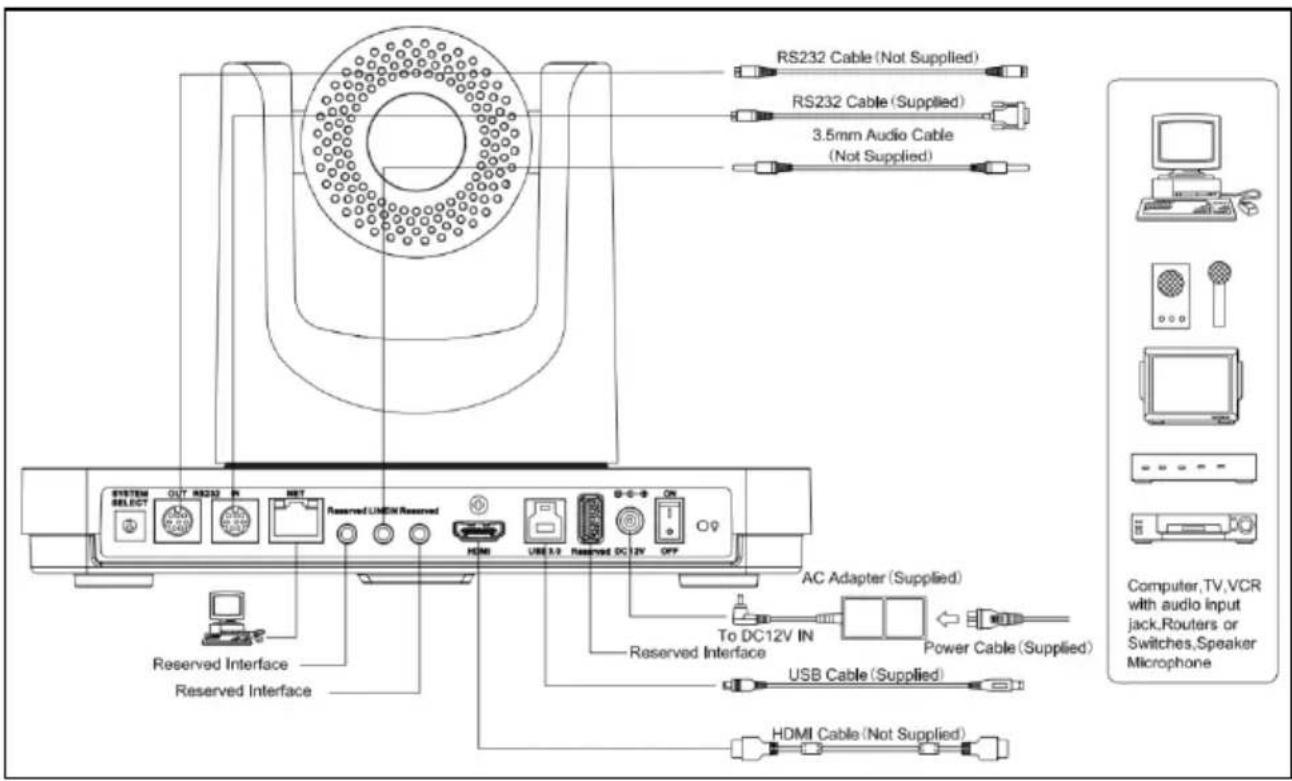
Step 2. Setting of the bottom switches
Set both of the switch1 and switch2 to "OFF". That is "Normal Working Mode."
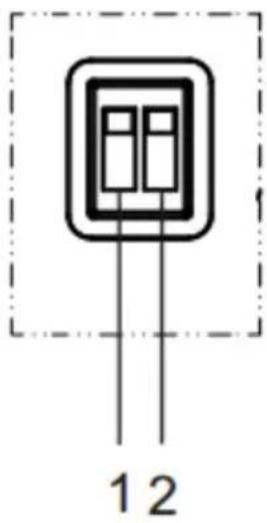
| SW-1 SW-2 Mode | ||
| 1 OFF OFF Normal Working Mode | ||
| 2 ON OFF - | ||
| 3 OFF ON - | ||
| 4 ON ON - | ||
Step 3. Set the Video System Switch to the desired setting
Video format options:
| VIDEO SYSTEM | |||
| 0 | 1080p60 8 720 | p30 | |
| 1 | 1080p50 9 720 | p25 | |
| 2 | 1080i60 A - | ||
| 3 | 1080i50 B - | ||
| 4 | 720p60 C - | ||
| 5 | 720p50 D - | ||
| 6 | 1080p30 E - | ||
| 7 | 1080p25 F - | ||
NOTE: After changing the switch, you need to restart the camera to take effect.
Step 4. Press the ON/OFF button to turn on the camera.
Step 5. When the camera starts, Pan-Tilt rotates to the maximum position of top right, then it returns to the center position. The initialization process is finished.
NOTE: If the position preset 0 has been stored, the position preset 0 will be called up after initialization. See IR Remote Control later in this manual for information about setting presets.
Step 6. (Optional) If you want to restore the factory default settings, Press the Menu button to display the On-screen Display (OSD) menu. Select the item Menu >Restore Default >Restore. Set the value Yes, and then press the HOME button to restore the factory default settings.
FEATURES
- 72.5° Wide-angle Lens
72.5° wide-angle, high-quality lens; supports 12x optical zoom.
- USB 3.0
USB3.0 ultra-high speed interface; can transfer uncompressed original video, and downward compatible with USB2.0. The USB, HDMI, and Network interfaces can output at the same time.
- AAC Audio Encoding
Supports audio line input. Supports AAC audio encoding, for better sound quality and lower bandwidth.
H.265 Support
Supports H.265 encoding, enabling full HD 1080p/60fps video stream at ultra-low bandwidth.
1080P Full HD
A 1/2.7 inch, 2.07 million effective pixels high quality HD CMOS sensor, can reach maximum 1920 x 1080 resolutions, achieving a high quality image.
- Ultra-high Frame Rate
Output frame rate up to 60fps in1080p.
Low-light
High SNR of CMOS sensor, combined with 2D and 3D noise reduction algorithm, effectively reduces the noise, even under low illumination conditions, to ensure that the picture can still remain clean and clear.
- Serial Interface Control
All the parameters of the camera can be remotely controlled using the RS232/485 interface.
PRODUCT SPECIFICATION
| Details | |
| Model UNITE | ^ 200 |
| Name UNITE | ^ Full-HD Video Conference Camera |
| Camera | |
| Video System | HD: 1080p/60, 1080p/50, 1080i/60, 1080i/50, 1080p/30, 1080p/25, 720p/60, 720p/50, 720p/30, 720p/25 |
| Sensor 1/2.7 inch, CMOS, Effective Pixel: 2.07M | |
| Scanning Mode Progressive | |
| Lens 12x, f3.5mm - 42.3mm, F1.8 - F2.8 | |
| Minimal Illumination 0.05 Lux @ (F1.8, AGC ON) | |
| Shutter 1/30s - 1/10000s | |
| White Balance Auto, Indoor, Outdoor, One Push, Manual | |
| Backlight Compensation Support | |
| Digital Noise Reduction 2D&3D Digital Noise Reduction | |
| Video S/N ≥55dB | |
| Horizontal Angle of View | 72.5° - 6.9° |
| Vertical Angle of View | 44.8° - 3.9° |
| Horizontal Rotation Range | ±170° |
| Vertical Rotation Range | -30° - +90° |
| Pan Speed Range | 1.7° - 100°/s |
| Tilt Speed Range | 1.7° - 69.9°/s |
| H & V Flip Support | |
| Image Freezing Support | |
| Number of Presets | 255 |
| Preset Accuracy | 0.1° |
| USB Features | |
| Operating System | Windows 7, Windows 8, Windows 8.1, Windows 10, Mac OS X, Linux |
| Color System | YUV 4:2:2 |
| Video Format USB3.0 : 1080p/30, 1080p/25, 720p/30, 720p/25 | |
| USB Video Communication Protocol | UVC1.0 |
| UVC PTZ Support | |
| Network Features | |
| Video Compression H.265/H.264/MJPEG | |
| Video Stream First Stream, | Second Stream |
| First Stream Resolution 1920x1080, 1280x720, 1024x576 | |
| Second Stream Resolution | 720x576, 720x480, 320x240 |
| Video Bit Rate 32Kbps - 8192Kbps | |
| Bit Rate Type Variable Rate, Fixed Rate | |
| Frame Rate 50Hz: 1fps - 50fps, 60Hz: 1fps - 60fps | |
| Audio Bit Rate 96Kbps, 128Kbps, 256Kbps | |
| Support Protocols TCP/IP, | HTTP, RTSP, RTMP, DHCP, Multicast, etc. |
| Input/ Output Interface | |
| HD Output 1xHDMI: Version 1.3 | |
| Network Interface 1xRJ45: | 10M/100M Adaptive Ethernet port |
| Audio Interface 1-ch: 3.5mm | Audio Interface, Line In |
| USB | 1xUSB3.0: Type B female jack |
| 1xUSB2.0: Type A female jack(Reserved Interface) | |
| Communication Interface | 1xRS-232 IN: 8pin Min DIN, Max Distance: 30m, Protocol: VISCA/Pelco-D/Pelco-P |
| 1xRS-232 OUT: 8pin Min DIN, Max Distance: 30m, Protocol: VISCA network use only | |
| 1xRS485: Share with RS232 In, Max Distance: 1200m, Protocol: VISCA/Pelco-D/Pelco-P | |
| Power Jack | JEITA type (DC IN 12V) |
| Generic Specification | |
| Input Voltage | DC 12V |
| Current Consumption | 1.5A (Max) |
| Operating Temperature | -10°C - 40°C |
| Storage Temperature | -40°C - 60°C |
| Power Consumption 12W (Max) | |
| Dimensions 240mm x 144mm x 160mm | |
| Weight 1.65Kg (3.6lb) | |
MAIN UNIT
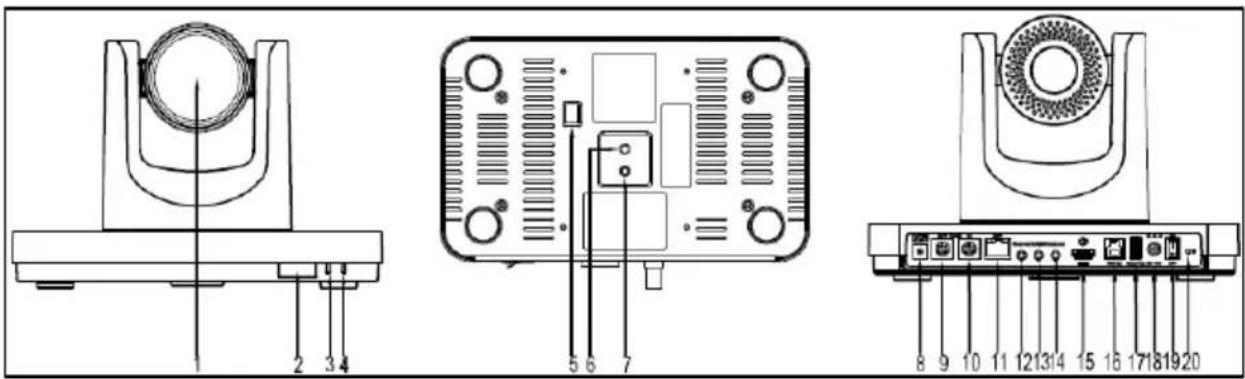
- Lens 11. RJ45 Interface
- Sensor for the Remote Control
- Power Lamp
- Standby Lamp
- Bottom Switches
- Tripod Screw Hole
- Fixing Screw Hole
- System Select Switch
- RS232 OUT Interface
-
RS232 IN Interface
-
Reserved Interface
- Line In Interface
- Reserved Interface
- HDMI Interface
- USB 3.0
- Reserved Interface
- DC IN 12V Interface
- POWER Switch
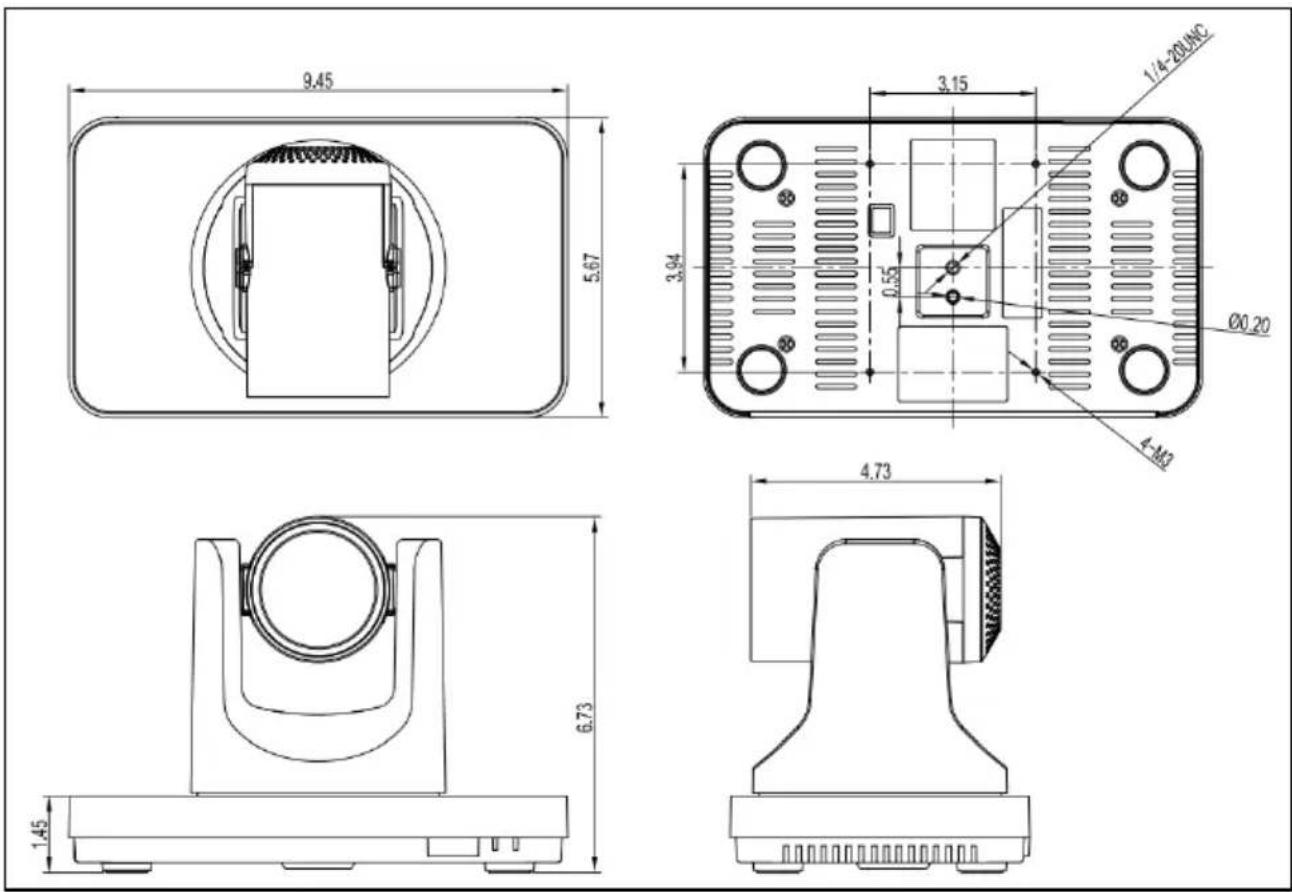
Unit: inch
IR REMOTE CONTROL
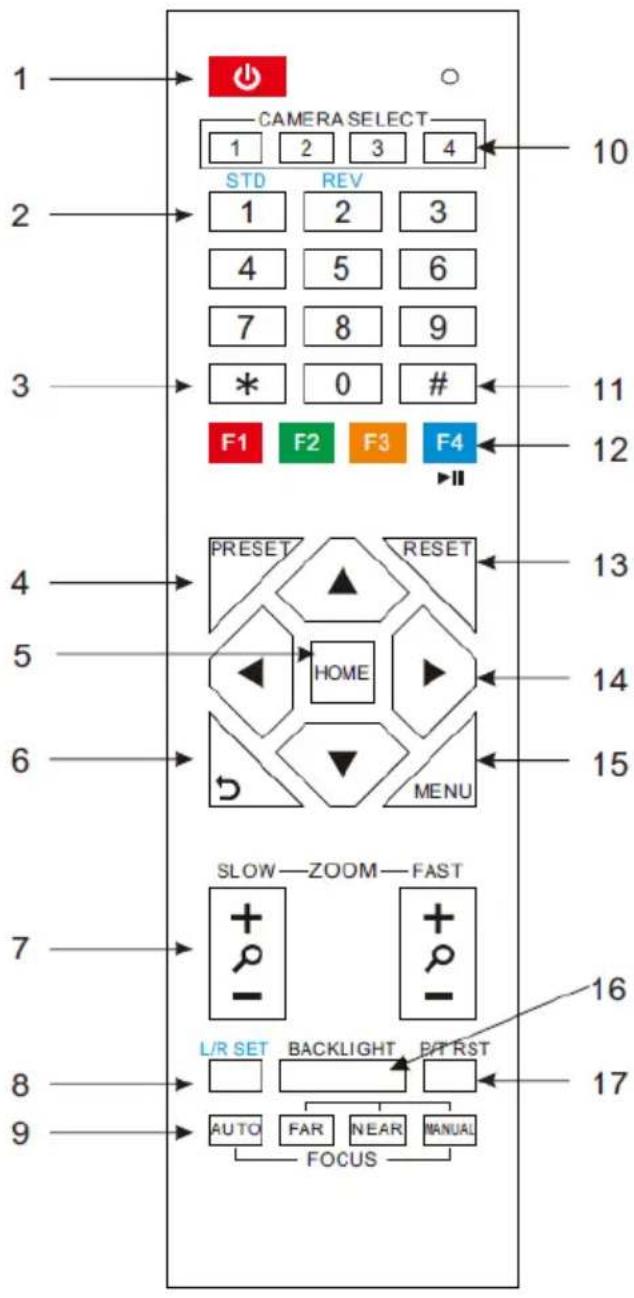
1. Standby Button
Press this button to enter standby mode. Press it again to enter normal mode.
NOTE: Power consumption in standby mode is approximately half of the normal mode.
2. Position Buttons
To set preset or call preset.
3. \* Button
For multiple functions.
4 &13. Set/Clear Preset Buttons
Set preset: Store a preset position
[PRESET] + Numeric button (0-9):
Setting a corresponding numeric key preset position
NOTE: Preset 0 - 9 via remote control and the rest from web, keyboard and the serial port.
Clear preset: Erase a preset position [RESET] + Numeric button (0-9), or: [*] + [#] + [RESET]: Erase all presets
5 &14. Pan/Tilt Control Buttons
Press the arrow buttons to perform panning and tilting. Press the [HOME] button to face the camera back to front.
6. Return Button
Press the button to back previous menu.
7. Zoom Buttons
Zoom+: Zoom In (Slow and fast speed)
Zoom-: Zoom Out (Slow and fast speed)
8. L/R Set Button
Set the left & right direction of the remote control.
[L/R Set] + [1]: Normal direction.
[L/R Set] + [2]: Left and right direction will be reversed.
9. Focus Buttons
Used for focus adjustment.
Press [AUTO] to adjust the focus on the center of the object automatically. To adjust the focus manually, press the [MANUAL] button, and adjust it with [Far] (focus on far object) and [Near] (focus on near object).
10. Camera Address Select Buttons
Press the button corresponding to the camera which you want to operate with the remote controller.
11. # Button
For multiple functions.
12. Multiple Function Buttons
Function 1. Set camera IR address
Press 3 keys contiguously can set camera IR address as follow:
[*] + [#] + [F1]: Address 1
[*] + [#] + [F2]: Address 2
[*] + [#] + [F3]: Address 3
[*] + [#] + [F4]: Address 4
Function 2. Image freezing function
Press [F4] to start the freeze function. The word "Freeze" displays on the upper left corner. After five seconds, the display disappears automatically (though the freeze feature continues). To cancel the freeze, press the [F4] key the word "Unfreeze" displays on the upper left corner. After five seconds, the display disappears automatically.
15. Menu Setting
Menu button: Press this button to enter or exit the OSD menu.
16. Backlight Button
Backlight button: Press this button to enable the backlight compensation. Press it again to disable the backlight compensation.
NOTE: Effective only in auto exposure mode.
NOTE: If there is a light behind the subject, the subject will appear dark. In this case, press the backlight ON / OFF button. To cancel this function, press the backlight ON / OFF button.
17. P/T RST Button
Press the button to self-calibrate pan and tilt once again.
Shortcut Set Function
[*] + [#] + [1]: Display OSD menu in English
[*] + [#] + [3]: Display OSD menu in Chinese
[*] + [#] + [4]: Show IP address
[*] + [#] + [6]: Quickly restore the default settings
[*] + [#] + [8]: Show the camera version
[*] + [#] + [9]: Quickly set mount mode (flip / normal)
SERIAL COMMUNICATION CONTROL
In default working mode, the camera can be controlled via RS232 or RS485 (half-duplex mode). The parameters are as follows:
Baud rate: 2400/4800/9600 bit/s.
Start bit: 1 bit.
Data bit: 8 bits.
Stop bit: 1bit.
Parity bit: none.
When the camera initializes, Pan-Tilt rotates to the maximum position of top right, then it returns to the center, and the process of initialization is finished.
(Note: If the position preset 0 has been stored, the position preset 0 is called up after initialization.) Then the users can control the camera with commands in the command list.
Control interface definition
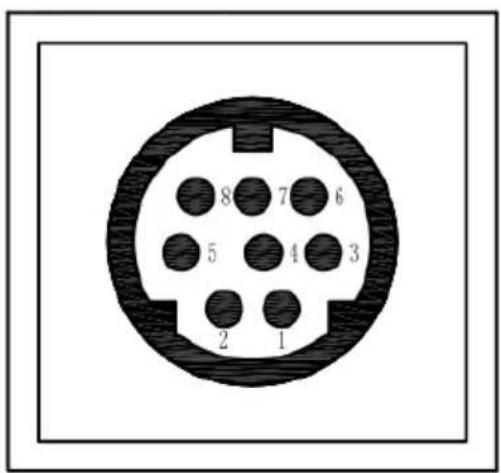
| No. Function | |
| 1 DTR | |
| 2 DSR | |
| 3 TXD | |
| 4 GND | |
| 5 RXD | |
| 6 RS485- | |
| 7 IR OUT | |
| 8 RS485- | |
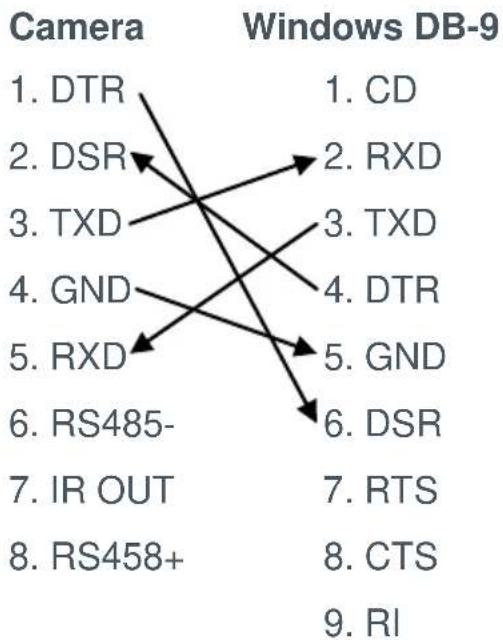
other
| Camera | Windows DB-9 | | ------ | ------------ | | 1. DTR | 1. CD | | 2. DSR | 2. RXD | | 3. TXD | 3. TXD | | 4. GND | 4. DTR | | 5. RXD | 5. GND | | 6. RS485- | 6. DSR | | 7. IR OUT | 7. RTS | | 8. RS458+ | 8. CTS | | 9. RI | 9. RI |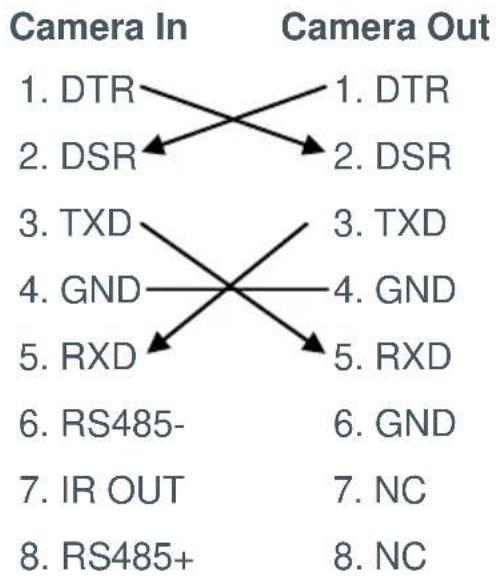
flowchart
graph TD
    A["1. DTR"] --> B["2. DSR"]
    C["3. TXD"] --> D["4. GND"]
    E["5. RXD"] --> F["6. RS485-"]
    G["7. IR OUT"] --> H["8. RS485+"]
    I["1. DTR"] --> J["2. DSR"]
    K["3. TXD"] --> L["4. GND"]
    M["5. RXD"] --> N["6. GND"]
    O["7. NC"] --> P["8. NC"]
Network configuration
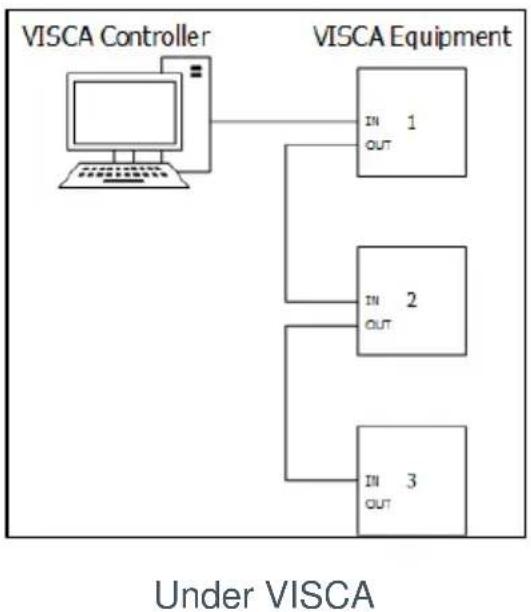
flowchart
graph TD
    A["VISCA Controller"] --> B["VISCA Equipment"]
    B --> C["IN 1 OUT"]
    B --> D["IN 2 OUT"]
    B --> E["IN 3 OUT"]
    style A fill:#f9f,stroke:#333
    style B fill:#ccf,stroke:#333
    style C fill:#dfd,stroke:#333
    style D fill:#dfd,stroke:#333
    style E fill:#dfd,stroke:#333
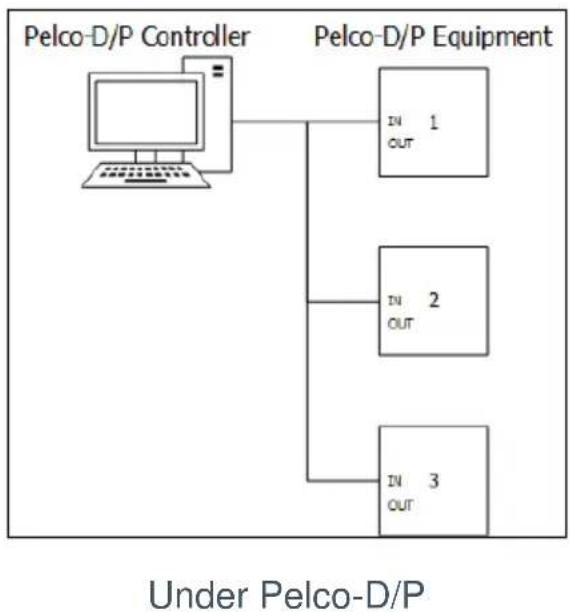
flowchart
graph TD
    A["Pelco-D/P Controller"] --> B["In 1 Out"]
    A --> C["In 2 Out"]
    A --> D["In 3 Out"]
    style A fill:#f9f,stroke:#333
    style B fill:#ccf,stroke:#333
    style C fill:#ccf,stroke:#333
    style D fill:#ccf,stroke:#333
Command list
The camera uses the VISCA/Pelco-D/Pelco-P serial standard. If you need VISCA/Pelco-D/Pelco-P protocol command list in detail, please contact ClearOne Technical Support.
MENU SETTING
1. MENU
Press the [MENU] button to display the main menu. Use the arrow buttons to select the item to be set. Press the [HOME] button to enter a sub-menu.
MENU
▶ Exposure
Color
Image
P/T/Z
Noise Reduction
Setup
Restore Default
[Home] Enter
[Menu] Exit
2. EXPOSURE
Select Exposure from the main menu and press the [HOME] button. The EXPOSURE menu appears, as shown in the following figure:
EXPOSURE
▶ Mode Auto
ExpCompMode Off
Backlight Off
Gain Limit 3
Anti-Flicker 50Hz
DRC 6
▲▼ Select Item
Change Value
[Menu] Back
Mode: Exposure mode. Options: Auto, Manual, SAE, AAE, Bright.
ExpCompMode (Effective only when exposure mode is Auto): Exposure compensation mode. Options: On, Off.
ExpComp (Effective only when ExpCompMode is On): Exposure compensation value. Options:-7 - +7.
Gain Limit (Effective only when exposure mode is Auto/AAE/Bright): Maximum gain limit. Options: 0 - 15.
Backlight (Effective only when exposure mode is Auto): Set the backlight compensation. Options:
On, Off.
DRC: Dynamic range control strength. Options: 0 - 8.
Bright (Effective only when exposure mode is Bright): Exposure bright level, Options: 0 - 17.
Anti-Flicker (Effective only when exposure mode is Auto/Bright): Options: Off, 50Hz, 60Hz.
Iris (Effective only when exposure mode is Manual / AAE): Aperture value. Options: F1.8, F2.0, F2.4, F2.8, F3.4, F4.0, F4.8, F5.6, F6.8, F8.0, F9.6, F11.0, Close.
Shutter (Effective only when exposure mode is Manual /SAE): Shutter value. Options: 1/30,1/60, 1/90,1/100,1/125,1/180,1/250,1/350, 1/500,1/725,1/1000,1/1500,1/2000,1/3000,1/4000,1/6000,1/10000.
3. COLOR
Select Color in the main menu and press the [HOME] button. The COLOR menu appears, as shown in the following figure:
COLOR
| WB Mode | Auto |
| RG Tuning | 0 |
| BG Tuning | 0 |
| Saturation | 90% |
| Hue | 7 |
| AWB sens | Low |
▲▼ Select Item
Change Value
[Menu] Back
WB-Mode: White balance mode. Options: Auto, Indoor, Outdoor, One Push, Manual.
RG (Effective only when WB-Mode is Manual): Red gain. Options: 0 - 255.
BG (Effective only when WB-Mode is Manual): Blue gain. Options: 0 - 255.
RG Tuning (Effective only when AWB sens is Low): Red gain fine-tuning. Options: -10 - +10
BG Tuning (Effective only when AWB sens is Low): Blue gain fine-tuning. Options: -10 - +10
Sat.: Saturation. Options: 60% -
200%.
Hue: Chroma adjustment. Options: 0 - 14
AWB sens: White balance sensitivity.
Options: Normal, High, Low.
4. IMAGE
Select Image in the main menu and press the [HOME] button. The IMAGE menu appears, as shown in the following figure:
IMAGE
▶ Luminance 6
Contrast 6
Sharpness 1
Flip-H Off
Flip-V Off
B&W-Mode Off
Gamma Default
Style Norm
▲▼ Select Item
Change Value
[Menu] Back
Luminance: Brightness adjustment.
Options: 0 - 14
Contrast: Contrast adjustment.
Options: 0 - 14
Sharpness: Sharpness adjustment.
Options: Auto, 0 - 15
Flip-H: Image flipped horizontally.
Options: On, Off.
Flip-V: Image flipped vertically.
Options: On, Off
B&W-Mode: Image color. Options:
On, Off
Gamma: Options Default, 0.45, 0.5,
0.56, 0.63
Style: Options: Norm, Clarity, Bright,
Soft.
5. P/T/Z
P/T/Z
▶ SpeedByZoom On
AF-Zone Center
AF-Sense Low
L/R Set STD
▲▼ Select Item
Change Value
[Menu] Back
SpeedByZoom: The depth of field scale switch. Options: On, Off
AF-Zone: Interested in focusing area.
Options: Top, Center, Bottom
AF-Sense: Automatic focusing sensitivity. Options: Low, Normal, High
L/R Set: Options: STD, REV
6. NOISE REDUCTION
Select Noise Reduction in the main menu and press the [HOME] button. The NOISE REDUCTION menu appears, as shown in the following figure:
NOISE REDUCTION
▶ NR2D-Level 3
NR3D-Level 4
D-HotPixel Off
▲▼ Select Item
Change Value
[Menu] Back
NR2D-Level: 2D noise reduction.
Options: Off, Auto, 1 - 5
NR3D-Level: 3D noise reduction.
Options: Off, 1 - 8
D-HotPixel: Dynamic bad points.
Options: Off, 1 – 5
7. SETUP
Select Setup in the main menu and press the [HOME] button. The SETUP menu appears, as shown in the following figure:
SETUP
▶ Language EN
DVI Mode DVI
Protocol VISCA
V_Address 1
V_AddrFix Off
Net Mode Serial
Baudrate 9600
▲▼ Select Item
Change Value
[Menu] Back
Language: Menu language. Options:
EN, Chinese, and Russian
DVI Mode: Options: DVI, HDMI.
Protocol: Control protocol type.
Options: AUTO, VISCA, PELCO-D,
PELCO-P
V_Address: Protocol address. To be decided according to the agreement,
AUTO, VISCA protocol Options: 1 - 7
P_D_Address: PELCO-D protocol.
Options: 0-254
P_P_Address: PELCO-P protocol.
Options: 0-31
V_AddrFix: The switch you can
change camera uart address.
Options: On, Off (When set to On,
the 88 30 01 FF command is
invalid.)
Net Mode: Set the serial port control
networking. Options: Serial, Paral
Baudrate: Serial port baud rate.
Options: 2400, 4800, 9600
8. RESTORE DEFAULT
Select Restore Default in the main menu and press the [HOME] button.
The RESTORE DEFAULT menu appears, as shown in the following figure:
RESTORE DEFAULT
▶Restore? No
Change Value
[Home] OK
[Menu] Back
Restore: Confirm restore factory settings. Options: Yes, No
NOTE: Press the [HOME] button to confirm.
IP FUNCTION
1. Operating Environment
Operating System: Windows 7/8/8.1/10
Note: Using the included utility programs requires Windows, but using the Web interface does not require any particular operating system.
Network Protocol: TCP/IP
2. Equipment Installation
1) Connect the camera to your network or to your PC directly via an Ethernet cable.
Note: To connect the camera directly, use an Ethernet crossover cable.
2) Turn on the camera.
3) If the orange light of internet port is on and the green light is flashing, then the camera is connected to the network or to your computer.
3. Internet Connection
Ways to connect the camera and a computer are shown in the figures below:
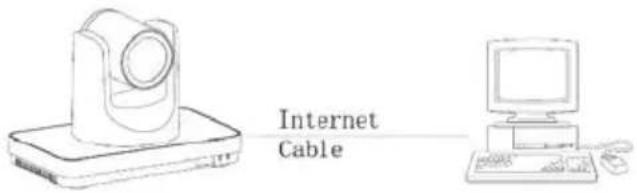
Connect directly by Ethernet crossover cable
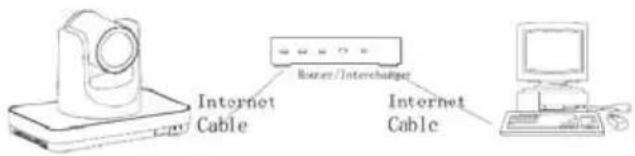
Connect via router/switch
4. Access the camera though LAN.
4.1. Setup IP address
The camera's default IP address is 192.168.100.88. If you forget the camera's IP address or have changed it, use the method below to show the camera IP address:
Press * and # and 4 on the remote control to display the camera IP address on-screen.
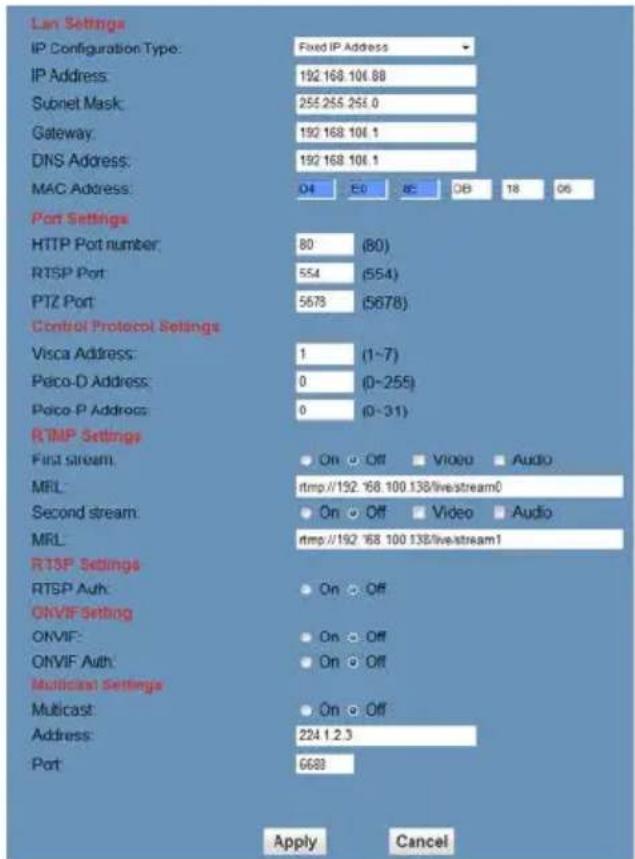
To change the camera's IP address:
a. Open the camera's Web interface (see Access Camera's Web Interface later in this Manual for detailed instructions).
b. On Web interface page, find "Network"-->Change IP. Enter a
new IP address, then Click "Apply". c. Restart camera.
4.2. Access camera's web
Input http://192.168.100.88 into a browser (Internet Explorer and Firefox work best).
Note: If you have changed the camera's IP address, enter the new address.
Note: To access the camera using an IP address, you must be on the same network as the camera.
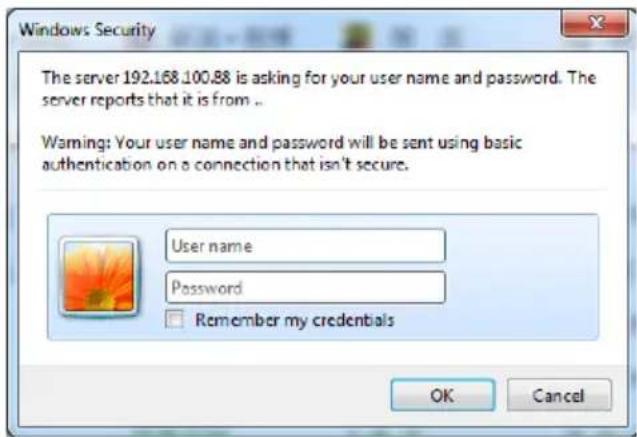
A login window appears. Input the user name: (default is "admin" and password (default is "admin", as shown below (the login window may not look exactly like this, depending on your operating system and browser):
After login, the Web interface appears, as shown below:
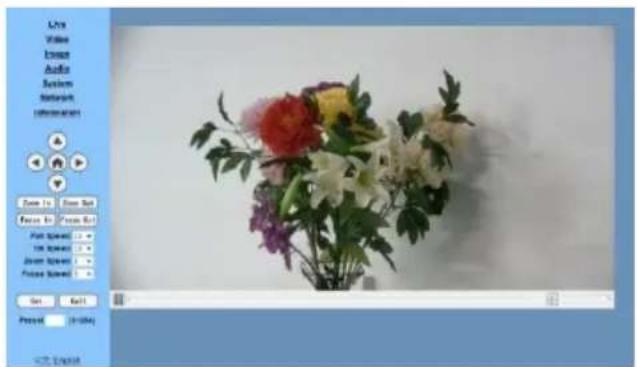
natural_image
Close-up of a colorful flower bouquet in a vase, displayed within an image editing software interface (no text on the flower or background)NOTE: If this is the first time using the web interface, you must install the VLC player software.
5. Access the camera though WAN.
5.1. Dynamic DNS setup for accessing the camera
Once you have set a domain name to camera, and forwarded the traffic
21 UNITE 200: User Guide
to the traffic to the correct address and port number, then you can use a domain name to access camera. Access link: http://hostname: port number.
For example, set up host computer name as: youdomain.f3322.org, camera port number:
- Access link would be:
http://youdomain.f3322.org:554.
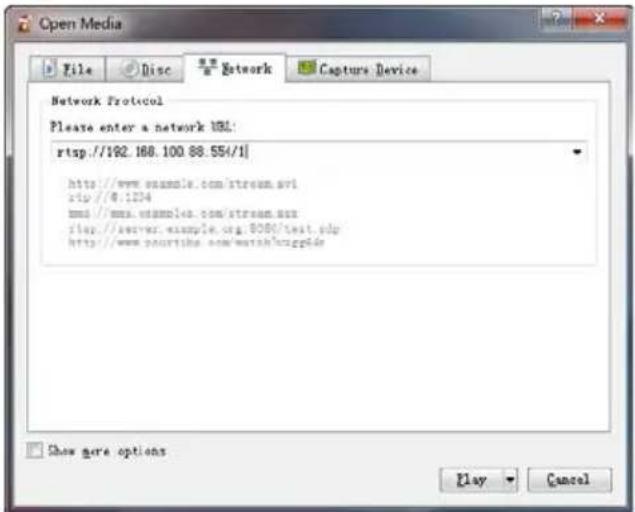
5.2. VLC stream media player monitoring
VLC media server procedure
Open VLC media player, click "Media"->"Open Network Steam", or type "Ctrl + N".
Input stream address:
rtsp://ipaddress:port number/1 (Main stream).
Example: rtsp://192.168.100.88:554/1
rtsp://ipaddress:port number/2 (Substream).
Example: rtsp://192.168.100.88:554/2
NOTE: The default RTSP port number is 554.
6. IP Camera parameter setup
All pages include two menu bars:
Real time monitoring: displaying video image
Parameter setup: with function buttons
Video viewing window
Video viewing window must be same as video resolution; the bigger the resolution, the bigger the playing area. Double-click the viewing window to show full-screen; double-click again to return to initialized size.
PTZ Setup
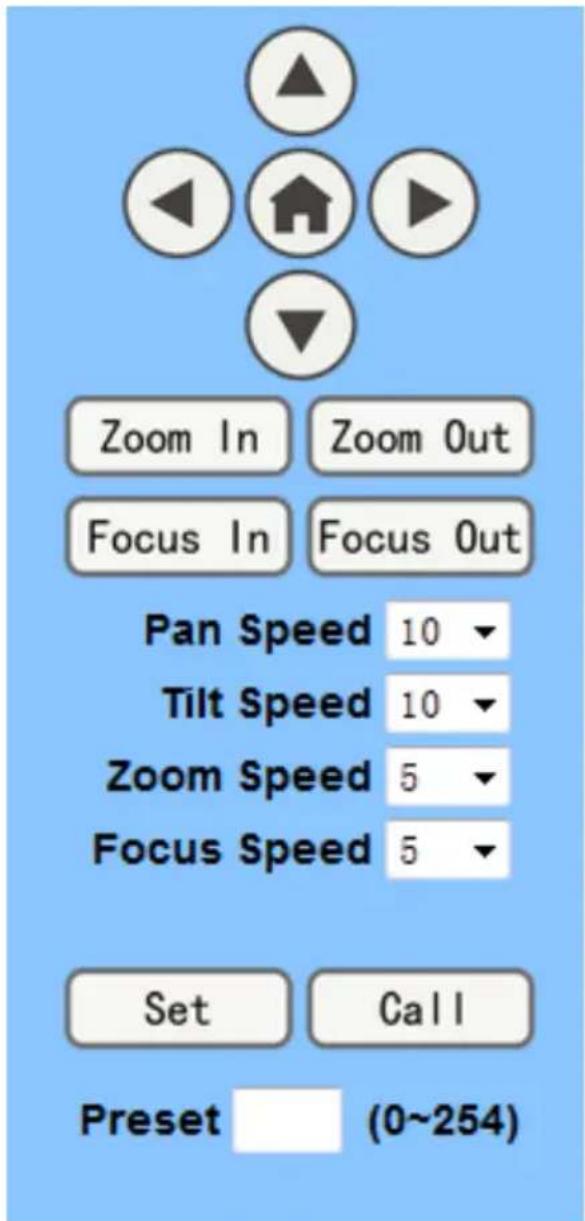
1) Pan-Tilt control: Up, Down, Left, Right, Home button as shown above.
2) Rate: Vertical speed can be chosen as 1 - 24, horizontal direction at the rate of 1 - 20. Select corresponding speed and click direction button to realize PTZ speed increase or decrease.
3) Zoom In/ Zoom out: for zooming in or zooming out. Focus In/ Focus Out: Focusing on distant objects or Focusing on close objects.
4) Set/Call: When PTZ has been set to a desired position, you can save that configuration as a preset for later use. Click the "Set" button to save a preset. At any point later, you can click the "Call" button to call this preset.
6.2. Media
For Video Setup, Select "Video".
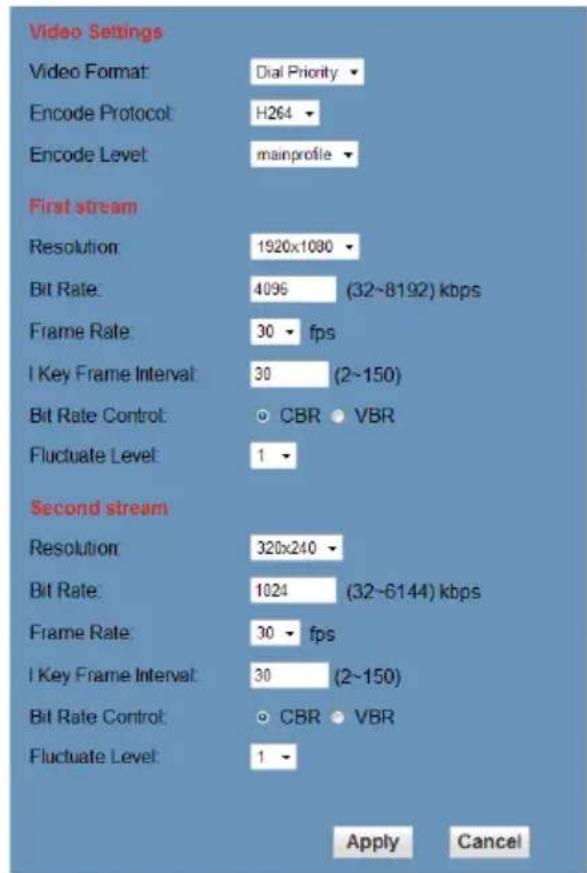
1) Video format
Supports 50HZ (PAL) and 60HZ (NTSC), and Dial priority.
2) Encode Protocol
Supports MJPEG, H.264 and H.265.
3) Encode Level
Supports baseline, main profile, and high profile.
4) Resolution
Main bit rate supports 1920x1080, 1280x720 and 1024x576. Minor bit rate supports720x480, 720x576and 320x240. The higher the resolution, the clearer the image will be, but more network bandwidth will be used.
5) Bit Rate
User can assign bit rate/stream. Generally speaking, the higher bit rate is, and the clearer the image will be. The bit allocation must combine with network bandwidth. If the network bandwidth is too low and the allocated bit rate is too high, the video quality will suffer.
6) Frame rate
You can specify the size of the frame rate. Generally speaking, the greater the frame rate, the smoother the image; the smaller the frame rate,
the choppier the image.
7) I key frame interval:
Set interval between 2 l frame. The bigger the interval, lower the response will be from viewing window.
8) Bit Rate control
Options:
Constant bit rate: video coder will be coding according to preset speed Variable bit rate: video coder will adjust the speed based on preset speed to gain the best image quality
9) Fluctuate level
Restrain the fluctuation magnitude of variable rate. Options: 1 - 6
6.3. Image Setup, Click "Image."
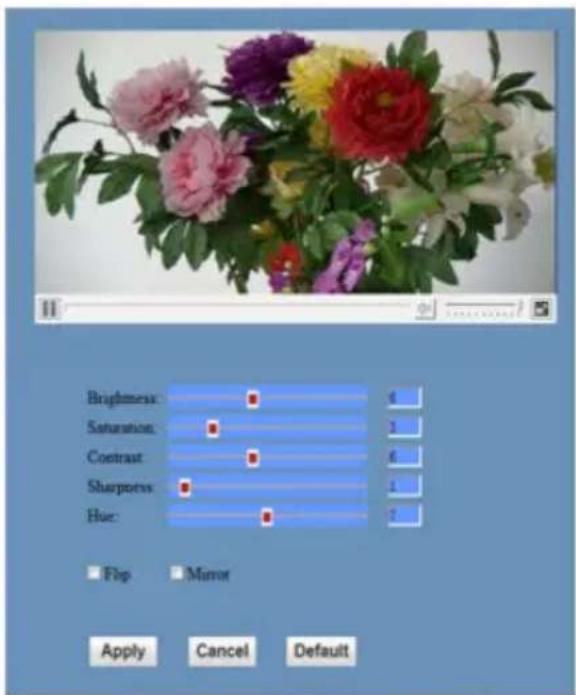
1) Brightness
Image brightness, 0 -14, slider control, on the right shows the corresponding numerical value. The default value is 7.
2) Saturation
Saturation 0 - 14, slider control, on the right shows the corresponding numerical value. The default value is 4.
3) Contrast
Contrast 0 - 14, slider control, on the right shows the corresponding numerical value. The default value is 8.
4) Sharpness
Sharpness 0 - 15, slider control, on the right shows the corresponding numerical value. The default value is 3.
5) Hue
Hue 0 - 14, slider control, on the right shows the corresponding numerical value. The default value is 6.
6) Flip & Mirror
Select Flip to turn the image upside down; select Mirror to flip the image horizontally. The default value for both is not selected.
7) Button
After adjusting any parameters, click "Apply" to save the settings or click "Cancel" to cancel the adjustment of the parameters. Click "Default" to revert to the default value.
6.4. Audio Setup, Click "Audio."
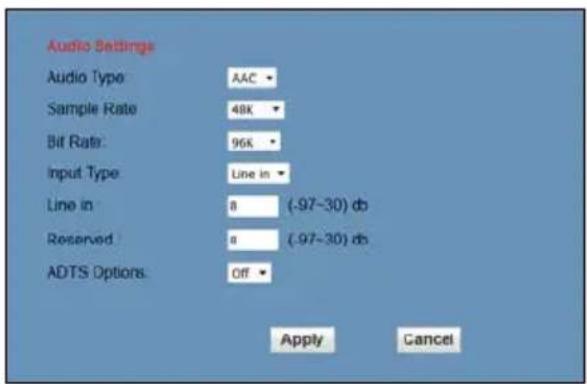
1) Audio Type
Option: AAC.
2) Sample rate
Options: 44.1K and 48K.
3) Bit rate
Options: 96K, 128K, 256K.
4) Input Type
Option: line in only
5) Line in:
The gain of the Line in.
6) Reserved
7) Apply Button
Click "Apply" to save changes, or click "Cancel" to discard the changes.
6.5. System setting, please click "System"
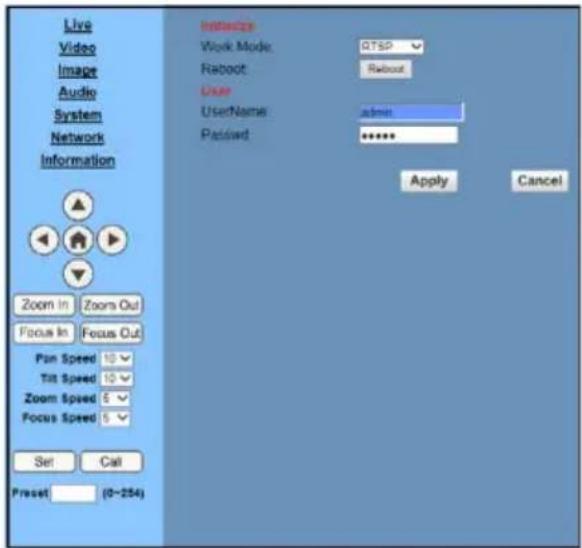
1) Work Mode
Work Mode RTSP
2) Reboot
Click the "Reboot" button to restart the system.
3) User and password
You can modify the password (letters and numbers only)
4) Apply / Cancel
Modify password and click "Apply" to change the password, or click "Cancel" to cancel password change.
6.6. Network Setting, Click "Network."
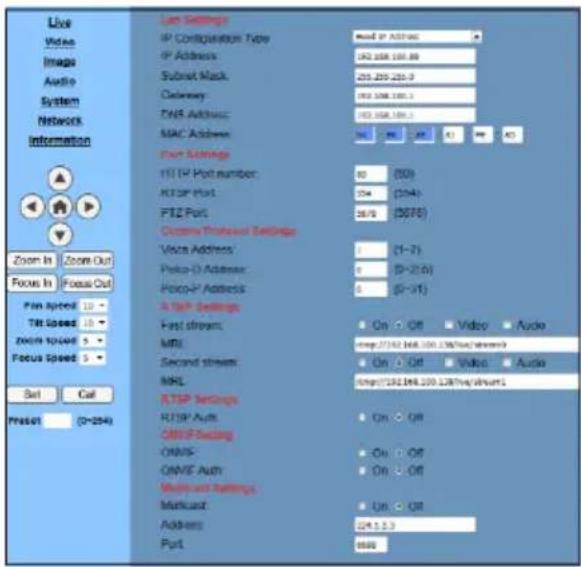
1) LAN Settings
The default IP address is 192.168.100.88. The MAC address can be modified.
2) Port Settings
HTTP Port, Default port number: 80 RTSP Port, Supports the RTSP protocol. Default port number: 554. PTZ Port, Supports PTZ protocol. Default port number: 5678.
3) Control Protocol Setting
Camera control communication protocols include Visca address, Pelco-D address, and Pelco-P address.
4) RTMP Setting
When configuring the camera stream, can set up two streams, in
the two stream selection control code stream of "On", "Off", "Video", "Audio", etc.
5) RTSP Setting
Setting network camera RTSP protocol of "On", "Off".
6) Multicast Setting
Multicast switch, multicast address (default address 224.1.2.3) and port (default port number: 6688) can be set.
7) Apply / Cancel
Modify network parameters then click "Apply" to save the changes, or click "Cancel" to discard the changes.
6.7. Device Information
Click “Information”, the current device information as shown below.
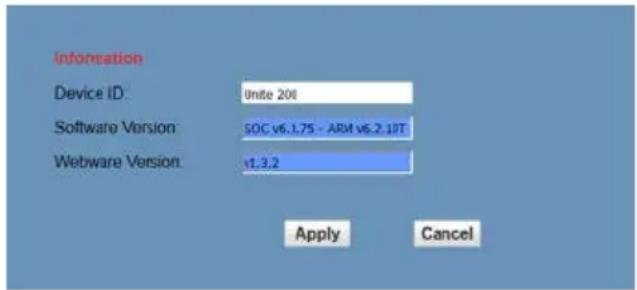
USB 3.0
Camera supports UVC protocol, compatible with USB 2.0 & USB 3.0.
USB 3.0 supports 1920x1080p/30 max output.
Support OS: Windows 7/8/8.1/10, Linux, Mac OS, etc.
General software as follows:
Windows: AMCAP, VLC, Debut Video Capture, etc.
Linux: V412 software driver and VLC media player, etc.
Mac OS: FaceTime. iChat, Photo Booth and Debut Video Capture, etc.
NOTE: We recommend using AMCAP version 8.0 in Windows, as its software performance is more stable. When using the high version of AMCAP in a low configuration system, it will slow the stream rendering.
NOTE: The first time the camera is accessed by USB cable, you must install a plug-in.
MAINTENANCE AND TROUBLESHOOTING
Camera Maintenance
- If camera will not be used for a long time, turn off the power switch and disconnect.
● AC power cord of AC adapter to the outlet. - Use a soft cloth to clean the camera cover.
- Use the soft dry cloth to clean the lens. If the camera is very dirty, clean it with diluted neutral detergent. Do not use any type of solvents, which may damage the surface.
Unqualified Application
- Do not shoot extremely bright objects for a long period of time, such as sunlight, strong light sources, etc.
- Do not operate in unstable lighting conditions, otherwise image may flicker.
Troubleshooting
| Problem Solution | |
| No image | 1. Check whether the power cord is connected, voltage is OK, POWER lamp is lit.2. Check whether the camera can self-test after start up.3. Check the BOTTOM switch and make sure the two switches are both set OFF.4. Check the video cable to make sure it is connected correctly. |
| Abnormal display of image | Check the video cable to make sure it is connected correctly. |
| Image dithering even at widest zoom position | 1. Check whether the camera is fixed correctly.2. Make sure there is nothing nearby causing vibrations. |
| IE browser not showing video image | When the camera is accessed the first time by Internet Explorer (or another web browser), you must install the plug-in. The first time you use this camera by internet (only for new user), you must install the player software (VLC). Please go to VLC website http://www.videolan.org/vlc, download and Install VLC (player software). After installation, log in again. You should see the video stream on the home page of the Web interface. |
| Unable to access IP Camera by browser | 1. Make sure your computer is connected to the network, to rule out cable failure or network failure caused by a virus. Make sure you can ping the computer from another machine and that the computer you're using can ping other machines on the local network or the gateway.2. Disconnect the camera from the network, ensure that the camera and PC are connected (either directly, using a crossover cable, or via a router or switch), and then follow the directions earlier in this guide for resetting the IP address.3. Check the server's IP address and subnet mask and gateway address.4. Check for MAC address conflicts.5. Make sure the HTTP port isn't occupied by other devices, or that routing rules aren't sending the traffic to a different address or port. |
| IP address modified incorrectly or forgot Web interface password | You can recover access to the camera using the IR remote control. Press "[*] + [#] + [Manual]" to restore the default values (default IP: 192.168.100.88, default username: admin, default password: admin). |
| The IR remote control cannot control the camera | 1. Change the remote control battery.2. Check the camera working mode.3. Check that the IR address of the Remote Commander is set correctly. |
| Serial communication cannot control the camera | 1. Check the camera working mode.2. Check that the control cable is connected correctly. |
- COPYRIGHT NOTICE
- Unite 200 USER GUIDE
- CONTENTS
- PREFACE
- PRECAUTIONS
- Caution to transport
- During installation, take the following precautions:
- Don't dismantle the camera
- SUPPLIED ACCESSORIES
- QUICK START
- Step 2. Setting of the bottom switches
- Step 3. Set the Video System Switch to the desired setting
- FEATURES
- - 72.5° Wide-angle Lens
- - USB 3.0
- - AAC Audio Encoding
- H.265 Support
- 1080P Full HD
- - Ultra-high Frame Rate
- Low-light
- - Serial Interface Control
- MAIN UNIT
- IR REMOTE CONTROL
- Standby Button
- Position Buttons
- \* Button
- &13. Set/Clear Preset Buttons
- &14. Pan/Tilt Control Buttons
- Return Button
- Zoom Buttons
- L/R Set Button
- Focus Buttons
- Camera Address Select Buttons
- # Button
- Multiple Function Buttons
- Function 1. Set camera IR address
- Function 2. Image freezing function
- Menu Setting
- Backlight Button
- P/T RST Button
- Shortcut Set Function
- SERIAL COMMUNICATION CONTROL
- Command list
- MENU SETTING
- MENU
- MENU
- EXPOSURE
- EXPOSURE
- COLOR
- IMAGE
- IMAGE
- P/T/Z
- P/T/Z
- NOISE REDUCTION
- NOISE REDUCTION
- SETUP
- SETUP
- RESTORE DEFAULT
- RESTORE DEFAULT
- IP FUNCTION
- Operating Environment
- Equipment Installation
- Internet Connection
- Access the camera though LAN.
- Setup IP address
- Access camera's web
- Access the camera though WAN.
- Dynamic DNS setup for accessing the camera
- VLC stream media player monitoring
- IP Camera parameter setup
- Video viewing window
- Media
- 1) Video format
- 2) Encode Protocol
- 3) Encode Level
- 4) Resolution
- 5) Bit Rate
- 6) Frame rate
- 7) I key frame interval:
- 8) Bit Rate control
- 9) Fluctuate level
- Image Setup, Click "Image."
- 1) Brightness
- 2) Saturation
- 3) Contrast
- 4) Sharpness
- 5) Hue
- 6) Flip & Mirror
- 7) Button
- Audio Setup, Click "Audio."
- 1) Audio Type
- 2) Sample rate
- 3) Bit rate
- 4) Input Type
- 5) Line in:
- 6) Reserved
- 7) Apply Button
- System setting, please click "System"
- 1) Work Mode
- 2) Reboot
- 3) User and password
- 4) Apply / Cancel
- Network Setting, Click "Network."
- 1) LAN Settings
- 2) Port Settings
- 3) Control Protocol Setting
- 4) RTMP Setting
- 5) RTSP Setting
- 6) Multicast Setting
- 7) Apply / Cancel
- Device Information
- USB 3.0
- MAINTENANCE AND TROUBLESHOOTING
- Camera Maintenance
- Unqualified Application
Brand : ClearOne
Model : Unite 200
Category : Camera