405 - Phone AUDIOCODES - Free user manual and instructions
Find the device manual for free 405 AUDIOCODES in PDF.


User questions about 405 AUDIOCODES
0 question about this device. Answer the ones you know or ask your own.
Ask a new question about this device
Download the instructions for your Phone in PDF format for free! Find your manual 405 - AUDIOCODES and take your electronic device back in hand. On this page are published all the documents necessary for the use of your device. 405 by AUDIOCODES.
USER MANUAL 405 AUDIOCODES
405 and 405HD Phones
Version 2.2.16
natural_image
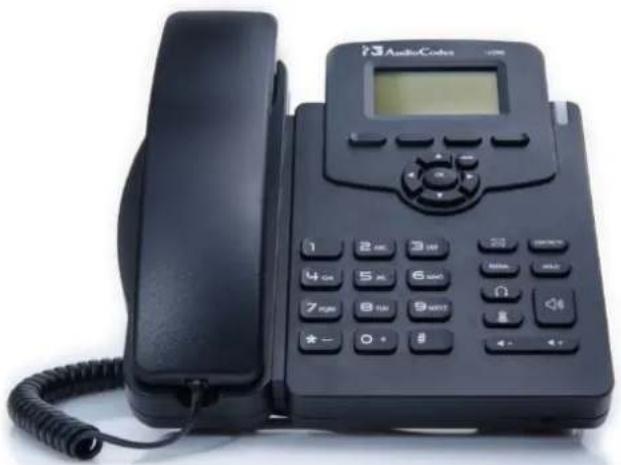
Black AudioCodes 1000 phone with attached keypad and cord (no visible text or symbols on device body)Table of Contents
1 Introducing the 405 / 405HD IP Phone....9
1.1 About AudioCodes' 400HD Series of IP Phones 9
1.2 Features Common to All AudioCodes IP Phones 9
1.3 Unified Communications 9
1.4 Enterprise IP Telephony....9
1.5 IP Contact Centers.... 10
2 Setting up the Phone....11
2.1 Unpacking.... 11
2.2 Device Description 11
2.2.1 Front View....11
2.2.2 Rear View 13
2.3 Cabling....15
2.4 Mounting....15
2.4.1 Mounting on a Desk 15
2.4.2 Mounting on a Wall....16
2.4.2.1 Routing the Handset Cable....16
3 Getting Started....17
3.1 LCD in Idle State.... 17
3.2 Softkeys....18
3.3 Accessing Menus....19
3.4 Entering Numbers, Alphabetical Letters and Symbols....20
3.5 Displayed Messages....22
4 Customizing Your Phone....23
4.1 Selecting Language 23
4.2 Selecting Ring Tone....24
4.3 Enabling Call Waiting 25
4.4 Setting Date and Time 26
4.5 Changing LCD Contrast Level 27
4.6 Setting the LCD Backlight Timeout....28
4.7 Changing the Default Answer Device....29
4.8 Restarting the Phone 29
4.9 Adjusting Volume 30
4.9.1 Adjusting Ring Volume 30
4.9.2 Adjusting Tones Volume....30
4.9.3 Adjusting Handset Volume 31
4.9.4 Adjusting Speaker Volume 31
4.9.5 Adjusting Headset Volume 31
4.10 Defining Call Forwarding 32
4.11 Managing Your Personal Directory....33
4.11.1 Accessing the Directory....33
4.11.2 Adding Contacts to the Personal Directory....33
4.11.3 Editing a Contact....35
4.11.4 Deleting a Contact....36
4.11.5 Searching for a Contact....36
4.12 Configuring Keys....37
4.12.1 Configuring Speed Dial Keys 37
4.13 Editing a Speed Dial.... 38
4.13.1 Deleting a Speed Dial....38
4.13.2 Configuring Softkeys 39
4.13.3 Deleting a Configured Softkey 40
4.13.4 Configuring a Softkey as a Speed Dial....40
4.13.5 Configuring a Softkey as a Speed Dial + BLF 40
4.13.6 Configuring a Navigation Key Position Function....41
4.13.6.1 Removing a Configured Function....42
4.13.7 Configuring a Function Key for Paging....42
4.13.8 Paging a Group 43
4.13.9 Receiving an Incoming Paging Call....43
5 Performing Basic Operations....45
5.1 Using VocaNOM for Direct Voice-Dialing 45
5.2 Using Audio Devices....45
5.3 Making Calls 46
5.3.1 Dialing....46
5.3.2 Redialing....47
5.3.3 Dialing a Missed Call....47
5.4 Answering Calls 48
5.5 Rejecting Incoming Calls....49
5.6 Silencing Incoming Calls 49
5.7 Ending an Established Call 49
5.8 Viewing Missed, Received and Dialed Calls....50
6 Performing Advanced Operations ....53
6.1 Answering Waiting Calls 53
6.2 Placing Calls On Hold 54
6.3 Calling a Contact Listed in the Directory....54
6.4 Enabling Auto Redial....54
6.5 Pressing a Speed Dial Key to Make a Call....56
6.6 Transferring a Call 56
6.6.1 Blind Transfer....56
6.6.2 Attended Transfer....57
6.6.3 Semi- Attended Transfer....57
6.7 Hosting 3-Way Conference Calls ...... 58
6.7.1 Leaving a 3-Way Conference You Set up without Disconnecting the Others .....58
6.8 Muting Calls 59
6.9 Activating Do Not Disturb 59
6.10 Retrieving Voice Mail Messages 60
6.11 Using Two Lines 60
6.11.1 Choosing a Extension Line....60
6.11.2 Making a Call on an Extension Line....61
6.11.3 Making up to Eight Calls per Extension Line....61
6.11.4 Toggling Between up to Eight Calls per Extension Line....61
6.11.5 Answering Calls 62
6.11.6 Ending Calls....62
6.12 Logging into a Remote HTTP/S Server 62
7 Troubleshooting....63
A Specific Third-Party Features....65
A.1 BroadSoft....65
A.1.1 Monitored Lines Based on BroadSoft's BroadWorks BLF Service 65
A.1.2 Support for SCA (Participant Only)....65
A.1.3 Softkey Display and Command Menu Options....66
A.1.3.1 Presence Management....66
A.1.3.2 Setting Unavailability Status....67
A.1.3.3 Setting Availability Status....67
A.1.3.4 Logging Out....68
A.1.4 Viewing Missed Calls....68
A.1.5 Configuring Do Not Disturb (DnD)....68
A.1.6 Configuring Automatic Forwarding....69
A.1.7 Configuring the 'Forward No Reply' Timeout as Number of Rings 69
A.1.8 Automatically Receiving an External Line 69
A.1.9 Viewing VOICEMAIL Indications Per Line....70
A.1.10 Listening in Capability for Call Center Supervisors....70
A.1.11 Hearing a Beep, not a Ring Tone, on Headsets when a Call Comes in to a Call Center .70
A.1.12 Recording an Agent's Welcome Greeting....70
A.1.13 Entering BroadWorks User Credentials for Xsi access....71
A.1.1 Setting up a Remote Conference....72
A.2 Genesys' Contact Centers 73
A.2.1 Using the BroadSoft ACD....73
A.2.1.1 Setting Unavailability Status....73
A.2.1.2 Setting Availability Status....74
A.2.2 Presence Management 74
A.2.3 Logging In 74
A.2.4 Logging Out 75
A.2.5 Configuring Do Not Disturb (DnD)....75
A.2.6 Configuring Automatic Forwarding....75
A.2.7 Listening in Capability for Call Center Supervisors....76
A.2.8 Recording an Agent's Welcome Greeting....77
List of Figures
Figure 2-1: Front View....12
Figure 2-2: Rear View ....14
Figure 2-3: Desktop Mounting ....15
Figure 2-4: Wall Mounting....16
Figure 3-1: LCD in Idle State....17
Figure 3-2: Menus....19
Figure 3-3: Alphanumerical Selection....20
Figure 3-4: Selected Alphanumerical Mode (Abc)....20
List of Tables
Table 2-1: Font View Description....12
Table 2-2: Rear View Description (from L-R)....14
Table 2-3: Cabling....15
Table 3-1: LCD in Idle State....17
Table 3-2: Softkeys....18
Table 3-3: Messages Displayed on LCD Indicating Processes In Progress....22
Table 4-1: Softkey Functionalities....39
Table 7-1: Troubleshooting ....63
Table A-1: Broadsoft-Softkey Display States and Command Menu Options....66
Table A-2: Genesys Contact Center Phones' BroadSoft ACD....73
Notice
Information contained in this document is believed to be accurate and reliable at the time of printing. However, due to ongoing product improvements and revisions, AudioCodes cannot guarantee accuracy of printed material after the Date Published nor can it accept responsibility for errors or omissions. Updates to this document can be downloaded from https://www.audiocodes.com/library/technical-documents.
This document is subject to change without notice.
Date Published: Dec-23-2019
WEEE EU Directive
Pursuant to the WEEE EU Directive, electronic and electrical waste must not be disposed of with unsorted waste. Please contact your local recycling authority for disposal of this product.
Customer Support
Customer technical support and services are provided by AudioCodes or by an authorized AudioCodes Service Partner. For more information on how to buy technical support for AudioCodes products and for contact information, please visit our Web site at https://www.audiocodes.com/services-support/maintenance-and-support.
Abbreviations and Conventions
Each abbreviation, unless widely used, is spelled out in full when first used.
Related Documentation
| Document Name |
| IP Phone Release Notes |
| IP Phone Administrator's Manual |
| IP Phone Quick Guide |
Documentation Feedback
AudioCodes continually strives to produce high quality documentation. If you have any comments (suggestions or errors) regarding this document, please fill out the Documentation Feedback form on our Web site at https://online.audiocodes.com/documentation-feedback.
Document Revision Record
| LTRT Description | |
| 12040 | First release. August 2015. |
| 12041 | 2.2.8. February 2016. |
| 12045 2.2.12. September 2017. | |
| 12046 2.2.14. January 2018. | |
| 12049 2.2.16 June 2018. | |
| 12057 2.2.16 fix | |
| 12058 2.2.16.376 | |
1 Introducing the 405 / 405HD IP Phone
The 405 / 405HD SIP IP Phone is a low-cost, entry-level IP phone designed to offer the essential everyday features that the modern business environment demands.
Features include:
■ Graphical, backlit multi-lingual LCD (132 X 64)
■ Four programmable soft keys
■ AudioCodes auto-provisioning
■ Full SIP protocol support with extensive interoperability
■ Robust security mechanisms
Power over Ethernet (PoE)
■ Multiple language support
■ Integration with voice quality monitoring
■ Full duplex speakerphone and headset connectivity
1.1 About AudioCodes' 400HD Series of IP Phones
The AudioCodes 400HD series of IP Phones includes a range of easy-to-use, feature-rich products for the service provider hosted services, enterprise IP telephony and contact center markets. Based on the same advanced, field-proven underlying technology as its other VoIP products, AudioCodes high quality IP phones enable systems integrators and end-customers to build end-to-end VoIP solutions.
1.2 Features Common to All AudioCodes IP Phones
■ High voice quality
■ AudioCodes Auto-provisioning
■ Full SIP protocol support with extensive interoperability
■ Robust security mechanisms
Power over Ethernet (PoE)
■ Out-of-the-box global redirection server support
■ Multiple language support
■ Integration with voice quality monitoring
■ Full duplex speakerphone and headset connectivity
■ Centralized management with AudioCodes EMS
1.3 Unified Communications
AudioCodes provides diverse solutions tailored for the Unified Communications (UC) market. AudioCodes' offering for UC includes media gateways, E-SBCs, call recording solutions, mobility and IP phones which, in addition to high quality voice calls, also support presence features.
1.4 Enterprise IP Telephony
AudioCodes IP phones offer reliable, high quality communications for users of on-premises, open source and hosted IP PBXs. Their wide range of essential business features, reliability and proven interoperability makes them the perfect choice for any SIP-based environment, from SOHO up to large enterprises.
1.5 IP Contact Centers
AudioCodes' IP phones provide the perfect solution for IP contact center agents. Combining excellent voice quality for contact center agents, with a compact and robust enclosure design and headset integration, AudioCodes' IP Phones offer several essential features required in the growing contact center market including fully certified VoIP interoperability with leading contact center solution providers.
2 Setting up the Phone
2.1 Unpacking
When unpacking, ensure that the following items are present and undamaged:
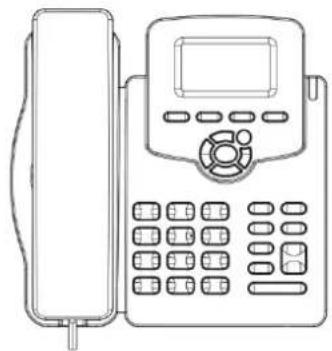
405 and 405HD IP Phone / Stand
Handset / Cord
natural_image
Line drawing of a classic office telephone with keypad and front panel (no text or symbols)
natural_image
Simple line drawing of a right-angle mechanical lever (no text or symbols)Cat 5e Ethernet Cable

natural_image
Illustration of a white ergonomic device with a curved handle and a black cord with connectors (no text or symbols)AC Power Adapter (Optional)

natural_image
Line drawing of a bundled cable with connectors (no text or symbols)
natural_image
Line drawing of a portable charger with cable and plug (no text or symbols)If anything appears to be missing or broken, contact the distributor from whom you purchased the phone for assistance.
2.2 Device Description
Use the graphics below to identify and familiarize yourself with the device's hardware functions.
2.2.1 Front View
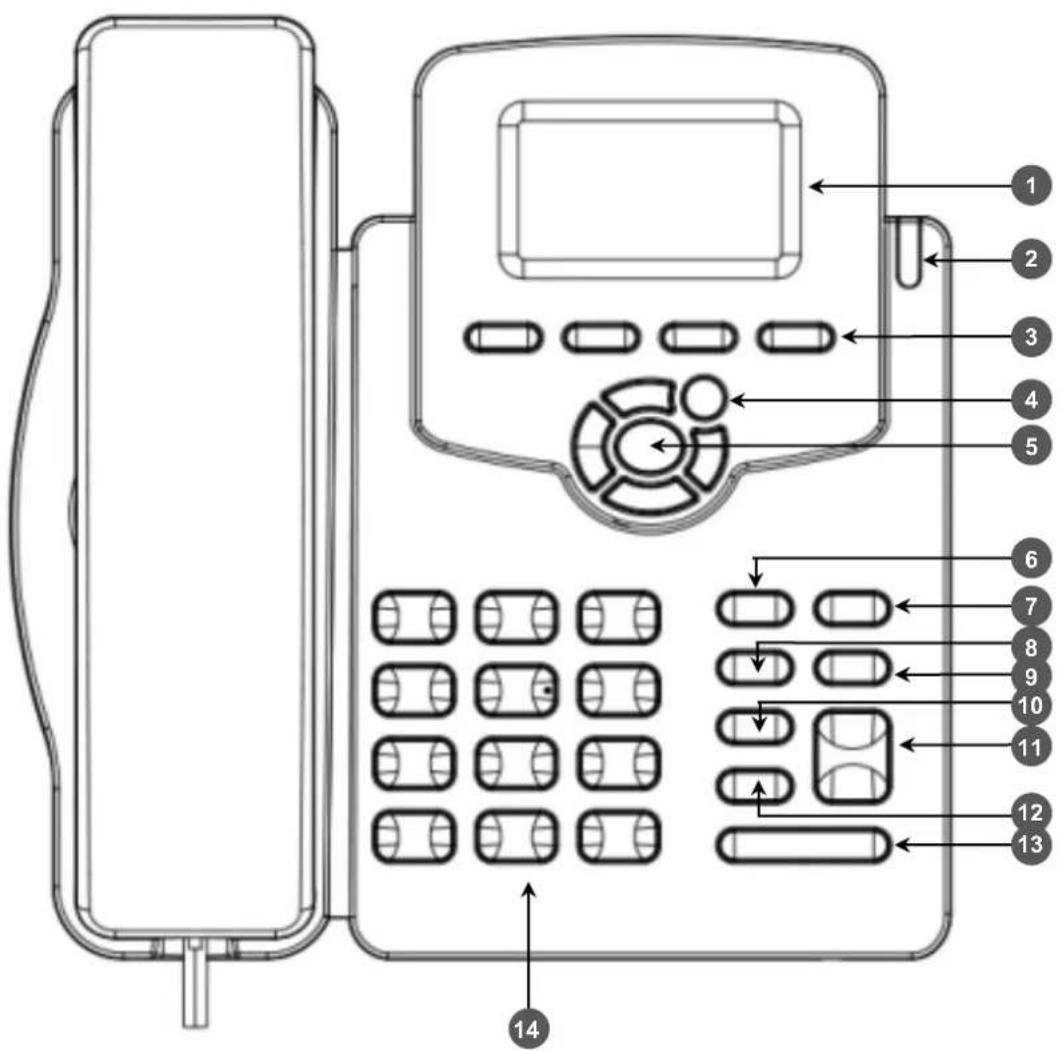
The front view of the phone is shown in Figure 2-1 and described in Table 2-1.
Figure 2-1: Front View
text_image
Diagram of a telephone handset with numbered labels pointing to various buttons and display screenTable 2-1: Font View Description
| Item # | Label/Name | Description |
| 1 | LCD | Liquid Crystal Display - interactive screen displaying calling information, enabling you to set up phone features. |
| 2 | Ring LED | Flashing green light indicates an incoming call.Steady green light indicates that there is voicemail. |
| 3 | Softkeys | See Section 3.2 on page 18 for details on the four softkeys and the available functions they offer. |
| 4 | MENU | Accesses menus (1) Call Log (2) Directory (3) Keys Configuration (4) Settings (5) Status (6) Administration. |
| 5 | Navigation Control / OK | Press the upper rim to scroll up menus/items in the LCD display screen. Press its lower rim to scroll down. Press its left or right rim to move the cursor left or right (when editing a contact number for example). Press the OK button to select a menu/item/option. |
| 6 VOICE MAIL | Retrieves voice mail messages. | |
| 7 CONTACTS | Press to directly access the Personal directory. | |
| 8 | REDIAL | Accesses recently dialed numbers; one can be selected to redial. |
| 9 | HOLD | Places an active call on hold. |
| 10 | HEADSET | Activates a call using an external headset. |
| 11 | SPEAKER | Activates the speaker, allowing a hands-free conversation. |
| 12 | MUTE | Mutes a call. |
| 13 | ▲VOL | Increases or decreases the volume of the handset, headset, speaker, ring tone and call progress tones. |
| VOL▼ | ||
| 14 | Alphanumerical Keypad | Keys for entering numbers, letters and symbols (e.g., colons). |
2.2.2 Rear View
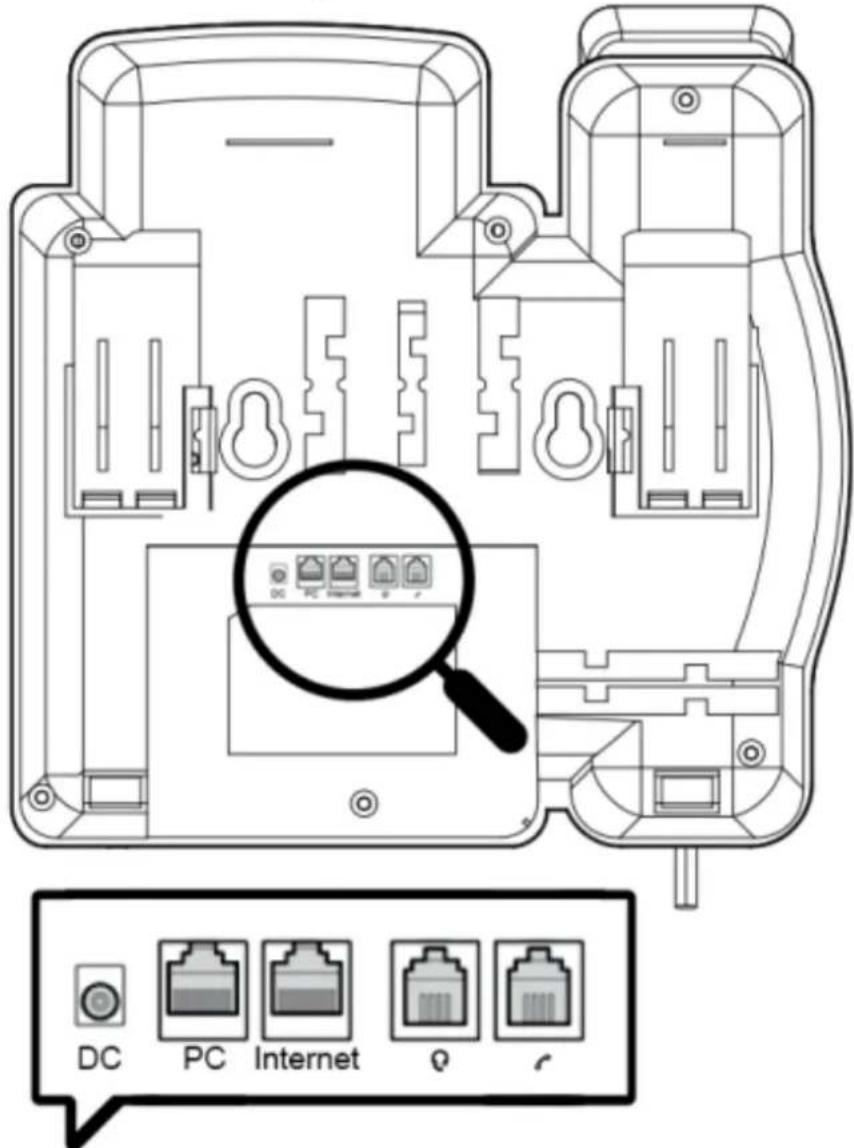
The rear view of the phone is shown in the figure below and described in the table below.
Figure 2-2: Rear View
text_image
Diagram of a device rear panel with labeled ports (DC, PC, Internet) and a magnified view highlighting internal components.Table 2-2: Rear View Description (from L-R)
| Label Description | |
| DC | 12V DC power jack that connects to the AC power adapter. |
| PC | RJ-45 port for connecting the phone to a PC (10/100 Mbps downlink). |
| Internet | RJ-45 port to connect to the Ethernet LAN cable for the LAN connection (uplink - 10/100 Mbps). If you're using Power over Ethernet (PoE), power to the phone is supplied from the Ethernet cable (draws power from either a spare line or signal line). |
 | Headset jack, i.e., RJ-9 port that connects to an external headset. |
 | Handset jack, i.e., RJ-9 port, to connect the handset. |
2.3 Cabling
The table below shows how to cable your phone.
Table 2-3: Cabling
| Step Description | |
| 1 | Connect the handset cord's shorter straight end to the handset. Connect the longer, straight end to the jack on the phone. |
| 2 | Connect the RJ-45 Internet port to your LAN network (LAN port or LAN switch/router), using a CAT 5 / 5e Ethernet cable. |
| 3 | Connect the RJ-45 PC port to a computer, using a CAT 5 / 5e straight-through Ethernet cable. |
| 4 | Connect the connector tip of the power adapter to the phone's power socket (labelled DC 12V). Connect the two-prong adapter directly to the electrical wall outlet. |
| 5 | Connect the RJ-9 headset jack to a headset (optional) |

Note: If the LAN to which the phone is connected supports Power over Ethernet (PoE), no adapter is required; the phone receives power from the Ethernet network.

Prior to connecting power, refer to the Compliancy and Regulatory Information at www.audiocodes.com/library.
2.4 Mounting
The phone can be mounted on a desk (or flat surface), or on a wall.
2.4.1 Mounting on a Desk
To mount the phone on a desk (or flat surface):
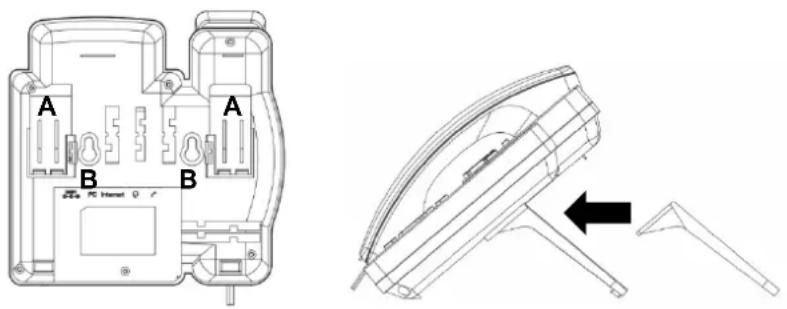
Slide the short edges of the L-shaped stand (the prongs) into the phone's two rear slots (see A below). Slide the prongs in until they lock.
Figure 2-3: Desktop Mounting
text_image
A B A B PC Internet2.4.2 Mounting on a Wall
To mount the phone on a wall:
- Hook the phone's two rear notches (see B below) onto wall mounting screws.
- Pull out the handset's cradle clip, which is by default in desktop mounting position, invert it, and then push it back in.
Figure 2-4: Wall Mounting
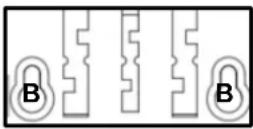
This is the wall mounting position.
2.4.2.1 Routing the Handset Cable
The phone features a groove for routing the handset cable.
3 Getting Started
The phone features an LCD, providing an intuitive, menu-driven user interface for configuring the phone and viewing call information.
This section shows how to use the phone's LCD.
3.1 LCD in Idle State
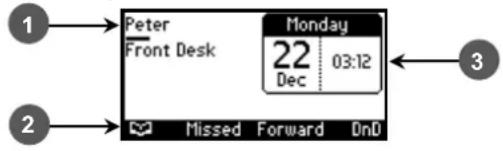
The figure below shows the phone's LCD in idle state. See the table below for reference.
Figure 3-1: LCD in Idle State
text_image
Peter Front Desk Monday 22 03:12 Dec Missed Forward DnDTable 3-1: LCD in Idle State
| Reference | Description |
| 1 | Extension lines. An extension line will only be displayed after your system administrator configures it using the Web interface. See the Administrator's Manual for details on how to configure a line. |
| 2 | Softkeys. To activate a softkey, press the key below it on the device. |
| 3 | Day, Date and Time. |
3.2 Softkeys
The table below describes the softkeys displayed in the LCD according to menu level currently accessed. To use a softkey, press the key located on the device directly below it.
Table 3-2: Softkeys
| Softkey Description | |
| Opens the phone's directory. Lets you select a contact in the Personal directory or Corporate directory. Displayed in idle state as well as (for example) after lifting the handset. | |
| Missed | Displays missed calls. |
| Forward | Defines and activates call forwarding. |
| DnD | Displayed in idle state. Activates the Do not Disturb feature. |
| Select | Selects a menu or menu option. Identical to the OK key. Either can be used. |
| Back | Displayed for example after pressing the MENU key as well as after selecting any of the submenu's under it. Returns you to the previous screen state or menu level. |
| Dial | Displayed after a number is keyed, a directory contact is selected, or a logged call is selected. Dials the phone number / directory contact / logged call. |
| Save | Saves settings. |
| Detail | Displayed after a number is keyed, a directory contact is selected, or a logged call is selected. Dials the phone number / directory contact / logged call. |
| Clear | Displayed for example after pressing the first digit key of a phone number. Deletes from right to left each time the digit or character is pressed. To delete all digits/characters, keep pressed until all are deleted. |
| New Call | Displayed after you dial a number and the call is answered. Also shown after you answer a call. Opens the NEW CALL screen in which you can key a number or URL to include in the current call. |
| Conf | Displayed after you dial a number and the call is answered. Also shown after you answer a call. Opens the CONFERENCE WITH screen in which you can key a number or URL to include in the current call. |
| Hold | Lets you place the call on hold. Displayed when you are in an active call. |
| URL | Displayed after lifting the handset, after selecting New Call, Conf or Trans, and after keying the Key. Lets you call a URL. |
| Opens the Call Log submenus. Lets you select All Calls, Missed Calls, Received Calls or Dialed Calls. Displayed after lifting the handset. Also displayed after New Call or Conf is selected. | |
| A/a/I | Enables choosing letters or digits (123). The letters option can be all caps (ABC), all small letters (abc) or first letter capitalized (Abc). |
| Start | Displayed after pressing Forward >selecting an extension line >selecting when to forward. Activates call forwarding. |
| Cancel | Cancels the currently initiated call or configuration. |
| End | Displayed for example after pressing the Dial softkey and when the called party lifts the handset/accepts the call. Also displayed after accepting an incoming call or lifting the handset to answer. Ends the call. |
| Edit | Displayed after a menu/submenu item to be edited is selected. Enables editing the selected item. |
| Delete | Displayed you select the Detail softkey after selecting a call under a Call Log submenu (e.g., under Missed Calls). Before deleting the call, a warning prompt is displayed. |
3.3 Accessing Menus
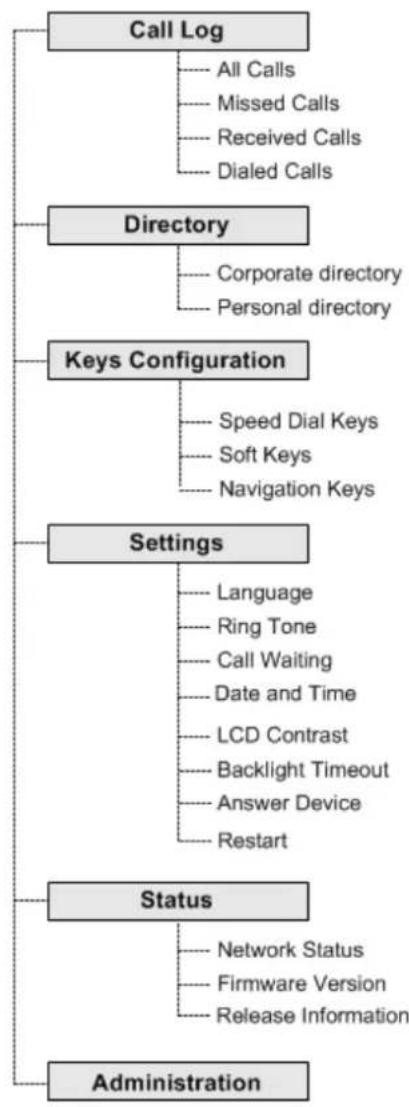
Menus are used to access information and to configure the phone. Example: Use Personal directory under Directory to add contacts; use Missed Calls under Call Log to view missed calls and reply to them; use Network Status under Status to view the phone's dynamic IP address.
The figure below shows the phone's menus and submenus.
Figure 3-2: Menus
flowchart
graph TD
    A["Administration"] --> B["Status"]
    B --> C["Settings"]
    C --> D["Keys Configuration"]
    D --> E["Directory"]
    E --> F["Call Log"]

    B --> G["Network Status"]
    B --> H["Firmware Version"]
    B --> I["Release Information"]

    C --> J["Language"]
    C --> K["Ring Tone"]
    C --> L["Call Waiting"]
    C --> M["Date and Time"]
    C --> N["LCD Contrast"]
    C --> O["Backlight Timeout"]
    C --> P["Answer Device"]
    C --> Q["Restart"]

    D --> R["Speed Dial Keys"]
    D --> S["Soft Keys"]
    D --> T["Navigation Keys"]

    E --> U["Corporate directory"]
    E --> V["Personal directory"]

    F --> W["All Calls"]
    F --> X["Missed Calls"]
    F --> Y["Received Calls"]
    F --> Z["Dialed Calls"]

Note:
- The Administration menu is intended for system administrators only. It is password protected. See the Administrator's Manual for details.
- If you define a second extension line, the Call Log menu displays menu items per extension.
- The Soft Keys item under the Keys Configuration menu is not displayed on IP phones in a Genesys or Broadsoft environment when the Automatic Call Distribution (ACD) feature is enabled.
To access the menus:
Press the MENU key located on the device.
To navigate to menus and items:
Press the navigating control's upper and lower rim -OR- press the listed item's number on the keypad, e.g., press 3 to navigate to Keys Configuration.
To select a menu or menu item:
Press the Select softkey or press the navigation control's OK button.
To cancel and move to a previous menu level:
Press the Back softkey.
3.4 Entering Numbers, Alphabetical Letters and Symbols
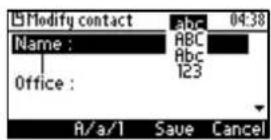
The phone's alphanumeric keypad lets you to enter alphabetical letters, numbers and symbols. To select either alphabet mode, number mode or symbol mode, press the A/a/1 softkey successively or press the # pound key successively.
To define a contact name, you need alphabet mode. To define an IP address, you need to revert from number mode to symbol mode: and back to number, etc. To dial a number to make a new call, press its key on the keypad when the LCD is in idle state.
To select a mode:
- Successively press the A/a/1 softkey or # key to select the mode required:
Figure 3-3: Alphanumerical Selection
-
Choose either:
-
abc = lower case letters
• ABC = upper-case letters
• Abc = first-letter upper case, the rest lower case
• 123 = numerical mode (i.e., numbers)
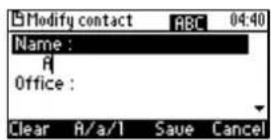
After selecting, the LCD displays your selection.
Figure 3-4: Selected Alphanumerical Mode (Abc)
- To enter a letter, press the required alphanumeric key on the keypad. Successive presses on the same key moves you to that key's next letter. Pressing another key enters the first letter indicated on it. Long-pressing a key when in alphabet mode enters the numerical digit corresponding to the pressed key.
To enter a symbol such as a period (full stop):
- Press the # key on the phone to change the mode from numerical 123, as shown in the figure below, to alphabet mode lower case letters abc:
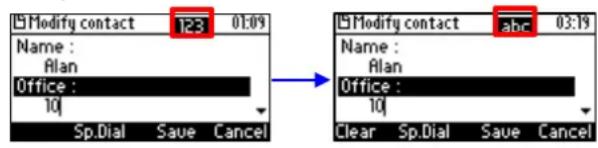
text_image
Modify contact 123 01:09 Name : Alan Office : 10j Sp.Dial Save Cancel Modify contact abc 03:19 Name : Alan Office : 10j Clear Sp.Dial Save Cancel- Press the 1 key on the keypad successively until a period (full stop) is entered.
- To revert to numbers (for example), press the pound # key successively until 123 mode is selected (shown in the figure below).
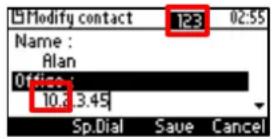
Successively pressing the 1 key produces:
• + (plus)
• . (period)
- \ (backslash)
• @ (at)
• ; (semi-colon)
• : (colon)
- # (pound)
• \$ (dollar)
• % (percentage)
• ^ (caret)
• & (ampersand)
• ! (exclamation mark)
• ? (question mark)
• + (plus)
- (minus)
- _ (underscore)
- \~ (approximately)
• * (asterisk)
• + (plus)
• (single apostrophe)
• | (vertical bar)
( (open parentheses)
• ) (close parentheses)
• { (open parentheses)
• } (close parentheses)
• [ (open parentheses)
• ] (close parentheses)
• " (apostrophe marks)
• ' (single apostrophe)
• < (less than)
• > (greater than)
• , (comma)
• / (forward slash)
Note that you can also use the star key to enter a fullstop, asterisk (*) symbol, and @ symbol.
3.5 Displayed Messages
Messages indicating processes in progress, displayed in the LCD, include:
Table 3-3: Messages Displayed on LCD Indicating Processes In Progress
| Message Description | |
| Initializing Initializing | |
| Discovering LLDP | Discovering Link Layer Discovery Protocol (LLDP) for initialization |
| Discovering CDP | Discovering Cisco Discovery Protocol (CDP) for initialization |
| Acquiring IP | Acquiring an IP address from a DHCP server |
| Initializing Network | Initializing the network |
| Registering | Registering to a SIP proxy server (at phone bootup) |
| Registration in Progress | SIP Registration in Progress |
| Registration Failure | SIP Registration failure |
| Downloading Firmware File | Downloading a firmware file |
| Upgrading Firmware | Upgrading the phone's firmware |
| Updating Configuration | Loading a configuration file |
| Generate Certificate | Generates the phone's security certificate |
| LAN link failure | The phone is not physically connected to a network device becausethe network cable is not plugged into the phonethe network device / network cable is damaged and/orthe network device is shut down |
| IP Duplication and Reboot | The phone received an IP address already taken by another device.This may have been due toa problem with the DHCP server-or-another device was given a static IP address within the range of the DHCP server |

Note: The status of factory installed certificates is also displayed. The phone start up (boot) process visually displays the following certificate status indications:
- Installed
- Self-Signed
- Not-Installed
4 Customizing Your Phone
You can customize your phone for enhanced usability.
4.1 Selecting Language
The LCD supports multiple languages. English is the default but you can change it to another.
To change the default language:
- Access the Languages screen (MENU key > Settings > Language).
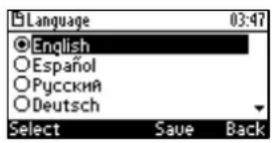
- Navigate to the language you require.
- Press the Select softkey.
- Press the Save softkey to apply your setting.
4.2 Selecting Ring Tone
The phone provides a selection of ring tones that you can choose from to indicate incoming calls. If line extensions are defined on your phone, you can assign a ring tone per line extension.
To select a ring tone:
- Access the Ring Tone screen (MENU key > Settings > Ring Tone).
- In the Ring Tone screen, select All Extensions, or select Extension 1 or Extension 2 (if extensions are configured).
- Navigate to a ring tone of your choice. A sample of each ring tone is played as you navigate through the list.
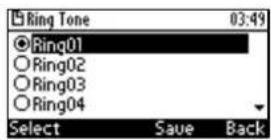
- Press the ⬆ - or ⬆ + key on the keypad to set ring tone volume. You can also increase or decrease ring tone volume when the phone is in idle state or when a call is incoming (see Section 4.9.1).
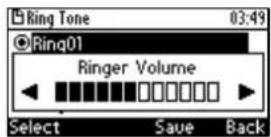
A few seconds after adjusting the volume level, the Ringer Volume indication is hidden.
- Press the Select softkey.
- Press the Save softkey to apply your setting.
4.3 Enabling Call Waiting
You can enable or disable the call waiting feature.
To enable or disable call waiting:
- Access the Call Waiting screen (MENU key > Settings > Call Waiting).
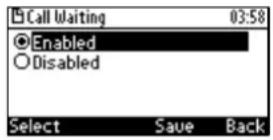
- Navigate to one of the following:
• Disabled (disables call waiting)
• Enabled (enables call waiting)
-
Press the Select softkey.
-
Press the Save softkey to apply your setting.
4.4 Setting Date and Time
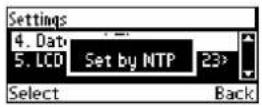
You can manually set date and time displayed on the phone. If a Network Time Protocol (NTP) server is deployed and enabled by your administrator, however, then date and time are automatically retrieved over the Internet from the server and manually setting them will not be possible. You'll receive this message:

Notes:
- It's recommended to implement an NTP server (system administrators can see the Administrator's Manual for detailed information).
- If date and time are manually set, the settings are not retained after rebooting the phone or powering off. You will need to manually reset date and time if you reboot or power off.
To set date and time:
- Access the Date and Time screen (MENU key > Settings > Date and Time).
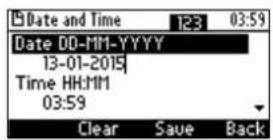
- Select the Date option and modify using the Clear softkey. The date format is DDMMYYYY.
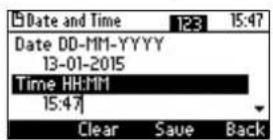
- Navigate to the Time option. The time is in the format HHMM. Modify using the Clear softkey. To change alphanumerical mode, see Section 3.4.
- Navigate to the Time format option.
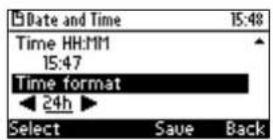
- Press the navigation control's left rim to change the format from 24h to 12h if required, or press the Select soft key.
- Press the Save softkey to apply your setting.
4.5 Changing LCD Contrast Level
The phone's LCD supports 0-30 contrast levels. You can select the level that suits you best.
To change the LCD's contrast level:
- Access the LCD Contrast submenu (MENU key > Settings > LCD Contrast).
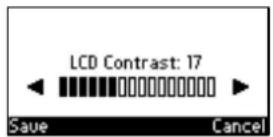
- Press the navigation control's left or right rim to navigate to the contrast level that suits you best.
- Press the Save softkey to apply your setting.
4.6 Setting the LCD Backlight Timeout
You can set the duration, in seconds, for which the phone's backlight is lit when the phone is not being used (idle). After the duration expires, the backlight turns off. You can opt to have the backlight on all the time by selecting the Always on option.
To set the LCD's backlight timeout:
- Access the Backlight Timeout screen (MENU key > Settings > Backlight Timeout).
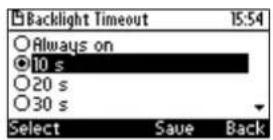
- Navigate to Always on or 10 seconds (default) 20 seconds, 30 seconds, 40 seconds, 50 seconds or 60 seconds).
- Press the Select softkey.
- Press the Save softkey to apply your setting.
4.7 Changing the Default Answer Device
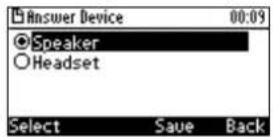
You can change the default answer device. The default answer device is the speaker.
To change the default to handset or headset:
- Access the Answer Device screen (MENU key > Settings > Answer Device).
-
Navigate to Speaker or Headset, and then press the Select softkey.
-
Press the Save softkey to apply the setting.
4.8 Restarting the Phone
You can restart the phone. You can use this feature to initially troubleshoot a phone issue (for example), as is done with pc issues.
To restart the phone:
- Access the Restart screen (MENU key > Settings > Restart).
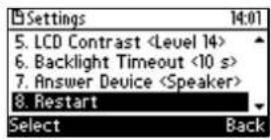
- Select Restart and then in the warning prompt that is displayed, press the Yes softkey.
4.9 Adjusting Volume
You can adjust the volume of the phone's
Ring
■ Tones (e.g., dial tone)
Handset
Speakerphone
Headset
4.9.1 Adjusting Ring Volume
You can adjust the volume of the ring indicating an incoming call.

Note: By default, you can adjust ringing volume in the phone's LCD. Your network administrator, however, can block this capability and provision ringing volume remotely. If this was done and you need to adjust the ringing volume, consult your network administrator.
To adjust ring volume:
- When the phone is in idle state (i.e., not in use), press the ▶ - or ▶ + key; the Ringer Volume bar is displayed on the screen:
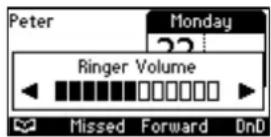
- Press the ▶ - or ▶ + key on the phone to adjust the volume. After adjusting, the Ringer Volume level disappears from the screen.
4.9.2 Adjusting Tones Volume
You can adjust the volume of the phone's tones, including dial tone, ring-back tone and all other call progress tones.
To adjust tones volume:
- Off-hook the phone (using handset, speaker or headset).
- Press the ◀ - or ◀ + key; the Tones Volume bar displays on the screen:
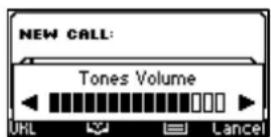
- Press the ▶ - or ▶ + key to adjust the volume. After adjusting, the Tones Volume bar disappears from the screen.
4.9.3 Adjusting Handset Volume
You can adjust the volume of the handset during a call or when making a call. After changing the volume, the newly adjusted level applies to all subsequent handset use.
To adjust handset volume:
- Off-hook the handset and make a call. During the call, press the 🔔 - or 🔔 + key:
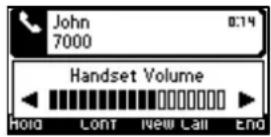
- After adjusting the volume, the Handset Volume bar disappears from the screen.
4.9.4 Adjusting Speaker Volume
You can adjust the volume of the speaker during a call. After changing the volume, it applies to all subsequent speaker use.
To adjust the speaker volume:
- Press the SPEAKER key and make a call. During the call, press the ◄ - or ◄ + key:
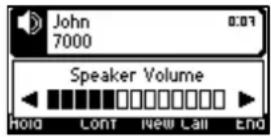
- After adjusting the volume, the Speaker Volume bar disappears from the screen.
4.9.5 Adjusting Headset Volume
You can adjust the volume of the headset during a call. After changing the volume, it applies to all subsequent headset use.
To adjust the headset volume:
-
During a call, press the HEADSET key.
-
Press the ▶ - or ▶ + key:
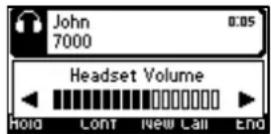
After adjusting the volume, the Headset Volume bar disappears from the screen.
4.10 Defining Call Forwarding
This feature allows an incoming call to be automatically redirected to another phone number if a user-defined condition is met, e.g., if the line is busy. You can also define call forwarding per extension or for all extensions - if you've defined extensions.
To define call forwarding:
- Press the Forward softkey when the LCD is in idle state:
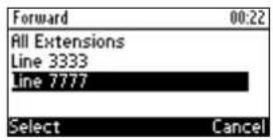
- In the Forward screen, navigate to a line or to All Extensions and press the Select softkey:
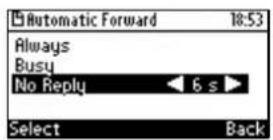
- In the Automatic Forward screen, navigate to a forwarding condition:
• Always: The call is always forwarded.
- Busy: The call is forwarded when the line is busy.
- No Reply: The call is forwarded if the incoming call is not answered after a user-defined time in seconds. To select the time (1-99 seconds), press the navigation control's left or right rim.
- Press the Select softkey and define the destination to where you want the call forwarded:
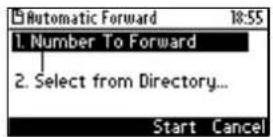
• Number To Forward: enter the number to which to forward the call.
- Select from Directory: navigate to this option and then select an existing contact to whom to forward the call.
- Scroll down to select a destination from the history of numbers previously forwarded to.
- Press the Start softkey to activate call forwarding; an → icon appears adjacent to the extension/s in the idle screen, indicating that call forwarding is active:
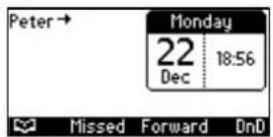
To deactivate call forwarding:
When the phone is on-hook, press the Forward softkey; the → icon disappears from the extension/s on the screen.

Note: If your enterprise deployed BroadSoft's BroadWorks server, your network administrator can control the Call Forwarding feature on the phone from the server. For more information, see the Administrator's Manual.
4.11 Managing Your Personal Directory
You can add contacts to the Personal Directory and edit and delete them if necessary. After adding a contact, you can call the contact directly from the directory (see Section 6.3 on page 54). If you receive an incoming call from a contact listed in the directory, the LCD displays the name listed. If you define a speed dial key to the contact, you can press it to call them.

Notes:
- You can add a maximum of 700 contacts to your Personal Directory.
- Your phone also features a Corporate Directory, set up by your system administrator by loading a file or using the LDAP (Lightweight Directory Access Protocol) server (see the Administrator's Manual).
• Corporate Directory contacts cannot be edited or deleted.
4.11.1 Accessing the Directory
It's necessary to access the Personal directory in order to perform the management operations subsequently described.
To access the Personal directory:
- Press the CONTACTS key on the phone -OR- when the LCD is in idle state, press the softkey -OR- press the MENU key and select Directory.
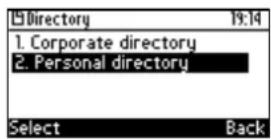
- Press the Select softkey:
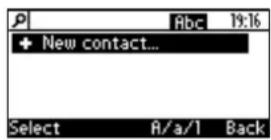
You can add a new contact to the directory, edit or modify an existing contact's information, delete a contact, or search for a contact.
4.11.2 Adding Contacts to the Personal Directory
You can add a contact to the Personal Directory. You can enter the contact's
Name
Office number
Home number -and/or- mobile number
You can assign them to a speed dial key that will let you dial that contact at the press of a single digit on the phone (1-9).
To add a contact to the phone directory:
- Access the Personal directory.
- Select + New contact...
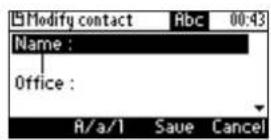
- In the 'Modify contact' screen that opens (shown above), enter the 'Name' of the new contact (see Section 3.4 on page 20 for information on alphanumeric modes).
- Navigate down and key in the new contact's 'Office' number (see Section 3.4 on page 20 for information on alphanumeric modes):
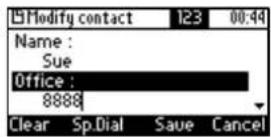
- Optionally, navigate down and enter the new contact's 'Home' and 'Mobile' numbers.
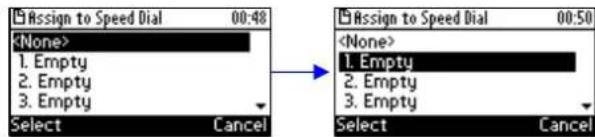
- Press the Sp. Dial softkey to assign this contact to a speed dial key if required, and in the Assign to Speed Dial screen that opens, navigate to an Empty, for example to 1. Empty:
text_image
Assign to Speed Dial 00:48- Press the Select softkey or the OK key on the phone; the contact is assigned to phone key 1.
- Press the Save softkey to save the configured contact's information.
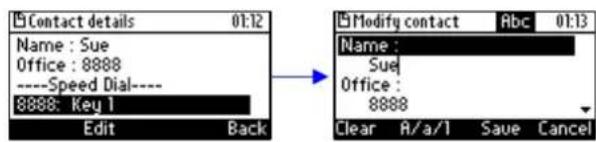
- To view and edit a speed dial key, open the Personal Directory and navigate to the contact whom you assigned to the speed dial key, and then press the Detail softkey; in the 'Contact details' screen that opens, navigate down to the configured speed dial and press the Edit softkey:
text_image
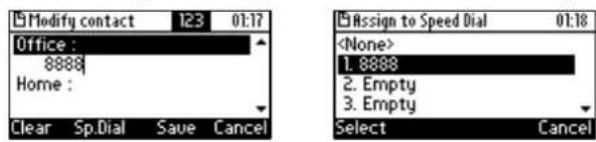
Contact details 01:12 Name : Sue Office : 8888 ----Speed Dial---- 8888: Key 1 Edit Back Modify contact Abc 01:13 Name : Sue Office : 8888 Clear A/a/1 Save Cancel- Navigate down to the contact's number and press the Clear softkey to modify the number. Press the Sp.Dial softkey to reassign the contact to another speed dial key if required.
text_image
Modify contact 123 01:17 Office : 8888 Home : Clear Sp.Dial Save Cancel Assign to Speed Dial 01:18- To test the speed dial key to which you assigned the contact, long-press the key; the phone of the contact to whom you assigned the speed dial key, is dialed.
4.11.3 Editing a Contact
You can edit an existing contact's information.
To edit contact information:
- Access the Personal directory and navigate to the name of the contact to edit:
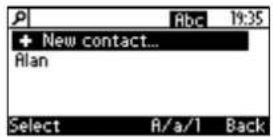
- Press the Detail softkey:
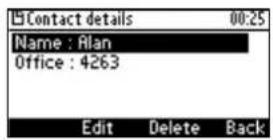
- Press the Edit softkey:

- Modify the contact's details (use the Clear softkey) and press the Save softkey.

Note: Corporate directory contacts cannot be modified.
4.11.4 Deleting a Contact
You can delete a contact from your personal directory.
To delete a contact:
- Access the Personal directory and navigate to the contact to delete:
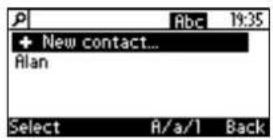
- Press the Detail softkey; the contact details are shown.
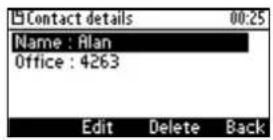
- Press the Delete softkey; a 'Delete current contact?' warning message appears:
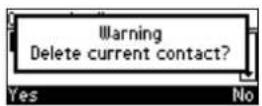
- Press the Yes softkey to remove the contact from the phone directory or No if you want to keep the contact in the directory; the contact is removed from the directory.

Note: Corporate directory contacts cannot be deleted.
4.11.5 Searching for a Contact
You can quickly and easily locate a contact in the directory. This is especially useful if you have a long list of contacts.
To search for a contact:
■ Access the phone directory.
- Navigate to the contact in the list -OR-
- Press the first letter in the contact's name using the keypad. As you press the key, the directory locates contacts whose names begin with that letter. For example, to search for the contact 'John', as you press the 'J' key the directory locates contacts whose names begin with "J". As you key in the next letter, i.e., 'o', contacts whose names begin with 'Jo' appear, etc.

text_image
John Judy 7000 Dial Detail Clear Back Jo John 7000 Dial Detail Clear Back4.12 Configuring Keys
This section shows how to configure keys.
You can configure
Speed Dial Keys
Soft Keys
Navigation Keys
4.12.1 Configuring Speed Dial Keys

Note: Section 4.11.2 also shows how to configure speed dial keys, but when adding a new contact to the Personal Directory or modifying an existing contact's details. You can choose whichever way suits you to configure speed dial keys.
You can define up to nine speed dial keys. A speed dial key can be key 1-9 on the phone which, when long-pressed, automatically dials the phone number of the contact to whom you assigned the speed dial key.
To configure a speed dial key:
- Choose a key on the phone (1-9) for your Speed Dial:
a. Open the Speed dial keys screen (MENU key > Keys Configuration > Speed dial keys):

text_image
Menu 02:02 1. Call Log 2. Directory 3. Keys Configuration 4. Settings Select Back Keys Configuration 02:03 1. Speed dial keys 2. Soft keys 3. Navigation Keys Select Backb. Navigate to an empty speed dial that has not yet been configured:
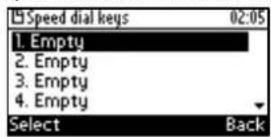
c. Press the Select softkey; the Speed Dial #1 screen (in this example) is displayed:
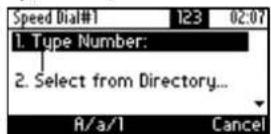
- Define a phone number:
- User-defined number: In the 'Type Number' field, enter the phone number to which to assign the speed dial key. If the contact is configured in the directory, their name will display as you enter the last digit of their number. Press the Save softkey; the new Speed Dial is created and shown in the Speed Dial screen:
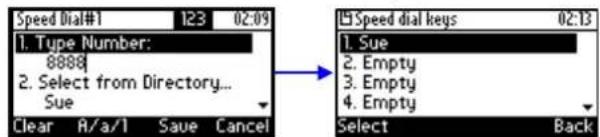
text_image
Speed Dial#1 123 02:09 1. Type Number: 8888 2. Select from Directory... Sue Clear R/a/1 Save Cancel Speed dial keys 02:13 1. Sue 2. Empty 3. Empty 4. Empty Select Back-OR-
- Select from Directory: Instead of entering the phone number in the 'Type Number' field, navigate down and select Select from Directory > Personal directory and then navigate to the defined contact in the directory:

flowchart
graph LR
    A["Select"] --> B["Save"]
    B --> C["Cancel"]
    D["Select"] --> E["Back"]
    F["Directory"] --> G["1. Corporate directory"]
    F --> H["2. Personal directory"]
    I["Select"] --> J["Back"]
    K["Select"] --> L["A/b/1"]
    M["Back"] --> N["7000"]
    O["Alan"] --> P["7000"]
    Q["John"] --> R["7000"]
    S["Nicole"] --> T["7000"]
    U["Abc"] --> V["7000"]
- Select the contact and then press the Save softkey; the new speed dial key is created and shown in the Speed Dial screen.
4.13 Editing a Speed Dial
You can edit a speed dial.
To edit a speed dial:
- Access the Speed Dial screen (MENU key > Keys Configuration > Speed dial keys).
- Navigate down to the speed dial key to edit and press the Select softkey.
- Edit as required. Press the Clear softkey to delete digits from right to left.
- Press the Save softkey to save your settings.
4.13.1 Deleting a Speed Dial
You can delete a speed dial.
To delete a speed dial:
- Access the Speed Dial screen (MENU key > Keys Configuration > Speed dial keys).
- Navigate down to the speed dial to delete and press the Select softkey.
- In the 'Type Number' field, delete the entire number by pressing the Clear softkey.
- Press the Save softkey; the Speed Dial is now shown as 'Empty' in the Speed Dial screen.
4.13.2 Configuring Softkeys
Located under your phone's LCD are four configurable softkey buttons. The idle screen by default displays the following softkeys from left to right: (Directory), Missed, Forward, and DnD.
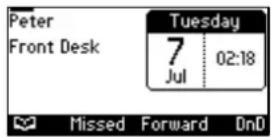
These softkeys may be reconfigured with different functionalities.
■ More softkeys can be added; when more are added, the rightmost softkey is More. When you press this softkey, you are scrolled to the next page of configured softkeys.

Note: When the Automatic Call Distribution (ACD) feature is enabled, you cannot configure softkeys (see the Administrator's Manual).
To configure a softkey:
- Open the Softkeys menu (MENU key > Keys Configuration > Soft keys).
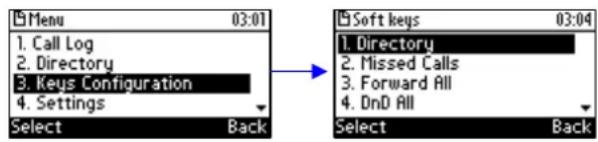
text_image
Menu 03:01 1. Call Log 2. Directory 3. Keys Configuration 4. Settings Select Back Soft keys 03:04 1. Directory 2. Missed Calls 3. Forward All 4. DnD All Select Back- Navigate to an existing softkey functionality (to reconfigure it), or navigate to 5.
to configure a new softkey functionality.
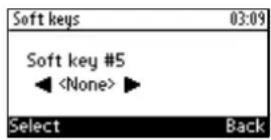
- On the phone, press the navigation control's right rim ▶ to navigate to and select a softkey functionality.
Table 4-1: Softkey Functionalities
| Softkey Functionality | Description |
| No functionality is assigned to the softkey. | |
| Press the softkey to display the Corporate and Personal Directories. | |
| Missed Calls | Press the softkey to display missed calls. |
| Forward | Press the softkey to forward all calls to all extensions. |
| DnD | Press the softkey to activate Do Not Disturb on all extensions. |
| Received Calls | Press the softkey to display all received calls. |
| Dialed Calls | Press the softkey to display all dialed calls. |
| All Calls | Press the softkey to display all dialed and received calls. |
| Speed Dial | Press the key on the phone, configured as a speed dial, to call the required party. |
| Speed Dial + BLF | Press the softkey, configured as a speed dial, to call the required party. |
4.13.3 Deleting a Configured Softkey
This section shows how to delete a configured softkey.
To delete a configured softkey:
- Long-press the softkey, e.g., the Missed softkey, until this screen is displayed:
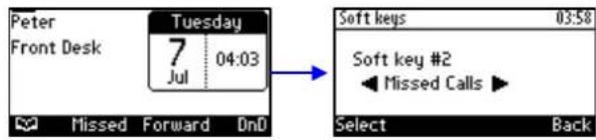
text_image
Peter Front Desk Tuesday 7 Jul 04:03 Soft keys 03:58 Soft key #2 ◀Missed Calls ▶ Select Back- Press the navigation control's left or right rim to navigate to and select Empty; you're returned to the idle LCD; the sofkey is removed.
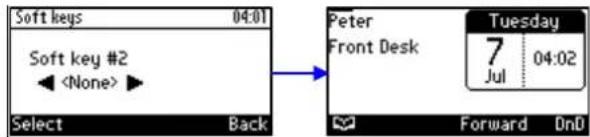
text_image
Soft keys 04:01 Soft key #24.13.4 Configuring a Softkey as a Speed Dial
You can configure a softkey as a speed dial.
To configure a softkey as a speed dial:
- Open the Soft Keys screen (MENU key > Keys Configuration > Soft keys).
- Select the softkey to configure as a speed dial, e.g., select the default Directory softkey.

text_image
Soft keys 04:07 1. Directory 2. Missed Calls 3. Forward All 4. DnD All Select Back Soft keys 04:08 Soft key #1 ← Directory ► Soft keys 04:09 Soft key #1 ← Speed Dial ► Select Back- Navigate to and select Speed Dial and then in the Soft Key # screen that opens, enter the telephone number to assign the speed dial to and press the Save softkey. View the speed dial displayed in the idle screen (press Back after saving).
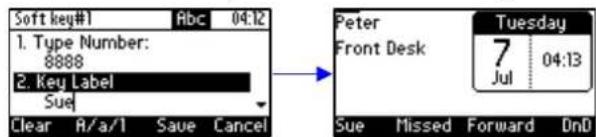
text_image
Soft key#1 Abc 04:12 1. Type Number: 8888 2. Key Label Sue Clear A/a/1 Save Cancel Peter Front Desk Tuesday 7 04:13 Jul Sue Missed Forward DnD4.13.5 Configuring a Softkey as a Speed Dial + BLF
You can configure up to four softkeys as a Speed Dial + BLF.

Note: Speed Dial + BLF is presently supported for specific third parties only (see under Appendix A.1 for details).
4.13.6 Configuring a Navigation Key Position Function
Each of the four positions of the navigation control button on the phone, i.e., Control Up, Control Down, Control Left, and Control Right, can be configured to perform one of the following five functions:
■ None (default)
Missed Calls
Received Calls
Dialed Calls
All Calls
Directory
To configure a navigation key position to perform a function:
- Access the Navigation Keys screen (MENU key > Keys Configuration > Navigation Keys):

text_image
Keys Configuration 2. Soft keys 3. Navigation Keys Select Back Navigation Keys 1.- Press the Select softkey; the navigation key's Control Up position is displayed.
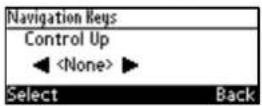
- Navigate to and select the function you want to configure, e.g., Missed Calls. You can choose either None (default), Missed Calls, Received Calls, Dialed Calls, All Calls, or Directory.
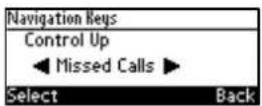
- Press the Select softkey; the key position is now configured:
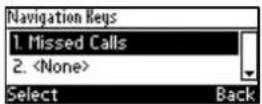
The user will be able to press the upper rim of the navigation control button on their phone in order to display Missed Calls on the phone's LCD screen.
- To configure another navigation control button position as a function, navigate down to the next
, and then press the Select softkey; the Control Down navigation control button position opens:
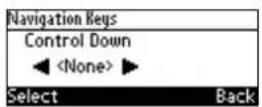
- Navigate to and select the next function you want to configure, e.g., Received Calls.

flowchart
graph LR
    A["Navigation Keys"] --> B["Control Down"]
    B --> C["Received Calls"]
    C --> D["Select Back"]
    E["Navigation Keys"] --> F["1. Missed Calls"]
    E --> G["2. Received Calls"]
    E --> H["Select Back"]
The user will be able to press the lower rim of the navigation control button on their phone in order to display Received Calls on the phone's LCD screen.
4.13.6.1 Removing a Configured Function
To remove a configured navigation control position function:
- Navigate to and select the configured navigation control position function you want to delete (Missed Calls, Received Calls, Dialed Calls, All Calls, or Directory).
- Navigate to and select
; the function is removed.
4.13.7 Configuring a Function Key for Paging
Live announcements can be made (paged) from a phone to a group of phones, to notify a team (for example) that a meeting is about to commence. The paged announcement is multicast via a designated group IP address, in real time, on all idle phones in the group, without requiring listeners to pick up their receivers. The name of the group is displayed on phone screens when the paging call comes in.

Note: The feature must be enabled in the Web interface by the network administrator before a Functional Key can be configured for paging. See the Administrator's Manual for more information.
Up to nine Function Keys can be configured for paging using the 1-9 keys on the keypad.
To configure a Function Key for paging:
- Access the Function Keys screen (MENU key > Keys Configuration > Function Keys):
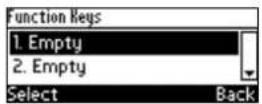

Note: You can alternatively long-press a key (1-9) until the Function Key Type screen opens.
- Navigate to and select an 'Empty' and then navigate to and select Paging.

flowchart
graph LR
    A["Function Key Type\nFunction Key: 1\n◀ Empty ▶"] --> B["Function Key Type\nFunction Key: 1\n◀ Paging ▶"]
    B --> C["Function Key #d\nGroup Name:\nA/a/1 Save Back"]
- In the 'Group Name' field, enter the name of the group, to be displayed in the phone's screen when there's an incoming / outgoing paging call. For phones to be in a group, all must be configured with the same name.
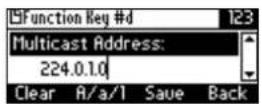
- Navigate down to the 'Multicast Address' field and enter the paging group's multicast IP address. Default = 224.0.1.0. For phones to be in a group, all must be configured with the same multicast address.
- Navigate down to the 'Multicast Port' field and enter the group's port. Default: 8888. For phones to be in a group, all must be configured with the same port.
- Press the Save softkey.
4.13.8 Paging a Group
Any phone configured in a paging group can be used to page the other phones configured in the group.
To page a group of phones:
- Long-press the Function Key that you configured for paging the group.
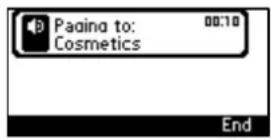
The phone speaker is enabled.
- Speak into the speaker and announce your message to the group.
- Press the End softkey when you finish making the announcement.
The phone speaker is disabled.
4.13.9 Receiving an Incoming Paging Call
If a key on your phone is configured for paging and you receive a paged call from another phone in the group, here's the screen you'll see:
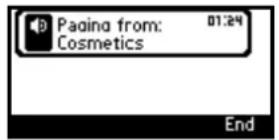
text_image
Padding from: Cosmetics 01:24 EndHow the paged call performs depends on whether your network administrator has enabled the barge-in feature or not (see the Administrator's Manual for more information about this).
Barge-in feature enabled: If you're in a regular call (with Steve, in the example below) when the paged call comes in (from Cosmetics, in the example below), the paged call is heard and the regular call is placed on hold.
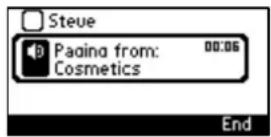
To revert to the regular call and ignore the paged call, press the End softkey and then the Resume softkey that's displayed.
Barge-in feature disabled: If you're in a regular call (with Steve, in the example below) when the paged call comes in (from Cosmetics, in the example below), you're prompted whether to accept or reject the paged call.
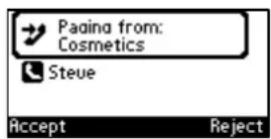
- If you press the Accept softkey: The regular call (with Steve) is placed on hold while the paged call (from Cosmetics) is heard.
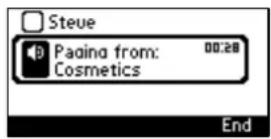
To return to the regular call, press the End softkey and then the Resume softkey.
- If you press the Reject softkey: The paged call is not heard and the regular call (with Steve) continues.

Note: The barge-in feature is only relevant if the paged user is in a regular call. If they're not in a regular call, then the paged call is heard irrespective of whether the barge-in feature is enabled or disabled.
5 Performing Basic Operations
This section shows how to perform basic phone operations.
5.1 Using VocaNOM for Direct Voice-Dialing
Your network administrator can configure VocaNOM functionality on your phone if you require it. The phone is directly integrated with AudioCodes' VocaNOM services to allow voice dialing to any other user in same corporate directory. After your network administrator configures the functionality, you'll see this softkey displayed in the phone's idle screen:
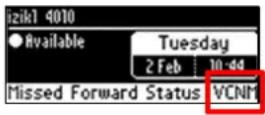
Press the key. A beep is played and then a voice prompt requests first and last name or department. Articulate the first and last name and then at the prompt, articulate "Office" or "Mobile". The VocaNOM service then directly dials the requested party according to your instructions. When the service identifies the requested party, the phone dials their number just as it does in a regular call. Later, you can press the REDIAL hard key on the phone and view the call logged in the phone's 'Dialed Calls' just like with any other call. The feature increases day-to-day work productivity.
5.2 Using Audio Devices
You can use one of the following audio devices on the phone for speaking and listening:
- Handset: To make a call or answer a call, lift the handset off the cradle.
Speaker (hands-free mode). To activate it, press the speaker key during a call or when making a call. To deactivate it, press the speaker key again.
Headset (hands-free mode). When talking on the phone, you can relay audio to a connected headset. To enable it, press the headset key. To disable it, press it again.
You can easily change audio device during a call.
To change from speaker/headset to handset: Activate speaker/headset and pick up the handset; the speaker/headset is automatically disabled.
To change from handset to speaker/headset: Off-hook the handset and press the speaker/headset key to activate the speaker/headset. Return the handset to the cradle; the speaker/headset remains activated.
5.3 Making Calls
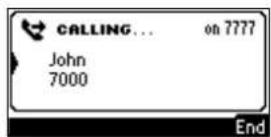
The phone offers multiple ways of making a call. After dialing a number:
LCD displays 📋 and the called party's phone number or contact name if it's listed in the phone directory
LCD displays the line extension number on which the called party is dialed
■ The phone plays a ring-back tone
LCD indications:
To end dialing a call before it's answered:
■ Press the End softkey or the speaker key.

Note:
- For advanced dialing using the phone directory, see Section 4.11.
• For defining a speed dial key, see Section 4.12.
• For using multiple lines, see Section 0.
5.3.1 Dialing
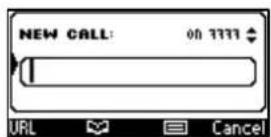
You can dial in multiple ways. Either (1) key-in the number on the keypad or (2) press the speaker key and enter the number or (3) press the speaker key or lift the handset and press the URL softkey and enter host and domain name or IP address or alphabetical letters (e.g., tvservice).
To dial a regular-digits phone number:
- On the keypad, key the first digit of a regular phone number; the LCD displays the digit in the NEW CALL field; key in the remaining digits. To delete (from right to left) entered digits, press the Clear softkey. To cancel the call, press the Cancel softkey.
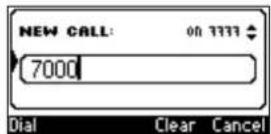
- Press the Dial softkey (if you don't, dialling is automatically performed after a few seconds) or press the # (pound) key.
To dial a URL:
- Press the speaker key or lift the handset; the LCD displays the NEW CALL field and the URL softkey:
- Press the URL softkey and enter a URL address, pressing the # key to toggle alphabetical letters and numerals (see Section 3.4 on page 20). To delete (from right to left) entered
letters/numerals, press the Clear softkey. To cancel the call, press the Cancel softkey.
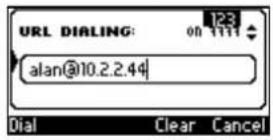
- Press the Dial softkey.
5.3.2 Redialing
You can redial a number previously dialed.
To redial a number previously dialed:
- Press the REDIAL key on the phone; the Dialed Calls screen is displayed, listing in chronological order, recently dialed numbers:
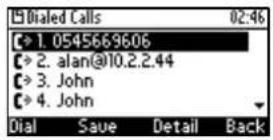
-
Navigate to the number to redial.
-
Press the Dial softkey or press the OK key on the phone's keypad.
5.3.3 Dialing a Missed Call
The phone logs all missed calls. The LCD in idle state shows the number of missed calls (if any):
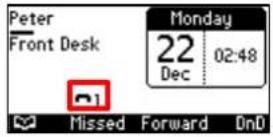
To dial a missed call:
- Press the Missed softkey; the Missed Calls screen is displayed.
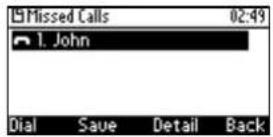
-
Navigate to the missed call to dial.
-
Press the Dial softkey or press the OK key on the phone.
5.4 Answering Calls
The phone indicates an incoming call as follows:
LCD displays together with the caller's phone number (or contact name if listed in the phone directory):
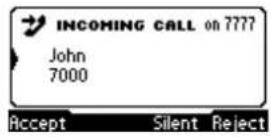
- Phone rings.
• Ring LED on the phone flashes green.
To answer:
- Pick up the handset:
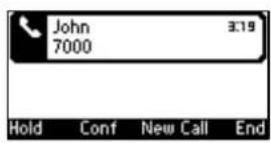
Or press the headset key:
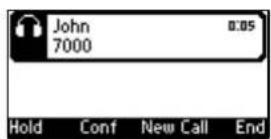
Or press the speaker key:
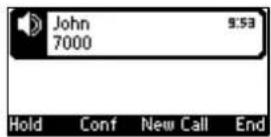
If you press the Accept softkey, the configured Answer Device (MENU key > Settings > Speaker / Headset) is activated.
5.5 Rejecting Incoming Calls
You can reject an incoming call; the caller hears a busy tone from your phone if you do.
To reject an incoming call:
■ Press the Reject softkey.

5.6 Silencing Incoming Calls
You can silence an incoming call's ringing. If you do, the caller hears normal ringing but no answer.
To silence the ringing of an incoming call:
■ Press the Silent softkey.
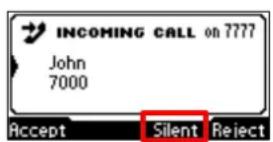
Answer a silenced call by pressing the Accept softkey or picking up the handset.
5.7 Ending an Established Call
You can end an established call.
To end an established call:
- Return the handset to the phone cradle if it was used to take the call -OR-
■ Press the headset key -OR-
■ Press the speaker key -OR-
Press the End softkey
5.8 Viewing Missed, Received and Dialed Calls
Your phone logs missed, received and dialed calls. In idle state, the LCD displays the number of missed calls (if any) above the Missed softkey:
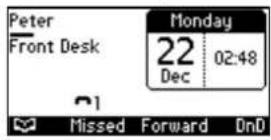
To view missed calls:
■ Press the Missed softkey; the Missed Calls screen is displayed.
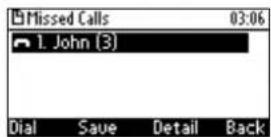

Note: After pressing the Missed softkey, the indication disappears from the screen.
To view call history:
- Access the Call Log screen (MENU key > Call Log).
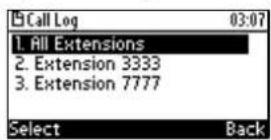
- Select a specific extension or All Extensions; this screen opens:
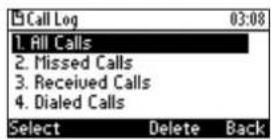
All Calls = calls that were missed, received and dialed
Missed Calls = calls that were not answered
Received Calls = the most recently answered numbers
Dialed Calls = the most recently dialed numbers
- Navigate to the option you want and press the Select softkey; a list of the logged calls is displayed, for example, Missed Calls:
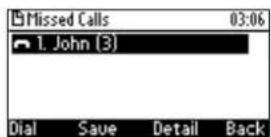
If multiple missed calls were from the same caller, the count is shown in parenthesis adjacent to the caller's name. In the above example, (3) missed calls were from John.
- Press the softkey you need:
Dial = dials the number of the selected logged entry.
Save = saves the related information about the call entry in the personal directory (for adding a contact in the directory, see Section 4.11 on page 33).
Detail = accesses the Call Details screen, which displays details of the call entry:
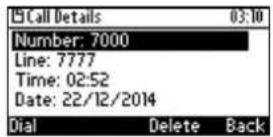
The Call Details screen displays the following logged call information:
Number = phone number logged
Time = the time the call was logged
Date = the date on which the call was logged
Duration = the duration of the call

Note:
- Call history lists are stored from the newest to oldest entries. The maximum number of entries for each call history type is 200. If this maximum is attained, the oldest entry is deleted and replaced with the new entry.
• The call history lists are saved on a daily basis. - After pressing the Missed softkey to view missed calls, the missed calls notification in the idle screen disappears. The next time a call is missed, the notification reappears in the idle screen.
This page is intentionally left blank.
6 Performing Advanced Operations
This section shows how to perform advanced operations.
6.1 Answering Waiting Calls
You can accept a call on an extension on which there already is an active call. Example:
a. A call with A is in progress on LINE 1
= call in progress
b. A call comes in from B
サ = call waiting
To answer B:
-
Press the Accept softkey; the 📋 icon is displayed indicating that the waiting call from B is answered; the previous call from A is put on hold:
-
To toggle between the calls, press the navigation control's upper or lower rim.

Note: To enable / disable the call waiting feature, see Section 4.3 on page 25.
6.2 Placing Calls On Hold
You can place a call on hold in order to answer a second incoming call (see Section 6.1 on page 53) or to make another call.
To place a call on hold:
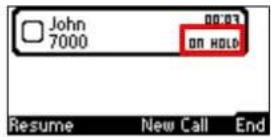
■ Accept an incoming call and then press the Hold softkey or HOLD key on the phone; the call is put on hold:
To retrieve a call on hold:
■ Press the HOLD key again -OR- press the Resume softkey.
6.3 Calling a Contact Listed in the Directory
You can call a contact listed in your directory.
To call a contact listed in your directory:
-
Press the CONTACTS key on the phone and then press the Select softkey to access the Personal directory.
-
Navigate to the contact to call (see also Section 4.11.5 on page 36).
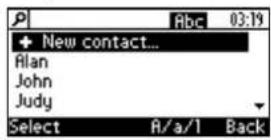
- Press the Dial softkey or the OK key on the phone.
6.4 Enabling Auto Redial
If a called party is unavailable because, for example, they're busy, the caller's phone's LCD prompts Extension Busy. Activate auto redial on busy?
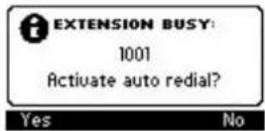
If the caller presses the Yes softkey to the prompt, the busy extension is automatically redialed every n seconds (configurable by the caller). The caller can stop the redialing at any time.

Note: Contact your network administrator to enable the feature if it is disabled (default).
When activated, Dialing
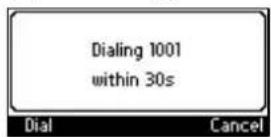
Pressing the Dial softkey redials the extension. Pressing the Cancel softkey deactivates autoredial.

Note:
- Calls can be made and received while auto-redial is activated.
- If auto-redial is activated while another extension is called - which is also unavailable - the caller is prompted to activate auto-redial on the new (busy) extension; the previous auto-redial is then deactivated.
- If auto-redial is activated on an unavailable extension and on that same extension an incoming call is answered, the feature is deactivated.
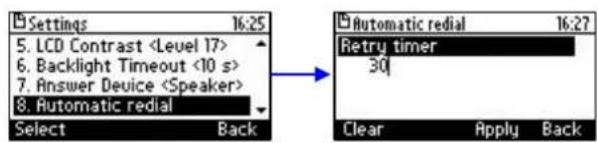
To change the redial interval:
- Open the 'Automatic redial' screen in the phone LCD (MENU > Settings > Automatic Redial).
text_image
Settings 16:25 5. LCD Contrast- Enter the interval you require and then press the Apply softkey.
6.5 Pressing a Speed Dial Key to Make a Call
You can press a Speed Dial key (1-9 on the phone's keypad) to make a call. See Section 4.12 for details on how to define a Speed Dial key.
To use a Speed Dial key:
Press a Speed Dial key 1-9 that you already defined; the phone automatically dials and calls the defined phone number.

Note: If you long-press a key that you have not defined as a Speed Dial, the Speed Dial #8 screen opens to let you define one.
6.6 Transferring a Call
You can connect a party with whom you're in a call, to another party. This is called transferring a call. Call transfers can be blind (default), attended or semi-attended.
| Transfer Method | When |
| Blind | Connect a party to another without waiting to hear the other's phone ring. |
| Attended | Connect a party to another after the other answers and agrees to take the call. |
| Semi-Attended | Connect a party to another before the other answers. |
6.6.1 Blind Transfer
You can perform a blind transfer.
To perform a blind transfer:
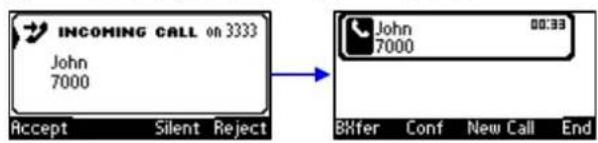
- In a call with John he asks you to connect him to Sue.
text_image
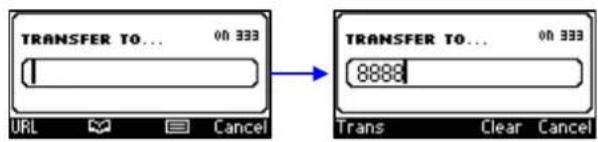
INCOMING CALL on 3333 John 7000 Accept Silent Reject John 7000 00:33 BXfer Conf New Call End- Press the BXfer softkey:
text_image
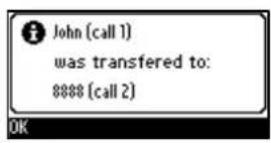
TRANSFER TO... 00 333 URL Cancel TRANSFER TO... 00 333 8888 Trans Clear Cancel- In the 'TRANSFER TO' field enter Sue's number, and then press the Trans softkey.
6.6.2 Attended Transfer
You can perform an attended transfer.

Note: Before performing an attended transfer, ask your network administrator to enable the capability. See the Administrator's Manual for detailed information.
To perform an attended transfer:
- In a call with John he asks you to connect him to Sue. Press the New Call softkey:

text_image
John 7000 0:07 Hold Conf New Call End NEW CALL: on 31111 URL Cancel- Enter Sue's number (8888) or press the Personal directory softkey to find her, and then press the Dial softkey; you'll hear Sue's phone ringing.
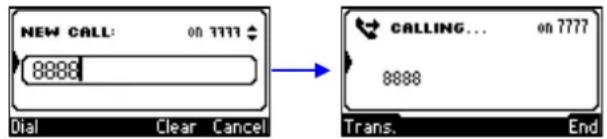
text_image
NEW CALL: on 7777 8888 Dial Clear Cancel CALLING... on 7777 8888 Trans. End- Wait for Sue to answer. When she answers, this screen is shown:
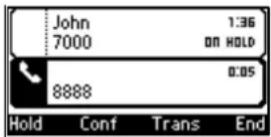
- Consult with Sue, and then press the Trans softkey; John is transferred to Sue.
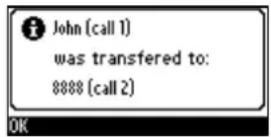
6.6.3 Semi- Attended Transfer
You can perform a semi-attended transfer.

Note: Before performing a semi-attended transfer, ask your network administrator to enable the capability. See the Administrator's Manual for detailed information.
To perform a semi-attended transfer:
- In a call with John he asks you to connect him to Sue. Press the New Call softkey:
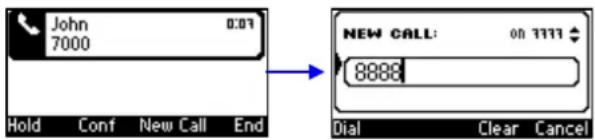
text_image
John 7000 0:01 Hold Conf New Call End NEW CALL: on 7777 8888 Dial Clear Cancel- Enter Sue's number (8888) or press the Personal directory softkey to find her, and then press the Dial softkey; you'll hear Sue's phone ringing.
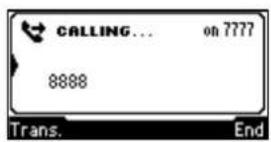
- Press the Trans softkey before she answers.
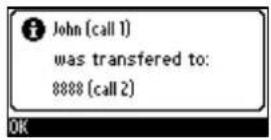
6.7 Hosting 3-Way Conference Calls
You can make a 3-way conference call with two other parties.
To make a 3-way conference call:
- Call the first participant; the call is established:
-
Press the Conf softkey; the CONFERENCE WITH...screen is displayed.
-
Enter the number of a second participant, and then press the Dial softkey. When the second participant answers, a call is established.
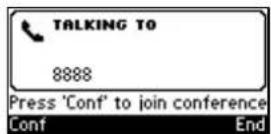
- Press the Conf softkey again; a 3-way conference call is established and the names of all participants are displayed on the screen.
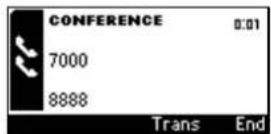
- To end the conference call, hang up the phone or press the End softkey.
6.7.1 Leaving a 3-Way Conference You Set up without Disconnecting the Others
A caller who sets up a three-way conference call with two other parties can leave it without disconnecting the two other parties. The two others continue uninterrupted. The 'Drop from Conference' feature supports this capability.
To leave a conference you set up, without disconnecting the other parties:
Press the Transfer softkey; you're disconnected from the conference; the two remaining parties continue unaffected.

Note: The initiator of a call conference can also drop out of the conference by on-hooking the phone, without disrupting parties B and C. In a conference call initiated by user A with participants B and C, user A can on-hook to drop out, and B and C can continue talking uninterruptedly.
6.8 Muting Calls
You can mute the microphone of the handset, headset, or speakerphone during a call so that the other party cannot hear you. While the call is muted you can still hear the other party. Muting calls can also be used during conference calls.
To mute/unmute a call:
- During a call, press the MUTE key.
- To unmute, press the MUTE key again and resume the conversation.

Note: The network administrator can disable the mute key. See the Administrator's Manual for more information.
6.9 Activating Do Not Disturb
The DnD feature stops the phone from ringing when others call you. If DnD is activated when someone calls you:
The caller hears a tone indicating that your phone is busy.
The call is blocked and the idle screen indicates 'Missed Calls'.
To activate DnD:
- Ensure that your phone is in idle state and that the idle screen is displayed, i.e., that you're not in an active call or dialing a number.
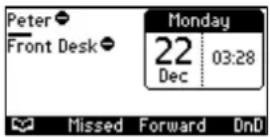
- Press the DnD softkey and select All Extensions or a specific line on which to activate DnD, and press the Select softkey; the screen displays an icon adjacent to the extension line/s indicating that incoming calls on them are blocked:
To deactivate DnD:
- Ensure that the phone is in idle state and that the idle screen is displayed, i.e., that you're not in an active call or dialing a number.
- Press the DnD softkey and select All Extensions or the specific line to deactivate, and press the Select softkey; the icon is no longer displayed on the screen and your phone now rings for incoming calls.

Note: If your enterprise deployed BroadSoft's BroadWorks, your network administrator can control the DnD on the phone from BroadWorks. See the Administrator's Manual.
6.10 Retrieving Voice Mail Messages
You can listen to voice mail messages. You can tell you have voice mail when (1) an envelope icon is displayed in the phone's idle screen (see the screen below), (2) the Ring LED on the phone is permanently lit green (see Figure 2-1, label 1), and (3) a stutter dial tone is heard when you pick up the handset.
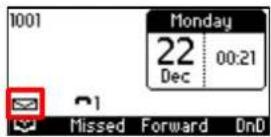
To listen to voice mail messages:
- Press the voicemail key 📧 on the phone
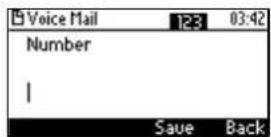
- Enter the number the voicemail box phone number; the phone dials your voicemail box. Follow the instructions of your voicemail provider.

Note: If the voicemail number has not been configured by your administrator then after pressing the voicemail key, enter it and press the Save softkey. Press the voicemail key again to listen to voice messages.
6.11 Using Two Lines
Your phone supports up to two lines. Each is configured with its own extension number. The figure below shows the idle screen of a phone set up with two lines whose extension numbers are Peter and Front Desk.
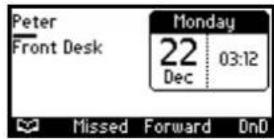

Note: Only your network administrator can configure the two lines. See the Administrator's Manual for details.
6.11.1 Choosing a Extension Line
You can select a line to use. The screen displays a bar above the extension number of the line currently being used (see the figure above). Until changed, all new calls are made on it.
To change lines:
-
Ensure that the LCD is in idle state and that no calls are established. View the two configured lines displayed in the screen. View the bar above the currently used line.
-
Navigate to and select the other line; the bar moves above it; all new calls will now be made on it.
6.11.2 Making a Call on an Extension Line
You can make a call on an extension line.
To make a call on an extension line:
- When the screen is in idle state, raise the handset or press the key of the first digit of the number to call; the NEW CALL screen is displayed:
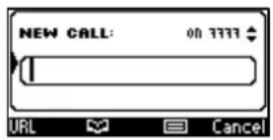
- Enter the number of the person to call, or press the 📋 softkey to select a contact from the directory and press the Dial softkey; the dialed number is called and the line on which the call is made is indicated in the screen.
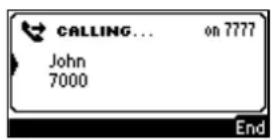
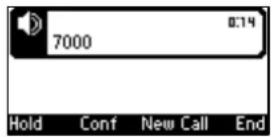
When the called party answers, this screen appears:
6.11.3 Making up to Eight Calls per Extension Line
You can make up to eight calls per extension line.
To make up to eight calls on an extension line:
- Make a call on an extension line to party 1. After establishing the call, press the NEW CALL softkey; the call with party 1 is automatically put on hold and the NEW CALL screen is displayed.
- Enter the phone number of party 2 or press the 📄 softkey to select their entry in the directory, and then press the Dial softkey; party 2 answers.
- To toggle between called party 1 (on hold) and called party 2, press the navigation control's upper and lower rim.
In this way you can make up to eight calls per extension line.
6.11.4 Toggling Between up to Eight Calls per Extension Line
After making up to eight calls on an extension line, you can toggle between the call that is active and those that are on hold. Toggling between lines involves putting the currently active call on hold and resuming the previously held call.
The icon indicates active.
The "icon indicates on hold.
To toggle between multiple-line calls:
Press the navigation control's upper or lower rim to select the conversation to resume and press the Resume softkey; the call that was previously active is now put on hold.
6.11.5 Answering Calls
You can answer an incoming call on a line extension.
To answer an incoming call on a line extension:
■ View the oncoming call indication on the screen.
■ Press the Accept softkey or lift the handset; the call is answered and all other calls are put on hold.
6.11.6 Ending Calls
You can only end calls that are active, i.e., not on hold.
To end an active call:
- Ensure that the call is active and not on hold.
- Press the End softkey or the SPEAKER key.
6.12 Logging into a Remote HTTP/S Server
When downloading a new configuration file from the provisioning server you can be prompted to enter the provisioning server login credentials (username and password).
You can configure this feature.
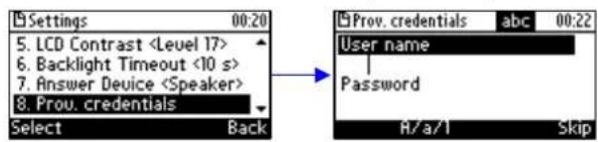
The feature may be useful (for example) when provisioning and attempting to download a configuration file from the provisioning server. In this case the server's authentication process recognizes that an HTTP username and/or password has not been specified or that these credentials are incorrect. The 'Prov. Credentials' screen then pops up prompting you to enter or reenter these login credentials.

Note: This feature is only available when the 'ui_interaction_enabled' configuration file parameter is enabled. See the Administrator's Manual for more information. When the parameter is not enabled, the 'Prov Credentials' option does not appear in the Settings menu on the phone.
You can also manually set the remote server login credentials.
To manually set remote server login credentials:
- Open the Prov. Credentials screen (MENU key > Settings > Prov. Credentials):
text_image
Settings 00:20 5. LCD Contrast- In the 'User name' field, enter the HTTP/S username.
- In the 'Password' field, enter the HTTP/S password.
- Press the now-enabled OK softkey to confirm, or press the Clear softkey to clear entered characters, or the Skip softkey to return to the previous menu.
7 Troubleshooting
Read this section if a problem with your phone occurs. If the section does not facilitate resolving the issue, contact your system administrator.
Table 7-1: Troubleshooting
| Symptom | Problem | Corrective Procedure |
| Phone is off (no LCD displays and LEDs) | Phone is not receiving power | ·Verify that the AC/DC power adapter is attached firmly to the DC input on the rear of the phone.·Verify that the AC/DC power adapter is plugged into the electrical outlet.·Verify that the electrical outlet is functional.·If using Power over Ethernet (PoE), contact your system administrator to check that the switch is supplying power to the phone. |
| 'LAN Link Failure' message displayed on the LCD | No LAN connection | ·Verify that the LAN cable is connected securely to the LAN port on the rear of the phone.·Verify that the other end of the LAN cable is connected to the network (switch). If it's not, inform your system administrator. |
| Phone is not ringing | Ring volume is set too low | ·Increase the volume (see Section 4.9.1) |
| 'Registration...' message displayed on the LCD and calls cannot be made or received | Line not registered to network | If your phone has multiple lines and an 'X' is displayed on the LCD for a line, this indicates that the line has not been successfully registered. For assistance, contact your system administrator. |
| LCD display is poor | LCD settings | ·Adjust the phone's screen contrast level (see Section 4.5)·Adjust the screen's backlight timeout (see Section 4.6) |
| Headset has no audio | Headset not connected properly | ·Verify that your headset is securely plugged into the headset port located on the side of the phone.·Verify that the headset volume level is adjusted adequately (see Section 4.9.5). |
| IP Duplication | Duplicate IP address conflict can occur on a DHCP network if you defined a static IP address for a network device | ·Convert the network device with the static IP address to a DHCP client-OR-·Exclude the static IP address from the DHCP scope on the DHCP server |
This page is intentionally left blank.
A Specific Third-Party Features
This appendix describes phone features that are only applicable to specific third parties.
A.1 BroadSoft
A.1.1 Monitored Lines Based on BroadSoft's BroadWorks BLF Service
This section shows how to configure Monitored Lines based on the BroadWorks BLF service, typically used by executive assistants or front desk operators to monitor lines in the network.

Note:
- The feature can also be configured by the network administrator from the Web interface. See the Administrator's Guide for detailed information.
- Before configuring monitored lines, your network administrator must enable the BLF service feature in BroadSoft's BroadWorks server. See the Administrator's Guide for detailed information.
To configure a monitored line:
- Long-press one of the four softkeys located on the device under the LCD; the Soft Keys screen is displayed.
- Navigate across to and select Speed Dial + BLF.
- Navigate down to enter the telephone number to assign the speed dial to.
- Navigate down to enter the a label to assign the speed dial to, and then press the Save softkey.
- View the line number displayed in the Soft Keys screen and in the LCD's idle screen.
text_image
2408889063 Sunday 16 Nov 00:10 Audio. Audio. Audio. Audio.The screen above shows:
(two softkeys on the left) two phones busy in conversation
■ (two softkeys on the right) two phones not busy
A semi-full icon (not shown) indicates that the phone is ringing.
A.1.2 Support for SCA (Participant Only)
The 405/405HD phone supports Shared Calls Appearance (SCA) as participant only. The feature enables multiple phones (the 440HD model) in a Broadsoft environment to be associated in an SCA group so that calls can be made or received on any phone in the group. If a call comes in on a phone in the group, all phones in the group ring simultaneously. The first to answer is connected to the caller. All other phones then stop ringing.
A.1.3 Softkey Display and Command Menu Options
The following tables show the different softkey display states and command menu options that are available according to your login state and the configured SIP server.
Table A-1: Broadsoft-Softkey Display States and Command Menu Options
| State Softkeys Displayed | Command Menu | Options | |
| Idle ACD Disabled | 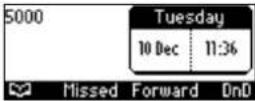 | - | |
| ACD Enabled (logged out) |  | ForwardDnD | |
| ACD Enabled (logged in) | 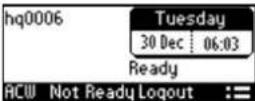 | MissedForwardDnD | |
| Ongoing Call ACD Disabled | 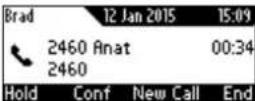 | - | |
| ACD Enabled (logged out) | |||
| ACD Enabled (logged in) | |||
A.1.3.1 Presence Management
This section describes how to login to and logout from the Call Center SIP server and to update your presence status when the ACD (Automatic Call Distribution) feature is enabled.

Note: When the ACD feature is enabled, whenever you login or logout or change your presence status, these updates are sent to the Call Center SIP server. This server then can automatically distribute incoming calls to different agents' phones based on their relative availability. For more information, see the Administrator's Manual.
A.1.3.1.1 Logging in
This section shows you how to log in to the phone. Log in immediately after starting a shift.
To log in to the phone:
- When the phone's LCD is in idle mode (Logged Out), press the Login softkey; the Log In screen is displayed:

text_image
9198130006 Friday 2 Jan 02:16 Logged Out Missed Login := Log In 123 Username: hq0006 Login A/a/1 Clear Cancel- Enter your Username. Obtain it from your system administrator. Press the A/a/1 softkey successively to navigate to and select the alphanumerical mode you require (abc, ABC, or Abc).
- Scroll down and enter your Password.
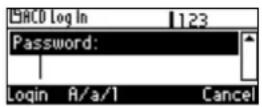
- Press the Login softkey; the Ready idle screen is displayed.
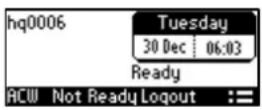
You're now available to take incoming calls. Incoming calls from now on will be directed to your phone.
A.1.3.2 Setting Unavailability Status
In the course of a shift, you may need to leave your desk for a break or to attend to other issues. Before leaving your desk, change your status to 'Not Ready' (unavailable) so that incoming calls to the Contact Center will not be sent to you.
To change your status to 'Not Ready':
- In the idle screen, press the Not Ready softkey and select the reason for not being ready to take a call. For example, you'll be at lunch or on a coffee break; the 'Ready' indication changes to 'Not Ready':

flowchart
graph LR
    A["hq0006"] --> B["Tuesday\n30 Dec 06:03\nReady"]
    B --> C["Not Ready Reason\n1. Lunch\n2. Coffee break\nSelect Back"]
    C --> D["hq0006"]
    D --> E["Friday\n2 Jan 00:16\nNot Ready\nACW Readu Logout"]
- Set the reason for your not being ready to take a call. For example, you are at lunch or on a coffee break. Press the Not Ready softkey to set this reason:
- If you have just finished a session with a customer and wish to carry out administrative tasks related to the call, then press the ACW (After Call Work). The 'After Call' status is displayed on the phone's LCD.
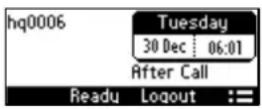
A.1.3.3 Setting Availability Status
When you return to your desk after taking a break or after attending to an external issue, it's important to restore your status to 'Ready' and resume work.
To restore your status to 'Ready':
In the idle screen, press the Ready softkey; the 'Not Ready' indication changes to 'Ready'.

text_image
hq0006 Friday 2 Jan 00:16 Not Ready ACW Ready Logout := hq0006 Tuesday 30 Dec 06:03 Ready ACW Not Ready Logout :=A.1.3.4 Logging Out
At the end of your shift, log out of the phone.
To log out of the phone:
In the idle screen, press the Logout softkey; the Logged Out indication is displayed:

text_image
hq0006 Tuesday 30 Dec 06:03 Ready 9198130006 Friday 2 Jan 02:16 Logged Out ACW Not Ready Logout := Missed Login :=A.1.4 Viewing Missed Calls
You can view a list of missed calls.
To view a list of missed calls:
- In the idle screen, press the :=softkey; the Command Menu opens.

text_image
hq0006 Friday 2 Jan 00:16 Not Ready Command Menu Missed Forward ACW Readu Logout := Select Cancel- Scroll down and select the Missed option:
- In the idle screen to which you're returned, view the Missed indication:
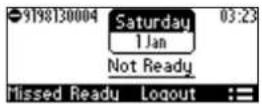
A.1.5 Configuring Do Not Disturb (DnD)
You can configure the phone so that no incoming calls will disturb you.
To configure DnD:
- In the idle screen, press the := softkey; the Command Menu opens.

text_image
hq0006 Friday 2 Jan 00:16 Not Ready ACW Readu Logout := Command Illenu Fwd DnD Select Cancel- Scroll down and select the DnD option:
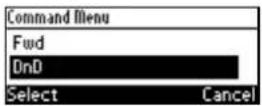
- In the idle screen to which you're returned, view the DnD indication.
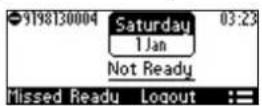
A.1.6 Configuring Automatic Forwarding
When you leave your workstation you can configure the phone so that any incoming calls will be forwarded.
To configure automatic forwarding:
- In the idle screen, press the := softkey; the Command Menu opens.

text_image
hq0006 Friday 2 Jan 00:16 Not Ready ACW Ready Logout := Command Menu Fwd DnD Select Cancel- Select the Fwd option; the Automatic Forward screen opens.

text_image
Automatic Forward Always Busy Select Back Automatic Forward Busy No Reply 6 s Select Back- Select the Always option or scroll down and select the Busy or No Reply option.
- Enter the Number to Forward to, or scroll down and select Select from Directory in which you can choose a contact number to which to forward calls.

text_image
Automatic Forward 1. Number To Forward 91 981 30004 Clear Start Cancel Automatic Forward 2. Select from Directory... Select Start Cancel- In the idle screen to which you're returned, view the 'Forward' indication.
A.1.7 Configuring the 'Forward No Reply' Timeout as Number of Rings
The 'Forward No Reply' timeout can be configured as 'number of rings' rather than as 'seconds'. Consult with your network administrator to enable this feature (see the Administrator's Manual for details). For example, the phone can be configured to ring 2r (2 rings), or 4r (4 rings), for example, before calls are forwarded. The setting can be changed according to user preference.
A.1.8 Automatically Receiving an External Line
The phone by default features automatic switching. Users do not need to press the 9 key, for example, in order to receive an external line; they can directly dial the number of the party they want. To configure manual switching, consult the network administrator (see the Administrator's Manual). When configured, users must press the 9 key, for example, to get a line to outside the enterprise; after pressing the key, they hear a secondary tone. They only then can dial the number of the party they need.
A.1.9 Viewing VOICEMAIL Indications Per Line
When a phone is in a Multi Line configuration, VOICEMAIL is indicated per line.
The screenshot below shows multiple lines configured.
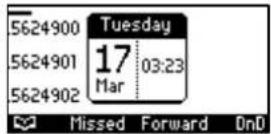
The shot below shows the screen displayed when you press the VOICEMAIL key on the phone.
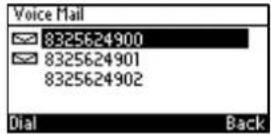
A.1.10 Listening in Capability for Call Center Supervisors
A call center supervisor can pick up an operator's handset and listen in on the conversation that the operator is conducting on headphones with the customer, without the customer at the other end sensing that the supervisor is listening in (because the supervisor is in effect muted).
See the Administrator's Manual for details on how to configure the feature.
A.1.11 Hearing a Beep, not a Ring Tone, on Headsets when a Call Comes in to a Call Center

Note: The network administrator can configure a beep instead of a ring tone to be played to headsets when a call comes in to the Call Center. For more information, see the Administrator's Manual.
A.1.12 Recording an Agent's Welcome Greeting
Agents in a call center can record personal voice greetings which play automatically when calls come in. An agent's recorded voice greeting welcomes callers to the service they're seeking. For example: Thanks for contacting Julie at Southern California Edison, how can I assist you?

Note: Before using this feature, your network administrator must enable it. For more information, see the Administrator's Manual.
The feature
- Allows agents to record greetings directly on the phones
■ Replaces cumbersome management from a media server
■ Replaces ad-libbed amateurish greetings
Gives callers a good first impression of the call center
■ Professionalizes customer care and improves agent productivity
■ Makes customers feel welcome when they consistently hear a cheerful and polite greeting.
To record a welcome greeting:
- Open the Greeting Message screen (MENU key > Settings > Greeting Message).

flowchart
graph LR
    A["Menu 11:20"] --> B["Settings 11:51"]
    B --> C["Greeting Message"]
    style A fill:#f9f,stroke:#333
    style B fill:#ccf,stroke:#333
    style C fill:#cfc,stroke:#333

Note: While the Greeting menu is open no calls can come in.
- Press the recording softkey 📋 and record your welcome greeting (max length: 10 seconds)
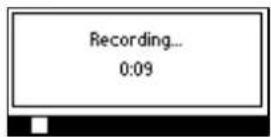
- When you finish recording, press the stop softkey ☐.
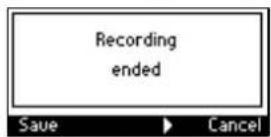
-
Press the ▶ softkey to play back your recording.
-
Press the Save softkey to save the recording. To delete it, select the Delete softkey.
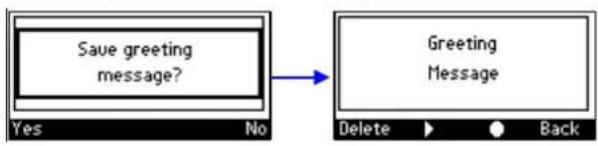
flowchart
graph LR
    A["Save greeting message?"] --> B["Greeting Message"]
    style A fill:#f9f,stroke:#333
    style B fill:#ccf,stroke:#333
A.1.13 Entering BroadWorks User Credentials for Xsi access
You can enter your BroadWorks user credentials for Xtended Services Interface (Xsi) access. The phone uses SIP authentication data to authenticate Xsi access. The phone sends the BroadWorks user ID to the Xtended Services Platform (Xsp) to identify the user, along with the SIP authentication user name and password to authenticate access to the Xsi.

Note: Consult your network administrator about this capability. For more information, see the Administrator's Manual.
A.1.1 Setting up a Remote Conference
This section shows how to set up a remote conference to which more than three participants can be added. A 'local' conference only supports a maximum of three participants (see Section 6.7 for information about a 'local' conference).

Note: Only after the enterprise's network administrator enables the feature, you can establish a remote conference.
To establish a remote conference | add participants:
- From the idle screen, call participant 1 either from a directory or from a call log.
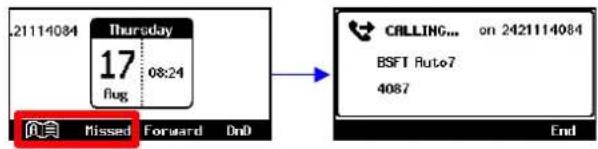
text_image
211114084 Thursday 17 08:24 Rug 负 Missed Forward DnD CALLING... on 2421114084 BSFT Ruto7 4087 End- Participant 1 answers and the call is established.
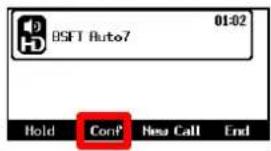
text_image
01:02 BSFT Auto7 Hold Comp New Call End- Press the Conf softkey.
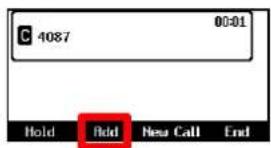
text_image
C 4087 00:01 Hold Add New Call End- Add participant 2: Press the Add softkey, enter their number and press the Dial softkey.

flowchart
graph LR
    A["NEW CALL: <br>[ "]] --> B["NEW CALL: <br>4085"]
    B --> C["BSFT Ruto5<br>4087"]
    C --> D["4087:4085 01:19"]
    D --> E["Hold Add New Call End"]
    F["Dialog"] --> B
    G["Clear"] --> B
    H["Cancel"] --> B
- Add participant 3 in the same way.

Note: After adding the first participant by selecting the Conf softkey, the letter C is displayed in the phone screen indicating that this is a conference call.
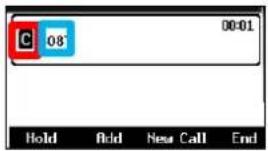
text_image
08 00:01 Hold Add New Call EndNote also that the names of all participants participating in the conference are typically displayed here. Names will scroll horizontally if they're longer than the box.
A.2 Genesys' Contact Centers
This section shows how to use AudioCodes IP phones in Genesys contact centers.

Note: The section is intended mainly for agents / hotline operators.
A.2.1 Using the BroadSoft ACD
Genesys Contact Center phones support the BroadSoft ACD. The table below shows how to use the functionalities.
Table A-2: Genesys Contact Center Phones' BroadSoft ACD
| State | Softkeys Displayed | Command Menu Options | |
| Idle Ready | 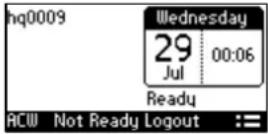 | Missed CallsForwardDnD | |
| Not Ready | 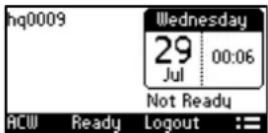 | Missed CallsForwardDnD | |
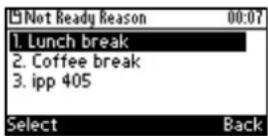 | |||
| Idle ACW | 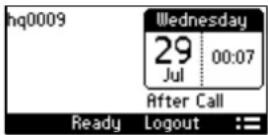 | Missed CallsForwardDnD | |
A.2.1.1 Setting Unavailability Status
In the course of a shift, you may need to leave your desk for a break or to attend to other issues. Before leaving your desk, change your status to 'Not Ready' (unavailable) so that incoming calls to the Contact Center will not be sent to you.
To change your status to 'Not Ready':
- In the idle screen, press the Not Ready softkey and select the reason for not being ready to take a call. For example, you'll be at lunch or on a coffee break; the 'Ready' indication changes to 'Not Ready':

flowchart
graph LR
    A["Readu"] --> B["Not Ready Reason 00:07"]
    B --> C["Select Back"]
    D["hq0009"] --> E["Not Ready"]
    E --> F["Back"]
- If you have just finished a session with a customer and wish to carry out administrative tasks related to the call, then press the ACW (After Call Work). The 'After Call' status is displayed
on the phone's LCD.
A.2.1.2 Setting Availability Status
When you return to your desk after taking a break or after attending to an external issue, it's important to restore your status to 'Ready' and resume work.
To restore your status to 'Ready':
In the idle screen, press the Ready softkey; the 'Not Ready' indication changes to 'Ready'.
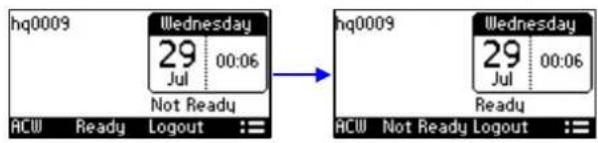
text_image
hq0009 Wednesday 29 Jul 00:06 Not Ready ACW Ready Logout := hq0009 Wednesday 29 Jul 00:06 Readu ACW Not Ready Logout :=A.2.2 Presence Management
This section describes how to login to and logout from the Call Center SIP server and to update your presence status when the ACD (Automatic Call Distribution) feature is enabled.

Note: When the ACD feature is enabled, whenever you login or logout or change your presence status, these updates are sent to the Call Center SIP server. This server then can automatically distribute incoming calls to different agents' phones based on their relative availability. For more information, see the Administrator's Manual.
A.2.3 Logging In
This section shows you how to log in to the Genesys Call Center SIP server. Log in immediately after starting a shift.
To log in to the phone:
- When the phone's LCD is in idle mode (Logged Out), press the Login softkey; the Log In screen is displayed:
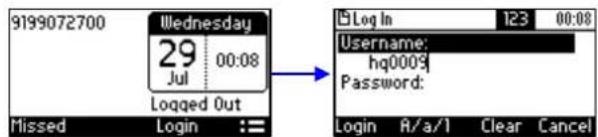
text_image
9199072700 Wednesday 29 Jul 00:08 Logged Out Missed Login := Log In 123 00:08 Username: hq0009 Password: Login R/a/1 Clear Cancel- Enter your Username. Obtain it from your system administrator. Press the A/a/1 softkey successively to navigate to and select the alphanumerical mode you require (abc, ABC, or Abc).
- Scroll down and enter your Password.
- Press the Login softkey; the Ready idle screen is displayed.
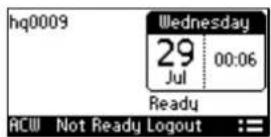
You're now available to take incoming calls. Incoming calls from now on will be directed to your phone.
A.2.4 Logging Out
At the end of your shift, log out of the phone.
To log out of the phone:
In the idle screen, press the Logout softkey; the Logged Out indication is displayed:
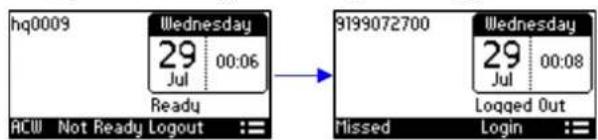
text_image
hq0009 Wednesday 29 Jul 00:06 Readu 9199072700 Wednesday 29 Jul 00:08 Logged Out Missed Login :=A.2.5 Configuring Do Not Disturb (DnD)
You can configure the phone so that no incoming calls will disturb you.
To configure DnD:
- In the idle screen, press the := softkey; the Command Menu opens.
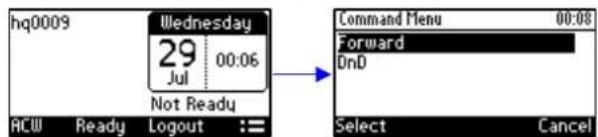
text_image
hq0009 Wednesday 29 Jul 00:06 Not Ready Command Menu 00:08 Forward OnD ACW Ready Logout := Select Cancel-
Scroll down and select the DnD option.
-
In the idle screen to which you're returned, view the DnD indication.
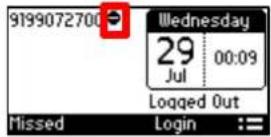
A.2.6 Configuring Automatic Forwarding
When you leave your workstation you can configure the phone so that any incoming calls will be forwarded.
To configure automatic forwarding:
- In the idle screen, press the := softkey; the Command Menu opens.
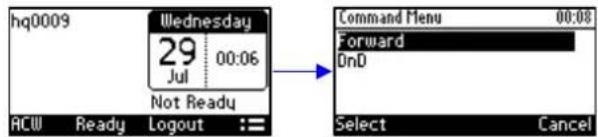
text_image
hq0009 Wednesday 29 Jul 00:06 Not Ready Command Menu 00:08 Forward OnD ACW Ready Logout := Select Cancel- Select the Forward option; the Automatic Forward screen opens.
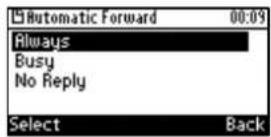
-
Select the Always option or scroll down and select the Busy or No Reply option.
-
Enter the Number to Forward to, or scroll down and select Select from Directory in which you can choose a contact number to which to forward calls.
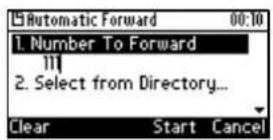
- In the idle screen to which you're returned, view the 'Forward' indication.
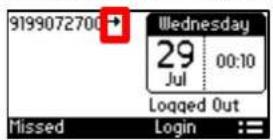
A.2.7 Listening in Capability for Call Center Supervisors
Call center supervisors can pick up an operator's phone and listen in on the conversation that the operator is conducting on headphones with the customer, without the customer at the other end sensing that the supervisor is listening in (because the supervisor is in effect muted).
A.2.8 Recording an Agent's Welcome Greeting
Agents in a call center can record personal voice greetings which play automatically when calls come in. An agent's recorded voice greeting welcomes callers to the service they're seeking. For example: Thanks for contacting Julie at Southern California Edison, how can I assist you?

Note: Before using this feature, your network administrator must enable it. For more information, see the Administrator's Manual.
The feature
- Allows agents to record greetings directly on the phones
■ Replaces cumbersome management from a media server
■ Replaces ad-libbed amateurish greetings
Gives callers a good first impression of the call center
■ Professionalizes customer care and improves agent productivity
■ Makes customers feel welcome when they consistently hear a cheerful and polite greeting.
To record a welcome greeting:
- Open the Greeting Message screen (MENU key > Settings > Greeting Message).

flowchart
graph LR
    A["Menu 11:20"] --> B["Settings 11:51"]
    B --> C["Greeting Message"]
    style A fill:#f9f,stroke:#333
    style B fill:#ccf,stroke:#333
    style C fill:#cfc,stroke:#333

Note: While the Greeting menu is open no calls can come in.
- Press the recording softkey 📋 and record your welcome greeting (max length: 10 seconds)
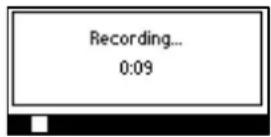
- When you finish recording, press the stop softkey ☐.
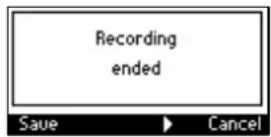
- Press the ▶ softkey to play back your recording.
- Press the Save softkey to save the recording. To delete it, select the Delete softkey.
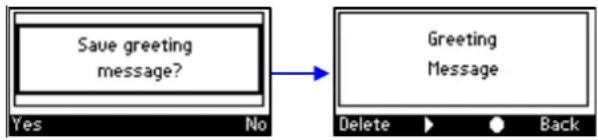
flowchart
graph LR
    A["Save greeting message?"] --> B["Greeting Message"]
    C["Yes"] --> D["Delete"] --> E["Back"]
International Headquarters
1 Hayarden Street,
Airport City
Lod 7019900, Israel
Tel: +972-3-976-4000
Fax: +972-3-976-4040
AudioCodes Inc.
27 World's Fair Drive,
Somerset, NJ 08873
Tel: +1-732-469-0880
Fax: +1-732-469-2298
Contact us : https://www.audiocodes.com/corporate/offices-worldwide
Website: https://www.audiocodes.com/
©2019 AudioCodes Ltd. All rights reserved. AudioCodes, AC, HD VoIP, HD VoIP Sounds Better, IPmedia, Mediant, MediaPack, What's Inside Matters, OSN, SmartTAP, User Management Pack, VMAS, VoIPerfect, VoIPerfectHD, Your Gateway To VoIP, 3GX, VocaNom, AudioCodes One Voice and CloudBond are trademarks or registered trademarks of AudioCodes Limited. All other products or trademarks are property of their respective owners. Product specifications are subject to change without notice.
Document #: LTRT-12058