
MCK75J - Humidifier DAIKIN - Free user manual and instructions
Find the device manual for free MCK75J DAIKIN in PDF.

| Product Type | Air Purifier with Humidifier |
| Model | MCK75JVM-K |
| Brand | Daikin |
| Power Supply | 220-240 V, 50/60 Hz |
| Power Consumption | Approx. 50 W |
| Dimensions (H x W x D) | Approx. 590 x 395 x 265 mm |
| Weight | Approx. 10.5 kg |
| Humidification System | Vaporization system with waterwheel |
| Air Purification Method | Streamer discharge, plasma ionizer, pleated filter, pre-filter |
| Deodorization | Streamer discharge + recyclable deodorizing cartridge |
| Airflow Settings | Auto, Quiet, Low, Standard, High, Turbo, Pollen |
| Humidification Settings | Continuous, High, STD, Low |
| Water Tank Capacity | Approx. 4 L |
| Coverage Area | Approx. 30 m² |
| Sensors | Dust, odor, humidity |
| Remote Control | Yes (CR2025 battery) |
| Filter Replacement Interval | Pleated filter: approx. 1 year; Humidifying filter: approx. 2 years |
| Maintenance | Pre-filter every 2 weeks, UNIT1/UNIT2 when lamps light |
| Safety Features | Child lock, auto shut-off if front panel opened |
| Noise Level | Approx. 20-50 dB |
Frequently Asked Questions - MCK75J DAIKIN
User questions about MCK75J DAIKIN
0 question about this device. Answer the ones you know or ask your own.
Ask a new question about this device
Download the instructions for your Humidifier in PDF format for free! Find your manual MCK75J - DAIKIN and take your electronic device back in hand. On this page are published all the documents necessary for the use of your device. MCK75J by DAIKIN.
USER MANUAL MCK75J DAIKIN
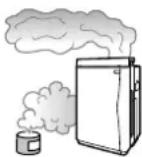
natural_image
Illustration of a white rectangular appliance with a side panel and handle (no text or symbols)
MODEL
MCK75JVM-K
Features
Deodorization
The strong decomposition capacity of streamer discharge assuredly removes unpleasant odor-causing components in cigarette smoke, formaldehyde, etc.
Dust collection
A high airflow rate nimbly catches pollen, house dust, etc.
Humidifi cation
The room is quickly humidified by the humidifying with "Vaporization system of high airflow rate".
About streamer discharge...
Streamer discharge nimbly decomposes odors and harmful gases by generating fast-moving electrons of high oxidising strength inside the air purifier. (Because the fast-moving electrons are generated and consumed inside the unit, it is absolutely safe.)
During operation, the fizzing sound of streamer discharge can be heard.
Also, depending on the conditions of use, the sound may be quieter or change in tone.
A very small amount of ozone is generated by the unit and may cause a slight odor at the air outlet. However, since the amount of ozone is minute, it will not cause any health problem.
About air purifying
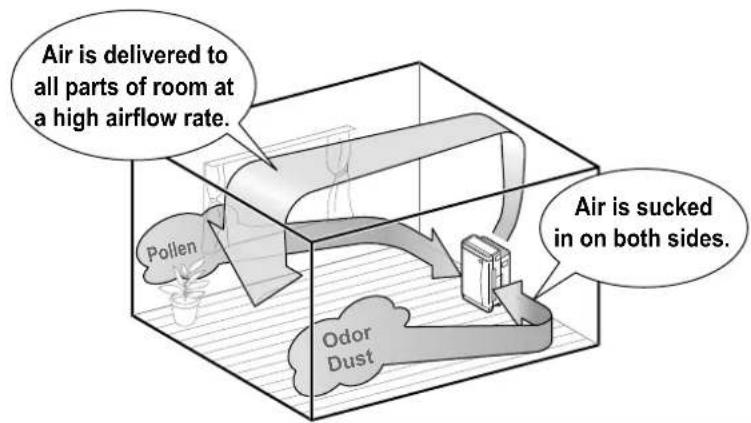
The powerful suction of a high airflow rate captures dust, pollen, etc.
Streamer discharge decomposes formaldehyde and odors.
• Purifying capacity increases alongside airflow rate.
Strong against pollen
Owing to a high airflow rate, even pollen that readily settles because of its large particle size is quickly caught.
How air is humidifi ed

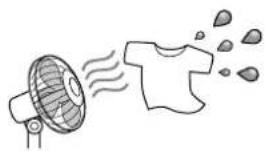
Adoption of vaporization system
This is the system to vaporize water by air-blow.
natural_image
Simple line drawing of a fan emitting smoke to a T-shirt (no text or symbols)• Vapours and mist are unseen to the eye.
- Humidifying capacity increases alongside airflow rate.
Water supply system by waterwheel
Waterwheel scoops up water only when needed and humidifying filter is not soaked to water. This specific system keeps the humidifying filter clean and prevent molds.
- As water is supplied from the water tank to the humidifying tray, the sound may be heard.
READ FIRST
Safety Precautions ■ 3
Names and Operation of Each Parts ■ ....7
Sensitivity Settings of the Dust Sensor ■ .....13
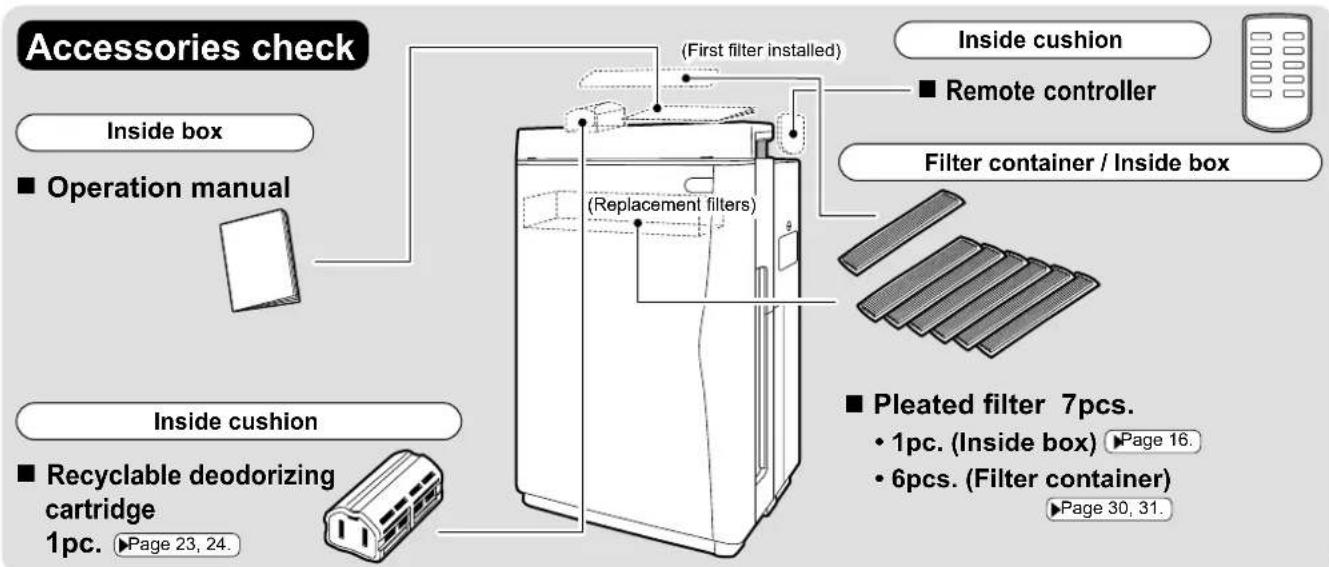
PREPARATIONS BEFORE USE
■ Installation 14
Preparation of Remote Controller ■ 15
■ Attach the Filter 16
■ Water Tank Preparations ...... 17
HOW TO OPERATE
■ Air Purifying Operation 19
■ Humidify and Air Purifying Operations ..... 20
How to Operate with Remote Controller ■ .....21
How to Use the Recyclable Deodorizing Cartridge 23
CARE and CLEANING
■ Quick Reference Table of Maintenance ..... 25
■ Care & Cleaning 27
TROUBLESHOOTING
■ Frequently Asked Questions 39
■ If These Lamps Light or Flash 40
■ Troubleshooting 41
Safety Precautions
Before use, read these Safety Precautions to ensure proper use. ■
■ The precautions used in this manual are classified into the following two types. Both contain important safety information, therefore observe them at all times.
 WARNING WARNING | Improper handling may lead to serious injury or even death. |  CAUTION CAUTION | Improper handling may lead to injury or property damage.In some situations, the consequences may be grave. |
The icons used in this manual mean the following. ■
 | Never do. |  | Be sure to follow the instructions. |  | Unplug the power cord. | Ke  ay ay | from fl ames. |
 | Do not disassemble. |  | Do not handle with wet hands. |  | Do not wet. | ||
After reading this manual, keep it in a handy place for future reference by users. ■

WARNING
Power supply cord and plug

Use only a 220 - 240V power supply.
Other power supplies may lead to fire or electric shock.
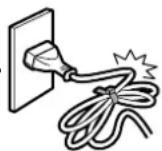
Do not damage, remodel, bend unreasonably, pull, twist or use the power supply cord bundled up.
Also, do not place heavy objects on or pinch the power supply cord.
Damage to the power supply cord may lead to fire or electric shock.
Do not use the unit when the power supply cord or plug is damaged • or plugged loosely into an electrical socket.
A damaged or loose cord or plug may lead to fire because of a short circuit or electric shock.
Do not use the unit beyond the rating of the electrical socket or - branching device.
Exceeding the rating of multiple socket outlets may lead to fire because of overheating.
- Do not insert or remove the power plug to turn the unit ON/OFF.
Abusive handling may lead to electric shock or fire because of overheating.
- Insert the power plug into the socket all the way to the base.
Incomplete connections may lead to electric shock or fire because of overheating.
- Periodically clean dust and other matter from the power plug with a dry cloth.
Insulation failure caused by humidity or otherwise may lead to fire.

- Stop operation and unplug the power supply cord if detecting anything strange such as burning odors.
Continued use the unit in anything strange may lead to electric shock or fire because of overheating.
Contact the service shop.
- If the power supply cord is damaged, it must be replaced by the manufacturer, its service shop or similarly qualified persons in order to avoid a hazard.
A damaged cord may lead to electric shock or fire because of overheating.

- Before cleaning or relocating the unit, stop operation and unplug the power supply cord from the electrical socket.
Handling with the unit plugged in and running may lead to electric shock or injury.

WARNING
Main unit |  | Do not use the unit anywhere there is airborne oil such as machine oil.•Airborne oils may lead to cracking, electric shock or ignition.Do not use the unit anywhere there are abundant oil vapours such as in kitchens, combustible or corrosive gases, or metallic dust.These kinds of environments may lead to fi re or damage.Keep fingers and objects out of the air inlets, air outlet and other openings.Improper handling may lead to electric shock, injury or damage.Do not wet the air outlet or unit frame.•Contact with water may lead to fi re or electric shock.Do not use combustible substances, i.e., hairspray, insecticides, etc., near the unit.Do not wipe the unit with benzene or thinner.These substances may lead to cracking, electric shock or ignition.Use a neutral liquid detergent to clean the unit.•Use of chlorine or acidic detergents to clean the unit may generate harmful gas and harm health. | 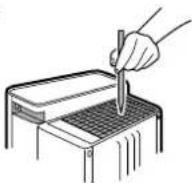 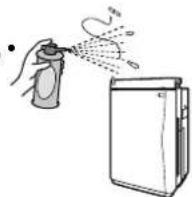 |
 | Keep cigarettes, incense and other naked fl ames away from the unit.•Naked flames may lead to fire. | ||
 | Do not disassemble, remodel or service the unit yourself.•Improper handling may lead to fi re, electric shock or injury.Contact the service shop. | ||
 | Do not operate the unit with wet hands.•Contact with water may lead to electric shock. | ||
 | Do not use the unit anywhere that is very humid such as bathrooms•or that experiences sudden temperature changes such as cold storage boxes.Improper environments may lead to electric shock or damage. |

CAUTION
Power supply cord and plug


Hold the power plug – not the power supply cord – and pull to unplug the • unit.
Pulling on the power supply cord may lead to fire or electric shock because of short circuits.


CAUTION
Main unit

Do not use the unit anywhere it is exposed to direct sunlight, rain or wind.
Overheating or contact with water may lead to fire or electric shock.
Do not use the unit anywhere that is hot such as near to heaters.
High temperatures may discolour or deform the unit.
Do not block the air inlets or air outlet with laundry, cloth, curtains, etc.
Adhering lint may obstruct air passage, possibly leading to overheating and fire.
Do not use the unit anywhere the floor is unstable.
If the unit topples over, water will spill from it, possibly wetting furniture or leading to fire or electric shock.
If the unit topples over, put it upright immediately.
Do not use the unit anywhere that chemicals are handled.
Volatile medicines or solvents (found in hospitals, factories, test labs, beauty salons, photo developing labs, etc.) may degrade mechanical parts, possibly causing water leaks that may resultantly wet furniture, etc.
Do not use powders such as cosmetics near to the unit.
Contact with powders may result in electric shock or damage.
Do not use the unit in cramped spaces such as closets.
Poor ventilation may lead to overheating and fire.
Do not expose plants or animals to direct air currents from the unit.
Overexposure to air currents may have adverse effects.
- Keep fish tanks, vases and other water containers away from the unit.
Water infiltration into the unit may lead to electric shock, fire or damage.
Do not climb, sit or lean on the unit. •
Falling or toppling over may lead to injury.
Do not remove the fi Iter with the unit lying on its side.
Handling of the sort facilitates dust infiltration, possibly leading to fire or electric shock.
Also, water may spill from the unit, possibly leading to damage
- Do not remove the float or Styrofoam from the float.
This will disable humidifi cation
- Do not remove the silver ion cartridge.
This will disable the antibacterial, anti-mildew and slime prevention effects.
- Regularly ventilate the room when using the unit in conjunction with combustion appliances.
Inadequate ventilation may lead to CO poisoning.
This product does not remove CO.
- Change the water in the tank for flesh tap water every day when humidifying and periodically clean inside the unit (humidifying tray, humidifying fi liter) to always keep it clean.
Failure to clean the unit may lead to mildew and bacteria proliferation because of grime and scale, and resultantly foul odors. Depending on their physical condition, some persons may be hypersensitive and their health jeopardised as a result.
• In such case, contact a doctor.
- Before moving the unit, stop operation and discard the water from the water tank and humidifying tray.
Leaks or spills from the water tank or humidifying tray may wet furniture or lead to electric shock or current leaks.
- This appliance is not intended to be used by persons with reduced physical, sensory or mental capabilities, or with lack of operation knowledge, unless they have been given supervision or instruction concerning the appliance use by person responsible for their safety. Keep out of children's reach to ensure that they do not play with the appliance.
- Unplug the unit during filling and cleaning.
Handling with the unit plugged in may lead to electric shock or damage.

CAUTION
Other

If used where pets are kept, be careful that pets do not urinate on the • unit or bite the power supply cord.
This may lead to electric shock or fire. In the event of abuse by pets, stop operation, unplug the power supply cord and contact the service shop.
Do not use combustion appliances where directly exposed to air currents from the air outlet.
Incomplete combustion of the combustion appliance may lead to CO poisoning, etc.
Before using indoor fumigating insecticides, stop operation to prevent chemicals from being sucked into the unit.
Because chemicals accumulate inside the unit, some persons may, depending on their physical condition, be hypersensitive and have their health jeopardised as a result.
Precautions in use
Keep TVs, radios, stereos, radio clocks and antenna wires at least 2m from the unit.
Interference may affect images and audio. The same applies to cordless phones, wireless microphones and other devices that emit weak electric waves. (However, audio interference may occur even beyond 2m depending on the strength of the electric waves. Reception is particularly hindered when using indoor antennas, therefore distance antennas far enough away to prevent noise from being picked up.)
Do not use the unit in the place of kitchen fans or stove hoods.
This kind of use will shorten the service-life of the pre-filter and pleated filter, possibly leading to damage.
Do not use the unit to preserve artwork, academic materials, etc., or for commercial or other special applications.
This kind of use may degrade the quality of preserved objects.
Correctly attach parts after cleaning the unit.
Using the unit with parts such as filters removed may lead to damage.
Use only tap water.
In general, tap water is chlorinated, which prevents bacteria from proliferating.
Do not add the below liquids to the water tank.
Hot water of 40^ C or more, aromatic oils, chemicals, dirty water, water containing fragrances or solvents, etc.
Liquids of the sort may deform or damage the unit.
Purified water, alkaline ion water, mineral water, well water, etc.
These types of water may lead to bacterial proliferation.
Do not overhumidify the room. •
Overhumidification may lead to condensation and mildew in the room.
Periodically clean the unit. •
Clean the unit as explained in "CARE and CLEANING". ▶Page 27-38.
Excessive dirt may lead to mildew, foul odors or lost humidification capacity.
- Be careful of freezing.
Discard water from the water tank and humidifying tray if freezing is suspected.
Using the unit when water is frozen may lead to damage.
- Discard water from the unit when the unit is not being used.
If not using the unit, discard the water from the water tank and humidifying tray.
Grime and scale may cause mildew and bacteria, possibly leading to foul odors.
This product does not remove the harmful substances (CO, etc.) in cigarette smoke.
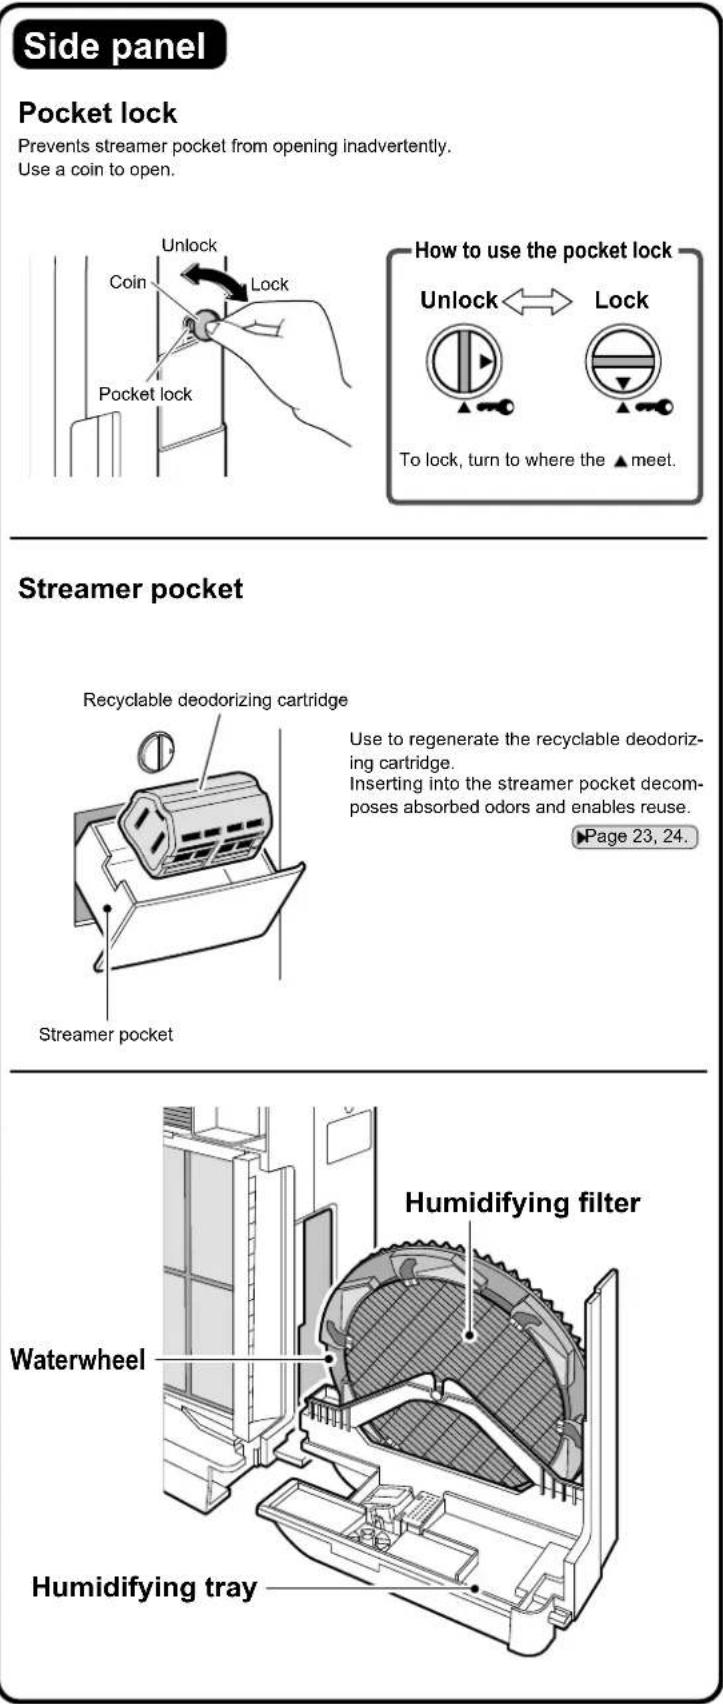
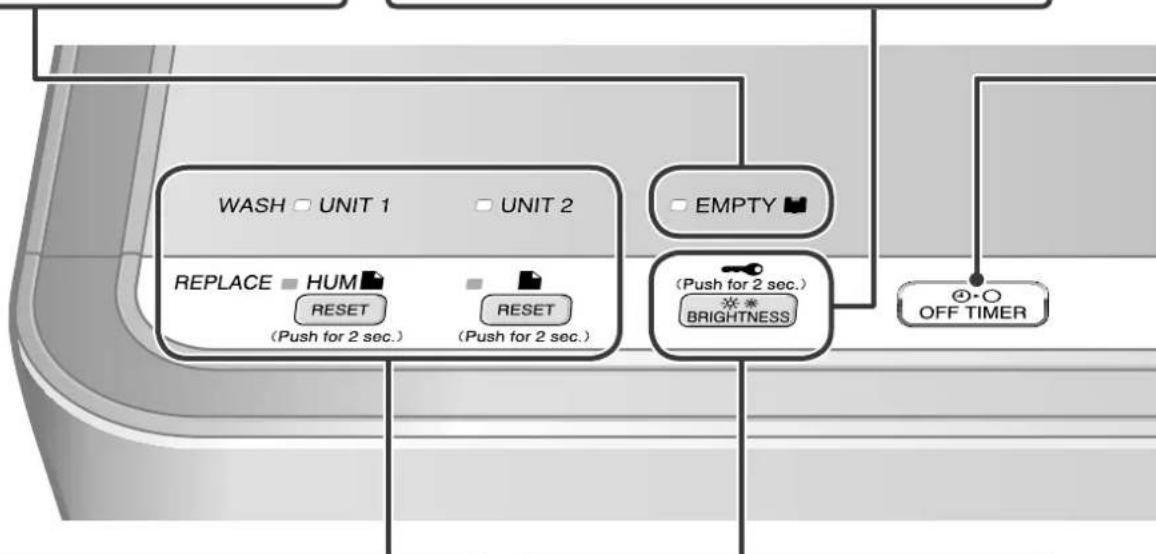
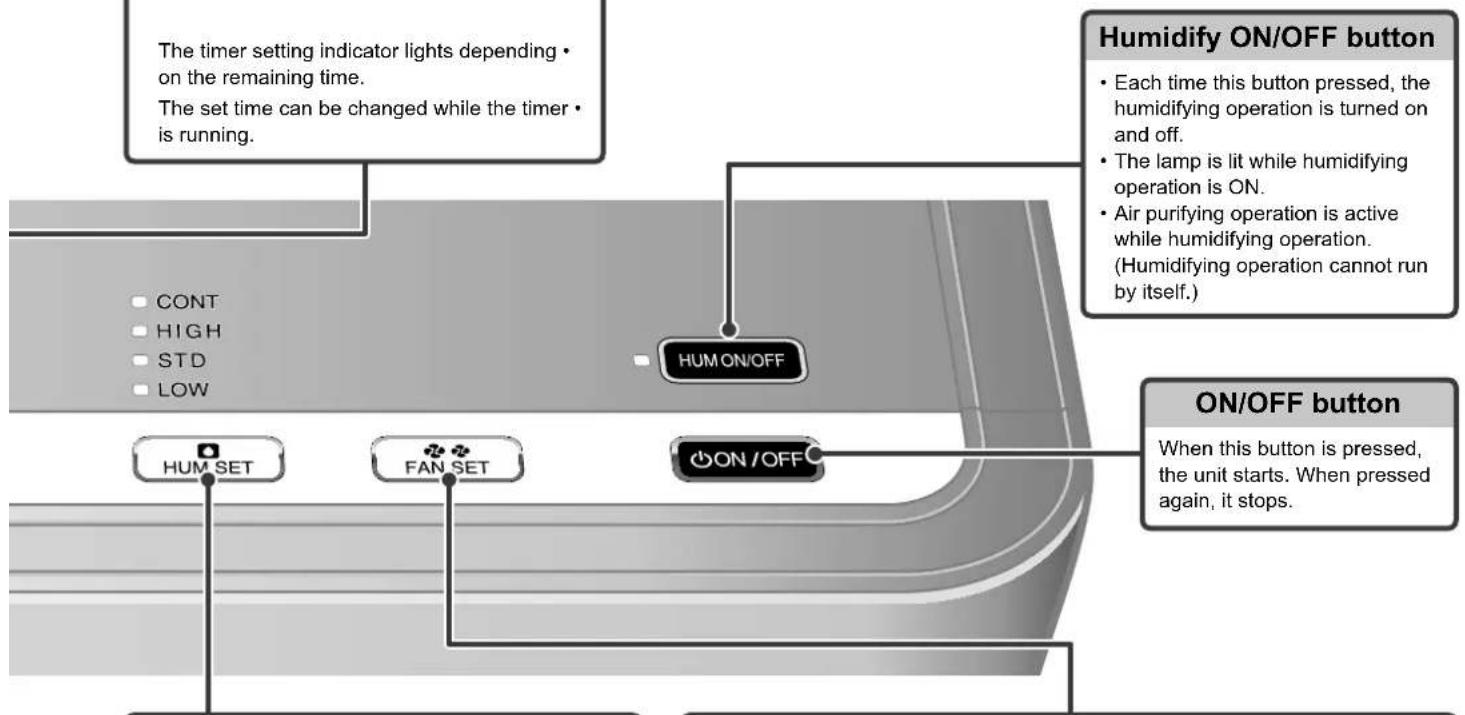
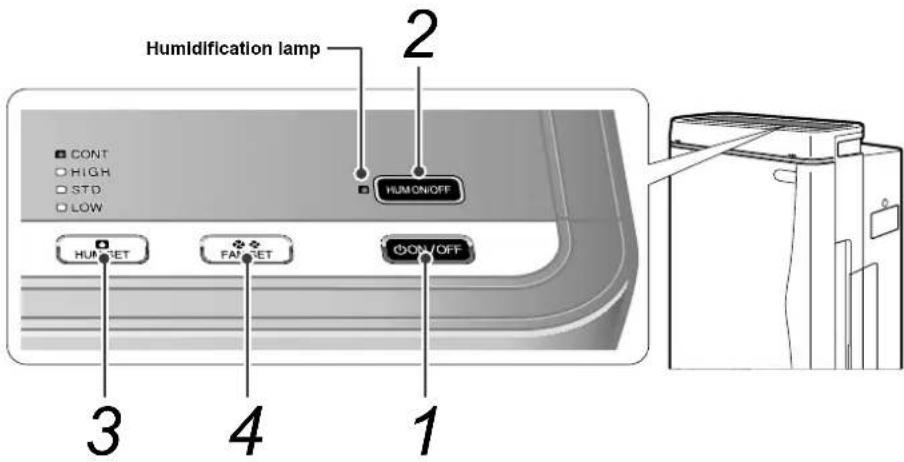
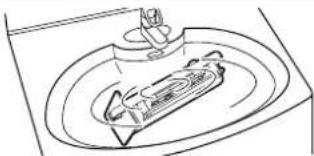
Names and Operation of Each Parts
Main unit
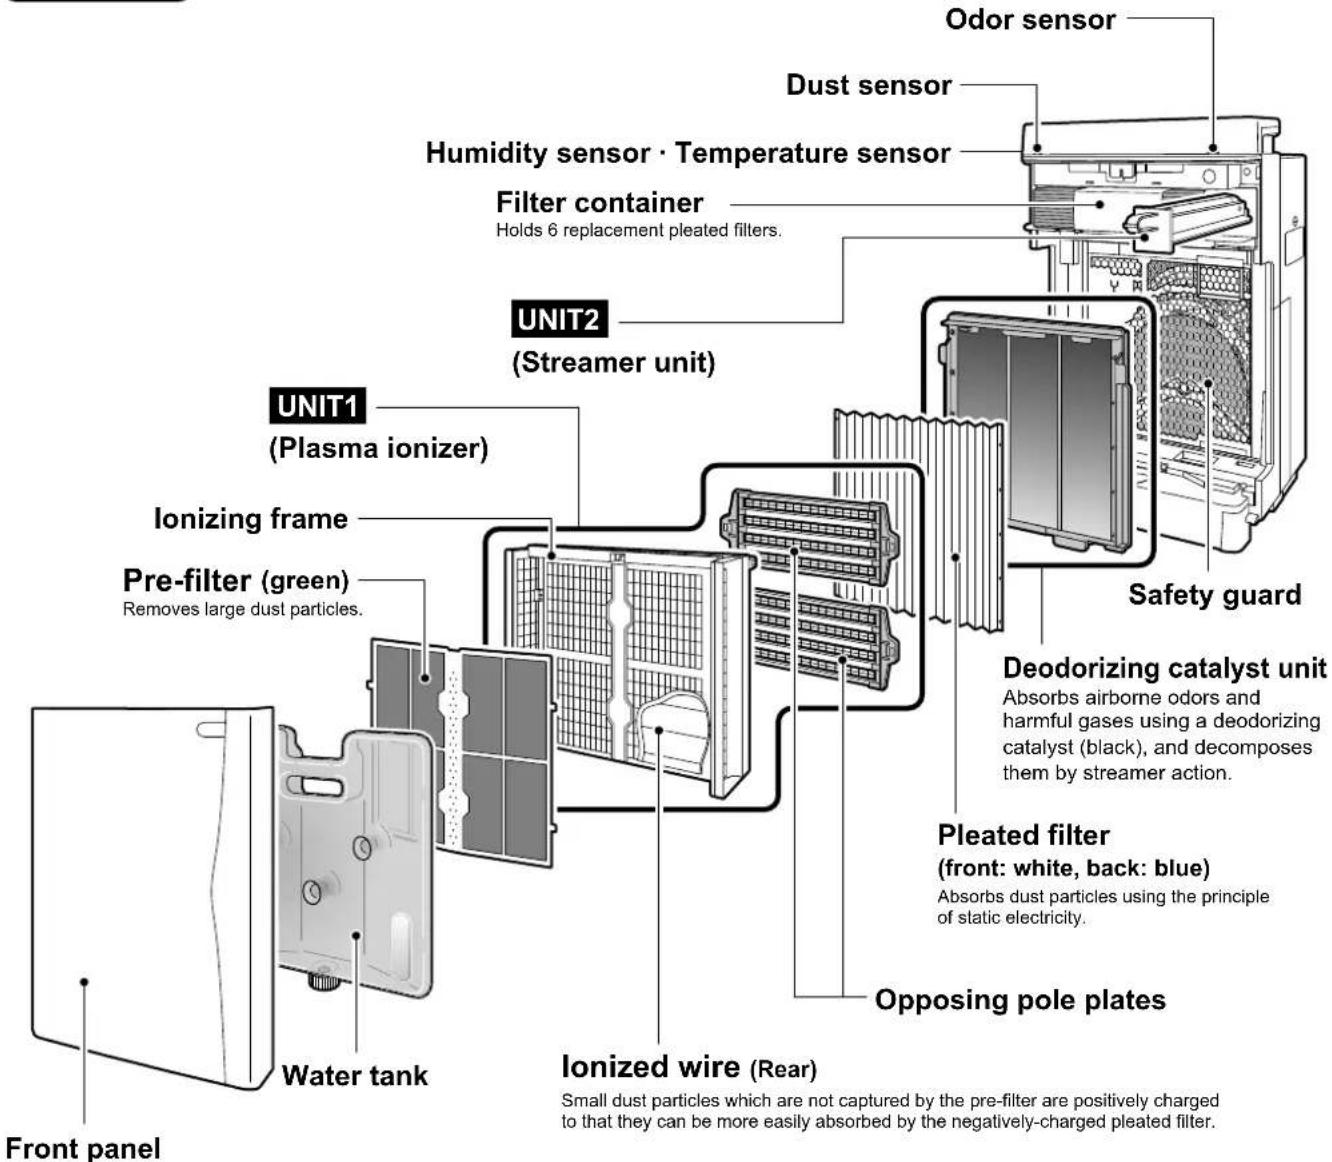

Names and Operation of Each Parts
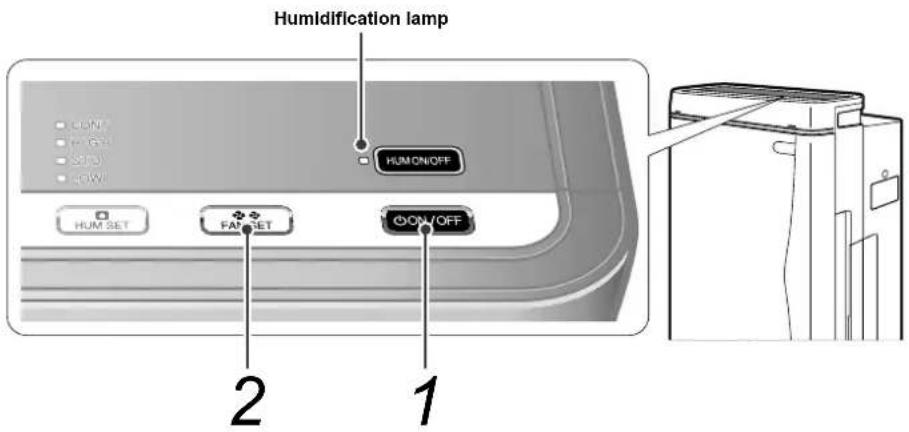
Operating panel

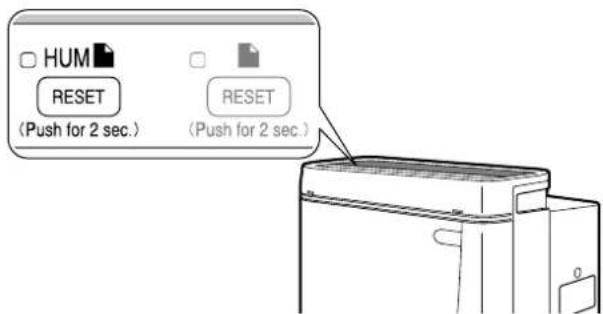
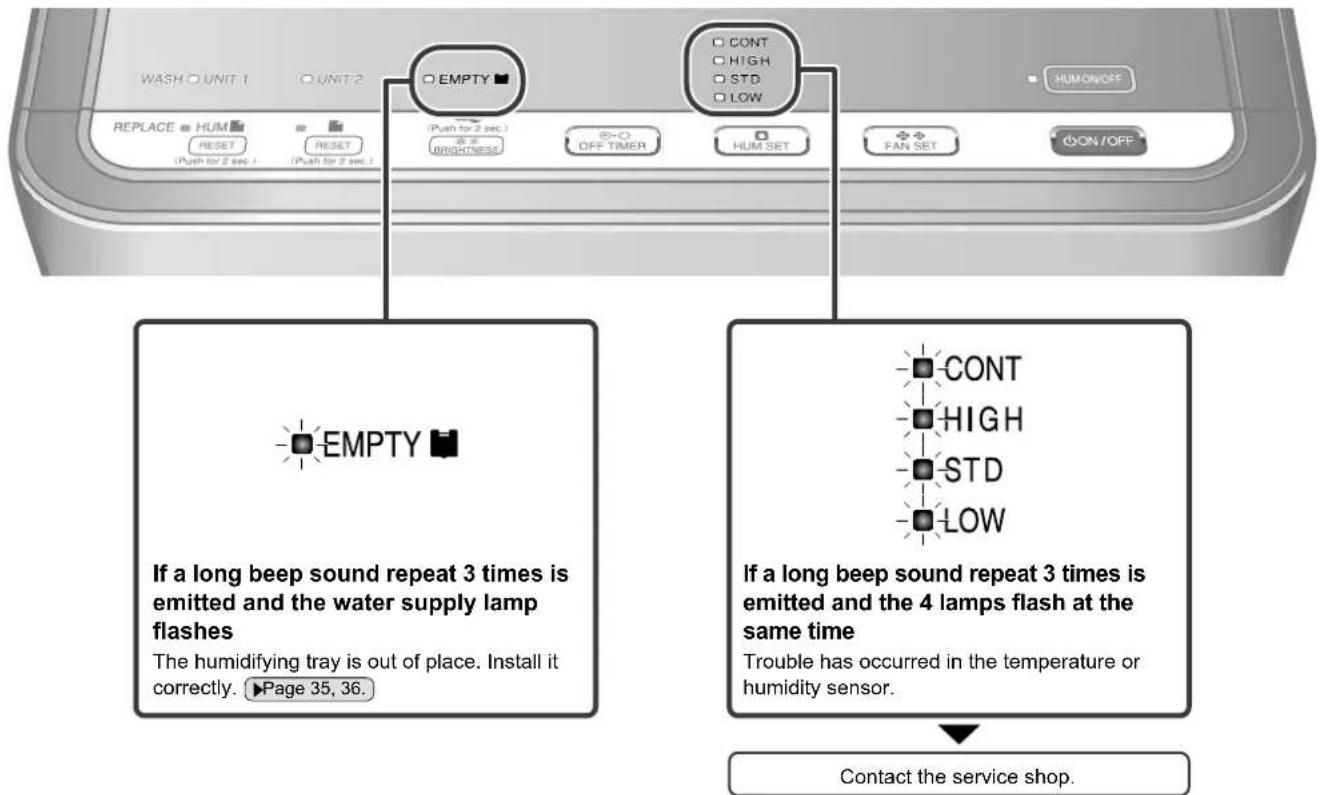
Water supply lamp
- If the water tank becomes empty during humidifying operation, a long beep sound repeat 3 times and this lamp lights.
Humidifying operation stops.
(Air purifying operation continues while the humidify lamp is lit.)
To resume humidifying operation, add water to the water tank, restore the water tank and press ON/OFF.
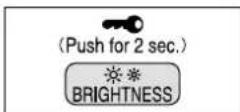
Brightness adjustment
Use to set lamp brightness for sleeping or as you prefer.
Each time the button is pressed, the brightness of the operating panel lamps and front indicator lamps change as follows. ▶Page 13.


- Only the front indicator lamps go completely off.
flowchart
graph TD
    A["WASH □ UNIT 1"] --> B["REPLACE HUM RESET"]
    C["UNIT 2"] --> D["RESET (Push for 2 sec.)"]
    E["EMPTY"] --> F["(Push for 2 sec.) BRIGHTNESS"]
    G["OFF TIMER"] --> H["OK"]
    style A fill:#f9f,stroke:#333
    style C fill:#f9f,stroke:#333
    style E fill:#f9f,stroke:#333
    style G fill:#ccf,stroke:#333
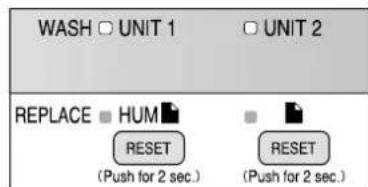
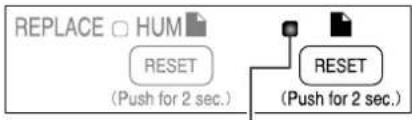
Humidifying fi Iter lamp (HUM)
- This lamp lights when it is time to replace the humidifying filter. It flashes if more time passes without changing the filter. ▶Page 37.
After replacing the fi Iter, press and hold for about 2 seconds.
(A short beep sound is emitted and the lamps go out.)
Air-purifying fi Iter lamp (■)
- This lamp lights when it is time to replace the pleated filter. It flashes if more time passes without changing the filter. ▶Page 30.
After replacing the filter, press and hold for about 2 seconds.
(A short beep sound is emitted and the lamps go out.)
UNIT lamp
UNIT1→This lamp lights when it is time to clean the plasma ionizer.
UNIT2→This lamp lights when it is time to clean the streamer unit.
Page 33, 34.
Child proof lock
Press and hold BRIGHTNESS for about 2 seconds to engage the child proof lock.
(Do the same to cancel the setting.) When engaged, the child proof lock restricts unit operation so that it is not inadvertently operated by children.
ATTENTION
- The recyclable deodorizing cartridge can be regenerated even while the child proof lock is engaged.
- If the front panel is removed while the child proof lock is engaged, the unit stops for safety reasons and the child proof lock is canceled.
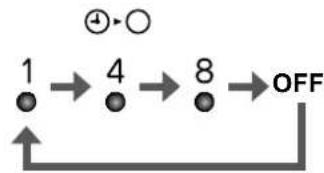
OFF TIMER button
Each time pressing this button, the OFF time changes as follows.
flowchart
graph TD
    A["1"] --> B["4"]
    B --> C["8"]
    C --> D["OFF"]
    D --> E["↑"]
    style A fill:#fff,stroke:#000
    style B fill:#fff,stroke:#000
    style C fill:#fff,stroke:#000
    style D fill:#fff,stroke:#000
    note right of A: ⊕→○
    note right of D: OFF
The timer setting indicator lights depending • on the remaining time.
The set time can be changed while the timer is running.
ATTENTION
- The operating panel is covered in a protective sheet to protect against scratching. Peel the sheet off before use.
- If the front panel is opened during operation, the unit stops for safety reasons.
■ If the unit malfunctions during operation
During operation, if the indicator lamps light erroneously or the unit cannot be operated because of lightning or other reason, unplug the power supply cord, wait at least 3 seconds, plug the power supply cord back in and start the unit.
flowchart
graph TD
    A["The timer setting indicator lights depending on the remaining time.<br>The set time can be changed while the timer is running."] --> B["HUM ON/OFF"]
    C["Humidify ON/OFF button"] --> D["Each time this button pressed, the humidifying operation is turned on and off.<br>The lamp is lit while humidifying operation is ON.<br>Air purifying operation is active while humidifying operation. (Humidifying operation cannot run by itself.)"]
    E["ON/OFF button"] --> F["When this button is pressed, the unit starts. When pressed again, it stops."] --> G["ON/OFF SET"]
    H["HUM SET"] --> I["FAN SET"]
    I --> J["ON/OFF"]
    style A fill:#f9f,stroke:#333
    style C fill:#f9f,stroke:#333
    style E fill:#f9f,stroke:#333
    style F fill:#ccf,stroke:#333
    style G fill:#cfc,stroke:#333
    style H fill:#fcc,stroke:#333
    style I fill:#cff,stroke:#333
    style J fill:#ffc,stroke:#333
Humidify setting button
Each time pressing this button, the humidify setting changes as follows.
Page 20.
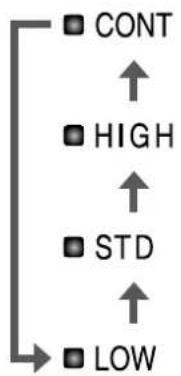
flowchart
graph TD
    A["CONT"] --> B["HIGH"]
    B --> C["STD"]
    C --> D["LOW"]
The humidify setting cannot be changed when • humidifying operation is OFF.
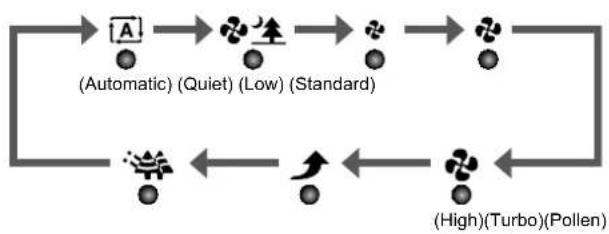
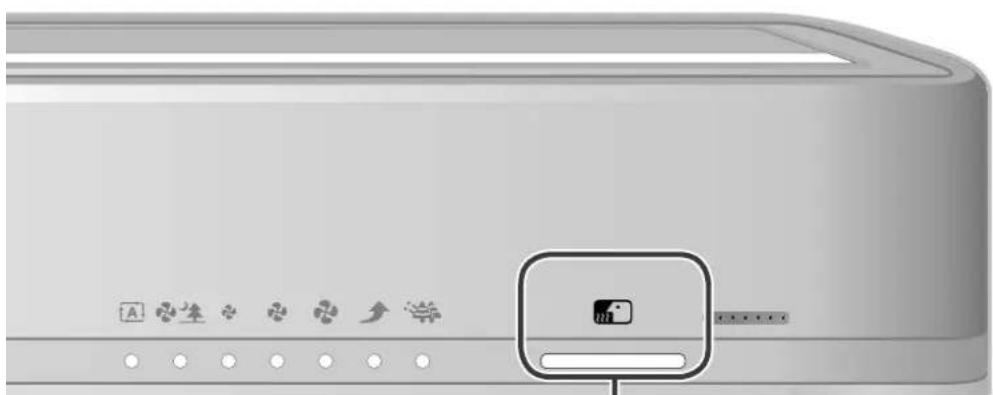
Fan setting button
Each time pressing this button, the airflow rate setting changes as follows. ▶Page 19.
flowchart
graph LR
    A["A"] --> B["Lightbulb"]
    B --> C["Lightbulb (Standard)"]
    C --> D["Lightbulb (Low)"]
    D --> E["Lightbulb (Automatic)"]
    E --> F["Lightbulb (High) (Turbo) (Pollen)"]
    F --> G["Lightbulb (Low) (Low)"]
    G --> H["Lightbulb (Standard)"]
    H --> I["Lightbulb (High) (Turbo) (Pollen)"]
    I --> J["Lightbulb (Low) (Low)"]
    J --> K["Lightbulb (Standard)"]
    K --> L["Lightbulb (High) (Turbo) (Pollen)"]
    L --> M["Lightbulb (Low) (Low)"]
    M --> N["Lightbulb (Standard)"]
    N --> O["Lightbulb (High) (Turbo) (Pollen)"]
    O --> P["Lightbulb (Low) (Low)"]
    P --> Q["Lightbulb (Standard)"]
    Q --> R["Lightbulb (High) (Turbo) (Pollen)"]
    R --> S["Lightbulb (Low) (Low)"]
    S --> T["Lightbulb (Standard)"]
    T --> U["Lightbulb (High) (Turbo) (Pollen)"]
    U --> V["Lightbulb (Low) (Low)"]
    V --> W["Lightbulb (Standard)"]
    W --> X["Lightbulb (High) (Turbo) (Pollen)"]
    X --> Y["Lightbulb (Low) (Low)"]
    Y --> Z["Lightbulb (Standard)"]
- “A” and “♣生”, “♣”, “♣” or “♣” will be lit simultaneously while in auto mode.
- The fan will be set to auto mode if the HIGH, STD, or LOW humidify setting is selected while in humidifying operation.
Names and Operation of Each Parts
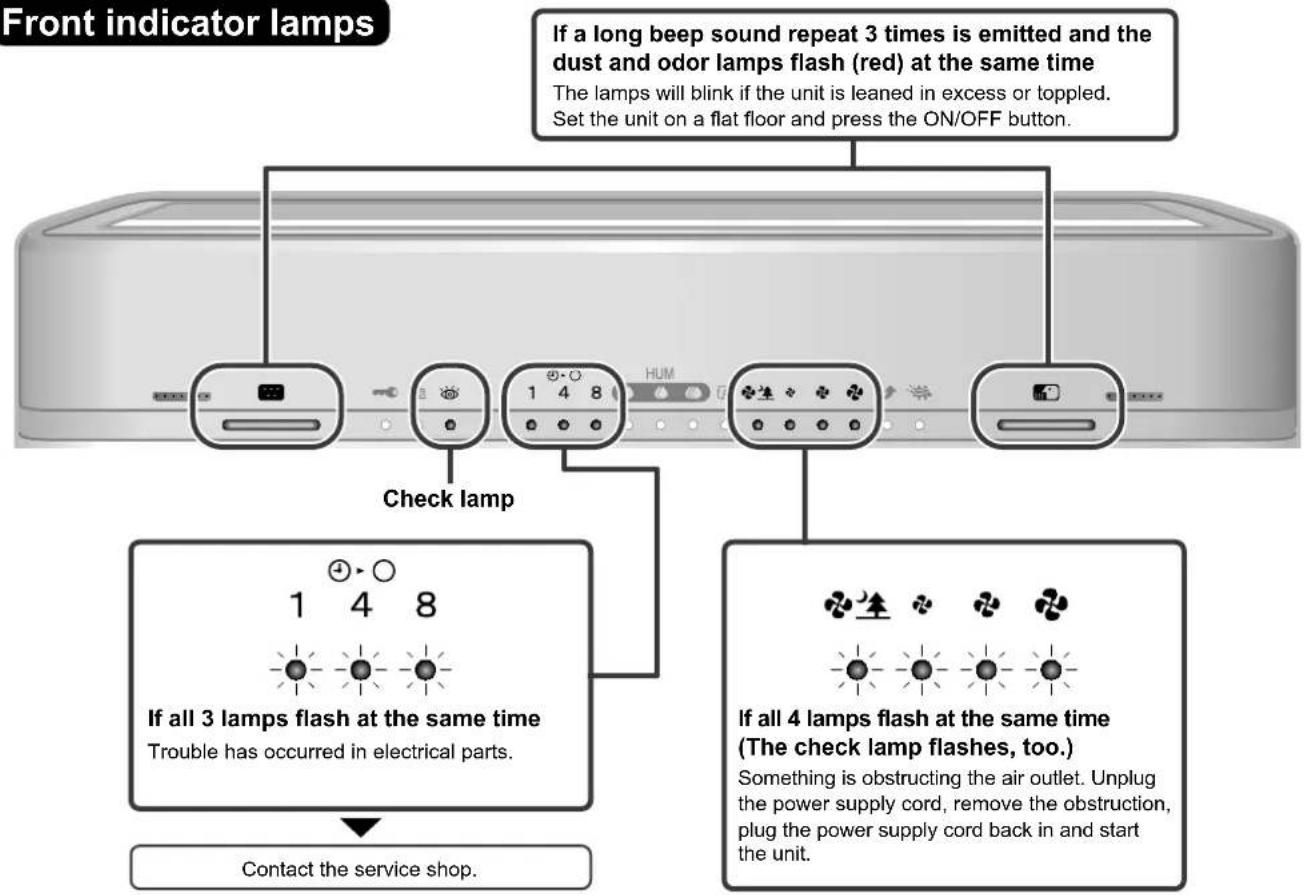
Front indicator lamps
The readings of room hygrometers and the unit's humidity indicator lamp may differ.
This is because air currents cause temperature and humidity drifts even in the same room.
Consider the humidity indicator lamp as just a reference reading.
Child proof lock lamp
This lamp is lit while the child proof lock is engaged. • If other buttons are pressed while the lamp is lit, a short beep sound repeat 3 times and button operations are ignored.
Regeneration lamp
This lamp is lit while the recyclable deodorizing cartridge is being regenerated in the streamer pocket.
Regeneration takes 8 hours.
Recyclable deodorizing cartridge regeneration is started and stopped by opening and closing the streamer pocket.
Page 24.
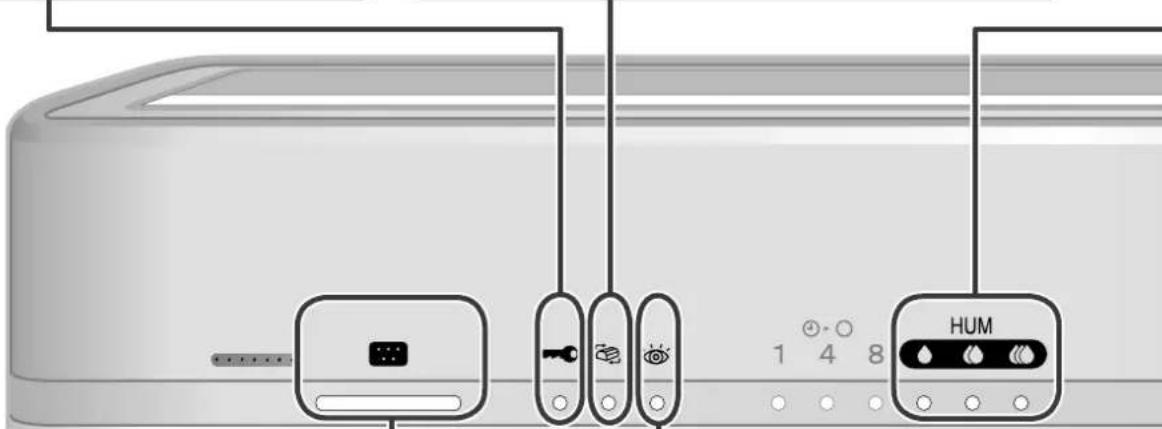
Dust sensor lamp
Dust sensor detects the dirty state of the air. The level of dirt is indicated by dust sensor lamp on 3 colors: green, orange and red.
When the lamp is lit on green, the air is clean.

In the following cases, the lamp is lit on green for the initial 2 seconds regardless how clean the air is.
Operation directly after setting the front panel. (1)
Operation directly after setting the power plug. (2)
■ If the dust sensor reaction is dull, adjust the sensitivity setting. ▶Page 13.
Sensor types and performance
| Dust sensor | Detectable | Cigarette smoke, pollen, mites, house dust, shed pet fur, diesel soot |
| Sometimes detectable | Steam, oil vapors |
Check lamp
This lamp lights to notify users that it is time to replacement or care. Check the operating panel for the area requiring attention.
(Any of the humidifying fi Iter lamp, Air-purifying fi Iter lamp, UNIT1/2 lamps, or water supply lamp will light or flash together with the check lamp.) ▶Page 25.
Humidity indicator lamp
(For reference only)
This lamp indicates the room humidity detected by humidity sensor.
◆ :Humidity: 40% or less
:Humidity: Approx. 50%
:Humidity: 60% or more
In case running the unit just to air purifying operation, the lamp also indicates the humidity level.
Odor sensor lamp
Odor sensor detects the changes in airborne odors. The level of odors is indicated by odor sensor lamp on 3 colors: green, orange and red.
When the lamp is lit on green, the air is clean.

In the following cases, the lamp is lit on green for the initial 1 minute. This state is regarded as the sensitivity reference value of the odor sensor.
Operation directly after setting the front panel. (1) Operation directly after setting the power plug. (2) In case the operation is started again. (3)
■ If the odor level remains constant without intensifying or weakening, the sensor may not detect even strong odors.
■ The odor sensor may not detect the type of odors other than ammonia, such as pet odors, garlic, etc.
■ Different people have different sensitivity to odors so you might notice an odor even though the lamp is green. If bothered by odors, set manual airflow control and run the unit at a higher airflow rate.
Sensor types and performance
| Odor sensor | Detectable | Cigarette odors, cooking odors, pet and toilet odors, raw waste odors, mildew odors, sprays, alcohol |
| Sometimes detectable | Sudden changes in temperature and humidity, odorless gases such as CO, steam, oil vapours, gas from combustion appliances |
Sensitivity Settings of the Dust Sensor
The setting of dust sensor sensitivity can be changed.
Operating panel
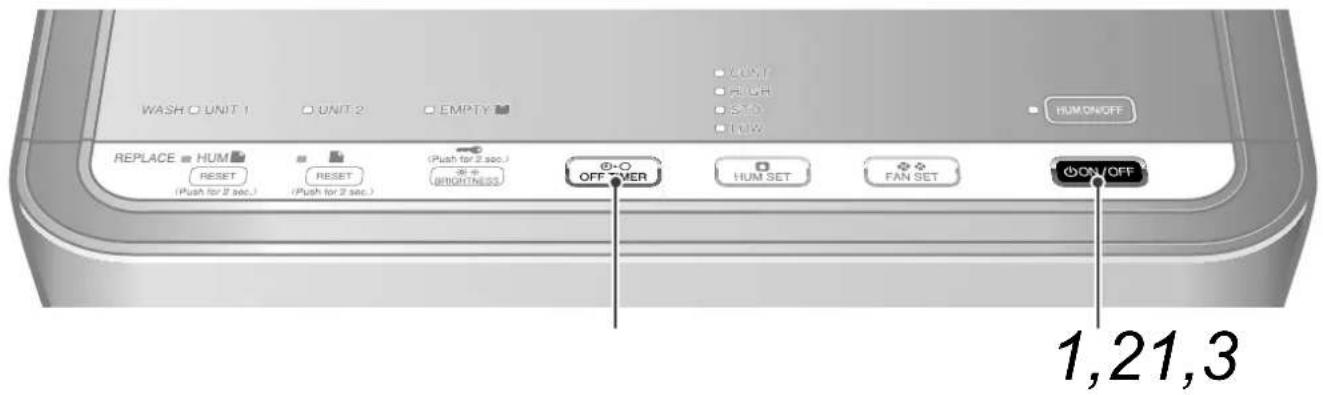
1 Press ON/OFF seconds. While holding down
- After a short beep sound is emitted and the airflow ("♣" (Low), "♣" (Standard), "♣" (High)) lamps flash for about 5 seconds, the lamp corresponding to the current sensitivity setting lights.
2 Change the sensitivity setting from ON/OFF • Each time the button is pressed, the airflow lamps and the sensitiv
• Each time the button is pressed, the airflow lamps and the sensitivity change as below.
- The sensitivity setting is indicated by the airflow lamps.
If the airflow lamps do not change, unplug the power supply cord, wait at least 3 seconds, plug the power supply cord back in and try the operation again from the beginning.
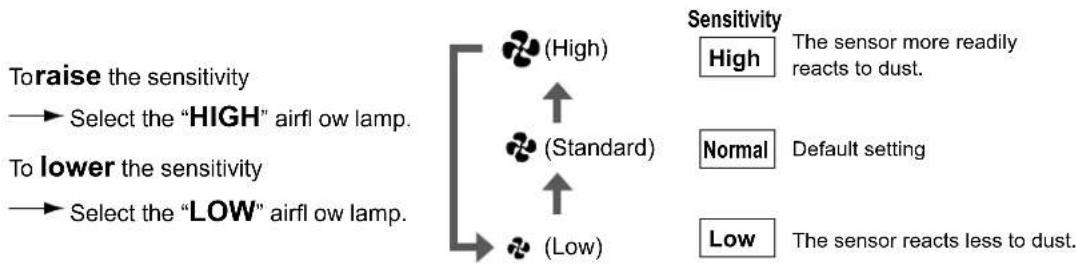
flowchart
graph TD
    A["Toraise the sensitivity"] --> B["Select the "HIGH" airflow lamp."]
    C["To lower the sensitivity"] --> D["Select the "LOW" airflow lamp."]
    E["(High)"] --> F["↑"]
    G["(Standard)"] --> H["↑"]
    I["(Low)"] --> J["↓"]
    K["Sensitivity"] --> L["High"] --> M["The sensor more readily reacts to dust."]
    N["Normal"] --> O["Default setting"]
    P["Low"] --> Q["The sensor reacts less to dust."]
3 After changing the setting, press OFF TIMER • A short beep sound is emitted and the lamp of the set sensitivity flashes.
4 Unplug the power supply cord, wait at least 3 seconds and plug the power supply cord back in. This completes the setting.
ATTENTION
- Dust sensor sensitivity can be set while the unit is running or stopped.
- If step 4 is not performed, the unit does not go back to the normal operating mode.
How to install
Set the unit in a preferred location.
Observe the following installation clearances to ensure unit performance.
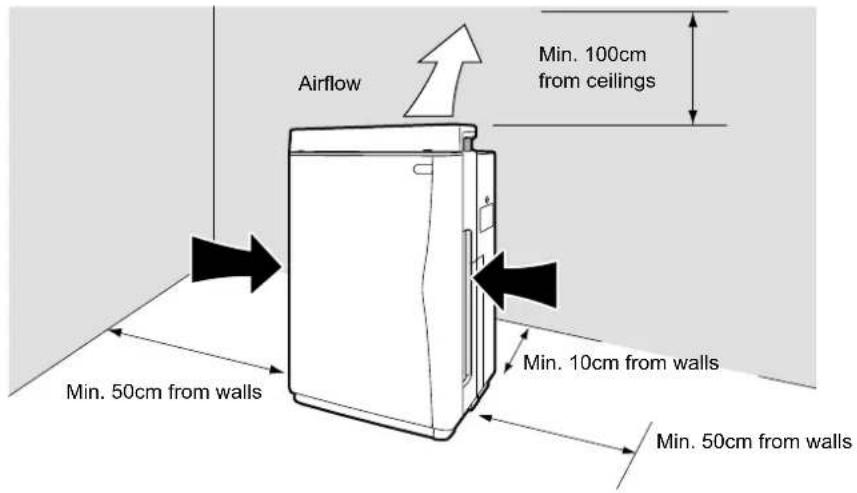
NOTE
Depending on the type of wall, the wall may dirty even at the above installation clearance. In such case, move the unit a safe distance away from the wall.
ATTENTION
Smart installation
Select a location that allows air to reach the entire room.
Air is blown slightly to the right, but nothing is wrong with the unit.
- Set the unit on a stable floor. Unless the floor is stable, the unit may vibrate excessively.
Do not use the unit in the following places.
■ In contact with walls, furniture, curtains, etc.
Contacted objects may stain or deform.
■ On thick pile carpets or bedding
The unit may tilt, possibly spilling water or preventing the water level sensor from working correctly.
■ Exposed to direct sunlight or near to heaters
The unit may deform or discolor and the temperature and humidity sensors and safety devices may malfunction.
■ Exposed to outdoor air (i.e., by windows, etc.) or drafts from air conditioners, etc.
Room humidity may not be correctly indicated.
■ Near to curtains, bedding, etc.
The air inlets may be blocked, possibly leading to damage.
■ On inclined or unstable floors
The unit may fall or topple over in earthquakes or if contacted by someone. If installed on an inclined surface, a safety device may trip and stop the unit.
■ Exposed to electromagnetic waves such as near to microwave ovens, speakers, etc.
The unit may not work correctly.
Preparation of Remote Controller
Remote controller setup
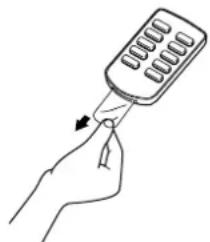
1 Remote controller preparations
Battery is already set in the remote controller.
To use the remote controller, pulling out the clear sheet from the battery cover.
natural_image
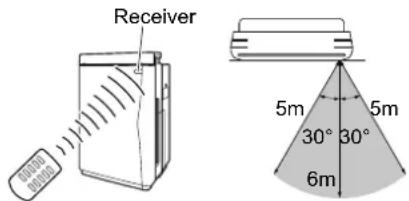
Line drawing of a hand holding a handheld device with a scroll wheel (no text or symbols)2 Using the remote controller Point the transmitter of the remote cont
Point the transmitter of the remote controller towards the receiver of the main unit. If an obstruction to the signal, such as a curtain, exists, the remote controller will not operate.
The distance from which the remote controller can transmit is approximately 6m.
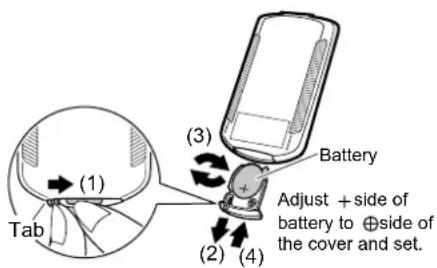
3 Battery replacement 1) Push the tab of the cover to
1) Push the tab of the cover toward the arrow.
2) Pull out the cover.
3) Replace the battery with CR2025 (lithium) battery.
(Be sure to set the battery with the + side of the cover as shown in the figure.)
4) Close the cover to its original position.
NOTE
Store the batteries where babies and children cannot reach them. ●
If, by chance, a battery is swallowed, be sure to contact a doctor immediately.
When discarding batteries, cover the terminals of the batteries with tape.
If mixed with other metal or batteries, heat, explosion or combustion may occur.
ATTENTION
Battery
The included coin type battery is prepared for initial use. ●
They will be consumed within 1 year from the manufacturing date of the air purifier.
- A replacement target is approximately 1 year but if the reception becomes difficult, replace the batteries with new coin type battery CR2025 (lithium).
Coin type battery close to the "recommended usage period" may need to be replaced soon.
- In order to prevent malfunctions or injuries due to leaking or explosions, be sure to remove the coin type battery when the unit will not be used for a long period of time.
Remote controller
Do not drop or place the remote controller in water.
(Damage may occur.)
Do not press the remote controller buttons with sharp objects.
(Damage may occur.)
- The signals may not be received well of electronic lighting style fluorescent lamps (such as inverter fluorescent lamps) are in the same room. For these cases, consult your dealer.
- If other electrical device operate by the remote controller, either separate them from the remote controller or consult your dealer.
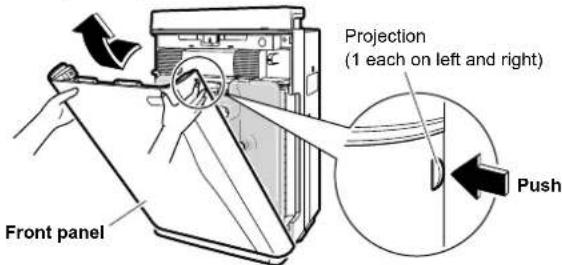
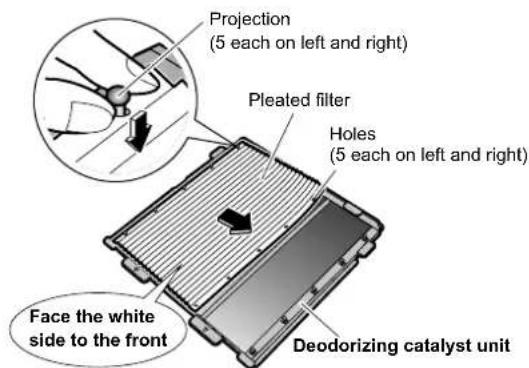
Attach the pleated fi Iter
Be sure to attach the pleated fi Iter before starting the unit.
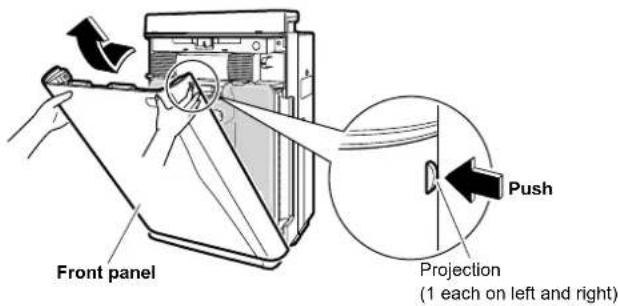
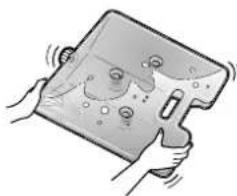
1 Remove the front panel. Push the 2 projections (left and right)
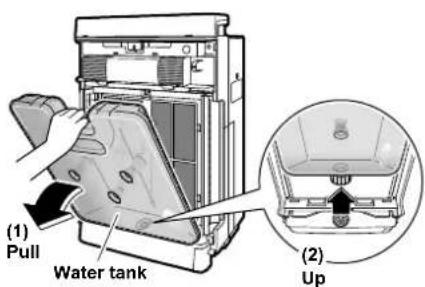
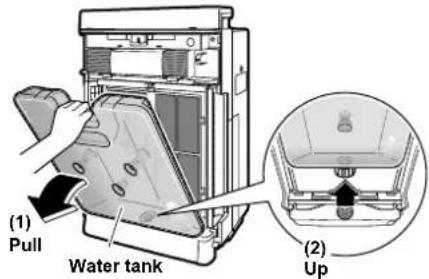
2 Remove the water tank. Holding the water tank by the hand upwards and out of the unit
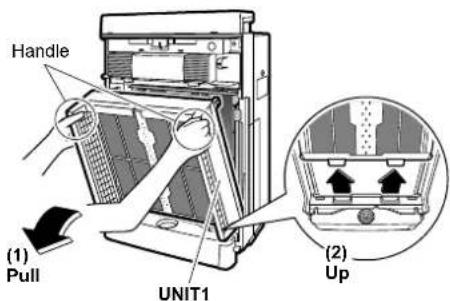
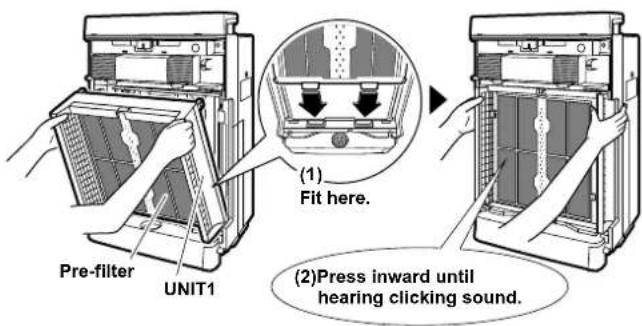
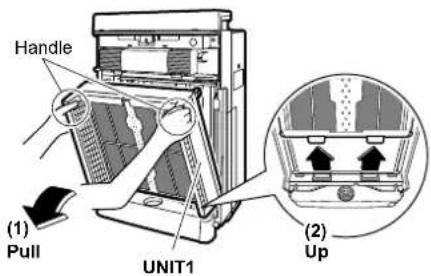
3 Remove the UNIT1. Holding the UNIT1 by the h and out of the unit
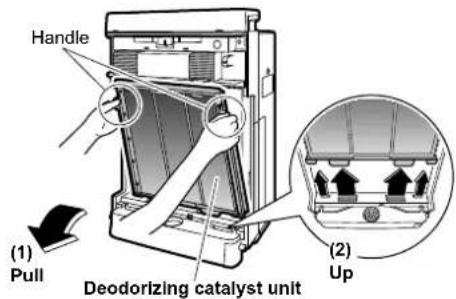
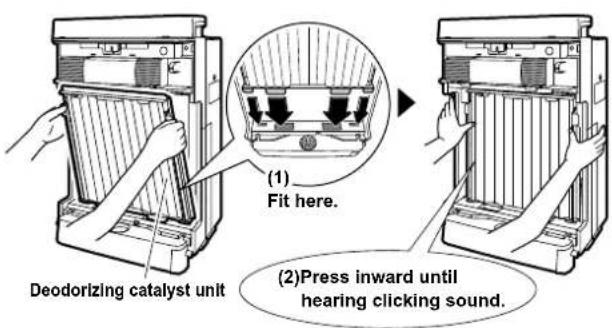
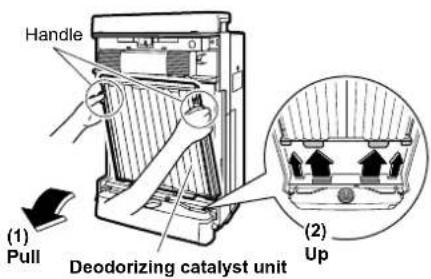
4 Remove the deodorizing catalyst unit.
Holding the deodorizing catalyst unit by the handle, pull the deodorizing catalyst unit upwards and out of the unit.
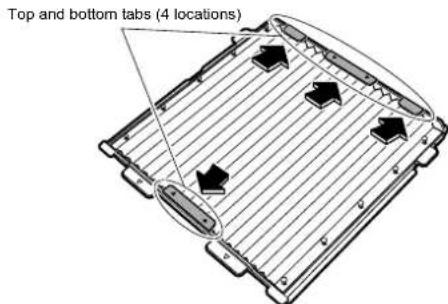
5 Attach the pleated fi Iter.
Attach the pleated filter with the white side facing to the front.
Fit the projections (5 locations) on the left and right faces of the deodorizing catalyst unit into the holes (5 locations) on the left and right of the pleated filter.

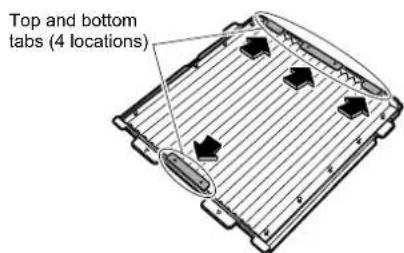
Insert the pleated filter underneath the tabs (4 locations) at the top and bottom of the deodorizing catalyst unit.
NOTE
Always run the unit with both a pre-fi iter (green) and pleated fi iter (front: white, back: blue). Running the unit without both fi liters may lead to damage.
- Unit performance drops if the pleated filter is attached backwards.
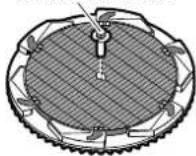
Water Tank Preparations
Water tank preparations
Air purifying operation can be operated even without water in the tank.
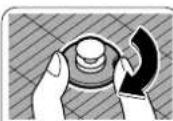
1 Open the cap on the water tank. Cap
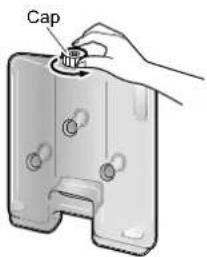
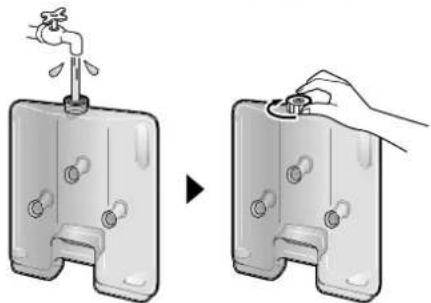
2 Add water to the tank and close the cap. Use only tap water.
Add water somewhere that can be wet if spilled.
Before adding the actual water to use in humidifi cation, add a small amount of water to the tank, shake to rinse internally and discard the water. Refer to water tank cleaning. ▶Page 28.
natural_image
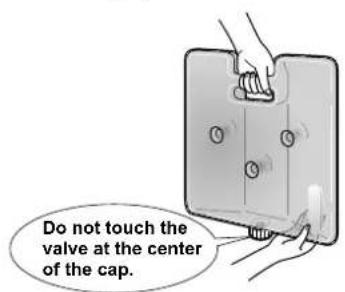
Illustration of a water dispenser being inserted into a container, showing the handle and valve (no text or symbols present)Close the water tank cap tightly. Unless tight, water may leak.
Hold a full water tank by the handle to carry. Do not touch the valve at the center of the cap. Water may spill from the tank.
NOTE
Do not add the following to the water tank.
- Hot water of 40^ or more, aromatic oils, chemicals, dirty water, water containing fragrances or solvents, etc. Liquids of the sort may deform or damage the unit.
- Purified water, alkaline ion water, mineral water, well water, etc. These types of water may lead to mildew or bacterial proliferation.
After attaching the fi Iter
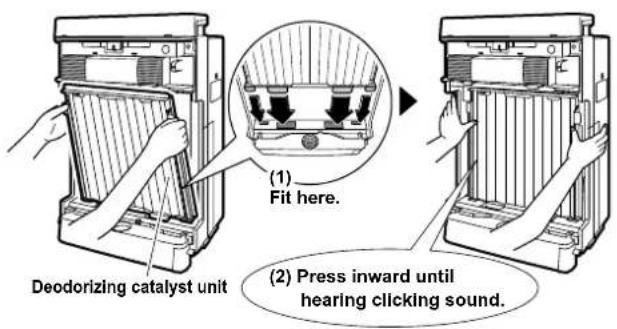
1 Restore the deodorizing catalyst unit.
- Holding the deodorizing catalyst unit by the handle, fit the projections on the unit into the grooves (4 locations) at the bottom of the main unit and press the deodorizing catalyst unit into the main unit.
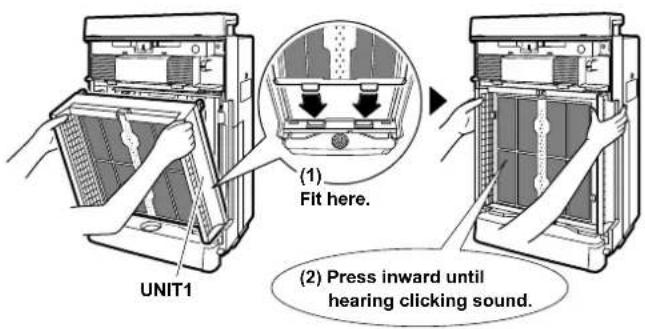
Restore the UNIT1.
Holding UNIT1 by the handle, fit the projections on the unit • into the grooves (2 locations) at the bottom of the main unit, and press UNIT1 into the main unit.
Restore the water tank.
Holding the water tank by the handle, fi t the tank into the • hole at the bottom of the main unit, and press the tank into the main unit.

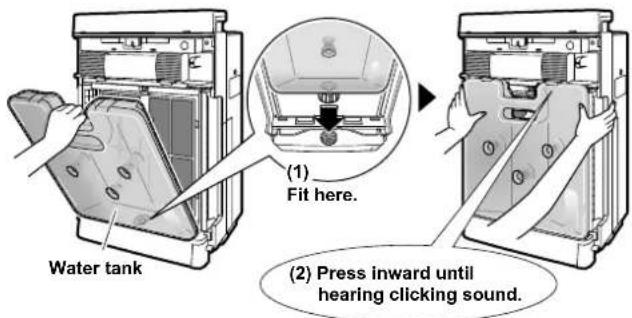
4 Restore the front panel.
Fit the tabs (2 locations) at the bottom of the panel into the grooves at the bottom of the main unit, and close the panel.
![[View from above] (1) Fit here. Bottom grooves (2 locations) Front panel (2)Press inward until hearing clicking sound.](/content/2026/05/811618/images/f0610466024ca404dfe71b90f4b89d8defc38dbf666d3b6df3c024246cca8d7f.jpg)
To correctly restore the front panel, press the front panel until hearing the clicking sound from the left and right sides. Unless properly installed, a safety switch may trip and prevent the unit from starting. Page 27.
NOTE
- Always run the unit with both a pre-filter (green) and pleated filter (front: white, back: blue).
Running the unit without both filters may lead to damage.
Air Purifying Operation
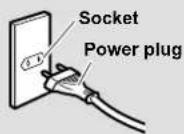
■ Plug the power supply cord into an electrical socket.
NOTE
- Do not insert or remove the power plug to turn the unit on/off. Abusive handling may lead to electric shock or fire because of overheating.
1
Press
ON/OFF
- If humidification was run the last time that the unit was used, humidification starts automatically, therefore press HUMON/OFF to turn OFF the humidifi cation lamp.
2
Press to change the airflow rate.
• Each time the button is pressed, the airflow rate changes as follows.

flowchart
graph LR
    A["(Automatic) (Quiet) (Low) (Standard) (High)"] --> B["(Turbo)"]
    B --> C["(Pollen)"]
    C --> D["Out"]
    D --> E["Out"]

Airflow rate ((Quiet) (Low) (Standard) (High)) is automatically adjusted according to the dirty state of the air.

Air flows at a super slow rate. This mode is recommended when sleeping.
Turbo modeA
This is the high airflow rate mode that quickly removes airborne dust.

The airflow rate is changed every 5 minutes to create gentle air currents so as to catch the pollen before settling on the floor.
ATTENTION
- The default settings are air purifying operation and "auto" airflow rate control. If the power supply cord is unplugged or if the front panel was opened and the unit restarted, the next time that the unit is used, it runs at the last used settings.
Humidify and Air Purifying Operations
- Do not move the unit while it is running. Displacements may cause water leaks, damage or malfunctions.
Air purifying operation is active while humidifying operation.
(Humidifi cation cannot run by itself.)
1
Press
ON/OFF
2
Press HUMON/OFF he humidifi cation lamp.
- If humidification was run the last time that the unit was used, the humidification lamp lights automatically.
3
Press to change the humidify setting.
Each time the button is pressed, the humidify setting changes as follows.

NOTE
Be sure to install the humidifying filter to run the unit.
4
Press to change the airflow rate.
• Each time the button is pressed, the airflow rate changes as follows.
- The fan will be set to auto mode if the HIGH, STD, or LOW humidity setting is selected while in humidifying operation. The airflow rate setting cannot be select.
- To set the airflow rate, set the humidify setting "CONT". Humidifying capacity increases alongside airflow rate.
- When set to "auto", airflow rate is automatically adjusted according to the dirty state of the air and humidity in the air.
ATTENTION
- As water is supplied from the water tank to the humidifying tray, the sound may be heard.
- If the set humidity is reached or the water supply lamp lights during humidification, humidification stops, but air purifying operation continues.
- Humidification rate varies according to the airflow rate setting.
How to Operate with Remote Controller
How to operate with remote controller
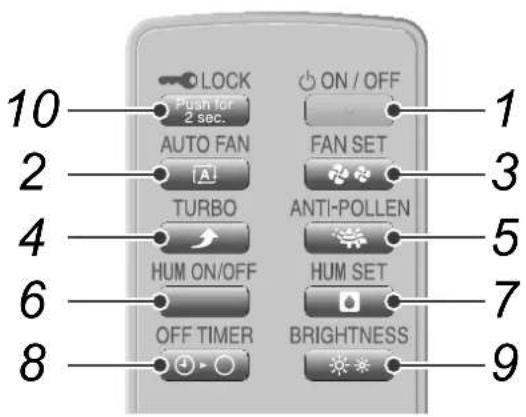
- ON/OFF button
- Auto fan button
- Fan setting button
- Turbo button
- Anti-pollen button
- Humidify ON/OFF button
- Humidify setting button
- OFF TIMER button
- Brightness adjustment button
- Child proof lock button
1 To start operation Press "ON/OFF".
Pressing again will stop.
2 To automatically switch the airflow rate Press "AUTO FAN".
- Automatically adjusts the airflow rate to “♣” (Quiet), “♣” (Low), “♣” (Standard), “♣” (High) in response to the quality of the air.
3 To manually switch the airflow rate Press "FAN SET".
• Each time it is pressed, the airflow rate switches as shown below allowing you to choose your desired flow.

flowchart
graph LR
    A["♣"] --> B["(Low)(Quiet) (Standard)"]
    B --> C["High"]
- The setting “♣♠” (Quiet) is a very low airflow rate and is convenient when sleeping.
- After setting “♣生” (Quiet), the power for cleaning the air decreases because of the operation at low airflow rate.
4 To clean the air quickly Press "TURBO".
- A high airflow rate will quickly remove any dirtiness in the air. This is convenient to use when cleaning.
5 To remove pollen Press "ANTI-POLLEN".
- Switching the airflow speed every 5 minutes between “♣” (Standard) and “♣” (Low) will catch pollen before they fall on the floor.
6 To switch the humidifying operation ON/OFF Press "HUM ON/OFF".
Each time it is pressed, the humidifying operation ON/OFF will switch.
When the humidifying operation ON/OFF is switched humidity indicator lamp indicate temporarily as shown below.
In case the humidifying operation is turned ON: the humidity indicator lamp will be changed and indicate the setting. In case the humidifying operation is turned OFF: the humidity indicator lamp will turn OFF for 2 seconds.
7 To change the humidify setting Press "HUM SET".
Each time it is pressed, the humidity indicator lamp indicate temporarily as shown below.

flowchart
graph LR
    A["STD"(Standard)"LOW"(Low)"HIGH"(High)"CONT"(Continuous)" --> B["↑"]
    B --> C["↓"]
    style A fill:#f9f,stroke:#333
    style B fill:#ccf,stroke:#333
8 To decide a time to stop operation Press "OFF TIMER".
• Each time it is pressed, the timer setting switches as shown below. The remaining time will be lit in the OFF timer lamp.

flowchart
graph LR
    A[""4"(4 hours)"1"(1 hour)"8"(8 hours) (Cancel)"] --> B
When the set time is reached, the operation will automatically stop.
- The set time can be changed if the button is pressed while the timer is operating.
9 To change the brightness of the operation panel lamps and front indicator lamps Press "BRIGHTNESS".
• Each time it is pressed, the display will switch as shown below.


flowchart
graph LR
    A["<Front indicator lamps>"] --> B["Bright"]
    B --> C["Dimmed"]
    C --> D["OFF"]
- Only the front indicator lamps go completely off.
10 To prevent incorrect operation Press “ ” for 2 seconds.
- Stops the function of the button other than the "LOCK" on the main unit and buttons on the remote controller.
- This makes it possible to prevent children from operating the unit incorrectly.
- To release the child proof lock settings, press "LOCK" again for 2 seconds.
- To release the child proof lock settings when the remote controller is not in your hand, press "Push for 2 sec." of the unit for 2 seconds.
NOTE
- The unit will not operate for 3 seconds after the front panel is set or power plug is inserted even though "ON/OFF" button on the remote controller is pressed.
- Operation will stop for safety when the front panel is opened during operation.
- When an incorrect operation is performed during operation.
If the main unit display is abnormally on or remote controller is disabled due to thunder or radio transmission during operation, pull the power plug and then re-insert it after 3 seconds.
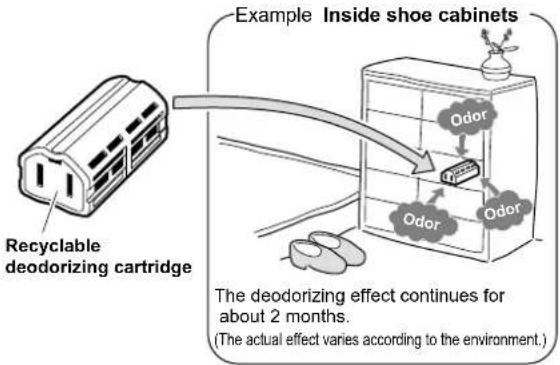
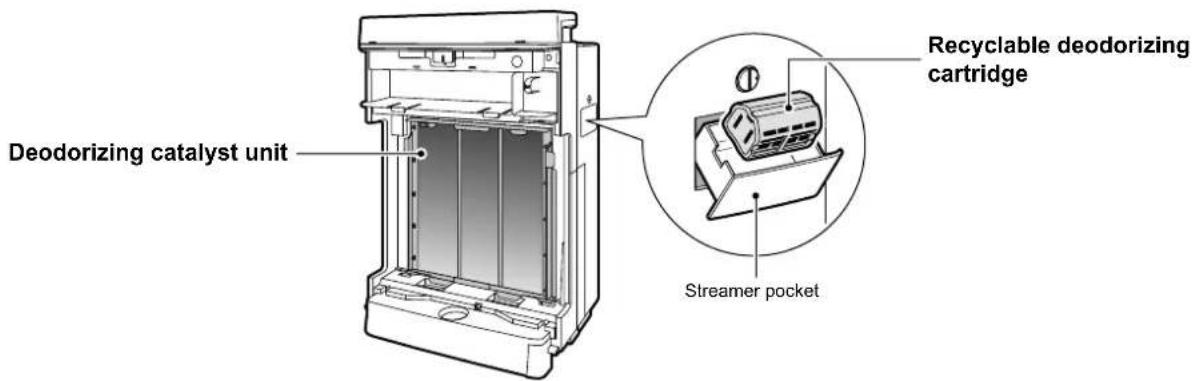
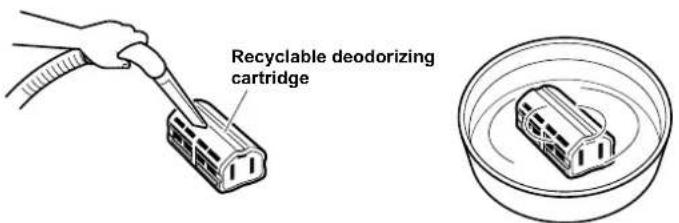
How to Use the Recyclable Deodorizing Cartridge
■ The recyclable deodorizing cartridge can be removed from the air purifier and used to deodorize remote locations.
Deodorizing capacity can be regenerated with the streamer pocket so as to use the cartridge time and time again.
Uses
The deodorizing cartridge can be used in the below places.
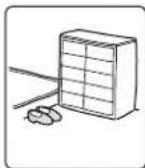
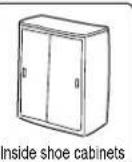
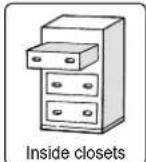
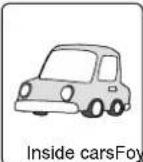
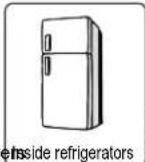
For refrigerator use only (The recyclable deodorizing cartridge cannot be used Inside freezers.)
- Do not use or store the recyclable deodorizing cartridge anywhere near to flames, exposed to direct sunlight or extremely hot or humid.
To use Inside refrigerators
Use 1 recyclable deodorizing cartridge per 450L of refrigerator.
For sanitary reasons, use the cartridge solely for the refrigerator.
Position the cartridge so as not to contact food.
Do not use the cartridge Inside freezers.
Condensation forms on the case if the cartridge is moved from cold places to warm places.
If condensation adheres to the cartridge, wipe up the water with a soft piece of cloth and dry the cartridge naturally.
To use Inside cars
Position the recyclable deodorizing cartridge so as not to obstruct the driver's vision.
Do not locate the cartridge under the driver's seat because it may obstruct pedal operations.
Do not locate the cartridge in hot places such as on the dashboard, because it may deform.
How to use
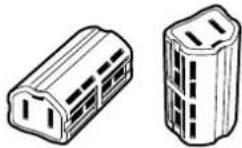
Take the recyclable deodorizing cartridge (1)(3) Set in a smelly place. out of the bag.
- Though it can be used as is, a better deodorizing effect is obtained if the cartridge is first regenerated before actual use.
Bag content: Deodorizing catalyst filter (1pc.)
Components: Photocatalyst (titanium apatite), activated charcoal
(2) Set the starting month on the back of the recyclable deodorizing cartridge.
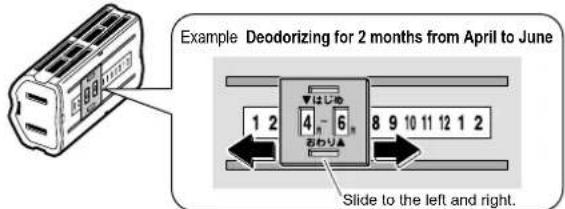
When the left slot is over the starting month, the month that the deodorizing cartridge should be regenerated is shown in the right slot.
| Expected duration of effect | About 2 months |
| Recommended coverage area | About 1.7m^2 |
The recyclable deodorizing cartridge removes odors by absorbing the odor element therefore sufficient effect may not be obtained if used in spacious places.
The recyclable deodorizing cartridge may be laid down or stood on end as demanded by the place of use.
NOTE
- The recyclable deodorizing cartridge is not edible. Accidental swallowing may result in serious illness, therefore be particularly mindful to place the cartridge out of the reach of children. If accidentally swallowed, consult a doctor.
- Do not use the cartridge together with other air fresheners, deodorizers, insecticides, etc.
-
Keep away from pets.
• Clothes may be stained if contacted by the cartridge. -
Use the cartridge solely for its intended purpose.
- Do not disassemble the cartridge.
- The recyclable deodorizing cartridge is not intended for use in spacious places and places of strong smell, therefore use the main unit in those cases.
- The air purifier may be used with the recyclable deodorizing cartridge inserted Inside the streamer pocket without any problems.
How to regenerate the recyclable deodorizing cartridge
After about 2 months (reference only), regenerate the recyclable deodorizing cartridge inside the streamer pocket.
Sufficient deodorizing effect may not be obtained if the cartridge is not regenerated periodically.
Recyclable deodorizing cartridge regeneration is started and stopped by opening and closing the streamer pocket.
Procedure Note
1 Open the streamer pocket and place the recyclable deodorizing cartridge inside.
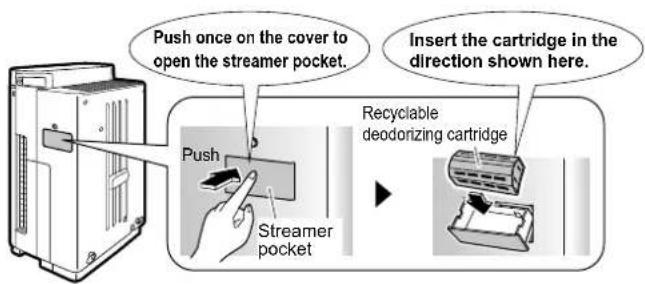
Do not put anything other than the recyclable • deodorizing cartridge into the streamer pocket. This may lead to damage.
The recyclable deodorizing cartridge cannot be • regenerated if wet with condensation, etc. Inserting a wet cartridge into the streamer pocket may lead to damage.
2 Close the streamer pocket.
flowchart
graph TD
    A["A short beep sound is emitted when the regeneration is properly started."] --> B["Close the streamer pocket."]
    B --> C["Regeneration start: Regeneration starts automatically."]
    C --> D["Regeneration end: Regeneration ends automatically."]
    D --> E["Regeneration ends: The regeneration lamp goes out."]
    style A fill:#f9f,stroke:#333
    style B fill:#ccf,stroke:#333
    style C fill:#cfc,stroke:#333
    style D fill:#fcc,stroke:#333
    style E fill:#cff,stroke:#333
After regeneration ends, remove the recyclable deodorizing cartridge and return it to its place of use.
Do not use the air purifier with the streamer pocket open. This may lead to damage.
The streamer pocket can be locked. Page 8.
When starting regeneration, make sure the • regeneration lamp lights.
The recyclable deodorizing cartridge can be • regenerated without running the air purifier by simply plugging into the power supply cord.
Regeneration stops automatically for safety reasons if the front panel is opened or the power supply cord is unplugged during regeneration. In such case, the regeneration time also resets. To start regeneration again, open and close the streamer pocket.
Depending on the conditions of use and how old the recyclable deodorizing cartridge is, regeneration may not completely restore the deodorizing effect.
The recyclable deodorizing cartridge can be • regenerated about 200 times. (The actual amount varies according to the environment.)
■ Main operating condition
| Regeneration | |
| Air purifi er running Possible | |
| Air purifi er stopped | Possible(Fan turns and air is blown from the air outlet.) |
| Child proof lock engaged Possible | |
| Unit unpluggedFront panel open | Impossible |
Quick Reference Table of Maintenance

WARNING
Before performing maintenance, stop the unit and • unplug the power supply cord.
If the check lamp lights, check the location that requires attention on the operating panel.
- Any of the humidifying filter lamp(HUM), Air-purifying filter lamp( ), UNIT1/2 lamps, or water supply lamp( EMPTY ) will light or flash together with the check lamp( ).
Remove parts for maintenance in numerical order.
Reattach them in the opposite order in which they were removed.
| Sequence | Part When to perform maintenance How to perform maintenance Reference page | ||||
| (1) | Front panel If dirty | Wipe | Page 27. | ||
| (2) | Water tank Every time you add water | Rinse with water | Page 28. | ||
| (3) | Pre-filter Once every 2 weeks | Vacuum cleaner | Rinse with water | Page 29. | |
| (4) | UNIT1(Plasma ionizer) | If the “UNIT1” lamp lights | Soak, drain and dry | Page 33, 34. | |
| (5) | UNIT2(Streamer unit) | If the “UNIT2” lamp lightsIf the sound of streamerdischarge changes in toneor becomes quieter | Soak, drain and dry | Page 33, 34. | |
| (6) | Pleated filter | If the Air-purifying filterlamp lights or flashes | Replace | Cannot berinsed in water | Page 30, 31. |
| (7) | Deodorizing catalyst unit If dirty | Vacuum cleaner | Cannot berinsed in water | Page 28. | |
| *Humidifying tray | Once every 3 daysIf the unit emits unpleasantodors or is noticeably dirty | Rinse with water | Page 36. | ||
| *Humidifying filter(Waterwheel) | Once every 1 weekIf the unit emits unpleasantodors or is noticeably dirty | Soak, drain and dry | Page 35. | ||
| *Humidifying filter | If the humidifying filterlamp lights or flashes | Replace | Page 37. | ||
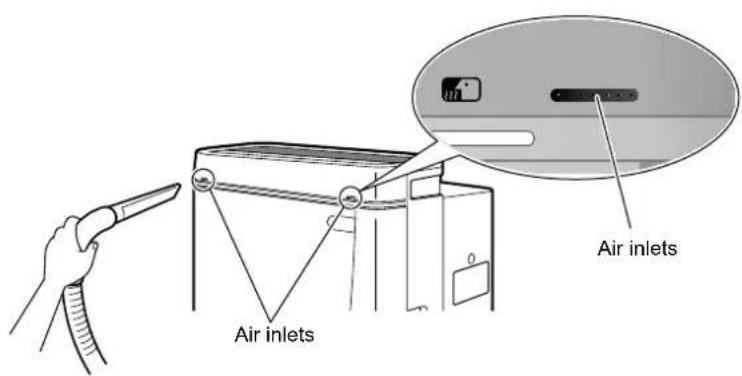
| Air inlets for Dust/Odorsensors and Temperature/Humidity sensors | If clogged | Vacuum cleaner | Page 27. | ||
| Recyclable deodorizingcartridge | If dust has accumulatedIf bothered by dirt | Vacuum cleanerSoak, drain and dry | Cannot be washedwith detergent | Page 28. | |
*To clean the humidifying tray or humidifying filter, first remove the (1) front panel and remove the (2) water tank.
To clean the humidifying tray or humidifying filter, first remove the (1) front panel and remove the (2) water tank.
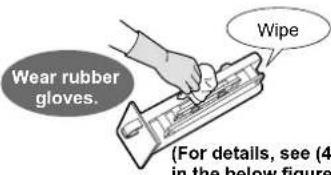
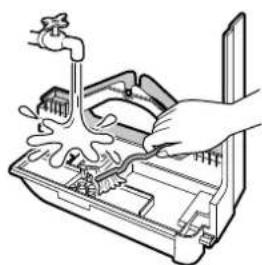
Care & Cleaning
Front panel cleaning Wipe
Wipe off dirt with a piece of cloth or tissue moistened with water.
For stubborn dirt, wipe with a cloth moistened with a neutral liquid detergent.
natural_image
Line drawing of a hand cleaning a refrigerator door (no text or symbols)CAUTION
Do not use hard bristle brushes, etc.
Tools of the sort may scratch the front panel.
WARNING
Do not use petrol, benzene, thinner, scouring powder, kerosene, alcohol, etc.
Substances of the sort may lead to cracking, electric shock or ignition.
Do not wash the unit frame with water.
Contact with water may lead to electric shock, fire or damage.
Sensor air inlet cleaning
(Dust, odor, temperature and humidity sensors)
Using a vacuum cleaner nozzle attachment with a narrow opening, suck up dust adhering to the air inlets and sensor holes.
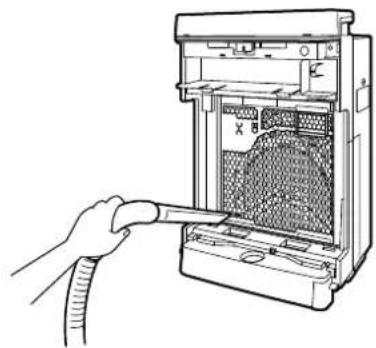
Unit frame cleaning
Vacuum cleaner
If dust has accumulated, suck it up with a vacuum cleaner.
natural_image
Line drawing of a hand inserting a cable into a computer tower (no text or symbols)NOTE
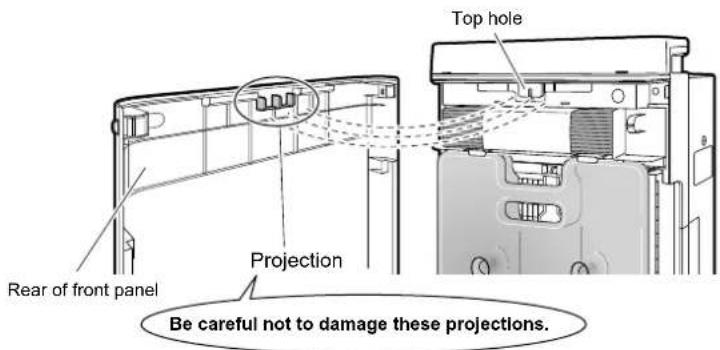
- Be careful not to scratch the front of the front panel or damage the projections on the back of it when it is removed. The projections on the backside operate as a safety switch that shuts power OFF when the panel is opened. If damaged, the unit cannot be started.
WARNING
In the rear of the hole at the top of the unit is a safety switch, therefore do not touch it. Touching the switch may result in electric shock. If the switches are accidentally damaged and the unit cannot be started as a result, contact the service shop.
Recyclable deodorizing cartridge cleaning
Vacuum cleaner
Soak, drain and dry
Cannot be washed with detergent
If dust has accumulated, suck it up with a vacuum cleaner.
- If the cartridge becomes dirty, soak the cartridge in warm or plain water for about 10 minutes, drain thoroughly and dry in a well-ventilated shade for about 1 day.

CAUTION
Do not disassemble the recyclable deodorizing cartridge.
Do not use detergents, chemicals, etc. • Substances of the sort diminish deodorizing performance.
Water tank cleaning
Rinse with water
• Each time before you add water to the tank, add a small amount of water to the tank, close the cap and shake to rinse internally.
Once a week, clean the inside of the tank by adding neutral liquid detergent to the water and shaking tank.
For stubborn dirt, wash with a soft bristle brush or neutral liquid detergent.
Rinse off the detergent thoroughly.
natural_image
Illustration of hands holding a device with a cartoon face on its screen (no text or symbols)Deodorizing catalyst unit cleaning
Vacuum cleaner
Cannot be rinsed in water
Replacement unnecessary
Remove the deodorizing catalyst unit and suck up dust with a vacuum cleaner.
Do not rub the front surface.
- For procedures on removing and restoring the deodorizing catalyst unit, see "Pleated filter replacement". ▶Page 30, 31.
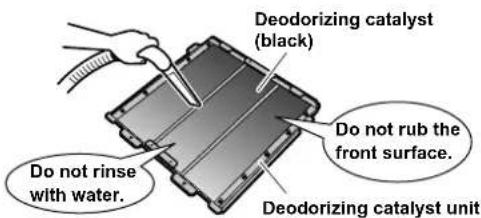

CAUTION
Do not rinse the deodorizing catalyst unit with water.
Contact with water prevents further use.

Care & Cleaning
Pre-fi Iter cleaning
(About once every 2 weeks)
Vacuum cleaner
Rinse with water
1 Remove the front panel.
Push the 2 projections (left and right) inwards, and pull the front panel upwards and remove.
Remove the water tank.
Holding the water tank by the handle, pull the tank • upwards and out of the unit.
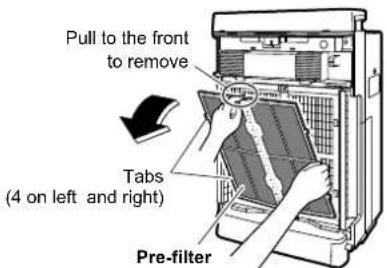
Clean the pre-fi Iter.
Suck up dust with a vacuum cleaner.

natural_image
Illustration of a hand inserting a device into a rack with a tool (no text or symbols visible)For stubborn dirt
Rinse the pre-fi iter with water.
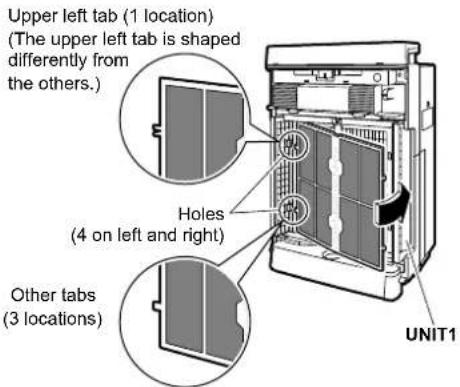
- Fit your fingers in the recess at the top of the pre-filter, pull the filter to the front and disengage the tabs (4 locations) on the left and right of the pre-filter from the holes (4 locations) on the left and right of UNIT1.
- For stubborn dirt, wash with a soft bristle brush or neutral liquid detergent, and dry thoroughly in a well-ventilated shade.
If water droplets remain on the pre-fi liter, the "UNIT1" lamp may light, therefore dry the pre-filter adequately before using it again.
5 Restore the pre-fi Iter.
Align the tabs (4 locations) on the left and right of the pre-fi liter with the holes (4 locations) on the left and right of UNIT1, and insert into the holes.
6 Restore the water tank. Holding the water tank by the hand, about the bottom of the water tank
Holding the water tank by the handle, fit the tank into the hole at the bottom of the main unit, and press the tank into the main unit.
7 Restore the front panel. • Fit the tabs (2) at the date
- Fit the tabs (2) at the addition of the panel into the grooves at the bottom of the main unit, and close the panel.
![[View from above] (1) Fit here. Bottom grooves (2 locations) Front panel (2) Press inward until hearing clicking sound.](/content/2026/05/811618/images/332afa70ef02b6d3655ffa2a3939207906669ad00b366af39d909cea7f968b70.jpg)
To correctly restore the front panel, press the front panel until hearing the clicking sound from the left and right sides. Unless properly installed, a safety switch may trip and prevent the unit from starting. ▶Page 27.
Pleated filter replacement
Cannot be rinsed in water
flowchart
graph TD
    A["REPLACE □ HUM"] --> B["RESET (Push for 2 sec.)"]
    B --> C["RESET (Push for 2 sec.)"]
The pleated fi Iter does not need replacing until the Air-purifying fi Iter lamp lights or fl ashes.
If the Air-purifying filter lamp lights or flashes
Replace

WARNING
Before performing maintenance, stop the unit and unplug the power supply cord.
1 Remove the front panel. ▶Page 29.
2 Remove the water tank. ▶Page 29.
3 Removed the UNIT1.
Holding the UNIT1 by the handle, pull the UNIT1 upwards • and out of the unit.
4 Remove the deodorizing catalyst unit. Holding the deodorizing catalyst unit by the handle, p
5 Replace the pleated filter with a new filter. Remove the used pleated filter.(1)
- Release the pleated filter from the projections (5 locations each) on the left and right of the deodorizing catalyst unit (front side).
(2) Take a new pleated filter from the filter storage area, remove it from its bag and attach it to the deodorizing catalyst unit.
Attach the pleated filter with the white side facing to the front.
Fit the projections (5 locations) on the left and right faces of the deodorizing catalyst unit into the holes (5 locations) on the left and right of the pleated filter.
Insert the pleated filter underneath the tabs • (4 locations) at the top and bottom of the deodorizing catalyst unit.
NOTE
- If the deodorizing catalyst unit is dirty, suck up dust with a vacuum cleaner. If the plate is dirty, wipe off dirt with a piece of cloth or tissue moistened with water. ▶Page 28. For stubborn dirt, wipe with a cloth moistened with a neutral liquid detergent. (Do not rinse in water.)
Care & Cleaning
6 Restore the deodorizing catalyst unit.
- Holding the deodorizing catalyst unit by the handle, fit the projections on the unit into the grooves (4 locations) at the bottom of the main unit and press the deodorizing catalyst unit into the main unit.
Holding UNIT1 by the handle, fit the projections on the unit • into the grooves (2 locations) at the bottom of the main unit, and press UNIT1 into the main unit.
8 Restore the water tank. ▶Page 29.
9 Restore the front panel. ▶Page 29.
10 Plug the power supply cord in.
11 Press and hold the air-purifying fi Iter reset button at the top of the unit for 2 seconds.
(A double acoustic tone is emitted and the Air-purifying filter lamp goes out.)
- After replacing the pleated filter, the Air-purifying filter lamp does not go out unless the filter reset button is pressed and held for 2 seconds.
Pleated fi Iter replacement
- For replacement pleated filters, contact the service shop. (See the ATTENTION on page 38.)
- The pleated filter does not need replacing until the Air-purifying filter lamp lights or flashes.
Replace the pleated filter if the Air-purifying filter lamp lights or flashes, even if the filter is not dirty. Visible grime and filter performance are not proportional to one another. - The replacement interval for the pleated filter varies according to how the unit is used and where it is located.
The Air-purifying filter lamp lights after about 1 year in a home where every day 10 cigarettes are smoked and the unit is used. (The replacement interval shortens when the unit is used where the air is particularly dirty.) - Dispose of used pleated filters as noncombustible waste. (Material: polypropylene/polyester nonwoven textile)
- If you replace the pleated filter before the Air-purifying filter lamp lights because dirt bothered you, press and hold the pleated filter reset button for 2 seconds.
UNIT1 (Plasma ionizer) removing and attaching

CAUTION
- Wear rubber gloves to remove and attach the opposite pole plates. Hands can be cut on the opposite pole plates and ionized wires.
Remove
1 Remove the front panel. ▶Page 29.
2 Remove the water tank. ▶Page 29.
3 Remove the UNIT1.
Holding the UNIT1 by the handle, pull the UNIT1 upwards • and out of the unit.
4 Remove the opposite pole plates on the backside of UNIT1.
Pinching together the white and green knobs (2 sets on left and right), lift the opposite pole plates up and out.
Attach
1 Attach the opposing pole plates. (1) Fit the opposite pole plates over the knobs (
The opposite pole plates have no required right and left direction and can be attached either side of ionizing frame. Attach them so that the arrow is visible.
(2) Insert securely until it clicks.
natural_image
Illustration of a hand inserting a grid into a rectangular device (no text or symbols visible)(3) Attach another side of the opposing pole plate.
natural_image
Technical line drawing of a mechanical component with internal grid structure and two directional arrows indicating flow or movement (no text or symbols)2 Restore the UNIT1 ▶Page 31, pre-fi Iter, water tank and front panel. ▶Page 29.
Care & Cleaning
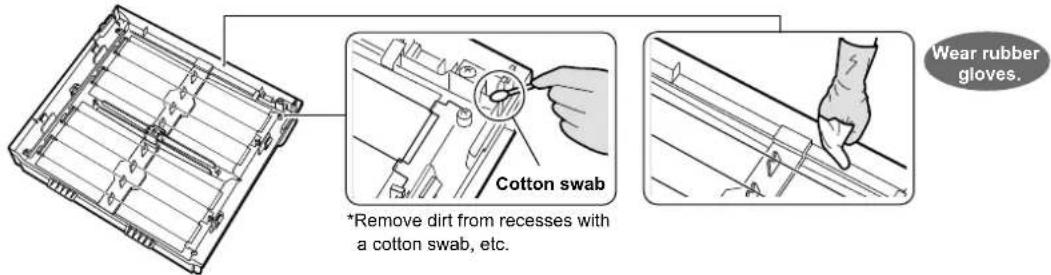
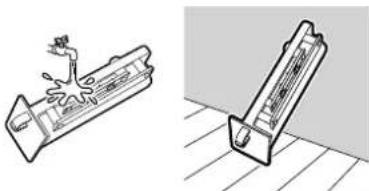
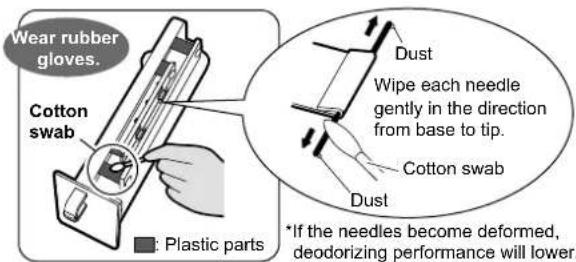
Cleaning UNIT1 (plasma ionizer) and UNIT2 (streamer unit)
WASH □ UNIT 1
UNIT 2
If UNIT lamps light
Soak, drain and dry

CAUTION
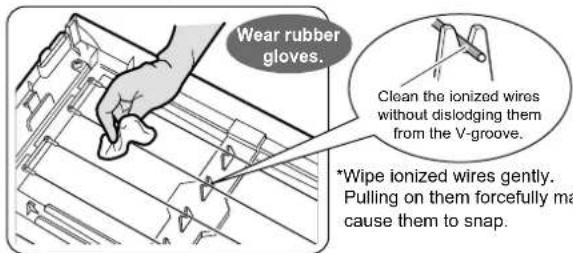
- Before performing maintenance, stop the unit and unplug the power supply cord. Wear • rubber gloves to when wiping or rubbing the units. Hands can be cut on the opposite pole plates and ionized wires.
| Procedure | UNIT1 | ||
| (1) Ionizing frame (2) Ionized wire (3) Opposing pole plates | |||
| Remove parts. | ▶Page 32. Page 32. | ▶ | |
Suck up dust on the front surface with a vacuum cleaner. ▼ ▼ | 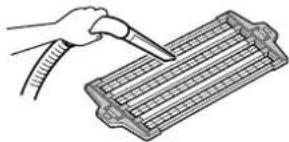 | ||
Soak in lukewarm or plain water.(Approx. 1 hour) ▼ ▼ |  | 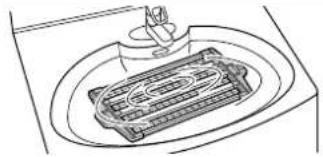 | |
Remove dirt with a piece of cloth, soft bristle brush, etc.Wear rubber gloves when cleaning. ▼ ▼ | 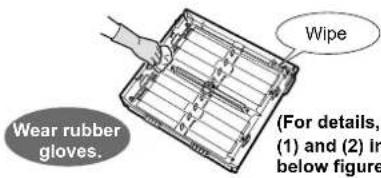 see (the.) see (the.) | 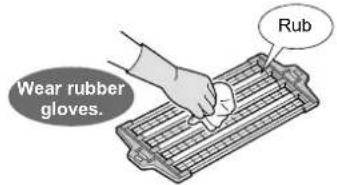 | |
| Rinse in running water and drain.▼Dry in a well-ventilated shade. (Approx. 1 day)▼ | 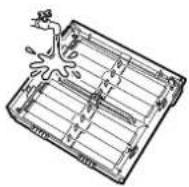  |   | |
| Reattach parts. | ▶Page 31. Page 32. | ▶ | |
Ionizing frame (Remove dirt after soaking but before drying.)(1)
Remove dirt from plastic parts with a soft piece of cloth.
- Wipe away dirt in recesses and places where fingers do not fit with a cotton swab, etc.
Do not leave any lint from cleaning cloths behind. Lint may lead to malfunction.

CAUTION
There are ionized wires to the rear of the opposite pole plates. Be careful not to snap these wires when removing and attaching the units.
- If the unit is run with broken ionized wires, the "UNIT1" lamp lights. While the lamp is lit, dust collecting capacity is low.
- If the ionized wires are accidentally snapped, they need replacing, therefore contact the service shop. (Do not replace the wires yourself.)
| UNIT2 | Notes | |
| (4) Streamer unit | ||
| Open the front panel and pull out the streamer unit. | ||
| Do not remove the screws from the ionizing frame or streamer unit. •This may lead to damage. | ||
 | Clean UNIT1 and UNIT2 somewhere that can be wet such as in a shower room or kitchen sink. •For stubborn dirt, soak UNIT1 and UNIT2 in lukewarm or plain water in which neutral liquid •detergent (i.e., kitchen cleaner, etc.) has been dissolved.Use the amount of neutral liquid detergent indicated in the cleaner's instructions. •Do not use powdered, alkaline or acidic cleaners, and do not rub with hard bristle brushes, etc. •Abusive handling may lead to deformation and damage.• Deodorizing performance lowers if the needles inside UNIT2 (streamer unit) become deformed. | |
 | ||
 | If cleaner remains on UNITS 1 or 2, the “UNIT1” and “UNIT2” lamps do not go out after cleaning, •therefore rinse off the cleaner well.Do not leave any lint from cleaning cloths behind. Lint may lead to malfunction. •Plastic parts may deform or discolor if exposed to direct sunlight. •If water remains on UNITS 1 or 2, even in small quantities, the “UNIT1” and “UNIT2” lamps do not •go out after cleaning, therefore dry thoroughly in a shade. | |
| Reattach the streamer unit as before. |
Ionized wire (8 locations)(2)
Remove dirt from ionized wires and surrounding plastic parts with a soft piece of cloth.
Streamer unit(4)
- If dust has accumulated on the needles, wipe gently with a cotton swab or soft piece of cloth.
- Remove dirt from plastic parts (■) in internal areas with a cotton swab or soft piece of cloth.
- Do not remove the screws.
Care & Cleaning
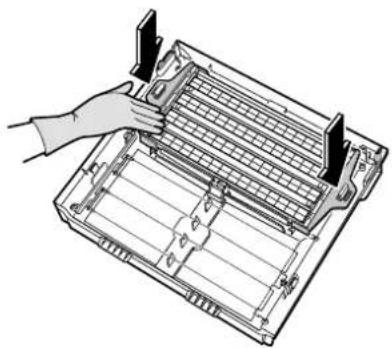
Humidifying fi Iter cleaning
(About once every 1 week)
Soak, drain and dry
How quickly the humidifying filter becomes dirty depends on the environment of use. If odors are emitted from the air outlet or if humidification capacity is low (the decrease of water is slow), clean the humidifying filter as follows even within 1 week.
Clean the humidifying filter in the same way if the unit has not been used for a long period of time.
1
Remove the front panel and water tank.
▶Page 29.
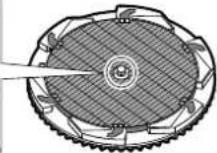
2
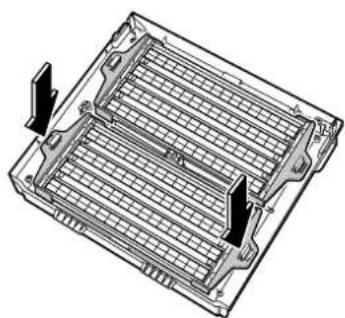
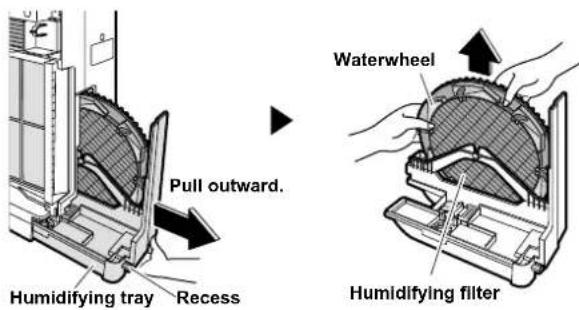
Pull out the humidifying tray and remove the waterwheel and humidifying fi Iter.
The water tank must first be removed to pull out the humidifying tray.
Hold the humidifying tray by the recess on its underside to • pull out. (See the figure at right.)
The humidifying tray contains water, therefore pull it out slowly.
Do not remove the humidifying fi Iter from the waterwheel. The fi Iter may lose its shape.

WARNING
- Before performing maintenance, stop the unit and unplug the power supply cord.
3
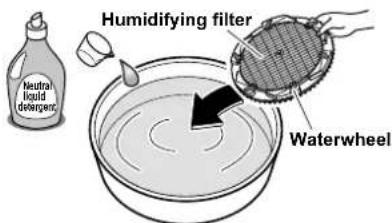
Dissolve neutral liquid detergent in warm or plain water.
Quantity: Use the amount of neutral liquid detergent indicated in the cleaner's instructions.
4
Immerse the humidifying fi Iter in the water and soak for about 30 - 60 minutes.
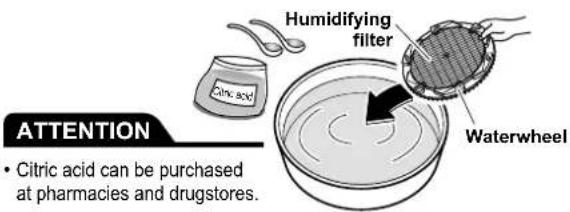
For stubborn scale (white or brown)
(Running the unit with scale diminishes humidifying capacity.)
3
Dissolve citric acid in warm (approx. 40°C or less) or plain water.
Quantity: Approx. 20g citric acid (2 large spoonfuls) per 3L water.
4
Immerse the humidifying filter in the water and soak for about 2 hours.
5
Rinse in running water.
Use clean water.
Repeat 2 - 3 times with fresh water each time.
- Do not apply force to the humidifying filter when cleaning. The filter may lose its shape.
Inadequate rinsing may lead to odors or unit deformation or discoloring.
6 Restore the humidifying tray.
- Reattach the humidifying filter and waterwheel to the humidifying tray, and push the humidifying tray back into the unit until hearing clicking sound.
Humidification cannot be run unless the humidifying filter is properly installed.
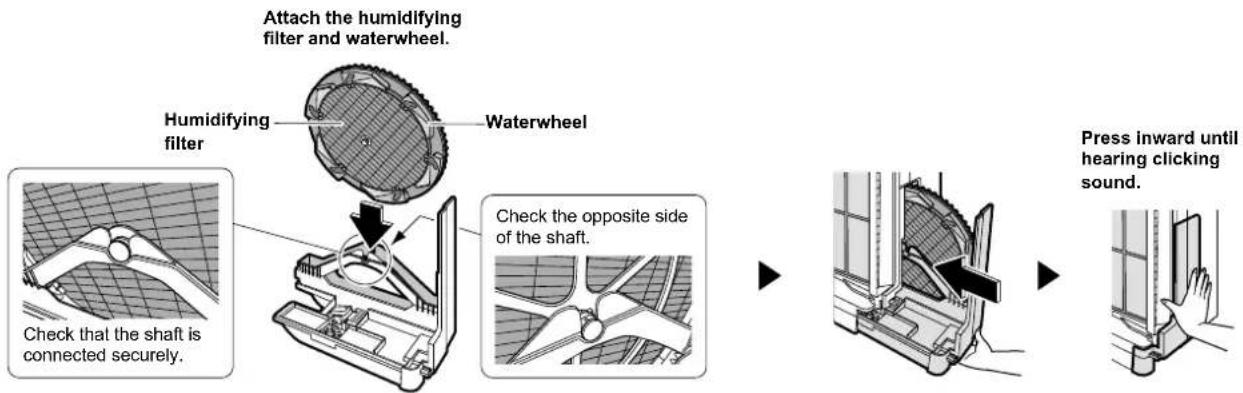
flowchart
graph LR
    A["Attach the humidifying filter and waterwheel."] --> B["Humidifying filter"]
    B --> C["Waterwheel"]
    C --> D["Check the opposite side of the shaft."]
    D --> E["Press inward until hearing clicking sound."]
Install the humidifying filter and waterwheel in the direction shown in the figure.
7 Restore the water tank and front panel. ▶Page 29.
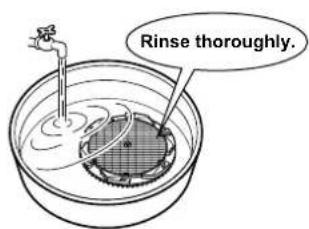
Humidifying tray cleaning (About once every 3 days) Rinse with water
If the unit emits unpleasant odors or becomes noticeably dirty, clean the unit by following the procedure described below, even if it was cleaned less than 3 days ago.
1 Remove the front panel and water tank. ▶Page 29.
2 Pull out the humidifying tray and remove the waterwheel and humidifying fi Iter. ▶ Page 35.
3 Rinse the humidifying tray in water.
4 Restore the humidifying tray. ▶See above.
5 Restore the water tank and front panel.
▶Page 29.
natural_image
Line drawing of a hand using a tool to clean or wash the interior of a washing machine (no text or symbols)For stubborn scale
Dissolve citric acid in lukewarm or plain water and moisten • a soft cloth or soft bristle brush with the water.
Remove scale with the soft cloth or the soft bristle brush. Rinse off thoroughly with clean water.
* About the quantity of citric acid, refer to "For stubborn scale (white or brown)". ▶Page 35.
ATTENTION
- Do not remove the float or silver ion cartridge.
- Without the float, humidifying operation cannot be run. Without the silver ion cartridge, the antibacterial, anti-mildew and slime prevention effects are disabled.
Depending on the water quality and environment of usage, the accumulated water in the humidifying tray may be discolored by scale etc. If that occurs, follow the instructions above and clean the tray.
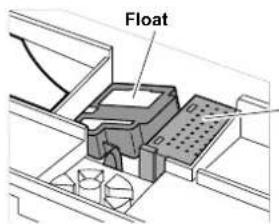
Silver Ion cartridge
Effective against bacteria, mildew and slime.
Care & Cleaning
Humidifying fi Iter replacement
(About every 2 years [2 seasons])
![DAIKIN MCK75J - (About every 2 years [2 seasons]) - 1](/content/2026/05/811618/images/d09bb3bafafd427d54e420685ba75e61832d64d102d6faaa99e6494de5203764.jpg)
flowchart
graph TD
    A["REPLACE"] --> B["HUM"]
    B --> C["RESET (Push for 2 sec.)"]
    C --> D["RESET (Push for 2 sec.)"]
If the humidifying filter lamp lights or flashes
Using the unit without replacing the humidifying filter causes mildew, foul odors and humidification loss.
Replace

WARNING
Before performing maintenance, stop the unit and unplug the power supply cord.
1 Remove the front panel and water tank.
▶Page 29.
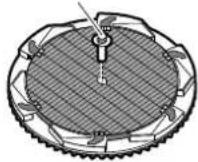
2 Pull out the humidifying tray and remove the waterwheel and humidifying fi Iter.
3 Remove the shaft that locks the humidifying fi lter and waterwheel.
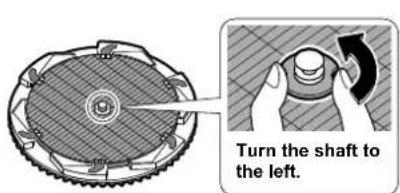
Pull the shaft out.
4 Remove the humidifying fi Iter from the waterwheel, and attach a new fi Iter.
Humidifying filter
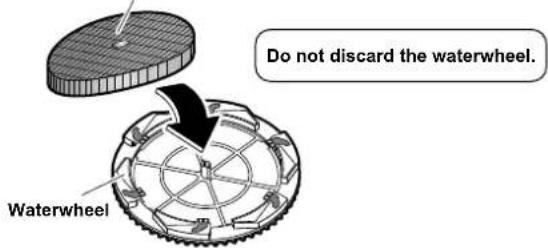
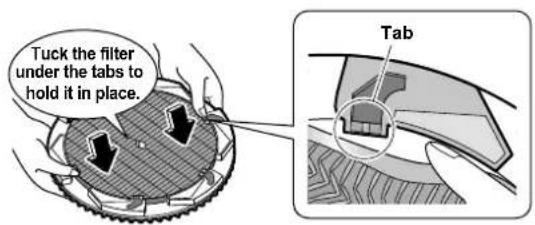
- Tuck the humidifying filter underneath the tabs (6 locations) on the waterwheel so that it does not stick out from the waterwheel.
5 Restore the shaft as before.
Restore the shaft.
Turn the shaft to the right.
6 Restore the humidifying tray. ▶Page 36.
7 Restore the water tank and front panel. Page 2
8 Plug the power supply cord in.
9 Press and hold the humidifying fi Iter reset button at the top of the unit for 2 seconds.
(A short beep sound is emitted and the humidifying filter lamp goes out.)
- After replacing the humidifying filter, the humidifying filter lamp does not go out unless the filter reset button is pressed and held for 2 seconds.
Humidifying fi Iter replacement
- For replacement humidifying filters, contact the service shop. (See the ATTENTION on page 38.)
- Dispose of used humidifying filters as noncombustible waste. (Material: Polyester, rayon)
Options
ATTENTION
- For replacement pleated filters, humidifying filters or recyclable deodorizing cartridges contact the service shop.
If the unit is used with dirty parts ●
Air is not cleaned.
Odors are not removed.
Unnecessary odors may be generated.
- Discard of the pleated filters, humidifying filters and recyclable deodorizing cartridges as noncombustible waste.
| Part Model | |
| Pleated fi Iter (7) KAC998A4E | |
| Humidifying fi Iter (Without frame) (1) | KNME998A4E |
■ Disposal requirements
Your product and the batteries supplied with the controller are marked with this symbol. This symbol means that electrical and electronic products and batteries shall not be mixed with unsorted household waste.
For batteries, a chemical symbol can be printed beneath the symbol. This chemical symbol means that the battery contains a heavy metal above a certain concentration. Possible chemical symbols are:
Pb: lead (>0.004%) ■
Hg: mercury (>0.0005%) ■
Disposal of this product must be done in accordance with relevant local and national legislation.
Units and waste batteries must be treated at a specialized treatment facility for re-use, recycling and recovery.
By ensuring correct disposal, you will help to prevent potential negative consequences for the environment and human health.
Please contact the installer or local authority for more information.
Frequently Asked Questions
Questions & Answers
Question:
The dust sensor does not change from the orange or red colour.
Answer:
This is due to dusts built up in the dust sensor. Suck up dust accumulated in the dust sensor hole with a vacuum cleaner. ▶Page 27. Normal operation is restored shortly after sucking up dust and running air purification. ▶Page 19.
Question:
The sensitivity of the dust sensor seems to be bad.
Answer:
This is because react time of the dust sensor differs depending on the size of room. Adjust the sensor with sensitivity settings. ▶Page 13.
Question:
Can I wash the deodorizing catalyst unit? Is replacement necessary?
Answer:
The deodorizing catalyst unit cannot be washed. (The unit will be ruined.) Remove the deodorizing catalyst unit from the main unit and suck up dust with a vacuum cleaner. ▶Page 28. It is not necessary to replace the deodorizing catalyst unit.
Question:
What to do if the ionized wires are cut?
Answer:
Wires need to be replaced. Contact the service shop. Do not replace the wires yourself.
Question:
Can I use the air purifi er while the "UNIT1" or "UNIT2" lamp is lit?
Answer:
For safety reasons, power to the ionized wires and streamer unit is shut OFF, therefore dust collecting performance and deodorizing effect drop markedly. Clean inside UNIT1 and 2 until the "UNIT1" and "UNIT2" lamps go out. (There are no safety issues while the lamps are lit.)
Question:
Does the deodorizing effect of the recyclable deodorizing cartridge disappear entirely in 2 months time?
Answer:
The effect should not completely disappear in 2 months time.
▶Page 23, 24.
The effect may decrease by about half depending on the conditions of use.
Question:
Can the unit run without the humidifying fi Iter?
Answer:
The unit will engage the humidify setting, but it will not humidify the room. Always install a humidifying filter. (Air can be cleaned.)
Question:
I threw the waterwheel (humidifying fi Iter frame) out.
Answer:
The humidifying filter does not rotate without the waterwheel, therefore the room is not humidified in the humidify setting. To purchase another waterwheel, contact the service shop. (Separately purchased humidifying filters do not come with a waterwheel.) Page 38.
Question:
Do I need to replace the silver ion cartridge in the humidifying tray?
Answer:
The silver ion cartridge do not need replacing for 10 years.
If These Lamps Light or Flash
Operating panel
Troubleshooting
The following situations have logical explanations.
Before requesting servicing, make the following checks.

flowchart
graph TD
    A["If this happens Check"] --> B["The current humidity remains high."]
    A --> C["The readings of the room hygrometer and unit's humidity indicator lamp differ."]
    A --> D["A catching sound is heard during operation."]
    A --> E["The sound of water is heard during operation."]
    A --> F["A splashing sound is heard during operation."]

    B --> G["Humidity in rooms facing north or rooms near plumbing fixtures such as bathrooms is normally high because moisture readily accumulates."]
    C --> H["This is because air currents cause temperature and humidity drifts even in the same room. Consider the humidity indicator lamp as just a reference reading."]
    D --> I["A catching sound is made when humidifying operation starts and stops."]
    E --> J["The sound of water may be heard as water is supplied from the water tank to the humidifying tray."]
    F --> K["This is the sound of water from the waterwheel splashing on the humidifying filter."]
flowchart
graph TD
A["If this happens Check"] --> B["How to resolve"]
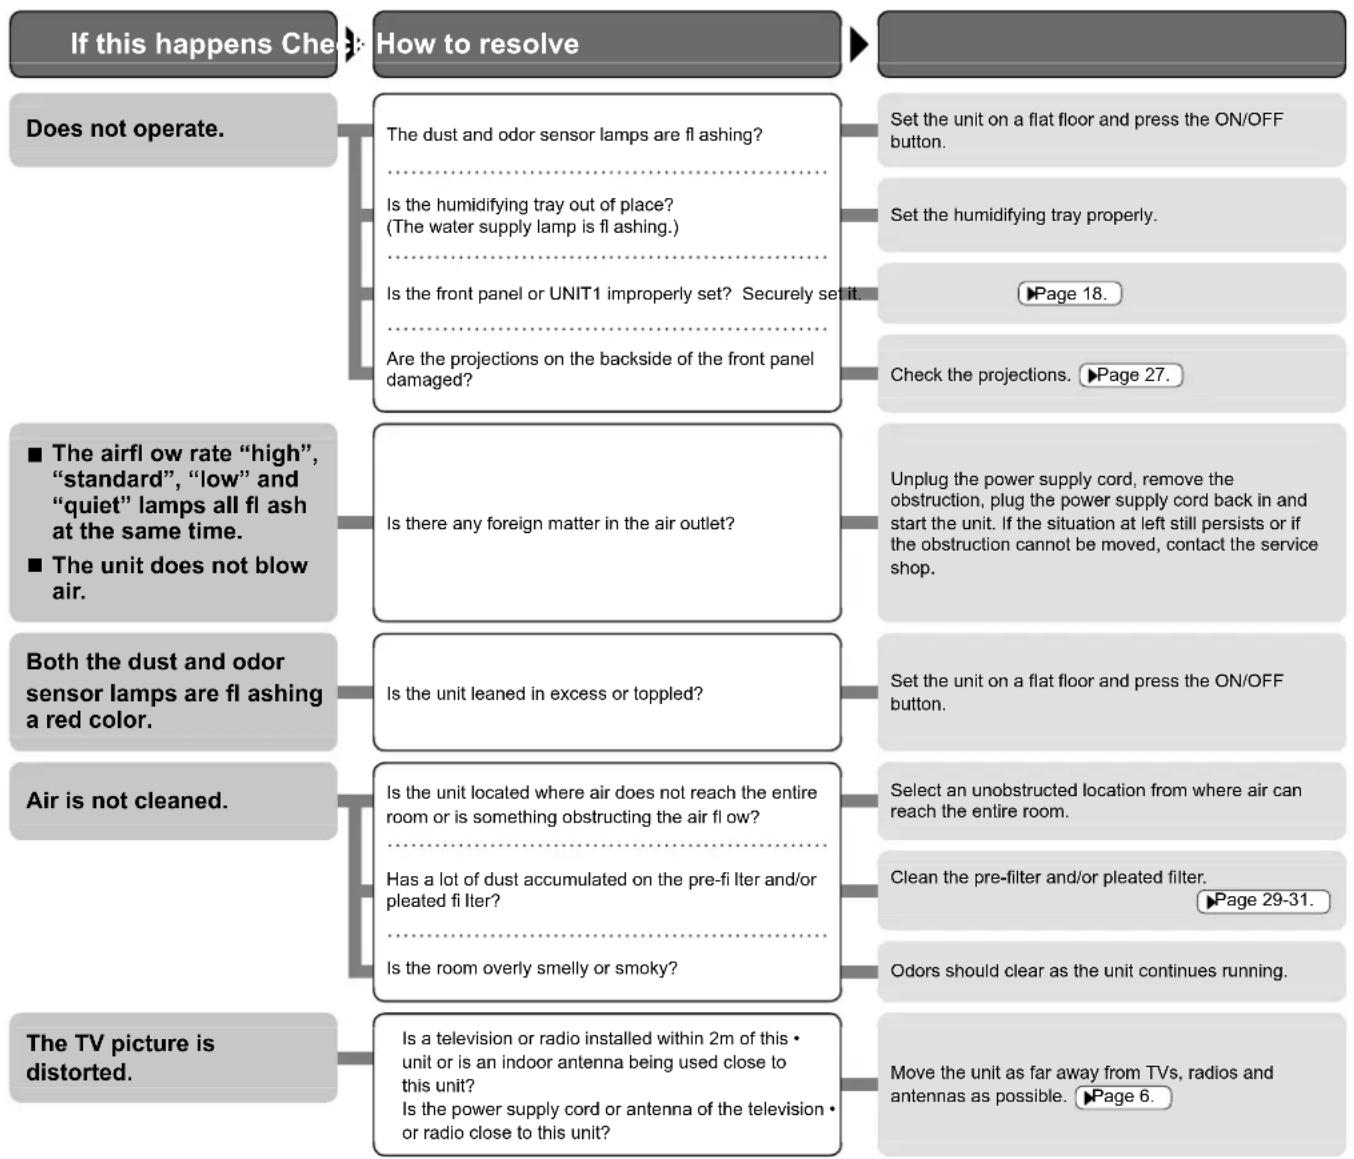
B --> C["Does not operate."]
C --> D["The dust and odor sensor lamps are fl ashing?"]
D --> E["Is the humidifying tray out of place? (The water supply lamp is fl ashing.)"]
E --> F["Is the front panel or UNIT1 improperly set? Securely set it."]
F --> G["Are the projections on the backside of the front panel damaged?"]
G --> H["■ The airfl ow rate “high”, “standard”, “low” and “quiet” lamps all fl ash at the same time."]
H --> I["■ The unit does not blow air."]
I --> J["Both the dust and odor sensor lamps are fl ashing a red color."]
J --> K["Air is not cleaned."]
K --> L["Is the unit located where air does not reach the entire room or is something obstructing the air flow?"]
L --> M["Has a lot of dust accumulated on the pre-fi liter and/or pleated filter?"]
M --> N["Is the room overly smelly or smoky?"]
N --> O["The TV picture is distorted."]
O --> P["Is a television or radio installed within 2m of this • unit or is an indoor antenna being used close to this unit?"]
P --> Q["Is the power supply cord or antenna of the television • or radio close to this unit?"]
B --> R["Set the unit on a flat floor and press the ON/OFF button."]
R --> S["Set the humidifying tray properly."]
S --> T["▶Page 18."]
T --> U["Check the projections. ▶Page 27."]
U --> V["Unplug the power supply cord, remove the obstruction, plug the power supply cord back in and start the unit. If the situation at left still persists or if the obstruction cannot be moved, contact the service shop."]
V --> W["Set the unit on a flat floor and press the ON/OFF button."]
W --> X["Select an unobstructed location from where air can reach the entire room."]
X --> Y["Clean the pre-filter and/or pleated filter. ▶Page 29-31."]
Y --> Z["Odors should clear as the unit continues running."]
Z --> AA["Move the unit as far away from TVs, radios and antennas as possible. ▶Page 6."]
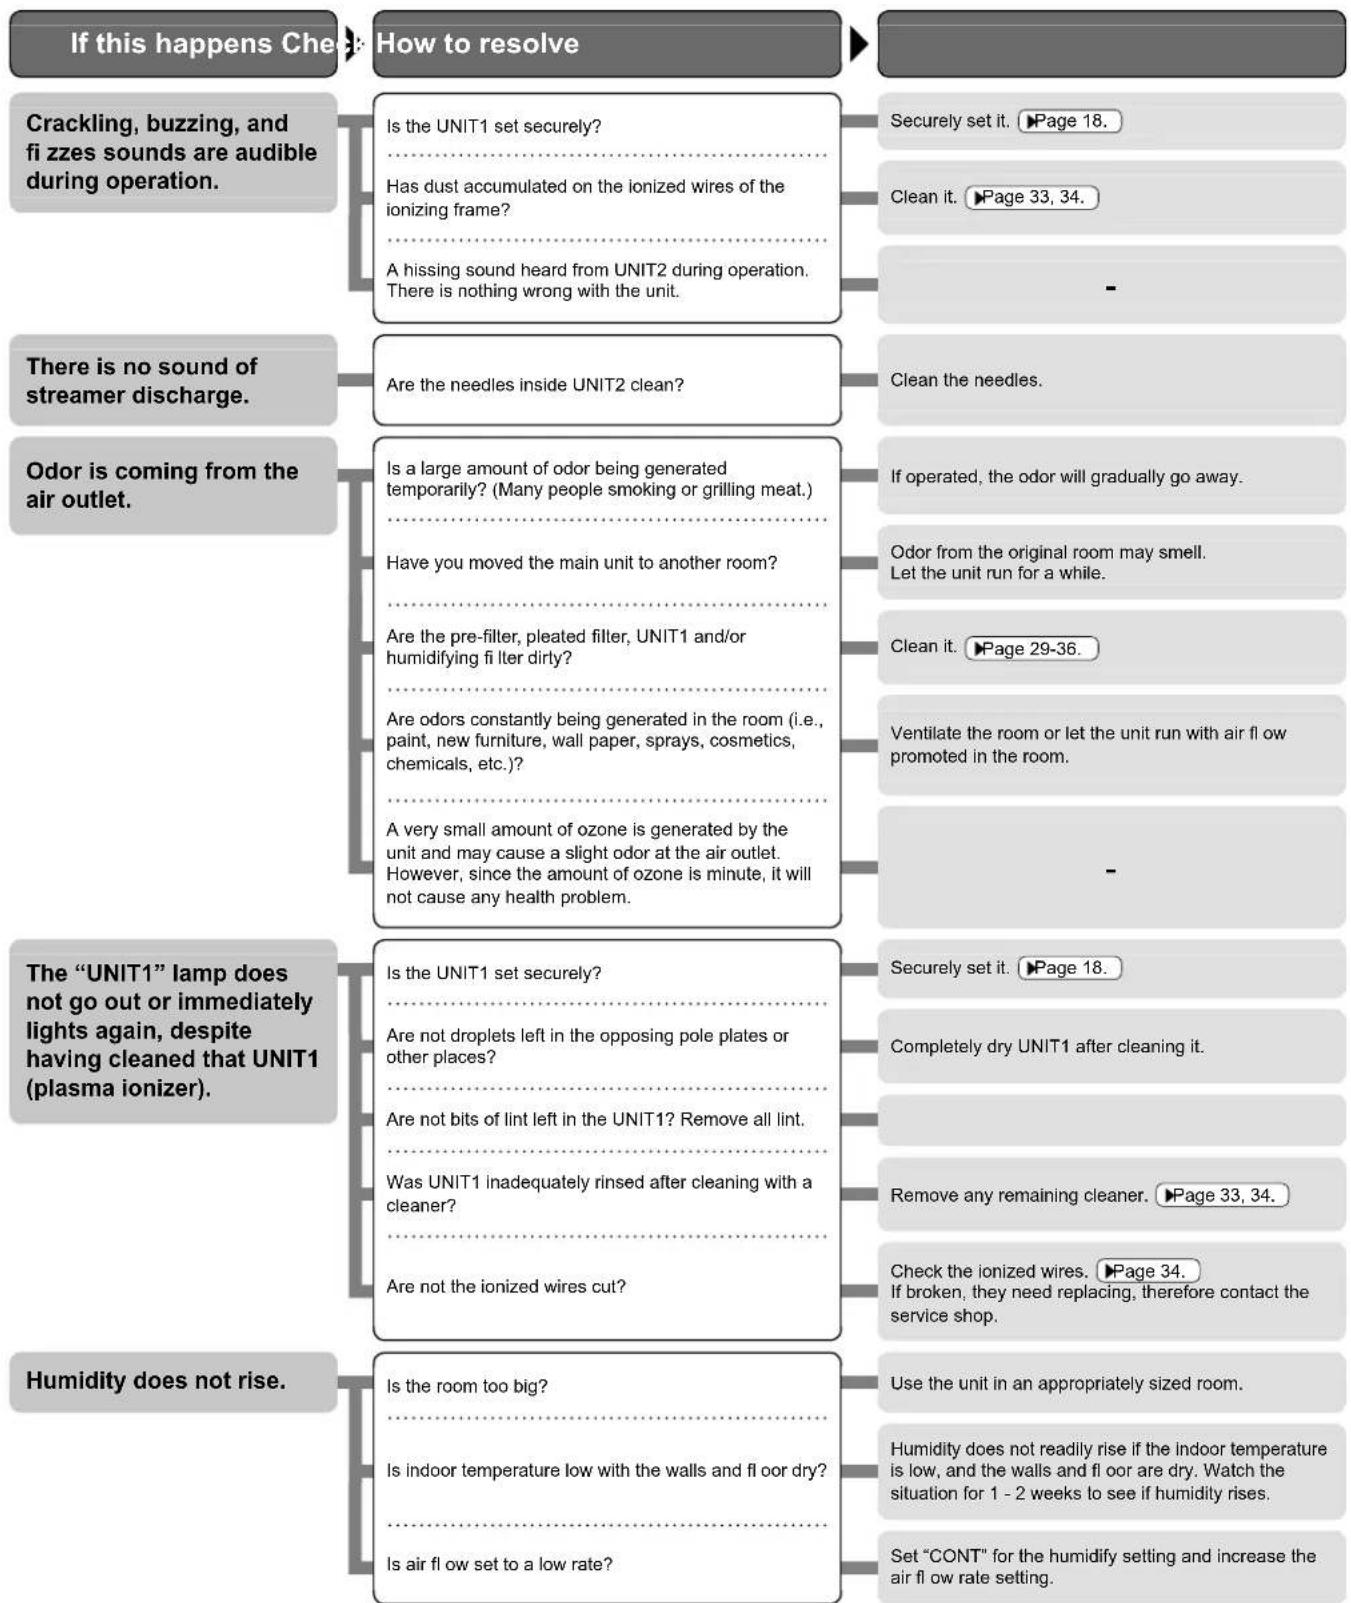
flowchart
graph TD
    A["If this happens Check: How to resolve"] --> B["Crackling, buzzing, and fi zzes sounds are audible during operation."]
    B --> C{Is the UNIT1 set securely?}
    C --> D["Has dust accumulated on the ionized wires of the ionizing frame?"]
    C --> E["A hissing sound heard from UNIT2 during operation. There is nothing wrong with the unit."]
    B --> F{There is no sound of streamer discharge.}
    F --> G{Are the needles inside UNIT2 clean?}
    G --> H["Odor is coming from the air outlet."]
    H --> I{Is a large amount of odor being generated temporarily? (Many people smoking or grilling meat.)}
    H --> J{Have you moved the main unit to another room?}
    H --> K{Are the pre-filter, pleated filter, UNIT1 and/or humidifying fi liter dirty?}
    H --> L{Are odors constantly being generated in the room (i.e., paint, new furniture, wall paper, sprays, cosmetics, chemicals, etc.)?}
    H --> M{A very small amount of ozone is generated by the unit and may cause a slight odor at the air outlet. However, since the amount of ozone is minute, it will not cause any health problem.}
    F --> N["The “UNIT1” lamp does not go out or immediately lights again, despite having cleaned that UNIT1 (plasma ionizer)."]
    N --> O{Is the UNIT1 set securely?}
    O --> P{Are not droplets left in the opposing pole plates or other places?}
    O --> Q{Are not bits of lint left in the UNIT1? Remove all lint.}
    O --> R{Was UNIT1 inadequately rinsed after cleaning with a cleaner?}
    O --> S{Are not the ionized wires cut?}
    N --> T["Humidity does not rise."]
    T --> U{Is the room too big?}
    U --> V{Is indoor temperature low with the walls and floor dry?}
    U --> W{Is air flow set to a low rate?}
    A --> X["Securely set it. ▶Page 18."]
    A --> Y["Clean it. ▶Page 33, 34."]
    A --> Z["-"]
    A --> AA["Clean the needles."]
    A --> AB["If operated, the odor will gradually go away."]
    A --> AC["Odor from the original room may smell. Let the unit run for a while."]
    A --> AD["Clean it. ▶Page 29-36."]
    A --> AE["Ventilate the room or let the unit run with air flow promoted in the room."]
    A --> AF["-"]
    A --> AG["Securely set it. ▶Page 18."]
    A --> AH["Completely dry UNIT1 after cleaning it."]
    A --> AI["Remove any remaining cleaner. ▶Page 33, 34."]
    A --> AJ["Check the ionized wires. ▶Page 34. If broken, they need replacing, therefore contact the service shop."]
    A --> AK["Use the unit in an appropriately sized room."]
    A --> AL["Humidity does not readily rise if the indoor temperature is low, and the walls and floor dry. Watch the situation for 1 - 2 weeks to see if humidity rises."]
    A --> AM["Set “CONT” for the humidify setting and increase the air flow rate setting."]
If the problem cannot be corrected after taking the above action, contact the service shop.
Troubleshooting
The following situations have logical explanations.
Before requesting servicing, make the following checks.
flowchart
graph TD
    A["If this happens Check"] --> B["How to resolve"]
    B --> C["Press Humidify Lamp is out."]
    B --> D["Install a humidifying filter. ▶Page 37."]
    B --> E["Soak the humidifying filter for about 30 - 60 minutes in warm or plain water in which neutral liquid detergent has been dissolved, then rinse in water. ▶Page 35, 36."]
    B --> F["Replace the humidifying filter. ▶Page 37."]
    B --> G["If the lamp is flashing, the humidifying tray is not properly installed. Install the tray properly. ▶Page 35, 36."]
    B --> H["If none of the front indicator lamps or the lamps on the operating panel light, the front panel may be open. Check that the front panel is securely closed. ▶Page 18."]
    A --> I["The unit does not humidify despite having added water to the water tank. Water level in the water tank does not lower."]
    A --> J["The room does not humidify despite setting the “CONT” humidify setting."]
    A --> K["The unit does not stop even though humidity is high."]
    A --> L["The water supply lamp is lit even though water was added."]
    J --> M["Is the water supply lamp lit?"]
    J --> N["Does the unit have a humidifying filter?"]
    J --> O["Humidification capacity is low when indoor temperature is low and humidity is high."]
    K --> P["Is the humidity setting set to “CONT”?"]
    K --> Q["Air purifying operation is in active while humidifying operation. Humidifying operation stops when the set humidity level is reached, but air purification continues."]
    K --> R["Is the unit exposed to direct sunlight or the hot air draught of heaters?"]
    L --> S["Has the float inside the humidifying tray come off?"]
    S --> T["Reattach the float as before. ▶Page 36."]
    M --> U["Add water. ▶Page 10, 17."]
    N --> V["Install a humidifying filter. ▶Page 37."]
    O --> W["-"]
    P --> X["Change the humidify setting. ▶Page 20."]
    Q --> Y["-"]
    R --> Z["Move the unit to a location where not exposed to direct sunlight or the hot air draught of heaters."]
If the problem cannot be corrected after taking the above action, contact the service shop.
MEMO
| CE - DECLARATION-OF-CONFORMITY | CE - DECLARATION-DE-CONFORMIDAD | CE - DECLARAÇÃO-DE-CONFORMIDADE | CE - ERKLÆRING OM-SAMSVAR | CE - IZJAVA-O-USKŁADNOSTI | CE - IZJAVA O SKLADNOSTI | CE - ATITIKTIES-DEKLARACIJA |
| CE - KONFORMITÄTSERKLÄRUNG | CE - DICHIARAZIONE-DI-CONFORMITA | CE - ЗАЯВЛЕНИЕ-O-COOTBETCTВИИ | CE - ILMOITUS-YHDENMUKAISUUDESTA | CE - MEGFELELŐSEĞI-NYILATKOZAT | CE - VASTAVUSDEKLARATSIÖON | CE - ATBilstÍBAŞ-DEKLARĆCIJA |
| CE - DECLARATION-DE-CONFORMITE | CE - ΔΗΛΩΣΗ ΣΥΜΜΟΡΦΩΣΗΣ | CE - OPFYLDELSESERKLÆRING | CE - PROHLÁŠENÍ-O-SHODĚ | CE - DEKLARACJA-ZGODNOŚCI | CE - ДЕКЛАРАЦИЯ-ЗА-СЪОТВЕТСТВИЕ | CE - VYHLÁSENIE-ZHODY |
| CE - CONFORMITEITSVERKLARING | CE - FÓRSÁKRAN-OM-ÖVERENSTÄMMELSE | CE - DECLARAȚIE-DE-CONFORMITATE |
DAIKIN INDUSTRIES, LTD.
| 17 | PL oświadcza z pełną odpowiedzialnością, że modele oczyszczaczy powietrza, których dotyczy niniejsze oświadczenie: |
| 18 | RD declará pe proprie räspondere că modelele de purificatoare de aer la care această declarație se referă: |
| 19 | Rb na lastno odgovornost izjavlja, da so modeli čisticev zraka, na katere se nanaša ta izjava: |
| 20 | ED kinnitab anuvastutusel, et ôhupuhashajta mudelid, mida kăsolev deklaratsioon puudulat: |
| 21 | DEA deklaripira na своя inklizklimetna ottopornost, che modelite vypadku prewićstatenii, за които će относяє тази декларация: |
| 22 | LT prislimdamas pilna atsakomybe patvirtina, kad oro valytuvu modeliai, kurlems taikoma și deklaracija: |
| 23 | LV uznemoties visu abildibu pazino, ga kaisa attritižă modeli uz kuriem attiecș šis paziņojums: |
| 24 | SK na voju vlastnu zodpovednosť vyhasuje, że modely čističa vzduchu, na ktorė sa vzťahuje toto vyhlásenie: |
| 09 | ☒S с исключительной ответственностью заявляет, что модели очистителей воздуха, к которым относится данная декларация: |
| 10 | ☒R erklærer under eneansvar, at luftrensermodelleme, som denne deklaration vedrører: |
| 11 | ☒I deklarsrar i egenskap av huvudansvarig, att de modeller av luftrenare som berörs av denna deklaration innebär att: |
| 12 | ☒N erklærer et helt og fult ansvar for at de luftrensermodelleme som berøres av denne deklarasjonen, innebærer at: |
| 13 | ☒P limolitaa yksincraean ornala vastuillaan, etiá lámán ilmotuksen tarkolitarnat ilmanpuhdistuslaiteiden mallit: |
| 14 | ☒Q prohlásuje na vlastni zodopvědnost, že modely zařízení pro čistění vzduchu, na které se toto prohlášení vztahuje: |
| 15 | ☒R izjavljuje pod isključivo vlastitom odgovornošću da modeli pročščivača źraka na koje se ova izjava odnosi: |
| 16 | ☒R saját kizárólagos feletősségére kijelení, hogy a nyilatkozatban leírt légliszítlo modellek: |
| 01 | GB declares under its sole responsibility that the air purifier models to which this declaration relates: |
| 02 | D erklärt auf seine alleinige Verantwortung dass die Modelle der Luftreinigungsfüther für die diese Erklärung bestimmt ist: |
| 03 | F déclare sous sa seule responsabilité que les modèles de purificateurs d'air visés par la présente déclaration: |
| 04 | NL verklaart hierbij op eigen exclusieve verantwoordelijkheid dat de typen luchtreinigers waarop deze verklaring betrekking heeft: |
| 05 | E declara bajo su única responsabilidad que los modelos de purificador de aire a los cuales hace referencia la declaración: |
| 06 | I dichiara sotto sua sola responsabilità che i modelli di depuratore di aria a cui la riferimento questa dichiarazione: |
| 07 | GR δήλινη με αποκλεστική ευθένη οπ τα μοντέλα των συσκεύων καθαριμού αέρα στα οπολα αναφέρεται η παρούσα δήλιουη: |
| 08 | F declara sob sua exclusiva responsabilitadde que os modelos de purificadores de ar aos quais esta declaración se refere: |
MCK75JVM-K
| 01 following the provisions of: | 10 under iagttagelse af bestemmelserne i: | 19 ob upoštevanju določb: | 01 Directives, as amended. | 10 Direktiver, med senere andringer. | 19 Direktive z vsemi spremembami. |
| 02 gemäß den Vorschriften der: | 11 enligt vilkoren i: | 20 vastavalt nõutele: | 02 Direktiven, gemäß Änderung. | 11 Direktiv, med företagna ändringar. | 20 Direktivid koos muudatustega. |
| 03 conformément aux stipulations des: | 12 gitt i henhold til bestemmelsene i: | 21 следaïki knyaite na: | 03 Directives, telles que modifiées. | 12 Direktiver, med foretatte endringer. | 21 Direktivik, с техните изменения. |
| 04 overeenkomstig de bepalingen van: | 13 noudattaen määräyksiä: | 22 laikantis nuostatu, pateikiamu: | 04 Richtlijnen, zoals geamendeerd. | 13 Direktivejä, selasina kuin ne ovat mutettuina. | 22 Direktvose su papildymas. |
| 05 siguiendo las disposiciones de: | 14 za dodrženi ustanoveni predpisu: | 23 levěrojot prasības, kas noteiktas: | 05 Directivas, según lo emnendado. | 14 v platném znění. | 23 Direktivás un to papildinájumos. |
| 06 secondo le prescrizioni per: | 15 prema odredbama: | 24 održiavajíc ustanovenia: | 06 Direttive, come da modifica. | 15 Smjenice, kako je izmijenjeno. | 24 Smernice, v platnom znení. |
| 07 με třípnčn tuw διατόξευν tuw: | 16 követi a(z): | 07 Öðnyišv, ómuš Čyouv trpontoniŋbci. | 16 irányeliv(ek) és módosításak rendelkezéseit. | ||
| 08 de acordo com o previsto em: | 17 zgodnie ze postanowieniami Dynaktyw: | 08 Directivas, conforme alteração em. | 17 z poźniejszymi poprawkami. | ||
| 09 в соответствии с положениями: | 18 in urma prevederilor: | 09 Дурестив, со всеми погравками. | 18 Directivelor, cu amendamentele respective. | ||
| 01 Note * | as set out inand judged positively byB> | 06 Nota * | 11 Information *enligoch godkäntsavenligt Certifikatet<>. | 16 Megjegyzés *a(z) alapján, a(z) igazolta a megleleist, a(z) tanisitvany szerint. | 21 Забележка *както е изложено вA> и оценено полокитално отB> сълласно Сартификата<>. |
| 02 Hinweis * | wie in der aufgeführt und von positiv beurteit gemäß Zertifikat<>. | 07 Σημείωση *óms kəboriζεται οτοA> как kriveta Bετιμα πό τοB> οδυρωνα με το Πατοποητικό<>. | 12 Merk *som det tremkommer i og gjennom positiv bedammelse avB> ifelge Sertifikat<>. | 17 Uwaga*zgodnie z dokumentacjaA> pozytywną opiniąB> i Świadectwem<>. | 22 Pastaba *kap rustalytaA> ir kap teigiamai nusprestaB> pagal SertifikataC>. |
| 03 Remarque * | te' que défini dansA> et évalué positivement par conformément au Certificaat<>. | 08 Nota *tal como estabelecido emA> e com o parecer positivo deB> de acordo com o Certificado<>. | 13 Huom *jotka on esstity asiakrijassaA> ja jotkaOn hyväksynyl SertifikaitinC> mukaisesti. | 18 Nota *asa cum este stabilit InA> si apreciat pozitiv deB> in conformitate cu CertificatulC>. | 23 Piezimes*Kä norādītsUn atbilstoliB> poztifivajam vērtājumam saskañar ser sertifikatu<>. |
| 04 Bemerk * | zoals vermeid enPositel beoordeeld doorovereenkomstig Certificaat<>. | 09 Примечание *как указано вA> и в соответствии с положительным решениемB> согласно | 14 Poznámka *jaky bylo uvedeno vA> a poztivně zjištěnoVsouladu s osvédčenimC>. | 19 Opomba*kol je doloděno vA> in odobreno s straniB> v skladu s certifikatomC>. | 24 Poznámka *ako bolo uvedenýA> a poztivne zistenéB> vs sülade s osvedčenímC>. |
| 05 Nota * | como se establece enA> y es valorado positivamente porB> de acuerdo con el Certificado<>. | 10 Bemærk *som antort iA> og positivi wurderet alB> ihenhold til Certifikat<>. | 15 Napomena *kako je izloženo uA> i poztivno ocijenjeno od straneB> prema CertifikatuC>. | 20 Márkus*nagu on náldatud dokumendsA> ja heaks kišedutB> járgi vastavat sertifikaadileC>. |
DAIKIN
On. Ommaretto
DAIKIN INDUSTRIES, LTD.
Head office:
Umeda Center Bldg., 2-4-12, Nakazaki-Nishi,
Kita-ku, Osaka, 530-8323 Japan
Tokyo office:
JR Shinagawa East Bldg., 2-18-1, Konan,
Minato-ku, Tokyo, 108-0075 Japan
http://www.daikin.com/global_ac/
DAIKIN EUROPE NV
- Features
- Deodorization
- Dust collection
- Humidifi cation
- About air purifying
- Strong against pollen
- How air is humidifi ed
- Adoption of vaporization system
- Water supply system by waterwheel
- READ FIRST
- PREPARATIONS BEFORE USE
- HOW TO OPERATE
- CARE and CLEANING
- TROUBLESHOOTING
- Safety Precautions
- WARNING
- Power supply cord and plug
- CAUTION
- Other
- Precautions in use
- Names and Operation of Each Parts
- Main unit
- Operating panel
- Water supply lamp
- Brightness adjustment
- Humidifying fi Iter lamp (HUM)
- Air-purifying fi Iter lamp (■)
- UNIT lamp
- Child proof lock
- ATTENTION
- OFF TIMER button
- Humidify setting button
- Fan setting button
- Front indicator lamps
- Child proof lock lamp
- Regeneration lamp
- Dust sensor lamp
- Check lamp
- Humidity indicator lamp
- Odor sensor lamp
- Sensitivity Settings of the Dust Sensor
- Press ON/OFF seconds. While holding down
- Change the sensitivity setting from ON/OFF • Each time the button is pressed, the airflow lamps and the sensitiv
- After changing the setting, press OFF TIMER • A short beep sound is emitted and the lamp of the set sensitivity flashes.
- Unplug the power supply cord, wait at least 3 seconds and plug the power supply cord back in. This completes the setting.
- How to install
- Set the unit in a preferred location.
- NOTE
- Smart installation
- Do not use the unit in the following places.
- Preparation of Remote Controller
- Remote controller setup
- Remote controller preparations
- Using the remote controller Point the transmitter of the remote cont
- Battery replacement 1) Push the tab of the cover to
- Battery
- Remote controller
- Attach the pleated fi Iter
- Be sure to attach the pleated fi Iter before starting the unit.
- Remove the front panel. Push the 2 projections (left and right)
- Remove the water tank. Holding the water tank by the hand upwards and out of the unit
- Remove the UNIT1. Holding the UNIT1 by the h and out of the unit
- Remove the deodorizing catalyst unit.
- Attach the pleated fi Iter.
- Water Tank Preparations
- Open the cap on the water tank. Cap
- Add water to the tank and close the cap. Use only tap water.
- After attaching the fi Iter
- Restore the deodorizing catalyst unit.
- Restore the UNIT1.
- Restore the water tank.
- Restore the front panel.
- Air Purifying Operation
- 1
- Press
- ON/OFF
- 2
- Press to change the airflow rate.
- Turbo modeA
- Humidify and Air Purifying Operations
- How to Operate with Remote Controller
- To switch the humidifying operation ON/OFF Press "HUM ON/OFF".
- To change the humidify setting Press "HUM SET".
- To decide a time to stop operation Press "OFF TIMER".
- To change the brightness of the operation panel lamps and front indicator lamps Press "BRIGHTNESS".
- To prevent incorrect operation Press “ ” for 2 seconds.
- How to Use the Recyclable Deodorizing Cartridge
- Uses
- To use Inside refrigerators
- To use Inside cars
- How to use
- How to regenerate the recyclable deodorizing cartridge
- Procedure Note
- Open the streamer pocket and place the recyclable deodorizing cartridge inside.
- Close the streamer pocket.
- Quick Reference Table of Maintenance
- If the check lamp lights, check the location that requires attention on the operating panel.
- Remove parts for maintenance in numerical order.
- Care & Cleaning
- Front panel cleaning Wipe
- Sensor air inlet cleaning
- (Dust, odor, temperature and humidity sensors)
- Unit frame cleaning
- Vacuum cleaner
- Recyclable deodorizing cartridge cleaning
- Water tank cleaning
- Rinse with water
- Deodorizing catalyst unit cleaning
- Pre-fi Iter cleaning
- (About once every 2 weeks)
- Remove the front panel.
- Remove the water tank.
- Clean the pre-fi Iter.
- For stubborn dirt
- Rinse the pre-fi iter with water.
- Restore the pre-fi Iter.
- Restore the water tank. Holding the water tank by the hand, about the bottom of the water tank
- Restore the front panel. • Fit the tabs (2) at the date
- Pleated filter replacement
- Restore the deodorizing catalyst unit.
- Restore the water tank. ▶Page 29.
- Restore the front panel. ▶Page 29.
- Plug the power supply cord in.
- Press and hold the air-purifying fi Iter reset button at the top of the unit for 2 seconds.
- Pleated fi Iter replacement
- UNIT1 (Plasma ionizer) removing and attaching
- Remove
- Attach
- Cleaning UNIT1 (plasma ionizer) and UNIT2 (streamer unit)
- Ionized wire (8 locations)(2)
- Streamer unit(4)
- Humidifying fi Iter cleaning
- (About once every 1 week)
- Soak, drain and dry
- 3
- 4
- 5
- Restore the humidifying tray.
- Restore the water tank and front panel. ▶Page 29.
- Humidifying tray cleaning (About once every 3 days) Rinse with water
- For stubborn scale
- Humidifying fi Iter replacement
- (About every 2 years [2 seasons])
- Replace
- Options
- ■ Disposal requirements
- Frequently Asked Questions
- Questions & Answers
- Question:
- Answer:
- If These Lamps Light or Flash
- MEMO
- DAIKIN INDUSTRIES, LTD.
- DAIKIN EUROPE NV
Brand : DAIKIN
Model : MCK75J
Category : Humidifier