
Tourbox - Controller Ikan - Free user manual and instructions
Find the device manual for free Tourbox Ikan in PDF.


| Product Type | Controller for digital creative software |
| Brand | Ikan |
| Model | TourBox |
| Power Supply | USB 5V (via computer USB port) |
| System Requirements | Windows 7 or higher / macOS 10.10 or higher |
| Connectivity | USB Type-C to computer; USB Type-A for peripherals |
| Main Functions | Rotating Section (Knob, Scroll, Dial), Prime Four Section (Tall, Short, Top, Side), Kit Section (Dpad, C1, C2) with customizable shortcuts |
| Software Compatibility | Adobe Photoshop (default), customizable via TourBox Console for other software |
| Customization | TourBox Console allows deep customization of all buttons and controls |
| Package Contents | TourBox device, connecting cable, quick start guide, user manual |
| Indicator | LED lamp indicates power/connection status |
| Dimensions | Approximately 12 cm x 8 cm x 3 cm (estimated based on typical size) |
| Weight | Approximately 150 g (estimated) |
| Warranty | Refer to manufacturer website for details |
| Manufacturer Website | www.tourboxtech.com |
Frequently Asked Questions - Tourbox Ikan
User questions about Tourbox Ikan
0 question about this device. Answer the ones you know or ask your own.
Ask a new question about this device
Download the instructions for your Controller in PDF format for free! Find your manual Tourbox - Ikan and take your electronic device back in hand. On this page are published all the documents necessary for the use of your device. Tourbox by Ikan.
USER MANUAL Tourbox Ikan
natural_image
Abstract line drawing of various geometric shapes and symbols on a black background (no text or labels)Quick Start Guide
Hello!
This Quick Start Guide introduces you to the basics of the TourBox device.
TourBox is an innovative controller for software control in the digital creative field.
The comprehensive customized feature can adapt to any work scenarios.
Please visit www.tourboxtech.com for more information.
1
Package List
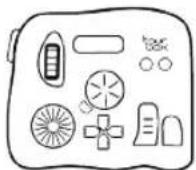
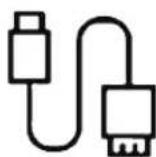
After unpacking the TourBox, please make sure that you have received the following items.
- A TourBox
●A connecting cable
• A quick start guide
- An user manual


Install the Driver & TourBox Console Application
Please visit www.tourboxtech.com/downloads to download the latest Driver and TourBox Console Application.
To make TourBox work correctly, please follow the installation guide on the download page to properly install all the applications.
* System requirements: Windows 7 or higher/ macOS 10.10 or higher.
*For all Mac users please finish the Security & Privacy Settings for both the Driver and the Application.
Using TourBox
natural_image
Illustration of a monitor with a cable and a small device, no text or symbols present① Open the TourBox Console and keep it running.
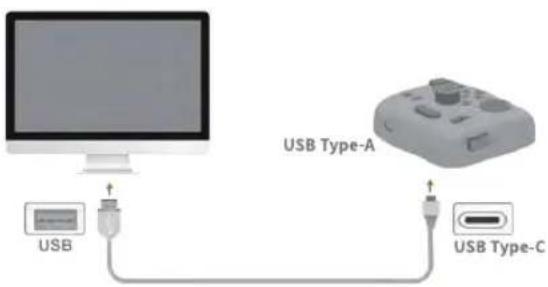
② Use the connecting cable to connect the USB Type-C interface on your TourBox and the USB port of your computer. Make sure the connection is firm, and the indicator lamp is on.
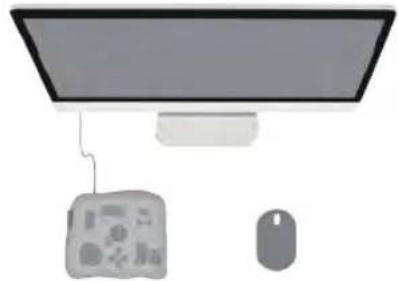
* You can use TourBox accompany with your mouse or tablet.
* The USB Type-C port on the TourBox is for connecting your computer. The input voltage is 5V.
* The USB Type-A port on the TourBox is reserved for you to connect with other PC peripheral devices. Do not connect this port with power supply, power bank or related accessories.
Meet the TourBox Console
TourBox Console can deeply customize TourBox. You can preset the TourBox based on your usage habits in different software.
- The Knob, the Scroll, the Dial, and buttons on the TourBox can use separately or in combination to adapt the different work scenarios.
- You can add multiple presets in the TourBox Console and shift them smoothly.
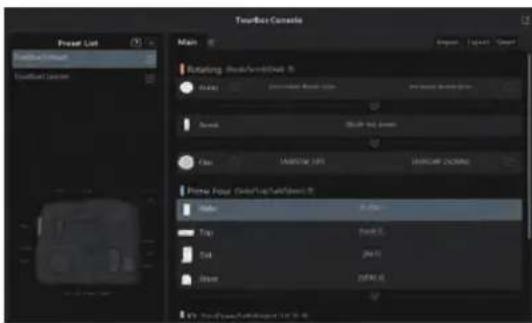
You can map any shortcut or built-in function through the TourBox Console to your device.
*The default preset of TourBox is based on Adobe® Photoshop® software.
The Layout of TourBox
According to the uses logic, the layout of TourBox is divided into three sections:
Rotating Section
Prime Four Section
Kit Section
You can learn about the basic functions of the three Sections on this page.
In this quick start guide, all the functions are set based on Adobe® Photoshop® software. For other software, please modify the functions in TourBox Console.
*tour button 🔒: Press to open/close the Guide interface Hold to open/close the HUD interface
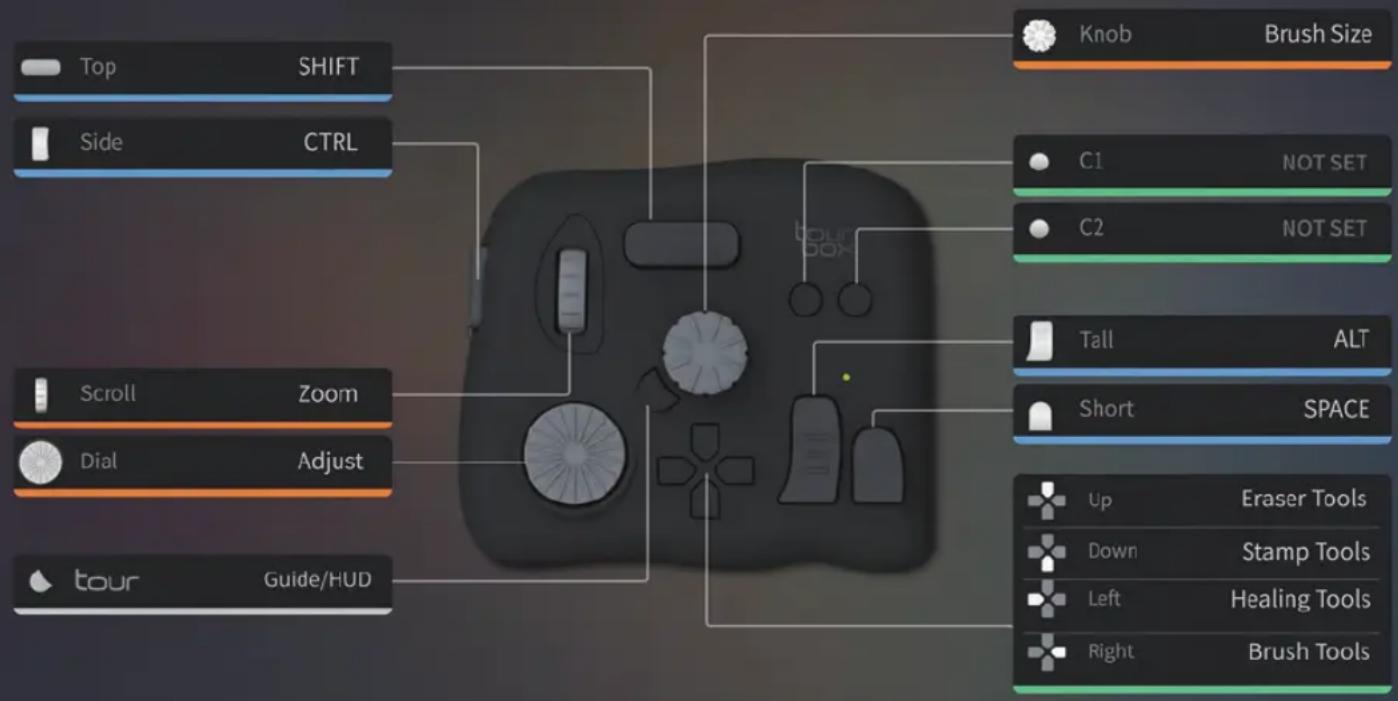
flowchart
graph TD
    A["Top"] --> B["SHIFT"]
    C["Side"] --> D["CTRL"]
    E["Scroll"] --> F["Zoom"]
    G["Dial"] --> H["Adjust"]
    I["tour"] --> J["Guide/HUD"]
    K["Knob"] --> L["Brush Size"]
    M["C1"] --> N["NOT SET"]
    O["C2"] --> P["NOT SET"]
    Q["Tall"] --> R["ALT"]
    S["Short"] --> T["SPACE"]
    U["Up"] --> V["Eraser Tools"]
    W["Down"] --> X["Stamp Tools"]
    Y["Left"] --> Z["Healing Tools"]
    AA["Right"] --> AB["Brush Tools"]
Overview of the Three Sections
8
- Rotating Section
the Knob, the Scroll, and the Dial
Prime Four Section
the Tall button, the Short button, the Top button, and the Side button
- Kit Section
the Dpad, the C1 button, and the C2 button
9
Rotating Section
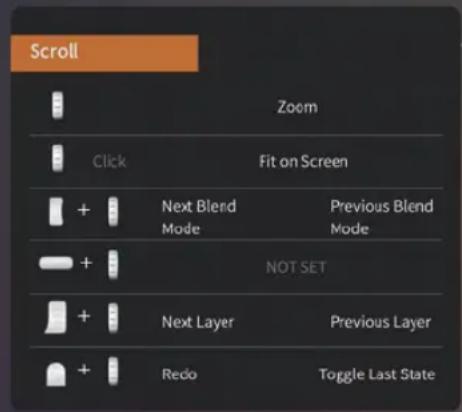
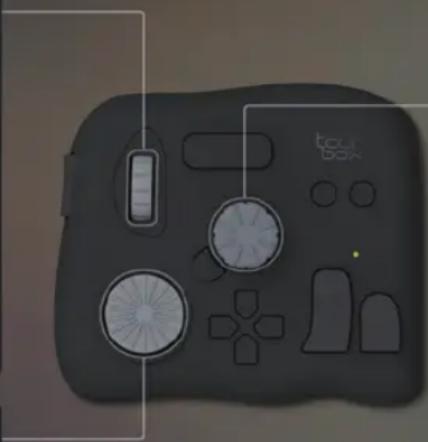
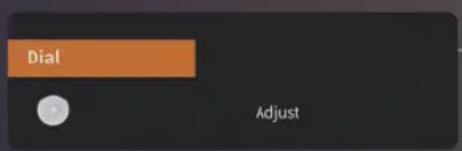
The Rotating Section can be used to quickly and accurately control software functions. The Rotating Section consists of the Knob, the Scroll, and the Dial. They can be used separately and in combination with other buttons.
For example: Rotate the knob to control the brush size. Rotate the knob while holding Tall button to control the brush opacity.
* You can also customize the functions in the TourBox Console.
Rotating Section
natural_image
3D rendered image of a black tactical game controller with multiple funnels and a 'tour box' label (no readable text beyond branding)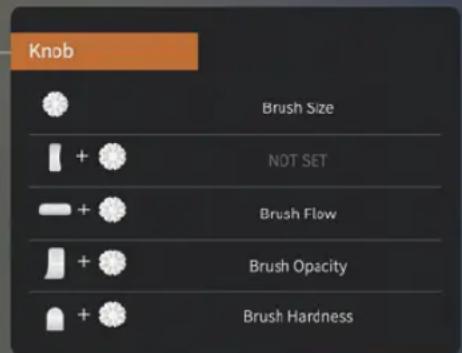
Prime Four Section
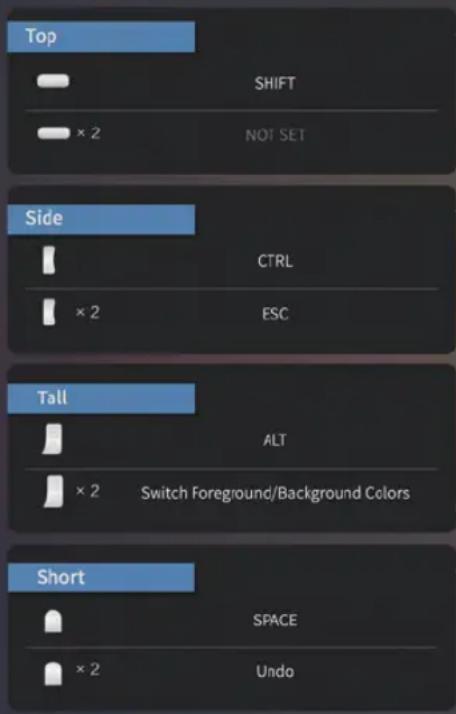
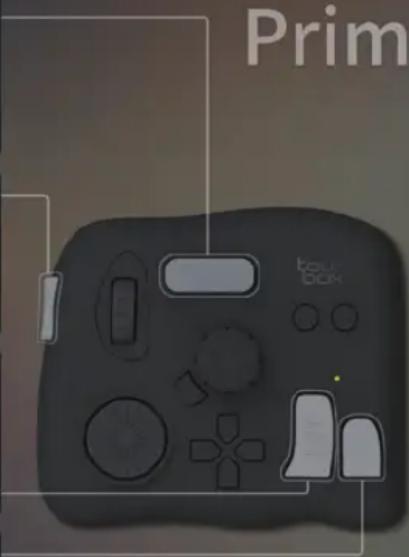
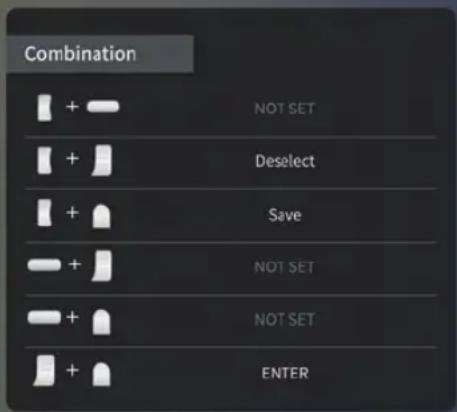
The Prime Four Section consists of the Tall button, the Short button, the Top button, and the Side button.
By clicking, double clicking, or using the combination of the Tall, the Short, the Top, and the Side can yield different functions.
*The Prime Four Section can work with other sections to provide more functions.
* You can also customize the functions in the TourBox Console.
Prime Four Section
Kit Section
The Kit Section consists of the Dpad, the C1, and the C2.
The buttons in the Dpad can assign four tools for fast switching as a kit.
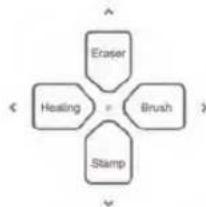
flowchart
graph TD
    A["Eraser"] --> B["Heating"]
    C["Brush"] --> B
    D["Stamp"] --> B
    B --> E["Return to Arrows"]
Holding
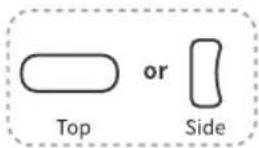
+

Dpad
can define eight more tools.
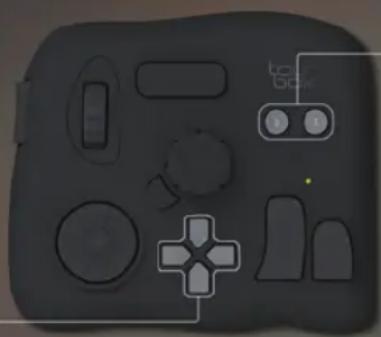
In addition, two customized keys the C1 and the C2 are reserved for you to add other functions.
* By holding the tour button 📁, you can turn on the Dpad's HUD to help you quickly locate the tools.
* You can also customize the functions in the TourBox Console.
Kit Section
natural_image
Gray gaming controller with buttons and control elements (no readable text or symbols)C1/C2

NOT SET

NOT SET


NOT SET


NOT SET
Dpad

Eraser Tools

Stamp Tools

Healing Tools

Brush Tools
Side+Dpad

Marquee Tools

Lasso Tools

Quick Selection/Magic Wand Tools

Crop Tools
Top+Dpad

Feather...

Fill...

Inverse

Free Transform
Other Features
Serial input function
○ Create, import/export and shift presets
Customizable shortcuts' description
Other functions
To learn more about the TourBox please visit www.tourboxtech.com

bar
| Category | Value | |---|---| | Category 1 | 100 | | Category 2 | 100 | | Category 3 | 100 | | Category 4 | 100 | | Category 5 | 100 | | Category 6 | 100 | | Category 7 | 100 | | Category 8 | 100 | | Category 9 | 100 | | Category 10 | 100 | | Category 11 | 100 | | Category 12 | 100 | | Category 13 | 100 | | Category 14 | 100 | | Category 15 | 100 | | Category 16 | 100 | | Category 17 | 100 | | Category 18 | 100 | | Category 19 | 100 | | Category 20 | 100 | | Category 21 | 100 | | Category 22 | 100 | | Category 23 | 100 | | Category 24 | 100 | | Category 25 | 100 | | Category 26 | 100 | | Category 27 | 100 | | Category 28 | 100 | | Category 29 | 100 | | Category 30 | 100 | | Category 31 | 100 | | Category 32 | 100 | | Category 33 | 100 | | Category 34 | 100 | | Category 35 | 100 | | Category 36 | 100 | | Category 37 | 100 | | Category 38 | 100 | | Category 39 | 100 | | Category 40 | 100 | | Category 41 | 100 | | Category 42 | 100 | | Category 43 | 100 | | Category 44 | 100 | | Category 45 | 100 | | Category 46 | 100 | | Category 47 | 100 | | Category 48 | 100 | | Category 49 | 100 | | Category 50 | 100 | | Category 51 | 100 | | Category 52 | 100 | | Category 53 | 100 | | Category 54 | 100 | | Category 55 | 100 | | Category 56 | 100 | | Category 57 | 100 | | Category 58 | 100 | | Category 59 | 100 | | Category 60 | 100 | | Category 61 | 100 | | Category 62 | 100 | | Category 63 | 100 | | Category 64 | 100 | | Category 65 | 100 | | Category 66 | 100 | | Category 67 | 100 | | Category 68 | 100 | | Category 69 | 100 | | Category 70 | 100 | | Category 71 | 100 | | Category 72 | 100 | | Category 73 | 100 | | Category 74 | 100 | | Category 75 | 100 | | Category 76 | 100 | | Category 77 | 100 | | Category 78 | 100 | | Category 79 | 100 | | Category 80 | 100 | | Category 81 | 100 | | Category 82 | 100 | | Category 83 | 100 | | Category 84 | 100 | | Category 85 | 100 | | Category 86 | 100 | | Category 87 | 100 | | Category 88 | 100 | | Category 89 | 100 | | Category 90 | 100 | | Category 91 | 100 | | Category 92 | 100 | | Category 93 | 100 | | Category 94 | 100 | | Category 95 | 100 | | Category 96 | 100 | | Category 97 | 100 | | Category 98 | 100 | | Category 99 | 100 | | Total (Total) |www.tourboxtech.com
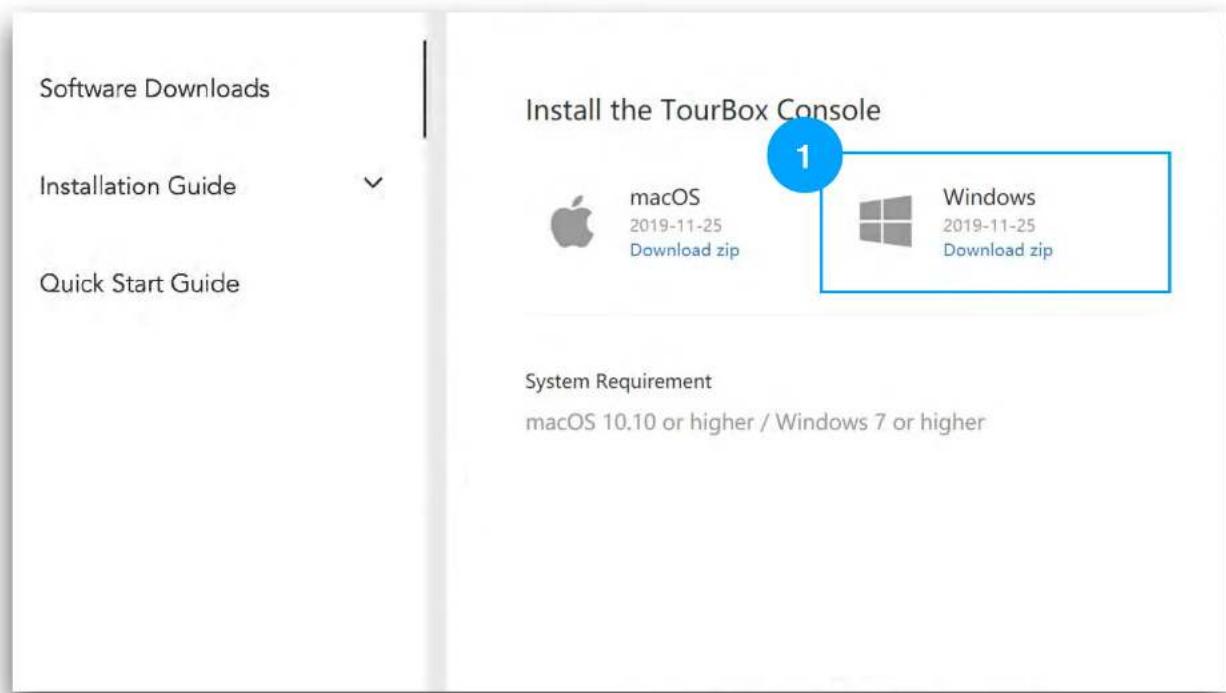
Step 1. Before connecting the TourBox to your computer, please download and install the driver based on your Windows Version.
Step 2. Please download and install the latest TourBox Console application.

arm
x86

CP210x_Univers al_Windows_Dri ver_ReleaseNot es.txt


dpinst.xml
silabser.cat
silabser.inf
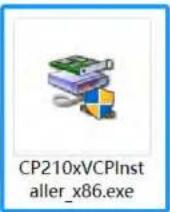
Please click the "CP210xVCPInstaller_x86.exe" to install the Driver.
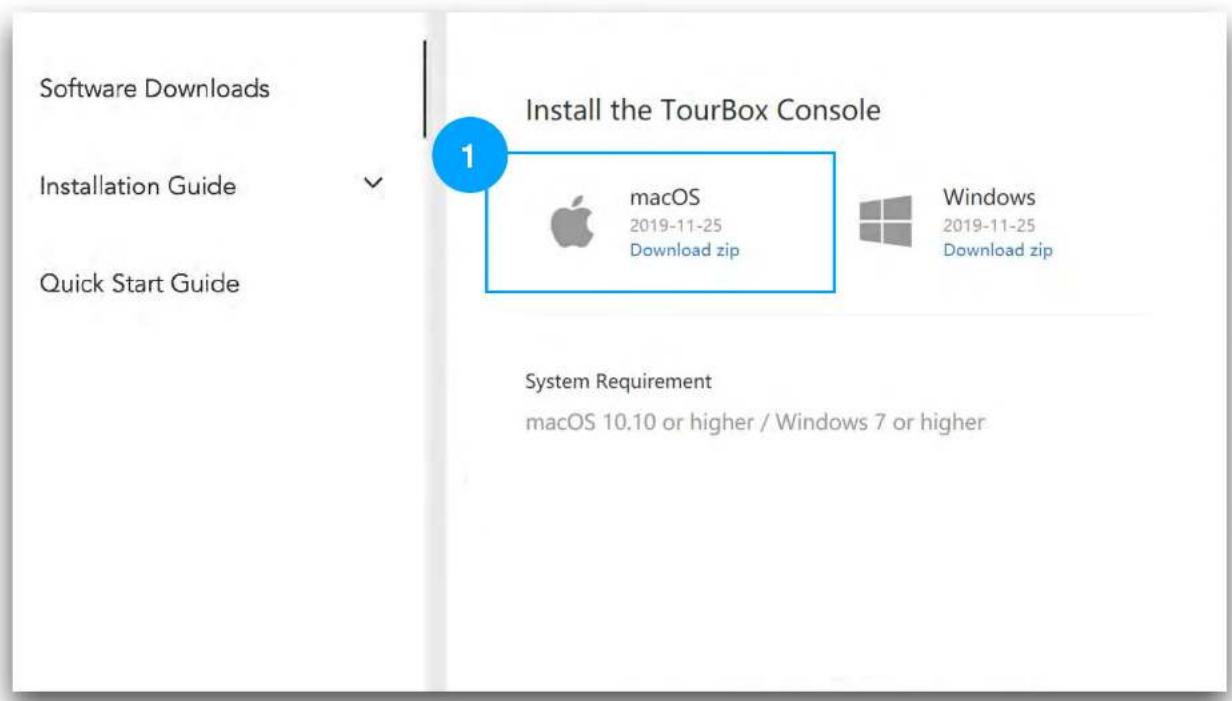
- Before connecting the TourBox to your computer, please download and install the Driver and the latest version of the TourBox Console Software.
Install the Driver
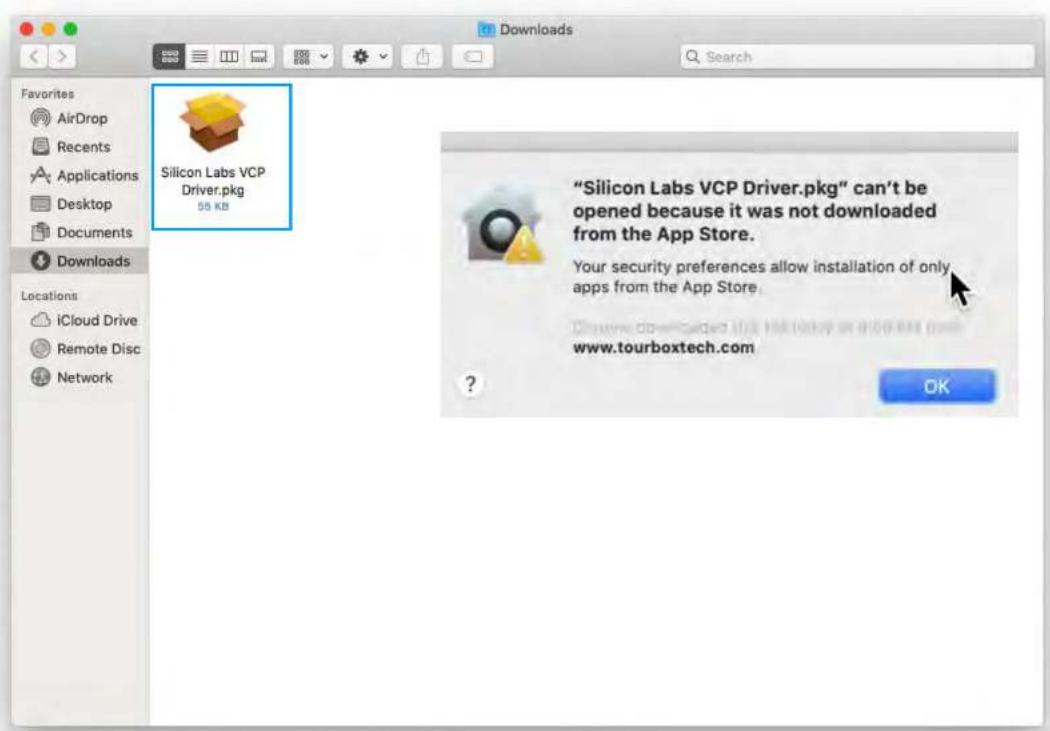
2.1. After downloading, please install the Driver first.
2.2. Click the "Silicon Labs VCP Driver.pkg" to install the Driver.
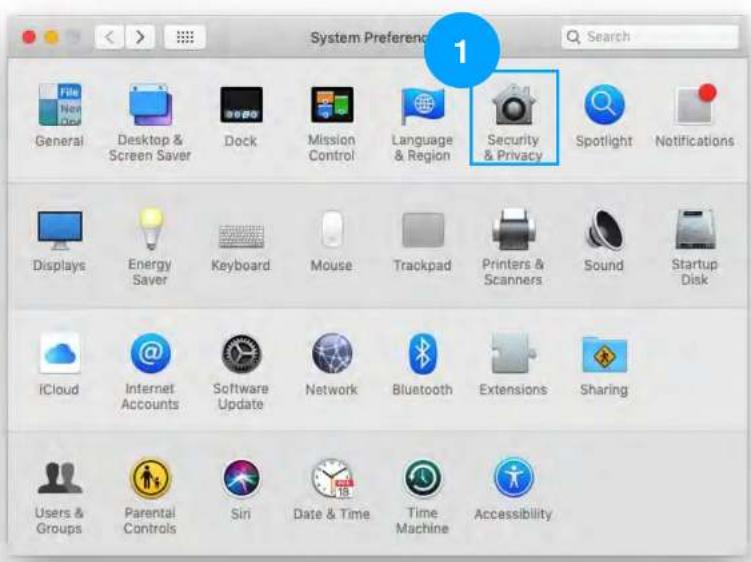
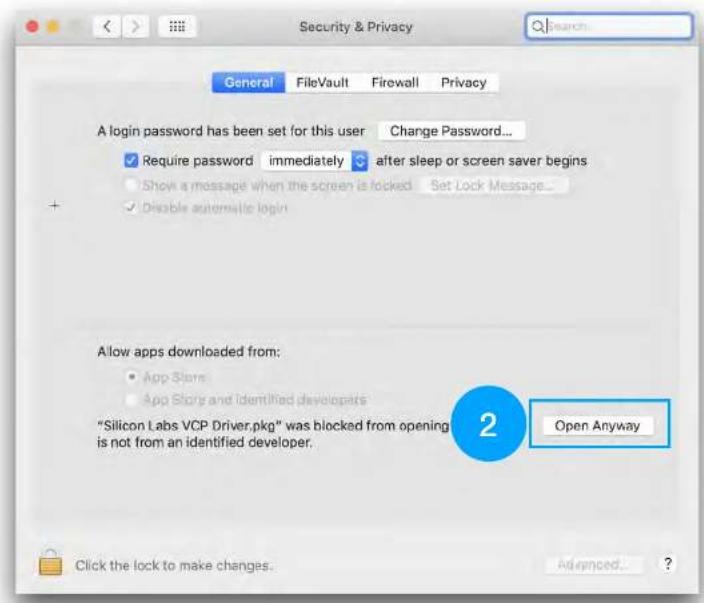
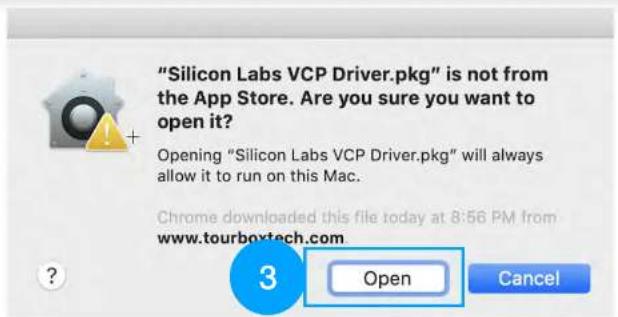
- Please open the System Preferences to allow macOS to open it.
System Preferences—>Security & Privacy—>General—>Open Anyway
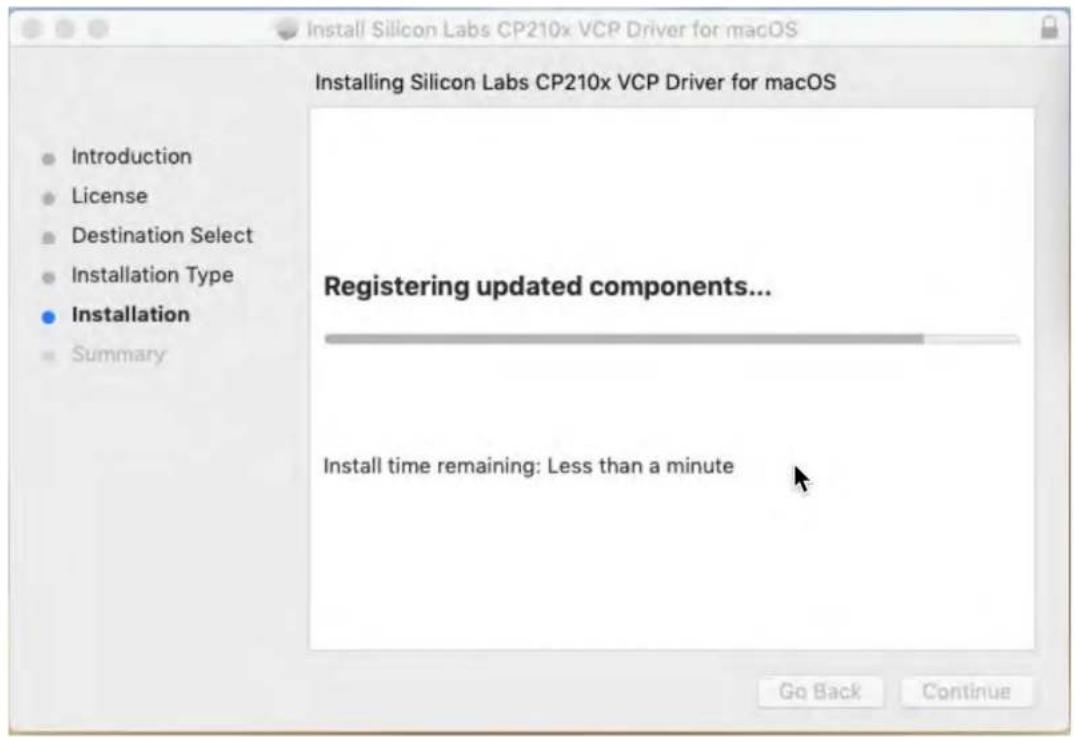
- The installation might take 1 min. Please wait in patience.
Install the Application
TourBox
Console.dmg
53.1 MB
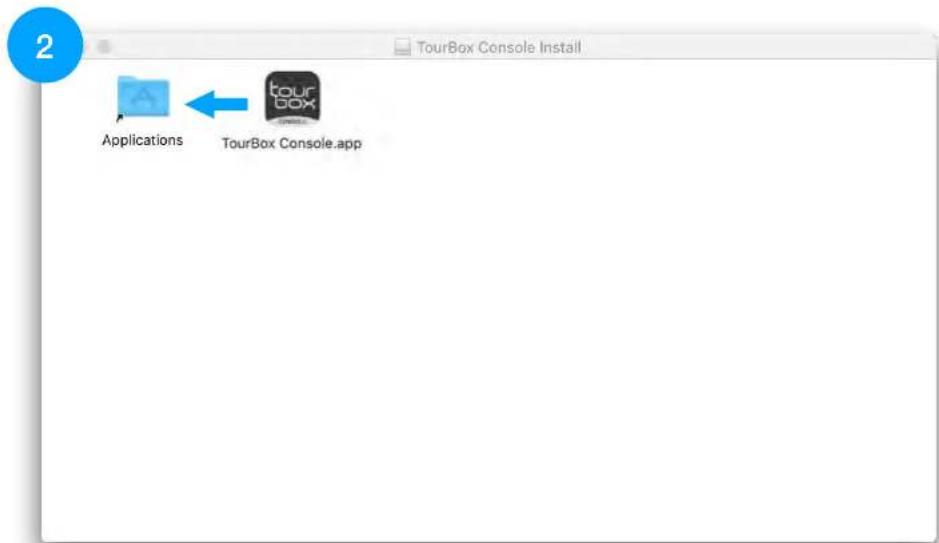
5.Drag the TourBox Console.app to the Applications.
- After installation, please run the TourBox Console and follow the pop-up window to finish the system setting.
- The pop-up windows may vary depends on different macOS system
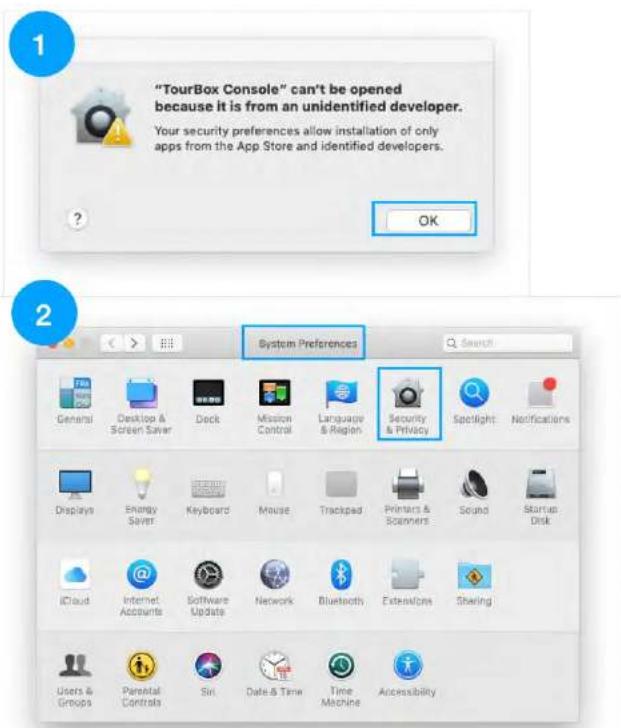
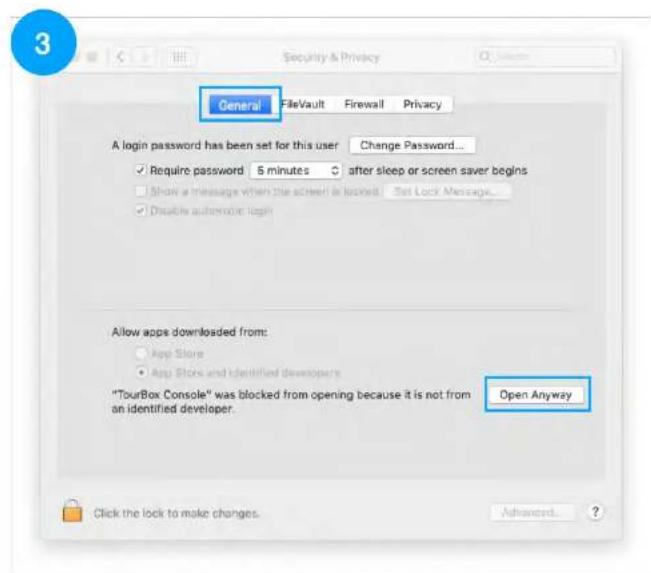
Please run the TourBox Console then open the System Preferences to allow macOS to open it.
System Preferences—>Security & Privacy—>General—>Open Anyway
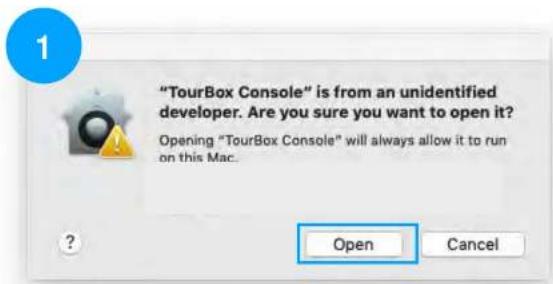
Please run the TourBox Console again then click Open.
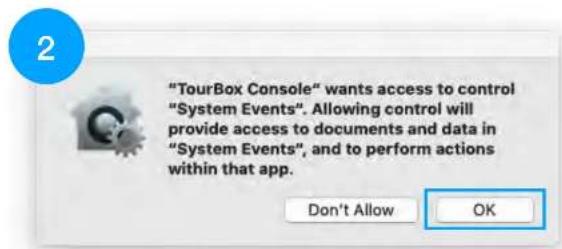
Allow the System Events accessing when it pop-up.
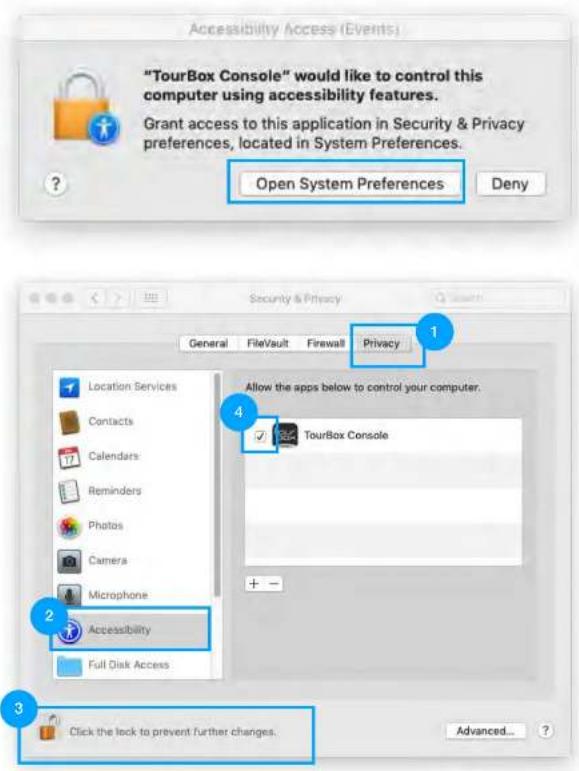
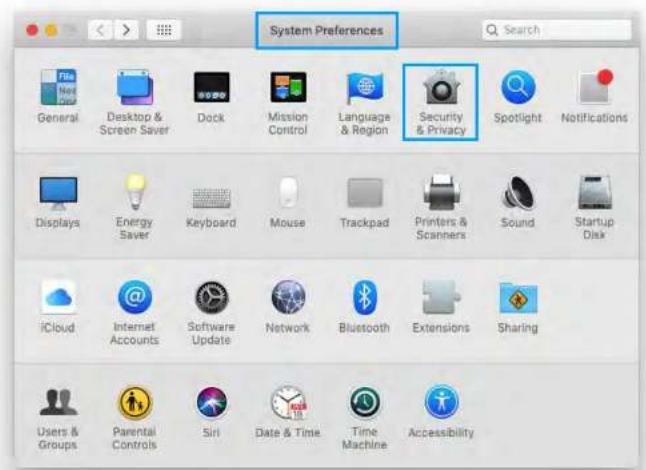
Please finish the Accessibility Setting
System Preferences-->Security & Privacy-->Privacy-->Accessibility-->TourBox Console.app
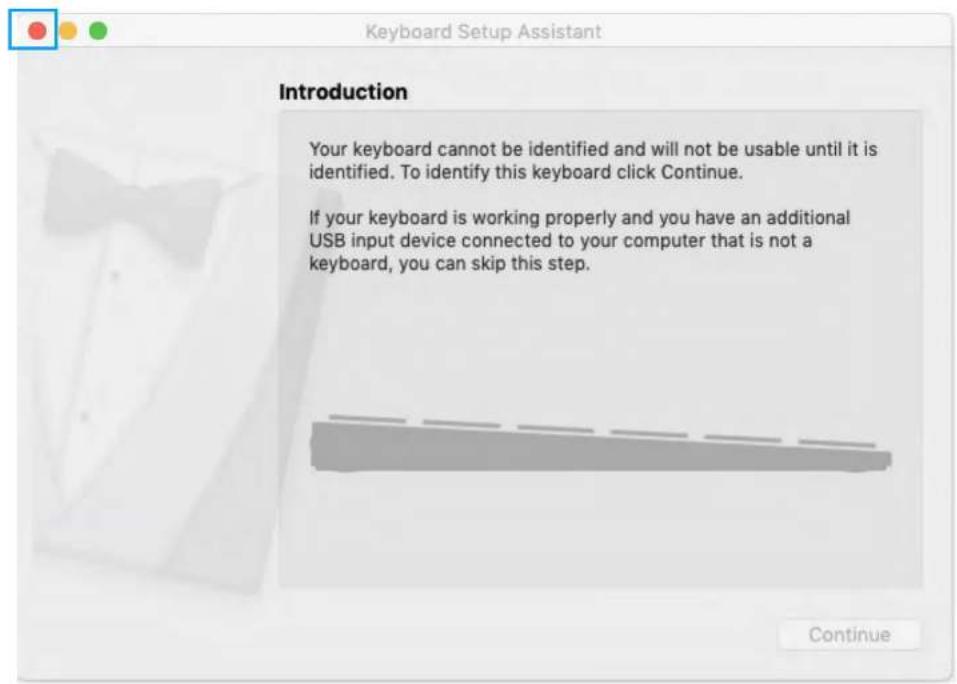
Please close the Keyboard Setup Assistant.
- Quick Start Guide
- Hello!
- Package List
- Install the Driver & TourBox Console Application
- Using TourBox
- Meet the TourBox Console
- The Layout of TourBox
- Overview of the Three Sections
- - Rotating Section
- Prime Four Section
- - Kit Section
- Rotating Section
- Kit Section
- Other Features
- Install the Driver
- Install the Application
Brand : Ikan
Model : Tourbox
Category : Controller