StudioMax III AKC320B - Lighting Photogenic - Free user manual and instructions
Find the device manual for free StudioMax III AKC320B Photogenic in PDF.


User questions about StudioMax III AKC320B Photogenic
0 question about this device. Answer the ones you know or ask your own.
Ask a new question about this device
Download the instructions for your Lighting in PDF format for free! Find your manual StudioMax III AKC320B - Photogenic and take your electronic device back in hand. On this page are published all the documents necessary for the use of your device. StudioMax III AKC320B by Photogenic.
USER MANUAL StudioMax III AKC320B Photogenic
Photogenic professional lighting
Daylight Corrected, Constant Color
StudioMax ^® III
Operator's Manual
Studio Max®III AKC320
Studio Max®III AKC320B
Studio Max®III AKC320R
Studio Max®III AKC320BR
Studio Max® III AKC160
Studio Max® III AKC160B
Studio Max® III AKC160R
Studio Max® III AKC160BR
OPERATORMANUALFORMONOLIGHTS
StudioMax ^® III AKC320
StudioMax ^® III AKC320B
StudioMax ^® III AKC320R
StudioMax ^® III AKC320BR
StudioMax ^® III AKC160
StudioMax ^® III AKC160B
StudioMax ^® III AKC160R
StudioMax ^® III AKC160BR
Thank you for selecting the Photogenic Professional StudioMax®III AKC series. The StudioMax III series incorporates state of the art electronic components, providing economical lighting control, power setting repeatability and corrected, constant color. These products are built for the operational needs of the semi-professional and amateur photographer and it is our expectation that your StudioMax III and StudioMax III accessories will provide you with years of dependable service. With this new StudioMax III series optional accessories include: all Photogenic “Quick-Change” reflectors and their attachments (gels, grids, etc.) and soft boxes.
INTRODUCTION
The StudioMax III's are self-contained light units and power supplies. They have a professional plug-in, color-corrected flashtube, a 100-watt ON/OFF modeling light, and bare bulb capability, both vertically and horizontally. The StudioMax III's are fitted with Photogenic's unique quick-change system for holding accessories made by Photogenic Professional.
Before using your new StudioMax III for the first time, please read this manual carefully and acquaint yourself with the controls and features. In this way, you can quickly get the greatest benefit from your new unit and maintain an efficient and safe operation.
Note: battery-capable models (AKC160B, AKC160BR, AKC320B and AKC320BR) require the separate purchase of a battery pack to operate in DC mode.
SAFETYPRECAUTIONS
Despite the measures that have been taken to make electronic flash equipment safe, it must be recognized that high voltages and high temperatures do exist within the power supply / lighting unit. Certain precautions must be observed in handling the unit.
Contact with internal high voltage may result in severe injury or death.
- Before installing or removing the flashtube and modeling lamp, be sure this appliance is turned off, cooled and unplugged from AC power source.
- Do not touch the glass tubes with bare hands, as normal body oils will shorten the bulb's life. Always use a clean cloth or wear gloves to protect your hand from glass breakage and heat.
- Do not defeat the purpose to the three-wire line cord by disconnecting the ground. Connect to properly functioning and grounded 3-pin receptacles only. If you are using an extension cord, be sure the cord has an equivalent or greater rating and has a ground.
- Do not insert a screwdriver or other metal objects into the flashtube socket area or vents. Contact with high voltage may result.
- Do not operate this appliance with a frayed or damaged line cord. When replacing or using the unit with an extension cable, be sure the cable has an equivalent or greater rating and is a properly connected 3-wire grounded cable.
- Do not attempt to use this appliance if it has been dropped or damaged, until a qualified service person has serviced the unit.
- Do not operate the unit with a damaged or broken flashtube or modeling lamp. To prevent damage always use Photogenic specified replacements for the flashtubes and modeling lamps.
- Perform no internal service work on this unit. Refer all such service to a qualified service person or return to the factory. This will provide you safety and continuation of your warranty.
- Do not operate when water is present (including ocean salt spray) and from extreme temperature shifts. If the unit is stored in hot or below freezing temperatures, allow at least one hour at room temperatures before using.
PREPARATIONANDBASICS
Unpacking and Setup:
Unpack all units carefully to remove all parts from the carton(s). Do not discard or destroy the packing material until the equipment has been inspected, assembled, and all parts accounted for. After unpacking, all parts should be examined for any damage, which may have been caused by rough handling during shipment. If any damage is detected, contact the delivering carrier at once. Claim for damage should be made to the delivering carrier before destroying packing cartons.
To set up the unit, first mount and secure it on a suitable stand. The StudioMax III stand adapter allows the unit to be mounted on a stand with a 3/8" to 5/8" post. Be sure to use a stand that is stable and will not tip easily.
The unit may be shipped with the modeling lamp and flashtube not installed. While installing the modeling lamp and flashtube (with glove or clean cloth to protect the hand) be sure they are properly inserted and tight to avoid arcing and failure of the socket contacts during operation. Do not touch the glass tubes with bare hands, as normal body oils will shorten the bulb's life. Always use a clean cloth or wear gloves to protect your hand from glass breakage and heat. If flashtube and modeling lamp are installed when received, there will be spacers between the glass to prevent damage during shipping. REMOVE THE SPACERS.
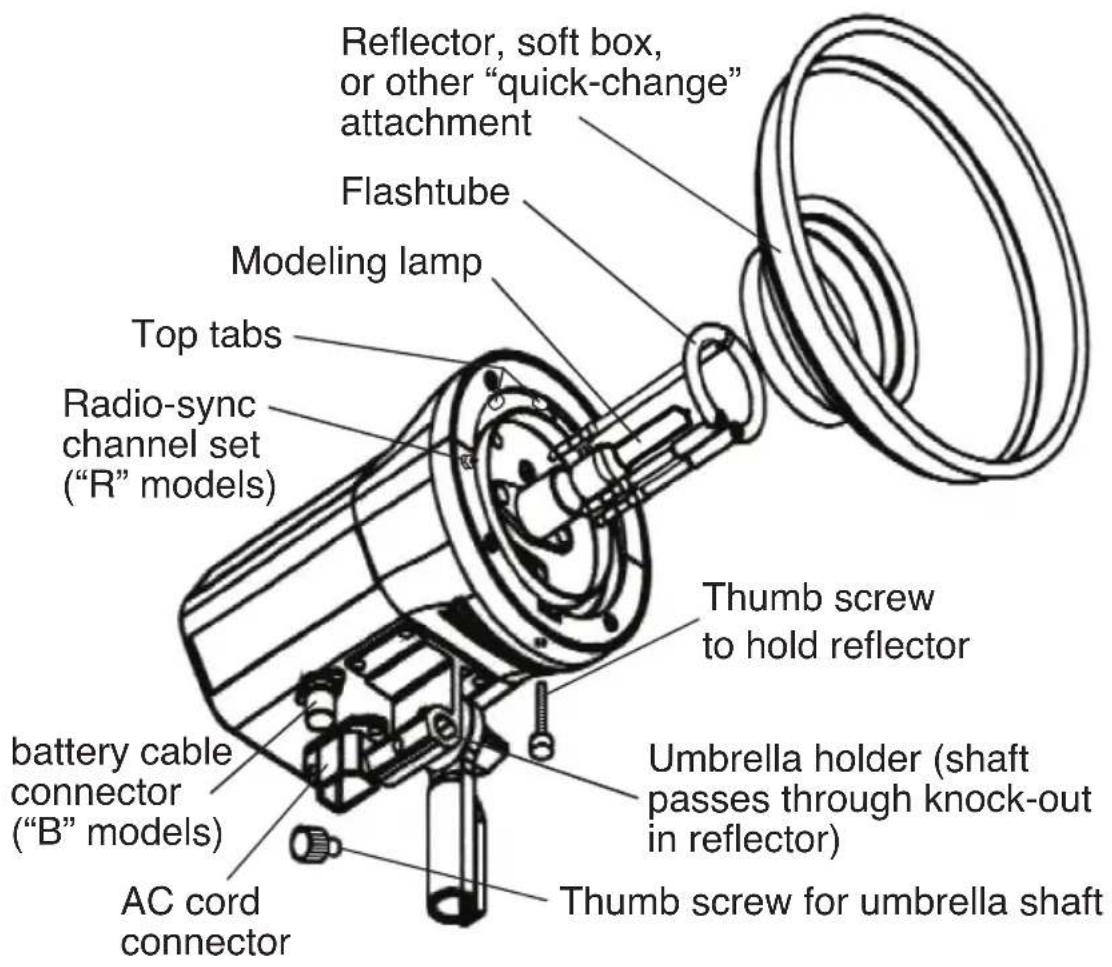
The 7- 12 inch reflector is attached by the “quick-change” mechanism. A solid tab and a thumb screw on the unit grip the ring on the reflector. To mount the reflector, loosen the thumbscrew so it does not show inside the circle and tilt the reflector past the stationary top-tab, then past the thumbscrew. Tighten the thumbscrew, securing the reflector (see illustration below.) All accessory reflectors and soft boxes are designed for use with this “quick-change” system or onto this 7- 12 inch reflector.
After mounting the light on your stand and with power switch OFF, attach the line AC line cord to the power-input connector, located on the bottom of the StudioMax III, and then connect the other end of the cable to a grounded wall outlet. Turn the power switch ON. The READY light will light only when the unit has charged to the selected setting.
text_image
Reflector, soft box, or other "quick-change" attachment Flashtube Modeling lamp Top tabs Radio-sync channel set ("R" models) battery cable connector ("B" models) AC cord connector Thumb screw to hold reflector Umbrella holder (shaft passes through knock-out in reflector) Thumb screw for umbrella shaftCONTROLPANELANDBASICOPERATION:
text_image
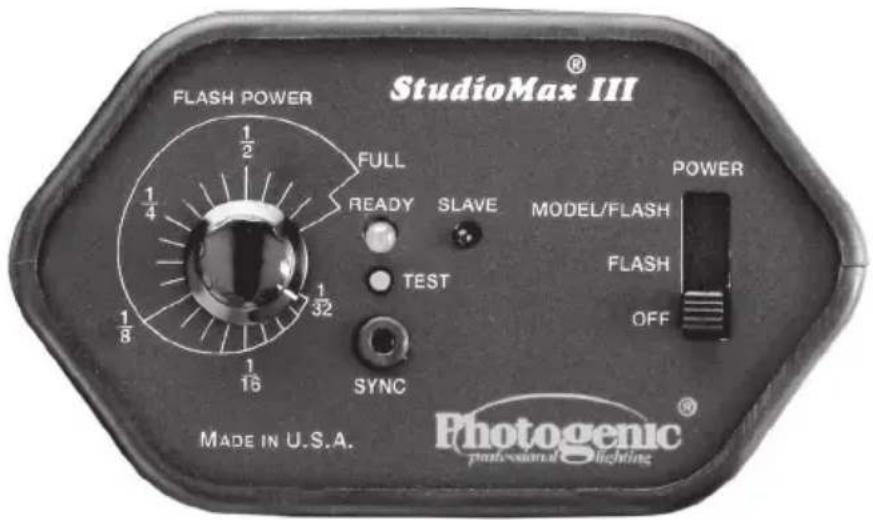
FLASH POWER StudioMax III FULL READY SLAVE MODEL/FLASH TEST SYNC OFF POWER 1/2 1/4 1/8 1/16 1/32 Made IN U.S.A. Photogenic® pathovonal SlightingPowerInput:
The power required to operate the StudioMax III is 105 to 125 volts AC, 50/60 Hz, 4 Amp, and/or, for a B (battery) model, an approved DC battery power pack (not included). The power cord has a 125V, 10 Amp. rating. Replacement cords or extension cords rated for less amperage may overheat and should not be used with StudioMax III.
CircuitProtection:
Circuit protection (fuse) automatically protects this appliance from excessive damage due to circuit or component failure. Operation exceeding the rated cycle of the appliance may cause the fuse to open. [Always replace fuse with same rating of fuse.]
To replace a blown fuse (power cord must be disconnected), simply unscrew the fuse holder cap (side front of unit) and replace the exposed fuse with a new fuse. If fuses continue to blow, contact your dealer or qualified service person.
(See specification section for fuses replacements)
PowerSwitch:
The three-position power switch controls the AC power to both the modeling and flash circuits. The lower position is OFF. Center position is flash only. Top position is flash and modeling light.
If using a battery model (B) with a battery pack, turn the Monolight ON before turning the battery pack power ON.
FlashPower:
All settings and controls of the StudioMax III are extremely stable and repeatable due to the use of an internal microcomputer. The AK320 and AK320B are adjustable from 10-watt seconds to 320-watt seconds. The AK160 and AK160B are adjustable from 5-watt seconds to 160-watt seconds.
To adjust the StudioMax III to its lowest flash power setting (5 or 10 watt seconds), rotate the FLASH POWER control knob fully counter clock-wise.
To adjust the StudioMax III to its greatest flash power setting (160 or 320 watt seconds), rotate the FLASH POWER control knob fully clock-wise.
Ready Light:
The StudioMax III is charged when the READYlamp is on. Lowest power (10 ws) charge time is a maximum of .1 seconds and at full power charge (320 ws) time is a maximum of 3 seconds. The unit may be flashed before fully charged.
It is normal for the Ready Light to stay on for a short time after the power switch is turned off.
ModelingLight:
The modeling light has two modes of operation:
- With POWERswitch in MODEL/FLASHupper position, the modeling lamp is ON.
- With POWER switch in FLASH or center position, the modeling lamp is OFF.
[Note: With battery models the modeling lamp is disabled to conserve the available battery power.]
TestFunction:
The TEST button is pressed to fire the flashtube for test purposes.
PowerOff:
Turning OFF the POWER switch will turn OFF both the AC line power and the battery pack power connection. The POWER switch must be ON for either power source. The battery pack will also have a POWER switch, which must be turned ON and OFF.
The StudioMax III POWER OFF position will “dump” the stored power in the flash capacitors by flashing the unit. This is for safety and reliability.
SynchronizationandTriggering:
Triggering is accomplished by using a camera flash or a trigger cable from one StudioMax III to the camera shutter contacts of "X" or "zero" delay.
Other units in the system are then triggered by built-in photoslave. It is best to connect the fill light directly to the camera since it will be positioned furthest back in the studio and will usually provide sufficient illumination to trigger the other units. It is suggested that all walls and ceiling be painted to either white or light neutral colors for most reliable photoslave operation.
After the trigger cord is properly connected, check the synchronization with the camera. Adjust the lighting unit to same height as the camera lens and face the lights into the lens. The lens aperture should be open to its fullest extent and set on "X" or "zero" delay. Remove the camera back. It is best to perform this test with the modeling lamps turned off.
While looking at the lens through the back of the camera, operate the shutter. A few sheets of white paper in front of the lens will cut down the brilliance of the flash and aid in making the observation. The flash of the light should then appear as a circle the same size as the aperture. If the circle is flattened on the sides, or if no light appears through the lens, the shutter is not synchronized. If the shutter appears not to be synchronized, a reputable camera repair shop should check the shutter contacts.
Photocell/Slave:
The built-in photoslave is operational when the unit is ON. If you wish to disable the photoslave, plug in the sync cord or other miniplug.
* When using the Studiomax III outside, direct sunlight may prevent the photoslave from turning off, thus preventing the sync jack from working properly. In the event that this happens, you may need to cover the sensor (labeled “slave”) on the back of the unit with a piece of electrical tape (or an equivalent light blocking material).
Radio-sync Channel Set:
NOTE: It is necessary to use a Photogenic RTT Radio Transmitter to trigger the StudioMax III radio monolight. The transmitter is available from your Photogenic dealer.
- Prepare the light for operation and disable the photoslave.
- Plug the light into an AC outlet or battery pack if the StudioMax III monolight is battery operated.
- Push the power switch to the FLASH position.
- Press and hold the radio-sync channel set button on the front of the StudioMax III monolight (see illustration, page 5). Point the RTT transmitter at the light and press the TEST button on the transmitter until the light flashes twice. Release the radio channel set button. The light will flash every time the TEST button is pressed.
- Mount the RTT transmitter on the hot shoe of your camera. The light will flash every time the shutter is released. If your camera does not have a hot shoe, use the miniplug-to-PC adapter cord provided with the transmitter, and insert the miniplug end into the side of the transmitter and insert the PC connector into the camera.
- When you want to trigger multiple lights, program each light separately to the same radio channel.
- The RTT transmitter can be programmed to four different radio channels. To program the light to a different radio channel, change the position of the DIP switches on the bottom of the transmitter and reprogram each light.
AKC160B, AKC160BR, AKC320B and AKC320BR:
A battery pack power source (AKB-1) is available to power “B” model StudioMax III lights. The AKB-1 uses a spill-proof 12-volt battery to generate the 300 volts required to power the AKC160B and BR for over 200 flashes and the AKC320B and BR for over 150 flashes, at FULL power.
OPERATION
StudioMaxIIIAllModels
FlashingRate:
Theunitrechargesquickly,asindicatedbytheREADYlightonthecontrol panel.Aquickseriesofflashescanbeobtainedwithinthelimitsofthe rechargetime.Continuousrapidflashing,however,canoverheatand damagetheflashtubeandinternalparts.Themaximumrecommendedrate offlashingdependsuponthepowerlevelbeingusedandtheamountof operationtime.Usethefollowingcharttoserveasaguideforthe maximumratetouseinyoursituation.
| PowerLevelOperatingTimeSec.Between | Flashes. | Numberof Flashes. | |
| Full Continuous 15 | Continuous | ||
| 30 minutes | 10 | 180 | |
| 1 minutes | 4 | 15 | |
| 1/4 | Continuous 10 | Continuous | |
| 30 minutes | 6 | 300 | |
| 3 minutes | 4 | 45 | |
| 1/32 | 1.5 | Continuous | |
ExposureInformation:
The following charts give the BCPS output for various umbrellas and reflectors. Coverage angle is given in degrees. Divide BCPS numbers in half for 160 w-s units.
| Umbrella | 32inch | 45inch | 60inch |
| Coverage | 120 degree | 120 degree | 120 degree |
| Full Power | 1658 | 1683 | 1683 |
| 1/2 | 829 | 841 | 841 |
| 1/4 | 414 | 421 | 421 |
| 1/8 | 207 | 210 | 210 |
| 1/16 | 104 | 105 | 105 |
| Reflectors | None | 7 1⁄2” | 14” | 16” | 20” | 24” |
| Coverage | 360° | 35° | 40° | 60° | 65° | 145° |
| Full | 703 | 7534 | 5274 | 7032 | 4922 | 1266 |
| 1/2 | 352 | 3767 | 2637 | 3516 | 2461 | 633 |
| 1/4 | 176 | 1884 | 1318 | 1758 | 1230 | 316 |
| 1/8 | 88 | 942 | 659 | 879 | 615 | 158 |
| 1/16 | 44 | 471 | 330 | 439 | 308 | 79 |
| 1/32 | 22 | 235 | 165 | 220 | 154 | 39 |
| GN@ASA 100 | 35 | 115 | 96 | 110 | 93 | 47 |
SPECIFICATIONS
AKC320, AKC320B,
AKC320R&AKC320BR
General:
Flash Power....10 to 320 watt-seconds.
(6 f-stops)
Flash Duration....1/120 second at Full
(6 f-stops)
1/400 second at 1/2
1/840 second at 1/4
1/1660 second at 1/8
1/2900 second at 1/16
1/4800 second at 1/32
Recycling time....0.02 to 3 seconds
Power Control....Full to 1/32 range (6 f-stops)
stepless resolution
Flash Color....5400 ±200K
Modeling Light Power 100 Watt, 120 VAC, ESR
Modeling Light Control ......ON or OFF
Triggering ...... Built-in Photoslave
Push-to-Test button
Sync Jack, Radio ("R" models)
Main Supply 105-125 VAC, 50/60 Hz, 3 amp
Consumption ....1 amp idling,
5 amps charge
Overload Protection ......Fuse. 3AG type, 8 amp SLO-BLO
Packaging ....Molded, high-impact, plastic case
Weight 2 pounds, 10 ounces
Dimensions (housing only)....5.25"W x 5.25"H x 7"L
FlashtubesandModelingLamps:
Flashtube ......Plug-in style, use only
Photogenic's Standard C4-12C
Modeling Lamp 100-Watt, 120 VAC, ESR
NO LARGER WATTAGE
Fuse 3AG type, 8 Amp, SLO-BLO
SPECIFICATIONS
AKC160, AKC160B,
ACK160R&AKC160BR
General:
Flash Power....5 to 160 watt-seconds (6 f-stops)
Flash Duration....1/175 second at Full
1/700 second at 1/2
1/1300 second at 1/4
1/2400 second at 1/8
1/4100 second at 1/16
1/7400 second at 1/32
Recycling time....0.01 to 1.5 seconds
Power Control....Full to 1/32 range (6 f-stops)
stepless resolution
Flash Color....5400 ±200K
Modeling Light Power 100 watt, 120 VAC, ESR
Modeling Light Control ......ON or OFF
Triggering ......Built-in Photoslave
Push-to-Test button
SyncJack, Radio ("R" models)
Main Supply 105-125 VAC, 50/60 Hz, 3 amp
Consumption .... 1 amp idling,
5 amps charge
Overload Protection ......Fuse. 3AG type, 8 Amp, SLO-BLO
Packaging ....Molded, high-impact, plastic case
Weight 3 pounds
Dimensions (housing only)....5.25"W x 5.25"H x 7"L
FlashtubesandModelingLamps:
Flashtube ......Plug-in style, use only
Photogenic's Standard C4-12C
Modeling Lamp 100 watt, 120 VAC, ESR
NO LARGER WATTAGE
Fuse ....3AG type, 8 Amp, SLO-BLO
Color Temperature Consistent and Constant
Theproblem: With the rare exception of units costing many thousands of dollars, flash lighting packs, up to now, do not control the color temperature of the light. The color temperature typically decreases by over 100 degrees Kelvin for every f-stop of power reduction. Over a 6-stop adjustment range, this results in a color temperature decrease of over 600K. Even units that have a small 3-stop range can produce significant color shifts of over 300 degrees. This can result in much larger shifts between two light sources than film can correct. (Kodak recommends less than 200 degrees shift between light sources for their 5500-degree daylight film.)
The solution: Photogenic has created an affordable solution to this problem. The new StudioMax III's provides consistent and constant color temperature across their 6-stop range. Be wary of claims of consistentcolor temperature at only one power level. This is not the same as constant-colortemperature over all power levels. Both are necessary to provide the perfect exposure we all strive for. The light produced by the new AKC's is consistent&constant. Every time you set a desired power level, you will receive the same amount of light as you obtained previously, and at the same color temperature. The light produced by the new StudioMax III is constant-color. No matter what power setting you select, the light will be the same color temperature. Using the standard color corrected flash lamp; every subject will be exposed to approximately 5400 degree Kelvin light, regardless of power setting. This solves forever the problem of unbalanced power settings in your studio, resulting in color temperature shifts in your pictures.
Reciprocity Explained
-Excerpts taken from Kodak TECHNICAL PUBLICATION DATA I FILM E31-July 2002
The reciprocity law states that the intensity of light falling on a photographic film multiplied by the exposure time equals the total amount of exposure.
IntensityxTime= Exposure
This means, for example, that an exposure of f 16 at 1/60 second is equivalent to an exposure of f 11 at 1/125 second. In either combination of settings, the same total amount of light reaches the
film. The reciprocity law applies to commonly available black-and-white and color films at exposure times from approximately 1/10 second to 1/1,000 second. This means that no adjustments are necessary for exposure or color in this shutter range. Most modern films however have increased this range to the point that no adjustments are necessary from approximately 1 second to 1/10,000 second. It should be pointed out that all photographic emulsions are subject to an effect often called “reciprocity-law failure.” At exposure times at the edges of the above ranges, you will begin to see underexposure (loss of effective film speed) at the normally calculated exposure setting, a change in contrast, a color shift, or a combination of these effects. The word “failure,” in this context, does not imply a short coming of the film, flash equipment or the camera, but merely that the reciprocity law does not hold for very long or very short exposures times.
We also sometimes refer to these changes in film response to particular illumination levels as “long-exposure effects” and “short-exposure effects.”
LONG-EXPOSURE EFFECTS: Under low-light conditions, you may have to extend your exposure times to a point of significant speed loss. With black-and-white films, the effect of this speed loss is partially offset by wide exposure latitude. Most color films require more than the normally calculated exposure when the lighting is unusually low. Also, the sensitivity differences between the many layers of color films can cause a color-balance shift, which means that you will sometimes need to use color-compensating filters to achieve an acceptable color balance.
When you must increase the indicated exposure to compensate for long-exposure effects, use a larger lens opening, if possible. Extending the exposure time will result in more speed loss, contrast change, and color shift. See the manufacturers data tables for your specific film to determine what exposure adjustment and filter may be necessary.
SHORT-EXPOSURE EFFECTS: Extremely short exposures produce essentially the same effect as long exposures: speed loss. There is also an increased scattering of exposed silver halide grains, the formation of smaller latent-image centers, and a lower rate of development at the latent-image centers.
The short-exposure effect appears as lower contrast or reduced density in the negative. Exposures of 1/10,000 second or shorter can cause this problem.
SERVICE
The photographer should not attempt to make repairs.
Consult a dealer for an authorized Photogenic Professional Lighting service agent. This will provide you safety, insure proper operational functions and provide continuation of your warranty.
Before removing the old tubes or installing new tubes, always unplug your StudioMax and discharge the stored energy by switching the POWER switch to OFF. Wait approximately two hours for the main capacitors to deplete any residual stored wattage. If the StudioMax does not flash when turned OFF (flash tube may be defective), the unit must remain OFF for four hours to discharge the main capacitors. Never place your fingers or any metal objects into the flash or modeling sockets. Contact with high voltage may result.
Limited StudioMax III Warranty
Photogenic warranties the “standard line” products are free from defects in material and workmanship of the AK series of StudioMaxIII Lights for a period of ONE year. At our choice, we will repair or replace any AKC series light that is deemed to be defective. This warranty does not cover damages caused by shipping, product abuse or use other than the intended photographic applications.
Any product modifications will render this warranty void. Use of other manufacture's accessories, which restrict normal or intended operation (especially venting airflow), may cause damage and will void this warranty.
General Trouble Shooting
COMMON PROBLEMS AND CAUSES
Unit does not charge.
Probable causes:
a. Fuse blown. (Unplug and discharge the unit-Replace fuse.)
b. No line power to unit. (Check line cord and outlet.)
c. Defective unit. (Return for repair.)
Modeling light does not turn on.
Probable causes:
a. Lamp turned off. (Press FULL ON/OFF button until LED lights.)
b. Lamp burned out. (Inspect and replace, when cool. Replace with same part number.)
Light flashes by itself without apparent reason.
Probable causes:
a. Defective trigger cord, or trigger cord incorrectly polarized.
b. Bright light falling on photoslave.
c. Poor connection in line cord.
d. Reverse connection on trigger cord connection at camera.
e. Some radio slaves will cause interference. Consult slave manufacturer.
Trigger cord will not flash unit, but charge indicator shows that the system has charged.
Probable causes:
a. Defective trigger cord.
b. Defective flashtube. Turn unit off. Wait until discharged (4 hours) and cool, then replace flashtube. (See SERVICE section of this manual)
Photoslave is not triggering the flash.
Note: The photoslave requires another flash to trigger the unit.
Probable causes:
a. Ambient light may be flooding the photocell.
b. Another light in the studio may be flooding the photocell.
c. The sync jack is being used.
d. Defective unit. Return for repair.

text_image
Photogenic professional lightingPhotogenic Professional Lighting 1268 Humbracht Circle Bartlett, Illinois 60103-1631 USA
Phone: (630)830-2500
Fax: (630)830-2525
Manual: # 116585
Revision: 05, 11/10