Kamvas Pro 16 GT1561 - Graphic tablet Huion - Free user manual and instructions
Find the device manual for free Kamvas Pro 16 GT1561 Huion in PDF.


| Product Type | Pen Display (Graphic Tablet with Screen) |
| Display Size | 15.6 inches (diagonal) |
| Display Resolution | 1920 x 1080 (Full HD) |
| Display Technology | IPS, Fully Laminated, Anti-glare Glass |
| Color Gamut | 120% sRGB, 90% Adobe RGB |
| Pressure Sensitivity | 8192 Levels |
| Tilt Support | ±60° |
| Pen Technology | Battery-free Electromagnetic Resonance (EMR) |
| Dimensions (W x H x D) | 439 x 271 x 14 mm |
| Weight | 1.5 kg (approx.) |
| Power Supply | USB-C (Power Delivery) or DC 12V adapter |
| Connectivity | USB-C (data + power), HDMI (video input) |
| Operating Systems | Windows 7/8/10/11, macOS 10.12+, Android (with USB-C PD support) |
| Pen Buttons | 2 side buttons (programmable) |
| Tablet Buttons | 8 Express Keys (programmable) |
| Cleaning Instructions | Use a soft, dry or slightly damp (water) cloth; do not use solvents or abrasive cleaners |
| Safety Warnings | Use only supplied power adapter; avoid liquid ingress; do not disassemble; stop use if damaged |
| Repair & Spare Parts | Not user-serviceable; contact Huion support for authorized repair and genuine parts |
| General Notes | Driver installation required; USB-C must support video (Thunderbolt or DP alt mode) for single-cable connection |
| Warranty | Standard 1-year manufacturer warranty (may vary by region) |
Frequently Asked Questions - Kamvas Pro 16 GT1561 Huion
User questions about Kamvas Pro 16 GT1561 Huion
0 question about this device. Answer the ones you know or ask your own.
Ask a new question about this device
Download the instructions for your Graphic tablet in PDF format for free! Find your manual Kamvas Pro 16 GT1561 - Huion and take your electronic device back in hand. On this page are published all the documents necessary for the use of your device. Kamvas Pro 16 GT1561 by Huion.
USER MANUAL Kamvas Pro 16 GT1561 Huion
Driver Installation 6
Windows 6
mac 9
Linux 12
Driver 21
Driver Interface Preview 21
Pen Display Setting 23
Digital Pen Setting 32
Driver Setting 36
Pen-enabled OSD Menu 41
How to Use the Digital Pen 45
Product Specifications 47
Troubleshooting Solutions 49
Product Overview Display Introduction
natural_image
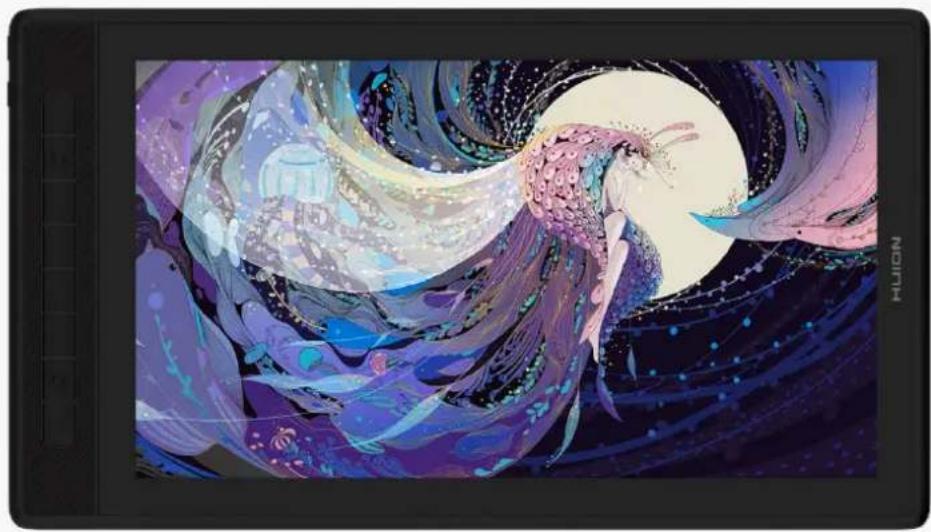
Illustration of a stylized female character with flowing hair, floating in a night sky with a full moon (no text or symbols)Thanks for choosing HUION Kamvas Pro 16(2.5K) creative pen display. As a new generation of professional pen display, Kamvas Pro 16(2.5K) enables you to enjoy drawing and creating with higher efficiency. With this pen display, you can freely write and draw, making lines varied in width, painting pictures in different shades of colors, and gaining a pen-on-paper experience.
To better understand and use this product, please read this user manual carefully. It shows how to use Kamvas Pro 16(2.5K) when you connect it to a computer running Windows operating system. It is also applicable to computers running Mac operating system unless a special note is given out. Design and specifications are subject to change without notice.
Note: The pictures in the User Manual are for reference only. Accessories
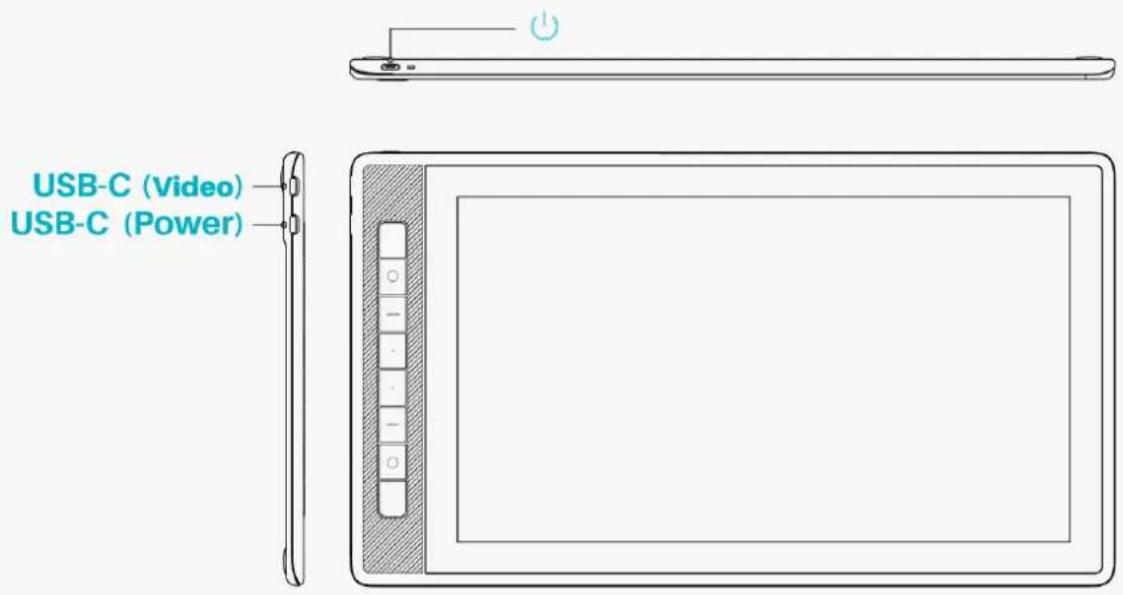
Product Overview
text_image
USB-C (Video) USB-C (Power)Accessories
Pen Display*1
Battery-free Digital Pen*1
Pen Holder*1
Standard Pen Nib*5, Felt Pen Nib*5
Pen Nib Clip*1
Foldable Stand*1
3-in-2 Cable*1
USB Extension Cable*1
Full-featured USB-C To USB-C Cable*1
USB Power Cable*1
USB Power Adapter*1
Quick Start Guide*1
Cleaning Cloth*1
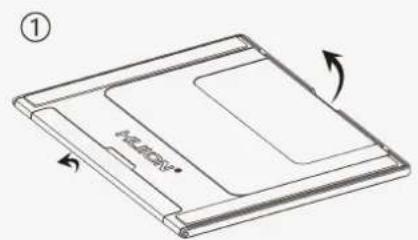
Stand Installation
An ergonomic adjustable stand is specially designed for KAMVAS Pro 16(2.5K). Adjust the angle of your pen display according to your habits and you can have a more comfortable drawing and writing experience.
text_image
① MEMORY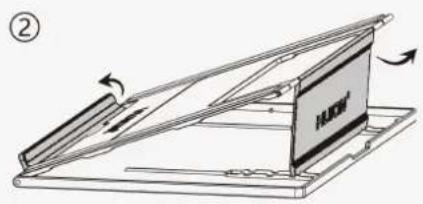
natural_image
Diagram of a folding screen setup with directional arrows indicating movement (no text or symbols)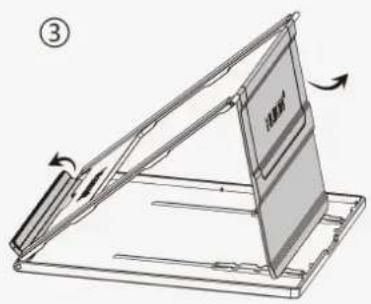
text_image
Diagram of a folding stand with labeled components and directional arrows indicating movement or rotation.Connection
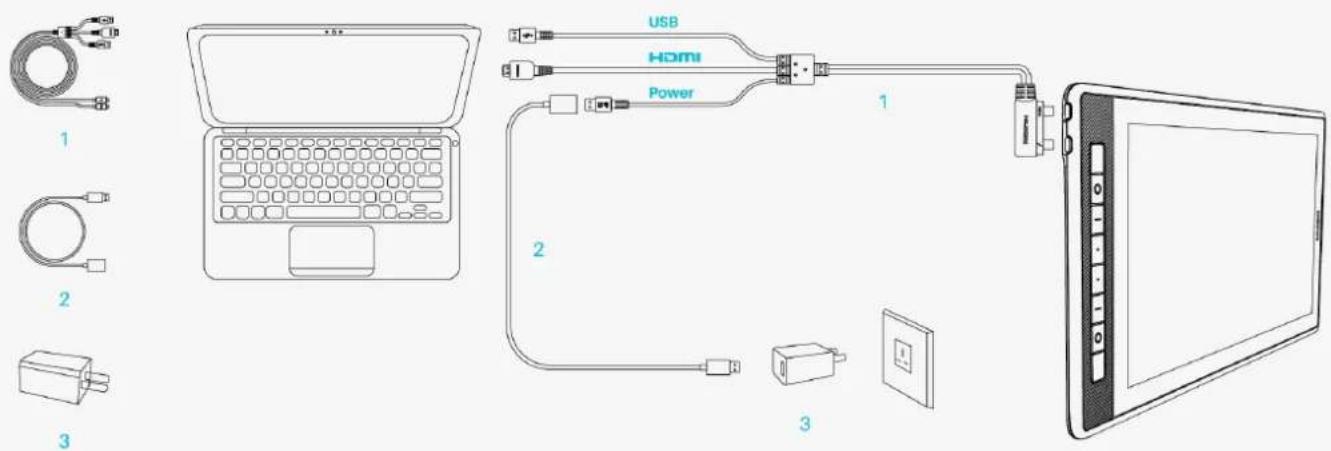
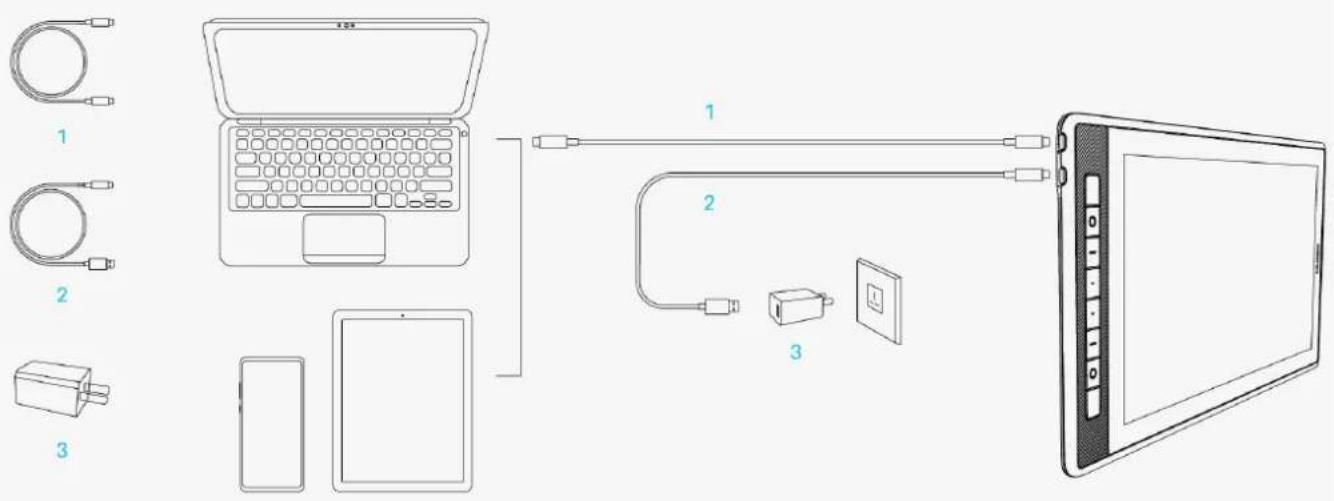
Kamvas Pro 16(2.5K) supports both computers and Android devices. The following are ways of connection for reference.
Connect via a Three-in-two Cable
Connect the pen display to your computer via a three-in-two Cable.
- Take out a three-in-two cable from the package and connect the pen display to a computer through it.
- Connect the power adapter to a power cable.
*The extended cable helps to connect the display to the power supply if the power cable is too short. Any USB power adapter is usable as long as the output is 5V, 3A.
text_image
USB HDMI Power 1 2 3Connect via a Full-featured USB-C to USB-C Cable
Connect the pen display to your computer or any Android device via a full-featured USB-C to USB-C cable.
- Take out the full-featured USB-C to USB-C cable and connect the display to a computer or Android device through it.
- Connect the power adapter to a power cable.
*Users can buy a full-featured USB-C to USB-C cable or a power cable separately, but make sure the former supports at least USB3.1 GEN1 data transfer protocol & DP1.2 and the output is at least 5V, 3A.
text_image
Diagram showing connected devices including a laptop, smartphone, and tablet with labeled componentsDriver Installation
Windows
How to Install the Driver on Windows Device
Notice:
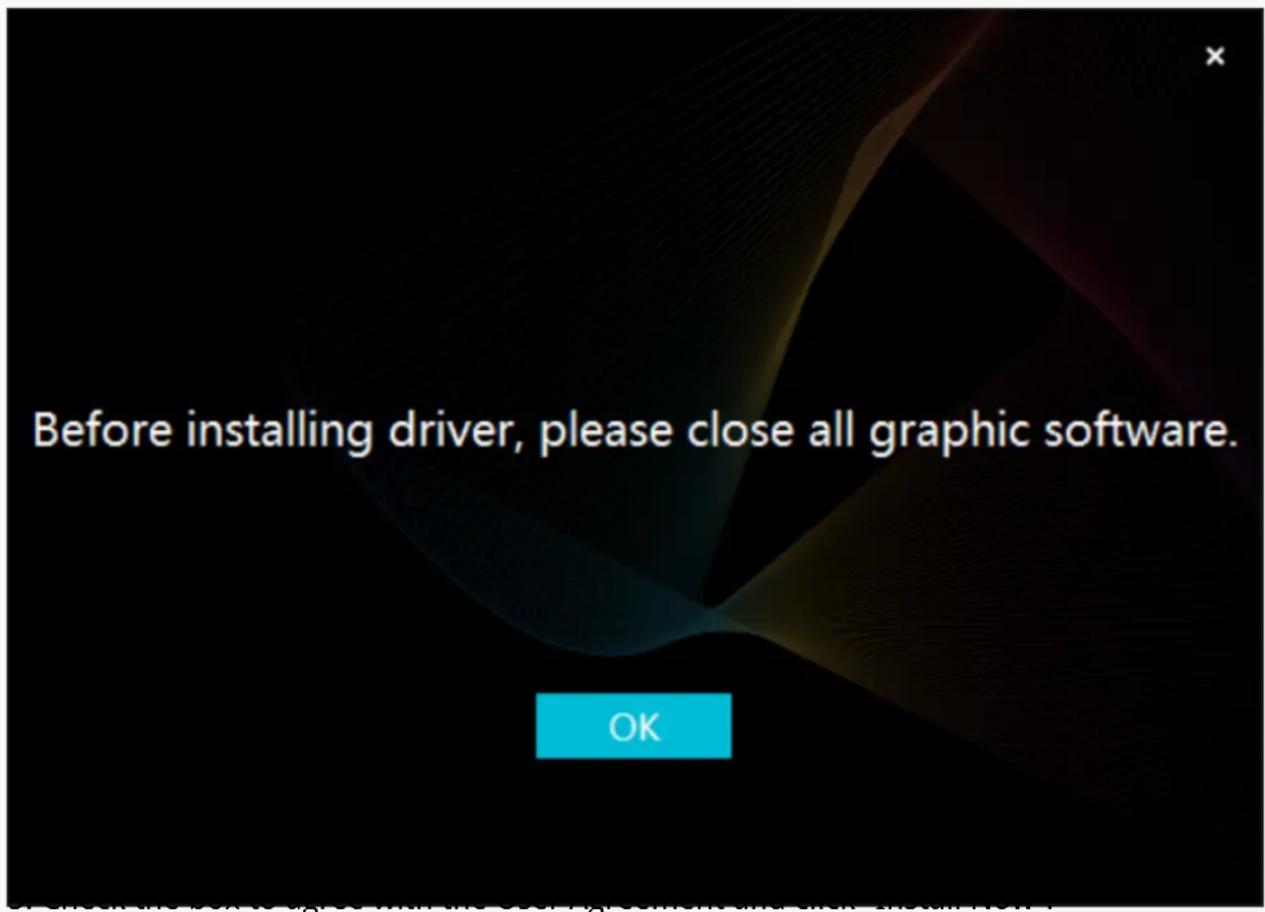
① Before installing the driver, please close all graphic software and antivirus programs. The note ("HuionTabletCore.exe" failed to launch!) below appears only on devices with Windows OS, indicating that the driver is blocked by antivirus programs or drawing applications.
② Please make sure your computer operating system is Windows 7 or later.
③ Open the driver and a picture of Kamvas Pro 16(2.5K) will appear, indicating that the pen display is successfully connected to your computer. Now you can use your pen display.
④ If the connection fails, please restart the driver or your computer.
Note: The pen display cannot work once the driver is uninstalled or deleted. In this case please click Driver-Kamvas Pro 16(2.5K) to reinstall a driver, and your pen display and digital pen will restore to their default settings.
Driver Installation
- Connect the pen display to your computer.
- Choose the correct driver for your device from our website: Driver-Kamvas Pro 16(2.5K).
- Click Driver-Kamvas Pro 16(2.5K) to download it.
- Double-click the driver and click "OK" to proceed.
text_image
Before installing driver, please close all graphic software. OK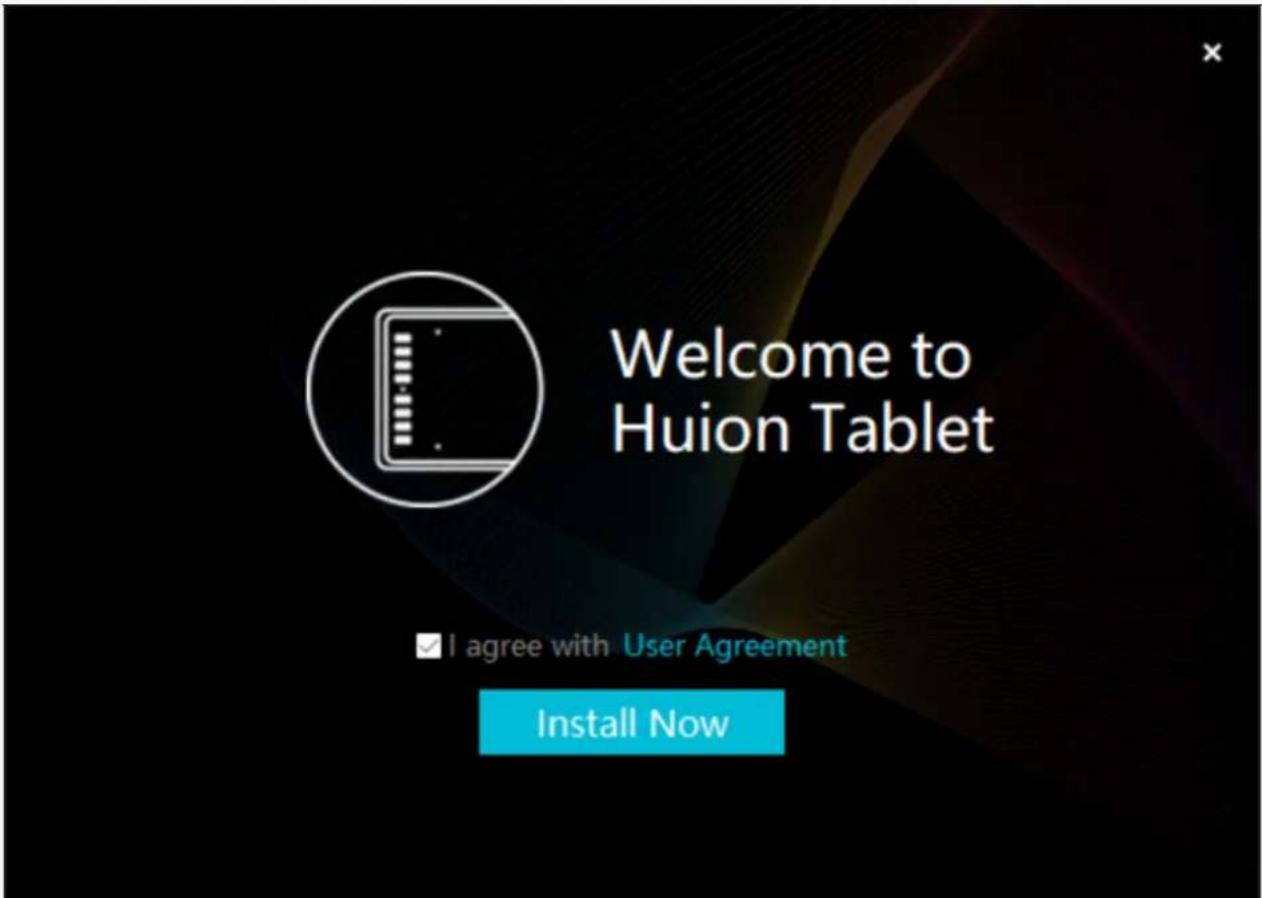
text_image
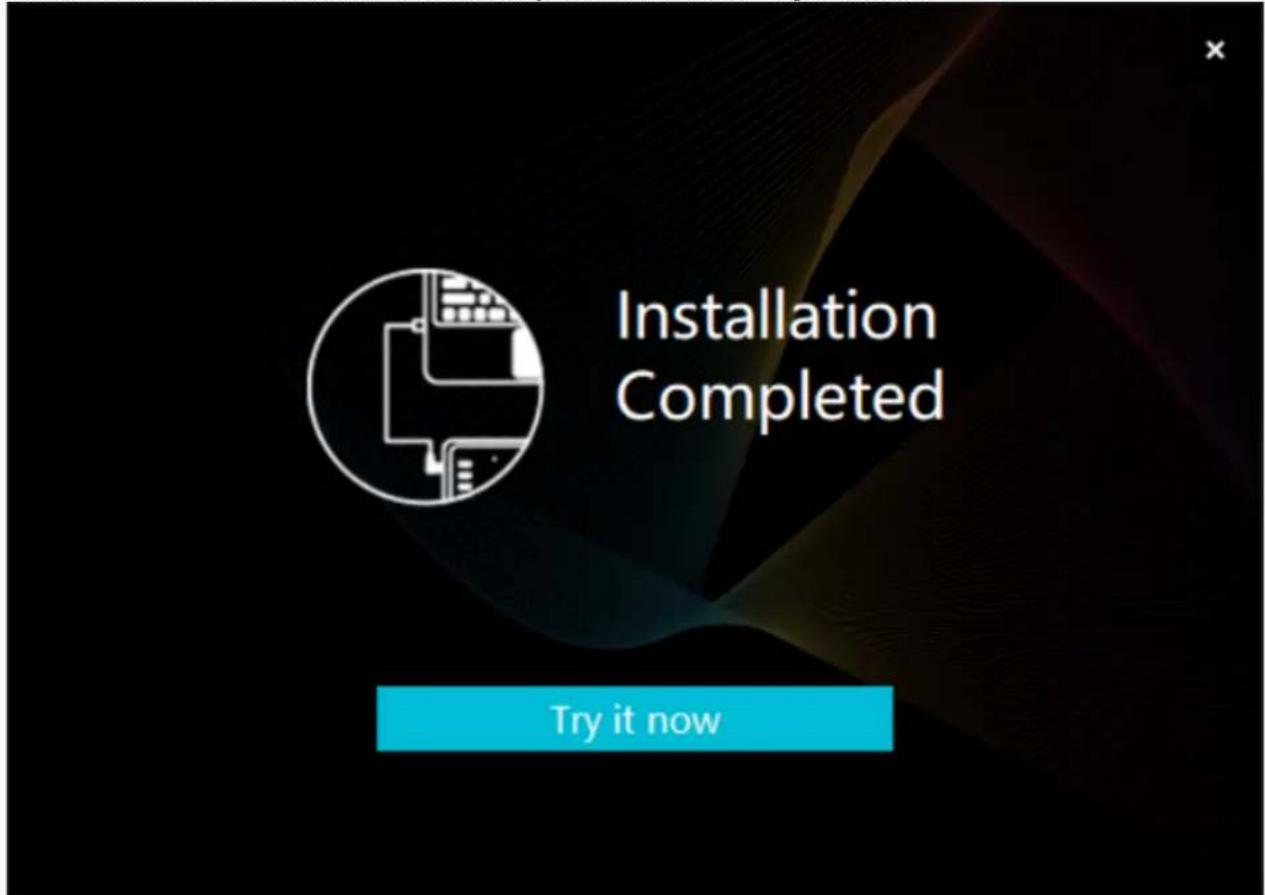
Welcome to Huion Tablet I agree with User Agreement Install Now- After the installation has been completed, click on "Try it now".
text_image
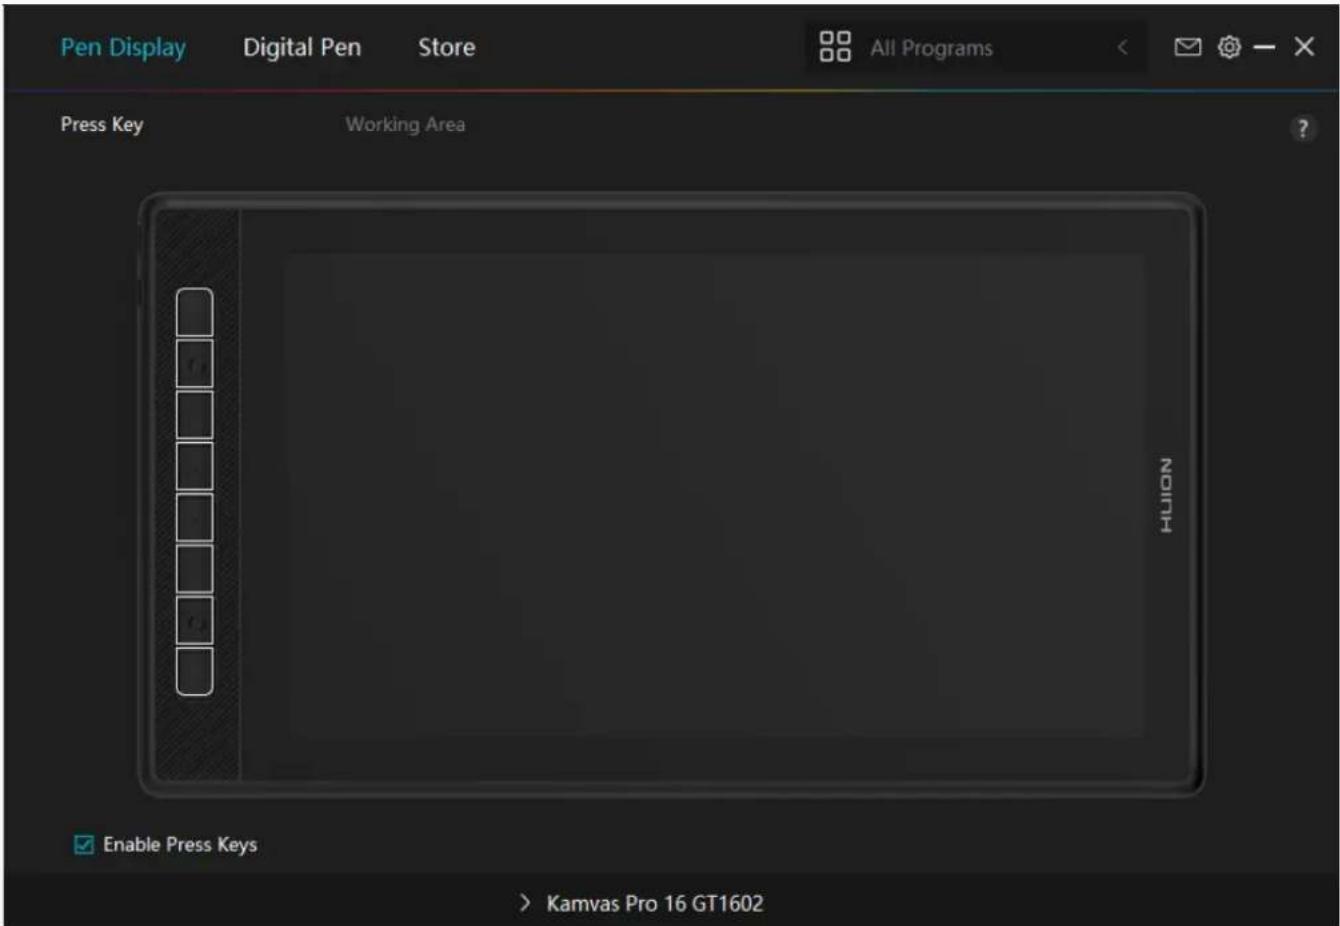
Installation Completed Try it now- A picture of Kamvas Pro 16(2.5K) will appear on the driver interface to indicate a successful connection. Now you can use your pen display.
text_image
Pen Display Digital Pen Store All Programs Press Key Working Area HUION Enable Press Keys > Kamvas Pro 16 GT1602mac
How to Install the Driver on Mac Device
Notice:
- Please make sure your computer operating system is macOS 10.12 or later.
- Open the driver and a picture of Kamvas Pro 16(2.5K) will appear, indicating that the pen display is successfully connected to your computer. Now you can use your pen display.
- If the connection fails, please restart the driver or your computer. For more information, please refer to Troubleshooting. See section.
Note: The pen display cannot work once the driver is uninstalled or deleted. In this case please click Driver-Kamvas Pro 16(2.5K) to reinstall a driver, and your pen display and digital pen will restore to their default settings.
Driver Installation
- Connect the pen display to your computer.
- Choose the correct driver for your device from our website: Driver-Kamvas Pro 16(2.5K)
-
Click Driver-Kamvas Pro 16(2.5K) to download it.
-
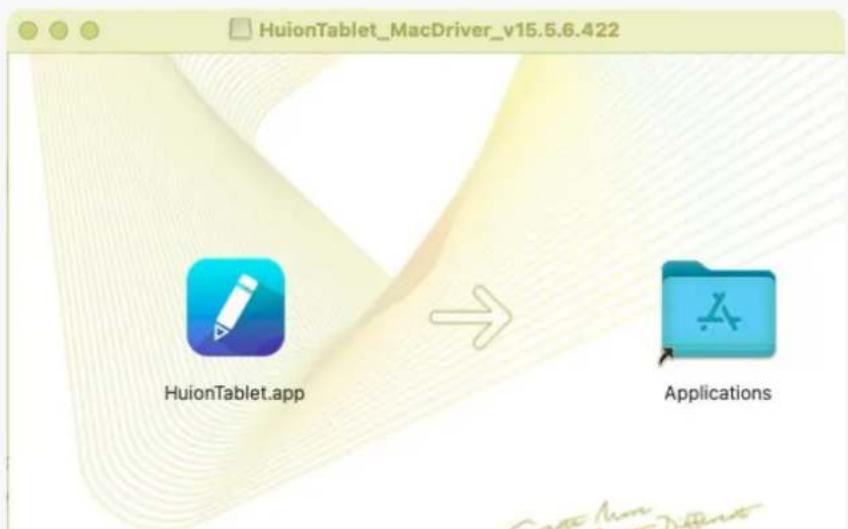
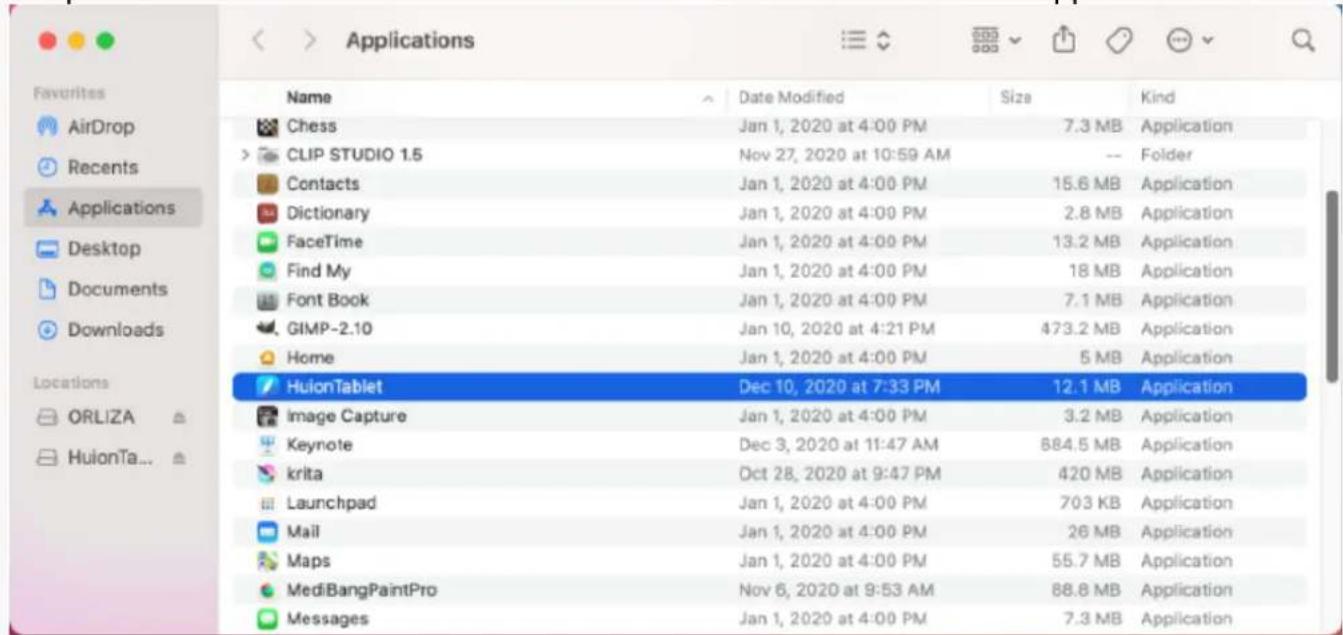
Unzip the driver file and drag the HuionTablet driver application into the "Applications" folder.
text_image
HuionTablet_MacDriver_v15.5.6.422 HuionTablet.app Applications- Open the folder and then find and double-click the HuionTablet driver application.
text_image
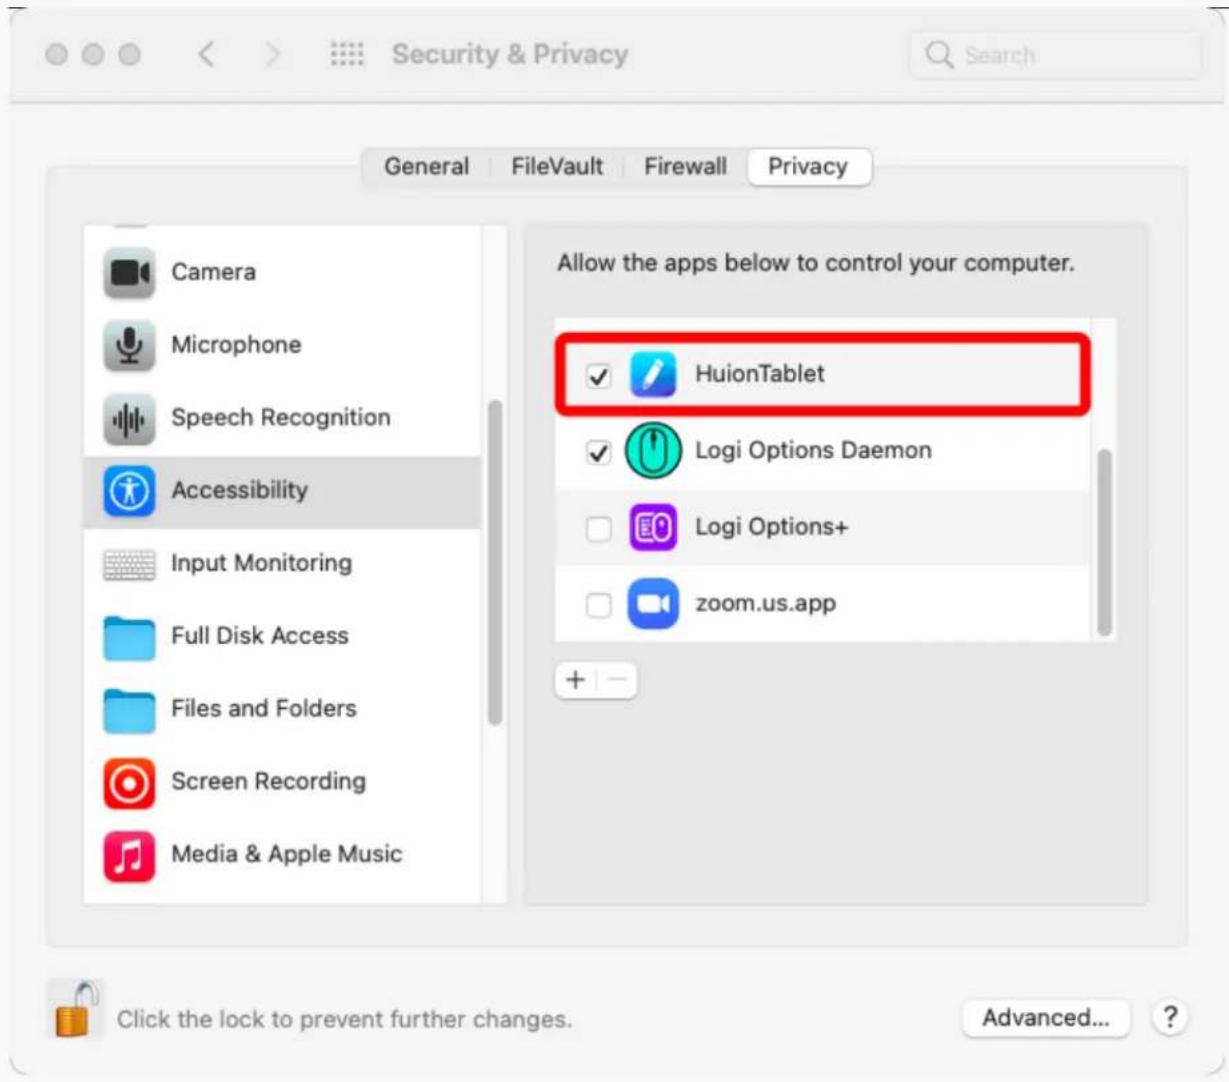
Favourites AirDrop Recents Applications Desktop Documents Downloads Locations ORLIZA HuionTa... Name Date Modified Size Kind Chess Jan 1, 2020 at 4:00 PM 7.3 MB Application CLIP STUDIO 1.5 Nov 27, 2020 at 10:59 AM -- Folder Contacts Jan 1, 2020 at 4:00 PM 15.6 MB Application Dictionary Jan 1, 2020 at 4:00 PM 2.8 MB Application FaceTime Jan 1, 2020 at 4:00 PM 13.2 MB Application Find My Jan 1, 2020 at 4:00 PM 18 MB Application Font Book Jan 1, 2020 at 4:00 PM 7.1 MB Application GIMP-2.10 Jan 10, 2020 at 4:21 PM 473.2 MB Application Home Jan 1, 2020 at 4:00 PM 5 MB Application HuionTablet Dec 10, 2020 at 7:33 PM 12.1 MB Application Image Capture Jan 1, 2020 at 4:00 PM 3.2 MB Application Keynote Dec 3, 2020 at 11:47 AM 884.5 MB Application krita Oct 28, 2020 at 9:47 PM 420 MB Application Launchpad Jan 1, 2020 at 4:00 PM 703 KB Application Mail Jan 1, 2020 at 4:00 PM 26 MB Application Maps Jan 1, 2020 at 4:00 PM 55.7 MB Application MediBangPaintPro Nov 6, 2020 at 9:53 AM 88.8 MB Application Messages Jan 1, 2020 at 4:00 PM 7.3 MB Application- Connect the pen display to your Mac, and click "Open System Preferences" when prompted. Go to Security & Privacy > Privacy > Accessibility settings and click the lock icon to unlock the settings.
Tick the checkbox on the left of the HuionTablet driver application to enable accessibility. Then click the lock icon to lock the settings.
text_image
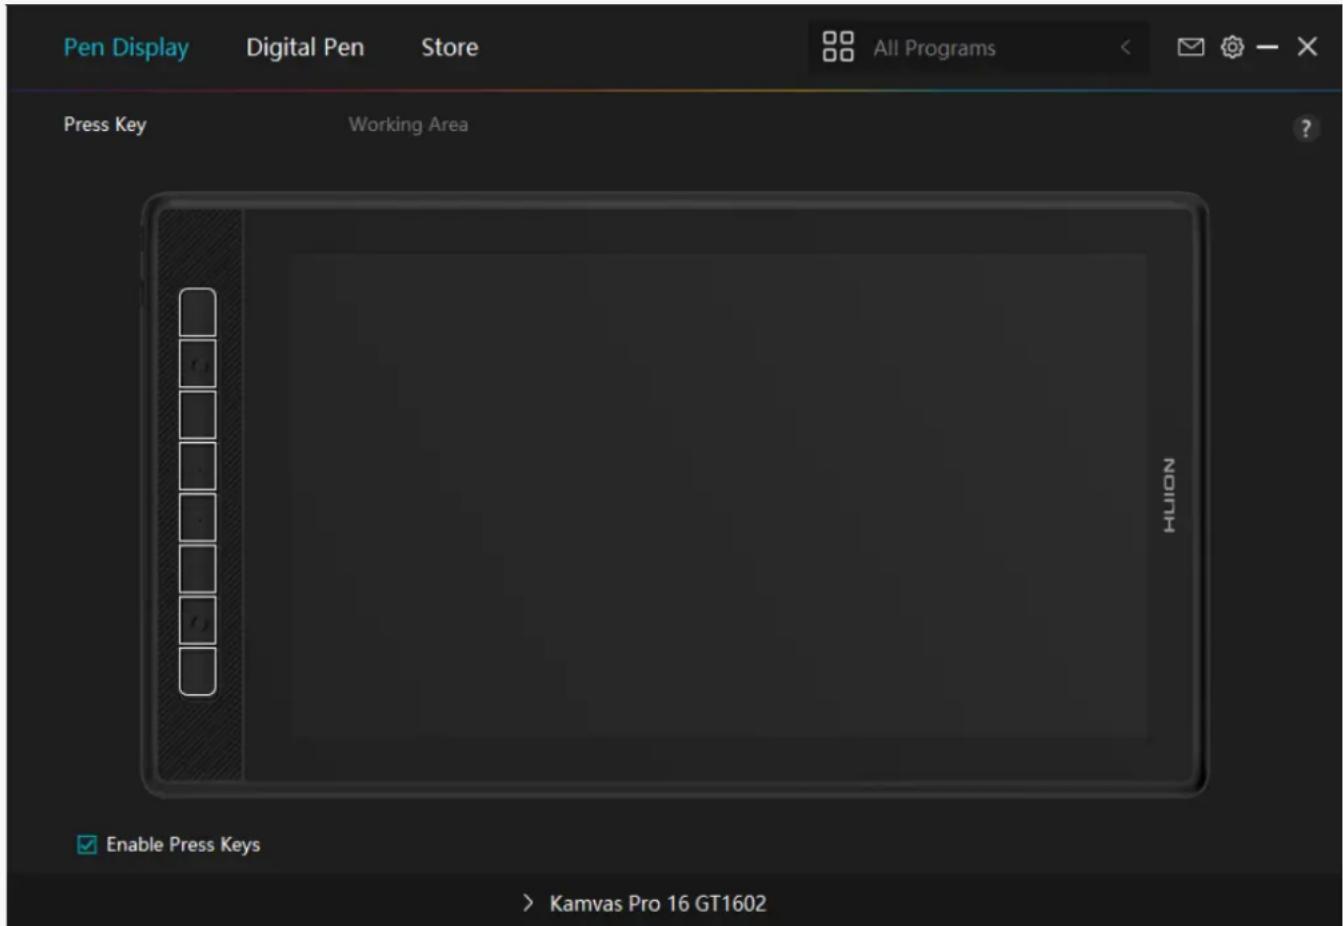
Security & Privacy General FileVault Firewall Privacy Camera Microphone Speech Recognition Accessibility Input Monitoring Full Disk Access Files and Folders Screen Recording Media & Apple Music Allow the apps below to control your computer. HuionTablet Logi Options Daemon Logi Options+ zoom.us.app Click the lock to prevent further changes. Advanced... ?- A picture of Kamvas Pro 16(2.5K) will appear on the driver interface to indicate that the pen display is successfully connected to your computer. Now you can use your pen display.
text_image
Pen Display Digital Pen Store All Programs Press Key Working Area Enable Press Keys > Kamvas Pro 16 GT1602Linux
How to Install and Uninstall the Drivers on Linux Devices
Notice:
- Please remember to close the command window and reboot your Linux device after installing the driver, or the driver will not be useful. After rebooting the device, you can access the system main menu to find the Huion Tablet driver and then open it to finish some settings.
- If you are running Linux operating system on VMware, you must use the VMware Workstation Pro version. And the Play version of VMware Workstation doesn't support the Huion Tablet driver.
- Some versions of the Ubutun operating system don't support using more than one monitor simultaneously. And we recommend you upgrade your system to 20.04LTS or later if you want to use a Huion painting device on multiple display screens simultaneously smoothly.
Huion Tablet Driver installation packages in 2 different formats are available for
Linux devices:
· tar.xz (file format)
- deb (file format)
Here are the step-by-step instructions for installing the driver packages in different file formats respectively:
1.Instructions for installing the driver package file in tar.xz format.
Linux operating systems supported:
Ubuntu
Steps to Install:
- Extract the contents of the driver file, huiontablet_XXXX.tar.xz, into a folder.
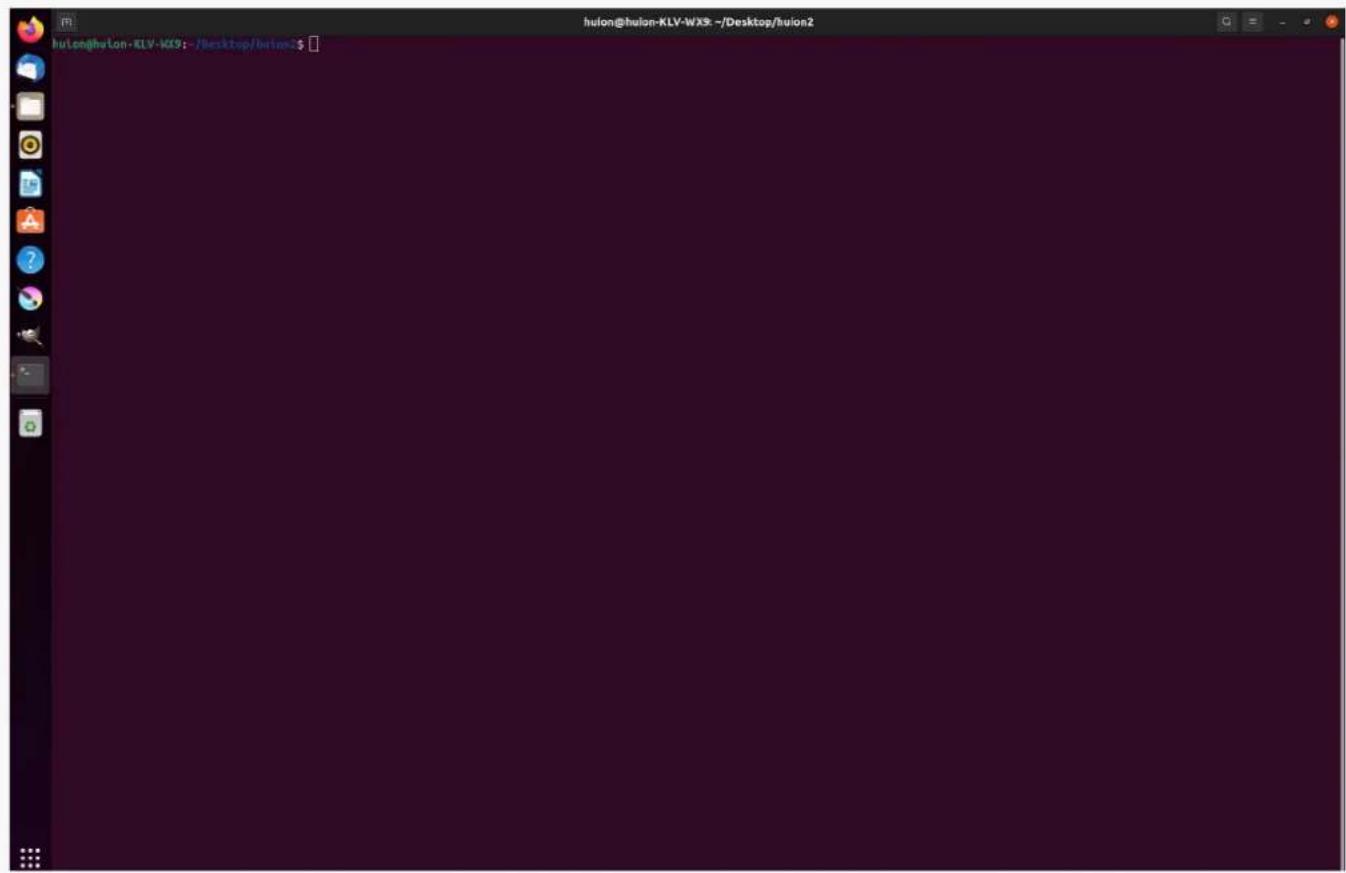
2.Open the command window in the folder.
text_image
huLong@huLon-KLV-KXS:~/Desktop/hulon2$3.Input the following command: "sudo sh install.sh", and press the enter key on the keyboard to make your Linux device execute it.
Kamvas Pro 16(2.5K)
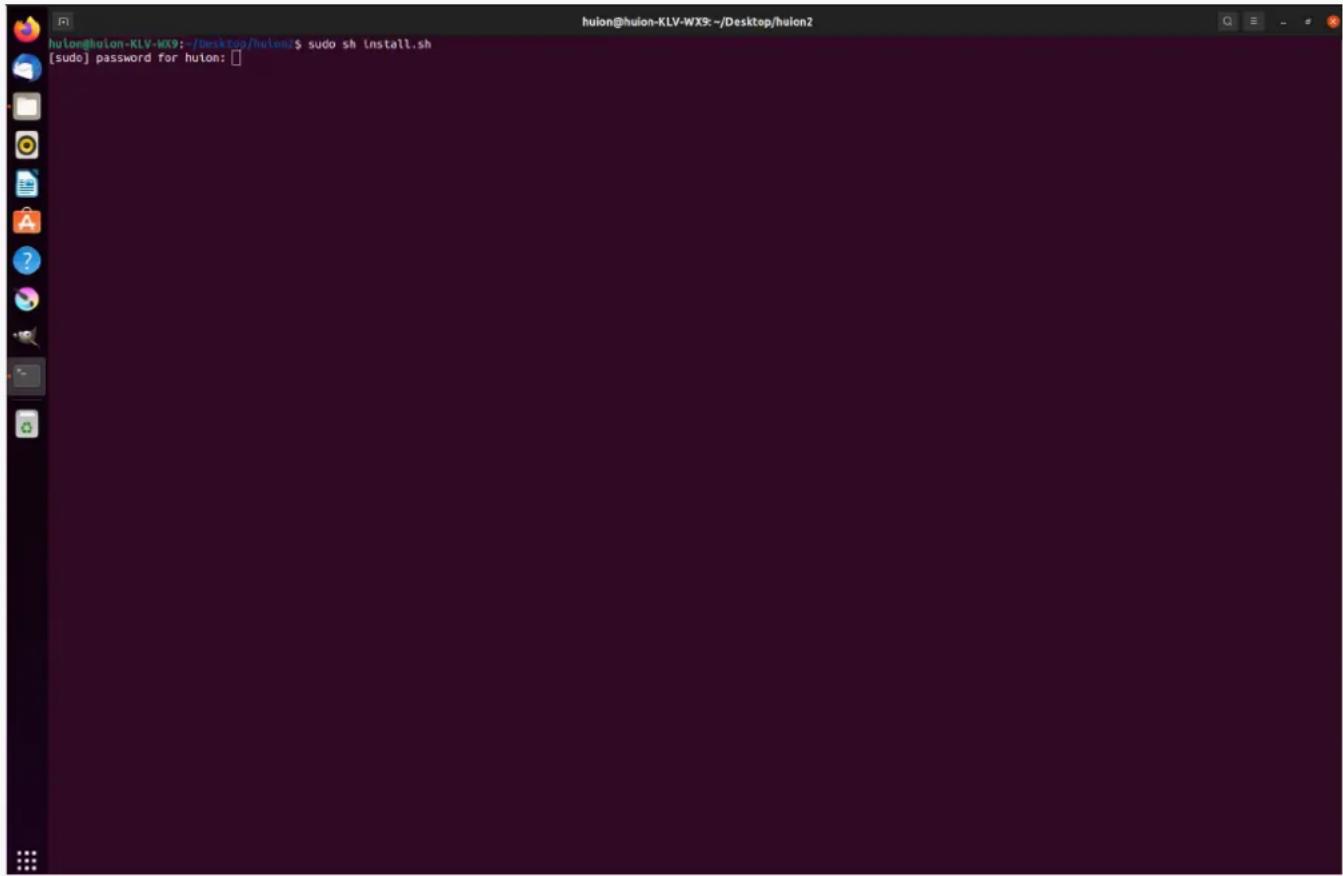
text_image
huion@huion-KLV-WX9:~/Desktop/hulon2 [sudo] password for hulon:- Enter the user password to complete the installation.
Kamvas Pro 16(2.5K)
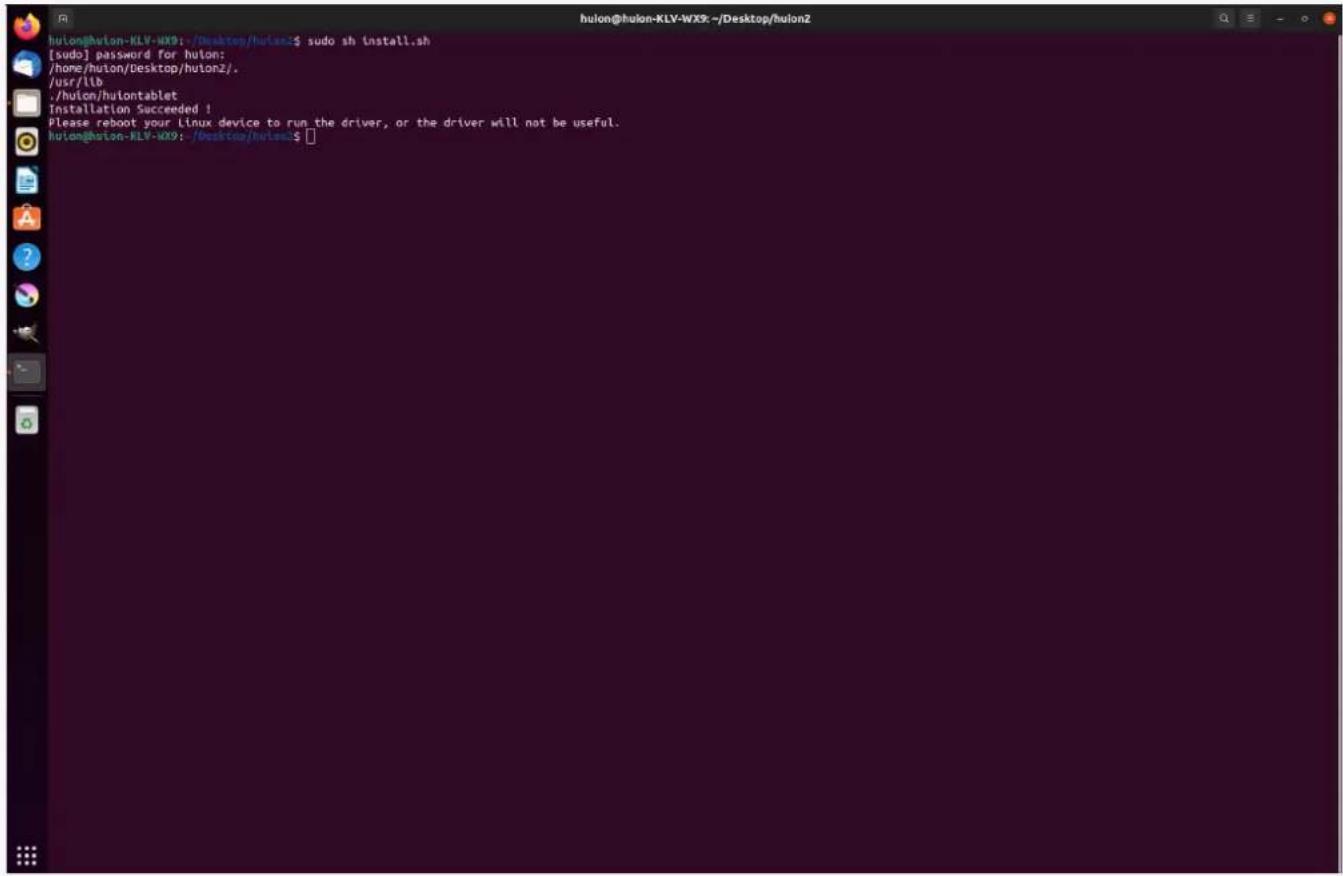
text_image
hulon@hulon-KLV-WX9:~/Desktop/hulon2$ sudo sh install.sh [sudo] password for hulon: /home/hulon/Desktop/hulon2/. /usr/lib ./hulon/huiontablet Installation Succeeded ! Please reboot your Linux device to run the driver, or the driver will not be useful. hulon@hulon-KLV-WX9:~/Desktop/hulon2$- Please reboot your Linux device to run the driver, or the driver will not be useful.
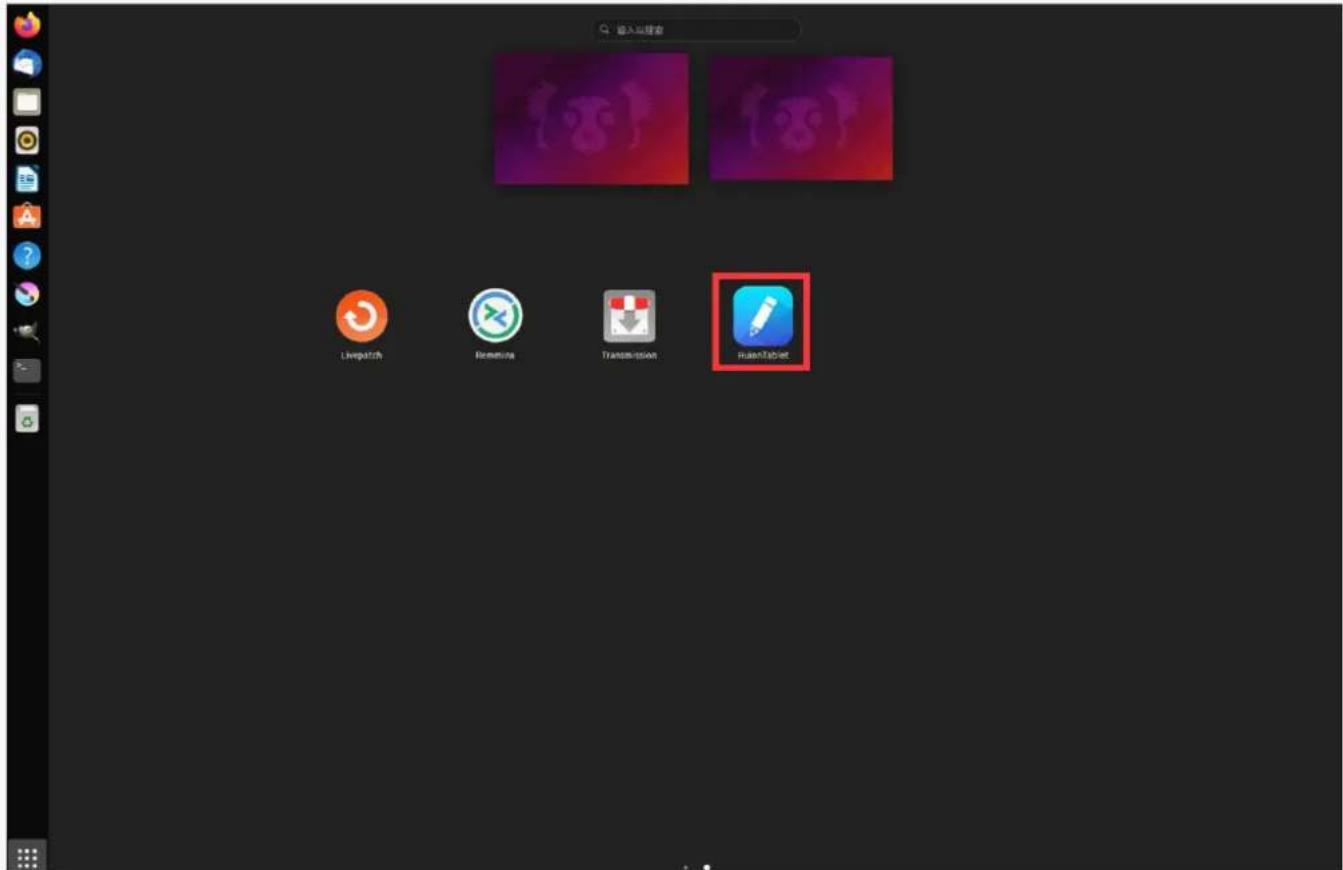
text_image
输入收藏器 Livepatch Rename Transmission RandomTabsetSteps to Uninstall:
- Open the command window in the folder of the driver.
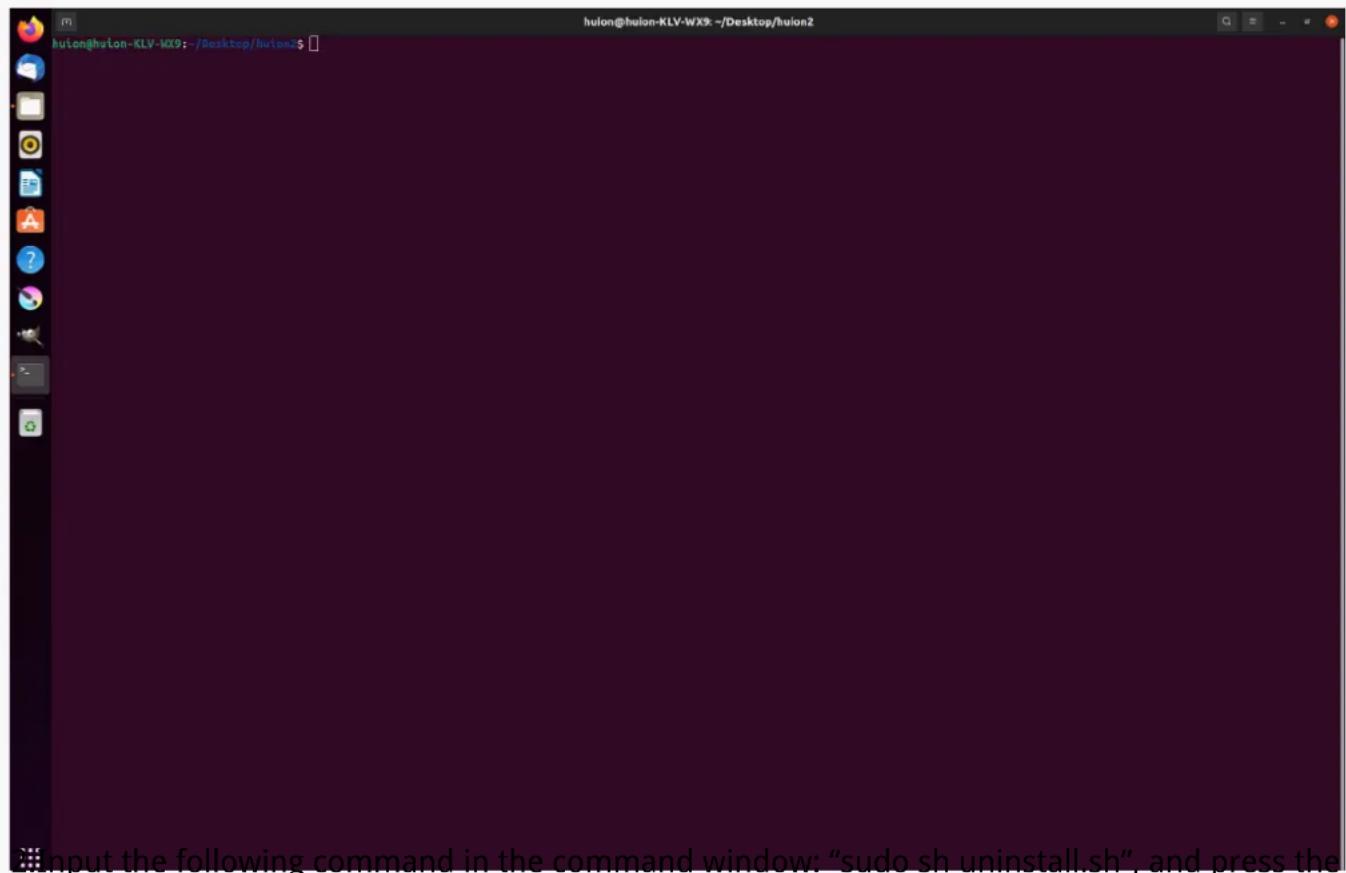
text_image
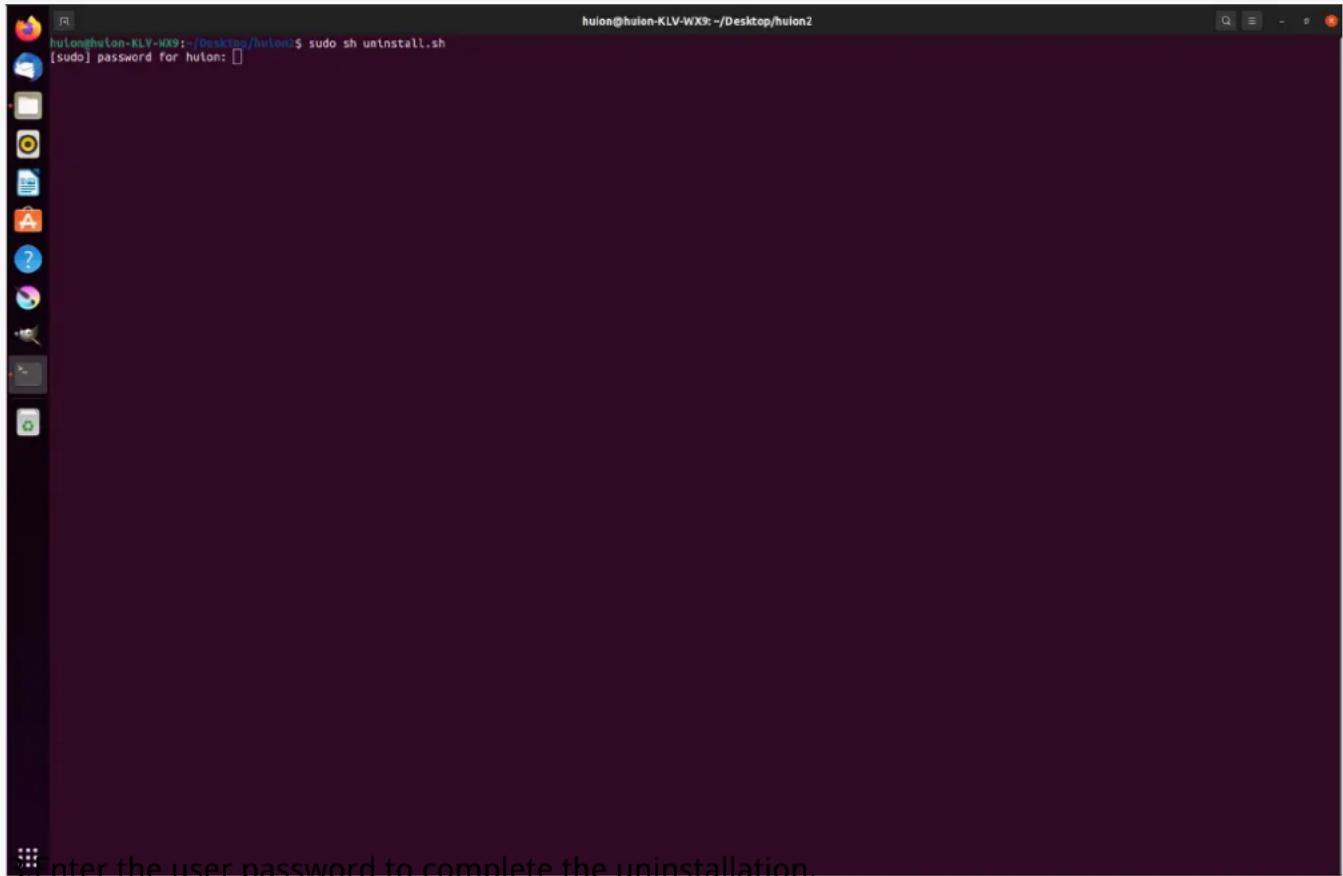
hulon@hulon-KLV-WX9:~/Desktop/hulon2$ hulon@hulon-KLV-WX9:~/Desktop/hulon2$ input the following command in the command window: "sudo sh uninstall.sh", and press theenter key on the keyboard to make your Linux device execute it.
Kamvas Pro 16(2.5K)
text_image
huion@huion-KLV-WX9: ~/Desktop/hulon2 huion@huion-KLV-WX9:~/Desktop/hulon2$ sudo sh uninstall.sh [sudo] password for hulon: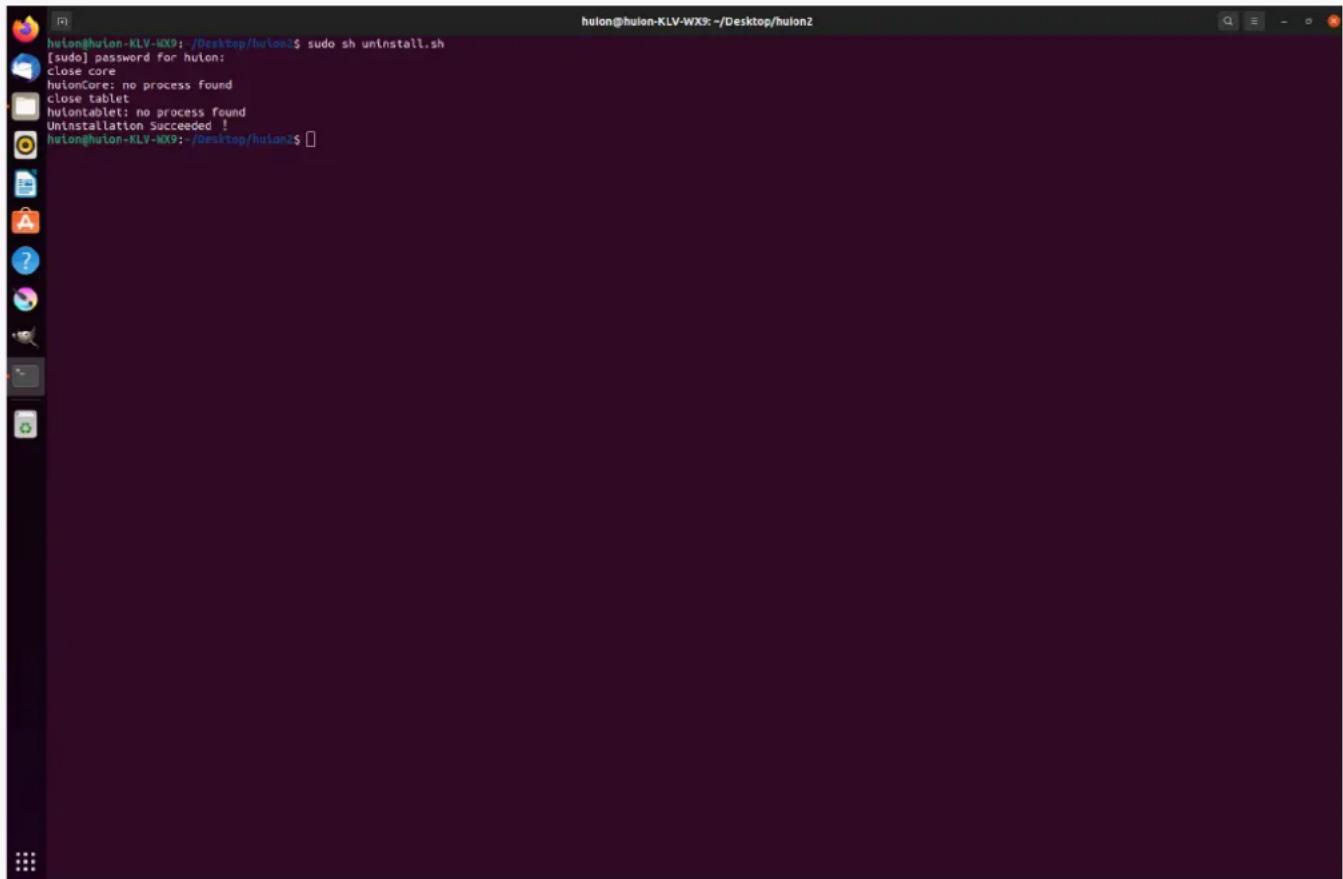
text_image
hulon@hulon-KLV-WX9: - /Desktop/hulonZ hulon@hulon-KLV-WX9: - /Desktop/hulonZ$ sudo sh uninstall.sh [sudo] password for hulon: close core huionCore: no process found close tablet huontablet: no process found Uninstallation Succeeded ! hulon@hulon-KLV-WX9: - /Desktop/hulonZ$- Instructions for installing the driver package file in deb format.
Linux operating systems supported:
Ubuntu
Steps to Install:
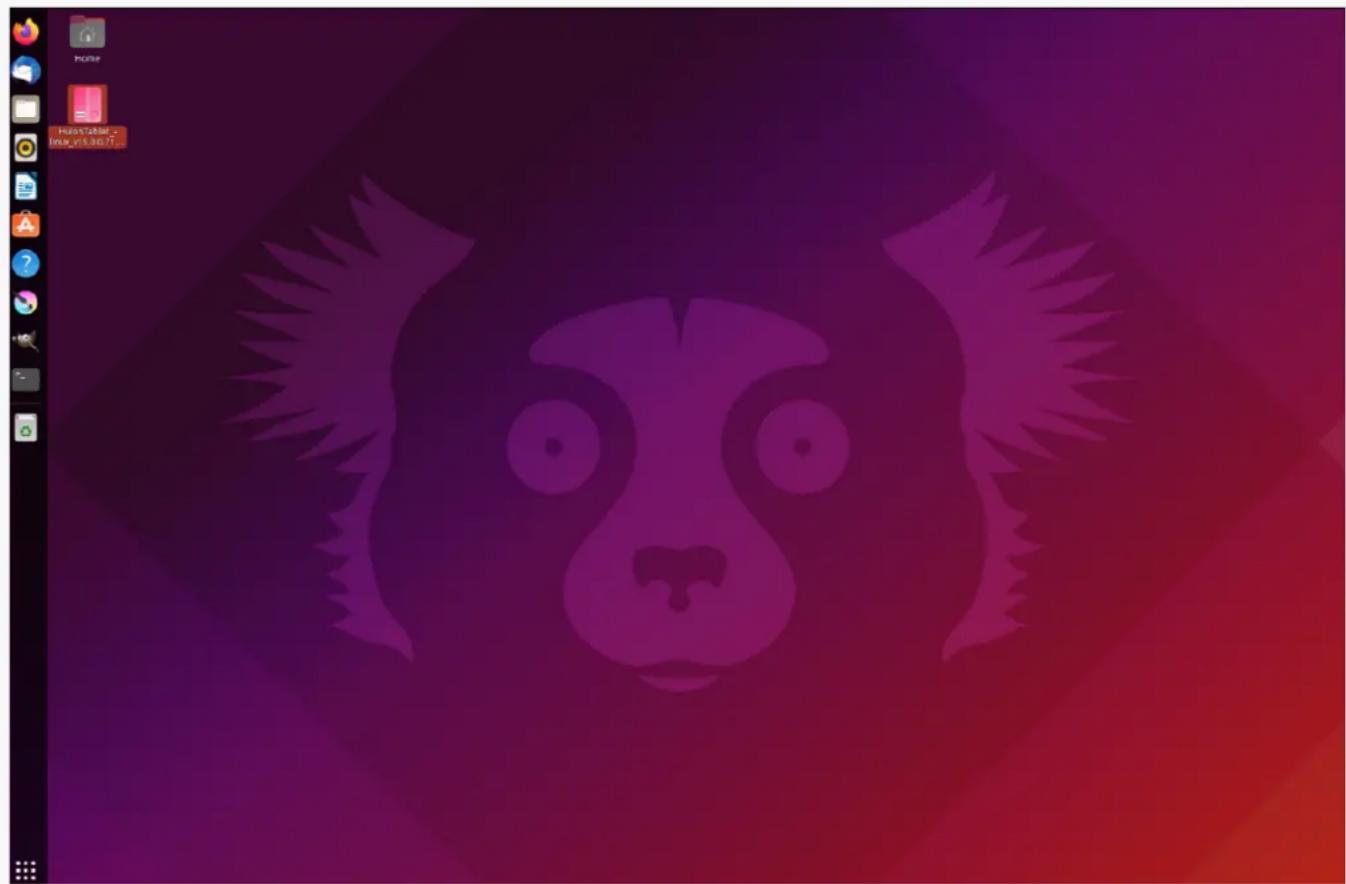
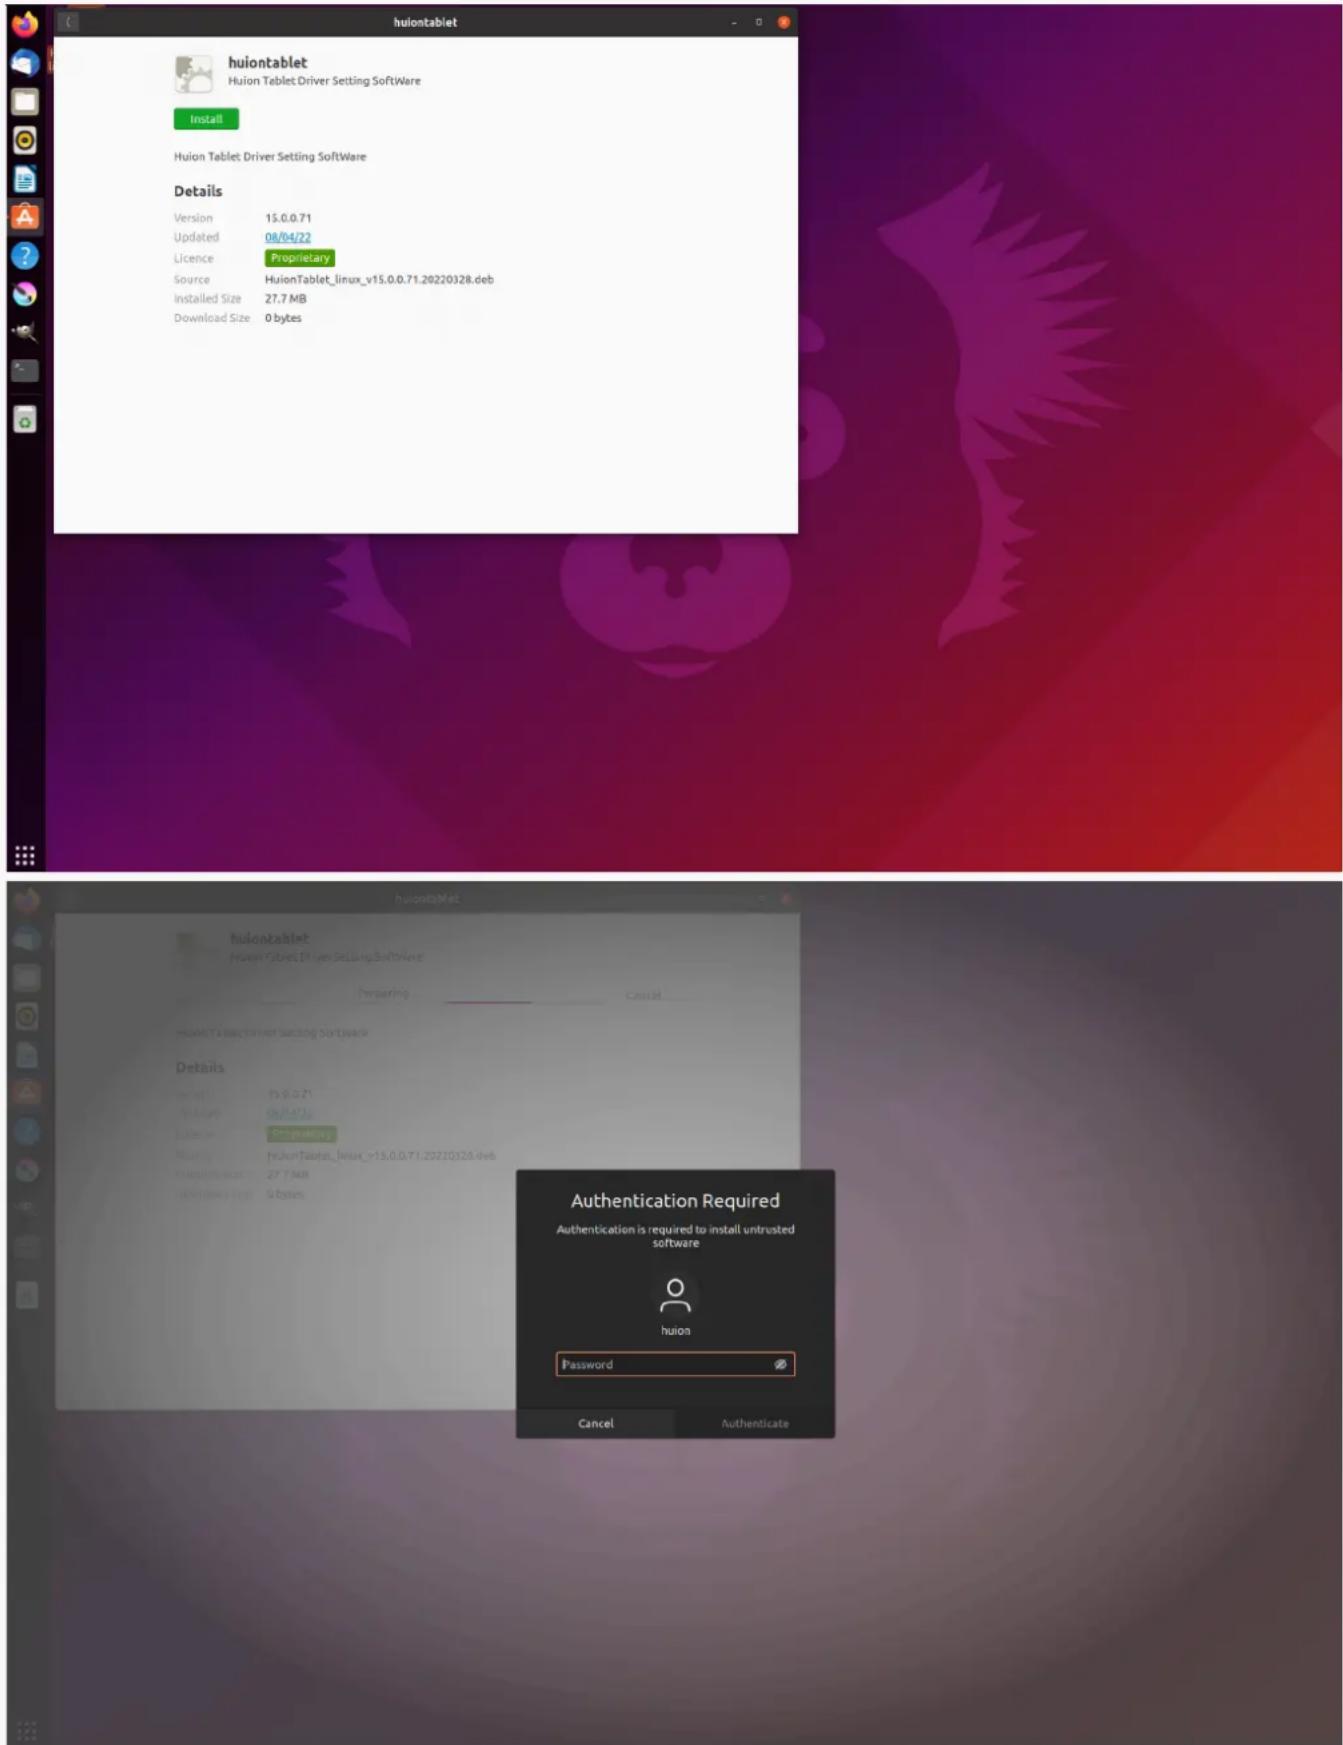
- Open the folder and double-click the driver file in deb format to enter the system default interface of installing the driver on the application store, then click to install.
natural_image
Purple-tinted illustration of a monkey's face on a gradient red-orange background (no text or symbols)- Enter the user password to complete the installation.
Kamvas Pro 16(2.5K)
text_image
huiontablet huion Tablet Driver Setting SoftWare Install Huion Tablet Driver Setting SoftWare Details Version 15.0.0.71 Updated 08/04/22 License Proprietary Source HuionTablet_linux_v15.0.0.71.20220328.deb Installed Size 27.7 MB Download Size 0 bytes huiontablet huion tablet Driver Setting SoftWare Preparing Cancel huion tablet driver setting software Details Size: 13.0.0.71 Width: 09.0.0.71 Distance: 100 miles Position: HuionTablet_linux_v15.0.0.71.20220328.deb Unsecured size: 27.7MB Unsecured size: 9 bytes Authentication Required Authentication is required to install untrusted software huion Password Cancel Authenticate- Please reboot your Linux device to run the driver, or the driver will not be useful.
text_image
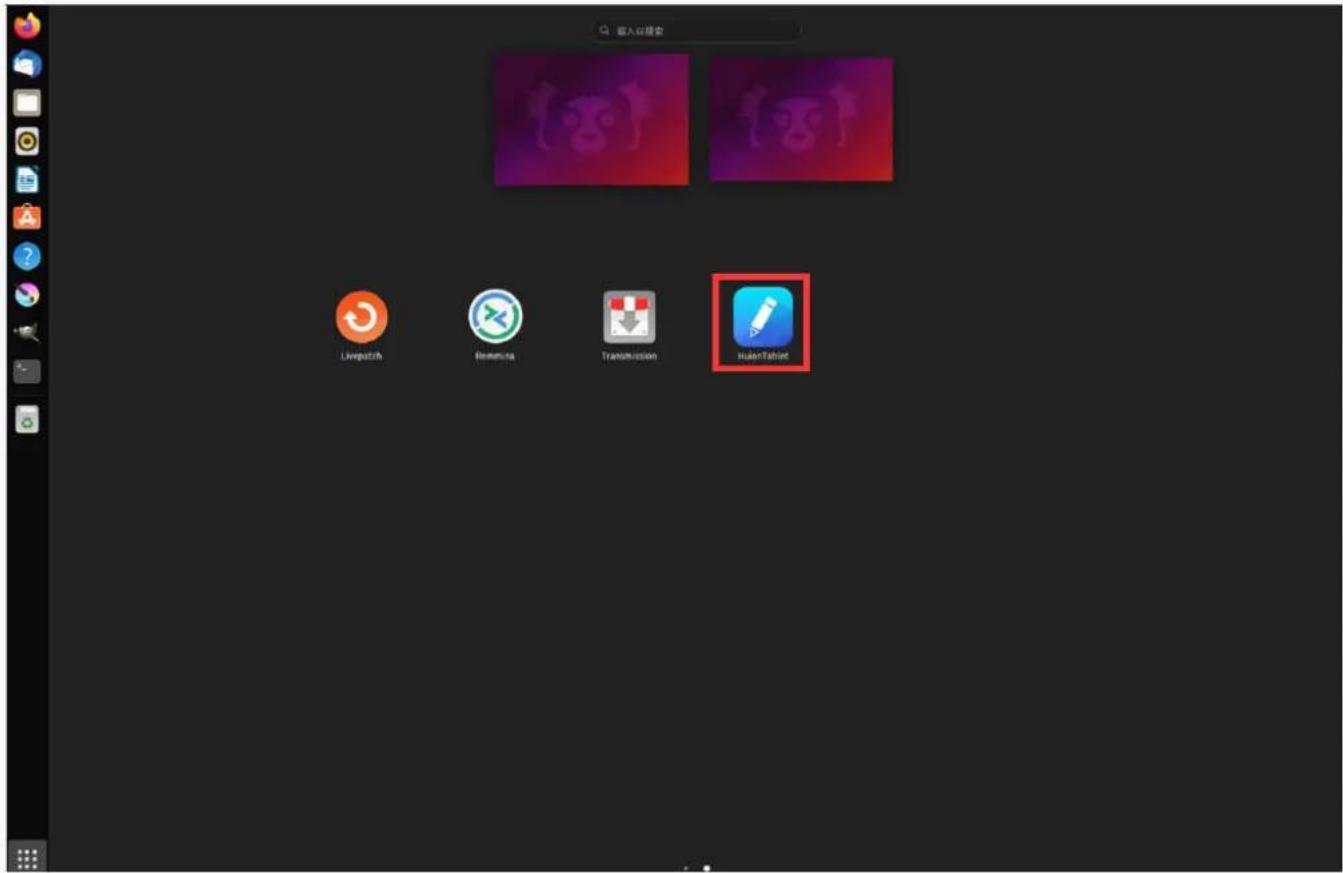
输入以镜台 Livepatch Researcha Transmission HulenTabletTips: Please ensure that your Linux device has been connected to the internet when installing the driver, or the installation will fail when entering the application store interface.
Steps to Uninstall:
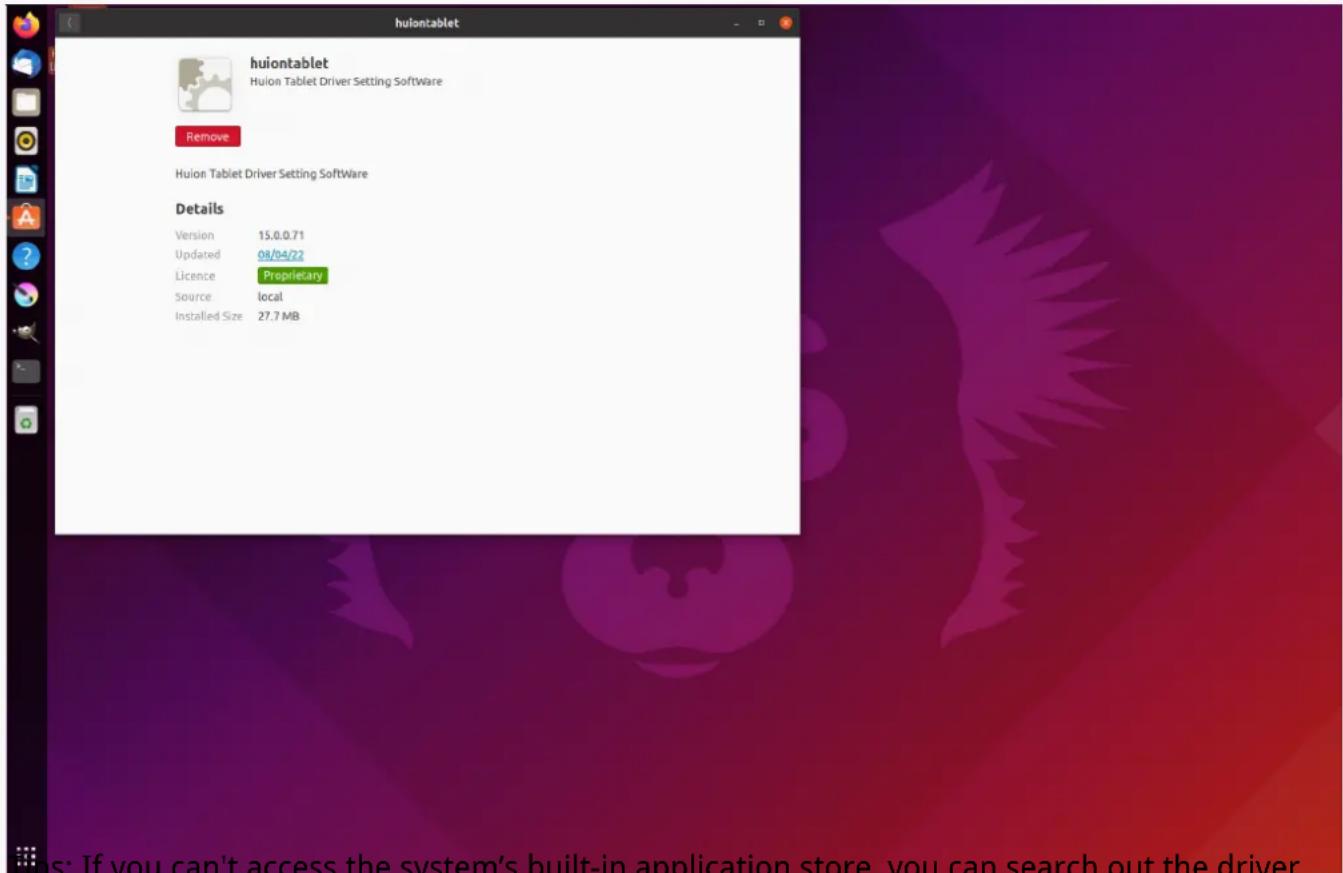
- Enter the interface of the installed applications on the system's built-in application store.
- Find the driver and click to uninstall it.
text_image
huiontablet huion tablet Hulon Tablet Driver Setting Software Remove Hulon Tablet Driver Setting Software Details Version 15.0.0.71 Updated 08/04/22 Licence Proprietary Source local Installed Size 27.7 MBTips: If you can't access the system's built-in application store, you can search out the driver file, huiontablet_xxx.deb, then double-click it to enter the installation interface, and click the remove button to uninstall it.
Driver
Driver Interface Preview
text_image
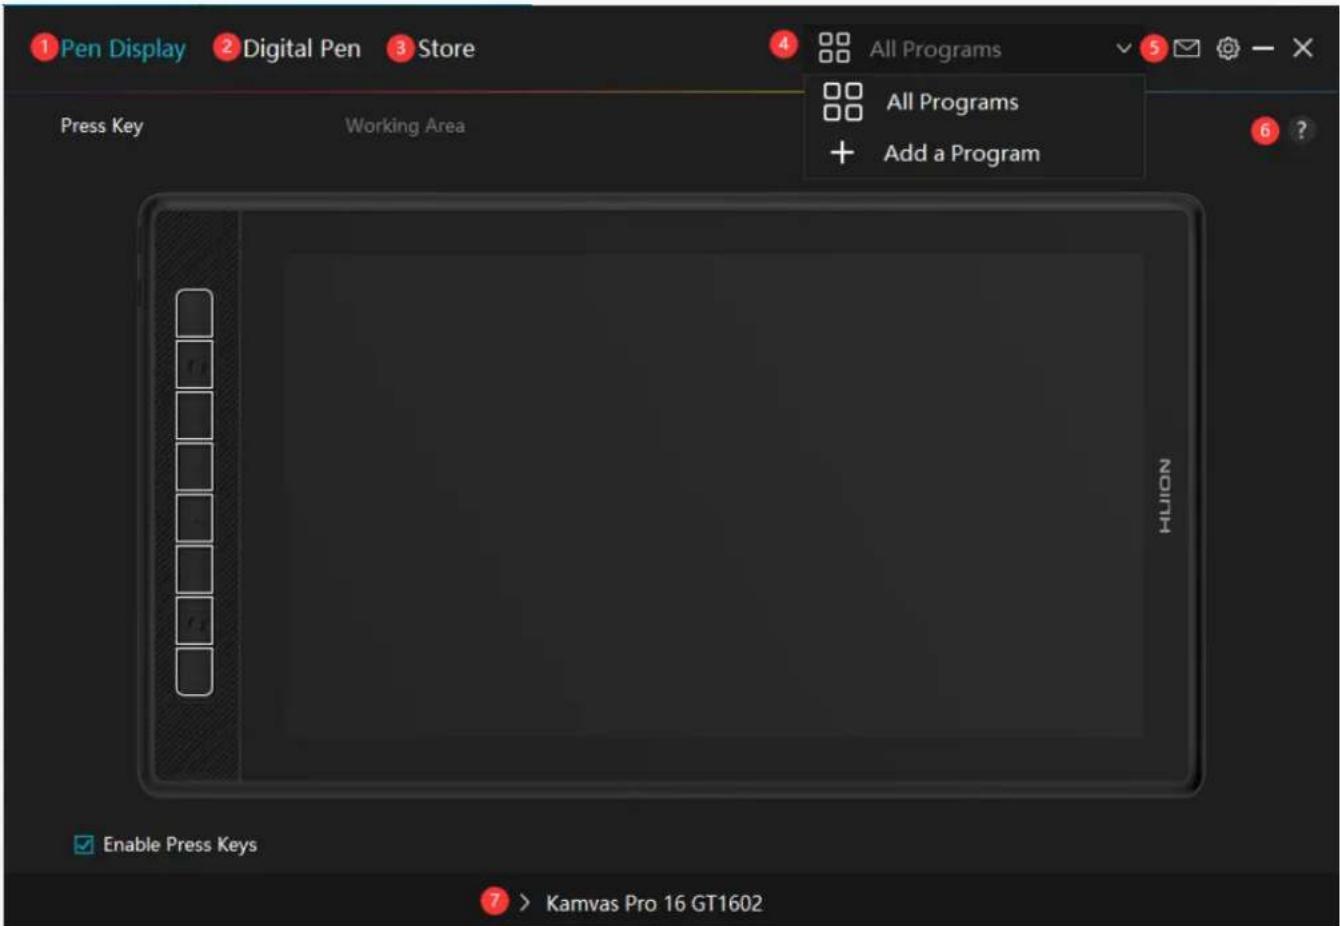
Pen Display Digital Pen Store All Programs All Programs + Add a Program Press Key Working Area NION Enable Press Keys Kamvas Pro 16 GT16021. Pen Display
On the "Pen Display" interface, Users can set functions of the display, including Press Key and Working Area Set.
See Section
2. Digital Pen
Users can set functions of the pen on this "Digital Pen" interface, including Press Key, Mode selection, Pressure Sensitivity Adjustment, and Pressure Test.
See Section
3. Store
Huion Store is where you can get the latest information about the product such as its FAQ or sales promotion. In addition, you can also purchase Huion's other products or accessories here.
4. Add Programs
- Some programs which have already been opened will appear for you to choose from after clicking Add a Program on the screen. For more programs, click Browser and choose the item that you want to get it added.
- You can set different functions for different programs. Functions of the press keys change automatically as you switch from one program to another.
- When you select "All programs", the functions of press keys that you set are valid for every program. By clicking Add a Program from the drop-down list, you can set the functions for a specific program and hence have unique settings for different programs. After that, when you launch a specific program, the Driver will automatically recognize it and the setting features will change to its corresponding ones.
5. Setting
Users can set the functions of a driver on this interface, including check out Device information, Backup setting, General setting, and its version.
See Section
6. Common Problems
Click “?” and jump to Forum in our website https://support.huion.com/en/support/home to get a user manual or feed back the problems to us.
7. Switch between Devices
The Driver is able to support two devices at most. Functions of them can be customized by users respectively. When switch to one of them, functions change to its corresponding ones.
Pen Display Setting
Press Key
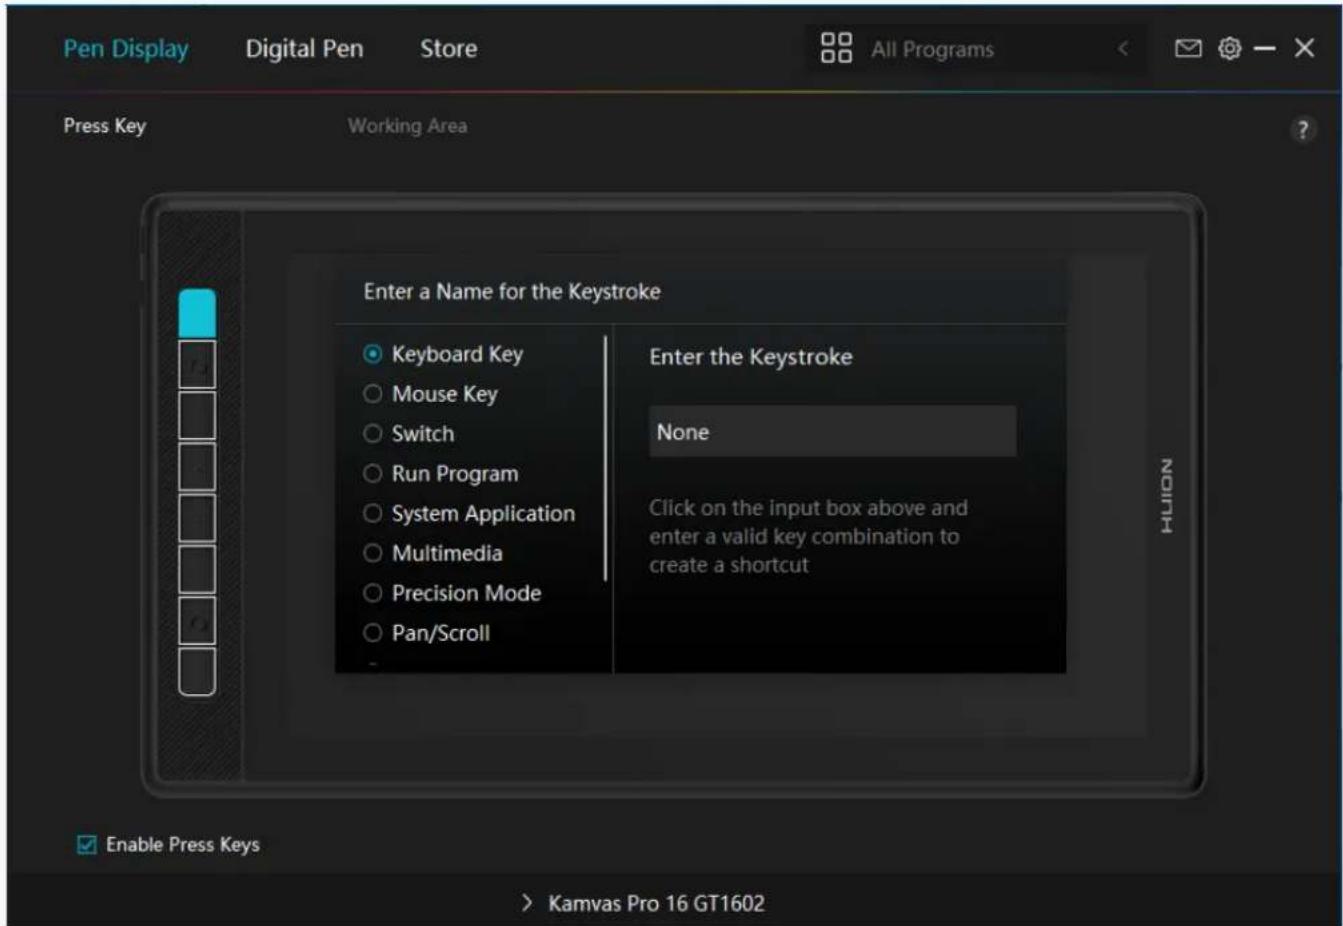
You can customize the functions of these press keys according to your own habits, and you can uncheck "Enable press keys" in the lower left corner to turn off these functions. Place the cursor over one of the buttons on the screen of your computer to check its default value. Click a button and then a pop-up dialog box appears. Choose what you want and set its function.
text_image
Pen Display Digital Pen Store All Programs Press Key Working Area Enter a Name for the Keystroke Keyboard Key Mouse Key Switch Run Program System Application Multimedia Precision Mode Pan/Scroll Enter the Keystroke None Click on the input box above and enter a valid key combination to create a shortcut Enable Press Keys > Kamvas Pro 16 GT1602Refer to this table of settings below to help you decide if you want to change the existing settings.
Note: The performance of functions in the table below is up to the device that users have connected.
Keyboard Key Click on the input box above and enter a valid key combination to create a shortcut.
Mouse Key Select the functions of a Mouse or Wheel. Please see the picture below for detailed information of these functions. Mouse: Left Button, Right Button, Middle Button, and Double-left Click. Wheel: Wheel Forward and Wheel Backward. Other functions: Ctrl, Alt, Shift, and Win .
Switch Select among Switch Screen, Switch Brush.
Run Program Click Browse and select the program that you want to run quickly. After that, press the key to launch the item.
System Application You can apply these functions to press keys: Lock the Screen, Sleep, Power Off, Show/Hide Desktop, Task View, Start Menu, and Calculator.
Multimedia You can apply these functions to press keys: Previous Song, Next Song, Play/Pause, Volume up, Volume down, and Muted.
Precision ModeYou can toggle between normal precision and a precision that you choose, from Fine to Ultra Fine. In the Precision Mode
| window that appears, move the slider to set the precision that you toggle into. For example, if you assign Precision Mode to a pen button, when you press the pen button, you switch to working in the precision that you selected from the slider. When you press the pen button again, you switch back to working in the normal precision. Press “Esc” to exit Precision Mode. | |
| Pan/Scroll This function allows you to pan and scroll in a document or item by moving the pen tip up and down or right and left.When you select Pan/Scroll, the Scroll Speed window appears. Move the slider to your preferred scrolling speed. | |
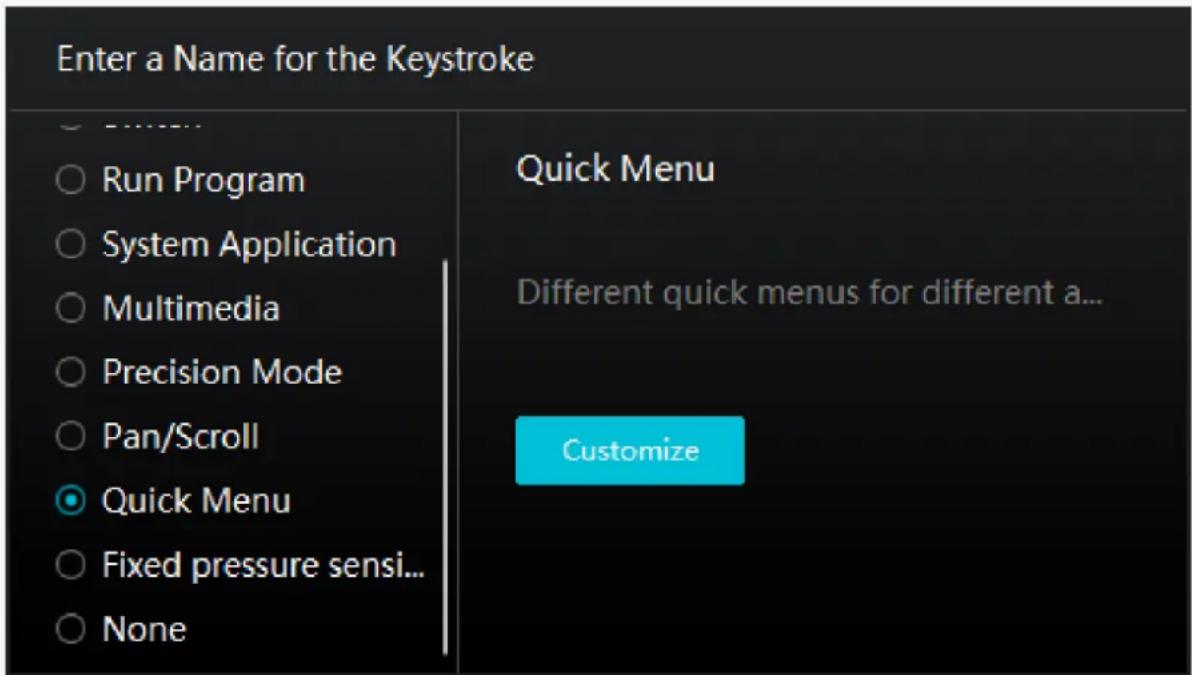
| Quick Menu Pick it up and you can use the key to pull up the Quick Menu. Detailed information for reference is down below this table. | |
| Fixed Pressure Sensitivity You can lock the pressure at the current level until you release the component. For example, if you assign this setting to a pen button, you can paint with pressure sensitivity enabled in your application until you reach the brush size you like. Then, press and hold the pen button to lock in that brush size as long as you are pressing and holding the button. | |
None When select None, the keys will not work. Note: The pictures are for reference only.
text_image
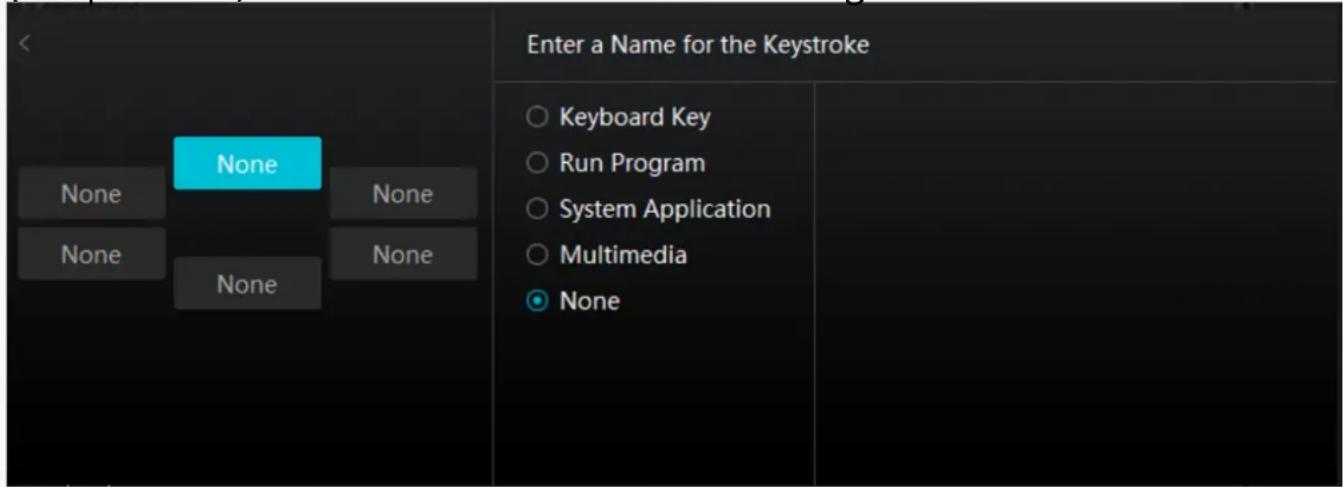
Enter a Name for the Keystroke ○ Run Program ○ System Application ○ Multimedia ○ Precision Mode ○ Pan/Scroll ● Quick Menu ○ Fixed pressure sensi... ○ None Quick Menu Different quick menus for different a... CustomizeClick Customize in the picture above to call out a quick menu (see picture 1). For each of the six buttons on the left, users can enter a name for it and set
unique function for it. After that, users can call up the Quick Menu by pressing the key (see picture 2). The menu disappears after a click on any of the six buttons. By clicking "Fix" once the menu will be fixed on the desktop while after a second try the "Fix" button changes to "Close" and the menu disappears (see picture 3). Put the cursor on the menu to drag it.
text_image
< None None None None None Enter a Name for the Keystroke ○ Keyboard Key ○ Run Program ○ System Application ○ Multimedia ● NonePicture 1
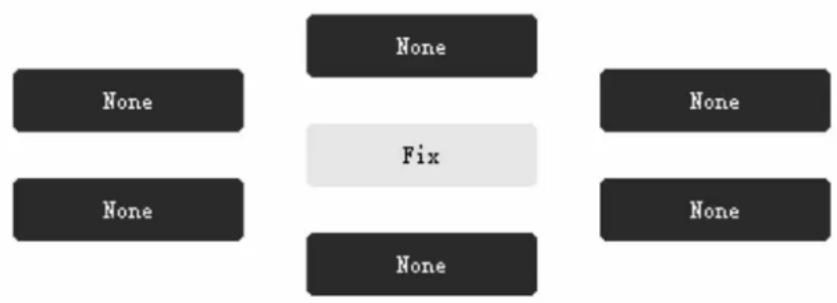
flowchart
graph TD
    A["Fix"] --> B["None"]
    A --> C["None"]
    A --> D["None"]
    A --> E["None"]
    A --> F["None"]
Picture 2
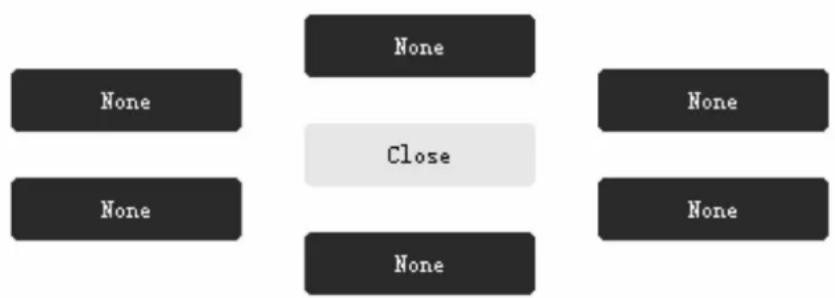
flowchart
graph TD
    A["None"] --> B["Close"]
    C["None"] --> B
    D["None"] --> B
    E["None"] --> B
Picture 3
Working Area
Select the Working Area tab to adjust the ratio of the distance of pen movement on the pen display to that of the corresponding cursor movement on the monitor. By default, the entire active area of the pen display maps to the whole monitor.
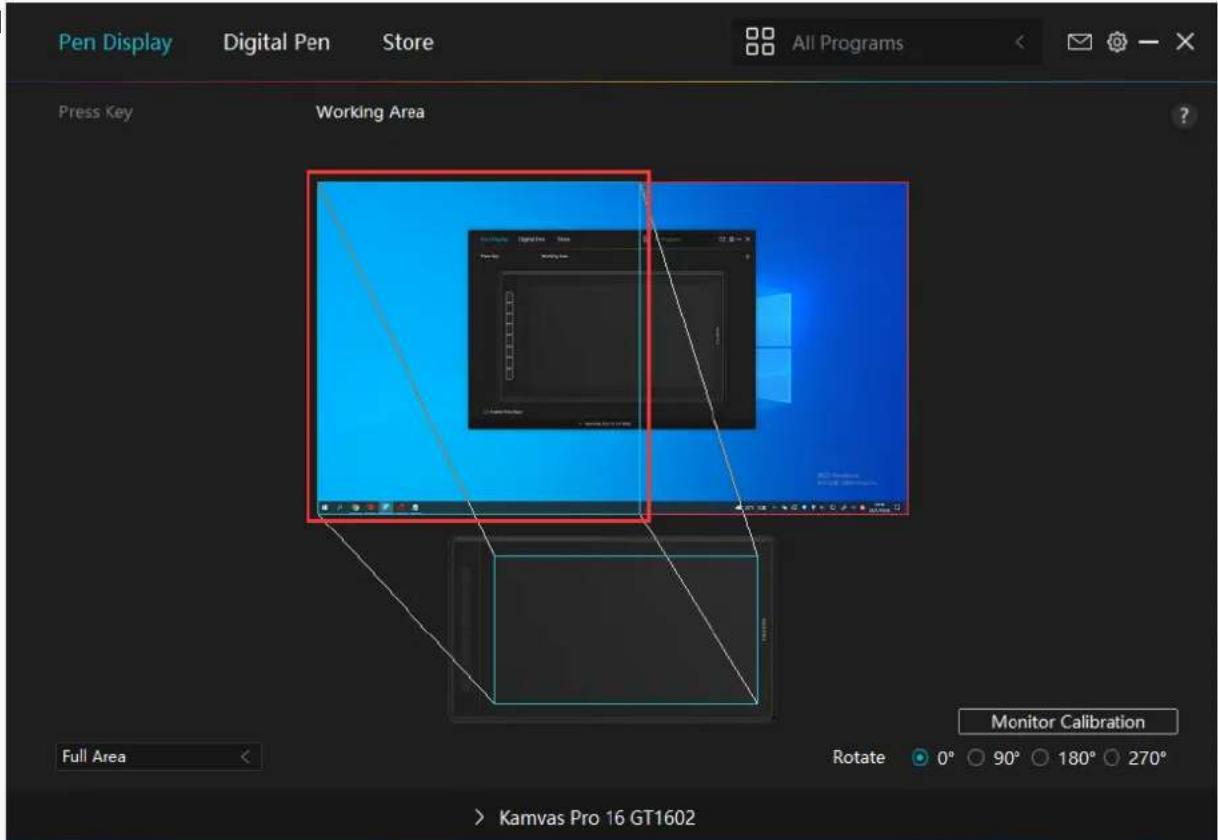
If more than one monitor is in use and they are in extended mode, users need to choose one that will be mapped to on the driver interface and the other one as the external display.
In mirror mode (All monitors display the same content), the pen display maps to the entire screen on each monitor and cursors displayed on them move simultaneously.
1. Working Area Setting
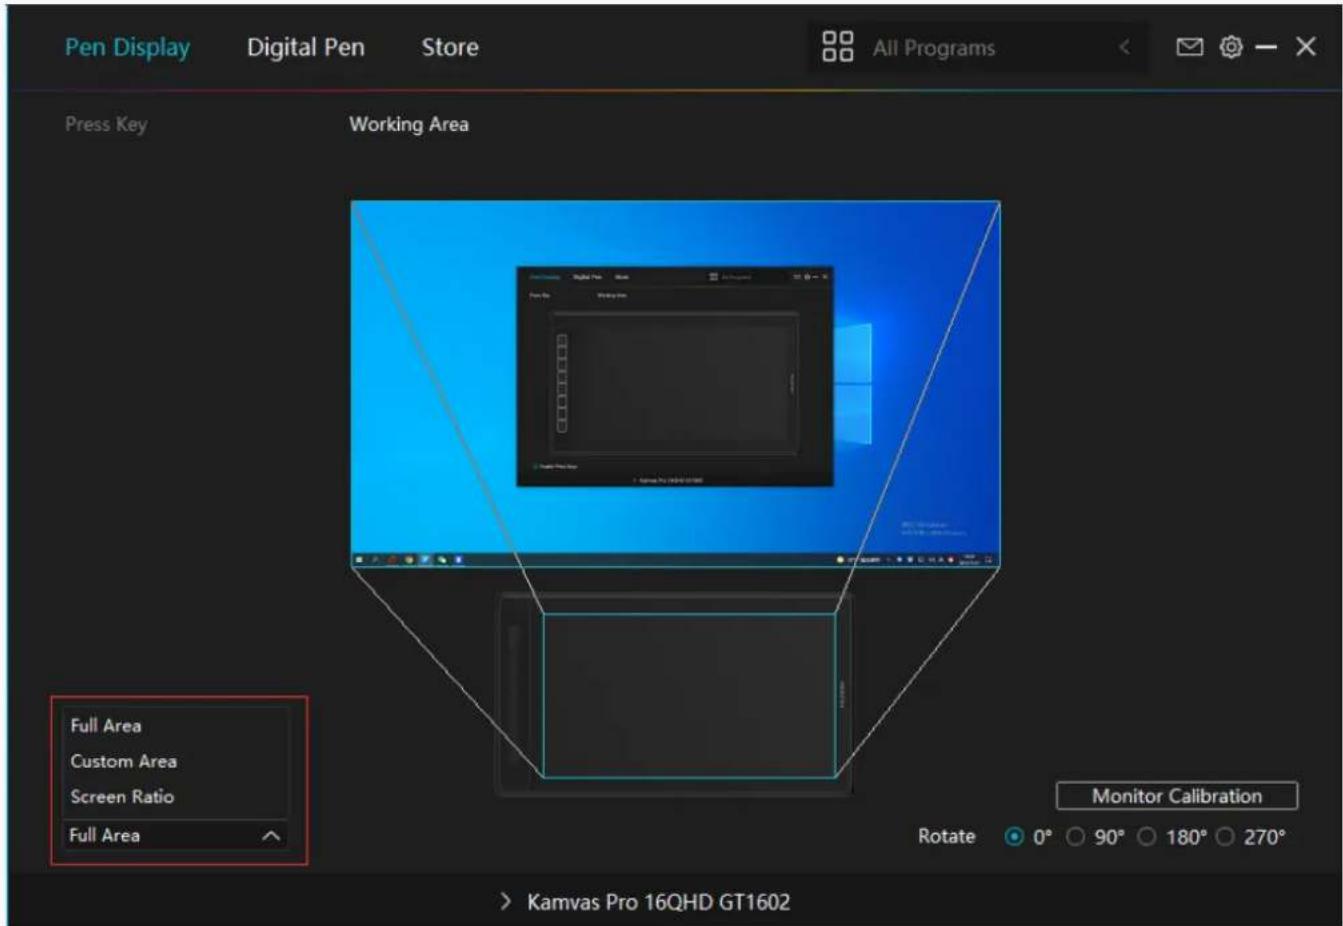
Define the pen display area that will be mapped to the monitor. Three modes on the driver can be chosen:
[1] Full Area: The entire active area of the pen display will be mapped to the monitor. It is the default setting.
[2] Screen Ratio: The ratio of the active pen display area is the same as that of the monitor, which as a general rule, is 16:9. For example, if you choose the screen ratio and draw a circle on the pen display, then a circle appears on the monitor that has been connected to the pen display, in this case some parts of the pen display may not work. But if you don't choose the screen ratio and draw a circle, then the circle may change into an oval on the monitor.
The ratio of the active pen display area depends on that of the display device, which as a general rule, is 16:9. In Screen Ratio mode, these two ratios keep the same.
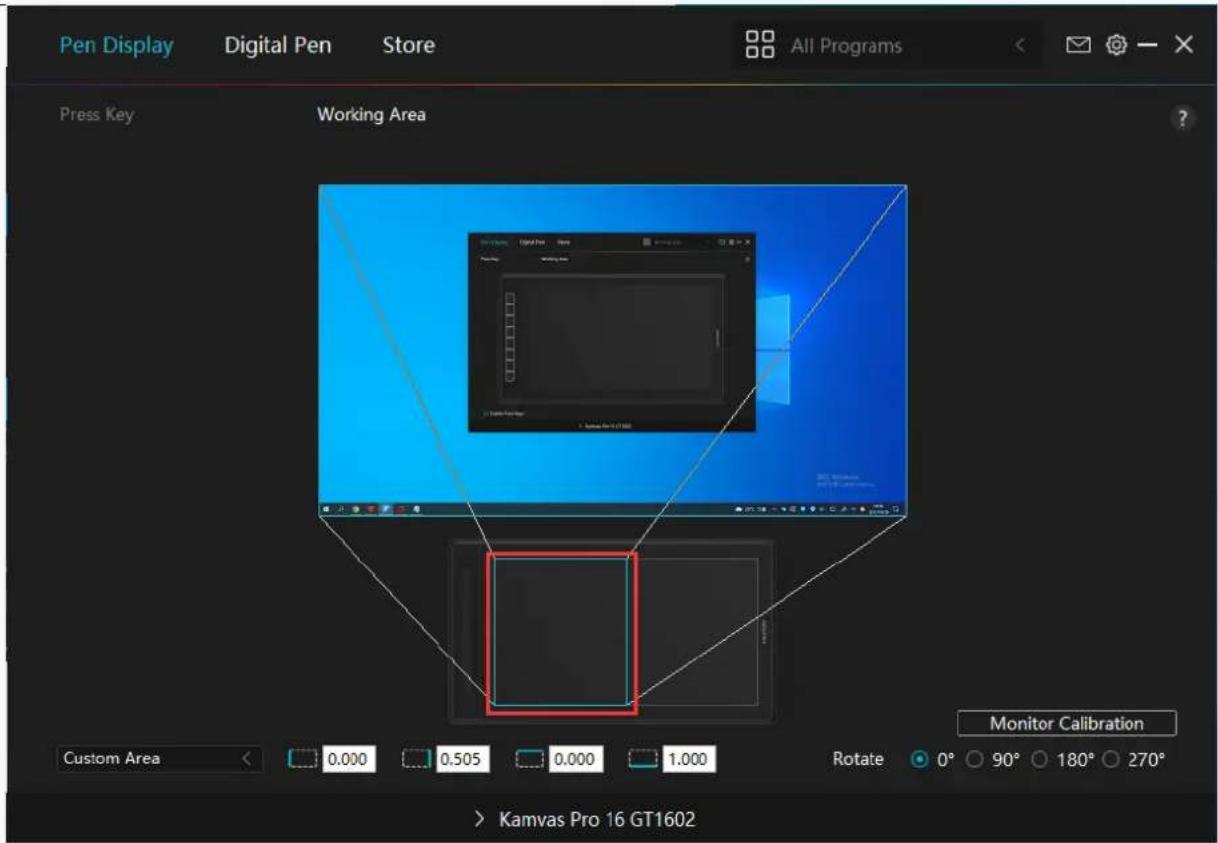
[3] Custom Area:
1> Enter coordinate values.
2> Users can adjust the working area of the pen display by changing the outlines of the smaller rectangle (see picture 1). Users can also drag the two blue rectangles to select the active areas of the digital pen on the screen and the pen tablet. (see picture 2 and 3).
Kamvas Pro 16(2.5K)
text_image
Pen Display Digital Pen Store All Programs Press Key Working Area Full Area Custom Area Screen Ratio Full Area Monitor Calibration Rotate 0° 90° 180° 270° Kamvas Pro 16QHD GT1602Picture 1
text_image
Pen Display Digital Pen Store All Programs Press Key Working Area Full Area Monitor Calibration Rotate 0° 90° 180° 270° > Kamvas Pro 16 GT1602Picture 2
Kamvas Pro 16(2.5K)
text_image
Pen Display Digital Pen Store All Programs Press Key Working Area Monitor Calibration Custom Area 0.000 0.505 0.000 1.000 Rotate 0° 90° 180° 270° > Kamvas Pro 16 GT1602Picture 3
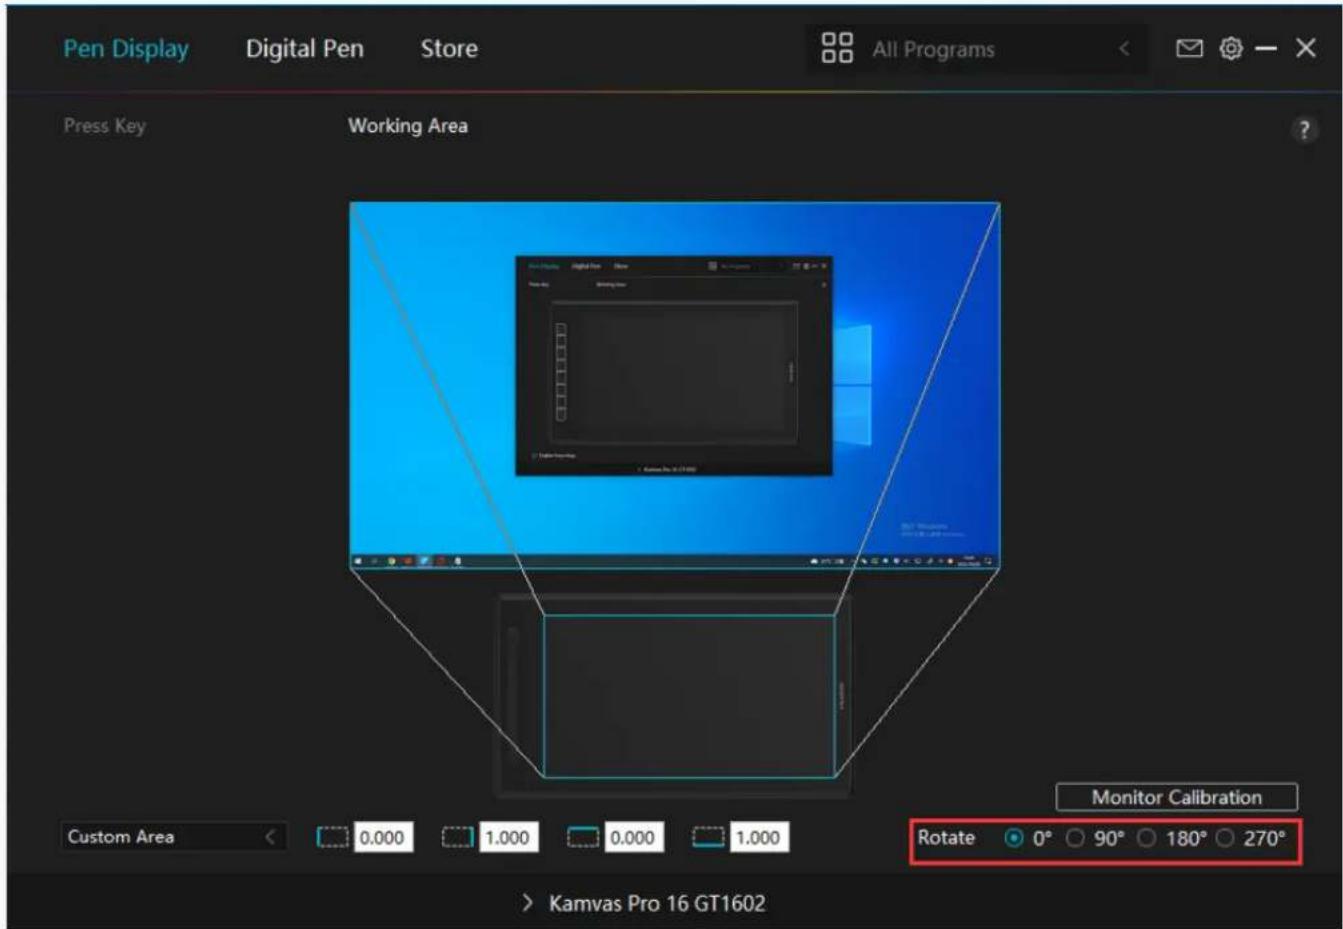
2. Rotate Working Area
Both left-handed and right-handed users can freely use the pen display because it can be rotated by 0^ , 90^ , 180^ or 270^ .
Kamvas Pro 16(2.5K)
text_image
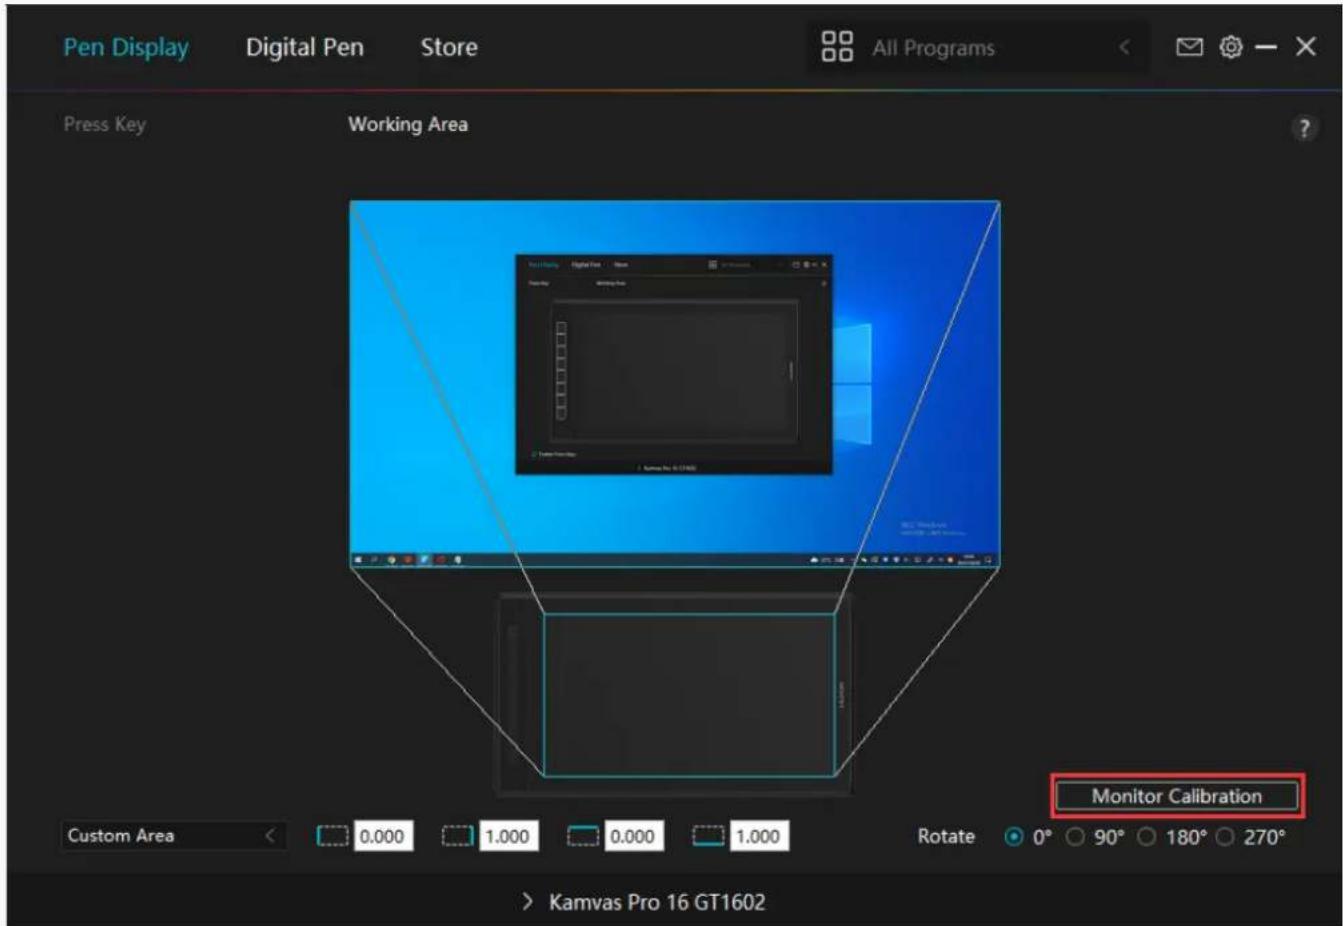
Pen Display Digital Pen Store All Programs Press Key Working Area Monitor Calibration Custom Area 0.000 1.000 0.000 1.000 Rotate 0° 90° 180° 270° > Kamvas Pro 16 GT16023. Calibrate Your Pen Display
Click Monitor Calibration tab and follow the instructions to calibrate your pen display.
Kamvas Pro 16(2.5K)
text_image
Pen Display Digital Pen Store All Programs Press Key Working Area Monitor Calibration Custom Area 0.000 1.000 0.000 1.000 Rotate 0° 90° 180° 270° > Kamvas Pro 16 GT1602Please use the digital pen to click on the center red dot of the cross in a common pen-holding posture. You can cancel Calibration and restore default.

Note: Please Use the Digital Pen to Click on the Center Red Dot of the Cross in A Common Pen-Holding Posture
Cancel Calibration
Recalculate
Restore Default
Digital Pen Setting
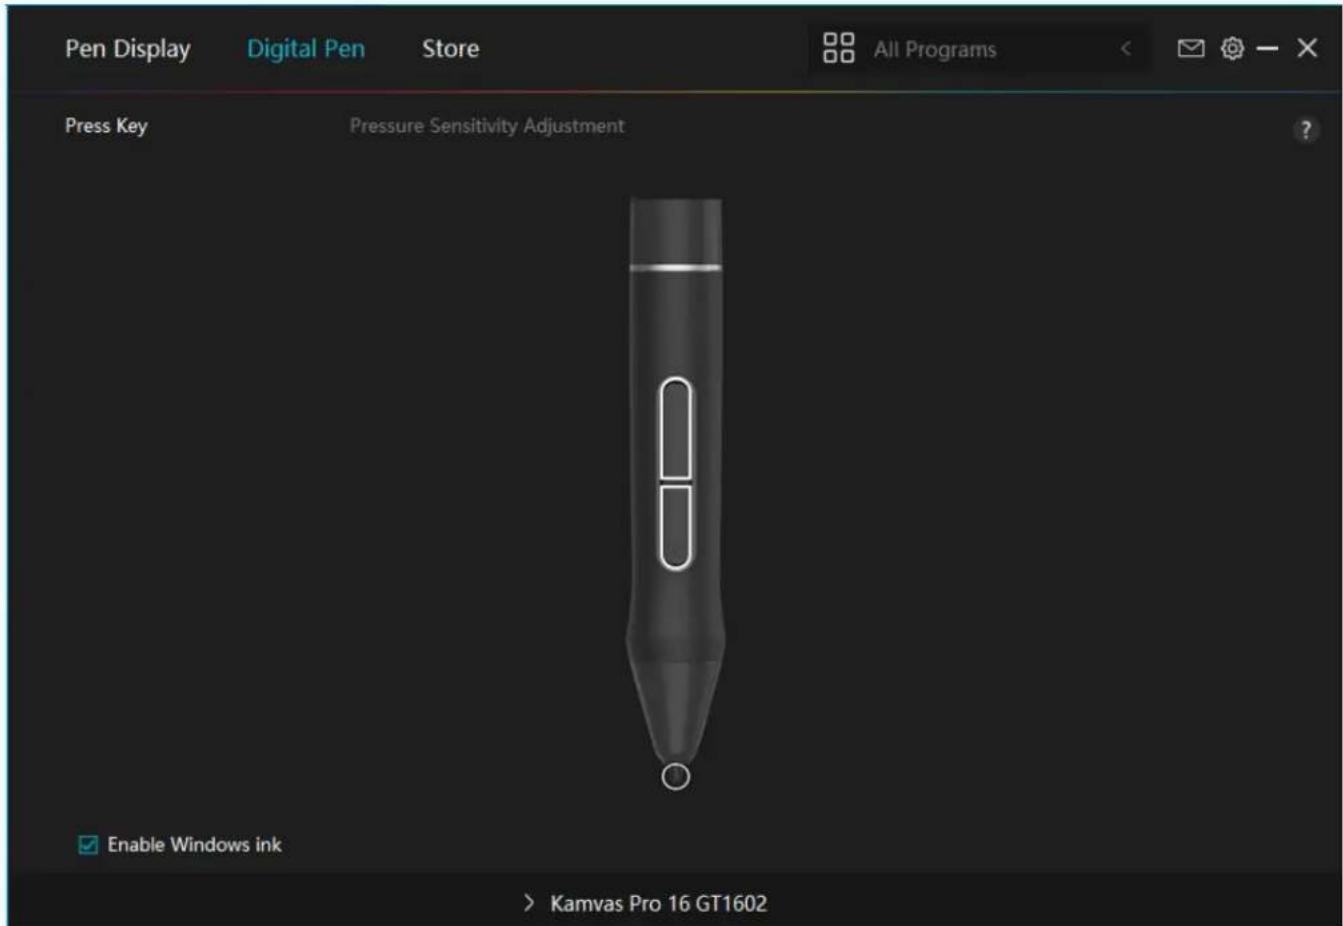
1. Press Key
You can use this digital pen to interact with your device, including drawing, writing, moving files, or activating the functions of pen press keys.
The setting of the pen press keys is the same as the Press Key setting of the display. Please refer to it.
See Section.
Kamvas Pro 16(2.5K)
text_image
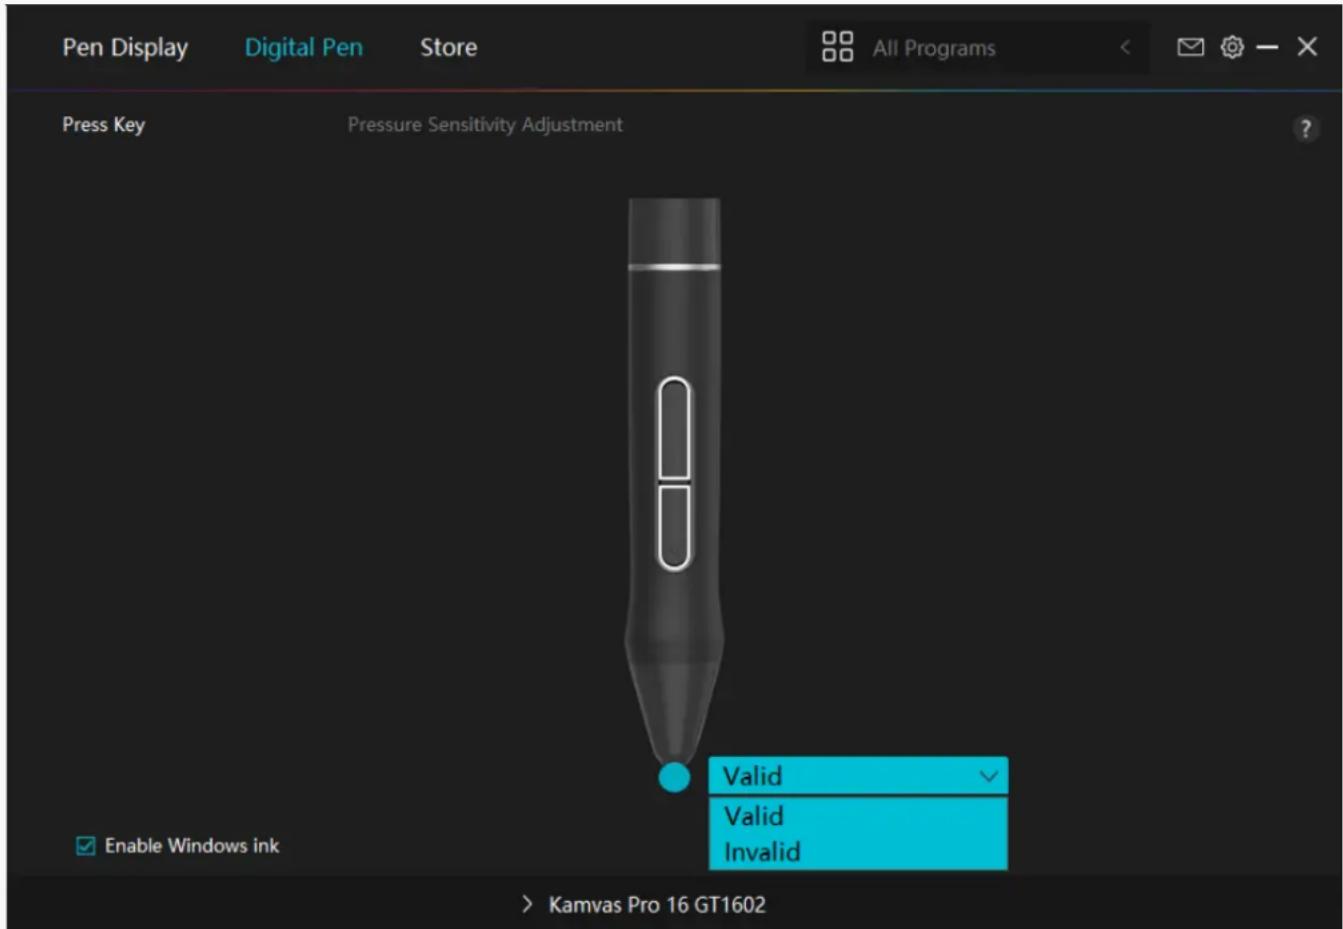
Pen Display Digital Pen Store All Programs Press Key Pressure Sensitivity Adjustment Enable Windows ink > Kamvas Pro 16 GT16022. Pen Nib Activity
The pen nib of the digital pen can be set as Valid/Invalid according to users' needs. Click the drop-down button to set its activity. In Valid mode, the pen works well, and in Invalid mode, the pen has a cursor movement, but cannot complete specified actions.
Kamvas Pro 16(2.5K)
text_image
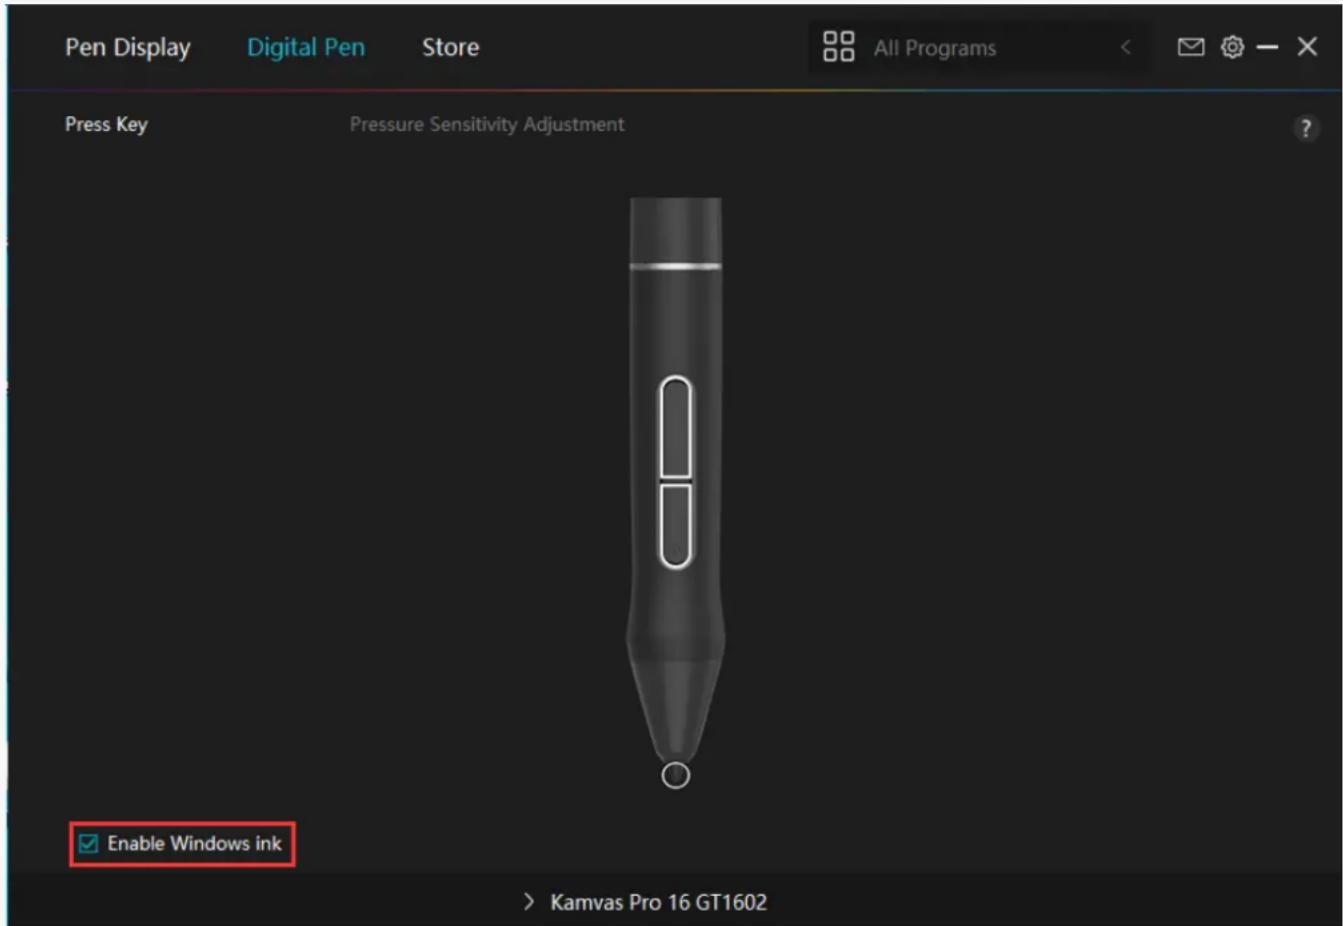
Pen Display Digital Pen Store All Programs Press Key Pressure Sensitivity Adjustment ? Enable Windows ink > Kamvas Pro 16 GT16023. Enable Windows ink
Microsoft Windows provides extensive support for pen input. Pen features are supported in such as Microsoft Office, Windows Whiteboard, Adobe Photoshop CC, SketchBook 6 and so on.
text_image
Pen Display Digital Pen Store All Programs Press Key Pressure Sensitivity Adjustment ? Enable Windows ink > Kamvas Pro 16 GT16024. Pressure Sensitivity Adjustment
Users can adjust the pressure sensitivity level by dragging the slider in the Pressure Sensitivity Adjustment box according to your usage habits. Click the redo button at the top right to revert to the default pressure.
(1) To decide the force required for a pen to produce a click or a pressure sensation.
(2) You can change the slope of the pressure response curve.
(3) To determine how much pressure needs to be applied to the pen nib to reach the highest pressure sensitivity level.
*Draw lines in the Pressure Test box with the pen, and the bar on the right will simultaneously show the pressure changes on the pen nib. Click the "Delete" button above to remove the lines, reset the pressure sensitivity level and test it until you find the appropriate pressure sensitivity level.
*A steep curve means a more sensitive response.
Kamvas Pro 16(2.5K)
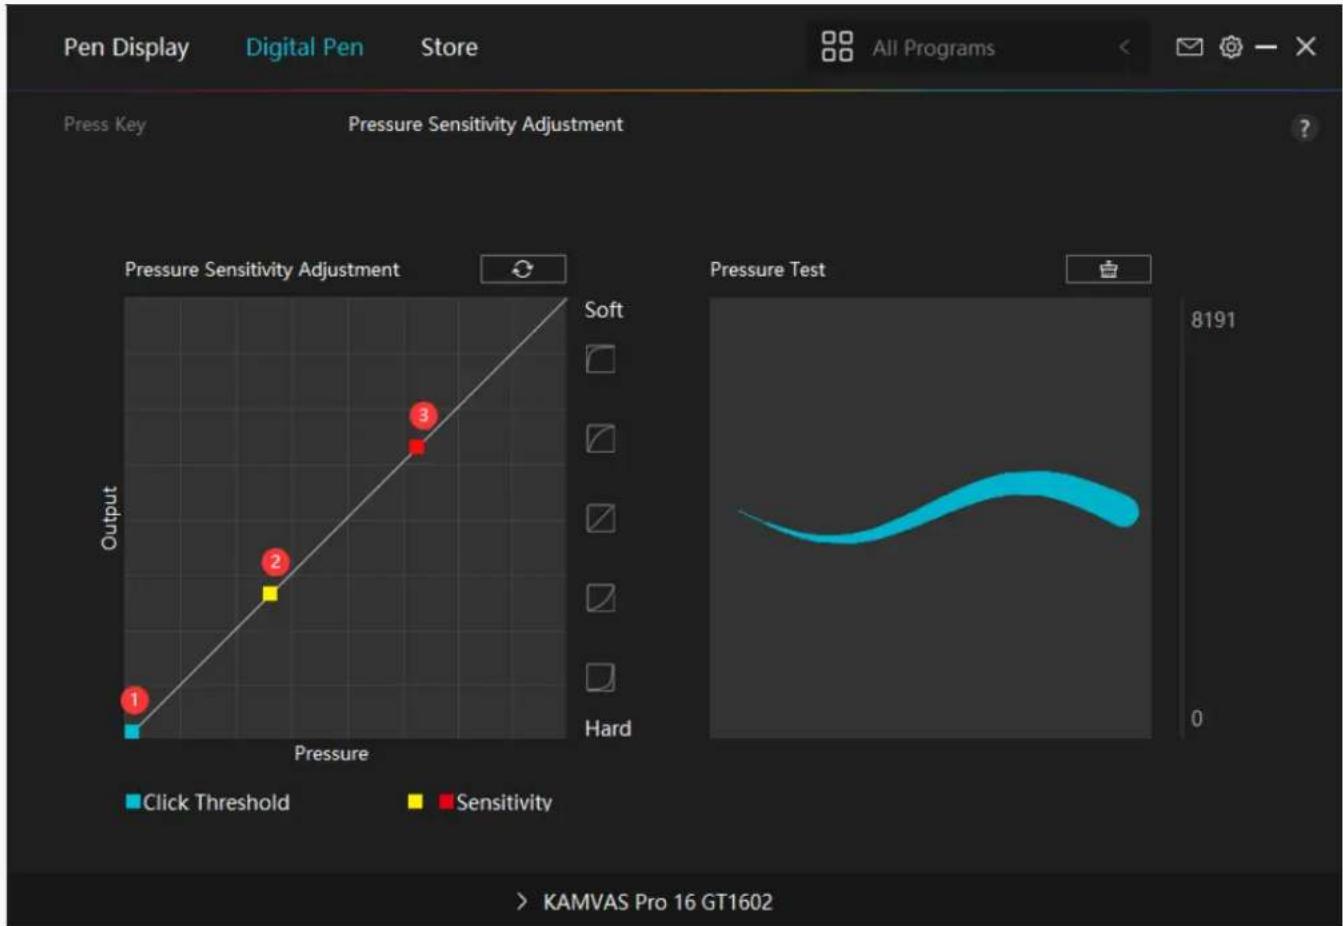
line
| Point | Pressure Sensitivity Adjustment | Click Threshold | |-------|----------------------------------|-----------------| | 1 | ~0.5 | Low | | 2 | ~1.0 | Medium | | 3 | ~1.5 | High |Driver Setting
1. Device
You can view the information of the firmware and the connected product here.
\*Display Settings
Scene Mode: "Standard Mode", "Gaming Mode", "Movie Mode", and "USER" to be chosen.
Brightness: Users can drag the corresponding slider to adjust the brightness.
Contrast Ratio: Users can drag the corresponding slider to adjust the contrast ratio. Saturation:Users can drag the corresponding slider to adjust the saturation.
Color Setting:"Color Temperature"and"Color Space".
Color Temperature: "6500K", "7500K", "9300K", "Custom Color" mode to be chosen. In "Custom Color" mode, users can change the color temperature by adjusting the RGB value.
Color Space: "Native", "sRGB", "AdobeRGB" mode to be chosen.
Note: For macOS users, the Display Setting is accessible only when a full-featured USB-C cable is used for the connection. If you need to change the display setting, please use a full-featured USB-C cable to connect your device.
For more information please refer to Pen-enabled OSD Menu.
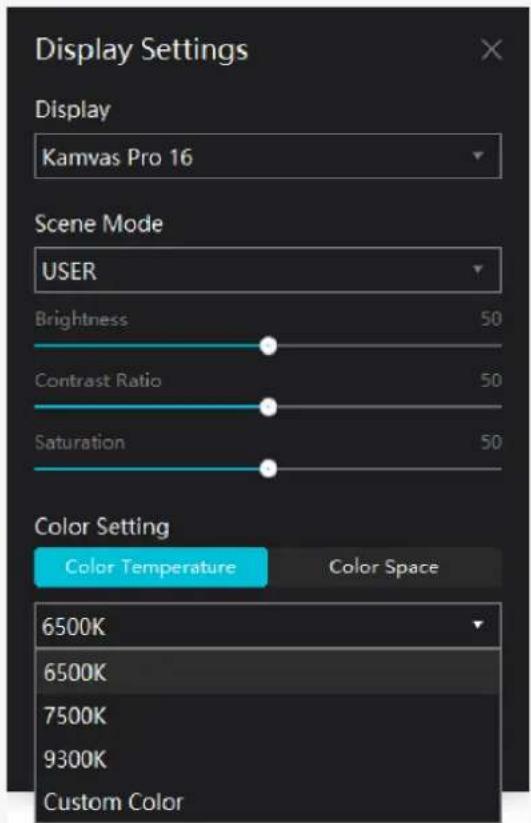
text_image
Display Settings Display Kamvas Pro 16 Scene Mode USER Brightness 50 Contrast Ratio 50 Saturation 50 Color Setting Color Temperature Color Space 6500K 6500K 7500K 9300K Custom Color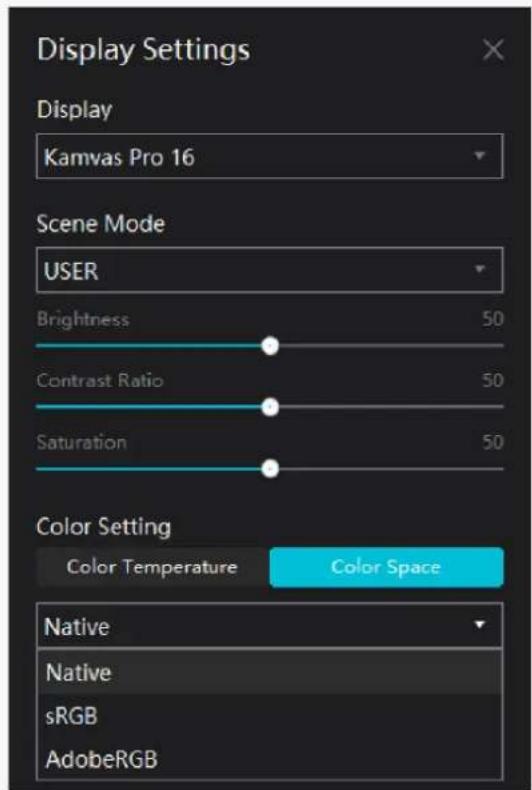
text_image
Display Settings Display Kamvas Pro 16 Scene Mode USER Brightness 50 Contrast Ratio 50 Saturation 50 Color Setting Color Temperature Color Space Native Native sRGB AdobeRGB2. Backup
The Driver can import and export your custom settings, which helps to avoid repeated settings when launching a different program.
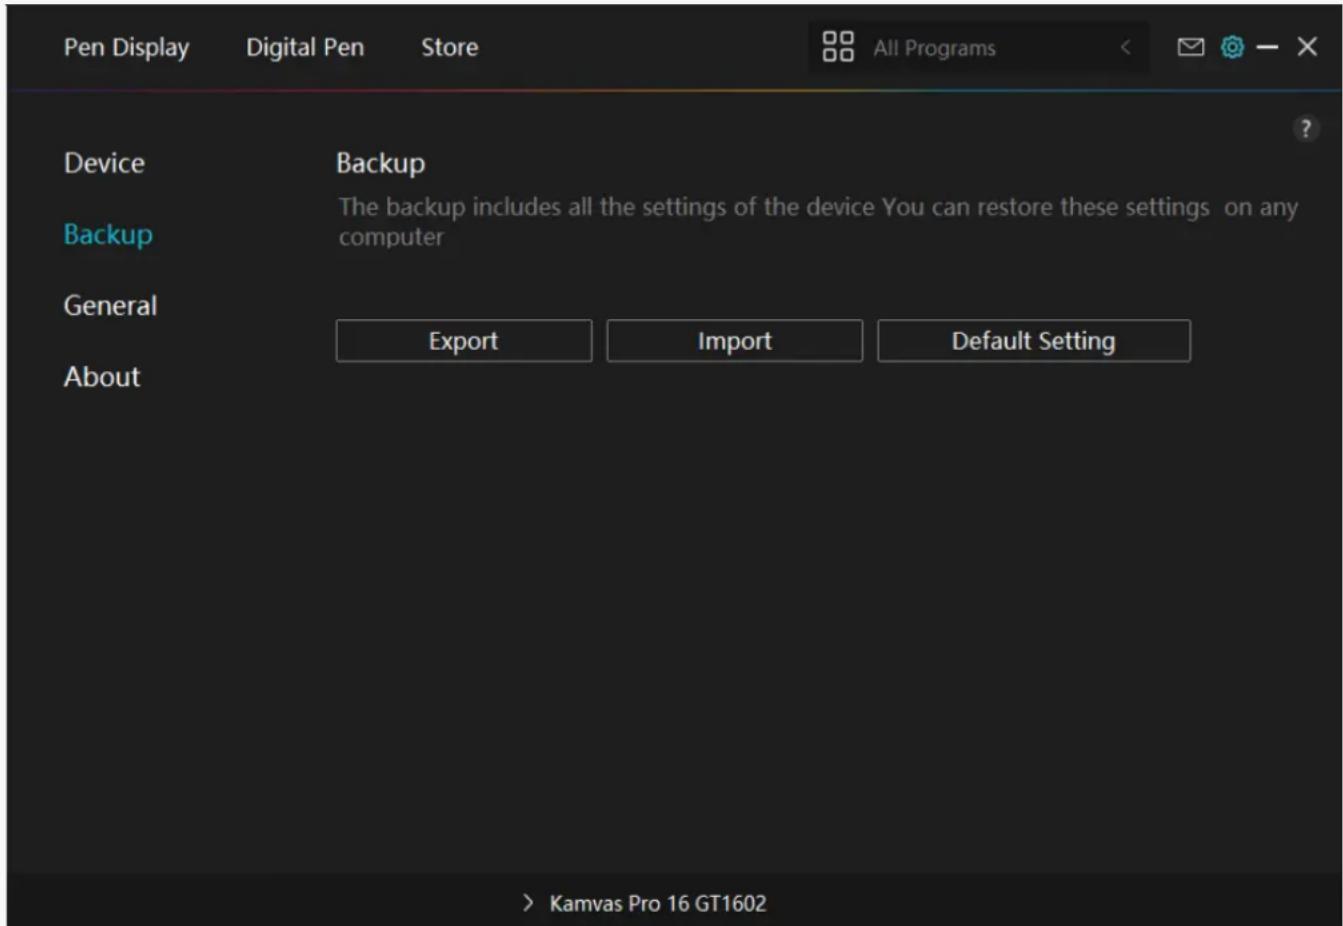
text_image
Pen Display Digital Pen Store All Programs Device Backup Backup The backup includes all the settings of the device You can restore these settings on any computer General Export Import Default Setting About > Kamvas Pro 16 GT16023. General Setting
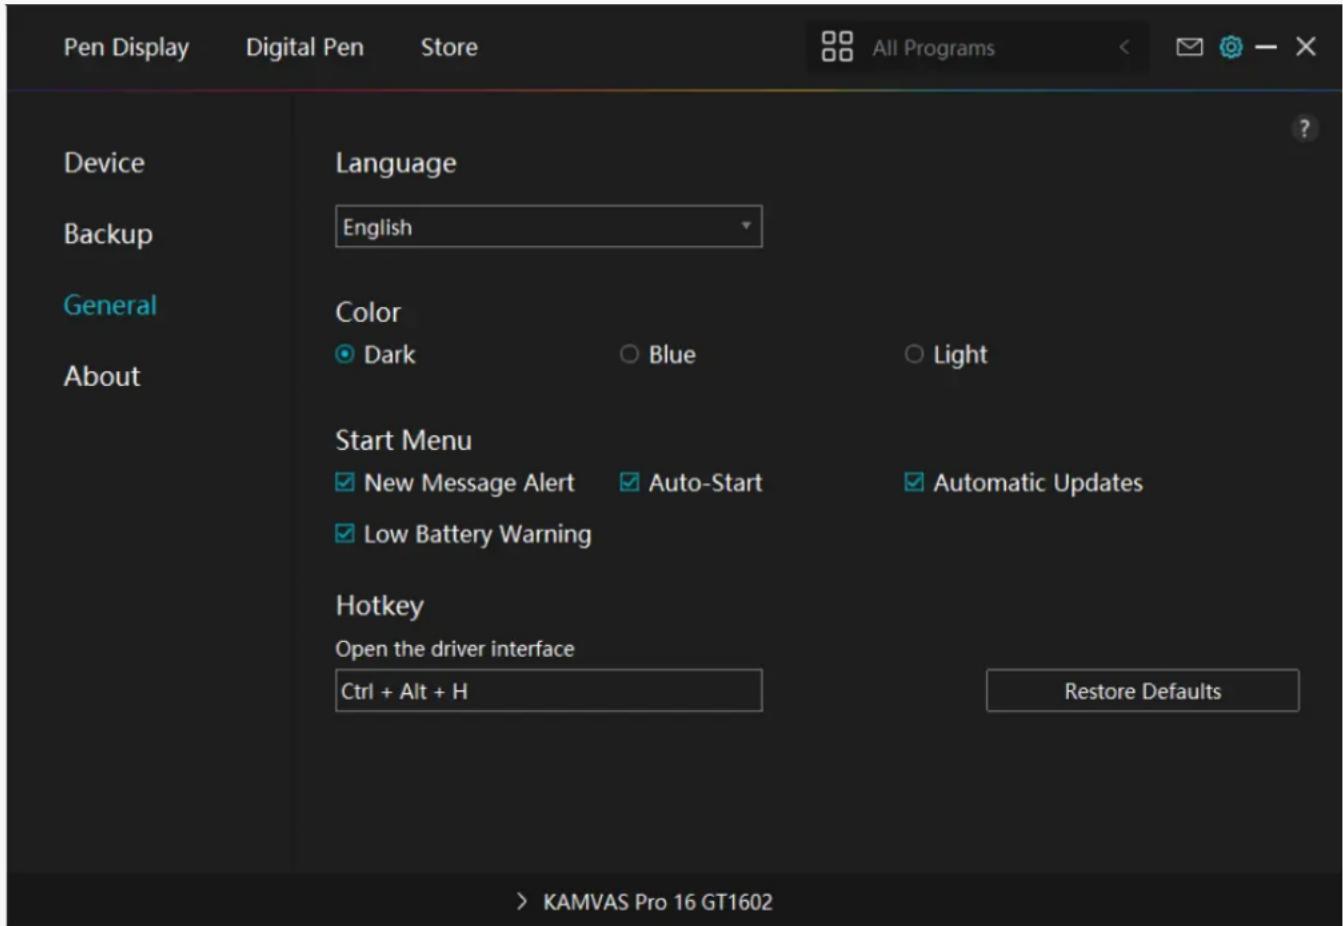
Language: Click the drop-down button to select a language.
Color: You can select the color of the Driver interface among Dark, Blue, and Light according to your preference.
Start Menu: Click to enable or disable "Auto-Start", "New Message Alert", "Automatic Updates", "Low Battery Warning".
Hotkey: You can set a hotkey to call out the Driver interface quickly according to your usage habits.
Kamvas Pro 16(2.5K)
text_image
Pen Display Digital Pen Store All Programs Device Language Backup English General Color About Dark Blue Light Start Menu ✓ New Message Alert ✓ Auto-Start ✓ Automatic Updates ✓ Low Battery Warning Hotkey Open the driver interface Ctrl + Alt + H Restore Defaults > KAMVAS Pro 16 GT16024. About
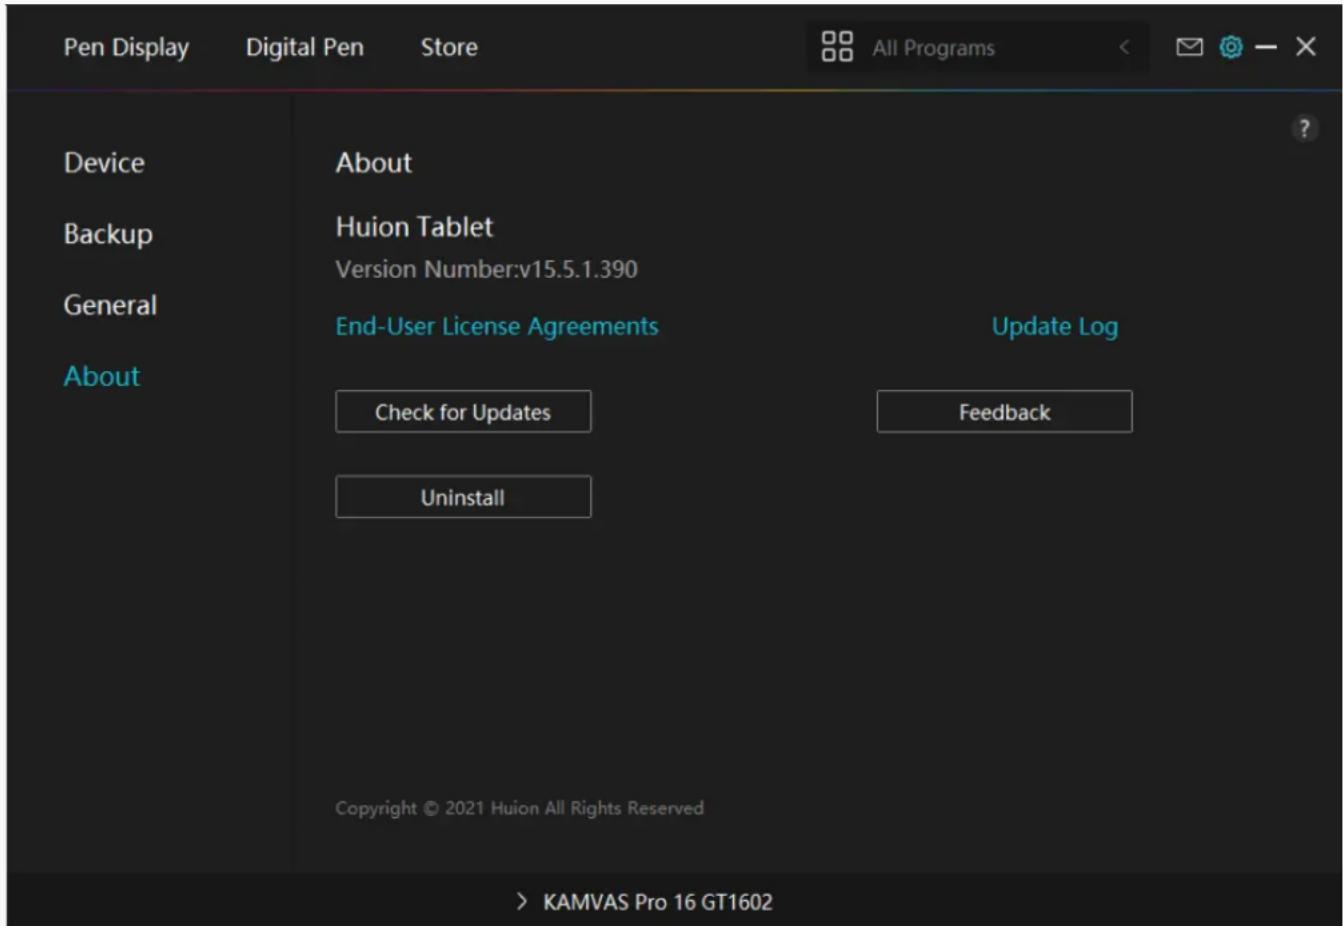
Users can check the Driver version number here. Click Check for Updates to view the latest Driver version and then follow the prompts to update the Driver if needed.
text_image
Pen Display Digital Pen Store All Programs Device About Backup Huion Tablet Version Number:v15.5.1.390 General End-User License Agreements Update Log About Check for Updates Feedback Uninstall Copyright © 2021 Huion All Rights Reserved KAMVAS Pro 16 GT1602Pen-enabled OSD Menu
OSD settings on KAMVAS Pro 16(2.5K) can be done with the digital pen.
Long press the power switch button to call up the OSD menu, and then use the digital pen to adjust the settings. The user interface is designed in a minimalist way, where options including Brightness, Color Temperature, General Settings and Exit are reserved, while some functions seldom used are eliminated.
Brightness Settings
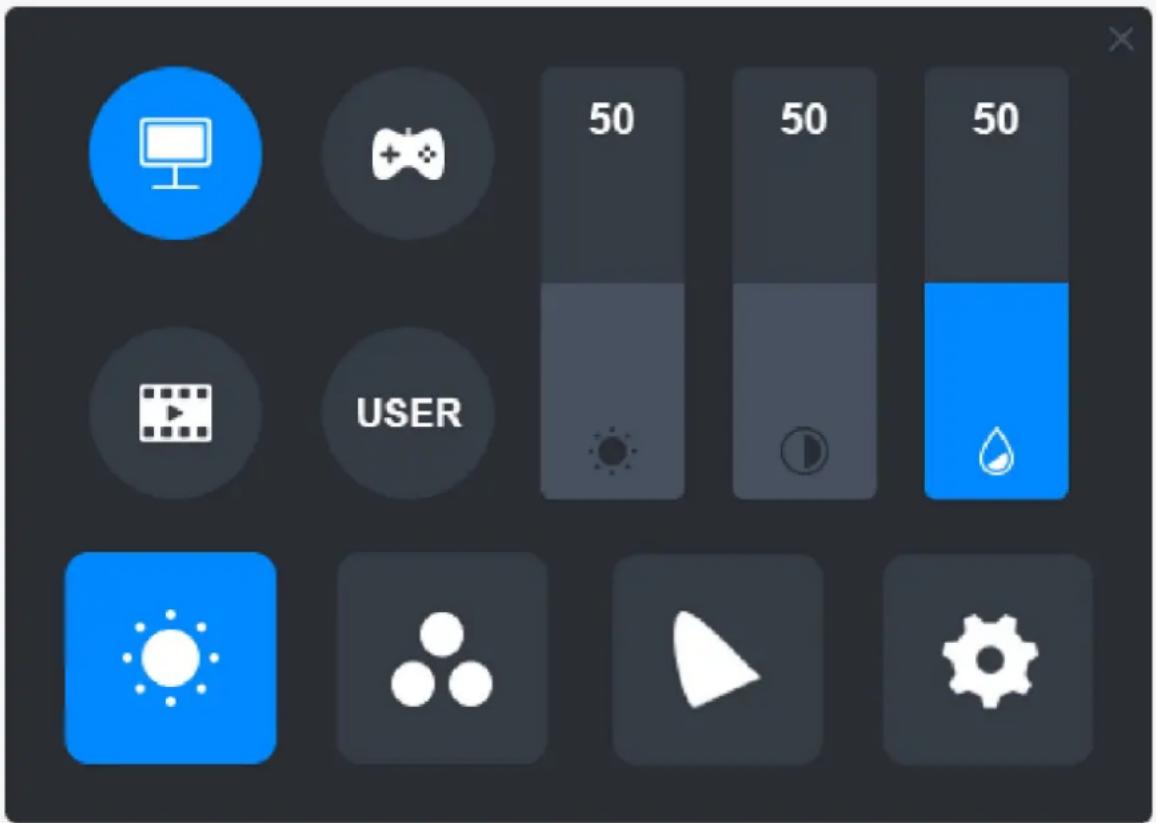
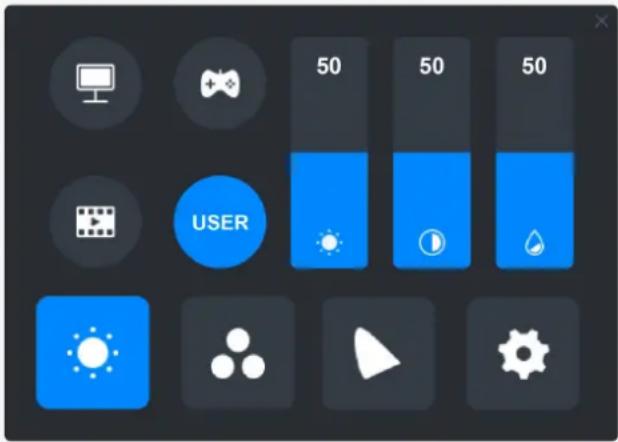
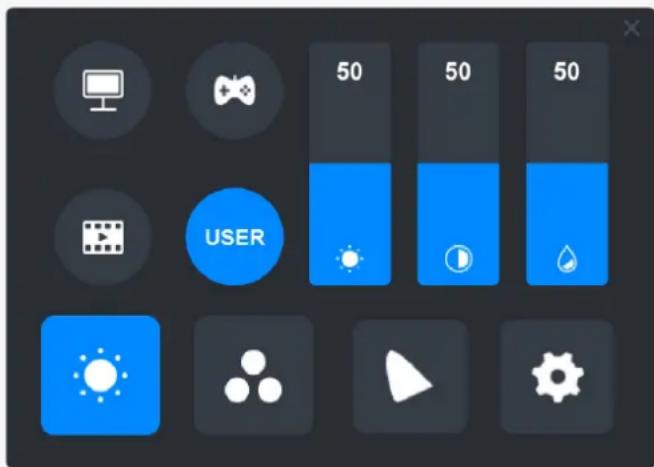
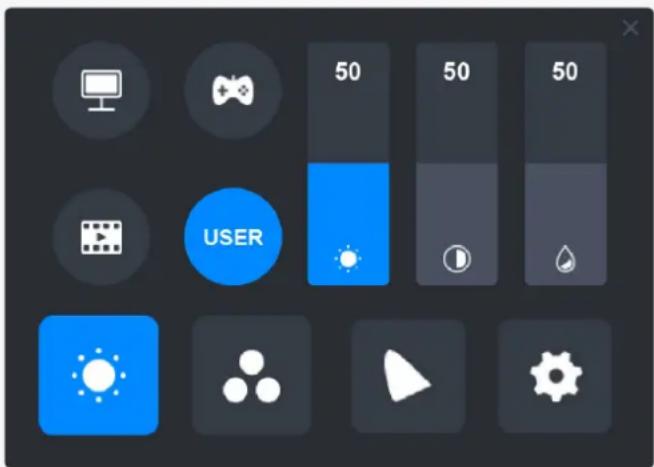
Click the sun icon to adjust the brightness. On the upper left of the interface, there are four modes to be chosen: "Standard Mode", "Game Mode", "Movie Mode" and "USER" mode. On the upper right are "Brightness", "Contrast", and "Saturation".
When "Standard Mode", "Game Mode", or "Movie Mode" is chosen, only the third bar will be blue and users can drag it to adjust the saturation.
text_image
50 50 50 USERWhen "USER" mode is chosen, all three bars will be blue and users can adjust the brightness, contrast, and saturation by dragging them.
text_image
50 50 50 USERColor Temperature Settings
On the upper left are three standard color temperatures ("6500K", "7500K", and "9300K") and a customizable one "USER" mode. On the upper right are the RGB color values: "R(Red)", "G(Green)", and "B(Blue)".
If "6500K", "7500K", or "9300K" is chosen, all three bars will be dark and users can not adjust "R(Red)", "G(Green)", or "B(Blue)".
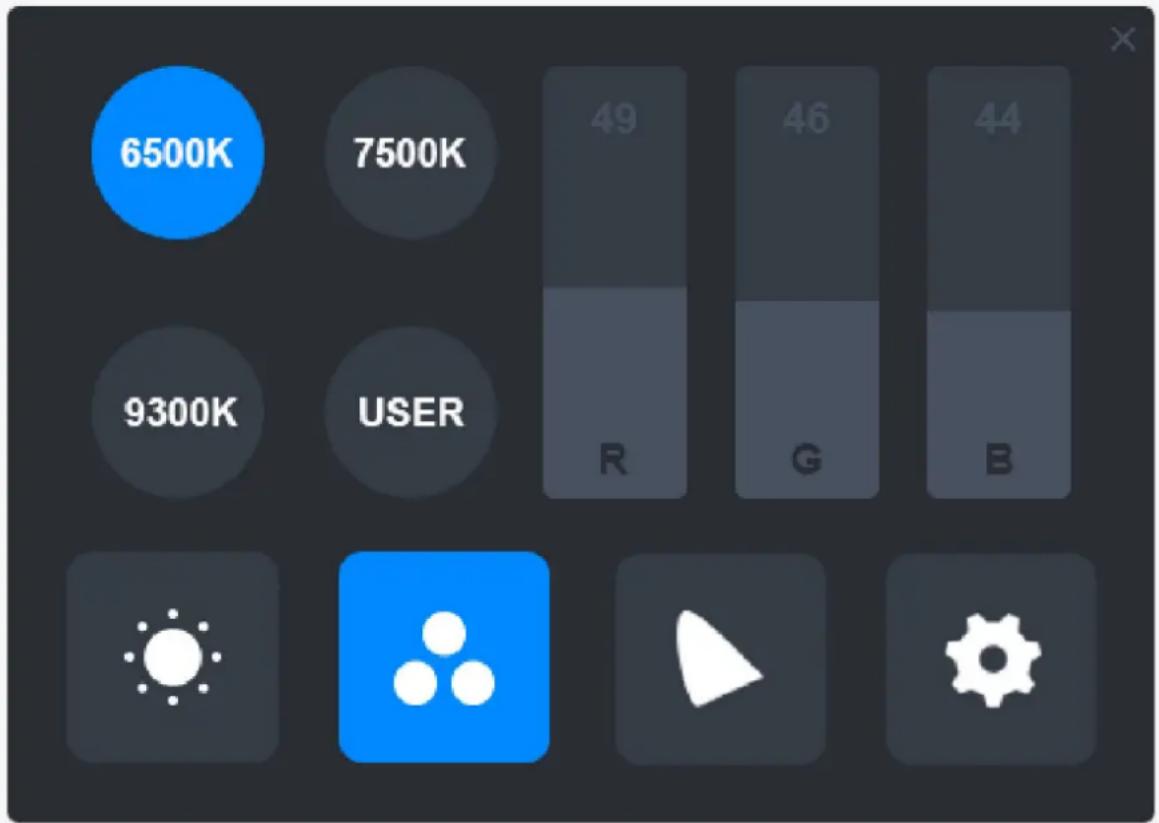
bar
| Category | Value | |---|---| | User | 6500K | | User | 7500K | | User | 9300K | | User | R | | User | G | | User | B |When "USER" mode is chosen, all three bars will be blue and users can adjust "R(Red)",
"G(Green)", and "B(Blue)" by dragging them respectively.
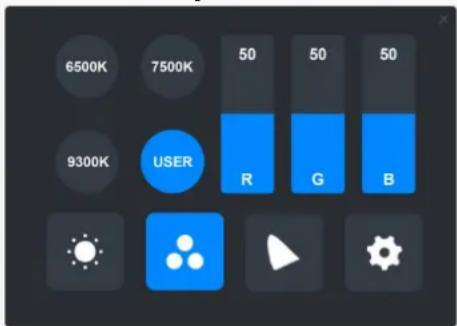
text_image
6500K 7500K 9300K USER R G BColor Gamut Settings
There are three color spaces on the menu: "Native", "sRGB", and "Adobe RGB".
The color coverage of them is as follows:
Native: 145% sRGB.
sRGB: 99% sRGB.
Adobe RGB: 99% Adobe RGB.
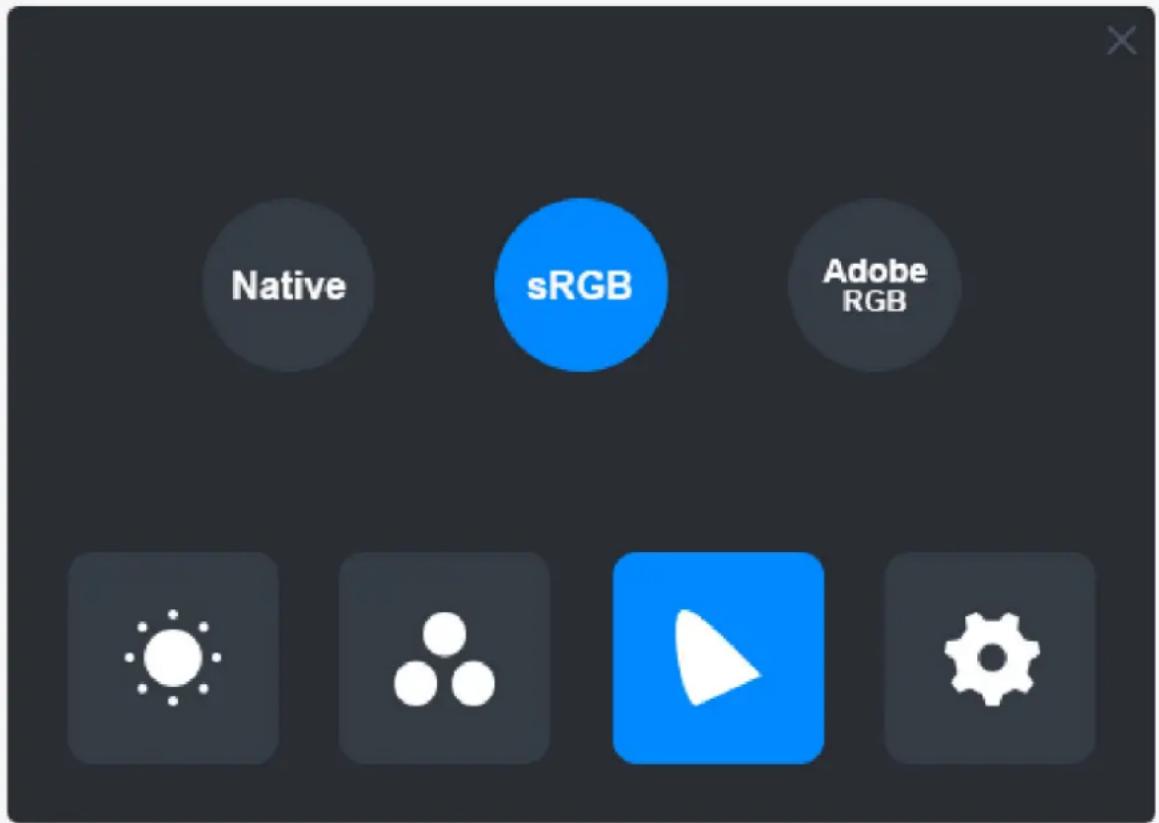
text_image
Native sRGB Adobe RGBNote:
You can click the horseshoe shape icon to choose the color space you want. If "Native" is chosen, you can still choose and adjust the desired brightness and color temperature freely. However, to make sure the colors which your pen display reveals are as similar as that in standard Adobe RGB and sRGB, only the brightness bar in "USER" mode can be dragged once you have chosen "sRGB" or "Adobe RGB".
text_image
50 50 50 USERNative
text_image
USER 50 50 50sRGB/AdobeRGB
General Settings
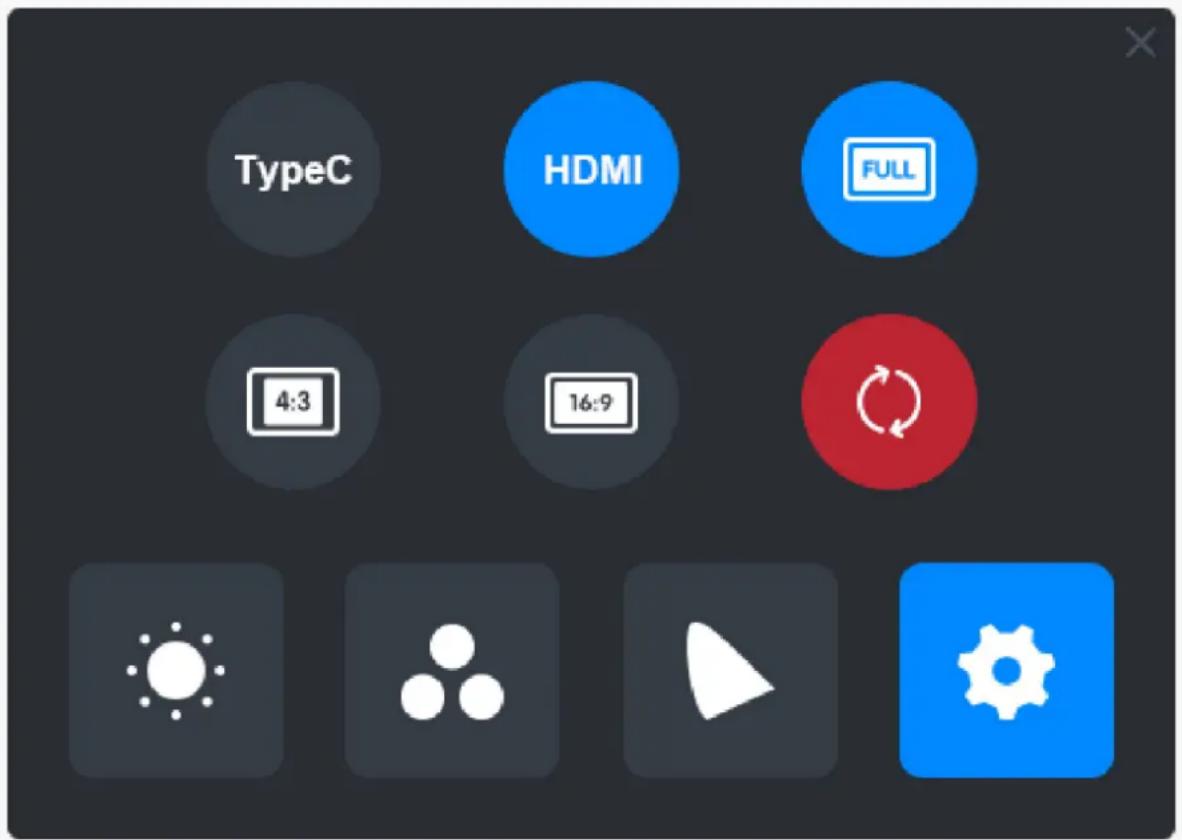
On the menu are "TypeC", "HDMI", "Full", "4:3", "16:9", and "Reset" to be chosen.
①TypeC/HDMI: connect via a type-c cable or HDMI cable.
②FULL: change the viewable area to full screen.
③4:3: change the aspect ratio of viewable area to 4:3.
④16:9: change the aspect ratio of viewable area to 16:9.
⑤ Reset: All the settings of the OSD menu will be reset to default ones.
text_image
TypeC HDMI FULL 4:3 16:9How to Use the Digital Pen
Hold the Pen:
Hold the digital pen as you hold a real pen. Adjust your grip so that you can toggle the pen press keys easily with your thumb or index finger. Be careful not to accidentally press the key while drawing with the pen.
Note: Please place the pen on the table when it is not in use. Do not put the pen on the pen display, otherwise it may interfere with the function of the mouse and other devices, and it may also prevent your computer from entering sleep mode.
Cursor Movement:
Move the pen slightly above the working area of the display without touching the surface of the pen display, and the cursor on the screen will move to the new position accordingly. Use the digital pen to touch the screen with a certain amount of force, and then you can make a left-click.
Click:
Tap on the pen display with the pen to register a click. Press lightly to highlight or select an item on the screen and double-click to open it.
Move:
Pick up a file or icon, then slide the pen nib across the display to move it.
Use the Pen Press Keys:
There are two press keys on the digital pen, whose functions can be programmed on the driver interface. The press keys on the pen will work as long as the vertical distance between the pen nib and the display is within 10mm.
Replace the Pen Nib:
Tip: When the pen nib is badly worn, please replace it with a new pen nib timely.
-
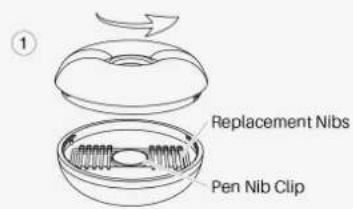
Rotate the pen holder counterclockwise and take out a replacement nib.
-
Tilt the pen, and pull the nib out of the pen through a nib clip.
-
Insert the replacement nib straight into the barrel of the pen until the nib stops moving forward.
text_image
Replacement Nibs Pen Nib Clip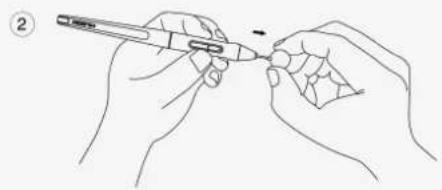
natural_image
Line drawing of hands holding a pen and eraser, no text or symbols present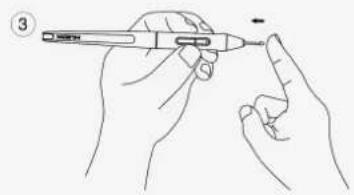
natural_image
Line drawing of a hand holding a pen with a small object inserted, no text or symbols presentProduct Specifications
Here are the product specifications to help you know more about the device. If you have any questions, please feel free to contact us.
The following data are for reference only.
Appearance
| Color: | Silvery Frost |
| Dimension: | 436.2 x 247.3 x 10~11.5mm |
| Workspace: | 349.6 x 196.7mm |
| Net Weight: | 1.28Kg |
| Stand: | ST200 |
| Interface: C(HDMI and DP) | USB-C(Power), Full-Featured USB- |
Screen
| Resolution: | 2560 x 1440(16:9) QHD |
| LCD Type: | IPS |
| AG Glass: | Anti-glare etched glass |
| Full Lamination: | YES |
| Contrast Ratio: | 1200:1 |
Brightness: 220cd/m2
Response Time: 14ms
Viewing Angle: 89°/89°(H)/89°/89°(V) (Typ.)(CR > 10)
AGamut: 145% sRGB
Display Color: 16.7M(8bit)
Technical Specifications
| Digital Pen: | PW517 |
| Pen Technology: Resonance | Battery-Free Electromagnetic |
| Pen Resolution: | 5080 LPI |
| Pressure Sensitivity: | 8192 Levels |
| Tilt Support: | ±60° |
| Sensing Height: | 10mm |
| Report Rate: | >300PPS |
| Accuracy: | ±0.5mm |
Operating Conditions
| Input Voltage: | AC 100-240V, 50/60Hz |
| Output Voltage: | 5V 3A |
| Power Consumption: | ≤ 10W |
| Standby Consumption: | ≤ 0.25W |
| Working Temp. and Humidity: | 0-40°C, 20-80% |
| Storage Temp. and Humidity: | -20°C~60°C, 10-90% |
OS Compatibility
Windows 7 or later
macOS 10.12 or later
Android (USB3.1 DP1.2 or later)
Troubleshooting Solutions
The pen display cannot sense the pen pressure while the cursor can move
You may have installed other drivers or run the drawing software when installing the driver. Please uninstall all the drivers, close the drawing software, and then reinstall the Huion driver. It's suggested to restart your computer after finishing the installation.
The digital pen does not work
- Make sure you are using the pen that originally came with your display.
- Make sure you installed the driver correctly.
The press key does not work
- Please check that the press key function is enabled in the driver;
- Make sure you have correctly defined the press key.
The computer cannot enter sleep mode
Please do not place the digital pen on the working area of the pen display when you are not using it, otherwise the computer will not be able to enter sleep mode.
The press key of the digital pen does not work
The press keys of the digital pen will not work if the pen nib touches the working area of the display, or when the vertical distance between the pen nib and the display is over 10mm.
The computer cannot recognize the pen display
Please check whether the USB port functions well. If not, please try another USB port.
If your problem is not resolved, please click FAQs to view more troubleshooting methods or email us(service@huion.com).