
Savi W445 - Headphones PLANTRONICS - Free user manual and instructions
Find the device manual for free Savi W445 PLANTRONICS in PDF.


| Product Type | Wireless Headset System |
| Model | Savi W445-M (D100-M USB Adapter + WH500 Headset) |
| Brand | Plantronics |
| Headset Form Factor | Over-the-ear with earloop or headband |
| Connectivity | USB Adapter (D100-M) to PC |
| Wireless Range | Up to 300 feet (91 meters) in high range mode |
| Audio Bandwidth | Wideband (default) or Narrowband |
| Talk Time | Up to 7 hours (narrowband), less in wideband |
| Battery Type | Rechargeable, replaceable (Plantronics supplied only) |
| Battery Charge Time | 3 hours full charge; 20 min minimum before first use |
| Battery Storage Life | Up to 75 hours when fully charged and stored normally |
| Power Supply | Base power supply (AC adapter) or USB charging cable |
| Charging Options | Deluxe Charger Base (also charges spare battery), Deluxe USB Charging Cable |
| Multi-Headset Conferencing | Up to 3 guest headsets can be subscribed |
| Softphone Compatibility | Optimized for Microsoft Lync; compatible with most softphones |
| Operating Systems | Windows XP SP3+, Vista SP1+, 7; Mac OS X (limited) |
| Weight (Headset) | Approximately 20 g (without battery) |
| Dimensions (USB Adapter) | Approximately 2.5 x 0.8 x 0.5 inches |
| Safety Features | Anti-Startle, G616 Acoustic Limiting, Audio Limiting (80/85 dBA) |
| Cleaning | Wipe with soft dry cloth; do not use liquids |
| Warranty | Standard Plantronics warranty |
Frequently Asked Questions - Savi W445 PLANTRONICS
User questions about Savi W445 PLANTRONICS
0 question about this device. Answer the ones you know or ask your own.
Ask a new question about this device
Download the instructions for your Headphones in PDF format for free! Find your manual Savi W445 - PLANTRONICS and take your electronic device back in hand. On this page are published all the documents necessary for the use of your device. Savi W445 by PLANTRONICS.
USER MANUAL Savi W445 PLANTRONICS
Wireless headset system
User Guide
OPTIMIZED FOR
Microsoft® Lync™
Welcome
Congratulations on purchasing your new Plantronics product. This user guide contains instructions for setting up and using your Savi W445-M (D100-M USB Adapter + WH500 Headset) Wireless Headset System.
Please refer to the separate safety instructions for important product safety information prior to installation or use of the product.
Contents
1 Package Contents......4
2 System Features....5
3 Headset Setup....6
Installing the Headset Battery....6
Customize the Headset 6
Wearing the Headset 7
Fitting the Headset with a Headband 7
4 System Setup....8
Connecting the Power Supply 8
Docking and Charging the Headset......8
Charging the Spare Battery 8
Connecting the USB Adapter to your PC 9
USB Adapter Indicator Light....9
Loading software 9
5 Using Your Headset System....10
Powering Up the Headset....10
Talk Time....10
Muting a Headset During A Call 10
Right Ear Headset Button Functions....10
Replacing Your Headset Battery....11
Placing the Headset in Sleep Mode 11
Battery Storage Time....11
Headset Tones....11
Battery Life....11
Headset Indicator Light 12
Subscribing a Headset 12
Ending Subscription 12
6 Making Calls With your Headset and PC....13
Software Installation 13
Making Calls With Your Headset and PC 13
Auto Answer 13
7 Plantronics Control Panel....15
Devices Tab 15
Applications Tab 17
Preferences Tab 18
About Tab 18
8 Plantronics Update Manager....19
Check for Updates Automatically....19
Check for Updates Now 19
Install Checked Updates.... 19
9 Troubleshooting and Common Questions....20
10 Appendix 21
Left Ear Headset/Savi System Button Functions ..... 21
Right Ear Headset/Savi System Button Functions.....22
1 Package Contents
Savi W445-M USB Adapter and Charger
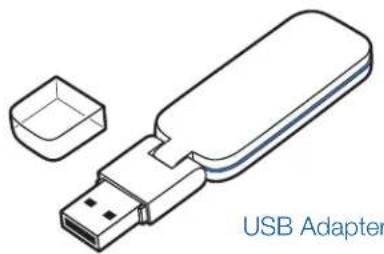
natural_image
Line drawing of a USB adapter with a small inset showing its internal structure (no text or symbols on the device itself)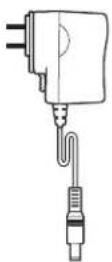
Base Power Supply
natural_image
Technical line drawing of a mechanical clamp or bracket component (no text or symbols)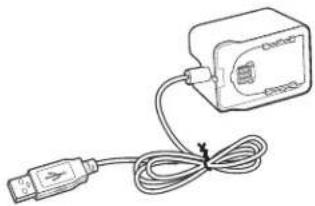
natural_image
Simple line drawing of a connected device with a cable (no text or symbols)Deluxe USB Charging Cable
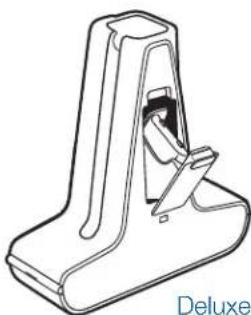
Deluxe Charger Base with Spare Battery
Savi WH500 Headset
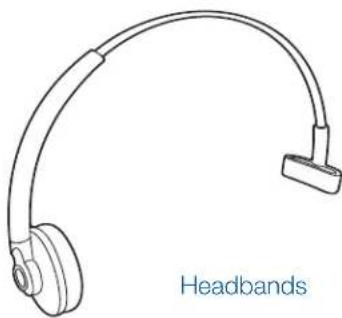
natural_image
Line drawing of a headband with ear and clip (no text or symbols on the headset itself)Headset
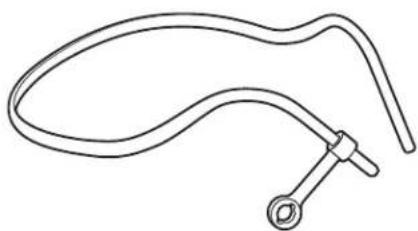
natural_image
Simple line drawing of a curved pipe or tube with a circular end cap (no text or symbols)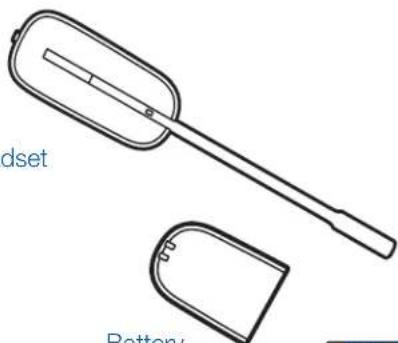
text_image
dset BatteryBattery

text_image
plantronics conv/MTT plantronics.Fit kit with earloops, eartips and foam sleeve
2 System Features
Savi USB Adapter Features
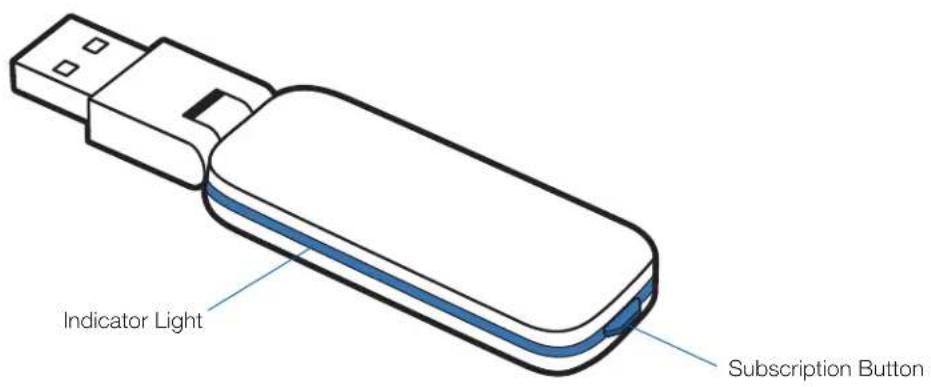
text_image
Indicator Light Subscription ButtonSavi WH500 Headset Features
text_image
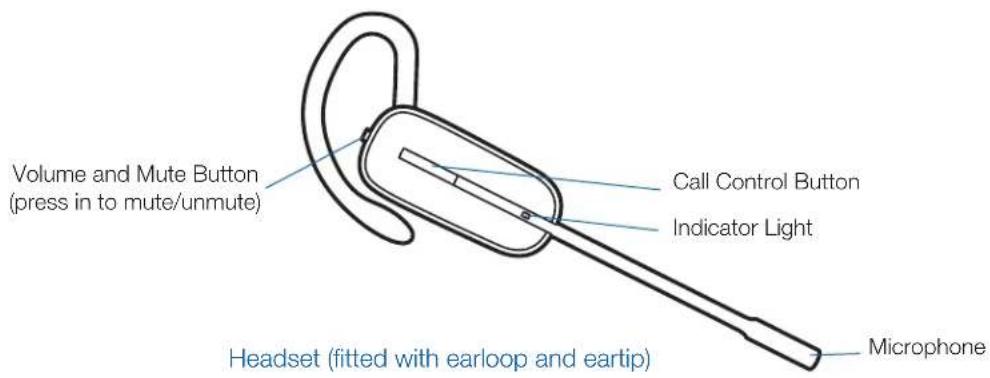
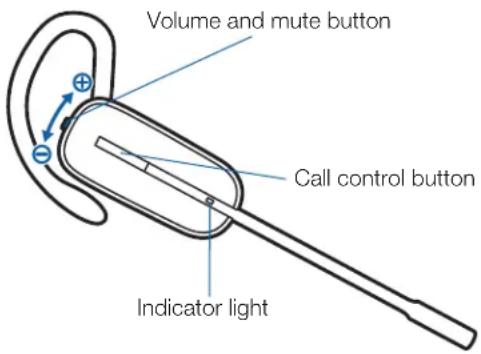
Volume and Mute Button (press in to mute/unmute) Call Control Button Indicator Light Headset (fitted with earloop and eartip) Microphone3 Headset Setup
Installing the Headset Battery
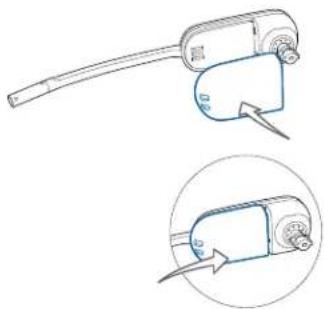
Position the battery as shown on the headset and slide into position until the battery snaps into place.
natural_image
Technical line drawing of a mechanical device with an arrow indicating motion, shown in two views (no text or symbols)NOTE This product has a replaceable battery. Use only the battery type supplied by Plantronics.
Customize the Headset
The headset can be converted for wearing on the left or right ear with either an earloop or headband.
Right earloop configuration
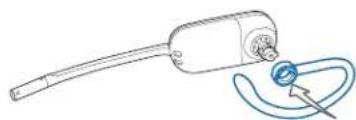
1 Choose the size of earloop that fits most comfortably. Align the earloop as shown and insert it onto the headset.
natural_image
Line drawing of a medical or laboratory device with a bulb and curved tubing (no text or symbols)2 Rotate the earloop up 90 degrees.
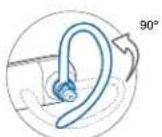
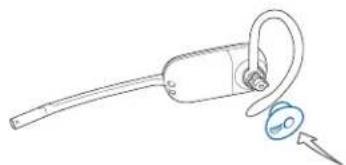
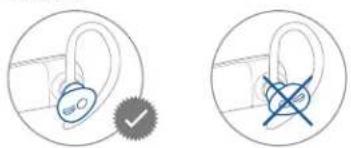
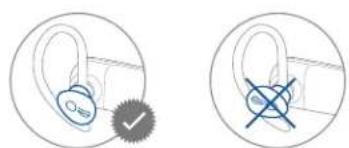
3 Choose the size and style of eartip that fits most comfortably. Align the eartip with the notch facing the microphone as shown.
natural_image
Line drawing of a medical device with a bulb and earpiece (no text or symbols)4 Press in to attach.
text_image
Diagram showing earbuds with a checkmark and cross symbol, likely illustrating a diagnostic or safety concept.Left earloop configuration
1 Choose the size of earloop that fits most comfortably. Align the earloop as shown and insert it onto the headset.

natural_image
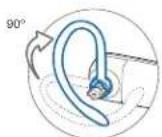
Line drawing of a medical device with a blue connector and curved tubing (no text or symbols)2 Rotate the earloop up 90 degrees.
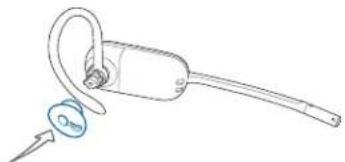
3 Choose the size and style of eartip that fits most comfortably. Align the eartip with the notch facing the microphone as shown.
natural_image
Line drawing of a earbuds with a probe inserted, no text or symbols present4 Press in to attach.
text_image
Diagram showing ear ear with a plus sign and a cross symbol, likely indicating a medical or diagnostic mark.Wearing the Headset
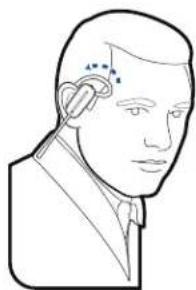
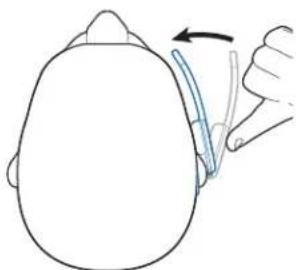
When you wear the headset, the microphone should rest as close to your cheek as possible without touching. The microphone can be adjusted inward by the pivoting earpiece to optimize the position of the headset.
1 Slide the headset over and behind your ear and fit the ear tip into your ear.
natural_image
Line drawing of a person's head with earphones (no text or symbols)2 Place your index finger on the headset indicator light and gently push in towards your cheek. As the headset is pushed in, you will feel soft clicks as the pivoting earpiece moves the microphone close to your mouth.
natural_image
Simple line drawing of a person's head with a hand pointing to the ear and a blue tool, no text or symbols present.Fitting the Headset with a Headband
The headset can be rotated for wearing on the left or right ear.
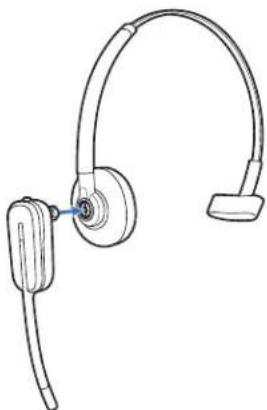
1 Hold the headband so it is aligned to receive the headset as shown and insert the headset into the headband.
natural_image
Line drawing of a pair of earphones with a curved headband (no text or symbols)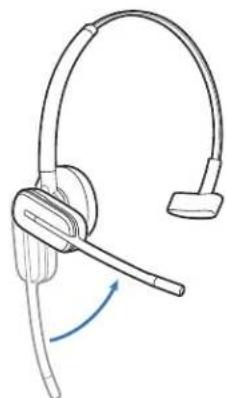
natural_image
Line drawing of a headset with a blue arrow indicating rotation (no text or symbols)2 Rotate the headset up.
3 To optimize the position of the headset, push the headset in so the microphone is close to your mouth.
4 System Setup
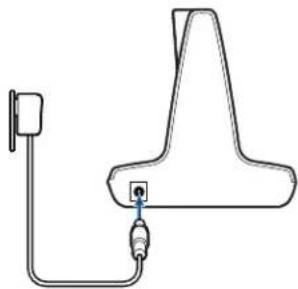
Connecting the Power Supply
1 Connect the base power supply into the power jack on the Deluxe Charger Base.
2 Connect the power supply to the outlet. The power indicator light will be solid green.
natural_image
Simple line drawing of a mechanical or electrical component with a plug and cable (no text or symbols)Docking and Charging the Headset
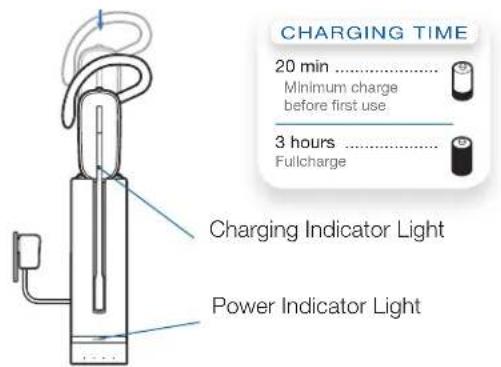
1 Gently push the headset into the charging cradle.
The charging indicator light on the headset will flash white to indicate that the headset battery is charging and will turn solid white when fully charged.
2 Charge for at least 20 minutes prior to first use. A full charge takes 3 hours.
text_image
CHARGING TIME 20 min ...... Minimum charge before first use 3 hours ...... Fullcharge Charging Indicator Light Power Indicator LightNOTE The USB charging cable can also be used to charge the headset.
To successfully charge your headset with the USB cable the PC must be on and in an active state (not standby). The charging time will vary according to the number of other devices drawing power from the PC's USB port(s).
Charging the Spare Battery
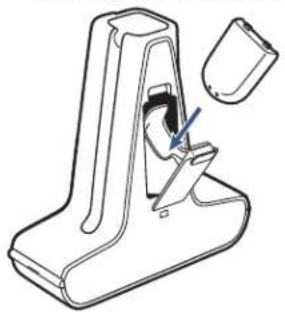
Both the Deluxe Charge Base and Deluxe Charging Cable can charge both the headset battery and the spare battery simultaneously or independently if desired. The spare battery is shipped with Savi 445 in the Deluxe Charger Base battery compartment. See "Replacing Your Headset Battery" for details on replacing your battery even during a call.
Charging the Battery in the Charge Base.
1 Ensure the deluxe charger base is powered on and the battery is correctly seated in the battery compartment. While charging the battery charge indicator will flash green; once fully charged the charge indicator will be solid green.
natural_image
Line drawing of a mechanical component with a tool inserted, no text or symbols present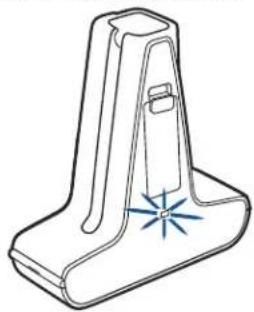
natural_image
Line drawing of a mechanical bracket with a starburst symbol on the base (no text or labels)Charging the Battery in the Deluxe USB Charger.
1 Connect the USB charger to an available USB port on the PC.

natural_image
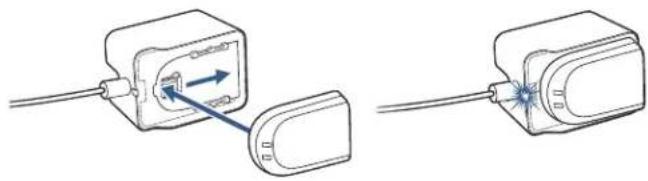
Illustration of a laptop connected to a USB cable and a device labeled 'Connect' (no text or symbols on the diagram itself)2 Set the battery on the battery-shaped receptacle and gently push down. Then slide the battery in the direction shown until the battery clicks into place. While charging the battery charge indicator will flash green; once fully charged the charge indicator will be solid green.
natural_image
Diagram showing two connected devices with arrows indicating connection points (no text or symbols present)Connecting the USB Adapter to your PC
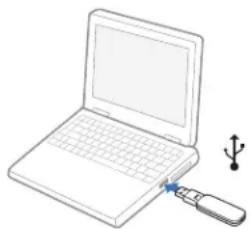
1 Insert the USB adapter into USB Port on PC. The indicator light on the USB adapter will be solid red to indicate the USB adapter is powered on and will turn solid green when it finds the headset.
natural_image
Line drawing of a laptop with a mouse and USB symbol on the right side (no text or labels)NOTE The headset may have to be charged before the USB adapter can find it.
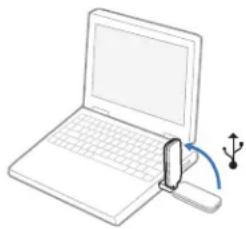
2 USB adapter can be folded as shown.
natural_image
Illustration of a laptop with a USB flash drive and a separate sensor device (no text or symbols)IMPORTANT NOTE For best performance it is recommended that Windows is updated with Service Pack levels listed below:
Microsoft Windows ^® XP Service Pack 3 (SP3) or later Microsoft Windows Vista ^® Service Pack 1 (SP1) or later
Loading software
1 Load Plantronics software by visiting plantronics.com/software and click on the download button.
USB Adapter Indicator Light
USB Adapter Status USB Indicator Light
Headset subscribed, no activity Solid green
Headset in talk mode Flashes green
Headset muted Flashes red
Incoming call Flashes red and yellow
Headset not subscribed Solid red
USB adapter subscription Flashes green and red
USB adapter conference subscription Flashes green and yellow
On conference call with one or more guest headsets subscribed Flashes yellow
5 Using Your Headset System
Powering Up the Headset
If the headset battery is charged and connected to the headset, the headset is automatically on. The headset does not have an on/off button.
Talk Time
With a single full charge, the Savi W445-M will provide up to 7 hours of talk time in narrowband mode. Talk time will be reduced when operating in wideband mode and/or if the headset is used consistently at a far distance from the adapter. The battery can be replaced, even mid-call, giving essentially unlimited talk time. See "Replacing Your Headset Battery"
Muting a Headset During A Call
To mute/unmute the call, press the volume/mute button in. The USB adaptor light will flash red when the headset is muted.
When mute is activated, you will hear three high tones. When unmuted, you will hear three low tones.
After the Plantronics software is loaded, the mute tones can be turned off by going to Start > Programs > Plantronics Control Panel > Devices > Device Settings > Headset – Mute Tone.
Right Ear Headset Button Functions
This table shows the headset button functions when you are wearing the headset on the right ear. If you wear the headset on the left ear, the volume button presses are opposite. See the appendix for a left ear headset button functions table.
text_image
Volume and mute button Call control button Indicator light
For your safety, do not use headset at high volumes for extended periods of time. Doing so can cause hearing loss. Always listen at moderate levels. For more information on headsets and hearing visit: plantronics.com/healthandsafety.
Function Type of Press Tones/Lights
| Place, answer, or end calls Short press call control button 1 mid-tone | USB adapter flashes green when headset in use | |
| Increase volume Short press volume up 1 tone with pitch increase | ||
| Decrease volume Short press volume down 1 tone with pitch decrease | ||
| Flash between calls While on a call, long press volume up or down (at least 112 sec) 1 mid-tone | ||
| Mute/unmute headset | While on a call, press the volume/mute button in | USB adaptor flashes red when muted3 high tones when muted3 low tones when unmuted |
| Low battery warning | Idle: 1 low tone/15 secsOn call: 3 low tones | |
Replacing Your Headset Battery
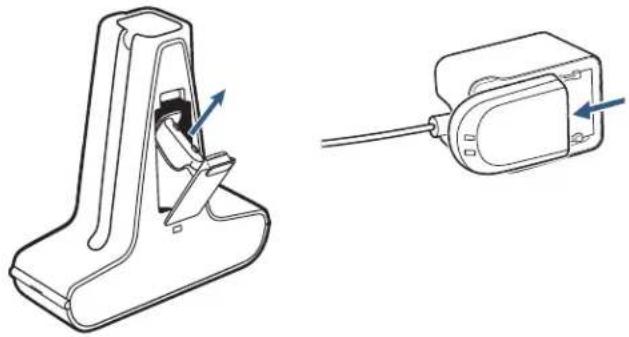
1 Once your spare battery is fully charged, remove the spare battery from the battery compartment on the side of the Deluxe Charging Cradle or from the back of the Deluxe USB Charging Cable. Because the battery is hot-swappable, you won't lose an active call if you replace the battery within five minutes.
natural_image
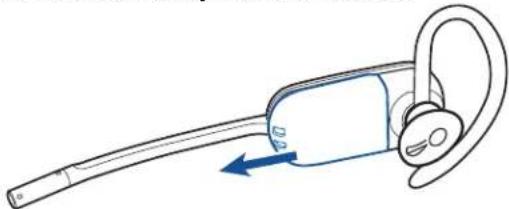
Technical line drawing of a mechanical component with a side view showing a pin and shaft assembly (no text or symbols)2 Disconnect the battery from the headset.
natural_image
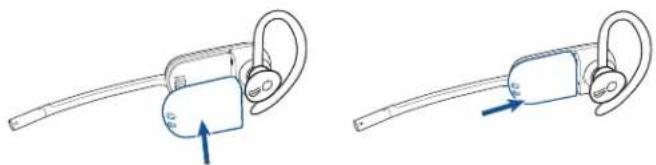
Line drawing of a wireless earbuds with a blue arrow indicating motion (no text or symbols)3 Slide the charged battery onto the headset until you hear a click.
natural_image
Two line drawings of a wireless ear adapter device with blue arrows indicating motion or movement (no text or symbols)4 Charge the spent battery by placing it in the Deluxe Charge Cradle battery compartment and closing the door, or on the Deluxe USB Charging cable as shown.
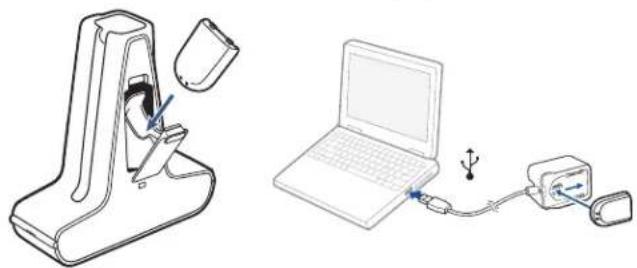
natural_image
Line drawings of a laptop connected to a power adapter via cable (no text or symbols)Placing the Headset in Sleep Mode
If you won't be using the headset for a long period of time and the headset will not be in the charging cradle, you can put the headset in sleep mode. With the headset idle, press the call control button for three seconds until you see the headset flash white twice. To wake the headset, press the call control button again and you will see two white flashes.
Battery Storage Time
If you remove a fully charged battery from the headset, it will provide up to 75 hours of battery storage time if stored under normal storage conditions.
Headset Tones
Out of range warning
If you are on a call and go out of the operating range, you will hear three low tones. You will hear a single mid tone when you are back in range.
If you stay out of range, active calls will be suspended. Calls will be re-established when you walk back into range. If you remain out of range for more than 5 minutes, the system will drop the call.
If you are not on a call and go out of the operating range and press the call control button, you will hear a single tone for the button press and three low tones for the failure to make a link.
Low battery warning
If you are on a call, you will hear a repeated single low tone every 15 seconds indicating that the battery is low. You should recharge the headset immediately.
If you are not on a call and press the call control button, you will hear three low tones indicating that the battery is low. You should recharge the headset immediately.
Battery Life
At the lower right corner of your screen in your system tray, your headset battery status will be indicated with one of the following icons:

100%75%50%25%0%
A warning will be issued if your headset is critically low.
Headset Indicator Light
If you are not on a call, you can toggle the headset in-use indicator light on and off by pressing the headset volume down button (press volume up for left ear configuration) for three seconds.
Subscribing a Headset
The headset and USB adapter that are supplied together are already subscribed to each other. However, if you wish to use a new headset with your existing USB adapter or you need to restore subscription to your current headset, the units can be subscribed to each other by the following method:
1 Ensure your headset is charged.
2 Double press the subscription button on the USB adapter. The USB adapter will flash red and green.
3 Press the volume up button (press volume down for left ear configuration) on the headset for three seconds until the headset indicator light turns solid white.
4 When the indicator light on the USB adapter goes solid green, the headset and the USB adapter are subscribed to one another.
To ensure subscription was successful, press the call control button: the headset will flash white and the USB adapter will flash green.
NOTE If the subscription process times out after two minutes or if the subscription process fails, the USB adapter indicator light will become solid red for four seconds and then return to its previous state. If this occurs, try to re-subscribe the headset again.
Ending Subscription
If the USB adapter is in subscription mode and you want to stop the adapter from searching for a headset, press the subscription button again. The subscription light will turn solid red for four seconds and then go to its previous state.
6 Making Calls With your Headset and PC
Software Installation
It is highly recommended that you install the Plantronics software. Though your Savi system will operate without the software, it will limit the system's full capabilities.
Install the Plantronics software to enable remote call answer/end with compatible softphones. The software can be downloaded at plantronics.com/software.
After installation, to visit the Plantronics control panel, click on Start > Programs > Plantronics > Plantronics Control Panel.
Making Calls With Your Headset and PC
| With Plantronics Software and a Compatible Softphone | Without Plantronics Software | |
| To place a call | Dial number from a compatible softphone application | 1. Short press call control button on headset2. Dial number from softphone application |
| To answer a call | Short press call control button on headset | 1. Short press call control button on headset2. Answer call using softphone application |
| To end a call | Short press call control button on headset | 1. Short press call control button on headset2. Hang up call using softphone application |
Softphone Compatibility
Remote call answer/end from the Savi headset is available for all softphones with no additional steps by the user except Skype™. For a list of compatible softphones visit plantronics.com/software.
For Skype support, please follow these steps:
1 Skype will display the following message during the install of Plantronics Unified Runtime Engine "PlantronicsURE.exe wants to use Skype". Choose "Allow Access" to connect.
2 You can also check Savi W445-M Skype connection status by going to Skype and checking the Tools > Options > Advanced > Advanced Settings > "Manage Other Programs Access" setting.
Auto Answer
Auto answer saves the user a button press to establish the radio link between headset and adapter.
The Savi W445-M is supplied with auto answer NOT SELECTED as the default. When auto answer is set to NOT SELECTED you must press the headset call control button to answer an incoming call. When Auto Answer is set to SELECTED an incoming call will be answered when the headset is removed from the charge cradle.
To change the setting, go to: Start > Programs > Plantronics > Plantronics Control Panel > Device Settings – USB adapter.
Conferencing Up to Three Guest Headsets
While on a call, you can subscribe up to three guest headsets to your USB adapter for conferencing. As you add headsets to the adapter, an additional headset icon will appear in the Plantronics Control Panel with a number from 1 to 3 indicating the number of guest headsets subscribed to the adapter.
Guests may conference in as described below:
1 While you are on a call, place the guest's headset into subscription mode.
2 Short press (less than one second) the subscription button on the USB adapter. The USB adapter light will flash yellow and green.
3 The USB adapter light will then turn solid yellow and you will hear a tone in the master headset indicating a guest wishes to join the call.
4 If you press the call control button on the master headset within five seconds, the guest is joined to the call.
If you do not press the call control button within five seconds, the request to join the call is rejected and the guest will hear an error tone in their headset.
5 Guests may leave the conference call by pressing their call control button.
When they do you will hear a single tone in the master headset as each guest leaves the call.
To see how many headsets are subscribed to the adapter, refer to the lower left-hand corner of the Plantronics Control Panel. The first headset is the master headset and the number inside the next headset is the number of guest headsets subscribed to the adapter. The examples below show 1, then 2, then 3 guest headsets subscribed to the adapter in addition to the master headset.

text_image
∩ + 123 ∩ + ∩ ∩ + ∩7 Plantronics Control Panel
User preferences and various device settings can be changed using the Plantronics Control Panel. To start this program, click Start > Programs > Plantronics > Plantronics Control Panel.
Devices Tab
To configure your settings, select Plantronics D100-M from the pull down menu and click the Device Settings box. Below are the setting options and defaults for the USB adapter and headset.
NOTE Some parameters that do not apply to a particular Plantronics device may appear grayed out.
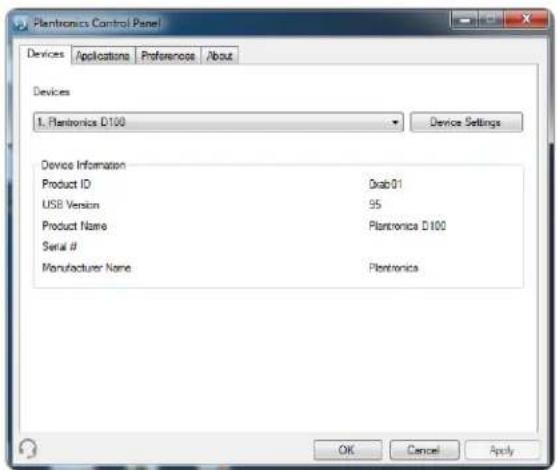
text_image
Plantronics Control Panel Devices Applications Preferences About Devices 1. Plantronics D100 Device Settings Device Information Product ID Drab01 USB Version 95 Product Name Plantronics D100 Serial # Manufacturer Name Plantronics OK Cancel ApplyDevice Settings – USB Adapter Tab
| Options | Feature Settings Default |
| General | Range High/Med/Low High |
| Auto Answer Selected/Not selected Not selected | |
| Audio | PC Audio Bandwidth Wideband/Narrowband Wideband |
| Feature Set Lock | Password (required) Locked/Unlocked Unlocked |
Range
The Savi W445-M is supplied with high range set as the default. Range can be minimized to help with PC buzzing, improve user density, or restrict range of users.
To change the Range default in the software, go to: Start > Programs > Plantronics > Plantronics Control Panel > Device Settings – USB adapter. You can also change the range setting by holding in the subscription button of the USB adapter for three seconds while it is in an idle state. The USB adapter light will flash green for high range, yellow for medium range and red for low range.
When Range is set to HIGH a user will have up to 300 feet of range. When Range is set to MEDIUM a user will have up to 150 feet of range. When Range is set to LOW a user will have up to 50 feet of range.
Auto Answer
The Savi W445-M is supplied with auto answer NOT SELECTED as the default. Auto answer saves the user a button press to establish the radio link between headset and adapter.
When auto answer is set to NOT SELECTED you must press the headset call control button to answer an incoming call. When Auto Answer is set to SELECTED an incoming call will be answered when the headset is removed from the charge cradle.
To change the default, go to: Start > Programs > Plantronics > Plantronics Control Panel > Device Settings – USB adapter.
PC Audio Bandwidth
The Savi W445-M is supplied with wideband audio as the default. Wideband audio delivers heightened speech clarity and life-like fidelity. However, wideband audio consumes more battery power and has more stringent access criteria which reduces the number of systems that can be deployed in a small area. All PCs support wideband audio.
To change the PC Audio Bandwidth default in the software, go to: Start > Programs > Plantronics > Plantronics Control Panel > Device Settings – USB adapter. You also can toggle between narrowband and wideband audio by doing a short press (less than one second) followed by a long press (more than three seconds) on the USB adapter subscription button while it is in an idle state. The USB adapter light will flash red for four seconds upon entering narrowband mode and flash green for four seconds upon entering wideband mode. When switching between narrowband and wideband audio, you must re-establish the audio link for the changes to take effect.
Feature Set Lock
See the Device Settings – Security Tab for more information.
Device Settings – Headset Tab
Options Feature Settings Default
| General Mute Tone Standard/Low/Off Off |
| Ringtone Sound 1/Sound 2/Sound 3 Sound 2 |
| PC Volume Standard/Low/Off Standard |
| System Tones Standard/Low/Off Standard |
| Second Inbound Call Ring Continuously/Ring Once/Ignore Ring Continuously |
Device Settings – Advanced Tab
Options Feature Settings Default
| Audio Protection | Anti-Startle Selected/Not selected Not selected | ||
| G616* | Selected/Not selected | Not selected | |
| Audio Limiting* | 80 dB/85dB/Off | Off | |
| Hours on Phone Per Day | 2/4/6/8 | 8 | |
| Feature Set Lock | Password (required) | Locked/Unlocked | Unlocked |
*The Audio and G616 Limiting features are supported in over-the-head mode only and are based on a typical headset and recommended acoustic coupling between the headset and the ear. Please see Headset setup for optimal wearing position.
Anti-Startle
Anti-startle provides advanced hearing protection against sudden loud sounds. When Anti-startle is SELECTED, the system identifies and eliminates sudden loud sounds and rapidly reduces them to a comfortable level. When Anti-startle is NOT SELECTED, the headset limits sound levels at 118 dBA to protect your hearing.
G616
G616 Acoustic Limiting provides additional hearing protection against acoustic shock. When G616 Acoustic Limiting is SELECTED, the system provides additional acoustic shock protection. Sound levels are limited to 102 dBA as recommended in the G616:2006 guideline issued by the Australian Communications Industry Forum (ACIF). When G616 Audio-Limiting is NOT SELECTED, the headset limits sound levels at 118 dBA to protect your hearing.
Audio Limiting
Audio Limiting provides advanced hearing protection for daily noise exposure. When Audio-Limiting is SELECTED, the system monitors and controls sound to ensure audio levels do not exceed 80 dBA or 85 dBA (whichever is selected) specified by current and imminent EU legislation. When Audio-Limiting is set to NOT SELECTED, the headset limits sound levels at 118 dBA to protect your hearing.
Feature Set Lock
See the Device Settings – Security Tab for more information.
Hours on Phone Per Day
The default is 8 hours. If you change the setting to 2/4/6 hours, the system will adjust the audio limiting algorithm accordingly.
Device Settings – Security Tab
Options Feature Default
| Feature Set Lock | Create new password None |
| Change password None |
Feature Set Lock
The Plantronics software allows the following device settings to be locked by the IT staff and prevent end users from changing them.
- Range
- Auto Answer
• PC Audio Bandwidth - Audio Protection (Anti-Startle, G616, Audio Limiting and Hours on phone per day)
The ability to lock/unlock these settings requires a password. In order to lock/unlock any setting follow these steps:
1 Create a new password
From the Security screen, create and confirm your new password and press Set. This will store the password directly in the device.
2 Lock/unlock a device setting
From the USB Adaptor or Advanced screen, enter your password in Feature Set Lock, lock/unlock each feature as desired and click Apply.
Change Your Password
You can always change the old password to a new one in the Change Password section. You will only able to change a password if there is a previous password set in the device.
NOTE In case you forget your password, you will need to call your local Plantronics Technical Support for assistance.
Applications Tab
The Applications Tab displays the status of Plantronics support for various applications such as softphones and media players. The status will only show as “enabled and running” for softphones and media players installed and running.
Preferences Tab
The Preferences Tab allows you to set preferences for the media player as well as other general settings.
Options Feature Settings Default
| Media Player Action to Media Player | |||
| - When a call begins | Mute/pause/do nothing | Pause | |
| - When a call ends | Play/do nothing | Play | |
| General | Launch audio devices control panel (Provides a shortcut to the Windows Sounds and Audio Devices control panel.) | ||
| Ring Both Headset and PC Selected/Not selected Not selected | |||
| Microsoft OC/Lync Dial-tone Enabled Selected/Not selected | Selected | ||
| Audio Sensing Enabled Selected/Not selected Selected | |||
| Maintain Headset to PC Link Selected/Not selected Not selected | |||
Ring Both Headset and PC
This parameter gives you the option to have the PC ringtone played on both the headset as well as the PC speaker.
When this parameter is selected, the PC ringtone will be heard on both the PC speaker as well as the headset.
When this parameter is not selected, the PC ringtone will only be heard on either the headset or the PC speaker based on how the PC audio has been set up.
Microsoft OC/Lync Dial-tone Enabled
If this feature is selected, when a PC radio link is established, Microsoft OC/Lync will assume the user is trying to place a VoIP call and provide a dial tone.
If this feature is not selected, when a PC radio link is established, Microsoft OC/Lync will sit idle.
Audio Sensing Enabled
Audio Sensing is a special feature supported by Plantronics wireless devices that can detect an audio signal at the USB port and automatically establish a PC radio link between the USB adapter and wireless headset without the user having to press the PC call control button. If the parameter "Microsoft OC/Lync Dial-tone Enabled" is selected, then every time a PC radio link is established the Microsoft OC/Lync dial tone will be heard. However, the user may have pressed the PC call control button
to listen to music, etc., and does not want to hear the dial-tone. In this case, if the user selects the "Audio Sensing Enabled" parameter, the radio link will be established automatically when any PC audio is detected at the USB port, thus eliminating the need for the user to press the PC call control button.
Maintain Headset to PC Link
This parameter forces the radio link to the PC to stay active even after the call has ended. This can eliminate the need to re-establish the radio link when switching between PC audio applications.
About Tab
The About Tab provides on-line access to this printable user guide and also includes Plantronics contact information. The current version of software and firmware currently running on your system is also shown here.
8 Plantronics Update Manager
All required software for Savi W445-M can be remotely updated when updates are available. Start Plantronics Update Manager from Windows Start Programs menu to change settings such as automatic or manual check for updates.
Check for Updates Automatically
By enabling this check box, you will activate a periodic automatic check for available software updates.
Check for Updates Now
You can choose to check for available software updates at any time by clicking on the Check For Updates Now button in Update Manager. From the Start menu > Programs > Plantronics > Plantronics Update Manager.
Install Checked Updates
Following an Automatic or Manual Check For Updates, this field will be populated with any applicable software updates and the Install Checked Updates will begin installation.
9 Troubleshooting and Common Questions
| My headset is unstable. | When you wear the headset, the microphone should rest as close to your cheek as possible without touching. The microphone can be adjusted inward by the pivoting earpiece to optimise the position of the headset. SeeWearing the headset. |
| My headset doesn’t work with Microsoft Lync/Office Communicator. | Ensure your headset is charged.Ensure your headset is subscribed to the USB adapter.If you press the call control button on your headset, you should hear a Microsoft Lync/Office Communicator dial tone. If not, you need to ensure the headset is the default device by going to Microsoft Lync/Office Communicator >Tools > Set Up Audio and Video > Handset or Headset and choosing your headset as the default.Disconnect and re-connect the USB adapter. It will be solid red until it subscribes to the headset; it will be solid green when successfully subscribed to the headset.Restart your computer. |
| I hear Microsoft Lync/Office Communicator audio through my PC speakers and only want to hear it through my headset. | Ensure that the headset is the default speaker/speakerphone device. Go to Microsoft Lync/Office Communicator >Tools > Set Up Audio and Video > Speaker/Microphone or Speakerphone and select your headset as the default device. |
| Speaking and/or listening volume is too low or too high. | Adjust headset listening volume with volume button.Adjust listening/speaking volumes in the computer’s sound control panel/system preferences.Adjust listening/speaking volumes in the softphone application. |
| The sound is distorted or I hear an echo in the headset. | Reduce speaking and/or listening volume on the computer using your softphone application.Point microphone towards your chin.If the distortion is still present, lower the volume on the headset. |
| I can no longer hear any audio through my PC Speakers. | For Windows XP systemsRefer to the “Audio” tab of the “Sounds and Audio Devices” option in your PC Control Panel.Under “Sound Playback”, change the default setting from “Plantronics D100-M” to your PC speakers. Click “OK” to confirm your change.For Windows Vista systemsRefer to the “Sound” option in your PC Control Panel.Under the “Playback” tab, change the default setting from “Plantronics D100-M” to your PC speakers. Click “OK” to confirm your change.For Mac OS XChoose Apple menu > System Preferences and click Sound.Click Output, and then select “Internal Speakers” or your speaker choice. |
| Talk time performance is significantly degraded even after a full recharge. | The replaceable battery is wearing out. Contactplantronics.comto purchase a new battery. Use only the battery type supplied by Plantronics. |
10 Appendix
Left Ear Headset/Savi System Button Functions
This table shows the headset button functions when you are wearing the headset on the left ear.
Headset function Type of Press Tones/Lights
| Place, answer, or end calls Short press call control button 1 mid-tone | Headset flashes whiteUSB adapter flashes green when in use | |
| Increase volume Short press volume down 1 tone with pitch increase | ||
| Decrease volume Short press volume up 1 tone with pitch decrease | ||
| Flash between calls While on a call, long press volume up or down (at least 112 seconds) 1 mid-tone | ||
| Mute/unmute headset While on a call, press the volume/mute button in USB: Flashes red | ||
| Sleep/wake headset To sleep: While idle, press call control button until flashes white twiceTo wake: Press call control until flashes white twice | 2 white flashes | |
| Headset subscription mode | 1. While idle, double press USB subscription button2. While idle, press volume down until headset light is solid white | USB: Flashes red and greenHeadset: Solid whiteSubscribed = USB solid green |
| Turns headset indicator light ON or OFF | While idle, press volume up until headset flashes white twice | 2 white flashes |
| Low battery warning | Idle: 1 low tone/15 secsOn call: 3 low tones | |
| Out of range | Idle: 1 tone plus 3 low tonesOn call: 3 low tones | |
| Back in range | On call: 1 mid-tone | |
USB function
| Headset subscribed, no activity | USB: Solid green | |
| Headset in talk mode | USB: Flashes green | |
| Headset muted | USB: Flashes red | |
| Incoming call | USB: Flashes red and yellow | |
| Headset not subscribed | USB: Solid red | |
| USB adapter subscription | USB: Flashes green and red | |
| USB adapter conference subscription | USB: Flashes green and yellow | |
| Conference call with 1+ guest headsets | USB: Flashes yellow | |
| Toggle between wideband/narrowband | While in idle, short press USB (<1 sec.) plus long press (>3 sec.) | Narrowband = USB flashes red 4 sec.Wideband = USB flashes green 4 sec. |
| Range setting | While in idle, press USB for three seconds | High range = USB flashes greenMedium range = USB flashes yellowLow range = USB flashes red |
Right Ear Headset/Savi System Button Functions
This table shows the headset button functions when you are wearing the headset on the right ear.
Headset function Type of Press Tones/Lights
| Place, answer, or end calls Short press call control button 1 mid-tone | Headset flashes whiteUSB adapter flashes green when in use | |
| Increase volume Short press volume up 1 tone with pitch increase | ||
| Decrease volume Short press volume down 1 tone with pitch decrease | ||
| Flash between calls While on a call, long press volume up or down (at least 112 seconds) 1 mid-tone | ||
| Mute/unmute headset While on a call, press the volume/mute button in USB: Flashes red | ||
| Sleep/wake headset To sleep: While idle, press call control button until flashes white twiceTo wake: Press call control until flashes white twice | 2 white flashes | |
| Headset subscription mode | 1. While idle, double press USB subscription button2. While idle, press volume down until headset light is solid white | USB: Flashes red and greenHeadset: Solid whiteSubscribed = USB solid green |
| Turns headset indicator light ON or OFF | While idle, press volume down until headset flashes white twice | 2 white flashes |
| Low battery warning | Idle: 1 low tone/15 secsOn call: 3 low tones | |
| Out of range | Idle: 1 tone plus 3 low tonesOn call: 3 low tones | |
| Back in range | On call: 1 mid-tone | |
USB function
| Headset subscribed, no activity | USB: Solid green | |
| Headset in talk mode | USB: Flashes green | |
| Headset muted | USB: Flashes red | |
| Incoming call | USB: Flashes red and yellow | |
| Headset not subscribed | USB: Solid red | |
| USB adapter subscription | USB: Flashes green and red | |
| USB adapter conference subscription | USB: Flashes green and yellow | |
| Conference call with 1+ guest headsets | USB: Flashes yellow | |
| Toggle between wideband/narrowband | While in idle, short press USB (<1 sec.) plus long press (>3 sec.) | Narrowband = USB flashes red 4 sec.Wideband = USB flashes green 4 sec. |
| Range setting | While in idle, press USB for three seconds | High range = USB flashes greenMedium range = USB flashes yellowLow range = USB flashes red |
Plantronics, Inc.
345 Encinal Street
Santa Cruz, CA 95060
United States
plantronics.com
For product support contact us at plantronics.com/support or call 1-800-544-4660.

Recyclable where facilities exist
© 2013 Plantronics, Inc. All rights reserved. Plantronics, D100-M, Savi, WH500-M and W445-M are trademarks or registered trademarks of Plantronics, Inc. Microsoft, Internet Explorer, Lync, Windows XP, Windows Vista, and Windows 7 are trademarks or registered trademarks of Microsoft Corporation in the US and other countries. Pentium is a trademark of Intel Corporation in the U.S. and other countries. All other trademarks are the property of their respective owners.
Patents: US, 7,633,963; D643,834; D635,962; BR DI70057796; CN ZL201030674530.7; ZL201030710900.8; EM 001788878-0001; 001792276-0003; IN 233102; KR 30-655804; TW D143596; D143955.
200897-06 (08.13)