
Buzz - Drone PARROT - Free user manual and instructions
Find the device manual for free Buzz PARROT in PDF.

| Product Type | Jumping MiniDrone |
| Model | Buzz |
| Brand | Parrot |
| Battery Type | Rechargeable LiPo (approximately 3.7V) |
| Charging Time | ~25 minutes with 2.4A charger; ~1.5 hours via USB computer |
| Flight Time | Approximately 20 minutes |
| Connectivity | Wi-Fi 2.4/5 GHz |
| Camera | Yes, for photos and video recording |
| Microphone & Speaker | Yes, for Walkie-Talkie mode |
| Control | Via smartphone app (FreeFlight3) on iOS/Android |
| Pre-programmed Acrobatics | Tail Shake, Snake, Slalom, Wave, Spin, Jumping Spinning Top, Touch |
| Light Effects | Adjustable headlights, flash, continuous brightness variation |
| Positions | Jumper, Kicker, Auto-Balance |
| Roadmap Feature | Program and record custom journeys |
| Battery Indicator | LED: red charging, green fully charged |
| Safety Age | Not suitable for children under 14 years |
| Usage Environment | Indoors recommended; avoid water, dust, and direct sunlight |
| Spare Parts & Accessories | Available from Parrot retailer or store.parrot.com |
| Warranty | Refer to retailer's General Conditions of Sale |
| Compliance Standards | EN 301489-17, EN300328, EN71-1, EN71-2, EN62115 |
Frequently Asked Questions - Buzz PARROT
User questions about Buzz PARROT
0 question about this device. Answer the ones you know or ask your own.
Ask a new question about this device
Download the instructions for your Drone in PDF format for free! Find your manual Buzz - PARROT and take your electronic device back in hand. On this page are published all the documents necessary for the use of your device. Buzz by PARROT.
USER MANUAL Buzz PARROT
natural_image
Top-down view of a blue and black drone with yellow headlight and wheels, no visible text or symbolsBUZZ
natural_image
Close-up of a white and black robotic car with two large tires, showing green light and no visible text or symbols.DIESEL
natural_image
Red and black drone with yellow stripes and green headlight, shown in a low-angle view against white background (no text or symbols)MARSHALL
User Guide
Table Of Contents
Before getting started
Charging the battery....4
Downloading the application....5
Turning the Jumping Night Drone on/off....5
Connecting a smartphone to the MiniDrone....5
Control
Description of the control screen....7
Wheel position....8
MiniDrone positions....8
Driving....8
Jumping....8
Hit....9
Pre-programmed acrobatics....9
Battery....10
Light effects....10
Talking through your MiniDrone....11
Photos....11
Videos....11
Retrieving photos and videos....12
Settings
Media settings....13
Control Settings....13
Speed Settings....13
Charge Settings....13
Network settings....14
Information....15
Roadmap
Create a roadmap....16
Managing roadmaps....18
Academy Drone
Updates
General information
Safety precautions and maintenance....22
Warning regarding the invasion of privacy 22
Battery....22
Warranty....23
Modifications....23
Recycling this product....23
Declaration of Conformity....23
Registered trademarks....24
Notice regarding the right to privacy....24
Before getting started
Charging the battery
- Insert the battery into the compartment provided (photos A and B). The small triangle on the battery indicates which side should be on top. The direction the triangle is pointing in shows which way the battery should be inserted.
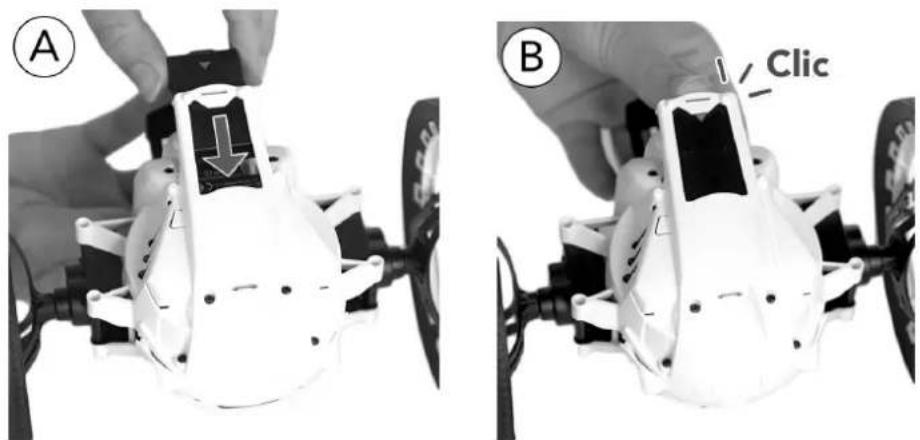
- Plug in the MiniDrone (photos C and D):
- When using a charger with a minimum power rating of 2.4A, charging time is approximately 25 minutes.
- When charging through a computer using the USB cable, charging time is approximately 1 hour and 30 minutes.
The LED next to the On/Off button lights up red to indicate the MiniDrone is charging. Once fully charged, the LED will turn green.
natural_image
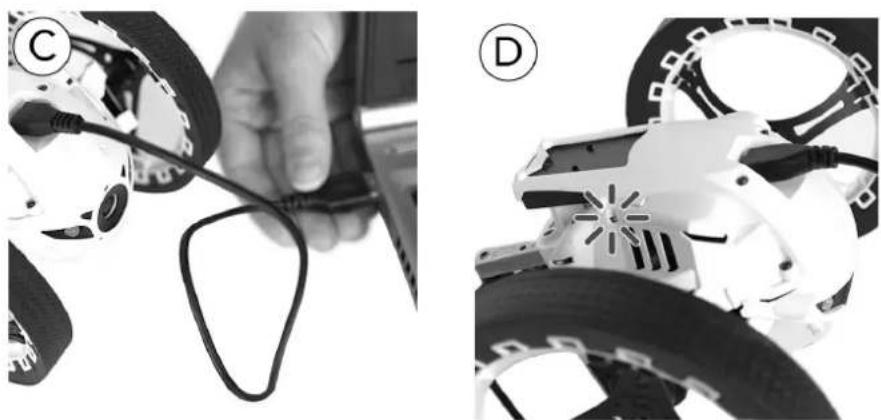
Two views of a robotic device with labeled parts (C and D), showing hands connecting wires to a mechanical component.To remove the battery:
-
Gently lift up the plastic component surrounding the battery.
-
Pull the battery out using the hooks on its back.
In order to keep the battery for the MiniDrone in optimum condition, never leave it half-inserted in its compartment.
Downloading the application
Connect to the App Store ^SM or Google Play ^TM and download the free FreeFlight3 application.
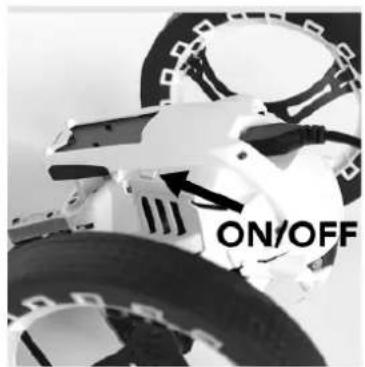
Turning the Jumping Night Drone on/off
Insert the battery into the slot or press the On/Off button to turn the MiniDrone on. The On/Off button can be found on the head of the MiniDrone, next to the LED.
Press the On/Off button to turn the MiniDrone off. The light-up eyes will switch off.
Connecting a smartphone to the MiniDrone
- Search for available Wi-Fi® networks on your smartphone:
- If you're using an iPhone or iPad, go to Settings > Wi-Fi.
- If you're using an Android™ smartphone, go to Settings > Wireless and Networks > Wi-Fi.
-
Select the MiniDrone network.
-
Wait for your smartphone to establish a connection to the MiniDrone Wi-Fi network. The Wi-Fi symbol will usually appear on your smartphone when connection is complete.
-
Launch the FreeFlight3 app.
The MiniDrone will connect to your smartphone automatically. A pop-up window saying "Sending status" and then "Connected" will appear. The MiniDrone will turn back on itself and emit a series of beeps.
If your phone doesn't automatically connect to the MiniDrone, press ≡ and then select the name of your MiniDrone from the list.
Refer to the Settings > Wi-Fi section for more information.
Control
- Launch the FreeFlight3 app.
The main screen will appear.
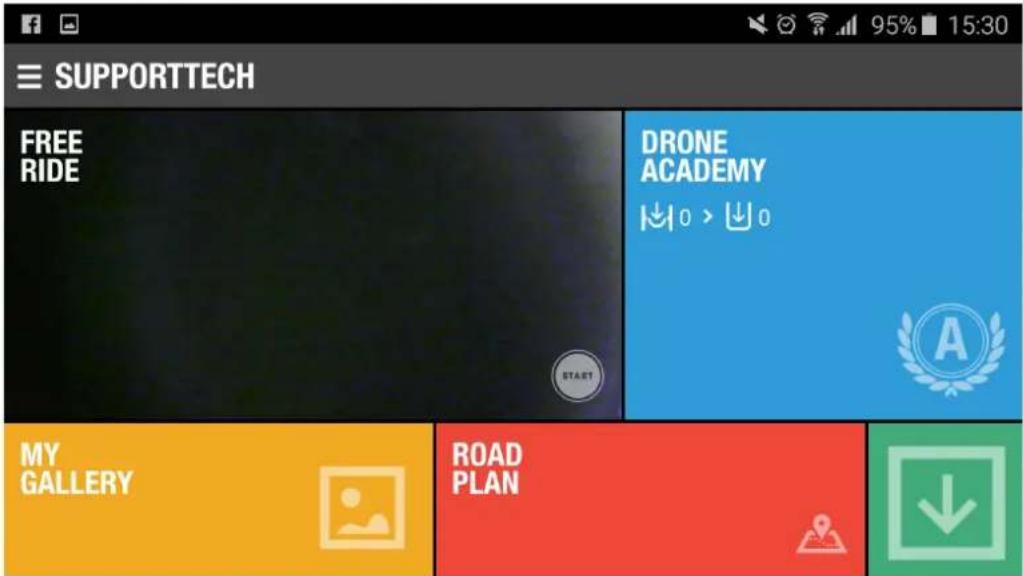
- Press Free Drive to drive your MiniDrone. Press Voice Transmission to drive the MiniDrone in Walkie-Talkie mode. For more information, go to the Talking through your MiniDronesection.
The control screen will appear.
Press < at any time to return to the main menu.
Description of the control screen
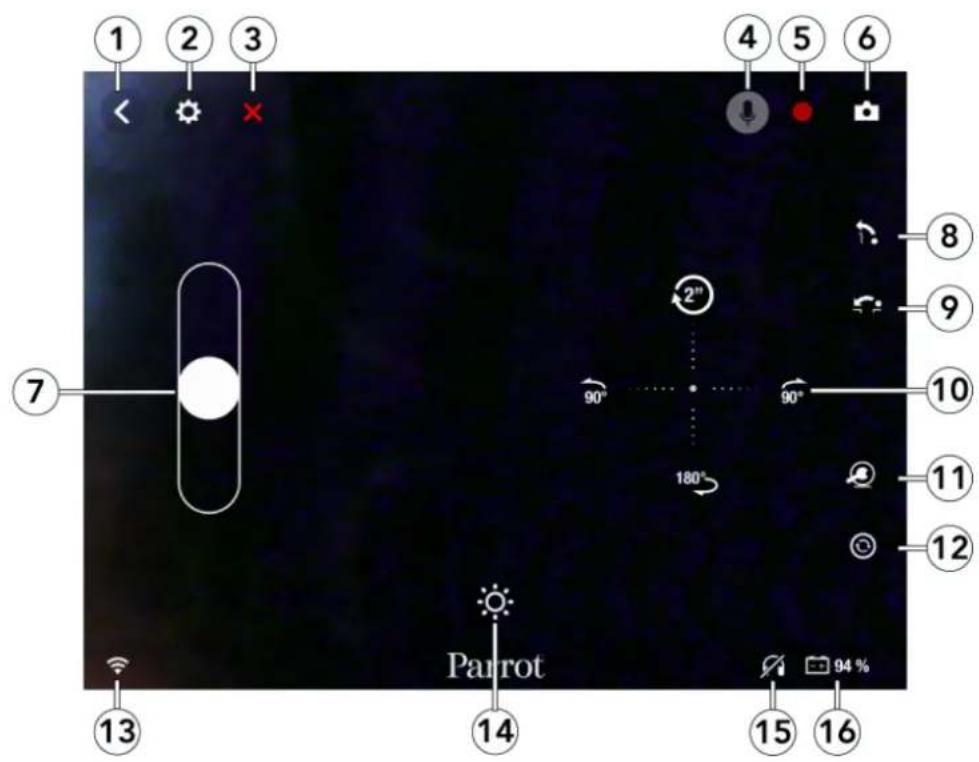
| No. | Description | No. | Description |
| 1 | Return to previous screen | 9 | Long jump |
| 2 | Settings | 10 | Right joystick |
| 3 | Stop current action | 11 | MiniDrone position |
| 4 | Walkie-Talkie( Voice Transmission mode only) | 12 | Pre-programmed acrobatics |
| 5 | Video recording | 13 | Wi-Fi signal |
| 6 | Photo | 14 | Light effects |
| 7 | Left joystick | 15 | Headset connected or disconnected |
| 8 | High jump | 16 | Battery level |
Wheel position
Before starting, choose the control mode for your MiniDrone:
- By bringing the wheels closer together, you are opting for responsive controls and a smoother driving experience.
- Moving the wheels further apart provides greater stability.
MiniDrone positions
Press the 🔒 button to switch between the Jumper and Kicker positions. Hold the 🔒 button down for 2 seconds to switch to Auto-Balance position.
Press 📋 once to return to normal mode.
The Jumper position lets you perform high and long jumps.
To switch to Kicker mode, press once.
The Kicker position is used to push objects out of your way while driving. The Auto-Balance position allows you to overcome certain obstacles more easily.
To prevent excessive wear to the rubber pad, the Auto-Balance position should be used when you are driving over rough surfaces.
Driving
Use the left joystick to move the MiniDrone forwards or backwards. Hold down the left joystick and tilt your smartphone left or right to move the MiniDrone to the left or right.
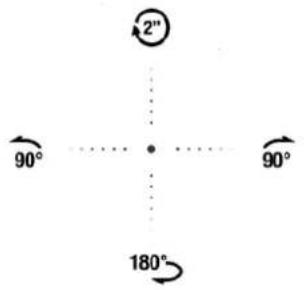
On the screen, drag your finger from the middle of the joystick to the ↘ or ↗ to make a quarter turn to the left or right.
Drag your finger from the middle of the joystick to the → to make a half turn to the right.
Drag your finger from the middle to the top to perform the selected pre-programmed trick. For more information, go to the Pre-programmed acrobatics section.
Jumping
Set your MiniDrone to the Jumper position to perform jumps, then:
- Press 1. to perform a high jump.
- Press to perform a long jump.
Before making a jump, it is necessary to compress the MiniDrone spring. This can be done just before performing the jump, in which case, you will need to allow for a delay of a few seconds.
You can also prepare for the jump by dragging the 📄 button to the left to compress the spring in advance, while still continuing to drive the MiniDrone. Once the cursor has returned to its original position, you can:
• Perform a long jump instantly by pressing
- Perform a high jump with a much shorter delay by pressing
The Jump function is blocked as soon as you pick the MiniDrone up in your hands. Do not make the MiniDrone jump when it is on a fragile surface (e.g. a glass table). It is not possible to perform jumps when battery power is low.
Hit
To push an object, set the MiniDrone to Kicker position. To do this, press once. Before pushing an object, it is necessary to compress the MiniDrone spring. This can be done just before impact, in which case you will need to allow for a delay of a few seconds.
You can also pre-empt the impact by dragging the 📄 button to the left to compress the spring in advance, while still continuing to drive the MiniDrone. Once the cursor has returned to its original position, you can hit the object with no delay. To do this:
-
Make sure the MiniDrone pad is in contact with the object you wish to hit.
-
Press
The Kick function is blocked as soon as you pick the MiniDrone up in your hands.
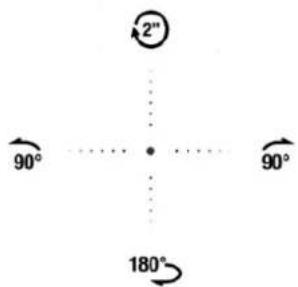
Pre-programmed acrobatics
Press Ⓤ to bring up the list of pre-programmed acrobatics.
| Icon | Name | Description |
 | Tail Shake | The MiniDrone takes a quarter turn to the right, then to the left, and then to the right again |
 | Snake | The MiniDrone turns back on itself to the right, then to the left |
 | Slalom | The MiniDrone does a slalom manoeuvre |
 | Wave | The MiniDrone puts itself in auto-balance mode then returns to its original position |
 | Spin | The MiniDrone turns on itself continuously for 2 seconds |
 | Jumping Spinning Top | The MiniDrone turns on itself and then jumps |
 | Touch | The MiniDrone taps the ground with its mechanical arm |
Press the ✗ button to interrupt a trick in progress.
To launch the last pre-programmed trick that was selected, drag your finger from the middle of the left joystick to the top.
Press the corresponding icon to start the desired trick.
Battery
The -+ icon shows the battery level for your MiniDrone. The MiniDrone battery lasts for approximately 20 minutes.
The number of jumps you do affects the MiniDrone battery life.
When the battery is low, the 📄 indicator turns red and the MiniDrone will start to beep. It will no longer be possible to perform jumps.
Light effects
Press 🙏 to display the list of light effects for the MiniDrone headlights.
Slide the cursor in the middle of the screen up or down to increase or decrease the brightness of the headlights.
Press Ⓞ to make the headlights flash.
Press ∼ to continuously vary the brightness of the lights.
Press ✗ to close the list of light effects.
Talking through your MiniDrone
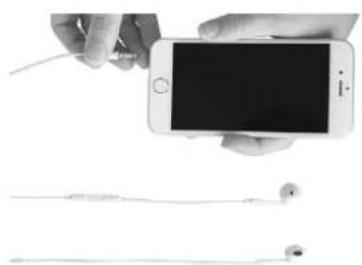
An in-built microphone and loudspeakers allows you to talk through your MiniDrone (Walkie-Talkie mode). To do this, press Voice Transmission on the main screen in the FreeFlight3 app, or press the icon.
natural_image
Close-up of hands holding a smartphone with a blank screen, next to two earphones (no visible text or symbols)- Connect a headset to your smartphone.
The 🔊 icon in the bottom-right corner of the screen will change to a 🔊.
- Press ↓.
The icon will turn blue.
- Talk into the microphone on your headset. The MiniDrone will then relay your speech.
Video recording will stop.
It is not possible to record a video and activate Walkie-Talkie mode at the same time. When you start a video recording, the sound captured by the MiniDrone while it moves is recorded in the video file. To retrieve the video file, see the Retrieving photos and videos section.
When you are in Voice Transmission mode, the video recording will stop, but you can talk to your MiniDrone using the headset connected to your smartphone.
Photos
Press the 🔒 button to take a photo.
Photos are saved in the MiniDrone internal memory. When the memory is full, a warning message will appear. It will then no longer be possible to take a photo.
Videos
Video recording starts automatically when you press Start. The icon will flash while a video is recording.
To stop recording, press
Videos are saved in the MiniDrone internal memory. When the memory is full, a warning message will appear. It will then no longer be possible to record a video. It is not possible to record a video and activate Walkie-talkie mode at the same time. When you start recording a video or switch on Walkie-Talkie mode, the other function will stop automatically.
Retrieving photos and videos
To retrieve photos and videos, your smartphone must be connected to the MiniDrone.
- Bring up the context menu. To do this:
- If the control screen is open, press < then ≡
- If the main screen is open, press
- Press Internal Memory.
The list of stored photos and videos in the MiniDrone internal memory will appear.
-
Select one or more photos and/or videos.
-
Press Transfer to move the photos or videos to your smartphone, or Delete them.
If you transfer the selected files, a pop-up will ask you if you want to delete them from the MiniDrone internal memory afterwards.
Settings
Press ⚙ to access the settings menu for your MiniDrone.
Press ⬇ at any time to revert to factory settings. This will also delete any roadmaps, photos and videos saved in the MiniDrone internal memory.
You can also revert to the factory settings without using the app. To do this, turn the MiniDrone on and press down on the On/Off button for 12 seconds.
Media settings
Use the Main Volume option to adjust the volume of the MiniDrone. This volume configures the animation sounds and the audio output in Walkie-Talkie mode.
The Auto Recording option is used to trigger or not trigger video recording when you press Start.
Control Settings
Use the Max Rotation option to configure the maximum rotation speed of the MiniDrone. If this value is low, you will need to tilt your smartphone a lot to turn the MiniDrone. If this value is high, then a slight tilt will be sufficient.
Use the Rotation Neutral Zone option to define the minimum tilt angle before rotation starts.
Speed Settings
Use the Max Speed option to configure the maximum speed of your MiniDrone. Use the Speed Neutral Zone option to configure the sensitivity of the joystick. If this value is low, a slight movement on the left joystick will be enough to move the MiniDrone forwards or backwards. If this value is high, more movement of your finger will be required.
Charge Settings
The Charge Settings screen shows you the last type of charging used and the battery level of your MiniDrone.
Network settings
The Product Name option can be used to edit the name of how the MiniDrone will be seen by your smartphone and other Wi-Fi devices. The name change will take effect once the MiniDrone has been restarted.
The MiniDrone network name can only contain numbers, letters and underscores ("_"). It must not exceed 32 characters in length.
Check in your smartphone's instruction manual (or technical specifications) to see if it supports connections to the 5 GHz Wi-Fi bandwidth. If this is not the case, use only the 2.4 GHz bandwidth.
The 5 GHz Wi-Fi bandwidth generally obtains the best performance for the MiniDrone, especially fro video feedback, whereas the 2.4 GHz bandwidth is more congested.
The Choose Your Country field lets you select which country you are in.
Activate the Outdoors option if you are using the MiniDrone outside. Deactivate this option if you are using it indoors.
Depending on the mode (indoors or outdoors) and the country selected, not all choices may be available. In some countries, for example, it is not permitted to use the 5 GHz Wi-Fi bandwidth outdoors.
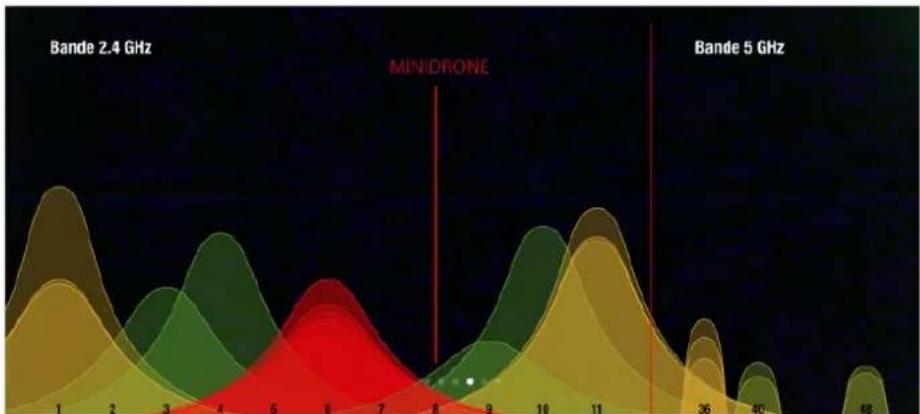
In automatic mode, FreeFlight3 automatically selects a channel depending on the country, mode (indoors or outdoors), the Wi-Fi bandwidth selected, and channel congestion. If you notice a problem with the quality of your Wi-Fi connection:
-
Select Manual mode.
-
Choose a channel that is not overloaded by referring to the information displayed in the diagram: each curve represents an access point and the height of the curve represents the strength of the signal. Therefore, you should opt for a channel where you see no curves or one which has a weak signal strength.
area
| Frequency | Bande 2.4 GHz | Bande 5 GHz | Minidrone | | --------- | ------------- | ----------- | --------- | | 1 | High | Low | Medium | | 2 | Medium | Low | Medium | | 3 | Medium | Low | Medium | | 4 | Medium | Low | High | | 5 | Low | Medium | High | | 6 | Low | High | Medium | | 7 | Low | Low | Medium | | 8 | Low | Low | Low | | 9 | Low | Low | Low | | 10 | Medium | Medium | Medium | | 11 | High | High | High | | 36 | Low | Low | Medium | | 40 | Low | Low | Medium | | 68 | Low | Low | Low |The number of times the eyes of the MiniDrone flash green during start-up only (2 or 5) indicate which Wi-Fi bandwidth is being used (2.4 GHz or 5 GHz).
If the MiniDrone does not appear in the Wi-Fi menu on your smartphone, it probably means that your MiniDrone is in 5 GHz.
If this is the case, press the On/Off button for 5 seconds to manually switch to the 2.4 GHz Wi-Fi bandwidth.
Information
The General Information screen displays:
- The version number of the FreeFlight3 app currently installed on your smartphone.
- The version number of the firmware installed on your MiniDrone.
• The hardware version of your MiniDrone.
Roadmap
The Roadmap function lets you program and record a journey for your MiniDrone. To access this function, press Roadmap.
Press < at any time to return to the main menu. The roadmap saves automatically.
Create a roadmap
You can create your roadmaps without necessarily being connected to your MiniDrone.
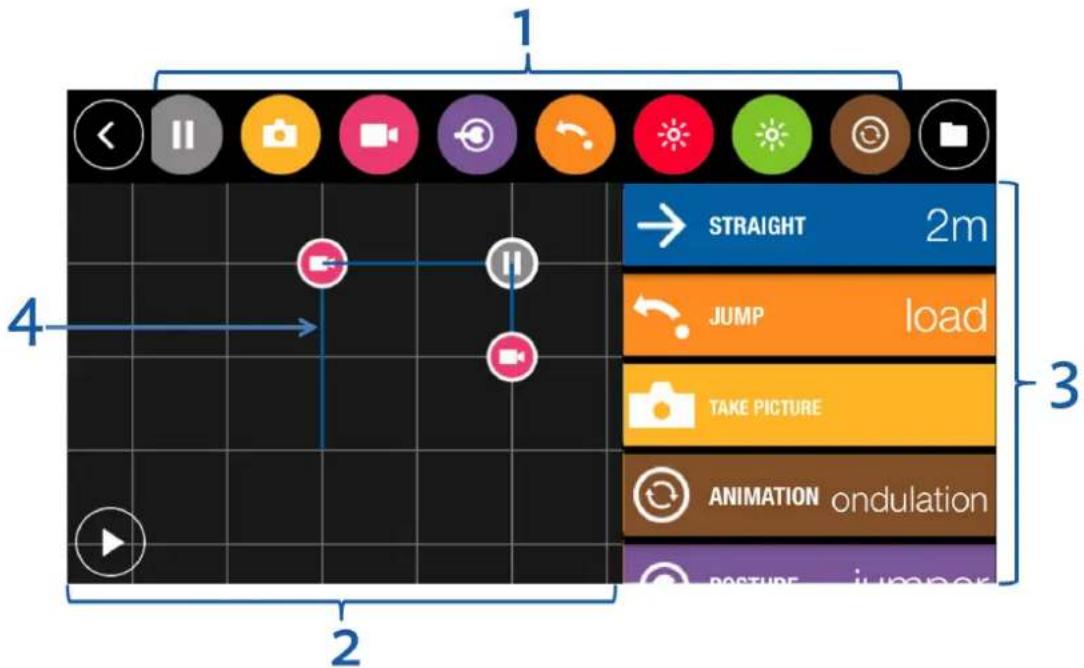
No. Description
1 List of available actions for a roadmap. Drag your finger to the left or right to scroll through the available actions.
2 Pictorial representation of the environment in which the MiniDrone will move. Each square represents an area measuring 1 m^2 . Move your fingers apart on the map to zoom in, or pinch them together in zoom out.
| 3 | Scheduled actions on your roadmap |
| 4 | MiniDrone trajectory. |
Press down on an action and drag it to the column on the right to add it to the roadmap. The corresponding trajectory will display on the environment.
Drag an action from the right-hand side column to the left-hand side one to delete it.
On your roadmap:
- Tap an action to edit its settings;
- Hold down an action for 2 seconds and drag it to a new location to edit the order of actions on your roadmap.
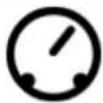
| Icon | MiniDrone action.Settings / Notes | |
 | AdvanceDefine the distance to travel | |
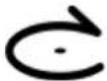 | Follow a circular trajectoryWhen you set a circular trajectory, consider the circle in which it is found. In the example opposite, to get from point A to point B:The Corner setting must have a value of α (in degrees).The Radius setting must have a value of r (in metres). | 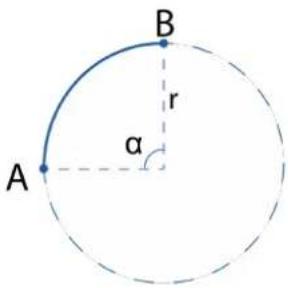 |
 | Change speedYou can insert several speed actions with different values within the same roadmap. | |
 | StopDefine the length of stops | |
 | Take a photo | |
 | FilmTo stop a recording, insert a second Record action, and select Off |
 | Change positionSee the Positions section for more information. |
 | Perform a jump, push an object or load the spring |
 | Change the colour and brightness of the eyesSelect the eyes and configure the brightness of the selected LED.To turn the eyes off, insert an action setting the brightness to 0%. |
 | Perform a pre-programmed trickSelect the type of trick. |
Press ▶ to start the sequence.
Managing roadmaps
Roadmaps save automatically as you design them.
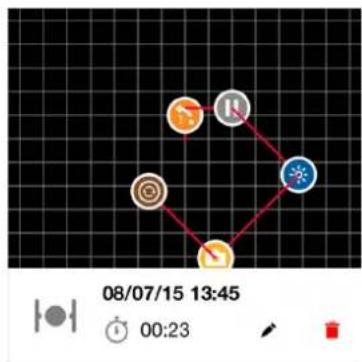
Press 📋 to access the list of roadmaps and display their saved dates and times as well as their lengths.
Press ↗ to rename a roadmap. Press ⚙ to delete it.
Press ☐ in the top-right corner to create a new roadmap.
flowchart
graph TD
    A["Player 1"] --> B["Player 2"]
    B --> C["Player 3"]
    C --> D["Player 4"]
    D --> E["Player 5"]
    style A fill:#f9f,stroke:#333
    style B fill:#f9f,stroke:#333
    style C fill:#f9f,stroke:#333
    style D fill:#f9f,stroke:#333
    style E fill:#f9f,stroke:#333
Academy Drone
An internet connection is necessary to use the Drone Academy.
To launch the Drone Academy:
- Launch the FreeFlight3 application.
- Press Drone Academy.
A profile is necessary to access the Drone Academy.
To create a profile:
- Press Sign up now.
- Type a user name, a password and an e-mail address.
- Press Register your profile.
The Drone Academy main screen appears:
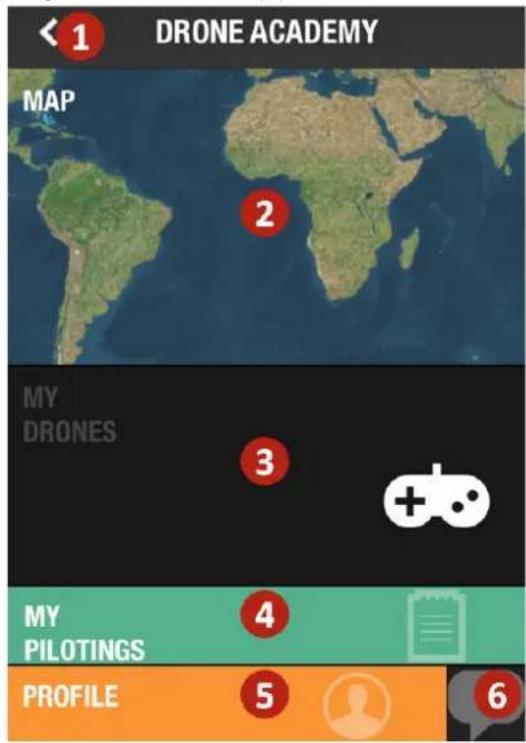
N° Description
1 Accessing the FreeFlight3 application home screen
2 Visualizing the map of the flights
| 3 | Accessing your list of drones |
| 4 | Accessing your list of flights |
| 5 | Modifying and disconnecting your profile |
| 6 | Sending a Drone Academy invitation |
To modify or delete your profile:
-
Press the Profile tab.
-
Press
-
Press Logout or Edit.
-
If you edit your profile slide the screens towards left to complete your profile.
To register a MiniDrone press My drones.
The first time you connect the MiniDrone to your smartphone, a pop-up ask you to register your MiniDrone in the Drone Academy.
To consult the shared flights:
-
Press Map.
-
Press 🔒 to search flights amongst:
- your flights or other user's flights,
• the type of media.
Press Q to search flights by user or place.
To consult and share your flights:
- Press My pilotings.
The list of your flights appears. You can sort them by date, rank or type.
-
Press the flight you wish to share.
-
Press Public to share the flight. You can also:
- press the stars to rate the flight,
- press the tabs at the bottom of the screen to consult the flight information.
Updates
Press Check for Updates to check if any updates are available for the MiniDrone.
There are two ways to update your MiniDrone:
• via the app (recommended).
- via USB by downloading the update file from our website. This method requires a computer.
Please refer to the MiniDrone updating procedure for more information.
General information
Safety precautions and maintenance
Accessories and spare parts are available from your Parrot retailer or from our website store.parrot.com.
The MiniDrone is not suitable for children under 14 years of age.
To reduce the risk of damage, we recommend that you bring the MiniDrone down in increments of approximately 80cm.
There are some public places (stations, airports etc.) and roads where you may not be permitted to use your MiniDrone.
It is recommended that the MiniDrone be used indoors. If sand or dust gets into the MiniDrone, irreversible damage may be caused and it will not be able to operate properly. Do not put the MiniDrone on water or on any damp surface. Do not use this device close to any liquid substances. Do not leave the MiniDrone in direct sunlight. Do not point the jump mechanism towards a person or an animal. Only use accessories specified by the manufacturer.
Warning regarding the invasion of privacy
Recording and circulating the image or voice of a person without their authorisation could constitute an infringement of their image and privacy rights and incur your liability. Ask for authorisation before filming people and recording their voice, particularly if you want to keep your recordings and/or circulate them on the Internet. Do not circulate any degrading images or sounds or which could undermine the reputation or dignity of an individual.
Battery
Failure to comply with instructions may cause permanent damage to the battery, its environment and may cause injury. Always use a Li Po battery charger. Never charge via a discharge lead. Never trickle charge or below 2.5 V. Never allow the battery temperature to exceed 60°C (140°F). Never disassemble or modify the wiring in the battery pack or puncture the battery cell. Never place the battery on top of combustible materials or leave it unattended during charging. Always charge in a 22 General information fireproof location. Always make sure that the charger output voltage corresponds to the battery voltage. Always keep out of the reach of children. Incorrect use of the battery can cause fires, explosions or other damage.

The battery terminals should not be allowed to short-circuit. The product should be connected only to class II appliances which display the symbol.
Warranty
For the warranty conditions please refer to the retailer's General Conditions of Sale where you purchased your MiniDrone.
Modifications
The explanations and specifications in this guide are given for information purposes only and may be modified without prior notice. They are deemed to be correct at time of going to press. The utmost care has been taken when writing this guide, as part of the aim to provide you with accurate information. However, Parrot shall not be held responsible for any consequences arising from any errors or omissions in the guide, nor for any damage or accidental loss of data resulting directly or indirectly from the use of the information herein. Parrot reserves the right to amend or improve the product design or user guide without any restrictions and without any obligation to notify users. As part of our ongoing concern to upgrade and improve our products, the product that you have purchased may differ slightly from the model described in this guide. If so, a later version of this guide might be available in electronic format at Parrot's website at www.parrot.com.
Recycling this product
The symbol on this product and on its literature shows that at the end of its life, it is not to be disposed of with household waste. The uncontrolled disposal of waste is harmful to the environment: please separate this from other types of waste and dispose of responsibly. Private individuals are invited to contact the retailer who sold them the product or to ask advice from their local authority to find out how and where it can be recycled.
Declaration of Conformity
Parrot SA, 174 quai de Jemmapes, 75010 Paris, France, declares under their sole responsibility that the product described in this user guide complies with EN 301489-17, EN300328, EN71-1, EN71-2, EN62115 technical standards following the provision of the Radio Equipment, Telecommunication Equipment directive (1999/5/EC R&TTE), and of the General Safety directive (2001/95/EC).
The Declaration of Conformity is available on our website:
Registered trademarks
Parrot, Parrot MiniDrones and the Parrot logo are trade-marks of PARROT SA.
App Store is a service mark of Apple Inc.
Google Play is a trademark of Google Inc.
The Bluetooth® word mark and logos are registered trademarks owned by
Bluetooth SIG, Inc. and any use of such marks by Parrot SA is under license.
All other trademarks mentioned in this guide are protected and are the property of their respective owners.
Notice regarding the right to privacy
Recording and distributing images of an individual without their consent could constitute a violation of their privacy, for which you may be held liable. Ask for permission before filming individuals, particularly if you want to keep your recordings and/or share them online. Do not distribute any degrading images or those that could undermine an individual's reputation or dignity.