 — Automotive — Mode d'emploi PDF")
Logan (2007) - Automotive RENAULT - Free user manual and instructions
Find the device manual for free Logan (2007) RENAULT in PDF.

| Product Type | Compact Car (Sedan) |
| Brand | Renault |
| Model | Logan (2007) |
| Body Style | 4-door sedan |
| Seating Capacity | 5 passengers |
| Engine Options | Petrol or Diesel (see manual for specific) |
| Transmission | Manual (5-speed) |
| Fuel Tank Capacity | Approximately 50 liters |
| Steering | Hydraulic power steering |
| Brakes | Front disc, rear drum (ABS optional) |
| Airbags | Driver and front passenger airbags |
| Seat Adjustment | Manual (fore/aft, recline, height on driver side) |
| Climate Control | Manual heating and ventilation, optional AC |
| Exterior Lighting | Halogen headlights with dipped and main beam |
| Instrumentation | Speedometer, tachometer, fuel gauge, temperature gauge |
| Safety Features | ABS, seatbelt pretensioners, immobilizer |
| Running-in Period (Petrol) | 1000 km (600 miles) do not exceed 130 km/h |
| Running-in Period (Diesel) | 1500 km (900 miles) do not exceed 2500 rpm |
| Spare Wheel | Emergency spare wheel in luggage compartment |
| Curb Weight | Approximately 1100 kg |
| Dimensions (L x W x H) | 4290 mm x 1740 mm x 1530 mm (approx.) |
| Service Interval | Refer to Service Coupon Booklet |
Frequently Asked Questions - Logan (2007) RENAULT
User questions about Logan (2007) RENAULT
0 question about this device. Answer the ones you know or ask your own.
Ask a new question about this device
Download the instructions for your Automotive in PDF format for free! Find your manual Logan (2007) - RENAULT and take your electronic device back in hand. On this page are published all the documents necessary for the use of your device. Logan (2007) by RENAULT.
USER MANUAL Logan (2007) RENAULT
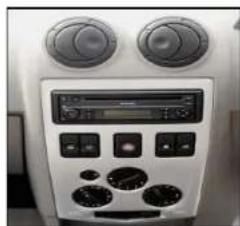
Dashboard
- Side air vent
- Left demister outlet
- Storage compartment
- Centre air vent
- Stalk for:
- direction indicators
- exterior lights
- front fog lights
-
rear fog lights
-
Instrument panel
-
Horn /Location for driver's airbag
- Windscreen wiper/washstalk
- Right demister outlet
- Side air vent
- Readout control
- Fuel filler flap opening control
- Headlight beam height adjustment

- Ignition switch
- Location for radio
- Electric window control
- Central locking switch
- Hazard warning lights switch
- Heating and ventilation controls
- Cigarette lighter
- Handbrake
- Rear window electric locking control
- Switch (dummy)
- Location for ashtray or cup holder
- Gear lever
- Heated rear screen control
- Electric window control
- Glove box
- Bonnet release
- Fuse box
Instrument Panel
- Rev counter (scale x 100)
- Fuel level gauge
- Multifunction display – Total mileage recorder, trip mileage, clock
- Coolant temperature indicator light
- Speedometer (km/hr)
- Rear fog light indicator light Front fog light indicator light Water in diesel filter warning Door(s) open warning light
- Multifunction key – Display selection, trip mileage reset button, setting the clock
- Low fuel level warning light Direction indicator light Coolant temperature warning
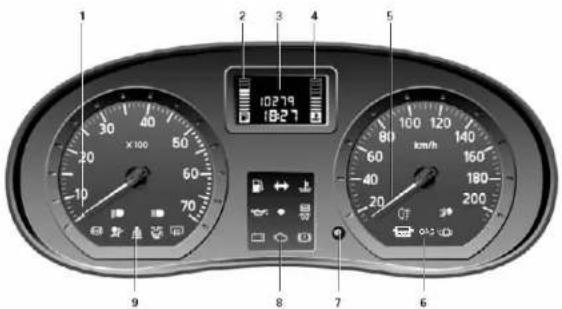
(Features can vary depending on model or vehicle)
Oil pressure warning light
Engine immobilizer warning light
Preheating warning light
Battery charge warning light
Toxic fume filter system warning light
Handbrake on
Dipped beam headlight
Main beam headlight
ABS warning light
Airbag warning light
Driver's seat belt reminding warning light
Rear screen demisting indicator
Exterior lighting and signals
Mark 1 located on:
Side lights
Headlight dipped beam
ED Main beam headlights
Mark 2 located on:
D Front fog lights
0 0# Rear fog lights
Fog lights can only function if exterior lighting is selected.
Switching off the lights
Direction indicators
Windscreen Wash/Wipe/De-icing
Windscreen wiper
With the ignition on, move stalk 1 around the steering wheel:
A: Park
B: Intermittent wiping
C: Normal wiping speed
D: Fast wiping speed
Windscreen washer / Headlights washer
With the ignition on, pull stalk 1 towards you.
De-icing
With the engine running, press button 2.
This function demists the rear screen
(depending on the vehicle).
Air Vents (air outlets)
- Left-hand side air vent
- Left-hand side window demister vent
- Windscreen demisting vents
- Centre air vent
- Control panel
- Right-hand side window demister vent
- Right-hand side air vent
- Front passenger heater footwell outlets
- Rear passenger heater footwell outlets (depending on vehicle)
natural_image
Front view of a white electronic device control panel with buttons and display (no visible text or symbols)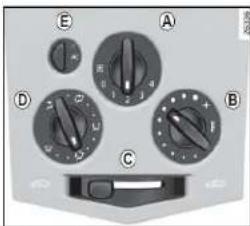
Heating, Ventilation, AC
Controls
A Adjusting the ventilation speed
B Adjusting the air temperature
C Selecting recirculation mode
D Air distribution
E Selecting the air conditioning

Adjusting the ventilation speed
To increase ventilation speed, move control from 0 to 4.

Do not open the refrigerant fluid circuit. This is
dangerous for the eyes.
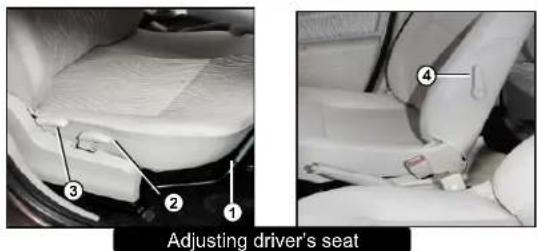
To move forwards or backwards
Lift bar 1 to release. Release bar in the desired seat position and ensure it locks in place properly.
To raise or lower driver's seat (depending on vehicle) Move lever 2.
To tilt the seat back
Pull lever 3 and tilt seat to the desired position.
To adjust lumbar support on driver's seat (depending on vehicle)
Turn lever 4.
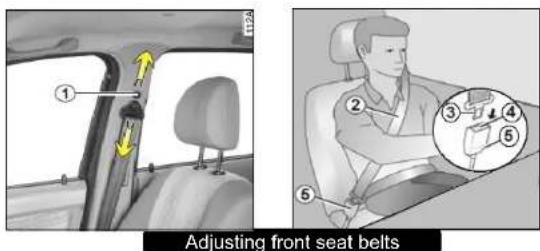
Adjusting the height of seat belt (depending on vehicle)
Move button 1 to select the required position
To fasten
Unwind the belt slowly and smoothly and ensure that buckle 3 locks into catch 5 (check that it is locked by pulling on buckle 3)
Unlocking
Press button 4 on catch 5 and the seatbelt will be rewound by the inertia reel.
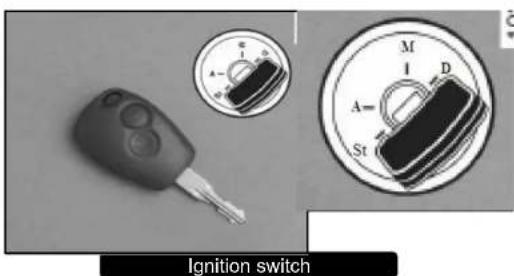
There are four positions:
St - Stop and steering lock; to lock remove key and slightly turn steering wheel; to unlock turn key and steering wheel slightly
A – Accessories position; ignition switched off, accessories continue to function
M – Ignition on; in petrol version engine may be started; in diesel version engine is preheating
D - Start position; if engine fails to start, key must be turned back to the St position before restarting.
natural_image
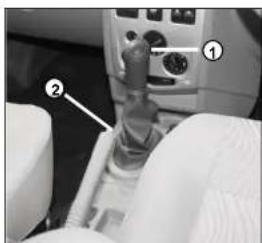
Close-up of a car gear shift lever with labeled parts (1 and 2), no visible text or symbols beyond labelsHandbrake
To apply
Pull upwards, Check that the vehicle is properly immobilised

Depending on the gradient and/or vehicle load, it may be necessary to apply the brake by atleast a further two notches and engage a gear. (1 ^st or reverse gear)
To release
Pull the lever up slightly, press button 2 and then lower the lever to the floor.

Make sure that the handbrake is properly released when driving, otherwise overheating may occur.
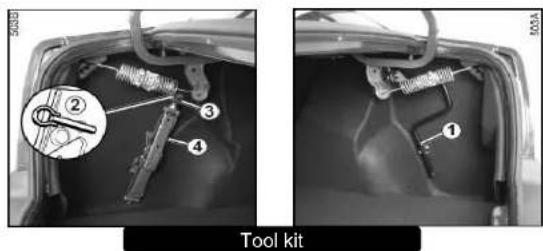
The following tools will be present In the luggage compartment:
1 - Wheel brace
2 - Towing hitch
4 - Jack
Undo bolt 3 to use the jack

The jack is designed for wheel changing purposes only. It should never be used for repairs or gaining access to the underneath of the vehicle.
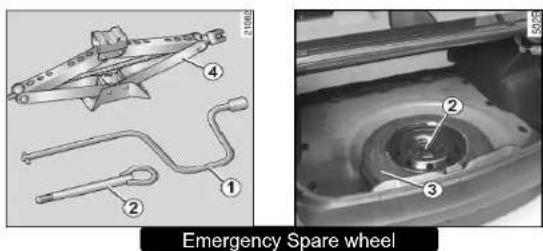
Emergency spare wheel is located in the luggage compartment.
To access the emergency spare wheel:
- Open the tailgate
- Lift up the luggage compartment carpet.
- Unscrew the centre fixing 2.
- Remove the emergency spare wheel 3

If the emergency spare wheel has been stored for several years, have it checked by your dealer to ensure that it is safe to use
natural_image
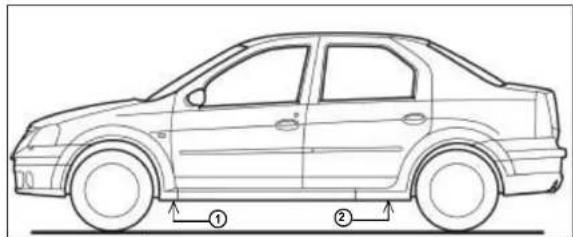
Line drawing of a sedan car with two side-mounted wheels (labeled ① and ②), no text or symbols present.Jacking Points
The jacking points for replacement of front or rear tyres are indicated in the figure above.
1 – Jacking point for replacing front tyre
2 - Jacking point for replacing rear tyre.
Driving during the running in period
Petrol version
For the first 1000 km (600 miles), do not exceed 130 km/h (78 mph) in the highest gear, 3000 to 3500 rpm.
On completion of 1000 km (600 miles) you may use your vehicle normally. However, it is only after 3000 km(1800 miles) have been covered that you may expect full performance.
Diesel version
For the first 1500 km (900 miles), do not exceed 2500 rpm. After this you may drive faster, although you may expect top performance after approximately 6000 km (3600 miles). During the running in period, do not accelerate hard while the engine is still cold and do not let the engine overrev.
Service intervals
Refer to the vehicle's Service Coupon Booklet.
WARNING
This document contains extracts of the main points relating to your vehicle. It will provide you with a summary of the equipment and allow you to familiarize yourself quickly with the vehicle.
However, it is not a substitute for the owner's handbook, which we would advise you to read carefully. You will find the owner's handbook in the glove box.
Authorized dealer

natural_image
Empty rounded rectangle outline with no text, numbers, or symbolsLOGAN Helpline
1800-22-6006

Mahindra RENAULT
My New Vehicle Delivery Form
Model:
SI No.
The following have been satisfactorily done during the delivery of my new vehicle:
(Please mark X in the box if the activity is not to your satisfaction/incomplete so that we can work to improve on the same
□ Warranty policy guidelines explained
□ Mandatory free services maintenance explained
□ Switches and controls explained
□ Fuse box location shown
☐ Spare wheel and jack location shown
□ Vehicle received with all fitments as per order
☐ Vehicle received with jack, wheel brace, hubcap spanner and towing hitch.
□ 24 hour helpline informed
☐ Introduction to service and service location
□ Vehicle documents explained
□ Top gear programme enrolment
☐ Reasonable quantity of fuel in fuel tank
□ Vehicle delivered in clean and good order
Customer's Name and Signature
My New Vehicle Delivery Form
Model:
S. No.:
Customer's Name:
Signature:-
Dealer's Stamp and Signature

- Dashboard
- Instrument Panel
- D Front fog lights
- 0# Rear fog lights
- Windscreen wiper
- Controls
- Adjusting the ventilation speed
- There are four positions:
- To apply
- To release
- Driving during the running in period
- Petrol version
- Diesel version
- Service intervals
- WARNING
- My New Vehicle Delivery Form
- Dealer's Stamp and Signature
Brand : RENAULT
Model : Logan (2007)
Category : Automotive