
Solar Panel - Solar panel REOLINK - Free user manual and instructions
Find the device manual for free Solar Panel REOLINK in PDF.


| Product Type | Solar panel for surveillance camera |
| Brand | Reolink |
| Model | Solar Panel |
| Rated Power | 6 W |
| Output Voltage | 5 V DC |
| Output Current | 1.2 A |
| Dimensions (W x D x H) | 190 x 155 x 17 mm |
| Weight | 350 g |
| Material | Monocrystalline silicon, tempered glass, aluminum frame |
| Cable | 4 m, USB-C or DC connector (depending on model) |
| Protection Rating | IP65 (weatherproof) |
| Operating Temperature | -20 °C to 60 °C |
| Key Features | Solar power for Reolink cameras, recharge built-in battery, continuous operation |
| Installation | Wall or pole mount, south-facing orientation recommended |
| Compatibility | Reolink cameras with solar power port (e.g., Argus, Lumus) |
| Maintenance and Cleaning | Clean surface with a soft cloth and soapy water, avoid abrasive products |
| Safety | Do not short-circuit, avoid shocks, use only with compatible cameras |
| Spare Parts and Repairability | Panel not repairable, complete replacement if damaged |
| Warranty | 2 years |
Frequently Asked Questions - Solar Panel REOLINK
User questions about Solar Panel REOLINK
0 question about this device. Answer the ones you know or ask your own.
Ask a new question about this device
Download the instructions for your Solar panel in PDF format for free! Find your manual Solar Panel - REOLINK and take your electronic device back in hand. On this page are published all the documents necessary for the use of your device. Solar Panel by REOLINK.
USER MANUAL Solar Panel REOLINK
If you need help, please contact Reolink before returning your product. Most questions can be answered through our online support center at https://support.reolink.com.
Room B, 4th Floor, Kingway Commercial Building, 171-173 Lockhart Road, Wan Chai, Hong Kong
Hoferstasse 9B, 71636 Ludwigsburg, Germany
prodsg@libelleconsulting.com
August, 2020
QSG4_S

Be Prepared, Be Reclink
EN/DE/FR/IT/ES
Reolink Solar Panel
Operational Instruction
@ReolinkTech https://reolink.com
EN
Contents
What's in the Box 1
How to Install 2
Troubleshooting
Specification 4
Notification of Compliance 5
What's in the Box
Solar Panel ×1
Bracket x1
Screws (in pack) ×1
Mounting Hole Template ×1
How to Install
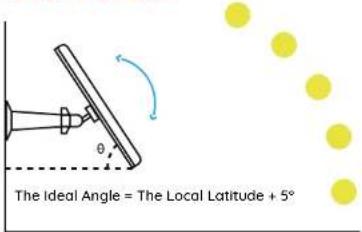
- Please select a position with the most sunlight throughout the year for your solar panel. The Reolink solar panel only needs a few hours of direct sunlight to sufficiently power your camera daily. The amount of energy that the solar panel can produce is affected by weather conditions, seasonal changes, geographic locations, etc.
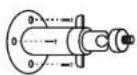
2 Mount the bracket with the mounting template and the screws provided in the package.
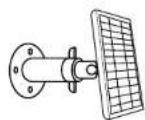
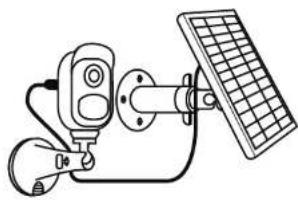
- Slot the solar panel into the bracket and make sure it's secure.
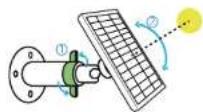
- Loosen the adjusting control on the bracket and adjust the angle of the solar panel to make it receive direct sunlight, and then retighten the adjusting control to secure your setting.
natural_image
Line drawing of a surveillance camera connected to a solar panel (no text or symbols)- Connect the solar panel to the Reolink Argus 2 camera with the micro USB cable.
IMPORTANT NOTICE:
• Make sure that there is NO blocking on the solar panel. The energy harvesting efficiency drops drastically even when a small portion of the solar panel is blocked.
- Please don't install the solar panel completely horizontally. Otherwise your solar panel might accumulate dust and other debris easily. It's advised to install the solar panel angularly to make it receive direct sunlight.
- Wipe the solar panel regularly to remove the dust or debris.
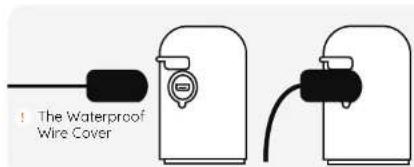

Make sure the camera is plugged in all the way and that the waterproof wire cover protects the interface between the camera and the solar panel.
Troubleshooting
Stop charging the battery-powered cameras
If your solar panel can't charge the camera anymore, try the following:
- Unplug and re-insert the charging cable. Please ensure the connection between the solar panel and camera is stable.
- Make sure that your Reolink Solar panel is pointed toward the sun and is not obstructed by trees, buildings, or other obstacles.
- Make sure that your camera is not working in temperatures below 0^ (32°F) or above 45^ (113°F).
- If the problem goes on, contact Reolink support.
Specifications
Physical Parameters
Size: 132.5x197.5x13.2 mm Cable Length: 4 Meters Weight: 280g
Electrical Parameters:
Max Voltage: 6.0V
Max Current: 530mA
Max: 3.2W
General:
Operating Temperature: -10° to 55° C (14° to 131° F) Weather resistance: IP65 certified weatherproof
Notification of Compliance
FCC Compliance Statement
This device complies with Port 15 of FCC Rules. Operation is subject to the following two conditions: (1) this device may not cause harmful interference, and (2) this device must accept any interference received, including interference that may cause undesired operation. For more information, visit: https://reolink.com/fcc-compliance-notice/

Simplified EU Declaration of Conformity
Reolink Communications declares that this device is in compliance with the essential requirements and other relevant provisions of Directive 2014/35/EU.

Correct Disposal of this product
This marking indicates that this product should not be disposed with other household wastes throughout the EU. To prevent possible harm to the environment or human health from uncontrolled waste disposal, recycle it responsibly to promote the sustainable reuse of material resources. To return your used device, please use the return on collection systems or contact the retailer where the product was purchased. They can take this product for environment safe recycling.
Limited warranty
This product comes with a 2-year limited warranty that is valid only if purchased from Reolink Official Store or a Reolink authorized reseller. Learn more: https://reolink.com/warranty-and-return/.
Terms and Privacy
Use of the product is subject to your agreement to the Terms of Service and Privacy Policy at reolink.com. Keep out of reach of children.
End User License Agreement
By using the Product Software that is embedded on the Reolink product, you agree to the terms of this End User License Agreement ("EULA") between you and Reolink. Learn more: https://reolink.com/eula/.
DE
Überblick
natural_image
Line drawing of a surveillance camera mounted on a cable with a solar panel nearby (no text or symbols)natural_image
Line drawing of a surveillance camera mounted on a wall-mounted panel (no text or symbols)Dimensions: 132.5x197.5x13.2 mm
natural_image
Line drawing of a surveillance camera mounted on a wall-mounted sensor with a solar panel nearby (no text or symbols)natural_image
Line drawing of a surveillance camera connected to a solar panel (no text or symbols)reolink.com/fcccompliance-notice/.
- Reolink Solar Panel
- Operational Instruction
- EN
- Contents
- What's in the Box
- How to Install
- IMPORTANT NOTICE:
- Troubleshooting
- Stop charging the battery-powered cameras
- Specifications
- Physical Parameters
- Electrical Parameters:
- General:
- Notification of Compliance
- FCC Compliance Statement
- Simplified EU Declaration of Conformity
- Correct Disposal of this product
- Limited warranty
- Terms and Privacy
- End User License Agreement
- DE
- Überblick
Brand : REOLINK
Model : Solar Panel
Category : Solar panel