
FSB2N25MC-BL - Soundbar Furrion - Free user manual and instructions
Find the device manual for free FSB2N25MC-BL Furrion in PDF.


| Product Type | Soundbar |
| Brand | Furrion |
| Model | FSB2N25MC-BL |
| Channels | 2.0 |
| Soundbar Dimensions (W x H x D) | Approximately 90 x 7 x 8 cm (35.4 x 2.8 x 3.1 in) |
| Weight | Approximately 2.5 kg (5.5 lbs) |
| Power Supply | AC 100-240V, 50/60Hz |
| Power Consumption | 40W (typical) |
| Wireless Connectivity | Bluetooth 5.0 |
| Audio Inputs | Optical, AUX (3.5mm), HDMI ARC |
| USB Playback | USB port (supports MP3/WMA) |
| Remote Control | Included (battery: CR2025) |
| Wall Mountable | Yes (bracket included) |
| Frequency Response | 80Hz - 20kHz |
| Total Output Power | 40W RMS (2 x 20W) |
| Standby Power Consumption | < 0.5W |
| Operating Temperature | 0°C to 40°C |
| Cleaning Instructions | Wipe with a dry, soft cloth. Do not use chemicals. |
| Safety Warnings | Do not expose to water or moisture. Use only supplied power adapter. |
| Spare Parts / Repairability | Contact Furrion support for spare parts; device is not user-serviceable. |
Frequently Asked Questions - FSB2N25MC-BL Furrion
User questions about FSB2N25MC-BL Furrion
0 question about this device. Answer the ones you know or ask your own.
Ask a new question about this device
Download the instructions for your Soundbar in PDF format for free! Find your manual FSB2N25MC-BL - Furrion and take your electronic device back in hand. On this page are published all the documents necessary for the use of your device. FSB2N25MC-BL by Furrion.
USER MANUAL FSB2N25MC-BL Furrion
2-zone Soundbar Speaker
Instruction Manual
Model: FSB2N25MC-BL
FSB2N25MCM-BL

Welcome
Thank you for purchasing this Furrion® 2-zone Soundbar Speaker. Before operating your new product, please read these instructions carefully. This instruction manual contains information for safe use, installation and maintenance of the product.
Please keep this instruction manual in a safe place for future reference. This will ensure safe use and reduce the risk of injury. Be sure to pass on this manual to new owners of this product.
The manufacturer does not accept responsibility for any damages due to not observing these instructions.
If you have any further questions regarding our products, please contact us at support@furrion.com
Contents
Welcome 2
Contents ....3
Important Safety Instructions....4
FCC Statement 4
IC Statement 4
Product Features ....5
Control Panel 5
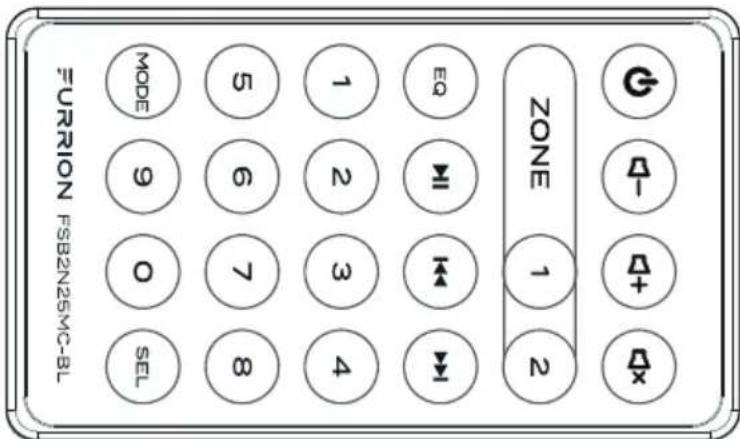
Remote Control 5
Installation 6
Operation....7
Basic Operation....7
Audio Operation....8
USB Operation....9
BT Audio Playback Operation 10
Electrical Connection....11
Wiring Diagram 11
Speaker and Power Wire Socket View....11
Specification....12
Warranty....13
Important Safety Instructions

CAUTION
RISK OF ELECTRIC SHOCK DO NOT OPEN

WARNING: TO REDUCE THE RISK OF ELECTRIC SHOCK, DO NOT EXPOSE THIS APPLIANCE TO RAIN OR MOISTURE.
CAUTION: TO REDUCE THE RISK OF ELECTRIC SHOCK, DO NOT REMOVE COVER (OR BACK). NO USER-SERVICEABLE PARTS INSIDE. REFER SERVICING TO QUALIFIED SERVICE PERSONNEL.

The lightning flash with arrowhead symbol, within an equilateral triangle, is intended to alert the user to the presence of uninsulated dangerous voltage within the products enclosure that may be of sufficient magnitude to constitute a risk of electric shock to persons.

The exclamation point within an equilateral triangle is intended to alert user to the presence of important operating and maintenance (servicing) instructions in the literature accompanying the appliance.
FCC Statement
This device complies with part 15 of the FCC Rules.
Operation is subject to the following two conditions:
(1) This device may not cause harmful interference, and
(2) this device must accept any interference received, including interference that may cause undesired operation.
NOTE: This equipment has been tested and found to comply with the limits for a Class B digital device, pursuant to Part 15 of the FCC Rules. These limits are designed to provide reasonable protection against harmful interference in a residential installation. This equipment generates, uses and can radiate radio frequency energy and, if not installed and used in accordance with the instructions, may cause harmful interference to radio communications.
However, there is no guarantee that interference will not occur in a particular installation. If this equipment does cause harmful interference to radio or television reception, which can be determined by turning the equipment off and on, the user is encouraged to try to correct the interference by one or more of the following measures:
- Reorient or relocate the receiving antenna.
- Increase the separation between the equipment and receiver.
- Connect the equipment into an outlet on a circuit different from that to which the receiver is connected.
- Consult the dealer or an experienced radio/TV technician for help.
Important Safety Instructions
WARNING: Changes or modifications to this unit not expressly approved by the part responsible for compliance could void the user's authority to operate the equipment.
FCC Radiation Exposure Statement
The device has been evaluated to meet general RF exposure requirement. The device can be used in portable exposure condition without restriction.
IC Statement
This device complies with Canada Industry licence-exempt RSS standard(s).
Operation is subject to the following two conditions: (1) this device may not cause interference. and (2) this device must accept any interference. Including interference that may cause undesired operation of the device.
- Before finally installing the unit, connect the wiring temporarily and make sure the unit and the system work properly.
- Fix the unit with screws according to following diagram.
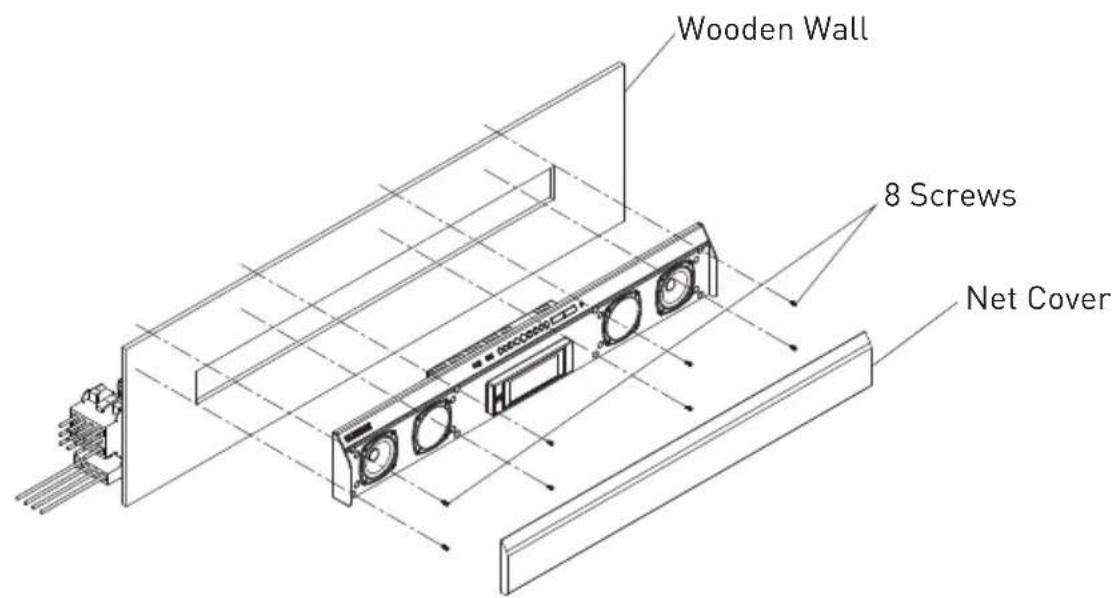
- Remove the Net Cover from the main unit.
- Fix the unit with 8 pieces (#8) pan-head self-tapping screws.
- Put the Net Cover back on the main unit.
Operation
Basic Operation
- Turn the unit On/Off
When the unit is Off, press POWER button to switch the unit On. When the unit is On, short press POWER button to switch the unit Off.
- Select function mode
Press MODE button repeatedly to select RADIO, USB (only available when a USB storage is inserted), AUX IN, TV, DVD or BT mode.
- Adjust the volume
During playback, press VOLUME +/VOLUME - button to increase/decrease the volume.
- Mute or resume sound
During playback, press MUTE button to silence the unit, press again to resume the sound immediately.
- Select and adjust the mode of the sound and menu
Press SEL button repeatedly to select the mode of VOL, BAS, TRE(treble), BAL (balance), LOUD OFF/LOUD ON, EQ OFF/FLAT/ROCK/POP/CLASSIC, RPT OFF/RPT ONE/RPT DIR (in USB mode), RDM OFF/RDM ON (in USB mode), DEVOL, DX/LOCAL (in RADIO mode), STEREO/MONO (in RADIO mode) in the sequence and circulation.
Press VOLUME +/VOLUME - button to select your desired mode.
- Select a preset EQ mode
Press EQ button repeatedly on the remote control to select the preset music equalizer curves: EQ OFF, CLASSIC, POP, ROCK, FLAT. The sound effect will be changed accordingly.
- Select the speaker ZONE 1/2
Press ZONE1/2 button to turn on or off the audio source in each of speakers. The corresponding icon "ZONE 1" or "ZONE 2" will be displayed on LCD once it is selected.
- Reset the unit
If the display is incorrect, or the function buttons are not effective or the sound is distorted, switch the unit to AUX IN mode, press and hold MODE button for more than 6 seconds to make the unit return to factory default settings and re-instate the correct functions.
Operation
Audio Operation
1. FREQUENCY SELECT
In RADIO mode: Press and hold SEL button for about 2 seconds to switch to radio region selection mode, then press VOLUME + or VOLUME - to select AREA USA / AREA EUR for model FSB2N25MC-BL (or select AREA AUS / AREA EUR for model FSB2N25MCM-BL).
2. TUNE/SEARCH UP/DOWN
In RADIO mode:
1) Press and hold ◀◀ or ▶▶ button on the front panel or press and hold ◀◀ or ▶▶ button on the remote control to automatically search up or down for an available station from the current frequency.
2) Press ◀◀ or ▶▶ button on the front panel or press ◀◀ or ▶▶ button on the remote control to manually search up or down step by step for your desired station from the current frequency.
3. AS & PS FUNCTION
In RADIO mode:
1) Press and hold ZONE 1 button on the front panel to automatically search the radio frequency from the lowest frequency till the search cycle is finished. Then 10 of the strongest stations are automatically stored in the corresponding preset memory band (FM0\~FM9).
When the AS (Automatic Storage) operation is complete, the radio station will resume to the previous played station.
2) Press and hold ZONE 2 button on the front panel to automatically search each preset stations from FM0 to FM9.
When the search cycle of PS (Preset Scan) is complete, the radio station will resume to the previous played station.
4. PRESET STATION AND PRESET NUMBER [0-9] BUTTONS
In RADIO mode:
1) To memorize the current frequency station:
a) Press and hold one of the 10 number buttons (0-9) on the remote control to store the current station.
b) Press and hold the PLAY/PAUSE button until the preset number flashes, then press PLAY/PAUSE button repeatedly to select the preset numbers from 0 to 9. Press and hold PLAY/PAUSE to confirm the selection.
2) To recall the preset memory on the current band, press one of the 10 number buttons (0-9) on the remote control to broadcast the corresponding preset station.
Operation
USB Operation
1. Pause Playback
During playback, press PLAY/PAUSE button on the front panel or remote control to pause the playback, press PLAY/PAUSE button again to resume normal playback.
2. Select Chapter with the ◀◀or ▶▶button
Press ▶◀ ▶button on the front panel or on the remote control during playback to select the previous or next chapter to playback.
3. Select Chapter
Press and hold Zone1 or Zone2 button on the front panel to select the previous or next DIR.
4. Repeat track(s)
- During playback, press SEL button repeatedly and select the RPT ONE mode to play the current track repeatedly.
- During playback, press SEL button repeatedly and select the RPT DIR mode to play the tracks in the album repeatedly.
- During playback, press SEL button repeatedly and select the RPT OFF mode to cancel RPT function.
5. Play tracks randomly
- During playback, press SEL button repeatedly and select the RDM ON mode to play all tracks randomly.
- During playback, press SEL button repeatedly and select the RPT OFF mode to cancel RDM function.
Operation
BT Audio Playback Operation
1. Pairing and connection
a) Turn on the Bluetooth mode of your external Bluetooth device.
b) Select the item from Finding the Bluetooth Device and enter it. After the device search is complete, it will show the name of the Bluetooth Device FSB2N25MC-BL-XXXXX (where X can be any character A-Z or number 0-9). Select it and enter it, a window will pop up and ask you to input a password, input 0000 and enter it. The device will now begin paring.
c) Once paired successfully, the LCD will display LINK OK. If pairing failed, the LCD will display NO LINK.
2. Play audio file from an external Bluetooth device to the unit
If your mobile device supports A2DP then you will be able to stream music from your Bluetooth device so it can be played by stereo speaker. Select your Bluetooth device to play the audio through Bluetooth. If your mobile device supports AVRCP then you will be able to control the basic audio output functions by the Wall-mount Stereo controls. Eg. Play/Pause.
Electrical Connection
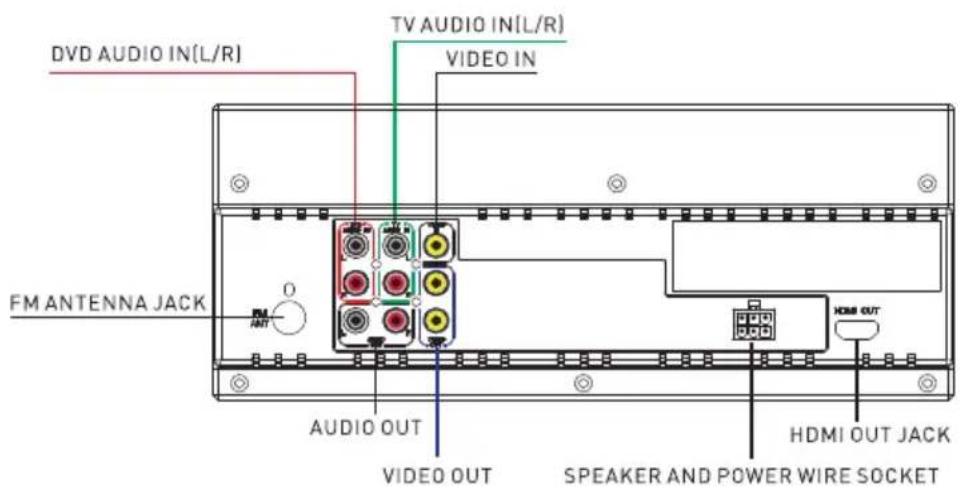
Wiring Diagram
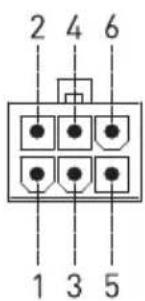
Speaker and Power Wire Socket View
NOTE: Reading the above file formats is not guaranteed.
Specification
| GENERAL | |
| Supply Voltage DC 12V | |
| Current Consumption Max. 7.5A | |
| Power Output 4 x 10W + 20W | |
| Number of channels 2 STEREO Channels | |
| Dimensions (W x H x D) 31 78 " x 4 116 " x 4 78 " / 810 x 124 x 103.8mm | |
| FM SECTION | |
| Frequency Range | For FSB2N25MCM-BL:87.5Mhz - 108Mhz (AUS) / 87.5Mhz - 108Mhz (EU)For FSB2N25MC-BL:87.5Mhz - 107.9Mhz (USA) / 87.5Mhz - 108Mhz (EU) |
| USB PLAYBACK | |
| System MP3 Audio System | |
| Frequency Characteristics | 20Hz - 100Hz <=5dB |
| 20Hz - 20KHz <=5dB | |
| Signal to Noise (USB) 50dB [1KHz] | |
| Video In/Out Level 1Vp-p | |
Warranty
Furrion warrants for a period of 1 year from date of retail purchase by the original end-use purchaser, that this product, when delivered to you in new condition, in original packaging, from a Furrion authorized reseller and used in normal conditions, is free from any defects in manufacturing, materials, and workmanship. In case of such defect, Furrion shall replace or repair the product at no charge to you. This warranty does not cover: products where the original serial numbers have been removed, altered or cannot readily be determined; damage or loss caused by accident, misuse, abuse, neglect, product modification, failure to follow instructions in instruction manual, commercial or industrial use; damage or loss caused to the decorative surface of product; to any data, software or information; and normal wear and tear. This warranty only protects the original end-user ("you") and is not transferable; any attempt to transfer this warranty shall make it immediately void. This warranty is only valid in the country of purchase.
THIS WARRANTY AND REMEDIES SET FORTH ABOVE ARE EXCLUSIVE AND IN LIEU OF ALL OTHER WARRANTIES, REMEDIES AND CONDITIONS, WHETHER ORAL OR WRITTEN, EXPRESS OR IMPLIED. FURRION SPECIFICALLY DISCLAIMS ANY AND ALL IMPLIED WARRANTIES, INCLUDING, WITHOUT LIMITATION, WARRANTIES OF MERCHANTABILITY AND FITNESS FOR A PARTICULAR PURPOSE. IF FURRION CANNOT LAWFULLY DISCLAIM IMPLIED WARRANTIES UNDER THIS LIMITED WARRANTY, ALL SUCH WARRANTIES, INCLUDING WARRANTIES OF MERCHANTABILITY AND FITNESS FOR A PARTICULAR PURPOSE ARE LIMITED IN DURATION TO THE DURATION OF THIS WARRANTY.
No Furrion reseller, agent, or employee is authorized to make any modification, extension, or addition to this warranty.
Warranty
FURRION IS NOT RESPONSIBLE FOR DIRECT, INDIRECT, SPECIAL, INCIDENTAL OR CONSEQUENTIAL DAMAGES RESULTING FROM ANY BREACH OF WARRANTY OR CONDITION, OR UNDER ANY OTHER LEGAL THEORY, INCLUDING BUT NOT LIMITED TO LOST PROFITS, DOWNTIME, GOODWILL, DAMAGE TO OR REPLACEMENT OF ANY EQUIPMENT OR PROPERTY, ANY COSTS OF RECOVERING, REPROGRAMMING, OR REPRODUCING ANY PROGRAM OR DATA STORED IN OR USED WITH FURRION PRODUCTS. FURRION'S TOTAL LIABILITY IS LIMITED TO THE REPAIR OR REPLACEMENT OF THIS PRODUCT PURSUANT TO THE TERMS OF THIS WARRANTY.
SOME STATES DO NOT ALLOW THE EXCLUSION OR LIMITATION OF INCIDENTAL OR CONSEQUENTIAL DAMAGES OR EXCLUSIONS OR LIMITATIONS ON THE DURATION OF IMPLIED WARRANTIES OR CONDITIONS, SO THE ABOVE LIMITATIONS OR EXCLUSIONS MAY NOT APPLY TO YOU. THIS WARRANTY GIVES YOU SPECIFIC LEGAL RIGHTS, AND YOU MAY ALSO HAVE OTHER RIGHTS THAT VARY BY STATE OR (WHERE APPLICABLE IN THE COUNTRIES WHERE FURRION HAS NON-US/CANADI-AN AUTHORIZED DEALERS) COUNTRY. NO ACTION OR CLAIM TO ENFORCE THIS WARRANTY SHALL BE COMMENCED AFTER THE EXPIRATION OF THE WARRANTY PERIOD.
Keep your receipt, delivery slip, or other appropriate payment record to establish the warranty period. Service under this warranty must be obtained by contacting Furrion at warranty@furrion.com
Product features or specifications as described or illustrated are subject to change without notice.
FURRION
Furrion Innovation Center & Institute of Technology
● 52567 Independence Ct., Elkhart, IN 46514, USA ● Toll free:1-888-354-5792
Email: support@furrion.com
©2007-2018 Furrion Ltd. Furrion® and the Furrion logo are trademarks licensed for use by Furrion Ltd. and registered in the U.S. and other countries.
FURRION.COM


- 2-zone Soundbar Speaker
- Welcome
- Contents
- Important Safety Instructions
- CAUTION
- FCC Statement
- FCC Radiation Exposure Statement
- IC Statement
- Operation
- Basic Operation
- Audio Operation
- FREQUENCY SELECT
- TUNE/SEARCH UP/DOWN
- AS & PS FUNCTION
- PRESET STATION AND PRESET NUMBER [0-9] BUTTONS
- USB Operation
- Pause Playback
- Select Chapter with the ◀◀or ▶▶button
- Select Chapter
- Repeat track(s)
- Play tracks randomly
- BT Audio Playback Operation
- Pairing and connection
- Play audio file from an external Bluetooth device to the unit
- Electrical Connection
- Specification
- Warranty
- FURRION
- Furrion Innovation Center & Institute of Technology
Brand : Furrion
Model : FSB2N25MC-BL
Category : Soundbar