
Genus One Net - Instant water heater and water tank Ariston Thermo - Free user manual and instructions
Find the device manual for free Genus One Net Ariston Thermo in PDF.


| Product Type | Combi boiler (instantaneous water heater and hot water storage) |
| Brand | Ariston Thermo |
| Model | Genus One Net |
| Power Output | 24 kW (G.C.N. 47-116-93), 30 kW (47-116-94), 35 kW (47-116-95) |
| Energy Source | Natural Gas (methane) or LPG (convertible by authorized service) |
| Wi-Fi Connectivity | Ariston Net for remote control via smartphone, tablet, or PC |
| Control Panel | Digital display with tactile buttons, keylock, and programming keys |
| Central Heating Temperature Range | 40°C to 82°C |
| Domestic Hot Water Temperature Range | 36°C to 60°C |
| Water Pressure (system) | 0.6 to 1.5 bar (cold), recommended 1 bar |
| Anti-frost Protection | Automatic activation when temperature drops below 8°C |
| Safety Features | Overheating protection, no flame detection, flow check, pressure sensor, PCB fault monitoring |
| Comfort Function | Time-based or always active to reduce wait time for hot water |
| Heating Schedule Programming | Free time programming, wizard, and preset programs (family, no lunch, midday, always active) |
| Holiday Function | Disables heating during absence, resumes on set return date |
| Thermoregulation (Auto) | Automatically adjusts boiler operation based on environmental conditions |
| Warranty | 12 years from date of installation (subject to annual service and registration) |
| Included Accessories | CUBE Room Sensor (wireless) |
| Maintenance | Annual service by Gas Safe Registered engineer required to maintain warranty |
| Compliance | Benchmark Scheme, UK Water Supply Regulations, CE marking |
Frequently Asked Questions - Genus One Net Ariston Thermo
User questions about Genus One Net Ariston Thermo
0 question about this device. Answer the ones you know or ask your own.
Ask a new question about this device
Download the instructions for your Instant water heater and water tank in PDF format for free! Find your manual Genus One Net - Ariston Thermo and take your electronic device back in hand. On this page are published all the documents necessary for the use of your device. Genus One Net by Ariston Thermo.
USER MANUAL Genus One Net Ariston Thermo
Including CUBE Room Sensor wireless
G.C.N.: 47-116-93 (24 KW)
G.C.N.: 47-116-94 (30 kW)
G.C.N.: 47-116-95 (35 KW)

ARISTON
GENUS ONE NET
USER'S MANUAL
kiwa
approved product

UK WATER SUPPLY
REGULATIONS

Country of Destination: GB/IE
HOT WATER | HEATING | RENEWABLES
Dear Customer,
Thank you for choosing an ARISTON boiler.
We warranty that your boiler is a reliable and technically sound product.
This manual provides detailed instructions and recommendations for proper installation, use and maintenance.
Remember to keep this manual in a safe place for future reference.
WARRANTY
This appliance is in warranty for 12 years (GENUS ONE NET Models) from the date of installation. Proof of installation or purchase and annual servicing must be provided upon request. The installation must have been carried out by a Gas Safe Registered engineer.
Ariston is obliged under this warranty to repair or replace a faulty appliance under our terms and conditions.
Any repair or replacement will be at Ariston's discretion. This warranty will only apply where the fault arises from defects in the appliance, caused either by material or workmanship of the manufacturer.
This warranty does not cover malfunction or damage arising from incorrect installation, commissioning or maintenance procedures as advised in the Installation and Servicing manual, inefficient flue system, poor or incorrect electricity and wiring, incorrect gas supply or pressure, tampering by inexperienced persons and any other cause not directly related to manufacture.
Ariston Thermo Uk Ltd cannot accept responsibility for any cost arising from repair or maintenance carried out by any third party.
This warranty does not affect your statutory rights.
The appliance must be registered with Ariston within 30 days from date of installation.
The boiler must be serviced annually either by a local Gas Safe Registered engineer or managed by Ariston directly which can be arranged by calling 0333 240 8777.
If the boiler is not serviced directly through Ariston then proof service must be sent in to Ariston UK (address on back cover of manual).”
Registration is online at www.ariston.co.uk.
Thank you for choosing an Ariston boiler compatible with Ariston
Net, the service designed and manufactured by Ariston, to provide a whole new experience in using a domestic heating system.
Ariston Net allows you to start, stop and check the temperature of domestic heating and water
Ready for

anytime, anywhere from a smartphone, tablet or PC. It allows you to constantly monitor energy consumption to ensure you save on your gas bill. It also notifies you in real time if there is a boiler failure. If a remote diagnostic service is activated, the service centre will be able to solve problems remotely where possible or arrange an appointment at your earliest convenience.
* The installation must have been carried out by a Gas Safe Registered engineer.
For more information call us on 0333 240 8777.
Disposal and recycling boiler.
Our products are designed and manufactured by using components made from recyclable materials where possible.
The boiler and its accessories have to be adequately disposed of and the various materials separated where possible.
The packaging used for the transport of the boiler must be disposed of by the installer.
ATTENTION!!
Recycling and disposal of the boiler and the accessories must be made as required by regulations.
SAFETY REGULATIONS
Key to symbols:

Failure to comply with this warning implies the risk of personal injury, in some circumstances even fatal

Failure to comply with this warning implies the risk of damage, in some circumstances even serious, to property, plants or animals.
Do not perform operations which involve opening the appliance.
Electrocution from live components.

Personal injury caused by burns due to overheated components, or wounds caused by sharp edges or protrusions.
Do not perform operations which involve removing the appliance from its installation space.
Electrocution from live components.

Flooding caused by water leaking from disconnected piping.

Explosions, fires or intoxication caused by gas leaking from disconnected piping.
Do not damage the power supply cable.
Electrocution from live uninsulated wires.

Do not leave anything on top of the appliance.
Personal injury caused by an object falling off the appliance as a result of vibrations.

Damage to the appliance or items underneath it caused by the object falling off as a result of vibrations.

Do not climb onto the appliance.
Personal injury caused by the appliance falling.

Damage to the appliance or any objects underneath it caused by the appliance falling away from its installation space.

Do not climb onto chairs, stools, ladders or unstable supports to clean the appliance.
Personal injury caused by falling from a height or cuts (stepladders shutting accidentally).

Do not attempt to clean the appliance without first switching it off and turning the external switch to the OFF position.
Electrocution from live components.

Do not use insecticides, solvents or aggressive detergents to clean the appliance.
Damage to plastic and painted parts.

Do not use the appliance for any use other than normal domestic use.
Damage to the appliance caused by operation overload.

Damage caused to objects treated inappropriately.
Do not allow children or inexperienced individuals to operate the appliance.
Damage to the appliance caused by improper use.

If you detect a smell of burning or smoke coming from the appliance, disconnect it from the electricity supply, turn off the main gas valve, open all windows and call for assistance.
Personal injury caused by burns, smoke inhalation, intoxication.

If there is a strong smell of gas, turn off the main gas valve, open all windows and call for assistance.
Explosions, fires or intoxication.

This appliance can be used by children aged from 8 years and above and person with reduced physical, sensory or mental capabilities or lack of experience and knowledge if they have been given supervision or instruction concerning use of the appliance in a safe way and understand the hazards involved. Children shall not play with the appliance. Cleaning and user maintenance shall not be made by children without supervision.
The installation and first ignition of the boiler must be performed by qualified Gas Safe Registered engineer in compliance with Gas Safety (instillation & use) regulations and all other national regulations regarding installation, and in conformity with any requirements established by local authorities and public health organisations.
After the boiler has been installed, the installer must ensure that the end user receives the declaration of conformity and the operating manual, and should provide all necessary information as to how the boiler and the safety devices should be handled.
This appliance is designed to produce hot water for domestic use (combi version).
It should be connected to a heating system and a distribution network for domestic hot water, both of which must be compatible with its performance and power levels.
The use of the appliance for purposes other than those specified is strictly forbidden. The manufacturer cannot be held responsible for any damage caused by improper, incorrect and unreasonable use of the appliance or by the failure to comply with the instructions given in this manual.
Installation, maintenance and all other interventions must be carried out in full conformity with the governing legal regulations and the instructions provided by the manufacturer. Incorrect installation can harm persons, animals and possessions; the manufacturing company shall not be held responsible for any damage caused as a result.
In the event of any maintenance or other structural work in the immediate vicinity of the ducts or flue gas exhaust devices and their accessories, switch the appliance off by switching the external bipolar switch to the "OFF" position and shutting off the gas valve.
When the work has been completed, ask a qualified technician to check the efficiency of the ducting and the devices.
If the boiler should be out of use for a prolonged period, it is recommended that the electrical power supply be disconnected and that the external gas cock be closed. If low temperatures are expected, the boiler and system pipe work should be drained in order to prevent frost damage.
Turn the boiler off and turn the external switch "OFF" to clean the exterior parts of the appliance.
Do not allow children or inexperienced persons to use the appliance without supervision.
CE labelling
The CE mark guarantees that the appliance conforms to the following directives:
- 2016/426/EU
relating to gas appliances
- 2014/30/EU
relating to electromagnetic compatibility
- 92/42/CEE
relating to energy efficiency
- 2014/35/EU
relating to electrical safety
- 2009/125/CE
Energy related Products
- 813/2013
Commission regulation (EU)
Do not forget the Log Book!
The Benchmark Scheme
Benchmark places responsibilities on both manufacturers and installers.
The purpose is to ensure that customers are provided with the correct equipment for their needs, that it is installed, commissioned and serviced in accordance with the manufacturer's instructions by competent persons and that it meets the requirements of the appropriate Building Regulations.
The Benchmark Checklist can be used to demonstrate compliance with Building Regulations and should be provided to the customer for future reference.
Installers are required to carry out installation, commissioning and servicing work in accordance with the Benchmark Code of Practice which is available from the Heating and Hotwater Industry Council who manage and promote the Scheme.
Visit www.centralheating.co.uk for more information.
CONTROL PANNEL
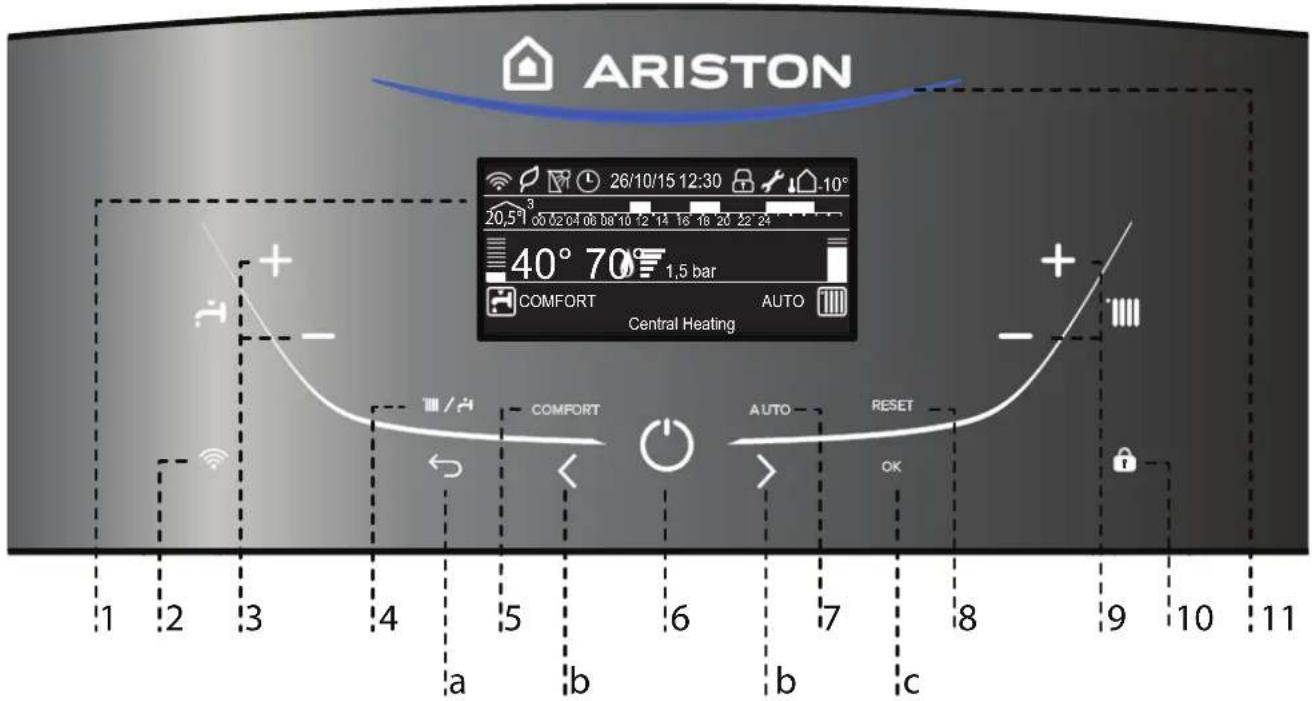
Legend:
- Display
- WIFI button
(enable / disable / configure) - Domestic Hot Water adjustment button +/-
- MODE button
(Operation mode selection summer/winter) - COMFORT button
- ON/OFF button
- Auto button (To activate Thermoregulation)
- RESET button
- Heating temperature adjustment button +/-
- Keylock
- Led Blue - Flame presence
Programming key
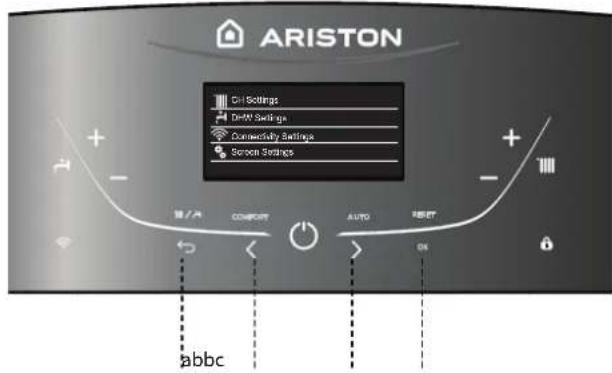
a. Esc button (Back)
b. Programming keys
c. Ok button programming key
DISPLAY
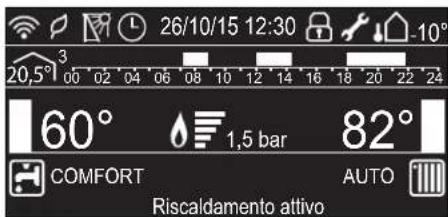
| Date and time | 26/10/15 12:30 |
| Keylock active | |
| D.H.W. set temperature and indication of the set temperature level | 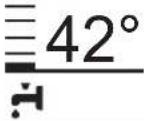 |
| C.H. set temperature and indication of the set temperature level |  |
| Warning scheduled maintenance | |
| Heating operation set |  |
| Heating operation active |  |
| D.H.W. operation set |  |
| D.H.W. operation active |  |
| Flame detected with indication of power used |  |
| Digital pressure gauge (bar) |  |
| Scrolling text displaying operation as information | Central heating |
| Error wsignalsThe display show the code and description |  |
| AUTO function activated | AUTO |
| Hot Water Comfort activated | COMFORT |
| CH Schedule programming(set display: boiler base - see user's menù) |  |
| [086Y] | |
| CH Schedule programming(set display: boiler complete - see user's menù) | |
| Internal temperature displayed for set zone. (with bus device connected - optional) |  |
| External temperature displayed |  |
| ECO mode | [HDD6] |
| WIFI active |  |
| WIFI connected to the local network, but without access to the server |  |
| WIFI not configured | [0322] |
| Solar temperature probe connected - option |  |
Initial operating procedures
Check the water pressure on the pressure gauge and make sure that the figure is between 0.6 and 1.5 bar when the system is cold. If the pressure is just under the minimum value the display will request a filling procedure - see note below.
FILLING PROCEDURE RE-ESTABLISH THE CORRECT PRESSURE USING THE FILLING LOOP (POSITIONED UNDERNEATH THE BOILER) AND PRESS THE MODE BUTTON FOR 5 SECONDS. THE DISPLAY SHOWS "Air Purge Active WHEN THE PRESSURE GAUGE INDICATES A PRESSU OF 1 BAR, CLOSE THE FILLING VALVE AND PRESS TH MODE BUTTON. THE DISPLAY RETURNS TO NORMAL VIEW.

Re-establish the correct pressure by filling loop.
If the pressure drops very frequently, there may be a water leak at some point in the system. If this is the case a plumber should be contacted.
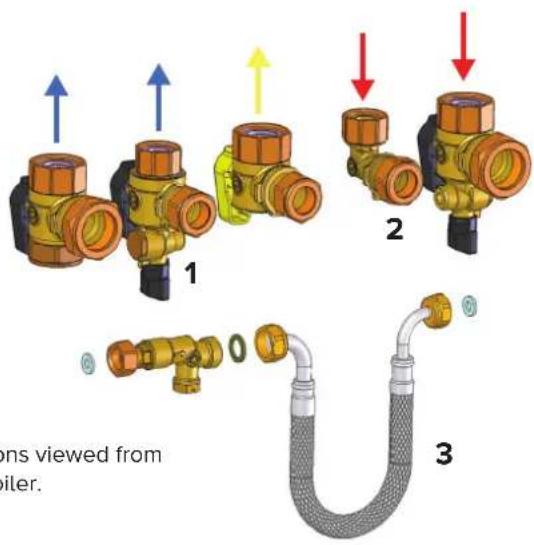
Note.
Connections viewed from behind boiler.
- To repressurise the system ensure flexible hose 3 is connected
- Slowly open taps 1 & 2 (see diagrams above)
- Water will be heard entering the system
- When the pressure gauge reads 1.5 bar close taps 1 & 2
Ignition procedure
Press the ON/OFF button (on the control panel to switch on the boiler.
The display shows the initialisation procedure - indicated by the bar.
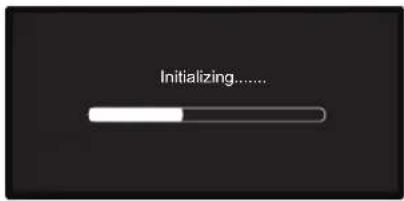
Once the procedure is completed, the display will visualise the temperatures set for the central heating and domestic hot water circuits (display configuration: boiler base).
It's also required to set the date, time and language - see the note below.
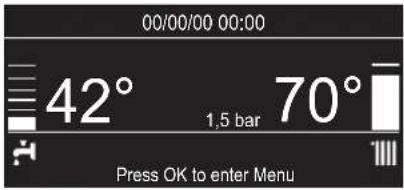
ATTENTION - Initial start-up

The first time the display requires a few basic settings.
First, select the language. Press the programming key b to select the language, then press the OK button to confirm.
Move on to setting the date and time. Press the programming key b to make a selection, press the OK button to confirm your selection. Press the programming key b to set the value.
Press the OK button to confirm. Save the settings by pressing OK.
Press the OK button to access the User's Menu.
Press the programming key b to scroll through the menu list and select a parameter, then press OK to confirm.
CAUTION!!
Some parameters are protected with an access code (safety code) which protects the boiler settings from unauthorised use.
Operating mode selection
Use the MODE button 4 to select the desired operating mode.
| Operating mode Display | |
| Winterheating + hot water production for domestic use with set temperature | 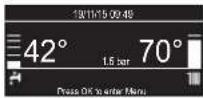 |
| Summeronly hot water production for domestic use with set temperature | 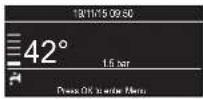 |
The ignition of the burner will be signalled by the blue LED 11.
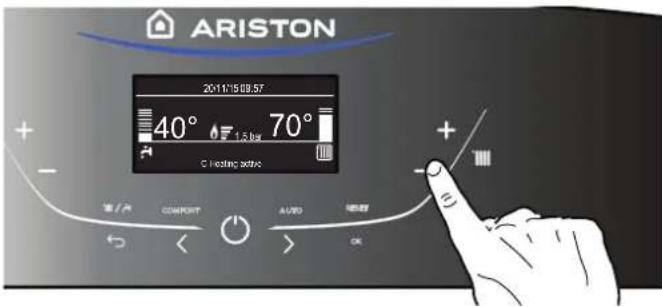
Adjusting the heating
It is possible to set the temperature of the heating water by pressing the buttons 9 +/-
The temperature that may be obtained which varies from 40^ C to 82^ C.
The value set previously will flash on the display.
Domestic hot water temperature adjustment
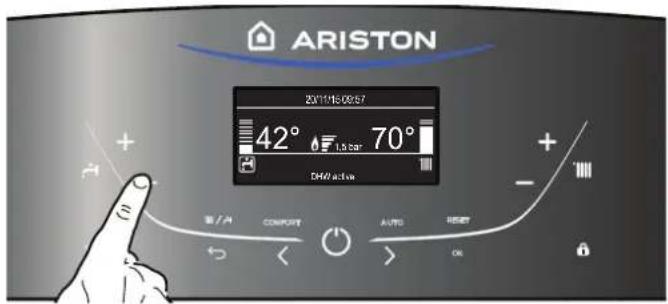
It is possible to set the temperature of the domestic hot water by pressing the buttons 3 a temperature may be obtained which varies from 36^ C to 60^ C. The value set previously will flash on the display.
Switching off the heating
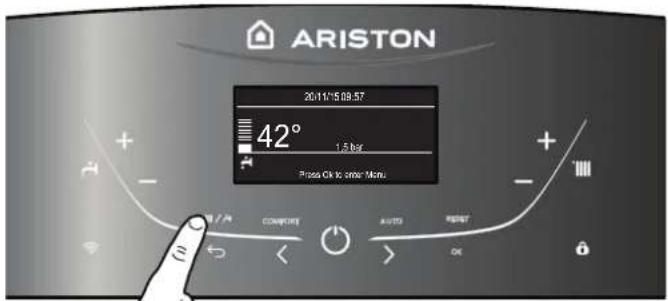
To switch off the heating, press the MODE button 4; the heating operation symbol will disappear from the display.
The boiler remains active only for the production of domestic hot water, indicating the set temperature.
Switching off the boiler
To switch off the boiler press the ON/OFF button ⏻the display will switch off.
The Anti-frost Function is allready active.
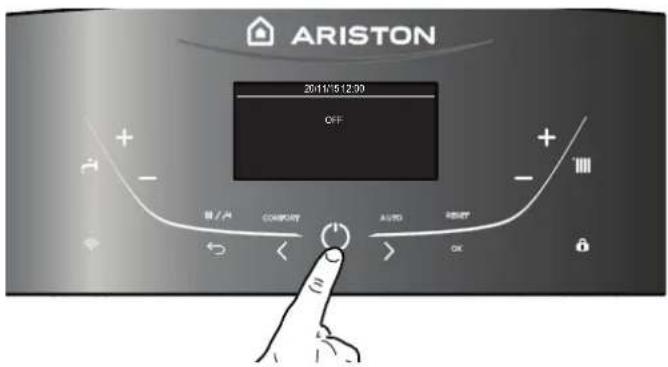
Switch off the boiler completely by switching the external electrical switch to the OFF position. Shut off the gas valve.
COMFORT function
The boiler allows the 'comfort' level for the output of domestic hot water to be increased through the "COMFORT" function. This function keeps the secondary exchanger warm during the periods in which the boiler is inactive, thereby bringing the initial thermal
condition of the water drawn to a higher temperature.
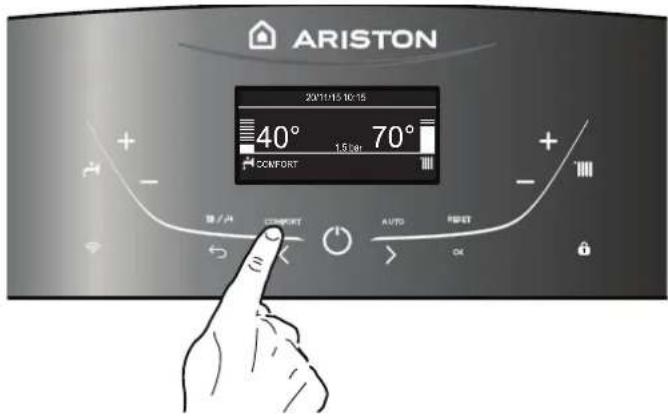
This function may be enabled by pressing the COMFORT button 5. Press to select:
- Comfort function disabled
- Comfort function set to: Time based
The Boiler will be ignited to quickly provide Hot Water for 30 minutes after the last tapping
- Comfort function set to: Always active
The Boiler will be ignited to quickly provide Hot Water all day long
When the function is enabled the text COMFORT appears on the display.
Control panel - Keylock
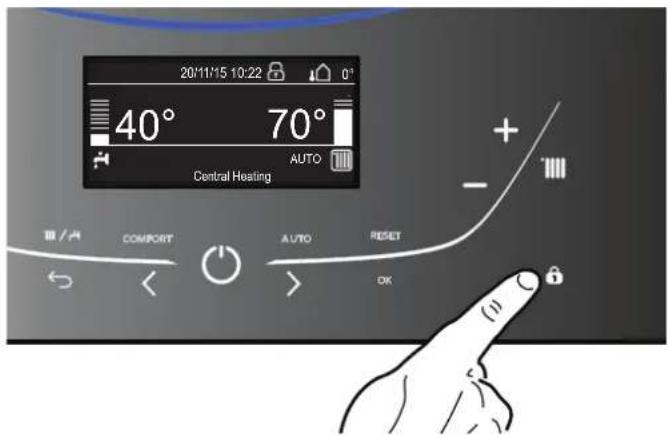
It's possible to lock the control panel of the boiler by pressing the button 10. The display shows the symbol
To unlock the control panel, press again the button 10. The symbol disappears from the display.
Auto button - Temperature adjustment activation
The AUTO function enables boiler operation to be adapted to environmental conditions and to the type of system it is installed on.
Comfortable temperature is reached inside the room in the quickest way possible, without wasting money, energy or efficiency, while substantially reducing the amount of wear experienced by the components.
Your installer will advise you on the devices connectable to the boiler and will program it according to the system.
In normal boilers the water temperature inside the heating elements is usually set to a high value (70-80°C), thereby ensuring effective heating during the few really cold winter days. It then becomes excessive on less cold days (of which there are many) more typical of the autumn and winter seasons. This leads to excessive room heating after the thermostat has been switched off, resulting in energy waste and uncomfortable conditions inside the room.
The AUTO function “takes control” of the boiler and selects the best operating regime based on environmental conditions, external devices connected to the boiler and the performance required. It constantly decides at which power level to operate based on the environmental conditions and the room temperature required.
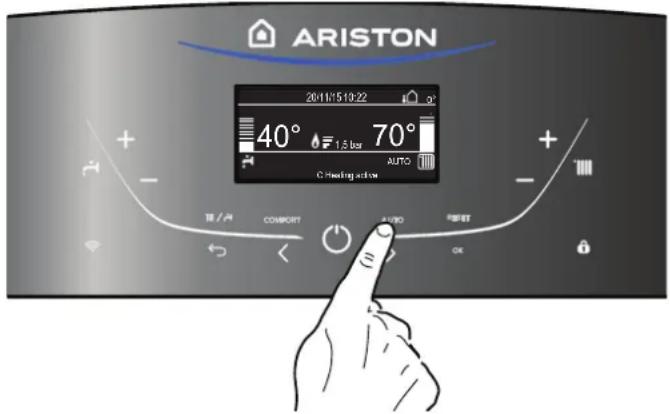
This function may be enabled by pressing the AUTO button 7.
When the function is enabled the text AUTO appears on the display.
Appliance shut-off conditions
The boiler is protected from malfunctions by means of internal checks performed by the electronic P.C.B., which stops the boiler from operating if necessary. In the event of the boiler being shut off in this manner, a code appears on the control panel display which refers to the type of shut-off and the reason behind it.
Two types of shut-off may occur:
Safety shut-off
This type of error is “volatile”, which means that the boiler starts up again automatically as soon as the problem which caused the shut-off is removed.
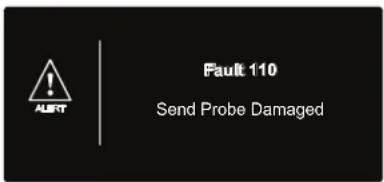
The display shows the code and the error description.
"Fault 110 - Send Probe Damaged"
In fact, soon as the cause of the shut-off disappears, the boiler starts up again and continues to operate normally.
If the boiler still indicates a safety shut-off, switch it off. Make sure the external electric switch is in the OFF position, shut off the gas valve and contact a qualified technician.
Safety shut-off due to insufficient water pressure
The system may be restarted, re-balancing the water pressure, by using the filling procedure - see note 1.
If the re-balancing request is performed on a frequent basis, switch the boiler off, bring the external electric switch to the OFF position, shut off the gas valve and contact a qualified technician to check for any leaks of water.
NOTE 1 - FILLING PROCEDURE
RE-ESTABLISH THE CORRECT PRESSURE USING
THE FILLING LOOP (POSITIONED UNDERNEATH
THE BOILER) AND PRESS THE MODE BUTTON
FOR 5 SECONDS. THE DISPLAY SHOWS "AIR PURGE ACTIVE".
WHEN THE PRESSURE GAUGE INDICATES A PRESSURE OF 1 BAR, CLOSE THE FILLING VALVE AND PRESS THE MODE BUTTON.
THE DISPLAY RETURNS TO NORMAL VIEW.
Operation shutdown
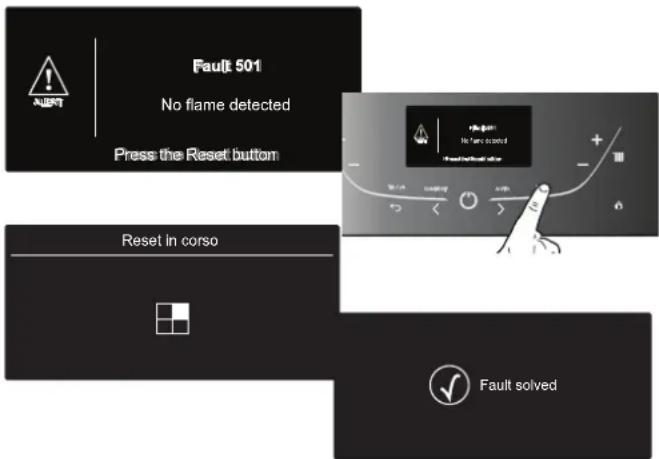
This type of error is “non-volatile”, which means that it is not removed automatically.
The display shows the code and the error description.
To restore normal operation press the RESET button on the control panel.
The display shows "Reset in progress" and then "Fault solved".
If the problem manifests itself again after several attempts to reset the appliance, contact a qualified technician.
Important
If this shutdown occurs frequently, contact an authorised Technical Service Centre for assistance. For safety reasons, the boiler will permit a maximum of 5 resets in 15 minutes (5 presses of the RESET button); at the 6th attempt within this 15-minute period the boiler will shut down and may only be operated again after the electricity supply has been disconnected. If the shutdown is occasional or an isolated event, this is not a problem.
Operation shutdown error table
| Display Description | |
| 1 01 | Overheating |
| 5 01 | No flame detection |
| 1 03 | Flow Check Failed |
| 1 04 | |
| 1 05 | |
| 1 06 | |
| 1 07 | |
| 1 08 | Filling Needed |
| 3 05 | PCB Fault |
| 3 06 | PCB Fault |
| 3 07 | PCB Fault |
Anti-frost Device.
The anti-frost function acts on the central heating flow temperature probe, independently from other regulations, when the electrical supply is turned on.
If the primary circuit temperature falls below 8^ C the pump will run for 2 minutes.
After the two minutes of circulation (fixed) the boiler will check the following:
a) if the central heating flow temperature is >8^ , the pump stops;
b) if the central heating flow temperature is between 4 and 8°C, the pump will run for another two minutes;
c) if the central heating flow temperature is <4^ , the burner will fire (heating position) at minimum power until the temperature reaches 33^ , the burner will go out and the pump will continue to run for two minutes.
If the flow temperature remains between 4-8°C the pump will continue to run for two minutes for a maximum of 10 times unless a temperature above 8°C is detected in the central heating flow, after this the the burner will fire. If lockout is caused by overheat the burner is kept OFF. The anti-frost device activates only when (with the boiler operating correctly):
- the system pressure is correct;
- the boiler is electrically powered;
- there is a supply of gas.
USER'S MENU
Press the OK button to access to the User's Menu.
Press the OK button to access the menu and the sub-menu.
Press the programming key < to navigate into the menu and the sub-menu.
Press the programming key <> to change the setting of the parameters.
Press the OK button to save the new settings.
Press the ESC button to exit until the normal display screen is restored.
The various parameters can be accessed and modified using the Ok button and the programming key < > (see fig. below).
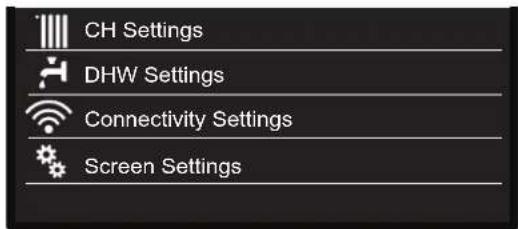
USER'S MENU STRUCTURE
| CH Settings | |||
| CH Setpoint Temperature | T set Z1 | ||
| T set Z2 | |||
| T set Z3 | |||
| Time program | Free Time Programming | ||
| Wizard time programming | |||
| Preset programs | |||
| Time program/manual mode | |||
| Holiday function The system will remain in antifreeze mode | de until midnight of the date set. | ||
| AUTO function Set of the best operation mode according to the type of installation. | |||
| DHW Settings | |||
| DHW comfort Setpoint Temperature | Set the domestic hot water temperature | ||
| Time program (NOT ACTIVE) | |||
| Comfort function | Disabled - Funzione Comfort disattivata | ||
| Time Based - Comfort function set to: Time Based. The Boiler will be ignited to quickly provide Hot Water for 30 minutes after the last tapping. | |||
| Always Active - Comfort function set to: Always Active. The Boiler will be ignited to quickly provide Hot Water all day long. | |||
| Connectivity Settings - see page 18 | |||
| ON/OFF Wi-Fi Network | |||
| Network configuration | |||
| Serial Number | |||
| Reset to factory settings | |||
| Signal Level | |||
| I Temp | |||
| Screen Settings | |||
| Language Selected language: English | |||
| Time & Date see page 12 | |||
| Zone to be set by display Select heating zone - from1 to 3 | |||
| Home screen Boiler base | Boiler complete | ||
| Automatic keylock The keylock will be activated together with the display stand-by | |||
| Stand-by timing Select the timing to pass at stand-by after the last use(from 1 to 10 minutes or 2 hours) | |||
| Brightness in standby Select Contrast level of screen | Press the Programming Keys b to select:- + | ||
| Home screen timing Select waiting time before you see the home screen (from 1 to 15 minutes) | |||
| Sound feedback volume Select the level of sound feedback when you press the display buttons (from 1 to 10) | |||
DISPLAY SETTINGS
The main screen of the display can be customised. The main screen can be used to check the time, date, boiler operating mode, temperature settings or temperatures detected by the accessories, schedule programming.
Press OK to access the display settings.
Press the programming key <and select:
- Screen settings
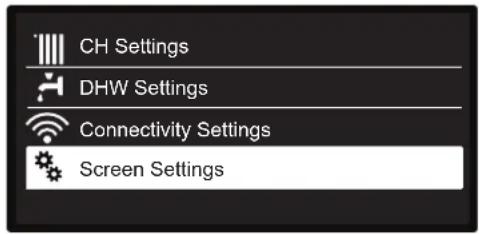
Press the OK button.
The "Screen settings" menu can be used to select the following parameters:
- Language
Press the OK button.
Press the programming key and select the desired language.
Press OK to confirm the choice, and press the back button ↩, to return to the previous screen.
Press the programming key <and select:
- Date and time:
- Press the OK button.
- Press the programming key < > and select the date,
- Press the OK button.
- Press the programming key < > to select the exact day.
- Press the OK button to confirm and move on to the month followed by the year, pressing the OK button to confirm after each step.
- Press the programming key < > to select the time,
- Press the OK button.
- Press the programming key < > to select the exact hour
- Press the OK button to confirm and move on to the minute value.
- Press the OK button to confirm
- Press the programming key < > to select summer time,
- Press the OK button
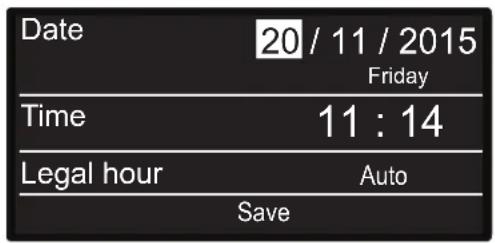
Setting the date and time
Press OK to confirm the choice, and press the ESC button ↩, to return to the previous screen.
Press the programming key < > to select:
- Zone to be set by display
to set the heating zone to show on the display
Press the programming key to select:
1 Set zone
2 Set zone
3 Set zone
Press the OK button to confirm your selection.
Press the ESC button to return to the previous screen.
Press the programming key
- Home screen
when selecting the start screen settings, you can choose which information to display.
Press the programming key to select:
Boiler base
Boiler complete
Press the OK button to confirm your selection.
Press the ESC button to return to the previous screen.
Boiler base
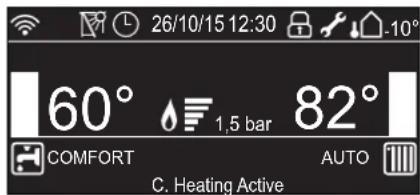
Boiler complete
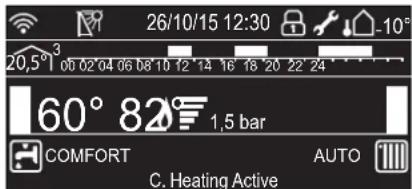
Press the programming key
- Automatic keylock
Press the programming key < to enable (ON) or disable (OFF) the keylock with the dispaly stand
Press the OK button to confirm.
Press the ESC button to return to the previous screen.
Press the programming key
- Standby timing
Press the programming key < > to select the timing to pass at stand-by after the last use (from 1 to 10 minutes or 24 hours)
Press the OK button to confirm.
Press the ESC button to return to the previous screen.
Press the programming key
- Brightness in standby
Press the programming key < > to adjust the brightness of the display during standby periods.
Press the OK button to confirm.
Press the ESC button to return to the previous screen.
Press the programming key
- Home screen timing
Press the programming key < > to set waiting time before the display come back to the home screen (from 1 to 15 minutes)
Press the OK button to confirm.
Press the programming key
- Sound feedback volume
Press the programming key < > to select the level of sound feedback when you press the display button (from 1 to 10).
Press the OK button to confirm.
Press the back button ↩ to return to the previous screen.
HEATING HOT WATER SETTING
Access to the USER'S MENU
Press the programming key
- Central Heating settings Press the OK button.
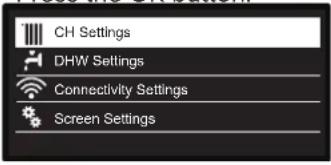
Selecting Heating settings
To set the flow temperature, press the programming key < > and select:
- Central heating Setpoint Temperature
Press the OK button.
The display screen shows:
- Zone 1 set T
- Zone 2 set T - active with Sensys connected
- Zone 3 set T - active with Sensys connected
Press the programming key
- Zone 1 set T
Press the OK button.
Press the programming key < > to set the flow temperature for the selected zone.
Press the OK button to confirm.
Repeat the above procedure to set the flow temperature for the other zones, if applicable.
Press the ESC button ↻.
T set Z1
Set the flow temperature of zone 1
75°C
Press OK to confirm
Change heating hot water temperature
NOTE
If there is only one heating zone, the setting of the flow temperature is done by the keys 9 - see p. 7

HEATING SCHEDULE PROGRAMMING
Schedule programming allows the boiler to heat the room in accordance with your own requirements.
Press OK to set heating schedule programming.
Press the programming key
- Central Heating settings
Press the OK button.
The display screen shows:
- Set heating temperature
- Time program
- Holiday function
- Termoregulation
Press the programming key
- Time program
Press the OK button.
The display screen shows:
- Free Time programming
- Wizard time programming
- Preset programs
- Time program/manual mode
Press the programming key
- FREE TIME PROGRAMMING
Press the OK button.
The display screen shows:
- All zones
- Zone 1
- Zone 2
- Zone 3
Press the programming key
Press the OK button.
Press the programming key
- Set Comfort T
Press the OK button.
Press the programming key
Press the OK button to confi rm.
Press the programming key
- Set Reduced T
Press the OK button.
Press the programming key < > to adjust the room temperature value during the reduced period (the temperature value will flash on the display).
Press the OK button to confirm.
Press the programming key < > to select:
- Set time program
Press the OK button.
Press the programming key < > to select the day or days of the week you wish to program.
Every time a day is selected, press the OK button to confirm.
The days selected for programming appear on the display in a box.
Press the programming key < > to select Save.
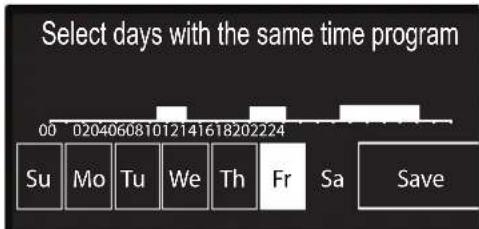
Selecting days heating schedule programming
Press the OK button and the programming key <set the start of the heating period corresponding to the flashing value.
Press the OK button to confirm.
Press the OK button and the programming key
Repeat the above procedure to set the start and end times for each comfort period added.
Once programming is complete, press the programming key < > and select Save.
Press the OK button to confirm.
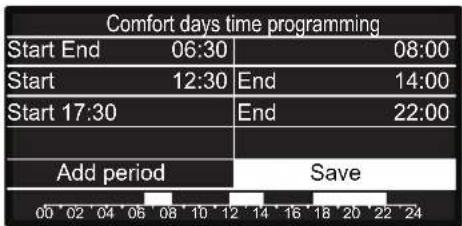
Setting comfort periods heating schedule programming
Press the programming key < > to select:
- Days remaining
if there are any days which have not yet been programmed, then repeat the steps described above.
Press the programming key < > to select:
- Modify
to change any previously programmed periods
Press the programming key
- Exit
to exit schedule programming.
Press the OK button to confirm.
The display reverts to showing the previous screen.
Press the ESC button to return to the main screen.
GUIDED PROGRAMMING
To facilitate schedule programming procedures, configuration can be carried out via:
- Wizard time programming
- Pre-set programs
Press the programming key
- WIZARD TIME PROGRAMMING
Press the OK button.
Press the programming key < > to select the zone in which you wish to apply schedule programming.
Press the OK button.
Press the programming key < > to select:
- Set time program
Press the OK button.
Now follow the step-by-step instructions which appear on the display from time to time.
- PRESET PROGRAMS
Press the OK button.
Press the programming key < > to select the zone in which you wish to apply schedule programming.
Press the OK button
Press the programming key
- Set programming
Press the OK button.
Press the programming key
- Family program
- No lunch program
- Midday program
- Always Active
Press the OK button to confirm.
Press the programming key < > to scroll through the days and the heating program start and end time.
Press the programming key < > to select save, then press the OK button.
Press the ESC button ↩ to return to the previous screen.
| Family program |
| No lunch program |
| Midday program |
| Always active |
Selecting half-day program
- TIME PROGRAM/MANUAL MODE
(this mode can be used to select either programmed or manual zone heating management)
Press the OK button.
Press the programming key < > to select the zone to which you wish to apply the setting.
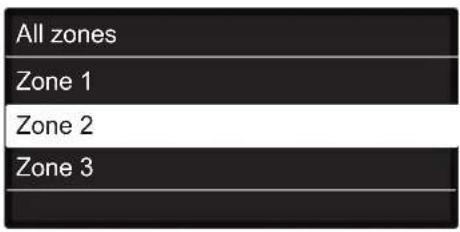
Selecting operating mode for zone 2
Select scheduled or manual programming.
Press the OK button.
Press the ESC button to return to the previous screen.
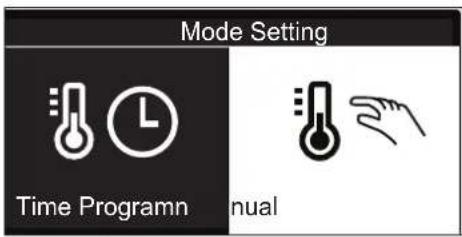
Selecting manual mode
MANUAL HEATING MODE
Manual mode disables heating schedule programming.
Manual operation allows the heating to be kept on constantly.
To select manual boiler operation, press the OK button to access the Menu.
Press the programming key < > to select:
- Time Program
Press the OK button.
Press the programming key < > to select:
- Manual
Press the programming key < > to select Manual mode and press the OK button.
Press the OK button again to save these settings. The display reverts to showing the previous screen.
Press the back button until the main screen reappears.
DOMESTIC HOT WATER SETTINGS
To access the domestic hot water settings, press the OK button. Press the programming key < > to select:
- DHW settings
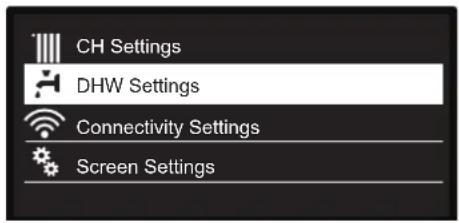
Selecting hot water settings
Press the OK button.
The display screen shows:
- DHW comfort Setpoint Temp
- Time program - NOT ACTIVE
- Comfort function
Press the programming key < > to select:
Press the OK button twice.
Press the programming key < > to select the desired domestic hot water temperature.
Press the OK button to confirm.
Press the ESC button to return to the previous screen.
COMFORT FUNCTION
The comfort function can be used to reduce the wait time when a request for domestic hot water is made.
Press the programming key < > to select:
- Comfort
Press the OK button.
Press the programming key < > to select:
- Disabled
- Timed (can be used to keep the secondary exchanger hot during periods of boiler inactivity this increasing wellbeing - 30 minutes)
- Always enabled
| Disabled |
| Time Based |
| Always Active |
Selecting timed Comfort mode
SPECIAL FUNCTIONS
To set special function programming, press the OK button. Press the programming key < > to select:
- CH Setting
Press the OK button.
Press the programming key < > to select:
- Holiday function
- Thermoregulation
Press the OK button to confirm your selection.
- HOLIDAY FUNCTION
The holiday function disables heating during the holiday period. Press the OK button
Press the programming key < > to select:
- ON (activates the function)
- OFF (deactivates the function)
Press the OK button..
If you select ON,, press the programming key < > to set the date on which you are due to return home.
This will allow the system interface to resume operation - in the mode set previously - on the set date.
Press the OK button to save the settings; the display reverts to showing the previous screen.
The “don” appears on the active sources screen when the holiday function is enabled.
- THERMOREGULATION (AUTO FUNCTION)
The AUTO function automatically sets the boiler operating regime in accordance with the installation type and the environmental conditions.
The temperature adjustment of a building consists of maintaining the indoor temperature at a constant level while the temperature outside changes.
Press the OK button.
Press the programming key < > to select:
- ON (activates the function)
- OFF (deactivates the function)
Press the OK button to save the settings; the display reverts to showing the previous screen.
If the heating hot water temperature does not match the desired value, it can be increased or decreased using the set heating temperature parameter.
The correction bar appears on the display.
The "AUTO" icon appears on the display.
Press the ESC button ↩ to return to the main screen.
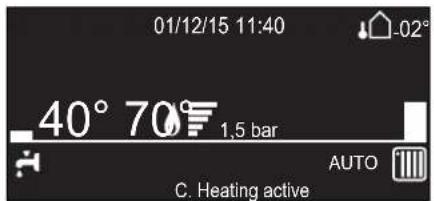
AUTO Function active
WIFI CONFIGURATION - CONNECTIVITY SETTING
Access to the USER'S MENU
Press the programming key < > to select:
- Connectivity Settings

Discover Ariston Net services!
To activate the Remote Control of the boiler refer to the ARISTON NET quick start guide in the box.
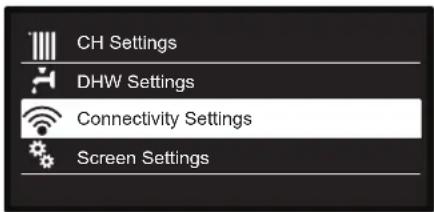
Press the OK button.
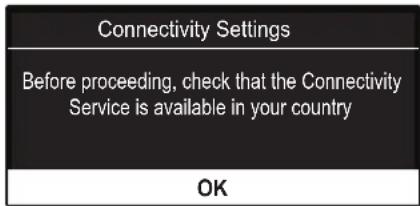
Press the OK button.
The dispaly shows the
Connettivity Settings menu
Connectivity Settings
| ON/OFF Wi-Fi Network | OK | Activation/Deactivation Wi-Fi Network of the system. Press the programming key <to>select: | OK | ON = “The Wifi network has been activated. In the case of first time activation, proceed to the Wifi Configuration by way of an Access Point.” | |||
| Note: Il sottomenu “Network configuration” viene visualizzato solo la rete WI-FI è impostata su ON. | OK | OFF = “Wifi Network has been disabled” | |||||
| Network configuration | OK | The procedure permits to create Wifi Access Point to connect the system with the Internet network. | OK | Now, you have to connect your smartphone or PC to the Wifi “Remote GW Thermo” and open with your internet browser by going to the web page link: 192.168.1.1 | Connection to the local network accomplished. | ||
| Configuration failed, please repeat the procedure. | |||||||
| Serial Number | OK | The serial number that have to use for the registration of the product is:XXXXXXXXX | OK | The display returns to the previous screen | |||
| Re-configuration | OK | Would you like to proceed and recover the data back to factory settings?Press the programming key < > to select OFF or ON and press OK. | OK | The display returns to the previous screen | |||
| WI-FI Signal Level | OK | Signal LevelXX% | OK | The display returns to the previous screen | |||
| I Temp | OK | If you enable this functionality will be requested at the Internet Service.0 OFF - 1 ONPress the programming key < > to select OFF or ON and press OK. | OK | The display returns to the previous screen | |||
Disposal and recycling boiler.
Our products are designed and manufactured for most of the components of recyclable materials.
The boiler and its accessories have to be adequately disposed and the various materials differentiated, where possible.
The packaging used for the transport of the boiler must be disposal by the installer / dealer.
ATTENTION!!
Recycling and disposal of the boiler and the accessories must be made as required by regulations.
Change of gas type
Our boilers are designed to function either with Natural Gas (methane) or L.P.G. gas. If you need to change from one gas to the other, one of our Authorised Service Centres must be contacted to convert the appliance.
Maintenance
Schedule an annual maintenance check-up for the boiler with a competent person.
Correct maintenance always results in savings in the cost of running the system.
Failure to arrange an annual service for the appliance will invalidate the second year of the manufacturers guarantee.
8 or 12 Year Warranty
Terms & Conditions
WHAT ARISTON REQUIRES
- The boiler must be registered with Ariston within 30 days from date of installation. Registration is on line at www.ariston.co.uk
• The boiler must be installed in accordance with the manufacturers instructions
• The boiler must be installed by a Gas Safe Registered engineer. - The installer must arrange for a Building Regulations Compliance Certificate to be issued to the boiler owner.
- The Building Regulations Compliance Certificate is to be made available upon request by any attending Ariston service representative.
- The Benchmark commissioning checklist, which can be found at the back of the Installation instructions, must be completed in full by the installer.
- The completed Benchmark checklist must be left with the boiler or be made available upon request by any attending Ariston representative.
- The boiler must be serviced by the 12 month anniversary of the installation. This must be carried out by a Gas Safe Registered engineer.
• Proof of annual service must be made available upon request by any attending Ariston representative. - The boiler must be installed on a clean system and corrosion inhibitors added. Fitting a magnetic filter is suggested.
All of the above are standard procedures which a competent installer will be aware of.
Failure to comply with any of the above will result in any warranty being withdrawn.
CONDITIONS OF THE 8 or 12 YEAR WARRANTY
- Ariston must be contacted immediately following any malfunction. Access must be granted for an Ariston approved engineer to inspect the appliance and it's installation. We are unable to cover any costs under warranty where Ariston have not been contacted and allowed access to inspect the appliance and installation. Removal or repair of the appliance by any other party than Ariston without prior inspection or authorisation will void this warranty.
- The 8 or 12 Year warranty is only applicable to appliances installed in the United Kingdom.
- The following is not covered under the warranty:
- Any external boiler controls (other than those supplied by Ariston), pipework and radiators
- Loss or damage caused by using the boiler in a non-domestic or commercial environment.
- Loss or damage caused by accident, theft, attempted theft, malicious damage or damage caused by fire or explosion.
- Damage caused by any disaster affecting the equipment including neglect without limitation.
- Clearing airlocks and partially or fully blocked pipes or work caused by equipment, which has not installed correctly.
- Dirty systems/dirt particles degradation of the boiler from other parts of the system.
- Claims arising from any problem with the supply of electricity, gas or water.
- Consequential loss or damage arising directly or indirectly caused by the boiler not working. Cosmetic damage.
- Costs arising from difficulties in getting to the boiler. This includes: pipe work under floor boards or pipe work contained in the fabric of the building. Ariston requires the warranty holder to carry out whatever works are necessary to enable Ariston staff or nominated representatives to gain access the boiler prior to arrival.
- Any water pressure adjustments on sealed systems, Claims arising from scale damage.
- Any modification, alteration to the boiler carried out without permission or authority from Ariston.

ITALIAN DESIGN
Ariston Thermo UK Ltd
Artisan Building
Hillbottom Road
High Wycombe
Bucks HP124HJ
Telephone: 01494 418500
ariston.co.uk
- GENUS ONE NET
- WARRANTY
- Disposal and recycling boiler.
- ATTENTION!!
- SAFETY REGULATIONS
- Do not perform operations which involve opening the appliance.
- Do not perform operations which involve removing the appliance from its installation space.
- Do not damage the power supply cable.
- Do not leave anything on top of the appliance.
- Do not climb onto the appliance.
- Do not climb onto chairs, stools, ladders or unstable supports to clean the appliance.
- Do not attempt to clean the appliance without first switching it off and turning the external switch to the OFF position.
- Do not use insecticides, solvents or aggressive detergents to clean the appliance.
- Do not use the appliance for any use other than normal domestic use.
- Do not allow children or inexperienced individuals to operate the appliance.
- If you detect a smell of burning or smoke coming from the appliance, disconnect it from the electricity supply, turn off the main gas valve, open all windows and call for assistance.
- If there is a strong smell of gas, turn off the main gas valve, open all windows and call for assistance.
- CE labelling
- Do not forget the Log Book!
- The Benchmark Scheme
- CONTROL PANNEL
- Legend:
- Programming key
- DISPLAY
- Initial operating procedures
- Note.
- Ignition procedure
- ATTENTION - Initial start-up
- CAUTION!!
- Operating mode selection
- Adjusting the heating
- Domestic hot water temperature adjustment
- Switching off the heating
- Switching off the boiler
- COMFORT function
- - Comfort function disabled
- - Comfort function set to: Time based
- - Comfort function set to: Always active
- Control panel - Keylock
- Auto button - Temperature adjustment activation
- Your installer will advise you on the devices connectable to the boiler and will program it according to the system.
- Appliance shut-off conditions
- Safety shut-off
- Safety shut-off due to insufficient water pressure
- NOTE 1 - FILLING PROCEDURE
- Operation shutdown
- Important
- Anti-frost Device.
- USER'S MENU
- DISPLAY SETTINGS
- Setting the date and time
- HEATING HOT WATER SETTING
- NOTE
- HEATING SCHEDULE PROGRAMMING
- GUIDED PROGRAMMING
- - TIME PROGRAM/MANUAL MODE
- MANUAL HEATING MODE
- DOMESTIC HOT WATER SETTINGS
- SPECIAL FUNCTIONS
- - HOLIDAY FUNCTION
- - THERMOREGULATION (AUTO FUNCTION)
- WIFI CONFIGURATION - CONNECTIVITY SETTING
- Change of gas type
- Maintenance
- or 12 Year Warranty
- Terms & Conditions
- WHAT ARISTON REQUIRES
- CONDITIONS OF THE 8 or 12 YEAR WARRANTY
Brand : Ariston Thermo
Model : Genus One Net
Category : Instant water heater and water tank