
ThinkCentre Tiny-In-One 24 Gen 3 - Screen LENOVO - Free user manual and instructions
Find the device manual for free ThinkCentre Tiny-In-One 24 Gen 3 LENOVO in PDF.


User questions about ThinkCentre Tiny-In-One 24 Gen 3 LENOVO
0 question about this device. Answer the ones you know or ask your own.
Ask a new question about this device
Download the instructions for your Screen in PDF format for free! Find your manual ThinkCentre Tiny-In-One 24 Gen 3 - LENOVO and take your electronic device back in hand. On this page are published all the documents necessary for the use of your device. ThinkCentre Tiny-In-One 24 Gen 3 by LENOVO.
USER MANUAL ThinkCentre Tiny-In-One 24 Gen 3 LENOVO
ThinkCentre TIO24Gen3Touch
User Guide
Machine Types: 10QX
ThinkCentre H21003-Reach User Guide Machine Types: 10QX Thi n
Product numbers
10QX-PAR1-WW
First Edition (May 2017)
© Copyright Lenovo 2017.
LENOVO products, data, computer software, and services have been developed exclusively at private expense and are sold to governmental entities as commercial items as defined by 48 C.F.R. 2.101 with limited and restricted rights to use, reproduction and disclosure.
LIMITED AND RESTRICTED RIGHTS NOTICE: If products, data, computer software, or services are delivered pursuant a General Services Administration "GSA" contract, use, reproduction, or disclosure is subject to restrictions set forth in Contract No. GS-35F-05925.
Contents
Safety information....iii
General Safety guidelines....iii
Chapter 1. Getting started ..... 1-1
Shipping contents 1-1
Locating connectors and controls on your monitor 1-3
Front view....1-3
Rear view 1-3
Setting up your monitor 1-4
Assembling your monitor 1-4
Connecting cables....1-8
Turning on your monitor and computer 1-11
Chapter 2. Adjusting and using your monitor .... 2-1
Adjusting the full-function monitor stand 2-1
Camera Swivel 2-3
Speakers 2-4
Wall Mounting (Optional) 2-5
Installing the monitor driver....2-5
Comfort and accessibility....2-6
Arranging your work area. 2-6
Positioning and viewing your monitor: 2-6
Quick tips for healthy work habits 2-7
Accessibility information....2-7
Adjusting your monitor image 2-8
Using the user controls 2-8
Using the OSD controls 2-8
Using the USB connectors 2-9
Using the Wake on touch Function 2-10
Touch Screen. 2-13
Selecting a supported display mode.... 2-14
Understanding power management 2-15
Caring for your monitor 2-16
Chapter 3. Reference information....3-1
Disassembling your monitor 3-1
Monitor specifications 3-4
Troubleshooting 3-6
Manual image setup 3-7
Manually installing the monitor driver 3-8
Installing the monitor driver in Windows 7....3-8
Installing the monitor driver in Windows 10. 3-9
Getting further help 3-9
Service information 3-10
Product numbers 3-10
Getting further help 3-10
Service parts 3-11
Appendix A. Service and Support ...... A-1
Registering your option....A-1
Online technical support....A-1
Telephone technical support....A-1
Appendix B. Notices ...... B-1
Recycling information B-2
Disposing of Lenovo computer components B-2
Turkish statement of compliance....B-3
Trademarks......B-3
Power cords and power adapters B-3
Safety information
General Safety guidelines
For tips to help you use your computer safely, go to:
http://www.lenovo.com/safety
Before installing this product, read the Safety Information.
Chapter 1. Getting started
This User's Guide provides detailed operation instructions for the user. For quick instruction overview, please see the Setup Poster for brief information.
Shipping contents
The product package should include the following items:
- AC Power Adapter
- Flat Panel Monitor
• Information Flyer
• Monitor Stand - Monitor Base
• Power Cord
• Reference and Driver CD

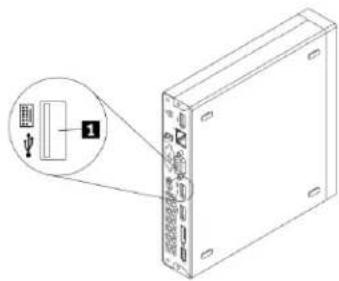
***Your monitor supports the following Tinys that can be installed in your monitor:
 (1) (1) | 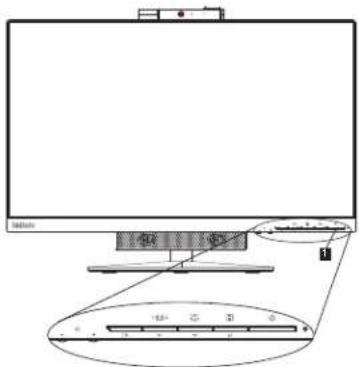 (2) (2) | |
 (1) (1) | 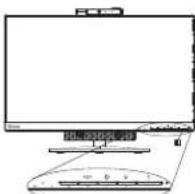 | |
| ThinkCentre M53, M83 | √ | √ |
| ThinkCentre M600, M700, M900 √ | √ | |
| ThinkCentre Chromcbox X √ | ||
| ThinkCentre M73, M93 √ X | ||
| ThinkCentre M900x, M910x, M910, M715 | √ | √ |
| ThinkCentre M715 √ | √ | |
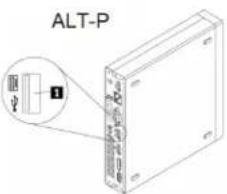
| Before you install your Tiny into your monitor, ensure that the Tiny is listed above.1. Install your computer into the TIO24Gen3Touch2. When using "ALT+P" to power on Tiny, please Connect a Lenovo keyboard the USB port shown as above on the rear of computer.3. Press ALT+P on the keyboard to power on the computer and TIO24Gen3Touch.Note 1: ThinkCentre M53, M83, M600, M700, M900, M900x, M910x, M910, M715 Tiny may also be powered on with the TIO24Gen3Touch power button. (See Figure 2)Note 2: When connect many cables to ThinkCentre M910x w/Gxf, it is recommended to do cable management or open lift door.Note 3: Some ThinkCentre M93&M73 can't be powered on with the TIO24Gen3Touch, please press ALT+P on the keyboard to power on computer. | ||
Locating connectors and controls on your monitor
Front view
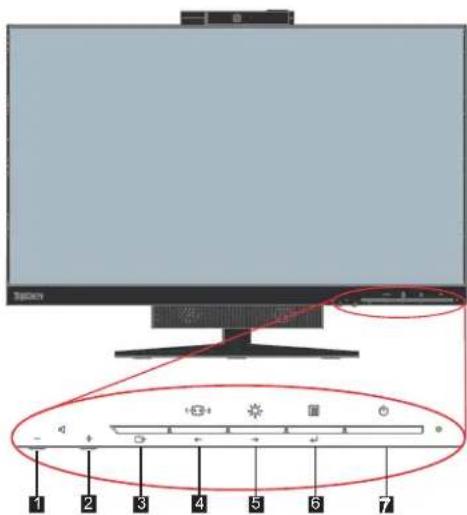
text_image
Diagram of a computer monitor with labeled buttons and indicators, showing navigation and function keys.| 1. Volume Down 2. Volume Up | |
| 3. Exit | 4. Modes switch/Left shift button |
| 5. Brightness control / Right shift button | 6. Menu-opening button/Selection button |
| 7. Power button |
Rear view

text_image
Lenovo 1 2 3 4| 1. Security-lock slot 2. AC power adapter connector | |
| 3. DisplayPort connector 4. USB 3.0 connector |
Setting up your monitor
This section provides information on how to set up your monitor.
- Assembling your monitor
- Connecting cables
- Turning on your monitor and computer
Note: Before setting up your monitor, ensure that you have read and understood the “Safety information” on page iii.
Assembling your monitor
To assemble your monitor, follow the four parts below one by one:
Part 1: Install the full-function monitor stand.
Part 2: Install the Tiny.
Part 3: Install the rear Wi-Fi antenna (optional).
Part 4: Install the Kensington-style cable lock (optional).
Part 1: Install the full-function monitor stand.
Note: The full-function monitor stand includes one monitor stand and one stand base.
- Place a soft, clean towel or cloth on the desk or surface. Hold the sides of your monitor and gently lay it down so that the screen is against the surface and the cover is facing up.
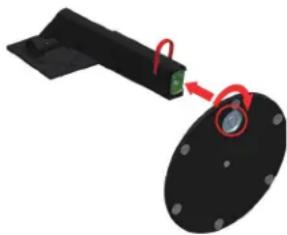
- Insert the three metal studs on the base into the corresponding holes in the stand. Then, tighten the screw as shown to secure the stand.
natural_image
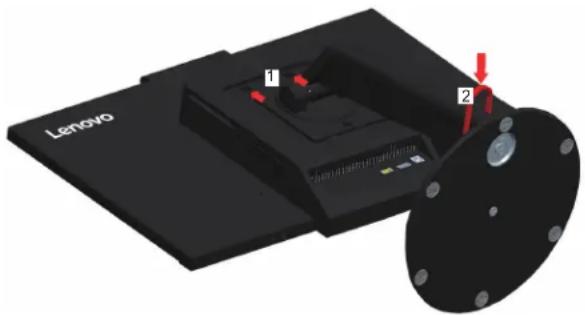
3D illustration of a battery connected to a circular component with red arrows indicating rotation (no text or symbols)- Insert the two metal tabs on the stand into the corresponding holes on the rear of the monitor. Then, pivot the stand downward until it clicks into position.
natural_image
3D diagram of a Lenovo computer with labeled parts and red arrows indicating motion (no text or symbols beyond labels)Part 2: Install the Tiny.
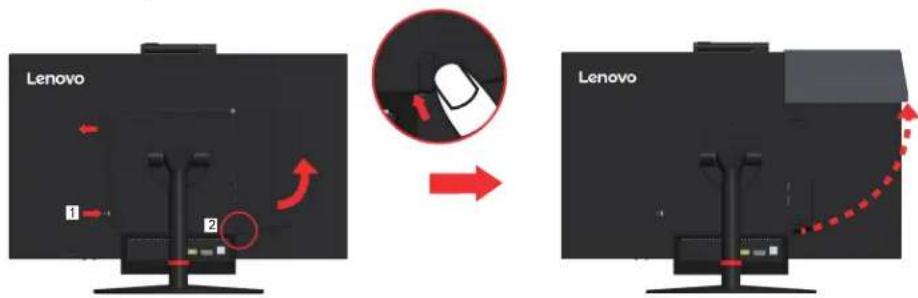
- Press the decorative cover 1 as shown to remove it. Then, press the button 2 to open the cable cover.
Note: Keep the decorative cover for future use.
text_image
Lenovo 1 2 Lenovo- With the Lenovo logo facing you, insert your Tiny into the computer bay until it rests on the stoppers.
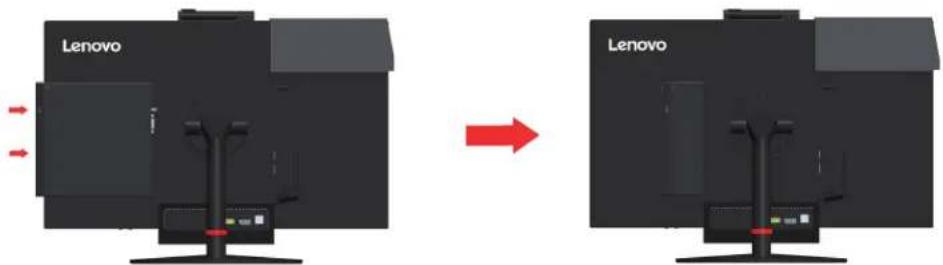
text_image
Lenovo Lenovo- Press the computer from the front until it completely snaps into position.
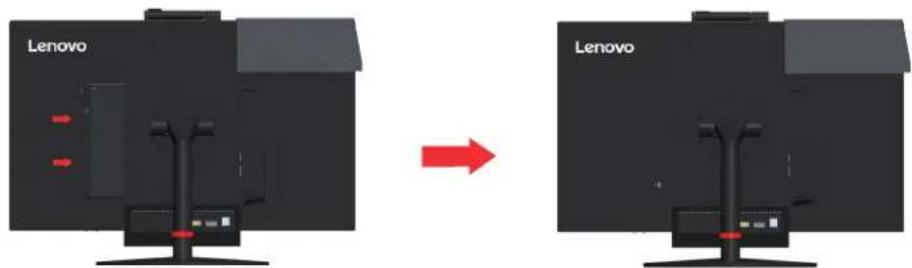
text_image
Lenovo LenovoNote: Make sure the Tiny is aligned with the back cover.
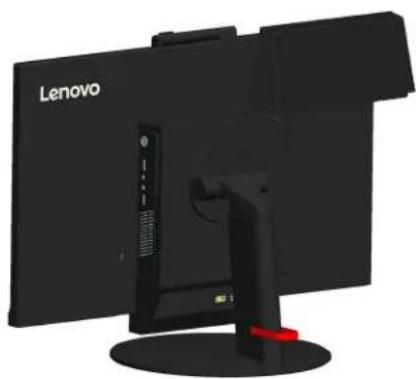
natural_image
Exterior view of a Lenovo desktop computer monitor with front panel and rear screen (no visible text or symbols on the device itself)- Tighten the screw to secure the Tiny.
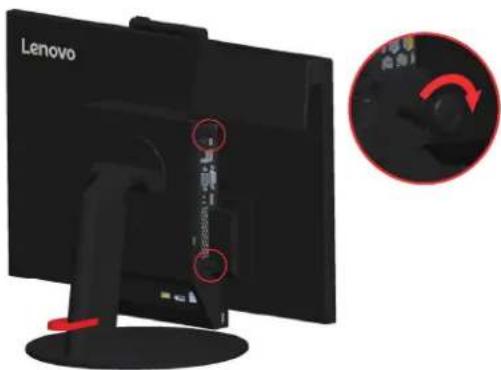
natural_image
Computer monitor with Lenovo logo and a close-up of its right-hand side showing a scroll wheel (no text or symbols on the device itself)Part 3: Install the rear Wi-Fi antenna (optional).
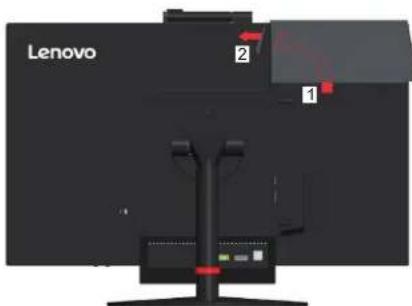
- Pivot the cable cover as shown to the open position. Then, press the decorative cover 2 from the inner side of the cable cover to remove the decorative cover.
text_image
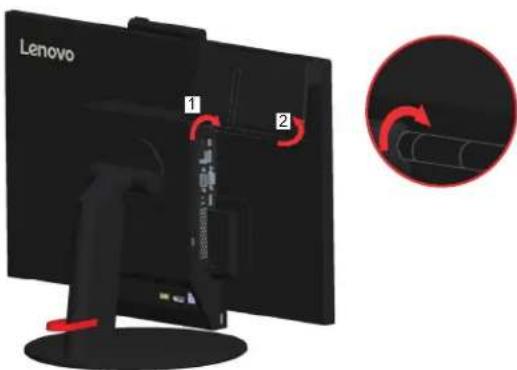
Lenovo 2 1- Screw the rear Wi-Fi antenna to the antenna connector on the rear of the computer. Then, adjust the angle of the antenna to 90 degrees.
text_image
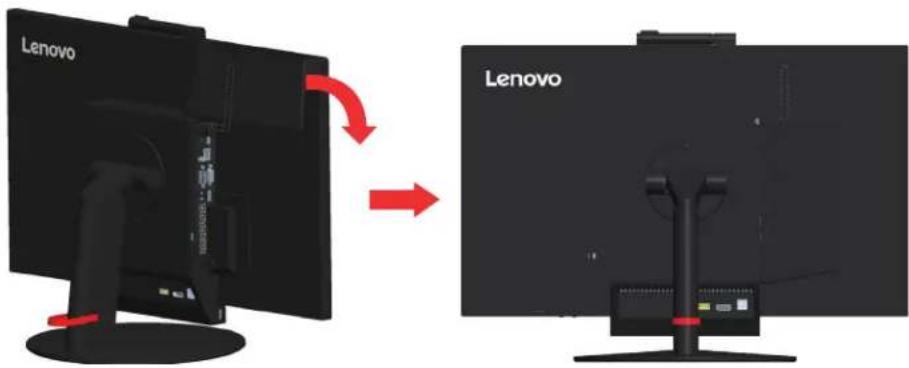
Lenovo 1 2- Pivot the cable cover as shown to the closed position.
text_image
Lenovo LenovoPart 4: Install the Kensington-style cable lock (optional).
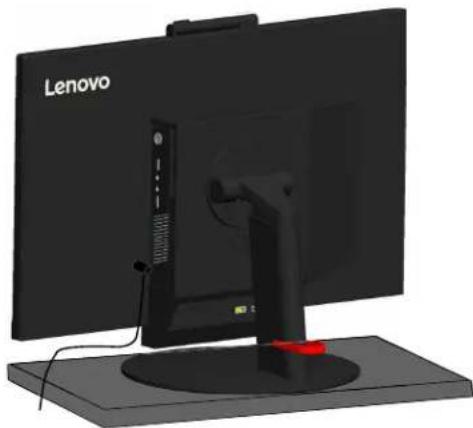
With the key of the Kensington-style cable lock, attach the lock to the security-lock slot on the rear panel of your computer as shown. The lock secures your monitor to a desk, table, or other non-permanent fixture. It also blocks the Tiny so that the Tiny cannot be removed from the monitor.
natural_image
3D rendering of a Lenovo computer monitor with a red stand and external cable, no visible text or symbols on the device itself.Connecting cables
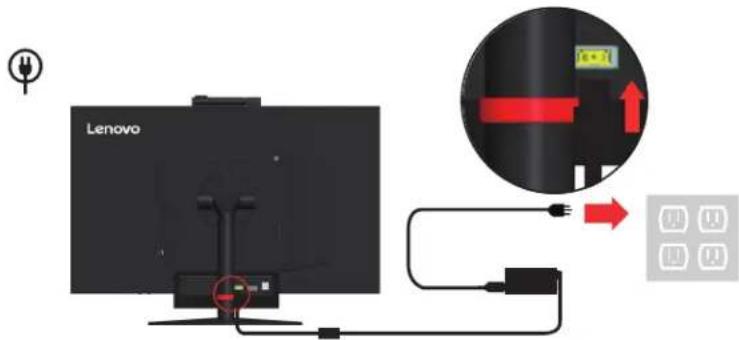
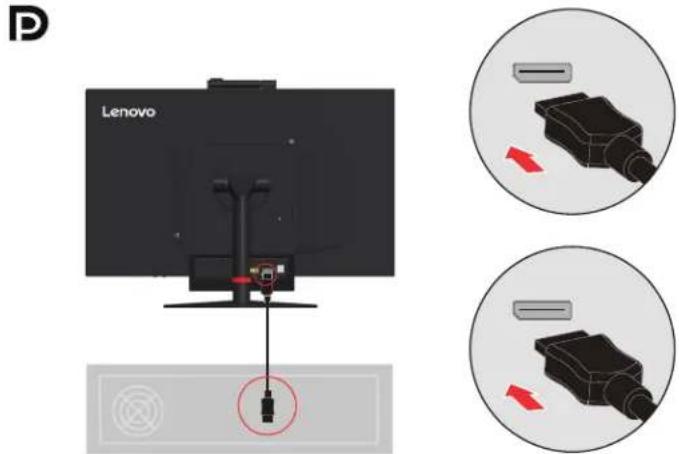
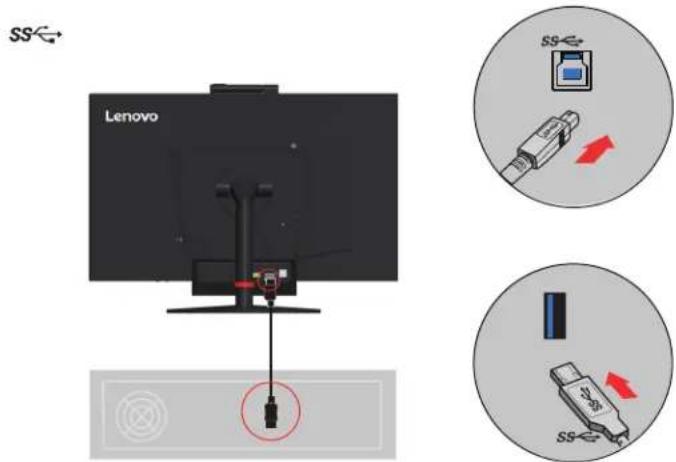
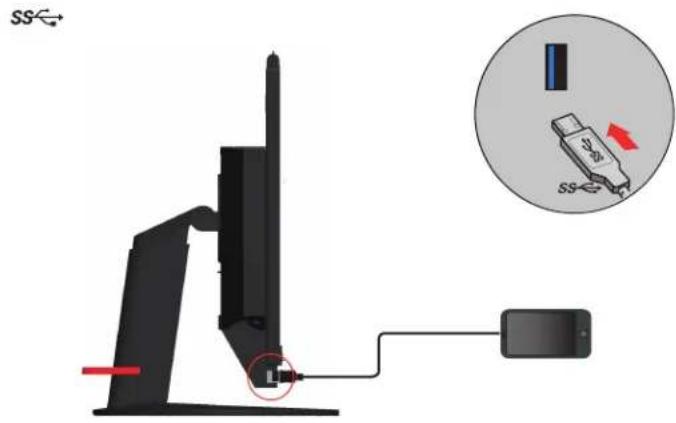
After assembling your monitor, you must connect cables correctly to use the monitor and computer. Your monitor can be used with either the Tiny installed in the monitor or an external desktop/laptop computer. To connect cables, do one of the following:
- If you use the Tiny installed in the monitor, connect the ac power adapter cable and power cord that comes with the monitor. First connect the ac power adapter cable to the ac power adapter connector on the monitor. Then, connect one end of the power cord to the ac power adapter and the other end to a properly-grounded electrical outlet.
text_image
LenovoNote: When using ThinkCentre M900x, M910x, M910 or M715 it is recommended to match 135W adapter which bundled with Tiny for better experience.
- Use a DisplayPort cable of this type as shown. Connect one end of the DisplayPort cable to the DisplayPort connector on the monitor and the other end to a DisplayPort connector on the computer. To locate the DisplayPort connector on the monitor, see "Locating connectors and controls on your monitor" on page 1-3.
text_image
D Lenovo- Use a type B-to-type A USB cable as shown. Connect type B connector of this cable to the USB 3.0 upstream connector on the monitor. Then, connect type A connector of the cable to a USB connector on the computer. To locate the USB 3.0 upstream connector on the monitor, see "Locating connectors and controls on your monitor" on page 1-3.
text_image
SS← Lenovo SS← USB SS←- Connect one end of the USB cable to the USB downstream terminal on the side of the monitor, and connect the other end of the USB cable to an appropriate USB port on your device.
Note: The USB downstream port does not provide power while the monitor switch is off.
text_image
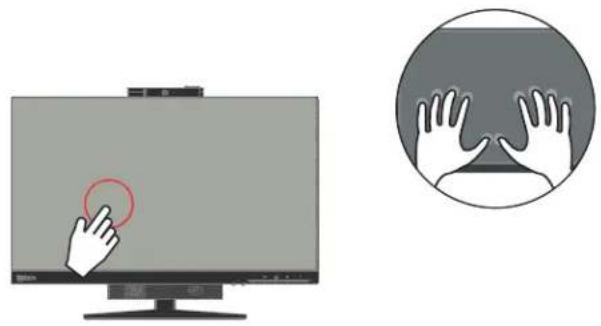
SS←→ I S- User is able to manage the on-screen configurations including applications, menu items and so on with the touch screen. For information on how to utilize touch screen, please see: "Touch Screen" on page 2-13
Note: If external system is attached to TIO24Gen3Touch with dual monitors in extended mode.TIO24Gen3Touch need to set as main screen..
natural_image
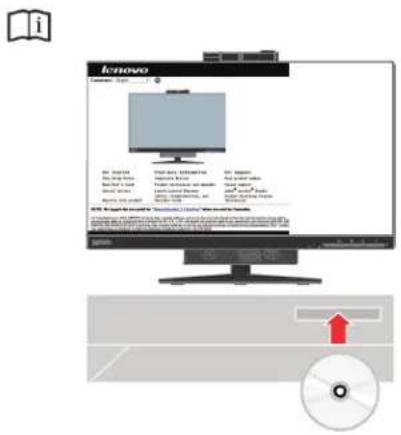
Illustration showing a monitor with a hand icon and a circular diagram of hands covering the surface (no text or symbols)- To initiate the monitor driver, insert the Reference and Driver CD, click Install driver, and follow the on-screen instructions.
text_image
lenovo C:\Users\My Documents\10.0.02\10.0.03\10.0.04\10.0.05\10.0.06\10.0.07\10.0.08\10.0.09\10.0.10\10.0.11\10.0.12\10.0.13\10.0.14\10.0.15\10.0.16\10.0.17\10.0.18\10.0.19\10.0.20\10.0.21\10.0.22\10.0.23\10.0.24\10.0.25\10.0.26\10.0.27\10.0.28\10.0.29\10.0.30\10.0.31\10.0.32\10.0.33\10.0.34\10.0.35\10.0.36\10.0.37\10.0.38\10.0.39\10.0.40\10.0.41\10.0.42\10.0.43\10.0.44\10.0.45\10.0.46\10.0.47\10.0.48\10.0.49\10.0.50\10.0.51\10.0.52\10.0.53\10.0.54\10.0.55\10.0.56\10.0.57\10.0.58\10.0.59\10.0.60\10.0.61\10.0.62\10.0.63\10.0.64\10.0.65\10.0.66\10.0.67\10.0.68\10.0.69\10.0.70\10.0.71\10.0.72\10.0.73\10.0.74\10.0.75\10.0.76\10.0.77\10.0.78\10.0.79\10.0.80\10.0.Turning on your monitor and computer
To turn on your monitor and computer, do one of the following:
- If you only have the Tiny installed in the monitor, press the power button on the monitor to turn on your monitor and computer. To locate the power button, see "Locating connectors and controls on your monitor" on page 1-3.
- If you only have the external desktop/laptop computer connected to the monitor, press the power button on the monitor to turn on your monitor. Then, press the power button on the computer to turn on your computer. To locate the power button, see "Locating connectors and controls on your monitor" on page 1-3.
- If you have both the Tiny installed in the monitor and the external desktop/laptop computer connected to the monitor, do one of the following:
- If you use the Tiny, press the power button on the monitor to turn on your monitor and computer. To locate the power button, see "Locating connectors and controls on your monitor" on page 1-3.
- If you use the external desktop/laptop computer, press the mode-switching button on the monitor to select the DP mode so that the monitor is turned on. Then, press the power button on the computer to turn on your computer. To locate the mode-switching button, see "Locating connectors and controls on your monitor" on page 1-3.
Note: When both the Tiny and the external desktop/laptop computer are working, you can press the mode-switching button to switch between the two computers. When you select the AIO mode, you will use the Tiny. When you select the DP mode, you will use the external desktop/laptop computer.
When you switch between the AIO mode and the DP mode, ensure that no data is being transmitted between your computer and any USB device that is connected to your monitor. If you switch between the two modes while the USB data is being transmitted, the transmission will be interrupted and loss of data may result.
When you switch between the AIO mode and the DP mode the following is required to wake your computer from sleep or hibernation:
- DP mode to AIO mode. If the Tiny installed in your monitor is in sleep or hibernation mode, press the power button of the monitor to wake up the Tiny.
- AIO mode to the DP mode. If the external desktop/laptop computer is in sleep or hibernation mode, press the power button of the external desktop/laptop computer to wake up it.
Note: When you switch between AIO mode and DP mode, the keyboard and mouse that are connected to your monitor are also switched.
Chapter 2. Adjusting and using your monitor
This section will give you information on adjusting and using your monitor.
Adjusting the full-function monitor stand
You can use the full-function monitor stand to adjust the monitor to your comfortable position.
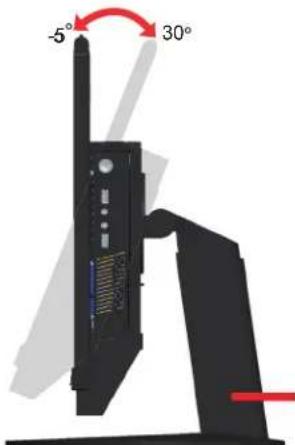
- The following illustration shows that you can adjust the monitor at an angle of -5^ to the front and 30^ to the rear.
text_image
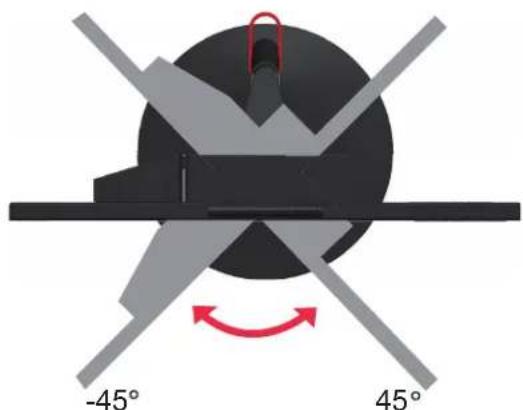
-5° 30°- The following illustration shows that you can turn the monitor at an angel of 45^ to the left and 45^ to the right.
natural_image
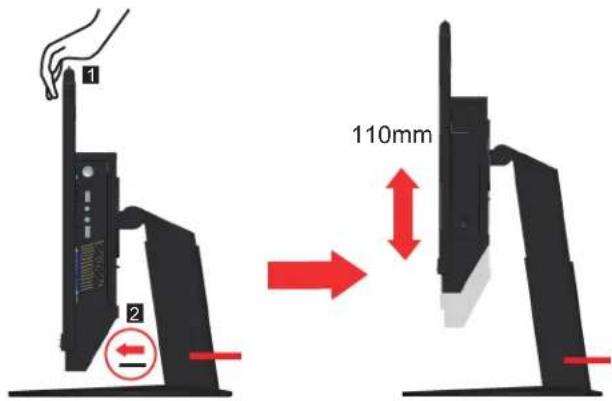
Diagram of a mechanical component with angular annotations (45°) and directional arrows, no readable text or symbols beyond labels- The following illustration shows that you can adjust the height of the full-function monitor stand within a length of 110 mm.
Note: Before you adjust the height, ensure that you pull out the latch that secures the stand and read the instructions on the label of the latch.
text_image
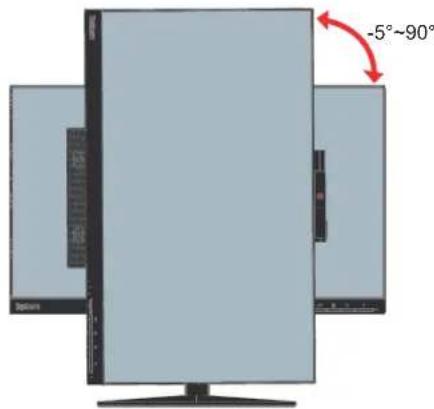
1 2 110mm- The following illustration shows that you can rotate clockwise the monitor at an angel of -5^ to the left and 90^ to the right.
Note: Adjust the screen position before rotating the monitor screen. (Make sure that the monitor screen ascent to its highest point,.
text_image
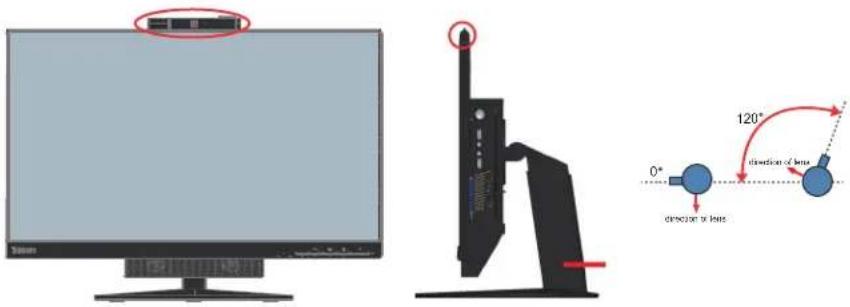
-5°~90°Camera Swivel
Please see the illustration below for an example of camera swivel ran.
text_image
Diagram showing a monitor setup with an LCD screen and a 3D mechanical component, alongside a diagram illustrating angular displacement of a device.Speakers
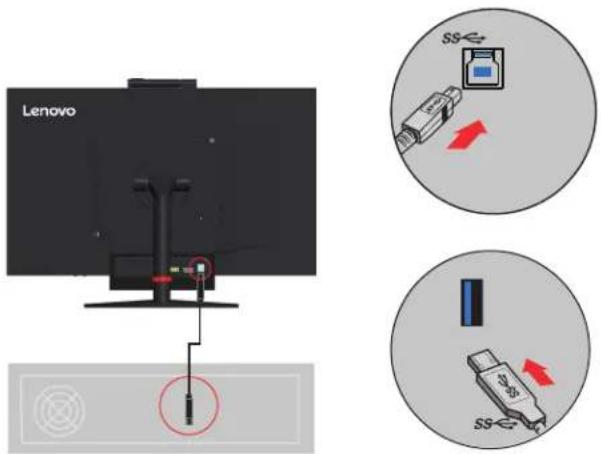
Your monitor has integrated 2*2W speakers which can support audio transmitted over the DP video input as well as USB audio. When you select the DP mode, the USB3.0 cable is required to connect to the system. When you select the AIO mode, the USB3.0 cable is not needed.
text_image
Lenovo SS SSSpeaker volume is adjusted using controls on the front of the monitor.
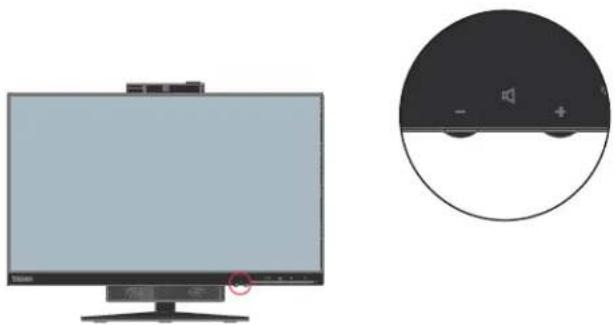
natural_image
Computer monitor and its rear view showing a speaker icon (no text or symbols on the device itself)Note: When a Headphone or Speaker connected to Tiny audio port, the monitor speaker would not mute until the audio playback device is switched.
Wall Mounting (Optional)
Refer to the instructions that come with the base mounting kit. To convert your LCD display from a desk-mounted to a wall-mounted display, do the following:
Step 1: Verify that the Power button is turned Off, then disconnect the power cord.
Step 2: Lay the LCD display face down on a towel or blanket.
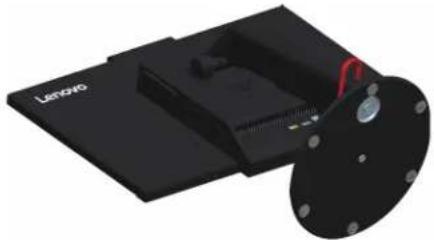
natural_image
Black Lenovo 3D printer with a red cable and mounting bracket (no visible text or symbols)Step 3: Remove the base and stand from the monitor.

natural_image
Black Lenovo 3.0 drive pad with ventilation slots and indicator lights (no text or symbols visible)Step 4: Attach the mounting bracket from the VESA compatible wall mounting kit (100mm x100mm distance), the type of VESA mounting screw is M4 x 10 mm.
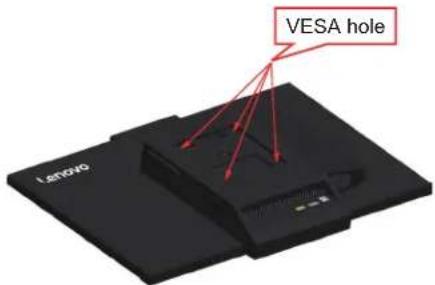
text_image
VESA hole LONDONStep 5: Attach the LCD display to the wall, and follow the instructions in the wall-mounting kit.
For use only with UL Listed Wall Mount Bracket with minimum weight/load: 8kg
Installing the monitor driver
To enjoy a better monitor performance, it is recommended that you install the monitor driver before using the monitor.
To install the monitor driver, do one of the following:
- If the optical drive is available, insert the CD that comes with the monitor into the optical drive. Then, follow the instructions on the screen.
- If the optical drive is not available, download the driver from the Lenovo Web site at http://support.lenovo.com/docs/TIO24Gen3Touch. Then, follow the instructions in 4."The following illustration shows that you can rotate clockwise the monitor at an angel of -5^ to the left and 90^ to the right."on page 2-2.
Comfort and accessibility
Good ergonomic practice is important to get the most from your personal computer and to avoid discomfort. Arrange your workplace and the equipment you use to suit your individual needs and the kind of work that you perform. In addition, use healthy work habits to maximize your performance and comfort while using your computer.
Arranging your work area
Use a work surface of appropriate height and available working area to allow you to work in comfort.
Organize you work area to match the way you use materials and equipment. Keep your work area clean and clear for the materials that you typically use and place the items that you use most frequently, such as the computer mouse or telephone, within the easiest reach.
Equipment layout and setup play a large role in your working posture. The following topics describe how to optimize equipment setup to achieve and maintain good working posture.
Positioning and viewing your monitor:
Position and adjust your computer monitor for comfortable viewing by considering the following items:
- Viewing distance:
Optimal viewing distances for monitors range from approximately 510mm to 760mm (20 in to 30 in) and can vary depending on ambient light and time of day. You can achieve different viewing distances by repositioning your monitor or by modifying your posture or chair position. Use a viewing distance that is most comfortable for you.
- Monitor height:
Position the monitor so your head and neck are in a comfortable and neutral (vertical, or upright) position. If your monitor does not have height adjustments, you might have to place books or other sturdy objects under the base of the monitor to achieve the desired height. A general guideline is to position the monitor such that the top of the screen is at or slightly below your eye-height when you are comfortably seated. However, be sure to optimize your monitor height so the line of site between your eyes and the center the monitor suits your preferences for visual distance and comfortable viewing when your eye muscles are in a relaxed stated.
- Tilt&Swivel&Pivot:
Adjust the tilt, swivel and pivot of your monitor to optimize the appearance of the screen content and to accommodate your preferred head and neck posture.
- General location:
Position your monitor to avoid glare or reflections on the screen from overhead lighting or nearby windows.
The following are some other tips for comfortable viewing of your monitor:
- Use adequate lighting for the type of work you are performing.
- Use the monitor brightness, contrast, and image adjustment controls, if equipped, to optimize the image on your screen to meet your visual preferences.
- Keep your monitor screen clean so you can focus on the screen's contents.
Any concentrated and sustained visual activity can be tiring for your eyes. Be sure to periodically look away from your monitor screen and focus on a far object to allow your eye muscles to relax. If you have questions on eye fatigue or visual discomfort, consult a vision care specialist for advice.
Quick tips for healthy work habits
The following information is a summary of some important factors to consider to help you remain comfortable and productive while you use your computer.
• Good posture starts with equipment setup:
The layout of your work area and the setup of your computer equipment have a large effect on your posture while using your computer. Be sure to optimize the position and orientation of your equipment by following the tips outlined in "Arranging your work area" on page 2-6 so you can maintain a comfortable and productive posture. Also, be sure to use the adjustment capabilities of your computer components and office furniture to best suit your preferences now and as your preferences change over time.
- Minor changes in posture can help avoid discomfort:
The longer you sit and work in front of your computer, the more important it is to observe your working posture. Avoid assuming any one posture for an extended period of time. Periodically make minor modifications in your posture to help deter any discomforts that might arise. Make use of any adjustments that your office furniture or equipment provide to accommodate changes in posture.
- Short, periodic breaks help ensure healthy computing:
Because computing is primarily a static activity, it is particularly important to take short breaks from your work. Periodically, stand up in front of your work area, stretch, walk for a drink of water, or otherwise take a short break from using your computer. A short break from work gives your body a welcome change in posture and helps to ensure you remain comfortable and productive while you do work.
Accessibility information
Lenovo is committed to providing greater access to information and technology to people with disabilities. With assistive technologies, users can access information in the way most appropriate to their disability. Some of these technologies are already provided in your operating system; others can be purchased through vendors or accessed at:
https://lenovo.ssbbartgroup.com/lenovo/request_vpat.php
Adjusting your monitor image
This section describes the user control features used to adjust your monitor image.
Using the user controls
Your monitor has four user controls on the front panel. To locate the user controls, see "Locating connectors and controls on your monitor" on page 1-3. You can use the user controls to adjust some settings of your monitor on the On Screen Display (OSD) main menu.
- Back button
Used to move back and exit from the OSD menu.
- Left shift button / Mode-switching button
Used to move to the left on the OSD menu and switch between the AIO mode (using the Tiny installed) and the DP mode (using an external desktop/laptop computer).
• Right shift button / brightness control
Used to move to the right on the OSD menu and adjust the brightness.
- Selection button / menu-opening button
Used to open the OSD main menu and select an option.
Using the OSD controls
The settings adjustable with the user controls are viewed through the OSD, as shown below.
Note: When switching to AIO mode, the monitor and the Tiny share the same power button on the monitor. However, if the enhanced power saving mode is enabled in the BIOS of the Tiny, you can only use the power button of the computer to turn on the computer.
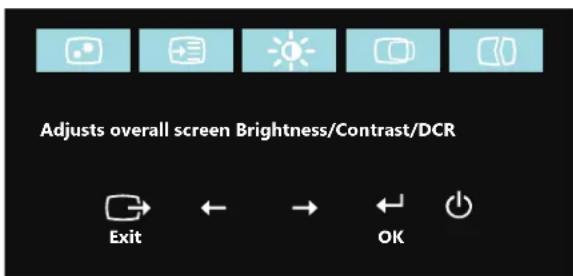
text_image
Adjusts overall screen Brightness/Contrast/DCR Exit ← → ← OKTo use the controls:
-
Press to open the main OSD menu.
-
Use or to move among the icons. Select an icon and press to access that function. If there is a sub-menu, you can move between options using or , then press to select that function. Use or to make adjustments. Press to save.
-
Press to move backwards through the sub-menus and exit from the OSD.
-
Press and hold for 10 seconds to lock the OSD. This will prevent accidental adjustments to the OSD. Press and hold for 10 seconds to unlock the OSD and allow adjustments to the OSD.
-
Enables DDC/CI by default. Use OSD Left Arrow Key, press and hold the buttons for 5 seconds to disable/enable DDC/CI function. The words "DDC/CI Disable/DDC/CI /Enable" shows on the screen.
Using the USB connectors
Your monitor has USB connectors. To locate the USB connectors, see "Locating connectors and controls on your monitor" on page 1-3.
- USB 3.0 connectors
Used to attach a device that requires a USB 2.0 or USB 3.0 connection, such as a keyboard, a mouse, a scanner, or a printer.
Note: The USB 3.0 connector on the panel left side can only be used as USB 2.0 connectors in one of the following conditions:
- You use the Tiny installed in the monitor and the 3-in-1 cable is connected to a USB 2.0 connector on the computer.
- You use an external desktop/laptop computer and the USB cable is connected to a USB 2.0 connector on the computer.
• USB 3.0 upstream connector
Used to transfer signals from the external desktop/laptop computer to the monitor.
Using the Wake on touch Function
You can wake up your monitor from sleep mode through touch. To use the function:
- Setting OSD.
Press to open the main OSD menu. Use or to select and press to access that function. Then you can use or to select Wake on touch and press to access that function. Use or to select On.
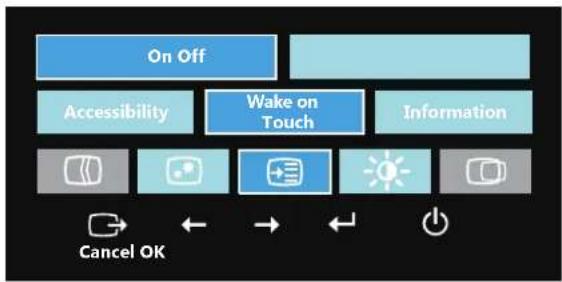
flowchart
graph TD
    A["On Off"] --> B["Accessibility"]
    A --> C["Wake on Touch"]
    A --> D["Information"]
    B --> E["Cancel OK"]
    C --> F["←"]
    C --> G["→"]
    C --> H["←"]
    C --> I["Power icon"]
- Setting Computer.
Open the Device Manager window by clicking Start, Control Panel, Device Manager icon. Click the HID-compliant device button to open the HID-compliant device Properties window.
Select Allow this device to wake the computer.
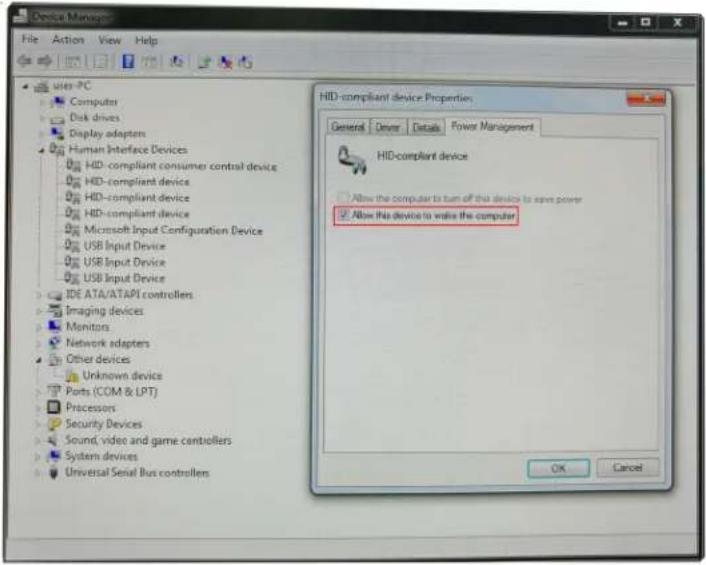
text_image
Device Manager File Action View Help user-PC Computer Disk drives Display adapters Human Interface Devices HID-compliant consumer control device HID-compliant device HID-compliant device HID-compliant device Microsoft Input Configuration Device USB Input Device USB Input Device USB Input Device IDE ATA/ATAPI controllers Imaging devices Monitors Network adapters Other devices Unknown device Ports (COM & LPT) Processors Security Devices Sound video and game controllers System devices Universal Serial Bus controllers HID-compliant device Properties General Driver Details Power Management HID-compliant device Allow the computer to turn off this device to save power Allow this device to write the computer OK CancelTable 2-1. OSD functions
| OSD Icon on Main Menu | Submenu | Description | Controls and Adjustments (DP) |
| Brightness/Contrast * | Brightness Adjusts overall brightness. | - + | |
| Contrast | Adjusts difference between | -light+ | |
| Image Properties | Input Signal | AIO Mode:Switch between the AIO mode (using the Tiny installed) and the DP mode (using an external desktop/laptop computer).Use the source from the Tiny.DP:Use the source from DP connector of external desktop/laptop computer. | |
| Color | Adjusts intensity of red, green, and blue.Preset modeNeutralsRGBReddishBluishCustom:Red: Increases or decreases the saturation of 'red' in the image.Green: Increases or decreases the saturation of 'green' in the image.Blue: Increases or decreases the saturation of 'blue' in the image. | ||
| Scaling | Original ARSame Aspect Ratio with input signalFullExpand image to full screen | ||
| Over Drive | OffNormalExtreme | ||
| Low blue light • On• Off | |||
| Options | Information | Shows resolution, refresh rate, and product details.Note: This screen does not allow any changes to the settings.This section lists the languages supported by your monitor. | |
| Language | Note: The language chosen only affects the language of the OSD. It has no effect on any software running on the computer. | ||
| Menu Position | Menu position adjusts menu location on the screen.DefaultCustomReturns the menu position to the default settings.Horizontal: Changes the horizontal position of the OSDVertical: Changes the vertical position of the OSD.Save | ||
| Factory Default | Resets monitor to the original factory settings.CancelReset | ||
| Accessibility | Controls button and menu settings for accessibility preferences.Button repeat rate: Select or to change.OffDefaultSlowMenu time out: Sets the length of time the OSD will remain active after the last time a button is pressed. | ||
| Wake on Touch | Wake up monitor from sleep mode through touch. | ||
| *Low Blue Light Mode is reducing the blue light content.*The use of Extreme Mode (response time) may result in reduced display quality when fast moving video graphics are displayed.Users should check Extreme Mode (response time) to verify if it is compatible with any applications they would like to use it with. | |||
Touch Screen
Touch screen will optimize your monitor experience. Please use with OS like Windows 7/10.
- You can use either single finger touch, or multi-finger touch up to maximum simultaneous 10 touch points.
- To activate touch functionality, you need to connect USB cable to your computer in DP mode. You don't need USB cable when select AIO mode.
- You do not need to install any other software.
| Procedures Descriptions | |
| Left edge swipe Swipe from the left edge of the screen to shuffle your running apps. | |
| Right edge swipe Swipe from the right edge of the screen to launch the Charm bar. | |
| Finger slide | Slide your finger to scroll up and down and slide your finger to pan the screen left or right. |
| Single Tap/Double Tap | Touch the target on the screen with one finger tip for one/two quick taps, then release. |
Note:
- Do not touch the screen with sharp objects, it may result in damage, and void warranty.
- Do not push hard, or rest anything on the glass surface (if in horizontal position) as it will damage the screen and void warranty.
- Please keep your hands clean and dry before touching the screen to ensure fluid touch operation.
- The touch function works only on OS and applications which can support touch function.
Take the steps outlined below to wake up the system and display when the latter is in standby mode:
AIO mode
- Tiny PC running and display off: move your mouse or tap the screen to wake up your PC.
- Tiny PC in standby mode and display off: click the mouse, tap the screen, press the power button on the front of the monitor, or press the power button on the Tiny PC to wake up your PC.
- Tiny PC in sleep mode and display off: press the power button on the front of the monitor, or press the power button on the Tiny PC to wake up your PC.
DP mode
- PC running and display off: move your mouse or tap the screen to wake up your PC.
- PC in standby mode and display off: click the mouse, tap the screen, or press the power button on the Tiny PC to wake up your PC.
- PC in sleep mode and display off: press the power button on the Tiny PC to wake up your PC.
Note: Turn on the wake on touch function, the power consumption will increase in sleep mode.
See "Using the Wake on touch Function" on page 2-10 to turn on the wake on touch function.
Selecting a supported display mode
The display mode that monitor uses is controlled by the computer. Therefore, refer to your computer documentation for details on how to change display modes.
The image size, position and shape might change when the display mode changes. This is normal and the image can be readjusted using automatic image setup and the image controls.
Unlike CRT monitors, which require a high refresh rate to minimize flicker, LCD or Flat Panel technology is inherently flicker-free.
Note: If your system has previously been used with a CRT monitor and is currently configured to a display mode outside the range of this monitor, you may need to re-attach the CRT monitor temporarily until you have re-configured the system; preferably to 1920x1080 at 60Hz, which is the Native Resolution Display mode.
The display modes shown below have been optimized at the factory.
Table 2-2. Factory set display modes
| Addressability Refresh rate | |
| 640x350 70 Hz | |
| 640x480 60Hz, 66Hz, 72Hz, 75Hz | |
| 720x400 70 Hz | |
| 800x600 60Hz, 72Hz, 75Hz | |
| 1024x768 60Hz, 70Hz, 75Hz | |
| 1152x864 75 Hz | |
| 1280x768 60 Hz | |
| 1280x800 60 Hz | |
| 1280x1024 60Hz, 72Hz, 75Hz | |
| 1366x768 60 Hz | |
| 1440x900 60Hz, 75Hz | |
| 1600x1200 60Hz, 70Hz, 75Hz | |
| 1680x1050 60 Hz | |
| 1920x1080 60Hz |
Understanding power management
Power management is invoked when the computer recognizes that you have not using your mouse or keyboard for a user-definable period. There are several states as described in the table below.
For optimal performance, switch off your monitor at the end of each working day, or whenever you expect to leave it unused for long periods during the day.
Table 2-3. Power indicator
| State Power Indicator Screen Restoring | Operation | Compliance | ||
| On | Solid green(AIO Mode/DP) | Normal | ||
| Standby/Suspend | Blinking green (AIO Mode)Note: If Tiny is in sleep, the LED is blinking greenSolid green (AIO Mode)If Tiny is on, the LED is solid green. | Blank | Press a key or move the mouse.There may be a slight delay reappears.Note: Standby also occurs if there is no image output to the monitor. | ENERGY STAR |
| Solid amber (DP) | ||||
| Off | Off(AIO Mode/DP) | Off | Press power key to switch on.There may be a slight delay before the image reappears. | ENERGY STAR |
Caring for your monitor
Be sure to turn off the power before you perform any maintenance on the monitor.
Do not:
- Apply water or liquid directly to your monitor.
- Use solvents or abrasives.
- Use flammable cleaning materials to clean your monitor or any other electrical equipment.
- Touch the screen area of your monitor with sharp or abrasive items. This type of contact may cause permanent damage to your screen.
- Use any cleaner which contains an anti-static solution or similar additives. This may harm the coating of the screen area.
Do:
- Lightly dampen a soft cloth with water and use this to gently wipe the covers and the screen.
- Remove grease or finger marks with a damp cloth and a little mild detergent.
Chapter 3. Reference information
This section contains Disassembling your monitor, monitor specifications, instructions to manually install the monitor driver, troubleshooting information, and service information.
Disassembling your monitor
To disassemble your monitor, follow the four parts below one by one:
Part 1: Remove the Kensington-style cable lock (optional).
Part 2: Remove the rear Wi-Fi antenna (optional).
Part 3: Remove the Tiny.
Part 4: Remove the full-function monitor stand.
Part 1: Remove the Kensington-style cable lock (optional).
With the key of the Kensington-style cable lock, unlock the lock that is attached to the rear panel of your computer.
Part 2: Remove the rear Wi-Fi antenna (optional).
- Press the cable cover 1 to open it. Then, pivot the cable cover as shown to the open position.
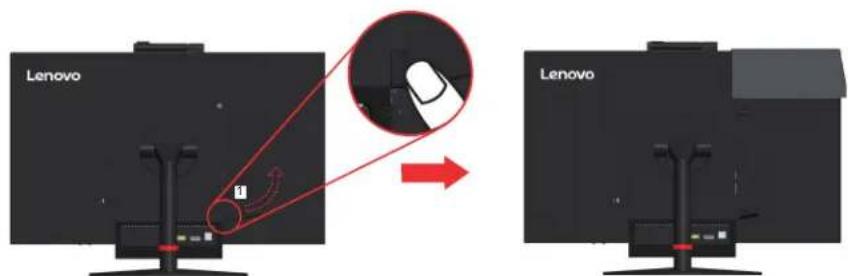
text_image
Lenovo Lenovo- Pivot the rear Wi-Fi antenna downward at an angle of about 90^ . Then, hold the thicker end of the rear Wi-Fi antenna and unscrew it from the computer.
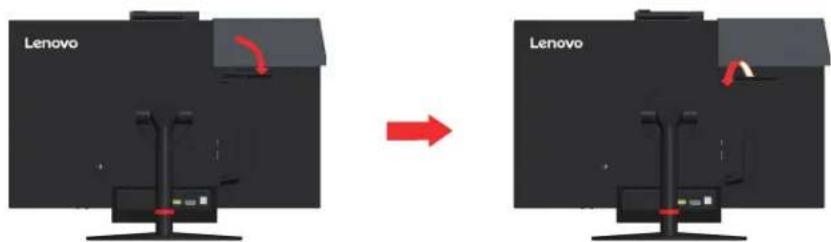
text_image
Lenovo LenovoPart 3: Remove the Tiny.
- Release the screw that secures the computer.
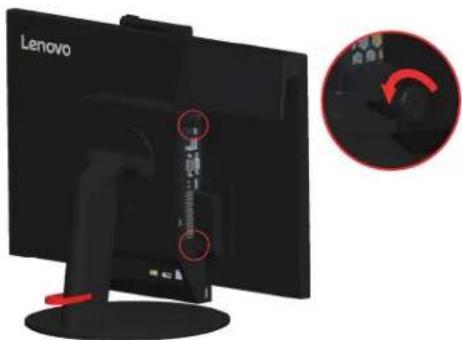
natural_image
Computer monitor with Lenovo logo and a close-up of its right-hand side showing a red circular button (no text or symbols on the device itself)- Push the computer from the rear as shown to disconnect it completely from the 3 in 1 cable.
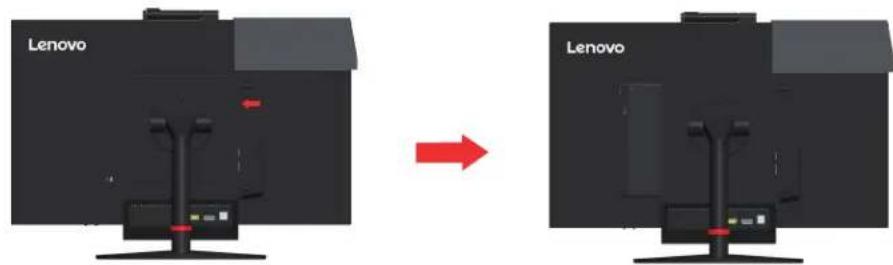
text_image
Lenovo Lenovo- Pull the computer out of the computer bay. Then, pivot the cable cover as shown to the closed position.

text_image
Lenovo 1 2- If the two decorative covers of the computer bay are available, insert the two covers into the corresponding slots.
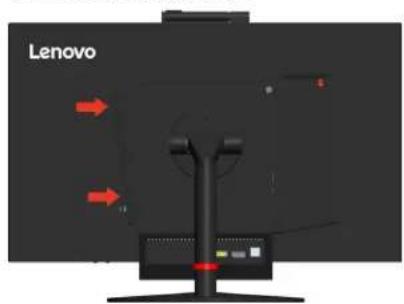
text_image
LenovoPart 4: Remove the full-function monitor stand.
- Place a soft, clean towel or cloth on the desk or surface. Hold the sides of your monitor and gently lay it down so that the screen is against the surface and the cover is facing up.
- Slide the latch upward as shown. Then, pivot the monitor stand upward to remove it.
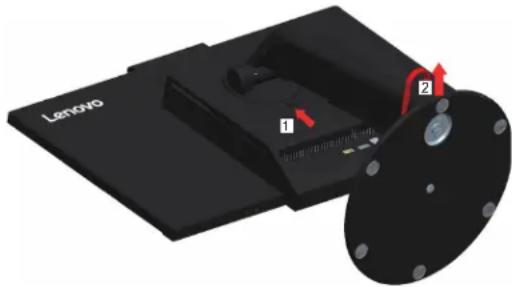
natural_image
3D diagram of a Lenovo computer with labeled parts (1 and 2), showing internal components and mounting holes (no text or symbols beyond labels)- If you want to hang your monitor on the wall, you can install a VESA mount bracket that can be ordered from Lenovo.
Monitor specifications
Table 3-1. Monitor specifications for type-model 10QX-PAR1-WW
| Dimensions Depth | HeightWidth | 282.3 mm (11.11 in.)399.4 mm (15.72 in.)539.8 mm (21.25 in.) |
| Stand Tilt range Range: -5°/+30° | ||
| Stand Swivel Range: -45°, +45° | ||
| Stand Pivot Range: -5°, 90° | ||
| Stand Lift Range: 110.0 mm | ||
| VESA mount Supported 100 mm (3.94 in.) | ||
| Image Viewable image size | Maximum heightMaximum widthPixel pitch | 605 mm (23.8 in.)297 mm (11.69 in.)527 mm (20.74 in.)0.275mm (H) x 0.275 mm (V) |
| Power input | Supply voltageMax supply currentMax ConsumptionTypical ConsumptionStandby/SuspendOff | 20VDC4.5 A32 W (max)19 W (typ)<0.5 W≤0.3 W |
| Power consumption | ||
| Note: Power consumption figures are for the monitor and the power supply combined | ||
| Video input (Analog) Interface | Horizontal addressabilityVertical addressabilityClock frequency | DP1920 pixels (max)1080 lines (max) 205 MHz10.8 Gbps (max) |
| Communications VESA DDC CI | ||
| Altitude Test Operation | 16404.2 ft | |
| Supported Display Modes(VESA Standard modes between noted ranges) | Horizontal frequencyVertical frequencyNative Resolution | DP: 30 kHz – 83 kHz30 Hz – 75 Hz1920 x 1080 at 60 Hz |
| Temperature | OperatingStorageShipping | 0° to 40°C (32°F to 104°F)-20° to 60°C (-4°F to 140°F)-20° to 60°C (-4°F to 140°F) |
Table 3-1. Monitor specifications for type-model 10QX-PAR1-WW
| Humidity | Operating | 8% to 80% |
| Storage | 5% to 90% | |
| Shipping | 5% to 90% |
Troubleshooting
If you have a problem setting up or using your monitor, you might be able to solve it yourself. Before calling your dealer or Lenovo, try the suggested actions that are appropriate to your problem.
Table 3-2. Troubleshooting
| Problem Possible cause Suggested action Reference | |||
| The words "Out of Range" are shown on the screen, and the power indicator is flashing green. | The system is set to a display mode which is not supported by the monitor. | ·If you are replacing an old monitor, reconnect it and adjust the display mode to within the specified range for your new monitor.·If using a Windows system, restart the system in safe mode, then select a supported display mode for your computer.·If these options do not work, contact the Support Center. | "Selecting a supported display mode"on page 2-14 |
| The image quality is unacceptable. | The video signal cable is not connected with the monitor or system completely. | Be sure the signal cable is firmly plugged into the system and monitor. | "Assembling your monitor"on page 1-4 |
| The color settings may be incorrect. | Select another color setting from the OSD menu. | "Adjusting your monitor image"on page 2-8 | |
| The automatic image setup function was not performed. | Perform automatic image setup. "Adjusting your monitor image"on page 2-8 | ||
| The power indicator is not lit and there is no image. | ·The monitor's power switch is not switched on.·The power cord is loose or disconnected.·There is no power at the outlet. | ·Be sure the power cord is connected properly.·Be sure the outlet has power.·Power on the monitor.·Try using another power cord.·Try using another electrical outlet. | "Assembling your monitor"on page 1-4 |
| Screen is blank and power indicator is amber. | The monitor is in Standby/Suspend mode. | ·Press any key on the keyboard or move the mouse to restore operation.·Check the Power Options settings on your computer. | "Understanding power management"on page 2-15 |
| The power indicator is amber, but there is no image. | The video signal cable is loose or disconnected from the system or monitor. | Be sure the video cable is connected with the system properly. | "Assembling your monitor"on page 1-4 |
| The monitor brightness and contrast are at the lowest setting. | Adjust the brightness and contrast setting on the OSD menu. | "Adjusting your monitor image"on page 2-8 | |
Table 3-2. Troubleshooting
| Problem Possible cause Suggested action Reference | |||
| One or more of the pixels appear discolored. | This is a characteristic of the LCD technology and is not an LCD defect. | If there are more than five pixels missing, contact the Support Center. | Appendix A."Service and Support"on page A-1 |
| • Fuzzy lines in text or a blurry image.• Horizontal or vertical lines through the image. | • Image setup has not been optimized.• Your system Display Properties setting have not been optimized. | Adjust the resolution settings on your system to match the native resolution for this monitor: 1920 x 1080 at 60 Hz. | "Adjusting your monitor image"on page 2-8 |
| Perform automatic image setup. If automatic image setup does not help, perform manual image setup. | "Selecting a supported display mode"on page 2-14 | ||
| When working in the native resolution, you may find additional improvements by adjusting the Dots Per Inch (DPI) setting on your system. | See the Advanced section of your system's display properties. | ||
| The image is not acceptable when switching to dual mode | It has not set the optimum resolution for each mode | • Use ThinkVision® Duo software to optimize the dual screen operation• Adjust graphic card resolution manually | "Using the user controls"on page 2-8 |
Manual image setup
If automatic image setup does not establish the image that you prefer, perform manual image setup.
Note: Have your monitor powered on for about 15 minutes, until the monitor warms up.
- Press at the bottom of the monitor to open the OSD menu.
- Use or to select and press to access.
- Use or to select Clock or Phase adjustment.
- Clock: (pixel frequency) adjusts the number of pixels scanned by one horizontal sweep. If the frequency is not correct, the screen shows vertical stripes and the picture does not have the correct width.
- Phase: adjusts the phase of the pixel clock signal. With a wrong phase adjustment, the picture has horizontal disturbances in light picture.
- When the image no longer looks distorted, save the Clock and Phase adjustments.
- Press to leave the OSD menu.
Manually installing the monitor driver
Below are steps for manually installing the monitor driver in Microsoft Windows 7 and Microsoft Windows 10.
Installing the monitor driver in Windows 7
To use the Plug and Play feature in Microsoft Windows 7, do the following:
Note: You must download file from the Reference and Driver CD to use the Plug and Play feature in Windows 7.
- Turn off the computer, all attached devices.
- Ensure that the monitor is connected correctly.
-
Turn on the monitor and then the system unit. Allow your computer to start the Windows 7 operating system.
-
Open the Display Properties window by clicking Start, Control Panel, Hardware and Sound icon.
-
Click the Display icon.
- Click the Adjust Resolution button.
- Click the Advanced Settings icon.
- Click the Monitor tab.
-
Click the Properties button.
-
Click the Driver tab.
-
Open the "Update Driver Software-Generic PnP Monitor" window by clicking on Update Driver and then click the "Browse my computer for driver software" button.
-
Select "Let me pick from a list of device drivers on my computer".
-
Insert the Lenovo Monitor CD into the CD drive and click the Have Disk button.
-
Click on the Browse button and navigate to the following directory: X:\Monitor Drivers\ (where X is the drive letter designator for the CD-ROM drive).
-
Select the "tio24gen3t.inf" file and click the Open button. Click the OK button.
-
Select TIO24Gen3T and click Next. The files will be copied from the CD to your hard disk drive.
-
Close all open windows and remove the CD.
-
Restart the computer.
The system will automatically select the maximum refresh rate and corresponding color matching profiles.
Note: On LCD monitors, unlike CRTs, a faster refresh rate does not improve display quality. Lenovo recommends using either 1920 x 1080 at a refresh rate of 60 Hz, or 640 x 480 at a refresh rate of 60 Hz.
Installing the monitor driver in Windows 10
To use the Plug and Play feature in Microsoft Windows 10, do the following:
Note: You must download files from the Lenovo Monitor CD to use the Plug and Play feature in Windows 10.
- Turn off the computer and all attached devices.
- Ensure that the monitor is connected correctly.
- Turn on the monitor and then turn on the computer. Allow your computer to boot into Windows 10 operating system.
-
On the Desktop, move mouse to low-right corner of screen, choose Setting, double click Control Panel, then double click the icon of Hardware and Sound, and then clicking Display.
-
Click the Change the display settings tab.
-
Click the Advanced Settings icon.
-
lick the Monitor tab.
-
Click the Properties button.
-
Click the Driver tab.
-
Click Update Driver, then click Browse the computer to find the driver program.
-
Select Pick from the list of device driver program on the computer.
-
Click the Have Disk button. Click the Browse button and navigate to the following directory:
X:\Monitor Drivers (where X is the drive letter designator for the CD-ROM drive).
-
Select the "tio24gen3t.inf" file and click the Open button. Click the OK button.
-
Select TIO24Gen3T and click Next. The files will be copied from the CD to your hard disk drive.
-
Close all open windows and remove the CD.
-
Restart the system. The system will automatically select the maximum refresh rate and corresponding Color Matching Profiles.
Note: On LCD monitors, unlike CRTs, a faster refresh rate does not improve display quality. Lenovo recommends using either 1920 x 1080 at a refresh rate of 60 Hz, or 640 x 480 at a refresh rate of 60 Hz.
Getting further help
If you still can't solve your problem, please contact the Lenovo Support Center. For more information on contacting the Support Center, please see Appendix A. "Service and Support" on page A-1
Service information
Product numbers
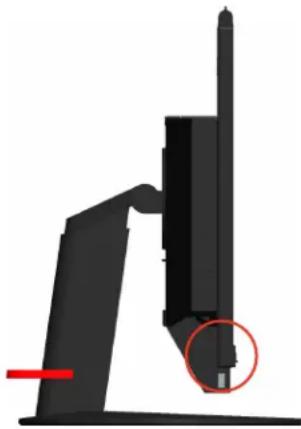
The product number for your monitor is located on the side of the display bezel as shown below.
natural_image
3D mechanical component diagram showing a lever and shaft assembly with a red circular annotation highlighting a specific part (no text or symbols present)Customer responsibilities
The warranty does not apply to a product which has been damaged due to accident, misuse, abuse, improper installation, usage not in accordance with product specifications and instructions, natural or personal disaster, or unauthorized alterations, repairs or modifications.
The following are examples of misuse or abuse and not covered by warranty:
- Images burned on to the screen of a CRT monitor. Burned image is preventable by utilizing a moving screen saver or power management.
• Physical damage to covers, bezel, base and cables. - Scratches or punctures on monitor screens.
- Pivot the monitor when working in AIO mode.
Getting further help
If you still can't solve your problem, please contact the Customer Support Centre. For more information on contacting the Customer Support Centre, please see Appendix A. "Service and Support" on page A-1.
Service parts
The following parts are for use by Lenovo service, or Lenovo authorized dealers to support the customer warranty. Parts are for service use only. The table below shows information for model 10QX-PAR1-WW.
Table 3-3. List of service parts
| FRU (Field Replaceable Unit) Part number | Description | Machine Type Model (MTM) | Color |
| 00PC117 | TIO24Gen3Touch-Monitor (24inch Touch Monitor, DP& 3in1 port) | 10QX Raven Black | |
| 54Y8966 90w Power Br | Brick (DT&AIO Common 90W with CMN) | 10QX Raven Black | |
| 01YY006 | TIO24Gen3Touch-Monitor FRU Stand and Base | 10QX Raven Black |
Appendix A. Service and Support
The following information describes the technical support that is available for your product, during the warranty period or throughout the life of the product. Refer to your Lenovo Statement of Limited Warranty for a fully explanation of Lenovo warranty terms.
Registering your option
Register to receive product service and support updates, as well as free and discounted computer Accessories and content. Go to: http://www.lenovo.com/support
Online technical support
Online technical support is available during the lifetime of a product at: http://www.lenovo.com/support
Product replacement assistance or exchange of defective components also is available during the warranty period, assistance for replacement or exchange of defective components is available. In addition, if your option is installed in a Lenovo computer, you might be entitled to service at your location. Your technical support representative can help you determine the best alternative.
Telephone technical support
Installation and configuration support through the Customer Support Centre will be withdrawn or made available for a fee, at Lenovo's discretion, 90 days after the option has been withdrawn from marketing. Additional support offerings, including step-by-step installation assistance, are available for a nominal fee.
To assist the technical support representative, have available as much of the following information as possible:
- Option name
- Flat Panel Monitor
- Option number
• Proof of purchase - Computer manufacturer, model, serial number, and manual
- Exact wording of the error message (if any)
• Description of the problem - Hardware and software configuration information for your system
If possible, be at your computer. Your technical support representative might want to walk you through the problem during the call.
Worldwide telephone list
Phone numbers are subject to change without notice. For the most current phone numbers, go to http://www.lenovo.com/support/phone
| Country or Region Telephone Number | |
| Africa Africa: +44 (0) 1475- | -555-055South Africa: +27-11-3028888 and 0800110756Central Africa: Contact the nearest LenovoBusiness Partner |
| Argentina | 0800-666-0011 (Spanish) |
| Australia | 131-426 (English) |
| Austria Warrant service and | support: 01-211-454-610 (German ) |
| Belgium Warrant service and | support: 02-225-3611 (Dutch, French) |
| Bolivia 0800-10-0189 ( Spanish) | |
| Brazil Sao Paulo region: (1) | 3889-8986Outside Sao Paulo region: 0800-701-4815(Brazilian Portuguese) |
| Brunci 801-1041 (English, Bahasa Mclayu) | |
| Canada | Toronto:416-383-3344Outside Toronto: 1-800-565-3344(English, French) |
| Chile Toll Free: 188-800-442-488800-361-213(Spanish) | |
| China | 86-10-58851110800-990-8888(Mandarin) |
| China(Hong Kong S.A.R.) | (852)3071-3561(Cantonese, English, Mandarin) |
| China(Macau S.A.R.) | ThinkCentre Commercial PC: 795-9892Multimedia Home PC: 0800-336(Cantonese, English, Mandarin) |
| Colombia | 1-800-912-3021 (Spanish) |
| Costa Rica 0-800-011-1029 (Spanish) | |
| Croatia 0800-0426 | |
| Cyprus | +357-22-841100 |
| Czech Republic | +420-2-7213-1316 |
| Denmark | Warranty service and support: 7010-5150 (Danish) |
| Dominican Republic | 1-866-434-2080 (Spanish) |
| Ecuador | 1-800-426911 (Spanish) |
| Egypt | +202-35362525 |
| El Salvador | 800-6264 (Spanish) |
| Estonia | +372 6776793+372 66 00 800 |
| Finland | Warranty service and support: +358-800-1-4260 (Finnish) |
| Country or Region | Telephone Number |
| France Warranty service and support (hardware): 0810-631-213Warranty service and support (software): 0810-631-020(French) | |
| Germany Warranty service and support: 01805-00-46-18 (German) | |
| Greece | +30-210-680-1700 |
| Guatemala | 1800-624-0051 (Spanish) |
| Honduras | Tegucigalpa: 232-4222San Pedro Sula: 552-2234(Spanish) |
| Hungary | +36-1-382-5716+36-1-382-5720(English, Hungarian) |
| India | 1800-425-2666+91-80-2535-9182(English) |
| Indonesia 021 5238 823 | Local number only: 001-803-606-282DID (Direct Inward Dialing): +603 8315 6859(English, Bahasa Indonesia) |
| Ireland Warranty service and support: 01-881-1444 (English) | |
| Israel Givat Shmuel Service and Center: +972-3-531-3900 (Hebrew, English) | |
| Italy Warranty service and support: +39-800-820094 (Italian) | |
| Japan Toll Free: 0120-20-5550International: +81-46-266-4716The above numbers will be answered with a Japanese language voice prompt. For telephone support in English, please wait for the Japanese voice prompt to end, and an operator will answer. Please say “English support please”, and your call will be transferred to an English-speaking operator.PC software: 0120-558-695Overseas calls: +81-44-200-8666(Japanese) | |
| Kazakhstan Call center: +77273231427(Standard charges Apply) (Russian, English) | |
| Kingdom of Saudi Arabia 800 85 000 52 (Standard Charges Apply) | |
| Korea | 1588-6782 (Korea) |
| Latvia | +371 7070360 |
| Lithuania +370 5 278 66 00 | |
| Luxembourg | +352-360-385-343(French) |
| Malaysia | Local number only: 1800-88-1889DID: +603 8315 6855(English, Bahasa Mclayu) |
| Malta | +35621445566 |
| Mexico | 001-866-434-2080(Spanish) |
| Middle East | +44 (0)1475-555-055 |
| Netherlands | +31-20-514-5770 (Dutch) |
| New Zealand | 0800-733-222 (English) |
| New Zealand | 001-800-220-1830 (Spanish) |
| Norway Warranty service and support: 8152-1550(Norwegian) | |
| Panama Lenovo Customer Support Center: 001-866-434-2080 (Toll Free)206-6047(Spanish) | |
| Peru | 0-800-50-866 (Spanish) |
| Philippines 1800-1601-0033 (English, Filipino) | |
| Poland | +48-22-878-6999 (Polski) |
| Portugal | +351-21-892-7046 (Portuguese) |
| Romania | +4-021-224-4015 |
| Russia | Moscow: +7-(495)-258-6300Toll Free: +8-800-200-6300 (Russian) |
| Singapore Local number only: 800-6011-343 DID: +603 8315 6859 (English) | |
| Slovakia | +421-2-4954-5555 |
| Slovenia | +386-1-200-50-60 (Slovenian) |
| Spain | 91-714-7983,0901-100-000 (Spanish) |
| Sri Lanka +9411 2493547 -9411 2493548 (English) | |
| Sweden Warranty service and support: 077-117-1040 (Swedish) | |
| Switzerland Warranty service and support: 0800-55-54-54 (German, French, Italian) | |
| Taiwan | 886-2-8723-9799,0800-000-700 (Mandarin) |
| Thailand | Local number only: 1-800-060-06666 2273 4088DID: +603 8315 6857 (Thai, English) |
| Turkey | 0212336036600800448825165 (Turkish) |
| Ukraine 044 362 42 81 (Standard Charges Apply) | |
| United Arab Emirates | 800035702810 (Standard Charges Apply) |
| United Kingdom | Standard warranty support: 08705-500-900 (English) |
| United States | 1-800-426-7378 (English) |
| Uruguay | 000-411-005-6649 (Spanish) |
| Venezuela | 0-800-100-2011 (Spanish) |
| Vietnam | For Northern Arca and Hanoi City: 844 3 946 2000 or 844 3 942 6457For Southern Arca and Ho Chi Minh City: 848 3 829 5160 or 844 3942 6457(Vietnamese, English) |
Appendix B. Notices
Lenovo may not offer the products, services, or features discussed in this document in all countries. Consult your local Lenovo representative for information on the products and services currently available in your area. Any reference to a Lenovo product, program, or service is not intended to state or imply that only that Lenovo product, program, or service may be used. Any functionally equivalent product, program, or service that does not infringe any Lenovo intellectual property right may be used instead.
However, it is the user's responsibility to evaluate and verify the operation of any other product, program, or service.
Lenovo may have patents or pending patent applications covering subject matter described in this document. The furnishing of this document does not give you any license to these patents.
You can send license inquiries, in writing, to:
Lenovo (United States), Inc.
1009 Think Place - Building One
Morrisville, NC 27560
U.S.A.
Attention: Lenovo Director of Licensing
LENOVO PROVIDES THIS PUBLICATION "AS IS" WITHOUT WARRANTY OF ANY KIND, EITHER EXPRESS OR IMPLIED, INCLUDING, BUT NOT LIMITED TO, THE IMPLIED WARRANTIES OF NON-INFRINGEMENT, MERCHANTABILITY OR FITNESS FOR A PARTICULAR PURPOSE.
Some jurisdictions do not allow disclaimer of express or implied warranties in certain transactions, therefore, this statement may not apply to you.
This information could include technical inaccuracies or typographical errors. Changes are periodically made to the information herein; these changes will be incorporated in new editions of the publication. Lenovo may make improvements and/or changes in the product(s) and/or the program(s) described in this publication at any time without notice.
The products described in this document are not intended for use in implantation or other life support applications where malfunction may result in injury or death to persons. The information contained in this document does not affect or change Lenovo product specifications or warranties. Nothing in this document shall operate as an express or implied license or indemnity under the intellectual property rights of Lenovo or third parties. All information contained in this document was obtained in specific environments and is presented as an illustration. The result obtained in other operating environments may vary.
Lenovo may use or distribute any of the information you supply in any way it believes appropriate without incurring any obligation to you.
Any references in this publication to non-Lenovo Web sites are provided for convenience only and do not in any manner serve as an endorsement of those Web sites. The materials at those Web sites are not part of the materials for this Lenovo product, and use of those Web sites is at your own risk.
Any performance data contained herein was determined in a controlled environment. Therefore, the result obtained in other operating environments may vary significantly. Some measurements may have been made on development-level systems and there is no guarantee that these measurements will be the same on generally available systems. Furthermore, some measurements may have been estimated through extrapolation. Actual results may vary. Users of this document should verify the applicable data for their specific environment.
Recycling information
Lenovo encourages owners of information technology (IT) equipment to responsibly recycle their equipment when it is no longer needed. Lenovo offers a variety of programs and services to assist equipment owners in recycling their IT products. For information on recycling Lenovo products, go to http://www.lenovo.com/recycling. The latest environmental information about our products is available at http://www.lenovo.com/ccodeclaration.
環境配慮に関して
Collecting and recycling a disused Lenovo computer or monitor
If you are a company employee and need to dispose of a Lenovo computer or monitor that is the property of the company, you must do so in accordance with the Law for Promotion of Effective Utilization of Resources. Computers and monitors are categorized as industrial waste and should be properly disposed of by an industrial waste disposal contractor certified by a local government. In accordance with the Law for Promotion of Effective Utilization of Resources, Lenovo Japan provides, through its PC Collecting and Recycling Services, for the collecting, reuse, and recycling of disused computers and monitors. For details, visit the Lenovo Web site at
www.ibm.com/jp/pc/service/recycle/pcrecycle/. Pursuant to the Law for Promotion of Effective Utilization of Resources, the collecting and recycling of home-used computers and monitors by the manufacturer was begun in October 1, 2003. This service is provided free of charge for home-used computers sold after October 1, 2003. For details, visit the Lenovo Web site at:
www.ibm.com/jp/pc/service/recycle/personal/.
Disposing of Lenovo computer components
Some Lenovo computer products sold in Japan may have components that contain heavy metals or other environmental sensitive substances. To properly dispose of disused components, such as a printed circuit board or drive, use the methods described above for collecting and recycling a disused computer or monitor.
Turkish statement of compliance
The Lenovo product meets the requirements of the Republic of Turkey Directive on the Restriction of the Use of Certain Hazardous Substances in Electrical and Electronic Equipment (EEE).
The following terms are trademarks of Lenovo in the United States, other countries, or both: Lenovo
The Lenovo logo
ThinkCenter
The ThinkCentre logo
ThinkVision
Microsoft and Windows are trademarks of the Microsoft group of companies. DisplayPort is a trademark of the Video Electronics Standards Association. Other company, product, or service names may be trademarks or service marks of others.
Power cords and power adapters
Use only the power cords and power adapters supplied by the product manufacturer. Do not use the ac power cord for other devices.