
TruTouch X9 - Screen Newline - Free user manual and instructions
Find the device manual for free TruTouch X9 Newline in PDF.


| Product Type | Collaboration Touch Screen |
| Brand | Newline |
| Model | TruTouch X9 |
| Display Size | 70 inches (diagonal) |
| Display Resolution | 1920 x 1080 pixels (Full HD) |
| Brightness | 350 cd/m² |
| Contrast Ratio | 4000:1 |
| Touch Technology | Projected Capacitive (P-Capacitive) |
| Touch Points | 10 (Windows) / 5 (Android) |
| Writing Tools | Pencil (stylus) or Finger |
| Camera | Top and Bottom (2M pixels each, 86° lens, 1920x1080@30fps) |
| Microphone | 4 built-in omnidirectional microphones, pickup range 8m |
| Speaker | Forward-facing, max power output 30W |
| Operating System | Android 4.3 (OPS slot for Windows via internal PC) |
| Processor | ARM Cortex A9 Quad Core 1.5GHz |
| RAM | 2GB |
| Storage | 8GB Flash |
| Connectivity Ports | HDMI, VGA, USB 2.0/3.0, RS232, RJ45, SD card reader, OPS slot |
| Power Supply | AC 100-240V, 50/60Hz |
| Power Consumption | Max <250W, Standby ≤0.5W |
| Dimensions (without stand) | 1588.7 x 1048.7 x 78 mm |
| Weight | 65 kg (143.3 lb) |
| VESA Mount | 400 x 400 mm (M8 screws) |
| Operating Temperature | 0°C to 40°C |
| Accessories Included | Remote control, power cord, stylus pen |
| Certifications | FCC Class B, WEEE compliant |
Frequently Asked Questions - TruTouch X9 Newline
User questions about TruTouch X9 Newline
0 question about this device. Answer the ones you know or ask your own.
Ask a new question about this device
Download the instructions for your Screen in PDF format for free! Find your manual TruTouch X9 - Newline and take your electronic device back in hand. On this page are published all the documents necessary for the use of your device. TruTouch X9 by Newline.
USER MANUAL TruTouch X9 Newline
Collaboration Touch Screen User Manual
V1.0
Newline Interactive, Inc.
www.newline-interactive.com
Contents
About This Document....1
1 Overview....2
1.1 Introduction ...... 2
1.2 Parts ...... 2
1.3 Ports 4
1.4 Remote Control....7
2 Installations....9
2.1 Safety Precautions ...... 9
2.2 Installation Precautions....10
2.3 Installation 11
3 Preparation ....13
3.1 Power On....13
3.2 Power Off....14
3.3 Position 15
4 System Applications....18
4.1 Home Page....18
4.2 Assistant Meeting.... 20
4.2.1 Newline Assistant 20
4.2.2 Switch Applications ...... 20
4.2.3 Add or Delete Applications....20
4.3 Whiteboard 24
4.3.1 Whiteboard Functions....25
4.3.2 Slide Operations....30
4.4 Signal Source 32
4.5 External Storage.... 32
4.5.1 External Storage Page 32
4.5.2 File Preview 33
4.5.3 File Filtering 34
4.5.4 File Search 34
4.5.5 File Operations.... 35
4.6 End Meeting 36
4.6.1 Manually End Meeting 36
4.6.2 Automatically End Meeting 38
4.7 Shortcut Settings and Applications .... 39
4.7.1 Shortcut Settings....39
4.7.2 Applications 44
5 Serial Port Control ....45
6 Specifications....49
7 More Information....52
Welcome:
Thanks for purchasing this product. Please read the instructions carefully before using this product.
This device complies with part 15 of the FCC Rules. Operation is subject to the following two conditions: (1) This device may not cause harmful interference, and (2) this device must accept any interference received, including interference that may cause undesired operation.

This equipment has been tested and found to comply with the limits for a Class B digital device, pursuant to part 15 of the FCC Rules. These limits are designed to provide reasonable protection against harmful interference in a residential installation. This equipment generates, uses and can radiate radio frequency energy and, if not installed and used in accordance with the instructions, may cause harmful interference to radio communications. However, there is no guarantee that interference will not occur in a particular installation. If this equipment does cause harmful interference to radio or television reception, which can be determined by turning the equipment off and on, the user is encouraged to try to correct the interference by one or more of the following measures:
• Reorient or relocate the receiving antenna.
- Increase the separation between the equipment and receiver.
- Connect the equipment into an outlet on a circuit different from that to which the receiver is connected.
- Consult the dealer or an experienced radio/ TV technician for help.
The symbol of the crossed out wheeled bin indicates this product should not be placed in municipal waste. Instead, you need to dispose of the waste equipment by handing it over to a designated collection point for the recycling of waste electrical and electronic equipment.
About This Document
Welcome to use the Collaboration Touch Screen.
This document describes multiple functions, instructions and notes of the product. Before using the product, read this document carefully.
Figures in this document are only for your reference.
Symbols are used in this document to indicate operations that need particular attention. The symbols are defined as follows.

NOTE
Provides additional information to supplement operations in the main text.

TIP
Provides tips for operations.
1 Overview
1.1 Introduction
The Collaboration Touch Screen adopts the advanced capacitive touch technology and All in One design, and integrates video, audio, touch, writing, and multi-media presentation functions. This product does not need additional devices, installation and wiring, and commissioning and maintenance.
Dedicated software is customized for the assistant meeting. It can meet requirements of various meeting modes, implementing convenient comments on local documents, viewing multi-media files, conducting multiparty remote video and audio meetings, managing local files, and improving meeting experience and work efficiency.
1.2 Parts
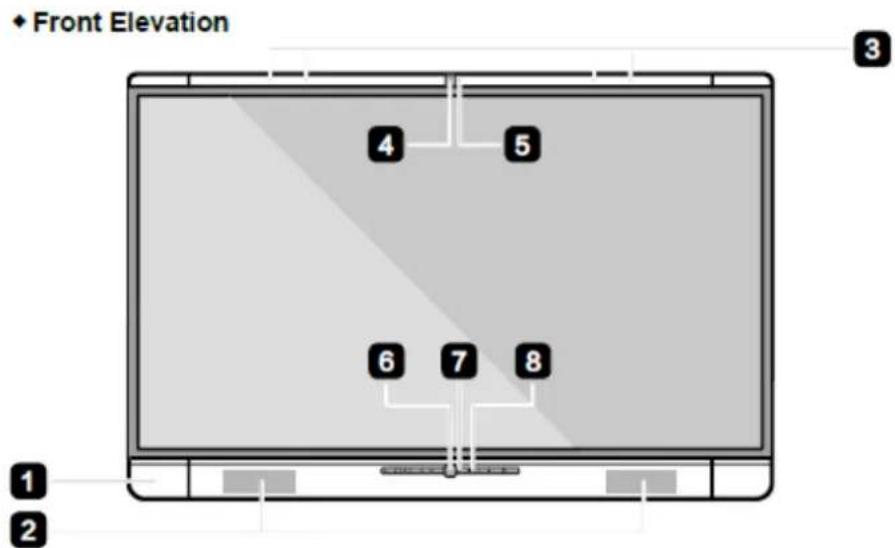
Front Elevation

NOTE
- The top and bottom cameras cannot be used at the same time.
- The indicators of the top and bottom cameras are white when in use and off when not in use.
Rear Elevation
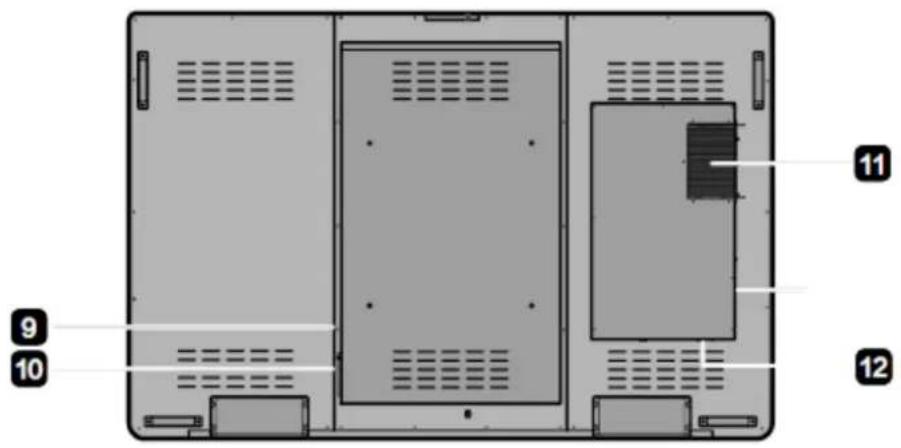
1 Front Ports
2 Speakers
3 Microphone Array
4 Top Camera
5 Camera Indicator
6 Bottom Camera
7 Camera Indicator
8 Front Buttons
9 General Power Switch
10 AC Power
11 Internal PC
12 Ports in the Back Panel
1.3 Ports
Front Ports
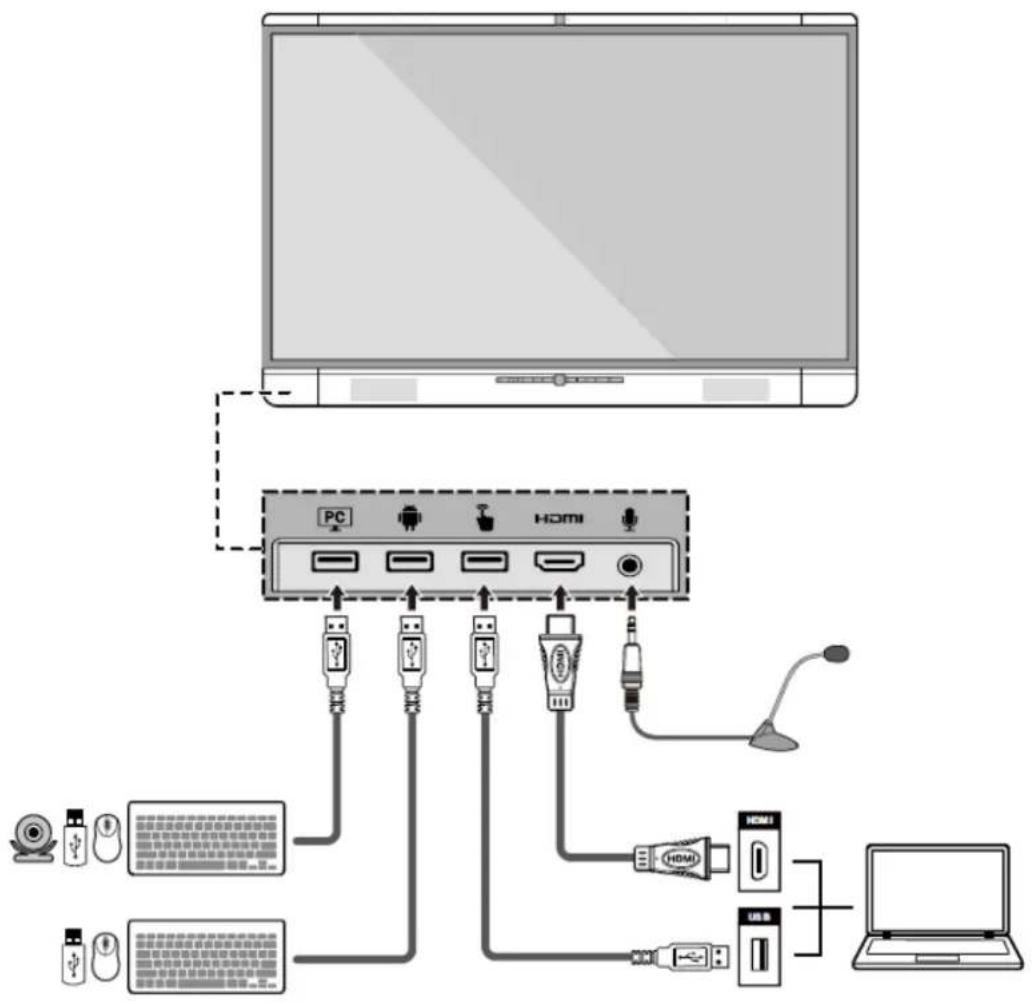
Rear Ports
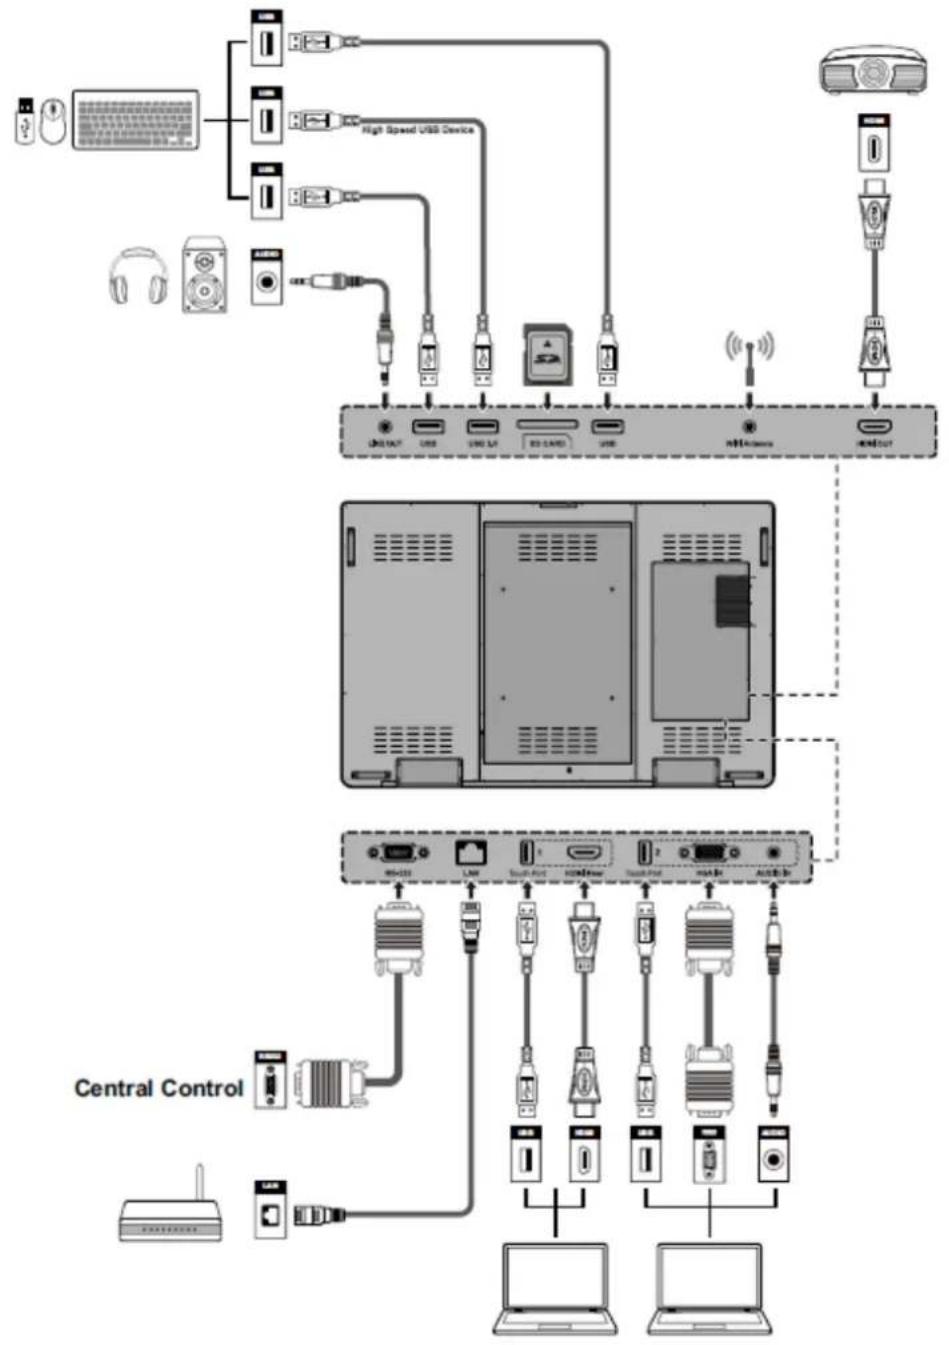
flowchart
graph TD
    A["Central Control"] --> B["High Speed USB Device"]
    A --> C["Laptop"]
    A --> D["Laptop"]
    B --> E["USB"]
    B --> F["USB UP"]
    B --> G["USB CARD"]
    B --> H["USB"]
    B --> I["USB"]
    C --> J["USB"]
    C --> K["Laptop"]
    C --> L["Laptop"]
    style A fill:#f9f,stroke:#333
    style B fill:#ccf,stroke:#333
    style C fill:#cfc,stroke:#333
    style D fill:#fcc,stroke:#333
    style E fill:#ffc,stroke:#333
    style F fill:#ffc,stroke:#333
    style G fill:#ffc,stroke:#333
    style H fill:#ffc,stroke:#333
    style I fill:#ffc,stroke:#333
    style J fill:#cfc,stroke:#333
    style K fill:#cfc,stroke:#333
Front Buttons

natural_image
User interface toolbar with playback, audio, and home control icons (no text or symbols)| Buttons | Operations | Functions |
 | Short press | Power on/off |
| [TC07] | Short press | Decrease volume |
| Long press for more than 1 second | Decrease volume continuously | |
 | Short press | Increase volume |
| Long press for more than 1 second | Increase volume continuously | |
 | Short press | Open the menu |
| [X435] | Short press | Return to last menu/Exit |
 | Short press | Go to the home page |
1.4 Remote Control
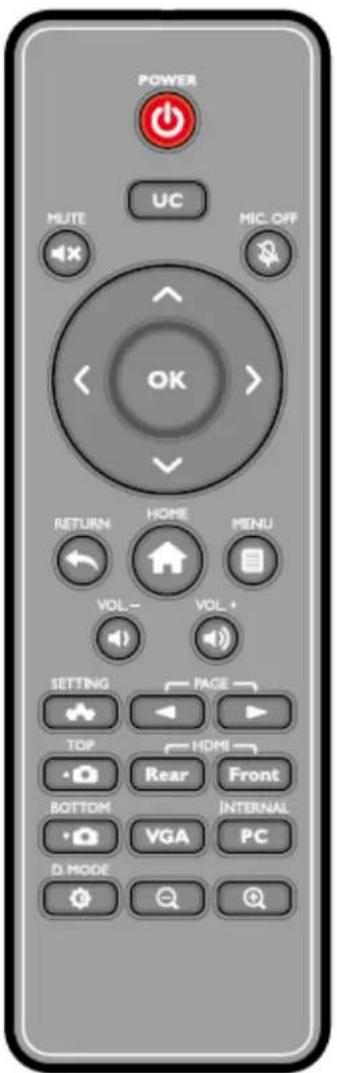
| Button | Function |
| Power On/Off | |
| UC | Start the Default UC Programs |
| Mute | |
| Microphone Mute | |
| Up/Down/Left/Right | |
| OK | Confirm/OK |
 | Return to Previous/Exit |
 | Go to the Home Page |
| [232K] | Open the Menu |
 | Switch to Top Camera |
 | Switch to Bottom Camera |
 | Increase Volume |
 | Decrease Volume |
 | Settings |
 | Switch Source to HDMI Front |
 | Switch Source to HDMI Rear |
 | Switch Source to VGA |
 | Switch Source to Internal PC |
 | Page Up |
 | Page Down |
| [327H] | Toggle Display Mode |
 | Zoom Out (PC) |
 | Zoom In (PC) |
2 Installations
2.1 Safety Precautions
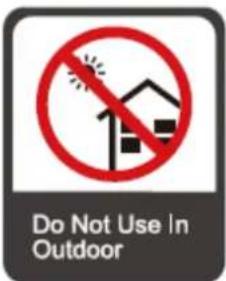
Installation Environment

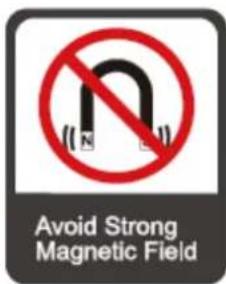
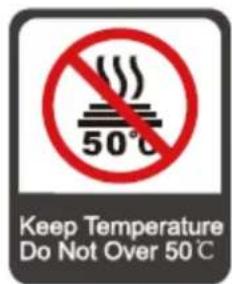



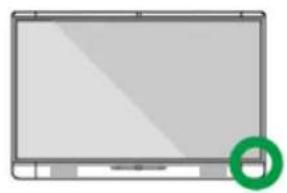
Installation Direction
natural_image
Illustration of a laptop with a green circular icon on the right side (no text or symbols)Hang the Unit Horizontally
natural_image
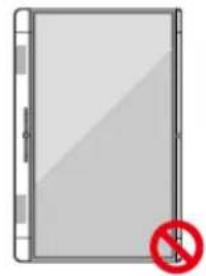
Illustration of a tablet device with a red prohibition symbol (no text or labels)No Vertical Installation
natural_image
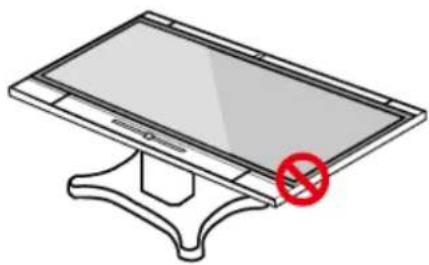
Illustration of a flat-screen monitor with a red prohibition symbol on the stand (no text or labels)Do Not Lay Flat
Installation Height
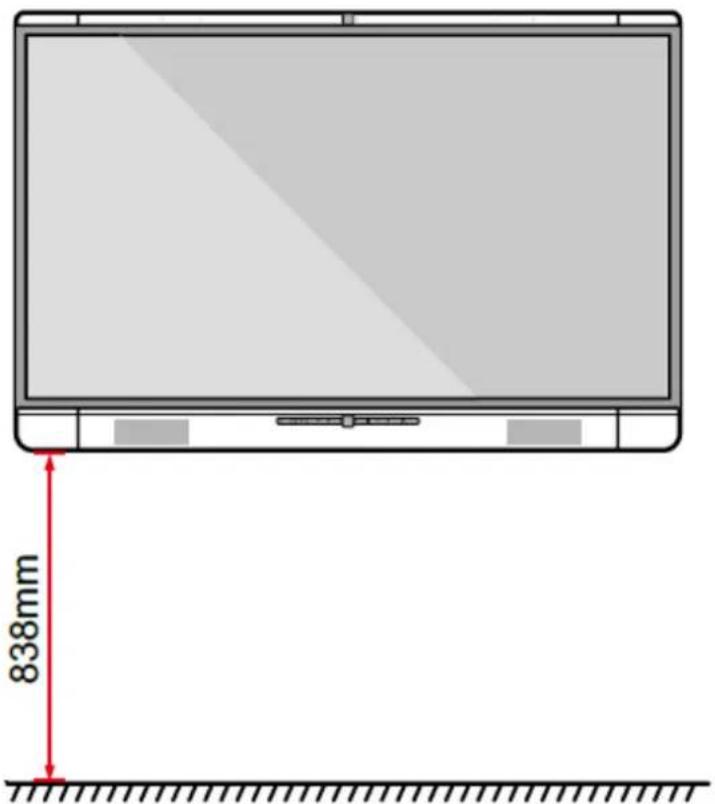
2.2 Installation Precautions
Weight Loading
- The back of the panel is equipped with holes in VESA standard. Please use a VESA standard mounting system.
- When using a mobile cart, please ensure the mobile cart has no less than 80kg loading capacity.
• Weight of the unit: 143.3 lb/65kg - When using wall-mount bracket, please ensure the wall can support the weight of the unit. We recommend that the wall surface is reinforced, and have a loading capacity twice the weight of the unit. Please consult a professional installer for wall-mount installation.
- Do not install the unit where it might be hit by a door.
Ventilation
Ensure adequate ventilation and/or air conditioning environment. We recommend to keep certain distance from the side of the unit to the wall or panels. Ventilation requirement is showed in following figure.
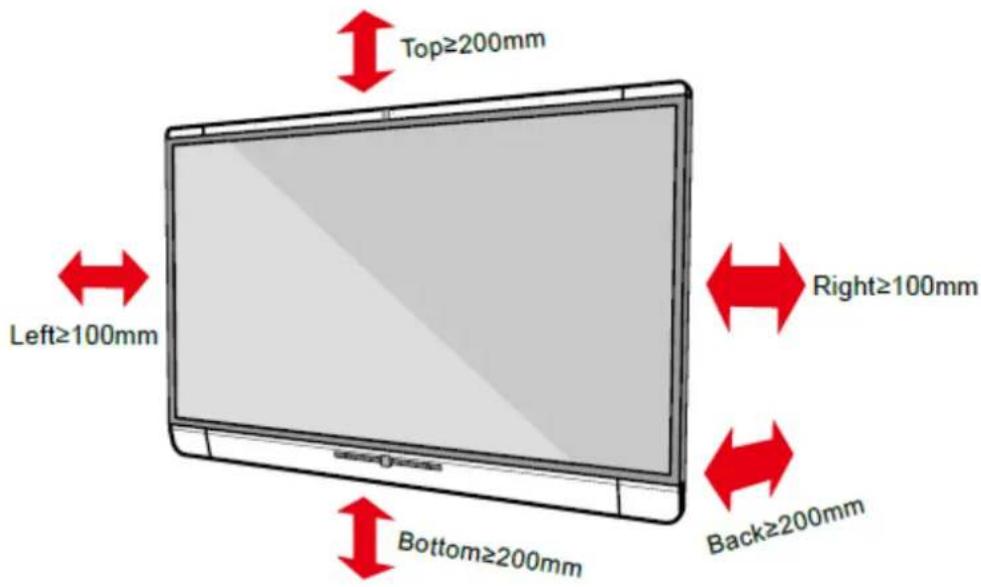
2.3 Installation
The dimensions of the 4 bracket mounting holes in the back panel is VESA MIS-F compliant (400 x 400mm). Please use the metric M8 screws with length of 10 to 15mm to secure the touch screen with the mounting system. Dimensions of the mounting holes in the back panel is shown in the following figure.

NOTE
Please have a professional installer to install the display unit.
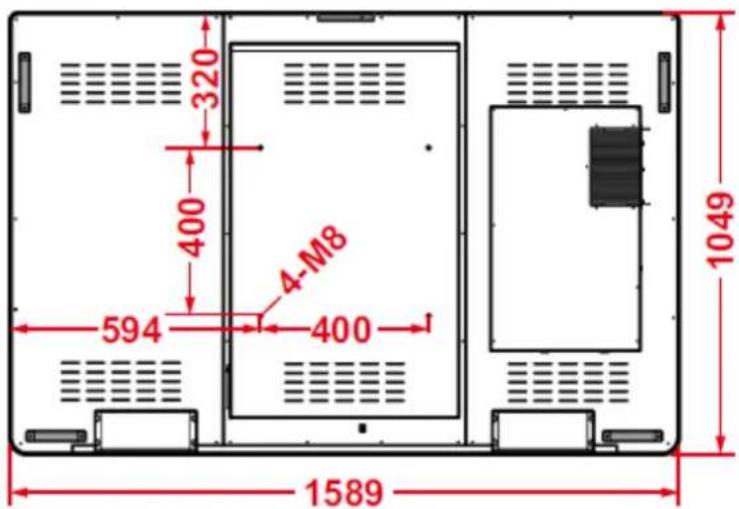
Unit: mm
3 Preparation
3.1 Power On
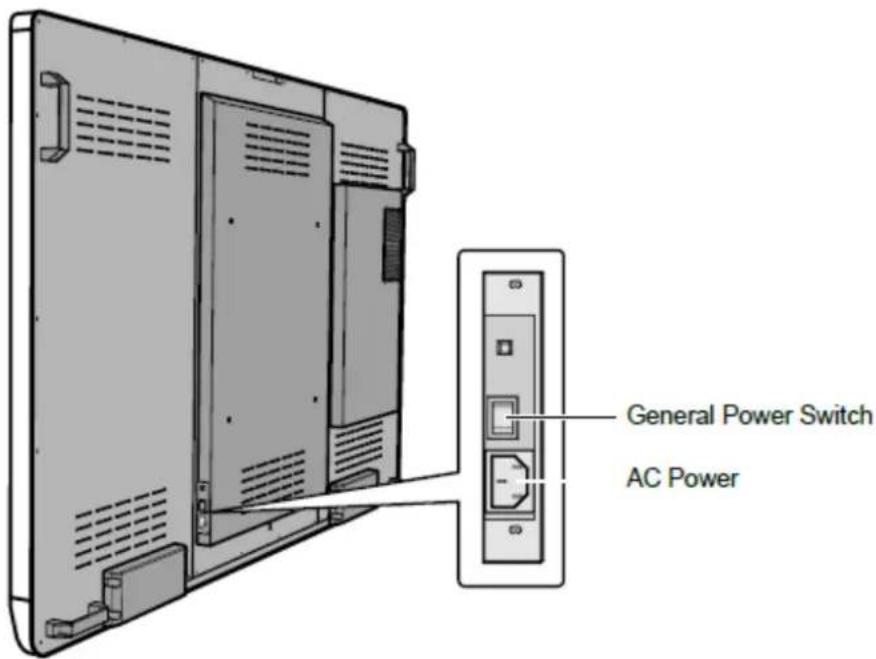
Step 1 Plug in the power plug to the power outlet, and plug in the power connector to the side of the unit. Please ensure the power is in the range of 100V-240V with frequency at 50Hz/60Hz ±5%. The power current must be grounded.
Step 2 Turn on the general power switch located on the side of the unit.
3.2 Power Off
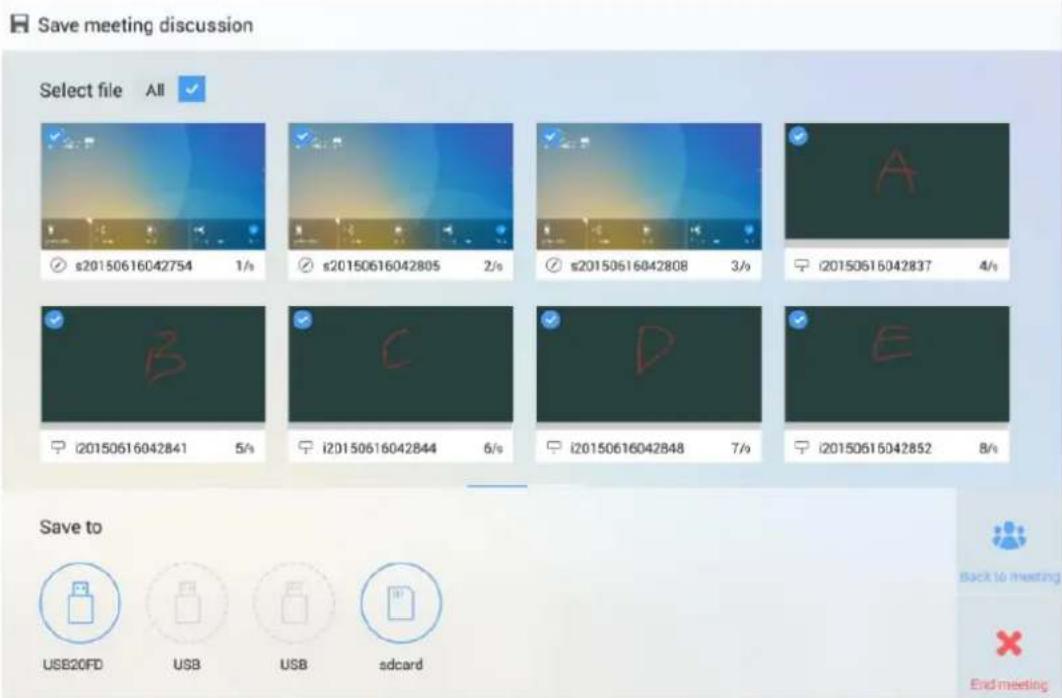
Step 1 Press the power button 🎨 on the front panel or the power button 🔒 on the remote control. The Save meeting discussion page is displayed as follows.
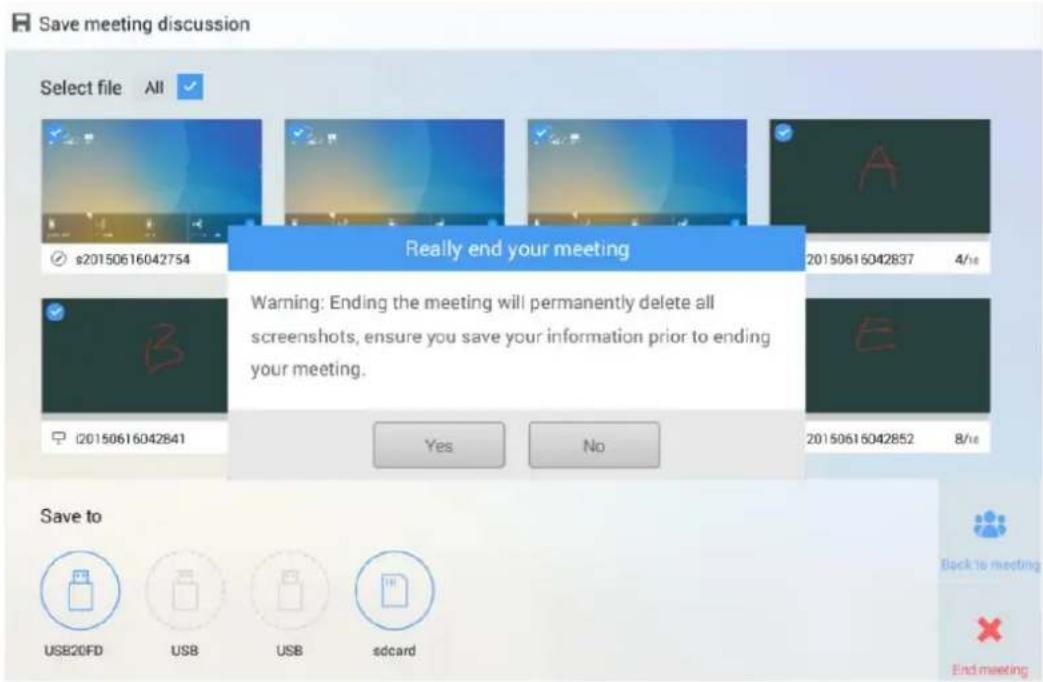
Step 2 Press the power button 🎨 on the front panel or the power button 🔊 on the remote control again. The Really end your meeting dialog box is displayed as follows.
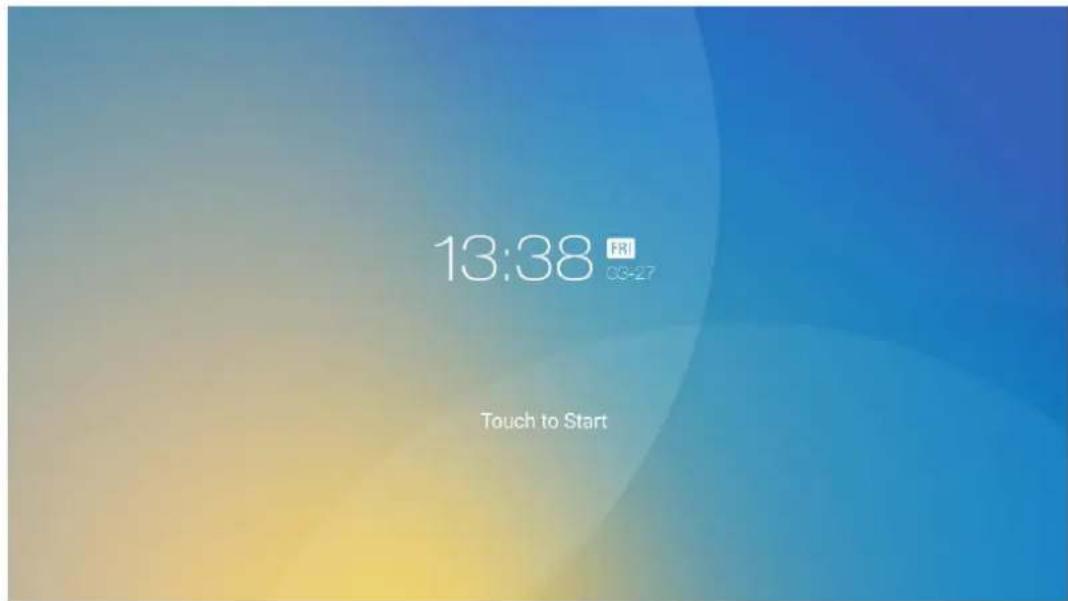
Step 3 In the Really end your meeting dialog box, click Yes. The meeting start page is displayed as follows.
Step 4 Press the power button 🎨 on the front panel or the power button ⏻ on the remote control again to power off the panel. The power indicator turns off.
Step 5 If you are not going to use the unit for an extended period of time, we recommend you to switch off the general power switch.
3.3 Position
If the cursor position has a big deviation from the actual touch point, calibration is used to eliminate the deviation. Positioning is required in the following scenarios:
• The computer with OPS inserted is used.
• The computer is connected through the HDMI or VGA interface.
NOTE
Interface operation on Android system does not need positioning. External devices with Microsoft Windows 7 or later versions require positioning.
If the positioning is not correct, perform the following operations to calibrate again:
Step 1 Ensure that the HDMI or VGA interface and external devices are connected properly.
Step 2 Select the corresponding signal source on the signal source page. The Windows page is displayed.
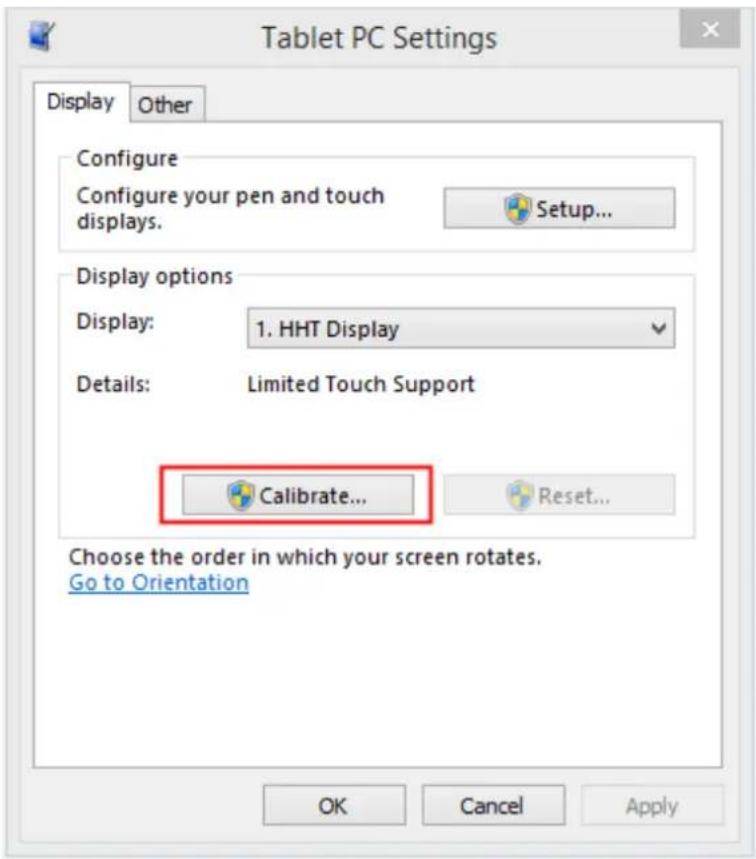
Step 3 Select Tablet PC Settings on the Control Panel page.
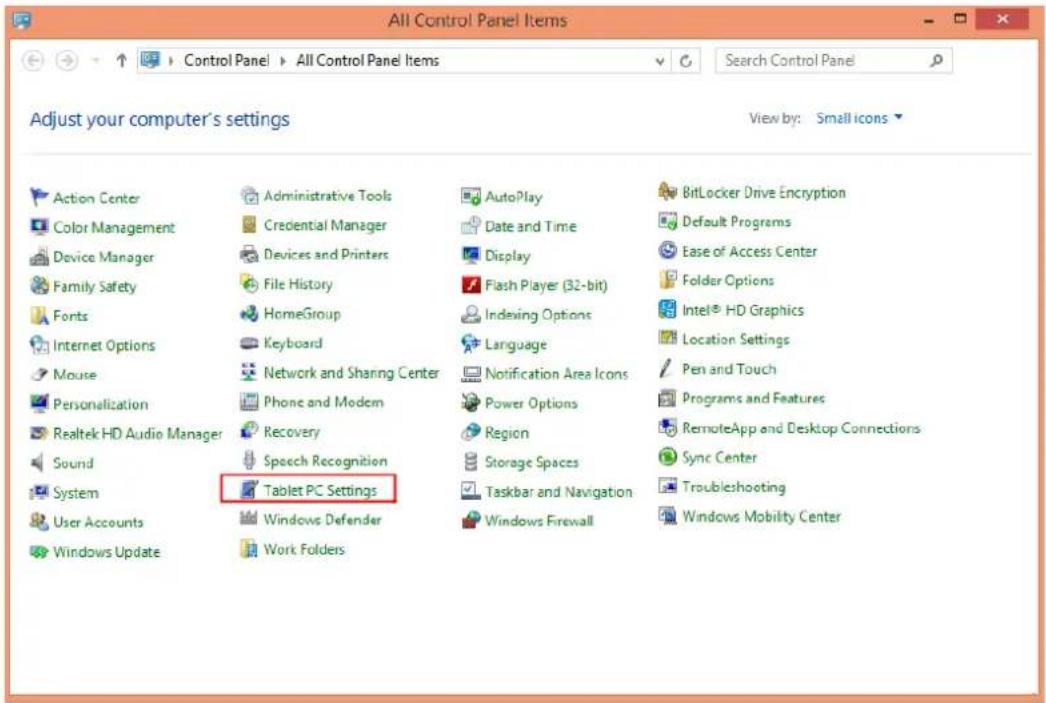
Step 4 Select

Calibrate...
in the Tablet PC Settings window.
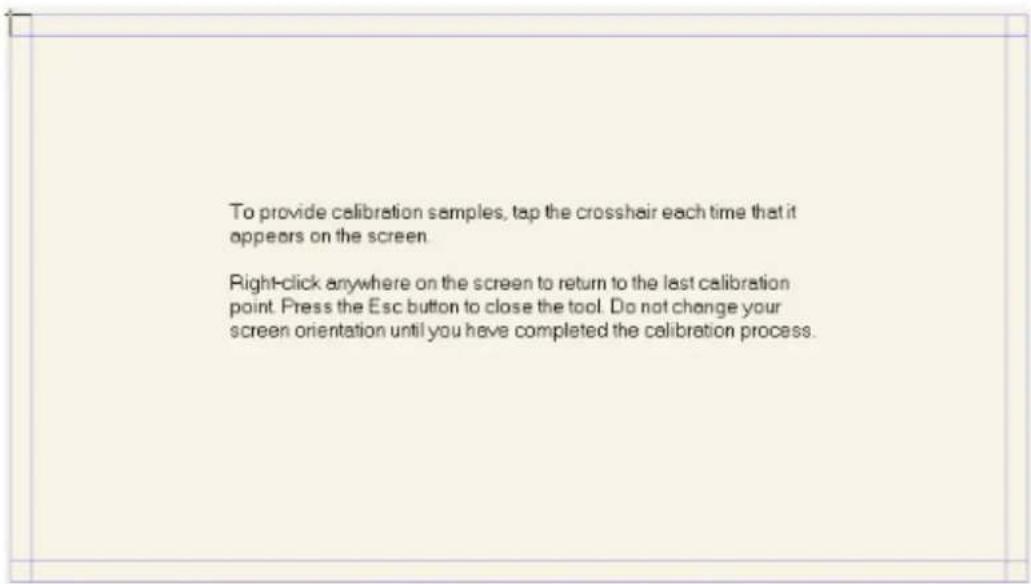
Step 5 Use the pen to click and hold the center of the flickering cross. Do not release it until moves to the next positioning point. Complete the calibration process as instructed.
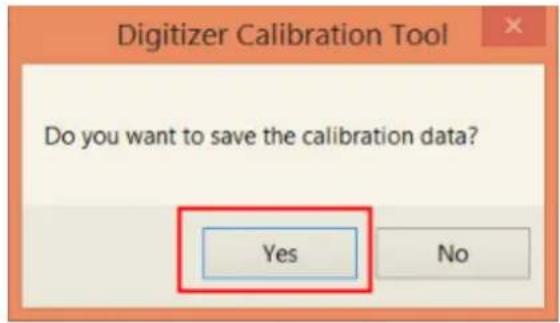
Step 6 After the calibration is complete, the Digitizer Calibration Tool dialog box is displayed. Click Yes to save calibration data.

TIP
- To ensure writing accuracy, you are advised to use the pencil released with the product for positioning.
- Positioning errors may cause failure of touch functions of the display. In that case, please perform positioning again.
Step 7 The Tablet PC Settings dialog box is displayed again. Click OK. The positioning is complete.
----End
4 System Applications
4.1 Home Page
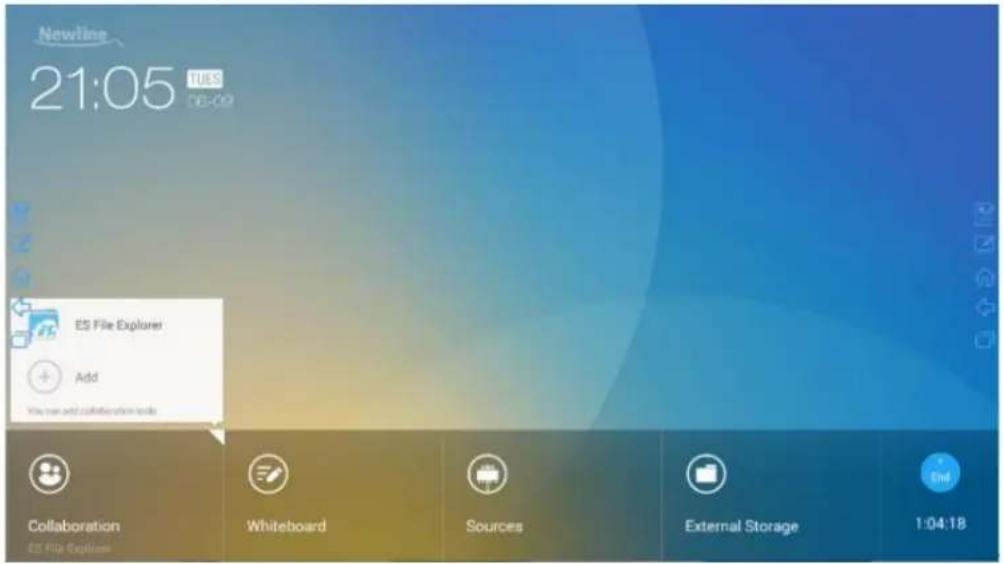
When the unit is turned on, it will show the “Meeting Start” page. User can touch the screen to start a meeting, and the unit will go to the Home page. See following figures.
Figure 4-1 Meeting Start page
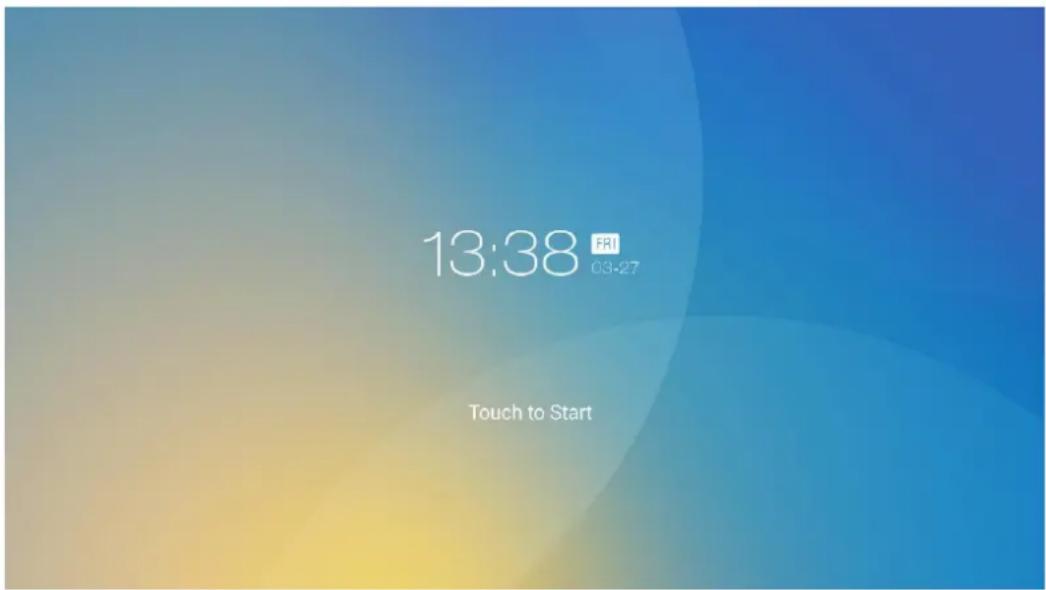
Figure 4-2 Home Page
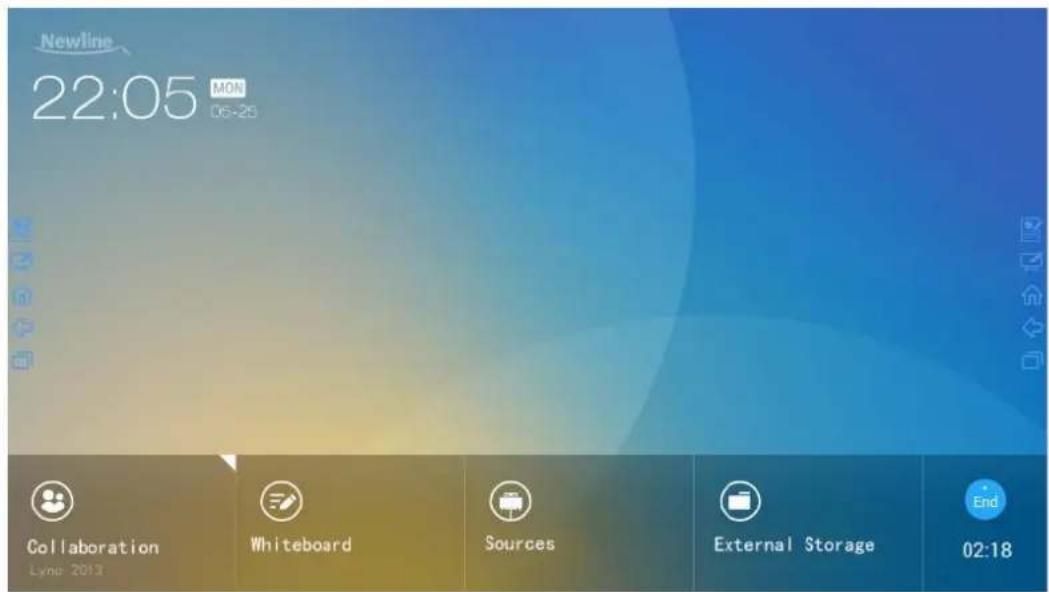
- Collaboration
User can touch here to start the default UC programs, or touch the small "triangle" to set three frequently use UC programs. The default UC program is the one used last time.
- Whiteboard
The "Whiteboard" provides whiteboard and screen annotation functions.
Sources
Customer can select one of the four sources to display, including HDMI Front, HDMI Rear, Internal PC and VGA.
- External Storage
Open up the file manager to open files from external USB disk.
• End
Press “End” to end a meeting. Customers will have the choice of saving the discussion boards screen captures and ending the meeting. Once a meeting is ended, all discussion boards will be cleared.
Quick Access Buttons on Both Sides
• : Start the Annotation Mode of Whiteboard
• : Start the Writing Mode of Whiteboard
• : Go to Home Page
• ←: Return to Previous App / Exit
• : Switch Apps
4.2 Assistant Meeting
4.2.1 Newline Assistant
Introduction
Newline Assistant is a tool used to obtain applications required by users on Windows system. On Android system, you can start Windows applications by clicking one button.
Installation
Step 1 Connect Internal PC correctly.
Step 2 On the home page, click Sources.
Step 3 On the displayed signal source selection page, select PC. The Windows page is displayed.
Step 4 Log in to the website www.newline-interactive.com and choose Products > Software to download Newline Assistant installation package.
Step 5 Install Newline Assistant as instructed.
4.2.2 Switch Applications
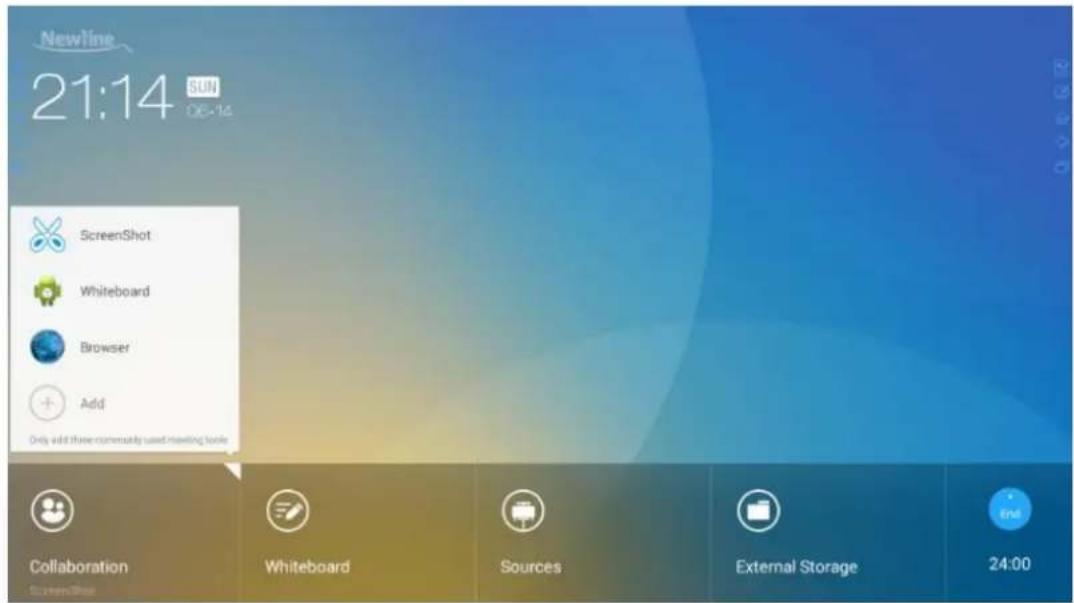
On the home page, click Collaboration to start applications used last time, or click the triangle at the upper right corner of Collaboration to open the application list and select current applications to start the collaboration meeting. See the following figure.
4.2.3 Add or Delete Applications
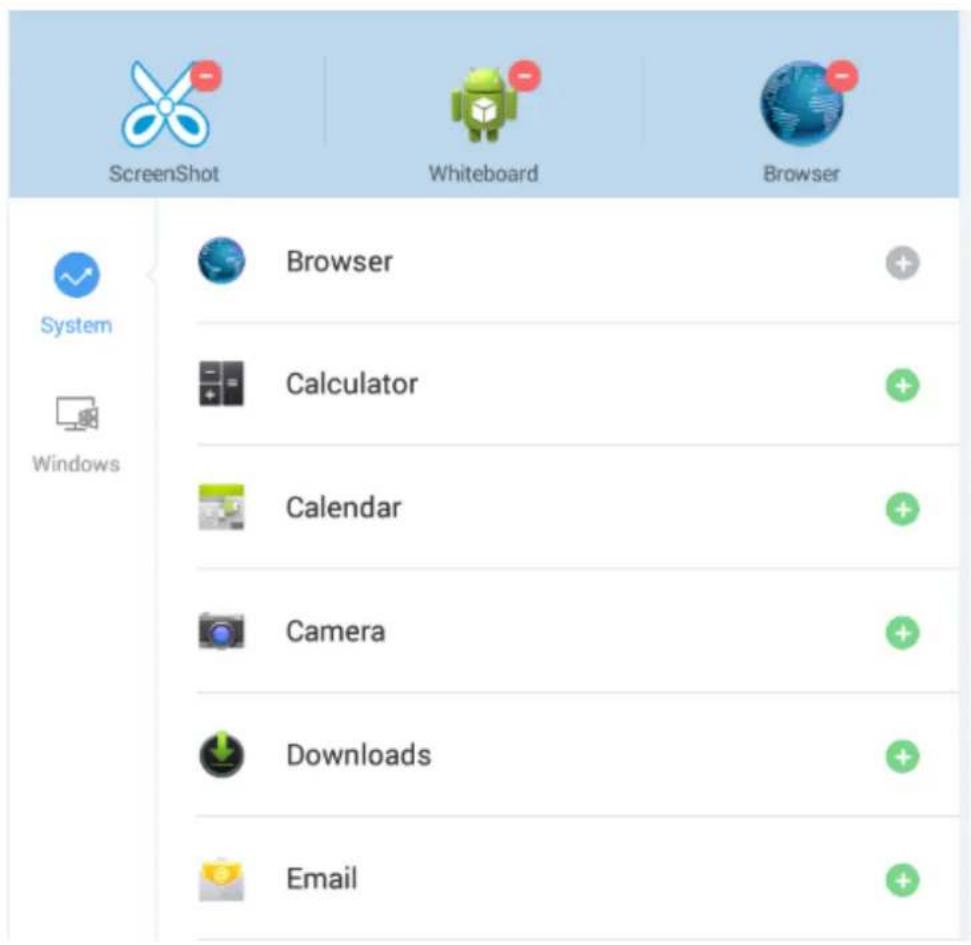
To change meeting software, click the triangle at the upper right corner of Collaboration, click Add on the displayed menu, and add or delete applications on the application customization page. The following figure shows the application customization page.

NOTE
The Windows icon on the left navigation area is available only when the Collaboration Touch Screen has Internal PC.
Add Applications on Android System
Step 1 On the application customization page, click √ to view applications on Android system.
Step 2 In the application list displayed on the right area, click + on the right of an application to add the application.
A maximum of 3 applications can be added. This is displayed on the right of an application that has been added.
Step 3 Return to the home page, click the triangle at the upper right corner of Collaboration, and click the added application on the displayed menu. After the application is started once, its name will be added to the lower area of the Collaboration button, and users can fast start the added application by only clicking Collaboration.
Add Applications on Windows System
Step 1 Run the Newline Assistant application on Windows system, and select applications to be added in the displayed Newline Assistant window.
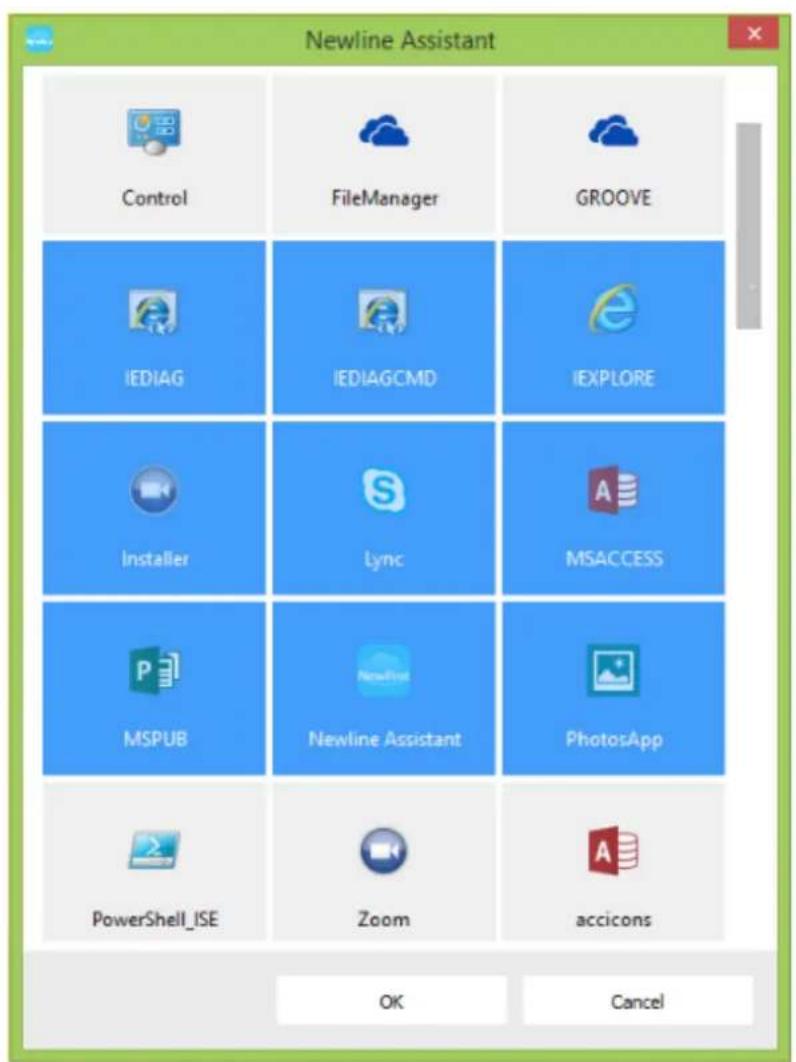
Step 2 Click to return to the home page. Click the triangle at the upper right corner of Collaboration and select Add on the displayed menu. The customization page is displayed.
Step 3 On the customization page, click Newline Assistant in Step 1.

to view all Windows applications added using
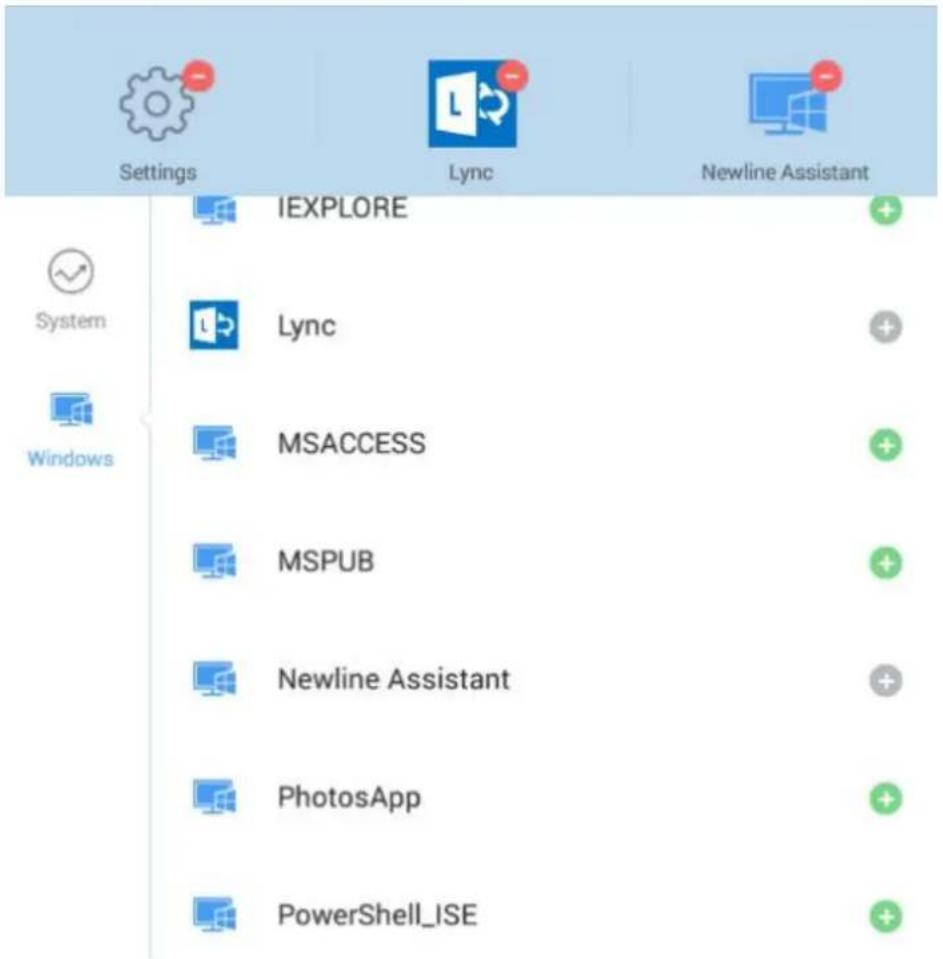
Step 4 Add applications on the page described in Step 3.
In the application list displayed on the right area, click + on the right of an application to add the application. A maximum of 3 applications (including Android and Windows applications) can be added. is displayed on the right of an application that has been added.
Step 5 Return to the home page, click the triangle at the upper right corner of Collaboration, and click the added application on the displayed menu. After the application is started once, its name will be added to the lower area of the Collaboration button, and users can fast start the added Windows application by only clicking Collaboration.
Delete Applications
On the application customization page, click at the upper right corner of an application to delete the application. After an application is deleted successfully, restores to .
4.3 Whiteboard
- Writing or Annotation On the whiteboard page, you can select pen type, width, and color to write or annotate. Also erase selected content or clear all contents.
- File management Preview, select, copy or delete a file.
To access the whiteboard meeting, click Whiteboard. See the following figure.
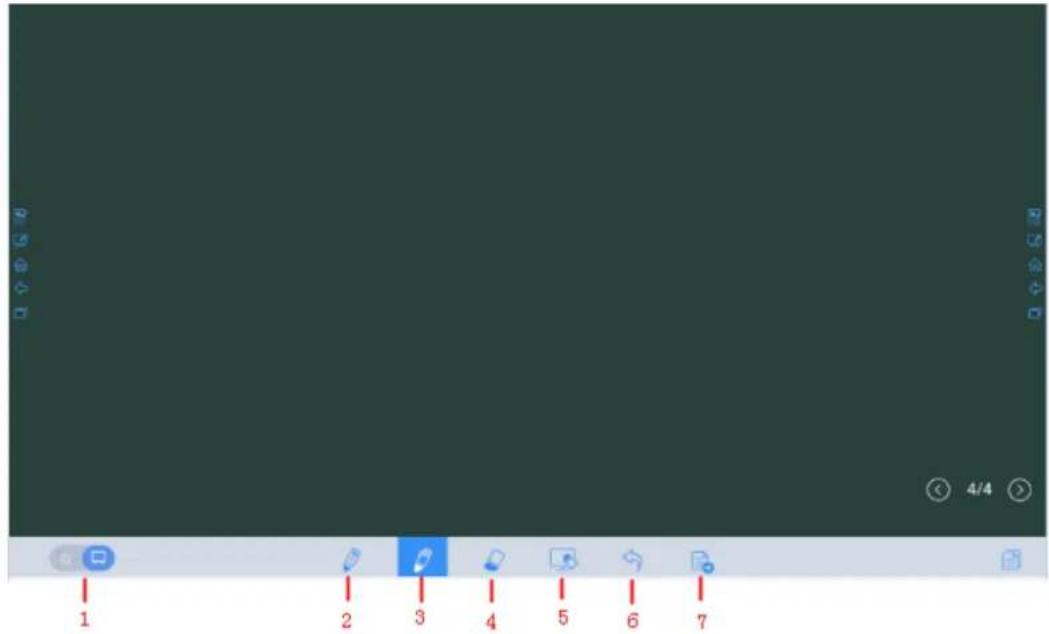
| SN | Icon Name |
| 1 | Switch between writing and annotation modes. |
| 2 | Hard pen |
| 3 | Highlighter |
| 4 | Eraser |
| 5 | Clear |
| 6 | Undo |
| 7 | New slide Only writing mode has this function. In annotation mode, Only writing mode has this function. In annotation mode, placed with placed with  (screenshot). For details about writing and annotation modes, see section Whiteboard Mode. (screenshot). For details about writing and annotation modes, see section Whiteboard Mode. |
4.3.1 Whiteboard Functions
New Slide and Settings
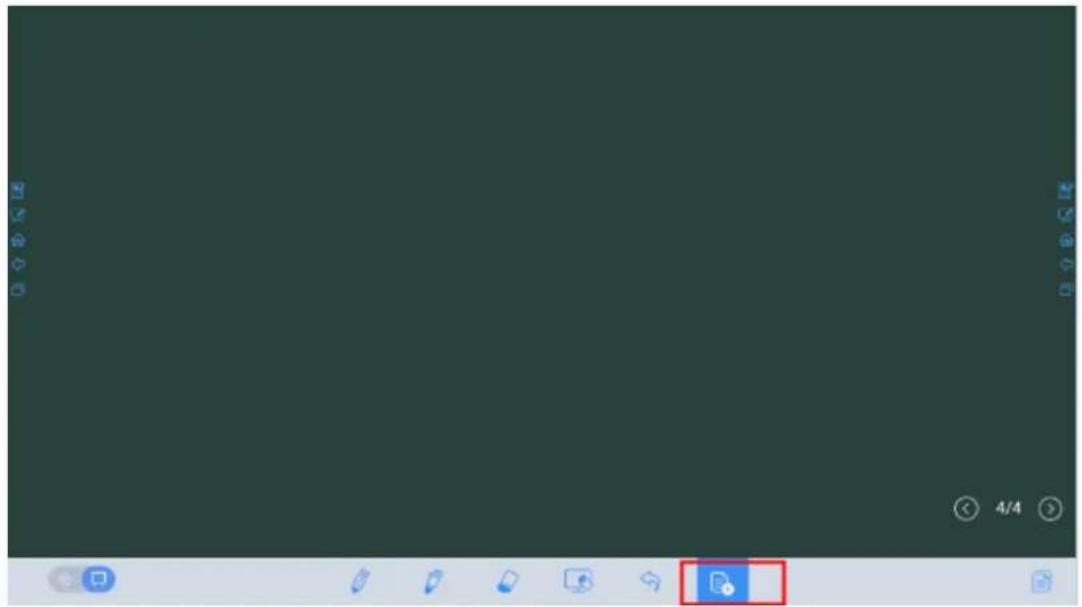
- Create a new slide
In writing mode, click to create a new slide. A maximum of 20 slides can be created. See the following figure.
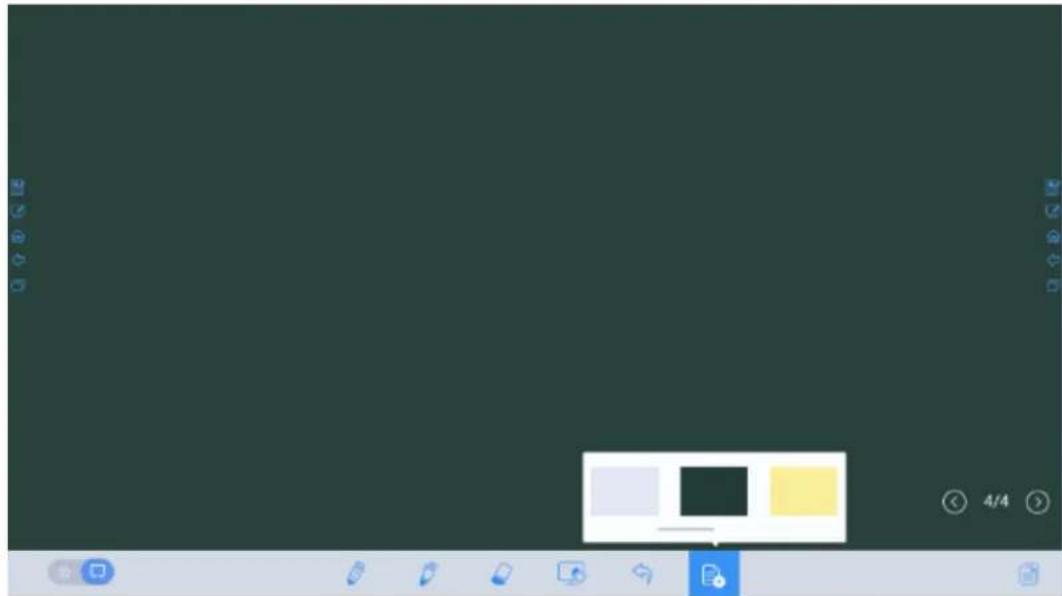
- Slide settings
Click and hold to set the background color of new slides. See the following figure.
natural_image
Blank dark image with a small white rectangle and yellow square in the center, no visible text or symbols.Whiteboard Mode
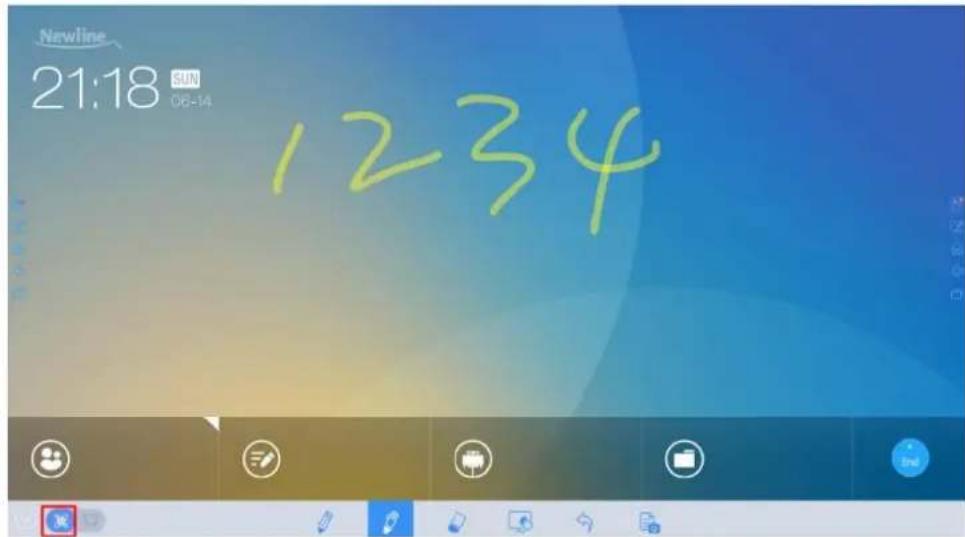
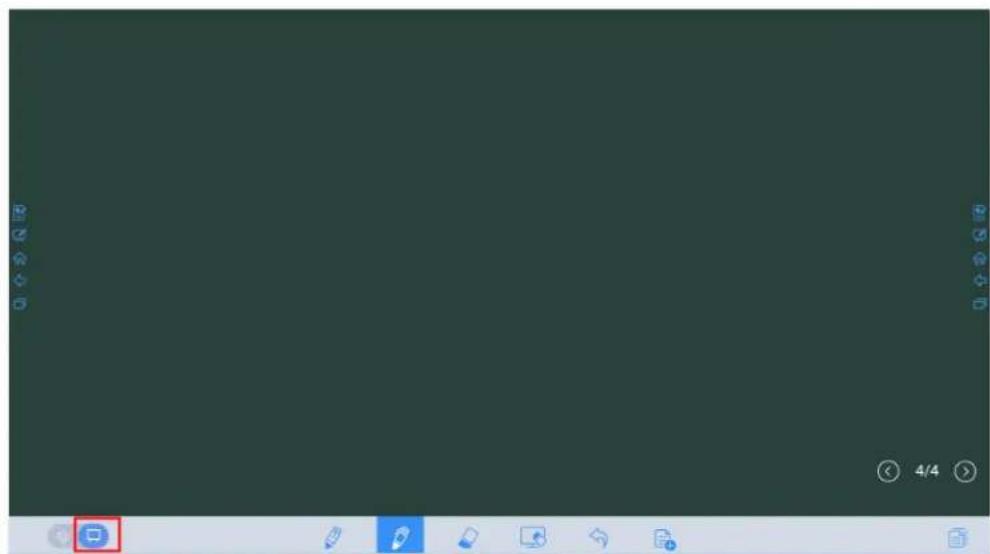
Click and at the lower left corner of the whiteboard to switch whiteboard modes.
• : Annotation mode
The background is transparent and the real-time image of the current signal source is displayed. You can comment on presentation content such as Office documents and pictures as required. See the following figure.
- : Writing mode
The background is in mono color. You can write content as required. See the following figure.
Pen Type
On the whiteboard, two types of pens are supported: hard pen and highlighter. Their icons are
• Hard pen: used to write.
- Highlighter: used to comment. Characters covered by comments are visible.
Line Type and Color
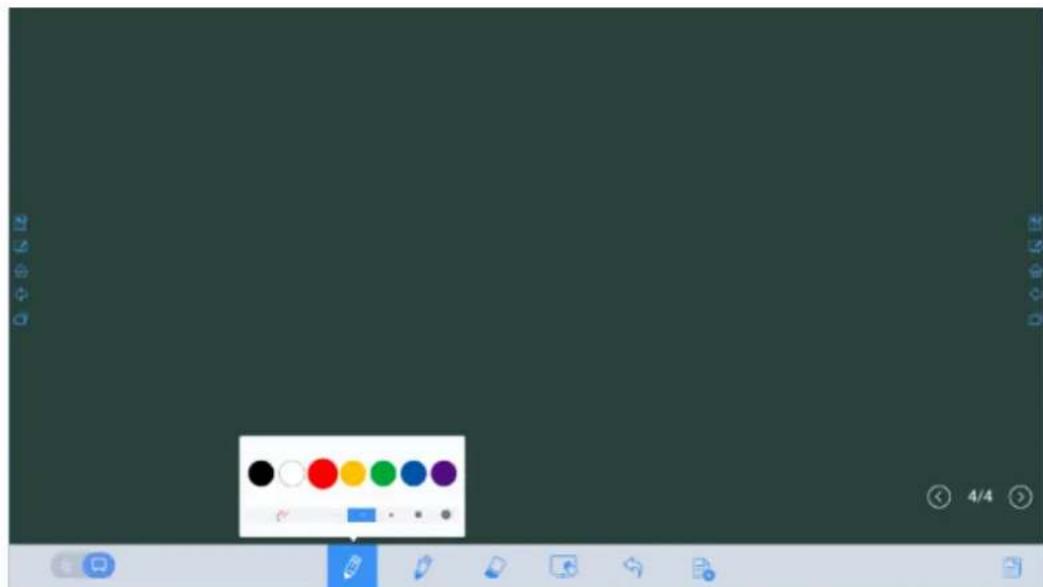
On the whiteboard, click and hold for . The line type and color selection page is displayed. You can select the line type and color for writing. See the following figure.
natural_image
Computer desktop with blank canvas and tool icons at bottom (no readable text or symbols)Eraser
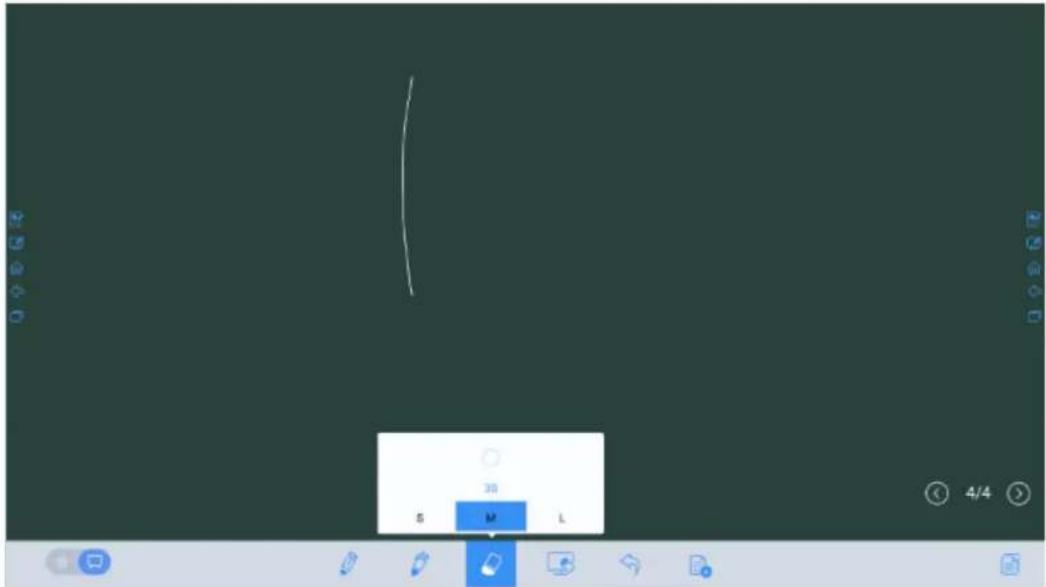
Two methods are available to erase written errors or content as follows:
- Use five fingers to touch the screen and a round is displayed indicating the scope for erasing. Move the round to erase the content that you have written.
- Click to clear wrong or unnecessary content. You can click and hold to set the radius of the eraser. See the following figure.
Screenshot
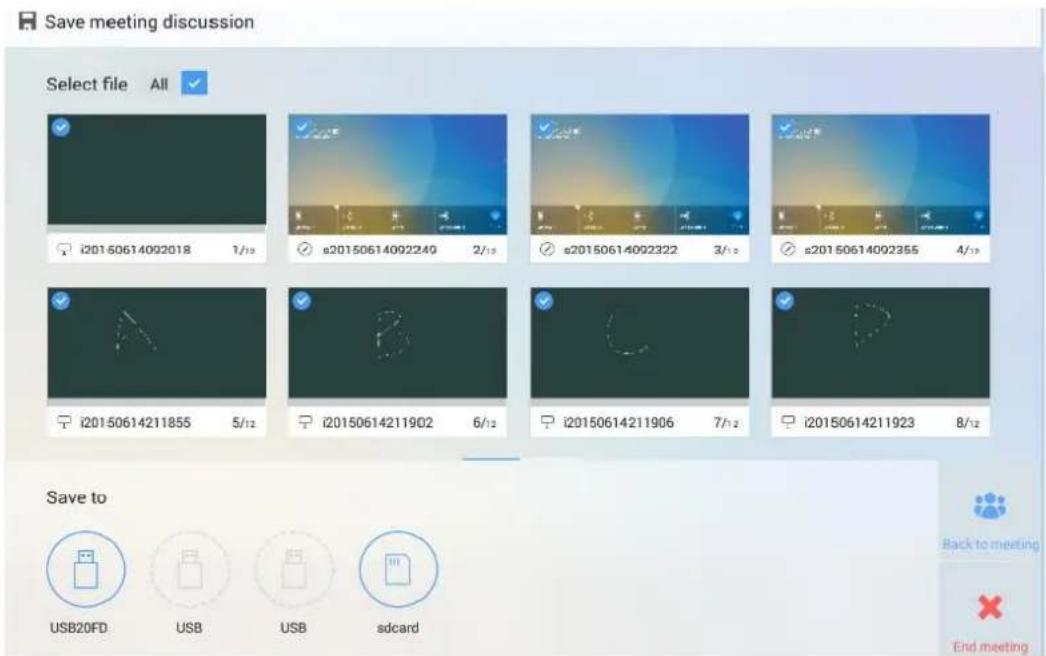
In comment mode, click to save the current image as a picture, as shown in Figure 4-3. After the meeting is ended, save screenshots in the Save meeting discussion dialog box, as shown in Figure 4-4.
Figure 4-3 Screenshot
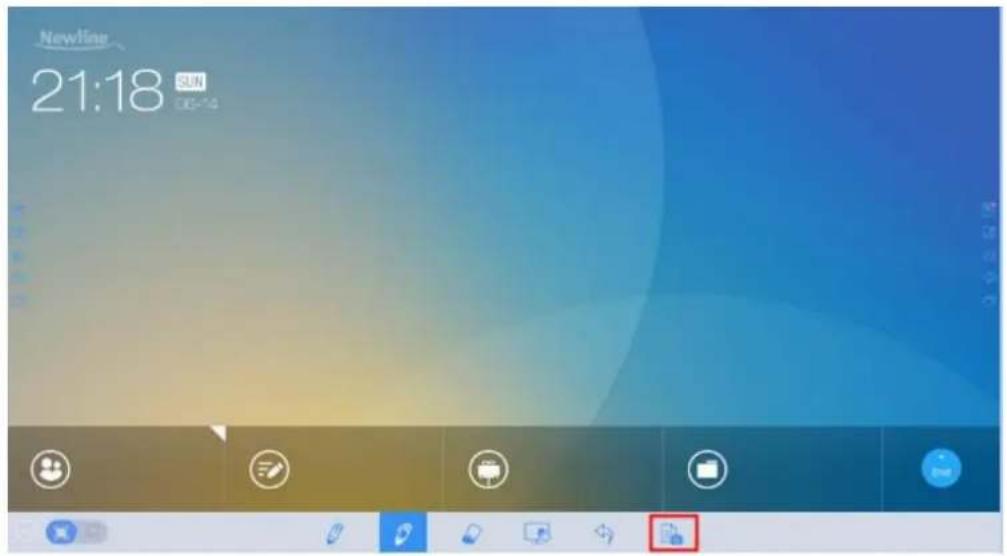
Figure 4-4 Save meeting discussion
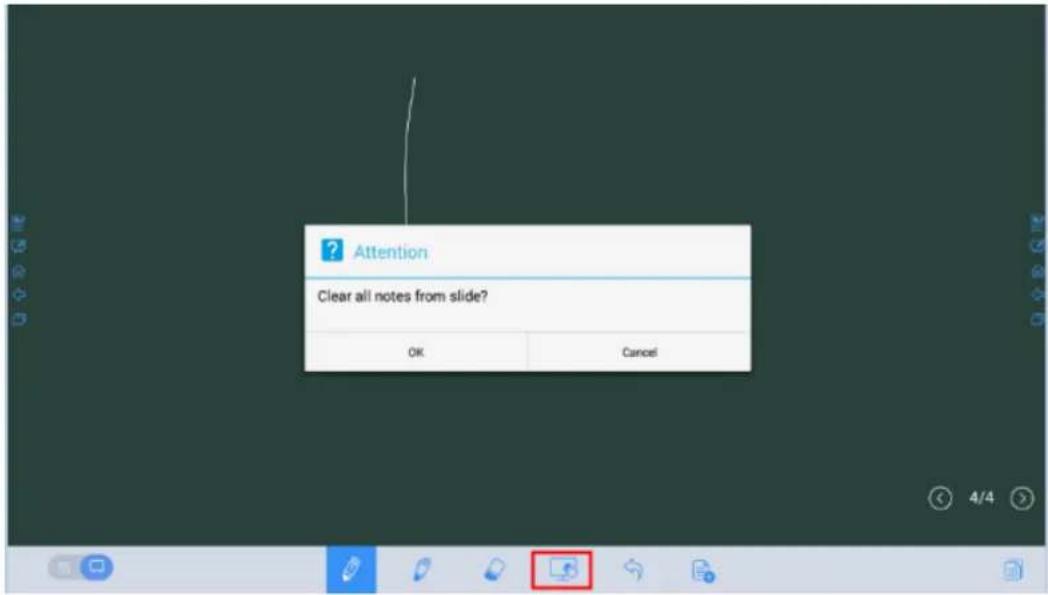
Clear
On the whiteboard page, click to clear all contents on the current writing slide, as shown in the following figure.
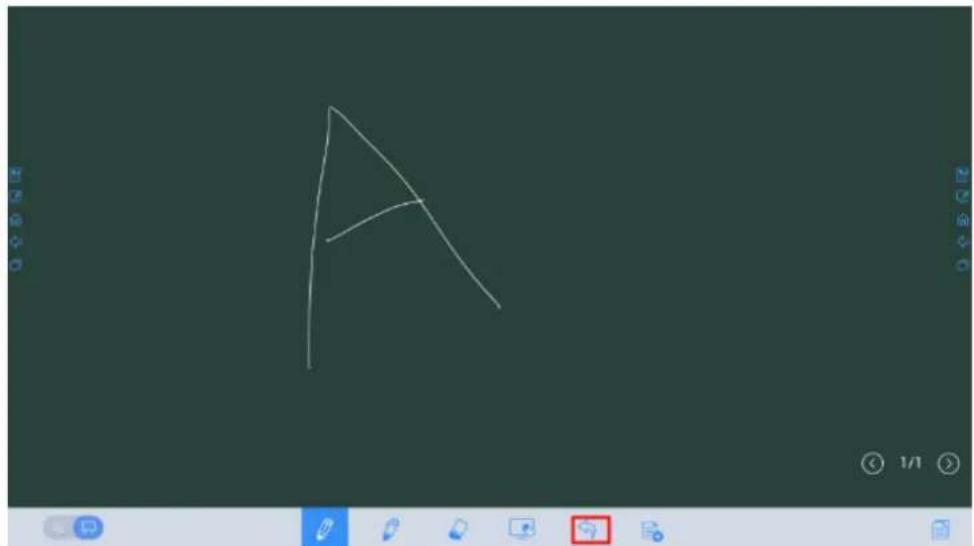
Cancel
On the whiteboard page, click to undo the latest operation, as shown in the following figure.
natural_image
Simple line drawing of a triangle labeled 'A' on a dark background, with no text or symbols present.4.3.2 Slide Operations
You can preview, select, and delete a created writing slide.
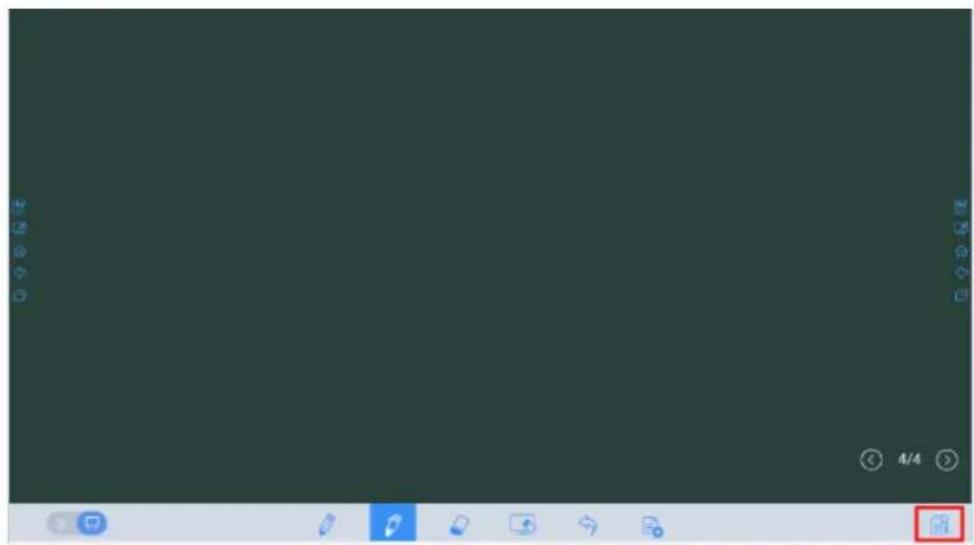
Slide Preview
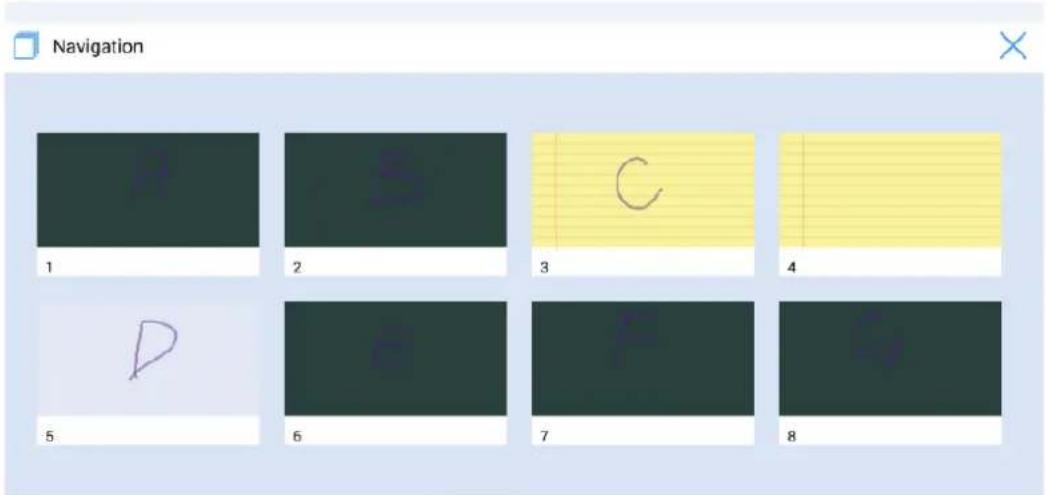
Click at the lower right corner of the whiteboard. All writing slides are displayed. Click one slide to switch to the slide for other operations. See the following figure.

NOTE
Only 8 slides are displayed in each column, and the remaining slides are displayed in the second column. You can slide one finger right or left to switch columns.
Slide Selection and Deletion
Click Ⓥ. The √ and 🔍 buttons are displayed. You can select and delete a writing slide as required. See the following figure.
- Click the slide: to select the current slide.
- Click : to select all slides.
- Click : to delete selected slides.
- Click : Buttons on the left are replaced with .
- Click : to close the Navigation page.

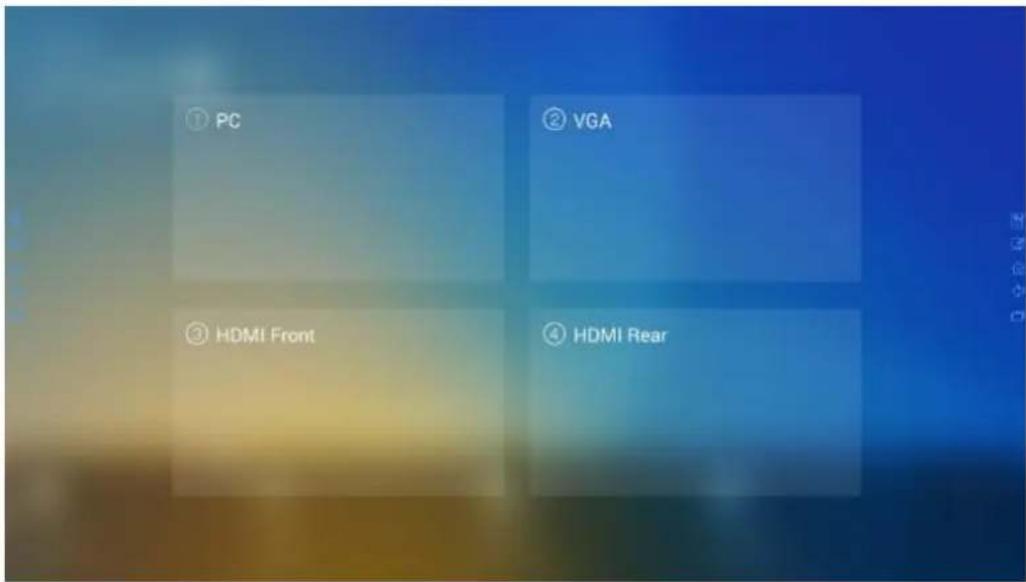
4.4 Signal Source
On the home page, click Sources. The signal source selection page is displayed. You can preview the image of the corresponding signal channel, as shown in the following figure.
If the channel has no signal input, No Signal is prompted. You can click the selected signal source to switch to the corresponding channel in full screen.
4.5 External Storage
The product supports connection to external storage devices. On the external storage page, you can view files stored in all external storage devices (for example, the USB flash disk and SD card) and preview, select, copy, delete and search content in each storage device.
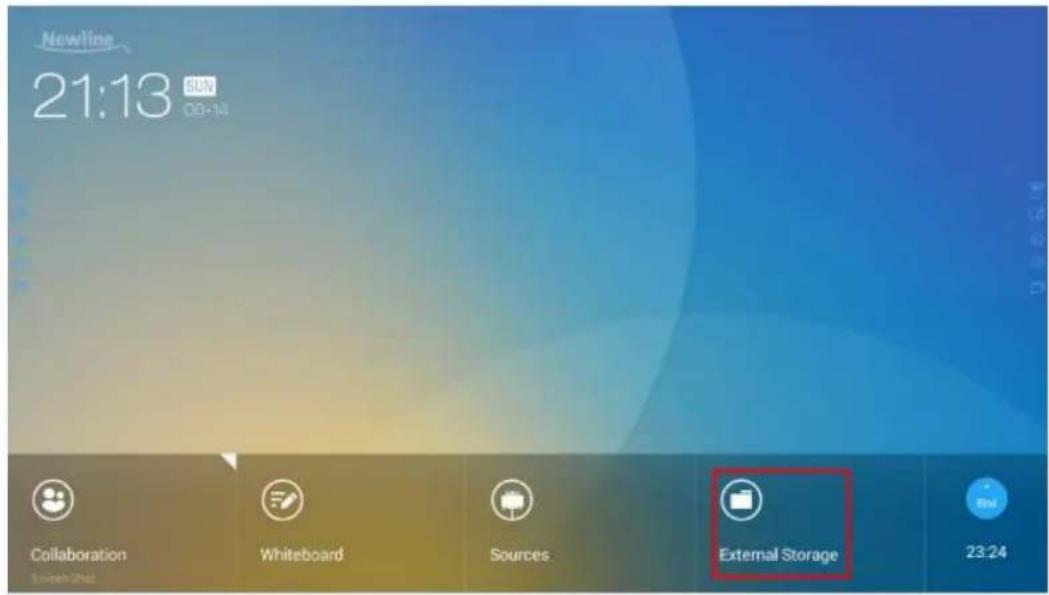
4.5.1 External Storage Page
On the home page, click External Storage as shown in the following figure.
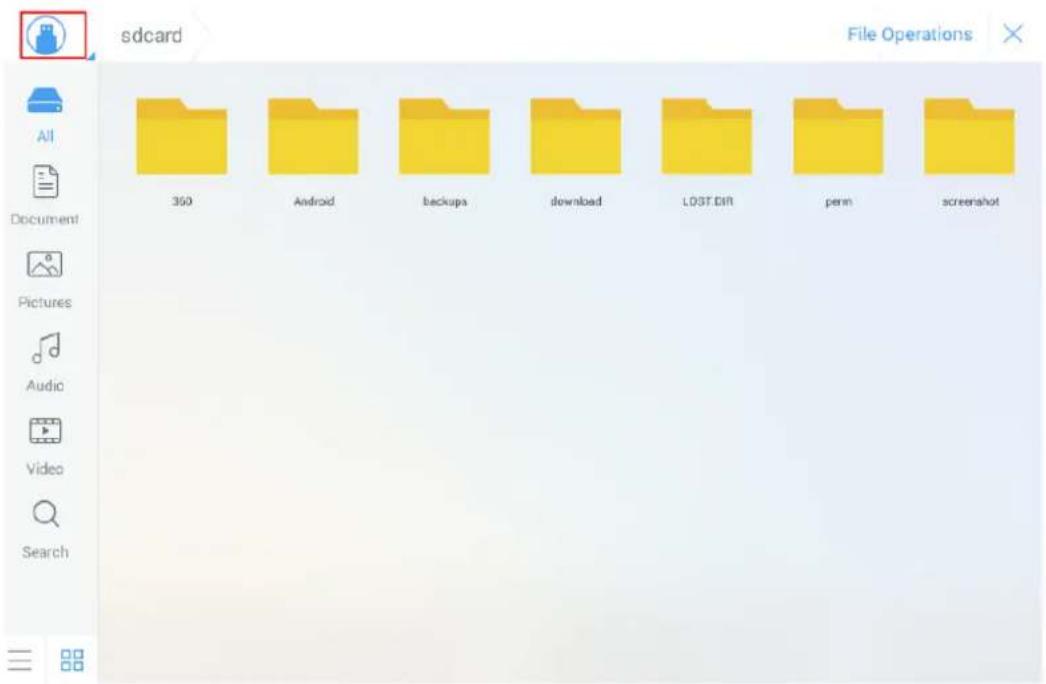
4.5.2 File Preview
By default, files saved to internal storage are displayed. You can click at the upper left corner to view all external storage devices connected to Android USB and preview a specified external storage device. See the following figure.
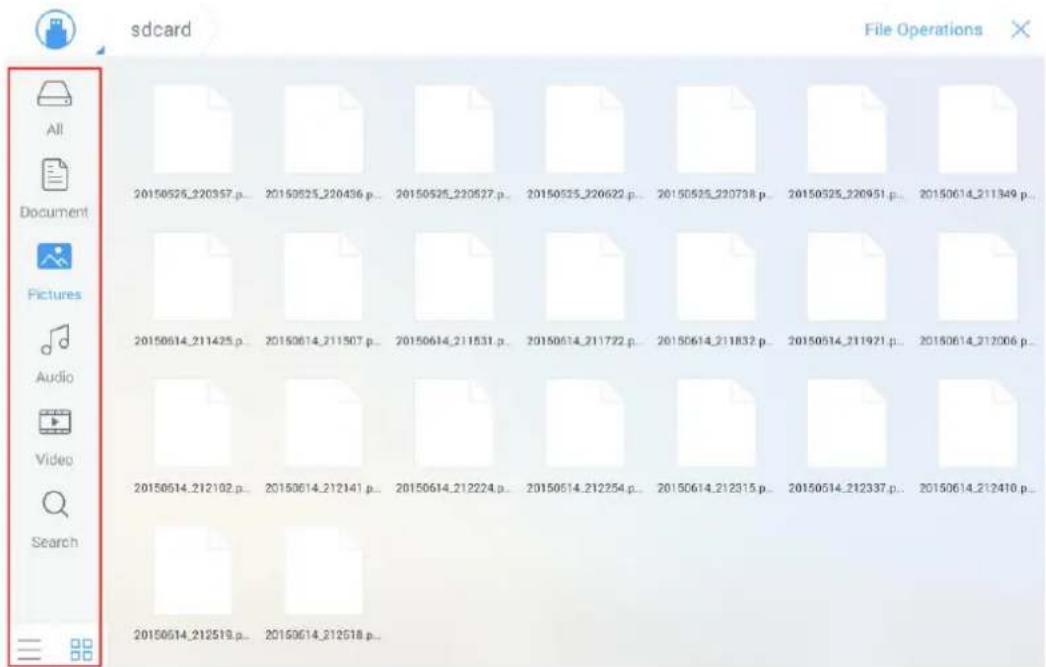
4.5.3 File Filtering
For your convenience, the system displays files by category, for example, document, picture, audio and video. You can click the icons on the left tool bar to filter files.
The system supports two view modes: list and thumbnail. You can click ≡ and □ at the lower left corner to switch view modes, as shown in the following figure.
4.5.4 File Search
Click and enter the key word in the search box. Files matching the key word are listed.
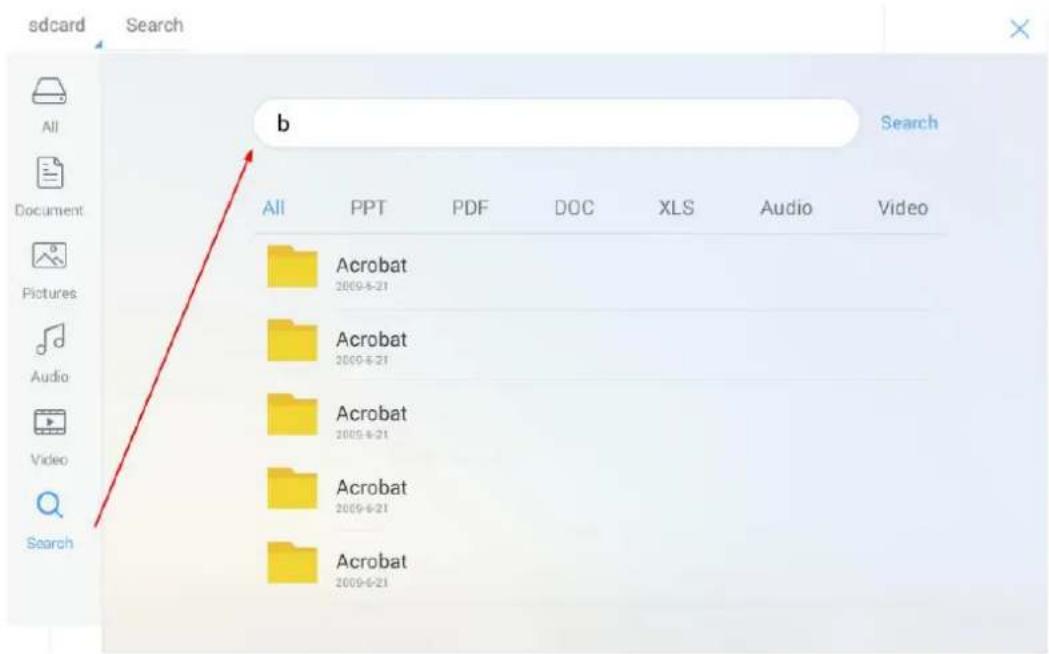
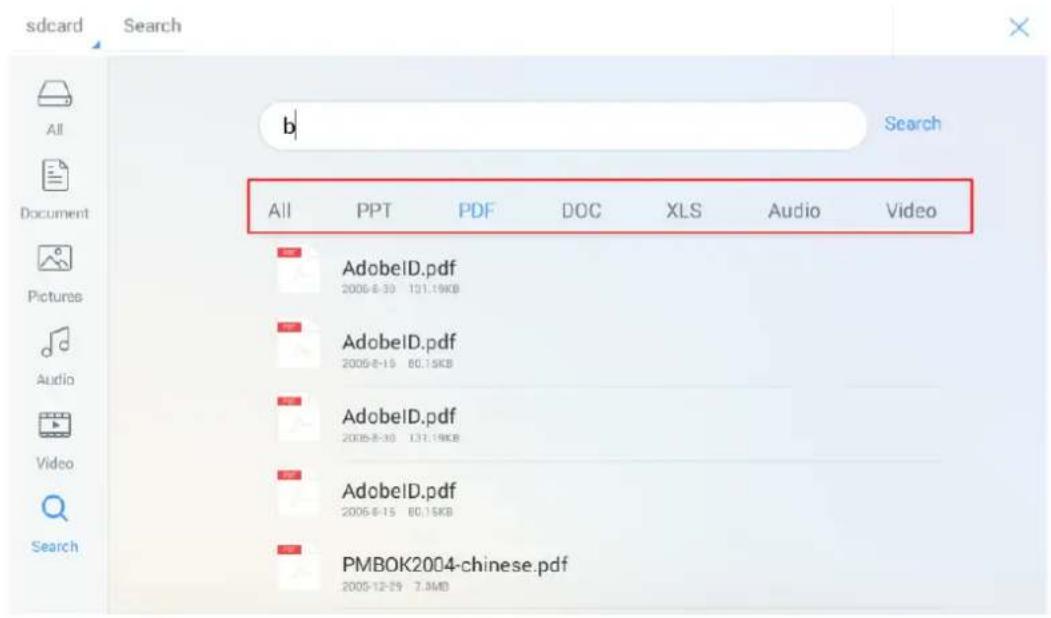
The system supports second filtering for searched files. Click the filtering tool bar below the search box to filter searched files based on PPT, PDF, DOC, XLS, Audio, and Video, as shown in the following figure.
4.5.5 File Operations
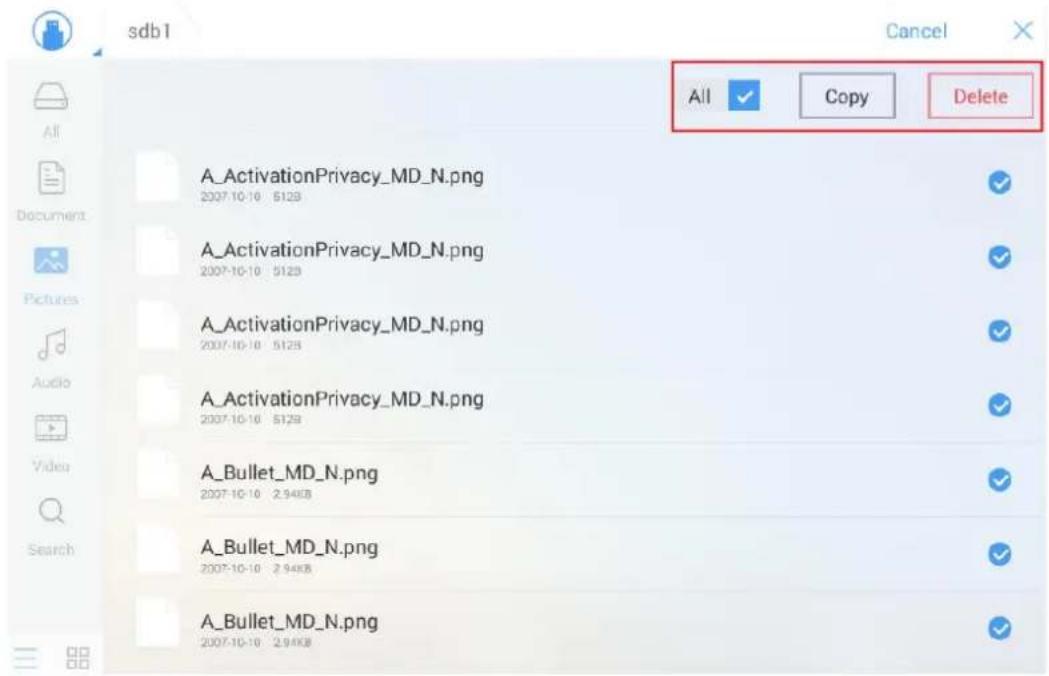
Click to perform operations on files in the storage, including select all files or one file, copy, delete and cancel, as shown in the following figure.
- Click the file: to select the current file.
• All: Select all files.
• Copy: Copy selected files. - Delete: Delete selected files.
- Cancel: Cancel current operation.
4.6 End Meeting
4.6.1 Manually End Meeting
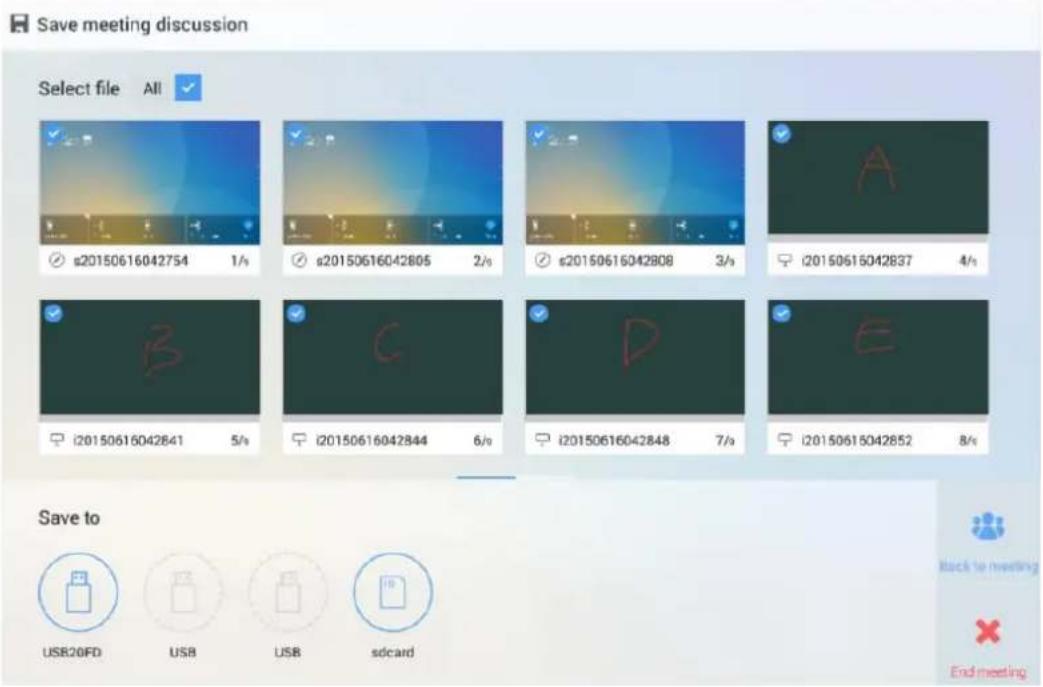
On the home page, click . The Save meeting discussion page will be displayed. The meeting will be ended and timer will stop.
File Naming
Save slides created during the meeting and annotation screenshots on the meeting record page, as shown in the following figure.
The picture is named as the creation time. You can slide right or left with one finger to switch pages.
File Storage
When no external USB flash disks and SD cards are connected, icons in the Save to area are in gray. When an external USB flash disk or SD card is connected, icons in the Save to area will turn into blue. Click the USB or SD card icon in blue. The system stores selected pictures to the "uc" folder under the root folder of the corresponding USB flash disk or SD card.
- Back to meeting: The meeting continues. Files are not cleared and timer continues.
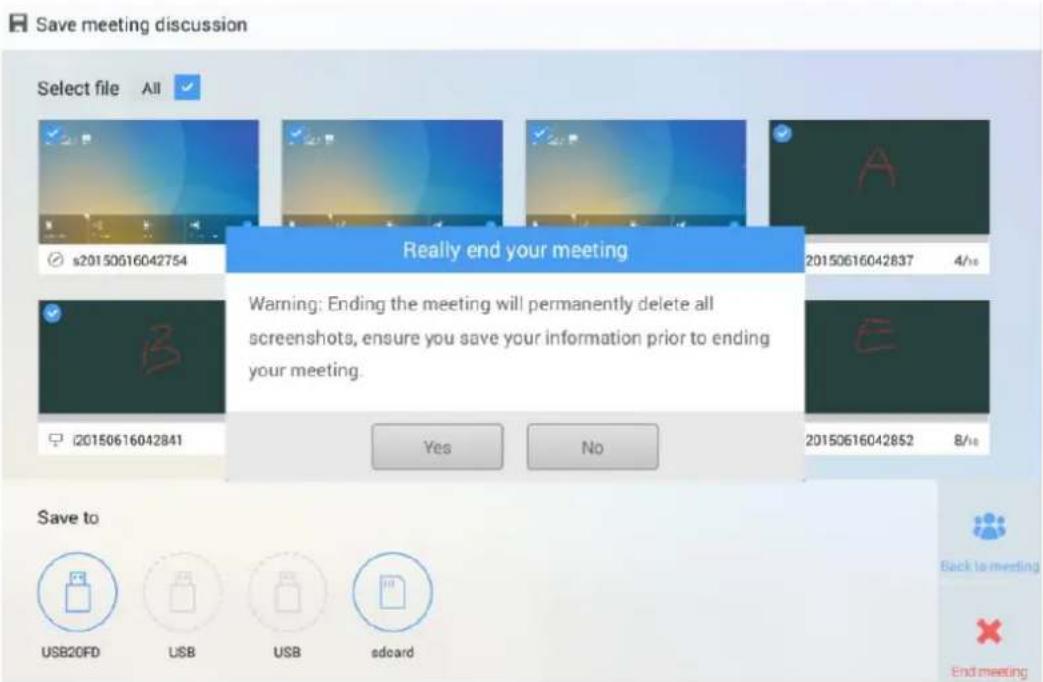
• End meeting: The Really end your meeting dialog box is displayed.
- Click Yes. All writing slides and screenshots will be deleted, and the start meeting page will be displayed (contents not saved to the external storage device will be lost). The current meeting will be ended and the timer will stop.
- Click No. The meeting continues and the system stays on the Save meeting discussion page.
4.6.2 Automatically End Meeting
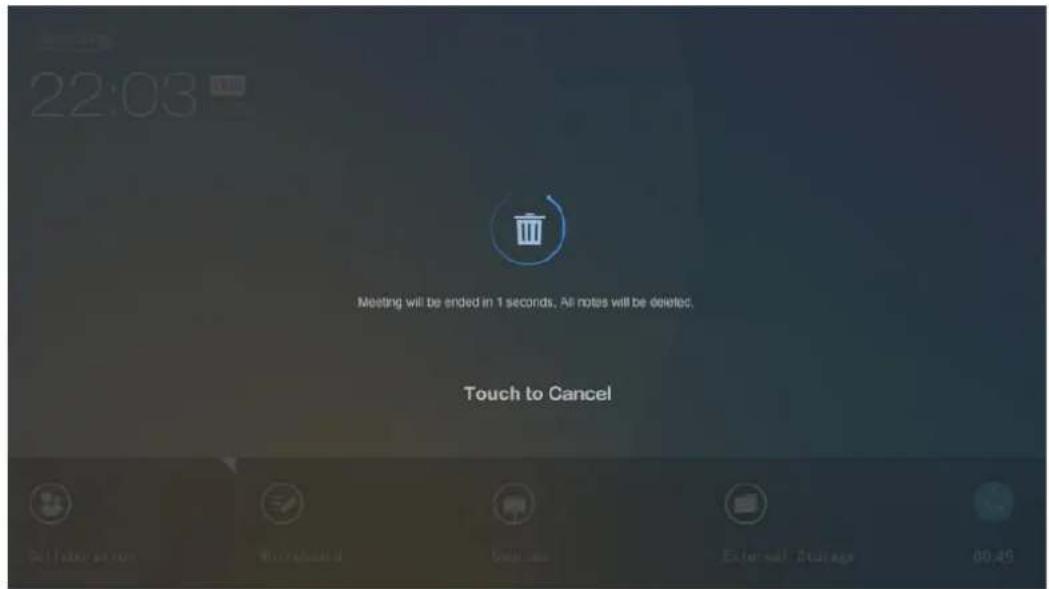
If the period without operations on the screen exceeds 30 minutes, the system will lock the screen automatically to protect your privacy. If the period without operations exceeds 60 minutes, the system will delete all meeting contents automatically, as shown in the following figure.
4.7 Shortcut Settings and Applications
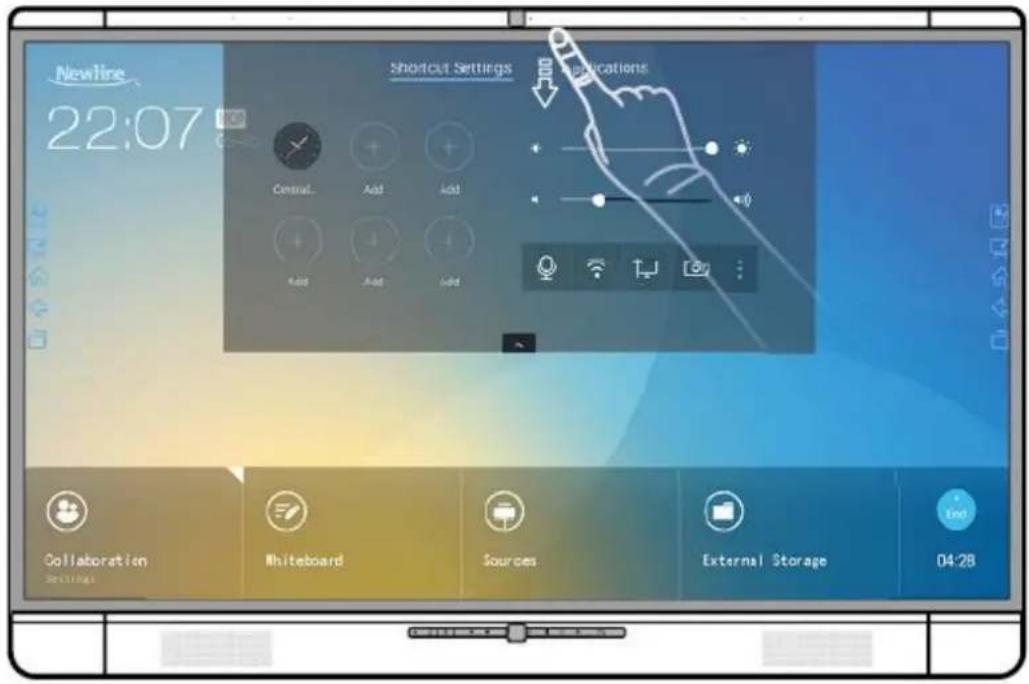
Slide one finger from the top blank border down, as shown in the following figure. The Shortcut Settings and Applications pages are displayed.
4.7.1 Shortcut Settings
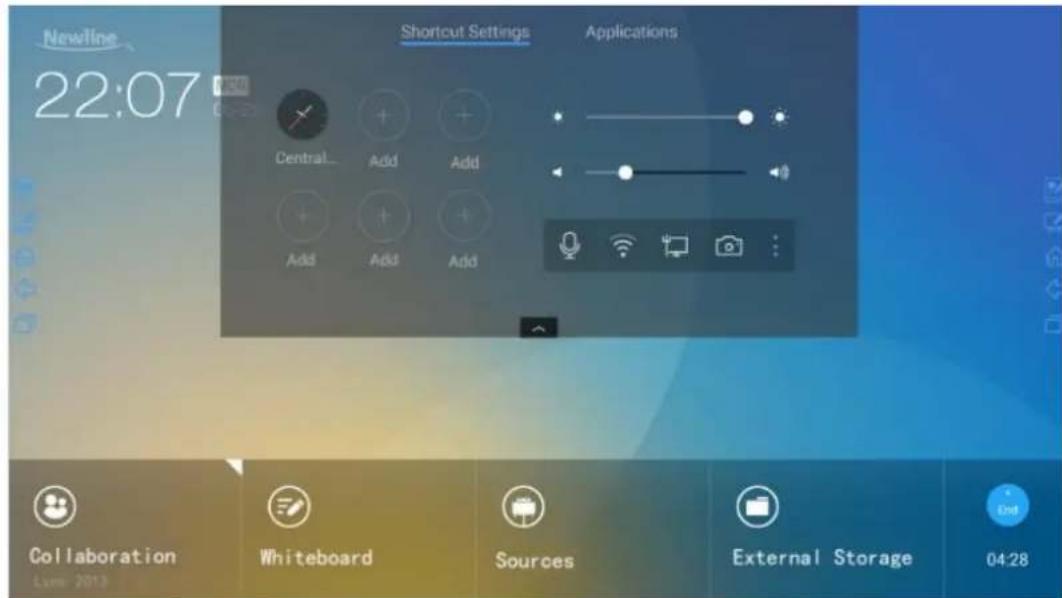
After a top-down slide, the Shortcut Settings page is displayed by default, as shown in the following figure.
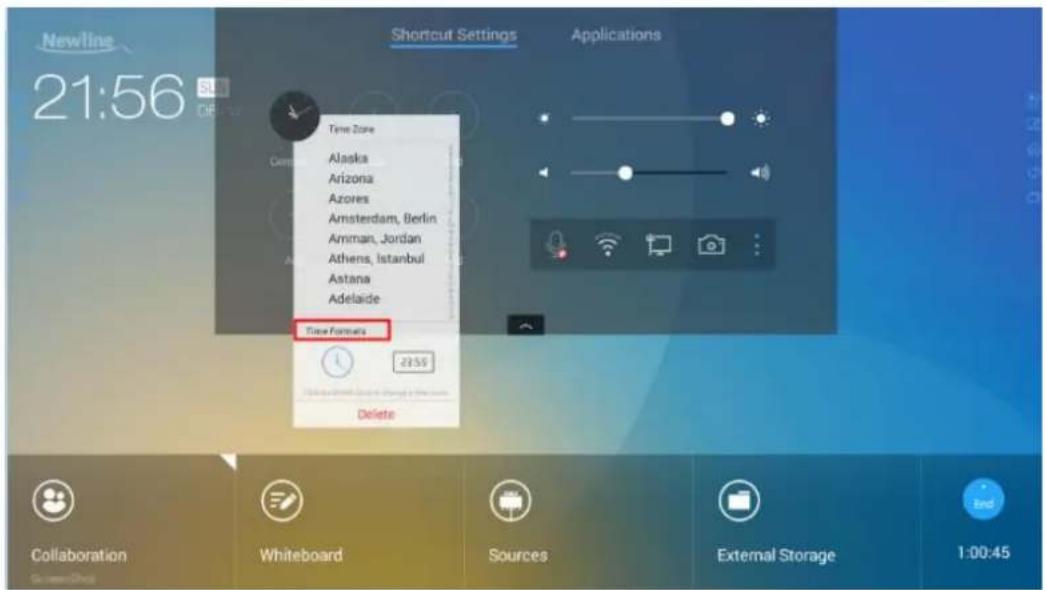
Clock Settings

Click to add the required time zone, and click Time Formats to set the time display mode (analog clock or electronic clock).
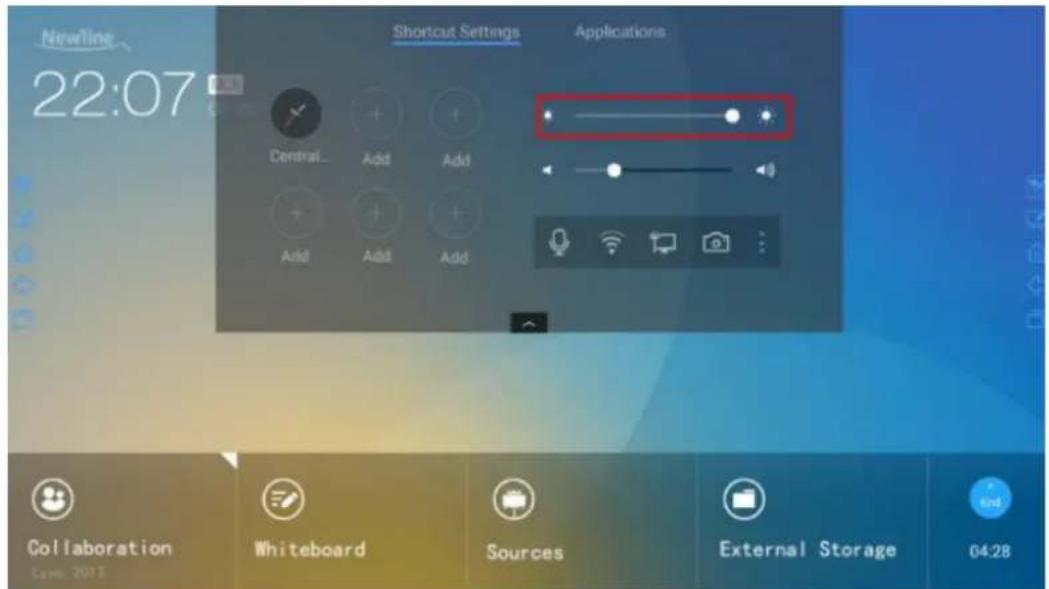
Brightness Adjustment
Drag the slider beside the icon to adjust the brightness.
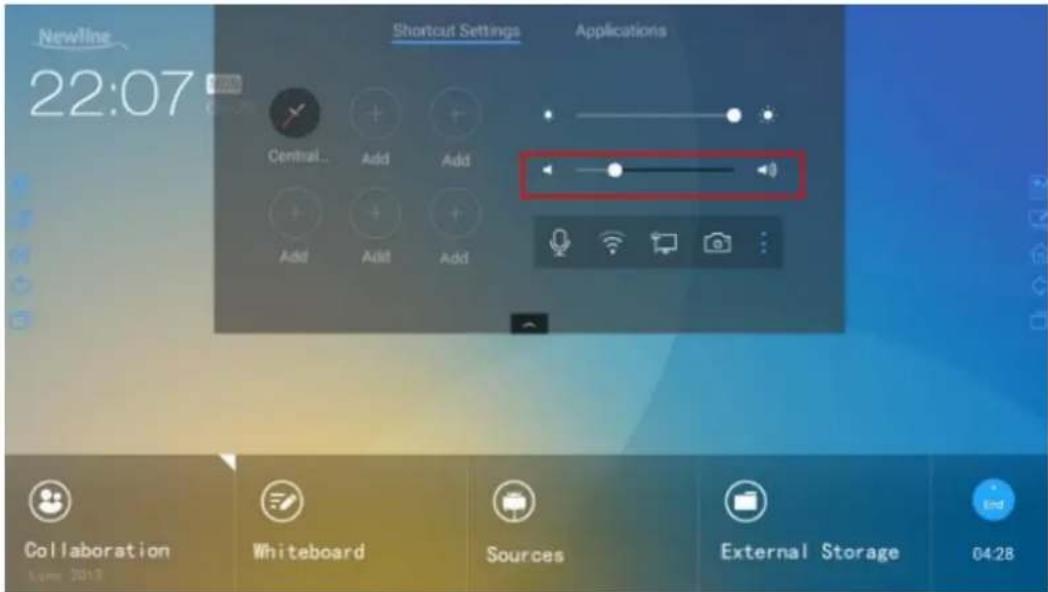
Volume Adjustment
Drag the slider beside the icon to adjust the volume.
Audio Mode
Click to enable or disable the audio mode.

Wi-Fi Settings
Click 📷 to enter the system settings page and select the Wi-Fi hotspot to be connected.
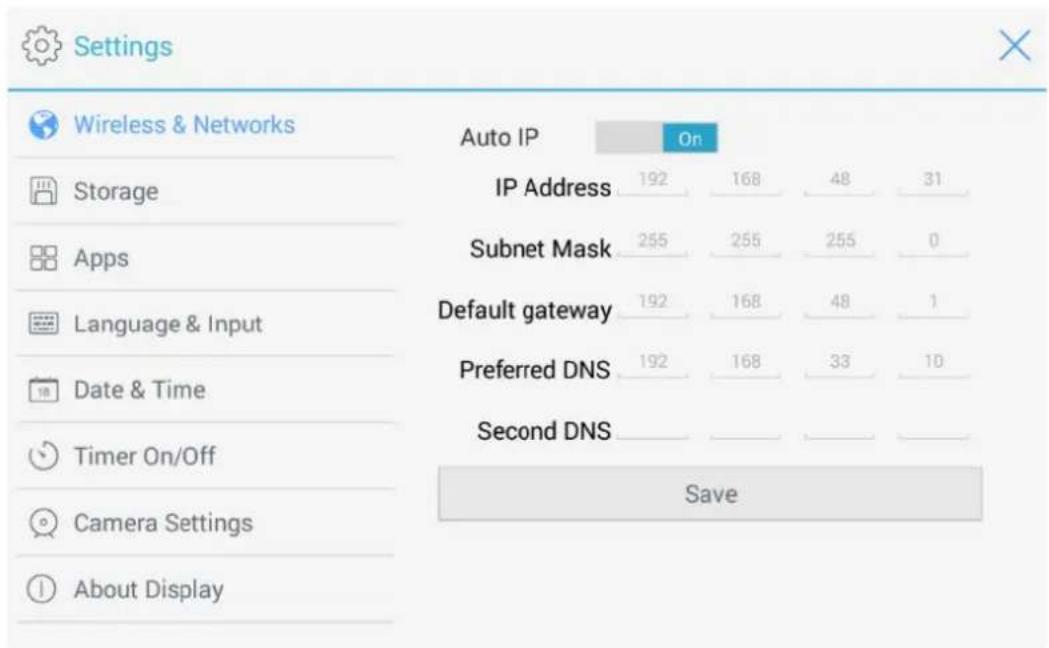
Wired Network Settings
Click 📄 to enter system settings page and set information about the wired network.
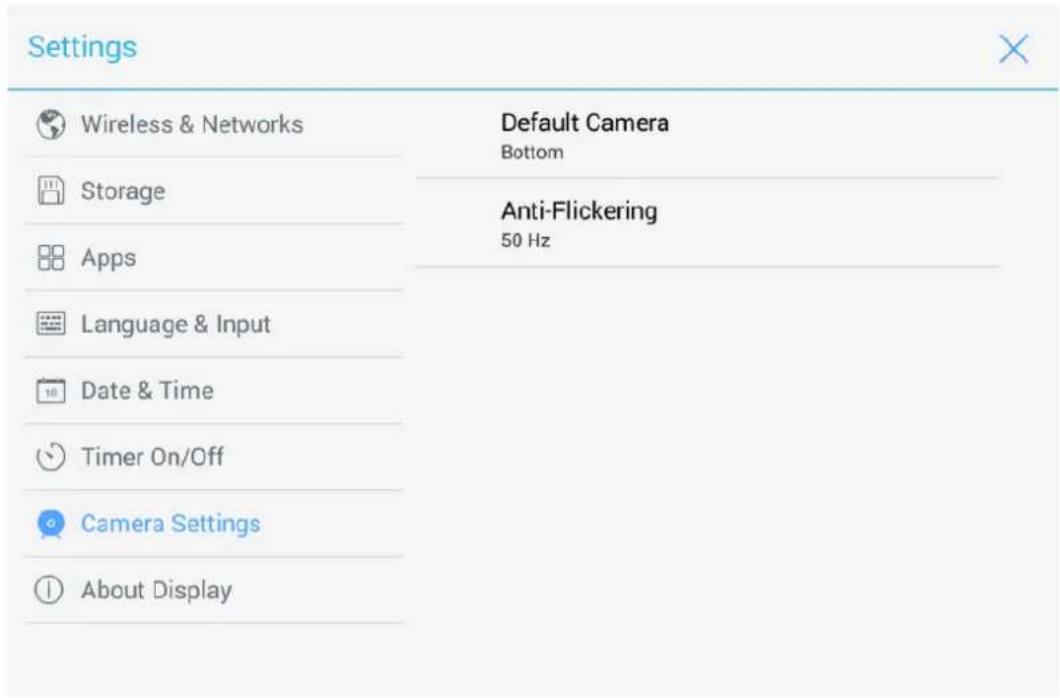
Camera Settings
Click 📄 enter system settings page and set the default camera used by the display and anti-flickering information.
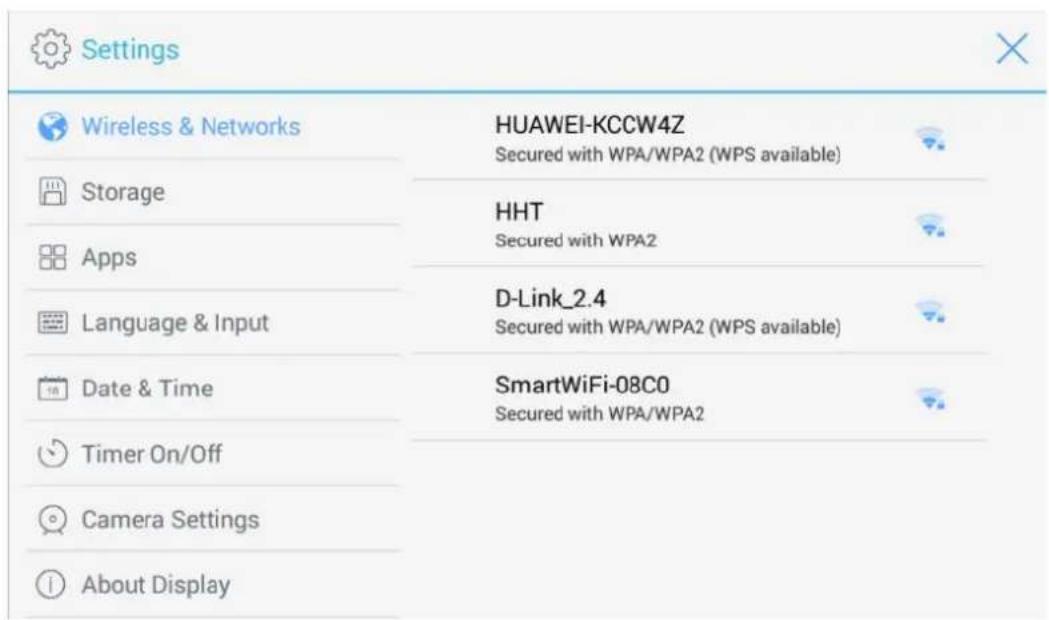
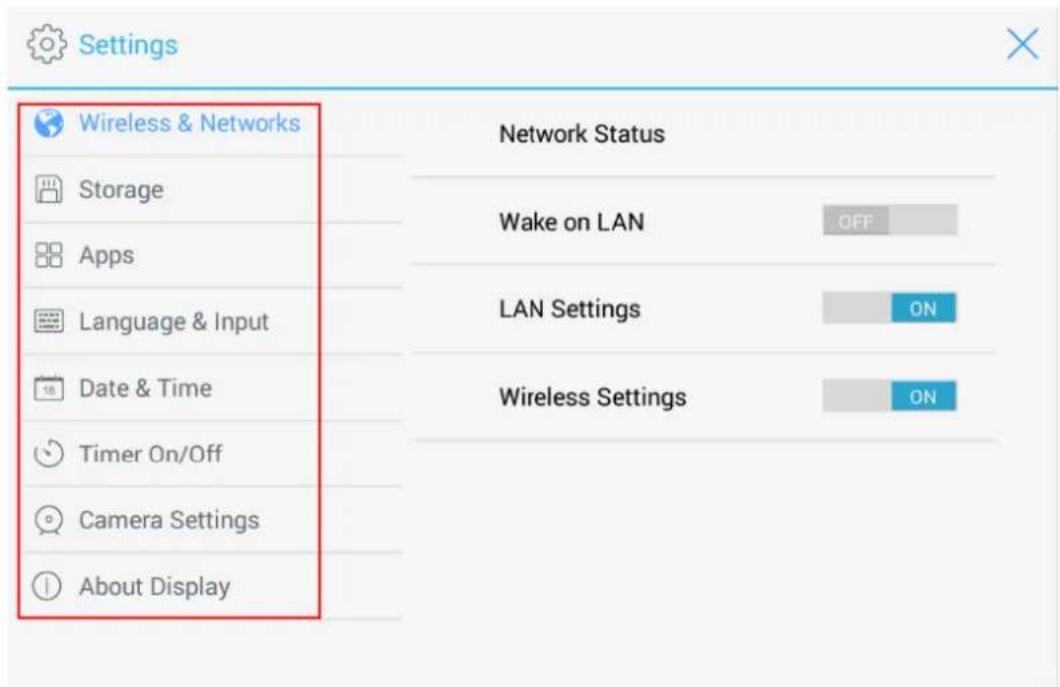
System Settings
Click to enter system settings page. Setting items are shown in the following figure.
4.7.2 Applications
In the assistant meeting, click Applications to fast select and start applications on Android system, and slide right and left on the screen to view all applications, as shown in the following figure.

5 Serial Port Control
Connect RS-232 port to the PC or controlling device. Enable RS-232 serial port connection and complete the following configuration.
| Port: COM1 (Set according to PC or controlling device's port number) | |||
| Bit rate | 19200 | Odd/even check | None |
| Data bits | 8 | Stop bit | 1 |
The following table lists the button controlling code and return code.
| Function | Controlling codes | Return codes |
| Power on | 7F 08 99 A2 B3 C4 02 FF 01 00 CF | 7F 09 99 A2 B3 C4 02 FF 01 00 01 CF 00 |
| Power off | 7F 08 99 A2 B3 C4 02 FF 01 01 CF | 7F 09 99 A2 B3 C4 02 FF 01 01 01 CF |
| Mute | 7F 08 99 A2 B3 C4 02 FF 01 02 CF | 7F 09 99 A2 B3 C4 02 FF 01 02 01 CF |
| Signal source | 7F 08 99 A2 B3 C4 02 FF 01 06 CF | 7F 09 99 A2 B3 C4 02 FF 01 06 01 CF |
| Start the whiteboard | 7F 08 99 A2 B3 C4 02 FF 01 07 CF | 7F 09 99 A2 B3 C4 02 FF 01 07 01 CF |
| Display status | 7F 08 99 A2 B3 C4 02 FF 01 09 CF | 7F 09 99 A2 B3 C4 02 FF 01 09 01 CF |
| HDMI Front | 7F 08 99 A2 B3 C4 02 FF 01 0A CF | 7F 09 99 A2 B3 C4 02 FF 01 0A 01 CF |
| HDMI Rear | 7F 08 99 A2 B3 C4 02 FF 01 0B CF | 7F 09 99 A2 B3 C4 02 FF 01 0B 01 CF |
| OPS | 7F 08 99 A2 B3 C4 02 FF 01 38 CF | 7F 09 99 A2 B3 C4 02 FF 01 38 01 CF |
| VGA | 7F 08 99 A2 B3 C4 02 FF 01 0D CF | 7F 09 99 A2 B3 C4 02 FF 01 0D 01 CF |
| Page Up | 7F 08 99 A2 B3 C4 02 FF 01 13 CF | 7F 09 99 A2 B3 C4 02 FF 01 13 01 CF |
| Page Down | 7F 08 99 A2 B3 C4 02 FF 01 14 CF | 7F 09 99 A2 B3 C4 02 FF 01 14 01 CF |
| VOL - | 7F 08 99 A2 B3 C4 02 FF 01 17 CF | 7F 09 99 A2 B3 C4 02 FF 01 17 01 CF |
| VOL + | 7F 08 99 A2 B3 C4 02 FF 01 18 CF | 7F 09 99 A2 B3 C4 02 FF 01 18 01 CF |
| Menu | 7F 08 99 A2 B3 C4 02 FF 01 1B CF | 7F 09 99 A2 B3 C4 02 FF 01 1B 01 CF |
| Home page | 7F 08 99 A2 B3 C4 02 FF 01 1C CF | 7F 09 99 A2 B3 C4 02 FF 01 1C 01 CF |
| Return (exit) | 7F 08 99 A2 B3 C4 02 FF 01 1D CF | 7F 09 99 A2 B3 C4 02 FF 01 1D 01 CF |
| Auto ADJ | 7F 08 99 A2 B3 C4 02 FF 01 20 CF | 7F 09 99 A2 B3 C4 02 FF 01 20 01 CF |
| OK | 7F 08 99 A2 B3 C4 02 FF 01 2B CF | 7F 09 99 A2 B3 C4 02 FF 01 2B 01 CF |
| ← | 7F 08 99 A2 B3 C4 02 FF 01 2C CF | 7F 09 99 A2 B3 C4 02 FF 01 2C 01 CF |
| → | 7F 08 99 A2 B3 C4 02 FF 01 2D CF | 7F 09 99 A2 B3 C4 02 FF 01 2D 01 CF |
| ↑ | 7F 08 99 A2 B3 C4 02 FF 01 2E CF | 7F 09 99 A2 B3 C4 02 FF 01 2E 01 CF |
| ↓ | 7F 08 99 A2 B3 C4 02 FF 01 2F CF | 7F 09 99 A2 B3 C4 02 FF 01 2F 01 CF |
| Freeze | 7F 08 99 A2 B3 C4 02 FF 01 3B CF | 7F 09 99 A2 B3 C4 02 FF 01 3B 01 CF |
| Set volume | 7F 08 99 A2 B3 C4 02 FF 05 XX CFNOTEXX indicates the volume value (0 to 100), corresponding to hexadecimals 00 to 64. | 7F 09 99 A2 B3 C4 02 FF 05 XX 01 CF |
| Set D.MODE | 7F 08 99 A2 B3 C4 02 FF 06 XX CFNOTEXX indicates the mode. 00 and 01 indicate standard and eco modes respectively. | 7F 09 99 A2 B3 C4 02 FF 06 XX 01 CF |
| Query the firmware version number | 7F 08 99 A2 B3 C4 02 FF 01 3D CF | 7F 09 99 A2 B3 C4 02 FF 01 3D 01 CF |
| Set Display Mode | 7F 08 99 A2 B3 C4 02 FF 07 XX CFNOTEXX indicates the mode. 00, 01, 02 and 03 indicate standard, bright, soft and custom modes respectively. | 7F 09 99 A2 B3 C4 02 FF 07 XX 01 CF |
| Start the default UC program | 7F 08 99 A2 B3 C4 02 FF 01 3F CF | 7F 09 99 A2 B3 C4 02 FF 01 3F 01 CF |
| Start commenting | 7F 08 99 A2 B3 C4 02 FF 01 40 CF | 7F 09 99 A2 B3 C4 02 FF 01 40 01 CF |
| Microphone mute | 7F 08 99 A2 B3 C4 02 FF 01 41 CF | 7F 09 99 A2 B3 C4 02 FF 01 41 01 CF |
| Switch cameras | 7F 08 99 A2 B3 C4 02 FF 08 XX CFNOTEXX=01 indicates that the top camera is enabled.XX=02 indicates that the bottom camera is enabled. | 7F 09 99 A2 B3 C4 02 FF 08 XX 01 CF |
| Backlight control + | 7F 08 99 A2 B3 C4 02 FF 01 47 CF | 7F 09 99 A2 B3 C4 02 FF 01 47 01 CF |
| Backlight control - | 7F 08 99 A2 B3 C4 02 FF 01 48 CF | 7F 09 99 A2 B3 C4 02 FF 01 48 01 CF |
| Set backlight brightness | 7F 08 99 A2 B3 C4 02 FF 09 XX CFNote:XX indicates the value of backlight brightness (0-100), corresponding to the hexadecimal number system (00-64). | 7F 09 99 A2 B3 C4 02 FF 09 XX 01 CF |
| Read the camera position | 7F 08 99 A2 B3 C4 02 FF 01 44 CF | 7F 09 99 A2 B3 C4 02 FF 01 44 XX CFNOTEXX=01 indicates that the top camera is enabled.XX=02 indicates that the bottom camera is enabled. |
| Microphone status | 7F 08 99 A2 B3 C4 02 FF 01 45 CF | 7F 09 99 A2 B3 C4 02 FF 01 45 XX CFNOTEXX=01 indicates that the microphone is mute.XX=02 indicates that the microphone is not mute. |
| Read the value of backlight brightness | 7F 08 99 A2 B3 C4 02 FF 01 49 CF | 7F 09 99 A2 B3 C4 02 FF 01 49 XX CFNote:XX indicates the value of backlight brightness (0-100), corresponding to the hexadecimal number system (00-64). |
6 Specifications
| Parameter | Value |
| Display | |
| Backlight | LED |
| Display Area | 1538.88*865.62mm |
| Active Screen Size | 70" |
| Display Ratio | 16:9 |
| Resolution | 1920*1080Pixel |
| Display Colors | 10bit |
| Brightness | 350cd/m2 (Max) |
| Contrast | 4000:1 |
| Response Time | 6ms |
| Speaker | |
| Speaker Position | Forward |
| Rated Impedance | 8Ω |
| Freq.Response | 90Hz(±20%)-20kHz |
| Output S.P.L. | 84±3dB |
| Max.Power Output | 30W |
| Microphone | |
| Sensitivity | -28dB±3dB |
| Frequency Response | 100Hz - 7.75KHz |
| Polar Patterns | Omnidirectional |
| Total Harmonic Distortion (THD) | less than 1% at 6dB SPL |
| Pickup range | 8m |
| Quantity | 4 |
| Camera | |
| Position | Top x 1 & Bottom x 1 (Only one can use in the same time) |
| Sensor | 2M Pixels |
| Lens | 86° |
| Video Resolution | 1920*1080@30fps (Max) |
| Frame Rate | 30fps/60fps |
| Electrical | |
| Power Consumption | Maximum <250WStandby Mode≤0.5W |
| Working Voltage | AC 100V-240V, 50Hz/60Hz |
| Touch | |
| Touch Surface | Tempered glass |
| Transparency | >90% |
| Haze | <2% |
| Touch Sensor | P-Capacitive Touch |
| HID support | HID |
| Touch Points | 10 Points in Windows/5 Points in Android |
| Writing Tools | Pencil or Finger |
| Touch Resolution | 63488 x 35840 |
| Scan Speed | 180Hz |
| Positioning Accuracy | 0.8mm |
| Communication Interface | USB-A |
| Transportation/Storage | |
| Storage Temperature/Humidity | -10°C-50°C/10%-90% |
| Working Temperature/Humidity | 0°C-40°C/10%-90% |
| Mounting (optional) | Wall-mounted / Floor Stand |
| Outline Dimension | 1588.7 x 1048.7 x 78mm |
| Packing Dimension | 1720 x 1180 x 270mm |
| Ports | |
| Front Interface Inputs | Microphone(3.5mm) x 1, HDMI x 1, USB(Touch) x 1, USB(OPS) x 1, USB(Android) x 1 |
| AV Inputs | HDMI(MHL*) x 1, VGA x 1, USB(Touch) x 2, Audio x 1 |
| AV Outputs | 3.5mm Line out x 1, HDMI x 1 |
| Other | USB2.0 x 2, RS232 x 1, RJ45 x 1, USB3.0 x 1, SD Reader, OPS Slot |
| Smart System | |
| Chips | ARM Cortex A9Quad Core 1.5GHz |
| RAM | 2GB |
| Flash | 8GB |
| Android Version | 4.3 |
| Multimedia File Formats Support | Image: JPEG, BMP, PNGVideo: MPEG1, MPEG2, MPEG4, H.264, H.265, RM, RMVB, MOV, MJPEG, VC1, DivX, FLV (Support 1080P, 4K HD Decoding)Audio: MP3, M4A, (AAC) |
| Android Software | |
| Input Resource Preview | Yes |
| On Screen Annotation | Yes |
| Discussion Board | Yes |
7 More Information
For more information
Please visit www.newline-interactive.com.
Contact Us for Supports
Please email us at support@newline-interactive.com.
Newline Interactive, Inc.
101 East Park Blvd. Suite 807
Plano, TX 75074
Tel: +1 (972) 468-9728

- Collaboration Touch Screen User Manual
- Contents
- About This Document....1
- Overview....2
- Installations....9
- Preparation ....13
- System Applications....18
- About This Document
- Overview
- Introduction
- Parts
- Front Elevation
- NOTE
- Rear Elevation
- Ports
- Front Ports
- Remote Control
- Installations
- Safety Precautions
- Installation Direction
- Installation Height
- Installation Precautions
- Weight Loading
- Ventilation
- Installation
- Preparation
- Power On
- Power Off
- Position
- Step 4 Select
- Calibrate...
- TIP
- System Applications
- Home Page
- - Collaboration
- - Whiteboard
- Sources
- - External Storage
- • End
- Quick Access Buttons on Both Sides
- Assistant Meeting
- Newline Assistant
- Introduction
- Installation
- Switch Applications
- Add or Delete Applications
- Add Applications on Android System
- Add Applications on Windows System
- Delete Applications
- Whiteboard
- Whiteboard Functions
- New Slide and Settings
- Whiteboard Mode
- Pen Type
- Line Type and Color
- Eraser
- Screenshot
- Clear
- Cancel
- Slide Operations
- Slide Preview
- Slide Selection and Deletion
- Signal Source
- External Storage
- External Storage Page
- File Preview
- File Filtering
- File Search
- File Operations
- End Meeting
- Manually End Meeting
- File Naming
- File Storage
- Automatically End Meeting
- Shortcut Settings and Applications
- Shortcut Settings
- Clock Settings
- Brightness Adjustment
- Volume Adjustment
- Audio Mode
- Wi-Fi Settings
- Wired Network Settings
- Camera Settings
- System Settings
- Applications
- Serial Port Control
- Specifications
- More Information
Brand : Newline
Model : TruTouch X9
Category : Screen