Orbit PFBD201 - Drone ProFlight - Free user manual and instructions
Find the device manual for free Orbit PFBD201 ProFlight in PDF.


User questions about Orbit PFBD201 ProFlight
0 question about this device. Answer the ones you know or ask your own.
Ask a new question about this device
Download the instructions for your Drone in PDF format for free! Find your manual Orbit PFBD201 - ProFlight and take your electronic device back in hand. On this page are published all the documents necessary for the use of your device. Orbit PFBD201 by ProFlight.
USER MANUAL Orbit PFBD201 ProFlight
natural_image
Technical line drawing of a four-blade mechanical component with no visible text or symbolsORBIT
PFBD201
Thank you for choosing ProFlight.
Please read this user manual before using this drone and keep it safe for future reference.
CONTENTS
SAFETY WARNINGS 3
SAFETY PRECAUTIONS 4
BATTERY CHARGING 5
PREPARING FOR FIRST FLIGHT 5
INSTALLING CONTROLLER BATTERIES 6
CONTROLLER DIAGRAM 6
DRONE DIAGRAM 7
UNFOLDING THE ARMS 7
FOLDING THE ARMS 7
REPLACEMENT OF THE PROPELLERS 8
BINDING OF CONTROLLER AND RECEIVER 8
GPS COMPASS CALIBRATION 9
GYROSCOPE CALIBRATION 10
GPS LOCATION SEARCH 10
PREPARING FOR TAKE OFF 11
FLIGHT INSTRUCTIONS 11
AIRCRAFT FUNCTIONS & FEATURES 12
HEADLESS MODE 12
ORBIT MODE 12
SPEED CONTROL 12
AUTO RETURN 13
CAMERA 13
APP 14
TROUBLESHOOTING GUIDE 19
SUPPORT 20
SAFETY WARNINGS
Read the entire instruction manual and familiarise yourself with the product and all its features before operating. Failure to operate the product correctly can result in damage to the product, surroundings or even serious injury. This product is not a toy and must be operated with caution and common sense. It requires some basic mechanical knowledge. This product is not intended for use by children without direct adult supervision. This manual contains instructions for safety, operation and maintenance. It is essential to read and follow all the instructions and warnings in this manual prior to assembly, setup or use in order to operate correctly and avoid damage or serious injury.
- Not intended for use by children under 14 years of age. This is not a toy.
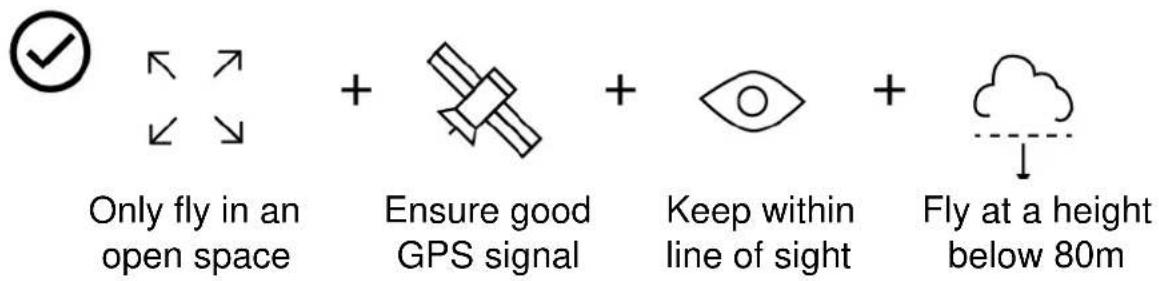
- Always operate your drone in open spaces away from vehicles, buildings, traffic and people.
• Always keep out of reach of children.
- Avoid exposure to water as moisture can cause damage to the electronics.
- Never operate your drone with low transmitter batteries.
text_image
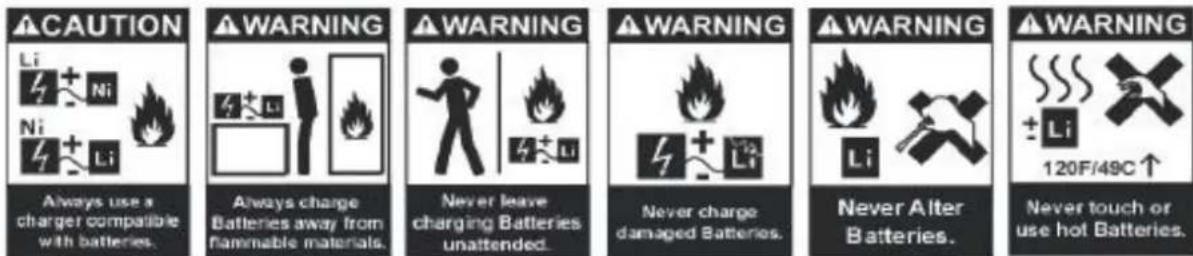
CAUTION Li Ni Ni Li Always use a charger compatible with batteries. WARNING Always charge Batteries away from flammable materials. WARNING Never leave charging Batteries unattended. WARNING Never charge damaged Batteries. WARNING Never Alter Batteries. WARNING 120F/49C ↑ Never touch or use hot Batteries.The battery charger included with the drone has been designed to safely charge the Li-Po battery.
- Mishandling of Li-Po batteries can result in a fire, personal injury, and /or property damage.
- By handling, charging or using the included Li-Po battery you assume all risks associated with lithium batteries.
- If at any time the battery begins to balloon or swell, discontinue use immediately. If charging or discharging, discontinue and disconnect. Continuing to use, charge or discharge a battery that is ballooning or swelling can result in fire.
• Always store the battery at room temperature in a dry area for best results.
- Do not store battery or drone in a car or direct sunlight. If stored in a hot environment, the battery can be damaged or even catch fire.
- Never use any other type of battery charger other than the one supplied with the drone. Failure to charge the battery with a compatible charger may cause fire resulting in personal injury and/or property damage.
- Never exceed the recommended charge rate.
- When a Li-Po battery is discharged below 3.7V, the battery may be damaged and may no longer accept a charge. The drone will automatically land and become inactive when the battery reaches this level, this is to protect the battery.
SAFETY PRECAUTIONS
text_image
Only fly in an open space + Ensure good GPS signal + Keep within line of sight + Fly at a height below 80m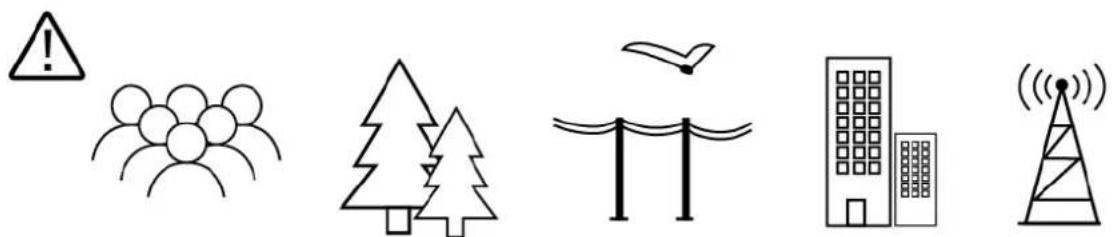
natural_image
Six symbolic icons representing weather, buildings, trees, birds, people, and a tower (no text or labels)When flying ensure that the drone is kept away from other people, trees, electric wires, buildings, airports or signal transmitting tower etc.

text_image
Weather and weather icons including no sign, cloud, raindrops, speaker, lightning bolt, and megaphoneEnsure that the weather conditions are suitable for flying. Do not fly the drone during snow, rain, fog, thunder or in windy conditions.
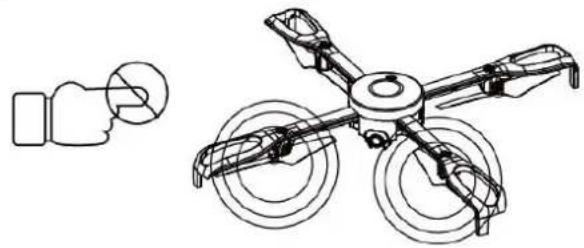
DO NOT touch the rotating blades during operation. They can cause injury or damage to property
natural_image
Technical line drawing of a drone with four propellers and a hand holding a circular component (no text or symbols)No-fly zones must be observed. It is the user's responsibility to ensure that the drone is operated legally and safely.
BATTERY CHARGING
Use only the supplied USB Li-Po charger to charge your battery.
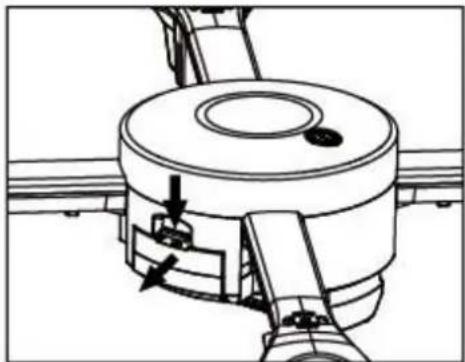
Remove the battery from the battery compartment on the right of the aircraft. Press down the release button and slide the battery out.
natural_image
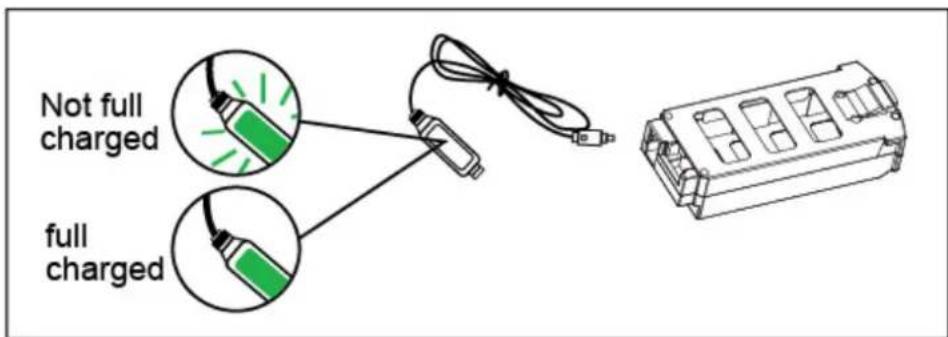
Technical line drawing of a mechanical assembly with no visible text or symbolsPlug the charger into a USB socket before attaching the battery. When the battery is charging the green LED on the charger will flash. When the battery is fully charged the LED will be illuminated. Charging should take around 180 minutes. DO NOT leave the battery unattended whilst charging.
text_image
Not full charged full chargedWARNINGS:
- DO NOT use other USB cables. They may lead to incorrect charging, and could cause damage or present a safety risk.
- When reinserting the battery, make sure it is secure and fully clicks into place.
PREPARING FOR FIRST FLIGHT
- Fully read and understand the safety warnings, and precautions.
- Make sure both the transmitter and aircraft batteries are sufficiently charged.
- Find a suitable place to fly the aircraft, away from people, buildings and vehicles.
- Make sure the throttle stick is centred before turning on the transmitter.
- Calibrate the GPS compass and gyroscope.
INSTALLING THE CONTROLLER BATTERIES
Unclip the battery cover from the rear of the controller and insert 4 x AA batteries, making sure the correct polarity is followed. Once the batteries are correctly installed, the battery cover must be re fitted.
CONTROLLER DIAGRAM
text_image
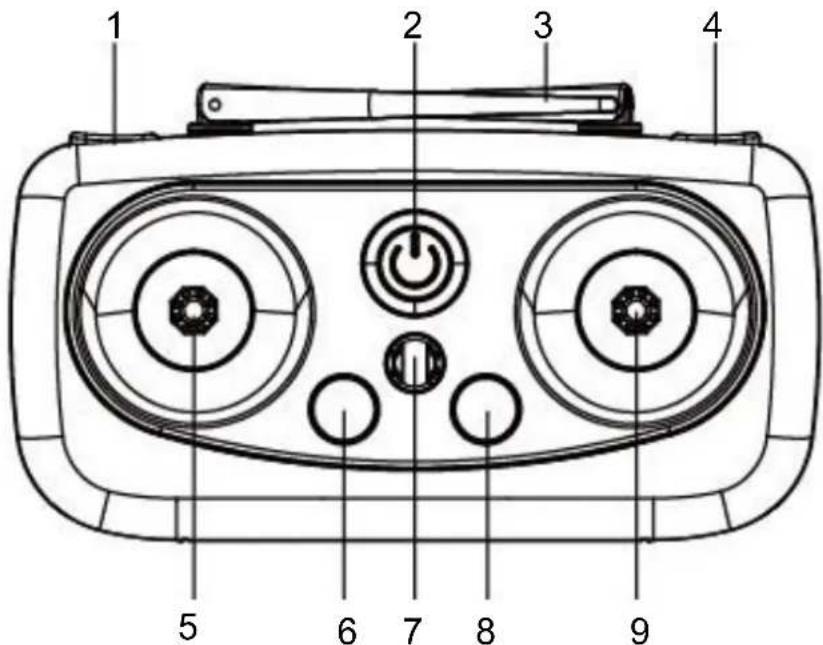
1 2 3 4 5 6 7 8 9| 1 | Speed Button |
| 2 | Power Button |
| 3 | Decoration Antenna |
| 4 | Headless mode (Short Press) |
| Orbit mode (Long Press) | |
| 5 | Left Joystick |
| Start Video (Short Press) | |
| 6 | Auto Take-Off |
| Auto Land (Short Press) | |
| Emergency Stop (Long Press) | |
| 7 | Ring |
| 8 | Auto Return (Short Press) |
| GPS Calibration (Long Press) | |
| 9 | Right Joystick |
| Take photo (Short Press) |
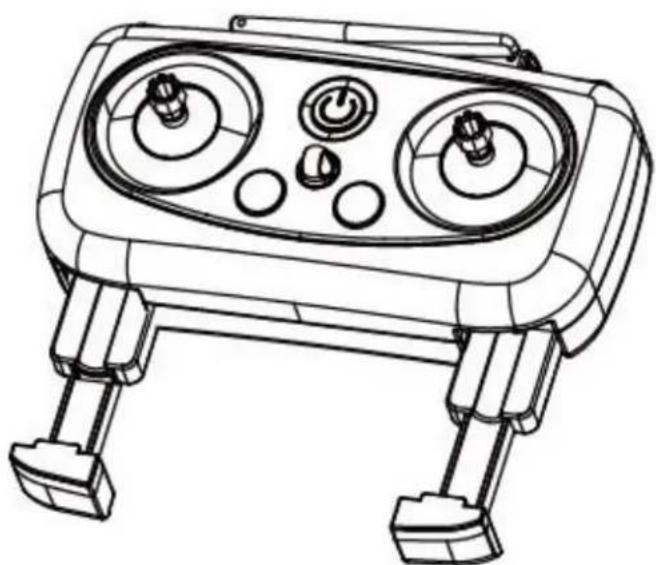
SMARTPHONE HOLDER
natural_image
Line drawing of a quadruped robot control panel with no text or symbolsDRONE DIAGRAM
| 1 | Switch |
| 2 | Blades |
| 3 | Motor |
| 4 | Camera |
| 5 | Battery |
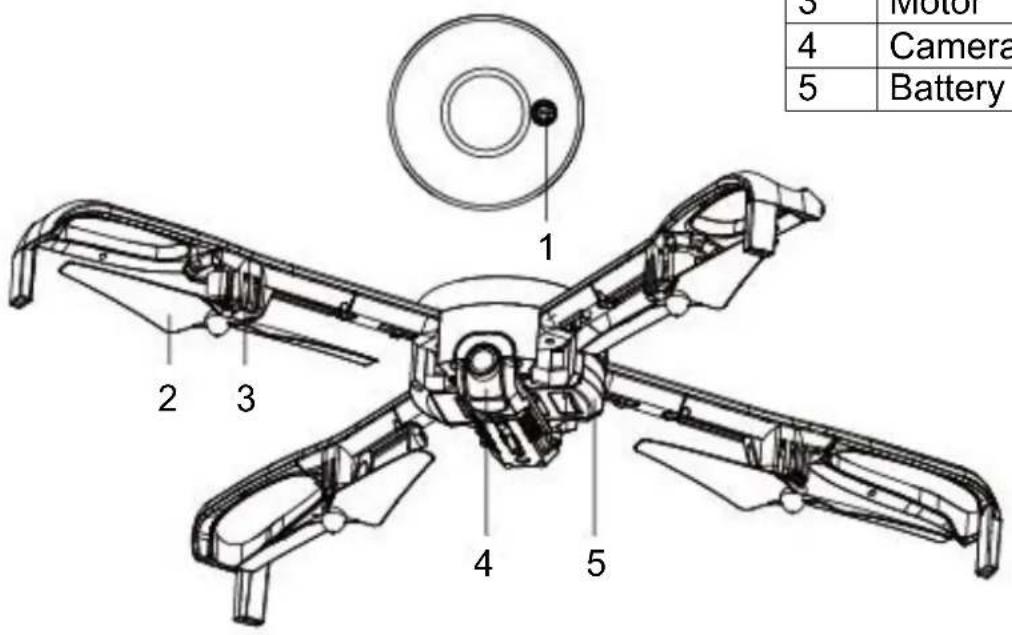
text_image
1 2 3 4 5 Motor Camera BatteryUNFOLDING THE ARMS
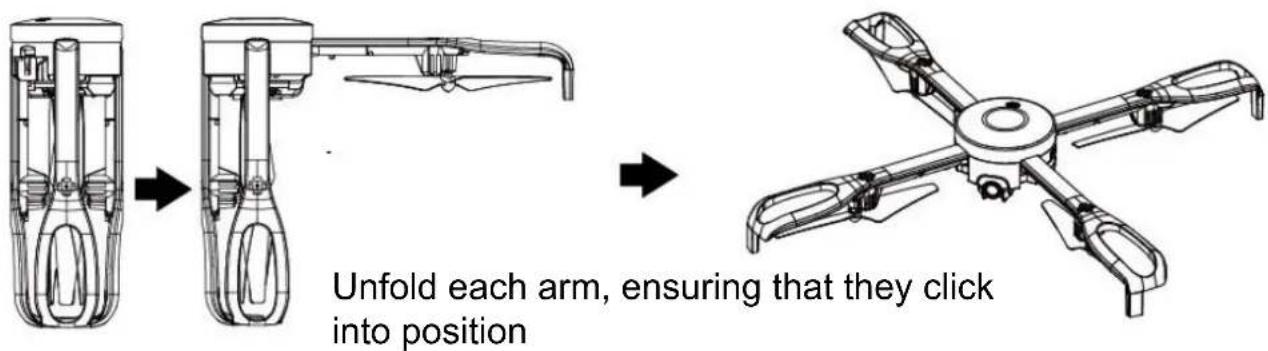
text_image
Unfold each arm, ensuring that they click into positionFOLDING THE ARMS
Fold each arm individually by sliding the switch on the underside of the arm to unlock the mechanism, and then carefully push the arm into the folded position.
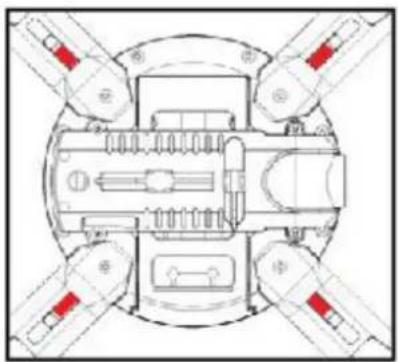
natural_image
Top-down schematic of a vehicle or mechanical assembly with four components and directional arrows (no text or labels)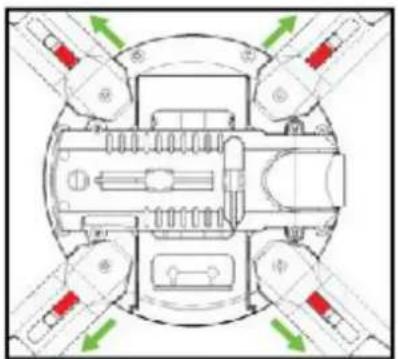
natural_image
Top-down schematic of a vehicle or mechanical assembly with four directional arrows indicating movement or force directions (no text or labels)REPLACEMENT OF THE PROPELLERS
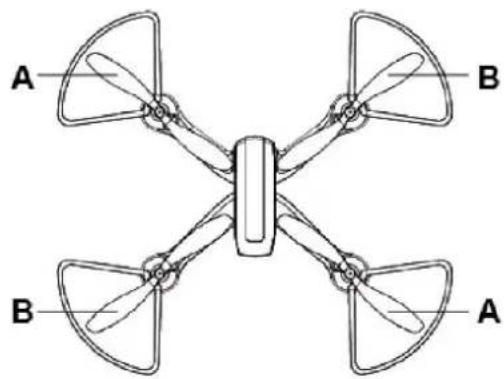
Should one of the fitted propellers become damaged, it can be replaced, by removing the screw from the side of the propeller before sliding the propeller off the motor shaft. Refitting is the reversal of removal.
It is important for the correct blade to be placed on the correct motor or the aircraft will not fly correctly. Each blade is marked with an A or B on the underside to indicate which motor it corresponds to.
natural_image
Diagram of a four-bladed drone with four propellers and central body, labeled A and B (no text or symbols on the diagram itself)BINDING OF CONTROLLER & RECEIVER
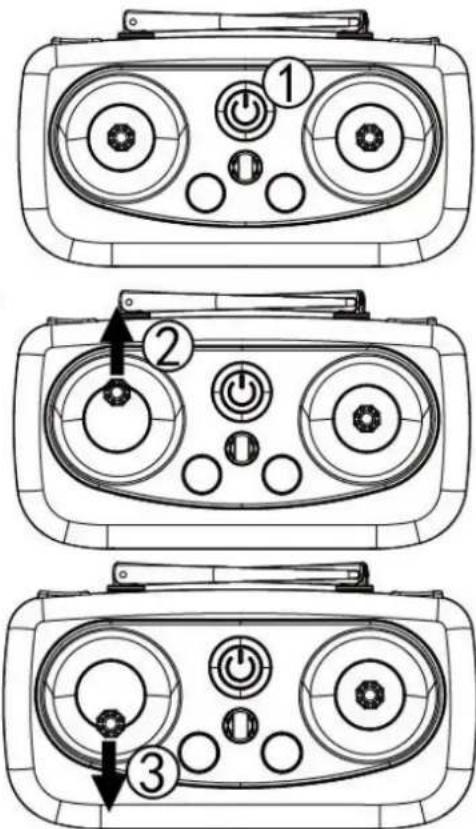
- Place the aircraft on a flat surface in an open area and insert the battery in before turning on. The lights on the underside of the drone will flash.
text_image
Diagram showing three labeled views of a device control panel with buttons and indicators, numbered 1, 2, and 3.- Turn on the controller.
- Press the left joystick up, until the controller bleeps.
- Press the left joystick down until the controller bleeps again.
The front lights on the drone will illuminate, while the rear lights flash. The drone will then find its location using GPS, at which point the rear lights will illuminate constantly. Please note this can take up to 2 minutes.
The aircraft can be flown using either the radio control supplied or by using the App on a smart device.
GPS COMPASS CALIBRATION
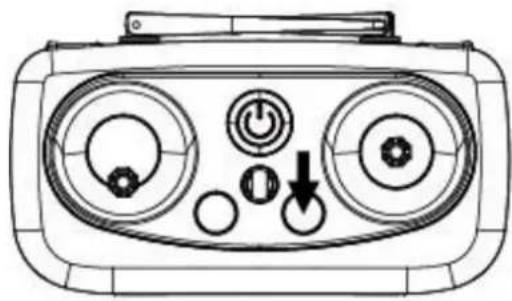
- Long press the GPS compass calibration button. The lights on the drone will flash.
natural_image
Line drawing of a portable radio device with two dials, buttons, and a power knob (no text or symbols)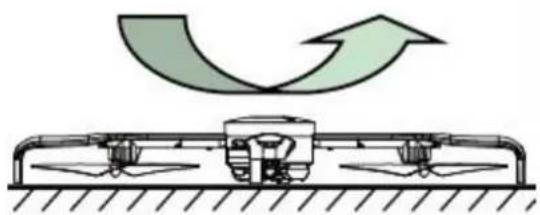
natural_image
Diagram of a mechanical device with directional arrows indicating motion or flow (no text or symbols)-
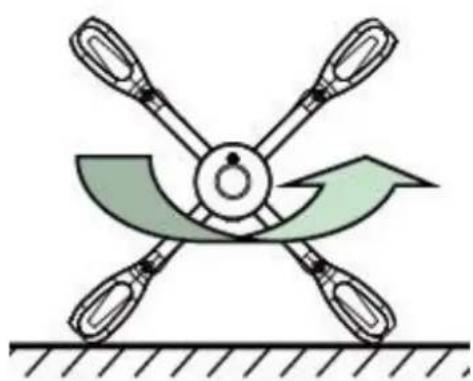
With the drone level, rotate it anticlockwise for 3 full revolutions. The lights at the rear of the drone will illuminate.
-
Then hold the drone with the front facing down, and rotate it anticlockwise for 3 full revolutions. The lights at the front of the drone will illuminate. The lights will then return to the same status as prior to calibration, indicating that calibration has finished.
natural_image
Diagram of a mechanical device with four blades and a curved blade, no text or symbols presentFor accuracy the GPS should be calibrated before each flight, and we would advise that the drone is at least 50cm away from the ground during calibration.
GYROSCOPE CALIBRATION
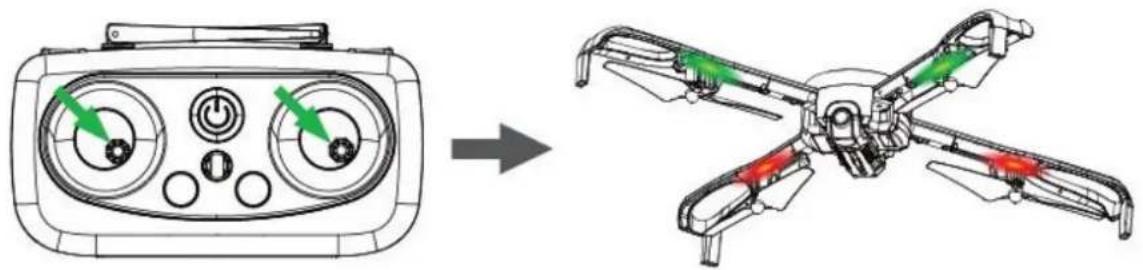
With the drone on a level surface, Pull both the joysticks to the lower right position at the same time, and hold in that position for 3-5 seconds. The four lights on the drone will flash to indicate it is calibrating.
natural_image
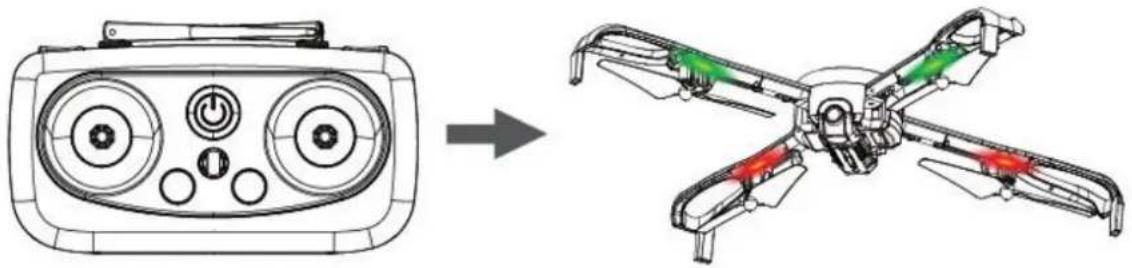
Diagram showing a device control panel transforming into a multi-rotor drone with green and red components (no text or symbols)Release the joystick, which will complete the calibration.
natural_image
Diagram showing a device with control panel and directional arrow, alongside a 3D model of a multi-rotor drone with colored internal components (no text or symbols)This should be carried out before each flight.
GPS LOCATION SEARCH
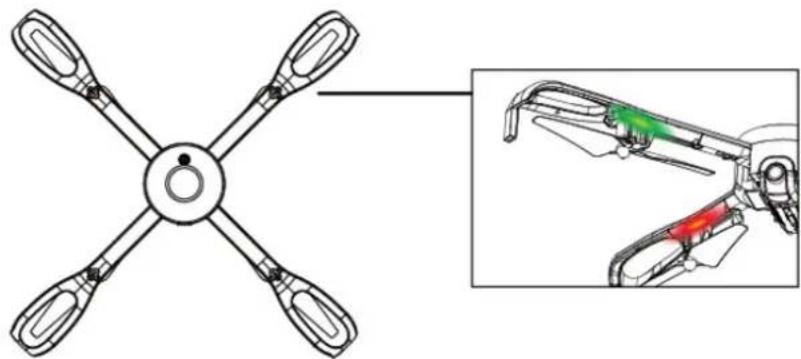
Once the drone has been calibrated, as shown in the previous steps, the drone should be placed on a flat surface in an open area in order to for it to fix its location via GPS. Once the location has been fixed, the rear lights will stop flashing and will be illuminated.
It can take around 2 minutes for the drone to fix on its location, although if the drone has been used within the previous hour, this time is reduced.
natural_image
Diagram of a four-blade propeller with a close-up inset showing internal components (no text or symbols)PREPARING FOR TAKE OFF
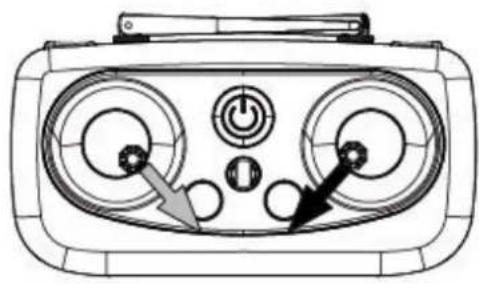
Once the controller has been calibrated the motors must be engaged. Before doing this, please ensure that the unit is in position, unfolded, and ready for flight.
natural_image
Front view of a portable radio device with two dials and control knobs (no text or symbols visible)To do this push the left joystick to the bottom right position at the same time as pushing the right joystick to the bottom left position.
The motors will then start to rotate.
TAKE OFF
There are two options for take off. It can be triggered by using the take off button which will result in the drone hovering at a set height above the ground. Alternatively the left joystick can be pushed forward.
FLIGHT INSTRUCTIONS
Before your first flight make sure you are familiar with the controls of the aircraft.
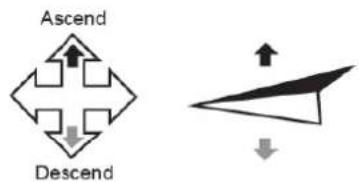
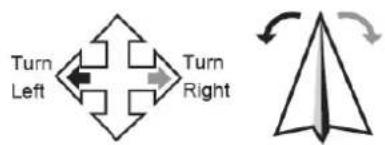
Left Joystick – Throttle & Rudder
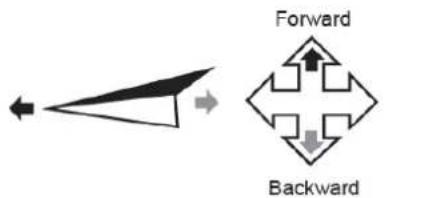
Right Joystick – Elevator & Aileron
Left Stick
flowchart
graph TD
    A["Ascend"] --> B["Down"]
    C["Descend"] --> D["Up"]
    E["Paper airplane"] --> F["Up"]
    G["Down"] --> H["Down"]
Right Stick
flowchart
graph LR
    A["Left Arrow"] --> B["Forward"]
    B --> C["Backward"]
    style A fill:#f9f,stroke:#333
    style B fill:#ccf,stroke:#333
    style C fill:#cfc,stroke:#333
flowchart
graph TD
    A["Turn Left"] --> B["Downward Arrow"]
    B --> C["Right"]
    C --> D["Upward Arrow"]
    D --> E["Paper airplane Symbol"]
    style A fill:#f9f,stroke:#333
    style E fill:#bbf,stroke:#333
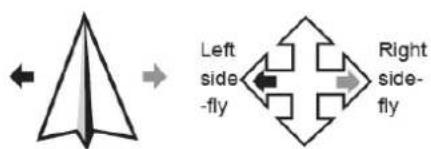
flowchart
graph LR
    A["Left side fly"] --> B["Right side fly"]
Note: Should the aircraft be left for a while with no control inputs it will go to sleep, simply press and hold the take off/land button to reactivate the aircraft.
AIRCRAFT FUNCTIONS AND FEATURES
HEADLESS MODE
The aircraft can be made to fly in Headless mode by pressing the headless flight button. This will make the aircraft fly without a front or rear. It will fly in the orientation of the pilot. If you move the right joystick right, the aircraft will fly right. Move the joystick left and it will fly left. Move the joystick forwards and the aircraft will fly away from you and pull it back to make it fly towards you. It does not matter which direction the drone is facing in headless mode.
ORBIT MODE
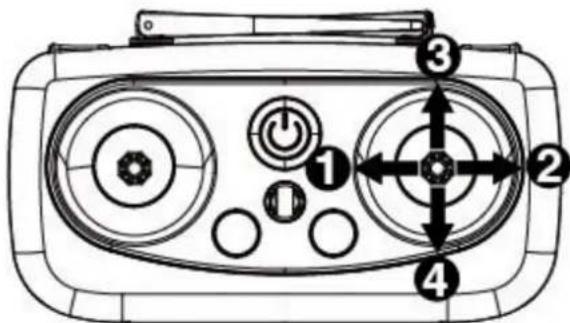
The aircraft can be made to fly in orbit mode by long pressing the headless flight button. The camera of the drone will automatically aim at the position of the smartphone. The orbit is controlled using the right joystick.
- Move the joystick to the left to orbit anti clockwise/ increase the speed of the anticlockwise orbit.
- Move the joystick to the right to slow the anticlockwise orbit, or to orbit in a clockwise direction
- Move the joystick up to increase the radius of the orbit.
- Move the joystick down to decrease the radius of the orbit.
text_image
Diagram of a device control panel with labeled buttons and adjustment knobsSPEED CONTROL
The drone has 3 speed settings. It will initially be set at 25% . By pressing the speed button the speed of the drone can be adjusted. The controller will bleep to indicate the speed it is set at after the button has been pressed.
- 25% - 1 Bleep,
50% - 2 Bleeps
100% - 3 Bleeps
AUTO RETURN
The drone has an auto return feature which will return the drone to within 2 metres of the take off position. Please note it will return in a straight line, and it is the responsibility of the user to make sure that there are no obstacles in the return route.
AUTO RETURN BUTTON
Press the auto return button, and the drone will return to the position of take off. Auto return can be cancelled at any point by moving the right joystick in any direction.
AUTO RETURN – LOST CONTACT WITH CONTROLLER
If the drone loses contact with the controller, the drone will automatically return to the position of take off. The controller will continuously bleep to indicate the loss of contact.
LOW BATTERY AUTO RETURN
If the battery is low, the drone will automatically return to the position of take off and the front of the drone will flash rapidly. If the battery is out of power, all the lights will flash, quickly find a suitable place to land before the drone carries out an emergency land in its current position.
CAMERA
As well as recording onto your phone through the app, the camera can also directly record onto a MicroSD card inserted into the drone (Not Supplied).
The MicroSD card can be inserted into side of the camera housing on the underside of the drone.
Pictures can be taken by pressing the right joystick button.
Press the left joystick button to start recording a video, press again to stop recording.
APP
The camera App can be downloaded by scanning the below QR code or search for LW FPV in your App Store:
text_image
QR code image containing encoded data, no visible human-readable textAndroid
text_image
QR code image containing encoded data, no visible human-readable textiOS
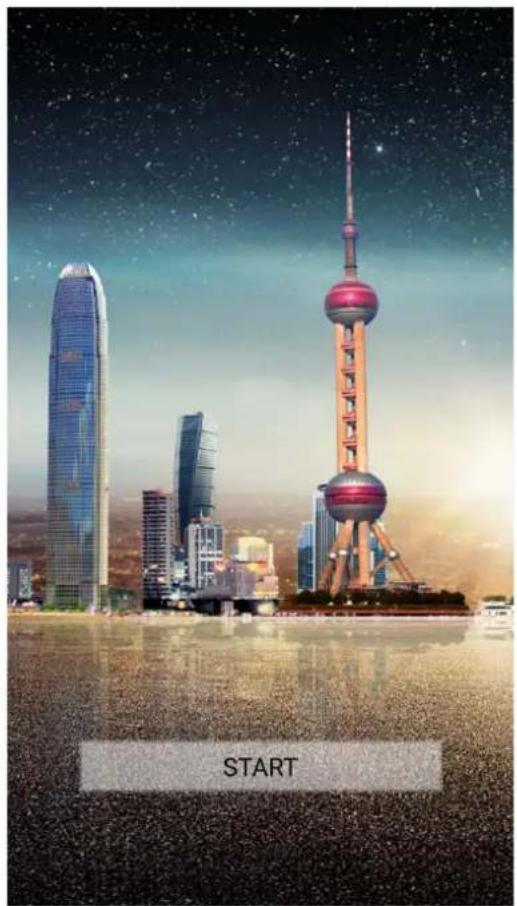
To connect the aircraft to your mobile device: Turn on the aircraft, while ensuring your controller is turned off. Go to the settings on your mobile device. Open the WiFi settings and search for a device starting with "LW-1080P-GPS". Select it and wait for it to connect. Open the LW FPV App and press the "START" button at the bottom of the screen. This will lead you to the control screen and show the view of the camera.
text_image
STARTMAIN SCREEN

text_image
7 8 9 10 11 6 Attitude:0.0ft Speed V:0.0mph NO.0 Roll:0° Distance:0.0ft Speed H:0.0mph ON/S E0.0 Pitch:0° View:0° HD Hover/Lock 5 4 3 2 1 12 13 Google VR 14 15 16 17| 1 | Auto Take Off | 10 | Attitude angle |
| 2 | Lock / Unlock Drone | 11 | Drone battery level & transmission signal |
| 3 | Auto Home | 12 | Settings menu |
| 4 | View Joystick Controls | 13 | Switch Map / Image view |
| 5 | Flight mode | 14 | VR Split Screen |
| 6 | Back to Main Menu | 15 | Record Video |
| 7 | Altitude / Distance | 16 | Take Photo |
| 8 | Vertical and horizontal speed | 17 | Folder |
| 9 | GPS Co-ordinates and signal info | ||
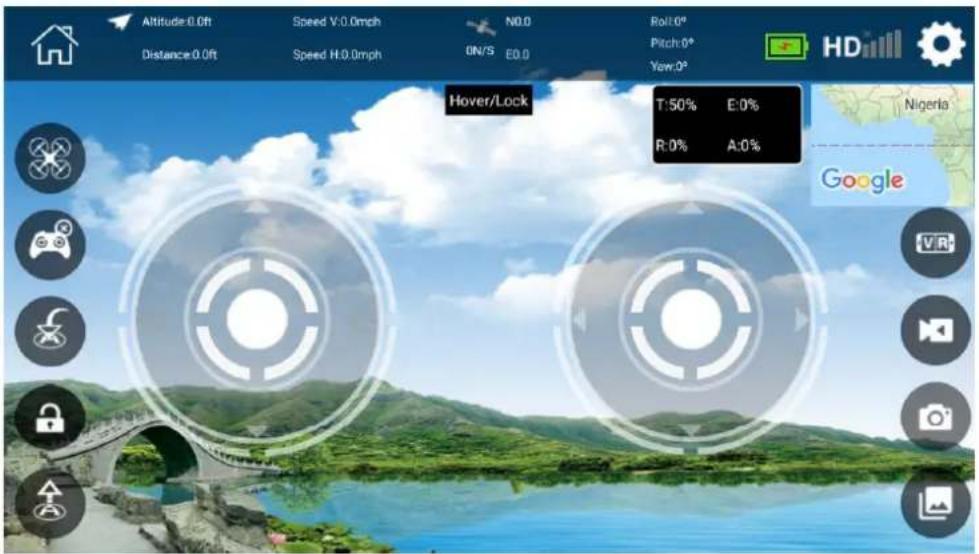
JOYSTICK CONTROLS
Once the drone is connected, display the joystick controls, and the drone can be flown using the onscreen joysticks (after the drone has been unlocked, and the take-off button has been pressed). The controller must be turned off to control the drone from the app.
text_image
Altitude:0.0ft Speed V:0.0mph N0.0 Roll:0° Pitch:0° Distance:0.0ft Speed H:0.0mph ON/S E0.0 View:0° HD Hover/Lock T:50% E:0% R:0% A:0% Nigeria Google VRSETTINGS MENU
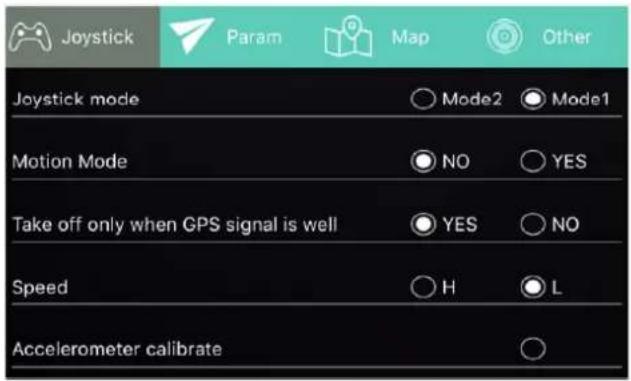
The settings menu is separated into 4 sections: Joystick, Param, Map and Other.
JOYSTICK
Joystick mode: Allows the left and right joysticks to be swapped.
Motion Mode: Allows the drone to be controlled by tilting your phone.
Take off only when GPS Signal is good. Drone will only take off when the signal is above 8 when activated.
text_image
Joystick Param Map Other Joystick mode ○ Mode2 ○ Mode1 Motion Mode ● NO ○ YES Take off only when GPS signal is well ● YES ○ NO Speed ○ H ○ L Accelerometer calibrateSpeed: Change the speed between High and Low
Calibrate Accelerometer: Advisable to calibrate before each flight
Calibrate Magnetometer: Advisable to calibrate before each flight
text_image
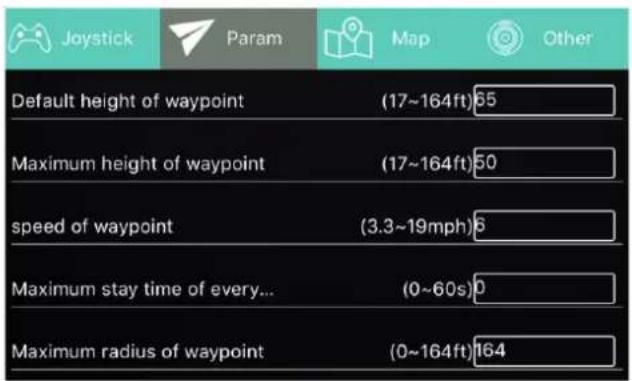
Joystick Param Map Other Default height of waypoint (17~164ft)65 Maximum height of waypoint (17~164ft)50 speed of waypoint (3.3~19mph)6 Maximum stay time of every... (0~60s)0 Maximum radius of waypoint (0~164ft)164PARAM
Allows the default height, max height and speed of waypoint to be set. You can also set the Maximum stay a each waypoint, maximum radius of waypoint and the default height of homeward travel.
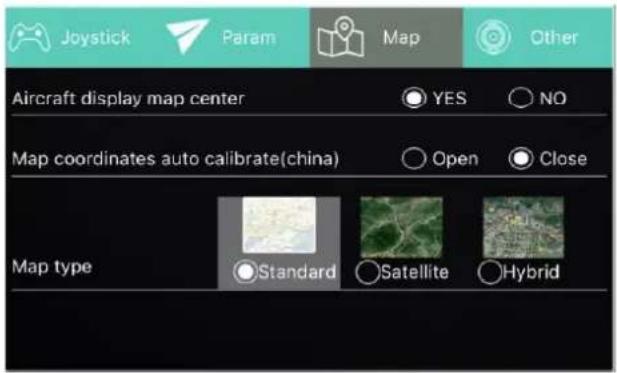
MAP
Select whether the drone is displayed in the centre of the map, and the type of map to be displayed (Between standard Satellite, and Hybrid)
text_image
Joystick Param Map Other Aircraft display map center YES NO Map coordinates auto calibrate(china) Open Close Map type Standard Satellite Hybrid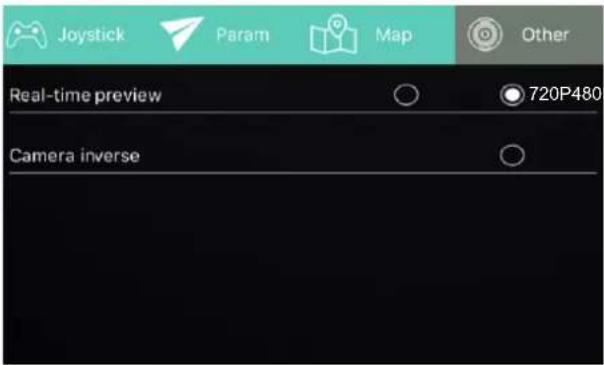
text_image
Joystick Param Map Other Real-time preview 720P480 Camera inverseOTHER
Select the image quality of the preview, and option to inverse the camera.
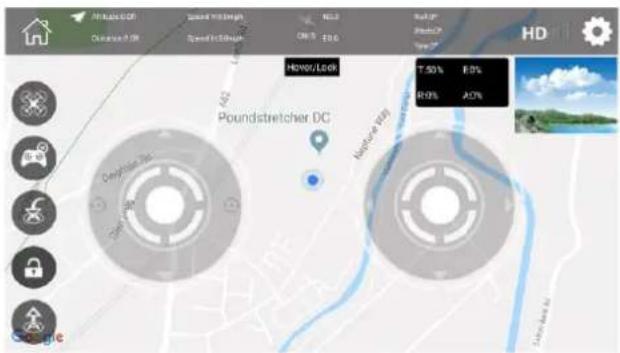
MAP VIEW
Press the map (13) to change from camera view to map view. The map will then show the current position of the drone.
text_image
Air Basic 03F Distance: 28K Speed: 160km/h SUN: -80.0 HD HOME/Lock T:50% E:0% Poundstretcher DC Nordance 49% R:0% A7% GoogleFLIGHT MODE
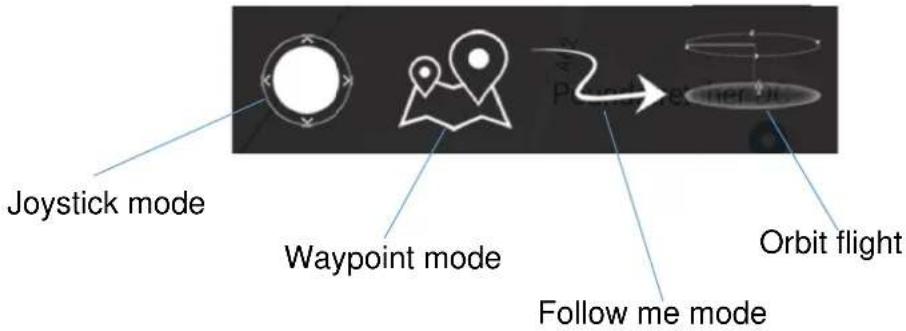
Use the flight mode button to choose the type of flight between joystick control, waypoint flight, follow me mode and Orbit flight. Ensure the controller is turned off when attempting to control the drone from the app.
text_image
Joystick mode Waypoint mode Follow me mode Orbit flightJOYSTICK MODE
Control the drone with the onscreen Joystick.
WAYPOINT MODE
Before starting the waypoint mode, check the Param settings within the menu to ensure they are suitable for the location. Then set the drone hovering at a height above 50 metres, ensuring there are no obstacles between the drone and the waypoints. To exit waypoint mode, use the joystick.
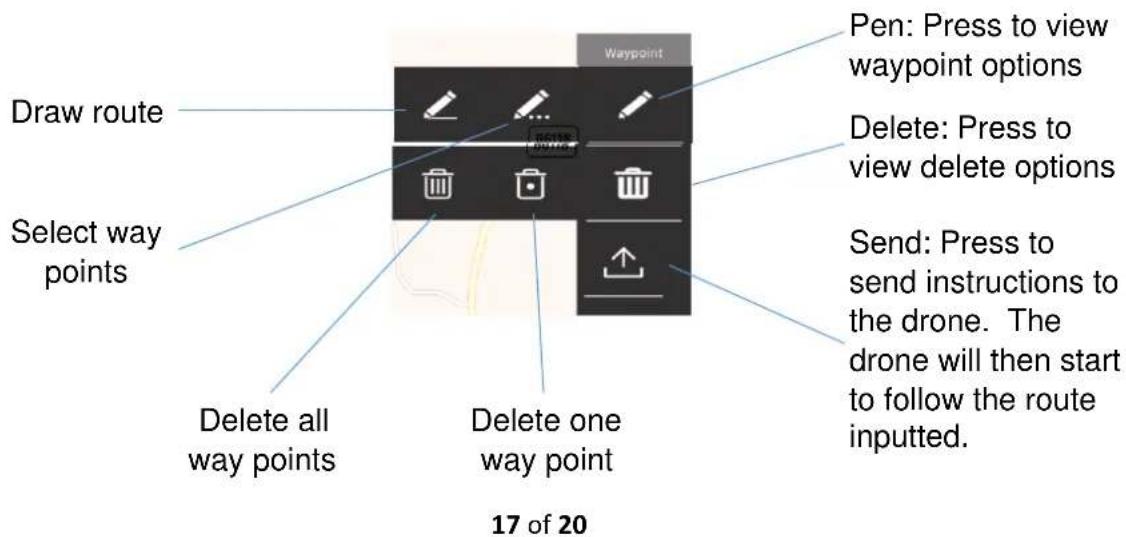
text_image
Draw route Select way points Delete all way points Waypoint Pen: Press to view waypoint options Delete: Press to view delete options Send: Press to send instructions to the drone. The drone will then start to follow the route inputted. 17 of 20FOLLOW ME MODE
When follow me mode is selected, the drone will auto fly, following the position of the smartphone. Follow me mode can be exited by returning to joystick mode.
ORBIT FLIGHT
The camera will be automatically orientated to the APP signal position. The right joystick is then used to control the position on the drone
| Left | Increase speed in anticlockwise direction, or increase speed in clockwise direction |
| Right | Increase speed in clockwise direction, or increase speed in anticlockwise direction |
| Forward | Move the drone further away to extend the orbit |
| Back | Move the drone close to decrease the size of the orbit |
Press the joystick mode button to turn off orbit flight.
WARNINGS:
• Always calibrate the drone before controlling using the APP.
- Ensure you understand the operating instructions provided before attempting to fly.
- Only compatible with Android 5.0 and above.
- Only compatible with iPhone 5.0 and above.
- The phone must be capable of connecting to a 5Ghz wifi network.
- If you experience problems with the image, the drone is either too far away or there is too much interference in the area. Try moving to a place with less interference.
- Ensure all safety warnings in the front of the manual are adhered to.
- Keep these instructions for future reference
TROUBLESHOOTING
| Problem | Cause | Solution | |
| 1 | The lights on the aircraft are flashing but it does not respond to the control | 1. The aircraft and transmitter are not connected.2. Insufficient battery power. | 1. Repeat the connection procedure.2. Recharge the battery. |
| 2 | The aircraft blades turn but it will not take off | 1. Insufficient battery power.2. The blades are distorted.3. Take off button not pressed. | 1. Recharge the battery.2. Replace the blades.3. Press the take off button. |
| 3 | The aircraft shakes in flight | The blades are damaged/distorted | Replace the blades. |
| 4 | The aircraft won’t fly using the App. | 1. Aircraft not connected to App.2. Connection not done in correct order.3. Main controller is turned on. | 1. Reconnect using the instructions on page 142. Reconnect using the instructions on page 143. Aircraft can not fly on App when main controller is turned on. Turn off controller, reset aircraft, app and WiFi to reconnect to App |
| 5 | Camera not working in App | 1. Aircraft not connected to App. | 1. Reconnect using the instructions on page 14 |
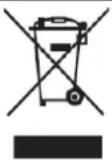
Disposal: Do not dispose this product as unsorted municipal waste. Collection of such waste must be handled separately as special treatment is necessary
Recycling facilities are now available for all customers at which you can deposit your old electrical products. Customers will be able to take any old electrical equipment to participating civic amenity sites run by their local councils. Please remember that this equipment will be further handled during the recycling process, so please be considerate when depositing your equipment. Please contact the local council for details of your local household waste recycling centres.
UK Support
http://www.proflightuk.co.uk/support/
If you have been through the troubleshooting, and the unit is failing to operate, our service line can be contacted on: 0871 971 3141
Office hours: 9AM - 5PM Monday to Friday
www.prolightuk.co.uk
Unit J6, Lowfields Business Park
Lowfields Way, Elland
West Yorkshire, HX5 9DA