
Delta Upland XC - Electronic dog collar GARMIN - Free user manual and instructions
Find the device manual for free Delta Upland XC GARMIN in PDF.


| Product Type | GPS Dog Tracking and Training Collar |
| Model | Delta Upland XC |
| Brand | Garmin |
| Dimensions (Handheld) | 5.4 x 2.9 x 1.6 in (13.7 x 7.4 x 4.1 cm) |
| Weight (Handheld) | 7.8 oz (221 g) with battery |
| Dimensions (Collar) | 1.9 x 1.0 x 0.6 in (4.8 x 2.5 x 1.5 cm) |
| Weight (Collar) | 4.2 oz (119 g) |
| Battery Type (Handheld) | Rechargeable lithium-ion |
| Battery Life (Handheld) | Up to 17 hours |
| Battery Type (Collar) | Rechargeable lithium-ion |
| Battery Life (Collar) | Up to 30 hours |
| Water Rating | IPX7 (Collar) / IPX7 (Handheld) |
| Tracking Range | Up to 5 miles (8 km) |
| Number of Dogs Supported | Up to 3 |
| Training Types | Momentary, Continuous, Ramp, Vibration, Tone |
| Display Type | 2.0 x 1.5 in (5.1 x 3.8 cm) transflective color TFT |
| GPS/GNSS | GPS, GLONASS |
| Connectivity | ANT+ |
| Compass | Yes, electronic compass |
| Memory/History | Up to 1000 dog data points |
| Cleaning | Wipe with damp cloth; remove collar for cleaning |
| Safety | Low battery warning, automatic sleep mode |
| Spare Parts Availability | Replacement collars, chargers, and accessories available from Garmin |
| Repairability | Batteries user-replaceable; service center available for other repairs |
Frequently Asked Questions - Delta Upland XC GARMIN
User questions about Delta Upland XC GARMIN
0 question about this device. Answer the ones you know or ask your own.
Ask a new question about this device
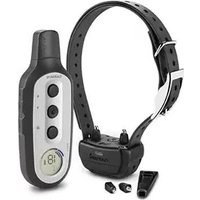
Download the instructions for your Electronic dog collar in PDF format for free! Find your manual Delta Upland XC - GARMIN and take your electronic device back in hand. On this page are published all the documents necessary for the use of your device. Delta Upland XC by GARMIN.
USER MANUAL Delta Upland XC GARMIN
natural_image
Orange GARMIN controller displaying a digital display with a dog running in a grassy field (no text or symbols on the device)Owner's Manual
All rights reserved. Under the copyright laws, this manual may not be copied, in whole or in part, without the written consent of Garmin. Garmin reserves the right to change or improve its products and to make changes in the content of this manual without obligation to notify any person or organization of such changes or improvements. Go to www.garmin.com for current updates and supplemental information concerning the use of this product.
Garmin ^* and the Garmin logo are trademarks of Garmin Ltd. or its subsidiaries, registered in the USA and other countries. Delta ^b is a trademark of Garmin Ltd. or its subsidiaries. These trademarks may not be used without the express permission of Garmin.
Table of Contents
Getting Started.... 1
Setting Up the Delta Upland XC System.... 1
Device Overviews.... 1
Delta Upland XC Handheld Device.... 1
LCD Display....1
Delta Upland XC Dog Collar Device.... 1
Beeper Device Overview.... 1
Charging the Handheld Device.... 1
Charging the Dog Collar Device.... 1
Attaching the Devices to the Collar Strap.... 2
Turning On the Devices.... 2
Turning Off the Devices.... 2
Dog Collar Devices.... 2
Pairing a Dog Collar Device with the Handheld Device...... 2
Selecting a Dog Collar Device.... 2
Managing Multiple Dog Collar Devices.... 3
Beeper Device.... 3
Beeper Sounds.... 3
Customizing the Beeper Sounds.... 3
Resetting to the Default Beeper Sounds.... 3
Introducing Your Dog to the Beeper Device.... 3
Turning the Beeper Sounds On or Off Remotely.... 3
Locating Your Dog Using the Beeper Device.... 3
Dog Training.... 3
Selecting and Installing the Contact Points.... 3
Fitting the Collar on Your Dog.... 4
Training Intensities and Methods...... 4
Training Modes.... 4
Selecting a Training Mode.... 4
Choosing the Correct Intensity Level.... 4
Changing the Intensity Level.... 4
Basic Training Commands....5
Training to Heel....5
Training to Sit and Stay....5
Training to Come Here....5
Collar Training....5
BarkLimiter Mode....6
Enabling BarkLimiter Mode 6
Changing the BarkLimiter Intensity Level.... 6
Training with BarkLimiter 6
Device Information......6
Delta Upland XC Handheld Device Specifications.... 6
Delta Upland XC Dog Collar Device Specifications....6
Beeper Device Specifications....7
Checking the Battery Charge Level of the Dog Collar
Device....7
Delta Upland XC Battery Replacement Instructions.... 7
Delta Upland XC Handheld Device Components.... 7
Replacing the Delta Upland XC Handheld Device
Battery....7
Delta Upland XC Dog Collar Device Components....7
Replacing the Delta Upland XC Dog Collar Device Battery
Assembly....7
Replacing the Beeper Battery 8
Getting More Information...... 8
Registering Your Device....8
Index....9
Getting Started
WARNING
See the Important Safety and Product Information guide in the product box for product warnings and other important information.
Setting Up the Delta Upland XC System
Before you can use the Delta Upland XC system, you must set up the devices.
1 Attach the dog collar device to the collar strap (Attaching the Devices to the Collar Strap).
2 Charge the handheld device (Charging the Handheld Device).
3 Charge the dog collar device (Charging the Dog Collar Device).
4 Turn on the devices (Turning On the Devices).
5 If necessary, pair the dog collar device with the handheld device (Pairing a Dog Collar Device with the Handheld Device).
Device Overviews
Delta Upland XC Handheld Device

| 1 | Power key / BarkLimiter ^TM key |
| 2 | Intensity level selection keys |
| 3 | Training keys |
| 4 | Dog collar device selection key |
| 5 | Training mode selection key |
| 6 | LCD display |
LCD Display
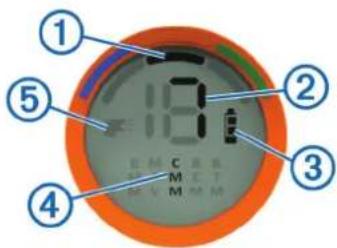
| 1 | Selected dog collar device |
| 2 | Stimulation intensity level |
| 3 | Battery charge level |
| 4 | Selected training mode |
| 5 | Bark correction mode |
Delta Upland XC Dog Collar Device
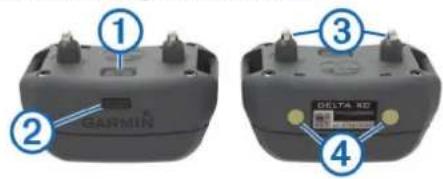
| 1 | Power key |
| 2 | Status LED |
| 3 | Contact points |
| 4 | Charging clip contacts |
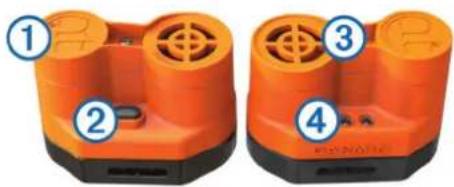
Beeper Device Overview
natural_image
Four orange and black electronic devices with labeled ports, shown from different angles (no text or symbols visible)| 1 | Battery cover |
| 2 | Power key |
| 3 | Speaker |
| 4 | Status LEDs |
Charging the Handheld Device
NOTICE
To prevent corrosion, thoroughly dry the USB port, the weather cap, and the surrounding area before charging or connecting to a computer.
You should fully charge the battery before you use the device for the first time. Charging a fully depleted battery takes about 2 hours.
NOTE: The device does not charge when it is outside the temperature range of 0^ to 40^ C ( 32^ to 104^ F).
1 Lift the weather cap ①.

natural_image
Back view of a device showing two labeled ports (① and ②) with no visible text or symbols beyond labels2 Plug the small end of the power cable into the mini-USB port ② on the device.
3 Plug the other end of the power cable into an appropriate power source.
The LCD display on the handheld device shows the current battery charge level. Charging is complete when the battery charge level icon stops flashing.
Charging the Dog Collar Device
NOTICE
To prevent corrosion, thoroughly dry the contacts on the collar and the surrounding area before connecting the charging clip.
Before you put the collar on the dog, remove the charging clip. If you do not remove the clip, it may become detached from the collar and become lost.
You should fully charge the battery before you use the device for the first time. Charging a fully depleted battery takes about two hours. The device does not charge when outside the temperature range of 0^ to 40^ C ( 32^ to 104^ F).
1 Snap the charging clip ① onto the device.

natural_image
Close-up of a gray electronic device with two ports and an orange arrow indicating rotation (no text or symbols)2 Plug the small end of the power cable into the mini-USB port ② on the charging clip.
3 Plug the other end of the power cable into a power source. The status LED is solid red when the collar is charging.
4 After the status LED turns solid green, remove the charging clip from the collar.
NOTE: The dog collar device returns to factory default settings each time it is charged or turned off.
Attaching the Devices to the Collar Strap
1 With the buckle ① facing outward, insert the end of the collar strap through the slot ② on the collar device.

2 Pull approximately two-thirds of the collar strap through the slot.
3 Insert the end of the collar strap through the slot ③ on the opposite side of the device.
4 Pull the strap until it is tight across the front of the device.
5 Insert the end of the collar strap through the slot ④ on the Beeper device.

natural_image
Orange and black mechanical device with a numbered label (4) pointing to its side, no visible text or symbols on the device itself.Turning On the Devices
- On the handheld device, hold the power key until the LCD display turns on.
- On the dog collar device, hold the power key until the status LED flashes and the collar beeps.
- On the beeper device, hold the power key until the red status LED flashes once.
Turning Off the Devices
- On the handheld device, hold the power key until the LCD display turns off.
- On the dog collar device, hold the power key until the status LED flashes and the collar beeps.
- On the beeper device, hold the power key until red status LED turns off, and then release the power key immediately.
Dog Collar Devices
You can use up to three dog collar devices with a single handheld device. You can select a different training mode and intensity level for each dog collar device.
Each dog collar device must be paired with the handheld device before it can be used. During the pairing process, each dog collar device is associated with a color on the handheld device. — indicates the selected color.
Pairing a Dog Collar Device with the Handheld Device
NOTE: If your handheld device and dog collar device were included in the same package, the devices are paired from the factory using the black color selection.
1 Turn on the dog collar device and the handheld device.
2 On the handheld device, select to choose a color. indicates the selected color.
3 On the handheld device, select an intensity level greater than 0 (Changing the Intensity Level).
4 On the dog collar device, hold the power key.
You must continue to hold the power key during the pairing process.
The device beeps once when you select the power key and again after five seconds.
5 After the second beep, select a training key on the handheld device.
The dog collar device turns off and beeps to indicate whether the devices paired successfully.
Short beep Devices paired successfully
Long beep Devices did not pair
TIP: If the devices did not pair successfully, you should verify the batteries in both devices are fully charged and the intensity level is set higher than 0.
Selecting a Dog Collar Device
Before you can select and control a dog collar device, you must pair the dog collar device with the handheld device (Pairing a Dog Collar Device with the Handheld Device).
Select 30 choose the color.
indicates the selected color.
The training keys control the dog collar device associated with the selected color.
Managing Multiple Dog Collar Devices
You can set the maximum number of active dog collar devices controlled by your handheld device.
1 Hold
indicates active devices.
2 Release to select the active dog collar devices.
Beeper Device
The beeper device emits high-volume sounds to provide information about the location and status of your dogs. You can operate the beeper device remotely using the Delta Upland system.
Beeper Sounds
The beeper device can emit two sounds: a beep and a hawk scream. These sounds indicate your dog's hunting and pointing status.
While your dog is hunting, the beeper device emits a series of one to three beeps every four seconds. You can select the number of beeps in the series, which is useful to distinguish between multiple dogs. You can also disable this sound so that the beeper device is silent while your dog is hunting.
When your dog is pointing, the beeper emits either one beep every second or one hawk scream every five seconds, depending on the setting you choose.
When you select beeper sounds, the selected sounds are indicated briefly by the status LEDs. The red status LED indicates the hunting sound, and the green status LED indicates the pointing sound.
Mode Red LED Hunting Sound Green LED Pointing Sound
| 1 1 blink 1 beep Solid Hawk scream | ||
| 2 2 blinks 2 beeps | ||
| 3 3 blinks 3 beeps | ||
| 4 Off Silent | ||
| 5 1 blink 1 beep Blinking Beep | ||
| 6 2 blinks 2 beeps | ||
| 7 3 blinks 3 beeps | ||
| 8 Off Silent |
Customizing the Beeper Sounds
1 With the device turned on, hold the power key until both LEDs blink rapidly three times, and release the power key.
2 Select the power key to cycle through the sound modes. Each time you select the power key, the LEDs indicate the selected sound mode. You may have to cycle through several sound modes to reach your preferred sound mode.
3 Hold the power key until both LEDs blink rapidly three times, and release the power key to set the sound mode to the current selection.
Resetting to the Default Beeper Sounds
You can reset your beeper device to the factory default sound settings, regardless of the current setting or power state of the device.
Hold the power key for 15 seconds.
The device emits a high-low, high-low beep sequence, and the LEDs flash to confirm the reset.
The next time you turn on the device, it is set to mode 1.
Introducing Your Dog to the Beeper Device
The beeper device is loud and may startle an inexperienced dog. You should introduce your dog to the device before you use it during a hunt. You can use any of these methods to help your dog adjust to the sounds.
- Place a piece of duct tape over the speaker opening to muffle the sounds during your first use of the device on the dog.
- Turn on the device, and place it near your dog's kennel for several hours.
This allows the dog to hear and adjust to the sounds in a comfortable location.
Turning the Beeper Sounds On or Off Remotely
Before you can turn the beeper sounds on or off remotely, the dog collar device and the beeper device must be turned on.
You can use the handheld device to turn the beeper sounds on or off remotely. Turning off the beeper sounds does not turn off the beeper device.
1 On the handheld device, select a training mode in which a training key is assigned to the beeper device.
2 Select the training key assigned to the beeper device to turn the beeper sounds on or off for the selected dog.
Locating Your Dog Using the Beeper Device
You can remotely trigger the beeper device to emit a series of beeps, which you can use to determine the location of your dog.
1 On the handheld device, select the dog to locate (Selecting a Dog Collar Device).
2 Select a training mode in which a training key is assigned to B (Selecting a Training Mode).
3 Hold the training key assigned to B.
The beeper device emits a series of beeps for as long as you hold the training key, up to eight seconds.
Dog Training
You should research and investigate the training methods best suited for you, your dog, and your needs. This manual provides some basic guidelines for training, but each dog has unique training needs.
When used properly, the Delta Upland XC training system is a very effective training tool to aid your dog in reaching its full potential. The use of the training system should be part of an overall training program.
Begin training your dog on a leash, without the Delta Upland XC training system. You should train your dog how to heel, sit, and come to you. After the dog understands these three basic commands, you can begin training with the dog collar device and the leash. Finally, when the dog consistently obeys commands using the leash and collar, you may be able to remove the leash to train with only the dog collar device.
Selecting and Installing the Contact Points
For best results, select the correct contact points based on your dog's coat.
1 Select the correct contact point length for your dog's coat type:
- For dogs with thicker coats, use the longer contact points.
- For dogs with shorter coats, use the shorter contact points.
2 If necessary, use the included wrench to remove the contact points.
3 Twist the contact points into the collar.
4 Tighten with the included wrench, but do not overtighten. When you put the collar on the dog, make sure the contact points are tight against the neck.
Fitting the Collar on Your Dog
CAUTION
To prevent irritation from the contact points, remove the collar for at least eight hours out of every 24-hour period.
This device is not intended for human use. Do not attempt to use on any person.
NOTICE
Before you put the collar on the dog, remove the charging clip. If you do not remove the clip, it may become detached from the collar and become lost.
In order to properly correct the dog, the collar and device must fit the dog properly. If the collar is too loose or positioned incorrectly, corrections may be inconsistent. This can delay or prevent successful training.
1 Place the collar around the middle of the dog's neck.
2 Position the device at the front of the dog's neck, with the status LED facing toward the dog's chin and the contact points against the throat.
TIP: For bark correction, the device contact points should be positioned near the dog's vocal cords. This location varies based on the breed of dog. If the device does not seem to detect the dog's barks, you should move the device closer to or farther from the dog's body to find the ideal location.
3 Position the Beeper device at the back of the dog's neck.
4 Tighten the strap so that it is very snug around the dog's neck, and fasten the buckle.
NOTE: The collar should fit tightly and should not be able to rotate or slide on the dog's neck. The dog must be able to swallow food and water normally. You should observe your dog's behavior to verify that the collar is not too tight.

natural_image
Line drawing of a dog holding a measuring tape (no text or symbols)5 Wiggle the device to work the contact points through the dog's coat.
NOTE: The contact points must have contact with the dog's skin to be effective.
6 If the strap is too long, cut off the excess, leaving at least 3 in. (8 cm) to spare.
TIP: You can mark the hole used to fasten the buckle for future reference.
Training Intensities and Methods
You can use several methods to train your dog. The Delta Upland XC system provides 18 stimulation intensity levels, which increase sequentially from 1 to 18.
Momentary stimulation: Applies a brief stimulation when you press the training key, regardless of how long the key is depressed.
Continuous stimulation: Applies stimulation to the dog the entire time you press the training key, for a maximum of 8 seconds. Your stimulations should typically be much shorter than 8 seconds.
Tone: Activates an audible tone the entire time you press the training key, for a maximum of 8 seconds. A tone can be used as either a positive or negative training cue, depending on your training program.
Vibration: Applies vibration instead of stimulation to the dog the entire time you press the training key, for a maximum of 8 seconds. The effectiveness of vibration may vary based on the dog's temperament and experience.
Training Modes
The Delta Upland XC system provides several training modes, which assign different combinations of momentary stimulation, continuous stimulation, tone, vibration, and remote beeper functionality to the training keys (Training Intensities and Methods). The three vertical letters on the LCD display correspond to the training key functions, from top to bottom.
Training keys that activate a stimulation are designated as high or low.
| Mode Top Key Middle Key Bottom Key | ||
| CMM Continuous (high) Momentary (high) Momentary (low) | ||
| MTV Momentary (low) Tone Vibration | ||
| BCM Beeper Continuous (high) Momentary (high) | ||
| BTM Beeper Tone Momentary (high) | ||
| BMM Beeper Momentary (high) Momentary (low) |
Selecting a Training Mode
You can select a different training mode for each dog collar device.
1 Select a dog collar device (Selecting a Dog Collar Device).
2 Select MODE to toggle through the available training modes.
Choosing the Correct Intensity Level
1 Set the intensity to the lowest level (Changing the Intensity Level).
2 Press a training key.
3 Observe the dog for a reaction, such as a head shake, neck movement, or just a change in expression.
Sometimes dogs will vocalize due to the surprise of the electrical stimulation. If the dog vocalizes more than once, the intensity level is too high for beginning training.
4 If there is no reaction, increase the intensity level by one level until the dog has a slight but recognizable reaction to the stimulation.
The intensity level that causes a slight but recognizable reaction is your dog's baseline level for beginning collar training. You do not need to, and should not, apply this intensity selection test again.
After you begin training, the dog's performance guides your intensity selection. As the dog advances in training, you may need to change the level depending upon the training situation.
Changing the Intensity Level
You can select a different intensity level for each dog collar device.
1 Select a dog collar device (Selecting a Dog Collar Device).
2 Select ▲ or ▽ increase or decrease the intensity level. The numerical intensity level appears on the LCD display.
TIP: You can hold ▲ or to cycle through intensity levels quickly.
Basic Training Commands
You should begin training your dog with a few basic commands without using the Delta Upland XC training system to correct the dog. You should train the three basic commands in the following order: "heel," "sit," and "here."
During initial training, you should put the dog collar device on the dog, but the device should be turned off. This allows the dog to get used to the device before you start using it to correct the dog. This also helps to prevent "collar-wise" behavior (Preventing Collar-Wise Behavior).
Initially, you should keep the training sessions short and only train one command during a session. This way, the dog is less likely to become confused and training should progress more quickly. Pay close attention while training the dog, so you can begin to learn when to go faster or slower, and when to take a break.
With plenty of repetition, consistency, patience, and a lot of praise, the dog should begin to obey these commands after several lessons. Each dog learns at a different rate, and some dogs may take longer to learn these commands. After the dog demonstrates a basic understanding of these commands while on a leash, training with collar stimulations can be introduced, while keeping the dog on the leash.
Training to Heel
Before you begin training, put a leash on the dog, and select an area with minimal distractions.
The first command that you will teach the dog is the "heel" command.
1 With the dog at your side on a leash, command the dog to "heel," and begin walking forward while gently pulling on the leash.
2 If the dog gets in front of you, repeat the command "heel," and move in another direction or pull back on the leash.
3 If the dog starts to lag behind you, lightly tug on the leash to bring the dog back to your side.
Reward the dog with praise when the dog obeys the command.
Training to Sit and Stay
Before you begin training, put a leash on the dog, and select an area with minimal distractions. Before you train to sit and stay, you should first train to heel.
The actual command is "sit," and the "stay" command is implied. When you command the dog to sit, the dog should stay until you indicate otherwise.
1 Begin training this command walking the dog on a leash in the heel position.
2 Stop walking, pull up on the leash, and command the dog to "sit."
3 Maintain steady pressure on the leash until the dog obeys the command.
4 If the dog does not obey and seems confused, gently push down on the dog's back above the flank, to make the dog sit.
Reward the dog with praise when the dog sits and stays.
Training to Come Here
Before you begin training, put a leash on the dog, and select an area with minimal distractions. Before you begin training the dog to come "here," you should first train the dog to "heel" and "sit." Also, you may need to use a long leash to effectively train "here."
Teaching your dog to come here is the most important command. The "here" command allows you to maintain control of your dog and can be used to call your dog away from a potentially dangerous situation. This command must be taught properly.
1 With the dog in a sitting position, move away to the end of the leash.
2 Command the dog to come "here" while gently tugging on the leash.
3 Reward the dog with praise as soon as the dog begins to move toward you.
4 If the dog begins to veer away, gently tug on the leash, and repeat the command to come "here."
The dog might resist this command. With repetition and patience, the dog will learn to obey the command.
Collar Training
Begin training your dog on a leash, without using the Delta Upland XC training system. After the dog shows a grasp of the commands "heel," "sit," and "here," you can begin training with the collar and the leash.
During the initial stage of collar introduction, the dog learns that collar stimulation means the same thing as a tug on the leash. At first, the dog may be alarmed by the electronic stimulation. The key is to be patient and consistent and not to start off at too high of an intensity. Be fair and consistent, and use repetition and praise when using the collar as a training tool.
If the dog does not respond to the stimulation level you have selected (Choosing the Correct Intensity Level), increase the stimulation one level at a time until you achieve the appropriate response. After you achieve the desired response, you can lower the stimulation level as long as the dog maintains consistency.
As the dog becomes more proficient with the commands, you can begin to introduce distractions, such as rolling a ball in front of the dog or walking him in the presence of others.
After the dog begins to respond consistently to the command during collar training, you can remove the leash and train with just the collar.
NOTE: You should train without a leash only when it is appropriate for your environment and your dog's temperament. You should follow all laws and regulations for your area regarding the use of dog leashes.
Eventually in most training situations, your commands will not require stimulation to be given with the command. You should only use stimulation when you need to repeat a command because the dog did not obey the first one.
As the dog becomes better trained, you can decrease the use of collar training. Continue to have the dog wear the collar until you feel certain that it is no longer needed to reinforce known commands. Abandoning the collar too early can lead to problems in the future.
Preventing Collar-Wise Behavior
If the Delta Upland XC training system is not used properly as part of your overall training program, the dog may exhibit "collar-wise" behavior. This occurs when the dog obeys commands while wearing the dog collar device, but does not obey commands when the device is removed. You should follow these tips to prevent this behavior.
- Begin training the dog without using the Delta Upland XC training system to correct the dog (Basic Training Commands).
-
Turn off the dog collar device and put it on the dog during initial training.
This allows the dog to get used to the device before you start using it to correct the dog. -
Turn off the dog collar device and put it on the dog outside of your training sessions.
This allows the dog to get used to the device and helps to prevent the dog from associating the presence of the device with training or obedience.
- Reward the dog with praise whenever the dog obeys a command.
Training the Dog to Heel and Sit with the Collar
Before you begin training your dog using the collar, your dog must show a grasp of the "heel," "sit," and "come" commands while on the leash, you must put on the collar (Fitting the Collar on Your Dog), and you must find the correct intensity level (Choosing the Correct Intensity Level).
When beginning collar training, start with the "heel" and "sit" commands.
1 With the dog at your side on a leash, pull up on the leash, and command the dog to "sit."
2 If the dog does not sit immediately, press a training key briefly, and repeat the command to "sit."
3 Reward the dog with praise when the dog obeys the command.
After the dog begins obeying the "sit" command without collar stimulation, you should move on to the "heel" command.
4 With the dog at your side on a leash and with the collar on, command "heel" and begin walking forward while gently pulling on the leash.
5 If the dog not heel, press a training key briefly, repeat the command to "heel", and move in another direction or pull back on the leash.
6 Reward the dog with praise when the dog obeys the command.
Training the Dog to Come Here with the Collar
Before you begin training your dog to come "here" using the collar, your dog must have a strong grasp of the "heel" and "sit" commands using the collar, you must put on the collar (Fitting the Collar on Your Dog), and you must find the correct intensity level (Choosing the Correct Intensity Level). Also, you may need to use a long leash to effectively train "here."
1 With the dog in a sitting position, move away to the end of the leash.
2 Command the dog to come "here."
3 If the dog does not move immediately toward you, press a training key briefly, gently tug on the leash, and repeat the command to come "here."
4 Reward the dog with praise as soon as the dog begins to move toward you.
5 If the dog begins to veer away, press a training key briefly, and repeat the command to come "here."
BarkLimiter Mode
When you enable BarkLimiter mode, the handheld device automatically activates a stimulation when the dog collar device detects a bark.
Enabling BarkLimiter Mode
When BarkLimiter mode is enabled, the device corrects the dog's barks automatically.
Select
✗ appears on the LCD display and the status LED on the dog collar device flashes three times when the device enters BarkLimiter mode.
TIP: Occasionally, the dog collar device may not enter BarkLimiter mode if there is signal interference or if it is outside the range of the handheld device. With ⚪ selected on the
LCD display, you can select any training key to force the device to enter BarkLimiter mode.
Changing the BarkLimiter Intensity Level
You can change the BarkLimiter intensity level based on your training style and preferences.
When BarkLimiter mode is enabled, select ▲ or ▼ to change the intensity level:
- Select U to set the stimulation for vibration only.
- Select A to enable Autorise. The system starts at the lowest intensity level and increases the intensity level automatically based on the dog's barking behavior. It may take up to one minute for the system to increase to an intensity level that discourages the dog from barking.
- Select 1 through 18 to set a specific intensity level.
Training with BarkLimiter
You can train your dog while BarkLimiter mode is turned on.
1 When BarkLimiter mode is active, select
✗ and a three-letter training mode appear on the LCD display.
2 Select a training mode (Selecting a Training Mode).
3 Select an intensity level (Changing the Intensity Level).
NOTE: When training mode is active, adjustments to the intensity level apply only to the training keys. You can adjust the BarkLimiter intensity level only when BarkLimiter mode is activated and training mode is not active.
Device Information
Delta Upland XC Handheld Device Specifications
| Battery type Rechargeable, replaceable lithium-ion | |
| Battery life 60 hr., typical use | |
| Operating temperature range From -20° to 60°C (from -4° to 140°F) | |
| Charging temperature range From 0° to 40°C (from 32° to 104°F) | |
| Storage temperature range (up to 1 mo.) | From -20° to 50°C (from -4° to 122°F) |
| Storage temperature range (up to 3 mo.) | From -20° to 40°C (from -4° to 104°F) |
| Storage temperature range (up to 1 yr.) | From -20° to 20°C (from -4° to 68°F) |
| Water rating IEC 60529 IPX7* | |
| Wireless range (Delta Upland XC) | 1.2 km (0.75 mi.) |
| Wireless range (Delta Sport XC) | 1.2 km (0.75 mi.) |
| Wireless range (Delta XC) 0.8 km | (0.5 mi.) |
*The device withstands incidental exposure to water of up to 1 m for up to 30 min. For more information, go to www.garmin.com /waterrating.
Delta Upland XC Dog Collar Device Specifications
| Battery type Rechargeable, replaceable lithium-ion | |
| Battery life 60 hr., typical use | |
| Operating temperature range From -20° to 50°C (from -4° to 122°F) | |
| Charging temperature range From 0° to 40°C (from 32° to 104°F) | |
| Storage temperature range (up to 1 mo.) | From -20° to 60°C (from -4° to 140°F) |
| Storage temperature range (up to 3 mo.) | From -20° to 45°C (from -4° to 113°F) |
| Storage temperature range (up to 1 yr.) | From -20° to 30°C (from -4° to 86°F) |
| Water rating IEC 60529 IPX7* | |
*The device withstands incidental exposure to water of up to 1 m for up to 30 min. For more information, go to www.garmin.com /waterrating.
Beeper Device Specifications
| Battery type CR123A lithium | |
| Battery life Up to 100 hr. | |
| Operating temperature range -20° to 43°C (-4° to 110°F) | |
| Water rating IEC 60529 IPX7* | |
*The device withstands incidental exposure to water of up to 1 m for up to 30 min. For more information, go to www.garmin.com /waterrating.
Checking the Battery Charge Level of the Dog Collar Device
Turn on the dog collar device.
The status LED flashes every few seconds while the device is on. The color of the status LED indicates the battery charge level.
| Green The battery has a good charge. | |
| Yellow The battery has less than a 50% charge. | |
| Red The battery should be charged soon. | |
| Flashing Red | The battery should be charged immediately. Training features are disabled. |
Delta Upland XC Battery Replacement Instructions
WARNING
This product contains a lithium-ion battery. To prevent the possibility of personal injury or product damage caused by battery exposure to extreme heat, store the device out of direct sunlight.
Do not use a sharp object to remove batteries.
CAUTION
Contact your local waste disposal department to properly recycle the batteries.
Delta Upland XC Handheld Device Components

| 1 | Security screws |
| 2 | Back plate |
| 3 | Battery |
| 4 | Battery connector |
| 5 | Gasket |
Replacing the Delta Upland XC Handheld Device Battery
Before you replace the battery, you must remove all dirt, water, and debris from the device. You also need the security screwdriver included with the new battery.
You can purchase a replacement battery at http://buy.garmin.com. You should use only an official Garmin® replacement part.
1 Remove the six security screws from the back of the device.
2 Lift up the back plate.
3 Grip the battery connector wires close to the connector, and pull the connector parallel to the circuit board to disconnect the battery connector from the device.
4 Remove the old battery from the back plate, noting the orientation of the battery.
The battery fits tightly. It may be necessary to pry the battery out of the back plate using a non-sharp, non-metal object.
5 Install the new battery into the back plate with the label side up, using the same orientation as the old battery.
6 With the new battery, connect the battery connector to the device.
When properly installed, the connector plug snaps into the port.
7 Verify the gasket is not damaged and is completely seated in the groove.
8 Hold the back plate and the device firmly together, and replace all six security screws without tightening.
9 Verify the back plate and the device are aligned with no gaps.
10 Tighten the screws evenly.
Delta Upland XC Dog Collar Device Components

| 1 | Battery assembly |
| 2 | Gasket |
| 3 | Battery connector |
| 4 | Device |
| 5 | Security screws |
Replacing the Delta Upland XC Dog Collar Device Battery Assembly
Before you replace the battery, you must remove all dirt, water, and debris from the device. You also need the security screwdriver included with the new battery.
You can purchase a replacement battery assembly at http://buy.garmin.com. You should use only a certified Garmin replacement part. The battery assembly includes a pre-assembled back plate with a gasket, battery, and battery connector.
1 Remove the four security screws from the corners of the device.
2 Lift up the battery assembly.
3 Grip the battery connector wires close to the connector, and pull the connector outward from the circuit board to disconnect the battery connector from the device.
4 With the new battery assembly, connect the battery connector to the device.
When properly installed, the connector plug snaps into the port and the top face of the connector plug is flush with the edges of the port.
5 Verify the gasket is not damaged and is completely seated in the groove.
6 Hold the battery assembly and the device firmly together, and replace all four security screws without tightening.
7 Verify the battery assembly and the device are aligned with no gaps.
8 Tighten the screws evenly.
Replacing the Beeper Battery
Before you can replace the battery, you must have a Phillipshead screwdriver and a CR123A lithium battery.
1 Using a Phillips-head screwdriver, remove the screw ① from the battery cover ②.

2 Remove the battery cover and battery ③.
3 Insert the new battery, observing polarity.
4 Verify the gasket ④ is fully seated in the groove.
5 Replace the battery cover and screw.
Getting More Information
You can find more information about this product on the Garmin website.
- Go to www.garmin.com/outdoor.
- Go to www.garmin.com/learningcenter.
- Go to http://buy.garmin.com, or contact your Garmin dealer for information about optional accessories and replacement parts.
Registering Your Device
Help us better support you by completing our online registration today.
- Go to http://my.garmin.com.
- Keep the original sales receipt, or a photocopy, in a safe place.
Index
A
accessories 8
B
bark correction 1,6
battery
charging 1
life 1,7
replacing 7,8
beeper 1, 3, 8
locating your dog 3
sounds 3
C
charging
collar 1
handheld 1
collar
attaching strap 2
charging 1
contact points 1, 3
fitting 4
pairing 2
contact points 1, 3, 4
D
device, registration 8
dog
collar 5
training 3,5
training basics 3, 5, 6
training intensity levels 4
dog collar device 1–3, 5
pairing 2
|
intensity level 1
changing 4
choosing 4
K
keys 1
P
pairing, collar 2
pairing a collar 2
power key 1,2
product registration 8
R
registering the device 8
S
selecting 2
specifications 6, 7
T
training 5,6
modes 1, 4, 6
troubleshooting 8
www.garmin.com/support

+43 (0) 820 220230 + 32 2 67


0800 770 4960 1-866-429-92


+385 1 5508 272
+385 1 5508 271

+420 221 985466
+420 221 985465

+ 45 4810 5050 + 358 9 6937


+33155693399+390236


(+52) 001-855-792-7671 080


+47 815 69 555

00800 4412 454
+44 2380 662 915

(+35) 1214 447 460 +386 4 2


0861 GARMIN (427 646)
+27 (0)11 251 9999

+34 93 275 44 97

+46 7744 52020 +886 2 264


0808 238 0000
+44 (0) 870 8501242

+49 (0)180 6 427646
20 ct./Anruf. a. d.
deutschen Festnetz,


- Table of Contents
- Getting Started.... 1
- Beeper Device.... 3
- Dog Training.... 3
- Device Information......6
- Getting Started
- WARNING
- Setting Up the Delta Upland XC System
- Device Overviews
- Charging the Handheld Device
- NOTICE
- Charging the Dog Collar Device
- Attaching the Devices to the Collar Strap
- Turning On the Devices
- Turning Off the Devices
- Dog Collar Devices
- Pairing a Dog Collar Device with the Handheld Device
- Selecting a Dog Collar Device
- Managing Multiple Dog Collar Devices
- Beeper Device
- Beeper Sounds
- Customizing the Beeper Sounds
- Resetting to the Default Beeper Sounds
- Introducing Your Dog to the Beeper Device
- Turning the Beeper Sounds On or Off Remotely
- Locating Your Dog Using the Beeper Device
- Dog Training
- Selecting and Installing the Contact Points
- Fitting the Collar on Your Dog
- CAUTION
- Training Intensities and Methods
- Training Modes
- Selecting a Training Mode
- Choosing the Correct Intensity Level
- Changing the Intensity Level
- Basic Training Commands
- Training to Heel
- Training to Sit and Stay
- Training to Come Here
- Collar Training
- Preventing Collar-Wise Behavior
- Training the Dog to Heel and Sit with the Collar
- Training the Dog to Come Here with the Collar
- BarkLimiter Mode
- Enabling BarkLimiter Mode
- Changing the BarkLimiter Intensity Level
- Training with BarkLimiter
- Device Information
- Checking the Battery Charge Level of the Dog Collar Device
- Delta Upland XC Battery Replacement Instructions
- Replacing the Delta Upland XC Handheld Device Battery
- Replacing the Delta Upland XC Dog Collar Device Battery Assembly
- Replacing the Beeper Battery
- Getting More Information
- Registering Your Device
- Index
- A
- B
- C
- D
- |
- K
- P
- R
- S
- T
- www.garmin.com/support
Brand : GARMIN
Model : Delta Upland XC
Category : Electronic dog collar