
Pro - Electronic dog collar GARMIN - Free user manual and instructions
Find the device manual for free Pro GARMIN in PDF.


| Product Type | Dog Training Collar System |
| Brand | Garmin |
| Model | Pro Trashbreaker |
| Handheld Battery Type | Rechargeable lithium-ion (replaceable) |
| Handheld Battery Life | Up to 60 hours typical use |
| Dog Collar Battery Type | Rechargeable lithium-ion (replaceable) |
| Dog Collar Battery Life | Up to 40 hours typical use |
| Charging Time | Approximately 2 hours for both devices |
| Wireless Range | Up to 4 mi (6.4 km) |
| Water Rating (Handheld) | IEC 60529 IPX7 (1 m for 30 min) |
| Water Rating (Dog Collar) | Up to 1 ATM (10 m depth) |
| Operating Temperature Range | -4°F to 140°F (-20°C to 60°C) |
| Charging Temperature Range | 32°F to 104°F (0°C to 40°C) |
| Number of Collar Devices Supported | Up to 9 |
| Training Modes | Continuous stimulation, tone, BarkLimiter |
| Intensity Levels | 6 levels (1-6) plus light mode (L) |
| Bark Detection | Yes, with Bark Odometer tracking |
| Light Feature | Yes, for locating dog at night |
| Contact Points | Short and long options for different coat types |
| Collar Fit | Adjustable strap, must fit snugly around dog's neck |
| Pairing | Factory paired if in same package; manual pairing available |
| Battery Replacement | User-replaceable with official Garmin part |
| Included Accessories | Handheld device, dog collar device, charger, collar strap, contact points, wrench |
| Support | www.garmin.com / 1-800-800-1020 |
Frequently Asked Questions - Pro GARMIN
User questions about Pro GARMIN
0 question about this device. Answer the ones you know or ask your own.
Ask a new question about this device
Download the instructions for your Electronic dog collar in PDF format for free! Find your manual Pro - GARMIN and take your electronic device back in hand. On this page are published all the documents necessary for the use of your device. Pro by GARMIN.
USER MANUAL Pro GARMIN
natural_image
Exterior view of a Garmin Ti-Pt Home phone with attached black and yellow belt (no visible text or symbols on device body)All rights reserved. Under the copyright laws, this manual may not be copied, in whole or in part, without the written consent of Garmin. Garmin reserves the right to change or improve its products and to make changes in the content of this manual without obligation to notify any person or organization of such changes or improvements. Go to www.garmin.com for current updates and supplemental information concerning the use of this product.
All rights reserved. Under the copyright laws, this manual may not be copied, in whole or in part, without the written consent of Garmin®. Garmin® reserves the right to change or improve its products and to make changes in the content of this manual without obligation to notify any person or organization of such changes or improvements.
Garmin® and the Garmin logo are trademarks of Garmin Ltd. or its subsidiaries, registered in the USA and other countries. BarkLimiter™ and Bark Odometer™ are trademarks of Garmin Ltd. or its subsidiaries. These trademarks may not be used without the express permission of Garmin.
Getting Started
WARNING
See the Important Safety and Product Information guide in the product box for product warnings and other important information.
Setting Up the Pro Trashbreaker System
Before you can use the Pro Trashbreaker system, you must set up the devices.
1 Attach the dog collar device to the collar strap (Attaching the Dog Collar Device to the Collar Strap).
2 Charge the handheld device (Charging the Handheld Device).
3 Charge the dog collar device (Charging the Collar).
4 Turn on the devices (Turning On the Dog Collar Device).
5 If necessary, pair the dog collar device with the handheld device (Pairing a Dog Collar Device with the Handheld Device).
Device Overviews
Pro Trashbreaker Handheld Device

| 1 | Intensity level and training mode dial |
| 2 | Battery level |
| 3 | Dog collar device toggle switch |
| 4 | Training keys |
Pro Trashbreaker Dog Device
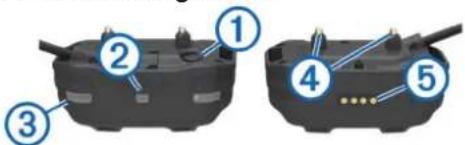
| 1 | Power key |
| 2 | Status LED |
| 3 | Lights |
| 4 | Contact points |
| 5 | Charging clip contacts |
Attaching the Dog Collar Device to the Collar Strap
1 With the buckle ① facing outward, insert the end of the collar strap through the slot ② on the collar device.

2 Pull most of the collar strap through the two slots ③ on the dog device.
3 Insert the end of the collar strap through the slot ④ on the opposite side of the device.
4 Pull the strap until it is tight across the front of the device.
5 Wrap the antenna keeper ⑤ around the collar strap.
6 NOTE: Do not bend the antenna sharply. You should lengthen the collar strap on the side with the antenna keeper to avoid bending the antenna sharply.
Slide the antenna ^⑥ through the antenna keeper.
Charging the Handheld Device
You should fully charge the battery before you use the device for the first time or whenever the battery is low (Checking the Battery Level). It is normal for the battery to discharge in approximately 7 to 10 weeks when the device is not in use. Charging a fully depleted battery takes about 2 hours.
NOTE: The device will not charge when it is outside the temperature range of 32^ to 104^ F ( 0^ to 40^ C).
1 Lift the weather cap ①.

natural_image
Close-up of a black mobile phone rear panel showing two labeled buttons (1 and 2) with no visible text or symbols beyond labels.2 Plug the small end of the power cable into the mini-USB port ② on the device.
3 Plug the other end of the power cable into an appropriate power source.
The status LED is solid red when the device is charging.
4 After the status LED turns solid green, unplug the power cable from the device.
Charging the Collar
NOTICE
To prevent corrosion, thoroughly dry the contacts on the collar and the surrounding area before connecting the charging clip.
You should fully charge the battery before you use the device for the first time or whenever the battery is low (Checking the Battery Level). It is normal for the battery to discharge in approximately 7 to 10 weeks when the device is not in use. Charging a fully depleted battery takes about 2 hours.
NOTE: The device will not charge when outside the temperature range of 32^ to 104^ F ( 0^ to 40^ C).
1 Snap the charging clip ① onto the device ②.

natural_image
Close-up of a black electric vehicle charging plug with labeled parts (1 and 2), showing internal wiring and a scroll wheel (no text or symbols beyond labels)2 Plug the power cable into a power source.
The status LED is solid red when the collar is charging.
3 After the status LED turns solid green, remove the charging clip from the collar.
Turning On the Dog Collar Device
- On the dog collar device, hold the power key until the status LED turns green and the collar beeps to turn it on in training mode.
- On the dog collar device, hold the power key until the status LED turns blue to turn on the BarkLimiter™ feature (BarkLimiter).
- On the dog collar device, hold the power key until the status LED turns yellow to enter pairing mode (Pairing a Dog Collar Device with the Handheld Device).
Turning Off the Device
1 On the dog collar device, hold the power key until the red LED appears.
2 Release the power key. The dog collar device beeps to confirm powering off. NOTE: If the device is powered off in BarkLimiter mode, the LED flashes the number of corrected barks before powering off (Checking the Bark Odometer).
Dog Collar Device
You can use up to 9 dog collar devices with a single handheld device.
Each dog collar device must be paired with the handheld device before it can be used. During the pairing process, each dog collar device is associated with a different color on the handheld device.
Pairing a Dog Collar Device with the Handheld Device
NOTE: If your handheld device and dog collar device were included in the same package, the devices are paired from the factory.
1 On the handheld device, move the toggle switch and select a key to choose the color associated with the dog collar device.
2 On the handheld device, set the intensity level to a numbered position (Changing the Intensity Level).
3 On the dog collar device, hold the power key for about 5 seconds until the status LED changes to yellow.
4 On the handheld device, select a training key.
The dog collar device beeps when the devices have paired successfully. If the device does not beep, pairing has not been successful.
TIP: If the devices did not pair successfully, you should verify the batteries in both devices are fully charged and the intensity level is set to a numbered position.
Selecting a Dog Collar Device
Before you can select and control a dog collar device, you must pair the dog collar device with the handheld device (Pairing a Dog Collar Device with the Handheld Device).
Select the color associated with a dog collar device:
- To select the button color, move the dog collar device toggle switch up.
- To select the inner ring color, move the toggle switch to the middle position.
- To select the outer ring color, move the toggle switch down.
The training keys control the dog collar device associated with the selected color.
Dog Training
You should research and investigate the training methods best suited for you, your dog, and your needs.
When used properly, the Pro Trashbreaker training system is an effective training tool to aid your dog in reaching its full potential. The use of the training system should be part of an overall training program.
Fitting the Collar on Your Dog
CAUTION
To prevent irritation from the contact points, remove the collar for at least eight hours out of every 24-hour period.
This device is not intended for human use. Do not attempt to use on any person.
In order to properly correct the dog, the collar and device must fit the dog properly. If the collar is too loose or positioned incorrectly, corrections may be inconsistent. This can delay or prevent successful training.
1 Place the collar around the middle of the dog's neck.
2 Position the device at the front of the dog's neck, with the status LED facing toward the dog's chin and the contact points against the throat.
3 Tighten the strap so that it is very snug around the dog's neck, and fasten the buckle.
NOTE: The collar should fit tightly and should not be able to rotate or slide on the dog's neck. The dog must be able to swallow food and water normally. You should observe your dog's behavior to verify the collar is not too tight.

natural_image
Line drawing of a dog's leg and neck with a zipper (no text or symbols)4 Wiggle the device to work the contact points through the dog's coat.
NOTE: The contact points must have contact with the dog's skin to be effective.
5 If the strap is too long, cut off the excess, leaving at least 3 in. (8 cm) to spare.
6 Mark the hole used to fasten the buckle for future reference (optional).
MURS Radio Interference
If your handheld device experiences interference from another transmitter, the LED flashes yellow when you press a training key.
Selecting and Installing the Contact Points
For best results, select the correct contact points based on your dog's coat.
1 Select the correct contact point length for your dog's coat type:
- For dogs with thicker coats, use the longer contact points.
- For dogs with shorter coats, use the shorter contact points.
2 If necessary, use the included wrench to remove the contact points.
3 Twist the contact points into the collar.
4 Tighten with the included wrench, but do not overtighten.
When you put the collar on the dog, make sure the contact points are tight against the neck.
Training Intensities and Methods
You can use several methods to train your dog. The Pro Trashbreaker system provides 6 stimulation intensity levels, which increase sequentially from 1 to 6.
Continuous stimulation: Applies stimulation to the dog the entire time you press the training key, for a maximum of 8 seconds. Your stimulations should typically be much shorter than 8 seconds.
Tone: Activates an audible tone instead of stimulation. A tone can be used as either a positive or negative training cue, depending on your training program.
Choosing the Correct Intensity Level
1 Set the intensity to the lowest level (Changing the Intensity Level).
2 Select a training key.
3 Observe the dog for a reaction, such as a head shake, neck movement, or just a change in expression.
Sometimes dogs will vocalize due to the surprise of the electrical stimulation. If the dog vocalizes more than once, the intensity level is too high for beginning training.
4 If there is no reaction, increase the intensity level by one level until the dog has a slight but recognizable reaction to the stimulation.
The intensity level that causes a slight but recognizable reaction is your dog's baseline level for beginning collar training. You do not need to, and should not, apply this intensity selection test again.
After you begin training, the dog's performance guides your intensity selection. As the dog advances in training, you may need to change the level depending upon the training situation.
Changing the Intensity Level
You can select a different intensity level for each dog collar device.
1 Select a dog collar device (Selecting a Dog Collar Device).
2 Adjust the intensity dial to increase or decrease the intensity level.
BarkLimiter
When the dog collar device is active and properly fitted on the dog, it detects and corrects barks automatically. The dog collar device starts at the lowest intensity level and increases the intensity level gradually until the dog stops barking. When the dog is quiet, the intensity decreases over time.
The status LED flashes briefly when the dog collar device detects motion or corrects a bark.
| Green, amber, or red flash | Motion was detected, and no correction was applied. |
| Blue flash A bark was detected, and a correction was applied. | |
NOTE: A green, amber, or red flash denotes how much charge is left in the dog device battery, ranging from high to low.
Enabling the BarkLimiter Feature
On the dog collar device, hold the power key until the LED flashes blue.
Bark Odometer™
When you turn off the device, the LED flashes red and green to report the number of times the device detected a bark since it was last turned on. This can help you track your dog's barking behavior.
| Red flash 10 barks | |
| Green flash 1 bark |
For example, one red flash followed by four green flashes indicates the device detected 14 barks.
Zero flashes indicates the device detected zero barks.
Checking the Bark Odometer
1 Remove the device from the dog.
2 Position the device so that you can see the status LED.
3 Hold the power key until the status LED turns red, and release.
4 Count the red and green flashes.
Using the Light
You can use the light feature on your device to verify pairing, help locate your dog, and provide safety for your dog at night.
1 Select a dog collar device (Selecting a Dog Collar Device).
2 Rotate the intensity dial to L.
3 Select the training key.
Device Information
Pro Trashbreaker Handheld Device Specifications
| Battery type Rechargeable, replaceable lithium-ion | |
| Battery life 60 hours typical use | |
| Operating temperature range From -4° to 140°F (from -20° to 60°C) | |
| Charging temperature range From 32° to 104°F (from 0° to 40°C) | |
| Storage temperature range From -4° to 104°F (from -20° to 40°C) | |
| Water rating IEC 60529 IPX7* | |
| Wireless range 4 mi. (6.4 km) | |
*The device withstands incidental exposure to water of up to 1 meter for up to 30 minutes.
Pro Trashbreaker Dog Collar Device Specifications
| Battery type Rechargeable, replaceable lithium-ion | |
| Battery life 40 hours typical use | |
| Operating temperature range From -4° to 140°F (from -20° to 60°C) | |
| Charging temperature range From 32° to 104°F (from 0° to 40°C) | |
| Storage temperature range (up to 1 month) | From -4° to 122°F (from -20° to 50°C) |
| Storage temperature range (up to 3 months) | From -4° to 95°F (from -20° to 35°C) |
| Water rating Up to 1 ATM* | |
*The device withstands pressure equivalent to a depth of 10 meters.
Checking the Battery Level
Turn on the dog collar device (Turning On the Dog Collar Device).
The status LED flashes every few seconds while the device is on. The color of the status LED indicates the battery charge level.
| Green The battery has a good charge. | |
| Yellow The battery should be charged soon. | |
| Red The battery is very low and should be charged immediately. | |
| Flashing Red | The battery is depleted and must be charged. Training features are disabled. |
Replacing the VHF Antenna in the Dog Collar Device
Before you replace the VHF antenna, you must remove all dirt, water, and debris from the device. You also need a small Phillips screwdriver and a larger Phillips screwdriver.
1 Remove the three screws ① from the cover over the VHF antenna.

2 Pry off the cover.
3 Remove the screw ② securing the VHF antenna to the back plate.
4 Pull the length of the antenna from the antenna guide to remove the old antenna.
5 Loop the antenna guide around the collar strap, and thread the new VHF antenna through the guide.
This helps to point the antenna up.
6 Replace the screw securing the VHF antenna to the back plate.
7 Replace the cover over the VHF antenna.
8 Replace the three screws on the cover.
Pro Trashbreaker Battery Replacement Instructions
WARNING
This product contains a lithium-ion battery. To prevent the possibility of personal injury or product damage caused by battery exposure to extreme heat, store the device out of direct sunlight.
Do not use a sharp object to remove batteries.
CAUTION
Contact your local waste disposal department to properly recycle the batteries.
Pro Trashbreaker Handheld Device Components
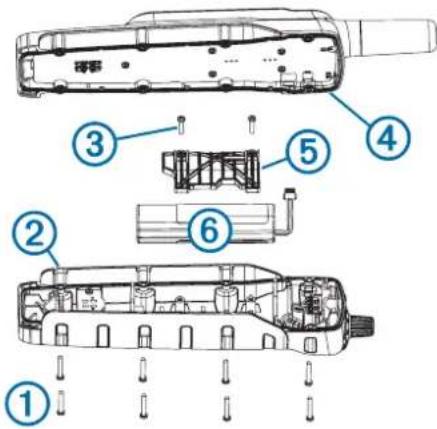
| 1 | Security screws |
| 2 | Back plate |
| 3 | Battery plate screws |
| 4 | Gasket |
| 5 | Battery plate |
| 6 | Battery |
Replacing the Pro Trashbreaker Handheld Device Battery
Before you replace the battery, you must remove all dirt, water, and debris from the device. You also need a small Phillips screwdriver and the security screwdriver included with the battery replacement kit.
You can purchase a replacement battery at http://buy.garmin.com. You should use only an official Garmin® replacement part.
1 Remove the eight security screws from the back of the device.
2 Lift up the back plate.
3 Grip the battery connector wires close to the connector, and pull the connector perpendicular to the circuit board to disconnect the battery connector from the device.
4 Grip the rotary switch connector wires close to the connector, and pull the connector perpendicular to the circuit board to disconnect the rotary switch connector from the device.
5 Remove the two screws from the battery plate.
6 Lift up the battery plate.
7 Remove the old battery from the back plate, noting the orientation of the battery.
The battery fits tightly. It may be necessary to pry the battery out of the back plate using a non-sharp, non-metal object.
8 Install the new battery into the back plate with the label side up, using the same orientation as the old battery.
The battery orientation is noted graphically inside the back plate.
9 Replace the battery plate to its original position.
10 Replace and tighten the battery plate screws.
11 With the new battery, connect the battery connector to the device.
When properly installed, the connector plug snaps into the port.
12Reconnect the rotary switch connector to the device.
When properly installed, the connector plug snaps into the port.
13 Verify the gasket is not damaged and is completely seated in the groove on the front half of the device.
14 While ensuring the battery and rotary switch wires are not pinched, hold the back plate and the device firmly together, and replace all eight security screws without tightening.
15 Verify the back plate and the device are aligned with no gaps.
16 Tighten the screws evenly.
17 Verify the gasket is not sticking out of the device.
Pro Trashbreaker Dog Collar Device Components

| 1 | Security screws |
| 2 | Top plate |
| 3 | Battery plate screws |
| 4 | Battery plate |
| 5 | Battery |
| 6 | Gasket |
| 7 | Front enclosure |
Replacing the Battery Assembly
Before you replace the battery, you must remove all dirt, water, and debris from the device. You also need a small Phillips screwdriver and the security screwdriver included with the battery replacement kit.
You can purchase a replacement battery at http://buy.garmin.com. You should use only an official Garmin replacement part.
1 Remove the three screws ① from the cover ② over the VHF antenna ③.

2 Pry off the cover.
3 Remove the screw securing the VHF antenna to the back plate.
4 Remove the six screws from the top plate, and remove the top plate.
5 Remove the two screws from the battery plate, and remove the battery plate.
6 Grip the battery connector wires close to the connector, and pull the connector perpendicular to the circuit board to disconnect the battery connector from the device.
7 Remove the battery.
The battery fits tightly. It may be necessary to pry the battery out of the back plate using a non-sharp, non-metal object.
8 Install the new battery into the front enclosure with the label side of the battery facing up, and the lead edge of the battery placed under the contact ledge of the device.
9 Replace the battery plate, and replace and tighten the two screws.

natural_image
Technical line drawing of a 3D coordinate system with no visible text or symbols10 Verify the gasket is not damaged and is completely seated in the groove.
11 With the new battery, connect the battery connector to the device.
When properly installed, the connector plug snaps into the port.
12 Replace the front plate, and replace and tighten the six screws to secure the front plate.
13 Replace the screw securing the VHF antenna to the back plate.
14 Replace the cover over the VHF antenna.
15Replace the three screws on the cover.
16 Verify the gasket is not sticking out of the device.
Getting More Information
You can find more information about this product on the Garmin website.
- Go to www.garmin.com/outdoor.
- Go to www.garmin.com/learningcenter.
- Go to http://buy.garmin.com, or contact your Garmin dealer for information about optional accessories and replacement parts.
Registering Your Device
Help us better support you by completing our online registration today.
- Go to http://my.garmin.com.
- Keep the original sales receipt, or a photocopy, in a safe place.
www.garmin.com/support

913-397-8200 1-800-800-1020

0808 238 0000 +44 (0) 870 8501242

Garmin International, Inc.
1200 East 151st Street
Olathe, Kansas 66062, USA
Garmin (Europe) Ltd.
Liberty House, Houndown Business Park
Southampton, Hampshire, SO40 9LR UK
Garmin Corporation
No. 68, Zhangshu 2nd Road, Xizhi Dist.
New Taipei City, 221, Taiwan (R.O.C.)


- Getting Started
- WARNING
- Setting Up the Pro Trashbreaker System
- Device Overviews
- Attaching the Dog Collar Device to the Collar Strap
- Charging the Handheld Device
- Charging the Collar
- NOTICE
- Turning On the Dog Collar Device
- Turning Off the Device
- Dog Collar Device
- Pairing a Dog Collar Device with the Handheld Device
- Selecting a Dog Collar Device
- Dog Training
- Fitting the Collar on Your Dog
- CAUTION
- MURS Radio Interference
- Selecting and Installing the Contact Points
- Training Intensities and Methods
- Choosing the Correct Intensity Level
- Changing the Intensity Level
- BarkLimiter
- Enabling the BarkLimiter Feature
- Bark Odometer™
- Checking the Bark Odometer
- Using the Light
- Device Information
- Pro Trashbreaker Handheld Device Specifications
- Pro Trashbreaker Dog Collar Device Specifications
- Checking the Battery Level
- Replacing the VHF Antenna in the Dog Collar Device
- Pro Trashbreaker Battery Replacement Instructions
- Pro Trashbreaker Handheld Device Components
- Replacing the Pro Trashbreaker Handheld Device Battery
- Replacing the Battery Assembly
- Getting More Information
- Registering Your Device
- www.garmin.com/support
Brand : GARMIN
Model : Pro
Category : Electronic dog collar