
WA Care 12 DI B - Washing machine BAUKNECHT - Free user manual and instructions
Find the device manual for free WA Care 12 DI B BAUKNECHT in PDF.


| Product Type | Washing Machine |
| Brand | Bauknecht |
| Model | WA Care 12 DI B |
| Capacity | 12 kg |
| Dimensions (HxWxD) | 850 x 600 x 600 mm |
| Water Pressure Range | 100 - 1000 kPa |
| Electrical Connection | 220-240 V, 50 Hz |
| Energy Saving Features | Eco-Ball system, recommended max load, temperature selection |
| Child Safety | Door lock via plastic screw, child-proof door |
| Transport Bolts | Must be removed before use; caps provided |
| Detergent Dispenser | Three chambers with adjustable separator for powder/liquid |
| Filter | Accessible behind plinth; clean 2-3 times per year |
| Door Seal | Clean with damp cloth; check periodically |
| Water Inlet Hose | Cold water only; mesh filter to clean |
| Drain Hose | Connect to siphon or sink edge with U-bend |
| Programmes | Cottons, synthetics, delicate, wool, rinse & spin, drain |
| Spin Speed Selection | Adjustable up to maximum (see model plate) |
| Safety Features | Overfoaming detection, imbalance correction, water stop system |
| Accessories | Pedestal drawer, stacking kit (optional) |
| After-Sales Service | Sticker inside door with service code |
Frequently Asked Questions - WA Care 12 DI B BAUKNECHT
User questions about WA Care 12 DI B BAUKNECHT
0 question about this device. Answer the ones you know or ask your own.
Ask a new question about this device
Download the instructions for your Washing machine in PDF format for free! Find your manual WA Care 12 DI B - BAUKNECHT and take your electronic device back in hand. On this page are published all the documents necessary for the use of your device. WA Care 12 DI B by BAUKNECHT.
USER MANUAL WA Care 12 DI B BAUKNECHT
DETERGENTS AND ADDITIVES
REMOVING THE FILTER/DRAINING RESIDUAL WATER
CARE AND MAINTENANCE
TROUBLESHOOTING GUIDE
AFTER-SALES SERVICE
ACCESSORIES
TRANSPORT / HANDLING
ELECTRICAL CONNECTION
BEFORE USING THE WASHING MACHINE
I. Removing the packaging and inspection
- After unpacking, make sure that the washing machine is undamaged. If in doubt, do not use the washing machine. Contact After-Sales Service or your local retailer.
- Check that the accessories and supplied parts are all present.
- Keep the packaging materials (plastic bags, polystyrene parts, etc.) out of reach of children, as they are potentially dangerous.
- If the appliance was exposed to the cold prior to delivery, keep it at room temperature for a few hours before operating.
2. Remove the transport bolts
- The washing machine is fitted with transport bolts to avoid any possible damage to the interior during transport. Before using the machine, it is imperative that the transport bolts are removed.
• After their removal, cover the openings with the 4 enclosed plastic caps.
3. Install the washing machine
- Remove the protective film from the control panel (if available on your model).
- Move the appliance without lifting it by the worktop.
• Install the appliance on a solid and level floor surface, preferably in a corner of the room. - Make sure that all four feet are stable and resting on the floor and then check that the washing machine is perfectly level (use a spirit level).
- In case of wooden or so-called “floating floors” (for instance certain parquet or laminate floors), place the appliance on a 60 x 60 cm sheet of plywood at least 3 cm in thickness which is secured to the floor.
4. Water inlet
- Connect the water supply inlet hose in accordance with the regulations of your local water company.
• Water inlet: Cold water only (if no other information on your programme chart) - Water tap: 3/4" threaded hose connector
• Water pressure (flow pressure): 100-1000 kPa (1-10 bar).
- Use only new hoses to connect the washing machine to the water supply. Used hoses must not be used and should be discarded.
5.Drain
- Connect the drain hose to the siphon or hook it over the edge of a sink by means of the "U" bend supplied.
- If the washing machine is connected to an integrated drainage system, ensure the latter is equipped with a vent to avoid simultaneous loading and draining of water (siphoning effect).
6. Electrical connection
- Electrical connections must be carried out by a qualified technician in compliance with the manufacturer's instructions and current standard safety regulations.
- Data regarding voltage, power consumption and protection requirements is given on the inside of the door.
- The appliance must be connected to the mains by means of a socket with an earth connection in accordance with current regulations. The washing machine must be earthed by law. The manufacturer declines all liability for damage to property or injury to persons or animals due to non-compliance with the directions given above.
- Do not use extension leads or multiple sockets.
- Before any maintenance on the washing machine disconnect it from the mains supply.
- After installation, access to the mains plug or to disconnection from mains supply must be ensured at all times via a double-pole switch.
- Do not operate the washing machine if it has been damaged during transport. Inform the After-Sales Service.
- Mains cable replacement is only to be carried out by After-Sales Service.
- The appliance must only be used in the household for the prescribed uses.
Minimum housing dimensions:
| Width: | 600 | mm |
| Height: | 850 | mm |
| Depth: | 600 | mm |
PRECAUTIONS AND GENERAL RECOMMENDATIONS
I. Packaging
- The packaging material is entirely recyclable, and marked with the recycling symbol Adhere to current local regulations when disposing of packaging material.
2. Disposing of packaging and scrapping old washing machines
- The washing machine is built from reusable materials. It must be disposed of in compliance with current local waste disposal regulations.
- Before scrapping, remove all detergent residues and cut off the power cable so that the washing machine is made unusable.
- This appliance is marked according to the European directive 2002/96/EC on Waste Electrical and Electronic Equipment (WEEE). By ensuring this product is disposed of correctly, you will help prevent potential negative consequences for the environment and human health, which could otherwise be caused by inappropriate waste handling of this product.
The symbol on the product, or on the documents accompanying the product, indicates that this appliance may not be treated as household waste. Instead it shall be handed over to the applicable collection point for the recycling of electrical and electronic equipment. Disposal must be carried out in accordance with local environmental regulations for waste disposal. For more detailed information about treatment, recovery and recycling of this product, please contact your local city office, your household waste disposal service or the shop where you purchased the product.
3. Safety instructions
- The washing machine is appropriate for indoor use only.
- Do not store flammable fluids near the appliance.
-
If you want to place a dryer on top of your washing machine, first contact our After-Sales Service or your specialist dealer to verify if this is possible. Placing a dryer on your washing machine is only admitted by using an appropriate stacking kit available through our After-Sales Service or your specialist dealer.
-
Do not leave the appliance plugged in when not in use.
- Turn off the tap when not in use.
- Before any cleaning and maintenance switch off the machine or disconnect it from the mains.
- Never open the door forcibly or use it as a step.
- Children must not be allowed to play with the washing machine or to climb into the drum (see also the following page chapter “Child Safety”).
- If necessary, the power cable may be replaced with an identical one obtained from our After-Sales Service. The power cable must only be replaced by a qualified technician.
4. Energy saving tips
- Achieve the best use of energy, water, detergent and time by using the recommended maximum load size.
- Do not exceed the detergent dosages indicated in the manufacturer's instructions.
- The Eco-Ball - a special system in the outlet - will prevent detergent loss from the drum to avoid detergent loss into the environment.
- Use “Prewash” for heavily soiled laundry only! Save detergent, time, water and energy consumption by not selecting “Prewash” for slight to normally soiled laundry.
- Pretreat stains with stain remover or soak drued in stains in water before washing to reduce the necessity of a hot wash programme.
- Save energy by using a 60°C instead of a 95°C wash programme or a 40°C instead of a 60°C wash programme.
- Save energy and time by selecting a high spin speed to reduce the water content in laundry before using a tumble dryer (for machines with adjustable spin speed).
5.EC Declaration of Conformity
- The appliance conforms to the following European Standards:
73/23/EEC Low voltage directive
89/336/EEC Electromagnetic Compatibility Directive
93/68/EC CE Marking Directive CE
DESCRIPTION OF THE WASHING MACHINE
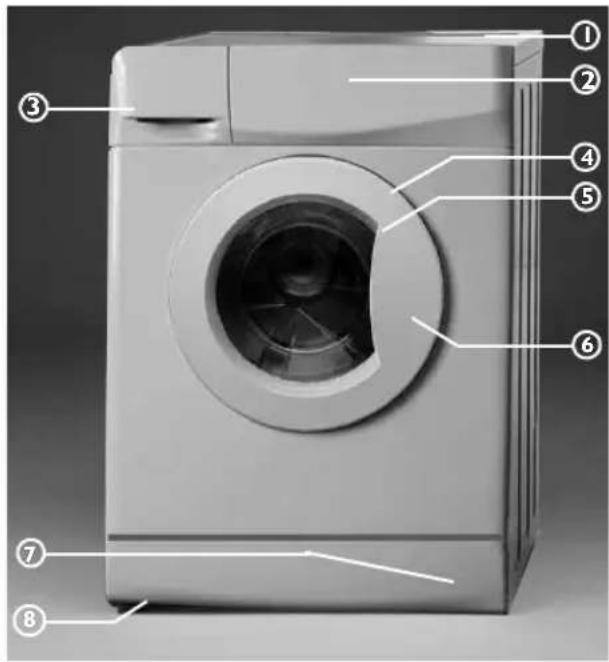
text_image
Labeled diagram of a washing machine with numbered parts for identification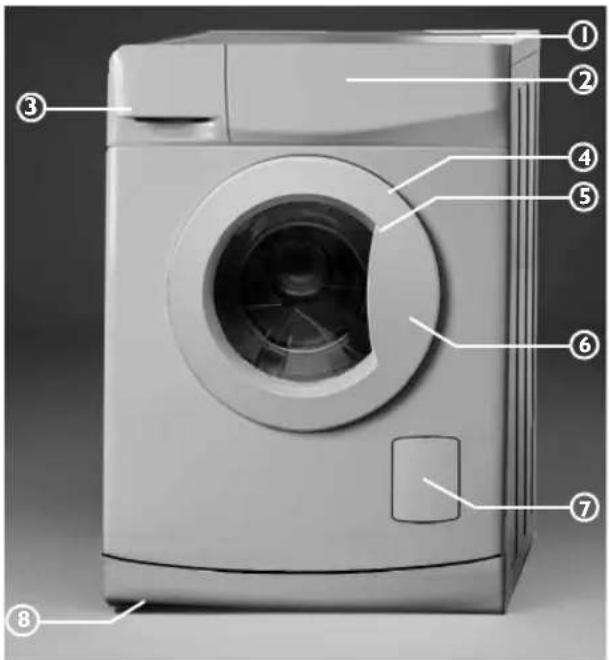
text_image
Labeled diagram of a washing machine with numbered parts for identificationI. Worktop
2. Control panel
3. Detergent dispenser
4. Service plate (inside the door)
5. Door
6. Child safety device (if provided, inside the door)
7. Pump access behind plinth or cover (depending on the model)
8. Adjustable feet
DOOR
To open the door, hold the door handle, press the inside handle (if available on your model) and pull the door. Close the door by pressing it without excessive force until it clicks shut.
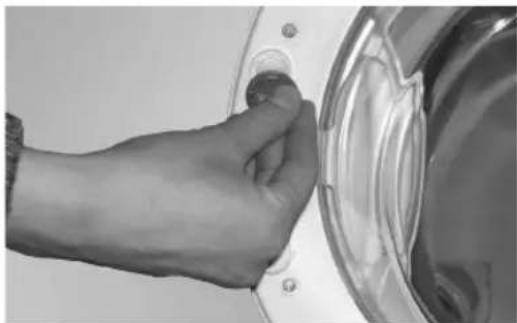
CHILD SAFETY
To protect the appliance against improper use, turn the plastic screw on the interior of the door by using a coin.
- Slot vertical: the door will not lock.
- Slot horizontal - normal position: the door can be locked again.
natural_image
Close-up of a hand pressing a button on a metallic door (no text or symbols visible)BEFORE THE FIRST WASH CYCLE
To remove any residual water used in testing by the manufacturer, we recommend that you carry out a short wash cycle without laundry.
I. Open the tap.
2. Close the door.
3. Pour a little detergent (about 30 ml) into the main wash chamber ∥ of the detergent dispenser.
4. Select and start a short programme (see separate "Programme Chart").
PREPARATION OF THE WASHING
I. Sort the laundry according to...
• Type of fabric / care label symbol
Cottons, mixed fibres, easy care/synthetics, wool, handwash items.
• Colour
Separate coloured and white items. Wash new coloured articles separately.
- Loading
Wash items of different sizes in the same load to improve washing efficiency and distribution in the drum.
- Delicates
Wash small items (e.g. nylon stockings, belts etc.) and items with hooks (e.g. bras) in a cloth bag or pillow case with zip. Always remove curtain rings or wash curtains with the rings inside a cotton bag.
2. Empty all pockets
Coins, safety pins etc. can damage your laundry as well as the appliance drum and tub.
3.Fasteners
Close zips and fasten buttons or hooks; loose belts or ribbons should be tied together.
Stain removal
• Blood, milk, eggs etc. are generally removed by the automatic enzyme phase of the programme.
- To remove red wine, coffee, tea, grass and fruit stains etc. add a stain remover to the main wash chamber of the detergent dispenser.
- Pre-treat heavily-soiled areas with stain remover if necessary.
Dyeing and bleaching
- Only use dyes and bleaches that are suitable for washing machines.
- Follow the Manufacturer's instructions.
- Plastic and rubber parts of the washing machine can be stained by dyes or bleaches.
Loading the laundry
I. Open the door.
2. Load the articles one at a time loosely into the drum, without overfilling. Observe the load sizes given in the quick reference guide.
Note: overloading the machine will result in unsatisfactory washing results and creased laundry.
- Close the door.
DETERGENTS AND ADDITIVES
Keep detergents and additives in a safe, dry place out of the reach of children!
The choice of detergent depends on:
- Type of fabric (cottons, easy care/synthetics, delicate items, wool).
Note: Use only specific detergents for washing wool. - Colour.
• The wash temperature.
• Degree and type of soiling.
Remarks:
- Any whitish residues on dark fabrics are caused by insoluble compounds used in modern phosphate-free powder detergents. If this occurs, shake or brush out the fabric or use liquid detergents.
- Use only detergents and additives specifically produced for domestic washing machines.
- When using descaling agents, dyes or bleaches for the pre-wash, make sure that they are suitable for use in domestic washing machines. Descalers could contain products which could damage your washing machine.
-
Do not use any solvents (e.g. turpentine, benzine). Do not machine wash fabrics that have been treated with solvents or flammable liquids.
-
Do not use liquid detergent for the main wash when having activated the “prewash” option (if available on your model).
- Do not use liquid detergent when activating the "Start Delay" function (if available on your washing machine).
Dosage
Follow the dosage recommendations on the detergent pack. They depend on:
• degree and type of soiling
- size of wash
full load: follow the detergent manufacturer's instructions;
half load: 3/4 the amount used for a full load;
Minimum load (about 1 kg):
1/2 the amount used for a full load
- water hardness in your area (ask for information from your water company). Soft water requires less detergent than hard water (refer to the water hardness table in the operating instructions).
Notes:
Too much detergent can result in excess foam formation, which reduces washing efficiency.
If the washing machine detects too much foam, it may prevent spinning.
Insufficient detergent may result in grey laundry in time and also calcifies the heating system, drum and hoses.
Where to put detergent and additives
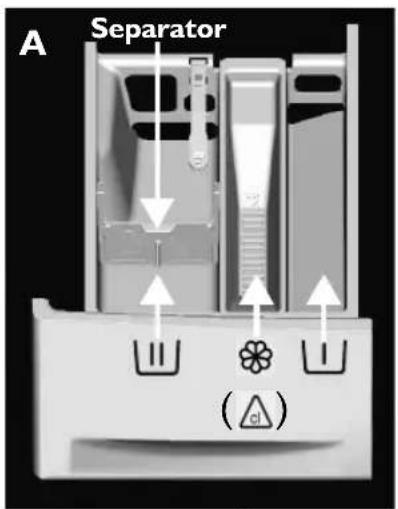
The detergent drawer has three chambers (fig. "A").
Prewash Chamber
• Detergent for the prewash
Main Wash Chamber
• Detergent for the main wash
- Stain remover
- Water softener
Softener Chamber

- Fabric softener
- Liquid starch
Pour additives only up to the "MAX" mark.
Using chlorine bleach

- Wash your laundry in the desired programme (Cotton, Synthetics), adding an appropriate amount of chlorine bleach to the SOFTENER chamber (close the detergent dispenser carefully).
- Immediately after end of programme, start the "Rinse and Spin" programme to eliminate any residual bleach smell; if you want, you can add softener.
Never put both chlorine bleach and softener into the softener chamber at the same time.
Using starch
- Select the "Rinse and Spin" programme and check that the spin speed is adjusted to not more than 800 rpm.
- Start the programme, pull out the detergent dispenser so that you can see approximately 3 cm of the softener chamber.
- Pour the starch solution prepared into the softener chamber while the water is running into the detergent dispenser.
How to position the separator in the main wash chamber for powder or liquid detergent
For use with powder detergent: place the separator in the higher position.
Lift the separator until its top can be reclined. Place its hooks on the upper end of the back guide rails and slightly push the separator down to fix it (fig. "B" and "C").
A gap should remain between the separator and the bottom of the main wash chamber, if the separator has been correctly installed (fig. "B" and "C").
For use with liquid detergent: place the separator in the lower position. Secure the separator in the chamber using the front guide rails.
Position the separator so that it touches the bottom of the main wash chamber (fig. "D").
text_image
A Separator (△)
text_image
Hooks Separator Guide Rails B 2 3 I C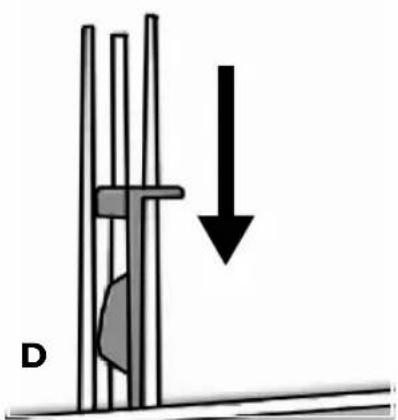
natural_image
Diagram showing a vertical structure with a shaded circular area and a downward arrow, labeled 'D' (no text or symbols beyond label)REMOVING THE FILTER/DRAINING RESIDUAL WATER
We recommend that you check and clean the filter regularly, at least two or three times a year.
Especially:
- If the appliance is not draining properly or if it fails to perform spin cycles.
- If the “Clean filter” indication lights up: IMPORTANT: make sure the water has cooled before draining the appliance. Stop the appliance and unplug it.
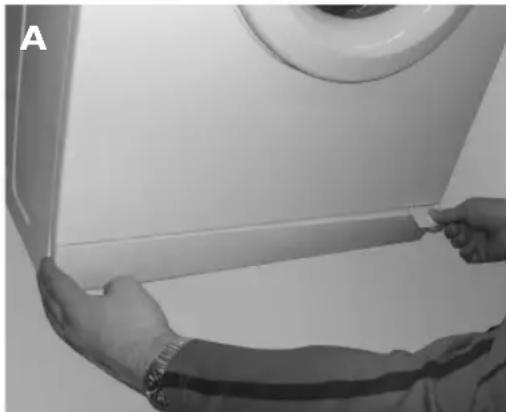
I. Remove the plinth or open the cover (depending on the model) by using the separator of the detergent dispenser (fig. A / B).
2. Place a container beneath it. If your washing machine has the filter situated behind the plinth (see pictures "A" and "C"), use a broad and very flat container with a maximum height of 2 cm.
3. Open the filter but do not remove it completely. Slowly turn the filter counterclockwise (fig. C) until the water begins to drain out.
4. Wait until all the water has drained.
5. Now unscrew the filter completely and remove it.
6. Tilt the appliance forwards carefully to allow the water to flow out.
7. Clean the filter and the filter chamber.
8. Check that the pump rotor moves freely.
9. Re-insert the filter and screw it in clockwise as far as it will go.
10. Pour about 1 litre of water into the detergent drawer to reactivate the "Eco system". Check that the filter is inserted properly and securely.
II. Reinstall the plinth or the cover, depending on the model.
12. Plug in the appliance again.
13. Select a programme and start it.
natural_image
Person installing or adjusting a wall-mounted component with a plastic clip, next to a washing machine (no visible text or symbols)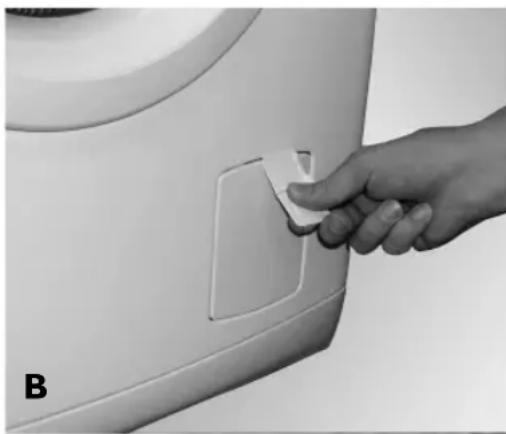
natural_image
Hand pressing a small white pad on a white industrial machine component (no text or symbols visible)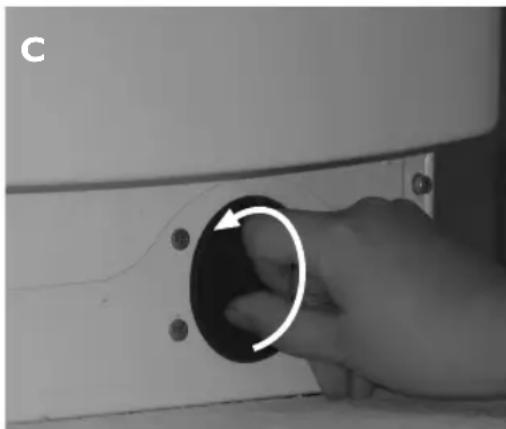
natural_image
Close-up of a hand holding a circular button with an arrow, pointing to a small black object on a white surface (no text or symbols visible)CARE AND MAINTENANCE
Appliance exterior and control panel
- Can be washed down with a soft, damp cloth.
- A little neutral detergent (non abrasive) can also be used.
- Dry with a soft cloth.
Appliance interior
• After each washing, leave the door open for some time to allow the inside of the appliance to dry.
- If you never or seldom wash your laundry at 95°C, we recommend to occasionally run a 95°C programme without laundry, adding a small amount of detergent, to keep the interior of the appliance clean.
Door seal
- Clean with a damp cloth when necessary.
- Check the condition of the door seal periodically.
Filter
- Check and clean the filter regularly, at least two or three times a year (see “Removing The Filter/Draining Residual Water”).
Water supply hose(s)
- Check the hose(s) regularly for brittleness and cracks.
- Regularly check and clean the mesh filter inside the inlet hose (see “Cleaning the mesh filter in the water supply hose(s)”).
Do not use flammable fluids for cleaning the appliance.
Detergent dispenser
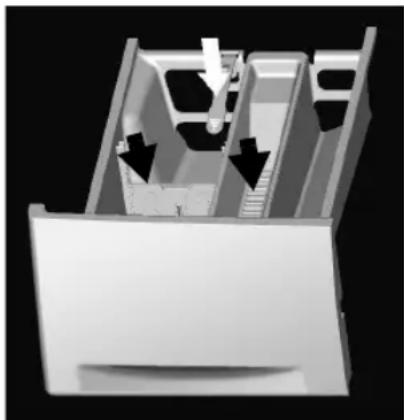
I. Press the release lever in the main wash compartment downward and remove the dispenser (see light arrow).
2. Remove the cover grid from the softener compartment. Remove the separator from the main wash compartment by pulling it upwards (see dark arrows).
3. Wash all the parts under running water.
4. Refit the separator and the cover grid in the detergent dispenser and fit the dispenser back inside its housing.
natural_image
3D rendered diagram of a mechanical or electronic component with internal channels and directional arrows (no text or symbols)Water supply hose(s)
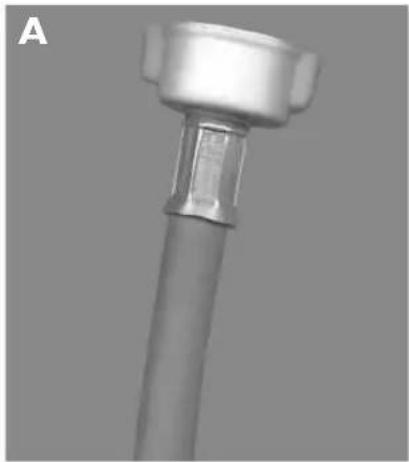
If a supply hose shows a damage, replace it by a new hose of the same type, available through our After-Sales Service or your specialist dealer.
If your supply hose has a transparent hose coating (fig. "C"), periodically check the colour of the transparent coating. If the coating begins to turn red, this is an indication that the hose may have a leak and should be replaced. Contact our After-Sales Service team or specialist dealer to obtain a replacement hose.
Cleaning the mesh filter in the water supply hose(s)
I. Close the tap and loosen the inlet hose on the tap.
2. Clean the internal mesh filter and screw the water inlet hose back onto the tap.
3. Now unscrew the inlet hose on the rear of the washing machine.
4. Pull off the mesh filter from the washing machine connection with universal pliers and clean it.
5. Refit the mesh filter and screw the inlet hose on again.
6. Turn on the tap and ensure that the connections are completely water-tight.
natural_image
Close-up of a metallic mechanical component with a cylindrical shaft and flange (no visible text or symbols)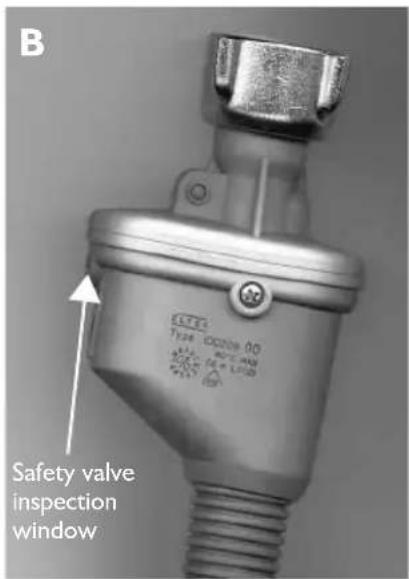
text_image
B Safety valve inspection window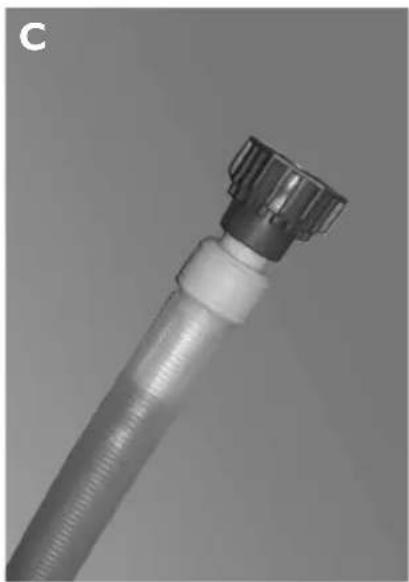
natural_image
Close-up of a white plastic hose with black filter cap and threaded end (no text or symbols visible)TROUBLESHOOTING GUIDE
Depending on the model, your washing machine is equipped with various automatic safety functions. This enables faults to be detected in good time and the safety system can react appropriately. These faults are frequently so minor that they can be removed within a few minutes.
The washing machine will not start, no indicator lamps are on.
Check whether:
- the mains plug is inserted into the socket;
- the wall socket is functioning correctly (use a table lamp or similar appliance to test it).
The washing machine will not start... and the "Start/Pause" indicator lamp flashes.
Check whether:
• the door is properly closed (child safety);
- the "Start/Pause" button has been pressed;
- the "Water tap closed" indication lights up. Open the water tap and press the "Start/Pause" button.
The appliance stops during the programme (varies depending on model)
Check whether:
- the “Anticrease” lamp lights up; terminate this option by pressing the “Start/Pause” button or by choosing and starting the “Drain” programme;
- another programme has been selected and the "Start/Pause" indicator lamp is flashing. Reselect the desired programme and press the "Start/Pause" button.
- the door has been opened and the “Start/Pause” indicator lamp is flashing. Close the door and press the “Start/Pause” button again.
- the washing machine's safety system has been activated (see "Fault description table").
Residue from detergent and additives left in the detergent drawer at end of wash.
Check whether:
- the cover grid of the softener chamber and the separator of the main wash chamber are correctly installed in the detergent dispenser and all parts are clean (see “Care And Maintenance”);
- sufficient water is entering. The mesh filters of the water supply could be blocked (see “Care And Maintenance”);
- the position of the separator in the main wash chamber is adapted to the use of powder or liquid detergent (see “Detergents And Additives”).
Machine vibrates during spin cycle.
Check whether:
- the washing machine is level and standing firmly on all four feet;
- the transport bolts have been removed. Before using the machine, it is imperative that the transport bolts are removed.
Final spin results are poor.
The washing machine has an imbalance detection and correction system.
If individual heavy items are loaded (e.g. bathrobes), this system may reduce the spin speed automatically or even interrupt the spin completely if it detects too great an imbalance even after several spin starts, in order to protect the washing machine.
- If the laundry is still too wet at the end of the cycle, add smaller articles of laundry and repeat the spin cycle.
- Excessive foam formation may prevent spinning. Use the correct amount of detergent.
- Check that the spin speed selector has not been set to "0".
If your washing machine has a time display: the programme time initially displayed is lengthened / shortened by a period of time:
This is a normal capacity of the washing machine to adapt to factors that can have an effect on the wash programme time, e.g.:
• excess foam formation;
- load imbalance due to heavy items of laundry;
• prolonged heating time due to reduced inlet water temperature;
Because of influences like these, the time remaining in the programme run is recalculated, and updated if necessary. In addition, during the filling phase, the washing machine determines the load and if necessary adjusts the initial programme time displayed accordingly. During such update periods, an animation appears on the time display.
Fault description table
| Red indication light is on | Digital display(if fitted on your machine) | Fault description |
| “Water tap closed” “FH” | “Water supply fault” | |
| “Clean pump” “FP” “Draining fault” | ||
| “Service” | from “F02” to “F35”“FA”“Fod” | “Electrical module fault”“Waterstop fault”“Overfoaming” |
a. "Water tap closed" indication lights up
The appliance has no or insufficient water supply.
For models with remaining time display, "FH" appears on that display. The "Start/Pause" indicator flashes.
Check whether:
- the water tap is fully open and there is sufficient water supply pressure.
- kinks are present in water hose.
- the mesh filters of the water supply are blocked (see “Care And Maintenance”/“Cleaning the mesh filter in the water supply hose(s)”).
• the water hose is frozen up. - if your washing machine has an inlet hose as shown on picture "B": the safety valve inspection window is red. Replace the hose by a new one available through our After-Sales Service or your specialist dealer.
After the problem has been removed, restart the programme by pressing "Start/Pause" again.
If the fault occurs again, contact our After-Sales Service (see "After-Sales Service").
b. "Clean pump" indication lights up
Waste water is not pumped out.
The "Clean pump" indication lights up.
For models with a remaining time display, "FP" appears on that display.
The washing machine stops in the appropriate programme step.
Unplug the appliance.
Check whether:
- kinks are present in the drain hose;
- the pump or the filter is blocked (see "Removing The Filter/Draining Residual Water").
IMPORTANT: make sure the water has cooled before draining the appliance.
• the drain hose is frozen up.
Plug in the appliance again.
Select and start the "Drain" programme or push the "Reset" button for at least 3 seconds and restart the desired programme.
If the fault occurs again, please contact our After-Sales Service (see "After-Sales Service").
c. "Service" indication lights up
The appliance stops during the programme.
For models with a remaining time display:
A failure code between "F02" and "F35", "FA" or "Fod" appears on that display.
If a failure code between "F02" and "F35" appears on the display:
Select and start the "Drain" programme or push the "Reset" button for at least 3 seconds.
Then select and start the desired programme again. If the fault persists, unplug the appliance and contact our After-Sales Service (see "After-Sales Service").
If failure code "FA" appears on the display:
Switch the appliance off, pull out the mains plug and turn the water tap off. Tilt the appliance forward carefully to allow the collected water to flow out from the bottom of the appliance.
Then:
I. connect the appliance to the electrical supply;
2. turn the water tap on (if water immediately flows into the appliance again, without the appliance being started, there is a failure. Turn off the tap and notify the After Sales Service);
3. select and start the desired programme again. If the failure occurs again, unplug the appliance and contact our After Sales Service (see "After-Sales Service").
If failure code "Fod" appears on the display:
Too much foam interrupted the washing programme. Avoid excessive detergent dosing.
I. Select and start the "Rinse & Spin" programme.
- Afterwards, select and start the desired programme again, using less detergent.
If the fault persists, unplug the appliance and contact our After Sales Service.
AFTER-SALES SERVICE
Before contacting After-Sales Service:
I. Try to remedy the problem yourself (see "Troubleshooting Guide").
2. Restart the programme to check whether the problem has solved itself.
3. If the washing machine continues to function incorrectly, call our After-Sales Service.
Specify:
• The nature of the problem.
• The washing machine model.
- The service code (number after the word SERVICE).
SERVICE
0000 000 00000
The After-Sales Service sticker can be found inside the door.
- Your full address.
- Your telephone number and area code. After-Sales Service phone numbers and addresses are given on the guarantee card. Alternatively, consult the dealer where you purchased the appliance.
ACCESSORIES
Via our After-Sales Service or your specialist dealer, you can obtain:
- a Pedestal Drawer which can be installed beneath your washing machine. It raises your machine to allow for more comfortable loading and unloading, as you now no longer need to bend as far to access the unit. Furthermore, it offers a great space-management tool and storage solution.
- a Stacking Kit by means of which you can fix your dryer on top of your washing machine and thus effectively save space.
Some models are able to be installed under your kitchen worktop; in that case, please contact our After-Sales Service (see above). Be aware that:
- the appliance MUST be installed under a continuous worktop.
- according to the legal safety regulations, the installation of the appliance MUST be carried out by an authorized technician or by our After-Sales Service.
- the appliance MUST be installed using the intermediate cover panel of the UBS Base Set which can be obtained from specialist dealers or our After-Sales Service.
TRANSPORT / HANDLING
Never lift the appliance by the worktop when transporting.
I. Pull out the mains plug.
2. Turn off the tap.
3. Check that machine door and detergent dispenser are properly closed.
4. Disconnect the inlet and drain hoses.
5. Eliminate all water from the hoses and from the appliance (see "Removing The Filter/Draining Residual Water").
6. Fit the transport bolts (obligatory).
ELECTRICAL CONNECTION
For Great Britain only
Warning - this appliance must be earthed
Fuse replacement
If the mains lead of this appliance is fitted with a BS I363A I3amp fused plug, to change a fuse in this type of plug use an A.S.T.A. approved fuse to BS I362 type and proceed as follows:
I. Remove the fuse cover (A) and fuse (B).
2. Fit replacement I3A fuse into fuse cover.
3. Refit both into plug.
Important:
The fuse cover must be refitted when changing a fuse and if the fuse cover is lost the plug must not be used until a correct replacement is fitted.
Correct replacement are identified by the colour insert or the colour embossed in words on the base of the plug. Replacement fuse covers are available from your local electrical store.
For the Republic of Ireland only
The information given in respect of Great Britain will frequently apply, but a third type of plug and socket is also used, the 2-pin, side earth type.
Socket outlet / plug (valid for both countries)
If the fitted plug is not suitable for your socket outlet, Please contact Whirlpool Service for further instruction. Please do not attempt to change plug yourself. This procedure needs to be carried out by a qualified Whirlpool technician in compliance with the manufactures instructions and current standard safety regulations.
