
GCI 4755/2 W-WS - Dishwasher BAUKNECHT - Free user manual and instructions
Find the device manual for free GCI 4755/2 W-WS BAUKNECHT in PDF.


User questions about GCI 4755/2 W-WS BAUKNECHT
0 question about this device. Answer the ones you know or ask your own.
Ask a new question about this device
Download the instructions for your Dishwasher in PDF format for free! Find your manual GCI 4755/2 W-WS - BAUKNECHT and take your electronic device back in hand. On this page are published all the documents necessary for the use of your device. GCI 4755/2 W-WS by BAUKNECHT.
USER MANUAL GCI 4755/2 W-WS BAUKNECHT
For maximum satisfaction from your dishwasher, carefully read these user instructions and consult the wash programme chart.
BEFORE USING THE DISHWASHER
- After unpacking, make sure the appliance is undamaged and that the door closes correctly. Do not use the appliance if it is damaged. If in doubt, consult your local retailer.
-
Keep potentially hazardous packaging (plastic bags etc.) out of the reach of children.
-
This appliance is designed for use in the home in compliance with its intended purpose.
- All water and electrical connections must be carried out by a qualified technician in compliance with the manufacturer's instructions (refer to the enclosed installation booklet) and current local safety regulations.
PROTECTING THE ENVIRONMENT
1. Packing
The packing box may be fully recycled as confirmed by the recycling symbol

2. Appliance
The appliance is built from reusable materials.
If you decide to scrap the dishwasher, it must be disposed of in compliance with local waste disposal laws. Before scrapping, cut off the power cable so that the appliance cannot be connected to the mains.
PRECAUTIONS AND GENERAL RECOMMENDATIONS
Child safety
- Do not allow children to play with the dishwasher.
- Store the detergent, rinse aid and salt in a dry place out of the reach of children.
General recommendations
- Only use detergents, rinse aids and regeneration salts specially recommended for use in domestic dishwashers.
- On completion of the wash programme switch off the dishwasher and turn off the water tap.
- Before cleaning or carrying out maintenance, switch off the appliance, disconnect the mains plug and turn off the water tap.
- If a fault occurs, switch off the appliance and turn off the water tap.
-
The open dishwasher door can only support the weight of the loaded rack when pull out. Do not rest objects on the open door or sit or stand on it since the appliance may topple over.
-
If necessary, the power cable may be replaced with one the same obtained from our After-Sales Service. The power cable must only be replaced by a qualified technician.
- For appliances with water-stop system:
The water inlet hose and plastic casing contain electrical components. Do not therefore cut the hose or immerse the plastic casing in water. If the hose is damaged switch off the appliance immediately. - Do not use solvents inside the dishwasher: risk of explosion!
- Load capacity: 9 place settings.
EC Declaration of Conformity
This appliance has been designed, constructed and distributed in compliance with the safety requirements of EC Directives:
73/23/EC
89/336/EC
93/68/EC
ENERGY AND WATER SAVING TIPS
- Do not rinse crockery under running water.
- If ecological energy sources are available such as solar panel heating, heat pumps or centralised heating systems, the appliance may be connected to the hot water mains up to a maximum temperature of 60^ C. Make sure the water inlet hose is of the correct type. Refer to the “Connections” chapter in these user instructions.
HOW TO FILL THE SALT CONTAINER
Check the water hardness level in your area.
Consult your local Water Board, check your last water bill for the correct adjustment.
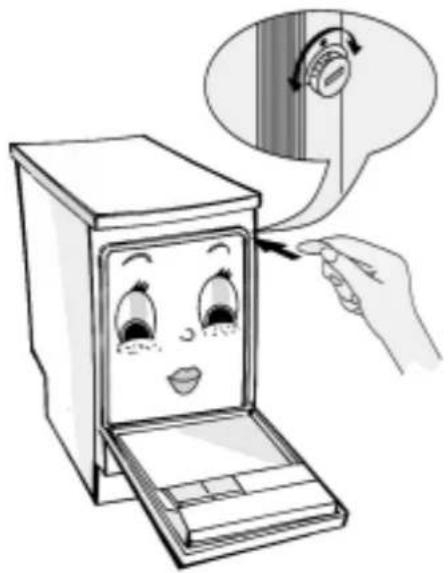
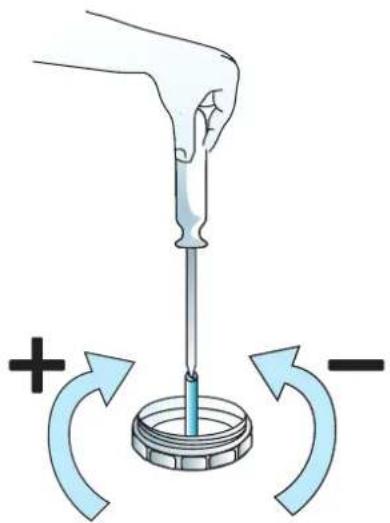
- Set the water hardness by turning the selector (if fitted and according to the model). Use the tables below to set the dial to the required setting:
• with 5 settings (see drawing):
| Selector setting | Water hardness | French degrees °fH | German degrees °dH |
| 1 1 soft * 0 - 15 0 - 9 | |||
| 1 1 - 2 medium 16 - 25 | 10 - 15 | ||
| 2 2 medium 26 - 38 16 | - 22 | ||
| 3 3 medium-hard 39 - 60 23 - 35 | |||
| 4 | 4 hard | 61 - 80 36 | - 46 |
| 5 4 very hard | 81 | - 92 47 - 54 | |
* If the water hardness level falls within category (soft), no salt is required.
• with 3 settings (see drawing):
| Water hardness | French degrees °fH | German degrees °dH |
| Minimum adjustment 0 - | 15 0 - 9 | |
| Medium adjustment | 16 - 40 10 | -23 |
| Maximum adjustment 40 | -92 24 | -54 |
- If the water hardness level exceeds category 1-2 (medium), before using the dishwasher for the first time, fill the salt container and run a wash cycle so that any excess saline solution discharged is immediately removed by the water to prevent corrosion. The pre-rinse cycle is not sufficient for this purpose.
- Check the salt level regularly.
- Important: Only use regeneration salts recommended for use in domestic dishwashers. Do not fill the salt container with detergent as this will cause irreparable damage to the water softener system.
To fill the salt container:
- Remove the lower rack.
- Unscrew the cap by turning it counterclockwise.
- If the dishwasher is new, fill the salt container with water (about 1 liter).
- Fill the container by using the provided funnel to the rim with salt (about 1.2 kg) and stir.
- Screw the cap back on by turning it clockwise.
5 Settings: (Factory setting 2).
natural_image
Illustration of a hand inserting a device into an open box with a cartoon face, showing the device's rotation and adjustment (no text or symbols present)3 Settings: (Factory setting Max.).
natural_image
Illustration of a hand using a screwdriver to lift a cylindrical component, with positive and negative curved arrows indicating rotation (no text or symbols)Salt level indicator
The dishwasher is equipped with an electric salt level indicator (depending on the model).
Electric indicator:
The salt level indicator lamp on the control panel illuminates when the salt container is empty.
HOW TO FILL THE RINSE AID DISPENSER
The rinse aid facilitates drying and prevents the formation of unsightly spots, streaks and carbonate deposits on crockery. Before using the dishwasher for the first time, fill the rinse aid dispenser. Thereafter, regularly check the rinse aid level.
Only use rinse aids recommended for use in domestic dishwashers.
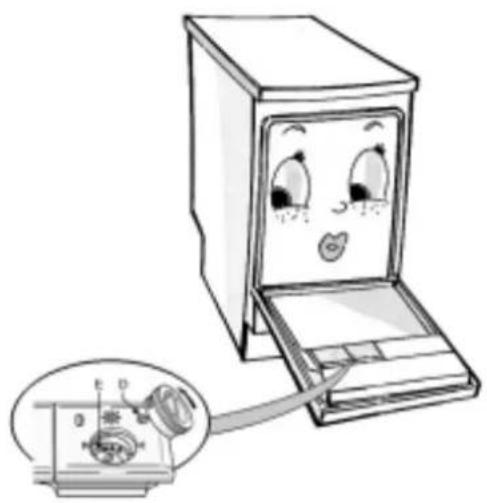
- Unscrew the cap. Fill the dispenser with rinse aid while monitoring the level indicator D (about 130 ml).
- Immediately wipe away any spilt rinse aid to prevent excess suds which may spoil washing results.
- Close the cap or lid.
How to adjust the rinse aid dosage regulator.
(Open the cover and close again following adjustment). Factory setting: 3.
If you are not satisfied with washing or drying results, change the dial setting with a spoon handle or coin (see E in the drawing).
If crockery is prone to whitish streaks, reduce the dosage by turning the dial to a lower setting. If instead crockery is wet, dull or spotted, increase the dosage by turning the dial to a higher setting.
Rinse aid level indicator (visual or electric indicator depending on the model installed).
Visual indicator: light = empty dark = full.
natural_image
Cartoon illustration of a computer with a smiling face inside, connected to a small device with a close-up view (no text or symbols)HOW TO FILL THE DETERGENT DISPENSER
Only use detergents recommended for use in domestic dishwashers. If you use "new generation" enzyme-based detergents, select the Bio programmes which are also suitable for all normal detergents.
If you use detergents in pellet form, follow the manufacturer's directions for use.
Always use the recommended dosage stated on the detergent pack. The use of detergent in excess of the recommended dosage may cause suds, poor washing results and pollution. The recommended dosage varies between different brands.
Only fill the detergent dispenser prior to start a wash programme.
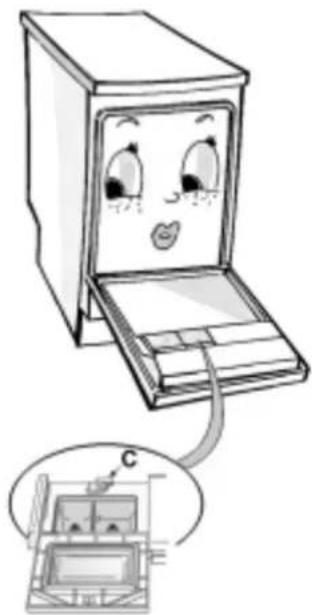
To open on lid (see C in the drawing).
natural_image
Illustration of a cartoon-style computer with a face on the screen and an inset showing a device labeled 'C' (no text or symbols present)CONNECTIONS
Refer to the separate installation instructions booklet.
Water inlet and drain:
• Strictly follow local Water Board regulations.
• Make sure the inlet and drain hoses are kink-free and are not crushed.
- If the hose length does not suffice, replace with similar hoses obtained from your local dealer or our After-Sales Service.
- The inlet hose must be securely clamped to the water tap to prevent leaks.
- When installing the appliance, make sure the drain water discharges correctly and, if necessary, remove the wire gauze from the sink siphon.
- Secure the drain hose with a clamp to the siphon to prevent it from dropping off during operation.
- For appliances with water-stop system only: if the water connections are made correctly, the water-stop system safeguards your home against damage caused by flooding.
Electrical connections:
- Closely adhere to local Electricity Board regulations.
- Voltage information is shown on the rating plate mounted inside the door on the right hand side.
- The appliance must be earthed as prescribed by law.
- Do not use extension leads or multiple adapters etc.
- Before carrying out maintenance, disconnect the mains plug.
- Do not use the dishwasher if it has been damaged in transit. Consult your local retailer or our After-Sales Service.
- The power cable must only be replaced by a qualified technician.
CONNECTIONS
1) ELECTRICAL CONNECTIONS "Warning - this appliance must be earthed"
This appliance is normally supplied with a mains lead having a plug fitted in the factory which has been checked for correct earth continuity.
If the fitted plug is not suitable for your socket outlet, or if the machine's mains lead is not fitted with a plug, you should fit a suitable new, good quality plug by following the instructions in (2) below.
Any unsuitable plug should be cut off and disposed of in order to avoid a possible shock hazard should it be inserted into a socket.
2) CONNECTION TO A REWIRABLE PLUG - to be carried out only by a qualified electrician
The wires in the mains lead are coloured in accordance with the following code:
BLUE - "NEUTRAL" ("N")
BROWN - "LIVE" ("L")
GREEN AND YELLOW - "EARTH" ("E")
To fit a new plug, proceed as follows:
2.1 Polarized Plugs (e.g. 3 pin, 13 amp plug conforming to BS 1363A)
a. The GREEN AND YELLOW wire must be connected to the terminal in the plug which is marked with the letter E or by the Earth symbol or coloured yellow or green and yellow.
b. The BLUE wire must be connected to the terminal which is marked with the letter N or coloured black.
c. The BROWN wire must be connected to the terminal which is marked with the letter L or coloured red.
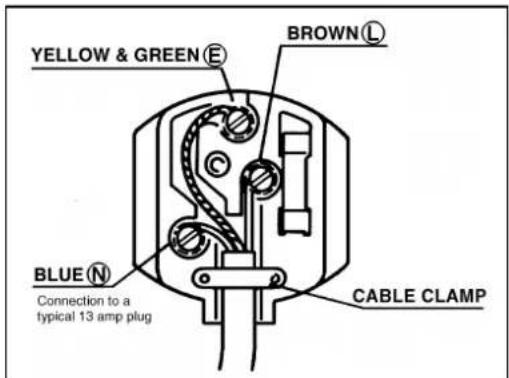
text_image
YELLOW & GREEN BROWN BLUE CABLE CLAMP Connection to a typical 13 amp plug2.2 Non-polarized plugs (e.g. 2 pin with side earth contact)
The wire which is coloured GREEN AND YELLOW must be connected to the earth contact. The other two wires should be connected to the two pins, irrespective of colour.
3) FUSE REPLACEMENT
If the mains lead of this appliance is fitted with a BS 1363A 13 amp fused plug, replace the fuse only with an A.S.T.A. approved type conforming to BS 1362 and proceed as follows:
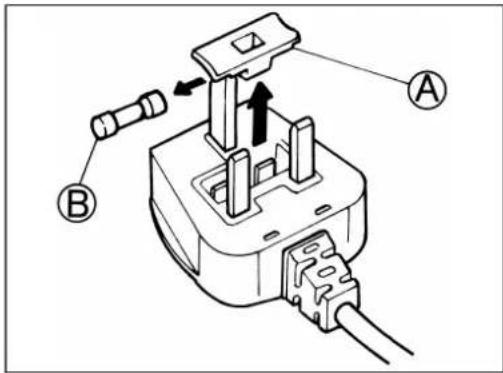
text_image
Technical diagram of a plug electrical socket with labeled components A and B, showing internal wiring and adjustment arrows.-
Remove the fuse cover (A) and the fuse (B).
-
Fit the replacement 13 A fuse into the fuse cover.
-
Refit both into the plug.
For all other types of plug, the supply socket should be protected by a 16 A fuse or circuit breaker at the distribution board.
MAINTENANCE AND CLEANING
Before cleaning or carrying out maintenance, press the ON/OFF push button and close the water tap.
- Clean the appliance exterior with a neutral detergent. Do not use abrasive detergents.
- Regularly wipe the door seal and inside of the door with a damp cloth to remove any food residues.
If the spray nozzles become clogged with food residues, clean the spray arms as follows:
Upper spray arm:
- Detach the spray arm by pushing it up 1 and turning it counter-clockwise 2 then pull it down 3.
- Rinse the nozzles under running water.
- Remount the spray arm by aligning it with the rotary mounting and insert it.
Make sure the spray arm rotates freely.
Lower spray arm:
• Pull the spray arm up (see drawing).
- Rinse the nozzles under running water.
- Remount the spray arm by aligning it with the rotor pin and insert it.
- Remount the spray arm and pull it down. Make sure the spray arm rotates freely.
Cleaning the filters:
- Rotate the central filter H by turning it counter-clockwise and extract it by pulling it up.
- Pull out the cylindrical filter L and extract it from the microfilter M separate the plactic filters by gently pushing on both pieces and pull (see drawing).
- Having removed the central filter you have also the possibility to take out the G filter (it is sufficient to lift it out).
- Clean all the components. While reassembling please note that the filters must be correctly assembled to ensure good washing results.
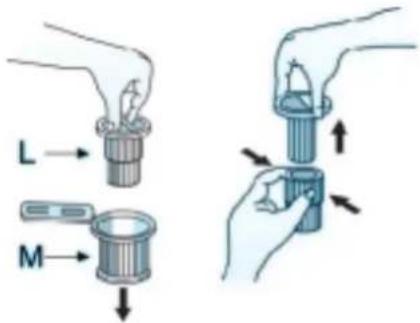
text_image
L M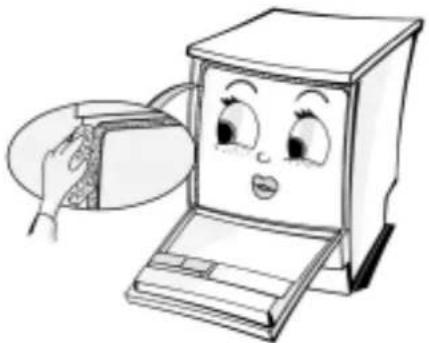
natural_image
Cartoon illustration of a computer with a smiling face and open lid, showing a hand inserting a slice into the screen (no text or symbols present)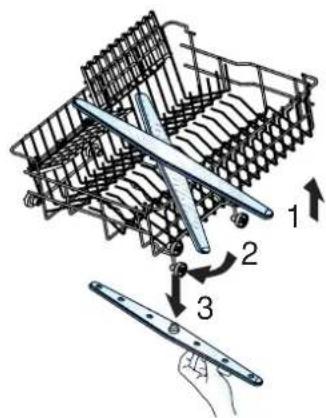
text_image
Technical diagram showing a mechanical assembly with labeled parts and directional arrows indicating assembly steps.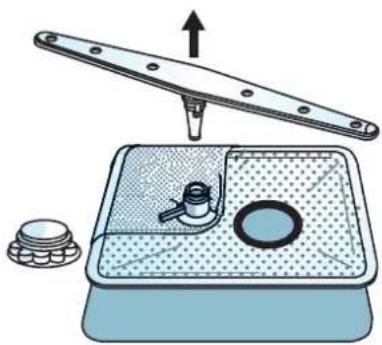
natural_image
Diagram of a kitchen sink with a drain, showing a lever and a side bowl (no text or symbols)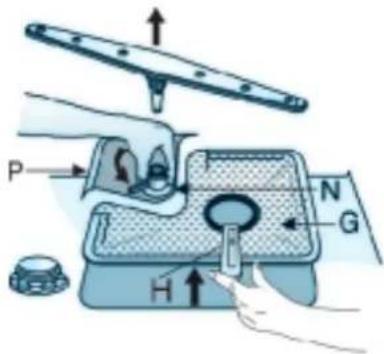
text_image
P H N GTROUBLESHOOTING GUIDE
If a fault occurs, before contacting our After-Sales Service, make the following checks to try and remedy the problem.
Restart the wash programme to see if the fault repeats.
If the malfunction persists, switch off the appliance and turn off the water tap. Call our After-Sales Service.
The appliance will not switch on:
• Power plug properly inserted in the mains socket?
• Power failure?
- Have you switched the dishwasher on or have you pressed the On/Off push button? Tap turned on? If not:
- Turn on the water tap.
- Make sure the water hose filter is not clogged.
To do this, turn off the water tap, disconnect the water hose, clean the filter, reconnect the water hose to the tap and turn on the tap.
• Door closed properly?
Crockery still dirty after washing:
• Have you selected the correct programme?
- Have you used the correct amount of detergent?
- Filters clogged or incorrectly assembled?
- Spray arms blocked or nozzles clogged?
- Salt container cap screwed down?
- Crockery loaded correctly? (the water jets must spray the entire surface of all items).
- Filters clogged?
Crockery loaded upside down?
When loading large items in particular, make sure the water circulates and does not collect inside them.
Spotted crockery:
• Water hardness duly checked and regulated?
- Salt container empty?
• Insufficient detergent?
Spotted glasses and cutlery:
- Too much rinse aid? (Adjust the rinse aid regulator to a lower setting).
When the appliance will not be used for a long period:
- Run twice the "Pre-Rinse" programme.
- Clean the filters.
• Take the power plug out of its socket. - Leave the door ajar to prevent bad odours.
- Close the water tap.
Upon re-use of the appliance please follow the following procedure:
- Open the water tap.
- Reconnect the power plug to the socket.
Note:
On some models when the On/Off push button is pressed, a pre-rinse cycle is performed prior to the actual wash programme to regenerate the water softener system.
AFTER-SALES SERVICE
Before contacting our After-Sales Service:
- Try to remedy the problem (see "Troubleshooting Guide").
- Switch off the dishwasher and restart the wash programme to see if the fault repeats.
If, after carrying out the above checks the malfunction persists, call our After-Sales Service and specify:
• The nature of the problem.
• The appliance type and model.
- The service number (the number after the word Service on the adhesive label) located inside the door on the right hand side.
SERVICE
0000 000 00000

- Your name, address and telephone number.