
CTAR 7743/2 IN - Cooker BAUKNECHT - Free user manual and instructions
Find the device manual for free CTAR 7743/2 IN BAUKNECHT in PDF.


User questions about CTAR 7743/2 IN BAUKNECHT
0 question about this device. Answer the ones you know or ask your own.
Ask a new question about this device
Download the instructions for your Cooker in PDF format for free! Find your manual CTAR 7743/2 IN - BAUKNECHT and take your electronic device back in hand. On this page are published all the documents necessary for the use of your device. CTAR 7743/2 IN by BAUKNECHT.
USER MANUAL CTAR 7743/2 IN BAUKNECHT
Instructions for use
Mode d'emploi
Gebruiksaanwijzing
natural_image
Close-up of wooden clothespins and clips, no text or symbols visibleBrugsanvisning
Bruksanvisning
Käyttöohje
natural_image
Black and white photo of two glass bottles with black lids, one partially filled in a white container (no visible text or symbols)
natural_image
Black and white close-up of multiple glasses with blurred background (no text or symbols)Οδηγίες χρήσης
natural_image
Close-up of a metallic industrial or kitchen appliance with perforated door and mounting bracket (no visible text or symbols)Návod k použití
Návod na použitie
InstrucΣiuni de utilizare
Instructions for use
Page 3
YOUR SAFETY AND THAT OF OTHERS IS VERY IMPORTANT
This manual and the appliance itself provide important safety messages, to be read and always observed.

This is the danger symbol, regarding safety, warning of potential risks to users and others.
All safety messages will be preceded by the danger symbol and the following words:

DANGER
Indicates a hazardous situation which, if not avoided, will result in serious injury.

WARNING
Indicates a hazardous situation which, if not avoided, could cause serious injury.
All messages relevant to safety specify the potential risk to which they refer and indicate how to reduce the risk of injury, damage and electric shocks due to incorrect use of the appliance. Make sure to comply with the following:
- Use protective gloves to perform all unpacking and installation operations.
- The appliance must be disconnected from the power supply before carrying out any installation operation.
- Installation and maintenance must be carried out by a specialised technician, in compliance with the manufacturer's instructions and the local safety regulations in force. Do not repair or replace any part of the appliance unless specifically stated in the user manual.
- The appliance must be earthed.
- The power cable must be long enough for connecting the appliance, fitted in the cabinet, to the power supply.
- For installation to comply with the current safety regulations, an omnipolar switch with minimum contact gap of 3mm is required.
- Do not use multi-sockets or extension cords.
- Do not pull the appliance's power cable.
- The electrical parts must not be accessible to the user after installation.
- The appliance is designed solely for domestic use for cooking food. No other use is permitted (e.g. heating rooms). The Manufacturer declines any liability for inappropriate use or incorrect setting of the controls.
- The appliance and its accessible parts become hot during use. Care should be taken to avoid touching heating elements. Very young (0-3 years) and young children (3-8 years) shall be kept away unless continuously supervised.
- Children from 8 years and above and persons with reduced physical, sensory or mental capabilities or lack of experience and knowledge can use this appliance only if they are supervised or have been given instructions on safe appliance use and if they understand the hazards involved. Children shall not play with the appliance. Cleaning and user maintenance shall not be made by children without supervision.
- Do not touch the appliance heating elements during and after use. Do not allow the appliance to come into contact with cloths or other flammable materials until all the components have cooled down completely.
- Do not place flammable materials on or near the appliance.
- Overheated oils and fats catch fire easily. Pay attention when cooking food products rich in fat and oil.
- A separator panel (not supplied) must be installed in the compartment under the appliance.
- If the surface is cracked, switch off the appliance to avoid the possibility of electric shock (only for appliances with glass surface).
- The appliance is not intended to be operated by means of an external timer or separate remote control system.
- Unattended cooking on a hob with fat or oil can be dangerous and may result in fire. NEVER try to extinguish a fire with water, but switch off the appliance and then cover flame e.g. with a lid or a fire blanket. Danger of fire: do not store items on the cooking surfaces.
- Do not use steam cleaners.
- Metallic objects such as knives, forks, spoons and lids should not be placed on the hob surface since they can get hot.
- After use, switch off the hob element by its control and do not rely on the pan detector (only for induction appliances).
SAFEGUARDING THE ENVIRONMENT
Disposal of packing
The packing material is 100% recyclable and marked with the recycling symbol (☐). The various parts of the packing must not be dispersed in the environment, but disposed of in compliance with local regulations.
Disposal
This appliance is marked in conformity with European Directive 2012/19/EU on Waste Electrical and Electronic Equipment (WEEE).
By ensuring that this appliance is correctly disposed of, the user can help prevent potentially negative consequences for the environment and the health of people.
The symbol ☒ on the appliance or the accompanying documentation indicates that this product should not be treated as domestic waste but must be taken to an appropriate collection point for recycling WEEE.
Energy saving tips
For optimum results, it is advisable to:
- Use pots and pans with bottom width equal to that of the cooking zone.
- Only use flat-bottomed pots and pans.
- When possible, keep pot lids on during cooking.
- Use a pressure cooker to to save even more energy and time.
- Place the pot in the middle of the cooking zone marked on the hob.
ECO DESIGN DECLARATION
- This appliance meets the Ecodesign requirements set out in European Regulation n. 66/2014, in conformity to the European standard EN 60350-2.
INSTALLATION
After unpacking the product, check for any damage during transport. In case of problems, contact the dealer or the After-Sales Service.
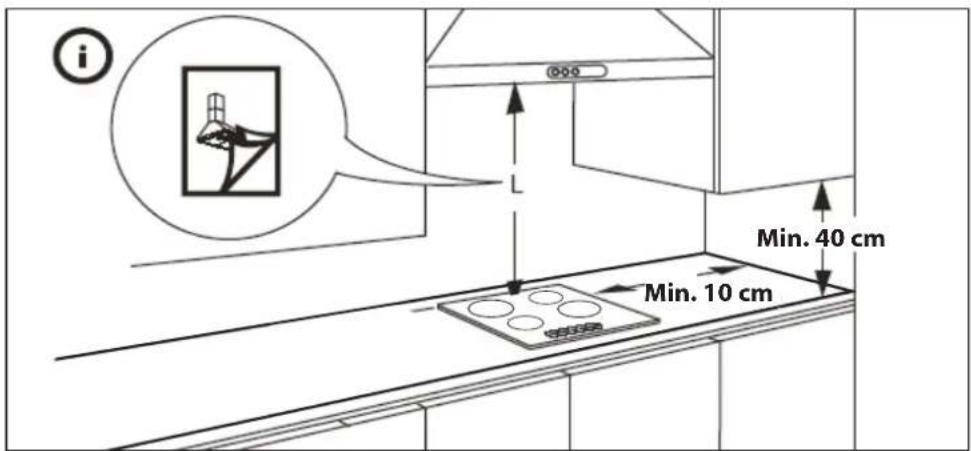
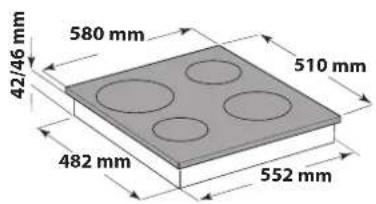
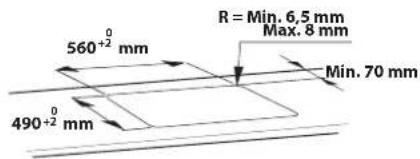
For built-in dimensions and installation instruction see the pictures in this paragraph.
A minimum distance must be maintained between the hob and the hood above it. Please refer to the user manual of the hood for more informations.
text_image
i Min. 40 cm Min. 10 cm580 X 510 mm
text_image
580 mm 42/46 mm 510 mm 482 mm 552 mmSTANDARD INSTALLATION
text_image
560⁺²⁰ mm 490⁺²⁰ mm R = Min. 6,5 mm Max. 8 mm Min. 70 mm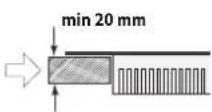
FLUSH INSTALLATION
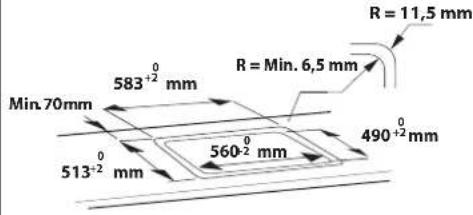
text_image
R = 11,5 mm 583⁺² mm R = Min. 6,5 mm Min.70mm 513⁺² mm 560⁻² mm 490⁺² mm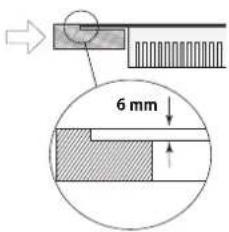
text_image
6 mm| 770 X 510 mm 770 mm 42/46 mm 482 mm 742 mm | STANDARD INSTALLATION R = Min. 6,5 mm Max. 8 mm Min. 70 mm 490 +2 mm | min 20 mm |
| FLUSH INSTALLATION R = Min. 6,5 mm Min. 70 mm 513 +2 mm 750 +2 mm | 6 mm |
WARNING
-Install a separator panel under the hob.
- The lower part of the product must not be accessible after installation.
- Do not fit the separator panel if an undertop oven is installed.
IMPORTANT:
- The distance between the underside of the appliance and the separator panel must respect the dimensions given in the figure;
- If an oven is installed under the hob, make sure the oven is equipped with a cooling system;
- Do not install the hob above a dishwasher or washing-machine, so that the electronic circuits do not come into contact with steam or moisture which could damage them.
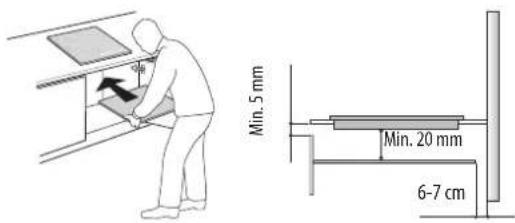
text_image
Min. 5 mm Min. 20 mm 6-7 cmPLACING THE HOB
After the electrical connection (see the chapter "Electrical connection") position each fixing clips on the dedicated slots on the lateral sides of the hob as shown in the picture. Then push the hob inside the cut out and check that the glass is flat and parallel to the worktop. The fixing clips are designed for every type of worktop material (wood, marble, etc).
IMPORTANT:
- Use protective gloves during hob installation
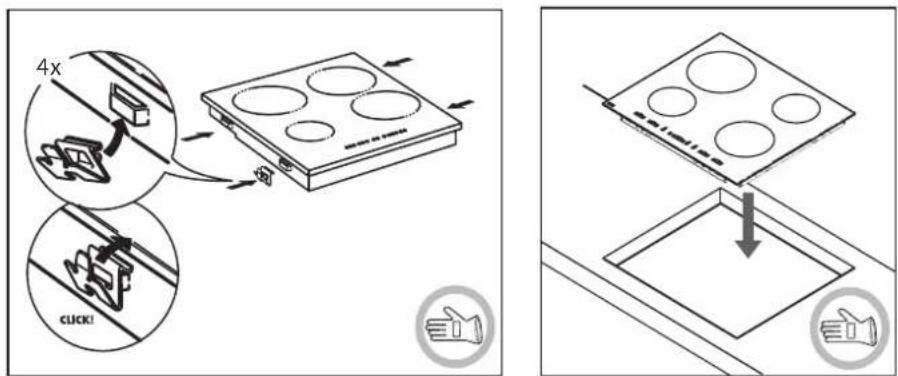
text_image
4x CLICK!REMOVE THE HOB
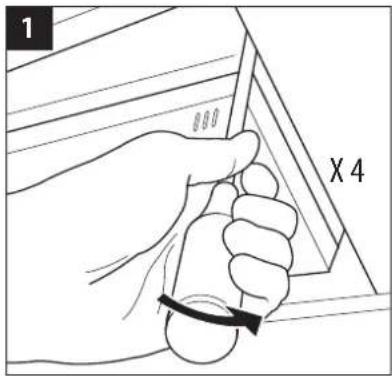
- To remove the hob, use a screwdriver (not provided) to prise off the fixing clips on the underside of the appliance.
text_image
1 X 4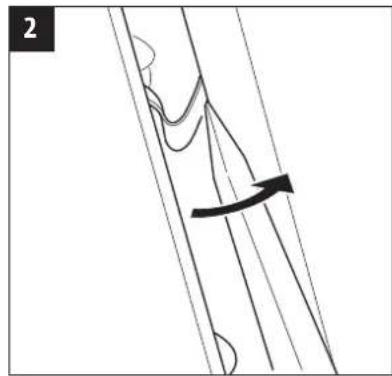
natural_image
Diagram of a mechanical or structural component with intersecting lines and an arrow indicating direction (no text or symbols)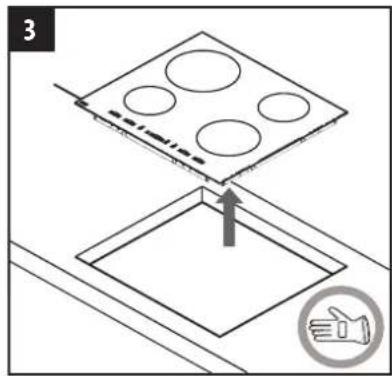
text_image
3ELECTRICAL CONNECTION
WARNING
-Disconnect the appliance from the power supply.
- Installation must be carried out by qualified personnel who know the current safety and installation regulations.
- The manufacturer declines all liability for injury to persons or animals and for damage to property resulting from failure to observe the regulations provided in this chapter.
- The power cable must be long enough to allow the hob to be removed from the worktop.
- Make sure the voltage specified on the dataplate located on the bottom of the appliance is the same as that of the home.
Connection to the terminal block
For the electrical connection, use an H05RR-F cable as specified in the table below.
| Conductors Amount x size | |
| 220-240V ~ + | 3 x 4 mm ^2 |
| 230-240V ~ + | 3 x 4 mm ^2 (Australia only) |
| 220-240V 3~ + | 4 x 1,5 mm ^2 |
| 380-415V 3N~ + | 5 x 1,5 mm ^2 |
| 380-425V 2N~ + | 4 x 1,5 mm ^2 |

text_image
B AThe appliance must be connected to the electricity supply by means of an omnipolar switch with minimum contact gap of 3mm.
IMPORTANT: the yellow/green earth wire must be connected to the terminal with the symbol ⏻ and must be longer than the other wires.
- Check the connection diagram label under the hob and place/remove bridges according to the connection type;
- Remove approx. 70 mm of the cable sheath from the power supply cable (B);
- Strip approx. 10 mm of sheath from the wires. Then insert the power supply cable into the cable clamp and connect the wires to the terminal block as indicated in the connection diagram placed close to the terminal block itself;
- Secure the power supply cable (B) by means of the cable clamp;
- Close the terminal board with the cover (A) securing it with the screw provided;
- After the electrical connection, fit the hob inside the cut-out.
CONTROL PANEL DESCRIPTION
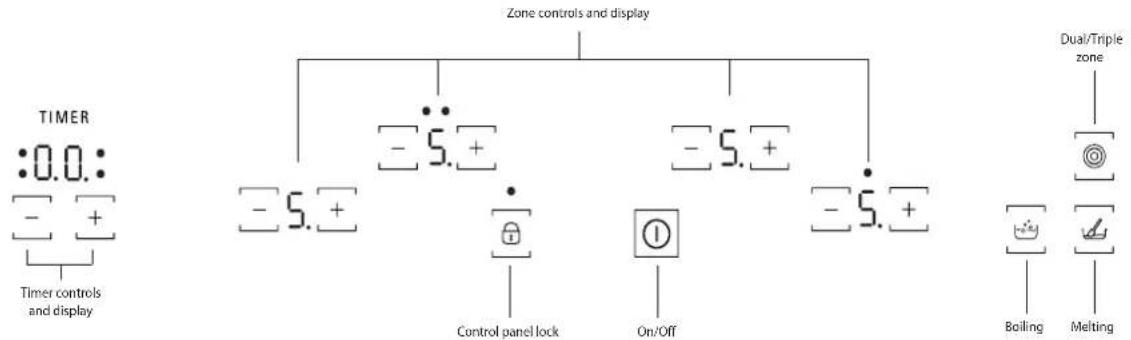
Control panel
flowchart
graph TD
    A["TIMER: 0.0:"] --> B["Timer controls and display"]
    C["Zone controls and display"] --> D["-5.+"]
    C --> E["-5.+"]
    C --> F["-5.+"]
    G["Dual/Triple zone"] --> H["Boiling"]
    G --> I["Melting"]
    J["Control panel lock"] --> K["On/Off"]
    L["+"] --> K
    M["+"] --> K
First use / after a power failure
After connecting the hob to the electrical power supply, the control panel is locked. To unlock the control panel, touch the controls for 2 seconds. The control panel lock indicator switches off and the hob can be used. Read the "Control panel lock" paragraph for more details.
Switching the hob ON/OFF
To switch the hob on, touch the control until the cooking zone displays light up. To switch off, touch the same control until the displays switch off. All the cooking zones are deactivated. If within 30 seconds of switching on, no function is selected, the hob switches off automatically.
Switching on and adjusting cooking zones

Power indicator display
Selected cooking zone indication
(the dot blinks when there is a Timer active on that zone)
Place the pot on the cooking zone, switching the hob on, activate the required cooking zone by touching the corresponding “-” or “+” controls: “5” will appear on the display. With “-” and “+” controls it is possible to select the required power level, from min. 0 to max. 9.
Deactivation of cooking zones
To switch off the cooking zone, touch simultaneously the control “-” and “+” or select the level “0” with the control “-”.
The cooking zone switches off and, if still hot, the letter "H" appears on the zone display.
Control panel lock
This function locks the controls to prevent accidental activation of the hob. To activate the control panel lock, touch the control ☐; an acoustic signal sounds and a luminous indicator appears on the display. The control panel is locked except for the switching off function. To deactivate the control panel lock, repeat the activation procedure.
The presence of water, liquid spilled from pots or any objects resting on the controls can accidentally activate or deactivate the control panel lock
Timer
The timer can be used to set the cooking time for a maximum of 99 minutes (1 hour and 39 minutes) for all the cooking zones. Select the cooking zone to be used, touch the timer “-” or “+” controls and a beep signals the function. The display shows “00”. The Timer value can be decreased and increased by keeping the finger on the controls “+” or “-”. After the Timer value selection, the display continues to blink for 10 seconds before the countdown starts.
When the set time has elapsed, an acoustic signal sounds and the cooking zone switches off automatically. To deactivate the timer, select the cooking zone, touch the Timer controls “-” and “+” simultaneously.
IMPORTANT:
- The dot blinking next to the power level display shows that the Timer function is active on that zone.
- The Timer is available for all the zones but one at a time.
Residual heat indicator.

WARNING

These indicators alert the user when cooking zones are still hot.
If the display shows H, the cooking zone is still hot. If the residual heat indicator of a given cooking zone is lit, that zone can be used, for example, to keep a dish warm or to melt butter.
When the cooking zone cools down, the display goes off.
Special function
Some models have special functions:
| Button | Function Name | Visual Indication | Description |
 | Dual/Triple zone | 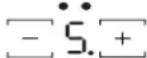 | The control activates the double or triple zone (if available). After positioning the pot/accessory on the chosen cooking zone, switch on the hob and select the cooking zone. Select the power level and touch the control one time to activate the dual zone or two times to activate the triple zone. To deactivate the function, simply touch the same button. LEDs above the controls are switched on only when the function is active for the selected zone. |
 | Boiling | Display shows: | This function sets the zone maximum power (for example to quickly bring water to the boil). After positioning the pot/accessory on the chosen cooking zone, switch on the hob, select the cooking zone and touch the boiling controls. After 10 minutes of usage of this function, the appliance automatically sets the zone to level 9. To deactivate the function simply touch the same control or lower the power level with "-" . It is possible to use this function in combination with dual/ triple zone function. |
 | Melting | Display shows:[WWDS] | This function sets a power level that is suitable for slowly melting delicate products without compromising their sensorial quality (chocolate, butter, etc.). After positioning the pot/accessory on the chosen cooking zone, switch on the hob, select the cooking zone and touch the melting control. To deactivate the function, simply press the same button or touch "-" and "+" to switch off the zone. It is possible to use this function in combination with dual/triple zone function. |
The hob is also equipped with the "auto shut off" function that switch off the cooking zone if no power level modification is done after a specific time frame depending on the power setting itself. In the table there is the time duration of each power level.
| Auto Shut Off TimePower Level | |
| 0 | 30 sec |
| 1 | 10 hours |
| 2 | 5 hours |
| 3 | 5 hours |
| 4 | 4 hours |
| 5 | 3 hours |
| 6 | 2 hours |
| 7 | 2 hours |
| 8 | 2 hours |
| 9 | 1 hours |
POWER LEVEL TABLE
| Power level | Type of cooking | Level use(indicating cooking experience and habits) | |
| Max. power | Boiling | Fast heating | Ideal for rapidly increasing the temperature of food to fast boiling in the case of water or rapidly heating cooking liquids |
| 9-7 | Frying - boiling | Ideal for browning, starting to cook, frying frozen products, fast boiling | |
| High power | Browning - slow frying - boiling - grilling | Ideal for slow frying, maintaining a high boil, cooking and grilling (short duration, 5-10 minutes) | |
| 7-5 | Browning - cooking - stewing - slow frying - grilling | Ideal for slow frying, maintaining a low boil, cooking and grilling (medium duration, 10-20 minutes), preheating | |
| Medium power | Cooking - stewing - slow frying - grilling | Ideal for stewing, maintaining a gentle boil, cooking and grilling (long duration). | |
| 4-3 | Cooking - simmering - thickening - creaming pasta | Ideal for prolonged cooking (rice, sauces, roasts, fish) with liquids (e.g. water, wine, broth, milk), creaming pasta. | |
| Ideal for prolonged cooking (volumes of less than a litre: rice, sauces, roasts, fish) with liquids (e.g. water, wine, broth, milk) | |||
| Low power 2-1 | Melting - defrosting - keeping food hot - creaming risottos | Ideal for softening butter, gently melting chocolate, thawing small products and keeping just-cooked food hot (e.g. sauces, soups, minestrone) | |
| Ideal for keeping just-cooked food hot, creaming risottos and keeping serving dishes warm (with induction-suitable accessory) | |||
Energy saving tips
For optimum results, it is advisable to:
- Use pots and pans with bottom width equal to that of the cooking zone.
- Only use flat-bottomed pots and pans.
- When possible, keep pot lids on during cooking.
- Use a pressure cooker to to save even more energy and time.
CLEANING

WARNING
-Do not use steam cleaners.
-Before cleaning, make sure the cooking zones are switched off and that the residual heat indicator ("H") is not displayed.
IMPORTANT: Do not use abrasive sponges or scouring pads. Their use could eventually ruin the glass.
• After each use, clean the hob (when it is cool) to remove any deposits and stains due to food residuals.
- Sugar or foods with a high sugar content damage the hob and must be immediately removed.
- Salt, sugar and sand could scratch the glass surface.
- Use a soft cloth, absorbent kitchen paper or a specific hob cleaner (follow the Manufacturer's instructions).
TROUBLESHOOTING GUIDE
- Read and follow the instructions given in the section "Control panel description".
- Read the following table:
| FAILURE DESCRIPTION POSSIBLE CAUSES CAUSES | MEASURE | |
| The hob does not switch on | Missing power supply | Check that power supply is on |
| Wrong connection of the main cable | Call a qualified technician to check the cable connection | |
| Bob failure | Call after sales service | |
| The hob switch on but "F" alternately to "L" is shown on each display | Strong light over the cooktop during start up | Reduce light over the control panel, restart the hob (disconnect and reconnect to the power supply) |
| The hob switch on but "F" alternately to one of "0, A, C, E t, H, J, U, 5, 3, 4, r" symbol is shown on the displays | Bob failure | Restart the hob (disconnect and reconnect to the power supply), if the problem persists call after sales service |
| Heater does not heat up but the display is on | Bob failure | Call after sales service |
| The hob plays 3 acoustic signals and then shut off | One or more buttons are continuously pressed for more than 3 seconds | Remove any object or liquid that is placed over the control panel |
| Not possible to switch the hob off | Bob failure | Disconnect the hob from power supply and call After sales service |
| The heater is not continuously on, it switches on and off cyclically even if on the display the power lever does not change. | Normal functioning of the hob | The on/off cycle allows the power regulation of the heater and is completely normal.In some cases a thermal protection could switch off the heater for some time to avoid the glass damage.Examples of such cases are: cooking long time at high power level, usage of pots smaller than the heating element, pot bottoms not flat. |
| The hob switch on but "F" alternately to "c" is shown on the displays | Control panel overheating | Wait until control panel temperature cool down.The hob will automatically switch on when the temperature powers below operating limit. |
IMPORTANT: To avoid a permanent damage the hob:
- do not use pots with bottoms that are not flat;
- do not use metal pots with enamelled bottom;
- do not place hot pots/pans over the control panel.
AFTER-SALES SERVICE
Before contacting the After-sales Service:
- See if you can solve the problem yourself with the help of the "Troubleshooting guide".
- Switch the appliance off and then on again it to see if the problem has been eliminated.
If the problem persists after the above checks, contact the nearest After-Sales Service.
Always specify:
• a brief description of the fault;
• the product type and exact model;
- the Service number (the number after the word Service on the rating plate), located under the appliance (on the metal plate).
- your full address;
- your telephone number.
SERVICE
0000 000 00000
If any repairs are required, contact an authorised After-Sales Service Centre (to ensure the use of original spare parts and correct repairs). Spare parts are available for 10 years.