
YunBike C1 - Electric bike Xiaomi - Free user manual and instructions
Find the device manual for free YunBike C1 Xiaomi in PDF.

| Product Type | Electric bike |
| Dimensions (L x W x H) | 1510 x 560 x 850 mm |
| Weight (including battery) | 16 kg |
| Frame Material | Yunbike aluminium alloy |
| Maximum Load | <100 kg |
| Wheel Size | 20 x 1-1/8 inches |
| Battery Type | Lithium-ion, 36V, 5.2Ah, 1.2kg |
| Charging Time | 2.5-3 hours |
| Range (with pedal assist) | 25-75 km |
| Maximum Speed (motor only) | 20 km/h |
| Motor Type | Brushless DC, 180W, 36V (rear hub) |
| Controller | High-sinusoidal oscillation controller |
| Display | LED panel with speed, battery, odometer, error codes |
| Lighting System | Yunbike WED-FIELD VISION |
| USB Ports | 2 (under control panel and at battery rear, 5V/1A) |
| App Compatibility | Smart Bike RDA (iOS & Android) |
| Safety Protections | Overheating, short circuit, overvoltage, overcurrent, anti-reverse, overload, excessive discharge, PCT protection |
| Warranty (Motor/Battery) | 24 months |
| Warranty (Electric parts/Structure) | 12 months |
| Maintenance | Check spokes and screws periodically; avoid water ingress; use original charger |
| Spare Parts Availability | Motor, battery, charger, controller, panel, brake parts, tires, pedals |
Frequently Asked Questions - YunBike C1 Xiaomi
User questions about YunBike C1 Xiaomi
0 question about this device. Answer the ones you know or ask your own.
Ask a new question about this device
Download the instructions for your Electric bike in PDF format for free! Find your manual YunBike C1 - Xiaomi and take your electronic device back in hand. On this page are published all the documents necessary for the use of your device. YunBike C1 by Xiaomi.
USER MANUAL YunBike C1 Xiaomi
natural_image
Pure electrical circuit lines without any symbolsBattery Charging device Pedals x 2 Hex wrench Keys x 2 Wrench
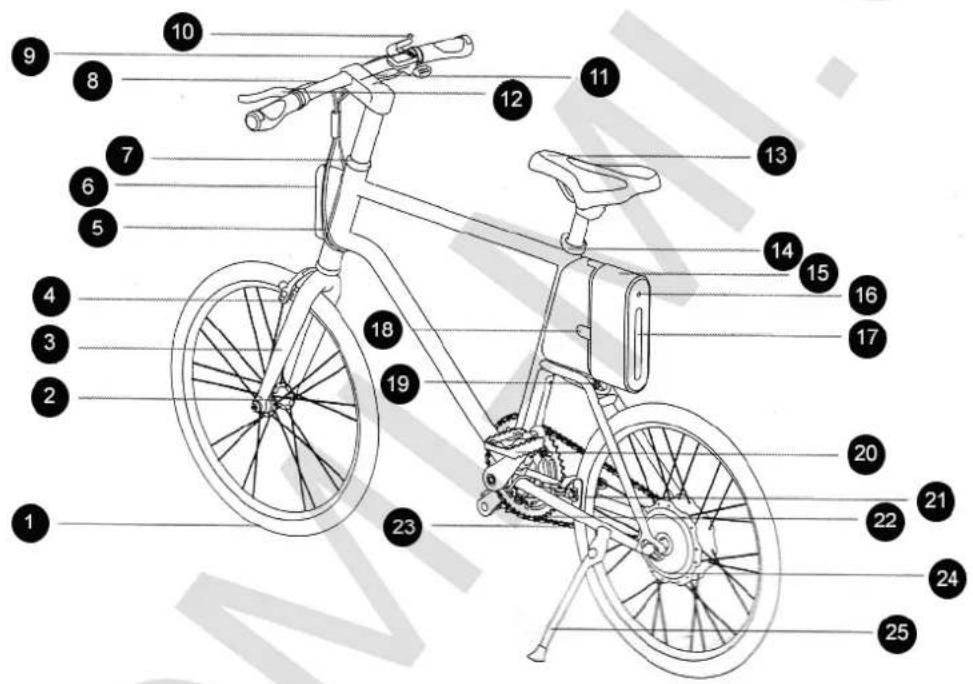
- Wheel
- Front sleeve
- Fork
- Front brake
- Brake System
- Headlights
- Front steering cup
- Wheel
- Measuring panel
- Right brake handle
- Stem
- Left brake handle
- Saddle
-
Saddle pin
-
Battery
- Power
- Battery
- Lock Battery
- Socket
- Pedal
- Rear brake
- Chain wheel
- Chain
- Motor
- Footstep
Assembling and settings
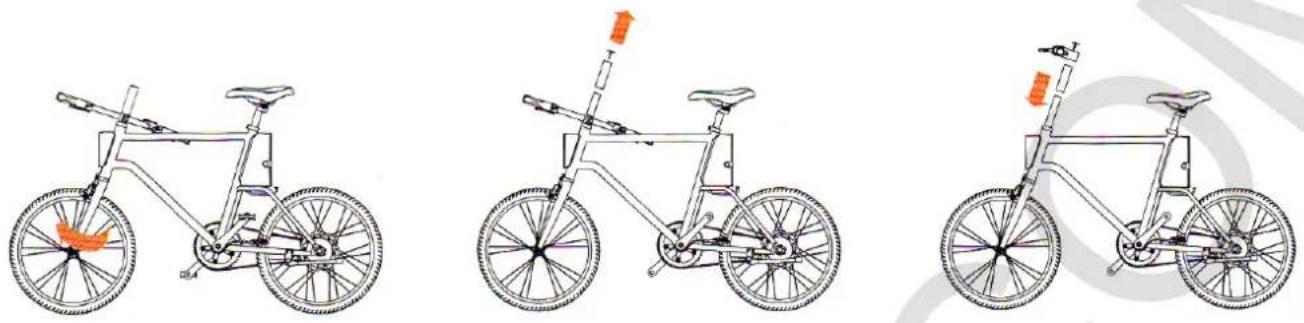
- Spinning front wheel clockwise by 180 degrees, confirm the right direction of motion (after the scroll wheel, press the front brakes).
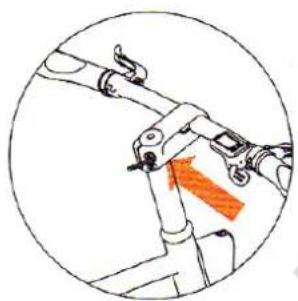
- Reduce the stem clamp bolt using a 5mm hex wrench (need to twist counterclockwise). Alternately, remove the front fork cartridge and other connecting elements.
- First assemble front fork sleeve and place the into steering column. Take connecting elements of stern (logo side up) and connect with the sleeve, insert tensioner bolt.
natural_image
Diagram of a bicycle suspension system with orange directional arrow indicating motion (no text or symbols)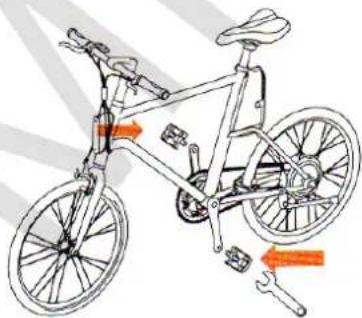
natural_image
Line drawing of a bicycle with highlighted parts and wrench, no text or symbols present- Set a stem parallel with the front wheel, then tighten the tensioner bolt.
- Set and secure the right and left pedals using the 5mm Allen key (on the pedals, you will see notation R/L, indicating the right and left foot).
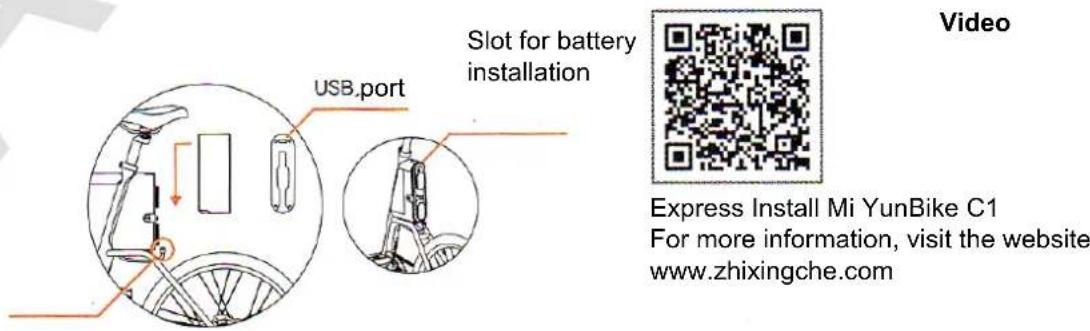
Setting / Removing of battery
When installing battery in a special slot, follow the signs depicted direction, then you need to connect the battery to the socket.
If you need to disassemble the battery, unplug it from the socket, turn key 90 degrees clockwise, remove the battery, pulling it up.
After dismantling the battery, you can see the presence of USB port. Open the protective case and connect USB cable, you can charge your digital devices (5V / 1A).
Driving of the Bicycle
Press and hold the power button (more than 2 seconds), the system will give power then strengthening is possible.
When driving, keep the velocity faster than 4.2 km/h (usually this speed is reached after passage of two circles). Using the control panel (which is located on the right side), you can adjust the ride only by an electric motor, in which case you can not pedal. Turn off power of brake and gears, then switch to gain.
Measuring panel has an USB port to charge your phone (5V / 1A).
If after bike C1 be at rest for 20 minutes, it automatically turns off.
During braking better use the left rear brake handle;
Please choose roads, that are banned from entering self-propelled vehicles;
Timely check the battery level since riding, low charge could affect the lifespan of the battery.
Use battery according to the conditions described in the instructions;
When driving on long distances, you need to contact the pro shop to check the spokes and screws.
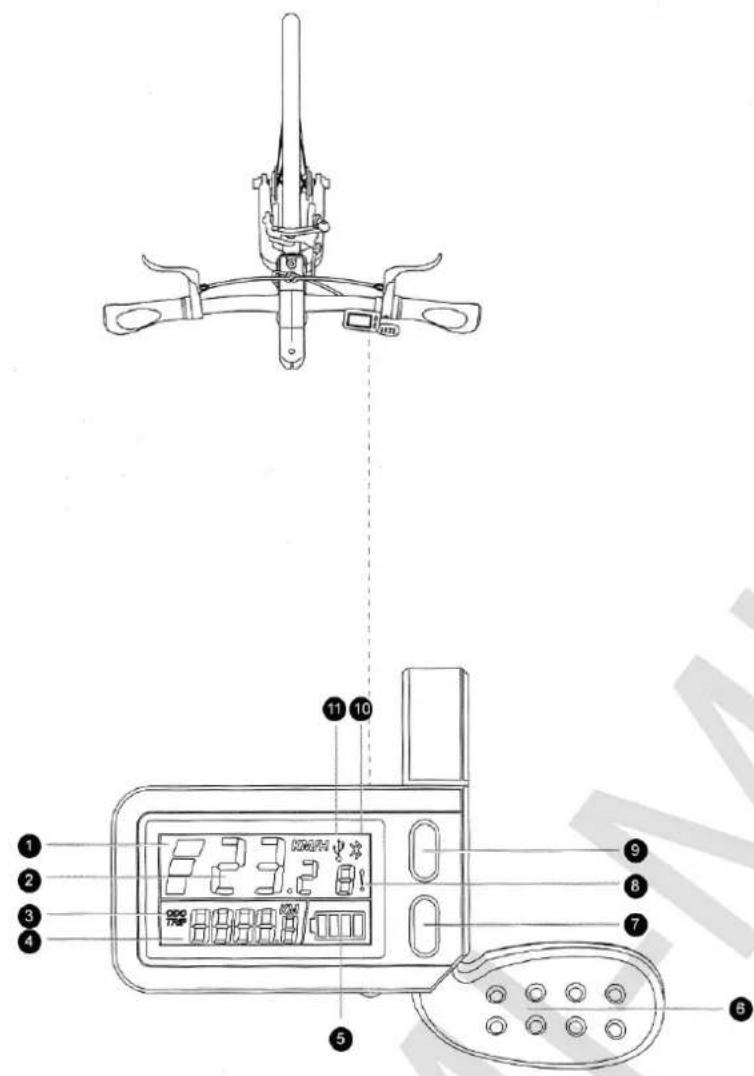
-
Level of gain; low, medium and high speed
-
Current speed
-
Run; ODO total mileage / TRIP single run
-
Mileage
-
Charge level of 4 blocks - 100-80% of charge; 3 blocks - 80-60% of charge; 2 blocks - 60-40% of charge; 1 unit - 40-20% of charge; 0 units - 20-0% of charge
-
Switch Gears
-
Gain -: Turn on: short press to decrease gain
-
Error Code: Hall sensor fault (1), switching of speeds fault (2) failure of the electric motor (3) protection of low pressure (4), protection against electric overload
(5), protection from blocking messages (6), problems powered brake system (7), failure data (8). If you find faults displayed wink appropriate designation
-
Gain + / Rear lights: Turn on: short press to increase the gain; long press to turn on backlight, repeated long press to turn off backlight
-
Bluetooth icon: when Bluetooth is connected, appropriate designation lits
-
USB icon: when connected to the USB port, the display shows the USB icon designation
Free warranty Terms
Note: The following are the conditions which can not be free warranty service.
A. Term of the warranty expired;
B. The emergence of breakage, due to improper care and device settings, and as a result of using Mi YunBike
C1 is not in accordance with instructions;
C. Failure as a result of misuse, improper care or accident;
D. Damage caused by self repair, alteration, dismantling, then the device does not meet its original state, or as a result of improper technical analysis and determination of fault;
E. Improper use of original charger, which caused
problems of Mi YunBike C1 charging;
F. You have not a valid document (current invoice) or a mismatch of data from the device;
G. Malfunction through smoke, pharmaceuticals, chemicals, corrosion, water ingress, etc.;
H. Malfunction of the electronic system bike through dampness, rain or snow;
I. Damage incurred in a force majeure (including but not limited to - lightning, fire or flood);
J. Natural breakdown / failure of parts that easily wear parts and consumables (fuses, light bulbs, brake pads, brake cables, spokes, tires, pedals, rubber plugs, plastic parts);
K. Maintenance device in unauthorized service centers;
L. After purchase you do not like the color, size vehicle.
Warranty
After-sales servicing is carried out according to the law on «The rights of consumers of China» and «Law on product quality of China». In warranty service includes:
During the warranty period you have the right to repair, modify or return.
For repair, replacement or return of goods, you must have a receipt.
First, officials from the customer must examine the goods, identify existing problems and confirm its compliance with the terms of the warranty service.
Enable / disable the battery, rear lights, charging
System:
- Press and hold the power button for more than 2 seconds, then turns indicator will light up 4. Every indicator points to a level of charge;
75-100% 4 LED1- lits;
50-75%, LED1 is off, LED2-4 lit;
25-50%, LED1, LED2 are off, LED3-4 lit;
0-25%, LED1, LED2, LED3 are off, LED4 lights; - One short press the power button - continuous flicker of 4 indicators; Press power button - 4 simultaneous flashing indicators;
Press power button - all 4 lights on constantly;
Press power button - repeat of three specified modes listed above indicators;
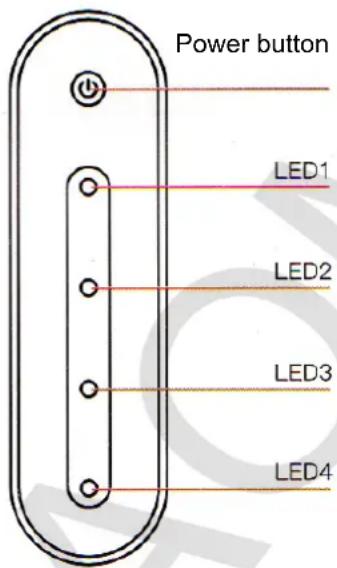
Turn off: under any circumstances, hold down the power button for 2 seconds to eliminate the vehicle;
Charging: When the battery charge indicators are lit red when the battery is fully charged, green lights are flashing;
Determining the level of charge the device while it 0-20%, LED1, LED2, LED3 are off, LED4 flickers; is charging:
98%, lamp 4 lits;
75-98%, LED1 flickers, the other 3 indicator lit continuously;
50-75%, LED1 is off, LED2 blinking, LED3, LED4 is constantly lit;
20-50%, LED1, LED2 are off, LED3 flickers, LED4 is lit constantly;
0-20%, LED1, LED2, LED3 are off, LED4 flickers;
List of faults
| Spare parts | Warranty term | Type of fault | |
| Engine | Brushless engine | 24 months | Motor phase coil, combustion; demagnetization of the wheel shaft deformation and other quality faults that can not be recovered (no warranty repair in case of water ingress into the motor) In the Hall sensor, bearing a guarantee of 12 months. During the 12 months in case of failure because of product quality expected to be replaced after 12 months - warranty repairs. |
| Battery | Li-ON Battery | 24 months | Warranty service is not provided in cases of battery failures in use of a charger or other products due to other human factors (external battery case is not included in warranty conditions). If within 3 months because of the quality of the goods have any damage as a result you have replaced the battery, and after a further 3 months you used the battery warranty repair, the warranty period is still 24 months. (If the first year of battery capacity may be less than 75% of an original standard battery capacity after maintenance battery capacity is not less than 85%. In two year battery capacity may be less than 60% of an original standard battery capacity after maintenance battery capacity It is not less than 70%). |
| Electric parts | Charger | 12 months | Cracks that are not originated from external influence; a short circuit, open circuit and other problems with quality of devices that affect its use. |
| Controller | 12 months | If a problem occurs due to problems with quality of the device, you are entitled to warranty service. If you've seen the internal components, you will be denied warranty service. | |
| Control panel | 12 months | Failure of a function, in absence of external damage or cable breaks. | |
| Выключение питания тормозной системы | 12 months | Failure of the brake system power off function, when there is no external damage or cable breaks. | |
| Структура | Рама, руль | 24 месяца | In the case of soldering, at break, components must be replaced (warranty |
| does not spread, if the damage occurred due to human factors or external influence). | |||
| Wheels rims | 12 months | Weld crack, rupture or deformation without any apparent reason (other than the impact of the human factor). | |
| Saddle | 12 months | Natural crack, break (apart from the impact of human factors). |
Specifications
| Main specifications | Size | Length x width x height = 1510h560h850mm, center distance 999mm, suitable for people with growth 160-190sm |
| Common weight | 16kg (include battery) | |
| Frame | Yunbike aluminium alloy | |
| Volume | <100kg | |
| Lighting system | Yunbike WED-FIELD VISION lighting system | |
| Size of wheel | 20x1-1.8" | |
| Mileage with gain | When storage conditions uniform rate, there is no wind, flat road - 75 km (maximum range with gain) / 25km (minimum run with gain) | |
| Maximum speed when driving with gain only | 20km/h | |
| Controller | High-sinusoidal oscillation controller | |
| Control panel | LED panel | |
| Power consumption | Brushless DC motor for low speed (located on the rear side, 180w, 36v) | |
| Gain regime | drive mode using electrodynamics + gain | |
| Lithium battery of Yunbike System | Battery weight | 36v, 5.2ah, lithium battery, 1.2kg |
| Charging time | 2.5-3 h | |
| Security technology (8 steps) | Protection of overheating, the protection of the PCT, short circuit protection, overvoltage protection, protection of over-current, from Anti-reverse protection, overload protection current output, protection of excessive discharge | |
| USB port | Port 2 (under the control panel and back side of the battery) | |
| Yunbike OS | Automatic diagnostics of vehicle problems | Gears shift fault, motor fault, malfunction of the Hall sensor, protection from low pressure, surge protection, protection from blocking notifications |
| Smart sensor | Control of a slope | |
| Yunbike APP | Support of iOS, Android | |

Use of APP
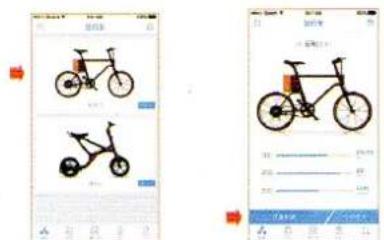
- Scan the QR-code or go to https://zhixingche.com/product/app, to download the Smart Bike RDA.
-
Start Smart Bike RDA application, select the appropriate bike home page. Click on the Bike C1 to access more information about the bike.
-
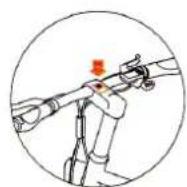
Click the button on the left side of the main page «connecting the vehicle» and enter the code.
- In order to successfully connect devices must use your smartphone to scan the QR-code, depicted on the handlebars of the bike.
Brand : Xiaomi
Model : YunBike C1
Category : Electric bike