B4 - Security Camera Vimtag - Free user manual and instructions
Find the device manual for free B4 Vimtag in PDF.


User questions about B4 Vimtag
0 question about this device. Answer the ones you know or ask your own.
Ask a new question about this device
Download the instructions for your Security Camera in PDF format for free! Find your manual B4 - Vimtag and take your electronic device back in hand. On this page are published all the documents necessary for the use of your device. B4 by Vimtag.
USER MANUAL B4 Vimtag
Note: Due to the continuous updating of the product and software, there may be a discrepancy between the operating guide and the APP interface. All the instructions are subject to the actual operation interface.
Contents
1. Introduction....3
1.1 What Is the Vimtag Cloud IP Camera?......3
2. Quick install and connect....4
2.1 Downloading the Vimtag App....4
2.2 Creating an Account....5
2.3. Wi-Fi Connection Setup through Wi-Fi Mode.....5
2.4. Wi-Fi Connection Setup through Ethernet Cable....9
3. Using Apps for iPhone and Android....10
3.1 Camera List Previews....10
3.2 Account Settings for Mobile Devices....11
3.3 View a camera's live video....12
3.4 Pan, Tilt, Zoom....12
3.5 SD card video recording setup....13
3.6 The records page....13
3.7 The settings page....14
3.7.1 About....15
3.7.2 Nickname....15
3.7.3 Date/Time....16
3.7.4 System Settings....16
3.7.5 Device Admin/Guest Password 17
3.6.6 Alarm....17
3.6.7 Record....18
3.6.8 Accessory....18
3.6.9 SD Card....19
3.7.10 Storage Device....19
3.7.11 Cloud Storage....20
3.7.12 Network....20
3.7.13 OSD (On Screen Display) 21
3.7.14 Others.... 21
4. Using the Vimtag PC client....22
4.1 Log In & Sign Up....22
4.2 View a camera's live video....23
4.3 Pan, Tilt....24
4.4 History access....24
4.5 Settings....26
4.6 Account Settings....27
1. Introduction
Thank you for making the choice to purchase Vimtag Cloud IP Camera. We're sure that you will love everything that this fantastic security camera has to offer from the ease of setup and use to all of the fantastic features it offers. In this manual, we'll cover everything you need to know about the camera, including how to set it up, how to download apps for your smartphone, and how to control all of the as of the camera right through our website.
Let's get started so you can get your camera set up and running to provide you with that added measure of security you need for your peace of mind.
1.1 What Is the Vimtag Cloud IP Camera?
The Vimtag Cloud IP Camera offers users a number of functions that help to make it an ideal solution to those looking for added security and peace of mind in both home and office settings. Let's examine some of the biggest benefits you will find now that you've chosen to use this security camera.
Traditional IP cameras tend to be difficult to install and use. The Vimtag Cloud IP Camera does not have issue. It’s relatively simple to set up and use, as you will see through the course of this manual. It is a plug and play system, and offers a wealth of different features.
In addition, it offers:
- WI-FI/3G/4G remote monitoring for real time control from anywhere
• Video in 720P/1080P/1536P HD - Motion detection function
- Observe what is happening in real time from remote locations
• Capture and store video and images both manually and automatically - Zoom in to get a better view of a specific area
- Communicate with people (or pets) in the viewing area
- Hear what is happening in the viewing area
Users will be able to work control and use their security camera through a variety of different devices, including iOS and Android devices. We will cover those devices, as well as how you can use them, through the course of this book.
2. Quick install and connect
One of the best features of this camera is the fact that you can operate and control it through multiple sources. You can use the interface on your computer at the www.vimtag.com/download site, or you can download an app for your iOS or Android device - it will work with both phones and tablets. Let's examine how you can get and set up the app on each of these different platforms.
You can operate and control the cameras in several way by downloading and installing the Vimtag app, available for the following platforms:
IOS or Android device (both phones and tablets). To use the application, you need to have:
- iOS devices: iOS 5.0 or above
- Android devices - Android 2.1 or above; at least 600MHz.
Laptop or computer for Windows or MAC
Webpage on the website by logging into your account at the www.vimtag.com site.
The following sections detail installing and using the Vimtag mobile app for iOS and Android devices.
2.1 Downloading theVimtag App
There are several ways to download the Vimtag application. These include:
- Scan QR code with the phone, to download and install the application " Vimtag ".

text_image
QR code with a blue logo in the center, likely linking to a digital service or website.- Download ' Vimtag ' APP from APP Store(iOS ) or Google Play Store(Android).
● PC users please download our APP: www.vimtag.com/download.
2.2 Creating an Account
To use the camera, you will need to set up an account with Vimta
To create an account:
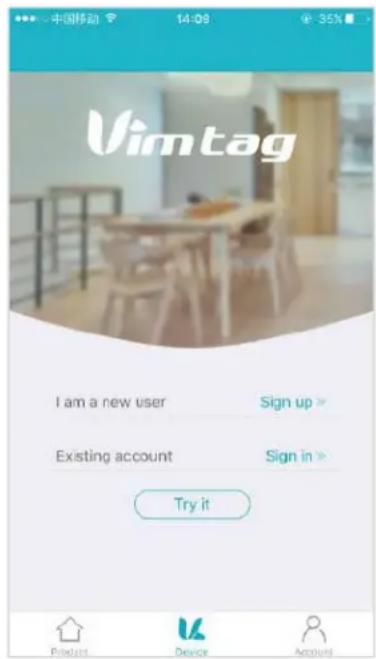
- In the Vimtag app on your mobile device, press I am a new user Sign up.
● The Sign Up page opens. Create a User name and a Password.
Logging in to the Vimtag Account
- Locate the Sign in link:
- Enter your user name and password in the appropriate fields.
- Click Sign in.
text_image
中国移动 14:09 35% Vimtag I am a new user Sign up > Existing account Sign in > Try it Product Device Account2.3. Wi-Fi Connection Setup through Wi-Fi Mode
Before connecting to your camera, please confirm your home Wi-Fi network is 2.4G. Meanwhile, please choose 2.4G WiF to connect your phone. Additionally, please put this camera more close to your router, it will help you to connect your home Wi-Fi successfully.
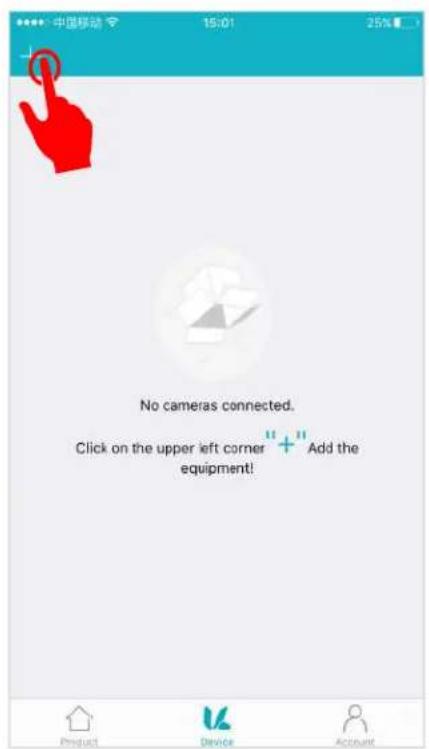
1) After successfully register and sign in, you should be brought to the camera list screen. You can see it's initially empty because you have not added any camera for it (Figure 1);
2) Select "add device" by clicking the plus icon at the top left select the device model (Figure 2) which will direct you to the QR Code Scan page;
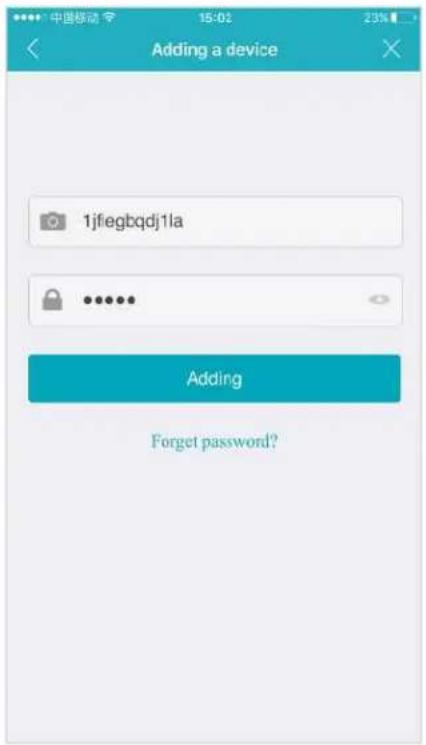
3) Scan the QR code at the camera (Figure 3); a device ID should be automatically filled in the "device ID" input box (Figure 4) if it scans successfully, and then click "Add".
4) Then, it will direct you to the "Network mode" page (Figure 5);
text_image
中国移动 15:01 25% No cameras connected. Click on the upper left corner " + Add the equipment!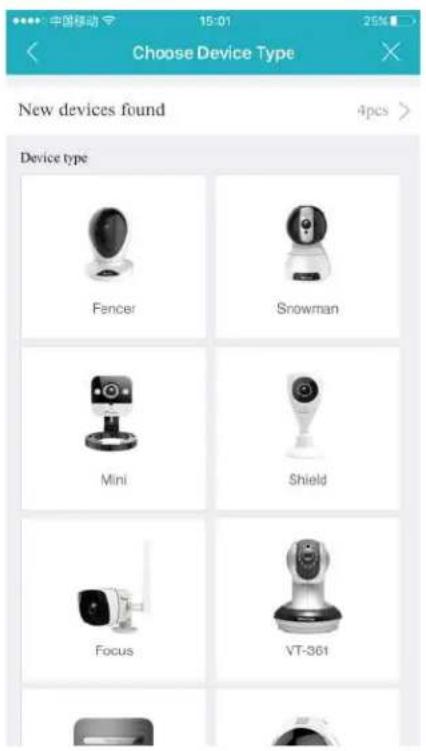
text_image
Choose Device Type New devices found 4pcs > Device type Fencer Snowman Mini Shield Focus VT-361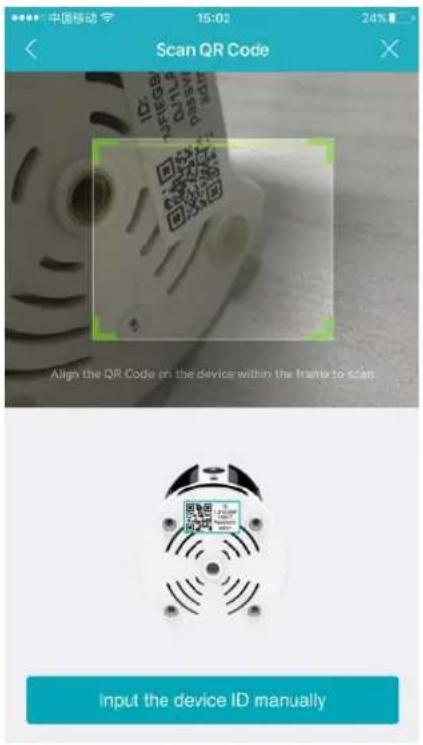
text_image
Scan QR Code Align the QR Code on the device within the frame to scan. Input the device ID manuallyFigure 1 Figure 2 Figure 3
text_image
Adding a device 1jfiegbqdj1la Adding Forget password?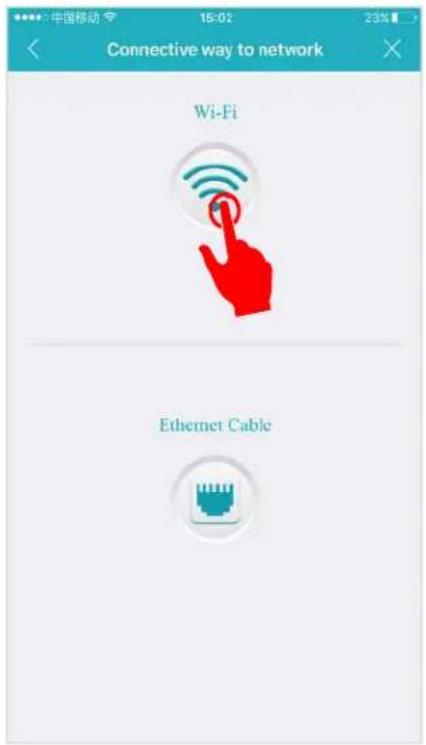
text_image
Connective way to network Wi-Fi Ethernet CableFigure 4 Figure 5
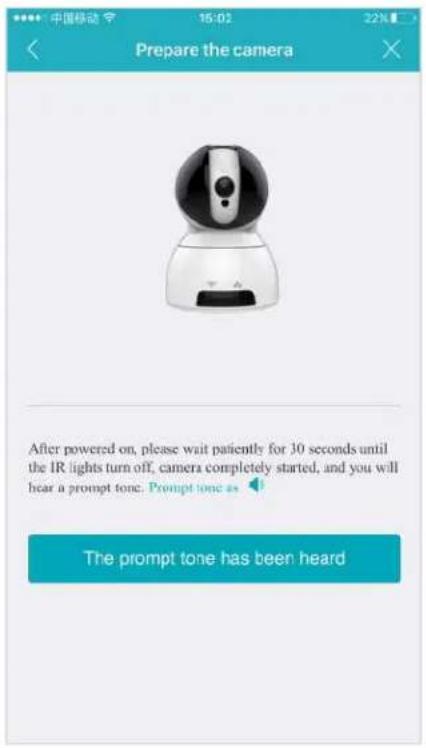
5) After you choose the "Wi-Fi, you should be asked to connect your power supply equipment. Plug in the power sour to power on the camera leaving the network cable unplugged, wait for 60 seconds to allow the camera getting read The camera is ready once you hear a "tick" sound after connecting the power for 60 seconds. Then, tap "Next" to enter next step (Figure 6).
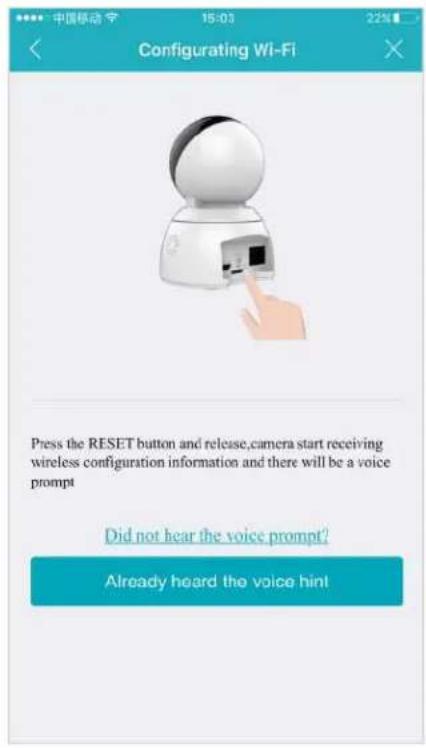
6) Please press the RESET button 1 seconds to reset the camera. After hearing the voice prompts (waiting for receiving wireless configuration information), tap "Next" (Figure 7).
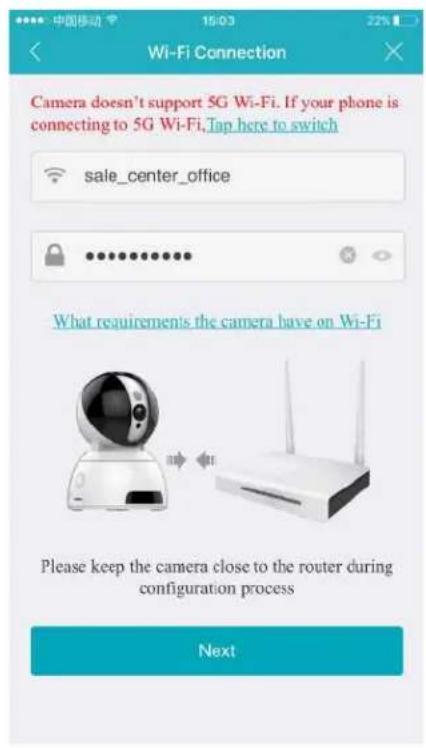
7) Then the Wi-Fi network name will automatically display. Please input your Wi-Fi password and tap the "Next" (Figure 8);
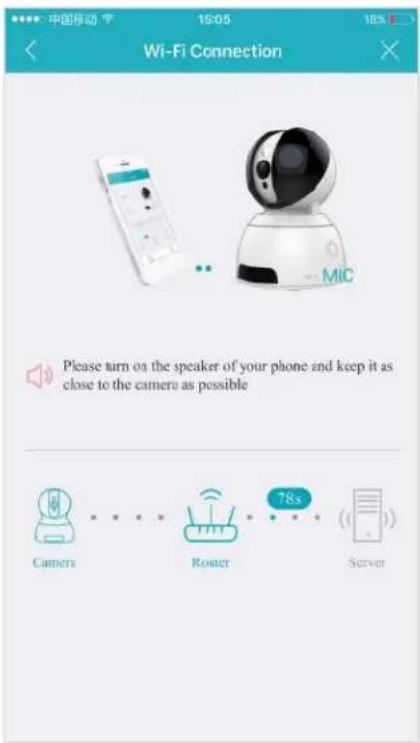
8) It will direct you the connection interface (Figure 9). In order to make the camera connect your Wi-Fi successfully, please confirm your phone has connected 2.4G Wi-Fi network that you would like the camera to connect, and keep your phone closer the Mic of the camera (The max distance is 6ft).
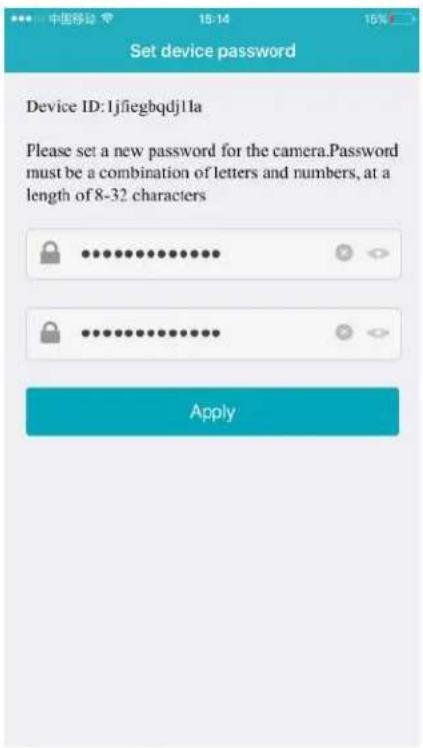
9) After the Wi-Fi connection succeeded, you should be asked to modify your camera password (Figure 10). Please input your new camera password and click "Apply".
10) Please modify your camera name (you can skip this step);
11) Congratulations! You add this IP camera successfully(Figure 11).
text_image
Prepare the camera After powered on, please wait patiently for 30 seconds until the IR lights turn off, camera completely started, and you will hear a prompt tone. Prompt tone as The prompt tone has been heardFigure 6
text_image
中国移动 15:03 22% Configurating Wi-Fi Press the RESET button and release, camera start receiving wireless configuration information and there will be a voice prompt Did not hear the voice prompt? Already heard the voice hintFigure7
text_image
中国移动 15:03 22% Wi-Fi Connection Camera doesn't support 5G Wi-Fi. If your phone is connecting to 5G Wi-Fi, Tap here to switch sale_center_office What requirements the camera have on Wi-Fi Please keep the camera close to the router during configuration process NextFigure 8
text_image
中国移动 15:05 Wi-Fi Connection MIC Please turn on the speaker of your phone and keep it as close to the camera as possible Camera Router 78s ServerFigure 9 Figure 10
text_image
Set device password Device ID: 1jflegbqdjila Please set a new password for the camera.Password must be a combination of letters and numbers, at a length of 8-32 characters Apply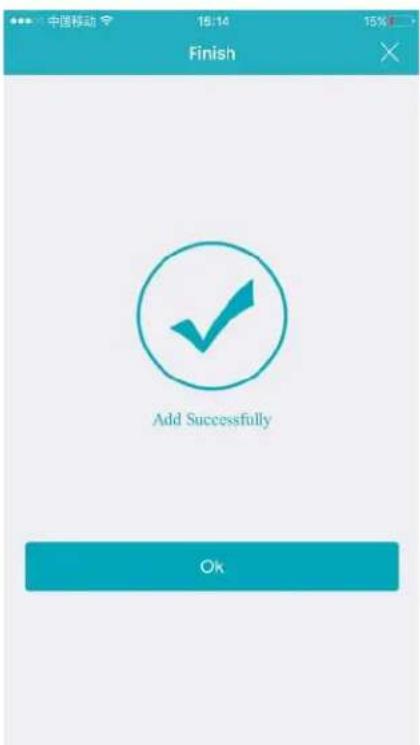
text_image
中国移动 15:14 15% Finish Add Successfully OkFigure 11
2.4. Wi-Fi Connection Setup through Ethernet Cable
If your router is not compatible with "Wi-Fi Connection mode", this is an alternative mode for Wi-Fi connection setup.
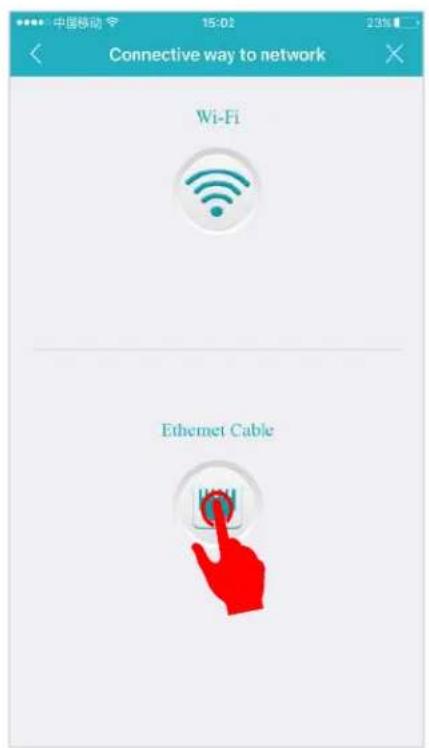
1) Follow Step 1- Step 4 in Wi-Fi Connection Mode Setup and then click "Ethernet Connection" icon to start the Wi-Fi Connection Setup through Ethernet Cable (Figure13).
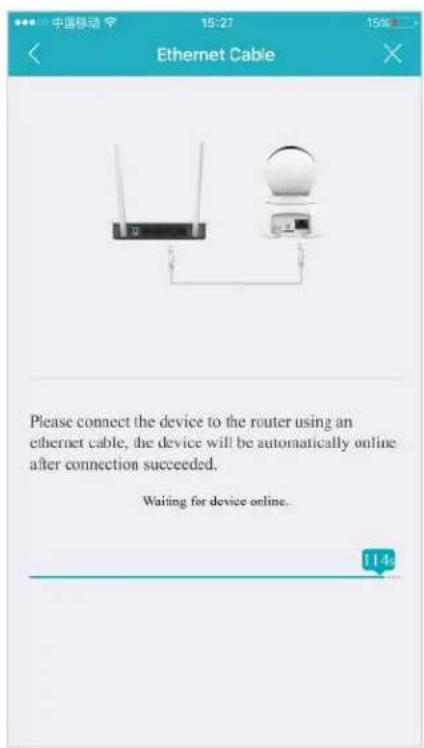
2) Use a RJ45 network cable to connect the camera with your router, wait for 120 seconds until it automatically detects the device and bring you to the next step (Figure 14).
3) After the wired network connection is successful. It requires you to change the default password at your first time use (Figure 15). Please click the "Apply" button after entering your password twice in the input box;
4) After modify the initial password, it will bring you to the "Config Wi-Fi" screen. Click the right arrow at the first input box and choose your home Wi-Fi, you will be directed back to the "Config Wi-Fi" screen with enter the WiFi password (Figure 16);
5) Once the Wi-Fi set up, you will see the screen like step 10 - step 11 in Wi-Fi Connection Mode.
text_image
中国移动 15:02 23% Connective way to network Wi-Fi Ethernet CableFigure 13 Figure 14
text_image
中国移动 15:27 Ethernet Cable Please connect the device to the router using an ethernet cable, the device will be automatically online after connection succeeded. Waiting for device online.Figure 15 Figure 16
3. Using Apps for iPhone and Android
3.1 Camera List Previews
The camera list panel contains all cameras you have added to you account. Each preview picture has various indicators for online, password changed status, offline or alarm.
3.2 Account Settings for Mobile Devices
The Vimtag app offers you access to view, monitor and configure yo devices. The app also has an option to view or configure your Accour information. Vimtag enables you to configure two types of settings: Account settings and Device settings. For information on Device settir see Overview of the Settings Page.
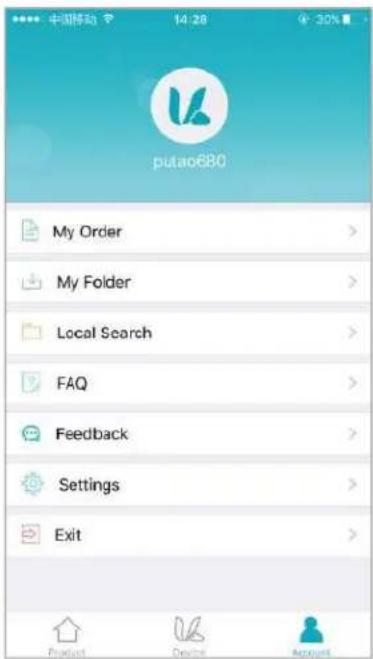
When you click the Account option, the following options appear:
- My folder
- Settings
- Exit
Any videos or snapshots that you take manually, or any scheduled vi that you choose to download to your mobile device are stored in yc folder location.
text_image
中国移动 14:28 putao680 My Order > My Folder > Local Search > FAQ > Feedback > Settings > Exit >The Settings page for iOS and Android are very similar. Minor differences are Account Settings for Mobile Devices indicated below.
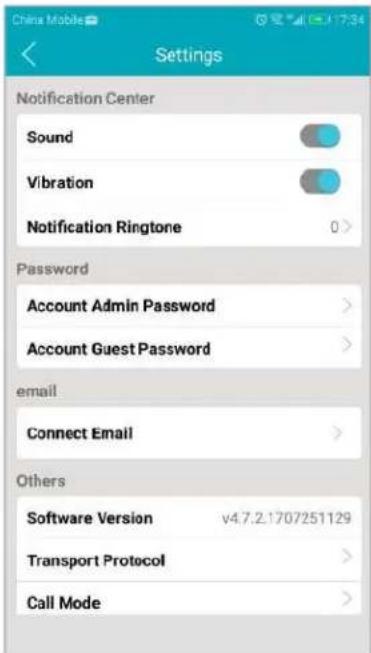
The Settings page for mobile devices contains the following options:
● Notification Center: Set the alarm mode, select the sound or vibration.
● In the Password section:
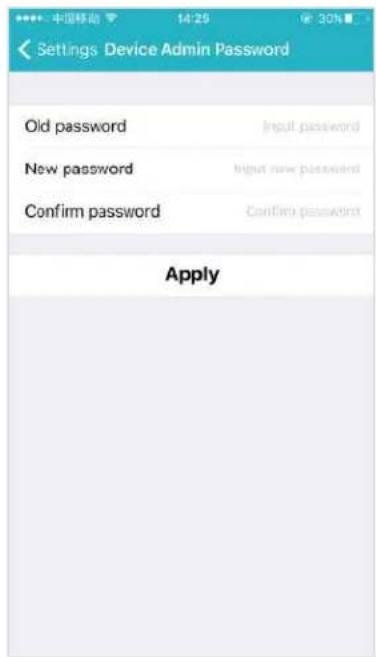
User admin password: Enter the Old password, and a new password, and then enter the new password again in the Confirm password field.
User guest password: If you wish to allow someone access to your Camera, you can assign them a user guest password, which can be disabled a time. Guests can view what the cameras are broadcasting and can m cameras, but they will not be able to make any changes in the settir use the remote microphone.
- Connect email: Enter an email address. This is the email account to which Notification is sent when you ask to reset your password.
- Software version
At the bottom of the screen, there is a Clear cache button. Click this the cache on your mobile device. The original snapshots and/or videos stored on either your SD card or Storage Device are not deleted when you click Clear Cache.
text_image
China Mobile Settings Notification Center Sound Vibration Notification Ringtone 0 > Password Account Admin Password > Account Guest Password > email Connect Email > Others Software Version v4.7.2.1707251129 Transport Protocol > Call Mode >3.3 View a camera's live video
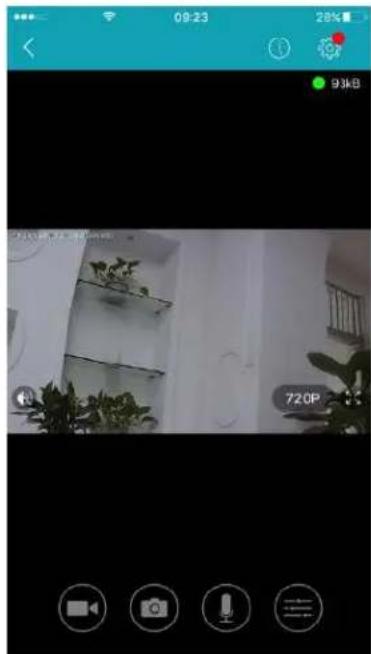
To view a camera's live video, touch a preview picture. Initial displ show a navigation bar with Buttons of record, snapshot, microphon speaker, and Image setting buttons. The navigation bar will Disappea after two seconds. Touch anywhere on the live view to activate it a
The following icons are located on each video image on the screen.
● Record (to initiate a live recording)
● Snapshot (to create a snapshot image of the current view)
● Microphone (to transmit your voice through the device)
● Speaker (to transmit remote sounds)
- Image setting (which enables you to set the mode for brightness contrast, saturation, etc.)
● Resolution (user can choose the resolution of the images.)
● History Access (which opens to the History page and a filter)
● Device settings (which opens with a list of Settings tabs)
text_image
09:23 28% 9:34B 720P3.4 Pan, Tilt, Zoom
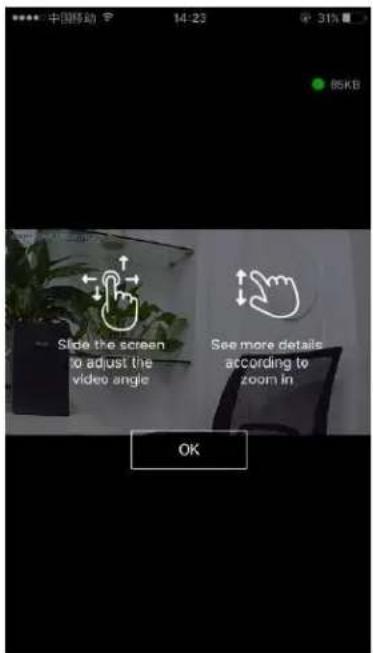
- Pan: Touch and swipe to the left or right to rotate the camera left or right.
- Tilt: Likewise, touch and swipe up or down to tilt the camera view up or down.
- Zoom : Zoom is accomplish two fingers touching the screen as if to pinch.Move two touching fingers apart to zoom in;Move two fingers together to zoom out.
text_image
中国移动 14:23 31% 85KB Slide the screen to adjust the video angle See more details according to zoom in OK3.5 SD card video recording setup
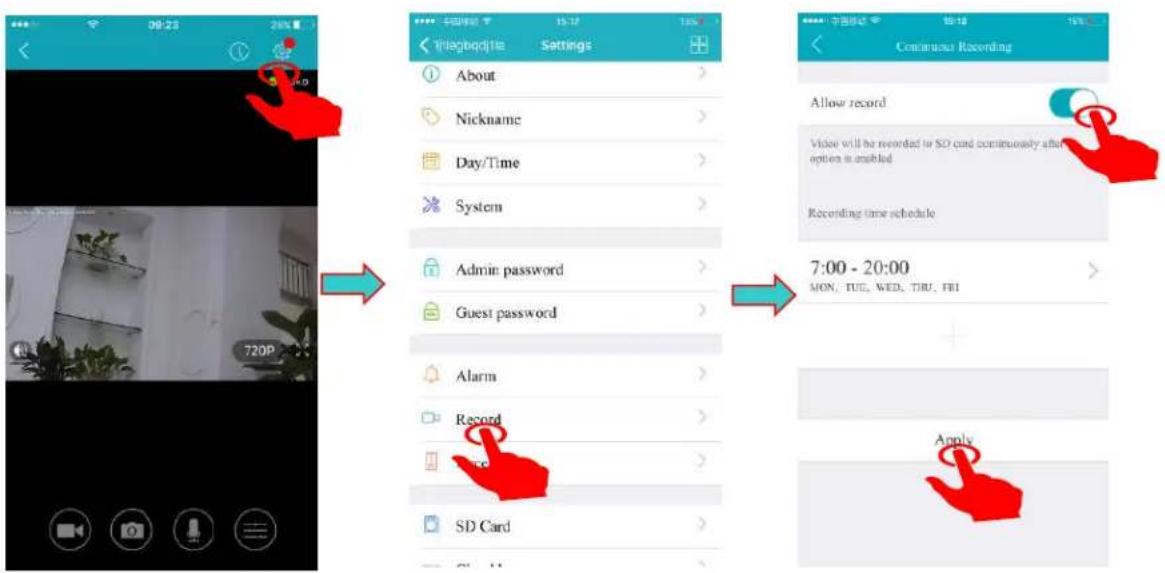
Please go to Setting to enable the recording function after the SD card is inserted into the card slot on a camera.
Note: Please insert and remove the SD Card when the power switch is in the OFF position.
Step 1: View the video
Step 2: Go to Setting Page
Step 3: Select 'Record'
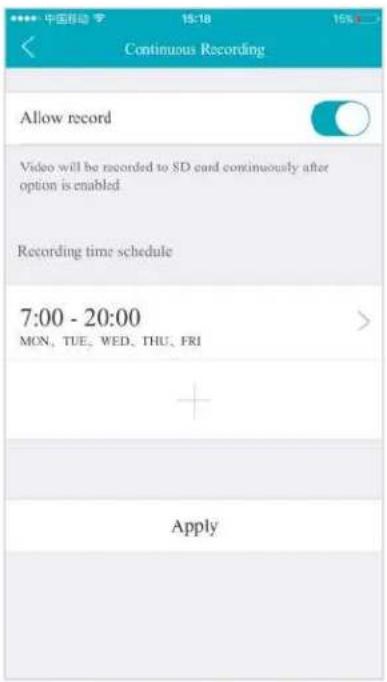
Step 4: Select 'Continuous Recording'
Step5: Open the 'Allow record' button, Click 'Apply'
text_image
09:23 20% 720P About Nickname Day/Time System Admin password Guest password Alarm Record SD Card Continuous Recording Allow record Video will be recorded in SD card continuously after option is enabled Recording time schedule 7:00 - 20:00 MON, TUE, WED, THU, FRI Apply3.6 The records page
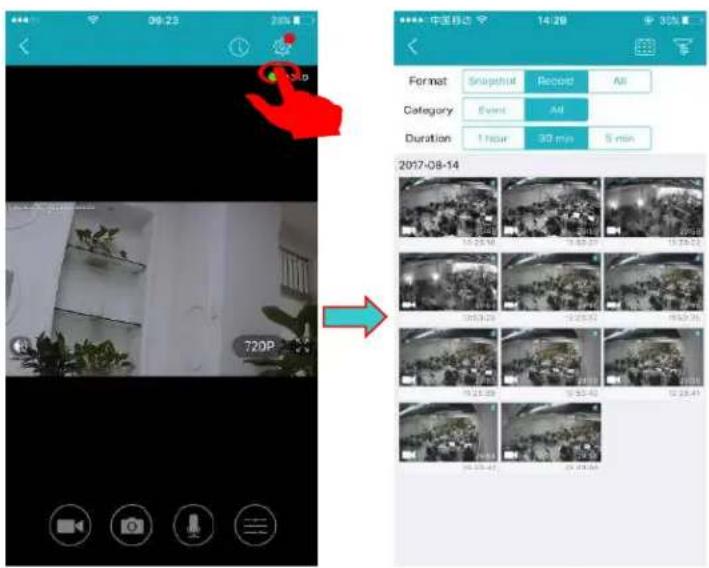
The Records page, which immediately to the right of the Playback page is where you will find all of the images that you have taken during a snapshot, as well as records of your videos.
- Snapshot
Clicking on one of the pictures will open up the image into a separate popup, making it larger and easier see. The image will have the time and date stamp on it.
- Record
Under the Records column, it will show you whether the record indicates video. All of this information is to give you a clear picture of what is happening in front of your camera and when it is happening. It's a fast way to find information that you might need.
- Time
Under the Time heading, you will see the exact time and date that you took the snapshot with your cam or the beginning of when you started to record the video.
text_image
09:23 28% 14:29 30% Format Snapshot Record All Category Event All Duration 1 hour 30 min 5 min 2017-08-14 72DP3.7 The settings page
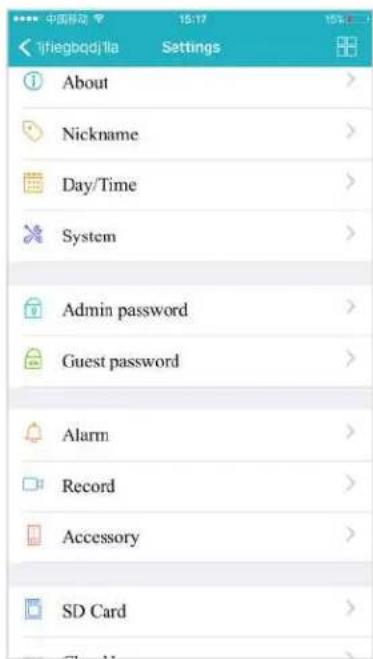
The Device Settings Page features a number of different tabs that are to the right of your cameras. You are able to switch between the d cameras to access the settings information for each of them. Let's lo the long list of items under this section.
- About
- Nickname
- Date/Time
- System
- Admin Password
- Guest Password
- Alarm
- Record
- Accessory
- SD Card
- Storage Device
- Cloud storage
- Network
- OSD (On Screen Display)
- Others
text_image
中国移动 15:17 15% Tjfiegbqdjlla Settings About Nickname Day/Time System Admin password Guest password Alarm Record Accessory SD Card3.7.1 About
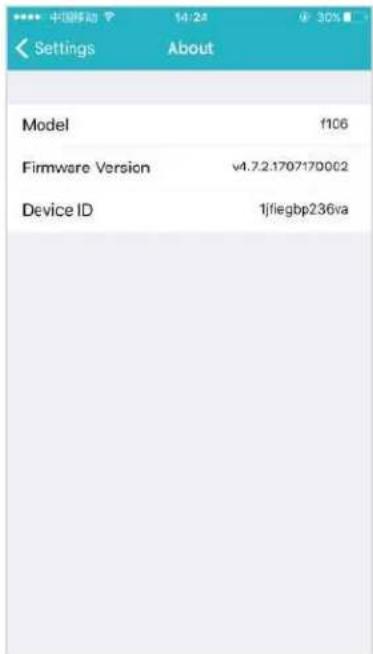
In this section, you will find information about the particular camera you are using.
It features several sections:
- Model - Shows the model of the camera you are using.
- Firmware Version - This shows the current firmware version you using.
• Device ID - This is the identifying number for your device.
text_image
中国移动 14:24 30% Settings About Model 1106 Firmware Version v4.7.2.1707170002 Device ID 1jflegbp236va3.7.2 Nickname
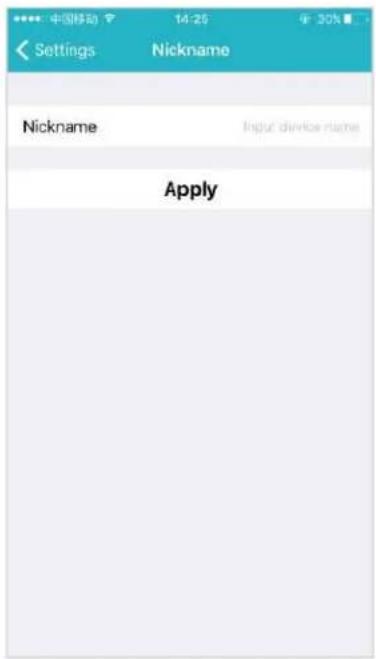
In this section, you will be able to enter a nickname for your camer type the name into the box and then click on apply.
Now, that camera will go by that particular nickname when it shows the left side of the screen. This can make it nice and easy to know camera is which quickly.
text_image
中国移动 14:25 9:30% Settings Nickname Nickname Input device name Apply3.7.3 Date/Time
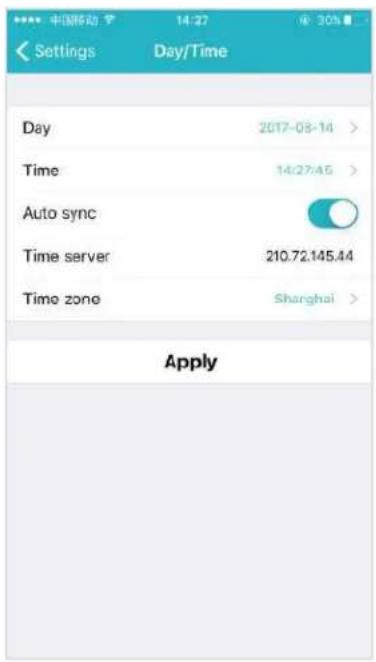
In the Date/Time tab, you can set the date and time for your camera the date, time, and the time zone. You can also choose to synchronize local date and time automatically. However, you can change the time manually if you prefer. You will want to have the correct date and ti you can schedule your recordings correctly.
text_image
中国移动 14:27 30% Settings Day/Time Day 2017-08-14 > Time 14:27:45 > Auto sync Time server 210.72.145.44 Time zone Shanghai > Apply3.7.4 System Settings
Under System, there are three sections under System, as detailed belo
- Online upgrade
Online upgrade displays the current version number and shows if there is a newer version. You will see a red dot next to the Setting icon identify there is a new upgrade available. To download and install the latest version, click Update.
- Restore to factory settings
If you click Restore, it will restore the camera to the factory defaults, can Restore to factory settings be helpful in case you have made char the camera and want to cancel these changes.
- Restart device
Clicking Restart reboots the camera. It is the same as unplugging the and plugging it back in again but is accomplished remotely.
Note: When the camera goes office, such as when using the Restart b the snapshots are deleted if you do not have an storage.

text_image
中国移动 14:27 30% Settings System Settings ONLINE UPGRADE No update available Restore to factory settings Restart device3.7.5 Device Admin/Guest Password
- Admin Password
Each camera can have an Admin password. You can choose to give person admin permissions on a single camera, but not all of the other cameras in your system, when you change the password through this setting.
- Guest Password
If you wish to grant someone access to your camera, you can assign device guest password, which can be disabled at any time. Guests do what the cameras are broadcasting and can move the cameras, but will not be able to make any changes in the settings or use the remote microphone.
text_image
Settings Device Admin Password Old password New password Confirm password Apply3.6.6 Alarm
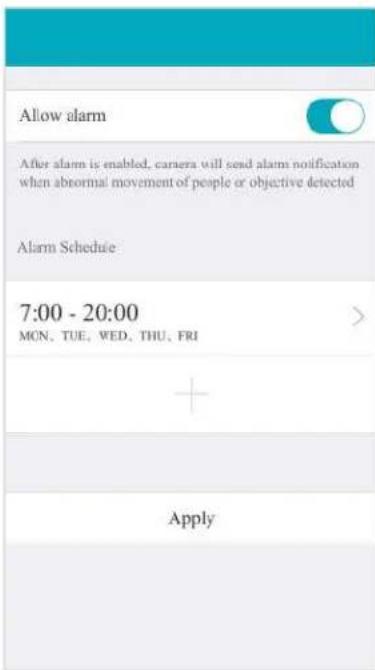
The camera carries the mobile detection and alarm. After the mobile detection opened, the alarm information can be sent to the mobile phone when the ca detects the moving events and the objects are moved.
text_image
Allow alarm After alarm is enabled, camera will send alarm notification when abnormal movement of people or objective detected Alarm Schedule 7:00 - 20:00 MCN, TUE, WED, THU, FRI + Apply3.6.7 Record
Under the Record tab, you have the ability to enable recordings b on two different options: Continuous Recording and Event record. Y should enable one of these options if you wish to schedule recordi times automatically.
text_image
Continuous Recording Allow record Video will be recorded to SD and continuously after option is enabled. Recording time schedule 7:00 - 20:00 MON, TUE, WED, THU, FRI + Apply3.6.8 Accessory
The cameras can detect motion in the viewing areas and can as a result of detection, take a snapshot, record a video, trigger an alert, etc.
The Accessory tab offers two options to configure what the camera should d when motion is detected in the covered area:
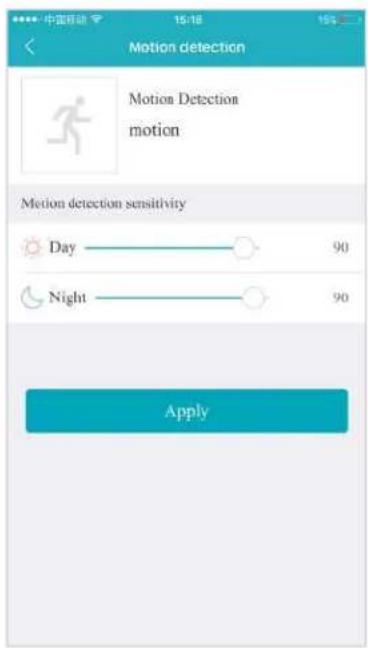
- Motion Detection
Select the Motion Detection tab to determine how sensitive the camera when it comes to sensing motion. You can change the sensitivity setting: day and night operation separately to improve motion detection.
- Add Accessory
The Add Accessory is for external devices connected to the camera. This will only occur if the camera has RF peripheral functions.
text_image
Motion detection Motion Detection motion Motion detection sensitivity Day —— ○ —— 90 Night —— ○ —— 90 Apply3.6.9 SD Card
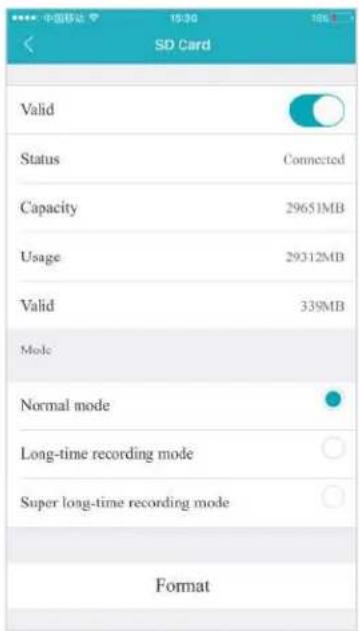
The SD Card section indicates whether you have an SD card in the c and whether it is enabled.
- To use the SD card, place it into the slot on the back of the
- If the camera does not recognize the SD card, remove the card unplug the camera. Put in the SD card and then plug in the c The camera will reboot, and then it should be recognized.
Note: It is always recommended that you format the card after insta
text_image
SD Card Valid Status Connected Capacity 29651MB Usage 29312MB Valid 339MB Mode Normal mode Long-time recording mode Super long-time recording mode Format3.7.10 Storage Device
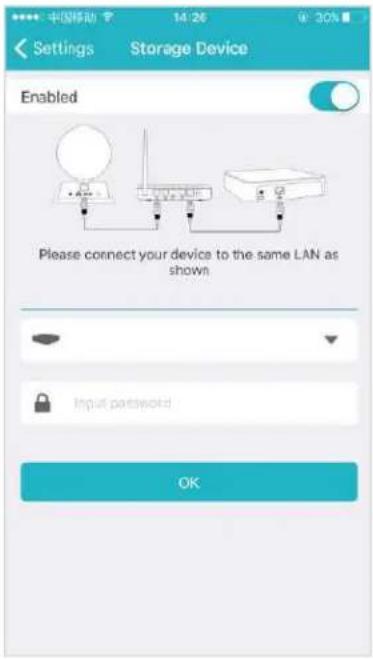
Using the Storage Device option, you can introduce another element the Storage Device, the Vimtag Cloud Box. The Vimtag Cloud Box is ideal DIY (Do It Yourself) security solution for homes and small bus that require the recording of many hours of continuous video.
To use a Vimtag Cloud Box, you must first connect the Vimtag Cloud the same network where one or more cameras are connected. Once have confirmed that the Vimtag Cloud Box is connected, you need to the Vimtag Cloud Box ID and password and enable its use in the SI Device tab.
text_image
中国移动 14:26 6:30% Settings Storage Device Enabled Please connect your device to the same LAN as shown Input passwords OK3.7.11 Cloud Storage
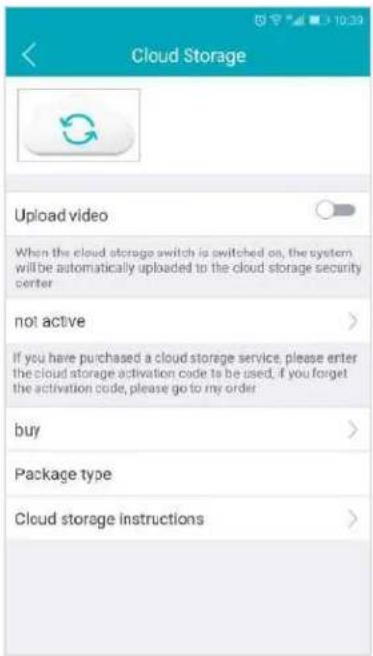
The cloud storage function is a video storage function developed by smart cameras based on moving object detection technology. When a camera detects moving events such as someone walked and objects were moved, the camera will automatically start to record, and highly encrypted upload to the cloud. At the same time effectively at the loss of key evidence caused by human destruction, SD card damage you can feel at ease.
text_image
Cloud Storage Upload video When the cloud storage switch is switched on, the system will be automatically uploaded to the cloud storage security center not active > If you have purchased a cloud storage service, please enter the cloud storage activation code to be used, if you forget the activation code, please go to my order buy > Package type Cloud storage instructions >3.7.12 Network
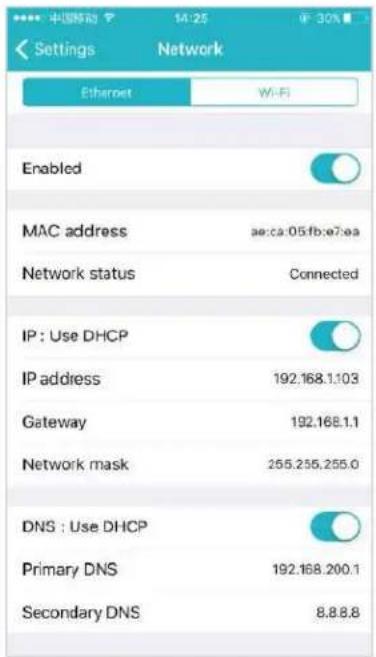
Warning: If you change the settings on this tab, it is possible that the network can be disconnected.
The Network Tab enables you to choose the network interface that you to use - Ethernet or Wi-Fi. When you choose Ethernet, you can view address, the network status, and the IP information.
Once your device is connected, it is recommended that you do not cl the settings or click Apply on the Network tab, as this is likely to ca be disconnected from the Network.
text_image
Settings Network Ethernet Wi-Fi Enabled MAC address ae:ca:05fb:e7:ea Network status Connected IP : Use DHCP IP address 192.168.1.103 Gateway 192.168.1.1 Network mask 255.255.255.0 DNS : Use DHCP Primary DNS 192.168.200.1 Secondary DNS 8.8.8.83.7.13 OSD (On Screen Display)
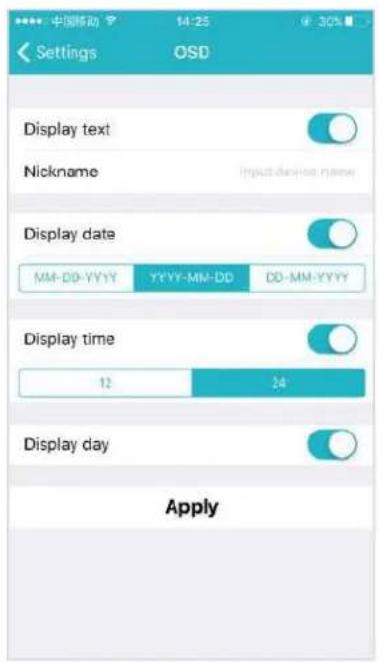
In the OSD tab, you are able to manage what displays on the video. These settings include:
● Display Text - Add text that will show up on the video screen.
- Display Date - Choose whether to display the date on the screen and the type of date format (MM-DD-YYY or YYY-MM-DD).
- Display Time - Choose whether to display the time on the screen the time format (12 hour or 24 hour).
- Display Day of the Week - Choose whether to display the day of t weekon the live screen.
After changing the settings, click Apply.
text_image
中国移动 14-25 @ 30% Settings OSD Display text Nickname Input device name Display date MM-DD-YYYY YYYY-MM-DD DD-MM-YYYY Display time 12 24 Display day Apply3.7.14 Others
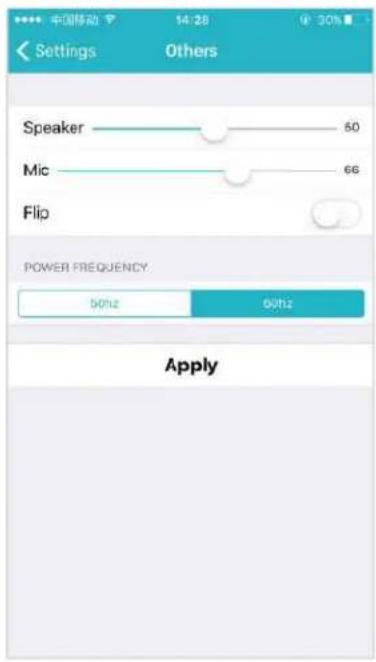
Use the sliders to adjust the Speaker and the Microphone. You can the Others volume higher or lower with these sliders. Sliding to the makes the volume go higher, and sliding to the left makes it lower
Flip is used when the camera is mounted upside down (for example it is attached to a ceiling). It will flip the images viewed from the (either snapshot or recordings) so that they appear properly.
text_image
中国移动 14:28 9:30% Settings Others Speaker 50 Mic 66 Flip POWER FREQUENCY 90Hz 90Hz Apply4. Using the Vimtag PC client
To access camera via download for PC client, please visit www.vimtag.com/download. Connect camera to your network with the included Ethernet cable.
4.1 Log In & Sign Up
- Log on to the vimtag PC client. The following window appears:
- Enter your User name and Password, and click Sign in. (If you are a new user, Select "Sign up" and create a Username and Password.)
- The website interface opens. If devices have been added, the current image for each active device is shown in the dashboard.
Note: for better viewing experience, you can download the VIMTAG PC client by clicking the "Download" in the upper right corner of the login screen.
4.2 View a camera's live video
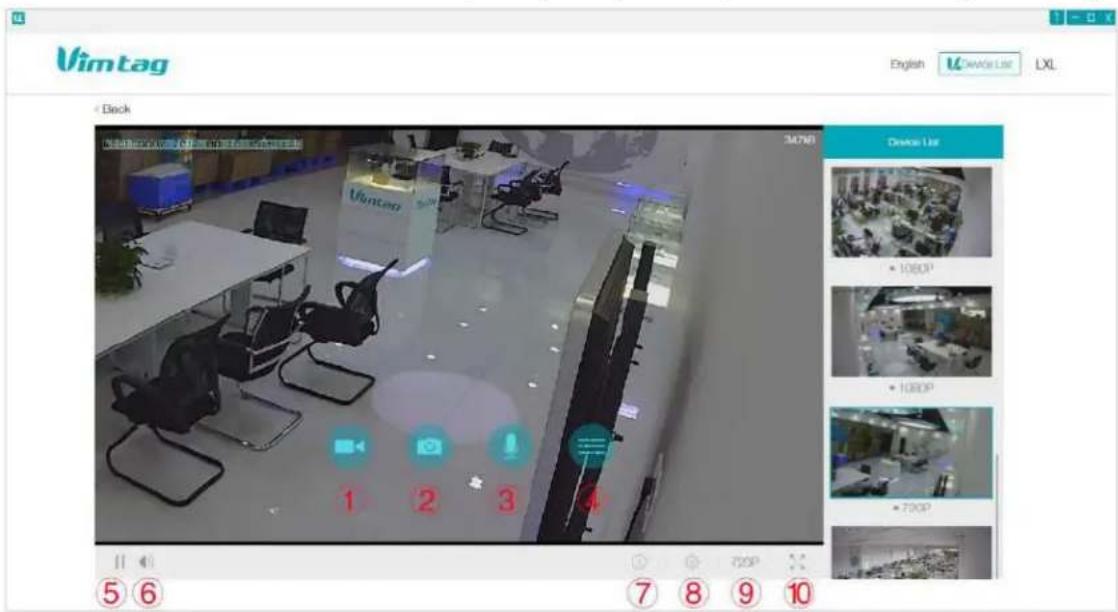
To view a camera's live video, touch a preview picture. Click on the video screen will show navigation bar with Buttons of record, snapshot, microphone and Image setting
text_image
Vimtag English LXL Black 3076 Device List 1 2 3 4 5 6 7 8 9 10buttons.
The following icons are located on each video image on the screen:
①Record: to initiate a live recording.
②Snapshot: to create a snapshot image of the current view.
③Microphone: to transmit your voice through the device.
④Image setting: which enables you to set the mode for brightness, contrast, saturation, etc.
⑤Stop/ Play: Press the button and you will be able to see the live feed.
⑥Speaker: to transmit remote sounds.
⑦History Access: which opens to the History page and a filter.
⑧Device settings: which opens with a list of Settings tabs.
⑨Resolution: user can choose the resolution of the images.
⑩Full screen view: Click to watch live video full screen.
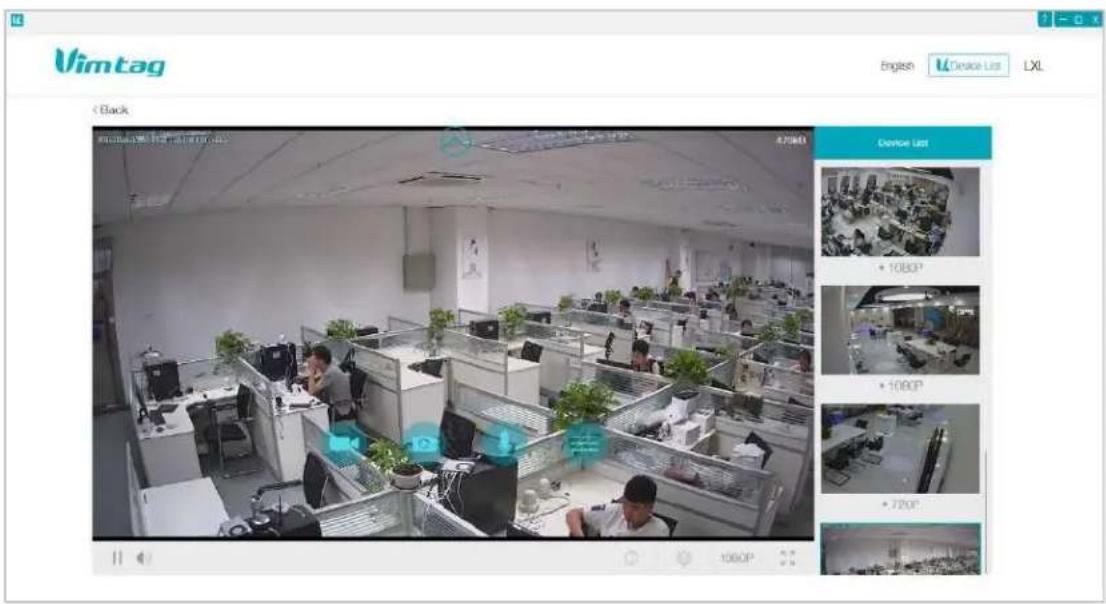
4.3 Pan, Tilt
text_image
Vimtag English Device List LXL < Back Device List • 1080P • 1080P • 720P 1080P(< > ) On computers only: move camera left, right, up and down using directional controls. These controls are only available as you move the mouse to hover over the display edges (top, bottom, left and in the middle). Not all cameras provide the full range of rotation, panning, tilting, etc.
Note: The screen can not be zoomed on the computer.
4.4 History access
If you do not have an SD card in your camera, this will be a blank screen. If you do have an SD card in camera and you capture videos, you will see a list of videos on the this screen.

text_image
Vimtag Back Format: Snapshot Record All Category Event All Duration 1 hour 30 min 5 min 2017-08-16 15:51:38 28:00 2017-08-16 16:19:30 2017-08-16 16:19:22 2017-08-16 16:19:14 2017-08-16 16:19:06 2017-08-16 16:18:58 2017-08-16 16:18:50 2017-08-16 16:18:42● Day: Quickly view video time
● Edit: Delete the video
- Snapshot: Clicking on one of the pictures will open up the image into a separate popup, making it larger and easier to see.
● Record: Under the Records column, it will show you whether the record indicates video.
● Event: Display motion detection video.
● Duration: Select the length of each video recording, the default is half an hour.
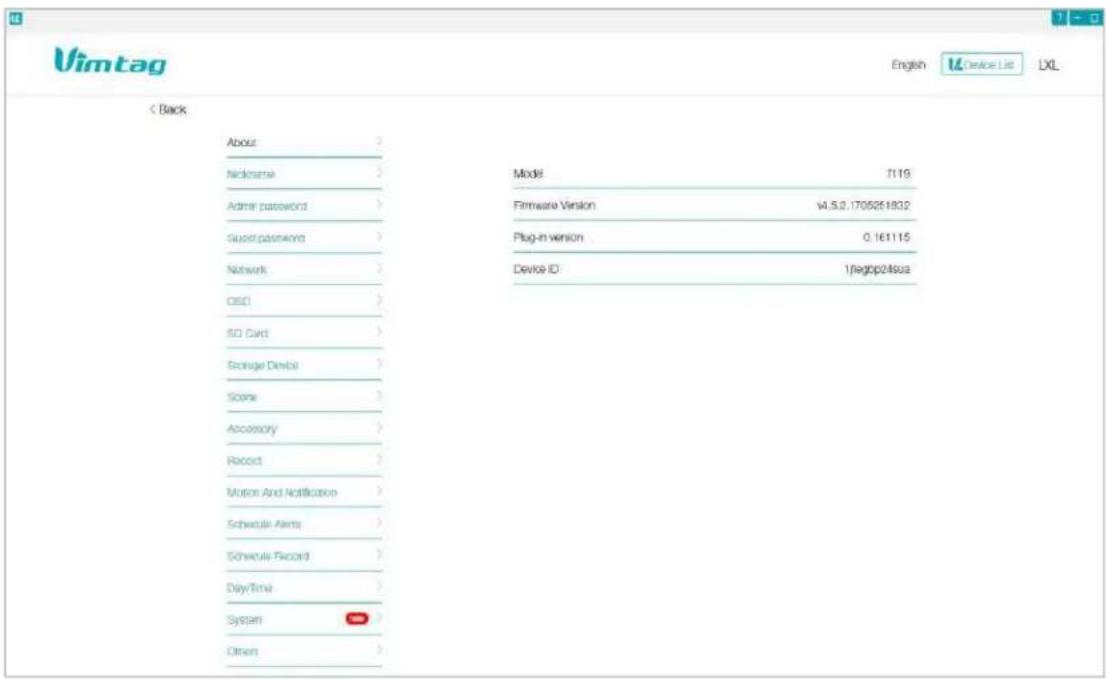
4.5 Settings
text_image
Vimtag Back About Nickname Admir password Guest password Network CSD SD Card Storage Device Scene Accessory Record Motion And Notification Schedule Alerts Schedule Record Day/Time System Others Model 7.119 Firmware Version v4.5.2.1705261832 Plug-in version 0.161115 Device ID 1negbp24sua● About: Provides information about your device.
- Nickname: Set a user-friendly name for your device.
- Admin Password: Change the Admin password for device.
- Guest Password: Create a Guest password for device.
● Network: Configure network settings.
- OSD (On Screen Display): Modify the on-screen display settings.
- SD Card: Enable the use of an SD Card. You can also format and unmount the SD Card.
- Storage Device: Enable a Vimtag Cloud Box for additional storage, then enter the device ID and password.
- Scene: Quickly select to turn alarm on or off.
- Accessory: Set the camera alarm when motion is detected in the covered area.
- Record : Schedule times when you want the camera to record.
● Date/Time: Set the date and time for the device.
● System: Set System options such as restoring to factory settings, restarting, etc.
- Others: Miscellaneous options such as flipping the camera view, adjusting the audio, etc.
- Delete: Delete the device.
4.6 Account Settings
text_image
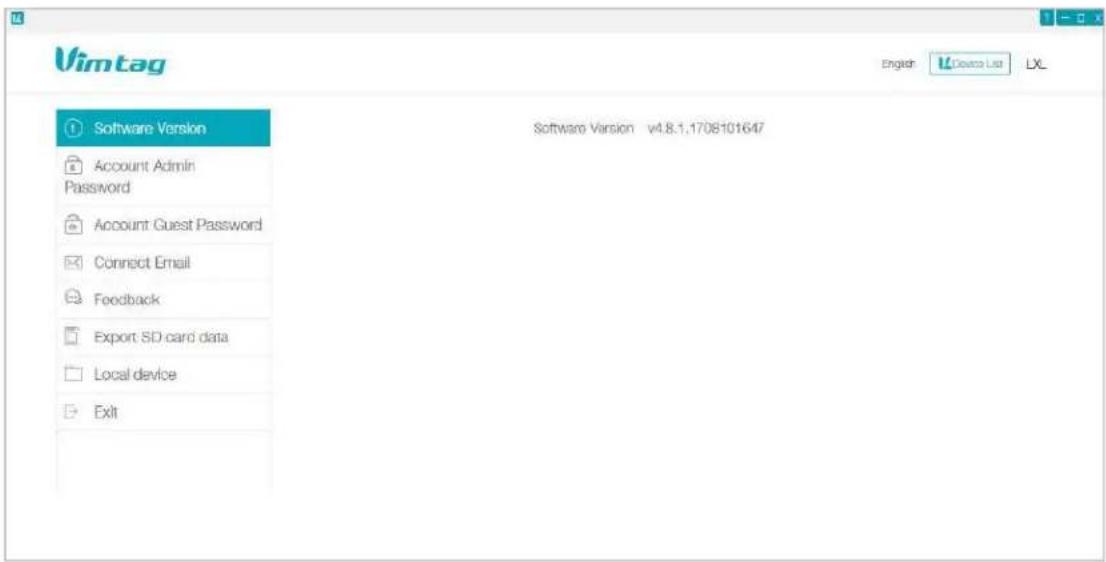
Vimtag Software Version Account Admin Password Account Guest Password Connect Email Feedback Export SD card data Local device Exit English L Devices List LX Software Version v4.8.1.1708101647The Settings page contains the following options:
● Software Version – View the current version of the software
- Account Admin Password – This enables you to change your account password.
- Account Guest Password – If you wish to allow someone access to your camera, you can assign them a user guest password, which can be disabled at any time. Guests can view what the cameras are broadcasting and can move the cameras, but they will not be able to make any changes in the setting or use the remote microphone.
- Connect Email – Enter an Email address. This is the email account to which notification is sent when you ask to reset your password.
- Export SD card data –Export the SD card data to your computer.
- Exit – Exit the current account.