
Galaxy J - Smartphone SAMSUNG - Free user manual and instructions
Find the device manual for free Galaxy J SAMSUNG in PDF.


User questions about Galaxy J SAMSUNG
0 question about this device. Answer the ones you know or ask your own.
Ask a new question about this device
Download the instructions for your Smartphone in PDF format for free! Find your manual Galaxy J - SAMSUNG and take your electronic device back in hand. On this page are published all the documents necessary for the use of your device. Galaxy J by SAMSUNG.
USER MANUAL Galaxy J SAMSUNG
Set up your device 7
Assemble your device 8
Install a SIM card and memory card 8
Charge the battery 9
Start using your device 11
Use the Setup Wizard 11
Lock or unlock your device 12
Add a Google account 12
Add a Samsung account 13
Add an email account 13
Transfer data from your old device 13
Set up your voicemail 14
Learn about your device 15
Navigation 16
Tap 16
Double-tap 16
Touch and hold 16
Swipe 16
Drag 17
i
UNL_J737U_EN_UM_TN_RG1_080818_FINAL
Pinch and spread 17
Common options 17
Home screen 18
Customize your Home screen 19
App shortcuts 20
Use folders 20
Wallpapers 21
Themes 21
Icons 22
Widgets 23
Home screen settings 23
Easy mode 24
Status bar 25
Status bar display 26
Notification panel 27
View the Notification panel 28
Quick settings 28
Bixby 29
Bixby Home 29
Bixby Vision 29
Face recognition 31
Register a face 31
Face recognition 31
Multi window 32
Window controls 33
Split screen view action 33
Enter text 34
Toolbar functions 34
Configure the Samsung keyboard 35
Use Google Voice typing 35
Emergency mode 37
Activate Emergency mode 37
Emergency mode features 38
Turn off Emergency mode 39
Apps 40
Using apps 41
Access apps 41
Add an apps shortcut 41
Search for apps 42
Galaxy Essentials 42
Uninstall or disable apps 42
Sort apps 43
Create and use folders 43
App settings 44
Samsung apps 46
Calculator 46
Calendar 47
Camera and video 50
Clock 55
Contacts 59
Email 66
Galaxy Apps 69
Gallery 70
Internet 74
Messages 78
My Files 81
Phone 83
Samsung Gear 93
Samsung Notes 94
Samsung+ 96
SmartThings 98
Google apps 99
Chrome 99
Drive 99
Duo 99
Gmail 99
Google 99
Maps 100
Photos 100
Play Movies & TV 100
Play Music 100
Play Store 100
YouTube 101
Additional apps 102
Facebook 102
Settings 103
Access Settings 104
Search for Settings 104
Connections 105
Wi-Fi 105
Manually connect to a Wi-Fi network 105
Wi-Fi preferences 106
Wi-Fi Direct 107
Share files with Wi-Fi Direct 107
Receive files with Wi-Fi Direct 107
Disconnect from Wi-Fi Direct 108
Bluetooth 108
Rename a paired device 109
Share files with Bluetooth 109
Receive files with Bluetooth 109
Unpair from a Bluetooth device 110
Phone visibility 110
Data usage 111
Monitor Wi-Fi data 111
Airplane mode 111
Mobile hotspot 112
Change the mobile hotspot password 112
Allowed devices list 113
Configure mobile hotspot settings 113
Tethering 114
Location 114
Recent location requests 115
Location services 115
Nearby device scanning 116
Connect to a printer 116
Virtual Private Networks 117
Manage a VPN 117
Connect to a VPN 118
Sounds and vibration 119
Sound mode 119
Easy mute 119
Vibrations 120
Volume 120
Use Volume keys for media 120
Media volume limiter 121
Ringtone 121
Notification sounds 121
Do not disturb 122
System sounds 122
Key-tap feedback 123
Sound quality and effects 123
Separate app sound 124
Notifications 125
Manage notifications 125
Smart alert 125
Display 126
Screen off settings 126
Screen brightness 126
Blue light filter 127
Font and screen zoom 127
Screen quality 128
One-handed mode 128
Device maintenance 129
Quick optimization 129
Battery 129
Storage 130
Memory card (SD card) 130
Mount a memory card 130
Remove a memory card 131
Format a memory card 131
Memory 132
Device security 132
Language and input 133
Change the device language 133
Default keyboard 133
Google Voice typing 134
Manage on-screen keyboards 134
Physical keyboards 135
Autofill service 135
Text-to-speech options 136
Pointer speed 136
Date and time 137
Report diagnostic information 137
Reset 138
Reset settings 138
Reset network settings 138
Factory data reset 139
Factory reset protection 140
Auto restart 141
Software update 141
Lock screen and security 142
Screen lock types 142
Set a secure screen lock 142
Biometrics 143
Clock and information 143
Find My Mobile 144
Security update 145
Install unknown apps 145
Secure Folder 145
App permission monitor 146
Secure startup 146
Encrypt SD card 146
View passwords 147
Security update service 147
Device administration 148
Credential storage 148
Knox active protection 149
Advanced security settings 149
Accounts 151
Samsung Cloud 151
Add an account 151
Account settings 152
Remove an account 152
Backup and restore 153
Samsung account 153
Google account 153
Go ogle settings 154
Accessibility 155
Vision 155
Hearing 157
Dexterity and interaction 157
More accessibility settings 158
Accessibility services 159
Other settings 160
Help 160
Manage game features 160
Device assistance app 160
Dual messenger 161
About phone 161
Getting help 162
Videos 162
Smart Simulator 162
Tips and Tricks 162
Samsung Care 162
Legal 163
Legal information 164
Intellectual property 165
Open source software 166
Disclaimer of warranties; exclusion of liability 166
Modification of software 167
Samsung Knox 167
Restricting children's access to your mobile device 168
Samsung Electronics America, Inc. 168
Special features
Learn about your mobile device's special features.
Meet Bixby
Bixby can help you understand your settings and set up your Samsung device. See Bixby on page 29.
Face recognition
Configure facial recognition security to add an extra layer of security when using your device. See Face recognition on page 31.
Direct Share
Share content with specific people directly. See Direct share on page 65.
Media volume limiter
Limit the maximum output of the device's volume. See Media volume limiter on page 121.
Multi window
Multitask by using two applications at the same time. See Multi window on page 32.
Special features
Getting started
Learn about your mobile device hardware, assembly procedures, and how to get started using your new device.
Front view

text_image
Front camera Proximity sensor Volume keys 12 45 Power key FRI ADJUST 24 Recent apps Back Home keyDevices and software are constantly evolving—the illustrations you see here are for reference only.
Getting started 4
- Proximity sensor
— Turns off the screen and disables touch functionality during a call when the device is in close proximity to the body.
- Turns the screen back on and enables touch functionality during a call when the device is outside a specific range from the body.
- Power key
— Press to turn the screen on or off.
- Press and hold to select a power control option.
• Volume keys
- Adjust the volume for ringtones, media, notifications, and system sounds. For more information, see Volume on page 120.
— In the camera app, press a volume key to take a photo.
Back view
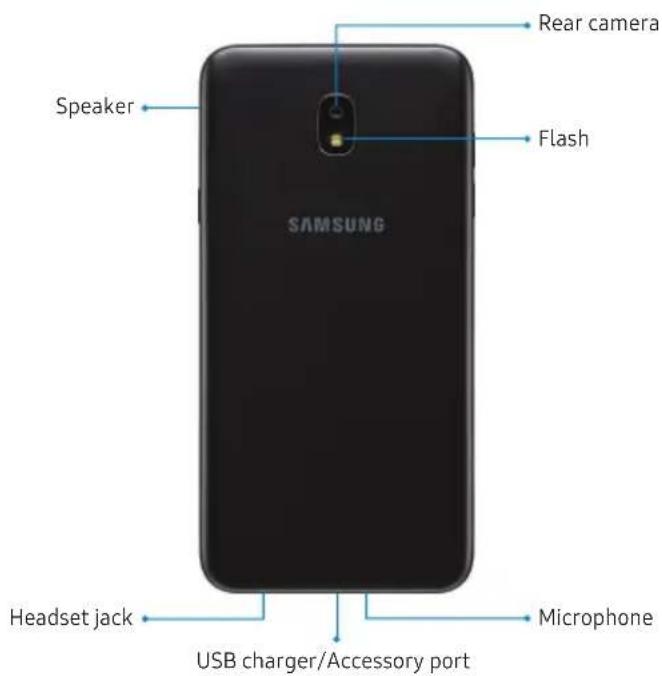
text_image
Speaker SAMSUNG Rear camera Flash Headset jack USB charger/Accessory port MicrophoneDevices and software are constant y evolving—the illustrations you see here are for reference on y
Getting started 6
Set up your device
Learn how to set up your device for the first time.
Assemble your device
Learn about your mobile device hardware, assembly procedures, and how to get started using your new device.
Install a SIM card and memory card
When you subscribe to a cellular network, you are provided with a SIM card. You may be able to use your previous SIM card.
Warning: Small components such as SIM cards and memory cards can pose a choking risk. Please be careful when handling these cards to avoid damaging them.
You can install an optional microSD ^™ memory card (not included) to add more memory space to your device. A memory card can be installed at any time. It is not necessary to install it prior to using the device.
Caution: Be careful when using the removal tool to eject an internal card tray.
-
Insert the removal tool into the hole on the SIM card/Memory card tray, and then push until the tray pops out.
-
Place the SIM card on the tray with the gold contacts facing down.
-
Place the memory card on the tray with the gold contacts facing down.
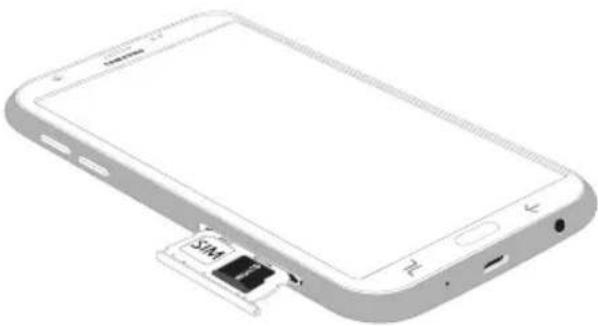
natural_image
Illustration of a smartphone with an attached SIM card (no text or symbols on the device body)- Slide the SIM card/Memory card tray back into the slot.
Charge the battery
Your device is powered by a rechargeable battery. A charger (charging head and USB cable) is included with the device for charging the battery from any standard outlet.
Note: You should dry the inside of the charging port before inserting a power connector to charge your device. If the charging port is not fully dry, your device may operate abnormally. For example, it may charge more slowly or overheat.
The battery comes partially charged. You can use the device while charging.
Caution: Use only charging devices and batteries (if applicable) that are approved by Samsung. Samsung charging devices and batteries are designed for your device to maximize battery life. Using other charging devices and batteries may void your warranty and may cause damage.
- Insert the USB cable into the USB charger/Accessory port.
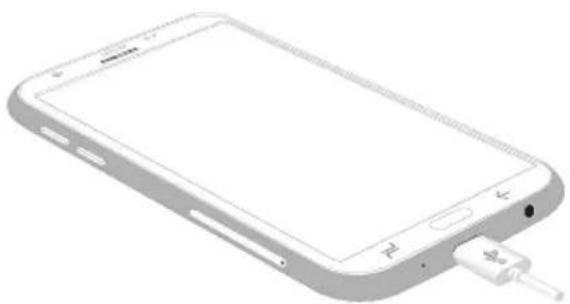
natural_image
Illustration of a smartphone with a USB port and cable connector (no text or symbols)-
Connect the USB cable to the charging head, and then plug the charging head into a standard outlet.
-
Unplug the charging head from the outlet and remove the USB cable from the device when charging is complete.
Set up your device
Start using your device
The instructions below explain how to turn your device on or off.
To turn the device on:
▶ Press and hold the Power key until the device turns on.
To turn the device off:
- Press and hold the Power key.
- Tap Power off, and confirm when prompted.
Use the Setup Wizard
The first time you turn your device on, the Setup Wizard guides you through the basics of setting up your device.
Follow the prompts to choose a default language, connect to a Wi-Fi ^® network, set up accounts, choose location services, learn about your device's features, and more.
Lock or unlock your device
Use your device's screen lock features to secure your device. By default, the device locks automatically when the screen times out.
To lock the device:
▶ Press the Power key.
To unlock the device:
▶ Press the Power key, or press the Home key, and then drag your finger across the screen.
The default Screen lock on your device is Swipe. To choose a secure screen lock, see Set a secure screen lock on page 142.
Add a Google account
Your new device uses your Google ^™ account to fully utilize its Android ^™ features.
-
From Settings, tap Cloud and accounts > Accounts.
-
Tap + Add account > Google.
Note: When you sign in to a Google account, Factory Reset Protection (FRP) is activated. FRP requires your Google account information when resetting to factory settings. For more information, see Factory reset protection on page 140.
Add a Samsung account
Create a Samsung account for access to Samsung content and apps on your device.
- From Settings, tap Cloud and accounts > Accounts.
- Tap + Add account > Samsung account.
Note: To quickly access your Samsung account, tap
Settings > Samsung account.
Add an email account
View and manage all of your email accounts.
- From Settings, tap Cloud and accounts > Accounts.
- Tap + Add account > Email.
Set up your device
Transfer data from your old device
Use Smart Switch ^™ to transfer contacts, photos, and other content from your old device.
For more information, visit samsung.com/us/support/owners/app/smart-switch.
To use Smart Switch:
- From Settings, tap Cloud and accounts > Smart Switch.
- Follow the prompts and select the content to transfer.
Visit samsung.com/smartswitch for more information.
Set up your voicemail
You can access your voicemail from a Home screen.
- From a Home screen, tap 📞 Phone.
- Touch and hold ☐ Voicemail.
- Follow the tutorial to create a password, record a greeting, and record your name.
For more information, see Voicemail on page 92.
Learn about your device
Learn some of the key features of your mobile device, including the screens and icons, as well as how to navigate the device and enter text using the keyboard.
Navigation
Please note that a touchscreen responds best to a light touch from the pad of your finger or a capacitive stylus. Using excessive force or a metallic object on the touchscreen may damage the tempered glass surface and void the warranty.
Tap
Lightly tap items to select or launch them.
- Tap the keyboard to enter characters or text.
- Tap an item to select it.
- Tap an app shortcut to launch the app.
Double-tap
Lightly tap items twice to select or launch them.
- Double-tap an image to zoom in or out.
Learn about your device
Touch and hold
Touch and hold items to activate them.
- Touch and hold a field to display a pop-up menu of options.
Swipe
Lightly drag your finger vertically or horizontally across the screen.
- Swipe the screen to unlock the device.
- Swipe the screen to scroll through the Home screens or menu options.
Drag
Touch and hold an item, and then move it to a new location.
- Drag an app shortcut to add it to a Home screen.
- Drag a widget to place it in a new location on a Home screen.
Pinch and spread
Pinch the screen using your thumb and forefinger or spread by moving your fingers apart.
- Pinch the screen to zoom out while viewing a picture or a web page.
- Spread your fingers on the screen to zoom in while viewing a picture or a web page.
Common options
The device uses basic command options to perform common actions.
- More options: Tap to view more menu options for a screen.
Delete: Tap to select items to delete. - Share: Tap to select items to share, and then choose a sharing method.
• Edit: Tap to customize the screen. - On/Off: Tap to turn the option on ( ) or off ( ).
- ▼ Menu: Tap to view available options for the field.
Home screen
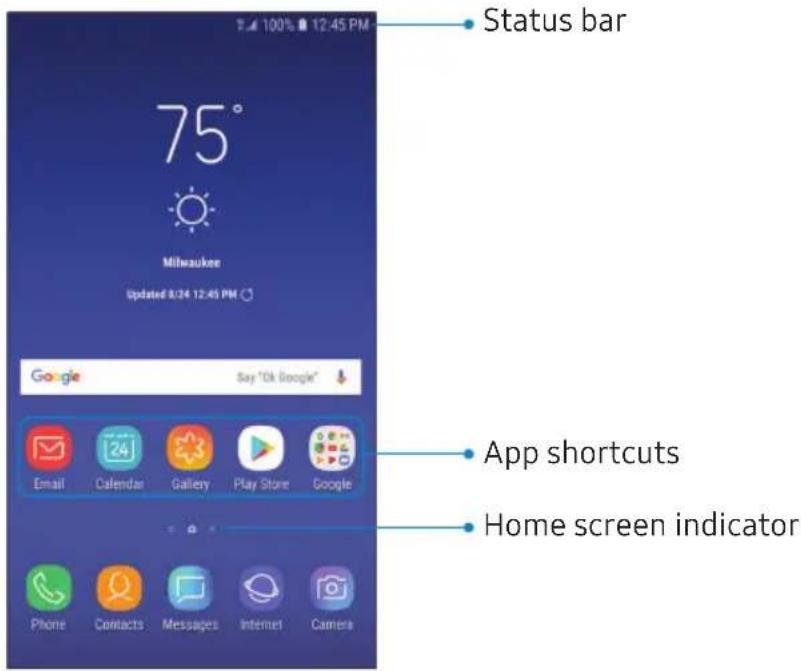
text_image
75° Milwaukee Updated 8/24 12:45 PM Status bar Google Say "Ok Google" App shortcuts Home screen indicator Phone Contacts Messages Internet CameraDevices and softw are are constantly evolving—the illustrations you see here are for reference only.
Learn about your device 18
Customize your Home screen
Your device has multiple Home screens to hold app shortcuts and widgets. You can add, remove, change the order of screens, as well as choose a different main Home screen.
- From a Home screen, pinch the screen.
-
Use these options to manage screens:
-
To align shortcuts into a line at the top of a screen, tap 📄 Align top.
- To align shortcuts into a line at the bottom of a screen, tap ☐ Align bottom.
• To remove a Home screen, tap 📋 Remove. -
To set a screen as the main Home screen, tap Main. This screen is displayed when you press the Home key.
-
To change the order of screens, touch and hold a screen, and then drag it to a new position.
- To add a screen, swipe to the end of the screens, and then tap + Add.
- To enable Bixby Home, swipe right, and then tap On/Off.
App shortcuts
You can use app shortcuts to launch an app from any Home screen.
- From Apps, touch and hold an app shortcut to open the options menu.
- Tap Add to Home.
To remove a shortcut:
- Touch and hold an app shortcut to open the options menu.
- Tap Remove from Home.
- Removing a shortcut does not delete the app, it just removes the shortcut from a Home screen.
To move a shortcut from one Home screen to another:
- Touch and hold an app shortcut to release it.
- Drag the app shortcut to a new Home screen, and then release it.
Use folders
You can organize App shortcuts in folders on an Apps list screen and Home screen.
For more information, see Create and use folders on page 43.
Wallpapers
Change the look of the Home and Lock screens with wallpaper. You can display a favorite picture or choose from preloaded wallpapers.
- From a Home screen, pinch the screen.
- Tap Wallpapers to customize.
- Tap View all to see all available wallpapers.
- Tap an image to choose it.
- Tap the screen or screens you want to apply the wallpaper to.
- Tap Set as wallpaper, and confirm when prompted.
Themes
Set the theme to be applied to your Home and Lock screens, wallpapers, and app icons.
- From a Home screen, pinch the screen.
- Tap Themes to customize.
- Tap a theme to preview and download it to My themes.
- Tap View all to see downloaded themes.
- Tap a theme, and then tap Apply to apply the selected theme.
Icons
Apply custom icons to replace built-in app icons.
-
From a Home screen, pinch the screen.
-
Tap Wallpapers > Icons to customize.
-
Tap an icon set to preview and download it to My icons.
- Tap View all to see downloaded icons.
- Tap an icon, and then tap Apply to apply the selected icon set.
Icon frames
You can show icons with shaded frames to make them stand out on the Home screen and Apps list screen.
- From Settings, tap Display > Icon frames and choose one of the following options:
- Icons only: Show icons only.
- Icons with frames: Show frames around icons.
- Tap Done, and confirm when prompted.
Widgets
Widgets are simple application extensions that run on a Home screen.
To add a widget to a Home screen:
- From a Home screen, pinch the screen.
- Tap Widgets.
- Touch and hold a widget, drag it to a Home screen, and release it.
To remove a widget from a Home screen:
-
From a Home screen, touch and hold a widget to open the options menu.
-
Tap 📋 Remove from Home screen.
Home screen settings
Customize your Home and Apps screens.
- From a Home screen, pinch the screen.
-
Tap Home screen settings to customize:
-
Home screen layout: Set your device to have a Home and Apps screen, or only a Home screen where all apps are located.
- Home screen grid: Choose a dimension option to determine how icons are arranged on the Home screen.
- Apps screen grid: Choose a dimension option to determine how icons are arranged on the Apps screen.
- Apps button: Add an apps button to the Home screen for easy access to the Apps screen.
-
App icon badges: Select how to show icon badges when apps receive notifications.
-
Add apps to Home screen: Automatically add newly downloaded apps to the Home screen.
- Quick-open notification panel: Enable this feature to open the Notification panel from the Home screen by swiping down.
- Hide apps: Select apps to hide.
-
About Home screen: View version information.
-
From Settings, tap Display > Easy mode > Standard mode.
- Tap Done to exit Easy mode.
Easy mode
Switch between the default screen layout and a simpler layout. The Easy mode layout has larger text and icons, making for a more straightforward visual experience.
- From Settings, tap Display > Easy mode.
- Tap Easy mode to enable this feature.
- Tap Done to confirm.
To disable Easy mode:
Learn about your device
Status bar
The Status bar provides device information on the right side and notification alerts on the left.
Status icons
Battery full
Battery low
Battery charging
Vibrate mode
Mute mode
Signal strength
Network not available
Wi-Fi active
Location service active
Notification icons
Missed call
Call in progress
Call on hold
New email
oo New voicemail
New message
File download in progress
↑ File upload in progress
Wi-Fi available
App updates available
Learn about your device
Status bar display
Configure display options for the Status bar.
From Settings, tap Display > Status bar
- Tap Show recent notifications only to display only the three most recent notification icons on the Status bar.
- Tap Show battery percentage to display the battery charge percentage next to the battery icon on the Status bar.
Notification panel
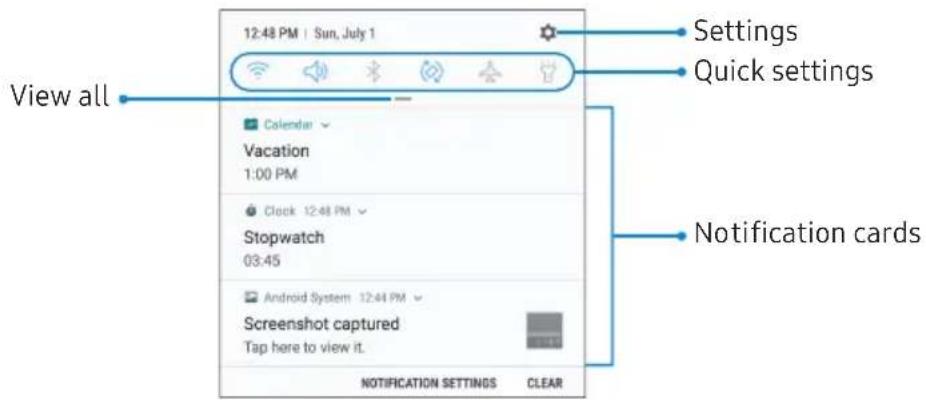
text_image
12:48 PM | Sun, July 1 Settings Quick settings View all Calendar Vacation 1:00 PM Clock 12:48 PM Stopwatch 03:45 Android System 12:44 PM Screenshot captured Tap here to view it. NOTIFICATION SETTINGS CLEAR Notification cardsDevices and software are constantly evolving—the illustrations you see here are for reference only.
Learn about your device 27
View the Notification panel
You can access the Notification panel from any screen.
- Drag the Status bar down to display the Notification panel.
- Swipe down the list to see notification details.
• To open an item, tap it.
- To clear a single notification, drag the notification left or right.
• To clear all notifications, tap Clear.
- Drag upward from the bottom of the screen or tap ← Back to close the Notification panel.
Quick settings
The Notification panel also provides quick access to device functions, allowing you to quickly turn them on or off.
- Drag the Status bar down to display the Notification panel.
-
Drag = View all downward.
-
Tap a setting to turn it on or off.
-
Tap : More options to reorder Quick settings or to change the button layout.
-
Drag = View all upward to close Quick settings.
Bixby
Bixby is a virtual assistant that learns, evolves, and adapts to you. It learns your routines, helps you set up reminders based on time and location, and is built in to your favorite apps. For more information, visit samsung.com/us/support/owners/app/Bixby.
You can customize Bixby's chat responses, quick commands, and more from the Bixby Home page.
Bixby Home
The Bixby Home page displays customized content based on your interactions. Bixby learns from your usage patterns and will suggest content you may like.
▶ From a Home screen, swipe right.
Bixby Vision
Bixby is integrated with your Camera, Gallery, and Internet apps to give you a deeper understanding of what you see. It provides contextual icons for translation, QR code detection, landmark recognition, or shopping.
Camera
Bixby Vision is available on the Camera viewfinder to help understand what you see.
From Apps, tap 📷 Camera > Bixby Vision and follow the prompts.
Gallery
Bixby Vision can be used on pictures and images saved in the Gallery app.
- From Apps, tap 🙏 Gallery, and then tap a picture to view it.
- Tap Bixby Vision and follow the prompts.
Internet
Bixby Vision can help you find out more about an image you find in the Internet app.
- From Apps, tap Samsung folder > Internet.
- Touch and hold an image until a pop-up menu is displayed.
- Tap Bixby Vision and follow the prompts.
Face recognition
Use face recognition as an alternative to entering passwords in certain apps. You can use face recognition to unlock the screen by recognizing your face.
Register a face
To use your face to unlock your device, you must set a pattern, PIN, or password.
- From Settings, tap Biometrics and security >Face recognition.
- Follow the prompts to register your face.
Face recognition
Customize how face recognition works.
From Settings, tap Biometrics and security > Face recognition for the following options:
- Remove face data: Delete existing faces.
- Face unlock: Enable or disable face recognition security.
- Screen-on face recognition: Unlock your device with face recognition as soon as the screen turns on.
- Faster recognition: Turn on for faster face recognition. Turn off to increase security and make it harder to unlock using an image or video of your likeness.
Multi window
Multitask by using two apps at the same time. Apps that support Multi window can be displayed together on a split screen. You can switch between the apps and adjust the size of their windows.
-
From any screen, tap Recent apps.
-
Tap ☐ Multi window in the title bar to launch an app in split screen view.
-
Recently opened apps are displayed in the lower window. Apps that support Multi window have the ⏻ Multi window icon in their title bar.
-
If there are no recently opened apps that support Multi window, or if you want to launch a different app, tap App list.
-
Tap an app in the lower window to add it to the split screen view.
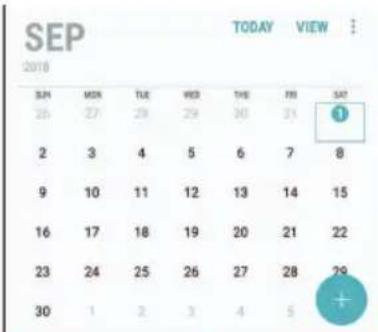
text_image
SEP 2018 SUN MON TUE WED THE FRI SAT 26 27 28 29 30 31 ① 2 3 4 5 6 7 8 9 10 11 12 13 14 15 16 17 18 19 20 21 22 23 24 25 26 27 28 29 30 1 2 3 4 5
text_image
Settings Sounds and vibration Sounds, Vibration, Do not disturb Notifications Block, inline, prioritize Display Brightness, Blue light filter; Home screen CLOSE ALLWindow controls
The Window controls modify the way app windows are displayed in split screen view.
▶ Tap the middle of the window border for the following options:
- Add app pair on Home screen: Add the open pair of apps as a shortcut to the Home screen.
- Switch windows: Swap the two windows.
- ✗ Close app: Close the selected app.
Split screen view action
The Recent apps key can be configured to switch between full screen view and split screen view.
- From Settings, tap Advanced features > Multi window, and then tap On/Off to enable Split screen view action.
-
To use Recent apps to switch between views:
-
To change the current app from full screen view to split screen view, touch and hold ➞ Recent apps.
- While in split screen view, touch and hold ➕ Recent apps to close the app on the bottom.
Enter text
Text can be entered using a keyboard or your voice.
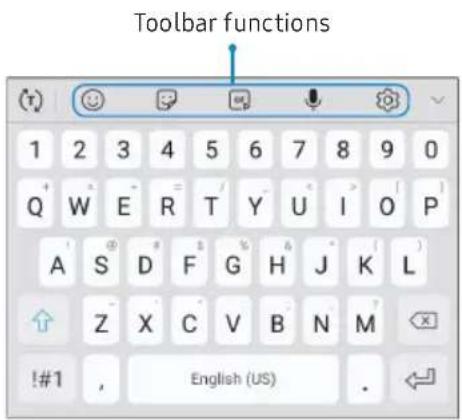
text_image
Toolbar functions 1 2 3 4 5 6 7 8 9 0 Q W E R T Y U I O P A S D F G H J K L Z X C V B N M !#1 , English (US) .▶ Tap a field to display the Samsung keyboard.
- Tap (T) Show predictive text to view suggested words while you type.
- Tap 🤒 Show toolbar functions to view all keyboard options.
Toolbar functions
The toolbar provides additional helpful functions.
▶ From the Samsung keyboard, tap ▼ Expand toolbar for the following options:
- Clipboard: Access the clipboard.
- Emojis: Insert an emoji.
• GIF keyboard: Add animated GIFs.
• One-handed keyboard: Change the keyboard layout for use with one hand. - Settings: Access keyboard settings.
• Stickers: Add illustrated stickers.
• Voice input: Use Google Voice™ typing.
Configure the Samsung keyboard
Set customized options for the Samsung keyboard.
▶ From the Samsung keyboard, tap ⚙️ Settings for the following options:
- Languages and types: Set the keyboard type and choose which languages are available on the keyboard.
- To switch between languages, slide the Space bar sideways.
- Smart typing: Use predictive text and auto-correction features to prevent common typing mistakes. Type by swiping between letters.
- Keyboard layout and feedback: Customize the appearance and function of the keyboard.
- Reset to default settings: Return keyboard to original settings and clear personalized data.
Learn about your device
- About Samsung keyboard: View version and legal information for the Samsung keyboard.
Use Google Voice typing
Instead of typing, enter text by speaking.
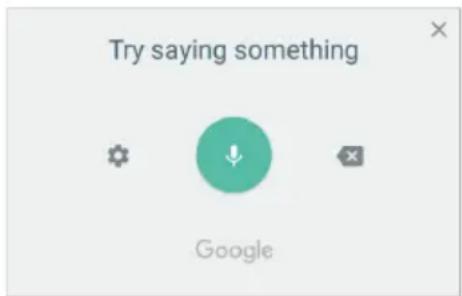
text_image
Try saying something Google- From the Samsung keyboard, tap 🖼 Voice input.
- Tap the screen and speak your text.
Configure Google Voice typing
Set customized options for Google voice typing.
- From the Samsung keyboard, tap 🖼 Voice input.
-
Tap ⚙️ Settings for options.
-
Languages: Choose the language for the keyboard.
- Offline speech recognition: Download languages for offline Google voice typing.
- Block offensive words: Hide potentially offensive words with asterisks.
Emergency mode
Use Emergency mode to access helpful emergency features and conserve your device's power during an emergency situation.
To save battery power, Emergency mode:
- Restricts application usage to only essential applications and those you select.
- Turns off connectivity features and Mobile data when the screen is off.
Activate Emergency mode
To activate Emergency mode:
- Press and hold the Power key.
- Tap Emergency mode.
- When accessing for the first time, read and accept the terms and conditions.
- Tap Turn on.
Emergency mode features
While in Emergency mode, only the following apps and features are available on the Home screen:
- Flashlight: Use the device's flash as a steady source of light.
• Emergency alarm: Sound an audible siren. - Share my location: Send your location information to your emergency contacts.
• Phone: Launch the call screen. - Internet: Launch the web browser.
• + Add:
— Email: Launch the Email app.
— Maps: Launch Google Maps ^™ .
- Battery charge: Display estimated battery charge remaining.
- Estimated usage time remaining: Display estimated standby time that can be reached based on current battery charge and usage.
- Emergency call: Dial the emergency telephone number (for example, 911). This kind of call can be made even without activated cellular service.
• More options:
— Turn off Emergency mode: Disable Emergency mode and return to standard mode.
- Remove: Choose apps to remove from the screen.
— Manage emergency contacts: Manage your medical profile and ICE (In Case of Emergency) group contacts.
— Settings: Configure the available settings. Only a limited number of settings are enabled in Emergency mode.
Turn off Emergency mode
When emergency mode is turned off, the device returns to standard mode.
- Press and hold the Power key.
- Tap Emergency mode.
Note: When Emergency mode is activated, Locating method is set to Battery saving. After Emergency mode is turned off, check your location settings.
For more information, see Location on page 114.
Apps
Learn how to change the way apps are displayed, organize apps into folders, and install, uninstall, or disable apps.
Using apps
The Apps list displays all preloaded and downloaded apps. You can uninstall, disable, or hide apps from view.
Access apps
Access and launch all apps from the Apps list.
- From a Home screen, swipe up or down to access Apps.
- Tap an app's shortcut to launch it.
- To return to the main Home screen press the Home key.
Add an apps shortcut
In addition to swiping to access apps, you can add an Apps button to the Home screen.
- From Apps, tap: More options > Home screen settings > Apps button.
- Tap Show Apps button > Apply.
Apps
41
Search for apps
If you are not sure exactly where to find a certain setting, you can use the Search feature.
- From Apps, tap Search phone.
- Enter a word or words in the Search phone field. As you type, apps that match are displayed on the screen.
- Tap an entry to go to that app.
- To customize the Finder search settings, tap More options > Settings.
Galaxy Essentials
View and download Samsung apps that are optimized for use with Galaxy devices.
▶ From Apps, tap: More options > Galaxy Essentials.
Apps
Uninstall or disable apps
Uninstall or disable apps you have download.
▶ From Apps, touch and hold an app to open the options menu.
• To uninstall an app, tap Uninstall.
• To disable an app, tap Disable.
Note: Some preloaded apps can only be disabled, not uninstalled. Apps that are disabled are turned off and hidden from view.
Sort apps
App shortcuts can be listed alphabetically or in your own custom order.
▶ From Apps, tap : More options > Sort.
- Custom order: Arrange apps manually.
- To remove empty spaces between apps, tap More options > Clean up pages.
- Alphabetical order: Sort apps alphabetically.
Create and use folders
Create a folder to organize App shortcuts on an Apps list screen.
- From Apps, touch and hold an app shortcut, and then drag it on top of another app shortcut until it is highlighted.
-
Release the app shortcut to create the folder.
-
Enter folder name: Name the folder.
• ○ Palette: Change the folder color. -
Add apps: Place more apps in the folder. Tap apps to select them, and then tap Add.
-
Tap ← Back to close the folder.
Copy a folder to a Home screen
Create a folder and copy it to a Home screen.
- From Apps, touch and hold a folder to open the options menu.
- Tap Add to Home.
Delete a folder
When you delete a folder, the app shortcuts are returned to the Apps list screen.
- From Apps, touch and hold a folder to delete.
- Tap Delete folder, and confirm when prompted.
Apps
App settings
Manage your downloaded and preloaded apps.
- From Settings, tap Apps.
- Tap ▼ Menu to set which apps to view, and then choose All apps, Enabled, or Disabled.
-
Tap : More options for the following options:
-
Sort by size/name: Sort the apps by size or name.
- Default apps: Choose or change apps that are used by default for certain features, like email or browsing the Internet.
- App permissions: Control which apps have permissions to use certain features of your device.
-
Show/Hide system apps: Show or hide system (background) apps.
-
Special access: Select which apps can have special access permissions to features on your device.
-
Reset app preferences: Reset options that have been changed. Existing app data is not deleted.
-
Tap an app to view and update information about the app. The following options may be displayed:
-
Uninstall/Disable: Uninstall or disable the app. Some preloaded apps can only be disabled, not uninstalled.
- Force stop: Stop an app that is not working correctly.
• Mobile data: View mobile data usage. - Battery: View battery usage since the last full charge.
-
Storage: Manage the app's storage usage.
• Memory: View memory usage. -
Notifications: Configure notifications from the app.
- Permissions: View permissions granted to the app for access to your device's information.
- Set as default: Set the app as a default for a certain category of apps.
Note: Options vary by app.
Samsung apps
The following apps come pre-installed or downloaded over-the-air to your device.
Calculator
The Calculator provides basic and advanced arithmetic functions.
▶ From Apps, tap ✕ Calculator.
View calculator history
View and clear your calculator history.
▶ From Apps, tap 🧑 Calculator > History.
• To return to the calculator, tap Keypad.
- To clear the calculator history, tap Clear history.
Convert units of measurement
Quickly convert units of measurement using the unit converter.
- From Apps, tap ✕ Calculator > □ Unit converter.
- Select a category and use the drop-down menus to choose units of measurement.
- Enter a numeric value to view the conversion.
Scientific calculator
The Calculator app also provides advanced arithmetic functions.
From Apps, tap 📋 Calculator, and turn the device to landscape view.
- If Auto rotate is not enabled, tap ☑ e= Rotate screen.
Calendar
Manage your events and tasks.
Add calendars
Add existing calendars to the Calendar app.
- From Apps, tap 📋 Calendar > ⚠ More options.
- Tap Manage calendars > Add account, and select an account type.
- Enter your account information and follow the prompts.
Calendar view
There are several ways the calendar can be viewed.
-
From Apps, tap 📋 Calendar > View, and then tap an option:
-
Year: Display all twelve months of this year. Swipe across the screen to display another year.
- Mon th: Display the current month. Swipe across the screen to display another month. Events and tasks are also displayed.
- Week: Display the current week. Swipe across the screen to display another week.
- Day: Display today's schedule by hour. Swipe across the screen to display another day.
-
Tasks: Display all tasks.
-
Tap Today to return to the current date.
Apps
47
Create an event
Use your Calendar to create events.
- From Apps, tap 📄 Calendar > + Add to add an event.
- Enter details for the event, and then tap Save.
Share an event
Share events from your Calendar.
- From Apps, tap 📋 Calendar, tap an event, and tap again to edit it.
- Tap Share, choose a sharing method, and follow the prompts.
Delete an event
Delete events from your Calendar.
- From Apps, tap 📋 Calendar, tap an event, and tap again to edit it.
- Tap Delete, and confirm when prompted.
Apps
Create a task
Use your Calendar to create tasks. Tasks are items you add to the calendar to be accomplished on a certain day. A task displays as a checklist item and is removed once you mark the task as complete.
- From Apps, tap 📞 Calendar > View > Tasks.
- Tap + Add to add a task.
- Enter details for the task, and then tap Save.
Delete a task
Delete tasks from your Calendar.
-
From Apps, tap 📄 Calendar, and tap a day on the calendar to view the tasks for the day, or tap View > Tasks.
-
Tap the ☑ Checkbox by the task to mark it as complete and remove it from the calendar.
- To delete a task, tap the task to open it, tap Delete, and confirm when prompted.
Calendar settings
Use Calendar settings to customize your calendar.
-
From Apps, tap 📋 Calendar >: More options >Settings.
-
Tap an option and follow the prompts.
Apps
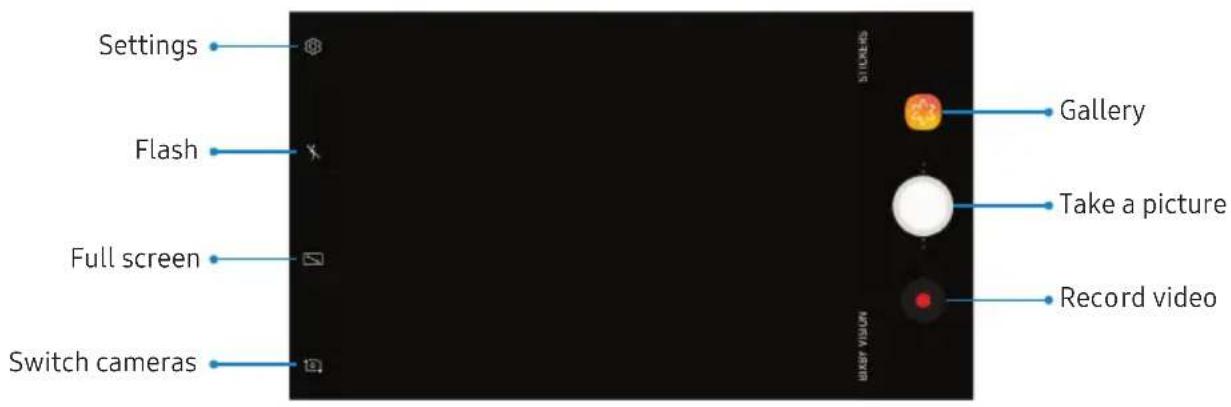
Camera and video
text_image
Settings Flash Full screen Switch cameras Gallery Take a picture Record videoDevices and software are constantly evolving—the illustrations you see here are for reference only.
Take pictures
Take pictures with your device's front or rear camera.
-
From Apps, tap 📷 Camera.
-
Use the display screen as a viewfinder.
-
To focus the shot, tap the screen. When you tap the screen, a brightness scale is displayed. Slide the light bulb to adjust the brightness.
- To add an effects filter, swipe to the left and tap a preview filter to apply it to the screen.
- To change the shooting mode, swipe to the right and select a mode.
-
To quickly switch between the front and rear cameras, swipe the screen up or down.
• To change a camera setting, tap ⚙️ Settings. -
Tap ○ Take a picture.
Record videos
Record high-quality videos using your device.
- From Apps, tap 📷 Camera and aim the camera at your subject.
- Tap Record to begin recording a video.
• To take a picture while recording, tap
Capture.
- To temporarily stop recording, tap 📄 Pause. To continue recording, tap 🔒 Resume.
- Tap ☐ Stop when you are finished recording.
Configure shooting mode
Allow the camera to determine the ideal mode for your pictures or choose from several shooting modes.
From Apps, tap 📷 Camera, and swipe to the right to see shooting modes.
Rear camera
- Auto: Allow the camera to determine the ideal mode for the picture.
- Pro: Manually adjust the ISO sensitivity, exposure value, white balance, and color tone while taking pictures.
- Panorama: Create a linear image by taking pictures in either a horizontal or vertical direction.
-
Continuous shot: Touch and hold the Camera button to take pictures continuously.
-
HDR (Rich tone): Enables the light sensitivity and color depth features of the device to produce a brighter and richer picture.
- Night: Use this to take photos in low-light conditions, without using the flash.
- Sports: Take clearer pictures of fast-moving subjects.
- Sound & shot: Enrich your pictures by adding a few seconds of background sound.
Front camera
- Selfie: Take selfie shots and apply various effects, such as an airbrushed effect.
- Wide selfie: Take wide-angle selfie shots to fit more people into your pictures.
- Sound & shot: Enrich your pictures by adding a few seconds of background sound.
Camera settings
Use the icons on the main camera screen and the settings menu to configure your camera's settings.
From Apps, tap Camera > Settings.
Rear camera
- Picture size: Select a resolution. Selecting a higher resolution for higher quality requires more memory.
• Video size: Select a resolution. Higher resolution requires more memory. - Timer: Take time-delayed pictures or videos.
Front camera
-
Picture size: Select a resolution. Selecting a higher resolution for higher quality requires more memory.
• Video size: Select a resolution. Higher resolution requires more memory. -
Save pictures as previewed: Save self-portraits or self-recordings as viewed on the camera screen, not as flipped images.
- Shooting methods:
- Tap screen: Tap the screen to take selfies.
- Show palm: Hold your hand out with your palm facing the camera to have your picture taken.
- Timer: Take time-delayed pictures or videos.
- Grid lines: Display viewfinder grid lines to help compose a picture or video.
- Location tags: Attach a GPS location tag to the picture.
- Review pictures: Review pictures after taking them.
Common
- Quick launch: Press the Home key twice in quick succession to open the camera.
• Storage location: Select the memory location. - A memory card (not included) must be installed to view Storage location.
- Floating Camera button: Add a camera button that you can move anywhere on the screen.
- Volume key function: Use the Volume key as the camera key, the record key, a zoom key, or for system volume.
- Reset settings: Reset the camera settings.
Clock
The Clock app offers features for keeping track of time and setting alarms.
▶ From Apps, tap 📐 Clock, and tap a tab to use a feature.
Alarm
Use the Alarm tab to set one-time or recurring alarms, and choose options for how to be notified.
-
From Apps, tap 🔒 Clock > + Add alarm.
-
Tap the following items to configure an alarm:
• Date: Choose the day for this alarm.
• Time: Set a time for the alarm.
- Repeat: Choose when to repeat the alarm.
- Alarm name: Enter a name for the alarm.
- Snooze: Allow snoozing. Set interval and repeat values for the alarm while snoozing.
- Alarm sound: Choose a sound to play for the alarm, and drag the slider to set the volume of the alarm.
- Vibration: Choose whether the alarm uses vibration alert.
-
Read time aloud: Read the time aloud when the alarm rings.
-
Tap Save to save the alarm.
Turn off alarm
At the set alarm time, the phone sounds the alarm and/or vibrates.
- To stop an alarm, tap Dismiss, or swipe ✗ Dismiss to the left or right.
- To postpone the alarm, tap Snooze.
Apps
55
Delete an alarm
You can delete an alarm that you created.
- From Apps, tap Ⓞ Clock, and find the alarm in the alarm list (under Alarm), and then touch and hold it to select it.
- Tap Delete.
World clock
The World clock lets you keep track of the current time in multiple cities around the globe.
- From Apps, tap Ⓞ Clock > World clock.
- Tap + Add city.
- Tap Search and enter the name of the city.
- Tap the city name in the list, and then tap Add.
- To remove a city, touch and hold it, and tap Delete.
Apps
56
Time zone converter
Set a time in a city on your World clock list to see what the local times would be in the other listed cities.
- From Apps, tap
Clock > World clock.
-
Tap (L) Time zone converter.
-
Tap ▼ Menu to choose a different city.
• To add a city to the list, tap Add city.
- Swipe the hours, minutes, and period (AM or PM) on the clock to set a time. Local times for the other cities listed are automatically updated.
- To return the clock to the current time, tap Reset.
Stopwatch
The Stopwatch lets you time events down to a hundredth of a second.
-
From Apps, tap Ⓞ Clock >Stopwatch.
-
Tap Start to begin timing.
• To keep track of lap times, tap Lap.
- Tap Stop to end timing.
- To continue timing after stopping the clock, tap Resume.
• To reset the Stopwatch to zero, tap Reset.
Timer
The Timer provides a countdown timer for up to 99 hours, 59 minutes, and 59 seconds.
- From Apps, tap Ⓞ Clock >Timer.
- Use the keypad and tap Hours, Minutes, and Seconds to set the length of the Timer.
-
Tap Start to begin the Timer.
-
To temporarily stop the Timer, tap Pause. To continue timing after pausing, tap Resume.
• To stop and reset the Timer, tap Cancel.
Apps
58
Contacts
Store and manage your contacts. You can synchronize with personal accounts added to your device. For more information, see Add an account on page 151.
Note: The Contacts app and the Contacts tab in the Phone app have different options and functions.
Add a contact
Use the following procedure to add a new contact.
-
From Apps, tap 🔒 Contacts > + Create contact, and then tap contact fields to enter information.
-
Choose a storage account for the contact. You can store the contact on the device or sync it with an account.
- Tap 📄 Contact photo to assign a picture or an animated GIF to the new contact.
- Enter a name and other contact information.
- Tap + Add field to enter additional entries.
- Tap Remove field to remove an entry.
- Tap √ View more for additional fields.
- Tap the label to the right of an entry to choose a label for the field (for example, Home or Work).
- Tap Scan business card to import contact information from a business card through the device's camera.
- Tap Save.
Edit a contact
When editing a contact, you can tap a field and change or delete information, or you can add more fields to the contact's list of information.
- From Apps, tap 🔒 Contacts, and then tap a contact.
- Tap ⓘ Details > Edit.
- Tap any of the fields to add, change, or delete information.
- Tap Save.
Share a contact
Share a contact by using various sharing methods.
- From Apps, tap 🔒 Contacts, and then tap a contact.
- Tap ⓘ Details > Share.
- Tap either vCard file (VCF) or Text.
- Choose a sharing method and follow the prompts.
Apps
60
Import contacts
Your device can import contacts from an installed memory card (not included).
- From Apps, tap 📄 Contacts >: More options > Manage contacts.
- Ta p Import/Export contacts.
- Tap Import and follow the prompts.
Export contacts
Manually back up contacts to an installed memory card (not included).
- From Apps, tap 📄 Contacts > More options > Manage contacts.
- Ta p Import/Export contacts.
- Tap Export and follow the prompts.
Apps
Link or unlink contacts
Consolidate contact information from multiple sources into one contact by linking entries into a single contact.
- From Apps, tap 🔒 Contacts, and then tap the contact to select it.
- Tap ⓘ Details > : More options > Link contacts.
- Tap contacts to choose them.
- Tap Link.
To unlink contacts:
- From Apps, tap 🔒 Contacts, and then tap the contact to select it.
- Tap ⓘ Details > : More options > Manage linked contacts.
- Tap Unlink beside contacts to unlink them from the main contact.
Favorites
When you mark contacts as favorites, they are easily accessible from other apps.
-
From Apps, tap 📄 Contacts, and then tap a contact.
-
Tap ⓘ Details.
-
Tap ☆ Add to Favorites to mark the contact as a favorite. The star brightens ★.
- To remove the contact from Favorites, tap ★ Remove from Favorites. The star then dims. ☆
Delete contacts
Delete a single contact or multiple contacts.
- From Apps, tap 🔒 Contacts, and then touch and hold a contact to select it.
- You can also tap other contacts to select them for deletion.
- Tap Delete, and confirm when prompted.
Apps
62
Groups
You can use groups to organize your contacts.
Create a group
Create your own contact groups.
- From Apps, tap

Contacts > Groups.
-
Tap Create, and then tap fields to enter information about the group:
-
Group name: Enter a name for the new group.
- Group ringtone: Customize the sounds for the group.
-
Add member: Select contacts to add to the new group, and then tap Done.
-
Tap Save.
Add or remove group contacts
Add more contacts to a group, or remove contacts.
From Apps, tap 🔒 Contacts > Groups, and then tap a group.
- To remove a contact, touch and hold a contact to select it, and then tap Remove.
- To add a contact, tap Edit > Add member, and then tap the contacts you want to add. When finished, tap Done > Save.
Send a message to a group
Send a text message to members of a group.
-
From Apps, tap 🔒 Contacts > Groups, and then tap a group.
-
Tap : More options > Send message.
Send an email to a group
Send an email to members of a group.
-
From Apps, tap 📄 Contacts > Groups, and then tap a group.
-
Tap : More options > Send email.
-
Tap contacts to select them, or tap the All checkbox at the top of the screen to select all, and then tap Done.
- Only group members that have an email address in their records are displayed.
- Choose an email account and follow the prompts.
Delete a group
Delete a group you have created.
-
From Apps, tap 🔒 Contacts > Groups, and then tap a group.
-
Tap : More options > Delete.
-
To only delete the group, tap Group only.
- To delete the group and the contacts in the group, tap Group and members.
Contacts settings
These settings allow you to modify settings associated with using the Contacts app.
- From Apps, tap 📄 Contacts >: More options >Settings.
- Tap an option and follow the prompts.
Direct share
Share content directly with your contacts from within any app. Once enabled, your frequent contacts are displayed in the Share window.
▶ From Apps, tap 📋 Settings > Advanced features > Direct share, and tap On/Off to enable.
Apps
65
View and manage all of your email accounts in one app. To add an email account, see Add an email account on page 13.
Create and send an email
Learn how to create and send email messages.
- From Apps, tap 📋 Email > 📋 Compose new email.
- Different email account may have additional steps and options.
- Tap the To field to add an email address or tap Add from Contacts to select a recipient from Contacts, Groups, or Recents.
- When adding multiple recipients, separate them with a semicolon (;) after each. More recipients can be added at any time before the message is sent.
Apps
- If adding a recipient from your Contacts, tap the contact to place a checkmark, and then tap Done. The contact is displayed in the recipients field.
-
Tap √ Show additional fields to add Cc and Bcc fields.
-
Tap the Subject and Message fields to enter text.
-
Tap Attach to add files, images, audio, and more to your email.
-
Tap : More options for additional email options.
-
Review your message and tap Send.
Manage the inbox
There are several tools available from the Inbox screen.
▶ From Apps, tap 📋 Email.
- Tap a message to read and reply or forward it.
- Tap Search to search for key words in your email inbox.
- Tap Edit for additional message options.
- Tap Sort to customize how messages display.
View multiple email accounts
You can view email you receive for multiple accounts, or you can view email accounts individually.
- From Apps, tap 📋 Email.
- Tap ≡ Mailbox at the top left of the screen to choose a different view:
- [A ccount name]: View email for only one email account.
- All accounts: View all email in a combined inbox.
Remove email accounts
Email accounts can be removed from your device.
- From Apps, tap 📋 Email.
- Tap ≡ Mailbox > ⚙️ Settings.
- Tap the account you want to remove.
- Tap Remove, and confirm when prompted.
Email settings
Modify settings associated with using the Email app.
- From Apps, tap 📋 Email.
-
Tap ≡ Mailbox > ⚙️ Settings.
-
Under General, tap an option, and then follow the prompts.
- Tap an account to configure specific settings for only that account.
Apps
68
Galaxy Apps
Find and download premium apps that are exclusive to Galaxy devices. A Samsung account is required to download from Galaxy Apps.
From Apps, tap Samsung folder > Galaxy Apps.
Apps
69
Gallery
View, edit, and manage pictures and videos.
The following categories allow you to organize your content:
- Pictures: View pictures and videos in the order they were saved. Content is organized by date.
- Albums: Create custom albums to organize your pictures and videos.
- Stories: Create custom collections of related pictures and videos and share them with your contacts.
View pictures
Pictures stored on your device are viewable in the Gallery app.
- From Apps, tap 🙏 Gallery > Pictures.
- Tap a picture to view it. Swipe left or right to view other pictures or videos.
• To mark the picture as a favorite, tap Favorite. The picture is added to Favorites under the Albums tab.
- To use Bixby Vision on the current picture, tap Bixby Vision. For more information, see Bixby on page 29.
- To access the following features, tap: More options:
- Details: View and edit information about the picture, including the date created, location, and properties.
Apps
70
- Set as wallpaper: Set the picture as wallpaper.
- Show date and location tags: See date and location tags when viewing your pictures.
- Print: Send the picture to a connected printer.
- Open in Photo Editor Pro: Edit the picture in Photo Editor Pro.
Edit pictures
Edit pictures stored on your device.
- From Apps, tap 🙏 Gallery > Pictures.
-
Tap a picture to view it.
-
Transform: Rotate, flip, crop, or make other changes to the overall appearance of the picture.
• Effects: Add color effects. - Stickers: Overlay illustrated or animated stickers.
- Draw: Add handwritten text or hand drawn content.
Play video
Play videos stored on your device.
- From Apps, tap

Gallery > Pictures.
- Tap a video to view it. Swipe left or right to view other pictures or videos.
• To mark the video as a favorite, tap Favorite. The video is added to Favorites under the Albums tab.
- To access the following features, tap: More options:
- Details: View and edit information about the video.
- Set as wallpaper: Set the video as wallpaper on the Lock screen.
-
Show date and location tags: See date and location tags when viewing your videos.
-
Tap ▶ Play video to play the video.
Apps
Edit video
Edit videos stored on your device.
-
From Apps, tap ✿ Gallery > Pictures.
-
Tap a video to view it.
-
Tap Edit to cut segments of the video.
-
Tap Save, and then confirm when prompted.
Share pictures and videos
Share pictures and videos from the Gallery app.

- From Apps, tap
Gallery > Pictures. - Tap : More options > Share, and then tap pictures and videos to select them.
- Tap Share, and then choose an app or connection to use for sharing your selection. Follow the prompts.
Delete pictures and videos
Delete pictures and videos stored on your device.
- From Apps, tap ✿ Gallery.
- Tap : More options > Edit.
- Tap pictures and videos to select them, or tap the All checkbox at the top of the screen to select all pictures and videos.
- Tap Delete, and confirm when prompted.
Take a screenshot
Capture an image of your screen. It will automatically create a Screenshots album in the Gallery app.
▶ From any screen, press and hold the Power and Volume down keys.
Internet
Access the Internet with a fully-featured web browser. For more information, visit samsung.com/us/support/owners/app/samsung-internet.
-
From Apps, tap Samsung folder > Internet.
-
Tap the address field, enter the web address, and then tap Go on the keyboard.
- Add to Bookmarks: Add the current web page to bookmarks.
- Refresh: Refresh or reload the current web page.
- < Back or ← Back: Return to the previous page.
• > Forward: Go forward to a recent page.
• Home: Display your Internet Home screen.
- Bookmarks: Manage bookmarked pages, saved pages, and history.
Apps
- Tabs: Manage open tabs. The number on the icon indicates the number of tabs that are currently open.
Quick menu
Access common features of your browser.
▶ Tap 🔵 Quick menu for the following options:
• Share: Share the web page with others.
• New tab: Open a new tab.
• Turn on Night mode: Switch to Night mode.
• Webpage text size: Change the text size.
- Close: Close the Quick menu.
- Settings: Change Quick menu options.
Browser tabs
Use tabs to view multiple web pages at the same time.
- From Apps, tap Samsung folder > Internet.
- Tap 1 Tabs > New tab.
• To close a tab, tap ✗ Close tab.
Bookmarks
The Bookmarks page stores Bookmarks, Saved pages, and History.
Save a Bookmark
Bookmarking a web page saves the web address so that you can access it quickly.
- From Apps, tap Samsung folder > Internet.
- Tap ☆ Add to Bookmarks.
Apps
Open a Bookmark
Quickly launch a web page from the Bookmarks page.
- From Apps, tap Samsung folder > Internet.
- Tap Bookmarks >Bookmarks.
- Tap a bookmark entry.
Save a web page
Saving a web page stores its content on your device so that you can access it offline.
- From Apps, tap Samsung folder > Internet.
- Tap : More options > Save webpage.
Open a saved web page
View a web page that has been saved.
- From Apps, tap Samsung folder > Internet.
- Tap Bookmarks > Saved pages.
- Ta p a saved page.
View history
To view a list of recently visited web pages:
▶ Tap Bookmarks > History.
Share pages
Web pages can be shared with your contacts.
- From Apps, tap Samsung folder > Internet.
- Tap: More options > Share, and follow the prompts.
Apps
Secret mode
Pages viewed in Secret mode are not listed in your browser history or search history, and leave no traces (such as cookies) on your device. Secret tabs are a darker shade than the normal tab windows.
Any downloaded files remain on your device after you close the secret tab.
- From Apps, tap Samsung folder > Internet.
- Tap 1 Tabs.
- Tap Turn on secret mode.
- Tap Set password to protect your Secret mode data with a password.
- or -
Tap Don't use password.
To turn off Secret mode:
- From Apps, tap Samsung folder > Internet.
- Tap 1 Tabs > Turn off secret mode.
Internet settings
Modify settings associated with using the Internet app.
- From Apps, tap Samsung folder > Internet.
- Tap : More options > Settings.
- Tap an option and follow the prompts.
Apps
77
Messages
Learn how to send and receive text messages (SMS) and multimedia messages (MMS).
- From Apps, tap Messages > Compose.
- You can choose recipients from Contacts or enter a phone number.
-
Tap Start.
-
Tap the Enter message field to enter a message.
• To add an attachment, tap + Attach.
- Review the message and tap 📋 Send.
Note: If you exit a message before you send it, the message is automatically saved as a draft.
Send SOS messages
Send a message with your location to designated contacts when you are in an emergency situation.
-
From Settings, tap Advanced features > Send SOS messages, and then tap On/Off to enable this feature.
-
Tap Send messages to > Add and add recipients by creating new contacts or selecting from Contacts.
- To include a picture from your front and rear camera, tap Attach pictures.
- To include a five-second audio recording in your SOS message, tap Attach audio recording.
- Press the Power key quickly three times to send an SOS message.
View Messages
From Apps, tap Messages, and then tap a message to view it.
- To play an audio or video attachment, tap ▶ Play.
- To scroll through the list of messages, swipe up or down.
Delete messages
- From Apps, tap □ Messages > : More options > Edit.
- Tap each message you want to delete.
- Tap Delete, and confirm when prompted.
Message search
Search through your messages by using the search feature.
- From Apps, tap Messages > Search.
- Enter a word or phrase to search for, and then tap 🔒 Search on the keyboard.
Messages settings
Configure the settings for text and multimedia messages.
From Apps, tap Messages >: More options >Settings.
Emergency alerts
Emergency alerts notify you of imminent threats and other situations. There is no charge for receiving an Emergency alert message.
-
From Apps, tap Messages > More options > Settings.
-
Tap Emergency alert settings to customize notifications for emergency alerts.
Apps
80
My Files
View and manage files stored on your device, including images, videos, music, and sound clips.
- From Apps, tap Samsung folder > My Files.
- Tap a category to view the relevant files or folders.
- Tap a file or folder to open it.
File groups
Files stored in the device are organized into the following groups:
- Recent files: View recently accessed files.
- This option displays if one or more files have been accessed recently.
- Categories: View your files based on the file type.
- Phone: View folders and files located on the device and optional memory card (not included).
• Cloud: View files saved on your cloud accounts.
— Cloud drives vary depending on the services you sign in to.
Apps
81
My Files options
Use My Files options to search, edit, clear file history, and more.
From Apps, tap Samsung folder > My Files.
The following options are available:
• Search: Search for a file or folder.
• More options:
- Get more space: View storage information for your device.
- Settings: View settings for the app.
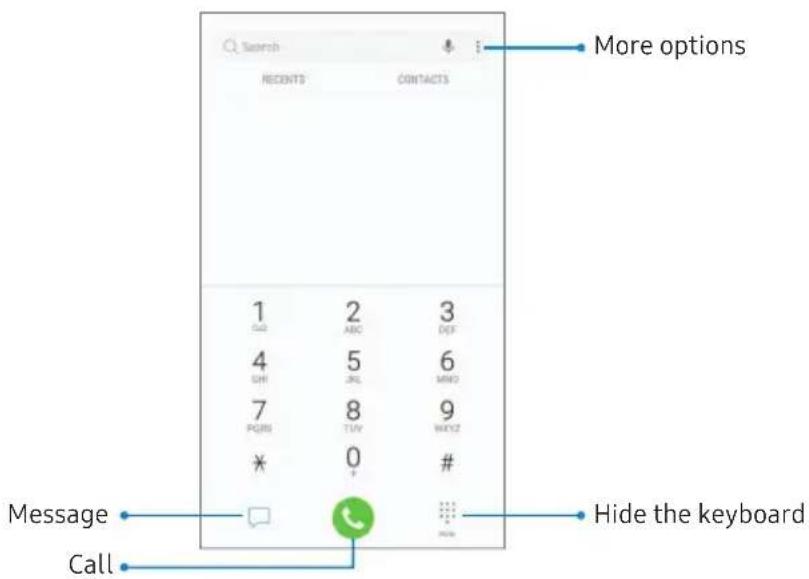
Phone
text_image
Search RECENTS CONTACTS More options 1 GND 2 ABC 3 DFF 4 GHI 5 JKL 6 MIND 7 PQRS 8 TUV 9 MAX12 * 0 # Message Call Hide the keyboardDevices and software are constantly evolving — the Illustrations you see here are for reference only
Make a call
Make a call from a Home screen.
-
From Apps, tap Phone.
-
Enter a number on the keypad and tap 📞 Call.
- Tap 📋 Keypad if the keypad is not displayed.
Enable swipe to call
Swipe a contact or number to the right to make a call.
-
From Settings, tap Advanced features > Swipe to call or send messages.
-
Tap On/Off to enable this feature.
Make a call from Recents
All incoming, outgoing, and missed calls are recorded in the Call log.
-
From Apps, tap 📞 Phone.
-
Tap Recents to display a list of recent calls.
-
Tap a contact, and then tap 📞 Call.
Make a call from Contacts
Call a contact from the Contacts app.
-
From Apps, tap 🔒 Contacts.
-
Swipe your finger across a contact to the right to call the contact.
Direct calls
Call the contact whose call log, message, or contact details are currently on the screen by bringing the device close to your ear.
From Settings, tap Advanced features > Direct call, and tap On/Off to enable.
Answer a call
When a call is received, the phone rings and the caller's phone number or name is displayed. If you are using an app, a pop-up screen is displayed for the incoming call.
On the incoming call screen, drag 📋 Answer to the right to answer the call.
- or -
On the incoming call pop-up screen, tap

Answer to answer the call.
Decline a call
You can choose to decline an incoming call. If you are using an app, a pop-up screen is displayed for the incoming call.
On the incoming call screen, drag 📞 Decline to the left to reject the call and send it to your voicemail.
- or -
On the incoming pop-up screen, tap 📞 Decline to reject the call and send it to your voicemail.
Decline with a message
You can choose to decline an incoming call with a text message response.
▶ On the incoming call screen, drag Send message upward and select a message.
- or -
On the incoming call pop-up screen, tap
Send message and select a message.
End a call
Tap 📞 End when you are ready to end your call.
Actions while on a call
You can adjust call volume, switch to a headset or speaker, and even multitask while on a call.
Adjust the call volume
▶ Press the Volume keys to increase or decrease the volume.
- or -
Tap 📋 Extra volume to quickly add more volume to the incoming audio.
Switch to headset or speaker
Listen to the call using the speaker or through a Bluetooth ^® headset (not included).
Tap Speaker to hear the caller using the speaker.
- or -
Tap ✗ Bluetooth to hear the caller using a Bluetooth headset.
Multitask
If you exit the call screen to use another app, your active call is indicated in the Status bar.
To return to the call screen:
Drag the Status bar down to display the Notification panel and tap the call.
To end a call while multitasking:
Drag the Status bar down to display the Notification panel, and then tap 📐 End call.
Apps
87
Call log
The numbers of the calls you have dialed, received, or missed are stored in the Call log.
- From a Home screen, tap 📞 Phone.
- Tap Recents. A list of recent calls is displayed. If the caller is in your Contacts list, the caller's name is displayed.
Save a contact from a recent call
Use recent call information to create a contact or update your Contacts list.
- From a Home screen, tap 📞 Phone.
- Tap Recents.
- Tap the call that contains the information that you want to save to your Contacts list.
- Tap ⓘ Details.
- Tap Create contact.
- or -
If you want to replace the number for an existing contact, tap Update existing.
Apps
88
Delete call records
To delete Call log entries:
- From a Home screen, tap 📋 Phone.
- Tap Recents.
- Touch and hold the call you want to delete from the Call log.
- Tap Delete.
Block a number
By adding a caller to your Block list, future calls from this number are sent directly to your voicemail, and messages are not received.
- From a Home screen, tap 📋 Phone.
- Tap Recents.
- Tap the caller you want to add to the Block list.
- Tap ⓘ Details > Block number, and confirm when prompted.
You can also modify your Block list in Settings:
From a Home screen, tap Phone > More options > Settings > Block numbers.
Speed dial
You can assign a shortcut number to a contact for speed dialing their default number.
- From a Home screen, tap 📋 Phone.
- Tap 📋 Keypad if the keypad is not displayed.
-
Tap : More options > Speed dial numbers. The Speed dial screen displays the reserved speed dial numbers.
-
Tap an unassigned number.
-
Tap ▼ Menu to select a different Speed dial number than the next one in sequence.
• Number 1 is reserved for Voicemail. -
Type in a name or number, or tap Add from
Contacts to assign a contact to the number.
- The selected contact is displayed in the Speed dial number box.
Make a call with Speed dial
You can make a call using Speed dial.
- From a Home screen, tap 📋 Phone.
- Tap 📋 Keypad if the keypad is not displayed.
- Touch and hold the Speed dial number.
- If the Speed dial number is more than one digit long, enter the first digits, and then hold the last digit.
Remove a Speed dial number
You can remove an assigned Speed dial number.
- From a Home screen, tap 📋 Phone.
- Tap 📋 Keypad if the keypad is not displayed.
- Tap : More options > Speed dial numbers.
- Tap Remove by the contact you want to remove from Speed dial.
Emergency calls
You can dial the emergency telephone number in your region regardless of the phone's cellular service status. If your phone is not activated, you can only make an emergency call.
- From a Home screen, tap 📋 Phone.
- Enter the emergency telephone number (911 in North America) and tap 📞 Call.
- Complete your call. During this type of call, you have access to most in-call features.
Make an emergency call from a locked screen
The emergency telephone number can be dialed even if the phone is locked, allowing anyone to use your phone to call for help in an emergency. When accessed from a locked screen, only the emergency calling feature is accessible to the caller. The rest of the phone remains secured.
- Drag 📞 Phone upward to open the call screen.
- Tap Emergency call to display the Emergency dialer.
- Enter the emergency telephone number (911 in North America) and tap Call
- Complete your call. During this type of call, you have access to most in-call features.
Voicemail
Use your phone's voicemail feature.
For information on setting up voicemail, see Set up your voicemail on page 14.
- From a Home screen, tap 📞 Phone.
- Touch and hold ☐ Voicemail.
- Follow the voice prompts from the voicemail center.
Phone settings
These settings allow you to modify settings associated with the Phone app.
- From a Home screen, tap 📋 Phone > More options > Settings.
- Tap an option and follow the prompts.
TTY mode
A teletypewriter (TTY) is a telecommunications device that allows people who are deaf, hard of hearing, or who have speech or language disabilities to communicate by telephone.
- From a Home screen, tap 📋 Phone > : More options > Settings.
- Tap More settings > TTY mode.
- Tap TTY OFF, TTY FULL, TTY HCO, or TTY VCO.
Apps
92
Samsung Gear
Connect your device to your Samsung Gear using this application. For more information, visit samsung.com/us/support/owners/app/samsung-gear .
▶ From Apps, tap Over Samsung Gear.
Apps
93
Samsung Notes
Use Samsung Notes to write and save notes. For more information, visit samsung.com/us/support/owners/app/samsung-notes.
- From Apps, tap Samsung folder > 📄 Samsung Notes.
- Tap + Create and type a note. Available options include:
• Text: Use the keyboard to type text.
• Pen: Use your finger to write text.
- Brush: Create a drawing.
- Attach: Insert an image or voice file into the note.
- More options > Turn on/off Rich text: Use enhanced text formatting.
- Tap Save when finished.
Edit notes
Make edits to notes you create.
- From Apps, tap Samsung folder > 📋 Samsung Notes.
- Tap a note to view it.
- Tap Edit to make changes.
- Tap Save.
Browse notes
Browse notes you create.
From Apps, tap Samsung folder > 📋 Samsung Notes.
- Browse note entries by swiping up or down.
• To search for a note, tap 🔒 Search.
Notes options
You can edit, share, or manage notes.
- From Apps, tap Samsung folder > 📋 Samsung Notes.
- Tap : More options for the following options:
- Edi t: Select notes to share, delete, or move.
- List/Grid view: Switch between List view and Grid view.
Apps
95
Samsung+
Samsung+ allows you to access live customer support, view device diagnostics, and learn about your registered Samsung devices. For support, visit samsung.com/us/samsung-plus.
- From Apps, tap Samsung folder > 🕐 Samsung+.
- Follow the prompts to log in with either a Samsung account or a Google Account.
Plus help
The plus icon is at the bottom of every screen to provide you quick access to the help you need.
- From Apps, tap Samsung folder > 🚗 Samsung+.
-
Tap Plus for the following options:
-
Search: Enter keywords to find the information you need.
- Community: View community boards where you can ask questions and give answers to other Samsung users.
- Text chat: Chat with an automated support system by texting.
- Call us: Start a phone call with customer service.
• Video chat: Start a video call with customer service.
Quick tabs
The app will open to your Home page. Swipe left and right across the tabs to view Help topics.
- Home: Register your Samsung devices and view customized cards.
- Diagnostics: View storage, connection speed, and battery levels for your device.
- Learn: View Articles about your device to help you get the most out of it.
- Community: View community boards where you can ask questions and give answers to other Samsung users.
- Get help: View quick links to call, video, and community support for your device.
Apps
97
SmartThings
Control your devices by monitoring them in one place. Check the status of your devices by looking at the dashboard.
Note: Non-Samsung connected device errors or defects are not covered by the Samsung warranty; contact the non-Samsung device manufacturer for support.
-
From Apps, tap Samsung folder > ✦ SmartThings, and sign in with your Samsung account.
-
Follow the prompts to begin using SmartThings.
Apps
Google apps
Enjoy these apps from Google. Certain apps require a Google Account. Visit google.com to learn more.
Chrome
Browse the Internet with Chrome ^™ and bring your open tabs, bookmarks, and address bar data from your computer to your mobile device.
Visit support.google.com/chrome to learn more.

Drive
Open, view, rename, and share files saved to your Google Drive ^™ cloud account.
Visit support.google.com/drive to learn more.

Duo
Make one-to-one video calls.
Visit support.google.com/duo to learn more.

Gmail
Send and receive email with Google's web-based email service.
Visit support.google.com/mail to learn more.

Find online content with tools that learn what interests you. Turn on your personalized feed to receive customized content.

Maps
Get directions and other location-based information. You must enable location services to use Google Maps. For more information, see Location on page 114.
Visit support.google.com/maps to learn more.

Photos
Store and back up your photos and videos automatically to your Google Account with Google Photos ^™ .
Visit support.google.com/photos to learn more.

Play Movies & TV
Watch movies and TV shows purchased from Google Play. You can also view videos saved on your device.
Visit play.google.com/store/movies to learn more.

Play Music
Play music and audio files on your device.
Visit support.google.com/music to learn more.

Play Store
Find new apps, movies and TV shows, music, books, magazines, and games in the Google Play ^™ store.
Visit support.google.com/play to learn more.

YouTube
Wadebo a nigh upload YouTube
from your device.
Visit support.google.com/youtube to learn more.
Additional apps
The following apps are preloaded or downloaded over the air to your device.

Keep up with friends and family with the Facebook ^™ app. Share updates, photos, and videos, as well as text, chat, and play games.
Apps
102
Settings
Configure your device's connections and settings.
Access Settings
There are a couple of ways to access your device settings.
▶ From a Home screen, swipe up to access Apps, and then tap Settings.
- or -
Drag down from the Status bar to display the Notification panel, and then tap ⚙️ Settings.
Search for Settings
If you are not sure exactly where to find a certain setting, you can use the Search feature.
- From Settings, tap Search.
- Enter a word or words in the Search field. As you type, settings that match display on the screen.
- Tap an entry to go to that setting.
Connections
Manage connections between your device and a variety of networks and other devices.
Wi-Fi
Connect your device to a Wi-Fi network.
- From Settings, tap Connections > Wi-Fi, and then tap On/Off to turn on Wi-Fi.
- When Wi-Fi is turned on, your device automatically scans for available networks and displays them.
- Tap the network you want to connect to.
- When you select an open network, you are automatically connected to the network. Otherwise, enter a password to connect.
Manually connect to a Wi-Fi network
Connect your device to a Wi-Fi network that is hidden.
- From Settings, tap Connections > Wi-Fi, and then tap On/Off to turn on Wi-Fi.
- Tap + Add network at the bottom of the list.
- Enter information about the Wi-Fi network:
• Network name: Enter the network name.
• Security: Select a security option and enter your password.
- Auto reconnect: Connect to this network automatically.
• Show advanced options: Add advanced options, such as IP settings and Proxy settings.
- Tap Connect.
Wi-Fi preferences
Customize advanced Wi-Fi services.
- From Settings, tap Connections > Wi-Fi, and then tap On/Off to turn on Wi-Fi.
-
Tap Advanced. To view all network settings, tap View more.
-
Switch to mobile data: Connect automatically to a mobile network connection when the Wi-Fi connection is unstable. When the Wi-Fi signal is strong, it switches back to Wi-Fi.
- Turn on Wi-Fi automatically: Enable Wi-Fi in frequently used locations.
• Network notification: Receive notifications when open networks in range are detected. - Manage networks: View your saved Wi-Fi networks.
- Wi-Fi control history: View devices that have turned your Wi-Fi on or off.
Connections
- WPS push button: Connect to a Wi-Fi network by pressing the WPS button on a router.
- WPS PIN entry: Connect to a Wi-Fi network by entering your WPS PIN.
- Keep Wi-Fi on during sleep: Specify whether to disconnect from Wi-Fi when the device is asleep.
• Install network certificates: Install authentication certificates. - MAC address: View your device's MAC address, which is required when connecting to some secured networks (not configurable).
- IP address: View your device's IP address (not configurable).
Wi-Fi Direct
Wi-Fi Direct uses Wi-Fi capability to share data between devices. A Wi-Fi network connection is not required.
- From Settings, tap Connections > Wi-Fi, and then tap On/Off to turn on Wi-Fi.
- T ap Wi-Fi Direct.
- Your device scans for discoverable Wi-Fi Direct devices.
- Tap a device, and then follow the prompts to connect.
Share files with Wi-Fi Direct
Share files with another device using Wi-Fi Direct.
- From an app, tap Share.
- or -
Tap : More options > Share.
- Tap Wi-Fi Direct and follow the prompts.
Receive files with Wi-Fi Direct
When another device attempts to send a file to your device using Wi-Fi Direct, your device begins downloading the file.
▶ To open the file, drag down the Status bar and tap File received.
Disconnect from Wi-Fi Direct
Disconnect your device from a Wi-Fi Direct device.
- From Settings, tap Connections > Wi-Fi > Wi-Fi Direct.
- Tap a device to disconnect it.
Bluetooth
Bluetooth allows you to pair your device to another Bluetooth-enabled device. Once a pairing is created, the devices continue to recognize their partnership and exchange information without having to re-enter a passcode.
- From Settings, tap Connections > Bluetooth, and then tap On/Off to turn on Bluetooth.
- Y our device scans for discoverable Bluetooth devices. To scan again, tap Scan.
- Tap a device, and follow the prompts to connect.
Rename a paired device
Rename a paired device to make it easier to recognize.
- From Settings, tap Connections > Bluetooth, and then tap On/Off to turn on Bluetooth.
- Tap ⚙️ Settings next to the previously paired device, and then tap Rename.
- Enter a new name, and tap Rename.
Share files with Bluetooth
Use Bluetooth to transfer information to a paired device.
- From an app, tap Share.
- or -
Tap : More options > Share.
- Tap Bluetooth and follow the prompts.
Receive files with Bluetooth
When another device attempts to send a file to your device using Bluetooth, you will see a request to accept the file.
- Tap Accept.
- To open the file, drag down the Status bar and tap File received.
Unpair from a Bluetooth device
When you unpair from a Bluetooth device, the two devices no longer recognize each other. To connect again, you have to pair the devices.
- From Settings, tap Connections > Bluetooth, and then tap On/Off to turn on Bluetooth.
- Tap ⚙️ Settings next to the paired device, and then tap Unpair to delete the paired device.
Phone visibility
Tablet visibility
Allow other devices to find your mobile device and transfer files.
From Settings, tap Connections > Phone visibility, and then tap On/Off.
Data usage
View your current mobile and Wi-Fi data usage.
From Settings, tap Connections > Data usage.
Monitor Wi-Fi data
View your Wi-Fi data usage and set restrictions for Wi-Fi networks.
▶ From Settings, tap Connections > Data usage. The following options are available:
- Wi-Fi data usage: View data usage over Wi-Fi connections.
- Restrict networks: Select networks to prevent apps that are running in the background from using them.
Airplane mode
Airplane mode disconnects your device from all networks and turns off connectivity features.
- From Settings, tap Connections > Airplane mode.
- Tap On/Off to enable this feature.
Mobile hotspot
Activate Mobile hotspot to allow other devices to use your device's Internet connection.
- From Settings, tap Connections > Mobile hotspot and tethering > Mobile hotspot.
- Tap On/Off to turn on Mobile hotspot.
- Activate Wi-Fi on the target device.
- Scan for Wi-Fi hotspots and select your device's Mobile hotspot.
- Enter your device's Mobile hotspot password on the target device.
Change the mobile hotspot password
Change your Mobile Hotspot password.
- From Settings, tap Connections > Mobile hotspot and tethering > Mobile hotspot.
- Tap the password and enter a new password.
- Tap Save.
Allowed devices list
Control which devices can connect to your Mobile hotspot.
- From Settings, tap Connections > Mobile hotspot and tethering > Mobile hotspot.
- Tap : More options > Allowed devices, and then tap Add to enter the other device's Device name and MAC address.
- Tap Add to add the device.
- To restrict connections to your Allowed devices list, tap Allowed devices only.
Configure mobile hotspot settings
Manage your security and connecting settings.
- From Settings, tap Connections > Mobile hotspot and tethering > Mobile hotspot.
-
Tap : More options > Configure mobile hotspot for the following settings:
-
Network name: View and change the name of your Mobile hotspot.
- Hide my device: Prevent your Mobile hotspot from being discoverable by other devices.
• Security: Choose the security level for your Mobile hotspot. - Password: If you choose a security level that uses a password, you can view or change it.
- Show advanced options: Configure additional Mobile hotspot settings.
Tethering
You can use tethering to share your device's Internet connection with a computer.
-
From Settings, tap Connections > Mobile hotspot and tethering.
-
Tap an option:
-
Tap Bluetooth tethering to share your device's Internet connection using Bluetooth.
- Connect the computer to the device using a USB cable, and then tap USB tethering.
Location
Some apps may require one or more location services be turned on for full functionality.
- From Settings, tap Connections > Location.
- Tap On/Off to turn on Location services.
- Tap Locating method to select how your location is determined:
- High accuracy: Uses GPS, Wi-Fi, and mobile networks.
- Battery saving: Uses Wi-Fi and mobile networks (no GPS).
• Phone only: Uses GPS only.
-
Tap Improve accuracy to use other connections for determining your location:
-
Wi-Fi scanning: Allow apps and services to scan for Wi-Fi networks automatically, even when Wi-Fi is turned off.
- Bluetooth scanning: Allow apps to scan for and connect to nearby devices automatically through Bluetooth, even when Bluetooth is turned off.
Recent location requests
Apps that have requested your location are listed under Recent location requests.
- From Settings, tap Connections > Location.
- Tap On/Off to turn on Location services.
- Tap an entry under Recent location requests to view the app's settings.
Location services
Location services store and use your device's most recent location data. Google apps can use this data to improve your search results based on places that you have visited.
- From Settings, tap Connections > Location.
- Tap an entry under Location services to use as a location service.
Nearby device scanning
Scan for nearby devices to connect to and set them up easily. You receive a notification when there are available devices to connect to.
- From Settings, tap Connections > More connection settings > Nearby device scanning.
- Tap On/Off to enable the feature.
Connect to a printer
Connect your device to a printer on the same Wi-Fi network.
- From Settings, tap Connections > More connection settings > Printing.
- Tap + A dd service and follow the prompts to add a print service.
- Tap the print service, and then tap: More options > Add printer.
Virtual Private Networks
Set up and manage your Virtual Private Networks (VPNs). You must set a secured screen lock before setting up a VPN. For more information, see Set a secure screen lock on page 142.
- From Settings, tap Connections > More connection settings > VPN.
- Tap Add VPN and follow the prompts to set up your VPN.
Manage a VPN
Use the VPN settings menu to edit or delete a VPN connection.
- Tap Settings > Connections > More connection settings > VPN.
- Tap ⚙️ Settings next to a VPN.
- Edit the VPN and tap Save.
- or -
Tap Delete to delete the VPN.
Connect to a VPN
Once you have set up a VPN connection, connecting to and disconnecting from a VPN is easy.
-
From Settings, tap Connections > More connection settings > VPN.
-
Tap a VPN, enter your log in information, and tap Connect.
- To disconnect, tap the VPN, and then tap Disconnect.
Sounds and vibration
Configure the sounds and vibrations used to indicate notifications, screen touches, and other interactions.
Sound mode
Switch between sound modes, while preserving the individual sound settings you have made.
From Settings, tap Sounds and vibration >
Sound mode, and then choose a mode:
- Sound: Use the sounds, vibrations, and volume levels you have chosen in Sound settings for notifications and alerts.
- Vibrate: Use vibration only for notifications and alerts.
- Mute: Set your device to make no sounds.
- Temporary mute: Set a time limit for muting the device.
Easy mute
Mute sounds and videos by covering the screen or turning over the device.
From Settings, tap Advanced features > Easy mute, and tap On/Off to enable.
Vibrations
Configure your device's vibrations.
-
From Settings, tap Sounds and vibration.
-
Tap options to customize:
-
Vibrate while ringing: Set your device to vibrate in addition to ringing when you receive a call.
- Vibration intensity: Set vibration intensity levels for calls, notifications, and feedback by dragging the sliders.
- Vibration pattern: Choose from preset vibration patterns.
Volume
Set the volume level for call ringtones, notifications, and other audio.
From Settings, tap Sounds and vibration > Volume, and drag the sliders.
Note: You can also use the Volume key to adjust the volume. Tap ▼ More to customize all volume options.
Use Volume keys for media
Set the default of the Volume key to control the media volume.
- From Settings, tap Sounds and vibration.
- Tap Use Volume keys for media to enable this feature.
Media volume limiter
Limit the maximum output of the device's volume while using headphones or Bluetooth speakers (not included).
- From Settings, tap Sounds and vibration > Volume.
- Tap : More options > Media volume limiter.
-
Tap On/Off to enable this feature.
-
To set the maximum output volume, drag the Custom volume limit slider.
- To require a PIN to make changes to the volume setting, tap Set volume limit PIN.
Ringtone
Choose from preset ringtones or add your own.
- From Settings, tap Sounds and vibration > Ringtone.
- Tap a ringtone to hear a preview and select it.
- or -
Tap Add to use an audio file as a ringtone.
Notification sounds
Customize notification sounds for certain apps or choose a default for all notifications.
From Settings, tap Sounds and vibration > Notification sounds and tap a sound to choose it.
Do not disturb
Set your device to mute all or some notifications and sounds during specific time periods.
From Settings, tap Sounds and vibration >
Do not disturb and configure the following:
- Turn on now: Enable this option.
- Turn on as scheduled: Configure Days, Start time, and End time to set up a do not disturb schedule.
- Allow exceptions: Customize which notifications are allowed while your device is in Do not disturb mode.
- App rules: Manage rules set by apps.
- Hide visual notifications: Select options for preventing visual notifications for apps silenced by Do not disturb.
System sounds
Set various other system sound options.
From Settings, tap Sounds and vibration, and tap to enable each option:
- Touch sounds: Play tones when you touch or tap the screen to make selections.
- Screen lock sounds: Play a sound when you unlock the screen.
- Charging sound: Play a sound when a charger is connected.
- Vibration feedback: Enable vibration when the navigation keys are tapped.
Key-tap feedback
Play tones when keys are tapped.
From Settings, tap Sounds and vibration, and then tap to enable each option:
- Dialing keypad tones: Play a tone when the dialing keypad is tapped.
- Keyboard sound: Play a sound when the Samsung keyboard is tapped.
- Keyboard vibration: Enable vibrations when the Samsung keyboard is tapped.
Sound quality and effects
Choose from advanced sound options to customize your audio experience.
From Settings, tap Sounds and vibration > Sound quality and effects. The following options are available:
- Dolby Atmos: Transform your experience with audio that surrounds you.
- Equalizer: Choose an audio preset that is customized to different genres of music.
-
Advanced/Basic: Manually adjust various sound qualities.
-
Tube Amp Pro: Simulate the soft timbre of a tube amplifier.
- Concert hall: Simulate the reverb of a concert hall.
- Adapt Sound: Customize your sound settings.
Separate app sound
You can choose to have an app play sound on a speaker or headphones separate from the rest of the sounds on your device.
- From Settings, tap Sounds and vibration > Separate app sound.
- Tap On/Off to enable Separate app sound, and then set the following options:
- App: Choose an app to play its sound on a separate audio device.
- Audio device: Choose the audio device that you want the app's sound to be played on.
Notifications
Select which apps you want to receive alerts from. Alerts include notifications, sounds, and vibrations.
Manage notifications
Allow or block notifications from apps and services.
▶ From Settings, tap Notifications.
- To customize App icon badges, tap App icon badges.
- To enable notifications, tap All apps, or tap On/Off next to an app.
- To configure additional notification settings, tap Advanced.
- To customize individual notification settings, tap an app or service.
Smart alert
Set the device to vibrate when you pick it up to notify you about missed calls and messages.
From Settings, tap Advanced features > Smart alert, and tap On/Off to enable.
Display
Configure your display's brightness, screen timeout delay, and other settings.
Screen off settings
Customize when the screen turns off.
-
From Settings, tap Display.
-
Tap an option to customize:
-
Screen timeout: Turn the screen off after a set amount of time.
- Block accidental touches: You can prevent the screen from turning on while the device is in a dark place, such as a pocket or a bag.
- Screen saver: Display colors or images after the screen has turned off or while charging.
Screen brightness
Adjust the screen brightness to suit your surroundings or personal preference. You may also want to adjust screen brightness to conserve battery power.
- From Settings, tap Display.
- Customize options under Brightness:
- Drag the Brightness slider to set a custom brightness level.
- Tap Auto brightness to automatically adjust the screen brightness based on the lighting conditions.
Blue light filter
Use the Blue light filter at night to help you sleep better. You can set a schedule to automatically turn this feature on and off.
From Settings, tap Display > Blue light filter, and then choose one of the following options:
- Drag the Opacity slider to set the opacity of the filter.
- Tap Turn on now to enable this feature.
- Tap Turn on as scheduled to set a schedule for when Blue light filter should be enabled. You can choose Sunset to sunrise or Custom schedule.
Font and screen zoom
You can set the screen zoom level and the font size and style.
-
From Settings, tap Display > Font and screen zoom for the following options:
-
Drag the Screen zoom slider to adjust the zoom level.
- Drag the Font size slider to adjust the size of text.
-
Tap a font to select it, or tap + Download fonts to find new fonts from Galaxy Apps.
-
Tap Done to set the screen zoom and font.
Screen quality
Customize the screen mode to match your viewing preferences.
From Settings, tap Display to configure an option:
- Tap Screen mode and choose Adaptive display or a specific type of screen mode based on what you are viewing.
One-handed mode
Change the screen layout to accommodate operating your device with one hand.
- From Settings, tap Advanced features > One-handed mode.
-
Tap On/Off to enable the following:
-
Gesture: Swipe up diagonally from either bottom corner to reduce the display size.
- Button: Press the Home key three times in quick succession to reduce the display size.
- Show keys on screen: Display the Home, Back, and Recents keys on the screen.
Device maintenance
View the status of your device's battery, storage, and memory. You can also automatically optimize your device's system resources.
Quick optimization
The quick optimization feature improves device performance through the following actions:
- Identifying apps that use excessive battery power and clearing unneeded items from memory.
- Deleting unnecessary files and closing apps running in the background.
- Scanning for malware.
To use the quick optimization feature:
- From Settings, tap Device maintenance.
- Tap Optimize now.
Battery
View how battery power is used for device activities.
From Settings, tap Device maintenance > Battery for options:
- Battery usage: View power usage by item.
- Power saving mode: Select a power mode to extend battery life.
- App power monitor: View power usage by app.
- Unmonitored apps: Select apps to exclude from being put to sleep by the App power monitor.
- Always sleeping apps: Select apps to put to sleep immediately when not being used.
- More options > Advanced settings: Configure advanced battery settings and notifications.
Storage
View the device memory and usage. Mount, unmount, or format an optional memory card (not included).
From Settings, tap Device maintenance > Storage.
• To increase available memory, tap Clean now.
Memory card (SD card)
Once an optional memory card (not included) has been installed in your device, the card memory is displayed in the Storage setting.
For more information, see Install a SIM card and memory card on page 8.
Mount a memory card
When you install an optional memory card, it is automatically mounted (connected to the device) and prepared for use. However, should you unmount the card without removing it from the device, you need to mount it before it can be accessed.
- From Settings, tap Device maintenance > Storage.
- Tap : More options > Storage settings.
- Under Portable storage, tap your SD card, and then tap Mount.
Remove a memory card
Warning: To prevent damage to information stored on the memory card, unmount the card before removing it from the device.
- From Settings, tap Device maintenance > Storage.
- Tap : More options > Storage settings.
- Under Portable storage, tap your SD card, and then tap Unmount.
- Remove your memory card from the device.
Format a memory card
Warning: When formatting an SD card, you should back up your music and photo files that are stored on the card because formatting the SD card deletes all the stored data.
- From Settings, tap Device maintenance > Storage.
- Tap : More options > Storage settings.
- Under Portable storage, tap your SD card, tap Format, and then follow the prompts.
Memory
Check the amount of available memory. You can close background apps and reduce the amount of memory you are using to speed up your device.
- From Settings, tap Device maintenance > Memory.
- The used and available memory are shown.
- To free up as much memory as possible, tap Clean now and follow the prompts.
- The selected apps and services in the list will be closed.
Device security
Enable and configure security services for your device.
From Settings, tap Device maintenance > Device security for the following options:
- Tap Scan phone to scan for security threats.
- Tap Knox active protection to enable extra protection against malicious attacks.
Language and input
Configure your device's language and input settings.
Change the device language
You can add languages to your list and organize them according to preference. If an app does not support your default language, then it will move to the next supported language in your list.
- From Settings, tap General management > Language and input > Language.
- Tap + Add language, and select a language from the list.
- Tap Set as default to change the device language.
- To switch to another language on the list, drag ♦Move next to the desired language to the top of the list, and then tap Done.
Default keyboard
You can select a default keyboard for your device's menus and keyboards. Additional keyboards can be downloaded from the Google Play store.
- From Settings, tap General management > Language and input.
- Tap Default keyboard, and select a keyboard.
Google Voice typing
Speak rather than type your text entries using Google voice typing.
- From Settings, tap General management > Language and input.
-
Tap On-screen keyboard > Google voice typing.
-
Languages: Select languages for Google voice typing.
- Voice Match: Train Google Assistant to recognize your voice when you say "Ok Google".
- Hands-free: Allow requests with the device locked.
-
Speech output: Select options for spoken feedback.
-
Offline speech recognition: Download and install speech recognition engines, allowing you to use voice input while not connected to the network.
- Block offensive words: Hide search results that contain offensive words.
- Bluetooth headset: Records audio through a Bluetooth headset, if available.
Manage on-screen keyboards
Enable or disable on-screen keyboards.
- From Settings, tap General management > Language and input.
- Tap On-screen keyboard > Manage keyboards.
- Tap each keyboard to enable or disable.
Physical keyboards
Customize options when you have a physical keyboard connected to your device (sold separately).
-
From Settings, tap General management > Language and input.
-
Tap Physical keyboard, and then choose an option:
-
Show on-screen keyboard: Show the on-screen keyboard while a physical keyboard is also being used.
- Keyboard shortcuts: Show explanations of the keyboard shortcuts on the screen.
Autofill service
Save time entering information using autofill services.
- From Settings, tap General Management > Language and input.
- Tap Autofill service and select your preferred service.
Text-to-speech options
Configure your Text-to-Speech (TTS) options. TTS is used for various accessibility features, such as Voice Assistant.
From Settings, tap General management > Language and input > Text-to-speech for options:
- Preferred engine: Choose either the Samsung or Google Text-to-speech engine. Tap ⚙️ Settings for options.
• Language: Select a default language. - Speech rate: Set the speed at which the text is spoken.
- Pitch: Set the pitch of the speech.
- Play: Tap to play a short demonstration of speech synthesis.
- Reset: Reset the speech rate and pitch.
Pointer speed
Configure pointer speed for an optional mouse or trackpad (not included).
- From Settings, tap General management > Language and input.
- Under Pointer speed, drag the slider to the right to go faster or to the left to go slower.
Date and time
By default, your device receives date and time information from the wireless network. Outside of network coverage, you can set the date and time manually.
From Settings, tap General management >
Date and time. The following options are available:
- Automatic date and time: Receive date and time updates from your wireless network. When Automatic date and time is disabled, the following options are available:
- Set date: Enter the current date.
- Set time: Enter the current time.
- Select time zone: Choose a new time zone.
- Use 24-hour format: Set the format for displaying time.
Report diagnostic information
This feature sends diagnostic information about your device when you are having technical problems.
-
From Settings, tap General management > Report diagnostic information.
-
Read and accept the consent information to enable this feature.
Reset
Reset device and network settings. You can also reset your device to its factory defaults.
Reset settings
You can reset your device to its factory default settings, which resets everything except the security, language, and account settings. Personal data is not affected.
- From Settings, tap General management > Reset > Reset settings.
- Tap Reset settings, and confirm when prompted.
Reset network settings
You can reset Wi-Fi, mobile data, and Bluetooth settings with Reset network settings.
- From Settings, tap General management > Reset > Reset network settings.
- Tap Reset settings, and confirm when prompted.
Factory data reset
You can reset your device to factory defaults, erasing all data from your device.
This action permanently erases ALL data from the device, including Google or other account settings, system and application data and settings, downloaded applications, as well as your music, photos, videos, and other files. Any data stored on an external SD card is not affected.
Note: When you sign in to a Google Account on your device, Factory Reset Protection is activated. This protects your device in the event it is lost or stolen.
If you reset your device to factory default settings with the Factory Reset Protection (FRP) feature activated, you must enter the user name and password for a registered Google Account to regain access to the device. You will not be able to access the device without the correct credentials.
Warning: If you reset your Google Account password, it can take 24 hours for the password reset to sync with all devices registered to the account.
Before resetting your device:
- Verify that the information you want to keep has transferred to your storage area.
- Log in to your Google Account and confirm your user name and password.
To reset your device:
- From Settings, tap General management > Reset > Factory data reset.
- Tap Reset and follow the prompts to perform the reset.
- When the device restarts, follow the prompts to set up your device.
Factory reset protection
When you sign in to a Google Account on your device, Factory Reset Protection is activated. Factory Reset Protection (FRP) prevents other people from using your device if it is reset to factory settings without your permission. For example, if your device is lost or stolen and a factory data reset is performed, only someone with your Google Account username and password can use the device.
You will not be able to access the device after a factory data reset if you do not have your Google Account username and password.
Caution: Before shipping your device back to Samsung or taking it to your nearest Samsung-authorized service center, you should remove your Google Account before resetting the device back to factory settings. For more information, visit samsung.com/us/support/frp.
Enable factory reset protection
Adding a Google Account to your device automatically activates the FRP security feature.
Disable factory reset protection
To disable FRP, remove all Google Accounts from the device.
-
From Settings, tap Cloud and accounts > Accounts > [Google account].
-
Tap Remove account.
Auto restart
Optimize your device by restarting it automatically at set times. Any unsaved data will be lost when the device restarts.
- From Settings, tap General management > Reset > Auto restart.
-
Tap On/Off to activate Auto restart, and then set the following parameters:
-
Time: Set the time of day to restart your device.
• Day: Select the day of the week to automatically restart your device.
Software update
Check for and install available software updates for your device.
From Settings, tap Software update for the following options:
- Download updates manually: Check for software updates.
- Download updates automatically: Update software automatically.
- Scheduled software updates: Install software updates at a time you set.
- Last update information: View information about the last software update.
Lock screen and security
Secure your device and protect your data with Lock screen and security settings.
Screen lock types
The various Screen lock types offer high, medium, or no security. Choose from the following: Swipe, Pattern, PIN, Password, and None.
Set a secure screen lock
It is recommended that you secure your device using a secure screen lock (Pattern, PIN, or Password).
-
From Settings, tap Lock screen > Screen lock type and tap a secure screen lock (Pattern, PIN, or Password).
-
Tap On/Off to enable showing notifications on the lock screen. The following options are available:
-
Hide content: Enable to hide the content of notifications.
- Notification icons only: Enable to hide notification details and show only the icon.
- Transparency: Adjust the transparency of notifications.
-
Auto-reverse text color: Reverse the color of notification text automatically based on the background color.
-
Tap Done when finished.
-
Configure the following screen lock options:
-
Smart Lock: Unlock your device automatically when trusted locations or other devices have been detected. A secure screen lock is required for this feature.
- Secure lock settings: Customize your secure lock settings. A secure screen lock is required for this feature.
Biometrics
The following biometric lock types are available:
- Face recognition: Use facial recognition to unlock your device. For more information, see Face recognition on page 31.
Clock and information
Configure features for the Lock screen.
From Settings, tap Lock screen for options:
- Clock style: Set the type and color of the clock on the Lock screen.
- Roaming clock: Change to digital clocks showing both local and home time zones when roaming.
- FaceWidgets: Enable widgets on the Lock screen to get quick access to useful information.
- Contact information: Show your contact information, such as your phone number or email address.
- Notifications: Select which notifications to display on the Lock screen.
- App shortcuts: Select which apps to open from the Lock screen.
Find My Mobile
Protect your device from loss or theft allowing your device to be locked, tracked, and for your data to be deleted remotely. For more information, visit samsung.com/us/support/owners/app/find-my-mobile. You must sign up for a Samsung account and enable Google location service to use Find My Mobile.
To access your device remotely, visit findmymobile.samsung.com.
-
From Settings, tap Biometrics and security > Find My Mobile.
-
Enter your Samsung account password or, if you are not logged in to your Samsung account, tap Add account and follow the prompts. The following options are available:
- Remote controls: Activate or deactivate Remote controls, which allows you to access your device remotely.
- Google location service: Activate or deactivate Google location service. This service must be on in order to find your device.
- Send last location: Allow your device to send its last location to the Find My Mobile server when the battery falls below a certain level.
Security update
Check the date of the last security software update.
From Settings, tap Biometrics and security > Security update to see if the latest security update is installed.
Install unknown apps
Allow selected apps to install unknown third-party apps.
- From Settings, tap Biometrics and security > Install unknown apps.
- Tap an app.
- Tap Allow from this source to enable apps to be installed using this app.
Secure Folder
Lock your private content and apps to enhance security. You must sign in to your Samsung account in order to use Secure Folder. You must also set a secure lock for your device.
From Settings, tap Biometrics and security > Secure Folder and follow the prompts to secure content on your device.
App permission monitor
Get notified when permissions you select are being used by apps running in the background.
- From Settings, tap Biometrics and security > App permission monitor.
- Tap On/Off next to the apps you want to be notified about when they use certain permissions.
Secure startup
Protect your device by requiring a numeric PIN, pattern, or password to be entered before it starts up. You must have a secured screen lock for this option to be available.
From Settings, tap Biometrics and security > Secure startup and select an option.
Encrypt SD card
Protect your optional memory (not included) card by encrypting its data.
- From Settings, tap Biometrics and security > Encrypt SD card.
- Tap Encrypt SD card and follow the prompts to encrypt all data on your memory card.
View passwords
Display password characters briefly as you type them.
From Settings, tap Biometrics and security > Other security settings > Make passwords visible to enable the feature.
Security update service
Automatically receive security updates.
From Settings, tap Biometrics and security > Other security settings for the following Security update service options:
- Security policy updates: Automatically or manually check for security policy updates.
- Automatic updates can also be limited to only when your device is connected to a Wi-Fi network.
- Send security reports: Use Wi-Fi to send security reports to Samsung for threat analysis.
Device administration
Manage your device administrators and application installation privileges.
-
From Settings, tap Biometrics and security > Other security settings > Device admin apps.
-
Tap an option to enable it as a device administrator.
Credential storage
Manage your security certificates. You can disable or remove certificates.
From Settings, tap Biometrics and security > Other security settings for the following options:
- Storage type: Select a storage location for credential contents.
- View security certificates: Display certificates in your device's ROM and other certificates you have installed.
- User certificates: View user certificates.
- Install from device storage: Install a new certificate from storage.
- Clear credentials: Erase the credential contents from the device and reset the password.
Knox active protection
Protect your device against malicious attacks.
From Settings, tap Biometrics and security > Other security settings > Knox active protection and follow the prompts.
Advanced security settings
Use these options to configure advanced security settings.
From Settings, tap Biometrics and security > Other security settings for the following advanced options:
- Trust agents: Perform selected actions when trusted devices are connected.
- This option is only displayed when a lock screen is enabled. For more information, see Set a secure screen lock on page 142.
- Pin windows: Pin an app on your device screen, preventing access to other features of your device.
- Usage data access: View the applications that can access your device's usage history.
- Notification access: View the applications that can access notifications you receive on your device.
- Do not disturb permission: View which apps have permission to change the Do not disturb settings.
Accounts
Set up and manage accounts, including your Google Account, Samsung account, email, and social networking accounts.
Samsung Cloud
Keep your data safe by backing up and restoring your device. You can also sync your data from multiple devices. For more information, visit samsung.com/us/support/owners/app/samsung-cloud.
- From Settings, tap Cloud and accounts > Samsung Cloud.
- If a Samsung account has not been added, follow the prompts to add one.
- Once a Samsung account is configured, you can view and manage items stored in the Samsung Cloud.
Accounts
Add an account
You can add and manage all your email, social networking, and picture and video sharing accounts.
-
From Settings, tap Cloud and accounts > Accounts > Add account.
-
Tap one of the account types.
-
Follow the prompts to enter your credentials and set up the account.
- Tap Auto sync data to enable automatic updates to your accounts.
Account settings
Each account has its own set of settings. In addition, you can configure common settings for all accounts of the same type.
Account settings and available features vary between account types and service providers. Contact your service provider for more information on your account's settings.
- From Settings, tap Cloud and accounts > Accounts > [Account type].
- Tap an account to configure that account's sync settings.
- Tap other available options for the account type.
Remove an account
You can remove accounts from your device.
- From Settings, tap Cloud and accounts > Accounts > [Account type].
- Tap the account and then tap Remove account.
Backup and restore
Configure your device to backup data to your personal accounts.
Samsung account
Enable backup of your information to your Samsung account.
From Settings, tap Cloud and accounts > Backup and restore for options:
- Back up data: Configure your Samsung account to back up your data.
- Restore data: Use your Samsung account to restore your backup data.
Google account
Enable backup of your information to your Google account.
From Settings, tap Cloud and accounts > Backup and restore for options:
- Back up my data: Enable back up of application data, Wi-Fi passwords, and other settings to Google servers.
- Backup account: Select a Google Account to be used as your backup account.
- Automatic restore: Enable automatic restoration of settings from Google servers.
Google settings
Configure your device's Google settings. Available options depend on your Google account.
From Settings, tap Google, and select an option to customize.
Accessibility
Accessibility services are special features that make using the device easier for those with certain physical disabilities.
For more information about Accessibility for Samsung products, please contact us at accessibility@sea.samsung.com.
Vision
You can turn on Accessibility features to assist with visual aspects of the device.
From Settings, tap Accessibility > Vision and tap an option:
- Voice Assistant: Give spoken feedback to assist blind and low-vision users.
- Voice Assistant help: View help on using Voice Assistant.
- Dark screen: Keep the screen turned off at all times for privacy.
- Rapid key input: Release your finger to enter selection instead of double tapping.
- Voice Label: Write voice recordings to NFC tags to provide information about nearby objects.
- Font and screen zoom: Configure the screen zoom level and font size and style.
- High contrast fonts: Adjust the color and outline of fonts to increase the contrast with the background.
- High contrast keyboard: Adjust the size of the Samsung keyboard and change its colors to increase the contrast between the keys and the background.
- Show button shapes: Show buttons with shaded backgrounds to make them stand out.
- Magnifier window: Magnify content shown on the screen.
- Magnification: Use exaggerated gestures such as triple-tapping, double pinching, and dragging two fingers across the screen.
- Large mouse/touchpad pointer: Enable a large pointer for a connected mouse or touchpad.
- Negative colors: Reverse the display of colors from white text on a black background to black text on a white background.
- Color adjustment: Adjust the color of the screen if you are color blind or have difficulty reading the display because of the screen color.
- Color lens: Adjust the screen colors if you have difficulty reading the text.
Hearing
You can turn on Accessibility features to assist with audio aspects of the device.
From Settings, tap Accessibility > Hearing and tap an option:
- Flash notification: Set the camera light or screen to blink whenever you receive a notification.
- Mute all sounds: Turn off all notifications and audio for privacy.
- Hearing aids: Improve the sound quality for use with hearing aids.
- Samsung subtitles (CC): Use Samsung subtitles with multimedia files when available.
- Google subtitles (CC): Use Google subtitles with multimedia files when available.
Accessibility
- Left/right sound balance: Use the slider to set the left and right balance when using a stereo device.
- Mono audio: Switch audio from stereo to mono for use with one earphone.
Dexterity and interaction
You can turn on Accessibility features to assist with dexterity and interaction aspects of the device.
From Settings, tap Accessibility > Dexterity and interaction and tap an option:
- Universal switch: Control your device with your customized switches.
- Assistant menu: Improve the device accessibility for users with reduced dexterity.
-
Touch and hold delay: Select a time interval for this action.
-
Click after pointer stops: Automatically click on an item after the pointer stops over it.
- Interaction control: Customize interactable or non-interactable areas, hardkeys, and the keyboard.
More accessibility settings
Customize additional accessibility features for your device.
▶ From Settings, tap Accessibility
- Text-to-speech: Set your preferred TTS engine and options. For more information, see Text-to-speech options on page 136.
- Direction lock: Unlock the screen by swiping in a series of directions.
- Direct access: Open your accessibility settings by pressing the Volume up key and the Power key together.
-
Accessibility shortcut: Quickly enable accessibility features using the Volume keys.
-
Notification reminder: Beep at set intervals to remind you of any unread notifications.
- Answering and ending calls: Select shortcuts for answering and ending calls.
- Single tap mode: Dismiss or snooze alarms, calendar events, and timer alerts, and answer or reject incoming calls with a single tap.
Accessibility services
Additional accessibility apps may be downloaded from the Google Play store.
-
From Settings, tap Accessibility.
-
Other installed accessibility services may be listed and configured under Services.
Other settings
Configure features on your device that make it easier to use.
Help
View the user manual on your device.
▶ From Settings, tap Help.
Manage game features
Automatically arrange all your games in one place. For more information on Game Launcher, visit samsung.com/us/support/owners/app/game-launcher.
From Settings, tap Advanced features > Games.
- Tap On/Off to enable Game Launcher.
- Tap On/Off to enable Game Tools.
Device assistance app
Device assistance apps help you by gathering information from the screen currently shown.
- Tap Settings > Apps > More options > Default apps > Device assistance app.
-
Tap an option to customize:
-
Device assistance app: Select your default assistance app.
- Analyze on-screen text: Analyze text shown on the screen to provide related content.
- Analyze on-screen images: Take and analyze images of the screen.
Dual messenger
Use two separate accounts for the same app.
- From Settings, tap Advanced features > Dual messenger.
- Tap On/Off next to supported apps to enable the feature for each app.
About phone
View information about your device, including current status, legal information, hardware and software versions, and more.
- From Settings, tap About phone, and then view your phone number, model number, serial number, and IMEI information.
- Tap additional items to view more information about your device.
Getting help

Videos
Visit samsung.com/spsn to learn more.

Smart Simulator
Visit samsungsimulator.com to learn more.

Tips and Tricks
Visit samsung.com/us/support/tips to learn more.

Samsung Care
Visit samsung.com/us/support to learn more.
Legal
View legal information for your device.
Legal information
READ THIS INFORMATION BEFORE USING YOUR MOBILE DEVICE.
Arbitration Agreement - This Product is subject to a binding arbitration agreement between you and SAMSUNG ELECTRONICS AMERICA, INC. ("Samsung"). You can opt out of the agreement within 30 calendar days of the first consumer purchase by emailing optout@sea.samsung.com or calling 1-800-SAMSUNG (726-7864) and providing the applicable information. For complete terms and conditions that bind you and Samsung, refer to the "Arbitration Agreement" section of the Terms & Conditions, included with the Product.
Find legal information online
The full Arbitration Agreement, Standard Limited Warranty, End User License Agreement (EULA), and Health & Safety Information for your device are available online.
Arbitration Agreement, Standard Limited Warranty, and Health & Safety Information:
Phone:
- English: samsung.com/us/Legal/Phone-HSGuide
• Spanish: samsung.com/us/Legal/Phone-HSGuide-SP
Tablet:
• English: samsung.com/us/Legal/Tablet-HSGuide
• Spanish: samsung.com/us/Legal/Tablet-HSGuide-SP
End User License Agreement:
- English: samsung.com/us/Legal/SamsungLegal-EULA4
- Spanish: samsung.com/us/Legal/SamsungLegal-EULA4/#SPANISH
Find legal information on the mobile device
The full Arbitration Agreement, Standard Limited Warranty, End User License Agreement (EULA) and Health & Safety Information are also available on the device, in the Samsung legal section of Settings. The location depends on the device, and is usually in the "About device" or "About phone" section, for example:
- Settings > About phone or About device or About tablet > Legal information > Samsung legal
- Or, use the Search feature to search for "Legal".
Intellectual property
All Intellectual Property, as defined below, owned by or which is otherwise the property of Samsung or its respective suppliers relating to the Product, including but not limited to, accessories, parts, or software relating thereto, is proprietary to Samsung and protected under federal laws, state laws, and international treaty provisions. Intellectual Property includes, but is not limited to, inventions (patentable or unpatentable), patents, trade secrets, copyrights, software, computer programs, and related documentation and other works of authorship.
You may not infringe or otherwise violate the rights secured by the Intellectual Property. Moreover, you agree that you will not (and will not attempt to) modify, prepare derivative works of, reverse engineer, decompile, disassemble, or otherwise attempt to create source code from the software. No title to or ownership in the Intellectual Property is transferred to you. All applicable rights of the Intellectual Property shall remain with Samsung and its suppliers.
Open source software
Some software components of this product, including but not limited to 'PowerTOP' and 'e2fsprogs', incorporate source code covered under GNU General Public License (GPL), GNU Lesser General Public License (LGPL), OpenSSL License, BSD License and other open source licenses. To obtain the source code covered under the open source licenses, please visit: opensource.samsung.com
Legal
Disclaimer of warranties; exclusion of liability
The information below explains that a user accepts this Product as sold, including the hardware and software components as created and packaged for sale. If the user changes these parameters through a unique modification, Samsung will not be held responsible for damages or issues that result from these end-user changes.
Except as set forth in the Standard Limited Warranty that accompanies the Product, the purchaser takes the product "as is", and Samsung makes no express or implied warranty of any kind whatsoever with respect to the Product, including but not limited to the:
-
merchantability of the Product or its fitness for any particular purpose or use;
• design, condition or quality of the Product;
• performance of the Product; -
workmanship of the Product or the components contained therein; or
- compliance of the Product with the requirements of any law, rule, specification or contract pertaining thereto.
Nothing contained in the User Manual shall be construed to create an express or implied warranty of any kind whatsoever with respect to the Product. In addition, Samsung shall not be liable for any damages of any kind resulting from the purchase or use of the Product or arising from the breach of the express warranty, including incidental, special or consequential damages, or loss of anticipated profits or benefits.
Modification of software
Samsung is not liable for performance issues or incompatibilities caused by your editing of registry settings, or your modification of Operating System (OS) software.
Legal
Using custom OS software may cause your device and applications to work improperly. Your carrier may not permit users to download certain software, such as custom OS.
Samsung Knox
Samsung Knox is Samsung's security platform and is a mark for a Samsung device tested for security with enterprise use in mind. Additional licensing fee may be required. For more information about Knox, please refer to: samsung.com/us/knox.
Restricting children's access to your mobile device
Your device is not a toy. Do not allow children to play with it because they could hurt themselves and others, damage the device, or make calls that increase your device bill. Keep the device and all its parts and accessories out of the reach of small children.
Samsung Electronics America, Inc.
Address:
85 Challenger Road
Ridgefield Park
New Jersey 07660
Phone: 1-800-SAMSUNG (726-7864)
Internet: samsung.com
©2018 Samsung Electronics America, Inc. Samsung, Samsung Galaxy, Multi Window, Samsung Gear, and Smart Switch are all trademarks of Samsung Electronics Co., Ltd.
Other marks are the property of their respective owners.
Manufactured under license from Dolby Laboratories. Dolby, Dolby Atmos, and the double-D symbol are trademarks of Dolby Laboratories.


Some multimedia (audio/video) files contain Digital Rights Management (DRM) technology to verify you have the right to use the files. Preloaded apps on your device may not be compatible with DRM-protected files.
Screen images are simulated. Appearance of device may vary.
The actual available capacity of the internal memory is less than the specified capacity because the operating system and default applications occupy part of the memory. The available capacity may change when you upgrade the device.
Please check with your service provider to verify qualifying services/features.