
CWTF15-3 - Coffee maker Bunn - Free user manual and instructions
Find the device manual for free CWTF15-3 Bunn in PDF.


User questions about CWTF15-3 Bunn
0 question about this device. Answer the ones you know or ask your own.
Ask a new question about this device
Download the instructions for your Coffee maker in PDF format for free! Find your manual CWTF15-3 - Bunn and take your electronic device back in hand. On this page are published all the documents necessary for the use of your device. CWTF15-3 by Bunn.
USER MANUAL CWTF15-3 Bunn
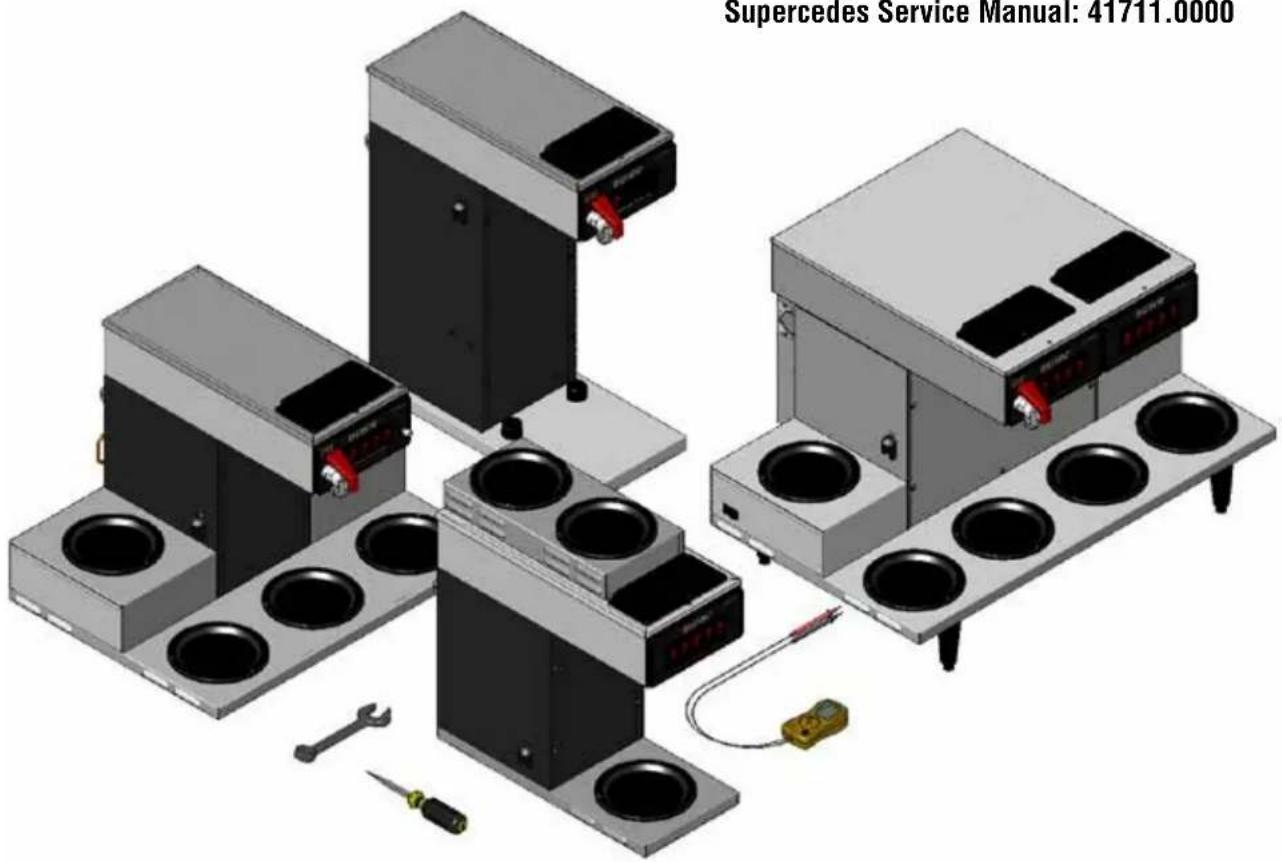
C, CS, CT, CWTF, CRT, CRTF Series Including DV, MV, APS/TC/TS, Single CW & Twins
Supercedes Service Manual: 41711.0000
natural_image
Isometric view of industrial equipment including control panels, fans, and a supercedes Service Manual (no text or symbols on components)SERVICE & REPAIR MANUAL
BUNN-O-MATIC CORPORATION
Bunn-O-Matic Corp. ("BUNN") warrants equipment manufactured by it as follows:
1) Airpots, thermal carafes, decanters, GPR servers, iced tea/coffee dispensers, MCP/MCA pod brewers thermal servers and Thermofresh servers (mechanical and digital)- 1 year parts and 1 year labor.
2) All other equipment - 2 years parts and 1 year labor plus added warranties as specified below:
a) Electronic circuit and/or control boards - parts and labor for 3 years.
b) Compressors on refrigeration equipment - 5 years parts and 1 year labor.
c) Grinding burrs on coffee grinding equipment to grind coffee to meet original factory screen sieve analysis - parts and labor for 4 years or 40,000 pounds of coffee, whichever comes first.
These warranty periods run from the date of installation BUNN warrants that the equipment manufactured by it will be commercially free of defects in material and workmanship existing at the time of manufacture and appearing within the applicable warranty period. This warranty does not apply to any equipment, component or part that was not manufactured by BUNN or that, in BUNN's judgment, has been affected by misuse, neglect, alteration, improper installation or operation, improper maintenance or repair, non periodic cleaning and descaling, equipment failures related to poor water quality, damage or casualty. In addition, the warranty does not apply to replacement of items subject to normal use including but not limited to user replaceable parts such as seals and gaskets. This warranty is conditioned on the Buyer 1) giving BUNN prompt notice of any claim to be made under this warranty by telephone at (217) 529-6601 or by writing to Post Office Box 3227, Springfield, Illinois 62708-3227; 2) if requested by BUNN, shipping the defective equipment prepaid to an authorized BUNN service location; and 3) receiving prior authorization from BUNN that the defective equipment is under warranty.
THE FOREGOING WARRANTY IS EXCLUSIVE AND IS IN LIEU OF ANY OTHER WARRANTY, WRITTEN OR ORAL, EXPRESS OR IMPLIED, INCLUDING, BUT NOT LIMITED TO, ANY IMPLIED WARRANTY OF EITHER MERCHANTABILITY OR FITNESS FOR A PARTICULAR PURPOSE. The agents, dealers or employees of BUNN are not authorized to make modifications to this warranty or to make additional warranties that are binding on BUNN. Accordingly, statements by such individuals, whether oral or written, do not constitute warranties and should not be relied upon.
If BUNN determines in its sole discretion that the equipment does not conform to the warranty, BUNN, at its exclusive option while the equipment is under warranty, shall either 1) provide at no charge replacement parts and/or labor (during the applicable parts and labor warranty periods specified above) to repair the defective components, provided that this repair is done by a BUNN Authorized Service Representative; or 2) shall replace the equipment or refund the purchase price for the equipment.
THE BUYER'S REMEDY AGAINST BUNN FOR THE BREACH OF ANY OBLIGATION ARISING OUT OF THE SALE OF THIS EQUIPMENT, WHETHER DERIVED FROM WARRANTY OR OTHERWISE, SHALL BE LIMITED, AT BUNN'S SOLE OPTION AS SPECIFIED HEREIN, TO REPAIR, REPLACEMENT OR REFUND.
In no event shall BUNN be liable for any other damage or loss, including, but not limited to, lost profits, lost sales, loss of use of equipment, claims of Buyer's customers, cost of capital, cost of down time, cost of substitute equipment, facilities or services, or any other special, incidental or consequential damages.
392, AutoPOD, AXIOM, BrewLOGIC, BrewMETER, Brew Better Not Bitter, BrewWISE, BrewWIZARD, BUNN Espress, BUNN Family Gourmet, BUNN Gourmet, BUNN Pour-O-Matic, BUNN, BUNN with the stylized red line, BUNNlink, Bunn-OMatic, Bunn-O-Matic, BUNNserve, BUNNSERVE with the stylized wrench design, Cool Froth, DBC, Dr. Brew stylized Dr. design, Dual, Easy Pour, EasyClear, EasyGard, FlavorGard, Gourmet Ice, Gourmet Juice, High Intensity, iMIX, Infusion Series, Intellisteam, My Café, Phase Brew, PowerLogic, Quality Beverage Equipment Worldwide, Respect Earth, Respect Earth with the stylized leaf and coffee cherry design, Safety-Fresh, savemycoffee.com, Scale-Pro, Silver Series, Single, Smart Funnel, Smart Hopper, SmartWAVE, Soft Heat, SplashGard, The Mark of Quality in Beverage Equipment Worldwide, ThermoFresh, Titan, trifecta, Velocity Brew, A Partner You Can Count On, Air Brew, Air Infusion, Beverage Bar Creator, Beverage Profit Calculator, Brew better, not bitter., BUNNSource, Coffee At Its Best, Cyclonic Heating System, Daypart, Digital Brewer Control, Nothing Brews Like a BUNN, Pouring Profits, Signature Series, Tea At Its Best, The Horizontal Red Line, Ultra are either trademarks or registered trademarks of Bunn-O-Matic Corporation.
Contents
Trouble Shooting....4
Component Access 10
Control Thermostat....10
Electronic Thermostat....11
ON/OFF Switch 12
Start Switch (Brew)....13
Solenoid (Inlet) 14
Tank Heater 16
Fill Basin 16
Tank Heater Switch 18
Thermal Cut-Off 20
Coil/Faucet 21
Limit Thermostat....22
Recovery Booster....23
Timer (Early Model) 24
Freshness Timer (Early Models).... 25
Digital Brew Timer (Late Model) 26
Warmer Elements 28
Schematic Wiring Diagrams.... 29
TROUBLESHOOTING
A troubleshooting guide is provided to suggest probable causes and remedies for the most likely problems encountered. If the problem remains after exhausting the troubleshooting steps, contact the Bunn-O-Matic Technical Service Department.
- Inspection, testing, and repair of electrical equipment should be performed only by qualified service personnel.
- All electronic components have 120 volt ac and low voltage dc potential on their terminals. Shorting of terminals or the application of external voltages may result in board failure.
- Intermittent operation of electronic circuit boards is unlikely. Board failure will normally be permanent. If an intermittent condition is encountered, the cause will likely be a switch contact or a loose connection at a terminal or crimp.
- Solenoid removal requires interrupting the water supply to the valve. Damage may result if solenoids are energized for more than ten minutes without a supply of water.
- The use of two wrenches is recommended whenever plumbing fittings are tightened or loosened. This will help to avoid twists and kinks in the tubing.
• Make certain that all plumbing connections are sealed and electrical connections tight and isolated.
• This brewer is heated at all times. Keep away from combustibles.
WARNING - • Exercise extreme caution when servicing electrical equipment.
• Unplug the brewer when servicing, except when electrical tests are specified.
• Follow recommended service procedures
- Replace all protective shields or safety notices
PROBLEM
Brew cycle will not start
PROBABLE CAUSE
- No water
- No power or incorrect voltage to the brewer
REMEDY
Water lines and valves to the brewer must be open.
(A1) Check the terminal block for 120 volts across the black and white terminals on two wire 120 volt brewers.
(A2) Check the terminal block for 120 volts across the red and white terminals and the black and white terminal on three wire 120/240 volt brewers.
(A3) Check the terminal block for 200 volts on "B Series" brewers or 240 volts on "A Series" brewers across the red and black terminals.
(B) Check circuit breakers or fuses.
TROUBLESHOOTING (cont.)
| PROBLEM | PROBABLE CAUSE | REMEDY |
| Brew cycle will not start (cont.) | 3. ON/OFF Switch | Refer to Service - ON/OFF Switch for testing. |
| 4. Start Switch | Refer to Service - Start Switch for testing procedures. | |
| 5. Timer | Refer to Service - Timer for testing procedures. | |
| 6. Solenoid Valve | Refer to Service - Solenoid Valve for testing procedures. | |
| 7. Water strainer/flow control (.222 GPM) Early models | (A) Direction of flow arrow must be pointing towards brewer.(B) Remove the strainer/flow control and check for obstructions. Clear or replace. | |
| Water is not hot | 1. Tank Heater Switch | Refer to Service - Tank Heater Switch for testing procedures. |
| 2. (A) Limit Thermostat(B) Thermal Cut-Off (Brewers with Faucet)CAUTION - Do not eliminate or bypass limit thermostat or thermal cut-off. Use only BOM replacement parts. | Refer to Service - Limit Thermostat for testing procedures. Thermal Cut-Off for testing procedures. | |
| 3. Control Thermostat | Refer to Service - Control Thermostat for testing procedures. | |
| 4. Tank Heater | Refer to Service - Tank Heater for testing procedures. | |
| Inconsistent beverage level in dispenser | 1. Strainer /flow control (.222 GPM) Early models. | (A) Direction of flow arrow must be pointing towards the brewer.(B) Remove the strainer/flow control and check for obstruction. Clear or replace. |
| 2. Syphon System | The brewer must be level or slightly lower in front to syphon properly. | |
| 3. Lime Build-upCAUTION - Tank and tank components should be delimed regularly depending on local water conditions. Excessive mineral build-up on stainless steel surfaces can initiate corrosive reactions resulting in serious leaks. | Inspect the tank assembly for excessive lime deposits. Delime as required. | |
| 4. Water Pressure | The water pressure to the brewer must be at least 20 psi (138 kPa). | |
| Consistently low beverage level in the dispenser | 1. Timer | Timer must be set for at least two minutes and fifteen seconds. |
| 2. Strainer/flow Control (.222 GPM) | (A) Direction of flow arrow must be pointing towards brewer.(B) Remove the strainer/flow control and check for obstructions. Clear or replace. | |
| Spitting or excessive steaming | 1. Lime Build-upCAUTION - Tank and tank components should be delimed regularly depending on local water conditions. Excessive mineral build-up on stainless steel surfaces can initiate corrosive reactions resulting in serious leaks. | Inspect tank assembly for excessive lime deposits. Delime as required. |
| Spitting or excessive steaming (cont.) | 2. Control Thermostat | Refer to Service - Control Thermostat for testing procedures. |
| Dripping from sprayhead | 1. Syphon System | The brewer must be level or slightly lower in front to syphon properly. |
| 2. Lime Build-upCAUTION- Tank and tank components should be delimed regularly depending on local water conditions. Excessive mineral build-up on stainless steel surfaces can initiate corrosive reactions resulting in serious leaks. | Inspect the tank assembly for excessive lime deposits. Delime as required. | |
| 3. Solenoid Valve | Remove the solenoid valve and clear any obstructions. Rebuild or replace the valve if necessary. | |
| Water flows into tank continuously (ON/OFF Switch "ON") | 1. Timer | Refer to Service - Timer for testing procedures. |
| Water flows into tank continuously (ON/OFF Switch "OFF") | 1. Solenoid Valve | Remove the Solenoid Valve and clean any obstruction. Rebuild or replace the valve if necessary. |
| Beverage overflows dispenser | 1.Dispenser | The dispenser must be completely empty before starting a brew cycle. |
| 2. Timer | Refer to Service - Timer for testing procedures. | |
| 3. Solenoid Valve | Remove the Solenoid Valve and clean any obstruction. Rebuild or replace the valve if necessary. |
TROUBLESHOOTING (cont.) PROBLEM PROBABLE CAUSE
| Weak beverage | 1. Filter Type | BUNN® paper filters must be used for proper extraction. |
| 2. Coffee Grind | A fine or drip grind must be used for proper extraction. | |
| 3. Sprayhead | A six-hole stainless steel spray-head must be used for proper extraction. | |
| 4. Funnel Loading | The BUNN® paper filter must be centered in the funnel and the bed of ground leveled by gentle shaking. | |
| 5. Water Temperature | Place an empty funnel on an empty dispenser beneath the sprayhead. Initiate a brew cycle and check the water temperature immediately below the sprayhead with a thermometer. The reading should not be less than 195°F (76°C). Adjust the control thermostat to increase the water temperature. Replace if necessary. | |
| Dry coffee grounds remain in the funnel | 1. Funnel Loading | The BUNN® paper filter must be centered in the funnel and the bed of grounds leveled by gently shaking. |
| Brewer is making unusual noises | 1. Solenoid | The nut on the solenoid must be tight or it will vibrate during operation. |
| 2. Plumbing Lines | Plumbing lines should not resting on the counter top. | |
| 3. Water Supply | (A) The brewer must be connected to a cold water line. | |
| (B) Water pressure to the brewer must not exceed 90 psi (620 kPa). Install a regulator if necessary to lower the working pressure to approximately 50 psi (345 kPa). |
TROUBLESHOOTING (cont.) PROBLEM
Brewer is making unusual noises (cont.)
Low beverage serving temperature
PROBABLE CAUSE
-
Tank Heater
-
Warmer
-
ON/OFF Switch
REMEDY
Remove and clean lime off the tank heater.
Refer to Service - Warmer element for testing procedures.
Refer to Service - ON/OFF Switch for testing procedures.
SERVICE
This section provides procedures for testing and replacing various major components used in this brewer should service become necessary. Refer to Troubleshooting for assistance in determining the cause of any problem.
WARNING - Inspection, testing, and repair of electrical equipment should be performed only by qualified service personnel. The brewer should be unplugged when servicing, except when electrical tests are required and the test procedure specifically states to plug-in the brewer.
COMPONENT ACCESS
WARNING - Disconnect the brewer from the power source before the removal of any panel or the replacement of any component.
All components are accessible by the removal of the top cover, front inspection panel, warmer plate(s) and rear utility cover (Twins only).
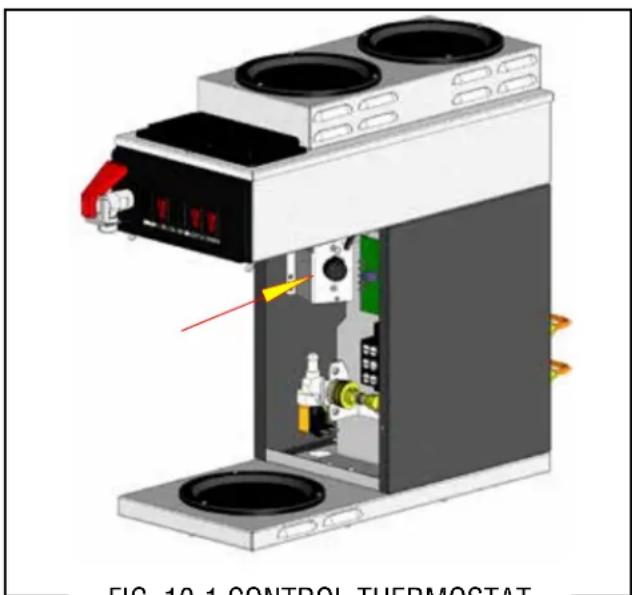
CONTROL THERMOSTAT
text_image
FIG. 10.1 CONTROL THERMOSTATFIG. 10-1 CONTROL THERMOSTAT
Location:
The control thermostat is located inside the trunk on the upper left side of the component bracket.
Test Procedures:
- Disconnect the brewer from the power source.
-
Disconnect the leads from control thermostat.
-
Gently remove the capillary bulb and grommet from the tank.
- Check for continuity across the thermostat terminals. The indication must be:
a) Continuity with knob rotated fully clockwise.
b) No continuity with knob rotated fully counterclockwise. NOTE: First style does not have the ON/OFF feature, simply check continuity.
If continuity is not present as described, replace control thermostat.
If continuity is present as described, refer to the wiring diagrams and check the brewer wiring harness.
Removal and Replacement:
- Disconnect the control thermostat wires.
- Remove the thermostat capillary bulb by firmly pulling up on the capillary at the tank lid. This will disengage the grommet from the tank lid.
- Remove the one #8-32 screw securing the control thermostat to the component bracket inside the trunk.
- Slide the grommet to the line 4.5" above the bulb on the new capillary tube.
- Insert the capillary bulb through the hole in the tank lid and press the grommet firmly and evenly so that the groove in the grommet fits into the tank lid.
- Carefully bend the capillary tube so that the tube and bulb inside the tank are in the vertical position.
NOTE - The capillary tube must be clear of any electrical termination and not kinked.
- Using #8-32 screw(s), secure the control thermostat to the component bracket inside the trunk.
- For first type thermostat, refer to Wiring Diagrams when reconnecting thermostat wires.
- Adjust the control thermostat as required.
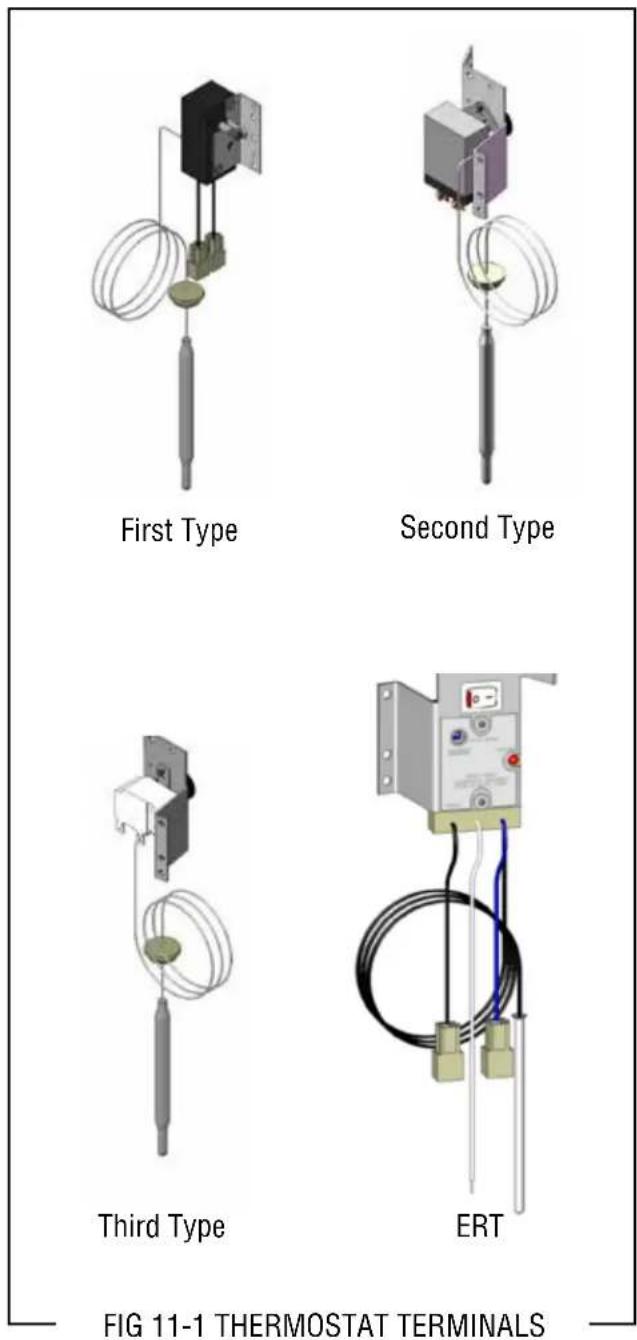
NOTE: First type will only turn approximately one turn. Clockwise to the stopper is approximately 180^ F, maximum counterclockwise to stopper is approximately 200^ F.
Later types will be approximately 200^ F when turned maximum clockwise. Turning it counterclockwise until it clicks will turn off (open contacts).
SERVICE (cont.)
OPTIONAL ELECTRONIC THERMOSTAT (ERT):
The ERT is located inside the trunk on the upper left side of the component bracket.
Test Procedures:
- Disconnect the brewer from the power source.
- Gently remove the temperature sensor and grommet from the tank.
- Check voltage across the blue wire from limit thermostat and the white wire at the terminal block. Connect the brewer to the power source. The indication must be: 120Vac.
If voltage is not present as described, refer to the wiring diagrams and check the brewer wiring harness. If voltage is present as described, proceed to #4.
- Disconnect the brewer from the power source.
- With the temperature sensor and grommet still out of the tank, check voltage across the black wire to the heater and the white wire at the terminal block. Connect the brewer to the power source. The indication must be: 120Vac.
If voltage is not present as described, replace ERT. If voltage is present as described, the ERT is functioning properly.
Removal and Replacement:
- Disconnect the control thermostat wires.
- Remove the temperature sensor by firmly pulling-up on the metal sheath at the tank lid. This will disengage the grommet from the tank lid.
- Remove the one #8-32 screw securing the ERT to the component bracket inside the trunk.
- Slide the grommet to the top of the sheath.
- Insert the temperature sensor through the hole in the tank lid and press the grommet firmly and evenly so that the groove in the grommet fits into the tank lid.
- Using the #8-32 screw, secure the ERT to the component bracket inside the trunk.
- For first type thermostat, refer to Wiring Diagrams when reconnecting ERT wires.
- Adjust the ERT as required.
text_image
First Type Second Type Third Type ERT FIG 11-1 THERMOSTAT TERMINALSNOTE: The ERT has a range of 170^ - 210^ F. Use care not to set it too high or boiling could occur.
SERVICE (cont.)
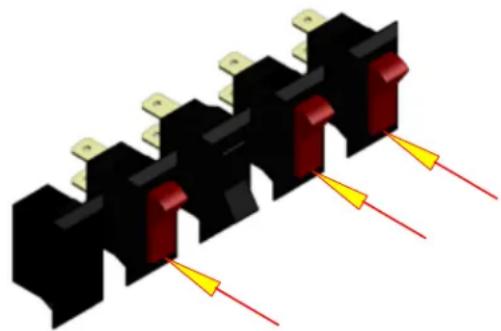
ON/OFF WARMER SWITCH
natural_image
3D diagram of a multi-pin electrical connector with red and black pins, no text or symbols presentFIG. 12-1 ON/OFF WARMER SWITCHES
Location:
The ON/OFF switch(s) are located on the front of the hood.
Test Procedure:
- Disconnect the brewer from the power source.
- Viewing the switch from the back remove the white or red wire from the upper terminal and the black wire from the center terminal.
- Check the voltage across the white wire or red wire and the black wire with a voltmeter. Connect the brewer to the power source. The indication must be:
a) 120 volts ac for two wire 120 volt models and three wire 120/240 volt models.
b) 200 to 240 volts ac for two wire 200 or 240 volt models.
- Disconnect the brewer from the power source.
If voltage is present as described, reconnect the white or red wire and proceed to #5.
If voltage is not present as described, refer to the Wiring Diagrams and check the brewer wiring harness.
- With the black wire removed, remove the wire from the lower terminal.
- Check for continuity across the center and lower terminal with the switch in the "ON" position. Continuity must not be present when the switch is in the "OFF" position.
If continuity is present as described, reconnect the black wire to the center terminal and the remaining wire to the lower terminal.
If continuity is not present as described, replace the switch.
Removal and Replacement:
- Remove the wires from the switch terminals.
- Compress the clips inside the hood and gently push the switch through the opening.
- Push the new switch into the opening and spread the clips to hold switch in the hood.
- Refer to Fig.7 when reconnecting the wires.
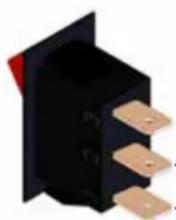
—
(3) WHI to Neutral or RED to L2
(2) BLK to L1
(1) To Warmer
WARMER SWITCH
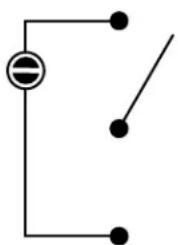
natural_image
Pure electrical circuit lines without any symbols(1) LOAD (WARMER)
(2) LINE (L1)
(3) NEUTRAL (L2)
FIG. 12-2 WARMER SWITCH TERMINALS
SERVICE (cont.)
START SWITCHES
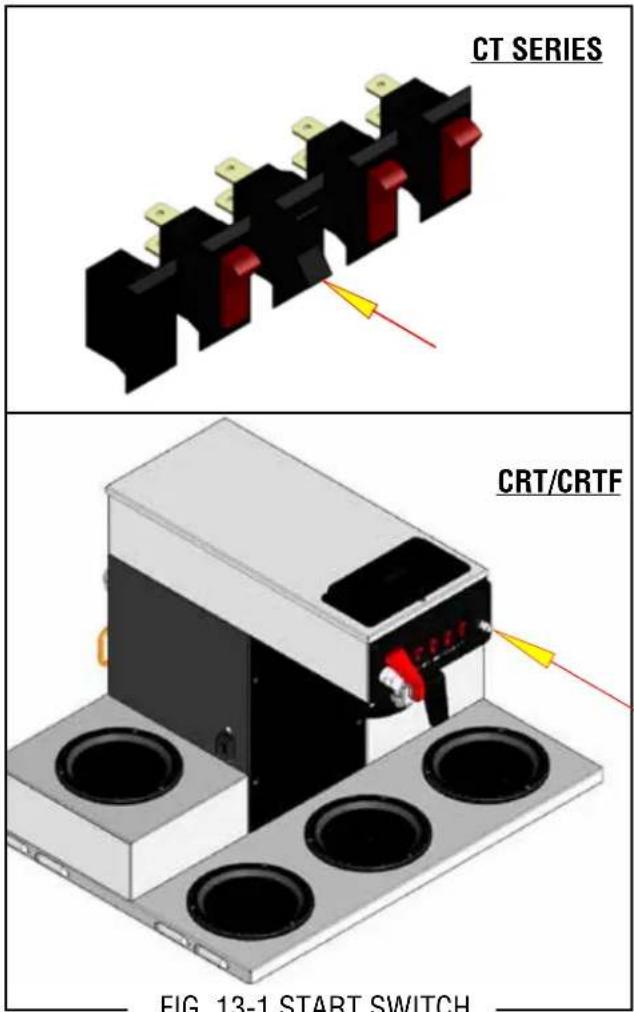
text_image
CT SERIES CRT/CRTF FIG 13-1 START SWITCHLocation: CRT/CRTF
On brewers w/out fresh light, the start switch is located in the right front of the hood.
On brewers w/fresh light, the start switch is located on the right side of the hood.
Location: CT/CWT/CWTF/TWINS
On most "CT" series brewers, the start switch is located in the front of the hood.
On some "convertible" or "CS" brewers, the start switch is located on either the right or left side of the hood.
NOTE: Optional on the left and right side warmer housings on 0/6 TWINS, connected in parallel to front mounted start switches.
Test Procedure:
- Disconnect the brewer from the power supply.
- Disconnect the blue wire and the white/red wire from the switch terminals.
- Check for continuity across the two terminals on the switch when it is held in the "pressed-in" position. Continuity must not be present across these terminals in the released position.
If continuity is present as described, reconnect the blue wire and the white/red to the switch terminals.
If continuity is not present as described, replace the switch.
Removal and Replacement:
- Remove the blue wire and white/red from the start switch.
- Remove round retaining nut from the front of the switch and remove switch and internal tooth lockwasher from the inside of the hood.
- Push new switch with internal tooth lockwasher through the hole in the hood and secure with round retaining nut.
- Refer to Fig. 11 when reconnecting the wires.
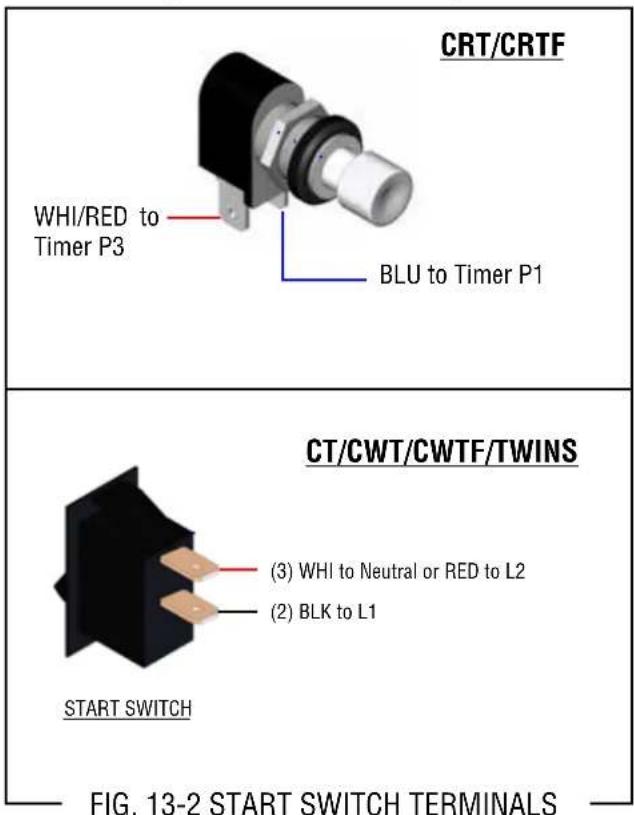
text_image
CRT/CRTF WHI/RED to Timer P3 BLU to Timer P1 CT/CWT/CWTF/TWINS (3) WHI to Neutral or RED to L2 (2) BLK to L1 START SWITCH FIG. 13-2 START SWITCH TERMINALSSERVICE (cont.)
SOLENOID VALVES
text_image
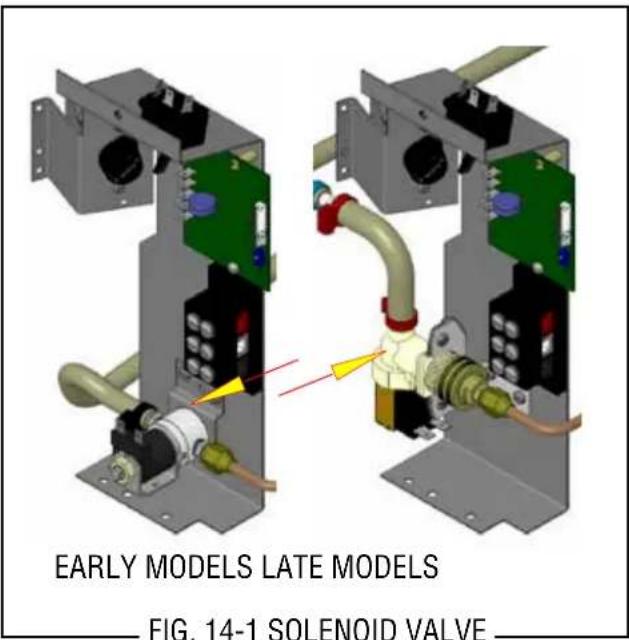
EARLY MODELS LATE MODELS FIG. 14-1 SOLENOID VALVELocation:
The solenoid valve is located inside the trunk on the lower center part of the component bracket.
Test Procedures:
- Disconnect the brewer from the power source.
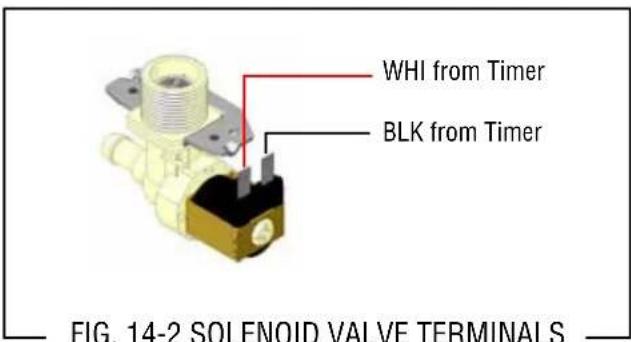
- Disconnect the white and black wires from the solenoid valve. With the "ON/OFF" switch in the "ON" upper position press the start switch.
- Check the voltage across the white and black wires with a voltmeter. Connect the brewer to the power source. The indication must be:
a) 120 volts ac for two wire 120 volt models and three wire 120/240 volt models.
b) 200 to 240 volts ac for two wire 200 or 240 volt models.
- Disconnect the brewer from the power source,
If voltage is present as described, proceed to #5 If voltage is not present as described, refer to Wiring Diagrams and check brewer wiring harness.
- Check for resistance across the solenoid valve coil terminals.
If resistance is present as described, reconnect the white and black wire from the timer.
If resistance is not present as described, replace the solenoid valve.
-
Check the solenoid valve for coil action. Connect the brewer to the power source. With "ON/OFF" switch in the "ON" upper position press start switch and listen carefully in the vicinity of the solenoid valve for a" clicking" sound as the coil magnet attracts.
-
Disconnect the brewer from the power source.
If the sound is heard as described and water will not pass through the solenoid valve, there may be a blockage in the water line before the solenoid valve or, the solenoid valve may require inspection for wear, and removal of waterborne particles.
If the sound is not heard as described, replace the solenoid valve.
Removal and Replacement:
- Remove the white and black from the solenoid valve.
- Turn off the water supply to the brewer.
- Disconnect the water lines to and from the solenoid valve.
- Remove the two #8-32 screws securing the solenoid mounting bracket to the component bracket. Remove solenoid bracket and solenoid valve as an assembly.
- Remove the two #10-32 screws and lockwashers securing the solenoid valve to the solenoid bracket.
- Using two #10-32 screws and lockwashers install new solenoid valve on solenoid mounting bracket.
- Using two #8-32 screws install solenoid valve and bracket to the component bracket.
- Securely fasten the water lines to and from the solenoid valve.
- Refer to Fig. 9 when reconnecting the wires.
text_image
WHI from Timer BLK from Timer FIG. 14-2 SOLENOID VALVE TERMINALSSERVICE (cont.)
SOLENOID VALVES
Disassembly:
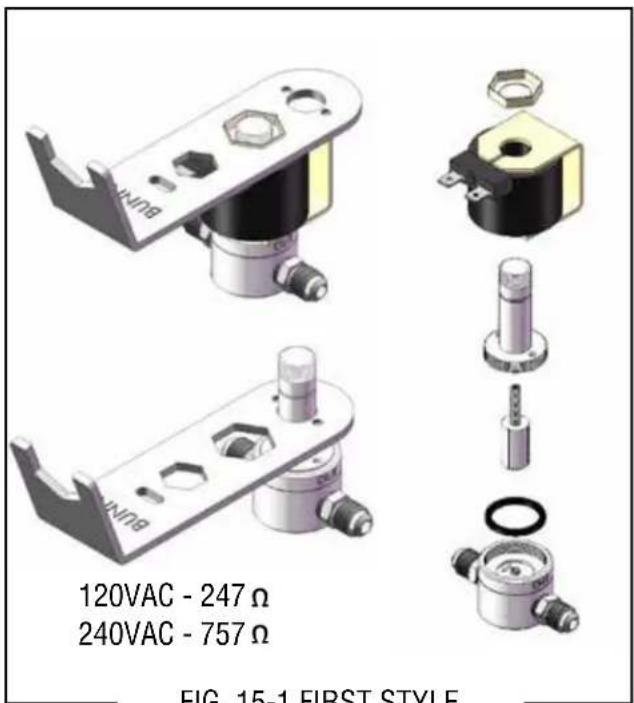
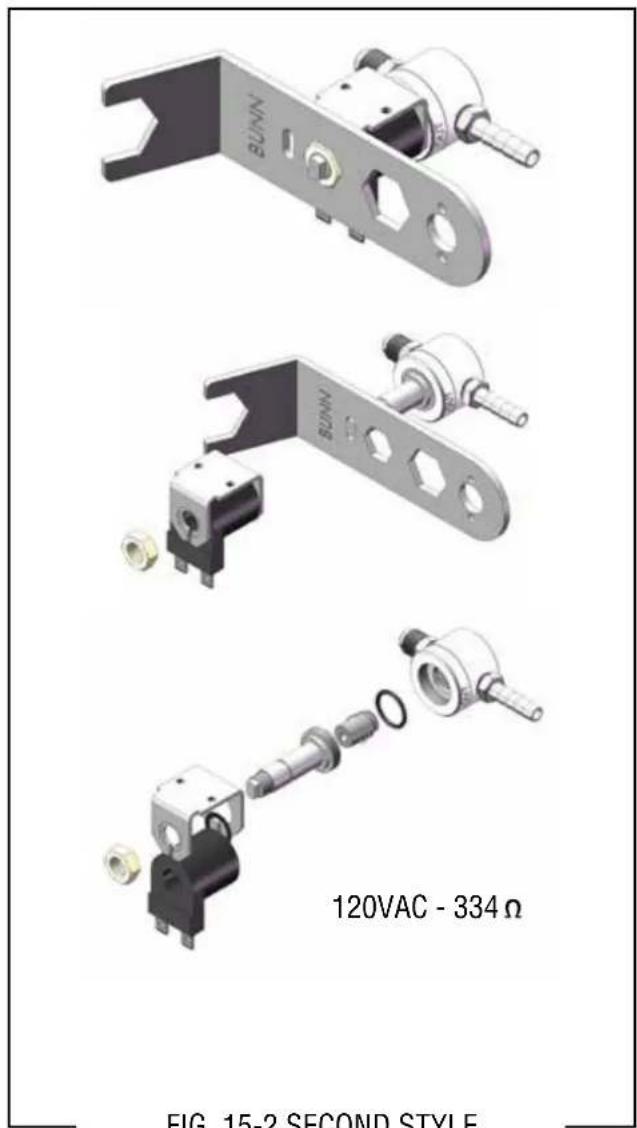
- Use of the basin wrench 01060.0000 is recommended for disassembly of early style valves as illustrated below.
- Disconnect from power source and turn off the water supply to the brewer.
- Disconnect the water lines to and from the solenoid valve.
- Remove the two #8-32 screws securing the sole-noid mounting bracket to the component bracket. Remove solenoid bracket and solenoid valve as an assembly.
- Remove the two #10-32 screws and lock washers securing the solenoid valve to the solenoid bracket.
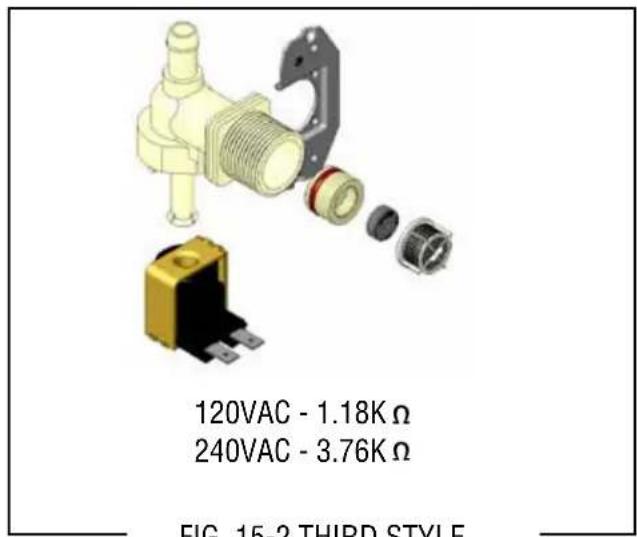
- Disassemble the valve according to the illustrations that correspond to the particular valve you have.
- On early style valves, leave the fittings installed in the base to use as leverage. DO NOT CLAMP THE BASE WITH LOCKING PLIERS AS THIS CAN CAUSE DAMAGE!
- Refer to Illustrated Parts Catalogs for replacement solenoids and repair/rebuild kits.
text_image
120VAC - 247 Ω 240VAC - 757 Ω FIG. 15-1 FIRST STYLEFIG. 15-1 FIRST STYLE
text_image
BUNN BUNN 120VAC - 334 Ω FIG. 15-2 SECOND STYLEFIG. 15-2 SECOND STYLE
text_image
120VAC - 1.18K Ω 240VAC - 3.76K Ω FIG. 15-2 THIRD STYLESERVICE (cont.)
FILL BASIN
natural_image
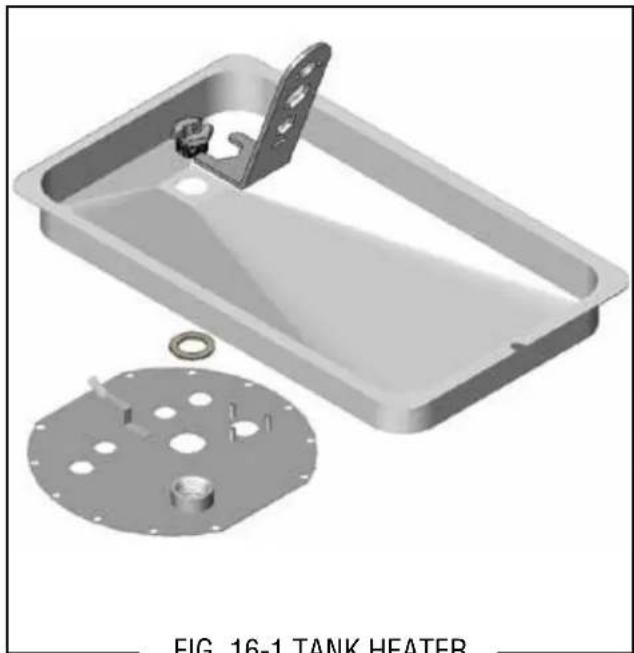
3D rendering of a mechanical assembly with a rectangular plate, flange, and circular base (no text or symbols)FIG. 16-1 TANK HEATER
TANK HEATER
natural_image
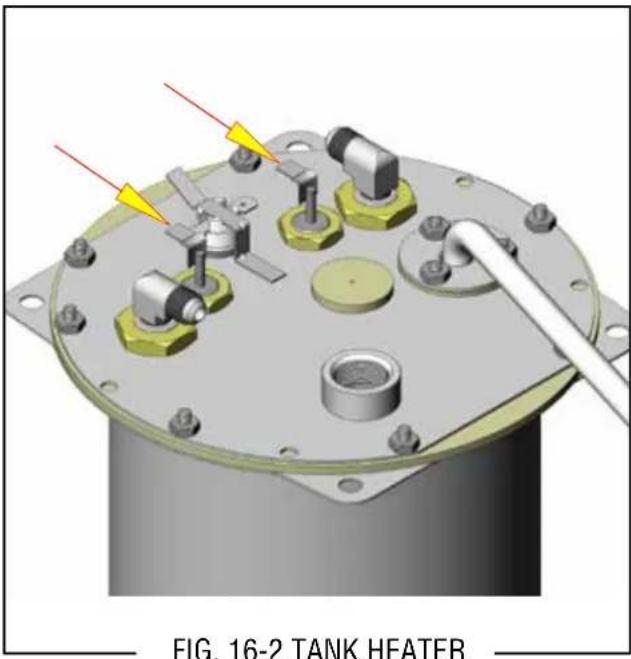
3D mechanical assembly diagram of a tank heater with labeled components and tool (no text or symbols on the diagram itself)FIG. 16-2 TANK HEATER
Disassembly:
- Use of the basin wrench 01060.0000 is recommended for removal of the fill basin.
- Disconnect from power source and turn off the water supply to the brewer.
- Remove top cover.
- Use the basin wrench (as shown above) turning counterclockwise to remove inlet fitting.
- Lift basin off of the tank inlet.
- Use new inlet gasket when reinstalling.
Location:
The tank heater is located inside the tank and secured to the tank lid.
Test Procedures:
- Disconnect the brewer from the power supply.
-
Check the voltage across the black and white wires on 120 volt models or the black and red wires for 120/240 volt models, 200 volt models and 240 volt models with a voltmeter. Connect the brewer to the power source. The indication must be:
a) 120 volts ac for two wire 120 volt 20 amp models.
b) 240 volts ac for three wire 120/240 volt models.
c) 200 to 240 volts ac for two wire 200 or 240 volt models. -
Disconnect the brewer from the power source.
If voltage is present as described, proceed to #4 If voltage is not present as described, refer to the Wiring Diagrams and check wiring harness.
- Disconnect the wires from the tank heater terminals.
- Check resistance value across tank heater terminals and compare to chart.
SERVICE (cont.)
| HEATER | RESISTANCE | |
| 1800W-120V | 7.40 - 8.70 Ω | |
| 1850W-220V | 24.40 -28.40 Ω | |
| 3500W-200V | 10.70 -12.66 Ω | |
| 3500W-240V | 15.36 -17.90 Ω | |
| TERMINAL TO SHEATH - INFINITE (OPEN) | ||
| FIG. 17-1 TANK HEATER RESISTANCE | ||
FIG. 17-1 TANK HEATER RESISTANCE
If resistance is present as described, reconnect the wires, the tank heater is ok.
If resistance is not present as described, replace the tank heater.
NOTE- If any resistance is read between sheath and either terminal, remove and inspect heater for cracks in the sheath.
Removal and Replacement:
- Disconnect the water supply tube from the fill basin.
- Remove the tank inlet fitting securing the fill basin to the tank lid, remove fill basin and tank inlet gasket. Set all three parts aside for reassembly.
- On brewers with faucet, shut-off water supply to the brewer and disconnect the inlet and outlet water lines to the faucet coil assembly.
- Disconnect the black wire on the limit thermostat from the tank heater switch. On late model brewers also disconnect the blue wire from the limit thermostat to the control thermostat.
- Disconnect the black wire and the white or red wire from the tank heater terminals.
- Remove sprayhead and the hex nut securing the sprayhead tube to the hood. Set aside for reassembly.
- Remove the eight #8-32 nuts securing the tank lid to the tank.
- Remove the tank lid with limit thermostat, sprayhead tube, tank heater, coil assembly and control thermostat w/bracket (early models only).
9 Remove the two hex nuts securing the tank heater to the tank lid. Remove tank heater with gaskets and discard. - Install new tank heater with gaskets on the tank lid and secure with two hex nuts.
TANK HEATER (Cont.)
- Install tank lid with limit thermostat, sprayhead tube, tank heater, coil assembly (brewers with faucet) and control thermostat with bracket (early brewers only) using eight #8-32 hex nut.
- Reconnect the inlet and outlet water lines to the faucet coil assembly.
- Secure sprayhead tube to hood using a hex nut.
- Install sprayhead.
- Reconnect the wires to the limit thermostat, tank heater and control thermostat. See limit thermostat and control thermostat sections in this manual when reconnecting wires.
- Install fill basin, secure with tank inlet fitting and gasket. Insert water supply line through grommet in fill basin.
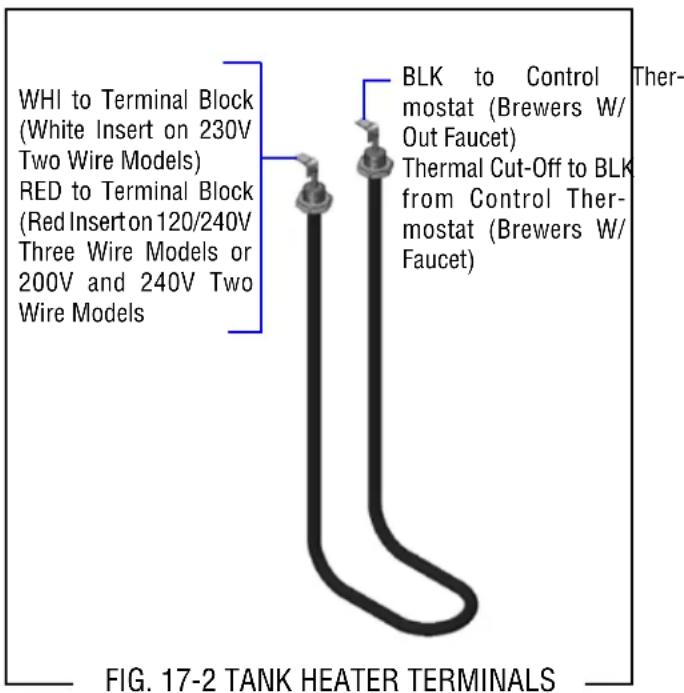
- Refer to Fig.13 when reconnecting the tank heater wires.
text_image
WHI to Terminal Block (White Insert on 230V Two Wire Models) RED to Terminal Block (Red Insert on 120/240V Three Wire Models or 200V and 240V Two Wire Models) BLK to Control mostat (Brewers W/ Out Faucet) Thermal Cut-Off to BLK from Control Ther- mostat (Brewers W/ Faucet) FIG. 17-2 TANK HEATER TERMINALSSERVICE (cont.)
TANK HEATER SWITCH
text_image
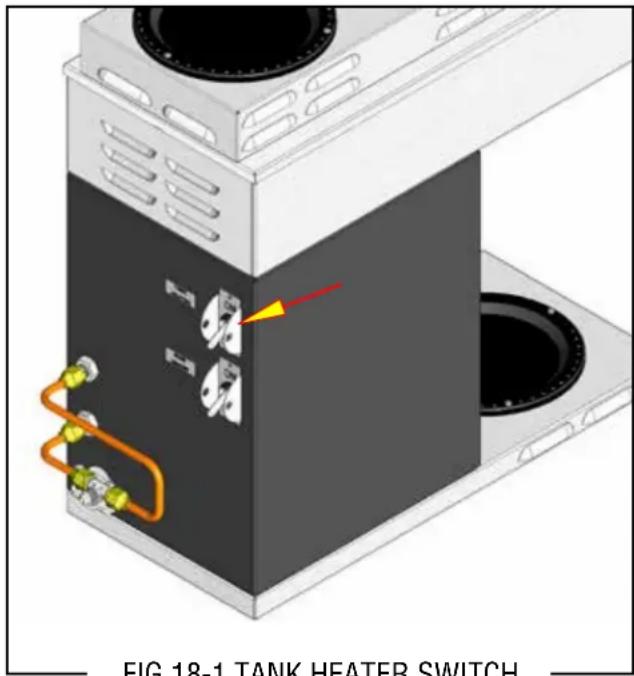
FIG 18-1 TANK HEATER SWITCHFIG 18-1 TANK HEATER SWITCH
Location:
The tank heater switch is located on the rear of the brewer on the upper left side of the trunk.
Test Procedure:
- Disconnect the brewer from the power source.
- Disconnect the black wire from the limit thermostat.
- With the tank heater switch in the "ON" position and with a voltmeter, check the voltage between the black wire removed from the limit thermostat and the white wire or red wire on the tank heater. Connect the brewer to the power source. The indication must be:
a) 120 volts ac on two wire 120 volt models.
b) 240 volts ac on three wire 120/240 volt models.
c) 200 to 240 volts ac on 200 volt or 240 volt models.
- Disconnect the brewer from the power source.
If voltage is not present as described, proceed to #5.
If voltage is present as described, the switch is working properly.
- With the tank heater switch in the "ON" upper position, check for continuity between the black wire removed from the limit thermostat and the black insert on the terminal block. Continuity should not be present in the "OFF" lower position.
If continuity is present as described, the tank heater switch is operating properly.
If continuity is not present as described, replace the tank heater switch.
Removal and Replacement:
- Shut off and disconnect the incoming water supply to the brewer.
- On automatic brewers gently remove the fill tube from back of fill basin.
- Remove the tank inlet fitting securing fill basin the tank lid. Remove fill basin and gasket. Set all three parts aside for reassembly.
- On brewers with faucets, disconnect the water supply to coil assembly and remove the tube from the tank to the faucet.
- Remove sprayhead and hex nut securing sprayhead tube to the hood. Set aside for reassembly.
- Disconnect the wires on the limit thermostat and the tank heater and the control thermostat (early models).
- Gently pull the thermostat sensor and grommet from the tank lid.
- Insert a tube to the bottom of the tank and syphon ALL of the water out.
- Remove the two #8-32 screws securing the tank assembly to the hood.
- Lift tank and components out as an assembly and set aside for reassembly.
- Disconnect the two black wires from the tank heater switch.
- Remove the plastic facenut, hex facenut and the switch indicator/guard bracket that secures tank heater switch to the rear of the brewer. Remove switch and discard.
- Insert new tank heater switch through the hole in the upper left rear of the trunk and secure with switch indicator/guard bracket, hex facenut and plastic facenut.
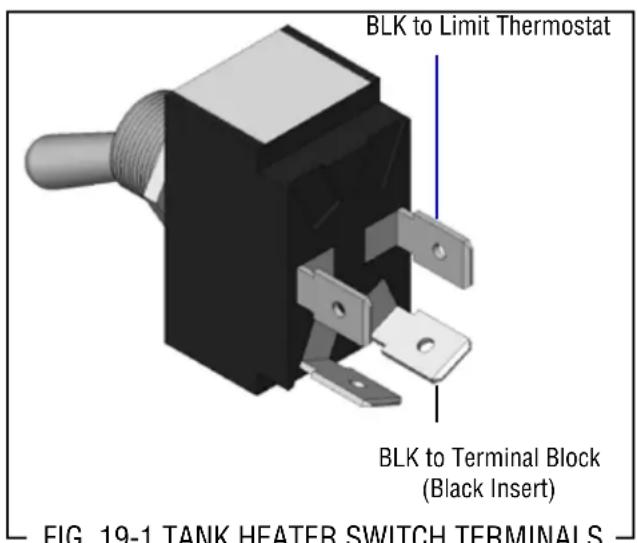
- Reconnect the two black wires to the tank heater switch terminals.
SERVICE (cont.)
TANK HEATER SWITCH (cont.)
- Set tank assembly inside the hood on mounting brackets and secure with two #8-32 screws.
- Reconnect the wires to the limit thermostat, tank heater and the control thermostat. Refer to limit thermostat, tank heater and control thermostat sections in this manual when reconnecting wires.
- Brewers with faucet reinstall the faucet tube and reconnect the water supply tube to the coil assembly.
- Secure the sprayhead tube to the hood using hex nut.
- Install sprayhead.
- Install fill basin, inlet gasket and secure to tank lid with tank inlet fitting.
- Carefully install water fill tube into the back of the fill basin.
- Reconnect and turn on the incoming water supply.
- Refer to Fig. 15 when reconnecting the wires.
text_image
BLK to Limit Thermostat BLK to Terminal Block (Black Insert) FIG. 19-1 TANK HEATER SWITCH TERMINALSFIG. 19-1 TANK HEATER SWITCH TERMINALS
SERVICE (cont.)
THERMAL CUT-OFF (Brewers W/Faucet)
natural_image
3D rendering of a mechanical component with labeled parts and a yellow arrow indicator (no readable text or symbols)Location:
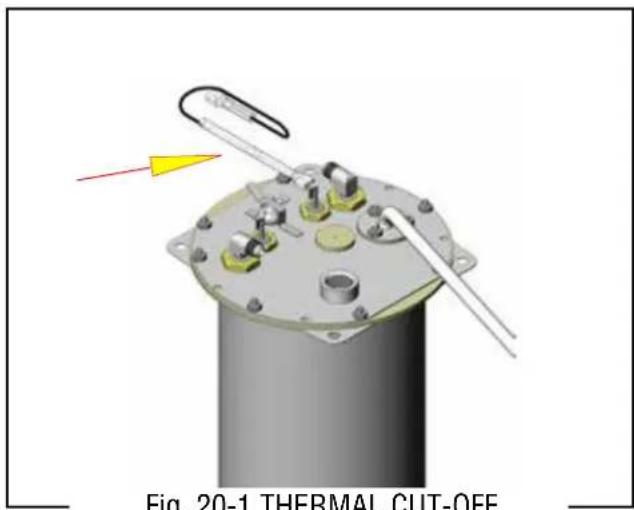
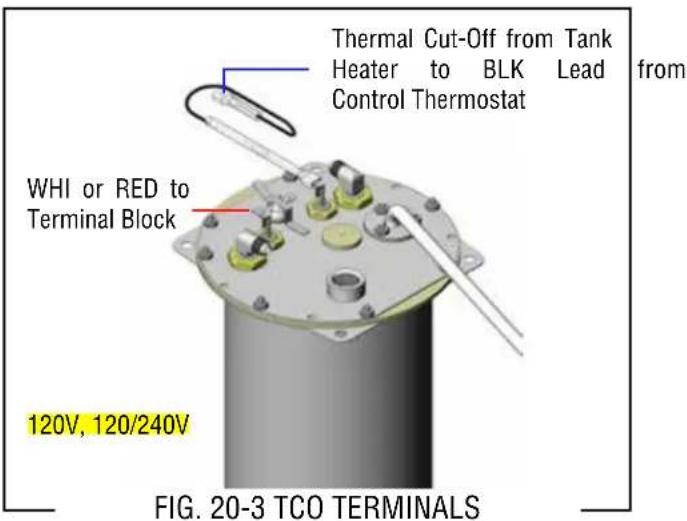
The thermal cut-off (TCO) is a thermal fuse located above the tank lid, connected to the tank heater.
NOTE: Installed only on tanks with coil faucet.
CE models have an additional TCO connected to the other heater terminal.
Test Procedures:
-
Disconnect the brewer from the power source.
-
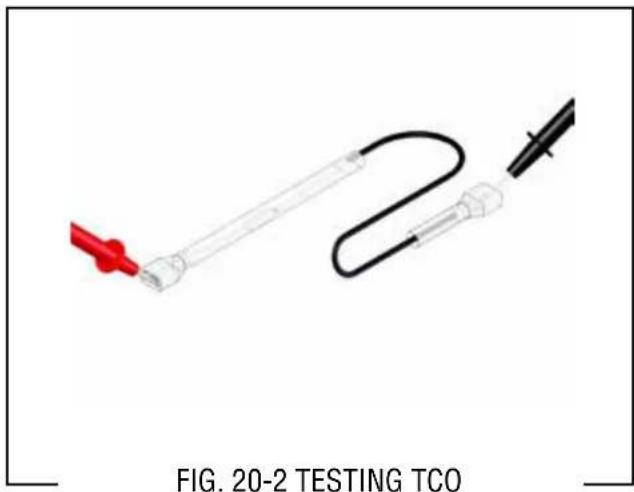
Disconnect both ends of the TCO.
-
Check for continuity across TCO with an ohmmeter.
If continuity is present as described, the TCO is operating properly.
If continuity is not present as described, replace the TCO.
text_image
FIG. 20-2 TESTING TCORemoval and Replacement:
- Disconnect both ends of the TCO.
- Install new thermal cut-off.
- Refer to Fig. 17 when reconnecting wires.
text_image
Thermal Cut-Off from Tank Heater to BLK Lead Control Thermostat from WHI or RED to Terminal Block 120V, 120/240V FIG. 20-3 TCO TERMINALS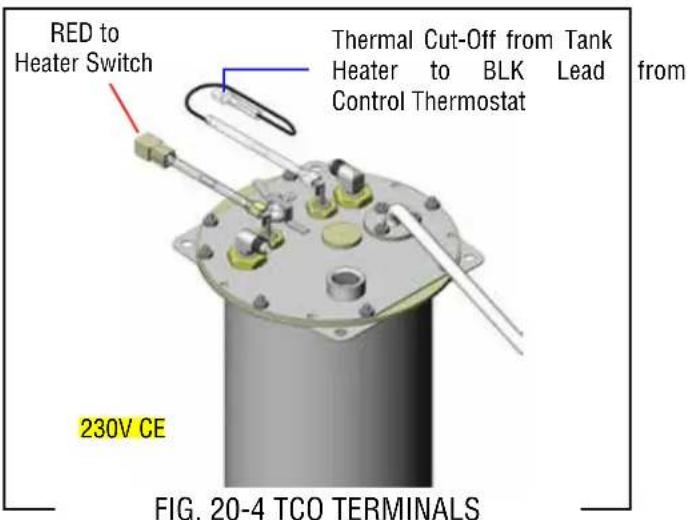
text_image
RED to Heater Switch Thermal Cut-Off from Tank Heater to BLK Lead Control Thermostat from 230V CE FIG. 20-4 TCO TERMINALSSERVICE (cont.)
COIL/FAUCET
Location:
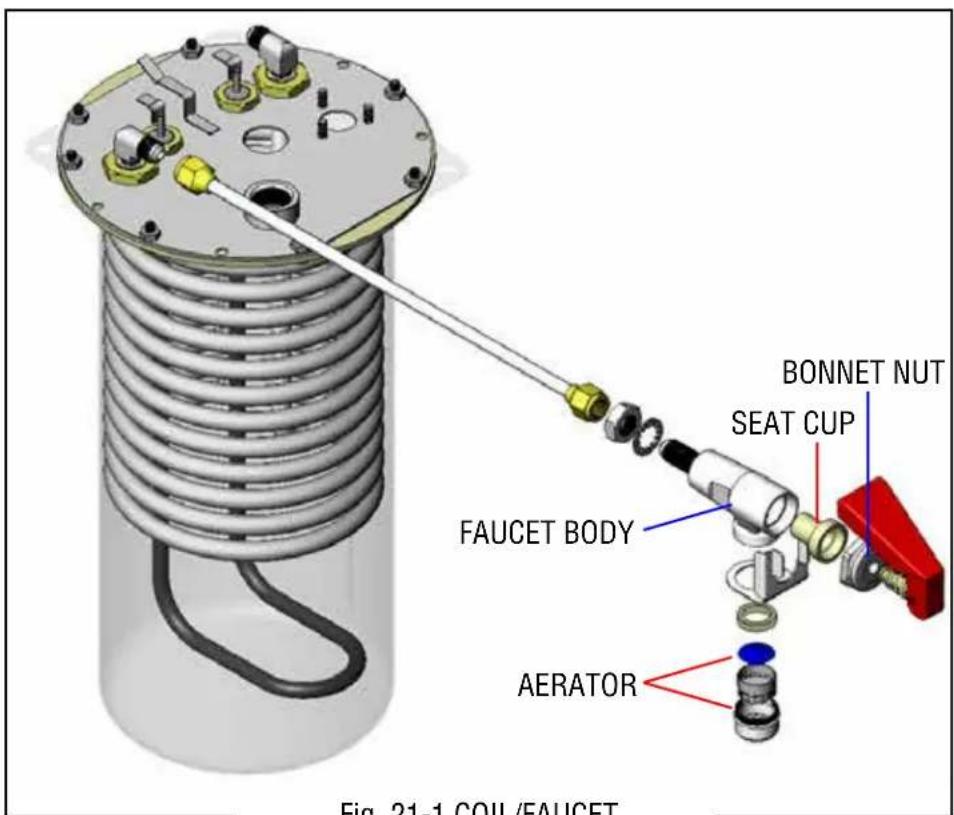
The coil for the faucet is located in the tank.
Operation:
Water inside the coil is separate from the brewing water and is always under line pressure. Brewing water in the tank heats the submerged coil. Use of a coil faucet during a brew cycle will not cause short potting, but is limited to 8-10 ounces of hot water before the cooler water is passed through coil.
Removal and Replacement:
- Disconnect the brewer from the power and water sources.
- Turn and remove aerator assembly from bottom of faucet. Clean parts of any mineral buildup. Install new gasket when reassembling.
- Remove the bonnet nut and remove handle assembly.
- Remove the seat cup. Clean inside the faucet body and install new seat cup.
text_image
BONNET NUT SEAT CUP FAUCET BODY AERATOR Fig. 21-1 COIL /FAUCETFig. 21-1 COIL/FAUCET
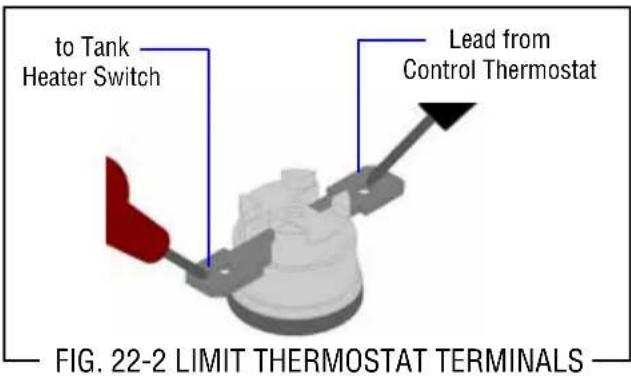
SERVICE (cont.) LIMIT THERMOSTAT
natural_image
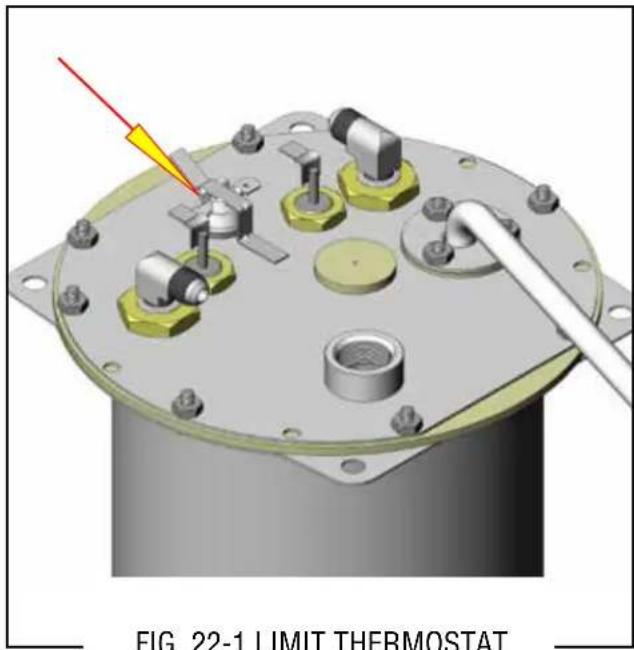
3D mechanical assembly diagram showing a limit thermostat with labeled components and a red arrow pointing to a specific part (no text or symbols on the diagram itself)Location: The limit thermostat is located inside the rear of the hood on the tank lid.
Test Procedures:
- Disconnect the brewer from the power source.
- Disconnect the blue and black wires from the limit thermostat.
- Check for continuity across the limit thermostat terminals with a ohmmeter.
If continuity is present as described, the limit thermostat is operating properly.
If continuity is not present as described, replace the limit thermostat.
Removal and Replacement:
- Remove all wires from limit thermostat terminals.
- Carefully slide the limit thermostat out from under the retaining clip and remove limit thermostat.
- Carefully slide the new limit thermostat into the retaining clip.
- Refer to the Fig. 5 when reconnecting the wires.
text_image
to Tank Heater Switch Lead from Control Thermostat FIG. 22-2 LIMIT THERMOSTAT TERMINALSRECOVERY BOOSTER RELAY (OPTIONAL)
natural_image
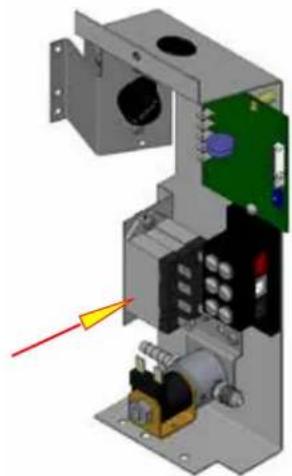
3D mechanical assembly diagram showing internal components with no visible text or symbolsFIG. 23-1 RECOVERY BOOSTER RELAY
Location
The recovery booster(s) are located inside the trunk on the center of the component brackets just above the solenoid valve. The coil is activated by the timer/solenoid circuit. The contacts then close, bypassing the mechanical thermostat, thereby allowing faster heating of the incoming water in the tank.
Test Procedures
- Disconnect the brewer from the power source.
- Disconnect the white and black wires from the coil of the recovery booster relay.
- With a voltmeter, check the voltage across the white and the black wires. Connect the brewer to the power source and initiate a brew cycle. The indication must be 120 volts ac.
- Disconnect the brewer from the power source.
If voltage is present as described, proceed to #5. If voltage is not present as described, refer to Wiring Diagrams and check the brewer wiring harness.
- Check the resistance across the coil's terminals.
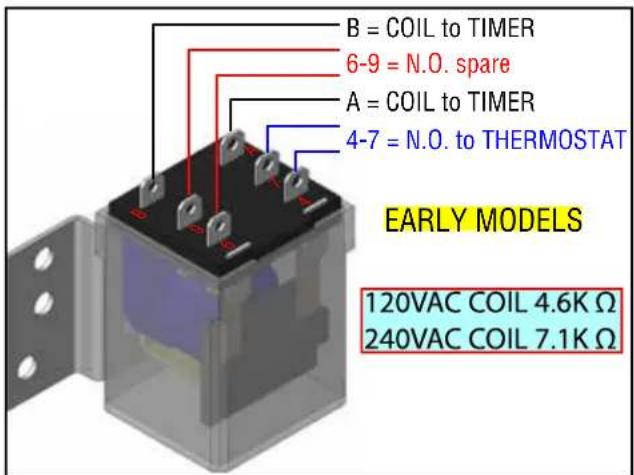
If resistance is present as described in FIG 9, reconnect the white and black wires to the coil.
If resistance is not present as described, replace the relay.
- Disconnect the blue and black wires from the relay
contact terminals. Connect the brewer to the power source. With the "ON/OFF" switch in the "ON" position and the start switch pressed and released, check for continuity across relay terminals.
- Disconnect the brewer from the power source.
If continuity is present as described, reconnect the blue and black wires to the relay contact terminals. If continuity is not present as described replace the relay.
Removal and Replacement:
- Remove all wires from the relay.
- Remove the two #8-32 screws securing the relay mounting bracket to the component bracket. Remove relay bracket and relay as an assembly.
- Remove the screw securing the relay to the relay mounting bracket.
- Install new relay to the component bracket.
- Refer to Fig. 9 when reconnecting the wires.
text_image
B = COIL to TIMER 6-9 = N.O. spare A = COIL to TIMER 4-7 = N.O. to THERMOSTAT EARLY MODELS 120VAC COIL 4.6K Ω 240VAC COIL 7.1K Ω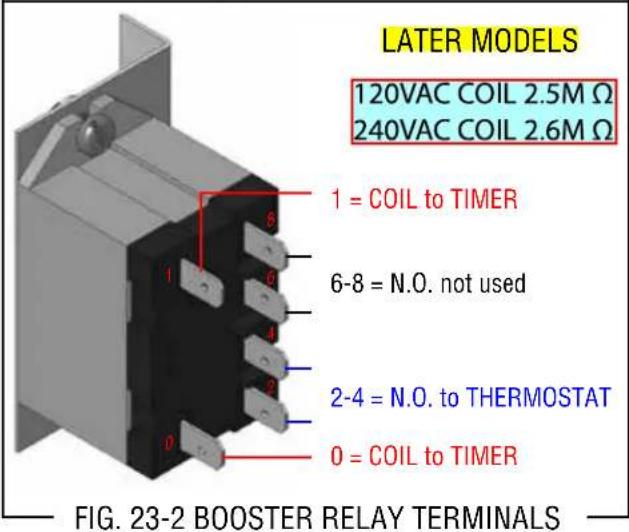
text_image
LATER MODELS 120VAC COIL 2.5M Ω 240VAC COIL 2.6M Ω 1 = COIL to TIMER 6-8 = N.O. not used 2-4 = N.O. to THERMOSTAT 0 = COIL to TIMER FIG. 23-2 BOOSTER RELAY TERMINALSSERVICE (cont.)
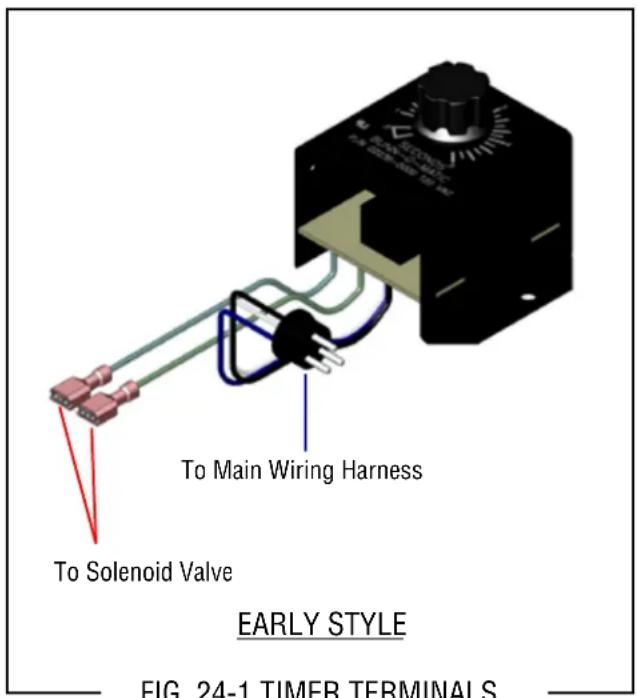
TIMER (Early Models)
text_image
To Solenoid Valve To Main Wiring Harness EARLY STYLE FIG. 24-1 TIMER TERMINALSFIG. 24-1 TIMER TERMINALS
Location:
The timer is located inside the front of the trunk on the upper right side of component bracket.
Test Procedure.
- Disconnect the brewer from the power source.
- Disconnect the polarized, three pin connector from the brewer wiring harness.
- With a voltmeter, check the voltage across sockets P2 & P3 (white and white/red wires) of the female connector when the "ON/OFF" switch is in the "ON" position (upper). Connect the brewer to the power source. The indication must be:
a) 120 volts ac for two wire 120 volt models and three wire 120/240 volt models.
b) 200 to 240 volts ac on two wire 200 volt or 240 volt models. - Disconnect the brewer from the power source.
If voltage is present as described, proceed to #5. If voltage is not present as described, refer to the Wiring Diagrams and check the brewer wiring harness.
- Check the voltage across the sockets P1 & P2 (blue and white wires) of the female connector with a voltmeter when the "ON/OFF" switch is in the "ON" position (upper) and start switch pressed.
Connect the brewer to the power source. The indication must be:
a) 120 volts ac for two wire 120 volt models and three wire 120/240 volt models.
b) 200 to 240 volts ac for two wire 200 volt or 240 volt models.
6. Disconnect the brewer from the power source.
7. Reconnect the three pin connector from main wiring harness to the timer.
If voltage is present as described, proceed to #8 If voltage is not present as described, refer to Wiring Diagrams and check the start switch and brewer wiring harness.
- With a voltmeter, check the voltage across the black and white wires when the "ON/OFF" switch is in the "ON" position (upper) and the "START" switch is pressed to the "START" position and released. Connect the brewer to the power source. The indication must be:
a) 120 volts ac for approximately 20 seconds for two wire 120 volt models and three wire 120/240 volt models.
b) 200 to 240 volts ac for approximately 20 seconds for two wire 200 volt or 240 volt models.
If voltage is present as described, the brew timer is operating properly. Reconnect the polarized, three pin connector.
If voltage is not present as described, replace the timer.
Removal and Replacement:
- Separate all connectors between the brewer wiring harness and the timer.
- Remove the one #8-32 screw securing timer to component bracket.
3 Install new timer circuit board as described in Late Model Timer section on the following pages. - Refer to Fig. 21 when reconnecting the wires.
- Install the Timer Setting decal provided with the replacement timer kit, below the schematic on the inside of the front access panel.
- Adjust the timer as required. Refer to Late Model Timer section on the following pages.
SERVICE (cont.)
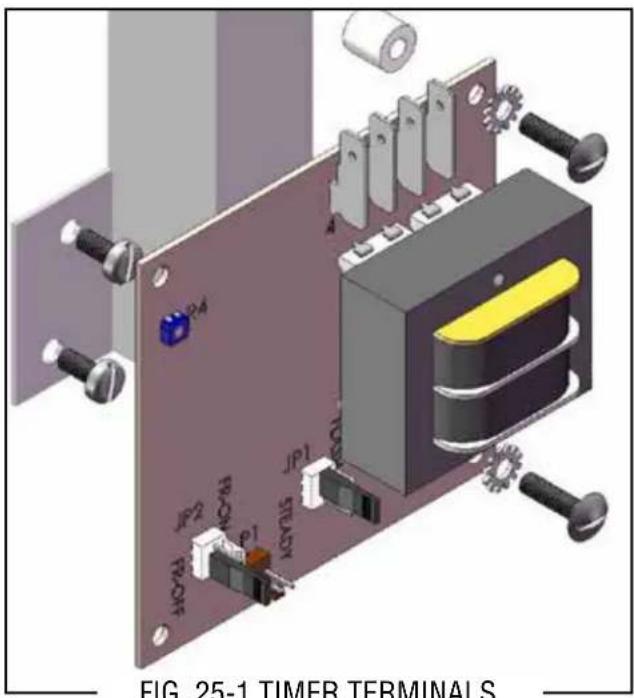
FRESHNESS TIMER (Early Models)
text_image
FIG. 25-1 TIMER TERMINALSFIG. 25-1 TIMER TERMINALS
Location:
The freshness timer is located inside the front of the trunk on the component bracket.
Operation:
The freshness timer activates an LED on the control panel after a predetermined amount of time (after the brew cycle) to indicate carafe on warmer too long.
Settings: Default settings underlined
JP1: Choose between flashing LED or steady.
JP2: Choose whether the LED stays ON, then
turns off; or is off, then turns on at the end of delay.
R4: Delay time adjustment, 20-60 minutes.
Test Procedure.
- Disconnect the brewer from the power source.
- With a voltmeter, check the voltage across T1 & T2 (black & white wires) of the fresh timer. Connect the brewer to the power source. The indication must be:
a) 120 volts ac for two wire 120 volt models and three wire 120/240 volt models.
b) 200 to 240 volts ac on two wire 200 volt or 240 volt models. - Disconnect the brewer from the power source.
If voltage is present as described, proceed to #4. If voltage is not present as described, refer to the Wiring Diagrams and check the brewer wiring harness.
- Check the voltage across the T3 and T4 (white/orange and white/blue wires) of the fresh timer with a voltmeter when the "ON/OFF" switch is in the "ON" position (upper) and start switch pressed. Connect the brewer to the power source. The indication must be: (when solenoid is activated)
a) 120 volts ac for two wire 120 volt models and three wire 120/240 volt models.
b) 200 to 240 volts ac for two wire 200 volt or 240 volt models. - Disconnect the brewer from the power source.
- Reconnect the three pin connector from main wiring harness to the timer.
If voltage is present as described, proceed to #7 If voltage is not present as described, refer to Wiring Diagrams and check the start switch and brewer wiring harness.
- With a voltmeter, check the voltage across connector P1 after the delay period (JP1 set to "STEADY", and JP2 set to "ON"). The indication must be:
3-5 volts dc (when solenoid is activated).
If voltage is present as described, the fresh timer is operating properly. If voltage is not present as described, replace the timer. NOTE: The freshness timer is no longer available.
Removal and Replacement:
- Disconnect the brewer from the power source.
- Disconnect all four connectors from the timer.
- Remove the two #8-32 screws securing timer to component bracket.
- Adjust the timer as required. Refer to Late Model Timer section on the following pages.
SERVICE (cont.)
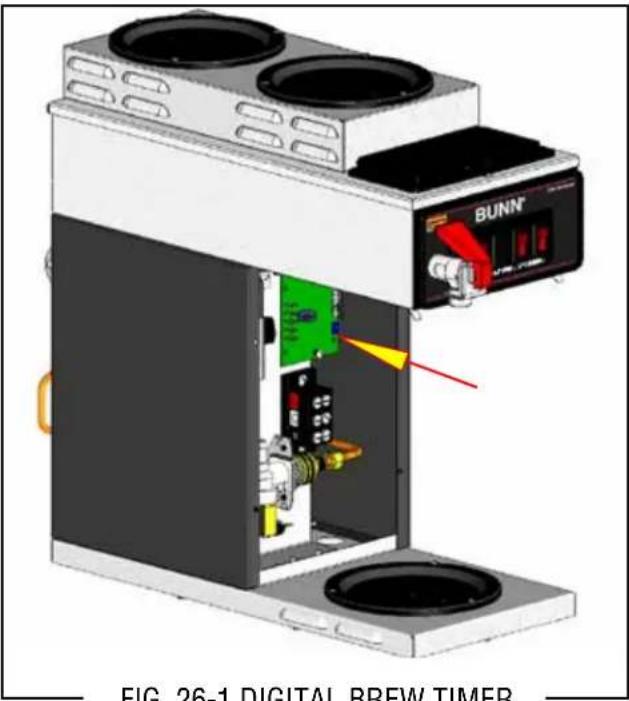
DIGITAL BREW TIMER (Late Models)
text_image
BUNN FIG. 26-1 DIGITAL BREW TIMERFIG. 26-1 DIGITAL BREW TIMER
Location:
The timer is located inside the front of the trunk on the upper right side of component bracket.
Test Procedure
NOTE: Do not remove or install wires while timer board is installed. Pressure applied to one side may cause damage to the board.
- Disconnect the brewer from the power source and remove the front access panel.
- With a voltmeter, check the supply voltage across terminals TL1 and TL2 when the "ON/OFF" switch is in the "ON" position. Connect the brewer to the power source. The indication must be:
a) 120 volts ac for two wire 120 volt models and three wire 120/240 volt models.
b) 200 to 240 volts ac on two wire 200 volt or 240 volt models. - Disconnect the brewer from the power source.
If voltage is present as described, proceed to #4. If voltage is not present as described, refer to the Wiring Diagrams and check the wiring harness.
- With a voltmeter, check the output voltage across terminals TL2 and TL4 when the "ON/OFF" switch is in the "ON" position. Connect the brewer to the power source and press the "START" switch. The indication must be as follows:
a) 120 volts ac for two wire 120 volt models and three wire 120/240 volt models.
b) 200 to 240 volts ac for two wire 200 volt or 240 volt models.
If voltage is present as described, the timer is operating properly. Reset the timer as required, to obtain the desired brew volume.
If voltage is not present as described, proceed to #6.
- With a voltmeter, check the input start voltage across terminals TL2 and TL5 when the "ON/OFF" switch is in the "ON" position. Connect the brewer to the power source and press the "START" switch. The indication must be as follows:
a) 120 volts ac for two wire 120 volt models and three wire 120/240 volt models.
b) 200 to 240 volts ac on two wire 200 volt or 240 volt models.
If voltage is not present as described, refer to the Wiring Diagrams and check the wiring harness to the start switch.
If voltage is present as described, disconnect the brewer from the power source and replace the timer.
Removal and Replacement:
- Remove the two #8-32 screws securing circuit board to the mounting bracket.
- Remove circuit board and spacers (as required).
- Remove all wires from the timer.
- Attach all wires to the replacement timer board prior to installation to the component mounting bracket. Refer to FIG. 21 when reconnecting the wires.
- Install new circuit board with spacers (as required) to the component mounting bracket.
- Adjust the timer as described in the next section.
SERVICE (cont.)
DIGITAL BREW TIMER (Late Models)(cont.)
Timer Setting:
NOTE: Prior to setting or modifying volumes, check that the brewer is connected to water supply, the tank is properly filled, and a funnel and server are in place.
NOTE: All volume settings must be done with the sprayhead installed.
- Modifying brew volumes. To modify a brew volume, first check that the SET/LOCK switch is in the "SET" position on the circuit board.
To increase a brew volume, place the ON/OFF switch in the "ON" position, press and hold the START switch until three clicks are heard. Release the switch and press it again one or more times. (Failure to release the switch within two seconds after the third click causes the volume setting to be aborted and previous volume setting will remain in memory) Each time the switch is pressed, two seconds are added to the brew time period. Allow the brew cycle to finish in order to verify that the desired volume has been achieved.
To decrease a brew volume, place the ON/OFF switch in the “ON” position, press and release the START switch once for every two-second interval to be removed from the total brew time period; then immediately press and hold down the START switch until three clicks are heard. Release the switch. (Failure to release the switch within two seconds after the third click causes the volume setting to be aborted and previous volume setting will remain in memory). Allow the brew cycle to finish in order to verify that the desired volume has been achieved.
- Setting brew volumes. To set a brew volume, first check that the SET/LOCK switch is in the "SET" position on the circuit board. Place the ON/OFF switch in the "ON" position, press and hold the START switch until three distinct clicks are heard and then release the switch. (Failure to release the switch within two seconds after the third click causes the volume setting to be aborted and previous volume setting will remain in memory.
View the level of the liquid being dispensed. When the desired level is reached, turn the ON/OFF switch to "OFF".
NOTE: Several ounces of water will continue to syphon from the tank after turning the switch "OFF". The brewer remembers this volume and will continue to brew batches of this size until the volume setting procedure is repeated.
NOTE: When brewing coffee, volume will decrease due to absorption by the coffee grounds.
- Setting programming disable feature. If it becomes necessary to prevent anyone from changing brew time once programmed, you can set the SET/LOCK switch to the "LOCK" position. This will prevent any further programming until switch is once again put into the "SET" position.
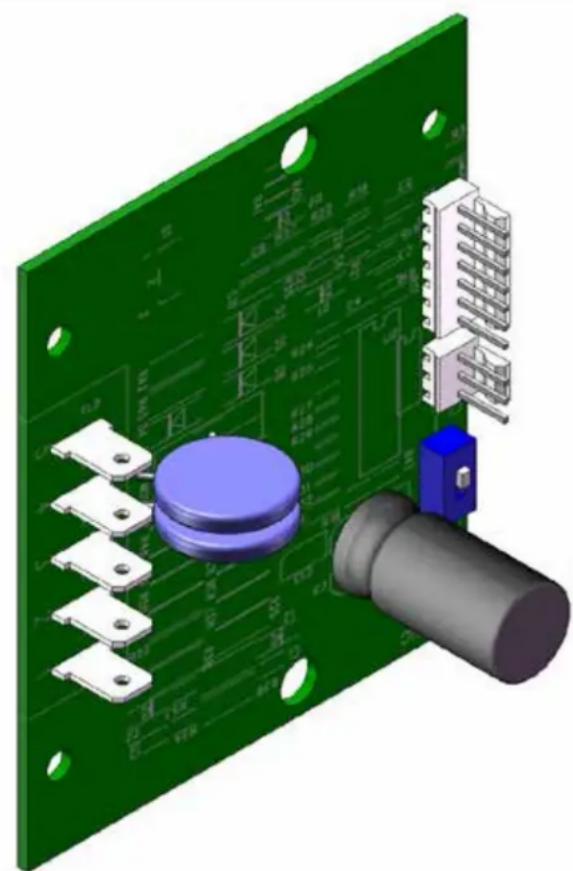
natural_image
3D CAD model of a green printed circuit board with electronic components and connectors (no visible text or symbols)BLU wire to TL5 from start switch
WHI/GRN wire to TL4 from solenoid
WHI/BLU wire to TL3 from solenoid
WHI wire to TL2 from N/L2
WHI/RED wire to TL1 from on/off switch
FIG. 27-1 DIGITAL TIMER WIRING
SERVICE (cont.)
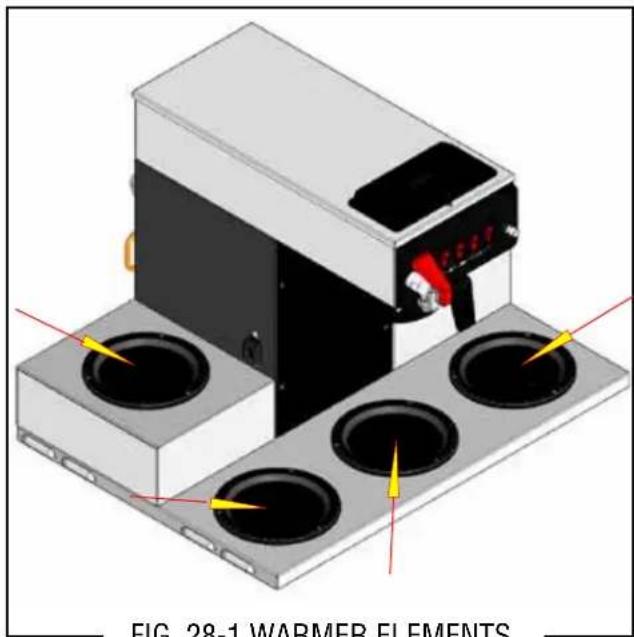
WARMER ELEMENT(S)
text_image
FIG. 28-1 WARMER ELEMENTSFIG. 28-1 WARMER ELEMENTS
Location:
The warmer element(s) is located under the warmer plate.
Test Procedures:
- Disconnect the brewer from the power source.
- With a voltmeter, check voltage across the two wires at the warmer element with the "ON/OFF" switch in the "ON" position. Connect the brewer to the power source. The indication must be 120 volts ac for two wire 120 volt models and three wire 120/208 and 120/240 volt models, or 230 volts ac for two wire 230 volt models.
- Disconnect the brewer from the power source.
If voltage is present as described, proceed to #4. If voltage is not present as described, refer to Wiring Diagrams and check wiring harness.
| WARMER | RESISTANCE | |||
| 100W-120V | 132 | -152 | Ω | Ω |
| 100W-220V | 450 | -532 | Ω | Ω |
| 100W-200V | 372 | -432 | Ω | Ω |
| TERMINAL TO SHEATH - INFINITE (OPEN) | ||||
| FIG. 28-2 WARMER ELEMENTS | ||||
FIG. 28-2 WARMER ELEMENTS
- Check the resistance across the two terminals on the warmer element. NOTE: There should be no resistance reading between the heater sheath and either terminal. Refer to the following chart.
If resistance is to specification, reconnect the two wires to the warmer element.
If resistance is not to specification, replace the warmer element.
Removal and Replacement:
- Remove the three #4-40 screws securing the warmer assembly to the brewer.
- Lift the warmer assembly from the brewer.
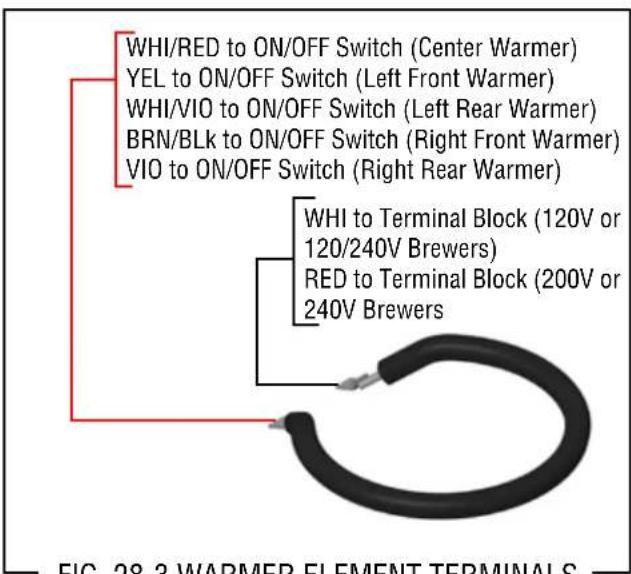
- Disconnect the two wires from the warmer element terminals.
- Remove the two #8-32 nuts securing the warmer element to the warmer plate.
- Securely install new warmer element.
- Reconnect the two wires to warmer element terminals.
- Securely install warmer assembly on the brewer.
text_image
WHI/RED to ON/OFF Switch (Center Warmer) YEL to ON/OFF Switch (Left Front Warmer) WHI/VIO to ON/OFF Switch (Left Rear Warmer) BRN/BLk to ON/OFF Switch (Right Front Warmer) VIO to ON/OFF Switch (Right Rear Warmer) WHI to Terminal Block (120V or 120/240V Brewers) RED to Terminal Block (200V or 240V Brewers) FIG. 28-3 WARMER ELEMENT TERMINALSFIG. 28-3 WARMER ELEMENT TERMINALS
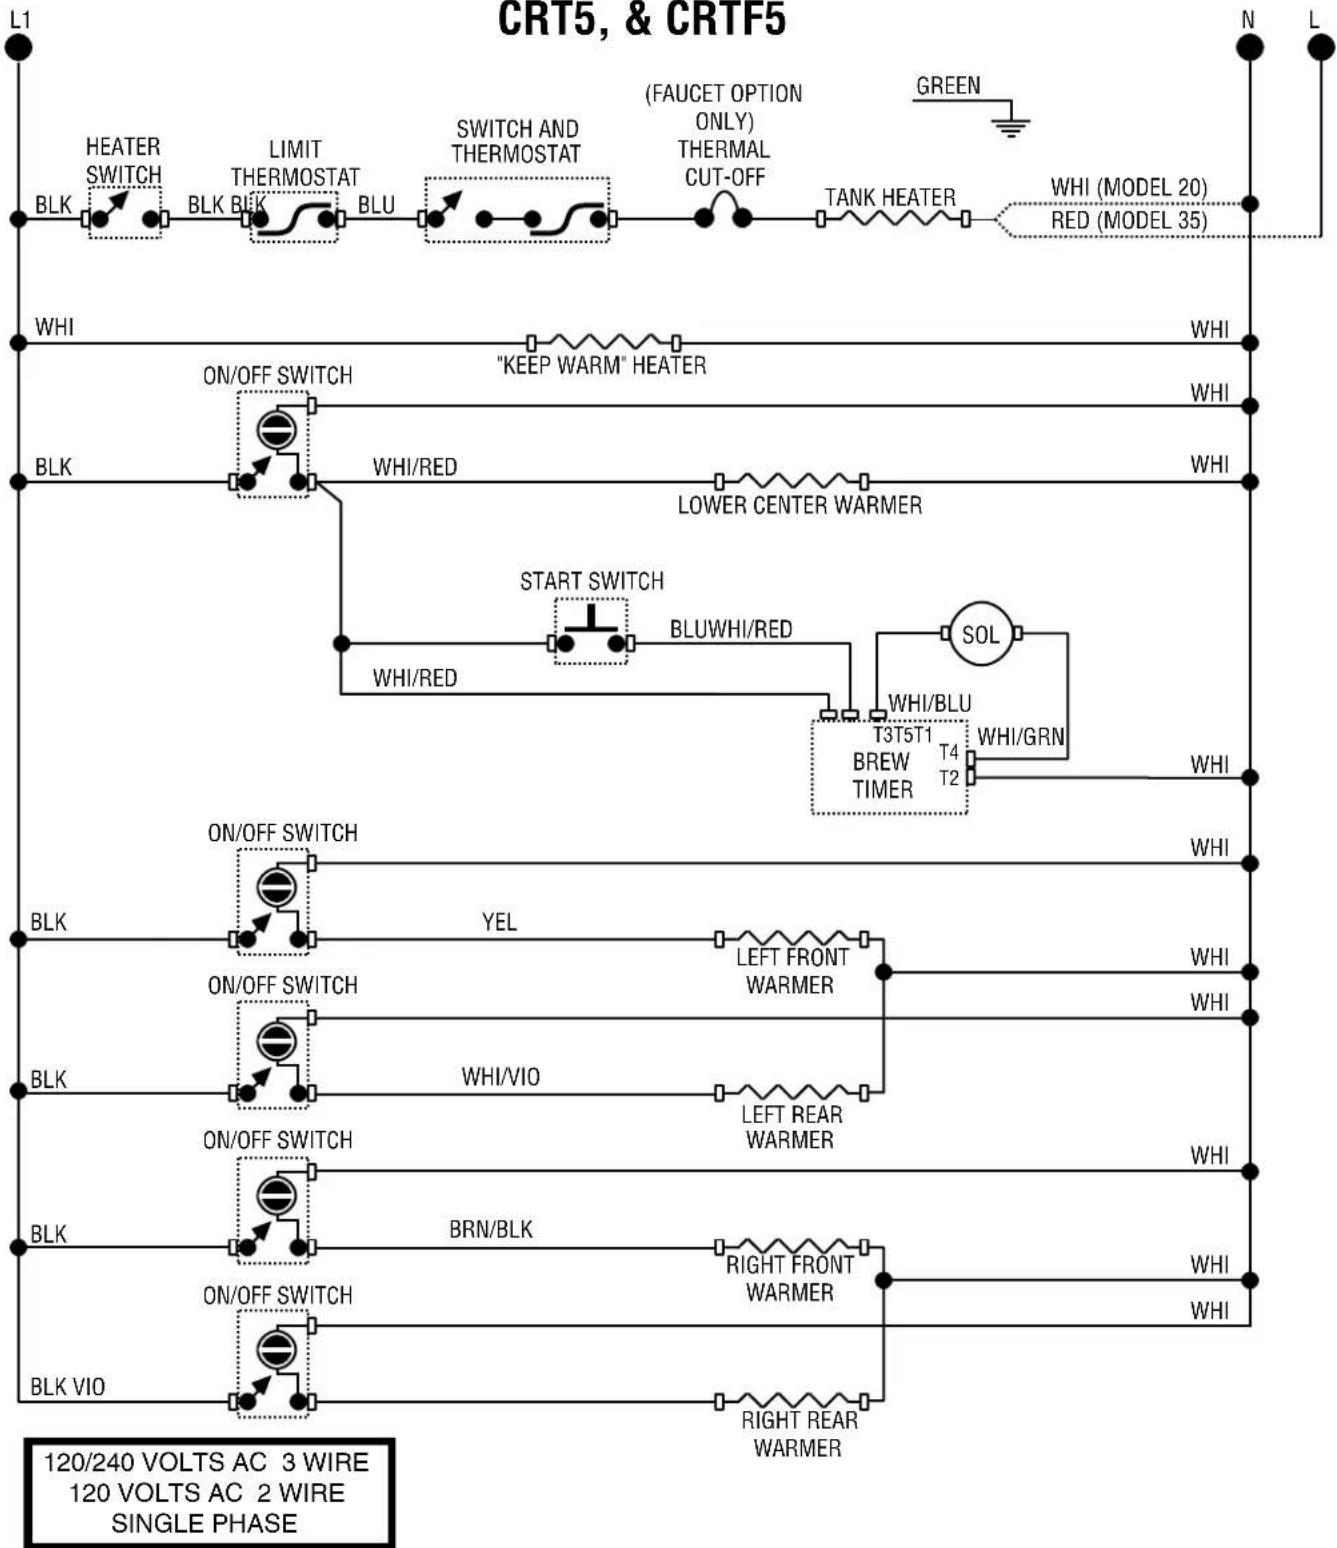
SCHEMATIC WIRING DIAGRAM
CRT5, & CRTF5
flowchart
graph TD
    A["L1"] --> B["HEATER SWITCH"]
    B --> C["BLK BLK BLK BLK BLK BLU"]
    C --> D["SWITCH AND THERMOSTAT"]
    D --> E["TAH TANK HEATER"]
    E --> F["WHI (MODEL 20) RED (MODEL 35)"]
    G["N"] --> H["L"]
    I["LEARN"] --> J["LEARN VIO"]
    K["ON/OFF SWITCH"] --> L["WHI/RED"]
    M["START SWITCH"] --> N["BLU/RED"]
    O[""KEEP WARM" HEATER"] --> P["LOWER CENTER WARMER"]
    Q["SOL"] --> R["WHI/BLU T3TST1 BREW TIMER T4 T2 WHI/GRN"]
    S["ON/OFF SWITCH"] --> T["YEL"]
    U["BRN/BLK"] --> V["LEFT FRONT WARMER"]
    W["RIGHT FRONT WARMER"] --> X["RIGHT REAR WARMER"]
    Y["WHI"] --> Z["WHI"]
    AA["WHI"] --> AB["WHI"]
    AC["WHI"] --> AD["WHI"]
    AE["WHI"] --> AF["WHI"]
    AG["WHI"] --> AH["WHI"]
10476.0000G 07/03 © 1990 BUNN-O-MATIC CORPORATION
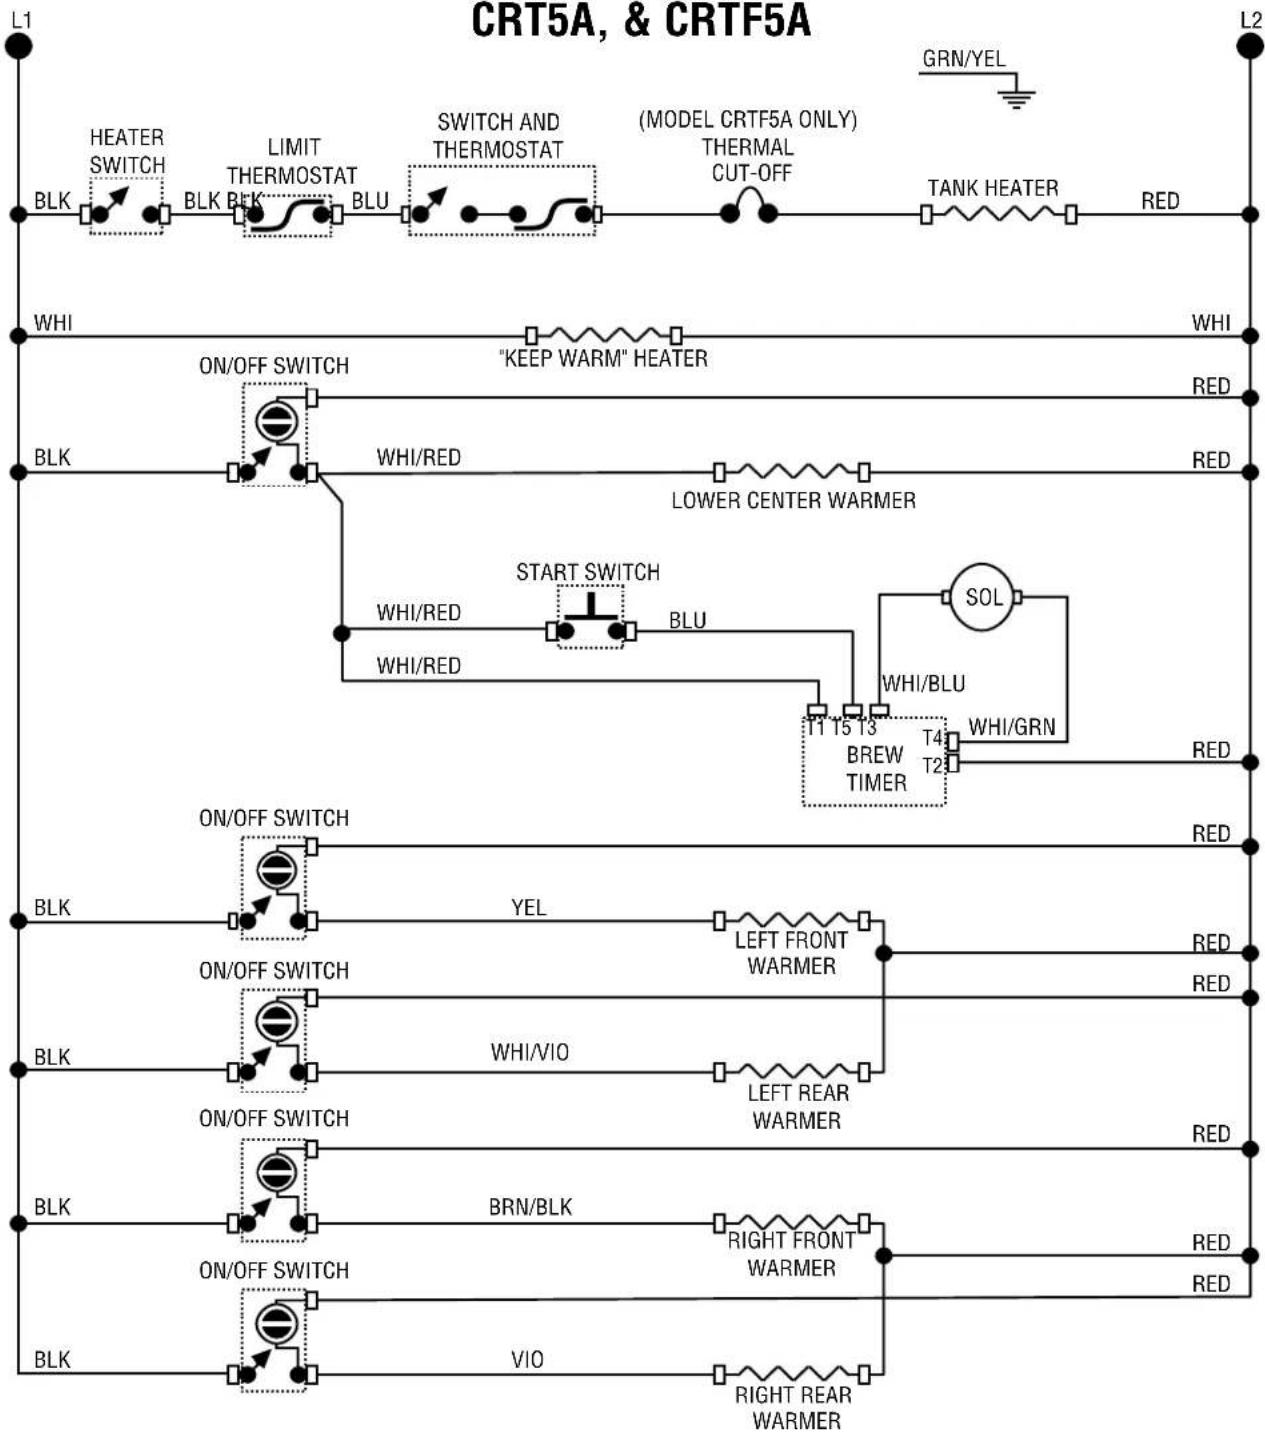
SCHEMATIC WIRING DIAGRAM
CRT5A, & CRTF5A
flowchart
graph TD
    subgraph_CRT5A["CRT5A, & CRTF5A"]
        L1["BLK"] --> BLK1["HEATER SWITCH"]
        BLK1 --> BLK2["BLK BLK"]
        BLK2 --> BLU["BLU"]
        BLU --> SWITCHAND["SWITCH AND THERMOSTAT"]
        SWITCHAND --> SWITCHANDTER["SWITCH AND THERMOSTAT"]
        SWITCHANDTER --> TANKCHEATER["TANK HEATER"]
        TANKCHEATER --> RED["RED"]
        GRN/YEL["GRN/YEL"] --> L2["L2"]
    end

    subgraph_CRTF5A["CRTF5A, & CRTF5A"]
        L1 --> WHI["WHI"]
        BLK --> ON/OFFSwitch["ON/OFF SWITCH"]
        BLK1 --> ON/OFFSwitch
        ON/OFFSwitch --> BLU
        BLU --> STARTSwitch["START SWITCH"]
        STARTSwitch --> BLU
        BLU --> SOL["SOL"]
        SOL --> WHI/BLU["WHI/BLU"]
        WHI/BLU --> T4["T4"]
        T4 --> WHI/GRN["WHI/GRN"]
        WHI/GRN --> RED["RED"]
        RED --> RED["RED"]
        RED --> RED["RED"]
        RED --> RED["RED"]
        RED --> RED["RED"]
        RED --> RED["RED"]
        RED --> RED["RED"]
        RED --> RED["RED"]
        RED --> RED["RED"]
        RED --> RED["RED"]
        RED --> RED["RED"]
        RED --> RED["RED"]
        RED --> RED["RED"]
        RED --> RED["RED"]
        RED --> RED["RED"]
        RED --> Red["RED"]
        RED --> RED["RED"]
        RED --> RED["RED"]
        RED --> RED["RED"]
        RED --> RED["RED"]
        RED --> RED["RED"]
        RED --> RED["RED"]
        RED --> RED["RED"]
        RED --> RED["RED"]
        RED --> RED["RED"]
        RED --> RED["RED"]
        RED --> RED["RED"]
        RED --> RED["RED"]
        RED --> RED["RED"]
        RED --> RED["Red"]
    end

    subgraph CRTF5A
        L2 --> BLK
        BLK1 --> BLK2
        BLK2 --> BLU
        BLU --> SWITCHAND
        SWITCHAND --> SWITCHANDTER
        SWITCHANDTER --> TANKCHEATER
        SWITCHANDTER --> TANKHEATER
        SWITCHANDTER --> RED
    end

    subgraph CRTF5A
        L2 --> BLK
        BLK1 --> BLK2
        BLK2 --> BLU
        BLU --> SWITCHAND
        SWITCHANDTER --> TANKCHEATER
        SWITCHANDTER --> TANKHEATER
        SWITCHANDTER --> RED
    end

    subgraph CRTF5A
        L2 --> BLK
        BLK1 --> BLK2
        BLK2 --> BLU
        BLU --> SWITCHAND
        SWITCHANDTER --> TANKCHEATER
        SWITCHANDTER --> TANKHEATER
        SWITCHANDTER --> RED
    end
240 VOLTS AC 2 WIRE SINGLE PHASE
10477.0000H 07/03 © 1990 BUNN-O-MATIC CORPORATION
SCHEMATIC WIRING DIAGRAM
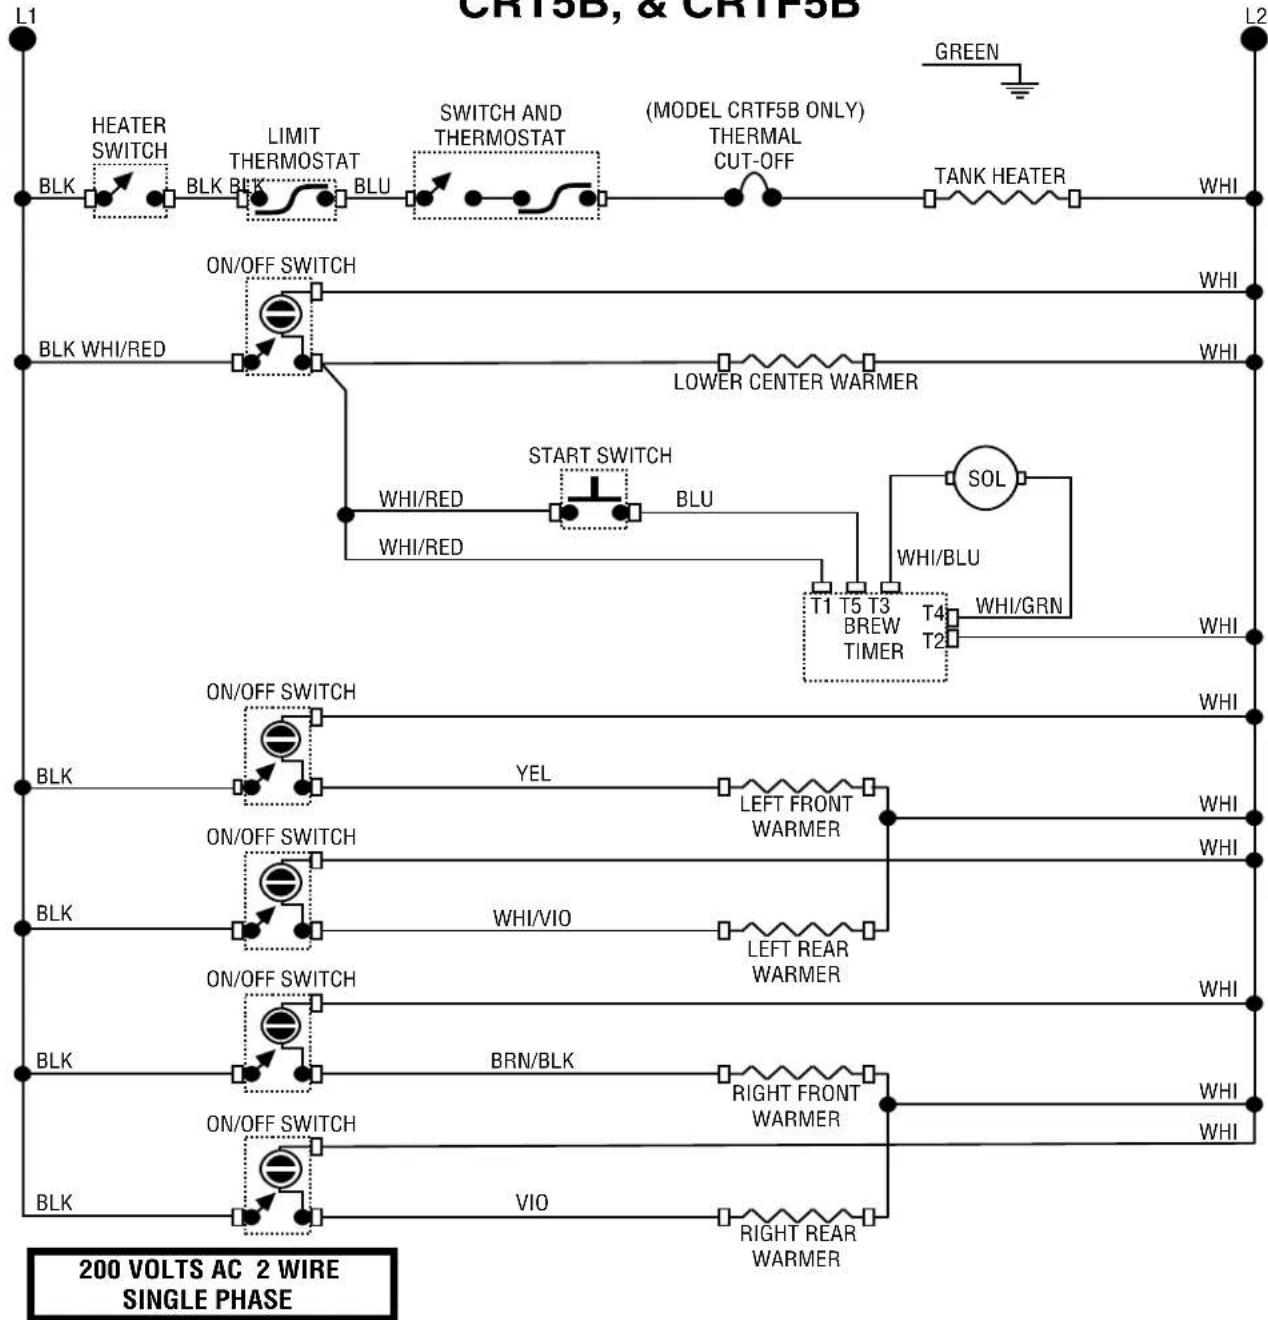
CRT5B, & CRTF5B
flowchart
Electrical single-phase power system diagram for CRT5B, & CRTFSB, showing BLK, BLU, and WHI/BLU connections with switch controls and warmers.10477.0001H 07/03 © 1993 BUNN-O-MATIC CORPORATION
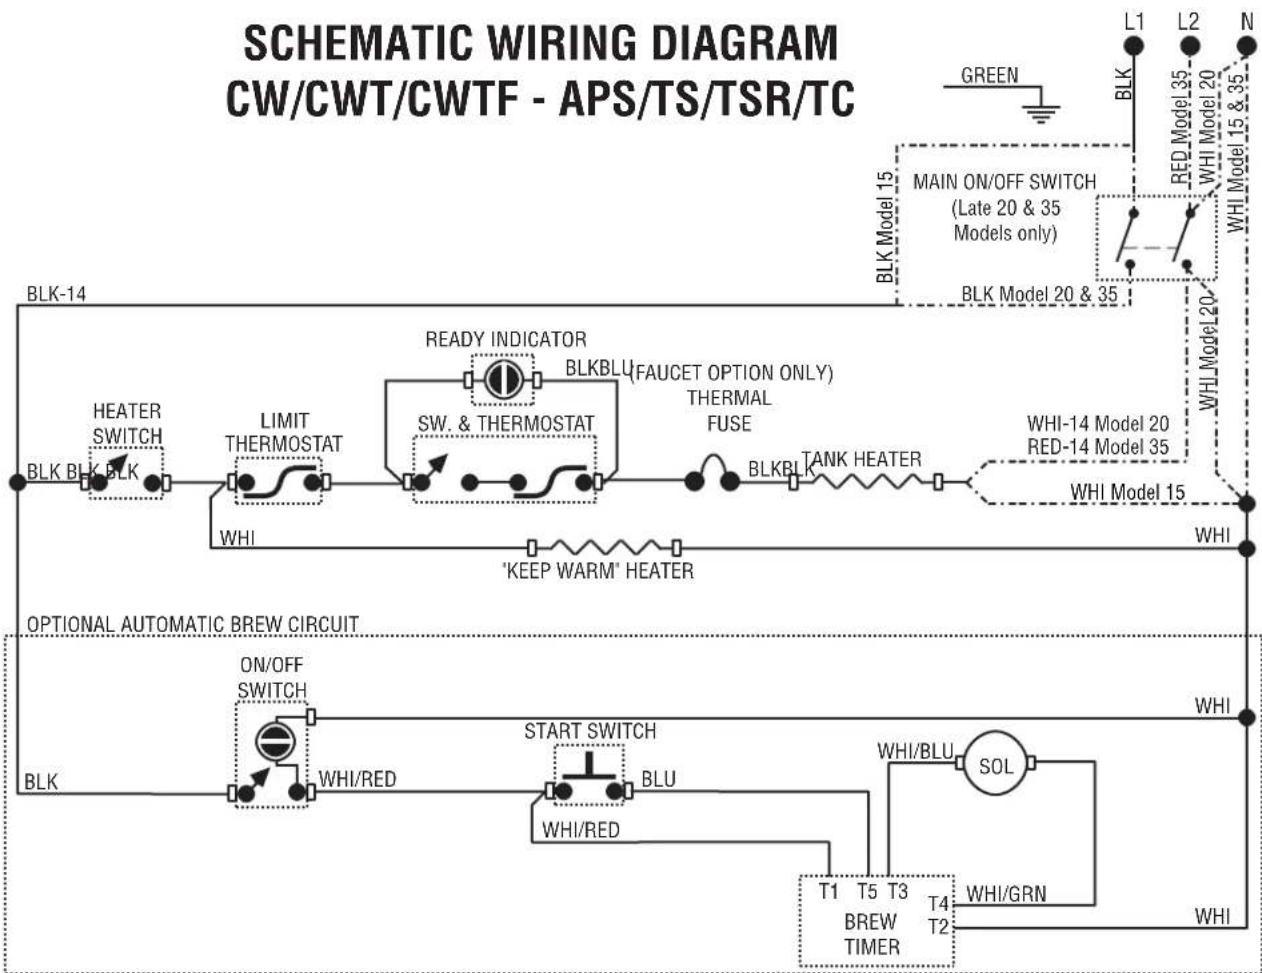
flowchart
graph TD
    subgraph "SLC" (Schematic Wiring Diagram)
        direction TB
        A["BLK-14"] --> B["HEATER SWITCH"]
        B --> C["LIMIT THERMOSTAT"]
        C --> D["READY INDICATOR"]
        D --> E["SW. & THERMOSTAT"]
        E --> F["THERMAL FUSE"]
        F --> G["BLKBLTANK HEATER"]
        G --> H["WHI-14 Model 20 RED-14 Model 35"]
        H --> I["WHI Model 15"]
        J["WHI"] --> K[""KEEP WARM" HEATER"]
        L["BLK"] --> M["ON/OFF SWITCH"]
        M --> N["WHI/RED"]
        O["Start SWITCH"] --> P["BLU"]
        Q["WHI/RED"] --> R["SOL"]
        S["T1 T5 T3 T4 T2"] --> T["BREW TIMER"]
        U["WHI/GRN"] --> V["WHI"]
    end

    style A fill:#f9f,stroke:#333
    style J fill:#f9f,stroke:#333
    style L fill:#f9f,stroke:#333
    style O fill:#f9f,stroke:#333
    style Q fill:#f9f,stroke:#333
    style S fill:#f9f,stroke:#333
    style T fill:#f9f,stroke:#333
    style U fill:#f9f,stroke:#333
    style V fill:#f9f,stroke:#333
120/240 VOLTS AC 3 WIRE 120 VOLTS AC 2 WIRE SINGLE PHASE
10693.0000G 02/07 © 1993 BUNN-O-MATIC CORPORATION
SCHEMATIC WIRING DIAGRAM CW-TS & CW-APS ERT
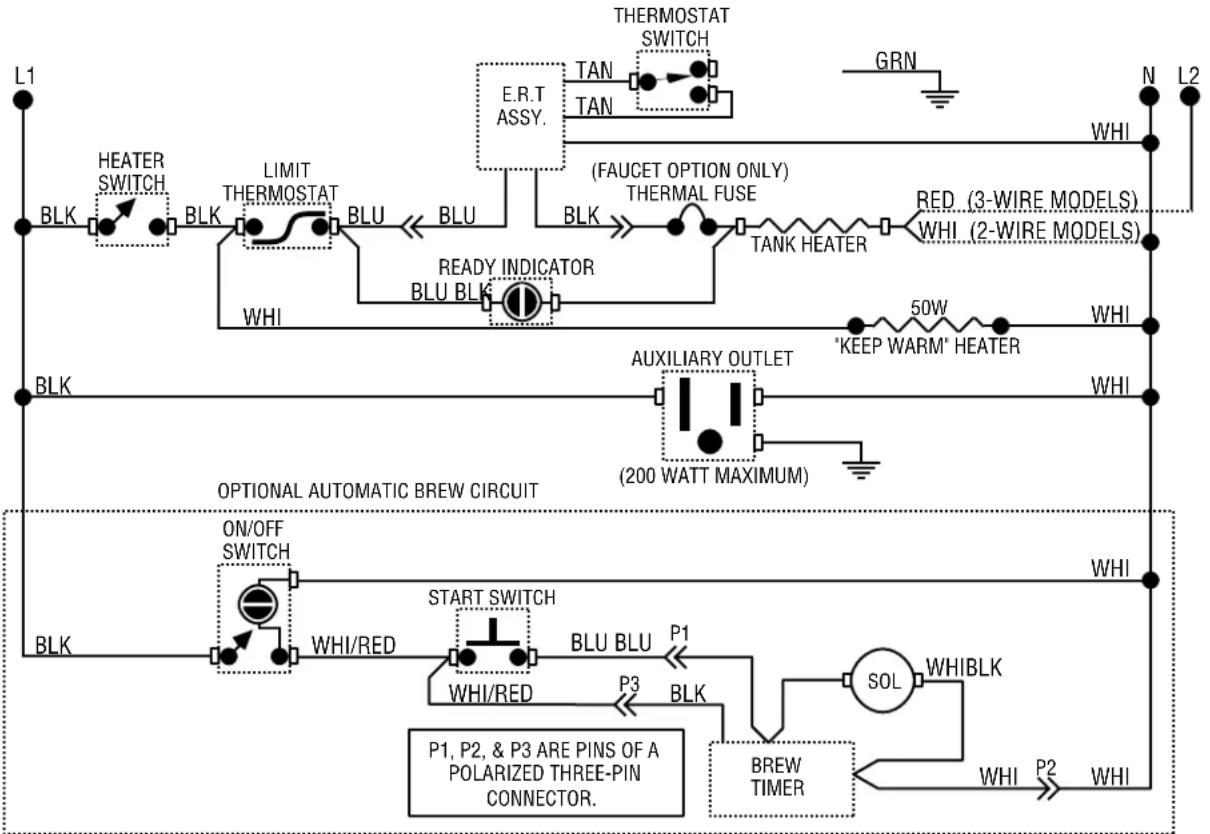
flowchart
graph TD
    subgraph Top_L1
        A["BLK"] --> B["HEATER SWITCH"]
        B --> C["BLK"]
        C --> D["LIMIT THERMOSTAT"]
        D --> E["BLU"]
        E --> F["BLU"]
        F --> G["BLU"]
        G --> H["READY INDICATOR BLU BLK"]
        H --> I["TANK HEATER"]
        I --> J["RED. (3-WIRE MODELS)"]
        J --> K["WHI (2-WIRE MODELS)"]
        K --> L["GRN"]
        L --> M["N"]
        M --> N["L2"]
    end

    subgraph Top_L2
        O["BLK"] --> P["AUXILIARY OUTLET"]
        P --> Q["WHI"]
        Q --> R["OPTIONAL AUTOMATIC BREW CIRCUIT"]
        R --> S["WHI"]
        S --> T["ON/OFF SWITCH"]
        T --> U["WHI/RED"]
        U --> V["START SWITCH"]
        V --> W["BLU BLU"]
        W --> X["P1"]
        X --> Y["P3"]
        Y --> Z["BREW TIMER"]
        Z --> AA["SOL"]
        AA --> AB["WHIBLK"]
        AB --> AC["WHI"]
        AC --> AD["P2"]
        AD --> AE["WHI"]
    end

    F --> F
    H --> H
    P --> P
    V --> V
    W --> W
    X --> X
    Y --> Y
    Z --> Z
    AA --> AA
    AB --> AB
    AC --> AC
    AD --> AD
120/240 VOLTS AC 3 WIRE 120 VOLTS AC 2 WIRE SINGLE PHASE
10693.0001C 9/96 © 1996 BUNN-O-MATIC CORPORATION
SCHEMATIC WIRING DIAGRAM FOR CWT-APS MV, CWTF-APS MV, CWTF-TS MV, CWTF-TSR MV
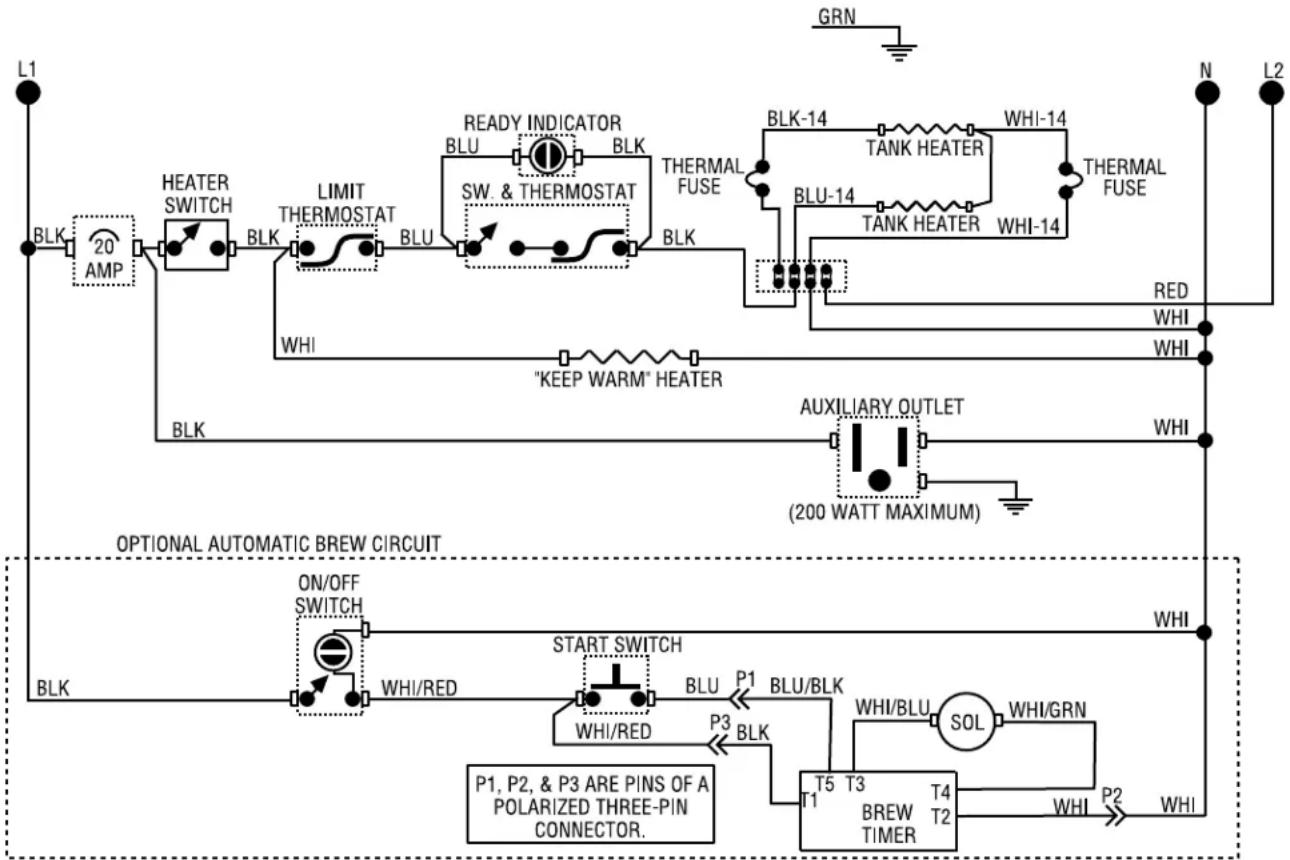
flowchart
graph TD
    subgraph Power Source
        L1["Power L1"] --> BLK1["BLK"]
        BLK1 --> 20_AMP["20 AMP"]
        BLK1 --> HEATERSwitch["HEATER SWITCH"]
        HEATERSwitch --> BLK2["BLK"]
        BLK2 --> LIMITTHERMOSTAT["LIMIT THERMOSTAT"]
        LIMITTHERMOSTAT --> BLU2["BLU"]
        BLU2 --> READYIndicator["READY INDICATOR"]
        READYIndicator --> BLU3["BLU"]
        BLU3 --> ThermalFuse["THERMAL FUSE"]
        ThermalFuse --> BLK3["BLK"]
        BLK3 --> BLK4["BLK-14"]
        BLK4 --> TANKHeater["TANK HEATER"]
        TANKHeater --> BLU4["BLU-14"]
        BLU4 --> WHI14["WHI-14"]
        BLU4 --> THERMALFuse["THERMAL FUSE"]
        THERMALFuse --> BLK5["BLK-14"]
        BLK5 --> RED["RED"]
        BLK5 --> WHI6["WHI"]
        BLK6["BLK"] --> BLK7["BLK"]
        BLK7 --> "KEEP WARM"HEATER["KEEP WARM" HEATER"]
        "KEEP WARM"HEATER --> AUXILIARYOUTLET["AUXILIARY OUTLET"]
        AUXILIARYOUTLET --> WHI7["WHI"]
        AUXILIARYOUTLET --> WHI8["WHI"]
        AUXILIARYOUTLET --> WHI9["WHI"]
    end

    subgraph Power Supply
        L2["Power L2"] --> N["N"]
        L2 --> L1
    end

    subgraph Optional Automatic Brew Circuit
        BLK1["BLK"] --> ON/OFFSwitch["ON/OFF SWITCH"]
        ON/OFFSwitch --> WHI/RED["WHI/RED"]
        WHI/RED --> STARTSwitch["START SWITCH"]
        STARTSwitch --> BLU_P1["BLU P1"]
        STARTSwitch --> BLU_BLK["BLU/BLK"]
        BLU_BLK --> P3["BLP P3"]
        P3 --> BLU_RL["P3"]
        BLU_RL --> WHI_BLU["SOL"]
        WHI_BLU --> WHI_GRN["WHI/GRN"]
        WHI_GRN --> T5["T5 T3 T4 T2"]
        T5 --> BREWTIMER["BREW TIMER"]
        BREWTIMER --> WHI["P2 WHI"]
    end

    style Power Source fill:#f9f,stroke:#333
    style Optional Automatic Brew Circuit fill:#ccf,stroke:#333
120/208 VOLTS AC 3 WIRE
120/240 VOLTS AC 3 WIRE
120 VOLTS AC 2 WIRE
SINGLE PHASE
10693.0002E 8/00 © 1998 BUNN-O-MATIC CORPORATION
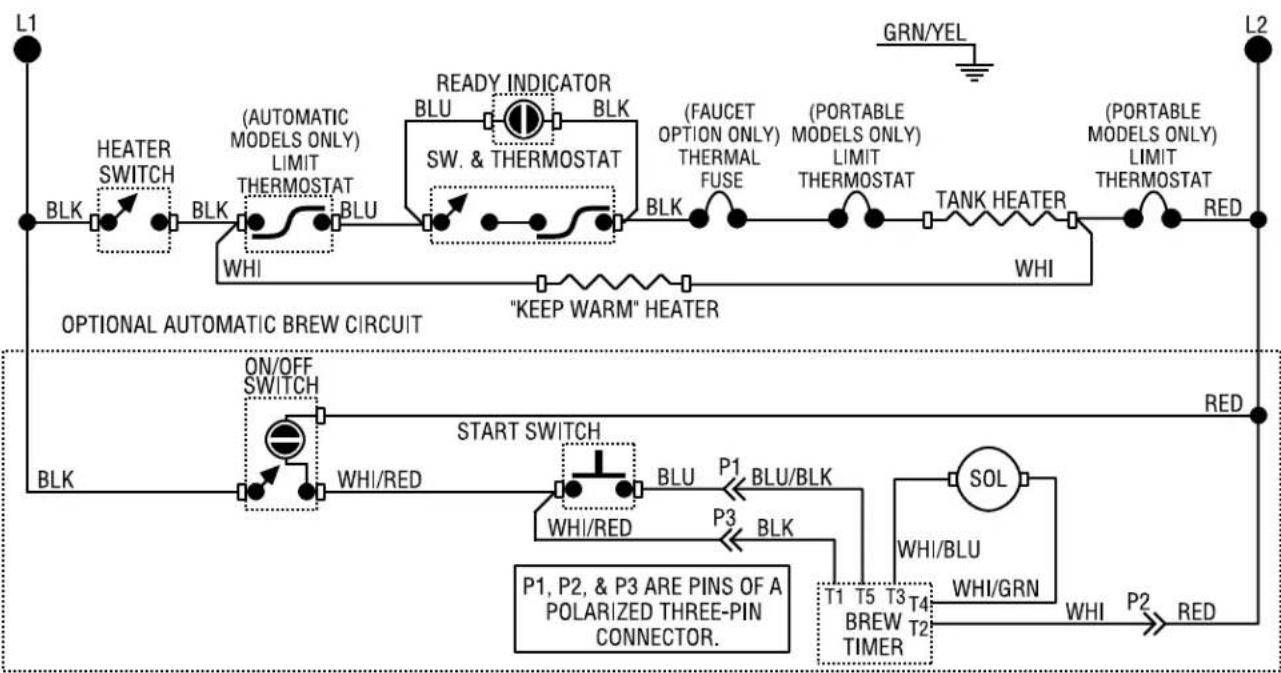
SCHEMATIC WIRING DIAGRAM FOR MODELS CWA, CWTA, CWTFA - APS, TS, TSR
flowchart
graph TD
    subgraph "OPTIONAL AUTOMATIC BREW CIRCUIT"
        L1["BLK"] --> HEATERSwitch["HEATER SWITCH"]
        HEATERSwitch --> BLK1["BLK"]
        BLK1 --> BLK2["BLK"]
        BLK2 --> BLU1["BLU"]
        BLU1 --> BLU2["BLU"]
        BLU2 --> BLU3["SW. & THERMOSTAT"]
        BLU3 --> BLU4["BLU"]
        BLU4 --> BLU5["BLU"]
        BLU5 --> BLU6["RL"]
        BLU6 --> BLU7["RL"]
        BLU7 --> BLU8["RL"]
        BLU8 --> BLU9["RL"]
        BLU9 --> BLU10["RL"]
        BLU10 --> BLU11["RL"]
        BLU11 --> BLU12["RL"]
        BLU12 --> BLU13["RL"]
        BLU13 --> BLU14["RL"]
        BLU14 --> BLU15["RL"]
        BLU15 --> BLU16["RL"]
        BLU16 --> BLU17["RL"]
        BLU17 --> BLU18["RL"]
        BLU18 --> BLU19["RL"]
        BLU19 --> BLU20["RL"]
        BLU20 --> BLU21["RL"]
        BLU21 --> BLU22["RL"]
        BLU22 --> BLU23["RL"]
        BLU23 --> BLU24["RL"]
        BLU24 --> BLU25["RL"]
        BLU25 --> BLU26["RL"]
        BLU26 --> BLU27["RL"]
        BLU27 --> BLU28["RL"]
        BLU28 --> BLU29["RL"]
        BLU29 --> BLU30["RL"]
        BLU30 --> BLU31["RL"]
        BLU31 --> BLU32["RL"]
        BLU32 --> BLU33["RL"]
        BLU33 --> BLU34["RL"]
        BLU34 --> BLU35["RL"]
        BLU35 --> BLU36["RL"]
        BLU36 --> BLU37["RL"]
        BLU37 --> BLU38["RL"]
        BLU38 --> BLU39["RL"]
        BLU39 --> BLU40["RL"]
        BLU40 --> BLU41["RL"]
        BLU41 --> BLU42["RL"]
        BLU42 --> BLU43["RL"]
        BLU43 --> BLU44["RL"]
        BLU44 --> BLU45["RL"]
        BLU45 --> BLU46["RL"]
        BLU46 --> BLU47["RL"]
        BLU47 --> BLU48["RL"]
        BLU48 --> BLU49["RL"]
        BLU49 --> BLU50["RL"]
        BLU50 --> BLU51["RL"]
        BLU51 --> BLU52["RL"]
        BLU52 --> BLU53["RL"]
        BLU53 --> BLU54["RL"]
        BLU54 --> BLU55["RL"]
        BLU55 --> BLU56["RL"]
        BLU56 --> BLU57["RL"]
        BLU57 --> BLU58["RL"]
        BLU58 --> BLU59["RL"]
        BLU59 --> BLU60["RL"]
        BLU60 --> BLU61["RL"]
        BLU61 --> BLU62["RL"]
        BLU62 --> BLU63["RL"]
        BLU63 --> BLU64["RL"]
        BLU64 --> BLU65["RL"]
        BLU65 --> BLU66["RL"]
        BLU66 --> BLU67["RL"]
        BLU67 --> BLU68["RL"]
        BLU68 --> BLU69["RL"]
        BLU69 --> BLU70["RL"]
        BLU70 --> BLU71["RL"]
        BLU71 --> BLU72["RL"]
        BLU72 --> BLU73["RL"]
        BLU73 --> BLU74["RL"]
        BLU74 --> BLU75["RL"]
        BLU75 --> BLU76["RL"]
        BLU76 --> BLU77["RL"]
        BLU77 --> BLU78["RL"]
        BLU78 --> BLU79["RL"]
        BluWHI/RED/WHI/RED/WHI/RED/WHI/RED/WHI/RED/WHI/RED/WHI/RED/WHI/RED/WHI/RED/WHI/RED/WHI/RED/WHI/RED/WHI/RED/WHI/RED/WHI/RED/WHI/RED/WHI/RED/WHI/RED/WHI/RED/WHI/RED/WHI/RED/
    end
    subgraph "START SWITCH"
            ON/OFFSwitch["ON/OFF SWITCH"] --> ON/OFFSwitch
            ON/OFFSwitch --> STARTSwitch
            STARTSwitch --> STARTSwitch
            STARTSwitch --> STARTSwitch
            STARTSwitch --> STARTSwitch
            STARTSwitch --> STARTSwitch
            STARTSwitch --> STARTSwitch
            STARTSwitch --> STARTSwitch
            STARTSwitch --> STARTSwitch
            STARTSwitch --> STARTSwitch
            STARTSwitch --> STARTSwitch
            STARTSwitch --> STARTSwitch
            STARTSwitch --> STARTSwitch
            STARTSwitch --> STARTSwitch
            STARTSwitch --> STARTSwitch
            STARTSwitch --> STARTSwitch
            STARTSwitch <--> P1, P2, &P3 ARE PINS OF A POLARIZED THREE-PIN CONNECTOR.
            P1, P2, &P3 ARE PINS OF A POLARIZED THREE-PIN CONNECTOR.
            P1, P2, &P3 ARE PINS OF A POLARIZED THREE-PIN CONNECTOR.
            P1, P2, &P3 ARE PINS OF A POLARIZED THREE-PIN CONNECTOR.
            P1, P2, &P3 ARE PINS OF A POLARIZED THREE-PIN CONNECTOR.
            P1, WHEATERINDICATOR(BLW) = (AUTOMATIC MODELS ONLY) LIMIT THERMOSTAT
            BILUTSOTENTIMBER(BLW) = (FAULT INDICATOR) BILUTSOTENTIMBER(BLW) = (PORTABLE MODELS ONLY) LIMIT THERMOSTAT
            SW & THERMOSTAT = (FAUCET OPTION ONLY) THERMAL FUSE = (PORTABLE MODELS ONLY) LIMIT THERMOSTAT = (PORTABLE MODELS ONLY) LIMIT THERMOSTAT
            FLAMFUSE = (FAULT INDICATOR) BILUTSOTENTIMBER(BLW) = (PORTABLE MODELS ONLY) LIMIT THERMOSTAT
            FLAMFUSE = (FAULT INDICATOR) BILUTSOTENTIMBER(BLW) = (PORTABLE MODELS ONLY) LIMIT THERMOSTAT
            FLAMFUSE = (FAULT INDICATOR) BILUTSOTENTIMBER(BLW) = (PORTABLE MODELS ONLY) LIMIT THERMOSTAT
            FLAMFUSE = (FAULT INDICATION) BILUTSOTENTIMBER(BLW) = (PORTABLE MODELS ONLY) LIMIT THERMOSTAT
            FLAMFUSE = (FAULT INDICATION) BILUTSOTENTIMBER(BLW) = (PORTABLE MODELS ONLY) LIMIT THERMOSTAT
            FLAMFUSE = (FAULT INDICATION) BILUTSOTENTIMBER(BLW) = (PORTABLE MODELS ONLY) LIMIT THERMOSTPAT
            FLAMFUSE = (FAULT INDICATION) BILUTSOTENTIMBER(BLW) = (PORTABLE MODELS ONLY) LIMIT THERMOSTAT
            FLAMFUSE = (FAULT INDICATION) BILUTSOTENTIMBER(BLW) = (PORTABLE MODELS ONLY) LIMIT THERMOSTAT
            FLAMFUSE = (FAULT INDICATION) BILUTSOTENTIMBER(BLW) =(PORTABLE MODELS ONLY) LIMIT THERMOSTAT
            FLAMFUSE = (FAULT INDICATION) BILUTSOTENTIMBER(BLW) =(PORTABLE MODELS ONLY) LIMIT THERMOSTAT
            FLAMFUSE = (FAULT INDICATION) BILUTSOTENTIMBER(BLW) =(PORTABLE MODELS ONLY) LIMIT THERMOSTAT
            FLAMFUSE = (FAULT INDICATION) BILUTOENTIMBER(BLW) =(PORTABLE MODELS ONLY) LIMIT THERMOSTAT
            FLAMFUSE = (FAULT INDICATION) BILUTOENTIMBER(BLW) =(PORTABLE MODELS ONLY) LIMIT THERMOSTAT
            FLAMFUSE = (FAULT INDICATION) BILUTOENTIMBER(BLW) =(PORTABLE MODELS ONLY) LIMIT THERMOSTAT
            FLAMFUSE = (FAULT INTEGRATED POWER)
            SOL["SOL"] --> WHI/BLW["WHI/BLW"] --> WHI/GRN["WHI/GRN"] --> WHI["P2"] --> RED["P2"] --> RED["P2"] --> RED["P2"] --> RED["P2"] --> RED["P2"] --> RED["P2"] --> RED["P2"] --> RED["P2"] --> RED["P2"] --> RED["P2"] --> RED["P2"] --> RED["P2"] --> RED["P2"] --> RED["P2"] --> RED["P2"] --> RED["P2"] --> RED["P2"] --> RED["P2"] --> RED["P2"] --> RED["P2"] --> Red["P2"] --> Red["P2"] --> Red["P2"] --> Red["P2"] --> Red["P2"] --> Red["P2"] --> Red["P2"] --> Red["P2"] --> Red["P2"] --> Red["P2"] --> Red["P2"] --> Red["P2"] --> Red["P2"] --> Red["P2"] --> Red["P2"] --> Red["P2"] --> Red["P2"] --> Red["P2"] --> Red["P2"] --> Red["P2"] --> Blue[PULB/LULB/LULB/LULB/LULB/LULB/LULB/LULB/LULB/LULB/LULB/LULB/LULB/LULB/LULB/LULB/LULB/LULB/LULB/LULB/LULB/LULB/LULB/LULB/LULB/LULB/LULB/LULB/LULB/LULB/LULB/LULB/LULB/LULB/LULLA
    end
220-240 VOLTS AC 2 WIRE SINGLE PHASE
10694.0000C 6/00 © 1994 BUNN-O-MATIC CORPORATION
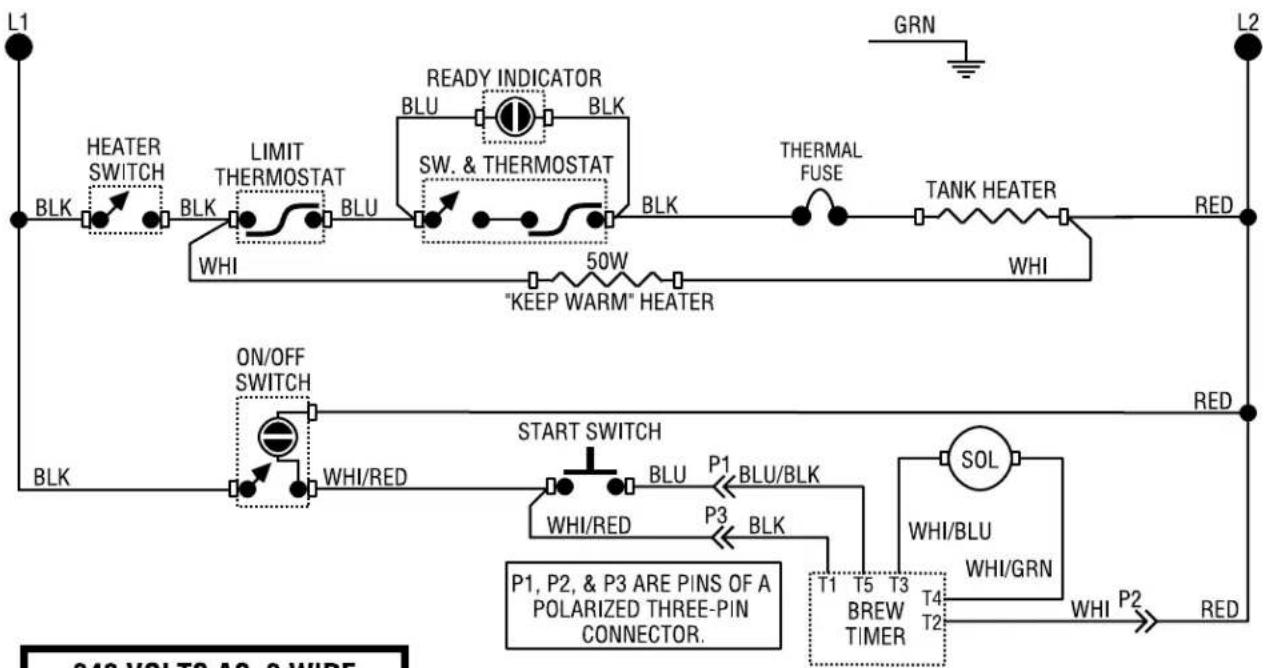
SCHEMATIC WIRING DIAGRAM CWTF-TSR
flowchart
graph TD
    subgraph Upper Circuit
        L1["BLK"] --> HEATERSwitch["HEATER SWITCH"]
        HEATERSwitch --> BLK1["BLK"]
        BLK1 --> LIMITTHERMOSTAT["LIMIT THERMOSTAT"]
        BLK1 --> BLU1["BLU"]
        BLU1 --> SW.THERMOSTAT
        SW.THERMOSTAT --> BLK2["BLK"]
        BLK2 --> TANKHEATER["TANK HEATER"]
        TANKHEATER --> RED["RED"]
        RED --> L2["BL2"]
        L2 --> GRN["GRN"]
        BLK --> ON/OFFSwitch["ON/OFF SWITCH"]
        ON/OFFSwitch --> BLK3["BLK"]
        BLK3 --> WHI/RED["WHI/RED"]
        BLK1 --> READYIndicator["READY INDICATOR"]
        READYIndicator --> BLU2["BLU"]
        BLU2 --> BLK4["BLK"]
        BLU4 --> SW.THERMOSTAT
        SW.THERMOSTAT --> BLK5["BLK"]
        BLK5 --> TANKHEATER
        TANKHEATER --> RED
        RED --> TANKHEATER
        TANKHEATER --> WHI["WHI"]
        WHI --> TANKHEATER
        TANKHEATER --> RED
        RED --> P2["P2"]
        P2 --> WHI_P2["WHI"]
        WHI_P2 --> RED
    end

    subgraph Lower Circuit
        ON/OFFSwitch --> BLK5
        BLK5 --> STARTSwitch["START SWITCH"]
        STARTSwitch --> BLU6["BLU"]
        BLU6 --> BLU7["BLU/BLK"]
        BLU7 --> P1["P1"]
        BLU7 --> BLU8["BLU/BLK"]
        BLU8 --> WHI/RED["WHI/RED"]
        BLU8 --> BLU9["P3"]
        BLU9 --> BLU10["BLU/BLK"]
        BLU10 --> P3["P3"]
        P3 --> BLU11["BLU/BLK"]
        BLU11 --> WHI/RED
        BLU11 --> BLU12["P1, P2, & P3 ARE PINS OF A POLARIZED THREE-PIN CONNECTOR."]
        BLU12 --> SOL["SOL"]
        SOL --> WHI/GRN["WHI/GRN"]
        WHI/GRN --> T4["T4"]
        T4 --> BREWTIMER["BREW TIMER"]
        BREWTIMER --> WHI_P2["P2"]
        WHI_P2 --> RED["RED"]
    end

    style Upper Circuit fill:#f9f,stroke:#333
    style Lower Circuit fill:#ccf,stroke:#333
240 VOLTS AC 2 WIRE
SINGLE PHASE
10694.0001C 6/00 © 1996 BUNN-O-MATIC CORPORATION
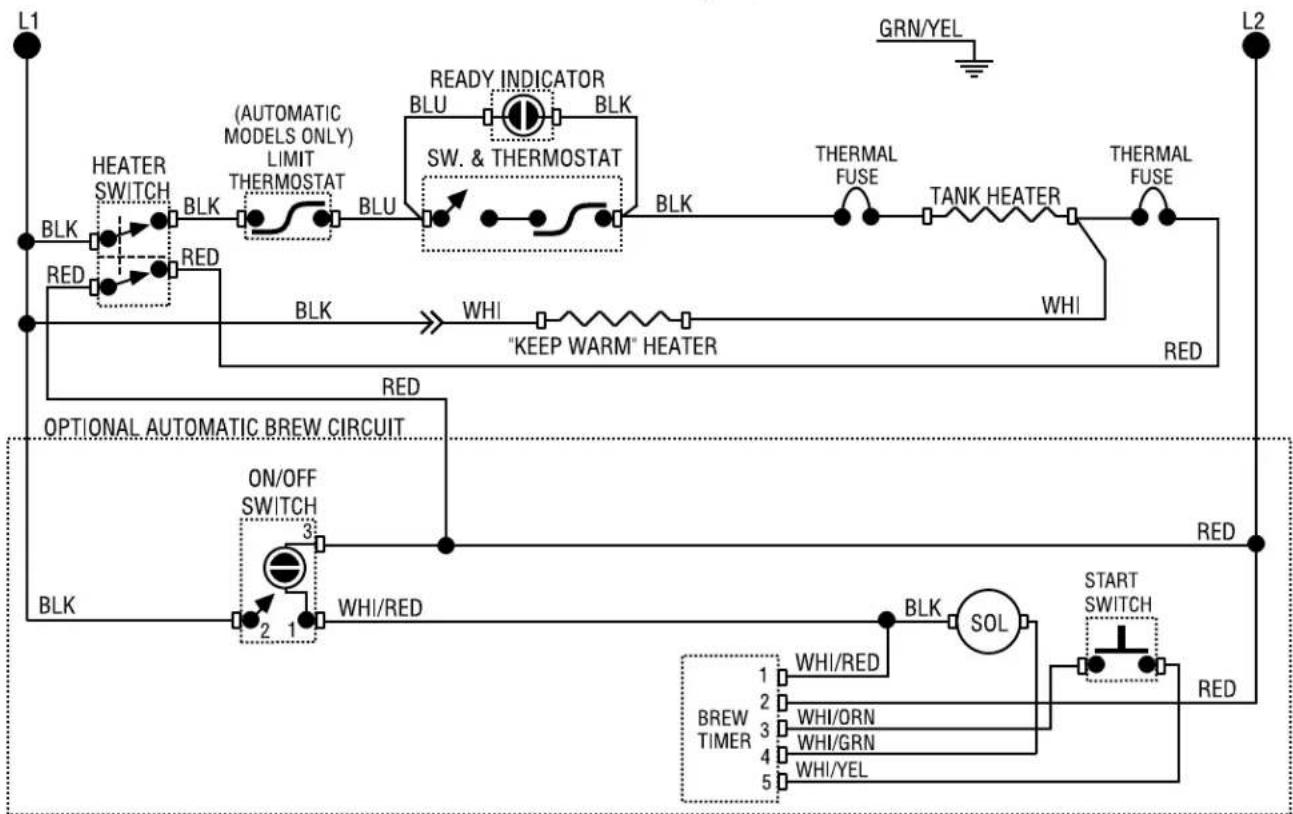
SCHEMATIC WIRING DIAGRAM FOR MODELS CWA, CWTA, CWTFA - APS, TS
flowchart
graph TD
    L1[" L1 "] --> BLK1[" BLK "]
    BLK1 --> HEATERSwitch[" HEATER SWITCH "]
    BLK1 --> RED1[" RED "]
    HEATERSwitch --> BLK2[" BLK "]
    BLK2 --> (AUTOMATIC MODELS ONLY)LIMIT[" (AUTOMATIC MODELS ONLY) LIMIT THERMOSTAT "]
    BLK2 --> BLU[" BLU "]
    BLU --> READYIndicator[" READY INDICATOR "]
    READYIndicator --> BLU2[" BLU "]
    BLU2 --> SW &Thermostat[" SW. & THERMOSTAT "]
    SW &Thermostat --> BLK3[" BLK "]
    BLK3 --> TANKHeater["TANK HEATER"]
    TANKHeater --> BLK4[" BLK "]
    BLK4 --> THERMALFUSE["THERMAL FUSE "]
    THERMALFUSE --> TANKHeater2[" TANK HEATER "]
    THERMALFUSE2 --> THERMALFUSE3[" THERMAL FUSE "]
    THERMALFUSE3 --> RED1[" RED "]
    THERMALFUSE3 --> RED2[" RED "]
    THERMALFUSE3 --> RED3[" RED "]
    THERMALFUSE3 --> RED4[" RED "]
    THERMALFUSE3 --> RED5[" RED "]
    THERMALFUSE3 --> RED6[" RED "]
    THERMALFUSE3 --> RED7[" RED "]
    THERMALFUSE3 --> RED8[" RED "]
    THERMALFUSE3 --> RED9[" RED "]
    THERMALFUSE3 --> RED10[" RED "]
    THERMALFUSE3 --> RED11[" RED "]
    THERMALFUSE3 --> RED12[" RED "]
    THERMALFUSE3 --> RED13[" RED "]
    THERMALFUSE3 --> RED14[" RED "]
    THERMALFUSE3 --> RED15[" RED "]
    THERMALFUSE3 --> RED16[" RED "]
    THERMALFUSE3 --> RED17[" RED "]
    THERMALFUSE3 --> RED18[" RED "]
    THERMALFUSE3 --> RED19[" RED "]
    THERMALFUSE3 --> RED20[" RED "]
    THERMALFUSE3 --> RED21[" RED "]
    THERMALFUSE3 --> RED22[" RED "]
    THERMALFUSE3 --> RED23[" RED "]
    THERMALFUSE3 --> RED24[" RED "]
    THERMALFUSE3 --> RED25[" RED "]
    THERMALFUSE3 --> RED26[" RED "]
    THERMALFUSE3 --> RED27[" RED "]
    THERMALFUSE3 --> RED28[" RED "]
    THERMALFUSE3 --> RED29[" RED "]
    THERMALFUSE3 --> RED30[" RED "]
    THERMALFUSE3 --> RED31[" RED "]
    THERMALFUSE3 --> RED32[" RED "]
    THERMALFUSE3 --> RED33[" RED "]
    THERMALFUSE3 --> RED34[" RED "]
    THERMALFUSE3 --> RED35[" RED "]
    THERMALFUSE3 --> RED36[" RED "]
    THERMALFUSE3 --> RED37[" RED "]
    THERMALFUSE3 --> RED38[" RED "]
    THERMALFUSE3 --> RED39[" RED "]
    THERMALFUSE3 --> RED40[" RED "]
    THERMALFUSE3 --> RED41[" RED "]
    THERMALFUSE3 --> RED42[" RED "]
    THERMALFUSE3 --> RED43[" RED "]
    THERMALFUSE3 --> RED44[" RED "]
    THERMALFUSE3 --> RED45[" RED "]
    THERMALFUSE3 --> RED46[" RED "]
    THERMALFUSE3 --> RED47[" RED "]
    THERMALFUSE3 --> RED48[" RED "]
    THERMALFUSE3 --> RED49[" RED "]
    THERMALFUSE3 --> RED50[" RED "]
    THERMALFUSE3 --> RED51[" RED "]
    THERMALFUSE3 --> RED52[" RED "]
    THERMALFUSE3 --> RED53[" RED "]
    THERMALFUSE3 --> RED54[" RED "]
    THERMALFUSE3 --> RED55[" RED "]
    THERMALFUSE3 --> RED56[" RED "]
    THERMALFUSE3 --> RED57[" RED "]
    THERMALFUSE3 --> RED58[" RED "]
    THERMALFUSE3 --> RED59[" RED "]
    THERMALFUSE3 --> RED60[" RED "]
    THERMALFUSE3 --> RED61[" RED "]
    THERMALFUSE3 --> RED62[" RED "]
    THERMALFUSE3 --> RED63[" RED "]
    THERMALFUSE3 --> RED64[" RED "]
    THERMALFUSE3 --> RED65[" RED "]
    THERMALFUSE3 --> RED66[" RED "]
    THERMALFUSE3 --> RED67[" RED "]
    THERMALFUSE3 --> RED68[" RED "]
    THERMALFUSE3 --> RED69[" RED "]
    THERMALFUSE3 --> RED70[" RED "]
    THERMALFUSE3 --> RED71[" RED "]
    THERMALFUSE3 --> RED72[" RED "]
    THERMALFUSE3 --> RED73[" RED "]
    THERMALFUSE3 --> RED74[" RED "]
    THERMALFUSE3 --> RED75[" RED "]
    THERMALFUSE3 --> RED76[" RED "]
    THERMALFUSE3 --> RED77[" RED "]
    THERMALFUSE3 --> RED78[" RED "]
    THERMALFUSE3 --> RED79[" RED "]
    THERMALFUSE3 --> RED80[" RED "]
230-240 VOLTS AC 2 WIRE SINGLE PHASE
10694.0002E 7/98 © 1997 BUNN-O-MATIC CORPORATION
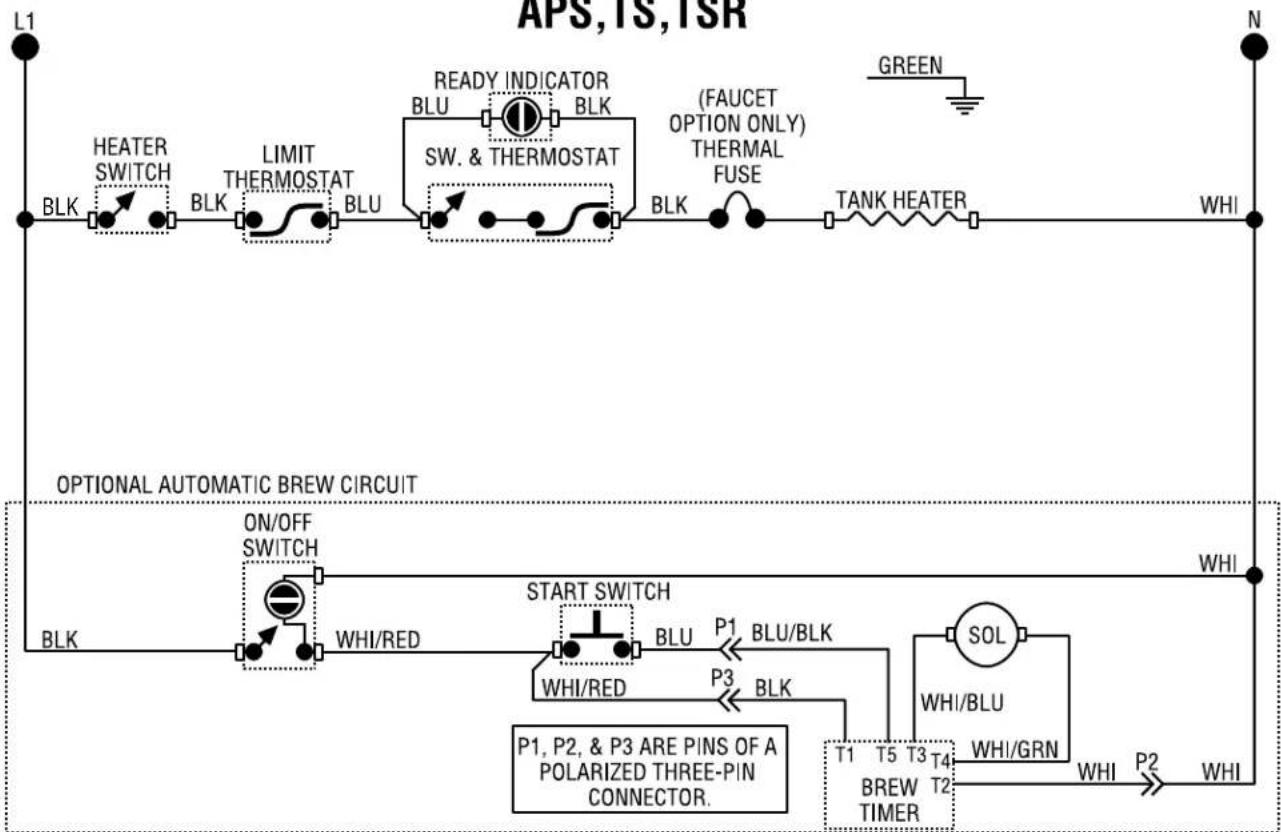
SCHEMATIC WIRING DIAGRAM FOR CWB, CWTB, CWTFB - APS, TS, TSR
flowchart
graph TD
    A["L1"] --> B["BLK"]
    B --> C["HEATER SWITCH"]
    C --> D["BLK"]
    D --> E["LIMIT THERMOSTAT"]
    E --> F["BLU"]
    F --> G["SW. & THERMOSTAT"]
    G --> H["READY INDICATOR BLK"]
    H --> I["BLU"]
    I --> J["BLK"]
    J --> K["TANK HEATER"]
    K --> L["WHI"]
    M["N"] --> N["OPTONAL AUTOMATIC BREW CIRCUIT"]
    O["START SWITCH"] --> P["BLU"]
    P --> Q["P1 BLU/BLK"]
    Q --> R["P3 BLK"]
    R --> S["P1, P2, & P3 ARE PINS OF A POLARIZED THREE-PIN CONNECTOR."]
    S --> T["T1 T5 T3 T4 BREW TIMER"]
    T --> U["WHI/BRN"]
    U --> V["P2 WHI"]
    W["SOL"] --> X["WHI/BLU"]
    X --> Y["WHI/GRN"]
    Y --> Z["WHI"]
100 VOLTS AC 2 WIRE SINGLE PHASE
10695.0000C 6/00 © 1996 BUNN-O-MATIC CORPORATION
SCHEMATIC WIRING DIAGRAM FOR CWB, CWTB, CWTFB - APS, TS, TSR
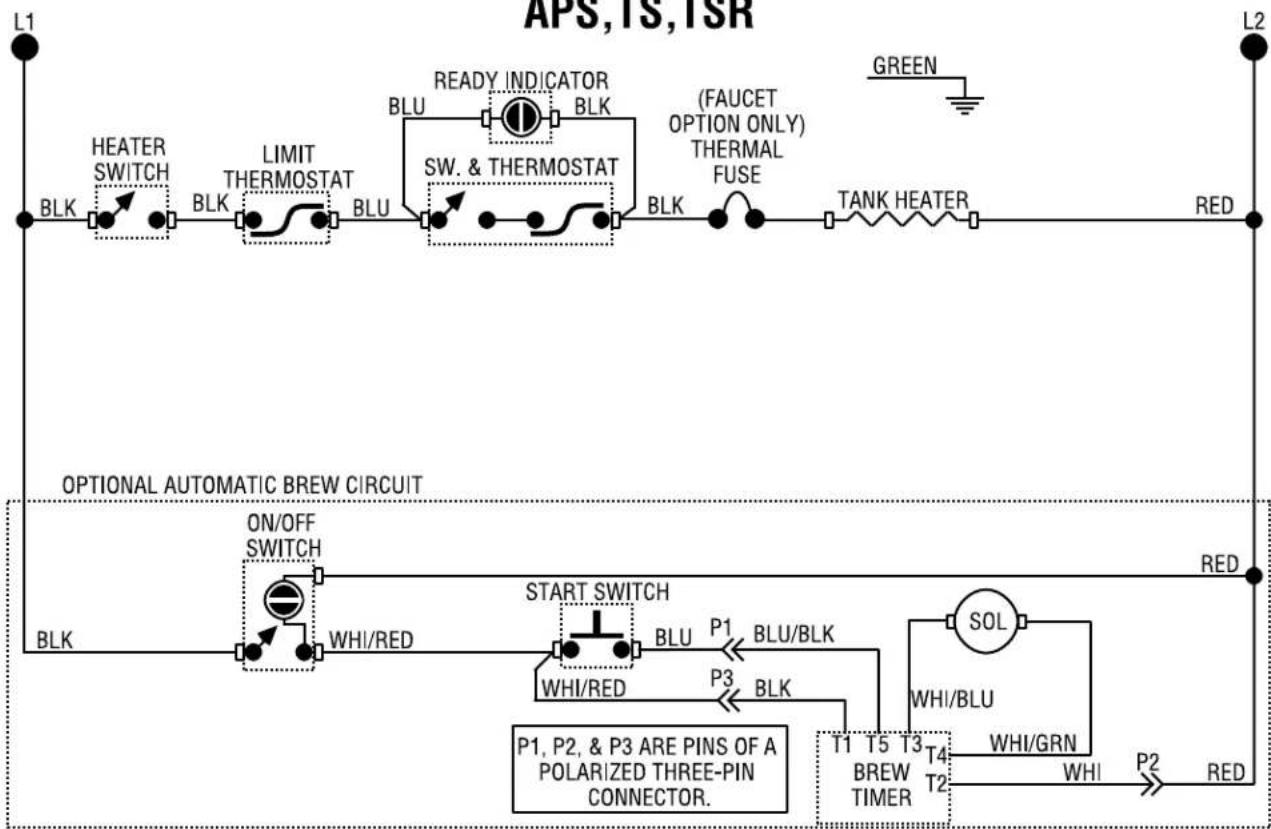
flowchart
graph TD
    subgraph L1
        A["BLK"] --> B["HEATER SWITCH"]
        B --> C["BLK"]
        C --> D["LIMIT THERMOSTAT"]
        D --> E["BLU"]
        E --> F["SW. & THERMOSTAT"]
        F --> G["BLK"]
        G --> H["TANK HEATER"]
        H --> I["RED"]
    end

    subgraph L2
        J["GREEN"] --> K["LEaded Capacitor"]
        K --> L["ON/OFF SWITCH"]
        L --> M["WHI/RED"]
        M --> N["START SWITCH"]
        N --> O["BLU"]
        O --> P["P1 BLU/BLK"]
        P --> Q["P3 BLK"]
        Q --> R["P1, P2, & P3 ARE PINS OF A POLARIZED THREE-PIN CONNECTOR."]
        R --> S["T1 T5 T3 BREW TIMER"]
        S --> T["T4 WHI/GRN"]
        T --> U["P2 WHI"]
        U --> V["P2 RED"]
    end

    style L1 fill:#f9f,stroke:#333
    style L2 fill:#f9f,stroke:#333
200 VOLTS AC 2 WIRE SINGLE PHASE
10696.0000B 6/00 © 1996 BUNN-O-MATIC CORPORATION
SCHEMATIC WIRING DIAGRAM
CWT/CWTF TWIN 0/2, 2/2, 4/2 & CWT TWIN-APS
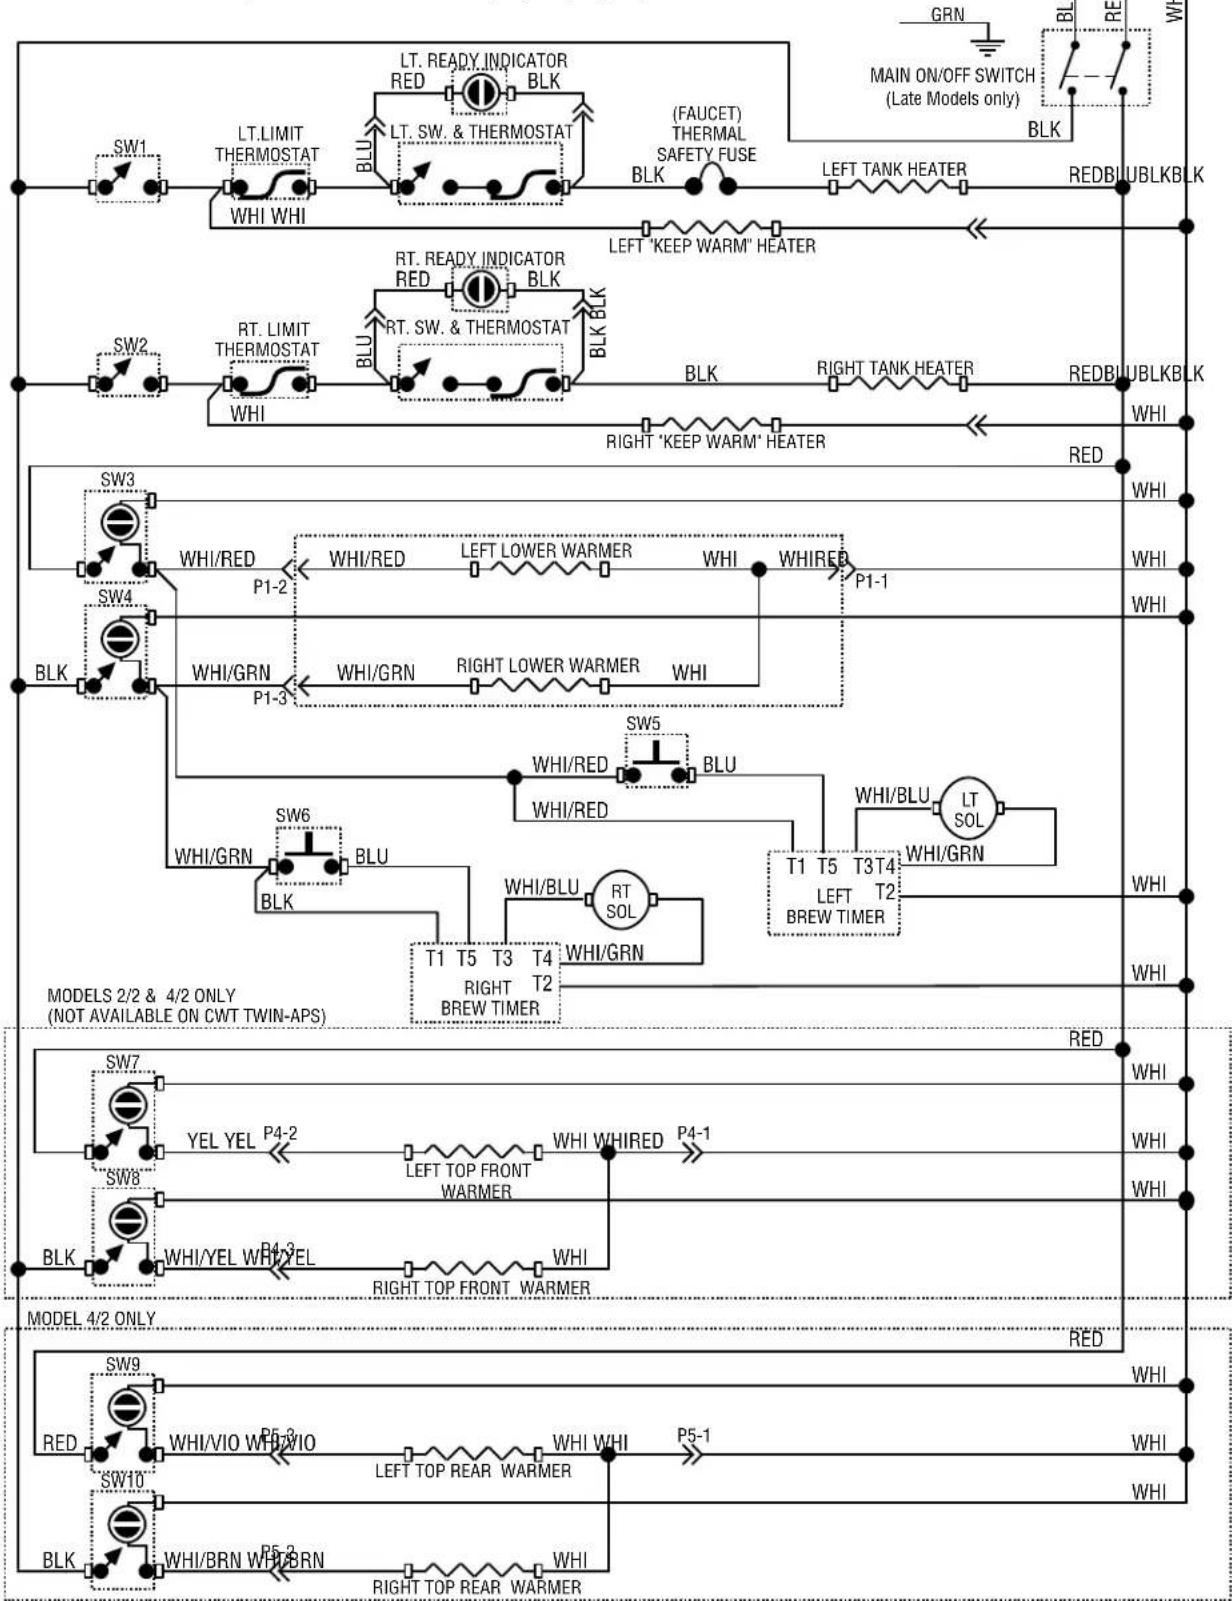
flowchart
graph TD
    subgraph Models 2/2 & 4/2 ONLY
        A["SW7"] --> B["YEL YEL P4-2"]
        B --> C["LEFT TOP FRONT WARMER"]
        C --> D["WHI WHIRED P4-1"]
        D --> E["WHI/YEL WHI/BRN P5-3"]
        E --> F["WHI/BRN WHI/BRN P5-3"]
    end

    subgraph Models 4/2 ONLY
        G["SW9"] --> H["WHI/VIO WHI/BRN P5-3"]
        H --> I["LEFT TOP REAR WARMER"]
        I --> J["WHI WHI P5-1"]
        J --> K["WHI/BRN WHI/BRN P5-3"]
    end

    subgraph Models 2/2 & 4/2 ONLY
        L["SW3"] --> M["WHI/RED P1-2"]
        M --> N["WHI/RED WHI/RED LEFT LOWER WARMER"]
        N --> O["WHI WHIRED P1-1"]
        O --> P["WHI/GRN P1-3"]
        P --> Q["WHI/GRN RIGHT LOWER WARMER"]
        Q --> R["WHI/GRN RIGHT LOWER WARMER"]
        R --> S["WHI/RED BLU"]
        S --> T["T1 T5 T3 T4 RIGHT BREW TIMER"]
        T --> U["WHI/BLU RT SOL"]
        U --> V["WHI/BLU LT SOL"]
        V --> W["WHI/GRN WHI/GRN"]
        W --> X["T1 T5 T3 T4 LEFT T2 BREW TIMER"]
        X --> Y["WHI/BLU LT SOL"]
    end

    subgraph Models 4/2 ONLY
        Z["SW8"] --> AA["BLK"]
        AA --> AB["WHI/YEL WHI/BRN P4-3"]
        AB --> AC["RIGHT TOP FRONT WARMER"]
        AC --> AD["WHI WHI RED P4-1"]
        AD --> AE["WHI/BRN WHI/BRN P5-3"]
    end

    subgraph Models 4/2 ONLY
        AF["SW1"] --> AG["SW1"]
        AG --> AH["LT.LIMIT THERMOSTAT WHI WHI"]
        AH --> AI["BTU BLU"]
        AI --> AJ["LT. READY INDICATOR RED BLK"]
        AJ --> AK["LEFT TANK HEATER BLK"]
        AK --> AL["LEFT 'KEEP WARM' HEATER"]
        AL --> AM["LEFT ON/OFF SWITCH (Late Models only)"]
        AN["BRN"] --> AO["BLK"]
        AO --> AP["WHI"]
        AP --> AQ["WHI/BRN WHI/BRN P5-3"]
    end

    style Models 2/2 & 4/2 ONLY
    style Models 4/2 ONLY
    style Models 2/2 & 4/2 ONLY
    style Models 4/2 ONLY
    style Models 4/2 ONLY
    style Models 4/2 ONLY
    style Models 4/2 ONLY
    style Models 4/2 ONLY
    style Models 4/2 ONLY
    style Models 4/2 ONLY
    style Models 4/2 ONLY
    style Models 4/2 ONLY
    style Models 4/2 ONLY
    style Models 4/2 ONLY
    style Models_4/2 ONLY
    style Models_4/2 ONLY
    style Models_4/2 ONLY
    style Models_4/2 ONLY
    style Models_4/2 ONLY
    style Models_4/2 ONLY
    style Models_4/2 ONLY
    style Models_4/2 ONLY
    style Models_4/2 ONLY
    style Models_4/2 ONLY
    style Models_4/2 ONLY
    style Models_5/6 ONLY
    style Models_5/6 ONLY
    style Models_5/6 ONLY
    style Models_5/6 ONLY
    style Models_5/6 ONLY
    style Models_5/6 ONLY
    style Models_5/6 ONLY
    style Models_5/6 ONLY
    style Models_5/6 ONLY
    style Models_5/6 ONLY
    style Models_5/6 ONLY
    style Models_5/6 Only
    style Models_5/6 Only
    style Models_5/6 Only
    style Models_5/6 Only
    style Models_5/6 Only
    style Models_5/6 Only
    style Models_5/6 Only
    style Models_5/6 Only
    style Models_5/6 Only
    style Models_5/6 Only
    style Models_5/6 Only
    style Models_5/6 Only
120/240 VOLTS AC 3 WIRE + GND SINGLE PHASE
10736.0000L 03/07 © 1993 BUNN-O-MATIC CORPORATION
SCHEMATIC WIRING DIAGRAM
CWT/CWTF TWIN 0/2, 2/2, 4/2 & CWT TWIN-APS
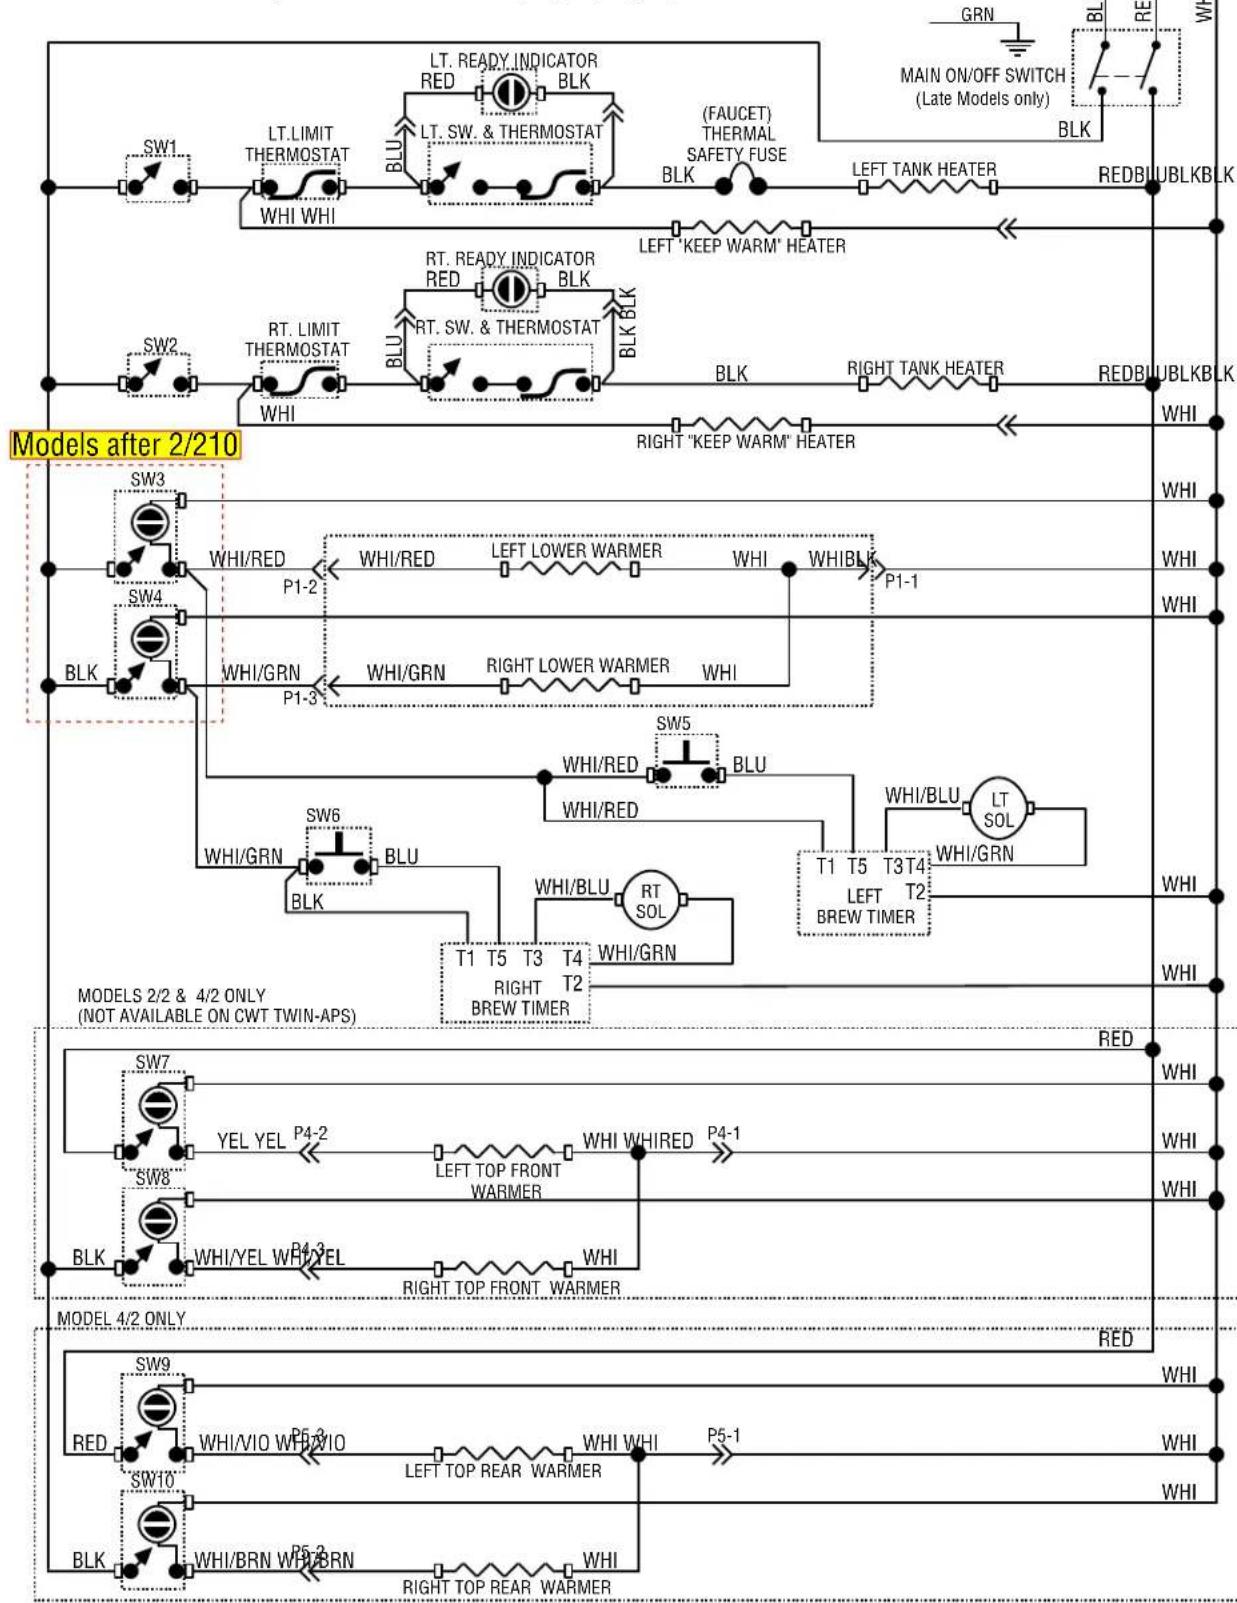
flowchart
graph TD
    subgraph Models After 2/210
        A["SW1"] --> B["LT.LIMIT THERMOSTAT"]
        B --> C["WHI WHI"]
        D["SW2"] --> E["RT.LIMIT THERMOSTAT"]
        E --> F["WHI"]
        G["SW3"] --> H["WHI/RED"]
        H --> I["P1-2"]
        J["SW4"] --> K["WHI/GRN"]
        L["BLK"] --> M["P1-3"]
        N["SW5"] --> O["WHI/RED"]
        P["SW6"] --> Q["BLU"]
        R["BLK"] --> S["SW7"]
        T["SW8"] --> U["BLK"]
        V["SW9"] --> W["RED"]
        X["SW10"] --> Y["BLK"]
    end

    subgraph Models After 2/201
        Z["WT"] --> AA["WT"]
        AB["WT"] --> AC["WT"]
        AD["WT"] --> AE["WT"]
        AF["WT"] --> AG["WT"]
        AH["WT"] --> AI["WT"]
        AJ["WT"] --> AK["WT"]
    end

    style Models After 2/201 fill:#f9f,stroke:#333
    style Models After 2/201 fill:#ccf,stroke:#333
    style Models After 2/201 fill:#cfc,stroke:#333
    style Models After 2/201 fill:#fcc,stroke:#333
120/240 VOLTS AC
3 WIRE + GND
SINGLE PHASE
10736.0000M 01/10 © 1993 BUNN-O-MATIC CORPORATION
SCHEMATIC WIRING DIAGRAM CWTFA
TWIN 2/2 & 4/2
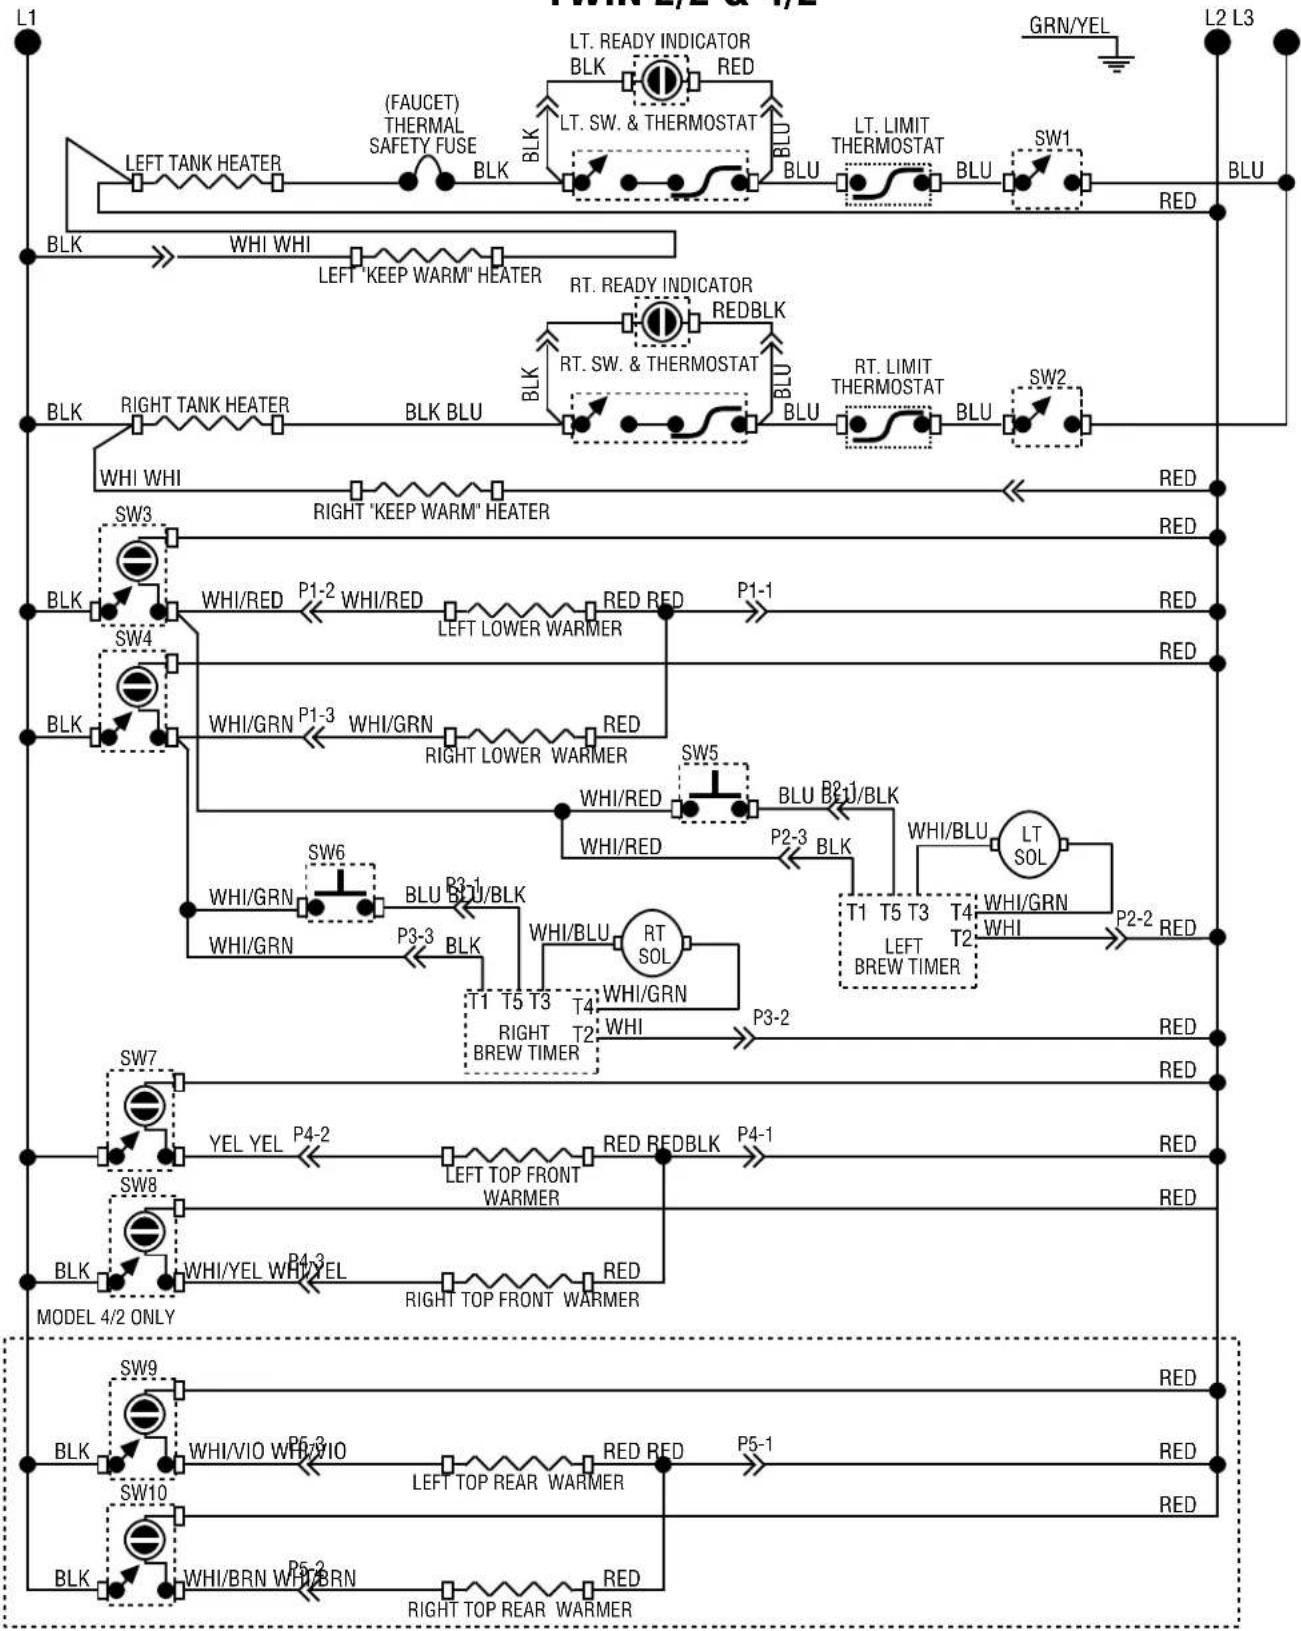
flowchart
graph TD
    subgraph Power Line
        L1["Power L1"] --> A1["LEFT TANK HEATER"]
        A1 --> B1["(FAUCET) THERMAL SAFETY FUSE"]
        B1 --> C1["BLK BLK"]
        C1 --> D1["LT. READY INDICATOR BLK RED BLU"]
        D1 --> E1["LT. SW. & THERMOSTAT"]
        E1 --> F1["BLU"]
        F1 --> G1["LT. LIMIT THERMOSTAT"]
        G1 --> H1["BLU"]
        H1 --> I1["SW1"]
        I1 --> J1["RED"]
        J1 --> K1["L2 L3"]
    end

    subgraph Power Line
        L2["Power L2"] --> M1["RIGHT TANK HEATER"]
        M1 --> N1["BLK BLU"]
        N1 --> O1["RLK BLK"]
        O1 --> P1["RLK BLU"]
        P1 --> Q1["RT. READY INDICATOR REDBLK"]
        Q1 --> R1["RLK BLK"]
        R1 --> S1["RT. SW. & THERMOSTAT"]
        S1 --> T1["BLU"]
        T1 --> U1["RLK BLU"]
        U1 --> V1["RT. LIMIT THERMOSTAT"]
        V1 --> W1["BLU"]
        W1 --> X1["SW2"]
        X1 --> Y1["RED"]
        Y1 --> Z1["L2 L3"]

    end

    subgraph Power Line
        L3["Power L3"] --> M2["RIGHT TANK HEATER"]
        M2 --> N2["BLK BLU"]
        N2 --> O2["RLK BLU"]
        O2 --> P2["RLK BLU"]
        P2 --> Q2["RT. READY INDICATOR REDBLK"]
        Q2 --> R2["RLK BLU"]
        R2 --> S2["RLK BLU"]
        S2 --> T2["RLK BLU"]
        T2 --> U2["RLK BLU"]
        U2 --> V2["SW3"]
        V2 --> W2["RIGHT 'KEEP WARM' HEATER"]
        W2 --> X2["RLK BLU"]
        X2 --> Y2["RLK BLU"]
        Y2 --> Z2["RLK BLU"]

    end

    subgraph Power Line
        W4["Power W4"] --> X4["SW4"]
        X4 --> Y4["RLK BLU"]
        Y4 --> Z4["RLK BLU"]
        Z4 --> AA["RLK BLU"]
        AA --> AB["RLK BLU"]

        SW5["Power W5"] --> X5["SW5"]
        X5 --> Y5["RLK BLU"]
        Y5 --> Z5["RLK BLU"]

        SW6["Power W6"] --> X6["SW6"]
        X6 --> Y6["RLK BLU"]
        Y6 --> Z6["RLK BLU"]

        SW7["Power W7"] --> X7["SW7"]
        X7 --> Y7["RLK BLU"]
        Y7 --> Z7["RLK BLU"]

        SW8["Power W8"] --> X8["SW8"]
        X8 --> Y8["RLK BLU"]
        Y8 --> Z8["RLK BLU"]

        SW9["Power W9"] --> X9["SW9"]
        X9 --> Y9["RLK BLU"]
        Y9 --> Z9["RLK BLU"]

        SW10["Power W10"] --> X10["SW10"]
        X10 --> Y10["RLK BLU"]

        SW11["Power W11"] --> X11["SW11"]
        X11 --> Y11["RLK BLU"]

        SW12["Power W12"] --> X12["SW12"]
        X12 --> Y12["RLK BLU"]

        SW13["Power W13"] --> X13["SW13"]
        X13 --> Y13["RLK BLU"]

        SW14["Power W14"] --> X14["SW14"]
        X14 --> Y14["RLK BLU"]

        SW15["Power W15"] --> X15["SW15"]
        X15 --> Y15["RLK BLU"]

        SW16["Power W16"] --> X16["SW16"]
        X16 --> Y16["RLK BLU"]

        SW17["Power W17"] --> X17["SW17"]
        X17 --> Y17["RLK BLU"]

        SW18["Power W18"] --> X18["SW18"]
        X18 --> Y18["RLK BLU"]

        SW19["Power W19"] --> X19["SW19"]
        X19 --> Y19["RLK BLU"]

        SW20["Power W20"] --> X20["SW20"]
        X20 --> Y20["RLK BLU"]

        SW21["Power W21"] --> X21["SW21"]
        X21 --> Y21["RLK BLU"]

        SW22["Power W22"] --> X22["SW22"]
        X22 --> Y22["RLK BLU"]

    end

    style Power Line fill:#f9f,stroke:#333,stroke-width:2px
    style Power Line fill:#ccf,stroke:#333,stroke-width:2px
    style Power Line fill:#cfc,stroke:#333,stroke-width:2px
230 VOLTS AC 3 WIRE
THREE PHASE
10736.0001G 12/00 © 1993 BUNN-O-MATIC CORPORATION
SCHEMATIC WIRING DIAGRAM
CWTFA & CWTFB TWIN 2/2 & 4/2
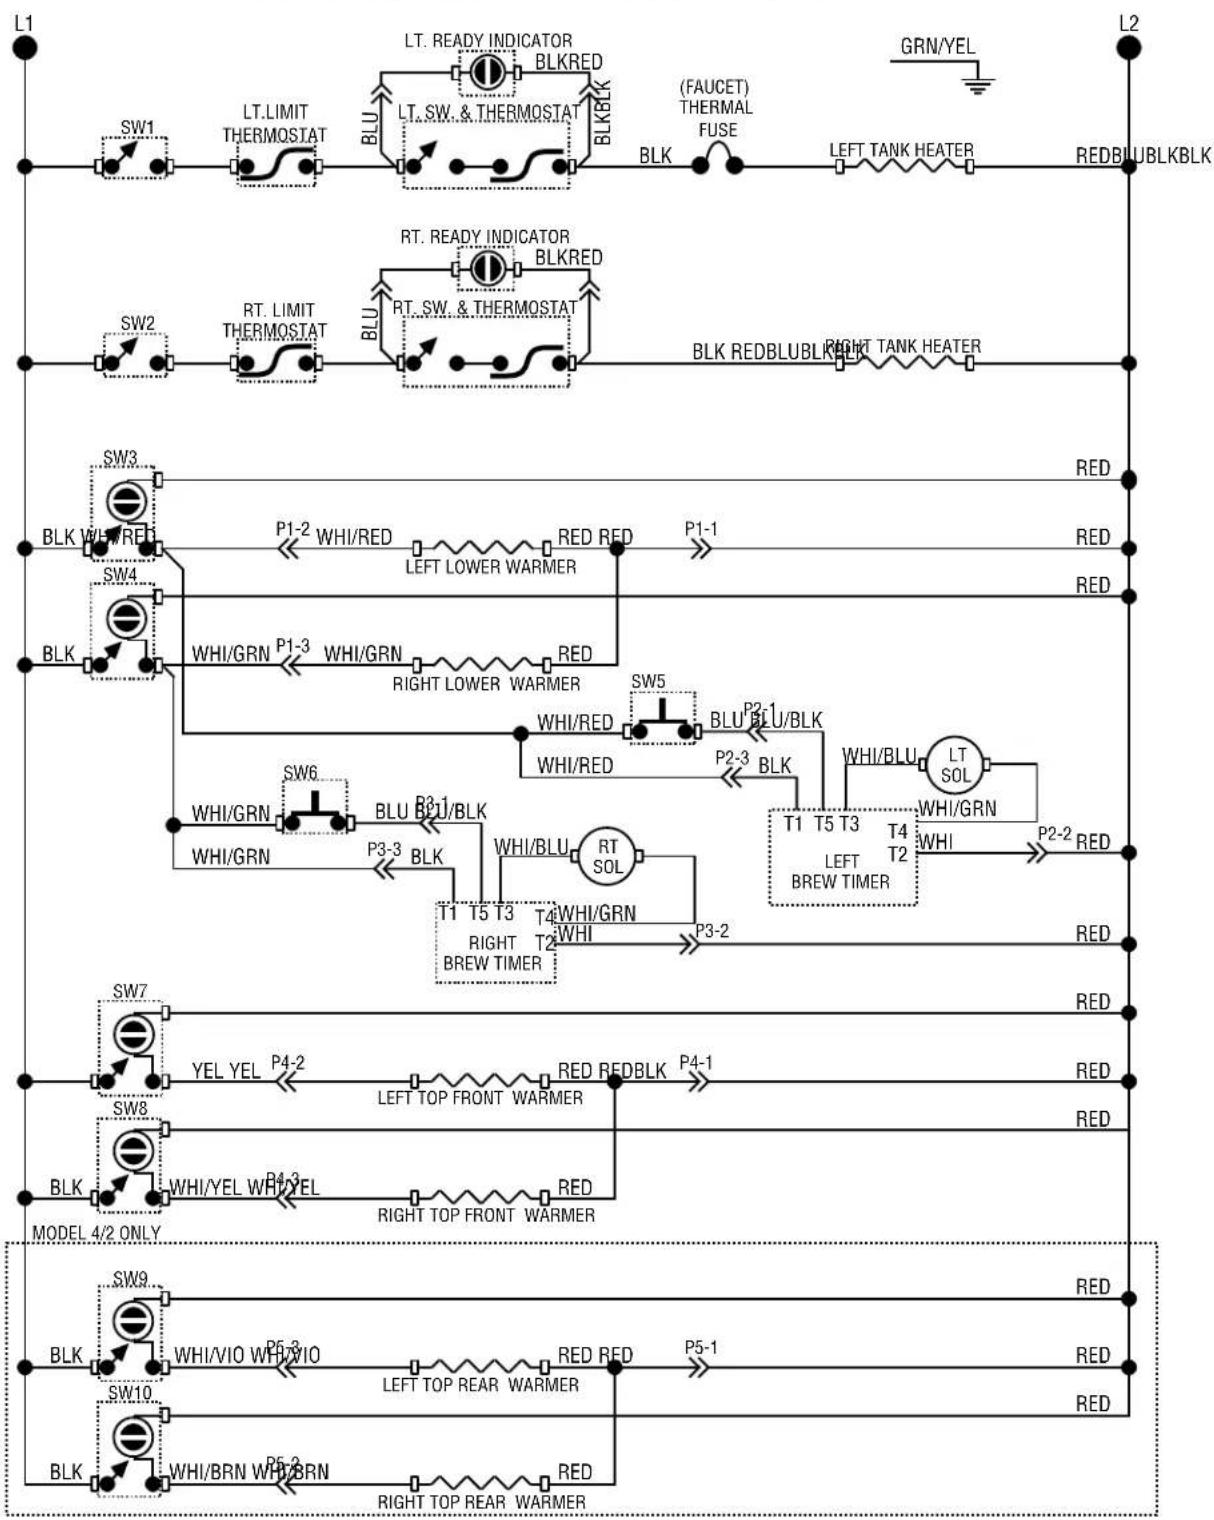
flowchart
graph TD
    L1["Model 4/2 ONLY"] --> SW1["SW1"]
    SW1 --> LT_LIMIT_THERMOSTAT["LT.LIMIT THERMOSTAT"]
    LT_LIMIT_THERMOSTAT --> BLU["BLU"]
    BLU --> LT_Ready_INDICATOR["LT. READY INDICATOR BLKRED"]
    LT Ready_INDICATOR --> BLK["BLK"]
    BLK --> BLKRedTHERMAL_FUSE["(FAUCET) THERMAL FUSE"]
    BLK --> BLKRedTANK_HEATER["LEFT TANK HEATER"]
    BLK --> REDUBLKBLKL["REDBUBLKBLKL"]

    L2["Model 4/2 ONLY"] --> SW2["SW2"]
    SW2 --> RT_LIMIT_THERMOSTAT["RT. LIMIT THERMOSTAT"]
    RT_LIMIT_THERMOSTAT --> BLU["BLU"]
    BLU --> LT_Ready_INDICATOR["LT. READY INDICATOR BLKRED"]
    LT Ready_INDICATOR --> BLKRedTHERMAL_FUSE
    BLKRedTHERMAL_FUSE --> BLK["BLK"]
    BLKRedTANK_HEATER --> REDUBLKBLKL["REDBUBLKBLKL"]

    L3["Model 4/2 ONLY"] --> SW3["SW3"]
    SW3 --> BLKWH/RED["BLK WH/RED"]
    BLKWH/RED --> P1-2["P1-2 WHI/RED"]
    P1-2 --> LEFT_LOWER_WARMER["LEFT LOWER WARMER"]
    P1-1["RED RED RED P1-1"] --> BLKWH/RED
    BLKWH/RED --> BLKREDWARMER["RIGHT LOWER WARMER"]

    L4["Model 4/2 ONLY"] --> SW4["SW4"]
    SW4 --> BLKWH/GRN["P1-3 WHI/GRN"]
    BLKWH/GRN --> BLU_B01/BLK["P3-3 BLK"]
    BLU_B01/BLK --> BLKNDWARMER["RIGHT LOWER WARMER"]

    L5["Model 4/2 ONLY"] --> BLKWH/GRN["P6-1 WHI/GRN"]
    BLKWH/GRN --> BLU_B01/BLK["P3-3 BLK"]
    BLU_B01/BLK --> BLKNDWARMER["RIGHT LOWER WARMER"]

    L6["Model 4/2 ONLY"] --> BLKWH/GRN["P6-2 WHI/GRN"]
    BLKWH/GRN --> BLU_B01/BLK["P3-3 BLK"]
    BLU_B01/BLK --> BLKNDWARMER["RIGHT LOWER WARMER"]

    L7["Model 4/2 ONLY"] --> BLKWH/GRN["P6-3 WHI/GRN"]
    BLKWH/GRN --> BLU_B01/BLK["P3-3 BLK"]
    BLU_B01/BLK --> BLKNDWARMER["RIGHT LOWER WARMER"]

    L8["Model 4/2 ONLY"] --> BLKWH/GRN["P6-2 WHI/GRN"]
    BLKWH/GRN --> BLU_B01/BLK["P3-3 BLK"]
    BLU_B01/BLK --> BLKNDWARMER["RIGHT LOWER WARMER"]

    L9["Model 4/2 ONLY"] --> BLKWH/GRN["P6-3 WHI/GRN"]
    BLKWH/GRN --> BLU_B01/BLK["P3-3 BLK"]
    BLU_B01/BLK --> BLKNDWARMER["RIGHT LOWER WARMER"]

    L10["Model 4/2 ONLY"] --> BLKWH/GRN["P6-2 WHI/GRN"]
    BLKWH/GRN --> BLU_B01/BLK["P3-3 BLK"]
    BLU_B01/BLK --> BLKNDWARMER["RIGHT LOWER WARMER"]

    L11["Model 4/2 ONLY"] --> BLKWH/GRN["P6-3 WHI/GRN"]
    BLKWH/GRN --> BLU_B01/BLK["P3-3 BLK"]
    BLU_B01/BLK --> BLKNDWARMER["RIGHT LOWER WARMER"]

    L12["Model 4/2 ONLY"] --> BLKWH/GRN["P6-2 WHI/GRN"]
    BLKWH/GRN --> BLU_B01/BLK["P3-3 BLK"]
    BLU_B01/BLK --> BLKNDWARMER["RIGHT LOWER WARMER"]
200 OR 240 VOLTS AC 2 WIRE SINGLE PHASE
10736.0002J 12/00 © 1993 BUNN-O-MATIC CORPORATION
SCHEMATIC WIRING DIAGRAM
CWTFA 2/2 TWIN, CWTFA 4/2 TWIN & CWTFA TWIN-APS
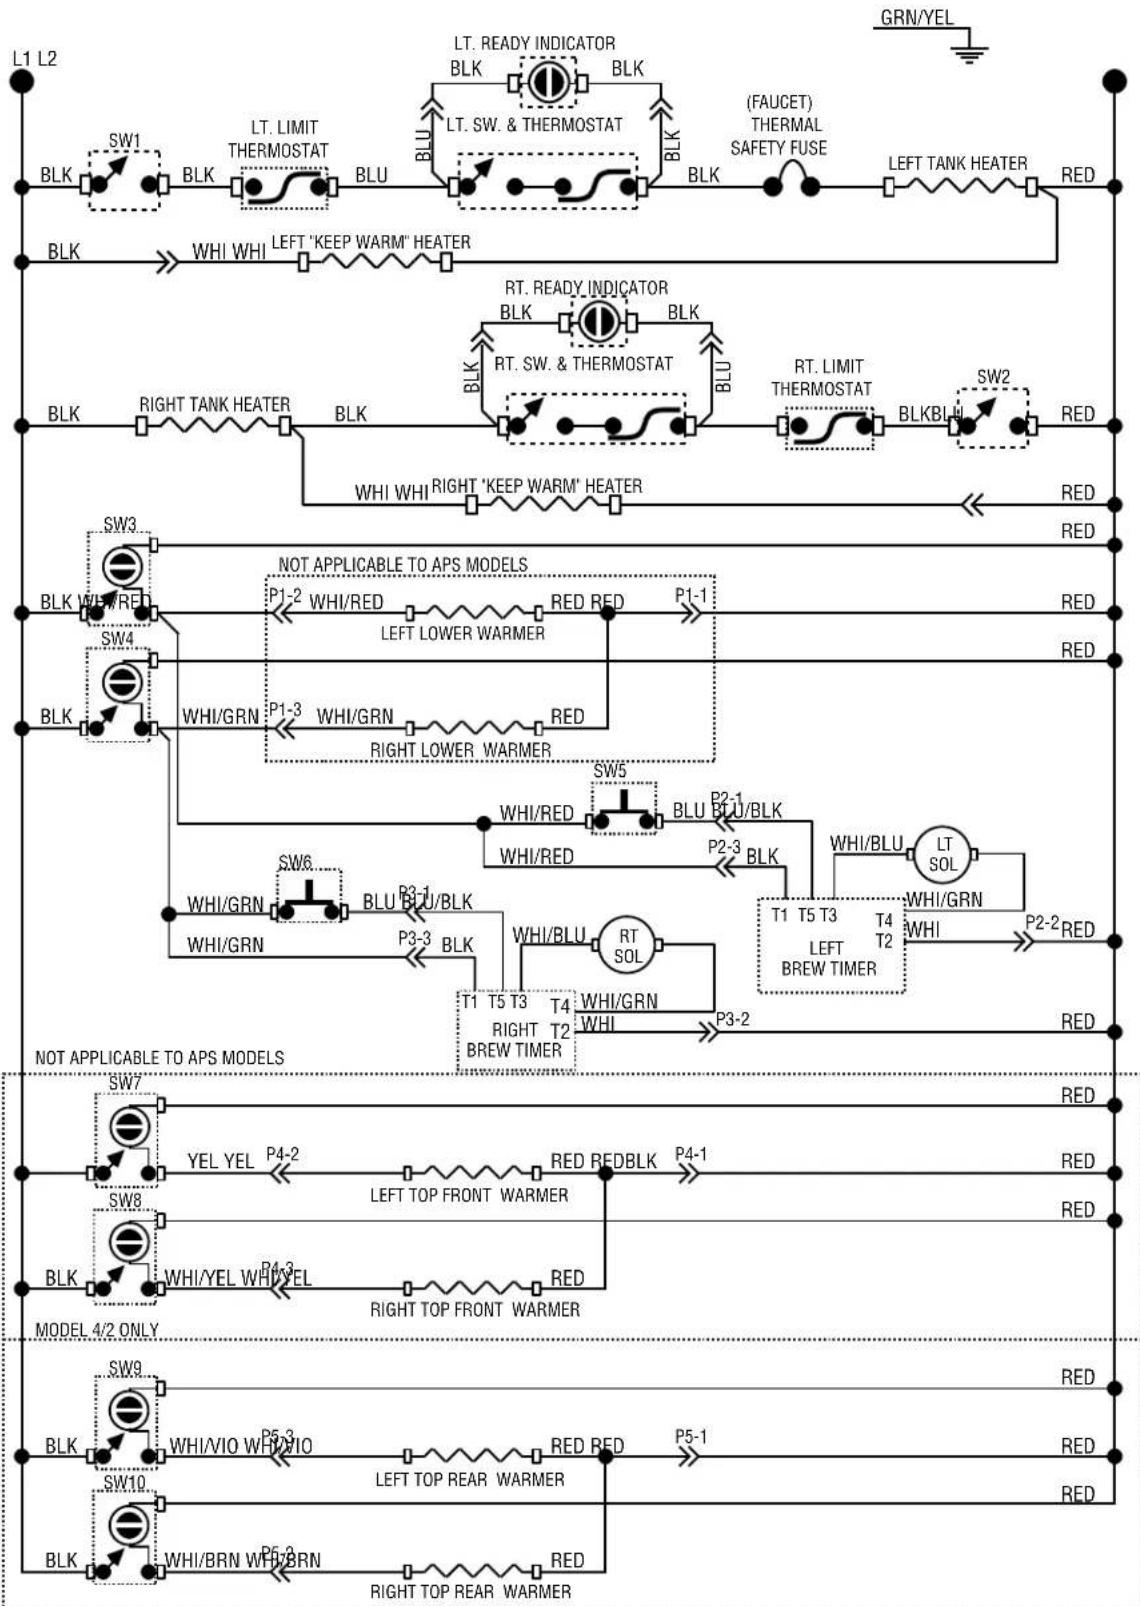
flowchart
graph TD
    subgraph Top_L2
        A["BLK"] --> B["SW1"]
        B --> C["BLK"]
        C --> D["LT. LIMIT THERMOSTAT"]
        D --> E["BLU"]
        E --> F["BT"]
        F --> G["LT. SW. & THERMOSTAT"]
        G --> H["BLK"]
        H --> I["LEFT TANK HEATER"]
        I --> J["RED"]
    end

    subgraph Bottom_L2
        K["BLK"] --> L["RIGHT TANK HEATER"]
        L --> M["BLK"]
        M --> N["WTI WHI LEFT 'KEEP WARM' HEATER"]
        N --> O["BT"]
        O --> P["RT. READY INDICATOR BLK"]
        P --> Q["BLK"]
        Q --> R["RT. SW. & THERMOSTAT"]
        R --> S["BLU"]
        S --> T["BT"]
        T --> U["RT. LIMIT THERMOSTAT"]
        U --> V["BLKBLH"]
        V --> W["SW2"]
        W --> X["RED"]
    end

    Bottom_L2 --> Y["NOT APPLICABLE TO APS MODELS"]
    Y --> Z["P1-2 WHI/RED RED RED P1-1"]
    Y --> AA["LEFT LOWER WARMER"]
    Y --> AB["RED"]
    Y --> AC["RED"]
    Bottom_L2 --> AD["NOT APPLICABLE TO APS MODELS"]
    AD --> AE["P3-3 WHI/GRN RED"]
    AD --> AF["RIGHT LOWER WARMER"]
    AD --> AG["RED"]
    AD --> AH["SW6"]
    AD --> AI["BLU BLU/BLK P3-1"]
    AD --> AJ["WHI/GRN BLU BLU/BLK P3-3"]
    AD --> AK["BLK"]
    AD --> AL["T1 T5 T3 T4 RIGHT T2 BREW TIMER"]
    AD --> AM["P2-2 RED"]
    AD --> AN["RED"]

    Bottom_L2 --> AO["NOT APPLICABLE TO APS MODELS"]
    AO --> AP["P4-2 RED REDBLK P4-1"]
    AO --> AQ["LEFT TOP FRONT WARMER"]
    AO --> AR["RED"]
    AO --> AS["RED"]
    Bottom_L2 --> AT["MODEL 4/2 ONLY"]
    AT --> AU["YEL YEL P4-2"]
    AT --> AV["WHI/YEL WHI/EL P4-3"]
    AT --> AW["RIGHT TOP FRONT WARMER"]
    AT --> AX["RED"]
    AT --> AY["P5-1 RED RED P5-1"]
    AT --> AZ["RED"]

    Bottom_L2 --> BA["WHL/VIO WHI/IO P5-3"]
    Bottom_L2 --> BB["WHI/BRN WHI/BRN P5-3"]
    Bottom_L2 --> BC["RIGHT TOP REAR WARMER"]
    Bottom_L2 --> BD[P5-3 RED RED RED RED RED RED RED RED RED RED RED RED RED RED RED RED RED RED RED RED RED RED RED RED RED RED RED RED RED RED RED RED RED RED RED RED RED RED RED RED RED RED RED RED RED RED RED RED RED RED RED RED RED RED RED RED RED RED RED RED RED RED RED RED RED RED RED RED RED RED RED RED RED RED RED RED RED RED RED RED RED RED RED RED RED RED RED RED RED RED RED RED RED RED RED RED RED RED RED RED Red Red Red Red Red Red Red Red Red Red Red Red Red Red Red Red Red Red Red Red Red Red Red Red Red Red Red Red Red Red Red Red Red Red Red Red Red Red Red Red Red Red Red Red Red Red Red Red Red Red Red Red Red Red Red Red Red Red Red Red Red Red Red Red Red Red Red Red Red Red Red Red Red Red Red Red Red Red Red Red Red Red Red Red Red Red Red Red Red Red Red Red Red Red Red Red Red Red Red RedRedRedRedRedRedRedRedRedRedRedRedRedRedRedRedRedRedRedRedRedRedRedRedRedRedRedRedRedRedRedRedRedRedRedRedRedRedRedRedRedRedRedRedRedRedRedRedRedRedRedRedRedRedRedRedRedRedRedRedRedRedRedRedRedRedRedRedRedRedRedRedRedRedRedRedRedRedRedRedRedRedRedRedRedRedRedRedRedRedRedRedRedRedRedRedRedRedRedRedRedredredredredredredredredredredredredredredredredredredredredredredredredredredredredredredredredredredredredredredredredredredredredredredredredredredredredredredredredredredredredredredredredredredredredredredredredredredredredredredredredredredredredredredredredredredredredredredredredredredredredreddots
    end
230 VOLTS AC 2 WIRE SINGLE PHASE
10736.0004A 02/06 © 2006 BUNN-O-MATIC CORPORATION
SCHEMATIC WIRING DIAGRAM
CWTFA TWIN-APS CE
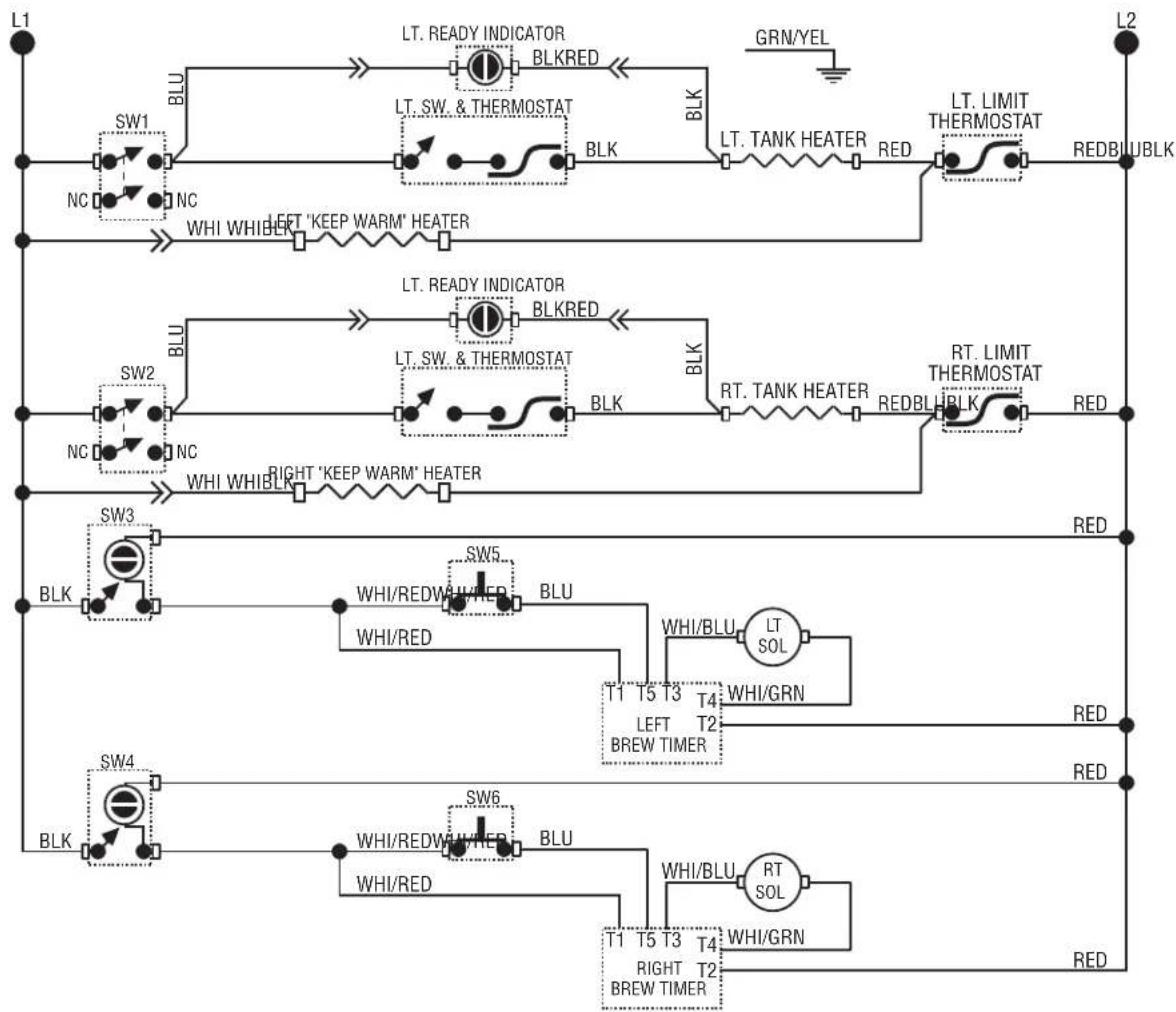
flowchart
graph TD
    L1["SW1"] --> BLU1["BLU"]
    BLU1 --> LTREADYINDICATOR["LT. READY INDICATOR"]
    LTREADYINDICATOR --> BLKRED["BLKRED"]
    BLKRED --> GRNYEL["GRN/YEL"]
    GRNYEL --> L2["LT. LIMIT THERMOSTAT"]
    L2 --> REDBUBLK["REDBUBLK"]

    NC["NC"] --> SW1
    SW1 --> BLU2["BLU"]
    BLU2 --> LTREADYINDICATOR["LT. READY INDICATOR"]
    LTREADYINDICATOR --> BLKRED["BLKRED"]

    WHIWHIBERT["'KEEP WARM'HEATER"] --> BLK
    BLK --> LTAYNEAR["LT. TANK HEATER"]
    LTAYNEAR --> RED["RED"]
    RED --> L2

    SW2["SW2"] --> BLU3["BLU"]
    BLU3 --> LTREADYINDICATOR["LT. READY INDICATOR"]
    LTREADYINDICATOR --> BLKRED["BLKRED"]

    NC["NC"] --> SW2
    SW2 --> BLU4["BLU"]
    BLU4 --> LTAYNEAR["LT. TANK HEATER"]
    LTAYNEAR --> REDBUBLK["REDBUBLK"]
    REDBUBLK --> L2

    SW3["SW3"] --> BLK4["BLK"]
    BLK4 --> RIGHT["'KEEP WARM'HEATER"]
    RIGHT["'KEEP WARM'HEATER"] --> BLK
    BLK --> RTAYNEAR["RT. TANK HEATER"]
    RTAYNEAR --> REDBUBLK["REDBUBLK"]

    SW5["SW5"] --> BLU5["BLU"]
    BLU5 --> RTAYNEAR["RT. TANK HEATER"]
    RTAYNEAR --> REDBUBLK["REDBUBLK"]

    BLK4 --> WHI/REDWAWHER["WHI/REDWAWHER"]
    WHI/REDWAWHER --> BLU6["BLU"]

    BLK4 --> WHI/REDWAWHER
    WHI/REDWAWHER --> BLU7["BLU"]

    SW6["SW6"] --> BLU8["BLU"]

    BLK4 --> WHI/REDWAWHER
    WHI/REDWAWHER --> BLU9["BLU"]

    BLK4 --> WHI/REDWAWHER
    WHI/REDWAWHER --> BLU10["BLU"]

    RTAYNEAR["RT. SOL"] --> LTAYNEAR
    LTAYNEAR --> WHI/GRN["WHI/GRN"]

    BT1["T1 T5 T3 T4"] --> LEFT["BREW TIMER"]
    BT2["T2"] --> Left_BREW_TIMER

    RTAYNEAR --> RTAYNEAR
    RTAYNEAR --> RTAYNEAR

    RTAYNEAR --> RTAYNEAR

    RTAYNEAR --> RTAYNEAR

    RTAYNEAR --> RTAYNEAR

    RTAYNEAR --> RTAYNEAR

    RTAYNEAR --> RTAYNEAR

    RTAYNEAR --> RTAYNEAR

    RTAYNEAR --> RTAYNEAR

    RTAYNEAR --> RTAYNEAR

    RTAYNAEER["SW6"] --> BLU10
    BLU10 --> WHI/REDWAWHER
    WHI/REDWAWHER --> BLU11["BLU"]

    RTAYNEAR["RT. SOL"] --> RTAYNEAR
    RTAYNEAR --> RTAYNEAR

    RTAYNEAR --> RTAYNEAR

    RTAYNEAR --> RTAYNEAR

    RTAYNEAR --> RTAYNEAR

    RTAYNEAR --> RTAYNEAR

    RTAYNEAR --> RTAYNEAR

    RTAYNEAR --> RTAYNEAR

    RTAYNEAR --> RTAYNEAER
    RTAYNEAR --> RTAYNEAER

    RTAYNEAR --> RTAYNEAER

    RTAYNEAR --> RTAYNEAER

    RTAYNEAR --> RTAYNEAER

    RTAYNEAR --> RTAYNEAER

    RTAYNEAR --> RTAYNEAER

    RTAYNEAR --> RTAYNEAER

    RTAYNEAR --> RTAYNEAER

    RTAYNEAR --> RTAYNAEER
    RTAYNEAR --> RTAYNAEER

    RTAYNAEER --> RTAYNAEER

    RTAYNAEER --> RTAYNAEER

    RTAYNAEER --> RTAYNAEER

    RTAYNAEER --> RTAYNAEER

    RTAYNAEER --> RTAYNAEER

    RTAYNAEER --> RTAYNAEER

    RTAYNAEER --> RTAYNAEER

    RENYEL["GRN/YEL"] --> L2
230 VOLTS AC
2 WIRE + GND
SINGLE PHASE
10736.0005B 08/07 © 2007 BUNN-O-MATIC CORPORATION
SCHEMATIC WIRING DIAGRAM CWTF TWIN 0/6
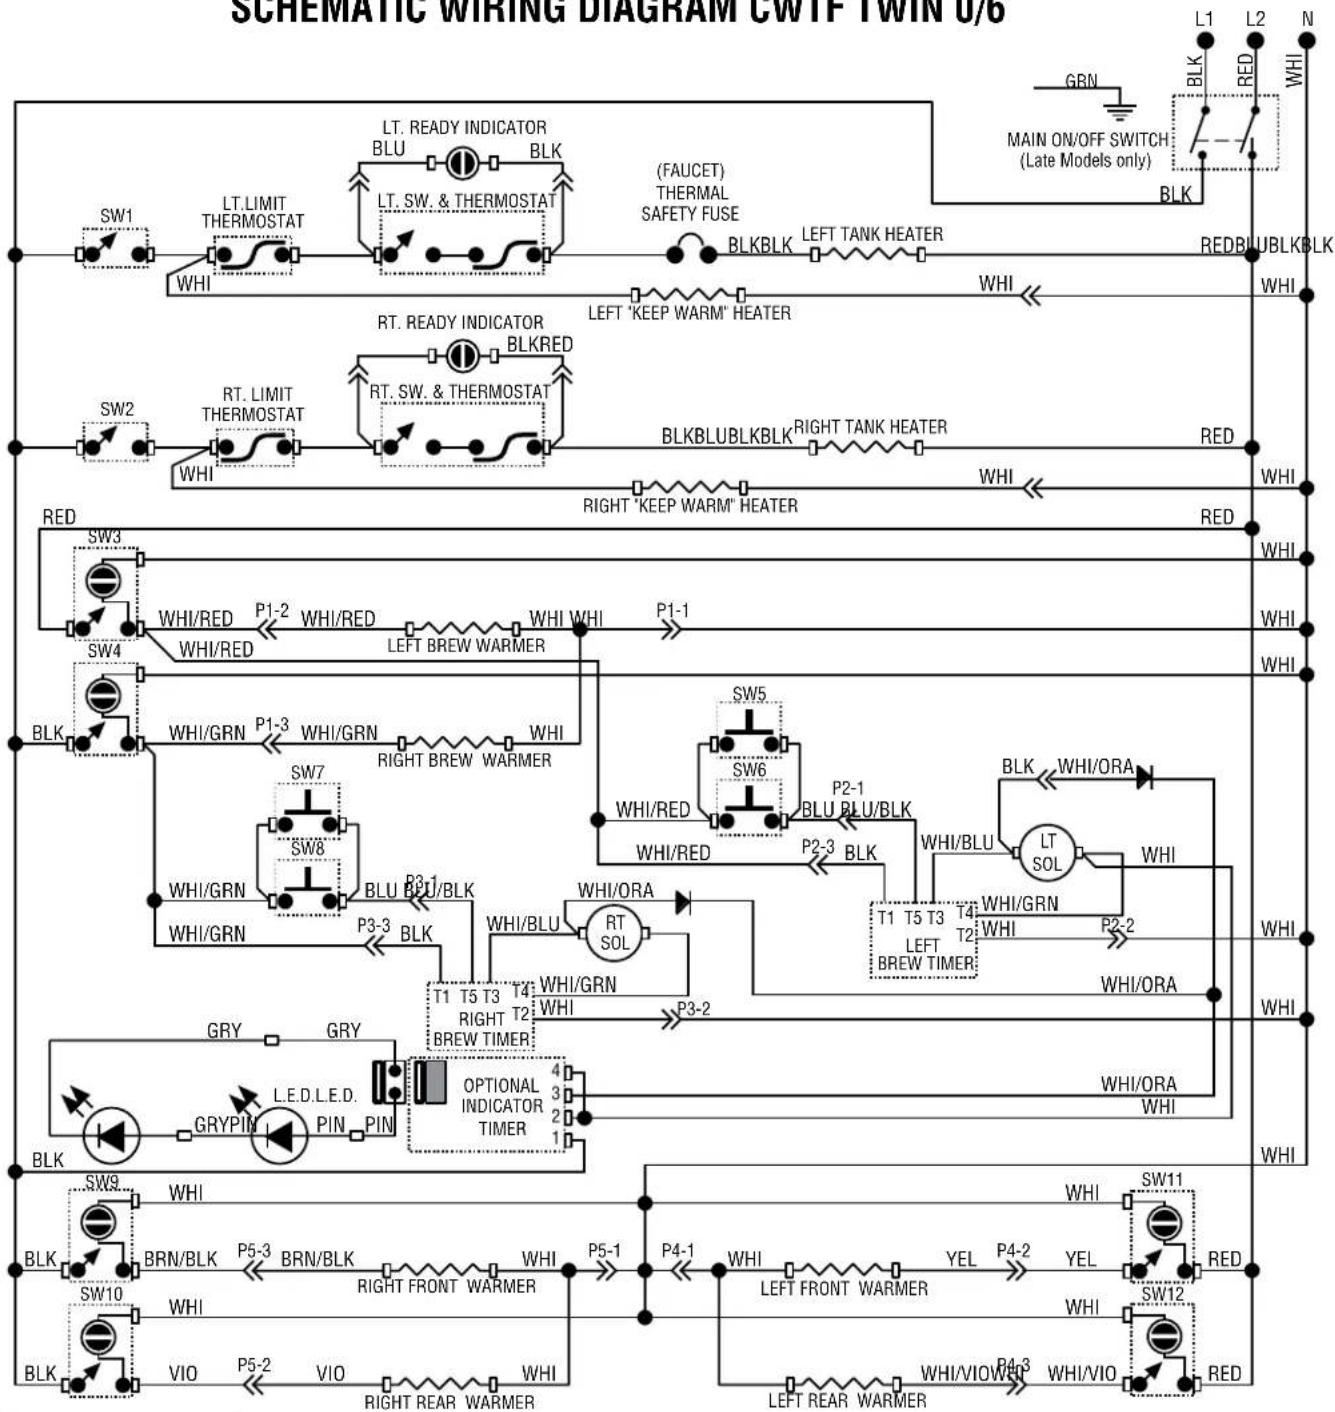
flowchart
graph TD
    subgraph Left_Switch
        A["SW1"] --> B["LT.LIMIT THERMOSTAT"]
        B --> C["WHI"]
        D["SW2"] --> E["RT.LIMIT THERMOSTAT"]
        E --> F["WHI"]
    end

    subgraph Right_Switch
        G["SW3"] --> H["WHI/RED P1-2 WHI/RED WHI"]
        H --> I["WHI/RED LEFT BREW WARMER"]
        J["SW4"] --> K["WHI/GRN P1-3 WHI/GRN WHI"]
        K --> L["WHI/GRN RIGHT BREW WARMER"]
        M["SW5"] --> N["SW6"]
        N --> O["WHI/RED BLU BLU/BLK"]
        P["SW6"] --> Q["WHI/RED P2-1 BLU BLU/BLK"]
        R["SW7"] --> S["WHI/GRN BLU BLU/BLK"]
        T["SW8"] --> U["WHI/GRN BLU BLU BLK"]
        V["SW9"] --> W["BRN/BLK P5-3 BRN/BLK"]
        W --> X["WHI"]
        Y["SW10"] --> Z["WHI"]
        AA["SW11"] --> AB["WHI"]
    end

    subgraph Target_Switch
        AC["RLT. READY INDICATOR BLU BLK"] --> AD["LEFT TANK HEATER BLKBLK"]
        AE["RT. READY INDICATOR BLKRED"] --> AF["LEFT 'KEEP WARM' HEATER BLKBLUBLKBLK"]
        AG["RLT. LIMIT THERMOSTAT"] --> AH["LEFT 'KEEP WARM' HEATER BLK"]
        AI["RLT. LIMIT THERMOSTAT"] --> AJ["LEFT 'KEEP WARM' HEATER BLK"]
        AK["RLT. LIMIT THERMOSTAT"] --> AL["LEFT 'KEEP WARM' HEATER BLK"]
    end

    subgraph Target_Births
        AM["RLT. READY INDICATOR BLK"] --> AN["LEFT TANK HEATER BLKBLKL"]
        AO["RLT. LIMIT THERMOSTAT"] --> AP["LEFT 'KEEP WARM' HEATER BLK"]
        AQ["RLT. LIMIT THERMOSTAT"] --> AR["LEFT 'KEEP WARM' HEATER BLK"]
    end

    subgraph Power_Circuit
        AS["P1-1"] --> AT["P2-3 BLK"]
        AU["P2-1"] --> AV["P2-3 BLK"]
        AW["P2-3 BLK"] --> AX["P2-3 BLK"]
        AY["P2-3 BLK"] --> AZ["P2-3 BLK"]
        BA["P2-3 BLK"] --> BB["P2-3 BLK"]
        BC["P2-3 BLK"] --> BD["P2-3 BLK"]
        BE["P2-3 BLK"] --> BF["P2-3 BLK"]
        BG["P2-3 BLK"] --> BH["P2-3 BLK"]
        BI["P2-3 BLK"] --> BJ["P2-3 BLK"]
        BK["P2-3 BLK"] --> BL["P2-3 BLK"]
        BM["P2-3 BLK"] --> BN["P2-3 BLK"]
        BO["P2-3 BLK"] --> BP["P2-3 BLK"]
        BQ["P2-3 BLK"] --> BR["P2-3 BLK"]
        BS["P2-3 BLK"] --> BT["P2-3 BLK"]
        BU["P2-3 BLK"] --> BV["P2-3 BLK"]
    end

    subgraph Power_Detrical
        BW["P3-1"] --> BX["P4-1"]
        BY["P4-1"] --> BYP["WHI"]
        BYP --> BYL["YEL"]
        BYL --> BYL1["YEL"]
        BYL1 --> BYL2["YEL"]
        BYL2 --> BYL3["YEL"]
        BYL3 --> BYL4["YEL"]
        BYL4 --> BYL5["YEL"]
        BYL5 --> BYL6["YEL"]
        BYL6 --> BYL7["YEL"]
        BYL7 --> BYL8["YEL"]
        BYL8 --> BYL9["YEL"]
        BYL9 --> BYL10["YEL"]
        BYL10 --> BYL11["YEL"]
        BYL11 --> BYL12["YEL"]
        BYL12 --> BYL13["YEL"]
    end

    style Left_Switch fill:#f9f,stroke:#333
    style Right_Switch fill:#f9f,stroke:#333
    style Target_Births fill:#f9f,stroke:#333
120/240 VOLTS AC
3 WIRE + GND
SINGLE PHASE
10741.0000H 01/07 © 1993 BUNN-O-MATIC CORPORATION
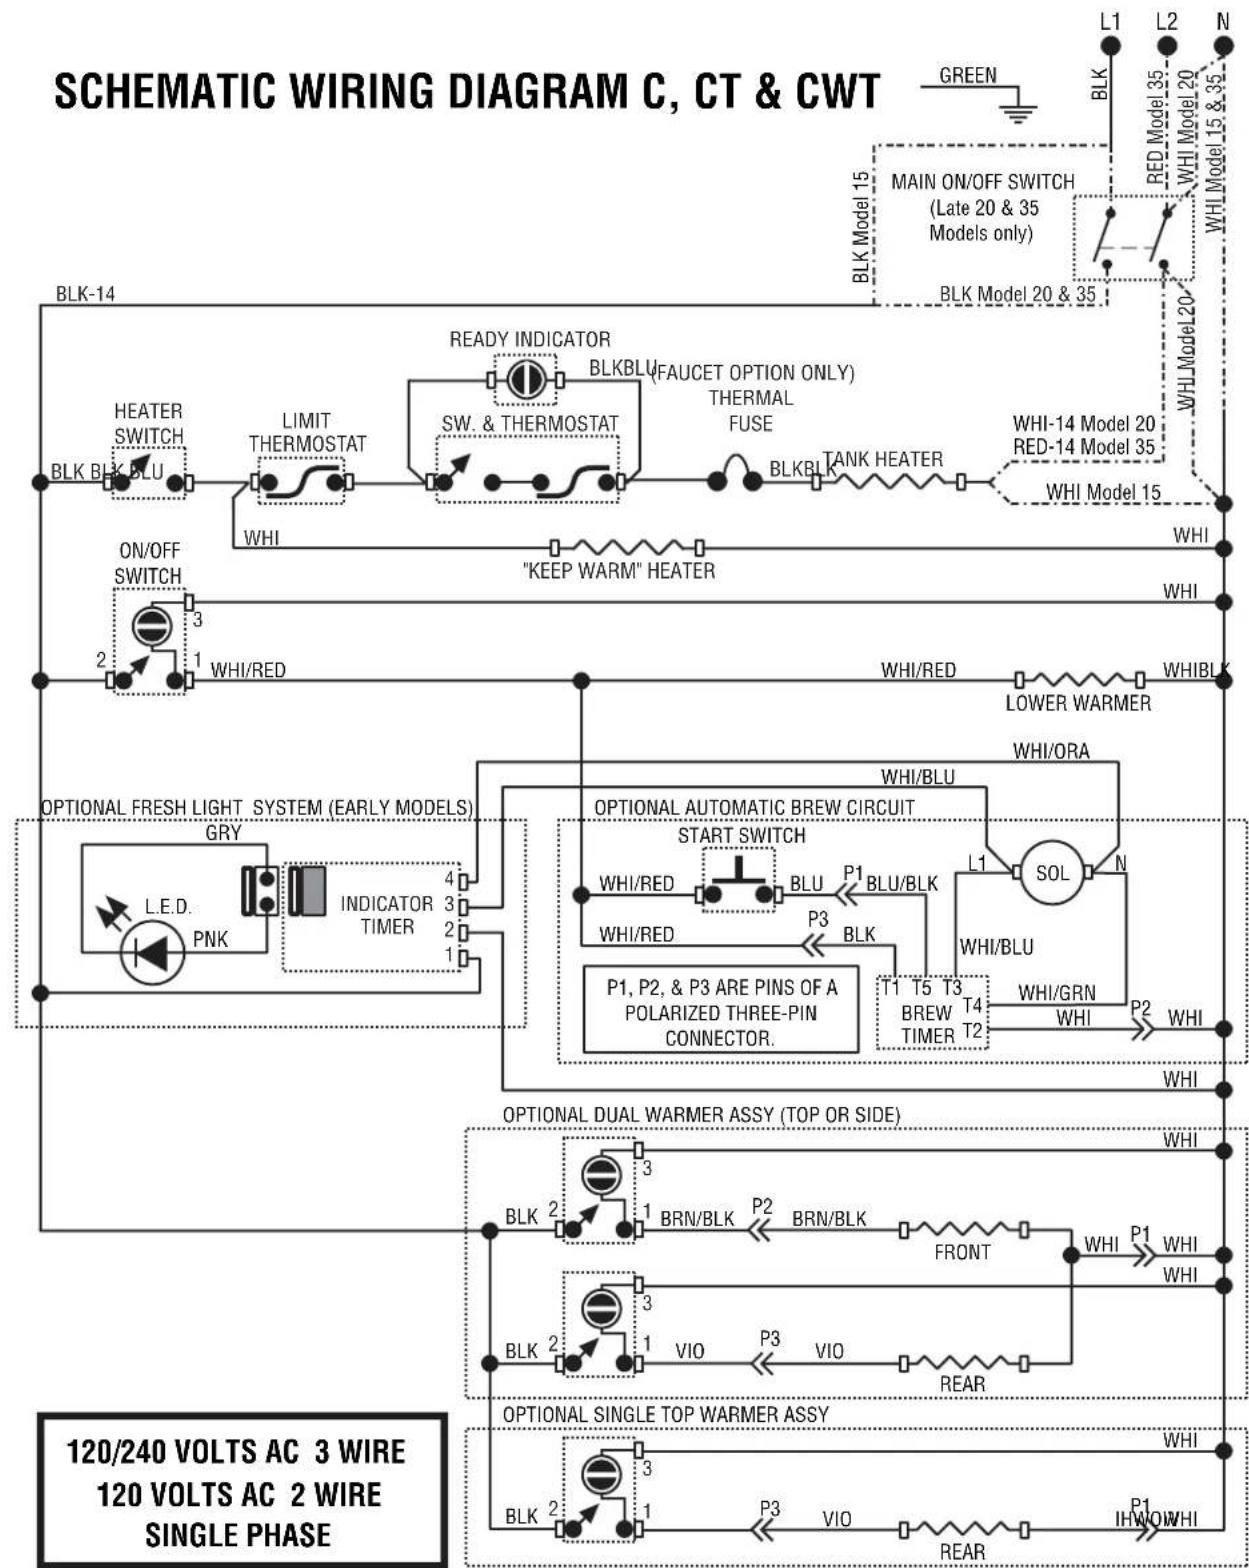
flowchart
graph TD
    subgraph "SCHEMATIC WIRING DIAGRAM C, CT & CWT"
        A["BLK-14"] --> B["HEATER SWITCH"]
        B --> C["LIMIT THERMOSTAT"]
        C --> D["SW. & THERMOSTAT"]
        D --> E["THermal FUSE"]
        E --> F["BLKBL TANK HEATER"]
        F --> G["WHI-14 Model 20 RED-14 Model 35"]
        G --> H["WHI Model 15"]
        I["ON/OFF SWITCH"] --> J[""KEEP WARM" HEATER"]
        K["2"] --> L["WHI/RED"]
        M["3"] --> N["WHI/RED"]
        O["1"] --> P["WHI/RED"]
        Q["2"] --> R["WHI/RED"]
        S["3"] --> T["WHI/RED"]
        U["4"] --> V["L.E.D. PNK"]
        W["5"] --> X["INDICATOR TIMER"]
        Y["6"] --> Z["OPTIONAL FRESH LIGHT SYSTEM (EARLY MODELS)"]
        AA["7"] --> AB["OPTIONAL AUTOMATIC BREW CIRCUIT START SWITCH"]
        AC["8"] --> AD["P1, P2, & P3 ARE PINS OF A POLARIZED THREE-PIN CONNECTOR."]
        AE["9"] --> AF["P1, P2, & P3 ARE PINS OF A POLARIZED THREE-PIN CONNECTOR."]
        AG["10"] --> AH["P1, P2, & P3 ARE PINS OF A POLARIZED THREE-PIN CONNECTOR."]
        AI["11"] --> AJ["P1, P2, & P3 ARE PINS OF A POLARIZED THREE-PIN CONNECTOR."]
        AK["12"] --> AL["P1, P2, & P3 ARE PINS OF A POLARIZED THREE-PIN CONNECTOR."]
        AM["13"] --> AN["P1, P2, & P3 ARE PINS OF A POLARIZED THREE-PIN CONNECTOR."]
        AO["14"] --> AP["P1, P2, & P3 ARE PINS OF A POLARIZED THREE-PIN CONNECTOR."]
        AQ["15"] --> AR["P1, P2, & P3 ARE PINS OF A POLARIZED THREE-PIN CONNECTOR."]
        AS["16"] --> AT["P1, P2, & P3 ARE PINS OF A POLARIZED THREE-PIN CONNECTOR."]
        AU["17"] --> AV["P1, P2, & P3 ARE PINS OF A POLARIZED THREE-PIN CONNECTOR."]
        AW["18"] --> AX["P1, P2, & P3 ARE PINS OF A POLARIZED THREE-PIN CONNECTOR."]
        AY["19"] --> AZ["P1, P2, & P3 ARE PINS OF A POLARIZED THREE-PIN CONNECTOR."]
        BA["20"] --> BB["P1, P2, & P3 ARE PINS OF A POLARIZED THREE-PIN CONNECTOR."]
        BC["21"] --> BD["P1, P2, & P3 ARE PINS OF A POLARIZED THREE-PIN CONNECTOR."]
        BE["22"] --> BF["P1, P2, & P3 ARE PINS OF A POLARIZED THREE-PIN CONNECTOR."]
        BG["23"] --> BH["P1, P2, & P3 ARE PINS OF A POLARIZED THREE-PIN CONNECTOR."]
        BI["24"] --> BJ["P1, P2, & P3 ARE PINS OF A POLARIZED THREE-PIN CONNECTOR."]
        BK["25"] --> BL["P1, P2, & P3 ARE PINS OF A POLARIZED THREE-PIN CONNECTOR."]
        BM["26"] --> BN["P1, P2, & P3 ARE PINS OF A POLARIZED THREE-PIN CONNECTOR."]
        BO["27"] --> BP["P1, P2, & P3 ARE PINS OF A POLARIZED THREE-PIN CONNECTOR."]
        BQ["28"] --> BR["P1, P2, & P3 ARE PINS OF A POLARIZED THREE-PIN CONNECTOR."]
        BS["29"] --> BT["P1, P2, & P3 ARE PINS OF A POLARIZED THREE-PIN CONNECTOR."]
        BU["30"] --> BV["P1, P2, & P3 ARE PINS OF A POLARIZED THREE-PIN CONNECTOR."]
        BW["31"] --> BX["P1, P2, & P3 ARE PINS OF A POLARIZED THREE-PIN CONNECTOR."]
        BY["32"] --> BZ["P1, P2, & P3 ARE PINS OF A POLARIZED THREE-PIN CONNECTOR."]
        CA["33"] --> CB["P1, P2, & P3 ARE PINS OF A POLARIZED THREE-PIN CONNECTOR."]
        CC["34"] --> CD["P1, P2, & P3 ARE PINS OF A POLARIZED THREE-PIN CONNECTOR."]
        CE["35"] --> CF["P1, P2, & P3 ARE PINS OF A POLARIZED THREE-PIN CONNECTOR."]
        CG["36"] --> CH["P1, P2, & P3 ARE PINS OF A POLARIZED THREE-PIN CONNECTOR."]
        CI["37"] --> CJ["P1, P2, & P3 ARE PINS OF A POLARIZED THREE-PIN CONNECTOR."]
        CK["38"] --> CL["P1, P2, & P3 ARE PINS OF A POLARIZED THREE-PIN CONNECTOR."]
        CM["39"] --> CN["P1, P2, & P3 ARE PINS OF A POLARIZED THREE-PIN CONNECTOR."]
        CO["40"] --> CP["P1, P2, & P3 ARE PINS OF A POLARIZED THREE-PIN CONNECTOR."]
        CEQ["41"] --> CR["P1, P2, & P3 ARE PINS OF A POLARIZED THREE-PIN CONNECTOR."]
        CS["42"] --> CT["P1, P2, & P3 ARE PINS OF A POLARIZED THREE-PIN CONNECTOR."]
        CU["43"] --> CV["P1, P2, & P3 ARE PINS OF A POLARIZED THREE-PIN CONNECTOR."]
        CY["44"] --> CZ["P1, P2, & P3 ARE PINS OF A POLARIZED THREE-PIN CONNECTOR."]
        DA["45"] --> DB["P1, P2, & P3 ARE PINS OF A POLARIZED THREE-PIN CONNECTOR."]
        DC["46"] --> DD["P1, P2, & P3 ARE PINS OF A POLARIZED THREE-PIN CONNECTOR."]
        DJ["47"] --> DE["P1, P2, & P3 ARE PINS OF A POLARIZED THREE-PIN CONNECTOR."]
        DV["48"] --> DW["P1, P2, & P3 ARE PINS OF A POLARIZED THREE-PIN CONNECTOR."]
        DX["49"] --> DY["P1, P2, & P3 ARE PINS OF A POLARIZED THREE-PIN CONNECTOR."]
        DXQ["50"] --> DXR["P1, P2, & P3 ARE PINS OF A POLARIZED THREE-PIN CONNECTOR."]
        DXS["51"] --> DXT["P1, P2, & P3 ARE PINS OF A POLARIZED THREE-PIN CONNECTOR."]
        DXU["52"] --> DXV["P1, P2, & P3 ARE PINS OF A POLARIZED THREE-PIN CONNECTOR."]
        DXV --> DXW["P1, P2, & P3 ARE PINS OF A POLARIZED THREE-PIN CONNECTOR."]
        DXX["53"] --> DXXP["P1, P2, & P3 ARE PINS OF A POLARIZED THREEWERMENT LINE Chart"]
    style "SCHEMATIC WIRING DIAGRAM C" fill:#f9f9f9,stroke:#ccc
    style "SCHEMATIC WIRING DIAGRAM C" fill:#f9f9f9
    style "SCHEMATIC WIRING DIAGRAM C" fill:#e6f7ff
    style "SCHEMATIC WIRING DIAGRAM C" fill:#e6f7ff
    style "SCHEMATIC WIRING DIAGRAM C" fill:#e6f7ff
    style "SCHEMATIC WIRING DIAGRAM C" fill:#e6f7ff
    style "SCHEMATIC WIRING DIAGRAM C" fill:#e6f7ff
    style "SCHEMATIC WIRING AGNERS" fill:#e6f7ff
    style "SCHEMATIC AGNERS" fill:#e6f7ff
    style "SCHEMATIC AGNERS" fill:#e6f7ff
    style "SCHEMATIC AGNERS" fill:#e6f7ff
    style "SCHEMATIC AGNERS" fill:#e6f7ff
    style "SCHEMATIC AGNERS" fill:#e6f7ff
    style "SCHEMATIC AGNERS" stroke:#000000
    style "SCHEMATIC AGNERS" stroke-width: 0.5mm
    style "SCHEMATIC AGNERS" stroke-width: 0.5mm
    style "SCHEMATIC AGNERS" stroke-width: 0.5mm
    style "SCHEMATIC AGNERS" stroke-width: 0.5mm
    style "SCHEMATIC AGNERS" stroke-width: 0.5mm
    style "SCHEMATIC AGNERS" stroke-width: 0.5m
    style "SCHEMATIC AGNERS" stroke-width: 0.5m
    style "SCHEMATIC AGNERS" stroke-width: 0.5m
    style "SCHEMATIC AGNERS" stroke-width: 0.5m
    style "SCHEMATIC AGNERS" stroke-width: 0.5m
    style "SCHEMATIC AGNERS" stroke-width: 0.5mm
    style "SCHEMATIC AGNERS" stroke-width: 0.5mm
    style "SCHEMATIC AGNERS" stroke-width: 0.5mm
    style "SCHEMATIC AGNERS" stroke-width: 0.5mm
    style "SCHEMATIC AGNERS" stroke-width: 0.5cm
    style "SCHEMATIC AGNERS" stroke-width: 0.5cm
    style "SCHEMATIC AGNERS" stroke-width: 0.5cm
    style "SCHEMATIC AGNERS" stroke-width: 0.5cm
    style "SCHEMATIC AGNERS" stroke-width: 0.5cm
    style "SCHEMATIC AGNERS" stroke-width: 0.5m
    style "SCHEMATIC AGNERS" stroke-width: 0.5m
    style "SCHEMATIC AGNERS" stroke-width: 0.5m
    style "SCHEMATIC AGNERS" stroke-width: 0.5m
    style "SCHEMATIC AGNERS" stroke-width: 0.5cm
    style "SCHEMATIC AGNERS" stroke-width: 0.5m
    style "SCHEMATIC AGNERS" stroke-width: 0.5m
    style "SCHEMATIC AGNERS" stroke-width: 0.5m
    style "SCHEMATIC AGNERS" stroke-width: 0.5cm
    style "SCHEMATIC AGNERS" stroke-width: 0.5mm
    style "SCHEMATIC AGNERS" stroke-width: 0.5mm
    style "SCHEMATIC AGNERS" stroke-width: 0.5mm
    style "SCHEMATIC AGNERS" stroke-width: 0.5mm
    style "SCHEMATIC AGNERS" stroke-width: 0.5km
10836.0000H 05/09 ©1995 BUNN-O-MATIC CORPORATION
SCHEMATIC WIRING DIAGRAM CWTB
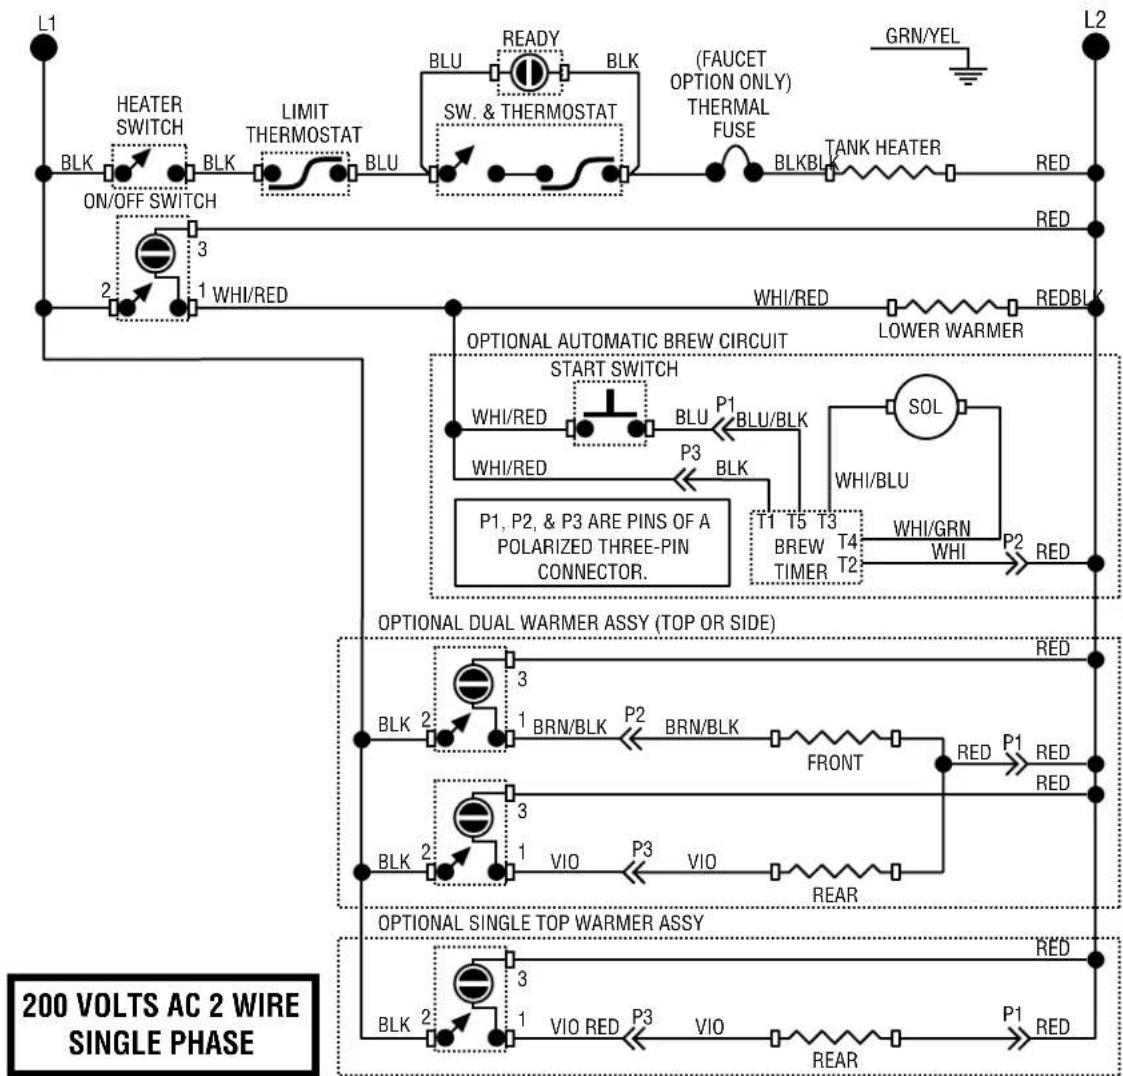
flowchart
graph TD
    subgraph_Phase1["200 VOLTS AC 2 WIRE SINGLE PHASE"]
        L1 --> BLK1["BLK ON/OFF SWITCH"]
        BLK1 --> BLK2["BLK"]
        BLK2 --> BLU1["BLU"]
        BLU1 --> BLU2["BLU"]
        BLU2 --> BLU3["SW. & THERMOSTAT"]
        BLU3 --> BLU4["BLU"]
        BLU4 --> BLU5["BLU"]
        BLU5 --> BLU6["BLU"]
        BLU6 --> BLU7["BLU"]
        BLU7 --> BLU8["BLU"]
        BLU8 --> BLU9["BLU"]
        BLU9 --> BLU10["BLU"]
        BLU10 --> BLU11["BLU"]
        BLU11 --> BLU12["BLU"]
        BLU12 --> BLU13["BLU"]
        BLU13 --> BLU14["BLU"]
        BLU14 --> BLU15["BLU"]
        BLU15 --> BLU16["BLU"]
        BLU16 --> BLU17["BLU"]
        BLU17 --> BLU18["BLU"]
        BLU18 --> BLU19["BLU"]
        BLU19 --> BLU20["BLU"]
        BLU20 --> BLU21["BLU"]
        BLU21 --> BLU22["BLU"]
        BLU22 --> BLU23["BLU"]
        BLU23 --> BLU24["BLU"]
        BLU24 --> BLU25["BLU"]
        BLU25 --> BLU26["BLU"]
        BLU26 --> BLU27["BLU"]
        BLU27 --> BLU28["BLU"]
        BLU28 --> BLU29["BLU"]
        BLU29 --> BLU30["BLU"]
        BLU30 --> BLU31["BLU"]
        BLU31 --> BLU32["BLU"]
        BLU32 --> BLU33["BLU"]
        BLU33 --> BLU34["BLU"]
        BLU34 --> BLU35["BLU"]
        BLU35 --> BLU36["BLU"]
        BLU36 --> BLU37["BLU"]
        BLU37 --> BLU38["BLU"]
        BLU38 --> BLU39["BLU"]
        BLU39 --> BLU40["BLU"]
        BLU40 --> BLU41["BLU"]
        BLU41 --> BLU42["BLU"]
        BLU42 --> BLU43["BLU"]
        BLU43 --> BLU44["BLU"]
        BLU44 --> BLU45["BLU"]
        BLU45 --> BLU46["BLU"]
        BLU46 --> BLU47["BLU"]
        BLU47 --> BLU48["BLU"]
        BLU48 --> BLU49["BLU"]
        BLU49 --> BLU50["BLU"]
        BLU50 --> BLU51["BLU"]
        BLU51 --> BLU52["BLU"]
        BLU52 --> BLU53["BLU"]
        BLU53 --> BLU54["BLU"]
        BLU54 --> BLU55["BLU"]
        BLU55 --> BLU56["BLU"]
        BLU56 --> BLU57["BLU"]
        BLU57 --> BLU58["BLU"]
        BLU58 --> BLU59["BLU"]
        BLU59 --> BLU60["BLU"]
        BLU60 --> BLU61["BLU"]
        BLU61 --> BLU62["BLU"]
        BLU62 --> BLU63["BLU"]
        BLU63 --> BLU64["BLU"]
        BLU64 --> BLU65["BLU"]
        BLU65 --> BLU66["BLU"]
        BLU66 --> BLU67["BLU"]
        BLU67 --> BLU68["BLU"]
        BLU68 --> BLU69["BLU"]
        BLU69 --> BLU70["BLU"]
        BLU70 --> BLU71["BLU"]
        BLU71 --> BLU72["BLU"]
        BLU72 --> BLU73["BLU"]
        BLU73 --> BLU74["BLU"]
        BLU74 --> BLU75["BLU"]
        BLU75 --> BLU76["BLU"]
        BLU76 --> BLU77["BLU"]
        BLU77 --> BLU78["BLU"]
        BLU78 --> BLU79["BLU"]
        BLU79 --> BLU80["BLU"]
        Blu100["WHI/RED"] --> RLBR
    end
    subgraph Phase1
            L1
            L2
    end
    subgraph Phase2
            L1
            L2
    end
    subgraph Phase3
            L1
            L2
    end
    subgraph Phase4
            L1
            L2
    end
    subgraph Phase5
            L1
            L2
    end
    subgraph Phase6
            L1
            L2
    end
    subgraph Phase7
            L1
            L2
    end
    subgraph Phase8
            L1
            L2
    end
    subgraph Phase9
            L1
            L2
    end
    subgraph Phase10
            L1
            L2
    end
    subgraph Phase11
            L1
            L2
    end
    subgraph Phase12
            L1
            L2
    end
    subgraph Phase13
            L1
            L2
    end
    subgraph Phase14
            L1
            L2
    end
    subgraph Phase15
            L1
            L2
    end
    subgraph Phase16
            L1
            L2
    end
    subgraph Phase17
            L1
            L2
    end
    subgraph Phase18
            L1
            L2
    end
    subgraph Phase19
            L1
            L2
    end
    subgraph Phase20
            L1
            L2
    end
    subgraph Phase21
            L1
            L2
    end
    subgraph Phase22
            L1
            L2
    end
    subgraph Phase23
            L1
            L2
    end
    subgraph Phase24
            L1
            L2
    end
    subgraph Phase25
            L1
            L2
    end
    subgraph Phase26
            L1
            L2
    end
    subgraph Phase27
            L1
            L2
    end
    subgraph Phase28
            L1
            L2
    end
    subgraph Phase29
            L1
            L2
    end
    subgraph Phase30
            L1
            L2
    end
    subgraph Phase31
            L1
            L2
    end
    subgraph Phase32
            L1
            L2
    end
    subgraph Phase33
            L1
            L2
    end
    subgraph Phase34
            L1
            L2
    end
    subgraph Phase35
            L1
            L2
    end
    subgraph Phase36
            L1
            L2
    end
    subgraph Phase37
            L1
            L2
    end
    subgraph Phase38
            L1
            L2
    end
    subgraph Phase39:
            L1
            L2
    end

    subgraph Phase40s_Options_Options_Options_Options_Options_Options_Options_Options_Options_Options_Options_Options_Options_Options_Options_Options_Options_Options_Options_Options_Options_Options_Options_Options_Options_Options_Options_Options_Options_Options_Options_Options_Options_Options_Options_Options_Options_Options_Options_Options_Options_Options_Options_Options_Options_Options_Options_Options_Options_Options_Optimal_Sothermal_Circuit_Circuit_Circuit_Circuit_Circuit_Circuit_Circuit_Circuit_Circuit_Circuit_Circuit_Circuit_Circuit_Circuit_Circuit_Circuit_Circuit_Circuit_Circuit_Circuit_Circuit_Circuit_Circuit_Circuit_Circuit_Circuit_Circuit_Circuit_Circuit_Circuit_Circuit_Circuit_Circuit_Circuit_Circuit_Circuit_Circuit_Circuit_Circuit_Circuit_Circuit_Circuit_Circuit_Circuit_Circuit_Circuit_Circuit_Circuit_Circuit_Circuit_C Circuit_TTL_TTL_TTL_TTL_TTL_TTL_TTL_TTL_TTL_TTL_TTL_TTL_TTL_TTL_TTL_TTL_TTL_TTL_TTL_TTL_TTL_TTL_TTL_TTL_TTL_TTL_TTL_TTL_TTL_TTL_TTL_TTL_TTL_TTL_TTL_TTL_TTL_TTL_TTL_TTL_TTL_TTL_TTL_TTL_TTL_TTL_TTL_TTL_TTL_TTL_TLL_TLL_TLL_TLL_TLL_TLL_TLL_TLL_TLL_TLL_TLL_TLL_TLL_TLL_TLL_TLL_TLL_TLL_TLL_TLL_TLL_TLL_TLL_TLL_TLL_TLL_TLL_TLL_TLL_TLL_TLL_TLL_TLL_TLL_TLL_TLL_TLL_TLL_TLL_TLL_TLL_TLL_TLL_TLL_TLL_TLL_TLL_TLL_TLL_TLL_TULL_TULL_TULL_TULL_TULL_TULL_TULL_TULL_TULL_TULL_TULL_TULL_TULL_TULL_TULL_TULL_TULL_TULL_TULL_TULL_TULL_TULL_TULL_TULL_TULL_TULL_TULL_TULL_TULL_TULL_TULL_TULL_TULL_TULL_TULL_TULL_TULL_TULL_TULL_TULLTULL(TULL-TULL) |
10836.0002E 07/00 ©1995 BUNN-O-MATIC CORPORATION
SCHEMATIC WIRING DIAGRAM CWTA
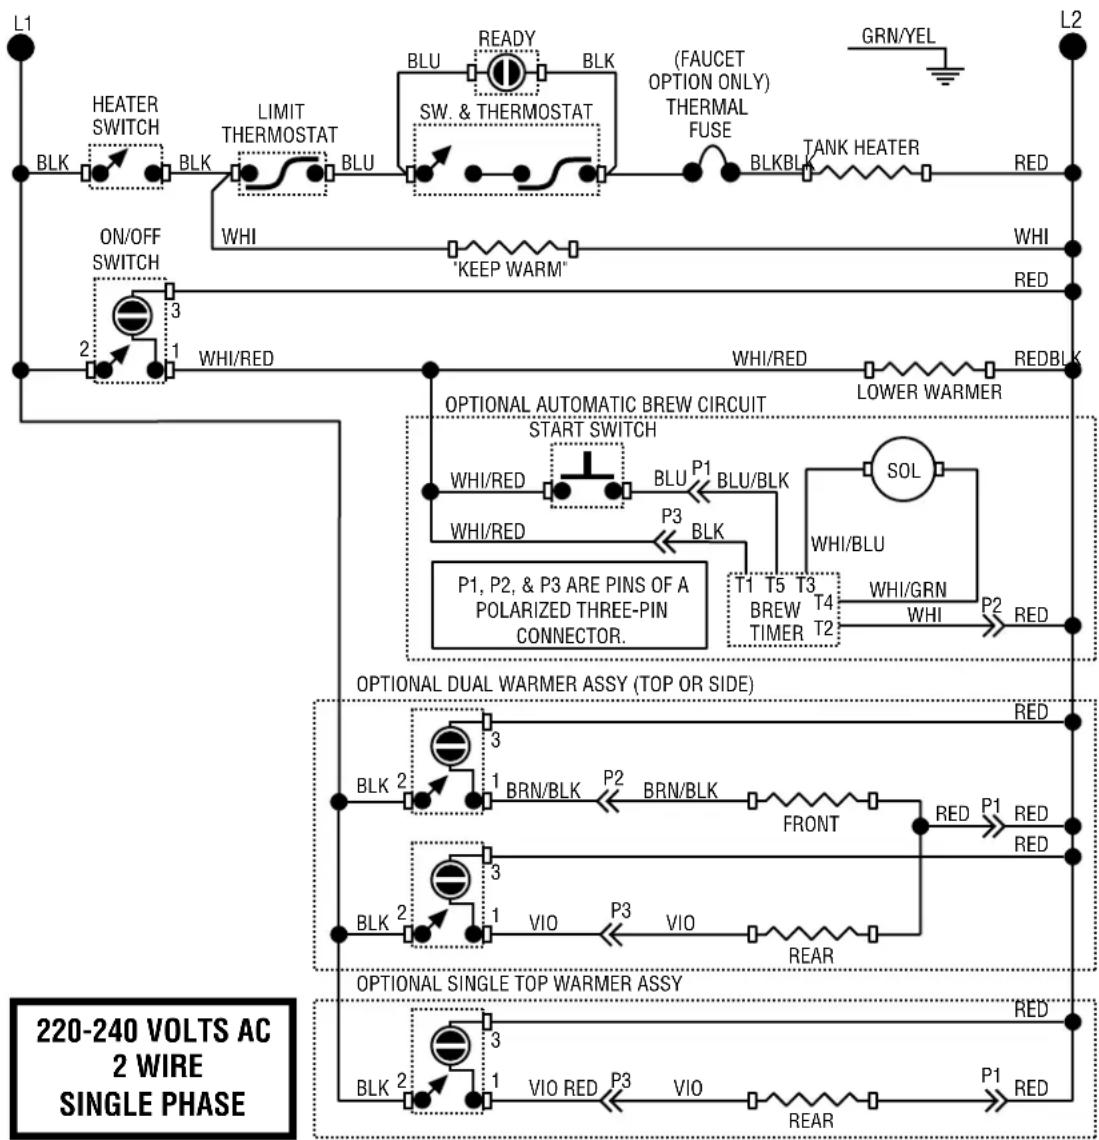
flowchart
graph TD
    subgraph_Phase_1["220-240 VOLTS AC 2 WIRE SINGLE PHASE"]
        L1 --> BLK1["BLK"]
        BLK1 --> HEATERSwitch["HEATER SWITCH"]
        BLK1 --> BLK1
        BLK1 --> BLU1["BLU"]
        BLU1 --> SW & Thermostat["SW. & THERMOSTAT"]
        SW & Thermostat --> BLK2["BLK"]
        BLK2 --> BLU2["BLU"]
        BLU2 --> BLK3["BLK"]
        BLK3 --> BLK4["BLK"]
        BLK4 --> BLK5["BLK"]
        BLK5 --> BLK6["BLK"]
        BLK6 --> BLK7["BLK"]
        BLK7 --> BLK8["BLK"]
        BLK8 --> BLK9["BLK"]
        BLK9 --> BLK10["BLK"]
        BLK10 --> BLK11["BLK"]
        BLK11 --> BLK12["BLK"]
        BLK12 --> BLK13["BLK"]
        BLK13 --> BLK14["BLK"]
        BLK14 --> BLK15["BLK"]
        BLK15 --> BLK16["BLK"]
        BLK16 --> BLK17["BLK"]
        BLK17 --> BLK18["BLK"]
        BLK18 --> BLK19["BLK"]
        BLK19 --> BLK20["BLK"]
        BLK20 --> BLK21["BLK"]
        BLK21 --> BLK22["BLK"]
        BLK22 --> BLK23["BLK"]
        BLK23 --> BLK24["BLK"]
        BLK24 --> BLK25["BLK"]
        BLK25 --> BLK26["BLK"]
        BLK26 --> BLK27["BLK"]
        BLK27 --> BLK28["BLK"]
        BLK28 --> BLK29["BLK"]
        BLK29 --> BLK30["BLK"]
        BLK30 --> BLK31["BLK"]
        BLK31 --> BLK32["BLK"]
        BLK32 --> BLK33["BLK"]
        BLK33 --> BLK34["BLK"]
        BLK34 --> BLK35["BLK"]
        BLK35 --> BLK36["BLK"]
        BLK36 --> BLK37["BLK"]
        BLK37 --> BLK38["BLK"]
        BLK38 --> BLK39["BLK"]
        BLK39 --> BLK40["BLK"]
        BLK40 --> BLK41["BLK"]
        BLK41 --> BLK42["BLK"]
        BLK42 --> BLK43["BLK"]
        BLK43 --> BLK44["BLK"]
        BLK44 --> BLK45["BLK"]
        BLK45 --> BLK46["BLK"]
        BLk10 --> ON/OFF_SWITCH["ON/OFF SWITCH"]
        ON/OFF_SWITCH --> ON/OFF_SWITCH
        ON/OFF_SWITCH --> ON/OFF_SWITCH
    end

    subgraph Phase_2
        L1
        L2
    end

    subgraph Phase_3
        L1
        L2
    end

    subgraph Phase_4
        L1
        L2
    end

    subgraph Phase_5
        L1
        L2
    end

    subgraph Phase_6
        L1
        L2
    end

    subgraph Phase_7
        L1
        L2
    end

    subgraph Phase_8
        L1
        L2
    end

    subgraph Phase_9
        L1
        L2
    end

    subgraph Phase_10
        L1
        L2
    end

    subgraph Phase_11
        L1
        L2
    end

    subgraph Phase_12
        L1
        L2
    end

    subgraph Phase_13
        L1
        L2
    end

    subgraph Phase_14
        L1
        L2
    end

    subgraph Phase_15
        L1
        L2
    end

    subgraph Phase_16
        L1
        L2
    end

    subgraph Phase_17
        L1
        L2
    end

    subgraph Phase_18
        L1
        L2
    end

    subgraph Phase_19
        L1
        L2
    end

    subgraph Phase_20
        L1
        L2
    end

    subgraph Phase_21
        L1
        L2
    end

    subgraph Phase_22
        L1
        L2
    end

    subgraph Phase_23
        L1
        L2
    end

    subgraph Phase_24
        L1
        L2
    end

    subgraph Phase_25
        L1
        L2
    end

    subgraph Phase_26
        L1
        L2
    end

    subgraph Phase_27
        L1
        L2
    end

    subgraph Phase_28
        L1
        L2
    end

    subgraph Phase_29
        L1
        L2
    end

    subgraph Phase_30
        L1
        L2
    end

    subgraph Phase_31
        L1
        L2
    end

    subgraph Phase_32
        L1
        L2
    end

    subgraph Phase_33
        L1
        L2
    end

    subgraph Phase_34
        L1
        L2
    end

    subgraph Phase_35
        L1
        L2
    end

    subgraph Phase_36
        L1
        L2
    end

    subgraph Phase_37
        L1
        L2
    end

    subgraph Phase_38
        L1
        L2
    end

    subgraph Phase_39
        L1
        L2
    end

    subgraph Phase_40
        L1
        L2
    end

    subgraph Phase_41
        L1
        L2
    end

    subgraph Phase_42
        L1
        L2
    end

    subgraph Phase_43
        L1
        L2
    end

    subgraph Phase_44
        L1
        L2
    end

    subgraph Phase_45
        L1
        L2
    end

    subgraph Phase_46
        L1
        L2
    end

    subgraph Phase_47
        L1
        L2
    end

    subgraph Phase_48
        L1
        L2
    end

    subgraph Phase_49
        L1
        L2
    end

    subgraph Phase_50
        L1
        L2
    end

    subgraph Phase_51)
       BlueLbP0["P0"] --> BlueLbP1["P0"] --> BlueLbP2["P0"] --> BlueLbP3["P0"] --> BlueLbP4["P0"] --> BlueLbP5["P0"] --> BlueLbP6["P0"] --> BlueLbP7["P0"] --> BlueLbP8["P0"] --> BlueLbP9["P0"] --> BlueLbP10["P0"] --> BlueLbP11["P0"] --> BlueLbP12["P0"] --> BlueLbP13["P0"] --> BlueLbP14["P0"] --> BlueLbP15["P0"] --> BlueLbP16["P0"] --> BlueLbP17["P0"] --> BlueLbP18["P0"] --> BlueLbP19["P0"] --> BlueLbP20["P0"] --> BlueLbP21["P0"] --> BlueLbP22["P0"] --> BlueLbP23["P0"] --> BlueLbP24["P0"] --> BlueLbP25["P0"] --> BlueLbP26["P0"] --> BlueLbP27["P0"] --> BlueLbP28["P0"] --> BlueLbP29["P0"] --> BlueLbP30["P0"] --> BlueLbP31["P0"] --> BlueLbP32["P0"] --> BlueLbP33["P0"] --> BlueLbP34["P0"] --> BlueLbP35["P0"] --> BlueLbP36["P0"] --> BlueLbP37["P0"] --> BlueLbP38["P0"] --> BlueLbP39["P0"] --> BlueLbP40["P0"] --> BlueLbP41["P0"] --> BlueLbP42["P0"] --> BlueLbP43["P0"] --> BlueLbP44["P0"] --> BlueLbP45["P0"] --> BlueLbP46["P0"] --> BlueLbP47["P0"] --> BlueLbP48["P0"] --> BlueLbP49["P0"] --> BlueLbP50["P0"] --> BlueLbP51["P0"] --> BlueLbP52["P0"] --> BlueLbP53["P0"] --> BlueLbP54["P0"] --> BlueLbP55["P0"] --> BlueLbP56["P0"] --> BlueLbP57["P0"] --> BlueLbP58["P0"] --> BlueLbP59["P0"] --> BlueLbP60["P0"] --> BlueLbP61["P0"] --> BlueLbP62["P0"] --> BlueLbP63["P0"] --> BlueLbP64["P0"] --> BlueLbP65["P0"] --> BlueLbP66["P0"] --> BlueLbP67["P0"] --> BlueLbP68["P0"] --> BlueLbP69["P0"] --> BlueLbP70["P0"] --> BlueLbP71["P0"] --> BlueLbP72["P0"] --> BlueLbP73["P0"] --> BlueLbP74["P0"] --> BlueLbP75["P0"] --> BlueLbP76["P0"] --> BlueLbP77["P0"] --> BlueLbP78["P0"] --> BlueLbP79["P0"] --> BlueLbP80["P0"] --> BlueLbP81["P0"] --> BlueLbP82["P0"] --> BlueLbP83["P0"] --> BlueLbP84["P0"] --> BlueLbP85["P0"] --> BlueLbP86["P0"] --> BlueLbP87["P0"] --> BlueLbP88["P0"] --> BlueLbP89["P0"] --> BlueLbP90["P0"] --> BlueLbP91["P0"] --> BlueLbP92["P0"] --> BlueLbP93["P0"] --> BlueLbP94["P0"] --> BlueLbP95["P0"] --> BlueLbP96["P0"] --> BlueLbP97["P0"] --> BlueLbP98["P0"] --> BlueLbP99["P0"]

end
10836.0003E 07/00 ©1995 BUNN-O-MATIC CORPORATION
SCHEMATIC WIRING DIAGRAM CWTA - CE
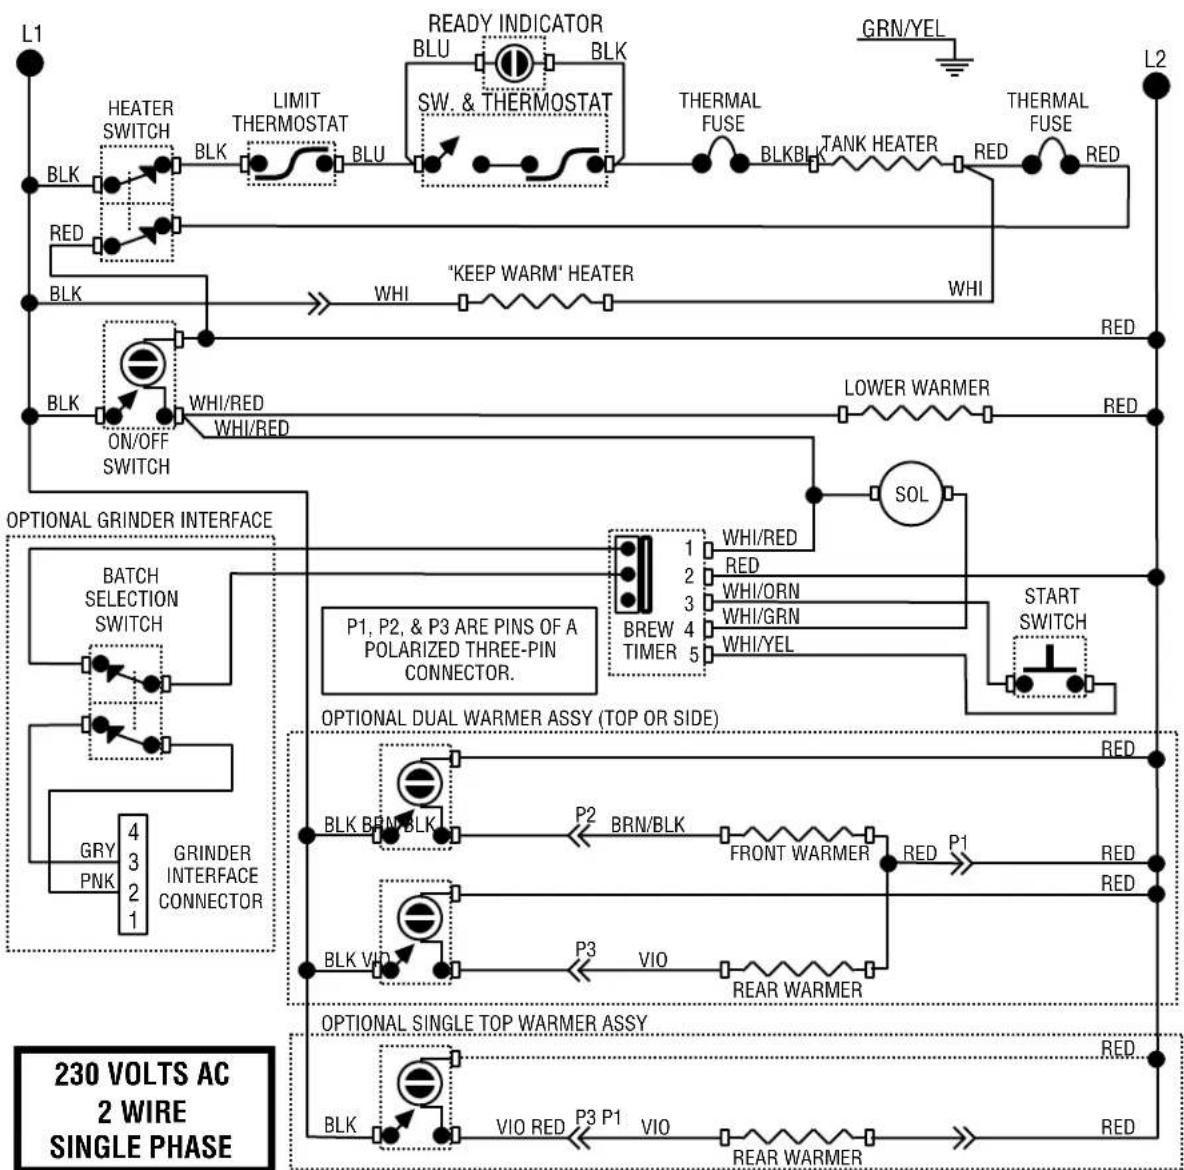
flowchart
graph TD
    subgraph Power Phase
        L1["Power L1"] --> BLK1["BLK"]
        BLK1 --> HEATERSwitch["HEATER SWITCH"]
        BLK1 --> RED1["RED"]
        BLK1 --> BLK["BLK"]
        BLK --> ON/OFFSwitch["ON/OFF SWITCH"]
        BLK --> BLK1
        BLK1 --> BLK2["BLK"]
        BLK2 --> BLK3["BLK"]
        BLK3 --> BLK4["BLK"]
        BLK4 --> BLK5["BLK"]
        BLK5 --> BLK6["BLK"]
        BLK6 --> BLK7["BLK"]
        BLK7 --> BLK8["BLK"]
        BLK8 --> BLK9["BLK"]
        BLK9 --> BLK10["BLK"]
        BLK10 --> BLK11["BLK"]
        BLK11 --> BLK12["BLK"]
        BLK12 --> BLK13["BLK"]
        BLK13 --> BLK14["BLK"]
        BLK14 --> BLK15["BLK"]
        BLK15 --> BLK16["BLK"]
        BLK16 --> BLK17["BLK"]
        BLK17 --> BLK18["BLK"]
        BLK18 --> BLK19["BLK"]
        BLK19 --> BLK20["BLK"]
        BLK20 --> BLK21["BLK"]
        BLK21 --> BLK22["BLK"]
        BLK22 --> BLK23["BLK"]
        BLK23 --> BLK24["BLK"]
        BLK24 --> BLK25["BLK"]
        BLK25 --> BLK26["BLK"]
        BLK26 --> BLK27["BLK"]
        BLK27 --> BLK28["BLK"]
        BLK28 --> BLK29["BLK"]
        BLK29 --> BLK30["BLK"]
        BLK30 --> BLK31["BLK"]
        BLK31 --> BLK32["BLK"]
        BLK32 --> BLK33["BLK"]
        BLK33 --> BLK34["BLK"]
        BLK34 --> BLK35["BLK"]
        BLK35 --> BLK36["BLK"]
        BLK36 --> BLK37["BLK"]
        BLK37 --> BLK38["BLK"]
        BLK38 --> BLK39["BLK"]
        BLK39 --> BLK40["BLK"]
        BLK40 --> BLK41["BLK"]
        BLK41 --> BLK42["BLK"]
        BLK42 --> BLK43["BLK"]
        BLK43 --> BLK44["BLK"]
        BLK44 --> BLK45["BLK"]
        BLK45 --> BLK46["BLK"]
        BLk10 --> RLWAMRHEATER["KEEP WARM" HEATER"]
    end
    subgraph Power Phase
        L2["Power L2"] --> GRN/YEL
        L2 --> THERMALFUSE
        L2 --> TANKHEATER
        L2 --> RED
        L2 --> RED
    end
    subgraph Power Phase
        L1 --> HEATERSwitch
        HEATERSwitch --> BLKWTHATL
        BLKWTHATL --> SW & THERMOSTAT
        SW & THERMOSTAT --> BLWHTL
    end
    subgraph Power Phase
        L2 --> THERMALFUSE
        THERMALFUSE --> TANKHEATER
        TANKHEATER --> RED
        RED --> RED
    end
    subgraph Power Phase
        L1 --> ON/OFFSwitch
        ON/OFFSwitch --> WHI/RED
        WHI/RED --> WHI/RED
    end
    subgraph Power Phase
        L2 --> ON/OFFSwitch
    end
    subgraph Power Phase
        L1 --> OPTIONALGRINDERINTERFACE
        L2 --> OPTIONALGRINDER_INTERFACE
    end
    subgraph Power Phase
        L1 --> BATCHSELECTIONSwitch
        L2 --> BATCHSELECTIONSwitch
    end
    subgraph Power Phase
        L1 --> GRYPNKW
        L2 --> GRYPNKW
    end
    subgraph Power Phase
        L1 --> GRINDERInterfaceConnector
    end
    subgraph Power Phase
        L2 --> GRINDERInterfaceConnector
    end
    subgraph Power Phase
        L1 --> P1["P1, P2, & P3 ARE PINS OF A POLARIZED THREE-PIN CONNECTOR."]
    end
    subgraph Power Phase
        L2 --> P1P["P1, P2, & P3 ARE PINS OF A POLARIZED THREE-PIN CONNECTOR."]
    end
    subgraph Power Phase
        L1 --> BRYPNKW
        L2 --> BRYPNKW
    end
    subgraph Power Phase
        L1 --> GRINDERInterfaceConnector
    end
    subgraph Power Phase
        L2 --> GRINDERInterfaceConnector
    end
    subgraph Power Phase
        L1 --> BRWBlkBRLW
        L2 --> BRWBlkBRLW
    end
    subgraph Power Phase
        L1 --> FRONTWARMER
        L2 --> FRONTWARMER
    end
    subgraph Power Phase
        L1 --> VIOVWRW
        L2 --> VIOVWRW
    end
    subgraph Power Phase
        L1 --> REARWARMER
    end
    subgraph Power Phase
        L1 --> VIOVWRW
    end
    subgraph Power Phase
        L1 --> REARWARMER
    end
    subgraph Power Phase
        L1 --> VIOVWRW
    end
10836.0004H 10/02 ©1997 BUNN-O-MATIC CORPORATION
SCHEMATIC WIRING DIAGRAM C-MV, CT-MV, CTF-MV, CWT-MV & CWTF-MV
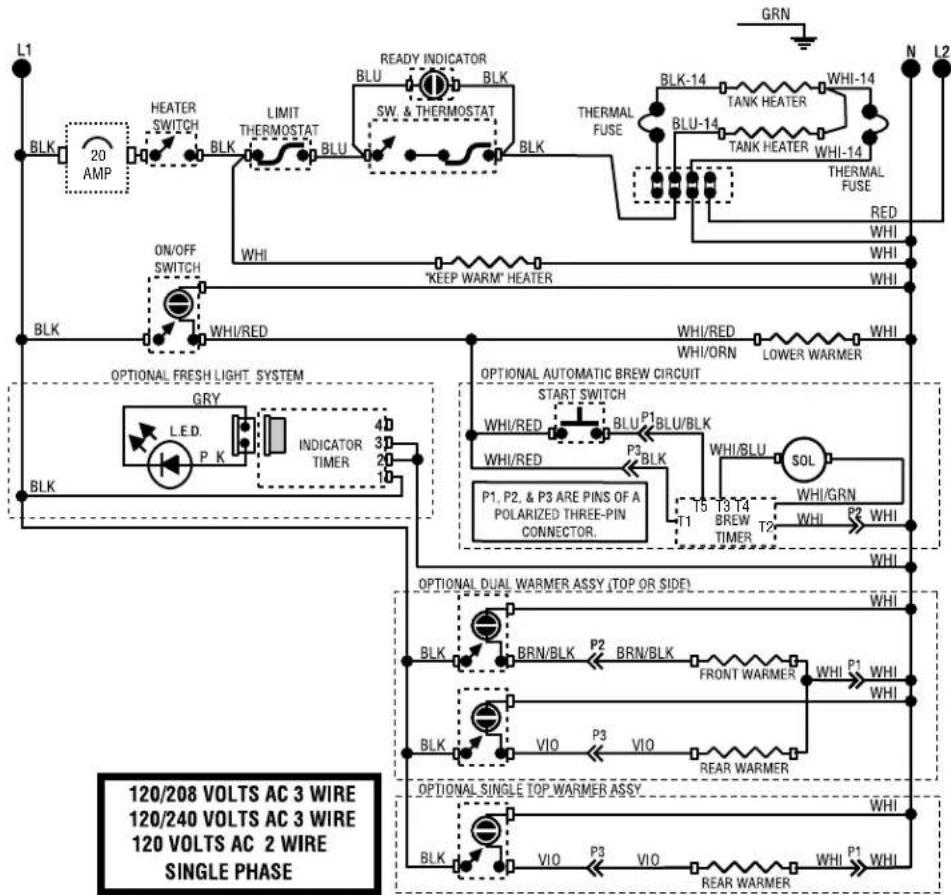
flowchart
graph TD
    A["120/208 VOLTS AC 3 WIRE"] --> B["120/240 VOLTS AC 3 WIRE"]
    B --> C["120 VOLTS AC 2 WIRE SINGLE PHASE"]

    subgraph Power Phase
        D["BLK"] --> E["HEATER SWITCH"]
        E --> F["LIMIT THERMOSTAT"]
        F --> G["SW & THERMOSTAT"]
        G --> H["READY INDICATOR"]
        H --> I["BLK"]
        I --> J["TLK"]
        J --> K["BLK-14"]
        K --> L["TANK HEATER"]
        L --> M["WHI-14"]
        M --> N["BLK-14"]
        N --> O["BLU-14"]
        O --> P["TANK HEATER"]
        P --> Q["WHI-14"]
        Q --> R["TRIMUL FUSE"]
        R --> S["RED"]
        S --> T["WHI"]
        T --> U["WHI/RED"]
        U --> V["WHI/RED"]
        V --> W["LOWER WARMER"]
        W --> X["WHI/RED"]
        X --> Y["WHI/RED"]
        Y --> Z["WHI/RED"]
    end

    subgraph Power Phase
        AA["BLK"] --> AB["ON/OFF SWITCH"]
        AB --> AC["WHI/RED"]
        AC --> AD["OPTICAL FRESH LIGHT SYSTEM"]
        AD --> AE["GRY"]
        AE --> AF["L.E.D. P.K."]
        AF --> AG["INDICATOR TIMER 4b"]
        AG --> AH["4b"]
        AH --> AI["BLK"]
    end

    subgraph Power Phase
        AJ["BLK"] --> AK["P1, P2, & P3 ARE PINS OF A POLARIZED THREE-PIN CONNECTOR."]
        AK --> AL["P1, P2, & P3 ARE PINS OF A POLARIZED THREE-PIN CONNECTOR."]
        AL --> AM["P1, P2, & P3 ARE PINS OF A POLARIZED THREE-PIN CONNECTOR."]
        AM --> AN["P1, P2, & P3 ARE PINS OF A POLARIZED THREE-PIN CONNECTOR."]
        AN --> AO["P1, P2, & P3 ARE PINS OF A POLARIZED THREE-PIN CONNECTOR."]
        AO --> AP["P1, P2, & P3 ARE PINS OF A POLARIZED THREE-PIN CONNECTOR."]
        AP --> AQ["P1, P2, & P3 ARE PINS OF A POLARIZED THREE-PIN CONNECTOR."]
        AQ --> AR["P1, P2, & P3 ARE PINS OF A POLARIZED THREE-PIN CONNECTOR."]
        AR --> AS["P1, P2, & P3 ARE PINS OF A POLARIZED THREE-PIN CONNECTOR."]
        AS --> AT["P1, P2, & P3 ARE PINS OF A POLARIZED THREE-PIN CONNECTOR."]
        AT --> AU["P1, P2, & P3 ARE PINS OF A POLARIZED THREE-PIN CONNECTOR."]
        AU --> AV["P1, P2, & P3 ARE PINS OF A POLARIZED THREE-PIN CONNECTOR."]
        AV --> AW["P1, P2, & P3 ARE PINS OF A POLARIZED THREE-PIN CONNECTOR."]
        AW --> AX["P1, P2, & P3 ARE PINS OF A POLARIZED THREE-PIN CONNECTOR."]
        AX --> AY["P1, P2, & P3 ARE PINS OF A POLARIZED THREE-PIN CONNECTOR."]
        AY --> AZ["P1, P2, & P3 ARE PINS OF A POLARIZED THREE-PIN CONNECTOR."]
        AZ --> BA["P1, P2, & P3 ARE PINS OF A POLARIZED THREE-PIN CONNECTOR."]
        BA --> BB["P1, P2, & P3 ARE PINS OF A POLARIZED THREE-PIN CONNECTOR."]
        BB --> BC["P1, P2, & P3 ARE PINS OF A POLARIZED THREE-PIN CONNECTOR."]
        BC --> BD["P1, P2, & P3 ARE PINS OF A POLARIZED THREE-PIN CONNECTOR."]
        BD --> BE["P1, P2, & P3 ARE PINS OF A POLARIZED THREE-PIN CONNECTOR."]
        BE --> BF["P1, P2, & P3 ARE PINS OF A POLARIZED THREE-PIN CONNECTOR."]
        BF --> BG["P1, P2, & P3 ARE PINS OF A POLARIZED THREE-PIN CONNECTOR."]
        BG --> BH["P1, P2, & P3 ARE PINS OF A POLARIZED THREE-PIN CONNECTOR."]
        BH --> BI["P1, P2, & P3 ARE PINS OF A POLARIZED THREE-PIN CONNECTOR."]
        BI --> BJ["P1, P2, & P3 ARE PINS OF A POLARIZED THREE-PIN CONNECTOR."]
        BJ --> BK["P1, P2, & P3 ARE PINS OF A POLARIZED THREE-PIN CONNECTOR."]
        BK --> BL["P1, P2, & P3 ARE PINS OF A POLARIZED THREE-PIN CONNECTOR."]
        BL --> BM["P1, P2, & P3 ARE PINS OF A POLARIZED THREE-PIN CONNECTOR."]
        BM --> BN["P1, P2, & P3 ARE PINS OF A POLARIZED THREE-PIN CONNECTOR."]
        BN --> BO["P1, P2, & P3 ARE PINS OF A POLARIZED THREE-PIN CONNECTOR."]
        BO --> BP["P1, P2, & P3 ARE PINS OF A POLARIZED THREE-PIN CONNECTOR."]
        BP --> BQ["P1, P2, & P3 ARE PINS OF A POLARIZED THREE-PIN CONNECTOR."]
        BQ --> BR["P1, P2, & P3 ARE PINS OF A POLARIZED THREE-PIN CONNECTOR."]
        BR --> BS["P1, P2, & P3 ARE PINS OF A POLARIZED THREE-PIN CONNECTOR."]
        BS --> BT["P1, P2, & P3 ARE PINS OF A POLARIZED THREE-PIN CONNECTOR."]
        BT --> BU["P1, P2, & P3 ARE PINS OF A POLARIZED THREE-PIN CONNECTOR."]
        BU --> BV["P1, P2, & P3 ARE PINS OF A POLARIZED THREE-PIN CONNECTOR."]
        BV --> BW["P1, P2, & P3 ARE PINS OF A POLARIZED THREE-PIN CONNECTOR."]
        BW --> BX["P1, P2, & P3 ARE PINS OF A POLARIZED THREE-PIN CONNECTOR."]
        BX --> BY["P1, P2, & P3 ARE PINS OF A POLARIZED THREE-PIN CONNECTOR."]
        BY --> BZ["P1, P2, & P3 ARE PINS OF A POLARIZED THREE-PIN CONNECTOR."]
        BZ --> CA["P1, P2, & P3 ARE PINS OF A POLARIZED THREE-PIN CONNECTOR."]
        CA --> CB["P1, P2, & P3 ARE PINS OF A POLARIZED THREE-PIN CONNECTOR."]
        CB --> CC["P1, P2, & P3 ARE PINS OF A POLARIZED THREE-PIN CONNECTOR."]
        CC --> CD["P1, P2, & P3 ARE PINS OF A POLARIZED THREE-PIN CONNECTOR."]
        AD --> CE["P1, BLK"] --> CF["OPTIONAL DUAL WARMER ASSY (TOP OR SIDE)"]
    end

    style Power Phase fill:#f9f9f9,stroke:#333
    style Power Phase fill:#f9f9f9,stroke:#333
    style Power Phase fill:#f9f9f9,stroke:#333
    style Power Phase fill:#f9f9f9,stroke:#333
    style Power Phase fill:#f9f9f9,stroke:#333
    style Power Phase fill:#f9f9f9,stroke:#333
    style Power Phase Fill:#f9f9f9,stroke:#333
    style Power Phase Fill-width: 5px
    style Power Phase Fill-width: 5px
    style Power Phase Fill-width: 5px
    style Power Phase Fill-width: 5px
    style Power Phase Fill-width: 5px
    style Power Phase Fill-width: 5px
    style Power Phase Fill-width: 5px
    style Power Phase Fill-width: 5px
    style Power Phase Fill-width: 5px
    style Power Phase Fill-width: 5px
10836.0005K 8/00 ©1997 BUNN-O-MATIC CORPORATION
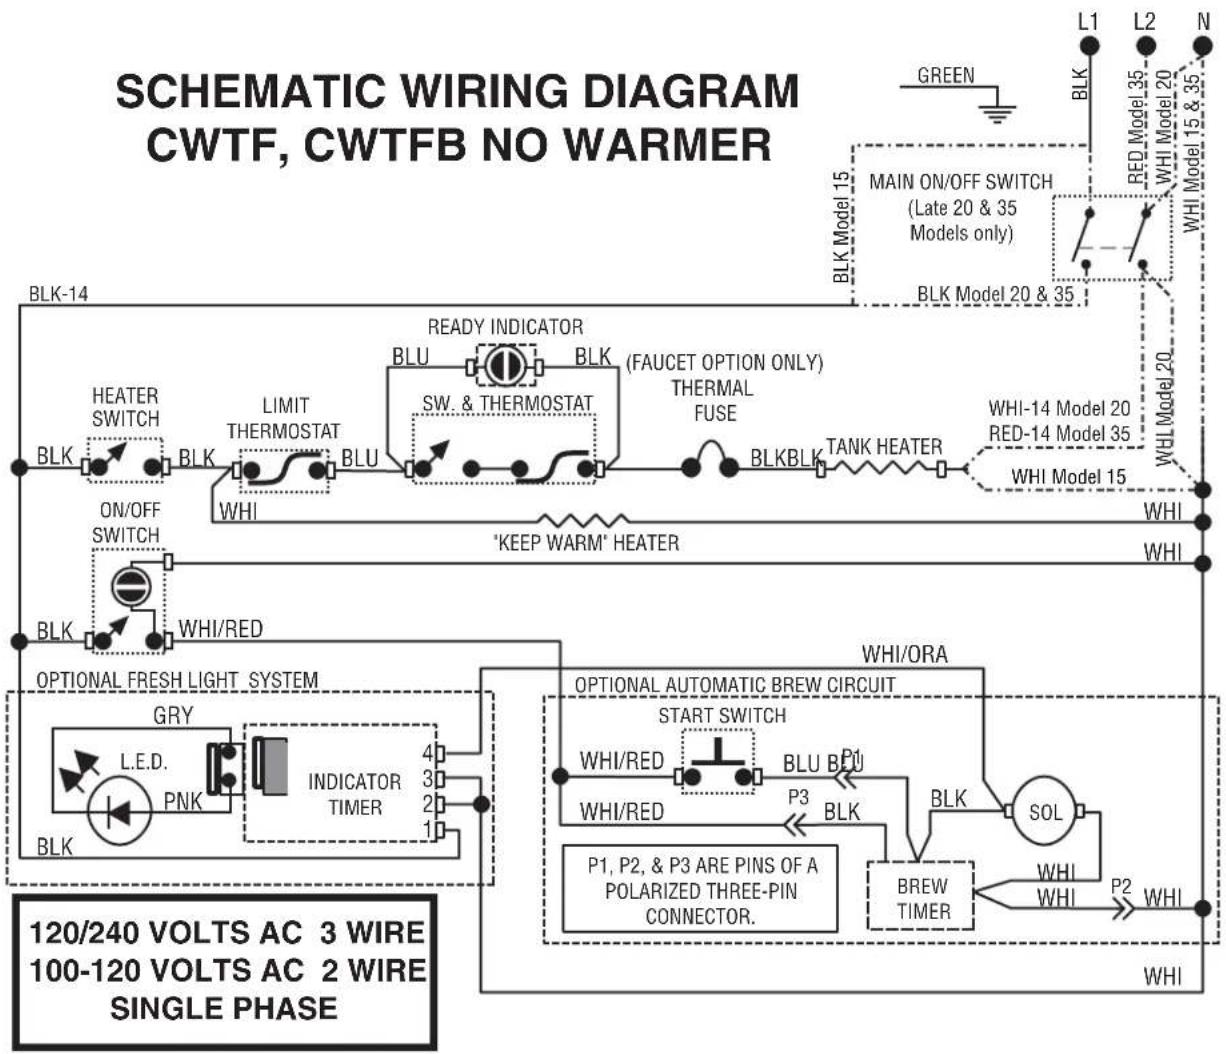
flowchart
graph TD
    subgraph "SCHEMATIC WIRING DIAGRAM CWT F, CWTFB NO WARMER"
        direction TB
        A["BLK-14"] --> B["HEATER SWITCH"]
        B --> C["ON/OFF SWITCH"]
        C --> D["WHI/RED"]
        D --> E["OPTIONAL FRESH LIGHT SYSTEM"]
        E --> F["GRY"]
        F --> G["L.E.D."]
        F --> H["PNK"]
        F --> I["INDICATOR TIMER"]
        I --> J["4"]
        I --> K["3"]
        I --> L["2"]
        I --> M["1"]
        N["READY INDICATOR"] --> O["BLU"]
        O --> P["SW & THERMOSTAT"]
        P --> Q["BLU"]
        Q --> R["BLK"]
        R --> S["TANK HEATER"]
        S --> T["WHI-14 Model 20 RED-14 Model 35"]
        T --> U["WHI Model 15"]
        V["MAIN ON/OFF SWITCH (Late 20 & 35 Models only)"] --> W["BLK Model 20 & 35"]
        X["GREEN"] --> Y["BLK"]
        Z["WHI"] --> AA["P2"]
        AB["WHI"] --> AC["P1, P2, & P3 ARE PINS OF A POLARIZED THREE-PIN CONNECTOR."] --> AC
    end

    subgraph "OPTIONAL AUTOMATIC BREW CIRCUIT"
        AC --> AD["START SWITCH"]
        AD --> AE["BLU BLU"]
        AE --> AF["P1"]
        AF --> AG["P3"]
        AG --> AH["BREW TIMER"]
        AH --> AI["SOL"]
        AI --> AJ["WHI"]
        AK["P1, P2, & P3 ARE PINS OF A POLARIZED THREE-PIN CONNECTOR."] --> AL["P2"]
        AL --> AM["P2"]
        AN["WHI"] --> AO["WHI"]
    end

    style "SCHEMATIC WIRING DIAGRAM CWT F, CWTFB NO WARMER"
    style "OPTIONAL AUTOMATIC BREW CIRCUIT"
    style "OPTIONAL FRESH LIGHT SYSTEM"
    style "OPTIONAL FRESH LIGHT SYSTEM"
    style "OPTIONAL AUTOMATIC BREW CIRCUIT"
    style "OPTIONAL FRESH LIGHT SYSTEM"
    style "OPTIONAL AUTOMATIC BREW CIRCUIT"
    style "OPTIONAL AUTOMATIC BREW CIRCUIT"
    style "OPTIONAL AUTOMATIC BREW CIRCUIT"
    style "OPTIONAL AUTOMATIC BREW CIRCUIT"
    style "OPTIONAL AUTOMATIC BREW CIRCUIT"
    style "OPTIONAL AUTOMATIC BREW CIRCUIT"
    style "OPTIONAL AUTOMATIC BREW CIRCUIT"
    style "OPTIONAL AUTOMATIC BREW CIRCUIT"

    %% Legend
    subgraph "OPTIONAL AUTOMATIC BREW CIRCUIT"
        direction TB
        E --> F
        F --> G
        G --> AH
        AH --> AI
    end
10836.0006M 02/07 ©1995 BUNN-O-MATIC CORPORATION
SCHEMATIC WIRING DIAGRAM
CWTFA NO WARMER
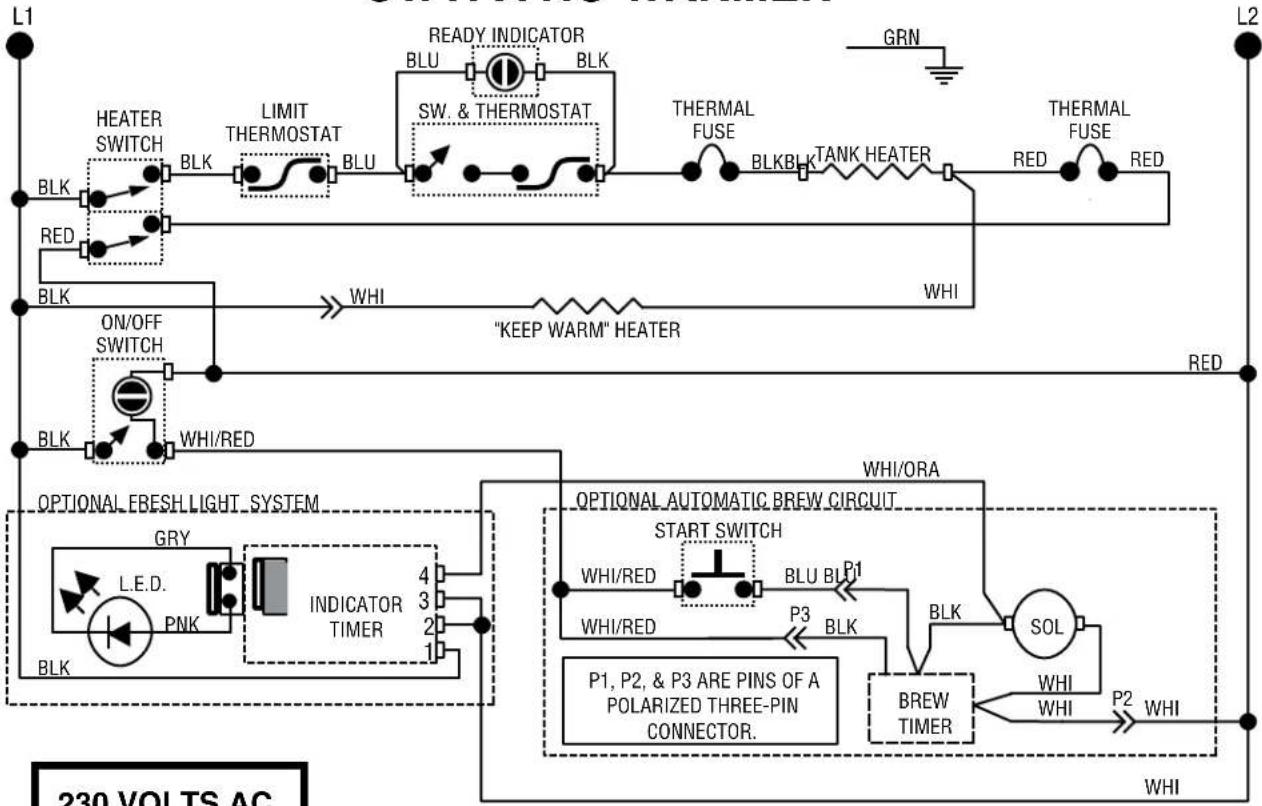
flowchart
graph TD
    subgraph Power Source
        L1["Power L1"] --> HEATERSwitch["HEATER SWITCH"]
        L1 --> RED["RED"]
        HEATERSwitch --> BLK1["BLK"]
        BLK1 --> LIMITThermostat["Limit Thermostat"]
        BLK1 --> BLU1["BLU"]
        BLU1 --> READYIndicator["READY INDICATOR"]
        READYIndicator --> BLU2["BLU"]
        BLU2 --> SW &Thermostat["SW. & THERMOSTAT"]
        SW &Thermostat --> BLU3["BLU"]
        BLU3 --> TANKHeater["TANK HEATER"]
        TANKHeater --> BLKB["BLKB"]
        BLKB --> TANKHeater
        TANKHeater --> RED["RED"]
        TANKHeater --> RED["RED"]
    end

    subgraph Power Source
        L2["Power L2"] --> HEATERSwitch
        L2 --> RED
        HEATERSwitch --> ON/OFFSwitch["ON/OFF SWITCH"]
        ON/OFFSwitch --> BLK4["BLK"]
        BLK4 --> WHI/RED["WHI/RED"]
        BLK4 --> WHI["WHI"]
    end

    subgraph Power Source
        L2 --> ON/OFFSwitch
        L2 --> RED
        ON/OFFSwitch --> BLK5["BLK"]
        BLK5 --> WHI/RED
        BLK5 --> WHI["WHI"]
    end

    subgraph Power Source
        L2 --> HEATERSwitch
        L2 --> RED
        HEATERSwitch --> BLK6["BLK"]
        BLK6 --> LIMITThermostat
        BLK6 --> BLU6["BLU"]
        BLU6 --> READYIndicator
        READYIndicator --> BLU7["BLU"]
        READYIndicator --> BLKB["BLKB"]
        READYIndicator --> BLKBb["TANK HEATER"]
        BLKBb --> TANKHeater
        BLKBb --> REDb["RED"]
        BLKBb --> REDb["RED"]
    end

    subgraph Power Source
        L2 --> HEATERSwitch
        L2 --> RED
        ON/OFFSwitch --> BLK7["BLK"]
        BLK7 --> WHI/RED
        BLK7 --> WHI["WHI"]
    end

    subgraph Power Source
        L2 --> HEATERSwitch
        L2 --> RED
        ON/OFFSwitch --> BLK8["BLK"]
        BLK8 --> WHI/RED
        BLK8 --> WHI["WHI"]
    end

    subgraph Power Source
        L2 --> HEATERSwitch
        L2 --> RED
        ON/OFFSwitch --> BLK9["BLK"]
        BLK9 --> WHI/RED
        BLK9 --> WHI["WHI"]
    end

    subgraph Power Source
        L2 --> HEATERSwitch
        L2 --> RED
        ON/OFFSwitch --> BLK10["BLK"]
        BLK10 --> WHI/RED
        BLK10 --> WHI["WHI"]
    end

    subgraph Power Source
        L2 --> HEATERSwitch
        L2 --> RED
        ON/OFFSwitch --> BLK11["BLK"]
        BLK11 --> WHI/RED
        BLK11 --> WHI["WHI"]
    end

    subgraph Power Source
        L2 --> HEATERSwitch
        L2 --> RED
        ON/OFFSwitch --> BLK12["BLK"]
        BLK12 --> WHI/RED
        BLK12 --> WHI["WHI"]
    end

    subgraph Power Source
        L2 --> HEATERSwitch
        L2 --> RED
        ON/OFFSwitch --> BLK13["BLK"]
        BLK13 --> WHI/RED
        BLK13 --> WHI["WHI"]
    end

    subgraph Power Source
        L2 --> HEATERSwitch
        L2 --> RED
        ON/OFFSwitch --> BLK14["BLK"]
        BLK14 --> WHI/RED
        BLK14 --> WHI["WHI"]
    end

    subgraph Power Source
        L2 --> HEATERSwitch
        L2 --> RED
        ON/OFFSwitch --> BLK15["BLK"]
        BLK15 --> WHI/RED
        BLK15 --> WHI["WHI"]
    end

    subgraph Power Source
        L2 --> HEATERSwitch
        L2 --> RED
        ON/OFFSwitch --> BLK16["BLK"]
        BLK16 --> WHI/RED
        BLK16 --> WHI["WHI"]
    end

    subgraph Power Source
        L2 --> HEATERSwitch
        L2 --> RED
        ON/OFFSwitch --> BLK17["BLK"]
        BLK17 --> WHI/RED
        BLK17 --> WHI["WHI"]
    end

    subgraph Power Source
        L2 --> HEATERSwitch
        L2 --> RED
        ON/OFFSwitch --> BLK18["BLK"]
        BLK18 --> WHI/RED
        BLK18 --> WHI["WHI"]
    end

    subgraph Power Source
        L2 --> HEATERSwitch
        L2 --> RED
        ON/OFFSwitch --> BLK19["BLK"]
        BLK19 --> WHI/RED
        BLK19 --> WHI["WHI"]
    end

    subgraph Power Source
        L2 --> HEATERSwitch
        L2 --> RED
        ON/OFFSwitch --> BLK20["BLK"]
        BLK20 --> WHI/RED
        BLK20 --> WHI["WHI"]
    end

    subgraph Power Source
        L2 --> HEATERSwitch
        L2 --> RED
        ON/OFFSwitch --> BLK21["BLK"]
        BLK21 --> WHI/RED
        BLK21 --> WHI["WHI"]
    end

    subgraph Power Source
        L2 --> HEATERSwitch
        L2 --> RED
        ON/OFFSwitch --> BLK22["BLK"]
        BLK22 --> WHI/RED
        BLK22 --> WHI["WHI"]
    end

    subgraph Power Source
        L2 --> HEATERSwitch
        L2 --> RED
        ON/OFFSwitch --> BLK23["BLK"]
        BLK23 --> WHI/RED
        BLK23 --> WHI["WHI"]
    end

    subgraph Power Source
        L2 --> HEATERSwitch
        L2 --> RED
        ON/OFFSwitch --> BLK24["BLK"]
        BLK24 --> WHI/RED
        BLK24 --> WHI["WHI"]
    end

    subgraph Power Source
        L2 --> HEATERSwitch
        L2 --> RED
        ON/OFFSwitch --> BLK25["BLK"]
        BLK25 --> WHI/RED
        BLK25 --> WHI["WHI"]
    end

    subgraph Power Source
        L2 --> HEATERSwitch
        L2 --> RED
        ON/OFFSwitch --> BLK26["BLK"]
        BLK26 --> WHI/RED
        BLK26 --> WHI["WHI"]
    end

    subgraph Power Source
        L2 --> HEATERSwitch
        L2 --> RED
        ON/OFFSwitch --> BLK27["BLK"]
        BLK27 --> WHI/RED
        BLK27 --> WHI["WHI"]
    end

    subgraph Power Source
        L2 --> HEATERSwitch
        L2 --> RED
        ON/OFFSwitch --> BLK28["BLK"]
        BLK28 --> WHI/RED
        BLK28 --> WHI["WHI"]
    end

    subgraph Power Source
        L2 --> HEATERSwitch
        L2 --> RED
        ON/OFFSwitch --> BLK29["BLK"]
        BLK29 --> WHI/RED
        BLK29 --> WHI["WHI"]
    end

    subgraph Power Source
        L2 --> HEATERSwitch
        L2 --> RED
        ON/OFFSwitch --> BLK30["BLK"]
        BLK30 --> WHI/RED
        BLK30 --> WHI["WHI"]
    end

    subgraph Power Source
        L2 --> HEATERSwitch
        L2 --> RED
        ON/OFFSwitch --> BLK31["BLK"]
        BLK31 --> WHI/RED
        BLK31 --> WHI["WHI"]
    end

    subgraph Power Source
        L2 --> HEATERSwitch
        L2 --> RED
        ON/OFFSwitch --> BLK32["BLK"]
        BLK32 --> WHI/RED
        BLK32 --> WHI["WHI"]
    end

    subgraph Power Source
        L2 --> HEATERSwitch
        L2 --> RED
        ON/OFFSwitch --> BLK33["BLK"]
        BLK33 --> WHI/RED
        BLK33 --> WHI["WHI"]
    end

    subgraph Power Source
        L2 --> HEATERSwitch
        L2 --> RED
        ON/OFFSwitch --> BLK34["BLK"]
        BLk_4["POLARIZED THREE-PIN CONNECTOR."]
            P1,P2,P3 ARE PINS OF A POLARIZED THREE-PIN CONNECTOR.
            P1,P2,P3 ARE PINS OF A POLARIZED THREE-PIN CONNECTOR.
            P1,P2,P3 ARE PINS OF A POLARIZED THREE-PIN CONNECTOR.
            P1,P2,P3 ARE PINS OF A POLARIZED THREE-PIN CONNECTOR.
            P1,P2,P3 ARE PINS OF A POLARIZED THREE-PIN CONNECTOR.
            P1,P2,P3 ARE PINS OF A POLARIZED THREE-PIN CONNECTOR.
            P1,P2,P3 ARE PINS OF A POLARIZED THREE-PIN CONNECTOR.
            P1,P2,P3 ARE PINS OF A POLARIZED THREE-PIN CONNECTOR.
            P1,P2,P3 ARE PINS OF A POLARIZED THREE-PIN CONNECTOR.
            P1,P2,P3 ARE PINS OF A POLARIZED THREE-PIN CONNECTOR.
            P1,P2,P5["POLARIZED THREE-PIN CONNECTOR."]
            P1,P5,P5["POLARIZED THREE-PIN CONNECTOR."]

    subgraph Power Source:
      direction LR
      direction LR: LR=LR

    style Power Source fill:#f9f,stroke:#333,stroke-width:4px,stroke-dasharray: 5 5
230 VOLTS AC 2 WIRE SINGLE PHASE
10836.0008A 12/99 ©1999 BUNN-O-MATIC CORPORATION
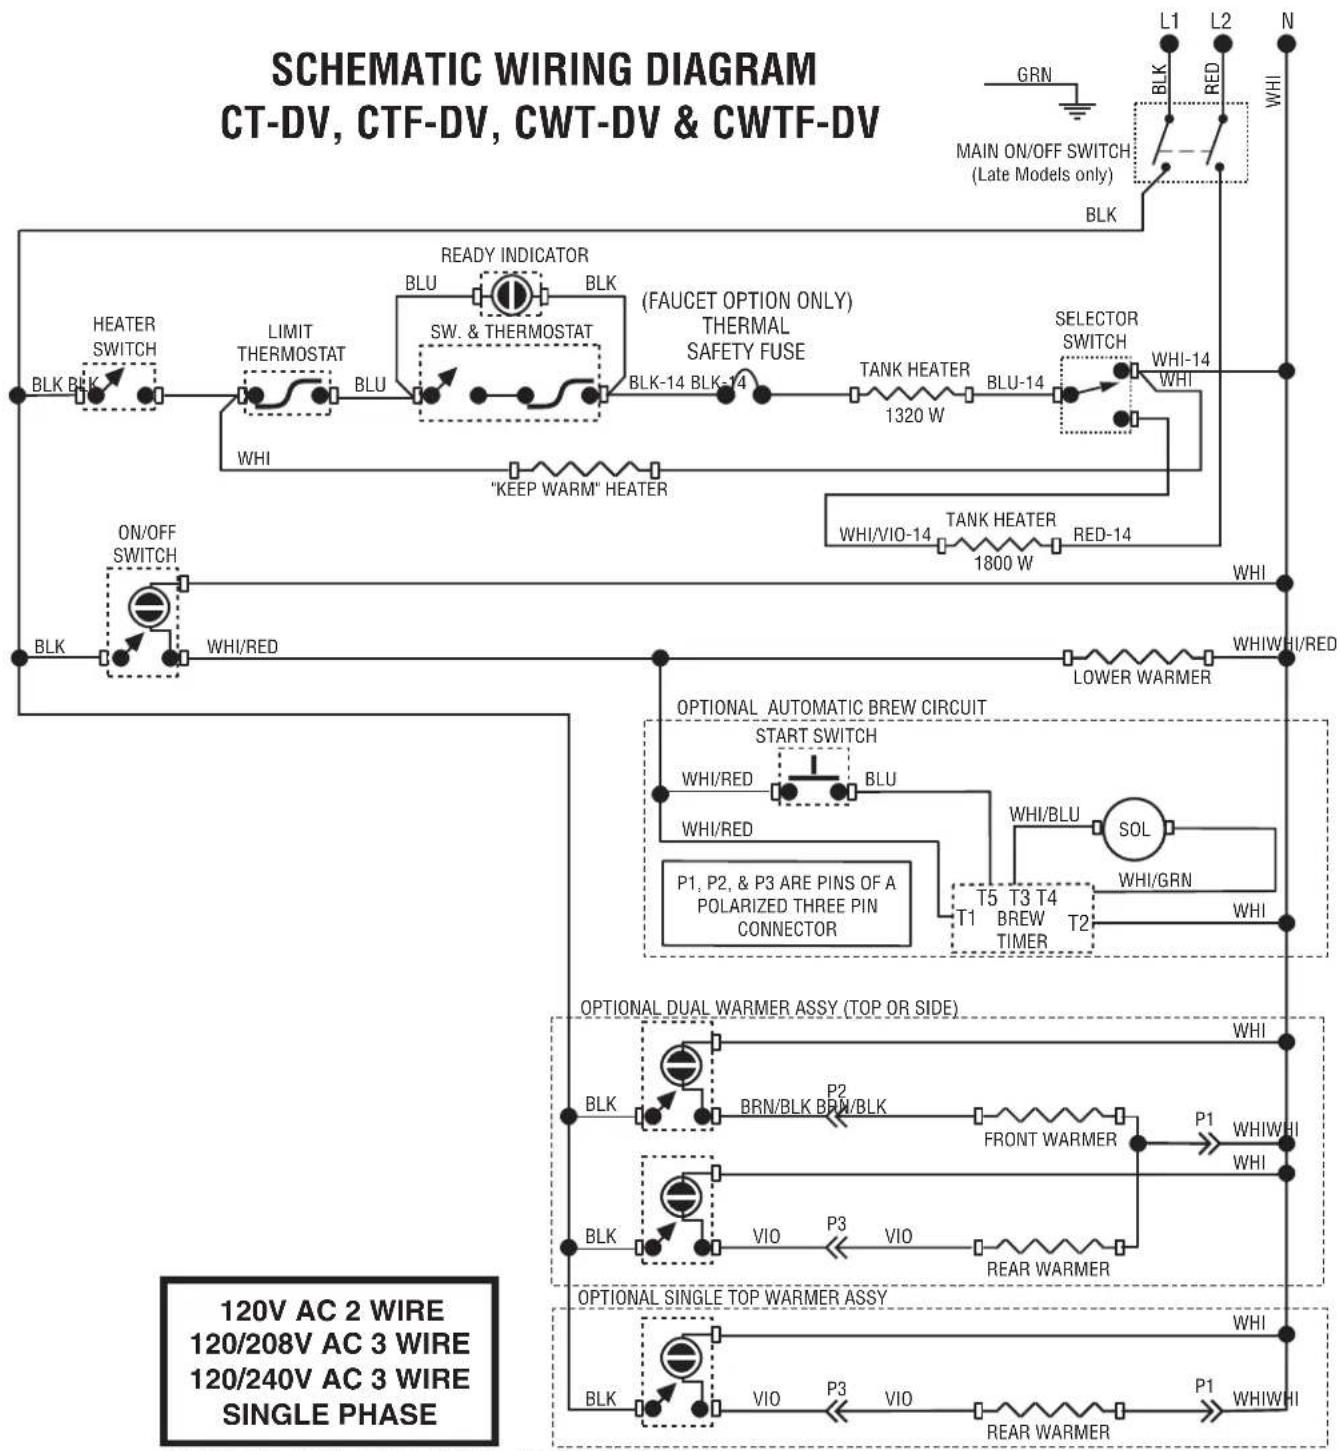
flowchart
graph TD
    A["HEATER SWITCH"] --> B["LIMIT THERMOSTAT"]
    B --> C["SW. & THERMOSTAT"]
    C --> D["BEAUX"]
    D --> E["BEAUX BLU-14 BLK-14"]
    E --> F["TANK HEATER 1320 W"]
    F --> G["TELECTOR SWITCH WHI-14"]
    G --> H["ON/OFF SWITCH"]
    H --> I["WHI/RED"]
    I --> J["LOWER WARMER"]
    J --> K["OPTIONAL AUTOMATIC BREW CIRCUIT START SWITCH"]
    K --> L["WHI/RED BLU"]
    L --> M["P1, P2, & P3 ARE PINS OF A POLARIZED THREE PIN CONNECTOR"]
    M --> N["T5 T3 T4 BREW TIMER T2"]
    N --> O["SOL WHI/GRN"]
    O --> P["WHI"]
    Q["OPTIONAL DUAL WARMER ASSY (TOP OR SIDE)"] --> R["BLK BRN/BLK BRN/BLK P2 FRONT WARMER P1 WHI/WHI"]
    R --> S["BLK VIO P3 VIO REAR WARMER P1 WHI/WHI"]
    T["OPTIONAL SINGLE TOP WARMER ASSY"] --> U["BLK VIO P3 VIO REAR WARMER P1 WHI/WHI"]
10836.0009C 02/07 ©2003 BUNN-O-MATIC CORPORATION
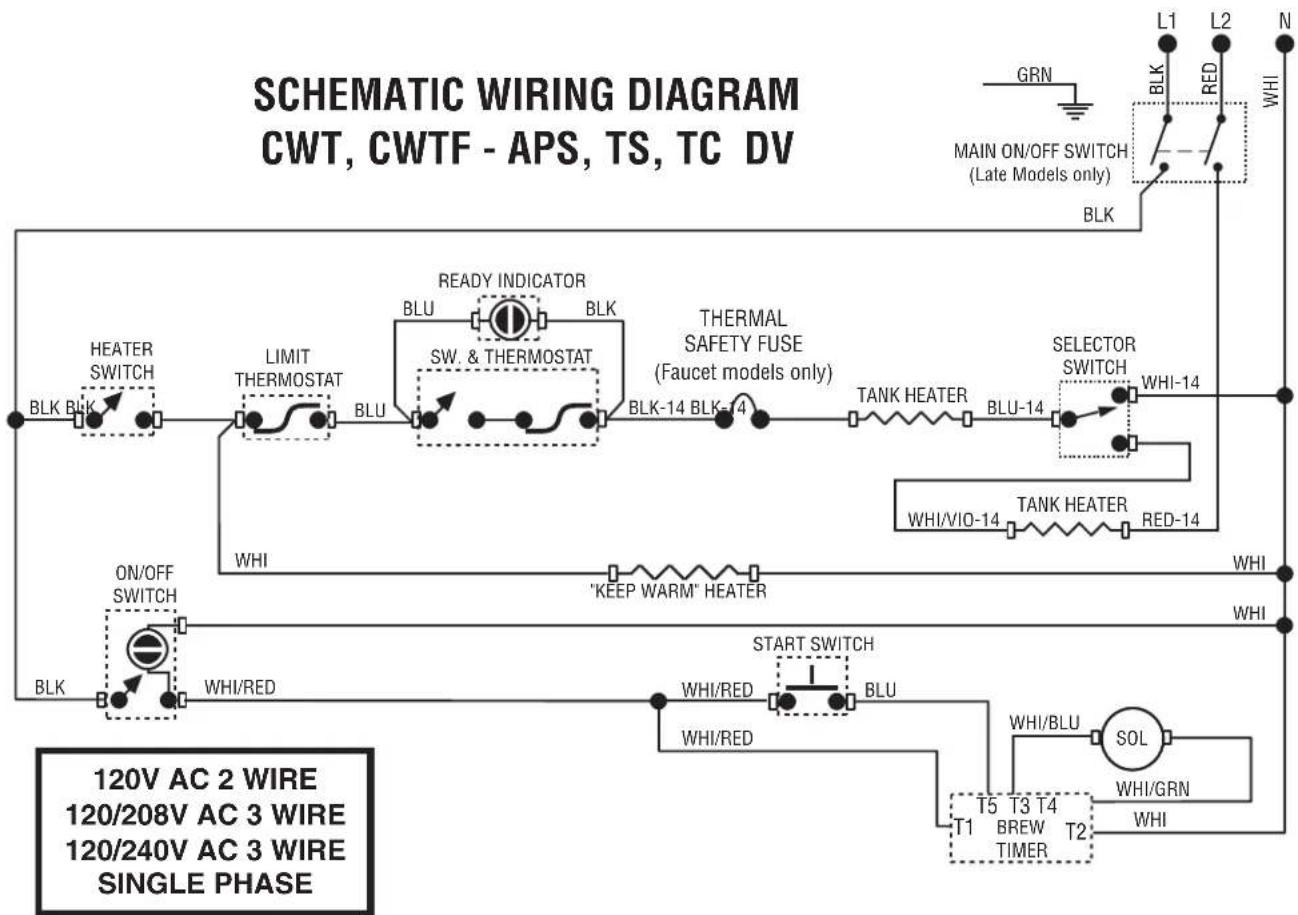
flowchart
graph TD
    A["120V AC 2 WIRE"] --> B["HEATER SWITCH"]
    C["120/208V AC 3 WIRE"] --> D["LIMIT THERMOSTAT"]
    E["120/240V AC 3 WIRE SINGLE PHASE"] --> F["START SWITCH"]
    G["120V AC 2 WIRE"] --> H["ON/OFF SWITCH"]
    I["120/208V AC 3 WIRE"] --> J["WHI/RED"]
    K["120/240V AC 3 WIRE SINGLE PHASE"] --> L["WHI/RED"]
    M["120V AC 2 WIRE"] --> N["WHI/RED"]
    O["120/208V AC 3 WIRE"] --> P["T5 T3 T4 BREW TIMER"]
    Q["120/240V AC 3 WIRE"] --> R["T2"]
    S["120V AC 2 WIRE"] --> T["SOL"]
    U["120/208V AC 3 WIRE"] --> V["WHI/RED"]
    W["120/240V AC 3 WIRE"] --> X["WHI/RED"]
    Y["120V AC 2 WIRE"] --> Z["WHI/RED"]
    AA["120/208V AC 3 WIRE"] --> AB["WHI/RED"]
    AC["120/240V AC 3 WIRE"] --> AD["WHI/RED"]
    AE["120V AC 2 WIRE"] --> AF["WHI/RED"]
    AG["120/208V AC 3 WIRE"] --> AH["WHI/RED"]
    AI["120/240V AC 3 WIRE"] --> AJ["WHI/RED"]
    AK["120V AC 2 WIRE"] --> AL["WHI/RED"]
    AM["120/208V AC 3 WIRE"] --> AN["WHI/RED"]
    AO["120/240V AC 3 WIRE"] --> AP["WHI/RED"]
    AQ["120V AC 2 WIRE"] --> AR["WHI/RED"]
    AS["120/208V AC 3 WIRE"] --> AT["WHI/RED"]
    AU["120/240V AC 3 WIRE"] --> AV["WHI/RED"]
    AW["120V AC 2 WIRE"] --> AX["WHI/RED"]
    AY["120/208V AC 3 WIRE"] --> AZ["WHI/RED"]
    BA["120/240V AC 3 WIRE"] --> BB["WHI/RED"]
    BC["120V AC 2 WIRE"] --> BD["WHI/RED"]
    BE["120/208V AC 3 WIRE"] --> BF["WHI/RED"]
    BG["120/240V AC 3 WIRE"] --> BH["WHI/RED"]
    BI["120V AC 2 WIRE"] --> BJ["WHI/RED"]
    BK["120/208V AC 3 WIRE"] --> BLT["WHI/RED"]
    BM["120/240V AC 3 WIRE"] --> BN["T5 T3 T4 BREW TIMER"]
    BO["120V AC 2 WIRE"] --> BP["WHI/RED"]
    BQ["WHI/RED"] --> BR["T5 T3 T4 BREW TIMER"]
    BS["WHI/RED"] --> BT["T5 T3 T4 BREW TIMER"]
    BU["WHI/RED"] --> BV["T5 T3 T4 BREW TIMER"]
    BW["WHI/RED"] --> BX["T5 T3 T4 BREW TIMER"]
    BY["WHI/RED"] --> BZ["T5 T3 T4 BREW TIMER"]
    CA["WHI/RED"] --> CB["T5 T3 T4 BREW TIMER"]
    CC["WHI/RED"] --> CD["T5 T3 T4 BREW TIMER"]
    EY["WHI/RED"] --> Z["T5 T3 T4 BREW TIMER"]
    AAY["WHI/RED"] --> Z
    ABY["WHI/RED"] --> Z
10836.0010B 02/07 ©2001 BUNN-O-MATIC CORPORATION
SCHEMATIC WIRING DIAGRAM
SINGLE CW
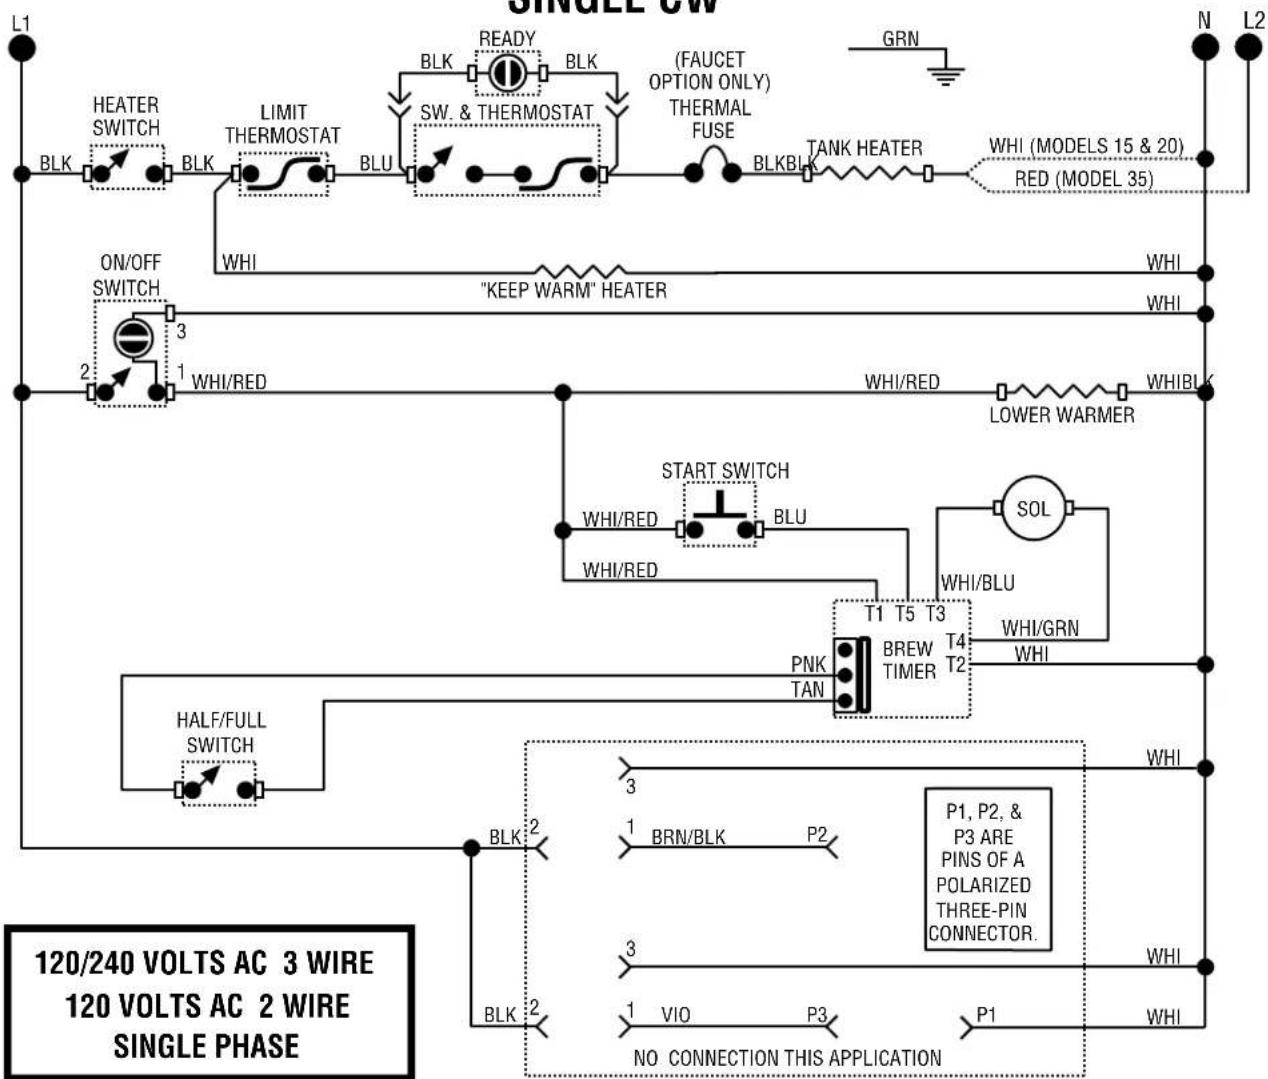
flowchart
graph TD
    A["120/240 VOLTS AC 3 WIRE 120 VOLTS AC 2 WIRE SINGLE PHASE"] --> B["HL1"]
    B --> C["HEATER SWITCH"]
    C --> D["BLK"]
    D --> E["BLK"]
    E --> F["LIMIT THERMOSTAT"]
    F --> G["BLU"]
    G --> H["SW. & THERMOSTAT"]
    H --> I["BLK"]
    I --> J["READY"]
    J --> K["BLK"]
    K --> L["(FAUCET OPTION ONLY) THERMAL FUSE"]
    L --> M["BLKBLK"]
    M --> N["TANK HEATER"]
    N --> O["WHI (MODELS 15 & 20) RED (MODEL 35)"]
    O --> P["N"]
    P --> Q["L2"]
    Q --> R["ON/OFF SWITCH"]
    R --> S["2"]
    S --> T["1 WHI/RED"]
    T --> U["WHI/RED"]
    U --> V["LOWER WARMER"]
    V --> W["WHIBL"]
    W --> X["START SWITCH"]
    X --> Y["WHI/RED"]
    Y --> Z["BLU"]
    Z --> AA["WHI/RED"]
    AA --> AB["SOL"]
    AB --> AC["WHI/BLU"]
    AC --> AD["T1 T5 T3 BREW TIMER T4 T2"]
    AD --> AE["WHI/GRN WHI"]
    AE --> AF["P1, P2, & P3 ARE PINS OF A POLARIZED THREE-PIN CONNECTOR."]
    AF --> AG["P1, VIO P3 NO CONNECTION THIS APPLICATION"]
    subgraph Single Phase
        AH["HALF/FULL SWITCH"] --> AI["BLK 2"]
        AI --> AJ["BRN/BLK P2"]
        AK["3"] --> AL["1 BRN/BLK P2"]
        AM["3"] --> AN["VIO P3 NO CONNECTION THIS APPLICATION"]
        AO["3"] --> AP["P1 WHI"]
        AQ["3"] --> AR["P3 NO CONNECTION THIS APPLICATION"]
10836.0011B 01/03 ©2003 BUNN-O-MATIC CORPORATION
SCHEMATIC WIRING DIAGRAM
CWTF TWIN 4/2 & 0/6 TWO-CIRCUIT
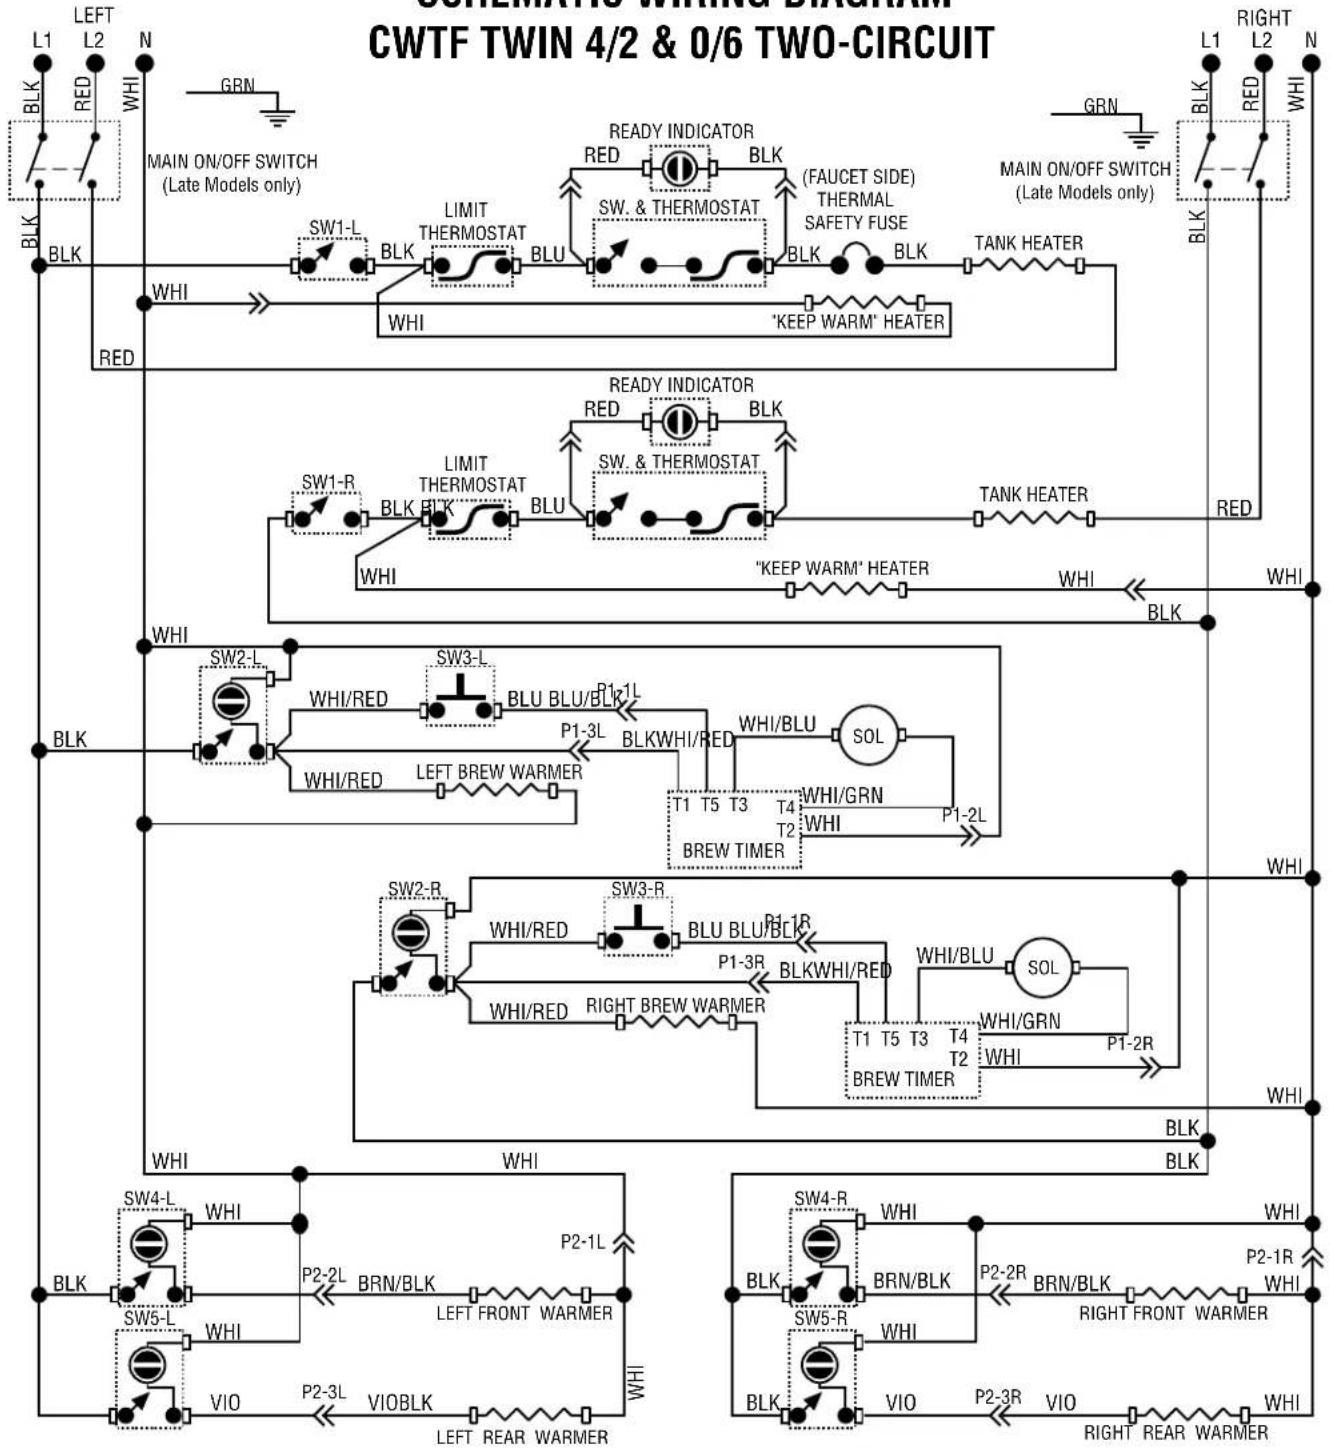
flowchart
graph TD
    subgraph_Main_Circuit_1["Main ON/OFF SWITCH (Late Models only)"]
        L1 --> BLK
        L2 --> BLK
        N --> BLK
        BLK --> BLK_L
        BLK --> BLK_R
        BLK --> BLK_TLK
        BLK --> BLK_BLK
        BLK --> BLK_TLK
        BLK --> BLK_BLK
        BLK --> BLK_TLK
        BLK --> BLK_BLK
        BLK --> BLK_TLK
        BLK --> BLK_BLK
        BLK --> BLK_TLK
        BLK --> BLK_BLK
        BLK --> BLK_TLK
        BLK --> BLK_BLK
        BLK --> BLK_TLK

        subgraph_Main_Circuit_2["Main ON/OFF SWITCH (Late Models only)"]
        L1 --> BLK
        L2 --> BLK
        N --> BLK
        BLK --> BLK_L
        BLK --> BLK_R
        BLK --> BLK_TLK
        BLK --> BLK_BLK
        BLK --> BLK_TLK
        BLK --> BLK_BLK
        BLK --> BLK_TLK
        BLK --> BLK_BRK
        BLK --> BLK_TLK
        BLK --> BLK_BLK
        BLK --> BLK_TLK

        subgraph_Main_Circuit_3["Main ON/OFF SWITCH (Late Models only)"]
        L1 --> BLK
        L2 --> BLK
        N --> BLK
        BLK --> BLK_L
        BLK --> BLK_R
        BLK --> BLK_TLK
        BLK --> BLK_BLK
        BLK --> BLK_TLK
        BLK --> BLK_BLK

        subgraph_Main_Circuit_4["Main ON/OFF SWITCH (Late Models only)"]
        L1 --> BLK
        L2 --> BLK
        N --> BLK
        BLK --> BLK_L
        BLK --> BLK_R
        BLK --> BLK_TLK
        BLK --> BLK_BLK
        BLK --> BLK_TLK

        subgraph_Main_Circuit_5["Main ON/OFF SWITCH (Late Models only)"]
        L1 --> BLK
        L2 --> BLK
        N --> BLK
        BLK --> BLK_L
        BLK --> BLK_R
        BLK --> BLK_TLK

        subgraph_Main_Circuit_6["Main ON/OFF SWITCH (Late Models only)"]
        L1 --> BLK
        L2 --> BLK
        N --> BLK
        BLK --> BLK_L
        BLK --> BLK_R
        BLK --> BLK_TLK

        subgraph_Main_Circuit_7["Main ON/OFF SWITCH (Late Models only)"]
        L1 --> BLK
        L2 --> BLK
        N --> BLK

        subgraph_Main_Circuit_8["Main ON/OFF SWITCH (Late Models only)"]
        L1 --> BLK
        L2 --> BLK
        N --> BLK

        subgraph_Main_Circuit_9["Main ON/OFF SWITCH (Late Models only)"]
        L1 --> BLK
        L2 --> BLK

        subgraph_Main_Circuit_10["Main ON/OFF SWITCH (Late Models only)"]
        L1 --> BLK
        L2 --> BLK

        subgraph_Main_Circuit_11["Main ON/OFF SWITCH (Late Models only)"]
        L1 --> BLK
        L2 --> BLK

        subgraph_Main_Circuit_12["Main ON/OFF SWITCH (Late Models only)"]
        L1 --> BLK
        L2 --> BLK

        subgraph_Main_Circuit_13["Main ON/OFF SWITCH (Late Models only)"]
        L1 --> BLK
        L2 --> BLK

        subgraph_Main_Circuit_14["Main ON/OFF SWITCH (Late Models only)"]
        L1 --> BLK
        L2 --> BLK

        subgraph_Main_Circuit_15["Main ON/OFF SWITCH (Late Models only)"]
        L1 --> BLK
        L2 --> BLK

        subgraph_Main_Circuit_16["Main ON/OFF SWITCH (Late Models only)"]
        L1 --> BLK
        L2 --> BLK

        subgraph_Main_Circuit_17["Main ON/OFF SWITCH (Late Models only)"]
        L1 --> BLK
        L2 --> BLK

        subgraph_Main_Circuit_18["Main ON/OFF SWITCH (Late Models only)"]
        L1 --> BLK
        L2 --> BLK

        subgraph_Main_Circuit_19["Main ON/OFF SWITCH (Late Models only)"]
        L1 --> BLK
        L2 --> BLK

        subgraph_Main_Circuit_20["Main ON/OFF SWITCH (Late Models only)"]
        L1 --> BLK
        L2 --> BLK

        subgraph_Main_Circuit_21["Main ON/OFF SWITCH (Late Models only)"]
        L1 --> BLK
        L2 --> BLK

        subgraph_Main_Circuit_22["Main ON/OFF SWITCH (Late Models only)"]
        L1 --> BLK
        L2 --> BLK

        subgraph_Main_Circuit_23["Main ON/OFF SWITCH (Late Models only)"]
        L1 --> BLK
        L2 --> BLK

        subgraph_Main_Circuit_24["Main ON/OFF SWITCH (Late Models only)"]
        L1 --> BLK
        L2 --> BLK

        subgraph_Main_Circuit_25["Main ON/OFF SWITCH (Late Models only)"]
        L1 --> BLK
        L2 --> BLK

        subgraph_Main_Circuit_26["Main ON/OFF SWITCH (Late Models only)"]
        L1 --> BLK
        L2 --> BLK

        subgraph_Main_Circuit_27["Main ON/OFF SWITCH (Late Models only)"]
        L1 --> BLK
        L2 --> BLK

        subgraph_Main_Circuit_28["Main ON/OFF SWITCH (Late Models only)"]
        L1 --> BLK
        L2 --> BLK

        subgraph_Main_Circuit_29["Main ON/OFF SWITCH (Late Models only)"]
        L1 --> BLK
        L2 --> BLK

        subgraph_Main_Circuit_30["Main ON/OFF SWITCH (Late Models only)"]
        L1 --> BLK
        L2 --> BLK

        subgraph_Main_Circuit_31["Main ON/OFF SWITCH (Late Models only)"]
        L1 --> BLK
        L2 --> BLK

        subgraph_Main_Circuit_32["Main ON/OFF SWITCH (Late Models only)"]
        L1 --> BLK
        L2 --> BLK

        subgraph_Main_Circuit_33["Main ON/OFF SWITCH (Late Models only)"]
        L1 --> BLK
        L2 --> BLK

        subgraph_Main_Circuit_34["Main ON/OFF SWITCH (Late Models only)"]
        L1 --> BLK
        L2 --> BLK

        subgraph_Main_Circuit_35["Main ON/OFF SWITCH (Late Models only)"]
        L1 --> BLK
        L2 --> BLK

        subgraph_Main_Circuit_36["Main ON/OFF SWITCH (Late Models only)"]
        L1 --> BLK
        L2 --> BLK

        subgraph_Main_Circuit_37["Main ON/OFF SWITCH (Late Models only)"]
        L1 --> BLK
        L2 --> BLK

        subgraph_Main_Circuit_38["Main ON/OFF SWITCH (Late Models only)"]
        L1 --> BLK
        L2 --> BLK

        subgraph_Main_Circuit_39["Main ON/OFF SWITCH (Late Models only)"]
        L1 --> BLK
        L2 --> BLK

        subgraph_Main_Circuit_40["Main ON/OFF SWITCH (Late Models only)"]
        L1 --> BLK
        L2 --> BLK

        subgraph_Main_Circuit_41["Main ON/OFF SWITCH (Late Models only)"]
        L1 --> BLK
        L2 --> BLK

        subgraph_Main_Circuit_42["Main ON/OFF SWITCH (Late Models only)"]
        L1 --> BLK
        L2 --> BLK

        subgraph_Main_Circuit_43["Main ON/OFF SWITCH (Late Models only)"]
        L1 --> BLK
        L2 --> BLK

        subgraph_Main_Circuit_44["Main ON/OFF SWITCH (Late Models only)"]
        L1 --> BLK
        L2 --> BLK

        subgraph_Main_Circuit_45["Main ON/OFF SWITCH (Late Models only)"]
        L1 --> BLK
        L2 --> BLK

        subgraph_Main_Circuit_46["Main ON/OFF SWITCH (Late Models only)"]
        L1 --> BLK
        L2 --> BLK

        subgraph_Main_Circuit_47["Main ON/OFF SWITCH (Late Models only)"]
        L1 --> BLK
        L2 --> BLK

        subgraph_Main_Circuit_48["Main ON/OFF SWITCH (Late Models only)"]
        L1 --> BLK
        L2 --> BLK

        subgraph_Main_Circuit_49["Main ON/OFF SWITCH (Late Models only)"]
        L1 --> BLK
        L2 --> BLK

        subgraph_Main_Circuit_50["Main ON/OFF SWITCH (Late Models only)"]
        L1 --> BLK
        L2 --> BLK

    end
TWO INDIVIDUAL BRANCH
CIRCUITS REQUIRED
EACH RATED
120/240 VOLTS AC
3 WIRE + GND
SINGLE PHASE
10847.0000D 01/07 ©1994 BUNN-O-MATIC CORPORATION
SCHEMATIC WIRING DIAGRAM CWT TWIN 2/2 & 4/2
W/RECOVERY BOOSTER
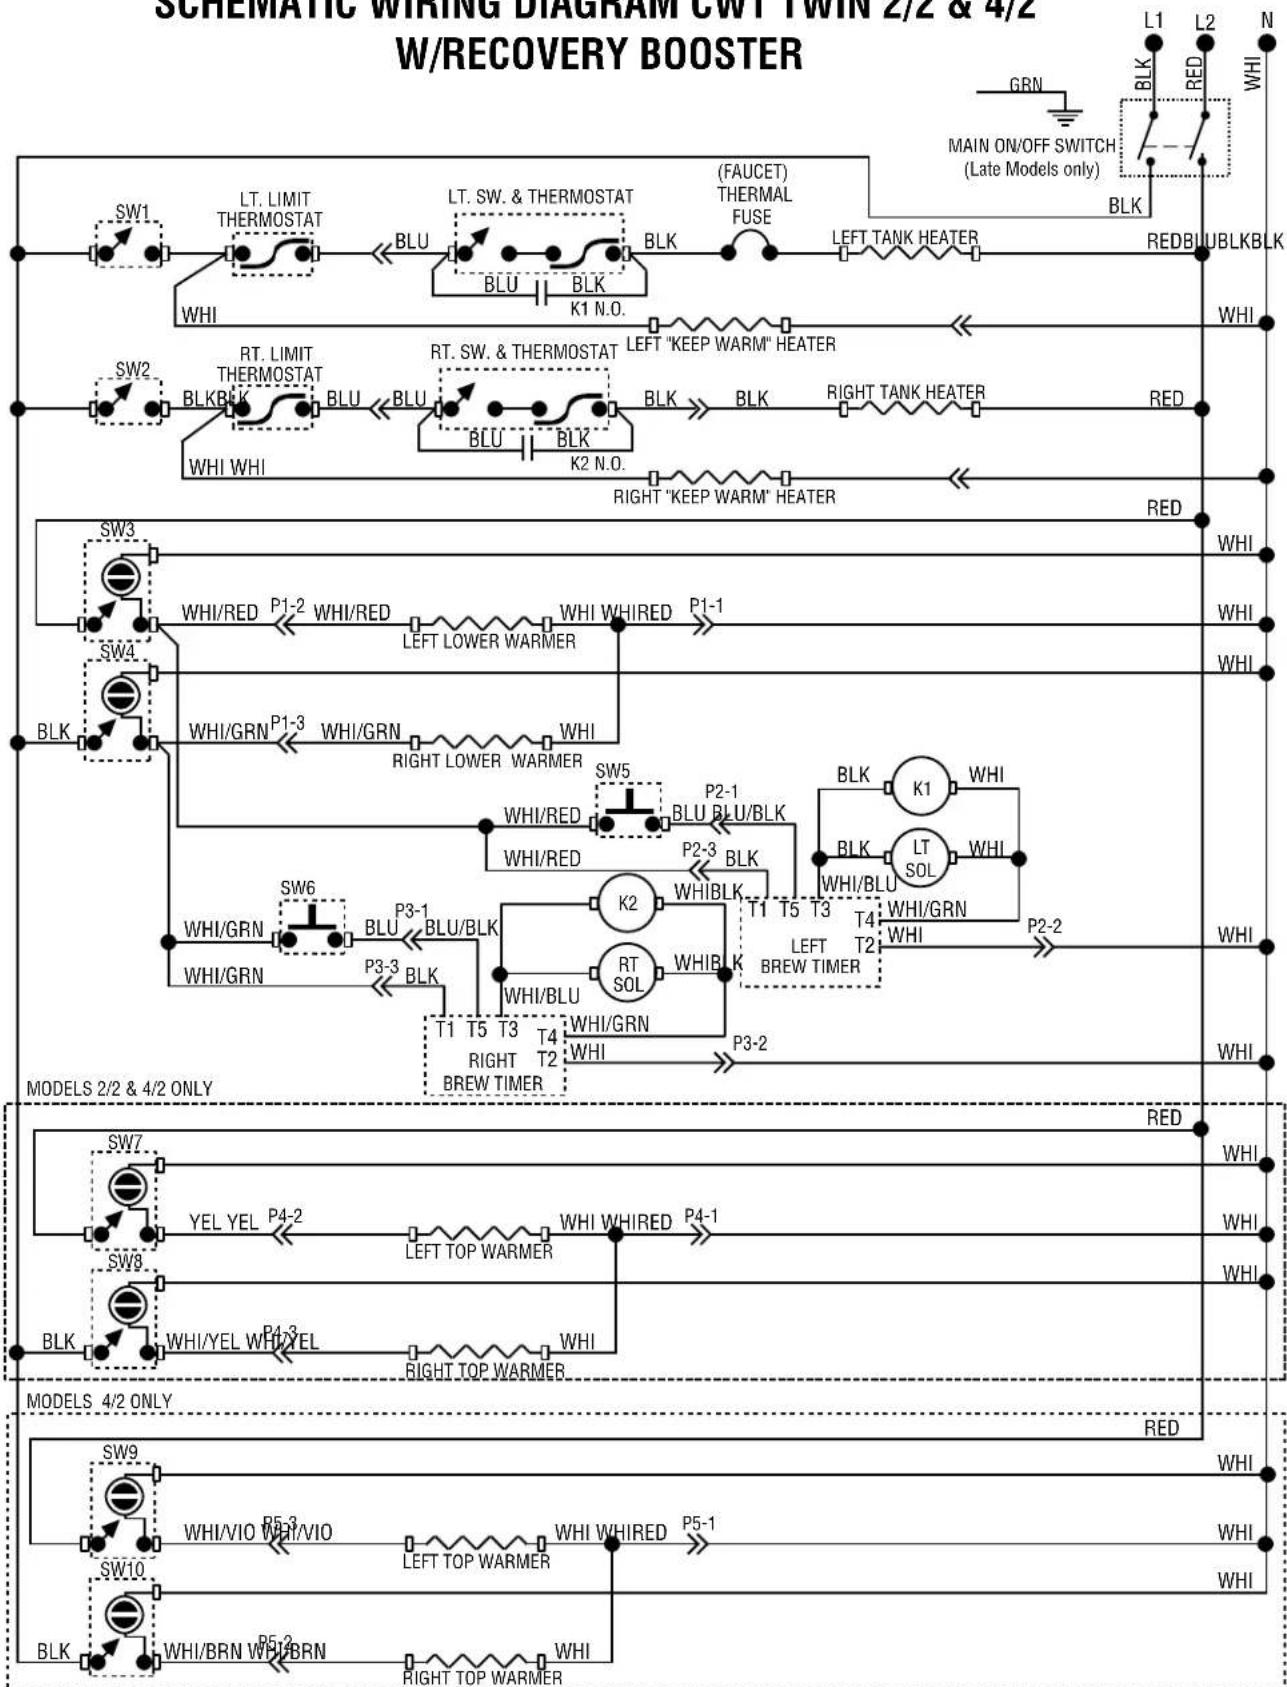
flowchart
graph TD
    subgraph "W/RECOVERY BOOSTER"
        A["SW1"] --> B["LT. LIMIT THERMOSTAT"]
        B --> C["BLU"]
        C --> D["BLK"]
        D --> E["LEFT TANK HEATER"]
        E --> F["RED BI UBLKB LK"]
        G["WHI"] --> H["RLT. LIMIT THERMOSTAT"]
        H --> I["BLU"]
        I --> J["BLK"]
        J --> K["LEFT "KEEP WARM" HEATER"]
        K --> L["RED BI UBLKB LK"]
        M["SW2"] --> N["RT. LIMIT THERMOSTAT"]
        N --> O["BLU"]
        O --> P["BLK"]
        P --> Q["RIGHT TANK HEATER"]
        Q --> R["RED BI UBLKB LK"]
        S["WHI"] --> T["RLT. LIMIT THERMOSTAT"]
        T --> U["BLU"]
        U --> V["BLK"]
        V --> W["LEFT "KEEP WARM" HEATER"]
        W --> X["RED BI UBLKB LK"]
        Y["SW3"] --> Z["WHI/RED P1-2 WHI/RED"]
        Z --> AA["WHI WHIRED P1-1"]
        AB["WHI"] --> AC["WHI/GRN P1-3 WHI/GRN"]
        AD["WHI"] --> AE["WHI/GRN P3-1 BLU/BLK"]
        AF["WHI"] --> AG["WHI/GRN P3-3 BLK"]
        AH["P2-1 BLU BLU/BLK"] --> AI["K2"]
        AJ["P2-3 BLK"] --> AK["RT SOL WHIR K"]
        AL["P3-2"] --> AM["T1 T5 T3 T4 WHI/GRN"]
        AN["P3-3"] --> AO["T1 T5 T3 T4 WHI/GRN"]
        AP["WHI/BLU"] --> AQ["WHI/BRN P5-2 BLN"]
        AR["WHI/BRN"] --> AS["P5-2 BLN"]
        AT["P2-1 BLU BLU/BLK"] --> AU["K1"]
        AV["P2-3 BLK"] --> AW["BT SOL WHIR K"]
        AX["P3-2"] --> AY["P2-1 BLU BLU/BLK"]
        AZ["P3-3"] --> BA["P2-3 BLK"]
        BB["K1"] --> BC["BLK LT SOL WHI"]
        BD["K1"] --> BE["BLK WHI/BLU"]
        BF["K1"] --> BG["WHI/GRN"]
        BH["K1"] --> BI["P2-2"]
        BJ["K1"] --> BK["WHI/BRN"]
    end
    subgraph "MODELS 2/2 & 4/2 ONLY"
        AK["P2-1 BLU BLU/BLK"] --> AL["P2-3 BLK"]
        AM["P2-3 BLK"] --> AN["P2-3 BLK"]
        AO["P2-3 BLK"] --> AP["P2-3 BLK"]
        AP["P2-3 BLK"] --> AQ["P2-3 BLK"]
        AR["P2-3 BLK"] --> AS["P2-3 BLK"]
        AS["P2-3 BLK"] --> AT["P2-3 BLK"]
        AU["P2-3 BLK"] --> AV["P2-3 BLK"]
        AW["P2-3 BLK"] --> AX["P2-3 BLK"]
        AX["P2-3 BLK"] --> AZ["P2-3 BLK"]
    end
    subgraph "MODELS 4/2 ONLY"
        BA["P2-1 BLU BLU/BLK"] --> BB["K1"]
        BB["K1"] --> BC["BT SOL WHI"]
        BD["K1"] --> BE["BT SOL WHI/BLU"]
        BE["K1"] --> BG["WHI/GRN"]
        BH["K1"] --> BI["P2-2"]
        BJ["K1"] --> BK["P2-2"]
        AK["P2-3 BLU BLU/BLK"] --> AL["P2-3 BLK"]
        AM["P2-3 BLK"] --> AN["P2-3 BLK"]
        AO["P2-3 BLK"] --> AP["P2-3 BLK"]
        AP["P2-3 BLK"] --> AZ["P2-3 BLK"]
        AS["P2-3 BLK"] --> AT["P2-3 BLK"]
        AU["P2-3 BLK"] --> AV["P2-3 BLK"]
        AW["P2-3 BLK"] --> AX["P2-3 BLK"]
        AX["P2-3 BLK"] --> AZ["P2-3 BLK"]
    end
120/240 VOLTS AC
3 WIRE + GND
SINGLE PHASE
10867.0000F 01/07 © 1995 BUNN-O-MATIC CORPORATION
SCHEMATIC WIRING DIAGRAM CWTF TWIN 0/6 WITH RECOVERY BOOSTER
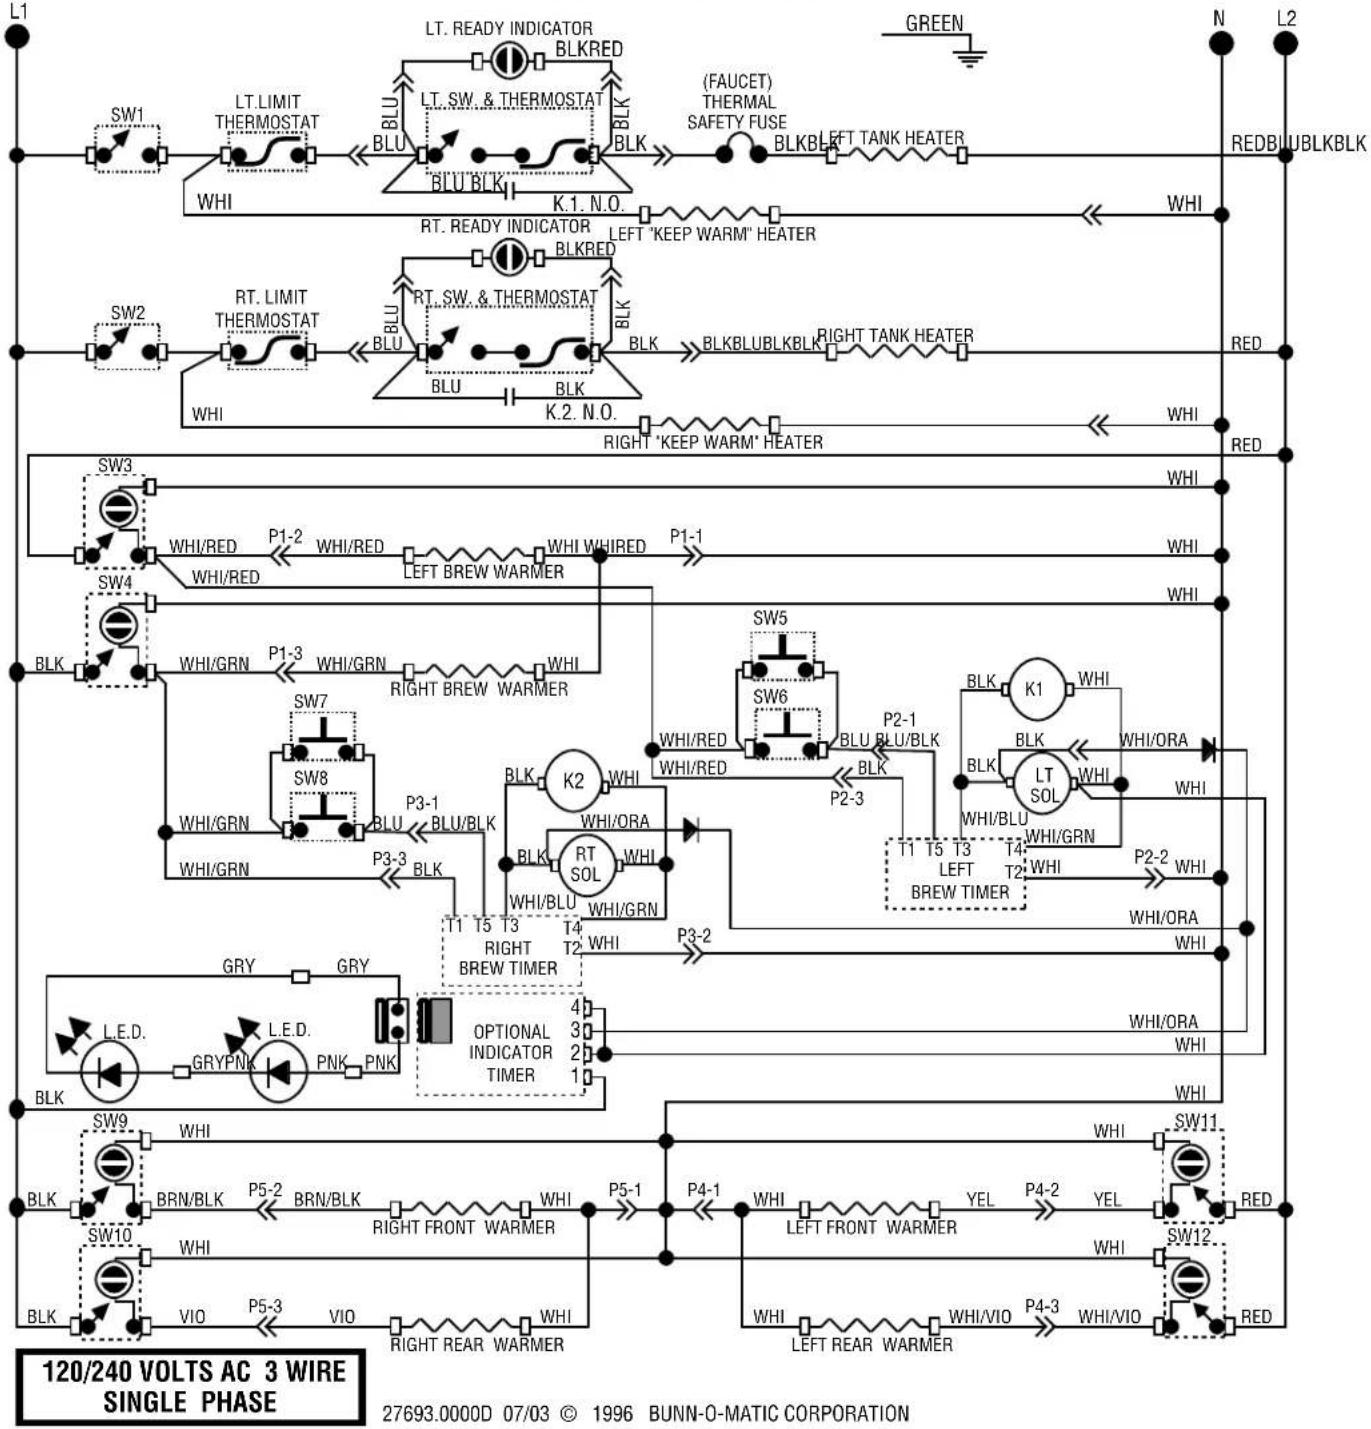
flowchart
graph TD
    subgraph_Phase_1["120/240 VOLTS AC 3 WIRE SINGLE PHASE"]
        L1 --> SW1
        L1 --> LT_LIMIT_THERMOSTAT
        LT_LIMIT_THERMOSTAT --> BLU
        BLU --> BLU_BLK
        BLU_BLK --> BLK
        BLK --> BLK_BLEFT_TANK_HEATER
        BLK_BLEFT_TANK_HEATER --> BLKBLUBLKBLK
        BLK_BLK --> BLKBLUBLKBLK
        BLK_BLK --> BLKBLUBLKBLK
        BLK_BLK --> BLKBLUBLKBLK
        BLK_BLK --> BLKBLUBLKBLK
        BLK_BLK --> BLKBLUBLKBLK
        BLK_BLK --> BLKBLUBLKBLK
        BLK_BLK --> BLKBLUBLKBLK
        BLK_BLK --> K1
        BLK_BLK --> K2
        BLK_BLK --> K3
        BLK_BLK --> K4
        BLK_BLK --> K5
        BLK_BLK --> K6
        BLK_BLK --> K7
        BLK_BLK --> K8
        BLK_BLK --> K9
        BLK_BLK --> K10
        BLK_BLK --> K11
        BLK_BLK --> K12
        BLK_BLK --> K13
        BLK_BLK --> K14
        BLK_BLK --> K15
        BLK_BLK --> K16
        BLK_BLK --> K17
        BLK_BLK --> K18
        BLK_BLK --> K19
        BLK_BLK --> K20
        BLK_BLK --> K21
        BLK_BLK --> K22
        BLK_BLK --> K23
        BLK_BLK --> K24
        BLK_BLK --> K25
        BLK_BLK --> K26
        BLK_BLK --> K27
        BLK_BLK --> K28
        BLK_BLK --> K29
        BLK_BLK --> K30
        BLK_BLK --> K31
        BLK_BLK --> K32
        BLK_BLK --> K33
        BLK_BLK --> K34
        BLK_BLK --> K35
        BLK_BLK --> K36
        BLK_BLK --> K37
        BLK_BLK --> K38
        BLK_BLK --> K39
        BLK_BLK --> K40
    end

    subgraph_Phase_2["120/240 VOLTS AC 3 WIRE SINGLE PHASE"]
        L1 --> SW1
        L1 --> LT_LIMIT_THERMOSTAT
        LT_LIMIT_THERMOSTAT --> BLU
        LT_LIMIT_THERMOSTAT --> BLU_BLK
        LT_LIMIT_THERMOSTAT --> BLU_BLK
        LT_LIMIT_THERMOSTAT --> BLU_BLK
        LT_LIMIT_THERMOSTAT --> BLU_BLK
    end

    subgraph_Phase_3["120/240 VOLTS AC 3 WIRE SINGLE PHASE"]
        L1 --> SW2
        L1 --> RT_LIMIT_THERMOSTAT
        RT_LIMIT_THERMOSTAT --> BLU
        RT_LIMIT_THERMOSTAT --> BLU_BLK
        RT_LIMIT_THERMOSTAT --> BLU_BLK
        RT_LIMIT_THERMOSTAT --> BLU_BLK
    end

    subgraph_Phase_4["120/240 VOLTS AC 3 WIRE SINGLE PHASE"]
        L1 --> SW3
        L1 --> SW4
        L1 --> BLK
        L1 --> BLM_RED
        L1 --> BLM/GRN
    end

    subgraph_Phase_5["120/240 VOLTS AC 3 WIRE SINGLE PHASE"]
        L1 --> SW4
        L1 --> BLM_RED
    end

    subgraph_Phase_6["120/240 VOLTS AC 3 WIRE SINGLE PHASE"]
        L1 --> SW5
        L1 --> SW6
    end

    subgraph_Phase_7["120/240 VOLTS AC 3 WIRE SINGLE PHASE"]
        L1 --> SW7
        L1 --> SW8
    end

    subgraph_Phase_8["120/240 VOLTS AC 3 WIRE SINGLE PHASE"]
        L1 --> SW9
    end

    subgraph_Phase_9["120/240 VOLTS AC 3 WIRE SINGLE PHASE"]
        L1 --> SW10
    end

    subgraph_Phase_10["120/240 VOLTS AC 3 WIRE SINGLE PHASE"]
        L1 --> SW11
    end

    subgraph_Phase_11["120/240 VOLTS AC 3 WIRE SINGLE PHASE"]
        L1 --> SW12
    end

    subgraph_Phase_12["120/240 VOLTS AC 3 WIRE SINGLE PHASE"]
        L1 --> SW13
    end

    subgraph_Phase_13["120/240 VOLTS AC 3 WIRE SINGLE PHASE"]
        L1 --> SW14
    end

    subgraph_Phase_14["120/240 VOLTS AC 3 WIRE SINGLE PHASE"]
        L1 --> SW15
    end

    subgraph_Phase_15["120/240 VOLTS AC 3 WIRE SINGLE PHASE"]
        L1 --> SW16
    end

    subgraph_Phase_16["120/240 VOLTS AC 3 WIRE SINGLE PHASE"]
        L1 --> SW17
    end

    subgraph_Phase_17["120/240 VOLTS AC 3 WIRE SINGLE PHASE"]
        L1 --> SW18
    end

    subgraph_Phase_18["120/240 VOLTS AC 3 WIRE SINGLE PHASE"]
        L1 --> SW19
    end

    subgraph_Phase_19["120/240 VOLTS AC 3 WIRE SINGLE PHASE"]
        L1 --> SW20
    end

    subgraph_Phase_20["120/240 VOLTS AC 3 WIRE SINGLE PHASE"]
        L1 --> SW21
    end

    subgraph_Phase_21["120/240 VOLTS AC 3 WIRE SINGLE PHASE"]
        L1 --> SW22
    end

    subgraph_Phase_22["120/240 VOLTS AC 3 WIRE SINGLE PHASE"]
        L1 --> SW23
    end

    subgraph_Phase_23["120/240 VOLTS AC 3 WIRE SINGLE PHASE"]
        L1 --> SW24
    end

    subgraph_Phase_24["120/240 VOLTS AC 3 WIRE SINGLE PHASE"]
        L1 --> SW25
    end

    subgraph_Phase_25["120/240 VOLTS AC 3 WIRE SINGLE PHASE"]
        L1 --> SW26
    end

    subgraph_Phase_26["120/240 VOLTS AC 3 WIRE SINGLE PHASE"]
        L1 --> SW27
    end

    subgraph_Phase_27["120/240 VOLTS AC 3 WIRE SINGLE PHASE"]
        L1 --> SW28
    end

    subgraph_Phase_28["120/240 VOLTS AC 3 WIRE SINGLE PHASE"]
        L1 --> SW29
    end

    subgraph_Phase_29["120/240 VOLTS AC 3 WIRE SINGLE PHASE"]
        L1 --> SW30
    end

    subgraph_Phase_30["120/240 VOLTS AC 3 WIRE SINGLE PHASE"]
        L1 --> SW31
    end

    subgraph_Phase_31["120/240 VOLTS AC 3 WIRE SINGLE PHASE"]
        L1 --> SW32
    end

    subgraph_Phase_32["120/240 VOLTS AC 3 WIRE SINGLE PHASE"]
        L1 --> SW33
    end

    subgraph_Phase_33["120/240 VOLTS AC 3 WIRE SINGLE PHASE"]
        L1 --> SW34
    end

    subgraph_Phase_34["120/240 VOLTS AC 3 WIRE SINGLE PHASE"]
        L1 --> SW35
    end

    subgraph_Phase_35["120/240 VOLTS AC 3 WIRE SINGLE PHASE"]
        L1 --> SW36
    end

    subgraph_Phase_36["120/240 VOLTS AC 3 WIRE SINGLE PHASE"]
        L1 --> SW37
    end

    subgraph_Phase_37["120/240 VOLTS AC 3 WIRE SINGLE PHASE"]
        L1 --> SW38
    end

    subgraph_Phase_38["120/240 VOLTS AC 3 WIRE SINGLE PHASE"]
        L1 --> SW39
    end

    subgraph_Phase_39["120/240 VOLTS AC 3 WIRE SINGLE PHASE"]
        L1 --> SW40
    end

    subgraph_Phase_40["120/240 VOLTS AC 3 WIRE SINGLE PHASE"]
        L1 --> SW41
    end

    subgraph_Phase_41["120/240 VOLTS AC 3 WIRE SINGLE PHASE"]
        L1 --> SW42
    end

    subgraph_Phase_42["120/240 VOLTS AC 3 WIRE SINGLE PHASE"]
        L1 --> SW43
    end

    subgraph_Phase_43["120/240 VOLTS AC 3 WIRE SINGLE PHASE"]
        L1 --> SW44
    end

    subgraph_Phase_44["120/240 VOLTS AC 3 WIRE SINGLE PHASE"]
        L1 --> SW45
    end

    subgraph_Phase_45["120/240 VOLTS AC 3 WIRE SINGLE PHASE"]
        L1 --> SW46
    end

    subgraph_Phase_46["120/240 VOLTS AC 3 WIRE SINGLE PHASE"]
        L1 --> SW47
    end

    subgraph_Phase_47["120/240 VOLTS AC 3 WIRE SINGLE PHASE"]
        L1 --> SW48
    end

    subgraph_Phase_48["120/240 VOLTS AC 3 WIRE SINGLE PHASE"]
        L1 --> SW49
    end

    subgraph_Phase_49["120/240 VOLTS AC 3 WIRE SINGLE PHASE"]
        L1 --> SW50
    end

    subgraph_Phase_50["120/240 VOLTS AC 3 WIRE SINGLE PHASE"]
        L1 --> SW51
    end

    subgraph_Phase_51["120/240 VOLTS AC 3 WIRE SINGLE PHASE"]
        L1 --> SW52
    end

    subgraph_Phase_52["120/240 VOLTS AC 3 WIRE SINGLE PHASE"]
        L1 --> SW53
    end

    subgraph_Phase_53["120/240 VOLTS AC 3 WIRE SINGLE PHASE"]
        L1 --> SW54
    end

    subgraph_Phase_54["120/240 VOLTS AC 3 WIRE SINGLE PHASE"]
        L1 --> SW55
    end

    subgraph_Phase_55["120/240 VOLTS AC 3 WIRE SINGLE PHASE"]
        L1 --> SW56
    end

    subgraph_Phase_56["120/240 VOLTS AC 3 WIRE SINGLE PHASE"]
        L1 --> SW57
    end

    subgraph_Phase_57["120/240 VOLTS AC 3 WIRE SINGLE PHASE"]
        L1 --> SW58
    end

    subgraph_Phase_58["120/240 VOLTS AC 3 WIRE SINGLE PHASE"]
        L1 --> SW59
    end

    subgraph_Phase_59["120/240 VOLTS AC 3 WIRE SINGLE PHASE"]
        L1 --> SW60
    end

    subgraph_Phase_60["120/240 VOLTS AC 3 WIRE SINGLE PHASE"]
        L1 --> SW61
    end

    subgraph_Phase_61["120/240 VOLTS AC 3 WIRE SINGLE PHASE"]
        L1 --> SW62
    end

    subgraph_Phase_62["120/240 VOLTS AC 3 WIRE SINGLE PHASE"]
        L1 --> SW63
    end

    subgraph_Phase_63["120/240 VOLTS AC 3 WIRE SINGLE PHASE"]
        L1 --> SW64
    end

    subgraph_Phase_64["120/240 VOLTS AC 3 WIRE SINGLE PHASE"]
        L1 --> SW65
    end

    subgraph_Phase_65["120/240 VOLTS AC 3 WIRE SINGLE PHASE"]
        L1 --> SW66
    end

    subgraph_Phase_66["120/240 VOLTS AC 3 WIRE SINGLE PHASE"]
        L1 --> SW67
    end

    subgraph_Phase_67["120/240 VOLTS AC 3 WIRE SINGLE PHASE"]
        L1 --> SW68
    end

    subgraph_Phase_68["120/240 VOLTS AC 3 WIRE SINGLE PHASE"]
        L1 --> SW69
    end

    subgraph_Phase_69["120/240 VOLTS AC 3 WIRE SINGLE PHASE"]
        L1 --> SW70
    end

    subgraph_Phase_70["120/240 VOLTS AC 3 WIRE SINGLE PHASE"]
        L1 --> SW71
    end

    subgraph_Phase_71["120/240 VOLTS AC 3 WIRE SINGLE PHASE"]
        L1 --> SW72
    end

    subgraph_Phase_72["120/240 VOLTS AC 3 WIRE SINGLE PHASE"]
        L1 --> SW73
    end

    subgraph_Phase_73["120/240 VOLTS AC 3 WIRE SINGLE PHASE"]
        L1 --> SW74
    end

    subgraph_Phase_74["120/240 VOLTS AC 3 WIRE SINGLE PHASE"]
        L1 --> SW75
    end

    subgraph_Phase_75["120/240 VOLTS AC 3 WIRE SINGLE PHASE"]
        L1 --> SW76
    end

    subgraph_Phase_76["120/240 VOLTS AC 3 WIRE SINGLE PHASE"]
        L1 --> SW77
    end

    subgraph_Phase_77["120/240 VOLTS AC 3 WIRE SINGLE PHASE"]
        L1 --> SW78
    end

    subgraph_Phase_78["120/240 VOLTS AC 3 WIRE SINGLE PHASE"]
        L1 --> SW79
    end

    subgraph_Phase_79["120/240 VOLTS AC 3 WIRE SINGLE PHASE"]
        L1 --> SW80
    end

    subgraph_Phase_80["120/240 VOLTS AC 3 WIRE SINGLE PHASE"]
        L1 --> SW81
    end

    subgraph_Phase_81["120/240 VOLTS AC 3 WIRE SINGLE PHASE"]
        L1 --> SW82
    end

    subgraph_Phase_82["120/240 VOLTS AC 3 WIRE SINGLE PHASE"]
        L1 --> SW83
    end

    subgraph_Phase_83["120/240 VOLTS AC 3 WIRE SINGLE PHASE"]
        L1 --> SW84
    end

    subgraph_Phase_84["120/240 VOLTS AC 3 WIRE SINGLE PHASE"]
        L1 --> SW85
    end

    subgraph_Phase_85["120/240 VOLTS AC 3 WIRE SINGLE PHASE"]
        L1 --> SW86
    end

    subgraph_Phase_86["120/240 VOLTS AC 3 WIRE SINGLE PHASE"]
        L1 --> SW87
    end

    subgraph_Phase_87["120/240 VOLTS AC 3 WIRE SINGLE PHASE"]
        L1 --> SW88
    end

    subgraph_Phase_88["120/240 VOLTS AC 3 WIRE SINGLE PHASE"]
        L1 --> SW89
    end

    subgraph_Phase_89["120/240 VOLTS AC 3 WIRE SINGLE PHASE"]
        L1 --> SW90
    end


    subgraph_Phase_90["120/240 VOLTS AC 3 WIRE SINGLE PHASE"]
        L1 --> SW99
    end


    subgraph_Phase_91["120/240 VOLTS AC 3 WIRE SINGLE PHASE"]
        L1 --> SW9A,B,C,D,E,F,G,H,I,J,K,L,M,N,O,P,Q,R,S,T,U,V,W,X,Y,Z,P,Q,R,S,T,U,V,W,X,Y,Z,P,Q,R,S,T,U,V,W,X,Y,Z,P,Q,R,S,T,U,V,W,X,Y,Z,P,Q,R,S,T,U,V,W,X,Y,Z,P,Q,R,S,T,U,V,W,X,Y,Z,P,Q,R,S,T,U,V,W,X,Y,Z,P,Q,R,S,T,U,V,W,X,Y,Z,P,Q,R,S,T,U,V,W,X,Y,Z,P,Q,R,S,T,U,V,W,X,Y,Z,p,q,r,s,t,u,v,w,x,y,z,k,l,m,n,o,p,q,r,s,t,u,v,w,x,y,z,k,l,m,n,o,p,q,r,s,t,u,v,w,x,y,z,k,l,m,n,o,p,q,r,s,t,u,v,w,x,y,z,k,l,m,n,o,p,q,r,s,t,u,v,w,x,y,z,k,l,m,n,o,p,q,r,s,t,u,v,w,x,y,z,k,l,m,n,o,p,q,r,s,t,u,v,w,x,y,z,k,l,m,n,o,p,q,r,r,s,t,u,v,w,x,y,z,k,l,m,n,o,p,q,r,s,t,u,v,w,x,y,z,k,l,m,n,o,p,q,r,r,s,t,u,v,w,x,y,z,k,l,m,n,o,p,q,r,r,s,t,u,v,w,x,y,z,k,l,m,n,o,p,q,r,r,s,t,u,v,w,x,y,z,k,l,m,n,o,p,q,r,r,s,t,u,v,w,x,y,z,k,l,m,n,o,p,q,r,r,s,t,u,v,w,x,y,z,k,l,m,n,o,p,q,r,r,s,t,u,v,w,x,y,z,k,l,m,n,o ,o ,p ,q ,r ,s ,t ,u ,v ,w ,x ,T ,T ,T ,T ,T ,T ,T ,T ,T ,T ,T ,T ,T ,T ,T ,T ,T ,T ,T ,T ,T ,T ,T ,T ,T ,T ,T ,T ,T ,T ,T ,T ,T ,T ,T ,T ,T ,T ,T ,T ,T ,T ,T ,T ,T ,T ,T ,T ,T ,T , T ,T ,T ,T ,T ,T ,T ,T ,T ,T ,T ,T ,T ,T ,T ,T ,T ,T ,T ,T ,T ,T ,T ,T ,T ,T ,T |