CDC 266 - Tumble drier CANDY - Free user manual and instructions
Find the device manual for free CDC 266 CANDY in PDF.


User questions about CDC 266 CANDY
0 question about this device. Answer the ones you know or ask your own.
Ask a new question about this device
Download the instructions for your Tumble drier in PDF format for free! Find your manual CDC 266 - CANDY and take your electronic device back in hand. On this page are published all the documents necessary for the use of your device. CDC 266 by CANDY.
USER MANUAL CDC 266 CANDY
GB User Instructions
CDC266
Reverse Action
CANDY
Safety reminders
WARNING Check that the product has no visible signs of damage before use. If damaged do not use and please call our national number: 08705 400 600.
WARNING Do not use the product if the fluff filter is not in position or is damaged; fluff could be ignited.
WARNING Foam rubber materials can, under certain circumstances, when heated become ignited by spontaneous combustion. Foam plastic, foam rubber and rubber-like material are not suitable for tumble drying. Articles made from these materials MUST NOT be placed in the dryer.
Always refer to the laundry care labels for directions on suitability for drying.
WARNING Misuse of a tumble dryer may create a fire hazard.
WARNING Where the hot surface symbol is located the temperature rise during operation of the tumble dryer may be in excess of 60 degrees C.
User's manual. This machine should only be used for its intended purpose as described in this manual. Ensure that it is fully understood before operating.
Installation. This machine should not be installed in a bathroom or shower room.
Never install the dryer against curtains and be sure to prevent items from falling or collecting behind the dryer.
Ventilation. Adequate ventilation must be provided in the room where the tumble dryer is located to prevent gases from appliances burning other fuels, including open fires, being drawn into the room during operation of the tumble dryer.
Exhaust air must not be discharged into a flue which is used for exhausting fumes from appliances burning gas or other fuels.
Check regularly that the air flowing through the dryer is not restricted:
Check the fluff filter after use, and clean, if necessary.
The venting hose or duct should be checked periodically and any accumulation of fluff removed.
The inlet and outlets should be kept free from obstructions.
If the dryer is used frequently the period between checks should be reduced accordingly.
Dryness. Clothes should be spin dried or thoroughly wrung before they are put into the tumble dryer. Clothes that are dripping wet should NOT be put into the dryer.
Lighters and matches must not be left in pockets and NEVER use flammable liquids near the machine.
Glass fibre curtains should never be put in this machine. Skin irritation may occur if other garments are contaminated with the glass fibres.
Garments treated or contaminated with flammable cleaning sprays or liquids such as petrol, cooking oil or aerosol sprays must not be put in this machine.
Lint or fluff must not be allowed to collect on the floor around the outside of the machine.
Cool down period. The drum inside may be very hot. Always allow the dryer to complete the cool down period before removing the laundry.
Faults. Do not continue to use this machine if it appears to be faulty.
After use. Remove the plug from the electricity supply. Always remove the plug before cleaning the appliance.
Supply cord. If the supply cord on this appliance is damaged, it must be replaced by a special cord which is only available from GIAS Service.
GIAS Service. To ensure the continued safe and efficient operation of this appliance we recommend that any servicing or repairs are only carried out by an authorised service engineer.
Installation
Contents
| Safety reminder 2 | Filter | 6 |
| Electrical requirements 3 | Water container | 6 |
| Installation requirements 4 | Condenser | 7 |
| Preparing the load 4 | Drying guide | 8 |
| Clothes preparation 4 | Controls & indicators | 8 |
| Maximum drying weight 4 | Operation | 9 |
| Sorting the load 4 | Cleaning the dryer | 10 |
| Do not tumble dry 5 | Technical specifications | 10 |
| Energy saving | Troubleshooting | 11 |
| Opening the door | 5 |
Before using the tumble dryer for the first time:
- please read this instruction book thoroughly.
- remove all items packed inside drum.
●wipe the inside of the drum and door with a damp cloth to remove any dust which may have settled in transit.
IMPORTANT: This dryer must only be used for drying household textiles and garments where a water solution has been used for the cleaning process.
DO NOT tumble dry fabrics treated with dry cleaning fluids.
IMPORTANT: The wires in the mains lead are coloured in accordance with the following code:
Blue - NEUTRAL Brown - LIVE Green-and-yellow - EARTH
If the supply cord on this appliance is damaged, it must be replaced by a special cord which is only available from GIAS Service or an authorised Dealer.
Electrical requirements
WARNING! ELECTRICITY CAN BE EXTREMELY DANGEROUS. THIS APPLIANCE MUST BE EARTHED.
This appliance is fitted with a moulded-on non-rewireable plug (in the UK fitted with a 13 Amp fuse).
The plug should be accessible for disconnection after the appliance has been installed.
Installation
Preparing the load
Installation requirements
text_image
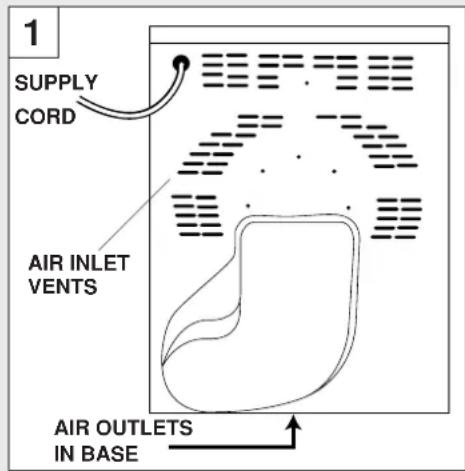
1 SUPPLY CORD AIR INLET VENTS AIR OUTLETS IN BASEIMPORTANT: This dryer must be installed such that the air inlets and outlets are not restricted (fig. 1).
There should be a gap of at least 12mm (0.5 inches) between the sides rear and base of the machine and the surrounding walls, cabinets and floor.
To ensure adequate ventilation the space between the bottom of the machine and the floor must not be obstructed.
NEVER install the dryer up against curtains.
Prevent items from falling or collecting behind and beneath the dryer as these may obstruct the air inlets and outlets.
Preparing the load
Before using the dryer for the first time wipe the inside of the drum and door with a damp cloth.
Make sure that the laundry you are going to dry is suitable for drying in a tumble dryer, as shown by the care symbols on each item.
Clothes preparation
Check that all fastenings are closed and that pockets are empty. Turn the articles inside out. Place clothes loosely in the drum to make sure that they don't get tangled.
Warning:
Do not overload the drum, large items when wet can exceed the maximum admissible clothes load (for example: sleeping bags, duvets).
Maximum drying weight
●Cottons Max. 6 kg
●Synthetics Max. 3 kg
Sort the load as follows:
A) By care symbols
Or the collar or inside seam:
Suitable for tumble drying.
Tumble drying at high temperature.
☒ Tumble drying at low temperature only.
Do not tumble dry.
B) By amount and thickness
Whenever the load is bigger than the dryer capacity, separate clothes according to thickness (e.g. towels from thin underwear).
Preparing the load Door
C) By type of fabric
Cottons/linen: Towels, cotton jersey, bed and table linen.
Synthetics: Blouses, shirts, overalls, etc. made of polyester or polyamid, as well as for cotton/synthetic mixes.
D) By drying level
- Sort into: iron dry, cupboard dry, etc.
- For delicate articles press the 'HEAT SETTING' button to select low drying temperature.
Do not tumble dry:
Woollens, silk, delicate fabrics, nylon stockings, delicate embroidery, fabrics with metallic decorations, garments with PVC or leather trimmings, training shoes, bulky items such as sleeping bags, etc.
IMPORTANT: Do not dry articles which have been treated with a dry cleaning fluid or rubber clothes (danger of fire or explosion).
Energy saving
Only put into the tumble dryer laundry which has been thoroughly wrung or spin-dried. The drier the laundry the shorter the drying time thus saving electricity.
ALWAYS try to dry the maximum weight of laundry, this will save time and electricity.
NEVER exceed the maximum weight, this will waste time and electricity.
ALWAYS check that the filter is clean before every drying cycle as this aids efficiency.
NEVER put dripping wet items into the tumble dryer, this may damage the appliance and waste time and efficiency.
Opening the door
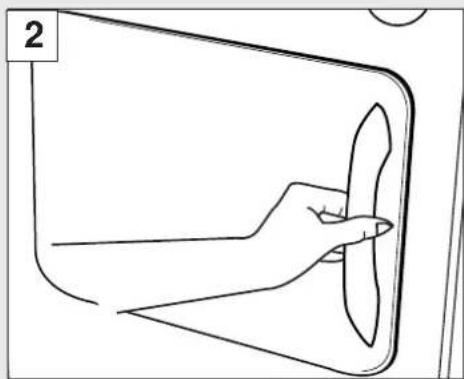
Pull on handle to open the door (fig. 3).
natural_image
Line drawing of a hand holding a propeller inside a vehicle door frame (no text or symbols)To restart the dryer, close the door and press the 'ON' button.
WARNING! WHEN THE TUMBLE DRYER IS IN USE THE DRUM AND DOOR MAY BE VERY HOT.
Filter Water container
Filter
IMPORTANT: To maintain the efficiency of the dryer check that the fluff filter is clean before each drying cycle.
natural_image
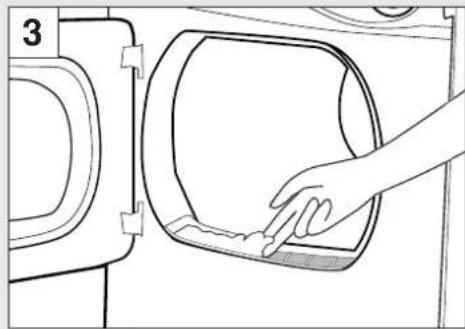
Line drawing of a hand placing a button into a washing machine (no text or symbols)- Gently remove lint using a soft brush or your fingertips (fig 3).
Clean Filter Indicator lights when the filter needs cleaning. If the laundry is not drying check that the filter is not clogged.
Water Container
The water removed from the laundry during the drying cycle is collected in a container at the bottom of the dryer.
When the container is full the 'EMPTY WATER' indicator on the control panel will light, and the container MUST be emptied. However, we recommend that the container is emptied after each drying cycle.
NOTE: Very little water will collect during the first few cycles of a new machine as an internal reservoir is filled first.
To remove the container:
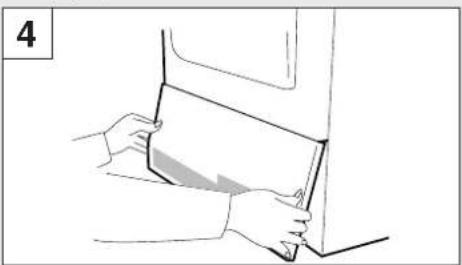
- Gently pull the bottom of the kickplate so that it unclips from the dryer. The top section can then be unhinged allowing the kickplate to be completely removed (fig. 4).
natural_image
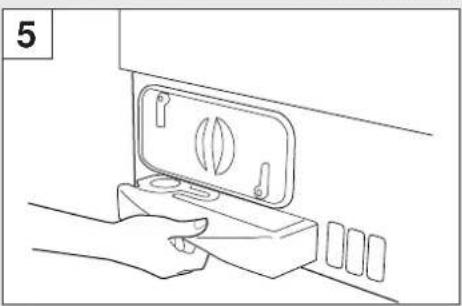
Line drawing of hands holding a rectangular object with a shaded triangular section, no text or symbols present- Pull firmly on the handgrip and slide the water container out of the dryer (fig. 5).
natural_image
Line drawing of a hand pressing a button on a wall-mounted device (no text or symbols)Condenser
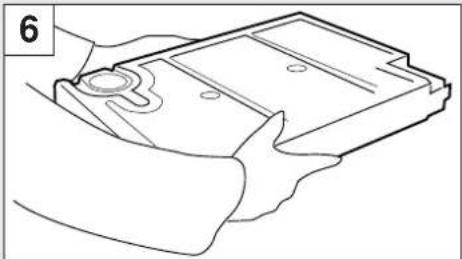
Support the container with both hands. When full, the water container will weigh about 4kg (fig. 6).
natural_image
Line drawing of a hand holding a rectangular object with a circular hole and mounting holes (no text or symbols)- Open the lid located on the top of the container and empty the water (fig. 7).

natural_image
Line drawing of a hand holding a magnifying glass over a wooden surface with a ring (no text or symbols)-
Refit the lid and slide the water container back into position. PUSH FIRMLY INTO PLACE.
-
Refit the kickplate by engaging the hinges at the top and 'snapping' the lower clips into place.
Condenser
IMPORTANT: Always switch off and remove the plug from the electricity supply before cleaning the condenser.
To maintain the efficiency of the dryer regularly check that the condenser is clean.
To remove the condenser:
-
Remove the kickplate (fig. 4).
-
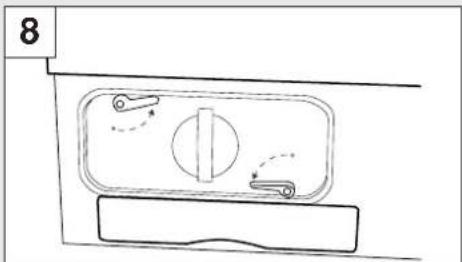
Turn the two locking levers anticlockwise (fig. 8).
natural_image
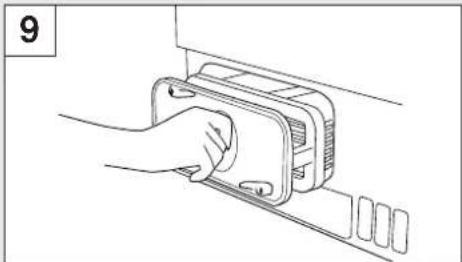
Simple line drawing of a door handle with a circular dial and directional arrows, no text or symbols present.- Pull out the condenser unit (fig. 9).
natural_image
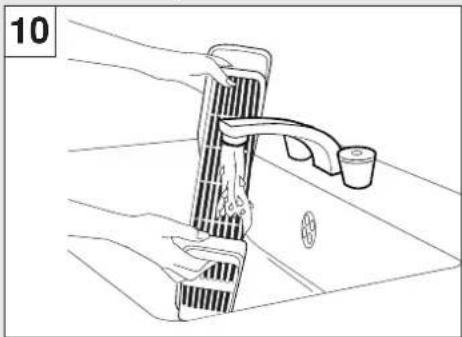
Line drawing of a hand inserting a component into a device (no text or symbols)- Gently remove any dust or fluff with a cloth, then wash the unit by holding it under a running tap (fig. 10) turning it so that water flows between the plates, to remove any dust or fluff.
natural_image
Line drawing of a kitchen sink with a faucet and cup, no text or symbols present-
Refit the condenser ensuring it is pushed firmly into place. Lock the two levers by turning them clockwise.
-
Refit the kickplate.
Drying guide Controls and indicators
Drying guide
The table shows approximate drying times, depending on the type of fabric and dampness of the clothes.
HEAT SETTING HEAVY LOAD MEDIUM LOAD LIGHT LOAD
COTTON HIGH 110-140 min 65-75 min 50-60 min
SYNTHETICS LOW - 60-70 min 40-50 min
ACRYLIC LOW - 40-55 min 30-40 min
REMEMBER: During the last 15 minutes the load is always tumbled in cool air.
Control panel and indicator lights

text_image
11 1 ON OFF CANDY No. 200 RETURN ON CONSENSER COOL THARLE = 0 2 4 5 3Operation
-
'ON' button and indicator – press to switch on, the indicator will light.
-
'HEAT SETTING' button - press to reduce the heat level for delicate items, press again to select high temperature.
D
Heat setting
D
Heat setting
- 'DRYING TIME' dial - selects drying time or pre-ironing option (a).
- 'CLEAN FILTER' indicator - lights when the filter needs cleaning.
- 'EMPTY WATER' indicator - lights when water container is full.
Operation
- Open the door and load the drum with laundry. Ensure that garments do not hinder closure of the door.
- If drying delicate items press the 'HEAT SETTING' button to reduce the heat level. Press again on completion, to select high temperature.
D
HIGH Heat setting
LOW Heat setting
- Turn 'DRYING TIME' dial until the required drying time aligns with the symbol (▼).
- Gently close the door pushing it slowly until you hear the door 'click' shut.
- Press the 'ON' button. The indicator will light and the drying cycle begins.
-
The load is dried by tumbling in thermostatically controlled warm air. Cool air is used for the last 15 minutes to reduce creasing and cool the load ready for handling.
-
When the program is fully completed the drum will stop rotating and the dial will point to the symbol (▼).
Open the door and remove the load.
WARNING! THE DRUM, DOOR AND LOAD MAY BE VERY HOT.
- Clean the filter and empty the water container after every drying cycle to ensure maximum dryer efficiency. (See 'Filter' and 'Water Container' sections).
- Clean the condenser after approximately every 10 drying cycles to ensure maximum dryer efficiency. (See 'Condenser' section).
Cleaning
Cleaning the dryer
IMPORTANT: Always switch off and remove the plug from the electricity supply before cleaning this appliance.
Clean the filter and empty the water container after every drying cycle.
Regularly clean the condenser.
After each period of use, wipe the inside of the drum and leave the door open for a while to allow circulation of air to dry it.
Wipe the outside of the machine and the door with a soft cloth.
DO NOT use abrasive pads or cleaning agents.
To prevent the door sticking, periodically clean the door gasket with a 'non-scratch cream cleaner.'
Technical specifications
Drum capacity 115 litres
Maximum load 6 kg
Height 85cm
Width 60cm
Depth 60cm
Energy Label Band C
Note: For electrical data refer to the rating label on the front of the dryer cabinet (with the door open).
Trouble shooting
Trouble shooting
Should your dryer operate incorrectly, check the following points before calling for a service engineer.
Drying time is too long/clothes are not dry enough:
●Have you selected the correct drying time/programme? Go to page 8.
●Were the clothes too wet? Were the clothes thoroughly wrung or spin-dried?
- Does the filter need cleaning? Go to page 6.
- Does the condenser need cleaning? Go to page 7.
●Is the dryer overloaded? Go to page 4.
●Are the inlets, outlets and base of the dryer free from obstructions?
- Has the 'HEAT SETTING' button been selected from a previous cycle? Go to page 9.
The dryer does not operate:
●Is there a working electricity supply to the dryer? Check using another appliance such as a table lamp.
●Is the plug properly connected to the mains supply?
●Is there a power failure?
●Has the fuse blown?
●Is the door fully closed? Go to page 9
●Is the dryer switched on, both at the mains supply and at the machine? Go to page 9.
●Has the drying time or the programme been selected? Go to page 9.
●Has the machine been switched on again after opening the door? Go to page 5.
●Has the dryer stopped operating because the water tray is full and needs emptying? Go to page 6.
The dryer is noisy
●Switch off the dryer and contact the Hoover service number 08705 400 600 for advice.
Clean Filter Indicator on
- Does the filter need cleaning? Go to page 9.
- Does the condenser need cleaning? Go to page 7.
Empty Water Indicator on
●Does the water container need emptying? Go to page 6.
If the supply cord on this appliance is damaged, it must be replaced by a special cord which is only available from GIAS Service or an authorised Dealer.
Should there still be a problem with your dryer after completing all the recommended checks, please call the national GIAS Service number – 08705 400 600 – for advice. They may be able to assist you over the telephone or arrange for a suitable appointment for an engineer to call under the terms of your guarantee. However, a charge may be made if any of the following applies to your machine:
●Is found to be in working order.
●Has not been installed in accordance with the installation instructions.
●Has been used incorrectly.
40000194.qxd 11/3/04 5:30 pm Page 12