
MH035FAEA - Air-conditioner SAMSUNG - Free user manual and instructions
Find the device manual for free MH035FAEA SAMSUNG in PDF.


User questions about MH035FAEA SAMSUNG
0 question about this device. Answer the ones you know or ask your own.
Ask a new question about this device
Download the instructions for your Air-conditioner in PDF format for free! Find your manual MH035FAEA - SAMSUNG and take your electronic device back in hand. On this page are published all the documents necessary for the use of your device. MH035FAEA by SAMSUNG.
USER MANUAL MH035FAEA SAMSUNG
features of your new air conditioner
• Cool Summer Offer
On those hot sweltering summer days and long restless nights, there is no better escape from the heat than the cool comforts of home. Your new air conditioner brings an end to exhausting hot summer days and lets you rest. Beat the heat with your own air conditioner this summer.
• Cost Efficient System
Your new air conditioner not only provides maximum cooling power in the summer, but also can be an efficient heating method in the winter with the advanced “Heat pump” system. “Heat pump” system is 3 times more efficient compared to the other electrical heating appliance, so you can further reduce its running cost. Now, meet year-round needs with one air conditioner.
- Look for Everywhere
The elegant and harmonious design gives priority to the esthetics of your space and complements any of your existing interior décor. With its soft color and rounded-edge shape, the new air conditioner adds class to any room. Enjoy what your air conditioner offers both functionally and esthetically.
- good'sleep
good'sleep function allows you to set a comfortable sleep temperature while saving energy and having sound sleep.
• mpiicro plasma ion) function
mpi function generates hydrogen(H) and oxygen( O_2 ) to attack undesirable air contaminants such as bacteria, pollen, and odor. It makes you breathe better as if you are staying around waterfalls, ocean surf, rivers and mountains.
SAMSUNG
For easy future reference write the model and serial number down. You can find your model number on the bottom side of the air conditioner.
Model #____
Serial #____
safety information
To prevent electric shock, disconnect the power before servicing, cleaning, and installing the air conditioner.
SAFETY INFORMATION
Before using your new air conditioner, please read this manual thoroughly to ensure that you know how to safely and efficiently operate the extensive features and functions of your new appliance.
Because the following operating instructions cover various models, the characteristics of your air conditioner may differ slightly from those described in this manual. If you have any questions, call your nearest contact center or find help and information online at www.samsung.com.
Important safety symbols and precautions:
| WARNING | Hazards or unsafe practices that may result in severe personal injury or death. |
| CAUTION | Hazards or unsafe practices that may result in minor personal injury or property damage. |
| CAUTION | To reduce the risk of fire, explosion, electric shock, or personal injury when using your air conditioner, follow these basic safety precautions: |
| Do NOT attempt. | |
| Do NOT disassemble. | |
| Do NOT touch. | |
| Follow directions carefully. | |
| Unplug the power plug from the wall socket. | |
| Make sure the machine is grounded to prevent electric shock. | |
| Call the contact center for help. | |
| Note. | |
These warning signs are here to prevent injury to you and others.
Please follow them carefully.
After reading this section, keep it in a safe place for future reference.

Do not place the air conditioner near hazardous substances or equipment that releases free flames to avoid fire, explosions or injuries.
- Potential risk of fire hazard or explosion.
Do not install the outdoor unit at an unstable place or elevated surface where there is potential risk of falling.
- If the outdoor unit falls, it may cause personal injury or loss of property.
Failure or damage may occur if any changes or modification that is not stated in the installation manual was performed. In this case, user will be responsible for the repair expenses.
Install the air conditioner away from direct exposure to sunlight, heating apparatus, and humid places.
- Hang curtains on windows to boost cooling efficiency and to avoid the risk of electric shock.
Do not cut the power plug and connect to a different power cable.
Do not yank the power cable and touch the power plug with hands.
- Potential risk of fire or electric shock.
Never use a damaged or dusted power plug, power cable, or loosened power receptacle.
- Potential risk of fire or electric shock.
Install an exclusive circuit breaker and short-circuit breaker for the air conditioner.
- Potential risk of electric shock or fire.
Do not insert anything such as fingers or branches into the air conditioner vents while the air conditioner is running.
- Keep the children away from the air conditioner to prevent them from putting their finger on the air conditioner. Potential risk of personal injury.
Ensure no water gets into the air conditioner.
- Potential risk or electric shock.
- If the water gets into the air conditioner, stop and unplug the power source immediately.
Turn off the air conditioner using the provided remote control or control accessory (if provided). Do not unplug to turn off the unit (unless there is an immediate danger).
Do not run the air conditioner for an extended period of time in a room with the door closed or with babies, elderly or disabled people.
- Open the door or windows to ventilate your room at least once an hour to prevent oxygen shortage.
The air conditioner is composed of moving parts. Keep children away from the unit to avoid physical injury.
Make sure that children take precautions against access to the air conditioner and they do not play with the unit.
Do not clean the interior of air conditioner on your own.
- You may damage the parts which can cause electric shock or fire.
- Consult contact center for cleaning the interior of the air conditioner.
Do not connect the air conditioner with heating apparatus or attempt to disassemble, remodel or repair if yourself.
- Potential risk of malfunction, electric shock or fire. If repairs are needed, consult the contact center.
Consult the place of purchase or contact center to install, reinstall or disassemble the air conditioner.
- Improper installation carries a risk of unit malfunction, water leakage, electric shock or fire.
- If installing in specialty areas, such as a factory complex or saline coastal area, consult the place of purchase or contact center for specific installation details.
- The units must be installed according to distances declared, in order to permit accessibility from each side, either to guarantee correct operation of maintenance or repairing products. The unit's parts must be reachable and removable completely under safety condition (for people or things).
Consult a dealer regarding the appropriate measures to prevent the allowable concentration from being exceeded.
- If the refrigerant leaks, and cause the concentration limit to be exceeded, hazards due to lack of oxygen in the room may result.
If the indoor unit gets wet, turn the power off immediately and call your nearest contact center.
- Potential risk of fire or electric shock.
Always make sure that the power supply is compliant with current safety standards. Always install the air conditioner in compliance with current local safety standards.
Verify that the voltage and frequency of the power supply comply with the specifications and that the installed power is sufficient to ensure the operation of any other domestic appliance connected to the same electric lines.
Use a rated circuit breaker only.
- Never use steel wires or copper wires as a circuit breaker. It may cause fire or unit malfunctions.
Do not put undue stress or place heavy object on the power cable.
Do not bend the power cable excessively.
- Potential risk of fire or electric shock.
To protect the product from water and possible shock, you should keep the power cable and the connection cord of the indoor and outdoor units in the protection tube.
When opening or closing the front panel, use a stable stool and watch your steps carefully.
Disconnect the air conditioner from power supply before it is repaired or disassembled.
Clean the air conditioner after the inner fan stops operating.
- Potential risk of injury or electric shock.

EVERE WARNING SIGNS (CONT'D)

Use a receptacle that has a ground terminal. The receptacle must be used exclusively for the air conditioner.
- Improper electrical grounding may cause electric shock or fire.
Be sure to ground the unit. Do not connect the ground wire to gas or water pipes, lighting rods, or telephone grounding lines.
- If the unit is not properly grounded, electric shock may result.

If you smell burning plastic, hear strange sounds, or see smoke coming from the unit, unplug the air conditioner immediately and call a contact center.
- Potential risk of fire or electric shock.

AUTION SIGNS

Do not block or place items in front of the air conditioner. Do not step, hang onto, or place heavy items on the air conditioner.
- Potential risk of personal injury.
If failure or damage occurs on the conditions of improper use not followed by the installation manual, there will be an extra labor charge for installing and construction.
- Potential risk of malfunction, electric shock or fire if repairs or installations are attempted by a non-qualified service technician.
Do not spray flammable gases such as insecticide near the air conditioner.
- Potential risk of electric shock, fire or unit malfunction.
Do not open the front grille during operation.
- Potential risk of electric shock or unit malfunction.
Cool air should not flow directly towards people, pets, and plants.
- It is harmful to your health, pets, and plants.
Do not drink drain water coming out of the air conditioner.
- Potential risk of health hazard.
Do not allow children to climb on the air conditioner.
Do not use the air conditioner as a cooling precision instrument for food, pets, plants, cosmetics or machinery.
Do not pull or give excessive shock to the air conditioner.
- Potential risk of fire, or unit malfunction and there are risk of personal injury because unit may fall down.
Do not spray water directly on the air conditioner or use benzene, thinner or alcohol to clean the surface of the unit.
- Potential risk of electric shock or fire.
- Potential risk of damage to the air conditioner.
Do not place any objects, especially containers with liquid.

Do not touch the pipe connected to the air conditioner.

Install the indoor unit away from lighting apparatus using the ballast.
- If you use the wireless remote control, reception error may occur due to the ballast of the lighting apparatus.
Install the outdoor unit where operating noise and vibration will not disturb your neighbor and in a well-ventilated area with no obstacle.
- Potential risk of malfunction.
- Operating noise may disturb your neighbor.
Make sure that there are no obstacles or covers that block the air conditioner.
Allow sufficient space for air circulation.
- Insufficient ventilation may result in poor performance.
If the power cable is damaged, the manufacturer or a qualified service technician must replace it.
If a power outage occurs while the air conditioner is working, turn off the power source immediately.
Max current is measured according to IEC standard for safety and current is measured according to ISO standard for energy efficiency.
Check for damage on delivery. If damaged, do not install the air conditioner and call the place of purchase immediately.
Keep indoor temperatures stable and not extremely cold, especially where there are children, elderly or disabled people.
The packaging material and used batteries of the remote controller (optional) must be disposed of in accordance with the national standards.
The refrigerant used in the air conditioner must be treated as chemical waste. Dispose the refrigerant following national standards.
Have a qualified service technician install the air conditioner and perform a trial operation.
Firmly connect the drain hose to the air conditioner for proper water drainage.
Check for damages on the outdoor unit installation pad at least once a year.
- Potential risk of personal injury or property loss.
When using a wireless remote control, the distance should not be more than 7 meters from the air conditioner.
If the remote control is not used for a long period of time, remove the batteries to prevent leakage of electrolyte.
When cleaning the outdoor unit, touch the heat exchanger radiator fins with extreme care.
- Wearing thick gloves can protect your hands.
Make sure that the condensed water dripping from the drain hose runs out properly and safely.
The appliance is not intended for use by persons (including children) with reduced physical, sensory or mental capabilities, or lack of experience and knowledge, unless they have been given supervision or instruction concerning use of the appliance by a person responsible for their safety: Young children should be supervised to ensure that they do not play with the appliance.

AUTION SIGNS (CONT'D)

Inspect the condition, electric connections, pipes and external case of the air conditioner regularly by a qualified service technician.
Do not open doors and windows in the room being cooled during operation unless necessary.
Do not block the air conditioner vents. If objects block the air flow, it may cause unit malfunction or poor performance.
Make sure there are no obstacles under the indoor unit.
- Potential risk of fire or loss of property.
The air conditioner should be used only for the applications for which it has been designed: the indoor unit is not suitable to be installed in areas used for laundry.
Our units must be installed in compliance with the spaces indicated in the installation manual to ensure either accessibility from both sides or ability to perform routine maintenance and repairs. The units' components must be accessible and that can be disassembled in conditions of complete safety either for people or things.
For this reason, where it is not observed as indicated into the Installation Manual, the cost necessary to reach and repair the unit (in safety, as required by current regulations in force) with slings, trucks, scaffolding or any other means of elevation won't be considered in-warranty and charged to end user.

Ensure the off-on and protection switches are properly installed.
Do not use the air conditioner if damaged. If problems occur, immediately stop operation and disconnect the plug from the power supply.
If the air conditioner will not be used for an extended period of time (for example, over several months), unplug the power from the wall.

Call the place of purchase or a contact center if repairs are needed.
- Potential risk of fire or electric shock if disassembly or repairs are attempted by a non-qualified service technician.
VIEWING YOUR AIR CONDITIONER
10
CLEANING AND MAINTAINING THE AIR CONDITIONER
28
APPENDIX
34
10 Checking the indoor unit and display
10 Main parts
10 Display
11 Opening the front panel
11 Power button, Room temperature sensor
11 Checking the outdoor unit
12 Checking the remote control
13 Remote control display
13 Using the remote control
13 Inserting the batteries
14 Turning the air conditioner on and off
14 Selecting operation mode
14 Auto
15 Cool
16 Dry
17 Fan
18 Heat
19 Adjusting the air flow direction
19 Vertical air flow
19 Horizontal air flow
20 Using the Turbo function
21 Setting timer
21 On timer
22 Off timer
23 Combining On timer and Off timer
24 good'sleep mode
25 Temperature changes in good'sleep mode
26 Using the Smart Saver function
26 Using the mpi function
27 Using the Evaporator Clean function
28 Cleaning the exterior
28 Using the Filter Reset
29 Cleaning the filter
29 Air filter
30 Bio filter
31 Replacing the filter
31 Deodorizing filter
32 Maintaining your air conditioner
32 Periodical checks
33 Internal protections via the unit control system
34 Troubleshooting
35 Operation ranges
This product has been determined to be in compliance with the Low Voltage Directive (2006/95/EC), and the Electromagnetic Compatibility Directive (2004/108/EC) of the European Union.

Correct Disposal of This Product
(Waste Electrical & Electronic Equipment)
(Applicable in countries with separate collection systems)
This marking on the product, accessories or literature indicates that the product and its electronic accessories (e.g. charger, headset, USB cable) should not be disposed of with other household waste at the end of their working life. To prevent possible harm to the environment or human health from uncontrolled waste disposal, please separate these items from other types of waste and recycle them responsibly to promote the sustainable reuse of material resources.
Household users should contact either the retailer where they purchased this product, or their local government office, for details of where and how they can take these items for environmentally safe recycling.
Business users should contact their supplier and check the terms and conditions of the purchase contract. This product and its electronic accessories should not be mixed with other commercial wastes for disposal.
viewing your air conditioner
Congratulations on the purchase of the air conditioner. We hope you enjoy the features of your air conditioner and stay cool or warm with optimal efficiency.
Please read the user manual to get started and to make the best use of the air conditioner.
CHECKING THE INDOOR UNIT AND DISPLAY
Carefully unpack your air conditioner and check the indoor unit to make sure it is not damaged.
Main parts
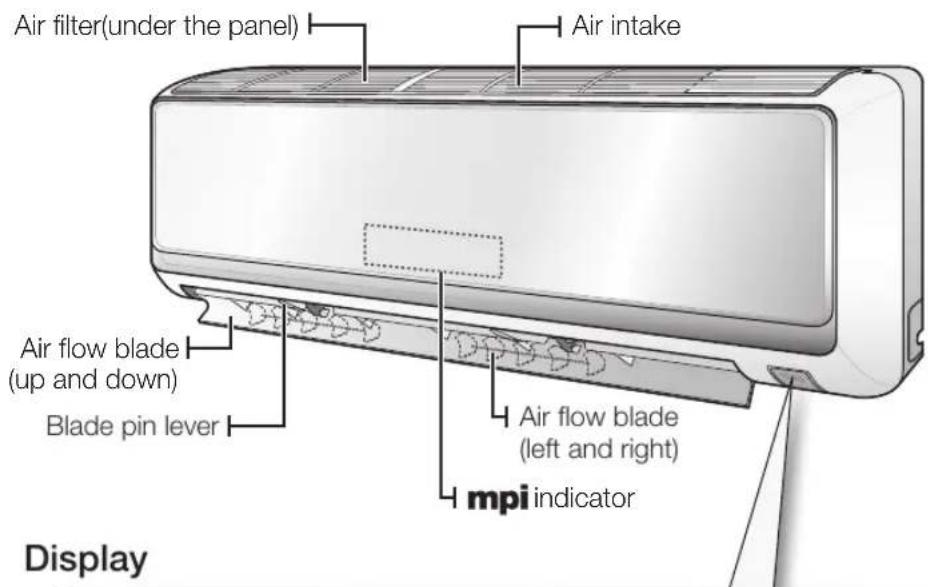
text_image
Air filter(under the panel) Air intake Air flow blade (up and down) Blade pin lever Air flow blade (left and right) mpi indicator Display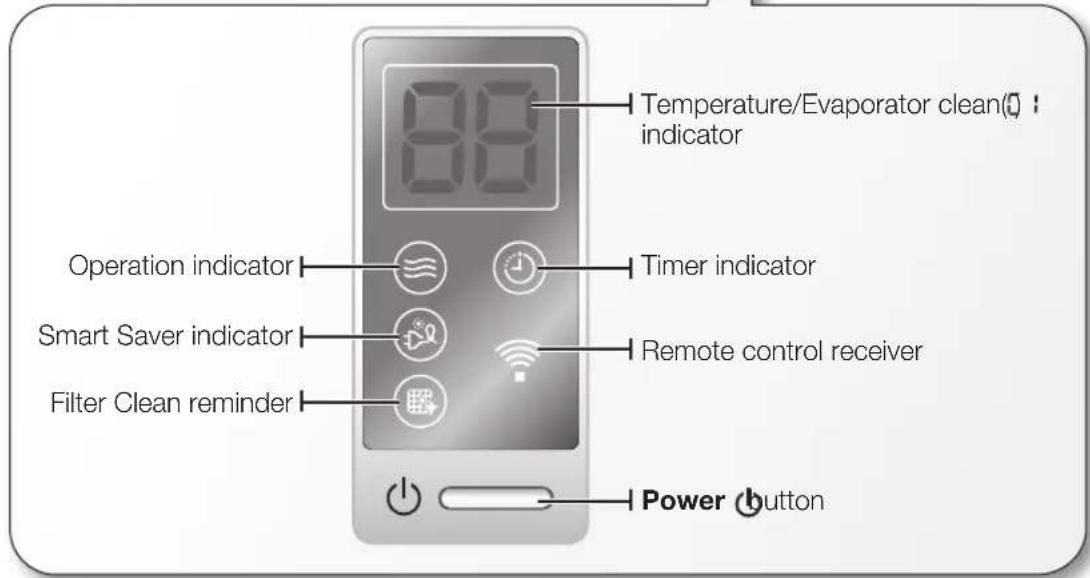
text_image
Temperature/Evaporator clean(0) indicator Operation indicator Timer indicator Smart Saver indicator Remote control receiver Filter Clean reminder Power button
Your air conditioner may slightly look different from illustration shown above depending on your model.
OPENING THE FRONT PANEL
Tightly grab front side of the front panel and lift up the panel to open. Then slightly push the panel up until the panel is hanged over the hooks of the unit.
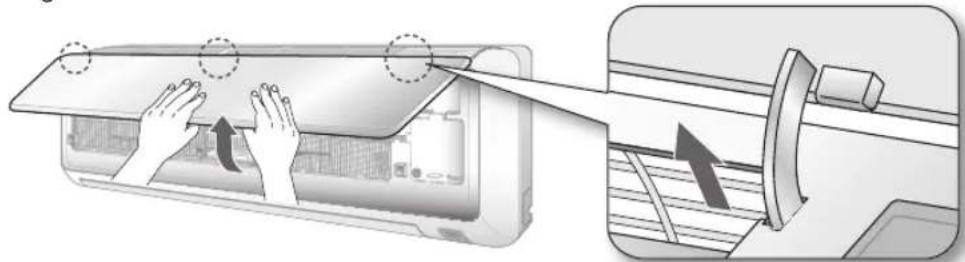
natural_image
Diagram of a car air conditioner unit being handled with hands, showing airflow direction (no text or symbols)Power button, Room temperature sensor
You may find the Power button on the right bottom side of the air conditioner. If the front panel is open, you can check the room temperature sensor.
You can turn on the air conditioner without the remote control by pressing the Power button. The room temperature sensor measures indoor room temperature.
CAUTION Make sure room temperature sensor does not get damaged.
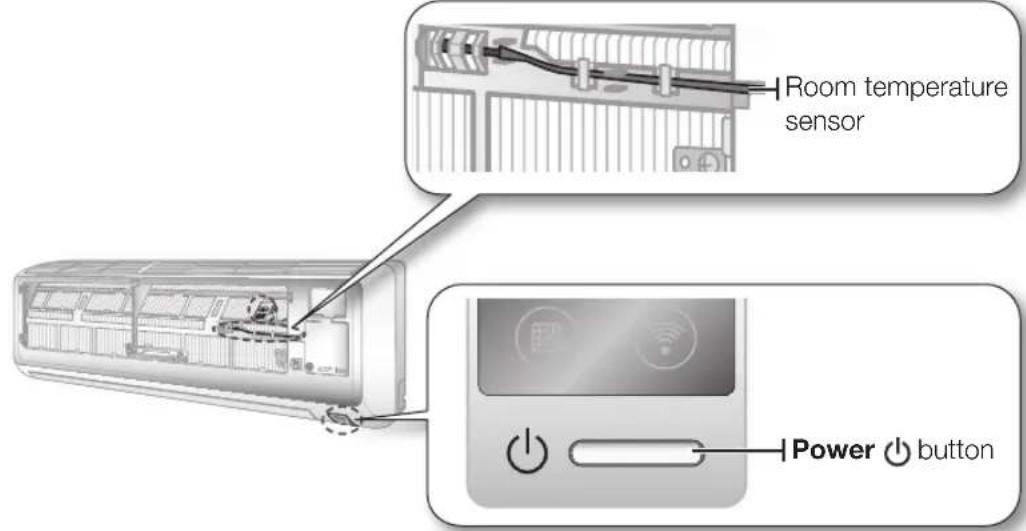
text_image
Room temperature sensor Power buttonCHECKING THE OUTDOOR UNIT
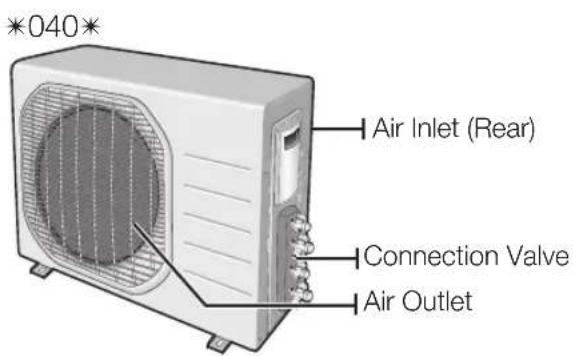
text_image
*040* Air Inlet (Rear) Connection Valve Air Outlet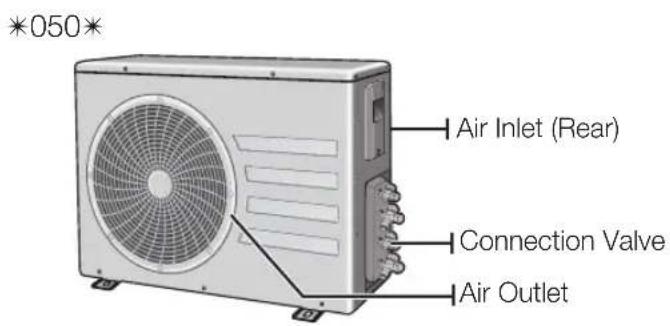
text_image
*050* Air Inlet (Rear) Connection Valve Air Outlet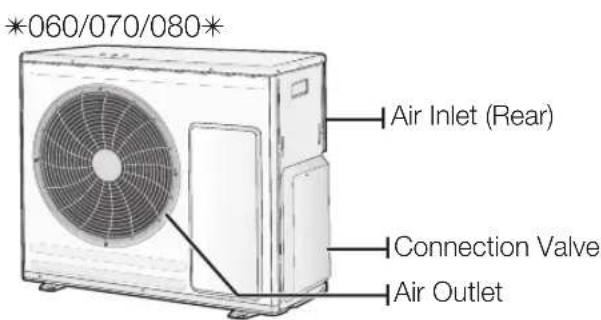
text_image
*060/070/080* Air Inlet (Rear) Connection Valve Air Outletviewing your air conditioner
CHECKING THE REMOTE CONTROL
You can activate the air conditioner by pointing the remote control away from it. When using the remote control, always point it directly at the air conditioner.
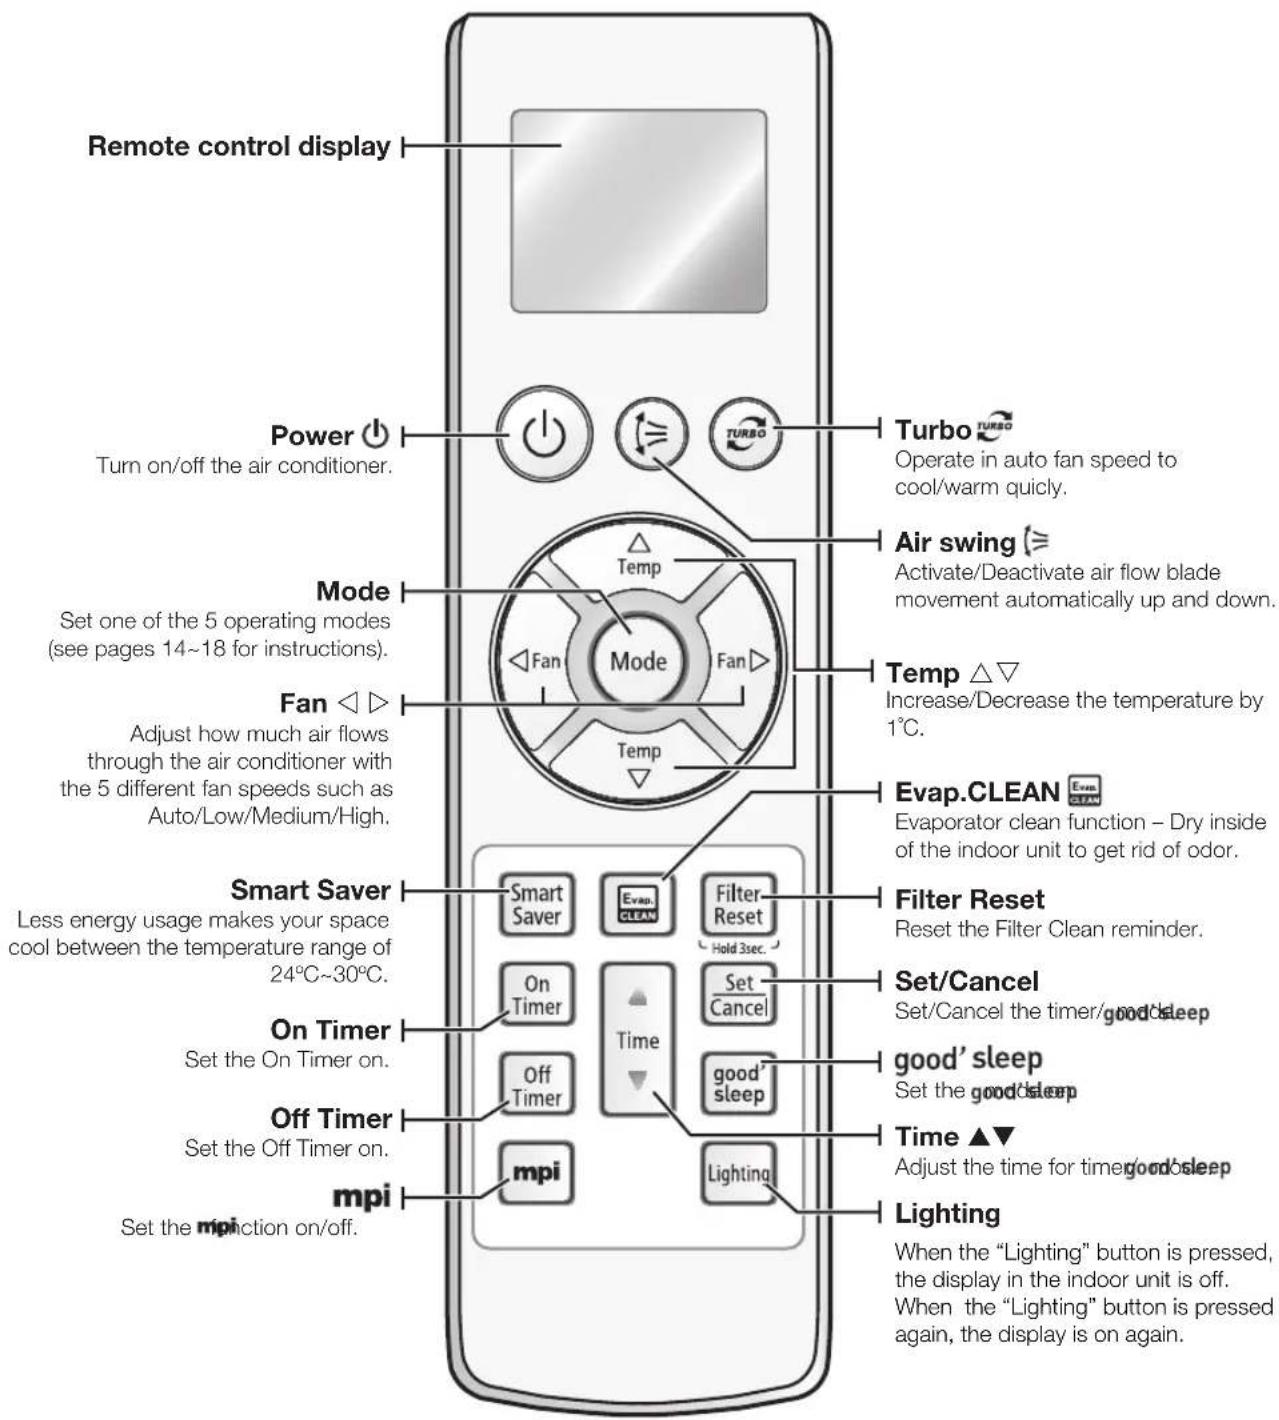
text_image
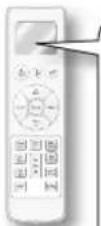
Remote control display Power Turn on/off the air conditioner. Mode Set one of the 5 operating modes (see pages 14~18 for instructions). Fan ◀ ▷ Adjust how much air flows through the air conditioner with the 5 different fan speeds such as Auto/Low/Medium/High. Smart Saver Less energy usage makes your space cool between the temperature range of 24°C~30°C. On Timer Set the On Timer on. Off Timer Set the Off Timer on. mpi Set the mpi function on/off. Turbo Operate in auto fan speed to cool/warm quickly. Air swing (Ⓧ Activate/Deactivate air flow blade movement automatically up and down. Temp △▽ Increase/Decrease the temperature by 1°C. Evap.CLEAN Evaporator clean function – Dry inside of the indoor unit to get rid of odor. Filter Reset Reset the Filter Clean reminder. Set/Cancel Set/Cancel the timer/good/sleep good' sleep Set the good/sleep Time ▲▼ Adjust the time for time/good/sleep Lighting When the "Lighting" button is pressed, the display in the indoor unit is off. When the "Lighting" button is pressed again, the display is on again.When you press the button, a short beep will sound and a transmit indicator( ^① ) appears on the remote control display.
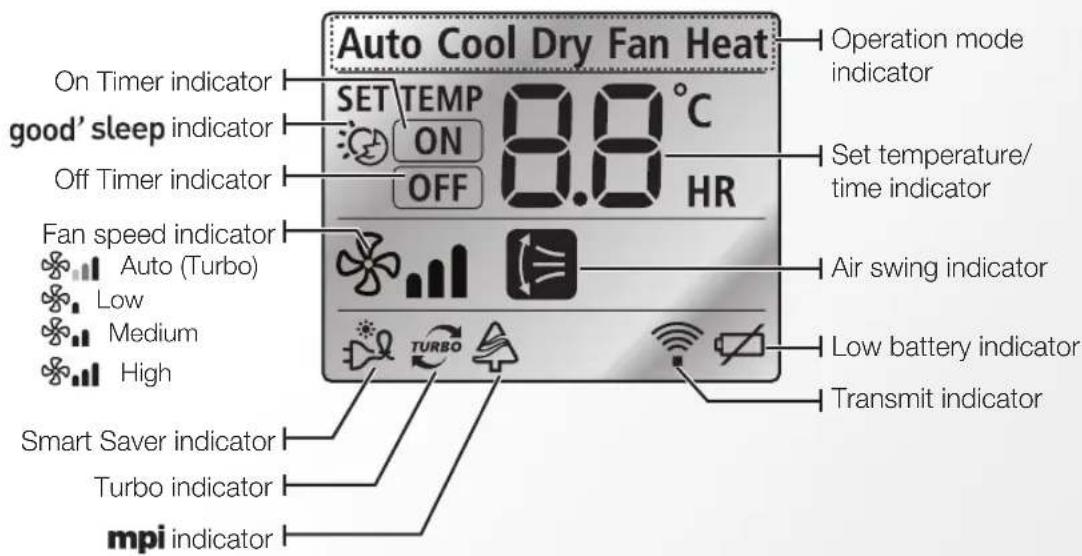
Remote control display
text_image
Auto Cool Dry Fan Heat On Timer indicator SET TEMP 8.8 °C good' sleep indicator OFF Timer indicator OFF ON HR Fan speed indicator Auto (Turbo) Low Medium High Smart Saver indicator Turbo indicator mpi indicator Operation mode indicator Set temperature/ time indicator Air swing indicator Low battery indicator Transmit indicatorUsing the remote control
- Point the remote control towards the remote control receiver of the indoor unit (see page 10 to find the location of remote control receiver).
- When you properly press the button on the remote control, you will hear beep sound from the indoor unit.

- The signal may not be received well of electronic lighting style fluorescent lamps such as inverter fluorescent lamps are in the same space.
- If other electrical products operate by the remote control, call your nearest contact center.
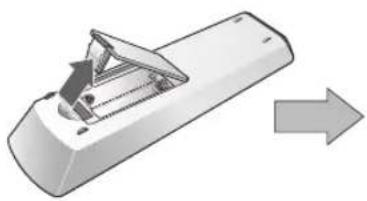
Inserting the batteries
natural_image
Illustration of a remote control device with a triangular cover and directional arrow (no text or symbols)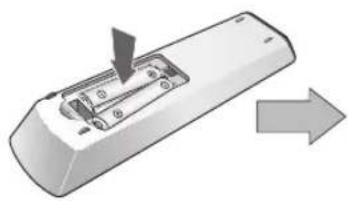
natural_image
Illustration of a remote control with an arrow indicating leftward movement (no text or symbols present)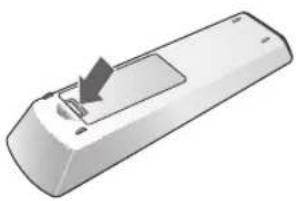
natural_image
Illustration of a remote control device with a black arrow pointing to the handle (no text or symbols)-
Push the lever as arrow indicates on the rear side of the remote control and pull up.
-
Insert two AAA batteries. 3.
Check and match the "+" and "-" signs accordingly. Make sure you have inserted the batteries in correct position.
Close the cover by place it back to its original position.
You should hear click sound when the cover is locked properly.

Correct disposal of batteries in this product
(Applicable in countries with separate collection systems)
This marking on the battery, manual or packaging indicates that the batteries in this product should not be disposed of with other household waste at the end of their working life. Where marked, the chemical symbols Hg, Cd or Pb indicate that the battery contains mercury, cadmium or lead above the reference levels in EC Directive 2006/66. If batteries are not properly disposed of, these substances can cause harm to human health or the environment.
To protect natural resources and to promote material reuse, please separate batteries from other types of waste and recycle them through your local, free battery return system.
operating basic function
TURNING THE AIR CONDITIONER ON AND OFF
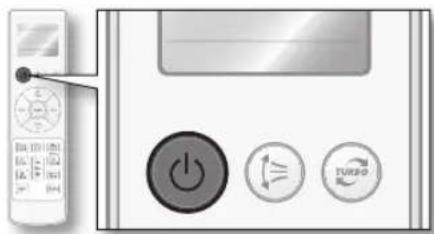
Press the Power ⏻ button on the remote control.
You will hear a ringing sound and the air flow blade will move up and down automatically when the air conditioner is properly on.
The air conditioner will operate in the most recent operation mode used or Auto mode.
When you turn off the air conditioner, air flow blade will stop moving and remain closed.
text_image
Diagram showing a remote control panel with power button, two directional icons, and a separate display screen.
Turning on/off your air conditioner without the remote control.
You can operate your air conditioner by pressing the Power ⏻ button on the right bottom side of the air conditioner.
In Auto mode, the air conditioner will automatically set the temperature and fan speed depending on the room temperature detected by the room temperature sensor.
- Turn on the air conditioner.
Press the Power ⏻ button on the remote control.
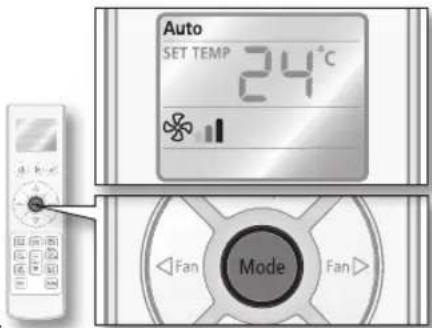
- Set the operating mode.
Press the Mode button on the remote control until Auto mode and Auto fan speed indicator appear on the remote control display.
The air conditioner will automatically set the operation mode to Cool or Heat depends on the room temperature.
text_image
Auto SET TEMP 24°C Fan Mode Fan
Each time you press the Mode button, the mode will change in order of Auto, Cool, Dry, Fan and Heat.
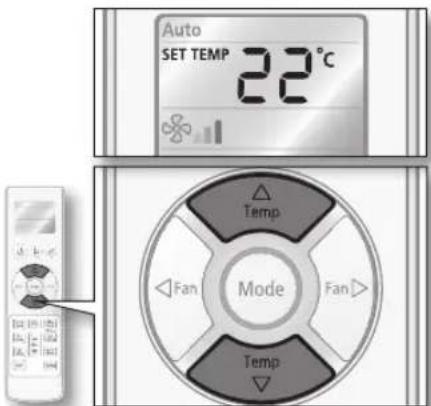
- Adjust the temperature (if you need to increase or decrease the room temperature).
Press the Temp △ or ▽ button on the remote control to increase or decrease the desired temperature.
You can set the desired temperature between the range of 16^ C\~ 30^ C.
text_image
Auto SET TEMP 22°C Temp Fan Mode Fan Temp
You can increase/decrease the temperature by 1^ C.

- While you are using the remote control, make sure correct indicator which matches your selection appears on the remote control display.
• Air flow can be adjusted manually (see page 19 for instructions).
Cool
In Cool mode, the air conditioner will cool your room. You can adjust the temperature and the fan speed to feel cooler in hot season.
- Turn on the air conditioner.
Press the Power ⏻ button on the remote control.
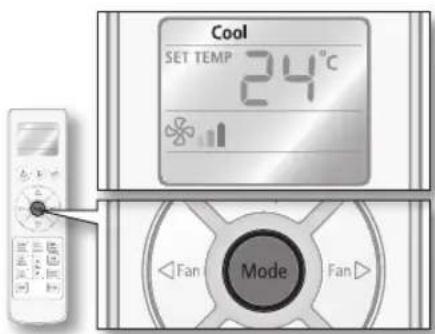
- Set the operating mode.
Press the Mode button on the remote control until Cool mode indicator appears on the remote control display.
The air conditioner operates in Cool mode and it will lower the temperature in your room.

Each time you press the Mode button, the mode will change in order of Auto, Cool, Dry, Fan and Heat.
text_image
Cool SET TEMP 24°C Mode Fan Fan- Set the temperature.
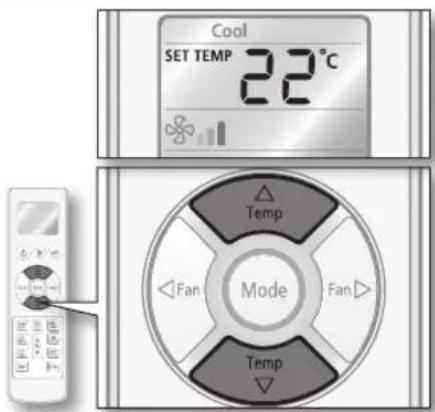
Press the Temp △ or ▽ button on the remote control to increase or decrease the desired temperature.
You can set the desired temperature between the range of 16^ C\~ 30^ C.
text_image
Cool SET TEMP 22°C Temp Fan Mode Fan Temp
You can increase/decrease the temperature by 1°C.
- Set the fan speed.
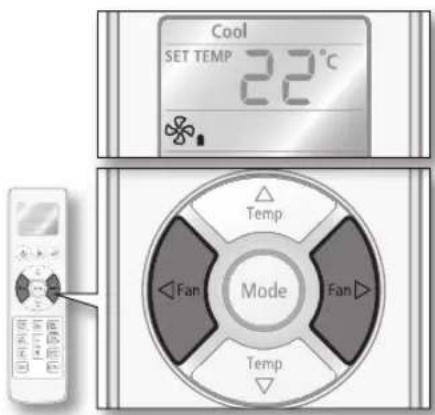
Press the Fan ◀ or ▷ button on the remote control to set the desired fan speed.
If room temperature reaches desired value, the air conditioner will shut off cooling for a while and just the fan runs.
text_image
Cool SET TEMP 22°C Temp Fan Mode Fan Temp
Each time you press the Fan ◀ or ▷ button, fan speed will change in order of Auto, Low, Medium and High.

- While you are using the remote control, make sure correct indicator which matches your selection appears on the remote control display.
• Air flow can be adjusted manually (see page 19 for instructions). - If current outside temperatures are much higher than the selected indoor temperature, it may take time to bring the inner temperature to the desired coolness.
The air conditioner in Dry mode acts like a dehumidifier by removing moisture from the indoor air. Dry mode makes the air feel refreshing in a humid climate.
- Turn on the air conditioner.
Press the Power ⏻ button on the remote control.
- Set the operating mode.
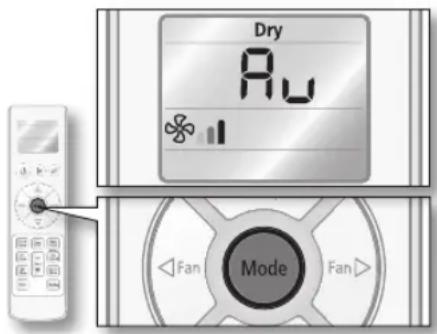
Press the Mode button on the remote control until Dry mode and Auto fan speed indicator appear on the remote control display.
In Dry mode temperature will be set automatically and R_U will appear on the remote control display.
text_image
Dry Au Mode Fan
Each time you press the Mode button, the mode will change in order of Auto, Cool, Dry, Fan and Heat.

- While you are using the remote control, make sure correct indicator which matches your selection appears on the remote control display.
• Temperature/Fan speed cannot be adjusted while using this mode.
• Air flow can be adjusted manually (see page 19 for instructions).
Fan
Fan mode can be selected to ventilate your room. Fan mode will be helpful to refresh the stale air in your room.
- Turn on the air conditioner.
Press the Power ⏻ button on the remote control.
- Set the operating mode.
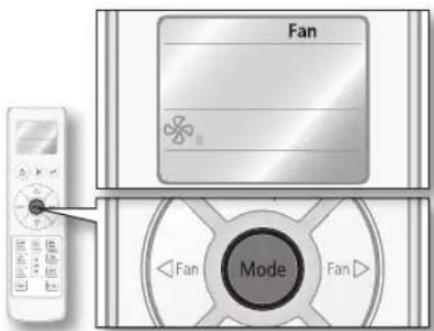
Press the Mode button on the remote control until Fan mode indicator appears on the remote control display.
The air conditioner operates in Fan mode and automatically adjusts the temperature according to the current room temperature.
text_image
Fan Mode Fan Fan
Each time you press the Mode button, the mode will change in order of Auto, Cool, Dry, Fan and Heat.
- Set the fan speed.
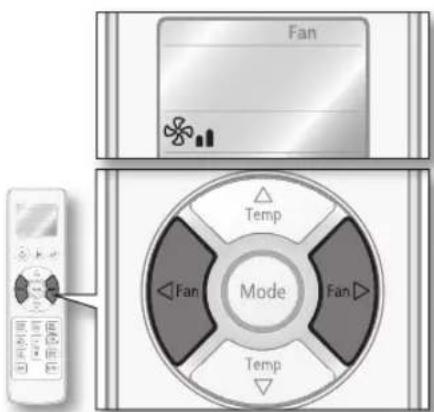
Press the Fan ◀ or ▷ button on the remote control to set the desired fan speed.
text_image
Fan Temp Fan Mode Temp
Each time you press the Fan ◀ or ▷ button, fan speed will change in order of Low, Medium and High.

- While you are using the remote control, make sure correct indicator which matches your selection appears on the remote control display.
• Air flow can be adjusted manually (see page 19 for instructions).
operating basic function
The air conditioner heats as well as cools. Warm your room with this versatile appliance in the cold of winter.
- Turn on the air conditioner.
Press the Power ⏻ button on the remote control.
- Set the operating mode.
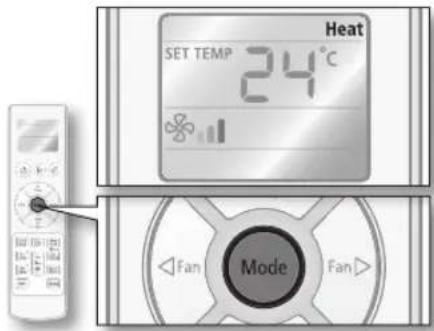
Press the Mode button on the remote control until Heat mode indicator appears on the remote control display.
The air conditioner operates in Heat mode and warms your room.
text_image
Heat SET TEMP 24°C Mode Fan
Each time you press the Mode button, the mode will change in order of Auto, Cool, Dry, Fan and Heat.
- Set the temperature.
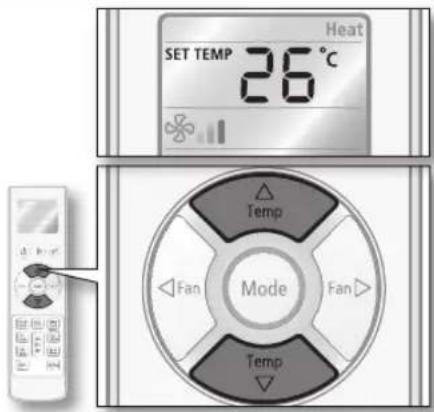
Press the Temp △ or ▽ button on the remote control to increase or decrease the desired temperature.
You can set the desired temperature between the range of 16^ C\~ 30^ C.
text_image
SET TEMP 26°C Heat Temp Fan Mode Fan Temp
You can increase/decrease the temperature by 1°C.
- Set the fan speed.
Press the Fan ◀ or ▷ button on the remote control to set the desired fan speed.
If room temperature reaches desired value, heating will stop for a while.
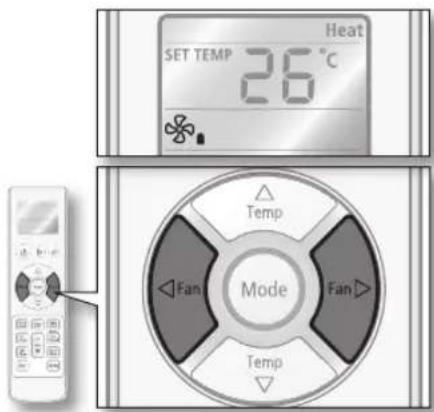
text_image
SET TEMP 26°C Heat Temp Fan Mode Fan
• Each time you press the Fan ◀ or ▷ button, fan speed will change in order of Auto, Low, Medium and High.
- Fan may not operate for about 3\~5 minutes at the beginning to prevent any cold blasts while the air conditioner is warming up.

• Air flow can be adjusted manually (see page 19 for instructions).
- Since the air conditioner heats the room by taking heat energy from outdoor air, the heating capacity may decrease when outdoor temperature is extremely low.
Use an additional heating appliance in combination with the air conditioner if you feel the air conditioner heats insufficiently.
Air flow can be directed to your desired position.
Vertical air flow
Air flow blades move up and down.
- Press the Air swing ≥slant button on the remote control.
Air swing indicator will be on and air flow blades move up and down continuously to circulate the air.
Press the Air swing ( ≥slant button on the remote control again, to keep the air flow direction in a constant position.
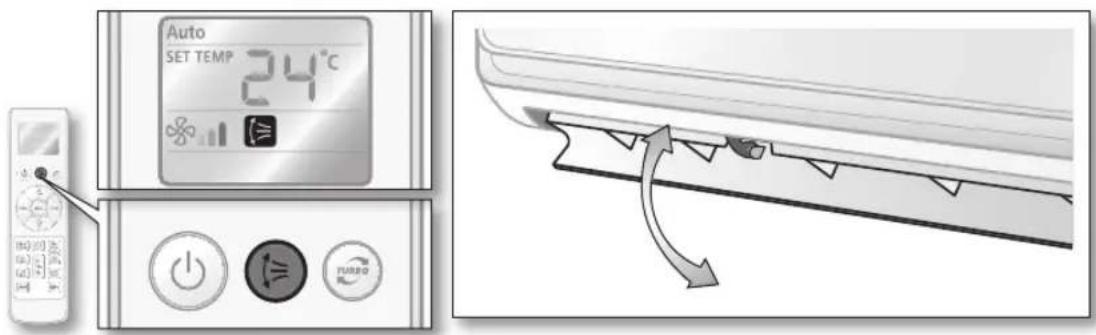
text_image
Auto SET TEMP 24°C FURBOHorizontal air flow
Make sure one of the blade pin lever that stick out of the air flow blades are not broken.
- Move the blade pin lever left or right to keep the air flow direction in a constant position you prefer.
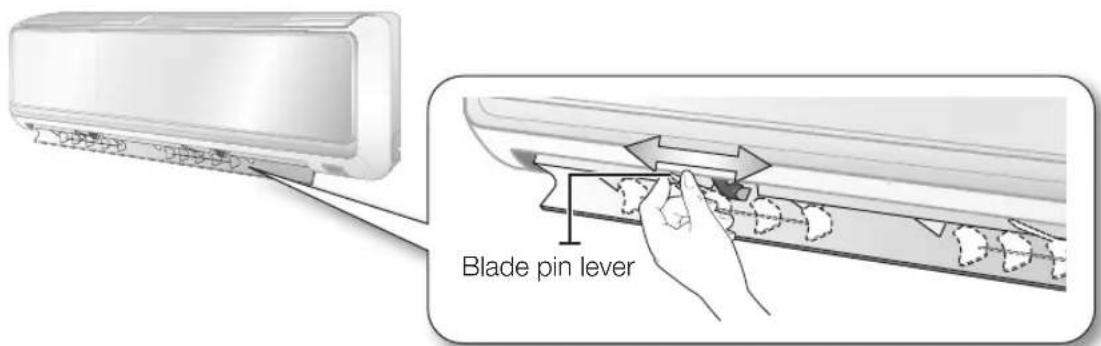
text_image
Blade pin leverCaution Be extremely careful with your fingers while adjusting the Horizontal air flow direction.
There is a potential risk of personal injury when the unit is mishandled.
using advanced functions
USING THE TURBO FUNCTION
Turbo function will be helpful to cool or heat your room quickly and effectively by operating at the maximum fan speed for 30 minutes.
- Turn on the air conditioner.
Press the Power ⏻ button on the remote control.
- Set the operating mode.
Press the Turbo button on the remote control until Turbo indicator appears on the remote control display. The air conditioner operates in Auto fan speed and automatically adjusts the temperature according to the current room temperature. The unit operates for 30 minutes and then operates in last used mode, or in Auto mode if Dry/Fan mode is most recent mode used
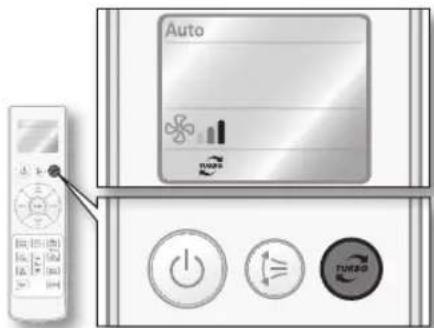
text_image
Auto TURBO
Turbo function is only available in Auto/Cool/Heat mode. If Turbo function is selected in Dry/Fan mode, operating mode changes to Auto.
To deactivate Turbo function
- Press the Turbo button on the remote control while Turbo function is on.
The air conditioner operates in last used mode, or in Auto mode if Dry/Fan mode is most recent mode used.

- While you are using the remote control, make sure corresponding indicator appears on the remote control display.
• Temperature/Fan speed cannot be adjusted while using this function.
• Air flow can be adjusted manually (see page 19 for instructions). - If you press the Mode button while the Turbo function is on, it will cancel the function.
SETTING TIMER
This advanced Timer function allows you to turn on/off your air conditioner automatically even when you are away. Simply set the time and your air conditioner will turn on/off automatically.
On Timer
This function allows you to turn on the air conditioner automatically within the time range of 24 hours.
On timer is available while your air conditioner is off.
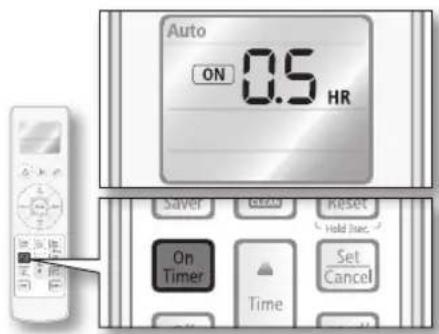
- Press the On Timer button on the remote control. On timer indicator blinks on the remote control display.
text_image
Auto ON 0.5 HR Saver Clean Reset On Timer Time Set Cancel- Set the time you want the air conditioner to turn on automatically.
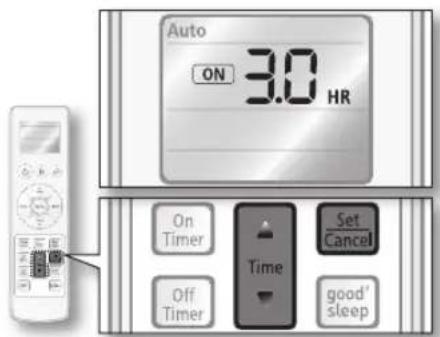
Press the Time ▲ or ▼ button on the remote control to change the time setting while On timer indicator is blinking.
You can set the time up to 24 hours, increasing in 30 minute unit up to first 3 hours and in hourly unit after first 3 hours.
text_image
Auto ON 3.0 HR On Timer Off Timer Time Set Cancel good' sleep- Press the Set/Cancel button on the remote control to active it on.
The remote control display will show the hour(s) you have set for 3 seconds and set desired temperature will display.
The air conditioner will operate automatically at set time and then On timer indicator stops blinking and stays on. If On timer is not set within 10 seconds, the air conditioner will end setting.
- Set the operating mode.
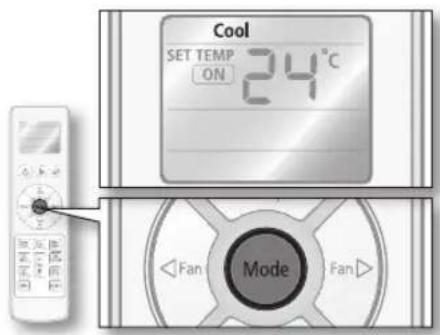
Press the Mode button on the remote control until the desired mode appears on the remote control display.
The air conditioner will operate in the mode you set.
text_image
Cool SET TEMP ON 24°C Mode Fan FanOn timer function is available in Auto/Cool/Dry/Fan/Heat mode.
- Temperature can also be adjusted (see step 3 on page 14 for instructions). - All the indicators other than On Timer indicator will disappear approximately after 10 seconds after the setup. - When the On Timer setting is done, you can press the On Timer button again to change the preset time. Press the Time ▲ or ▼ button to change time setting and then press the Set/Cancel button to active it on.
To deactivate the On Timer
- Press the Set/Cancel button on the remote control while On Timer is on.
On timer you set will be canceled and On timer indicator will disappear.
SETTING TIMER
Off Timer
This function allows you to turn off the air conditioner automatically within the time range of 24 hours. Off timer is available while your air conditioner is on.
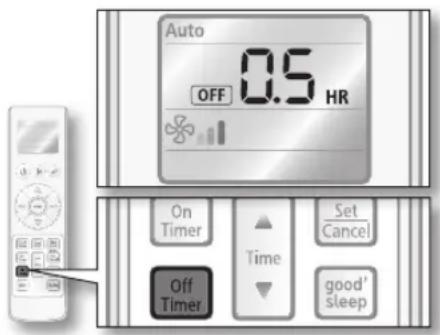
- Press the Off Timer button on the remote control.
Off timer indicator blinks on the remote control display.
text_image
Auto OFF 0.5 HR On Timer Off Timer Time Set Cancel good's sleep- Set the time you want the air conditioner to turn off automatically.
Press the Time ▲ or ▼ button on the remote control to change the time setting while Off timer indicator is blinking.
You can set the time up to 24 hours, increasing in 30 minute unit up to first 3 hours and in hourly unit after first 3 hours.
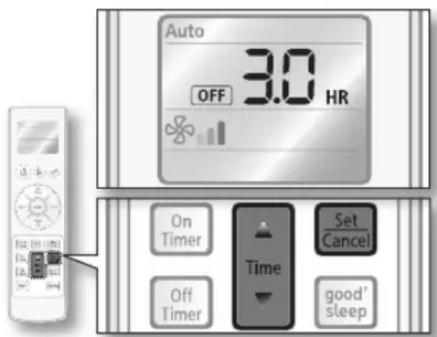
text_image
Auto OFF 3.0 HR On Timer Time Set Cancel Off Timer good' sleep- Press the Set/Cancel button on the remote control to active it on.
The remote control display will show the hour(s) you have set for 3 seconds and set desired temperature will display.
The air conditioner will operate automatically at set time and then Off timer indicator stops blinking and stays on. If Off timer is not set within 10 seconds, the air conditioner will end setting.

- When the Off Timer setting is done, you can press the Off Timer button again to change the preset time.
Press the Time ▲ or ▼ button to change the time setting and then press the Set/Cancel button to active it on.
- All the indicators other than Off Timer indicator will disappear approximately after 10 seconds after the setup.
- You can combine Off timer function with On timer function to turn on and then off the air conditioner at the desired time (see page 23 for instructions).
To deactivate the Off Timer
- Press the Set/Cancel button on the remote control while Off Timer is on.
Off timer you set will be canceled and Off timer indicator will disappear.
Combining On Timer and Off Timer
You can combine the On timer and Off timer together for more convenient use of the timer function.
- Set the On timer.
Press the On Timer button.
Set the time with Time ▲ or ▼ button.
Press Set/Cancel button to activate the On timer.
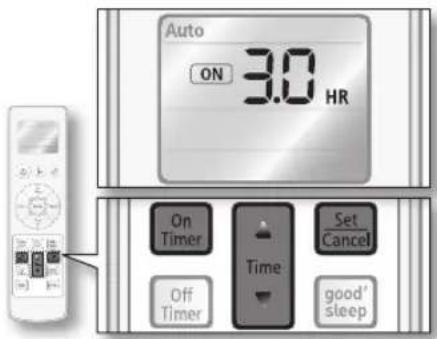
text_image
Auto ON 3.0 HR On Timer Time Set Cancel Off Timer good' sleep
See page 21 for more detail instructions on setting On timer.
- Set the Off timer.
Press the Off Timer button.
Set the time with Time ▲ or ▼ button.
Press Set/Cancel button to activate the Off timer.
When you set the time, there can be two possible options:
Preset time of On Timer is shorter than Off Timer
The air conditioner will turn on and then off automatically. Set up should be done while the air conditioner is off.
ex.) If the preset time of the On Timer is 3 hours and the Off Timer is 5 hours, the air conditioner will turn on after 3 hours from the moment you have set the timer. Your air conditioner will remain on for 2 hours and then turn off automatically.
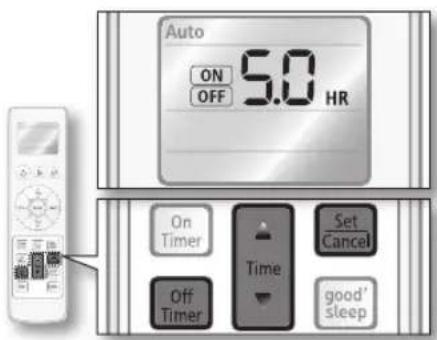
text_image
Auto ON 5.0 HR OFF On Timer Time Set Cancel Off Timer good' sleepPreset time of On Timer is longer than Off Timer
The air conditioner will turn off and then on automatically. Set up should be done while the air conditioner is operating.
ex.) If the preset time of the On Timer is 3 hours and the Off Timer is 1 hour, the air conditioner will turn off an hour after the moment you have set the timer. Your air conditioner will remain off for two hours and then it will turn on automatically.
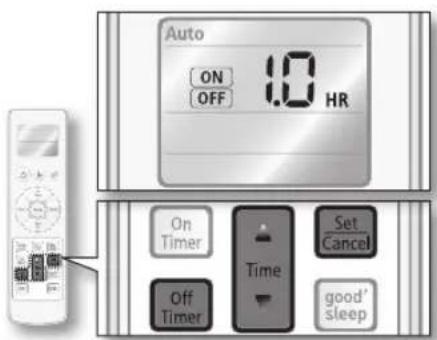
text_image
Auto ON 1.0 HR OFF On Timer Time Set Cancel Off Timer good' sleep
See page 22 for more detail instructions on setting Off timer.
To deactivate the timer combination
- Press the Set/Cancel button on the remote control while timer combination is on. Both of the On and Off timer will be canceled and the indicators will disappear.
using advanced functions
SETTING TIMER
good'sleep mode
good' sleep mode allows you to set a comfortable sleep temperature while saving energy and having sound sleep. good's sleep be set up when the air conditioner is on.
- Set the operating mode.
Press the Mode button on the remote control until Cool or Heat appears on the remote control display.

good'sleep is only available in Cool or Heat mode.
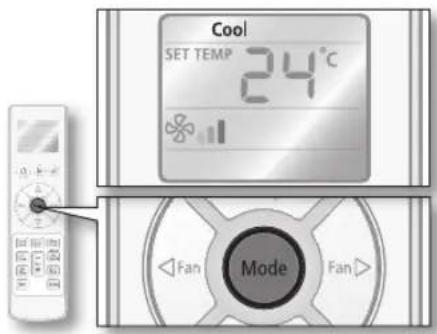
text_image
Cool SET TEMP 24°C Mode Fan Fan- Press the good'sleep button on the remote control.
good' sleep indicator appears and Off timer indicator starts blinking on the remote control display.
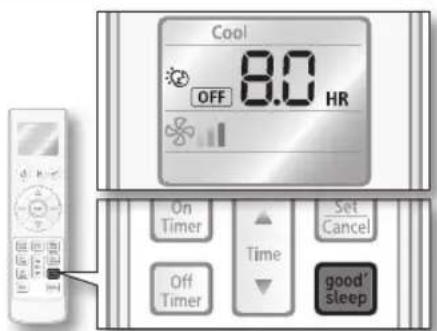
text_image
Cool OFF 8.0 HR On Timer Time Set Cancel Off Timer good's sleep- Set the length of time you want the air conditioner to stay on.
Default good'sleep time is set to 8 hours.
Press Time ▲ or ▼ button on the remote control to change the time setting while Off timer indicator is blinking.
You can set the time up to 12 hours, increasing in 30 minute unit up to first 3 hours and in hourly unit after first 3 hours.
- Press the Set/Cancel button on the remote control to active it on.
The remote control display will show the hour(s) you have set for 3 seconds and set desired temperature will display.
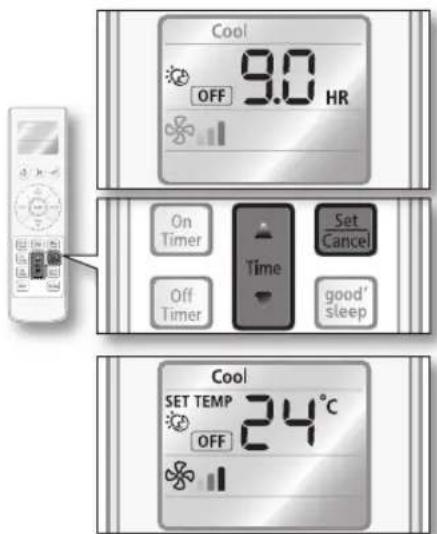
text_image
Cool OFF 9.0 HR On Timer Off Timer Time Set Cancel good' sleep Cool SET TEMP 24°C OFFWhen the set time has elapsed, the air conditioner will automatically turn off and then good' sleep indicator disappears.
If good'sleep mode is not set within 10 seconds, the air conditioner will end setting.

- Temperature/Fan speed/Air swing can be adjusted after settinggood'sleep in Heat mode.
- Temperature can be adjusted and the air conditioner automatically adjusts the Fan speed/Air swing after setting good' sleep in Cool mode.
- If you press the Mode button while the good'sleep mode is on, it will cancel the mode.
Temperature changes ingood'deep
To prevent excessive cooling/heating during sleep, the good sleep automatically modifies the temperature setting in accordance with the time setting. Temperature and air current change according to the three stages; Fall asleep, Sound sleep, and Wake up from good sleep and then the air conditioner will automatically turn off when the set time has elapsed.
Three stage good' sleep prevents you from having difficulty sleeping in summer/winter night.
• Fall asleep : Eases you into sleep by dropping the temperature.
- Sound sleep : Relaxes your body and raises your temperature slightly.
- Wake up from good' sleep mode :
Allows you to wake up from comfortable intermittent air and it makes you feel refresh.

- Set Off timer ingood'sleep mode over 5 hours. You feel disturbed sleep if the good'sleep is set too short or long because the default is set to 8-hour-operation.
- If the good's sleep mode is set less than 4 hours, the operation will stop at the set time. If the good's sleep over 5 hours, it will run as Wake up stage for the last one hour before stop.
- Recommended set temperature is between 25°C\~27°C for cooling and 21°C\~23°C for heating.
To deactivate good sleep
- Press the Set/Cancel button on the remote control while good'sleep mode is on. good'sleep mode you set will be canceled and good'sleep will disappear.
using advanced functions
USING THE SMART SAVER FUNCTION
This function will set the temperature range limit to help you save energy while the air conditioner is operating in Cool mode.
- Press the Smart Saver button on the remote control while the air conditioner is operating in Cool mode.
Smart Saver indicator and air swing indicator appears automatically on the remote control display. The air flow blades move up and down.
If the current set temperature is lower than 24^ C, it will automatically raise to 24^ C.
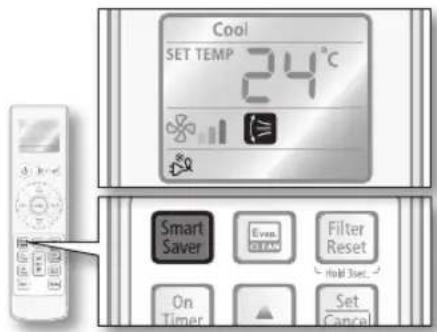
text_image
Cool SET TEMP 24°C Smart Saver Clean Filter Reset Hold 3set... On Timer Set Cancel
• Smart Saver function is only available in Cool mode.
- When Smart Saver function is activated, temperature range will be limited to 24°C\~30°C.
- If the desired temperature is lower than 24^ C, turn off the Smart Saver function by pressing the Smart Saver button again.
- Temperature/Fan speed can also be adjusted (see step 3\~4 on page 15 for instructions).
• Air flow can be adjusted manually (see page 19 for instructions).
- If you press the Mode button while the Smart Saver function is on, it will cancel the function.
To deactivate the Smart Saver function
- Press the Smart Saver button on the remote control while Smart Saver function is on.
Smart Saver function you set will be canceled and Smart Saver indicator will disappear on the remote control display.
USING THE mφiNCTION
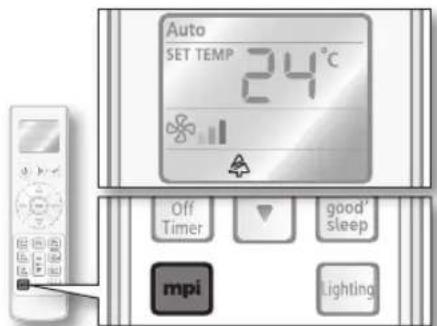
mpi (micro plasma ion) generates hydrogen(H) and oxygen( O_2 ) to remove a polluted substance and decomposition of such harmful particles. It makes you breathe better as if you are staying around waterfalls, ocean surf, rivers and mountains.
- Press the mpi button on the remote control.
mpi indicator will appear on the remote control display and the air conditioner generates MPI.

- Thempi function can be selected whether the air conditioner is on/off.
- Thempi function will be on automatically when you turn on the air conditioner.
text_image
Auto SET TEMP 24°C Off Timer good' sleep mpi LightingTo deactivate mpiction
- Press the mpitton on the remote control while fumpin is on.
mpi function you set will be canceled and blue light will turn off.
USING THE EVAPORATOR CLEAN FUNCTION
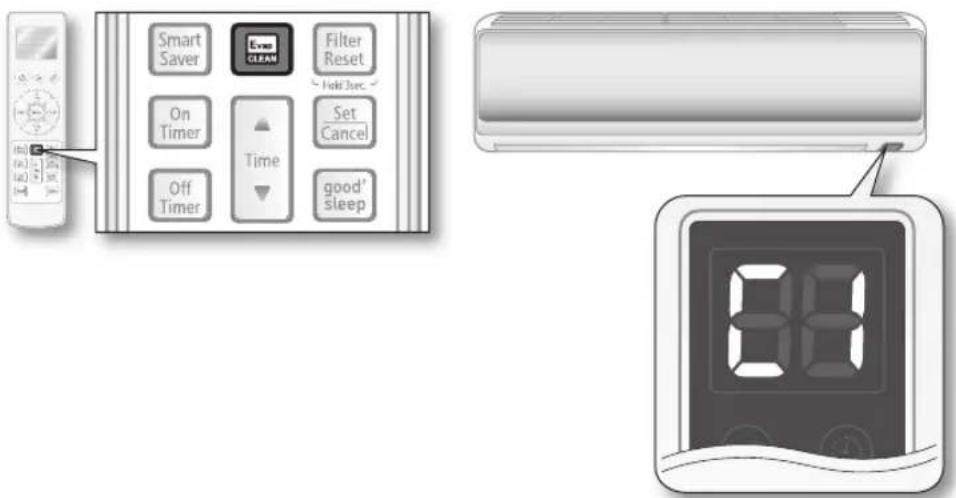
Evaporator clean function will prevent from growing mold by eliminating the moisture inside of the indoor unit. Your indoor unit evaporates the moisture inside of the unit. Activate this function to provide you with more clean and healthier air.
1. Press the Evap. CLEAN button.
The Evaporator clean indicator appears only on the indoor unit display as [1(Clean). When the air conditioner is turned on, the Evaporator clean function runs after stopping the air conditioner operation.
text_image
Smart Saver CLEAN Filter Reset On Timer Time Set Cancel Off Timer good' sleep▶ When the air conditioner is turned off,
The Evaporator clean indicator on the indoor unit display appears and the Evaporator cleaning function runs.
▶ When the air conditioner is turned on,
The Evaporator clean indicator on the indoor unit display appears and the Evaporator cleaning function runs after stopping the air conditioner operation.
Evaporator Cleaning time can vary, depending on the previously used mode.
Auto(cool), Cool, Dry mode : approximately 30 minutes.
Auto(heat), Heat, Fan mode : approximately 15 minutes.
cleaning and maintaining the air conditioner
Make sure the power is turned off and unplugged from the wall socket when cleaning the air conditioner.
If system contains 3 kg or more of fluorinated greenhouse gases. In this case, it has to be checked for leakage at least once every 12 months, according to regulation n°842/2006. This activity has to be covered by qualified personnel only.
In the case above, a maintenance book has to be available for each unit installed.
CLEANING THE EXTERIOR
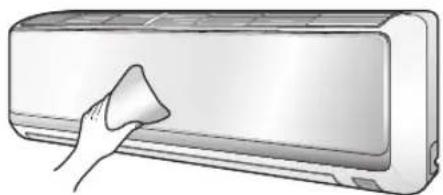
- Wipe the surface of the unit with a slightly wet or dry cloth when needed.
natural_image
Illustration of a hand cleaning a wall-mounted air conditioner (no text or symbols)Do not use Benzene, Thinner or Clorox™. They may damage the surface of the air conditioner and can create a risk of fire.
USING THE FILTER RESET
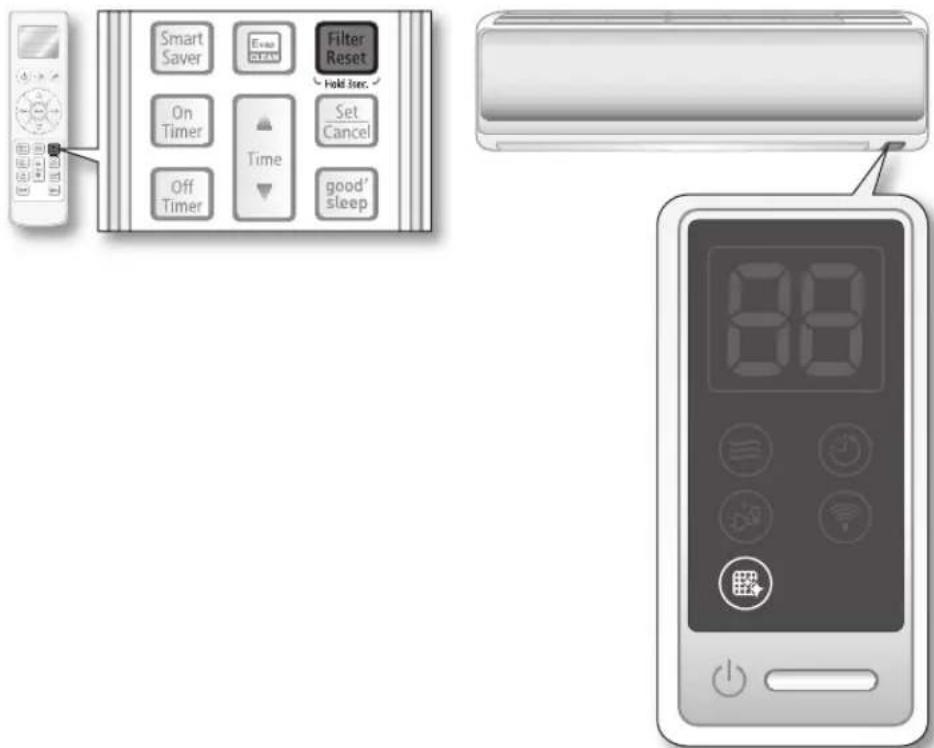
The Filter clean reminder will light up on the indoor unit display to notify you that the filter needs cleaning. After cleaning filter, press and hold Filter Reset button for 3 seconds to reset the Filter clean reminder. Filter clean reminder will be turned off.
text_image
Smart Saver Clean Filter Reset Hold sec. On Timer Time Set Cancel Off Timer good' sleep
If you use this product without inserting the filter, the product can be damaged by dust.
When cleaning the filter, make sure to unplug the power from the unit. No special tools are needed to clean it.
Air filter
Washable foam based air filter captures large particles from the air. The filter is cleaned with a vacuum or by hand washing.
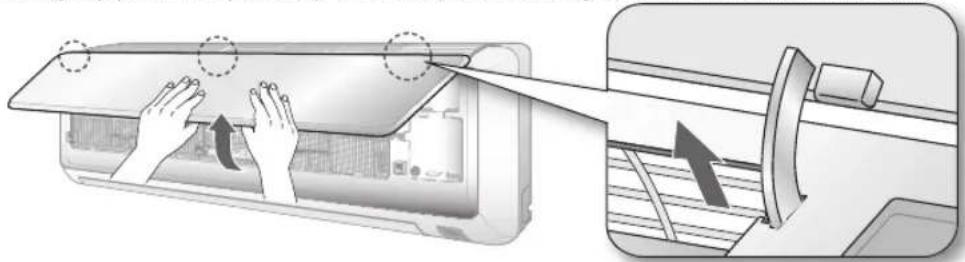
- Open the front panel.
Tightly grab front side of the front panel and lift up the panel to open. Then slightly push the panel up until the panel is hanged over the hooks of the unit.
natural_image
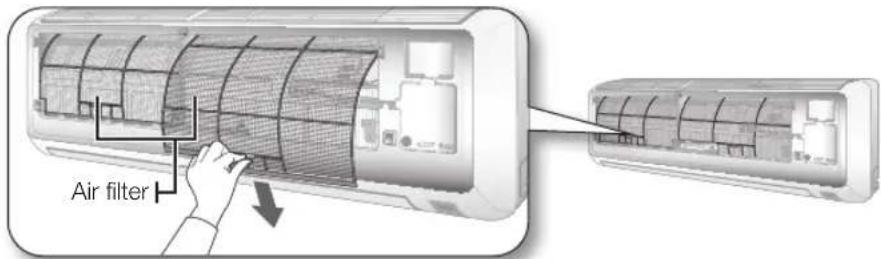
Illustration of a hand pressing down on a wall-mounted air conditioner unit, showing airflow direction (no text or symbols)- Grab the handle and lift it up. Then, pull the Air filter towards you and slide it down.
text_image
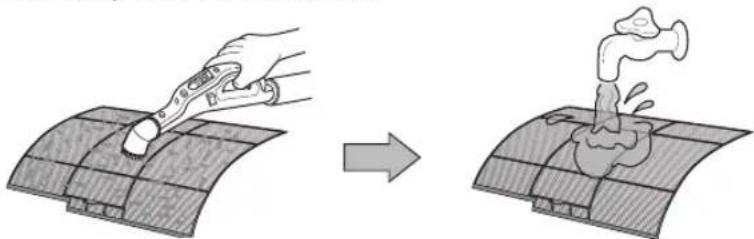
Air filter- Clean the Air filter with a vacuum cleaner or soft brush. If dust is too heavy, then rinse it with running water and dry it in a ventilated area.
natural_image
Diagram showing a hand using a tool to press down a curved surface, then to press a flame or smoke from above (no text or symbols present)
- For the best conditions, repeat every two weeks. - If the Air filter dries in a confined(or humid) area, odors may generate. If it occurs, re-clean and dry it in a well-ventilated area.
-
Insert the Air filter back in its original position.
-
Close the front panel.
cleaning and maintaining the air conditioner
CLEANING THE FILTER
Bio filter
Washable foam based Bio filter leads to reduction in allergens that thrive in polluted air. The filter is cleaned with a vacuum or by hand washing.
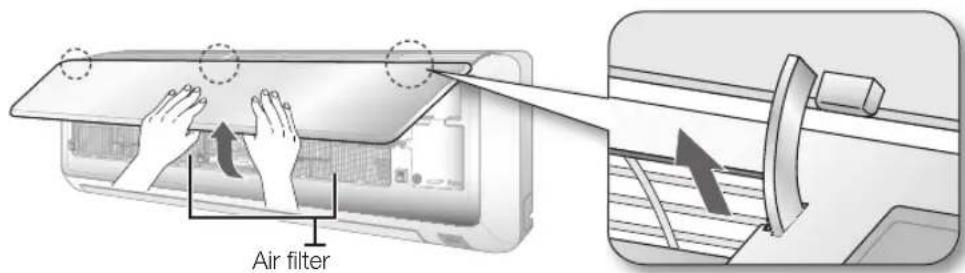
- Open the front panel.
Tightly grab front side of the front panel and lift up the panel to open.
Then slightly push the panel up until the panel is hanged over the hooks of the unit.
text_image
Air filter- Remove the Air filter.
Grab the handle and lift it up. Then, pull the Air filter towards you and slide it down.
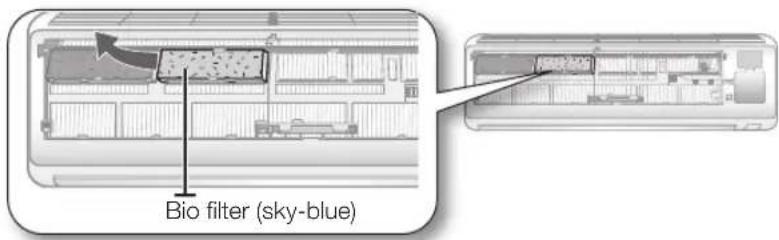
- Slide the Bio filter(sky-blue) out to remove it from the slot.
text_image
Bio filter (sky-blue)
Bio filter can be placed in any 4 slots beneath the air filter.
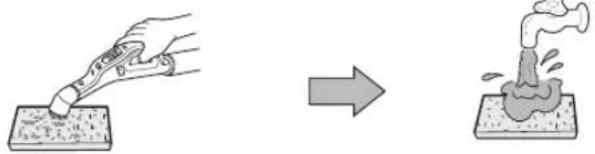
- Clean the Bio filter with a vacuum cleaner or soft brush. Then rinse it with running water and dry it in a ventilated area.
natural_image
Illustration showing a hand using a tool to apply material to a granular block, followed by an arrow indicating process (no text or symbols)-
Install the Bio filter back in position.
-
Close the front panel.

Clean the Bio filter every 3 months. The cleaning term may differ on usage and environmental conditions.
REPLACING THE FILTER
Replacement filter may be purchased from the retail store or ordered from the dealer where you purchased the unit. If you cannot find one, please call a contact center.
Deodorizing filter
Deodorizing filter absorbs efficiently cigarette smoke, pet odors and other unpleasant smells. Deodorizing filter cleaning is simple, just remove old filter and install a new one.
- Open the front panel.
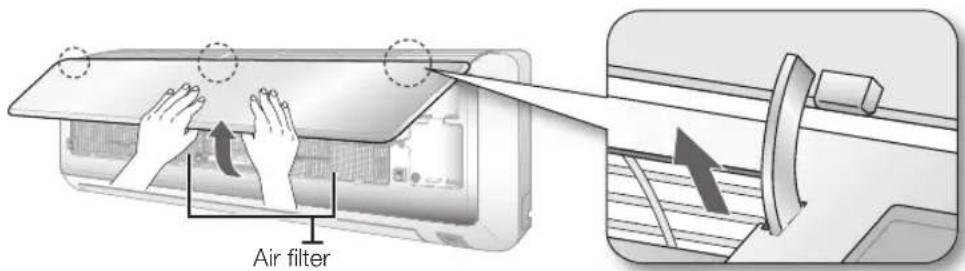
Tightly grab front side of the front panel and lift up the panel to open. Then slightly push the panel up until the panel is hanged over the hooks of the unit.
text_image
Air filter- Remove the Air filter.
Grab the handle and lift it up. Then, pull the Air filter towards you and slide it down.
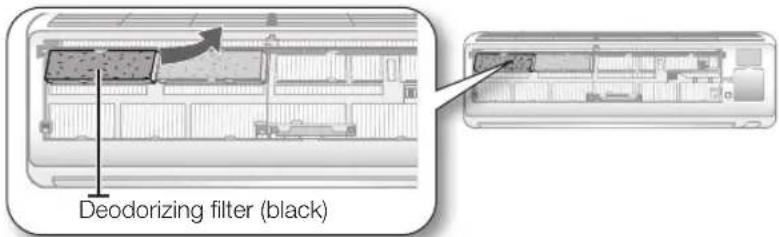
- Slide the Deodorizing filter(black) out to remove it from the slot.
text_image
Deodorizing filter (black)
Deodorizing filter can be placed in any 4 slots beneath the air filter.
-
Install the new Deodorizing filter back in position.
-
Close the front panel.

- Durability of the Deodorizing filter can be different depending on usage and environmental conditions. However, it is recommended to change the Deodorizing filter once a year.
- Even if Deodorizing and Bio filters are installed in an inverted position, it will not affect its filtration system.
cleaning and maintaining the air conditioner
MAINTAINING YOUR AIR CONDITIONER
If the air conditioner will not be used for an extended period of time, dry the air conditioner to maintain it in best condition.
- Dry the air conditioner thoroughly by operating in Fan mode for 3 to 4 hours and disconnect the power plug. There may be internal damage if moisture is left in components.
- Before using the air conditioner again, dry the inner components of the air conditioner again by running in Fan mode for 3 to 4 hours. This helps remove odors which may have generated from dampness.
Periodical checks
Refer to the following chart to maintain the air conditioner properly.
| Type | Description | Every 2 weeks | Every 3 months | Every 4 months | Once a year |
| Indoor unit | Clean the air filter(1) | ● | |||
| Clean the bio filter(1) | ● | ||||
| Replace the deodorizing filter(1) | ● | ||||
| Clean the condensate drain pan (2) | ● | ||||
| Thoroughly clean the heat exchanger (2) | ● | ||||
| Clean the condensate drain pipe (2) | ● | ||||
| Replace the remote control batteries(1) | ● | ||||
| Outdoor unit | Clean the heat exchanger on the outside of the unit (2) | ● | |||
| Clean the heat exchanger on the inside of the unit (2) | ● | ||||
| Clean the electric components with jets of air (2) | ● | ||||
| Verify that all the electric components are firmly tightened (2) | ● | ||||
| Clean the fan (2) | ● | ||||
| Verify that all the fan assembly is firmly tightened (2) | ● | ||||
| Clean the condensate drain pan (2) | ● |
●: This check mark requires checking the indoor/outdoor unit periodically, following to the description to maintain the air conditioner properly.

The checks and maintenance operations described are essential to guarantee the efficiency of the air conditioner. The frequency of these operations varies according to the characteristics of the area, the amount of dust, etc.
(1) The described operations should be performed more frequently if the area of installation is very dusty.
(2) These operations must always be performed by qualified personnel. For more detailed information, see the Installation Manual.
Internal protections via the unit control system
This internal protection operates if an internal fault occurs in the air conditioner.
| Type Description | |
| Against cold air | The internal fan will be off to against cold air when the heat pump is heating. |
| De-ice cycle | The internal fan will be off to against cold air when the heat pump is heating. |
| Anti-protection of internal battery | The compressor will be off to protect internal battery when the air conditioner operates in Cool mode. |
| Protect compressor | The air conditioner does not start operating immediately to protect the compressor of the outdoor unit after it has been started. |

If the heat pump is operating in Heat mode, De-ice cycle is actuated to remove frost from an outdoor unit that may have deposited at low temperatures.
The internal fan is switched off automatically and restarted only after the de-ice cycle is completed.
TROUBLESHOOTING
Refer to the following chart if the air conditioner operates abnormally. This may save time and unnecessary expenses.
| PROBLEM SOLUTION | |
| The air conditioner does not operate immediately after it has been restarted. | ·Because of the protective mechanism, the appliance does not start operating immediately to keep the unit from overloading.The air conditioner will start in 3 minutes. |
| The air conditioner does not work at all. | ·Check that the power plug is properly connected. Insert the power plug into the wall socket correctly.·Check if the circuit breaker is switched off.·Check if there is a power failure.·Check your fuse. Make sure it is not blown out. |
| The temperature does not change. | ·Check if you selected Fan mode.Press the Mode button on the remote control to select another mode. |
| The cool(warm) air does not come out of the air conditioner. | ·Check if the set temperature is higher(lower) than the current temperature. Press the Temp △ or ∇ button on the remote control to change the set temperature. Press the Temp △ or ∇ button to increase or decrease the temperature.·Check if the air filter is blocked by dirt. Clean the Air filter every two weeks.·Check if the air conditioner has just been turned on. If so, wait 3 minutes. |
| The fan speed does not change. | ·Check if you selected Auto or Dry mode.The air conditioner automatically adjusts the fan speed to Auto in Auto/Dry mode. |
| Timer function does not set. | ·Check if you press the Set/Cancel button on the remote control after you have set the time. |
| Odors permeate in the room during operation. | ·Check if the appliance is running in a smoky area or if there is a smell entering from outside. Operate the air conditioner in Fan mode or open the windows to air out the room. |
| The air conditioner makes a bubbling sound. | ·A bubbling sound may be heard when the refrigerant is circulating through the compressor. Let the air conditioner operate in a selected mode. |
| Water is dripping from the air flow blades. | ·Check if the air conditioner has been cooling for an extended period of time with the air flow blades pointed downwards. Condensation may generate due to the difference in temperature. |
| Remote control is not working. | Check if your batteries are depleted.Make sure batteries are correctly installed.Make sure nothing is blocking your remote control sensor.Check that there are strong lighting apparatus near the air conditioner. Strong light which comes from fluorescent bulbs or neon signs may interrupt the electric waves. |
| The indoor unit display shows “dF” during the heating mode | This IS NOT AN ERROR CODE, but the system is informing us it is preforming a regular defrost cycle (melting the ice of outdoor unit heat exchanger). The code “dF” will disappear automatically at the end of defrost. |
| SYMPTOMS | CHECK ERROR MODE(DISPLAYED) | MANAGEMENT |
| The abnormal signal is displayed | Some signal is displayed on the window LED like E101, E121, E122, E154, E162, A186, E187, , E2121, E231, E251, E416, E458, E461, E462, E464, E465, E467, E468, E469, E471, E472, E554, E556, E142 | This product has something wrong, please call the nearest contact center. |
OPERATION RANGES
The table below indicates the temperature and humidity ranges the air conditioner can be operated within. Refer to the table for efficient use.
| MODE | OPERATIONAL TEMPERATURE | INDOOR HUMIDITY | IF OUT OF CONDITIONS | |
| INDOOR OUTDOOR | ||||
| COOLING | 16°C to 32°C -5°C | to 43°C 80% or less | Condensation may occur on the indoor unit with risk to have either water blow off or drops on the floor. | |
| HEATING | 27°C or less -15°C | to 24°C - | Internal protection triggers and the air conditioner will stop. | |
| DRYING | 18°C to 32°C -5°C to | 43°C - | Condensation may occur on the indoor unit with risk to have either water blow off or drops on the floor. | |

The standardized temperature for heating is 7^ C. If the outdoor temperature drops to 0^ C or below, the heating capacity can be reduced depending on the temperature condition.
If the cooling operation is used at over 32^ C(indoor temperature), it does not cool at its full capacity.
QUESTIONS OR COMMENTS?
| COUNTRY CALL | OR VISIT US ONLINE AT | |
| AUSTRIA | 0810 - SAMSUNG (7267864, € 0.07/min) | www.samsung.com |
| BELGIUM 02-20 | 01-24-18 | www.samsung.com/be (Dutch)www.samsung.com/be_fr (French) |
| BOSNIA 051 13 | 3 1999 www.samsung.com | |
| BULGARIA 070 | 01 33 11 , share cost tariff www.samsung.com/bg | |
| CROATIA 062 | SAMSUNG (062 726 786) www.samsung.com/hr | |
| CZECH 800 - SAMSUNG (800-726786) www.samsung.com | ||
| DENMARK 70 | 70 19 70 www.samsung.com | |
| FINLAND 030-6 | 227 515 www.samsung.com | |
| FRANCE | 01 48 63 00 00 | www.samsung.com/fr |
| GERMANY | 0180 6 SAMSUNG bzw.0180 6 7267864*[HHP] 0180 6 M SAMSUNG bzw.0180 6 67267864**(*0,20 €/Anruf aus dem dt. Festnetz, aus dem Mobilfunk max. 0,60 €/Anruf) | www.samsung.com |
| CYPRUS | 8009 4000 only from landline | www.samsung.com/gr |
| GREECE | 80111-SAMSUNG (80111 726 7864) only from land line(+30) 210 6897691 from mobile and land line | www.samsung.com/gr |
| HUNGARY 06-80 | -SAMSUNG(726-7864) | http://www.samsung.com/hu |
| ITALIA | 800-SAMSUNG(726-7864)[HHP] 800.Msamsung (800.67267864) | www.samsung.com |
| INDIA | 1800 3000 82821800 266 8282 | www.samsung.com/in |
| LUXEMBURG | 261 03 710 | www.samsung.com |
| MONTENEGRO | 020 405 888 | www.samsung.com |
| NETHERLANDS | 0900-SAMSUNG (0900-7267864) (€ 0,10/Min) | www.samsung.com |
| NORWAY 815 | 56480 www.samsung.com | |
| POLAND | 0 801-172-678* lub +48 22 607-93-33 **[HHP] 0 801-672-678* lub +48 22 607-93-33***(całkowity koszt połączenia jak za 1 impuls według taryfy operatora)** (koszt połączenia według taryfy operatora) | www.samsung.com/pl |
| PORTUGAL | 808 20-SAMSUNG(808 20 7267) | www.samsung.com |
| ROMANIA | 08008 SAMSUNG (08008 726 7864)TOLL FREE No. | www.samsung.com/ro |
| SERBIA | 011 321 6899 | www.samsung.com/rs |
| SLOVAKIA | 0800 - SAMSUNG(0800-726 786) | www.samsung.com |
| SPAIN | 902 - 1 - SAMSUNG (902 172 678) | www.samsung.com |
| SWEDEN 0771 | 726 7864 (SAMSUNG) www.samsung.com | |
| SWITZERLAND | 0848 - SAMSUNG(7267864, CHF 0.08/min) | www.samsung.com/ch (German)www.samsung.com/ch_fr (French) |
| U.K | 0330 SAMSUNG (7267864) | www.samsung.com |
| EIRE | 0818 717100 | www.samsung.com |
| LITHUANIA | 8-800-77777 | www.samsung.com/lt |
| LATVIA | 8000-7267 | www.samsung.com/lv |
| ESTONIA | 800-7267 | www.samsung.com/ee |
| RUSSIA | 8-800-555-55-55 | www.samsung.com |
| GEORGIA | 0-800-555-555 | www.samsung.com |
| ARMENIA | 0-800-05-555 www.samsung.com | |
| AZERBAIJAN | 088-55-55-555 | www.samsung.com |
| KAZAKHSTAN | 8-10-800-500-55-500(GSM: 7799) | www.samsung.com |
| UZBEKISTAN | 8-10-800-500-55-500 | www.samsung.com |
| KYRGYZSTAN | 00-800-500-55-500 | www.samsung.com |
| TADJIKISTAN | 8-10-800-500-55-500 | www.samsung.com |
| MONGOLIA | +7-800-555-55-55 | www.samsung.com |
| BELARUS 810-8 | 800-500-55-500 www.samsung.com | |
| COUNTRY CALL | OR VISIT US ONLINE AT | |
| UKRAINE | 0-800-502-000 | www.samsung.com/ua (Ukrainian)www.samsung.com/ua_ru (Russian) |
| MOLDOVA | 0-800-614-40 www.samsung.com | |
| U.A.E | 800-SAMSUNG (726-7864) | www.samsung.com |
| OMAN | 800-SAMSUNG(726-7864) | www.samsung.com/ae (English)www.samsung.com/ae_ar (Arabic) |
| KUWAIT | 183-2255 (183-CALL) | www.samsung.com/ae (English)www.samsung.com/ae_ar (Arabic) |
| BAHRAIN | 8000-4726 | www.samsung.com/ae (English)www.samsung.com/ae_ar (Arabic) |
| QATAR 800-2255 | (800-CALL) | www.samsung.com/ae (English)www.samsung.com/ae_ar (Arabic) |
| EGYPT | 08000-726786 | www.samsung.com |
| JORDAN | 800-22273065777444 | www.samsung.com/Levant(English) |
| SYRIA | 18252273 | www.samsung.com/Levant(English) |
| IRAN | 021-8255 | www.samsung.com |
| MOROCCO | 080 100 2255 www.samsung.com | |
| SAUDI ARABIA | 9200-21230 | www.samsung.com/sa (Arabic) |
| TURKEY 444 77 | 11 www.samsung.com | |
| ARGENTINE | 0800-333-3733 | www.samsung.com.ar |
| URUGUAY | 000 405 437 33 | www.samsung.com |
| PARAGUAY | 009 800 542 0001 | www.samsung.com.py |
| BRAZIL | 0800-124-421 (Demais cidades e regiões)4004-0000 (Capitais e grandes centros) | www.samsung.com.br |
| CHILE | 800-SAMSUNG(726-7864)[HHP] 02-24828200 | www.samsung.com/cl |
| BOLIVIA | 800-10-7260 | www.samsung.com |
| COLOMBIA | 01-8000 112 112Bogotá: 6001272 | www.samsung.com/co |
| COSTA RICA | 0-800-507-7267 | www.samsung.com/latin (Spanish)www.samsung.com/latin_en (English) |
| DOMINICA | 1-800-751-2676 | www.samsung.com/latin (Spanish)www.samsung.com/latin_en (English) |
| ECUADOR | 1-800-10-7267 | www.samsung.com/latin (Spanish)www.samsung.com/latin_en (English) |
| EL SALVADOR | 800-6225 | www.samsung.com/latin (Spanish)www.samsung.com/latin_en (English) |
| GUATEMALA | 1-800-299-0013 | www.samsung.com/latin (Spanish)www.samsung.com/latin_en (English) |
| HONDURAS | 800-27919267 | www.samsung.com/latin (Spanish)www.samsung.com/latin_en (English) |
| JAMAICA 1-800 | -234-7267 www.samsung.com | |
| NICARAGUA | 00-1800-5077267 | www.samsung.com/latin (Spanish)www.samsung.com/latin_en (English) |
| PANAMA | 800-7267 | www.samsung.com/latin (Spanish)www.samsung.com/latin_en (English) |
| PERU | 0-800-777-08Desde celulares por favor llamar al número336 8686 | www.samsung.com/pe |
| PUERTO RICO | 1-800-682-3180 | www.samsung.com |
| TRINIDAD & TOBAGO | 1-800-SAMSUNG(726-7864) | www.samsung.com |
| VENEZUELA | 0-800-100-5303 | www.samsung.com/ve |
| AUSTRALIA | 1300 362 603 www.samsung.com/au | |
| PHILIPPINES | 1-800-10-7267864 [PLDT]1-800-8-7267864 [Globe landline and Mobile]02-4222111 [Other landline] | www.samsung.com/ph |
| SINGAPORE | 1800-SAMSUNG(726-7864) | www.samsung.com/sg |
Air Conditioner user manual

100%
Recycled Paper
This manual is made with 100% recycled paper.

imagine the possibilities
Thank you for purchasing this Samsung product.
To receive more complete service, please register your product at
www.samsung.com/register