
PC4NUSKEN - Air-conditioner SAMSUNG - Free user manual and instructions
Find the device manual for free PC4NUSKEN SAMSUNG in PDF.


| Product Type | Air Conditioner (4-Way Cassette) |
| Brand | Samsung |
| Model | PC4NUSKEN |
| Covered Models | PC4NUSKAN, PC4NBSKAN |
| Panel Type | For 4 Way Cassette |
| Accessories Included | M5×35 bolts (4), Installation manual |
| Installation | Panel must be firmly fixed to indoor unit; ensure no gap between panel and ceiling |
| Electrical Connections | Connect panel connector to indoor unit PCB connector; match wire colors |
| Air Flow | 4-way directional airflow with adjustable blades |
| Front Grille | Detachable with safety clips; handles located left and right of Samsung logo |
| Filter | Washable; accessed by opening front grille and pressing [PUSH] signs |
| Safety Clips | Must be connected before grille installation to prevent dropping |
| Maintenance After Blade Adjustment | Turn off and on circuit breaker to synchronize blade angles |
| Authorized Service | List of service stations provided for Turkey (other regions may vary) |
| Repairability | Part of Samsung's service network; replaceable panel and grille parts |
| User Manual | PDF available for free download; 15 pages in English |
Frequently Asked Questions - PC4NUSKEN SAMSUNG
User questions about PC4NUSKEN SAMSUNG
0 question about this device. Answer the ones you know or ask your own.
Ask a new question about this device
Download the instructions for your Air-conditioner in PDF format for free! Find your manual PC4NUSKEN - SAMSUNG and take your electronic device back in hand. On this page are published all the documents necessary for the use of your device. PC4NUSKEN by SAMSUNG.
USER MANUAL PC4NUSKEN SAMSUNG
This manual is made with 100% recycled paper.
imagine the possibilities
Thank you for purchasing this Samsung product.
For Slim 1 Way cassette
PC1NUSMAN
Accessories
Please check the components below before you install the product.
| M4x25 bolt | Installation manual |
| Screw Tightening torque | ||
| M4 | 12.0 ~ 18.0kgf · cm | 1.2 ~ 1.8N · m |

After the installation, the installer should explain to users how to use the product.
Installing the product

Handle the panel carefully.
Do not lean the panel against the wall and do not place the panel on a projecting object. Otherwise, scratches might form on the surface of the panel.
◆ Be careful when gripping the air intake panel for installation.
text_image
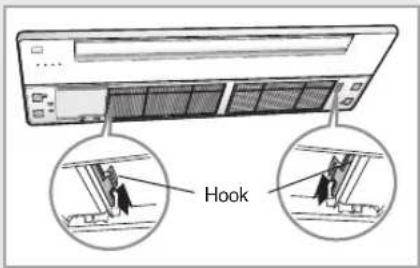
Hook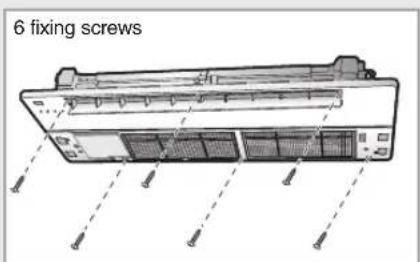
text_image
6 fixing screws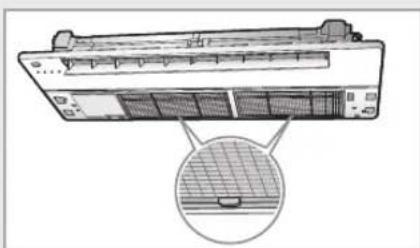
natural_image
Technical line drawing of an air conditioner unit with a magnified inset showing internal structure (no text or symbols)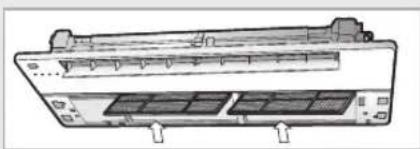
natural_image
Technical line drawing of a dual-chamber air conditioner unit (no text or symbols)1 Fix 2 hooks of the panel on both sides of the indoor unit.
2 Tighten the panel fixing screws.
2-1 Tighten the panel fixing screws temporarily.
2-2 Close the gap between the panel and the ceiling by adjusting the position of the panel and then tighten the screws completely.
3 Open the filter by pressing the two [PUSH] signs on the filter.
4 Connect the cables between the indoor unit and the panel.
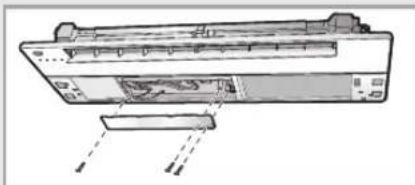
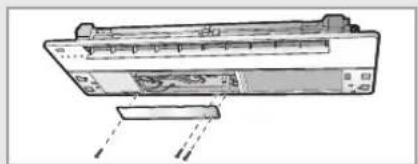
4-1 Remove the 3 screws of the electrical component box and take out the electrical component box cover.
4-2 Connect the panel connector to the indoor unit PCB connector.
◆ Connect the swing motor of the panel or the connectors of remote controller sensor to each connector of the indoor unit.
◆ Make sure the colors of the connector match.
4-3 Reassemble the electrical component box.
4-4 Close the filter.

If the connector is disconnected or the color of the cables is mixed up, the air conditioner and the remote control will not operate.
5 Check if the panel is firmly fixed to the indoor unit.
5-1 When tightening the screws, make sure that there is no gap between the panel and the ceiling and the panel should be parallel with the ceiling or ceiling joint.
◆ If the panel is installed incorrectly, air may leak.
When there is a gap between the panel and the ceiling, adjust the height of the indoor unit.
5-2 Check the installation again as incomplete installation might cause the below problems.
If the gap between the panel and the indoor unit is over 15mm, air may leak or condensing water may come out. Therefore, the 15mm distance between the panel and the indoor unit should be maintained by using a vertical gauge (pattern sheet).
6 Connect the grille.
6-1 Connect the safety clips of the panel to each side of the grille.
6-2 Fix the grille by pushing the [Push] button.

Before installing the grille, you should connect the safety clips to each side of the grille in order to prevent the grille from dropping.
natural_image
Technical line drawing of a printer or printer with visible internal components and base structure (no text or symbols)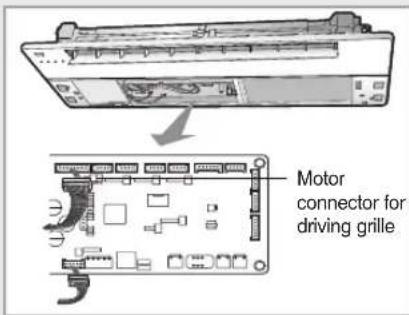
text_image
Motor connector for driving grille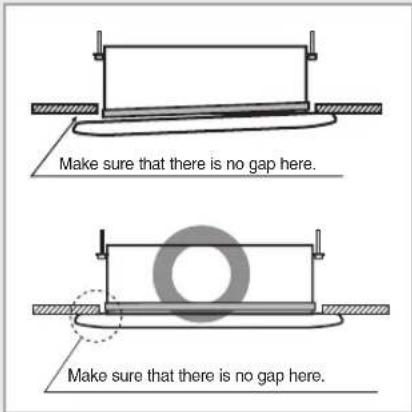
text_image
Make sure that there is no gap here. Make sure that there is no gap here.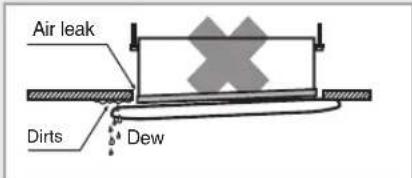
text_image
Air leak Dirts Dew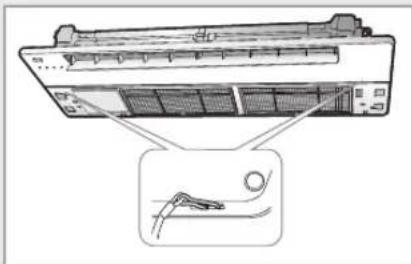
natural_image
Diagram of a server rack with ventilation slots and a close-up inset showing a cable or cable attachment (no text or symbols present)For Slim 1 Way cassette
PC1NUPMAN
Accessories
Please check the components below before you install the product.
| M4x25 bolt | Installation manual |
| Screw Tightening torque | ||
| M4 | 12.0 ~ 18.0kgf · cm | 1.2 ~ 1.8N · m |

After the installation, the installer should explain to users how to use the product.
Installing the product

Handle the panel carefully.
Do not lean the panel against the wall and do not place the panel on a projecting object. Otherwise, scratches might form on the surface of the panel.
◆ Be careful when gripping the air intake panel for installation.
text_image
Ceiling sleeve Base bolt Hanger bracket 30mm Ceiling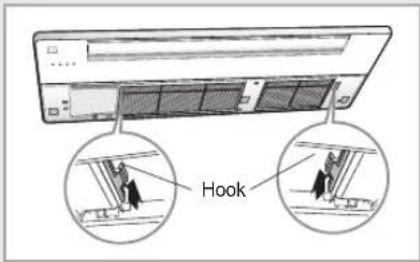
text_image
Hook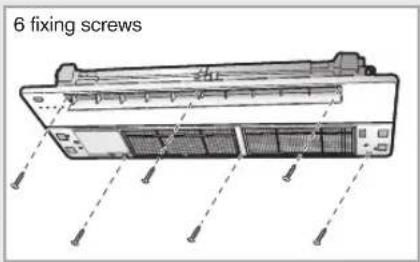
text_image
6 fixing screws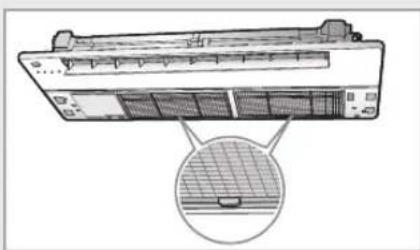
natural_image
Technical line drawing of a server rack with a magnified inset showing internal components (no text or symbols)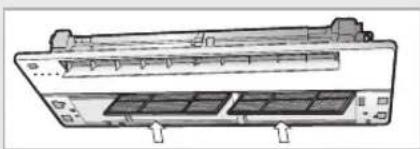
natural_image
Technical line drawing of a mechanical device with no visible text or symbols1 Fix 2 hooks of the panel on both sides of the indoor unit.

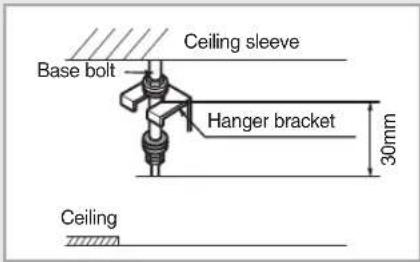
When the hooks of the panel cannot be fixed to the indoor unit, check whether the step motor covers that are at the left or right inside the panel (2 places) are touching the base bolt.
When the length of the base bolt is 30mm for hanger hole, the step motor cover will not touch the base bolt.
2 Tighten the panel fixing screws.
2-1 Tighten the panel fixing screws temporarily.
2-2 Close the gap between the panel and the ceiling by adjusting the position of the panel and then tighten the screws completely.
3 Open the filter by pressing the two [PUSH] signs on the filter.
4 Connect the cables between the indoor unit and the panel.
4-1 Remove the 3 screws of the electrical component box and take out the electrical component box cover.
4-2 Connect the panel connector to the indoor unit PCB connector.
◆ Connect the swing motor of the panel or the connectors of remote controller sensor to each connector of the indoor unit.
◆ Make sure the colors of the connector match.
4-3 Reassemble the electrical component box.
4-4 Close the filter.

If the connector is disconnected or the color of the cables is mixed up, the air conditioner and the remote control will not operate.
5 Check if the panel is firmly fixed to the indoor unit.
5-1 When tightening the screws, make sure that there is no gap between the panel and the ceiling and the panel should be parallel with the ceiling or ceiling joint.
◆ If the panel is installed incorrectly, air may leak.
When there is a gap between the panel and the ceiling, adjust the height of the indoor unit.
5-2 Check the installation again as incomplete installation might cause the problems below.
If the gap between the panel and the indoor unit is over 15mm, air may leak or condensing water may come out. Therefore, the 15mm distance between the panel and the indoor unit should be maintained by using a vertical gauge (pattern sheet).
6 Connect the grille.
6-1 Hook the grille by putting the hinge part into the groove, fit the 3 link parts as shown in the picture and then pull them down to connect.

Before installing the grille, you should connect the safety clips to each side of the grille in order to prevent the grille from dropping.
※ Caution when detaching the panel.
When detaching the panel, grip the link part where the panel and intake panel are connected (1) and push up the link at the panel part (2) to disconnect as shown in the picture(1).
When power supply malfunctions, detach the panel by using a driver at the marked point (2) and proceed with the same method as shown in the picture(1) to detach the panel and then check the power connection status.
natural_image
Diagram of a front panel with a handle and internal components, showing no text or symbols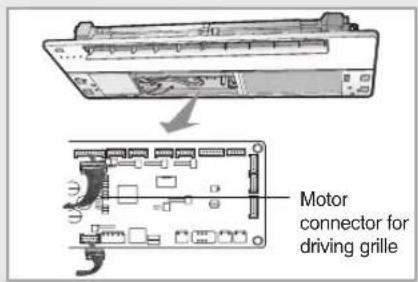
text_image
Motor connector for driving grille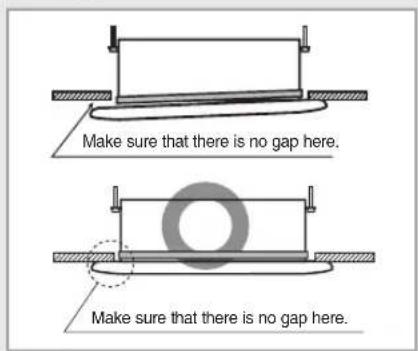
text_image
Make sure that there is no gap here. Make sure that there is no gap here.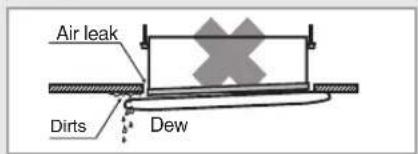
text_image
Air leak Dirts Dew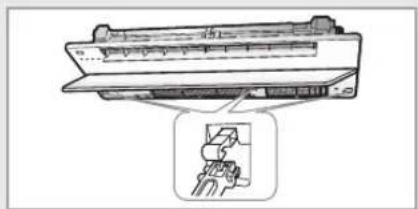
natural_image
Diagram of a computer monitor with an icon showing a person inside (no text or symbols present)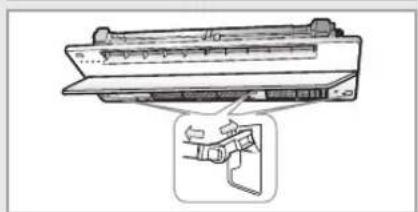
natural_image
Technical line drawing of a mechanical component with an inset showing a firearm (no text or symbols)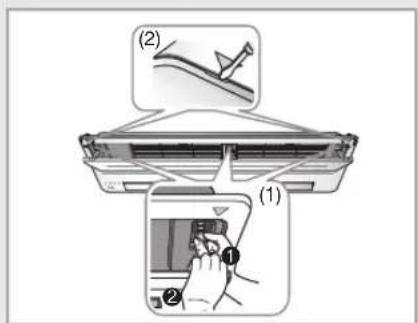
text_image
(1) (2) ① ②For Slim 1 Way cassette
PC1MWSKAN/PC1NWSMAN/PC1BWSMAN
Accessories
Please check the components below before you install the product.
| M4x25 bolt | Installation manual |
| Screw Tightening torque | ||
| M4 | 12.0 ~ 18.0kgf · cm | 1.2 ~ 1.8N · m |

After the installation, the installer should explain to users how to use the product.
Installing the product

Handle the panel carefully.
Do not lean the panel against the wall and do not place the panel on a projecting object. Otherwise, scratches might form on the surface of the panel.
◆ Be careful when gripping the air intake panel for installation.
text_image
Transparent part Transparent part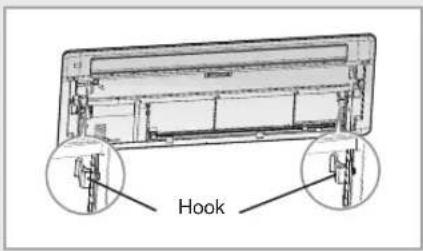
text_image
Hook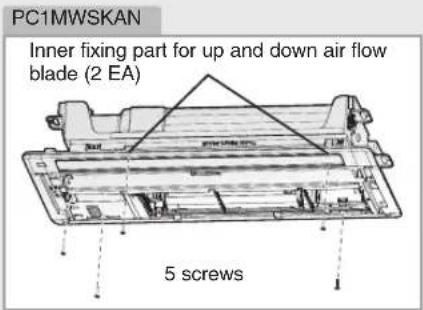
text_image
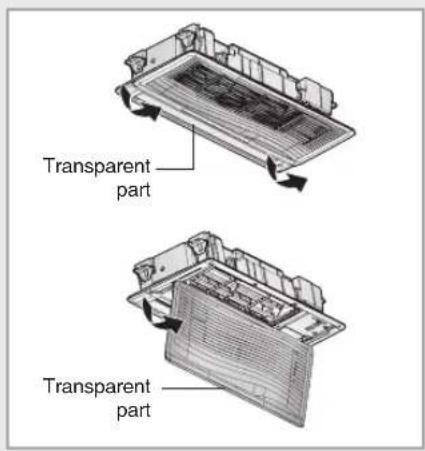
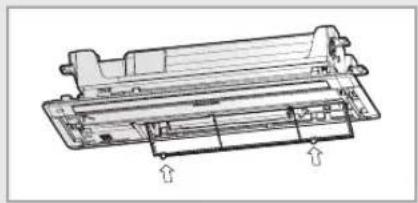
PC1MWSKAN Inner fixing part for up and down air flow blade (2 EA) 5 screws1 Pull the transparent part of the grille to open the grille.
2 Put the hooks of the panel into the grooves on both sides of the indoor unit to fix the panel.
3 Tighten the panel screws.
3-1 Tighten the panel screws temporarily.
3-2 Adjust the position of the panel to fit tightly against the ceiling without any gap, and then tighten the screws correctly.
4 Pull the filter handle to detach the filter.
5 Connect cables between the indoor unit and the panel.
5-1 Remove the 2 screws from the electrical component box.
5-2 Grip the handle of the box and then open the cover as shown in the picture.
5-3 Connect the connectors of the panel to the indoor unit PCB connector.
◆ Connect the swing motor of the panel and connectors of the remote controller receiver to the connectors of the indoor unit.
◆ Make sure the same color of the connectors are connected each other.
5-4 Close the cover and then tighten the cover with screws (2 EA).
5-5 Assemble the filter back.

If the connectors are not connected or different colors of the connectors are connected each other, the air conditioner and remote controller does not work.
6 Check if the panel is firmly fixed to the indoor unit
6-1 When tightening the screws, make sure that there is no gap between the panel and the ceiling and the panel should be parallel with the ceiling or ceiling joint.
◆ If the panel is installed incoorectly, air may leak.
When there is a gap between the panel and the ceiling, adjust the height of the indoor unit.
6-2 Since the incorrect installation may cause the problem as shown in the picture, check the installation status again.
7 Close the grille.
If the center of the grille is not closed tightly, press the center with hands to close the grille completely.
natural_image
Technical line drawing of a mechanical component with no visible text or symbols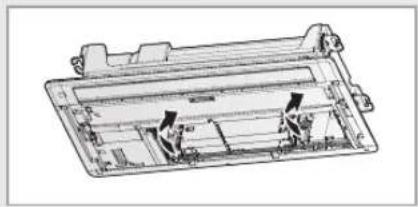
natural_image
Technical line drawing of a mechanical assembly with internal components (no text or symbols)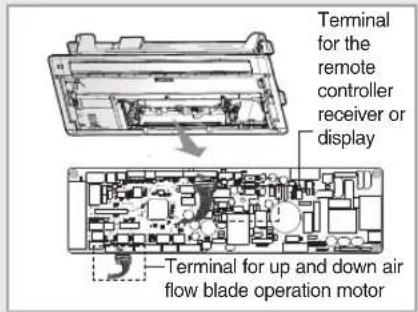
text_image
Terminal for the remote controller receiver or display Terminal for up and down air flow blade operation motor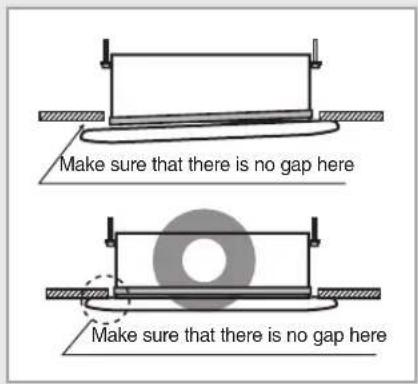
text_image
Make sure that there is no gap here Make sure that there is no gap here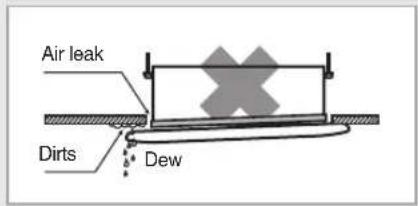
text_image
Air leak Dirts Dew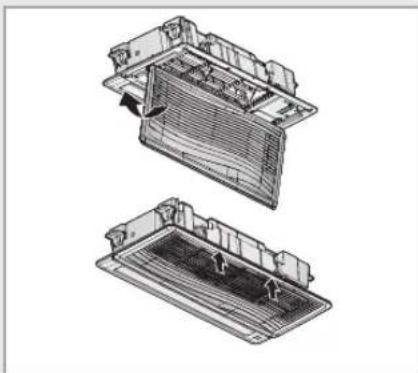
natural_image
Technical line drawing of two views of a mechanical component with internal structure (no text or symbols)For 2 Way Cassette
PC2NUSMEN
Accessories
| M4x12 bolt | M4x16 bolt | Installation manual | User's manual |
 |  |  |  |
natural_image
Technical line drawing of a rectangular panel with internal grid structure (no text or symbols)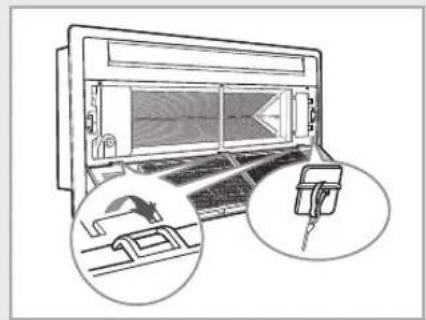
natural_image
Diagram of a device with two circular insets showing internal components (no text or symbols)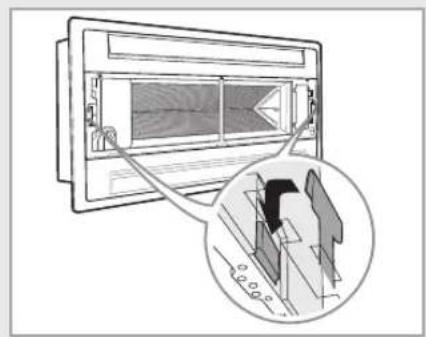
natural_image
Technical diagram of a mechanical device with an inset close-up showing internal components (no text or symbols)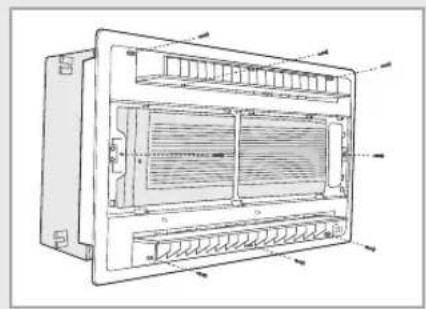
natural_image
Technical line drawing of a multi-chamber air vent system (no text or labels)1 Open the front grille by pushing on both sides and center.
2 Remove the front grille.
2-1 Remove the safety clips.
2-2 Open the front grille about 45q and pull it forward.
3 Fix 2 hooks of the panel on both sides of the indoor unit.
4 Assemble 8 bolts to the panel and the indoor unit temporarily, then adjust it not to leave a gap between the ceiling and the panel.
5 Install the air flow blade.
5-1 Fix the right part of the blade to the indoor unit.

If the direction is incorrect, the blade will not be inserted smoothly. Check that prominence of the right side has a small rectangular groove.
5-2 Fix the other side of the blade.
5-3 Fix the middle part of the blade by pushing slightly the middle tab in the indoor unit.
6 Connect cables between the electrical component box and panel.
6-1 Detach 2 screws from the electrical component box.
6-2 Connect the connector of the panel to the electrical component box.
6-3 Reassemble the electrical component box.

Be careful about the color of cables not so that they will be mixed up.
7 Check out that the panel is fixed to the indoor unit.
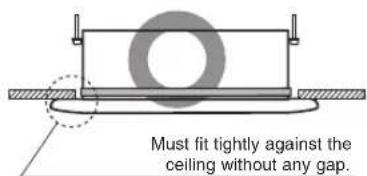
7-1 Fix bolts tightly between the panel and the surface of the ceiling.

If the panel is installed incorrectly, air may leak.
7-2 Check it out not to cause air leaks.
text_image
Must fit tightly against the ceiling without any gap.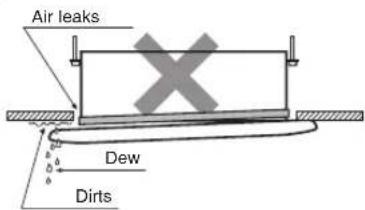
text_image
Air leaks Dew Dirts
If there is a gap between the panel and the ceiling, adjust the height of the indoor unit. Unless adjust the height, dew may form and drip from the gap.
8 Reinstall the front grille in the reverse way.

Do not close any discharge area of panel.
natural_image
Line drawing of a rectangular electronic device with internal grid structure and a magnified inset showing a small object (no text or symbols)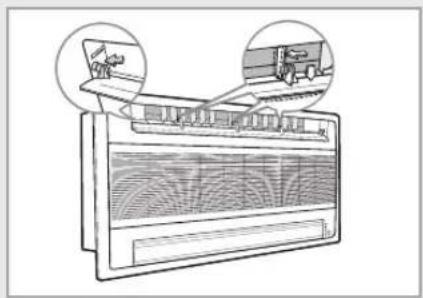
natural_image
Diagram of a refrigerated air conditioner unit with two circular insets showing internal components (no text or labels)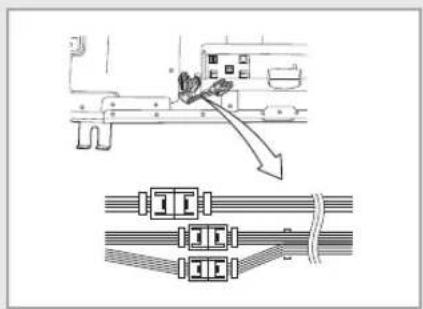
natural_image
Technical diagram showing a mechanical assembly with a downward arrow and a close-up of a cable with four connectors (no text or symbols present)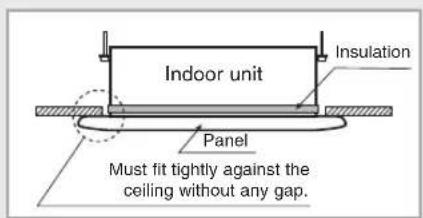
text_image
Indoor unit Insulation Panel Must fit tightly against the ceiling without any gap.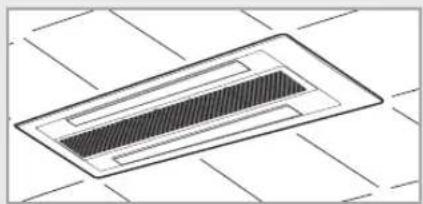
natural_image
Pure technical diagram of a rectangular component with internal hatching, no text or symbols presentFor 4 Way Cassette
PC4NUSKAN / PC4NUSKEN / PC4NBSKAN
Accessories
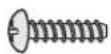
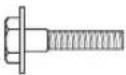
| Bolt(M5XL35 MACHINE)(4) | Installation manual(1) |
 |  |

If the supplied bolt is lost, you may purchase M5 machine bolt (with length of the thread more than 20mm long) and a circular washer from any retail hardware store to replace the lost bolt.
natural_image
Technical line drawing of a mechanical fan assembly (no text or symbols)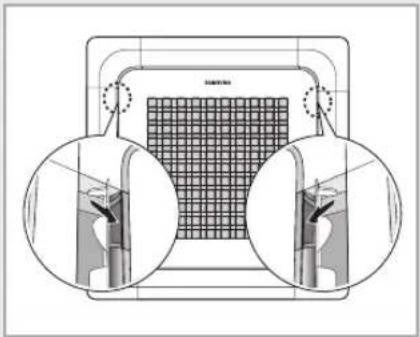
natural_image
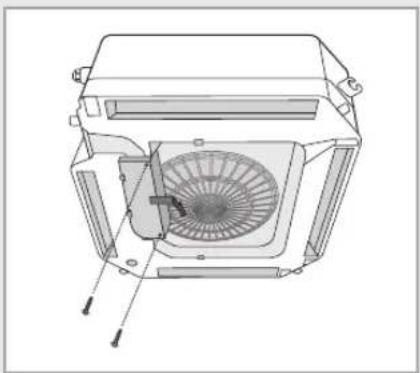
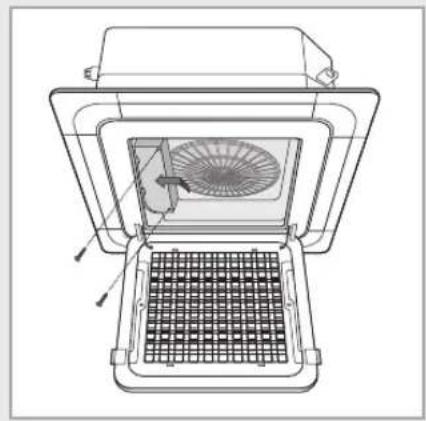
Diagram of a scientific apparatus with two circular components and a grid-patterned chamber (no text or symbols)1 Open the electrical component box cover.
• After untightening the screws, slide the electrical component box cover in the direction of the arrow as shown in the figure and pull it down.
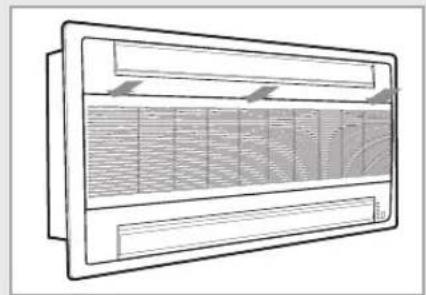
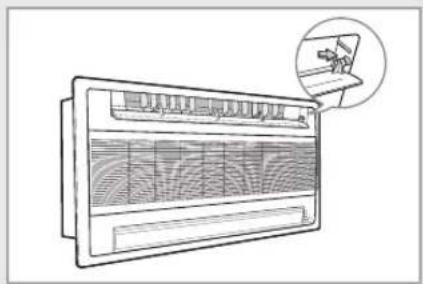
2 Push the switch type handles inward and pull the grille to open.
- Handles are located on the left and right side of the Samsung logo on the grille. - You may have to open the air flow blades first in order to find the handles.
There is no need to detach the grille for the installation of the panel. However, if you want to detach the grill follow the instructions below.
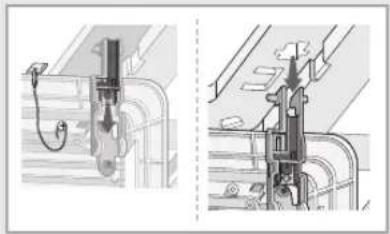
Detach the front grille
1) Remove the safety clips first.
2) Pull the green switch on the hinge part towards the OPEN sign and press and pull the hinge part to remove the grille.
( There are two hinges on the grille and you must apply this step on both of them to remove the grille.)
3) For attaching the front grille, reverse the procedure above.
natural_image
Technical line drawing of mechanical components and piping (no text or symbols)3 Install the panel using 2 hooks on the both sides of the indoor unit.
4 Detach the 4 corners of the panel. Use two grooves on the each corner of the panels when pulling them out.
- Handle the corner with digital display gently, since there are electrical cables connected to that corner.
5 Fix the bolt to the panel.
5-1 Fix 4 bolts to the panel temporarily.
5-2 Fix them tightly not to make a gap between the panel and the ceiling.
6 Connect 3 cables between the indoor unit and the panel.
- Make sure you check the number of pins on the two white terminal before connecting the cables.
text_image
Hook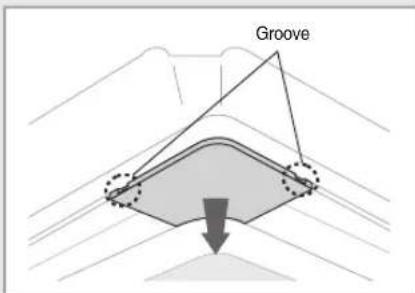
text_image
Groove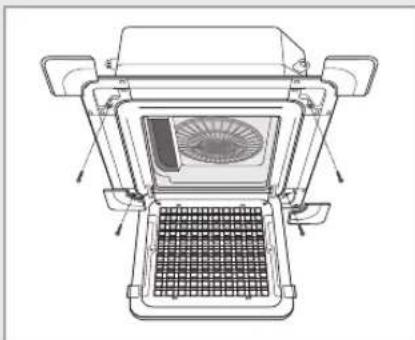
natural_image
Technical line drawing of a mechanical device with internal components and mounting brackets (no text or symbols)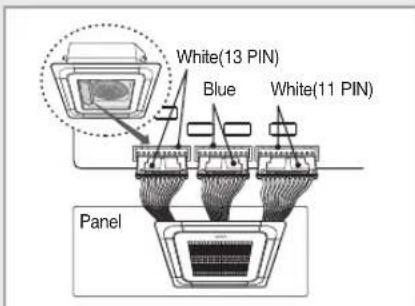
text_image
White(13 PIN) Blue White(11 PIN) PanelFor 4 Way Cassette(Continued)
natural_image
Technical line drawing of a refrigerator interior with fan and grating (no text or symbols)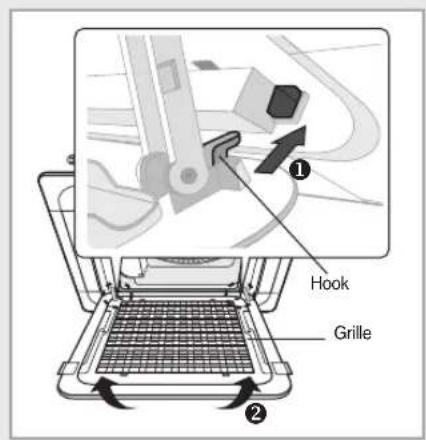
text_image
Hook Grille
natural_image
Pure technical diagram of a microchip or integrated circuit package without any text, labels, or symbols7 Close the electrical component box cover and tighten the screws.
8 Attach and close the front grille.
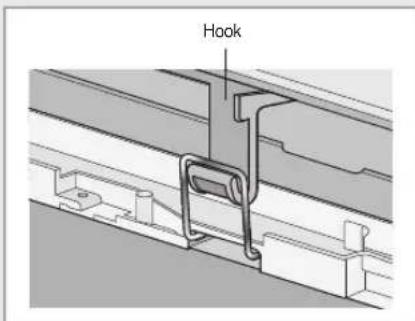
- Make sure the hooks on the rear side of grille fits properly into the grooves on panel (1) and then push the panel to close (2).
9 Check out that the panel is fixed to the indoor unit.
- Fix screws tightly between the panel and the surface of the ceiling. If the panel is installed incorrectly, air may leak.
- Do not block any discharge vents in the panel.

If the angle on the air flow blades has been changed by user due to opening the front grille for installation or maintenance, you must turn off the circuit breaker and turn it on again before using the air conditioner.
Otherwise, angles of the each angle can be different or some of the blade may not close when the product is off.
SERViS iSTASYONLARI GÖSTERiR LISTE
| ITHALATÇI/IMALATÇI-ÜRETİCİ FİRMANIN | ||
| 1 | ÜNVANI | SAMSUNG ELECTRONICS ISTANBUL PAZ.VE TİCLİMİTEDŞİRKETİ LTD. ŞTİ. |
| 2 | MERKEZ ADRESİ | FLAT OFİSİSTANBULİŞ MERKEZİ OTAKÇILAR CAD.NO:78K:3NO:B3 EYUP |
| 3 | TELEFON 0212 4670600 | |
| 4 | FAKS 0212 4378578 | |
| 6 | TİCARET SİCİL NO | 692388 |
| 8 | VERGİ NO 7420937337 | |
| 1 | Servis Adi AHMET DOĞRUDAĞ-DOĞUŞ ELEKTRONİKYetkili Ad SoyadVergi Dairesi TOPİCU MEYDANIVergi No 66274290310Telefon No 904142153076HYB No 63HYB-14Adres HAMİDİYE MAH.263.SOK.RÜMEYSA APT ALTI NO:27/AŞehir ŞANLIURFA | |
| 2 | Servis Adi AK GÜVEN SOĞUTMA-ALİ YILDIZYetkili Ad SoyadVergi Dairesi İSTİK LAL VERGİ DAİRESİVergi No 9600318198Telefon No 03243286260HYB No 33HYB-400Adres BAHÇELIEVLER MH. HÜSEYİN OKAN MERZECİ BLV. NO:476/A.Şehir MERSİN | |
| 3 | Servis Adi ATEŞ ELEKTRONİK - ÖZCAN ATEŞYetkili Ad SoyadVergi Dairesi ARDAVergi No 34690345408Telefon No 02842352837HYB No 95HYB-770Adres FATİH MAH. İBRAHİM AY CAD. PEMBE KÖŞK APT. NO:1 /EDİRNEŞehir EDİRNE | |
| 4 | Servis Adi AYTEK ÇINAR-ŞAFAK KOÇ-ÜMİT TELLAL ORTAKLIĞİ/BİRLİKTEKNİK ORTALIĞİYetkili Ad SoyadVergi Dairesi GÖNENVergi No 2510992103Telefon No 02667627811HYB No 10HYB-867Adres MALKOÇ MAHALLESİ MÜFTİ ŞEVKET CADDESİ NO:60/D /GÖNENŞehir BALIKESİR | |
| 5 | Servis Adi BASARAN TEKNİK SERVİS-MEHMET BASARANYetkili Ad SoyadVergi Dairesi SFRKVergi No 14257597684Telefon No 0242.7220548HYB No 07HYB-537Adres KÖKEZ MAHALLESİ BURMAHANCI CADDESİ No:104/CŞehir ANTALYA | |
| 6 | Servis Adi BAYRAK ELEKTRONİK TAMİR BAKIM HİZMETLERİ SAN.TİC.LTD.ŞTİ.Yetkili Ad SoyadVergi Dairesi GAZLERVergi No 1550544868Telefon No 903624316480HYB No 55HYB-922Adres 91 MAYIS MAH.AĞABALİ CAD. NO:38 İLKADIM/ SAMSUNŞehir SAMSUN | |
| 7 | Servis Adi BERK SERVİS HASAN BAYRAKTARYetkili Ad SoyadVergi Dairesi İLYA5BEYVergi No 10743028780Telefon No 902626414565HYB No 34HYB-9252Adres - KIZILAY CD.1201/2 SK. - NO:1/CŞehir KOCAELİ | |
| 8 | Servis Adi EKREM | MANDAL-GÜVEN TEKNİK |
| Yetkili Ad Soyad | ||
| Vergi Dairesi BEYDAGI V.D. | ||
| Vergi No 6120003245 | ||
| Telefon No 904225242145 | ||
| HYB No 44HYB-45 | ||
| Adres UÇBAĞLAR MAH.YUNUS EMRE CAD.NO:25 | ||
| Şehir MALATYA | ||
| 9 | Servis Adi EMİR ELEKTRONİK-SECATTİN AYLANÇ | |
| Yetkili Ad Soyad | ||
| Vergi Dairesi ERZURUM | ||
| Vergi No 12956155408 | ||
| Telefon No 04422373701 | ||
| HYB No 25HYB-223 | ||
| Adres GEZ MAH.CAYKARA CAD. NO:44/14 | ||
| Şehir ERZURUM | ||
| 10 | Servis Adi EM-TA TEKNİK-EMRAH KORUYUCU | |
| Yetkili Ad Soyad | ||
| Vergi Dairesi OSMANİYE | ||
| Vergi No 5800184897 | ||
| Telefon No 903286125766 | ||
| HYB No 01HYB-3156 | ||
| Adres 7 OCAK MAH.D.AHMET ALKAN CAD. NO:132/C./MERKEZ | ||
| Şehir OSMANİYE | ||
| 11 | Servis Adi ENVER TURKUT - TURKUT TEKNİK | |
| Yetkili Ad Soyad | ||
| Vergi Dairesi DÜDEN | ||
| Vergi No 20410577534 | ||
| Telefon No 02423442333 | ||
| HYB No 07HYB-253 | ||
| Adres GÜVENLİK MAHALLESİ 267.SOKAK No:16 A/A MURATPAŞA/ANTALYA | ||
| Şehir ANTALYA | ||
| 12 | Servis Adi FATİH TÜRK-HAZAR SOĞUTMA | |
| Yetkili Ad Soyad | ||
| Vergi Dairesi SIVRICE | ||
| Vergi No 93784205288 | ||
| Telefon No 904242186621 | ||
| HYB No 23HYB-226 | ||
| Adres RÜSTEM PAŞA MH.HACİ HAYRİ CD. NO:100/E | ||
| Şehir ELAZIG | ||
| 13 | Servis Adi GARANTI SERVİS DAYANIKLI TÜKETİM MALLARI PAZARLAMA SERVİS HİZMETLERİ SANAYİ VE TİCARET LTD.STİ. | |
| Yetkili Ad Soyad | ||
| Vergi Dairesi GAZOSMANPAŞA | ||
| Vergi No 3980963962 | ||
| Telefon No 02126250625 | ||
| HYB No 34HYB-4664 | ||
| Adres ALİBEYKÖY GÜZELTEPE MAHALLESİ AVCI SOKAK NO.8/B EYÜP | ||
| Şehir ISTANBUL | ||
| 14 | Servis Adi GENERAL SOĞUTMAHALİL ABBASOĞLU | |
| Yetkili Ad Soyad | ||
| Vergi Dairesi KILIS | ||
| Vergi No 0010358834 | ||
| Telefon No 905442754211 | ||
| HYB No 27HYB-4201 | ||
| Adres ALTINÜZÜM MAHALLESİ NEMİKA CADDESİ No:73 A/Z1 / KİLİS MERKEZ | ||
| Şehir KİLİS | ||
| 15 | Servis Adi GÖKSEI SARFAKLAR | |
| Yetkili Ad Soyad | ||
| Vergi Dairesi KARESİ | ||
| Vergi No 34540021010 | ||
| Telefon No 0266247072 | ||
| HYB No 10HYB-528 | ||
| Adres HACİ İLBEY MAH.ANAFARTALAR CAD. NO:80/A POSTAKODU:10100 ALTIEYLÜL/BALIKESİR | ||
| Şehir BALIKESİR |
SERViS iSTASYONLARI GÖSTERiR LISTE
| 16 | Servis Adi Hakan GÜZEL - ÖZKA ELEKTRONİK | |
| Yetkili Ad Soyad | ||
| Vergi Dairesi BİSMİL | ||
| Vergi No 4530610913 | ||
| Telefon No 04124 52111 | ||
| HYB No 21HYB-3322 | ||
| Adres | ALTIOK MAHALLESİ, İSMAİL BEŞİKÇI CADDESİ, JİYAN 3APARTMANI ALTI 87/B / BİSMİL | |
| Şehir DIYARBAKIR | ||
| 17 | Servis Adi IKLİM SOĞUTMA-NİLÜFER ALIÇ | |
| Yetkili Ad Soyad | ||
| Vergi Dairesi MUT | ||
| Vergi No 52693906434 | ||
| Telefon No 03247745503 | ||
| HYB No 33HYB-925 | ||
| Adres PINARBASI MAHALLESİ ATATÜRK BULVARI No:61/C / MUT | ||
| Şehir MERSİN | ||
| 18 | Servis Adi | MAVIAY MÜHENDİSLİK MAKİNE İNŞAAT ELEKTRONİK SANAYİVE TİCARET LİMİTED ŞİRKETİ |
| Yetkili Ad Soyad | ||
| Vergi Dairesi parnukkale | ||
| Vergi No 6130962275 | ||
| Telefon No 02582620090 | ||
| HYB No 20HYB-1221 | ||
| Adres | Merkezefendi Mahallesi 92 Ekim Bulvarı No:37/A Maviay İşMerkezi Merkezefendi/Denizli / DENİZLİ | |
| Şehir DENİZLİ | ||
| 19 | Servis Adi | MEHMET ALKAYA HİZMET ELEKTRONİK TEKNİK SEVISİKAYAPINAR ŞUBESİ |
| Yetkili Ad Soyad | ||
| Vergi Dairesi GÖKALP | ||
| Vergi No 0540127437 | ||
| Telefon No 04122575172 | ||
| HYB No 21HYB-3383 | ||
| Adres | MEDYA MAHALLESİ 153.SOKAK SEÇKİN SİTESİ ALTİ 5/A/41 / KAYAPINAI | |
| Şehir DIYARBAKIR | ||
| 20 | Servis Adi NAİLE KABASAKAL | |
| Yetkili Ad Soyad | ||
| Vergi Dairesi nazılı | ||
| Vergi No 22297368582 | ||
| Telefon No 02563 36266 | ||
| HYB No 90HYB-588 | ||
| Adres | ALTINTAŞ MAHALLESİ FEVZİ ÇAKMAK CADDESİ NO:22/ANAZİLLİ/AYDIN / NAZİLLİ | |
| Şehir AYDIN | ||
| 21 | Servis Adi NECMİ GÜRALP ÖZCAN GÜRALP MÜHENDİSLİK | |
| Yetkili Ad Soyad | ||
| Vergi Dairesi ZİYAPAŞA | ||
| Vergi No 6710909848 | ||
| Telefon No 903224540680 | ||
| HYB No 01HYB-9924 | ||
| Adres GAZİPAŞA MH. BORSA CAD. BORSA APT.NO:32/F | ||
| Şehir ADANA | ||
| 22 | Servis Adi PINAR ELEKTRONİK | |
| Yetkili Ad Soyad | ||
| Vergi Dairesi İSTİK LAL | ||
| Vergi No 8210021023 | ||
| Telefon No 0324 3368928 | ||
| HYB No 33HYB-21 | ||
| Adres MAHMUDİYE MAH.108 SOK.NO:32/B | ||
| Şehir MERSİN | ||
| 23 | Servis Adi SALİHL TEKNİK-TİMUR ACAR Esnaf | |
| Yetkili Ad Soyad | ||
| Vergi Dairesi ADIL ORAL | ||
| Vergi No 25850298920 | ||
| Telefon No 05542154996 | ||
| HYB No 45HYB-725 | ||
| Adres CUMHURIYET MH. ESKİ MANİSA YOLU NO: 87 TURGUTLU/ | ||
| Şehir MANİSA | ||
| 24 | Servis Adi | SAMTIT ELEKTRİK ELEKTRONİK BİLİŞIM DAYANIKLI TÜKETİM MALLARI SANAYİ VE TİCARET LTD. STİ. |
| Yetkili Ad Soyad | ||
| Vergi Dairesi SELQUK | ||
| Vergi No 7420421384 | ||
| Telefon No 03322388484 | ||
| HYB No 42HYB-1352 | ||
| Adres | MUSALLA BAĞLARI MAH. TELGRAFÇI HAMDİBEY CAD. NO:10 / SELÇUKLU | |
| Şehir KONYA | ||
| 25 | Servis Adi SİMGE ELEKTRONİK-YAŞAR ALAR | |
| Yetkili Ad Soyad | ||
| Vergi Dairesi YILD RIM BEYAZIT | ||
| Vergi No 55804106610 | ||
| Telefon No 0312 3251876 | ||
| HYB No 06HYB-84 | ||
| Adres ETLİK MAH. YENİ ETLİK CAD. NO:205/A | ||
| Şehir ANKARA | ||
| 26 | Servis Adi SİSTEM GURUP ELEKTRONİK TİCARET VE TAAHHÜT LTD. STİ. | |
| Yetkili Ad Soyad | ||
| Vergi Dairesi MALTEPE | ||
| Vergi No 7710312272 | ||
| Telefon No 903122120143 | ||
| HYB No 06HYB-2185 | ||
| Adres ETİMAH.GAZI MUSTAFA KEMAL BULVARI NO:104/A ÇANKAYAANKARA | ||
| Şehir ANKARA | ||
| 27 | Servis Adi STAR ELEKTRONİK SERVİS HİZMETLERİ-MEHMET YILMAZ | |
| Yetkili Ad Soyad | ||
| Vergi Dairesi KARADENİZ | ||
| Vergi No 13669438404 | ||
| Telefon No 904623216224 | ||
| HYB No 61HYB-1084 | ||
| Adres INÖNU MAH. YAVUZ SELİM BULVARI YAVUZ SELİM APARTMANI NO.164/A / ORTAHİSAR | ||
| Şehir TRABZON | ||
| 28 | Servis Adi UFUK NEBİ TEMEL | |
| Yetkili Ad Soyad | ||
| Vergi Dairesi ERGANİ | ||
| Vergi No 17482883854 | ||
| Telefon No 0412612043 | ||
| HYB No 21HYB-3383 | ||
| Adres ADNAN MENDERES MAHALLESI YENİ HAL CADDESİ, SOKAK 1/1 / ERGANİ | ||
| Şehir DIYARBAKIR | ||
| 29 | Servis Adi ÜN SOĞUTMA-AKİF ÜN | |
| Yetkili Ad Soyad | ||
| Vergi Dairesi DÖRTYOL | ||
| Vergi No 31831635246 | ||
| Telefon No 0326712 38 90 | ||
| HYB No 31HYB-28 | ||
| Adres YESİL MAH. ATATÜRK CD.KERVAN SOK.NO:4 | ||
| Şehir HATAY | ||
| 30 | Servis Adi WEGA ELEKTRONİK SACIT SEN | |
| Yetkili Ad Soyad | ||
| Vergi Dairesi CORLU | ||
| Vergi No 62722902022 | ||
| Telefon No 282-653 82 81 | ||
| HYB No 95HYB-362 | ||
| Adres CAMIATİK MAH. ÇALISKAN SOKAK NO. 8/A ÇORLU | ||
| Şehir TEKİRDAG | ||
| 31 | Servis Adi YUSUF KEMİK - MEGA TEKNİK SERVİS | |
| Yetkili Ad Soyad | ||
| Vergi Dairesi GAZ KENT | ||
| Vergi No 5440343766 | ||
| Telefon No 03423381070 | ||
| HYB No 27HYB-1012 | ||
| Adres INCİLIPINAR MAH. MUAMMER AKSOY BLV. KEPKEP PLAZA İŞ MRK. ALTI NO: 8 ŞEHİTKAMIL/ | ||
| Şehir GAZİANTEP | ||