
MWR-ZS00 - Air-conditioner SAMSUNG - Free user manual and instructions
Find the device manual for free MWR-ZS00 SAMSUNG in PDF.


User questions about MWR-ZS00 SAMSUNG
0 question about this device. Answer the ones you know or ask your own.
Ask a new question about this device
Download the instructions for your Air-conditioner in PDF format for free! Find your manual MWR-ZS00 - SAMSUNG and take your electronic device back in hand. On this page are published all the documents necessary for the use of your device. MWR-ZS00 by SAMSUNG.
USER MANUAL MWR-ZS00 SAMSUNG
Air Conditioner user manual

100% Recycled Paper
This manual is made with 100% recycled paper.
imagine the possibilities
Thank you for purchasing this Samsung product.
G-116338 REV. 1

Contents
Preapartion
Safety Precautions 3
Name of the parts 4
Basic function
Basic operation 8
Controlling individual zone 10
Other functions 12
Schedule
Setting the current time 14
Setting the timer 15
Setting
Using the Smart tuning function 20
Checking the error 21
Resetting the filter cleaning alarm 22
User mode 22
ENGLISH-2
Safety Precautions
Before using the Zone controller, read the instructions in this booklet carefully.
Keep this user manual with the installation manual in a handy and safe place. If the user of this product changes, hand over the manuals to the new user.
Never attempt to install the air conditioning system or move the Zone controller by yourself.
| WARNING | Hazards or unsafe practices that may result in severe personal injury or death. |
| CAUTION | Hazards or unsafe practices that may result in minor personal injury or property damage. |
SEVERE WARNING SIGNS
▶ Do not attempt to install or repair this product by yourself.
This product contains no user-serviceable parts. So always consult an authorized service personnel for repairs.
- When moving, consult an authorized service personnel for disconnection and re-installation of the Zone controller.
▶ Ensure that the wall is strong enough to support the weight of the Zone controller.
▶ Install the product using the proper electric power.
In the event of a malfunction (burning smell, etc.), immediately stop the operation, turn off the electrical breaker, and consult an authorized service personnel.
CAUTION SIGNS
▶ Do not install this product in places where it will come into contact with volatile substances such as machine oil, benzene, gasoline or naphtha.
▶ Do not install this product in places where it will come into contact with combustible gases such as sulfuric gas, hydrogen gas, methane gas, etc.
▶ Do not spill liquid of any kind into the Zone controller.
▶ Do not operate this product with wet hands.
- Avoid using spray products such as insecticides near this product.
▶ Do not press the buttons on the Zone connector with a sharp object.
▶ To avoid disconnection, do not over-stretch the cables during installation.
▶ Do not use this product for other purposes.
▶ Do not clean this product with substances such as benzene or acid/alkali solvents.
ENGLISH-3
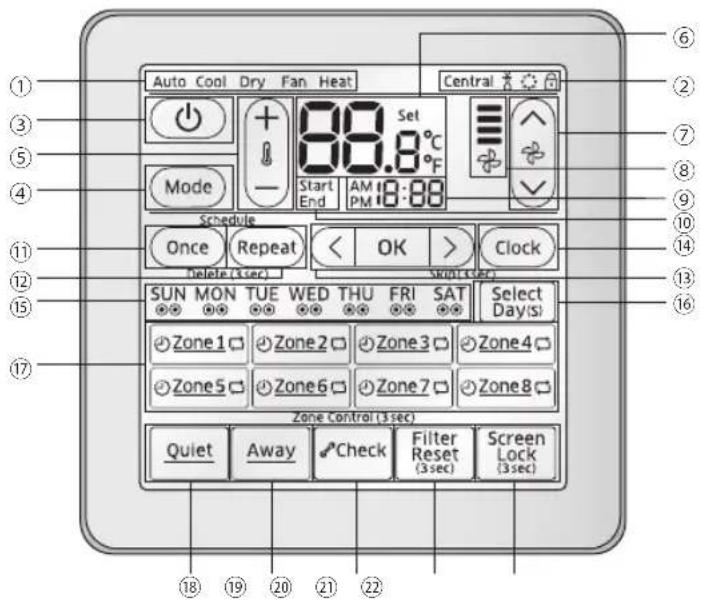
Name of the parts
Master controller (MWR-ZS00)
text_image
Auto Cool Dry Fan Heat Central 88.8°C Mode Start End AM 18:88 Schedule Once Repeat < OK > Clock Delete (3 sec) SUN MON TUE WED THU FRI SAT Select Day(s) Zone1 Zone2 Zone3 Zone4 Zone5 Zone6 Zone7 Zone8 Zone Control (3 sec) Quiet Away Check Filter Reset Screen Lock (3 sec) ① ② ③ ④ ⑤ ⑥ ⑦ ⑧ ⑨ ⑩ ⑪ ⑫ ⑬ ⑭ ⑮ ⑯ ⑰ ⑱ ⑲ ⑳ ㉑ ㉒ ㉓ ㉔ ㉕ ㉖ ㉗ ㉘ ㉙ ㉚ ㉛ ㉜ ㉝ ㉞ ㉟ ㉳ ㉴ ㉵ ㉜ ㉝ ㉞ ㉟ ㉟a ㉟b ㉟c ㉟d ㉟e ㉟f ㉟g ㉟h ㉟i ㉟j ㉟k ㉟l ㉟m ㉟n ㉟o ㉟p ㉟q ㉟r ㉟v ㉟w ㉟x ㉟y ㉟z ㉟u ㉟v ㉟w ㉟x ㉟y ㉟z ㉟u ㉟v| Part Indication Name and explanation | |||
| Indicator | 1 | Auto Cool Dry Fan Heat | Operation mode indicatorSelected operation mode appears |
| 2 | Central | Option (Central, Defrost, Virus doctor, Screen lock) indicatorIcon appears when indoor unit is under central control.icon appears when outdoor unit operates in defrost mode.icon appears when virus doctor function is activated.icon appears when the screen is locked. | |
| Main Control | 3 |  | Power buttonTap to turn on/off the indoor unit |
| 4 | Mode | Mode buttonTap to select desired operation mode | |
| 5 | (ccoo) | Temperature adjustment buttonTap + and – to increase or decrease the desired temperature | |
| 6 | 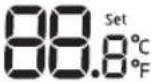 | Temperature indicatorDesired temperature appears (default setting, it can be changed.)Tap and hold to view current room temperatureWhen Demand Response signal occurs;- Temperature and DRED level (1~3) will be displayed alternately in 1 second interval in Cool/Heat mode (ex: d ↔ 240)- Only DRED level (1~3) will be displayed in Fan mode (ex: d ) | |
ENGLISH-4
| Part Indication Name and explanation | |||
| Main Control | 7 | [PT6C] | Fan speed adjustment buttonTap up and down arrow to select desired fan speed |
| 8 | [1042] | Fan speed indicatorSelected Fan speed (Auto/Low/Medium/High) appears here | |
| 9 | 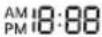 | Time indicatorCurrent time appearsUsed to set the time for a schedule | |
| 10 | [10007] | Timer start/end selection indicatorAppears when selecting start/end time for a timer | |
| Schedule & Zone Setting | 11 | [7B04] | Once buttonTap to set non-repetitive timer |
| 12 | [CC00] | Repeat buttonTap to set repetitive (weekly) timer | |
| 13 | 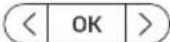 | Select/OK buttonTap <, > button to select options for timer and clockTap OK button to set the selected options | |
| 14 | [WTH4] | Clock buttonTap to set current time | |
| 15 | SUN MON TI [1H0W] | Repetitive (Weekly) timer indicatorShows the status of the repetitive (weekly) timer | |
| 16 | [8017] | Select Day(s) buttonTap to select the day(s) to set up repetitive (weekly) timerSelected: Not selected: SUN | |
| 17 | 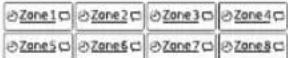 | Zone selection buttonTap to open/close the damper for zone 1 through 8Tap and hold to control individual zoneDamp closed: /Damp opened: Zone1Non-repetitive timer iconAppears when non-repetitive timer is scheduled in such zoneNot scheduled: /Scheduled: eZone1Repetitive (Weekly) timer iconAppears when repetitive (weekly) timer is scheduled in such zoneNot scheduled: /Scheduled: Zone1 | |
| Options | 18 |  | Quiet buttonTap to activate/deactivate Quiet mode |
| 19 |  | Away buttonTap to activate/deactivate Away modeOnly the text “away” appears in the model with away mode | |
| 20 |  | Check buttonDisplayed during the initial set up stageNormally inactive but blinks when checking is needed | |
| 21 |  | Filter Reset (3sec) buttonNormally inactive but blinks when time is reached for filter cleaning | |
| 22 |  | Screen Lock (3sec) buttonTap and hold for 3 seconds to lock/unlock screen | |
ENGLISH-5
Name of the parts
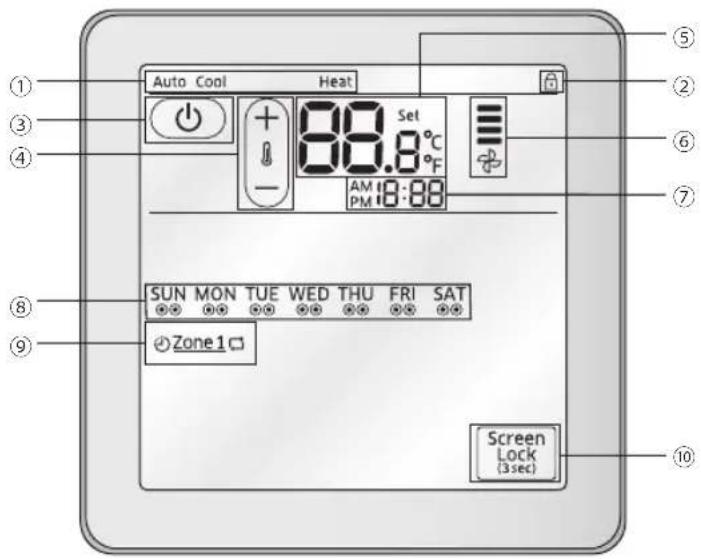
Slave (Individual zone) controller (MWR-ZS10)
text_image
Auto Cool Heat 88.8°C AM 18:08 PM 18:08 SUN MON TUE WED THU FRI SAT Zone1 Screen Lock (3sec) ① ② ③ ④ ⑤ ⑥ ⑦ ⑧ ⑨ ⑩| Part Indication Name and explanation | |||
| Indicator | 1 | Auto Cool Heat | Operation mode indicatorSlave controller does not display the operation mode of the indoor unit. Only Auto, Cool and Heat will be displayed accordingly.'Auto' will be displayed when the desired temperature is set to a zone to controller the damper automatically. 'Auto' and 'Heat' or 'Cool' can be displayed at the same time.Cool' will be displayed when the indoor unit is operating in Cool, Dry or Fan mode.'Heat' will be displayed when the indoor unit is operating in Heat mode.When the desired temperature is set to a zone,'Auto' will appear however, it will disappear when you open/close the damper manually by using thePowerbutton or by the master controller. |
| 2 | [06x4] | Screen lock indicatorAppears when the screen is locked.Command cannot be executed and icon will blink for 3 seconds when;- If you have selected the temperature that is beyond the range of upper or lower temperature limit. | |
| Main Control | 3 |  | Power buttonTap to turn on/off the damper |
| 4 | 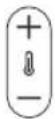 | Temperature adjustment buttonTap + and – to increase or decrease the desired temperatureWhen the room temperature has not reached the desired temperature, damper will remain open | |
ENGLISH-6
| Part Indication Name and explanation | |||
| Main Control | 5 | 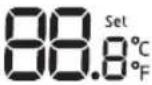 | Temperature indicatorDesired temperature appears (default setting, it can be changed.)Tap and hold to view current room temperature |
| 6 | ### | Fan speed indicatorSelected Fan speed (Auto /Low/Medium/High) from the master | |
| 7 |  | Time indicatorCurrent time appears | |
| 8 |  | Repetitive (Weekly) timer indicatorShows the status of the repetitive (weekly) timer | |
| 9 |  | Zone /Schedule indicatorDisplays current zone numberDisplays status of damperDamp closed:/Damp opened:Zone1Non-repetitive timer iconAppears when non-repetitive timer is scheduled in such zoneNot scheduled:/Scheduled:Zone1Repetitive (Weekly) timer iconAppears when repetitive (weekly) timer is scheduled in such zoneNot scheduled:/Scheduled:Zone1 | |
| 10 |  | Screen Lock (3sec) buttonTap and hold for 3 seconds to lock/unlock screen | |
ENGLISH-7
Basic operation
Turning on/off the power
Tap the Power button to turn on/off the power.

text_image
Auto 23.0°C PM 12:00 Mode Schedule Once Repeat Clock Zone 1 Zone 2 Zone 3 Zone 4 Zone 5 Zone 6 Zone 7 Zone 8 Zone Control (On) Quiet Away Screen Lock OnSelecting the operation mode
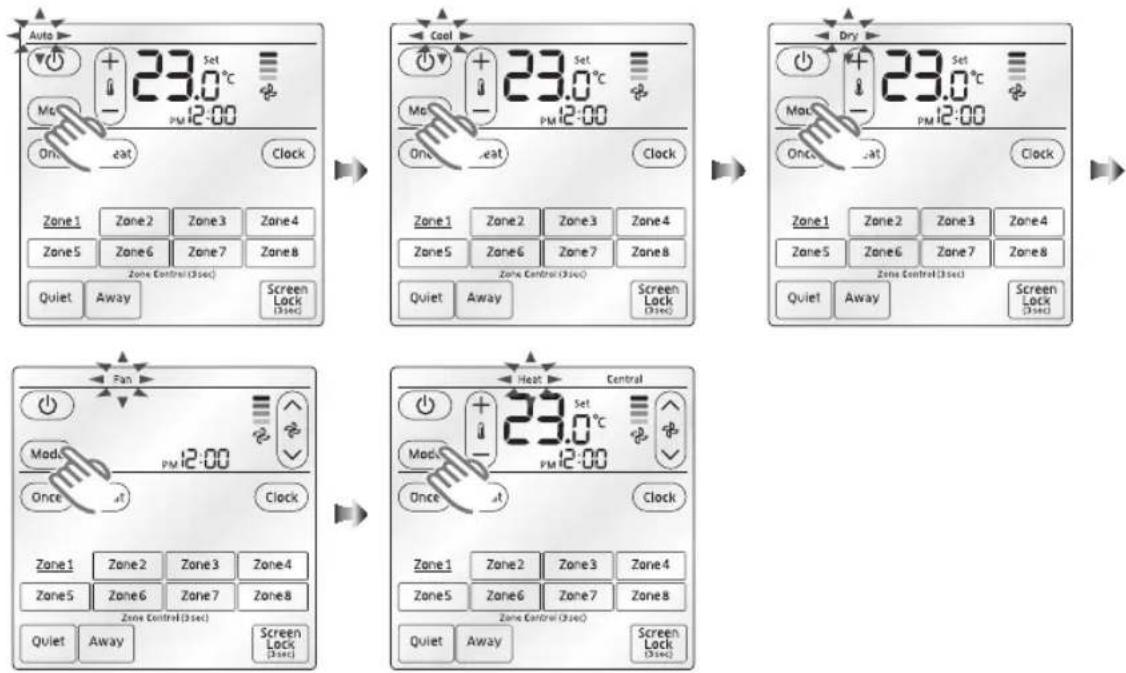
Press the Mode button to set the operation mode.
▶ Operation mode will be repeated in following order: Auto → Cool → Dry → Fan → Heat
flowchart
graph TD
    A["Auto"] --> B["Zone 1 Zone2 Zone3 Zone4"]
    B --> C["Zone5 Zone6 Zone7 Zone8"]
    C --> D["Zone Control (3sec)"]
    D --> E["Quiet Away Screen Lock (3sec)"]

    F["Cool"] --> G["Zone 1 Zone2 Zone3 Zone4"]
    G --> H["Zone5 Zone6 Zone7 Zone8"]
    H --> I["Quiet Away Screen Lock (3sec)"]

    J["Dry"] --> K["Zone 1 Zone2 Zone3 Zone4"]
    K --> L["Zone5 Zone6 Zone7 Zone8"]
    L --> M["Quiet Away Screen Lock (3sec)"]

    N["Fan"] --> O["Zone 1 Zone2 Zone3 Zone4"]
    O --> P["Zone5 Zone6 Zone7 Zone8"]
    P --> Q["Zone Control (3sec)"]
    Q --> R["Quiet Away Screen Lock (3sec)"]

    S["Heat"] --> T["Zone 1 Zone2 Zone3 Zone4"]
    T --> U["Zone5 Zone6 Zone7 Zone8"]
    U --> V["Zone Control (3sec)"]
    V --> W["Quiet Away Screen Lock (3sec)"]
ENGLISH-8
Adjusting the desired temperature
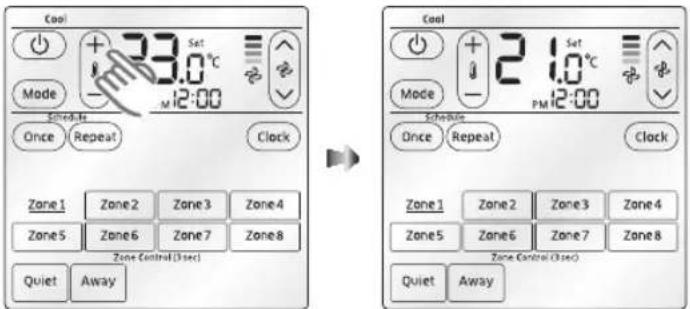
Tap the Temp +,- button to adjust the desired temperature.
▶ You can increase/decrease the temperature in 0.1/0.5/1.0 °C unit within following temperature range for each mode:
| Mode Temperature range |
| Auto 18 °C ~ 30 °C |
| Cool 18 °C ~ 30 °C |
| Dry 18 °C ~ 30 °C |
| Fan Temperature adjustment is not possible |
| Heat 16 °C ~ 30 °C |

NOTE
- If upper/lower temperature limit was set from user mode, temperature range can be different from information indicated above.
• If you try to set the temperature beyond upper/lower temperature limit, icon will blink for 3 seconds.
text_image
Cool + 3.0°C Mode - 12:00 Schedule Once Repeat Clock Zone 1 Zone 2 Zone 3 Zone 4 Zone 5 Zone 6 Zone 7 Zone 8 Zone Control (3 sec) Quiet Away Cool + 2.0°C Mode - PM 12:00 Schedule Once Repeat Clock Zone 1 Zone 2 Zone 3 Zone 4 Zone 5 Zone 6 Zone 7 Zone 8 Zone Control (3 sec) Quiet AwayChecking the current room temperature
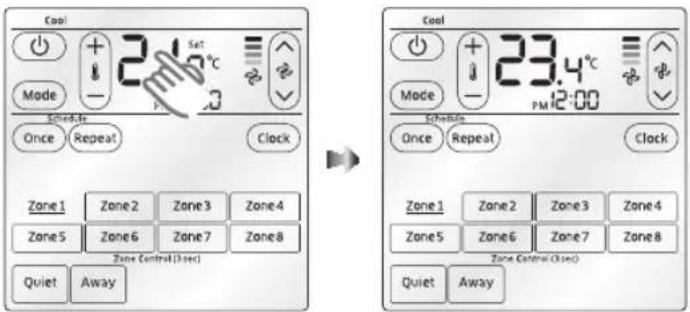
Tap the temperature indicator to check current room temperature.
▶ Default setting for controller was set to display desired temperature.
text_image
Cool Mode 2.5°C Set Clock Once Repeat Clock Zone 1 Zone 2 Zone 3 Zone 4 Zone 5 Zone 6 Zone 7 Zone 8 Zone Control (3 sec) Quiet Away Cool Mode 23.4°C PM 12:00 Schedule Once Repeat Clock Zone 1 Zone 2 Zone 3 Zone 4 Zone 5 Zone 6 Zone 7 Zone 8 Zone Control (3 sec) Quiet Away
NOTE
• This function is not available in Fan mode.
ENGLISH-9
Basic operation
Selecting the Fan speed
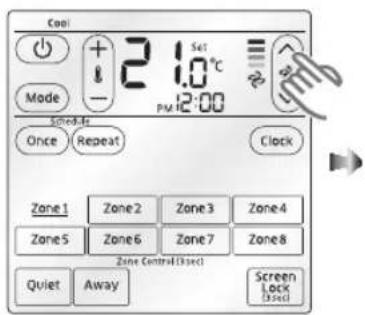
Tap the Fan ∧, ∨ button to set the desired fan speed.
▶ You can select one of the following Fan speed :
Auto ( , , , , ) → Low ( ) → Medium ( ) → High ( )
▶ Actual fan speed may be different for each operation mode.
| Mode Supported fan speed |
| Auto Fan speed is set to auto and cannot be adjusted. |
| Cool Auto, Low, Medium, High |
| Dry Fan speed is set to auto and cannot be adjusted. |
| Fan Auto, Low, Medium, High |
| Heat Auto, Low, Medium, High |
text_image
Cool Mode +2 1.0°C PM 12:00 Screw-Fe Once Repeat Clock Zone 1 Zone 2 Zone 3 Zone 4 Zone 5 Zone 6 Zone 7 Zone 8 Zone Control (3sec) Quiet Away Screen Lock Closed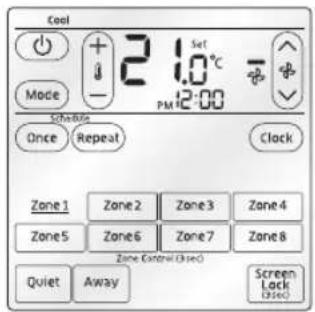
text_image
Cool Mode + - Set 2 1.0°C PM 12:00 Schedule Once Repeat Clock Zone 1 Zone 2 Zone 3 Zone 4 Zone 5 Zone 6 Zone 7 Zone 8 Zone Control Close Quiet Away Screen Lock (3 sec)Controlling individual zone
Open/Close the damper for each zone
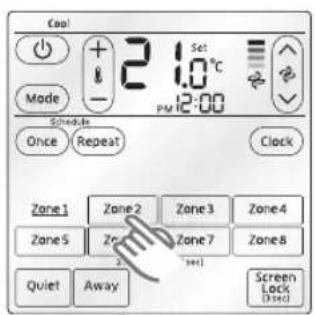
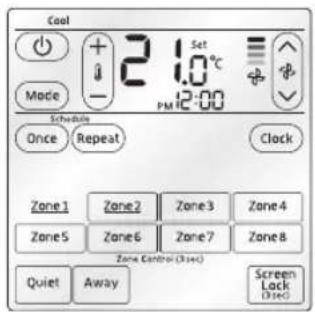
Tap the button for desired zone(s) to open/close the damper.
▶ You can select from Zone 1 \~ Zone 8.
▶ Status (Open/close) of the damper for each zone will be displayed as follows.
Damper open: / Damper close:
Zone1
text_image
Cool Mode + 2 1.0°C - PM 12:00 Schedule Once Repeat Clock Zone1 Zone2 Zone3 Zone4 Zone5 Zone6 Zone7 Zone8 Quiet Away Screen Lock (3 sec)→
text_image
Cool Mode Schedule Once Repeat Clock Zone1 Zone2 Zone3 Zone4 Zone5 Zone6 Zone7 Zone8 Zone Control (Dec) Quiet Away Screen Lock (Dec)ENGLISH-10
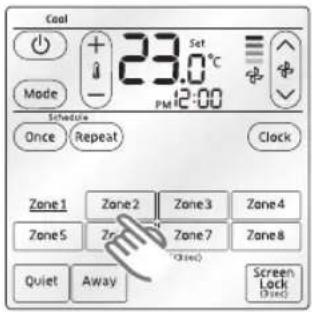
Setting the temperature to open/close the damper automatically
text_image
Cool Mode Schedule Once Repeat 23.0°C PM 12:00 Clock Zone1 Zone2 Zone3 Zone4 Zone5 Zone6 Zone7 Zone8 Quiet Away Screen Lock (Dec) Set-
Tap and hold the desired Zone (1\~8) button for 3 seconds.
-
When the desired zone is selected, border line for other zones will disappear and only selected zone will have border line.
▶ If the selected zone already has previous temperature setting, it will be displayed in temperature indicator.
If the selected zone doesn't have previous temperature setting, it will display the same temperature set from the master controller.
text_image
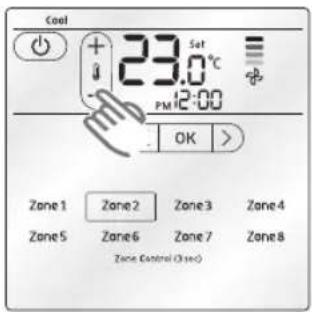
Cool + 23.0 Set PM 12:00 OK > Zone 1 Zone 2 Zone 3 Zone 4 Zone 5 Zone 6 Zone 7 Zone 8 Zone Control Close- Tap the Temp +, - button to set the desired temperature for the selected zone.
When the room temperature of the zone reaches the desired temperature, damper will be closed automatically and otherwise, damper will be open.
text_image
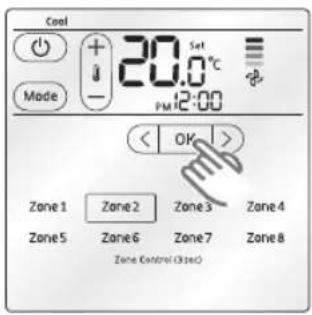
Cool 20.0°C PM 12:00 OK Zone 1 Zone 2 Zone 3 Zone 4 Zone 5 Zone 6 Zone 7 Zone 8 Zone Control (3sec)- Tap the OK button to end the setting.
When the temperature setting for the selected zone is complete, temperature indicator will display the temperature set from the master controller.
ENGLISH-11
Other functions
Using the Quiet function
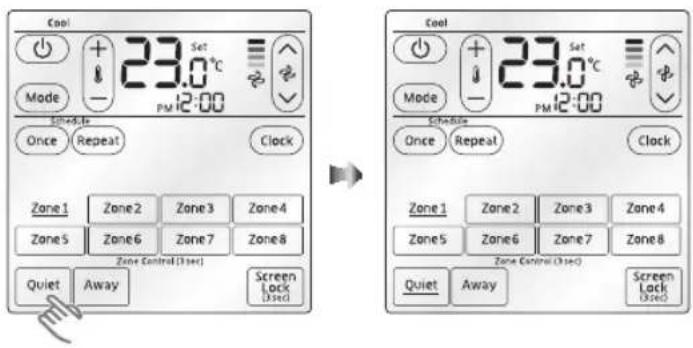
Quiet operation reduces noise of the operation.
Tap the Quiet button while the air conditioner is on.
▶ Quiet function will be on and the button will be underlined.
▶ Tap the Quiet button again to cancel the Quiet function.
text_image
Cool Mode 23.0°C PM 12:00 Schedule Once Repeat Clock Zone 1 Zone 2 Zone 3 Zone 4 Zone 5 Zone 6 Zone 7 Zone 8 Zone Control (3 sec) Quiet Away Screen Lock (3 sec) Cool Mode 23.0°C PM 12:00 Schedule Once Repeat Clock Zone 1 Zone 2 Zone 3 Zone 4 Zone 5 Zone 6 Zone 7 Zone 8 Zone Control (3 sec) Quiet Away Screen Lock (3 sec)
NOTE
- If you select Quiet function in Fan mode or from the unit that doesn't support the function, will blink for 3 seconds.
Using the Away function
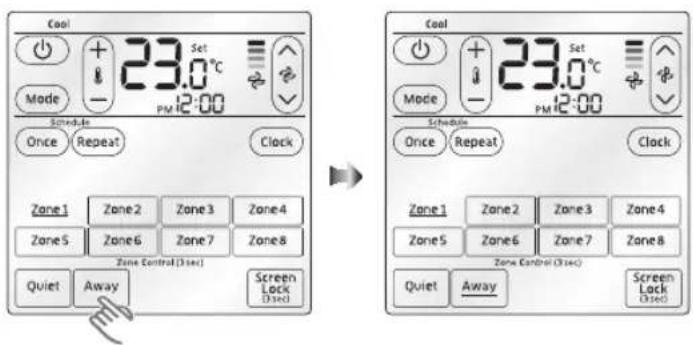
Away operation operates indoor units for set time and turns off automatically.
Tap the Away button while the air conditioner is on.
▶ Away function will be on and the button will be underlined.
Tap the Away button again to cancel the Quiet function.
text_image
Cool Mode Schedule Once Repeat Clock Zone1 Zone2 Zone3 Zone4 Zone5 Zone6 Zone7 Zone8 Zone Control (3 sec) Quiet Away Screen Lock (3 sec) Cool Mode Schedule Once Repeat Clock Zone1 Zone2 Zone3 Zone4 Zone5 Zone6 Zone7 Zone8 Zone Control (3 sec) Quiet Away Screen Lock (3 sec)ENGLISH-12
Locking/Unlocking the screen
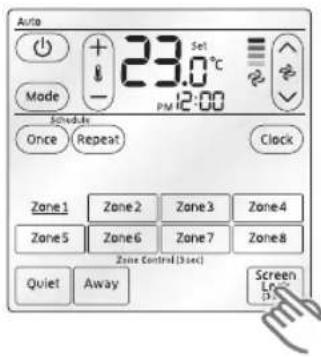
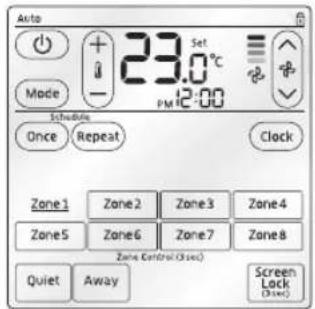
Tap the Screen Lock (3sec) button for 3 seconds to lock/unlock the screen.
▶ You may lock/unlock the screen anytime (whether unit is on or off).
▶ When the screen is locked, () icon will appear.
text_image
Auto Mode Schedule Once Repeat 23.0°C PM 12:00 Clock Zone1 Zone2 Zone3 Zone4 Zone5 Zone6 Zone7 Zone8 Zone Control (3 sec) Quiet Away Screen Screen Line→
text_image
Auto Mode + 23.0°C PM 12:00 Schedule Once Repeat Clock Zone1 Zone2 Zone3 Zone4 Zone5 Zone6 Zone7 Zone8 Zone Control (Closed) Quiet Away Screen Lock (Closed)Setting the current time
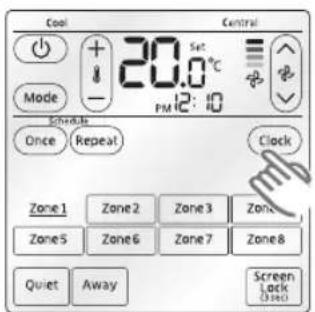
text_image
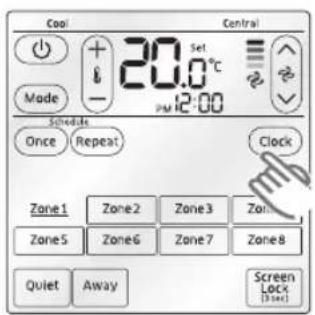
Cool Central + - 20.0°C Set PM 12:00 Made Schedules Once Repeat Clock Zone1 Zone2 Zone3 Zone4 Zone5 Zone6 Zone7 Zone8 Quiet Away Screen Lock (None)- Tap the Clock button to set the current time.
▶ <, OK, > button will appear and AM will starts to blink.
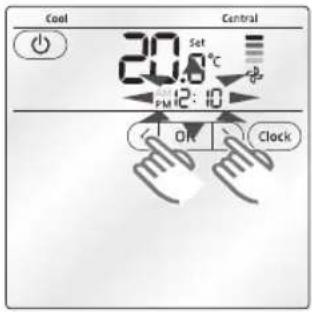
text_image
Cool Central 20.0 Set °C + - PMIC: 10 ON Clock- Set AM/PM, hour, minute in order.
▶ Tap <, > to select the value and tap the OK button to set next item.

- When you tap the <, > button shortly, hour and minute value will increase or decrease by 1. However, if you tap and hold the <, > button, it will increase or decrease by 5 and then 10.
text_image
Cool Mode + - 20.0°C PM 12: 10 Central Schedule Once Repeat Clock Zone1 Zone2 Zone3 Zone4 Zone5 Zone6 Zone7 Zone8 Quiet Away Screen Lock (Lock)- Tap the Clock button again to complete the time setting.
ENGLISH-14
Setting the timer
Setting the non-repetitive timer
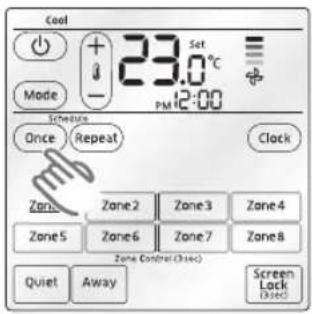
text_image
Cool + 23.0°C Mode PM12:00 Schedule Once Repeat Clock Zone Zone 2 Zone 3 Zone 4 Zone 5 Zone 6 Zone 7 Zone 8 Zone Control (Close) Quiet Away Screen Lock (Close)- Tap the Once button.
▶ When you tap the Once button, temperature indicator will start to blink.
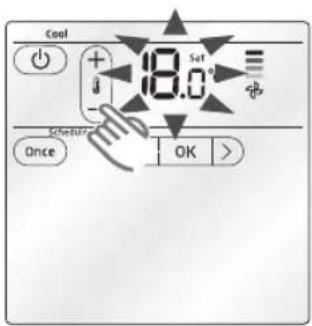
text_image
Cool + 8.0 Set - Scheater Once OK >- Tap the Temp +,- button to adjust the desired temperature.
▶ Temperature range for desired temperature is different for each operation mode.
▶ Tap OK button and move on to the next step.
text_image
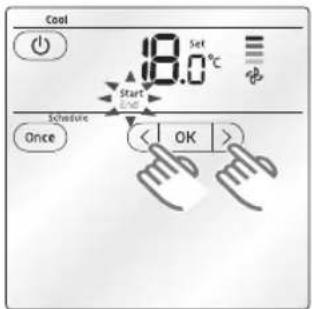
Cool 8.0°C Start End Schedule Once OK- Tap the <,> button to select Start or End.
▶ Select 'Start' to set the time for the air conditioner to turn on automatically. (After setting the 'Start' time, you can choose to set or skip 'End' time setting.)
▶ Select 'End' to set the time for the air conditioner to turn off automatically. (Air conditioner should be on already to set 'End' time only.)
▶ Tap OK button and move on to the next step.
text_image
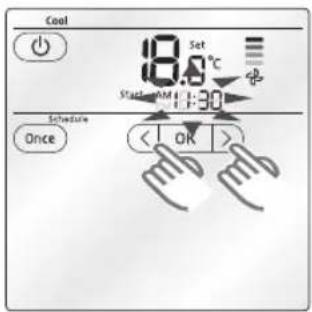
Cool 8.0 Set Start: 12.0°C +30 Schedule Once OK- Set the 'Start' time for the timer.
▶ Tap <, > to select the value and tap the OK button to set next item.
▶ Set AM/PM, hour, minute in order.
▶ After setting the minute, tap the OK button to move on to 'End' time setting.

- Skip this step and move on to the next step if you have selected 'End' from step 3.
- If the current time has already passed the set time, timer will be executed on the next day.
ENGLISH-15
Setting the timer
text_image
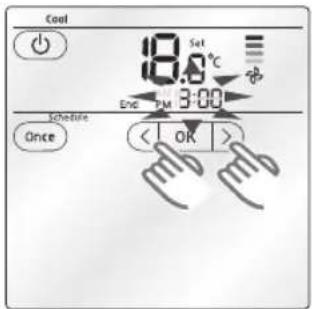
Cool Set 8.0 °C End PM 3:00 Schedule Once < | OK >- Set the 'End' time for the timer.
▶ Tap <, > to select the value and tap the OK button to set next item.
▶ Set AM/PM, hour, minute in order.
▶ After setting the minute, tap the OK button to move on to the next step.

NOTE
- If you want to turn off the air conditioner manually, tap and hold the > button for 3 seconds and press the OK button when the hour and minute display as --:--.
text_image
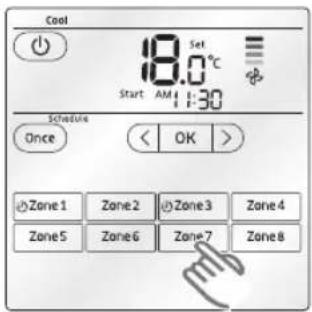
Cool 18.0°C Start AM 1:30 Schedule Once < OK > Zone1 Zone2 Zone3 Zone4 Zone5 Zone6 Zone7 Zone8- Select the zone you wish to apply the timer.
▶ You can select as many zones as you want by tapping each Zone button.
▶ When timer is applied properly, icon will appear on the left side of the zone button.
▶ After selecting the zone, tap the OK button to complete the timer setting.

NOTE
- Previously applied timer setting (that hasn't been executed) will be canceled upon adding a new (non-repetitive) timer.
- You must select at least 1 zone when you set the timer. (If you tap the OK button without selecting a zone, all the zone indicator will blink twice and wait for the user to select a zone.)
- Select the common zone (Default: Zone 1) if you just want to turn on the indoor unit.
Cancelling the non-repetitive timer
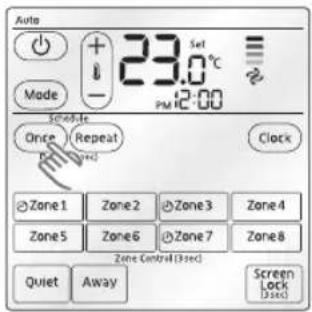
Tap and hold the Once button for 3 seconds to delete existing timers.
▶ 'Delete (3sec)' is displayed under the 'Once/Repeat' button when the timer setting exists.
icon will blink for 3 seconds and it will disappear afterwards.
▶ Timer is successfully deleted when icon disappears.
text_image
Auto Made 23.0°C PM 12:00 Schedule Once Repeat Clock Zone1 Zone2 Zone3 Zone4 Zone5 Zone6 Zone7 Zone8 Zone Control(3sec) Quiet Away Screen Lock(3sec)ENGLISH-16
Setting the repetitive (weekly) timer
text_image
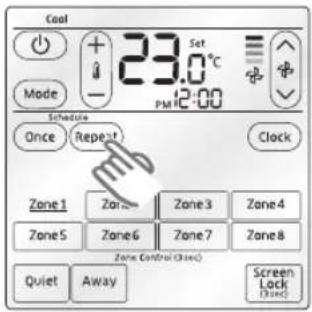
Cool 23.0°C Mode PMI 12:00 Schedule Once Repeat Clock Zone1 Zone Zone3 Zone4 Zone5 Zone6 Zone7 Zone8 Zone Control (Close) Quiet Away Screen Lock (Close)- Tap the Repeat button.
▶ When you tap the Repeat button, temperature indicator will start to blink.
text_image
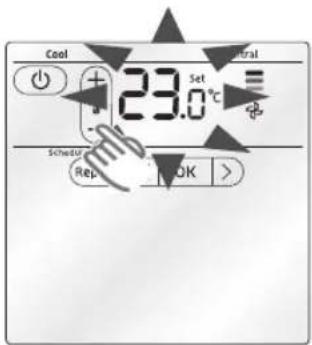
Cool Set Neutral 23.0 °C Scheufer Rep OK >- Tap the Temp +, - button to adjust the desired temperature.
▶ Temperature range for desired temperature is different for each operation mode.
▶ Tap OK button and move on to the next step.
text_image
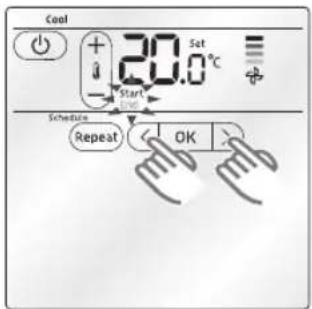
Cool + - 20.0 Sat °C Start END Schedule Repeat OK- Tap the <,> button to select Start or End.
▶ Select 'Start' to set the time for the air conditioner to turn on automatically. (After setting the 'Start' time, you can choose to set or skip 'End' time setting.)
▶ Select 'End' to set the time for the air conditioner to turn off automatically. (Air conditioner should be on already to set 'End' time only.)
▶ Tap OK button and move on to the next step.
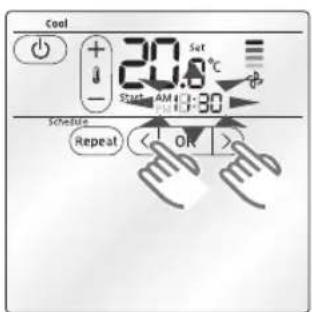
text_image
Cool 20.0 Set °C Start AM 1:30 Schedule Repeat < ON >- Set the 'Start' time for the timer.
▶ Tap <, > to select the value and tap the OK button to set next item.
▶ Set AM/PM, hour, minute in order.
▶ After setting the minute, tap the OK button to move on to 'End' time setting.

- Skip this step and move on to the next step if you have selected 'End' from step 3.
ENGLISH-17
Setting the timer
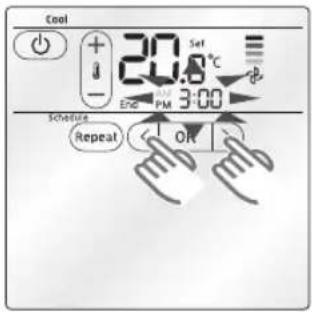
text_image
Cool Set 20.8°C 3:00 End PM Schedule Repeat OR- Set the 'End' time for the timer.
▶ Tap <, > to select the value and tap the OK button to set next item.
▶ Set AM/PM, hour, minute in order.
▶ After setting the minute, tap the OK button to move on to the next step.

- If you want to turn off the air conditioner manually, tap and hold the > button for 3 seconds and press the OK button when the hour and minute display as --:--.
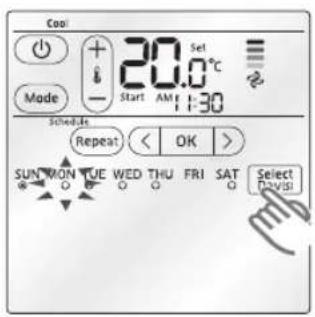
text_image
Cool Mode + - Start AM 20.0°C 1:30 Schedule Repeat < > OK > SUN MON TUE WED THU FRI SAT Select Davis- Tap <, > button to select the day to apply the timer.
▶ Display may differ depending on the previously set weekly timer.
SUN : No weekly timer has been set.
MON: One weekly timer has been set.
TUE : Two weekly time has been set and cannot add another timer.
Tap Select Day(s) button after selecting the day, ○ will become ◎ when timer is successfully added.
▶ Tap <, > button again to select another day and tap Select Day(s) button again to add the timer.
▶ When finished applying the timer to desired day(s), tap the OK button to complete the setting and move on to the next step.

- You may select as many days as you want but cannot select same day twice.
- If you tap the OK button without selecting a day, all the active schedule indicator will blink twice (1 time per second) and wait for the user to select a day.
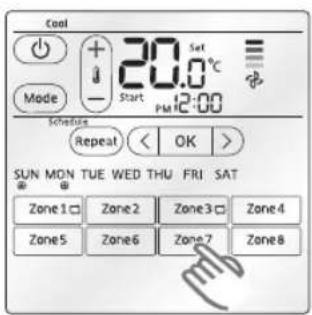
text_image
Cool Mode + - Start 20.0 Set °C PM 12:00 Schedule Repeat OK SUN MON TUE WED THU FRI SAT Zone1 Zone2 Zone3 Zone4 Zone5 Zone6 Zone7 Zone8- Select the zone you wish to apply the timer.
▶ You can select as many zones as you want by tapping each Zone button.
▶ When timer is applied properly, icon will appear on the right side of the zone button.
▶ After selecting the zone, tap the OK button to complete the timer setting.

- You must select at least 1 zone when you set the timer. (If you tap the OK button without selecting a zone, all the zone indicator will blink twice and wait for the user to select a zone.)
- Select the common zone (Default: Zone 1) if you just want to turn on the indoor unit.
ENGLISH-18
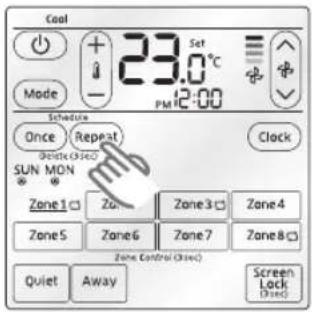
Cancelling the repetitive (weekly) timer
text_image
Cool 23.0°C Mode Set PM 12:00 Schedule Once Repeat Clock Sun MON Zone1 Zone Zone3 Zone4 Zone5 Zone6 Zone7 Zone8 Zone Control (Close) Quiet Away Screen Lock Close- Tap and hold the Repeat button for 3 seconds to delete existing timers.
- 'Delete (3sec)' is displayed under the Once/Repeat button when the timer setting exists.
text_image
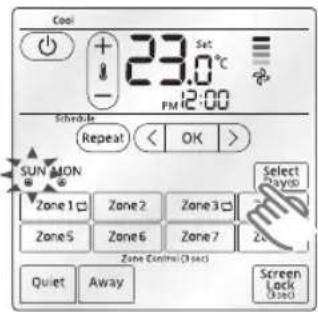
Cool + 23.0°C - PM 12:00 Schedule Repeat < OK > SUN MON Zone 1 Zone 2 Zone 3 Zone 5 Zone 6 Zone 7 Zone Control (3sec) Select Days Quiet Away Screen Lock 3sec- Tap the <, > button to select the day you want to delete the timer.
▶ Zones that applied the selected timer will be displayed.
icon will blink for 3 seconds and it will disappear afterwards.
Timer is successfully deleted when icon disappears.
Tap Select Day(s) button after selecting the day, Ⓞ will become ○ when timer is successfully removed.
Tap <, > button again to select another day and tap Select Day(s) button again to remove the timer.
▶ When finished removing the timer on desired day(s), tap the OK button to complete the setting.
ENGLISH-19
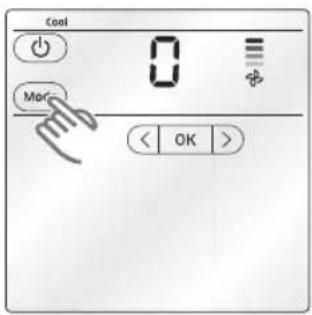
Using the Smart tuning function
Smart tuning function adjusts the fan speed.
text_image
Cool More OK- Tap and hold the Mode button for more than 5 seconds.
▶ <, OK, > button will appear and number on the temperature indicator will start to blink.
text_image
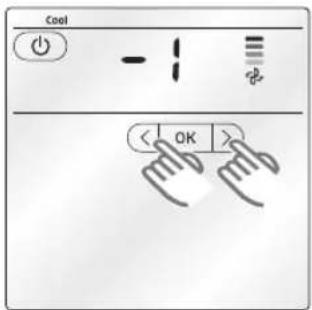
Cool OK- Tap <, > button to set the level for air volume.
▶ Default value is set to 0.
▶ You can select from 5 different levels. (-2, -1, 0, 1, 2)
▶ Select larger number if you feel that air volume is weak and small number when too strong.
ENGLISH-20
Checking the error
When there's any error, Check button will start to blink and you can check the error code.
Tap and hold the Check button for 3 seconds.
▶ Error code will be displayed.
▶ When all the error is cleared, the Check button will disappear.
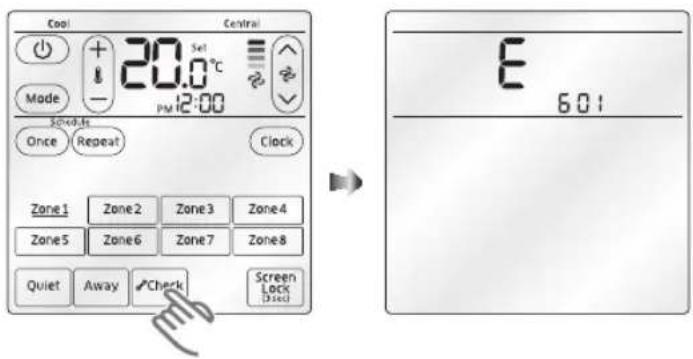
text_image
Cool Central + - 20.0°C Mode 50+0.4s Once Repeat Clock Zone1 Zone2 Zone3 Zone4 Zone5 Zone6 Zone7 Zone8 Quiet Away Check Screen Lock (3 sec) E 6:01Zone controller error codes
| Display Description | |
| 601 | Communication error between Zone controller and indoor unit after successful communication. |
| 602 | No communication between Master (Main) and Slave (Sub) Zone controllers. |
| 604 | No communication between Zone controller and indoor unit. |
| 607 | Two or more Zone controllers is set as Master (Main). |
| 620 | Zone controller(s) has different temperature unit setting with indoor unit. |
Resetting the filter cleaning alarm
After the air conditioner is operated for certain period of time, the Filter Reset (3sec) button will blink to alert the user that it's time to clean the filter.
Tap and hold the Filter Reset (3sec) button for 3 seconds.
▶ Filter cleaning alarm will be reset and the Filter Reset (3sec) button will disappear.
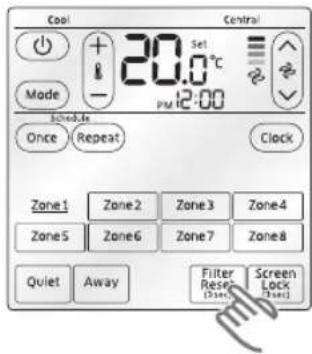
text_image
Cool Central + 20.0°C Mode + - PM 12:00 Schedule Once Repeat Clock Zone1 Zone2 Zone3 Zone4 Zone5 Zone6 Zone7 Zone8 Quiet Away Filter Reset Screen Lock (See) (See)User mode
Setting menu and descriptions of user mode
You can check and/or change below settings from the user mode.
Tap and hold the Mode and Once button for 3 seconds to enter the user mode.
| Main Menu | Sub Menu | Function SEG No. Default Description Unit | |||||
| 1 Auto stop 1200~12 hours 1 hour | |||||||
| 2 Temperature limit | Lower temperature 12 | 16 | 16~30°C61~86°F | 1°C/1°F | |||
| Upper temperature 34 | 30 | 16~30°C61~86°F | 1°C/1°F | ||||
| 3 | All Lock | 1 | 0 | 0 - Disable, 1 - Enable | - | ||
| Partial button lock | Power button lock | 2 | 0 | 0 - Disable, 1 - Enable | - | ||
| Mode button lock | 3 | 0 | 0 - Disable, 1 - Enable | - | |||
| Temperature button lock | 4 | 0 | 0 - Disable, 1 - Enable | - | |||
| Fan speed button lock | 5 | 0 | 0 - Disable, 1 - Enable | - | |||
| Schedule button (Once/Repeat) lock | 6 | 0 | 0 - Disable, 1 - Enable | - | |||
| 4 | 1 | Current date setting (Year/Month/day) | 12/34/56 | 10/01/01 | 00~99/1~12/1~31 | Year, Month, Day | |
| 2 | Current time setting (Day/hour/minute) | day, AM/PM, 12/34 | Fri/PM/12/00 | Sun~Sat/AM~PM/0~12/0~60 | Day, Hour, Minute | ||
ENGLISH-22
| Main Menu | Sub Menu | Function SEG No. Default Description Unit | |||||
| 5 | 1 | Daylight saving time application/ method | Daylight saving time application | 1 0 0 - Disable, 1 - Enable - | |||
| Daylight saving time application method | 2 | 0 | 0 - Weekly unit, 1 - Daily unit | - | |||
| 2 | Beginning date of daylight saving time (Weekly unit) (?Month, ?th Sunday) | 12,4 03,F | 1~12 (Month) 1~4th,F(Final) week | - | |||
| 3 | Ending date of daylight saving time (Weekly unit) (?Month, ?th Suanday) | 12,4 10,F | 1~12 (Month) 1~4th,F(Final) week | - | |||
| 4 | Beginning date of daylight saving time (Daily unit) (Month, day) | 12,34 0322 | 1~12 (Month), 1~31 (Day) | Month, day | |||
| 5 | Ending date of daylight saving time (Daily unit) (Month, day) | 12,34 0922 | 1~12 (Month), 1~31 (Day) | Month, day | |||
| 6 | Check/Set backlight duration | 12 | 5 | 0~30 sec. | 1 sec | ||
| 8 | Smart Tuning | 12 | 0 | -2 ~ +2 | - | ||
| 9 | Displayed contents when power is OFF | Temperature, Time | 1 0 | 0 - Off, 1 - Time only, 2 - Temperature only, 3 - Time and temperature | - | ||
| Schedule | 2 | 0 | 0 - Off, 1 - On | ||||
| 0 | Reset user mode to default value (except for current time) | 1 0 | 0 - Diable, | 1 - Reset | - | ||

NOTE
• Refer to page 25 for detail instructions on how to change the settings from the user mode.
ENGLISH-23
User mode
Information on the setting value
▶ 20 digits are available to be changed in the `User Mode', they are presented in the form of two digits per page. Press the [>] button to move to the next page.
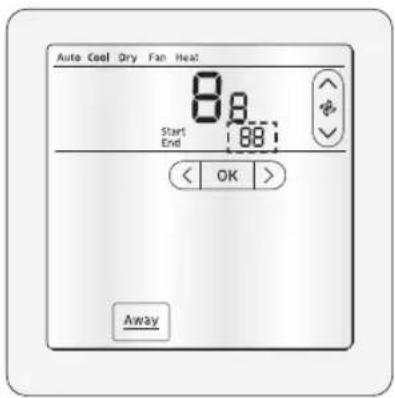
text_image
Auto Cool Qry Fan Heat 88 Start End 88 < OK > Away| PAGE DISPLAY SEG | ||||
| 1 Auto | Start | SEG1 SEG2 | ||
| 2 Cool SEG3 SEG4 | ||||
| 3 Dry SEG5 SEG6 | ||||
| 4 Fan SEG7 SEG8 | ||||
| 5 Heat SEG9 SEG10 | ||||
| 6 Auto | End | SEG11 SEG12 | ||
| 7 Cool SEG13 SEG14 | ||||
| 8 Dry SEG15 SEG16 | ||||
| 9 Fan SEG17 SEG18 | ||||
| 10 | Heat SEG19 SEG20 | |||
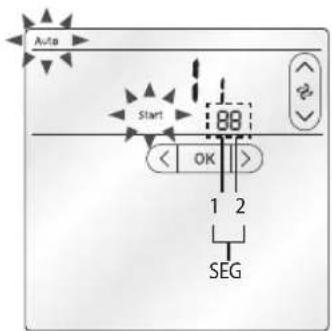
text_image
Auto Start 88 OK 1 2 SEG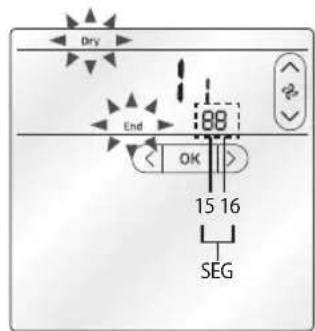
text_image
Dry End 88 OK 15 16 SEGAs the 'Auto' mode and 'Start' indicators are displayed, it means you are setting the SEG1 and SEG2 in page 1.
As the 'Dry' mode and 'End' indicators are displayed, it means you are setting the SEG15 and SEG16 in page 8.
ENGLISH-24
How to change the settings from the user mode
text_image
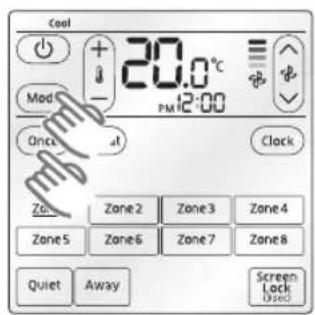
Cool 20.0°C PM 12:00 Mod Once Clock Zone 2 Zone 3 Zone 4 Zone5 Zone6 Zone7 Zone8 Quiet Away Screen Lock (Yes)- Tap and hold the Mode and Once button for 3 seconds.
▶ You will enter the user mode and number of main menu ("1") will be blinking.
text_image
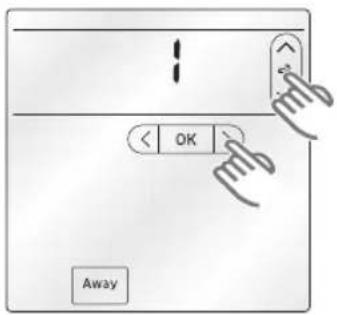
< OK > Away- Select the Main menu.
▶ Tap ∧, ∨ button to select desired value.
▶ Tap > button to move to next page (item).
text_image
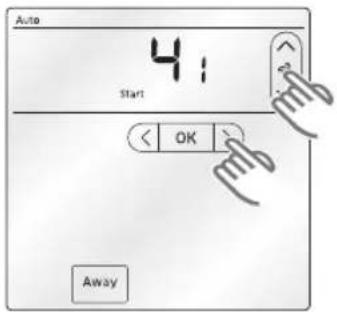
Auto 4: Start < OK Away- Select the sub men.
This may not be available when there is no sub menu under main menu.
▶ Tap ∧, ∨ button to select desired value.
▶ Tap > button to move to next page (item).
▶ Tap < or Away button to move to previous page (item).
text_image
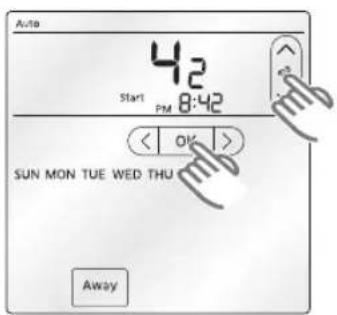
Auto 42 Start PM 8:42 < OK > SUN MON TUE WED THU Away- Change the setting.
▶ Tap ∧, ∨ button to select desired value.
For some settings, you may have to select days (Sun\~Sat) and time (AM/PM, hour, minute) by tapping ∧, ∨ button.
▶ Tap > button to move to next page (item).
- Tap the OK button to complete the setting.
- Tap the Away button to exit the user mode.

NOTE
- When 🔒 icon blinks for 3 seconds after tapping the > button, it means there is no more page that you can move to.
ENGLISH-25
MEMO
ENGLISH-26
MEMO
ENGLISH-27