Ultra Serie 4 - Chauffe-eau instantané et chaudière Weil-McLain - Free user manual and instructions
Find the device manual for free Ultra Serie 4 Weil-McLain in PDF.


User questions about Ultra Serie 4 Weil-McLain
0 question about this device. Answer the ones you know or ask your own.
Ask a new question about this device
Download the instructions for your Chauffe-eau instantané et chaudière in PDF format for free! Find your manual Ultra Serie 4 - Weil-McLain and take your electronic device back in hand. On this page are published all the documents necessary for the use of your device. Ultra Serie 4 by Weil-McLain.
USER MANUAL Ultra Serie 4 Weil-McLain
Gas-fi red water boilers – Series 4
Featuring

text_image
UControl® FIFlexibility
Boiler Manual
- Installation • Maintenance
- Startup
- Parts
text_image
WEIL-M.LAIN Ultra® Series 4 ENERGY STARWARNING
This manual must only be used by a qualified heating installer/service technician. Read all instructions, including this manual and all other information shipped with the boiler, before installing. Perform steps in the order given. Failure to comply could result in severe personal injury, death or substantial property damage.
Part number 550-100-400/0717
Contents
Hazard definitions & Ultra at-a-glance 2
Please read before proceeding 4
Prepare boiler location 5
Prepare boiler. 7
Install water piping 9
Using with Weil-McLain AQUA PLUS water heaters ..... 14
Venting/air piping — general 16
Sidewall vent/air termination: Separate pipes ..... 20
DIRECT VENT 25
Install condensate line 27
Gas piping 29
Field wiring — basic system 30
U-Control operation and setup 32
Startup — fi ll the system 35
Startup — final checks 37
Check-out/startup verification 42
The Ultra Gas-fi red water boiler, Featuring 2 Flexibility . 44
Prepare boiler — convert for propane 48
Placing boiler — wall-mounting option 50
Install water piping — advanced 52
Direct-connected DHW piping 56
Multiple boiler installations 58
Venting/air piping — Massachusetts installations. . . . . . . 65
Vent/air piping — options 66
Sidewall vent/air termination: Weil-McLain cap. 67
Sidewall vent/air termination: 3" or 4" concentric ..... 72
Vertical vent/air termination: 3" or 4" concentric ..... 75
Concentric vent/air termination assembly. 78
DIRECT VENT: Vertical vent / sidewall air 79
Install vent/air piping — boiler to termination ..... 82
DIRECT EXHAUST venting — general ..... 83
DIRECT EXHAUST — Boiler room air openings ..... 84
DIRECT EXHAUST — Sidewall 86
DIRECT EXHAUST — Vertical 89
Install vent — from boiler to termination 91
Gas piping — sizing gas lines 93
Field wiring — advanced 94
U-Control operation and setup — advanced ..... 99
Annual startup and general maintenance. . . . . . . . . . . . . 108
Annual startup 109
Troubleshooting....115
Maintenance 125
Replacement parts 128
Dimensions....136
Ratings — Ultra Series 4 boilers .....137
Installation and Service Certifi cate . . . . . . . . . . . . . . . . . 140
Hazard definitions
The following defined terms are used throughout this manual to bring attention to the presence of hazards of various risk levels or to important information concerning the life of the product.
DANGER
Indicates presence of hazards that will cause severe personal injury, death or substantial property damage.
WARNING
Indicates presence of hazards that can cause severe personal injury, death or substantial property damage.
CAUTION
Indicates presence of hazards that will or can cause minor personal injury or property damage.
NOTICE
Indicates special instructions on installation, operation or maintenance that are important but not related to personal injury or property damage.
(see page 44 and page 46 for details of all models)

text_image
Front Front door Supply Return Air intake Flue Top (control panel swung open) Electronic display, buttons Interior (typical) Aluminum condensing heat exchanger Gas valve, blower and venturi Condensate drain U3003BASIC INSTALLATION
Quick view ...
| Pages | Procedure |
| 4 | Please read before proceedingRead safety information before proceeding |
| 5-6 | Prepare boiler locationClearances, floor and foundationAir openings to room for ventilation |
| 7-8 | Prepare boilerMake sure vent/air piping can be connectedRemove from crateConvert for propane, if requiredHydrostatic testPlace boiler in position |
| 9-15 | Install water pipingInstall boiler trim and near boiler pipingComplete system piping and connections |
| 16 | Appliances left on an existing vent systemFor appliances remaining on a vent system after old boiler is disconnected — verify that the vent system works for remaining appliances |
| 16-26 | Vent/air pipingLocate air intake piping to prevent contaminants from entering boilerInstall vent/air terminationInstall vent and air piping using materials |
| 27-28 | Install condensate pipingConnect condensate hoseInstall condensate pump and filter, if required |
| 29 | Gas pipingVerify gas pipe sizeConnect boiler to gas line |
| 30-31 | Field wiringConnect wiring to boiler and components |
| 32-34 | U-Control operation and setupU-Control operation and setup information |
| 35-42 | Start-upClean system, then fill; add inhibitorVerify water chemistryPurge air from systemPerform final checksStart and operate boilerPerform final verification testsFill out Installation and Service Certificate |
BASIC INSTALLATION
(Pages 3–42)
This section covers basic installation and start-up for most applications. It is limited to conventional systems and to sidewall vent/air piping using the Weil-McLain termination cap.
For applications not covered in this section, see the ADVANCED INSTALLATION section.
ADVANCED INSTALLATION
(Pages 44–107)
Read and follow the instructions in the BASIC INSTALLATION section first. Then use the ADVANCED section for additional information.
This section covers multiple boiler systems and additional system types not covered under the BASIC section. It also includes alternative vent/air piping methods, water and acceptages pipe sizing guidelines and advanced, detailed information on the U-Control.
MAINTENANCE & SPECIFICATIONS
(Pages 108–140)
This section covers maintenance requirements for all boilers, repair parts lists, boiler dimensions and specifications.
Please read before proceeding
WARNING
Installer— Read all instructions, including this manual and all other information shipped with the boiler, before installing. Perform steps in the order given.
User — This manual is for use only by a qualified heating installer/service technician. Refer to User's Information Manual for your reference.
User — Have this boiler serviced/inspected by a qualified service technician, at least annually. Failure to comply with the above could result in severe personal injury, death or substantial property damage.
NOTICE
Write in the CP number in the space provided on the Installation certificate on page 140 if not already shown.
When calling or writing about the boiler— Please have the boiler model number from the boiler rating label and the CP number from the boiler jacket.
Consider piping and installation when determining boiler location.
Any claims for damage or shortage in shipment must be filed immediately against the transportation company by the consignee.
DANGER
If any part of a boiler, burner or its controls has been sprayed with or submerged under water, either partially or fully, DO NOT attempt to operate the boiler until the boiler has been either replaced or completely repaired, inspected, and you are sure that the boiler and all components are in good condition and fully reliable.
Otherwise, by operating this boiler, you will cause a fire or explosion hazard, and an electrical shock hazard, leading to serious injury, death, or substantial property damage. See the instructions at right.
Saltwater Damage — The exposure of boiler components to saltwater can have both immediate and long-term effects. While the immediate effects of saltwater damage are similar to those of freshwater (shorting out of electrical components, washing out of critical lubricants, etc.), the salt and other contaminants left behind can lead to longer term issues after the water is gone due to the conductive and corrosive nature of the salt residue. Therefore, Weil-McLain equipment contaminated with saltwater or polluted water will no longer be covered under warranty and should be replaced.
Electrical Damage — If any electrical component or wiring came into contact with water, or was suspected to have come into contact with water, replace the boiler with a new Weil-McLain boiler.
WARNING
Failure to adhere to the guidelines below can result in severe personal injury, death or substantial property damage.
When servicing boiler —
• To avoid electric shock, disconnect all electrical supplies to the boiler before performing maintenance.
• To avoid severe burns, allow boiler to cool before performing maintenance.
- This boiler contains ceramic fi ber and fi berglass materials. Refer to the WARNING and instructions on page 109.
Boiler operation —
- Do not block flow of combustion or ventilation air to boiler.
- Should overheating occur or gas supply, fail to shut off, do not turn off or disconnect electrical supply to pump. Instead, shut off the gas supply at a location external to the appliance.
Combustion air —
• DO NOT install combustion air intake where there is a risk of combustion air contamination.
Carbon monoxide detector —
• A carbon monoxide detector that is wired on the same electrical circuit as the boiler is strongly recommended.
SURGE PROTECTOR —
- Provide surge protection in the boiler power supply. This will reduce the possibility of damage to the boiler control.
Boiler water —
The Ultra heat exchanger is made of aluminum, and requires that system pH always be between 7.0 and 8.5 and water chemistry be checked. Chemical treatment may be necessary. ADDITIONAL CHEMICAL TREATMENT MAY BE NECESSARY. See page 35 for details.
- Thoroughly flush the system (BEFORE connecting boiler) to remove sediment. The high-efficiency heat exchanger can be damaged by build-up or corrosion due to sediment.
Do not use petroleum-based cleaning or sealing compounds in boiler system. Gaskets and seals in the system may be damaged. This can result in substantial property damage.
- Continual fresh make-up water will reduce boiler life. Mineral buildup in eat exchanger reduces heat transfer, overheats the aluminum heat exchanger, and causes failure. Addition of oxygen carried in by make-up water can cause internal corrosion. Leaks in boiler or piping must be repaired at once to prevent make-up water. Use this boiler ONLY in a closed-loop system.
Do not add cold water to a hot boiler. Thermal shock can cause heat exchanger to crack.
Freeze protection fluids —
- NEVER use automotive or standard glycol antifreeze. Use only freeze-protection fluids made for hydronic systems. Use only freeze-protection fluids recommended in this manual (see page 35). Follow all guidelines given by the antifreeze manufacturer. Thoroughly clean and flush any replacement boiler system that has used glycol before installing the new Ultra boiler
CAUTION
Frozen Water Damage Hazard
Residences or buildings that are unattended in severely cold weather, boiler system components failures, power outages, or other electrical system failures could result in frozen plumbing and water damage in a matter of hours. For your protection, take preventative actions such as having a security system installed that operates during power outages, senses low temperature, and initiates an effective action. Consult with your boiler contractor or a home security agency.
Commonwealth of Massachusetts
When the boiler is installed within the Commonwealth of Massachusetts:
• This product must be installed by a licensed plumber or gas fitter.
• If antifreeze is used, a reduced pressure back-flow preventer device shall be used.
- Sidewall vent air installations — see instruction on page 65.
Prepare boiler location
Installations must comply with:
- Local, state, provincial, and national codes, laws, regulations and ordinances.
• National Fuel Gas Code, ANSI Z223.1 /NFPA 54 – latest edition. - Standard for Controls and Safety Devices for Automatically Fired Boilers, ANSI/ASME CSD-1, when required.
• National Electrical Code. - For Canada only: Natural Gas and Propane Installation Natural Gas and Propane Installation CAN/CSA B149.1 or B149.2 Installation Code, CSA C22.1 Canadian Electrical Code Part 1 and any local codes.
NOTICE
The Ultra boiler gas manifold and controls met safe lighting and other performance criteria when boiler underwent tests specified in ANSI Z21.13 — latest edition.
Before locating the boiler, check:
- Check for nearby connection to:
• System water piping
- Venting connections
Gas supply piping
- Electrical power
- Condensate drain
- Check area around boiler. Remove any combustible materials, gasoline and other flammable liquids.
WARNING
Failure to keep boiler area clear and free of combustible materials, gasoline and other fl ammable liquids and vapors can result in severe personal injury, death or substantial property damage.
- The Ultra boiler must be installed so that gas control system components are protected from dripping or spraying water or rain during operation or service.
- If new boiler will replace existing boiler, check for and correct system problems, such as:
• System leaks causing oxygen corrosion or heat exchanger cracks from hard water deposits.
• Incorrectly-sized expansion tank.
- Lack of freeze protection in boiler water causing system and boiler to freeze and leak.
Provide clearances:
Clearances from combustible materials
- Hot water pipes — at least 12 ” from combustible materials.
- Vent pipe — at least 3/16" from combustible materials.
- See Figure 1 for other clearance minimums.
Figure 1 Clearances required
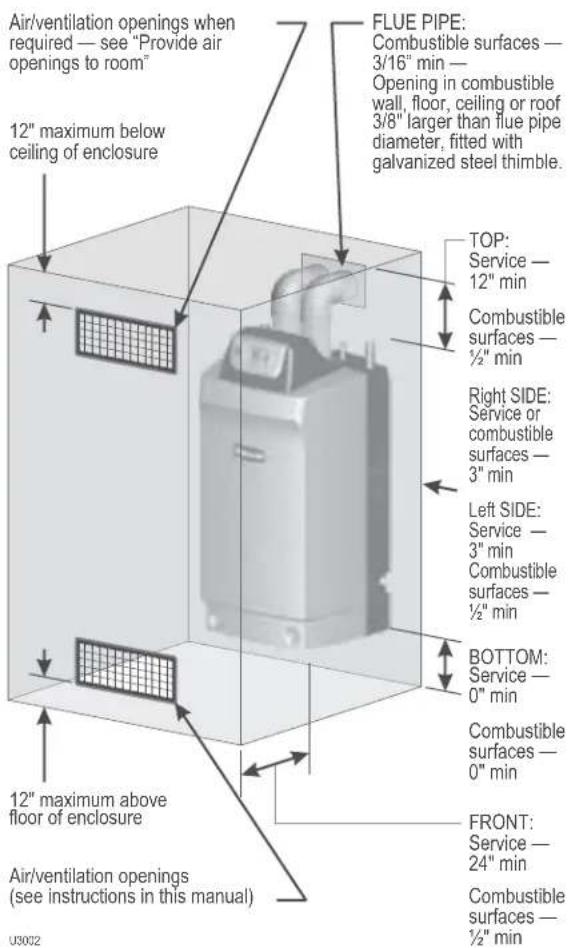
text_image
Air/ventilation openings when required — see "Provide air openings to room" 12" maximum below ceiling of enclosure FLUE PIPE: Combustible surfaces — 3/16" min — Opening in combustible wall, floor, ceiling or roof 3/8" larger than flue pipe diameter, fitted with galvanized steel thimble. TOP: Service — 12" min Combustible surfaces — ½" min Right SIDE: Service or combustible surfaces — 3" min Left SIDE: Service — 3" min Combustible surfaces — ½" min BOTTOM: Service — 0" min Combustible surfaces — 0" min FRONT: Service — 24" min Combustible surfaces — ½" min 12" maximum above floor of enclosure Air/ventilation openings (see instructions in this manual) U9002Clearances for service access
- See Figure 1 for recommended service clearances. If you do not provide minimum clearances shown, it might not be possible to service the boiler without removing it from the space.
- Ultra boilers can be wall mounted (using special wall mount kit) or floor mounted. No clearance is required at the rear of the unit, either for service or for clearance to combustible surfaces.
- Boilers can be wall mounted ONLY if using the optional wall-mount kit available from Weil-McLain. See page 50 for instructions.
Prepare boiler location (continued)
Flooring and foundation
Flooring
- The Ultra boiler is approved for installation on combustible flooring, but must never be installed on carpeting.
WARNING
Do not install boiler on carpeting even if foundation is used. Fire can result, causing severe personal injury, death or substantial property damage.
Foundation
- Provide a solid foundation pad, at least 2 inches above the floor, if any of the following is true:
• floor can become flooded.
• the floor is dirt, sand, gravel or other loose material.
• the boiler mounting area is severely uneven or sloped.
- The minimum foundation size is:
• Ultra-80 to -230: 24 inches wide x 20 inches deep.
• Ultra-299/310 to -399: 24 inches wide x 23 inches deep.
-
Foundation may be of wood, brick or concrete (minimum 2 inches thick) construction.
-
If flooding is possible, elevate boiler sufficiently to prevent water from reaching boiler.
Residential garage installation
Precautions
-
Take the following special precautions when installing the boiler in a residential garage. If the boiler is located in a residential garage:
-
Mount the boiler at a height above the floor as specified in the National Fuel Gas Code, ANSI Z223.1 NFPA 54 for U. S. installations, or Natural Gas and Propane Installation CAN/CSA B149.1 and B149.2 for Canadian installations.
- Locate or protect the boiler so it cannot be damaged by a moving vehicle.
- Ensure that the installation complies with all applicable codes.
Provide air openings to room
Air openings — Ultra boiler alone in boiler room
- No air ventilation openings into boiler room are needed when clearances around Ultra boiler are at least equal to the SERVICE clearances shown in Figure 1, page 5.
- For spaces that do NOT supply this clearance, provide two openings as shown in Figure 1, page 5. Each opening must provide 1 square inch free area per 1,000 Btuh of boiler input.
Air openings — Ultra boiler in same space with other gas or oil-fi red appliances
- Follow the National Fuel Gas Code (U. S.) or Natural Gas and Propane Installation CAN/CSA B149.1 and B149.2 (Canada) to size/verify size of the combustion/ventilation air openings into the space.
WARNING
The space must be provided with combustion/ventilation air openings correctly sized for all other appliances located in the same space as the Ultra boiler.
Reinstall boiler jacket front door after servicing. The boiler front door must be securely fastened to the boiler to prevent boiler from drawing air from inside the boiler room. This is particularly important if the boiler is located in the same room as other appliances.
Failure to comply with the above warnings could result in severe personal injury, death or substantial property damage.
- Size openings only on the basis of the other appliances in the space. No additional air opening free area is needed for the Ultra boiler because it takes its combustion air from outside (direct vent installation).
Prepare boiler
Vent and air piping (page 16)
- The Ultra boiler requires a special vent system, designed for pressurized venting. Ultra boilers are rated ANSI Z21.13 Category IV (pressurized vent, likely to condense in the vent). See instructions beginning on page 16.
- You must also install air piping from outside to the boiler air intake adapter. The resultant installation is categorized as direct vent (sealed combustion). Note prevention of combustion air contamination on page 16 when considering vent/air termination.
- Vent and air must terminate near one another and may be vented vertically through the roof or out a side wall. You may use any of the vent/air piping methods covered in this manual. Do not attempt to install the Ultra boiler using any other means.
- Be sure to locate the boiler such that the vent and air piping can be routed through the building and properly terminated. The vent/air piping lengths, routing and termination method must all comply with the methods and limits in instructions beginning on page 16.
Remove boiler from crate
CAUTION
Cold weather handling — If boiler has been stored in a very cold location (below 0^ F) before installation, handle with care until the plastic components come to room temperature.
- The Ultra boiler is generally easier to handle and maneuver after removing from crate.
- After removing outer shipping carton from boiler, REMOVE jacket front door by loosening two (2) screws at lower front. Removing the door will prevent possible damage to the door during handling.
- To remove boiler from pallet (after removing jacket front door):
a. Remove the lag screws securing the shipping brackets.
b. Unscrew the two rear boiler legs and remove the shipping brackets.
c. Replace legs.
d. Discard the cardboard protector insert on the rear of the boiler.
NOTICE
Do not drop boiler or bump jacket on floor or pallet. Damage to boiler can result.
Prepa re boiler for propane (when required)
Propane operation
WARNING
Ultra boilers must be converted for propane operation unless specifi cally manufactured for propane Propane-ready boilers have suffi x "LP" after the model number. All other boilers require conversion for propane operation.
Refer to propane conversion instructions beginning on page 48.
Failure to comply could result in severe personal injury, death or substantial property damage.
Placing floor-mounted boilers
- Set boiler in place and check level.
a. Adjust legs, if necessary to level boiler.
Wall-mounted boilers
- Boilers can be wall mounted ONLY if using the optional wall-mount kit available from Weil-McLain. See page 50 for instructions.
Prepare boiler (continued)
WARNING
DO NOT install a relief valve with a pressure higher than 30 PSIC is the maximum allowable relief valve setting for the Ultra boiler.
Perform hydrostatic pressure test
Pressure test boiler before permanently attaching water or gas piping or electrical supply.
Prepare boiler for test
- See Figure 2 for reference in following steps.
- Remove supply line tees* and 3/4" elbow from accessory bag. Pipe to boiler supply connection as shown. Use pipe dope sparingly. (* 1"x1"x1/4" and *1"x1"x3/4" tees with Ultra-80 to -230 or * 1-1/4"x1-1/4"x1/4" and *1-1/4"x1-1/4"x3/4" tees with Ultra 299/310/399.
- Temporarily plug the 34 " relief valve tapping in the street elbow with a 34 " NPT pipe plug.
- Connect a hose to the boiler drain valve, the other end connected to a fresh water supply. Make sure the hose can also be used to drain the boiler after test.
- Connect a nipple and shutoff valve to system supply connection on the supply tee. This valve will be used to bleed air during the fill. (Valve and nipple are not included with boiler.)
- Connect a shutoff valve to system return connection. (Valve is not included with boiler.)
- To avoid getting water on boiler, you may want to pipe street elbows on top of shutoff valves and attach catch-buckets beneath.
- If convenient, install the boiler circulator and any other piping compatible with Figure 2 that would still allow bleeding air from shutoff valves.
- Follow guidelines in this manual for piping components, locations and sizing.
Fill and pressure test
- Open the shutoff valves you installed on supply and return connections.
- Slowly open boiler drain valve and fresh water supply to fill boiler with water. The boiler will fill quickly because of its low water content.
- When water reaches shutoff valves, close boiler drain valve.
- Close shutoff valves.
- Slowly reopen boiler drain valve until test pressure on the pressure/temperature gauge reaches at least 45 psig, but no higher than 55 psig.
- Hold at test pressure for 10 minutes.
WARNING
Do not leave boiler unattended. A cold water fi ll could expand and cause excessive pressure, resulting in severe personal injury, death or substantial property damage.
- Make sure constant gauge pressure has been maintained throughout test. Check for leaks. Repair if found.
WARNING
Leaks must be repaired at once. Failure to do so can damage boiler, resulting in substantial property damage.
Figure 2 Hydrostatic test piping connections
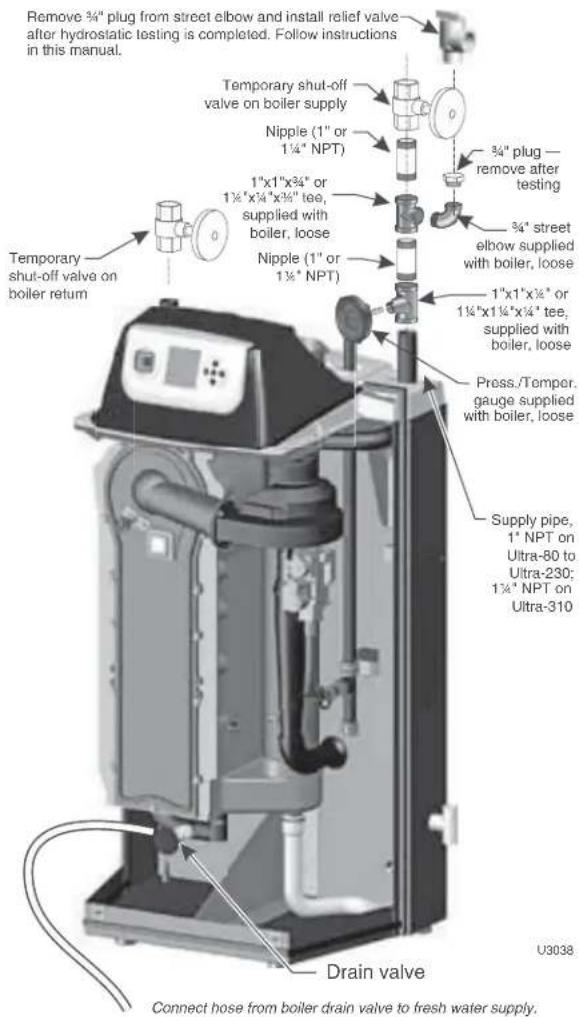
text_image
Remove ¾" plug from street elbow and install relief valve after hydrostatic testing is completed. Follow instructions in this manual. Temporary shut-off valve on boiler supply Nipple (1" or 1¼" NPT) 1"x1"x3/4" or 1½"x1/4"x3/8" tee, supplied with boiler, loose Nipple (1" or 1¾" NPT) 3/4" plug — remove after testing 3/4" street elbow supplied with boiler, loose 1"x1"x3/8" or 1½"x1¼"x3/4" tee, supplied with boiler, loose Press./Temper. gauge supplied with boiler, loose Supply pipe, 1" NPT on Ultra-80 to Ultra-230; 1¾" NPT on Ultra-310 Drain valve Connect hose from boiler drain valve to fresh water supply. U3038WARNING
Do not use petroleum-based cleaning or sealing compounds in boiler system. Gaskets and seals in the system may be damaged. This can result in substantial property damage.
Drain and remove fi ttings
- Disconnect fill water hose from water source.
- Drain boiler through drain valve. Remove hose after draining.
- Remove nipples and valves unless they will remain for use in the system piping.
- Remove plug from relief valve street elbow. See page 9 to install relief valve.
Install water piping
WARNING
Use two wrenches when tightening water piping at boiler, using one of the wrenches to prevent the boiler interior piping from turning. Failure to support the boiler piping connections to prevent them from turning could cause damage to boiler components.
General piping information
Additional controls, when required
NOTICE
The U-Control module uses temperature sensors to provide both high limit protection and modulating temperature control. The U-Control module also provides low water protection by sensing the temperature of the heat exchanger. Some codes/jurisdictions may require additional external controls for high limit and/or low water cutoff protection.
Additional limit controls
Following standard industry practices, if installation is to comply with ASME or Canadian requirements, an additional high temperature limit may be needed. Consult local requirements for other codes/standards to determine if needed.
- Install a manual reset high temperature limit constructed to prevent a temperature setting above 200^ F in system supply piping between boiler and isolation valve. (Note that the U-Control module operating limit function shuts the boiler down at 195^ F, or lower if set to a lower value.)
WARNING
Multi-temperature systems — If the heating system includes circuits that require lower temperature water (radiant slab circuits, for example) as well as higher temperature circuits, it is recommended to protect low-temperature circuits with limit controls that are wired to a U-Control external limit circuit (P13 terminals 1 and 2 for manual reset, or P13 terminals 3 and 4 for automatic reset).
- See instructions beginning on page 30 for wiring information.
a. Manual reset operation: If external limit controls are to cause manual reset of the U-Control module, connect series-wired isolated contacts to P13 terminals 1 and 2 (see page 30 for wiring information).
b. Automatic reset operation: If external limit controls are to cause automatic reset of the U-Control module, connect series-wired isolated contacts to P13 terminals 3 and 4 (see page 30 for wiring information).
c. If using a manual reset limit control or wiring in the manual reset circuit, set U-Control boiler limit at least 20^ F less than the external manual reset limit (i.e., set U-Control no higher than 180^ F for a 200^ F external limit, for example).
Separate low water cutoff
- A low water cutoff device is recommended when the boiler is installed above piping level, and may be required by certain state or local codes or insurance companies. Consult local requirements to determine. See the NOTICE above regarding the inherent protection provided by the U-Control module.
-
The U-Control's integral protection is accepted in many jurisdictions as meeting the requirement for low water protection. See page 95 for details.
-
When required, use a low water cutoff designed for water installations. Electrode probe-type is recommended. See Replacement parts section at the end of this manual for the Weil-McLain low water cut-off kit.
- Purchase low water cutoff and install in a tee in the supply piping above boiler.
- See fi eld wiring instructions beginning on page 30 for wiring additional limit controls.
Backflow preventer
- Use backflow check valve in cold water supply as required by local codes.
Instal I r elief valve
- Install relief valve in 34 " street elbow piped from boiler supply piping tee (Figure 2, page 8). Pipe the relief valve only as shown, in the location shown.
- Connect discharge piping to safe disposal location, following guidelines in the WARNING below.
WARNING
To avoid water damage or scalding due to relief valve operation, as per local or state codes:
Discharge line must be connected to relief valve outlet and run to a safe place of disposal. Terminate the discharge line in a manner that will prevent possibility of severe burns or property damage should the valve discharge.
Discharge line must be as short as possible and be the same size as the valve discharge connection throughout its entire length.
Discharge line must pitch downward from the valve and terminate at least 6" above the floor drain where any discharge will be clearly visible.
The discharge line shall terminate plain, not threaded, with a material serviceable for temperatures of 375^ F or greater.
Do not pipe the discharge to any place where freezing could occur.
No shutoff valve shall be installed between the relief valve and boiler, or in the discharge line. Do not plug or place any obstruction in the discharge line.
Test the operation of the valve after filling and pressurizing system by lifting the lever. Make sure the valve discharges freely. If the valve fails to operate correctly, replace it with a new relief valve.
Failure to comply with the above guidelines could result in failure of the relief valve to operate, resulting in possibility of severe personal injury, death or substantial property damage.
Install water piping (continued)
System water piping methods
NOTICE
All piping methods shown in this manual use primary/secondary connection to the boiler loop. These designs ensure proper flow through the Ultra boiler, for the most efficient and reliable operation of the boiler and the heating system. For other piping methods, consult your local Weil-McLain representative or see separate Ultra boiler piping guides.
Circulators
The boiler circulator (Taco 007 for Ultra-80 and -105; Taco 0014 for Ultra-155, -230, and -299/310; Taco 0013 for Ultra-399) is shipped loose. Locate it in the return piping, as shown in the appropriate piping diagram in this manual.
WARNING
DO NOT use the boiler circulator in any location other than the ones shown in this manual. The boiler circulator is selected to ensure adequate flow through the Ultra boiler.
Install the boiler circulator only on the boiler return piping. This ensures the pressure drop through the boiler will not cause low pressure in the circulator intake.
Failure to comply could result in unreliable performance and nuisance shutdowns from insufficient flow.
Circulator flow rate
Size circulators based on the flow rate required to achieve the temperature change needed. You can closely estimate temperature rise (or drop) through a circuit by using the following formula, where TD is temperature rise (or drop), FLOW is flow rate (in gpm), and BTUH is the heat load for the circuit:
$$ \text { FLOW } = \frac {\text { BTUH }}{\text { TD } \times 5 0 0} $$
Examples:
Consider a system loop for a system with total heating load equal to 210,000 Btuh. The desired temperature drop through the system piping is 20^ F. Then the required flow rate is:
$$ \text { FLOW } = \frac {2 1 0 , 0 0 0}{2 0 \times 5 0 0} = 2 1 \mathrm{gpm} $$
SIMPLIFIED: For 20° temperature drop, FLOW = MBH / 10.
Circulator head requirement
The circulator must be capable of delivering the required flow against the head loss that will occur in the piping. Determine the pipe size needed and the resultant head loss using accepted engineering methods. The simplified pipe sizing here is limited to residential systems, and does not include systems with fan coil units or radiant tubing.
CAUTION
The following simplified method for pipe and circulator sizing must be limited to residential applications using baseboard (finned or cast iron), cast iron radiators or convectors. DO NOT apply for radiant heating, fan coil units or commercial installations.
Simplifi ed pipe/circulator selection
-
Install the boiler and piping using the recommended piping layouts beginning on page 12 and in the ADVANCED section of this manual.
-
Size the piping and components for each circuit in the space heating system using Figure 3 At the flow rates listed, the head loss in all piping will be 0.04 feet per foot of pipe.
a. Determine the heating load (Btuh) for each circuit.
b. Calculate the flow rate for each circuit using its load. To use a 20^ F temperature drop, just divide the MBH (1,000's of Btuh) by 10.
Example — Flow for 20^ F temp drop with 35,000 Btuh: FLOW = 35 MBH / 10 = 3.5 gpm
c. Find the pipe size in Figure 3 that has a max flow rate just larger than that required for the circuit.
d. Find the total equivalent length (TEL) of the circuit. TEL accounts for losses through fittings and valves by using the equivalent length of pipe that would cause the same head loss. Add these numbers to the measured length of the circuit to find TEL in feet. TEL is usually close to 1.5 times the length of the circuit for residential baseboard, radiator or convector applications.
e. Measure the length of each circuit from the circulator outlet back to its inlet. Then multiply this length times 1.5 to get the approximate TEL of the circuit.
f. Find the head loss for each circuit:
TEL = 1.5 X Circuit Length (feet)
HEAD = TEL X 0.04 (feet water column)
g. NOTE: Size system header piping for the total flow of all connected zones.
3. Example:
a. For a circuit with heating load = 45,000 Btuh (= 45 MBH). Measured length of circuit is 88 feet.
b. Flow = 45 MBH / 10 = 4.5 gpm.
c. TEL = 1.5 x 88 feet = 132 feet.
d. From Figure 3, select 1" pipe (max flow = 7.1 gpm).
c. Head loss = TEL x 0.04 = 132 x 0.04 = 5.28 feet.
f. Select a circulator that can deliver at least 4.5 gpm at a head of 5.28 feet. (Read the NOTICE below.)
NOTICE
To use this method, limit the flow through 34 " fi nned-tube baseboard to 3.9 gpm, or use 1" baseboard and limit flow to 7.1 gpm. If the total load of the circuit requires more flow, split the circuit into two or more.
Also see Figure 9, page 15 for quick-selection information for applications using Taco 007 circulators or equivalent for zone piping.
Figure 3 Flow rates for 0.04 feet head loss per foot of pipe (140°F water)
| Pipe size (inches) | MAX Flow rate (GPM) @ 0.04 feet per foot | Pipe size (inches) | MAX Flow rate (GPM) @ 0.04 feet per foot |
| 3/4 | 3.9 | 2 | 45 |
| 1 | 7.1 | 21⁄2 | 75 |
| 11⁄4 | 16 | 3 | 140 |
| 11⁄2 | 24 | 4 | 290 |
In stall water piping (continued)
Expansion tank and make-up water
- Ensure expansion tank size will handle boiler and system water volume and temperature. Allow 3 gallons for boiler and its piping.
CAUTION
Undersized expansion tanks cause system water to be lost from relief valve and make-up water to be added through fi ll valve. Eventual boiler failure can result due to excessive make-up water addition.
- Tank must be located as shown in this manual, or following recognized design methods. See tank manufacturer's instructions for details. When installing air vents and expansion tanks, refer to manufacturer's instructions.
- Connect the expansion tank to the air separator only if the separator is on the suction side of the circulator. Always install the system fill connection at the same point as the expansion tank connection to the system.
- Most piping drawings in this manual show diaphragm expansion tanks. See Figure 4 for piping from air separator to expansion tank and make-up water line using a closed-type expansion tank.
- Most chilled water systems are piped using a closed-type tank, as shown in Figure 51, page 55.
Diaphragm (or bladder) expansion tank
- (Figure 4) Always install an automatic air vent on top of the air separator to remove residual air from the system.
NOTICE
When using diaphragm or bladder tanks only — when the boiler is installed above the system main piping, install an automatic air vent in the top of the outgoing boiler piping to prevent air pocketing.
Closed-ty pe expansion tank
-
See Figure 4, Alternate, for piping connections when using a closed-type expansion tank.
-
Pitch any horizontal piping up towards tank 1 inch per 5 feet of piping. Connect to tank with at least 34 " piping to allow room for air to rise.
CAUTION
DO NOT install automatic air vents on closed-type expansion tank systems. Air must remain in the system and return to the tank to provide its air cushion. An automatic air vent would cause air to leave system, resulting in water-logging the expansion tank.
DO NOT use a closed-type expansion tank on a system with a Weil-McLain AQUA PLUS water heater. The water heater must use an automatic air vent. Operation of the automatic air vent will deplete air in the piping, causing the expansion tank to waterlog.
CAUTION
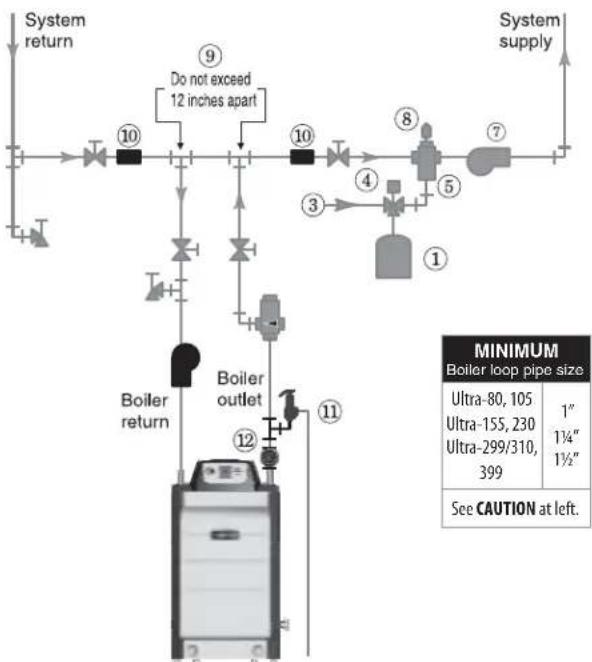
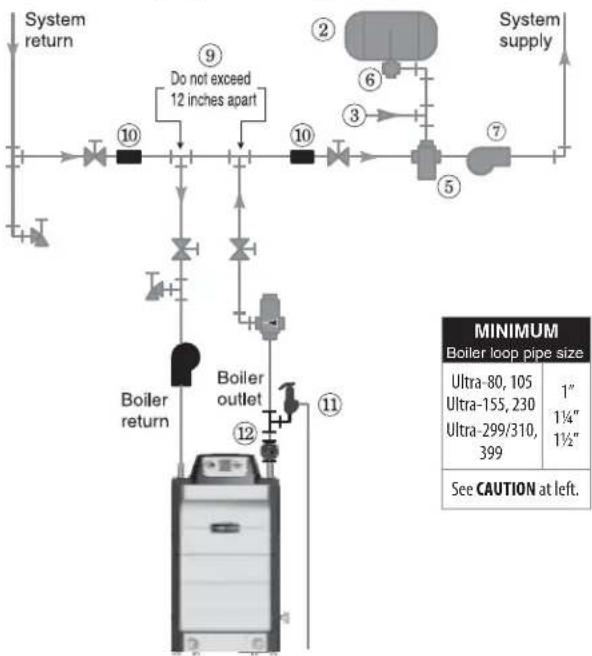
Use at least the MINIMUM pipe size shown in Figure 4 on all boiler loop piping (connecting boiler to and from the primary/secondary connection, item 9). Use only primary/secondary piping as shown. Failure to follow these guidelines could result in system problems.
Figure 4 Expansion tank piping
Piping to diaphragm (or bladder) expansion tank
flowchart
graph TD
    A["System return"] --> B["10"]
    B --> C["10"]
    C --> D["4"]
    D --> E["5"]
    E --> F["7"]
    F --> G["System supply"]
    H["Boiler outlet"] --> I["12"]
    I --> J["11"]
    J --> K["Boiler return"]
    style A fill:#f9f,stroke:#333
    style G fill:#ccf,stroke:#333
    style K fill:#cfc,stroke:#333
    note right of C: "Do not exceed 12 inches apart"
    note left of K: "See CAUTION at left."
    note_right_of_L["MINIMUM Boiler loop pipe size"]
    note right of L: Ultra-80,105 1"
    note right of L: Ultra-155,230 1"
    note right of L: Ultra-299/310,399 1"
    note right of L: 1¼"
    note right of L: 1½"
    note right of L: 1"
Alternate — Piping to closed-type expansion tank
flowchart
graph TD
    A["System return"] --> B["10"]
    B --> C["10"]
    C --> D["10"]
    D --> E["10"]
    E --> F["10"]
    F --> G["10"]
    G --> H["10"]
    H --> I["10"]
    I --> J["10"]
    J --> K["10"]
    K --> L["10"]
    L --> M["10"]
    M --> N["10"]
    N --> O["10"]
    O --> P["10"]
    P --> Q["10"]
    Q --> R["10"]
    R --> S["10"]
    S --> T["10"]
    T --> U["10"]
    U --> V["10"]
    V --> W["10"]
    W --> X["10"]
    X --> Y["10"]
    Y --> Z["10"]
    Z --> AA["10"]
    AA --> AB["10"]
    AB --> AC["10"]
    AC --> AD["10"]
    AD --> AE["10"]
    AE --> AF["10"]
    AF --> AG["10"]
    AG --> AH["10"]
    AH --> AI["10"]
    AI --> AJ["10"]
    AJ --> AK["10"]
    AK --> AL["10"]
    AL --> AM["10"]
    AM --> AN["10"]
    AN --> AO["10"]
    AO --> AP["10"]
    AP --> AQ["10"]
    AQ --> AR["10"]
    AR --> AS["10"]
    AS --> AT["10"]
    AT --> AU["10"]
    AU --> AV["10"]
    AV --> AW["10"]
    AW --> AX["10"]
    AX --> AY["10"]
    AY --> AZ["10"]
    AZ --> BA["10"]
    BA --> BB["10"]
    BB --> BC["10"]
    BC --> BD["10"]
    BD --> BE["10"]
    BE --> BF["10"]
    BF --> BG["10"]
    BG --> BH["10"]
    BH --> BI["10"]
    BI --> BJ["10"]
    BJ --> BK["10"]
    BK --> BL["10"]
    BL --> BM["10"]
    BM --> BN["10"]
    BN --> BO["10"]
    BO --> BP["10"]
    BP --> BQ["10"]
    BQ --> BR["10"]
    BR --> BS["10"]
    BS --> BT["10"]
    BT --> BU["10"]
    BU --> BV["10"]
    BV --> BW["10"]
    BW --> BX["10"]
    BX --> BY["10"]
    BY --> BZ["10"]
① Diaphragm-type expansion tank
② Closed-type expansion tank
③ Make-up water supply
④ Fill valve, typical
⑤ Air separator
⑥ Tank fitting
⑦ System circulator
⑧ Automatic air vent
⑨ Primary/secondary connection
⑩ System supply/return sensors
⑪ Relief valve
⑫ Temperature/Pressure gauge
Install water piping — typical systems
Zoning with zone valves
- Connect boiler to system as shown in Figure 5 when zone valve zoning. The primary/secondary piping shown ensures the boiler loop will have sufficient flow. It also avoids applying the high head of the boiler circulator to the zone valves. Also see the information on page 14 and page 15 for suggested piping and sizing.
CAUTION
Use at least the MINIMUM pipe size shown in Figure 5 on all boiler loop piping (connecting boiler to and from the primary/secondary connection, item 21). Use only primary/secondary piping as shown. Failure to follow these guidelines could result in system problems.
- When using a closed-type expansion tank, connect the expansion tank and make-up water piping as shown in Figure 4, page 11. (DO NOT use a closed-type tank with a AQUA PLUS water heater.)
- Connect DHW (domestic hot water) piping to indirect storage water heater as shown.
NOTICE
By default, the U-Control Module turns off space heating during DHW heating (if DHW input is priority 1). The boiler circulator will turn off, preventing hot water from circulating to the system (optional time out setting can be used to override). The flow/check valve shown on the boiler outlet piping prevents gravity circulation in the boiler loop during DHW heating.
NOTICE
Overriding the Outdoor Reset function by setting control to DHW mode when system is intended for space heating may violate Section 303 of the 2007 Energy Act. See page 137 for compliance information and exemptions.
- Controlling the circulators
a. The U-Control can control up to three circulators (boiler circulator and two others). Refer to Field wiring, beginning on page 30, for instructions on wiring to circulators.
b. The factory default settings are: DHW circulator as Circulator 1, boiler circulator as Circulator 2 and system circulator as Circulator 3. See Field wiring instructions, beginning on page 30, for details.
1 Ultra boiler
2 Indirect water heater (DHW), if used
3 Boiler relief valve (see page 9 for piping details)
4 Relief valve discharge piping (see page 9 for details)
5 DHW circulator (see page 56 for suggested sizing)
6 Isolation valves
7 System circulator (see information above for wiring)
8 Diaphragm (or bladder) type expansion tank (see page 56 for piping of closed-type expansion tank, if used)
9 Air separator [with automatic air vent only on systems using diaphragm (or bladder) type expansion tank]
10 Flow/check valves
11 Purge/drain valves
12 Boiler circulator
13 Zone valves, typical
20 Make-up water supply
21 Primary/secondary connection
23 DHW connections — see water heater manual for piping
24 Strap system supply and return sensors to lines as shown, at least 6 pipe diameters (but no more than 3 feet) from boiler connection tees.
25 Systems using high-head pumps may require a bypass pressure regulator to prevent damage to control valves.
26 Temperature/Pressure gauge
27 DHW relief valve, if used
Items supplied with boiler
Items supplied by others
Other piping alternatives
See page 14 and page 15 and ADVANCED INSTALLATION section for additional piping suggestions.
Install water piping — typical systems (continued)
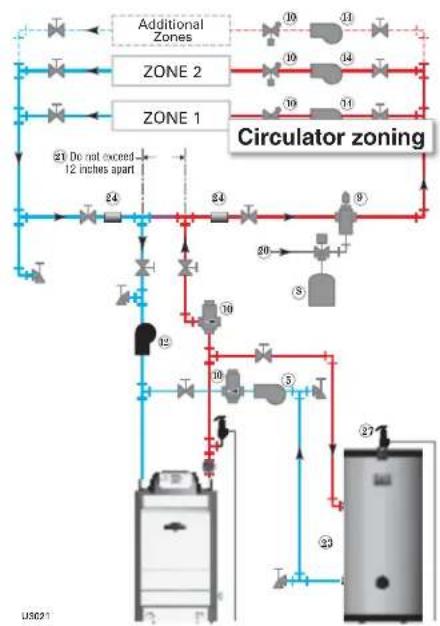
Zoning with circulators
- Connect boiler to system as shown in Figure 6 when circulator zoning. The boiler circulator cannot be used for a zone. It must supply only the boiler loop. Also see the information on page 14 and page 15 for suggested piping and sizing.
CAUTION
Use at least the MINIMUM pipe size shown in Figure 6 on all boiler loop piping (connecting boiler to and from the primary/secondary connection, item 21). Use only primary/secondary piping as shown. Failure to follow these guidelines could result in system problems.
- Install a separate circulator for each zone.
- When using a closed-type expansion tank, connect the expansion tank and make-up water piping as shown in Figure 4, page 11. (DO NOT use a closed-type tank with a AQUA PLUS water heater.)
- Connect DHW (domestic hot water) piping to indirect storage water heater as shown.
NOTICE
By default, the U-Control Module turns off space heating during DHW heating (if DHW input is priority 1). The boiler circulator will turn off, preventing hot water from circulating to the system (optional timeout setting can be used to override). The flow/check valve shown on the boiler outlet piping prevents gravity circulation in the boiler loop during DHW heating.
NOTICE
Overriding the Outdoor Reset function by setting control to DHW mode when system is intended for space heating may violate Section 303 of the 2007 Energy Act. See page 137 for compliance information and exemptions.
- Controlling the circulators
a. The U-Control can control up to three circulators (boiler circulator and two others). Refer to Field wiring, beginning on page 30, for instructions on wiring to circulators.
b. The factory default settings are: DHW circulator as Circulator 1, boiler circulator as Circulator 2. See Field wiring instructions, beginning on page 30, for details.
c. The zone circulators in Figure 6 must be controlled by circulator relays activated by the zone thermostats or zone controller.
1 Ultra boiler
2 Indirect water heater (DHW), if used (see page 56)
3 Boiler relief valve (see page 9 for piping details)
4 Relief valve discharge piping (see page 9 for details)
5 DHW circulator (see page 56 for suggested sizing)
6 Isolation valves
7 System circulator (see information above for wiring)
8 Diaphragm (or bladder) type expansion tank (see page 56 for piping of closed-type expansion tank, if used)
9 Air separator [with automatic air vent only on systems using diaphragm (or bladder) type expansion tank]
10 Flow/check valves
11 Purge/drain valves
12 Boiler circulator
14 Zone circulators, typical
20 Make-up water supply
21 Primary/secondary connection (tees no more than 12 inches apart)
23 DHW connections — see water heater manual for piping
24 Strap system supply and return sensors to lines as shown, at least 6 pipe diameters (but no more than 3 feet) from boiler connection tees.
26 Temperature/Pressure gauge
27 DHW relief valve, if used
Items supplied with boiler
Items supplied by others
Other piping alternatives
See page 14 and page 15 and ADVANCED INSTALLATION section for additional piping suggestions.
Using w ith Weil-McLain AQUA PLUS water heaters See AQUA PLUS - Product Manual for typical water piping.
See ADVANCED INSTALLATION section for additional piping information and applications.
NOTICE The information in this section is for usage of Ultra boilers with Weil-McLain AQUA PLUS indirect water heaters.
NOTICE For dedicated DHW applications, use the circulator supplied with the boiler to circulate to the water heater as shown in this section.
NOTICE By default, the U-Control Module turns off space heating during DHW heating (if DHW input is priority 1). The boiler circulator will turn off, preventing hot water from circulating to the system (optional timeout setting can be used to override).
⚠️ CAUTION DO NOT use a closed-type expansion tank on a system with a Weil-McLain AQUA PLUS water heater. The water heater must use an automatic air vent. Operation of the automatic air vent will deplete air in the piping, causing the expansion tank to waterlog. Always use a diaphragm- or bladder-type expansion tank with AQUA PLUS water heaters.
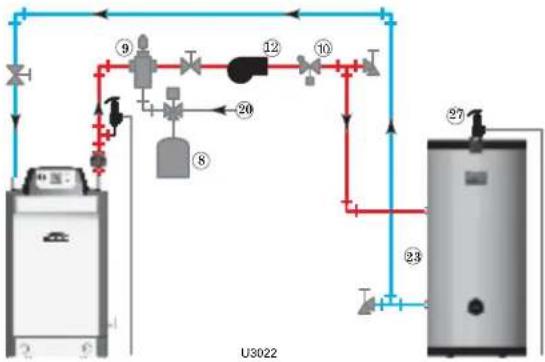
- Follow the guidelines on this page and page 15 to connect the water heater to the boiler. Use Figure 8 for dedicated water heating-only applications. Use Figure 9 and Figure 10, page 15 for combined space heating/water heating applications.
Figure 8 Ultra boiler with Ultra PLUS or AQUA PLUS water heater — dedicated water heating application, typical piping schematic
flowchart
graph TD
    A["Valve ⑧"] --> B["Valve ⑨"]
    B --> C["Valve ⑩"]
    C --> D["Valve ⑪"]
    D --> E["Valve ②7"]
    E --> F["Valve ②3"]
    F --> G["Control Unit"]
    H["U3022"] --> I["Valve ⑨"]
    I --> J["Valve ⑪"]
    K["Pressure Gauge"] --> L["Valve ⑨"]
    L --> M["Valve ⑪"]
    N["Flow Line"] --> O["Return Line"]
    P["Flow Line"] --> Q["Return Line"]
- The AQUA PLUS water heater can also be installed as one of the zones in the system. This method, however, requires flow through the main system even during the summer (non-space heating) months. Piping as shown in Figure 9 and Figure 10, page 15 allows isolation of flow to just the water heater piping during non-heating periods.
Figure 7 Use the table below to size DHW loop piping and select a circulator (see ADVANCED section for other DHW tanks)
| Boiler Ultra | Partial load (see Figure 9 and Figure 10, page 15) (combined space heating/water heating application) | ||||||
| PLUS model | GPM | MBH 115/140 | GPH 115/140 | Head loss (ft) | DHW pipe size | CIRC | |
| -80(71 MBH) | 40 | 6.5 | 71/71 | 160/124 | 8.5 | 1 | 007 |
| 60 | 6.5 | 71/71 | 168/132 | 8.5 | 1 | 007 | |
| 80 | 6.5 | 71/71 | 176/140 | 8.5 | 1 | 007 | |
| -105(94 MBH) | 40 | 10.1 | 94/94 | 217/154 | 17.0 | 114 | 0014 |
| 60 | 6.4 | 94/94 | 211/162 | 8.6 | 1 | 007 | |
| 80 | 6.4 | 94/94 | 219/170 | 8.6 | 1 | 007 | |
| -155(139 MBH) | 40 | 12.1 | 119/98 | 248/160 | 15.9 | 114 | 0014 |
| 60 | 12.1 | 139/120 | 295/220 | 15.9 | 114 | 0014 | |
| 80 | 12.1 | 139/139 | 305/230 | 15.9 | 114 | 0014 | |
| -230(207 MBH) | 40 | 13.5 | 120/100 | 251/162 | 15.2 | 114 | 0014 |
| 60 | 18.4 | 169/128 | 350/207 | 23.7 | 112 | 1400-20 | |
| 80 | 13.5 | 207/207 | 430/325 | 15.2 | 114 | 0014 | |
| -299/310(252 MBH) | 40 | 13.1 | 120/100 | 250/162 | 9.7 | 114 | 0010 |
| 60 | 19.3 | 170/129 | 351/208 | 11.7 | 112 | 0014 | |
| 80 | 24.9 | 252/252 | 510/381 | 18.4 | 112 | 1400-20 | |
| -399(365 MBH) | 40 | 13.1 | 120/100 | 250/162 | 9.7 | 114 | 0010 |
| 60 | 19.3 | 170/129 | 351/208 | 11.7 | 112 | 0014. | |
| 80 | 24.9 | 320/253 | 636/382 | 18.4 | 112 | 1400-20 | |
| Dedicated boiler (see Figure 8)(water heating only) | ||||||
| LUSmodel | GPM | MBH115/140 | GPH115/140 | Headloss (ft) | DHWpipe size | CIRC |
| 40 | 6.5 | 71/71 | 160/124 | 8.5 | 1 | 007 |
| 60 | 6.5 | 71/71 | 168/132 | 8.5 | 1 | 007 |
| 80 | 6.5 | 71/71 | 176/140 | 8.5 | 1 | 007 |
| 40 | 6.4 | 94/86 | 203/141 | 8.6 | 1 | 007 |
| 60 | 6.4 | 94/94 | 211/162 | 8.6 | 1 | 007 |
| 80 | 6.4 | 94/94 | 219/170 | 8.6 | 1 | 007 |
| 40 | 12.1 | 119/98 | 248/160 | 15.9 | 114 | 0014 |
| 60 | 12.1 | 139/120 | 295/220 | 15.9 | 114 | 0014 |
| 80 | 12.1 | 139/139 | 305/230 | 15.9 | 114 | 0014 |
| 40 | Not recommended — boiler capacityexceeds maximum output of water heater | |||||
| 60 | ||||||
| 80 | 13.5 | 207/207 | 430/325 | 15.2 | 114 | 0014 |
| 40 | Not recommended —boiler capacity exceedsmaximum output of water heater | |||||
| 60 | ||||||
| 80 | ||||||
| 40 | ||||||
| 60 | ||||||
| 80 | ||||||
Using with Weil-McLain AQUA PLUS water heaters (cont.) See AQUA PLUS - Product Manual for typical water piping.
Figure 9 Ultra boiler with Ultra PLUS or AQUA PLUS-40, -60 or -80 water heater, zone valve zoning, typical piping
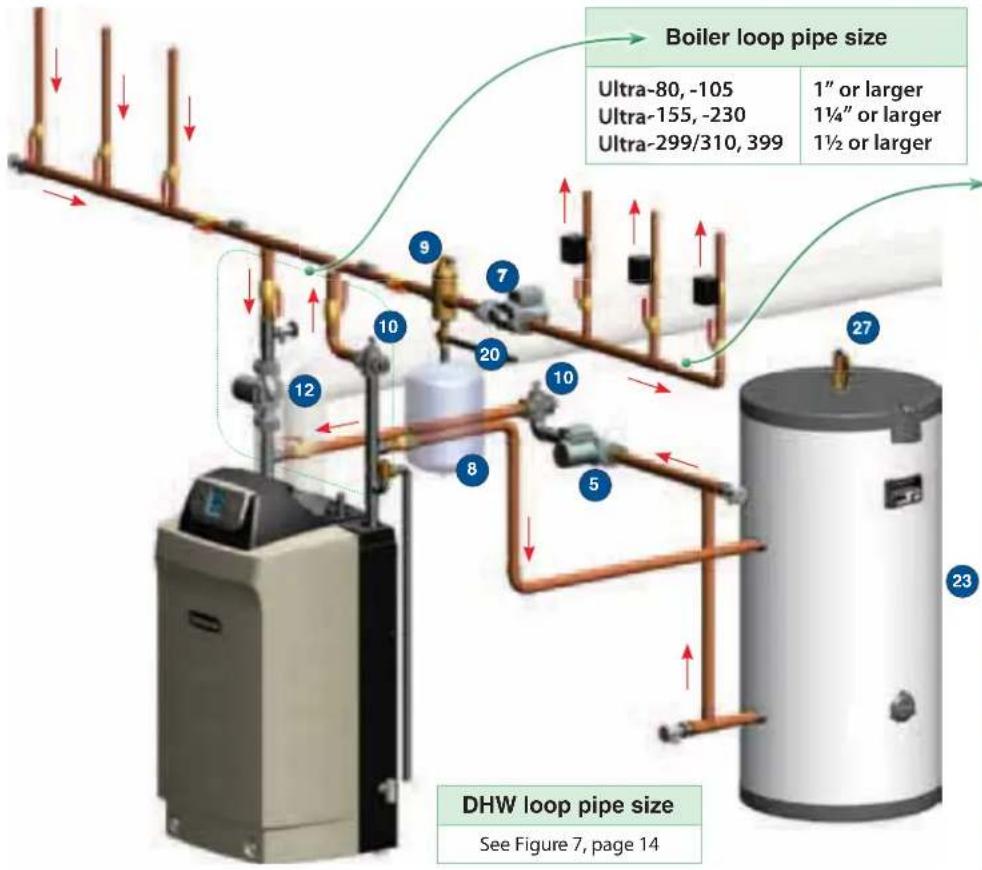
text_image
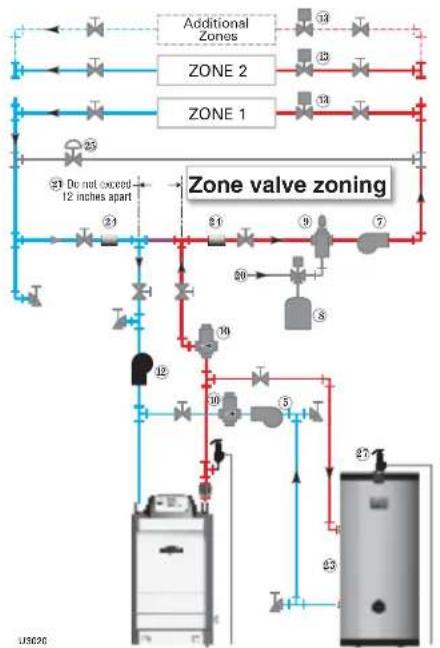
Boiler loop pipe size Ultra-80, -105 Ultra-155, -230 Ultra-299/310, 399 1" or larger 1¼" or larger 1½ or larger DHW loop pipe size See Figure 7, page 14Figure 10 Ultra boiler with Ultra PLUS or AQUA PLUS water heater, typical piping schematics
flowchart
graph TD
    A["Additional Zones"] --> B["ZONE 2"]
    B --> C["ZONE 1"]
    C --> D["Zone valve zoning"]
    D --> E["12"]
    D --> F["30"]
    D --> G["5"]
    D --> H["8"]
    D --> I["9"]
    D --> J["7"]
    D --> K["60"]
    D --> L["8"]
    D --> M["12"]
    D --> N["30"]
    D --> O["5"]
    D --> P["8"]
    D --> Q["12"]
    D --> R["30"]
    D --> S["5"]
    D --> T["8"]
    D --> U["12"]
    D --> V["30"]
    style A fill:#f9f,stroke:#333
    style B fill:#f9f,stroke:#333
    style C fill:#f9f,stroke:#333
    style D fill:#ccf,stroke:#333
    style E fill:#cff,stroke:#333
    style F fill:#cff,stroke:#333
    style G fill:#cff,stroke:#333
    style H fill:#cff,stroke:#333
    style I fill:#cff,stroke:#333
    style J fill:#cff,stroke:#333
    style K fill:#cff,stroke:#333
    style L fill:#cff,stroke:#333
    style M fill:#cff,stroke:#333
    style N fill:#cff,stroke:#333
    style O fill:#cff,stroke:#333
    style P fill:#cff,stroke:#333
    style Q fill:#cff,stroke:#333
    style R fill:#cff,stroke:#333
    style S fill:#cff,stroke:#333
flowchart
graph TD
    A["Additional Zones"] --> B["ZONE 2"]
    B --> C["ZONE 1"]
    C --> D["Circulator zoning"]
    D --> E["Valve 10"]
    D --> F["Valve 5"]
    D --> G["Valve 27"]
    D --> H["Valve 23"]
    D --> I["Valve 20"]
    D --> J["Valve 19"]
    D --> K["Valve 18"]
    D --> L["Valve 17"]
    D --> M["Valve 16"]
    D --> N["Valve 15"]
    D --> O["Valve 14"]
    D --> P["Valve 13"]
    D --> Q["Valve 12"]
    D --> R["Valve 11"]
    D --> S["Valve 10"]
    D --> T["Valve 9"]
    D --> U["Valve 8"]
    D --> V["Valve 7"]
    D --> W["Valve 6"]
    D --> X["Valve 5"]
    D --> Y["Valve 4"]
    D --> Z["Valve 3"]
    D --> AA["Valve 2"]
    D --> AB["Valve 1"]
    D --> AC["Valve 0"]
System/zone pipe sizing
(Baseboard, convector or cast iron radiators ONLY)
For residential space heating applications (other than radiant heating or unit heaters) ONLY, you can use:
| Ultra Model | System header |
| -80 | 1" or larger |
| -105, -155 | 1 14 " or larger |
| -230 | 1 12 " or larger |
| -299/310, 399 | 2" or larger |
| Recommendations are based on a 20°F temp drop through the system. | |
| Zone piping selection for series loops with finned-tube baseboard — general | |
| Copper pipe and baseboard size | Max recommended feet of baseboard |
| 3/4" | 106 |
| 1" | 179 |
| Contact your supplier to size the system and zone circulators needed. See below for zone piping using Taco 007 or equivalent circulators. | |
| Limits for series loop zones with finned-tube baseboard using Taco 007 (or equivalent) circulators | |||
| Copper pipe and baseboard | Max load MBH | Max foot of baseboard | Max total length of circuit (feet) |
| 3/4" | 50 | 82 | 93 |
| 1" | 79 | 104 | 123 |
Legend for Figure 9 and Figure 10
5 DHW circulator (see page 56 for suggested sizing)
7 System circulator (provided by installer)
8 Diaphragm type expansion tank ONLY — DO NOT use a closed-type tank with AQUA PLUS water heaters, because the automatic air vent will deplete the air from the system, causing the expansion tank to waterlog.
9 Air separator with automatic air vent
10 Flow/check valves
12 Boiler circulator — provided with boiler
13 Zone valves, typical
20 Make-up water supply
21 Primary/secondary connection
23 DHW connections — see water heater manual for piping
24 Strap system supply and return sensors to lines as shown, at least 6 pipe diameters (but no more than 3 feet) from boiler connection tees.
25 Systems using high-head pumps may require a bypass pressure regulator to prevent damage to control valves.
27 DHW relief valve must be installed in the tapping on top of the AQUA PLUS water heater.
Items supplied with boiler
Items supplied by others
Venting/air piping — general
DANGER
Do not install the Ultra boiler into a common vent with any other appliance. This will cause fl ue gas spillage or appliance malfunction, resulting in possible severe personal injury, death or substantial property damage.
WARNING
Existing common vent systems may be too large for the appliances remaining connected after the existing boiler is removed.
WARNING
Failure to follow all instructions can result in fl ue gas spillage and carbon monoxide emissions, causing severe personal injury or death.
When removing a boiler from an existing common vent system
The Ultra boiler cannot be common vented with any other appliance. When an existing boiler is replaced with an Ultra boiler, the Ultra boiler CANNOT use the existing common vent. The Ultra boiler requires its own vent and air piping, as specified in this manual. This may cause a problem for the appliances that remain on the old common vent, because the vent may be too large. The following test is intended to check for proper operation of the appliances remaining on the old common vent system.
Vent system verification
At the time of removal of an existing boiler, the following steps shall be followed with each appliance remaining connected to the common venting system placed in operation, while the other appliances remaining connected to the common venting system are not in operation. Seal any unused openings in the common venting system.
Existing vent test procedure
(The following is intended to test whether the appliances remaining on an existing vent system will operate satisfactorily.)
- Visually inspect the venting system for proper size and horizontal pitch and determine there is no blockage or restriction, leakage, corrosion or other defi ciencies which could cause an unsafe condition.
- Test vent system — Insofar as is practical, close all building doors and windows and all doors between the space in which the appliances remaining connected to the common venting system are located and other spaces of the building. Turn on clothes dryers and any appliance not connected to the common venting system. Turn on any exhaust fans, such as range hoods and bathroom exhausts, so they will operate at maximum speed. Do not operate a summer exhaust fan. Close fi replace dampers.
- Place in operation the appliance being inspected. Follow the lighting instructions. Adjust thermostat so appliance will operate continuously.
- Test for spillage at draft hood relief opening after 5 minutes of main burner operation. Use the flame of a match or candle, or smoke from a cigarette, cigar, or pipe.
- After it has been determined that each appliance remaining connected to the common venting system properly vents when tested as outlined herein, return doors, windows, exhaust fans, fi replace dampers, and any other gas-burning appliance to their previous conditions of use.
Any improper operation of common venting system should be corrected so the installation conforms with the National Fuel Gas Code, ANSI Z223.1 — latest edition. Correct by re-sizing to approach the minimum size as determined using the appropriate tables in Part 11 of that code. Canadian installations must comply with B149.1 or B149.2 Installation Code.
WARNING
You must provide combustion air.
Direct vent — Install air inlet piping for the Ultra boiler as described in the Boiler manual and this addendum. The air termination fitting must be installed with the clearances and geometry relative to the vent outlet depicted in this manual to ensure that flue products do not enter the air intake.
Direct exhaust — Provide combustion air openings to boiler room/building as specified in this addendum and as required by all applicable codes.
Ensure that the combustion air will not contain any of the contaminants in Figure 11DO NOT place combustion air supply opening or intake near a swimming pool, for example. Avoid areas subject to exhaust fumes from laundry facilities. These areas will always contain contaminants.
Contaminated combustion air will damage the boiler, resulting in possible severe personal injury, death or substantial property damage.
Figure 11 Corrosive contaminants and sources
| Products to avoid |
| Spray cans containing chloro/fluorocarbons |
| Permanent wave solutions |
| Chlorinated waxes/cleaners |
| Chlorine-based swimming pool chemicals |
| Calcium chloride used for thawing |
| Sodium chloride used for water softening |
| Refrigerant leaks |
| Paint or varnish removers |
| Hydrochloric acid/muriatic acid |
| Cements and glues |
| Antistatic fabric softeners used in clothes dryers |
| Chlorine-type bleaches, detergents, and cleaning solvents found in household laundry rooms |
| Adhesives used to fasten building products and other similar products |
| Excessive dust and dirt |
| Areas likely to have contaminants |
| Dry cleaning/laundry areas and establishments |
| Swimming pools |
| Metal fabrication plants |
| Beauty shops |
| Refrigeration repair shops |
| Photo processing plants |
| Auto body shops |
| Plastic manufacturing plants |
| Furniture refinishing areas and establishments |
| New building construction |
| Remodeling areas |
| Garages with workshops |
| Buildings under construction (where air is contaminated with particulates) |
Venting/air piping — general (continued)
DANGER
Ultra Boilers must be vented and supplied with combustion and ventilation air using piping and methods described in manual.
Every boiler must have its own vent. DO NOT common vent with any other appliance. See page 16.
Inspect finished vent and air pipir to ensure all are airtight and comply with the instructions provided and with all requirements of applicable codes.
Failure to provide a properly-installed vent and air system will cause severe personal injury or death.
WARNING
Venting/combustion air piping - Installations must provide provisions for combustion and ventilation air in accordance with the section "Air for Combustion and Ventilation," of the National Fuel Gas Code - ANSI Z223.1/NFPA54 – latest edition, or Sections 8.2, 8.3, or 8.4 of Natural Gas and Propane Installation Code - CAN/CSA B149.1, or applicable provisions of the local building codes.
WARNING
Use only the materials listed in this manual for vent and air pipe and fittings. Failure to comply could result in severe personal injury, death or substantial property damage.
WARNING
If used, a masonry chimney can ONLY be used as a PIPE CHASE for vent and air pipes — The vent and air piping must be installed as instructed in this manual and all joints must be sealed. The chimney must be used only for Ultra boilers. NO OTHER appliance or fi replace can be connected to the chimney.
The chimney must be straight, with no offsets, and the vent and air piping materials must comply with this instruction manual.
The chimney must be fitted with a sealed access opening, through which the interior of the chimney can be inspected.
The chimney and liner must be inspected at least once annually to verify condition.
Failure to comply could result in severe personal injury, death or substantial property damage.
Combustion air piping
- Combustion air must be piped from outside to the boiler, following the instructions in this manual, and compliant with all applicable codes. Read the warning in Figure 11, page 16, and ensure the air intake will not be likely to draw in contaminated air.
- Combustion air can be piped individually for each boiler, or it can be manifolded as shown in Figure 59, page 59. Air piping must always terminate on the same side (or roof) of the building as the vent.
Vent piping
- Boiler flue gases must be piped from the boiler to outside, following the instructions in this manual, and compliant with all applicable codes. The vent pipe must terminate either through the sidewall or through the roof, located with the correct separation from the air termination. See Figure 14, page 18, and the associated instructions referenced.
- Each Ultra boiler requires a separate vent. Do not common vent.
Vent and air piping materials
- See Figure 13, page 19 for approved vent and air piping materials.
Venting & air — general (cont.)
Figure 12 Vent and air pipe options and maximum allowable piping lengths
| Ultra model | Vent or air pipe size | • Maximum equivalent feet of piping• Number of elbows allowed at these lengths(All applications include allowance for the terminations.) | ||||||||||
| Direct vent Sidewall with Weil-McLain vent/air cap | Direct vent Sidewall with separate pipes — or — Direct exhaust (sidewall or vertical) | 3" Concentric Sidewall or Vertical DO NOT use CPVC or ABS [Note 1] | 4" Concentric Sidewall or Vertical DO NOT use CPVC or ABS) [Note 1] | Direct vent Vertical with separate pipes | Direct vent Vertical exhaust Sidewall air | |||||||
| Direct vent only | Direct vent or Direct exhaust | Direct vent only | Direct vent only | Direct vent only | Direct vent only | |||||||
| Length Ells Length Ells Length Ells Length Ells Length Ells | ||||||||||||
| -80/105 | 2"* | 100 (ab) | 2 | 100 (a) | 2 | 100 (ab) | 1 | NA | 100 (a) | 1 | 100 (a) | |
| 3" | 100 | 2 | 100 | 2 | 100 | 1 | NA | 100 | 1 | 100 | ||
| -155 | 3" | 100 | 2 | 100 | 2 | 100 | 1 | NA | 100 | 1 | 100 | |
| -230 | 3" | 30 (c) | 2 | 30 (c) | 2 | 30 (c) | 1 | 30 (c)(d) | 1 | 30 (c) | 1 | 30 (c) |
| 4" | 100 (d) | 2 | 100 | 2 | 70 (d) | 1 | 100 | 1 | 100 | 1 | 100 | |
| -299 | 4" | 100 | 2 | 100 | 2 | 70 (d) | 1 | 100 | 1 | 100 | 1 | 100 |
| -310 | 4" | 100 | 2 | 100 | 2 | 70 (d) | 1 | 100 | 1 | 100 | 1 | 100 |
| -399 | 4" | 100 | 2 | 100 | 2 | NA | 100 | 1 | 100 | 1 | 100 | |
| Note 1: | IPEX 3" and 4" PVC concentric vent kits can be used with standard PVC pipe, fittings and cement (ANSI/ASTM D1785) except where ULC S636 compliance is required. For ULC S636 compliance, all pipe, fittings and cement must be IPEX System 636. When using IPEX kits, use only IPEX product code 196006 for 3" venting or IPEX product code 196021 for 4" venting.Contact Weil-McLain for ordering information and availability of Weil-McLain venting kits. | |||||||||||
| Polypropylene - Separate pipe and concentric termination by respective manufacturers. | ||||||||||||
| Additional notes | a — Use 3"x2" reducer at boilerb — Use 3"x2" reducers at termination | c — Use 4"x3" reducer at boilerd — Use 4"x3" reducers at termination | ||||||||||
| * Ultra-80 and 105 boilers installed with 2-inch vent piping automatically derate due to the pressure loss in the vent and air piping. The derate ranges up to 10% for the Ultra-80 at 100 feet or 15% for the Ultra-105 at 100 feet. | ||||||||||||
| Equivalent feet for elbows — deduct from maximum equivalent length of piping:PVC • 7 feet per for each 4-inch elbow & 2 or 3-inch 90° long-radius or 45° elbow• 16 feet for each 2- or 3-inch short-radius elbowPP • Centrotherm 3" = 6' 4" = 20' Duravent 3" = 17' 4" = 22' | Stainless steel (AL29-4C) vent pipeinstall an adapter at the boiler for all applications. Also install an adapter at the termination unless using separate-pipetermination. | |||||||||||
Venting & air — general (cont.)
Figure 13 Vent and air piping materials — Use only the materials listed below, ensuring that all materials meet local codes
| Item Material | Standards for installations in: | ||
| United States Canada | |||
| Plastic piping materials | |||
| Vent or air pipe & fi ttings | PVC schedule 40 ANSI/ASTM D1785 | Plastic vent pipe must be certifi ed to ULC S636 when required. (Note 2)Air pipe can be any of those listed at left if acceptable for local codes. | |
| PVC-DWV (Note 1) ANSI/ASTM D2665 | |||
| CPVC schedule 40 (Note 1) ANSI/ASTM F441 | |||
| ABS-DWV schedule 40 (Note 1) ANSI/ASTM D2661 | |||
| PVC & ABS pipe cement & primer | PVC ANSI/ASTM D2564 | ||
| CPVC (Note 1) ANSI/ASTM F493 | |||
| ABS (Note 1) | ANSI/ASTM D2235 | ||
| Polypropylene vent pipe, fi ttings, terminations | Simpson-Duravent — Obtain all materials from M&G Simpson-DuraventCentrotherm Eco Systems InnoFlue® Single-wall — Obtain all materials from Centrotherm | See manufacturer's literature for detailed informationMUST USE LOCKING COLLAR ON EVERY JOINT | ULC S636 |
| AL29-4C piping materials | |||
| Vent pipe AL29-4C stainless steel | Heat Fab, Inc. — Saf-T-Vent®Z-Flex, Inc. — Z-Vent IISimpson Dura-Vent — FasNSealTM | Certifi ed for Category IV and direct vent appliance venting | Certifi ed for Category IV and direct vent appliance venting |
| Weil-McLain bird screens (purchase separately) | |||
| Weil-McLain bird screens | For 2" or 3" vent or air termination(cut to size if necessary)3" vent screen:W-M part number 383-500-105 | For 3" or 4" vent or air termination(cut to size if necessary)4" vent screen:W-M part number 383-500-110 | |
| Note 1: DO NOT use DWV, CPVC or ABS when using concentric vent termination. Use ONLY PVC schedule 40. | |||
| Note 2: IPEX PVC concentric terminations utilize PVC pipe/fittings certified to ULC S636. Where ULC S636 compliance is required, use only IPEX System 636 pipe, fi ttings and cement. | |||
| ⚠WARNING AL29-4C vent piping — Install a PVC-to-stainless adapter supplied by the vent pipe manufacturer at the boiler vent connection and at the termination (when using Weil-McLain plate or concentric PVC termination). DO NOT mix piping from different vent pipe manufacturers unless using adapters specifically designed for the purpose by the manufacturer. | |||
| ⚠WARNING Plastic piping — Do not attempt to connect different types of plastic piping together. | |||
| ⚠WARNING DO NOT use cellular core pipe. | |||
| ⚠WARNING All vent and air pipes require abird screen at each terminationwhere specified in the manual or vent supplement. Purchase bird screens separately from Weil-McLain or vent kit supplier. Note that most kits do not include the screens. | |||
Sidewall vent/air termination: Separate pipes
Allowable vent/air pipe materials
-
Use only the materials listed in Figure 13, page 19.
-
The Weil-McLain vent termination kit includes inside and outside wall plates, bird screens, and mounting hardware to secure the plates (kit included with boiler).
Maximum piping length
-
Locate the terminations such that the total air piping and vent piping from the boiler to the termination will not exceed the maximum length given in Figure 14.
-
Maximum lengths listed in Figure 14 allow for 2 elbows. Additional elbows required a reduction in maximum length as explained in the table notes.
Connecting from termination to boiler
- Install the terminations as instructed in the following. Then proceed to page 82 to complete the air and vent piping between the termination and the boiler.
Determine location — separate elbows
WARNING
A gas vent extending through an exterior wall shall not terminate adjacent to the wall or below building extensions such as eaves, parapets, balconies or decks. Failure to comply could result in severe personal injury, death or substantial property damage.
-
Locate the vent/air terminations using the following guidelines.
-
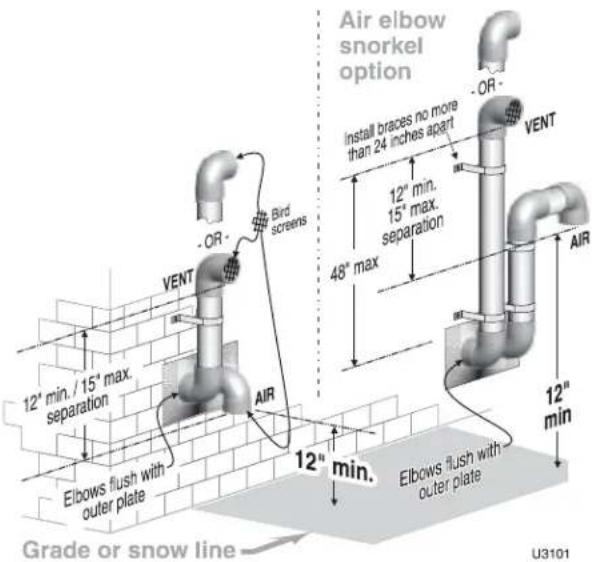
The air piping must terminate in a down-turned elbow as shown in Figure 15. This arrangement avoids recirculation of flue products into the combustion air stream.
a. Apply the configuration on the left side of Figure 15 unless the terminations would fail to meet minimum clearance to grade or snow line.
b. Apply the configuration on the right side of Figure 15 when the terminations need to be raised higher to meet clearance to grade or snow line.
c. The vent and air pipes may run up as high as 4 feet, as shown in Figure 15 right side with no enclosure. The vent and air pipes must be secured with braces, and all clearances and lengths must be maintained. Space braces no further than 24 inches apart. (See WARNING below for extremely cold climates.)
d. External venting greater than 4 feet requires an insulated enclosure around the vent and air pipes. The vent and air terminations must exit through the enclosure as shown in Figure 15, maintaining all required clearances.
- The vent piping must terminate in an elbow pointed outward or away from the air inlet, as shown in Figure 15.
WARNING
Do not exceed the maximum lengths of the outside vent piping shown in Figure 15. Excessive length exposed to the outside could cause freezing of condensate in the vent pipe, resulting in potential boiler shutdown. In extremely cold climates, install an insulated chase around the vent piping, particularly when using longer lengths. The chase must allow for inspection of the vent pipe, and insulation must be protected from water.
Figure 14 Maximum piping lengths for separate vent and air pipe sidewall termination
| Boiler Ultra | Maximum Piping, 2” * | Maximum Piping, 3” * | Maximum Piping, 4” * | |||
| Feet | Elbows | Feet | Elbows | Feet | Elbows | |
| -80 ** 100 2 100 2 | Not allowed | |||||
| -105 ** 100 2 100 2 | ||||||
| -155 Not allowed 100 2 | ||||||
| -230 Not allowed 30 2 100 2 | ||||||
| -299/310 Not allowed Not allowed 100 2 | ||||||
| -399 Not allowed Not allowed 100 2 | ||||||
* Install pipe reducers to adapt from pipe size used to the outside diameter required at the boiler. You do not have to reduce allowable pipe length for the reducers.
** Ultra-80 and 105 boilers installed with 2-inch vent piping automatically derate due to the pressure loss in the vent and air piping. The derate ranges up to 10% for the Ultra-80 at 100 feet or 15% for the Ultra-105 at 100 feet.
For piping using more than 2 elbows, reduce maximum allowable length:
- 7 feet for each additional 4-inch elbow (90° or 45°)
- 7 feet for each additional 2 or 3-inch long radius elbow
• 16 feet for each 2 or 3-inch short radius elbow - 7 feet for each 2 or 3-inch 45-degree elbow.
Figure 15 Sidewall termination — separate pipes — confi guration options and minimum clearances from vent to air terminations
text_image
Air elbow snorkel option Install braces no more than 24 inches apart 12" min. 15" max. separation 48" max - OR - VENT - OR - VEHT AIR 12" min. Elbows flush with outer plate 12" min. Elbows flush with outer plate Grade or snow line U3101Sidewall vent/air termination: Separate pipes (continued)
- You must consider the surroundings when terminating the vent and air:
a. Position the vent termination where vapors will not damage nearby shrubs, plants or air conditioning equipment or be objectionable.
b. The fl ue products will form a noticeable plume as they condense in cold air. Avoid areas where the plume could obstruct window views.
c. Prevailing winds could cause freezing of condensate and water/ice buildup where fl ue products impinge on building surfaces or plants.
d. Avoid possibility of accidental contact of flue products with people or pets.
e. Do not locate the terminations where wind eddies could affect performance or cause recirculation, such as inside building corners, near adjacent buildings or surfaces, window wells, stairwells, alcoves, courtyards or other recessed areas.
f. Do not terminate above any door or window or under a deck. Condensate can freeze, causing ice formations.
g. Locate or guard vent to prevent condensate damage to exterior finishes.
- Maintain clearances as shown in the illustrations in this manual section. Also maintain the following:
a. Vent must terminate:
• At least 6 feet from adjacent walls.
• No closer than 5 feet below roof overhang.
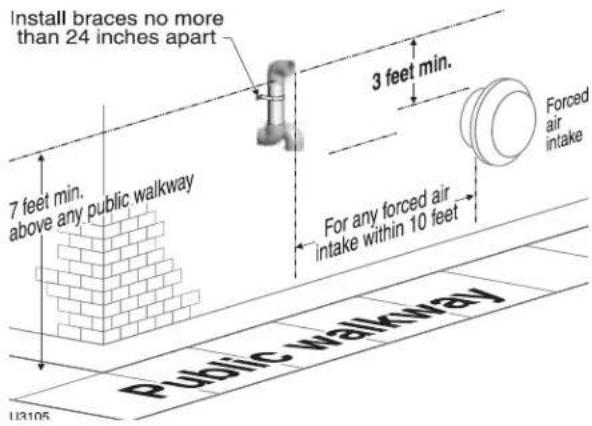
• At least 7 feet above any public walkway.
• At lease 3 feet above any forced air intake within 10 feet.
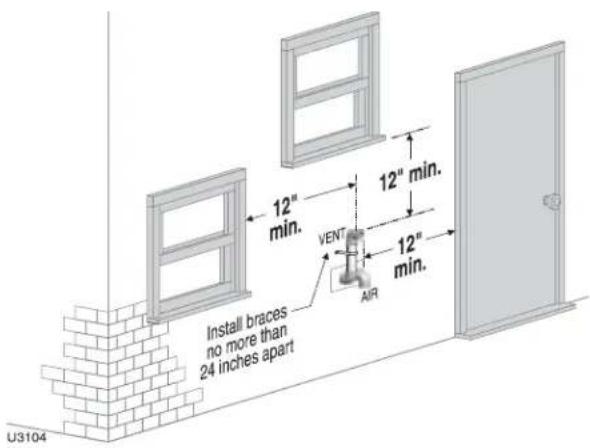
- No closer than 12 inches below or horizontally from any door or window or any other gravity air inlet.
b. Do not terminate closer to 4 feet horizontally from any electric meter, gas meter, regulator, relief valve or other equipment. Never terminate above or below any of these within 4 feet horizontally.
- Locate terminations so they are not likely to be damaged by foreign objects, such as stones or balls, or subject to buildup of leaves or sediment.
- Do not connect any other appliance to the vent pipe or multiple boilers to a common vent pipe.
Completing the vent/air piping
- Install vent/air penetrations as explained in the following pages before installing vent and air piping from the boiler to the terminations. Insert piping from boiler air and vent connections, then attach exterior termination piping.
- Follow instructions beginning on page 71 to complete piping from boiler to termination.
Figure 16 Sidewall termination with separate pipes — clearances to openings
text_image
U3104 Install braces no more than 24 inches apart 12" min. 12" min. VENT AIR 12" min.Figure 17 Sidewall termination with separate pipes — clearances to public walkway or forced air intake
text_image
Install braces no more than 24 inches apart 7 feet min. above any public walkway 3 feet min. For any forced air intake within 10 feet Forced air intake Public walkway U3105Figure 18 Multiple terminations — separate pipes — clearance from vent of one to air intake of the next
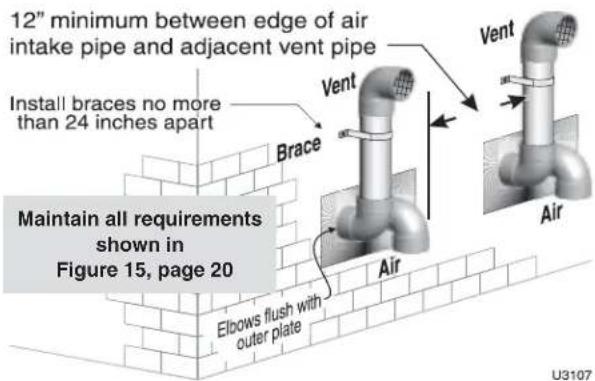
text_image
12" minimum between edge of air intake pipe and adjacent vent pipe Install braces no more than 24 inches apart Brace Maintain all requirements shown in Figure 15, page 20 Elbows flush with outer plate Vent Air Vent Air U3107Sidewall vent/air termination: Separate pipes (continued)
Multiple vent/air terminations
- When terminating multiple Ultra boilers, terminate each vent/air connection as described in this manual.
WARNING
All vent pipes and air inlets must terminate at the same height to avoid possibility of severe personal injury, death or substantial property damage.
- Place wall penetrations to obtain minimum clearance of 12 inches between vent pipe and adjacent air inlet elbow, as shown in Figure 18, page 21 for U. S. installations.
- For Canadian installations, provide clearances required by Natural Gas and Propane Installation CAN/CSA B149.1 or B149.2 Installation Code.
- The air inlet of an Ultra boiler is part of a direct vent connection. It is not classified as a forced air intake with regard to spacing from adjacent boiler vents.
- Combustion air (NOT vent piping) can be manifolded as shown in Figure 59, page 59.
Prepare wall penetrations
- Air pipe penetration:
a. Cut a hole for the air pipe. Size the air pipe hole as close as desired to the air pipe outside diameter.
- Vent pipe penetration:
a. Cut a hole for the vent pipe. For either combustible or noncombustible construction, size the vent pipe hole at least 0.4" larger than the vent pipe diameter:
- 2^3/4 hole for 2"
• 4" hole for 3" - 5" hole for 4"
b. Insert a galvanized metal thimble in the vent pipe hole as shown in Figure 20.
- Use a sidewall termination plate as a template for correct location of hole centers. Sidewall termination plates must be purchased separately. See the parts list at the end of this manual for part numbers.
- Follow all local codes for isolation of vent pipe when passing through floors or walls.
- Seal exterior openings thoroughly with exterior caulk.
Termination and fittings
- Prepare the vent termination elbow and the air termination elbow (Figure 20) by inserting bird screens. Bird screens must be purchased separately. See the parts list at the end of this manual for part numbers.
- When completed, the air termination coupling must be oriented at least 12 inches below the vent termination and at least 12 inches above grade or snow line as shown in Figure 15, page 20.
- You can orient the vent termination elbow either directly outward or 90 degrees away from the air inlet elbow as shown in Figure 15, page 20.
- Maintain the required dimensions of the finished termination piping as shown in Figure 15, page 20.
- Do not extend exposed vent pipe outside of building more than shown in this document. Condensate could freeze and block vent pipe.
NOTICE
If extending the vent and air pipes out from the wall, install a coupling on each pipe. Mount the piping with the coupling fl ush with the outer plate.
Figure 19 Multiple terminations — separate pipes — clearance from vent of one to air intake of the next — alternate configuration of air and vent terminations
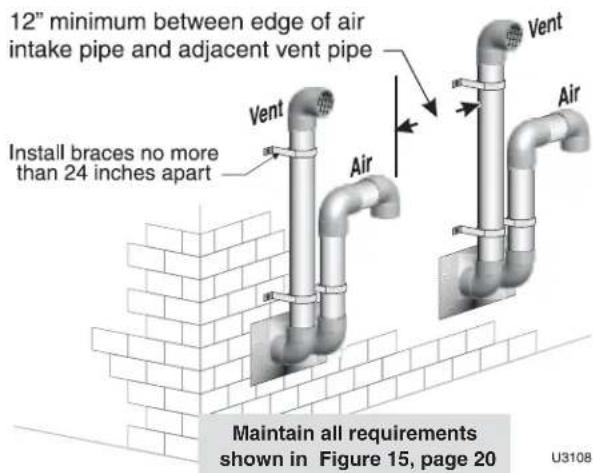
text_image
12" minimum between edge of air intake pipe and adjacent vent pipe Vent Air Install braces no more than 24 inches apart Vent Air Maintain all requirements shown in Figure 15, page 20 U3108Figure 20 Sidewall termination assembly — using separate pipes
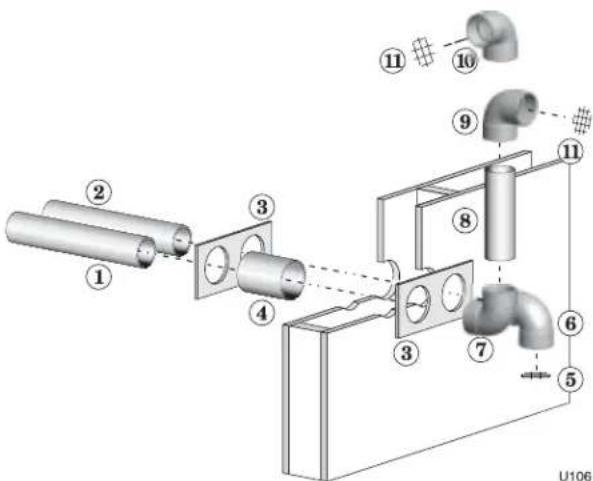
text_image
Technical diagram of a mechanical assembly with numbered components, likely for manufacturing or assembly documentation.1 Vent piping
2 Air piping
3 Sidewall termination plates, by installer
4 Galvanized thimbles, by installer
5 Bird screen (air), by installer
6 Air inlet elbow
7 Elbow
8 Nipple
9 Elbow (vent termination)
10 Alternate elbow orientation
11 Bird screen (vent termination) — supplied by installer
Vertical vent/air termination: Separate pipes
Allowable vent/air pipe materials
-
Use only the materials listed in Figure 13, page 19.
-
Purchase bird screens for vent and air terminations separately. See the parts list at the end of this manual.
Maximum piping length
-
Locate the terminations such that the total air piping and vent piping from the boiler to the termination will not exceed the maximum length given in Figure 21.
-
Maximum lengths listed in Figure 21 allow for 1 elbow. Additional elbows required a reduction in maximum length as explained in the table notes.
Connecting from termination to boiler
- Install the termination penetrations as instructed in the following. Then proceed to page 82 to complete the piping between the termination and the boiler.
Determine location
- Locate the vent/air terminations using the following guidelines:
- The air piping must terminate in a down-turned 180-degree return bend as shown in Figure 22. Locate the air inlet pipe no further than 2 feet from the center of the vent pipe. This placement avoids recirculation of flue products into the combustion air stream.
- The vent piping must terminate in an up-turned coupling as shown in Figure 22. The top of the coupling must be at least 1 foot above the air intake. The air inlet pipe and vent pipe can be located in any desired position on the roof, but must always be no further than 2 feet apart and with the vent termination at least 1 foot above the air intake.
- You must consider the surroundings when terminating the vent and air:
a. Position the vent termination where vapors will not damage nearby shrubs, plants or air conditioning equipment or be objectionable.
b. The flue products will form a noticeable plume as they condense in cold air. Avoid areas where the plume could obstruct window views.
c. Prevailing winds could cause freezing of condensate and water/ice buildup where flue products impinge on building surfaces or plants.
d. Avoid possibility of accidental contact of flue products with people or pets.
e. Do not locate the terminations where wind eddies could affect performance or cause recirculation, such as inside building corners, near adjacent buildings or surfaces, window wells, stairwells, alcoves, courtyards or other recessed areas.
f. Do not terminate above any door or window. Condensate can freeze, causing ice formations.
g. Locate or guard vent to prevent condensate damage to exterior finishes.
Figure 21 Maximum piping lengths for separate vent and air pipe vertical termination
| Boiler Ultra | Maximum Piping, 2” * | Maximum Piping, 3” * | Maximum Piping, 4” * | |||
| Feet | Elbows | Feet | Elbows | Feet | Elbows | |
| -80 30 1 | 100 1 | Not allowed | ||||
| -105 30 1 | 100 1 | |||||
| -155 Not | allowed 100 1 | |||||
| -230 Not | allowed 30 1 100 1 | |||||
| -299/310 Not allowed Not allowed 100 1 | ||||||
| -399 Not allowed Not allowed 100 1 | ||||||
* Install reducers as necessary where connecting to the boiler vent and air connections.
For piping using more than 1 elbow, reduce maximum allowable length:
- 7 feet for each additional 4-inch elbow (90° or 45°)
- 7 feet for each additional 2 or 3-inch long radius elbow
• 16 feet for each 2 or 3-inch short radius elbow
- 7 feet for each 2 or 3-inch 45-degree elbow.
NOTE: The 180-degree return bend is included in the allowed fitings. No deduction is required.
Figure 22 Vertical termination — separate pipes
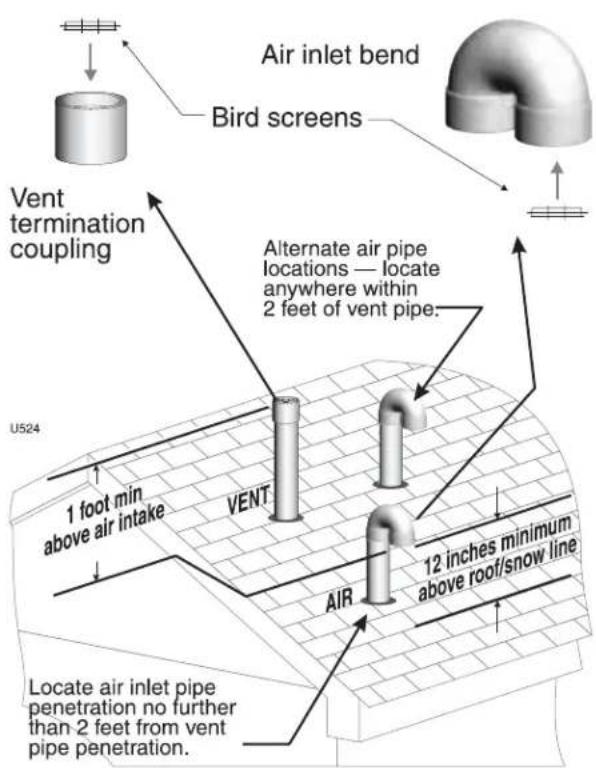
text_image
Air inlet bend Bird screens Vent termination coupling Alternate air pipe locations — locate anywhere within 2 feet of vent pipe. 1 foot min above air intake VENT U524 12 inches minimum above roof/snow line VENT AIR Locate air inlet pipe penetration no further than 2 feet from vent pipe penetration.Vertical vent/air termination: Separate pipes (continued)
- Maintain clearances to vent termination as given below:
a. Vent must terminate:
• At least 6 feet from adjacent walls.
• No closer than 5 feet below roof overhang.
• At least 7 feet above any public walkway.
- At least 3 feet above any forced air intake within 10 feet.
• No closer than 12 inches below or horizontally from any door or window or any other gravity air inlet.
b. Air inlet must terminate at least 6 inches above the roof or snow line and at least 12 inches below the vent termination as shown in Figure 22, page 23.
c. Do not terminate closer to 4 feet horizontally from any electric meter, gas meter, regulator, relief valve or other equipment. Never terminate above or below any of these within 4 feet horizontally.
-
Locate terminations so they are not likely to be damaged by foreign objects, such as stones or balls, or subject to buildup of leaves or sediment.
-
Do not connect any other appliance to the vent pipe or multiple boilers to a common vent pipe.
Prepare roof penetrations
- Air pipe penetration:
a. Cut a hole for the air pipe. Size the air pipe hole as close as desired to the air pipe outside diameter.
- Vent pipe penetration:
a. Cut a hole for the vent pipe. For either combustible or noncombustible construction, size the vent pipe hole at least 0.4" larger than the vent pipe diameter:
- 2^3/4 hole for 2"
• 4" hole for 3" - 5" hole for 4"
b. Insert a galvanized metal thimble in the vent pipe hole.
- Space the air and vent holes to provide the minimum spacings shown in Figure 22, page 23.
- Follow all local codes for isolation of vent pipe when passing through floors, ceilings and roofs.
- Provide fl ashing and sealing boots sized for the vent pipe and air pipe.
Termination and fi ttings
- Prepare the vent termination elbow and the air termination elbow (Figure 22, page 23) by inserting bird screens. Bird screens must be purchased separately. See the parts list at the end of this manual for part numbers.
a. If using 3-inch piping for an Ultra-230, cut a 4-inch bird screen by placing 3-inch fi tting on screen and cutting around it as a template.
- The air piping must terminate in a down-turned 180-degree return bend as shown in Figure 22, page 23. Locate the air inlet pipe no further than 2 feet from the center of the vent pipe. This placement avoids recirculation of fl ue products into the combustion air stream.
Figure 23 Termination location — separate pipes — terminations for multiple boilers
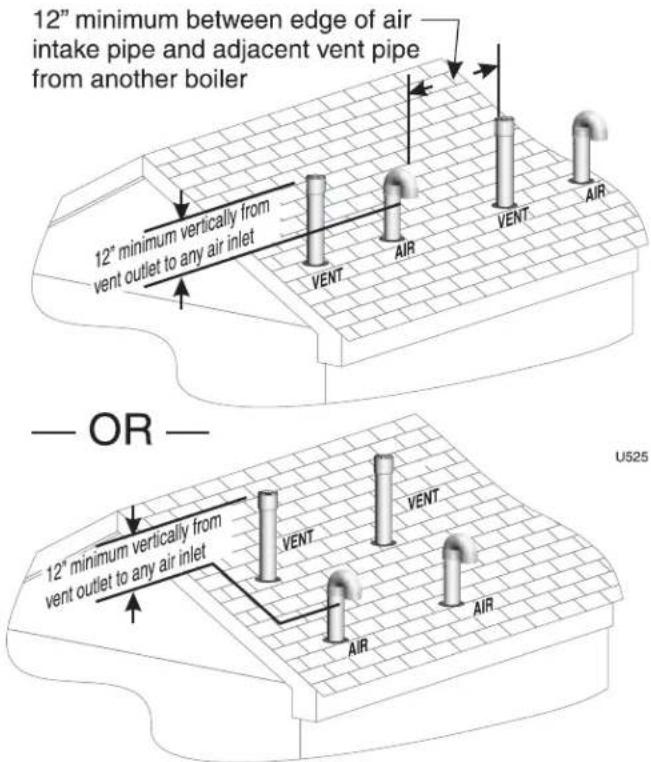
text_image
12" minimum between edge of air intake pipe and adjacent vent pipe from another boiler 12" minimum vertically from vent outlet to any air inlet VENT AIR VENT AIR — OR — 12" minimum vertically from vent outlet to any air inlet VENT VENT AIR AIR U525- The vent piping must terminate in an up-turned coupling as shown in Figure 22, page 23. The top of the coupling must be at least 1 foot above the air intake. The air inlet pipe and vent pipe can be located in any desired position on the roof, but must always be no further than 2 feet apart and with the vent termination at least 1 foot above the air intake.
- Maintain the required dimensions of the finished termination piping as shown in Figure 22, page 23.
- Do not extend exposed vent pipe outside of building more than shown in this document. Condensate could freeze and block vent pipe.
Multiple vent/air terminations (Figure 23)
- When terminating multiple Ultra boilers, terminate each vent/air connection as described in this section.
⚠ WARNING Terminate all vent pipes at the same height and all air pipes at the same height to avoid possibility of severe personal injury, death or substantial property damage.
- Place roof penetrations to obtain minimum clearance of 12 inches between edge of air intake elbow and adjacent vent pipe of another boiler for U. S. installations (see Figure 2). For Canadian installations, provide clearances required by Natural Gas and Propane Installation CAN/CSA B149.1 or B149.2 Installation Code.
- The air inlet of an Ultra boiler is part of a direct vent connection. It is not classified as a forced air intake with regard to spacing from adjacent boiler vents.
DIRECT VENT
Figure 24 DIRECT VENT APPLICATIONS — Vent and air termination options
| DIRECT VENTSIDEWALL termination | DIRECT VENTVERTICAL termination | DIRECT VENTVERTICAL vent andSIDEWALL air | ||||
| Well-McLainsidewallterminationplate(See Boilermanualpage 67) | 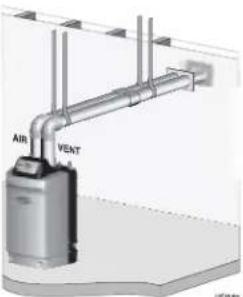 | 3" or 4"concentrictermination(See Boilermanualpage 72) | 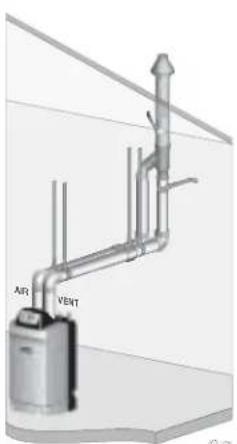 | VerticalventterminationandSidewallairtermination(See Boillermanualpage 79) | 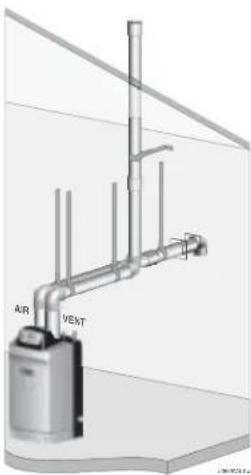 | |
| 3" or 4"concentrictermination(See Boillermanualpage 72) | 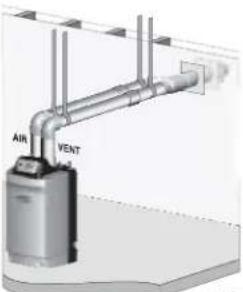 | Verticaltermination withseparate ventandair pipes(See Boilermanualpage 73) | 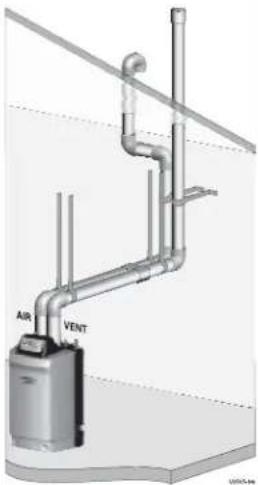 | |||
| Sidewalltermination withseparate ventandair pipes(See Boilermanualpage 66) | 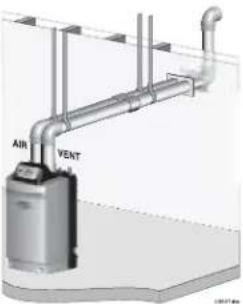 | |||||
| Direct ventinstallationsequence | Step 1 Install the boiler.Step 2 Determine the termination method — sidewall or vertical, concentric or separate pipes, etc.Step 3 Determine proper location for wall or roof penetration for each termination.Step 4 Install termination assembly as described in this manual.Step 5 Install air and vent piping from boiler to termination.Step 6 Install pipe supports and brackets as required. | |||||
DIRECT EXHAUST
Figure 25 DIRECT EXHAUST APPLICATIONS — Vent termination options (combustion air from room)
| DIRECT EXHAUSTSidewall termination | DIRECT EXHAUSTVertical termination | ||
| Sidewall vent termination(See Boiler manual page 83) | 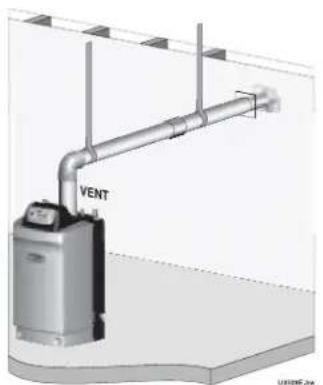 | Vertical vent termination(See Boiler manual page 83) | 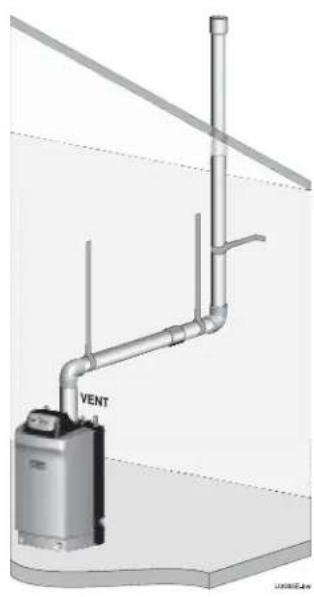 |
| Direct exhaust installation sequence | Step 1 Install the boiler.Step 2 Determine the proper location for roof or wall penetration for each termination.Prepare roof penetrations before installing vent piping.Finish by attaching external pipe and fittings as shown in the termination instructions.Vertical terminations only — Install terminations as described in this addendum.Support vertical runs on the outside of the building with brackets as shown in the termination instructions.Step 3 Install vent piping from boiler to termination.Install a hanger support within 6 inches of any upturn in the piping.Slope horizontal piping downward toward the boiler at least 1/4 inch per foot.Step 4 Connect the vent piping at the boiler per manual instructions. | ||
Install condensate line
Prepare condensate fi ttings
- Remove PVC fittings and gasket from the accessories bag.
- Deburr and chamfer outside and inside of 12 " x 114 " PVC nipple to ensure even cement distribution when joining.
- Clean nipple ends and all fittings. Dry thoroughly.
- For each joint in the condensate line, apply the following. Assemble parts ONLY in the order given.
a. Apply primer liberally to both joint surfaces — pipe end and fl tting socket.
b. While primer is still damp, lightly apply approved cement to both surfaces in a uniform coating.
c. Apply a second coat of cement to both surfaces. Avoid using too much cement on sockets to prevent cement buildup inside.
d. With cement still wet, insert pipe into fl tting, twisting 14 turn. Make sure pipe is fully inserted.
e. Wipe excess cement from joint. Check joint to be sure a smooth bead of cement shows around the entire joint.
- See Figure 26.
- Assemble the 12 " PVC nipple to the PVC reducing elbow as shown.
- Allow joint to dry completely.
- Then slide gasket over nipple as shown in Figure 27.
- Slide nipple through jacket condensate line hole to position as shown in Figure 27.
- Cement the 12 " tee to the protruding 12 " nipple. Be sure both nipple and reducing elbow finish upright.
CAUTION
Firmly press the reducing elbow and the tee together while the cement sets to ensure the gasket is securely compressed. The gasket ensures the jacket enclosure is airtight at this location.
Connect condensate trap line and fi ttings
- Remove condensate trap line from bag.
-
Ultra-80 & -105 only — Figure 28
a. Guide the condensate trap line through the bracket hole as shown.
b. Place a hose clamp over the end of the condensate line.
c. Then slide the end of the trap line over the heat exchanger condensate connection.
d. Tighten the hose clamp to secure the trap line.
e. Place a hose clamp over the other end of the condensate trap line.
f. Slide the trap line over the reducing elbow and secure with the hose clamp. -
Ultra-155 and larger — Figure 30, page 28 or Figure 31, page 28
a. Slide a hose clamp over each end of the condensate trap line.
b. Slide the trap line onto the heat exchanger condensate connection and PVC reducing elbow as shown.
c. Tighten the hose clamps to secure the trap line.
Figure 26 Condensate trap assembly
PVC reducing elbow
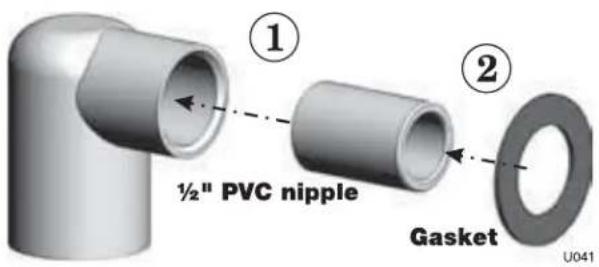
text_image
① ½" PVC nipple Gasket U041Figure 27 Condensate trap assembly into jacket
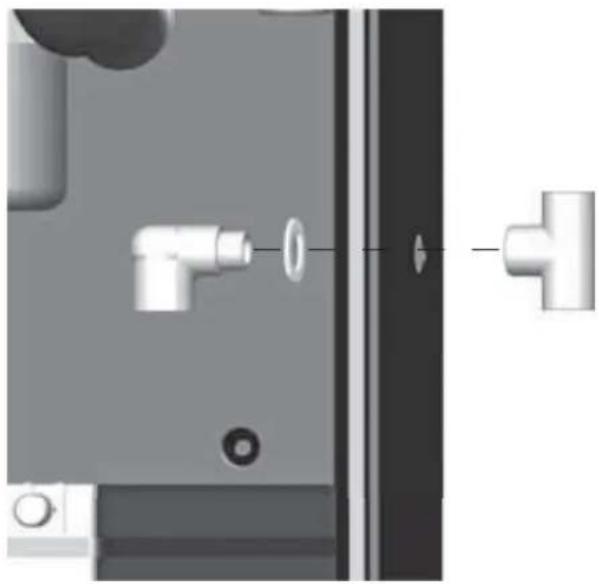
natural_image
Mechanical assembly diagram showing pipe connection and mounting bracket (no text or symbols)Figure 28 Condensate drain — Ultra-80 & -105
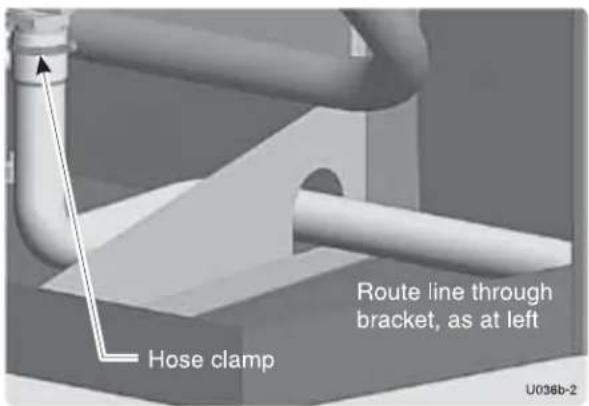
text_image
Hose clamp Route line through bracket, as at left U036b-2Install condensate line (continued)
Condensate drain tubing
- Connect condensate drain tubing to the 12 " PVC tee and run to floor drain or condensate pump (see Figure 32). Use 12 " PVC or CPVC pipe; or 5/8" I. D. tubing.
NOTICE
Use materials approved by the authority having jurisdiction. In the absence of other authority, PVC and CPVC pipe must comply with ASTM D1785, F441 or D2665. Cement and primer must comply with ASTM D2564, F656, or F493. For Canada, use CSA or ULC certified PVC or CPVC pipe, fittings and cement.
- Leave the top of the 12 " tee OPEN. This is needed as a vacuum break.
- When installing a condensate pump, select one approved for use with condensing boilers and furnaces. The pump should have an overflow switch to prevent property damage from condensate spillage. See Figure 29 for required flow capacity.
- When sizing condensate pumps, make sure to include the total load of all Ultra boilers connected to it.
CAUTION
The condensate line must remain unobstructed, allowing free flow of condensate. If condensate is allowed to freeze in the line or if the line is obstructed in any other manor, condensate can exit from the boiler tee, resulting in potential water damage to property.
NOTICE
Condensate from the Ultra boiler will be slightly acidic (typically with a pH from 3.2 to 4.5). Install a neutralizing filter if required by local codes. See Replacement parts section at the end of this manual for the Weil-McLain kit.
Figure 29 Suggested condensate pump capacity, GPH
| Boiler | Minimum recommended condensate pump capacity, per boiler, GPH | ||
| Ultra-80 2 Ultra-230 6 | |||
| Ultra-105 | 3 | Ultra-299/310 | 8 |
| Ultra-155 4 Ultra-399 8 | |||
Figure 30 Condensate drain — Ultra-155 & -230 (PVC tee installation shown applies to all models)
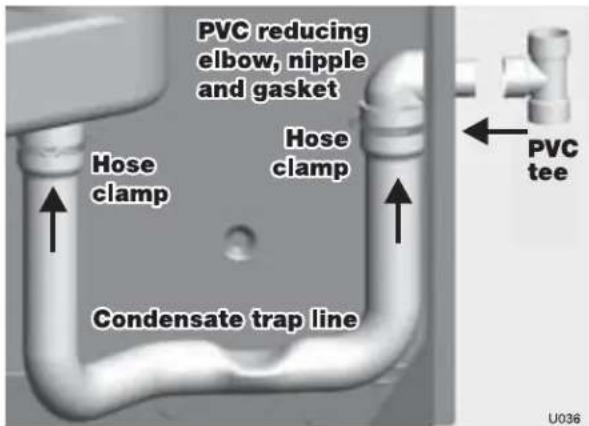
text_image
PVC reducing elbow, nipple and gasket Hose clamp Hose clamp Condensate trap line PVC tee U036Figure 31 Condensate drain — Ultra-299/310 & -399
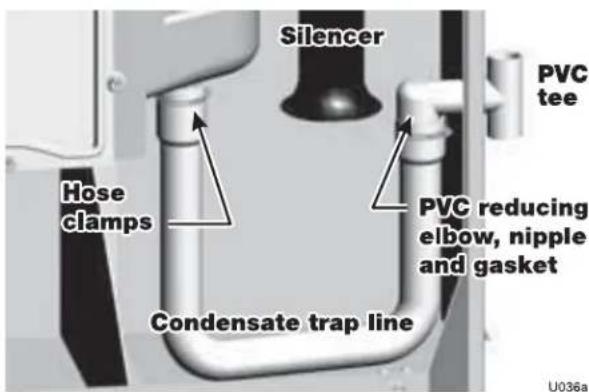
text_image
Silencer Hose clamps Condensate trap line PVC tee PVC reducing elbow, nipple and gasket U036aFigure 32 Condensate pump (by others), typical
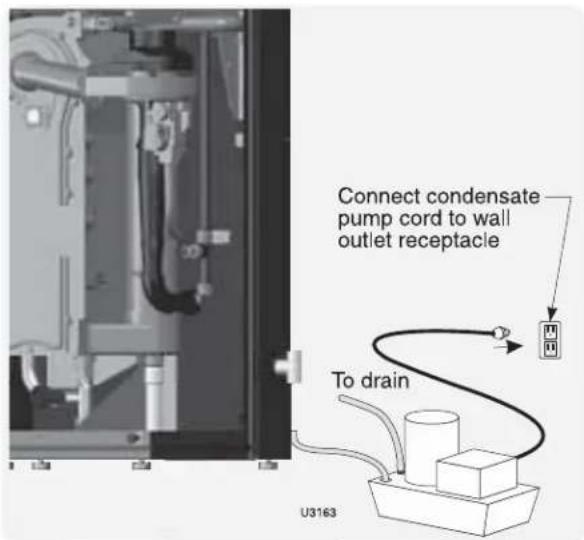
text_image
Connect condensate pump cord to wall outlet receptacle To drain U3163Gas piping
Connecting gas supply piping
- Remove jacket front panel and refer to Figure 33 to pipe gas to boiler.
a. Install ground joint union for servicing, when required.
b. Install manual shutoff valve in gas supply piping outside boiler jacket when required by local codes or utility requirements.
c. In Canada — When using manual main shutoff valve, it must be identified by the installer.
- Wall-mounted boilers
a. Refer to separate Ultra Boiler Wall-mounting instructions.
b. Gas connection may enter from the bottom of boiler as explained in the Wall-mounting instructions.
-
Support piping with hangers, not by boiler or its accessories.
-
Purge all air from gas supply piping.
-
Before placing boiler in operation, check boiler and its gas connection for leaks.
a. Close manual main shutoff valve during any pressure testing at less than 13" w.c.
b. Disconnect boiler and gas valve from gas supply piping during any pressure testing greater than 13" w.c.
WARNING
Do not check for gas leaks with an open flame — use bubble test. Failure to use bubble test or check for gas leaks can cause severe personal injury, death or substantial property damage.
- Use pipe dope compatible with propane gases. Apply sparingly only to male threads of pipe joints so that pipe dope does not block gas flow.
WARNING
Failure to apply pipe dope as detailed above can result in severe personal injury, death or substantial property damage.
WARNING
DO NOT adjust or attempt to measure gas valve outlet pressure. The gas valve is factory-set for the correct outlet pressure. This setting is suitable for natural gas and propane, requiring no fi eld adjustment. Attempting to alter or measure the gas valve outlet pressure could result in damage to the valve, causing potential severe personal injury, death or substantial property damage.
WARNING
Ultra boilers are shipped ready to fire natural gas ONLY. (Exception: Ultra-80LP is propane-ready.) You must install the propane orifice if the boiler will be connected to propane. See page 48. Failure to comply could result in severe personal injury, death or substantial property damage.
Gas pipe sizing
- See page 93 for gas line sizing information.
Check gas pressure at inlet to boiler
- See Figure 39, page 40, Figure 40, page 40, or Figure 41, page 41 for location of the gas inlet pressure test port.
WARNING
Use two wrenches when tightening gas piping at boiler, using one wrench to prevent the boiler gas line connection from turning. Failure to support the boiler gas connection pipe to prevent it from turning could damage gas line components.
Figure 33 Connect gas supply piping
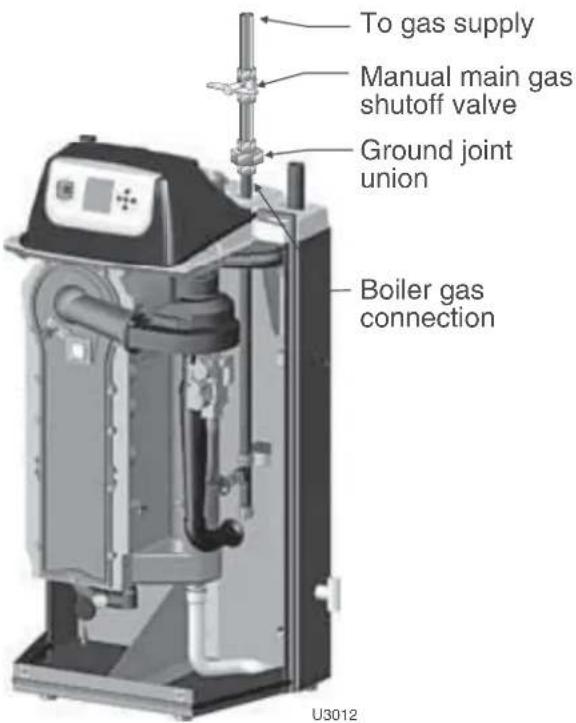
text_image
To gas supply Manual main gas shutoff valve Ground joint union Boiler gas connection U3012Natural gas supply pressure
-
Pressure required at gas valve inlet pressure port:
a. Maximum: 13" w.c. with no flow (lockup) or with boiler on b. Minimum: 4" w.c. (for all except 5" for -299/310) with gas flowing (verify during boiler startup, while boiler is at high fire) -
Install 100% lockup gas pressure regulator in supply line if inlet pressure can exceed 13" w.c. at any time. Adjust lockup regulator for 13" w.c. maximum.
Propane supply pressure
-
Adjust propane supply regulator provided by gas supplier for 13" w.c. maximum pressure.
-
Pressure required at gas valve inlet pressure port:
a. Maximum: 13" w.c. with no flow (lockup) or with boiler on
b. Minimum: 4" w.c. with gas fl owing (verify during boiler startup, while boiler is at high fi re).
Field wiring — basic system
WARNING
ELECTRICAL SHOCK HAZARD — For your safety, turn off electrical power supply at service entrance panel before making any electrical connections to avoid possible electric shock hazard. Failure to do so can cause severe personal injury or death.
NOTICE
Wiring must be N.E.C. Class 1. If original wiring as supplied with boiler must be replaced, use only type 105 °C wire or equivalent. Boiler must be electrically grounded as required by National Electrical Code ANSI/NFPA 70 – latest edition, and/or the Canadian Electrical Code Part I, CSA C22.1, Electrical Code.
NOTICE
The installation must comply with: National Electrical Code and any other national, state, provincial or local codes or regulations. In Canada, CSA C22.1 Canadian Electrical Code Part 1, and any local codes.
NOTICE
The boiler when installed, must be electrically bonded to ground in accordance with the requirements of the authority having jurisdiction or, in the absence of such requirements, with the National Electrical Code, ANSI/NFPA 70 – latest edition, and/or the Canadian Electrical Code Part I, CSA C22.1, Electrical Code.
Wiring - general
- The U-Control provides plug-in, color-coded, non-interchangeable terminal strips for all field wiring. See the schematic diagram (Figure 111, page 96) & ladder diagram (Figure 112, page 97).
- The U-Control provides programmable flexibility in system operation, allowing control of heat supply for up to three different heating systems. Read this manual thoroughly before connecting the wiring to ensure trouble-free start-up and operation.
Wiring - overview
See this and following pages for wiring information. Also see the Advanced section of this manual for additional wiring connections and options.
Make the following connections, some of which depend on your system and how the U-Control will be programmed.
☐ Connect 120VAC power (minimum 15-amp source)
□ Connect wiring for up to three circulators
□ Connect thermostats and/or heat demand contacts
- The U-Control can regulate the boiler for up to three different heating systems.
☐ Install system & outdoor sensors, when used
- The boiler is shipped with an outdoor sensor, a system supply sensor and a system return sensor. The system supply sensor will be required for most space heating applications. The system return sensor must also be installed when using the system supply sensor. Use of the outdoor sensor is optional.
- Locate the sensors on the system piping as shown in Figure 4, page 11 and other piping drawings throughout this manual.
Line voltage power input
- Provide and install a fused disconnect or service switch (15-ampere rated recommended) as required by applicable codes.
- Connect minimum 15-ampere, 120 VAC power wiring to Ultra boiler line voltage terminal strip as shown in Figure 34, page 31, and Figure 111, page 96.
Wiring circulators
- The U-Control provides for connection of up to three circulators, one of which must be the boiler circulator. In addition, you can connect a system circulator and a DHW circulator, for examples.
WARNING
The maximum allowable current for each circulator is 2.2 amps at 120 VAC. For circulators with higher amp ratings, you must install a circulator relay or starter to provide line voltage to the circulator. For circulators rated over 2.2 amps, connect only the circulator relay or starter coil to the Ultra circulator terminals.
Field wiring — basic system (continued)
Figure 34 Simplified wiring — basic system with DHW and space heating (see ADVANCED section for more information)
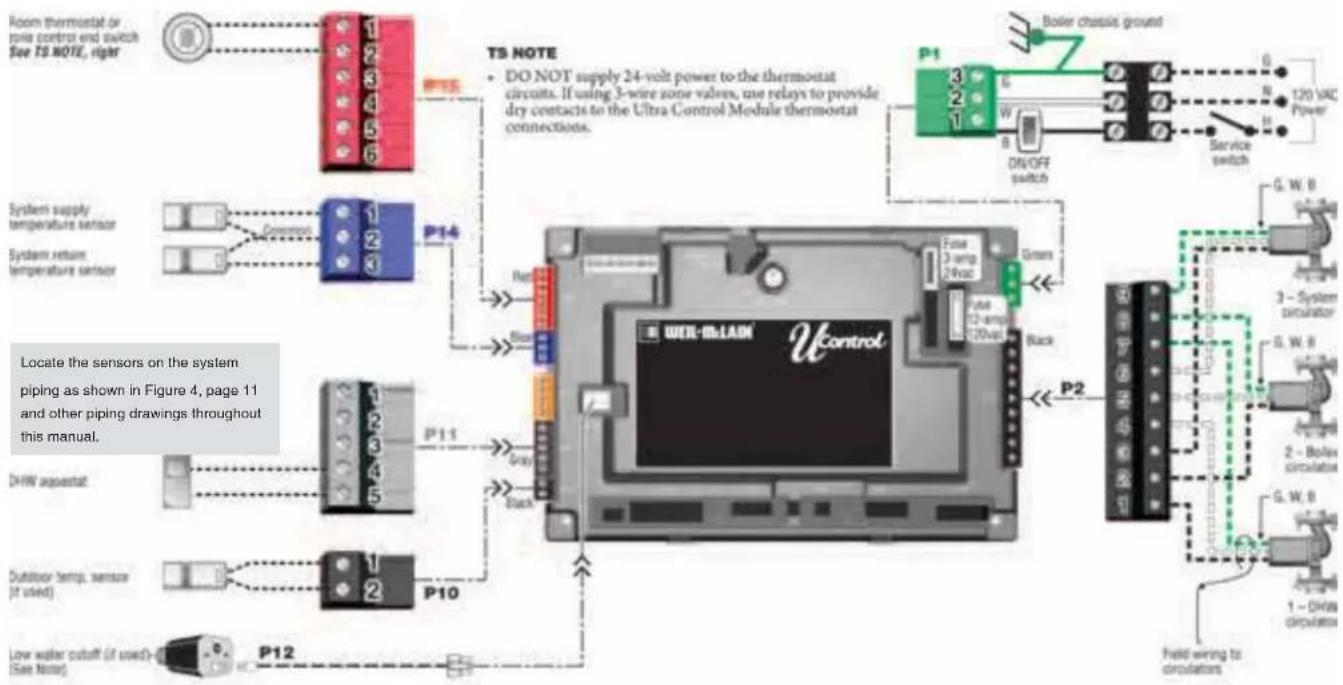
flowchart
graph TD
    A["Room thermostat or zone control end switch<br>See TS NOTE, right"] --> B["1 2 3 4 5 6"]
    B --> C["P15"]
    C --> D["TS NOTE<br>DO NOT supply 24-volt power to the thermostat circuits. If using 3-wire zone valves, use relays to provide dry contacts to the Ultra Control Module thermostat connections."]
    D --> E["P1"]
    E --> F["Boiler chassis ground"]
    F --> G["120 VAC Power"]
    E --> H["Service switch"]
    H --> I["G.W.B"]
    I --> J["3 - System circulator"]
    I --> K["G.W.B"]
    K --> L["2 - Bolea circulator"]
    E --> M["P2"]
    M --> N["Field wiring to circulators"]
    D --> O["Red"]
    D --> P["Blue"]
    D --> Q["Gray"]
    D --> R["Back"]
    D --> S["P10"]
    S --> T["P11"]
    T --> U["DHW asestat"]
    U --> V["1 2 3 4 5"]
    V --> W["P12"]
    W --> X["Low water cutoff (if used)<br>(See Note)"]
    style A fill:#f9f,stroke:#333
    style E fill:#ccf,stroke:#333
    style F fill:#cfc,stroke:#333
    style G fill:#fcc,stroke:#333
    style H fill:#cff,stroke:#333
    style I fill:#ffc,stroke:#333
    style J fill:#cfc,stroke:#333
    style K fill:#cfc,stroke:#333
    style L fill:#cfc,stroke:#333
    style M fill:#cfc,stroke:#333
    style N fill:#cfc,stroke:#333
    style O fill:#cfc,stroke:#333
    style P fill:#cfc,stroke:#333
    style Q fill:#cfc,stroke:#333
    style R fill:#cfc,stroke:#333
    style S fill:#cfc,stroke:#333
    style T fill:#cfc,stroke:#333
    style U fill:#cfc,stroke:#333
    style V fill:#cfc,stroke:#333
    style W fill:#cfc,stroke:#333
    style X fill:#cfc,stroke:#333
| Wire the DHW tank aquastat to the U-Control “heat demand 1” input, terminals P11 #4 and #5. |
| Wire the space heating thermostat (or zone controller or zone valve end switches) across the U-Control “heat demand 2” input, terminals P15 #1 and #2. |
| Attach a sensor (supplied with boiler) to the system supply pipe and wire to terminals P14 #1 and #2.[Locate sensor in the position shown in piping diagrams on page 11 through page 15.] |
| Attach a sensor (supplied with boiler) to the system return pipe and wire to terminals P14 #2 and #3.[Locate sensor in the position shown in piping diagrams on page 11 through page 15.] |
| Install the outdoor temperature sensor (supplied with boiler) and wire to terminals P10 #1 and #2.The outdoor sensor must be installed unless specifically exempted in the Energy Act statement on page 137. |
| Wire the DHW circulator (supplied by installer) as circulator 1, following instructions on Connect the boiler circulator (supplied with boiler) as circulator 2, following instructions on page 30. |
| Wire the boiler circulator (supplied with boiler) as circulator 2, following instructions on page 30. |
| Wire the system circulator (supplied by installer) as circulator 3, following the instructions on page 30. |
NOTICE
Detailed control information and additional wiring — see the ADVANCED INSTALLATION section of this manual.
U-Control operation and setup
WARNING
Temperature settings — You must ensure that the U-Control is set for the proper water temperatures for the system. Excessive water temperature can cause significant property damage in some applications.
Multi-temperature systems — If the heating system includes circuits that require lower temperature water (radiant slab circuits, for example) as well as higher temperature circuits (DHW, finned tube baseboard, etc.), it is recommended to protect low-temperature circuits with limit controls that are wired to a U-Control external limit circuit. Failure to provide regulation can result in substantial property damage.
U-Control overview
The U-Control is fully programmable to meet system requirements, allowing supply water regulation for up to three different systems.
U-Control features include:
Blower speed modulation to control the Ultra boiler's fi ring rate.
☐ Advanced PID response to anticipate system needs based on response to heat input.
☐ Graphic and robust text display for ease of operation monitoring and troubleshooting.
☐ Preset operating parameters for typical heating systems (fi nned tube baseboard, radiant floor, DHW, and others), including target temperatures, reset curves and circulator assignments.
☐ Control of up to three circulators (boiler circulator plus two others), assignable for each of the three possible inputs.
☐ Programmable priority assignments for the heat inputs.
☐ Integral outdoor reset option, with reset curves matched to the system type selected.
☐ Multiple boiler/heat source sequencing or modulation.
☐ Built-in 0–10 VDC signal generator to allow parallel modulation of multiple boilers; also capable of accepting 0–10 VDC input.
☐ Dual sensors for boiler outlet temperature and flue temperature, providing redundant protection.
☐ Integral low water protection (by monitoring boiler heat exchanger temperature).
☐ Boiler is shipped with an outdoor sensor and strap-on system supply and return sensors.
Sequence of operation
- Figure 35 is a summary of the operating sequence for the U-Control.
- The symbols shown appear in the display as the U-Control cycles the boiler.
- The wrench symbol appears when a scheduled maintenance date arrives. This informs the homeowner to call the contractor for service.
- The exclamation mark symbol appears when a problem has been detected.
Figure 35 U-Control sequence of operation
| Display | Control action (also see Figure 36, page 33) |
| POWER UP | Check the boiler model listed on the power-up screen. If it is not correct, turn off the boiler. See Figure 115, page 102 to change setting.When power is turned on, the screen lists sensors that are detected. If any sensor is not listed, make sure it is connected correctly. Turn off power and restart. |
 Standby Standby | Standby — no calls for heatToggles through no dots, 1 dot, 2 dots, then 3 dots while in standby (wrench symbol will show instead if maintenance is needed) |
 Blower on Blower on | Call for heat detectedDisplay on with BLUE light (space heating) or PURPLE light (DHW)Start min/max on timers if more than one system is calling — highest priority starts fi rstStart circulators for this priority setupCalculate target temp — If sensor temp is below target temp, begin fi ring sequenceBlower to ignition speed for prepurgeMultiple boilers/heat sources only — Start additional-heat timer — type 1 boiler starts immediately; type 2 activates other heat source immediately, but doesn't start unless the timer times out; type 3 (LEAD boiler) starts immediately and sends 0–10 VDC signal to others after timer times out; type 4 receives signal from LEAD boiler and starts immediately (and starts timer for the next boiler, if programmed) |
 Ignition on Ignition on | After prepurge times out, begin ignition cycleActivate gas valve and ignition sparkContinue ignition spark for ignition periodTurn off spark and use electrode to check for fl ame signal |
 Space heating Space heating | Flame detectedHold boiler at low fire for 1 minuteRelease boiler to modulationNOTE: If flame is not detected, the gas valve is turned off, blower turns on (postpurge), and control starts cycle again. After 5 failures, the control waits 60 minutes, then tries again.If priority timer times out, switch to next priority and start priority timerIf demand satisfied, go to postpurge |
 DHW heating DHW heating | Flame detectedRelease boiler to modulation immediatelyNOTE: If flame is not detected, the gas valve is turned off, blower turns on (postpurge), and control starts cycle again. After 5 failures, the control waits 60 minutes, then tries again.If priority timer times out, switch to next priority and start priority timerIf demand satisfied, go to postpurge |
 Blower on Blower on | Demand satisfied (temperature reaches target temperature or limit setting)Gas valve offBlower to ignition speed for postpurgeReturn to standby after purge |
 Maintenance Maintenance | Display turns RED, toggling between graphic screen and maintenance screen (occurs when maintenance schedule timer times out)Will show during standby onlyBoiler operates as normal |
 Error/fault Error/fault | Display turns RED due to error or limit eventFlashing display means lockout condition — display toggles between three screens as in Figure 124, page 117. |
 WWSD WWSD | Warm weather shutdown — the boiler will not be allowed to fi re if the outside temperature is greater than the WWSD setting. |
U-Control operation and setup (continued)
Figure 36 U-Control display and navigation

text_image
WEIL-McLAIN HH:MM AM MM/DD/YY MODULATION INFO 1 — Screen color (Blue = space heating or when a button is pressed) (Screen will show solid red, with the exclamation mark symbol, if a non-shutdown failure occurs; i.e., failure of a non-critical sensor, such as outdoor or system supply or return sensor.) Time and date 2 — Status graphic 3 — Firing rate bar 4 — Operating status / Active system BUTTONS ← Move selection up ← Move selection down ← Next screen ← Previous screen ← Enter PRESS ▶ to switch to INFO screen. The INFO screen, below is for at-a-glance information during normal operation. HDW HEATING (Domestic hot water heating) RED BACKLIGHT WEIL-McLAIN MODULATION ALERT INFO Alternating colors NO BACKLIGHT WEIL-McLAIN MODULATION INFO BOILER IN LOCKOUT (Attention required to restart boiler) HH:MM AM MM/DD/YY STATUS: ######## MODULATION: TARGET: ### ° SUPPLY: ### ° RETURN: ### ° OUTDOOR: ### ° DEMAND: ### ### ##### PUMPS: # # ADD'L HEAT DEMAND: ### SETTINGS SELECT ▲▼ ▲ PREVIOUS ENTER U5002U-Control operation and setup (continued)
NOTICE
For detailed control information and additional wiring the ADVANCED INSTALLATION section of this manual.
EXPRESS SETUP – using default settings
- The U-Control is factory programmed to supply a DHW circuit (control priority 1) and finned tube baseboard space heating (control priority 2).
- Control priority 3 is also available, and preset to run all three circulators if desired, but requires settings to be configured.
WARNING
Low-temperature systems (radiant slab, etc.) — DO NOT use the Ultra boiler control as the only means of water temperature regulation for low-temperature systems if higher-temperature systems are also supplied.
Figure 37 Factory default settings
| Priority | Type | Target temperature Circulators | enabled |
| 1 | DHW Direct | 190°F #1 Only | |
| 2 | Finned tube BB | 180°F fi xed (if no outdoor sensor) or 180°F at 0°F outside / 130°F at 70°F outside | #2 and #3 |
| 3 Custom | 180°F fi xed (if no outdoor sensor) or 180°F at 0°F outside / 130°F at 70°F outside | None | |
- You can use the factory default settings for most systems supplying space heating with fi nned-tube baseboard with or without a DHW tank, provided:
a. A DHW tank, if used, must be piped directly to the boiler, as in the piping shown in Figure 5, page 12 or Figure 6, page 13.
b. If the DHW tank is a separate zone off of the system main, or if it is piped as in Figure 48, page 52, you will need to enable additional circulators for DHW operation. The U-Control is factory programmed to operate only the DHW circulator during DHW heating.
c. The heat emitters in the system must be finned tube baseboard only. Other heat emitters require changes in the U-Control setup. See ADVANCED INSTALLATION section for information.
- Wiring to use the factory default settings — see information in Figure 34, page 31 for wiring instructions.
Startup — fi ll the system
Clean system to remove sediment
-
You must thoroughly flush the system (without boiler connected) to remove sediment. The high-efficiency heat exchanger can be damaged by buildup or corrosion due to sediment.
-
For zoned systems, flush each zone separately through a purge valve. (If purge valves and isolation valves are not already installed, install them to properly clean the system.)
-
Flush system until water runs clean and you are sure piping is free of sediment.
WARNING
Do not use petroleum-based cleaning or sealing compounds in boiler system. Damage to elastomer seals and gaskets in system could occur, resulting in substantial property damage.
Before fi lling the boiler and system with water, verify the following. DO NOT fi ll with softened water. Boiler corrosion can occur.
Failure to comply could result in boiler failure or unreliable operation.
Water chemistry
Water pH between 7.0 and 8.5
-
Maintain boiler water pH between 7.0 and 8.5. Check with litmus paper or have chemically analyzed by water treatment company.
-
If pH differs from above, consult local water treatment company for treatment needed.
-
DO NOT use softened water. Softened water can cause corrosion.
Hardness less than 7 grains
- Consult local water treatment companies for unusually hard water areas (above 7 grains hardness).
Chlorine concentration must be LESS THAN 200 ppm
-
Filling with chlorinated fresh water should be acceptable since drinking water chlorine levels are typically less than 5 ppm.
-
Do not use the boiler to directly heat swimming pool or spa water.
-
Do not fill boiler or operate with water containing chlorine in excess of 200 ppm.
Antifreeze
-
Use only antifreeze listed by Weil-McLain as suitable for use with Ultra Gas Boilers. A list of approved antifreeze products is available at www.Weil-McLain.com.
-
See Replacement parts at the end of this manual for Weil-McLain part numbers to obtain antifreeze through a Weil-McLain distributor.
Use the correct amount of antifreeze
-
Determine the freezing temperature needed (to protect against lowest likely temperature the system water will encounter).
-
Find the antifreeze concentration by volume needed for this temperature from the antifreeze manufacturer's data on the antifreeze container.
-
Add up the volume (gallons) of all system piping and components, including the expansion tank and boiler.
a. Boiler water content is listed on page 137
b. Remember to include expansion tank water content.
- Multiply this volume by the (percent) antifreeze needed to find the number of gallons of antifreeze to add.
Fill and test water system
-
Fill system only after ensuring the water meets the requirements of this manual.
-
Close manual and automatic air vents and boiler drain valve.
-
Fill to correct system pressure. Correct pressure will vary with each application.
a. Typical cold water fill pressure for a residential system is 12 psi.
b. Pressure will rise when boiler is turned on and system water temperature increases. Operating pressure must never exceed 25 psig.
- At initial fill and during boiler startup and testing, check system thoroughly for any leaks. Repair all leaks before proceeding further.
⚠ WARNING Eliminate all system leaks. Continual fresh make-up water will reduce boiler life. Minerals can build up in sections, reducing heat transfer, overheating heat exchanger, and causing heat exchanger failure.
Use inhibitor supplied with boiler
-
The Ultra boiler is shipped with Sentinel X100 inhibitor and Sentinel inhibitor test kit. See Repair Parts at the end of this manual for re-ordering information.
-
After filling the system as directed in these instructions, use a caulking gun to inject the X100 inhibitor into the system, following the instructions on the tube.
-
Inject all of the inhibitor supplied with the boiler. Allow time for the water to circulate and mix. Then check the inhibitor level. Add additional inhibitor if necessary.
Startup — fill the system (continued)
Freeze protection (when used)
WARNING
Follow these guidelines to prevent possibility of severe personal injury, death or substantial property damage:
NEVER use automotive or standard glycol antifreeze, even glycol made for hydronic systems Use only freeze-prevention fluids recommended by Weil-McLain for application in Ultra Boiler systems.
Thoroughly flush any system that has used glycol before installing the new Ultra boiler.
Review the material safety sheet (MSDS) for the fluid used with the boiler owner and leave a copy for reference. The MSDS contains information on potential hazards and first aid procedures for exposure or ingestion.
Check antifreeze inhibitor level least annually Glycol concentration and inhibitor levels may change over time. Add antifreeze to increase concentration if necessary. Add inhibitor as needed to bring to acceptable level, using inhibitor test kit to verify.
When using freeze protection fl uid with automatic fi linstall a water meter to monitor water make-up. Freeze protection fl uid may leak before the water begins to leak, causing concentration to drop, reducing the freeze protection level.
DO NOT exceed 50% antifreeze
by volume. Antifreeze moves more sluggishly than water and can interfere with heat transfer. At antifreeze concentrations higher than 50%, sludge can develop in the boiler, potentially causing damage to the heat exchanger.
Clean the system before filling.
Always drain and flush the system thoroughly before filling with antifreeze. Sludge, iron oxide deposits and other sediment in the system inhibit flow and can cause rapid breakdown of inhibitors.
Use only antifreeze recommended by Weil-McLain.
NOTICE
Weil-McLain provides information for application of the antifreeze products listed in this document only for use in Weil-McLain Ultra boilers. Do not apply these products or instructions for other applications. Local codes may require a backflow preventer or actual disconnection from city water supply.
Check/verify water chemistry
- The system may have residual substances that could affect water chemistry.
- After the system has been filled and leak tested, verify water pH and chlorine concentrations are acceptable.
- Verify antifreeze concentration, when used.
- Follow the instructions on the Sentinel test kit to sample the system water and verify inhibitor concentration.
Check inhibitor concentration annually
- Test the pH of a sample of system water at least annually. The pH of the water mixture must be between 7.0 and 8.5. (Or use the Sentinel inhibitor test kit to check concentration.)
- If pH is outside this range (or inhibitor test kit indicates low level), the inhibitor level may not be sufficient to prevent corrosion.
- Test antifreeze concentration.
WARNING
Test antifreeze concentration at least annually. If concentration is low, add antifreeze or drain system and refi ll with correct mixture.
- Follow instructions on antifreeze container to determine the amount of antifreeze needed. DO NOT exceed 50% by volume concentration of antifreeze.
- Check inhibitor level after adjustments are made.
Purge air from water system
- Connect a hose to the purge valve (see purge/drain valves, item 11, in piping diagrams beginning on page 12 and page 52. Route hose to an area where water can drain and be seen.
- Close the boiler or system isolation valve between the purge valve and fill connection to the system.
- Close zone isolation valves.
- Open quick-fill valve on cold water make-up line.
- Open purge valve.
- One zone at a time, open the isolation valves. Allow water to run through the zone, pushing out the air. Run until no noticeable air flow is present.
-
Close the zone isolation valves and proceed with the next zone. Follow this procedure until all zones are purged.
-
Close the quick-fill water valve and purge valve and remove the hose. Open all isolation valves. Watch that system pressure rises to correct cold-fi ll pressure.
-
After the system has operated for a while, eliminate any residual air by using the manual air vents located throughout the system.
-
If purge valves are not installed in system, open manual air vents in system one at a time, beginning with lowest floor. Close vent when water squirts out. Repeat with remaining vents.
-
Open automatic air vent (diaphragm-type or bladder-type expansion tank systems only) one turn.
-
Starting on the lowest floor, open air vents one at a time until water squirts out.
-
Repeat with remaining vents.
-
Refi ll to correct pressure.
Startup — fi nal checks
Check for gas leaks
WARNING
Before starting the boiler, and during initial operation, use a leak detector or smell near the floor and around the boiler for gas odorant or any unusual odor. Remove boiler front door and smell interior of boiler enclosure. Do not proceed with startup if there is any indication of a gas leak. Repair any leak at once.
DO NOT adjust or attempt to measure gas valve outlet pressure. The gas valve is factory-set for the correct outlet pressure. This setting is suitable for natural gas and propane, requiring no field adjustment. Attempting to alter or measure the gas valve outlet pressure could result in damage to the valve, causing potential severe personal injury, death or substantial property damage.
Propane boilers only — Your propane supplier mixes an odorant with the propane to make its presence detectable. In some instances, the odorant can fade, and the gas may no longer have an odor. Before startup (and periodically thereafter), have the propane supplier verify the correct odorant level in the gas.
Check thermostat circuit(s)
- Disconnect the two external wires connected to the boiler thermostat terminals (see Field wiring, beginning on page 30 for terminal locations).
- Connect a voltmeter across these two incoming wires. Close each thermostat, zone valve and relay in the external circuit one at a time and check the voltmeter reading across the incoming wires.
- There should NEVER be a voltage reading.
- If a voltage does occur under any condition, check and correct the external wiring. (This is a common problem when using 3-wire zone valves.)
- Once the external thermostat circuit wiring is checked and corrected if necessary, reconnect the external thermostat circuit wires. Allow the boiler to cycle.
Inspect/fi II condensate system
Inspect/check condensate lines and fi ttings
- Inspect the condensate drain line, condensate PVC fittings and condensate trap. (See page 27 for component locations.)
- Pour water into the top of the boiler's 12 " PVC condensate tee and check for any leaks in the condensate drain line or fittings. Repair any leaks.
Fill condensate trap with water
- Loosen the hose clamp securing the right end of the condensate trap to the PVC reducing elbow (see page 27 for details).
- Slide the trap hose end off of the elbow.
- Fill the trap with fresh water to within an inch of the end of the hose.
- Replace trap hose on PVC reducing elbow and tighten the hose clamp.
WARNING
The condensate trap must be filled with water during all times of boiler operation to avoid flue gas emission from the condensate drain line. [Prime the condensate trap (by pouring water into the outlet tee while restricting flow in drain tube) if boiler has been out of service for an extended period.] Failure to fill the trap could result in severe personal injury or death.
Final checks before starting boiler
☐ Read the instructions to adjust and set up the U-Control module.
☐ Verify that the boiler model is set correctly in the U-Control, and that it displays correctly.
☐ Verify that the boiler and system are full of water and all system components are correctly set for operation.
☐ Fill vent condensate trap with water (by removing hose clamp and hose at PVC reducing elbow). Replace hose on PVC reducing elbow and tighten clamp.
☐ Verify electrical connections are correct and securely attached.
☐ Inspect vent piping and air piping for signs of deterioration from corrosion, physical damage or sagging. Verify air piping and vent piping are intact and correctly installed per this manual.
Startup — final checks (continued)
To start the boiler
- Turn OFF the boiler ON/OFF switch.
- Read and follow the Operating Instructions, Figure 38, page 39.
- The U-Control display will show installed sensors when first powered. Make sure the right sensors are detected. If not, determine the cause and correct before proceeding.
If boiler does not start correctly
- Check for loose connections, blown fuse or service switch off?
- Is external limit control (if used) open? Is boiler water temperature above 200 °F?
- Is thermostat set below room temperature?
- Is gas turned on at meter or boiler?
- Is incoming gas pressure less than 5" w.c. for natural gas or 4" w.c. for propane?
- Are parameters set correctly in this manual?
- Is the warm weather shutdown activated?
- If none of the above corrects the problem, refer to Troubleshooting, beginning on page 115.
☐ Check system and boiler
□ Check water piping
- Check system piping for leaks. If found, shut down boiler and repair immediately. (See WARNING on page 35 regarding failure to repair leaks.)
- Vent any remaining air from system using manual vents. Air in the system will interfere with circulation and cause heat distribution problems and noise.
☐ Check vent piping and air piping
- Check for gas-tight seal at every connection and seam of air piping and vent piping.
⚠ WARNING Venting system must be sealed gas-tight to prevent fl ue gas spillage and carbon monoxide emissions which will result in severe personal injury or death.
□ Check gas piping
- Check around the boiler for gas odor following the procedure of page 29 of this manual.
WARNING
If you discover evidence of any gas leak, shut down the boiler at once. Find the leak source with bubble test and repair immediately. Do not start boiler again until corrected. Failure to comply could result in severe personal injury, death or substantial property damage.
☐ Propane boilers — verify conversion
- Verify propane orifice has been installed per Propane Conversion instructions.
WARNING
DO NOT adjust or attempt to measure gas valve outlet pressure. The gas valve is factory-set for the correct outlet pressure. This setting is suitable for natural gas and propane, requiring no fi eld adjustment.
Attempting to alter or measure the gas valve outlet pressure could result in damage to the valve, causing potential severe personal injury, death or substantial property damage.
Ultra boilers are shipped ready to fi re natural gas ONLY. Exception: The Ultra-80LP is factory-equipped to fi re propane. You must install the propane orifi ce if the boiler will be connected to propane. See page 48.
Failure to comply could result in severe personal injury, death or substantial property damage.
Startup — final checks (continued)
Figure 38 Operating instructions (WARNING — Verify that the U-Control is set for the correct boiler model before proceeding.)
If you do not follow these instr exactly, a fire or explosion may causing property damage, personal injury or loss of life.
ctions result
A. This appliance does not have a. Use only your hand to toggle the power pilot. It is equipped with ignition device which automatically lights the burner. Do not try to light the burner by hand. If the switch or valve will be run, don't try to repair it, call a qualified service technician. Force or attempted repair may result in a fire or explosion.
ot turn by
B. Before OPERATING, smeth. also not use this appliance if any part has around the appliance area for gas. Be sure to smell next to the floor because some gas is heavier than air and will settle on the floor. See below.
WHAT TO DO IF YOU SMELL GAS
• Do not try to light any appliance. • Immediately call your gas supplier from a
- Do not touch any electric neighbor's phone. Follow the switch, do not use any other in supplier's instructions.
Switch, do not use any phone in your building.
• If you cannot reach your gas call the fire department.
gas
supplier,
OPERATING INSTRUCTIONS
- STOP! Read the safety information at left on this label. This appliance is equipped with an ignition device which automatically lights the burner. Do not try to light the burner by hand.
- Set room thermostat(s) to lowest setting.
- Turn OFF all electrical power to the appliance.
- Toggle the power switch located on Boiler to "off" position.
- Locate boiler manual gas valve (in the gas piping connected to the boiler).
- Turn boiler manual gas valve knob counterclockwise ↕ to open gas supply.
- Wait five (5) minutes to clear out any gas. Then smell for gas, including near the floor.
- If you smell gas, STOP! Turn the boiler manual gas valve to OFF. Then follow WHAT TO DO IF YOU SMELL GAS. If you don't smell gas, go to step 9, below.
- Turn ON all electrical power to the appliance including the power switch located on Boiler.
- Set thermostat(s) to desired setting.
- The boiler display will show symbols and/or text describing the status of the boiler as it proceeds through its operating sequence. "Standby" status means the burner is off.
- If the appliance will not operate when there is a call for heat and piping is not hot, follow the instructions "To Turn Off Gas To Appliance" below and call your service technician or gas supplier.
(ON Position Shown)
Gas valve CLOSED
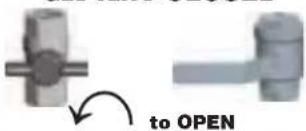
natural_image
Two 3D mechanical components with a curved arrow labeled 'to OPEN' indicating rotation or operation (no text or symbols on the components themselves)Gas valve OPEN
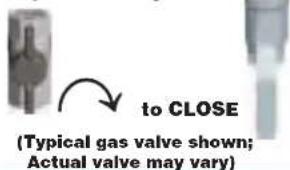
text_image
to CLOSE (Typical gas valve shown; Actual valve may vary)TO TURN OFF GAS TO THE APPLIANCE
- Set room thermostats to lowest setting.
-
Turn OFF all electrical power to the appliance including the power switch located on Boiler.
-
Close external manual gas cock (valve handle perpendicular to gas piping). Turn gas valve knob clockwise ↕ to close gas supply.
-
Replace boiler access door.

550-101-272 (0617)
Startup — final checks (continued)
☐ Check flame & combustion with instruments
WARNING
For Ultra-399 propane boilers, special start-up is required. See page 41 for procedure. See DANGER on page 49 before proceeding.
- Initiate a call for heat on one of the heat demand inputs.
- Access the U-Control installer menus by pressing and holding the UP and DOWN arrow keys for fi ve seconds.
- Use the U-Control display to navigate to Manual test mode (see Figure 115, page 102) and force the firing rate to MAX (high fire).
- Look at the flame through the flame inspection window. The high fire flame should be blue and should be stable. The burner surface should be covered with orange dots.
-
Remove the flue temperature sensor from the flue pipe and insert a combustion test probe., using a calibrated combustion test instrument.
-
Test for CO_2 (or O_2 ) and for CO. The CO_2 values must be within 1.0% of the values listed in Figure 42, page 41. If results are acceptable, proceed to step 7. IF NOT, follow the instructions under “Throttle screw adjustment procedure” to set the throttle screw position. See WARNING below.
WARNING
If combustion at either high or low fi re is outside the range given in Figure 42, follow the procedure given on page 41 for adjusting the throttle screw on the venturi. If throttle screw adjustment does not correct the problem, then shut down the boiler and contact your local Weil-McLain representative. Throttle screw adjustment must be done only by a qualified technician, using calibrated test instruments. Failure to comply could result in severe personal injury, death or substantial property damage.
- Measure natural gas input:
a. Operate boiler 10 minutes.
b. Turn off other appliances.
c. At natural gas meter, measure time (in seconds) required to use one cubic foot of gas.
d. Calculate gas input:
$$ \frac {3 6 0 0 \times 1 0 0 0}{\text { number of seconds from step } c} = B t u h $$
e. Btuh calculated should approximate input rating on boiler rating label.
- Use the U-Control display to navigate to Manual test mode (see Figure 115, page 102) and force the firing rate to MIN (low fire).
- Look at the flame through the flame inspection window. The low fire flame should be stable and evenly distributed over burner surface with a uniform orange color.
- Repeat the combustion test of steps 4 and 5 above.
- Use the U-Control display to navigate to Manual test mode (see Figure 115, page 102) and force the fi ring rate to AUTO (normal operation).
- Replace the fl ue gas temperature sensor. When replacing the sensor, remove the rubber grommet from the probe. Insert the rubber grommet into the fl ue pipe, then insert the probe into the rubber grommet.
Figure 39 Models 80 & 105 — Throttle screw location (ONLY for use by a qualified technician, using calibrated combustion test instruments)
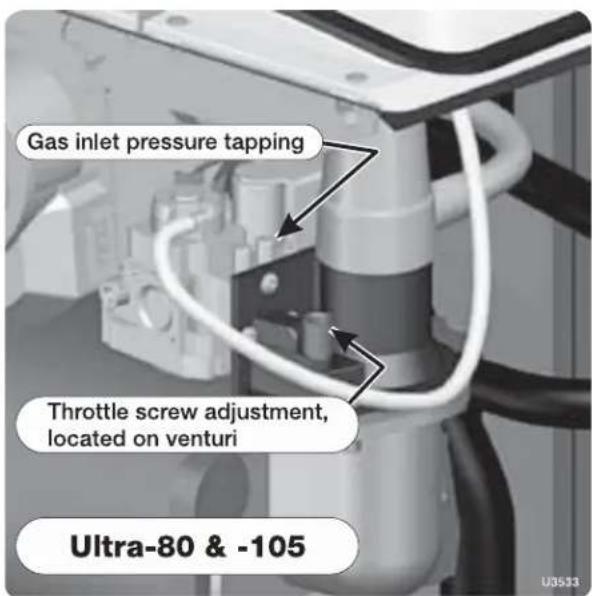
text_image
Gas inlet pressure tapping Throttle screw adjustment, located on venturi Ultra-80 & -105Figure 40 Models 155, 230 & 299/310 — Throttle screw location (ONLY for use by a qualified technician, using calibrated combustion test instruments)

text_image
Throttle screw adjustment, located on venturi Gas inlet pressure tapping Ultra-155 to -299Startup — final checks (continued)
WARNING
You must replace the fl ue gas temperature sensor to prevent fl ue gas spillage into the boiler enclosure. Failure to comply could result in severe personal injury, death or substantial property damage.
Ultra-399 propane con version & start-up
Ultra-399 boilers are converted for propane by adjustment of the gas valve throttle screw (no orifice change) — Figure 41. This must only be done while using a combustion analyzer.
-
Turn the gas valve throttle screw clockwise 5 turns before starting the boiler. Then follow the start-up procedure on page 40.
-
Once the boiler is started, make slight adjustments to the throttle screw to obtain a CO_2 of 10.2% with CO less than 100 ppm air free. (Allow the combustion analyzer's reading to stabilize before making adjustments.)
-
After the boiler has been set up correctly, the conversion is complete. Fill in the information on the propane conversion label and attach the label to the boiler rating plate.
Throttle screw adjustment procedure
See Figure 39, page 40, Figure 40, page 40, or Figure 41 for location of the throttle screw.
WARNING
DO NOT attempt to adjust the throttle screw unless by a qualified technician, and with the use of calibrated combustion test instruments. Adjust the throttle screw only as needed to meet the combustion values given in Figure 42.
-
This procedure is only necessary when specified elsewhere in this manual or when combustion tests indicate the need, as explained under "☐ Check flame & combustion with instruments, page 40."
-
Boiler behavior that might indicate a need to check combustion values at high fire (as per page 40) to verify boiler is in adjustment include: difficulty igniting, poor flame stability at low fire, combustion noise or high carbon monoxide values.
-
Combustion readings must be taken at both high fi re and low fi re. DO NOT attempt an adjustment of the throttle screw at low fi re. Just check the combustion values.
-
Use the U-Control display to navigate to Manual test mode (see Figure 115, page 102) and force the fi ring rate to MAX (high fi re). After the boiler has had time to stabilize, take a CO₂ reading.
a. If the CO_2 is HIGH, turn the throttle screw CLOCKWISE to lower the input. Allow the boiler to stabilize and take another reading. Continue until the desired CO_2 value is achieved.
b. If the CO_2 is LOW, turn the throttle screw COUNTER-CLOCKWISE to increase the input. Allow the boiler to stabilize and take another reading. Continue until the desired CO_2 value is achieved.
-
Lock the boiler into low fi re. Check the combustion readings. If results are acceptable at low fi re, verify high fi re readings again. Restore fi ring rate to AUTO.
-
Consult your local Weil-McLain representative if acceptable results cannot be obtained for both high and low fi re.
Figure 41 Model 399 — Throttle screw location (ONLY for use by a qualified technician, using calibrated combustion test instruments)
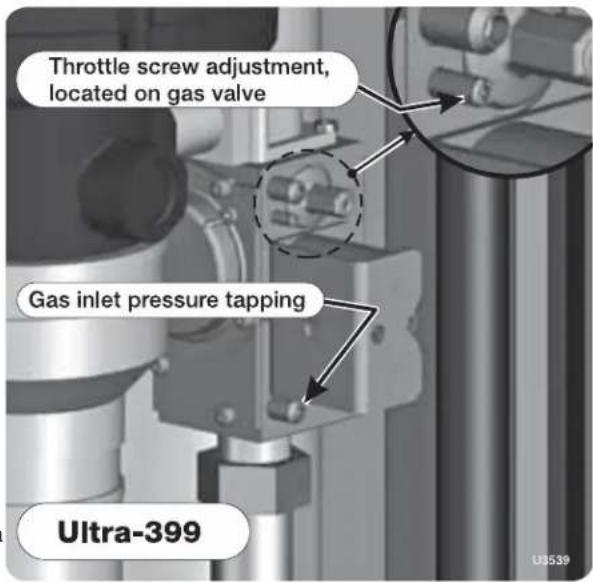
text_image
Throttle screw adjustment, located on gas valve Gas inlet pressure tapping Ultra-399
Adjust and test boiler controls
- Follow instructions in this manual to set and verify operation of the boiler controls.
Figure 42 Acceptable CO2 and CO values (CO2 values must be within 1.0% of the values listed)
| Boiler Ultra | Fuel | High fi re | Low fi re | ||
| %CO2 | CO ppm | %CO2 | CO ppm | ||
| -80 | NG | 8.6 | < 60 | 7.8 | < 60 |
| LP | 9.6 | < 60 | 8.6 | < 60 | |
| -105 | NG | 9.0 | < 60 | 8.4 | < 60 |
| LP | 10.1 | < 60 | 9.2 | < 60 | |
| -155 | NG | 9.0 | < 60 | 8.0 | < 60 |
| LP | 10.0 | < 60 | 8.5 | < 60 | |
| -230 | NG | 9.0 | < 60 | 8.0 | < 60 |
| LP | 10.0 | < 60 | 9.0 | < 60 | |
| -299/310 | NG | 9.0 | < 60 | 8.0 | < 60 |
| LP | 10.0 | < 60 | 9.0 | < 60 | |
| -399 | NG | 9.2 | < 100 | 8.4 | < 60 |
| LP | 10.2 | < 100 | 10.0 | < 60 | |
The values above are with the boiler front door removed. Values will typically increase about 0.2% once the door is reinstalled. The values above are for altitudes up to 5,500 feet. For higher altitudes, CO_2 may be slightly lower and CO slightly higher.
Check-out/startup verification
☐ Verified that the U-Control is set for the correct boiler model?
☐ Entered installation date and installer contact information into U-Control?
☐ Boiler and heat distribution units filled with water?
☐ Water chemistry verified per page 35?
☐ Sentinel X100 corrosion inhibitor added and water tested to be within range?
☐ Automatic air vents, if used, open one full turn?
☐ Air purged from system?
☐ Air purged from gas piping? Piping checked for leaks?
□ Primed condensate trap?
☐ Propane orifi ce installed for propane fi ring and propane conversion label affi xed to jacket?
WARNING
Ultra boilers are shipped ready to fire natural gas ONLY. Exception: The Ultra-80LP is factory-equipped to fi re propane. To fi re on propane, for all other models, you must follow the instructions in this manual to install the propane orifi ce or conversion kit, or make adjustments required, if the boiler will be connected to propane. See page 9. Failure to comply could result in severe personal injury, death or substantial property damage.
☐ Thermostat circuit wiring checked to ensure there are no stray voltages?
☐ Followed Operating Instructions, Figure 38, page 39?
☐ Burner flame and combustion verified per page 40?
☐ Verified control operation for space heating and DHW (if used) per this manual?
☐ Tested additional fi eld-installed controls? — If boiler has a low water cutoff, additional high limit or other controls,
tested for operation as outlined by manufacturer? (Boiler should be operating and should go off when controls are tested. Verify controls cause automatic reset lockout or manual reset lockout as desired.)
☐ Set additional field-installed limit control(s) to system temperature requirements? Adjusted balancing valves and controls to provide design temperature to system?
☐ For multiple zones, adjusted for correct flow in each zone?
☐ Verified thermostat heat anticipator (if available) set properly?
☐ Cycled boiler with thermostat (and with DHW aquastat, if installed) — Raised to highest setting and verified boiler goes through normal startup cycle? Lowered to lowest setting and verified boiler goes off?
☐ Measured natural gas input? (page 40)
☐ Checked incoming gas pressure by connecting manometer to gas valve ahead of boiler? (Gas pressure must be at least 5 inches w.c. for natural gas, and 4 inches w.c. for propane, with boiler operating at high fire, and no more than 13 inches w.c. with boiler operating or boiler off.)
☐ Observed several operating cycles for proper operation?
☐ Set room thermostat to desired room temperature (and DHW aquastat, if installed, to desired DHW storage temperature)?
Reviewed all instructions shipped with this boiler with owner or maintenance person?
☐ Fill in Installation certifi cate, page 140.
☐ Fill out the warranty registration card and send to Weil-McLain.
☐ Return instructions to envelope and give to owner or place inside boiler housing.
NOTICE
Fill out start-up data on the Installation and Service Certifi cate, page 140.
ADVANCED INSTALLATION
(Pages 44–107)
READ AND FOLLOW INSTRUCTIONS IN THE BASIC INSTALLATION SECTION FIRST. This section is supplemental information only.
This section covers multiple boiler systems and system types not covered under the BASIC section. It also includes alternative vent/air piping methods, water and gas pipe sizing guidelines and advanced, detailed information on the U-Control and boiler wiring.
ADVANCED INSTALLATION
Quick view ...
| Pages | Procedure |
| 44-47 | Identify and locate boiler componentsRead about boiler features and functions. |
| 48-49 | Modify boilers for propane operation, if requiredAll boilers except the Ultra-399 require an orifi ce change to operate on propane — follow instructions. |
| 50-51 | Wall mounting optionWall mounting Ultra boilers requires a special kit.Follow instructions in this section to wall mount the boiler. |
| 52-55 | Additional system piping applicationsTh is section provides additional piping suggestions not covered in the BASIC section.It includes an application with an existing indirect water heater piped as a zone. |
| 56-57 | Sizing DHW piping and circulatorsTh is section provides information on boiler head loss vs flow and other information needed for sizing DHW piping. |
| 58-64 | Installing multiple Ultra boilersTh is section provides application information and suggested piping for multiple boiler systems. |
| 66-92 | Vent / air piping alternativesThis section provides installation instructions for four additional vent / air piping methods not covered BASIC section (two sidewall confi gurations and two vertical confi gurations). |
| 93 | Gas pipingSize or verify sizing of gas supply lines with the information in this section. |
| 94-98 | Field wiringTh is section includes wiring diagrams and additional wiring options available with the U-Control module. |
| 99- 107 | U-Control operation and setup — advancedTh is section provides a complete description of U-Control setting options and diagnostics. |
The Ultra Gas-fired water boiler, Featuring UControl Flexibility
Ultra Models -80, -105, -155 and -230
1. Cast aluminum Nanogate coated heat exchanger
2. Heat exchanger access cover
3. Blower
The advanced blower design and air inlet silencer on Ultra boilers result in very quiet operation.
Models Ultra-80 & 105 — Air enters the boiler enclosure through the air intake adapter (18), flows through the enclosure, enters the air inlet silencer (5), then enters the blower. The blower pulls air through the silencer and pushes it into the venturi (6), where it mixes with gas before entering the burner.
Models Ultra-155 & 230 — Air enters the boiler enclosure through the air intake adapter (18), flows through the enclosure, enters the air inlet silencer (5), then enters the venturi (6). The blower pulls air and gas through the venturi and pushes the mixture into the burner.
4. Gas valves and sense lines
The automatic gas valve (4a) senses the vacuum in the venturi caused by flowing air, and allows gas to flow when power is applied. Models 80 and 105 use a sensing line (4c) from the gas valve to the blower outlet so the gas valve references the same pressure as the venturi inlet.
5. Air inlet silencer
The horn-shaped air inlet silencer signifi cantly reduces fan noise, providing exceptionally quiet operation.
6. Venturi
When air flows through the venturi, it creates a vacuum. This vacuum pulls gas from the gas valve. So gas will only flow if air is flowing. On model 80 and 105, the gas/air mixture enters the burner after the venturi. On models 155 and 230, the gas/air mixture enters the blower before passing on to the burner.
7. Outlet water temperature dual sensor
This sensor monitors boiler outlet water temperature. The control module adjusts boiler fi ring rate so the outlet temperature is correct, based on boiler outlet and system supply temperatures.
8. Boiler return water temperature sensor
This sensor monitors return water temperature. The control module reduces or increases boiler input, depending on how close the return water temperature is to the outlet water temperature.
9. Electronic display & buttons
The electronic display is used to configure boiler settings and monitor boiler operation.
The buttons allow changing display mode, entering setting values, and resetting after lockout.
10. Flue pipe adapter with internal drain
11. Burner (not shown)
Made with high-grade stainless steel construction, the burner uses pre-mixed air and gas. The burner and control provide modulating fi ring.
12. Water outlet pipe (system supply)
13. Water return pipe (system return)
14. Gas connection pipe
15. U-Control Module
The U-Control Module responds to signals from the room thermostats, DHW aquastats (when used), boiler sensors (boiler return, boiler supply, system return, system supply, fl ue temperature, and outdoor temperature, if used). The control module automatically adjusts blower speed (and gas fl ow rate) to match boiler output to space heating and/or DHW heating demand.
16. Swing-away control panel assembly
The Ultra control panel is mounted to a hinged sub panel, allowing the panel to be swung forward and down for easy access to the electrical connections.
17 Air intake adapter
The air intake adapter incorporates an internal drain on models 80 and 105.
18. Electrical entrance
Knockouts are provided in the jacket top panel, allowing conduit entry directly behind the control panel or near the wall.
19. Boiler drain valve
20. Flue gas condensate drain
Connect the boiler internal condensate trap line to the heat exchanger here (parts supplied with boiler, but fi eld installed).
21. Flue gas condensate drain connection
The condensate trap PVC fittings are field-installed, connected to the condensate trap line as shown in this manual.
22. Front door
The front door is sealed to the boiler assembly around its entire perimeter.
23. Jacket door retainer screws
Two (2) screws secure the door in place.
24. Ignition electrode/fl ame sensor
The burner flame is ignited by applying a high voltage to the ignition electrode. This causes a spark (from electrode to ground). After ignition, the electrode measures flame signal.
25. Flame inspection window
The quartz glass window provides a view of the burner surface and flame.
26. Flue gas dual sensor
This dual sensor monitors the fl ue gas exit temperature. The control module will shut down the boiler if fl ue gas temperature gets too hot. This protects the fl ue pipe and the heat exchanger from overheating.
27. ON/OFF switch
The Ultra Gas-fired water boiler, Featuring Ucontrol Flexibility
Front view (all models)

natural_image
Exterior view of a modern industrial gas stove or boiler unit with labeled components (no readable text beyond labels)Ultra-80 & 105 (front door removed)
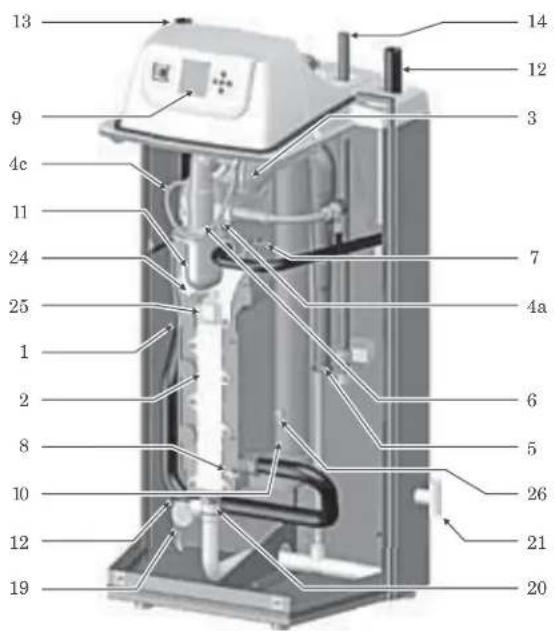
text_image
Labeled diagram of a portable air conditioner unit with numbered componentsTop view (all models)
Top is shown with top cover removed and control panel swung down for easy access to wiring terminals.
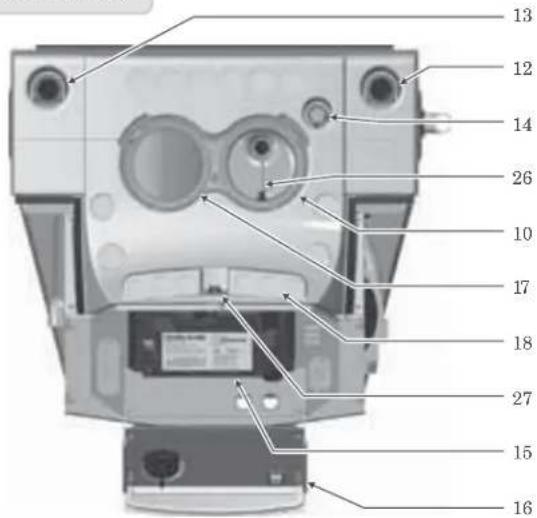
text_image
Labeled diagram of a device interior with numbered parts for identificationUltra-155 & 230 (front door removed)
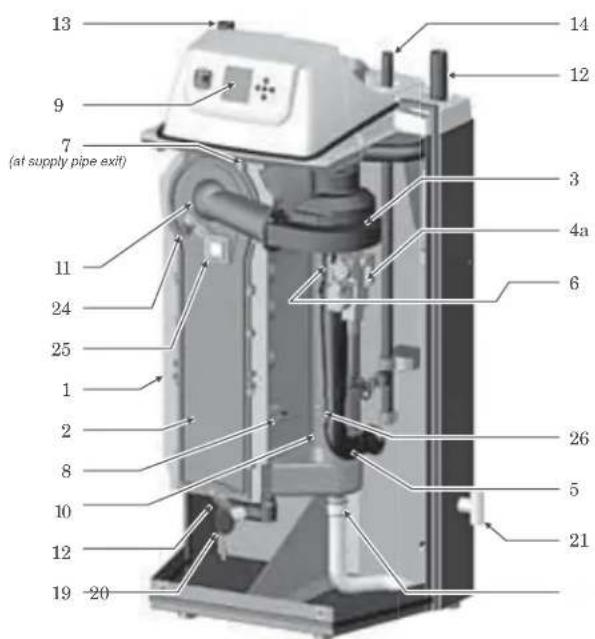
text_image
13 9 7 (at supply pipe exit) 11 24 25 1 2 8 10 12 19 -20 14 12 3 4a 6 26 5 21U3001
The Ultra Gas-fired water boiler, Featuring Ucontrol Flexibility
Ultra Models -299/310 and -399
- Cast aluminum Nanogate coated heat exchanger
- Heat exchanger access cover
- Blower
The advanced blower design and air inlet silencer on Ultra boilers result in very quiet operation.
Air enters the boiler enclosure through the air intake adapter (18), flows through the enclosure, enters the air inlet silencer (5), then enters the venturi (6). The blower pulls air and gas through the venturi and pushes the mixture into the burner.
- Gas valves and sense lines
The automatic gas valve (4a) senses the vacuum in the venturi caused by flowing air, and allows gas to flow when power is applied. The manual gas valve (4b) allows shutting off the gas supply for servicing or shutdown.
- Air inlet silencer
The horn-shaped air inlet silencer signifi cantly reduces fan noise, providing exceptionally quiet operation.
- Venturi
When air flows through the venturi, it creates a vacuum. This vacuum pulls gas from the gas valve. So gas will only flow if air is flowing. The gas/air mixture enters the blower before passing on to the burner.
- Outlet water temperature dual sensor
This sensor monitors boiler outlet water temperature. The control module adjusts boiler fi ring rate so the outlet temperature is correct, based on boiler outlet and system supply temperatures.
- Boiler return water temperature sensor
This sensor monitors return water temperature. The control module reduces or increases boiler input, depending on how close the return water temperature is to the outlet water temperature.
- Electronic display & buttons
The electronic display is used to configure boiler settings and monitor boiler operation.
The buttons allow changing display mode, entering setting values, and resetting after lockout.
-
Flue pipe adapter with internal drain
-
Burner (not shown)
Made with high-grade stainless steel construction, the burner uses pre-mixed air and gas. The burner and control provide modulating fi ring. - Water outlet pipe (system supply)
- Water return pipe (system return)
-
Gas connection pipe
-
U-Control Module
The U-Control Module responds to signals from the room thermostats, DHW aquastats (when used), boiler sensors (boiler return, boiler supply, system return, system supply, fl ue temperature, and outdoor temperature, if used). The control module automatically adjusts blower speed (and gas fl ow rate) to match boiler output to space heating and/or DHW heating demand.
- Swing-away control panel assembly
The Ultra control panel is mounted to a hinged sub panel, allowing the panel to be swung forward and down for easy access to the electrical connections.
-
Air intake adapter
-
Electrical entrance
Knockouts are provided in the jacket top panel, allowing conduit entry directly behind the control panel or near the wall.
-
Boiler drain valve
-
Flue gas condensate drain
Connect the boiler internal condensate trap line to the heat exchanger here (parts supplied with boiler, but fi eld installed).
- Flue gas condensate drain connection
The condensate trap PVC fittings are field-installed, connected to the condensate trap line as shown in this manual.
- Front door
The front door is sealed to the boiler assembly around its entire perimeter.
- Jacket door retainer screws
Two (2) screws secure the door in place.
- Ignition electrode/fl ame sensor
The burner flame is ignited by applying a high voltage to the ignition electrode. This causes a spark (from electrode to ground). After ignition, the electrode measures flame signal.
- Flame inspection window
The quartz glass window provides a view of the burner surface and flame.
- Flue gas dual sensor
This dual sensor monitors the fl ue gas exit temperature. The control module will shut down the boiler if fl ue gas temperature gets too hot. This protects the fl ue pipe and the heat exchanger from overheating.
- ON/OFF switch
The Ultra Gas-fired water boiler, Featuring UControl Flexibility
Front view (all models)
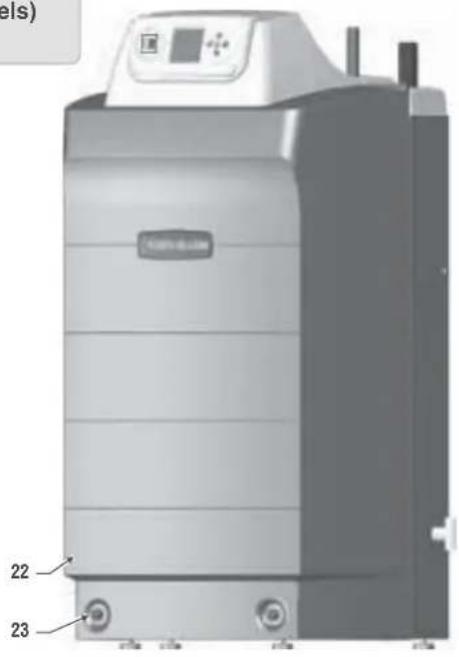
natural_image
Exterior view of a portable industrial machine with labeled components (no readable text or symbols beyond part numbers)Ultra-299/310 (front door removed)
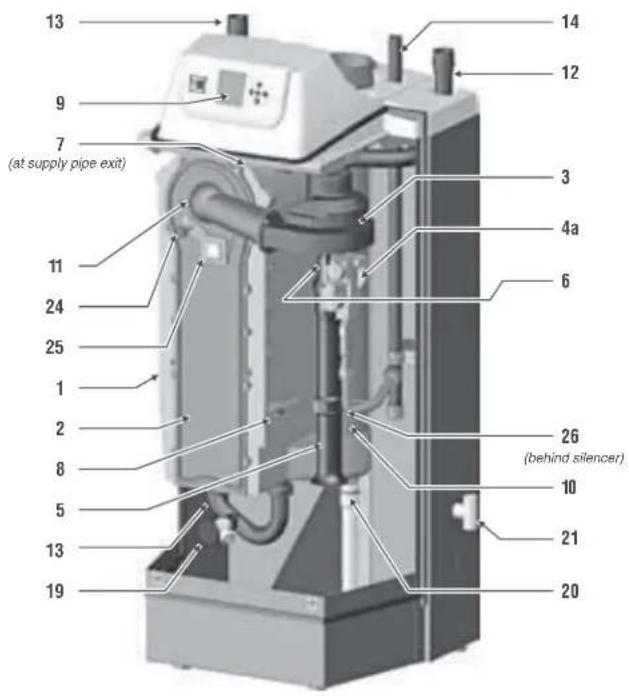
text_image
13 9 7 (at supply pipe exit) 11 24 25 1 2 8 5 13 19 14 12 3 4a 6 26 (behind silencer) 10 21 20Top view (all models)
Top is shown with top cover removed and control panel swung down for easy access to wiring terminals.
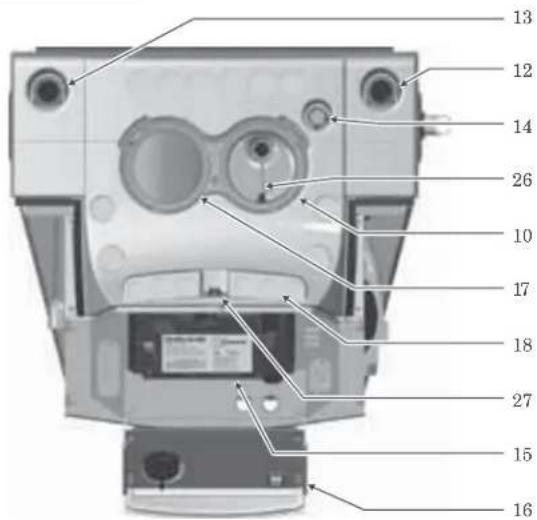
text_image
Labeled diagram of a device casing with numbered parts for identificationUltra-399 (front door removed)
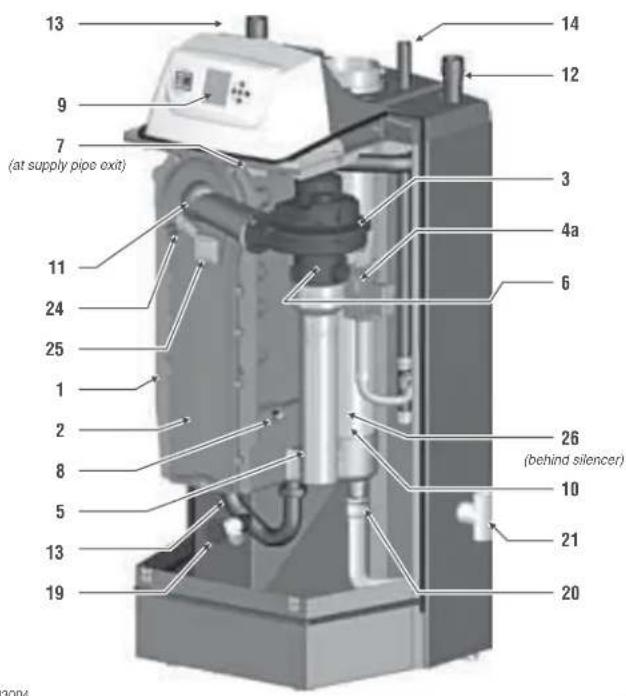
text_image
13 9 7 (at supply pipe exit) 11 24 25 1 2 8 5 13 19 14 12 3 4a 6 26 (behind silencer) 10 21 20 3004Prepare boiler — convert for propane
Prepa re boiler for propane (when required)
Propane operation
WARNING
Ultra boilers must be converted for propane operation unless specifically manufactured for propane. Propane-ready boilers have suffi x "LP" after the model number. All other boilers require conversion for propane operation.
Ultra-80 natural gas boilers require installation of a burner in addition to an orifi ce change. DO NOT use the instructions in this manual for these boilers. Use only the instructions included in the special-order conversion kits.
Converting existing natural gas-fired boiler for propane — For a boiler already installed, you must turn off gas supply, turn off power and allow boiler to cool before proceeding. You must also completely test the boiler after conversion to verify performance and start up the boiler following instructions beginning on page 35 of this manual.
High altitude installations — For installations more than 5,500 feet above sea level, obtain the high altitude propane orifice kit..
Verify orifice size — See Figure 43. Verify when installing that the orifi ce size marking matches boiler size. Use only the special-order high altitude orifi ce for altitudes above 5,500 feet.
For Ultra 310 boiler:
— Sea level (to 5,500 feet), Part number 540-202-833, Assembly Bag Orifice Gas Ult 310 Canada supplied with boiler.
— High altitude (above 5,500 feet), Part number 383-500-648, Kit Conversion Liquefi ed Petroleum (Propane) Gas Ultra 310 - special order.
Failure to comply could result in severe personal injury, death or substantial property damage.
Installing propane orifi ce
WARNING
If boiler is already installed — You must turn off electrical supply to the boiler and close the external manual gas shut-off valve to isolate the boiler during conversion. Allow the boiler to cool if it has been operating. Following conversion of an installed boiler, follow all instructions in this manual to start up the boiler and verify operation of the boiler and all system components.
- Locate propane orifi ce disc from conversion kit bag.
- Verify that the stamping on the orifice disk matches the model size (see Figure 43).
- With the new boiler on its back, remove jacket front door by removing two (2) screws at lower front.
Figure 43 Orifi ce identifi cation
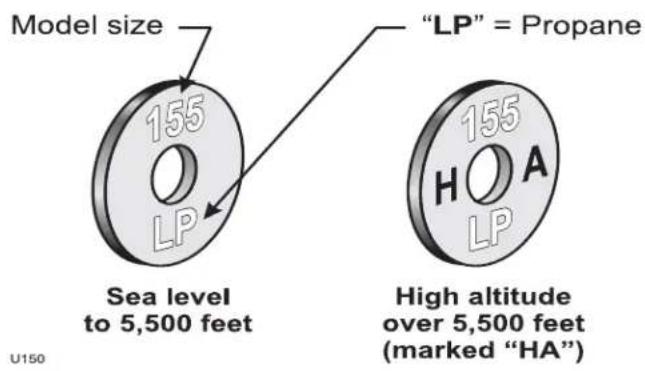
text_image
Model size "LP" = Propane Sea level to 5,500 feet High altitude over 5,500 feet (marked "HA") U150Figure 44 Installing propane orifice (Ultra-105 or Ultra-80LP ONLY)
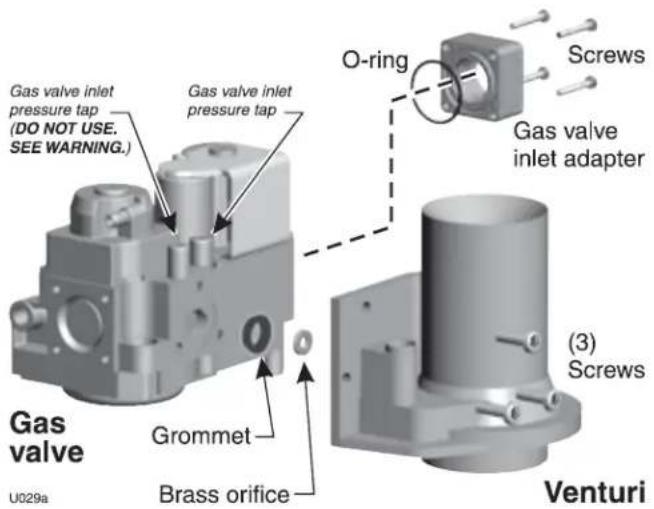
text_image
Gas valve inlet pressure tap (DO NOT USE. SEE WARNING.) Gas valve inlet pressure tap O-ring Screws Gas valve inlet adapter Gas valve U029a Grommet Brass orifice (3) Screws VenturiPrepare boiler — convert for propane (continued)
- Lift the door away from boiler.
- Remove the air inlet silencer from the adapter:
a. Models 80 and 105: See Figure 134, page 133.
b. Models 155 and 230: See Figure 135, page 134.
c. Models 299/310 and 399: See Figure 136, page 135.
-
Disconnect the gas valve electrical plug.
-
See Figure 43, page 48 or Figure 45. Remove the 4 screws securing gas valve inlet adapter to valve.
- Use a 5mm wrench to remove the three Allen-head screws securing the gas valve to the venturi (Figure 43, page 48 or Figure 45).
- Place orifice in the black rubber grommet in the side of the gas valve and secure in valve (Figure 43, page 48 or Figure 45).
DANGER
See Figure 43, page 48 or Figure 45. Inspect the O-ring between the gas valve and gas valve inlet adapter whenever they are disassembled. The O-ring must be in good condition and must be installed. Failure to comply will cause a gas leak, resulting in severe personal injury or death.
- Reposition gas valve against venturi and replace (3) Allenhead screws securing valve to venturi (Figure 43, page 48 or Figure 45).
- See Figure 43, page 48 or Figure 45. Secure gas valve inlet adapter to gas valve with 4 screws. Make sure the plastic hose is connected from gas valve to inlet elbow on Ultra-80 and -105.
WARNING
DO NOT ATTEMPT TO MEASURE VALVE OUTLET PRESSURE. The valve could be damaged by manometer fluid contamination. Failure to comply could result in severe personal injury, death or substantial property damage.
- Connect gas valve electrical plug to valve terminals.
- Re-attach the air inlet silencer.
- After installation is complete, attach the propane conversion label (in conversion kit bag) next to the boiler rating plate.
- Replace jacket front panel.
Figure 45 Installing propane orifice (Ultra-155, -230, & -299/310)
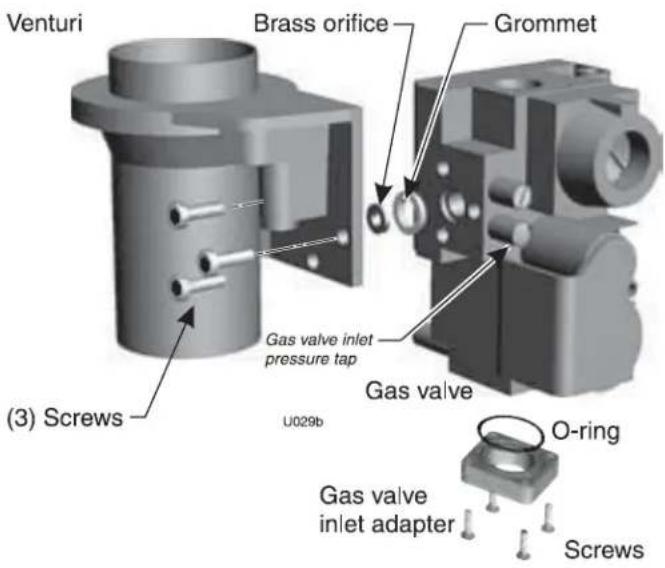
text_image
Venturi Brass orifice Grommet Gas valve gas valve inlet pressure tap U029b Gas valve O-ring Gas valve inlet adapter Screws (3) ScrewsUltra-399 boilers
DANGER
Ultra-399 boilers are converted for propane by adjustment of the gas valve throttling screw. See instructions on page 41 of this manual.
Do not perform the propane conversion of an Ultra-399 boiler without using a fl ue gas analyzer. The proper use of a fl ue gas analyzer is required to determine proper gas valve settings. Improper gas valve settings can cause severe personal injury, death or substantial property damage.
Placing boiler — wall-mounting option
Wall-mounted boilers (Ultra-80 through -399)
- The wall-mounting kit is NOT supplied as standard equipment with the boiler, and must be purchased separately. See WARNING below.
WARNING
Wall mount Ultra boilers only using the Weil-McLain Ultra boiler wall-mounting kit and accompanying instructions. (See Repair parts section for part number of wall mounting kit.) DO NOT use the shipping bracket to wall mount the boiler.
The wall must be vertically plumb and capable of carrying the weight of the boiler. The operating weights for wall-mountable boilers are:
Ultra-80: 139 pounds Ultra-105: 145 pounds
Ultra-155: 181 pounds Ultra-230: 192 pounds
Ultra-299/310: 229 pounds Ultra -3 99: 22 9 pounds
Failure to comply with above and the procedure given below could result in severe personal injury, death or substantial property damage.
- Verify kit contents:
a. Wall-mount bracket.
b. Black iron bushing, 1" x 1/8" NPT.
c. Lag screws, (2) 3/8" x 3" hex head.
d. Grommet, (1) 7/8" O. D. & grommets, (2) 1 3/8" O. D.
e. Automatic air vent, 1/8" NPT.
f. Items b through c are needed only if routing piping through bottom of enclosure (applies only for Ultra-80 through -230).
g. Verify all parts listed above are available before proceeding.
-
Stud spacing: Bracket holes are spaced for studs on 16-inch centers. For other stud spacing, provide secure, solid mounting surface on which to attach the boiler wall-mounting bracket.
-
Wood stud wall: Install bracket with lag screws (3/8" x 3") included in kit, only into the studs.
-
Metal stud wall: Secure bracket to studs with 3/16-inch toggle bolts and 3/16-inch flat washers (not included with kit).
-
DO NOT attempt to attach the wall mount bracket using anchors or any means other than directly securing to the wall studs (or equivalent wood structure if studs are not on 16-inch centers).
-
The boiler bracket must engage with the wall-mount bracket. Make sure the brackets are not just resting edge to edge.
-
Mount the boiler on the wall following these instructions. Perform all procedures given in the Boiler Manual on pages 1 through 9 before mounting the boiler.
WARNING
The boiler is heavy. Use caution not to drop the boiler or cause bodily injury while lifting and handling. Verify that the boiler is securely attached to prevent possibility of boiler falling after installation.
Figure 46 Install wall-mount bracket
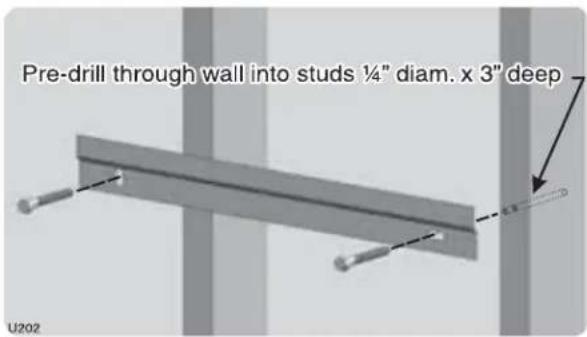
text_image
Pre-drill through wall into studs ¼" diam. x 3" deep U202Figure 47 Place boiler on wall-mount bracket
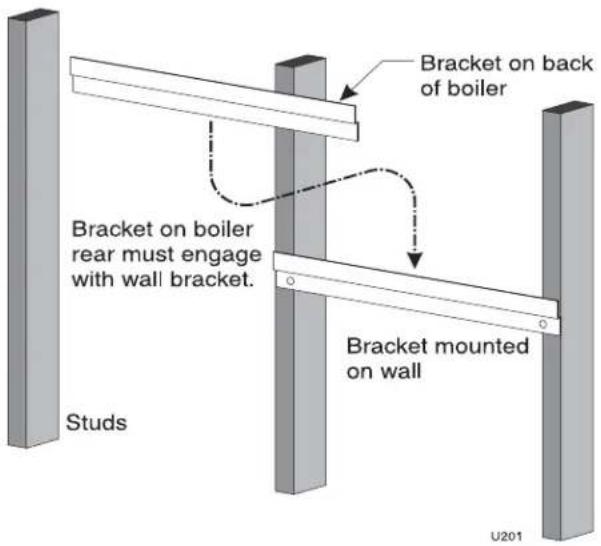
text_image
Bracket on back of boiler Bracket on boiler rear must engage with wall bracket. Studs Bracket mounted on wall U201Placing boiler — wall-mounting option (continued)
Prepare boiler for wall mounting
- Remove the jacket front panel. This will simplify lifting and handling the boiler when mounting.
- When piping will be routed out the top of the boiler, no special preparation is needed other than that given in this manual.
Install wall-mount bracket
- Locate studs.
- Place the wall-mount bracket on the wall, using a level to align correctly.
- Place the bracket so the mounting slots are centered over the studs.
- Level the bracket and trace the outline of the screw slots with a pencil.
- Remove bracket and drill holes 1/4" diameter by 3 inches deep, centered on the screw slot outlines. (For metal stud walls, using 3/16" toggle bolts, drill required clearance holes.)
- See Figure 47, page 50. Position bracket on wall. Insert and loosely tighten the two lag screws (or toggle bolts for metal studs).
- Level the bracket. Then tighten screws securely. For drywall or plaster lathe installations, avoid tightening so much that brackets dig into wall surface.
Place boiler on bracket
-
Measure 30/4 inches below the bottom edge of the wall-mount bracket for Ultra-80 to -230 (35 5/8" for Ultra-299/310/399). Strike a line or place a piece of masking tape on the wall with its top edge even with the 30-inch mark. (This line, or tape, will indicate whether the boiler has been properly seated onto the wall-mount bracket.)
-
Obtain assistance to lift the boiler into position:
-
Measure 30/4 inches below the bottom edge of the wall-mount bracket for Ultra-80 to -230 (35 5/8" for Ultra-299/310/399). Strike a line or place a piece of masking tape on the wall with its top edge even with the 30-inch mark. (This line, or tape, will indicate whether the boiler has been properly seated onto the wall-mount bracket.)
- Obtain assistance to lift the boiler into position:
a. Lift the boiler high enough that its rear bracket will be above the wall-mount bracket.
b. Let the rear of the boiler slide against the lag screw heads as you lower the boiler into place.
c. When the brackets are engaged correctly, the bottom of the boiler enclosure will be at or near the pencil line, or tape, you applied in step 1.
d. If the boiler does not slide down close to the mark, or tape, adjust until the brackets properly engage.
Install water piping — advanced
Zoning with zone valves
(alternate to piping shown in Figure 5, page 12)
High-fl ow-rate/high-head-loss DHW circuits
- For applications requiring DHW circuit flow rates higher than allowable for the boiler, or for high pressure-drop coil-type DHW tanks, connect the piping as in Figure 48. The DHW water only flows through the secondary circuit connector piping. NOTE: Make sure to size the connector piping (Figure 48, item 23) to handle the total flow it must handle.
- Connect boiler to system as shown in Figure 48 when zone valve zoning. The primary/secondary piping shown ensures the boiler loop will have sufficient flow. It also avoids applying the high head of the boiler circulator to the zone valves.
CAUTION
Use at least the MINIMUM pipe size shown in Figure 48 on all boiler loop piping (connecting boiler to and from the primary/secondary connection, item 21). Use only primary/secondary piping as shown. Failure to follow these guidelines could result in system problems.
- When using a closed-type expansion tank, connect the expansion tank and make-up water piping as shown in Figure 4, page 11.
- Connect DHW (domestic hot water) piping to indirect storage water heater as shown.
NOTICE
By default, the U-Control Module turns off space heating during DHW heating (if DHW input is priority 1). The boiler circulator will turn off, preventing hot water from circulating to the system (optional timeout setting can be used to override). The flow/check valve shown on the boiler outlet piping prevents gravity circulation in the boiler loop during DHW heating.
NOTICE
Overriding the Outdoor Reset function by setting control to DHW mode when system is intended for space heating may violate Section 303 of the 2007 Energy Act. See page 137 for compliance information and exemptions.
- Controlling the system circulator and boiler circulator
a. You will have to set up the U-Control to operate both the boiler circulator and the DHW circulator during DHW operation. The system circulator should be off during DHW heating. Read the instructions on U-Control operation and setup, beginning on page 32.
1 Ultra boiler
2 Indirect water heater (DHW), if used
3 Boiler relief valve (see page 9 for piping details)
4 Relief valve discharge piping (see page 9 for details)
5 DHW circulator (see page 56 for suggested sizing)
6 Isolation valves
7 System circulator (see information above for wiring)
8 Diaphragm (or bladder) type expansion tank (see page 56 for piping of closed-type expansion tank, if used)
9 Air separator [with automatic air vent only on systems using diaphragm (or bladder) type expansion tank]
10 Flow/check valves
11 Purge/drain valves
12 Boiler circulator
13 Zone valves, typical
20 Make-up water supply
21 Primary/secondary connection (tees no more than 12 inches apart)
23 DHW supply/return
24 Strap system supply and return sensors to lines as shown, at least 6 pipe diameters (but no more than 3 feet) from boiler connection tees.
25 Systems using high-head pumps may require a bypass pressure regulator to prevent damage to control valves.
26 Temperature/Pressure gauge
27 DHW relief valve, if used
Items supplied with boiler
Items supplied by others
Install water piping — advanced (continued)
Example system with DHW as a zone, zoning with circulators
- Connect boiler to system as shown in Figure 49 when circulator zoning. The boiler circulator cannot be used for a zone. It must supply only the boiler loop. Also see the information on page 10 for suggested piping and sizing.
CAUTION
Use at least the MINIMUM pipe size shown in Figure 49 on all boiler loop piping (connecting boiler to and from the primary/secondary connection, item 21). Use only primary/secondary piping as shown. Failure to follow these guidelines could result in system problems.
- Install a separate circulator for each zone.
- DO NOT use a closed-type tank with a AQUA PLUS water heater in the system. The automatic air vent required on the water heater will deplete air in the system, causing the expansion tank to waterlog. Use only a diaphragm- or bladder-type tank, suitable for automatic air vent applications.
- In this example, the AQUA PLUS 60 DHW tank is piped as a zone in the system, with piping connections to the tank in accordance with the AQUA PLUS manual.
- Wiring to the U-Control
a. Priority 1 = AQUA PLUS 60 (zone 1): wire AQUA PLUS 60 aquastat terminals to U-Control P11, pins 4 and 5. Wire DHW circulator, A, to U-Control P2, terminals 1, 4 and 7 (H, N, G).
b. Wire zone pumps B and C to a two-zone circulator relay.
c. Priority 2 = finned-tube baseboard (zones 2 and 3): wire circulator relay end switch 1 to U-Control P15, pins 1 and 2.
- Make sure to set Priority 1 to DHW system, not DHW direct.
NOTICE
Overriding the Outdoor Reset function by setting control to DHW mode when system is intended for space heating may violate Section 303 of the 2007 Energy Act. See page 137 for compliance information and exemptions.
- Controlling the system circulator and boiler circulator
a. You will have to set up the U-Control to operate both the boiler circulator and the DHW circulator during DHW operation. Read the instructions on U-Control operation and setup, beginning on page 32.
2 Indirect water heater (DHW), if used
3 Boiler relief valve (see page 9 for piping details)
4 Relief valve discharge piping (see page 9 for details)
6 Isolation valves
8 Diaphragm (or bladder) type expansion tank (see page 56 for piping of closed-type expansion tank, if used)
9 Air separator [with automatic air vent only on systems using diaphragm (or bladder) type expansion tank]
10 Flow/check valves
11 Purge/drain valves
12 Boiler circulator
20 Make-up water supply
21 Primary/secondary connection (tees no more than 12 inches apart)
24 Strap system supply and return sensors to lines as shown, at least 6 pipe diameters (but no more than 3 feet) from boiler connection tees.
26 Temperature/Pressure gauge
Items supplied with boiler
Items supplied by others
Install water piping — advanced (continued)
Radiant heating applications
- The Ultra boiler is ideal for use in radiant heating. The Ultra boiler's unique heat exchanger design allows it to work well even in condensing mode. So there is no need to regulate boiler return water temperature in radiant heating applications.
- Connect boiler to system as shown in Figure 50 for typical radiant heating applications. The primary/secondary piping shown ensures the boiler loop will have sufficient flow. Size the system piping and circulator to provide the flow and pressure drop needed for the radiant system.
CAUTION
Use at least the MINIMUM pipe size shown in Figure 50 on all boiler loop piping (connecting boiler to and from the primary/secondary connection, item 21). Use only primary/secondary piping as shown. Failure to follow these guidelines could result in system problems.
- Adding the recommended high limit control (Figure 50, item 22) can help ensure supply water temperature will not exceed the maximum allowable for the radiant system. Wire this limit control in either the manual reset or automatic reset external limit circuit of the U-Control.
- When using a closed-type expansion tank, connect the expansion tank and make-up water piping as shown in Figure 4, page 11.
- Connect DHW (domestic hot water) piping to indirect storage water heater as shown.
NOTICE
By default, the U-Control Module turns off space heating during DHW heating (if DHW input is priority 1). The boiler circulator will turn off, preventing hot water from circulating to the system (optional timeout setting can be used to override). The flow/check valve shown on the boiler outlet piping prevents gravity circulation in the boiler loop during DHW heating.
NOTICE
Overriding the Outdoor Reset function by setting control to DHW mode when system is intended for space heating may violate Section 303 of the 2007 Energy Act. See page 137 for compliance information and exemptions.
- Controlling the circulators
a. The U-Control can control up to three circulators (boiler circulator and two others). Refer to Field wiring, beginning on page 30, for instructions on wiring to circulators.
Figure 50 Typical radiant heating system piping plus optional DHW
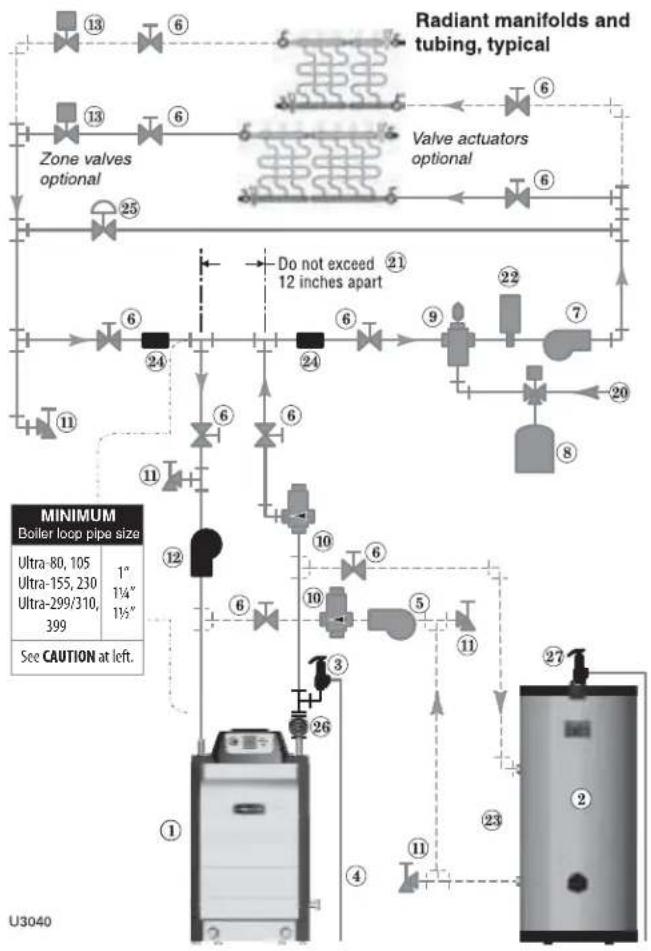
flowchart
graph TD
    A["Zone valves optional"] --> B["Valve actuators optional"]
    B --> C["Valve actuator ⑥"]
    C --> D["Radiant manifolds and tubing, typical"]
    D --> E["Do not exceed 12 inches apart"]
    E --> F["Valve actuator ②"]
    F --> G["Valve actuator ③"]
    G --> H["Valve actuator ④"]
    H --> I["Valve actuator ⑤"]
    I --> J["Valve actuator ⑥"]
    J --> K["Valve actuator ⑦"]
    K --> L["Valve actuator ⑧"]
    L --> M["Valve actuator ⑨"]
    M --> N["Valve actuator ⑩"]
    N --> O["Valve actuator ⑪"]
    O --> P["Valve actuator ⑫"]
    P --> Q["Valve actuator ⑬"]
    Q --> R["Valve actuator ⑭"]
    R --> S["Valve actuator ⑮"]
    S --> T["Valve actuator ⑯"]
    T --> U["Valve actuator ⑰"]
    U --> V["Valve actuator ⑱"]
    V --> W["Valve actuator ⑲"]
    W --> X["Valve actuator ⑳"]
    X --> Y["Valve actuator ㉑"]
    Y --> Z["Valve actuator ㉒"]
    Z --> AA["Valve actuator ㉓"]
    AA --> AB["Valve actuator ㉔"]
    AB --> AC["Valve actuator ㉕"]
    AC --> AD["Valve actuator ㉖"]
    AD --> AE["Valve actuator ㉗"]
    AE --> AF["Valve actuator ㉘"]
    AF --> AG["Valve actuator ㉙"]
    AG --> AH["Valve actuator ㉚"]
    AH --> AI["Valve actuator ㉛"]
    AI --> AJ["Valve actuator ㉜"]
    AJ --> AK["Valve actuator ㉝"]
    AK --> AL["Valve actuator ㉞"]
    AL --> AM["Valve actuator ㉟"]
    AM --> AN["Valve actuator ㉟c"]
    AN --> AO["Valve actuator ㉟d"]
    AO --> AP["Valve actuator ㉟e"]
    AP --> AQ["Valve actuator ㉟f"]
    AQ --> AR["Valve actuator ㉟g"]
    AR --> AS["Valve actuator ㉟h"]
    AS --> AT["Valve actuator ㉟i"]
    AT --> AU["Valve actuator ㉟j"]
    AU --> AV["Valve actuator ㉟c"]
    AV --> AW["Valve actuator ㉟d"]
b. The factory default settings are: DHW circulator as Circulator 1, boiler circulator as Circulator 2. See Field wiring instructions, beginning on page 30, for details.
Legend — Figure 50
1 Ultra boiler
2 Indirect water heater (DHW), if used
3 Boiler relief valve (see page 9 for piping details)
4 Relief valve discharge piping (see page 9 for details)
5 DHW circulator (see page 56 for suggested sizing)
6 Isolation valves
7 System circulator (see information above for wiring)
8 Diaphragm (or bladder) type expansion tank (see page 56 for piping of closed-type expansion tank, if used)
9 Air separator | with automatic air vent only on systems using diaphragm (or bladder) type expansion tank|
10 Flow/check valves
11 Purge/drain valves
12 Boiler circulator
13 Zone valves, when used (zoning may also be done using manifold-mounted valve actuators)
20 Make-up water supply
21 Primary/secondary connection (tees no more than 12 inches apart)
22 Optional high limit temperature control, set to protect radiant tubing
23 DHW supply/return
24 Strap system supply and return sensors to lines as shown, at least 6 pipe diameters (but no more than 3 feet) from boiler connection tees.
25 Systems using high-head pumps may require a bypass pressure regulator to prevent damage to control valves.
26 Temperature/Pressure gauge
27 DHW relief valve, if used
Items supplied with boiler
Items supplied by others
Install water piping — advanced (continued)
Chilled water systems
- Install boiler so that chilled medium is piped in parallel with the heating boiler. Use appropriate valves to prevent chilled medium from entering boiler. See Figure 51 for typical installation of balancing valve and check valve.
CAUTION
Use at least the MINIMUM pipe size shown in Figure 51 on all boiler loop piping (connecting boiler to and from the primary/secondary connection, item 21). Use only primary/secondary piping as shown. Failure to follow these guidelines could result in system problems.
- The space heating system may be zoned with circulators if a separate circulator is supplied for the chilled water loop.
NOTICE
If antifreeze is used in the system, consider the effects of antifreeze on circulator sizing and DHW performance. Some local codes may require double-wall DHW heat exchanger design.
WARNING
Chilled medium, if used, is piped in parallel with heating boiler as shown in Figure 51. Use appropriate valves to prevent chilled medium from entering boiler.
If boiler is connected to heating coils located in air handling units where they can be exposed to refrigerated air, use flow control valves or other automatic means to prevent gravity circulation during cooling cycle.
NOTICE
By default, the U-Control Module turns off space heating during DHW heating (if DHW input is priority 1). The boiler circulator will turn off, preventing hot water from circulating to the system (optional timeout setting can be used to override). The flow/check valve shown on the boiler outlet piping prevents gravity circulation in the boiler loop during DHW heating.
NOTICE
Overriding the Outdoor Reset function by setting control to DHW mode when system is intended for space heating may violate Section 303 of the 2007 Energy Act. See page 137 for compliance information and exemptions.
- Controlling the circulators
a. The U-Control can control up to three circulators (boiler circulator and two others). Refer to Field wiring, beginning on page 30, for instructions on wiring to circulators.
Figure 51 Chilled water system plus optional DHW piping
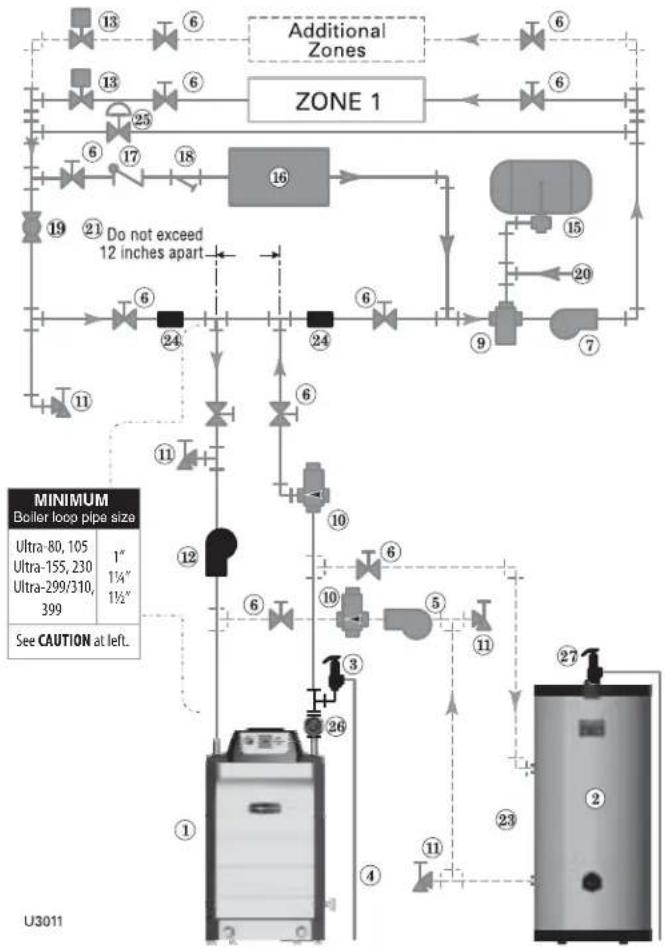
flowchart
graph TD
    A["13"] --> B["6"]
    C["13"] --> D["6"]
    E["25"] --> F["6"]
    G["17"] --> H["18"]
    I["19"] --> J["16"]
    K["24"] --> L["6"]
    M["24"] --> N["6"]
    O["10"] --> P["6"]
    Q["10"] --> R["5"]
    S["11"] --> T["27"]
    U["26"] --> V["4"]
    W["23"] --> X["2"]
    Y["27"] --> Z["2"]
    style A fill:#f9f,stroke:#333
    style C fill:#f9f,stroke:#333
    style E fill:#f9f,stroke:#333
    style G fill:#f9f,stroke:#333
    style I fill:#f9f,stroke:#333
    style K fill:#f9f,stroke:#333
    style M fill:#f9f,stroke:#333
    style O fill:#f9f,stroke:#333
    style Q fill:#f9f,stroke:#333
    style U fill:#f9f,stroke:#333
    style W fill:#f9f,stroke:#333
    style Y fill:#f9f,stroke:#333
    style Z fill:#f9f,stroke:#333
    subgraph "Additional Zones"
        direction TB
        1[" "] --> 2[" "]
        2 --> 3[" "]
        3 --> 4[" "]
        4 --> 5[" "]
        5 --> 6[" "]
        6 --> 7[" "]
        7 --> 8[" "]
        8 --> 9[" "]
        9 --> 10[" "]
        10 --> 11[" "]
        11 --> 12[" "]
        12 --> 13[" "]
        13 --> 14[" "]
        14 --> 15[" "]
        15 --> 16[" "]
        16 --> 17[" "]
        17 --> 18[" "]
        18 --> 19[" "]
        19 --> 20[" "]
        20 --> 21[" "]
        21 --> 22[" "]
        22 --> 23[" "]
        23 --> 24[" "]
        24 --> 25[" "]
        25 --> 26[" "]
        26 --> 27[" "]
        27 --> 28[" "]
        28 --> 29[" "]
        29 --> 30[" "]
        30 --> 31[" "]
        31 --> 32[" "]
        32 --> 33[" "]
        33 --> 34[" "]
        34 --> 35[" "]
        35 --> 36[" "]
        36 --> 37[" "]
        37 --> 38[" "]
        38 --> 39[" "]
        39 --> 40[" "]
        40 --> 41[" "]
        41 --> 42[" "]
        42 --> 43[" "]
        43 --> 44[" "]
        44 --> 45[" "]
        45 --> 46[" "]
        46 --> 47[" "]
        47 --> 48[" "]
        48 --> 49[" "]
        49 --> 50[" "]
        50 --> 51[" "]
        51 --> 52[" "]
        52 --> 53[" "]
        53 --> 54[" "]
        54 --> 55[" "]
        55 --> 56[" "]
        56 --> 57[" "]
        57 --> 58[" "]
        58 --> 59[" "]
        59 --> 60[" "]
        60 --> 61[" "]
        61 --> 62[" "]
        62 --> 63[" "]
        63 --> 64[" "]
        64 --> 65[" "]
        65 --> 66[" "]
        66 --> 67[" "]
        67 --> 68[" "]
        68 --> 69[" "]
        69 --> 70[" "]
        70 --> 71[" "]
        71 --> 72[" "]
        72 --> 73[" "]
        73 --> 74[" "]
        74 --> 75[" "]
        75 --> 76[" "]
        76 --> 77[" "]
        77 --> 78[" "]
        78 --> 79[" "]
        79 --> 80[" "]
        Note: "Do not exceed" indicates the minimum threshold for additional zones. The chart includes a legend entry for "Additional Zones" and notes that "MINIMUM Boiler loop pipe size" is listed below the plot area.
b. The factory default settings are: DHW circulator as Circulator 1, boiler circulator as Circulator 2. See Field wiring instructions, beginning on page 30, for details.
Legend — Figure 51
1 Ultra boiler
2 Indirect water heater (DHW), if used
3 Boiler relief valve (see page 9 for piping details)
4 Relief valve discharge piping (see page 9 for details)
5 DHW circulator (see page 56 for suggested sizing)
6 Isolation valves
7 System circulator (see information above for wiring)
8 Diaphragm (or bladder) type expansion tank (see page 56 for piping of closed-type expansion tank, if used)
9 Air separator [with automatic air vent only on systems using diaphragm (or bladder) type expansion tank]
10 Flow/check valves
11 Purge/drain valves
12 Boiler circulator
13 Zone valves, typical
15 Closed-type expansion tank
16 Water chiller
17 Check valve
18 Strainer
19 Balancing valve
20 Make-up water supply
21 Primary/secondary connection (tees no more than 12 inches apart)
23 DHW supply/return
24 Strap system supply and return sensors to lines as shown, at least 6 pipe diameters (but no more than 3 feet) from boiler connection tees.
25 Systems using high-head pumps may require a bypass pressure regulator to prevent damage to control valves.
26 Temperature/Pressure gauge
27 DHW relief valve, if used
Items supplied with boiler
Items supplied by others
Sizing dire ct-connected DHW piping
Direct-connected DHW piping
NOTICE
For Weil-McLain AQUA PLUS water heaters,
refer to the AQUA PLUS water heater manual for application information. Also see quick-select information on page 14. The information here is for other water heater designs.
NOTICE
When using the Ultra boiler for dedicated DHW applications, use the circulator supplied with the boiler (007 for Ultra-80/105; 0014 for Ultra-155/230/299/310; 0013 for Ultra-399) to circulate to the water heater, except where higher flow rates may be required for the heater used. Use the following method to select a circulator for the water heater on combined space heating/DHW systems.
- To pipe the DHW tank and boiler, follow the suggested piping diagrams beginning on page 12.
- Figure 55, page 57 shows the pump curves for typical DHW circulators. Use these curves along with boiler pressure drop data from Figure 54, page 57 to size the DHW piping and circulator.
- Procedure to select a DHW circulator:
Step 1:
From the water heater manufacturer's data, find:
Required boiler water flow rate, GPM, at 190°F.
- Pressure drop across the water heater at this flow rate, in feet water column (this is H3 in the formula below).
Step 2:
Find your boiler model in Figure 54, page 57.
Select a flow rate in the Flow rate column just larger than the required boiler water flow rate from Step 1.
Step 3:
Read across the row selected to find the boiler pressure drop, H1, and the pressure drop in the piping, H2. Make sure to use the copper pipe size given in column 3 when piping the water heater.
Step 4:
Add the pressure drop across the water heater, from Step 1, to the values of H1 and H2 for total head loss.
$$ \mathrm{H} _ {\text { total }} = \mathrm{H} 1 + \mathrm{H} 2 + \mathrm{H} 3 $$
Step 5:
Select a circulator that can deliver the required flow rate, gpm, against the total head loss found in Step 4.
Example:
Consider an Ultra-155 used with a water heater that requires a flow of 12 gpm with boiler water at 190^ F. The water heater is to be piped as in Figure 52.
From the example water heater manufacturer's data, the head loss across the water heater at 12 gpm is 5.5 feet water column.
Read down the first column of Figure 54, page 57 for the Ultra-155 until you find a flow rate just larger than the required 12 gpm. You'll find a value of 13 gpm in the third row.
At 13 gpm, with an Ultra-155, the recommended pipe size is 1¼ inch. From the table, the head losses are:
$$ \mathrm{H} 1 = 1 3. 3 \text { feet } $$
$$ \mathrm{H} 2 = 3. 9 \text { feet } $$
H3 = 5.5 feet (from water heater manufacturer's data)
$$ \mathrm{H} _ {\text { total }} = 1 3. 3 + 3. 9 + 5. 5 = 2 2. 7 \text { feet. } $$
The closest circulator selection (from Figure 55, page 57) that can deliver 12 gpm at 22.7 feet head is either a Taco 1400 (top chart) or a Taco 0013 (bottom chart).
Note that, if the water heater were piped as in Figure 53, then H1 would be 0, so total head loss would be H2 + H3, or 9.4 feet (3.9 + 5.5). A Taco 0010 would handle the load if piped this way.
NOTICE
See previous pages in this manual for piping details not shown below. For DHW piping as shown below, use sizing information in Figure 54, page 57.
Figure 52 DHW piping direct-connected across the boiler
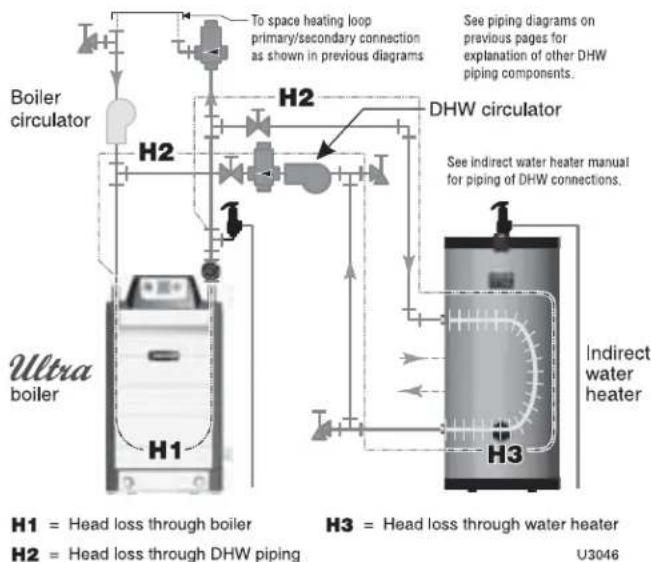
flowchart
graph TD
    A["Boiler circulator"] --> B["H1"]
    B --> C["Ultra boiler"]
    C --> D["H2"]
    D --> E["H2"]
    E --> F["DHW circulator"]
    F --> G["H3"]
    G --> H["Indirect water heater"]
    H --> I["H1 = Head loss through boiler"]
    H --> J["H3 = Head loss through water heater"]
    K["H2 = Head loss through DHW piping"] --> L["U3046"]
Figure 53 DHW piping as a secondary circuit — for high-flow-rate applications
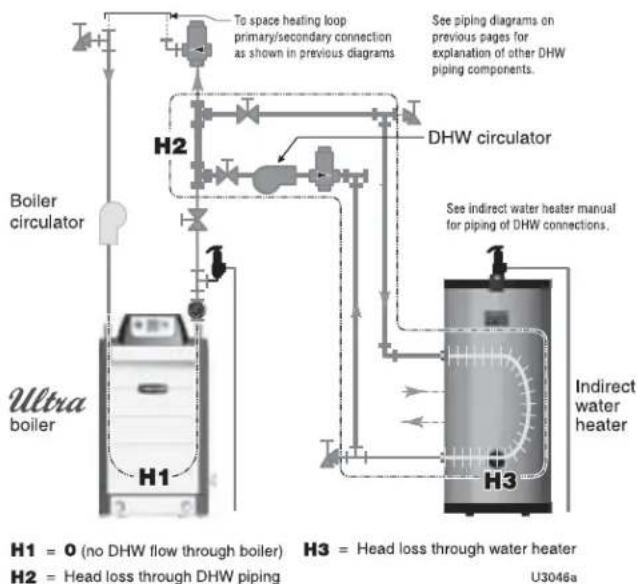
flowchart
graph TD
    A["Boiler circulator"] --> B["H1"]
    B --> C["Ultra boiler"]
    C --> D["H2"]
    D --> E["DHW circulator"]
    E --> F["H3"]
    F --> G["Indirect water heater"]
    H["H1 = 0 (no DHW flow through boiler)"] --> I["H2 = Head loss through DHW piping"]
    J["H3 = Head loss through water heater"] --> K["U3046a"]
Sizing direct-connected DHW piping (continued)
Figure 54 Pipe sizing and head losses for DHW applications (H1=Ultra boiler head loss; H2=piping head loss)
| Flow rate | Temp rise | Pipe size | H1 H2 | |
| GPM °F Inches | Boiler head lossFeet w.c. | Piping head lossFeet w.c. | ||
| Ultra-80 (71,000 Btuh output) | ||||
| 7 20 1 6.6 2.7 | ||||
| 9 16 1 11.6 4.2 | ||||
| 10 14 1 14 14.6 2.5 | ||||
| Ultra-105 (94,000 Btuh output) | ||||
| 7 27 1 7.0 2.7 | ||||
| 9 21 1 11.2 4.2 | ||||
| 10 19 1 14 13.6 2.5 | ||||
| 13 14 1 14 22.2 3.9 | ||||
| Ultra-155 (139,000 Btuh output) | ||||
| 9 31 1 14 6.2 2.1 | ||||
| 10.0 | 28 1 14 | 7.7 | 2.5 | |
| 13 21 1 14 13.3 3.9 | ||||
| 16 17 1 14 20.5 5.7 | ||||
| Ultra-230 (207,000 Btuh output) | ||||
| 13 32 1 14 9.4 3.9 | ||||
| 16 26 1 14 13.7 5.7 | ||||
| 21 20 1 12 22.0 2.9 | ||||
| Ultra-299/310 (279,000 Btuh output) | ||||
| 18 31 1 12 6.6 2.2 | ||||
| 22 25 1 12 9.5 3.1 | ||||
| 29 19 2 17.4 2.9 | ||||
| Ultra-399 (365,000 Btuh output) | ||||
| 22 34 1 12 9.5 3.1 | ||||
| 29 25 2 15.5 2.9 | ||||
| 36 20 2 22.8 4.3 | ||||
Figure 55 Pump curves for typical circulators suggested for DHW loop
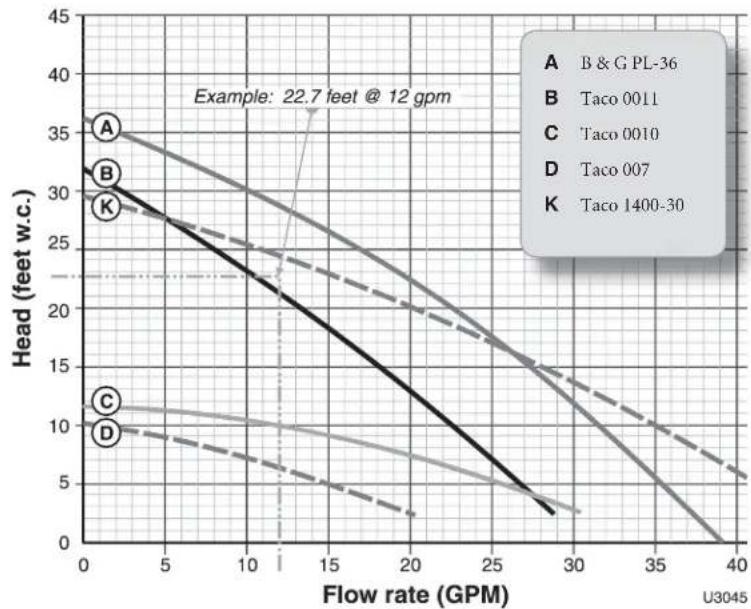
line
| Flow rate (GPM) | Head (feet w.c.) | | --------------- | ---------------- | | 0 | 35 | | 5 | 30 | | 10 | 25 | | 15 | 20 | | 20 | 15 | | 25 | 10 | | 30 | 5 | | 35 | 0 | | 40 | -5 |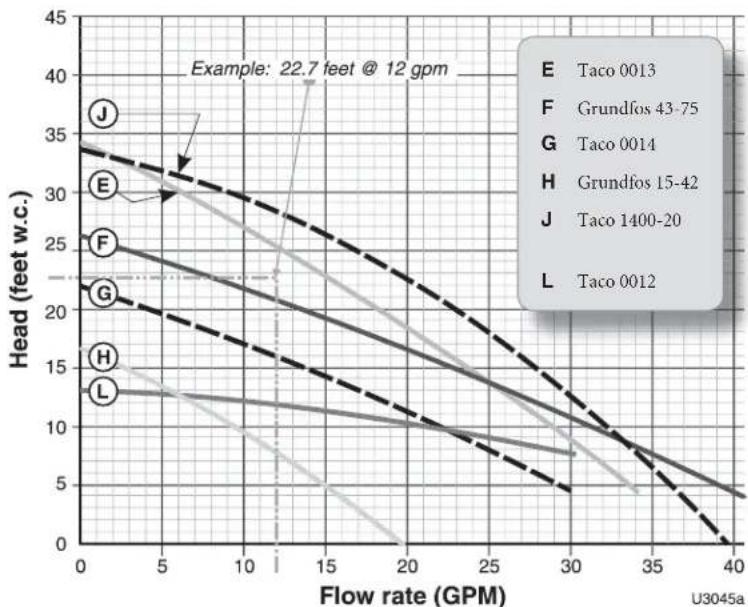
line
| Flow rate (GPM) | Head (feet w.c.) - E | Head (feet w.c.) - F | Head (feet w.c.) - G | Head (feet w.c.) - H | Head (feet w.c.) - J | Head (feet w.c.) - L | | --------------- | --------------------- | --------------------- | --------------------- | --------------------- | --------------------- | --------------------- | | 0 | 34 | 33 | 26 | 25 | 36 | 13 | | 5 | 32 | 31 | 24 | 23 | 34 | 12 | | 10 | 30 | 29 | 22 | 21 | 32 | 11 | | 15 | 28 | 27 | 20 | 19 | 30 | 10 | | 20 | 26 | 25 | 18 | 17 | 28 | 9 | | 25 | 24 | 23 | 16 | 15 | 26 | 8 | | 30 | 22 | 21 | 14 | 13 | 24 | 7 | | 35 | 20 | 19 | 12 | 11 | 22 | 6 | | 40 | 18 | 17 | 10 | 9 | 20 | 5 |Multiple boiler installations
Placing multiple boilers
- Locate multiple boilers in boiler room according to:
a. Figure 56 (side-to-side), or b. Figure 57 (back-to-back).
c. Figure 58 (wall mounting). - Provide indicated clearances around boilers for access and servicing. If recommended dimensions are not possible, provide at least the minimum clearances given on page 5. Also follow local codes.
- Construct boiler foundation if boiler room floor is uneven or if there is a danger of flooding. Size foundation to allow for clearance and spacing dimensions shown in the illustrations at right.
- Chalk line boiler locations on foundation or boiler room floor.
- Uncrate, assemble and mount boilers according to instructions in this manual.
- Provide clearance for installation of venting, air piping, gas piping, expansion tank, primary circulator and other accessories.
Wall mounting (Ultra Models 80 - 399)
- Ultra boilers may be wall mounted, following the instructions on page 50. (See Repair parts section for part number of wall mounting kit.)
- When wall mounting boilers, provide approximately 6 inches between boilers for easy removal of boiler jacket door. See Figure 58.
- Follow all applicable codes regarding piping, electrical connections and clearances.
- When wall mounting boilers, verify the wall construction is suitable for the structural load. See page 50 for details.
Figure 56 Side-to-side mounting of multiple Ultra boilers
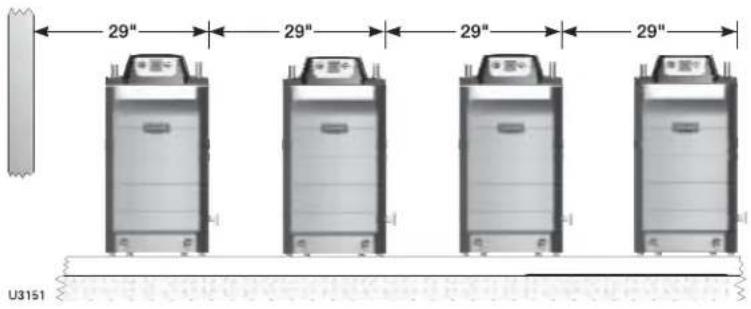
text_image
29" 29" 29" 29" U3151Figure 57 Back-to-back installation of multiple Ultra boilers
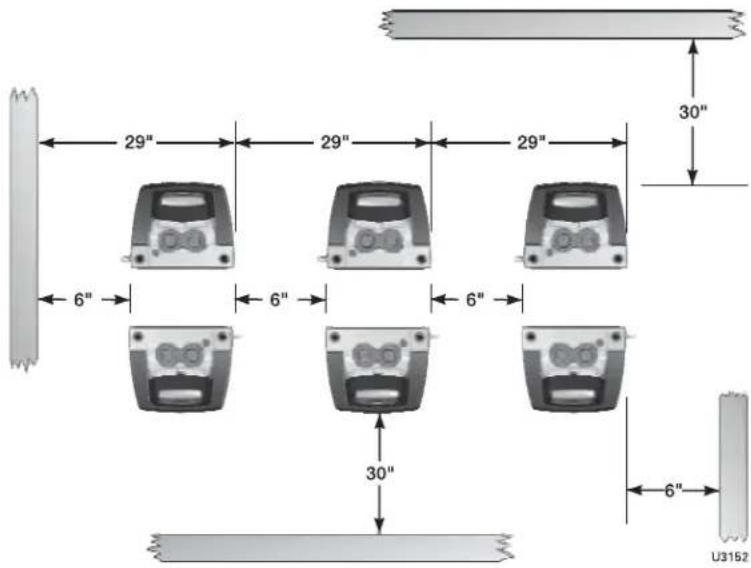
text_image
29" 29" 29" 6" 6" 6" 30" 30" 6" U3152 30"Figure 58 Wall mounting multiple Ultra boilers
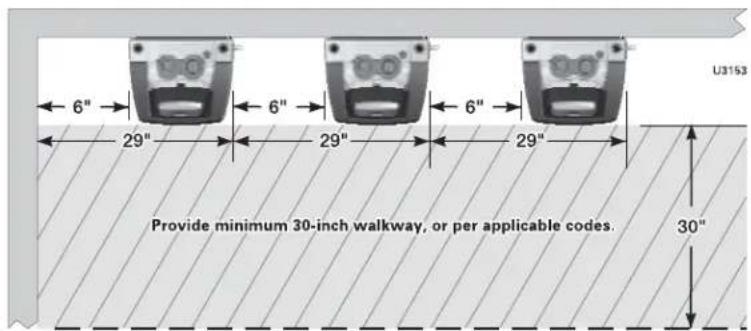
text_image
6" 29" 6" 29" 6" 29" U3153 Provide minimum 30-inch walkway, or per applicable codes. 30"Multiple boiler installations (continued)
Manifolded combustion air option
- Multiple Ultra boilers can use a common combustion air manifold.
a. See Figure 139, page 138 for minimum cross sectional area of combined air ducts.
b. Provide minimum clearance to adjacent vents and grade/snow line as shown in Figure 59.
c. Provide minimum free area in duct (adjusted for louver restriction) of 1 square inch per 2,000 Btuh total boiler input.
d. If combustion air damper is used, wire to boilers to prevent operation except after damper has opened.
ONLY air piping can be combined. DO NOT use combined vent piping. Flue gas leakage and boiler component damage can occur. Failure to comply could result in severe personal injury, death or substantial property damage.
Figure 59 Manifolded combustion air option
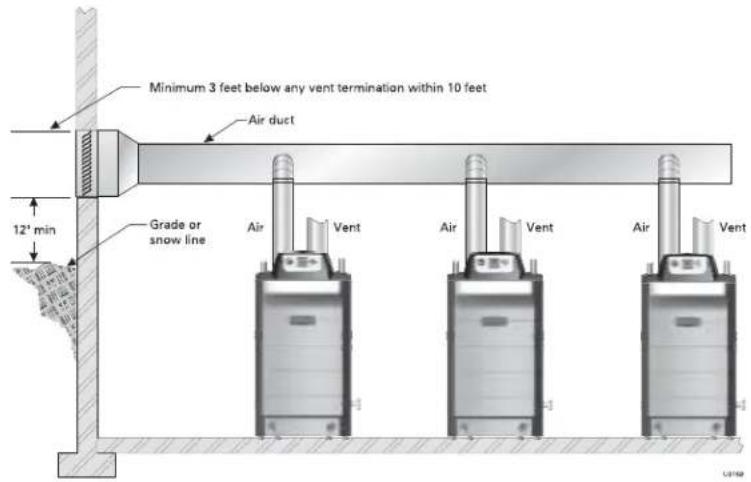
text_image
Minimum 3 feet below any vent termination within 10 feet Air duct 12' min Grade or snow line Air Vent Air Vent Air Vent
DO NOT use common venting — the manifold option is only for combustion air — all vent pipes must be routed and terminated individually as described in this manual.
See Figure 139, page 138 for minimum cross sectional area of combined air ducts.
OR
Calculate required cross section (for area in square inches):
MIN. AREA = TOTAL MBH INPUT DIVIDED BY 2
Example: A multiple boiler system with (6) Ultra-155 boilers has a total input of 6 × 155 = 930 MBH (930,000 Btuh). The required duct cross sectional area is:
MIN. AREA = 930 DIVIDED BY 2 = 465 sq. inches
Multiple boiler installations (continued)
Easy-Fit® piping installation
- Main header and Easy-Fit ^® Manifold pipe sizing.
a. New system — See page 10.
b. Replacing boilers in an existing system — Without reducing size, connect system supply and return lines. Install tees or crosses for Easy-Fit ^® manifolds as shown in Figure 60 or Figure 61. Size manifolds to handle total connected boiler output as shown.
- Provide connections in main header for Easy-Fit® manifolds as close as possible to the midpoint of multiple boilers.
a. Use tees for four or less boilers, as in Figure 60.
b. Use either tees (Figure 60) or crosses (Figure 61) for five or more boilers.
- Manifold placement:
a. To alternate spacing for supply and return lines to boilers, reverse the short-end and long-end of the manifolds as shown in Figure 60 and Figure 61.
b. Return manifold must be on the return side of the main and supply manifold must be on the supply side of the main. Drawings in this manual show flow in system main from right to left. For system flowing left to right, reverse the locations of the manifolds accordingly.
-
Connect from Easy-Fit® manifold branches to boiler supply and return connections using copper or steel pipe, sized for the required flow rate.
-
Provide a flow/check valve in the supply piping of each boiler as shown in piping diagrams in this manual. Install an isolation valve on the supply and return of each boiler as shown. Some local codes may require the use of individual water level controls and limits on each boiler when isolation valves are installed.
-
Install main system air eliminator and primary circulator in supply piping as shown in piping diagrams. Place expansion tank on suction side of system circulator as shown.
-
Install system accessories as shown in drawings.
-
Piping recommendation drawings:
a. Figure 60 and Figure 61 show details of Easy-Fitmanifolds.
b. Figure 62, page 61 is a schematic piping drawing showing the locations of typical boiler piping and system piping, including limits and other devices often required by local codes.
c. Figure 63, page 62 and Figure 64, page 63 are three-dimensional piping drawings of typical multiple boiler installation.
d. Figure 65, page 64 shows recommended piping when an isolating heat exchanger is needed.
- If desired, other primary/secondary piping arrangements can be used.
NOTICE
When using isolation valves on each boiler, some codes may require providing a low water control and additional limit for each boiler. Consult local codes to determine if omission of the individual boiler isolation valves may allow the use of a single water level control and additional limit for the entire multiple boiler system. The U-Control module proves water level using a dual temperature sensor installed in the Ultra heat exchanger. This will satisfy some code requirements for low water cutoff protection.
Maximum connected load per manifold:
2-inch manifold — 450 MBH
3-inch manifold — 1400 MBH
4-inch manifold — 2900 MBH
Figure 60 Single-sided EZ-Fit Header connection
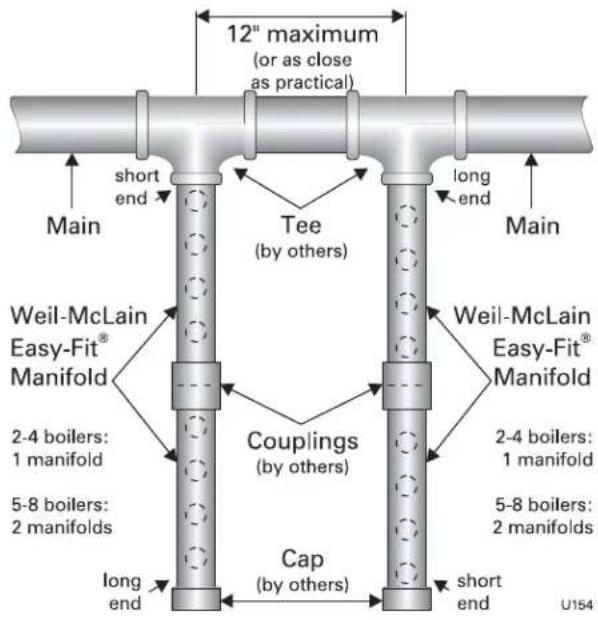
text_image
12" maximum (or as close as practical) Main short end Tee (by others) long end Main Weil-McLain Easy-Fit® Manifold Couplings (by others) Cap (by others) long end U154 2-4 boilers: 1 manifold 5-8 boilers: 2 manifolds 2-4 boilers: 1 manifold 5-8 boilers: 2 manifolds short endFigure 61 Double-sided EZ-Fit Header connection
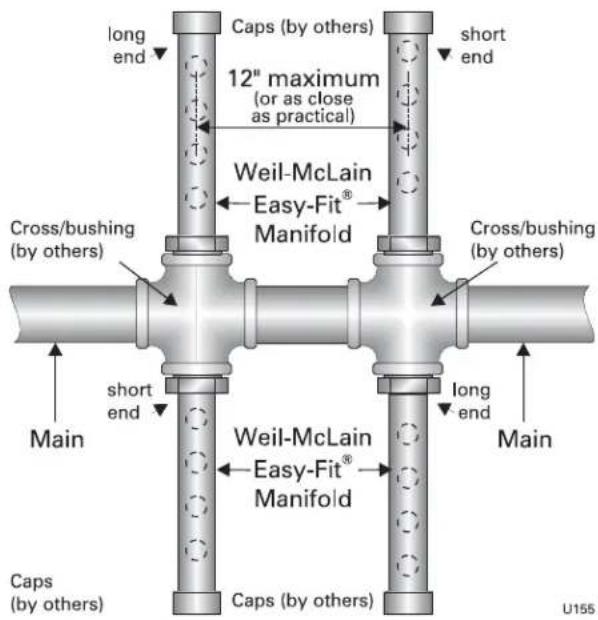
text_image
long end Caps (by others) short end 12" maximum (or as close as practical) Weil-McLain Easy-Fit® Manifold Cross/bushing (by others) Cross/bushing (by others) Main short end Weil-McLain Easy-Fit® Manifold long end Main Caps (by others) Caps (by others) U155Multiple boiler installations (continued)
Figure 62 Piping schematic — typical piping for multiple Ultra boilers, using Weil-McLain Easy-Fit manifolds
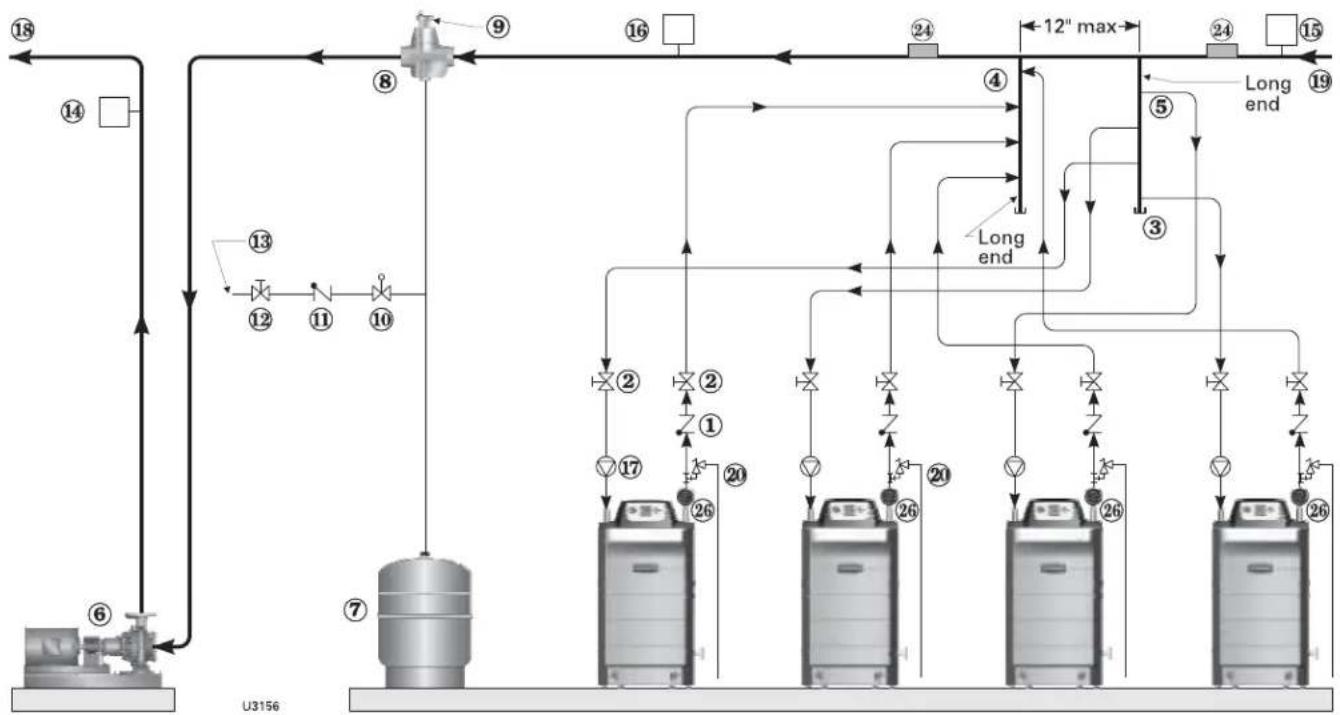
flowchart
graph TD
    A["18"] --> B["①"]
    C["14"] --> D["②"]
    E["6"] --> F["⑦"]
    G["⑧"] --> H["⑨"]
    I["⑪"] --> J["⑫"]
    K["⑪"] --> L["⑬"]
    M["⑪"] --> N["⑭"]
    O["⑪"] --> P["⑮"]
    Q["⑪"] --> R["⑰"]
    S["⑪"] --> T["⑱"]
    U["⑪"] --> V["⑲"]
    W["⑪"] --> X["⑳"]
    Y["⑪"] --> Z["㉑"]
    AA["㉒"] --> AB["㉓"]
    AC["㉔"] --> AD["㉕"]
    AE["㉖"] --> AF["㉗"]
    AG["㉘"] --> AH["㉙"]
    AI["㉚"] --> AJ["㉛"]
    AK["㉜"] --> AL["㉝"]
    AM["㉞"] --> AN["㉟"]
    AO["㉟"] --> AP["㉟a"]
    AQ["㉟a"] --> AR["㉟b"]
    AS["㉟b"] --> AT["㉟c"]
    AU["㉟c"] --> AV["㉟d"]
    AW["㉟d"] --> AX["㉟e"]
    AY["16"] --> AZ["24"]
    BA["24"] --> BB["3"]
    BC["3"] --> BD["4"]
    BE["4"] --> BF["5"]
    BG["5"] --> BH["6"]
    BI["6"] --> BJ["7"]
    BK["7"] --> BL["8"]
    BM["8"] --> BN["9"]
    BO["9"] --> BP["10"]
    BQ["10"] --> BR["11"]
    BS["11"] --> BT["12"]
    BU["12"] --> BV["13"]
    BW["13"] --> BX["14"]
Legend — Figure 62
| 1 Flow/check valve (each boiler)2 Isolation valves (when used)3 Cap4 Easy-Fit® Manifold (supply) — layout and size per page 605 Easy-Fit® Manifold (return) — layout and size per page 606 Primary circulator7 Expansion tank (diaphragm type)8 System air eliminator9 System automatic air vent10 Pressure reducing valve | 11 Check valve or backflow preventer, as required by applicable codes12 Isolation valve13 Cold water supply14 Supply water temperature control (when used)15 Low water cutoff (when used) (place above primary header)16 Water flow switch (when used)17 Boiler circulator (each boiler)18 System supply19 System return20 Boiler relief valve and discharge piping, installed per Ultra Boiler Manual24 Strap system supply and return sensors to lines as shown, at least 6 pipe diameters (but no more than 3 feet) from boiler connection tecs.26 Temperature/pressure gauge |
Multiple boiler installations (continued)
Figure 63 Piping layout — typical piping for multiple Ultra boilers, using Weil-McLain Easy-Fit manifolds (2-boiler system)
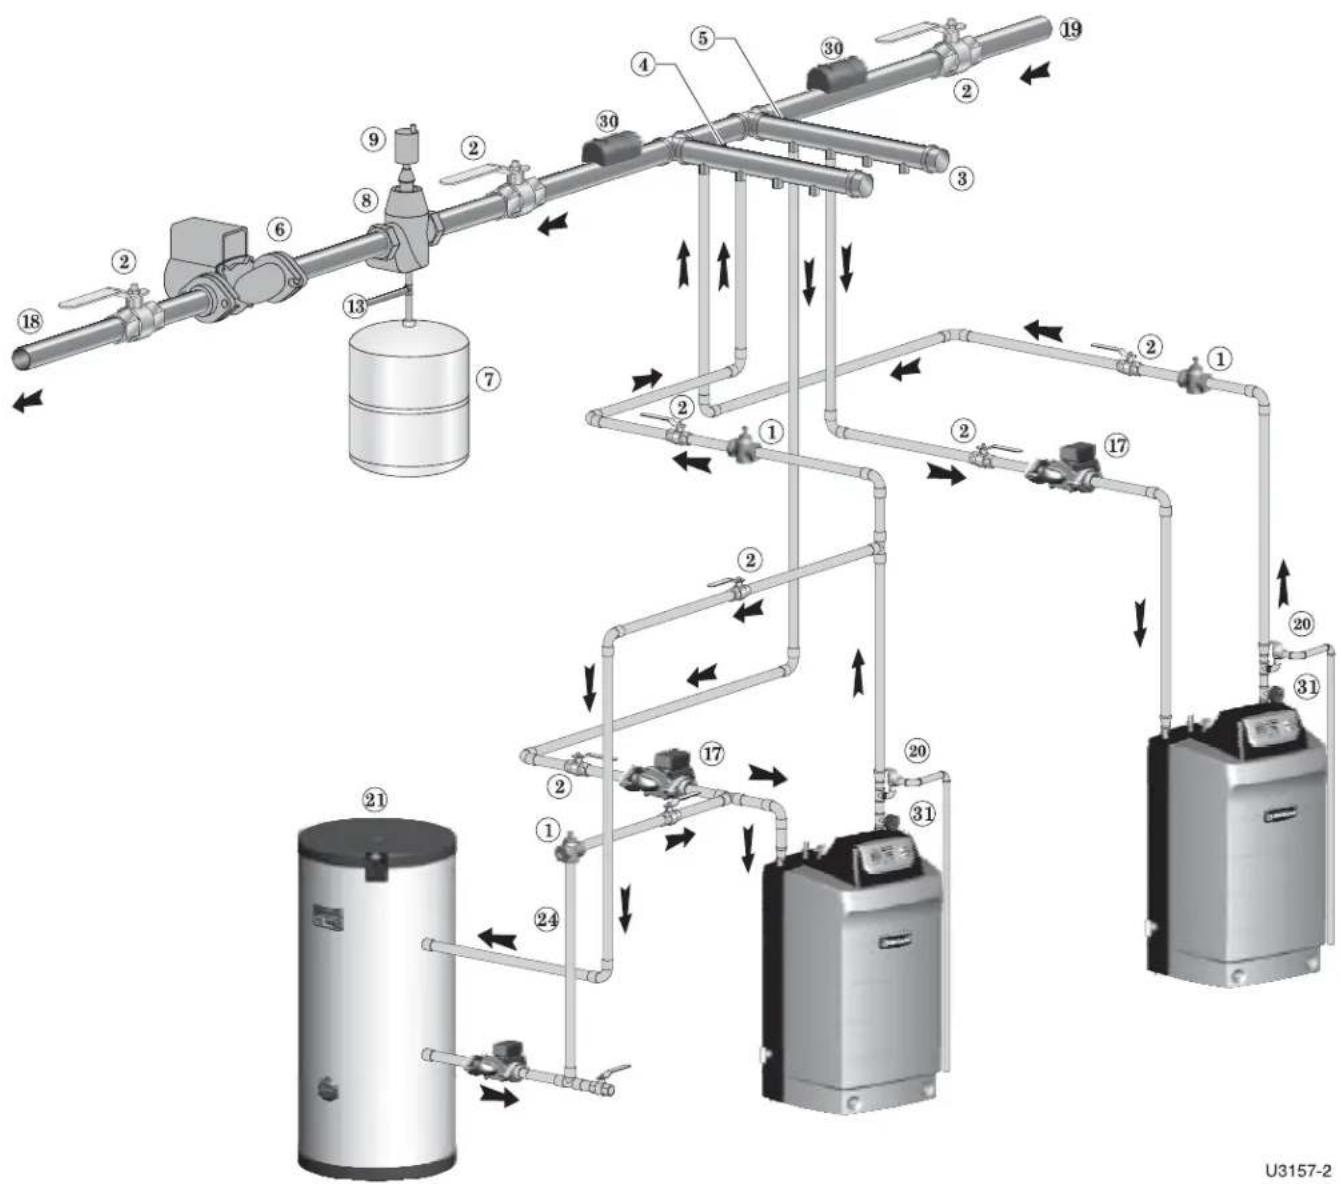
flowchart
graph TD
    A["18"] --> B["2"]
    B --> C["6"]
    C --> D["8"]
    D --> E["13"]
    E --> F["7"]
    F --> G["19"]
    G --> H["2"]
    H --> I["30"]
    I --> J["4"]
    J --> K["5"]
    K --> L["30"]
    L --> M["2"]
    M --> N["3"]
    N --> O["19"]
    O --> P["2"]
    P --> Q["17"]
    Q --> R["2"]
    R --> S["1"]
    S --> T["2"]
    T --> U["17"]
    U --> V["2"]
    V --> W["17"]
    W --> X["20"]
    X --> Y["31"]
    Y --> Z["20"]
    Z --> AA["31"]
    AA --> AB["20"]
    AB --> AC["31"]
    AC --> AD["20"]
    AD --> AE["31"]
    AE --> AF["20"]
    AF --> AG["31"]
    AG --> AH["20"]
    AH --> AI["31"]
    AI --> AJ["20"]
    AJ --> AK["31"]
    AK --> AL["20"]
Legend — Figure 63
1 Flow/check valve (each boiler)
2 Isolation valves (when used)
3 Caps
4 Easy-Fit® Manifold (supply) — layout and size per page 60
5 Easy-Fit® Manifold (return) — layout and size per page 60
6 Primary circulator
7 Expansion tank (diaphragm type)
8 System air eliminator
9 System automatic air vent
3 Cold water supply
17 Boiler circulator (each boiler)
18 System supply
19 System return
20 Boiler relief valve and discharge piping, installed per Ultra Boiler Manual
21 Indirect-fi red storage water heaters (Weil-McLain AQUA PLUS shown) Example is shown connected to one boiler of the system. Preferably, use the last boiler in the lead/lag sequence and set its Priority to DHW Direct so it will switch to DHW fi ring and turn off its boiler circulator on a call for domestic water heating.
24 DHW boiler-side circulator
30 Strap system supply and return sensors to lines as shown, at least 6 pipe diameters (but no more than 3 feet) from boiler connection tees.
32 Temperature/pressure gauge
Multiple boiler installations (continued)
Figure 64 Piping layout — typical piping for multiple Ultra boilers, with DHW storage heaters (4-boiler system)
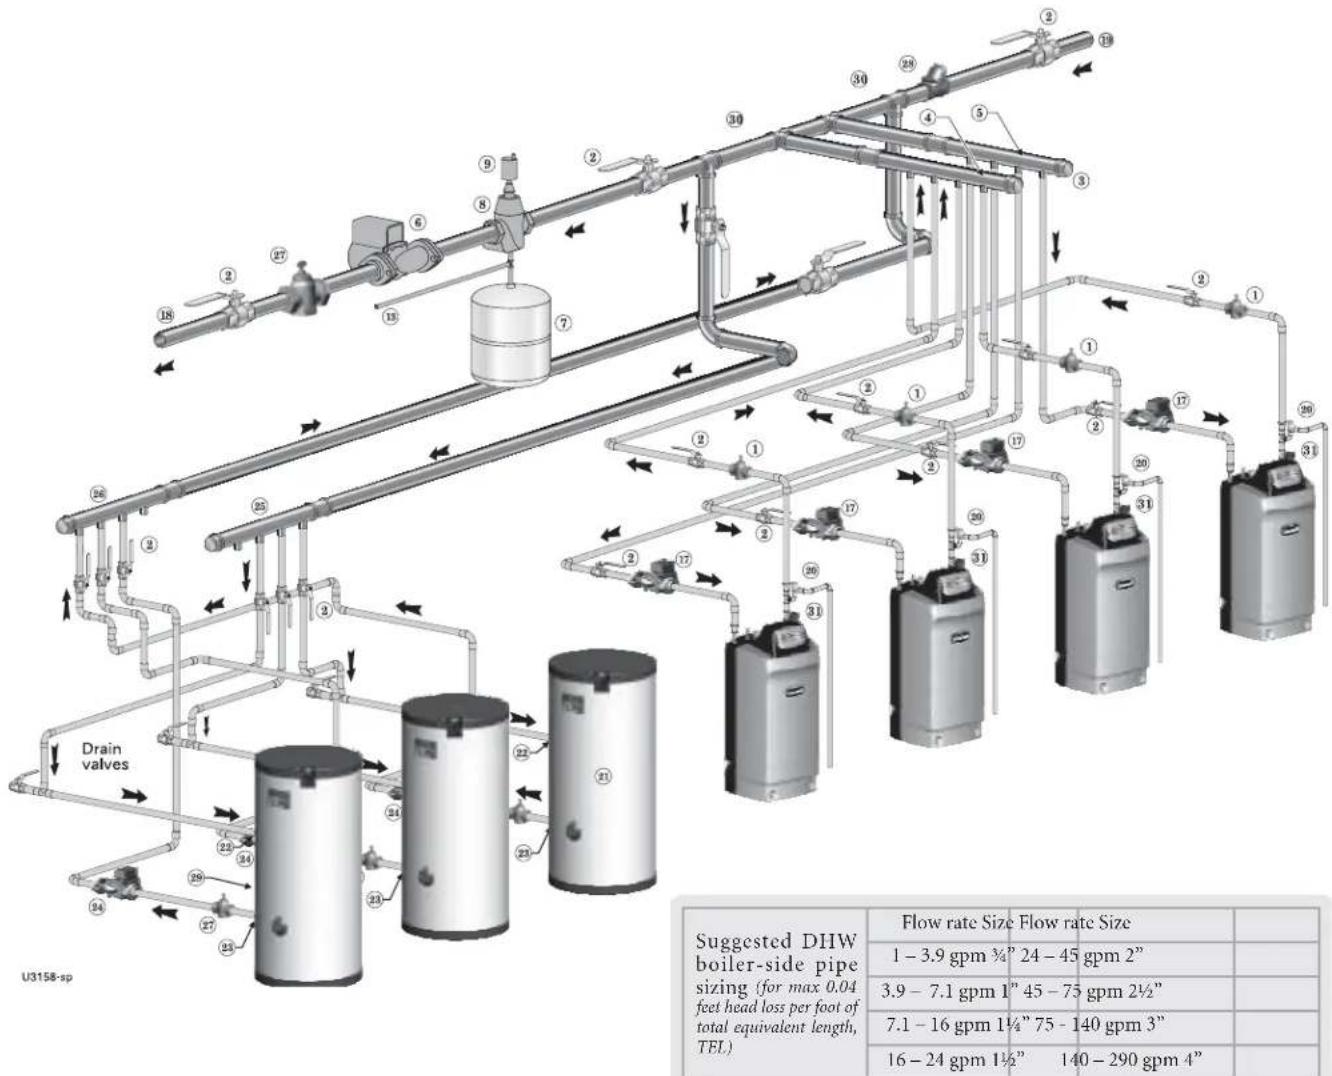
flowchart
graph TD
    A["Drain valves"] --> B["16"]
    A --> C["20"]
    A --> D["24"]
    A --> E["27"]
    A --> F["31"]
    A --> G["34"]
    A --> H["37"]
    A --> I["40"]
    A --> J["43"]
    A --> K["46"]
    A --> L["49"]
    A --> M["52"]
    A --> N["55"]
    A --> O["58"]
    A --> P["61"]
    A --> Q["64"]
    A --> R["67"]
    A --> S["70"]
    A --> T["73"]
    A --> U["76"]
    A --> V["79"]
    A --> W["82"]
    A --> X["85"]
    A --> Y["88"]
    A --> Z["91"]
    A --> AA["94"]
    A --> AB["97"]
    A --> AC["100"]

    subgraph_PipeSize["Suggested DHW boiler-side pipe sizing (for max 0.04 feet head loss per foot of total equivalent length, TEL)"]
        direction TB
        B --> C
        C --> D
        D --> E
        E --> F
        F --> G
        G --> H
        H --> I
        I --> J
        J --> K
        K --> L
        L --> M
        M --> N
        N --> O
        O --> P
        P --> Q
        Q --> R
        R --> S
        S --> T
        T --> U
        U --> V
        V --> W
        W --> X
        X --> Y
        Y --> Z

    Note: Flow rate Size: 1 - 3.9 gpm ¾"
Flow rate Size: 24 - 45 gpm 2"
Flow rate Size: 3.9 - 7.1 gpm 1"
Flow rate Size: 45 - 75 gpm 2½"
Flow rate Size: 7.1 - 16 gpm 1¼"
Flow rate Size: 75 - 140 gpm 3"
Flow rate Size: 16 - 24 gpm 1½"
Flow rate Size: 140 - 290 gpm 4"
Suggested DHW boiler-side pipe size: 1 - 3.9 gpm ¾"
Suggested DHW boiler-side pipe size: 24 - 45 gpm 2"
Suggested DHW boiler-side pipe size: 3.9 - 7.1 gpm 1"
Suggested DHW boiler-side pipe size: 45 - 75 gpm 2½"
Suggested DHW boiler-side pipe size: 7.1 - 16 gpm 1¼"
Suggested DHW boiler-side pipe size: 75 - 140 gpm 3"
Suggested DHW boiler-side pipe size: 16 - 24 gpm 1½"
Suggested DHW boiler-side pipe size: 140 - 290 gpm 4"
Note: Data is presented in a table format.
Legend — Figure 64
1 Flow/check valve (each boiler)
2 Isolation valves (when used)
3 Caps
4 Easy-Fit® Manifold (supply) — layout and size per page 60
5 Easy-Fit® Manifold (return) — layout and size per page 60
6 Primary circulator
7 Expansion tank (diaphragm type)
8 System air eliminator
9 System automatic air vent
13 Cold water supply
17 Boiler circulator (each boiler)
18 System supply
19 System return
20 Boiler relief valve and discharge piping, installed per Ultra Boiler Manual
21 Indirect-fired storage water heaters (Weil-McIain AQUA PLUS shown) — Example is shown with reverse-return boiler-side piping using a single circulator. Alternate: each water heater could have its own circulator.
22 Boiler water inlet
23 Boiler water outlet
24 DHW boiler-side circulators
25 DHW boiler-side supply Easy-Fit® Manifold
26 DHW boiler-side return Easy-Fit® Manifold
27 Flow/check valves (to prevent induced or gravity flow in heating system or DHW piping)
28 Check valve to prevent heat migration in heating system.
29 See water heater manual for DHW piping — The DHW piping must also be manifolded together since the boiler-side piping is manifolded. If DHW heaters supply separate DHW circuits, provide an individual circulator for each water heater, and control each circulator by its water heater's aquastat.
30 Strap system supply and return sensors to lines as shown, at least 6 pipe diameters (but no more than 3 feet) from boiler connection tees.
31 Temperature/pressure gauge
NOTICE
This piping is sug- gested only. The
layout above should be controlled with a boiler sequencing panel that provides DHW operation as well. Wire the heating system circulator to operate only on call for heat. Alternatively, use the boiler sequencing panel to provide domestic priority by disabling the heating system circulator any time there is a DHW call for heat. The boiler circulators, item 17, must operate on any call for heat, whether heating system or DHW. Offset the DHW boiler-side supply and return manifolds as shown so the total run of pipe and fittings to each of the water heaters is approximately equal.
Multiple boiler installations (continued)
Figure 65 Piping layout — typical piping for multiple Ultra boilers, using isolation exchanger
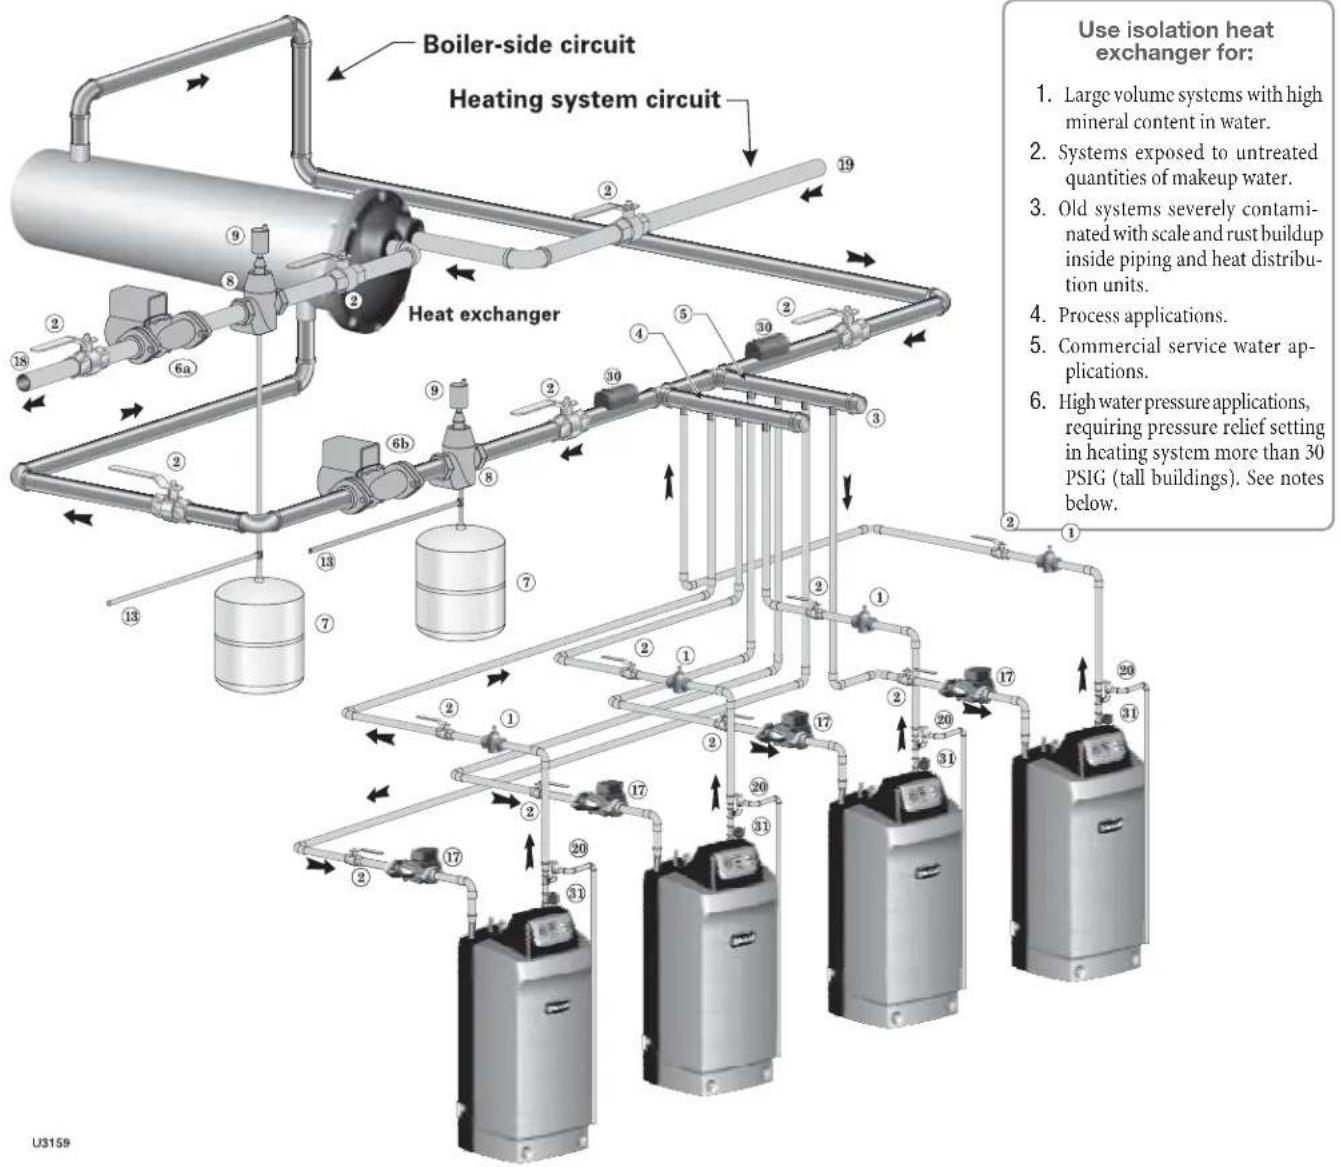
flowchart
graph TD
    A["Boiler-side circuit"] --> B["Heating system circuit"]
    B --> C["Heat exchanger"]
    C --> D["19"]
    C --> E["20"]
    C --> F["30"]
    C --> G["4"]
    C --> H["5"]
    C --> I["6a"]
    C --> J["6b"]
    C --> K["7"]
    C --> L["8"]
    C --> M["9"]
    C --> N["10"]
    C --> O["11"]
    C --> P["12"]
    C --> Q["13"]
    C --> R["14"]
    C --> S["15"]
    C --> T["16"]
    C --> U["17"]
    C --> V["18"]
    C --> W["19"]
    C --> X["20"]
    C --> Y["21"]
    C --> Z["22"]
    C --> AA["23"]
    C --> AB["24"]
    C --> AC["25"]
    C --> AD["26"]
    C --> AE["27"]
    C --> AF["28"]
    C --> AG["29"]
    C --> AH["30"]
    style A fill:#f9f,stroke:#333
    style B fill:#ccf,stroke:#333
    style C fill:#cfc,stroke:#333
    style D fill:#fcc,stroke:#333
    style E fill:#cff,stroke:#333
    style F fill:#ffc,stroke:#333
    style G fill:#cfc,stroke:#333
    style H fill:#fcc,stroke:#333
    style I fill:#cfc,stroke:#333
    style J fill:#fcc,stroke:#333
    style K fill:#cfc,stroke:#333
    style L fill:#fcc,stroke:#333
    style M fill:#cfc,stroke:#333
    style N fill:#fcc,stroke:#333
    style O fill:#cfc,stroke:#333
    style P fill:#fcc,stroke:#333
    style Q fill:#cfc,stroke:#333
    style R fill:#fcc,stroke:#333
    style S fill:#cfc,stroke:#333
    style T fill:#fcc,stroke:#333
    style U fill:#cfc,stroke:#333
    style V fill:#fcc,stroke:#333
    style W fill:#cfc,stroke:#333
    style X fill:#fcc,stroke:#333
    style Y fill:#cfc,stroke:#333
    style Z fill:#fcc,stroke:#333
U3159
Legend — Figure 65
1 Flow/check valve (each boiler)
2 Isolation valves (when used)
3 Cap
4 Easy-Fit ^® Manifold (supply) — layout and size per page 60
5 Easy-Fit® Manifold (return) — layout and size per page 60
6a Heating system circulator (exchanger tube-side)
6b Heat exchanger shell-side circulator
7 Expansion tanks (diaphragm type)
8 System air eliminator
9 System automatic air vent
13 Cold water supply connections
17 Boiler circulator (each boiler)
18 Heating system supply
19 Heating system return
20 Boiler relief valve and discharge piping, installed per Ultra Boiler Manual
30 Strap system supply and return sensors to lines as shown, at least 6 pipe diameters (but no more than 3 feet) from boiler connection tees.
31 Temperature/pressure gauge
Notes:
- Contact heat exchanger manufacturer for heat exchanger shell-side and tube-side piping and circulator requirements. Tube-side flow and temperatures must meet heating system requirements.
- Contact heat exchanger manufacturer for sizing heat exchanger.
- Heat exchanger shell-side circuit requires its own expansion tank as shown.
- Heating system circuit requires its own expansion tank, as shown, plus its own relief valve set to protect heating system and heat exchanger piping and components.
- When individual isolation valves are used, individual boiler and level controls may be required.
Venting/air piping — Massachusetts installations Instructions for the Commonwealth of Massachusetts
(a) For all sidewall horizontally-vented gas-fueled equipment installed in every dwelling, building or structure used in whole or in part for residential purposes, including those owned or operated by the Commonwealth and where the side wall exhaust vent termination is less than seven (7) feet above finished grade in the area of the venting, including but not limited to decks and porches, the following requirements shall be satisfied:
- INSTALLATION OF CARBON MONOXIDE DETEC-
TORS. At the time of installation of the side wall horizontal vented gas fueled equipment, the installing plumber or gas fi tter shall observe that a hard wired carbon monoxide detector with an alarm and battery back-up is installed on the floor level where the gas equipment is to be installed. In addition, the installing plumber or gas fi tter shall observe that a battery operated or hard wired carbon monoxide detector with an alarm is installed on each additional level of the dwelling, building or structure served by the side wall horizontal vented gas fueled equipment. It shall be the responsibility of the property owner to secure the services of qualified licensed professionals for the installation of hard wired carbon monoxide detectors
a. In the event that the side wall horizontally vented gas fueled equipment is installed in a crawl space or an attic, the hard wired carbon monoxide detector with alarm and battery back-up may be installed on the next adjacent floor level.
b. In the event that the requirements of this subdivision can not be met at the time of completion of installation, the owner shall have a period of thirty (30) days to comply with the above requirements; provided, however, that during said thirty (30) day period, a battery operated carbon monoxide detector with an alarm shall be installed.
-
APPROVED CARBON MONOXIDE DETECTORS. Each carbon monoxide detector as required in accordance with the above provisions shall comply with NFPA 720 and be ANSI/UL 2034 listed and IAS certifi ed.
-
SIGNAGE. A metal or plastic identification plate shall be permanently mounted to the exterior of the building at a minimum height of eight (8) feet above grade directly in line with the exhaust vent terminal for the horizontally vented gas fueled heating appliance or equipment. The sign shall read, in print size no less than one-half (1/2) inch in size, "GAS VENT DIRECTLY BELOW. KEEP CLEAR OF ALL OBSTRUCTIONS."
-
INSPECTION. The state or local gas inspector of the side wall horizontally vented gas fueled equipment shall not approve the installation unless, upon inspection, the inspector observes carbon monoxide detectors and signage installed in accordance with the provisions of 248 CMR 5.08(2)(a) 1 through 4.
(b) EXEMPTIONS: The following equipment is exempt from 248 CMR 5.08(2)(a)1 through 4:
-
The equipment listed in Chapter 10 entitled "Equipment Not Required To Be Vented" in the most current edition of NFPA 54 as adopted by the Board; and
-
Product Approved side wall horizontally vented gas fueled equipment installed in a room or structure separate from the dwelling, building or structure used in whole or in part for residential purposes.
(c) MANUFACTURER REQUIREMENTS — GAS EQUIPMENT
VENTING SYSTEM PROVIDED. When the manufacturer of Product Approved side wall horizontally vented gas equipment provides a venting system design or venting system components with the equipment, the instructions provided by the manufacturer for installation of the equipment and the venting system shall include:
-
Detailed instructions for the installation of the venting system design or the venting system components; and
-
A complete parts list for the venting system design or venting system.
VENTING SYSTEM NOT PROVIDED. When the manufacturer of a Product Approved side wall horizontally vented gas fueled equipment does not provide the parts for venting the flue gases, but identifies "special venting systems", the following requirements shall be satisfied by the manufacturer:
-
The referenced "special venting system" instructions shall be included with the appliance or equipment installation instructions; and
-
The "special venting systems" shall be Product Approved by the Board, and the instructions for that system shall include a parts list and detailed installation instructions.
(e) A copy of all installation instructions for all Product Approved side wall horizontally vented gas fueled equipment, all venting instructions, all parts lists for venting instructions, and/or all venting design instructions shall remain with the appliance or equipment at the completion of the installation.
Vent /air piping — options
Vent and air pipe termination options
- Vent and air piping must terminate out the sidewall or through the roof of the building, using only one of the methods described in this manual.
- Sidewall options (see Figure 12, page 18, left side):
a. TOP: Weil-McLain termination cap (kit included with boiler) — see page 67 for instructions.
b. MIDDLE: Concentric PVC pipe (requires special kit, page129).
c. BOTTOM: Separate air pipe and vent pipe.
- Vertical options (Figure 12, page 18, right side):
a. TOP: Concentric PVC pipe (requires special kit, page 129).
b. BOTTOM: Separate air pipe and vent pipe.
Vent and air pipe diameters
- Vent and air pipe diameters can be as specified in Figure 12, page 18.
Vent and air pipe minimum length
- Vent pipe and air pipe must each be at least 2 feet long, with 2 elbows if sidewall venting or 1 elbow if vertical venting.
Vent and air pipe installation sequence
Step 1 Install the boiler.
Step 2 Determine the termination method — sidewall or vertical, concentric or separate pipes, etc.
Step 3 Determine proper location for wall or roof penetration for each termination.
Step 4 Install termination assembly as described in this manual.
Step 5 Install air and vent piping from boiler to termination.
Step 6 Install pipe supports and brackets as required.
Figure 66 Sidewall and vertical termination options
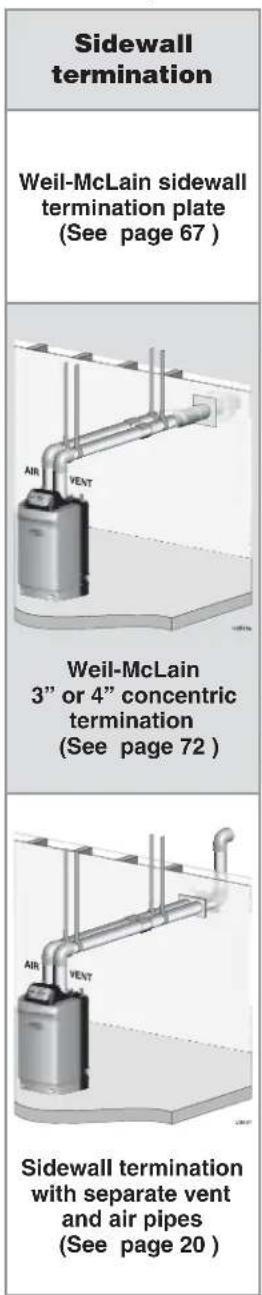
text_image
Sidewall termination Weil-McLain sidewall termination plate (See page 67 ) Weil-McLain 3" or 4" concentric termination (See page 72 ) Sidewall termination with separate vent and air pipes (See page 20 )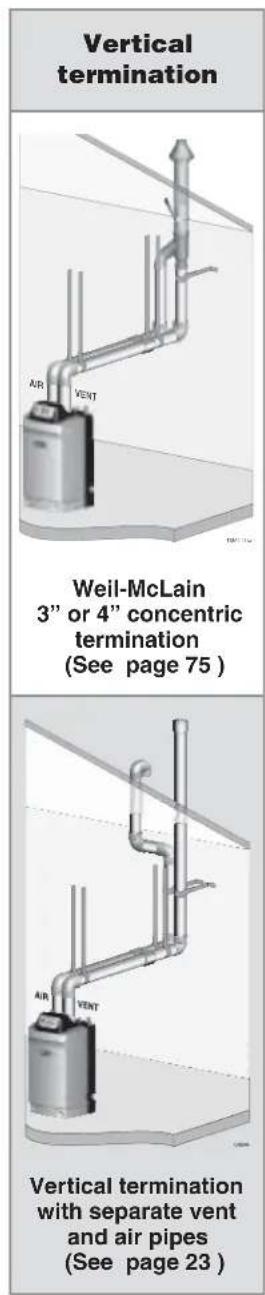
text_image
Vertical termination Weil-McLain 3" or 4" concentric termination (See page 75 ) Vertical termination with separate vent and air pipes (See page 23 )Sidewall vent/air termination: Weil-McLain cap
Vent and air pipe termination options
- This section covers sidewall termination using the Weil-McLain sidewall vent cap.
a. Models 80, 105 and 155 requires a 3-inch pipe size kit.
b. Models 230, 299/310 and 399 requires a 4-inch pipe size kit.
c. The Weil-McLain sidewall vent/air cap kit includes the termination cap, inside and outside wall plates, and mounting hardware to secure the plates.
- For other termination options and parts required, see page 66.
Vent and air pipe requirements
- Vent and air pipe diameters can be as specified in Figure 67.
Figure 67 Vent and air pipe requirements
| Ultra models | 2” Plastic | 3” Plastic or 3” AL29-4C | 4” Plastic or 4” AL29-4C |
| -80 & -105 | Yes Yes No | ||
| -155 No | Yes No | ||
| -230 No | Yes Yes | ||
| 299/310/399 | No | No Yes | |
| Use appropriate adapters where needed — Ultra-80 through -155 require 3.5 inch outside diameter pipe at the boiler vent and air connections. Ultra-230, -299/310 and -399 boilers require 4.5 inch outside diameter pipe at the boiler vent and air connections. | |||
Vent and air pipe minimum length
- Vent pipe and air pipe must each be at least 2 feet long, with two (2) elbows if sidewall venting or 1 elbow if vertical venting.
Vent and air pipe maximum length
- See Figure 69, page 68 for maximum length of vent and air piping using the Weil-McLain sidewall vent cap.
Vent and air pipe installation sequence
Step 7 Install the boiler.
Step 8 Determine the termination method — sidewall or vertical, concentric or separate pipes, etc.
Step 9 Determine proper location for wall or roof penetration for each termination.
Step 10 Install termination assembly as described in this manual.
Step 11 Install air and vent piping from boiler to termination.
Step 12 Install pipe supports and brackets as required.
Figure 68 Vent and air termination options
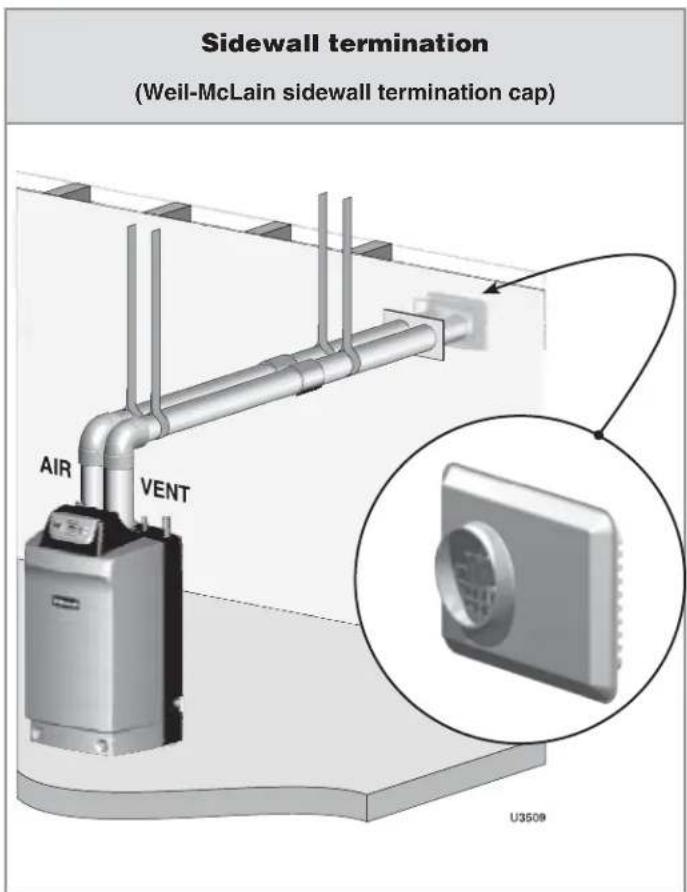
text_image
Sidewall termination (Weil-McLain sidewall termination cap) AIR VENT U350®NOTICE
Other vent/air piping alternatives — see information beginning on page 66. Options include other termination fittings and vertical terminations.
Commonwealth of Massachusetts
When the boiler is installed within the Commonwealth of Massachusetts:
- This product must be installed by a licensed plumber or gas fitter.
- Sidewall vent air installations — see instructions on page 65.
Sidewall vent/air termination: Weil-McLain cap (cont.)
WARNING
Provide pipe adapters as needed where pipe size is different from termination connections or boiler connections, and for all AL29-4C vent pipe connections at the boiler and the termination.
Allowable vent/air pipe materials
- Use only the materials listed in Figure 13, page 19.
Maximum piping length
-
Locate the termination such that the total air piping and vent piping from the boiler to the termination will not exceed the maximum length given in Figure 69.
-
Maximum lengths listed in Figure 69 allow for 2 elbows. Additional elbows required a reduction in maximum length as explained in the table notes.
Figure 69 Maximum piping lengths for Weil-McLain sidewall vent/air plate
| Boiler Ultra | Maximum Piping, 2” * | Maximum Piping, 3” * | Maximum Piping, 4” * | |||
| Feet | Elbows | Feet | Elbows | Feet | Elbows | |
| -80 ** 100 | 2 | 100 | 2 | Not allowed | ||
| -105 ** | 100 | 2 | 100 | 2 | ||
| -155 | Not allowed | 100 | 2 | |||
| -230 | Not allowed | 30 | 2 | 100 | 2 | |
| -299/310 | Not allowed | Not allowed | 100 | 2 | ||
| -399 | Not allowed | Not allowed | 100 | 2 | ||
* Install pipe reducers to adapt from pipe size used to the 3.5 inch outside diameter required at the termination. You do not have to reduce allowable pipe length for the reducers. Also install reducers as necessary where connecting to the boiler vent and air connections.
** Ultra-80 and 105 boilers installed with 2-inch vent piping automatically derate due to the pressure loss in the vent and air piping. The derate ranges up to 10% for the Ultra-80 at 100 feet or 15% for the Ultra-105 at 100 feet.
For piping using more than 2 elbows, reduce maximum allowable length:
- 7 feet for each additional 4-inch elbow (90° or 45°)
- 7 feet for each additional 2 or 3-inch long radius elbow
• 16 feet for each 2 or 3-inch short radius elbow
- 7 feet for each 2 or 3-inch 45-degree elbow.
Connecting from termination to boiler
- Install the termination as instructed in the following. Then proceed to page 71 to complete the air and vent piping between the termination and the boiler.
Determine location for termination cap
WARNING
A gas vent extending through an exterior wall shall not terminate adjacent to the wall or below building extensions such as eaves, parapets, balconies or decks. Failure to comply could result in severe personal injury, death or substantial property damage.
-
Locate the vent/air terminations using the following guidelines.
-
You must consider the surroundings when terminating the vent and air:
a. Position the vent termination where vapors will not damage nearby shrubs, plants or air conditioning equipment or be objectionable.
b. The fl ue products will form a noticeable plume as they condense in cold air. Avoid areas where the plume could obstruct window views.
c. Prevailing winds could cause freezing of condensate and water/ice buildup where fl ue products impinge on building surfaces or plants.
Figure 70 Termination location – Weil-McLain vent/air plate – height above grade or snow line
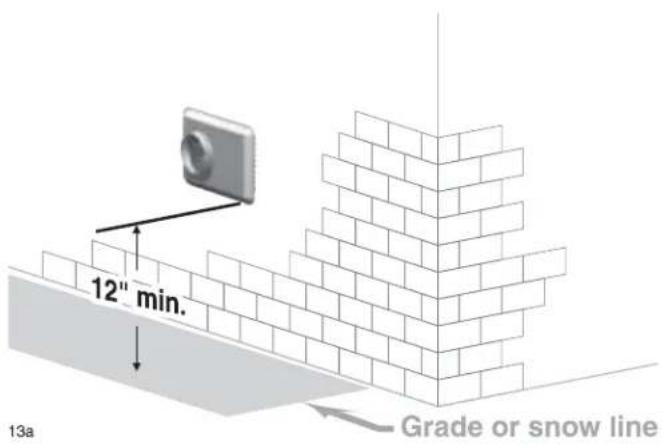
text_image
12" min. Grade or snow line 13aSidewall vent/air termination: Weil-McLain cap (cont.)
d. Avoid possibility of accidental contact of fl ue products with people or pets.
e. Do not locate the terminations where wind eddies could affect performance or cause recirculation, such as inside building corners, near adjacent buildings or surfaces, window wells, stairwells, alcoves, courtyards or other recessed areas.
f. Do not terminate above any door or window or under a deck. Condensate can freeze, causing ice formations.
g. Locate or guard vent to prevent condensate damage to exterior finishes.
- Maintain clearances as shown in Figure 70, page 68, Figure 71, Figure 71 and Figure 73. Also maintain the following:
a. Vent must terminate:
• At least 6 feet from adjacent walls.
• No closer than 5 feet below roof overhang.
• At least 7 feet above any public walkway.
• At least 3 feet above any forced air intake within 10 feet.
- No closer than 12 inches below or horizontally from any door or window or any other gravity air inlet.
b. Air inlet must terminate at least 12" above grade or snow line
c. Do not terminate closer than 4 feet horizontally (above or below) from any electric meter, gas meter, regulator, relief valve or other equipment.
- Locate terminations so they are not likely to be damaged by foreign objects, such as stones or balls, or subject to buildup of leaves or sediment.
Multiple vent/air terminations
- When terminating multiple Ultra boilers, terminate each vent/air connection as described in this manual.
WARNING
All vent pipes and air inlets must terminate at the same height to avoid possibility of severe personal injury, death or substantial property damage.
- Place wall penetrations to obtain minimum clearance as shown in Figure 73 for U. S. installations. For Canadian installations, provide clearances required by Natural Gas and Propane Installation CAN/CSA B149.1 or B149.2 Installation Code.
- The air inlet of an Ultra boiler is part of a direct vent connection. It is not classified as a forced air intake with regard to spacing from adjacent boiler vents.
- Combustion air (NOT vent piping) can be manifolded as shown in Figure 59, page 59.
Figure 71 Termination location – Weil-McLain vent/air plate – clearances to openings
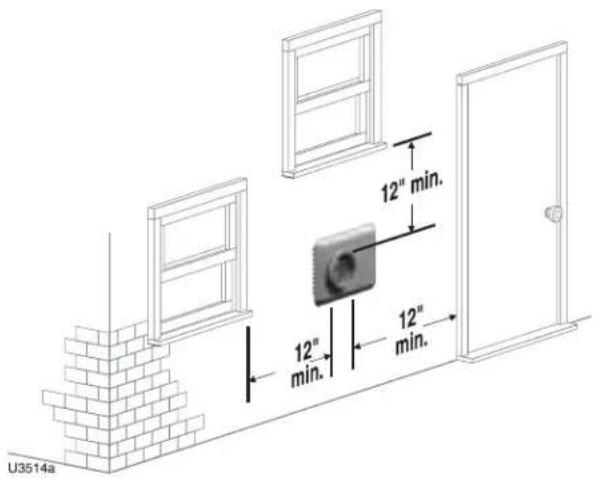
Figure 72 Termination location – Weil-McLain vent/air plate – clearances to public walkway or forced air intake
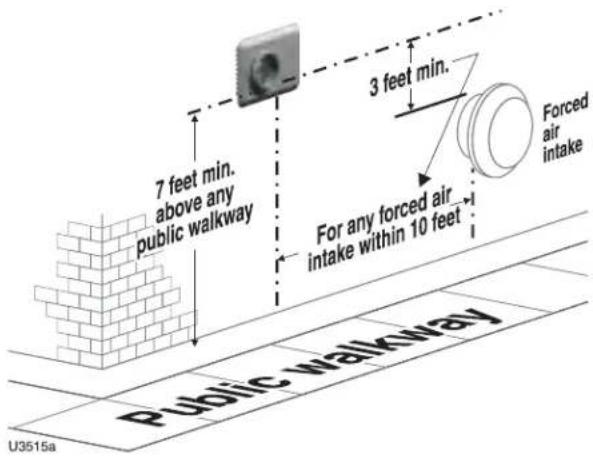
text_image
7 feet min. above any public walkway 3 feet min. For any forced air intake within 10 feet Forced air intake Public walkway U3515aFigure 73 Termination location – Weil-McLain vent/air plate – multiple boilers – clearance from vent to air intake of the next boiler
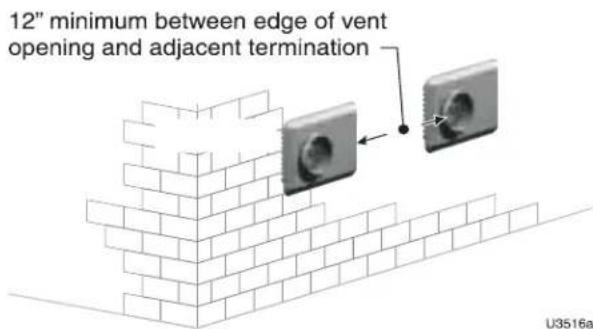
text_image
12" minimum between edge of vent opening and adjacent terminationSidewall vent/air termination: Weil-McLain cap (cont.)
Install terminations — Weil-McLain vent/air cap
NOTICE
The inside and outside cover plates are stamped to identify the exhaust (vent) and intake (air) openings. Make sure to orient the plates correctly.
- Locate termination opening and avoid obstructions:
a. Use the template supplied with the termination kit.
b. Locate the template on the outside building surface where the penetration is to be made.
c. Make sure there will be no obstructions that might prevent proper placement of the termination.
d. Use the template to mark the locations for the four mounting holes, flue pipe and air pipe. Level the template with a spirit level.
WARNING
For the Weil-McLain plate, the template must be level to ensure the fl ue and air pipe will be side-to-side, as shown in Figure 74. Failure to comply could result in severe personal injury, death or substantial property damage.
e. Cut holes in the wall as shown in Figure 75, using the location marks made with the template. For best results, use a small-diameter, long drill bit to drill centering holes for the fl ue and air pipe openings. Then drill the large openings from both the inside and outside.
f. The flue pipe and air pipe may be run through a rectangular cutout (as marked on the template) in lieu of two separate holes if desired.
- Drill holes for the screws or plastic anchors to secure the outside plate. Install the outside plate and mount the termination on the plate (temporarily).
a. Cut the flue pipe so the extension through the wall will cause the vent pipe to fully extend into the termination socket.
b. Cut the air pipe so the extension through the wall will butt the air pipe against the stops inside the termination.
c. When using 3-inch vent piping with a 4-inch termination (Ultra-230 applications), increase the flue pipe size to 4 inch before the pipe passes through the wall. This is required to obtain a seal between the flue pipe and the termination.
d. Temporarily slide the flue and air pipes through the opening(s). Slide the inside wall plate over the two pipes and into position on the inside wall.
e. Position the inside plate so the fl ue pipe and air pipe slope downward slightly toward the boiler (1/4" per foot).
f. Mark the four (4) mounting holes for the plate.
g. Remove the vent and air pipe, drill the four mounting holes, and mount the inside plate.
- Test fit the vent/air termination on the vent pipe. Make sure the vent pipe fully penetrates the termination socket and the air pipe butts against the interior stops.
- Apply silicon RTV sealant to the interior of the vent termination and slide onto vent pipe. Rotate slightly to spread the silicon to ensure a tight seal around the vent pipe.
- Secure the termination in place using the four (4) #10 x 1/2" sheet metal screws and lock washers (see Figure 75).
Figure 74 Hole preparation in wall — Weil-McLain vent/air plate
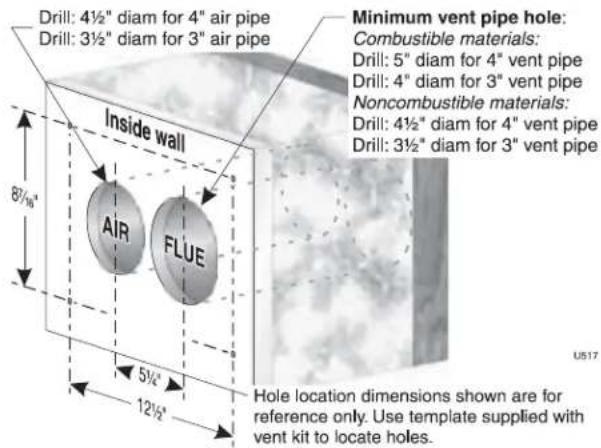
text_image
Drill: 4½" diam for 4" air pipe Drill: 3½" diam for 3" air pipe Minimum vent pipe hole: Combustible materials: Drill: 5" diam for 4" vent pipe Drill: 4" diam for 3" vent pipe Noncombustible materials: Drill: 4½" diam for 4" vent pipe Drill: 3½" diam for 3" vent pipe Inside wall AIR FLUE 8½" 5½" 12½" Hole location dimensions shown are for reference only. Use template supplied with vent kit to locate holes. US17Figure 75 Termination assembly — Weil-McLain vent/air plate
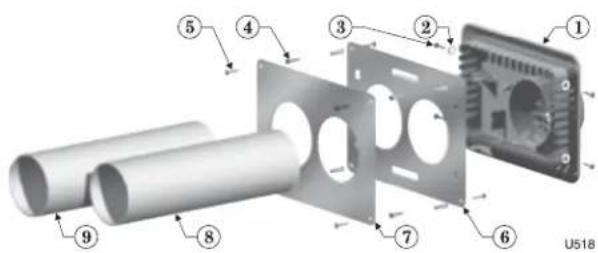
text_image
Exploded view diagram of a mechanical assembly with numbered components for identification1 Vent termination (3" or 4")
2 Lock washer, #10 (4)
3 Sheet metal screw, #10 x ½" (4)
4 Plastic wall anchor (8)
5 Sheet metal screw, #10 x 1¼" (8)
6 Outer mounting plate
7 Inner mounting plate
8 Vent pipe (butt to screen in termination)
9 Air pipe (butt to stops in termination)
Figure 76 Install termination plate
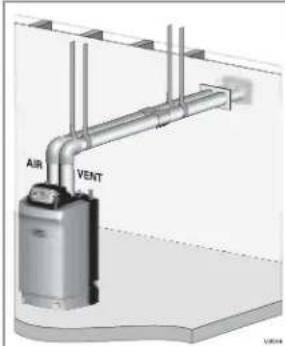
text_image
AIR VENTWeil-McLain sidewall termination plate
• Install pipe supports every 5 feet on both the horizontal and vertical runs.
• Install a hanger support within 6 inches of any upturn in the piping.
• The Weil-McLain plate termination must be installed before piping from the boiler to the termination.
- Slope horizontal piping downward toward the boiler at least 1/4 inch per foot.
Install vent/air piping — boiler to W-M termination
Complete termination preparation
- Install vent and air terminations before proceeding. See previous pages for instructions.
Installing vent and air piping
- For reference in the following, see previous pages.
- Work from the boiler to vent or air termination. Do not exceed the lengths given in the previous pages for either the air or vent piping.
a. As shown in the maximum length tables, the Ultra-80 or Ultra-105 may be installed with either 2-inch or 3-inch vent and air piping.
b. As shown in the maximum length tables, the Ultra-230 may be installed with either 3-inch or 4-inch vent and air piping.
c. You must install appropriate pipe reducers, where required, at both the boiler and at the termination assembly.
- See Figure 77 for attaching vent and air pipes at the boiler.
- Cut pipe to required lengths.
- Deburr inside and outside of pipe ends.
- Chamfer outside of each pipe end to ensure even cement distribution when joining.
- Clean all pipe ends and fittings. Dry thoroughly.
- Dry assemble entire vent or air piping to ensure proper fit before assembling any joint.
- For each joint:
a. Handle fittings and pipes carefully to prevent contamination of surfaces.
b. Apply primer liberally to both joint surfaces — pipe end and fi tting socket.
c. While primer is still damp, lightly apply approved cement to both surfaces in a uniform coating.
d. Apply a second coat to both surfaces. Avoid using too much cement on sockets to prevent cement buildup inside.
e. With cement still wet, insert pipe into fi tting, twisting ¼ turn. Make sure pipe is fully inserted.
f. Wipe excess cement from joint. Check joint to be sure a smooth bead of cement shows around the entire joint.
- Install pipe supports as shown in Figure 76, page 70.
- Slope vent and air piping continuously toward boiler, with at least 1/4 inch drop per foot of run. Do not allow sags at any point.
- Maintain minimum clearance of 3/16 inch between vent pipe and any combustible wall or material.
- Seal wall or floor penetration openings following local code requirements.
Figure 77 Boiler vent and air connections
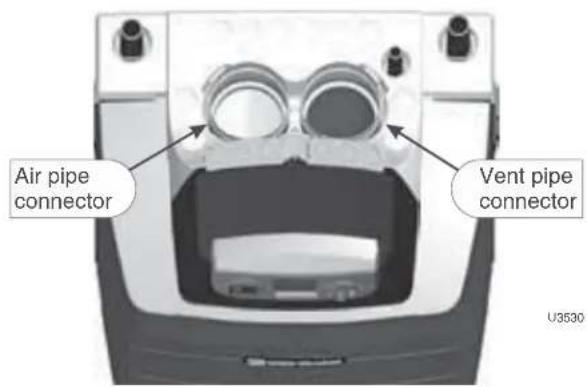
text_image
Air pipe connector Vent pipe connector U3530Inserting/securing vent or air pipe into boiler connectors
WARNING
AL29-4C vent pipe — If using AL29-4C stainless vent pipe, you must install a PVC-to-vent pipe adapter at the boiler vent connection (and at the termination if using the Weil-McLain plate or the concentric termination). Use only the adapter made by the vent pipe manufacturer.
- PVC/ABS pipe — Clean and chamfer insertion end of pipe. Deburr inside of insertion end. Clean and deburr inside and outside of other end of pipe.
WARNING
The pipe end must be smooth and chamfered to prevent possible damage to sealing gasket in vent or air pipe adapter. Failure to comply could result in leakage, causing possible severe personal injury or death.
- Inspect vent or air adapter (above) — verify no obstructions or foreign objects inside.
- Loosen clamp screw.
- Measure 3½ inches from end of pipe and make a mark with felt-tip pen.
- Loosen adapter clamp screw.
- Apply small amount of silicon grease to end of pipe to ease insertion.
- Insert pipe into adapter.
- Slide pipe down until the 3½-inch mark is reached.
WARNING
Do not apply excessive force or bend the adapter or flue/air pipe when inserting. The adapter or seal could be damaged.
- Secure vent or air pipe by tightening the adapter clamp securely. Do not overtighten. The seal is accomplished with the internal gasket. The clamp is only to hold the pipe in place.
Sidewall vent/air termination: 3" or 4" concentric
Termination kit — 3" or 4" concentric termination
- The 3" or 4" concentric termination kit must be purchased separately. See below.
Use only the vent materials and kits listed in Figure 12, page 18 for concentric venting. Provide pipe adapters as specified in Figure 12, page 18.
Commonwealth of Massachusetts
When the boiler is installed within the Commonwealth of Massachusetts:
- This product must be installed by a licensed plumber or gas fitter.
• See instruction in the Boiler manual.
Allowable vent/air pipe materials
Use only the materials listed in Figure 13, page 19.
Maximum piping length
- Locate the termination such that the total air piping and vent piping from the boiler to the termination will not exceed the maximum length given in Figure 12, page 18.
- Maximum lengths listed in Figure 12, page 18 allow for 1 elbow. Additional elbows required a reduction in maximum length as explained in the table notes.
Connecting from termination to boiler
- Install the termination as instructed in the following.
- Then proceed to page 82 to complete the air and vent piping between the termination and the boiler.
- The center lines between the air and vent are wider at the concentric termination connections than at the boiler. See Figure 87, page 77 for suggestions on adjusting the spacing when required. In addition to the method given there, you can rotate the Y-fitting slightly, which will cause the air pipe to be slightly higher or lower than the vent, but the center lines will match those at the boiler vent and air connections.
Determine locations for terminations
A gas vent extending through an exterior wall shall not terminate adjacent to the wall or below building extensions such as eaves, parapets, balconies or decks. Failure to comply could result in severe personal injury, death or substantial property damage.
Locate the vent/air terminations using the following guidelines.
- You must consider the surroundings when terminating the vent and air:
a. Position the vent termination where vapors will not damage nearby shrubs, plants or air conditioning equipment or be objectionable.
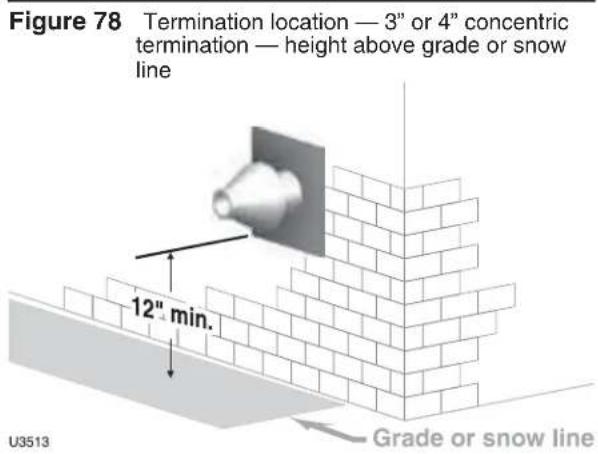
text_image
Figure 78 Termination location — 3" or 4" concentric termination — height above grade or snow line 12" min. U3513 Grade or snow lineFigure 79 Termination location — 3" or 4" concentric termination — clearances to openings
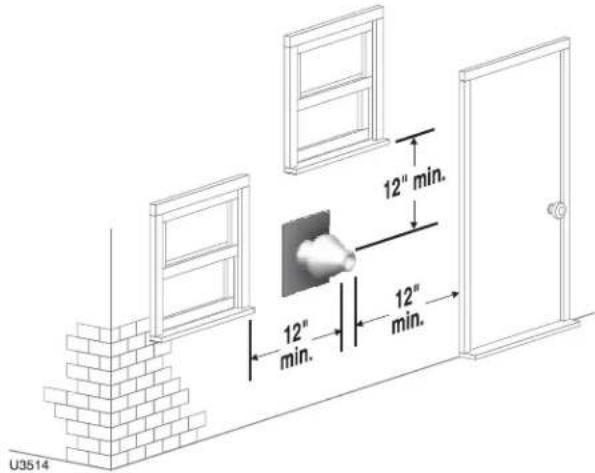
All vent and air pipes require a bird screen at each termination. Most kits do not include the screens. Purchase separately from Weil-McLain or vent kit supplier if not included.
Sidewall vent/air termination: 3" or 4" concentric (cont.)
b. The fl ue products will form a noticeable plume as they condense in cold air. Avoid areas where the plume could obstruct window views.
c. Prevailing winds could cause freezing of condensate and water/ice buildup where fl ue products impinge on building surfaces or plants.
d. Avoid possibility of accidental contact of fl ue products with people or pets.
e. Do not locate the terminations where wind eddies could affect performance or cause recirculation, such as inside building corners, near adjacent buildings or surfaces, window wells, stairwells, alcoves, courtyards or other recessed areas.
f. Do not terminate above any door or window or under a deck. Condensate can freeze, causing ice formations.
g. Locate or guard vent to prevent condensate damage to exterior finishes.
- Maintain clearances as shown in Figure 78, Figure 79, Figure 80 and Figure 81. Also maintain the following:
a. Vent must terminate:
• At least 6 feet from adjacent walls.
• No closer than 5 feet below roof overhang.
• At least 7 feet above any public walkway.
• At least 3 feet above any forced air intake within 10 feet.
- No closer than 12 inches below or horizontally from any door or window or any other gravity air inlet.
b. Air inlet must terminate at least 12" above grade or snow line.
c. Do not terminate closer than 4 feet horizontally (above or below) from any electric meter, gas meter, regulator, relief valve or other equipment.
- Locate terminations so they are not likely to be damaged by foreign objects, such as stones or balls, or subject to buildup of leaves or sediment.
Multiple vent/air terminations
- When terminating multiple Ultra boilers, terminate each vent/air connection as described in this addendum.
WARNING
All vent pipes and air inlets must terminate at the same height to avoid possibility of severe personal injury, death or substantial property damage.
- Place wall penetrations to obtain minimum clearance as shown in Figure 81 for U. S. installations. For Canadian installations, provide clearances required by CSA B149.1 or B149.2 Installation Code.
- The air inlet of an Ultra boiler is part of a direct vent connection. It is not classified as a forced air intake with regard to spacing from adjacent boiler vents.
- Combustion air (NOT vent piping) can be manifolded as shown in Boiler manual, page 55.
Figure 80 Termination location — 3" or 4" concentric termination — clearances to public walkway or forced air intake
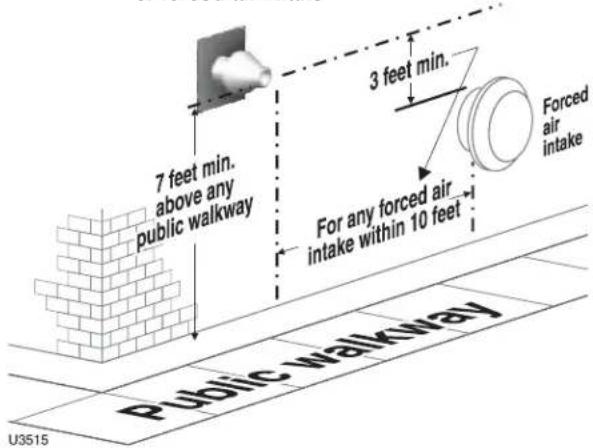
text_image
7 feet min. above any public walkway 3 feet min. For any forced air intake within 10 feet Forced air intake Public walkway U3515Figure 81 Termination location — 3" or 4" concentric termination — multiple boilers — clearance from vent of one to air intake of the next
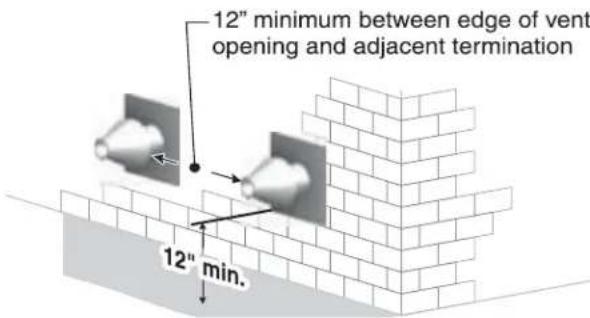
text_image
12" minimum between edge of vent opening and adjacent termination 12" min.Sidewall vent/air termination: 3" or 4" concentric (cont.)
Install terminations — concentric pipes
- Assemble the vent termination as described for vertical concentric terminations, beginning on page 76.
WARNING
If necessary, you can shorten the lengths of the inner and outer pipes for a shorter fi nished assembly. But you must ensure the pipes butt correctly at both ends. Failure to properly assemble the concentric termination can result in fl ue gas recirculation, causing possible severe personal injury or death.
- Wall penetration:
a. 3" termination: Preferably, use a thimble with a 4½-inch hole. If not using a thimble, carefully use a hole saw to cut a hole not larger than 4¾ inches in diameter through the wall. The finished hole must provide a solid stop for the rain cap ribs, as shown in the inset to Figure 82.
b. 4" termination: Preferably, use a thimble with a 6-inch hole. If not using a thimble, carefully use a hole saw to cut a hole not larger than 6 14 inches in diameter through the wall. The finished hole must provide a solid stop for the rain cap ribs, as shown in the inset to Figure 82.
-
Secure the termination in place so the rain cap will butt against the outside wall or outer thimble plate as shown in Figure 82.
-
Before beginning vent and air piping from the boiler to the concentric termination, mount and secure the concentric termination as shown in Figure 82 and Figure 105.
WARNING
The vent and air piping must be securely supported, and must not rest its weight on the boiler fittings. Failure to properly support the vent and air piping could result in vent piping damage, resulting in possible severe personal injury, death or substantial property damage.
The supports/bracing used must support the termination assembly to prevent slippage or movement.
The clamps used on the outside of the termination pipe must not cut into the pipe or contain sharp edges that could cause a crack to form.
WARNING
When inserting the partially-assembled termination kit through the roof penetration, wrap plastic or other protection over the end of the exposed assembly to prevent debris from entering the pipes. If the air passages become blocked, the boiler will not operate. Once the rain cap has been cemented to the assembly, there is no way to correct the problem. The assembly would have to be replaced if it were cut to be removed and cleaned. Altering the assembly in any way could result in severe personal injury or death due to toxic fl ue product emissions.
WARNING
When using AL29-4C stainless vent pipe, use the vent pipe manufacturer's PVC adapter when connecting to the concentric vent attachment.
- After the assembly has been positioned in the opening and all supports have been attached, install a bird screen (purchased separately if not included with the kit) and rain cap as follows:
a. Place the bird screen on the end of the inner pipe as in Figure 89, page 78.
b. Cement the rain cap in place as shown.
Figure 82 Installing and supporting the concentric sidewall vent assembly
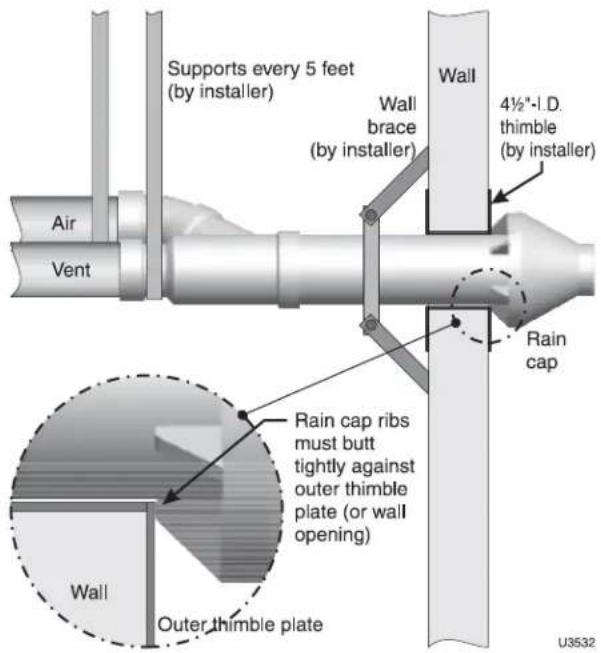
text_image
Supports every 5 feet (by installer) Wall Wall Wall 4½"-I.D. thimble (by installer) Air Vent Wall Rain cap Rain cap ribs must butt tightly against outer thimble plate (or wall opening) Wall Outer thimble plate U3532WARNING
Ensure that the wall material is strong enough to prevent the rain cap from being pushed inward if struck or pushed from the outside.
Figure 83 Concentric termination requirements
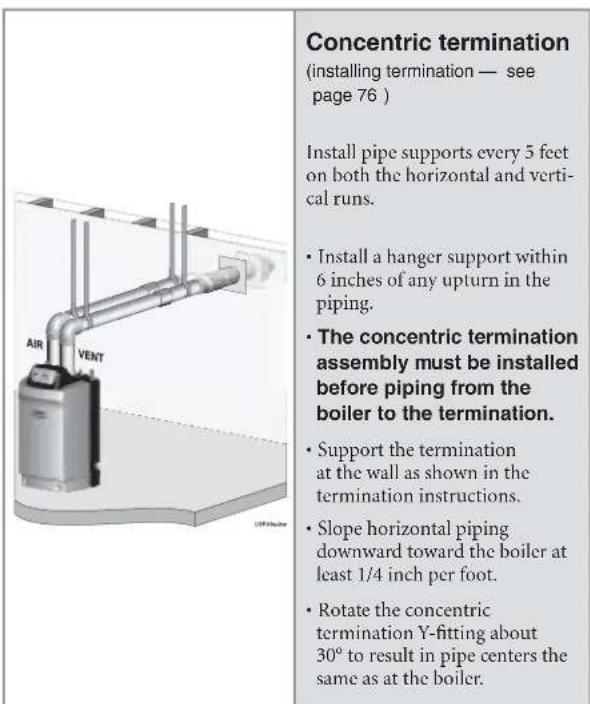
text_image
Concentric termination (installing termination — see page 76 ) Install pipe supports every 5 feet on both the horizontal and verti- cal runs. • Install a hanger support within 6 inches of any upturn in the piping. • The concentric termination assembly must be installed before piping from the boiler to the termination. • Support the termination at the wall as shown in the termination instructions. • Slope horizontal piping downward toward the boiler at least 1/4 inch per foot. • Rotate the concentric termination Y-fitting about 30° to result in pipe centers the same as at the boiler.Vertical vent/air termination: 3" or 4" concentric
Termination kit - 3" or 4" concentric termination
- The 3" or 4" concentric termination kit must be purchased separately. See below.
Use only the vent materials and kits listed in Figure 12, page 18 for concentric venting. Provide pipe adapters as specified in Figure 12, page 18.
Allowable vent/air pipe materials
Use only the materials listed in Figure 13, page 19.
Maximum piping length
-
Locate the termination such that the total air piping and vent piping from the boiler to the termination will not exceed the maximum length given in Figure 12, page 18.
-
Maximum lengths listed in Figure 12, page 18 allow for 1 elbow. Additional elbows required a reduction in maximum length as explained in the table notes.
Connecting from termination to boiler
- Install the termination as instructed in the following. Then proceed to page 82 to complete the piping between the termination and the boiler.
Determine location
Locate the concentric vent/air termination using the following guidelines:
- The concentric vent/air assembly must terminate as shown in Figure84.
- The vent and air piping connected to the termination assembly must comply with the instructions in this supplement.
- You must consider the surroundings when terminating the vent and air:
a. Position the termination where vent vapors will not damage nearby shrubs, plants or air conditioning equipment or be objectionable.
b. The fl ue products will form a noticeable plume as they condense in cold air. Avoid areas where the plume could obstruct window views.
c. Prevailing winds could cause freezing of condensate and water/ice buildup where fl ue products impinge on building surfaces or plants.
d. Avoid possibility of accidental contact of flue products with people or pets.
e. Do not locate the termination where wind eddies could affect performance or cause recirculation, such as inside building corners, near adjacent buildings or surfaces, window wells, stairwells, alcoves, courtyards or other recessed areas.
f. Locate or guard vent outlet to prevent condensate damage to exterior finishes.
- Maintain clearances to termination as given below:
a. Vent outlet must be located:
Figure 84 Vertical termination — 3" or 4" concentric
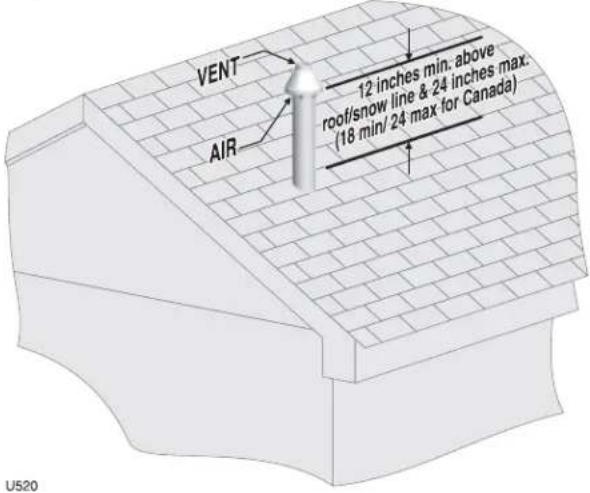
text_image
VENT AIR 12 inches min. above roof/snow line & 24 inches max. (18 min/ 24 max for Canada) U520Figure 85 Vertical termination — 3" or 4" concentric — multiple boilers
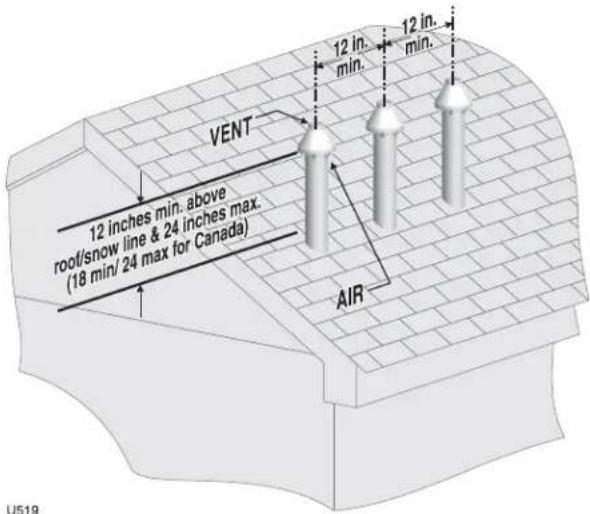
text_image
VENT 12 inches min. above root/snow line & 24 inches max. (18 min/ 24 max for Canada) 12 in. min. 12 in. min. AIR U519WARNING
All vent and air pipes require a bird screen at each termination. Most kits do not include the screens. Purchase separately from Weil-McLain or vent kit supplier if not included.
Vertical vent/air termination: 3" or 4" concentric (cont.)
• At least 6 feet from adjacent walls.
• No closer than 5 feet below roof overhang.
• At least 7 feet above any public walkway.
- At lease 3 feet above any forced air intake within 10 feet.
• No closer than 12 inches below or horizontally from any door or window or any other gravity air inlet.
b. Air inlet must terminate at least 12 inches above the roof or snow line as shown in Figure 84, page 75. (For Canada, the minimum is 18 inches.)
c. Do not terminate closer than 4 feet horizontally from any electric meter, gas meter, regulator, relief valve or other equipment. Never terminate above or below any of these within 4 feet horizontally.
- Locate termination so it is not likely to be damaged by foreign objects, such as stones or balls, or subject to buildup of leaves or sediment.
- Do not connect any other appliance to the vent pipe or multiple boilers to a common vent pipe.
Multiple vent/air terminations
- When terminating multiple Ultra boilers, install the concentric vent/air termination assemblies as described in this addendum.
⚠ WARNING All vent outlets must terminate at the same height to avoid possibility of severe personal injury, death or substantial property damage.
- Place roof penetrations to obtain minimum of 12 inches between centers of adjacent vent pipe of another boiler for U. S. installations (see Figure 85, page 75).
- For Canadian installations, provide clearances required by CSA B149.1 or B149.2 Installation Code.
- The air inlet of an Ultra boiler is part of a direct vent connection. It is not classified as a forced air intake with regard to spacing from adjacent boiler vents.
Prepare roof penetrations
- Roof penetration hole:
a. 3" termination: Cut a 5-inch diameter hole to clear the 4½-inch termination outside diameter.
b. 4" termination: Cut a 6.5-inch diameter hole to clear the 6-inch termination outside diameter.
c. Insert a galvanized metal thimble in the vent pipe hole.
- Follow all local codes for isolation of vent pipe when passing through floors, ceilings and roofs.
- Provide fl ashing and sealing boots sized for the concentric termination outside diameter.
Assembling the concentric termination
- See Figure 89, page 78 for the dimensions and details of the termination assembly.
-
Prepare the bird screen (purchased separately if not included with the kit). Cut the bird screen to size if required. If the bird screen must be trimmed, cut the bird screen to fit the outside diameter of the PVC inner pipe supplied with the termination kit.
-
Partially assemble the vent termination kit in the sequence shown in Figure 89, page 78.
WARNING
DO NOT install the rain cap and bird screen until the assembly has been inserted through the roof and all supports have been installed. Follow instructions to cover the end of the assembly with plastic before inserting through the roof penetration to prevent debris from blocking the air passages.
- Use the following procedures to prepare termination components and cement together.
- Deburr inside and outside of pipe ends.
- Chamfer outside of each pipe end to ensure even cement distribution when joining.
- Clean all pipe ends and fittings.
- Dry thoroughly.
- Dry assemble entire vent or air piping to ensure proper fit before assembling any joint.
- For each joint:
a. Handle fittings and pipes carefully to prevent contamination of surfaces.
b. Apply primer liberally to both joint surfaces — pipe end and fi tting socket.
c. While primer is still damp, lightly apply approved cement to both surfaces in a uniform coating.
d. Apply a second coat to both surfaces. Avoid using too much cement on sockets to prevent cement buildup inside.
e. With cement still wet, insert pipe into fitting, twisting 14 turn. Make sure pipe is fully inserted.
WARNING
If necessary, you can shorten the lengths of the inner and outer pipes for a shorter finished assembly. But you must ensure the pipes butt correctly at both ends. Failure to properly assemble the concentric termination can result in fl ue gas recirculation, causing possible severe personal injury or death.
Mount concentric termination
- Before beginning vent and air piping from boiler, mount and secure the concentric termination as shown in Figure 106, page 92, and Figure 88, page 77.
WARNING
The vent and air piping must be securely supported, and must not rest its weight on the boiler fittings. DO NOT drill or screw into either the vent pipe or air pipe. Failure to properly support the vent and air piping could result in vent piping damage, resulting in possible severe personal injury, death or substantial property damage.
Vertical vent/air termination: 3" or 4" concentric (cont.)
WARNING
When inserting the partially-assembled termination kit through the roof penetration, wrap plastic or other protection over the end of the exposed assembly to prevent debris from entering the pipes. If the air passages become blocked, the boiler will not operate. Once the rain cap has been cemented to the assembly, there is no way to correct the problem. The assembly would have to be replaced if it were cut to be removed and cleaned. Altering the assembly in any way could result in severe personal injury or death due to toxic fl ue product emissions.
WARNING
When using AL29-4C stainless vent pipe, use the vent pipe manufacturer's PVC adapter when connecting to the concentric vent attachment.
- After the assembly has been positioned in the roof opening and all supports have been attached, install a bird screen (purchased separately if not included with the kit) and rain cap as follows:
a. Place the bird screen on the end of the inner pipe as in Figure 89, page 78.
b. Cement the rain cap in place as shown.
Vent termination support
-
Support the concentric vent/air termination at the roof penetration as shown in Figure 88.
-
The supports/bracing used must support the termination assembly to prevent vertical slippage or sideways movement.
- The clamps used on the outside of the termination pipe must not cut into the pipe or contain sharp edges that could cause a crack to form.
Figure 87 3" or 4" concentric termination supports
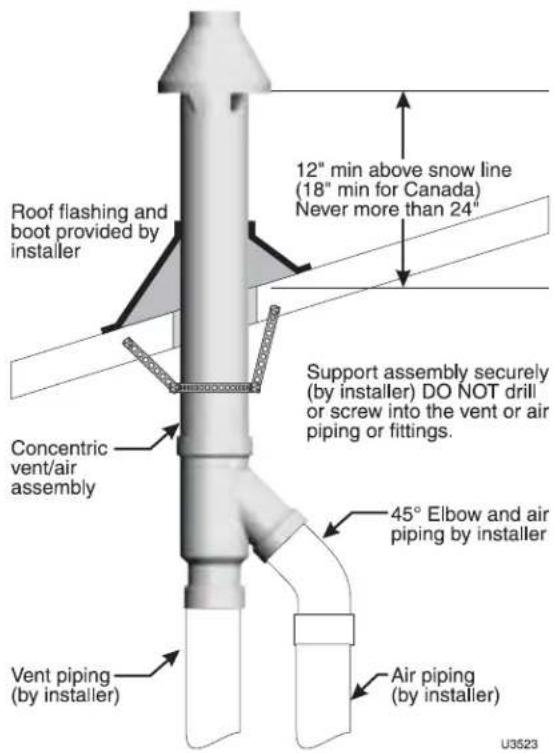
text_image
Roof flashing and boot provided by installer 12" min above snow line (18" min for Canada) Never more than 24" Concentric vent/air assembly Support assembly securely (by installer) DO NOT drill or screw into the vent or air piping or fittings. 45° Elbow and air piping by installer Vent piping (by installer) Air piping (by installer) U3523Figure 86 Concentric termination requirements
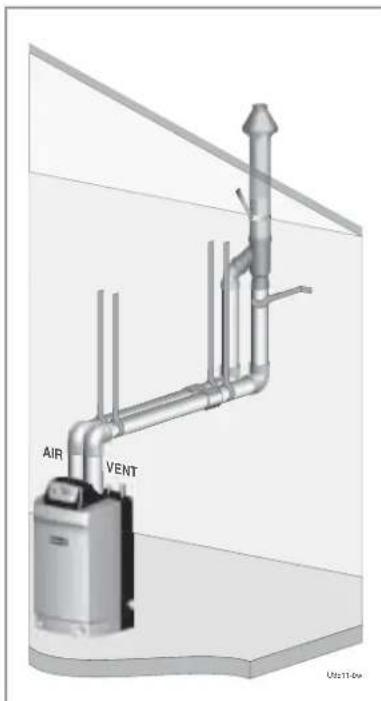
text_image
AIR VENT Ubs 17-04xConcentric termination
(installing termination — see page 75)
• Install pipe supports every 5 feet on both the horizontal and vertical runs.
• Install a hanger support within 6 inches of any upturn in the piping.
- The concentric termination assembly must be installed before piping from the boiler to the termination.
- Support the termination at the ceiling and above the roof as shown in the termination instructions.
- Slope horizontal piping downward toward the boiler at least 1/4 inch per foot.
- Use long-radius elbows for air piping when using 2" or 3" pipe to reduce pressure drop.
- Rotate the concentric termination Y-fitting about 30^ to result in pipe centers the same as at the boiler.
Figure 88 Alternate piping configuration, using (3) 45-degree elbows to obtain closer pipe centers
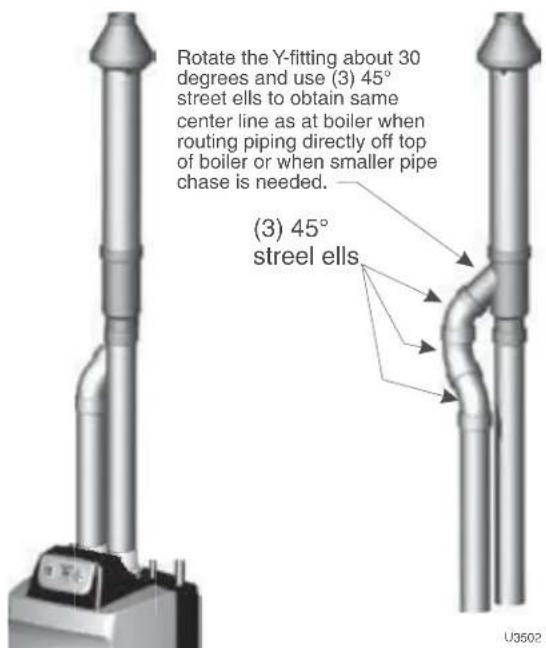
text_image
Rotate the Y-fitting about 30 degrees and use (3) 45° street ells to obtain same center line as at boiler when routing piping directly off top of boiler or when smaller pipe chase is needed. (3) 45° steel ells U3502Concentric vent/air termination assembly
Figure 89 3" or 4" concentric termination assembly — DO NOT attach the rain cap until the termination has been inserted through the roof or wall and all supports have been installed.
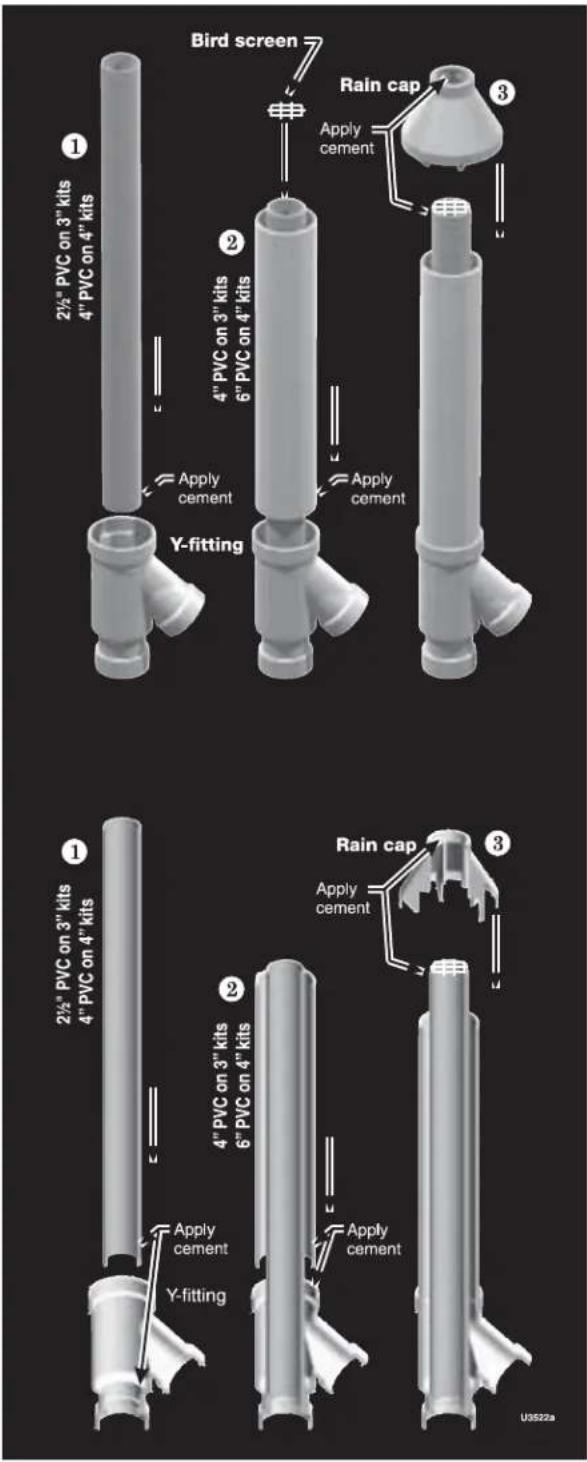
text_image
Bird screen 2½ PVC on 3" kits 4" PVC on 4" kits Apply cement Y-fitting 4" PVC on 3" kits 6" PVC on 4" kits Apply cement Rain cap Apply cement 3 3 2½ PVC on 3" kits 4" PVC on 4" kits Apply cement Y-fitting 4" PVC on 3" kits 6" PVC on 4" kits Apply cement Rain cap Apply cement 3 3 U3522aFigure 90 3" or 4" concentric termination assembly (see kit manufacturer's instructions for details)
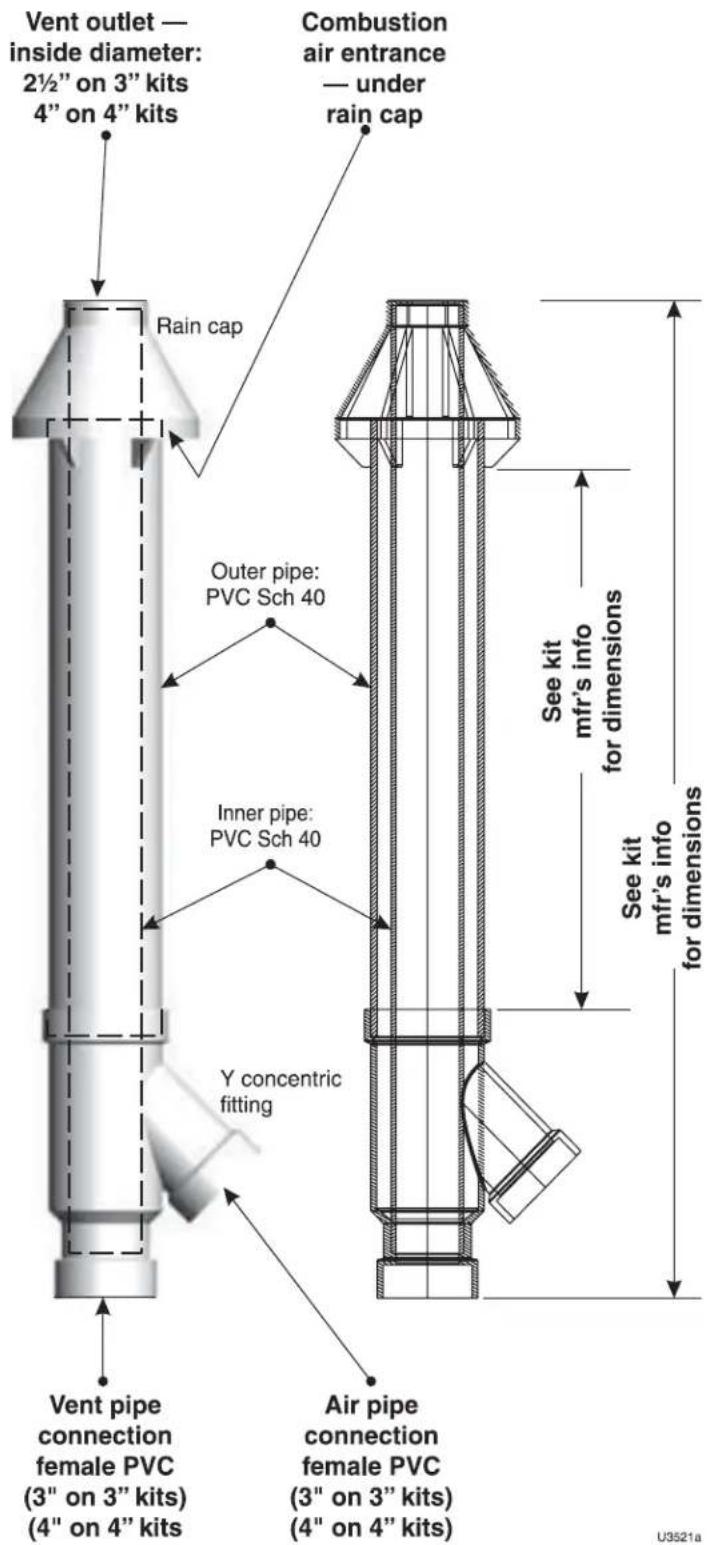
text_image
Vent outlet — inside diameter: 2½" on 3" kits 4" on 4" kits Combustion air entrance — under rain cap Rain cap Outer pipe: PVC Sch 40 Inner pipe: PVC Sch 40 Y concentric fitting See kit mfr's info for dimensions See kit mfr's info for dimensions Vent pipe connection female PVC (3" on 3" kits) (4" on 4" kits) Air pipe connection female PVC (3" on 3" kits) (4" on 4" kits) U3521aDIRECT VENT: Vertical vent / sidewall air
Allowable vent/air pipe materials
- Use only the materials listed in Figure 13, page 19.
- Purchase bird screens for vent and air terminations separately. See the parts list at the end of this manual.
Maximum piping lengths
- Locate the terminations such that the total air piping and vent piping from the boiler to the termination will not exceed the maximum length given in Figure 12, page 18.
- Maximum lengths listed in Figure 12, page 18 allow for 1 elbow in the air piping and 1 elbow in the vent piping. Additional elbows required a reduction in maximum length as explained in the table notes.
Figure 91 Direct vent: Vertical vent / sidewall air
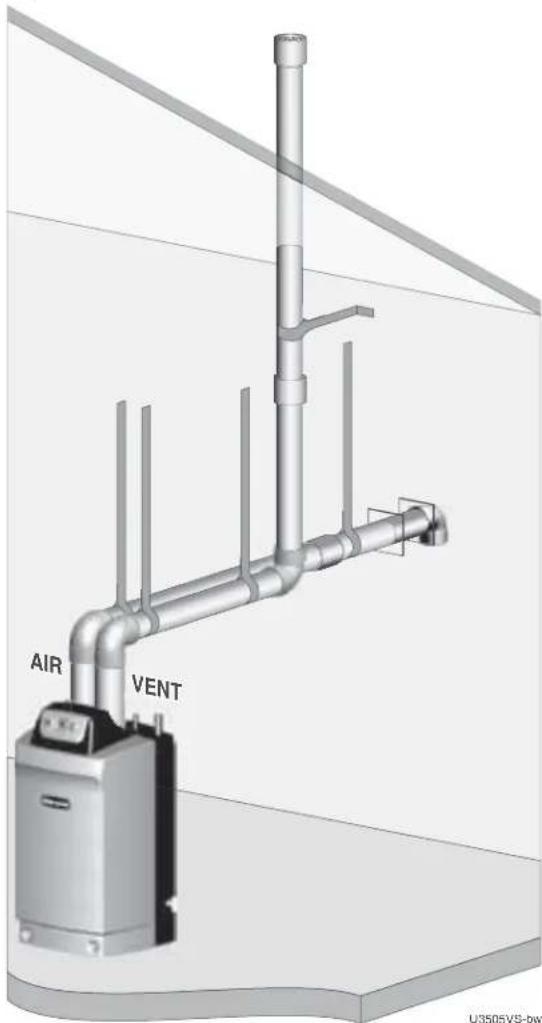
text_image
AIR VENT U3505VS-bwDetermine location
- Locate the vent termination using the following guidelines:
-
The vent piping must terminate in an up-turned coupling as shown in Figure 92, page 80. The top of the coupling must be at least 1 foot above the air intake.
-
You must consider the surroundings when terminating the vent and air:
a. Position the vent termination where vapors will not damage nearby shrubs, plants or air conditioning equipment or be objectionable.
b. The flue products will form a noticeable plume as they condense in cold air. Avoid areas where the plume could obstruct window views.
c. Prevailing winds could cause freezing of condensate and water/ice buildup where fl ue products impinge on building surfaces or plants.
d. Avoid possibility of accidental contact of fl ue products with people or pets.
e. Do not locate the terminations where wind eddies could affect performance or cause recirculation into building or appliance air intakes, such as inside building corners, near adjacent buildings or surfaces, window wells, stairwells, alcoves, courtyards or other recessed areas.
f. Do not terminate above any door or window. Condensate can freeze, causing ice formations.
g. Locate or guard vent to prevent condensate damage to exterior finishes.
- Maintain clearances to vent termination as given below:
a. Vent must terminate:
• At least 6 feet from adjacent walls.
• No closer than 5 feet below roof overhang.
• At least 3 feet above any forced air intake within 10 feet.
- No closer than 12 inches below or horizontally from any door or window or any other gravity air inlet.
b. Do not terminate vent closer than 4 feet horizontally from any electric meter, gas meter, regulator, relief valve or other equipment. Never terminate above or below any of these within 4 feet horizontally.
-
Locate terminations so they are not likely to be damaged by foreign objects, such as stones or balls, or subject to buildup of leaves or sediment.
-
Do not connect any other appliance to the vent pipe. Do not connect multiple boilers to a common vent pipe.
Prepare roof penetrations
- Vent pipe penetration:
a. Cut a hole for the vent pipe. For either combustible or noncombustible construction, size the vent pipe hole at least 0.4" larger than the vent pipe diameter:
- 2^3/4 hole for 2"
• 4" hole for 3"
- 5" hole for 4"
b. Insert a galvanized metal thimble in the vent pipe hole.
-
Follow all local codes for isolation of vent pipe when passing through floors, ceilings and roofs.
-
Provide flashing and sealing boots sized for the vent pipe and air pipe.
DIRECT VENT: Vertical vent / sidewall air (continued)
Termination and fi ttings
- Prepare the vent termination coupling by inserting a bird screen. Bird screens must be purchased separately. See the parts list at the end of this manual for part numbers.
a. If using 3-inch piping for an Ultra-230, cut a 4-inch bird screen by placing 3-inch fi tting on screen and cutting around it as a template.
- Maintain the required dimensions of the finished termination piping as shown in Figure 92.
Multiple vent terminations
-
When terminating multiple Ultra boilers, terminate each vent/air connection as described in this section.
-
Place adjacent terminations at least 6 inches apart.
-
For Canadian installations, provide clearances required by CSA B149.1 or B149.2 Installation Code.
Connecting from vent termination to boiler
- Install the termination penetration as instructed in the preceding. Then proceed to page 82 to complete the piping between the termination and the boiler.
Determine location for air inlet elbow
-
The air inlet of an Ultra boiler is part of a direct vent connection. It is not classified as a forced air intake with regard to spacing from adjacent appliance terminations.
-
Locate the air inlet elbow (termination) using the following guidelines.
-
The air piping must terminate in a down-turned elbow as shown in Figure 93.
a. Apply the confi guration on the left side of Figure 93 unless the terminations would fail to meet minimum clearance to grade or snow line.
b. Apply the confi guration on the right side of Figure 93 when the terminations need to be raised higher to meet clearance to grade or snow line.
c. The air pipe may run up the side of the building, as shown. The vent and air pipes must be secured with braces, and all clearances and lengths must be maintained. Space braces no further than 24 inches apart.
- You must consider the surroundings when terminating the air connection:
a. Make sure there are no obstructions for air flow. DO NOT locate the termination where plants could grow and cause obstruction to air flow.
b. Do not locate the terminations where wind eddies could affect performance or cause recirculation with exhaust from other appliances, such as inside building corners, near adjacent buildings or surfaces, window wells, stairwells, alcoves, courtyards or other recessed areas.
c. Locate the air inlet termination at least 12 inches below and 12 inches horizontally from any appliance or building vent outlet.
- Locate terminations so they are not likely to be damaged by foreign objects, such as stones or balls, or subject to buildup of leaves or sediment.
Figure 92 Vent termination (through the roof) for direct vent: vertical vent / sidewall air
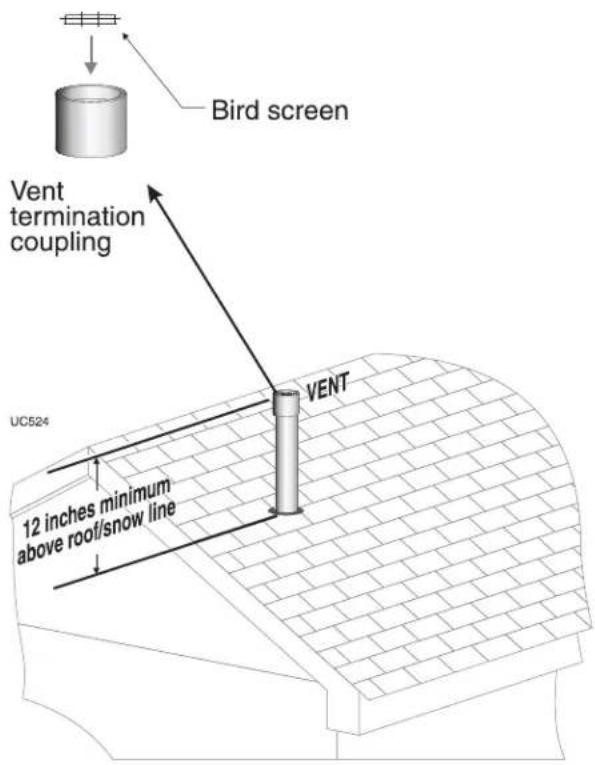
text_image
Bird screen Vent termination coupling Vent UC524 12 inches minimum above roof/snow lineFigure 93 Sidewall air inlet (termination) for direct vent: vertical vent / sidewall air
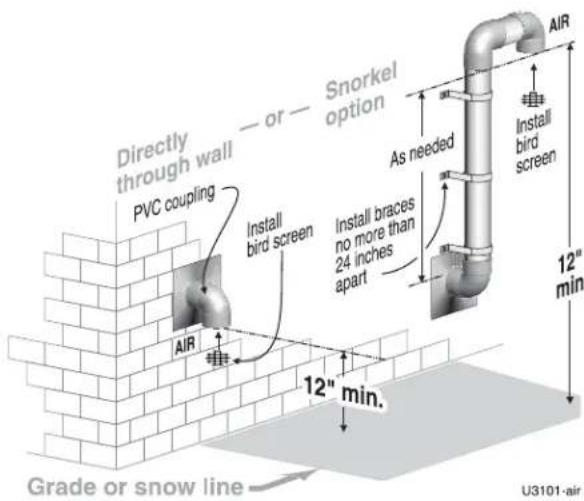
text_image
Directly through wall — or — Snorkel option PVC coupling As needed Install bird screen Install braces no more than 24 inches apart Air 12" min. 12" min. Grade or snow line U3101-airDIRECT VENT: Vertical vent / sidewall air (continued)
Multiple air terminations
- When terminating multiple Ultra boiler air connections, terminate each air connection as described in this manual.
- Place wall penetrations to obtain minimum clearances as instructed in this manual.
- Place adjacent air inlets for multiple Ultra boilers at least 6 inches apart.
- For Canadian installations, provide clearances required by CSA B149.1 or B149.2 Installation Code.
- Combustion air (NOT vent piping) can be manifolded as shown in the Ultra boiler manual.
Prepare wall penetrations
- Air pipe penetration:
a. Cut a hole for the air pipe. Size the air pipe hole as close as desired to the air pipe outside diameter.
- Seal exterior openings thoroughly with exterior caulk.
Termination and fi ttings
-
Prepare the air termination elbow (Figure 93) by inserting a bird screen. Bird screens must be purchased separately. See the parts list at the end of this manual for part numbers.
-
Use metal plates (by installer) at inside and outside penetrations as shown in Figure 94.
NOTICE
If extending the air pipe out from the wall, install a coupling on each pipe. Mount the piping with the coupling flush with the outer plate.
Connecting from air termination to boiler
- Install the terminations as instructed in the following. Then proceed to page 82 to complete the air and vent piping between the termination and the boiler.
Figure 94 Sidewall air inlet installation for direct vent: vertical vent / sidewall air
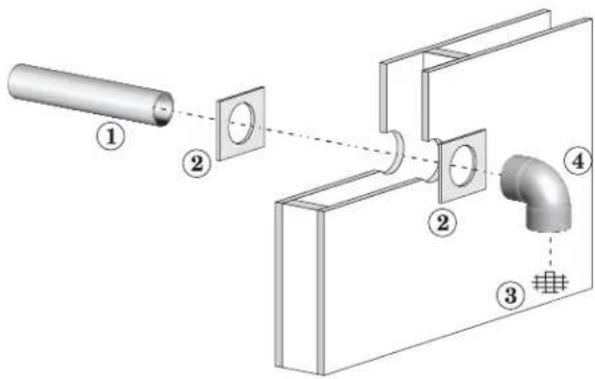
text_image
Technical diagram showing a pipe connection with labeled components: cylinder, square, pipe fitting, and support structure.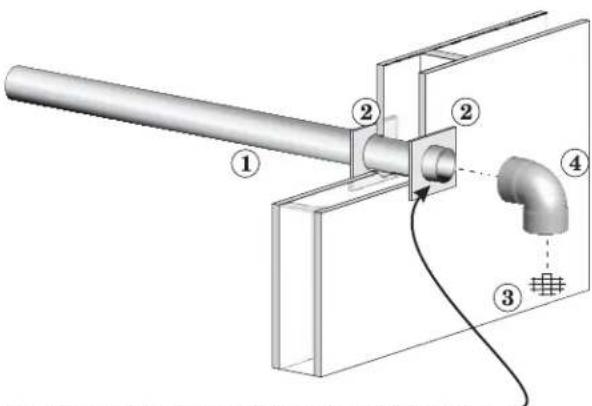
text_image
Technical diagram of a pipe connection system with numbered components and wiring, showing structural components and connections.Extend air pipe through outside plate enough to attach termination coupling (or elbow when snorkeled).
U106-air
| 1 Air piping2 Sidewall plates, by installer | 3 Bird screen (air), by installer4 Air inlet elbow |
Install vent/air pipi ng — boiler to termination
Complete termination preparation
- Install vent and air terminations before proceeding. See previous pages for instructions.
Installing vent and air piping
- For reference in the following see:
a. Sidewall terminations: see Figure 105, page 92.
b. Vertical terminations: see Figure 106, page 92.
- Work from the boiler to vent or air termination. Do not exceed the lengths given in the previous pages for either the air or vent piping.
a. As shown in the maximum length tables, the Ultra-80 or Ultra-105 may be installed with either 2-inch or 3-inch vent and air piping.
b. As shown in the maximum length tables, the Ultra-230 may be installed with either 3-inch or 4-inch vent and air piping.
c. You must install appropriate pipe reducers, where required, at both the boiler and at the termination assembly.
-
See Figure 95 for attaching vent and air pipes at the boiler.
-
Cut pipe to required lengths.
-
Deburr inside and outside of pipe ends.
-
Chamfer outside of each pipe end to ensure even cement distribution when joining.
-
Clean all pipe ends and fittings. Dry thoroughly.
-
Dry assemble entire vent or air piping to ensure proper fit before assembling any joint.
-
For each joint:
a. Handle fittings and pipes carefully to prevent contamination of surfaces.
b. Apply primer liberally to both joint surfaces — pipe end and fitting socket.
c. While primer is still damp, lightly apply approved cement to both surfaces in a uniform coating.
d. Apply a second coat to both surfaces. Avoid using too much cement on sockets to prevent cement buildup inside.
e. With cement still wet, insert pipe into fl tting, twisting 14 turn. Make sure pipe is fully inserted.
f. Wipe excess cement from joint. Check joint to be sure a smooth bead of cement shows around the entire joint.
-
Install pipe supports as shown in Figure 105, page 92 or Figure 106, page 92.
-
Slope vent and air piping continuously toward boiler, with at least 1/4 inch drop per foot of run. Do not allow sags at any point.
-
Maintain minimum clearance of 3/16 inch between vent pipe and any combustible wall or material.
-
Seal wall or floor penetration openings following local code requirements.
Figure 95 Boiler vent and air connections
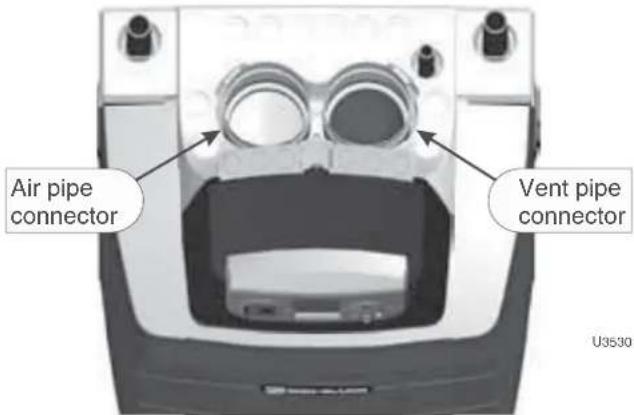
text_image
Air pipe connector Vent pipe connector U3530Inserting/securing vent or air pipe into boiler connectors
WARNING
AL29-4C vent pipe — If using AL29-4C stainless vent pipe, you must install a PVC-to-vent pipe adapter at the boiler vent connection (and at the termination if using the Weil-McLain plate or the concentric termination). Use only the adapter made by the vent pipe manufacturer.
- PVC/ABS pipe — Clean and chamfer insertion end of pipe. Deburr inside of insertion end. Clean and deburr inside and outside of other end of pipe.
WARNING
The pipe end must be smooth and chamfered to prevent possible damage to sealing gasket in vent or air pipe adapter. Failure to comply could result in leakage, causing possible severe personal injury or death.
-
Inspect vent or air adapter (above) — verify no obstructions or foreign objects inside.
-
Loosen clamp screw.
-
Measure 3½ inches from end of pipe and make a mark with felt-tip pen.
-
Loosen adapter clamp screw.
-
Apply small amount of silicon grease to end of pipe to ease insertion.
-
Insert pipe into adapter.
-
Slide pipe down until the 3½-inch mark is reached.
WARNING
Do not apply excessive force or bend the adapter or fl ue/air pipe when inserting. The adapter or seal could be damaged.
- Secure vent or air pipe by tightening the adapter clamp securely. Do not overtighten. The seal is accomplished with the internal gasket. The clamp is only to hold the pipe in place.
DIRECT EXHAUST venting — general
Vent and air piping materials
- See Figure 13, page 19 for approved vent and air piping materials, for both direct exhaust and direct vent.
Use the same vent or air piping throughout. — Do not connect different types of piping together.
Vent piping
-
Boiler flue gases must be piped from the boiler to outside, following the instructions in this manual, and compliant with all applicable codes. The vent pipe must terminate either through the sidewall or through the roof, located with the correct separation from the air termination. See the associated instructions in the following pages.
-
Each Ultra boiler requires a separate vent. DO NOT common vent.
Combustion air openings for direct exhaust
Provide combustion air openings to room and building. Combustion and ventilation air for direct exhaust boilers is provided from the boiler room. Follow all instructions in the Boiler manual and this addendum plus all applicable codes, providing combustion air openings as specified. Failure to comply could result in severe personal injury, death or substantial property damage.
-
Combustion air must be supplied through openings into the boiler room, following the instructions in this manual, and compliant with all applicable codes. Read the warning on page 16, and ensure the air and boiler room will not contain contaminated air.
-
Where the Ultra boiler shares a space with other appliances, the combustion air openings must be sized to handle the combined requirements of all appliances in the space.
SIDEWALL direct exhaust option
- Read and follow instructions in Boiler manual, including page 65 for Massachusetts installations when applicable.
VERTICAL direct exhaust option
- Read and follow instructions in Boiler manual, including page 65 for Massachusetts installations when applicable.
Every vent pipe requires a bird screen at its termination. Bird screens are not supplied with the Ultra boiler. Purchase separately from Weil-McLain.
SIDEWALL DIRECT EXHAUST
material
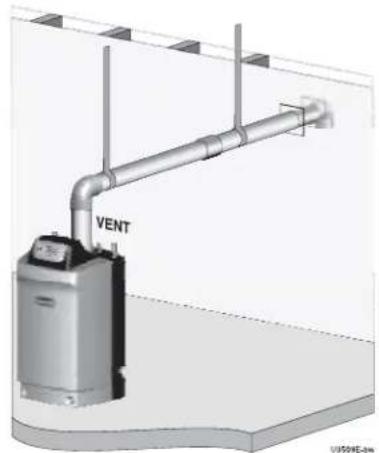
text_image
VENT V509E-6mboiler
VERTICAL
DIRECT EXHAUST
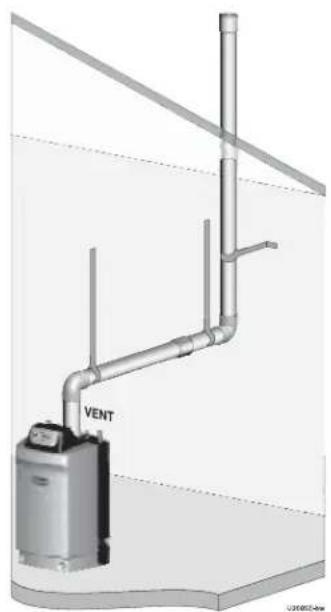
natural_image
Technical diagram of a piping system with a vent and control unit, no text or symbols presentDIRECT EXHAUS T — Boiler room air openings
Combustion air provision
The Ultra boiler can use inside air if no contaminants are present in the boiler space. (If contaminants are likely to be present, install the boiler as a direct vent appliance, using the appropriate vent instructions in this manual.)
The boiler room must be fitted with combustion air openings large enough to provide air for all appliances in the room. Use the following information to size the openings. Ensure the installation complies with all applicable codes and standards.
Sizing combustion air openings
Air openings provide for ventilation (as well as combustion air) to prevent overheating of the boiler controls and boiler space. Air is also needed for other appliances located in the same space.
Use Figure 96, page 85, selecting the appropriate installation conditions.
WARNING
Air openings must be sized to handle all appliances and air movers (exhaust fans, etc.) using the air supply.
The sizing given in Figure 96, page 85 is based on the National Fuel Gas Code, ANSI Z223.1, allowing adequate air openings for gravity-vented gas appliances (Category I) in addition to that needed for the Ultra boiler.
The air openings recommended in Figure 96, page 85 will allow adequate ventilation and combustion air provided the boiler room is not subjected to negative pressure due to exhaust fans or other mechanical ventilation devices.
Refer to the National Fuel Gas Code for dealing with other conditions.
Free area – louver allowance
The free area of openings means the area after reduction for any installed louvers or grilles. Be sure to consider this reduction when sizing the air openings.
Special considerations
Tight construction
ANSI Z223.1 defi nes unusually tight construction where:
- Walls and ceilings exposed to the outside atmosphere have a continuous water vapor retarder with a rating of 1 perm or less with openings gasketed, and ...
- Weather-stripping has been added on openable windows and doors, and ...
- Caulking or sealants are applied to areas such as joints around windows and door frames, between sole plates and floors, between wall-ceiling joints, between wall panels, at penetrations for plumbing, electrical, and gas lines, and in other openings.
For buildings with such construction, provide air openings into the building from outside, sized per the appropriate case in Figure 96, page 85 if appliances are to use inside air for combustion and ventilation.
Exhaust fans and air movers
The appliance space must never be under a negative pressure unless all appliances are installed as direct vent. Always provide air openings sized not only to the dimensions required for the fi ring rate of all appliances, but also to handle the air movement rate of the exhaust fans or air movers using air from the building or space.
Motorized air dampers
If the air openings are fitted with motorized dampers, electrically interlock the damper to:
• Prevent the boiler from firing if the damper is not fully open.
- Shut the boiler down should the damper close during boiler operation.
To accomplish this interlock, wire anisolated contact (proving the damper open) in series with the thermostat input to the boiler. The boiler will not start if this contact is open, and will shut down should it open during operation.
DIRECT EXHAUST — Boiler room air openings (continued)
Figure 96 MINIMUM combustion air openings for direct exhaust applications — ALL OPENING SIZES ARE FREE AREA
| Air openingsThe required air opening sizes below are FREE AREA, after reduction for louver obstruction. Note the exception below for large spaces. | Ultra boilerWITH other appliances in room | Ultra boilerWITHOUT other appliances in room |
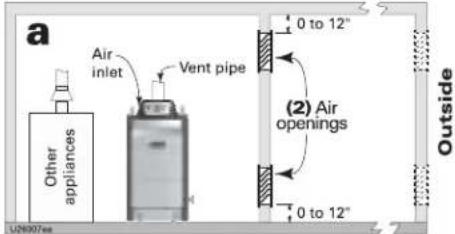 | TWO openings, each at least:1 square inch per 1,000 Btuh of all appliances in the room | TWO openings, each at least:1 square inch per 4,000 Btuh of all appliances in the room |
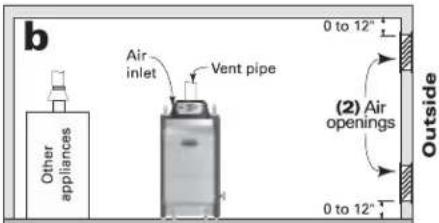 | TWO openings, each at least:1 square inch per 4,000 Btuh of all appliances in the room— OR —ONE opening **, each at least:1 square inch per 3,000 Btuh of all appliances in the room | TWO openings, each at least:1 square inch per 4,000 Btuh of all appliances in the room— OR —ONE opening **, each at least:1 square inch per 3,000 Btuh of all appliances in the room |
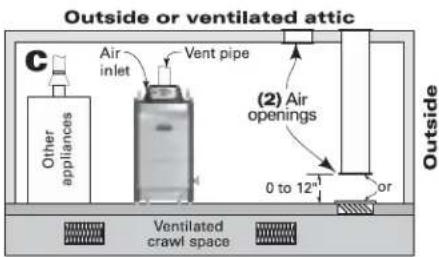 | TWO openings, each at least:1 square inch per 2,000 Btuh of all appliances in the room— OR —ONE opening **, each at least:1 square inch per 3,000 Btuh of all appliances in the room | TWO openings, each at least:1 square inch per 4,000 Btuh of all appliances in the room— OR —ONE opening **, each at least:1 square inch per 3,000 Btuh of all appliances in this room |
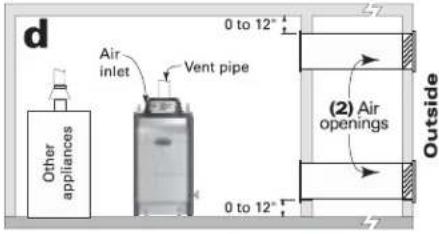 | TWO openings, each at least:1 square inch per 4,000 Btuh of all appliances in the room— OR —ONE opening **, each at least:1 square inch per 3,000 Btuh of all appliances in the room | TWO openings, each at least:1 square inch per 4,000 Btuh of all appliances in the room— OR —ONE opening **, each at least:1 squares inch per 3,000 Btuh of all appliances in the room |
| ** NOTICE:Requirements for using the SINGLE air opening option. | A single combustion air opening can be used for cases b, c or d above, sized as listed, provided that:The single opening must communicate directly to the outdoors or to a space that communicates directly with outdoors (NOT to an interior space).The top of the opening must be within 12 inches of the ceiling.The free area of the opening must be at least equal to the sum of the areas of all equipment vent connectors in the space. | |
| SPECIAL EXCEPTION FOR LARGE SPACES: | NO combustion air openings are needed when the boiler (and other appliances) are installed in a space with a volume NO LESS than 50 cubic feet per 1,000 Btuh of all appliances in the space. That is, total the input of all appliances in MBH (1,000's of Btuh), then multiply this total times 50. The building MUST NOT be of tight construction.Example: For a total input of 1500 MBH (1,500,000 Btuh) and an 8-foot ceiling height, the minimum volume would be 50 × 1500 × 8 = 60,000 cubic feet. | |
DIRECT EXHAUST — Sidewall
Figure 97 DIRECT EXHAUST — Sidewall termination
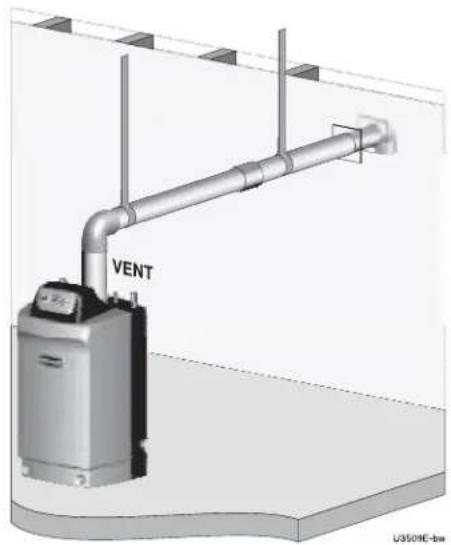
natural_image
3D diagram of a utility vehicle with a vent and pipe connection (no text or symbols)DIRECT EXHAUST – Sidewall termination – installation sequence overview
Step 1 Install the boiler.
Step 2 Determine the proper location for wall penetration for each termination.
• Prepare wall penetrations before installing vent piping.
- Finish by attaching external pipe and fi ttings as shown in the termination instructions.
• Support vertical runs on the outside of the building with brackets as shown in the termination instructions.
Step 3 Install vent piping from boiler to termination.
• Install a hanger support within 6 inches of any upturn in the piping.
• Install pipe supports every 5 feet on both the horizontal and vertical runs.
- Slope horizontal piping downward toward the boiler at least 1/4 inch per foot.
Step 4 Connect the vent piping at the boiler per instructions in this addendum.
Allowable vent pipe materials
- Use only the materials listed in Figure 13, page 19.
- Install a bird screen in each vent pipe termination (coupling or elbow). Bird screens are not supplied with the Ultra boiler. Purchase separately from Weil-McLain.
Maximum piping length
- Locate the termination such that the total vent piping from the boiler to the termination will not exceed the maximum length given in Figure 12, page 18.
- Maximum lengths listed in Figure 12, page 18 allow for 2 elbows. Additional elbows require a reduction in maximum length as explained in the table notes.
Determine location for sidewall termination
WARNING
A gas vent extending through an exterior wall shall not terminate adjacent to the wall or below building extensions such as eaves, parapets, balconies or decks, except as otherwise instructed in this manual or local codes. Failure to comply could result in severe personal injury, death or substantial property damage.
Place the vent terminations using the following guidelines.
- Terminate the vent piping with a down-turned elbow as shown in Figure 98, page 87. The elbow must butt against the outside wall plate. If vent piping is extended outside, install an elbow at the outer plate and continue vent piping from the elbow when snorkeling as in Figure 98, page 87 right side.
a. Apply the configuration on the left side of Figure 98 unless the termination would fail to meet minimum clearance to grade or snow line.
b. Apply the configuration on the right side of Figure 98 when the termination needs to be raised higher to meet clearance to grade or snow line.
c. The vent pipe may run up as high as 4 feet, as shown in Figure 98 right side, with no enclosure. The vent pipe must be secured with braces, and maintain all required clearances.
d. Space braces no further than 24 inches apart. (See WARNING below for extremely cold climates.)
e. External venting greater than 4 feet requires an enclosure around the vent pipe. The vent termination must exit through the enclosure as shown in Figure 98, maintaining all required clearances.
WARNING
Do not exceed the maximum length of the outside vent piping shown in Figure 98. Excessive length exposed to the outside could cause freezing of condensate in the vent pipe, resulting in potential boiler shutdown. In extremely cold climates, install an insulated chase around the vent piping, particularly when using longer lengths. The chase must allow for inspection of the vent pipe, and insulation must be protected from water.
DIRECT EXHAUST — Sidewall (continued)
Figure 98 DIRECT EXHAUST — Sidewall — configuration options and minimum clearances
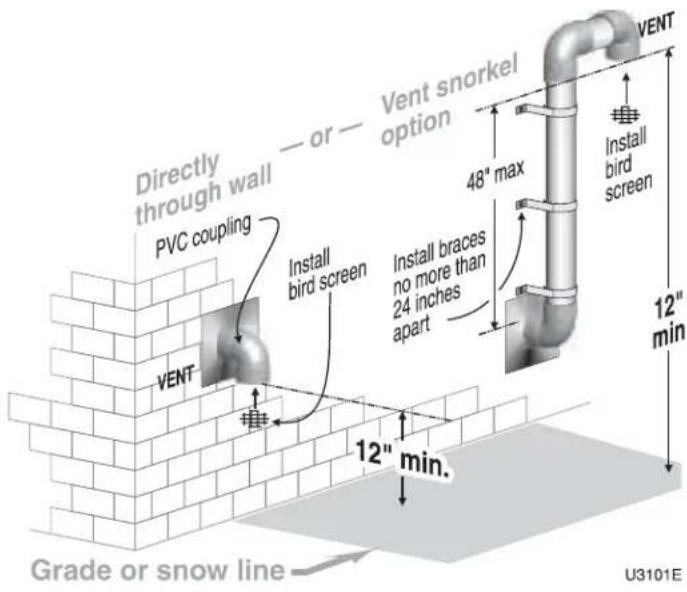
text_image
Directly through wall — or — Vent snorkel option PVC coupling Install bird screen 48" max Install braces no more than 24 inches apart Vent Vent Install bird screen 12" min. 12" min. Grade or snow line U3101E- Consider the surroundings when terminating the vent:
a. Position the vent termination where vapors will not damage nearby shrubs, plants or air conditioning equipment or be objectionable.
b. The fl ue products will form a noticeable plume as they condense in cold air. Avoid areas where the plume could obstruct window views.
c. Prevailing winds could cause freezing of condensate and water/ice buildup where fl ue products impinge on building surfaces or plants.
d. Avoid possibility of accidental contact of fl ue products with people or pets.
e. Do not locate the terminations where wind eddies could affect performance, such as inside building corners, near adjacent buildings or surfaces, window wells, stairwells, alcoves, courtyards or other recessed areas.
f. Do not terminate above any door or window or under a deck. Condensate can freeze, causing ice formations.
g. Locate or guard vent to prevent condensate damage to exterior finishes.
- Maintain clearances as shown in the illustrations in this manual section. Also maintain the following:
a. Vent must terminate:
• At least 6 feet from adjacent walls.
• No closer than 5 feet below roof overhang.
• At lease 3 feet above any forced air intake within 10 feet.
- No closer than 48 inches below or horizontally from any door or window or any other gravity air inlet.
b. Do not terminate closer than 4 feet horizontally from any electric meter, gas meter, regulator, relief valve or other equipment.
Figure 99 DIRECT EXHAUST — Sidewall — clearances to openings
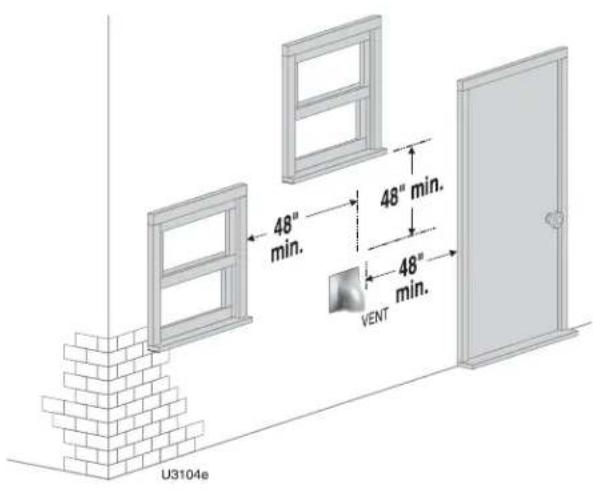
Figure 100 DIRECT EXHAUST — Sidewall — clearances from vent exit to forced air intake
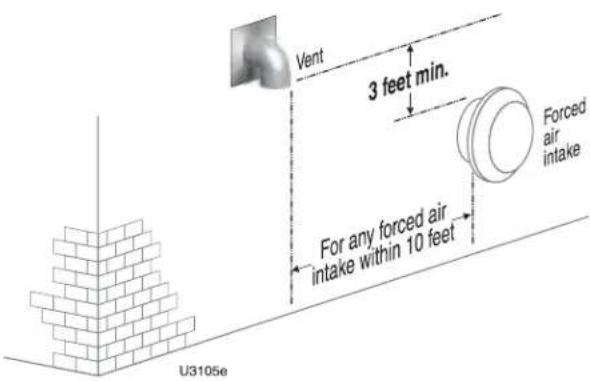
text_image
Vent 3 feet min. For any forced air intake within 10 feet Forced air intake U3105e- Because Ultra boilers are Category IV appliances, the National Fuel Gas Code, ANSI Z223.1, requires that the vent must not terminate over a public walkway or over an area where condensate or vapor could create a nuisance or hazard, or could be detrimental to the operation of regulators, relief valves, or other equipment.
- Where the vent penetrates an outside wall, the annular space around the penetration must be permanently sealed using approved materials to prevent entry of combustion products into the building.
DIRECT EXHAUST — Sidewall (continued)
- Locate termination so it is not likely to be damaged by foreign objects, such as stones or balls, or subject to buildup of leaves or sediment.
- Do not connect any other appliance to the vent pipe. Do not connect multiple boilers to a common vent pipe.
Completing the vent piping
- Install vent penetration as explained in the following before installing vent piping from the boiler to the termination.
- Insert piping from boiler vent connections, then attach exterior termination piping.
- Follow instructions beginning on page 91 to complete piping from boiler to termination.
Multiple vent terminations
- When terminating multiple direct exhaust Ultra boilers, terminate each vent connection as described in this manual for individual vents. Space terminations as required for best installation practices and required maintenance.
Prepare wall penetrations
- Wall penetration:
a. Cut a rough opening large enough to clear the diameter of the metal thimble used.
b. Provide metal cover plates (item 2, Figure 101). The outer plate MUST provide a stop to prevent the vent elbow from being pushed inward. (See NOTICE at right.) Hole diameters in the metal plates must be:
• 2-inch PVC, CPVC or ABS — 2½" hole diameter.
• 3-inch PVC, CPVC or ABS — 58 " hole diameter.
• 4-inch PVC, CPVC or ABS — 4/8" hole diameter.
- AL29-4C vent pipe and elbow — size hole large enough to clear vent pipe, but small enough to prevent the elbow from being pushed through.
c. Insert the galvanized metal thimble (by installer) in the vent pipe hole as shown in Figure 101.
- Follow all local codes for isolation of vent pipe when passing through floors or walls.
Termination and fi ttings
- Prepare the vent termination elbow (Figure 98, page 87) by inserting a bird screen. Bird screens are not supplied with the Ultra boiler. Purchase separately from Weil-McLain.
- You can install the vent termination using either of the configurations shown in Figure 98, page 87.
- Maintain the required dimensions of the finished termination piping as shown in Figure 98, page 87.
- Seal exterior openings thoroughly with exterior caulk.
- Do not extend exposed vent pipe outside of the building more than shown in this document. Condensate could freeze and block vent pipe.
Figure 101 DIRECT EXHAUST — Sidewall — termination assembly — all parts by installer
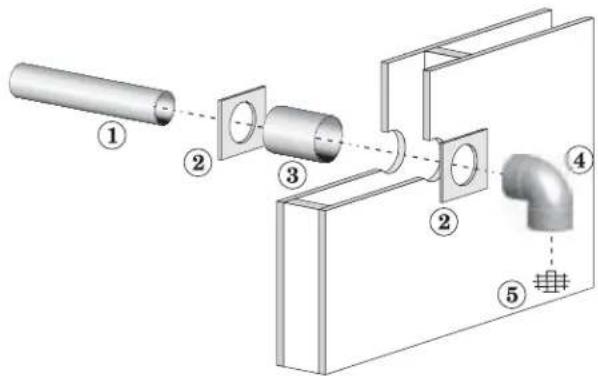
text_image
Technical diagram showing a pipe connection with labeled components including cylinder, pipe fitting, and pipe bend.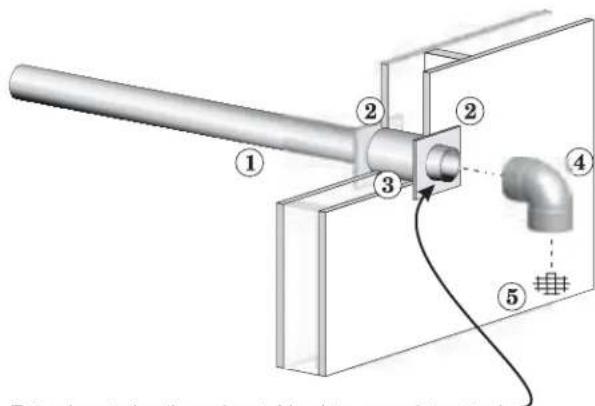
text_image
Extend duct wire through outside plate enough to attackExtend vent pipe through outside plate enough to attach termination coupling (or elbow when snorkeled).
U106e
| 1 Vent piping2 Cover plates3 Galvanized thimble | 4 Vent termination elbow5 Bird screen |
NOTICE
The Weil-McLain sidewall termination kit supplied with each boiler includes metal plates with two openings. These plates can be trimmed and used for direct exhaust vent termination cover plates when the vent diameter used matches the hole size in the plates provided with the boiler.
DIRECT EXHAUST — Vertical
Figure 102 DIRECT EXHAUST vertical termination
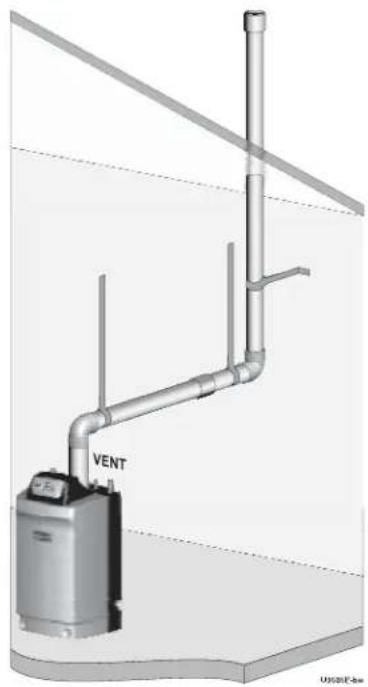
natural_image
Technical diagram of a piping system with a vent and support structure (no text or symbols)DIRECT EXHAUST — Vertical termination — installation sequence overview
Step 1 Install the boiler.
Step 2 Determine the proper location for wall penetration for each termination.
• Prepare roof penetrations before installing vent piping.
• Finish by attaching external pipe and fittings as shown in the termination instructions.
• Install terminations as described in this manual.
- Support vertical runs on the outside of the building with brackets as shown in the termination instructions.
Step 3 Install vent piping from boiler to termination.
• Install a hanger support within 6 inches of any upturn in the piping.
• Install pipe supports every 5 feet on both the horizontal and vertical runs.
- Slope horizontal piping downward toward the boiler at least 1/4 inch per foot.
Step 4 Connect the vent piping at the boiler per manual instructions.
Allowable vent pipe materials
- Use only the materials listed in Figure 13, page 19.
- Install a bird screen in each vent pipe termination (coupling or elbow). Bird screens are not supplied with the Ultra boiler. Purchase separately from Weil-McLain.
Maximum piping length
- Locate the termination such that the total vent piping from the boiler to the termination will not exceed the maximum length given in Figure 12, page 18.
- Maximum lengths listed in Figure 12, page 18 allow for 2 elbows. Additional elbows require a reduction in maximum length as explained in the table notes.
Determine location for vertical termination
- Locate the vent termination using the following guidelines:
- The vent piping must terminate in a coupling as shown in Figure 103, page 90.
- Consider the surroundings when terminating the vent:
a. Position the vent termination where vapors will not damage nearby shrubs, plants or air conditioning equipment or be objectionable.
b. The flue products will form a noticeable plume as they condense in cold air. Avoid areas where the plume could obstruct window views.
c. Prevailing winds could cause freezing of condensate and water/ice buildup where fl ue products impinge on building surfaces or plants.
d. Avoid possibility of accidental contact of fl ue products with people or pets.
e. Do not locate the termination where wind eddies could affect performance or cause recirculation, such as inside building corners, near adjacent buildings or surfaces, window wells, stairwells, alcoves, courtyards or other recessed areas.
f. Locate or guard vent to prevent condensate damage to exterior finishes.
- Maintain clearances as shown in the illustrations in this manual section. Also maintain the following:
a. Vent must terminate:
- At least 12 inches above roof or snow line as shown in Figure103.
• At least 6 feet from adjacent walls.
• No closer than 5 feet below roof overhang.
• At lease 3 feet above any forced air intake within 10 feet.
- No closer than 48 inches below or horizontally from any door or window or any other gravity air inlet.
b. Do not terminate closer than 4 feet horizontally from any electric meter, gas meter, regulator, relief valve or other equipment.
- Where the vent penetrates the roof, the annular space around the penetration must be permanently sealed using approved materials to prevent entry of combustion products into the building.
- Locate terminations so they are not likely to be damaged by foreign objects, such as stones or balls, or subject to buildup of leaves or sediment.
- Do not connect any other appliance to the vent pipe. Do not connect multiple boilers to a common vent pipe.
DIRECT EXHAUST — Vertical (continued)
Prepare roof penetration
- Vent pipe penetration:
a. Cut a hole for the vent pipe. For either combustible or noncombustible construction, size the vent pipe hole at least 0.5" larger than the vent pipe diameter:
• 3" hole for 2"
• 4" hole for 3"
- 5" hole for 4"
b. Insert a galvanized metal thimble in the vent pipe hole.
- Follow all local codes for isolation of vent pipe when passing through floors, ceilings and roofs.
- Provide fl ashing and sealing boots sized for the vent pipe and air pipe.
Termination and fi ttings
- Prepare the vent termination coupling (Figure 103) by inserting a bird screen. Bird screens are not supplied with the Ultra boiler. Purchase separately from Weil-McLain.
- The vent piping must terminate in a coupling as shown in Figure 103.
- Maintain the required dimensions of the finished termination piping as shown in Figure 103.
- Do not extend exposed vent pipe outside of building more than shown in this document. Condensate could freeze and block vent pipe.
Multiple vent terminations
- When terminating multiple Ultra boilers, terminate each vent connection as described in this section. Space terminations as required for best installation practices and required maintenance.
Complete termination preparation
- Install vent terminations before proceeding. See previous pages for instructions.
Installing direct exhaust vent piping
- For reference in the following see:
a. Sidewall terminations: see Figure 97, page 86.
b. Vertical terminations: see Figure 102, page 89.
- Work from the boiler to vent or air termination. Do not exceed the lengths given in the previous pages for either the air or vent piping.
a. As shown in the maximum length tables, the Ultra-80 or Ultra-105 may be installed with either 2-inch or 3-inch vent piping.
b. As shown in the maximum length tables, the Ultra-230 may be installed with either 3-inch or 4-inch vent piping.
c. You must install appropriate pipe reducers, where required, at the boiler vent connection.
- See Figure 104 for attaching vent and air pipes at the boiler.
- Cut pipe to required lengths.
Figure 103 DIRECT EXHAUST — Vertical termination
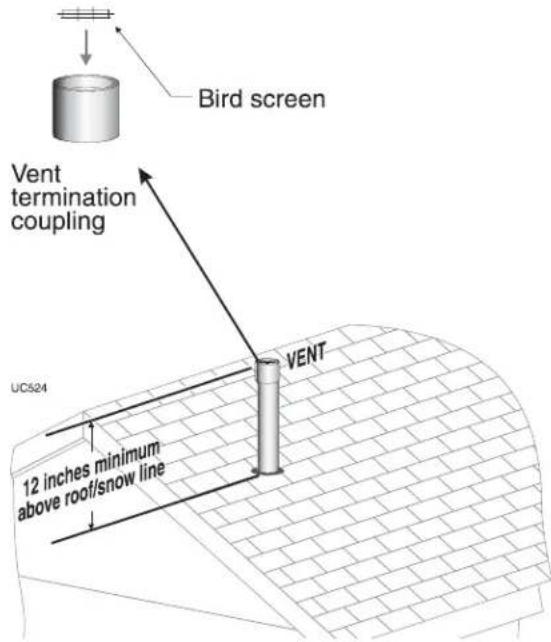
text_image
Bird screen Vent termination coupling UC524 VENT 12 inches minimum above roof/snow lineWARNING
Sidewall terminations: The vent pipe must extend through the outer cover plate only enough to install the termination elbow. The plate must provide a stop to prevent the vent elbow from being pushed inward.
- Deburr inside and outside of pipe ends.
- Chamfer outside of each pipe end to ensure even cement distribution when joining.
- Clean all pipe ends and fittings. Dry thoroughly.
- Dry assemble entire vent or air piping to ensure proper fit before assembling any joint.
- For each joint:
a. Handle fittings and pipes carefully to prevent contamination of surfaces.
b. Apply primer liberally to both joint surfaces — pipe end and fitting socket.
c. While primer is still damp, lightly apply approved cement to both surfaces in a uniform coating.
d. Apply a second coat to both surfaces. Avoid using too much cement on sockets to prevent cement buildup inside.
e. With cement still wet, insert pipe into fi tting, twisting 14 turn. Make sure pipe is fully inserted.
f. Wipe excess cement from joint. Check joint to be sure a smooth bead of cement shows around the entire joint.
- Install pipe supports as shown in Figure 105, page 92 or Figure 106, page 92.
- Slope vent and air piping continuously toward boiler, with at least 1/4 inch drop per foot of run. Do not allow sags at any point.
- Maintain minimum clearance of 3/16 inch between vent pipe and any combustible wall or material.
- Seal wall or floor penetration openings following local code requirements.
Install vent — from boiler to termination
Figure 104 Boiler vent and air connections
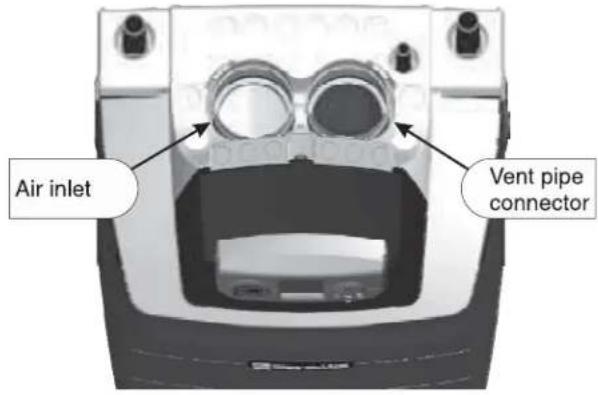
text_image
Air inlet Vent pipe connectorWARNING
Air inlet opening protection: Obtain a bird screen (sized for air inlet opening) the from Weil-McLain. Insert the bird screen into the air inlet opening to prevent foreign objects from falling into the opening.
Inserting/securing vent or air pipe into boiler connectors
WARNING
AL29-4C vent pipe — If using AL29-4C stainless vent pipe, you must install a PVC-to-vent pipe adapter at the boiler vent connection (and at the termination if using the Weil-McLain plate or the concentric termination). Use only the adapter made by the vent pipe manufacturer.
- PVC/ABS pipe — Clean and chamfer insertion end of pipe. Deburr inside of insertion end. Clean and deburr inside and outside of other end of pipe.
WARNING
The pipe end must be smooth and chamfered to prevent possible damage to sealing gasket in vent or air pipe adapter. Failure to comply could result in leakage, causing possible severe personal injury or death.
- Inspect vent or air adapter (above) — verify no obstructions or foreign objects inside.
- Loosen clamp screw.
- Measure 3½ inches from end of pipe and make a mark with felt-tip pen.
- Loosen adapter clamp screw.
- Apply small amount of silicon grease to end of pipe to ease insertion.
- Insert pipe into adapter.
- Slide pipe down until the 3½-inch mark is reached.
WARNING
Do not apply excessive force or bend the adapter or flue/air pipe when inserting. The adapter or seal could be damaged.
- Secure vent or air pipe by tightening the adapter clamp securely. Do not overtighten. The seal is accomplished with the internal gasket. The clamp is only to hold the pipe in place.
Install vent/air piping — boiler to terminations (cont.)
Figure 105 Sidewall termination methods and installation requirements
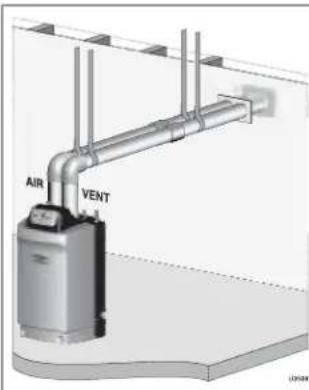
text_image
AIR VENTWeil-McLain sidewall termination plate
(install termination — page 70)
• Install pipe supports every 5 feet on both the horizontal and vertical runs.
• Install a hanger support within 6 inches of any upturn in the piping.
• The Weil-McLain plate termination must be installed before piping from the boiler to the termination.
- Slope horizontal piping downward toward the boiler at least 1/4 inch per foot.
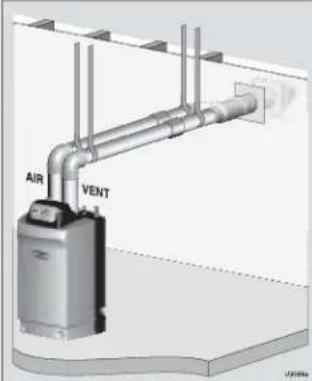
text_image
AIR VENTWeil-McLain 3" or 4" concentric termination
(install termination — page 72)
• Install pipe supports every 5 feet on both the horizontal and vertical runs.
• Install a hanger support within 6 inches of any upturn in the piping.
- The Weil-McLain 3" PVC concentric termination assembly must be installed before piping from the boiler to the termination. Support the termination at the wall as shown in the termination instructions.
- Slope horizontal piping downward toward the boiler at least 1/4 inch per foot.
- Rotate the concentric termination Y-fitting about 30^ to result in pipe centers the same as at the boiler.
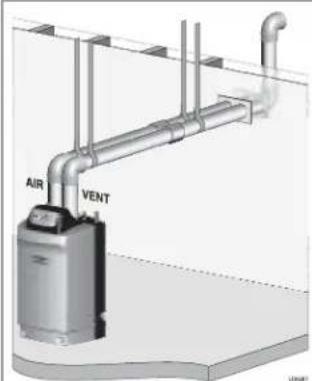
text_image
AIR VENTSidewall termination with separate vent and air pipes
(install termination — page 20)
- Prepare wall penetrations before installing vent and air piping. Finish by attaching external pipe and fittings as shown in the termination instructions.
• Install pipe supports every 5 feet on both the horizontal and vertical runs.
• Install a hanger support within 6 inches of any upturn in the piping. - Support vertical runs on the outside of the building with brackets as shown in the termination instructions.
- Slope horizontal piping downward toward the boiler at least 1/4 inch per foot.
Figure 106 Vertical termination methods and installation requirements
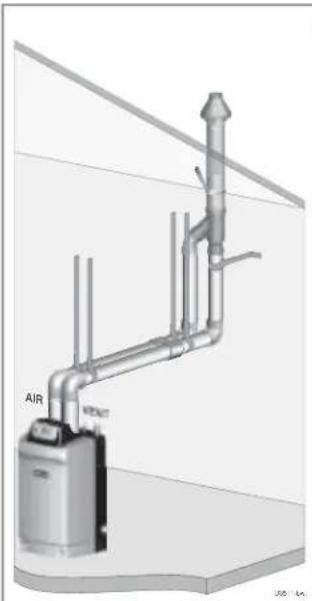
natural_image
Technical diagram of an air vent system with pipe connections and a base unit (no text or symbols)Weil-McLain 3" or 4" concentric termination
(install termination — page 75)
• Install pipe supports every 5 feet on both the horizontal and vertical runs.
• Install a hanger support within 6 inches of any upturn in the piping.
- The Weil-McLain 3" PVC concentric termination assembly must be installed before piping from the boiler to the termination. Support the termination at the ceiling and above the roof as shown in the termination instructions.
- Slope horizontal piping downward toward the boiler at least 1/4 inch per foot.
- Use long-radius elbows for air piping when using 2" or 3" pipe to reduce pressure drop.
- Rotate the concentric termination Y-fitting about 30^ to result in pipe centers the same as at the boiler.
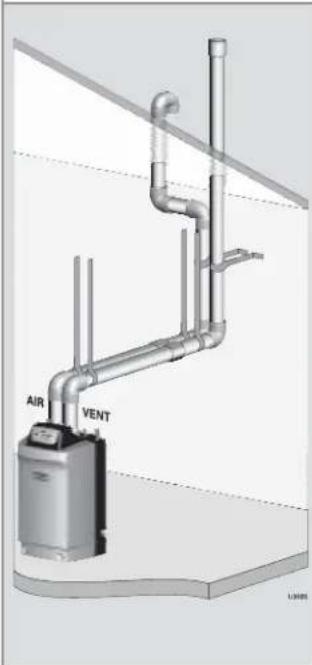
text_image
AIR VENT LUNESVertical termination with separate vent and air pipes
(install termination — page 23)
• Prepare roof penetrations before installing vent and air piping. Finish by attaching termination fittings as shown in termination instructions.
• Install pipe supports every 5 feet on both the horizontal and vertical runs.
• Install a hanger support within 6 inches of any upturn in the piping.
- Slope horizontal piping downward toward the boiler at least 1/4 inch per foot.
• Air piping may be offset as shown at left so termination can be located as required in the installation instructions.
- Use long-radius elbows for air piping when using 2" or 3" pipe to reduce pressure drop.
Gas piping — sizing gas lines
Natural Gas:
Pipe sizing for natural gas
- Size gas piping from meter outlet to entrance of boiler in accordance with Figure 108 and Figure 109.
- Use total input of all boilers. Divide total input in Btuh by 1,000 to obtain cubic feet per hour of natural gas.
a. Pipe lengths in Figure 108 are equivalent length of straight pipe. Convert pipe fittings to equivalent lengths using data from Figure 107.
b. Figure 108 is only for natural gas with specific gravity 0.60, with a pressure drop through the gas piping of 0.30" w.c.
c. For additional gas pipe sizing information, refer to ANSI Z223.1 NFPA 54 (or Natural Gas and Propane Installation CAN/CSA B149.1 or B149.2 for Canadian installations).
Natural gas supply pressure
- Pressure required at gas valve inlet pressure port:
a. Maximum: 13" w.c. with no flow (lockup) or with boiler on
b. Minimum: 4" w.c. (for all except 5" for -299/310) with gas flowing (verify during boiler startup, while boiler is at high fire)
- Install 100% lockup gas pressure regulator in supply line if inlet pressure can exceed 13" w.c. at any time. Adjust lockup regulator for 13" w.c. maximum.
Propane Gas:
You must follow the instructions, beginning on page 48, to operate the boiler on propane. Failure to comply could result in severe personal injury, death or substantial property damage.
Pipe sizing for propane gas
- Contact gas supplier to size pipes, tanks and 100% lockup gas pressure regulator.
Propane supply pressure
- Adjust propane supply regulator provided by gas supplier for 13" w.c. maximum pressure.
- Pressure required at gas valve inlet pressure port:
a. Maximum: 13" w.c. with no flow (lockup) or with boiler on
- Minimum: 4" w.c. with gas flowing (verify during boiler startup, while boiler is at high fire).
Manifolded gas supply lines
- Construct gas header for multiple boilers using Figure 107 and the sizing tables below. Refer to the National Fuel Gas Code for other conditions.
- Provide manual shutoff gas valve and ground joint union as shown in Figure 33, page 29 and Figure 107 for each boiler. When gas line enters from top of the boiler, the boiler internal gas piping provides a drip leg.
- A 14 " NPT gas piping riser from header to boiler will be large enough for most jobs. Ensure the piping is large enough so that the minimum pressure at the boiler will be at least 5 inches water column with all connected appliances firing.
Figure 107 Common gas line for multiple boilers
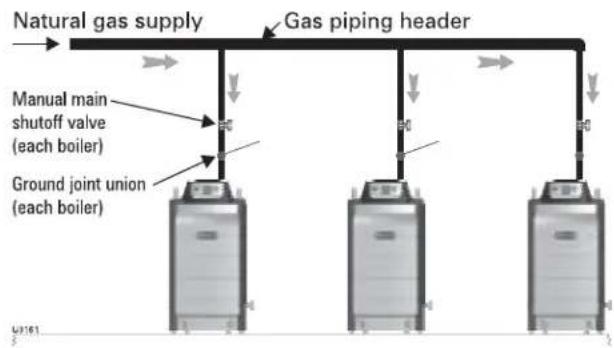
flowchart
graph TD
    A["Natural gas supply"] --> B["Gas piping header"]
    B --> C["Manual main shutoff valve (each boiler)"]
    B --> D["Ground joint union (each boiler)"]
    C --> E["Three boiler units"]
    D --> F["Three boiler units"]
Figure 108 Pipe capacity for 0.60 specific gravity natural gas
| Gas pipe total length, feet | Capacity (cubic feet per hour, 0.60 specific gravity) | ||||
| 1” | 11⁄4” | 11⁄2” | 2” | 21⁄2” | |
| 10 | 520 | 1050 | 1600 | 3050 | 4800 |
| 20 | 350 | 730 | 1100 | 2100 | 3300 |
| 30 | 285 | 590 | 890 | 1650 | 2700 |
| 40 | 245 | 500 | 760 | 1450 | 2300 |
| 50 | 215 | 440 | 670 | 1270 | 2000 |
| 75 | 175 | 360 | 545 | 1020 | 1650 |
| 100 | 150 | 305 | 460 | 870 | 1400 |
| 150 | 120 | 250 | 380 | 710 | 1130 |
Figure 109 Equivalent lengths of straight pipe for typical gas line fittings
| Pipe size inches | Equivalent length, feet | |
| 90° Elbow | Tee | |
| 1 | 2.62 | 5.24 |
| 1 14 | 3.45 | 6.90 |
| 1 12 | 4.02 | 8.04 |
| 2 | 5.17 | 10.3 |
| 2 12 | 6.16 | 12.3 |
Field wiring — advanced
WARNING
ELECTRICAL SHOCK HAZARD — For your safety, turn off electrical power supply at service entrance panel before making any electrical connections to avoid possible electric shock hazard. Failure to do so can cause severe personal injury or death.
NOTICE
Wiring must be N.E.C. Class 1. If original wiring as supplied with boiler must be replaced, use only type 105 °C wire or equivalent. Boiler must be electrically grounded as required by National Electrical Code ANSI/NFPA 70 – latest edition.
Installation must comply with:
- National Electrical Code and any other national, state, provincial or local codes or regulations.
- In Canada, CSA C22.1 Canadian Electrical Code Part 1, and any local codes.
Wiring - general
- The U-Control provides plug-in, color-coded, non-interchangeable terminal strips for all field wiring. See the schematic diagram (Figure 111, page 96) & ladder diagram (Figure 112, page 97).
- The U-Control provides programmable fl exibility in system operation, allowing control of heat supply for up to three different heating systems. Read this manual thoroughly before connecting the wiring to ensure trouble-free start-up and operation.
Wiring - overview
You will need to make the following connections, some of which depend on your system and how the U-Control will be programmed. (See this and following pages for more information.)
☐ Connect 120VAC power (minimum 15-amp source)
□ Connect wiring for up to three circulators
□ Connect external limits, if used
- Two different circuits are available — The U-Control will require manual reset for one of these circuits. The U-Control will automatically reset after limit operation and re-closure for limits in the other circuit.
□ Connect thermostats and/or heat demand contacts
- The U-Control can regulate the boiler for up to three different heating systems.
□ Connect remote operation input, if used
- The U-Control will operate and modulate the boiler based on a 0–10 VDC control signal from a remote controller, when desired.
☐ Connect the “additional heat demand” circuit to a second heating source, when used
• The U-Control allows the boiler to act as the primary or
secondary heat source when another heat source, such as a heat pump or another boiler is available.
☐ Connect to remote alarm, when used
□ Connect wiring for multiple boiler operation
• The U-Control provides the flexibility for control of multiple Ultra boilers.
- You will need to program the boilers' U-Controls based on the interconnection method you choose.
☐ Install system & outdoor sensors, when used
- The boiler is shipped with an outdoor sensor, a system supply sensor and a system return sensor. The system supply sensor will be required for most space heating applications. The system return sensor must also be installed when using the system supply sensor. Use of the outdoor sensor is optional.
Line voltage power input
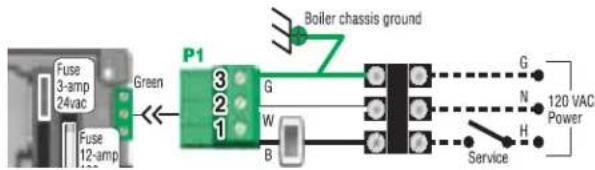
text_image
Fuse 3-amp 24vac Fuse 12-amp Green P1 3 2 1 G W B Boiler chassis ground G N 120 VAC Power H Service- Provide and install a fused disconnect or service switch (15-ampere rated recommended) as required by applicable codes.
- Connect minimum 15-ampere, 120 VAC power wiring to Ultra boiler line voltage terminal strip as shown in Figure 111, page 96 and above.
Wiring circulators
- The U-Control provides for connection of up to three circulators, one of which must be the boiler circulator. In addition, you can connect a system circulator and a DHW circulator, for examples. See Figure 110, page 95.
⚠ WARNING The maximum allowable current for each circulator is 2.2 amps at 120Ω/AC circulators with higher amp ratings, you must install a circulator relay or starter to provide line voltage to the circulator. For circulators rated over 2.2 amps, connect only the circulator relay or starter coil to the Ultra circulator terminals.
- You can connect any of the circulators you use to any of the three circulator activation terminals. The U-Control setup allows you to assign which circulators activate on a call for heat (this can be customized for each of the heating systems supplied by the boiler).
- The U-Control factory default settings for DHW heating are configured for direct piping to the boiler, with Circulator 1 being the only circulator being activated
Field wiring — advanced (see Figure 111 & Figure 112) (continued)
Figure 110 Wiring to circulators

text_image
Black P2 9 8 7 6 5 4 3 2 1 Field wiring to circulators G, W, B Circulator 3 G, W, B Circulator 2 (default Boiler) G, W, B Circulator 1 (default DHW)during DHW heating. To use factory default settings, make sure to connect the DHW circulator to terminals 1, 4 and 7, as below:
- The factorydefault for space heating is designed for finned-tube baseboard, and set up to activate Circulator 2 and Circulator 3 on a call for heat. Connect the boiler circulator to terminals 2, 5 and 8 and the system circulator to terminals 3, 6 and 9 to use these default settings.
- Make sure the U-Control is programmed to activate the system circulator when it is required (during space heating, for instance).
Thermostats & DHW tank temperature control connections
NOTICE
Use isolating relays if using 3-wire zone valves to avoid damage and nuisance problems due to stray voltage.
- The U-Control allows operation by up to three different heating systems.
- The factory default configuration is for "heat demand 1" to be DHW and "heat demand 2" to be space heating. For factory default operation:
a. Connect the space heating thermostat to terminal strip P15, terminals 1 and 2 to use the default setup.
b. Connect the DHW tank temperature control across terminal strip P11, terminals 4 and 5 to use the default setup.
The U-Control m odule provides internal low water protection
- The U-Control and internal sensors in the Ultra boiler provide both temperature control and low water protection (using temperature senors), as explained below:
NOTICE
The U-Control module uses temperature sensors to provide both high limit protection and modulating temperature control.
The U-Control module also provides low water protection by using a dual sensor to monitor the temperature of the heat exchanger. [The U-Control constantly monitors the sensor signals to ensure they are within 10 °F of one another. If the sensor difference exceeds 10 °F, the boiler is shutdown on automatic reset.] This method is accepted in many areas as meeting the requirement for a low water cut-off.
Some codes or jurisdictions may require additional external controls for high limit and/or low water cutoff protection. Follow the guidelines in this manual to install additional controls when required.
- Install thermostats on inside walls away from the influences of drafts, hot or cold water pipes, lighting fixtures, television, sun rays, or fi replaces.
-
Thermostat anticipator (if applicable):
-
If connected directly to the boiler, set anticipator for 0.1 amps.
- If connected to relays or other devices, set to match total electrical power requirements of connected devices. See device manufacturers' specifications and the thermostat instructions for details.
Low water cut-offs
- See the NOTICE on this page regarding internal low water protection provided by the U-Control.
- When an external low water cut-off is installed, connect as shown in the U-Control wiring diagrams (Figure 111, page 96 & Figure 112, page 97).
- When possible, use the Weil-McLain Ultra low water cut-off kit listed in the back of this manual. It includes a probe-type low water cut-off and provides a simple harness connection for the wiring.
Continued after page 98
Field wiring — advanced (see Figure 111 & Figure 112) (continued)
Figure 111 Schematic wiring diagram — Ultra-80 through Ultra-399

text_image
Ucontrol Schematic Wiring Diagram (See ladder wiring diagram for notes) Field wiring Factory wiring Additional heat demand contacts Alarm contacts Modulating output (0 - 10 VDC) Transformer BL BK WH 120V 24V P1 3 2 1 Boiler chassis ground G N 120 VAC Power H Service switch G, W, B P3 White Fuse 3-amp 24vac Fuse 12-amp 120vac Green Blue Orange Gray Black P15 P16 P14 P13 P12 P11 P10 P12V Common Future use Call for heat demand 1 (Default DHW input) See TS NOTE, below. Additional limits if used (Will require manual reset) Additional limits if used (Control will automatically reset) System supply temperature sensor System return temperature sensor System supply temperature sensor Call for heat demand 2 (Default for thermostat) See TS NOTE, below. Additional limits if used (Will require manual reset) Additional limits if used (Control will automatically reset) Outdoor temp. sensor (if used) Low water cutoff (if used) (See Note 7) TS NOTE DO NOT supply 24-volt power to the thermostat circuits. If using 3-wire zone valves, use relays to provide dry contacts to the Ultra Control Module thermostat connections. Display/interface panel Heat exchanger outlet temp. sensor Gas valve Blower Test power Circulator 3 G, W, B Circulator 2 (Default Boiler) G, W, B Circulator 1 (Default DHW) NOTE: Connect wire harnesses to circulators in the field. Ignition electrode Ground P16 P15 Red Blue Orange Gray Black P2 P10 P11Field wiring — advanced (see Figure 111 & Figure 112) (continued)
Figure 112 Ladder wiring diagram — Ultra-80 through Ultra-399
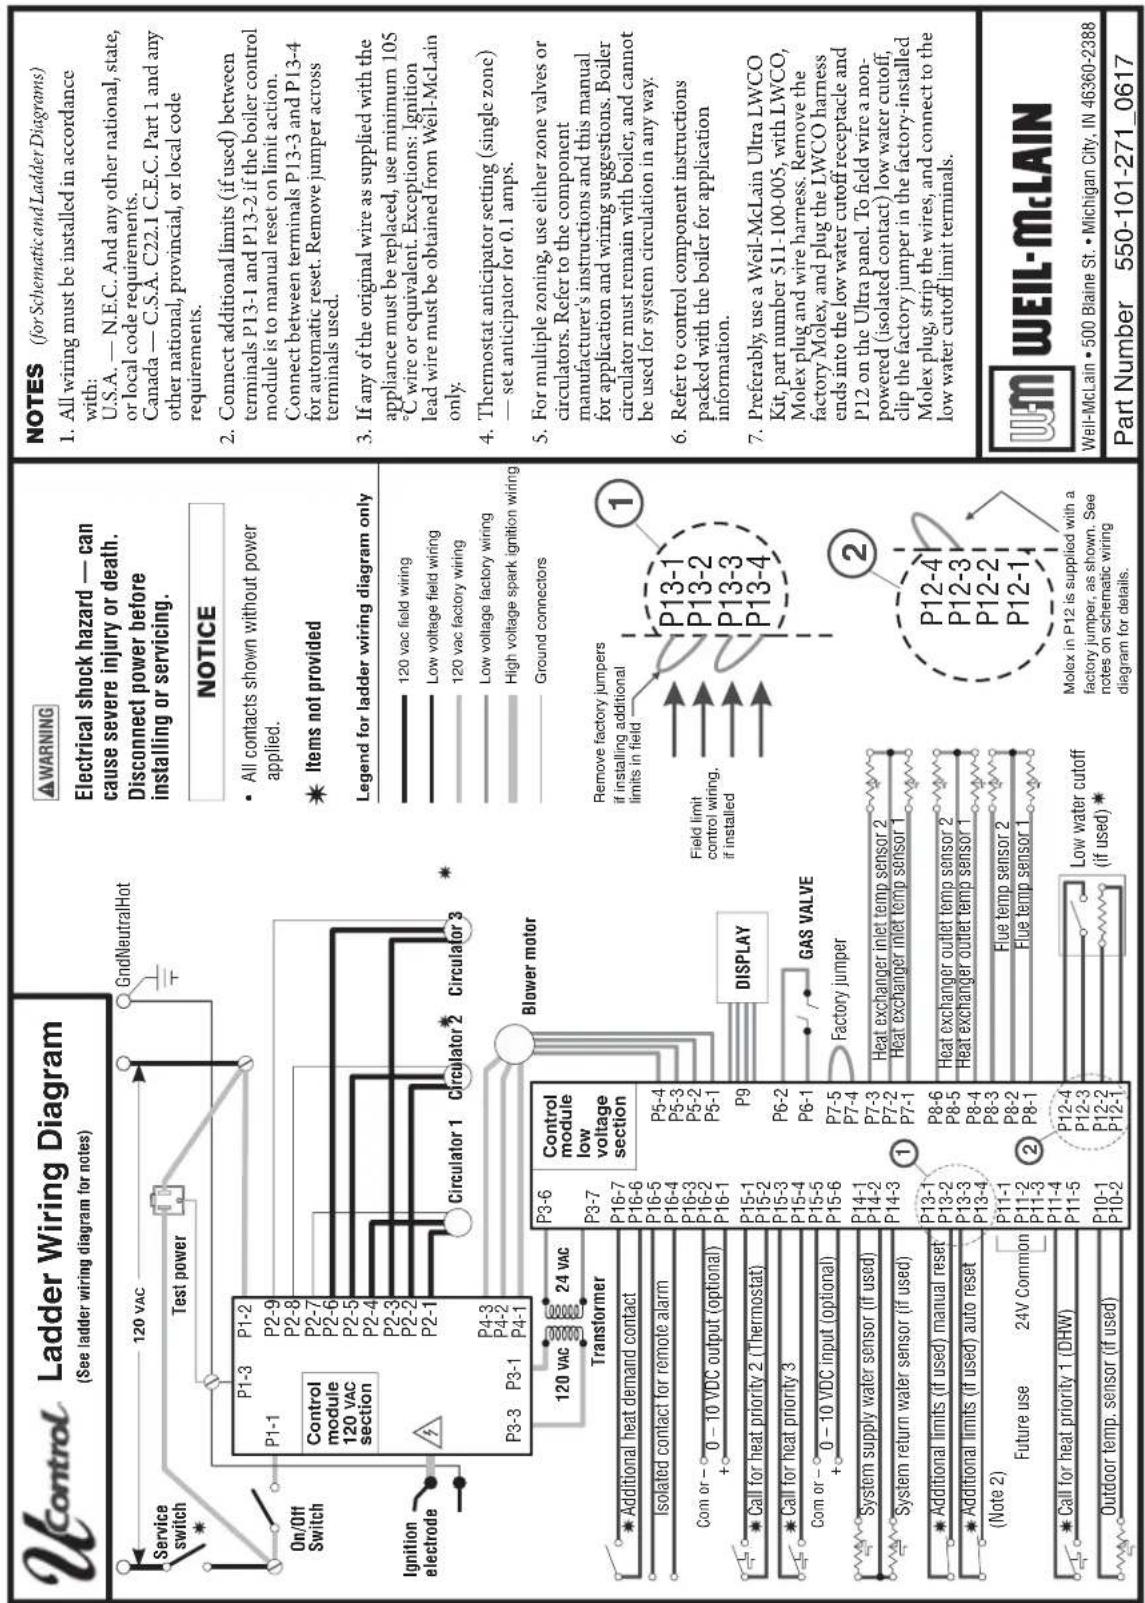
text_image
Ladder Wiring Diagram (See ladder wiring diagram for notes) Service switch * 120 VAC Test power On/Off Switch P1-3 P1-2 P1-1 P2-9 P2-8 Control module 120 VAC section P2-7 P2-6 P2-5 P2-4 P2-3 P2-2 P2-1 P4-3 P4-2 P4-1 Circulator 1 Circulator 2 Circulator 3 Ignition electrode P3-3 P3-1 Blower motor Transformer 120 VAC 24 VAC P3-6 P3-7 Control module low voltage section P5-4 P5-3 P5-2 P5-1 P9 DISPLAY GAS VALVE Factory jumper P7-5 P7-4 P7-3 P7-2 P7-1 P8-6 P8-5 P8-4 P8-3 P8-2 P8-1 P13-1 P13-2 P13-3 P13-4 P11-1 P11-2 P11-3 P11-4 P11-5 P10-1 P10-2 Additional heat demand contact Isolated contact for remote alarm Com or - 0 - 10 VDC output (optional) * * Call for heat priority 2 (Thermostat) * Call for heat priority 3 Com or - 0 - 10 VDC input (optional) System supply water sensor (if used) System return water sensor (if used) * Additional limits (if used) manual reset * Additional limits (if used) auto reset (Note 2) Future use 24V Common * Call for heat priority 1 (DHW) Outdoor temp. sensor (if used) Electrical shock hazard — can cause severe injury or death. Disconnect power before installing or servicing. NOTICE • All contacts shown without power applied. * Items not provided Legend for ladder wiring diagram only Low voltage field wiring Low voltage factory wiring High voltage spark ignition wiring Ground connectors Remove factory jumpers if installing additional limits in field Field limit control wiring, if installed Molex in P12 is supplied with a factory jumper, as shown. See notes on schematic wiring diagram for details. NOTES (for Schematic and Ladder Diagrams) 1. All wiring must be installed in accordance with: U.S.A. — N.E.C. And any other national, state, or local code requirements. Canada — C.S.A. C22.1 C.E.C. Part 1 and any other national, provincial, or local code requirements. 2. Connect additional limits (if used) between terminals P13-1 and P13-2 if the boiler control module is to manual reset on limit action. Connect between terminals P13-3 and P13-4 for automatic reset. Remove jumper across terminals used. 3. If any of the original wire as supplied with the appliance must be replaced, use minimum 105 °C wire or equivalent. Exceptions: Ignition lead wire must be obtained from Weil-McLain only. 4. Thermostat anticipator setting (single zone) — set anticipator for 0.1 amps. 5. For multiple zoning, use either zone valves or circulators. Refer to the component manufacturer's instructions and this manual for application and wiring suggestions. Boiler circulator must remain with boiler, and cannot be used for system circulation in any way. 6. Refer to control component instructions packed with the boiler for application information. 7. Preferably, use a Weil-McLain Ultra LWCO Kit, part number 511-100-005, with LWCO, Molex plug and wire harness. Remove the factory Molex, and plug the LWCO harness ends into the low water cutoff receptacle and P12 on the Ultra panel. To field wire a non-powered (isolated contact) low water cutoff, clip the factory jumper in the factory-installed Molex plug, strip the wires, and connect to the low water cutoff limit terminals. Molex in P12 is supplied with a factory jumper, as shown. See notes on schematic wiring diagram for details. Part Number 550-101-271_0617Field wiring — advanced (see Figure 111 & Figure 112) (continued)
Additional limits
- The U-Control allows connection of external limit controls, both for manual reset and for automatic reset operation of the U-Control.
- Manual reset of the U-Control on limit action — Connect external limits across P13, terminals 1 and 2 if the U-Control is to require manual reset when a limit opens, even if the limit re-closes. (Remove the factory jumper when using these terminals.)
NOTICE
The U-Control will lockout when a limit in its manual reset circuit opens. The U-Control activates its alarm terminals and shuts the boiler down until an operator manually resets the U-Control (as explained in this manual). This reset function can be done by a homeowner or a service technician.
- Automatic reset of the U-Control on limit action — Connect external limits across P13, terminals 3 and 4 if the U-Control is to reset automatically when the limit circuit closes after a limit condition. (Remove the factory jumper when using these terminals.)
Remote operation/modulation
- The U-Control module provides terminals to input a remote 0–10 VDC operating signal. This can be provided by a separate controller if the boiler is configured as Type 4 (SHADOW boiler mode).
- Connect the 0–10 VDC signal positive terminal to P15 terminal 6, and the signal common to terminal 5.
- When receiving a remote operating signal, the boiler starts when the signal exceeds 1.0 VDC (and shuts off if the signal drops below 0.5 VDC). The boiler remains at low fire until the signal exceeds 2.0 VDC. Between 2.0 and 10.0 VDC, the boiler fi ring rate increases with the signal value, reaching full input at 10.0 VDC.
- The U-Control continues to monitor boiler temperatures, based on the values set up under Priority 1 operation. See the following section for details.
Additional heat demand option
- The U-Control module can be set up to activate another heat source using its additional heat demand dry contracts (P16, terminals 6 and 7).
- Connect these terminals to call for heat from the other heat source. (See the following section to program the boiler to activate the other source, either as the primary or secondary heat source.)
Alarm contacts (low voltage ONLY)
- The U-Control's alarm dry contact (P16, terminals 4 and 5) closes when the boiler enters lockout.
- Connect these terminals for remote alarm notification.
Multiple boiler wiring options
- The U-Control can be programmed to sequence multiple boilers or operate/modulate in tandem from a 0–10 VDC source generated by the lead boiler or from a remote controller.
- See "ADDITIONAL HEAT DEMAND," page 99 for recommended wiring.
Outdoor temperature sensor
- The U-Control provides programmable options when using an outdoor temperature sensor. This sensor is supplied with the boiler, and can be used if desired (not required). See the following section for outdoor temperature options. The outdoor sensor must be installed unless specifically exempted in the Energy Act statement on page 137.
- Mount the outdoor sensor on an exterior wall, shielded from direct sunlight or flow of heat or cooling from other sources.
- Connect the sensor leads to P10, terminals 1 and 2, as shown in the wiring diagrams. Thermostat wire can be used to connect the sensor.
System supply & return temperature sensors
(see Figure 4, page 11 for placement of sensors)
- The boiler is also shipped with two strap-on temperature sensors, intended for system supply and return.
- These sensors can be attached to piping up to 3-inch diameter.
- Thermostat wire can be used to connect these sensors.
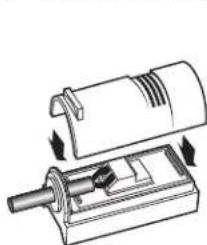
natural_image
Mechanical assembly diagram showing a cylindrical component being inserted into a housing with arrows indicating motion (no text or symbols)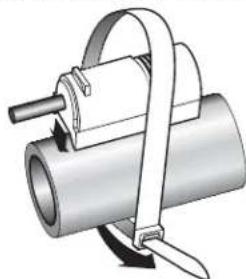
natural_image
Mechanical assembly diagram showing a cylindrical component with a curved arm and a pin, no text or symbols present.U5004
- The system supply temperature sensor allows the U-Control to regulate temperature in the system main piping
- Locate the supply sensor at least six pipe diameters, but no further than 3 feet, downstream from the boiler connection to the main to ensure adequate mixing.
- The system return sensor allows the U-Control to monitor and display system return temperature.
- For multiple boiler applications, install a system supply temperature sensor and system return sensor wired to the LEAD boiler.
- The U-Control also compares the system return temperature with the system supply temperature. Should the return temperature ever exceed the supply temperature, the U-Control knows there is likely a sensor failure and will report this problem on the display.
U-Control operation and setup — advanced
WARNING
Low-temperature systems (radiant slab, etc.) — DO NOT use the Ultra boiler control as the only means of water temperature regulation for low-temperature systems if higher-temperature systems are also supplied.
ADVAN CED SETUP - OVERVIEW
- Access contractor menus by pressing and holding the UP and DOWN arrow keys at the same time for 5 seconds.
- The contractor screen will show:
a. BOILER SETTINGS
b. SYSTEM SETTINGS
c. DIAGNOSTICS
d. MAINTENANCE INFO
e. SET DATE AND TIME
-
Navigate through the menus as shown in Figure 115, page 102. For a description of each of the menu options, see Figure 116, page 104.
-
You will need to adjust settings as required for the systems supplied by the boiler and connect the wiring accordingly.
ADVANCED SETUP – BOILER SETTINGS
BOILER MODEL
WARNING
Check the boiler model against the model listed on the boiler's rating plate. Change the selection to the correct model if not. Also verify the model number on the U-Control display at power-up. Failure to correct could result in severe personal injury, death or substantial property damage.
HIGH ALTITUDE
WARNING
If the boiler is installed at an altitude above 5,500 feet, select YES for high altitude. The U-Control will automatically adjust firing rates (blower speeds) to compensate for altitude.
WWSD
- WWSD stands for "warm weather shutdown." It means the boiler will not be allowed to fire if the outside temperature is greater than the WWSD setting.
- When the boiler is kept off because the outside temperature is above WWSD, the graphic display will show "WWSD," and the boiler will remain in standby until the outside temperature drops below WWSD temperature.
- WWSD does not apply to DHW systems.
- The outdoor sensor must be installed to use this function.
ADJUST OUTDOOR
- Use this setting to adjust the outdoor sensor temperature to account for solar or other effects that would cause the sensor to read incorrectly.
ADDITIONAL HEAT DEMAND
- This setting is for multiple boilers or multiple heating sources (an Ultra boiler collaborating with a heat pump or a different boiler, for examples).
- For Type 4 boilers, this function only applies to the Priority 1 system.
- OFF — Function disabled.
- Type 1 — This means the Ultra boiler is the primary heat source.
a. When the Ultra boiler receives a call for heat, it begins its startup sequence and also starts a delay timer (set as ADD'L HEAT DEMAND TIME).
b. When the delay timing is reached, the U-Control closes the "Additional heat demand contact," terminals P16 #6 and #7. Use this contact to start the next heat source.
c. If the next heat source is an Ultra boiler, connect this contact to the boiler's "heat demand 1" terminals (P11 #4 and #5). Program the second boiler's delay timer to start a third boiler the same way, and so on to sequentially fire multiple boilers.
- Type 2 — This means the boiler is the secondary heat source.
a. When the U-Control receives a call for heat, it immediately activates the "Additional heat demand contact," terminals P16 #6 and #7. This contact is used to start the next heat source immediately.
b. When the delay timing is reached, the Ultra boiler begins its startup sequence and continues to heat until the demand is satisfied.
c. Type 2 assignment would generally only be used if the other heat source is a different boiler or a heat pump, for example.
- Type 3 — This assigns the boiler as the LEAD boiler in a multiple boiler system.
a. This LEAD boiler must have system supply and return sensors mounted on the system supply and return pipes and wired to the boiler.
b. When the U-Control receives a call for heat, it begins its heating sequence and starts the additional heat demand delay timer.
c. When the delay timing is reached, the U-Control sends a 0–10 VDC proportional signal out its 0–10 VDC output terminals, P16 #1 and #2.
d. If the heat demand is satisfied before the timer runs out, the next boiler is not started.
e. Connect these output terminals to the SHADOW boilers' 0–10 VDC input terminals, P15 #5 and #6. The SHADOW boilers will start and modulate based on the signal strength. The SHADOW boilers must be set up as Type 4 (see below). They do not need their additional heat timers to be setup.
U-Control operation and setup — advanced (continued)
f. An alternate method is to daisy chain the other boilers. That is, connect the output of each to the input of the next. Each of these boilers would be set up as a Type 4 (see below), and each needs its additional heat timer set for the desired delay between boilers.
- Type 4 — This assigns the boiler as a SHADOW boiler in a multiple boiler system.
a. The boiler can be wired and setup to run in parallel with the other SHADOW boilers as in 6c, above. Or they can be set up for sequential operation following 6d, above.
b. When the boiler receives a 0–10 VDC input on terminals P15 #5 and #6, it starts up and modulates fi ring rate according to the signal.
c. If wired and setup per 6d above, it also starts its additional heat delay timer immediately. When the delay timing is reached, the U-Control sends out a 0–10 VDC signal (on terminals P16 #1 and #2) for the next boiler.
d. The boiler uses the settings for Priority 1 while receiving the 0–10 VDC signal.
ADVANCED SETUP - PRIORITY 1, 2, 3
- Priority 1, 2 and 3 refer to the three possible heating inputs that can be handled by the U-Control.
- Select the priority level desired for the application. Priority 1 is usually assigned to domestic water heating, because of the need for quick response. Priority 2 and 3 usually used for space heating circuits.
- Each of the three inputs has its own set of operating parameters, programmed using the menus shown in Figure 115, page 102.
- The inputs to the U-Control are: a. Priority 1 — P11 #4 and #5, "heat demand 1" b. Priority 2 — P15 #1 and #2, "heat demand 2" c. Priority 3 — P15 #3 and #4, "heat demand 3"
ADVANCED SETUP - SYSTEM TYPE
- For each priority being used, select the appropriate system type. See Figure 114, page 101 for system options and preset temperatures.
- The temperature presets are chosen based on normal best setting for these systems. The temperature values can be changed, if desired, under "TEMPERATURES."
ADVANCED SETUP - TEMPERATURES
-
Setup desired temperatures for each of the priorities used.
-
For an explanation of the target temperatures and associated outdoor temperatures, see Figure 113.
a. Outdoor temp for max target means the outdoor temperature at which the target temperature reaches its maximum value. In the example of Figure 113, this occurs at 25 °F outside.
b. Outdoor temp for min target means the outdoor temperature at which the target temperature reaches its minimum. In the example of Figure 113, this occurs at 70 °F.
c. Note that the reset lines are curved. The shape of this curve is matched (or characterized) to the response of the system type chosen to ensure the most effective reset operation.
Figure 113 Typical outdoor reset curves
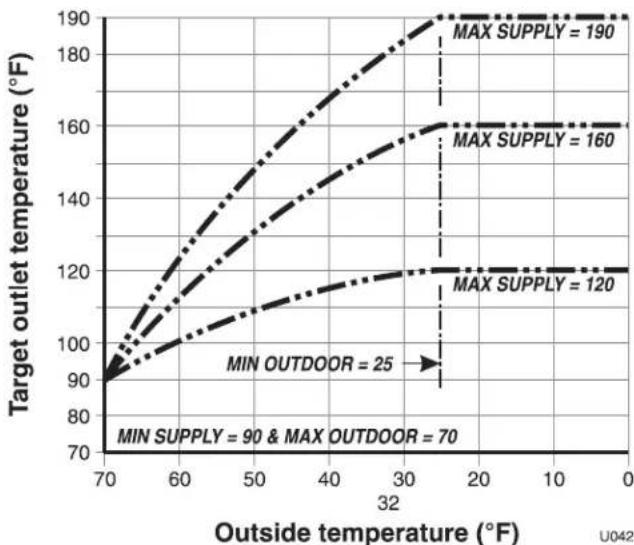
line
| Outside temperature (°F) | Target outlet temperature (°F) - MAX SUPPLY = 190 | Target outlet temperature (°F) - MAX SUPPLY = 160 | Target outlet temperature (°F) - MAX SUPPLY = 120 | Target outlet temperature (°F) - MIN OUTDOOR = 25 | | ------------------------- | ----------------------------------------------- | ----------------------------------------------- | ----------------------------------------------- | ---------------------------------------------- | | 70 | 90 | 90 | 90 | 90 | | 32 | 190 | 160 | 120 | 120 |- Modulate on differential — The temperature must drop this many degrees below target temperature for the boiler to come on.
- Modulate off differential — While the boiler is firing, as the temperature increases above the target temperature, the boiler fi ring rate is reduced. At this many degrees above the target temperature, the boiler shuts down.
U-Control operation and setup — advanced (continued)
Figure 114 U-Control system types and preset parameters
| System type Display | Preset temperatures Note | ||||||
| 8-character 3-char | Max Target Temp | Outdoor Temp for Max Target | Min Target Temp | Outdoor Temp for Min Target | |||
| Fan-coil FAN-COIL FCL 190 0 140 70 | |||||||
| Finned tube baseboard | FIN BASE FTB 180 0 | 130 70 | |||||
| Cast iron baseboard | IRN BASE | CIB | 180 | 0 | 120 | 70 | |
| Cast iron radiators | RADIATOR | CIR | 180 | 0 | 120 | 70 | |
| Radiant – slab on grade | RAD SLAB | RSG | 120 | 0 | 80 | 70 | |
| Radiant – thin slab | RAD SLAB | RTS | 140 | 0 | 80 | 70 | |
| Radiant – below floor (staple up) | RADFLOOR | RSU | 160 0 | 90 70 | |||
| Radiant – above floor (sleeper system) | RADFLOOR | RAF | 140 0 | 90 70 | |||
| Custom | CUSTOM | CUS | 190 | 0 | 70 | 70 | • Does not pass along Add'l Heat Demand |
| DHW – system | DOMESTIC | DHW | 190 | DHW heating ignores outdoor reset and warm weather shutdown | • U-Control modulates to system temperature sensors. | ||
| DHW – direct | DOMESTIC | DHW | 190 | • U-Control modulates to boiler temperature sensors.• Does not pass along Add'l Heat Demand | |||
ADVANCED SETUP – CIRCULATOR EXERCISING
- For each circulator, select whether you want the U-Control to automatically start the circulator and run for 10 seconds for each 72-hour period of inactivity.
ADVANCED SETUP – FREEZE PROTECTION CIRCULATORS
- This function automatically fires the boiler at low fire and starts the circulators chosen if the heat exchanger sensor detects a temperature less than 40 °F. The circulators turn off when the temperature rises above 45 °F.
- Use this section to enter contractor's information and to enter an automatic notice for maintenance (default is 12 months). Because this shows on the display, it is an automatic means of notifying the homeowner of need for scheduled maintenance by the technician. Update the screen reminder to reset for the next maintenance date.
U-Control operation and setup — advanced (continued)
Figure 115 U-Control menus (press and hold the UP and DOWN arrow keys for 5 seconds to enter contractor menus)
| Menus Next screen Next screen Next screen | |||||
| Follow information at the bottom of each screen to navigate to next/previous screen or enter/save data | |||||
| BOILER SETTINGS BOILER MODEL ###### 80 | 105155230 | 299310399 | Carefully verify that the boiler model number on the display now agrees with the boiler rating plate. Setting these incorrectly could resu severe personal injury, death substantial property damage. | ||
| HIGH ALTITUDE ## NO | YES | ||||
| HIGH TEMP LIMIT ### | |||||
| WWSD SETTING ####FADJUST OUTDOOR ####F | ##### | ||||
| ADD'L HEAT DEMAND TYPE: ########### | OFFTYPE 1 - ULTRA = PRIMARY HEAT SOURCE TYPE 2 - ULTRA = BACKUP HEAT SOURCE TYPE 3 - ULTRA = LEAD (0-10V OUTPUT)TYPE 4 - ULTRA = SHADOW (0-10V INPUT) | ||||
| ADD'L HEAT DEMAND TIME: ## MINUTES | ##MINUTES | ||||
| SYSTEM SETTINGS BOILER PRIORITY 1 SYSTEM | TYPE: #### OFF | FAN COILFINNED TUBE BASEBOARDCAST IRON BASEBOARDCAST IRON RADIATORRADIANT - SLAB ON GRADERADIANT - THIN SLABRADIANT - ABOVE FLOORCUSTOMDHW - DIRECTDHW - SYSTEM | |||
| TEMPERATURES MAX SUPPLY: ### °F | MIN SUPPLY: ### °FMAX OUTDOOR: ### °FMIN OUTDOOR: ### °FMODULATE ON DIFF: ### °FMODULATE OFF DIFF:### °F | MIN SUPPLY, MAXOUTDOOR AND MINOUTDOOR are not shown for DHW types | |||
| TIMES | MAX ON TIME: ### MINMIN ON TIME: ### MINBOOST INTERVAL: ### MINPRE PUMP TIME: ### SECPOST PUMP TIME: ### SEC | not on Priority 3not on Priority 1 | |||
| CIRCULATORS: # # # | CIRCULATOR 1: ###CIRCULATOR 2: ###CIRCULATOR 3: ### | ON/OFFON/OFFON/OFF | |||
| MAXIMUM RATE: %MINIMUM RATE: % | ##### %##### % | ||||
| BOILER PRIORITY 2BOILER PRIORITY 3 | SAME MENUS AS FOR PRIORITY 1SAME MENUS AS FOR PRIORITY 1 | ||||
| CIRCULATOR EXERCISING | CIRCULATOR 1: ####CCIRCULATOR 2: ####CCIRCULATOR 3: #### | ON/OFFON/OFFON/OFF | |||
| FREEZE PROTECT CIRCS | CIRCULATOR 1: ####CCIRCULATOR 2: ####CCIRCULATOR 3: #### | ON/OFFON/OFFON/OFF | |||
| MAINTENANCE INFO | NAMEPHONEMODELCP#INSTALLEDLAST DATENEXT DATEINTERVAL SETTINGSRESET REMINDER | #######################-#####-######ULTRA ################mm/DD/YYMM/DD/YYDD/MM/YY## MONTHSPRESS ENTER TO RESET | |||
U-Control operation and setup — advanced (continued)
Figure 115 U-Control menus, continued (press and hold the UP and DOWN arrow keys for 5 seconds to enter contractor menus)
| Menus Next screen Next screen Next screen Next screen | ||||
| Follow information at the bottom of each screen to navigate to next/previous screen or enter/save data | ||||
| SET DATE AND TIME SET YR/MN/DAY/HR/MIN | ||||
| DIAGNOSTICS TEMPERATURES STATUS:####### | ||||
| SYSTEM SUPPLY:#####F | ||||
| SYSTEM RETURN:#####F | ||||
| BOILER OUT1:#####F | ||||
| BOILER OUT2:#####F | ||||
| BOILER IN1:#####F | ||||
| FLUE 1:#####F | ||||
| FLUE 2:#####F | ||||
| OUTDOOR:#####F | ||||
| LIST OF LOCKOUTS LIST OF LOCKOUTS INPUT STATUS OUTPUT STATUS TEMPERATURES | ||||
U-Control operation and setup — advanced (continued)
Figure 116 U-Control setup options (see Figure 115, page 102 for location in menu sequence)
| Menu/Item Units Low Value | High Value | Default | Comment | ||
| Boiler Settings | |||||
| Boiler Model | 80, 105, 155,230, 299, 310,399 | factory | THIS MUST BE SET CORRECTLY FOR SAFE OPERATION. Adjusts blower speedsand fl ame sense (Display will show "HA" after the model number if high altitude has beenselected, below.) | ||
| High Altitude | yes or no no Adjusts ignition and low fi re fan speed (for altitudes above 5, 500 feet only) | ||||
| High Limit | °F 50 200 200 If boiler out temperature reaches this temperature boiler will lockout which requires amanual reset | ||||
| WWSD Temp | °F Off, 50 100 70 Boiler will not respond to heating calls above this outdoor temp | ||||
| Adjust Outdoor | °F(difference) | -10 | +10 | 0 | This value plus outdoor sensor reading equals outdoor temp (Use this setting tocompensate for solar gain or other factors that cause a shift in sensor temperature.) |
| Add'l Heal Demand Type | Types | Off | Type 4 | Off | Type 1 — Ultra is primary source, starts secondary after delay (requires system sensors)Type 2 — Ultra is secondary source, starts primary immediatelyType 3 — Boilers operate in parallel, Ultra boiler is LEAD, outputs 0–10 VDC to othersType 4 — Boilers operate in parallel, Ultra boiler is SHADOW, receives 0–10 VDC input |
| Add'l Heat Demand Time | minutes | 0 | 240 | 0 | Delay before bringing on additional heating appliances |
| System Settings | |||||
| Boiler Priority 1 | |||||
| System Type | Types | Off | Custom | DHW - direct | DHW-direct doesn't use ODR, boost, or Add'l heat demand output |
| Max Supply | °F 60 190 190 Boiler enters manual reset lockout at 200°F | ||||
| Min Supply | °F 60 190 N/A | N/A | DITW does not use reset | ||
| Max OD Reset | °F 50 100 N/A | N/A | DHW does not use reset | ||
| Min OD Reset | °F –20 | 50 N/A | N/A - DHW does not use reset | ||
| Modulate On Diff | °F | 2 | 10 | 5 | Boiler turns on if temperature drops below target minus differential on |
| Modulate Off Diff | °F | 2 | 10 | 5 | Boiler shuts down if modulates past target plus differential off |
| Max On Time | minutes | off | 240 | 30 | Longest time boiler will satisfy this system before switching to an active lower priority |
| Min On Time | — | — | — | — | Priority 1 does not have this setting |
| Boost Interval | minutes | off | 240 N/A | (not used) | When operating on ODR increases target 10F when this time expires until reaching MAX |
| Prepump Time: ### SEC | seconds | 0 | 240 | 20 | Additional time to run circulators longer than standard 10 second time |
| Postpump Time: ### SEC | seconds | off | 240 30 Circulator run time after call for heat ends | ||
| Circulator 1 | on-off | off | on on Circulator activates on this call for heat if on | ||
| Circulator 2 | on-off | off | on | off | Circulator activates on this call for heat if on |
| Circulator 3 | on-off | off | on | off | Circulator activates on this call for heat if on |
| Maximum Rate | %Rate | 21% | 100% | 96% | Boiler Model and altitude specific (derated to 96% from factory)NOTE: Adjusting boiler fi ring rate will affect AFUE rating. |
| Minimum Rate | %Rate | 20% | 99% | 33% (80-299/310)20% (399) | Boiler Model and altitude specifi c |
| Boiler Priority 2 | |||||
| System Type | Types | FTB | Finned-Tube Baseboard | ||
| Max Supply | °F 60 190 180 Highest target the control will calculate based on outdoor temperatureTarget temperature if outdoor sensor is not detected (manual reset lockout at 200°F) | ||||
| Min Supply | °F 60 190 130 Lowest target the control will calculate based on outdoor air temperature | ||||
| Max OD Reset | °F 50 100 70 Outdoor air temperature that forces the minimum supply water to be target temperature | ||||
| Min OD Reset | °F | -20 | 50 | 0 | Outdoor air temperature that forces the maximum supply water to be target temperature |
| Modulate On Diff | °F | 2 | 10 | 5 | Boiler turns on if temperature drops below target minus differential on |
| Modulate Off Diff | °F | 2 | 10 | 5 | Boiler shuts down if modulates past target plus differential off |
U-Control operation and setup — advanced (continued)
Figure 116 U-Control setup options (see Figure 115, page 102 for location in menu sequence), continued
| Menu/Item Units Low | Value | High Value | Default | Comment | |
| Max On Time | minutes off 240 30 Longest time boiler will satisfy this system before switching to an active lower priority | ||||
| Min On Time | minutes off 240 15 Time boiler will satisfy this system before switching to the next active priority | ||||
| Boost Interval | minutes off 240 off When operating on ODR increase target 10F when this time expires until reaching MAX | ||||
| Prepump Time: ### SEC | seconds 0 240 20 Additional time to run circulators longer than standard 10 second time | ||||
| Postpump Time: ### SEC | seconds off 240 30 Circulator run time after call for heat ends | ||||
| Circulator 1 | on-off off on off Circulator activates on this call for heat if on | ||||
| Circulator 2 | on-off off on on Circulator activates on this call for heat if on | ||||
| Circulator 3 | on-off off on on Circulator activates on this call for heat if on | ||||
| Maximum Rate | %Rate | 21% | 100% | 96% | Boiler Model and altitude specific (derated to 96% from factory)NOTE: Adjusting boiler firing rate will affect AFUE rating. |
| Minimum Rate | %Rate 20% | 99% | 33% (80-299/310)20% (399) | Boiler Model and altitude specific | |
| Boiler Priority 3 | |||||
| System Type | Types | Custom | |||
| Max Supply | °F | 60 190 190 Highest target the control will calculate based on outdoor temperatureTarget temperature if outdoor sensor is not detected(manual reset lockout at 200°F) | |||
| Min Supply | °F | 60 190 70 Lowest target the control will calculate based on outdoor air temperature | |||
| Max OD Reset | °F | 50 | 100 | 70 | Outdoor air temperature that forces the minimum supply water to be target temperature |
| Min OD Reset | °F | -20 | 50 | 0 | Outdoor air temperature that forces the maximum supply water to be target temperature |
| Modulate On Diff | °F | 2 10 5 Boiler turns on if temperature drops below target minus differential on | |||
| Modulate Off Diff | °F | 2 10 5 Boiler shuts down if modulates past target plus differential off | |||
| Max On Time | — | — | — | — | Priority 3 does not have this setting |
| Min On Time | minutes off 240 15 Time boiler will satisfy this system before switching to the next active priority | ||||
| Boost Interval | minutes off 240 off When operating on ODR increase target 10F when this time expires until reaching MAX | ||||
| Prepump Time: ### SEC | seconds 0 240 20 Additional time to run circulators longer than standard 20 second time | ||||
| Postpump Time: ### SEC | seconds off 240 30 Circulator run time after call for heat ends | ||||
| Circulator 1 | on-off off on on Circulator activates on this call for heat if on | ||||
| Circulator 2 | on-off off on on Circulator activates on this call for heat if on | ||||
| Circulator 3 | on-off off on on Circulator activates on this call for heat if on | ||||
| Maximum Rate | %Rate | 21% | 100% | 96% | Boiler Model and altitude specific (denoted to 96% from factory)NOTE: Adjusting boiler firing rate will affect AFUE rating. |
| Minimum Rate | %Rate | 20% | 99% | 33% (80-299/310)20% (399) | Boiler Model and altitude specific |
| Circulator Exercising | |||||
| Circulator 1 | on-off off on on Circulators exercise 10 seconds every 72 hours of inactivity if on | ||||
| Circulator 2 | on-off off on on Circulators exercise 10 seconds every 72 hours of inactivity if on | ||||
| Circulator 3 | on-off off on on Circulators exercise 10 seconds every 72 hours of inactivity if on | ||||
| Freeze Protect Circs | |||||
| Circulator 1 | on-off | off | on | off | If HxOut sensor out falls below 40F boiler fires low and turns on this circ until 45F |
| Circulator 2 | on-off | off | on | on | If IIxOut sensor out falls below 40F boiler fires low and turns on this circ until 45F |
| Circulator 3 | on-off | off | on | off | If HxOut sensor out falls below 40F boiler fires low and turns on this circ until 45F |
U-Control operation and setup — advanced (continued)
Figure 117 U-Control diagnostic information (see Figure 115, page 102 for location in menu sequence
| Menu/Item Units Low Value High Value Default Comment | |||||
| Diagnostics | |||||
| Temperatures | |||||
| Status | Text data Current operating status of the boiler. Prepurge, Ignition, Name of the system Type being satisfied, post purge, Warm Weather Shutdown, Trouble | ||||
| System Supply | °F data Temperature of the remote system supply sensor | ||||
| System Return | °F data Temperature of the remote system return sensor | ||||
| Boiler Out1 | °F data Temperature of the first sensing element of the boiler's heat exchanger outlet sensor | ||||
| Boiler Out2 | °F data Temperature of the second sensing element of the boiler's heat exchanger outlet sensor | ||||
| Boiler In1 | °F data Temperature of the boiler's heat exchanger inlet sensor | ||||
| Flue1 | °F data Temperature of the first sensing element of the boiler's flue gas sensor | ||||
| Flue2 | °F data Temperature of the second sensing element of the boiler's flue gas sensor | ||||
| Outdoor | °F data Temperature of the remote outdoor air temperature sensor | ||||
| Inputs | |||||
| Status | Text data Current operating status of the boiler. Prepurge, Ignition, Name of the system Type being satisfied, post purge, Warm Weather Shutdown, Trouble | ||||
| Priority 1 | on-off data Call for heat status on Priority 1 Input | ||||
| Priority 2 | on-off data Call for heat status on Priority 2 Input | ||||
| Priority 3 | on-off data Call for heat status on Priority 3 Input | ||||
| Analog Input | vdc data Value of 0-10 VDC input signal on P15 #5 and #6 | ||||
| Manual Limit | open-closed data External manual limit P13-1 & P13-2 | ||||
| Auto Limit | open-closed data External auto limit P13-3 & P13-4 | ||||
| Low Wtr Cutoff | open-closed data Low water cutoff device on P12-3 & P12-4 | ||||
| Blower Tach | rpm | data Feedback from blower sensor | |||
| Flame Signal | no units | data | Number indicating the presence and quality of the flame used to shutdown boiler | ||
| Outputs | |||||
| Gas Valve | on-off data Control's gas valve circuit status | ||||
| Circulator 1 | on-off data Control's circulator 1 relay status | ||||
| Circulator 2 | on-off data Control's circulator 2 relay status | ||||
| Circulator 3 | on-off data Control's circulator 3 relay status | ||||
| Blower Signal | % of rate | data Control's signal controlling the blower speed | |||
| Add'l Heat Demand | on-off data Control's signal controlling the additional heat demand | ||||
| Alarm | on-off data Control's alarm contact status | ||||
| Analog Output | vdc data Value of 0-10 VDC output signal on P16 #1 and #2 | ||||
| Errors | |||||
| Control Fault | # | 0 | Displays number of control faults | ||
| Ignition Retries | # | 0 | Displays number of ignition attempts boiler is currently on | ||
| Manual Reset Cnt | # | 0 | Displays number of manual reset lockouts since last cleared | ||
| Auto Reset Cnt | # | 0 | Displays number of auto reset lockouts since last cleared | ||
| Lockout History 1 | Choose this to view the most recent error recorded | ||||
| Time & Date | text | data Displays time and date that lockout occurred | |||
| Status | text | data Displays what the status of the boiler at the time of the error | |||
| Manual Reset | yes or none | data Choose this to view the details of manual reset lockouts | |||
| Auto Reset | yes or none | data Choose this to view the details of auto reset lockouts | |||
| Inputs | menu | menu Choose this to view the status of the Boiler Inputs at the time of the error | |||
| Outputs | menu | menu Choose this to view the status of the Boiler Outputs at the time of the error | |||
| Temperatures | menu | menu Choose this to view the Boiler Temperatures at the time of the error | |||
| Lockout History 2 | Choose this to view the second most recent error recorded | ||||
| Time & Date | text | data Displays time and date that lockout occurred | |||
| Status | text | data Displays what the status of the boiler at the time of the error | |||
U-Control operation and setup — advanced (continued)
Figure 117 U-Control diagnostic information (see Figure 115, page 102 for location in menu sequence), continued
| Menu/Item Units Low | Value | High Value | Default | Comment | |
| Manual Reset | yes or none data | Choose this to view the details of manual reset lockouts | |||
| Auto Reset | yes or none data | Choose this to view the details of auto reset lockouts | |||
| Inputs | menu menu Choose this to view the status of the Boiler Inputs at the time of the error | ||||
| Outputs | menu menu Choose this to view the status of the Boiler Outputs at the time of the error | ||||
| Temperatures | menu menu Choose this to view the Boiler Temperatures at the time of the error | ||||
| Lockout History 3 | Choose this to view the third most recent error recorded | ||||
| Time & Date | text data Displays time and date that lockout occurred | ||||
| Status | text data Displays what the status of the boiler at the time of the error | ||||
| Manual Reset | yes or none data Choose this to view the details of manual reset lockouts | ||||
| Auto Reset | yes or none data Choose this to view the details of auto reset lockouts | ||||
| Inputs | menu menu Choose this to view the status of the Boiler Inputs at the time of the error | ||||
| Outputs | menu menu Choose this to view the status of the Boiler Outputs at the time of the error | ||||
| Temperatures | menu menu Choose this to view the Boiler Temperatures at the time of the error | ||||
| Software Versions | |||||
| Display #.## format data Software version of the microprocessor on the display circuit board | |||||
| Main Micro | #.# format | data | Software version of the main microprocessor on the control circuit board | ||
| Second Micro | #.# format | data | Software version of the second microprocessor on the control circuit board | ||
| Manual Test Mode | |||||
| Status | text | data | Current operating status of the boiler. Prepurge, Ignition, Name of the system Type being satisfied, post purge, Warm Weather Shutdown, Trouble | ||
| Target | °F | data | Calculated target temperature based on outdoor temp or the max setpoint if no ODR | ||
| Modulation | °F | data | Temperature of the sensor the boiler is using to base its modulation | ||
| System Supply | °F | data | Temperature of the remote mounted system water supply sensor | ||
| System Return | °F | data | Temperature of the remote mounted system water return sensor | ||
| Boiler Out | °F | data | Temperature of the outlet sensor on the boiler heat exchanger | ||
| Boiler In | °F | data | Temperature of the inlet sensor on the boiler heat exchanger | ||
| Flame Signal | no units | data | Number indicating the presence and quality of the flame used to shutdown boiler | ||
| Blower Signal | % of rate | data Control's output to the blower | |||
| Blower Tach | rpm | data Blower's feedback to the control | |||
| Force Rate | Low, Med, High, or Auto | Auto | Used to manually force a rate during a call for heat. Choose auto for normal operation. | ||
| Manual Reset | Reset selected condition | ||||
| Maintenance Info | |||||
| Name | text | blank | Contractor name to appear in maintenance reminders and during lockouts | ||
| Phone | text blank | Contractor phone number | |||
| Model | text | blank | Displays the boiler model selected in the boiler setup | ||
| CP Number | text blank | Enter the CP# of the boiler | |||
| Installed | text blank | Enter the date the boiler was installed | |||
| Last Date | text data Date automatically entered when Reset Reminder is choose by contractor | ||||
| Next Date | text | data | Date automatically calculated when Reset Reminder is selected by contractor | ||
| Interval Settings | months | 6 | 24 | 12 | Contractor selects maintenance reminder frequency based on service history |
| Reset Reminder | menu | menu | Contractor selects this to update Last maintenance Date and Next Date. IHomeowner uses this to ignore the reminder and update only the Next Date. | ||
| Set Time and Date | |||||
| Year | text | 2017 | Set year (homeowner or contractor) | ||
| Month | text 1 | Set month (homeowner or contractor) | |||
| Day | text 1 | Set day (homeowner or contractor) | |||
| Hour | text 12 | Set hour (homeowner or contractor) | |||
| Minute | text 0 | Set minute (homeowner or contractor) | |||
Annual startup and general maintenance
WARNING
Follow the service and maintenance procedures given throughout this manual and in component literature shipped with the boiler. Failure to perform the service and maintenance could result in damage to the boiler or system. Failure to follow the directions in this manual and component literature could result in severe personal injury, death or substantial property damage.
Figure 118 Service and maintenance schedules
| Service technician (see following pages for instructions) | Owner maintenance (see Ultra User's Information Manual for instructions) | ||
| ANNUAL START-UP (See First-year special inspection) | General: • Reported problems. • Inspect interior; clean and vacuum if necessary; WARNING — no solvents. • Clean condensate trap and fi ll with fresh water. • Check for leaks (water, gas, fl ue, condensate). • Check system water chemistry, inhibitor level and antifreeze concentration, if used. • Verify fl ue and air lines in good condition and sealed tight. • Check system water pressure/system piping/expansion tank. • Check control settings. • Ignition electrode (clean with steel wool and reposition) — replace if worn. • Ignition and ground wiring. • Wiring and connections. • Perform start-up checkout and performance verification beginning with Startup — fi ll the system, page 35 . • Flame inspection (stable, uniform). • Flame signal (see Figure 119, page 112 ) . • Clean Nanogate coated heat exchanger if fl ue temp is more than 54°F above return water temp. • Inspect jacket front door gaskets; replace if necessary. Additional if combustion or performance indicate need: • Clean heat exchanger, page 126 • Remove and clean burner using compressed air only. • Vacuum the blower. Review: • Review with owner. | Daily | Check boiler area. Check air openings. Check pressure/temperature gauge. Verify boiler front door is securely in place. |
| Monthly | Check vent piping. Check air piping. Check relief valve. Check condensate drain system. Check automatic air vents (if used). | ||
| Periodically | Test low water cutoff (if used). | ||
| Every 6 months | Check boiler piping (gas and water) Operate relief valve. | ||
| End of season | Shut boiler down (unless boiler used for domestic water). | ||
Annual startup
HANDLING CERAM IC FIBER MATERIALS
REMOVING BURNER GASKET or COVER PLATE INSULATION
WARNING
The Ultra burner gasket (models 80 and 105) and cover plate insulation (all models) contain ceramic fi ber material. Ceramic fi bers can be converted to cristobalite in very high temperature applications. The International Agency for Research on Cancer (IARC) has concluded, "Crystalline silica inhaled in the form of quartz or cristobalite from occupational sources is carcinogenic to humans (Group 1).":
■ Avoid breathing dust and contact with skin and eyes.
- Use NIOSH certified dust respirator (N95). This type of respirator is based on the OSHA requirements for cristobalite at the time this document was written. Other types of respirators may be needed depending on the job site conditions. Current NIOSH recommendations can be found on the NIOSH web site at http://www.cdc.gov/niosh/homepage.html. NIOSH approved respirators, manufacturers, and phone numbers are also listed on this web site.
- Wear long-sleeved, loose fitting clothing, gloves, and eye protection.
■ Apply enough water to the combustion chamber lining or base insulation to prevent airborne dust.
■ Remove combustion chamber lining or base insulation from the boiler and place it in a plastic bag for disposal.
■ Wash potentially contaminated clothes separately from other clothing. Rinse clothes washer thoroughly.
NIOSH stated First Aid
■ Eye: Irrigate immediately
■ Breathing: Fresh air.
FIRST-YEAR SPECIAL INSPECTION
NOTICE
It is recommended that you obtain a Weil-McLain Ultra Boiler Maintenance kit before attempting the fi rst-year inspection, to ensure all parts that may be needed are available. This kit includes a heat exchanger cover plate gasket, burner gasket (80 and 105 only), new ignitor, and ignitor gasket. See listing in Replacement parts section of this manual. These parts must be on hand when you perform the fi rst-year inspection in the event they must be replaced.
WARNING
Failure to replace the items above when needed could result in severe personal injury, death or substantial property damage.
- No later than 12 months after the boiler is installed, perform a first-year inspection of the boiler. This must include the following in addition to routine annual start-up procedures.
a. Remove the heat exchanger cover plate (see page 112 for instructions on removal and replacement).
b. Inspect the heat exchanger and clean if necessary (see "Cleaning the heat exchanger — pin side when required," page 125, and all referenced illustrations and instructions).
c. Inspect the cover plate insulation and gasket. Replace if not in good condition.
d. Remove the burner and inspect carefully. Clean the burner thoroughly using a vacuum cleaner and a soft brush if needed. Make sure there is no blockage or accumulation of debris in the burner or the burner ports. Replace the burner if necessary.
e. Models 80 and 105 only — inspect the burner gasket, and replace if the gasket is not in good condition. Make sure the burner is clean. Then securely fasten it tightly to the cover plate.
f. Disconnect condensate trap and drain lines. Inspect, then fl ush thoroughly.
- Determine follow-up maintenance and service needs based on the condition of the heat exchanger and condensate lines.
a. If the heat exchanger shows substantial fouling, or if condensate lines show accumulation of sediment, schedule a follow-up service call to perform the first-year inspection again, sooner than the normal twelve months between.
b. Heavy fouling of the exchanger or condensate lines indicates possible combustion air contamination. Inspect the air intake area carefully, and remove possible contaminants. See Figure 11, page 16, for products to avoid.
WARNING
You must eliminate causes of corrosion and contamination to ensure reliable operation of the boiler and system.
Annual startup (continued)
WARNING
The boiler should be inspected and started annually, at the beginning of the heating season, only by a qualified service technician. In addition, the maintenance and care of the boiler designated in Figure 118, page 108 and explained on the following pages must be performed to assure maximum boiler efficiency and reliability. Failure to service and maintain the boiler and system could result in equipment failure.
WARNING
Electrical shock hazard — Turn off power to the boiler before any service operation on the boiler except as noted otherwise in this instruction manual. Failure to turn off electrical power could result in electrical shock, causing severe personal injury or death.
Address reported problems
- Inspect any problems reported by owner and correct before proceeding.
Inspect boiler area
-
Verify that boiler area is free of any combustible materials, gasoline and other flammable vapors and liquids.
-
Verify that air intake area is free of any of the contaminants listed on page 16 of this manual. If any of these are present in the boiler intake air vicinity, they must be removed. If they cannot be removed, reinstall the air and vent lines per this manual.
Inspect boiler interior & door gaskets
-
Remove jacket front door and inspect interior of boiler.
-
Visually inspect the door gaskets. Make sure all are in good condition. Obtain replacements if any gasket is damaged.
WARNING
Door gaskets must be intact, and must provide a reliable seal. Replace any damaged gasket.
-
Remove the venturi air inlet silencer and clean if necessary. Replace silencer.
-
Vacuum any sediment from the inside of the boiler and components. Remove any obstructions.
WARNING
Do not use solvents to clean any of the boiler components. The components could be damaged, resulting in unreliable or unsafe operation.
Clean condensate trap
- Loosen condensate trap line hose clamps and remove trap line.
- Empty water from trap line and inspect. Flush out if needed with fresh water.
- Check condensate elbow and tee and condensate line to drain. Flush if necessary to clean.
- Reinstall condensate trap line and tighten hose clamps.
- Fill trap with fresh water by pouring into upturned end of PVC condensate tee.
Check all piping for leaks
WARNING
Eliminate all system or boiler leaks. Continual fresh make-up water will reduce boiler life. Minerals can build up in sections, reducing heat transfer, overheating heat exchanger, and causing heat exchanger failure. Leaking water may also cause severe property damage.
- Inspect all water and gas piping and verify to be leak free.
- Look for signs of leaking lines and correct any problems found.
- Check gas line using procedure on page 29.
Check air openings
- Verify that combustion and ventilation air openings to the boiler room and/or building are open and unobstructed. Check operation and wiring of automatic combustion air dampers, if used.
- Verify that boiler vent discharge and air intake are clean and free of obstructions.
Flue vent system and air piping
- Visually inspect entire fl ue gas venting system and combustion air piping for blockage, deterioration or leakage. Repair any joints that show signs of leakage in accordance with vent manufacturer's instructions. When air is ducted to boiler, verify that air inlet hose is connected and properly sealed.
WARNING
Failure to inspect for the above conditions and have them repaired can result in severe personal injury or death.
Check water system
- Verify all system components are correctly installed and operational.
- Check the cold fill pressure for the system. Verify it is correct (usually around 12 psig).
- Watch the system pressure as the boiler heats up (during testing) to ensure pressure doesn't rise too high. Excessive pressure rise indicates expansion tank sizing or performance problem.
Annual startup (continued)
-
Inspect automatic air vents and air separators. Remove air vent caps and briefly press push valve to flush vent. Reinstall caps. Make sure vents do not leak. Replace any leaking vents.
-
Check system water chemistry (pH, hardness and inhibitor level). See page 35.
Check expansion tank
-
Expansion tanks provide space for water to move in and out as the heating system water expands due to temperature increase or contracts as the water cools. Tanks may be open, closed or diaphragm or bladder type. See page 11 of this manual for suggested location of expansion tanks and air eliminators.
-
Open-type — located above highest radiator or baseboard unit, usually in the attic or closet. Has a gauge glass and overflow pipe to a drain.
-
Closed-type — welded gas tight and located above boiler. Tank is partially filled with water, leaving an air cushion for expansion.
-
Make sure this type of tank is fitted with a tank fitting, such as the B & G Tank-Trol or Taco Taco-Trol. This fitting reduces gravity circulation of air-saturated tank water back to the system and prevents the air from bubbling up through the water as it returns from the system.
-
Do not use automatic air vents in systems with closed-type tanks. The air will escape from the system instead of returning to the tank. Eventually, the tank will waterlog and no longer control pressurization. The boiler relief valve will weep frequently.
-
Diaphragm- or bladder-type — welded gas tight with a rubber membrane to separate the tank pressurizing air and the water. May be located at any point in the system, but most often found near the boiler.
-
Systems with this type of expansion tank require at least one automatic air vent, preferably located on top of an air eliminator, as shown in examples in this manual.
-
If relief valve has tended to weep frequently, the expansion tank may be waterlogged or undersized.
-
Closed-type tank — tank is most likely waterlogged. Install a tank fitting if not already installed. Then check fill level per fitting manufacturer's instructions. If fill level is correct, check tank size against manufacturer's instructions. Replace with a larger tank if necessary.
- Diaphragm- or bladder-type — first, check tank size to be sure it is large enough for the system. If size is too small, add additional tank (or tanks) as necessary to provide sufficient expansion. If tank size is large enough, remove tank from system and check charge pressure (usually 12 psig for residential applications). If tank won't hold pressure, membrane has been damaged. Replace tank.
Inspect ignition electrode
- Remove the ignition electrode from the boiler heat exchanger access cover.
- Remove any white oxides accumulated on the ignition electrode using steel wool. If the ignition electrode cannot be cleaned satisfactorily, replace ignitor with a new one.
- Reinstall ignition electrode, making sure gasket is in good condition and correctly positioned.
- Make sure the electrodes are parallel to each other.
Check ignition wiring
- Check ignition cable electrical resistance. A good cable will have resistance between 900 and 1000 ohms. Replace if not acceptable.
- Inspect boiler ground wire from heat exchanger access cover to ground terminal strip.
- Verify all wiring is in good condition and securely attached.
- Check ground continuity of wiring using continuity meter.
- Replace ground wires if results are not satisfactory.
Check all boiler wiring
- Inspect all boiler wiring, making sure wires are in good condition and securely attached.
Check control settings
- Use the U-Control display to navigate through all settings. Adjust settings if necessary.
- Check settings of external limit controls (if any) and adjust if necessary.
Perform startup and checks
- Start boiler and perform checks and tests specified in this manual.
- Verify cold fill pressure is correct and that operating pressure does not go too high.
- Complete the check-out procedure on page 42.
Annual startup (continued)
Check burner fl ame
WARNING
The boiler contains ceramic fi ber materials. Use care when handling these materials per instructions on page 109 of this manual. Failure to comply could result in severe personal injury.
- Inspect flame through observation window using the procedure on page 40.
- If flame is unsatisfactory at either high fire or low fire, turn off boiler and allow boiler to cool down. Then remove burner and clean it thoroughly using a vacuum cleaner or compressed air. Do not use compressed air to clean burner if performed inside a building.
- To access the burner, remove the heat exchanger cover plate following the procedure beginning on page 125.
- When replacing burner, ensure gasket is in good condition and correctly positioned. After tightening the three retainer screws, bend up the retainer tabs as shown in Figure 120 to prevent screw rotation.
- Reattach the cover plate using the method given in Figure 126, page 126 or Figure 128, page 127.
- After servicing, reinstall boiler components. Retest boiler.
Check fl ame signal
- Navigate to Diagnostics/Inputs on the U-Control display (see Figure 115, page 102). The flame signal value must be at least 20 above the Shutdown values given in Figure 119.
Figure 119 Flame signal shutdown values
| Model Ultra – | Shutdown fl ame signal | Model Ultra – | Shutdown fl ame signal |
| 8095 | 230 | 100 | |
| 80 HA | 95 | 230 HA | 100 |
| 105 | 135 | 299/310 | 130 |
| 105 HA | 135 | 299/310 HA | 130 |
| 155 | 80 | 399 | 120 |
| 155 HA | 80 | 399 HA | 120 |
| NOTE: “HA” means high altitude, 5500 feet or more above seal level. | |||
-
If the flame signal drops to less than 20 above the Shutdown values, the U-Control will attempt to correct by increasing the boiler fi ring rate to increase flame signal.
-
A lower flame signal may indicate a fouled ignitor or damaged ignitor insulation. If cleaning the ignitor does not improve, ground wiring is in good condition, and ground continuity is satisfactory, replace the ignitor.
Figure 120 Burner assembly
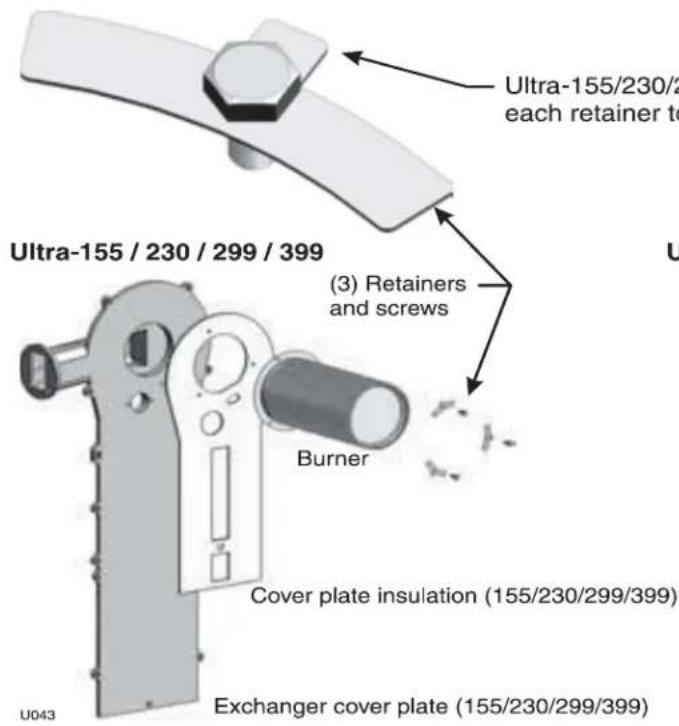
text_image
Ultra-155/230/299 / 399 Ultra-155 / 230 / 299 / 399 (3) Retainers and screws Burner Cover plate insulation (155/230/299/399) Exchanger cover plate (155/230/299/399)Ultra-155/230/299/399: After tightening retainer screws, bend up tab or each retainer to prevent screws from turning.
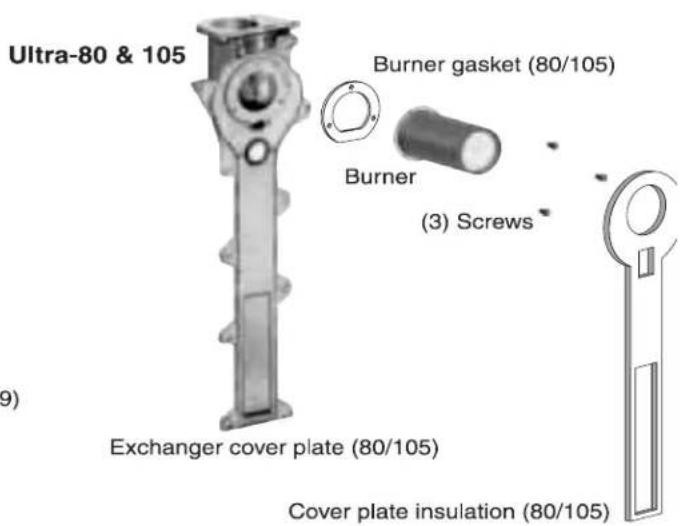
text_image
Ultra-80 & 105 Burner gasket (80/105) Burner (3) Screws Exchanger cover plate (80/105) Cover plate insulation (80/105)Annual startup (continued)
- If flame signal still remains low, inspect the vent and air piping. Then inspect the heat exchanger, following the procedures given in this manual for removal and reinstallation of the head exchanger cover plate and other boiler components. Clean the exchanger as described in this manual if necessary.
Check blower speeds
-
For installations at altitudes above 5,500 feet, make sure the control is set up for high altitude in the boiler setup menu. The U-Control module automatically adjusts low fi re and ignition rates to compensate for high altitude conditions.
-
For installations below 5,500 feet, high altitude should NOT be enabled.
-
Use the U-Control display to navigate to Manual test mode (see Figure 115, page 102).
-
Set the fi ring rate to MINIMUM (low fi re).
-
Write down the blower RPM value shown and compare to the value in Figure 121. The value should no less than the "Minimum setting" and no higher than the Ignition "Factory setting" listed. Low fi re rate (and corresponding blower speed) is adjusted in the boiler setup menu.
-
Set the fi ring rate to MEDIUM (ignition rate).
- Write down the blower RPM value. It should be within 200 RPM of the value listed in Figure 121.
- Set the fi ring rate to MAXIMUM (high fi re).
- Write down the blower RPM value. It should be within 200 RPM of the value given in Figure 121.
- If any of the values are outside the ranges listed in the previous steps, contact the factory for technical assistance.
Check fl ue gas temperature
- Set the boiler to high fi re. Then adjust the U-Control module display to view fl ue gas temperature and boiler return temperature.
- The flue gas temperature should be no more than 54°F higher than the boiler return temperature.
- If the fl ue temperature is higher than this, shut down the boiler, allow to cool, and follow the procedure starting on page 125 to clean the Nanogate coated heat exchanger.
Figure 121 Firing rates and corresponding blower speeds (low fire, ignition, and high fire) — for altitudes up to 5,500 feet
| Ultra Model | -80 | -105 | -155 | -230 | -299/310 | -399 | ||||||||||||
| % | RPM | Btu/Hr | % | RPM | Btu/Hr | % | RPM | Btu/Hr | % | RPM | Btu/Hr | % | RPM | Btu/Hr | % | RPM | Btu/Hr | |
| Low fi re | ||||||||||||||||||
| Minimum setting | 20 | 1,300 | 16,000 | 20 | 1,300 | 21,000 | 20 | 1,300 | 31,000 | 20 | 1,300 | 46,000 | 20 | 1,400 | 62,000 | 20 | 1,520 | 79,800 |
| Factory setting | 33 | 1,983 | 26,400 | 33 | 1,983 | 34,650 | 33 | 1,983 | 51,150 | 33 | 1,983 | 75,900 | 33 | 2,156 | 102,300 | 20 | 1,520 | 79,800 |
| High altitude | 33 | 1,983 | 26,400 | 33 | 1,983 | 34,650 | 33 | 1,983 | 51,150 | 33 | 1,983 | 75,900 | 30 | 1,981 | 93,000 | 28 | 2,002 | 111,720 |
| Ignition (“Medium” setting in manual test mode) | ||||||||||||||||||
| Factory setting | 47 | 2,300 | 37,600 | 47 | 2,300 | 49,350 | 47 | 2,300 | 72,850 | 47 | 2,300 | 108,100 | 36 | 2,330 | 111,600 | 33 | 2,303 | 131,670 |
| High altitude | 62 | 3,500 | 49,600 | 62 | 3,500 | 65,100 | 62 | 3,500 | 96,100 | 62 | 3,500 | 142,600 | 51 | 3,202 | 158,100 | 40 | 2,725 | 159,600 |
| High fire (adjust if desired to match maximum system load — High fire % rate = Max heat load / Boiler output) | ||||||||||||||||||
| Factory setting | 94 | 5,200 | 75,200 | 94 | 5,200 | 98,700 | 94 | 5,200 | 145,700 | 94 | 5,200 | 216,200 | 96 | 5,818 | 297,600 | 96 | 6,099 | 383,040 |
| Maximum setting | 100 | 5,500 | 80,000 | 100 | 5,500 | 105,000 | 100 | 5,500 | 155,000 | 100 | 5,500 | 230,000 | 100 | 6,050 | 299,000 | 100 | 6,340 | 399,000 |
Annual startup (continued)
Check boiler relief valve
- Inspect the relief valve and lift the lever to verify flow as in the following warnings, excerpted from a relief valve manufacturer's warning label. Before operating any relief valve, ensure that it is piped with its discharge in a safe area to avoid severe scald potential. Read page 9 before proceeding further.
WARNING
Safety relief valves should be reinspected AT LEAST ONCE EVERY THREE YEARS, by a licensed plumbing contractor or authorized inspection agency, to ensure that the product has not been affected by corrosive water conditions and to ensure that the valve and discharge line have not been altered or tampered with illegally. Certain naturally occurring conditions may corrode the valve or its components over time, rendering the valve inoperative. Such conditions are not detectable unless the valve and its components are physically removed and inspected. This inspection must only be conducted by a plumbing contractor or authorized inspection agency — not by the owner. Failure to reinspect the boiler relief valve as directed could result in unsafe pressure buildup, which can result in severe personal injury, death or substantial property damage.
WARNING
Following installation, the valve lever must be operated AT LEAST ONCE A YEAR to ensure that waterways are clear. Certain naturally occurring mineral deposits may adhere to the valve, rendering it inoperative. When manually operating the lever, water will discharge and precautions must be taken to avoid contact with hot water and to avoid water damage. Before operating lever, check to see that a discharge line is connected to this valve directing the flow of hot water from the valve to a proper place of disposal. Otherwise severe personal injury may result. If no water flows, valve is inoperative. Shut down boiler until a new relief valve has been installed.
- After following the above warning directions, if the relief valve weeps or will not seat properly, replace the relief valve. Ensure that the reason for relief valve weeping is the valve and not over-pressurization of the system due to expansion tank waterlogging or under-sizing.
Review with owner
- Review the User's Information Manual with the owner.
- Emphasize the need to perform the maintenance schedule specified in the User's Information Manual (and in this manual as well).
- Remind the owner of the need to call a licensed contractor should the boiler or system exhibit any unusual behavior.
- Remind the owner to follow the proper shutdown procedure and to schedule an annual startup at the beginning of the next heating season.
Troubleshooting
VERIFY PROPER OPERATION AFTER SERVICING.
CAUTION
Before servicing and making connections ... ALWAYS TURN POWER OFF TO THE BOILER TO PREVENT ELECTRICAL SURGES, WHICH CAN DAMAGE BOILER COMPONENTS.
WARNING
ELECTRICAL SHOCK HAZARD — The boiler ON/OFF switch does not turn off all power to the boiler. TURN OFF ALL POWER TO THE BOILER WHEN SERVICING. Internal wiring is still powered when the switch is off.
CAUTION
Label all wires prior to disconnection when servicing controls. Wiring errors can cause improper and dangerous operation. Always disconnect power to boiler before servicing. Failure to comply could result in severe personal injury, death or substantial property damage.
WARNING
Never jumper (bypass) any device except for momentary testing. Severe personal injury, death or substantial property damage can result.
NOTICE
Before calling, always complete the "Ultra Gas Data Collection Sheet" (page 124). Record the boiler size and CP number (located on the lower center support frame in the center of the boiler).
Reinstall boiler jacket front door
WARNING
Reinstall boiler jacket front door after servicing. The boiler front door must be securely fastened to the boiler to prevent boiler from drawing air from inside the boiler room. This is particularly important if the boiler is located in the same room as other appliances. Failure to keep the door securely fastened could result in severe personal injury or death.
Before troubleshooting:
- See Figure 122 for tools and kits recommended for troubleshooting Ultra boilers.
- Check for 120 VAC (minimum 102 VAC to maximum 132 VAC) to boiler.
- Check the U-Control's last three lockout histories.
a. See page 99, "ADVANCED SETUP - OVERVIEW."
b. Scroll down to DIAGNOSTICS and press the enter key.
c. Scroll down to ERRORS and press the enter key.
d. Record the first four data records and then highlight the history record you want to view.
e. Follow information at the bottom of the screen to navigate through your lockout histories.
Figure 122 Tools and kits for troubleshooting
| Tools needed for troubleshooting | Purpose |
| #2 Phillips Screwdriver | Remove 4 screws to remove the top front cover |
| U-Control Screwdriver or 1/16" flat blade screwdriver | Used for wiring on terminal blocks for the U-Control (comes with boiler) |
| 1/8" Allen Wrench (Hex Key) | To add orifi ce to change from natural to propane |
| 7mm Nut driver (Ultra 155/230/299/310/399) | To change the burner (#2 Phillips Screwdriver for the 80 and 105) |
| 11mm Nut driver | To remover the front cover plate on the burner |
| 4mm Allen wrench (long handled preferred) | To remove the blower assembly from the heat exchanger |
| Multimeter | To take measurement readings on sensors and electrical components |
| Manometer (Incline or digital) | To measure the gas pressure coming to the boiler. |
| Combustion analyzer (Digital preferred) | For combustion testing. |
| Contact thermometer | For checking surface temperatures of heat exchanger and pipes |
| P/N 383-500-605 Maintenance Kit (80 and 105) | This kit should be on hand when performing annual maintenance in the event replacement is required. |
| P/N 383-500-620 Maintenance Kit (155/230/299/310/399) | This kit should be on hand when performing annual maintenance in the event replacement is required. |
Troubleshooting (continued)
Check the following:
- Make sure thermostat is calling for heat and contacts (including appropriate zone controls) are closed. Check for 24 VAC between thermostat wire nuts and ground.
- Make sure all external limit controls are either installed (and closed) or temporarily jumpered for testing.
- Make sure that connectors to control module are securely plugged in at module and originating control.
- Gas pressures:
• Maximum: 13" w.c. with no flow (lockup) or with boiler on
- Minimum: 4" w.c. (for all except 5" for -299/310) for natural gas, or 4" w.c. for propane, with gas flowing (verify during startup with boiler at high fi re)
Always check control module fuses
WARNING
ALWAYS check control module fuses before replacing control module or any major components (blower, etc.). If one of these fuses is blown, it can prevent control module or other components from operating.
- Turn OFF power to boiler at external line switch.
- Remove jacket door and jacket top panel. Rotate the swing-away control panel forward to expose the U-Control module.
- Remove and inspect the two fuses (located as shown below).
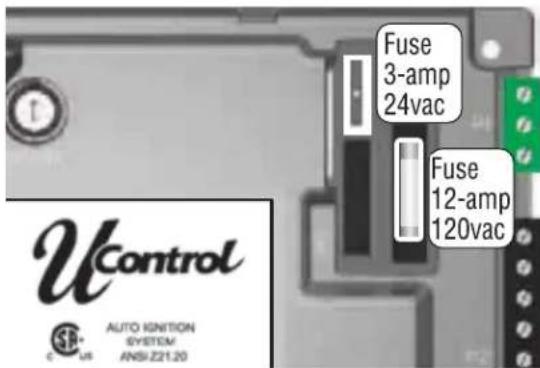
text_image
Fuse 3-amp 24vac Fuse 12-amp 120vac Ucontrol AUTO IGNITION SYSTEM ANSI:221.20- If necessary, replace the fuse:
a. Low voltage circuit fuse is 3-amp fast-blow (Littelfuse 257003).
b. Line voltage circuit fuse is 12-amp slow-blow (Littelfuse 326012P).
WARNING
Do not jumper fuse or replace with any fuse except as specified. Failure to comply could result in severe personal injury, death or substantial property damage.
- Reinstall jacket top panel and boiler jacket door after checking the fuses.
- Restore power to boiler at external line switch and verify boiler operation after completing boiler service.
Checking temperature sensors
- The boiler temperature sensors (flue, outdoor, return water and supply water) are all resistance-type devices.
- Figure 123 shows the correct value for the sensor at various temperatures.
- Use the resistance values at 32^ F, 60^ F, 70^ F and 212^ F to measure the sensor resistance at known temperatures (ice point, room temperature and sea level boiling point). For ice point and boiling point, insert the sensor in water at that temperature. Use an ohmmeter to read resistance value.
- To check whether the control module is correctly sensing temperature, you can use a resistance decade box. Connect the decade box temporarily in place of a sensor and read the corresponding temperature on the U-Control display. The temperature should be close to the value corresponding to the input resistance.
Figure 123 Sensor resistance values
| Sensor resistance values | |||||
| Temp (°F) | Sensor ohms | Temp (°F) | Sensor ohms | ||
| Min | Max | Min | Max | ||
| 32 | 34265 | 37871 | 120 | 4517 | 4992 |
| 40 | 27834 | 30764 | 130 | 3698 | 4088 |
| 50 | 21630 | 23907 | 140 | 3043 | 3364 |
| 60 | 16944 | 18727 | 150 | 2517 | 2782 |
| 70 | 13372 | 14780 | 160 | 2091 | 2311 |
| 80 | 10629 | 11747 | 170 | 1744 | 1928 |
| 90 | 8504 | 9399 | 180 | 1461 | 1615 |
| 100 | 6847 | 7568 | 190 | 1229 | 1359 |
| 110 | 5545 | 6129 | 200 | 1038 | 1147 |
Troubleshooting (continued)
Make sure to determine the causes of outages. Do not leave the boiler operating without a complete diagnosis.
U-Control fault indications
- The U-Control provides diagnostic information for both automatic reset conditions and manual reset conditions. See Figure 117, page 106 for information available on the U-Control display.
- Figure 124 shows the screen behavior during an automatic or manual reset condition. The table
below the display illustration lists manual reset conditions and how to reset from them.
- Figure 125, page 118 lists conditions that will cause the control to display a constant red screen. The boiler will automatically restart if the condition self-corrects or the technician uses the U-Control's manual reset screens to reset.
Figure 124 U-Control display toggles when in lockout, with screen flashing red to gray
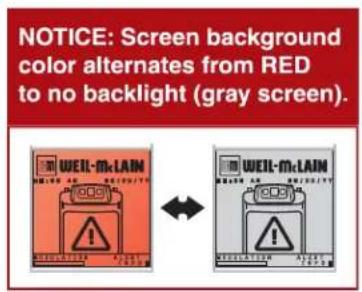
text_image
NOTICE: Screen background color alternates from RED to no backlight (gray screen).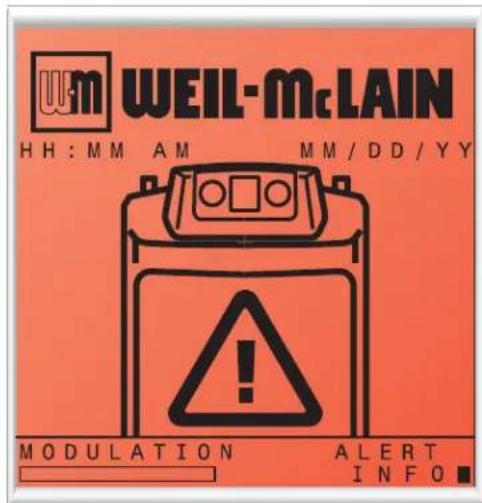
text_image
WEIL-McLAIN HH:MM AM MM/DD/YY MODULATION ALERT INFOSEE TOP LINE OF DISPLAY FOR ERROR
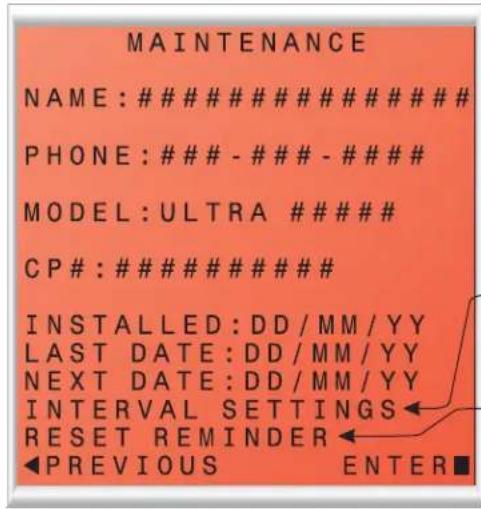
text_image
MAINTENANCE NAME: ######## PHONE: ####-###-### MODEL: ULTRA ### CP#: ######## INSTALLED: DD/MM/YY LAST DATE: DD/MM/YY NEXT DATE: DD/MM/YY INTERVAL SETTINGS RESET REMINDER PREVIOUS ENTER
text_image
3 ALTERNATING SCREENSSelect MANUAL RESET to reset condition. Make sure to correct the cause of the problem if possible. ____
- The service technician can change the interval setting by selecting this line.
-Select RESET REMINDER to reset the counter. The reset reminder will not occur again until the INTERVAL time has elapsed.
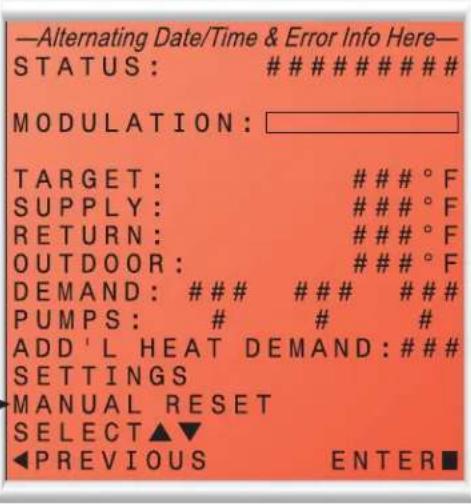
text_image
—Alternating Date/Time & Error Info Here— STATUS: ####### MODULATION: TARGET: #### °F SUPPLY: #### °F RETURN: #### °F OUTDOOR: #### °F DEMAND: #### #### ### PUMPS: # # # ADD'L HEAT DEMAND:### SETTINGS MANUAL RESET SELECT▲▼ ▲PREVIOUS ENTER■Troubleshooting (continued)
Figure 125 Troubleshooting suggestions for Ultra boilers
U-Control Error Condition Log
| The U-control is able to record information about the boiler's condition at the time of the three previous faults or errors. This information is available to view in Contractor Menus under “DIAGNOSTICS” by selecting “ERRORS.” The control will display the following information: | ||
| Information Description Action | ||
| Control Fault | Records the number of internal control faults | Select and press the enter key to reset this count |
| Ignition Retries Displays the number of ignition attempts in the current ignition sequence. | ||
| Manual Reset Count Records number of lockouts that required a manual reset since this count was last cleared. | Select and press the enter key to reset this count | |
| Auto Reset Count Records number of lockouts that have automatically reset since this count was last cleared. | Select and press the enter key to reset this count | |
| Lockout History 1 | Details of present or last recorded lockout | Select and press the enter key for more details |
| Lockout History 2 | Details of boiler during the second oldest lockout still in memory | Select and press the enter key for more details |
| Lockout History 3 | Details of boiler during the oldest lockout still in memory | Select and press the enter key for more details |
How to read the last 3 lockout histories:
- Scroll down to "DIAGNOSTICS" and press the enter key (Square Key in center)
- Scroll down to "ERRORS" and press the enter key (Square Key in center)
- Scroll down to "LOCKOUT HISTORY #" and press the enter key.
- Scroll to choose the either "MANUAL RESET" or "AUTO RESET" and press the enter key to display
the fault condition that was recorded.
- Press the left arrow key to return to the LOCKOUT HISTORY # screen. Scroll up or down to highlight other choices and press the enter key to view the details of the boiler's condition when the lockout was recorded.
- TO CLEAR ALL LOCKOUT HISTORIES: While on the "ERRORS" screen, hold the Left and Right arrow buttons simultaneously for 5 seconds.
U-Control Fault Displays, Diagnostics and Suggested Corrective Actions
| Display | Condition Diagnostics Corrective Action(s) | ||
| Nothing shown on display screen and blower running at full speed | Control is not receiving 24V power | Check wiring for short circuit or incorrect wiring. | Correct wiring per wiring diagram including connection of transformer to the U-Control. |
| Check 3-amp low voltage fuse on U-Control shown on page 100. | Replace fuse with proper part found in replacement part section of this manual. If fuse blows again recheck wiring per diagram. | ||
| Check transformer connection to the U-control per wiring diagram. Check for 24V output of transformer. | Replace transformer if it is receiving 120VAC, but not outputting 24VAC. | ||
Troubleshooting (continued)
Figure 125 Troubleshooting suggestions for Ultra boilers (continued)
| Display | Condition Diagnostics Corrective Action(s) | ||
| Nothing is shown in display screen and no other boiler components are operating | Control is not receiving 120V power. | Check service switch and/or circuit breaker to boiler turned is on. | Turn on service switch to power boiler. |
| Is there 120 Volts at the service switch? | Troubleshoot and correct the power supply to the service switch. | ||
| Is the Ultra's ON/OFF POWER SWITCH located behind the control pod turned on? | Turn the Ultra's power switch behind the control pod to ON. | ||
| Check for 120 volts at the line voltage terminal block located inside the control pod. | Correct wiring inside the control pod using the wiring diagram in this manual. | ||
| Inspect 12-amp fuse as shown on page 100. Replace if necessary. | Replace the fuse with proper part found in the replacement part section of this manual. If fuse blows again recheck wiring per diagram. | ||
| Nothing is shown on display screen, but boiler is operating | Occurs when the communication is lost from the U-control to the display. | Check for loose connections and proper pin alignment/engagement on the U-Control's plug P9 and the back of the display circuit board. | Check for continuity on the wire harness from the display to the U-control. See repair parts section for proper replacement part. |
| Cycle power off and on using boiler power switch and check for operation. | Replace with new display module. See repair parts section for proper replacement part. | ||
| TEMP RISE TOO QUICKLY | Occurs when supply water temperature in heat exchanger rises faster than 2°F per second during the first two minutes the burner is on. | Automatically resets after 1 minute delay or using manual reset on display.Manual reset is necessary after 5 automatic resets have occurred during the same Priority heat demand. Reset using manual reset screen on display. | Verify water pipe is installed correctly using primary/secondary connection to the boiler loop. Refer to Figure 4 page 11 for example of primary/secondary connection.Minimum pipe sizesUltra 80/105 - minimum 1 inchUltra 155/230 - minimum 1.25 inchUltra 299/310/399 - minimum 1.5 inch |
| Verify proper circulator sizing for boiler size and system requirements starting on page 9.Boiler ship with proper size circulators:Ultra 80/105 - Taco 007Ultra 155/230/299/310 - Taco 0014Ultra 399 - Taco 0013 | |||
| See message displayed TEMPERATURE SENSOR and follow procedure for loose connections. | |||
| SUPPLY 58F > RETURN | Boiler Out temperature has exceeded the Boiler In temperature by more than 58°F, when burner is on. | Automatically resets after 30 second delay or using manual reset on display. | Verify water pipe is installed correctly using primary/secondary connection to the boiler loop. Refer to Figure 4 page 11 for example of primary/secondary connection.Minimum pipe sizesUltra 80/105 - minimum 1 inchUltra 155/230 - minimum 1.25 inchUltra 299/310/399 - minimum 1.5 inch |
| Verify proper circulator尺寸为 boiler size and system requirements starting on page 9.Boiler ship with proper size circulators:Ultra 80/105 - Taco 007Ultra 155/230/299/310 - Taco 0014Ultra 399 - Taco 0013 | |||
| See message displayed TEMPERATURE SENSOR and follow procedure for loose connections. | |||
Troubleshooting (continued)
Figure 125 Troubleshooting suggestions for Ultra boilers (continued)
| Display | Condition Diagnostics Corrective Action(s) | ||
| RETURN > SUPPLY | Occurs when a return water temperature is greater than the corresponding supply temperature by 10°F or more. Applies to system sensors or boiler sensors. Condition must occur for 10 minutes for system sensors. | Automatically resets when condition no longer exists. | Verify proper flow direction of the boiler circulator. This circulator should be installed to push water through the boiler's return pipe as shown in Figure 4 on page 11. Verify proper placement of system sensors for single or multiple boiler systems. System sensors should be on system piping not on the boiler loop. System sensors may need located further away from boiler loop connection to the system if proximity to the boiler loop is causing sensors to be heated inaccurately. |
| TEMPERATURE SENSOR | Occurs when a temperature sensor has electrically shorted (SHORT) or has become disconnected (OPEN). | Automatically resets when condition no longer exists. | Check all the temperature readings of the boiler on the DIAGNOSTICS - TEMPERATURES menu to determine if any sensors are currently displayed as SHORT or OPEN. Compare this to the boiler temperatures recorded in the DIAGNOSTICS - ERRORS - LOCKOUT HISTORY # - TEMPERATURES during the last several lockout conditions. Determine which sensors are suspect and measure their resistance value and compare it to the values shown in Figure 109. If the resistance values are incorrect replace the temperature sensor. Refer to repair parts section for proper part number. OUTDOOR TEMP, SYSTEM SUPPLY, and SYSTEM RETURN are the optional outdoor air temperature and system water temperature sensors. If these are not being used they will always be shown as OPEN. This is normal unless the sensors were installed. |
| Check wire harness for loose connections and pin engagement at sensor connection, chassis mount connection through sheet metal cabinet, and U-Control module. Unplug connection at sensor and at U-Control and check continuity between ends. | |||
| If problem persists after checking items above replace U-Control. Refer to repair parts section for kit number. | |||
| FLUE TEMP TOO HIGH | Occurs when flue temperature sensor exceeds 216°F. | Automatic reset occurs if temperature drops below 216°F for 2.5 min. Manual reset is required if the temperature rises above 225°F. Reset using manual reset screen on display. | Follow procedure for above for SHORT and OPEN sensor conditions to properly diagnose sensor. In addition inspect heat exchanger combustion chamber and flueways for abnormal wear or buildup. Inspect vent system for abnormal wear or damage. Contact Weil-McLain Technical Support. |
| TEMPERATURE SENSOR | Occurs when dual temperature sensors values have spread by more that 10°F. | Automatically resets when sensors are within 10°F. | Follow procedure for above for SHORT and OPEN sensor conditions to properly diagnose sensor. If measured resistance values of sensors convert to temperatures separated by more than 10°F replace the sensor. |
| LOW WTR CUTOFF OPEN | Occurs when Low Water Cutoff Device contacts open for more than 1 second. | Requires manual reset of U-Control and may require manual reset of LWCO device depending on model. | Check for low water condition in system. Repair system as necessary refer to piping section of this manual. If low water condition does not exist check Diagnostics - Inputs screen to view status of Low Water Cutoff . If shown as OPEN check wiring between LWCO and U-Control. |
Troubleshooting (continued)
Figure 125 Troubleshooting suggestions for Ultra boilers (continued)
| Display | Condition Diagnostics Corrective Action(s) | ||
| DISPLAY COMM | Occurs when display communications out for 30 seconds. | Automatically resets when communication is re-established. | Check for a loose connection at the molex plug on the control and connection on the back of the display. |
| LIMIT OPEN | Occurs when manual or automaticresetlimitopens. | Automatic external limit will reset 2.5 minutes after external limit device closes.Manual limit fault must be reset by choosing Reset Lockout on the display. | Is there an external safety device connected? If yes, trouble shoot the external limit to determine and correct the cause that opened the limit. Also check for loose wiring connections.Remove the top front cover and inspect the ORANGE - 4 PIN connector P13.Ensure a jumper is installed between pins 1&2 if not using a manual reset external limit.Ensure a jumper is installed between pins 3&4 if not using a automatic reset external limit. |
| HIGH TEMP LIMIT | Boiler temperature sensor reached High Temp Limit setting (no higher than 200°F). | Reset using manual reset screen on display. | Verify all isolation valves are open and circulators are programmed into the U-Control properly. Each Priority input can be confi gured to turn on any combination of three circulator outputs. Refer to the U-Control Setup section to confi gure these properly for the system.Verify water pipe is installed correctly using primary/secondary connection to the boiler loop. Refer to Figure 4 page 11 for example of primary/secondary connection.Minimum pipe sizesUltra 80/105 - minimum 1 inchUltra 155/230 - minimum 1.25 inchUltra 299/310/399 - minimum 1.5 inch |
| Verify proper circulator sizing for boiler size and system requirements starting on page 9.Boiler ship with proper size circulators:Ultra 80/105 - Taco 007Ultra 155/230/299/310 - Taco 0014Ultra 399 - Taco 0013 | |||
| See message displayed TEMPERATURE SENSOR and follow procedure for loose connections. | |||
| FLAME FAULT | Occurs when flame is detected when there should be no flame. | Reset using manual reset screen on display. | Burner may be operating too hot due to incorrect combustion. Inspect flame and conduct combustion test.Force boiler into hi-fi re. Check fl ue gases with combustion analyzer and correct using the maintenance and startup procedure in this manual.Verify FLAME SIGNAL value quickly goes to zero on the DIAGNOSTICS - INPUTS screen when the gas valve closes.Check for flame at burner via flame current with burner off . Turn boiler off and watch flame through observation port. If flame continues after shutdown replace gas valve and venturi. |
Troubleshooting (continued)
Figure 125 Troubleshooting suggestions for Ultra boilers (continued)
| Display | Condition Diagnostics Corrective Action(s) | ||
| BLOWER FAULT | Blower unable to reach required speed or does not reach 0 RPM when turned off. | Automatically resets after 1 hour or can be reset by using manual reset on screen. | Check wire harness for loose connections and pin engagement at blower connections, chassis mount connection through sheet metal cabinet, and U-Control module. Unplug connection at sensor and at U-Control and check continuity between ends. Blower is connected to both low voltage and line voltage harness. |
| Check Diagnostics - Inputs screen with boiler in standby mode and blower not running. If BLOWER SPEED is not 0 RPM then replace blower. | |||
| If blower does not rotate during ignition sequence check for 120V power at blower connection. If 120Vac power at blower motor and it doesn't start replace blower. Check power at U-Control. If 120Vac is not present at U-Control when boiler is powered replace U-Control. Refer to repair parts section. | |||
| IGNITION FAULT | Boiler went through 5 ignition attempts and never detected flame. | Automatically resets after 1 hour or can be reset by using manual reset on screen. | Check condensate trap for blockage allowing condensate to accumulate inside heat exchanger |
| Fouled, worn, bent, or faulty igniter.Fouled igniters can be cleaned for additional use with fine grit sand paper or steel wool.Worn or badly fouled igniters should be replaced with the proper repair part.Igniter rods should be parallel with a 3.5mm (0.138 in) spark gap. | |||
| Dirty burner and/or heat exchanger will cause high back pressure and poor ignition. Follow procedure in maintenance section of this manual to clean burner and heat exchanger using fl ue cleaning tool and rinse method.Visual inspection of fl ueways will often will not be able to diagnose condition. | |||
| Check combustion settings on high and low fire and adjust per setup instructions if necessary. | |||
| Check incoming gas pressure with boiler off and at high fire. Adjust within limits on rating label. | |||
| Verify correct boiler model is selected in control and high altitude is selected for installations 5500 ft above sea level. | |||
| Check ignition cable resistance. Should measure 1000 Ohms (+/- 50 Ohms) | |||
| Check for fl ue pipe and intake pipe restrictions or blockage | |||
| Check burner fasteners and gaskets | |||
| Check venturi gaskets and proper propane orifice | |||
| Check condensate trap for blockage allowing condensate to accumulate inside heat exchanger | |||
Troubleshooting (continued)
Figure 125 Troubleshooting suggestions for Ultra boilers (continued)
| Display | Condition Diagnostics Corrective Action(s) | ||
| GAS VALVE FAULT | The U-Control has detected a problem with it gas valve output circuit | Automatic retry when condition exists. Boiler will reset if conditions clears. If condition does not clear boiler will retry in 1 hour. If condition is not clear after 1 hour, boiler will require manual reset. | Check wire harness connections between gas valve and U-Control. |
| Check resistance between | |||
| If lockout reoccurs replace U-Control. | |||
| AIR PRESSURE SW FAULT | Air Pressure switch is open Ultra | residential boilers do not use an air pressure switch, but instead have a wire jumper installed between P7 pins 4 & 5. Reset using manual reset screen on display | Check boiler size selected in U-Control against boiler rating label. Correct if necessary to select the proper boiler size. |
| Check the P7 connection as seen on Figures 98 & 99 to determine proper jumper wire location. | |||
| GAS PRESSURE SW FAULT | Gas pressure switch is open (high or low) | Residential Ultra Boilers do not use gas pressure switches. Requires manual reset. | Check boiler size selected in U-Control against boiler rating label. Correct if necessary to select the proper boiler size. |
| HW FAULT EXPANSION BRD | Expansion Control Board hardware has failed. | Residential Ultra Boilers do not use an Expansion Control Board. Requires manual reset. | Check boiler size selected in U-Control against boiler rating label. Correct if necessary to select the proper boiler size. |
| GV FAULT EXPANSION BRD | Gas valve output of the Expansion Board | Residential Ultra Boilers do not use an Expansion Control Board. Requires manual reset. | Check boiler size selected in U-Control against boiler rating label. Correct if necessary to select the proper boiler size. |
| EXP BOARD COM FAULT | Communication between the Expansion Control Board and the U-Control Board has failed | Residential Ultra Boilers do not use an Expansion Control Board. Requires manual reset. | Check boiler size selected in U-Control against boiler rating label. Correct if necessary to select the proper boiler size. |
Ultra Gas B oiler Data Collection Sheet
| Customer Info: Maintenance Info: | ||
| Contact: Name: | ||
| Contractor: Phone: | ||
| Job name: Model: | ||
| City, state: CP#: | ||
| Distributor: Installed: |
System Components: Boiler/System Piping Details (Please Sketch)
| Near boiler pipe size: | |
| Boiler circulator model: | |
| DHW tank (yes/no): | |
| DHW direct/system: | |
| Dhw model: | |
| Dhw pipe size: | |
| DHW circulator model: | |
| Is there air in system?: |
| Diagnostic Errors: | |
| Control fault: | |
| Ignition retries: | |
| Manual reset CNT: | |
| Auto reset CNT: | |
| Software Versions: | |
| Display: | |
| Main micro: | |
| Second micro: | |
| Lockout History #1 | Lockout History #2 | Lockout History #3 | |||||
| HH:MM MM/DD/YY: HH:MM MM/DD/YY: HH:MM MM/DD/YY: | |||||||
| Status: Status: Status: | |||||||
| Manual reset: Manual reset: Manual reset: | |||||||
| If yes-description: If yes-description: If yes-description: | |||||||
| Auto reset: | Auto reset: | Auto reset: | |||||
| If yes-description: If yes-description: If yes-description: | |||||||
| Priority 1: | Priority 1: | Priority 1: | |||||
| Priority 2: | Priority 2: | Priority 2: | |||||
| Priority 3: | Priority 3: | Priority 3: | |||||
| Manual limit: | Manual limit: | Manual limit: | |||||
| Auto limit: | Auto limit: | Auto limit: | |||||
| Low WTR Cutoff: | Low WTR Cutoff: | Low WTR Cutoff: | |||||
| Blower tach: | Blower tach: | Blower tach: | |||||
| Flame Signal: | Flame Signal: | Flame Signal: | |||||
| Outputs: | Outputs: | Outputs: | |||||
| Gas valve: | Gas valve: | Gas valve: | |||||
| Circulator 1: | Circulator 1: | Circulator 1: | |||||
| Circulator 2: | Circulator 2: | Circulator 2: | |||||
| Circulator 3: | Circulator 3: | Circulator 3: | |||||
| Blower signal: | Blower signal: | Blower signal: | |||||
| Additional heat demand: | Additional heat demand: | Additional heat demand: | |||||
| Alarm: | Alarm: | Alarm: | |||||
| Temperatures: | Temperatures: | Temperatures: | |||||
| System supply: | System supply: | System supply: | |||||
| System return: | System return: | System return: | |||||
| Boiler out 1: | Boiler out 1: | Boiler out 1: | |||||
| Boiler out 2: | Boiler out 2: | Boiler out 2: | |||||
| Boiler in 1: | Boiler in 1: | Boiler in 1: | |||||
| Flue 1: | Flue 1: | Flue 1: | |||||
| Flue 2: | Flue 2: | Flue 2: | |||||
| Outdoor: | Outdoor: | Outdoor: | |||||
Maintenance
Disconnect power
WARNING
Electrical shock hazard — Disconnect all electrical power to the boiler before attempting maintenance procedures. Failure to complete could result in severe personal injury, death or substantial property damage.
Install boiler jacket front door after startup or servicing
WARNING
Reinstall boiler jacket front door after start-up or servicing. The boiler front door must be securely fastened to the boiler to prevent boiler from drawing air from inside the boiler room. This is particularly important if the boiler is located in the same room as other appliances.
Inspect boiler jacket door gaskets. Gaskets must be in good condition, with no tears or gaps. Replace if necessary.
Failure to keep the door securely sealed and fastened could result in severe personal injury or death.
Perform start-up and check/out
WARNING
Removing and reinstalling components can change boiler behavior. After any maintenance procedure, you must prove the boiler is operating correctly. To do so, follow the complete procedure for boiler and system start-up, beginning on page 35. Failure to comply could result in severe personal injury, death or substantial property damage.
General maintenance
-
Oil motor in system requiring regular oiling.
-
See Oiled bearing circulators for motor oiling procedures.
Oiled bearing circulators
-
The circulator shipped with the Ultra boiler is water-lubricated. No oiling is required.
-
Check other circulators in the system. Oil any circulators requiring oil, following circulator manufacturer's instructions. Over-oiling will damage the circulator.
NOTICE
Attention to homeowners and installers of Ultra Series 4 boilers—see page 126 for the latest cleaning information for our newly coated heat exchangers.
Cleaning the heat exch anger — pin side when required
WARNING
The boiler contains ceramic fiber materials. Use care when handling these materials per instructions on page 109 of this manual. Failure to comply could result in severe personal injury.
- Shut down boiler:
a. Follow "To Turn Off Gas to Appliance" instructions on boiler and Lighting instructions. b. Do not drain boiler unless it will be exposed to freezing temperatures. If using freeze prevention fluid in system, do not drain. - Allow time for boiler to cool to room temperature if it has been fi ring.
- Remove jacket front door by removing two (2) screws at lower front. Lift door away from boiler to remove.
- Follow the applicable procedures under “Accessing & cleaning heat exchanger: Ultra-80 and Ultra-105 Only,” page 126 or “Accessing & cleaning exchanger: Ultra-155, -230, -299/310 and -399 Only,” page 127.
Clean the c ast aluminum heat exchanger when required — water side
- In order for the efficiency of boilers to increase beyond the condensing limit, new materials have been introduced for the heat exchanger, including aluminum.
- Aluminum has excellent heat transfer characteristics and is light in weight.
- These new materials also require cleaning solutions that differ from those used in conventional cast iron and steel boilers.
WARNING
One common cleaning method that CANNOT be used with systems containing aluminum is a solution of trisodium phosphate, commonly referred to as "TSP."
The reason that trisodium phosphate cannot be used is that the cleaning solution has a very high pH level — while removing the scale in the system, it also removes the natural protective oxide layer from the aluminum. The oxide layer will reform, but if small amounts of the trisodium phosphate remain in the system, the chemical will continue to remove the protective oxide layer, leading to reduced heat exchanger life.
- Use ONLY the cleaning product available from Weil-McLain, Sentinel X400. See the Repair Parts section at the end of this manual for ordering information.
Maintenance (continued)
For the first 5 years, vacuum or rinse heat exchanger with water only. No tool cleaning is necessary.
- This heat exchanger is coated to prevent the formation of Aluminum Oxide. Cleaning the heat exchanger via mechanical means (cleaning tools, blade, or brush) could shorten the life of the coating.
- Heat exchanger inspection is recommended at yearly intervals. Only clean heat exchanger if soiling is clearly present. If cleaning is necessary fl ush only with water and a mild detergent. From the cover plate opening, inspect the collection area and underneath the vent pipe to ensure that it is free of debris. If cleaning is necessary fl ush only with water and a mild detergent.
• Cleaning the heat exchanger should not be necessary until 5 years after commissioning date.
Accessing & cleaning heat exchanger: Ultra-80 and Ultra-105 Only
- Close the external manual gas valve.
- Disconnect the flexible gas line at its flare fitting.
- Remove the air silencer by separating it from the air adapter on the blower inlet.
- Disconnect wiring: • gas valve plug • blower power supply plug • blower control connector • ignition cable • ground wire.
- Release the heat exchanger cover plate by removing the nuts securing it to the exchanger.
- Pull the entire blower/venturi/gas valve/cover plate assembly out of the boiler. (See Replacement parts section for component identification and locations.)
- Use a vacuum cleaner to remove any accumulation on the heating surfaces. Do not use any solvent.
- If the vacuum cleaner is unable to clean completely, wash the heating surfaces with clean, warm water. If further cleaning is necessary, use the Heat Exchanger Cleaning Tool (see Replacement parts at the end of this manual) or a piece of 20-gauge or lighter sheet metal 34 wide by about 18 inches long to loosen deposits. See Figure 127 See water spraying notice on next page
- Inspect the heat exchanger cover plate insulation. Replace if insulation is damaged. Read the ceramic fiber WARNING on page 109 before handling or disposing of ceramic fiber materials.
- Reinstall the blower/venturi/gas valve/cover plate assembly and secure the cover plate with nuts.
WARNING
You must gradually tighten the cover plate nuts. For Ultra-80 and -105, follow the tightening sequence shown in Figure 126, making two or three passes with a torque wrench. The final torque MUST NOT exceed 50 inch-pounds, +/- 10 inch-pounds.
- Reconnect wiring: • gas valve plug • blower power supply plug • blower control connector • ignition cable • ground wire.
DANGER
If the valve adapter block is removed, carefully inspect the O-ring that should still be in the gas valve inlet adapter block. The O-ring must be in good condition and must be installed when gas valve is reconnected. Failure to comply will cause a gas leak, resulting in severe personal injury or death.
- Reconnect the fl exible gas line.
- Reinstall the air silencer by pressing onto the air inlet adapter.
- Perform a soap suds leak test on all interior gas piping after starting the boiler.
Cleaning the heat exchanger — water side (ALL models)
- Follow the procedure given in "Clean the cast aluminum heat exchanger when required — water side," page 125 to clean the water side of the exchanger.
- Follow the complete procedure for boiler and system start-up, beginning on page 35.
Figure 126 Nut tightening sequence — 80 & 105 Gradually tighten the nuts, repeating the sequence shown below until the torque reaches 50 inch-pounds (+/- 10 inch-pounds
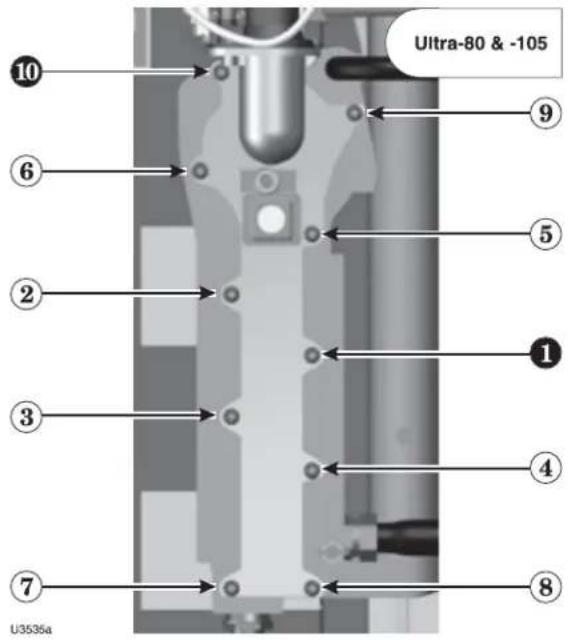
text_image
Ultra-80 & -105 ⑩ ⑥ ② ③ ⑦ U3535aFigure 127 Cleaning the exchanger pin-side
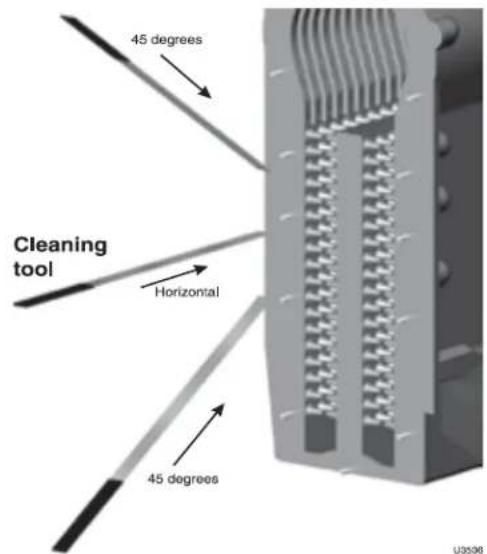
text_image
45 degrees Cleaning tool Horizontal 45 degrees U3508Maintenance (continued)
Accessing & c leaning exchanger: Ultra-155, -230, -299/310 and -399 Only
- Close the external manual gas valve.
- Disconnect wiring: • gas valve electrical plug • two electrical Molex plugs from the blower assembly • ignition cable • ground wire.
-
Disconnect the flexible gas line at its flare fitting.
-
Remove the air silencer by lifting the plastic clamp off of the gas line and then gently sliding the air silencer down and off the valve.
-
Remove hex head nuts (10mm box end wrench) from heat exchanger cover plate and remove burner cover plate from heat exchanger.
-
Pull the entire blower/venturi/gas valve/cover plate assembly out of the boiler. (See Replacement parts section for component identification and locations.)
-
Remove three (3) M4 hex head screws (7mm box end wrench) and burner clips securing burner to cover plate. Remove cover plate.
-
Use a vacuum cleaner to remove any accumulation on the heating surfaces. Do not use any solvent.
-
If the vacuum cleaner is unable to clean completely, wash the heating surfaces with clean, warm water. If further cleaning is necessary, use the Heat Exchanger Cleaning Tool (see Replacement parts at the end of this manual) or a piece of 20-gauge or lighter sheet metal 34 wide by about 18 inches long to loosen deposits. See Figure 127, page 126 See water spraying notice.
-
Inspect the heat exchanger cover plate insulation and gasket. Replace if damaged. Read the ceramic fi ber WARNING on page 109 before handling or disposing of ceramic fi ber materials.
-
Replace the burner, hex head screws and burner clips removed in step 7. See Figure 120, page 112.
-
Place cover plate gasket in groove of heat exchanger cover plate. Replace cover plate.
-
Reinstall hex head nuts on the cover plate mounting studs and tighten in a staggering pattern until cover plate is uniformly tightened.
WARNING
You must gradually tighten the cover plate nuts. For Ultra-155 through -399, follow the tightening sequence shown in Figure 128, making two or three passes with a torque wrench. The final torque MUST NOT exceed 50 inch-pounds, +/- 10 inch-pounds.
-
Reinstall air silencer by sliding on gas valve venturi and securing clamp to gas line.
-
Reconnect wiring: • gas valve electrical plug • two electrical Molex plugs from the blower assembly • ignition cable • ground wire.
-
Reconnect the fl exible gas line and gas valve electrical plug.
-
Perform a soap suds leak test on all interior gas piping after starting the boiler.
Cleaning the heat exchanger — water side (ALL models)
- Follow the procedure given in "Clean the cast aluminum heat exchanger when required — water side," page 125 to clean the water side of the exchanger.
- Follow the complete procedure for boiler and system start-up, beginning on page 35.
Figure 128 Nut tightening sequence — 155 to 399 — Gradually tighten the nuts, repeating the sequence shown below until the torque reaches 50 inch-pounds (+/- 10 inch-pounds)
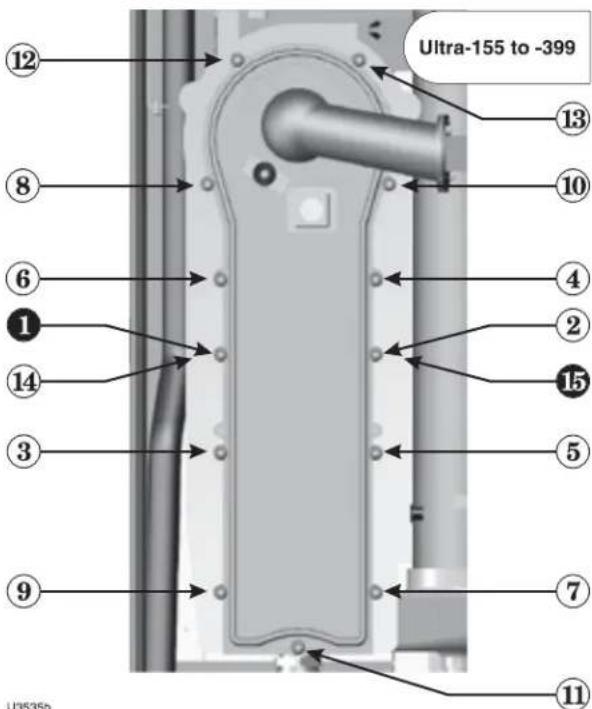
text_image
Ultra-155 to -399 ⑫ ⑥ ① ⑭ ⑧ ⑬ ⑭ ⑮ ⑦ ⑪ U3535bWATER SPRAY HEAT EXCHANGER PINS AFTER USING CLEANING TOOL
- After using the cleaning tool as shown in Figure 127, page 126, spray water downward from above the pins to flush remaining sediment.
- Remove sediment from the bottom of the heat exchanger.
- Then disconnect the condensate line at the bottom of the heat exchanger.
a. Loosen the hose clamps at both ends of the condensate line.
b. Remove the line and place a pan under the trap connection.
c. Spray water into the bottom of the heat exchanger to flush remaining sediment to the condensate outlet.
d. Spray water through the condensate line to clean it thoroughly.
e. Remove pan and replace the condensate line.
f. Follow instructions on page 126 or page 127 to check components and replace burner and cover.
Replacement parts
WARNING
Replacement parts must be purchased through a local Weil-McLain distributor. When ordering, specify boiler model and size and include description and part number of replacement part. Results from using modified or other manufactured parts will not be covered by warranty and may damage boiler or impair operation.
NOTICE
Weil-McLain part numbers are found in Weil-McLain Boilers and Controls Repair Parts Lists.
WARNING
The boiler contains ceramic fiber materials. Use care when handling these materials per instructions on page 109 of this manual. Failure to comply could result in severe personal injury.
Reinstall boiler jacket front door after startup or servicing
WARNING
Inspect boiler jacket front door gaskets and reinstall boiler jacket front door after start or servicing. The boiler front door must be securely fastened to the boiler to prevent boiler from drawing air from inside the boiler room. This is particularly important if the boiler is located in the same room as other appliances. Failure to keep the door securely fastened could result in severe personal injury or death.
Figure 129 Propane conversion kits and instructions
WARNING
The conversion kits listed below are only for use with Ultra Series 4 boilers. For series 1 or series 2 boilers, refer to the boiler manual or contact Weil-McLain for the correct parts.
| Natural to propane conversion — SERIES 4 BOILERS ONLY(not required for Ultra-399 — adjustment is made with throttle screw, not with orifi ce) | |||||||
| Sea level (to 5,500 feet altitude) High altitude (above 5,500 feet) | |||||||
| Model | Kit part # | Kit location | Instructions | Model | Kit part # | Kit location | Instructions |
| Ultra-80 | 383-501-020 | SPECIAL ORDER | ⚠ In kit only | Ultra-80LP | 383-500-644 | SPECIAL ORDER | See page 48 or kit |
| Ultra-105 | 540-100-001 Supplied with boiler | See page 48 | Ultra-105 | 383-500-645 | SPECIAL ORDER | See page 48 or kit | |
| Ultra-155 | 383-500-115 Supplied with boiler | See page 49 | Ultra-155 | 383-500-646 | SPECIAL ORDER | See page 49 or kit | |
| Ultra-230 | 383-500-120 Supplied with boiler | See page 49 | Ultra-230 | 383-500-647 | SPECIAL ORDER | See page 49 or kit | |
| Ultra-299 | 540-202-832 Supplied with boiler | See page 49 | Ultra-299 | 383-500-394 | SPECIAL ORDER | See page 49 or kit | |
| Ultra-310 | 540-202-833 Supplied with boiler | See page 49 | Ultra-310 | 383-500-648 | SPECIAL ORDER | See page 49 or kit | |
| Propane to natural conversion | |||||||
| -80 | 383-501-021 | SPECIAL ORDER | ⚠ In kit only | Contact factory | |||
| ⚠ Boilers marked with this symbol require special installation procedures. Do not use the instructions in this manual — use only the instructions supplied in the conversion kit. | |||||||
Replacement parts (continued)
Figure 130 Miscellaneous parts and kits
| Description | Part Number |
| CHEMICALS | |
| Antifreeze, aluminum-safe, Sentinel X500 (1 gallon). . . . . . . . . . . . . . . . . . . . . . . . . . . . . . . . . . . . . . . . . . . . . . . . . . . . . . . . . . . . . . . . . . . . . . . . . . . . . . . . . . . . . . . . . . . . . . . . . . . . . | 592-900-029 |
| Antifreeze, aluminum-safe, Sentinel X500 (5 gallon). . . . . . . . . . . . . . . . . . . . . . . . . . . . . . . . . . . . . . . . . . . . . . . . . . . . . . . . . . . . . . . . . . . . . . . . . . . . . . . . . . . . . . . . . . . . . . . . . . | 582-900-006 |
| Corrosion inhibitor, Sentinel X100 (one tube, 275 ml) . . . . . . . . . . . . . . . . . . . . . . . . . . . . . . . . . . . . . . . . . . . . . . . . . . . . . . . . . . . . . . . . . . . . . . . . . . . . . . . . . . . . . . . . . . . . . . . . . . . Inhibitor quick-test kit . . . . . . . . . . . . . . . . . . . . . . . . . . . . . . . . . . . . . . . . . . . . . . . . . . . . . . . . . . Cleaner, Sentinel X400 (one tube, 275 ml) . . . . . . . . . . . . . . . . . . . . . . . . . . . . . . . . . . . . . . . . . . . . . . | 592-900-002592-900-005592-900-003 |
| BOILER ACCESSORIES AND CONTROLS | |
| Boiler circulator, without fl anges Ultra-80/105 Taco Model 007Ultra-155/230/299/310 Taco Model 0014Ultra-399 Taco Model 0013 | 511-405-113511-405-133511-405-140 |
| Circulator hardware kit – inlet (1 fl ange, 2 nuts, 2 screws, and 1 gasket)1"11⁄4"11⁄2" | 381-354-525381-354-526381-354-531 |
| Low water cut-off with test button | 511-100-005 |
| Heat exchanger cleaning tool | 591-706-200 |
| Annual maintenance kit (Igniter, igniter gasket, cover plate gasket, cover plate insulation, burner gasket, fl ue sensor gasket and venturi gasket) | 383-500-605383-500-620 |
| Pressure relief valve, ASME 30 PSI, 3/4" NPT male Ultra-80 - 299/310Ultra-80 - 399 | 383-500-095511-546-921 |
| Ultra boiler wall-mount kit | 389-900-180 |
| VENT / AIR TERMINATIONS | |
| Vent/air termination wall penetrate cover plate (2 are shipped with each boiler) | 383-500-100 |
| Vent termination bird screen (2 are shipped with each boiler) 3" vent - Ultra-80/105/1554" vent - Ultra-230/299/310/399) | 383-500-105383-500-110 |
| Weil-McLain sidewall vent/air cap termination kit — Includes W-M sidewall vent/air termination cap, inside and outside cover plates, and mounting hardware; openings are sized for PVC pipe.3" kit - Ultra-80 - 1554" kit - Ultra-230 - 399 383-500-397 | 383-500-398 |
| Concentric vent kit (for sidewall or vertical termination) 3" PVC only | 383-500-350 |
| CONDENSATE HANDLING | |
| Condensate neutralizer kit | 383-500-631 |
Replacement parts (continued)
Figure 131 Jacketparts
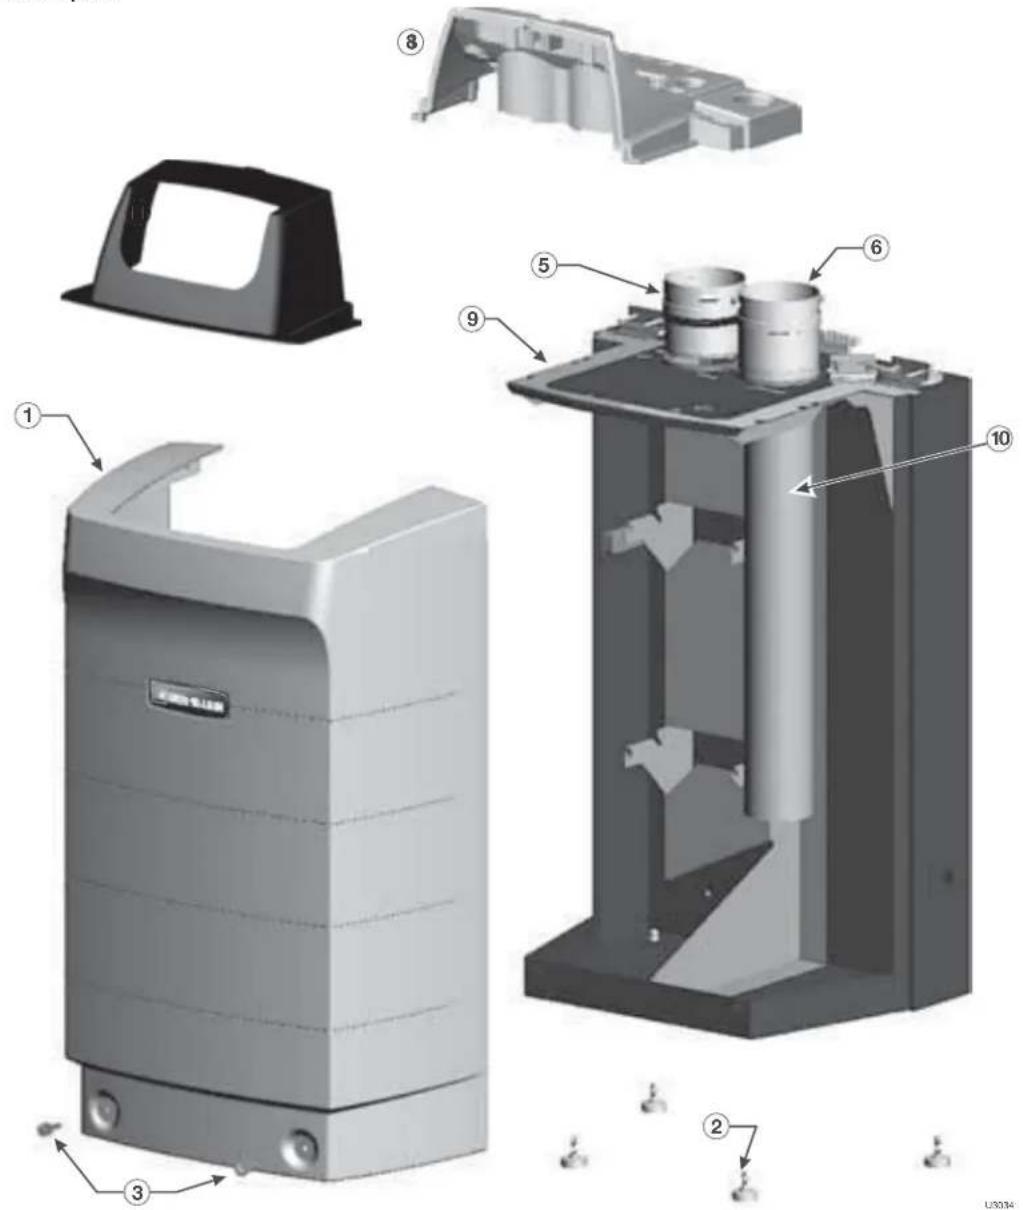
text_image
Exploded view diagram of a battery pack assembly with numbered parts for identification| Item | Description | Boiler models | Part number |
| 1 | Jacket front door All 383-500-135 | ||
| 2 | Boiler leg kit (4 required) All 383-500-065 | ||
| 3 | Screw fl at head slotted 17 Series for jacket front door (2 required) | All 562-650-126 | |
| 4 | Screw clip-on receptacle (not shown) (2 required) | All 383-500-180 | |
| 5 | Air inlet pipe adapter 3" | 80/105 | 560-907-704 |
| 3" | 155 | 560-907-707 | |
| 4" | 230-399 | 560-907-710 | |
| Item | Description | Boiler models | Part number |
| 6 Flue outlet pipe adapter | 3" | 80/105 560-907-771 | |
| 3" | 155 560-907-771 | ||
| 4" | 230-399 560-907-773 | ||
| 7 Top cover, front All 383-500-607 | |||
| 8 Top cover, rear 80/230 383-500-608 | |||
| 299/310/399 383-500-609 | |||
| 9 Door Gasket replacement kit (not shown) All 383-500-610 | |||
| 10 Flue pipe | 3" | 80/105 560-907-775 | |
| 3" | 155 560-907-772 | ||
| 4" | 230-399 560-907-774 | ||
Replacement parts (continued)
Figure 132 Controls
| Item | Description | Part Number |
| 1 | Ultra U-Control module 383-500-658 | |
| 2 | Transformer, 120V/24V 383-500-628 | |
| 3 | Display board assembly (includes plastic and display screen) 383-500-756 | |
| 4 | On/off power switch 383-500-205 | |
| 5 | Flue temperature sensor replacement kit 383-500-600 | |
| 6 | System temperature sensors (2 required) 383-500-601 | |
| 7 | Outdoor temperature sensor 510-312-218 | |
| 8 | Display to U-Control wire harness (not shown) 383-500-633 | |
| 9 | Line voltage wire harness (male) (not shown) 383-500-639 | |
| 10 | Low voltage wire harness (male) (not shown) 383-500-640 | |
| 11 | 120 volt, 3-wire receptacle (not shown) 383-500-638 | |
| 12 | Ultra U-Control module fuses (not shown)F1 - 3-amp, fast-blow ATO (5 fuses)F2 - 12-amp, fast-blow AG (5 fuses) | 383-500-603383-500-604 |
| 13 | Jumper for low voltage terminal blocks, (5 jumpers)(not shown) | 383-500-641 |
| 14 | Ultra U-Control terminal block kit, (includes 1 high voltage terminal block, 6 low voltage terminal blocks, and U-Control screwdriver) (not shown) | 383-500-642 |
| 15 | 24V LWCO kit with quick connect harness (not shown) 511-100-005 |
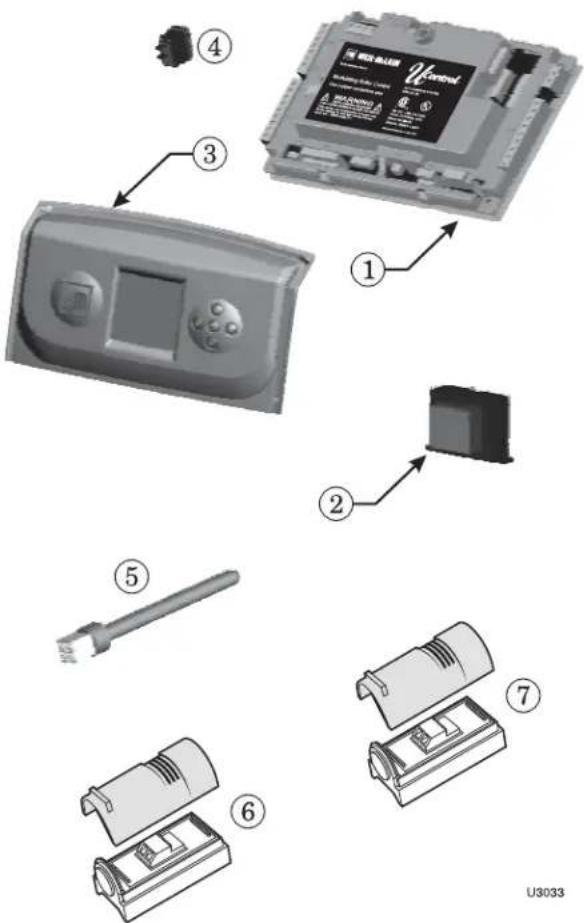
text_image
Exploded view diagram of a battery pack assembly with numbered parts for identificationReplacement parts (continued)
Figure 133 Heat exchanger and piping — Ultra-80 and -105
| Item Description | Boiler Models | Part Number | |
| 1 | Heat exchanger replacement kit - Heat exchanger, cover plate, burner, electrode, water sensors, compression fi ttings, condensate fi tting, gaskets, and hardware | 80NG80LP105 | 383-500-670383-500-671383-500-672 |
| 2 | Cover plate replacement kit - Cover plate, cover plate gasket, burner gasket, and hardware | 80/105 383-501-022 | |
| 3 | Cover plate gasket/insulation 80/105 591-200-000 | ||
| 4 | Burner gasket 80/105 590-300-000 | ||
| 5 | Cover plate studs, M6, 1 pitch All 560-340-598 | ||
| 6 | Cover plate nuts, M6, 1 pitch All 561-928-449 | ||
| 7 | Water compression fi tting, 28 mm 80-230 383-500-260 | ||
| 8 | Water compression fi tting, 22 mm | 80/105 564-100-002 | |
| 9 | Supply water pipe assembly - Pipe, compression fi tting & plugs | 80/105 383-500-760 | |
| 10 | Return water pipe assembly - Pipe, drain valve (assembled) & compression fi tting | 80/105 383-501-037 | |
| 11 | Boiler drain valve, 3/4” NPT | All 511-246-392 | |
| 12 | Blower assembly kit - Blower, gasket, and hardware | 80/105 | 383-501-027 |
| 13 | Gas pipe | 80/105 560-907-682 | |
| 14 | Flexible gas line | 80/105 383-500-616 | |
| 15 | Gas Pipe lower pipe clamp and hardware | 80/105 383-500-617 | |
| 16 | Gas valve/venturi kit - Gas valve, venturi, 90° elbow, gaskets, and hardware (assembled) (For LP boilers, make sure to reinstall the existing propane orifi ce) | 80105 | 383-501-029383-501-030 |
| 17 | Gasket cork, for in between gas valve venturi & burner inlet | All | 590-317-310 |
| 18 | Air silencer kit - Air silencer and gasket | 80/105 383-501-026 | |
| 19 | Air silencer adapter kit - Air silencer adapter and hardware | 80/105 | 383-501-025 |
| 20 | Condensate trap kit - Condensate trap, hose clamps, pvc fittings, and gasket | 80/105 | 383-501-031 |
| 21 | Return/supply sensor kit - (1) sensor All 383-500-602 | ||
| 22 | Ignition electrode kit - Ignition electrode, suppressor, gasket, and hardware | All | 383-500-045 |
| Ignition electrode gasket ONLY | All 511-330-253 | ||
| 23 | Ignition cable kit (not shown) - Ignition cable, suppressor, and wire tie | All | 383-500-619 |
| 24 | Inspection glass kit - Bracket, glass, gasket and hardware | All | 383-500-020 |
| 25 | Burner replacement kit - Burner, gaskets and hardware | 80NG80LP105 | 383-501-032383-501-033383-501-034 |
| 26 | Gasket rubber, blower | 80/105 590-300-003 | |
| 27 | Condensate fi tting | 80/105 561-200-000 | |
Replacement parts (continued)
Figure 134 Heat exchanger and piping — Ultra-80 and -105
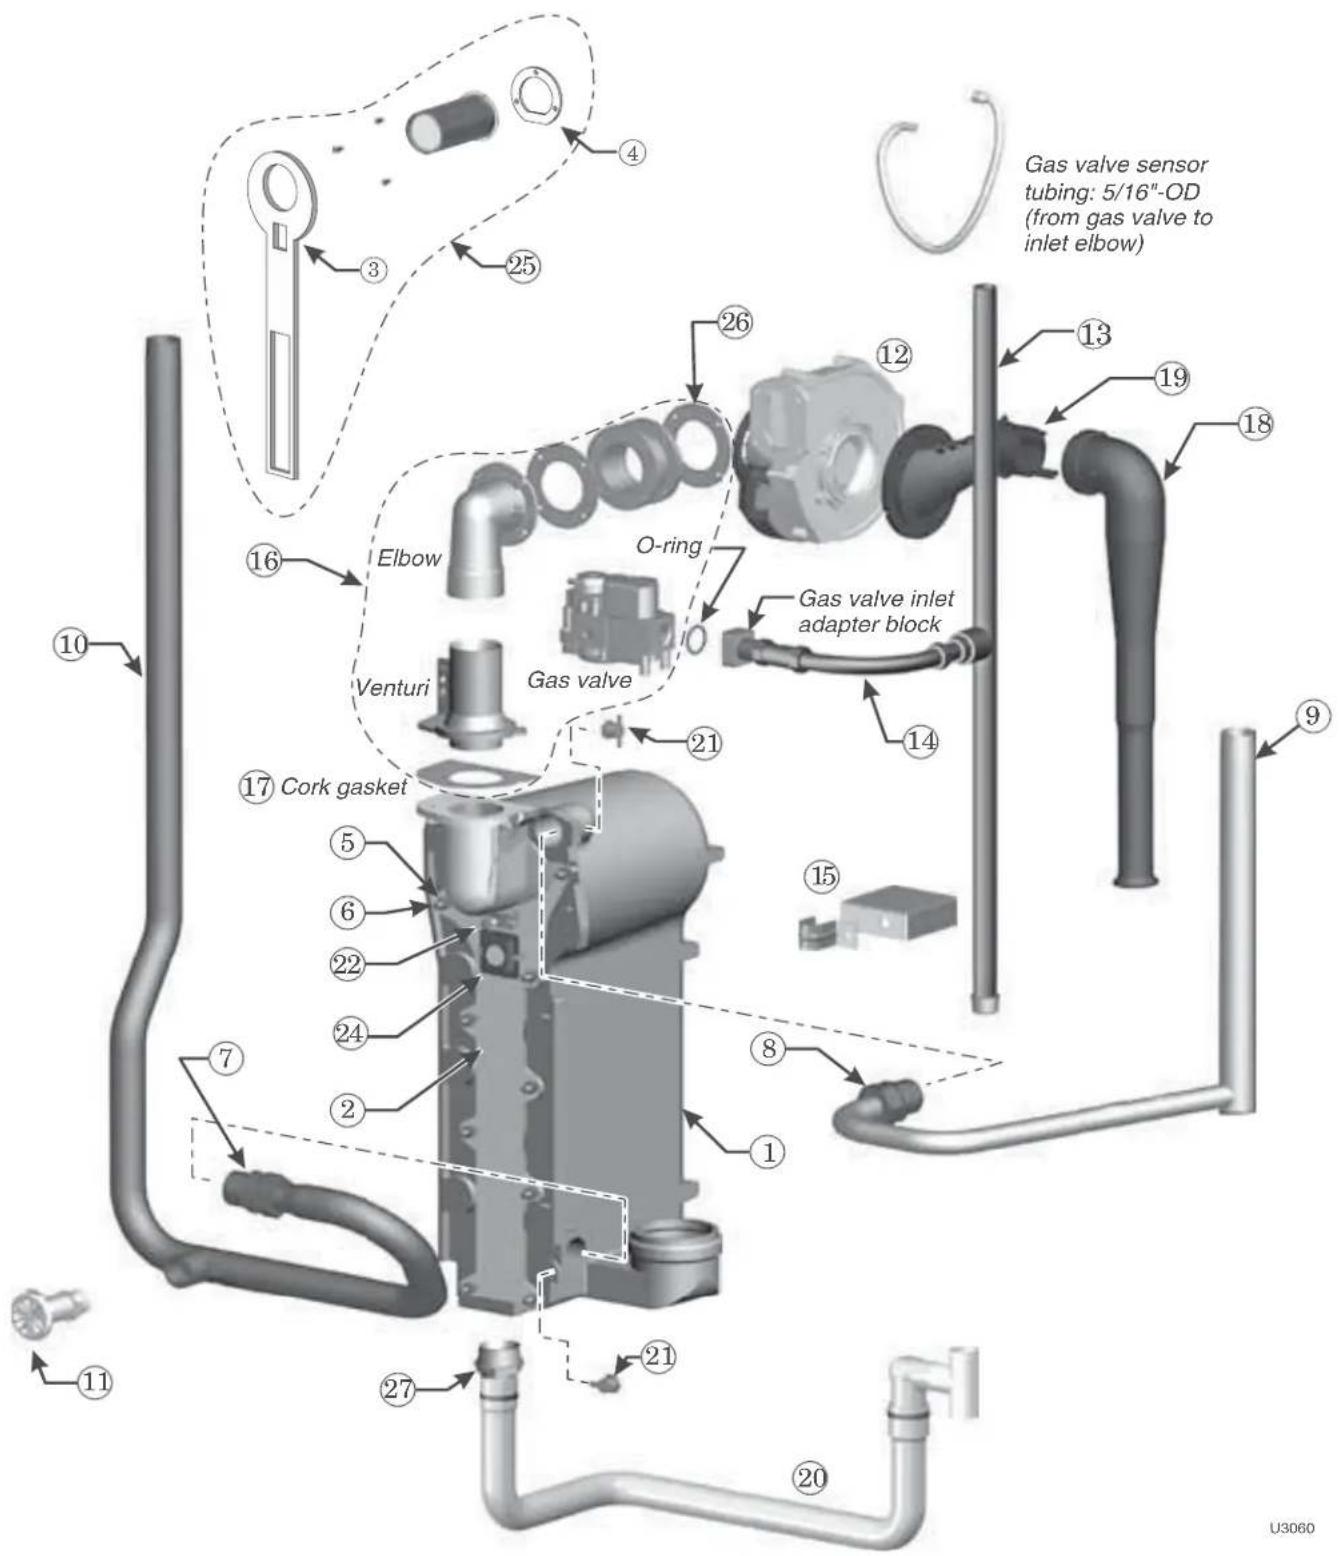
text_image
Gas valve sensor tubing: 5/16"-OD (from gas valve to inlet elbow) Elbow O-ring Gas valve inlet adapter block Venturi Gas valve Cork gasket 10 21 12 13 14 15 16 17 20 21 22 24 25 26 27 28 29 U3060Go to www.weil-mclain.com to locate Weil-McLain distributors
Replacement parts (continued)
Figure 135 Heat exchanger and piping Ultra-155 & -230
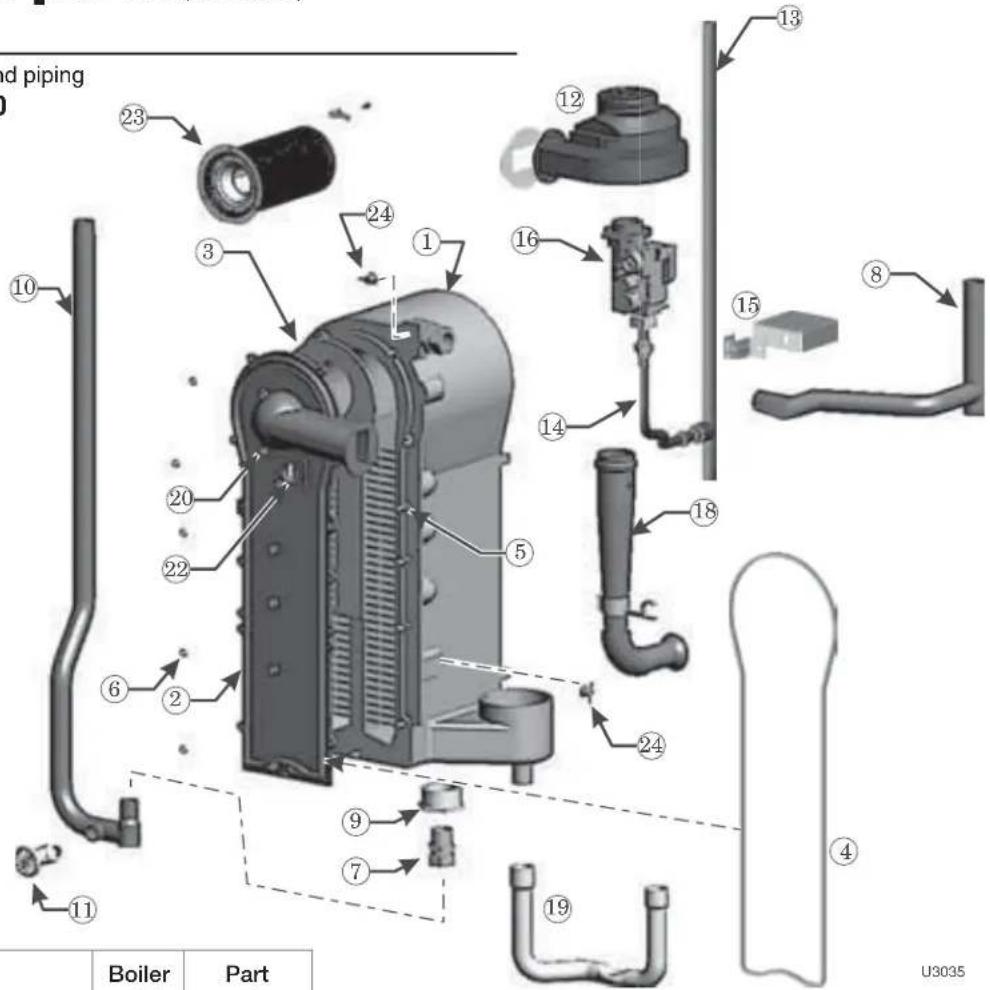
text_image
and piping Boiler Part U3035| Item | Description | Boiler models | Part number |
| 1 | Heat exchanger replacement kit - Heat exchanger, cover plate, burner, electrode, water sensors, compression fi ttings, condensate fi tting, gaskets, and hardware | 155230 | 383-500-673383-500-674 |
| 2 | Cover plate replacement kit - Cover plate, cover plate gasket, burner gasket, and hardware | 155/230 | 383-500-395 |
| 3 | Cover plate insulation 155/230 383-500-250 | ||
| 4 | Cover plate gasket 155/230 383-500-255 | ||
| 5 | Cover plate studs, M6, 1 pitch All 560-340-598 | ||
| 6 | Cover plate nuts, M6, 1 pitch All 561-928-449 | ||
| 7 | Water compression fi tting, 28 mm 80-230 383-500-260 | ||
| 8 | Supply water pipe assembly - Pipe, temperature well, check valve, cap (assembled) & compression fi tting & plugs | 155/230 | 383-500-762 |
| 9 | Return water bushing, 1 1/4" BSP x 1" BSP (not use on Ultra-299/310) | 155/230 | 383-500-280 |
| 10 | Return water pipe assembly - Pipe, drain valve, cap (assembled) & compression fi tting | 155/230 | 383-500-763 |
| 11 | Boiler drain valve, 3/4" NPT | All 511 | -246-392 |
| 12 | Blower assembly kit - Blower, gasket, and hardware | 155230 | 383-500-035383-500-040 |
| 13 | Gas pipe | 155/230 | 560-907-683 |
| 14 | Flexible gas line | 155/230 | 383-500-767 |
| Item | Description | Boiler models | Part number |
| 15 | Gas pipe lower clamp and hardware | 155/230 383-500-617 | |
| 16 | Gas valve/venturi kit - Gas valve, venturi, adapter block, O-ring and hardware (assembled) be sure to reinstall the existing propane orifi ce) | 155230 | 383-500-025383-500-030 |
| 17 | Gasket cork, for in between gas valve venturi & blower inlet (not shown) | All 590-317-310 | |
| 18 | Air silencer kit - Air silencer and gasket | 155/230 383-500-295 | |
| 19 | Condensate trap kit - Condensate trap, hose clamps, pvc fi ttings, and gasket | 155/230 383-500-060 | |
| 20 | Ignition electrode kit - Ignition electrode, suppressor, gasket, and hardware | All 383-500-045 | |
| Ignition electrode gasket ONLY (not shown) | 511-330-253 | ||
| 21 | Ignition cable kit (not shown) - Ignition cable, suppressor, and wire tie | All 383-500-619 | |
| 22 | Inspection glass kit - Bracket, glass, gasket and hardware | All 383-500-020 | |
| 23 | Burner replacement kit - Burner, gaskets and hardware | 155230 | 383-500-085383-500-090 |
| 24 | Return/supply sensor kit - (1) sensor | All 383-500-602 | |
Replacement parts (continued)
Figure 136 Heat exchanger and piping Ultra-299/310 & -399
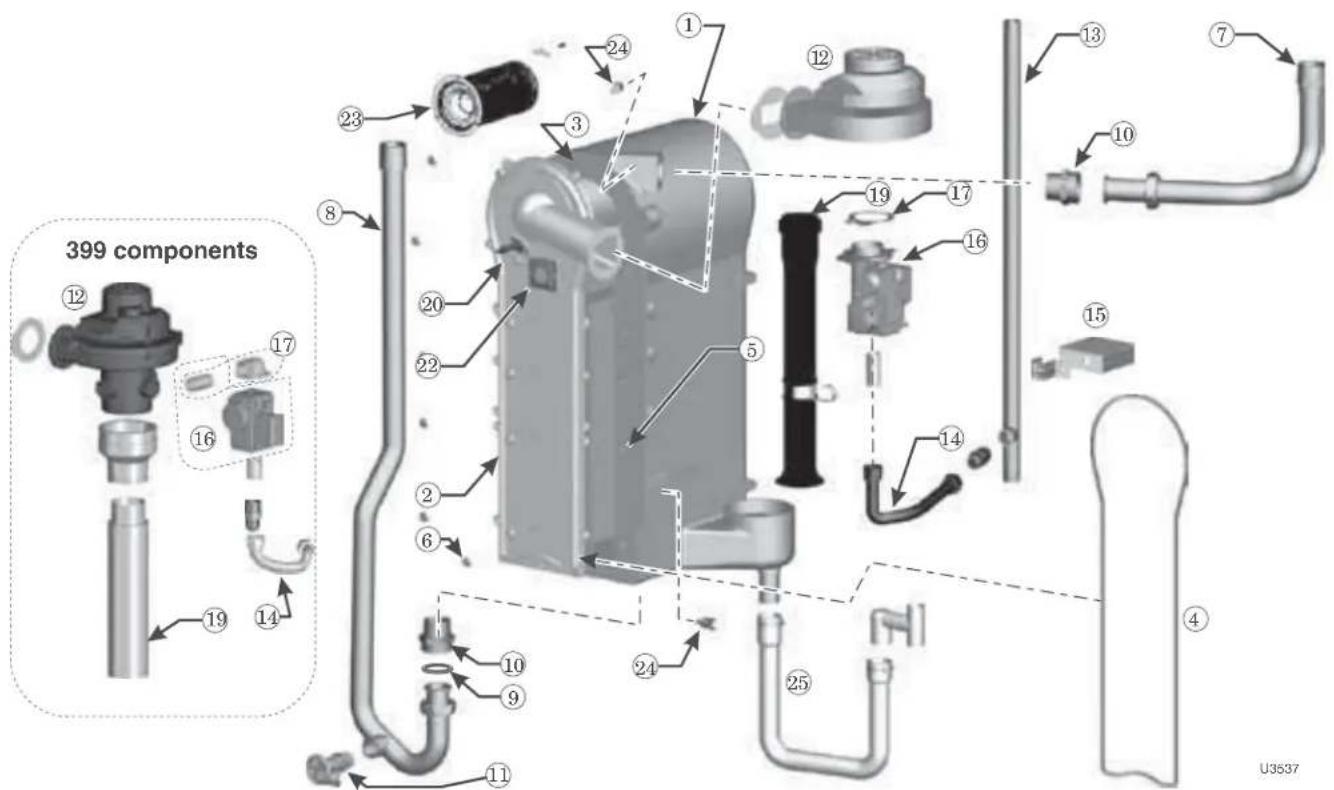
text_image
399 components ① ② ③ ④ ⑤ ⑥ ⑦ ⑧ ⑨ ⑩ ⑪ ⑫ ⑬ ⑭ ⑮ ⑯ ⑰ ⑱ ⑲ ⑳ ㉑ ㉒ ㉓ ㉔ ㉕ ㉖ ㉗ ㉘ ㉙ ㉚ ㉛ ㉜ ㉝ ㉞ ㉟ ㉳ ㉻ ㉒ ㉓ ㉔ ㉕ ㉖ ㉗ ㉘ ㉙ ㉚ ㉛ ㉜ ㉝ ㉞ ㉟ ㉟a ㉟b ㉟c ㉟d ㉟e ㉟f ㉟g ㉟h ㉟i ㉟j ㉟k ㉟l ㉟m ㉟n ㉟o ㉟p ㉟q ㉟r ㉟s ㉟t ㉟u ㉟v ㉟w ㉟x ㉟y ㉟z| Item | Description | Boiler models | Part number |
| 1 | Heat exchanger replacement kit - Heat exchanger, cover plate, burner, electrode, water sensors, compression fittings, condensate fitting, gaskets, and hardware | 299/310/399 | 383-500-675 |
| 2 | Cover plate replacement kit - Cover plate, cover plate gasket, burner gasket, and hardware | 299/310/399 | 383-500-395 |
| 3 | Cover plate insulation | 299/310/399 | 383-500-250 |
| 4 | Cover plate gasket | 299/310/399 | 383-500-255 |
| 5 | Cover plate studs, M6, 1 pitch | All | 560-340-598 |
| 6 | Cover plate nuts, M6, 1 pitch | All | 561-928-449 |
| 7 | Supply water pipe assembly - Pipe, temperature well, check valve, cap (assembled) & compression fitting & plugs | 299/310/399 | 383-500-764 |
| 8 | Return water pipe assembly - Pipe, drain valve, cap (assembled) & compression fitting | 299/310/399 | 383-500-385 |
| 9 | Supply/Return water piping square cut EPDM gasket (Ultra-299/310 only) | 299/310/399 | 562-248-755 |
| 10 | Fitting, double nipple for supply/return | 299/310/399 | 561-326-828 |
| 11 | Boiler drain valve, 3/4" NPT | All | 511-246-392 |
| 12 | Blower assembly kit - Blower, gasket, and hardware | 299/310 399 | 383-500-360 383-500-650 |
| 13 | Gas pipe | 299/310/399 | 560-907-679 |
| 14 | Flexible gas line | 299/310/399 | 383-500-768 |
| Item | Description | Boiler models | Part number |
| 15 | Gas pipe lower clamp and hardware | 299/310 | 383-500-625 |
| 16 | Gas valve/venturi kit - Gas valve, venturi, (For 310LP boilers, make sure to reinstall the existing propane orifice) | 299/310 | 383-500-390 |
| Gas valve kit - Gas valve, venturi, adapter block, O-ring and hardware (assembled) | 399 | 383-500-652 | |
| 17 | Gas valve outlet adapter/nipple kit | 399 | 383-500-651 |
| 18 | Gasket cork, for in between gas valve venturi & blower inlet | All | 590-317-310 |
| 19 | Air silencer kit - Air silencer and gasket | 299/310399 | 383-500-355383-500-654 |
| 20 | Ignition electrode kit - Ignition electrode, suppressor, gasket, and hardware | All | 383-500-045 |
| Ignition electrode gasket ONLY | 511-330-253 | ||
| 21 | Ignition cable kit (not shown) - Ignition cable, suppressor, and wire tie | All | 383-500-619 |
| 22 | Inspection glass kit - Bracket, glass, gasket and hardware | All | 383-500-020 |
| 23 | Burner replacement kit - Burner, gaskets and hardware | 299/310 | 383-500-407 |
| 24 | Return/supply sensor kit - (1) sensor | All | 383-500-602 |
| 25 | Condensate trap kit - Condensate trap, hose clamps, pvc fittings, and gasket | 299/310/399 | 383-500-626 |
Dimensions
Figure 137 Dimensional data
① Supply connection (note 1)
② Return connection (note 1)
③ Control panel
④ Electrical entrance openings
⑤ Vent connection:
Ultra-80/105/155 — 3"
Ultra-230/299/310/399 — 4"
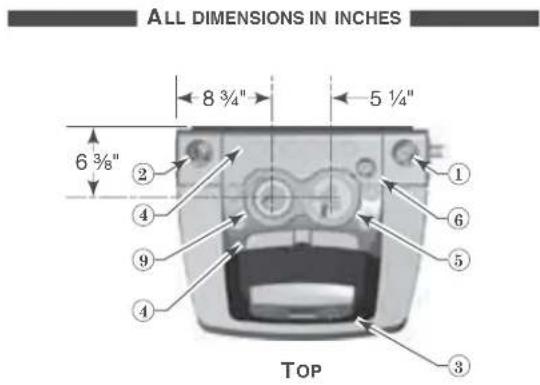
text_image
ALL DIMENSIONS IN INCHES 8 3/4" 5 1/4" 6 3/8" ① ② ③ ④ ⑤ ⑥ ⑦ ⑧ ⑨ ⑩ TOP⑥ Gas connection (note 1)
⑦ Drain valve (inside enclosure)
⑧ Condensate drain ( 12 " PVC)
⑨ Air connection: Ultra-80/105/155 — 3" Ultra-230/299/310/399 — 4"
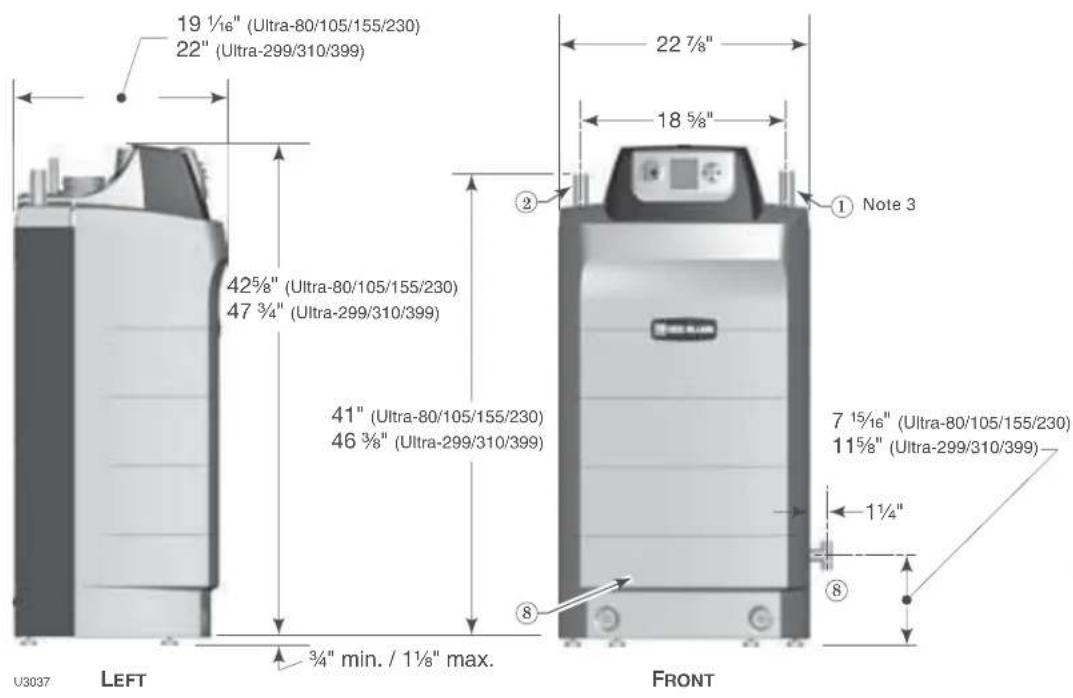
text_image
19 ½" (Ultra-80/105/155/230) 22" (Ultra-299/310/399) 42 ⅓" (Ultra-80/105/155/230) 47 ⅓" (Ultra-299/310/399) 41" (Ultra-80/105/155/230) 46 ⅓" (Ultra-299/310/399) 3/4" min. / 1 ⅓" max. U3037 LEFT FRONT 22 ⅓" 18 ⅓" ① Note 3 ② ⑧ 7 ⅓/16" (Ultra-80/105/155/230) 11 ⅓" (Ultra-299/310/399) 1 ⅓" 1 ⅓" ⑧
natural_image
3D rendering of a cylindrical mechanical component with no visible text or symbols| Notes | |
| 1 | Boiler supply and return tappings are both 1” NPT (Ultra-80/105/155/230) or 114 ” NPT (Ultra-299/310).See page 10 for recommended piping sizes.Wall-hung boiler option — water piping and gas pipe can only be routed through top of enclosure using wall-mounting kit. See page 5 for mounting instructions. |
| 2 | Boiler circulator is shipped loose.Circulator must be mounted in the return piping.Both 1” and 114 ” circulator fl anges are shipped with boiler on Ultra-80/105/155/230.Both 114 ” and 112 ” circulator fl anges are shipped with boiler on Ultra-299/310 and Ultra-399. |
| 3 | Relief valve is shipped loose.See page 9 for mounting details. Relief valve mounts on supply pipe off of supply tee and 34 ” street elbow as shown. |
Ratings — Ultra Series 4 boilers
Figure 138 Ratings and engineering data
| Boiler Model Number | CSA Input | DOE Heating Capacity | Net AHRI Ratings | DOE Seasonal Effi ciency | Boiler Water Content | Vent/Air Pipe Size | ||
| Btuh (Note 7) | Btuh (Note 2 and 7) | Btuh (Note 3) | AFUE, % (Note 1) | Gallons | (Note 4) | |||
| Ultra-80 80,000 71,000 62,000 93.5 0.69 2" or 3" | ||||||||
| Ultra-105 105,000 94,000 82,000 94.0 0.82 2" or 3" | ||||||||
| Ultra-155 | 155,000 | 139,000 | 121,000 | 94.0 | 1.17 | 3" | ||
| Ultra-230 | 230,000 | 207,000 | 180,000 | 94.1 | 1.57 | 3" or 4" | ||
| Ultra-299 | 299,000 | 270,000 | 235,000 | 92.5 | 2.10 | 4" | ||
| Ultra-310 | 310,000 | 289,000 | 252,000 | 93.3 | 2.10 | 4" | ||
| Boiler Model Number | CSA Input | Gross Output | Net AHRI Ratings | Combustion Effi ciency | Thermal Effi ciency | Boiler Water Content | Vent/Air Pipe Size | |
| Btuh (Note 7) | Btuh (Note 7) | Btuh (Note 3) | % (Note 5) | % (Note 6) | Gallons | (Note 4) | ||
| Ultra-399 | 399,000 | 364,000 | 317,000 | 91.7 | 91.3 | 2.10 | 4" | |
| Notes | ||||||||
| 1 | As an Energy Star Partner, Weil-McLain has determined that Ultra boilers meet the Energy Star guidelines for energy efficiency. NOTE: Adjusting boiler fi ring rate will affect AFUE rating. | |||||||
| 2 | Based on standard test procedures prescribed by the United States Department of Energy. | |||||||
| 3 | Net AHRI ratings are based on net installed radiation of sufficient quantity for the requirements of the building and nothing need be added for normal piping and pickup. Ratings are based on a piping and pickup allowance of 1.15. An additional allowance should be made for unusual piping and pickup loads. | |||||||
| 4 | Ultra boilers must be direct-vented. Ultra boilers require special venting, consistent with Category IV boiler. Use only the vent materials and methods specified in this manual. Ultra-80 and -105 vent/air pipes can be either 2" or 3" pipe. Vent/air pipe length limits for 2" piping are not as long as for 3" piping. Ultra-230 vent/air pipes can be either 3" or 4" pipe. Vent/air pipe length limits for 3" piping are not as long as for 4" piping. | |||||||
| 5 | Combustion efficiency is based on AHRI testing procedure BTS-2000, and equal to 100% minus flue loss. | |||||||
| 6 | Thermal effi ciency is based on AHRI testing procedure BTS-2000. | |||||||
| 7 | Ratings shown are for sea level applications only. For altitudes from sea level to 5,500 feet above sea level, the Ultra boiler requires no modifications and automatically derates itself by approximately 4% per 1000 feet above sea level. | |||||||
| THE OUTDOOR SENSOR SUPPLIED WITH THE BOILER MUST BE INSTALLED UNLESS EXEMPTED BELOW: IMPORTANT In accordance with Section 303 of the 2007 Energy Act, this boiler is equipped with a feature that saves energy by reducing the boiler water temperature as the heating load decreases. This feature is equipped with an override which is provided primarily to permit the use of an external energy management system that serves the same function. | THIS OVERRIDE MUST NOT BE USED UNLESS AT LEAST ONE OF THE FOLLOWING CONDITIONS IS TRUE: • An external energy management system is installed that reduces the boiler water temperature as the heating load decreases. • This boiler is not used for any space heating. • This boiler is part of a modular or multiple boiler system having a total input of 300,000 BTU/hr or greater. • This boiler is equipped with a tankless coil (not applicable to Ultra boilers). | |||||||
Ratings — Multiple Ultra Series 4 boilers
Figure 139 Ratings and engineering data Figure 141 for notes)
| Boilers in systemModel Ultra - | TotalCSAinput | DOEHeatingcapacity | BoilerH.P. | Netwaterratings | Manifoldedcombustionair ductsize | Foundation size | ||||||||
| Side-to-sidearrangement(height 2" to 4") | Back-to-backarrangement(height 2" to 4") | |||||||||||||
| Input,MBH | Output,MBH | - MBH | Squareinches | Length(inches) | Length(inches) | Length(inches) | Length(inches) | |||||||
| 8010 | 515 | 5230 | 299/310 | 399 | - Note 1 | - Note 2 | Figure 59, page 59 | Note 3 | ||||||
| 2 160 | 142 | 4.2 123 | 80 | 56 23 | 27 48 | |||||||||
| 2 | 210 188 | 5.6 163 | 105 | |||||||||||
| 2 | 310 278 | 8.3 242 | 155 | |||||||||||
| 2 | 460 414 | 12.4 | 360 | 230 | ||||||||||
| 2 | 598 540 | 16.1 | 468 | 299 | ||||||||||
| 2 | 798 730 | 21.8 | 634 | 385 | ||||||||||
| 3 240 | 213 | 6.4 185 | 120 | 85 23 | 56 48 | |||||||||
| 3 | 315 282 | 8.4 245 | 157 | |||||||||||
| 3 | 465 417 | 12.5 | 363 | 232 | ||||||||||
| 3 | 690 621 | 18.6 | 540 | 345 | ||||||||||
| 3 | 897 810 | 24.2 | 702 | 449 | ||||||||||
| 3 | 1197 | 1095 | 32.7 | 951 | 578 | |||||||||
| 4 320 | 284 | 8.5 247 | 160 | 114 | 24 56 | 49 | ||||||||
| 4 | 420 376 | 11.2 | 327 | 210 | ||||||||||
| 4 | 620 556 | 16.6 | 483 | 310 | ||||||||||
| 4 | 920 828 | 24.7 | 720 | 460 | ||||||||||
| 4 | 1196 | 1080 | 32.3 | 936 | 598 | |||||||||
| 4 | 1596 | 1460 | 43.6 | 1268 | 770 | |||||||||
| 5 400 | 355 | 10.6 | 309 | 200 | 143 | 24 85 | 49 | |||||||
| 5 | 525 470 | 14 409 | 267 | |||||||||||
| 5 | 775 695 | 20.8 | 604 | 387 | ||||||||||
| 5 | 1150 | 1035 | 30.9 | 900 | 575 | |||||||||
| 5 | 1495 | 1350 | 40.3 | 1170 | 748 | |||||||||
| 5 | 1995 | 1825 | 54.5 | 1585 | 963 | |||||||||
| 6 480 | 426 | 12.7 | 370 | 240 | 172 | 24 85 | 49 | |||||||
| 6 | 630 564 | 16.8 | 490 | 315 | ||||||||||
| 6 | 930 834 | 24.9 | 725 | 465 | ||||||||||
| 6 | 1380 | 1242 | 37.1 | 1080 | 690 | |||||||||
| 6 | 1794 | 1620 | 48.4 | 1404 | 897 | |||||||||
| 6 | 2394 | 2190 | 65.4 | 1902 | 1155 | |||||||||
| 7 560 | 497 | 14.8 | 432 | 280 | 201 | 24 | 114 | 49 | ||||||
| 7 | 735 658 | 19.7 | 572 | 367 | ||||||||||
| 7 | 1085 | 973 | 29.1 | 846 | 542 | |||||||||
| 7 | 1610 | 1449 | 43.3 | 1260 | 805 | |||||||||
| 7 | 2093 | 1890 | 56.5 | 1638 | 1047 | |||||||||
| 7 | 2793 | 2555 | 76.3 | 2219 | 1348 | |||||||||
| 8 640 | 568 | 17 | 494 | 320 | 230 | 24 | 114 | 49 | ||||||
| 8 | 840 752 | 22.5 | 654 | 420 | ||||||||||
| 8 | 1240 | 1112 | 33.2 | 967 | 620 | |||||||||
| 8 | 1840 | 1656 | 49.5 | 1440 | 920 | |||||||||
| 8 | 2392 | 2160 | 64.5 | 1872 | 1196 | |||||||||
| 8 | 3192 | 2920 | 87.2 | 2536 | 1539 | |||||||||
Ratings — Multiple Ultra Series 4 boilers (continued)
Figure 140 Engineering data (see Figure 141 for notes)
| Boiler ModelUltra | Shipping weight | Operating weight | Water content | Water flow rate per boiler | Vent/air pipe size —Provide a separate vent for each boiler | Electrical service required | |
| Pounds per boiler | Pounds per boiler | Gallons per boiler5 Note 6 | GPM@ 20°F rise | GPM@ 40°F rise | Amps per boiler | ||
| Note 4 Note | |||||||
| -80 | 199 139 0.7 7.1 3.6 2" or 3" 15.0 | ||||||
| -105 | 207 145 0.8 9.4 4.7 2" or 3" 15.0 | ||||||
| -155 | 234 181 1.2 13.9 7.0 3" | 15.0 | |||||
| -230 | 246 192 1.6 20.7 | 10.4 | 3" or 4" 15.0 | ||||
| -299 | 297 229 2.1 27.9 | 14.0 | 4" | 15.0 | |||
| -310 | 297 229 2.1 28.9 | 14.5 | 4' | 15.0 | |||
| -399 | 297 229 2.1 36.5 | 18.2 | 4" | 15.0 | |||
Figure 141 Notes for Figure 139 and Figure 140
| 1 | Based on standard test procedures outlined by DOE for individual boilers. |
| 2 | Net AHRI ratings are based on piping and pickup allowance of 1.15.Consult Weil-McLain Technical Services for other allowances. |
| 3 | Foundation sizes in Figure 139 provide 6 inches between boilers and 2 inches from boiler to edge of foundation Smaller foundations are possible with reduced service clearances.See page 58 for details.For side-to-side installations, see Figure 56, page 58.For back-to-back installations, see Figure 57, page 58 . |
| 4 | Operating weight is the total weight of the boiler, including water. |
| 5 | Ultra-80 and -105 vent/air pipes can be either 2” or 3” pipe. Vent/air pipe length limits for 2” piping are not as long as for 3” piping.Ultra-230 vent/air pipes can be either 3” or 4” pipe. Vent/air pipe length limits for 3” piping are not as long as for 4” piping.All Ultra installations require a separate vent pipe and termination for each boiler.Vent piping cannot be manifolded. Install and terminate vents as described in vent/air installation instructions in this manual.Combustion air piping can be individually piped or manifolded. See Figure 59, page 59, for manifolded air piping. |
| 6 | Total amp requirement includes up to three circulators, not exceeding 2.2 amps per circulator. |
Installation and Service Certifi cate
Boiler Model ____ Series ____ CP Number ____ Date Installed ____
BTU Input ____
☐ Installation instructions have been followed.
☐ Check-out sequence has been performed.
☐ Above information is certified to be correct.
Information received and left with owner/maintenance person.
Installer
(Company) (Address)
(Phone) (Installer's Signature)
START-UP DATA
| Boiler Model CO | 2 High fi re % CO | 2 Low fi re % | |||
| Fuel Natural ____ LP ____ CO High fi re ppm CO Low fi re ppm | |||||
| Was orifice changed? ____ Was gas valve throttle adjusted (Ultra-399) for propane? ____ | |||||
| Natural gas input rate measured ____ Btuh | |||||
| U-CONTROL SET-UP DATA | |||||
| Boiler Model WWSD Temp °F Add'l Heat Demand Type 1____ 2____ 3____ 4____ | |||||
| High Altitude yes ____ no ____ | Adjust Outdoor | °F | Add'l Heat Demand Time | minutes | |
| Manual Reset Temp | °F | ||||
| PRIORITY 1 Settings | PRIORITY 2 Settings | PRIORITY 3 Settings | |||
| System Type | System Type | System Type | |||
| Max Supply | °F | Max Supply | °F | Max Supply | °F |
| Min Supply | °F | Min Supply | °F | Min Supply | °F |
| Max OD Reset | °F | Max OD Reset | °F | Max OD Reset | °F |
| Min OD Reset °F Min OD Reset °F Min OD Reset | °F | ||||
| Modulate On Diff | °F | Modulate On Diff | °F | Modulate On Diff | °F |
| Modulate Off Diff | °F | Modulate Off Diff | °F | Modulate Off Diff | °F |
| Max On Time | minutes | Max On Time | minutes | Max On Time — | |
| Min On Time | — | Min On Time | minutes | Min On Time | minutes |
| Boost Interval | minutes | Boost Interval | minutes | Boost Interval | minutes |
| Pre-pump Time: | seconds | Pre-pump Time: | seconds | Pre-pump Time: | seconds |
| Post-pump Time: | seconds | Post-pump Time: | seconds | Post-pump Time: | seconds |
| Circulator 1 | on-off | Circulator 1 | on-off | Circulator 1 | on-off |
| Circulator 2 | on-off | Circulator 2 | on-off | Circulator 2 | on-off |
| Circulator 3 | on-off | Circulator 3 | on-off | Circulator 3 | on-off |
| Maximum Rate | %Rate | Maximum Rate | %Rate | Maximum Rate | %Rate |
| Minimum Rate | %Rate | Minimum Rate | %Rate | Minimum Rate | %Rate |
| Circulator Exercising | Freeze Protection Circulators | ||||
| Circulator 1 | on____ off____ | Circulator 1 | on____ off____ | ||
| Circulator 2 | on____ off____ | Circulator 2 | on____ off____ | ||
| Circulator 3 | on____ off____ | Circulator 3 | on____ off____ | ||