
TX-49EXN688 - TV PANASONIC - Free user manual and instructions
Find the device manual for free TX-49EXN688 PANASONIC in PDF.


User questions about TX-49EXN688 PANASONIC
0 question about this device. Answer the ones you know or ask your own.
Ask a new question about this device
Download the instructions for your TV in PDF format for free! Find your manual TX-49EXN688 - PANASONIC and take your electronic device back in hand. On this page are published all the documents necessary for the use of your device. TX-49EXN688 by PANASONIC.
USER MANUAL TX-49EXN688 PANASONIC
Operating Instructions LED TV
natural_image
Simple line drawing of a flat-screen monitor with no text or symbolsFor more detailed instructions, please refer to [eHELP] (Built-in Operating Instructions).
text_image
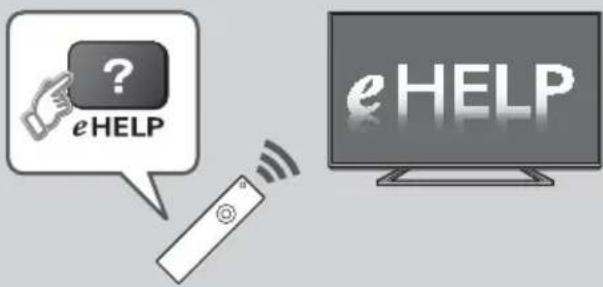
eHELP eHELP• How to use [eHELP] → (p. 17)
Thank you for purchasing this Panasonic product.
Please read these instructions carefully before operating this product and retain them for future reference.
Please carefully read the "Safety Precautions" of this manual before use.
The images shown in this manual are for illustrative purposes only.
Please refer to Pan European Guarantee Card if you need to contact your local Panasonic dealer for assistance.

TQB0E2731P31
DOLBY AUDIO™

text_image
POWERED BY DRAGONContents
Be Sure to Read
Important Notice.... 3
Safety Precautions 4
Quick Start Guide
Accessories 7
Connections 9
Identifying Controls 14
First time Auto Setup 16
Using your TV
Watching TV....17
How to Use eHELP 17
How to Use Menu Functions 19
Changing Picture and Sound settings 20
Retuning from Setup Menu 21
Tuning and Editing Channels 22
Multi Window 24
Child Lock 25
Watching External Inputs 25
Viewing Teletext 26
Using TV Guide 27
USB HDD Recording 28
Timer Programming 30
Using Media Player 31
Using Home Network 32
Others
FAQs 34
Maintenance 35
Specifications 35
- For information about the trademarks, refer to [eHELP] (Search by Purpose > Read first > Before use > Licence).
The illustration for TX-49EXN688 is used in this manual unless otherwise mentioned. Illustrations shown may be different depending on the model.
Notice for DVB / Data broadcasting / IPTV functions
- This TV is designed to meet the standards (as of August, 2016) of DVB-T / T2 (MPEG2, MPEG4-AVC(H.264) and MPEG HEVC(H.265)) digital terrestrial services, DVB-C (MPEG2, MPEG4-AVC(H.264) and MPEG HEVC(H.265)) digital cable services and DVB-S (MPEG2, MPEG4-AVC(H.264) and MPEG HEVC(H.265)) digital satellite services.
Consult your local dealer for availability of DVB-T / T2 or DVB-S services in your area.
Consult your cable service provider for availability of DVB-C services with this TV. - This TV may not work correctly with the signal which does not meet the standards of DVB-T / T2, DVB-C or DVB-S.
- Not all the features are available depending on the country, area, broadcaster, service provider, satellite and network environment.
- Not all CI modules work properly with this TV. Consult your service provider about the available CI module.
- This TV may not work correctly with CI module that is not approved by the service provider.
- Additional fees may be charged depending on the service provider.
- Compatibility with future services is not guaranteed.
Panasonic does not guarantee operation and performance of peripheral devices made by other manufacturers; and we disclaim any liability or damage arising from operation and/or performance from usage of such other maker's peripheral devices.
The recording and playback of content on this or any other device may require permission from the owner of the copyright or other such rights in that content. Panasonic has no authority to and does not grant you that permission and explicitly disclaims any right, ability or intention to obtain such permission on your behalf. It is your responsibility to ensure that your use of this or any other device complies with applicable copyright legislation in your country. Please refer to that legislation for more information on the relevant laws and regulations involved or contact the owner of the rights in the content you wish to record or playback.
This product is licensed under the AVC patent portfolio license for the personal and non-commercial use of a consumer to (i) encode video in compliance with the AVC Standard (“AVC Video”) and/or (ii) decode AVC Video that was encoded by a consumer engaged in a personal and non-commercial activity and/or was obtained from a video provider licensed to provide AVC Video. No license is granted or shall be implied for any other use.
Additional information may be obtained from MPEG LA, LLC.
See http://www.mpegla.com.

This mark shows that the construction of the product is double-insulated.

This mark indicates the product operates under AC voltage.
Transport only in upright position.
Safety Precautions
To help avoid risk of electrical shock, fire, damage or injury, please follow the warnings and cautions below:
■ Mains plug and lead
Warning
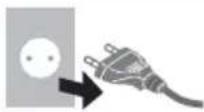
If you detect anything unusual, immediately remove the mains plug.
- This TV is designed to operate on AC ∼ 220-240 V, 50 / 60 Hz.
- Insert the mains plug fully into the mains socket.
- To turn Off the apparatus completely, you must pull the mains plug out of the mains socket.
Consequently, the mains plug should be easily accessible at all times.
- Disconnect the mains plug when cleaning the TV.
- Do not touch the mains plug with wet hands.
• Do not damage the mains lead.
- Do not place a heavy object on the lead.
- Do not place the lead near a high temperature object.
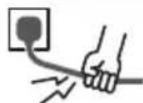
- Do not pull on the lead. Hold onto the mains plug body when disconnecting the plug.
- Do not move the TV with the lead plugged into a mains socket.
- Do not twist the lead, bend it excessively or stretch it.
- Do not use a damaged mains plug or mains socket.
- Ensure the TV does not crush the mains lead.
- Do not use any mains lead other than that provided with this TV.




Take care
Warning
- Do not remove covers and never modify the TV yourself as live parts are accessible and risk of electric shock when they are removed. There are no user serviceable parts inside.


- Do not expose the TV to rain or excessive moisture. This TV must not be exposed to dripping or splashing water and objects filled with liquid, such as vases, must not be placed on top of or above the TV.

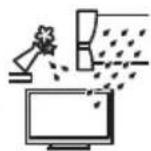
- Do not insert foreign objects into the TV through the air vents.
- If the TV is used in an area where insects may easily enter the TV.
It is possible for insects to enter the TV, such as small flies, spiders, ants, etc. which may cause damage to the TV or become trapped in an area visible on the TV, e.g. within the screen.
- If the TV is used in an environment where there is dust or smoke.
It is possible for dust/smoke particles to enter the TV through the air vents during normal operation which can become trapped inside the unit. This may cause overheating, malfunction, deterioration in picture quality, etc.
- Do not use an unapproved pedestal / mounting equipment. Be sure to ask your local Panasonic dealer to perform the setup or installation of approved wall-hanging brackets.
- Do not apply any strong force or impact to the display panel.
- Ensure that children do not climb on the TV.
- Do not place the TV on sloping or unstable surfaces, and ensure that the TV does not hang over the edge of the base.

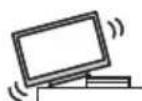
Warning
Never place a TV in an unstable location. A TV may fall, causing serious personal injury or death. Many injuries, particularly to children, can be avoided by taking simple precautions such as:
- Using cabinets or stands recommended by the manufacturer of the TV.
- Only using furniture that can safely support the TV.
- Ensuring the TV is not overhanging the edge of the supporting furniture.
- Not placing the TV on tall furniture (for example, cupboards or bookcases) without anchoring both the furniture and the TV to a suitable support.
- Not placing the TV on cloth or other materials that may be located between the TV and supporting furniture.
• Educating children about the dangers of climbing on furniture to reach the TV or its controls.
If your existing TV is being retained and relocated, the same considerations as above should be applied.
• This TV is designed for table-top use.
- Do not expose the TV to direct sunlight and other sources of heat.

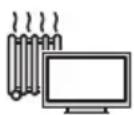
To prevent the spread of fire, keep candles or other open flames away from this product at all times

■ Suffocation / Choking Hazard
Warning
- The packaging of this product may cause suffocation, and some of the parts are small and may present a choking hazard to young children. Keep these parts out of reach of young children.
Pedestal
Warning
- Do not disassemble or modify the pedestal.
Caution
- Do not use any pedestal other than the one provided with this TV.
- Do not use the pedestal if it becomes warped or physically damaged. If this occurs, contact your nearest Panasonic dealer immediately.
- During setup, make sure that all screws are securely tightened.
- Ensure that the TV does not suffer any impact during installation of the pedestal.
- Ensure that children do not climb onto the pedestal.
- Install or remove the TV from the pedestal with at least two people.
- Install or remove the TV according to the specified procedure.
■ Radio waves
Warning
- Do not use the TV in any medical institutions or locations with medical equipment. Radio waves may interfere with the medical equipment and may cause accidents due to malfunction.
- Do not use the TV near any automatic control equipment such as automatic doors or fire alarms. Radio waves may interfere with the automatic control equipment and may cause accidents due to malfunction.
- Keep at least 15 cm away from the TV if you have a cardiac pacemaker. Radio waves may interfere with the operation of the pacemaker.
- Do not disassemble or alter the TV in any way.
■ Built-in wireless LAN
Caution
- Do not use the built-in wireless LAN to connect to any wireless network (SSID*) for which you do not have usage rights. Such networks may be listed as a result of searches. However, using them may be regarded as illegal access.
*SSID is a name for identifying a particular wireless network for transmission. - Do not subject the built-in wireless LAN to high temperatures, direct sunlight or moisture.
- Data transmitted and received over radio waves may be intercepted and monitored.
- The built-in wireless LAN uses 2.4 GHz and 5 GHz frequency bands. To avoid malfunctions or slow response caused by radio wave interference when using the built-in wireless LAN, keep the TV away from other devices that use 2.4 GHz and 5 GHz signals such as other wireless LAN devices, microwave ovens, and mobile phones.
- When problems occur due to static electricity, etc., the TV might stop operating to protect itself. In this case, turn the TV off at the Mains power On / Off switch, then turn it back on.
Ventilation
Caution
Allow sufficient space (at least 10 cm) around the TV in order to help prevent excessive heat, which could lead to early failure of some electronic components.
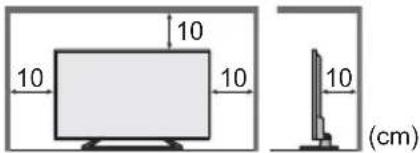
text_image
10 10 10 10 (cm)- Ventilation should not be impeded by covering the ventilation openings with items such as newspapers, tablecloths and curtains.

- Whether you are using a pedestal or not, always ensure the vents at the bottom of the TV are not blocked and there is sufficient space to enable adequate ventilation.
■ Moving the TV
Caution
Before moving the TV, disconnect all cables.
- At least two people are required to move the TV.
■ When not in use for a long time
Caution
This TV will still consume some power even in the Off mode, as long as the mains plug is still connected to a live mains socket.
- Remove the mains plug from the wall socket when the TV is not in use for a prolonged period of time.
■ Excessive volume
Caution
- Do not expose your ears to excessive volume from the headphones. Irreversible damage can be caused.

- If you hear a drumming noise in your ears, turn down the volume or temporarily stop using the headphones.
■ Battery for the Remote Control
Caution
- Incorrect installation may cause battery leakage, corrosion and explosion.
- Replace only with the same or equivalent type.
- Do not mix old and new batteries.
- Do not mix different battery types (such as alkaline and manganese batteries).
- Do not use rechargeable batteries (Ni-Cd, etc.).
- Do not burn or break up batteries.
- Do not expose batteries to excessive heat such as sunshine, fire or the like.
• Make sure you dispose of batteries correctly. - Remove the battery from the unit when not using for a prolonged period of time to prevent battery leakage, corrosion and explosion.
LED TV
Declaration of Conformity (DoC)
"Hereby, Panasonic Corporation declares that this TV is in compliance with the essential requirements and other relevant provisions of the Directive 2014/53/EU."
If you want to get a copy of the original DoC of this TV, please visit the following website:
http://www.ptc.panasonic.eu/doc
Authorized Representative:
Panasonic Testing Centre
Panasonic Marketing Europe GmbH
Winsbergring 15, D-22525 Hamburg, Germany

5.15 - 5.35 GHz band of wireless LAN is restricted to indoor operation only in the following countries.
Austria, Belgium, Bulgaria, Czech Republic, Denmark, Estonia, France, Germany, Iceland, Italy, Greece, Spain, Cyprus, Latvia, Liechtenstein, Lithuania, Luxembourg, Hungary, Malta, Netherlands, Norway, Poland, Portugal, Romania, Slovenia, Slovakia, Turkey, Finland, Sweden, Switzerland, Croatia
Maximum radio-frequency power transmitted in the frequency bands
| Type of wireless | Frequency band | Maximum EIRP |
| Wireless LAN | 2 412-2 472 MHz | 20 dBm |
| 5 150-5 250 MHz | 23 dBm | |
| 5 250-5 350 MHz | 23 dBm | |
| 5 470-5 725 MHz | 23 dBm |
Accessories
Standard accessories
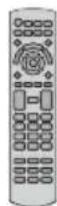
Remote Control
→ (p. 14)
N2QAYB001115
Pedestal
→ (p. 7)
40-inch model
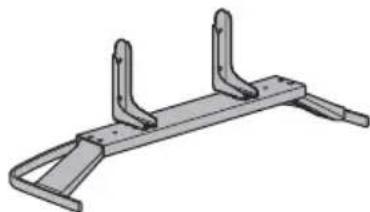
natural_image
Technical drawing of a metal frame structure with two vertical supports and curved ends (no text or symbols)49-inch model
55-inch model
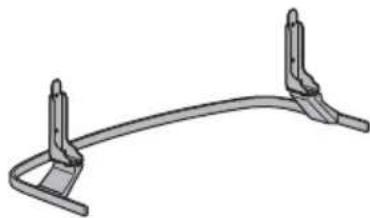
natural_image
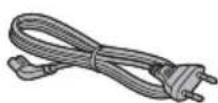
Mechanical component with two vertical supports and a curved end (no text or symbols)Mains lead
→ (p. 10)
Batteries (2)
R6
→ (p. 15)

Operating Instructions
Pan European Guarantee Card
- Accessories may not be placed all together. Take care not to throw them away unintentionally.
Assembling / Removing the pedestal
40-inch model
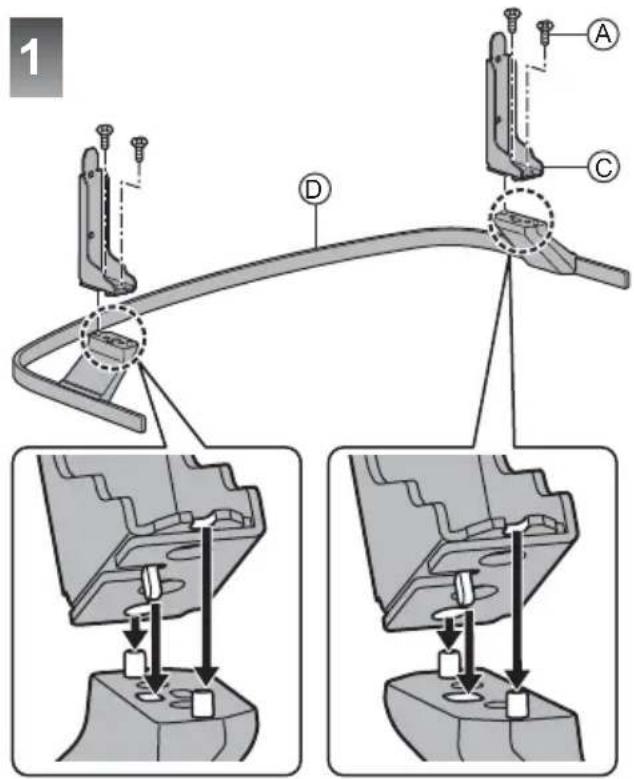
Ⓐ Assembly screw (4)

M5 × 10
⑧ Assembly screw (4)

M4 × 12
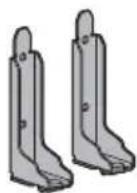
© Bracket (2)
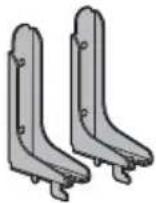
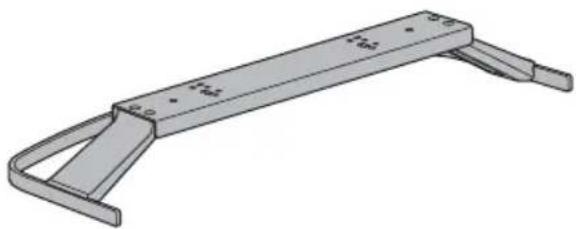
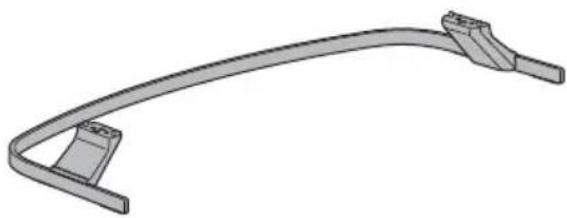
D Base
natural_image
3D rendering of a mechanical bracket or support structure with no visible text or symbols■ Assembling the pedestal
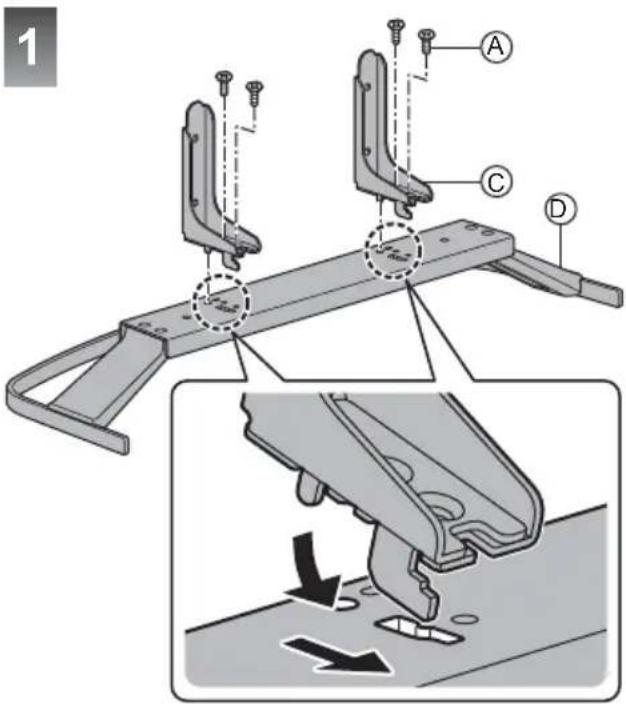
text_image
1 A C D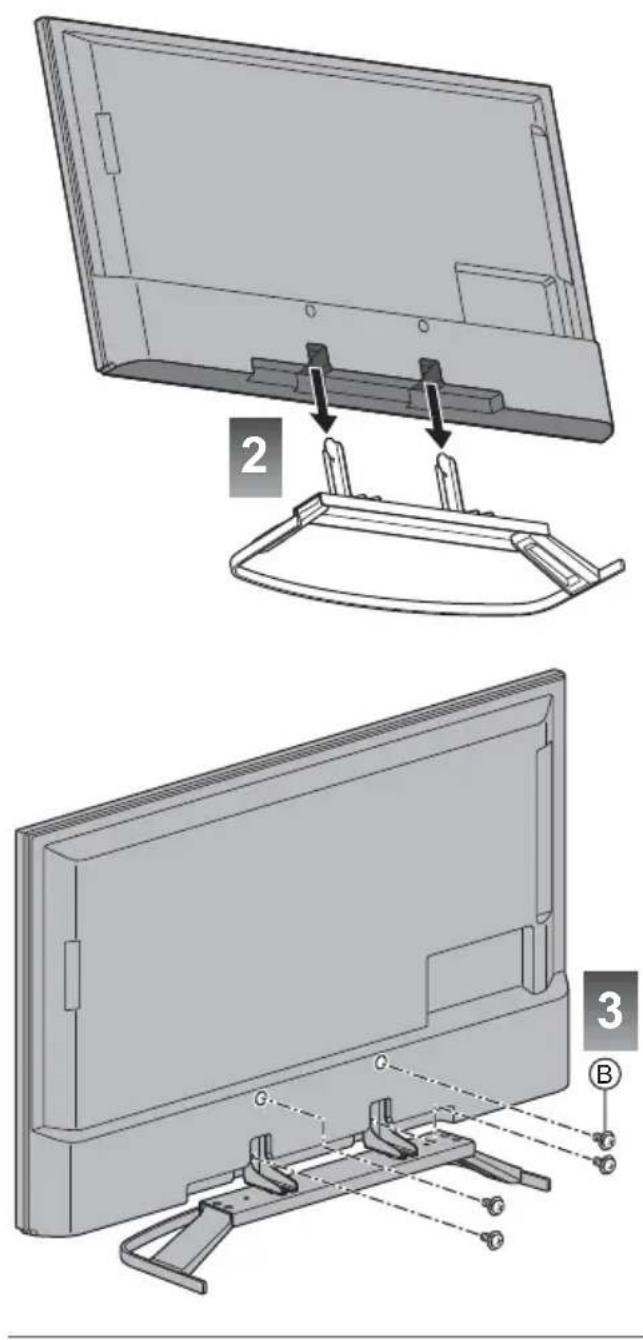
49-inch model 55-inch model
Ⓐ Assembly screw (4)

M5 × 15
⑧ Assembly screw (4)

M4 × 12
© Bracket (2)
D Base
natural_image
3D rendering of a curved metal bracket with two side slots (no text or symbols)■ Assembling the pedestal
text_image
1 A C D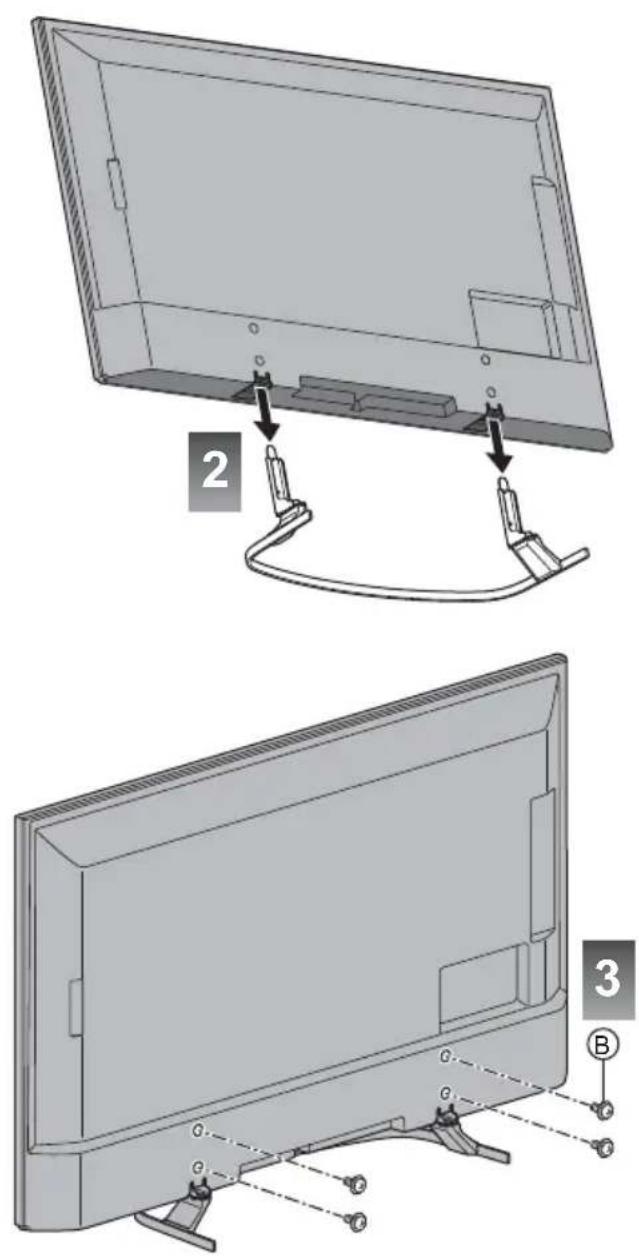
Removing the pedestal from the TV
Be sure to remove the pedestal in the following way when using the wall-hanging bracket or repacking the TV.
1 Remove the assembly screws® from the TV.
2 Pull out the pedestal from the TV.
3 Remove the assembly screws from the bracket.
Connections
- External equipment and cables shown are not supplied with this TV.
- Please ensure that the unit is disconnected from the mains socket before attaching or disconnecting any cables.
- Check the terminal type and cable plugs are correct for connection.
- Use a fully wired HDMI compliant cable.
- Keep the TV away from electronic equipment (video equipment, etc.) or equipment with an infrared sensor, otherwise distortion of image / sound may occur or operation of other equipment may be affected.
- Please also read the manual of the equipment being connected.
Terminals
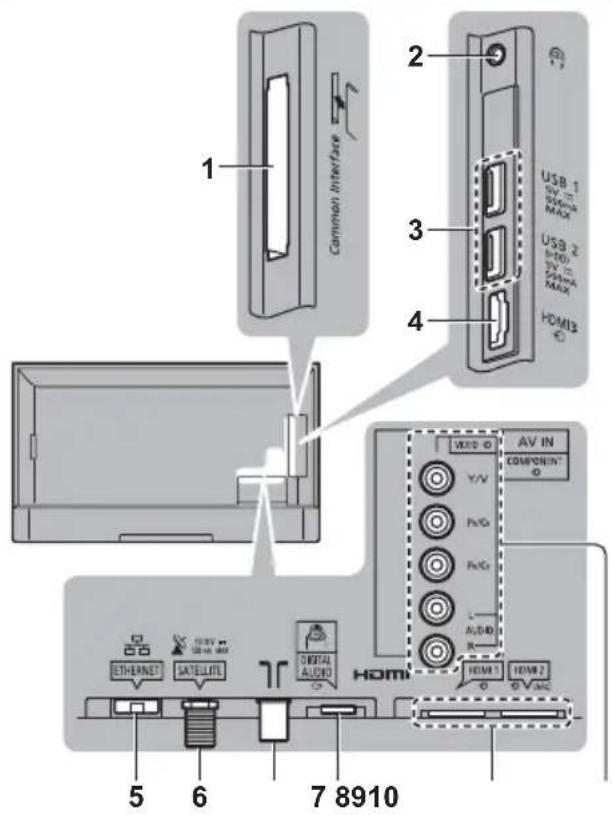
text_image
1 Common Interface 2 USB 1 TV 20 SPMA MAX 3 USB 2 VDD VDD MAX HDMI3 E 4 5 6 7 8910 AV IN COMPANY Y/Y P/VG P/VG L- AUDIO R- HDMI HDMI 1 HDMI 2 SATELLITE DIGITAL AUDIO1 Cl slot (p. 13)
2 Headphone jack (p. 13)
3 USB 1 - 2 port
4 HDMI3
5 ETHERNET terminal (p. 11)
6 Satellite terminal (p. 10)
7 Terrestrial / cable terminal (p. 10)
8 DIGITAL AUDIO
9 HDMI1 - 2 (p. 11, 12, 13)
10 AV (COMPONENT / VIDEO)→(p. 12)
• To watch content in 4K format, use HDMI terminal. → (p. 12)
Basic connections
■ Mains lead
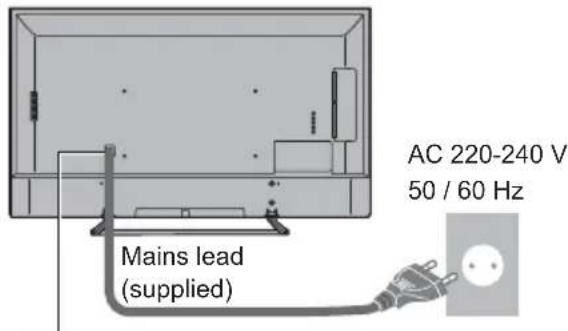
text_image
Mains lead (supplied) AC 220-240 V 50 / 60 HzInsert the mains plug firmly into place.
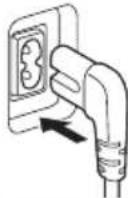
- When disconnecting the mains lead, be absolutely sure to disconnect the mains plug from the mains socket first.
Aerial
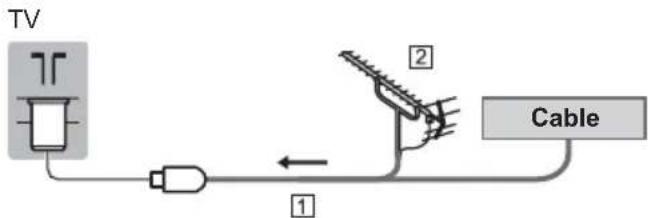
text_image
TV 1 2 Cable① RF cable
② Terrestrial aerial
• For DVB-C, DVB-T, Analogue
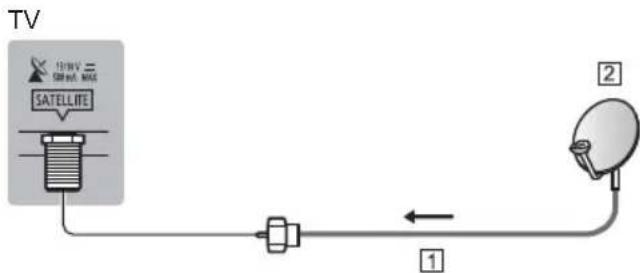
Satellite dish
DVB-S
flowchart
graph TD
    TV["TV"] --> Satellite["SATELLITE"]
    Satellite -->|Signal| Device["Device 1"]
    Device -->|Signal| Ground["Ground"]
    Device -->|Signal| Satellite["Satellite"]
    Satellite -->|Signal| Ground
    style TV fill:#f9f,stroke:#333
    style Satellite fill:#ccf,stroke:#333
    style Ground fill:#cfc,stroke:#333
1 Satellite cable
② Satellite dish
- To ensure your satellite dish is correctly installed, please consult your local dealer. Also consult the received satellite broadcasting companies for details.
DVB-via-IP client connection
This TV has DVB-via-IP client function and can connect to DVB-via-IP server or SAT>IP compatible servers to receive broadcast streaming.
- It is recommended to connect to DVB-via-IP server with a LAN cable.
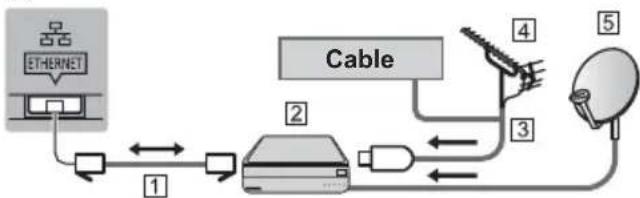
■ Wired connection
TV
flowchart
graph LR
    A["ETHERNET"] --> B["Cable"]
    B --> C["Satellite"]
    C --> D["Satellite"]
    D --> E["Satellite"]
    E --> F["Cable"]
    F --> G["Satellite"]
    G --> H["Satellite"]
    H --> I["Cable"]
    I --> J["Satellite"]
    J --> K["Cable"]
    K --> L["Satellite"]
    L --> M["Cable"]
    M --> N["Satellite"]
    N --> O["Cable"]
    O --> P["Satellite"]
    P --> Q["Cable"]
    Q --> R["Satellite"]
    R --> S["Cable"]
    S --> T["Satellite"]
    T --> U["Cable"]
    U --> V["Satellite"]
    V --> W["Cable"]
    W --> X["Satellite"]
    X --> Y["Cable"]
① LAN cable (Shielded)
• Use Shielded Twist Pair (STP) LAN cable.
② DVB-via-IP server
3 RF cable
4 Terrestrial aerial
5 Satellite dish
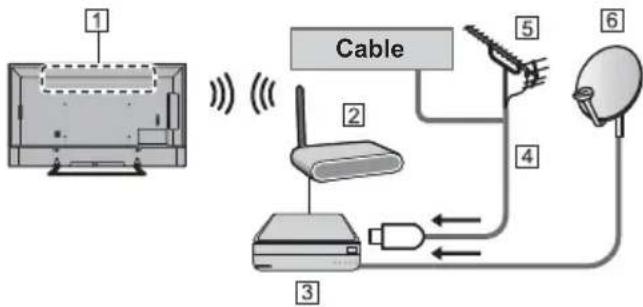
■ Wireless connection
text_image
1 Cable 2 3 4 5 6Built-in wireless LAN
② Access point
③ DVB-via-IP server
4 RF cable
⑤ Terrestrial aerial
6 Satellite dish
- This function may not be available depending on network condition and broadcast.
- For information about the connections, read the manual of the DVB-via-IP server.
- For details, refer to [eHELP] (Search by Purpose > Functions > DVB-via-IP).
AV devices
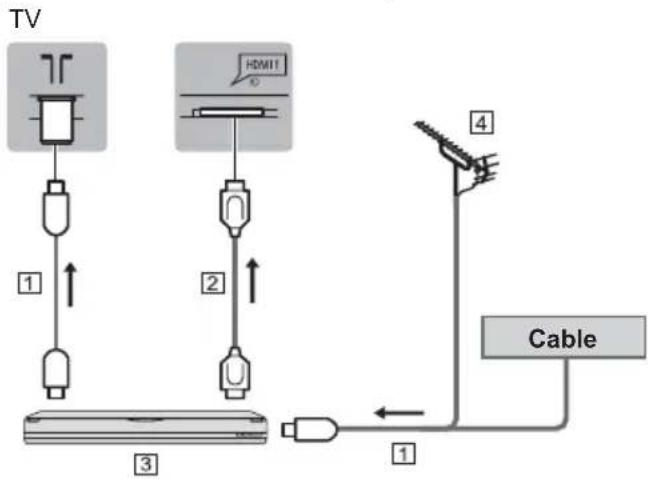
■ DVD Recorder / Blu-ray Recorder, etc.
flowchart
graph TD
    TV["TV"] --> 1["Component 1"]
    1 --> 2["Component 2"]
    2 --> 3["Component 3"]
    3 --> 4["Cable"]
    4 --> 1
    4 --> 2
    2 --> 1
    style TV fill:#f9f,stroke:#333
    style Cable fill:#ccf,stroke:#333
    style 1 fill:#dfd,stroke:#333
    style 2 fill:#dfd,stroke:#333
    style 3 fill:#dfd,stroke:#333
    style 4 fill:#dfd,stroke:#333
① RF cable
② HDMI cable
③ DVD Recorder / Blu-ray Recorder, etc.
4 Terrestrial aerial
■ Set top box
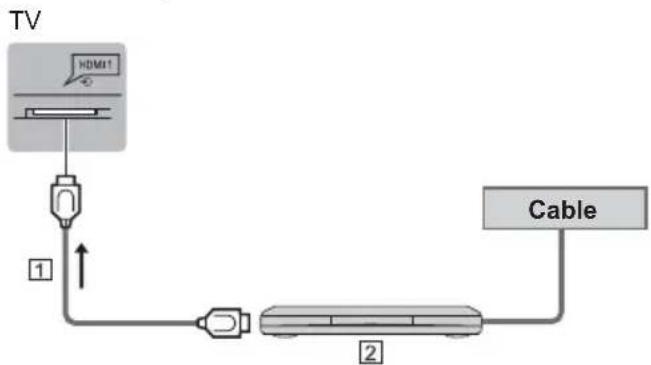
flowchart
graph TD
    TV["TV"] -->|HDMI1| A["Switch"]
    A --> B["Router ①"]
    B --> C["Cable"]
    C --> D["Router ②"]
1 HDMI cable
② Set top box
Network
A broadband network environment is required to be able to use internet services.
- If you do not have any broadband network services, please consult your retailer for assistance.
• Prepare the internet environment for wired connection or wireless connection. - Setup of the network connection will start when first using the TV. (p. 16)
■ Wired connection
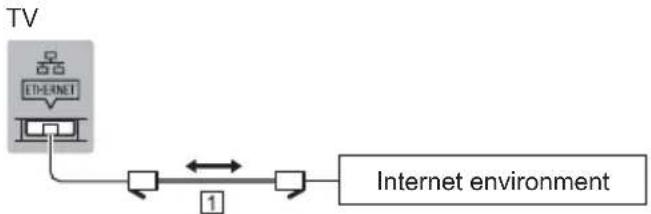
flowchart
graph LR
    TV["TV"] --> Internet1["Internet"]
    Internet1 -->|1| Internet2["Internet environment"]
    Internet1 <--> Internet2
1 LAN cable (Shielded)
• Use Shielded Twist Pair (STP) LAN cable.
■ Wireless connection
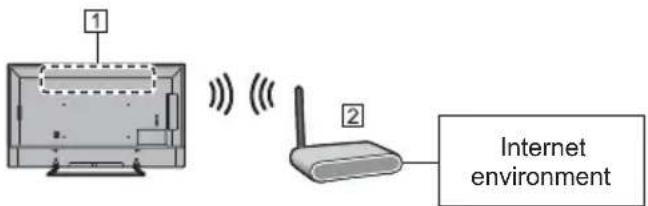
text_image
1 2 Internet environment① Built-in wireless LAN
② Access point
Connections for 4K compatible equipment
TV

flowchart
graph LR
    A[" HDMI1 "] --> B[" Cable "]
    B --> C[" Cable "]
    C --> D[" Box "]
    style A fill:#f9f,stroke:#333
    style D fill:#bbf,stroke:#333
① HDMI cable
② 4K compatible equipment
- To watch high-definition 4K more accurately or HDR content, connect the 4K compatible equipment to HDMI1 or 2 terminal.
- Connect the 4K compatible equipment to HDMI terminal using a 4K compatible cable and you can watch content in 4K format.
■ [HDMI Auto Setting] (Setup Menu)
Reproduces the image more precisely with the expanded colour gamut when connecting the 4K compatible equipment. Select the mode depending on the equipment.
[Mode1]:
For better compatibility. Set to [Mode1] when the image or sound in HDMI input is not played properly. [Mode2]:
For the 4K compatible equipment that has the function to output the image precisely with the expanded colour gamut
• To change the mode
- Select the HDMI input mode connected to the equipment.
- Display the menu and select [HDMI Auto Setting] (Setup Menu).
- For information about the valid format, refer to [eHELP] (Search by Purpose > Watching > 4K resolution > HDMI Auto Setting).
Other connections
■ DVD Player
COMPONENT equipment)
TV
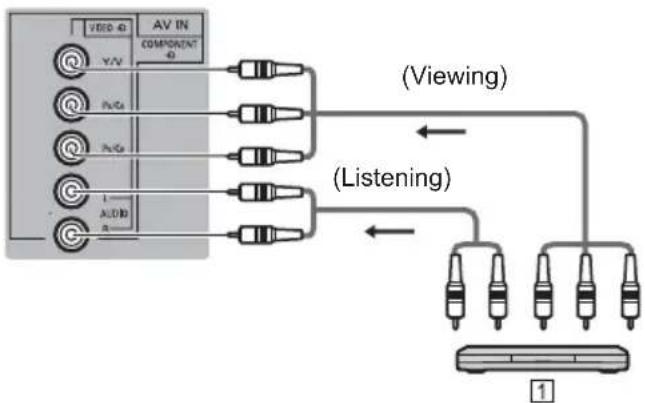
flowchart
graph TD
    A["VIDEO 4"] --> B["AV IN COMPONENT 4"]
    B --> C["(Viewing)"]
    D["AC 8"] --> E["(Listening)"]
    F["AC 9"] --> E
    G["AC 10"] --> E
    H["AC 11"] --> E
    I["AC 12"] --> E
    J["AC 13"] --> E
    K["AC 14"] --> E
    L["AC 15"] --> E
    M["AC 16"] --> E
    N["AC 17"] --> E
    O["AC 18"] --> E
    P["AC 19"] --> E
    Q["AC 20"] --> E
    R["AC 21"] --> E
    S["AC 22"] --> E
    T["AC 23"] --> E
    U["AC 24"] --> E
    V["AC 25"] --> E
    W["AC 26"] --> E
    X["AC 27"] --> E
    Y["AC 28"] --> E
    Z["AC 29"] --> E
    AA["AC 30"] --> E
    AB["AC 31"] --> E
    AC["AC 32"] --> E
    AD["AC 33"] --> E
    AE["AC 34"] --> E
    AF["AC 35"] --> E
    AG["AC 36"] --> E
    AH["AC 37"] --> E
    AI["AC 38"] --> E
    AJ["AC 39"] --> E
    AK["AC 40"] --> E
    AL["AC 41"] --> E
    AM["AC 42"] --> E
    AN["AC 43"] --> E
    AO["AC 44"] --> E
    AP["AC 45"] --> E
    AQ["AC 46"] --> E
    AR["AC 47"] --> E
    AS["AC 48"] --> E
    AT["AC 49"] --> E
    AU["AC 50"] --> E
    AV["AC 51"] --> E
    AW["AC 52"] --> E
    AX["AC 53"] --> E
    AY["AC 54"] --> E
① DVD Player
■ Camcorder / Game equipment
(VIDEO equipment)
TV
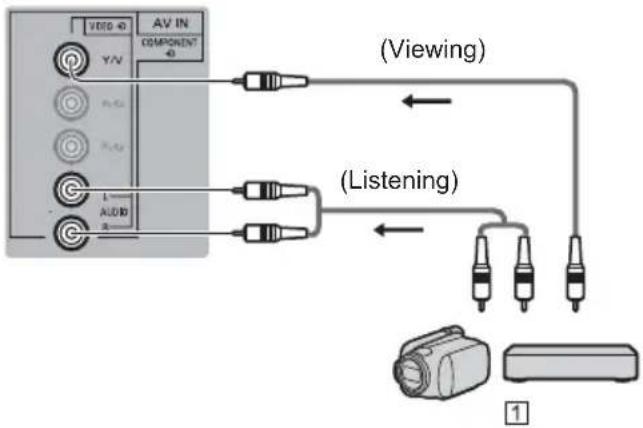
flowchart
graph TD
    A["VIDEO-4"] --> B["AV IN COMPONENT-4"]
    C["Y/V"] --> B
    D["Radio"] --> B
    E["Radio"] --> B
    F["L Audio"] --> B
    G["Audio"] --> B
    H["(Viewing)"] --> B
    I["(Listening)"] --> B
    J["Device 1"] --> K["Residential Display"]
① Camcorder / Game equipment
■ Amplifier (listening with external speakers)
- Use HDMI2 to connect the TV to an amplifier which has ARC (Audio Return Channel) function. If connecting to an amplifier without ARC function, use DIGITAL AUDIO.
- To enjoy multi-channel sound from external equipment (e.g. Dolby Digital 5.1ch), connect the equipment to the amplifier. For information about the connections, read the manuals of the equipment and amplifier.
TV
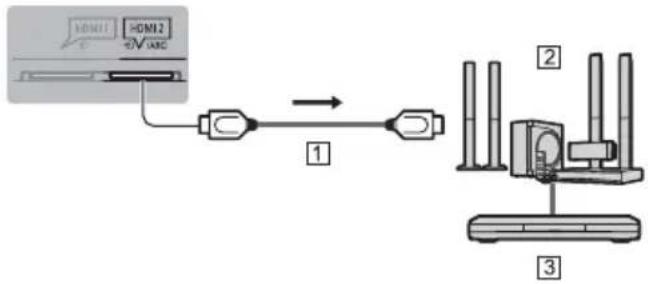
flowchart
graph LR
    A[" HDMI1 "] --> B[" HDMI2 "]
    B --> C[" USB cable "]
    C --> D[" Router "]
    D --> E[" 2 "]
    D --> F[" 3 "]
① HDMI cable
② Amplifier with speaker system
③ External equipment (DVD Player, etc.)
■ Headphones
- For information about the volume settings, refer to [eHELP] (Search by Purpose > Settings > Sound).
TV
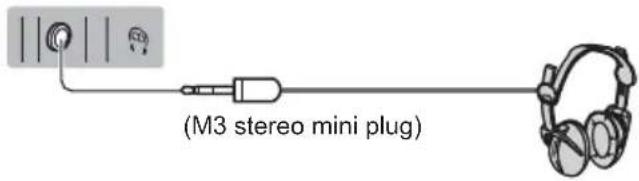
- Turn the TV off with Mains Power On / Off switch whenever inserting or removing the CI module.
- If a smart card and a CI module come as a set, first insert the CI module, then insert the smart card into the CI module.
- Insert or remove the CI module completely in the correct direction as shown.
- Normally encrypted channels will appear. (Viewable channels and their features depend on the CI module.)
If encrypted channels do not appear
[Common Interface] in the Setup Menu
- There might be some CI modules in the market with older firmware versions that do not work fully interoperable with this new CI+ v1.3 TV. In this case, please contact your content provider.
- For details, refer to [eHELP] (Search by Purpose > Functions > Common Interface), read the manual of the CI module, or check with the content provider.
TV
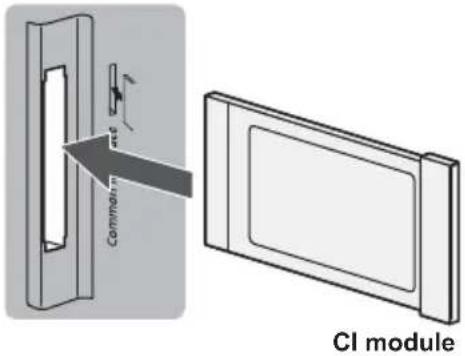
text_image
Common Cl module■ USB HDD (for recording)
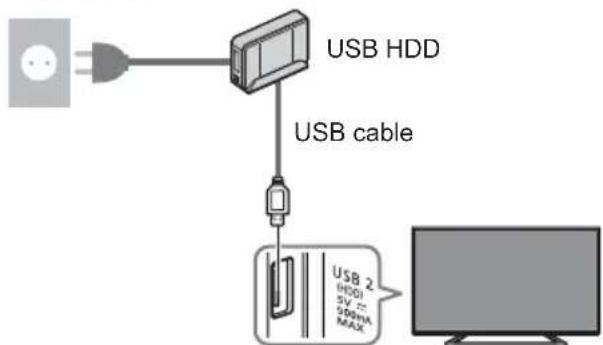
• Use USB 2 port for connecting the USB HDD.
- For details, refer to [eHELP] (Search by Purpose > Recording).
■ VIERA Link
• Use HDMI1 - 3 for VIERA Link connection.
- For details, refer to [eHELP] (Search by Purpose > Functions > VIERA Link "HDAVI Control™").
Identifying Controls
Remote Control
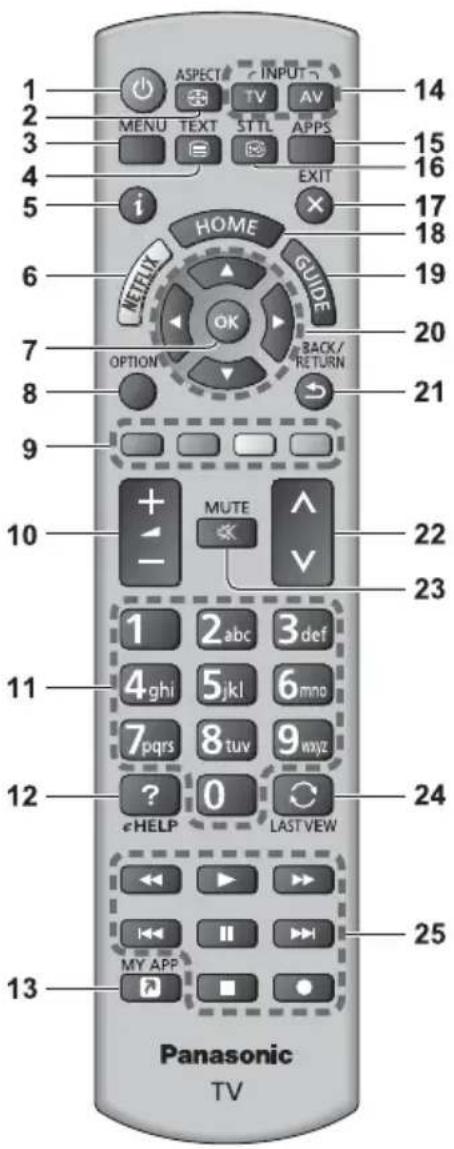
text_image
1 ASPECT INPUT 2 MENU TEXT STTL APPS 3 EXIT 4 i 5 HOME GUIDE 6 OK BACK/ 7 OPTION RETURN 8 9 10 MUTE 11 2 abc 3 def 12 4 ghi 5 jkl 6 mno 13 ? 0 LAST VIEW 14 15 16 17 18 19 20 21 22 23 24 25 cHELP MY APP Panasonic TV1 [O]: Standby On / Off switch
2 Aspect
• Changes aspect ratio.
3 [Main Menu]
- Press to access Picture, Sound, Network, Timer, Setup and Help Menus, etc.
4 Teletext button
5 Information
• Displays channel and programme information.
6 Netflix
- Accesses NETFLIX service directly.
- A broadband network environment is required in order to fully use this function.
- This service may be stopped or changed without notice.
7 OK
• Confirms selections and choices.
- Press after selecting channel positions to quickly change channel.
• Displays channel list.
8 [Option Menu]
- Easy optional setting for viewing, sound, etc.
9 Coloured buttons
(red-green-yellow-blue)
• Used for the selection, navigation and operation of various functions.
10 Volume Up / Down
11 Numeric buttons
• Changes channel and teletext pages.
- Sets characters.
- When in Standby mode, switches TV on.
12 [eHELP]
• Displays [eHELP] (Built-in Operating Instructions).
13 [My App]
- Assigns a favourite application. After setting, starts the application easily by pressing this button.
- For details, refer to [eHELP] (Search by Purpose > Home Screen > Apps > My App)
14 Input mode selection
- TV - switches to DVB-S / DVB-C / DVB-T / DVB-via-IP / Analogue.
- AV - switches to AV input mode from Input Selection list.
15 APPS
• Displays [Apps] (applications list).
16 Subtitles
- Displays subtitles.
17 Exit
- Returns to the normal viewing screen.
18 HOME
• Displays [Home Screen].
- For details, refer to [eHELP] (Search by Purpose > Read first > Features).
19 TV Guide
• Displays Electronic Programme Guide.
20 Cursor buttons
• Makes selections and adjustments.
21 Return
- Returns to the previous menu / page.
22 Channel Up / Down
23 Sound Mute On / Off
24 Last view
- Switches to previously viewed channel or input mode.
25 Operations for contents, connected equipment, etc.
■ Installing / Removing batteries
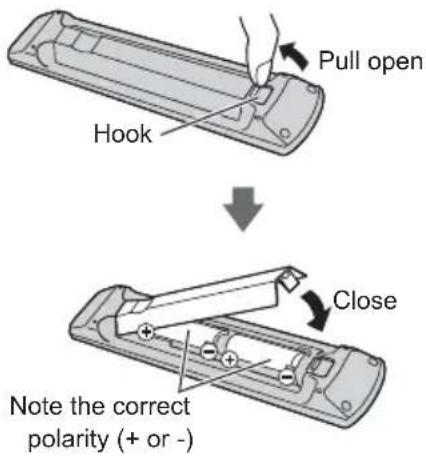
text_image
Pull open Hook ↓ Close Note the correct polarity (+ or -)Indicator / Control panel
- When pressing 4, 5, 6 buttons, the control panel guide appears on the right side of the screen for 3 seconds to highlight which button has been pressed.
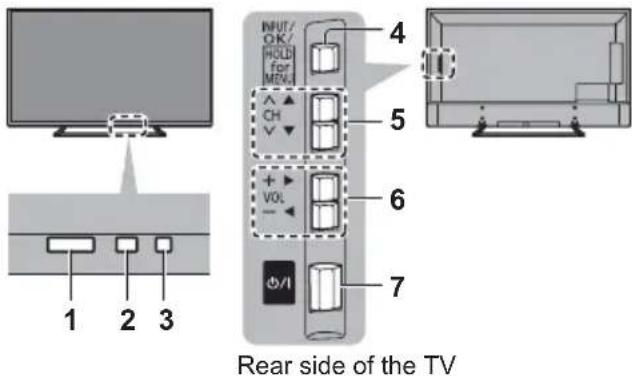
text_image
1 2 3 INPUT/ OK/ HOLD for MDU 4 5 CH V 6 VOL - 7 ⊕/I Rear side of the TV1 Remote control signal receiver
- Do not place any objects between the TV remote control signal receiver and remote control.
2 Ambient sensor
- Senses brightness to adjust picture quality when [Ambient Sensor] in the Picture Menu is set to [On].
3 Power LED
Red: Standby
Green: On
Orange:
Standby with some functions (recording, etc.) active
- The LED blinks when the TV receives a command from the remote control.
4 Input mode selection
- Press repeatedly until you reach the desired mode.
[Main Menu]
- Press and hold for about 3 seconds to display main menu.
OK (when in the menu system)
5 Channel Up / Down
- Cursor Up / Down (when in the menu system)
6 Volume Up / Down
- Cursor Left / Right (when in the menu system)
7 Mains power On / Off switch
- Use to switch the mains power.
- To turn Off the apparatus completely, you must pull the mains plug out of the mains socket.
• [⏻/l]: Standby / On
First time Auto Setup
When the TV is turned on for the first time, it will automatically search for available TV channels and give options to set up the TV.
• These steps are not necessary if the setup has been completed by your local dealer.
- Please complete connections (p. 9 - 13) and settings (if necessary) of the connected equipment before starting Auto Setup. For information about the settings for the connected equipment, read the manual of the equipment.
1 Plug the TV into a live mains socket and turn the power on

• Takes a few seconds to be displayed.
natural_image
Close-up of a remote control panel with a power button and eight buttons (no text or symbols visible)2 Select the following items
Set up each item by following the on-screen instructions.
Example:
Please select your viewing environment.
Home Shop
■ How to use the remote control

Move the cursor

Access the item / store the setting

Return to the previous item (if available)
Select the language
Select [Home]
Select [Home] for use in a home viewing environment.
• [Shop] is for shop display.
- To change the viewing environment later on, the set will need to have all settings initialised by accessing Shipping Condition.
Set up the network connection
Select your country
- Depending on the country you select, select your Region or store the Child Lock-PIN number ("0000" cannot be stored).
Tick the TV signal mode to tune, and then select [Start Auto Setup]
![PANASONIC TX-49EXN688 - Tick the TV signal mode to tune, and then select [Start Auto Setup] - 1](/content/2026/05/806194/images/dcb5ffa81c41ff830947890a8de4d619159ed19e1c28e3da0c78267c23e6ee41.jpg)
tune (search for the available channels)
□: skip tuning
• Auto Setup screen varies depending on the country and the signal mode you select.
• [DVB-C Network Settings]
Normally set [Frequency] and [Network ID] to [Auto].
If [Auto] is not displayed or if necessary, enter [Frequency] and [Network ID] specified by your cable provider with numeric buttons.
Auto Setup is now complete and the TV is ready for viewing.
If tuning has failed check the Satellite cable, RF cable, and the network connection, and then follow the on-screen instructions.
Note
- The TV goes into Standby mode when no operation is performed for 4 hours if [Auto Standby] in the Timer Menu is set to [On].
- The TV goes into Standby mode when no signal is received and no operation is performed for 10 minutes if [No signal Power off] in the Timer Menu is set to [On].
• To retune all channels
[Auto Setup] in [Tuning Menu] (Setup Menu)
• To add the available TV signal mode later → [Add TV Signal] in [Tuning Menu] (Setup Menu) - To initialise all settings → [Shipping Condition] in [System Menu] (Setup Menu)
Watching TV
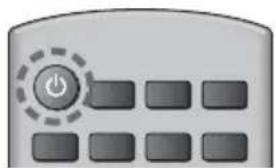
1 Turn power on
(TV)
or

(Remote Control)
- Mains power On / Off switch should be on. (p. 15)
Displays information bar on the edge of screen for several seconds.
- For information about the operation and settings, refer to [eHELP]. (Search by Purpose > Read first > Features)
2 Select the mode
TV
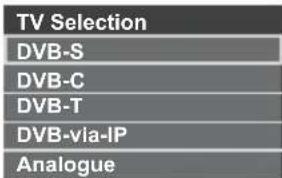
text_image
TV Selection DVB-S DVB-C DVB-T DVB-via-IP Analogue- Selectable modes vary depending on the channels stored.
3 Select a channel
or

• To select a channel position with 2 or more-digit, e.g. 399

How to Use eHELP
[eHELP] is the detailed operating instructions built into the TV, and gives a more detailed explanation for a better understanding of the operation of each feature.
1 Display [eHELP]
![PANASONIC TX-49EXN688 - Display [eHELP] - 1](/content/2026/05/806194/images/b97d5a2e323c6092fc62481e553b193c1d2f9da78d5490fee028e1eb75504719.jpg)
eHELP
or
MENU
![PANASONIC TX-49EXN688 - Display [eHELP] - 2](/content/2026/05/806194/images/8c68e536e34d124658c1ac5c7a9e17087e0e292f4362d44892170221984c7b60.jpg)
![PANASONIC TX-49EXN688 - Display [eHELP] - 3](/content/2026/05/806194/images/feead8de89a4b473977bc1392a57819d577513bf0890f43503cbf1a001c5fd2a.jpg)
[Help] [eHELP]
- If the [eHELP] has been accessed previously since the TV was turned on, the confirmation screen is displayed to select whether to go to the [First page] or to the [Last viewed page].
2 Select the menu
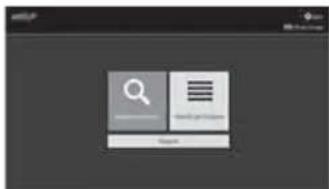
text_image
Screenshot of a software interface with a search icon and document tabs, likely for user search or configuration.
①select
②access
• To access [How to use] (green)
[Keyword Search]:
Search the content of eHELP in the keyword.
[Search by Purpose]:
Search the content of eHELP for each item.
[Support]:
Access the support information (FAQs, etc.).
3 Select the item
Example:
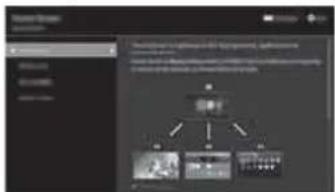
flowchart
graph TD
    A["Data Processing"] --> B["Image Module"]
    A --> C["Video Module"]
    A --> D["Image Processing Module"]
    B --> E["Data Monitoring"]
    C --> F["Video Monitoring"]
    D --> G["Image Monitoring"]
① select
②access
• To return to the previous screen / field
BACK/RETURN

- To scroll the description (if more than 1 page) While the description is highlighted

• To open the reference screen ( → )

- To display the menu related to the description (only for some descriptions)

(red)
- To check the features of this TV Search by Purpose > Read first > Features
How to Use Menu Functions
Various menu items allow you to make settings for the picture, sound, and other functions.
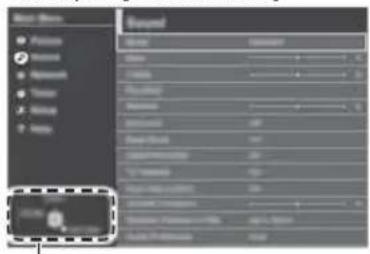
1 Display the menu

- Displays the functions that can be set (varies according to the input signal).
2 Select the menu
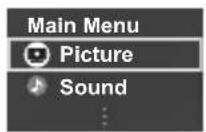
3 Select the item
Example: [Sound Menu]
text_image
Sound OKOperation guide
• To exit the menu screen

• To return to the previous screen


• To change menu pages
■ Choose from among alternatives

■ Adjust using the slide bar

■ Go to the next screen

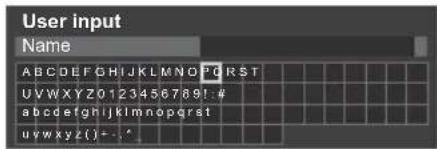
■ Enter characters by free input menu
You can enter names or numbers freely for some items.
text_image
User input Name ABCDEFGHIJKLMNOPQRSTUVWXYZ0123456789!.# abcdefghijklmnopqrstuvwxyz()+..^1 Set characters one by one
2 Store
BACK/RETURN

- You can set characters by using numeric buttons.
■ To reset the settings
• Picture or sound settings only
[Reset to Defaults] in the Picture Menu or Sound Menu
• To initialise all settings
→ [Shipping Condition] in [System Menu] (Setup Menu)
Changing Picture and Sound settings
■ Picture
1 Display the menu and select [Picture]
MENU
![PANASONIC TX-49EXN688 - Display the menu and select [Picture] - 1](/content/2026/05/806194/images/2469272c79a671fd4ba9d9ba2dbae6cceddf1ae013eb9e0183a467aed20a6198.jpg)
Picture
![PANASONIC TX-49EXN688 - Display the menu and select [Picture] - 2](/content/2026/05/806194/images/1048d11f79d6e38edc3e2e0bc5d2c1537674c38b187c4785ac51552076911910.jpg)
①select
② access
2 Select [Viewing Mode]
![PANASONIC TX-49EXN688 - Select [Viewing Mode] - 1](/content/2026/05/806194/images/a6a534afdd19628e139723b9133f9f7377e049e21333d0a548777c61ad90647e.jpg)
① select
② access
3 Select the picture mode
You can select your favourite mode for each input.
[Dynamic]:
Improves contrast and sharpness for viewing in a bright room.
[Normal]:
Normal use for viewing in a normal lighting condition.
[Cinema]:
Improves the performance of contrast, black and colour reproduction for watching movies in a darkened room.
[True Cinema]:
Reproduces the original image quality precisely without any revision.
[Custom]:
Adjusts each menu item manually to suit your favourite picture quality.
- The following items can be adjusted and stored for each mode.
[Backlight] / [Contrast] / [Brightness] / [Colour] / [Tint] / [Sharpness] / [Colour Temperature] / [Vivid Colour] / [Adaptive Backlight Control] / [Ambient Sensor] / [Noise Reduction] / [MPEG Remaster] / [Resolution Remaster] / [Dynamic Range Remaster] / [Intelligent Frame Creation] / [Clear Motion]
- For information about the other items, refer to [eHELP] (Search by Purpose > Settings > Picture).
- To reset the current [Viewing Mode] to the default settings → [Reset to Defaults] in the Picture Menu
Sound
1 Display the menu and select [Sound]
MENU
![PANASONIC TX-49EXN688 - Display the menu and select [Sound] - 1](/content/2026/05/806194/images/6e85150c41b0bfbfb49473f82b95e83eb738e183aff85163022318d69567f855.jpg)
![PANASONIC TX-49EXN688 - Display the menu and select [Sound] - 2](/content/2026/05/806194/images/83e13c62a4408ba54c1367419eec9b470a202ed39359d2a9757f14b44e876852.jpg)
Sound
![PANASONIC TX-49EXN688 - Display the menu and select [Sound] - 3](/content/2026/05/806194/images/b4d1722cf5904252565b0f6a0595812dce231631745e8b70621f25c0f1f4284e.jpg)
① select
The Ground Truth image displays a single, solid horizontal line. According to Rule 2 (UNDERSCORE & LINE RULES), this is a stylistic or background line, not a placeholder underscore. Therefore, the OCR result must ignore it. The provided OCR content is "____", which consists of four underscores. This is an incorrect interpretation of the line as a placeholder, violating the rule that stylistic lines must be ignored. The OCR has hallucinated text (underscores) where none should exist, violating the rule to ignore such lines. Hence, the OCR result is inconsistent with the Ground Truth.
② access
2 Select [Mode]
![PANASONIC TX-49EXN688 - Select [Mode] - 1](/content/2026/05/806194/images/a7d6d070e0367395275fdc4b56cf9d0255f68106031600f4c9cc183186f2110b.jpg)
① select
② access
3 Select the sound mode
You can select your favourite mode for each input.
[Standard]:
Provides the suitable sound quality for all types of scenes.
[Music]:
Improves sound quality for watching music videos, etc.
[Ambience]:
Improves spatial effects and provides clear sounds.
[User]:
Adjusts the sounds manually using the equaliser to suit your favourite sound quality.
The following items can be adjusted and stored for each mode.
[Bass] / [Treble] / [Surround] / [Bass Boost]
For the User mode, [Equaliser] is available in the Sound Menu instead of [Bass] and [Treble]. Select [Equaliser] and adjust the frequency.
- This function is effective only for the sound from TV speakers.
- For information about the other items, refer to [eHELP] (Search by Purpose > Settings > Sound).
• To reset the current [Mode] to the default settings
[Reset to Defaults] in the Sound Menu
Retuning from Setup Menu
Automatically retunes the channels received in the area.
- This function is available if channel tuning is already performed.
- Only the selected mode is retuned. All the previous tuning settings are erased.
- Child Lock PIN number is required to retune locked channels.
• If tuning has not been done completely
[Manual Tuning] in [Tuning Menu] (Setup Menu) - For details, refer to [eHELP] (Search by Purpose > Watching > Tuning and editing channels > Auto Setup).
DVB-S
1 Select DVB-S

2 Display the menu and select [Setup]
MENU
![PANASONIC TX-49EXN688 - Display the menu and select [Setup] - 1](/content/2026/05/806194/images/9522435956e6844b16830ff421c301c4fa9abd4e500917aa41ee7c594efb4086.jpg)
![PANASONIC TX-49EXN688 - Display the menu and select [Setup] - 2](/content/2026/05/806194/images/b4a6c07d5d47bcb233bd39cde6277a21bfadff1ce2096211ea25832040cce532.jpg)
Setup
![PANASONIC TX-49EXN688 - Display the menu and select [Setup] - 3](/content/2026/05/806194/images/af942eb428103b9c3aafff19e3c7d95ec6451b82484524035dcab33025121fe2.jpg)
① select
② access
3 Select [DVB-S Tuning Menu]
![PANASONIC TX-49EXN688 - Select [DVB-S Tuning Menu] - 1](/content/2026/05/806194/images/c6db57e96850ef3c2fbff93404463a853a5d96c5510fd556755444bcca36402c.jpg)
①select
②access
4 Set [Antenna System] and [LNB Configuration]
| DVB-S Tuning Menu |
| : |
| Antenna System DiSEqC 1.0 |
| LNB Configuration |
| : |
1 Select [Antenna System] and set
2 Select [LNB Configuration]
3 Set [LNB] and [Satellite]
4 Store
BACK/RETURN
![PANASONIC TX-49EXN688 - Set [Antenna System] and [LNB Configuration] - 1](/content/2026/05/806194/images/daf7dd8596b119d43a8f088c937d7939b2a947021cba384a47669a1be63e06f8.jpg)
5 Select [Auto Setup]
![PANASONIC TX-49EXN688 - Select [Auto Setup] - 1](/content/2026/05/806194/images/33b277a46278193cd647012f501babc8bc0e475442e22777416f1c38e2c13b8a.jpg)
①select
②access
6 Set [Search Mode] / [Scan Mode]
• After settings, select [Start scan].
7 A confirmation screen is displayed and press the OK button to start Auto Setup (Settings are made automatically)
When the operation is completed, the channel at the lowest position will be displayed.
DVB-C, DVB-T, Analogue
1 Select DVB-C, DVB-T or Analogue

2 Display the menu and select [Setup]
![PANASONIC TX-49EXN688 - Display the menu and select [Setup] - 1](/content/2026/05/806194/images/33252b07b7d579569c229bd55fcc01985a1536e524ffac7521b1b2cb22f7a341.jpg)
![PANASONIC TX-49EXN688 - Display the menu and select [Setup] - 2](/content/2026/05/806194/images/320fdbe0302c2c1a13dbe30df05039f27a4fa013796052b4d9ff4ae67d1129c0.jpg)
Setup
![PANASONIC TX-49EXN688 - Display the menu and select [Setup] - 3](/content/2026/05/806194/images/40a6f9855941083993704c0d61271abb530320b2657051c9346e308b7d3710df.jpg)
①select
②access
3 Select [DVB-C Tuning Menu], [DVB-T Tuning Menu] or [Analogue Tuning Menu]
![PANASONIC TX-49EXN688 - Select [DVB-C Tuning Menu], [DVB-T Tuning Menu] or [Analogue Tuning Menu] - 1](/content/2026/05/806194/images/41b94830988345a43a4a9f9197704438fd4ef9828935127411c745ff15d62320.jpg)
① select
② access
- The menu name varies depending on the TV mode.
4 Select [Auto Setup]
5 Set [DVB-C Auto Setup Settings] (DVB-C)
• After settings, select [Start scan].
6 A confirmation screen is displayed and press the OK button to start Auto Setup (Settings are made automatically)
When the operation is completed, the channel at the lowest position will be displayed.
DVB-via-IP
1 Select DVB-via-IP
TV
2 Display the menu and select [Setup]
MENU
![PANASONIC TX-49EXN688 - Display the menu and select [Setup] - 1](/content/2026/05/806194/images/214f1e2f422840d9bd192a783f08481b1ab9a594400b7b4e5d3876ac68c89b43.jpg)
Setup
![PANASONIC TX-49EXN688 - Display the menu and select [Setup] - 2](/content/2026/05/806194/images/963185effa72ef92ba3daf0f7bb104ca9461e5437fef1fb41ee22c094c393b43.jpg)
①select
② access
3 Select [DVB-via-IP Tuning Menu]
![PANASONIC TX-49EXN688 - Select [DVB-via-IP Tuning Menu] - 1](/content/2026/05/806194/images/f3024b48d06e0b25af57df809468af695c60f99f88bf2c02a56248cfc2d17f7e.jpg)
① select
② access
4 Select [Auto Setup]
5 A confirmation screen is displayed and press the OK button to access
6 Select a server from [Server List]
7 Select [Client Settings]
- Select the network environment between the client and the server.
8 Select [Search Channels]
9 Set [DVB-via-IP Search Mode] and select [Start Auto Setup]
- Set DVB-via-IP Configuration to tune DVB channels. When the operation is completed, the channel at the lowest position will be displayed.
Tuning and Editing Channels
You can retune channels, create your favourite channel lists, skip unwanted channels, etc.
- For details, refer to [eHELP] (Search by Purpose > Watching > Tuning and editing channels).
1 Select the mode
TV
2 Display the menu and select [Setup]
MENU
![PANASONIC TX-49EXN688 - Display the menu and select [Setup] - 1](/content/2026/05/806194/images/aaae11d1d41fa02e1d3e6b57e7fe3cbeb8e04f6035a13fed48b6455330b229e3.jpg)
Setup
![PANASONIC TX-49EXN688 - Display the menu and select [Setup] - 2](/content/2026/05/806194/images/13eb596c63e934630f7eb4ed6fa7a50210cb01bb4f59331ac03b003c4f48daff.jpg)
① select
② access
3 Select [DVB-S Tuning Menu], [DVB-C Tuning Menu], [DVB-T Tuning Menu], [DVB-via-IP Tuning Menu] or [Analogue Tuning Menu]
![PANASONIC TX-49EXN688 - Select [DVB-S Tuning Menu], [DVB-C Tuning Menu], [DVB-T Tuning Menu], [DVB-via-IP Tuning Menu] or [Analogue Tuning Menu] - 1](/content/2026/05/806194/images/c7d87e0058aaaa029c4e141fd304a925f69d7206acc2a893a65a66006b6870e1.jpg)
① select
② access
• The menu name varies depending on the TV mode.
[Channel List Editor]
- For information about [Channel List] (Analogue), refer to [eHELP] (Search by Purpose > Watching > Tuning and editing channels > Channel List Editor).
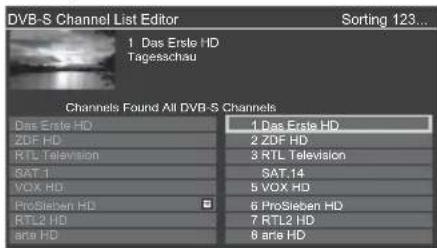
■ Edit DVB channels
You can edit the list of All DVB Channels by adding / deleting and moving channels.
- Channels not in all DVB channels list cannot be displayed except in this function.
1 Select a channel to edit (○ Encrypted channel) Example: DVB-S
text_image
DVB-S Channel List Editor 1 Das Erste HD Tagesachau Channels Found All DVB-S Channels Das Erste HD ZDF HD RTL Television SAT 1 VOX HD ProSieben HD RTL2 HD arte HD 1 Das Erste HD 2 ZDF HD 3 RTL Television SAT.14 5 VOX HD 6 ProSieben HD 7 RTL2 HD 8 arte HD Sorting 123...• To swap / move the channel position

(green)

Set the new position

or


Store

(green)
• To delete the channel

(blue)
• To delete all channels

(yellow)
• To add channel
Select a channel from [Channels Found]


Add it to All DVB Channels

• To sort channel names in alphabetical order

(red)
• To add all channels (if available)

(yellow)

(green)
(depending on the broadcaster)
- To add consecutive channels to the list at once (if available)

(yellow)


① make the channel block ② add
• To change the category of [Channels Found]

(blue)
2 Store
BACK/RETURN


• To exchange channel list (DVB-S)
[Exchange Channel List] in [Other Settings] (Setup Menu)
• Follow the on-screen instructions.
- During the operation, remove USB devices other than the USB Flash Memory used for this function.
Note
- If a VCR is connected only with the RF cable in Analogue, edit [VCR].
[Favourites Editor]
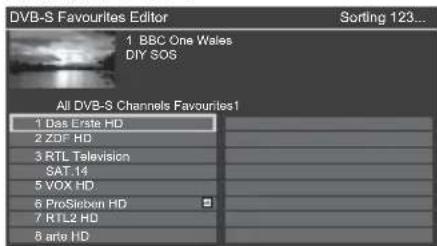
■ List favourite DVB channels
Create your favourite channel lists from various broadcasters (up to 4: [Favourites]1 to 4).
The favourites lists are available from "Category" in the information banner and the TV Guide screen.
1 Select a channel to list (→Encrypted channel)
Example: DVB-S
text_image
DVB-S Favourites Editor 1 BBC One Wales DIY SOS All DVB-S Channels Favourites1 1 Das Erste HD 2 ZOF HD 3 RTL Television SAT.14 5 VOX HD 6 ProSieben HD 7 RTL2 HD 8 arte HD Sorting 123...
• To sort channel names in alphabetical order

(red)
• To display other favourites

(green)
• To change the category

(blue)
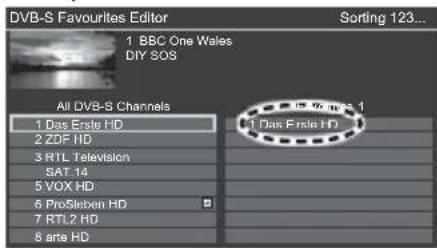
2 Add it to the favourites list
Example: DVB-S
text_image
DVB-S Favourites Editor 1 BBC One Wales DIY SOS All DVB-S Channels 1 Das Erste HD 2 ZOF HD 3 RTL Television SAT.14 5 VOX HD 6 ProSieben HD 7 RTL2 HD 8 ante HD 1 Das Erste HD Sorting 123...
• To add consecutive channels to the list at once

(yellow)


① make the channel block ② add
• To add all channels to the list

(yellow)

(green)
3 Store
BACK/RETURN


■ Edit DVB favourites list
You can edit the favourites list while the cursor is on the channel in the favourites list.
• To move the channel


Select the new position


Store

• To delete the channel

(blue)
• To delete all channels

(yellow)
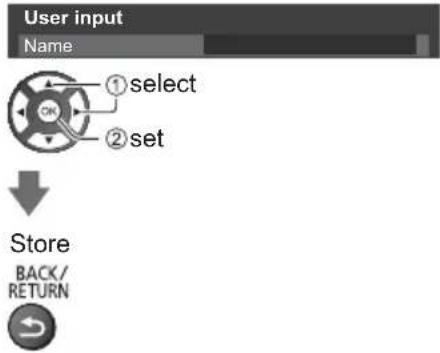
• To name the favourites

(red)

Enter characters (maximum 10 characters)
text_image
User input Name ①select ②set Store BACK/ RETURN[Update Channel List]
By updating the DVB channel list, you can add new channels, delete removed channels or change channel names and positions automatically.
- The channel list is updated while keeping your settings in [Favourites Editor], [Channel List], [Child Lock], etc.
- Depending on the signal condition, the update may not work properly.
Multi Window
Displays the digital TV programme and external input (AV / COMPONENT / HDMI) at once.
- For details, refer to [eHELP] (Search by Purpose > Functions > Multi Window).
Display [Apps] and select [Multi Window]
APPS
![PANASONIC TX-49EXN688 - Display [Apps] and select [Multi Window] - 1](/content/2026/05/806194/images/fe19f0f7973f6bcec1e68477255587fef57f34a6f6347ff4167703059ded1786.jpg)
![PANASONIC TX-49EXN688 - Display [Apps] and select [Multi Window] - 2](/content/2026/05/806194/images/e6777e199dd99adcd836dd53ff90d4b28068d130c590d9adb3fa2b32faedb380.jpg)
![PANASONIC TX-49EXN688 - Display [Apps] and select [Multi Window] - 3](/content/2026/05/806194/images/5537b707d87bdfe354868c2f9663083f211eba6333a385cbf8d4b19270d54124.jpg)
① select
② access
![PANASONIC TX-49EXN688 - Display [Apps] and select [Multi Window] - 4](/content/2026/05/806194/images/2b1f87417c0b000d8482d754ea5405ee5f8e21d192debf1343218e9c6756ae4b.jpg)
text_image
1 DV9-T AV EXIT PandP Swap 1 2 31 Main screen
② Sub screen
3 Colour bar
• Remote control operations apply to the main screen.
- You can change the view by using the coloured buttons while the colour bar is displayed.
If the colour bar is not displayed
![PANASONIC TX-49EXN688 - Display [Apps] and select [Multi Window] - 5](/content/2026/05/806194/images/9c489b40a9347abad0334555e02a10a793bf6b91ce3dd6cc4eee34306dd5afb8.jpg)
Child Lock
You can lock specific channels / AV input terminals to restrict access to them.
When the locked channel / input is selected, a message appears. Enter the PIN number to watch.
- For details, refer to [eHELP] (Search by Purpose > Functions > Child Lock).
1 Display the menu and select [Setup]
![PANASONIC TX-49EXN688 - Display the menu and select [Setup] - 1](/content/2026/05/806194/images/50de2d86370fd0f5efe8d56ee8e217fab61338004daab8cc2326d5bd4380a60e.jpg)
flowchart
graph LR
    A["MENU"] --> B["Setup"]
    B --> C["① select"]
    B --> D["② access"]
2 Select [Child Lock]
![PANASONIC TX-49EXN688 - Select [Child Lock] - 1](/content/2026/05/806194/images/25cbc50689c89f0e49b80e8fc9f72341a2d5db931dd4a31d5dee41bb4a9ec333.jpg)
1 Enter the PIN number (4 digits)
![PANASONIC TX-49EXN688 - Select [Child Lock] - 2](/content/2026/05/806194/images/fd6bdc71275dbf9e479f908107d1921c8366e74784c6b30497cf64a846ed2a7b.jpg)
- Enter the PIN number twice at first setting.
• Make a note of the PIN number in case you forget it. - “0000” may be stored as the default PIN number depending on the country you select.
2 Select [Child Lock List] and set the channel / input to be locked
![PANASONIC TX-49EXN688 - Select [Child Lock] - 3](/content/2026/05/806194/images/2745db9899d6c38aa7dffd515e0ddc888533518d5f7241dd54468838dfbd09ff.jpg)
text_image
Child Lock List - TV and AV Sorting 123... Name Input 101 BBC 1 Wales 7 BBC THREE -14 E4C VCR 1 BBC1 HDDZ HDMI1 AV Type Free TV Free TV Free TV Analogue Analogue Analogue Analogue External![PANASONIC TX-49EXN688 - Select [Child Lock] - 4](/content/2026/05/806194/images/a927b2f6651e1437af9dbe5fc2014c04c7a6c07932d8ce33c6f35694952298f4.jpg)
: Appears when the channel / input is locked
- To lock all
![PANASONIC TX-49EXN688 - Select [Child Lock] - 5](/content/2026/05/806194/images/30a08651f6b6754ebc43be05d0b85da3a15c79a5841ec2fe7fac0f230026baa2.jpg)
• To cancel all locks
![PANASONIC TX-49EXN688 - Select [Child Lock] - 6](/content/2026/05/806194/images/58b36e0780b6589a384cf35f73169d9713cc6a941253283876b6acd38a6cfbc0.jpg)
• To sort channel names in alphabetical order
![PANASONIC TX-49EXN688 - Select [Child Lock] - 7](/content/2026/05/806194/images/6b61b40dc9d65caa1ed751bb9c779cf3ef084d64359d61122dde6207b162986b.jpg)
- To jump to the head of the next channel / input group (blue)
Watching External Inputs
Connect the external equipment (VCR, DVD, etc.) and you can watch through the input.
- For details, refer to [eHELP] (Search by Purpose > Watching > External equipment).
1 Display the input selection menu

2 Select the input mode connected to the equipment
- You can also select the input pressing the AV button. Press repeatedly until the desired input is selected.
- You can select [COMPONENT] and [VIDEO] in [AV].
Operating the equipment with TV's remote control
You can operate the content in Media Player / media server, recording functions or the connected equipment with the following buttons of this TV's remote control.
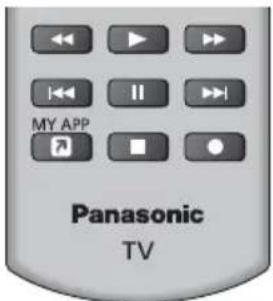
text_image
MY APP Panasonic TV■ How to change the code
Each Panasonic product has its own remote control code. Change the code according to the product for operation.

Press and hold Standby On / Off switch during the following operations
Enter the appropriate code, see table below


| Type of the equipment, features Code | |
| DVD Recorder, DVD Player, Blu-ray Disc Player | 70 |
| Player theatre, Blu-ray Disc theatre | 71 |
| VCR 72 | |
| Using in USB HDD Recording, Media Player, DLNA features or VIERA Link | 73 (default) |
Viewing Teletext
Teletext services are the text information provided by the broadcaster.
The features may vary depending on the broadcaster.
- For details, refer to [eHELP] (Search by Purpose > Watching > Teletext).
■ TOP mode (For TOP text broadcasting)
TOP is a particular improvement of the standard teletext service that results in easier search and effective guide.
- Fast overview of the teletext information available
- Easy to use step-by-step selection of the topical subject
• Page status information on the bottom of the screen
• Available page up / down

• To select among subject blocks

- To select next subject within the subject block (After the last subject, it moves to the next subject block.)

■ FLOF (FASTEXT) mode
(For FLOF (FASTEXT) broadcasting)
In FLOF mode, four differently coloured subjects are situated on the bottom of the screen. To access more information about one of these subjects, press the appropriate coloured button. This facility enables fast access to information on the subjects shown.
■ List mode
In List mode, four differently coloured page numbers are situated on the bottom of the screen. Each of these numbers can be changed and stored in the TV's memory.
■ To change mode
[Teletext] in [Display Settings] (Setup Menu)
1 Switch to Teletext

- Displays the index page (content varies depending on the broadcaster).
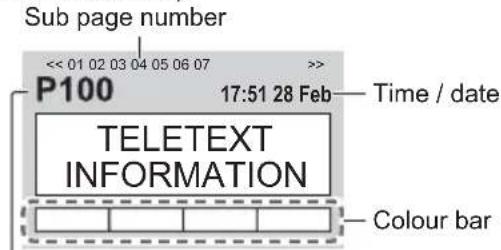
text_image
Sub page number << 01 02 03 04 05 06 07 P100 17:51 28 Feb TELETEXT INFORMATION Time / date Colour barCurrent page number
2 Select the page

or or

Coloured buttons
(Corresponds to the colour bar)
■ Watch TV and teletext in two windows at once
- Operations can be made only in teletext screen.
Set [Picture and text] to [On] / [Off]


(Press twice)
To adjust contrast


(Press three times)


■ To return to TV
EXIT

Using TV Guide
TV Guide - Electronic Programme Guide (EPG) provides an on-screen listing of the programmes currently broadcast and the forthcoming broadcasts over the next seven days (depending on the broadcaster).
- When this TV is turned on for the first time, or the TV is switched off for more than a week, it may take some time before TV Guide is completely shown.
• Not valid in Analogue - For details, refer to [eHELP] (Search by Purpose > Watching > TV Guide).
1 Select DVB-S, DVB-C, DVB-T or DVB-via-IP
TV
2 Display TV Guide

- To change the layout. ([Landscape] / [Portrait]) OPTION

View [Landscape] to see several channels.
View [Portrait] to see one channel by time.
- The availability of this function depends on the country you select.
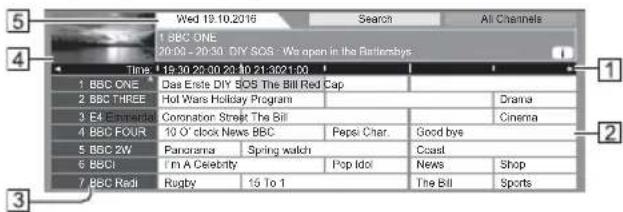
Example: [Landscape]
text_image
Wed 19:10.2016 Search All Channels 1 BBC ONE 20:00 - 20:30: DIY SOS - We open in the Batterdays Time 19:30-20:30 20:30 21:30:21:00 1 BBC ONE 2 BBC THREE 3 E4 Emiranda 4 BBC FOUR 5 BBC 2W 6 BBCI 7 BBC Radi Das Erste DIY SOS The Bill Red Cap Hull Wars Holiday Program Coronation Street The Bill 10 O'clock News BBC Pepsi Char. Papid Idol 15 To 1 Good bye Coast News Shop The Bill Sports① Time
② Programme
③ Channel position and name
4 TV screen
⑤ Date
■ To watch the programme
1 Select the current programme
- The current programme is displayed on the top left of the screen.
2 Select [View]
![PANASONIC TX-49EXN688 - Select [View] - 1](/content/2026/05/806194/images/c2a77dfcabad1b4a1256190518c40394a10438f475d94efe4f60dce5979299c0.jpg)
- To use [Timer Programming] or [Signal Supported Recording] (if available) (p. 30)
■ [Timer Programming]
Select the forthcoming programme

• To check / change / cancel a timer event → (p. 30)
■ To return to TV

USB HDD Recording
You can record the digital TV programmes to the connected USB HDD and enjoy playing back in various ways.
- For details, refer to [eHELP] (Search by Purpose > Recording).
■ Preparation
Connect the USB HDD to the USB 2 port with the USB cable.
• Prepare the USB HDD for the exclusive use of recording with this TV.
- Be sure to connect the USB HDD to the mains socket.
• To remove the USB HDD safely from the TV
[Safely remove USB] in [USB Device Setup] (Setup Menu)
- Check the terminal type and cable plugs are correct for connection.
Mains socket
text_image
USB HDD USB cable USB 2 HDDI SVC SODNA MAXSetting for USB HDD
Format and set up the USB HDD with this TV in order to use it for recording.
- Please note that USB HDD will be formatted and all data in it will be erased after this setup.
- Before setting, connect the USB HDD and be sure to turn on the USB HDD.
1 Display the menu and select [Setup]
![PANASONIC TX-49EXN688 - Display the menu and select [Setup] - 1](/content/2026/05/806194/images/8e21b186d145005d1a87faa05822057e8215b9ec9764e007c8b706c0f46b3ccc.jpg)
flowchart
graph LR
    A["MENU"] --> B["Setup"]
    B --> C["① select"]
    B --> D["② access"]
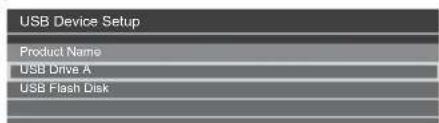
2 Select [USB Device Setup]
![PANASONIC TX-49EXN688 - Select [USB Device Setup] - 1](/content/2026/05/806194/images/e9ec4062f06413106be6b890028d8a8b5d705270c4fb63abceb4bba212638da4.jpg)
3 Select the USB HDD for recording and start setup
text_image
USB Device Setup Product Name USB Drive A USB Flash Disk
- Follow the on-screen instructions.
Recording
1 Display the menu and select [Setup]
![PANASONIC TX-49EXN688 - Display the menu and select [Setup] - 1](/content/2026/05/806194/images/efa95c31eacbe5c50c8ffcfad405df34a6a70524f8a5365c5d810fafa9eade42.jpg)
flowchart
graph LR
    A["MENU"] --> B["Setup"]
    B --> C["OK"]
    C --> D["① select"]
    C --> E["② access"]
2 Select [Recording Setup]
![PANASONIC TX-49EXN688 - Select [Recording Setup] - 1](/content/2026/05/806194/images/69ff8f9874b8d9886e5b16edb7f224e69ede6e81dd9a82d62d8b226955b5e411.jpg)
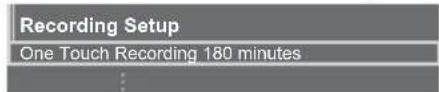
[One Touch Recording]
Records the current programme to the USB HDD immediately.
- Confirm the remote control code is "73" (p. 25).
Select the maximum recording time
text_image
Recording Setup One Touch Recording 180 minutes
■ To start One Touch Recording

[REW LIVE TV]
Records the current programme to the USB HDD constantly within the maximum recordable time.
- Confirm the remote control code is "73" (p. 25).
Select [Auto] to start [REW LIVE TV]
![PANASONIC TX-49EXN688 - Select [Auto] to start [REW LIVE TV] - 1](/content/2026/05/806194/images/6415ad7438edb07b78235693a185189777f3f51ca0a3bd93a927cff2301ca5c3.jpg)
text_image
Recording Setup ... REW LIVE TV Auto![PANASONIC TX-49EXN688 - Select [Auto] to start [REW LIVE TV] - 2](/content/2026/05/806194/images/f40a600fbdf067eda76cfe88dc20fdf38522c79ca070b5116e38b4c1333ab6f6.jpg)
text_image
select access / start [REW LIVE TV]- When you select [Auto], recording will start automatically.
- This recording may not start if another recording is in progress, TV signal condition is bad or there are no images displayed.
■ To operate [REW LIVE TV]
• To pause
![PANASONIC TX-49EXN688 - ■ To operate [REW LIVE TV] - 1](/content/2026/05/806194/images/b9a8bf60e9132d51afc84454a6e350615c0a6e0d5a810a399e536c8402174c6c.jpg)
• To search backward (up to 90 minutes)
![PANASONIC TX-49EXN688 - ■ To operate [REW LIVE TV] - 2](/content/2026/05/806194/images/7b746b200dbac7f79a44b26225b85cbeed29fceffac82dc8f1d53318c7ca3696.jpg)
- After pausing or searching backward, the following buttons are available for operation.
![PANASONIC TX-49EXN688 - ■ To operate [REW LIVE TV] - 3](/content/2026/05/806194/images/f669d4bebd982192f6f4dabc5bb17818133a1ab4fd1d2694e2dd65c1cc0113e4.jpg)
1 Search backward
![PANASONIC TX-49EXN688 - ■ To operate [REW LIVE TV] - 4](/content/2026/05/806194/images/e466d1cac1846f1c41758221b80f1bba029bddfbecc3cf808dd710e4d15b9a02.jpg)
② Playback / Pause
![PANASONIC TX-49EXN688 - ■ To operate [REW LIVE TV] - 5](/content/2026/05/806194/images/76a4bc409423f187c3a929161cf74448ac39ccd91fe3ae77beedd0371285cc51.jpg)
![PANASONIC TX-49EXN688 - ■ To operate [REW LIVE TV] - 6](/content/2026/05/806194/images/c4a743b5ca802480a0fc90d72e6b124a034341b625a7a955fe9c23a206f725bb.jpg)
3 Search forward
![PANASONIC TX-49EXN688 - ■ To operate [REW LIVE TV] - 7](/content/2026/05/806194/images/ecf3665a7502c95048cedcf97a1ec788376b490564260d6b771ec53a4db14314.jpg)
4 Return to the current programme
![PANASONIC TX-49EXN688 - ■ To operate [REW LIVE TV] - 8](/content/2026/05/806194/images/51c355d7d91795b45057cb3cb033425b04bd5cdf3433e7e4c85efd1dd0ddbfc8.jpg)
■ To stop [REW LIVE TV]
![PANASONIC TX-49EXN688 - ■ To stop [REW LIVE TV] - 1](/content/2026/05/806194/images/97f45c8d058e5d8408e4b2c0b432022c94d8acaa4313f1ccebf40f097ec50231.jpg)
text_image
Recording Setup ... REW LIVE TV Auto Off![PANASONIC TX-49EXN688 - ■ To stop [REW LIVE TV] - 2](/content/2026/05/806194/images/6715322cf6bff8923c097b9c088a8f843c23c76cf81614391322c34f241438e9.jpg)
- If you stop [REW LIVE TV], the recorded content for [REW LIVE TV] will be deleted.
- [REW LIVE TV] is stopped and the recorded content is deleted automatically in the following conditions: (Even if [REW LIVE TV] stops for the following conditions, as long as the setting is [Auto], a new recording starts automatically in a condition that makes the recording available.)
• Other channels selected
- Locked channel selected
- Invalid channel selected
- No TV signal
• External input selected
- When the full-screen application (TV Guide, Media Player, eHELP, etc.) is launched
- When the TV enters Standby or is turned off
- When another recording starts
Timer Programming
This function allows you to select programmes that you want to record to the USB HDD.
- For details, refer to [eHELP] (Search by Purpose > Recording > Timer Programming).
1 Select DVB-S, DVB-C, DVB-T or DVB-via-IP

2 Display the menu and select [Timer]


Timer
① select
② access
3 Select [Timer Programming]

① select
② access
4 Start making the settings

[USB HDD Rec.]:
Records the programme to the USB HDD.
5 Select and set the item
(channel, date, start time, end time)
- 3 and 5 can also be entered with numeric buttons.
flowchart
graph TD
    A["1: USB HDD Rec."] --> B["2: 3 ITV1 21:30 22:30 <TIMER>"]
    B --> C["3: USB HDD Rec."]
    C --> D["4: Wed 19.10.2016"]
    D --> E["5: Wed 19.10.2016 Start End"]
    C --> F["6: BSC ONE1 Red Cap"]
    F --> G["7: Thu 20.10.2016"]
    G --> H["End"]
    style A fill:#f9f,stroke:#333
    style B fill:#ccf,stroke:#333
    style C fill:#cfc,stroke:#333
    style D fill:#fcc,stroke:#333
    style E fill:#cff,stroke:#333
    style F fill:#ffc,stroke:#333
    style G fill:#fcf,stroke:#333
    style H fill:#cff,stroke:#333
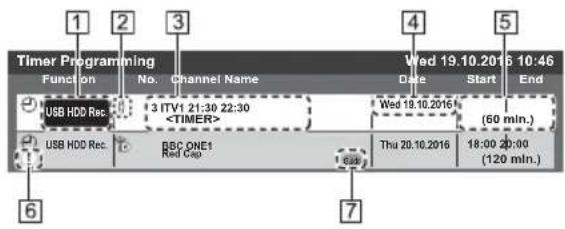
1 Function [USB HDD Rec.]
② TV mode
DVB-T
- You cannot change the mode within the menu.
③ Channel position, channel name, etc.
4 Date
5 Start time / End time / Duration (automatic display)
6 !: Overlapped timer events
7 [Signal Supported Recording] (if available)
- This function is Timer Programming which is controlled by information from the TV Guide; if programme start and end times are changed by the broadcaster, the timer event will follow the change. Note that this function only works reliably if correct information is received from broadcasters.
6 Store

■ To edit a timer event

① select the event
② access

Correct as necessary
• To delete a timer event

(red)


Using Media Player
Media Player allows you to enjoy photo, video or music recorded on the USB Flash Memory / USB HDD / network device, and content recorded with this TV to the formatted USB HDD.
- For details, refer to [eHELP] (Search by Purpose > Media Player).
Easy List View:
Still pictures / moving pictures recorded with digital cameras are displayed.
Mix Folder View:
All files grouped by folder are displayed.
Recorded TV mode (For exclusive USB HDD):
TV programmes recorded on the USB HDD with this TV are played back.
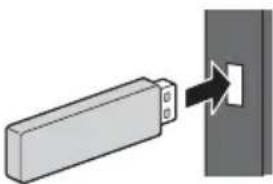
■ To insert or remove the USB Flash Memory
Ensure alignment is straight and complete when inserting or removing.
natural_image
Diagram showing a rectangular device emitting a black arrow to a vertical panel (no text or symbols)- Connect the USB Flash Memory to the USB 1 or 2 port.
- To remove the USB Flash Memory safely from the TV [Safely remove USB] in [USB Device Setup] (Setup Menu)
- Check the terminal type and devices are correct for connection.
• For the USB HDD Connection → (p. 28)
1 Insert the USB Flash Memory to the TV
- To play back content in the USB HDD / network device, ensure the connection and settings are completed.
2 Display [Home Screen] and select [Devices]
![PANASONIC TX-49EXN688 - Display [Home Screen] and select [Devices] - 1](/content/2026/05/806194/images/55c230cb422c0d3eff683c3b28a0552d6d6077ed26c422eb6fc0e1cbd9128e96.jpg)
text_image
HOME ①select ②access3 Select the device (USB Flash Memory / USB HDD / network device)
- When a confirmation screen about the network device is displayed, enter User / Password to access.
4 Select the content
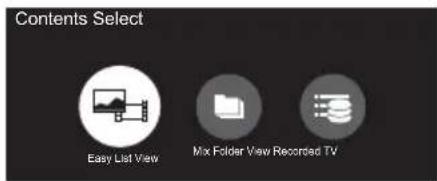
text_image
Contents Select Easy List View Mix Folder View Recorded TV
5 The thumbnail view is displayed
Example:
text_image
Screenshot of a software interface with Chinese text labels and a highlighted section showing a small icon.- To display / hide information of the highlighted content i
Note
- Select the appropriate device and content for playing back each file.
- You can use the following buttons during playback. Confirm the remote control code is "73" (p. 25).

Using Home Network
DLNA®
This TV is a DLNA Certified ^TM product.
DLNA (Digital Living Network Alliance) is a standard that makes DLNA Certified digital electronics easier and more convenient to use on a home network. To learn more, visit www.dlna.org.
To use DLNA features, you need a home network environment and you can operate the features without a broadband network environment.
- For details, refer to [eHELP] (Search by Purpose > Network).
Network connections
■ Wireless connection (For DLNA and internet service)
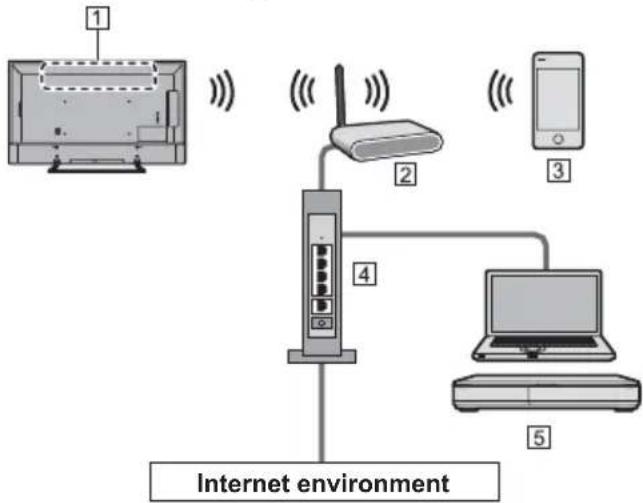
text_image
1 2 3 4 5 Internet environment① Built-in wireless LAN
② Access point
③ Smartphone, etc.
4 Hub / Router
5 DLNA Certified media server (PC, etc.)
■ Wired connection (For DLNA and internet service)
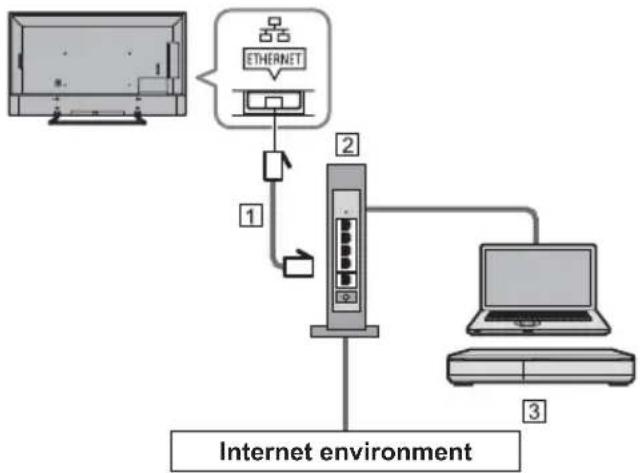
flowchart
graph TD
    A["Internet environment"] --> B["2"]
    B --> C["1"]
    B --> D["3"]
    E["Ethernet"] --> B
    style A fill:#f9f,stroke:#333
    style B fill:#ccf,stroke:#333
    style C fill:#cfc,stroke:#333
    style D fill:#fcc,stroke:#333
1 LAN cable (Shielded)
• Use Shielded Twist Pair (STP) LAN cable.
② Hub / Router
③ DLNA Certified media server (PC, etc.)
Network settings
- Ensure the connections are completed before starting network setup.
1 Display the menu and select [Network]
![PANASONIC TX-49EXN688 - Display the menu and select [Network] - 1](/content/2026/05/806194/images/dc054949c2e0ebebb3cf3ce3d05aaa57159ab2816c2da2d1872bfbef7a3f24d5.jpg)
flowchart
graph LR
    A["MENU"] --> B["Network"]
    B --> C["OK"]
    C --> D["① select"]
    C --> E["② access"]
2 Select [Network Connection]
- Follow the on-screen instructions.
Using DLNA® features
- Ensure the preparations of the media server, network connections and network settings are completed.
■ Playback of sharing content stored in the media server
Store photo, video or music content into the DLNA Certified media server connected to your home network. And then you can enjoy the content on this TV.
1 Display [Home Screen] and select [Devices]



①select
J
②access
2 Select the media server

①select
②access
3 Select the file

①select
②access
- Depending on the condition of media server, you may need to select the folder before selecting the file.
• To display / hide information of the highlighted file

Note
- Non-playable files are also listed but cannot be selected.
- You can use the following buttons during playback. Confirm the remote control code is "73" (p. 25).


■ Playback of sharing content on this TV with the DMC (Digital Media Controller) network equipment
You can enjoy content stored in the media server by controlling with the DMC network equipment connected to your home network.
- For details, refer to [eHELP] (Search by Purpose > Network).
■ Sharing the content of this TV with another piece of network equipment
You can enjoy the content of this TV with another network equipment connected to your home network.
- For details, refer to [eHELP] (Search by Purpose > Network).
FAQs
Before requesting service or assistance, please follow these simple guides to solve the problem.
- For details, refer to [eHELP] (Support > FAQs).
The TV does not switch on
- Check the mains lead is plugged into the TV and the mains socket.
The TV goes into Standby mode
• Auto power standby function is activated.
The remote control does not work or is intermittent
- Are the batteries installed correctly? → (p. 15)
• Has the TV been switched on? - The batteries may be running low. Replace them with new ones.
- Point the remote control directly at the TV's remote control signal receiver (within about 7 m and a 30 degree angle of the signal receiver).
- Situate the TV away from sunshine or other sources of bright light so they do not shine on the TV's remote control signal receiver.
No image is displayed
- Check the TV is turned on.
- Check the mains lead is plugged into the TV and the mains socket.
- Check the correct input mode is selected.
- Check the setting of [AV] ([COMPONENT] / [VIDEO]) in [Input Selection] to match the signal being output by the external equipment.
• Is [Backlight], [Contrast], [Brightness] or [Colour] in the Picture Menu set to the minimum? - Check all required cables and connections are firmly in place.
An unusual image is displayed
- This TV has a built-in Self Test. Makes a diagnosis of picture or sound problems.
→ [TV Self Test] (Help Menu) - Turn the TV off with Mains power On / Off switch, then turn it on again.
• If the problem persists, initialise all settings.
[Shipping Condition] in [System Menu] (Setup Menu)
The image or sound from external equipment are unusual when the equipment is connected via HDMI
- Set [HDMI Auto Setting] (Setup Menu) to [Mode1] → (p. 12)
Parts of the TV become hot
- Parts of the TV may become hot. These temperature rises do not pose any problems in terms of performance or quality.
When pushed with a finger, the display panel moves slightly and makes a noise
- There is a little gap around the panel to prevent damage to the panel. This is not a malfunction.
Maintenance
First, remove the mains plug from the mains socket.
Display panel, Cabinet, Pedestal
Regular care:
Gently wipe the surface of the display panel, cabinet, or pedestal by using a soft cloth to remove dirt or fingerprints.
For stubborn dirt:
(1) First clean the dust from the surface.
(2) Dampen a soft cloth with clean water or diluted neutral detergent (1 part detergent to 100 parts water).
(3) Wring out the cloth firmly. (Please note, do not let liquid enter the TV inside as it may lead to product failure.)
(4) Carefully wipe moisten and wipe away the stubborn dirt.
(5) Finally, wipe away all the moisture.
Caution
- Do not use a hard cloth or rub the surface too hard, otherwise this may cause scratches on the surface.
- Take care not to subject the surfaces to insect repellent, solvent, thinner or other volatile substances. This may degrade surface quality or cause peeling of the paint.
- The surface of the display panel is specially treated and may be easily damaged. Take care not to tap or scratch the surface with your fingernail or other hard objects.
- Do not allow the cabinet and pedestal to make contact with a rubber or PVC substance for a long time. This may degrade surface quality.
Mains plug
Wipe the mains plug with a dry cloth at regular intervals. Moisture and dust may cause fire or electrical shock.
Specifications
TV
Model No.
40-inch model : TX-40EXN688
49-inch model : TX-49EXN688
55-inch model : TX-55EXN688
Dimensions (W × H × D)
40-inch model
899 mm × 573 mm × 220 mm (With Pedestal)
899 mm × 518 mm × 65 mm (TV only)
49-inch model
1 102 mm × 699 mm × 253 mm (With Pedestal)
1 102 mm × 644 mm × 77 mm (TV only)
55-inch model
1 240 mm × 777 mm × 253 mm (With Pedestal)
1 240 mm × 722 mm × 78 mm (TV only)
Mass
40-inch model
13.0 kg Net (With Pedestal)
11.0 kg Net (TV only)
49-inch model
15.0 kg Net (With Pedestal)
14.0 kg Net (TV only)
55-inch model
18.0 kg Net (With Pedestal)
17.0 kg Net (TV only)
Power source
AC 220-240 V, 50 / 60 Hz
Panel
LED LCD panel
Sound
Speaker output
20 W (10 W + 10 W)
Headphones
Connection terminals
1.0 V[p-p] (including synchronisation)
P_B/C_B, P_R/C_R
±0.35 V[p-p]
HDMI 1 / 2 / 3 input
TYPE A Connectors
HDMI1 / 3:
4K, Content Type, Deep Colour, x.v.Colour™
HDMI2:
4K, Content Type, Audio Return Channel, Deep Colour, x.v.Colour™
- This TV supports "HDAVI Control 5" function.
Card slot
Common Interface slot (complies with CI Plus) × 1
ETHERNET
RJ45, IEEE802.3 10BASE-T / 100BASE-TX
USB 1 / 2
USB1: DC = 5 V, Max. 500 mA [Hi-Speed USB (USB 2.0)]
USB2: DC== 5 V, Max. 900 mA [SuperSpeed USB (USB 3.0)]
DIGITAL AUDIO output
PCM / Dolby Digital, Fibre optic
Receiving systems / Band name
DVB-S / S2
Digital satellite services (MPEG2, MPEG4-AVC(H.264) and MPEG HEVC(H.265))
Receiver frequency range - 950 MHz to 2 150 MHz DiSEqC - Version 1.0
DVB-C
Digital cable services (MPEG2, MPEG4-AVC(H.264) and MPEG HEVC(H.265))
DVB-T / T2
Digital terrestrial services (MPEG2, MPEG4-AVC(H.264) and MPEG HEVC(H.265))
PAL B, G, H, I
SECAM B, G
SECAM L, L'
VHF E2 - E12
VHF A - H (ITALY)
CATV (S01 - S05)
CATV S11 - S20 (U1 - U10)
VHF H1 - H2 (ITALY)
UHF E21 - E69
CATV S1 - S10 (M1 - M10)
CATV S21 - S41 (Hyperband)
PAL D, K
SECAM D, K
VHF R1 - R2
VHF R3 - R5
VHF R6 - R12
UHF E21 - E69
PAL 525/60
Playback of NTSC tape from some PAL Video recorders (VCR)
M.NTSC
Playback from M.NTSC Video recorders (VCR)
NTSC (AV input only)
Playback from NTSC Video recorders (VCR)
Satellite dish input
Female F-type 75 Ω
Aerial input
VHF / UHF
Operating conditions
Temperature
0^ C - 35^ C
Humidity
20% - 80% RH (non-condensing)
Built-in wireless LAN
Standard compliance and Frequency range\*
IEEE802.11a/n
5.180 GHz - 5.320 GHz, 5.500 GHz - 5.580 GHz, 5.660 GHz - 5.700 GHz
IEEE802.11b/g/n
2.412 GHz - 2.472 GHz
Security
WPA2-PSK (TKIP/AES)
WPA-PSK (TKIP/AES)
WEP (64 bit/128 bit)
*: The frequency and channel differ depending on the country.
Note
- Design and Specifications are subject to change without notice. Mass and Dimensions shown are approximate.
- For information about the power consumption, display resolution, etc., refer to Product fiche.
- For information about the open source software, refer to [eHELP] (Search by Purpose > Read first > Before use > Licence).
■ When using the wall-hanging bracket
Please contact your local Panasonic dealer to purchase the recommended wall-hanging bracket.
• Holes for wall-hanging bracket installation
Rear of the TV
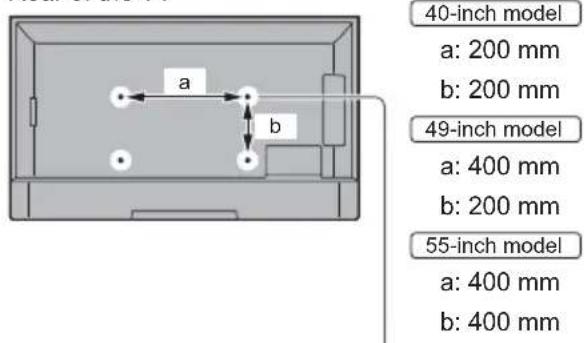
text_image
40-inch model a: 200 mm b: 200 mm 49-inch model a: 400 mm b: 200 mm 55-inch model a: 400 mm b: 400 mm(View from the side)
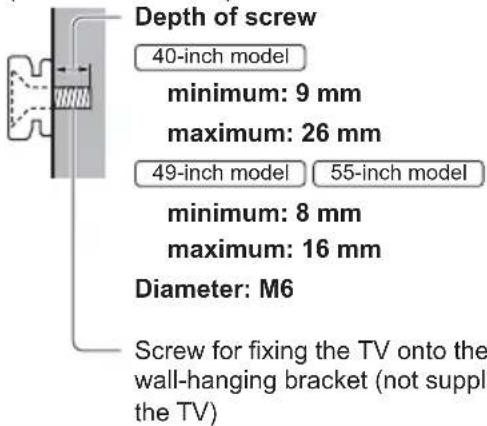
text_image
Depth of screw 40-inch model minimum: 9 mm maximum: 26 mm 49-inch model 55-inch model minimum: 8 mm maximum: 16 mm Diameter: M6 Screw for fixing the TV onto the wall-hanging bracket (not suppl the TV)Warning
- Using other wall-hanging brackets, or installing a wall-hanging bracket by yourself have the risk of personal injury and product damage. In order to maintain the unit's performance and safety, be absolutely sure to ask your dealer or a licensed contractor to secure the wall-hanging brackets. Any damage caused by installing without a qualified installer will void your warranty.
- Carefully read the instructions accompanying optional accessories, and be absolutely sure to take steps to prevent the TV from falling off.
- Handle the TV carefully during installation since subjecting it to impact or other forces may cause product damage.
• Take care when fixing wall brackets to the wall. Always ensure that there are no electrical cables or pipes in the wall before hanging bracket. - To prevent fall and injury, remove the TV from its fixed wall position when it is no longer in use.
Disposal of Old Equipment and Batteries
Only for European Union and countries with recycling systems

These symbols on the products, packaging, and/or accompanying documents mean that used electrical and electronic products and batteries must not be mixed with general household waste.
For proper treatment, recovery and recycling of old products and used batteries, please take them to applicable collection points in accordance with your national legislation.
By disposing of them correctly, you will help to save valuable resources and prevent any potential negative effects on human health and the environment.
For more information about collection and recycling, please contact your local municipality.
Penalties may be applicable for incorrect disposal of this waste, in accordance with national legislation.
Note for the battery symbol (bottom symbol):
This symbol might be used in combination with a chemical symbol. In this case it complies with the requirement set by the Directive for the chemical involved.
Customer's Record
The model number and serial number of this product may be found on its rear panel. You should note this serial number in the space provided below and retain this book, plus your purchase receipt, as a permanent record of your purchase to aid in identification in the event of theft or loss, and for Warranty Service purposes.
Model Number Serial Number
Русский
Panasonic®
Модель №
TX-40EXN688
TX-49EXN688
TX-55EXN688
natural_image
Simple line drawing of a flat-screen monitor with no text or symbolsPanasonic Testing Centre
Panasonic Marketing Europe GmbH
Winsbergring 15, D-22525 Hamburg, Германия

natural_image
Technical drawing of a metal frame structure with two vertical supports and curved ends (no text or symbols)Модель 49"
Модель 55"
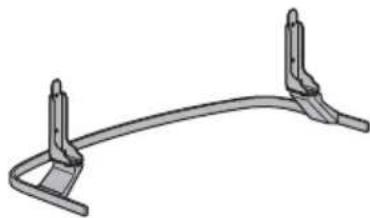
natural_image
Mechanical component with curved and straight ends, no visible text or symbolsШнур питания
→ (стр. 10)
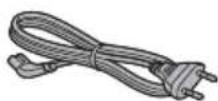
Батарейки (2)
R6
→ (стр. 15)
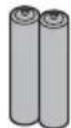
natural_image
3D rendering of a metal L-shaped bracket with mounting holes (no text or symbols)■ Сборка подставки
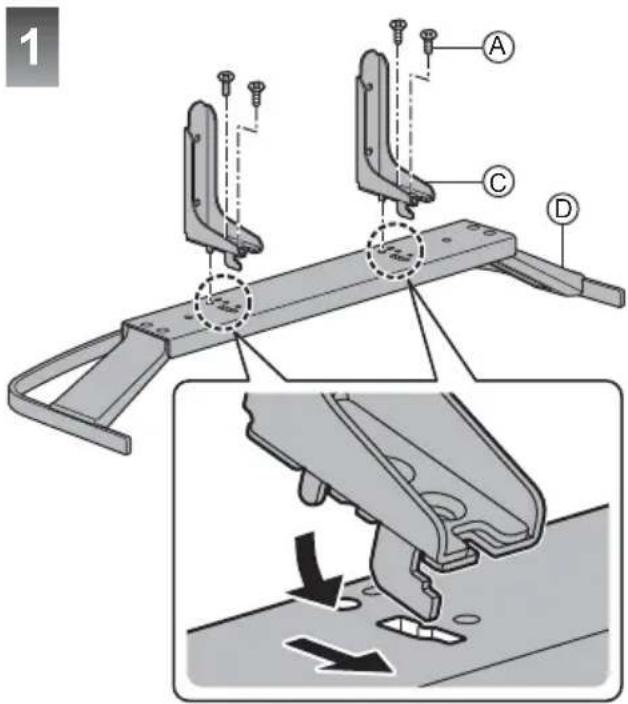
text_image
1 A C D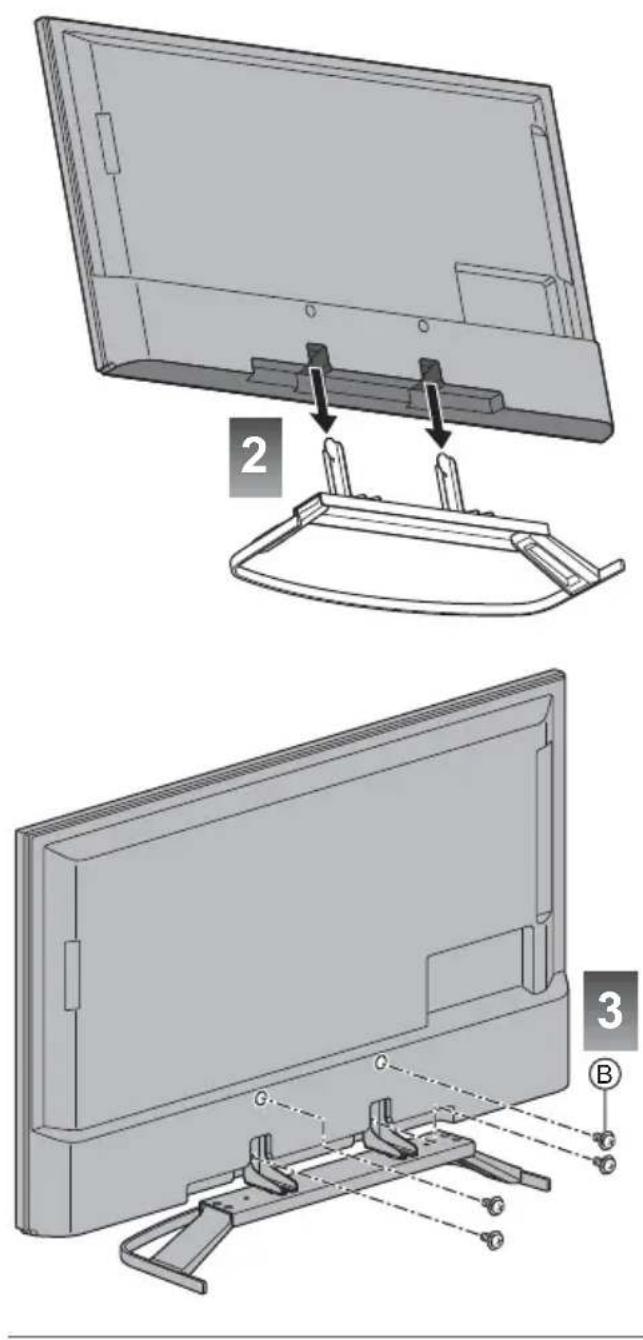
Модель 49" Модель 55"
natural_image
3D rendering of a curved metal bracket with two side slots (no text or symbols)■ Сборка подставки
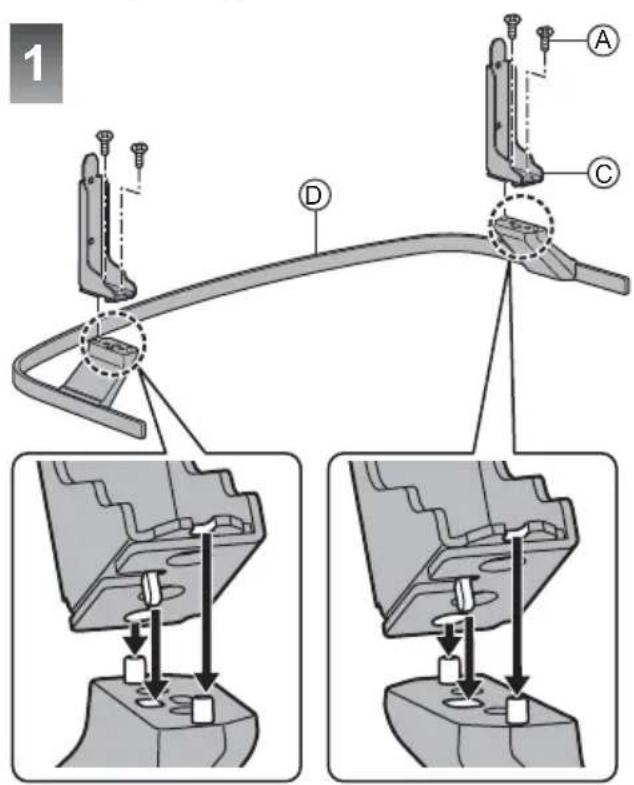
text_image
1 D A C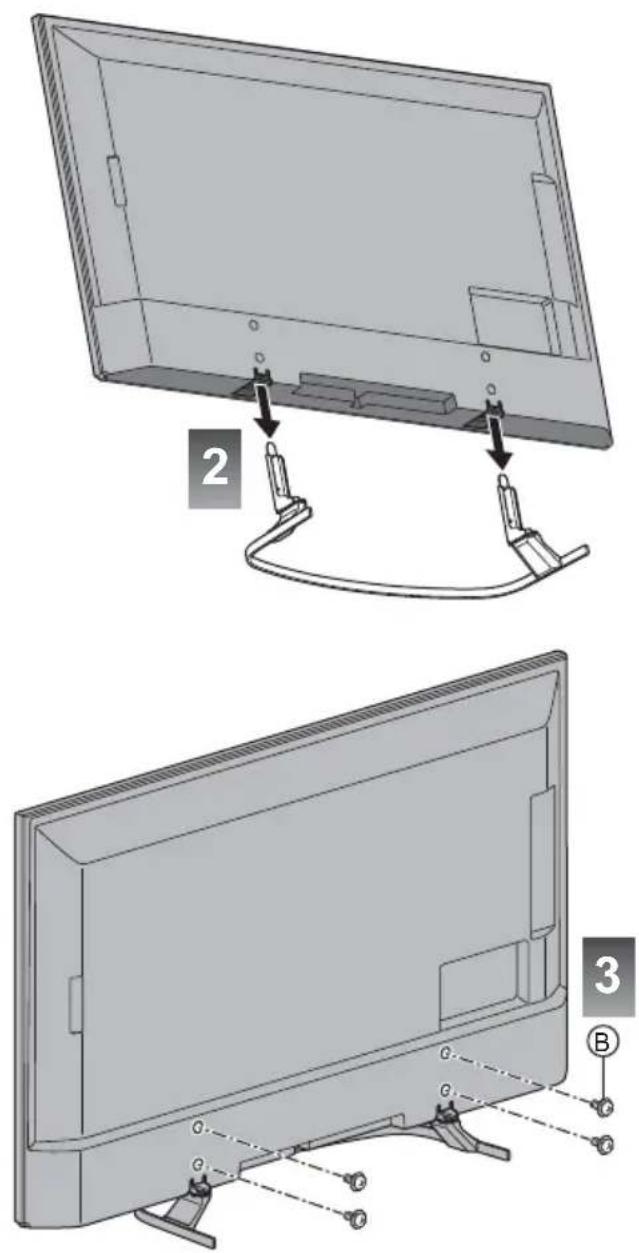
text_image
Diagram showing a monitor connected to three labeled ports (1, 2, 3) in a container or panel assembly.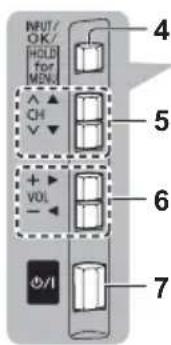
text_image
INPUT/ OK/ HOLD for MENU ↑ CH ↓ + - VOL - 4 5 6 7 0/1natural_image
Close-up of a remote control panel with a power button and eight buttons (no text or symbols visible)text_image
Screenshot of a software interface with a search bar and document preview, likely for user search or download.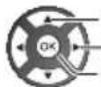
① выбор
② доступ
• To add all channels to the list

(Желтая)


(Зеленая)
3 Сохраните
BACK/
RETURN


natural_image
Illustration of a USB flash drive interacting with a wall-mounted component (no text or symbols)text_image
Screenshot of a software interface with Chinese text labels and tool icons20 Bτ (10 Bτ + 10 Bτ)
Наушники
P_B/C_B, P_R/C_R
±0,35 B[p-p]
Вход HDMI 1 / 2 / 3
Разъемы типа А
HDMI1 / 3:
4K, Content Type, Deep Colour, x.v.Colour™
HDMI2: