AT2005USB - Microphone Audio-Technica - Free user manual and instructions
Find the device manual for free AT2005USB Audio-Technica in PDF.


| Product Type | Dynamic Microphone |
| Model | AT2005USB |
| Brand | Audio-Technica |
| Polar Pattern | Cardioid |
| Frequency Response | 50 Hz - 15 kHz |
| Connectors | USB (Type B), XLR (3-pin) |
| Power Source | USB bus power (5V DC) or 48V phantom power via XLR |
| Dimensions (Length x Diameter) | 184 mm x 51 mm (7.2" x 2.0") |
| Weight | 268 g (9.5 oz) |
| Headphone Monitoring | 3.5 mm headphone jack with volume control |
| Bit Depth / Sample Rate (USB) | 16-bit, 44.1/48 kHz |
| Accessories Included | USB cable (3 m), tripod desk stand, stand clamp, pouch |
| Maintenance | Wipe with a dry, soft cloth; avoid moisture and dust |
| Safety | Do not disassemble; keep away from liquids; use only with compatible equipment |
| Spare Parts / Repairability | Not user-serviceable; contact Audio-Technica support for repairs |
| General Information | Designed for home recording, podcasting, and live streaming |
Frequently Asked Questions - AT2005USB Audio-Technica
User questions about AT2005USB Audio-Technica
0 question about this device. Answer the ones you know or ask your own.
Ask a new question about this device
Download the instructions for your Microphone in PDF format for free! Find your manual AT2005USB - Audio-Technica and take your electronic device back in hand. On this page are published all the documents necessary for the use of your device. AT2005USB by Audio-Technica.
USER MANUAL AT2005USB Audio-Technica
natural_image
Line drawing of a desktop microphone on a tripod stand (no text or symbols)Instruction Manual
AT2005USB
Cardioid Dynamic USB/XLR Microphone
Contents
Introduction & features 3
Setting up your microphone with stand clamp & desk stand 4
Preliminary setup with Mac OS X 5
Preliminary setup with Windows XP 6
Preliminary setup with Windows Vista 9
Preliminary setup with Windows 7 10
Using headphones 13
Selecting software 13
Setting your software levels 13
Positioning your microphone 13
XLR operation 13
Protecting your microphone 13
Specifications 14
Compliance with FCC rules (USA only)
This device complies with Part 15 of the FCC rules. Operation is subject to the following two conditions:(1) this device may not cause harmful interference, and (2) this device must accept any interference received, including interference that may cause undesired operation.
FCC WARNING
You are cautioned that any changes or modifications not expressly approved in this manual could void your authority to operate this equipment.
Canada only
This Class B digital apparatus complies with Canadian ICES-003.
Federal Communications Commission Statement
Note: This equipment has been tested and found to comply with the limits for a Class B digital device, pursuant to part 15 of the FCC Rules. These limits are designed to provide reasonable protection against harmful interference in a residential installation. This equipment generates, uses and can radiate radio frequency energy and, if not installed and used in accordance with the instructions, may cause harmful interference to radio communications. However, there is no guarantee that interference will not occur in a particular installation. If this equipment does cause harmful interference to radio or television reception, which can be determined by turning the equipment off and on, the user is encouraged to try to correct the interference by one or more of the following measures:
— Reorient or relocate the receiving antenna.
— Increase the separation between the equipment and receiver.
— Connect the equipment into an outlet on a circuit different from that to which the receiver is connected.
— Consult the dealer or an experienced radio/TV technician for help.
Thank you for buying the Audio-Technica AT2005USB cardioid dynamic USB/XLR microphone. Equipped with both USB and an XLR outputs, this digital/analog mic is designed both for live performance and digitally capturing music or any acoustic audio source using your favorite recording software.
The AT2005USB offers high-quality articulation and intelligibility perfect for home studio recording, field recording, podcasting, voiceover, and on-stage use. Its cardioid polar pattern reduces pickup of sounds from the sides and rear, improving isolation of desired sound source.
The microphone also features a built-in headphone jack with volume control that allows you to directly monitor from your microphone. The microphone's focused pickup pattern delivers excellent off-axis rejection, while its A/D converter with a 16-bit, 44.1/48 kHz sampling rate ensures clear, articulate sound reproduction.
Audio-Technica's state-of-the-art design and manufacturing techniques ensure that the microphone complies with the company's renowned consistency and reliability standards.
Features
- Handheld dynamic microphone with USB digital output and XLR analog output
- USB output connects to your computer for digital recording, while the XLR output connects with your sound system's conventional microphone input for use in live performance
- Smooth, extended frequency response ideally suited for podcasting, home studio recording, field recording, voiceover, and on-stage use
• Built-in headphone jack allows you to directly monitor from your microphone - Adjust headphone volume with easy-to-use controls on the bottom of the microphone
• High-quality A/D converter with 16-bit, 44.1/48 kHz sampling rate - Compatible with Windows and Mac
- Low-mass diaphragm provides excellent frequency response
- Cardioid polar pattern reduces pickup of sounds from the sides and rear, improving isolation of desired sound source
- Tripod desk stand with folding legs for secure and easily portable tabletop use
- Pivoting, threaded stand clamp attaches securely to the supplied tripod or to a conventional microphone stand
• USB and XLR cables included
• Durable metal construction for long-lasting performance - On/off switch functions for both USB and analog operation
AT2005USB
text_image
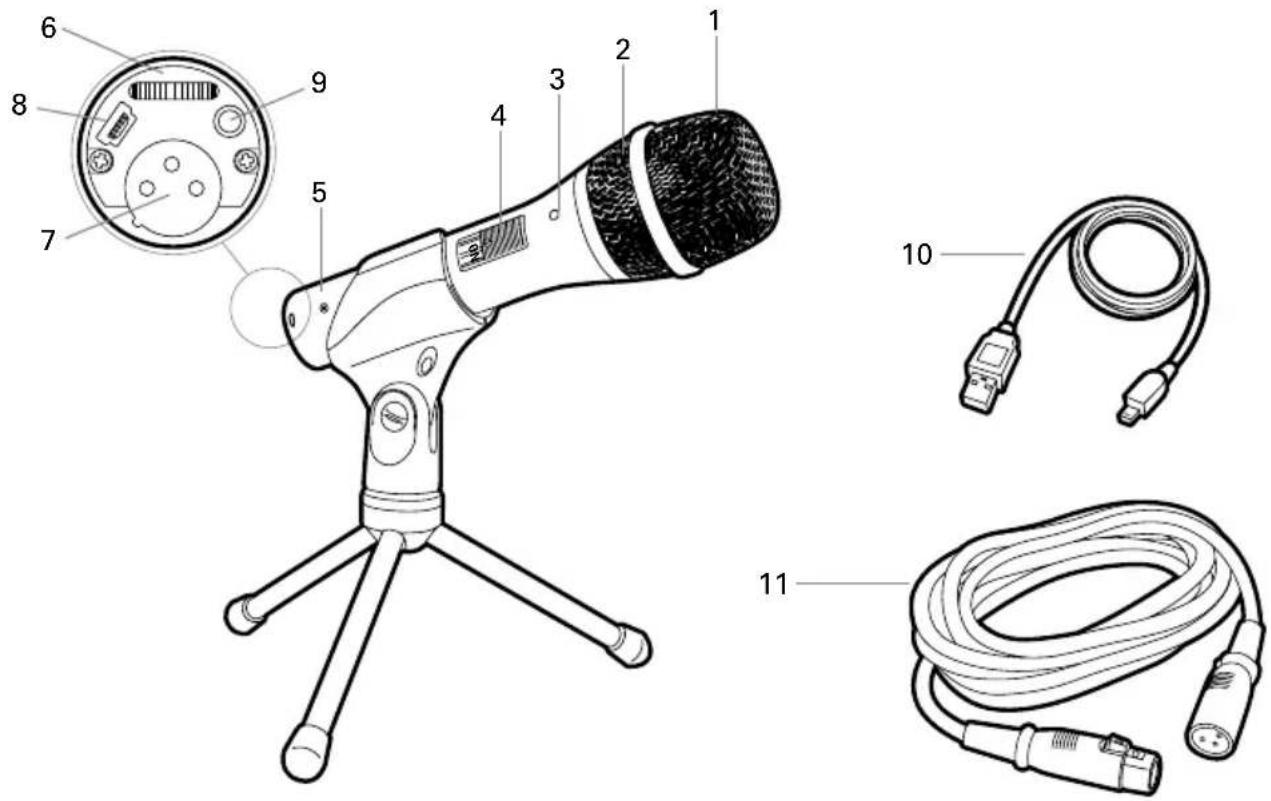
Technical diagram of a desktop microphone with labeled parts including an attached screen, cable, and connector.- Windscreen–Multi-stage grille design offers excellent protection against plosives and sibilance without compromising high-frequency clarity
- Capsule-Dynamic microphone element with cardioid polar pattern
- Blue LED-Blue light shows mic is receiving USB power (Note: The blue LED is not affected by the on/off switch position)
- ON/OFF switch-Functions for both USB and analog operation
- Metal construction-Tough, durable, resilient design
- Headphone level control—Up/Down dial controls headphone volume
- XLR connector-XLR connector with analog output for connection to PA system's conventional microphone input
- USB-USB connector for connection to your Mac or PC
- Headphone Jack—1/8-inch (3.5 mm) stereo jack for connecting your headphones
- USB cable
- XLRM to XLRF cable
Setting up your microphone with included stand clamp and tripod desk stand
A. Screw the stand clamp onto the threaded portion of the desk stand.
B. Extend the tripod legs to provide a wide, secure base, and place the tripod desk stand on a flat surface.
B. Install the AT2005USB microphone into the microphone mount, with ON/OFF switch up
C. The top of the microphone should be facing the sound source.
D. Use a screwdriver or coin to loosen and tighten the pivot screw for angle adjustment.
E. Plug the provided USB cable into the USB output at the base of the microphone, or plug the provided XLR cable into the microphone input of your sound system.
Note: Many recording software programs are available online. Audacity is widely used free software for recording and editing sounds. It is available online at http://audacity.sourceforge.net/
Preliminary setup with Mac OS X
- Plug the free end of the provided USB cable into the USB port on your computer. The microphone's blue LED will illuminate, indicating the microphone is receiving power. Your computer will automatically recognize the USB device and install a driver.
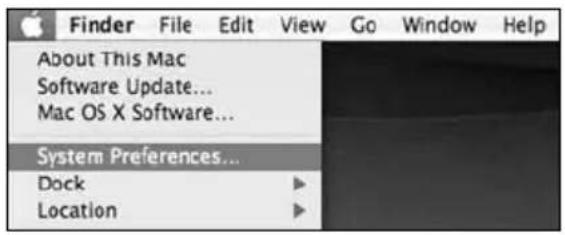
- To select the AT2005USB as your audio input, first, open your System Preferences.
text_image
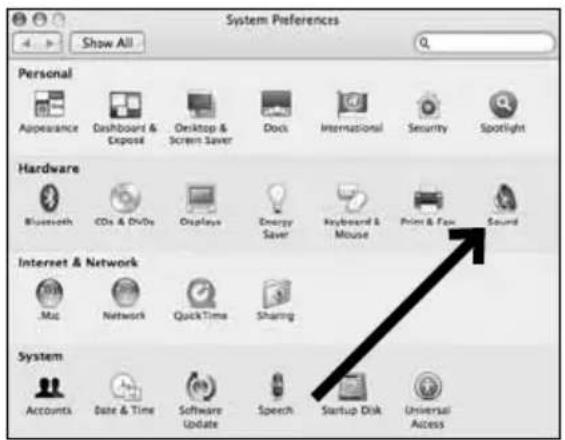
Finder File Edit View Go Window Help About This Mac Software Update... Mac OS X Software... System Preferences... Dock Location- Next, click Sound to display the Sound preference pane.
text_image
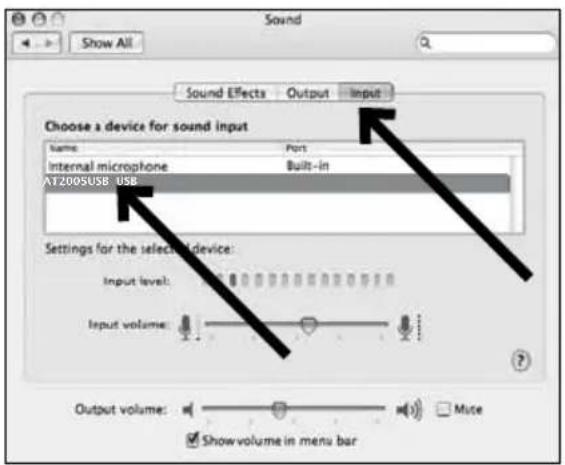
System Preferences Show All Personal Appearance Dashboard & Expose Desktop & Screen Saver Dock International Security Spotlight Hardware Bluetooth CDs & DVDs Displays Energy Saver Keyboard & Mouse Print & Fax Sound Internet & Network Mac Network Quick Time Sharing System Accounts Date & Time Software Update Speech Startup Disk Universal Access- Click the Input tab and select the AT2005USB as the device for sound input.
text_image
Sound Show All Sound Effects Output Input Choose a device for sound input Name: Port Internal microphone Built-in AT200SUSB USB Settings for the selected device: Input level: Input volume: Output volume: Mice Show volume in menu barYour preferences are now set to use the AT2005USB on your Mac with GarageBand or another recording program of your choice.
Preliminary setup with Windows XP
(Service Pack 2; other operating systems may vary slightly)
-
Plug the free end of the USB cable into the USB port on your computer. The microphone's blue LED will illuminate, indicating the mic is receiving power. Your computer will automatically recognize the USB device and install a driver.
-
In the lower right portion of your screen you may see a message that new hardware was found; or you may see a driver software installation notice.
-
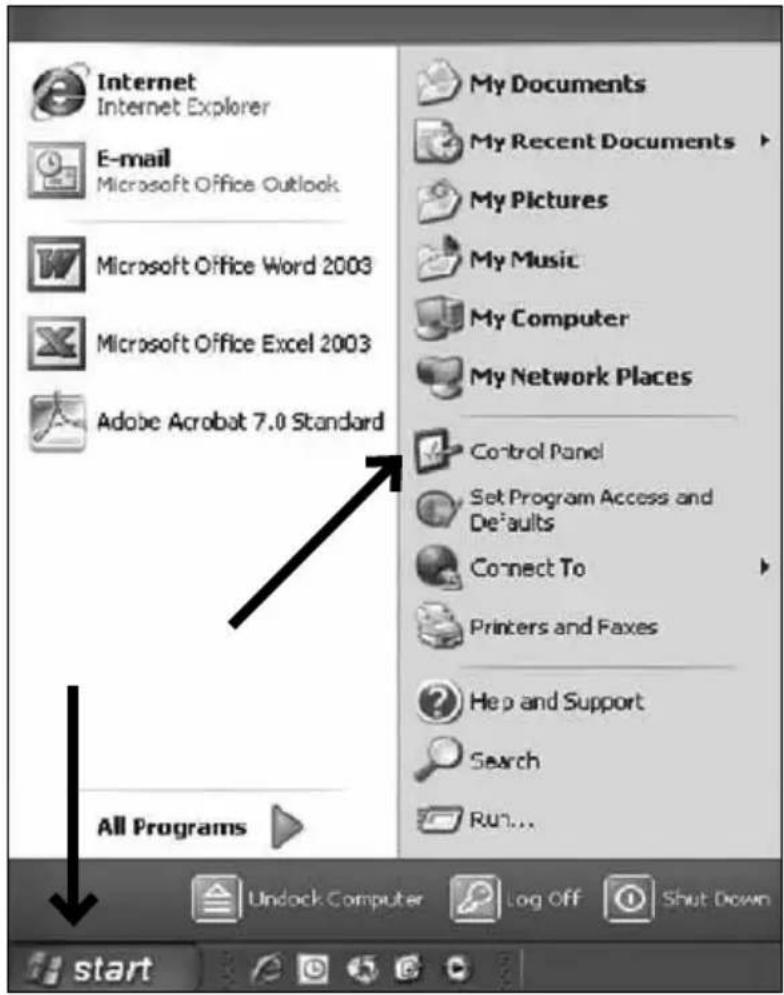
To select the AT2005USB as your default recording device, begin at your Start menu. Select Control Panel.
text_image
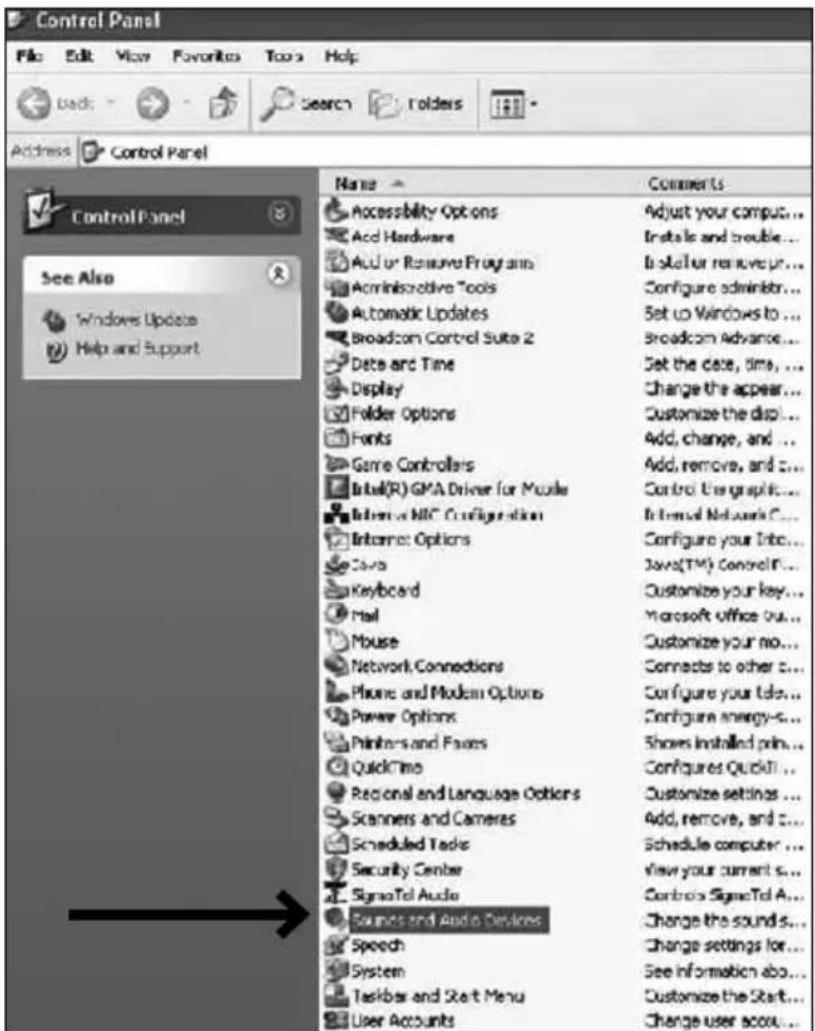
Internet Internet Explorer E-mail Microsoft Office Outlook Microsoft Office Word 2003 Microsoft Office Excel 2003 Adobe Acrobat 7.0 Standard All Programs My Documents My Recent Documents My Pictures My Music My Computer My Network Places Control Panel Set Program Access and Defaults Connect To Printers and Faxes Help and Support Search Run... Undock Computer Log Off Shut Down start4. Select Sounds and Audio Devices.
text_image
Control Panel File Edit View Favorites Tools Help Back Search Folders Address Control Panel ControlPanel See Also Windows Update Help and Support Name Comments Accessibility Options Adjust your compus... Acc Hardware Installs and trouble... Acc or Remove Programs Install our remove up... Administrative Tools Configure administrator... Automatic Updates Set up Windows to... Broadcom Control Suite 2 Broadcom Advance... Date and Time Set the case, time, ... Display Change the appear... Folder Options Customize the disp... Fonts Add, change, and ... Game Controllers Add, remove, and ... Intel(R) GMA Driver for Music Control Use graphic... Internet NLC Configuration Internal Network C... Internet Options Configure your Info... Java(TM) Console... Keyboard Customize your key... Mail Microsoft office out... Mouse Customize your no... Network Connections Connects to other c... Phone and Modem Options Configure your Info... Power Options Configure energy-s... Printers-and-Faxes Shows installed pin... QuickTime Configures Quicktl ... Regional and Language Options Customize settings ... Scanners and Cameras Add, remove, and c... Scheduled Tasks Schedule computer ... Security Center View your current s... SigmaTel Audio Controls Signal Tel A... Sources and Audio Devices Change the sounds... Speech Change settings for... System See information info... Taskbar and Start Menu Customize the Start... User Accounts Change user accu...Preliminary setup with Windows XP (continued)
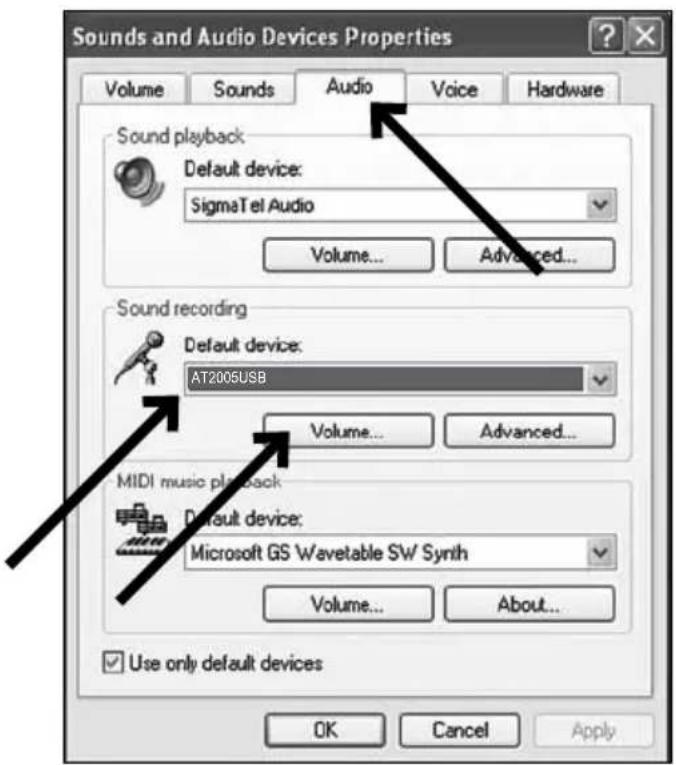
- Select the Audio tab, and choose AT2005USB as the default device.
- Adjust computer volume by clicking on the Volume button beneath Sound recording Default device.
text_image
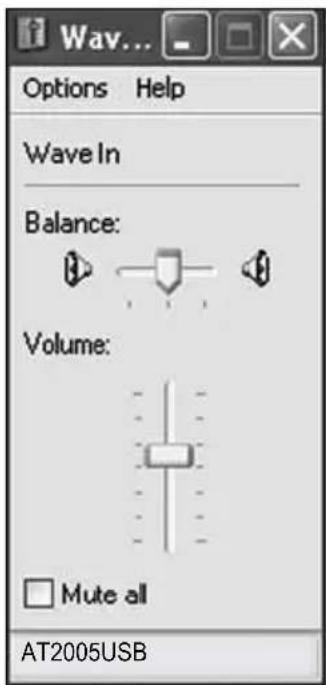
Sounds and Audio Devices Properties Volume Sounds Audio Voice Hardware Sound playback Default device: SigmaTel Audio Volume... Advanced... Sound recording Default device: AT2005USB Volume... Advanced... MIDI music playback Default device: Microsoft GS Wavetable SW Synth Volume... About... Use only default devices OK Cancel Apply- Through the Wave In window, you can set the computer volume or mute the microphone.
text_image
Wav... Options Help Wave In Balance: Volume: Mute all AT2005USBYour preferences are now set to use the AT2005USB with Windows XP with the recording program of your choice.
Preliminary setup with Windows Vista
-
Plug the free end of the USB cable into the USB port on your computer. The microphone's blue LED will illuminate, indicating the mic is receiving power. Your computer will automatically recognize the USB device and install a driver.
-
In the lower right portion of your screen you may see a message that new hardware was found; or you may see a driver software installation notice.
-
To select the AT2005USB as your default recording device, begin at your Start menu. Select Control Panel.
-
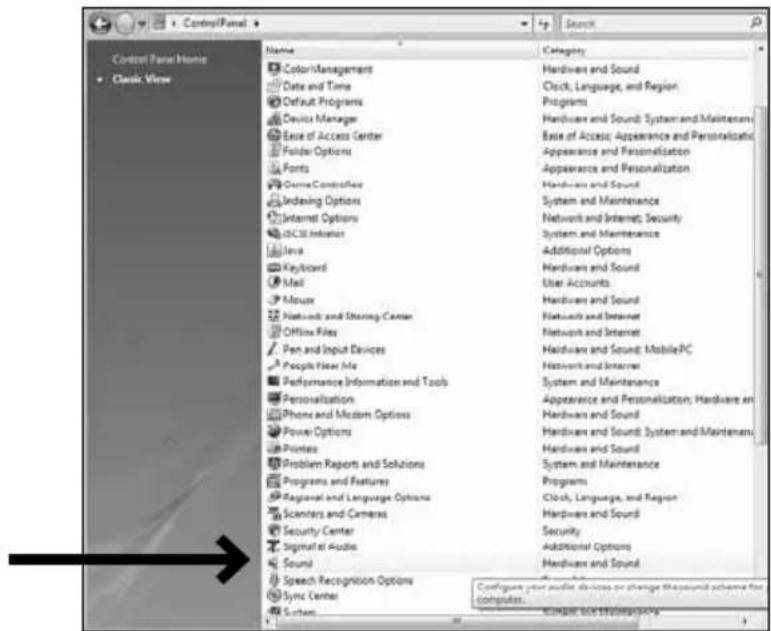
Select (double-click) Sound.
text_image
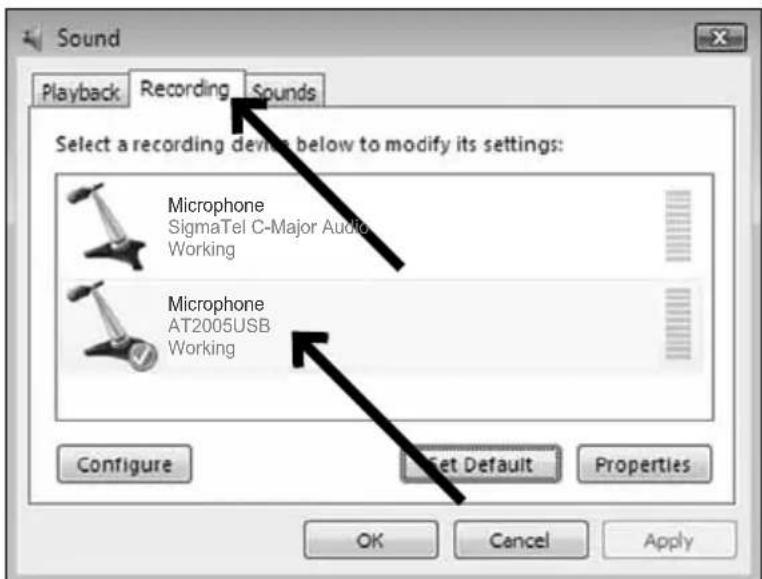
Control Panel Home • Clock View Name Category Color/Management Hardware and Sound Date and Time Clock, Language, and Region Default Programs Programs Device Manager Hardware and Sound: System and Maintenance Ease of Access Center Base of Access: Appearance and Personalization Folder Options Appearance and Personalization Ports Hardware and Sound Chrome Controls Hardware and Sound Indexing Options System and Maintenance Internet Options Network and Internet Security ID/CSE Initiator System and Maintenance Java Additional Options Keyboard Hardware and Sound Mail User Accounts. Mouse Hardware and Sound Networks and Sharing Center Network and Internet Offline Files Network and Internet Pen and Input Devices Hardware and Sound: MobilePC People File Help Hardware and Internet Performance Information and Tools System and Maintenance Personalization Appearance and Personalization; Hardware and Phone and Modem Options Hardware and Sound Power Options Hardware and Sound: System and Maintenance Printers Hardware and Sound Problem Reports and Solutions System and Maintenance Programs and Features Programs Regional and Language Options Click, Language, and Region Scinters and Cameras Hardware and Sound Security Center Security Signal at Audio Additional Options Sound Hardware and Sound Speech Recognition Options Sync Center Surfaces Configure your audio devices or change the sound scheme for computes... CREATE AND ORDER- Select the Recording tab. Make sure that the AT2005USB microphone is set as the default recording device. (You should see a green check mark beside the USB microphone icon.)
text_image
Sound Playback Recording Sounds Select a recording device below to modify its settings: Microphone SigmaTel C-Major Audio Working Microphone AT2005USB Working Configure Set Default Properties OK Cancel ApplyYour preferences are now set to use the AT2005USB with Windows Vista with the recording program of your choice.
Preliminary setup with Windows 7
- Plug the free end of the USB cable into the USB port on your computer. The microphone's blue LED light will illuminate, indicating the mic is receiving power. Your computer will automatically recognize the USB device and install a driver.
- In the lower right portion of your screen you may get a message that new hardware was found; or you may see a driver software installation notice.
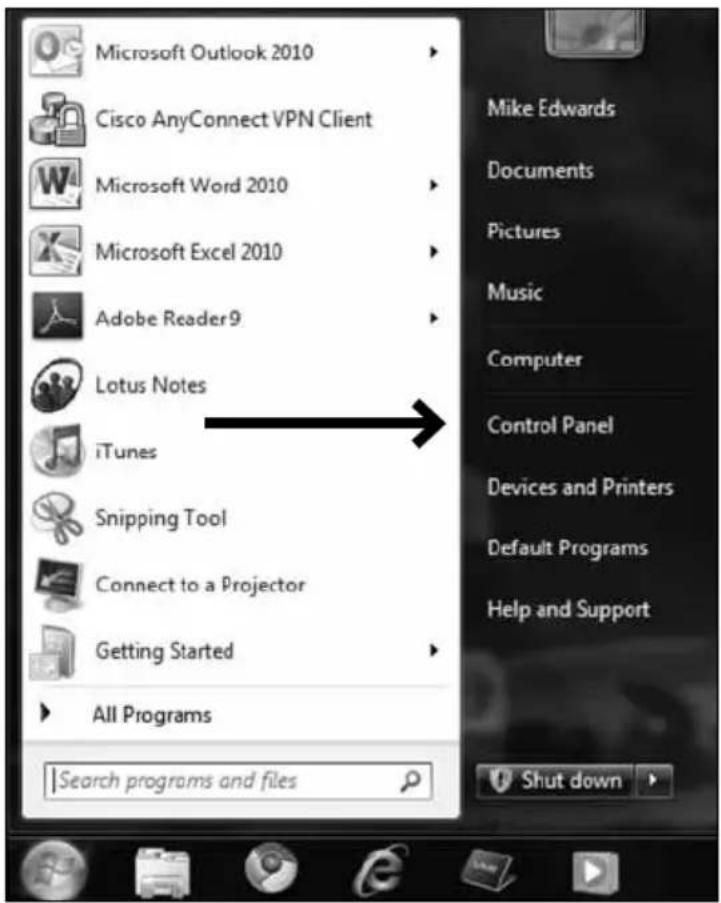
3. Start menu > Control Panel > Sound
To select the AT2005USB as your default recording device, begin at your Start menu. Select Control Panel.
text_image
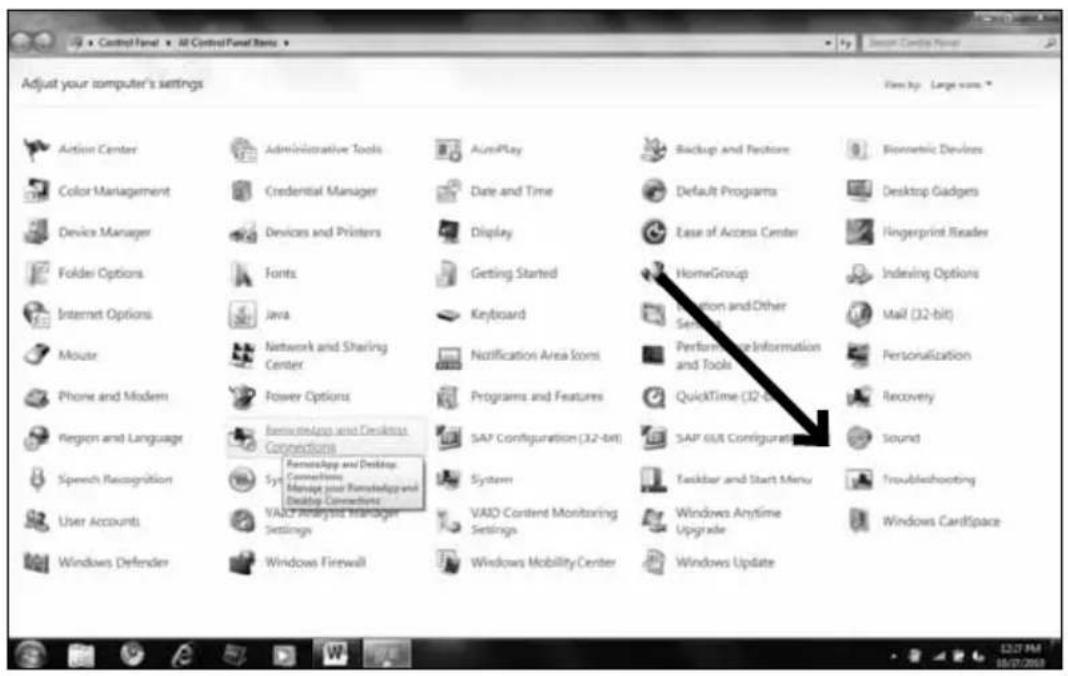
Microsoft Outlook 2010 Cisco AnyConnect VPN Client Microsoft Word 2010 Microsoft Excel 2010 Adobe Reader9 Lotus Notes iTunes Snipping Tool Connect to a Projector Getting Started All Programs Search programs and files Mike Edwards Documents Pictures Music Computer Control Panel Devices and Printers Default Programs Help and Support Shut down4. Select Sound.
text_image
Adjust your computer's settings Active Center Color Management Device Manager Folder Options Internet Options Mouse Phone and Modem Region and Language Speech Recognition User Accounts Windows Defender Administrative Tools Credential Manager Devices and Printers Fonts Java Network and Sharing Center Power Options RemoteApp and Desktop Connections Sync RemoteApp and Desktop Connections Manage your RemoteApp and Desktop Connections VAIO Analyst Manager Settings Windows Firewall AutoPlay Date and Time Display Getting Started Keyboard Notification Area Soms Programs and Features SAP Configuration (32-bit) System VAIO Content Monitoring Settings Windows Mobility Center Backup and Restore Default Programs Ease of Access Center HomeGroup Information and Other Settings Performance Information and Tools QuickTime (32-bit) SAP 6UI Configurati Taskbar and Start Menu Windows Anytime Upgrade Windows Update Bionumeric Devices Desktop Gadgets Fingerprint Reader Indexing Options Mail (32-bit) Personalization Recovery Sound Troubleshooting Windows CardSpace5. The following screen will pop up:
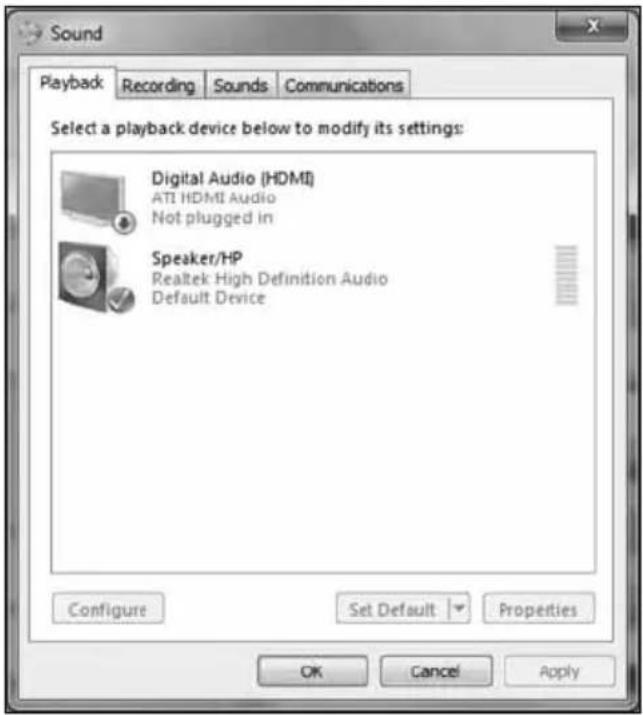
text_image
Sound Playback Recording Sounds Communications Select a playback device below to modify its settings: Digital Audio (HDMI) ATI HDMI Audio Not plugged in Speaker/HP Realtek High Definition Audio Default Device Configure Set Default Properties OK Cancel ApplyPreliminary setup with Windows 7 (continued)
- Select the Recording tab, and choose AT2005USB as the default device.
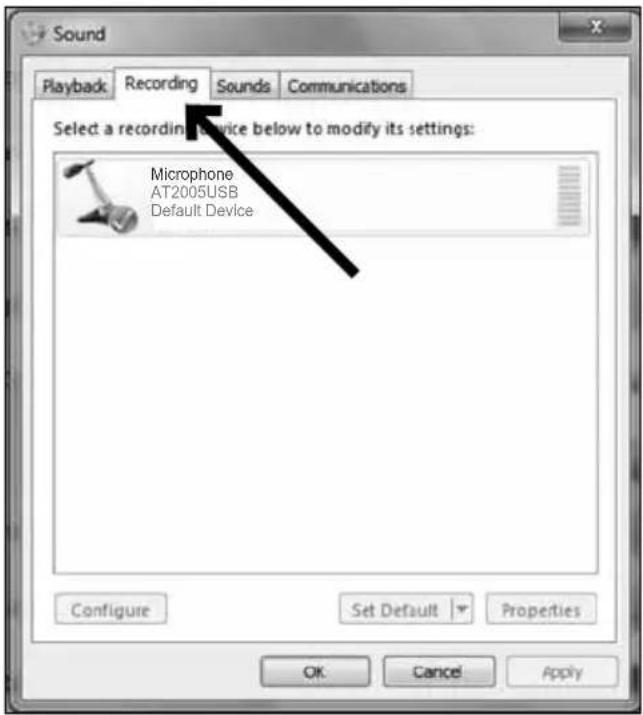
text_image
Sound Playback Recording Sounds Communications Select a recording device below to modify its settings: Microphone AT2005USB Default Device Configure Set Default Properties OK Cancel Apply- Double click on the AT2005USB icon to open the Microphone Properties window. Select the levels tab to adjust microphone level (loudness). You may need to come back to this window to readjust the level after you begin recording.
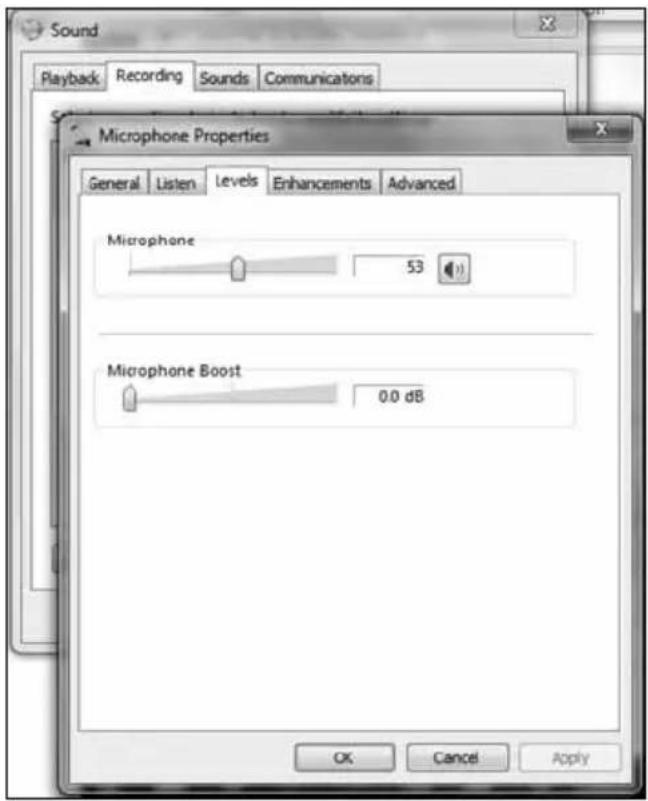
text_image
Sound Playback Recording Sounds Communications Microphone Properties General Listen Levels Enhancements Advanced Microphone 53 Microphone Boost 0.0 dB OK Cancel ApplyYour preferences are now set to use the AT2005USB with Windows 7 with the recording program of your choice.
Using headphones
The 1/8" (3.5 mm) headphone jack on the bottom of the microphone allows you to directly monitor your recording with a pair of headphones. When your preliminary setup is completed, and your USB microphone is connected to your computer's USB port (the microphone's blue LED is illuminated), plug your headphones into the headphone jack on the bottom of the microphone. While talking into the microphone, you should hear yourself in the headphones. Adjust the volume up or down by rotating the the Up/ Down dial on the bottom of the microphone. Note: The Up/ Down dial only adjusts the volume of the mic's headphone output; it does not adjust the microphone level.
Selecting software
You have many choices in recording software. Audacity, available for free online at http://audacity.sourceforge.net/, is a widely used software program that provides basic recording software.
Setting your software levels
Correct adjustment of microphone level is important for optimum performance. Ideally, the microphone level should be as high as possible without overloading the input of your computer. If you hear distortion, or if your recording program shows levels that are consistently overloaded (at peak levels), turn the microphone volume (or level) down, either through your control panel (or system preferences) settings, or through your recording software. If your recording program shows insufficient level, you can increase the microphone gain either from the control panel (or system preferences) settings or through your recording program.
No further microphone level adjustments should be needed, as long as the acoustic input does not change significantly.
Positioning your microphone
It is important to position the microphone directly in line (on axis) with the person speaking/singing or instrument (or other sound source) to achieve the best frequency response of the microphone.
For use in speaking/singing applications, the ideal placement for the microphone is directly in front of the person speaking/singing. The same placement is optimal when miking an instrument such as an acoustic guitar, drums or piano. Experiment with different mic placements to find the best sound for your particular setup.
XLR operation
For live-sound applications, connect the XLRF connector of the included XLR cable to the XLRM output on the bottom of the microphone; connect the cable's XLRM connector to a standard XLRF microphone input on your mixer. Turn the microphone's ON/OFF switch to the "ON" position. Set the microphone's level by following the instructions included with your mixer. Note: The ON/OFF switch does not affect the LED.
Protecting your microphone
Take care to keep foreign particles from entering the windscreen. An accumulation of iron or steel filings on the diaphragm, and/or foreign material in the windscreen's mesh surface, can degrade performance.
AT2005USB Specifications ^†
Element: Dynamic
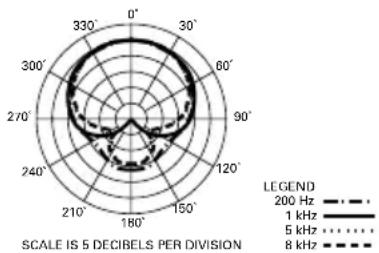
Polar Pattern: Cardioid
Frequency Response: 50 - 15,000 Hz
Power Requirements: USB Power (5V DC)
Bit Depth: 16 bit
Sample Rate: 44.1 kHz/48 kHz
Controls: On/off switch; headphone volume control
Weight: 266 g (9.4 oz)
Dimensions: 183.6 mm (7.23") long, 51.0 mm (2.01") maximum body diameter
Output Connector: USB-type/XLR-type
Headphone Output Power: 10 mW @ 16 ohms
Headphone Jack: 3.5 mm TRS (stereo)
Accessories Included: Stand clamp for 58 "-27 threaded stands, tripod desk stand, 2 m (6.6') mini USB cable, 3 m (9.8') XLRF-type to XLRM-type cable
System Requirements: Macintosh: MAC OS X; USB 1.0 or 2.0; 64 MB RAM (minimum)
Windows: XP/Vista/Windows 7; USB 1.0 or 2.0; 64 MB RAM (minimum)
†In the interest of standards development, A.T.U.S. offers full details on its test methods to other industry professionals on request. Specifications are subject to change without notice.
Frequency Response
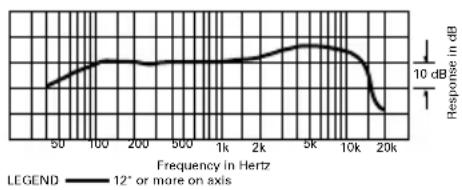
line
| Frequency in Hertz | Response in dB | | ------------------ | -------------- | | 50 | ~0.8 | | 100 | ~1.0 | | 200 | ~1.0 | | 500 | ~1.0 | | 1k | ~1.0 | | 2k | ~1.0 | | 5k | ~1.0 | | 10k | ~1.0 | | 20k | ~0.5 |Polar Pattern
radar
| Angle | Value | |-------|-------| | 0° | 200 Hz | | 30° | 1 kHz | | 60° | 5 kHz | | 90° | 8 kHz | | 120° | 200 Hz | | 150° | 1 kHz | | 180° | 5 kHz | | 210° | 8 kHz | | 240° | 200 Hz | | 270° | 1 kHz | | 300° | 5 kHz | | 330° | 8 kHz |AT2005USB
To reduce the environmental impact of a multi-language printed document, product information is available online at www.audio-technica.com in a selection of languages.