
Lite HAC-HDBW3802EP-Z-3711 - Security Camera Dahua Technology - Free user manual and instructions
Find the device manual for free Lite HAC-HDBW3802EP-Z-3711 Dahua Technology in PDF.


User questions about Lite HAC-HDBW3802EP-Z-3711 Dahua Technology
0 question about this device. Answer the ones you know or ask your own.
Ask a new question about this device
Download the instructions for your Security Camera in PDF format for free! Find your manual Lite HAC-HDBW3802EP-Z-3711 - Dahua Technology and take your electronic device back in hand. On this page are published all the documents necessary for the use of your device. Lite HAC-HDBW3802EP-Z-3711 by Dahua Technology.
USER MANUAL Lite HAC-HDBW3802EP-Z-3711 Dahua Technology
HDCVI IR Vandal-proof Dome Camera
User's Manual
Table of Contents
1 Packing List....
2 General Introduction 2
2.1 Overview 2
2.2 Features....2
3 Device Structure....3
3.1 Dimension....3
3.2 Cable Port 3
4 Installation....5
5 HCVR Settings 8
5.1 Control Coaxial Device 8
5.2 Set Audio Coax....8
6 Menu Function 10
6.1 Menu Operation....10
6.2.8 Gamma 14
6.2.9 2DNR....14
6.2.10 3DNR 14
6.3 Advanced 14
6.3.1 Smart IR....14
6.3.2 Alarm Setting....14
6.3.3 Motion Detection....15
6.3.4 Privacy Mask....15
Appendix Maintenance....16
Welcome
Thank you for purchasing our HDCVI camera!
This user's manual is designed to be a reference tool for your system.
Please read the following safeguard and warnings carefully before you use this series product!
Please keep this user's manual well for future reference!
Important Safeguards and Warnings
Electrical safety
- All installation and operation here should conform to your local electrical safety codes.
- The power shall conform to the requirement in the SELV (Safety Extra Low Voltage) and the Limited power source is rated DC 12V or AC24V in the IEC60950-1. (Power supply requirement is subject to the device label).
- Please install easy-to-use device for power off before installing wiring, which is for emergent power off when necessary.
- Please check if the power supply meets the requirements of working voltage of the camera before operating the device (The material and length of the power supply cable will influence terminal voltage value).
- Please prevent the line cord from being trampled or pressed, especially the plug, power socket and the junction from the device.
Environment
- Please don't aim the device at strong light (such as lighting, sunlight and so on) to focus.
- Please transport, use and store the device within the range of allowed humidity and temperature.
- Please do not allow water and other liquid falling into the camera in case that the internal components are damaged.
- Please keep the sound ventilation in case of heat accumulation.
- Heavy stress, violent vibration or water splash are not allowed during transportation, storage and installation.
- Please pack the device with standard factory packaging or material with same quality when transporting the device.
- It is recommended to use the device together with lightning protection device to enhance lightning protection effect.
- It is recommended to GND the device to enhance device reliability.
- It is advised to use qualified video transmission cable to improve video quality. It is recommended to use RG59 coaxial cable or higher standard.
Warning
- Please use the standard accessories provided by manufacturer and make sure the device is installed and fixed by professional engineers.
- Please prevent the device surface from the radiation of laser beam when using laser beam device.
- Please do not provide two or more power supply modes for the device, otherwise it may cause damage to the device.
Statement
- Please refer to the actual product for more details; the manual is just for reference.
- The manual will be regularly upgraded according to the product update; the upgraded content will be added in the manual without prior announcement.
- Please contact the customer service for the latest procedure and supplementary documentation.
• The company is not liable for any loss caused by the operation which is not followed by the manual.
- Please refer to the company's final explanation if there is any doubt or dispute.
1 Packing List
Please check if there is any obvious damage to the device appearance when opening the packing box, and confirm if the accessories are in accordance with those in the list, please refer to Table 1-1 for more details about the accessories.
| Accessory Name | Quantity |
| Camera | 1 |
| User Manual | 1 |
| Installation Accessory Bag | 1 |
| Installation Position Map | 1 |
| L-shaped Wrench | 1 |
| Video Adapted Cable | 1 |
Table 1-1
2 General Introduction
2.1 Overview
This series HDCVI camera conforms to the HDCVI standard. It supports video signal high-speed long distance transmission without any delay. It can be controlled by the HCVR conforming to the HDCVI.
2.2 Features
Adopts high-performance CMOS image sensor, megapixel definition.
☐ 4M and 4K output supports RG59 coaxial cable transmission without any loss. The distance is over 500m.
☐ High speed, long distance and real-time transmission.
□ Supports ICR switch to realize monitoring both in daytime and at night.
□ Supports auto exposure, AWB, auto electronic shutter, auto electronic gain.
□ Supports OSD menu.
□ Supports WDR.
□ Supports 3DNR.
□ Supports DC 12V/AC 24V power supply.
□ Supports power reverse output function.
□ Supports IP67 compliance.
□ Supports IK10 compliance.
☐ Some models support electrical heating function.
It can be applied to scenarios with complex light conditions and requirement of UHD image quality, such as financial, telecom, supermarket, hotel, government, school, airport, factory, public safety, forensic and safe city etc.
3 Device Structure
3.1 Dimension
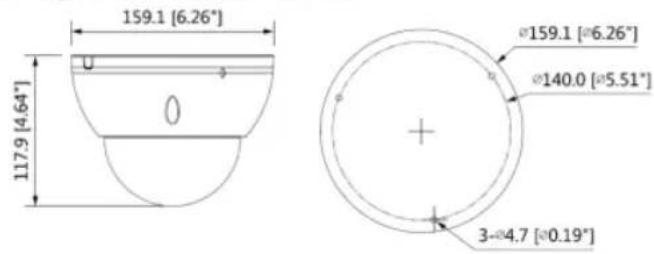
Please refer to Figure 3-1 for the dimension. The unit is mm.
text_image
159.1 [6.26°] 117.9 [4.64°] Ø159.1 [Ø6.26°] Ø140.0 [Ø5.51°] 3-Ø4.7 [Ø0.19°]Figure 3-1
3.2 Cable Port
Note
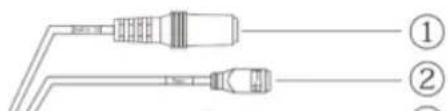
- The following figure is for reference only, which is used to know the functions of cable port.
- Different devices may have different cables, please refer to the actual product for more details.
natural_image
Diagram of two connected cable connectors labeled ① and ②, showing internal wiring (no text or symbols beyond labels)| SN | Port | Port name | Connector | Function description |
| 2 | POWER | Power input port | - | Input DC 12V or AC 24V, please be sure to conform to device label instruction when providing power for the device.CautionIt may cause device abnormality or even damage if it fails to provide power to the device according to the device label instruction. |
| 3 | DC 12V OUT | Power reverse output port | - | Reversely output DC 12V power, max load 4W. |
| 4/5 | VIDEO OUT | Video output port | BNC | It can connect to TV monitor to check image when outputting analog video signal.● Yellow: Analog video output port.● Black: HDCVI HD video output port. |
| 6 | I/O | Alarm port | - | Alarm signal input/output.● Orange: RS485 port-B.● Yellow: RS485 port-A.● Black: ALARM_GND, same GND for alarm input and output.● Red: ALARM_IN1, alarm input 1.● Green: ALARM_IN2, alarm input 2.● Blue: ALARM_OUT, on-off alarm output. |
Table 3-1
4 Installation
The dome camera mainly adopts ceiling mount, the installation location includes ceiling and wall.
Caution
- Please install the device in time after it is taken apart, which is to avoid the camera module being exposed in humid environment for a long time.
- The installation ceiling or wall shall be thick enough to sustain at least 3X weight of the camera.
- As for the installation mode of side cable outlet, it has to make sure the direction of side cable outlet is in accordance with the direction of installation position map when pasting the installation position map, and it has to pull the cable through pedestal outlet slot and then lock the screws firmly.
- Please do not remove the electrostatic adsorption film on the surface of transparent cover before installation and debugging are completed, which is to avoid damage during installation; Please do not touch the dome cover after removing the electrostatic adsorption film, which is to avoid leaving stain.
- The following installation figure is for reference only.
text_image
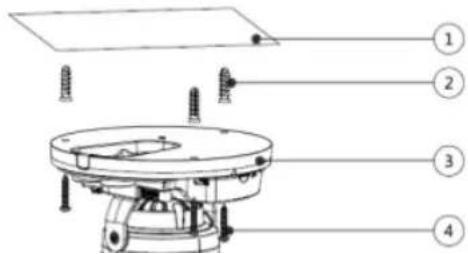
Technical diagram of a mechanical assembly with numbered parts labeled 1 to 4installation position map, take out the expansion bolts ② from the accessories bag and knock them into the mounting holes and fix them firmly.
Step 2
Use inner hex wrench ⑦ to loosen the fixing screw ⑥ on the dome enclosure and take down the dome enclosure ⑤。
Step 3
Adjust the location of dome pedestal ③ according to top cable outlet or side cable outlet, pull the cable through the side cable slot on the installation surface and pedestal (please skip this step if it is top cable outlet), align the fixing holes of screws on the dome pedestal with the fixing holes of expansion bolts on the installation surface, and then inset the self-tapping screws ④ into the expansion bolts and lock them firmly, and fix the dome on the installation surface.
Step 4
Connect the video output port of device cable to the back-end encoding device and connect the power port of device cable to power.
Step 5
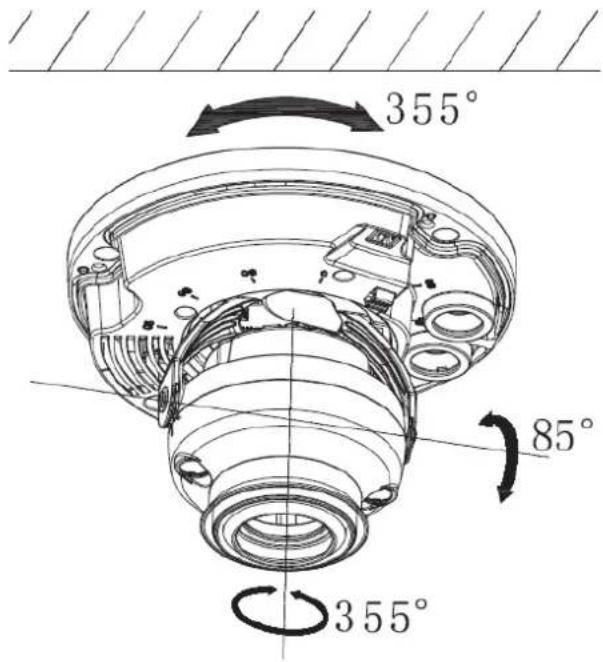
Adjust the lens angle to a proper monitoring location after image is displayed on the back-end encoding device, and adjust focal length to make image clear, which is shown in Figure 4-2.
text_image
355° 85° 355°Figure 4-2
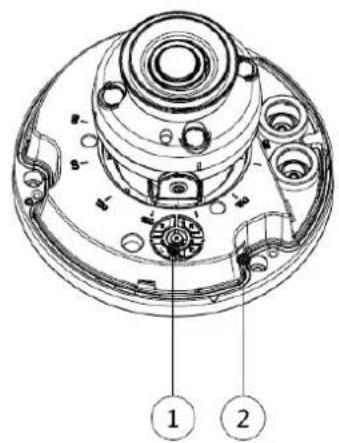
For some models, it can use 5-direction button to realize OSD menu operation, which is shown in Figure 4-3.
text_image
Technical diagram of a mechanical device with labeled parts, showing internal components and numbered annotations.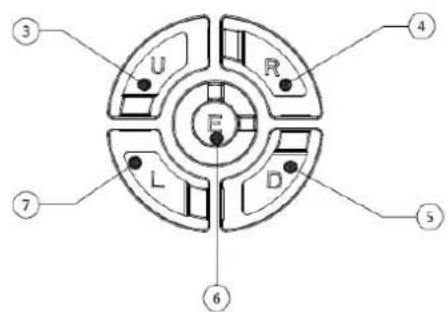
text_image
U R F L D ③ ④ ⑤ ⑥ ⑦Figure 4-3
Please refer to Table 4-1 for more details about 5-direction button.
| Number | Name | Function |
| 1 | 5-direction button | - |
| 2 | USB | It is used for upgrading camera system. |
| 3 | Up | ● It is to select OSD menu items under OSD menu. ● After exiting OSD menu, press left and right buttons to zoom and press up and down buttons to focus manually. |
| 4 | Right | |
| 5 | Down | |
| 7 | Left | |
| 6 | Middle | Confirm button |
Table 4-1
Note
Left and right buttons fail to realize focus and zoom function when using 5-direction button to operate OSD menu, at this moment it needs to exit OSD menu and then operate.
Step 6
Use enclosure fixing screw ⑥ to fix the dome on the pedestal.
So far, device installation and cable connection have been completed, you can check monitoring image via back-end encoding device.
5 HCVR Settings
5.1 Control Coaxial Device
This HDCVI camera series can adjust OSD menu via coaxial control. After connecting the camera to HCVR, from Main Menu->Setting->System->PTZ, you need to select the channel number for access and set “control mode” as “HDCVI” and the “protocol” as “HD-CVI”. Click “Save” button after setting is completed. See Figure 5-1.
Figure 5-1
5.2 Set Audio Coax
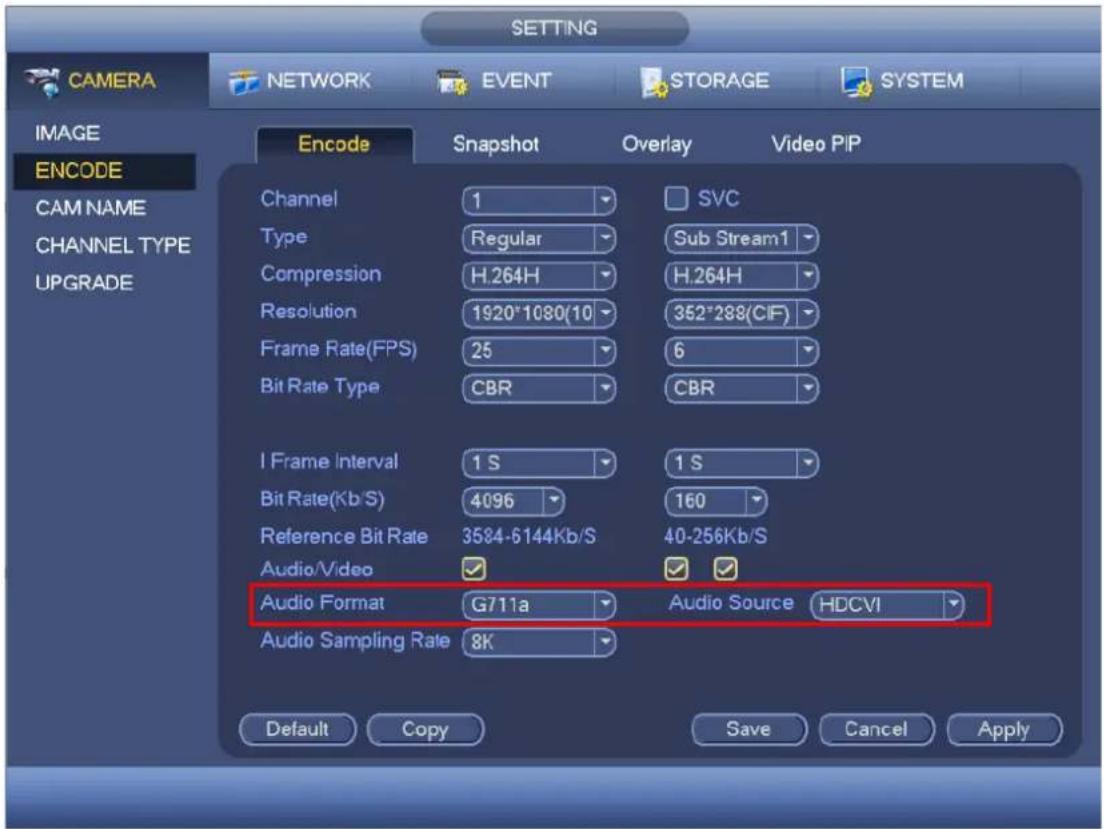
From “Main Menu > Setting > Camera > Encode > Encode”, you need to set “Audio Format” as “G711a” and the “Audio Source” as “HDCVI”. Click “Save” after setting is completed. See Figure 5-2 for more details.
text_image
CAMERA NETWORK EVENT STORAGE SYSTEM IMAGE ENCODE CAM NAME CHANNEL TYPE UPGRADE Encode Snapshot Overlay Video PIP Channel 1 SVC Type Regular Sub Stream1 Compression H.264H H.264H Resolution 1920*1080(10) 352*288(CIF) Frame Rate(FPS) 25 6 Bit Rate Type CBR CBR I Frame Interval 1 S 1 S Bit Rate(Kb/S) 4096 160 Reference Bit Rate 3584-6144Kb/S 40-256Kb/S Audio/Video ✓ ✓ Audio Format G711a Audio Source HDCVI Audio Sampling Rate 8K Default Copy Save Cancel ApplyFigure 5-2
6 Menu Function
6.1 Menu Operation
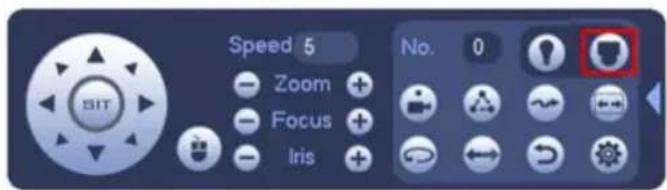
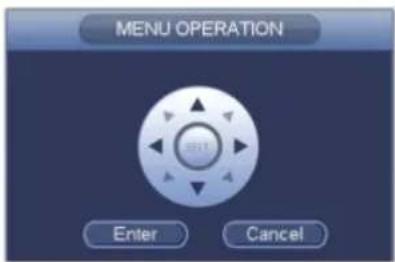
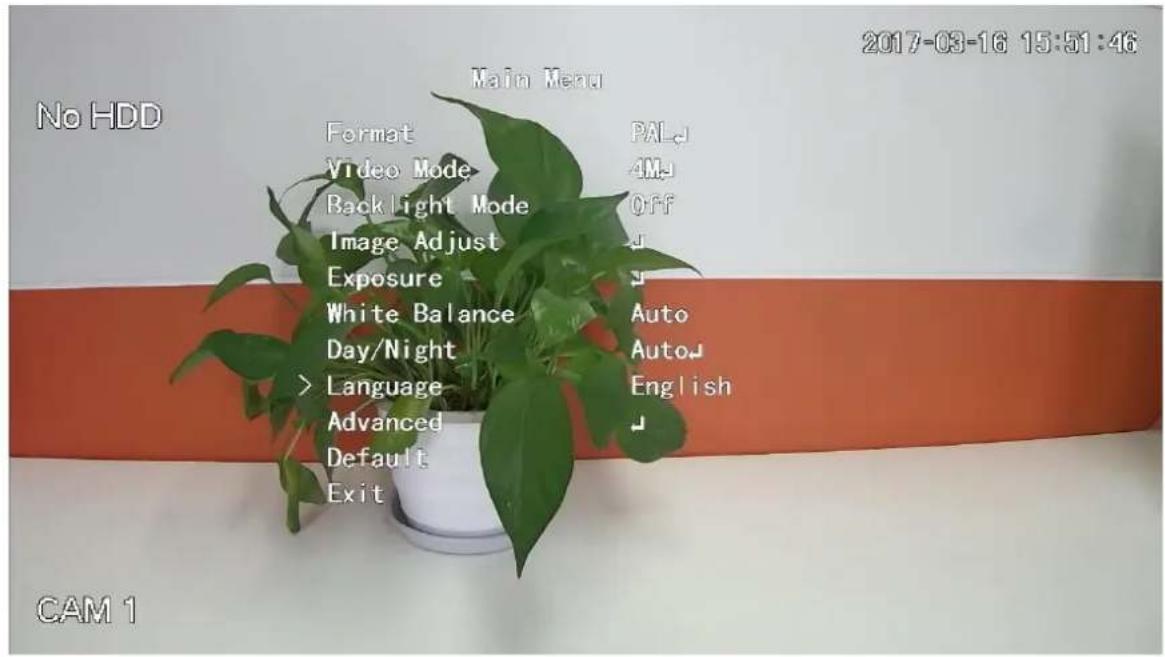
Click the right mouse button and select "PTZ Control", then you will see the "PTZ Setup" menu, which is as shown in Figure 6-1 and Figure 6-2.
text_image
Speed 5 Zoom + Focus + Iris + No. 0Figure 6-1
text_image
MENU OPERATION Enter CancelFigure 6-2
text_image
Main Menu No HDD Format PAL Video Mode 4M Backlight Mode Off Image Adjust Exposure White Balance Auto Day/Night Auto Language English Advanced Default Exit CAM 1 2017-03-16 15:51:46Figure 6-3
If there is “◀” in the parameter value, click the “Enter” button in “Menu Operation” interface to go to the 2nd menu. Click “Return” button to go back to the previous menu interface. Please refer to Table 6-2 for more details about menu path.
| 1st Menu | 2nd Menu | |
| Format | PAL | |
| NTSC | ||
| Video Mode | 4K | |
| 4M | ||
| Backlight Mode | BLC | 1~5 |
| WDR | 1~5 | |
| HLC | 1~5 | |
| Off | ||
| Image Adjust | Image mode | Standard/Soft/Flamboyant |
| Sharpness | 0~15 | |
| Brightness | 0~15 | |
| Contrast | 0~15 | |
| Saturation | 0~15 | |
| Chroma | 0~15 | |
| Sharpness suppress | 0~15 | |
| Chroma suppress | 0~15 | |
| Gamma | 0~15 | |
| 2DNR | 0~15 | |
| 3DNR | 0~15 | |
| Return/Exit | ||
| Exposure | Exposure mode | Auto/Low noise/Anti-smear/Manual |
| Exposure level | 0~15 | |
| Anti-flicker | Outdoor/50Hz/60Hz | |
| Return/Exit | ||
| WB | Auto | |
| 1st Menu | 2nd Menu | |
| Auto track | ||
| Area WB | ||
| Manual | Blue gain (0~100) /Red gain(0~100) | |
| Sodium Lamp | ||
| Indoor | ||
| Outdoor | ||
| Auto | ||
| Day/Night | Black/White | |
| Color | ||
| Language | Chinese/English/Korean/Japanese/German/Russian/French/Portuguese/Spanish/Polish/ Italian | |
| Camera name | ||
| Mirror | Horizontal/Vertical | |
| D-Zoom | 1~8 | |
| Lens type | Manual/DC | |
| Lens | Auto Focus/Reset | |
| Audio mode | External audio/Off | |
| Smart IR | ||
| Advanced | Alarm setting | |
| Defog | ||
| Motion detection | ||
| Privacy mask | ||
| Coaxial 485 | ||
| System info | ||
| Intelligent | Defocus detection/video tampering/motion detection/tripwire/people counting | |
| Return/Exit | ||
| Default | ||
| Exit | Save | |
Table 6-2
Note
- The operation interface above is an example of HCVR7116H-4M series, different backend devices have different operation interface, please refer to corresponding HCVR manual for more details.
- Menus are different according to different products, please refer to actual device for exact menu.
6.2 Image Adjust
Select “Main Menu > Image Adjust” to set the image parameter of the camera, which it to increase the definition of monitoring scene.
6.2.1 Image Mode
The image display mode which is preset by the system.
- Standard: the standard mode of image display, each parameter is the system default.
- Soft: compared to standard mode, it mainly lowered saturation and sharpness.
● Flamboyant: compared to standard mode, it mainly enhanced saturation.
6.2.2 Sharpness
It is used to adjust the image definition and image edge sharpness.
The bigger the value is, the higher the detail contrast of the image plane becomes, and the image becomes clearer. The image tends to generate noise when the value is set too high. The range is between 0 and 15.
6.2.3 Brightness
It is used to adjust the overall brightness of the image. Users can adjust the value when the image becomes too bright or too dark. Both the dark and bright area will be increased or lowered equally at the same time during adjustment.
The bigger the value is, the brighter the image becomes. The image tends to be foggy or overexposed if the value is set too high. The range is between 0 and 15.
6.2.4 Contrast
It is used to adjust the image contrast. Users can adjust the value when the overall image brightness is appropriate but the contrast is not enough.
The bigger the value is, the more obvious the contrast becomes. The dark area of the image becomes too dark and the bright area tends to be overexposed when the value is set too high; the image becomes foggy when the value is set too low. The range is between 0 and 15.
6.2.5 Saturation
The bigger the value is, the more obvious it becomes for chroma suppression effect during high gain, and the image color is more likely to tend to be black and white. The range is between 0 and 15.
6.2.8 Gamma
It is used to optimize brightness and contrast and implement subtle adjustment of bright and dark layer.
The image becomes foggier and brighter when the value gets bigger; the image becomes sharper and darker when the value gets smaller. The range is between 0 and 15.
6.2.9 2DNR
It is used to reduce the image noise.
The bigger the value is, the smaller the noise becomes. The range is between 0 and 15.
6.2.10 3DNR
It is used to reduce image noise in low illuminance environment.
Compared to general 2DNR, 3DNR not only realizes noise reduction for brightness and saturation of the video separation signal but also for the original data generated by sensor, which can greatly improve noise reduction capability and make image clearer and brighter, but it is easy to generate smear.
The bigger the value is, the smaller the noise becomes; but it is easier to lose image details and generate smear. The range is between 0 and 15.
6.3 Advanced
Select "Main Menu > Advanced" to set the advanced functions of the camera.
6.3.3 Motion Detection
It is used to detect if there is any moving object in the area which has been set. It will trigger alarm when there is moving object in the monitoring area. Users can select different areas and sensitivity levels according to the actual needs.
Area selection (SN): It is to select the serial number of the motion detection box. It is between 0 and 3.
☐ Display: It is to set if it is to display the current motion detection box on the image.
☐ Alarm upload: It is to select if it is to upload the detected alarm.
☐ Sensitivity: It is to set the sensitivity. The range is between 0 and 10.
☐ Area setting: It is to set the location and size of the current motion detection box.
6.3.4 Privacy Mask
It is used to set the privacy mask area. It can mask some certain areas in the device monitoring range to protect privacy; for example, it needs to mask privacy in the ATM where the users need to enter password.
Area selection (SN): select the area which is to be set. It is between 0 and 3.
☐ Display (on/off): select if the area is masked.
☐ On: The area is enabled to mask.
☐ Off: The area is disabled to mask.
☐ Area setting: it is to set the location and size of the masked area.
Appendix Maintenance
Attention
Please maintain the device according to the following instructions in order to ensure the image effect and long-term stable operation of the device.
Maintenance for lens and mirror surface
The lens and mirror surface are covered with antireflection coating, so it may produce hazardous substance and lead to performance reduction or scratch, dimness etc. Please don't touch sensor CCD (or CMOS) directly, you can use hair dryer to remove dust or dirt on the lens surface. Please use dry cloth slightly soaked with alcohol to get rid of dust and dirt gently if it is necessary to be cleaned.
Camera Body Maintenance
Use a soft dry cloth to clean the camera body when it is dirty, in case the dirt is hard to remove, use a clean dry cloth soaked with mild detergent and wipe gently, make it dry later. Don't use volatile solvent like alcohol, benzene, thinner and etc. or strong detergent with abrasiveness, otherwise it will damage the surface coating or reduce the working performance of the device.
Maintenance for Dome Cover
Dome cover is an optical device, please don't touch or wipe cover surface directly during installation and use, please refer to the following methods to deal with once dirt is found:
Stained with dirt
Use oil-free soft brush or hair dries to remove it gently.
Stained with grease or fingerprint
Use soft cloth to wipe the water drop or oil gently to make it dry, then use oil-free cotton cloth