
G 6927 SCi XXL - Dishwasher MIELE - Free user manual and instructions
Find the device manual for free G 6927 SCi XXL MIELE in PDF.


User questions about G 6927 SCi XXL MIELE
0 question about this device. Answer the ones you know or ask your own.
Ask a new question about this device
Download the instructions for your Dishwasher in PDF format for free! Find your manual G 6927 SCi XXL - MIELE and take your electronic device back in hand. On this page are published all the documents necessary for the use of your device. G 6927 SCi XXL by MIELE.
USER MANUAL G 6927 SCi XXL MIELE
Operating instructions for dishwashers
natural_image
Black-and-white photo of a set dining table with glasses, plates, and utensils (no text or symbols visible)To avoid the risk of accidents or damage to the appliance, it is essential to read these instructions as well as the installation plan before it is installed and used for the first time.
Guide to the appliance.... 5
Guide to the appliance 5
Control panel....6
Display....7
Warning and Safety instructions.... 8
Caring for the environment 18
Energy-saving dishwashing.... 19
EcoFeedback consumption indicator.... 20
Before using for the first time 21
Opening the door 21
Closing the door.... 22
Safety lock.... 22
Basic settings.... 23
Before using the appliance for the first time, you require: 25
Dishwasher salt 25
Filling the salt reservoir.... 26
Add salt reminder 27
Rinse aid....28
Adding rinse aid 28
Add rinse aid reminder 29
Loading the dishwasher.... 30
Notes 30
FlexAssist 32
Upper basket.... 32
Adjusting the upper basket 35
Lower basket.... 36
Cutlery 39
3D+ cutlery tray (depending on model).... 39
Loading examples 41
Dishwashers with cutlery tray.... 41
Comparison tests 43
Standard height with cutlery tray 43
XXL height with cutlery tray 46
Operation.... 49
Detergent 49
Adding detergent.... 51
Switching on.... 52
Selecting a programme 52
Starting the programme 53
Time display 53
Energy management 54
At the end of the programme 54
Switching off.... 55
Unloading the dishwasher.... 55
Interrupting a programme.... 56
Changing a programme.... 56
Programme options.... 57
Extras 57
Delay start 59
DetergentAgent 63
Programme chart 64
Further programmes 68
Cleaning and care 69
Cleaning the wash cabinet 69
Cleaning the door and the door seal.... 69
Cleaning the door front 70
Checking the filters in the wash cabinet 71
Cleaning the filters.... 71
Cleaning the spray arms.... 73
Problem solving guide 74
Technical problems 74
Water inlet fault 77
Water drainage fault 78
General problems 79
Noises....81
Unsatisfactory washing result 82
Maintenance 85
Cleaning the water inlet filter.... 85
Cleaning the drain pump and non-return valve.... 86
After sales service 87
Repairs 87
Warranty 87
Optional accessories 88
Electrical connection 90
Contents
Water connection 91
The Miele Waterproof system.... 91
Connection to the water supply 91
Drainage 93
Technical data.... 94
Settings menu.... 95
Opening the Settings menu.... 95
Language 95
Time of day 96
Date 96
Water hardness 97
Rinse aid....98
Consumption (EcoFeedback) 98
EcoStart.... 99
Networking 101
Miele@home 101
Change main menu 106
Save extras.... 106
System lock.... 107
Temperature 107
Brightness 107
Volume.... 108
Memory 109
Check filters 109
Automatic 109
AutoOpen 110
BrilliantLight.... 110
Software version.... 111
Showroom programme.... 111
Factory default settings 111
Closing the Settings menu 111
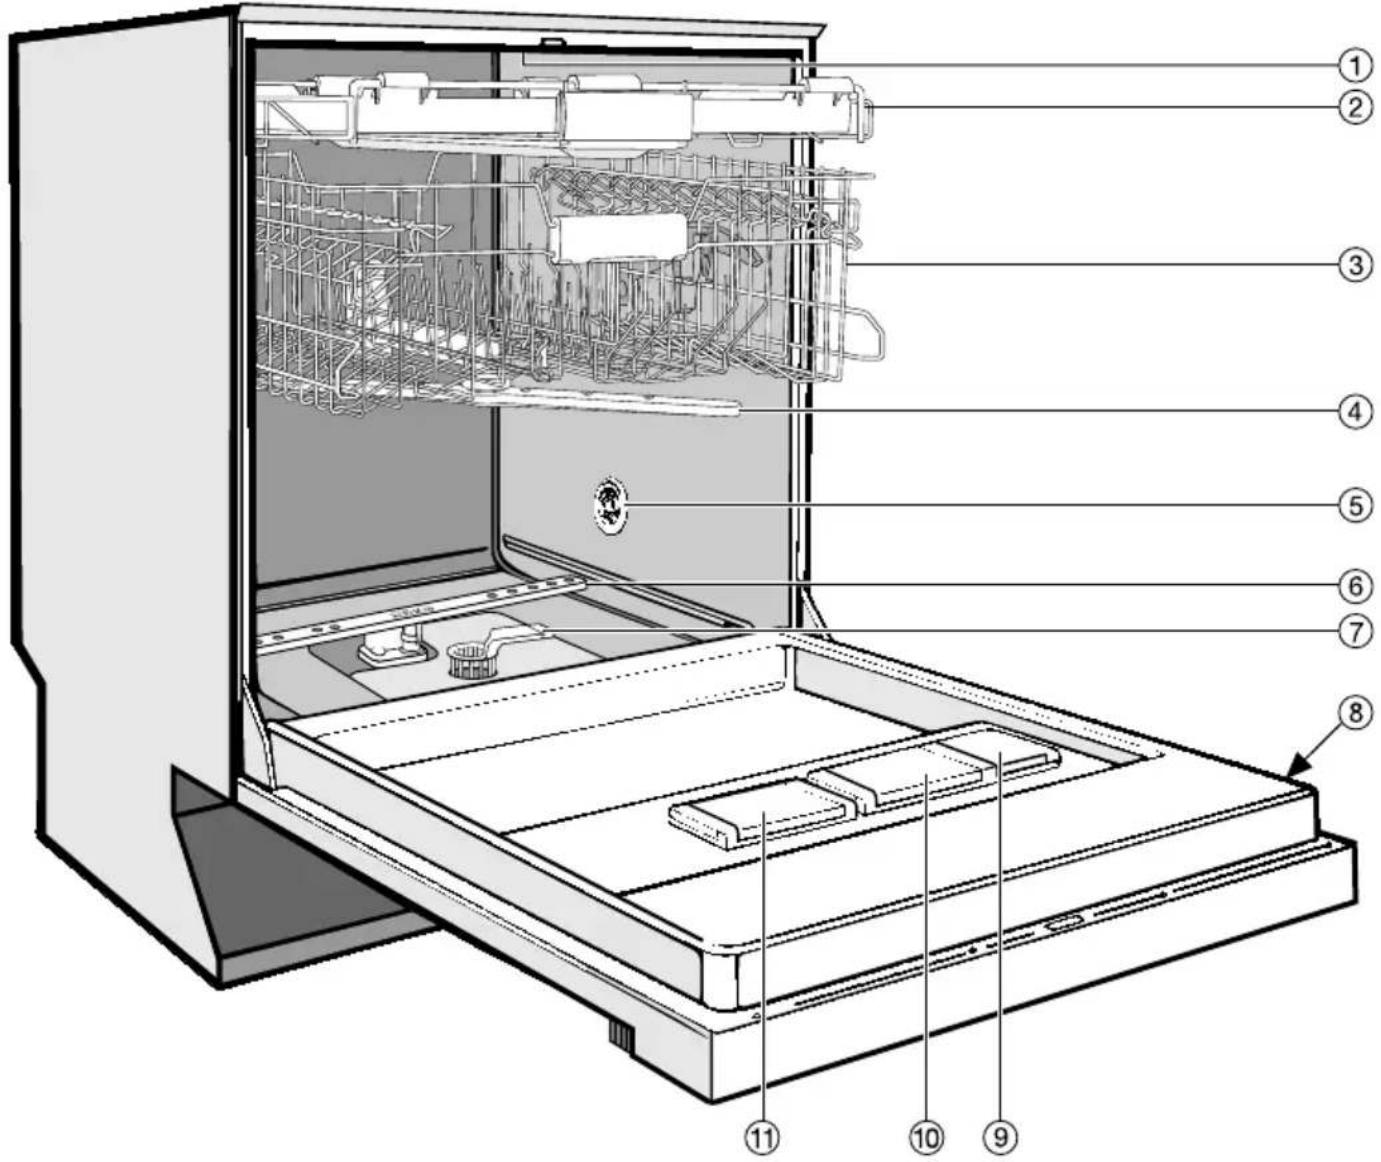
Guide to the appliance
text_image
Technical diagram of a refrigerator internal structure with numbered labels pointing to different compartments① Upper spray arm (not visible)
② Cutlery tray (depending on model)
③ Upper basket
④ Middle spray arm
⑤ Heat exchanger return (depending on model)
⑥ Lower spray arm
⑦ Filter combination
⑧ Data plate
⑨ Rinse aid reservoir
⑩ Dual compartment detergent dispenser
⑪ Salt reservoir
Control panel
flowchart
graph LR
    Start["Start"] --> 1["①"]
    1 --> 2["②"]
    2 --> 3["③"]
    3 --> 4["④"]
    4 --> 5["③"]
    5 --> 6["⑤"]
    6 --> 7["⑥"]
    style Start fill:#f9f,stroke:#333
    style ProcessingStep1 fill:#ccf,stroke:#333
    style OutputStep2 fill:#cfc,stroke:#333
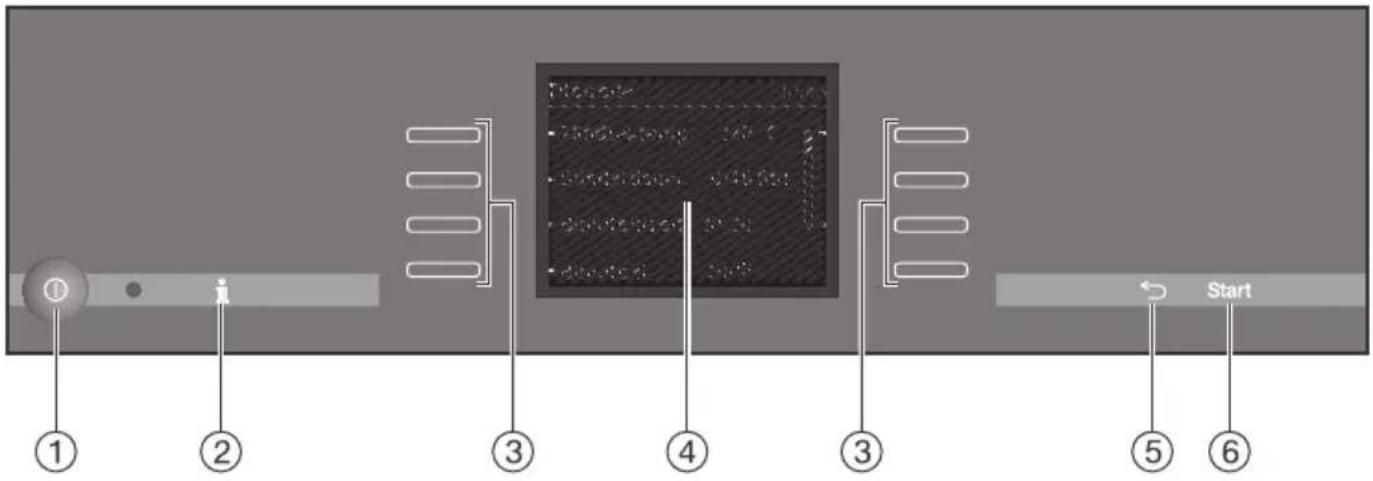
① On/Off sensor ①
For switching the dishwasher on and off.
② Information sensor i
For displaying additional information about the option in the display.
③ Sensor controls
For selecting the option marked with a dash listed next to the sensor.
For selecting a programme.
For altering values displayed.
For navigating to further screens.
The sensor controls light up when active.
④ Display
See "Display" for further information.
⑤ Back sensor
For navigating back to the previous menu or deleting values which have been set previously.
⑥ Start sensor
For starting the selected programme.
These operating instructions apply to several different dishwasher models with different heights.
The specific dishwasher models are referred to as follows:
Standard = 80.5 cm high dishwashers (integrated)
and 84.5 cm high dishwashers (freestanding)
XXL = 84.5 cm high dishwashers (integrated)
Display
General
The display is used to select or set the following:
- the programme
- any Extras
– the Delay start function - the Settings menu
- information
The display can show the following:
- the programme name
– the stage the programme is at
– the current time of day and the date
– the estimated time left for the programme to run
– the energy and water consumption (EcoFeedback)
– any relevant fault messages and information
To save energy, the dishwasher switches off after a few minutes if you do not press any sensors during this time.
To switch the dishwasher back on again, press the Ⓐ sensor.
A dash - in the display next to a sensor indicates that a function can be selected with that sensor. The relevant sensor lights up.
The scroll bar | on the right of the display indicates that more options or more text are available which can be displayed by touching the relevant illuminated sensor.
A dotted line will appear under the last option available.
Touch the sensor next to OK to confirm a message or setting and also to move to the next menu or another menu level.
A tick √ will appear beside the option which is currently selected.
To exit a sub-menu, touch the sensor.
If you do not press any of the sensors for several seconds, the display will return to the previous menu level. You may need to enter your settings again.
The Settings menu is used to alter the dishwasher's electronics to suit different requirements (see "Settings menu").
This dishwasher complies with current safety requirements. Inappropriate use can, however, lead to personal injury and damage to property.
To avoid the risk of accidents and damage to the dishwasher, please read the installation plan and the operating instructions carefully before it is installed and used for the first time. They contain important information on its installation, safety, use and maintenance.
Keep the installation plan and the operating instructions in a safe place and pass them on to any future owner.
Miele cannot be held liable for damage caused by non-compliance with this information.
Correct application
This appliance is designed for domestic use and for use in similar environments by guests in hotel or motel rooms, bed & breakfasts and other typical living quarters. This does not include common/shared facilities or commercial facilities within hotels, motels or bed & breakfasts.
This dishwasher is not suitable for outdoor use.
It must only be used as specified in these operating instructions for cleaning domestic crockery and cutlery. Any other usage is not supported by the manufacturer and could be dangerous.
This appliance is not intended for use by persons (including children) with reduced physical, sensory or mental capabilities, or lack of experience and knowledge, unless they have been given supervision or instruction concerning its use by a person responsible for their safety, and are able to recognise the dangers of misuse.
Safety with children
▶ Young children must not be allowed to use this appliance.
▶ Older children may only use the appliance when its operation has been clearly explained to them and they are able to use it safely, recognising the dangers of misuse.
▶ Cleaning work may only be carried out by older children under the supervision of an adult.
Children should be supervised to ensure that they do not play with the appliance. Keep small children away from the appliance at all times to avoid the risk of injury. There is the risk that children may lock themselves in the dishwasher.
If the automatic door opening mechanism (depending on model) is active, keep young children away from the area in which the door opens. Danger of injury in the unlikely event of a fault with the opening mechanism.
Danger of suffocation! Children may be able to wrap themselves in packing material or pull it over their heads with the risk of suffocation. Keep children away from any packing material.
Keep detergent and other household agents out of the reach of children at all times. Some dishwasher detergents are strongly alkaline and contain irritants and corrosive ingredients. They can be extremely dangerous if swallowed, and can cause burning in the mouth, nose and throat, or inhibit breathing. Avoid contact with the skin and eyes. Keep children away from the dishwasher when the door is open. There could still be detergent residues in the cabinet or dispenser. Check that the dispenser is empty after the completion of a programme. Seek medical advice immediately if your child has swallowed or inhaled detergent, e.g. Poisons Information Centre (Australia) or National Poisons Centre (NZ).
Technical safety
▶ Repairs and other work by unqualified persons could be dangerous. Installation, maintenance work and repairs to electrical appliances must only be carried out by a Miele approved service technician.
Before installation, check the dishwasher for visible signs of damage. Under no circumstances should you use a damaged dishwasher. A damaged dishwasher could be dangerous.
The electrical safety of this appliance can only be guaranteed when continuity is complete between it and an effective earthing system. It is most important that this basic safety requirement is present and regularly tested and, where there is any doubt, the electrical system in the house should be checked by a qualified electrician.
Miele cannot be held liable for the consequences of an inadequate earthing system (e.g. electric shock).
▶ Reliable and safe operation of this dishwasher can only be assured if it has been connected to the mains electricity supply.
The dishwasher must only be plugged into the electricity supply via a suitable switched socket. The electrical socket must be easily accessible after the dishwasher is installed so that it can be disconnected from the electricity supply at any time.
There must be no electrical sockets behind the dishwasher. Danger of overheating and fire risk if the dishwasher were to be pushed up against a plug.
The dishwasher must not be installed under a cooktop. The high radiant temperatures which are sometimes generated by a cooktop could damage the dishwasher. For the same reason, it should not be installed next to open fires or other appliances which give off heat, such as heaters etc.
To avoid the risk of damage to the dishwasher, make sure that the connection data on the data plate (fuse rating, voltage and frequency) matches the mains electricity supply before connecting the dishwasher to the mains. Consult a qualified electrician if in any doubt.
Do not connect the dishwasher to the mains supply until it has been fully installed and any adjustment has been made to the door springs.
Do not connect the appliance to the mains electricity supply by a multi-socket adapter or an extension lead. These do not guarantee the required safety of the appliance (e.g. danger of overheating).
The dishwasher may only be operated if the door opening mechanism is working correctly. Otherwise there could be a risk of injury whilst the automatic door opening mechanism (depending on model) is active.
To check that the door opening mechanism is working correctly:
- the door springs must be adjusted equally on both sides. They are correctly adjusted when the door remains stationary when left half open (approx. 45^ opening angle). It is also important that the door cannot fall open.
- the door locking pins automatically retract when the door opens at the end of the drying phase.
This appliance must not be installed and operated in mobile installations (e.g. on a ship).
Do not install the dishwasher in a room where there is a risk of frost. Frozen hoses may burst or split. The reliability of the electronic control unit may be impaired at temperatures below freezing point.
To avoid any damage to the appliance, the dishwasher must only be operated when it is connected to a fully vented plumbing system.
The plastic housing of the water connection contains an electrical valve. The housing must not be dipped in water.
There are electrical wires in the water inlet hose. Do not cut the water inlet hose, even if it is too long.
The integrated Waterproof system offers protection from water damage, provided the following conditions are met:
- The dishwasher is correctly installed and plumbed in.
- The dishwasher is properly maintained and parts are replaced where it can be seen that this is necessary.
- The tap has been turned off when the appliance is not used for a longer period of time (e.g. during holidays).
The Waterproof system will work even if the appliance is switched off. However, the appliance must remain connected to the electricity supply.
The water pressure (flow pressure at the connection point) must be between 50 and 1000 kPa (0.5 and 10 bar).
A damaged appliance could be dangerous. If the dishwasher gets damaged, switch it off at the mains and call Miele.
The manufacturer's warranty will be invalidated if the appliance is not repaired by a Miele approved service technician.
▶ Faulty components must only be replaced by genuine Miele spare parts. The manufacturer can only guarantee the safety of the appliance when Miele replacement parts are used.
During installation, maintenance and repair work, the appliance must be disconnected from the mains electricity supply.
If the mains connection cable is damaged, it must be replaced with a special cable of the same type (available from Miele) by a Miele authorised service technician only in order to avoid a hazard.
This dishwasher is supplied with a special lamp (depending on model) to cope with particular conditions (e.g. temperature, moisture, chemical resistance, abrasion resistance and vibration). This special lamp must only be used for the purpose for which it is intended. It is not suitable for room lighting. Replacement lamps may only be replaced by a Miele authorised technician.
In areas which may be subject to infestation by cockroaches or other vermin, pay particular attention to keeping the appliance and its surroundings in a clean condition at all times. Any damage which may be caused by cockroaches or other vermin will not be covered by the warranty.
Correct installation
The dishwasher must be installed and connected in compliance with the installation instructions.

Be careful when installing the dishwasher. Wear protective gloves to avoid injury on any sharp metal components.
The dishwasher must be correctly aligned to ensure problem-free operation.
In order to ensure stability, built-under and integrated dishwashers must only be installed under a continuous worktop which is secured to adjacent cabinetry.
If you want to convert your freestanding dishwasher to a built-under (“U”) model, you will need to order the appropriate conversion kit. If you remove the existing plinth, you must replace it with a U-model plinth. This is necessary to avoid the risk of injury caused by protruding metal parts.
The door springs on either side need to be evenly adjusted. They are correctly adjusted if the half-opened door (approx. 45° door opening angle) remains in this position when it is released. The door must not fall down under its own weight.
The appliance may only be used with correctly adjusted door springs.
Correct use
Do not use solvents in the dishwasher. Danger of explosion!
Do not inhale or ingest dishwasher detergent. Some dishwasher detergents are strongly alkaline and contain irritants or corrosive ingredients. They can be extremely dangerous if swallowed, and can cause burning in the nose, mouth and throat, or inhibit breathing. Avoid contact with the skin and eyes. Seek medical advice immediately if detergent has been swallowed or inhaled, e.g. Poisons Information Centre (Australia) or National Poisons Centre (NZ).
▶ Avoid leaving the door open unnecessarily as someone could trip over it and be injured by it.
Do not sit or lean on the opened door. This could cause the dishwasher to tip and be damaged, and you could get injured.
Dishes can be very hot at the end of a programme. Allow them to cool until they are comfortable enough to handle before unloading.
▶ Only use detergent and rinse aid formulated for domestic dishwashers. Do not use washing-up liquid.
Do not use commercial or industrial detergents as these may cause damage, and there is a risk of a severe explosive chemical reaction (such as an explosive oxyhydrogen gas reaction).
Do not fill the rinse aid reservoir with powder or liquid detergent. This will cause serious damage to the reservoir.
▶ Inadvertently filling the salt reservoir with powder or liquid dishwasher detergent will damage the water softener. Make sure you have picked up the correct packet of dishwasher salt before filling the salt reservoir!
▶ Only use special coarse grained dishwasher salt for reactivation. Do not use other salts such as cooking salt, agricultural grade or gritting salt. These may contain insoluble additives which can impair the functioning of the water softener.
In an appliance with a cutlery basket (depending on model) cutlery is cleaned and dried more efficiently if placed in the basket with the handles downwards. However, to avoid the risk of injury, place knives and forks etc. with the handles upwards.
▶ Plastic items which cannot withstand being washed in hot water, such as disposable plastic containers, or plastic cutlery and crockery should not be cleaned in the dishwasher. The high temperatures in the dishwasher may cause them to melt or lose shape.
If you use the “FlexiTimer/Delay start” option (depending on model), make sure that the dispenser is dry before adding detergent. Wipe dry if necessary. Detergent will clog if poured into a damp dispenser and may not be thoroughly dispersed.
▶ Please observe the information given in “Technical data” regarding the capacity of the dishwasher.
Accessories
▶ Use only genuine original Miele spare parts. If spare parts or accessories from other manufacturers are used, the warranty will be invalidated, and Miele cannot accept liability.
Disposal of your old dishwasher
▶ Make the door lock inoperative so that children cannot accidentally shut themselves in. Remove or destroy the locking bracket of the door lock, and make appropriate arrangements for the disposal of the appliance.
Disposal of the packing material
The transport and protective packaging has been selected from materials which are environmentally friendly for disposal, and can normally be recycled.
Recycling the packaging reduces the use of raw materials in the manufacturing process and also reduces the amount of waste in landfill sites. Ensure that any plastic wrappings, bags etc. are disposed of safely and kept out of the reach of babies and young children. Danger of suffocation.
Disposing of your old appliance
Electrical and electronic appliances often contain valuable materials. They also contain specific materials, compounds and components, which were essential for their correct function and safety. These could be hazardous to human health and to the environment if disposed of with your domestic waste or if handled incorrectly. Please do not, therefore, dispose of your old appliance with your household waste.
Please dispose of it at your local community waste collection / recycling centre for electrical and electronic appliances. You are also responsible for deleting any personal data that may be stored on the appliance prior to disposal. Please ensure that your old appliance poses no risk to children while being stored prior to disposal.
Energy-saving dishwashing
This dishwasher is exceptionally economical in its use of water and electricity.
You can make the most of your appliance by following these tips:
- For most economical dishwashing, make full use of the baskets without overloading the dishwasher.
- Choose the programme to suit the type of crockery being washed and the degree of soiling.
- Select the ECO programme for energy-saving dishwashing. This programme is the most efficient in terms of its combined energy and water consumption at cleaning normally soiled crockery.
- If your dishwasher is connected to a hot water supply, select the SolarSave programme for washing a lightly to moderately soiled load. Because the water is not heated in this programme, crockery may still be slightly damper at the end of this programme than it would be with other programmes.
– Follow the detergent manufacturer's recommendations on detergent dosage. - When using powder or liquid detergent you can use ^1/_3 less detergent if baskets are only half full.
You can find further tips on energy-saving dishwashing in “Miele's guide to dishwashing”.
EcoFeedback consumption indicator
The Consumption function is used for calling up information about the energy and water consumption of your dishwasher (see “Settings menu - Consumption”).
Three different types of information can be displayed:
– an estimate of the consumption before the programme begins
– the actual consumption at the end of the programme
– the total consumption of the dishwasher
1. Consumption estimate:
The estimated energy and water consumption for a programme can be shown in the display.
■ Select the programme you want.
■ Select the Estimated consumption option.
The estimated energy and water consumption will appear in the display.
The estimated consumption levels will be displayed as a bar chart. The more bars (III) in the display, the more energy or water will be used.
The values are influenced by the programme selected and any programme options selected.
The consumption indicator is switched on as standard. However, you can also switch the indicator off (see “Settings menu - Consumption”).
2. Actual consumption
At the end of the programme you can call up the actual amount of energy and water used by the programme which has just been run.
■ To do this you first have to activate the Display consumption option in the "Settings - Consumption" menu.
■ At the end of the programme select the Consumption option and confirm your choice with OK.
Switching the dishwasher off at the end of the programme will delete the actual consumption values for the programme which has just been run.
3. "Consumption" setting
The Total consumption setting gives a total of the energy and water which has been used in all previous dishwasher programmes (see “Settings menu - Consumption”).
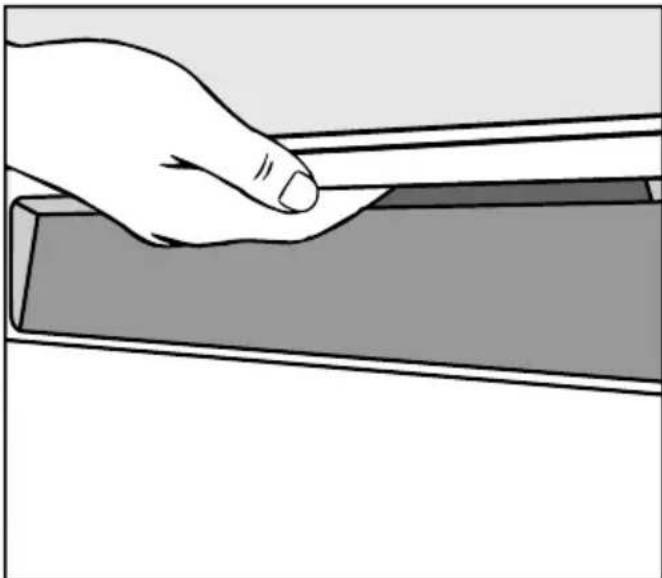
Opening the door
At the end of programmes with a drying phase (see “Programme chart”), the door will open automatically a little in order to help the drying process. This function can be deactivated if preferred (see “Settings menu - AutoOpen”).
natural_image
Illustration of a hand pressing down on a rectangular object (no text or symbols)■ To open the door, reach under the door grip and pull.
■ Open the door fully to disengage the locking mechanism.
The door locking pins will retract.
If the door is opened during operation, all functions are automatically interrupted.
Water in the dishwasher may be hot. Danger of scalding! Only open the door during operation if absolutely necessary and exercise extreme caution when doing so.
⚠️ Keep the area around the door free of obstructions.
Before using for the first time
Closing the door
■ Push the baskets right in.
■ Then raise the door upwards until the catch engages.
The door will then close automatically.
Danger of injury! Do not put your hand inside the door as it is closing.
Safety lock
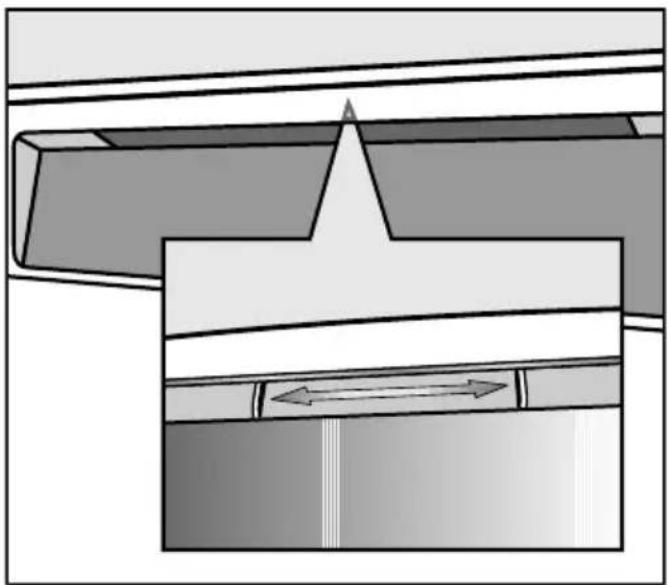
The child safety lock can be used to prevent children opening the dishwasher. The door can then only be opened by using a lot of force.
natural_image
Pure mechanical assembly diagram showing layered components and directional arrows (no text or symbols)■ To lock the door, push the slide underneath the door grip to the right.
■ To unlock the door, push the slide to the left.
Basic settings
■ Switch the dishwasher on using the ① sensor.
The welcome screen will appear when the dishwasher is switched on for the first time.
Language
The display will change automatically to the screen for setting the language.
■ Select the language you want as well as the country, if appropriate, and confirm with OK.
To learn about the display, read the section with the same name.
A tick √ will appear next to the language that has been set.
Date
The display will change to the screen for setting the date.
You can show the actual date and time in the display.
■ Set the year using +/- and confirm with OK.
■ Then set the month and the day and confirm them with OK.
Keeping the relevant sensor pressed will increase or decrease the time automatically.
Time of day
The display will then change to the screen for setting the time.
The time of day needs to be set before the Delay start programme option can be used.
You can also show the current time of day in the display.
■ Use +/- to set the hour and confirm with OK.
■ Then set the minutes and confirm with OK.
Time of day display
The display will then change to the screen for setting the display for the time of day.
■ Select the display you require for the time of day, and confirm this with OK.
■ Confirm the message about energy consumption with OK.
Water hardness
The display will change to the screen for setting the water hardness.
- The dishwasher must be programmed to the correct water hardness for your area.
- Your local water authority will be able to advise you of the water hardness level in your area.
- Where the water hardness fluctuates e.g. between 1.8 and 2.7 mmol/l (10 - 15 °d - German scale), always programme the dishwasher to the higher value (2.7 mmol/l or 15 °d in this example).
In the event of a fault, it will help the service technician if you know the hardness of your local water supply.
Enter the water hardness below:
mmol/l
The dishwasher is programmed at the factory for a water hardness level of 0.2 mmol/l (1 °d - German scale).
■ Select the water hardness level for your water supply and confirm with OK.
See “Settings menu - Water hardness” for more information.
Finally, prompts will appear in the display.
After confirming this with OK, the prompts Insufficient salt and Insufficient rinse aid may appear.
- Add salt and rinse aid if necessary (see “Before using for the first time - Dishwasher salt” and “Rinse aid”).
■ Confirm the messages with OK.
The display will change to show the main menu.
Before using the appliance for the first time, you require:
- approx. 1 kg dishwasher salt,
– domestic dishwasher detergent, - rinse aid formulated for domestic dishwashers.
Every dishwasher is tested at the factory. There will be residual water in the appliance from this test. It is not an indication that it has been used previously.
Dishwasher salt
In order to achieve good cleaning results, the dishwasher needs to operate with soft water. Hard water results in a build-up of calcium deposits on crockery and in the dishwasher. Mains water with a hardness level higher than 0.7 mmol/l (4 °d - German scale) needs to be softened. This takes place automatically in the integrated water softener. The water softener in the dishwasher is suitable for a water hardness level of up to 12.6 mmol/l (70 °d - German scale).
The water softener requires dishwasher salt.
Depending on the water hardness level (< 3.8 mmol/l, or 21 °d - German scale), dishwasher salt is not required if combination tablets are being used (see "Operation, Detergent").
If the water in your area is very soft and constantly lower than 0.9 mmol/l (5 °d - German scale), you do not have to add dishwasher salt. The prompt to add salt will be switched off automatically if the water softener has been programmed for this to happen.
⚠️ Dishwasher detergent will damage the water softener. Do not fill the salt reservoir with powder or liquid detergent.
⚠️ Only use special coarse grained dishwasher salt for reactivation, as other salts (e.g. cooking salt, agricultural grade or gritting salt) may contain insoluble additives which can impair the functioning of the water softener.
Before using for the first time
Filling the salt reservoir
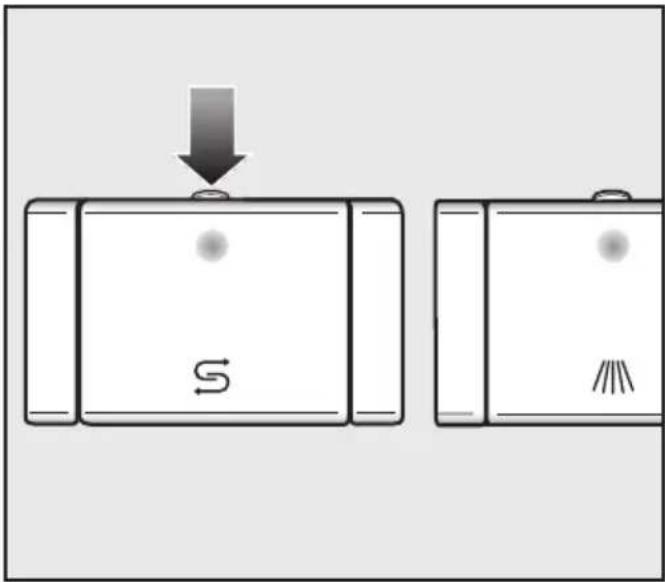
■ When filling the salt reservoir only open the door halfway to ensure that all the salt gets into the reservoir.
text_image
Diagram showing a switch with an arrow pointing to a terminal block, labeled 'S' and 'R'■ Press the button on the lid of the salt reservoir in the direction of the arrow.
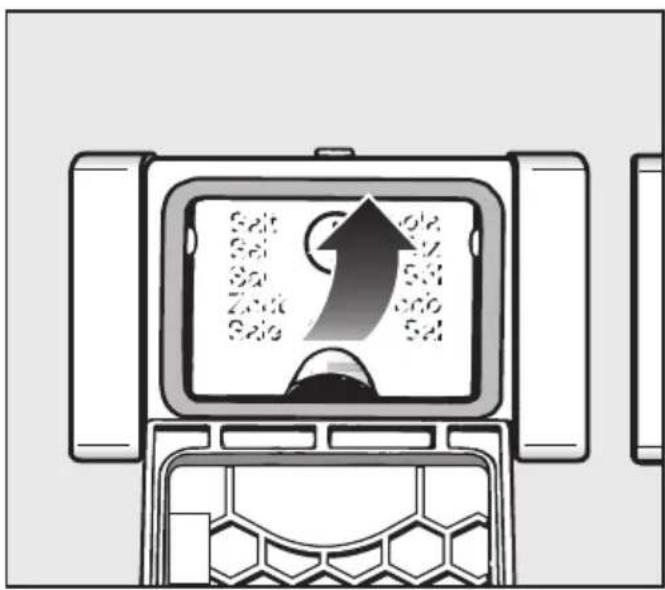
The flap will spring open.
text_image
Salt Salt Salt Zn2 Salt Salt Salt Salt Salt Salt Salt Salt Salt Salt Salt Salt Salt Salt Salt Salt Salt Salt Salt Salt Salt Salt Salt Salt Salt Salt Salt Salt Salt Salt Salt Salt Salt Salt Salt Salt Salt Salt Salt Salt Salt Salt Salt Salt Salt Salt Salt Salt Salt Salt Salt■ Lift up the funnel.
Do not fill the reservoir with water.
text_image
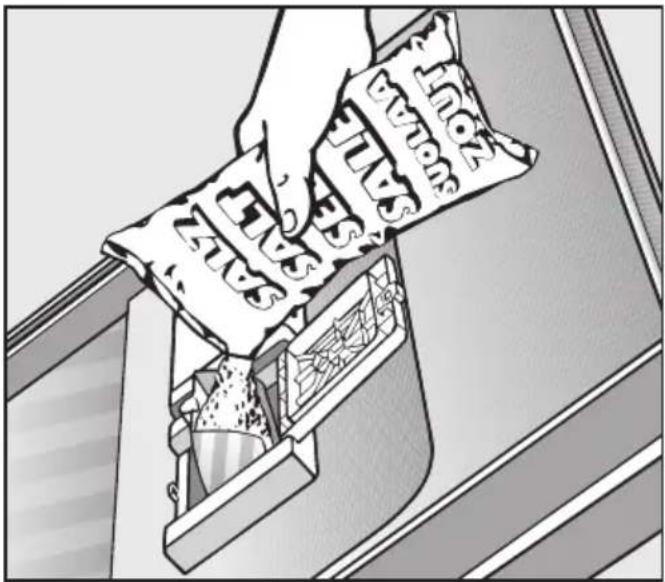
Illustration showing a hand pouring contents into a container with visible text labels, likely illustrating food waste or packaging.■ Add dishwasher salt only until the reservoir is full or until water runs out of the opening. The salt reservoir holds approx. 1 kg of salt, depending on the brand used.
Do not add any more than 1 kg of salt.
As the salt reservoir is filled, displaced water may overflow.
■ Clean any excess salt from around the reservoir opening and then close the flap.
■ Immediately after filling the salt reservoir, run the QuickPowerWash programme with the Short option and without any crockery in the dishwasher to dissolve and remove any traces of salt from the cabinet.
Add salt reminder
■ Fill the salt reservoir with dishwasher salt for reactivation when
Insufficient salt appears in the display (If it appears during a programme, wait until the end of the programme).
■ Confirm with OK.
The message will go out.
⚠️ Risk of corrosion! Immediately after filling the salt reservoir, run the QuickPowerWash programme with the Short programme option selected and without any crockery in the dishwasher to remove any traces of salt from the cabinet.
After the salt reservoir has been filled, the refill reminder may still appear in the display if the salt concentration has not yet reached the correct level. If this is the case, confirm again with OK.
The refill reminder will be switched off if you have programmed the dishwasher for a water hardness below 0.9 mmol/l (5 °d - German scale).
If you only ever use multi-function combination products in your dishwasher, you can switch off both refill reminders for salt and rinse aid if you wish (see “Settings menu - Switching off the refill reminders”).
If you switch to using detergent that does not contain salt or rinse aid, it is important to remember to add dishwasher salt and rinse aid and to switch the reminders back on.
Rinse aid
Rinse aid is necessary to ensure water does not cling and leave marks on crockery during the drying phase and helps crockery dry faster after it has been washed.
Rinse aid is poured into the storage reservoir and the amount set is dispensed automatically.
Inadvertently filling the rinse aid reservoir with powder or liquid detergent will damage the reservoir. Only pour rinse aid formulated for domestic dishwashers into the reservoir.
Alternatively, it is possible to use
– household vinegar with a max. 5% acid content
or
– liquid citric acid up to 10% acid content
The resulting rinsing and drying quality will not, however, be as good as when rinse aid is used.
Do not use vinegar with a higher acid content (e.g. vinegar essence 25% acid). This would damage the dishwasher.
If you only ever use combination products containing rinse aid in your dishwasher, you do not need to add rinse aid.
Adding rinse aid
natural_image
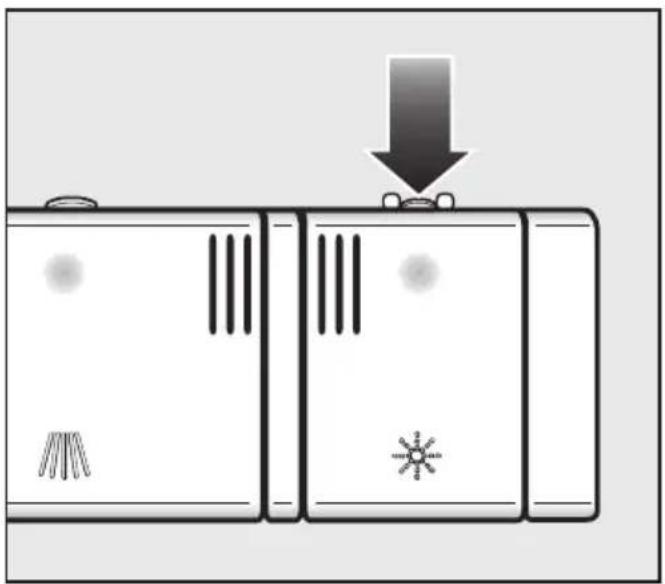
Diagram of a battery pack with three compartments and a downward arrow indicating a drop or adjustment (no text or symbols)■ Press the button on the lid of the rinse aid reservoir in the direction of the arrow until the flap springs open.
natural_image
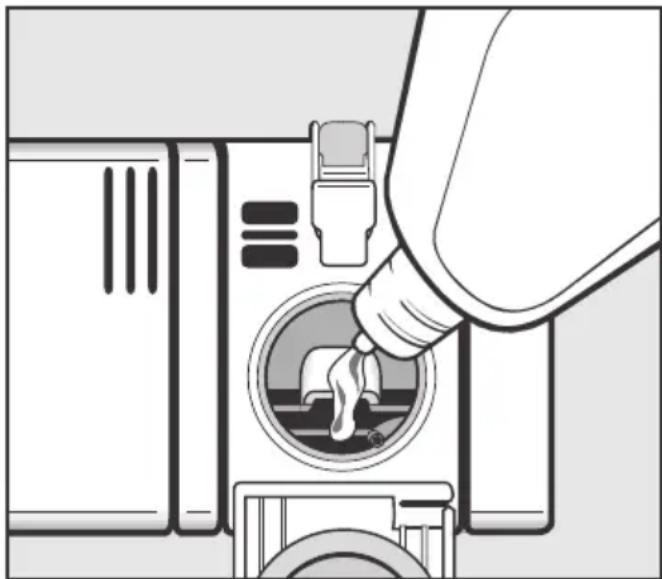
Illustration of a hand pouring liquid into a washing machine (no text or symbols)■ Add rinse aid only until it is visible in the opening.
The rinse aid reservoir holds approx. 110 ml.
■ Close the flap firmly so that it clicks into place. Otherwise water can enter the rinse aid reservoir during a programme.
■ Wipe up any spilled rinse aid. This prevents over-foaming occurring during the next programme.
You can adjust the rinse aid dosage for best results (see "Settings menu - Rinse aid").
Add rinse aid reminder
When the ✦ Insufficient rinse aid message appears in the display, the reservoir contains sufficient rinse aid for 2 - 3 programmes only.
■ Add rinse aid in plenty of time.
■ Confirm with OK.
The message will go out.
If you only ever use multi-function combination products in your dishwasher, you can switch off both refill reminders for salt and rinse aid if you wish (see “Settings menu - Switching off the refill reminders”).
If you switch to using detergent that does not contain salt or rinse aid, it is important to remember to add dishwasher salt and rinse aid and to switch the reminders back on.
Notes
Remove coarse food residues from crockery.
There is no need to rinse items under running water.
Do not wash items soiled with ash, sand, wax, lubricating grease or paint in the dishwasher. Ash does not dissolve and is distributed in the wash cabinet. Wax, sand, lubricating grease and paint cause damage to the dishwasher.
Crockery can be loaded anywhere in the baskets, but the following notes should be observed:
- Do not place crockery and cutlery inside other pieces where they may be concealed.
- Load the crockery so that water can access all surfaces. This ensures that they get properly cleaned.
- Make sure that all items are securely positioned.
- Hollow items such as cups, glasses, pans, etc. must be inverted in the basket.
- Tall, narrow, hollow items, e.g. champagne glasses, should be placed in the centre of the basket to ensure better water coverage.
-
Wide based items should be placed at an angle so that water can run off them freely.
-
The spray arms must not be blocked by items which are too tall or hang through the baskets. If in doubt, test for free movement by manually rotating the spray arms.
- Make sure that small items cannot fall through the holders in the baskets.
Small items, e.g. lids, should therefore be placed in the cutlery tray or cutlery basket (depending on model).
Some foodstuffs may contain natural dyes, e.g. carrots, tomatoes or tomato sauce. Plastic items in the dishwasher may discolour if large quantities of these foodstuffs find their way into the dishwasher on the crockery. The stability of plastic items is not affected by this discolouration.
Cleaning silver cutlery in the dishwasher may also cause plastic items to discolour.
Items not suitable for dishwashers:
- Wooden cutlery and crockery or items with wooden parts: these may discolour and fade. The glue used in these items is not dishwasher-proof and wooden handles may come loose after being washed in a dishwasher.
- Craft items, antiques, valuable vases and decorative glassware are also not suitable for dishwashers.
- Plastic items which are not heat-resistant: the high temperatures in the dishwasher may cause them to melt or lose shape.
- Copper, brass, tin and aluminium items may discolour or become matt.
- Colours painted over a glaze may fade after a number of washes.
- Delicate glassware and glassware containing lead crystal: clouding may occur over time.
Please note
Silverware previously cleaned with a silver polish may still be damp or spotted at the end of a programme, where water has not run off smoothly. It may need to be rubbed dry with a soft cloth.
Silver which has been in contact with foods containing sulphur can discolour. These include egg yolk, onions, mayonnaise, mustard, pulses, fish, fish brine and marinades.
⚠️ Aluminium components (e.g. rangehood grease filters) must not be cleaned with caustic alkaline commercial or industrial cleaning agents.
These may damage the material, or in extreme cases, there is a risk of a severe explosive chemical reaction (such as an explosive oxyhydrogen gas reaction).
Useful tip: When purchasing new crockery and cutlery, make sure they are dishwasher-proof.
Glass care
- Clouding may occur on glasses after frequent washing. If delicate glassware is washed in the dishwasher, ensure that only very low temperatures are used (see programme chart), or a special glass-care programme is used (depending on model). This will reduce the risk of clouding.
– Purchase glassware which is dishwasher-safe (e.g. Riedel glassware). - Use detergents with glass protective additives.
FlexAssist
The yellow coded FlexAssist parts indicate which elements of the dishwasher baskets and cutlery tray are moveable. They also act as grips and have symbols embossed on them to show what the moveable parts are used for.
Upper basket
See “Loading the dishwasher - Loading examples” for examples of how to load crockery and cutlery.
⚠ For safety reasons, do not operate the dishwasher without the upper and lower baskets in place (except when running the Tall items programme, if available).
■ Use the upper basket for small, lightweight and delicate items such as cups, saucers, glasses, dessert bowls, etc.
Shallow pans or casserole dishes can also be placed in the upper basket.
■ Long items such as soup ladles, mixing spoons and long knives should be placed lying down across the front of the upper basket.
Cup rack
■ Raise the rack upwards using the yellow lever ☐ to make room for tall items.
Glasses can be arranged along the positioning rail of the cup rack to give them some support during the programme.
■ Lower the cup rack and lean the glasses against it.
Hinged spikes
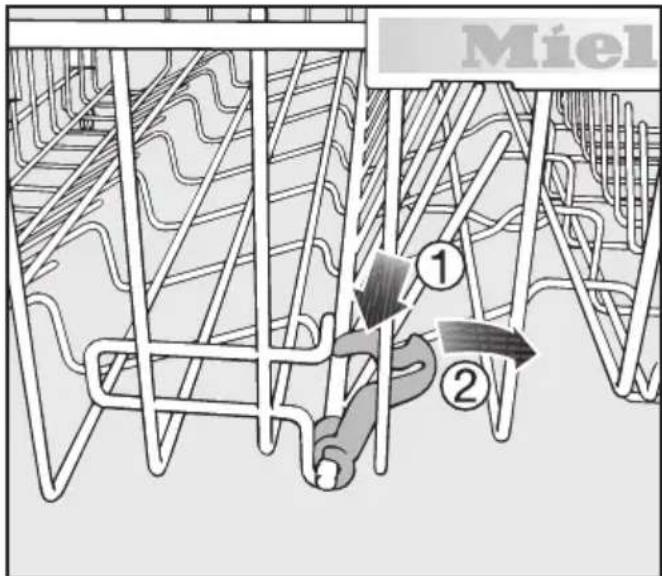
The rows of spikes can be lowered to make more room for larger items such as casserole dishes.
text_image
Miel ① ②■ Press the yellow lever downwards ① and then lower the spikes ②.
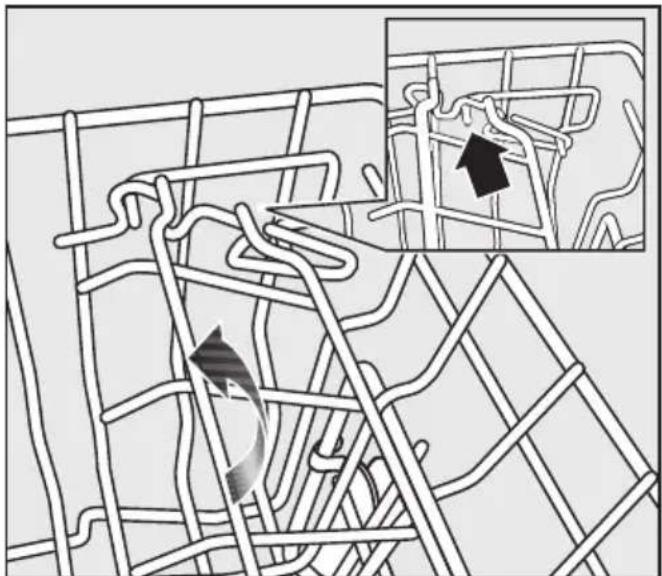
Jumbo cup rack (depending on model)
The cup rack can be set at two different widths so that it can also accommodate large cups.
natural_image
Diagram of a road network with directional arrows indicating movement or flow (no text or symbols present)■ Pull the cup rack upwards and click it back into position at the required width.
Loading the dishwasher
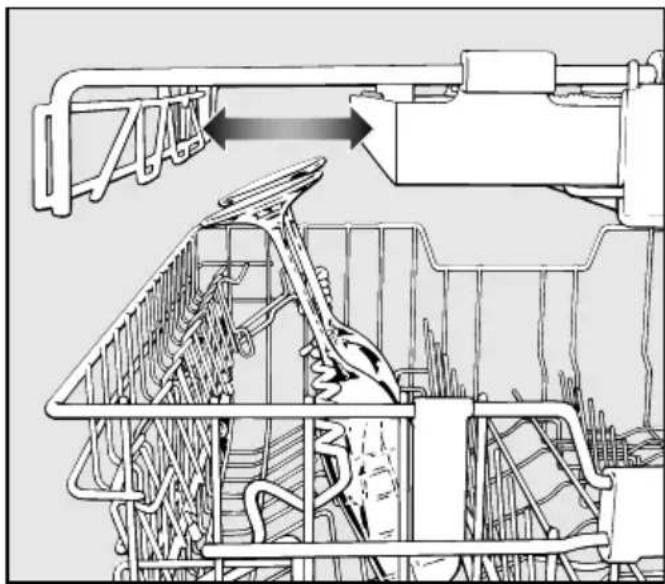
Glass rail
This rail is designed to hold glasses with long stems securely.
natural_image
Technical line drawing of a mechanical assembly with internal components and directional arrows (no text or symbols)■ Lower the rail with the yellow lever ⚡ and lean tall glasses against it.
■ You can also move one of the side inserts in the cutlery tray to make more room for tall glasses (see "Cutlery, 3D+ cutlery tray").
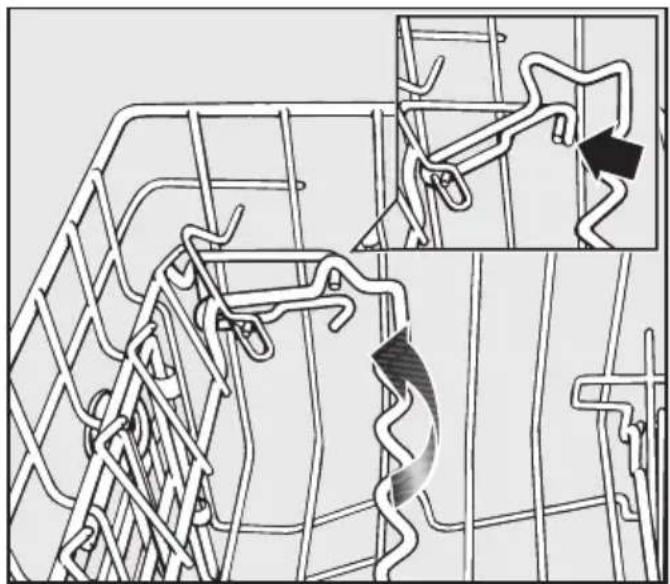
Adjusting the height
You can set the glass rail at two different heights.
natural_image
Diagram of a car interior showing structural elements and a highlighted route (no text or labels)■ Pull the rail upwards and click it back into position at the required height.
Use the low setting for small glasses and tumblers.
Use the high setting for tall glasses and glasses with stems.
Adjusting the upper basket
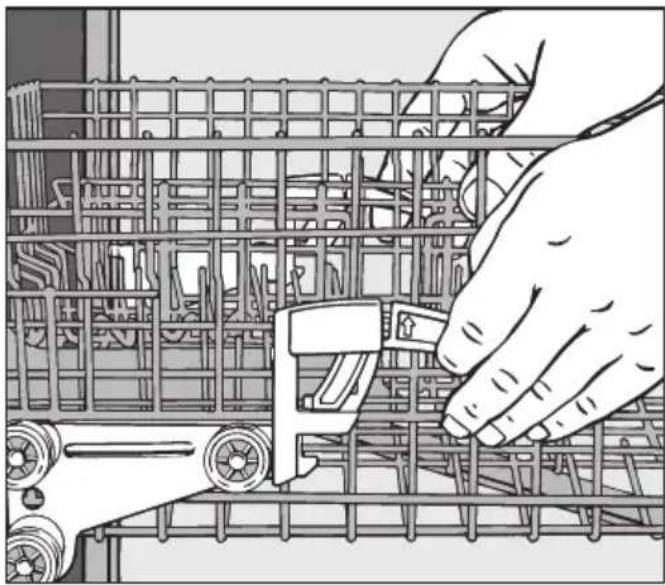
In order to gain more space for taller pieces of crockery in the bottom or upper basket, the upper basket can be adjusted on three levels with 2 cm between each level.
The upper basket can also be set at an angle with one side high and the other side low. This can be useful to help prevent water being left in deep dishes etc. Ensure, however, that the basket can be inserted smoothly into the cabinet. It is better to adjust the basket before loading it.
■ Pull out the upper basket.
natural_image
Illustration of a hand adjusting a mechanical component on a grid-patterned device (no text or symbols visible)To raise the upper basket:
■ Pull the basket up until it clicks into place.
To lower the upper basket:
■ Pull upwards on the levers at either side of the upper basket.
■ Adjust the basket to the desired height and then push the levers securely back down into position.
Depending on the setting of the upper basket, the following plate dimensions can be accommodated.
Dishwashers with cutlery basket (see data plate for model number)
| Upper basket level | Plate ∅ in cm | ||
| Upper basket Lower basket | |||
| Stand-ard | XXL | ||
| Top 20 | 24 31 (35*) | ||
| Middle | 22 26 29 | ||
| Bottom | 24 28 27 | ||
Dishwashers with cutlery tray (see data plate for model number)
| Upper basket level | Plate ∅ in cm | ||
| Upper basket Lower basket | |||
| Stand-ard | XXL | ||
| Top 15 | 19 31 (35*) | ||
| Middle | 17 21 29 | ||
| Bottom | 19 23 27 | ||
* When tilted, plates of up to 35 cm can be accommodated (see "Lower basket").
Lower basket
See "Loading the dishwasher - Loading examples" for examples of how to load crockery and cutlery.
■ For larger and heavier items such as plates, serving platters, saucepans, bowls, etc.
Glasses, cups and small items such as saucers can also be placed in the lower basket. Do not place thin, delicate glassware in the lower basket.
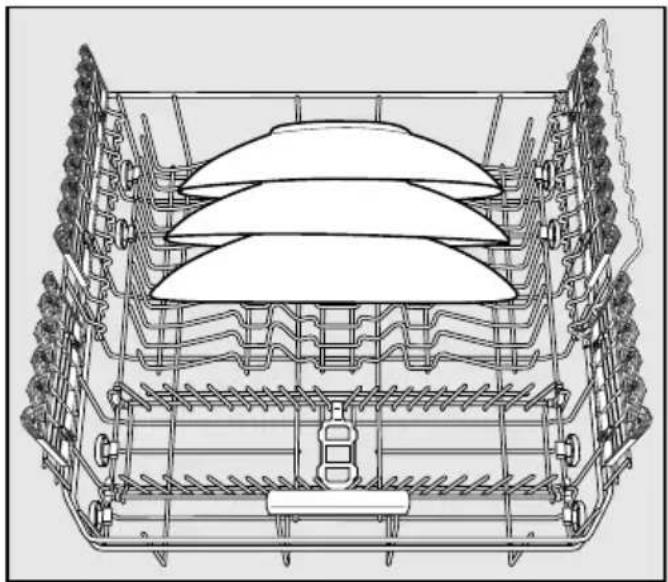
natural_image
Technical line drawing of a multi-level industrial or construction structure with structural framework and no visible text or symbols■ Place large platters and dishes in the centre of the lower basket.
When tilted, plates up to 35 cm in diameter can be accommodated.
Removable MultiComfort insert
The rear section of the lower basket is used for washing cups, glasses, plates, pots and pans.
You can remove the MultiComfort insert to make more room for larger items such as pans and casserole dishes.
Removing the insert
■ Pull the yellow handle forwards and remove the insert.
Refitting the insert
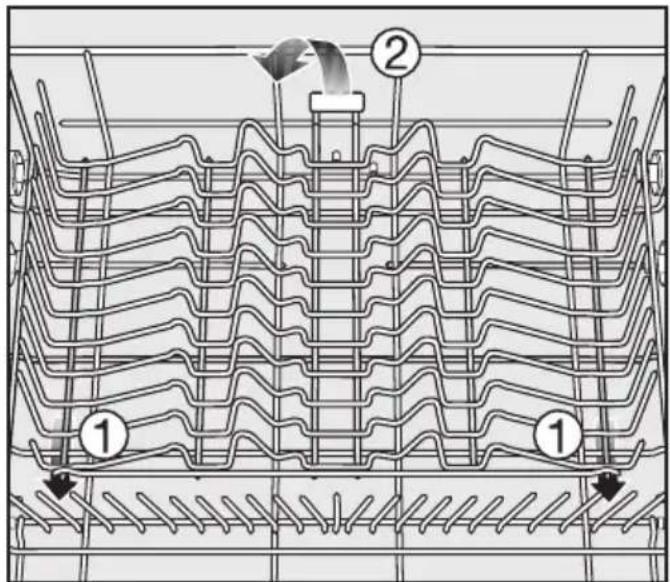
text_image
Technical diagram of a multi-layered mechanical or electrical component with labeled parts 1 and 2, showing internal flow arrows.■ Fit the insert into the lower basket with the hooks going under the long cross-piece ① as illustrated.
■ Press down on the insert until it clicks into position ②.
FlexCare glass holder
Silicone padding in the FlexCare glass holder provides a stable and secure hold for delicate stemware.
■ Stem glassware, e.g. wine glasses or champagne flutes, can be leaned against the glass holder or suspended from it.
■ The glass holder can be raised to make more room for tall items.
You can set the glass holder at two different heights.
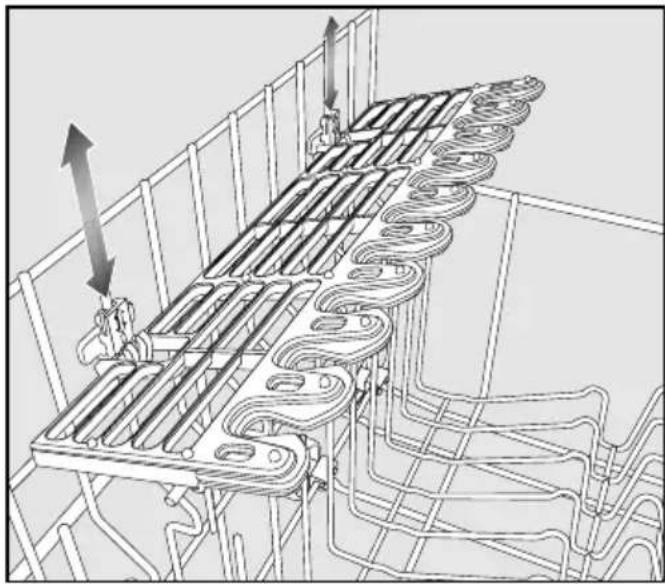
natural_image
Technical diagram of a heat exchanger or cooling system with coiled ducts and airflow arrows (no text or labels)■ Slide the glass holder to the desired height until the catches click into place at the top or rest on the bottom.
Glass rail
This rail is designed to hold glasses with long stems securely.
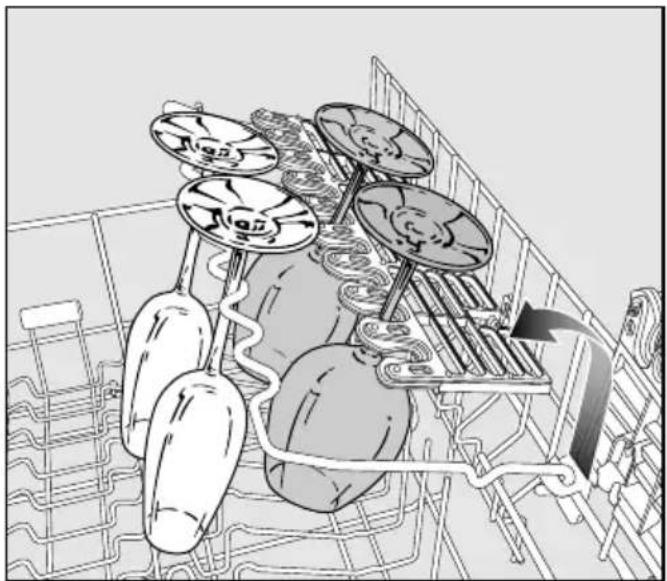
natural_image
Illustration of a supermarket aisle with hanging goods and a conveyor belt, no text or symbols present■ Lower the rail and lean tall glasses against it.
Loading the dishwasher
Hinged spikes
The spikes at the front are used for washing plates, soup bowls, platters, dessert bowls and saucers.
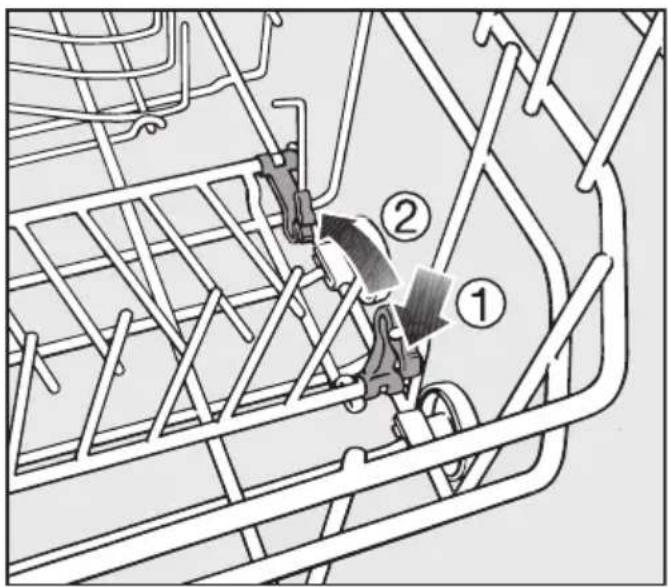
Both rows of spikes can be lowered to make more room for large items, e.g. pots, pans and dishes.
text_image
Technical diagram showing mechanical assembly with labeled parts ① and ②, likely illustrating a gear or linkage mechanism.■ Press the yellow lever downwards ①, and then lower the spikes ②.
Bottle holder
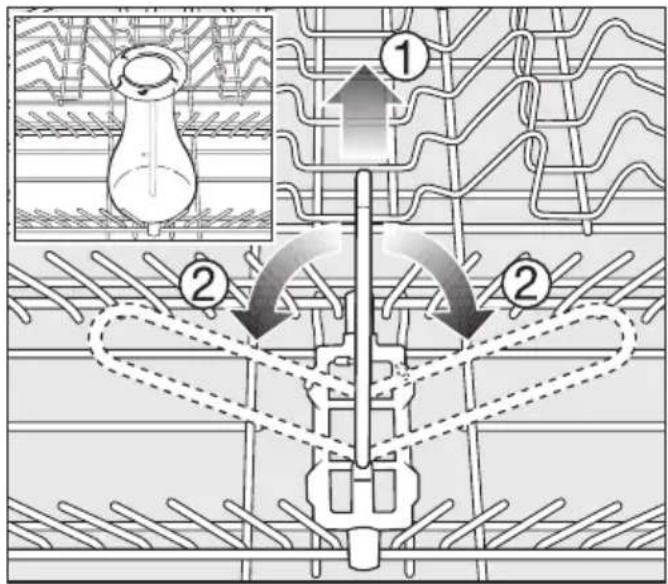
The bottle holder can be used to wash narrow items, e.g. milk and baby bottles.
flowchart
graph TD
    A["Component 1"] --> B["Flow Arrow ①"]
    B --> C["Component 2"]
    C --> D["Flow Arrow ②"]
    D --> E["Component 2"]
    style A fill:#f9f,stroke:#333
    style E fill:#bbf,stroke:#333
If the bottle holder is not needed, lift it up ① and fold the sides down ②, as illustrated.
Cutlery
3D+ cutlery tray (depending on model)
See "Loading the dishwasher - Loading examples" for examples of how to load crockery and cutlery.
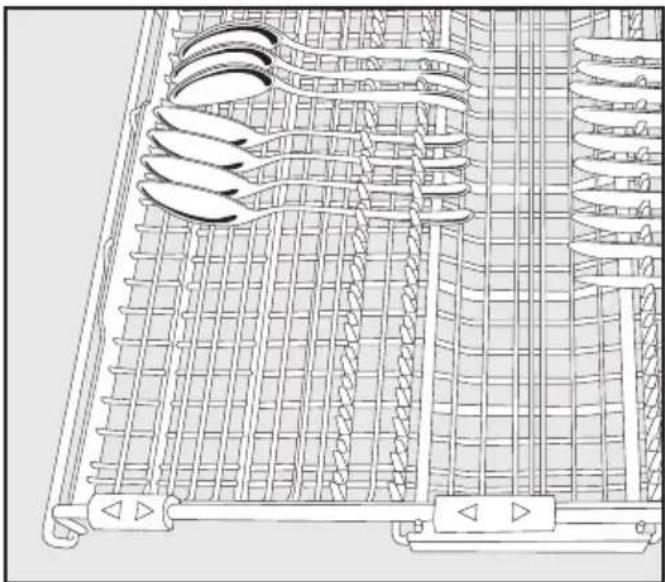
■ Arrange the cutlery in the tray as shown.
To make unloading much easier, cutlery should be grouped in zones, one for knives, one for forks, one for spoons, etc.
Spoon heads should be placed in contact with at least one of the serrated retainers on the base of the cutlery tray to ensure that water runs off them freely.
natural_image
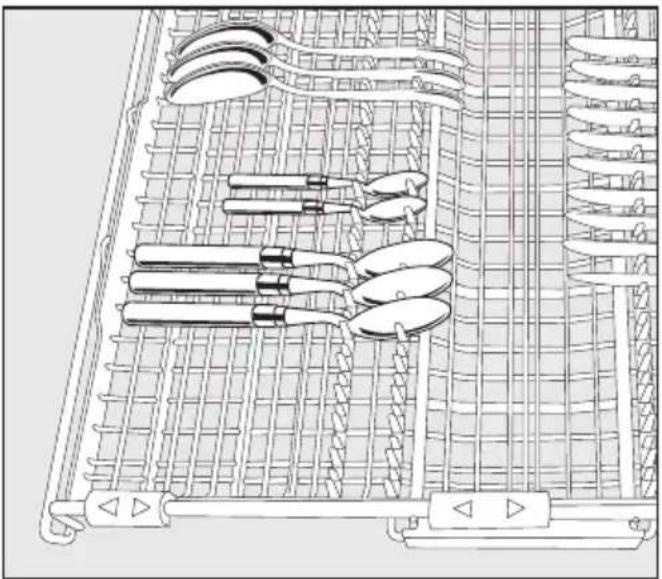
Technical line drawing of a mechanical component with coiled spring and grid structure (no text or symbols)For optimum cleaning results, arrange spoons with the inner part facing the centre of the cutlery tray.
The upper spray arm must not be blocked by items which are too big (e.g. cake servers).
The side sections of the tray can be moved into the middle using the yellow grips in order to accommodate tall items of crockery in the upper basket (see also “Upper basket, glass rail”).
natural_image
Technical line drawing of a mechanical assembly with multiple tools and grid components (no text or symbols)If spoon handles do not fit between the holders, then lay them the other way round.
Loading the dishwasher
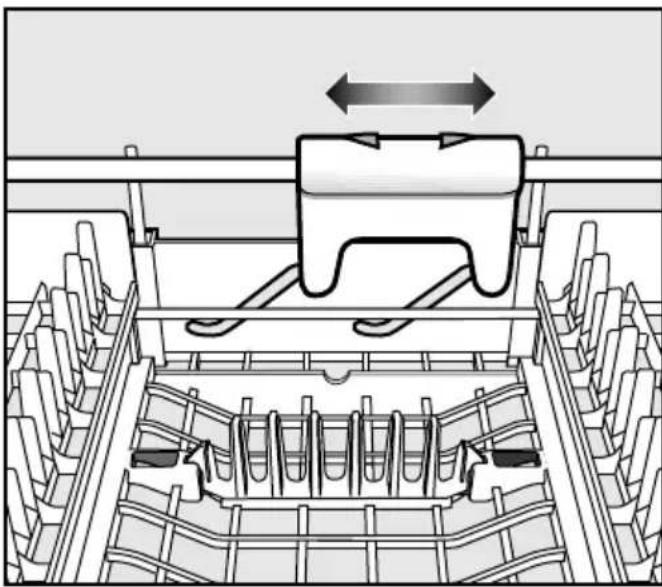
natural_image
Technical diagram of a mechanical assembly with internal components and directional arrows (no text or symbols)You can use the yellow slide to adjust the height of the middle section of the cutlery tray to make more room for large items of cutlery, such as serving spoons and ladles.
Both rows of spikes in the middle section of the cutlery tray can be flipped over to make room for larger pieces of cutlery.
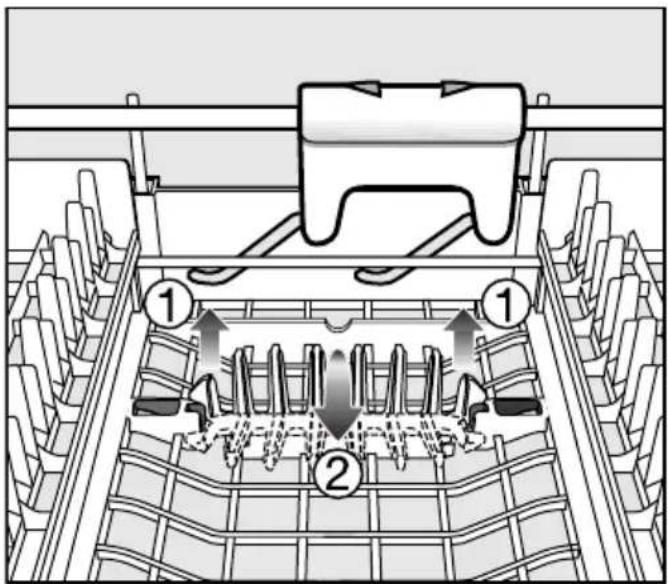
text_image
Technical diagram of a mechanical assembly with numbered components and directional arrows indicating flow or movement.■ Raise the spikes ① and then flip them over ②.
Loading examples
Dishwashers with cutlery tray
Upper basket
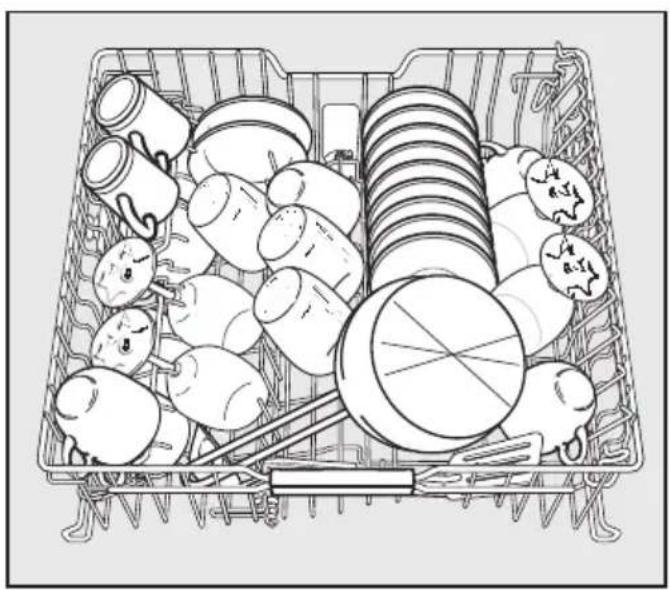
natural_image
Illustration of a basket filled with various items including cans, bowls, and cutlery (no text or symbols)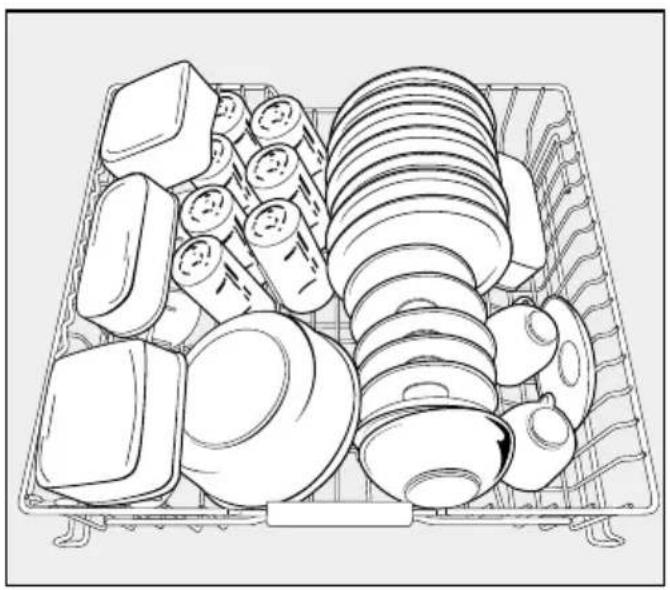
natural_image
Line drawing of a multi-tiered kitchen appliance basket with various kitchen utensils (no text or symbols)Lower basket
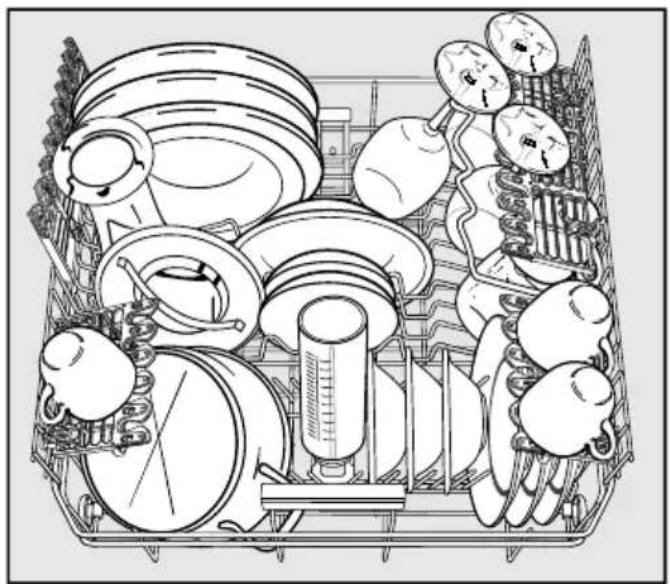
natural_image
Illustration of various household appliances and fixtures in a container (no text or symbols visible)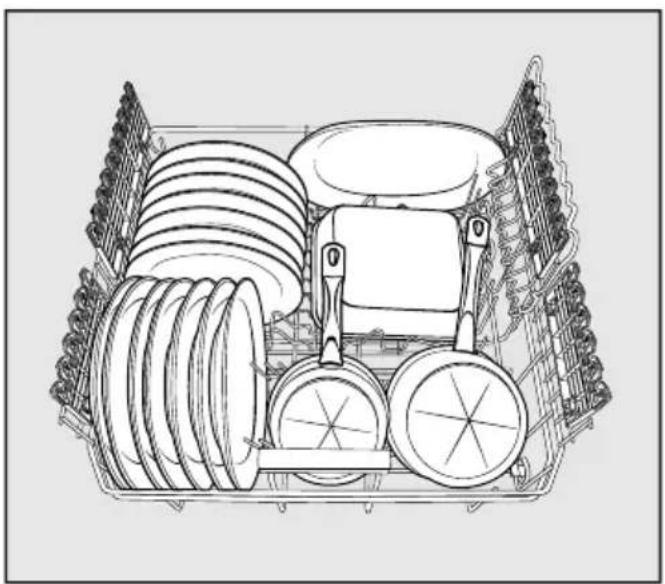
natural_image
Line drawing of a multi-tiered kitchen appliance with wheels and a tray (no text or symbols)Loading the dishwasher
Cutlery tray
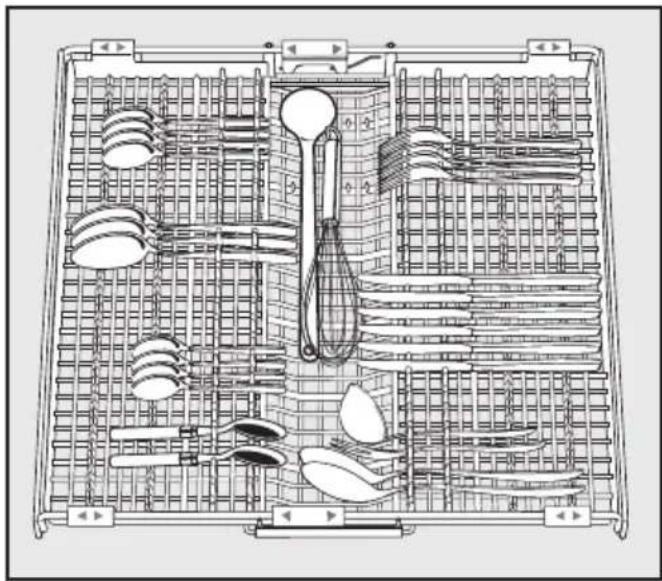
natural_image
Technical line drawing of a kitchen utensil grid with cutlery and kitchenware (no text or labels)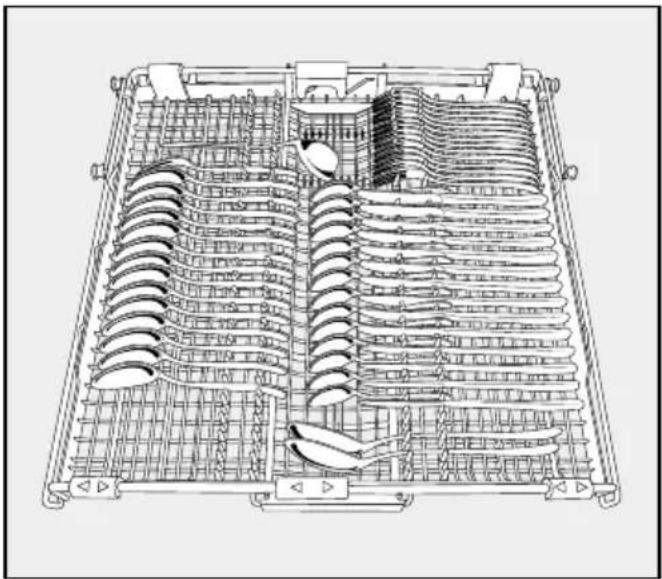
natural_image
Technical line drawing of a mechanical assembly with internal components (no text or symbols)Heavily soiled items
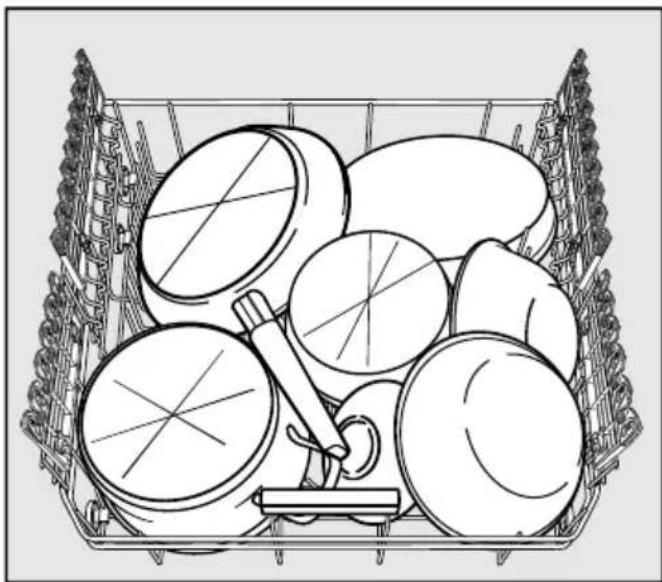
natural_image
Line drawing of a basket filled with various round objects, including a magnifying glass and a tool, with no text or symbols present.Standard height with cutlery tray
Test standard: AS/NZS 2007.1:2005, AS/NZS 2007.2:2005;
AS/NZS 6400:2005
Standard programme ECO
for energy label comparison
tests:
Capacity: 14 place settings
Detergent quantity: 32.5 g in Compartment II
Rinse aid dispensing: Setting 3
You can find information on adjusting the rinse aid dosage in the “Rinse aid” section of this booklet.
The door opens automatically during the drying phase.
Do not close the door until the drying test has finished.
Upper basket level:
Position: Bottom
Jumbo cup rack Outer position
(if available):
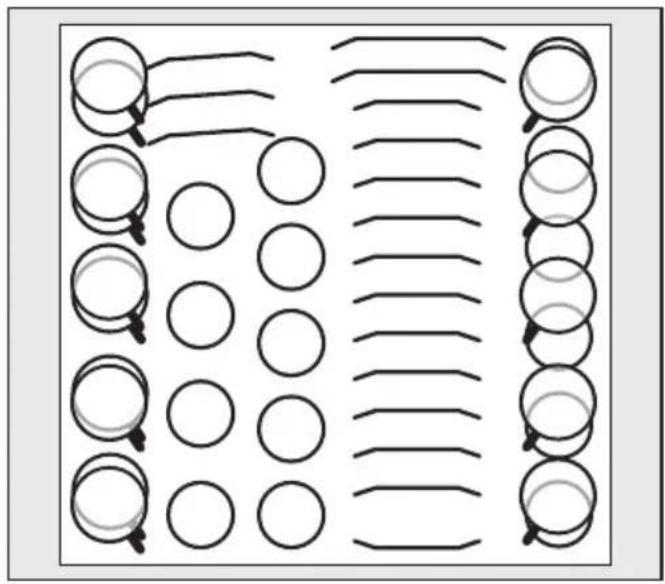
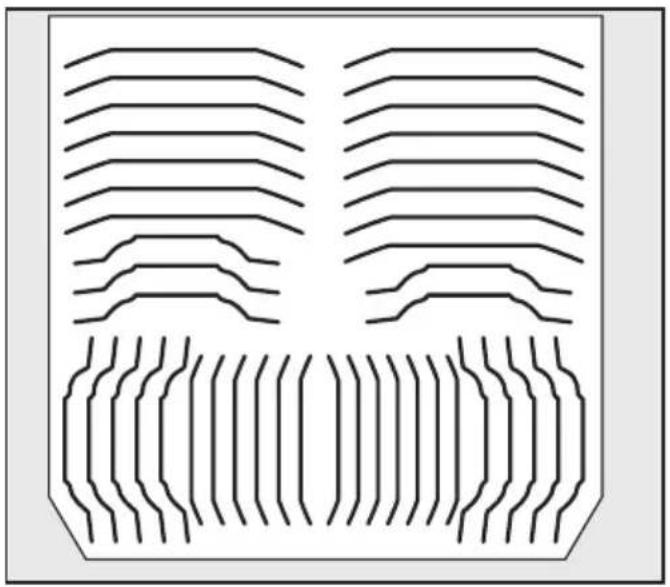
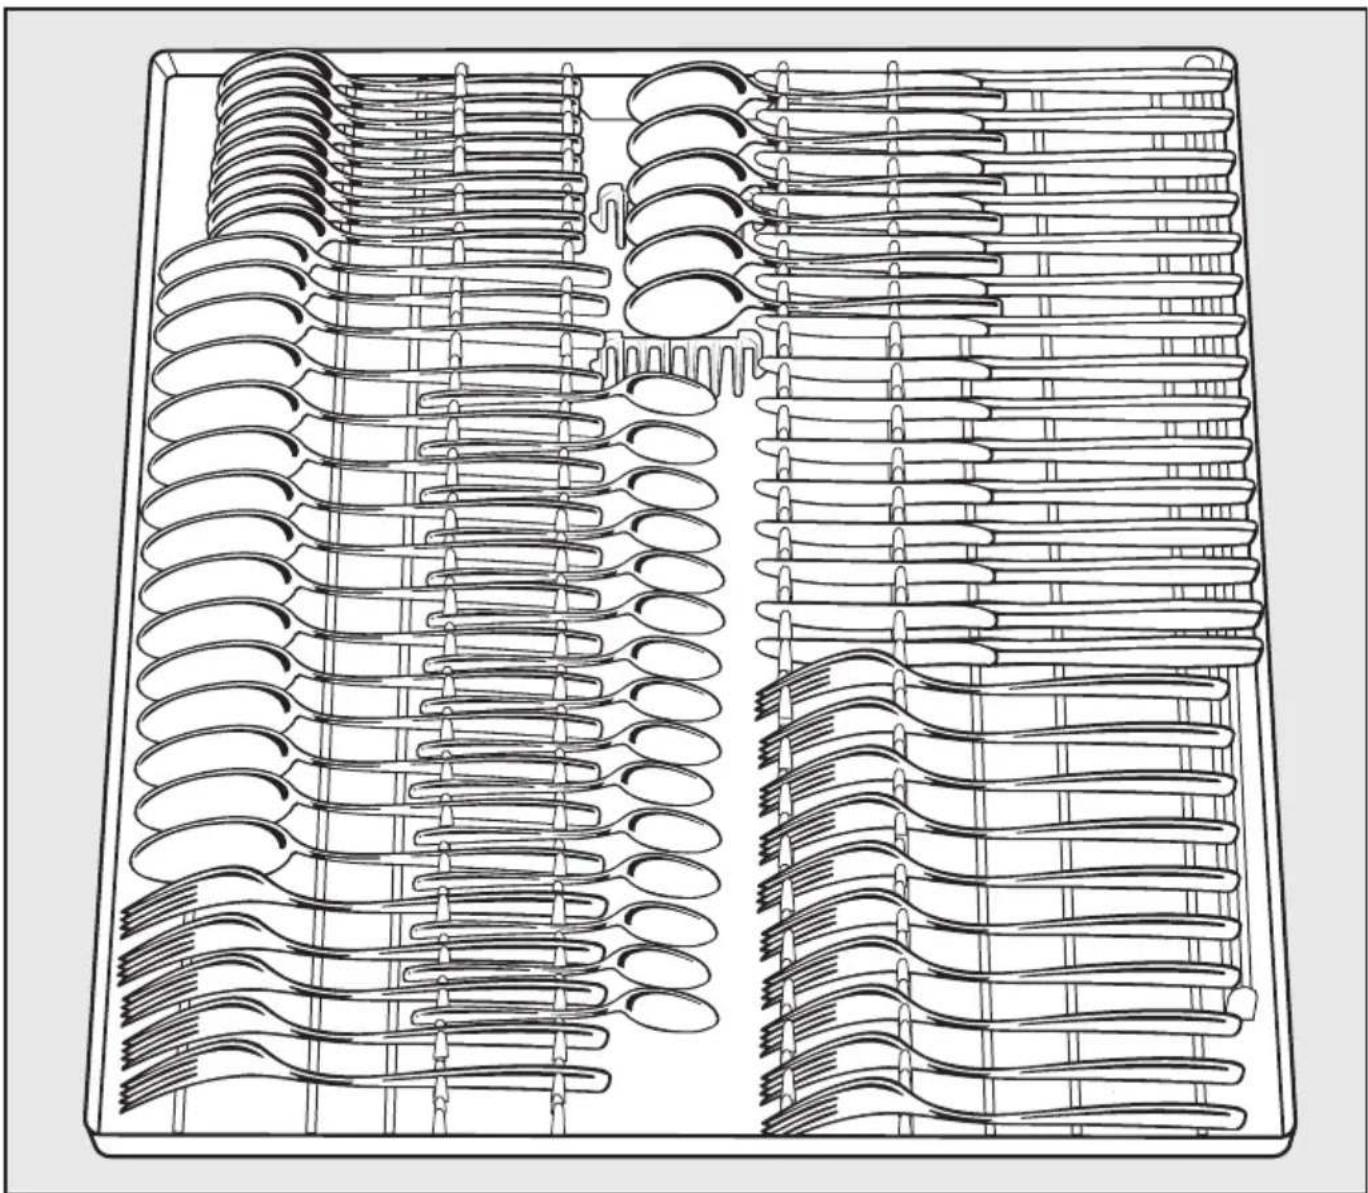
Loading examples
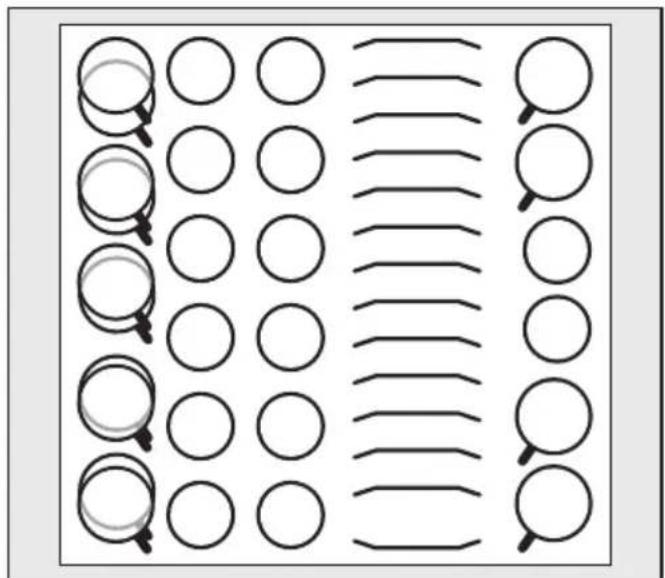
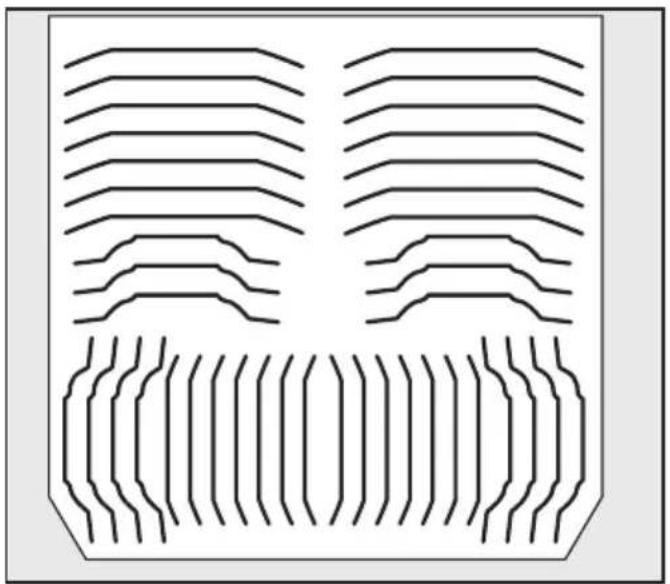
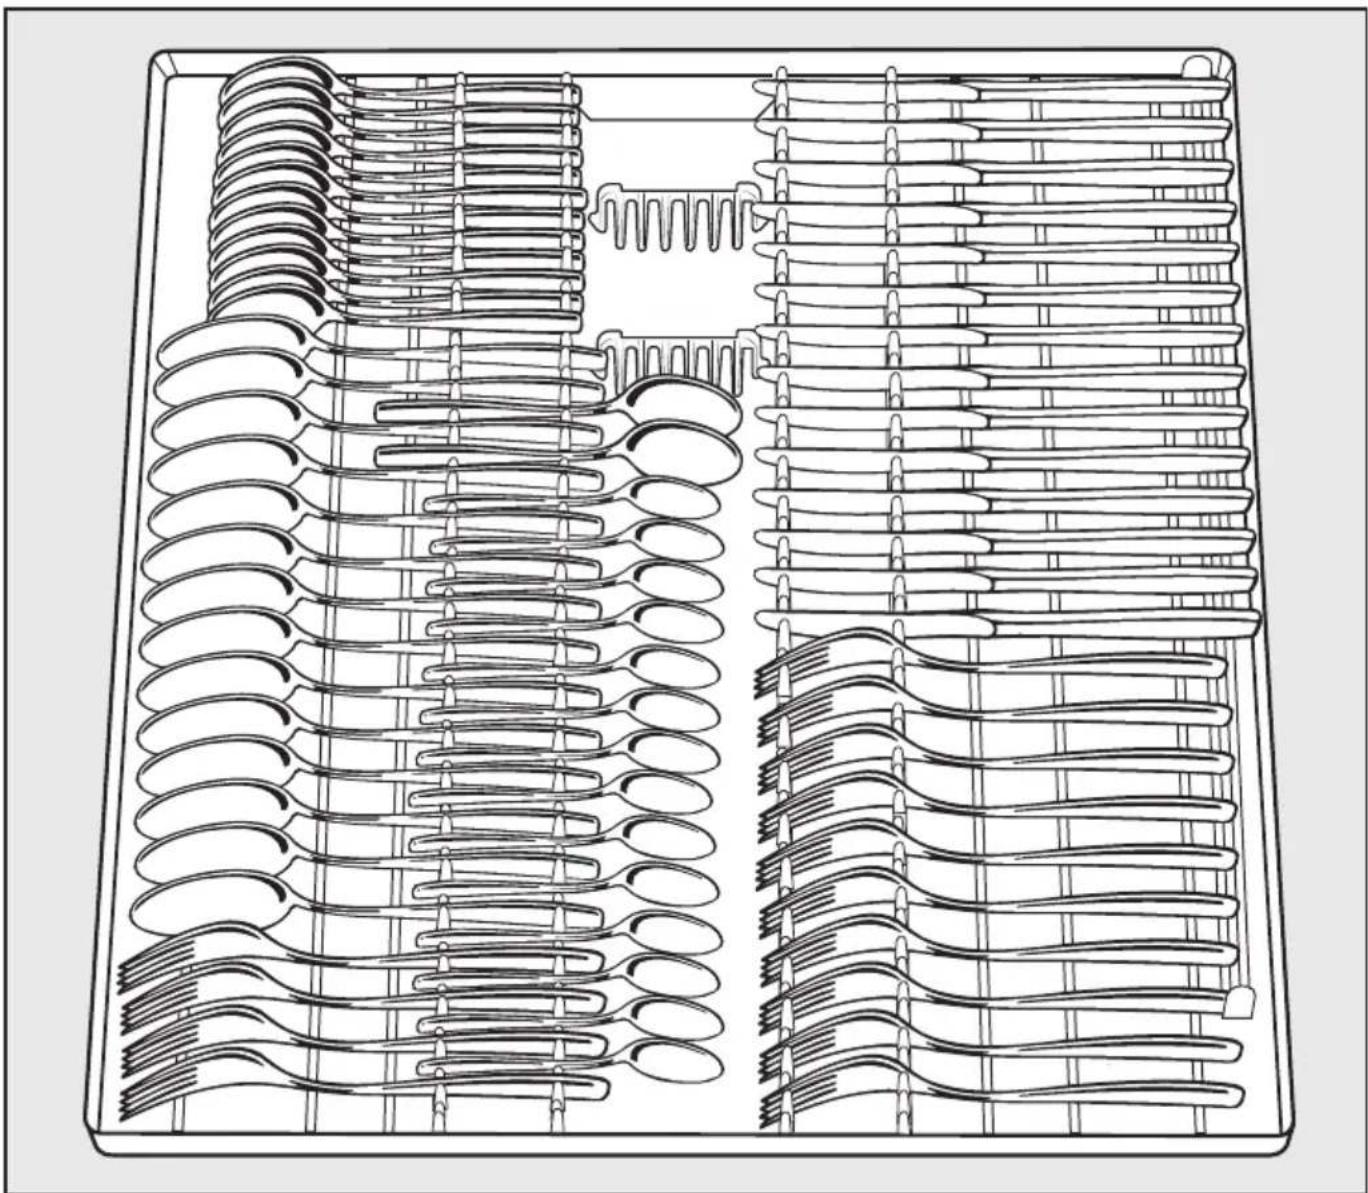
Pictures illustrating how to load the dishwasher are shown on the following pages.
Picture ①: Upper basket
Picture ②: Lower basket
Picture ③: Cutlery tray
Do not lower or remove the basket inserts.
Remove the bottle holder from the lower basket (if available).
Capacity
14
text_image
Diagram showing a grid of circles with horizontal and vertical line patterns, each containing a magnifying glass icon.①
natural_image
Abstract geometric pattern with horizontal lines and wavy shapes, no text or symbols present②
natural_image
Line drawing of a multi-tiered abacus with wavy metal bands and a central spoon (no text or symbols)3
XXL height with cutlery tray
Test standard: AS/NZS 2007.1:2005, AS/NZS 2007.2:2005;
AS/NZS 6400:2005
Standard programme ECO
for energy label comparison
tests:
Capacity: 15 place settings
Detergent quantity: 33.7 g in Compartment II
Rinse aid dispensing: Setting 3
You can find information on adjusting the rinse aid dosage in the “Rinse aid” section of this booklet.
The door opens automatically during the drying phase.
Do not close the door until the drying test has finished.
Upper basket level:
Position: Bottom
Jumbo cup rack Outer position
(if available):
Loading examples
Pictures illustrating how to load the dishwasher are shown on the following pages.
Picture ①: Upper basket
Picture ②: Lower basket
Picture ③: Cutlery tray
Do not lower or remove the basket inserts.
Remove the bottle holder from the lower basket (if available).
Capacity
15
text_image
Diagram showing a grid of circles with magnifying glasses, likely illustrating a selection or categorization task.1
natural_image
Abstract geometric pattern with repeating horizontal and vertical lines, no text or symbols present②
Comparison tests
natural_image
Line drawing of a rectangular tray with wavy, oval-shaped cutouts and a spoon, no text or symbols present.3
Detergent
⚠️ Only use detergents formulated for domestic dishwashers. Do not use washing-up liquid.
Active ingredients
Modern detergents contain various active ingredients, the most important of which are:
- Complexing agents to prevent calcification.
– Alkalis to aid the removal of dried on soiling. - Enzymes to break down starch and loosen protein.
- Oxygen based bleaching agents to remove coloured stains (e.g. tea, coffee, tomato sauce).
Most dishwasher detergents are mildly alkaline and contain enzymes and oxygen based bleaching agents.
Types of detergent:
- Powder and liquid gel detergents. These detergents allow you to adjust the amount dispensed according to the amount of load and level of soiling.
- Tab detergents. These are suitable for most levels of soiling.
You can also buy combination products (see "Programme options - DetergentAgent", if applicable).
In addition to detergent, these products contain rinse aid and salt substitutes.
They are available as “3 in 1” or when they also contain other components such as glass and stainless steel protective additives and enhanced cleaning power, as “5 in 1”, “7 in 1”, “All in 1” etc.
Refer to the manufacturer's packaging as to whether combination products are suitable for the water hardness level in your area.
Please note that the cleaning and drying results of combination detergents can vary greatly.
For optimum cleaning and drying results, use Miele dishwasher detergent and add Miele salt and Miele rinse aid separately. See "Optional accessories".
Detergent dosage
■ Follow the dosage recommended by the manufacturer on the packaging.
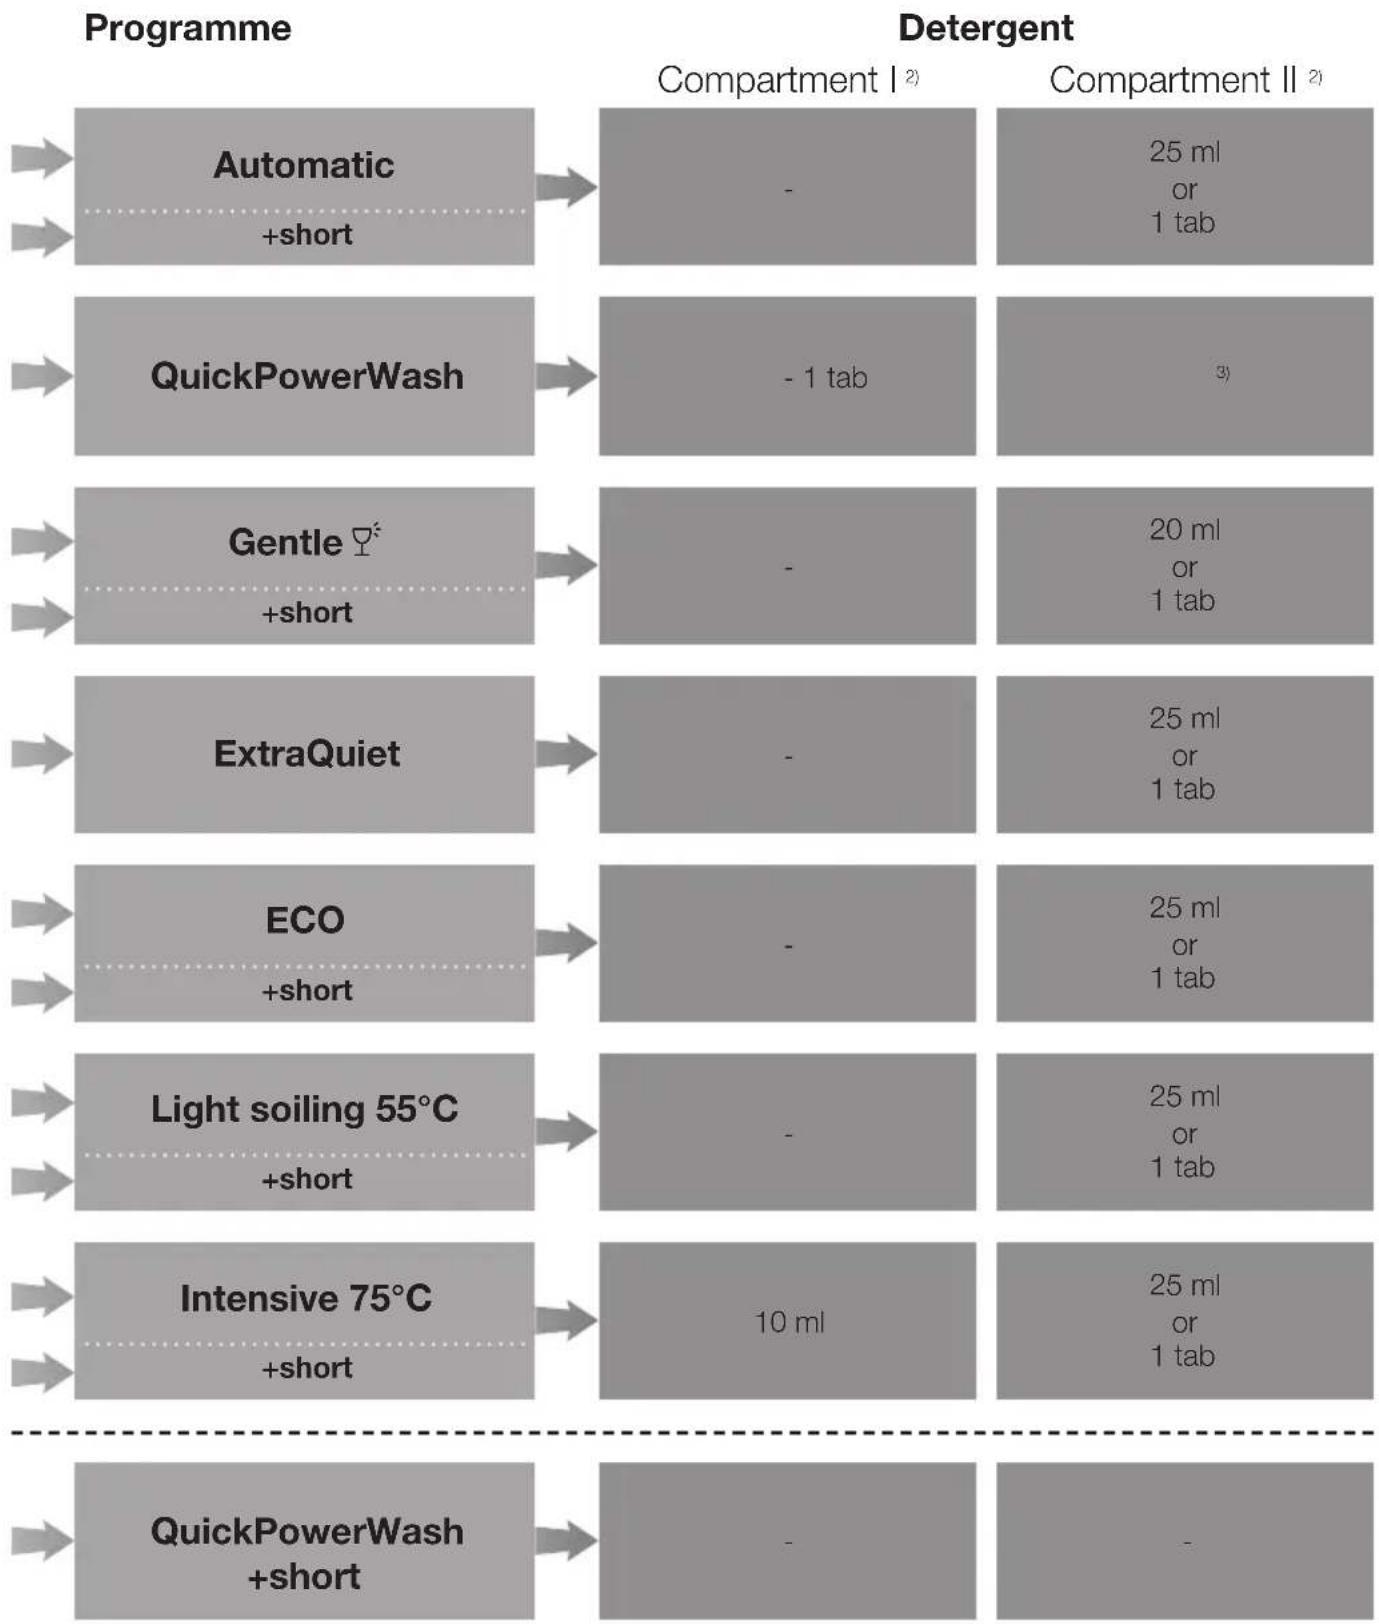
■ Unless directed otherwise, use one detergent tab or add 20 to 30 ml detergent to compartment II, depending on the level of soiling. With very heavy soiling you can also add a small amount of detergent to compartment I.
- Tabs may not dissolve completely when the “QuickPowerWash” programme (if available) is used.
Failure to dispense the recommended amount of detergent may impair cleaning results.
⚠️ Dishwasher detergents contain irritant or corrosive ingredients which can cause burning in the nose, mouth and throat if swallowed, or inhibit breathing. Avoid inhalation of powder detergents and do not ingest dishwasher detergent. Seek medical advice immediately if detergent has been swallowed or inhaled. Keep detergent and other household agents out of the reach of children at all times. Keep children away from the dishwasher when the door is open. There could still be detergent residues in the cabinet. To avoid the danger of children coming into contact with the dishwasher detergent, only add detergent just before starting the programme and close the door, activating the safety lock (if your dishwasher is fitted with one).
Adding detergent
natural_image
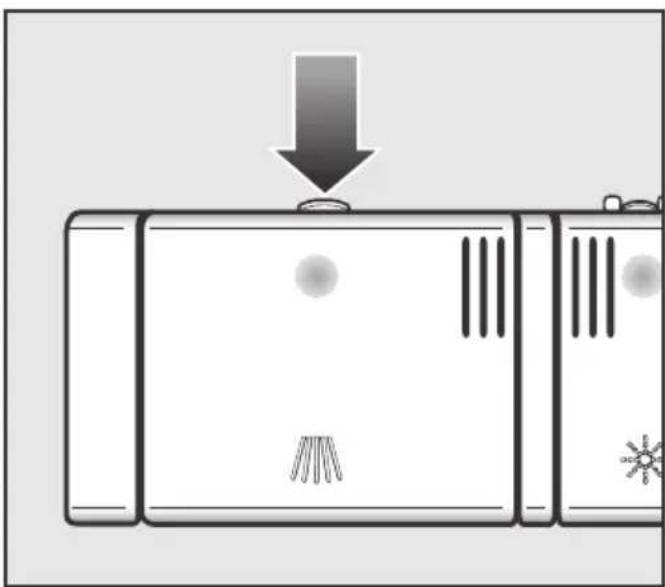
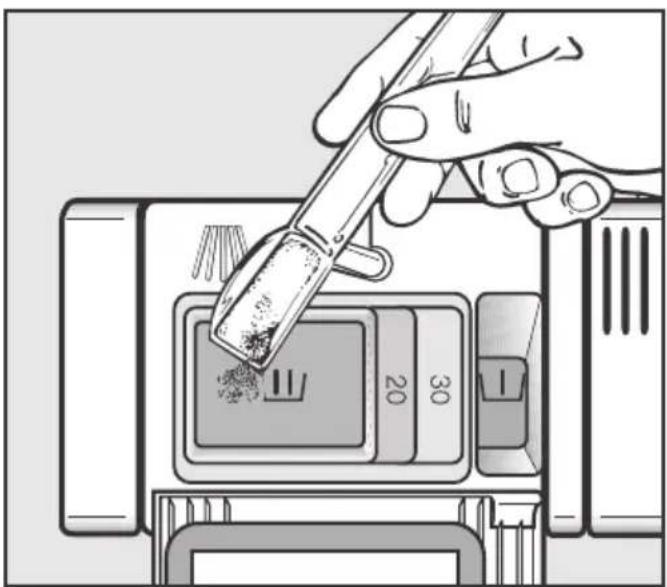
Diagram of a refrigerator with a downward arrow indicating a drop or change, showing no text or symbols.■ Press the opening catch on the detergent dispenser. The flap will spring open.
The flap is always open at the end of a programme.
natural_image
Illustration of a hand using a tool to clean or store items on a device (no text or symbols visible)■ Add the required amount of detergent and close the flap.
■ Make sure that the detergent packaging is properly closed after use to avoid it getting damp and becoming lumpy.
For information
Compartment I holds max. 10 ml, Compartment II holds max. 50 ml.
There are marks in Compartment II to assist with dispensing: 20, 30. The marks indicate a level of approx. 20 or 30 ml when the door is open in a horizontal position.
Switching on
■ Make sure the spray arms are not obstructed.
■ Close the door.
■ Turn on the tap if it is turned off.
■ Switch the dishwasher on using the ① sensor.
The main menu will appear in the display.
Switch the Memory function on (see "Settings menu, Memory") if you want the last programme used to appear in the display instead of the main menu.
Selecting a programme
Choose your programme according to the type of load and how dirty it is.
The different programmes and their uses are described in the Programme chart later on in this booklet.
■ Use the selector sensors to select the programme you want.
The display will change to show the programme menu.
Touch the i sensor to call up more information about the programme currently selected.
You can now select Extras for your programme (see "Programme options").
To select a different programme, touch the sensor to return to the main menu.
Starting the programme
■ Press the Start sensor.
The programme starts, and the prompt Crockery can be added appears in the display.
As long as this prompt is showing, crockery can be added without compromising the wash results.
⚠️ Water in the dishwasher may be hot. Danger of scalding from water in the cabinet.
Make sure you open the door very carefully.
A programme should only be cancelled in the first few minutes, if at all. Otherwise important programme stages could be omitted.
Time display
The estimated duration of the programme selected appears in hours and minutes in the display before the programme begins. During the programme, the time left until the end of the programme is displayed.
Each programme stage is indicated by a symbol:
Pre-wash / Soak
// Main wash
Interim rinse
Final rinse
Drying
Finish
The programme duration displayed may vary with the same programme. It is influenced by, among other things, the water temperature at each intake, the reactivation process, the water softener, the type of detergent, the amount of crockery and how dirty it is.
When a programme is selected for the first time, the display will show the average programme duration for a cold water intake.
The times shown in the Programme chart refer to standard test loads and temperatures.
Each time a programme is run, the electronic unit takes the new conditions into account, and calculates the time required.
Energy management
To save energy, the dishwasher will switch off automatically 10 minutes after the last time a sensor has been pressed or after the end of a programme.
■ Press the ① sensor to switch the dishwasher back on.
The dishwasher will not switch off automatically if the time of day display has been activated (see “Settings menu - Time of day”).
The dishwasher will not switch off whilst a programme is running, during the Delay start period or if there is a fault.
At the end of the programme
The buzzer might sound at the end of the programme.
The programme has finished when Prog. finished appears in the display and the door has opened slightly (if applicable).
In the QuickPowerWash programme the door will not open until a few minutes after the programme has finished.
If the Display consumption programmable function is switched on, you can now use the Consumption option to view the actual energy and water consumption of the programme which has just finished (see “Settings - Consumption”).
The drying fan may continue to run for a few minutes at the end of the programme.
You can now empty the dishwasher.
⚠️ If you have deactivated the automatic door opening function (see “Settings menu - AutoOpen”), but would still like to open the door at the end of the programme, then make sure that you open the door fully.
Otherwise steam from the dishwasher could damage the edge of the worktop because the fan is no longer running.
Switching off
At the end of a programme:
■ The dishwasher can be switched off at any time using the ① sensor.
Switching the dishwasher off during a programme cancels the programme.
Switching the dishwasher off during the run-up to a Delay start time will also stop the process.
If the dishwasher is not going to be used for a longer period of time, e.g. whilst on holiday, the tap should be turned off.
Unloading the dishwasher
Dishes tend to break and chip more easily when they are hot. Allow the dishes to cool until they are comfortable enough to handle before unloading them.
If you open the door fully after switching off, the dishes will cool much faster.
First unload the lower basket, then the upper basket and finally the cutlery tray (depending on model).
This will prevent water drops from the upper basket and cutlery tray from falling onto the dishes in the lower basket.
Interrupting a programme
A programme is interrupted as soon as the door is opened.
If the door is closed again, the programme will continue from the point it was at before the door was opened.
⚠️ Water in the dishwasher may be hot. Danger of scalding!
Only open the door if absolutely necessary and exercise extreme caution when doing so. Before closing the door again, leave it ajar for approx. 20 seconds. This will enable the temperature in the wash cabinet to settle. Then raise the door up and push until the catch engages.
Changing a programme
If the detergent dispenser flap has already opened, do not change the programme.
If a programme has already started and you wish to change it, proceed as follows:
■ Press the Back sensor ↩.
■ Confirm the message Cancel the programme? with Yes.
The programme will be cancelled.
■ Select the Main menu option.
The display will revert to the main menu.
■ Select the programme you want, and then start it.
Extras
Extras can be selected for the programme you have chosen before starting it.
■ Switch the dishwasher on using the ① sensor.
■ Select a programme.
■ Select the Extras option.
All available Extras will appear listed in the display.
Those that can be used with the programme selected will be indicated by a dash and an illuminated sensor.
■ Select the Extras you want.
A tick ☑ will appear beside the Extra to show that it has been selected.
■ To cancel the selection of an Extra, touch the appropriate sensor again.
■ When you have finished selecting Extras, confirm with OK.
The display will change back to the programme menu.
The number of Extras selected, e.g. 1 of 4, will appear in the programme menu.
You can save the selected Extras for the respective programme (see “Settings menu - Save Extras”).
Short
The Short Extra reduces the duration of the programmes in which this option is available by up to 30% (see "Programme chart").
The selection of the Short Extra may take precedence over other selected Extras.
In order to achieve optimum cleaning results, energy consumption may increase slightly with this option.
When used in combination with the QuickPowerWash programme, the Short Extra results in a wash programme without drying or automatic opening of the door.
Energy save
The Energy save Extra reduces the energy consumption of programmes in which this option is available by up to 20%.
In order to achieve optimum cleaning results, the programme duration is extended with this option.
Intensive lower basket
The Intensive lower basket Extra intensifies cleaning performance in the lower basket in programmes in which this option is available.
Energy and water consumption are increased slightly due to the extended wash duration in the lower basket.
Extra dry
The Extra dry Extra improves the drying performance in programmes in which this option is available.
Energy consumption is increased due to an extended fan running time and an increased final rinse temperature.
Soak
The Soak Extra is used for soaking crockery with dried on soiling.
Energy and water consumption will increase with this Extra.
If you are using powder dishwasher detergent, add approx. 5 g to compartment I.
Pre-wash
The Pre-wash Extra can be used for removing easily soluble soiling from crockery.
Adding a pre-wash will increase the programme duration and increase energy and water consumption levels.
Delay start
There are three ways of starting the programme by means of delaying the start. You can set the start time or the finish time of a programme. You also have the option of taking advantage of time variable economy rates of electricity using the EcoStart or SmartStart function.
When using the Delay start function, make sure that the detergent compartment is dry before adding detergent. Wipe dry with a cloth if necessary. If the compartment is wet, powder detergent can become lumpy and stick to the dispenser, with the result that it is not fully dispensed.
Do not use liquid detergent when selecting Delay start, as it can run into the dishwasher before it is required.
⚠️ To prevent children coming into contact with dishwasher detergent: Add the detergent immediately before starting the programme, i.e. before activating Delay start with OK. Then lock the door with the safety lock.
■ Switch the dishwasher on using the ① sensor.
■ Select the programme you want from the main menu.
■ Select the Delay start option from the programme menu for the selected programme.
You then have a choice of the Start at, Finish at and EcoStart or SmartStart functions.
■ Select the function you want.
Now enter the required time.
If, while you are setting the time, you do not press any sensors for several seconds, the display will revert to the previous menu. You will then have to enter your settings again.
If you keep the + or - sensor pressed, the value shown will automatically increase or decrease.
If the time of day display has been switched off (see “Settings menu, Time of day”), the display will go out 10 minutes after activating the Delay start function and only the Start indicator light will flash slowly.
To switch the display back on for a few minutes, press the ① sensor.
Start at
With the Start at function, you set the exact time at which you want the programme to start.
■ Use +/- to set the hour and confirm with OK.
The hour will be saved and the minute number block will be highlighted.
■ Use +/- to set the minutes and confirm with OK.
The display will change to show the programme menu.
■ Select OK to start the programme.
The Start indicator will light up. The programme name and the start time will then appear in the display.
When the set time is reached, the programme selected will begin automatically.
Finish at
With the Finish at function, you set the time at which you wish the programme to end.
■ Use +/- to set the hour and confirm with OK.
The hour will be saved and the minute number block will be highlighted.
■ Use +/- to set the minutes and confirm with OK.
The display will change to show the programme menu.
■ Select OK to start the programme.
A message will appear in the display if the programme cannot be completed by the set finish time because it has too long a running time.
The Start indicator will light up. The programme name and the estimated start time for the programme selected will appear in the display.
The selected programme will start automatically when the estimated start time is reached.
EcoStart
The EcoStart function allows you to take advantage of time variable economy rates of electricity. Before you can use this option, you must set up to three electricity tariff time zones (see "Settings menu - EcoStart").
You then set the latest time at which the programme selected should end.
The dishwasher will start automatically in the cheapest tariff zone within the time set.
■ Use +/- to set the hour and confirm with OK.
The hour will be saved and the minute number block will be highlighted.
■ Use +/- to set the minutes and confirm with OK.
The display will change to show the programme menu.
■ Select OK to start the programme.
The estimated start time for the programme selected will appear in the display.
The Start indicator will light up to confirm that the programme has started.
The selected programme will start automatically during the most cost effective time zone. It will finish at the latest by the set finish time.
SmartStart
(only functional in selected countries)
The SmartStart function is used for starting your dishwasher automatically at a time when your energy costs are most economical.
If the SmartStart option has been activated in the Settings menu, SmartStart will appear in the Delay start menu instead of EcoStart (see "Settings, Miele@home, SmartStart").
If your energy provider offers this service, they will send a signal to your dishwasher when energy costs are at their most economical.
This signal will start the dishwasher.
You can set a time, by which the programme has to have finished by. The dishwasher will then calculate the latest possible start time for the programme selected and will wait until this start time for the signal from the energy provider.
Set the time, by which the selected programme has to be finished by.
■ Use +/- to set the hour and confirm with OK.
The hour will be saved and the minute number block will be highlighted.
■ Use +/- to set the minutes and confirm with OK.
The Wait for SmartStart message will appear in the display.
The Start indicator light will come on to confirm that the programme has started.
The selected programme will start automatically as soon as the energy provider has sent the signal, or the latest calculated start time has been reached.
The time remaining will appear in the display and the Start indicator will light up.
Changing or deleting set times
You can change the set times or the programme before the start time in the display is reached.
■ Select the Change option.
The display will change to show the programme menu.
■ Select the Start at, Finish at or EcoStart function.
■ To change the set time, select the desired time with +/- and confirm with OK.
■ To delete the set time, select the Reset option and confirm the reset time with OK.
The display will change to show the programme menu.
DetergentAgent
For optimum cleaning results, the dishwasher automatically adjusts the programme sequence to the type of detergent being used. Depending on the programme, this can mean that the running time and energy consumption vary slightly.
If you only ever use multi-function combination products containing salt and rinse aid in your dishwasher, you can switch the reminders off if you wish (see “Settings menu - Refill reminders”). The DetergentAgent function will not be affected by this.
Ensure that you refill dishwasher salt and rinse aid and switch on the refill reminders again if you are not using combination products.
Programme chart
| Programme | Programme sequence | ||||
| Pre-wash Ma | main wash Interim | rinse Final rinse | Drying | ||
| °C °C | |||||
| ECO^1) | X 48 X 34 X | ||||
| Automatic Variable | ble programme sequence,sensor-controlled adjustment according to amount of crockery and soilingIf required 45-65 If required | 57-70 X | |||
| Intensive 75°C | 2X 75 X 58 X | ||||
| QuickPower-Wash | 65 X 65 X | ||||
| Gentle ♀^ X 45 | X 58 X | ||||
| Light soiling55°C | X 55 X 58 X | ||||
| ExtraQuiet 46 X | 60 X | ||||
| Hygiene | 69 2X | 70 X | |||
| SolarSave | 2X X | X X X | |||
| Tall items 65°C | X 65 X 58 X | ||||
| Pasta/Paella | X 75 X 58 X | ||||
| Glasses warm | 40 2X | 54 | |||
| Maintenanceprogramme | 75 2X | 70 X | |||
1) This programme is the most efficient in terms of its combined energy and water consumption for cleaning normally soiled crockery.
| Consumption2) | Duration2) | |||
| Electricity Water | ||||
| Cold water Hot water Litres Cold 15°C 55°C kWh kWh h:min h:min | water Hot water | |||
| 0.533) / 0.544) | 0.323) / 0.344) | 11.43) / 11.14) | 2:49 2:41 | |
| 0.755) -1.106) | 0.505) -0.656) | 6.55) -15.06) | 1:54-2:52 1:37 | -2:47 |
| 1.35 0.90 1 | 4.5 2:59 2:49 | |||
| 1.30 0.80 1 | 1.5 0:58 0:58 | |||
| 0.95 0.45 1 | 3.5 2:06 1:51 | |||
| 1.05 0.60 1 | 3.5 2:17 2:03 | |||
| 1.00 0.70 9 | 5 4:20 4:11 | |||
| 1.55 1.15 1 | 3.0 2:31 2:27 | |||
| 0.06 27.0 2:30 | ||||
| 1.10 0.55 1 | 4.0 1:54 1:42 | |||
| 1.35 0.95 1 | 4.0 2:35 2:24 | |||
| 0.80 0.40 1 | 3.0 1:17 1:03 | |||
| 2.05 1.25 2 | 2.0 2:11 1:47 | |||
2) In practice there may be variations to these figures due to variable conditions and data recorded by the sensors. The durations displayed in your dishwasher will reflect your household conditions.
Selecting programme options will also affect consumption levels and programme durations (see “Programme options”).
3) Standard height dishwashers
^4) XXL dishwashers
5) Part load with light soiling
^6) Full load with heavy soiling
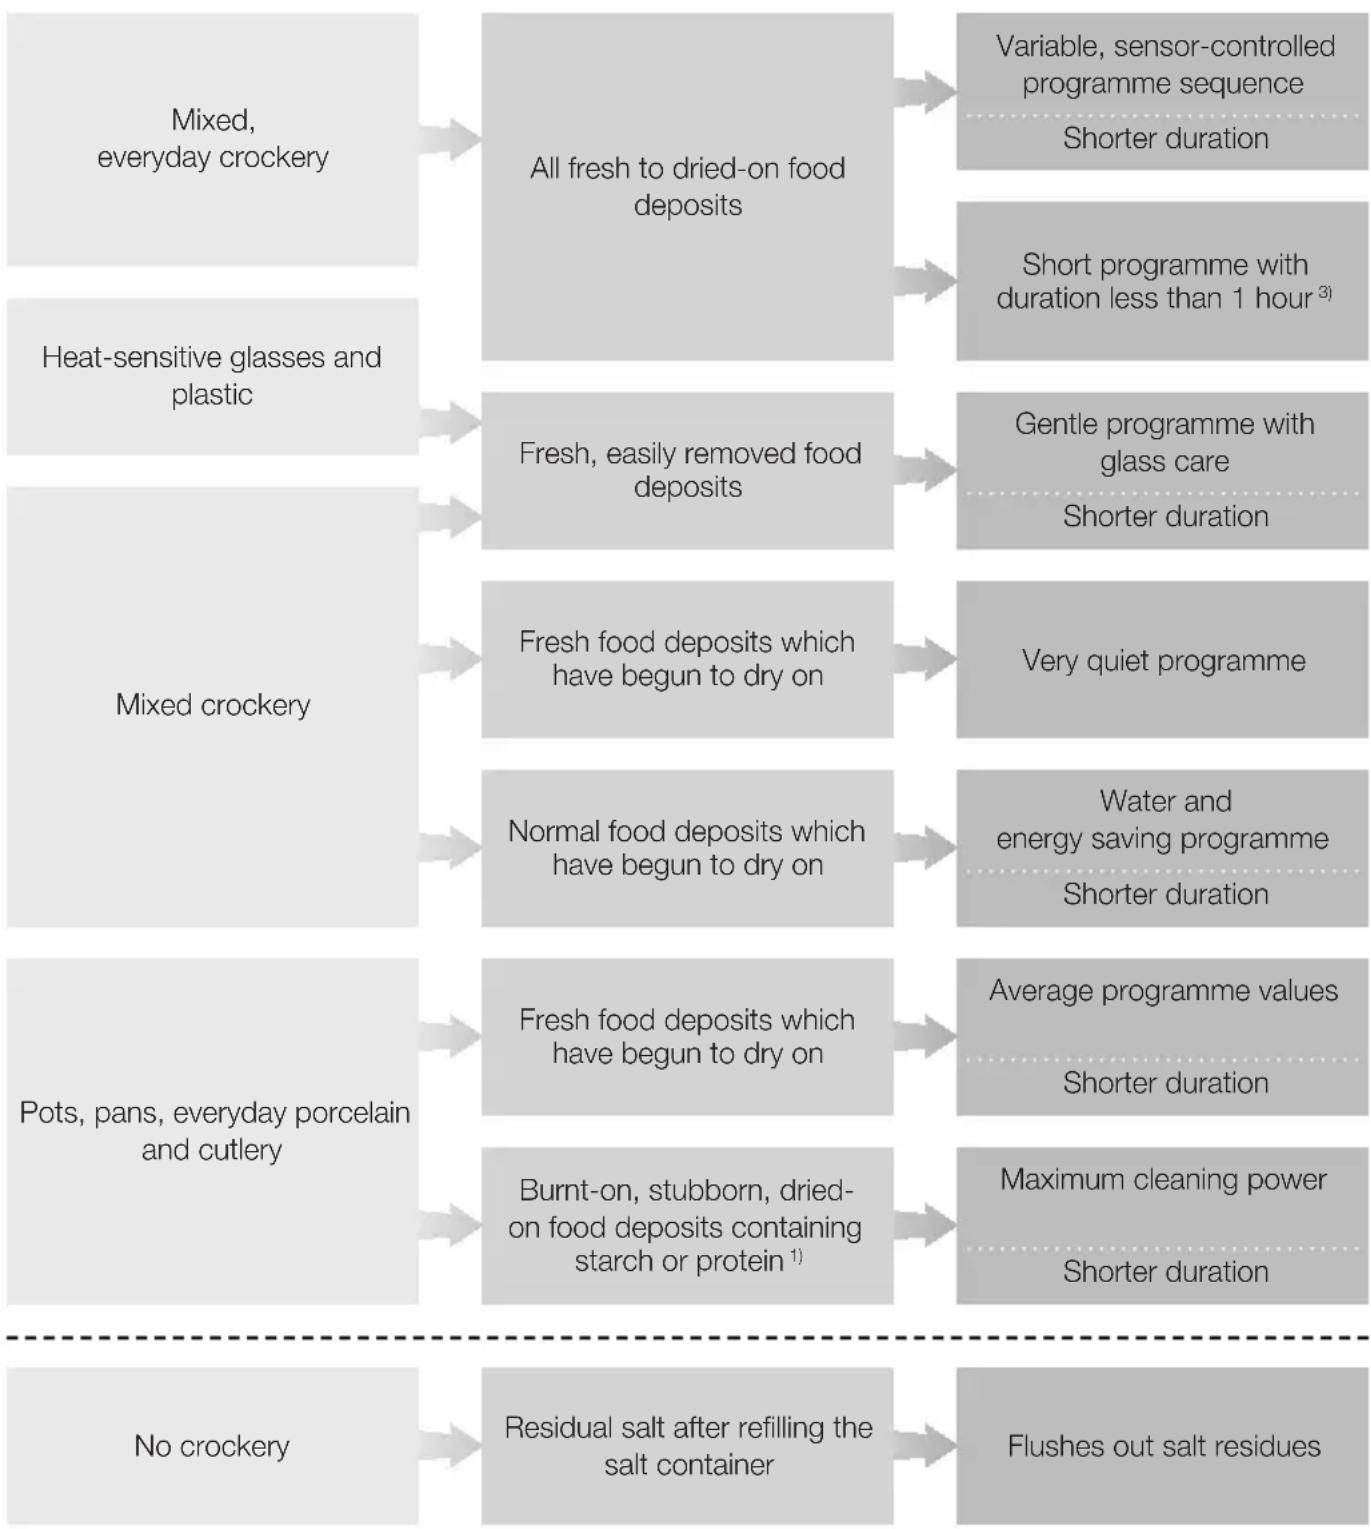
Crockery Food deposits Programme
features
flowchart
graph TD
    A["Mixed, everyday crockery"] --> B["All fresh to dried-on food deposits"]
    B --> C["Variable, sensor-controlled programme sequence"]
    B --> D["Shorter duration"]
    E["Heat-sensitive glasses and plastic"] --> F["Fresh, easily removed food deposits"]
    F --> G["Short programme with duration less than 1 hour 3)"]
    H["Mixed crockery"] --> I["Fresh food deposits which have begun to dry on"]
    I --> J["Gentle programme with glass care"]
    I --> K["Shorter duration"]
    L["Pots, pans, everyday porcelain and cutlery"] --> M["Fresh food deposits which have begun to dry on"]
    M --> N["Very quiet programme"]
    M --> O["Normal food deposits which have begun to dry on"]
    O --> P["Water and energy saving programme"]
    O --> Q["Shorter duration"]
    R["No crockery"] --> S["Burnt-on, stubborn, dried-on food deposits containing starch or protein 1"]
    S --> T["Average programme values"]
    S --> U["Shorter duration"]
    V["Residual salt after refilling the salt container"] --> W["Flushes out salt residues"]
^1) Food such as potatoes, pasta, rice or stews can leave starchy deposits. Deposits containing protein can be left by food such as meat, fish or eggs and bakes.
bar
| Programme | Detergent | Compartment I 2) | Compartment II 2) | | :--- | :--- | :--- | :--- | | Automatic +short | - | 25 ml or 1 tab | | | QuickPowerWash | - 1 tab | 3) | | | Gentle +short | - | 20 ml or 1 tab | | | ExtraQuiet | - | 25 ml or 1 tab | | | ECO +short | - | 25 ml or 1 tab | | | Light soiling 55°C +short | - | 25 ml or 1 tab | | | Intensive 75°C +short | 10 ml | 25 ml or 1 tab | | | QuickPowerWash +short | - | - | - |2) see "Detergent"
3) best cleaning results are only achieved with Miele's quick dissolving UltraTab Multi
Further programmes
Hygiene
Special programme for items which need to be hygienically clean, e.g. baby bottles and chopping boards.
SolarSave
This programme does not heat the water. To use it, the water intake temperature must be at least 45^ C (see “Water connection - Connection to the water supply”). This programme is suitable for mixed loads of crockery and glassware with moderate, slightly dried on food residues.
Pasta/Paella
Programme with long soak phases incorporated for mixed loads of crockery, pots and pans and robust porcelain. This programme is particularly suitable for removing soiling containing starch left by pasta, rice and potatoes.
Tall items 65°C
Programme for very large heat-resistant items, (e.g. very deep pans). In this programme the upper basket needs to be removed to make space for large items in the lower basket. This programme has a medium action to remove fresh to slightly dried on residues.
Glasses warm
This programme does not use rinse aid and omits the drying phase. It is particularly suitable for cleaning beer glasses where a good head of froth is needed.
Maintenance programme
The wash cabinet is largely self-cleaning. However, if residues or soiling build up in the cabinet, they can be removed by running the “Maintenance programme” without a load. This programme is designed for cleaning the wash cabinet using care products such as Miele's dishwasher cleaner or conditioner (see “Optional accessories - Dishwasher care products). Please follow usage instructions on the packaging.
Check your dishwasher regularly (approx. every 4-6 months). This way faults and problems can be avoided.
⚠️ The external surfaces of this appliance are all susceptible to scratching.
Contact with unsuitable cleaning agents can alter or discolour the external surfaces.
Cleaning the wash cabinet
The wash cabinet is largely self-cleaning, provided that the correct amount of detergent is always used.
If there are nevertheless limescale or grease deposits in the cabinet, these can be removed with the Miele DishClean conditioning agent (available from Miele or at shop.miele.com). Follow the dosage recommended by Miele on the packaging.
Using mainly low temperature programmes (below 50°C) could cause bacteria and unpleasant odours to build up in the wash cabinet. To avoid this, the dishwasher will increase the temperature in the final rinse of the selected programme automatically after several programmes using low temperatures have been run.
■ Clean the filters in the wash cabinet regularly.
Cleaning the door and the door seal
Mould could build up on the door seal and the sides of the dishwasher door as these surfaces are outside the wash cabinet and are not accessed and cleaned by the spray arm jets.
■ Wipe the door seals regularly with a damp cloth to remove food deposits.
■ Wipe off any food or drink residues which may have dripped onto the sides of the dishwasher door before closing it.
Cleaning the door front
⚠️ Soiling that is left too long might become impossible to remove and could cause external surfaces to alter or discolour.
Remove any soiling immediately.
■ Clean the front with a solution of warm water and a little washing-up liquid applied with a soft sponge. Wipe the surfaces dry using a soft cloth.
For cleaning, you can also use a clean, damp microfibre cloth, such as the Original Miele all purpose microfibre cloth, without any cleaning agent.
To avoid damaging external surfaces, do not use:
- cleaning agents containing soda, ammonia, acids or chlorides,
- cleaning agents containing descaling agents,
- abrasive cleaning agents, e.g. powder cleaners and cream cleaners,
– solvent-based cleaning agents, - stainless steel cleaning agents,
- dishwasher cleaner,
- oven cleaner,
- glass cleaning agents,
– hard, abrasive brushes or sponges, e.g. pot scourers, brushes or sponges which have been previously used with abrasive cleaning agents, - dirt erasers,
- sharp metal scrapers,
- steel wool or metal scourers,
- steam cleaning appliances.
Checking the filters in the wash cabinet
The filter combination in the base of the wash cabinet retains coarse soil from the suds solution, preventing it accessing the circulation system and re-entering the cabinet through the spray arms.
This dishwasher must not be used without all the filters in place.
Collection of coarse soil may cause the filters to clog. The level of soiling and time it takes before the filters need cleaning will vary depending on use.
The message Check filters will appear in the display after every 50 programme cycles (factory default setting).
You can set the interval for this message to appear to between 30 and 60 programme cycles (see "Settings menu - Check filters").
■ Check the filter combination.
■ Clean it if necessary.
■ Then confirm the message with OK.
The message will disappear. The display will change to show the programme selection menu.
Cleaning the filters
■ Switch the dishwasher off.

text_image
Extrude ① ②■ Turn the handle anti-clockwise to release the filter combination ①.
■ Lift the filter combination out of the dishwasher ②. Remove any coarse particles and rinse the filter well under running water.
Use a nylon brush if necessary.
⚠️ During cleaning ensure that course soil doesn't get into the circulation system and cause a blockage.
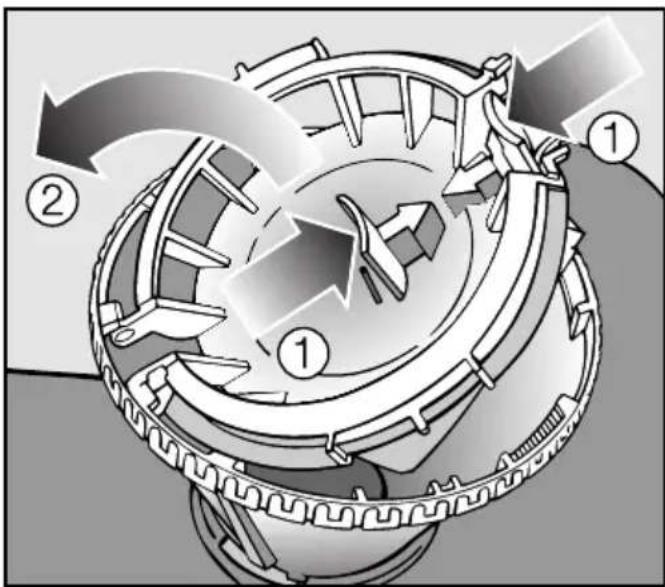
text_image
Technical diagram of a mechanical device with numbered components and directional arrows indicating motion or flow.To clean the inside of the filter, the flap must be opened:
■ Press the catches ① together in the direction of the arrows as shown, and open the filter ②.
■ Rinse all the filters under running water.
■ Then close the flap so that the catch engages.
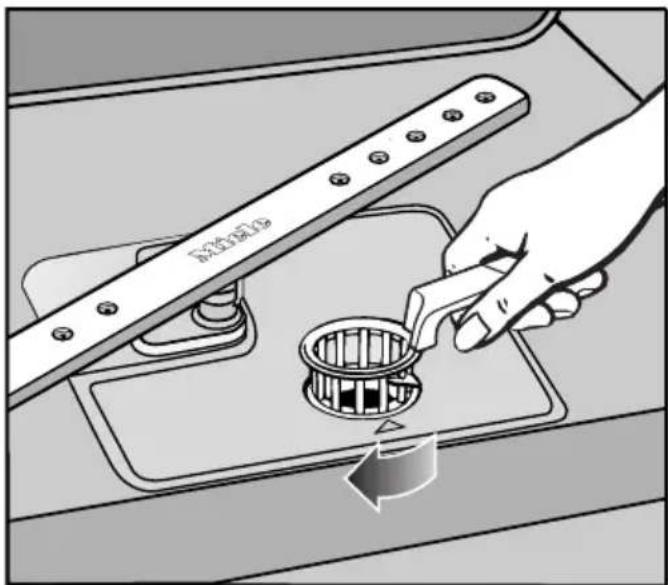
text_image
EFFECTED■ Replace the filter combination so that it lies flat in the base of the wash cabinet.
■ Then turn the handle clockwise until both arrows point towards each other. This will lock the filter combination in place.
⚠️ Take care when you are fitting the filter combination that it is secured in position correctly.
Otherwise coarse soil could get into the circulation system and cause a blockage.
Cleaning the spray arms
Particles of food can get stuck in the spray arm jets and bearings. The spray arms should therefore be inspected and cleaned regularly (approx. every 4 - 6 months).
■ Switch the dishwasher off.
Remove the spray arms as follows:
■ Take out the cutlery tray (if your dishwasher is fitted with one).
■ Push the top spray arm upwards to engage the inner ratchet. Then unscrew the spray arm.
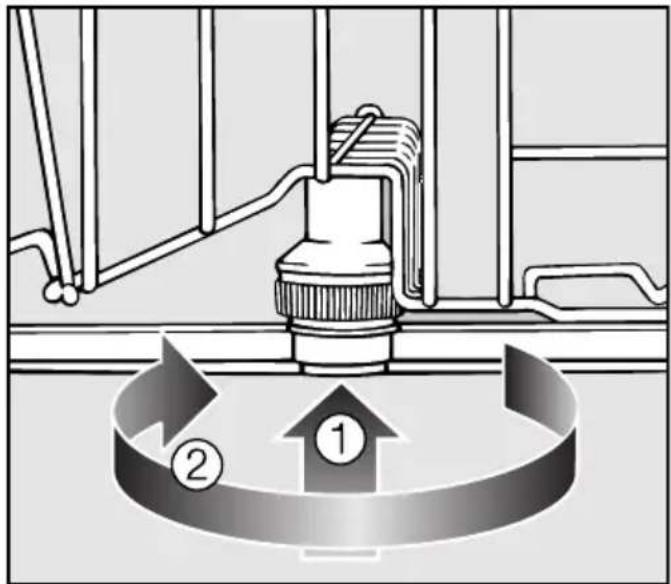
text_image
Diagram illustrating a mechanical or fluid system with labeled components and directional arrows, likely representing a cycle or process.■ Push the middle spray arm upwards ① to engage the ratchet. Then unscrew the spray arm ②.
■ Remove the lower basket.
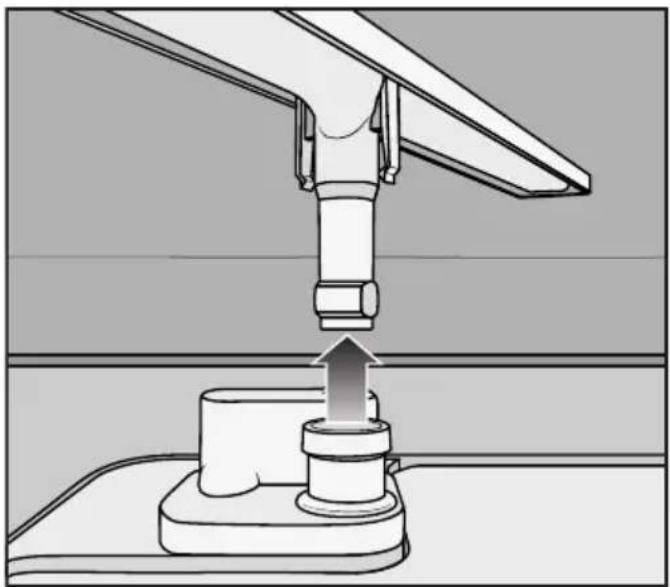
natural_image
Mechanical assembly diagram showing a lever pressing a component (no text or symbols present)■ Pull the lower spray arm firmly upwards to remove it.
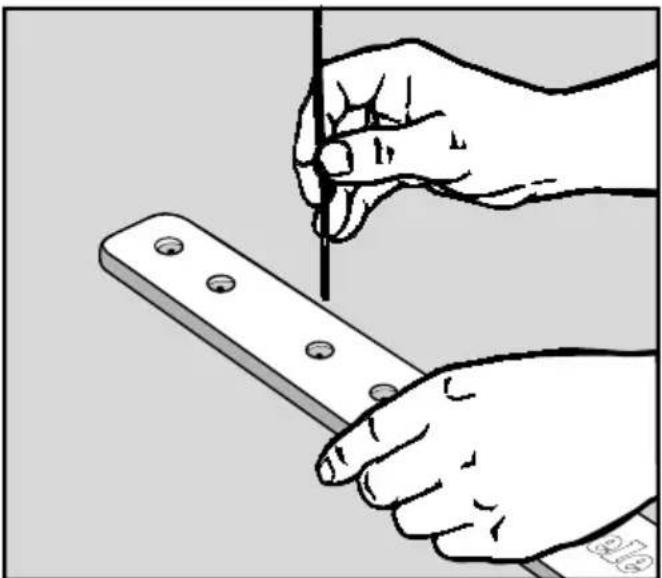
natural_image
Illustration of two hands using a tool to cut a metal bracket (no text or symbols present)■ Use a pointed object to push food particles into the spray arm jets.
■ Rinse thoroughly under running water.
■ Refit the spray arms and check that they rotate freely.
With the help of the following guide, minor faults in the performance of the appliance, some of which may result from incorrect operation, can be put right without contacting Miele. This will save time and money.
Please note that a call-out charge will be applied to unnecessary service visits where the problem could have been rectified as described in these operating instructions.
⚠️ Unauthorised or incorrect repairs could cause personal injury or damage to the appliance.
Repair work to electrical appliances must only be carried out by a suitably qualified and competent person in strict accordance with current local and national safety regulations. The manufacturer cannot be held liable for unauthorised work.
Technical problems
| Problem Possible cause | and remedy |
| The display remains dark after the dishwasher has been switched on with the 1 sensor. | The appliance is not plugged in.■ Insert the plug and switch on at the socket. |
| The mains fuse has tripped.■ Reset or replace the fuse (see data plate for minimum fuse rating). | |
| The dishwasher stops during a programme. | The mains fuse has tripped.■ Reset or replace the fuse (see data plate for minimum fuse rating).■ If the mains fuse trips again, call Miele. |
| The buzzer sounds.One of the following fault messages appears in the display: | Before rectifying the problem, you must:■ Switch the dishwasher off using the ➊ sensor. |
| ⚠ Technical fault FXX | There may be a technical fault.After a few seconds:■ Switch the dishwasher back on.■ Select the programme you want.■ Press the Start sensor.If the fault message appears again, there is a technical fault.■ Call Miele. |
| ◀ Waterproof fault | The Waterproof system has reacted.■ Turn off the tap.■ Call Miele. |
| ⚠ Technical fault F78 | A fault has occurred in the circulation pump.■ Switch the dishwasher off for at least 30 seconds with the ➊ sensor.■ Switch the dishwasher back on.■ Select the programme you want.■ Press the Start sensor.If the fault message appears again, there is a technical fault.■ Call Miele. |
Problem solving guide
| Problem Possible cause | and remedy |
| The buzzer sounds. One of the following fault messages appears in the display: | Before rectifying the problem, you must: ■ Switch the dishwasher off using the ➊ sensor. |
| Fault auto. door closing The door is sometimes obstructed by an item inside the appliance. ■ If this is the case, remove the item and switch the dishwasher on again. ■ If the same message appears again, call Miele. | |
| Fault auto. door opening There may be a technical fault. ■ Open the door manually. ■ If the same message appears again, call Miele. | |
Water inlet fault
| Problem Possible cause | and remedy |
| The buzzer sounds.One of the following fault messages appears in the display: | |
| Water inlet faultPlease open the stopcock | The tap is turned off.Turn on the tap fully. |
| Water intake | Before rectifying the problem, you must:Switch the dishwasher off using the 1 sensor. |
| Water intake is restricted.Turn on the tap fully and start the programme again.Clean the water inlet filter (see “Maintenance”).The water pressure at the intake is lower than 50 kPa (0.5 bar).Seek professional advice. | |
| The following message appears in the display during the SolarSave programme:i Intake temp. too low | The intake water has not reached the required temperature of 45°C (see “Water connection - Connection to the water supply”).Start the programme again.If the fault message appears again, select a different programme. |
Water drainage fault
| Problem Possible cause | and remedy |
| The buzzer sounds.The following faultmessage appears in the display:Drain fault | Before rectifying the problem, you must:■ Switch the dishwasher off with the 1 sensor. |
| The water outlet is restricted.There might be water in the wash cabinet.■ Clean the filter combination (see “Cleaning and care - Cleaning the filters”).■ Clean the drain pump (see “Maintenance”).■ Clean the non-return valve (see “Maintenance”).■ Remove any kink or loop in the drain hose. |
General problems
| Problem Possible cause | and remedy |
| The display is dark. The dishwasher has switched off automatically to save energy.■ Switch the dishwasher back on using the 1 sensor. | |
| The interior lighting doesn't switch on when the door is opened. | The interior lighting has been switched off permanently.■ Switch the lighting back on again (see “Settings menu - BrilliantLight”). |
| The following fault appears in the display: ⚫ Salt reservoir lid During a programme the warning buzzer will also sound and the programme will be cancelled. | The salt reservoir lid has not been closed properly.■ Close the salt reservoir lid. |
| If the salt reservoir lid has opened during a programme:■ Switch the dishwasher off and back on again with the 1 sensor.■ Close the salt reservoir lid.■ Start the programme again. | |
| Detergent residue is left in the dispenser at the end of a programme. | The dispenser was still damp when detergent was added.■ Make sure the dispenser is dry before adding detergent. |
| The detergent dispenser lid cannot be closed properly. | Clogged detergent residue is blocking the catch.■ Clean the detergent from the catch. |
| At the end of a programme there is a film of moisture on the inside of the door and the interior walls. | This is caused by the drying system and does not indicate a fault. The moisture will dissipate after a while. |
Problem solving guide
| Problem Possible cause | and remedy |
| Water remains in the wash cabinet at the end of a programme. | Before rectifying the problem, you must:■ Switch the dishwasher off using the ➊ sensor. |
| The filter combination in the wash cabinet is clogged.■ Clean the filter combination (see “Cleaning and care - Cleaning the filters”). | |
| The drain pump or non-return valve may be blocked.■ Clean the drain pump or the non-return valve (see “Maintenance”). | |
| The drain hose is kinked.■ Remove any kink from the drain hose. |
Noises
| Problem Possible cause | and remedy |
| Knocking noise in the wash cabinet. | A spray arm is knocking against an item in a basket.■ Interrupt the programme, and rearrange the items which are obstructing the spray arm. |
| Rattling noise in the wash cabinet. | Items of crockery are insecure in the wash cabinet.■ Interrupt the programme, and rearrange the items of crockery. |
| A foreign object (e.g. a cherry stone) has become lodged in the drain pump.■ Remove the foreign object from the drain pump (see “Maintenance - Cleaning the drain pump and non-return valve”). | |
| Knocking noise in the water pipes. | This may be caused by the on-site installation or the cross-section of the piping.■ This has no influence on dishwasher function. If in doubt, contact a suitably qualified plumber. |
Unsatisfactory washing result
| Problem Possible cause | and remedy |
| The dishes are not clean. | The dishes were not loaded correctly.■ See notes in “Loading the dishwasher”. |
| The programme was not powerful enough.■ Select a more intensive programme (see “Programme chart”). | |
| There is some stubborn soiling although most of the crockery is only lightly soiled (e.g. with tea stains).■ Use the Automatic programme option (see “Settings menu - Automatic”). | |
| Not enough detergent was dispensed.■ Use more detergent, or change your detergent. | |
| Items are blocking the path of the spray arms.■ Rearrange the items so that the spray arms can rotate freely. | |
| The filter combination in the base of the wash cabinet is not clean or is not correctly fitted. This may cause the spray arm jets to get blocked.■ Clean and/or fit the filter combination correctly.■ Clean the spray arm jets if necessary (see “Cleaning and care - Cleaning the spray arms”). | |
| The non-return valve is open and blocked. Dirty water has flowed back into the wash cabinet.■ Clean the drain pump and the non-return valve (see “Maintenance”). | |
| Smearing appears on glassware and cutlery, there is a bluish sheen on the surface of glassware; film can be wiped off. | The rinse aid dosage is set too high.■ Reduce the dosage (see “Settings menu - Rinse aid”). |
| Dishes, cutlery and glasses are not dry or are flecked. | The amount of rinse aid may be insufficient, or the rinse aid reservoir is empty.■ Replenish the reservoir, increase the dosage or change the brand of rinse aid (see “Before using for the first time - Rinse aid”). |
| Crockery was taken out of the cabinet too soon.■ Leave it in for longer (see “Operation”). | |
| Combination tabs have been used which have impaired drying performance.■ Change your detergent, or replenish the rinse aid (see “Before using for the first time - Rinse aid”). | |
| Glassware has a brown or blue tinge, and film cannot be wiped off. | This may be caused by the detergent.■ Change your detergent. |
| Glassware is dull and discoloured; film cannot be wiped off. | The glassware is not dishwasher-proof. The surfaces are affected.■ There is no remedy.Purchase glassware which is dishwasher-proof. |
| Tea or lipstick stains have not been completely removed. | The wash temperature of the selected programme was too low.■ Select a programme with a higher wash temperature. |
| The bleaching effect of the detergent used is too low.■ Change your detergent. | |
| Plastic items are discoloured. | Natural dyes e.g. from carrots, tomatoes or tomato sauce may be the cause. The amount of detergent used or its bleaching effect was not sufficient to deal with natural dyes.■ Use more detergent (see “Operation - Detergent”). Discolouration is irreversible. |
Problem solving guide
| Problem Possible cause | and remedy |
| White residue is visible on cutlery and crockery, clouding occurs on glassware; film can be wiped off. | Not enough rinse aid was used.■ Increase the dosage (see “Settings menu - Rinse aid”). |
| There is no salt in the salt reservoir.■ Fill the salt reservoir (see “Before using for the first time - Dishwasher salt”). | |
| An unsuitable combination detergent has been used.■ Change your detergent. Use a standard liquid, tablet or powder detergent, and fill the salt and rinse aid reservoirs in the dishwasher. | |
| The water softener is programmed to too low a water hardness level.■ Programme the water softener to a higher water hardness level (see “Settings menu - Water hardness”). | |
| There are rust stains on cutlery. | The affected items are not corrosion resistant.■ There is no remedy.Purchase cutlery which is dishwasher-proof. |
| A programme was not run after dishwasher salt was added. Traces of salt have got into the wash cycle.■ Always run the QuickPowerWash programme with the Short programme option selected and without any crockery in the dishwasher after adding dishwasher salt. |
Cleaning the water inlet filter
A filter is incorporated in the screw connection of the valve on the water inlet hose. The filter must be cleaned when dirty, otherwise insufficient water flows into the wash cabinet.
The plastic housing of the water connection contains an electrical component.
The housing must not be dipped in water.
Recommendation
If the mains water contains a large amount of insoluble substances, we recommend fitting a large-area filter in the connection between the tap and the water inlet hose threaded union. This filter is available from Miele.
Cleaning the filter:
■ Disconnect the dishwasher from the mains supply.
Switch off at the mains socket and withdraw the plug.
■ Turn off the tap.
■ Unscrew the inlet hose.
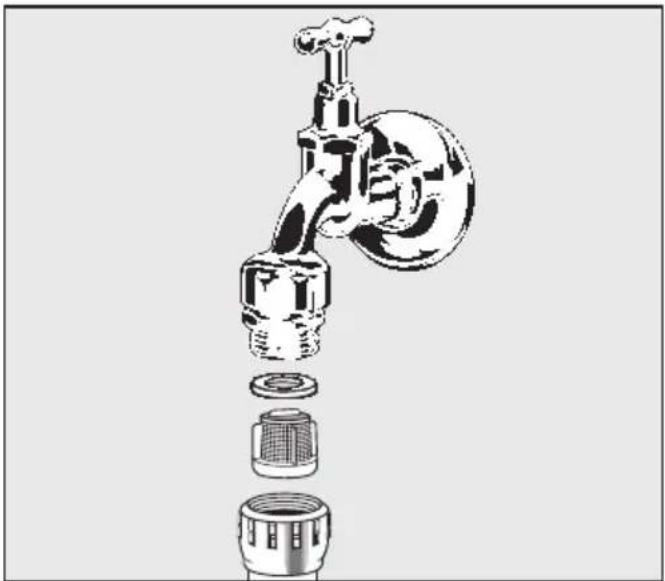
natural_image
Exploded view diagram of a faucet showing internal components (no text or labels)■ Carefully remove the washer.
■ Withdraw the filter using pointed pliers and rinse clean under running water.
■ Replace the filter and washer, making sure they are sitting correctly.
■ Reconnect the inlet hose to the tap, making sure it goes on correctly and is not cross-threaded.
■ Turn on the tap.
If water leaks out, the inlet hose may not be connected securely or it may have been screwed on at an angle.
■ Unscrew and reconnect the inlet hose correctly.
Cleaning the drain pump and non-return valve
If the water has not been pumped away at the end of a programme, the drain pump or the non-return valve might be blocked. They are, however, easy to clean.
■ Disconnect the dishwasher from the mains supply. Switch off at the mains socket and withdraw the plug.
■ Take the filter combination out of the wash cabinet (see “Cleaning and care - Cleaning the filters”).
■ Scoop the water out of the cabinet using a suitable container or utensil.
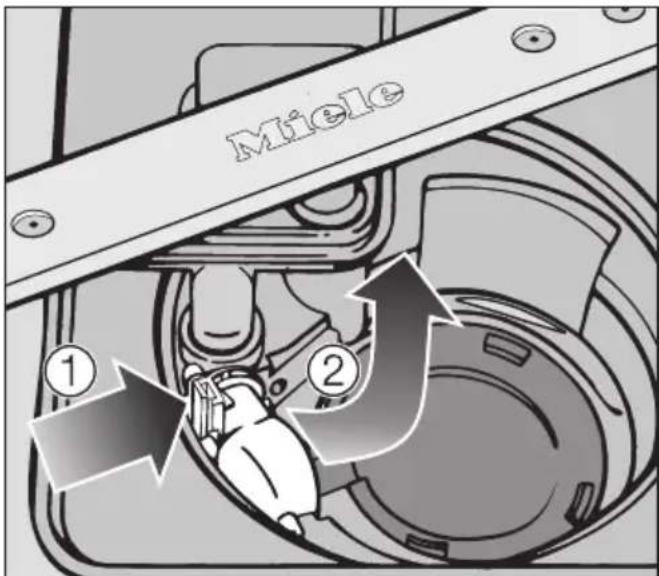
text_image
Miole ① ②■ Press the catch for the non-return valve inwards ①.
■ Tilt the non-return valve inwards until it is released ②.
■ Rinse it thoroughly under running water and remove any soiling from the non-return valve.
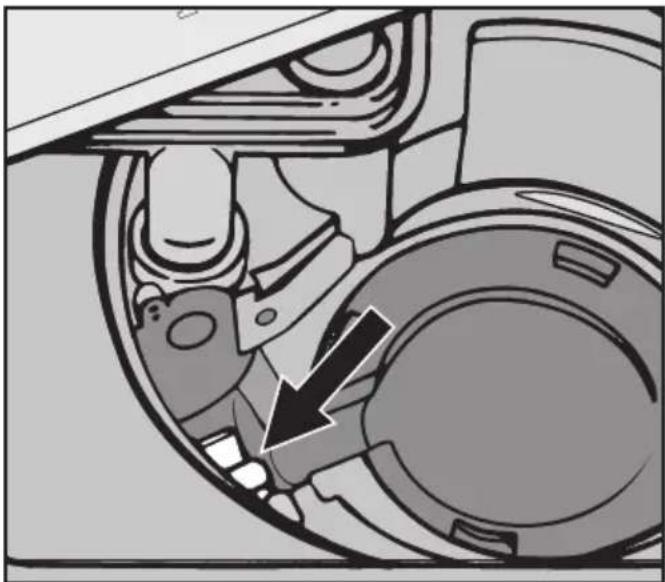
natural_image
Mechanical assembly diagram showing a gear and housing component with an arrow indicating direction (no text or symbols)The drain pump is situated under the non-return valve (see arrow).
- Remove all foreign objects from the drain pump (watch out for glass or bone splinters which are particularly difficult to detect and could cause injury). Turn the drain pump impeller by hand to check that there are no more obstructions. You will feel a little resistance when you turn the impeller. - Carefully refit the non-return valve and secure it with the catch.
⚠️ Ensure that the catch engages correctly.
⚠️ Be careful not to damage any delicate components when cleaning the drain pump and the non-return valve.
Repairs
In the event of any faults which you cannot remedy yourself, please contact Miele.
The contact details for Miele are given at the back of these instructions.
When contacting Miele, please quote the model and serial number of your dishwasher, both of which are shown on the data plate on the right-hand side of the door.
Warranty
The manufacturer's warranty for this appliance is 2 years.
For further information, please refer to your warranty booklet.
Dishwasher detergent and rinse aid, as well as cleaning and care products, are available as optional accessories. All the products are designed for use with Miele dishwashers.
These and many other useful products can be ordered from Miele or via the Miele Webshop (see end of this booklet for contact details).
Dishwasher detergent, rinse aid and salt
When you decided to buy a Miele dishwasher, you chose excellent quality and performance. Ensuring that your dishwasher always delivers the best possible results will also depend on your choice of dishwasher detergent, rinse aid and dishwasher salt, as cleaning results can vary depending on the brand used.
With Miele cleaning products and detergents, you can be sure of optimum results as these products have been specially designed for Miele dishwashers.
Detergent tabs
- sparkling results even with stubborn food deposits
– combination product with other components such as rinse aid, salt and glass protection additives - phosphate-free - safe for the environment
- water-soluble wrapping - no need to unwrap
Powder detergent
– with active oxygen for thorough cleaning
– with enzymes which are effective even in low temperature programmes
– with glass protection against corrosion
Rinse aid
- for gleaming glasses
- helps crockery to dry
– with glass protection against corrosion - specially designed cap for precise, easy dispensing
Dishwasher salt
- prevents limescale on crockery and in the appliance
- extra coarse-grained
Dishwasher care products
Miele cleaning and care products provide optimum care for your dishwasher.
Dishwasher cleaner
- cleans the dishwasher effectively and thoroughly
- removes grease, bacteria and unpleasant odours
- ensures excellent dishwashing results
Dishwasher descaler
- removes heavy limescale deposits
- mild and gentle with natural citric acid
Dishwasher conditioner
- removes odours, limescale and light deposits
- maintains the elasticity and leak tightness of the seals
Dishwasher freshener
- neutralises unpleasant odours
- fresh, pleasant lime and green tea scent
- easy to attach to the dishwasher basket
– very economical, lasts for 60 wash cycles
This dishwasher is supplied with a mains cable with moulded plug ready for connection to an AC single phase supply, (230 - 240 V 50 Hz for NZ and Australia) via a suitable switched socket.
⚠️ The electrical socket must be easily accessible after the dishwasher has been installed. Do not connect the dishwasher to the mains electricity supply by an extension lead. Extension leads do not guarantee the required safety of the appliance (e.g. danger of overheating).
Do not connect the appliance solely to an inverter such as those used with an autonomous energy source e.g. solar power. When switched on, peak loads in the system can cause the safety switch-off mechanism to be triggered. This can damage the electronic unit. The machine must not be used with so-called energy-saving devices either. These reduce the amount of energy supplied to the machine, causing it to overheat.
⚠️ Before connecting the appliance, check that the connection data on the data plate (voltage, frequency, rated load and fuse rating) matches the mains electricity supply. If in any doubt, consult a qualified electrician.
The data plate is located on the right-hand side of the door.
All electrical work must be carried out by a suitably qualified and competent person in strict accordance with current local and national safety regulations.
For extra safety, it is advisable to install a residual current device (RCD), with a trip current of 30 mA.
The Miele Waterproof system
As long as your dishwasher has been installed correctly, the Miele waterproof anti-leak system will protect you from water damage.
Connection to the water supply
⚠️ Water in the dishwasher must not be used as drinking water.
- The dishwasher may be connected to a cold or hot water supply, max. 60°C.
We would only recommend connection to a hot water supply if it is economical, e.g. a solar powered supply. When connected to a hot water supply, all programmes will be carried out with hot water.
- The SolarSave programme (if available) requires a hot water supply of between 45°C (minimum) and 60°C (maximum).
The higher the water intake temperature, the better the cleaning and drying results.
Water connection
- The inlet hose is approx. 1.5 m long.
- A tap with a 3/4" male thread must be provided on site.
- IMPORTANT: Australia and New Zealand This appliance must be installed according to AS/NZS 3500.1. Back flow prevention is already integrated in the appliance.
- The water pressure (flow pressure at the take-off point) must be between 50 and 1000 kPa (0.5 and 10 bar). If the water pressure is lower than this, the fault message Water intake will appear in the display (see “Problem solving guide”). If the water pressure is too high, a pressure reducer valve must be fitted.
After connecting the dishwasher to the water supply, check that all plumbing connections are watertight.
⚠️ To avoid any damage to the appliance, the dishwasher must only be operated when it is connected to a fully vented plumbing system.
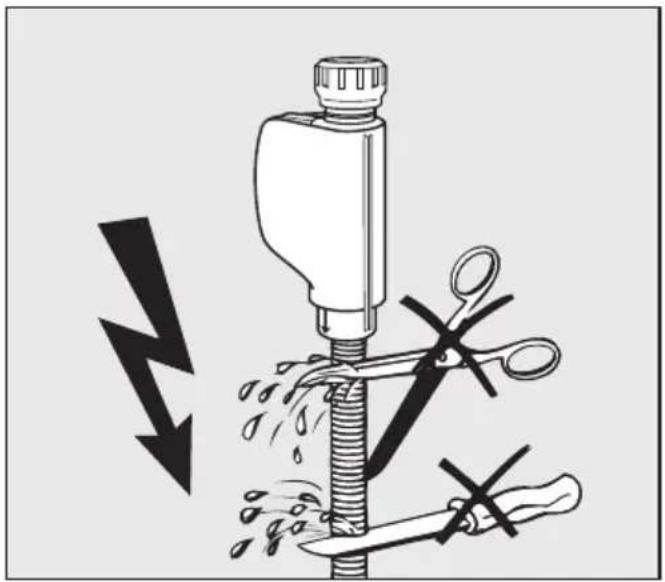
natural_image
Illustration of a mechanical device with scissors cutting down a pipe, showing water droplets and a knife (no text or symbols)⚠️ The inlet hose must not be shortened or damaged in any way as it contains electrical components (see illustration).
Drainage
- The appliance drainage system is fitted with a non-return valve which prevents dirty water from flowing back into the dishwasher via the drain hose.
- The dishwasher is supplied with approx. 1.5 ~m of flexible drain hose with an internal diameter of 22 ~mm .
- The drain hose can be extended using a connection piece to attach a further length of hose. The drainage length must not be longer than 4 m, and the delivery head must not exceed 1 m.
- If the hose is to be directly fitted to the drainage outlet on site, use the hose clip supplied (see installation diagram).
- The hose can be directed to the left or the right of the appliance.
- The on-site connector for the drain hose can be adapted to different widths of hose. If the connector protrudes too far into the drain hose, it will need to be shortened. Otherwise the drain hose may become blocked.
- The drain hose must not be shortened.
⚠️ Make sure that there are no kinks in the hose, and that it is not squashed or stretched.
After commissioning the appliance, ensure that the water outlet does not leak.
Venting the drainage system
If the on-site drain connection is situated lower than the guide path for the bottom basket rollers in the open door, the drainage system must be vented. Otherwise a siphoning effect during a programme can cause the appliance to empty itself of water.
■ To vent it: Open the dishwasher door fully.
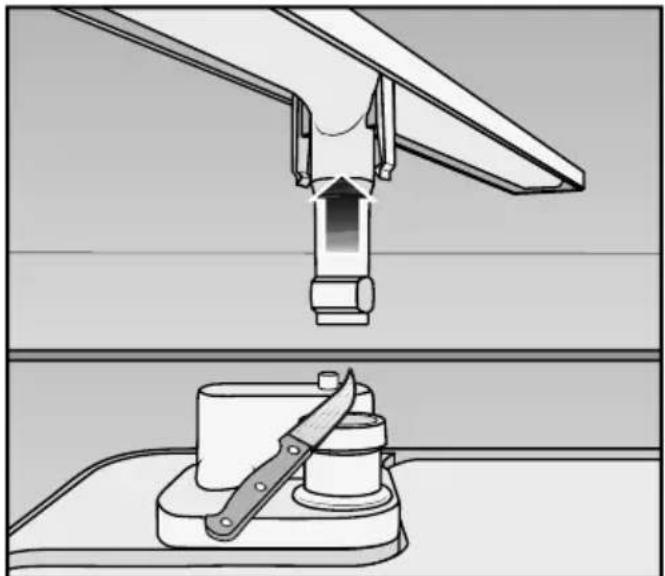
natural_image
Technical illustration showing a mechanical assembly with a valve and a tool, no text or symbols present■ Pull the lower spray arm firmly upwards to remove it.
■ Cut off the top of the vent valve in the wash cabinet.
Technical data
| Dishwasher model Standard XXL | ||
| Height freestanding model 84.5 | cm (adjustable + 3.5 cm) | - |
| Height built-in model 80.5 cm (adjustable + 6.5 cm) | 84.5 cm (adjustable + 6.5 cm) | |
| Height of building-in recess Min. | 80.5 cm (+ 6.5 cm) | Min. 84.5 cm (+ 6.5 cm) |
| Width 59.8 cm 59.8 cm | ||
| Width of building-in recess 60 cm | 60 cm | |
| Depth freestanding model 60 cm | - | |
| Depth built-in model 57 cm 57 cm | ||
| Weight Max. 64 kg Max. 56 kg | ||
| Voltage See data plate | ||
| Rated load | See data plate | |
| Fuse rating | See data plate | |
| Power consumption when switched off | 0.2 W | 0.2 W |
| Power consumption when not switched off | 3.0 W | 3.0 W |
| Networked standby | 0.6 W | 0.6 W |
| Test certificates awarded | See data plate | |
| Water pressure (flow rate) | 50 - 1000 kPa(0.5 - 10 bar) | 50 - 1000 kPa(0.5 - 10 bar) |
| Hot water connection | Up to max. 60 °C | Up to max. 60 °C |
| Delivery head | Max. 1 m | Max. 1 m |
| Drainage length | Max. 4 m | Max. 4 m |
| Mains cable | Approx. 1.9 m | Approx. 1.9 m |
| Capacity | 14 place settings | 15 place settings |
Settings menu for changing standard settings
Opening the Settings menu
■ Switch the dishwasher on with the ① sensor if it is switched off.
The main menu will appear in the display.
If the memory function is activated, the programme menu for the programme last selected will be displayed instead (see “Settings menu - Memory”). If this is the case, use the sensor to get to the main menu.
To learn about the display, read the section with the same name.
■ Select the Settings ▶ option.
The display will change to show the Settings ▶ menu.
■ Select the option you want to change.
Touch the i sensor to call up more information about the programme currently selected.
Sub-menu options which have already been selected will have a tick √ beside them.
■ To exit a sub-menu again, use the sensor.
The display will revert to the menu above.
Language
The display can be set to appear in one of several different languages.
You can change the language in the display via the Language ▶ sub-menu.
■ Select the language you want and confirm this with OK.
Some languages also have a country option to select.
■ If so, select the appropriate country and confirm your selection with OK.
The flag after the word Language acts as a guide if a language which you do not understand has already been set.
If this is the case, keep selecting the option which has a flag after it until you reach the Language ▶ sub-menu.
Time of day
The dishwasher is delivered with the time of day (clock) display deactivated.
To save energy, the dishwasher will switch off automatically a few minutes after the last time a button has been pressed or after the end of a programme.
Setting the time of day (clock) display
When the time of day (clock) display has been activated, the current time of day will appear in the display a few minutes after the last time a button has been pressed or after the end of a programme. This increases energy consumption.
■ Select the Display option.
■ Select the setting you want and confirm with OK.
If the Night dimming option is selected, the time of day is automatically switched off at night.
■ If you have selected On or Night dimming, confirm the message about higher energy consumption with OK.
Setting the clock format
You can select either a 24-hour or 12-hour clock.
■ Select the Clock format option.
■ Select the setting you want and confirm with OK.
Setting the time of day
You can set the current time of day. The current time of day must be set before you can use the Delay start programme option.
■ Select the Set the time option.
■ Set the hour with +/- and confirm with OK.
Then set and confirm the minutes.
The time of day has now been saved.
Date
You can set the actual date and show it in the display.
■ Set the year with the +/- sensors and confirm with OK.
Then set the month and the day and confirm them both with OK.
Water hardness
This appliance is fitted with a water softener.
The dishwasher must be programmed for the water hardness in your area.
- The dishwasher must be programmed to the correct water hardness for your area.
- Your local water authority will be able to advise you of the water hardness level in your area.
- Where the water hardness fluctuates e.g. between 1.8 and 2.7 mmol/l (10 - 15 °d - German scale), always programme the dishwasher to the higher value (2.7 mmol/l or 15 °d in this example).
■ Select the water hardness level for your area and confirm your selection with OK.
A tick √ will appear beside the water hardness which has been set.
| °d mmol/l °f Display | |||
| 1 0.2 2 | 1 | ||
| 2 0.4 4 | 2 | ||
| 3 0.5 5 | 3 | ||
| 4 0.7 7 | 4 | ||
| 5 0.9 9 | 5 | ||
| 6 1.1 1 | 6 | ||
| 7 1.3 1 | 3 7 | ||
| 8 1.4 1 | 4 8 | ||
| 9 1.6 1 | 6 9 | ||
| 10 1.8 1 | 8 10 | ||
| °d mmol/l °f Display | |||
| 11 2.0 | 20 11 | ||
| 12 2.2 | 22 12 | ||
| 13 2.3 | 23 13 | ||
| 14 2.5 | 25 14 | ||
| 15 2.7 | 27 15 | ||
| 16 2.9 | 29 16 | ||
| 17 3.1 | 31 17 | ||
| 18 3.2 | 32 18 | ||
| 19 3.4 | 34 19 | ||
| 20 3.6 | 36 20 | ||
| 21 3.8 | 38 21 | ||
| 22 4.0 | 40 22 | ||
| 23 4.1 | 41 23 | ||
| 24 4.3 | 43 24 | ||
| 25 4.5 | 45 25 | ||
| 26 4.7 | 47 26 | ||
| 27 4.9 | 49 27 | ||
| 28 5.0 | 50 28 | ||
| 29 5.2 | 52 29 | ||
| 30 5.4 | 54 30 | ||
| 31 5.6 | 56 31 | ||
| 32 5.8 | 58 32 | ||
| 33 5.9 | 59 33 | ||
| 34 6.1 | 61 34 | ||
| 35 6.3 | 63 35 | ||
| 36 6.5 | 65 36 | ||
| 37-45 6.6 | -8.0 66-80 37-45 | ||
| 46-60 8.2 | -10.7 82-107 46-60 | ||
| 61-70 | 10.9-12.5 | 109-125 61-70 | |
Rinse aid
You can adjust the rinse aid dosage for best results.
The rinse aid dosage is set in stages from 0 to 6.
It is set to 3 at the factory.
The dosage can turn out to be higher than the set value due to the automatic adjustment of the Automatic programme.
If spots appear on crockery and glassware:
- Increase the rinse aid dosage.
If clouding or smearing appears on crockery and glassware:
– Decrease the rinse aid dosage.
■ Select the desired setting with +/- and confirm with OK.
Consumption (EcoFeedback)
You can programme the dishwasher so that the energy and water consumption of the currently selected programme appears in the display. The estimated consumption can be displayed before the programme starts and the actual consumption can be displayed after the programme has finished.
In this menu you can also call up the total energy and water used in all previous dishwasher programmes (see "Caring for the environment - EcoFeedback consumption indicator").
Consumption indicator
■ Select the Display consumption option.
■ Select the setting you want and confirm with OK.
Total consumption
You can display the values for Energy and Water.
■ Select the Total consumption option.
You can also reset the values for the total consumption to 0.
■ Select the Reset option.
■ Select the Yes option.
■ Confirm the message with OK.
The values are now reset to 0.
EcoStart
In order to run your dishwasher in the most economical way, you can use the EcoStart option to take advantage of your electricity supplier's time variable tariffs (see “Programme options - Delay start with EcoStart - EcoStart”). With this option selected, your dishwasher will start automatically at your electricity supplier's cheapest tariff times.
To use this option, you must first set up to three electricity tariff time zones in which the dishwasher can start. You can allocate different priorities to these time zones. The time with the cheapest electricity tariff will be given Priority 1.
Contact your electricity supplier to find out the times of the cheapest electricity tariffs.
Once the electricity tariff times have been set, you can use the EcoStart option to set the latest finish time required for each programme. The dishwasher will then start automatically in the cheapest electricity tariff time and the programme will end at the latest at the finish time set.
Setting the electricity tariff times
Before you can use the EcoStart option, you must set at least one electricity tariff time.
■ Select an electricity tariff time from T1-T3 to set.
The start of the electricity tariff time selected will appear in the display and the hour number block will be highlighted.
■ Use +/- to set the hours and minutes for the start time and confirm both with OK.
The end of the electricity tariff time selected will appear in the display and the hours number block will be highlighted.
■ Use +/- to set the hours and minutes for the end time and confirm both with OK.
The electricity tariff time will be saved and its priority will appear in the display.
■ Select the priority you want and confirm this with OK.
■ Confirm the message with OK.
The electricity tariff time will be activated.
Changing the electricity tariff times
You can change the start, finish or priority of an electricity tariff time.
■ Select an electricity tariff time from T1-T3 to change.
■ Select the setting you want to change.
■ Use +/- to change the setting and confirm with OK.
The change will be saved.
Deleting the electricity tariff times
■ You can delete the settings for an electricity tariff time and in doing so deactivate the EcoStart option for this time zone.
■ Select an electricity tariff time from T1-T3 to delete.
■ Select Delete.
■ Confirm the query Delete tariff T1? with Delete.
The settings for the electricity tariff time selected will be reset.
■ Confirm the message with OK.
The electricity tariff time has now been deleted.
Networking
Your dishwasher is equipped with an integrated Wi-Fi module.
In order to connect your dishwasher to your Wi-Fi network, you must first activate the network function.
This will add the Miele@home option to the "Settings" menu.
Networking is deactivated ex-works.
Make sure that your Wi-Fi network signal strength is strong enough at the installation site of your dishwasher.
■ Select the setting you want and confirm with OK.
Miele@home
This option is only displayed if you have activated the network settings (see “Settings, Networking”).
There are a number of ways of connecting your dishwasher to your Wi-Fi network:
Miele@mobile App (only functional in selected countries)
The Miele@mobile App can be used to connect to your network.
■ Download the Miele@mobile App from one of the App stores.
■ Follow the instructions in the App.
WPS Push Button
As an alternative to networking your dishwasher via the Miele@mobile App we recommend using WPS (Wireless Protected Setup). To do so, you will need a WPS-compatible router.
■ Select the WPS push button option.
Please wait... will appear in the display.
■ Activate the “WPS” function on your router within two minutes.
■ Once connection has been established, confirm the message with OK.
The dishwasher will then revert to the Miele@home menu.
If the connection fails, you have probably not connected WPS to your router quickly enough. Repeat the steps above.
SmartStart
(only functional in selected countries)
The SmartStart function is used for starting your dishwasher automatically at a time when your energy costs are most economical.
Once SmartStart Permitted has been activated, the Delay start menu for the programme selected will no longer show the EcoStart option. Instead SmartStart will appear in the display. The dishwasher will then start within a timeframe set by you once it receives the signal from your energy provider. If it has not received a signal from your energy provider by the latest start time set, the dishwasher will start automatically.
■ Select the setting you want and confirm with OK.
■ Confirm the message with OK.
Remote control
Once you have installed the Miele@mobile App on your tablet PC or your Smartphone, you will be able to operate your dishwasher remotely. Your dishwasher must be signed on to a Wi-Fi network and the Remote control function must be activated.
■ Select the setting you want and confirm with OK.
■ Touch the sensor twice to return to the main menu.
After activating the Remote control function, the MobileControl option will appear in the display.
In order to operate your dishwasher with the Miele@mobile app, the MobileControl function has to be activated.
■ Select the MobileControl option.
■ Close the door and press the Start sensor.
The Start indicator will light up and Remote control Active will appear in the display.
The dishwasher can now be operated remotely using the Miele@mobile App.
If the time of day display has been switched off (see “Settings menu, Time of day”), the display message will go out after 10 minutes following activation of a Delay start time or remote control.
To switch the display back on for a few minutes, press the ① sensor.
If you now do not wish to operate the dishwasher remotely with the Miele@mobile App, you can cancel the MobileControl function.
■ Select Cancel and confirm with Yes.
SuperVision
If you have set up a Miele@home network with your dishwasher and have set up your dishwasher as the SuperVision master appliance, you can monitor other appliances connected to the Miele@home network.
SuperVision display
In order to use your dishwasher as the SuperVision master appliance, you have to activate the SuperVision display.
■ Select the setting you want and confirm with OK.
Standby display
Once you have activated the SuperVision display, you can specify whether appliances in the Miele@home network should be displayed when your dishwasher is in Standby mode, or only if there is a fault with one of them.
■ Select the setting you want and confirm with OK.
Your dishwasher's energy consumption will increase depending on which setting you choose.
Appliance options
Once you have activated the SuperVision display, you can specify which appliances in the Miele@home network should be displayed and whether the audible tones of those appliances should be replicated by your dishwasher.
■ Select the setting you want and confirm with OK.
System settings
You can use this option to sign your dishwasher on to an existing Miele@home network or create a Miele@home network with your dishwasher.
For instructions on how to do so, please read your Miele@home instruction manual. This is available to download as a pdf from www.miele-at-home.de.
Module settings
We recommend connecting your dishwasher to your Wi-Fi network with the help of the Miele@mobile App or via WPS.
If you would rather set up the connection to your router yourself, or you have a special network configuration, you can enter the relevant settings using the necessary technical knowledge.
Starting module activity
If you wish to reset all entered settings and values for Miele@home, you can restore the factory default settings on your Wi-Fi module. Any settings which do not affect Miele@home will remain unchanged.
■ Select Restart w. default settings and confirm with OK.
Please wait... will appear in the display.
The message Restart successful will appear in the display after a few minutes.
■ Confirm the message with OK.
The Wi-Fi module factory default settings have been restored.
If the factory default settings were not restored to your Wi-Fi module, repeat the instructions above.
Change main menu
You can change the order of the programmes in the programme selection menu and also enter your favourite programmes into the first four programme places.
■ Select the programmes you want to place in the first to fourth position of the programme selection menu.
■ Confirm each position with OK.
The programmes you have selected will then appear together in the display.
■ If you are happy with the order in which they are shown, confirm with OK.
■ To change the order in which they are shown, select Change.
Enter the settings again.
Save extras
Additional programme options can be added to some programmes, e.g. Short (see “Programme options - Extras”).
You can use the Save extras option to save settings you have chosen for a particular programme so that they are automatically selected when you run the programme in the future.
The dishwasher is delivered with this function deactivated.
■ Select the setting you want and confirm with OK.
System lock
The system lock prevents your dishwasher being used without your knowledge.
If an attempt is made to switch the dishwasher on when the system lock is activated, System lock 🔒 will appear in the display.
The lock must be deactivated before the dishwasher can be used.
The appliance will lock each time it is switched on while the system lock is activated.
The appliance is delivered with the system lock deactivated.
■ Select the setting you want and confirm with OK.
Deactivating the system lock
To unlock the dishwasher, proceed as follows:
■ Switch the dishwasher on using the ① sensor.
System lock 🔒 will appear in the display.
■ Confirm with OK and keep the sensor pressed for six seconds.
The dishwasher is now unlocked and ready for use.
Temperature
The temperature can be displayed in °C/Celsius or °F/Fahrenheit.
The factory default setting is °C.
■ Select the option you want and confirm with OK.
Brightness
There are seven different display brightness settings.
■ Select the brightness you want and confirm this with OK.
Volume
A sequence of audible tones will sound at the end of the programme or if there is a fault as long as the buzzer has been activated.
Buzzer in the event of a fault
The buzzer in the event of a fault will sound four times at intervals with a short pause between each set of tones.
The buzzer which sounds when there is a fault cannot be deactivated.
Buzzer at the end of a programme
The buzzer at the end of a programme will sound four times at intervals with a short pause between each set of tones.
Buzzer tones
The volume of the tone at the end of the programme can be selected in seven stages or switched off.
■ Select the volume you want using the Quieter and Louder options, or switch the buzzer off.
■ Confirm with OK.
Night time buzzer tone
You can select a different volume for the buzzer at night, or switch it off.
■ Select the volume you want for the night time buzzer using the Quieter and Louder options, or switch the night time buzzer off.
■ Confirm with OK.
Night time
You can select the times for night time to begin and end.
■ Select the Start at option.
■ Use +/- to set the time in hours and minutes for the night time to begin and confirm both with OK.
■ Select the Finish at option.
■ Use +/- to set the time in hours and minutes for the night time to end and confirm both with OK.
Keypad tone
An audible tone sounds each time a sensor is pressed.
The volume for the keypad tone can be set in seven stages, or switched off.
■ Select the volume you want using the Quieter and Louder sensors, or switch the keypad tone off.
■ Confirm with OK.
Memory
With the Memory function activated, the dishwasher will save the last programme selected.
When you switch the dishwasher off and back on again, the last programme selected will appear in the display instead of the ECO programme.
■ Select the setting you want and confirm with OK.
Switching off the refill reminders
If you only ever use multi-function combination products containing salt and rinse aid in your dishwasher, you can switch the refill reminders for salt and rinse aid off if you wish. Doing so will not affect the DetergentAgent function (see “Programme options - DetergentAgent”).
■ Select the setting you want and confirm with OK.
If you switch to using detergent that does not contain salt or rinse aid, it is important to remember to add dishwasher salt and rinse aid and to switch the reminders back on.
Check filters
You can adjust the interval at which the message to remind you to check the filters appears.
You can set an interval of between 30 and 60 programme cycles.
The “Check filters” message is set at the factory to appear after every 50 programme cycles.
■ Select the interval you want and confirm this with OK.
Automatic
You can adjust the Automatic programme so that it will remove stubborn soiling from a lightly soiled load. Energy consumption will increase with this option.
■ Select the setting you want and confirm with OK.
AutoOpen
Towards the end of some programmes the door will open automatically a little in order to assist the drying process.
This function can be deactivated if wished.
■ Select the setting you want and confirm with OK.
⚠️ If you have deactivated the automatic door opening function but would still like to open the door at the end of the programme, then make sure that you open the door fully. Otherwise steam from the dishwasher could damage the edge of the worktop because the fan is no longer running.
BrilliantLight
This dishwasher has interior lighting. When the door is open, the lighting will switch off automatically after 15 minutes.
The interior lighting can be switched off permanently.
■ Select the setting you want and confirm with OK.
Software version
You can call up the electronic software version of your dishwasher for technical support purposes.
■ Confirm the display with OK.
Showroom programme
For demonstration purposes only.
The dishwasher is fitted with various demonstration programmes for showroom use.
- Demo mode
Demonstration programme for showrooms. - Demo with sound
This programme activates the circulation pump to demonstrate the sound of the dishwasher. - Demo AutoOpen
The door will open automatically. - Cont. BrilliantLight
The interior lighting is on constantly.
Factory default settings
You can reset all dishwasher settings to the factory default settings.
You will be given the choice of Appliance settings or Main menu.
Wi-Fi module settings have to be reset separately.
■ Select the one you would like to reset.
■ Confirm the message Reset settings? or Reset main menu? with Yes.
Closing the Settings menu
To close the Settings ▶ menu, use the ◁ sensor. This will take you back to the main menu.
Miele Australia Pty. Ltd.
ACN 005 635 398
ABN 96 005 635 398
Miele Experience Centre and
Head Office Melbourne:
1 Gilbert Park Drive
Knoxfield, VIC 3180
Miele Experience Centre South Melbourne:
206-210 Coventry Street
South Melbourne, VIC 3205
Miele Experience Centre and Office Sydney:
3 Skyline Place
Frenchs Forest, NSW 2086
Miele Experience Centre and Office Brisbane:
Tenancy 4C, 63 Skyring Terrace
Newstead, QLD 4006
Miele Experience Centre Gold Coast:
131 Ferry Road
Southport, QLD 4215
Miele Experience Centre and Office Adelaide:
83-85 Sir Donald Bradman Drive
Hilton, SA 5033
Miele Experience Centre and Office Perth:
205-207 Stirling Highway
Claremont, WA 6010

1300 4 MIELE (1300 464 353)
www.miele.com.au

text_image
MíleleMiele New Zealand Limited
IRD 98 463 631
Head Office:
Level 2, 10 College Hill
Freemans Bay, Auckland 1011
Miele Experience Centre
Auckland:
8 College Hill
Freemans Bay, Auckland 1011
Telephone:
0800 464 353 (0800 4 MIELE)
www.miele.co.nz
Miele Global Headquarters Germany
Miele & Cie. KG
Federal Republic of Germany
Miele
G 6922 / G 6927