
CIPCAM720ODWDR - Security Camera CONCEPTRONIC - Free user manual and instructions
Find the device manual for free CIPCAM720ODWDR CONCEPTRONIC in PDF.


| Product Type | Outdoor HD Waterproof Security Camera |
| Resolution | 720p (1280x720) H.264 |
| Network | Wi-Fi 802.11b/g/n, 10/100 Ethernet |
| Storage | MicroSD slot up to 64GB, supports alarm recording and snapshots |
| Night Vision | IR-CUT filter, auto IR LEDs (distance not specified) |
| Lens | Adjustable focus, vision angle varies by model |
| Pan/Tilt | Motorized pan and tilt (model dependent), configurable speed and cruise |
| Audio | Built-in microphone and speaker, two-way audio (via app) |
| Alarm I/O | 1 alarm input, 1 alarm output |
| Motion Detection | Configurable up to 4 areas with adjustable sensitivity |
| PIR Sensor | Human movement detection for alarm triggering |
| Power Supply | DC 5V or 12V (adapter included, check model) |
| Operating Temperature | -10°C to +40°C (14°F to 104°F) |
| Indoor/Outdoor | Outdoor rated (waterproof) |
| Mounting | Wall or ceiling mount, bracket included |
| Dimensions | Not specified by manufacturer |
| Weight | Not specified by manufacturer |
Frequently Asked Questions - CIPCAM720ODWDR CONCEPTRONIC
User questions about CIPCAM720ODWDR CONCEPTRONIC
0 question about this device. Answer the ones you know or ask your own.
Ask a new question about this device
Download the instructions for your Security Camera in PDF format for free! Find your manual CIPCAM720ODWDR - CONCEPTRONIC and take your electronic device back in hand. On this page are published all the documents necessary for the use of your device. CIPCAM720ODWDR by CONCEPTRONIC.
USER MANUAL CIPCAM720ODWDR CONCEPTRONIC
natural_image
Abstract black logo design with curved lines forming a circular shape, labeled 'CONCEPTRONIC' below (no additional text or symbols)
natural_image
Stylized grayscale illustration of a city skyline with wind turbines, swirls, and airplane icons (no text or symbols)User Manual
Statement
If the user manual doesn't help you to solve the problem, please call our technology center for technical support.
Notice
1. Installation Environment
Keep away from the places for high-temperature, heat source and direct sunlight;
Keep away from water and if wet, power off immediately.
Avoid using in the damp environment; the reference range for operation humidity is below 85%RH.
Avoid using in too hot or too cold environment, the reference range for operation temperature is -10^ +40^
Please install it horizontally or wall mount, avoid strenuous vibration and do not place other items on top of the unit.
2. Transport and Handling
Please handle the item carefully.
Do not move the item between too hot and too cold areas.
Please disconnect the item from the mains before moving.

Notice:
- Do not fall down the camera or beat it strongly.
- Do not touch the optical components for the image sensor, such as the lens, if necessary, please place a clean and moistened cloth with alcohol and wipe the dirt gently; When not in use, please place the dust cover onto the item to protect the image sensor.
- Do not aim the camera directly into the sun or at other intense light sources that could affect the image quality, this will also shorten the service life for the image sensor.
- Keep away from laser when it is working, otherwise the image sensor can be damaged.
- If the equipment is not working properly, please contact the store or the service center, do not disassemble or modify the equipment in any way.
Index
Index 3
1 Product Introduction....4
1.1. Product Overview ...... 4
1.2. Product Exposition....5
2 Device Connection....6
6
6
2.1. Connection Diagram ......6
2.2.Wi-Fi Setting 6
6
6
6
6
2.2.1. Configuration via network cable connection....6
2.2.2. WPS/QSS One key configure Wi-Fi 7
2.2.3.Mobile Phone Setting....7
3 View Video by Browser 8
8
3.1. Access to camera webpage and install Plug-in ....8
3.2.View Live Video....9
4 Query and Playback SD Record by Browser....10
10
4.1. Playback Video .... 10
5 Device Configuration and Local Setting .... 11 .... 11
5.1. Device Configuration....11 ....11 ....11 ....11 ....11
5.1.1. System 11
5.1.2. Network....15
5.1.3. Audio and Video 20
5.1.4. Safety 23
5.1.5. Alarm 25
5.1.6. Storage....27
5.1.7. Log....29
5.2. Local Setting....29
1 Product Introduction
1.1. Product Overview
Thank you for choosing X series high definition SmartP2P IP Camera, the IP Camera combines a high definition digital video camera with network connectivity and a powerful web server to bring high definition video to your desktop from anywhere on your local network or over the Internet. It includes indoor HD PTZ camera, indoor HD cube camera, outdoor HD waterproof camera etc. It is very suitable for home, shops, offices and so on.
Product features:
Support High profile H.264 encoding, 3 kinds of resolution video stream simultaneously, suitable for Local, Internet and Cross-platform view;
➢ Support Wi-Fi protocol 802.11b/g/n;
➢ Support WPS/QSS one key Wi-Fi configuration;
Support one touch Wi-Fi configuration on mobile phone before connect to the network;
Support max. 64G SD/TF card storage for the alarm video and pictures, timing snapshot and recording, support MP4 format;
Built-in web server, use one port to send all the data, users can facilitate network setting;
➢ Support IE/Firefox/Chrome/Safari browser to view video and configure deice;
➢ Support P2P private network through transmission via manufacturer cloud platform;
➢ Provide IOS/Android mobile phone Apps;
Provide Windows/Mac OS PC client software.
1.2. Product Exposition
Please check carefully if all listed items are included in the package, it includes camera, power adapter, network cable, installation bracket. If anything missing, please contact vendor in time.
The camera functions maybe different due to different product model, the main functions as below:
- Main chip and sensor: Due to main control chip and sensor is different, so the camera support different resolution:720P, 1080P and above;
- Power input port: Check power supply if 5V or 12V. Plug right power supply, or it will damage the camera or cannot run. We suggest to use the default power adapter.
● RJ45 Port: Network port; - Wi-Fi function: The device features Wi-Fi function, built-in Wi-Fi module and antenna. The Wi-Fi antenna includes built-in Wi-Fi antenna, integration antenna, separated antenna and so on. The separated antenna would be packed with the camera in the gift box, users should install it to camera before it works.
- IR-CUT: A filter switching device, from day and night to switch to a different filter, then forbid or allow the infrared light in, which make the picture more true;
- Lens: Due to focus length of lens is different, so vision angle of lens is different. Please twist the lens for best effect if the video is fuzzy;
- PTZ: Control PTZ remotely, view video from several vision angle. Some device have PTZ function and some device have not PTZ due to the product cover is different, and PTZ moving angle maybe different;
- SD socket: Some product use SD socket and some use MicroSD socket due to the products cover are different, Max support 64GB memory card;
● MIC inside: Can collect the sound from camera workplace;
● Speaker inside: can play sound from device start, talking and alarm;
● Audio in port: If the camera without MIC in it, you can connect extra MIC to collect sound;
● Audio out port: If the camera without speaker in it, you can connect extra sound systems; - Alarm in port: Connect with switchable sensor, check sensor signal if high or low to judge if detect any event;
- Alarm out Port: Connect with external alarm device, control device alarm action when detect any event;
- Reset button: After the camera started, press and hold the reset button for at least 10 seconds, it restores default settings and reboot; press and hold the reset button for 3 seconds to set up the Wi-Fi by using WPS/QSS; press the reset button briefly, the Wi-Fi indicator will flashes for a few seconds while the camera was connecting with Wi-Fi connection, you can assess Wi-Fi signal intensity by the flash frequency, the faster flash, the stronger signal;
- Wi-Fi indicator: Blue LED for Wi-Fi indicator that be used to display Wi-Fi work state, such as off, slow flash, fast flash, steady work etc;
- Work status
indicator: Red LED is operation indicator that displays the state of equipment, there are off, slow
flash and flashlights flash, when someone access video, otherwise slow flash;
- POE function: The function that supply power to camera through network cable. But you need the camera with POE module. the device connect to POE switcher by a network cable and POE switcher supply power for device through the network cable;
- PIR function: The device with PIR sensor, used for detect the human movement, it trigger alarm if detect any abnormal.
2 Device Connection
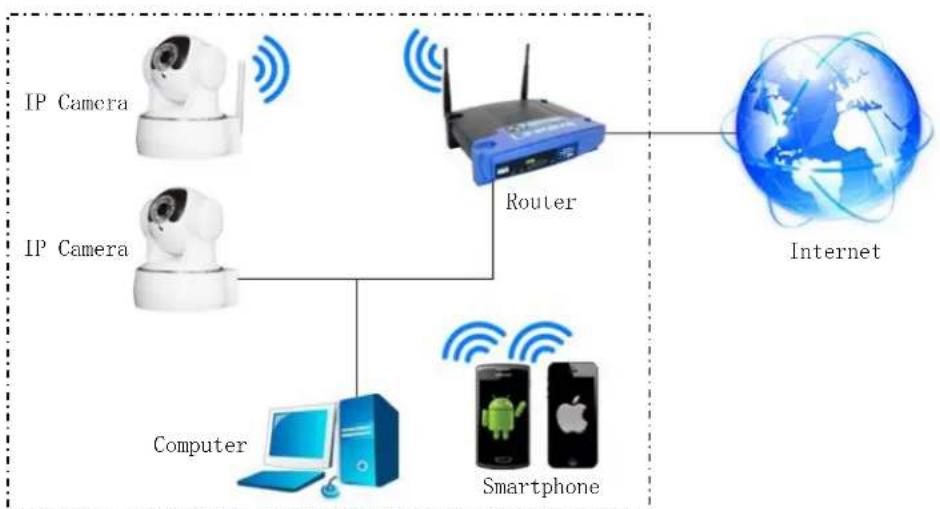
2.1. Connection Diagram
flowchart
graph TD
    A["IP Camera"] --> B["Router"]
    C["IP Camera"] --> B
    D["Computer"] --> E["Smartphone"]
    F["Internet"] --> B
    style A fill:#f9f,stroke:#333
    style C fill:#f9f,stroke:#333
    style D fill:#ccf,stroke:#333
    style E fill:#cfc,stroke:#333
    style F fill:#fcc,stroke:#333
Local Network
Figure1
Power on the camera by attaching the power adapter, and then connect the camera and router by network cable, so you can visit the camera via computer in LAN and view camera video as <<3. View video by browser>>
You can also connect camera and router by Wi-Fi, you need to configure Wi-Fi of the camera as<<2.2 Wi-Fi Setting>>.
2.2. Wi-Fi Setting
You can setting up the Wi-Fi as the following three way.
2.2.1. Configuration via network cable connection
Connect the camera and router by network cable as Figure1, please login the camera as <<3.View video by browser>>, access to system configuration interface to finish the setting as<<5.1.2.3 Wi-Fi setting>>.Pull up the network cable, then you can connect the router by Wi-Fi.
2.2.2. WPS/QSS One key configure Wi-Fi
Power on the camera and wait for 1 minute, the camera started, hold on reset button 3 seconds, and then click "WPS/QSS" button of the router, the camera and router will be configured Wi-Fi as WPS/QSS protocol, after configuration successfully, the blue Wi-Fi indicator of the camera will quickly flash several times, and then it will be connected to router automatically and the blue indicator will be always on.
Notice: Due to some router do not support WPS/QSS function, so you can not use the configuration way.
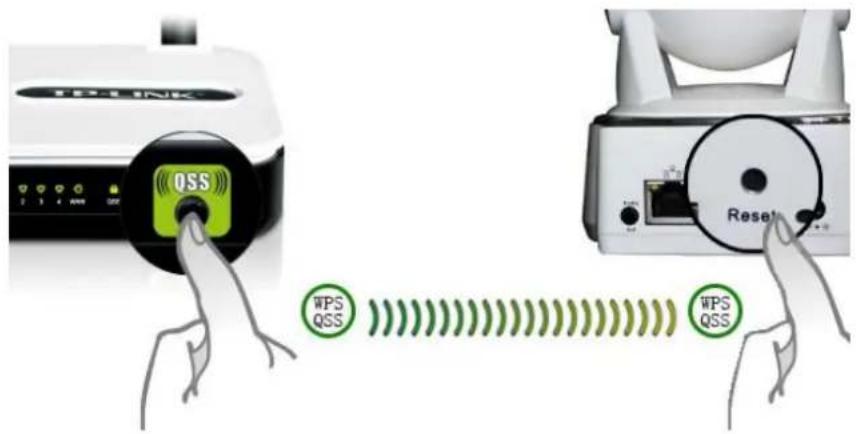
Figure2
2.2.3. Mobile Phone Setting
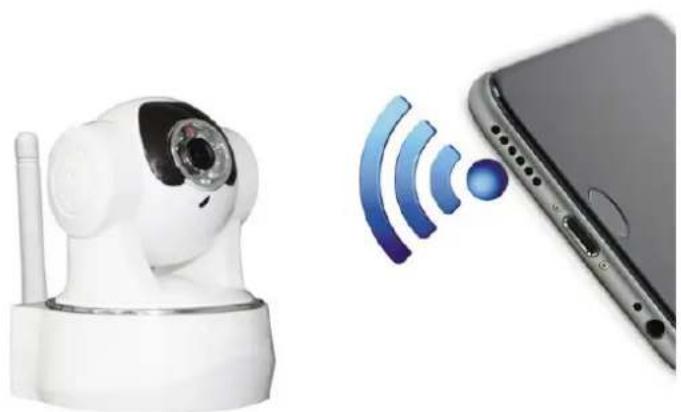
Install the "Cam Viewer 1" App in android phone or iPhone at first, open the App, access to More interface, select "One key configure Wi-Fi" and fill in Wi-Fi SSID and password, and then click configure to finish the setting as Figure3.
natural_image
White smart camera and smartphone with Wi-Fi signal icon (no text or symbols on devices)Figure3
Tips:
- Before configuration, please power on the camera, after 5 minutes, you can configure the camera (blue Wi-Fi indicator flash slowly), otherwise you can't configure, and must power on the camera again;
- Move mobile phone speaker to camera MIC, click Configure; (please confirm if the camera have
MIC, otherwise the configuration will be unsuccessfully)
- After configuring successfully, the blue Wi-Fi indicator will flash several times quickly, and then connect to router automatically and the blue indicator is always on. You can click Configure several times when the configuration is unsuccessfully.
3 View Video by Browser
3.1. Access to camera webpage and install Plug-in
Double click to Open the "SearchPro" in the attached CD and click Search as Figure 4.
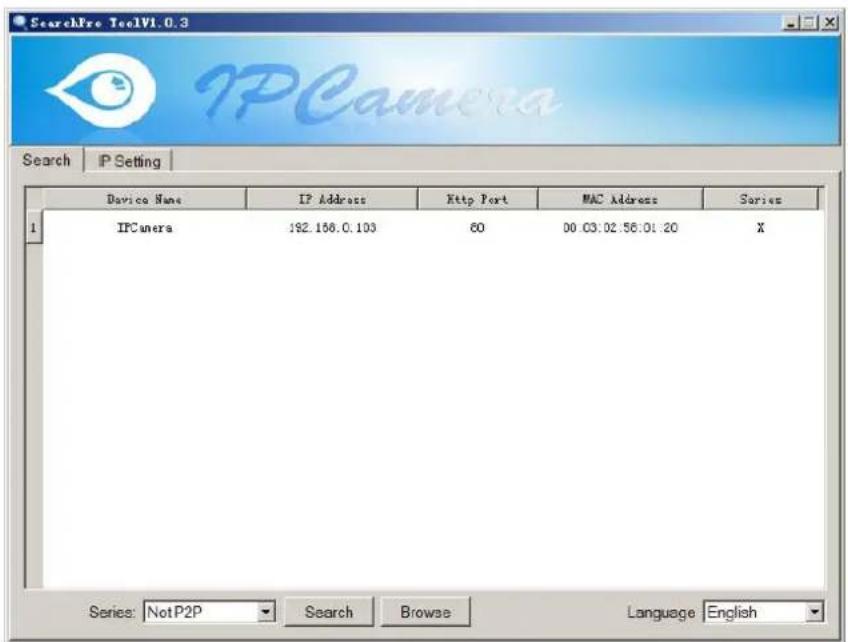
Figure4
Select the founded device and double click it to open to view in the browser, enter user name and password at popup dialog to login camera webpage as Figure5.
Tips: default username/password:admin/12345, please modify the password for safety.
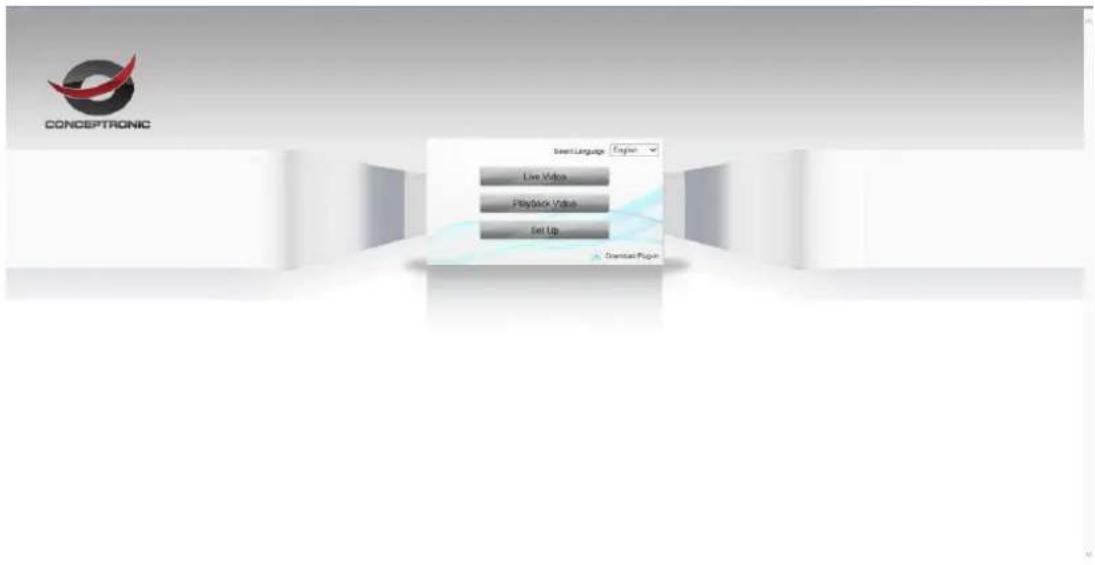
Figure5
- Need to download plug-in when first use, click "download plug-in" as figure 6, click Run to install it.
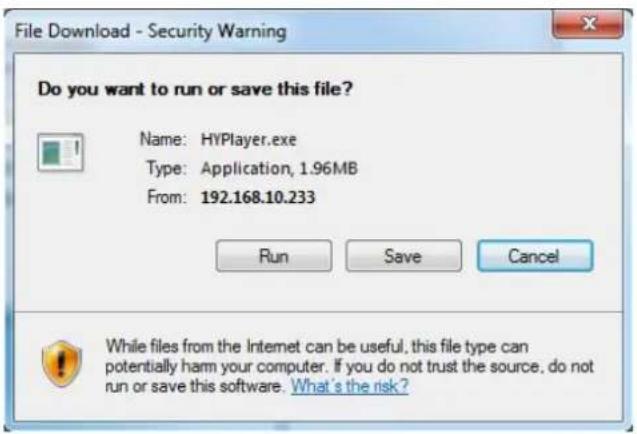
Figure6
3.2. View Live Video
Access to Live Video interface, it plays video automatically as Figure7.
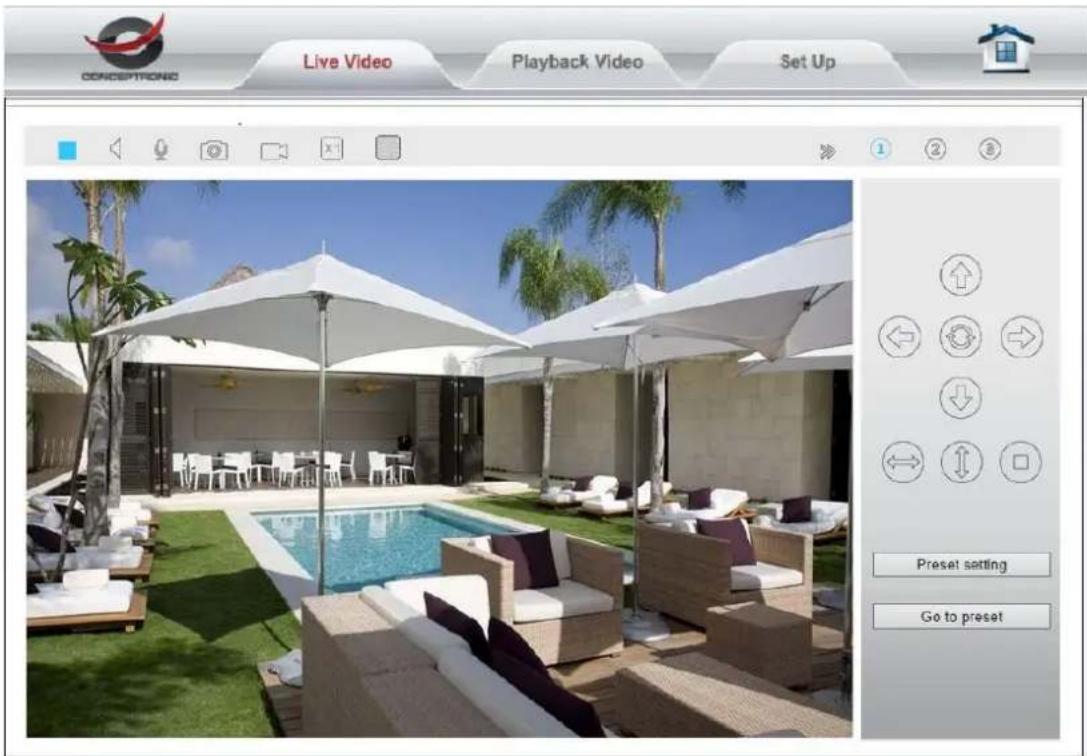
Figure7
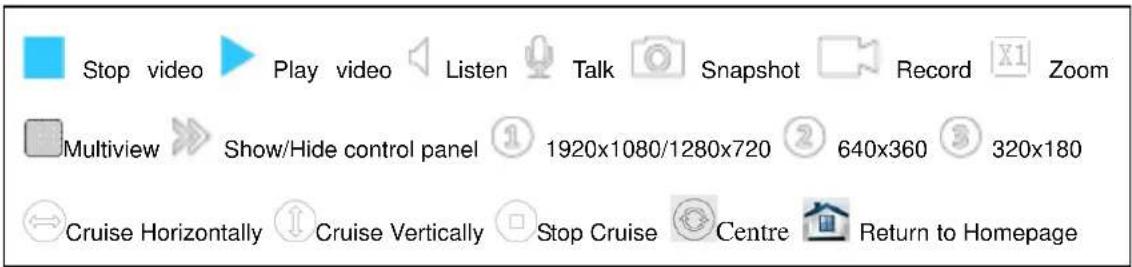
Note:
- You can view one or four video in a screen, need to set up the cameras in 5.1.1.5 multiple setting.
- You can click to zoom in and out the video, 1x, 2x, 3x, 4x optional.
- The first stream will change to 1920x1080 or 1280x720 automatically according to different camera.
4 Query and Playback SD Record by Browser
4.1. Playback Video
Click Playback Video to access to SD record playback interface, click record date which you want to query ,click Search to list recording file, select one to playback it, also can click download button to download the file as Figure8.
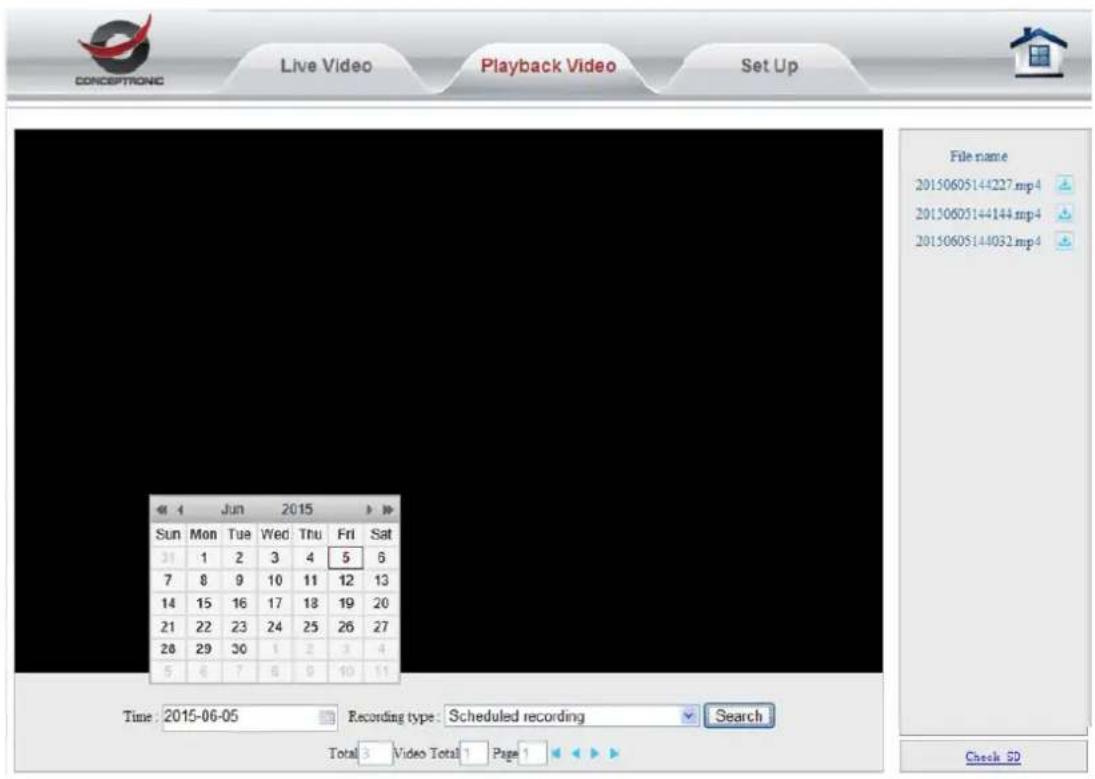
Figure8
5 Device Configuration and Local Setting
5.1. Device Configuration
5.1.1. System
5.1.1.1. Device Status
You can view current user, network connection way, Mac address, SD status and internet IP address of the camera as Figure9.
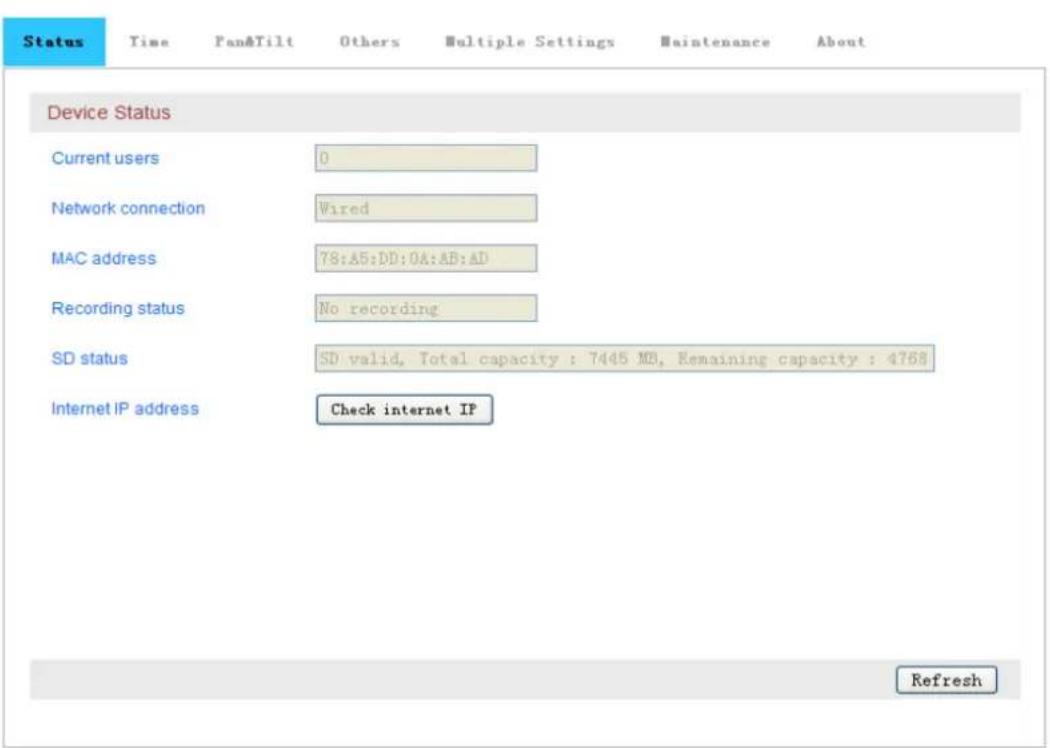
Figure9
5.1.1.2. Time Setting
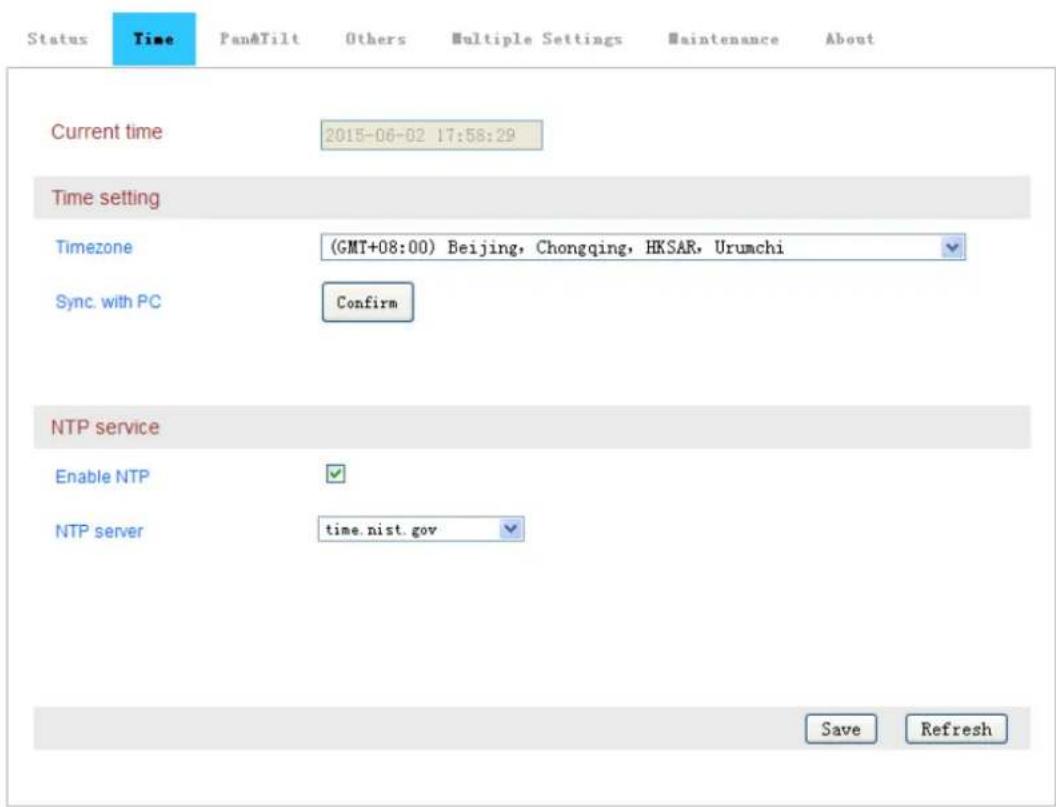
Figure10
5.1.1.3. Pan&Tilt Setting
You can set up Pan&Tilt speed, cruise circles (1-10 turns) and disable motion detection when PTZ moving as Figure11.
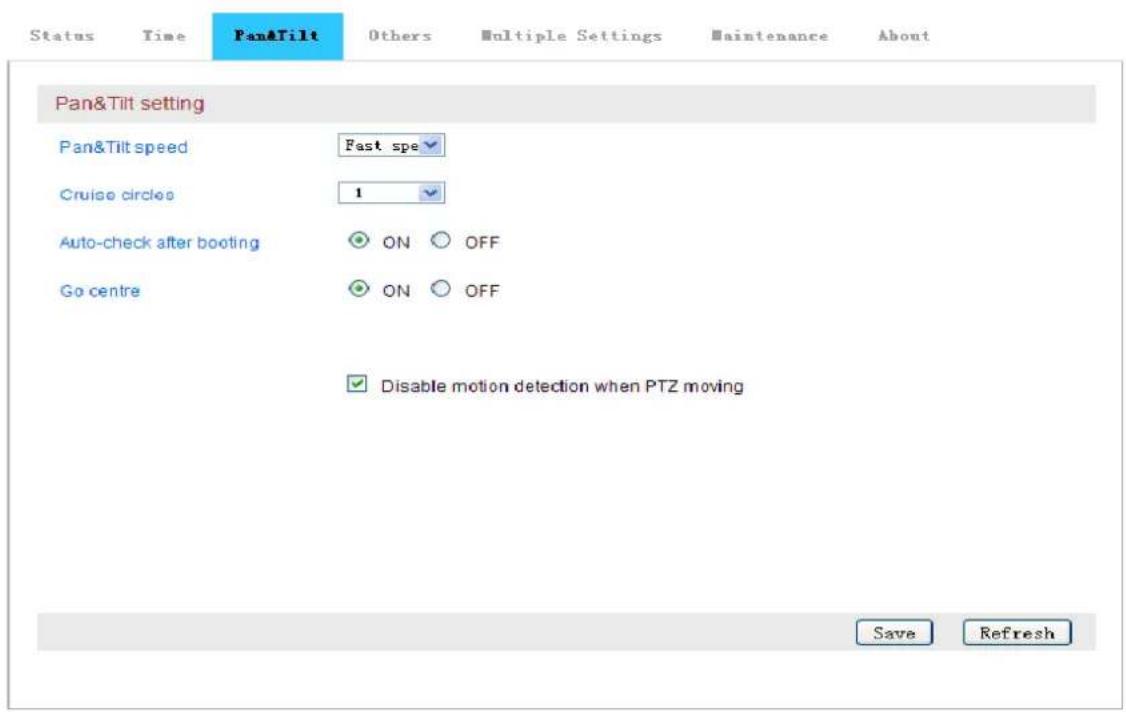
Figure11
5.1.1.4. Others Setting
You can turn off Status LED and Wi-Fi LED of the camera in others setting as Figure12.
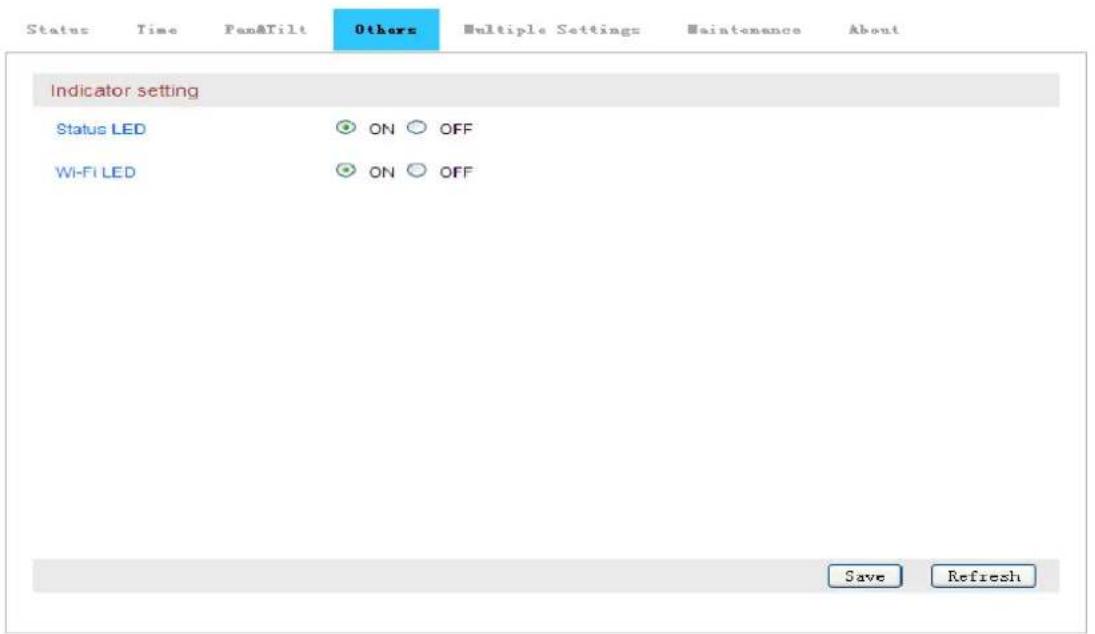
Figure12
5.1.1.5. Multiple Settings
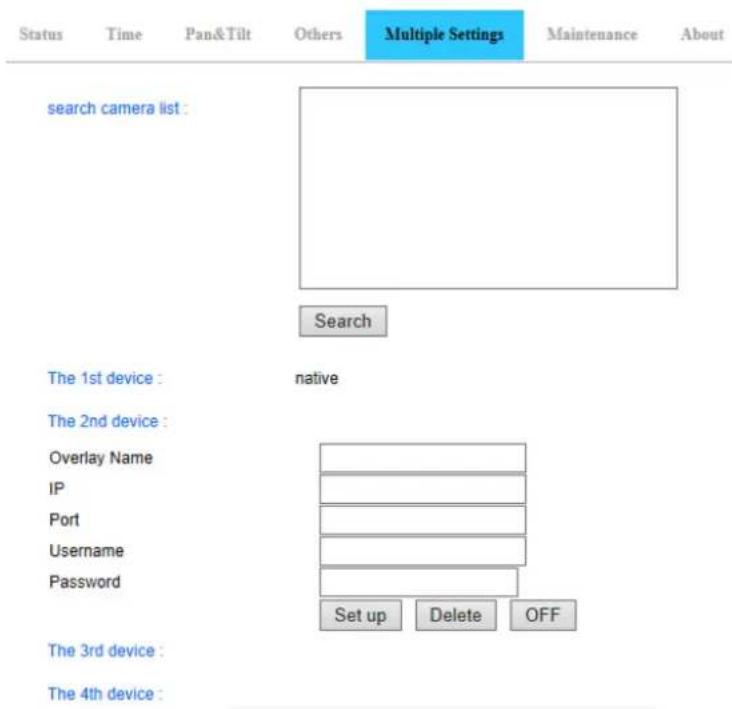
Please set up multiple devices at first, then you can view 1 or 4 split screen at chapter 3.2 browse interface.
5.1.1.6. System Maintenance
The system maintenance includes System setting and Restart timing setting. You can set up reboot, backup setting, restore backup setting, upgrade camera and timing reboot etc as Figure13.
![Status Time Pan& Tilt Others Multiple Settings Maintenance About System setting Reboot Reboot Restore to default Restore to default Backup setting Backup setting Restore backup setting Browse... Restore backup setting Upgrade Browse... Upgrade Restart timing settings Enable schedule reboot ✓ Sun Mon Tue Wed Thu Fri Sat Time 00 : 00 [hr:mm] Save](/content/2026/05/805790/images/4b39c73dae37f443ba956b57e0bf4fc8d98546fbe7ada7fe49fa83092974c242.jpg)
Figure13
5.1.1.7. Device information
You can modify device name and check system firmware version, system firmware time and Web UI firmware here as Figure14.
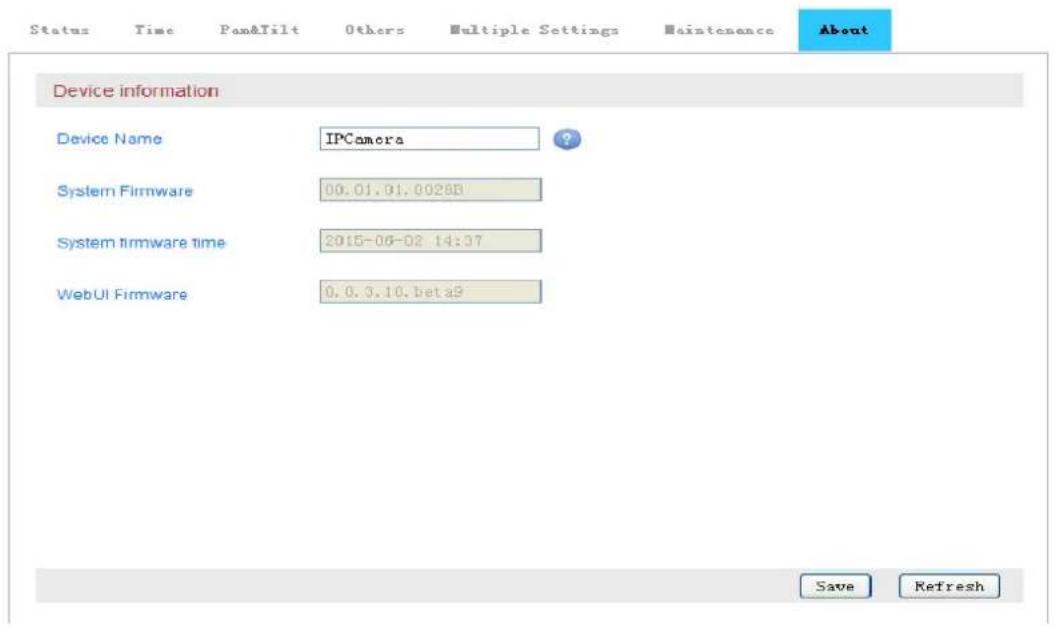
Figure14
5.1.2. Network
5.1.2.1. IP Address Setting
You can modify IP address of the camera here, there is no default IP address, it is DHCP.
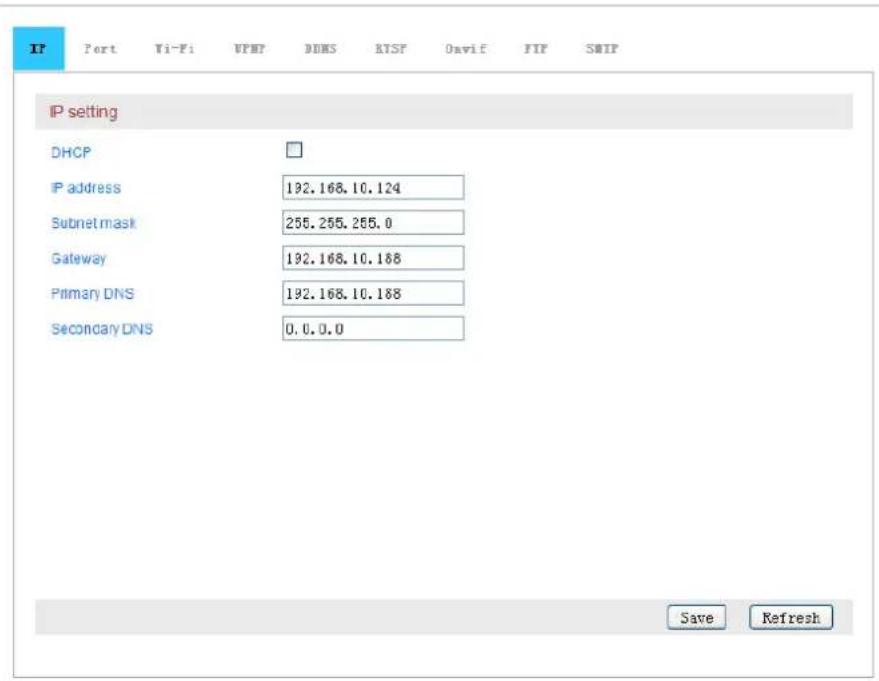
Figure15
5.1.2.2. Port Setting
You can change webpage HTTP port here as Figure16.
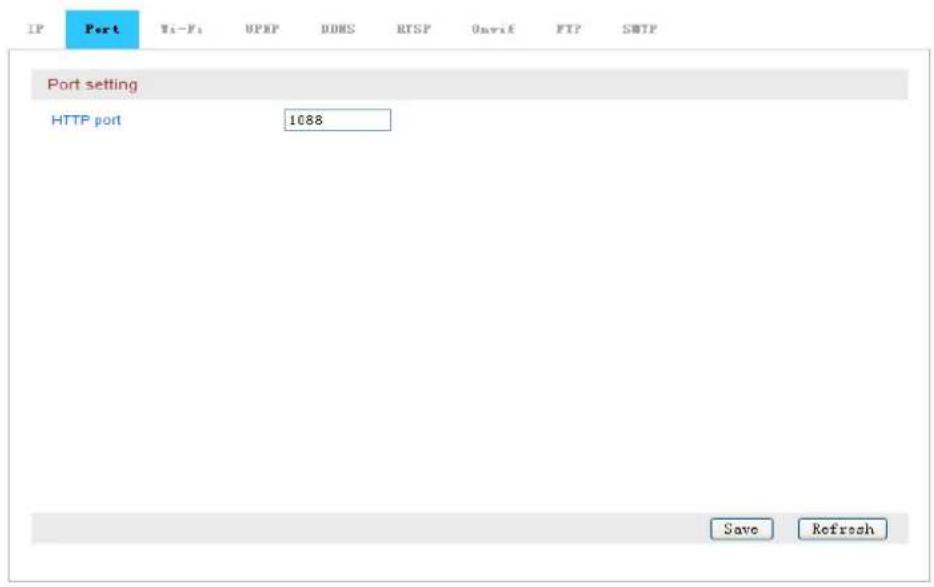
Figure16
5.1.2.3. Wi-Fi Setting
Click Search and enable Wi-Fi, then select the wireless router you want to connect, enter password of the router, click Save to finish the Wi-Fi configuration. Click Test to check if your settings are successful or not as Figure17.
![IP Port Wi-Fi UPWP DDMS RTSP Onvif FTP SMTP Wireless Network List: 100%----1----[ SMARTHYR ]---AES---WPA2PSK 100%----8----[ yfb_test2 ]---AES---WPAPSK 100%----11----[ TEST ]---AES---WPAPSK 99%----8----[ EN-01 ]---TKIP---WPAPSK 89%----1----[ huiyan1 ]---AES---WPAPSK 83%----11----[ 1234567890 ]---TKIP---WPAPSK 83%----6----[ MERCURY_0123 ]---AES---WPAPSK 78%----1----[ HN1A002EAA00001 ]---undefined---undefin 78%----1----[ ibaby ]---AES---WPAPSK 73%----1----[ 00000 ]---AES---WPAPSK Search Enable Wi-Fi: ON OFF SSID: Authorization: NONE Encryption: TKIP Key: Test Save](/content/2026/05/805790/images/cd82edca983b85d7dfc0cec73627a9bc62df45c7f874a1972b1f8d9cf75cfc22.jpg)
Figure17
5.1.2.4. Port Forwarding
Access to port forwarding, you can enable UPNP port forwarding and check the status of it as Figure18.
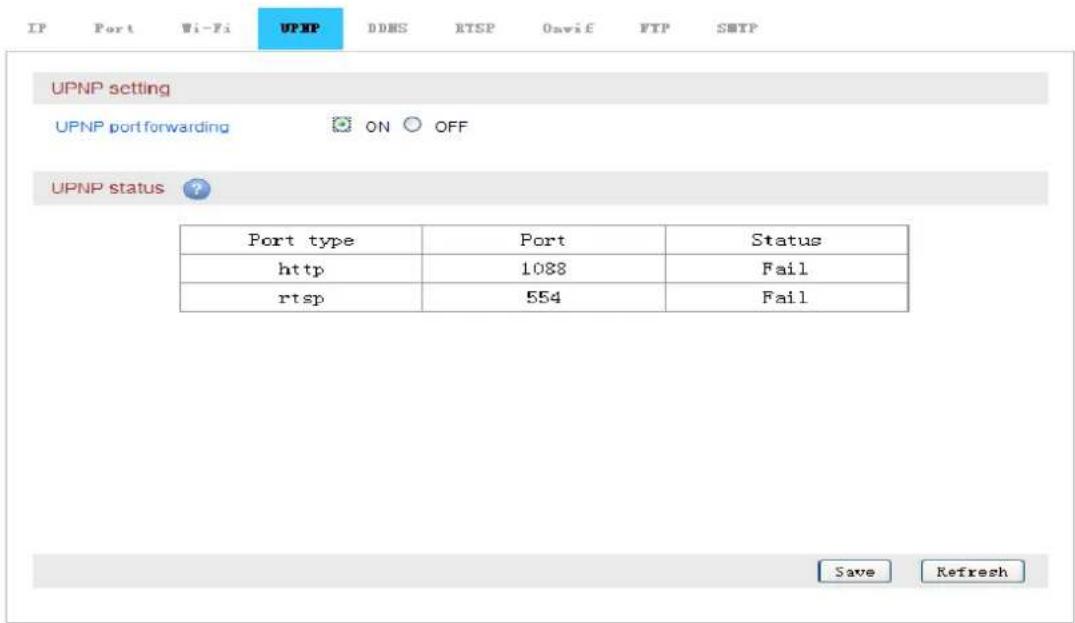
Figure18
5.1.2.5. DDNS Setting
You can enable manufacturer's DDNS and set up third party DDNS (the third party DDNS support 3322.org/Dyndns.org/No-ip.com now, the manufacturer provide a free DDNS for every camera.
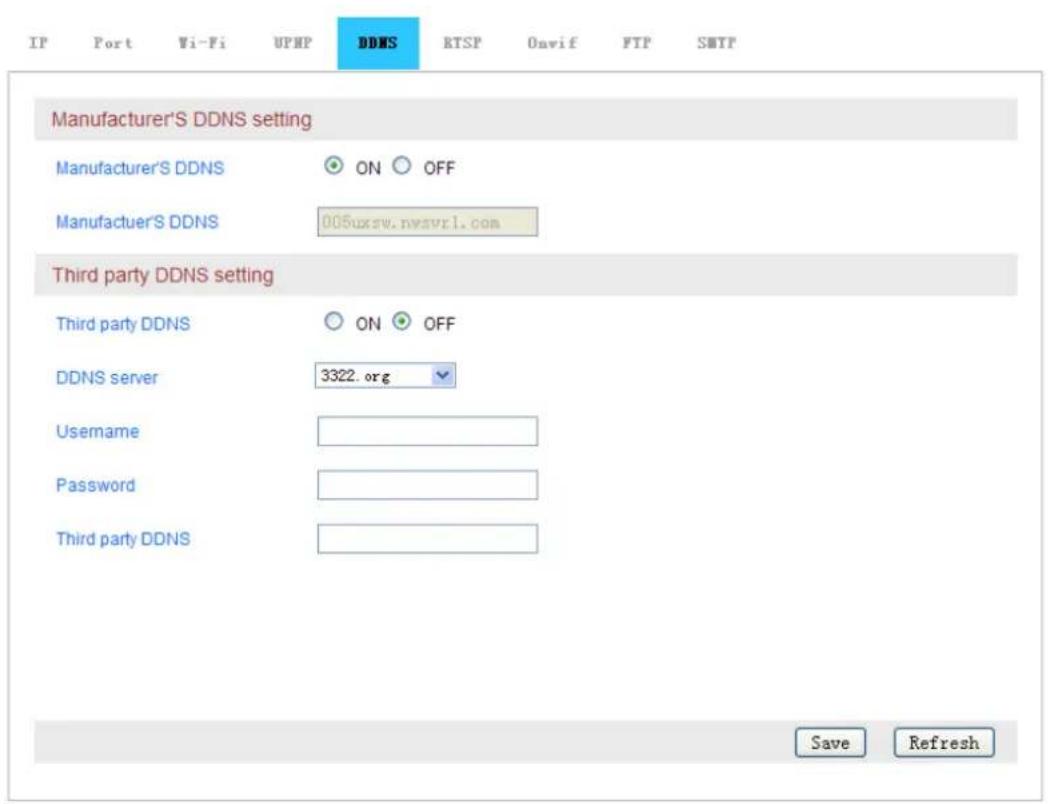
Figure19
5.1.2.6. RTSP Setting
You can set up RTSP port, also can off RTSP authentication as Figure20.
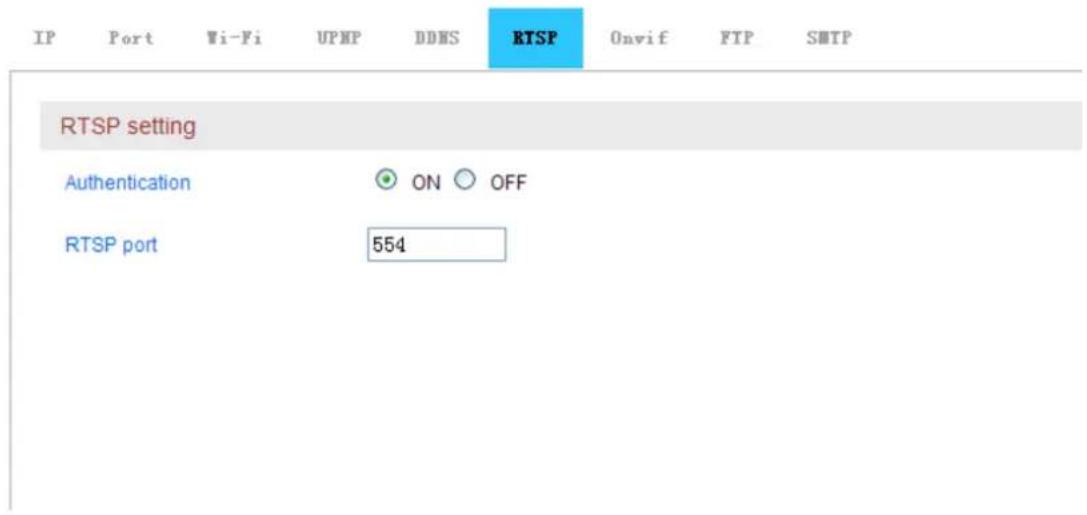
Figure20
You can view video by some general RTSP stream media software, for example, VLC. The visit link as below:
First stream: rtsp://user:password@IP:rtsp port/live/ch0
Second stream: rtsp://User:password@IP:rtsp port/live/ch1
Third stream: rtsp://user:password@IP:rtsp port/live/ch2
5.1.2.7. FTP Setting
Access to FTP setting, please fill in relative FTP parameters as the following case to achieve the FTP transfer as Figure21.
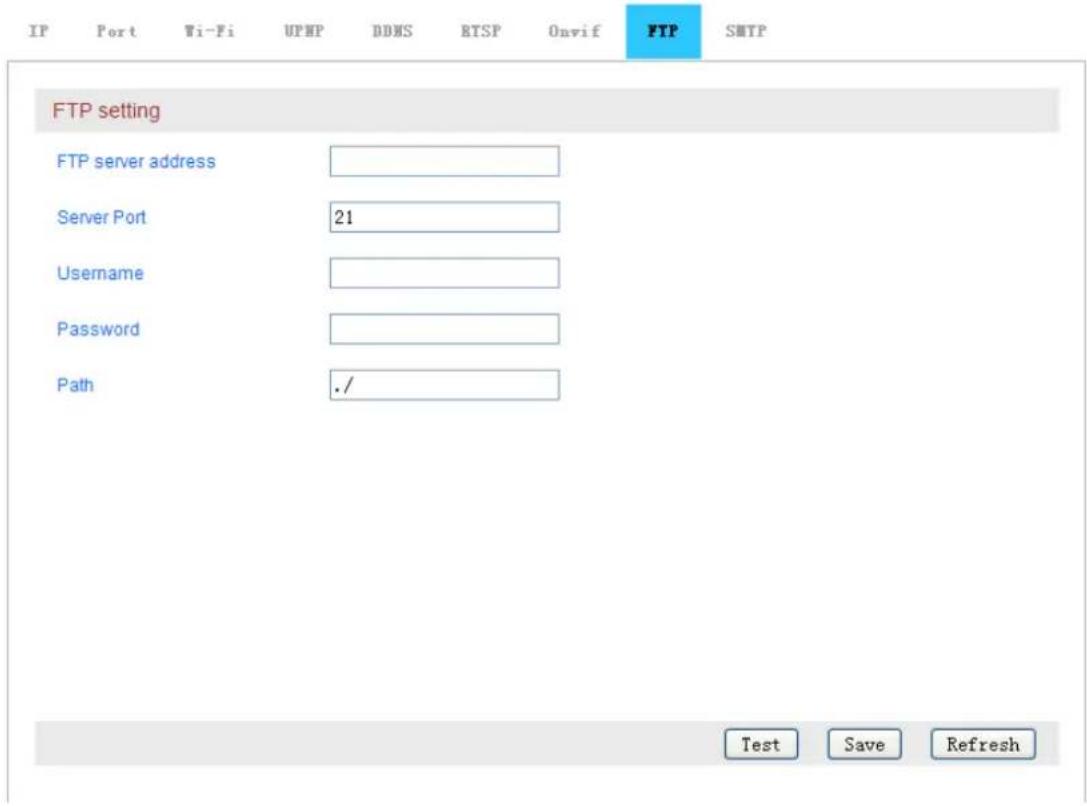
Figure21
5.1.2.8. SMTP (E-mail) Setting
Please fill in relative parameters as the following case to achieve the E-mail transfer, as Figure22.
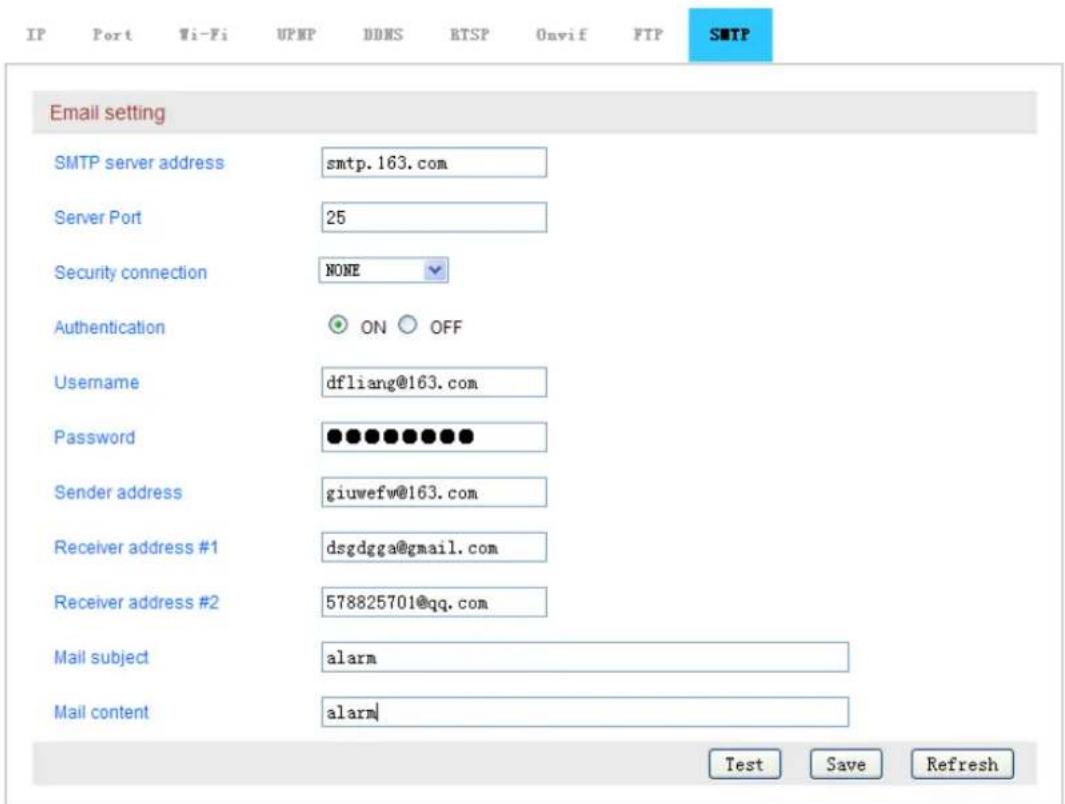
Figure22
5.1.3. Audio and Video
5.1.3.1. Video Encoding Setting
Access to Video Encoding setting, you can set up AC frequency and video stream as Figure23.
AC frequency: 50HZ and 60HZ optional;
Video stream: Bit rate (256\~4096kbps), frame rate (1\~30fps), video encoding control etc;
Tips: you can set up the video with audio or not.
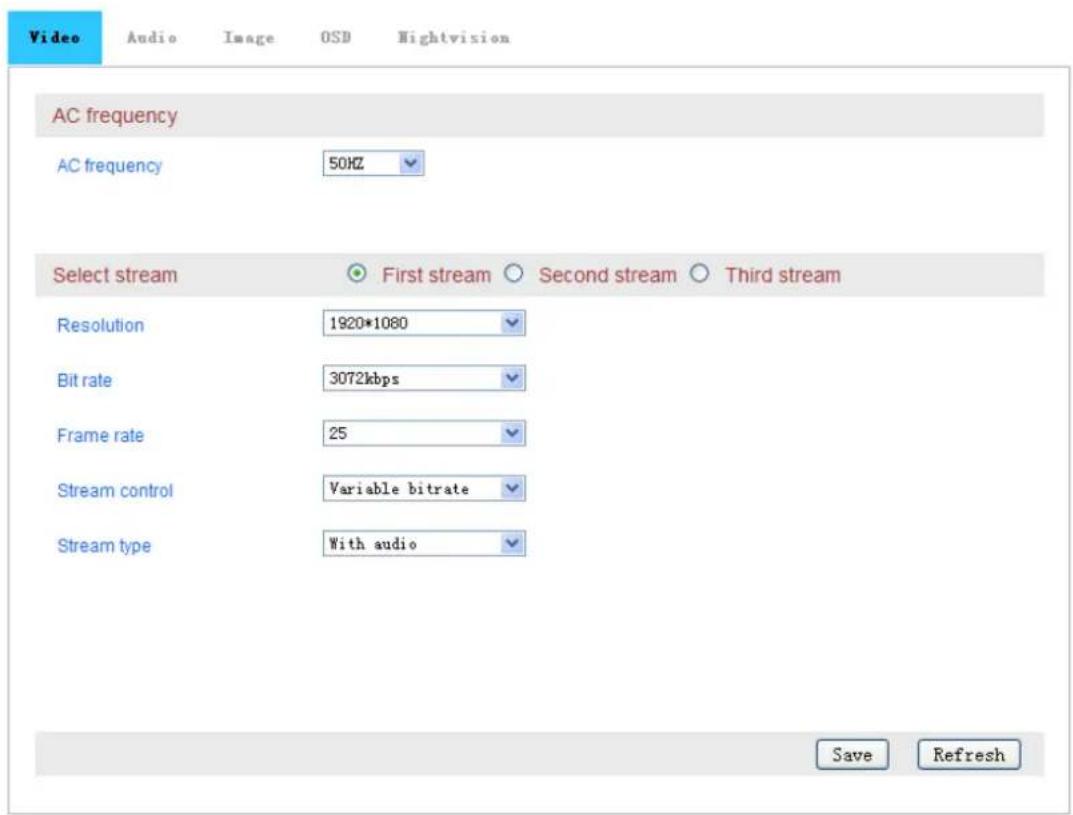
Figure23
5.1.3.2. Volume Setting
Access to Volume setting, you can adjust the volume of MIC and speaker as Figure24.
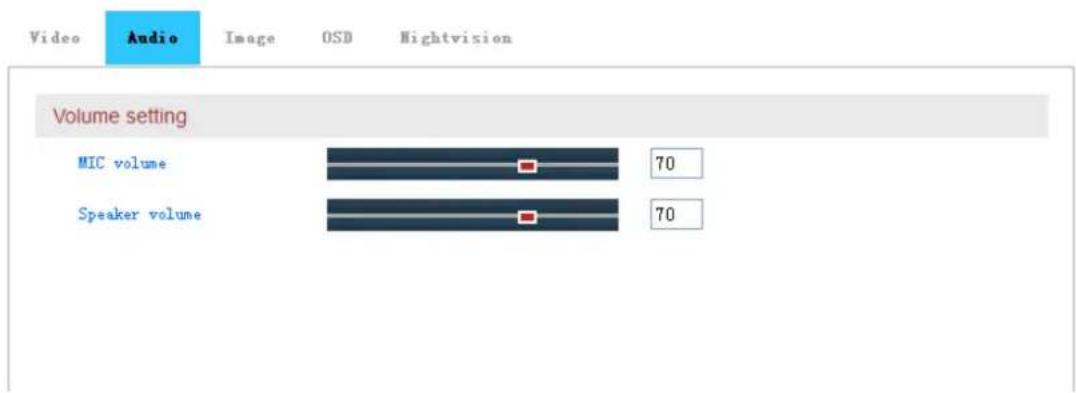
Figure24
5.1.3.3. Image Setting
Access to Image Setting, you can flip and mirror the image, also can adjust the brightness, contrast, saturation and hue of image for getting best color effect as Figure25.
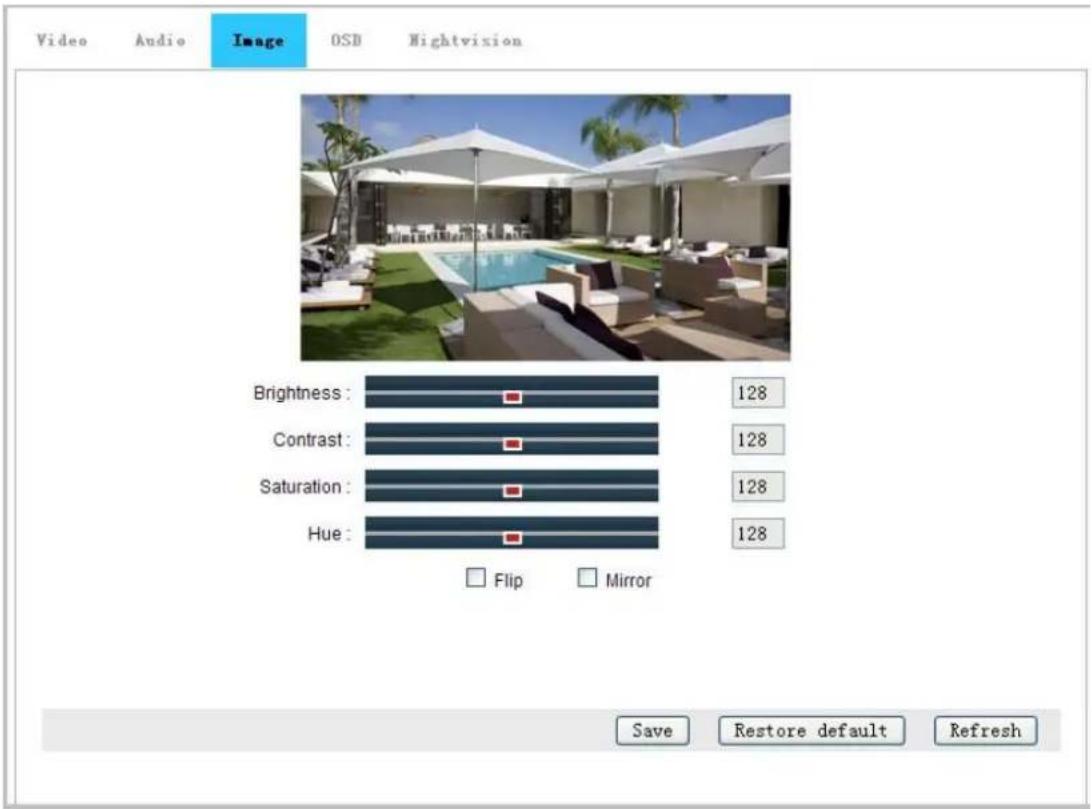
Figure25
5.1.3.4. OSD Setting
Access to OSD setting, you can overlay the time and name in Live video as Figure26.
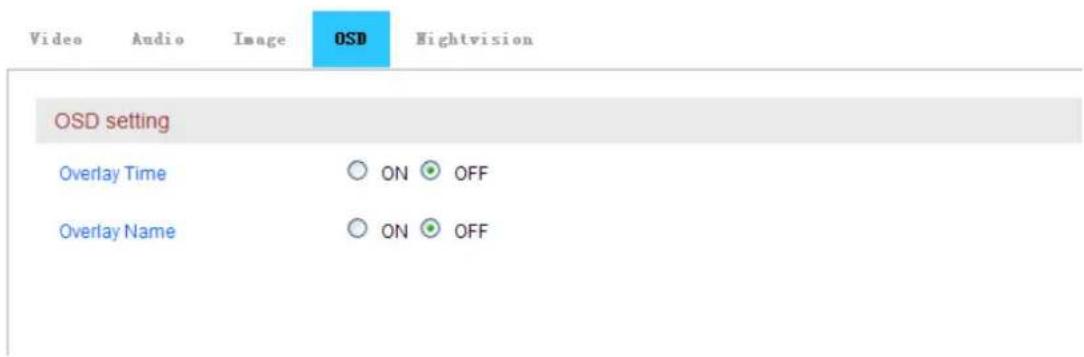
Figure26
5.1.3.5. Night vision Settings
Access to Night vision Settings, you can set up IR LED and IRCUT as Figure27.
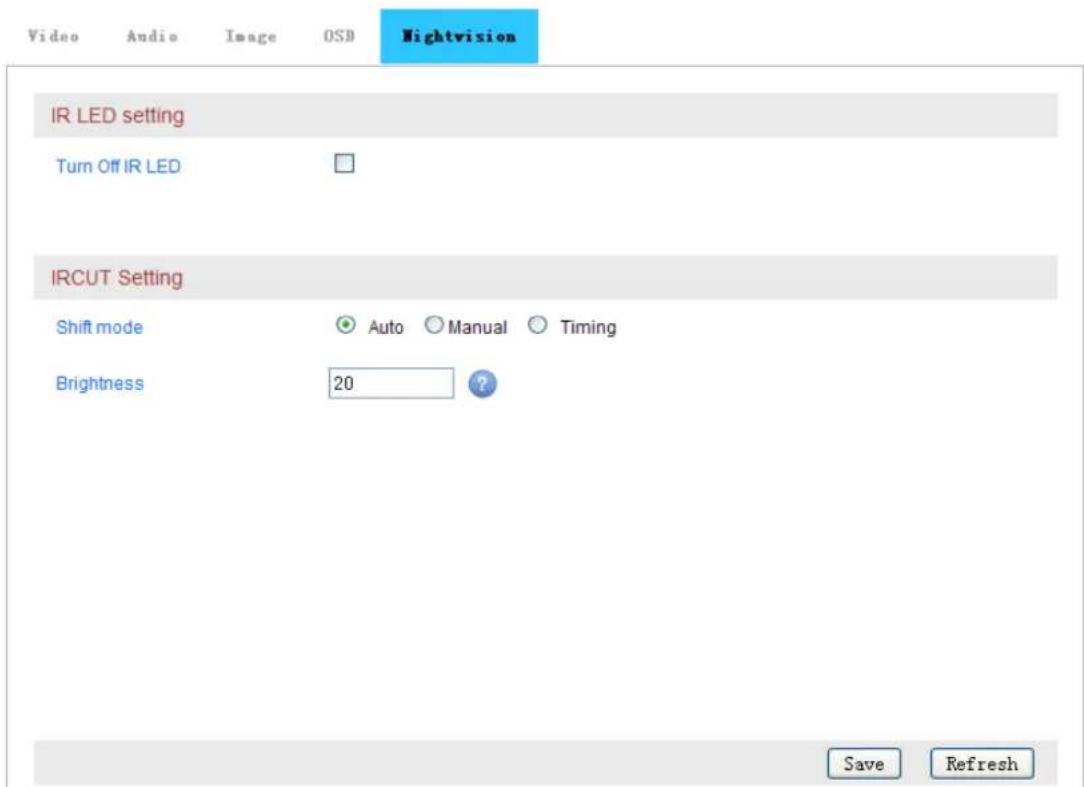
Figure27
5.1.4. Safety
Access to User management, you can add or edit the user as Figure28.
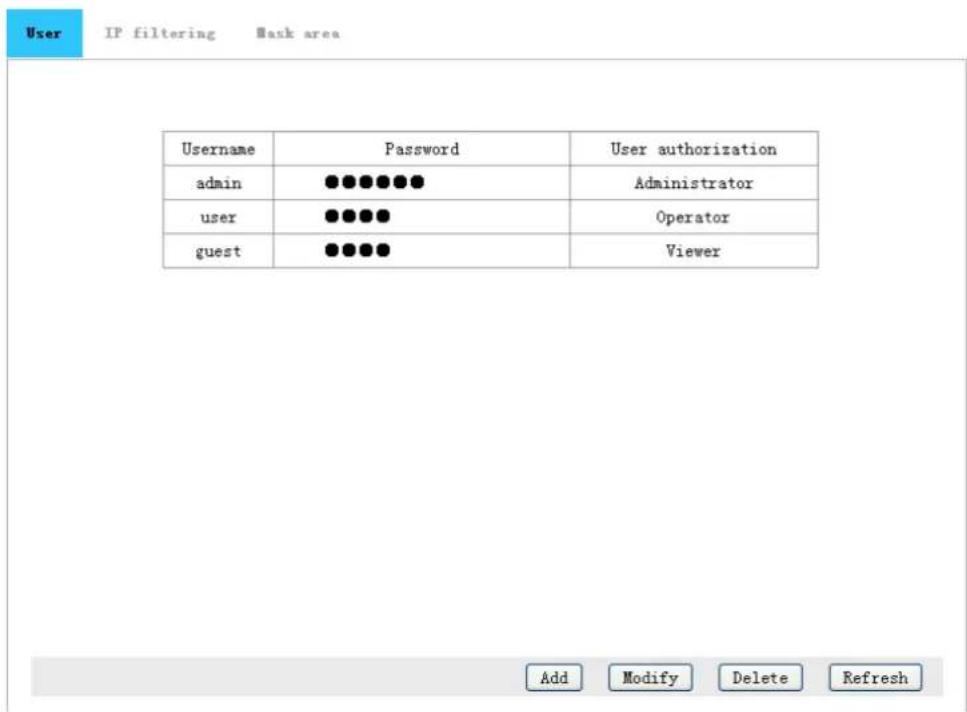
Figure28
Tips: After setting up, click save and refresh button, the entering info will display in the webpage.
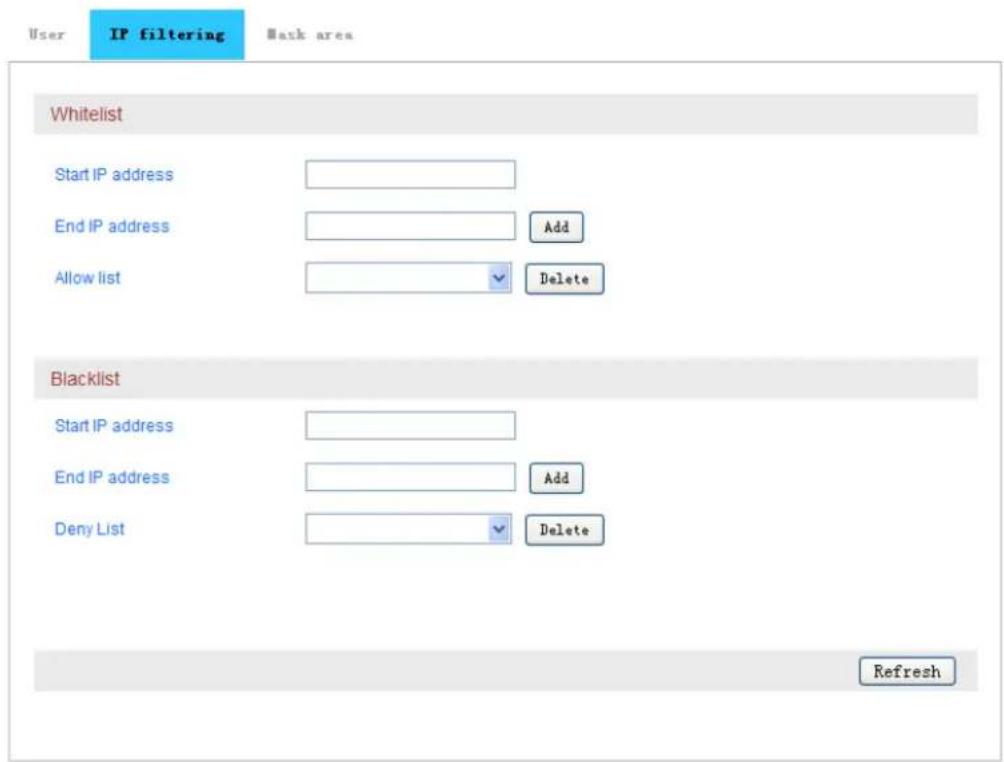
You can set up the IP filtering to allow or deny some IP address to visit the device as below.
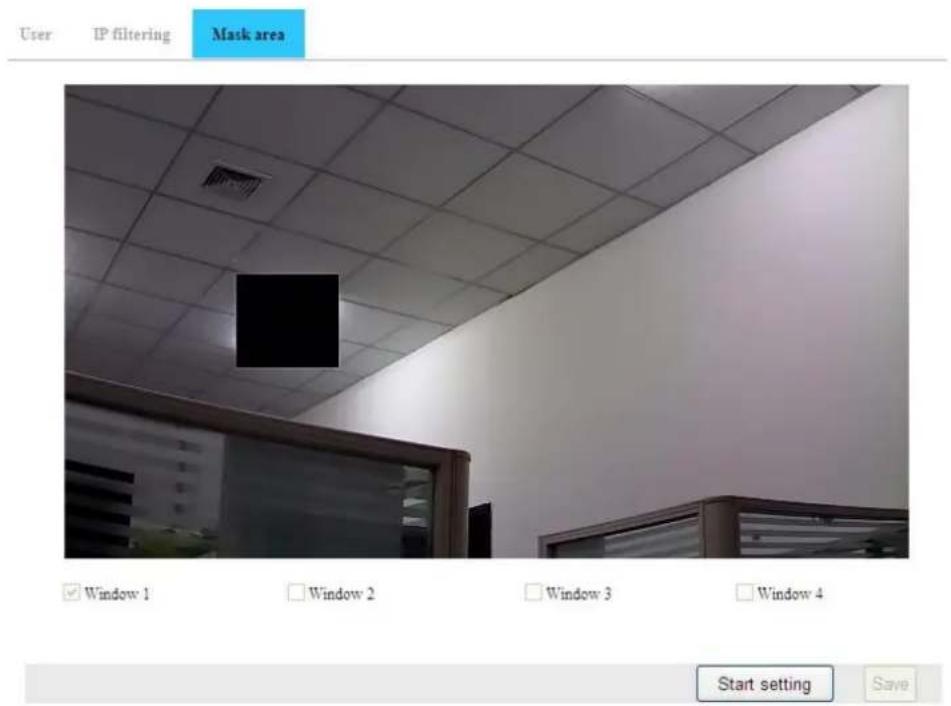
Also you can set up some mask area you don't want to be monitored, please click "Start setting" to enable the function, and then ticked a window, it will show a red frame in video, click the frame, it will become green, click and slide it you can move or resize it, and then click Save to finish the setting as below.
5.1.5. Alarm
5.1.5.1. IO Detect
Access to IO detector, can enable detect function and set up input signal type as Figure29.
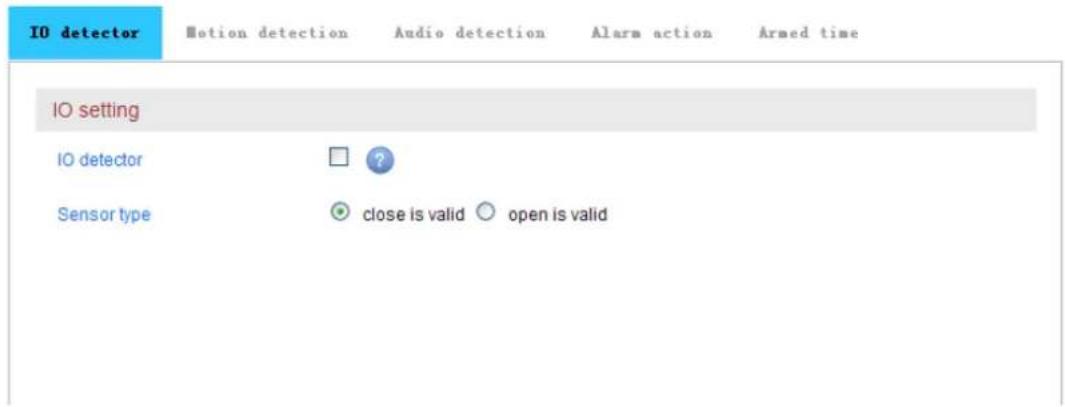
Figure29
5.1.5.2. Motion Detection
Access to motion detection, you can set up Max 4 detection area, also can set up the sensitivity for every area as Figure30.
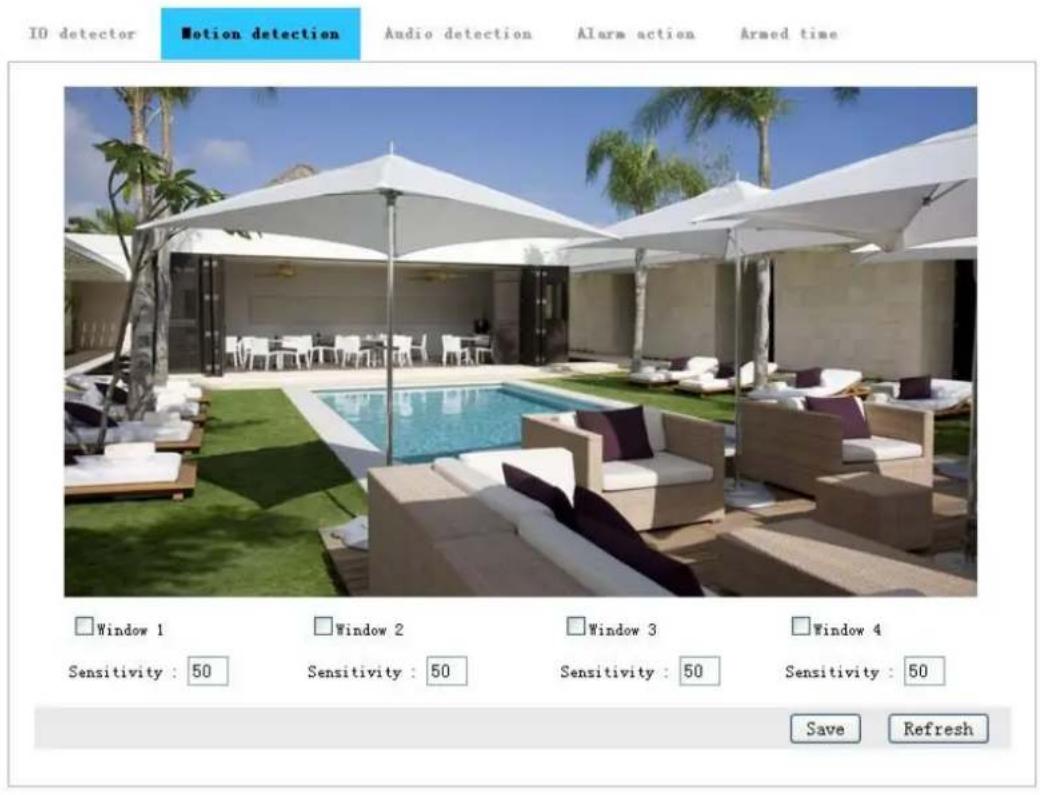
Figure30
5.1.5.3. Audio Detection
Access to audio detection, you can enable audio detection and set up sensitivity of it as Figure31.
![IO detector Motion detection Audio detection Alarm action Armed time Audio setting Audio detection ON OFF Sensitivity 5 [1-10]](/content/2026/05/805790/images/b3ddbf22340b887792802bdff96074c2742b5662319940875060f2349a08ea8e.jpg)
Figure31
5.1.5.4. Linkage alarm setting
You can set up IO detect, motion detection and audio detect, it can linkage to trigger the action: snapshot to Email or FTP server or SD card, recording to FTP server or SD card, and trigger IO output as Figure32.
Tips: The usage for combination of alarm trigger in alarm trigger type:
For example, you enable the audio detection and motion detection, so the camera is enabled combination of alarm trigger, it will perform the action in alarm action setting when the audio detect and motion detection detect any change.
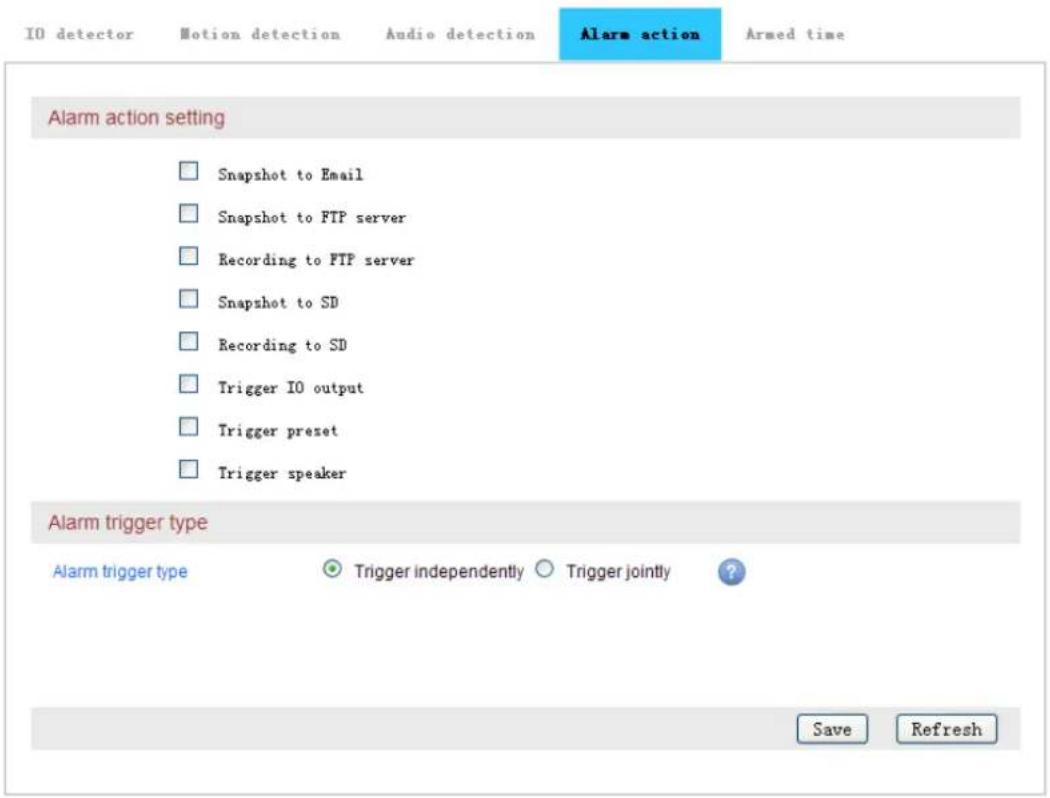
Figure32
5.1.5.5. Protected duration setting
After setting up alarm detect type and alarm trigger linkage, you need to set up protected duration. You must set up it, then the camera perform trigger linkage; the time format is 7 days, 24 hours per day, 15 minutes per a block as Figure33.
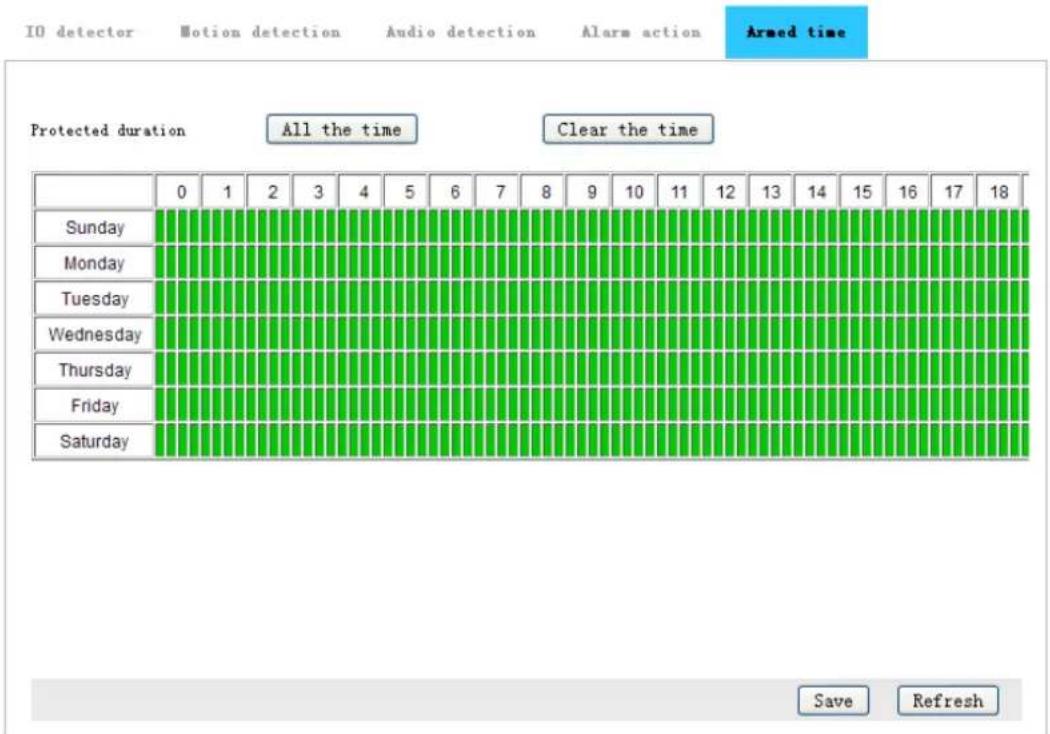
Figure33
5.1.6. Storage
5.1.6.1. SD Management
Access to SD management, you can check and download recording and snapshot file in SD card, and check SD card remaining capacity, format SD as Figure34.
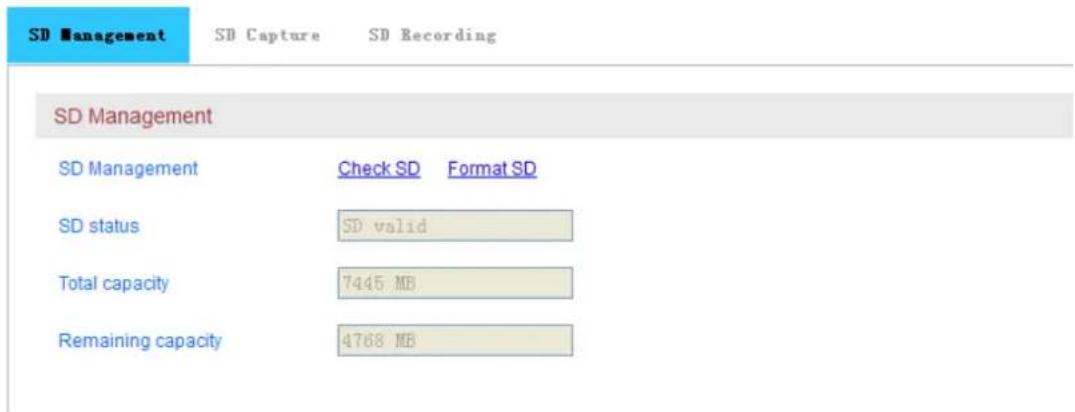
Figure34
5.1.6.2. SD Capture setting (Timing Snapshot)
Access to SD capture, you can enable timing snapshot and set up snapshot time interval and snapshot duration; time format is 7 days, 24 hours per day, 15 minutes per a block as Figure35.
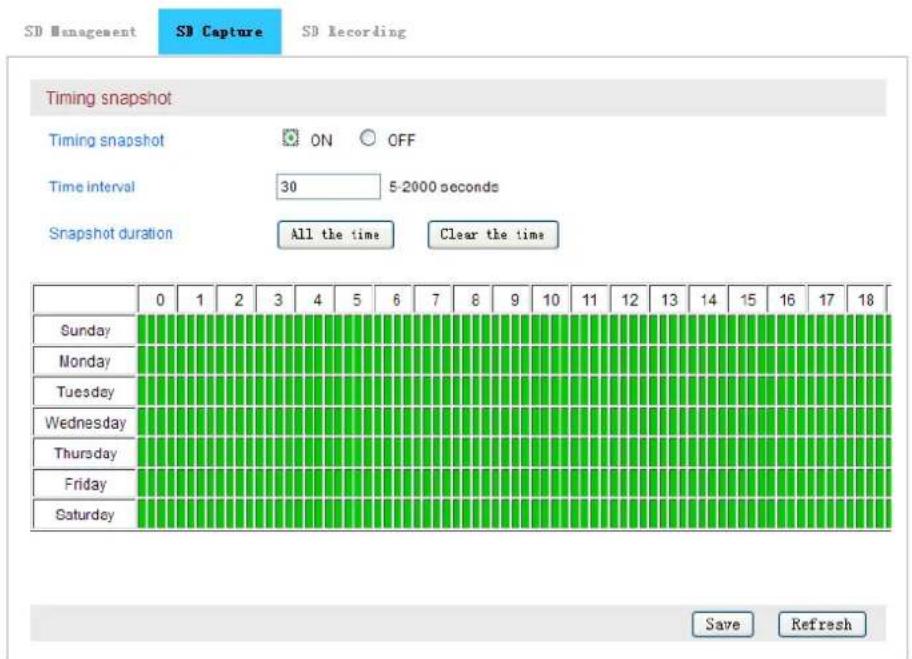
Figure35
5.1.6.3. SD Card Recording Setting
Access to SD Card Recording Setting, you can enable SD recording and set up recording duration for every file; time format is as 7 days, 24 hours a day, 15 minutes per a block as Figure36.
Tips: it will overwrite SD recording file automatically by default, also overwrite previous recording file when the SD space is full.
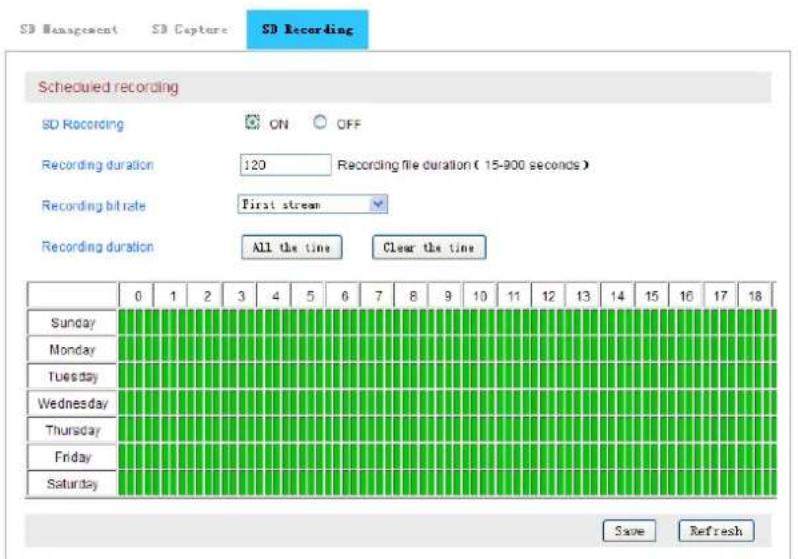
Figure36
5.1.7. Log
Access to Log menu, you can check the user operation log as Figure37.
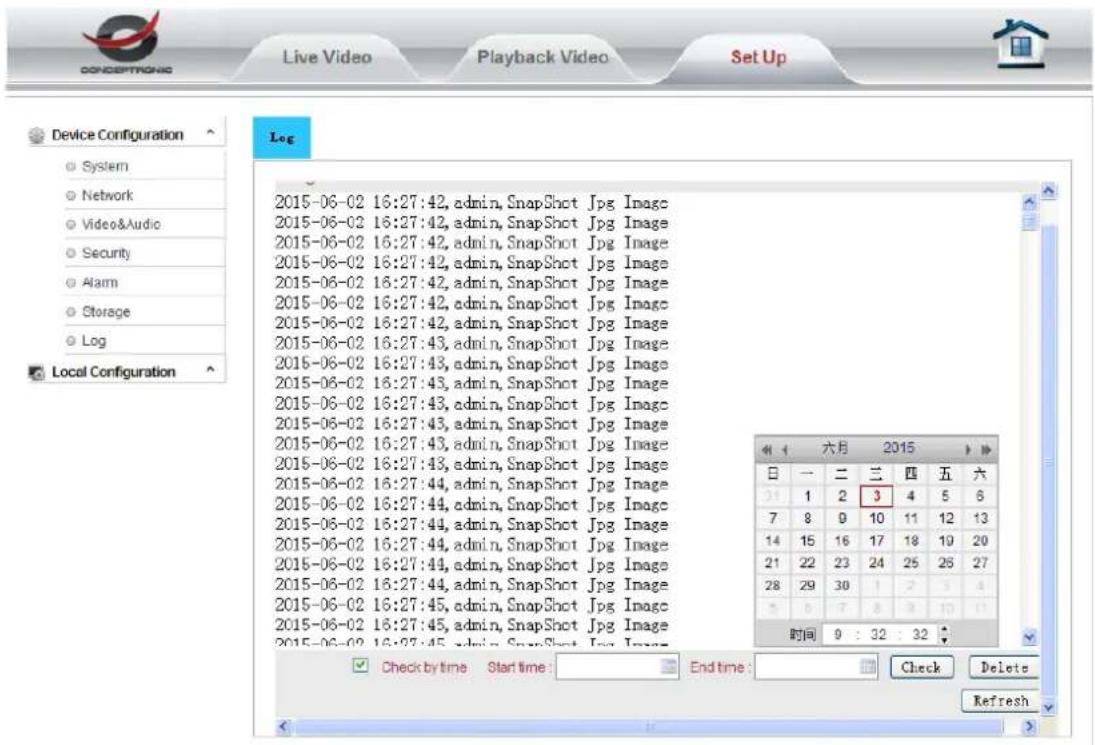
Figure37
5.2. Local Setting
Access to local configuration, you can set up recording path, snapshot path and recording duration as Figure38.
Tips:
- You must use administrator to run the browse, then recording path and snapshot path can be save successfully at above IE9; the default recording path is D:\HYRec.
- You can enable to show motion detection frame when viewing video.
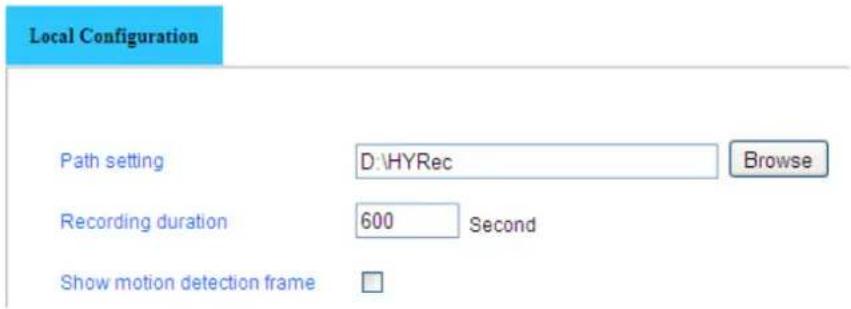
Figure38

- User Manual
- Statement
- Notice
- Installation Environment
- Transport and Handling
- Notice:
- Index
- Product Introduction
- Product Overview
- Product features:
- Product Exposition
- Device Connection
- Connection Diagram
- Wi-Fi Setting
- Configuration via network cable connection
- WPS/QSS One key configure Wi-Fi
- Mobile Phone Setting
- View Video by Browser
- Access to camera webpage and install Plug-in
- View Live Video
- Note:
- Query and Playback SD Record by Browser
- Playback Video
- Device Configuration and Local Setting
- Device Configuration
- System
- Device Status
- Time Setting
- Pan&Tilt Setting
- Others Setting
- Multiple Settings
- System Maintenance
- Device information
- Network
- IP Address Setting
- Port Setting
- Wi-Fi Setting
- Port Forwarding
- DDNS Setting
- RTSP Setting
- FTP Setting
- SMTP (E-mail) Setting
- Audio and Video
- Video Encoding Setting
- Volume Setting
- Image Setting
- OSD Setting
- Night vision Settings
- Safety
- Alarm
- IO Detect
- Motion Detection
- Audio Detection
- Linkage alarm setting
- Protected duration setting
- Storage
- SD Management
- SD Capture setting (Timing Snapshot)
- SD Card Recording Setting
- Log
- Local Setting
Brand : CONCEPTRONIC
Model : CIPCAM720ODWDR
Category : Security Camera