
Vaio PCG-GRT260G - Laptop SONY - Free user manual and instructions
Find the device manual for free Vaio PCG-GRT260G SONY in PDF.


| Product Type | Notebook (Laptop) |
| Brand | Sony |
| Model | Vaio PCG-GRT260G |
| Operating System | Microsoft Windows XP |
| LCD Screen | Color TFT |
| Battery Type | Rechargeable lithium-ion |
| AC Adapter | Included (100-240V) |
| Power Saving Modes | Standby (sleep) and Hibernate |
| Special Buttons | Volume Up/Down, Channel Up/Down, TV On, Magnify, Brightness, Power |
| Connectivity Ports | i.LINK (IEEE 1394), VGA, USB, Headphone, Microphone |
| TV Tuner | Available on selected models (GigaPocket) |
| Remote Control | Infrared remote with AA batteries (supplied) |
| Main Software | Giga Pocket, SonicStage, DVgate, PowerDVD, Norton Internet Security |
| Hard Disk Drive | Internal (capacity varies by configuration) |
| Optical Drive | CD/DVD (read/write capabilities) |
| Cleaning Instructions | Use soft dry cloth; mild detergent if needed; no solvents |
| Safety Precautions | Avoid heat, direct sunlight, moisture, magnetic fields; ensure ventilation |
| Spare Parts Availability | Battery, AC adapter available from Sony |
| Repairability | Contact Sony Service Center for repairs |
| General Information | User manual in PDF (276 pages) available for free download |
Frequently Asked Questions - Vaio PCG-GRT260G SONY
User questions about Vaio PCG-GRT260G SONY
0 question about this device. Answer the ones you know or ask your own.
Ask a new question about this device
Download the instructions for your Laptop in PDF format for free! Find your manual Vaio PCG-GRT260G - SONY and take your electronic device back in hand. On this page are published all the documents necessary for the use of your device. Vaio PCG-GRT260G by SONY.
USER MANUAL Vaio PCG-GRT260G SONY
Congratulations on your purchase of this Sony VAIO® computer, and welcome to the online VAIO® Computer User Guide. This user guide provides detailed information on all aspects of using your new VAIO computer, from keyboard functions to preinstalled software programs.
In the left navigation window, click the topics you want to learn more about, and that information will be displayed in this main window.
View the Electronic Flyer, which provides updates and supplemental information about your computer.
Go to the Sony Computing Support Site to view the VAIO® Computer Specifications, which list your computer's hardware specifications and preinstalled software information.
For Sony software information, click Start and Welcome to VAIO Life.
This section provides information on how to safely use your Sony computer.
Your computer is a portable device and can be used in a variety of environments. Whenever possible, you should apply the following ergonomic considerations:
- Position of your computer — Place the computer directly in front of you as you work. Keep your forearms horizontal, with your wrists in a neutral, comfortable position while using the keyboard, touch pad, or external mouse. Let your upper arms hang naturally at your sides. Take breaks during sessions with your computer. Excessive use of the computer may strain muscles or tendons.
- Furniture and posture — Sit in a chair with good back support and armrests. Adjust the level of the chair so your feet are flat on the floor. A footrest may make you more comfortable. Sit in a relaxed, upright posture and avoid slouching forward or leaning far backward.
- Viewing angle of the computer's display — Tilt the display to find the best viewing angle. Also try adjusting the brightness setting of the display. Following these suggestions can reduce eye strain and muscle fatigue.
- Lighting — Choose a location where windows and lights do not create glare or reflection on the display. Use indirect lighting to avoid bright spots on the display. You can purchase accessories for your display that help reduce glare. Proper lighting adds to your comfort and work effectiveness.
- Placement of an external display — When using an external display, set the display at a comfortable viewing distance. Make sure the display screen is at eye level or slightly lower when you are sitting in front of the monitor.
- Do not use or store your computer in a location subject to:
■ Heat sources, such as radiators or air ducts
- Direct sunlight
■ Excessive dust
- Moisture or rain
■ Mechanical vibration or shock
■ Strong magnets or speakers that are not magnetically shielded
■ Ambient temperature higher than 95°F (35°C) or less than 40°F (5°C)
■ High humidity
- Do not place electronic equipment near your computer. When running, the computer's electromagnetic field may cause other electronic equipment in close proximity to malfunction.
- Provide adequate air circulation to prevent internal heat buildup. Do not place your computer on porous surfaces such as rugs or blankets, or near materials such as curtains or draperies that may block ventilation. Leave a space of at least 8 inches (20 cm) behind the back of the computer.
- If the computer is brought directly from a cold location to a warm one, moisture may condense inside your computer. In this case, allow at least one hour before turning on your computer. If any problems occur, unplug your computer, and contact your Sony Service Center.
- The computer uses high-frequency radio signals and may interfere with radio or TV reception. Should this occur, move the computer a suitable distance away from the radio or TV.
- Do not drop the computer or place heavy objects on top of the computer.
- Use only specified peripheral equipment and interface cables.
- Do not use cut or damaged connection cables.
- If the telephone company makes a service call to your home or office and determines that your computer is responsible for a problem, the telephone company may bill you for the service call. Also, if you do not disconnect your computer when it is adversely affecting a telephone line, the telephone company has the right to disconnect your service until you correct the problem.
- Clean the computer with a soft, dry cloth or a soft cloth lightly moistened with a mild detergent solution. Do not use any type of abrasive pad, scouring powder, or solvent such as alcohol or benzine, as these may damage the finish of your computer. You can use canned compressed air specifically for computers to remove dust.
- If a solid object falls onto the computer or a liquid leaks into the computer, immediately turn off and unplug the computer. It is best to have the computer checked by qualified personnel before you use it again.
-
Avoid rubbing the LCD screen as this can damage the screen. Use a soft, dry cloth to wipe the LCD screen or canned compressed air.
■ Always disconnect the power cord before cleaning the computer. -
Direct sunlight can damage the LCD. Be careful when using the computer near a window.
- Do not scratch the LCD or exert pressure on it. This can cause a malfunction.
- Using the computer in low temperature conditions may produce a residual image on the screen. This is not a malfunction. When the computer returns to normal temperature, the screen returns to normal.
The screen becomes warm during operation. This is normal and does not indicate a malfunction.
The LCD is manufactured using high-precision technology. You may, however, see tiny black points and/or bright points (red, blue, or green) that continuously appear on the LCD. This is a normal result of the manufacturing process and does not indicate a malfunction.
Your VAIO® computer comes with a battery and an AC adapter. This chapter explains how to install and use these supplied accessories to power your computer. It also describes ways you can efficiently utilize the battery as a power source.
The supplied battery is not charged when you receive your computer. To charge the battery and begin using the computer immediately, insert the battery into the computer and use the supplied AC adapter as a power source. The computer automatically charges the installed battery while it uses AC power.
Connecting the AC adapter
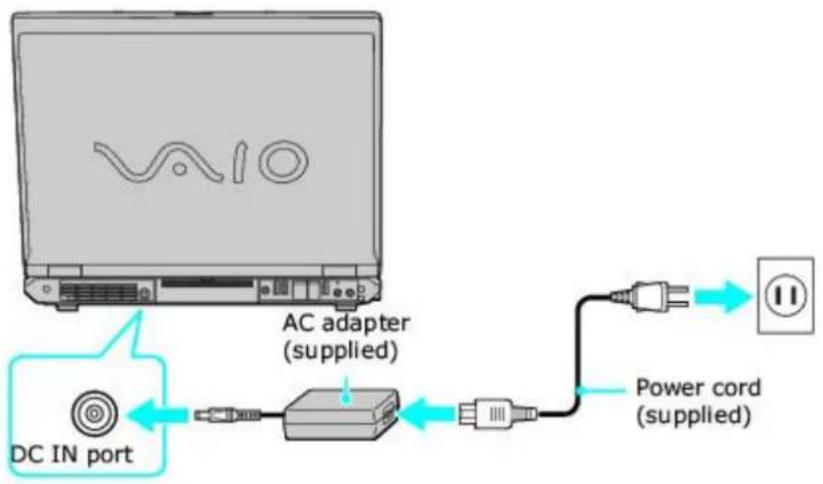
To connect the AC adapter
- Plug the AC adapter cable into the DC IN port.
Connecting the AC Adapter to the Computer
text_image
vao AC adapter (supplied) DC IN port Power cord (supplied)- Plug the power cord into the AC adapter and an AC outlet.
Use only the supplied AC adapter with your computer.
Turning on the computer
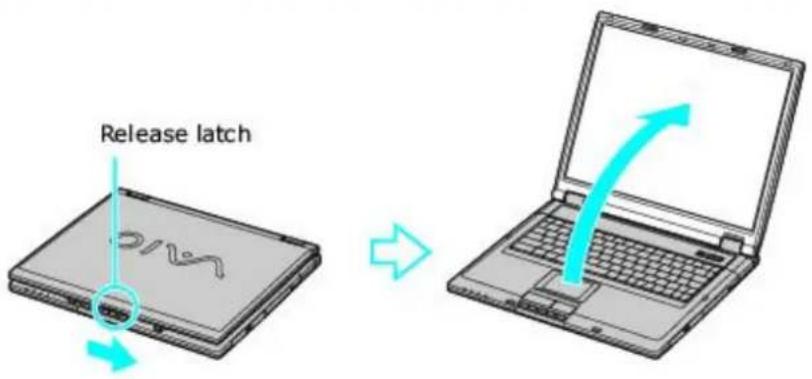
To open and turn on the computer
- Slide the cover release latch and lift the cover while holding the bottom of the computer firmly.
Opening the Computer
text_image
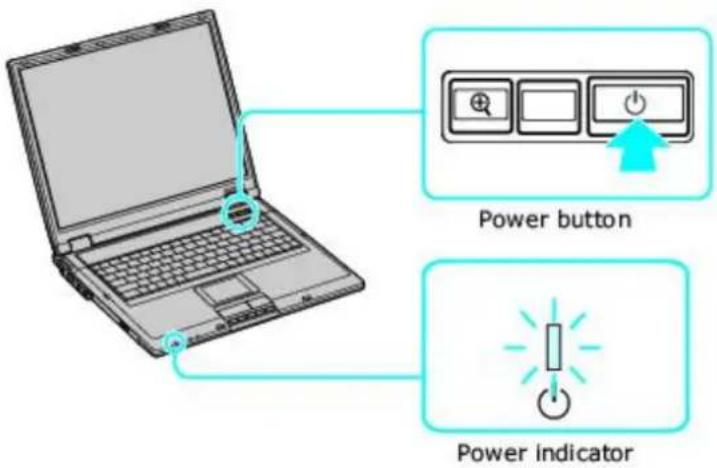
Release latch- Press the power button until the power indicator turns on.
Turning on the Computer
text_image
Power button Power indicatorIf you continue to press the power button, the computer turns off.
-
If the computer screen is too dark or too bright, follow these steps to adjust the brightness:
-
Your computer is equipped with a Brightness button, located next to the Power button. Pressing it will adjust the LCD screen brightness.
- To increase brightness, press the Fn and F5 keys, and then press the Up Arrow or the Right Arrow key.
- To decrease brightness, press the Fn and F5 keys, and then press the Down Arrow or the Left Arrow key.
Your computer, depending on the model you purchased, may come equipped with one battery bay and one multipurpose bay that supports a second battery. If your computer comes with two bays, you can purchase a second rechargeable battery to extend your computing time. For information on how to extend the life of the battery, see Conserving Battery Power for more information.
When operating your computer on battery power, your computer's CPU speed is reduced.
The battery that comes with your computer is not fully charged at the time of purchase.
The brightness of your computer screen automatically dims when you switch from AC power to battery power. To increase the brightness, press the Fn and F5 keys, and then press the Up Arrow ↑ or Right Arrow → key.
Using a second battery
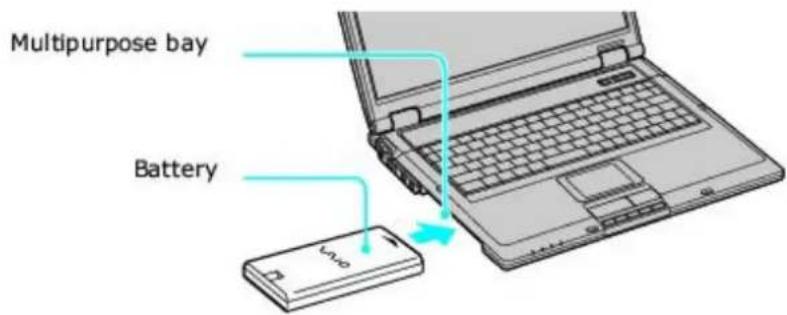
To insert a second battery
- If another device is in the multipurpose bay, remove that device.
- Insert the battery into the multipurpose bay. When the computer uses the second battery, the Battery 2 indicator turns on.
Inserting the Second Battery
text_image
Multipurpose bay Battery- Slide the weight saver in the direction of the arrow until it clicks into place. The weight saver stabilizes the battery.
Inserting the Weight Saver
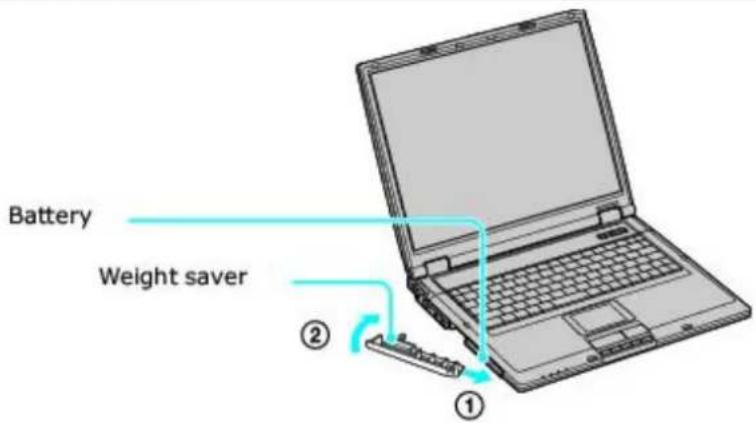
text_image
Battery Weight saver ① ②- Lock the weight saver RELEASE switch.
Locking the Weight Saver
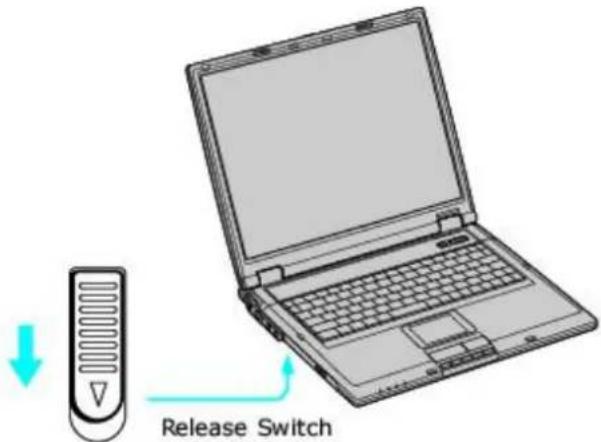
text_image
Release SwitchTo remove the second battery
-
Make sure the Battery 2 indicator is off and the Battery 1 indicator is on or the computer is connected to AC power. If the Battery 2 indicator is on:
-
Double-click the CPU icon 📋 or Profile icon 📋, depending on the model you purchased. The PowerPanel dialog box appears.
- On the Battery tab, click Primary Battery in the Battery Switch box.
-
Click OK.
-
Turn the computer over, and unlock the weight saver and the multipurpose bay.
Unlocking the Second Battery
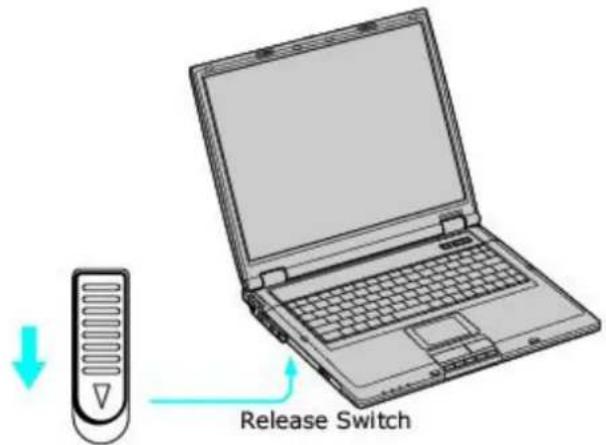
text_image
Release Switch- Pull the weight saver and battery gently from the multipurpose bay.
- Insert the weight saver into the multipurpose bay to protect the bay.
You may use the power saving modes and PowerPanel utility to conserve battery power. Conserving battery power may significantly extend your computing time, depending on how you use your computer.
Using power saving modes
In addition to the normal operating mode, which allows you to turn off specific devices to save power, your computer has two distinct power saving modes: Standby and Hibernate. Use the Standby and Hibernate power saving modes to override a power profile setting and initiate immediate action.
- Standby — Saves the state of the system and peripheral devices in memory (RAM). Power consumption is reduced to a minimum. The system remains on, and the computer screen (LCD) is off.
- Hibernate — Saves the state of the system and peripheral devices to the hard disk. Power consumption is reduced to the lowest possible setting without being completely off. Hibernate mode consumes the lowest level of power. Your computer enters Hibernate mode when the remaining battery charge drops below 5 percent, regardless of the setting you select.
Since some programs and peripheral devices prevent the system from entering Hibernate mode, save your data frequently to avoid data loss.
To activate Standby mode
- Press the Fn and Esc keys. The power indicator blinks in this mode.
- Press any key to return to normal mode.
To activate Hibernate mode
- Press the Fn and F12 keys, or press the power button and release it immediately. Do not move the computer until the power indicator turns off.
- Press the power button to return to normal mode.
If your computer does not activate Hibernate mode, see Battery for more information.
Using PowerPanel utility
The PowerPanel utility enables you to select and customize a predefined power management profile to conserve battery life. The following table describes all the predefined power management profiles in PowerPanel. You can customize the settings for all the following profiles, except the Disable Power Management profile.
Profile
Icon Description

Maximum Performance
Provides the best system performance but conserves minimal power.

Maximum Battery Life
Provides power saving features to give you maximum battery life and good performance. It slows the computer and puts it into Standby mode after a specified time.

Ultimate Battery Life
Extends the Maximum Battery Life by stopping power to the optical drive and Memory Stick® media slot.

Power Management Off
Disables all power management settings, such as Standby and Hibernate modes. You cannot change the settings of this profile.

AC Power
Indicates when AC power is in use. Similar to Power Management Off and the Standby mode after a half hour. Power Management automatically loads the AC profile unless you disable this feature.

Games
Disables the display and the Hard Disk Standby timer.

Presentation
Keeps the display on at all times while conserving power. This option is ideal for slide show presentations. You can establish settings for LCD (Video) Standby, Hard Disk Standby, and Standby mode to optimize power management for your system.

Camera
Optimizes performance and power requirements for camera usage.

DVD
Optimizes performance and power requirements for DVD usage.

Word Processing
Optimizes power management with longer time-outs on the hard disk and display screen. You can also establish settings for LCD (Video) Standby, Hard Disk Standby, and Standby mode to optimize power management for your system.

Spreadsheet
Optimizes performance and power requirements for spreadsheet programs.

Communications
Extends battery life by initiating a quick display time-out. The Internal modem remains powered on. You can also establish settings for LCD (Video) Standby, Hard Disk Standby, and Standby mode to optimize power management for your system.

Automatic Profile Selection
Automatically selects a profile suitable for active software programs.
To select a profile
- Right-click the CPU icon 📋 or Profile icon 📋, depending on the model you purchased. See Locating battery information for Battery icon descriptions.
- Select Profiles, and click the profile on the shortcut menu. The profile settings are implemented instantly. See Using PowerPanel utility for descriptions of available profiles.
When you use the battery to power your computer, your system automatically selects the Maximum Battery Life power management profile by default. If you select a different power management profile while using battery power, that profile is selected automatically the next time you use the battery to power your computer.
See PowerPanel Help for information on customizing the power management profiles.
To customize your profile settings
You can customize your profile settings to sustain enough power for a particular computing function.
- Right-click the CPU icon 📋 or Profile icon 📋, depending on the model you purchased.
- Select Edit/Create Profiles from the shortcut menu.
- In the left panel, select the profile you want to change.
- In the right panel, right-click the setting under System, LCD (Video), Hard Disk, or Other Devices that you want to change. See the following table for a description of each power management setting.
- Make your changes from the drop-down menu.
- Click File, and click Save.
Not all power management settings described in the table below are available on your computer, depending on the configuration you purchased.
Power Management Setting Description
CPU Control ^1 Controls the processor speed. You can select either Performance, Adaptive, or Battery Life. These selections are listed in order from the greatest to least amount of power consumed.
Standby Timer Controls the time it takes the system to activate the Standby mode when it is idle. The longer you allow the computer to sit idle while it is not in a power saving mode the more power the computer consumes.
Hibernate
Timer Controls the time it takes the system to activate the Hibernate mode when it is idle. The longer you allow the computer to sit idle while it is not in a power saving mode the more power the computer consumes. Hibernate mode conserves more power than Standby mode.
CPU Fan Control ^1 (On selected models) Controls the speed of the processor fan. You can set the fan speed to different levels. Level 1 (Quiet) conserves the most power.
Lid Close Action Controls the state of your system when the lid of the computer is closed. You can select either Standby, Hibernate, or LCD Off.
Hibernate on Low Battery Controls the state of your system when the battery power is low. You can turn this setting On or Off. Selecting On conserves the most power when the battery is low.
darker you set the computer screen the more power you conserve.
LCD Standby Timer Controls the time it takes the system to turn off power to the computer screen (LCD) when the system is idle. The system itself still functions on full power.
HDD Standby Timer Controls the time it takes the system to turn off power to the hard disk drive when the system is idle. This setting only turns off power to the hard disk drive.
i.LINK Port Controls power to the i.LINK ^ port. Disabling power to the i.LINK port conserves power.
Memory Stick Port Power-saving Controls power to the Memory Stick media slot. Disabling power to the Memory Stick media slot conserves power.
Optical Drive Power-Saving Controls power to the optical drive. Disabling power to the optical drive conserves power.
↓ Slows the processor speed.
Locating battery information
You can view the remaining battery charge and miscellaneous battery information on the Battery Information toolbar, the PowerProfile window, and the Power Meter window.
The Battery icons that appear on the Battery Information toolbar and PowerPanel window indicate the current status of the installed battery.
Battery icon Charge status


Charging
Fully charged


Discharging
No battery
To view the Battery Information toolbar
-
Right-click the center of the Windows® taskbar.
-
Select Toolbars from the shortcut menu, and click Battery Information. The Battery Information toolbar appears on the taskbar.
If the Battery Information toolbar is hidden behind the taskbar icons, right-click the taskbar and click to cancel Lock the Taskbar. Click and drag the edge of the Battery Information toolbar to the left until it is in clear view.
The total charge remaining in the battery is listed in percent and real-time values.
Battery Information Toolbar

text_image
Battery Information 100% 2:02 -100%- 2:02 No Battery 0:00* The Battery Information Toolbar may appear slightly different on your computer, depending on the number of batteries your computer supports.
- Percentage indicator — Displays the percentage of the remaining charge.
- Time indicator — Displays estimated time (hours : minutes) remaining before the battery fully discharges, also known as the time-to-empty.
To close the Battery Information toolbar
- Right-click the Battery Information toolbar.
- Select Toolbars from the shortcut menu, and click to cancel Battery Information. The Battery Information toolbar disappears from the taskbar.
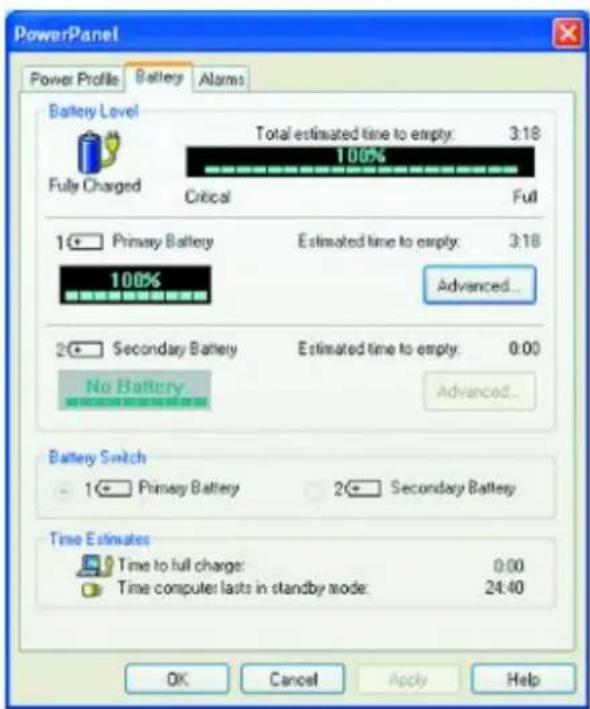
To view the PowerPanel window
Double-click the CPU icon 📋 or Profile icon 📋, depending on the model you purchased. The PowerPanel window appears.
PowerPanel
text_image
PowerPanel Power Profile Battery Alarms Battery Level Fully Charged Total estimated time to empty: 3:18 100% Critical Full 1 Primary Battery Estimated time to empty: 3:18 100% Advanced... 2 Secondary Battery Estimated time to empty: 0:00 No Battery Advanced... Battery Switch 1 Primary Battery 2 Secondary Battery Time Estimates Time to full charge: 0:00 Time computer lasts in standby mode: 24:40 OK Cancel Apply Help* The PowerPanel window may appear slightly different on your computer, depending on the number of batteries your computer supports.
- Power Profile — Displays the power management settings for various devices on your system. You can change the settings to conserve power.
- Battery tab — Displays the total charge remaining in the battery. You can click Advanced for specific information on the battery.
- Alarms tab — Displays the alarm settings, which notify you when the battery is fully charged or too low. You can change your computer's alarm settings on this window.

Click Help in the lower right corner of the window for more information.
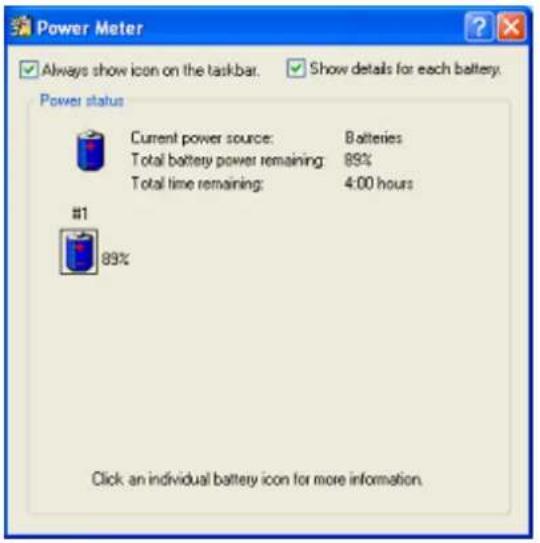
To view the Power Meter window
- Double-click the Power icon. The Power Meter window appears. You can also rollover the Power icon to view the remaining battery charge.
Power icon Power status


Computer is using AC power.
Computer is using AC power and charging the battery.
Battery is charging.
Battery is fully charged.
Battery is discharging.
No battery is inserted in the computer.

If the Power icon is not displayed on the Taskbar Notification area, see To display the Power icon on the taskbar
text_image
Power Meter ✓ Always show icon on the taskbar. ✓ Show details for each battery. Power status Current power source: Batteries Total battery power remaining: 89% Total time remaining: 4:00 hours #1 89% Click an individual battery icon for more information.To display the Power icon on the taskbar
- Click Start on the Windows® taskbar, and click Control Panel.
- Click Performance and Maintenance, and click Power Options. The Power Options Properties window appears.
- Select the Advanced tab, and then select Always show icon on the taskbar in the Options box. The power icon appears on the taskbar. See the power icon descriptions above for more information.
Inserting a battery
To insert a battery
- Lift the lid of the computer.
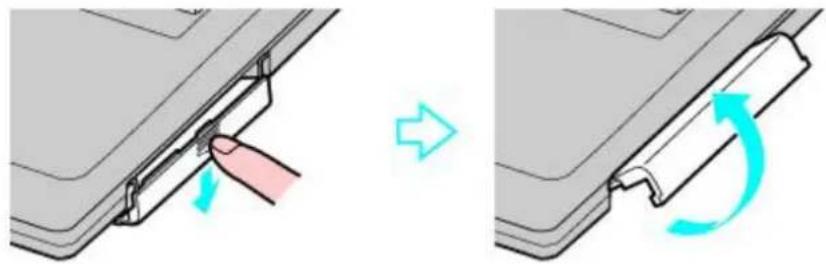
- Push the battery bay cover down to open it. The battery bay cover swings out but does not detach from the computer.
Opening the Battery Bay
natural_image
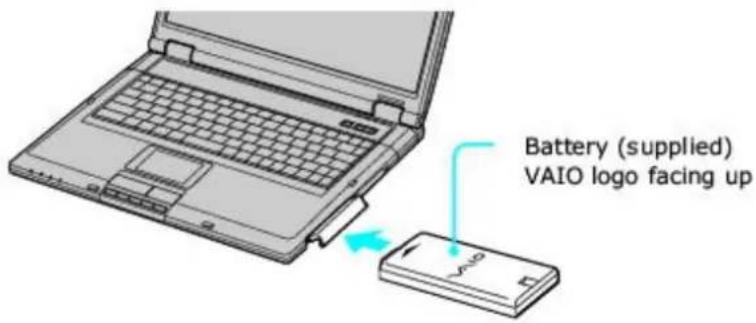
Diagram showing a device being inserted into a slot, with arrows indicating the process (no text or symbols present)- Slide the battery into the battery bay. If the computer is on, it automatically detects the battery.
Inserting a Battery
text_image
Battery (supplied) VAIO logo facing up- Push the battery bay cover up until it clicks into place.
If a port replicator is attached to your computer, do not insert or remove the battery. Lifting and turning the computer with a port replicator attached could cause a temporary loss of power.
Some programs and peripheral devices prevent the system from automatically entering Hibernate. If you are using battery power, save your data frequently to avoid data loss and manually activate a power saving mode. See Using power saving modes for more information.
Removing a battery
If you are not using the computer for an extended period of time, remove the battery from the computer to avoid damaging the battery. Remove the battery when the computer is off.
To remove a battery
- Make sure the computer is off.
- Push the battery bay cover down to open it.
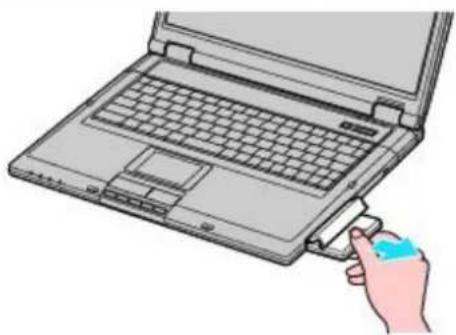
- Pull the battery out of the battery bay.
Removing a Battery
natural_image
Illustration of a hand inserting a small object into a laptop keyboard (no text or symbols visible)- Push in and lift up the battery bay cover until it clicks into place.
Charging a battery
You will need to charge the battery if battery power drops below 10 percent or you have not used the battery for a long time. The lithium-ion battery supplied with your computer may be recharged at any time, whether you wait until the battery is completely or partially discharged. Charging a partially discharged battery does not affect battery life. If you charge the battery and find that battery power is still low, the battery may be reaching the end of its life, and you may need to replace it.
The battery supplied with your computer is not charged at the time of purchase.
To charge a battery
You can charge the battery when the computer is on or off. However, the battery will charge faster when the computer is off. Charging the battery takes several hours. See your VAIO® Computer Specifications for the approximate time needed to charge your battery.
Charge the battery at temperatures between 50°F and 80°F (10°C to 30°C). Lower temperatures require more time to charge.
-
Insert the battery into the battery bay. If you want to charge more than one battery, insert the second battery into the computer. See To insert a second battery for more information.
-
Connect the AC adapter to the computer. The computer automatically charges the battery as long as the computer is using AC power.
The battery indicator blinks while the battery charges. The battery indicator stops blinking when the battery is fully charged.
When using two batteries, the battery you insert first charges first. The second battery you insert begins charging when the first battery is 85 percent charged.
Battery Indicators
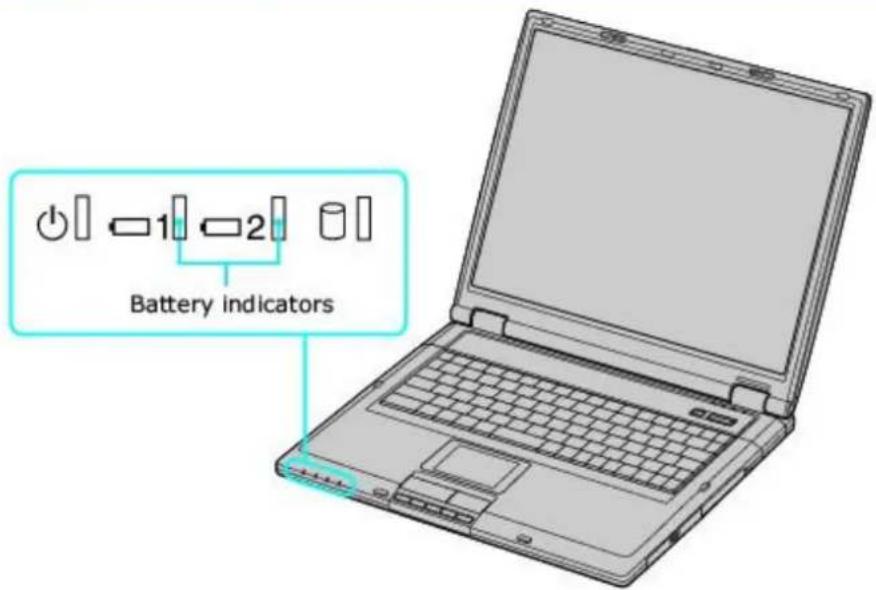
text_image
Battery indicatorsBattery indicator status Description
On The computer is using battery power.
Single blink The battery is running out of power.
Double blink The battery is charging.
Off The computer is using AC power.
Notes on batteries
- Never leave the battery in temperatures above 140°F (60°C), such as under direct sunlight or in a car parked in the sun.
■ While the battery is in use or being discharged, the battery heats up. This is normal and is not cause for concern. - Keep the battery away from heat sources.
- Keep the battery dry.
- Do not open or disassemble the battery.
- Do not expose the battery to any mechanical shock.
- Battery life is shorter in a cold environment because of decreased battery efficiency at low temperatures.
Using Special Buttons
Depending on the model you purchased, your VAIO® computer is equipped with a variety of audio- and video-oriented function buttons: Volume Up and Down, Channel Up and Down, TV On, Brightness, and Magnify screen. Only models equipped with a TV tuner and GigaPocket software will feature TV functionality; not all models feature TV functionality.
Using Special Buttons
Depending on the model you purchased, your VAIO® computer is equipped with a variety of audio- and video-oriented function buttons: Volume Up and Down, Channel Up and Down, TV On, Brightness, and Magnify screen. Only models equipped with a TV tuner and GigaPocket software will feature TV functionality; not all models feature TV functionality.
About the special buttons
The following information shows where the special buttons are located, and briefly describes their functionality.
Special Buttons (GigaPocket models only)
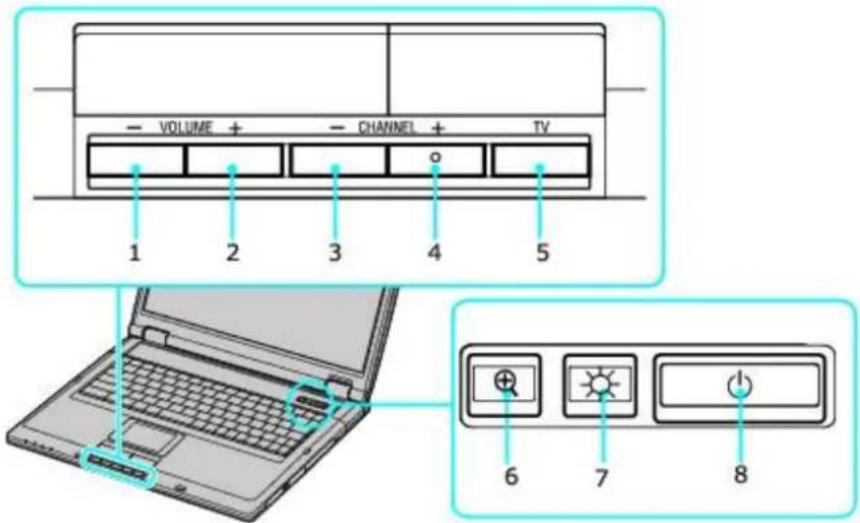
text_image
- VOLUME + - CHANNEL + TV 1 2 3 4 5 6 7 8Number Type of Button
1 Volume Down. The Volume Up and Down buttons control the audio output on your computer.
2 Volume Up. The Volume Up and Down buttons control the audio output on your computer.
3 Channel Down. The Channel Up and Down buttons control the television channel selections.
4 Channel Up. The Channel Up and Down buttons control the television channel selections.
5 TV On. The TV On button launches GigaPocket software that enables you to watch television or record programs.
6 Magnify. The Magnify button, located next to the computer's brightness button, works as a screen resolution toggle button. By pressing it, you can alternate between different screen resolutions.
7 Brightness. The Brightness button, located between the Magnify and Power buttons, toggles brightness levels for the computer's LCD screen.
8 Power. The Power button turns your computer on or off.
Special Buttons (Models without GigaPocket)
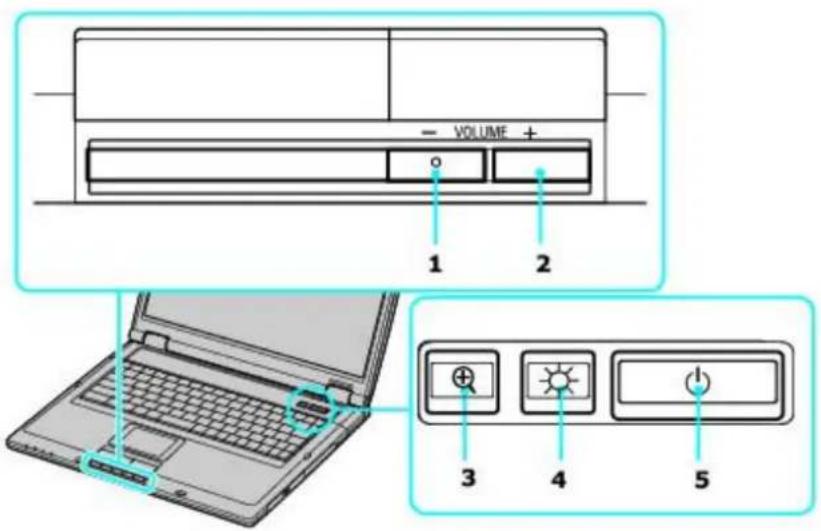
text_image
- VOLUME + 1 2 3 4 5Number Type of Button
1 Volume Down. The Volume Up and Down buttons control the audio output on your computer.
2 Volume Up. The Volume Up and Down buttons control the audio output on your computer.
3 Magnify. The Magnify button, located next to the computer's brightness button, works as a screen resolution toggle button. By pressing it, you can alternate between different screen resolutions.
4 Brightness. The Brightness button, located between the Magnify and Power buttons, toggles brightness levels for the computer's LCD screen.
5 Power. The Power button turns your computer on or off.
Using the TV On button
Certain models are equipped with a TV tuner, which enables you to watch and record television with the help of the GigaPocket software.
The TV On button will launch GigaPocket and its TV viewing/recording capabilities.
For more information, see Giga Pocket Personal Video Recorder.
How to use the TV button
- Locate the TV button below the touch pad and press the button once.
- The GigaPocket window appears on the screen.

You must connect your computer to a television cable or antenna in order to view television with GigaPocket.
Using the TV On button
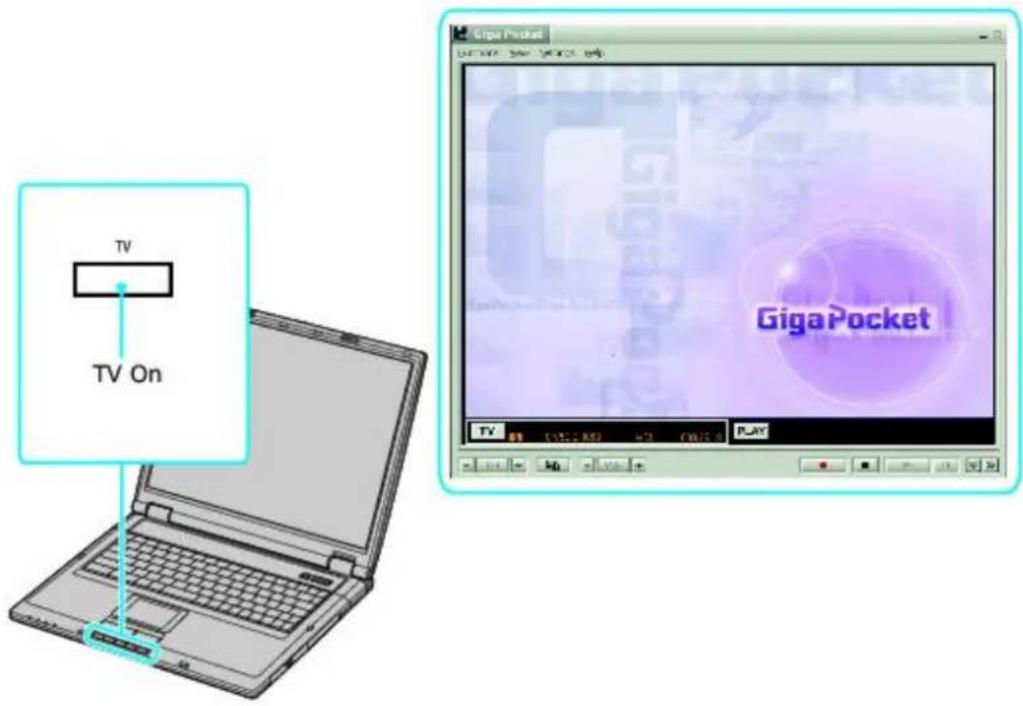
text_image
TV TV On GigaPocketYou can connect a digital video (DV) recorder, such as an i.LINK® digital video camera recorder, to the i.LINK® S400 (IEEE 1394) port on your computer. The i.LINK digital-video camera recorder is an external device that enables you to record and view digital images.
i.LINK is a trademark of Sony used to designate that a product contains an IEEE 1394 connector. The i.LINK connection may vary, depending on the software application, operating system, and compatible i.LINK devices. All products with an i.LINK connection may not communicate with each other. Refer to the documentation that came with your compatible i.LINK device for more information on operating conditions and proper connection. Before connecting compatible i.LINK PC peripherals to your system, such as a CD-RW or hard disk drive, confirm their operating system compatibility and required operating conditions.
Connecting an i.LINK digital video recorder
You can connect an i.LINK digital video (DV) recorder when the computer is on or off. Connecting the DV recorder when the computer is in a power saving mode (Standby or Hibernate) may cause the computer to malfunction.
Before you connect an i.LINK digital video recorder
- Do not connect more than one digital video camera recorder at a time. The preinstalled programs on your computer will not recognize multiple cameras.
- Do not connect an external device that requires power from the i.LINK port. The i.LINK port does not supply power to the external device.
- The i.LINK port supports transfer rates of up to 400 Mbps; however, the actual transfer rate is the lowest transfer rate of the external device.
- The i.LINK features available may vary depending on the programs you use. See the help guide that accompanied your program for more information.
To connect an i.LINK digital video recorder
- Turn on the digital video (DV) device and the computer.
- Plug the i.LINK® cable into the i.LINK port on the DV device.
- Plug the other end of the i.LINK cable into the i.LINK port on your computer. The Found New Hardware window appears on the lower right corner of your screen.
Connecting an i.LINK Digital Video Camera Recorder
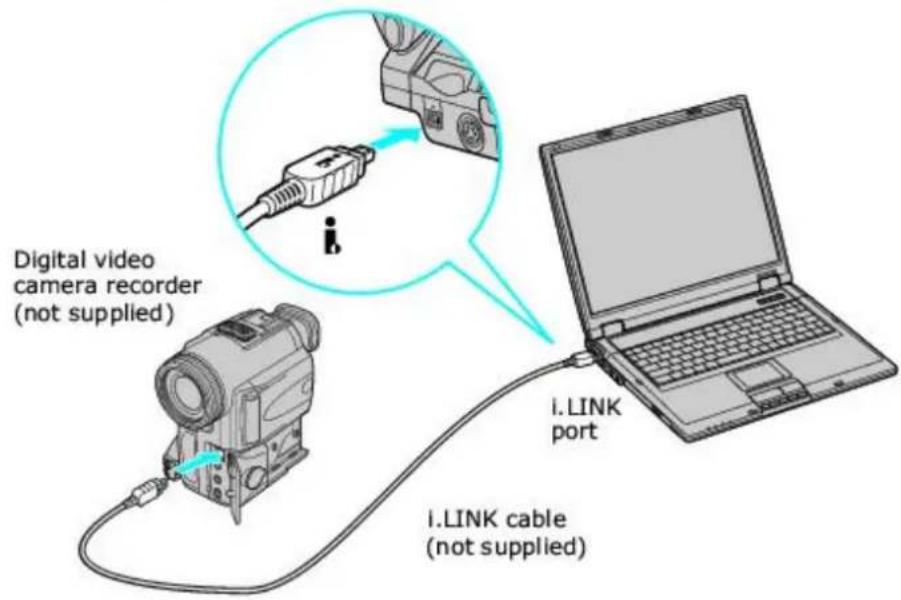
text_image
Digital video camera recorder (not supplied) i.LINK port i.LINK cable (not supplied)See the guide that accompanied your digital video camera recorder for more information on its installation and use.
Disconnecting the i.LINK digital video recorder
You can disconnect the digital video recorder while the computer is on or off. Simply unplug the i.LINK cable from the i.LINK port on the computer. Disconnecting the cable when the computer is in a power saving mode (Standby or Hibernate) may cause the computer to malfunction.
Using a digital video camera recorder
Your computer comes with preinstalled driver software that is compatible with most Sony digital video camera recorders. If you purchased a camera that comes with its own driver software, install these drivers before you use the camera.
To view images
You can view images captured by your digital video camera recorder three different ways. Select one set of instructions from the following list:
- If your digital video camera recorder is compatible with the preinstalled programs, the Digital Video Device window appears when you connect the camera to the computer. Select the program you want to use in this window, and click OK.
- Click Start, and click All Programs. Select a program in which to view your images.
- Click Start, and click Welcome to VAIO Life. Click Movies, and select a program in which to view your images.
You can connect an external display (such as a computer monitor or a projector) to your computer.
Connecting a computer monitor
Your computer can display images to the computer screen (LCD), to an external computer monitor, or to both the LCD and external monitor while your computer is on.
To connect a computer monitor
- Make sure the computer monitor is plugged into an AC outlet.
- Plug the display cable into the Monitor (VGA) port on the computer.
-
If it is not already on, turn on the computer monitor.
-
Press the Fn+F7 keys to toggle the display between your computer, the monitor, or both the computer and monitor.
You cannot use the Monitor (VGA) port on your computer when a port replicator is connected to the computer. Use the Monitor (VGA) port on the port replicator instead.
Connecting a Computer Monitor
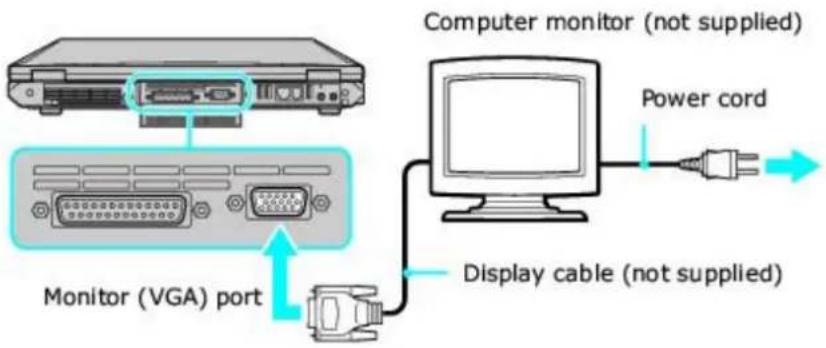
text_image
Computer monitor (not supplied) Power cord Monitor (VGA) port Display cable (not supplied)You can connect a multimedia device, such as a multimedia computer monitor or projector, to your computer. Connecting a multimedia device enables you to display images on your computer screen (LCD), the multimedia device, or both.

For information on connecting a TV to your computer, see Playing DVDs.
To connect a multimedia computer monitor or projector
-
Plug the device into an AC outlet.
-
Plug the device cable into the Monitor (VGA) port ☐ on your computer. If you are using a multimedia computer monitor, which has built-in speakers and a microphone, plug the audio cable into the Headphone jack ☐ on your computer to hear sound.
To locate the Monitor port and Headphone jack, see "Locating Controls and Ports" in the "Setting Up" chapter of your printed VAIO® Computer Quick Start.
- Turn on the device (if it is not already on), and then turn on your computer.
Connecting a Projector
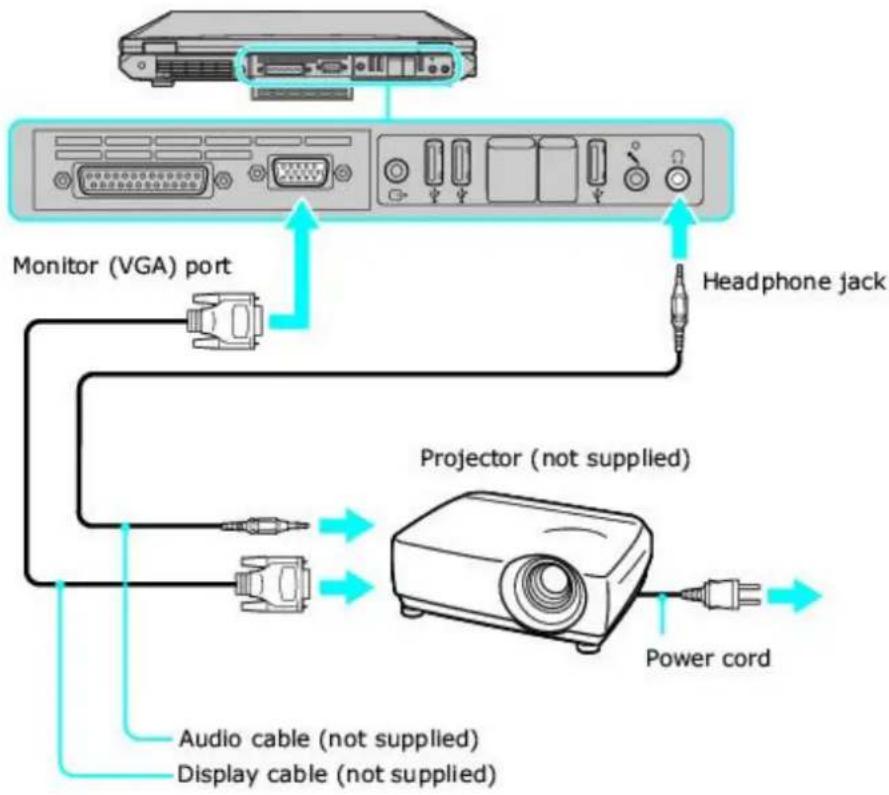
flowchart
graph TD
    A["Monitor (VGA) port"] --> B["Projector (not supplied)"]
    B --> C["Power cord"]
    D["Headphone jack"] --> B
    E["Audio cable (not supplied)"] --> B
    F["Display cable (not supplied)"] --> B
- Press the Fn+F7 key combination to toggle the display between your computer, the monitor, or both. See Selecting a display for more information.

See the guide that accompanied your projector for more information on its installation and use.
Selecting a display
You can connect external displays to your computer while it is on. When you connect an external display (projector, computer monitor, or TV) to your computer, you can switch the display between the computer screen (LCD), the external display, or both, using shortcut keys.
Shortcut keys Result
Fn+F7 Toggles the display between the computer screen (LCD), a connected TV, and both the LCD and TV.
Select one display (LCD or TV) when playing a DVD. Connect the TV cable before you turn on the computer; otherwise, Fn+F7 will not work. You cannot use the Fn+F7 function to switch between LCD and TV once a DVD is inserted into the optical drive.

You may not be able to display the computer screen (LCD) and an external display or projector at the same time, depending on the types of computer displays and projectors you are using.
Disconnecting a computer monitor or projector
You can disconnect the external computer monitor or projector by unplugging the monitor (VGA) cable from your computer's port. Disconnecting the external display when the computer is in a power saving mode (Standby or Hibernate) may cause the computer to malfunction.
Your computer comes with built-in stereo speakers. If you wish to enhance the sound quality of your computer, you can purchase and connect external speakers. If you want to purchase speakers, make sure the speakers are designed for computer use. You can shop Sony online at http://www.sonystyle.com/vaio or contact your local retailer.
Connecting speakers
You can connect external speakers to your computer to enhance the sound quality of your computer.

Do not place floppy disks on the speakers. The speakers' magnetic field may damage the data stored on the
floppy disks.
To connect speakers to your computer
- Turn down the volume of the speakers.
- Plug the speaker cable into the Headphone jack on the computer.
- Plug the other end of the speaker cable into the speaker.
Connecting Speakers
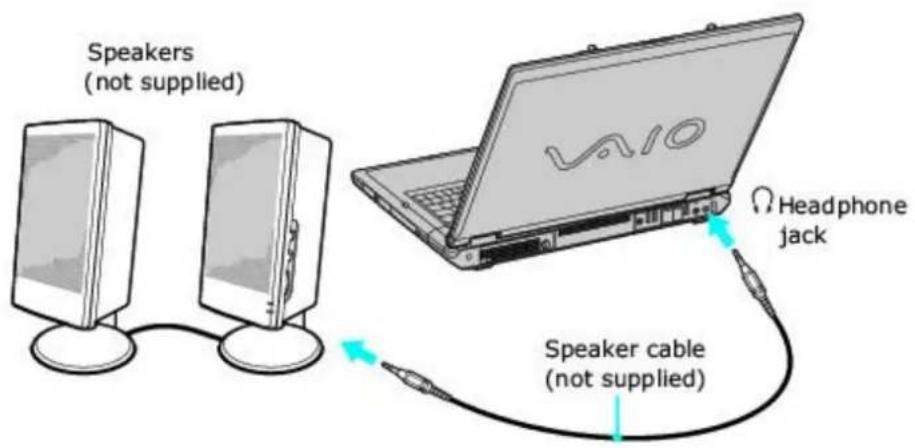
text_image
Speakers (not supplied) LAVI Headphone jack Speaker cable (not supplied)
See the guide that accompanied your speakers for more information on its installation and use.
Disconnecting speakers
You can disconnect external speakers when the computer is on or off. Simply unplug the speaker cable from the Headphone jack on the computer.
Adjusting the volume
To adjust the volume for playing CDs and DVDs, use the Volume icon 📋 on the Windows® taskbar or the Volume Up and Down buttons. Adjusting the volume for playing CDs or DVDs does not adjust the volume for recording sound files.
You can only adjust the recording volume in the Recording Control window. See Using a microphone to record sound for instructions on how to open this window.
To adjust the volume of your speakers
- Right-click the Volume icon on the Windows® taskbar, and select Open Volume Control. The Volume Control window appears.
- Click and drag the Volume Control slider up to increase volume and down to decrease volume.
- Click to cancel any Mute check boxes that are selected.
Sound device Function
Volume Control Adjust the sound level from the speakers or headphones.
Wave Adjust the wavfile sound or the system sound of Windows.
SW Synth Adjusts the internal or external synthesizer volume.
CD Audio Adjust the volume of the CD in the optical drive.
Microphone Adjust the internal or external microphone volume.
Telephony Adjust the modem or telephone volume.
PC Beep Adjust the beep sound when inserting or removing the PC Card and other devices.
Line ^1 Adjusts the sensitivity of input volume.
On selected models only.
As a shortcut, you can press the Fn+F4 keys and the Up Arrow or Right Arrow keys to change the volume setting. You can also press the Fn+F3 keys to toggle the mute option on and off.
Enabling the audio feature
If you do not hear sound when playing a CD or DVD, you may need to enable the audio feature.
To enable the audio feature
- Click Start on the Windows® taskbar, and click Control Panel.
- Click Performance and Maintenance, and click System. The System Properties window appears.
- Select the Hardware tab, and click Device Manager. The Device Manager window, which lists the hardware devices, appears.
- Double-click the name of the optical drive, such as DVD/CD-ROM drives ^1 .
- Double-click the listed drive name, and click the Properties tab.
- Click the Enable digital CD audio for this CD-ROM device check box if it is not already selected.
1 The read/write drive letter designation may vary, depending on your system's hardware configuration.
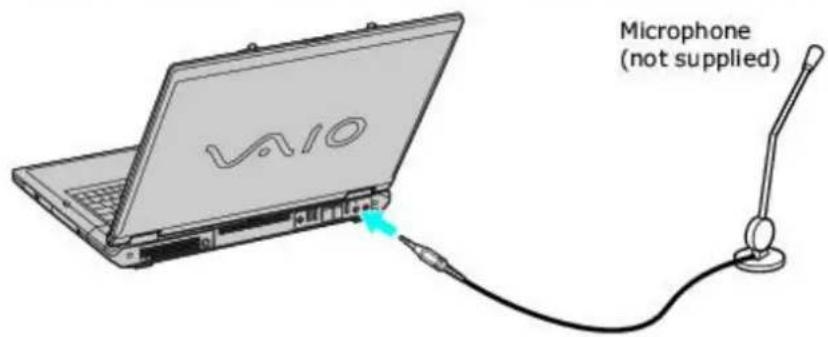
You can connect an external microphone to your computer to enhance the sound input to your computer. Make sure your microphone is designed for computer use. If you wish to purchase a microphone, shop Sony online at http://www.sonystyle.com/vaio or contact your local retailer.
Connecting a microphone
Plug the microphone cable into the Microphone jack ^1 on the computer.
Connecting a Microphone
text_image
V410 Microphone (not supplied)A protruding dot located next to the Microphone jack distinguishes this jack from the Headphone jack.
Disconnecting a microphone
You can disconnect an external microphone when the computer is on or off. Simply unplug the microphone cable from the Microphone jack on the computer.
Using a microphone to record sound
You can record messages, memos, etc. by connecting a microphone to the Microphone jack on your computer.
To record from a microphone
- Double-click the Volume icon 📋 on the Windows® taskbar. The Volume Control window appears.
- From the Options menu, click Properties. The Properties dialog box appears.
- Click to select the Recording option in the Adjust volume for box, and click OK. The Recording Control window appears.
- Click the Select check box at the bottom of the Microphone column, if it is not already selected. Close the Recording Control window.
- Click Start, and select All Programs, Accessories, Entertainment, and then Sound Recorder. The Sound - Sound Recorder window appears.
For help using Sound Recorder, click Help in the Sound Recorder window.
To adjust the volume for recording sound
You can only adjust the volume for recording in the Recording Control window.
- Right-click the Volume icon on the taskbar, and select Adjust Audio Properties.
- On the Audio tab, click Volume in the Sound recording box. The Recording Control window appears.
- Click and drag the Microphone slider up to increase volume and down to decrease volume.
A protruding dot located next to the Microphone jack distinguishes this jack from the Headphone jack.
Giga Pocket Personal Video Recorder is a suite of interactive Sony audio and video components that are designed to create, capture, and play back video files derived from television and your personal videos. ^1

Giga Pocket Personal Video Recorder hardware and software applications are not available on all VAIO® computers.
^1 Unauthorized duplication of audio or video files is a violation of applicable laws.
Giga Pocket Personal Video Recorder is a unique set of tools that enhance your VAIO® computer's capabilities. Giga Pocket gives you a wide range of video viewing, recording, and playback capabilities, such as:
- Watching and recording television programs from your computer.
■ Viewing and recording TV programming simultaneously. - Setting and managing daily/weekly timer recording schedules.
■ Managing Video Capsules (recorded video contents) on your computer. - Recording personal video content from a videotape.
- Playing your Video Capsules on other computers.
- Operating Giga Pocket functions with a remote control device.
- Sharing Giga Pocket features and functions with other computers on a network.
- Transforming Video Capsules into gMovie format for viewing on your CLIÉ handheld.

For an explanation of Giga Pocket terms, see the Glossary.
Giga Pocket Personal Video Recorder includes:
- Giga Pocket — This application enables you to watch TV programs on your computer's display and record them onto the hard disk drive as Video Capsules for later playback.
- Timer Recording Manager — The Timer Recording Manager keeps track of all TV program recordings you have scheduled. This program also enables you to modify timer recordings.
- Timer Recording Wizard — The Wizard interface guides you through setting up a timer recording schedule. You can program one-time recordings and set up daily or weekly recurring recording schedules.
- Giga Pocket Explorer — The Giga Pocket Explorer program functions as your video file management system, and stores recorded Video Capsules as well as modified Playlists. Giga Pocket Explorer contains export/import functions for file format conversions.
- Giga Pocket Server — The Giga Pocket Server enables multiple computers on a network to use certain Giga Pocket software functions.
- CLIÉ Converter — The CLIÉ Converter is a plug-in application that enables the conversion of Video Capsules into gMovie format. You can change the format your Giga Pocket contents and transfer them onto a Memory Stick® media for viewing with your Sony CLIÉ Handheld.
Accessing the Giga Pocket Help
For more information about Giga Pocket Personal Video Recorder, follow these steps:
- Click Start in the Windows® taskbar and select All Programs.
- Select Giga Pocket, Help, and click Giga Pocket Help.
Giga Pocket Personal Video Recorder maintains information about the software and Video Capsules on your computer's drive D, in a folder named D:\Giga Pocket V5. This folder and its contents are not designed for your direct maintenance. Please do not move, modify or delete the Giga Pocket Folder or any of its contents. Any alteration to this folder or its contents may cause your Giga Pocket software and Video Capsules to stop working properly.
The information in this section provides guidelines to follow when using Giga Pocket Personal Video Recorder.
Display setup
Always set up your display as follows when you use Giga Pocket:
- Color quality: Use factory default settings (32-bit).
- Screen resolution: Use the factory preset screen resolution setting. Using other display settings may cause an improper screen image or an incorrect recording by Giga Pocket software.
- Check your display setup in the Microsoft® Windows® operating system before starting up Giga Pocket software. For more information, refer to the operating system manual.
- Do not change the display setup while Giga Pocket is running, or your system may operate improperly.
Hard disk drive
- When the available free space on your hard disk approaches 100 MB, you are not able to create a new Video Capsule. Delete unnecessary Video Capsules or files in order to increase available space on your hard disk drive.
- If you directly delete, move, or rename a file in the D:\Giga Pocket V5 folder, Giga Pocket Personal Video Recorder features may not work properly.
Network
- Microsoft® Windows® XP operating system supports a single Giga Pocket user at any given time. Even if a different user logs on using the Fast User Switching feature, Giga Pocket is not available to any other user account. For more information, see the Giga Pocket Help.
- Microsoft Windows XP operating system supports a single Giga Pocket user at any given time. If a different user logs on using the Fast User Switching feature, the Timer Recording feature is not available to another user account. The Timer Recording Manager icon appears in the task tray of the 1st user to log on.
The most common terms for Giga Pocket Personal Video Recorder software are defined below.
Cabinet A cabinet acts as a container for Video Capsules in Giga Pocket Explorer. A network cabinet is located on other computers in a network environment.
CATV Refers to Community Access Television, otherwise known as cable television.
Clip A clip is a Video Capsule when it is stored in a Playlist.
Cut A cut is a selected scene taken from a previously recorded Video Capsule.
Expiration date A Video Capsule is stored on the hard disk drive for a preset period of time. When this time has expired, the Video Capsule is automatically deleted.
Film roll During Video Capsule playback, a snapshot view of the scenes are captured on a film roll. You can scroll freely through the film roll to view different scenes.
GOP Group of Pictures (GOP) are the smallest unit of measure for the images captured on a Video Capsule. A single GOP is approximately 0.5 to 1 second in length.
HotSync® Registered trade name for the method of linking between a handheld device and a larger computer, such as a desktop or notebook computer.
Management information Management information contains the creation date of Video Capsules and their thumbnails. This information is required for preview.
MPEG file extension. A file that contains compressed moving pictures using the MPEG standard, with.mpg as the file name
Safety Tab Removing the safety tab from a Video Capsule prevents accidental erasing of your video data.
Slip play This feature allows you to view delayed video playback. While your recording is in progress, you are able to view the recording from the beginning.
Snapshot A snapshot is a miniature view displayed on the film roll in Giga Pocket, Playlist Builder, and the preview monitor in Giga Pocket Explorer.
Stand by mode Stand by mode is a power saving mode that is set up by using the Windows® operating system. Your computer stays in this power saving mode until approximately 5 minutes before the timer recording is due to begin.
STB Refers to set-top box, otherwise known as a cable box.
Thumbnail A thumbnail is a miniature view on recorded Video Capsules or in playback by Giga Pocket. The main thumbnail is displayed in calendar view or in the Giga Pocket Explorer list area.
Timer recording A timer recording is a preset video recording event.
Video Capsule A Video Capsule is a virtual container that holds the video images recorded with Giga Pocket Recorder. A Video Capsule is created on your computer hard disk drive and managed with Giga Pocket Explorer.
Accessing the Giga Pocket Help
For more information about Giga Pocket, follow these steps:
- Click Start in the Windows taskbar and point to All Programs.
- Point to Giga Pocket, point to Help, and then select Giga Pocket Help.
This section illustrates how to set up the cables and connections for your Giga Pocket Personal Video Recorder system.
The hardware configuration of your computer may vary from the illustrations shown. To view the specific hardware configuration for your computer, see the online specifications sheet.
To set up TV connections
The best method of connecting your computer system, TV monitor or display, and cable service access, depends on the type of cable connection available in your home.
TV signal reception strength will vary widely depending on service availability in your area as well as the type of connection available.
Your VAIO ^® Computer is supplied with certain audio and video cables. Depending on your in-home cable access, you may require extra cables, adapters or connection equipment not supplied with your computer.
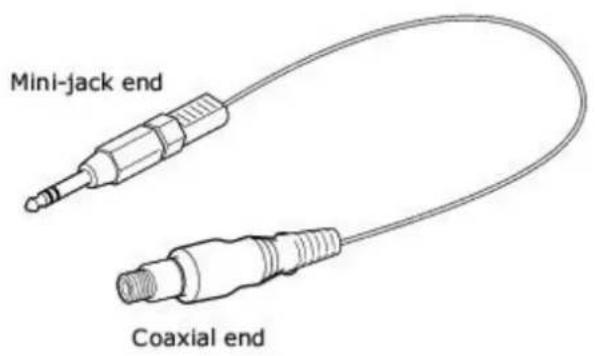
The TV coaxial converter cable
One primary cable to connect your computer to a TV cable or antenna is the TV coaxial converter cable (supplied with computers featuring GigaPocket). The mini-jack end connects to the computer's VHF/UHF port, whereas the coaxial end connects to the cable service access or antenna
TV coaxial converter cable
text_image
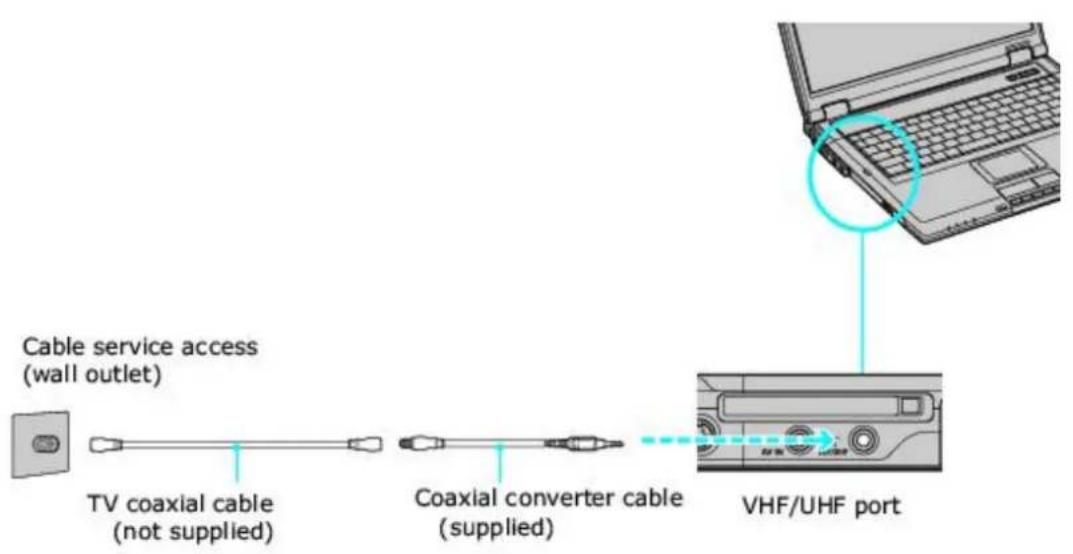
Mini-jack end Coaxial endConnecting to standard cable access (CATV)
Option 1
- Connect one end of a TV coaxial cable (optional) to your cable service access. Connect the other end to the coaxial converter cable (supplied).
- Connect the mini-jack end of the coaxial converter cable to the VHF/UHF port on the back panel of your computer.
To connect in CATV mode (Option 1)
text_image
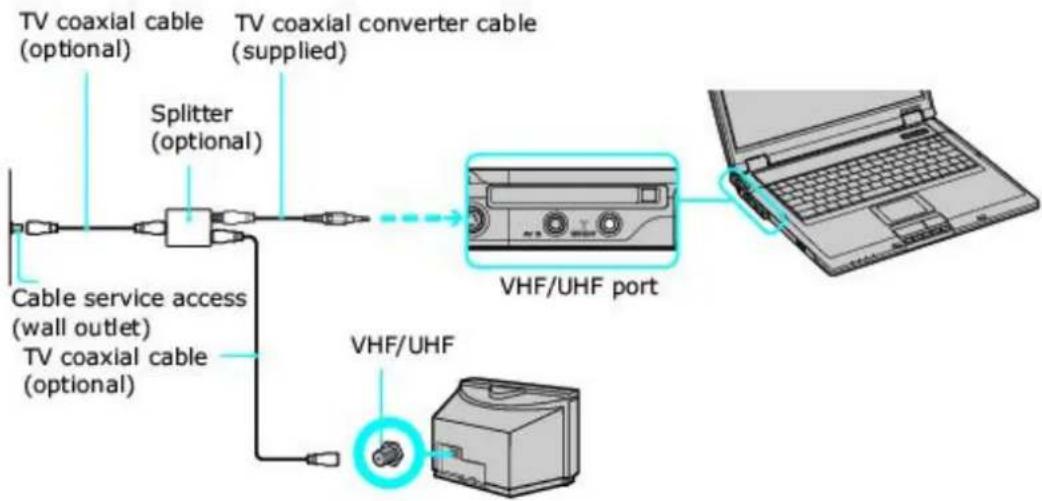
Cable service access (wall outlet) TV coaxial cable (not supplied) Coaxial converter cable (supplied) VHF/UHF portOption 2
- Connect one end of a TV coaxial cable (optional) to your cable service access. Connect the other end to the single-connection end of a splitter adapter.
- Connect the TV coaxial converter cable (supplied) to the double-connection end of the splitter adapter. Connect the other end to the VHF/UHF port on the back panel of your computer.
- Connect a third TV coaxial cable (optional) to the double-connection end of the splitter adapter. Connect the other end to the VHF/UHF port on the rear of your TV monitor or display.
To connect in CATV mode (Option 2)
text_image
TV coaxial cable (optional) Splitter (optional) Cable service access (wall outlet) TV coaxial cable (optional) TV coaxial converter cable (supplied) VHF/UHF port VHF/UHFConnecting to a standard antenna (air)
You can connect your Giga Pocket system to an indoor/outdoor antenna system, using Option 1 or 2 from the previous section, Connecting to standard cable access (CATV). Depending on the type of antenna system in your home, your connection may require a VHF/UHF RF combiner/transformer (optional) to connect your computer and the indoor/outdoor antenna system.
If you are connecting to an indoor/outdoor antenna, you may need to reorient the antenna for best reception. Move the antenna cable away from other power sources or connectors to reduce reception interference.
Option 1
- Connect one end of a TV coaxial cable (optional) to your antenna outlet. Connect the other end to a VHF/UHF RF combiner/transformer (optional).
- Connect the TV coaxial converter cable (supplied) from the combiner/transformer to the VHF/UHF port on the back panel of your computer.
Option 2
- Connect both ends of the antenna's twin lead cable to the screw-type grips on the combiner/transformer.
- Connect the TV coaxial converter cable (supplied) from the combiner/transformer to the VHF/UHF port on the back panel of your computer.
To connect in standard antenna mode (air)
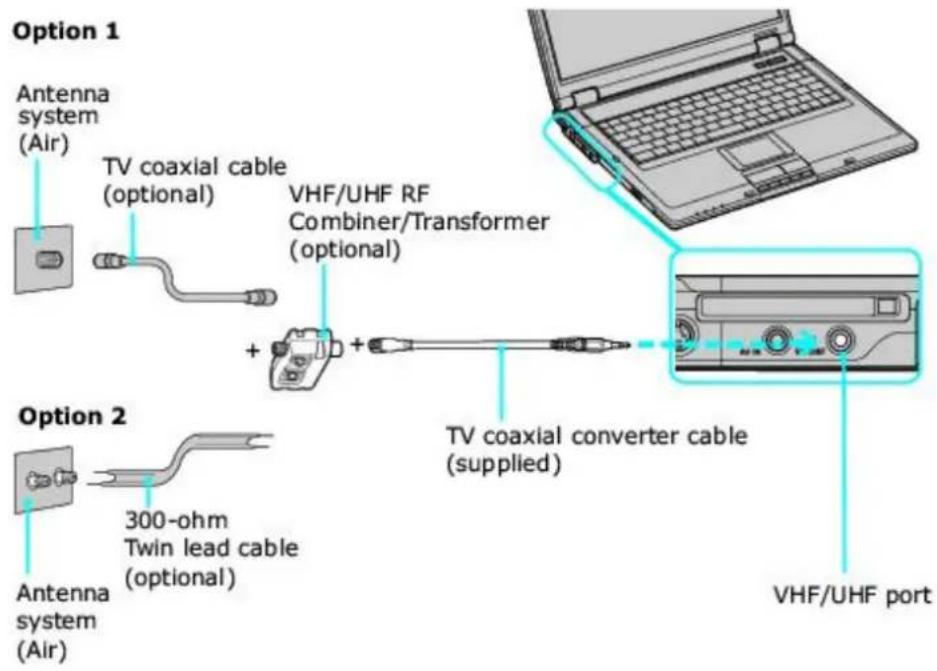
text_image
Option 1 Antenna system (Air) TV coaxial cable (optional) VHF/UHF RF Combiner/Transformer (optional) + + Option 2 300-ohm Twin lead cable (optional) Antenna system (Air) TV coaxial converter cable (supplied) VHF/UHF portYour VAIO • Computer is supplied with certain audio and video cables. Depending on your in-home cable access, you may require extra cables, adapters or connection equipment not supplied with your computer.
Connecting with a cable or satellite set-top box (STB)
You can connect your Giga Pocket system to cable service access that uses a set-top box (cable or satellite).
Option 1
- Connect one end of a TV coaxial cable (optional) to your cable service access. Connect the other end to the In jack on the back panel of your set-top box (STB).
- Connect a second TV coaxial cable (optional) to the Out jack on your STB. Connect the other end to the single-connection end of a splitter adapter (optional).
- Connect the TV coaxial converter cable (supplied) to the double-connection end of the splitter adapter. Connect the other end to the VHF/UHF port on the back panel of your computer.
- Connect a fourth TV coaxial cable (optional) to the double-connection end of the splitter adapter. Connect the other end to the VHF/UHF port on the rear of your TV monitor or display.
To connect in STB mode (Option 1)
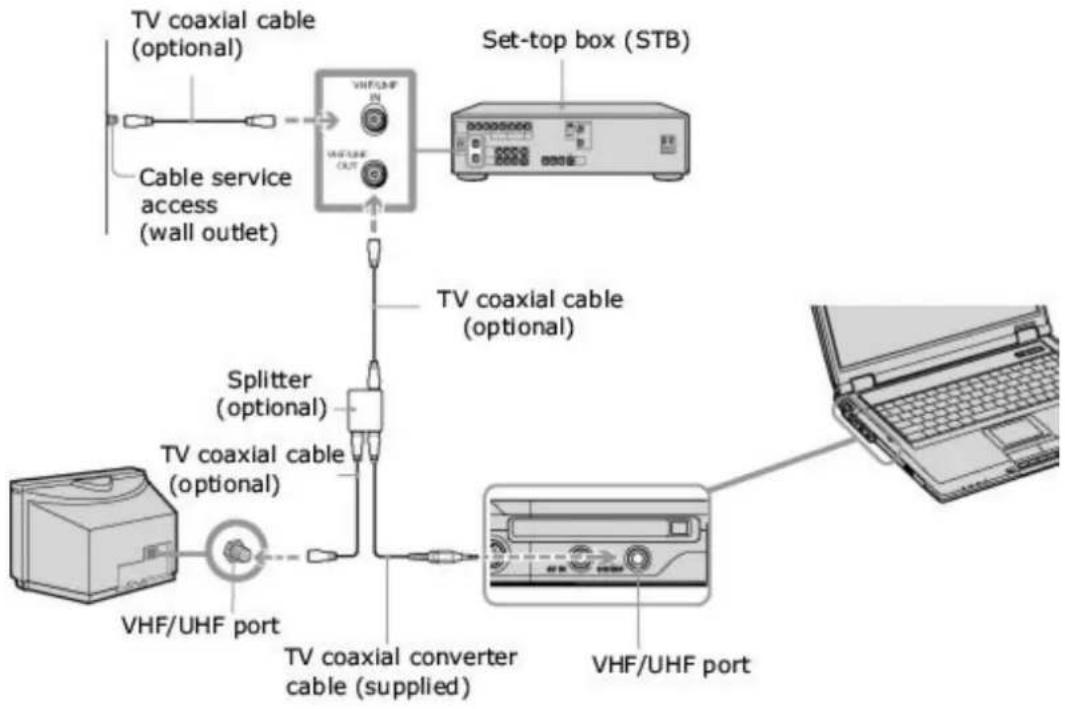
text_image
TV coaxial cable (optional) Cable service access (wall outlet) VHF/CMF VHF/CMF SET-top box (STB) TV coaxial cable (optional) Splitter (optional) TV coaxial cable (optional) VHF/UHF port TV coaxial converter cable (supplied) VHF/UHF portOption 2
- Connect one end of a TV coaxial cable (optional) to your cable service access. Connect the other end to the In jack on the back panel of your set-top box (STB).
- Connect a second TV coaxial cable (optional) to the Out jack on your STB unit. Connect the other end to the VHF/UHF port on the rear of your TV monitor or display.
- Connect one end of the stereo A/V cable with triple RCA jacks (optional) to the Video Out and Audio-OUT (L/R) jacks on the back panel of your STB unit, matching the plug and jack colors.
- Connect the mini-jack end of the A/V cable into the AV In jack of your computer.
To connect in STB mode (Option 2)
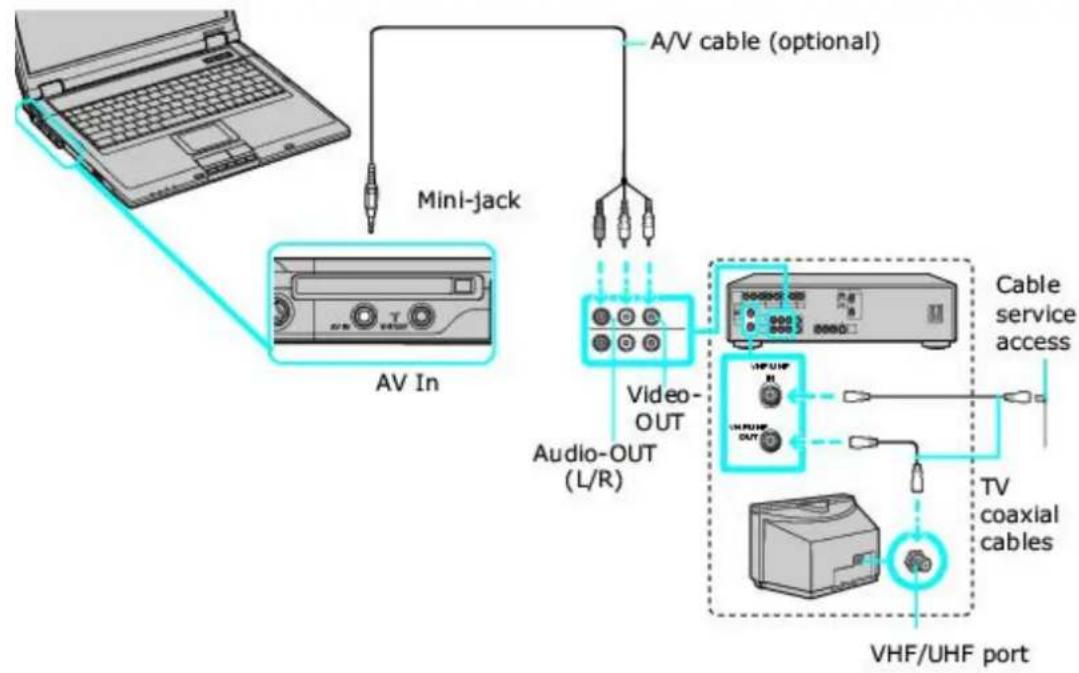
flowchart
graph TD
    A["Laptop"] --> B["Mini-jack"]
    B --> C["AV In"]
    C --> D["Video OUT"]
    D --> E["Audio-OUT (L/R)"]
    E --> F["Cable service access"]
    F --> G["VHF/UHF port"]
    G --> H["TV coaxial cables"]
    H --> I["Audio-OUT (L/R)"]
    I --> J["A/V cable (optional)"]
To set up additional equipment
This section illustrates how to set up additional equipment with the Giga Pocket Personal Video Recorder System.
Connecting a VCR or camcorder with an audio cable
Your VAIO® computer has both audio and video connection capability. You can locate the connections behind the bottom panel on the front of the system unit. You can connect a VCR or camcorder, using the audio jacks and video ports.
- Connect a dual audio cable (optional) to the L and R audio jacks, located on the either the front or rear panels of your computer.
- Connect the other ends of the dual audio cable to your VCR or camcorder.
Connecting equipment with an S-video or video cable
Your VCR or camcorder may have either standard video or S-video connection capability.
Option 1
- Connect an S-video cable (optional) directly into the S-video jack on your computer.
- Connect the other end of the S-video cable into the appropriate port on your compatible VCR or camcorder.
- Connect an audio cable with double RCA plugs at each end (optional) into the composite audio L and R jacks.
Option 2
- Connect the mini-jack end of an A/V cable with triple RCA plugs at the other end (optional) directly into the AV In jack of your computer.
- Connect the other ends of the A/V cable into the appropriate jacks on your compatible VCR or camcorder.
To connect a VCR or camcorder
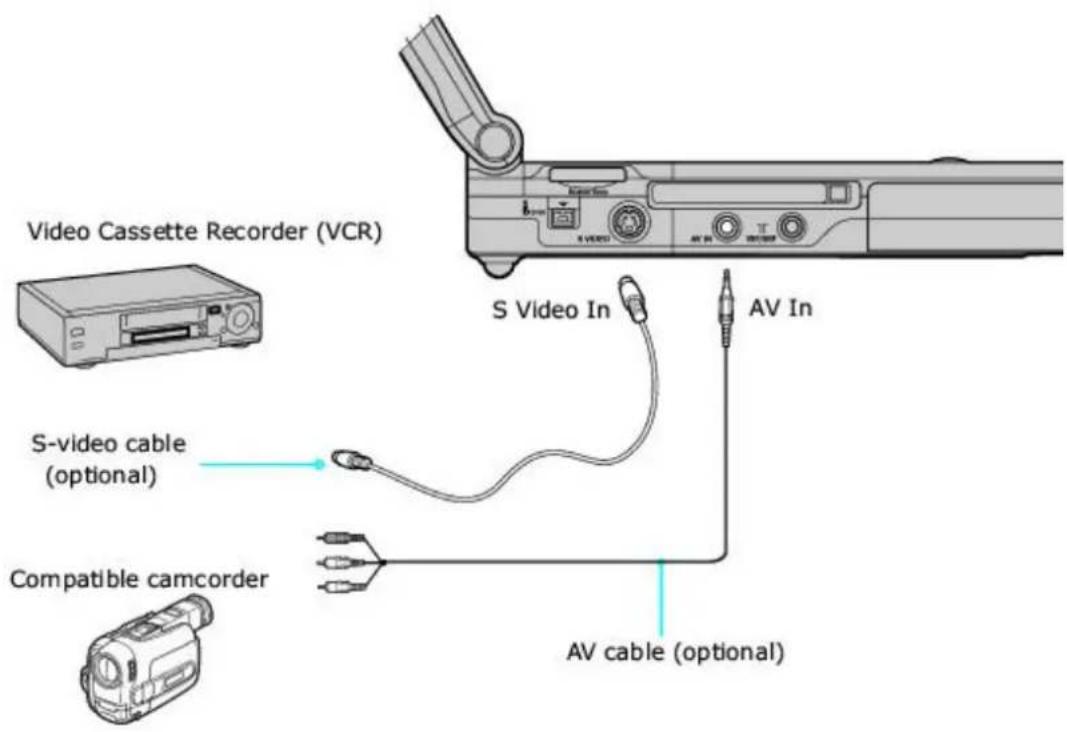
text_image
Video Cassette Recorder (VCR) S-Video cable (optional) Compatible camcorder S Video In AV In AV cable (optional)Connecting the GigaPocket Remote Control
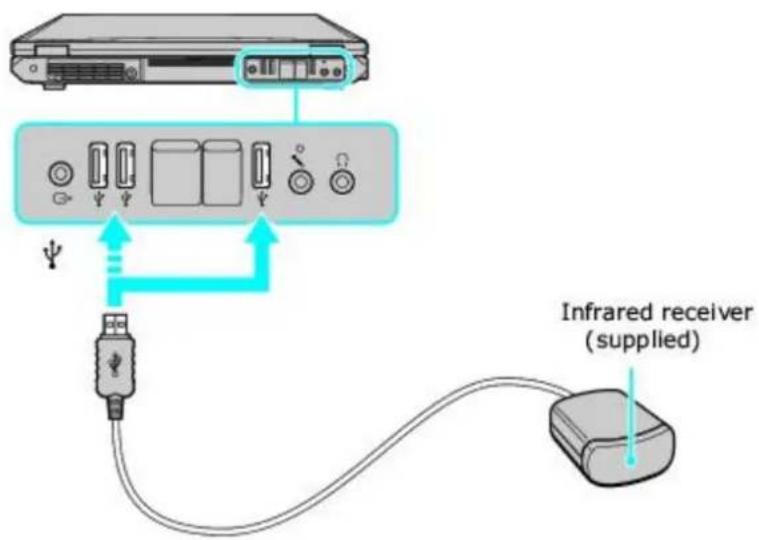
Your computer also features a remote control and an infrared (IR) remote control receiver. The IR remote control receiver must be plugged into one of the computer's USB ports in order to receive the signals from the remote control.
About the Remote Control
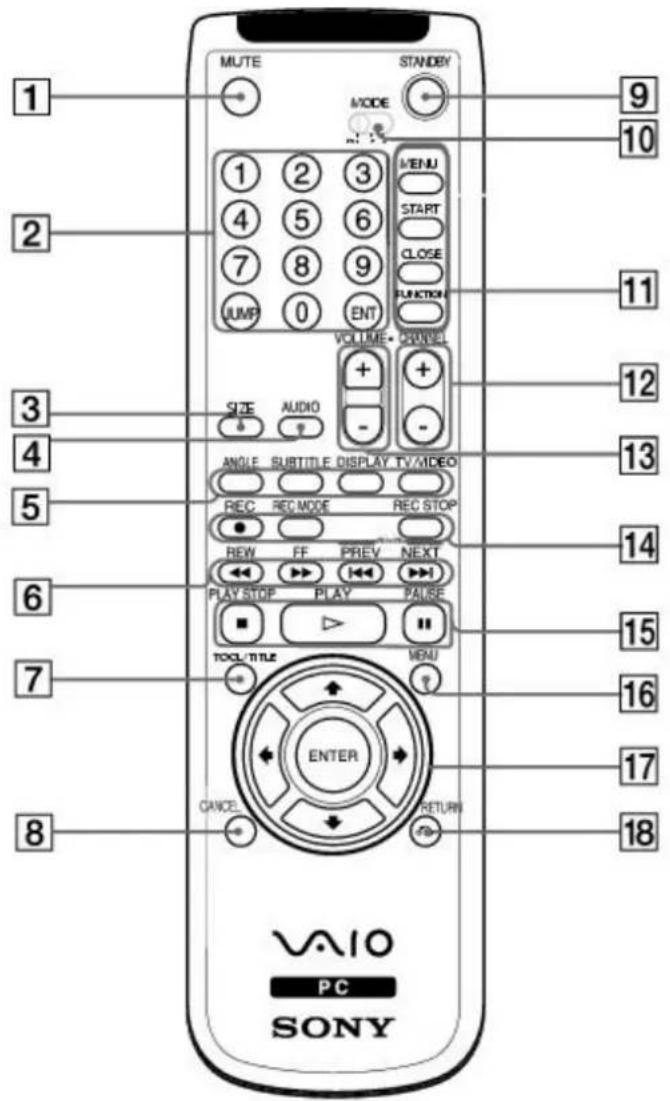
GigaPocket Personal Video Recorder features are controlled with the remote control. The remote control can start and stop video recording and playback, select channels, and set viewing preferences. This section describes the basic functions of your remote control.
Remote Control
text_image
1 2 3 4 5 6 7 8 9 JUMP 0 ENT VOLUME* MENU + AUDIO - SIZE ANGLE SUBTITLE DISPLAY TV/MIDEO REC REC MODE REC STOP REW FF PREV NEXT PLAY STOP PLAY PULSE TOOL/TITLE MENU ENTER CANCEL RETURN 9 10 11 12 13 14 15 16 17 18 VAIO PC SONY1 MUTE button
Press to turn off the sound. Press again to restore the sound.
2 Channel number buttons (1-9)
Press to select specific channels.
(Press the ENT button to activate channel selection.)
JUMP button
Press to go to the previous channel. Press again to return to the current channel.
ENT button
3 SIZE button
Press to view the current software in full-screen size. Press again to return the view to its original size.
4 AUDIO button
Press to view available sound mode options on the monitor/display.
5 DVD angle button
Press to change the camera angle during DVD playback. See the DVD player software for details. This function is not available for other software.
DVD Subtitle button
Press to turn on/off subtitles or to change the subtitle language during DVD playback. See the DVD player software for details. This function is not available for other software.
DISPLAY button
During DVD playback in full screen mode, press to show the settings window.
When using Giga Pocket software, press to display the TV/Recording deck and playback deck screens. Press again to hide these views.
TV/VIDEO button
Press to change the on-screen image from the TV/Recording deck to external video equipment, such as your VCR.
(Note: You cannot change the input source while recording.)
6 REW and FF buttons
Press to rewind or fast-forward.
PREV and NEXT buttons
Press to move back to the previous screen or forward to the next screen.
7 TITLE button
The function of this button may vary between DVDs. See the DVD player software instructions for details.
8 CANCEL button
When using Giga Pocket software, press to close an error message dialog box. The window returns to its original size when displayed in full-screen mode.
(Note: This function is not available for other software.)
9 STANDBY button
Press to place the system into Stand by mode.
(Note: You cannot place the computer into Stand by mode when certain Giga Pocket functions are running.)
10 MODE switch
Set the switch from 1 to 3, to change the remote control's control between computers. The target computer's remote control software determines the assigned number.
(Note: The default setting is 1, if you are using a single computer.)
11 MENU button
Press to view a shortcut menu of available software applications. Press again to hide this menu.
(Note: For Giga Pocket software, the Select Video Capsules window displays. Press the button again to hide this window.)
START button
Press to start the selected software.
CLOSE button
Press to close the current software.
FUNCTION button
When Giga Pocket software is selected with the Menu button, press to switch from the TV/recording deck to the playback deck.
When using SonicStage software, press to change from the music drive (hard disk drive) to the CD.
12 CHANNEL button
Press to change channels automatically (no number input required).
(Note: This function is available for Giga Pocket software only.)
13 VOLUME button
Press to raise or lower the volume.
14 REC button
Press to begin recording.
REC MODE button
Press to select the recording mode.
REC STOP button
Press to stop recording.
(Note: The REC, REC MODE, and REC STOP functions are available for Giga Pocket software only.)
15 PLAY STOP button
Press to stop playback.
PLAY button
Press to begin playback.
PAUSE button
Press to pause playback.
16 MENU button
Press to display the root menu during DVD playback. Press again to minimize the window. See the DVD player software for details.
When using Giga Pocket software, press to display Video Capsule listings.
When using SonicStage software, press to display Playlists.
When using VAIO Media software, press to display the main menu.
17 Direction and ENTER buttons
Press a direction arrow to navigate through menus. Press ENTER to select.
18 RETURN button
Press to return to the previous screen.
(Note: This function is not available for Giga Pocket software.)
For more details about the function buttons on your remote control, see the Giga Pocket Help.
To set up the remote control
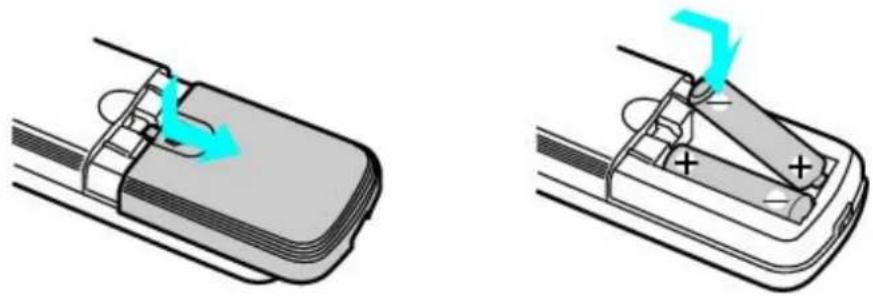
Insert two AA batteries (supplied) into the remote control as shown.
Inserting batteries into the remote control
natural_image
Two technical diagrams showing a battery being inserted into a device, with no visible text or symbols.Under normal use, the AA batteries may last up to six months. If your remote control does not operate properly, the batteries may need to be replaced.
If your remote control is not being used for extended periods of time, remove the batteries to avoid possible damage from battery leakage.
Connecting the infrared receiver
- Connect the infrared receiver cable to a USB port located on either the front or back panel of your computer.
- Place the infrared receiver unit in a position that enables it to communicate with your remote control.
The infrared receiver must be visible in a line-of-sight with your remote control in order to function properly.
Connecting the infrared receiver (back panel)
text_image
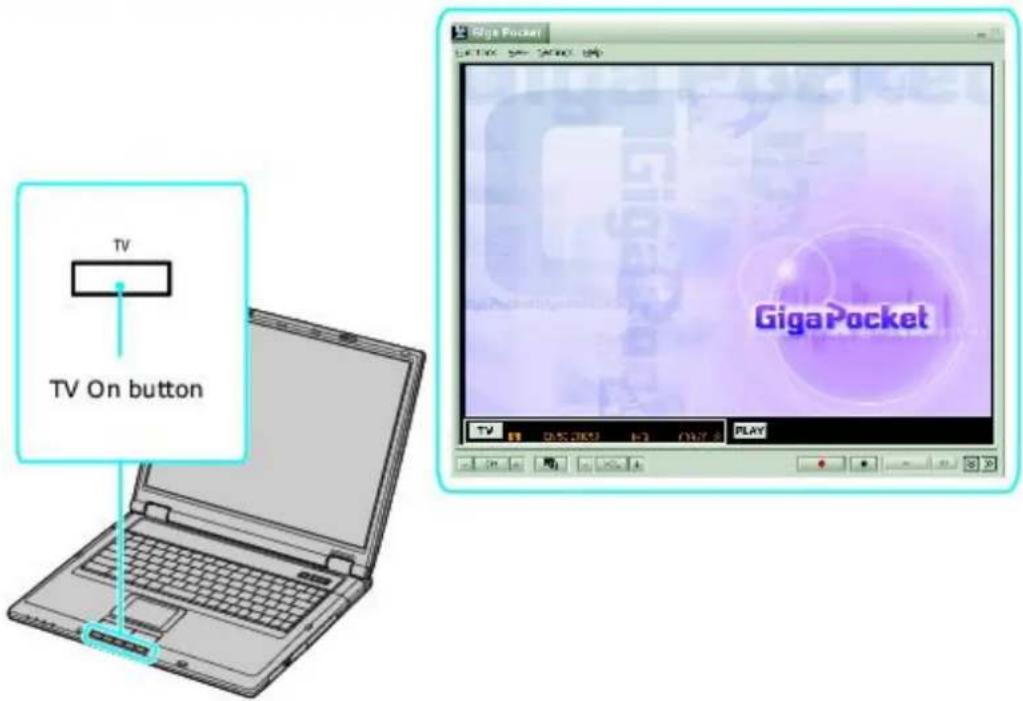
Infrared receiver (supplied)Certain models are equipped with a TV tuner, which enables you to watch and record television with the help of the GigaPocket software.
The TV On button will launch GigaPocket and its TV viewing/recording capabilities.
How to use the TV button
- Locate the TV button below the touch pad and press the button once.
- The GigaPocket window appears on the screen.

You must connect your computer to a television cable or antenna in order to view television with GigaPocket.
Using the TV button
text_image
TV TV On button GigaPocketGiga Pocket Personal Video Recorder software features and functions are detailed in this section, enabling you to begin viewing or recording TV programs.
To set up TV viewing
When you start Giga Pocket Personal Video Recorder for the first time, you are automatically prompted to set the video input source for watching TV or cable TV (CATV) programs on your computer.
Starting Giga Pocket for TV Setup (For first time setup)
- Verify that the computer time and date settings as displayed in the taskbar are correct.
To adjust these settings:
- Right-click with your mouse. A shortcut menu appears.
- Select Adjust Date/Time, and a dialog box appears.
-
Correct the date and time, if necessary.
-
Click Start in the Windows taskbar, point to All Programs, point to Giga Pocket, point to All Software, and then click TV Setup.
The TV Setup Wizard appears.
TV Setup Wizard

text_image
TV Setup Wizard Customize the Channel listing. By clicking on any channel in the list, you can verify the picture on the monitor window. After channels are scanned, an OK mark shows up in the list for channels with signal. It may take a few minutes to complete scanning. Note: Please scan when all channels are available. Auto Scan... You must have an internet connection set up. You can click the "Download all Channel Settings" icon in the iEPG listing site. The channel names are also downloaded. Go to Web Site... The channel listing only saves the channels that have an OK mark in the Signal column. Channel list : Channel number Channel name Signal C1 CH001 OK C2 CH002 OK C3 CH003 OK C4 CH004 OK C5 CH005 OK C6 CH006 OK C7 CH007 OK C8 CH008 OK C9 CH009 OK C10 CH010 OK C11 CH011 OK C12 CH012 OK C13 CH013 OK C14 CH014 OK Add... Select channel to modify and click on the "Modify" or "Delete" button. Modify... Delete < Back Next > Cancel Help-
Depending on your cable service access, select Standard CATV, Standard antenna, or set-top box (STB).
-
Standard CATV (C1-C125) without STB — For this connection, you must use a coaxial cable directly (without an STB) to your computer. The default setting for this connection option is STD. Depending on your local connection requirements, HRC and IRC are also available.
-
Standard antenna (2-69) — Select this option if you connect an aerial antenna's coaxial cable directly to your computer for watching TV programs.
-
STB (Set top box) — Select this option if the broadcast signal is received from a set top box (STB) such as a digital cable box or a satellite cable box. Make sure that the Input channel on your STB (Ch. 3, Ch. 4, etc.) matches the Input channel listed in the Giga Pocket TV Setup dialog box.
If you are not sure of the type of cable connection to use (Standard, HRC, or IRC), contact your cable provider for information.
-
Click Next. The wizard displays a dialog box that enables you to customize the channel listings.
-
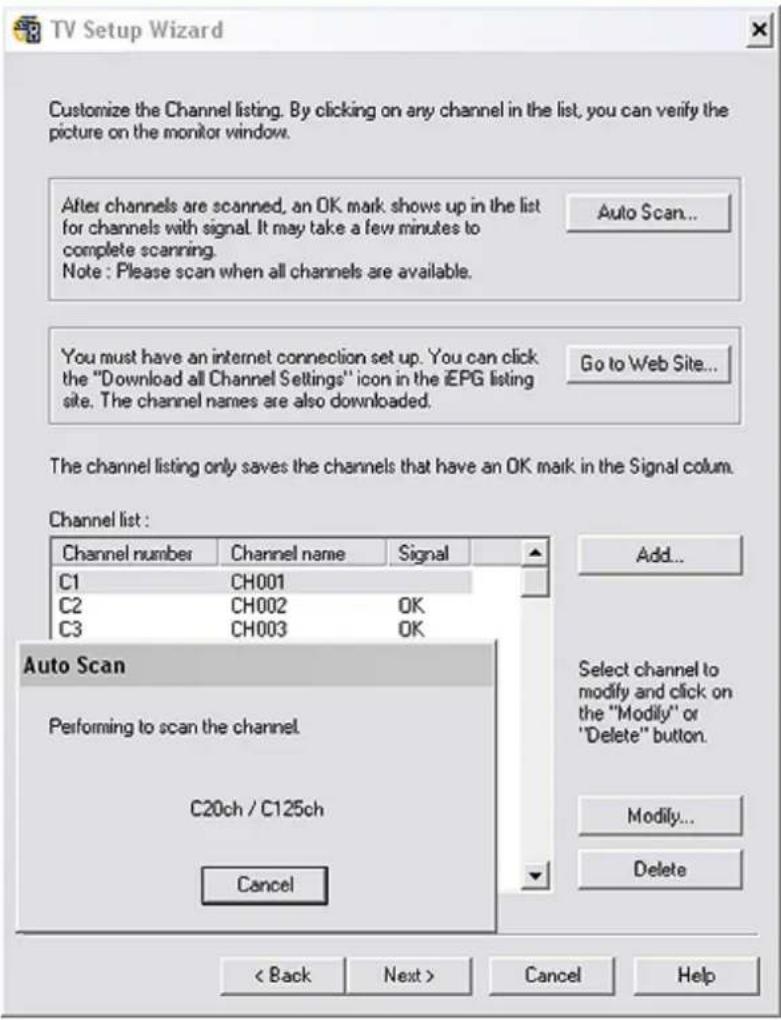
Click Auto Scan.
You can view the channel reception in the pop-up TV Setup - Monitor window.
TV Setup Wizard - Customize the channel listing
text_image
Customize the Channel listing. By clicking on any channel in the list, you can verify the picture on the monitor window. After channels are scanned, an OK mark shows up in the list for channels with signal. It may take a few minutes to complete scanning. Note : Please scan when all channels are available. Auto Scan... You must have an internet connection set up. You can click the "Download all Channel Settings" icon in the iEPG listing site. The channel names are also downloaded. Go to Web Site... The channel listing only saves the channels that have an OK mark in the Signal column. Channel list : Channel number Channel name Signal C1 CH001 C2 CH002 OK C3 CH003 OK Add... Auto Scan Performing to scan the channel. C20ch / C125ch Select channel to modify and click on the "Modify" or "Delete" button. Modify... Delete Cancel < Back Next > Cancel HelpIf your computer is connected to the Internet, you can click Go to Web Site... and download channel listings from the iEPG listing site.
- Connect to the Internet.
- Click Go to Web Site... and download channel listings by clicking Download all Channel Settings.
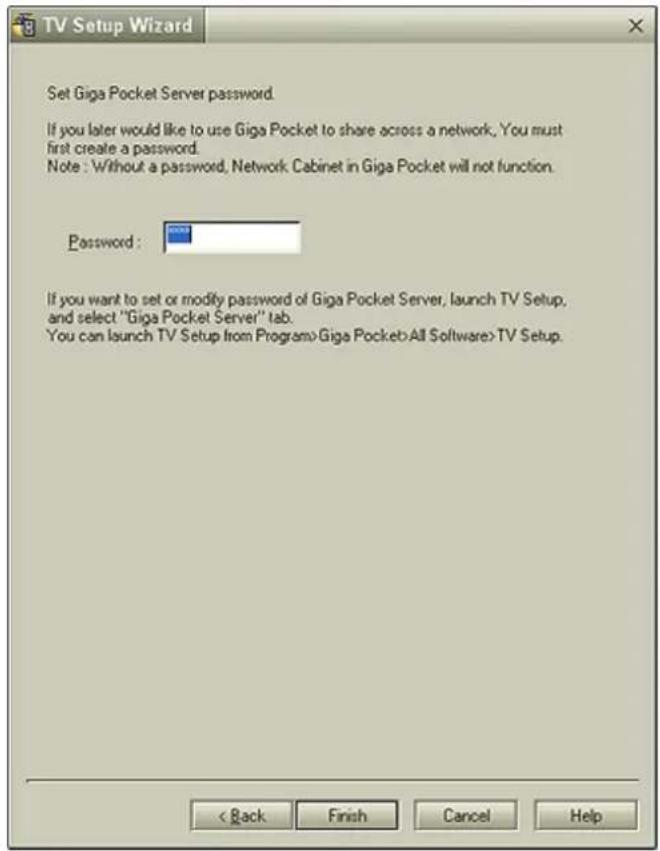
- Click Next. For the first time setup, you are prompted to set your Giga Pocket Server password.
TV Setup Wizard - Giga Pocket Server password
text_image
Set Giga Pocket Server password. If you later would like to use Giga Pocket to share across a network, You must first create a password. Note : Without a password, Network Cabinet in Giga Pocket will not function. Password : If you want to set or modify password of Giga Pocket Server, launch TV Setup, and select "Giga Pocket Server" tab. You can launch TV Setup from Program>Giga Pocket>All Software>TV Setup. < Back Finish Cancel Help- Type in a password and click Finish.
Setting up your display (monitor)
When using Giga Pocket Personal Video Recorder, set your display settings as follows:
- Colors — Use the default factory settings (32-bit).
- Screen area — Use the default factory settings.
If you change the default settings, you may experience poor image quality on your display.
Microsoft® Windows® XP operating system supports a single Giga Pocket user at any given time. Even if a different user logs on using the fast switch feature, Giga Pocket is not available to any other user account. For more information, see the Giga Pocket Help.
Giga Pocket enables you to watch a TV program on your computer display while recording it onto your hard disk drive. Using the Giga Pocket Slip Play feature, you can view a program from the beginning even while it is being recorded.
Starting Giga Pocket
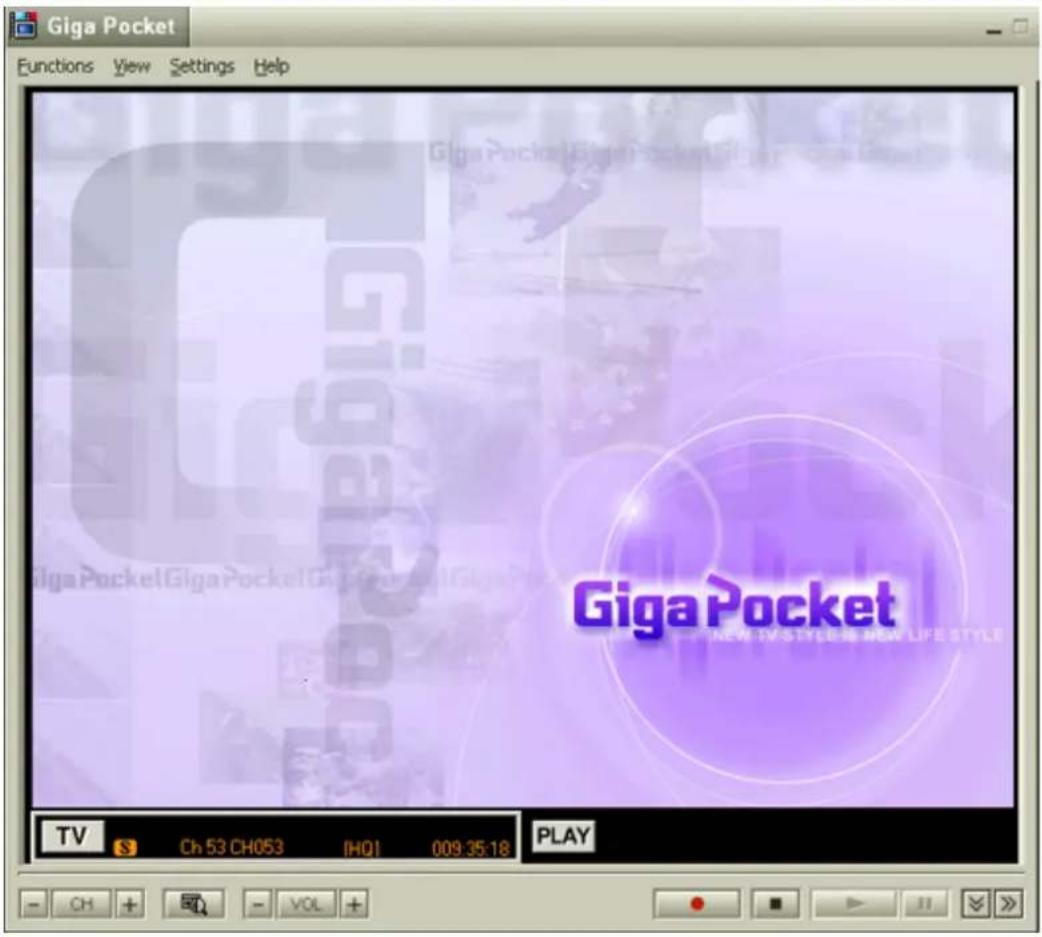
- Click Start in the Windows® taskbar, point to All Programs, point to Giga Pocket, then click Giga Pocket. The Giga Pocket window appears.
Giga Pocket window
text_image
Giga Pocket Functions View Settings Help GigaPocket TV Ch 53 CH053 [HQ] 009:35:18 PLAY GigaPocket NEW TV STYLE IS NEW LIFE STYLEThe current television broadcast is displayed, based on the selected channel.
Using the TV/Recording deck and Playback deck
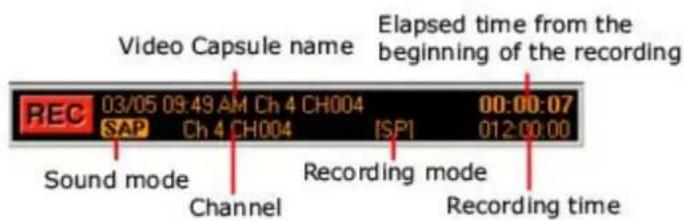
Giga Pocket features two decks on the main interface window: the TV/Recording deck and the Playback deck.
TV/Recording deck (detail)
text_image
Video Capsule name Elapsed time from the beginning of the recording 03/05 09:49 AM Ch 4 CH004 00:00:07 REC SAP Ch 4 CH004 [SPI] 012:00:00 Sound mode Channel Recording mode Recording timeUse the TV/Recording deck to view programs and record Video Capsules. You can use the Playback deck of your Giga Pocket to play back a prerecorded Video Capsule.
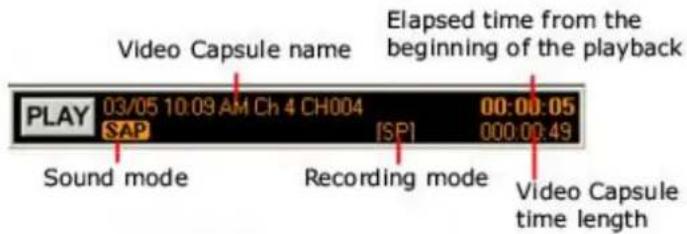
Playback deck (detail)
text_image
Video Capsule name Elapsed time from the beginning of the playback PLAY 03/05 10:09 AM Ch 4 CH004 00:00:05 SAP [SP] 000.00:49 Sound mode Recording mode Video Capsule time lengthRecording a Video Capsule
Giga Pocket stores recorded images as Video Capsules. The Video Capsules provide file recording information, which can be viewed through Giga Pocket Explorer. Manage your Video Capsules with Giga Pocket Explorer.

You cannot record a program into a previously recorded Video Capsule. All new content is recorded into a new Video
Capsule.
- Select your program by switching to the appropriate channel. Use the channel buttons located at the bottom of the Giga Pocket window, or use the right and left direction arrows on your keyboard.
- Click Record , located at the bottom of the window, to begin recording your Video Capsule.
- When your program has completed or you wish to end the Video Capsule, click Stop ☐.

To pause your recording session, click Pause 11. Click on it again to resume recording.
Using the Slip Play feature
While a program is being recorded on the TV/Recording deck, you can watch that same program from the beginning, using the Playback deck. You can begin using Slip Play to view your recording, beginning approximately ten seconds after your recording session begins.
- From the menu bar, click Functions.
- Select Start Slip Play.
Additional information about Giga Pocket
- Giga Pocket can be used for external video recording. Depending on conditions, not all video images can be recorded or displayed.
■ Video input from game consoles may not be recorded or displayed in Giga Pocket.
- When you input an image from a video player device, such as a VCR that is connected to your computer, the following images may not record or display:
■ The still images of a paused playback screen.
- A screen without images, such as a blue screen.
- The menu screens of the attached video player device.
- The Giga Pocket software's displayed image or images from a prerecorded Video Capsule may be interrupted or distorted under the following circumstances:
■ If you change the channel on an attached video player device.
■ If you switch input during the analog input from an attached video player device.
■ If you attempt to play back a damaged video tape.
■ If you press Pause during the recording process.
- When you play a Video Capsule for a few seconds from the end of the film roll using the scroll bar, you may not be able to see a displayed image.
- The computer's response may decrease when you attempt to play a Video Capsule while recording a TV program using Giga Pocket.
Giga Pocket may interrupt or stop playback to allocate system resources for the timer recording event, if there are other applications running simultaneously. If this occurs, wait until Giga Pocket finishes recording before playing the Video Capsule.
The timer recording may fail due to an "Event buffer of audio overflow" error in the following circumstances:
- The input cable (coaxial or video cable) is disconnected after recording starts.
- You record a TV channel that has no broadcast content.
- You record video content from an old video tape with poor signal quality.
The on-screen display may shift and split under some circumstances. If this occurs, switch the TV/Recording deck and the playback deck, or switch the channel. The recording proceeds even if the on-screen display shifts.
- Giga Pocket does not operate properly if used concurrently with other video applications, such as DVgate or MovieShaker software.
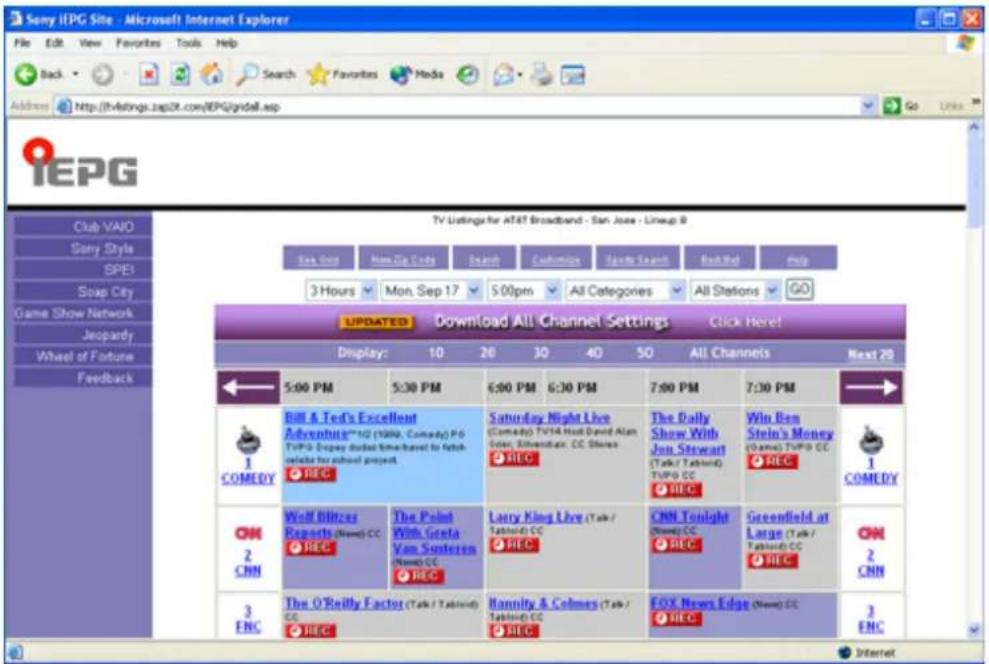
Using the TV Program Web site
- Click Start in the Windows taskbar, point to All Programs, point to Giga Pocket, and then select Zap2it.
You can also go directly to the Web site at http://www.sony.com/vaiotv.
Timer Recording requires an Internet connection. See the section, To set up your Internet Electronic Program Guide service, for information on setting up for first-time use.
Internet Electronic Program Guide Web site
text_image
Sony iEPG Site - Microsoft Internet Explorer File Edit View Favorites Tools Help Back Search Favorites Media Address http://ivatings.zap2k.com/IEPG@indall.asp IEPG Club VAIO Sony Style SPEI Soap City Game Show Network Jeopardy Wheel of Fortune Feedback TV Listings for AT&T Broadband - San Jose - Lineup 8 Sun Wed Mon Zip Code Search Customize Sports Search Best Red Help 3 Hours Mon Sep 17 5:00pm All Categories All Stations GO UPDATED Download All Channel Settings Click Here! Display: 10 26 30 40 50 All Channels Next 20 ← 5:00 PM 5:30 PM 6:00 PM 6:30 PM 7:00 PM 7:30 PM → 1 COMEDY Bill & Ted's Excellent Adventus~1Q (Video, Comedy) PG TVP0-Display dated time-travel to fetch refunds for school project. REC Saturday Night Live (Comedy) TVIA Host David Alan Solar, Silverwater, CC Shares REC The Daily Show With Jon Stewart (Talk / Tablet) TVP0 CC REC Win Ben Stein's Money (Chrome) TVP0 CC REC 1 COMEDY ON Wall Blances Reports (Named) CC REC The Point With Santa Van Susteners (Named) CC REC Larry King Live (Talk / Tablet) CC REC CNN Tonight (Named) CC REC Greenfield at Large (Talk / Tablet) CC REC 2 CNN 3 ENC The O'Reilly Factor (Talk / Tablet) CC Hannily & Colmes (Talk / Tablet) CC REC FOX News Edge (Named) CC REC 3 ENC InternetThe appearance of the online channel guide Web site, its contents, and the accuracy of the TV listings are controlled by the TV listing provider and may change without notice. Pay-per-view channels can be accessed when making payments directly to the appropriate TV program provider.
You can schedule up to 100 timer recordings using Giga Pocket Personal Video Recorder.
From the online channel guide, click on the REC icon 📄 REC to select the program you wish to record. The Timer Recording Wizard begins and the New Timer Recording - Set Channel and Start Date and Time window appears.

Timer recordings create virtual containers for the recorded content that are called Video Capsules.
Accessing the Giga Pocket Help
For more information about Giga Pocket Personal Video Recorder, follow these steps:
- Click Start in the Windows® taskbar and select All Programs.
- Select Giga Pocket, Help, and click Giga Pocket Help.
With the Timer Recording Wizard, you can set, adjust, and cancel the timer recording settings.
Using the Timer Recording Wizard
- Click Start in the Windows taskbar, select All Programs, then select Giga Pocket.
- Select Timer Recording Wizard. The Timer Recording Wizard dialog box appears.
Timer Recording Wizard
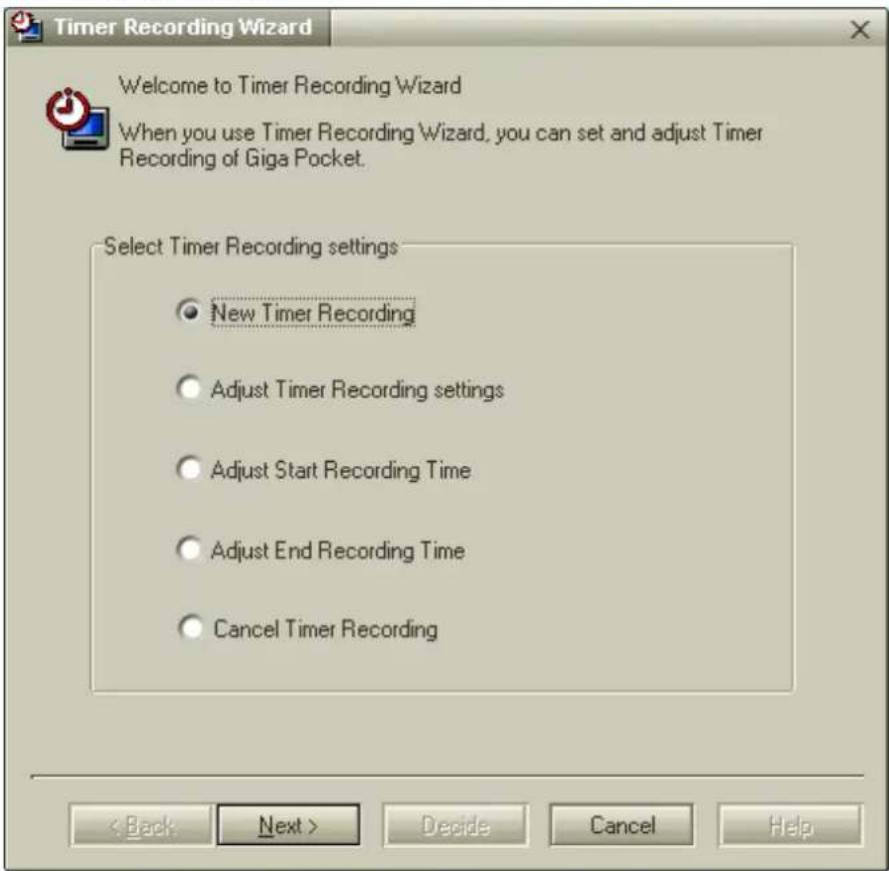
text_image
Timer Recording Wizard Welcome to Timer Recording Wizard When you use Timer Recording Wizard, you can set and adjust Timer Recording of Giga Pocket. Select Timer Recording settings New Timer Recording Adjust Timer Recording settings Adjust Start Recording Time Adjust End Recording Time Cancel Timer Recording < Back Next > Decide Cancel Help- Select the desired option from the Select Timer Recording Settings menu and click Next. Follow the on-screen instructions. Click Help for assistance.
New Timer Recording - Set Channel and Start Date and Time
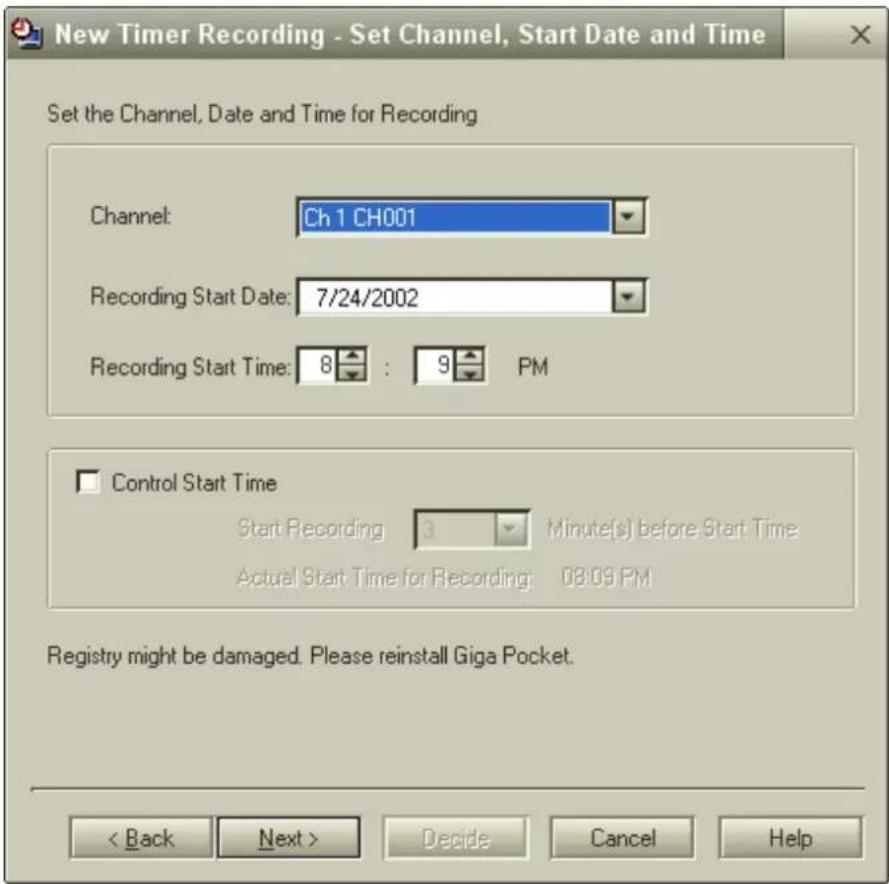
text_image
New Timer Recording - Set Channel, Start Date and Time Set the Channel, Date and Time for Recording Channel: Ch 1 CH001 Recording Start Date: 7/24/2002 Recording Start Time: 8 : 9 PM Control Start Time Start Recording 3 Minute(s) before Start Time Actual Start Time for Recording: 08:09 PM Registry might be damaged. Please reinstall Giga Pocket. < Back Next > Decide Cancel Help- Verify that the information is correct and click Next. The programming station and time information is
automatically programmed into the appropriate Timer Recording Wizard fields.
- You can set the stop time for your timer recording and select the recording mode. The stop time is automatically programmed into the Timer Recording Wizard. Verify the stop time, choose a recording mode, and then click Next
Recording Mode Description
Standard Play (SP) Standard recording mode (MPEG-1, MPEG-2, and AVI).
High Quality (HQ) Image quality is improved, but recording requires more space on the hard disk drive as compared to using SP or LP recording modes (MPEG-1, MPEG-2, and AVI).
Long Play (LP) Image quality is reduced, but recording requires less space on the hard disk drive as compared to using HQ recording mode (MPEG-1).
New Timer Recording - Set Stop Time and Recording Mode
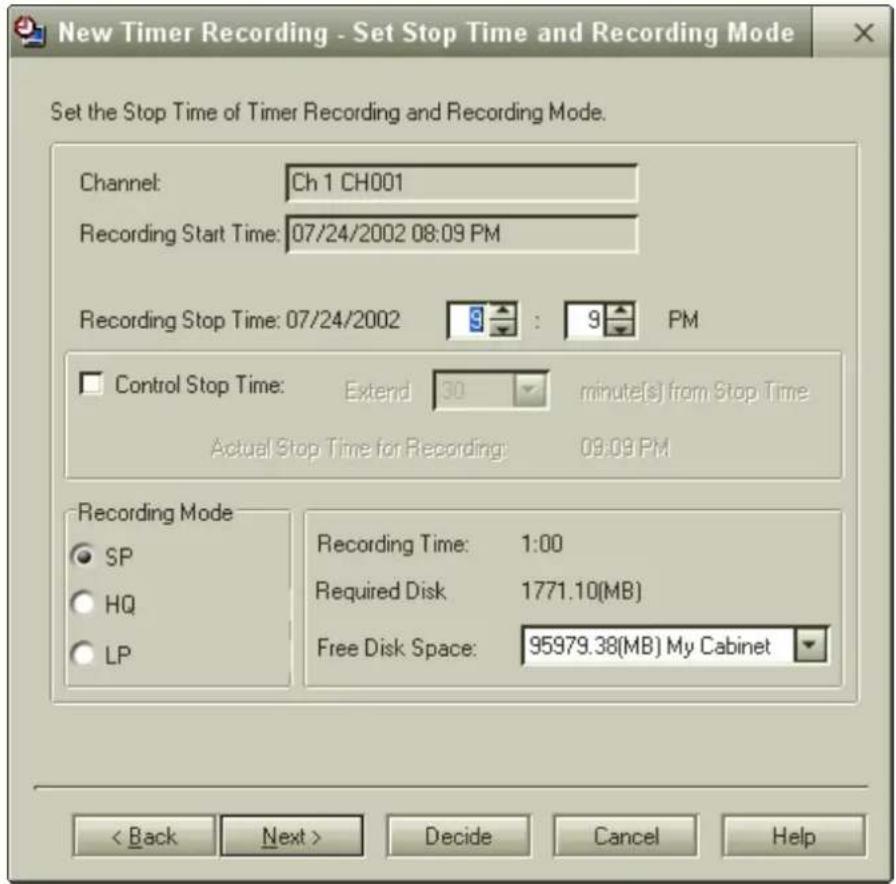
text_image
New Timer Recording - Set Stop Time and Recording Mode Set the Stop Time of Timer Recording and Recording Mode. Channel: Ch 1 CH001 Recording Start Time: 07/24/2002 08:09 PM Recording Stop Time: 07/24/2002 : 9 PM Control Stop Time: Extend 30 minute(s) from Stop Time Actual Stop Time for Recording: 09:09 PM Recording Mode SP HQ LP Recording Time: 1:00 Required Disk: 1771.10(MB) Free Disk Space: 95979.38(MB) My Cabinet < Back Next > Decide Cancel Help- From the New Timer Recording - Set Details dialog box, you can customize the timer recording schedule. Select how often you want to record the program.
New Timer Recording - Set Details
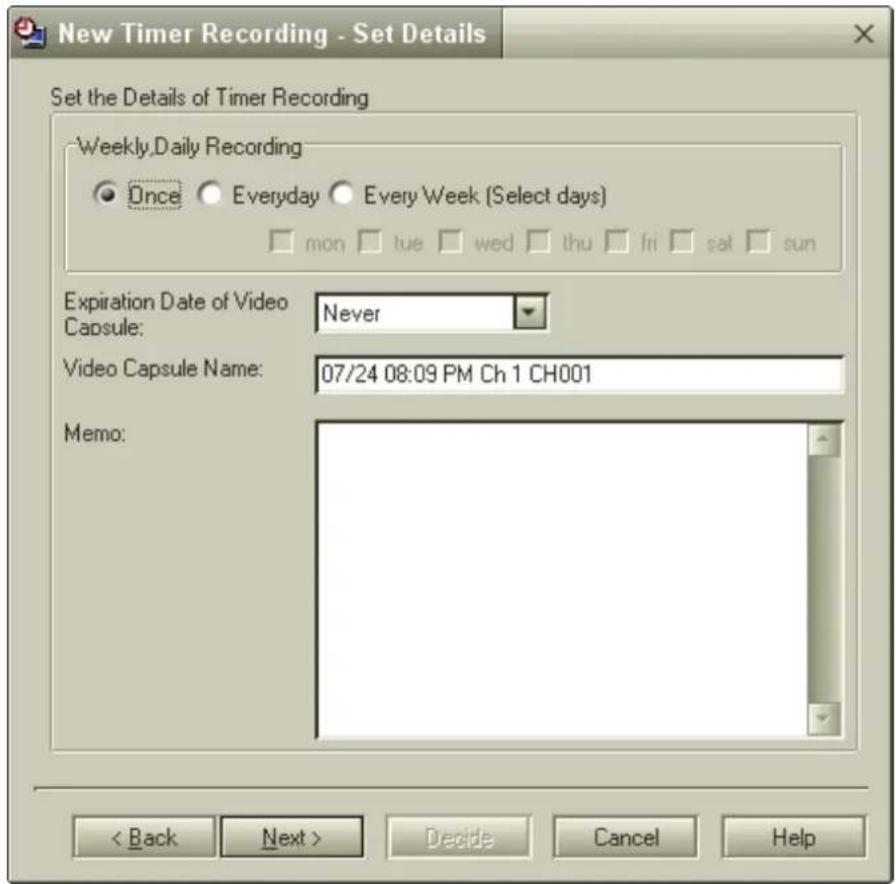
text_image
New Timer Recording - Set Details Set the Details of Timer Recording Weekly.Daily Recording Once Everyday Every Week (Select days) mon tue wed thu fri sat sun Expiration Date of Video Capsule: Never Video Capsule Name: 07/24 08:09 PM Ch 1 CH001 Memo: < Back Next > Decide Cancel Help- Select a date for the recorded program to be automatically deleted from your hard disk drive, using the Expiration date of Video Capsule drop-down list.
To maintain adequate space on your hard disk drive, Giga Pocket Personal Video Recorder enables you to set an expiration date for your Video Capsules to be automatically deleted.
- Click Decide to review your setting preferences. The New Timer Recording - Confirm dialog box appears. Click Next.
New Timer Recording - Confirm
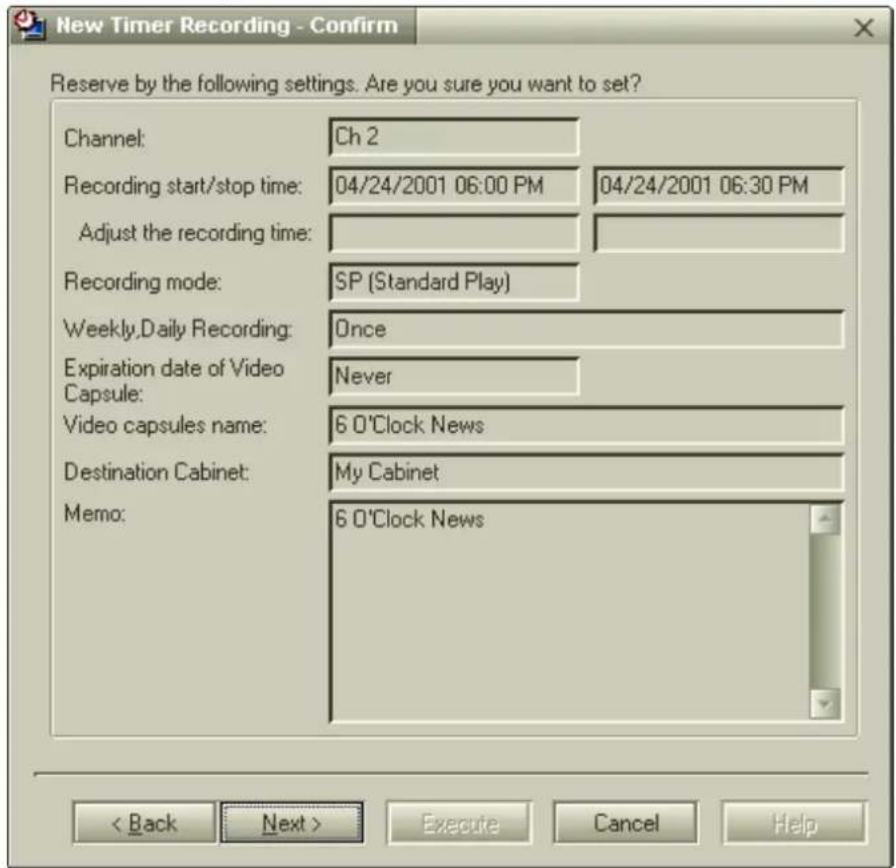
text_image
New Timer Recording - Confirm Reserve by the following settings. Are you sure you want to set? Channel: Ch 2 Recording start/stop time: 04/24/2001 06:00 PM 04/24/2001 06:30 PM Adjust the recording time: Recording mode: SP (Standard Play) Weekly.Daily Recording: Once Expiration date of Video Capsule: Never Video capsules name: 6 O'Clock News Destination Cabinet: My Cabinet Memo: 6 O'Clock News < Back Next > Execute Cancel Help- The New Timer Recording - Completed dialog box appears. Click Finish.
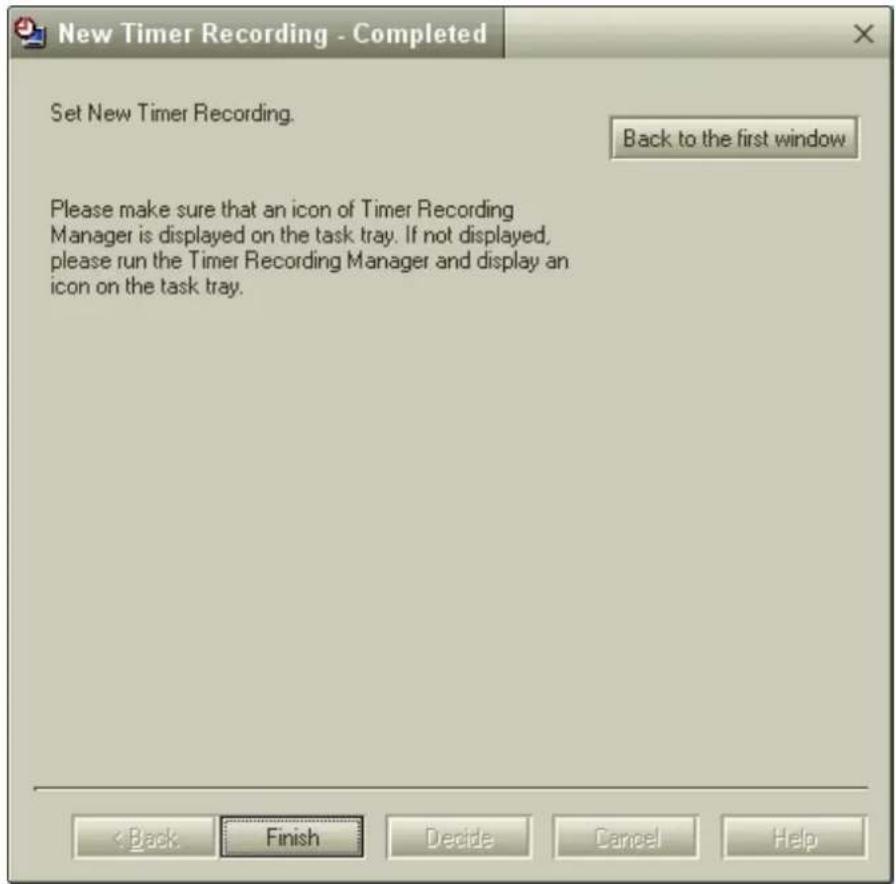
text_image
New Timer Recording - Completed Set New Timer Recording. Back to the first window Please make sure that an icon of Timer Recording Manager is displayed on the task tray. If not displayed, please run the Timer Recording Manager and display an icon on the task tray. < Back Finish Decide Cancel HelpAdditional information about the Timer Recording Wizard
- Timer recording requires approximately 30 seconds (pre-recording) preparation time prior to beginning each recording session. Please keep this in mind when setting up multiple, back-to-back recording sessions. Giga Pocket software stops the current timer recording, pauses to prepare, and then begins the next timer recording according to the set start time. The length of your first Video Capsule is approximately 30 seconds shorter than the actual time set.
You may experience some timing problems with multiple recording sessions when the second timer recording is preset as a daily or weekly recorded event. The first timer recording may end as early as 60 seconds sooner than the set stop time.
- Scheduled daily or weekly timer recording sessions do not occur if your hard disk drive does not have sufficient space. Giga Pocket software does not allow a new Video Capsule to be created if there is less than 100 MB of free space on the hard disk drive. These scheduled events resume at their scheduled time, as hard disk drive space becomes available.
- Approximately three minutes before Giga Pocket begins a timer recording and during a timer recording, you must avoid:
■ Starting up or using other software applications.
- Setting up, changing, or deleting timer recordings.
- All activities that may access the hard disk drive, such as copying files.
Accessing the Giga Pocket Help
For more information about Giga Pocket Personal Video Recorder, follow these steps:
- Click Start in the Windows® taskbar and select All Programs.
- Select Giga Pocket, Help, and click Giga Pocket Help.
The Timer Recording Manager keeps track of all scheduled TV recordings. Your computer settings, by default, are set to start Timer Recording Manager automatically when the computer is turned on.
Timer recordings are being performed when the Timer Recording Manager icon ⏻ (Timer Recording Manager) is visible in the Windows taskbar. The timer recording does not start unless the Timer Recording Manager application is available. For the Timer Recorder Manager application to be available, your computer should be in Stand by or Hibernate mode, if the system is not in active use. You can schedule up to 100 programs at a time, for timer recording with the Timer Recording Manager.
Microsoft® Windows® XP operating system supports a single Giga Pocket user at any given time. If a different user logs on using the fast switch feature, the Timer Recording feature is not available to another user account. The Timer Recording Manager icon appears in the taskbar of the first user to log on.
Using the Timer Recording Manager
-
Click Start in the Windows® taskbar, select All Programs, select Giga Pocket, and then click All Software.
-
Click Timer Recording Manager. The Timer Recording Manager dialog box appears:
-
Windows Stand by button — Places the Windows operating system into Stand by mode when the preset timer recording is set to begin, or if a Video Capsule is set to expire. Windows automatically starts and performs the appropriate action.
- Interrupt Current Recording button — Stops the current timer recording. Use this option when you wish to end the current recording session.
- Timer Recording List — Displays a list of timer recordings that have been performed, as well as pending timer recordings. If a daily/weekly timer recording is set, only the current recording session is shown.
The total number of timer recordings displayed does not exceed 100.
Timer Recording Manager dialog box
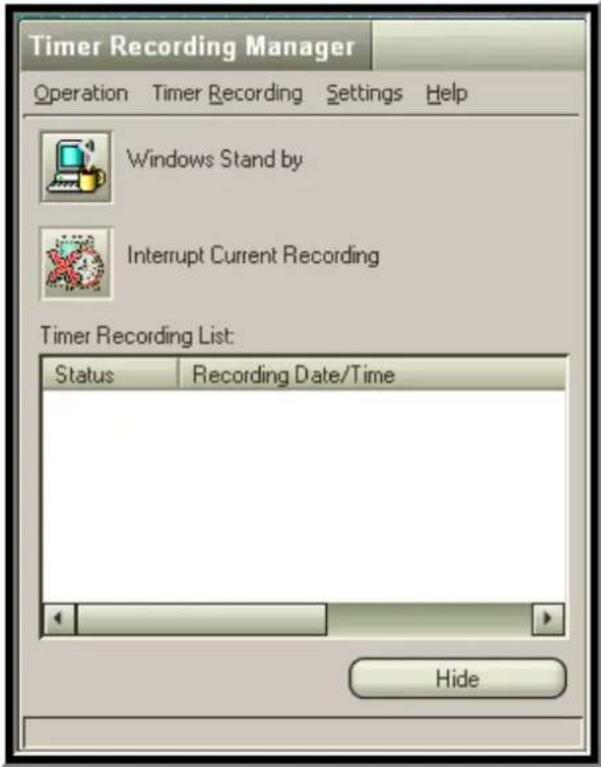
text_image
Timer Recording Manager Operation Timer Recording Settings Help Windows Stand by Interrupt Current Recording Timer Recording List: Status Recording Date/Time HideDouble-click on a recorded timer recording to play it back on Giga Pocket.
- Click Hide to restore Timer Recording Manager to the taskbar.
If you turn off your computer, the timer recording function is disabled.
Viewing your selected program recording schedule
You can easily view the programs you have selected to record, using Giga Pocket Personal Video Recorder. The Timer Recording Manager feature enables you to change or cancel your timer recording at any time.
To view your scheduled timer recordings, follow these steps:
- Double-click on the Timer Recording Manager icon

located in the Windows® taskbar.
Review your scheduled timer recordings and make any desired changes or cancellations.
- Click Hide to return the icon to the taskbar.

You do not have to be connected to the Internet to use the Timer Recording Manager feature.
Additional information about the Timer Recording Manager
- When creating a timer recording, it is important to remember the following information:
■ The timer recording function is disabled if you turn your computer off.
- Your computer should be in Stand by or Hibernate mode, if the system is not in active use.
- Disable screensavers and any other applications that may access your computer's hard disk drive during the timer recording.
If you are using a set-top box (STB), make sure it is turned on and set to the channel you want to record.
- When you set up a timer recording using Giga Pocket software, always use the Timer Recording Manager. If the Timer Recording Manager is not set up, the recording does not start, even if you set the timer recording settings with the Timer Recording Wizard.

Your computer's default setting enables Timer Recording Manager to start automatically when the computer is used.
The timer recording starts a few seconds earlier than the specified recording start time.
■ Under certain circumstances, a daily or weekly timer recording may not be executed the second and subsequent times.
- A timer recording may fail if the computer's clock setting is changed right before the preset recording time. Before changing the computer's clock setting, verify that there are no timer recordings set to begin.
Close the Time Recording Manager before changing the computer's clock setting. Restart Timer Recording Manager after you have changed the time setting.
- If a different user logs on, using the fast switch or switch user features, the Timer Recording feature is not available to another user account. The Timer Recording Manager icon appears in the taskbar of the first user to log on.
Accessing the Giga Pocket Help
For more information about Giga Pocket Personal Video Recorder, follow these steps:
- Click Start in the Windows® taskbar and select All Programs.
- Select Giga Pocket, Help, and click Giga Pocket Help.
The Giga Pocket Explorer application serves as a file manager for your Video Capsules. Video Capsules and saved Playlists are managed in Cabinets.
Giga Pocket Explorer enables you to play back Video Capsules using Giga Pocket. You can import MPEG files, that were created with compatible Sony applications, and export Video Capsules as AVI or MPEG files.
Using Giga Pocket Explorer
- Click Start in the Windows taskbar, point to All Programs, point to Giga Pocket, point to Giga Pocket Explorer.
The Giga Pocket Explorer main window appears.
- Click on the desired Cabinet to see a list of saved Video Capsules and Playlists.
Giga Pocket Explorer main window
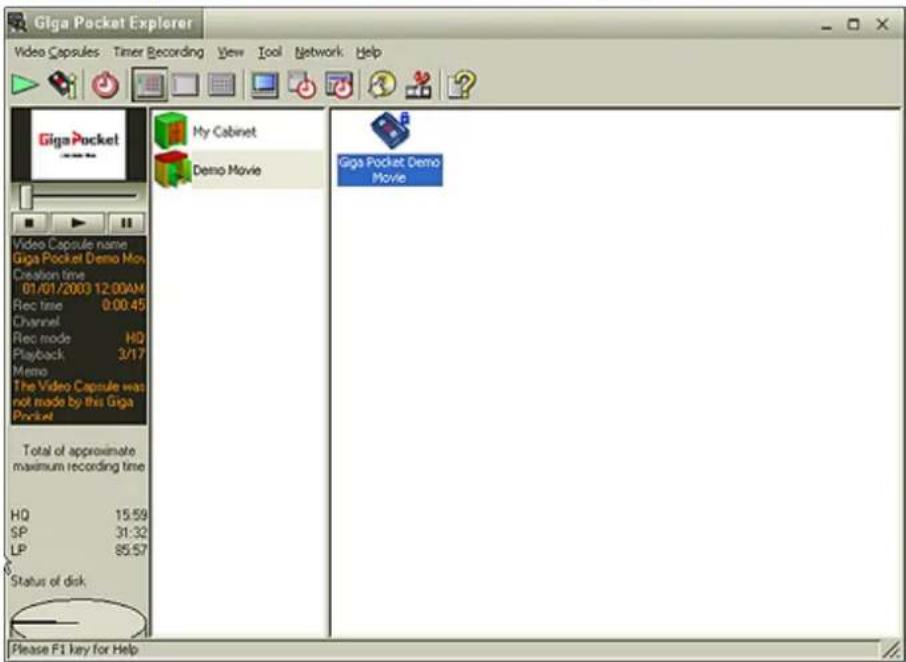
text_image
Giga Pocket Explorer Video Capsules Timer Recording View Tool Network Help Giga Pocket My Cabinet Demo Movie Giga Pocket Demo Movie Video Capsule name Giga Pocket Demo Mov Creation time 01/01/2003 12:00AM Rec time 0:00:45 Channel Rec mode HQ Playback 3/17 Memo The Video Capsule was not made by this Giga Pocket Total of approximate maximum recording time HQ 15.59 SP 31:32 LP 85.57 Status of disk. Please F1 key for HelpUsing the Giga Pocket Explorer Toolbar functions
From the Giga Pocket Explorer toolbar, you can:
■ Launch Giga Pocket to play a selected Video Capsule or Playlist.
- Launch Timer Recording Wizard 📄 set up timer recordings.
- Launch Click to DVD software 📄 to burn Video Capsules to DVD recordable media. See Click to DVD software Help for more details.
- Launch DVgate Plus software to edit your Video Capsules.
■ Launch Giga Pocket Help to obtain further assistance.
- Change the display views for your video contents, and edit recording information.
Accessing the Click to DVD Help
For additional information about using Click to DVD software features, follow these steps to access the Click to DVD Help.
- Click Start in the Windows taskbar, point to All Programs.
- Point to Click to DVD and click Click to DVD Help.
Accessing the DVGate Plus Help
For additional information about using Click to DVD software features, follow these steps to access the DVGate Plus Help.
- Click Start in the Windows taskbar, point to All Programs.
- Point to DVGate Plus and click DVGate Plus Help.
Recording Video Capsules onto recordable DVD media
You can record Video Capsules to DVD-R/DVD+R/DVD-RW/DVD+RW media with the Make DVD feature.

The Click to DVD software or another preinstalled DVD-writing program must be installed in order to burn Video rules to recordable DVD media.
- From the Giga Pocket Explorer main window, select the Video Capsules you want to burn onto a DVD.
- On the Giga Pocket Explorer Toolbar, click Launch DVD Writing Software.
- The Click to DVD software launches. Follow the on-screen instructions.
Exporting Video Capsules
You can export your Video Capsules as MPEG-1, MPEG-2, or AVI file formats for viewing on external media.
- In the list area, right-click the Video Capsule you want to export. A shortcut menu appears.
- Select Export. The Export dialog box appears.
Export dialog box
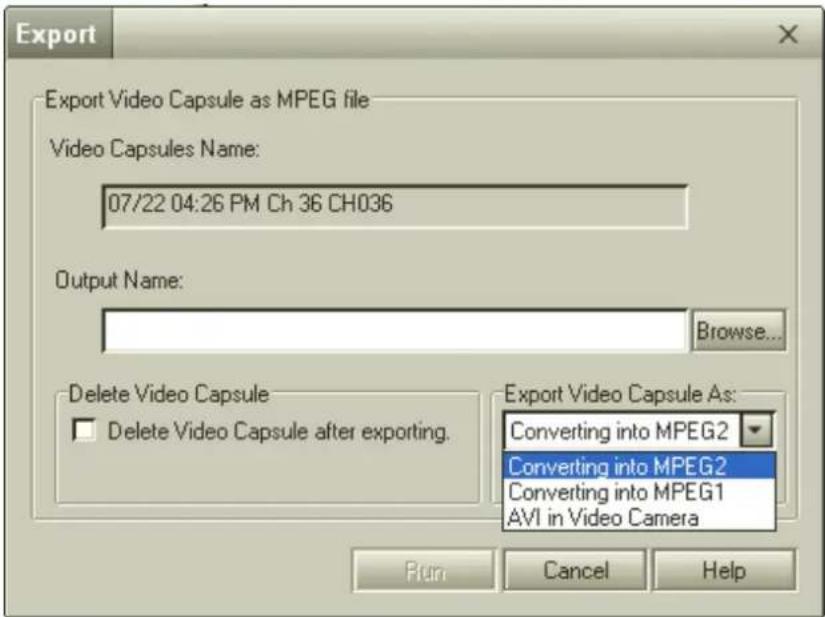
text_image
Export Export Video Capsule as MPEG file Video Capsules Name: 07/22 04:26 PM Ch 36 CH036 Output Name: Browse... Delete Video Capsule Delete Video Capsule after exporting. Export Video Capsule As: Converting into MPEG2 Converting into MPEG2 Converting into MPEG1 AVI in Video Camera Run Cancel Help- Enter an output name for the file you want to export and specify the location for the exported file.
You can select the option, Delete Video Capsule after export. If you do not want to delete the Video Capsule after export, leave the option disabled. - In the section, "Export Video Capsule As:", select to convert to an AVI, MPEG-1, or MPEG-2 format.
- Click Run to begin exporting.
Some conversion formats may not be available, depending on the recording mode that was used to create the Video Capsule.
Additional information about using Giga Pocket Explorer
■ Video Capsules that are recorded using High Quality (HQ) or Standard Play (SP) mode can be converted and exported as MPEG-1, MPEG-2, and AVI files.
MPEG-2 files need a specific system environment for playback:
■ A VAIO computer that has Giga Pocket Personal Video Recorder installed.
■ A VAIO computer that has DVD playback capabilities.
If you wish to play your Video Capsule in a different system environment, you can convert and export your Video Capsule using MPEG-1 format.
■ Video Capsules that are recorded using Long Play (LP) mode can be converted and exported as MPEG-1 files.
- You can convert an imported MPEG file into a Video Capsule, only if the file was created using DVgate Plus or other VAIO AV applications.
Using Network Cabinets
Giga Pocket Explorer enables you to connect to Video Capsules in network cabinets located on other computers in the network. These network cabinets can be accessed through the Giga Pocket Explorer main window when you are connected to the network.
Connecting to Network Cabinets
- On the Giga Pocket Explorer menu, select Network and then Connect/Disconnect. The Connect/Disconnect Server dialog box appears.
Connect/Disconnect Server dialog box
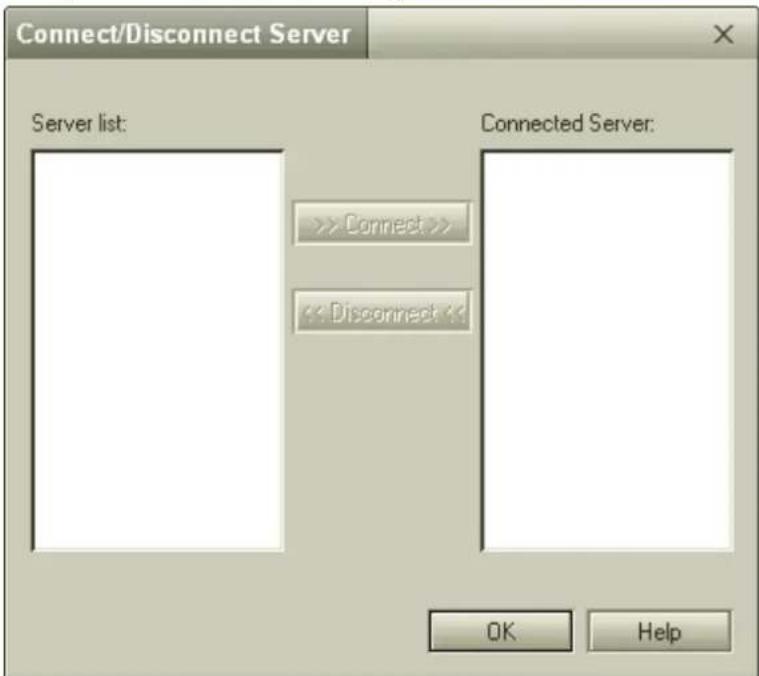
text_image
Connect/Disconnect Server Server list: >> Connect >> << Disconnect 11 Connected Server: OK Help- Select the server you want to connect to from the Server list on the left side.
- Click Connect to add the selected server to the Connected Server list, then click OK. The server is connected.
- To disconnect, repeat step 1, then select the server you want to disconnect from the Connected Server list on the right.
- Click Disconnect, then click OK. The server is disconnected.
Accessing the Giga Pocket Help
For more information about Giga Pocket Personal Video Recorder, follow these steps:
- Click Start in the Windows® taskbar and select All Programs.
- Select Giga Pocket, Help, and click Giga Pocket Help.
The CLIÉ Converter is a plug-in application that enables the conversion of Video Capsules into gMovie format. You are able to convert your Giga Pocket contents and HotSync® onto a Memory Stick® media for viewing with your Sony CLIÉ Handheld. In order to use the CLIÉ Converter plug-in application, make sure you have install all required software for the CLIÉ handheld.
The Sony CLIÉ Handheld personal entertainment organizers provide a rich and compelling handheld computing experience. Powered by the Palm operating system, the CLIÉ handheld is ready to deliver music and video with amazing clarity. For more information on this exciting device, go to the Sony Style Web site at http://sonystyle.com/vaio/clie.
Starting CLIÉ Converter
- Click Start in the Windows taskbar and point to All Programs.
- Point to Giga Pocket, point to Plug-ins, and then click CLIÉ Converter. The Giga Pocket -> CLIÉ Converter dialog box appears.
Giga Pocket -> CLIÉ Converter main
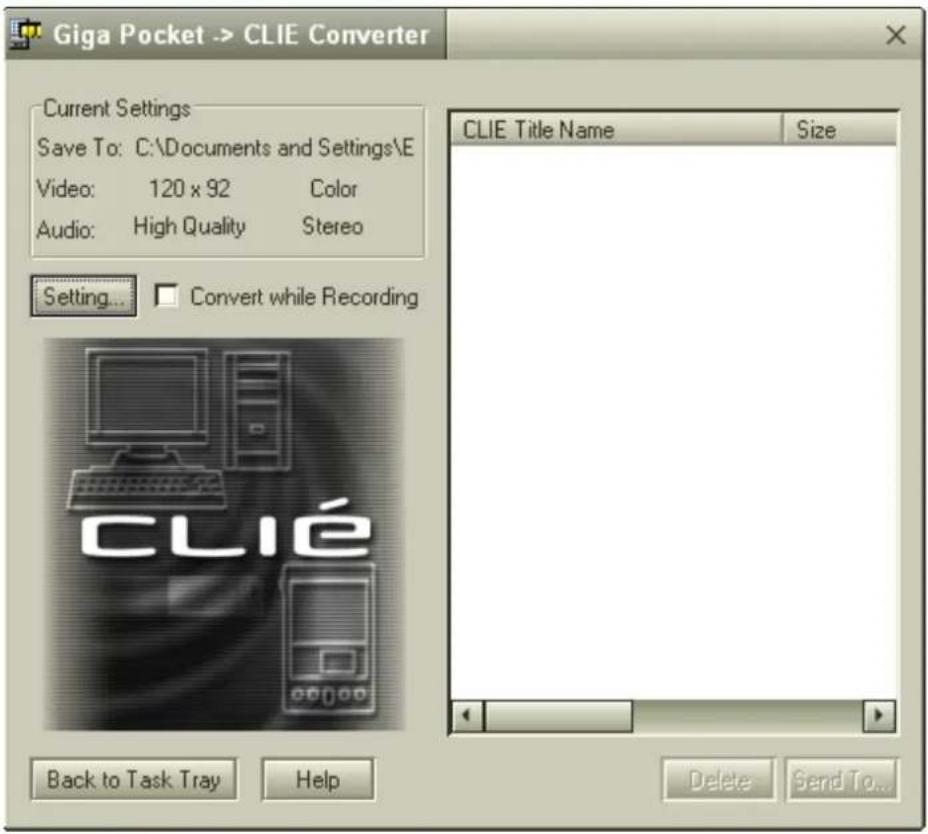
text_image
Giga Pocket -> CLIE Converter Current Settings Save To: C:\Documents and Settings\E Video: 120 x 92 Color Audio: High Quality Stereo Setting... Convert while Recording CLIE Title Name Size Back to Task Tray Help Delete Send To...Converting Video Capsules
- From the Giga Pocket -> CLIÉ Converter dialog box, click the Setting... button. The Settings dialog box appears. Enter your desired settings and click OK.
-
Start Giga Pocket Explorer as follows:
-
Click Start in the Windows taskbar, and then select All Programs.
- Select Giga Pocket, and then click Giga Pocket Explorer.
- Resize the Giga Pocket Explorer window so that the Giga Pocket -> CLIÉ Converter dialog box is visible.
- Click on the Cabinet icon to display the contents in the list area.
- Drag the Video Capsule from the Giga Pocket Explorer window and drop it in the list area of the Giga Pocket -> CLIÉ Converter main dialog box. The Video Capsule automatically converts into a video file.
During conversion, the Convert to CLIÉ dialog box appears, displaying the conversion status. When conversion is complete, the dialog box automatically closes.
The conversion process may take time, depending on the settings selected.
To convert multiple Video Capsules, hold down the Ctrl key while selecting Video Capsules in Giga Pocket Explorer. Drag and drop all selected capsules to the Giga Pocket -> CLIÉ Converter main window.
Transferring converted video files to a Memory Stick media
- Insert a Memory Stick® media into the Memory Stick media slot on your computer.
- From the Giga Pocket -> CLIÉ Converter main window, click to select the videos you want to transfer to the Memory Stick media.
- Click Send To. The Send To dialog box appears.
- Select Using Memory Stick as the transfer destination. Click OK.
During transfer, the Forwarding dialog box appears, displaying the transfer status. When transfer is complete, the Clie Converter window appears. Click OK.
Your converted video files can be played back on CLIÉ Handhelds that support the use of a Memory Stick media.
Transferring converted video files using the HotSync® operation
You can transfer your converted video files directly to your CLIÉ Handheld, when you launch a HotSync operation.
- From the Giga Pocket -> CLIÉ Converter main window, click to select the videos you want to transfer using the HotSync operation.
- Click Send To. The Send To dialog box appears.
- Select Using HotSync as the transfer destination. Designate a user name, if applicable to your handheld's configuration. Click OK.
- The "Send to HotSync" message box appears. Follow the on-screen instructions and click OK.
For more information about the HotSync operation, see the information supplied with your CLIÉ Handheld.
Accessing the CLIÉ Converter Help
For more information about using the CLIÉ Converter plug-in application, follow these steps:
- Click Start in the Windows taskbar and point to All Programs.
- Point to Giga Pocket, point to Help, and then click CLIÉ Converter Help.
Internet Electronic Program Guide is a free, online service that enables quick and easy access to your local TV listings. You can use the Internet Electronic Program Guide service with your Giga Pocket Personal Video Recorder for a "one-click" set up of timer recordings and record your favorite TV programs.
Giga Pocket Personal Video Recorder must be set up and configured correctly before you can use the Internet Electronic Program Guide service.
You must read and accept the User Agreement before accessing the Internet Electronic Program Guide Web site (first time only).
The Internet Electronic Program Guide service is available only to users in the United States.
1 Unauthorized duplication of audio or video files is a violation of applicable laws.
To set up your Internet Electronic Program Guide service
You must be connected to the Internet, before setting up your Internet Electronic Program Guide service.
Sony recommends using Microsoft Internet Explorer as your Web browser to access the Internet Electronic Program Guide service.
To set up Internet Electronic Program Guide service, follow these steps:
- Click Start in the Windows® taskbar and point to All Programs.
- Point to Giga Pocket, then click TV Program Web site. Microsoft® Internet Explorer launches, and you are directed to the Internet Electronic Program Guide Web site.
- The Terms of Use window appears. Click I accept, to continue.
The Welcome and Registration window appears.
Internet Electronic Program Guide Welcome and Registration window
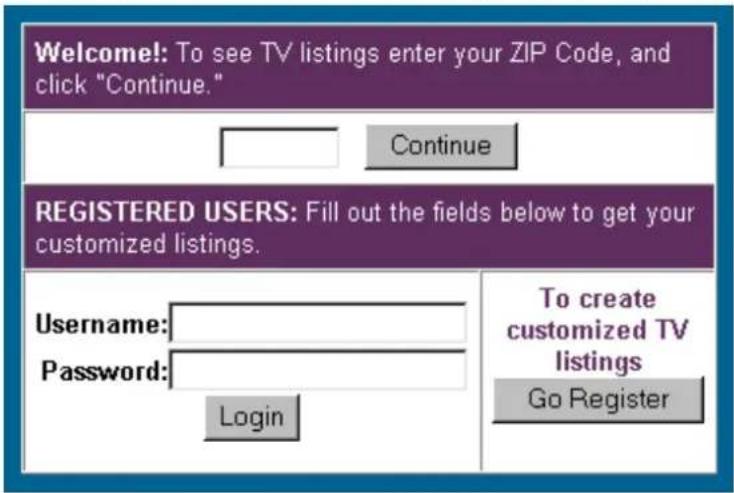
text_image
Welcome!: To see TV listings enter your ZIP Code, and click "Continue." Continue REGISTERED USERS: Fill out the fields below to get your customized listings. Username: Password: Login To create customized TV listings Go Register- In the Welcome! section, enter your 5-digit zip code and click Continue. The Choose Your Provider window appears, listing all TV providers or TV services available in your area.
- Select your TV provider and then click Confirm Channel Lineup. The Confirm Lineup window appears, listing available channels by number and name.
- Click Yes if the channel lineup is correct. Otherwise, click No and repeat steps 3 and 4 until you locate the correct channel lineup.
- Your TV listings appear in table format, organized by time and channel. Click Download All Channel Settings to set your channels. The Channel Information Converter window appears, if this is the first time you have used this download feature. Click OK.
Close all Giga Pocket applications before downloading your TV listings.
If you are using set-top box (STB) mode, you do not need to click Download All Channel Settings.
- Verify the channel settings and click OK.
- Your personal channel settings appear whenever you access the Internet Electronic Program Guide Web site.
If your TV provider adds new channels or changes existing channels, an Update icon appears next to Download All Channel Settings. Click Update to add the new or updated channels to your personal channel setting.
Notice
© 2003 Sony Electronics Inc. Reproduction in whole or in part without written permission is prohibited. All rights reserved. This manual and the software described herein, in whole or in part, may not be reproduced, translated, or reduced to any machine-readable form without prior written approval.
SONY CANNOT WARRANT THAT THE FUNCTIONS DESCRIBED IN THIS GUIDE WILL BE UNINTERRUPTED OR ERROR-FREE. SONY ALSO ASSUMES NO RESPONSIBILITY, AND SHALL NOT BE LIABLE FOR ANY DAMAGES TO, OR VIRUSES THAT MAY INFECT, YOUR COMPUTER EQUIPMENT, OR OTHER PROPERTY ON ACCOUNT OF YOUR ACCESS TO, USE OF, OR BROWSING IN ANY DESCRIBED WEB SITE, OR YOUR DOWNLOADING OF ANY MATERIALS, DATA, TEXT, IMAGES, VIDEO, OR AUDIO FROM ANY DESCRIBED WEB SITE. WEB SITE INFORMATION IS OBTAINED FROM VARIOUS SOURCES AND MAY BE INACCURATE. COPIES OF COPYRIGHTED INFORMATION MAY ONLY BE MADE FOR LEGALLY PERMISSIBLE PURPOSES.
Important information for Canadian customers: Your new VAIO computer includes certain software versions or upgrades, and Internet services or offers that are available to U.S. customers only.
Sony, VAIO, Memory Stick, Memory Stick PRO, the Memory Stick logo, CLIÉ, and Giga Pocket are trademarks or registered trademarks of Sony.
All other trademarks are trademarks or registered trademarks of their respective owners.
Notice
© 2003 Sony Electronics Inc. Reproduction in whole or in part without written permission is prohibited. All rights reserved. This manual and the software described herein, in whole or in part, may not be reproduced, translated, or reduced to any machine-readable form without prior written approval.
SONY CANNOT WARRANT THAT THE FUNCTIONS DESCRIBED IN THIS GUIDE WILL BE UNINTERRUPTED OR ERROR-FREE. SONY ALSO ASSUMES NO RESPONSIBILITY, AND SHALL NOT BE LIABLE FOR ANY DAMAGES TO, OR VIRUSES THAT MAY INFECT, YOUR COMPUTER EQUIPMENT, OR OTHER PROPERTY ON ACCOUNT OF YOUR ACCESS TO, USE OF, OR BROWSING IN ANY DESCRIBED WEB SITE, OR YOUR DOWNLOADING OF ANY MATERIALS, DATA, TEXT, IMAGES, VIDEO, OR AUDIO FROM ANY DESCRIBED WEB SITE. WEB SITE INFORMATION IS OBTAINED FROM VARIOUS SOURCES AND MAY BE INACCURATE. COPIES OF COPYRIGHTED INFORMATION MAY ONLY BE MADE FOR LEGALLY PERMISSIBLE PURPOSES.
Important information for Canadian customers: Your new VAIO computer includes certain software versions or upgrades, and Internet services or offers that are available to U.S. customers only.
Sony, VAIO, Memory Stick, Memory Stick PRO, the Memory Stick logo, CLIÉ, and Giga Pocket are trademarks or registered trademarks of Sony.
All other trademarks are trademarks or registered trademarks of their respective owners.
IMPORTANT-READ CAREFULLY: YOUR USE OF YOUR COMPUTER'S SOFTWARE CONSTITUTES AGREEMENT TO THIS LICENSE.
This End-User License Agreement ("License") is a legal agreement between you and Sony Electronics Inc. ("SONY"), the manufacturer of your computer system ("COMPUTER"). All Sony software and third party software (other than software provided by Microsoft Corporation or otherwise subject to its own separate license) included with your COMPUTER, downloaded from Web sites or provided as updates/upgrades as well as related services shall be referred to herein as the SOFTWARE. This License covers only the SOFTWARE. The SOFTWARE includes computer software, the associated media, any printed materials, and any "on-line" or electronic documentation, as well as Sony-supplied or authorized updates/upgrades thereto. All software provided by Microsoft Corporation is covered by a separate End User License Agreement, as may be selected other third party software (in which case you will be informed of such fact). You may use the SOFTWARE only in connection with the use of the COMPUTER. By installing, copying, downloading or otherwise using the SOFTWARE, you agree to be bound by the terms of this License. If you do not agree to the terms of this License, SONY is unwilling to license the SOFTWARE to you. In such event, you may not use or copy the SOFTWARE, and you should promptly contact SONY for instructions on return of the entire COMPUTER and included SOFTWARE for a refund of the purchase price of the COMPUTER.
SOFTWARE LICENSE
The SOFTWARE is protected by copyright laws and international copyright treaties, as well as other intellectual property laws and treaties. The SOFTWARE is licensed, not sold.
GRANT OF LICENSE
This License grants you the following rights:
- Software — You may install and use one copy of the SOFTWARE on the COMPUTER.
- Storage/Network Use — You may not use the SOFTWARE over a network or distribute the SOFTWARE to other computers over a network except as specifically described in documentation provided with the SOFTWARE.
- Back-up Copy — A back-up copy of the SOFTWARE is included with the COMPUTER. You may use the back-up copy solely for recovery purposes.
DESCRIPTION OF OTHER RIGHTS AND LIMITATIONS
- Limitation on Reverse Engineering, Decompilation and Disassembly — You may not modify, reverse engineer, decompile, or disassemble the SOFTWARE in whole or in part.
- Separation of Components — The SOFTWARE is licensed as a single product. Its component parts may not be separated for use on more than one computer.
- Single COMPUTER — The SOFTWARE is licensed with the COMPUTER as a single integrated product. The SOFTWARE may only be used with the COMPUTER except as specifically described in documentation provided with the SOFTWARE.
- Rental — You may not rent or lease the SOFTWARE.
- Software Transfer — You may permanently transfer all of your rights under this License only as part of a sale or transfer of the COMPUTER, provided you retain no copies, transfer all of the SOFTWARE (including all copies, component parts, the media and printed materials, all versions and any upgrades of the SOFTWARE and this License), and the recipient agrees to the terms of this License.
- Termination — Without prejudice to any other rights, SONY may terminate this License if you fail to comply with the terms and conditions of this License. In such event, you must destroy all copies of the SOFTWARE and all of its component parts.
COPYRIGHT
All title and copyrights in and to the SOFTWARE (including but not limited to any images, photographs, animation, video, audio, music, text and "applets," incorporated into the SOFTWARE), and any copies of the SOFTWARE, are owned by SONY or its suppliers. All rights not specifically granted under this License are reserved by SONY.
USE OF SOFTWARE WITH COPYRIGHTED MATERIALS
The SOFTWARE is capable of being used by you to store, process and use content created by you and third parties. Such content may be protected by copyright, other intellectual property laws, and/or agreements. You agree to use the SOFTWARE only in compliance with all such laws and agreements that apply to such content. You agree that SONY may take appropriate measures to protect copyright of content stored, processed or used by the SOFTWARE. Such measures include, but are not limited to, counting the frequency of your backup and restoration through certain SOFTWARE features, refusal to accept your request to enable restoration of data through certain SOFTWARE features and termination of this License in the event of your illegitimate use of the SOFTWARE.
HIGH RISK ACTIVITIES
The SOFTWARE is not fault-tolerant and is not designed, manufactured or intended for use or resale as on-line control equipment in hazardous environments requiring fail-safe performance, such as in the operation of nuclear facilities, aircraft navigation or communication systems, air traffic control, direct life support machines, or weapons systems, in which the failure of the SOFTWARE could lead directly to death, personal injury, or severe physical or environmental damage ("High Risk Activities"). SONY and its suppliers specifically disclaim any express or implied warranty of fitness for High Risk Activities.
PROHIBITION ON EXPORT. EXCEPT FOR EXPORT TO CANADA FOR USE IN CANADA BY CANADIAN CITIZENS, THE SOFTWARE AND ANY UNDERLYING TECHNOLOGY MAY NOT BE EXPORTED OUTSIDE THE UNITED STATES OR TO ANY FOREIGN ENTITY OR "FOREIGN PERSON" AS DEFINED BY U.S. GOVERNMENT REGULATIONS, INCLUDING WITHOUT LIMITATION, ANYONE WHO IS NOT A CITIZEN, NATIONAL OR LAWFUL PERMANENT RESIDENT OF THE UNITED STATES. BY DOWNLOADING OR USING THE SOFTWARE, YOU ARE AGREEING TO THE FOREGOING AND YOU ARE WARRANTIES THAT YOU ARE NOT A "FOREIGN PERSON" OR UNDER THE CONTROL OF A FOREIGN PERSON.
U.S. GOVERNMENT RESTRICTED RIGHTS
THE SOFTWARE PRODUCT and documentation are provided with RESTRICTED RIGHTS. Use, duplication, or disclosure by the United States Government is subject to restrictions as set forth in subparagraph (c)(1) and (2) of the Commercial Computer Software-Restricted Rights at 48 CFR 52.227-19, as applicable. Manufacturer is Sony Electronics Inc., One Sony Drive, Park Ridge, New Jersey 07656.
LIMITED WARRANTY ON CD-ROM MEDIA
SONY warrants that for a period of ninety (90) days from the date of its delivery to you the CD-ROM media on which the back-up copy of the SOFTWARE is furnished to you will be free from defects in materials and workmanship under normal use. This limited warranty extends only to you as the original licensee. SONY's entire liability and your exclusive remedy will be replacement of the CD-ROM media not meeting SONY's limited warranty and which is returned to SONY with proof of purchase in the form of a bill of sale (which is evidence that the CD-ROM media is within the warranty period). SONY will have no responsibility to replace a disk damaged by accident, abuse or misapplication. ANY IMPLIED WARRANTIES ON THE CD-ROM MEDIA, INCLUDING THE IMPLIED WARRANTIES OF MERCHANTABILITY AND FITNESS FOR A PARTICULAR PURPOSE, ARE LIMITED IN DURATION TO NINETY (90) DAYS FROM THE DATE OF DELIVERY. SOME STATES DO NOT ALLOW LIMITATIONS ON HOW LONG AN IMPLIED WARRANTY LASTS, SO THESE LIMITATIONS MAY NOT APPLY TO YOU. THIS WARRANTY GIVES YOU SPECIFIC LEGAL RIGHTS, AND YOU MAY ALSO HAVE OTHER RIGHTS WHICH VARY FROM STATE TO STATE.
EXCLUSION OF WARRANTY ON SOFTWARE
You expressly acknowledge and agree that use of the SOFTWARE is at your sole risk. The SOFTWARE is provided "AS IS" and without warranty of any kind and SONY and SONY's licensors (In this Section, SONY and SONY's licensors shall be collectively referred to as "SONY") EXPRESSLY DISCLAIM ALL WARRANTIES, EXPRESS OR IMPLIED, INCLUDING, BUT NOT LIMITED TO, THE IMPLIED WARRANTIES OF MERCHANTABILITY AND FITNESS FOR A PARTICULAR PURPOSE. SONY DOES NOT WARRANT THAT THE FUNCTIONS CONTAINED IN THE SOFTWARE WILL MEET YOUR REQUIREMENTS, OR THAT THE OPERATION OF THE SOFTWARE WILL BE CORRECTED. FURTHERMORE, SONY DOES NOT WARRANT OR MAKE ANY REPRESENTATIONS REGARDING THE USE OR THE RESULTS OF THE USE OF THE SOFTWARE IN TERMS OF ITS CORRECTNESS, ACCURACY, RELIABILITY, OR OTHERWISE. NO ORAL OR WRITTEN INFORMATION OR ADVICE GIVEN BY SONY OR A SONY AUTHORIZED REPRESENTATIVE SHALL CREATE A WARRANTY OR IN ANY WAY INCREASE THE SCOPE OF THIS WARRANTY. SHOULD THE SOFTWARE PROVE DEFECTIVE. YOU (AND NOT SONY OR A SONY AUTHORIZED REPRESENTATIVE) ASSUME THE ENTIRE COST OF ALL NECESSARY SERVICING, REPAIR OR CORRECTION. SOME JURISDICTIONS DO NOT ALLOW THE EXCLUSION OF IMPLIED WARRANTIES, SO THE ABOVE EXCLUSION MAY NOT APPLY TO YOU.
Without limiting the foregoing, it is specifically provided that SOFTWARE is not designed or intended for use on a computer other than COMPUTER. SONY provides no warranty that any other computer hardware and software will not be damaged by the SOFTWARE or any data you download using the SOFTWARE. You expressly acknowledge and agree that use of Page 106
SOFTWARE is at your sole risk and you are responsible for installation of the SOFTWARE and use of the SOFTWARE on your COMPUTER.
LIMITATION OF LIABILITY
IN THIS SECTION, SONY AND SONY'S LICENSOR'S SHALL BE COLLECTIVELY REFERRED TO AS "SONY." SONY SHALL NOT BE LIABLE FOR ANY INCIDENTAL OR CONSEQUENTIAL DAMAGES FOR BREACH OF ANY EXPRESS OR IMPLIED WARRANTY, BREACH OF CONTRACT, NEGLIGENCE, STRICT LIABILITY OR ANY OTHER LEGAL THEORY RELATED TO THIS PRODUCT. SUCH DAMAGES INCLUDE, BUT ARE NOT LIMITED TO, LOSS OF PROFITS, LOSS OF REVENUE, LOSS OF DATA, LOSS OF USE OF THE PRODUCT OR ANY ASSOCIATED EQUIPMENT, DOWN TIME AND PURCHASER'S TIME, EVEN IF SONY HAS BEEN ADVISED OF THE POSSIBILITY OF SUCH DAMAGES. IN ANY CASE, SONY'S ENTIRE LIABILITY UNDER ANY PROVISION OF THIS AGREEMENT SHALL BE LIMITED TO THE AMOUNT ACTUALLY PAID BY YOU ALLOCABLE TO THE SOFTWARE. SOME STATES DO NOT ALLOW THE EXCLUSION OR LIMITATION OF CONSEQUENTIAL OR INCIDENTAL DAMAGES, SO THE ABOVE EXCLUSION OR LIMITATION MAY NOT APPLY TO YOU.
SOFTWARE DATA COLLECTION AND MONITORING
The SOFTWARE contains features which may allow SONY and/or third parties to collect data from, control and/or monitor computers and devices running or interacting with the SOFTWARE. You hereby agree that such activities may occur. SONY's current privacy policy is located at www.sony.com. Please contact applicable third parties for privacy policies related to their software and services.
AUTOMATIC UPDATE FEATURE
From time to time, SONY or third parties may automatically update or otherwise modify the SOFTWARE, for example, but not limited to, for purposes of enhancement of security functions, error correction and improvement of functions, at such time as you interact with SONY's or third parties's servers, or otherwise. Such updates or modifications may delete or change the nature of features or other aspects of the SOFTWARE, including functions you may rely upon. You hereby agree that such activities may occur at SONY's sole discretion and that SONY may condition continued use of the SOFTWARE upon your complete installation or acceptance of such update or modifications.
GOVERNING LAW AND JURISDICTION, JURY TRIAL WAIVER
This agreement shall be governed by the laws of the State of California, United States of America, without regards to conflict of laws provisions. Any dispute arising out of this Agreement shall be subject to the exclusive venue of the state and federal courts of Santa Clara County, California, and the parties hereby consent to the venue and jurisdiction of such courts. THE PARTIES HERETO WAIVE TRIAL BY JURY WITH RESPECT TO ANY MATTERS ARISING UNDER OR RELATING TO THIS AGREEMENT.
SONY RESERVES THE RIGHT TO AMEND THE SPECIFIC TERMS OF THE LICENSE REGARDING THE SOFTWARE AT ITS SOLE DISCRETION BY NOTICE TO YOU AT THE E-MAIL ADDRESS YOU HAVE PROVIDED TO SONY AS PART OF YOUR REGISTRATION, OR ANY OTHER LEGALLY RECOGNIZABLE FORM OF NOTICE. If you do not agree to the terms to be amended, which shall be notified to you by SONY before they take effect, you must return the entire COMPUTER, any other materials bundled in the package at the time of the purchase, together with any software you obtained from Sony Web site for refund pursuant to the terms in the first paragraph of this License, titled "IMPORTANT- READ CAREFULLY". Your continued use of the SOFTWARE after notice shall be deemed agreement to be bound by such amendment.
If any part of this Agreement is held invalid or unenforceable, the other parts will remain valid.
Should you have any questions concerning this license or this limited warranty, you may contact SONY, by writing to SONY at Sony Technical Response Center, 12451 Gateway Boulevard, Fort Myers, Florida 33913.
This section describes how to troubleshoot common problems you may encounter when using Giga Pocket Personal Video Recorder functions. Many problems have simple solutions, so try these suggestions before you contact Sony Customer Support.
Why can't I see an image or an image that is displayed properly when I am using a VCR?
Some images from an externally-connected video player device or a video game console, may not display or are not displayed correctly. These images include:
■ Images from a playback screen that is in pause mode.
■ Menu screens of the connected video player device.
The end of the film roll being played back using the scroll bar.
■ Video output from a video game console.
■ Video output from a VCR, using a coaxial cable.
Giga Pocket cannot record or display all video images from this source.
Why does my Giga Pocket viewing window or the images played back from a Video Capsule, appear distorted or corrupted?
There are some situations where screen or image distortion may occur, such as:
- When you change the channel on the video player device.
- If there is a damaged section on your video tape.
When using Giga Pocket Personal Video Recorder, set your display settings as follows:
- Colors — Use the default factory settings (32-bit).
- Screen area — Use the default factory settings.
If you use other settings, you may experience poor image quality on your display.
Why does my system seem to slow down when I play a Video Capsule?
Your computer may respond slower if you try to play back a Video Capsule while recording a TV program with Giga Pocket. During a timer recording, Giga Pocket may interrupt or stop your Video Capsule playback to prioritize your computer's resources for the timer recording. If this occurs, wait until the timer recording session has completed, and then play back the Video Capsule.
Why did I get the error message, "Event buffer of audio overflow?"
The timer recording may fail in certain situations, such as:
- The coaxial cable (input) is disconnected after recording has started.
The TV channel has lost broadcast signal during the recording session.
■ Video content being recorded has poor signal quality.
Why did my on-screen display shift or split?
Your on-screen display may shift or split in rare instances. If this should occur, switch the TV/Recording deck and the playback deck, or try switching the channel. Your timer recording continues even if the on-screen display has shifted or split.
Why did Giga Pocket stop allowing me to create new Video Capsules?
You cannot create a new Video Capsule when the remaining free space on your hard disk drive reaches approximately 100 MB. Delete any unnecessary Video Capsules or files to increase the free space on your hard drive.
Giga Pocket including PicoPlayer
CAREFULLY READ THE FOLLOWING AGREEMENT BEFORE USING THIS SOFTWARE. USE OF THIS SOFTWARE INDICATES YOUR ACCEPTANCE OF THE AGREEMENT.
IMPORTANT-READ CAREFULLY:
This End User License Agreement (EULA) is a legal agreement between you and Sony Electronics Inc. (SONY), the manufacturer of your SONY computer system (COMPUTER). Please read this EULA carefully before using Giga Pocket (including PicoPlayer) software and related materials distributed together with this EULA (SONY SOFTWARE). By using the SONY SOFTWARE, you agree to be bound by the terms of this EULA. You may use the SONY SOFTWARE only in connection with the use of COMPUTER. SONY SOFTWARE is licensed not sold.
If you do not agree to the terms of this EULA, SONY is unwilling to license the SONY SOFTWARE to you. In such event, you may not use or copy the SONY SOFTWARE, and you should promptly contact SONY for instructions on return of the entire COMPUTER and included SONY SOFTWARE for a refund of the purchase price of the COMPUTER.
SONY SOFTWARE LICENSE
Copyright laws and international copyright treaties, as well as other intellectual property laws and treaties protect the SONY SOFTWARE.
GRANT OF LICENSE. This License grants you the following rights:
Software.
You may use one copy of the SONY SOFTWARE on the COMPUTER except that you may make multiple copies and distribute the PicoPlayer software to other users that agree to the PicoPlayer license
Back-up Copy.
You may make one back-up copy of SONY SOFTWARE solely for archival purposes.
DESCRIPTION OF REQUIREMENTS, RESTRICTIONS, RIGHTS AND LIMITATIONS
Limitation on Reverse Engineering, Decompilation and Disassembly.
You may not modify, reverse engineer, decompile, or disassemble the SONY SOFTWARE in whole or in part.
Rental.
You may not rent or lease the SONY SOFTWARE.
Software Transfer.
You may permanently transfer all of your rights under this EULA only as part of a sale or transfer of SONY SOFTWARE, provided you retain no copies, transfer all of the SONY SOFTWARE (including all copies, component parts, the media and printed materials, all versions and any upgrades of the SONY SOFTWARE and this EULA), and the recipient agrees to the terms of this EULA.
Termination.
Without prejudice to any other rights, SONY may terminate this EULA if you fail to comply with the terms and conditions of this EULA. In such event, you must destroy all copies of the SONY SOFTWARE and all of its component parts.
Confidentiality.
You agree to keep information contained in SONY SOFTWARE which is not publicly known, confidential to yourself, and not to disclose such information to others without prior written approval from SONY.
COPYRIGHT
audio, music, text and "applets", incorporated into the SONY SOFTWARE), and any copies of the SONY SOFTWARE, are owned by SONY or its suppliers. SONY reserves all rights not specifically granted under this EULA.
USE OF SONY SOFTWARE WITH COPYRIGHTED MATERIALS
The Sony Software is capable of being used to process, store and share personally created and other content. You agree to use the Sony Software only in compliance with all copyright and other laws and agreements that apply to such content.
HIGH RISK ACTIVITIES
The SONY SOFTWARE is not fault-tolerant and is not designed, manufactured or intended for use or resale as on-line control equipment in hazardous environments requiring fail-safe performance, such as in the operation of nuclear facilities, aircraft navigation or communication systems, air traffic control, direct life support machines, or weapons systems, in which the failure of the SONY SOFTWARE could lead to death, personal injury, or severe physical or environmental damage (High Risk Activities). SONY and its suppliers specifically disclaim any express or implied warranty or condition of fitness for High Risk Activities.
PROHIBITION ON EXPORT.
THE SONY SOFTWARE AND ANY UNDERLYING TECHNOLOGY MAY NOT BE EXPORTED OUTSIDE THE UNITED STATES OR TO ANY FOREIGN ENTITY OR "FOREIGN PERSON" AS DEFINED BY U.S. GOVERNMENT REGULATIONS, INCLUDING WITHOUT LIMITATION, ANYONE WHO IS NOT A CITIZEN, NATIONAL OR LAWFUL PERMANENT RESIDENT OF THE UNITED STATES. BY DOWNLOADING OR USING THE SONY SOFTWARE, YOU ARE AGREEING TO THE FOREGOING AND YOU ARE WARRANTING THAT YOU ARE NOT A "FOREIGN PERSON" OR UNDER THE CONTROL OF A FOREIGN PERSON.
U.S. GOVERNMENT RESTRICTED RIGHTS.
(I) THE SOFTWARE PRODUCT and documentation are provided with RESTRICTED RIGHTS. Use, duplication, or disclosure by the United States Government is subject to restrictions as set forth in subparagraph (c)(1) and (2) of the Commercial Computer Software-Restricted Rights at 48 CFR 52.227-19, as applicable. Manufacturer is Sony Electronics Inc., One Sony Drive, Park Ridge, New Jersey 07656. (II) All SONY technical data and computer software is commercial in nature and developed solely at private expense. Software is delivered as Commercial Computer Software as defined in DFARS 252.227-7014 (June 1995) or as a commercial item as defined in FAR 2.101(a) and as such is provided with only such rights as are provided in the SONY standard commercial license for such software. Technical data is provided with limited rights only as provided in DFARS 252.227-7015 (Nov.1995) or FAR 52.227-14 (June 1987), whichever is applicable.
EXCLUSION OF WARRANTY ON SONY SOFTWARE.
You expressly acknowledge and agree that use of the SONY SOFTWARE is at your sole risk. The SONY SOFTWARE is provided "AS IS" and without warranty or CONDITIONS of any kind. SONY and SONY's licensors (hereinafter, SONY and SONY's licensors shall be collectively referred to as "SONY") EXPRESSLY DISCLAIM ALL WARRANTIES AND CONDITIONS, EXPRESS OR IMPLIED, INCLUDING, BUT NOT LIMITED TO, THE IMPLIED WARRANTIES AND CONDITIONS OF MERCHANTABILITY QUALITY AND FITNESS FOR A PARTICULAR PURPOSE. SONY DOES NOT WARRANT THAT THE FUNCTIONS CONTAINED IN THE SONY SOFTWARE WILL MEET YOUR REQUIREMENTS, OR THAT THE OPERATION OF THE SONY SOFTWARE WILL BE CORRECTED. FURTHERMORE, SONY DOES NOT WARRANT OR MAKE ANY REPRESENTATIONS REGARDING THE USE OR THE RESULTS OF THE USE OF THE SONY SOFTWARE IN TERMS OF ITS CORRECTNESS, ACCURACY, RELIABILITY, OR OTHERWISE. NO ORAL OR WRITTEN INFORMATION OR ADVICE GIVEN BY SONY OR A SONY AUTHORIZED REPRESENTATIVE SHALL CREATE A WARRANTY OR CONDITION OR IN ANY WAY INCREASE THE SCOPE OF THIS WARRANTY. SHOULD THE SONY SOFTWARE PROVE DEFECTIVE, YOU (AND NOT SONY OR A SONY AUTHORIZED REPRESENTATIVE) ASSUME THE ENTIRE COST OF ALL NECESSARY SERVICING, REPAIR OR CORRECTION. SOME JURISDICTIONS DO NOT ALLOW THE EXCLUSION OF IMPLIED WARRANTIES OR CONDITIONS, SO THE ABOVE EXCLUSION MAY NOT APPLY TO YOU.
LIMITATION OF LIABILITY
SONY SHALL NOT BE LIABLE FOR ANY INCIDENTAL, INDIRECT OR CONSEQUENTIAL DAMAGES FOR BREACH OF ANY EXPRESS OR IMPLIED WARRANTY OR CONDITION, BREACH OF CONTRACT, NEGLIGENCE, STRICT LIABILITY OR ANY OTHER LEGAL THEORY RELATED TO THIS PRODUCT AND SONY SOFTWARE. SUCH DAMAGES INCLUDE, BUT ARE NOT LIMITED TO, LOSS OF PROFITS, LOSS OF REVENUE, LOSS OF DATA, LOSS OF USE OF THE PRODUCT OR ANY ASSOCIATED EQUIPMENT, DOWN TIME AND PURCHASER'S TIME, EVEN IF SONY HAS BEEN ADVISED OF THE POSSIBILITY OF SUCH DAMAGES. IN ANY CASE, THE ENTIRE LIABILITY TO SONY, UNDER ANY PROVISION OF THIS AGREEMENT SHALL BE LIMITED TO THE AMOUNT ACTUALLY PAID BY YOU, ALLOCABLE TO THE SONY SOFTWARE. SOME JURISDICTIONS DO NOT ALLOW THE EXCLUSION OR LIMITATION OF CONSEQUENTIAL, INDIRECT OR INCIDENTAL DAMAGES, SO THE ABOVE EXCLUSION OR LIMITATION MAY NOT APPLY TO YOU.
GOVERNING LAW AND JURISDICTION, JURY TRIAL WAIVER
This agreement shall be governed by the laws of the State of California, United States of America, without regards to conflict of laws provisions. Any dispute arising out of this Agreement shall be subject to the exclusive venue of the state and federal courts of Santa Clara County, California, and the parties hereby consent to the venue and jurisdiction of such courts. THE PARTIES HERETO WAIVE TRIAL BY JURY WITH RESPECT TO ANY MATTERS ARISING UNDER OR RELATING TO Page 16
AGREEMENT.
If any part of this Agreement is held invalid or unenforceable, the other parts will remain valid.
Should you have any questions concerning this license or this limited warranty, you may contact SONY by writing to SONY at Sony Technical Response Center, 12451 Gateway Boulevard, Fort Myers, Florida 33913.
Internet Connections
This section describes the basic steps for setting up your dial-up or Ethernet connection to the Internet. The New Connection Wizard guides you through the process of connecting to the Internet and choosing an Internet service provider (ISP) or setting up an existing account. When you connect to the Internet, you can register your VAIO® computer, use online services, and gain access to Sony Computing Support.
Internet Connections
This section describes the basic steps for setting up your dial-up or Ethernet connection to the Internet. The New Connection Wizard guides you through the process of connecting to the Internet and choosing an Internet service provider (ISP) or setting up an existing account. When you connect to the Internet, you can register your VAIO® computer, use online services, and gain access to Sony Computing Support.
Setting up a dial-up Internet connection
Before you can connect to the Internet, you need to connect your computer to a telephone line via a telephone cable (not supplied). Once you set up your telephone cable, you're ready to connect to the Internet.
To connect a telephone cable
- Locate the Modem jack on your computer. For location information, see "Locating Ports and Controls" in the "Setting Up" chapter of your printed VAIO® Computer Quick Start.
- Plug one end of the telephone cable into the Modem jack. Make sure it clicks into place.
- Plug the other end into the wall jack.
Connecting a Telephone Cable
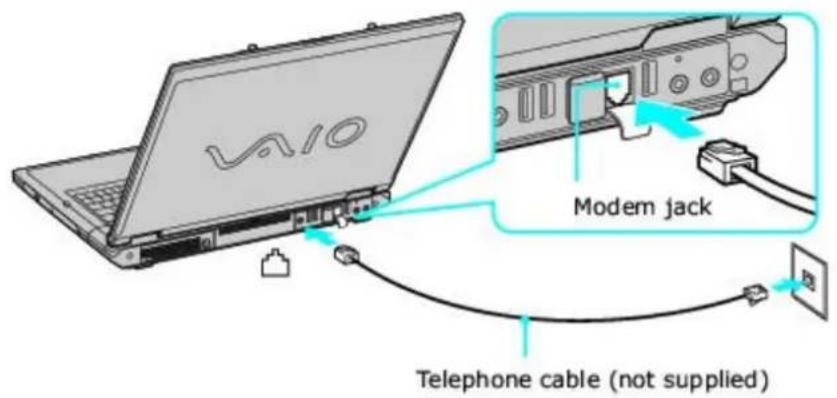
text_image
V410 Modern jack Telephone cable (not supplied)Your computer does not work with party lines, cannot be connected to a coin-operated telephone, and may not work with multiple telephone lines or a private branch exchange (PBX). Some of these connections may result in excess electrical current and could cause a malfunction in the internal modem.
If you connect a telephone cable coming through a splitter, the modem or connected device may not work properly.
To set up a dial-up connection to the Internet
- Connect your computer to a telephone line. See To connect a telephone cable for more information.
- Click Start, point to All Programs, Accessories, Communications, and click New Connection Wizard. The New Connection Wizard appears.
New Connection Wizard
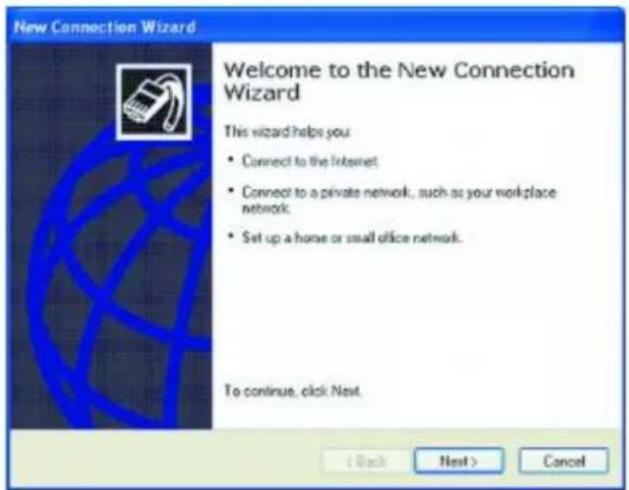
text_image
New Connection Wizard Welcome to the New Connection Wizard This wizard helps you • Connect to the Internet • Connect to a private network, such as your workplace network. • Set up a home or small office network. To continue, click Next. < Back Next > Cancel- Click Next. If the Location Information dialog box appears, follow the on-screen instructions.
-
If it is not already selected, click to select Connect to the Internet, and click Next.
-
Follow the on-screen instructions.
Setting up an Ethernet Internet connection
Your computer accommodates both 10BASE-T and 100BASE-TX Ethernet connections, with data transfer speeds of between 10 and 100 Mbps.
To connect an Ethernet cable
- Locate the Ethernet port on your computer. For location information, see "Locating Controls and Ports" in the "Setting Up" chapter of your printed VAIO® Computer Quick Start.
Connecting an Ethernet Cable
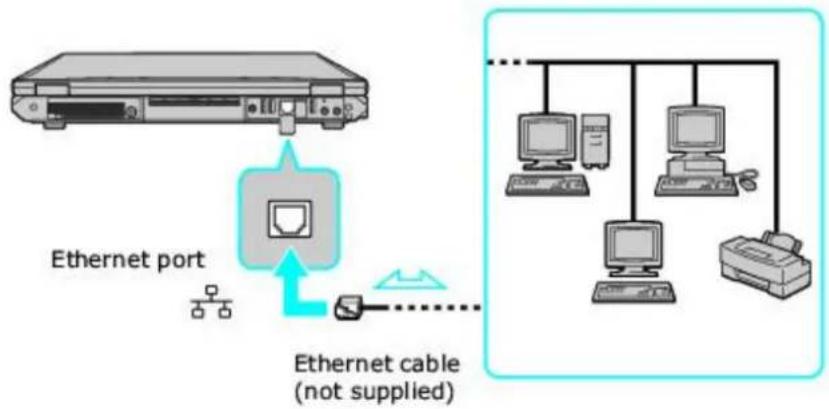
text_image
Ethernet port Ethernet cable (not supplied)- Plug one end of the Ethernet cable into your computer's Ethernet port and the other into the network connection.
To set up an Ethernet connection to the Internet
- Connect your computer to a network connection.
- Click Start, point to All Programs, Accessories, Communications, and click New Connection Wizard. The New Connection Wizard appears.
New Connection Wizard
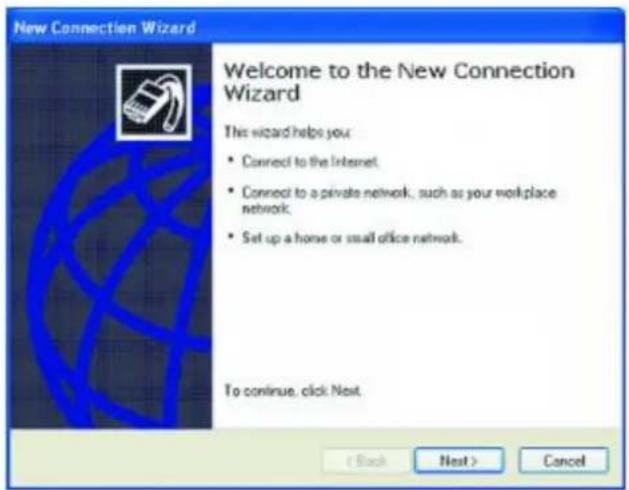
text_image
New Connection Wizard Welcome to the New Connection Wizard This wizard helps your • Connect to the Internet • Connect to a private network, such as your workplace network; • Set up a horse or small office network. To continue, click Next < Back Next > Cancel- Click Next. If the Location Information dialog box appears, follow the on-screen instructions.
- If it is not already selected, click to select Connect to the Internet, and click Next.
- Follow the on-screen instructions.
Customizing your Internet connection
The Internet Properties dialog box enables you to change the way you view the Internet. You can change your home page, fonts, language, and colors. You can also regulate content and set browsing preferences.
To open the Internet Properties dialog box
- Click Start on the Windows® taskbar, and then Control Panel.
- Click the tabs to view options.
- Make changes, and click Apply to activate your changes.
-
Click OK.
-
Click Network and Internet Connections, and then Internet Options. The Internet Properties dialog box appears.
With a Sony computer, you can easily set up or connect to a variety of networks. The New Connection Wizard and Network Setup Wizard make it easy to gain access to networks (LANs) using wireless, Ethernet, or dial-up connections.
For more information about networking, click Start, Help and Support, and then Networking and the Web.
Types of Networks®
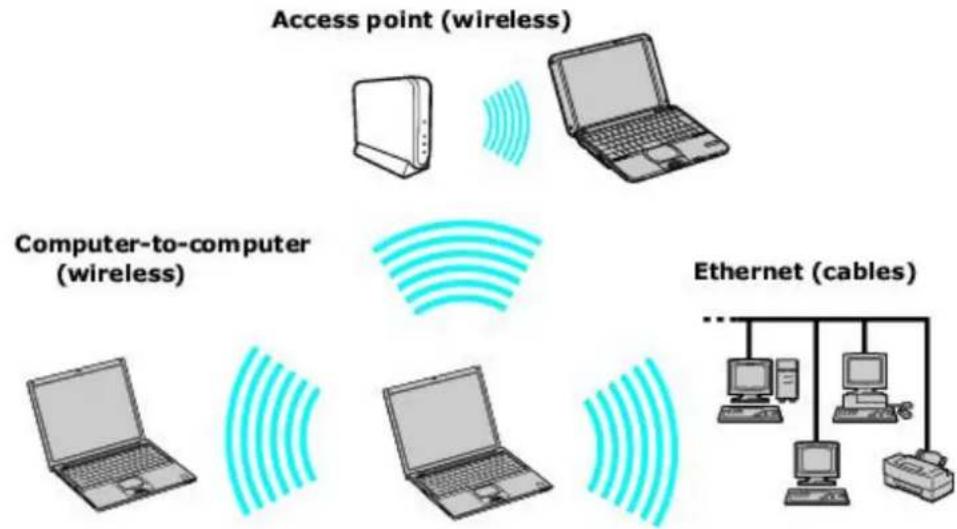
flowchart
graph TD
    A["Access point (wireless)"] --> B["Computer-to-computer (wireless)"]
    B --> C["Ethernet (cables)"]
    C --> D["Computer"]
    C --> E["Mac"]
    C --> F["Desktop"]
* The computers represented in this graphic may not be identical to the model you purchased.
Using Ethernet and dial-up connections
For setting up local area networks (LANs), Ethernet is a widely installed technology. Your computer accommodates both 10BASE-T and 100BASE-TX Ethernet connections, with data transfer speeds of between 10 and 100 Mbps.
To connect to a local area network using a telephone or Ethernet cable
- Connect an Ethernet or telephone cable to your computer. See To connect an Ethernet cable and Setting up a dial-up Internet connection for more information.
Connecting an Ethernet Cable
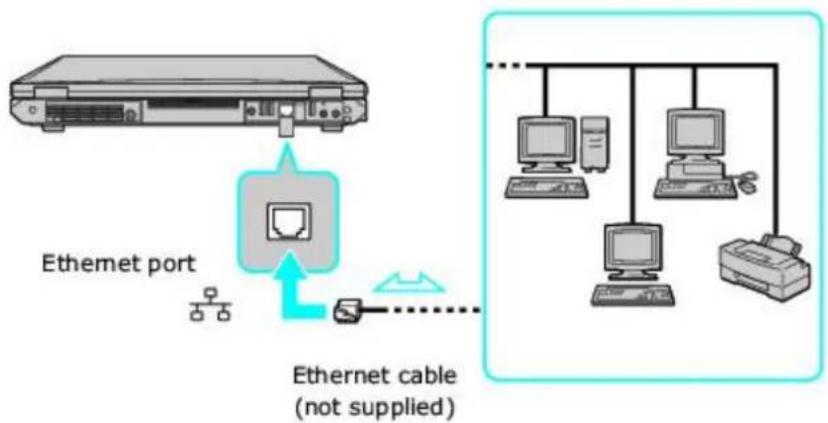
flowchart
graph TD
    A["Ethernet port"] --> B["Ethernet cable (not supplied)"]
    B --> C["Computer 1"]
    B --> D["Computer 2"]
    B --> E["Computer 3"]
    B --> F["Printer"]
- Click Start, point to All Programs, Accessories, Communications, and click Network Setup Wizard. The Network Setup Wizard appears.
Network Setup Wizard
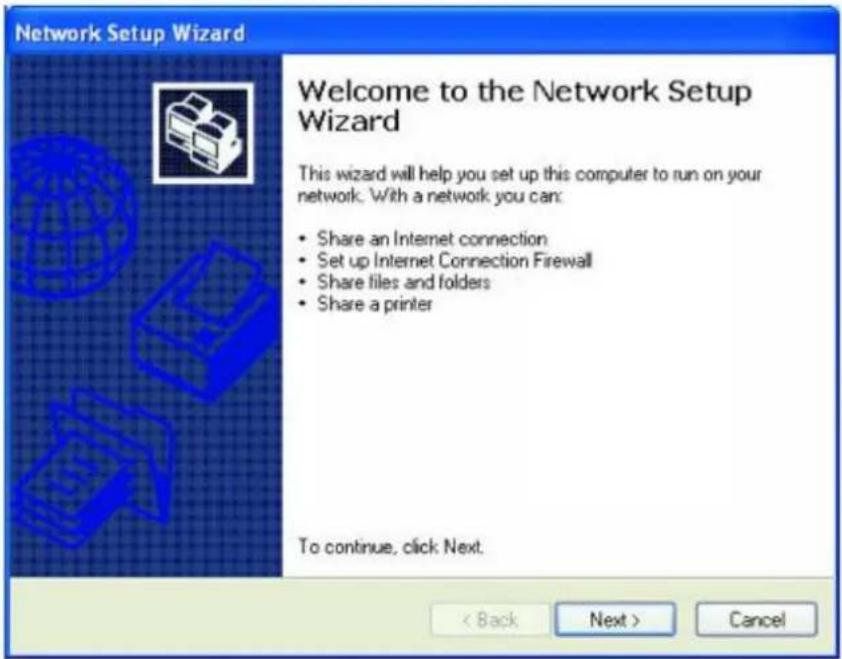
text_image
Network Setup Wizard Welcome to the Network Setup Wizard This wizard will help you set up this computer to run on your network. With a network you can: • Share an Internet connection • Set up Internet Connection Firewall • Share files and folders • Share a printer To continue, click Next. < Back Next > Cancel- Click Next. If you are prompted to the Local Information dialog box, follow the on-screen instructions.
Only connect 10BASE-T and 100BASE-TX cables to the Ethernet port. Do not connect any other type of network cable or any telephone cable. Connecting cables other than those listed above may result in an electric current overload and could cause a malfunction, excessive heat, or fire in the port. To connect the unit to the network, see Using Ethernet and dial-up connections or contact your network administrator.
You can connect to an Ethernet network from a remote location and use data, programs, and network resources. See Microsoft® Windows® Help by clicking Help and Support from the Start menu, and then clicking Networking and the Web in the left panel.
- Connect an Ethernet or telephone cable to your computer. See To connect an Ethernet cable and Setting up a dial-up Internet connection for more information.
- From the Start menu, point to All Programs, Accessories, Communications, and click New Connection Wizard.
- Click Next. If you are prompted to the Local Information dialog box, follow the on-screen instructions.
- Click Connect to the network at my workplace, and then click Next.
- Follow the on-screen instructions.
- Ask your network administrator for the detailed settings and devices needed to connect to an existing network.
Using wireless network connections (selected models only)
A wireless local area network (LAN) is a network in which you can connect to a LAN through a wireless (radio) connection. You can opt to purchase a Sony Wireless LAN Access Point to set up a LAN.
The wireless LAN access point is designed for building a wireless LAN environment. Because a wireless LAN configuration requires no wiring, you can operate multiple computers more freely than ever before.
Your computer is equipped with a built-in mini PCI card that allows for wireless connections. For information about your computer's wireless capabilities, see the Welcome page to view your VAIO® Computer Specifications.

For more information on Sony Wireless LAN, go to http://www.sonystyle.com/vaio.
There are two types of wireless connections:
An infrastructure network is one that extends an existing wired local network to wireless devices by providing an access point. The access point bridges the wireless and wired LAN and acts as a central controller for the wireless LAN. The access point coordinates transmission and reception from multiple wireless devices within a specific range.
- A computer-to-computer (ad-hoc) network is one in which a local network is created only by the wireless devices themselves, with no other central controller or access point. Each device communicates directly with other devices in the network. You can set up an ad-hoc network easily at home.
To connect to a wireless network
- Make sure an access point is set up. See the instructions that accompanied the access point for more information.
- Move the Wireless LAN switch to ON.
Turning on the Wireless Network Switch
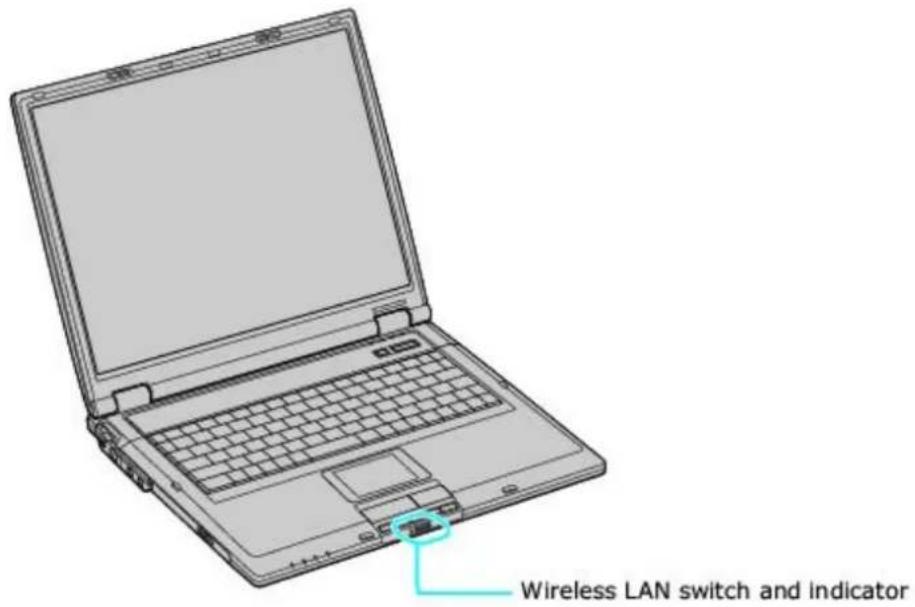
text_image
Wireless LAN switch and indicator- Click Start, Control Panel, Network and Internet Connections, and then click Network Connections. The Network Connections window appears.
- In the right panel under LAN or High-Speed Internet, click Wireless Network Connection. The Wireless Network Connection window appears.
Wireless Network Connection
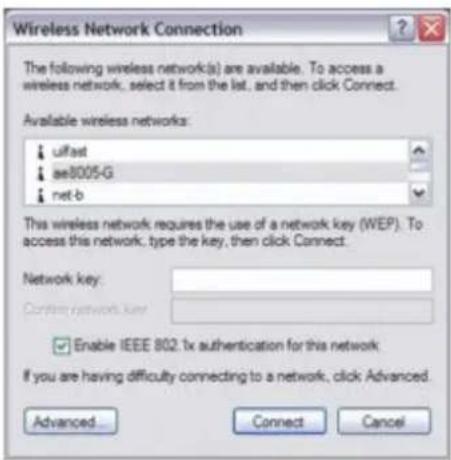
text_image
Wireless Network Connection The following wireless network(s) are available. To access a wireless network, select it from the list, and then click Connect. Available wireless networks: ulfast ae8005-G net-b This wireless network requires the use of a network key (WEP). To access this network, type the key, then click Connect. Network key: Confirm network key: Enable IEEE 802.1x authentication for this network If you are having difficulty connecting to a network, click Advanced. Advanced... Connect Cancel- From the Available wireless networks list, select the name of the network in which you want to connect. If you do not see the network name, see If the network does not appear in the Available wireless networks list box.
- If required, type the network key in the Network key box. (If necessary, ask the administrator for the key.)
- Retype the network key in the Confirm network key box.
- Click Connect.
If the network does not appear in the Available wireless networks list box
- Click Advanced on the Wireless Network Connection dialog box. The Wireless Network Connection Properties dialog box appears.
Wireless Network Connection Properties
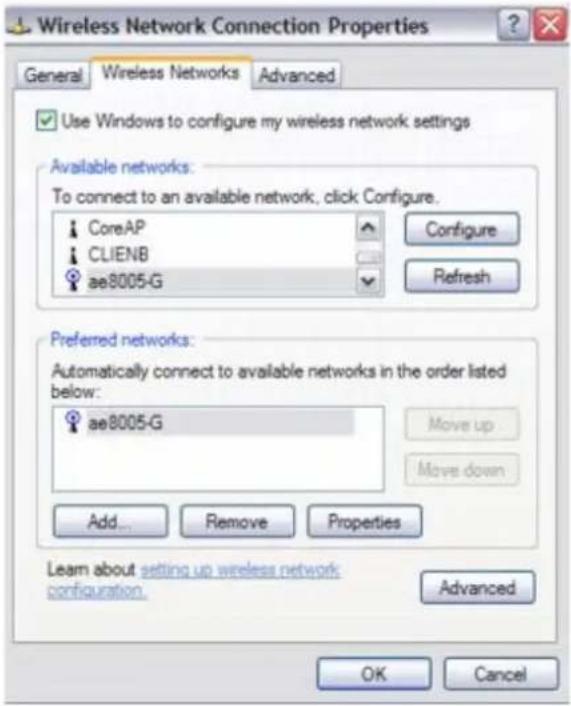
text_image
Wireless Network Connection Properties General Wireless Networks Advanced Use Windows to configure my wireless network settings Available networks: To connect to an available network, click Configure. CoreAP CLIENB ae8005-G Configure Refresh Preferred networks: Automatically connect to available networks in the order listed below: ae8005-G Move up Move down Add... Remove Properties Learn about setting up wireless network configuration. Advanced OK Cancel- Click Add in the Preferred networks box. The Wireless network properties dialog box appears.
Wireless Network Properties
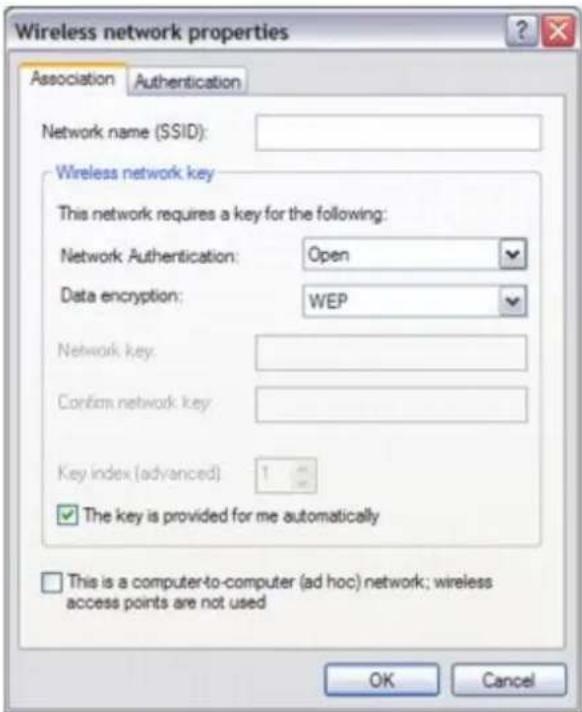
text_image
Wireless network properties Association Authentication Network name (SSID): Wireless network key This network requires a key for the following: Network Authentication: Open Data encryption: WEP Network key: Confirm network key: Key index (advanced) 1 The key is provided for me automatically This is a computer-to-computer (ad hoc) network; wireless access points are not used OK Cancel- Type the name of the network (access point) you want to connect to in the Network name (SSID) box.
The following steps are for networks that require a network key. If you do not know the network key or are not sure a network key is required, see the network administrator or the guide that accompanied your access point for more information.
-
If available, make sure the Data encryption (WEP enabled) check box is selected. If the Data encryption (WEP enabled) check box is not available:
-
Select an authentication method from the Network Authentication menu.
-
Select a data encryption method from the Data Encryption menu.
-
Click to cancel the The key is provided for me automatically check box.
-
Type the network key in the Network key box if it is required by the selected authentication method.
-
Retype the network key in the Confirm network key box.
-
Click OK. The network name appears in the Preferred networks list box.
To set up a computer-to-computer (ad-hoc) network
The computer-to-computer (ad-hoc) network is only supported by the IEEE 802.11b wireless standard.
- Move the Wireless LAN switch to ON.
Turning on the Wireless Network Switch
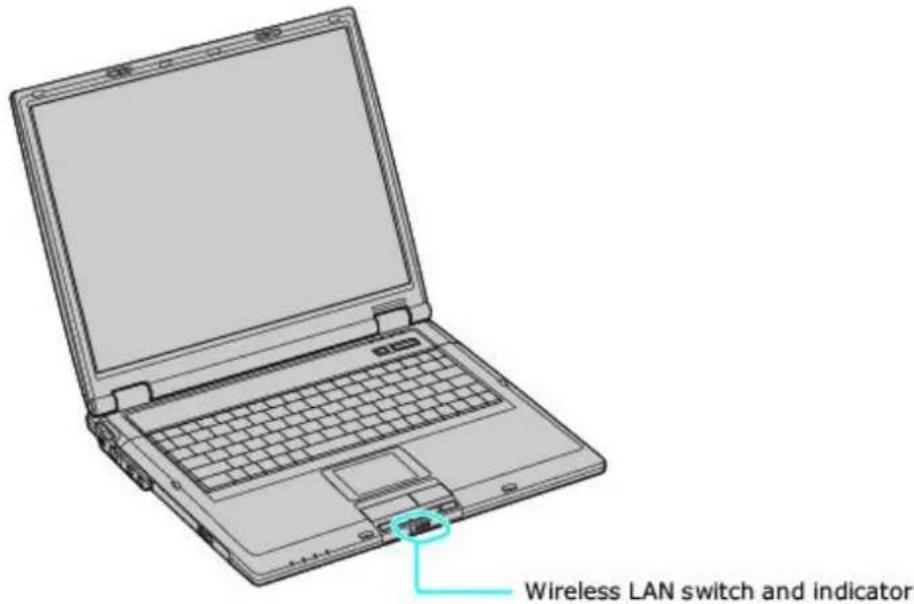
text_image
Wireless LAN switch and indicator- Click Start, Control Panel, Network and Internet Connections, and then click Network Connections. The Network Connections window appears.
- In the right panel under LAN or High-Speed Internet, click Wireless Network Connection. The Wireless Network Connection window appears.
Wireless Network Connection
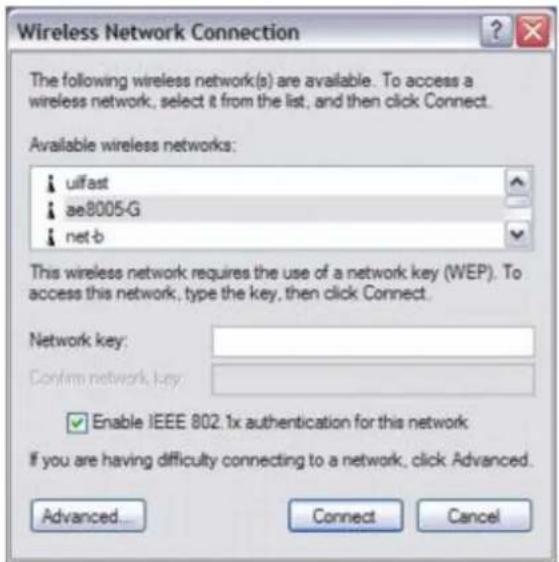
text_image
Wireless Network Connection The following wireless network(s) are available. To access a wireless network, select it from the list, and then click Connect. Available wireless networks: ulifast ae8005-G net-b This wireless network requires the use of a network key (WEP). To access this network, type the key, then click Connect. Network key: Confirm network key: Enable IEEE 802.1x authentication for this network If you are having difficulty connecting to a network, click Advanced. Advanced... Connect Cancel- Click Advanced. The Wireless Network Connection Properties dialog box appears.
Wireless Network Connection Properties
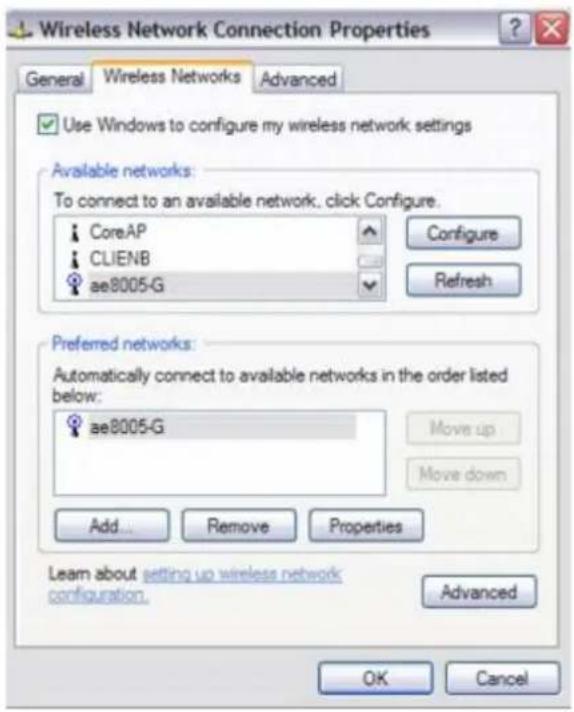
text_image
Wireless Network Connection Properties General Wireless Networks Advanced Use Windows to configure my wireless network settings Available networks: To connect to an available network. click Configure. CoreAP CLIENB ae8005-G Configure Refresh Preferred networks: Automatically connect to available networks in the order listed below: ae8005-G Move up Move down Add... Remove Properties Learn about setting up wireless network configuration. Advanced OK Cancel- Click Add. The Wireless network properties dialog box appears.
Wireless Network Properties
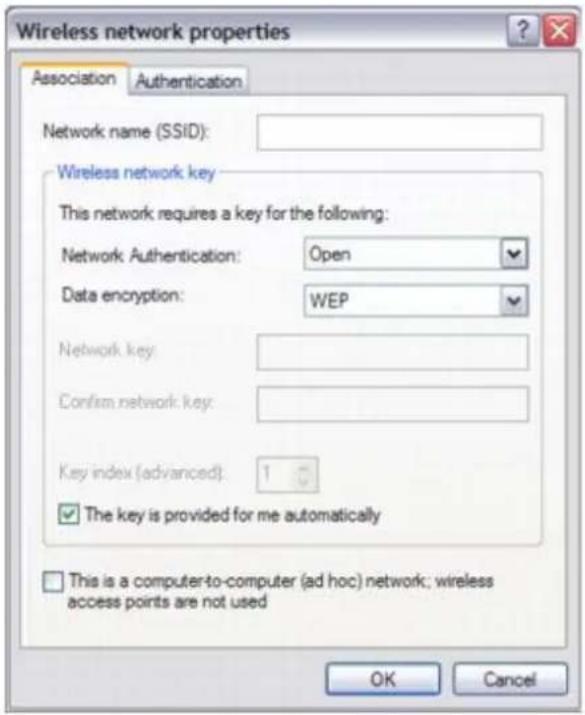
text_image
Wireless network properties Association Authentication Network name (SSID): Wireless network key This network requires a key for the following: Network Authentication: Open Data encryption: WEP Network key: Confirm network key: Key index (advanced): 1 The key is provided for me automatically This is a computer-to-computer (ad hoc) network; wireless access points are not used OK Cancel- Type the name of the network you want to connect to in the Network name (SSID) box.
-
If available, make sure the Data encryption (WEP enabled) check box is selected. If the Data encryption (WEP enabled) check box is not available:
-
Select an authentication method from the Network Authentication menu.
-
Select a data encryption method from the Data Encryption menu.
-
Click to cancel the The key is provided for me automatically check box.
- Type a network key in the Network key box.
- Retype the network key in the Confirm network key box.
- Click to select This is a computer-to-computer (ad hoc) network; wireless access points are not used.
-
Click OK. The network name appears in the Preferred networks list box.
-
Click Advanced. The Advanced dialog box appears.
Advanced
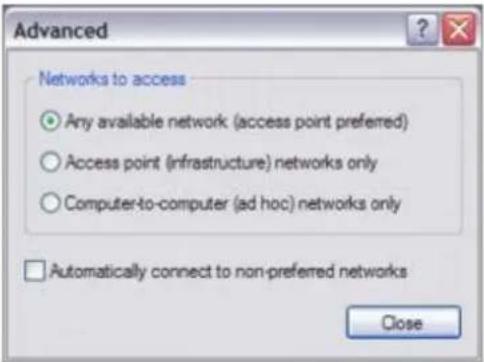
text_image
Advanced Networks to access Any available network (access point preferred) Access point (infrastructure) networks only Computer-to-computer (ad hoc) networks only Automatically connect to non-preferred networks Close- Click to select Computer-to-computer {ad hoc} networks only, and then click Close.
To disconnect from a wireless network
- For computers with built-in wireless LAN functionality, move the Wireless LAN switch to OFF.

Turning off the wireless LAN functionality while accessing remote documents, files, or resources may
result in data loss.
To disconnect from a computer-to-computer (ad-hoc) network
- Click Start, Control Panel, Network and Internet Connections, and then click Network Connections. The Network Connections window appears.
- In the right panel under LAN or High-Speed Internet, click Wireless Network Connection Enabled. The Wireless Network Connectioin Status window appears.
- Click Properties. The Wireless Network Connection Properties dialog box appears.
- On the Wireless Networks tab, click Advanced. The Advanced dialog box appears.
- Click to select Any available network (access point preferred), and click Close.
- Move the Wireless LAN switch to OFF.
Checking your network connection status
Whether you have a wireless, Ethernet, or dial-up connection, you can check the status of that connection.
To check your network connection status
- Click Start on the taskbar, and click Control Panel, Network and Internet Connections, and Network Connections. The Network Connections window appears.
- Under LAN or High-Speed Internet, click the enabled network connection to open the connection status window.
Wireless Network Connection Status
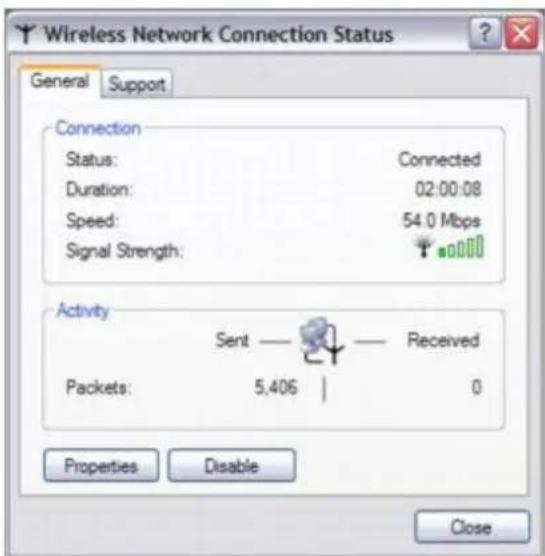
text_image
Wireless Network Connection Status General Support Connection Status: Connected Duration: 02:00:08 Speed: 54.0 Mbps Signal Strength: Activity Sent — Received Packets: 5,406 | Properties Disable CloseInserting and Ejecting CDs or DVDs
Avoid using adhesive labels to identify your CDs or DVDs. Adhesive labels may damage the optical drive if they come off while the disc is in the drive.
To insert a disc
- Turn on the computer or exit a power saving mode (Standby or Hibernate) if one is active. For more information, see Using power saving modes.
- Press the Eject button on the optical drive cover to open the drive tray. The drive tray slides out.
Opening the Drive Tray
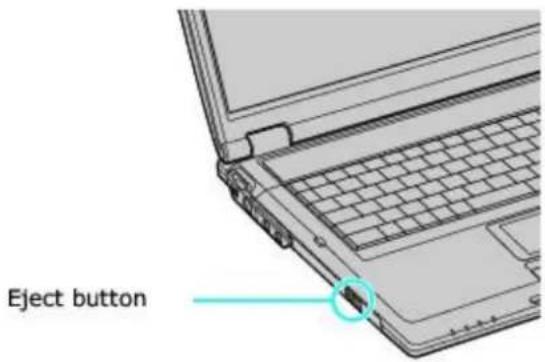
text_image
Eject button- Place a disc on the drive tray with the label facing up.
You can play some DVDs on both sides. Insert this type of DVD with the side you want to play facing up.
Inserting a Disc
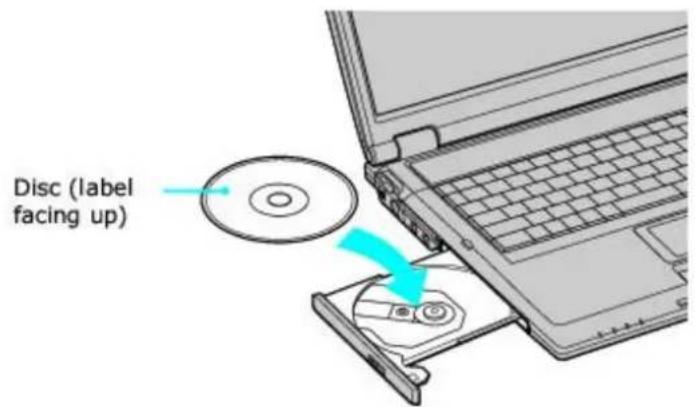
text_image
Disc (label facing up)- Press the disc onto the tray until the disc clicks securely into place.
If you do not seat the disc firmly over the hub, the disc may come loose while it is in the drive. A loose disc may damage the optical drive and make opening the drive tray difficult.
- Push the drive tray gently to close it. The Busy indicator on the drive cover blinks while your computer is reading data from the drive.
To eject a disc
- Turn on the computer or exit a power saving mode (Standby or Hibernate) if one is active. For more information,
see Using power saving modes.
- Close all programs that access the optical drive, and wait for the Busy indicator on the drive cover to turn off.
- Press the Eject button on the drive cover to open the drive tray. The drive tray slides out.
If the Eject button does not work, turn off the computer and insert a thin, straight object (such as a paper clip) into the manual eject hole next to the Eject button.
- Lift the disc from the drive.
- Push the drive tray gently to close it.
Inserting and Ejecting CDs or DVDs
Avoid using adhesive labels to identify your CDs or DVDs. Adhesive labels may damage the optical drive if they come off while the disc is in the drive.
To insert a disc
- Turn on the computer or exit a power saving mode (Standby or Hibernate) if one is active. For more information, see Using power saving modes.
- Press the Eject button on the optical drive cover to open the drive tray. The drive tray slides out.
Opening the Drive Tray
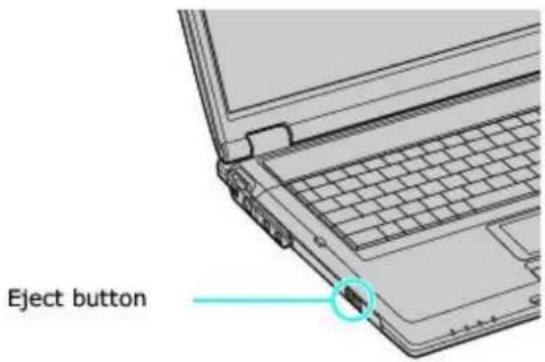
text_image
Eject button- Place a disc on the drive tray with the label facing up.
You can play some DVDs on both sides. Insert this type of DVD with the side you want to play facing up.
Inserting a Disc
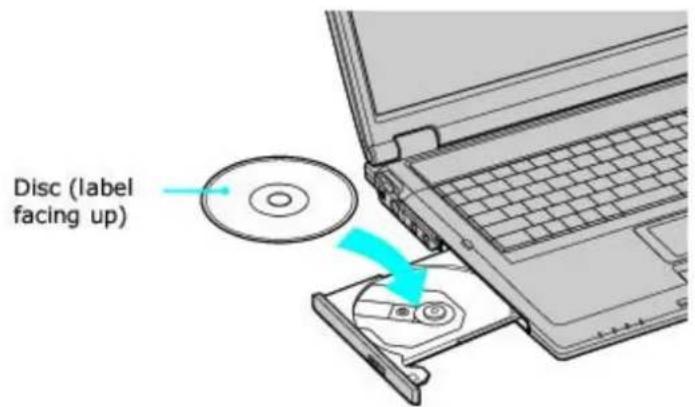
text_image
Disc (label facing up)- Press the disc onto the tray until the disc clicks securely into place.
If you do not seat the disc firmly over the hub, the disc may come loose while it is in the drive. A loose disc may damage the optical drive and make opening the drive tray difficult.
- Push the drive tray gently to close it. The Busy indicator on the drive cover blinks while your computer is reading data from the drive.
To eject a disc
- Turn on the computer or exit a power saving mode (Standby or Hibernate) if one is active. For more information,
see Using power saving modes.
- Close all programs that access the optical drive, and wait for the Busy indicator on the drive cover to turn off.
- Press the Eject button on the drive cover to open the drive tray. The drive tray slides out.
If the Eject button does not work, turn off the computer and insert a thin, straight object (such as a paper clip) into the manual eject hole next to the Eject button.
- Lift the disc from the drive.
- Push the drive tray gently to close it.
Your computer plays and records CDs and DVDs, depending on the model you purchased. Check your specifications for the type of optical drive installed on your computer and use the table below to see which types of media your optical drive supports.
Optical Drive Media (disc) Support
CD-ROM Plays CD, CD-R, and CD-RW
CD-RW Plays CD, CD-R, and CD-RW
Records to CD-R and CD-RW
CD-RW/DVD-ROM Plays CD, CD-R, and CD-RW
Records to CD-R and CD-RW
Plays DVD and most DVD-R and DVD-RW
DVD-RW Plays CD, CD-R, and CD-RW
Records to CD-R and CD-RW
Plays DVD, DVD-R, and DVD-RW
Records to DVD-R and DVD-RW
DVD±RW Plays CD, CD-R, and CD-RW
Records to CD-R and CD-RW
Plays DVD, DVD-R, DVD-RW, DVD+R and DVD+RW
Records to DVD-R, DVD-RW, DVD+R, and DVD+RW

Do not remove the optical drive when the computer is in a power saving mode (Standby or Hibernate). Doing so may cause the computer to malfunction.

If you plan to use an external optical drive, connect the drive before you launch any preinstalled CD/DVD program.
Playing CDs
Before you play an audio CD, you may need to enable your computer's audio feature.
To enable the audio feature
- Click Start on the Windows® taskbar, and then click Control Panel, Performance and Maintenance, and System. The System Properties dialog box appears.
As a shortcut, you can press Fn + Windows key + Insert to open the System Properties dialog box.
- Select the Hardware tab, and in the Device Manager box, click Device Manager. A window with a listing of the computer's hardware devices appears.
- Double-click the optical drive device to open the submenu.
- Double-click the listed drive, and select the Properties tab.
- Click to select the Enable digital CD audio for this CD-ROM device check box if it is not already selected.
- Click OK.
To adjust the volume for playing CDs and DVDs
Some programs have built-in volume controls, which you can adjust. If there are no volume controls, then adjust the volume of your computer's built-in speakers by doing one of the following:
- Using the Function keys. An on-screen display may appear, notifying you when a change occurs.
- To increase volume, press the Fn and F4 keys, and then press ↑ or →.
- To decrease volume, press the Fn and F4 keys, and then press ↓ or ←.
■ Using the Volume icon.
- Double click the Volume icon 📋 on the Taskbar Notification area. The Volume Control dialog box appears.
- In the Volume Control and Wave columns, move the Volume sliders up to increase volume and down to decrease volume.
To play an audio CD
- Insert the disc into the optical drive.
- If nothing appears on the desktop once you insert an audio CD disc, then click Start, point to All Programs, and click to open a CD program, such as SonicStage. If the Audio CD window appears, click to select an option.
Audio CD
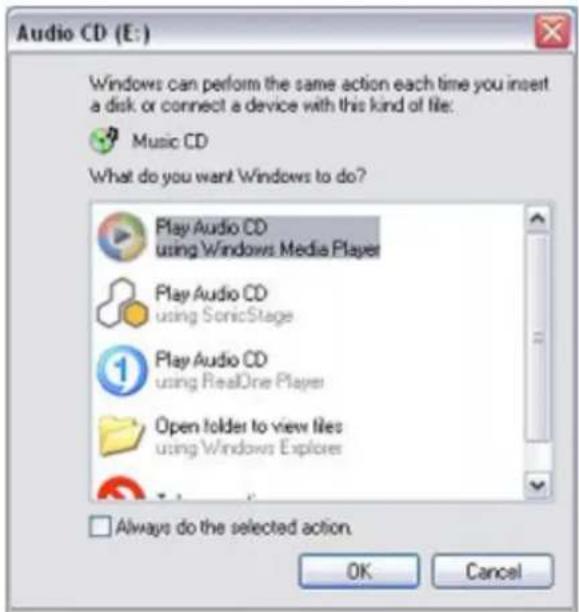
text_image
Audio CD (E:) Windows can perform the same action each time you insert a disk or connect a device with this kind of file. Music CD What do you want Windows to do? Play Audio CD using Windows Media Player Play Audio CD using SonicStage Play Audio CD using RealOne Player Open folder to view files using Windows Explores Always do the selected action. OK CancelCopying files to CDs
Before you copy files to a CD-RW or CD-R disc, read the following notes to avoid a computer malfunction and ensure the best results:
■ Deactivate the screen saver and exit anti-virus software.
■ Deactivate memory-resident disc utilities to avoid data loss.
- Disable the FindFast program if it is installed on your computer. Click Start and point to All Programs to see a list of programs on your computer.
- Connect and use the AC adapter to power your computer or make sure your battery is at least 50 percent charged. See Powering Your Computer for more information.
To copy files to a CD-RW or CD-R
- Insert a blank CD-R or CD-RW disc into the optical drive.
If the CD Drive window appears, click Take no action.
CD Drive
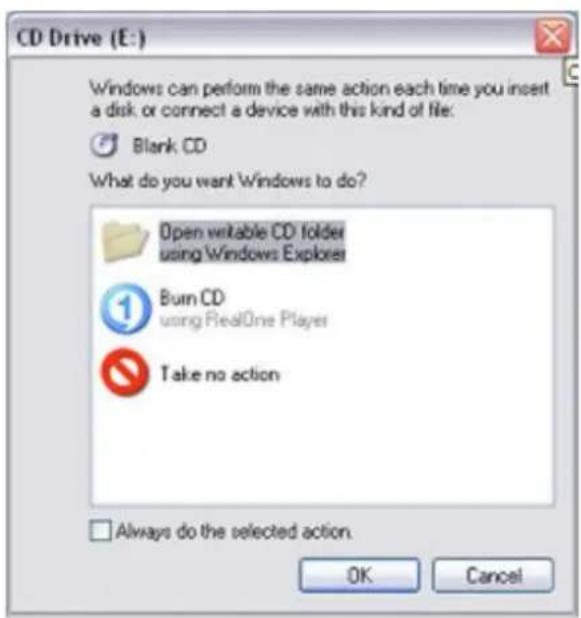
text_image
CD Drive (E:) Windows can perform the same action each time you insert a disk or connect a device with this kind of file: Blank CD What do you want Windows to do? Open writable CD folder using Windows Explorer Burn CD using RealOne Player Take no action Always do the selected action. OK Cancel- Open Windows Explorer by pressing the Windows key and the E key simultaneously.
-
In the Folders panel on the left, locate the file(s) or folder(s) you want to copy and either:
-
Right-click the file(s) or folder(s), point to Send To, and click the optical drive name.
-
Drag the file(s) or folder(s) onto the optical drive icon in the Files Stored on This Computer panel.
-
Close Windows Explorer.
- Click Start, and My Computer.
- Click the optical drive icon under Devices with Removable Storage. A new window appears with the file(s) or folder(s) you want to copy listed under Files Ready to Be Written to the CD.
- In the CD Writing Tasks box, click Write these files to CD.
- Follow the instructions on the CD Writing Wizard.
CD Writing Wizard
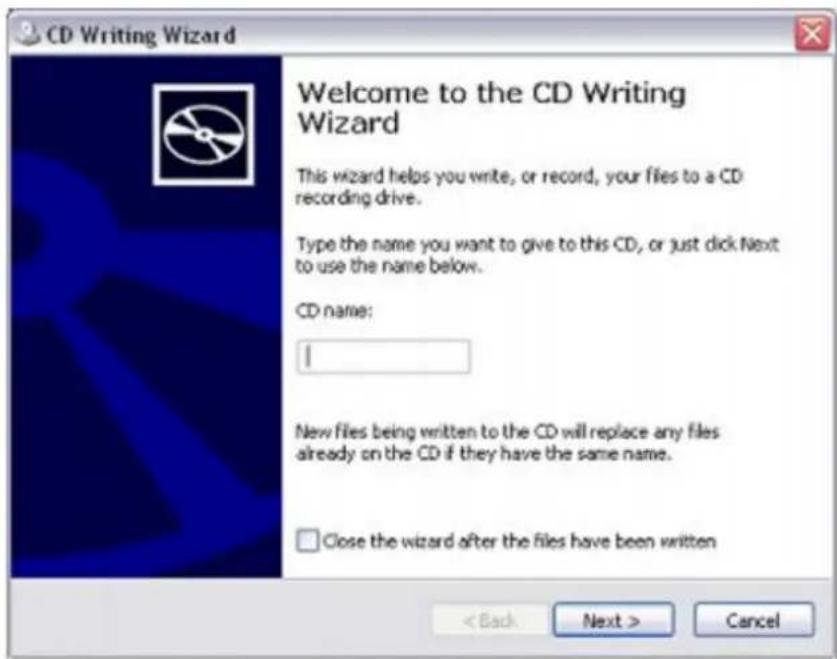
text_image
CD Writing Wizard Welcome to the CD Writing Wizard This wizard helps you write, or record, your files to a CD recording drive. Type the name you want to give to this CD, or just click Next to use the name below. CD name: New files being written to the CD will replace any files already on the CD if they have the same name. Close the wizard after the files have been written < Back Next > CancelDo not strike or shake the computer while writing data to a disc.
1 The read/write drive letter designation may vary, depending on your system's hardware configuration.
Playing DVDs
You can play DVDs in your computer's optical drive and view the video on a multimedia display or on a TV.
Connecting your computer to a TV
Your computer is equipped with an A/V OUT jack, which enables you to connect your computer to a TV. To locate the A/V OUT jack on your computer, see "Locating Controls and Ports" in the "Setting Up" chapter of your printed VAIO® Computer Quick Start.
To connect a TV to your computer
- Make sure your computer is turned off, then locate the A/V OUT jack on the computer.
- Plug one end of an audio-video (AV) cable (not supplied) into the A/V OUT jack.
- Plug the other end of the AV cable into the audio and video ports on the TV.
Connecting a TV
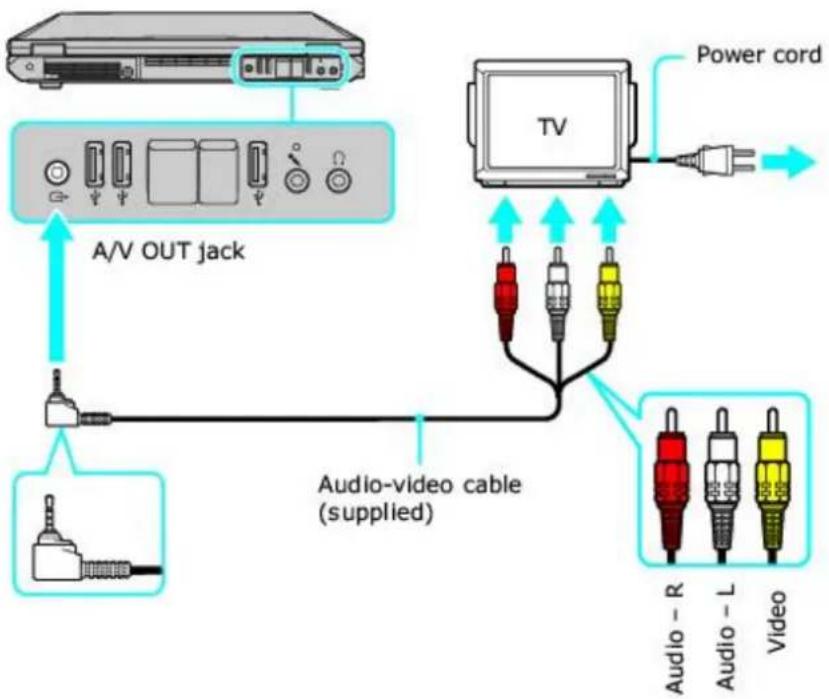
text_image
Power cord A/V OUT jack TV Audio-video cable (supplied) Audio - R Audio - L Video- Switch the TV input channel to external input.
See the guide that accompanied your TV for information on how to switch to external input.
Do not remove the optical drive when the computer is in a power saving mode (Standby or Hibernate). Doing so may cause the computer to malfunction.
Connect the external optical drive if you plan to use one.
To play a DVD
- Close all open programs.
- Disable the screen saver and the virus checker.
-
If you are using battery power, set the power management profile to DVD. Follow these steps:
-
Close all open programs.
- Right-click the CPU icon 📋 or Profile icon 📋, depending on the model you purchased, on the Taskbar Notification area.
-
Select Profiles from the shortcut menu, and then select DVD from the submenu menu. You can also select Automatic Profile Selection, which sets the power management profile to DVD whenever a DVD is inserted into the optical drive. See Conserving Battery Power for more information.
-
Connect the TV to the computer. See Connecting your computer to a TV for more information.
-
Open a preinstalled DVD program, such as WinDVD, by following these steps:
-
Click Start on the taskbar, and point to All Programs.
-
Select a program, such as WinDVD, to play the DVD. For instructions on how to use a program, see the help guide included with the DVD program.
-
Select a display.
-
Press the Fn+F7 keys to view the image on either the computer screen (LCD) or the TV. See Selecting a display for more information.
The Fn+F7 keys will not work once a DVD is inserted into the optical drive. Switching the display while a DVD is playing may cause the computer to malfunction, and you may need to restart the DVD software.
- Insert the DVD into the optical drive.
Systems equipped with a CD-RW/DVD-ROM drive can read most DVD-R media.
Some discs recorded at 20 or 24 bits may produce noise while playing. If you have audio devices connected, this may damage your hearing and the speakers. Reduce the volume before playing a DVD.
Do not switch power saving modes while the computer is playing a DVD.
Do not use memory-resident utility software to speed up disc access when playing a DVD. This may cause the computer to malfunction.
Disconnecting your computer from a TV
Simply unplug the audio-video (AV) cable from the A/V OUT jack on the computer.
Playing DVDs on your computer
Your computer is equipped with an optical drive that enables you to watch DVDs and most DVD-R discs on your computer.
To play a DVD while using AC power
- Close all open programs.
-
Insert the DVD into the optical drive.
-
Open a preinstalled DVD program, such as WinDVD ^® , by following these steps:
-
Click Start on the taskbar, and point to All Programs.
- Select a program, such as WinDVD, to play the DVD. For instructions on how to use a program, see the help guide included with the DVD program
To play a DVD while using battery power
-
Set the power management profile to DVD.
-
Close all open programs.
- Right-click the CPU icon 📋 or Profile icon 📋, depending on the model you purchased, on the Taskbar Notification area.
-
Select Profiles from the shortcut menu, and then select DVD from the submenu. You can also select Automatic Profile Selection, which sets the power management profile to DVD whenever a DVD is inserted into the optical drive. See Conserving Battery Power for more information.
-
Insert the DVD into the optical drive.
-
Open a preinstalled DVD program, such as WinDVD, by following these steps:
-
Click Start on the taskbar, and point to All Programs.
- Select a program, such as WinDVD, to play the DVD. For instructions on how to use a program, see the help guide included with the DVD program.
Some discs recorded at 20 or 24 bits may produce noise while playing. If you have audio devices connected, this may damage your hearing and the speakers. Reduce the volume before playing a DVD.
Do not switch power saving modes while the computer is playing a DVD.
Do not use memory-resident utility software to speed up disc access when playing a DVD. This may cause the computer to malfunction.
Copying files to DVDs (on selected models only)
Use the table shown on Copying and Playing CDs and DVDs to see which type of DVD media your computer supports.
To copy files to a DVD-R or DVD-RW
- Connect the AC adapter to the computer. See Connecting the AC adapter for more information.
- Insert the disc into the optical drive. See Inserting and Ejecting CDs or DVDs for more information.
- Click Start, All Programs, and select the DVD software program you want to use from the submenu.
You can also reference the online help guides supplied with the program.
Do not strike or shake the computer while copying files to a disc.
Using the Touch Pad
A pointing device called a touch pad is located in front of the keyboard. You can point to, select, drag, and scroll objects on the screen using the built-in touch pad.
Using the Touch Pad
A pointing device called a touch pad is located in front of the keyboard. You can point to, select, drag, and scroll objects on the screen using the built-in touch pad.
Locating the Touch Pad
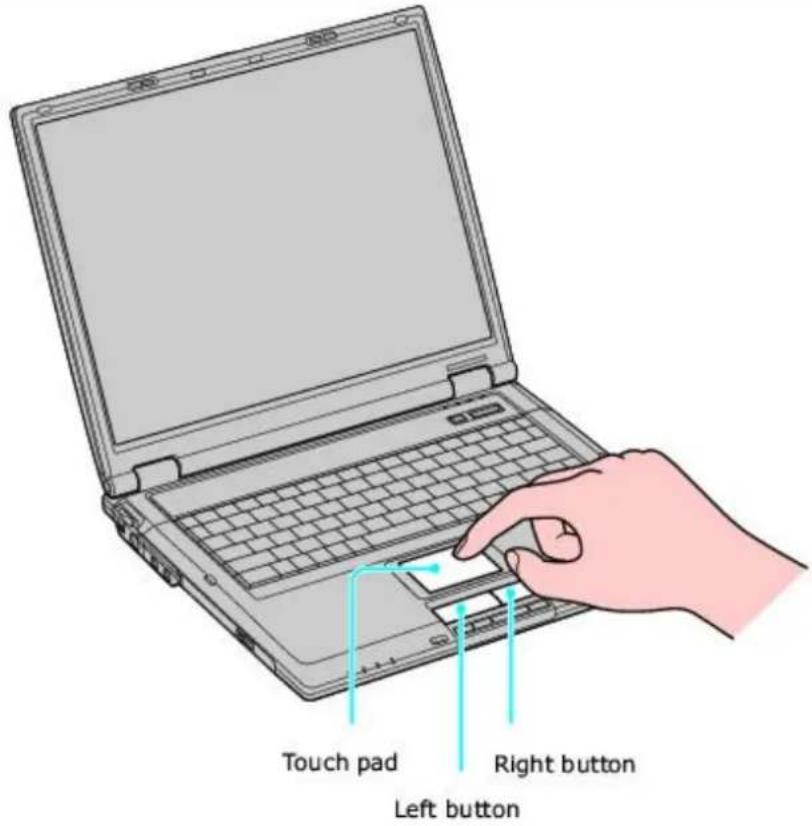
text_image
Touch pad Right button Left buttonTouch Pad Action Description
Sliding one finger Equivalent to using a mouse to place the pointer on an item.
Tapping once Equivalent to pressing the left button once.
Tapping twice Equivalent to pressing the left button twice.
Sliding one finger while pressing the left button
Equivalent to using the mouse to drag an item.
Moving your finger along the right edge of the touch pad only with programs that support a touch pad scroll feature.)
Equivalent to scrolling vertically. (The scroll function is available
Moving your finger along the bottom to scroll horizontally available only with programs that support a touch pad scroll
Equivalent to scrolling horizontally. (The scroll function is
available only with programs that support a touch pad scroll feature.)
Customizing the touch pad
Sony Notebook Setup lets you customize, enable, or disable the touch pad. Open the Mouse Properties dialog box to set your touch pad and mouse preferences, such as changing pointers, enabling or disabling the tapping feature, clicking both buttons simultaneously, and adjusting the touch pad speed.
To customize the touch pad and mouse
- Right-click the Touchpad icon on the Taskbar Notification area, and click Mouse Properties from the shortcut menu. The Mouse Properties dialog box appears.
To enable the touch pad
- Press the Windows key . The Start menu appears.
- Press P until All Programs is selected, and press Enter.
- Press S until Sony Notebook Setup is selected, and press Enter. A submenu appears with Sony Notebook Setup preselected.
- Press Enter. The Sony Notebook Setup dialog box appears.
- Press the Right Arrow key → to select the Device tab.
- Press the Tab key to select the Default button, and press Enter. A pop-up window appears.
- Press the Left Arrow key ← to select OK, and press Enter. The Enable Touchpad option is automatically selected.
- Press the Tab key to select the Apply button, and press Enter.
- Click OK.
To disable the touch pad
- Click Start on the Windows® taskbar, and point to All Programs.
- Point to Sony Notebook Setup, and click Sony Notebook Setup in the submenu. The Sony Notebook Setup dialog box appears.
- Click the Device tab.
- In the left panel, click to cancel the Pointing Device check box.
- Click Apply. A Sony Notebook Setup message appears.
- Click Yes.
Your VAIO® computer is equipped with a Memory Stick® slot that supports certain types of Memory Stick® media.
About Memory Stick media
Memory Stick® media are a compact, portable, and versatile data storage media designed for exchanging and sharing digital data with compatible devices. You can store different data formats on a single Memory Stick media. The following types of Memory Stick media are available, but compatibility with your computer can vary.
- MagicGate Memory Stick media (MG Memory Stick media) — Provides copyright protection with authentication and encryption, using Sony® MagicGate technology. Authentication ensures that protected content is only transferred between compliant devices and media. Protected content can be recorded and transferred in an encrypted format to prevent unauthorized duplication or playback.
- Memory Stick PRO media — Provides MagicGate copyright protection and high-speed transfer features when used with compatible Memory Stick PRO devices. VAIO® computers support Memory Stick PRO media for data storage purposes only. Currently, high-speed data transfer and the MagicGate technology features, such as authentication and encryption, are not available.
■ Memory Stick media — Provides data storage only. The Memory Stick media does not provide MagicGate technology or high-speed data transfer.
Currently, Sony® SonicStage and OpenMG software are not compatible with the new Memory Stick PRO media. Sony suggests using only MG Memory Stick media to store and transfer any data created with SonicStage or OpenMG software.
Visit the Sony Computing Support Web site at http://www.sony.com/pcsupport regularly for the latest information on the new Memory Stick PRO media.
Memory Stick media do not support video file playback directly from the media. Copy the video file to your hard disk drive and then play back the file.
Inserting Memory Stick media
Before using Memory Stick® media, back up important data. The media slot accommodates only one Memory Stick media at a time.
To insert Memory Stick media
- Insert the Memory Stick media with the arrow facing up and toward the Memory Stick media slot.

Inserting the media in the wrong direction may damage the connector pins.
- Carefully slide the Memory Stick media into the slot until it clicks in place. The Memory Stick media indicator briefly blinks.
Inserting Memory Stick Media
Insert Memory Stick media (not supplied) with the arrow facing the slot
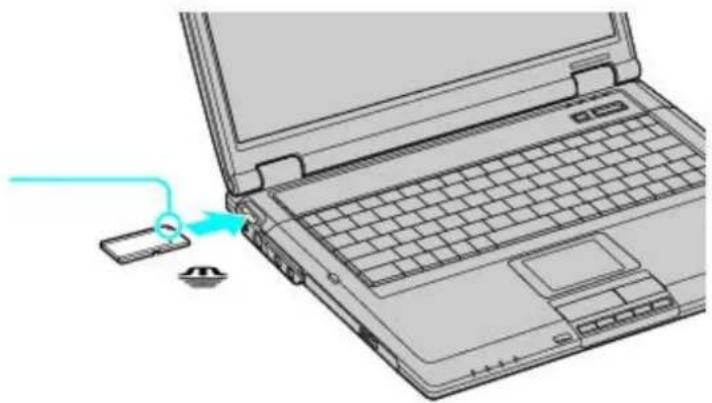
natural_image
Line drawing of a laptop with a cable being inserted into a device (no text or symbols present)Viewing the contents
Depending on the model you purchased, the Sony Memory Stick window may appear when you insert a Memory Stick® media. From this window, you can choose to view, print, copy or organize your Memory Stick images or data. If the Sony Memory Stick window does not appear when you insert your Memory Stick media, then follow these steps:
To view the contents
- From the Start menu, click My Computer. The My Computer window appears.
- Click Sony MemoryStick. The Sony MemoryStick window appears, displaying the contents stored on the Memory Stick media.
Write-protecting Memory Stick media
Memory Stick® media is designed with a write-protect tab to protect data from accidental erasure or overwriting. Move the tab to the right or left to set or release write-protection. When the write-protect tab of the Memory Stick media is set to LOCK, data cannot be recorded or erased.
Write-protect off Data can be saved on the Memory Stick media.
Write-protect on Data can be read from but not saved on the Memory Stick media.
Using the Write-Protect Tab
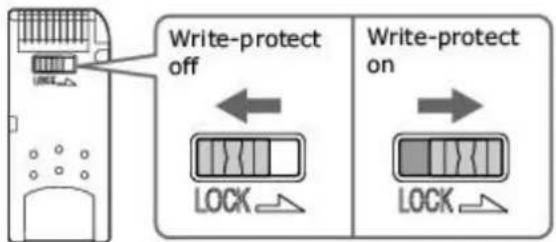
text_image
Write-protect off Write-protect on LOCK LOCK(Back of Memory Stick Media)
Formatting Memory Stick media
Memory Stick® media is formatted for immediate use when you purchase it. If you need to reformat Memory Stick media, use the Memory Stick Formatter that is provided with the media. For more information about using Memory Stick Formatter, refer to Formatter Help.
! Formatting Memory Stick media erases all data, including music data, previously saved to it. Before you reformat Memory Stick media, confirm that the media does not contain files you want to keep. Back up important data before formatting the media.
To format Memory Stick media
- Insert the Memory Stick media into the Memory Stick media slot. See To insert Memory Stick media for more information.
- From the Start menu, click My Computer. The My Computer window appears.
- Right-click Sony MemoryStick, and click Format from the menu. The Format Sony MemoryStick dialog box appears.
- Select Quick Format in the Format options box, and then click Start.
Removing Memory Stick media
If the Memory Stick® media is removed prematurely, a blue screen with a message may appear prompting you to continue or exit. Reinsert the media into the slot and press Enter to continue. This enables the media to finish reading or writing data.
To remove Memory Stick media
- Wait a minimum of 10 seconds after the Memory Stick media finishes reading or writing data before removing the media.
- Make sure the access light is off.
- Push the Memory Stick media in toward the computer.
- When the Memory Stick media ejects, pull it out.
The Memory Stick media may eject completely from the slot.
Your computer includes one or more PC Card slots. A PC Card enables you to connect devices such as an optical drive, floppy disk drive, or Network Interface Card (NIC).
See your VAIO® Computer Specifications for the type of PC Card that is compatible with your computer. These slots are compatible with CardBus. If your computer has more than one PC Card slot, use the lower slot for Type III PC Cards. You do not need to turn off your computer to insert or remove a PC Card.
Inserting PC Cards
Some PC Cards may require you to disable idle devices when using the PC Card. You can use Sony Notebook Setup to disable these devices.
To open Sony Notebook Setup
- Click Start on the Windows taskbar, and then click All Programs.
- Point to Sony Notebook Setup, and click Sony Notebook Setup. The Sony Notebook Setup dialog box appears.
To insert a PC Card
- Make sure the front label of the PC Card is facing up.
- Push the PC Card gently into the slot. The system automatically detects the PC Card.
Do not force a PC Card into the slot; this may damage the connector pins.
When a PC Card is inserted, do not place your computer in a bag or case. Pressure or shock to a PC Card may damage your computer.
Touching the head of the PC Card will not damage the connector pins, but damage may occur if the head of the PC Card is sticking out of the PC Card slot while the computer is being transported.
Inserting a PC Card
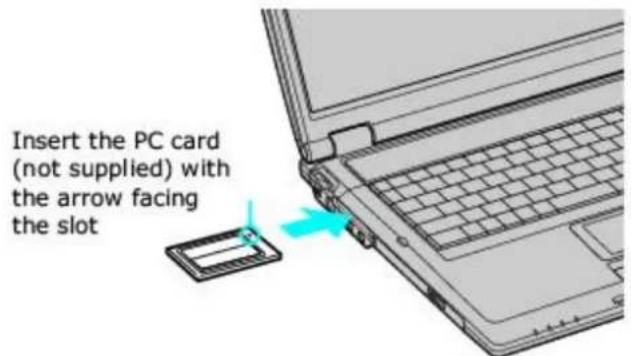
text_image
Insert the PC card (not supplied) with the arrow facing the slotRemoving PC Cards
You can remove PC Cards while the computer is on or off. PC Cards draw power from the computer when they are inserted into the PC Card slot, whether or not you use the card.
If you are not using your PC Card and you are using a battery as a power source, remove the PC Card from the PC Card slot to conserve battery power.
To remove a PC Card while your computer is on
- Double-click the Safely Remove Hardware icon appears.

on the taskbar. The Safely Remove Hardware dialog box
- Click to select the PC Card in the Hardware devices window, if it is not already selected.
- Click Stop. The Stop a Hardware device window appears.
- Make sure the PC Card is selected, and click OK. A message appears stating it is safe to remove the hardware device.
- Push the Release button. The Release button pops out.
- Push the Release button a second time. The PC Card pops out.
- Gently pull the card out of the slot.
To remove a PC Card while the computer is off
- Push the Release button once. The Release button pops out.
- Push the Release button a second time. The PC Card pops out.
- Gently pull the card out of the slot.
(Microsoft® Windows® XP Professional only) After you have initially setup your new VAIO® computer, you can change the language displayed in Microsoft® Windows® XP Professional operating system. The multilingual user interface (MUI) language option changes the text controlled by Windows XP Professional operating system. Menus, help files, and icons generated by Windows XP Professional are shown in your selected language. All other programs are displayed in English as the default language.
The multilingual user interface language option is not designed to replace a localized version of the Microsoft® Windows® XP Professional operating system. Under certain conditions, some third-party software applications may not function properly.
To Change the Language Option
- Click Start on the Windows® taskbar, and then click Control Panel.
- Click Date, Time, Language and Regional Options, and then click Regional and Language Options. The Regional and Language Options dialog box appears.
- Click the Languages tab.
- From the Language used in menus and dialogs shortcut menu, select the desired language:
English
- español
Português
Français
- Click Apply. The Change Regional Options shortcut window appears.
- Click OK.
- Click Start on the Windows® taskbar, and then click Logoff.
Additional users can also change to their desired language(s) without affecting your existing language settings.
Changing Numbers, Currency, Time, and Date Formats
You can change your operating system's number, currency, time, and date formats to coordinate with your chosen country or language settings.
To change these formats
- Click Start on the Windows taskbar, and then click Control Panel.
- Click Customize to change the number, currency, time, and date settings.
- Click Apply.
- Click OK.
-
Click OK.
-
Click Date, Time, Language and Regional Options, and click Regional and Language Options. The Regional and Language Options dialog box appears.
-
From the Regional Options tab, click the Standards and formats shortcut menu to view the available country choices. Select the desired country.
This feature changes the appearance, such as color, of certain Sony programs.
To change the window design
- Click Start, and then Control Panel.
- In the left panel, click Switch to Classic View.
- Double-click UI Design Selector.
-
Click << or >> to view the designs.
-
Click Apply to select a design that appears in the center window. The UI Design Selector window design changes. The window design of certain Sony programs will match the UI Design Selector window.
-
Click OK.
Your computer is compatible with many popular printers. However, to ensure the best performance, printers must be compatible with the Microsoft® Windows® operating system installed on your computer.
You can connect a universal serial bus (USB) printer to your computer. The New Hardware Wizard enables you to easily install the printer software, but some printers require separate driver software installation. See the instructions that accompanied your printer for more information.
To connect a USB printer
- Plug the USB cable into the USB port on your computer or port replicator, if applicable. See "Locating Controls and Ports" in the "Setting Up" chapter of your printed VAIO® Computer Quick Start.
- Plug the other end of the USB cable into the USB port on the printer. The Found New Hardware Wizard appears.
Connecting a USB Printer
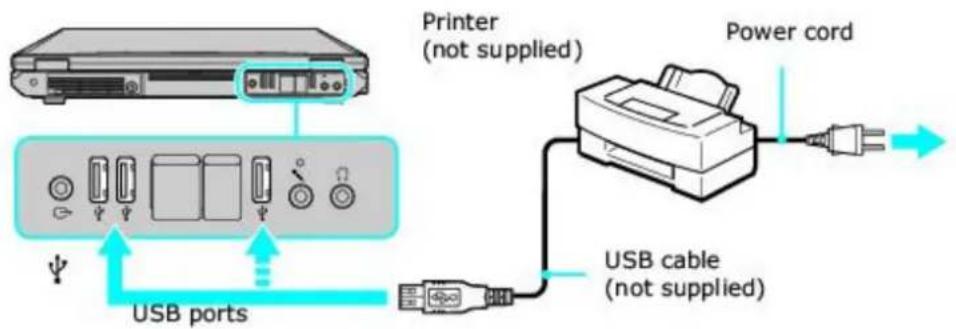
text_image
Printer (not supplied) Power cord USB ports USB cable (not supplied)See the guide that accompanied the printer for more information on its installation and use.
You can disconnect the printer cable when the computer is on or off. Disconnecting a printer when the computer is in a power saving mode (Standby or Hibernate) may cause the computer to malfunction.
To disconnect a printer
- Unplug the printer cable from the computer.
You can connect a parallel port printer to your computer or port replicator, if applicable. The new hardware wizard enables you to easily install the printer software, but some printers require separate driver software installation. See the instructions that accompanied your printer for more information.
To connect a parallel port printer
- Plug the printer cable into the Printer port 📋 on your computer or port replicator, if applicable. See "Locating Controls and Ports" in the "Setting Up" chapter of your printed VAIO® Computer Quick Start.
- Plug the other end of the printer cable into the port on the printer.
- Restart your computer by clicking Start, Turn Off Computer, and Restart. If the New Hardware Wizard appears, follow the on-screen instructions.
- Make sure the computer recognizes the printer. Follow these steps:
- Click Start, Control Panel, Printers and Other Hardware, and then Printers and Faxes. If the computer recognizes the printer, it will be listed in the Printers and Other Hardware window. If the computer does not recognize the printer, you may need to install the printer driver software. See the guide that accompanied the printer for more information.
Connecting a Parallel Printer
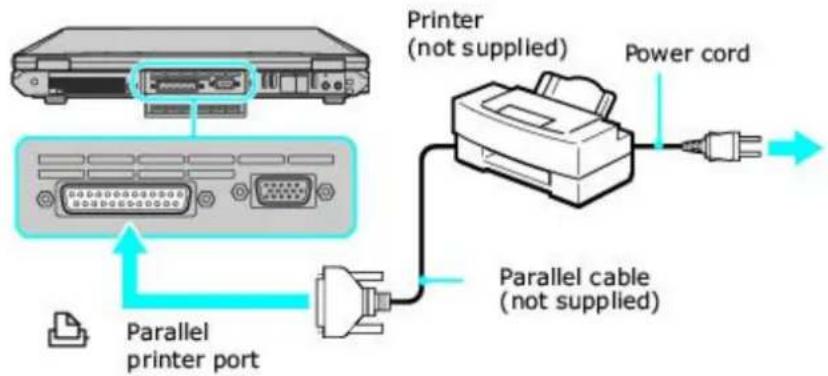
text_image
Printer (not supplied) Power cord Parallel printer port Parallel cable (not supplied)See the guide that accompanied the printer for more information on its installation and use.
Locating Ports and Jacks
A port replicator is a device that attaches to your notebook and contains additional jacks and ports, such as USB ports. A port replicator may come with your computer, depending on the model you purchased. If you wish to purchase a port replicator, shop Sony online at http://www.sonystyle.com/vaio or contact your local retailer.
The printer port on this port replicator is intended for printer connections only.
Port Replicator (Back Panel)
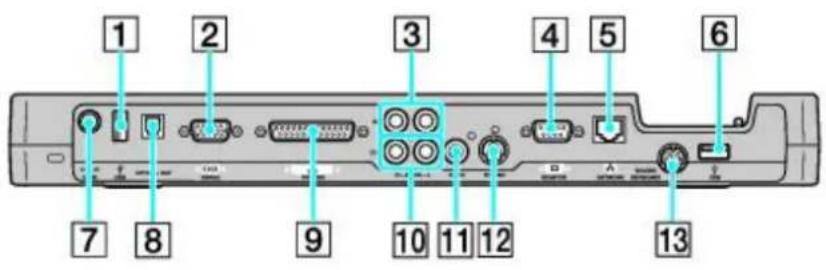
text_image
1 2 3 4 5 6 7 8 9 10 11 12 131 USB 2.0 port (high-/full-/low-speed)
8 Optical Out port
2 Serial port
9 Printer port
3 Audio In jacks
10 Audio Out jacks
4 Monitor (VGA) port
11 Video Out jack
5 Network (Ethernet) port (10BASE-T/100BASE-TX)
12 S Video Out port
6 USB 2.0 port (high-/full-/low-speed)
13 PS/2 port
7 DC IN port
Locating Ports and Jacks
A port replicator is a device that attaches to your notebook and contains additional jacks and ports, such as USB ports. A port replicator may come with your computer, depending on the model you purchased. If you wish to purchase a port replicator, shop Sony online at http://www.sonystyle.com/vaio or contact your local retailer.
The printer port on this port replicator is intended for printer connections only.
Port Replicator (Back Panel)
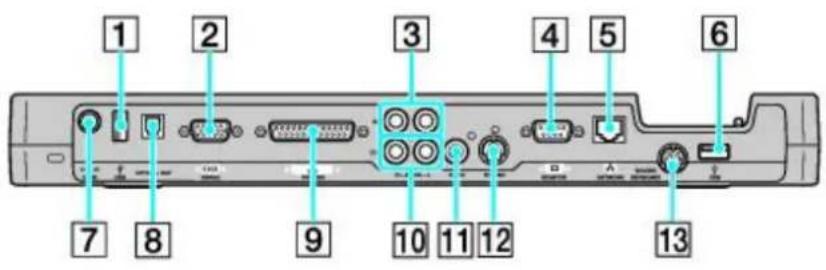
text_image
1 2 3 4 5 6 7 8 9 10 11 12 131 USB 2.0 port (high-/full-/low-speed)
8 Optical Out port
2 Serial port
9 Printer port
3 Audio In jacks
10 Audio Out jacks
4 Monitor (VGA) port
11 Video Out jack
5 Network (Ethernet) port (10BASE-T/100BASE-TX)
12 S Video Out port
6 USB 2.0 port (high-/full-/low-speed)
13 PS/2 port
7 DC IN port
Connect a port replicator to the computer while the computer is off. Use the AC adapter (not the battery) to power the computer while it is connected to a port replicator.
Moving the computer with the port replicator attached could disconnect the AC adapter or power cord, and may cause the computer to lose power or malfunction.
To connect a port replicator
- Turn off the computer, and disconnect all attached devices.
- On the bottom of the computer, slide the port replicator cover down until the port replicator connector is completely visible. lift and remove the port replicator cover to display the port replicator connector.
Removing the Port Replicator Cover
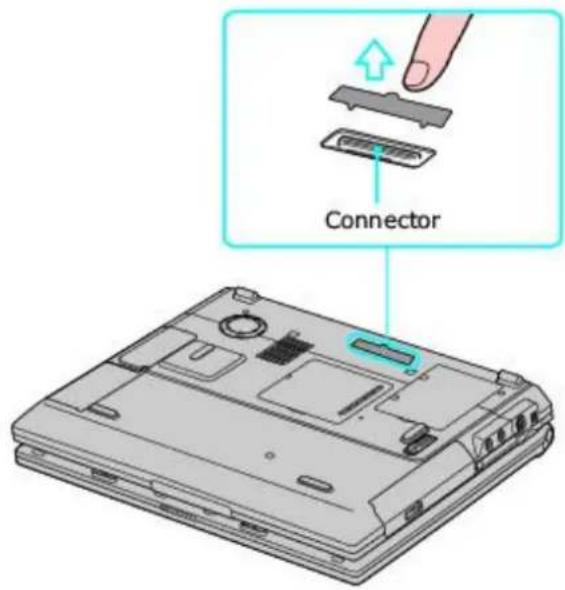
text_image
ConnectorYou can charge the battery by installing it before you connect the port replicator. The battery automatically charges once you connect the AC adapter.
- Align the connector on the bottom of the computer with the port replicator connector, and gently push the computer down until it clicks into place.
Connecting a Port Replicator
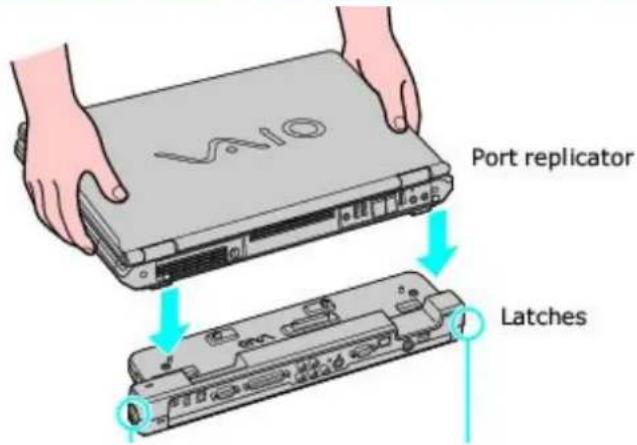
text_image
V40 Port replicator Latches- Make sure the port replicator is securely fastened to the computer.
Securing a Port Replicator
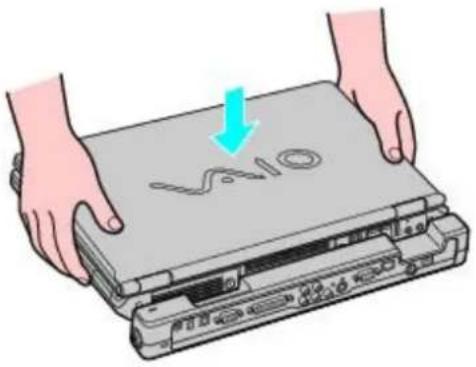
text_image
V210Connecting an AC Adapter to a Port Replicator
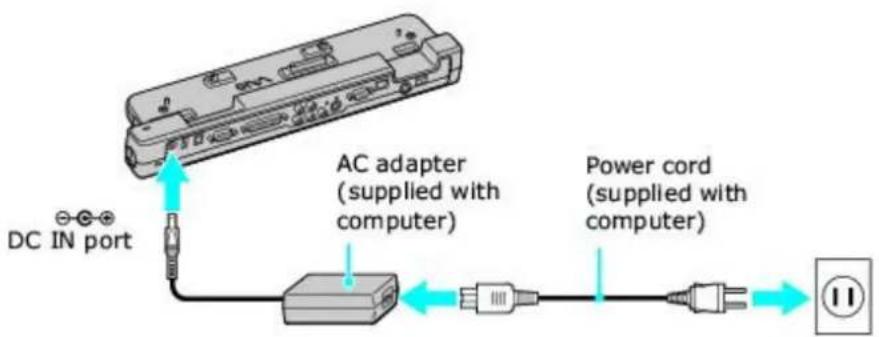
text_image
DC IN port AC adapter (supplied with computer) Power cord (supplied with computer)- Plug the AC adapter into the DC IN port on the port replicator, and plug the power cord into the AC adapter and an AC outlet. The power indicator turns on.
- Turn on the computer.
To disconnect a port replicator
- Close any active programs to prevent data loss.
- Turn off the computer and disconnect the power cord.
- Pull the release latches on each side of the port replicator to release the computer from the port replicator.
Releasing a Computer from a Port Replicator
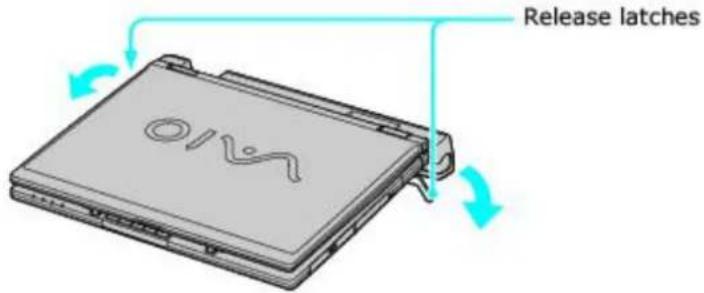
text_image
Release latches O12- Lift the computer away from the port replicator.
Disconnecting a Port Replicator
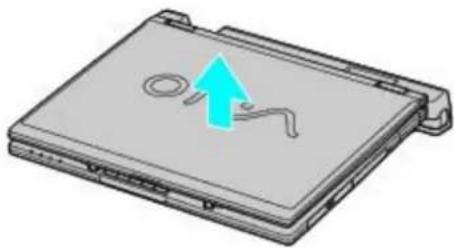
natural_image
3D illustration of a laptop with a highlighted blue arrow pointing upward (no text or symbols)Using the Keyboard
Although your computer's keyboard is very similar to a typewriter's keyboard, you can use the additional keys on the computer's keyboard to perform specific computer-related tasks.
Using the Keyboard
Although your computer's keyboard is very similar to a typewriter's keyboard, you can use the additional keys on the computer's keyboard to perform specific computer-related tasks.
Keyboard descriptions
Key Description
text_image
Diagram of a grid of labeled keys arranged in a diamond pattern, with numbers 1 to 10 visible at each corner.The numeric keypad contains the keys found on a typical calculator. Use the numeric keypad to type numbers or perform mathematical calculations, such as addition and subtraction. Numbers appear on the front beveled edge of the numeric keys. Press the Num Lock key to activate the numeric keypad. (When you do so, the Num Lock indicator light turns on.) Press the Num Lock key again to deactivate the numeric keypad.
The arrow keys move the pointer on the screen. They also function as the Home, End, Page Up, and Page Down keys, respectively, when the Fn key is pressed.
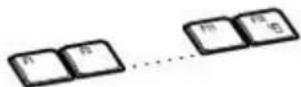
The correction keys enable you to make corrections to keystrokes.
The 12 function keys along the top of the keyboard perform designated tasks. For example, in many programs, F1 is the Help key. The task associated with each function key may vary from one program to the next.


The Escape key cancels commands.
The Print Screen key takes an electronic snapshot of the screen and moves it to the Clipboard. You can then paste the screen shot into a document and print it.
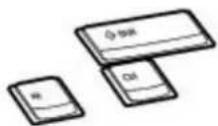
The operator keys provide a variety of commands. For example, in many programs, instead of choosing the Save command from a menu, you can hold down Ctrl and press S (referred to as Ctrl+S). Also, the Shift key to produces capital letters or special symbols, such as @ and \$.

The Windows key opens the Start menu. It is the equivalent of clicking Start on the Windows® taskbar. See Windows key combinations for more information.

for more information.

The Fn key is used in combination with other keys to issue commands. See Fn key combinations
The Applications key opens a shortcut menu of context-sensitive choices. It is the equivalent of clicking the right mouse button.
Windows key combinations
Key combination Function
+F1 Displays the VAIO Help and Support Center window.
+Tab Switches the selected button on the taskbar.
+D Displays the desktop.
+E Displays the My Computer window.
+F Displays the Search Results window, where you can find a file or folder. This is the equivalent of selecting Search from the Start menu.
+Ctrl+F Displays the Search Results - Computers window, where you can locate other computers. This is the equivalent of selecting Search, and then Computer from the Start menu.
+M Minimizes all displayed windows.
Shift+ M Returns all minimized windows to their previous size.
+R Displays the Run window. This is the equivalent of selecting Run from the Start menu.
Fn+ 📋 +Insert Displays the System Properties window. This is the equivalent of selecting Control Panel, and then System from the Start menu.
Indicator lights
Indicator Function
Power

Turns on when the power to the computer is on, blinks in Standby mode, and turns off when the computer is in Hibernate mode or off.
Battery

Turns on when the computer is using battery power, blinks when the battery is running out of power, double-blinks when the battery is charging.
Memory Stick®

Turns on when data is read from or written to the Memory Stick media. (Do not enter Standby mode or turn off the computer when this indicator is on.) When the indicator is off, the Memory Stick media is not being used. Hard Disk

Turns on when data is read from or written to the hard disk. Do not enter Standby mode or turn off the computer when this indicator is on. Num Lock

Press this key to activate the numeric keypad. Press it a second time to deactivate the numeric keypad. The numeric keypad is not active when the indicator is off. Caps Lock

Press this key to type letters in uppercase. Letters appear in lowercase if you press Shift while the indicator is on. Press the key a second time to turn off the indicator. Normal typing resumes when the Caps Lock indicator is off. Scroll Lock

Press this key to change how you scroll the display. Normal scrolling resumes when the Scroll Lock indicator is off. The Scroll Lock key functions differently depending on the program you are using and does not work with all programs. Wireless LAN: Turns on when the wireless LAN function is running.
On selected models only.
Fn key combinations
Key combination Function
Fn+F3 Toggles the built-in speakers off and on.
Fn+F4 Adjusts the built-in speaker volume. An on-screen display appears notifying you when a change occurs.
To increase volume, press the Fn+F4 keys and then press the ↑ or → key.
To decrease volume, press the Fn+F4 keys and then press the ↓ or ← key.
Fn+F5 Adjusts the brightness of the computer screen (LCD).
To increase brightness, press the Fn+F5 keys and then press the ↑ or → key.
To decrease brightness, press the Fn+F5 keys and then press the ↓ or ← key.
Fn+F7 Toggles the display between the computer screen (LCD), a connected external display, and both the LCD and an external display.

Select one display when playing a DVD. Connect the cable(s) before you turn on the computer; otherwise, Fn+F7 will not work. You cannot use the Fn+F7 function to switch between the LCD and an external display once a DVD is inserted into the optical drive.
Fn+F12 Puts the system into Hibernate mode, a power management state. To return the system to normal operating mode, press the power button. Hibernate mode consumes the lowest level of power.
Fn+Esc Puts the system into Standby mode, a power management state. To return the system to the active state, press any key or the power button.
Connecting External Mice and Keyboards
Your computer is compatible with many popular mice and keyboards. To function properly, the device you connect must be compatible with the Microsoft * Windows * operating system installed on your computer.
Connecting a mouse or keyboard
If you connect the mouse or keyboard when the computer is on, you may need to restart the computer for it to recognize the device.
To connect a USB mouse or keyboard to your computer
- Plug the USB cable into the USB port 🌐. See "Locating Controls and Ports" in the "Setting Up" chapter of your printed VAIO® Computer Quick Start. (One USB port supports one USB connection.)
- If the New Hardware Wizard appears, follow the on-screen instructions to complete the installation process.
Although the New Hardware Wizard guides you through the software installation, some devices require separate driver software installation. See the instructions that accompanied your mouse or keyboard for more information
Connecting a USB Mouse or Keyboard
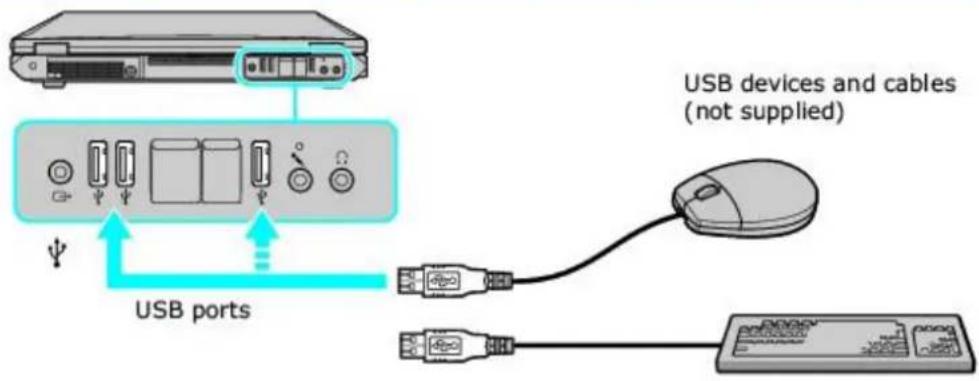
text_image
USB ports USB devices and cables (not supplied)To connect a PS/2 mouse or keyboard
- Connect the port replicator to the computer.
- Plug the PS/2 cable of the mouse or keyboard into the PS/2 port.
Connecting PS/2 Mouse or Keyboard*
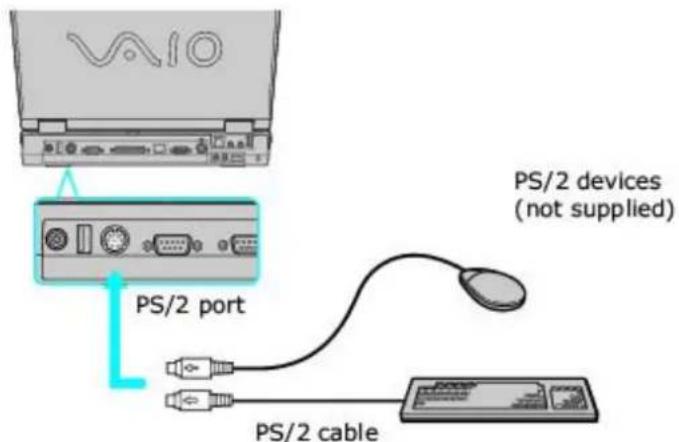
text_image
PS/2 devices (not supplied) PS/2 port PS/2 cable* The computer in this graphic may not be identical to the model you purchased.
Disconnecting a mouse or keyboard
You can disconnect a USB or PS/2 mouse or keyboard when the computer is on or off. Disconnecting the mouse or keyboard when the computer is in a power saving mode (Standby or Hibernate) may cause the computer to malfunction.
To disconnect a mouse or keyboard
■ Unplug the USB or PS/2 cable from the USB or PS/2 port.
Before you upgrade your computer's memory, read the safety information in Precautions and Procedures. For the type of module and amount of memory installed on your computer, see the Welcome page to view the VAIO® Computer Specifications.

Sony recommends that memory upgrades be performed by an authorized Sony Service Center. To find the
nearest center or agent, go to: http://www.sony.com/pcsupport.
The procedures described below assume familiarity with the general terminology associated with personal computers and with the safety practices and regulatory compliance required for using and modifying electronic equipment. When installing a memory module in your computer, make sure you read the proper safety precautions below. Mistakes that occur when installing or removing a memory module may cause a malfunction.
- Turn off the computer. Disconnect the computer from its power source and from any telecommunications links, networks, or modems before you install or remove a memory module. Failure to do so may result in personal injury or equipment damage.
- Introducing any liquids or any foreign substances or objects into the memory slots, or other internal components of the computer, will result in damage to the computer.
- Electrostatic discharge (ESD) can damage disk drives, memory modules, and other components. Perform the procedures described below only at an ESD workstation. If such a station is not available, do not work in a carpeted area, and do not handle materials that produce or hold static electricity (cellophane wrappers, for example). Ground yourself by momentarily touching an unpainted metal object that is grounded, such as a pipe, radiator, or faucet.
- Do not open the memory module package until you are ready to install the module. The package protects the module from ESD.
- Use the special protective package to store a memory module and prevent ESD.
- Only use memory modules that are compatible with your computer. For the type of module and amount of memory installed on your computer, see the Welcome page to view the VAIO® Computer Specifications. If you wish to purchase a memory module, shop Sony online at http://www.sonystyle.com/vaio or contact your local retailer.
Make sure you read the safety information in Precautions and Procedures before you remove or install a memory module. When installing a memory module, do not open the module package until you are ready to install it. The package protects the module from Electrostatic discharge (ESD).
For memory upgrades and information about which memory modules to use, refer to your VAIO® Computer Specifications available on the Welcome page.
To remove a memory module
-
Turn off the computer and all attached devices.
-
Disconnect the power cord, all cables, and remove the battery if it is installed.
-
Wait for the computer to cool down.
The interior of the computer becomes extremely hot during operation. Wait at least one hour for the computer to cool down before you remove the screws.
- Turn the computer over and use an appropriate screwdriver to loosen and remove the screw(s) on the memory bay.
To avoid damaging the computer, do not remove or loosen any other screws.
Removing the Bottom Screw(s)
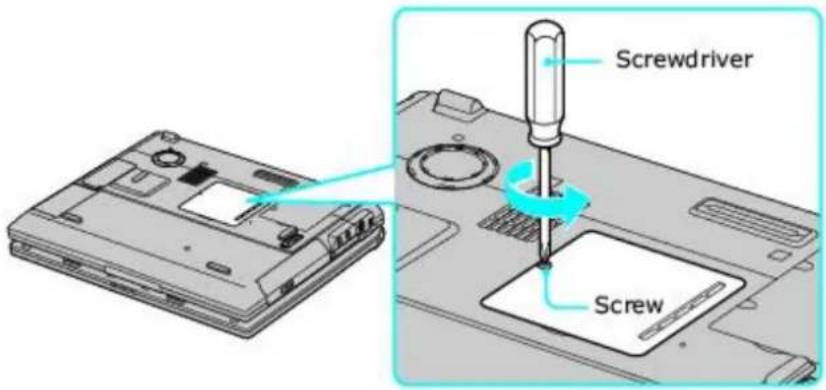
text_image
Screwdriver Screw- Touch a metal object (such as the connector panel on the back of your computer) to discharge static electricity.
Avoid touching any part of the motherboard or other components inside the computer.
- Remove the memory module by pulling out the tabs (see arrows No. 1), and pulling out the module in the direction of arrow No. 2. See To install a memory module for more information.
Removing a Memory Module
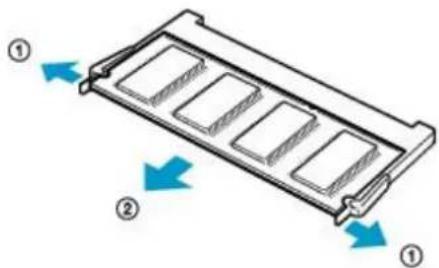
text_image
Diagram showing a rack with four compartments and directional arrows labeled ① and ② indicating flow or movement.To install a memory module
- Remove the new memory module from its packaging, and install the memory module by sliding it into the open slot at a 45-degree angle. See To remove a memory module.
Installing a New Memory Module
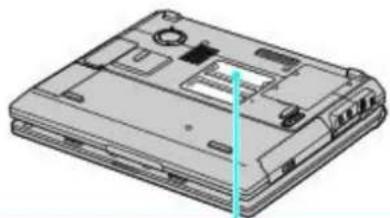
natural_image
3D technical illustration of a computer case with internal components and a green arrow indicating a specific part (no text or symbols present)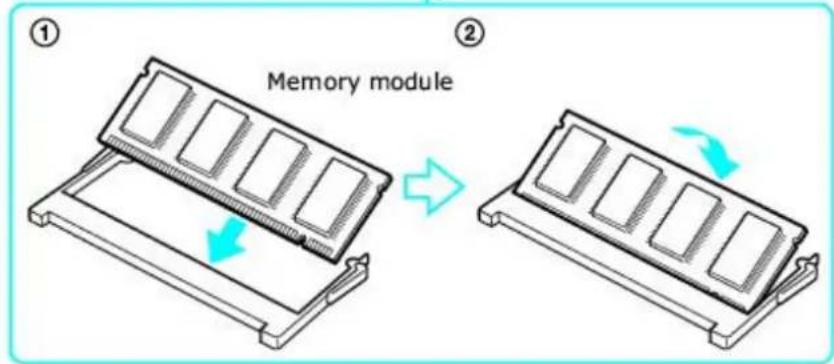
text_image
① Memory module ②- Push the module down until it snaps into place.
- When the module is correctly seated, close the memory bay.
- Replace the fastening screw(s) on the memory bay.
- Make sure the system recognizes the new memory module. See Confirming Added Memory Capacity for more information.
After you have installed a new memory module, make sure the operating system recognizes it.
To check your system's memory
- Turn on the computer.
- Click Start on the Windows® taskbar, point to All Programs, and then point to Sony Notebook Setup.
- Select Sony Notebook Setup from the submenu. The Sony Notebook Setup dialog box appears.
- On the About This Computer tab, make sure the System Memory displayed in the System Information box matches the amount of memory installed.
The displayed memory may be less than the installed memory due to the amount used by the display adapter.
Sony Notebook Setup
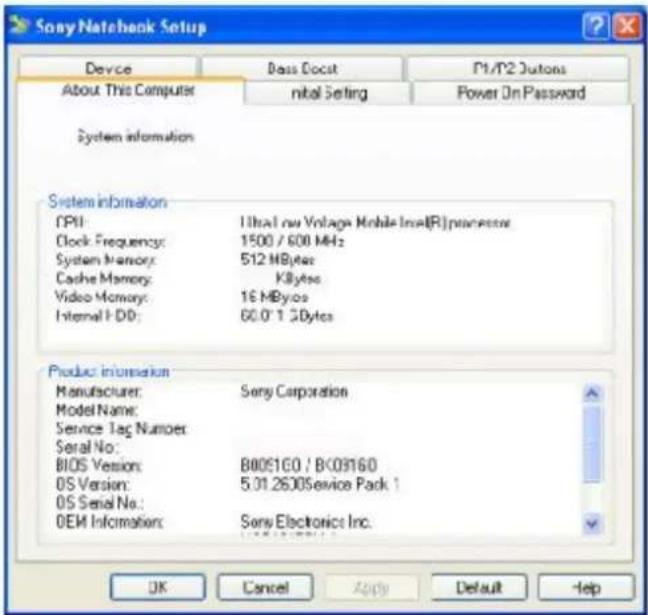
text_image
Sony Natecheck Setup Device Bass Docet P1/P2 Buttons About This Computer mbal Setting Power On Password System information System information CPU: Ultra low Voltage Mobile Inlet(R) processors Clock Frequency: 1500 / 600 MHz System Memory: 512 MBytes Cache Memory: KBytes Video Memory: 16 MBytes Internal HD: 60.0" 1.2Bytes Product information Manufacturer: Sony Corporation Model Name: Service Tag Number: Serial No: BIOS Version: B800160 / B-03160 OS Version: 5.31.2600 Service Pack 1 OS Serial No.: OEM Information: Sony Electronics Inc. OK Cancel Apply Default HelpUsing a Floppy Disk Drive
You can connect a floppy disk drive to your computer. The floppy disk drive enables you to read or write data to a floppy disk.
Using a Floppy Disk Drive
You can connect a floppy disk drive to your computer. The floppy disk drive enables you to read or write data to a floppy disk.
Connecting a floppy disk drive
You can connect a floppy disk drive when your computer is on or off. Connecting the drive when the computer is in a power saving mode (Standby or Hibernate) may cause the computer to malfunction.
To connect a USB floppy disk drive
- Close any active programs to prevent data loss.
- Plug the USB cable (with the USB icon ☐ facing upward) into the USB port ☐. The Found New Hardware pop-up message appears.
Connecting a Floppy Disk Drive
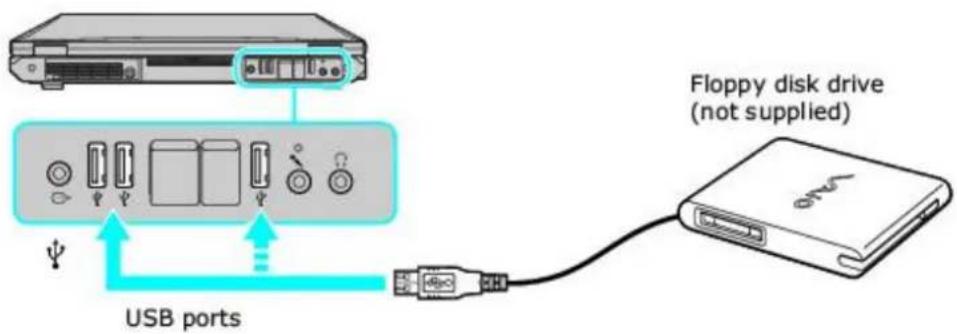
text_image
Floppy disk drive (not supplied) USB portsInserting and removing floppy disks
To write data to a disk, use one that is not write-protected or disable the write-protect feature. The floppy disk drive cannot write data to a disk if it is inserted into the drive improperly.
To insert a floppy disk
- Hold the floppy disk with the label facing up.
- Push the floppy disk into the drive until it clicks into place.
Inserting a Floppy Disk
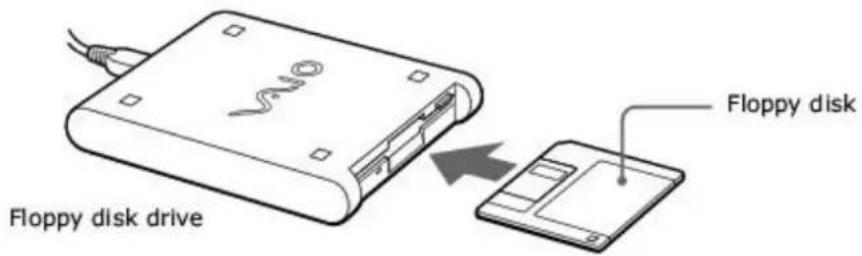
text_image
Floppy disk drive Floppy diskDo not open the shutter manually and touch the surface of the floppy disk.
To remove a floppy disk
- Close all programs that access the floppy disk.
- Wait for the LED indicator on the floppy disk drive to turn off.
- Push the Eject button, and remove the disk.
To avoid losing data, do not push the Eject button when the LED indicator is on.
Removing a Floppy Disk
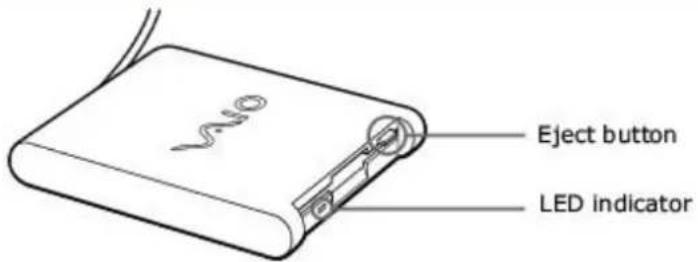
text_image
Eject button LED indicatorProtecting floppy disks
- Do not open the shutter manually or touch the surface of the floppy disk.
- Keep floppy disks away from magnets, direct sunlight, and heat sources.
Disconnecting a floppy disk drive
You can disconnect a USB floppy disk drive when the computer is on or off. Disconnecting the drive when the computer is in a power saving mode (Standby or Hibernate) may cause the computer to malfunction.
- Close all programs accessing the floppy disk drive.
- Double-click the Safely Remove Hardware icon on the taskbar. The Safely Remove Hardware window appears.
- Select the floppy disk drive in the Hardware devices window, if it is not already selected.
- Click Stop. The Stop a Hardware device window appears.
- Make sure the floppy disk drive is selected, and click OK. A message appears stating it is now safe to remove the hardware device.
- Remove the floppy disk drive from the computer.
Storing a floppy disk drive
Fold the floppy disk drive cable and connector into the side compartment on the floppy disk drive.
Storing a Floppy Disk Drive
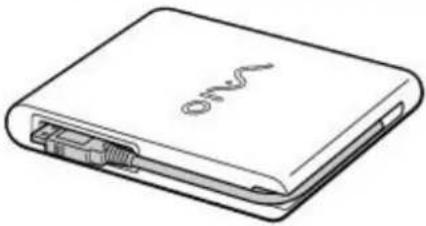
natural_image
Line drawing of a flat electronic device with ports and a logo on the cover (no text or symbols)Computer
What do I do if my computer won't start?
- Make sure the computer is securely plugged into a power source and turned on. Make sure the power indicator shows the power is on.
■ Make sure the battery is inserted properly and charged.
■ Make sure the floppy disk drive (if applicable) is empty. - If the computer is plugged into a power strip or uninterruptible power supply (UPS), make sure the power strip or UPS is turned on and working.
If you are using an external display, make sure it is plugged into a power source and turned on. Make sure the brightness and contrast controls are adjusted correctly. See the guide that came with your display for details. - Disconnect the AC adapter and remove the battery. Wait one minute. Reattach the AC adapter and reinsert the battery. Turn on the power.
- Condensation may cause the computer to malfunction. If this occurs, do not use the computer for at least one hour.
-
If the computer still does not turn on, follow these steps:
-
Unplug the power cord and remove the battery.
- Use a thin, straight object (such as a paper clip) to press the reset button.
- Reinsert the power cord and the battery.
- Turn on the computer.
Computer
What do I do if my computer won't start?
- Make sure the computer is securely plugged into a power source and turned on. Make sure the power indicator shows the power is on.
■ Make sure the battery is inserted properly and charged.
■ Make sure the floppy disk drive (if applicable) is empty. - If the computer is plugged into a power strip or uninterruptible power supply (UPS), make sure the power strip or UPS is turned on and working.
If you are using an external display, make sure it is plugged into a power source and turned on. Make sure the brightness and contrast controls are adjusted correctly. See the guide that came with your display for details. - Disconnect the AC adapter and remove the battery. Wait one minute. Reattach the AC adapter and reinsert the battery. Turn on the power.
- Condensation may cause the computer to malfunction. If this occurs, do not use the computer for at least one hour.
-
If the computer still does not turn on, follow these steps:
-
Unplug the power cord and remove the battery.
- Use a thin, straight object (such as a paper clip) to press the reset button.
- Reinsert the power cord and the battery.
- Turn on the computer.
Computer
What do I do if my computer won't start?
- Make sure the computer is securely plugged into a power source and turned on. Make sure the power indicator shows the power is on.
■ Make sure the battery is inserted properly and charged.
■ Make sure the floppy disk drive (if applicable) is empty. - If the computer is plugged into a power strip or uninterruptible power supply (UPS), make sure the power strip or UPS is turned on and working.
If you are using an external display, make sure it is plugged into a power source and turned on. Make sure the brightness and contrast controls are adjusted correctly. See the guide that came with your display for details. - Disconnect the AC adapter and remove the battery. Wait one minute. Reattach the AC adapter and reinsert the battery. Turn on the power.
- Condensation may cause the computer to malfunction. If this occurs, do not use the computer for at least one hour.
-
If the computer still does not turn on, follow these steps:
-
Unplug the power cord and remove the battery.
- Use a thin, straight object (such as a paper clip) to press the reset button.
- Reinsert the power cord and the battery.
- Turn on the computer.
What do I do if a BIOS error appears when my computer starts?
If the message "Press
- Press the F2 key. The BIOS Setup menu appears.
- Set the date (month/day/year). Press Enter.
- Press the Down Arrow key ↓ to select System Time, and then set the time (hour: minute: second). Press Enter.
- Press the Right Arrow key → to select the Exit tab, and then press the Down Arrow key ↓ to select Get Default Values. The message Load default values for all SETUP items appears.
- Press Enter. The Setup Confirmation window appears.
- Select Yes, and press Enter.
- Select Exit (Save Changes), and press Enter. The Setup Confirmation window appears again.
- Select Yes, and press Enter. The computer restarts.
If this occurs on a regular basis, contact Sony Computing Support (http://www.sony.com/pcsupport).
What do I do if the message "Operating system not found" appears when my computer starts, and why won't Windows start?
■ Make sure the computer does not have a "non-bootable" floppy disk in the floppy disk drive (if applicable).
■ If a non-bootable floppy disk is in the drive:
- Remove the floppy disk.
- Restart the computer and confirm that the Microsoft® Windows® operating system starts properly.
- If Windows still does not start, follow these steps to initialize the BIOS:
- If there is a disk in the floppy disk drive, then remove it.
- Turn off the computer.
- Remove any peripheral devices connected to the computer.
- Restart the computer.
-
Press the F2 key when the Sony logo appears. The BIOS Setup window appears.
-
Press the Right Arrow key → to select the Exit menu.
- Press the Down Arrow key ↓ to select Get Default Values. The message Load default values for all SETUP items appears.
- Press Enter. The Setup Confirmation window appears.
- Select Yes, and press Enter.
- Select Exit (Save Changes), and press Enter. The Setup Confirmation window appears again.
- Select Yes, and press Enter. The computer restarts.
What do I do if my computer stops responding?
It is best to turn off your computer using the Turn Off Computer option on the Microsoft® Windows® Start menu, located on the taskbar. Using other methods, including those listed below, may result in loss of unsaved data.
- Click Start on the Windows® taskbar, select Turn Off Computer, and then click Turn Off.
- If your computer does not turn off, press the Ctrl+Alt+Delete keys simultaneously. When the Windows Task Manager dialog box appears, click Turn Off from the Shut Down menu.
- If your computer still does not turn off, press and hold the power button or slide and hold the power switch until the computer turns off.
- If your computer stops responding while playing a CD or DVD, press the Ctrl+Alt+Delete keys simultaneously. You can turn off the computer from the Windows Task Manager.
Pressing the Ctrl+Alt+Delete keys simultaneously or turning off the computer with the power button or switch may cause loss of data.
■ Remove the AC adapter and battery.
Why won't my computer enter Standby or Hibernate mode?
Your computer may become unstable if the operating mode is changed before the computer completely enters Standby or Hibernate.
To restore the computer to normal operating stability:
- Close all open programs.
-
Restart the computer. Follow these steps:
-
Press the Windows key .
- Press U.
-
Press R to select restart.
-
If the computer does not restart, follow these steps:
-
Press the Ctrl+Alt+Delete keys simultaneously. The Windows Task Manager window appears.
- Press and release Alt to highlight the menu bar, and press the Right Arrow → key to select Shut Down.
- Press Enter.
-
Press R to select restart.
-
If this procedure does not work, press and hold the power button or slide and hold the power switch until the computer turns off.
Why is the sound of my computer's fan so loud?
The computer's fan may be running at a high speed to cool the CPU. By lowering the CPU speed, you also lower the speed and noise level of the computer's fan. If your computer comes with the PowerPanel utility ^1 , use it to lower the CPU speed. If your computer does not come with the PowerPanel utility, use the power schemes to lower the CPU speed.
To lower the CPU fan speed using the PowerPanel utility ^2 :
- On the Windows® taskbar, right-click the CPU icon 📋 or Profile icon 📋, depending on the model you purchased.
- Select Edit/Create Profiles. The AC Power - Profile Editor window appears.
- Double-click System to open the System submenu if it is not already open.
- Double-click CPU Fan Control, and select Level 1 Quiet.
- Restart your computer.

See PowerPanel Help for more information.
To lower the CPU speed using the power schemes ^3 :
- Click Start on the Windows® taskbar, and click Control Panel.
- Click Performance and Maintenance, and click Power Options. The Power Options Properties window appears.
- Select Portable/Laptop in the Power schemes box.
- Click Apply.
- Click OK.
1 Available on selected models.
^2 Available on selected models only.
^3 Available on selected models only.
Why does the System Properties dialog box display a slower CPU speed than the maximum?
This is normal. Because your computer's CPU utilizes a type of CPU speed controlling technology for power conservation purposes, System Properties may display the CPU's current speed instead of the maximum speed.
Why don't my changes appear on the computer screen (LCD)?
You may need to refresh the computer screen. Press and hold the Windows key , and press D twice.
How do I know when the battery is charged?
To determine the remaining battery charge, see Locating battery information.
How do I know when the battery is charged?
To determine the remaining battery charge, see Locating battery information.
When is the computer using AC power?
When the computer is directly connected to the AC adapter, it uses AC power, even if a battery is installed.
When should I recharge the battery?
- When the battery level falls below 10 percent.
- When both the battery and power indicators blink.
- When you have not used the battery for a long time.
When should I replace the battery?
If the battery power is still low after charging it, the battery may be reaching the end of its life and should be replaced.
Should I be concerned that the installed battery is warm?
No, it is normal for the battery to be warm when it is powering the computer.
Can my computer enter Hibernate mode while using battery power?
Your computer can enter Hibernate mode while using battery power, but some software programs and peripheral devices prevent the system from entering Hibernate mode. If you are using a program that prevents the system from entering Hibernate mode, save your data frequently to avoid losing data. See To activate Hibernate mode for information on how you can manually activate Hibernate mode.
Why doesn't my computer enter Hibernate mode?
You may first need to enable Hibernate mode. Follow these steps:
- Click Start on the Windows® taskbar, and click Control Panel.
- Click Performance and Maintenance, and click Power Options. The Power Options Properties window appears.
- Select the Hibernate tab.
- Click to check the box next to Enable hibernation.
Why can't I use the DV recorder?
You may not be able to use the DV recorder, and the message DV equipment seems to be disconnected or turned off may appear because the i.LINK ^® cable is not securely plugged into the ports on the computer or camera. Unplug the connectors, and plug them in again. See Connecting an i.LINK digital video recorder for more information.
i.LINK is a trademark of Sony used only to designate that a product contains an IEEE 1394 connection. The i.LINK connection may vary, depending on the software applications, operating system, and compatible i.LINK devices. All products with an i.LINK connection may not communicate with each other. Refer to the documentation that came with your compatible i.LINK device for information on operating conditions and proper connection. Before connecting compatible i.LINK PC peripherals to your system, such as CD-RW or hard disk drive, confirm their operating system compatibility and required operating conditions.
Why can't I use the DV recorder?
You may not be able to use the DV recorder, and the message DV equipment seems to be disconnected or turned off may appear because the i.LINK ^® cable is not securely plugged into the ports on the computer or camera. Unplug the connectors, and plug them in again. See Connecting an i.LINK digital video recorder for more information.
i.LINK is a trademark of Sony used only to designate that a product contains an IEEE 1394 connection. The i.LINK connection may vary, depending on the software applications, operating system, and compatible i.LINK devices. All products with an i.LINK connection may not communicate with each other. Refer to the documentation that came with your compatible i.LINK device for information on operating conditions and proper connection. Before connecting compatible i.LINK PC peripherals to your system, such as CD-RW or hard disk drive, confirm their operating system compatibility and required operating conditions.
Why doesn't my modem work?
■ Make sure the telephone cable is securely plugged into the Modem jack on the computer and the wall jack.
■ Make sure the telephone cable is working. Plug the cable into an ordinary telephone and listen for a dial tone.
■ Make sure the telephone number the program is dialing is correct.
- Make sure the software you are using is compatible with the computer's modem. (All preinstalled Sony programs are compatible.)
Why doesn't my modem work?
■ Make sure the telephone cable is securely plugged into the Modem jack on the computer and the wall jack.
■ Make sure the telephone cable is working. Plug the cable into an ordinary telephone and listen for a dial tone.
■ Make sure the telephone number the program is dialing is correct.
- Make sure the software you are using is compatible with the computer's modem. (All preinstalled Sony programs are compatible.)
Why is my modem connection slow?
Your computer is equipped with a V.90 compatible modem. Many factors may influence modem connection speed, including telephone line noise or compatibility with telephone equipment, such as fax machines or other modems. If you think your modem is not connecting properly to other PC-based modems, fax machines, or your Internet Service Provider (ISP), follow these steps:
- Ask your telephone company to verify your telephone line is free of any line noise.
- If your problem is fax-related, make sure there are no problems with the fax machine you are calling and that it is compatible with fax modems.
If you are having a problem connecting with your ISP, make sure the ISP is not experiencing technical problems.
If you have a second telephone line, try connecting the modem to that line.
Why can't my computer connect to a wireless LAN access point?
- Connection availability is affected by distance and obstructions. You may need to move your computer away from obstructions or closer to any access point you may be using.
■ Make sure the Wireless LAN switch on the computer is on.
■ Make sure power to the access point is on.
■ Make sure the access point is displayed in the Available networks window.
■ Make sure the encryption key is correct.
Why can't my computer connect to a wireless LAN access point?
- Connection availability is affected by distance and obstructions. You may need to move your computer away from obstructions or closer to any access point you may be using.
■ Make sure the Wireless LAN switch on the computer is on.
■ Make sure power to the access point is on.
■ Make sure the access point is displayed in the Available networks window.
■ Make sure the encryption key is correct.
Why can't I access the Internet?
- Check the access point settings. Refer to the instructions supplied with the access point.
■ Make sure your computer and the access point are connected to one another.
■ Move your computer away from obstructions or closer to any access point you may be using.
■ Make sure your computer is properly configured for Internet access.
Why is the data transfer speed slow?
- The wireless LAN data transfer speed is affected by distance and obstructions between devices and access points. Other factors include device configurations, radio conditions, and software compatibility. To maximize the data transfer speed, move your computer away from obstructions or closer to any access point you may be using.
- If you are using a wireless LAN access point, the device may be temporarily overloaded depending on how many other devices are communicating via the access point.
- If your access point interferes with other access points, change the access point channel. See your access point instructions for more information.
Why is the communication speed interrupted or slowed down when MPEG2 data is transferred?
The typical effective data transfer speed via an access point is 4-5 Mbps when adhering to the IEEE 802.11b standard or both the IEEE 802.11b and IEEE 802.11g standards (selected models only). High-rate stream transfers with MPEG2 data may lower this rate.
How do I avoid data transfer interruptions?
- When your computer is connected to an access point, data transfer interruptions may occur when using large files or if the computer is in close proximity to microwaves and cordless telephones.
- Move the computer closer to the access point.
■ Make sure the access point connection is intact. For more information, see Checking your network connection status - Change the access point channel. See your access point instructions for more information.
Can I connect to an IEEE 802.11a device?
Computers with built-in wireless LAN support the IEEE 802.11b standard only. Devices connecting to a wireless LAN using the IEEE 802.11a standard cannot connect to devices using the IEEE 802.11b standard.
What are channels?
Wireless LAN communication occurs on divided frequency bands known as channels. Third-party wireless LAN access point channels may be preset to different channels from Sony devices.
If you are using a wireless LAN access point, refer to connectivity information contained in your access point instructions.
When I change the encryption key, the network connection stops. What do I do?
Two computers with built-in wireless LAN may lose a peer-to-peer network connection if the encryption key is changed. You can either change the encryption key back to the original profile or restart both computers.
Why doesn't my microphone work?
If you are using an external microphone, make sure the microphone is turned on and is properly plugged into the Microphone jack on the computer.
Why doesn't my microphone work?
If you are using an external microphone, make sure the microphone is turned on and is properly plugged into the Microphone jack on the computer.
What do I do if the computer doesn't recognize the mouse?
■ Make sure the mouse is securely plugged into the port.
- Restart the computer with the mouse connected to the computer.
What do I do if the computer doesn't recognize the mouse?
■ Make sure the mouse is securely plugged into the port.
- Restart the computer with the mouse connected to the computer.
What do I do if the pointer doesn't move when I use the mouse?
■ Make sure another mouse is not installed.
If you are playing a disc, press the Ctrl+Alt+Delete keys simultaneously to stop playback and restart the computer.
If you still cannot use the pointer, restart the computer. You can restart the computer three different ways:
- Press the Windows key 📄, and press U. When the Turn Off Computer window appears, press R.
- Press the Ctrl+Alt+Delete keys simultaneously. When the Windows Task Manager window appears, press the Alt key to highlight the menu bar, and press the Right Arrow key → to select Shut Down. Press Enter, and then press R.
- Press and hold the power button. When the computer turns off, press the power button again to restart the computer.
Why won't my speakers work?
■ Make sure the speakers are properly connected and the volume is turned up loud enough to hear sound.
- Your speakers may not be designed for computer use.
- If the speakers have a mute button, set the button to off.
If the speakers have a volume control, make sure the volume is turned up loud enough to hear sound.
- If you have connected an audio cable to the Headphones jack, disconnect the cable and use the speaker cable that was supplied with the speakers.
If you are using battery power, make sure the battery is inserted properly and is charged.
- If the speakers require external power, make sure the speakers are connected to a power source. See the guide that accompanied the speakers for more information.
Why won't my speakers work?
■ Make sure the speakers are properly connected and the volume is turned up loud enough to hear sound.
- Your speakers may not be designed for computer use.
- If the speakers have a mute button, set the button to off.
If the speakers have a volume control, make sure the volume is turned up loud enough to hear sound.
- If you have connected an audio cable to the Headphones jack, disconnect the cable and use the speaker cable that was supplied with the speakers.
If you are using battery power, make sure the battery is inserted properly and is charged.
- If the speakers require external power, make sure the speakers are connected to a power source. See the guide that accompanied the speakers for more information.
Why can't I hear sound from my speakers?
- If the computer is using battery power, make sure the battery is properly inserted and is charged.
- If you are using a program that has its own volume control, make sure the volume control is properly set. See that program's help guide for more information.
- Your speakers may be set to mute, the volume setting may be too low, or the audio option may be disabled. See Adjusting the volume and Enabling the audio feature for more information.
Why don't the Fn+F3 or the Fn+F4 key combinations work?
The Fn+F3 keys toggle the built-in speakers on and off. The Fn+F4 keys adjust the built-in speaker volume. The computer may not recognize the Fn+F3 and Fn+F4 keys if the correct speakers are not selected. Follow these steps:
- Right-click the Volume icon on the taskbar, and select Adjust Audio Properties.
- On the Volume tab, click Advanced in the Speaker settings box. The Advanced Audio Properties window appears.
- On the Speakers tab, select the correct speaker setup from the Speaker setup drop-down menu.
Why do I hear noise distortion while listening to music with speakers or headphones?
You may experience noise distortion while listening to music with speakers or headphones if the CPU control is set to Automatic Profile Selection. If your computer is using battery power, use the preinstalled PowerPanel program to set the CPU control to Maximum Performance. Follow these steps:
- Right-click the CPU icon 📋 or the Profile icon 📋, point to Profiles, and select Maximum Performance.
- Profile icon available on selected models only.
What do I do if the touch pad does not work?
■ Try restarting your computer. Follow these steps:
- Press the Windows key .
- Press U. The Turn off computer window opens.
- Press R to restart the computer.
- If the computer does not restart, follow these steps:
- Press the Ctrl+Alt+Delete keys simultaneously. The Windows Task Manager window appears.
- Press and release Alt to highlight the menu bar, and press the Right Arrow key → to select Shut Down
- Press Enter.
-
Press R to restart the computer.
-
If you still cannot restart your computer, press and hold the power button to turn off the computer.
- If the pointer does not move while playing a disc, press Ctrl+Alt+Delete simultaneously to stop playback and restart the computer.
If you are still experiencing problems, make sure another mouse is not installed. - You may have disabled the touch pad without connecting a mouse to the computer. See To enable the touch pad.
If your computer is interpreting a single-click as a double-click, you may want to change the button assignments. Follow these steps:
- Click Start on the Windows® taskbar and click Control Panel and Printers and Other Hardware and Mouse. The Mouse Properties dialog box appears.
- On the Buttons tab, select your preferences in the Button Selection box.
- Click Apply to install your settings.
- Click OK to close the window.
What do I do if the touch pad does not work?
■ Try restarting your computer. Follow these steps:
- Press the Windows key .
- Press U. The Turn off computer window opens.
- Press R to restart the computer.
- If the computer does not restart, follow these steps:
- Press the Ctrl+Alt+Delete keys simultaneously. The Windows Task Manager window appears.
- Press and release Alt to highlight the menu bar, and press the Right Arrow key → to select Shut Down
- Press Enter.
-
Press R to restart the computer.
-
If you still cannot restart your computer, press and hold the power button to turn off the computer.
- If the pointer does not move while playing a disc, press Ctrl+Alt+Delete simultaneously to stop playback and restart the computer.
If you are still experiencing problems, make sure another mouse is not installed. - You may have disabled the touch pad without connecting a mouse to the computer. See To enable the touch pad.
If your computer is interpreting a single-click as a double-click, you may want to change the button assignments. Follow these steps:
- Click Start on the Windows® taskbar and click Control Panel and Printers and Other Hardware and Mouse. The Mouse Properties dialog box appears.
- On the Buttons tab, select your preferences in the Button Selection box.
- Click Apply to install your settings.
- Click OK to close the window.
How do I maintain CDs and DVDs?
- Avoid touching the surface of the disc with your fingers. Fingerprints and dust on the surface of the disc may cause reading errors.
- Try using canned compressed air to clean dusty discs.
-
Do not clean the disc with solvents (such as benzine, thinner, alcohol, commercially available cleaners, or anti-static spray), which may damage the disc. To clean the disc, follow these steps:
-
Hold the edge of the disc, and use a soft cloth to wipe the surface from the center out.
- If the disc is badly soiled, moisten a soft cloth with water, wring it out well, and use it to wipe the surface of the disc from the center out.
- Wipe off any remaining moisture with a dry, soft cloth.
- Do not drop or bend the disc.
How do I maintain CDs and DVDs?
- Avoid touching the surface of the disc with your fingers. Fingerprints and dust on the surface of the disc may cause reading errors.
- Try using canned compressed air to clean dusty discs.
-
Do not clean the disc with solvents (such as benzine, thinner, alcohol, commercially available cleaners, or anti-static spray), which may damage the disc. To clean the disc, follow these steps:
-
Hold the edge of the disc, and use a soft cloth to wipe the surface from the center out.
- If the disc is badly soiled, moisten a soft cloth with water, wring it out well, and use it to wipe the surface of the disc from the center out.
- Wipe off any remaining moisture with a dry, soft cloth.
- Do not drop or bend the disc.
Why does my computer freeze when I try to read a disc?
The disc your computer is trying to read may be dirty or damaged. Follow these steps:
- Restart the computer by clicking Start, Turn Off Computer, and Restart.
- Eject the disc from the optical drive.
- Examine the disc for dirt or damage. If the disc is dirty, see How do I maintain CDs and DVDs? for instructions on how to clean it.
What do I do if the drive tray won't open?
■ Make sure the computer is on.
- Press the Eject button on the optical drive.
- If the Eject button does not work, click Start on the Windows® taskbar, and click My Computer. Right click the optical drive icon, and select Eject from the shortcut menu.
- If none of the above options work, insert a thin, straight object (such as a paper clip) in the manual eject hole near the Eject button.
What do I do if the optical drive isn't playing my CD or DVD properly?
■ Make sure the disc was inserted into the drive with the label facing up.
■ Make sure the necessary program(s) is installed according to the manufacturer's instructions.
- If the CD or DVD is dirty or damaged, the computer will stop responding. Follow these steps:
- Restart the computer by pressing the Ctrl+Alt+Delete keys, and selecting Restart from the Shut Down menu of the Windows Task Manger dialog box.
- Remove the CD or DVD from the optical drive.
- Check the disc for dirt or damage. If you need to clean the disc, see How do I maintain CDs and DVDs? for instructions.
■ If you are playing a CD or DVD and cannot hear sound, follow these steps:
- Double-click the Volume icon 📋 on the Taskbar Notification area, and click to cancel the Volume Control Mute All and Wave Mute check boxes.
- Check the volume setting in the audio mixer.
- If you are using external speakers, check the volume settings on the speakers and the connections between the speakers and the computer.
-
Make sure the CD audio feature is enabled and the correct driver software is installed. Follow these steps:
-
Click Start on the Windows® taskbar, click Control Panel, Performance and Maintenance, and System. The System Properties window appears.
-
Select the Hardware tab, and click Device Manager in the Device Manager box. A window with a listing of the computer's hardware devices appears.
If an "X" or an exclamation point appear on the listed device, you may need to enable the device or reinstall the drivers.
- Double-click the optical drive device to open the submenu.
- Double-click the listed drive, and select the Properties tab.
- Click to select the Enable digital CD audio for this CD-ROM device check box, if it is not selected.
You can confirm the driver software by selecting the Driver tab, and clicking Driver Details.
-
Click OK to close the window.
-
Make sure an adhesive label was not attached to the CD or DVD. Adhesive labels can come off while the disc is in the optical drive and damage the drive or cause it to malfunction.
- If a region code warning appears, the disc may be incompatible with the optical drive. Check the DVD package to make sure the region code is compatible with the optical drive.
- If you notice condensation on the computer, do not use the computer for at least one hour. Condensation can cause the computer to malfunction.
Why did the computer screen (LCD) go blank?
- Your computer screen may go blank if the computer has lost power or has entered a power saving mode (Standby or Hibernate). If the computer is in LCD (Video) Standby mode, press any key to activate the computer screen. See Using power saving modes for more information.
- Make sure the computer is plugged into a power source and is on. The power indicator on the computer will be on if the computer is on.
- If your computer is using battery power, make sure the battery is inserted properly and is charged. See Using the Battery for more information.
- If the display mode is set to external display, use the Fn+F7 key combination. See Selecting a display for more information.
Why can't I view the entire DVD video display on a TV screen?
The display resolution may not be properly set. To adjust the display resolution, see Selecting a display for more information. It is recommended that you adjust the display resolution to 1024 x 768 or smaller, depending on the size of the external display screen.
How do I adjust the image on the TV screen?
Use the controls on your external display to adjust the image. See the help guide that accompanied your display for more information.
How do I change the video resolution on the TV screen?
The video may not appear on the entire TV screen if your computer resolution is set larger than 1024 x 768. Adjust the video resolution to 1024 x 768 or smaller.

If you are using the A/V Out jack, plug the audio-video (AV) cable into the computer before you start the computer.
To change the video resolution, follow these instructions:
- Right-click the desktop, and select Properties from the shortcut menu. The Display Properties dialog box appears.
- Select the Settings tab.
- Move the screen resolution slider to the left to reduce the size and to the right to increase the size of the video resolution.
How do I switch the computer screen (LCD) from LCD to TV?
Press the Fn+F7 keys to view the image on either the computer screen (LCD) or the TV. See Selecting a display for more information.
The Fn+F7 key combination will not work once a DVD is inserted into the optical drive. Switching the display while a DVD is playing may cause the computer to malfunction, and you may need to restart the DVD software.
Why can't I open my image files?
You may need to reformat your Memory Stick® media.
! Formatting Memory Stick media erases all data, including music data, previously saved to it. Before you reformat Memory Stick media, back up important data and confirm that the media does not contain files you want to keep.
- Copy the data from the Memory Stick media onto your computer's hard disk to save data or images.
- Format the Memory Stick media using Memory Stick Formatter software preinstalled on your computer. For instructions about formatting a Memory Stick media, see Formatting Memory Stick media.
Why can't I open my image files?
You may need to reformat your Memory Stick® media.
! Formatting Memory Stick media erases all data, including music data, previously saved to it. Before you reformat Memory Stick media, back up important data and confirm that the media does not contain files you want to keep.
- Copy the data from the Memory Stick media onto your computer's hard disk to save data or images.
- Format the Memory Stick media using Memory Stick Formatter software preinstalled on your computer. For instructions about formatting a Memory Stick media, see Formatting Memory Stick media.
Why can't I save music files onto my Memory Stick media?
- Only MagicGate Memory Stick media can be used with copyright protected data, such as music.
Copyright protected music cannot be checked out to any Memory Stick media other than MG Memory Stick media.
■ Using recorded music requires permission of the copyright holders.
■ Sony is not responsible for music files that cannot be recorded from a CD or downloaded from other sources.
Can I copy images from a digital video camera using Memory Stick media?
Yes, and you can view video clips that you have recorded with Memory Stick media-compatible video camera recorders.
How do I prevent damage to the Memory Stick media?
- Do not use the media in locations that are subject to static electricity or electrical noise.
- Do not touch the media connector with your finger or metallic objects.
- Do not attach labels other than the supplied label to a media.
- Do not bend, drop, or apply strong shock to the media.
- Do not disassemble or modify the media.
- Do not allow the media to get wet.
How do I extend the life of the Memory Stick media?
- Use the supplied storage case. See the instructions that came with your media for more information on its use.
- Do not use or store the media in a location that is subject to:
■ Extremely high temperatures, such as in a car parked in the sun
- Direct sunlight
■ High humidity or places with corrosive substances
Why doesn't my PC Card work?
■ Make sure the PC Card is inserted properly. See Inserting PC Cards for more information.
■ Make sure the PC Card is compatible with the Microsoft® Windows® operating system installed on your computer.
- See the instructions that accompanied your PC Card. You may need to install driver software if you are not using a Sony PC Card.
Why doesn't my PC Card work?
■ Make sure the PC Card is inserted properly. See Inserting PC Cards for more information.
■ Make sure the PC Card is compatible with the Microsoft® Windows® operating system installed on your computer.
- See the instructions that accompanied your PC Card. You may need to install driver software if you are not using a Sony PC Card.
Why doesn't my computer recognize attached devices?
For some PC Cards, if you alternate between normal power operation and the Standby or Hibernate modes while the card is inserted into the PC Card slot, the computer may not recognize the PC Card or the connected device. Restart your computer.
Why can't I insert my PC Card?
■ Make sure you are inserting the card correctly. See Inserting PC Cards for more information.
- You may not be able to use some PC Cards or some functions of the PC Card with this computer. Check the guide that accompanied your PC Card for more information on its use.
Why can't I print a document?
■ Make sure the printer is on, and the printer cable is securely connected to the ports on your printer and computer.
■ Make sure the printer is compatible with the Microsoft® Windows® operating system installed on your computer.
- You may need to install the printer driver software before you use the printer. See the guide that accompanied the printer for more information.
- If the printer is not functioning after the computer resumes from a power saving mode (Standby or Hibernate), then restart the computer.
- If the bidirectional communication functions are provided with your printer, disabling the functions on your computer may enable printing. Follow these steps:
- Click Start, and then Control Panel.
- Click Printers and Other Hardware.
- Click Printers and Faxes.
- Right-click an unused printer and select Properties.
- Click the Ports tab.
- Click to cancel the Enable bidirectional support check box.
- Click OK.
This change to the settings disables the bidirectional communication functions of your printer, such as data transfer, status monitoring, and remote panel.
Why can't I print a document?
■ Make sure the printer is on, and the printer cable is securely connected to the ports on your printer and computer.
■ Make sure the printer is compatible with the Microsoft® Windows® operating system installed on your computer.
- You may need to install the printer driver software before you use the printer. See the guide that accompanied the printer for more information.
- If the printer is not functioning after the computer resumes from a power saving mode (Standby or Hibernate), then restart the computer.
- If the bidirectional communication functions are provided with your printer, disabling the functions on your computer may enable printing. Follow these steps:
- Click Start, and then Control Panel.
- Click Printers and Other Hardware.
- Click Printers and Faxes.
- Right-click an unused printer and select Properties.
- Click the Ports tab.
- Click to cancel the Enable bidirectional support check box.
- Click OK.
This change to the settings disables the bidirectional communication functions of your printer, such as data transfer, status monitoring, and remote panel.
Why doesn't the Safely Remove Hardware icon

appear on the taskbar when the drive is connected?
The computer does not recognize the floppy disk drive. First, make sure the USB cable is properly connected to the USB port. If you need to secure the connection, wait a few moments for the computer to recognize the drive. If the icon still does not appear, follow these steps:
- Close all programs that were accessing the floppy disk drive.
- Wait for the LED indicator on the floppy disk drive to turn off.
- Push the Eject button, and remove the disk.
- Reconnect the floppy disk drive by inserting the USB connector (with the USB icon facing upward) into the USB port.
- Restart the computer by clicking Start on the Windows® taskbar, Turn Off Computer, and then Restart.
Why doesn't the Safely Remove Hardware icon

appear on the taskbar when the drive is connected?
The computer does not recognize the floppy disk drive. First, make sure the USB cable is properly connected to the USB port. If you need to secure the connection, wait a few moments for the computer to recognize the drive. If the icon still does not appear, follow these steps:
- Close all programs that were accessing the floppy disk drive.
- Wait for the LED indicator on the floppy disk drive to turn off.
- Push the Eject button, and remove the disk.
- Reconnect the floppy disk drive by inserting the USB connector (with the USB icon facing upward) into the USB port.
- Restart the computer by clicking Start on the Windows® taskbar, Turn Off Computer, and then Restart.
Why is the drive unable to write data to a floppy disk?
Make sure the floppy disk is properly inserted in the drive. See Inserting and removing floppy disks for instructions on how to insert the disk properly.
If the disk is inserted properly and you are still unable to write data to it, the disk may be full or write-protected. You can either use a floppy disk that is not write-protected or disable the write-protect feature.
If you have questions about your computer or the preinstalled programs, refer to the following sources for answers in the sequence listed below.
1 VAIO® Computer Documentation
The on-screen VAIO® Computer User Guide and the printed VAIO® Computer Quick Start provide information on how to maximize your computer capabilities and solve common problems.
2 Program Guides and Help Files
The preinstalled programs on your computer may come with individual help guides. These guides are stored on the hard disk as on-screen Help files. You can find the Help files from the Help menu under the specific program.
3 Operating System Online Support
Your computer comes preinstalled with a Microsoft® Windows® operating system. For operating system support, you can visit Microsoft® customer support at: http://support.microsoft.com/directory/.
4 Sony Computing Support
This service provides instant access to information on commonly encountered problems. Type a description of the problem and the Knowledge Database searches for the corresponding solutions online. You can visit Sony Computing Support at: http://www.sony.com/pcsupport.
Depending on the configuration you purchased, your computer may not include all of these software programs listed below.
Adobe® Reader®
Adobe Systems Inc.
Adobe Reader software enables you to view, navigate, and print electronic documents in Adobe's Portable Document Format (PDF), an open file format intended to preserve the fidelity of documents created on many major computer platforms.
Support:
web site http://www.adobe.com
telephone 800-685-3652
hours M - F, 6 AM - 5 PM PST
Adobe® Photoshop® Elements
Adobe Systems Inc.
Using state-of-the-art image editing tools, you can unleash your artistic ability and create digital images for print, e-mail, and posting to the Web. The versatile image capturing options enable you to start working with digital and traditional photos immediately. Explore extensive creative possibilities for your personal images with Adobe Photoshop Elements software. Upgrade possible to Adobe® Photoshop® software.
Support: See Adobe® Reader®
Adobe® Premiere® LE
Adobe Systems Inc.
Adobe Premiere LE software offers interface and editing tools for producing movies for video, multimedia, and the Web. View source clips and edited footage simultaneously on-screen. You can create your own personal video clips that are up to three hours in length, with complete audio-video synchronization. Upgrade possible to full version of Adobe® Premiere® software.
Support: See Adobe® Reader®
Adobe® Premiere®
Adobe Systems Inc.
Professional digital video editing software that enables you to create professional video productions. Take advantage of the sophisticated new Adobe Title Designer, MPEG-2 export, DVD authoring, and powerful audio tools.
Support: See Adobe® Reader®
America Online® (Broadband or Dial-Up)
America Online, Inc.
America Online is a popular Internet online service. Stay in touch with family and friends with easy-to-use e-mail. Manage your personal finances, get the latest news and sports scores, and chat with thousands of others who share your interests.
Support:
AT&T WorldNet Service offers fast, reliable Internet access. Customer benefits include Web-based e-mail, video e-mail, multiple e-mail accounts, free Web pages, online and live agent technical support, instant messaging, and parental controls.
Support:
web site http://help.att.net
Boingo Wireless
Boingo Wireless, Inc.
Boingo Wireless service offers Wi-Fi access in hundreds of hot spot locations, including airports, hotels, coffee shops, and other public spaces. Experience the Internet up to 100 times faster than dial-up, and enjoy being totally mobile.
Support:
web site http://www.boingo.com/servicecenter.html
telephone 800-880-4117
e-mail support@boingo.com
hours M - F, 4 AM - 10 PM PST
Sat-Sun, 6 AM - 3 PM PST
Click to DVD
Sony Electronics Inc.
At the touch of a button, Click to DVD software allows you to automatically burn DVDs from a digital video device. Create DVDs by capturing video content straight from a digital video (DV) device or by importing video from stored files — and you can also edit the video if desired. Create DVD photo albums and slide shows with picture files or by importing pictures from a digital still camera. What's more, you can easily give a professional look to your DVDs by adding chapter menus, backgrounds, and menu screens. You're only a few clicks away from your own DVDs!
Support: Sony Electronics, see VAIO® Support Agent
CLIÉ Converter
Sony Electronics Inc.
CLIÉ Converter software is a plug-in application that converts Giga Pocket® Video Capsules into Movie Player format for playback on your Sony® CLIÉ handheld. After converting your Video Capsules, you can use CLIÉ Converter software to transfer them to Memory Stick® media or to save them to your hard disk drive for transfer to your CLIÉ handheld during your next HotSync® operation.
Support: Sony Electronics, see VAIO Support Agent
Corel® WordPerfect®
Corel Corp.
WordPerfect software is a powerful word-processing tool that helps you produce newsletters, articles, reports, proposals, books, and other documents. This software enables you to add graphics, tables, and charts to documents. You can publish to paper, electronic media, and the World Wide Web. WordPerfect 10 software allows you to format, structure, and edit documents at any time and gives you complete control over the design. WordPerfect 10 software includes Quattro Pro® and Corel Presentations . It also includes CorelCENTRAL – software, which has Day Planner, Calendar, Address Book, Mail, Card File, Memos, Alarms and Admin.
Support:
web site http://www.corel.com
telephone 613-274-0500
CyberLink PowerDVD®
CyberLink Corp.
CyberLink PowerDVD software offers high-quality playback of DVD movies on your computer. Cyberlink PowerDVD software includes all the controls you expect from a home DVD player, plus a range of additional features. For example, you can bookmark scenes to come back to them later. The customizable controls, advanced navigation bar, and dynamic player skins combine to deliver a premium viewing experience. Page 20
Support:
web site http://www.gocyberlink.com/english/cs/support/index_tech.jsp
Drag'n Drop CD
DigiOn, Inc., and Easy Systems Japan Ltd.
Drag'n Drop CD software is designed to make CD creation simple. You can create your own audio or data CDs that can be read in most audio CD players or personal computers. With Drag'n Drop CD software, you can also back up CDs.
Support:
web site http://www.ddcd.jp/dd3e/sony/cd
Drag'n Drop CD+DVD
DigiOn, Inc., and Easy Systems Japan Ltd.
Drag'n Drop CD+DVD software is designed to make CD and DVD creation simple. You can create you own audio or data CDs and data DVDs. These discs can be read in most audio CD players or personal computers. With Drag'n Drop CD+DVD software, you can also back up CDs.
Support:
web site http://www.ddcd.jp/dd3e/sony/cd
DVgate
Sony Electronics Inc.
Connect a compatible digital video camera to your computer's i.LINK® port and capture video clips and still images. You can edit clips from your video, add new clips, and combine clips into new movie segments. You can also save your images in a variety of popular file formats.
Support: Sony Electronics, see VAIO Support Agent
DVgate Plus
Sony Electronics Inc.
Connect a compatible digital video camera to your computer's i.LINK® port and capture video clips and still images. Edit clips from your video, add new clips, and combine clips into new movie segments. Save your movies back to your digital video camera or in a variety of popular file formats.
Support: Sony Electronics, see VAIO Support Agent
EarthLink TotalAccess® (DSL or Dial-Up)
EarthLink, Inc.
EarthLink, one of the world's largest Internet Service Providers, offers dial-up and broadband access to the Internet. Member benefits include e-mail, newsgroups, an EarthLink Personal Start PageSM, free storage space for your personal Web site, a member magazine, and 24-hour technical support.
Support:
web site http://support.earthlink.net
EverQuest®
Sony Online Entertainment Inc.
This introductory edition of the EverQuest game, a constantly evolving fantasy world, takes users to new heights of online role-playing gaming. Enter an enormous virtual environment—an entire world with its own diverse species, economic systems, alliances, and politics. Make yourself a noble human knight, a vicious dark elf thief, a greedy dwarven merchant, or whatever your heart desires as you meet new friends from around the world and face epic challenges. Rated TEEN by the ESRB: Content may be suitable for persons ages 13 and older. May contain violent content, mild or strong language, and/or suggestive themes.
Support:
telephone 858-537-0898
e-mail eqtech@soe.sony.com
hours M - F, 9 AM - 6 PM PST
Giga Pocket® Personal Video Recorder Sony Electronics Inc.
Giga Pocket® Personal Video Recorder is a unique set of hardware and software components that provide you with excellent TV viewing, recording, and playback experiences. You can watch and record your favorite TV programs from your computer, create custom playlists, and play your Video Capsules on other compatible computers. Giga Pocket® Personal Video Recorder enables your computer, TV, VCR, and other video player devices to work in harmony.
Support: Sony Electronics, see VAIO Support Agent
ImageStation®
Sony Electronics, Inc.
With ImageStation® online service, you can store, organize, and share your photos and video clips online. ImageStation online service membership is free (except for transactions) and includes unlimited storage of digital photos, storage for 15 minutes of video clips, tools to personalize the design and arrangement of your pictures in albums, and access to stories and tips about image handling in ImageStation Magazine.
Support: Sony Electronics, see VAIO Support Agent
Microsoft® Age of Empires® II
Microsoft Corp.
The Age of Empires game is the sequel to the award-winning, best-selling realtime strategy game Age of Empires. The Age of Empires II game spans a thousand years, from the fall of Rome through the Middle Ages in which players lead one of 13 civilizations into greatness. The game keeps the epic scope of the original product's game play while evolving the combat and economic features. Rated TEEN by the ESRB: Content may be suitable for persons ages 13 and older. May contain violent content, mild or strong language, and/or suggestive themes.
Support: See Microsoft® Works
Microsoft® Encarta® Online
Microsoft Corp.
The Encarta Online encyclopedia includes more than 47,000 encyclopedia articles, many with multimedia features such as video and audio clips. You'll also find links to trusted Web sites with even more information. An interactive world atlas lets you zoom in on a particular region or country. Content may be suitable for persons ages 6 and older. May contain minimal violence and some comic mischief or crude language.
Support: See Microsoft® Works
Microsoft® Family Game Pack
Microsoft Corp.
Play classic games like chess and checkers with Bicycle Board Games (rated E). Own and run your own zoo in Zoo Tycoon (rated E). Play golf on the finest courses in Links (rated E). Rated E for EVERYONE by the ESRB: Content may be suitable for persons ages 6 and older. May contain minimal violence and some comic mischief or crude language.
Support: See Microsoft® Works
Microsoft® Internet Explorer
Microsoft Corp.
Internet Explorer offers dramatic performance, reliability, and usability improvements making it the fastest, easiest and most cost-effective Web browser for people to use, manage and support. Whether you use the Web to read e-mail, news or sports reports, shop online, listen to music or play videos, or share your images and photos with friends family or work colleagues, IE 6 makes it easy, exciting and fun.
Microsoft® MSN®
Microsoft Corp.
MSN Internet service combines fast, reliable service with innovative Microsoft software to make the Web more useful for you and your family. The new MSN 8 Internet service includes smart features such as automatic e-mail virus protection services, an intelligent junk mail filter, powerful parental controls, and easy switching tools.
Support: See Microsoft® Works
Microsoft® Money Standard
Microsoft Corp.
Microsoft Money Standard provides a quick and easy way to organize and manage your personal finances. New features include auto-balancing, a bills estimator, spending comparison reports, and investment reminders. Save time organizing and managing your cash flow and balancing your checkbook. Create and track a budget, pay your bills, organize your finances, and view a complete picture of your financial health all in one place.
Support: See Microsoft® Works
Windows® Movie Maker 2
Microsoft Corp.
Windows Movie Maker 2 makes home movies amazingly fun. With Movie Maker 2 you can create, edit and share your home movies right on your PC. Build your movie with a few simple drag-and-drops. Delete bad shots and include only the best scenes. Add special effects, music and narration. Then share your movie via the Web, e-mail, on your PC, CD, or even DVD. You can also save your edited movie back to the DV tape in your camera to play on a TV or even on the camera itself.
Support: See Microsoft® Works
Microsoft® Office XP Professional
Microsoft Corp.
Microsoft Office XP Professional software redefines the relationship between people and software by providing a smarter, simpler way of working. New Office XP Professional software features include context-sensitive smart tags, enhanced formatting options, and more, that enable you to continually integrate additional services into Office and access information anytime. The Office XP Professional suite includes Word, Excel, Outlook ^® , PowerPoint ^® , and Access software.
Support: Sony Electronics, see VAIO Support Agent
Microsoft® Office XP Small Business Edition
Microsoft Corp.
Microsoft Office XP Small Business Edition helps you get work done more quickly by providing real-time, context-sensitive options for important actions, from formatting to error correction. Task panes consolidate important tasks into a single integrated view, enabling you to conduct searches, launch and format documents, and view the contents of your Clipboard from one location. The Office XP Small Business Edition suite includes Word, Excel, Outlook®, and Publisher software.
Support: Sony Electronics, see VAIO Support Agent
Microsoft® Simulation Game Pack
Microsoft Corp.
Fly your own aircraft in Flight Simulator (rated E). Drive like a maniac in Midtown Madness 2 (rated E). Live in a world of mythology with Age of Mythology (rated T). Rated E for EVERYONE: Content may be suitable for persons ages 6 and older. May contain minimal violence and some comic mischief or crude language. Rated T for TEEN: Content may be suitable for persons ages 13 and older. May contain violent content, mild or strong language, and/or suggestive themes.
Support: See Microsoft® Works
Microsoft® Windows Media® Player
Microsoft Corp.
Using one of the premiere video and music playback software programs, you can better enjoy listening and watching many different kinds of media. Other great features include, instant-on playback, Mini-player mode, Intelligent Streaming technology, 5.1-channel surround sound audio codec, and built-in Smart Jukebox features.
Support: See Microsoft® Works
Microsoft® Works
Microsoft Corp.
Works lets you quickly and easily create high-quality, fun documents. Works provides the core tools you need to create documents, manage lists and schedules, create reports and budgets and organize information from many sources. Works includes Word Processor, Works Database, Works Spreadsheet, Works Portfolio, and Works Calendar.
Support:
web site http://www.support.microsoft.com
MoodLogic
MoodLogic, Inc.
MoodLogic is the world's largest descriptive database of song information. The information is provided from music lovers like you. MoodLogic allows you to browse the songs by artist and genre, narrow your selections by tempo or year, save your favorite playlist and transfer it to a portable player.
Support:
web site http://www.moodlogic.com/support
e-mail help@moodlogic.com
Network Smart Capture
Sony Electronics Inc.
Network Smart Capture captures images and video from any Sony® Digital Camcorder that supports a standard i.LINK® connection. Send your video or still images through e-mail or upload them to the ImageStation® service. You can use the Web camera function to automatically upload your captured images.
Support: Sony Electronics, see VAIO Support Agent
Norton Internet Security
Symantec Corporation
Symantec's Norton Internet Security – software provides essential protection from viruses, hackers, and privacy threats. This easy-to-use, integrated suite includes full versions of Norton AntiVirus® and Norton Personal Firewall software to defend your PC against the most common Internet dangers. Norton Internet Security also includes Norton Spam Alert, which helps you detect and filter unwanted e-mail. Norton Parental Control keeps your children safe by letting you block objectionable Web sites and set up separate Internet access privileges for each member of your household. Automatic downloads keep Norton Internet Security software updated against new security threats. This is a trial version of the Norton Internet Security software.
Support:
web site http://www.symantec.com/techsupp
PC-cillin®
Trend Micro, Inc.
PC-cillin antivirus software provides complete, easy-to-use, Internet-era virus protection at your computer's entry points (including beaming, synchronization, and Internet access) to defend against potential threats hidden inside files, e-mail, or on the Web. (Subscription required after initial evaluation period.)
Support:
web site http://www.trendmicro.com/en/support
telephone 800-864-6027
e-mail pc-cillin@support.trendmicro.com
hours M - F, 5 AM - 5 PM (PST)
Sony Electronics Inc.
PictureGear Studio still image management software displays still images from your hard drive or a Sony digital still camera. The still images appear in a convenient light-table format so that you can easily view the contents of an entire folder, create your own photo albums and make prints.
Support: Sony Electronics, see VAIO Support Agent
PowerDVD
CyberLink Corp.
PowerDVD software offers high-quality playback of DVD movies on your computer. PowerDVD software includes all the controls you expect from a home DVD player, plus a range of additional features. For example, you can bookmark scenes to come back to them later. The customizable controls, advanced navigation bar, and dynamic player skins combine to deliver a premium viewing experience.
Quicken® New User Edition
Intuit Inc.
Quicken software is a fast, easy way to organize your finances. Quicken software works just like your checkbook, so it's easy to learn and use. You can even pay your bills online. Quicken software manages all of your finances, bank accounts, credit cards, investments, and loans. (Users of earlier versions of Quicken software must upgrade for a fee.) Upgrade possible to Quicken® Deluxe, and other versions.
Support:
web site http://www.intuit.com/support
QuickTime®
Apple Computer, Inc.
The versatile QuickTime software plays many different kinds of media files, including video, audio, and virtual reality (VR) movies. You can play QuickTime files (referred to as "QuickTime movies") using QuickTime Player or any other application, such as a Web browser or word processor, that supports QuickTime software.
Support:
web site http://www.info.apple.com
telephone 800-275-2273
RealOne Player
RealNetworks, Inc.
RealOne Player is an all-in-one digital media player that lets you find everything and play anything. RealOne Player fuses a streaming media player, jukebox, browser and new content discovery services all in one application. Play CDs, MP3s and internet radio stations from anywhere in the world. View video clips and movies with the same player. Download music directly to your Sony MiniDisc Walkman® player or your Sony Memory Stick Walkman® player.
Support:
web site(s) http://service.real.com/rjoptions.html
telephone 206-674-2680
RecordNow
Easy Systems LTD, Japan
RecordNow is the ideal CD and DVD disc-mastering software. The RecordNow wizard makes it easy for the novice user to start recording right away.
Support:
web site http://www.easy.co.jp/jrn45/sony
Sony Electronics Inc.
The SonicStage jukebox application gives you all the tools you need to manage music on your computer. SonicStage software sports high-quality digital audio storage, a music visualizer, a sleek player skin design, audio CD burning capability (on computer models that include a CD recording device), and a parametric equalizer for fine-tuning audio playback.
Support: Sony Electronics, see VAIO Support Agent
SonicStage Mastering Studio
Sony Electronics Inc.
Use SonicStage Mastering Studio software to record songs from analog records or cassette tapes into your computer, and output them to CD-R or CD-RW discs, or audio files in WAV format.
Support: Sony Electronics, see VAIO Support Agent
Sony on Yahoo!
Yahoo! Inc.
Personalize your own Web portal with Sony on Yahoo! Get a free Web mail account, customized news and local weather reports, comics, instant messaging, and more.
Support:
web site http://help.yahoo.com
Screenblast® ACID®
Sony Pictures Digital Entertainment
Use the amazing Screenblast® ACID® software to produce, arrange, and edit your loop-based music. With ACID software, you can slice out long hours from the music-making equation and unlock the doors of your creativity by picking, painting, and playing your songs.
Support:
web site http://www.sonicfoundry.com/support/default.asp
Screenblast® ACID® Deluxe
Sonic Foundry, Inc. and Sony Pictures Digital Entertainment
Screenblast® ACID® Deluxe software lets you produce, arrange, and edit your loop-based music. With Screenblast ACID Deluxe software you get unlimited tracks, track-at-once burning, higher bit rates, and express effects like reverb.
Support:
web site http://www.sonicfoundry.com/support/default.asp
Screenblast® Sound Forge®
Sonic Foundry, Inc. and Sony Pictures Digital Entertainment
Sony Screenblast® Sound Forge® software enables you to record, edit, and process mono or stereo audio files for your multimedia or Internet projects. Whether you want to use a number of professional effects, convert video into streaming media, or synchronize audio to video—this software has everything you need to create rich, immersive multimedia and Internet content.
Support:
web site http://www.sonicfoundry.com
Sony® VAIO® Product Registration
Sony Electronics Inc.
VAIO Product Registration is an integrated registration application for both Sony Electronics and Microsoft Corporation. By registering with Sony, you enable Sony to notify you of software and hardware issues that may affect your user experience. Microsoft directs the data to Sony Electronics. Sony uses the registration data for warranty and product support purposes and the analysis of customer feedback on Sony computer features.
Sound Blaster® Audigy
Creative Labs, Inc.
Easily create, customize, and listen to MP3/WMA files, set up properties for audio devices, and record sound or music from various sources. Enjoy cinema-quality sound immediately and experience fully enhanced digital or analog sound.
Support
web site http://www.americas.creative.com/support/custsup.asp
Station.com
Sony Online Entertainment Inc.
Sony Online's award-winning Web site offers gamers the best in casual online games. With popular TV titles such as Jeopardy! Wheel of Fortune Online, card games, and action titles like Cosmic Rift, the station rewards its players with a host of contests and cash giveaways as well as localization so players can play in French, German and Japanese.
Support: Sony Electronics, see VAIO Support Agent
TurboTax® for the Web
Intuit, Inc.
Quickly and easily prepares and files tax returns without downloading or installing any software. From the easy-to-use interview to features such as Instant Data Entry, also found in the TurboTax desktop products, TurboTax for the Web offers easy, fast and customized tax preparation.
Support:
web site http://www.intuit.com/support
telephone 900-555-4932; 800-644-3193
hours M - F, 5 AM - 5 PM PST
^1 Support from 900-555-4932 is fee-based. Support from 800-644-3193 is automated and free of charge.
VAIO Action Setup
Sony Electronics Inc.
VAIO Action Setup manages the settings for your computer's shortcut keys.
Support: Sony Electronics, see VAIO Support Agent
VAIO Edit Components
Sony Electronics Inc.
VAIO Edit Components is a software plug-in for Adobe® Premiere® software that provides maximum compatibility and video quality for capturing video from your Sony digital camcorder.
Support: Sony Electronics, see VAIO Support Agent
VAIO Hints and Tips
Sony Electronics Inc.
VAIO Hints and Tips provides helpful information about using your computer's preinstalled hardware and software. You can find suggestions on improving system performance, answers to frequently asked questions, and creative ways to tap into your computer's multimedia capabilities. As you become familiar with your computer's features, your creative VAIO® computer experience expands.
Support: Sony Electronics, see VAIO Support Agent
VAIO Media
Sony Electronics Inc.
VAIO Media software brings multimedia to your network, enabling you to share music, video, and still image files between your VAIO® computers. You can set up one or more computers as "media servers," which store your multimedia files page 275
make them available to other VAIO computers on your wired or wireless network.
Support: Sony Electronics, see VAIO Support Agent
VAIO Music Services
Sony Electronics Inc.
Download music from the web, create your own albums, or have CDs sent straight to your house with VAIO Music Services. The ultimate place on the Web for music lovers to find out information about their favorite artist and get all of the latest music news.
Support: Sony Electronics, see VAIO Support Agent
VAIO Support Agent
Sony Electronics Inc.
VAIO Support Agent provides immediate, interactive online support with information about your preinstalled software and answers to frequently asked questions.
Support:
web site http://www.sony.com/pcsupport
telephone 888-4-SONY-PC (888-476-6972)
hours 7 days a week, 24 hours a day
Support from 1-888-4-SONY-PC is free of charge for 90 days after the original date of purchase.
WinDVD® for VAIO®
InterVideo, Inc.
WinDVD software serves as a simple-to-use DVD player that offers all the features you would expect to find in a standard consumer DVD player, including advanced display and navigation features such as zoom, pan, bookmark, and time search.
Support:
web site http://www.intervideo.com/jsp/Support.jsp
telephone 510-651-0888