
Vaio PCG-F590 - Laptop SONY - Free user manual and instructions
Find the device manual for free Vaio PCG-F590 SONY in PDF.


| Product Type | Notebook (Laptop) |
| Brand | Sony |
| Model | VAIO PCG-F590 |
| Processor | Intel Pentium III 750 MHz with SpeedStep Technology |
| Hard Disk Drive | 18.1 GB |
| Standard RAM | 128 MB SDRAM (upgradable to 256 MB) |
| LCD Screen | 15.0" XGA TFT |
| Graphics | 6 MB video, supports 3D graphics |
| Sound | 16-bit CD-quality stereo |
| Optical Drive | DVD-ROM (reads CD 10.3x-24x, DVD 1.7x-8x) |
| Diskette Drive | Removable 3.5" 1.44 MB |
| Modem | 56K V.90 compatible |
| Infrared | 4 Mbps, 1.1 Mbps, 115 Kbps IrDA |
| Expansion Slots | 2x PC Card (Type I/II/III), CardBus |
| Ports | 2 USB, i.LINK (IEEE1394), Serial, PS/2, VGA, Video out, Parallel, RJ-11, Microphone, Headphone, Port replicator |
| Battery | Lithium-ion, dual battery support |
| Power | 49.5 W max (19.5V DC / AC 100-240V) |
| Dimensions (WxDxH) | 12.8" x 10.5" x 2.1" (324 x 265.5 x 54.1 mm) |
| Weight | 7.3 lb (3.3 kg) with battery and weight saver |
| Operating Temperature | 41°F to 95°F (5°C to 35°C) |
| Cleaning | Soft dry cloth; avoid abrasive cleaners |
| Safety | Do not expose to moisture; laser caution in DVD drive |
| Spare Parts / Repairability | Memory upgrade, battery replacement; contact Sony Service Center |
Frequently Asked Questions - Vaio PCG-F590 SONY
User questions about Vaio PCG-F590 SONY
0 question about this device. Answer the ones you know or ask your own.
Ask a new question about this device
Download the instructions for your Laptop in PDF format for free! Find your manual Vaio PCG-F590 - SONY and take your electronic device back in hand. On this page are published all the documents necessary for the use of your device. Vaio PCG-F590 by SONY.
USER MANUAL Vaio PCG-F590 SONY
© 2000 Sony Electronics Inc. All rights reserved. This manual and the software described herein, in whole or in part, may not be reproduced, translated, or reduced to any machine-readable form without prior written approval.
SONY ELECTRONICS INC. PROVIDES NO WARRANTY WITH REGARD TO THIS MANUAL, THE SOFTWARE, OR OTHER INFORMATION CONTAINED HEREIN AND HEREBY EXPRESSLY DISCLAIMS ANY IMPLIED WARRANTIES OF MERCHANTABILITY OR FITNESS FOR ANY PARTICULAR PURPOSE WITH REGARD TO THIS MANUAL, THE SOFTWARE, OR SUCH OTHER INFORMATION. IN NO EVENT SHALL SONY ELECTRONICS INC. BE LIABLE FOR ANY INCIDENTAL, CONSEQUENTIAL, OR SPECIAL DAMAGES, WHETHER BASED ON TORT, CONTRACT, OR OTHERWISE, ARISING OUT OF OR IN CONNECTION WITH THIS MANUAL, THE SOFTWARE, OR OTHER INFORMATION CONTAINED HEREIN OR THE USE THEREOF.
Sony Electronics Inc. reserves the right to make any modification to this manual or the information contained herein at any time without notice. The software described herein is governed by the terms of a separate user license agreement.
This product contains software owned by Sony and licensed by third parties. Use of such software is subject to the terms and conditions of license agreements enclosed with this product. Some of the software may not be transported or used outside the United States. Software specifications are subject to change without notice and may not necessarily be identical to current retail versions.
Updates and additions to software may require an additional charge. Subscriptions to online service providers may require a fee and credit card information. Financial services may require prior arrangements with participating financial institutions.

As an ENERGY STAR Partner, Sony Corporation has determined that this product meets the ENERGY STAR guidelines for energy efficiency.
The International ENERGY STAR Office Equipment Program is an international program that promotes energy saving through the use of computers and other office equipment. The program backs the development and dissemination of products with functions that effectively reduce energy consumption. It is an open system in which business proprietors can participate voluntarily. The targeted products are office equipment such as computers, displays, printers, facsimiles and copiers. Their standards and logos are uniform among participating nations. ENERGY STAR is a U.S. registered mark.
Sony, i.LINK, VAIO and the VAIO logo are trademarks of Sony Corporation. Windows, Windows NT, and the Windows logo are registered trademarks of Microsoft Corporation. Intel, SpeedStep, and Pentium are trademarks of Intel Corporation.
This product incorporates copyright protection technology that is protected by method claims of certain U.S. patents and other intellectual property rights owned by Macrovision Corporation and other rights owners. Use of this copyright protection technology must be authorized by Macrovision Corporation, and is intended for home and other limited viewing uses only unless otherwise authorized by Macrovision Corporation. Reverse engineering or disassembly is prohibited.
All other trademarks are trademarks of their respective owners.
Owner's Record
The model number and serial number are located on the bottom of your Sony VAIO® Notebook. Record the serial number in the space provided here. Refer to the model and serial number when you call your Sony Service Center.
Model Numbers: PCG-9241, PCG-9242, PCG-9231, PCG-9232, PCG-9221, PCG-9211, PCG-9212, PCG-9201, PCG-9202,
Serial Number: ____
Safety Information
WARNING
☐ To prevent fire or shock hazard, do not expose your notebook computer to rain or moisture.
☐ To avoid electrical shock, do not open the cabinet. Refer servicing to qualified personnel only.
☐ Never install modem or telephone wiring during a lightning storm.
☐ Never install telephone jacks in wet locations unless the jack is specifically designed for wet locations.
☐ Never touch uninsulated telephone wire or terminals unless the telephone line has been disconnected at the network interface.
☐ Use caution when installing or modifying telephone lines.
☐ Avoid using the modem during an electrical storm.
☐ Do not use the modem or a telephone to report a gas leak in the vicinity of the leak.
☐ A socket outlet should be as close as possible to the unit and easily accessible.
! To change the backup battery, please contact your nearest Sony Service Center.
! Caution - The use of optical instruments with this product will increase eye hazard. As the laser beam used in this product is harmful to the eyes, do not attempt to disassemble the cabinet. Refer servicing to qualified personnel only.
! For DVD-ROM: Danger - Visible and invisible laser radiation when open. Avoid direct exposure to beam.
! For CD-RW: Danger - Invisible laser radiation when open. Avoid direct exposure to beam.
! Caution: To reduce the risk of fire, use only No. 26 AWG or larger telecommunication line cord.
AMERTISSEMENT
If you have questions about this product, you can reach the Sony Customer Information Service Center at 1-888-4SONYPC; or write to the Sony Customer Information Service Center at 12451 Gateway Blvd., Ft. Myers, FL 33913 or find Sony Customer Service on the web at: http://www.sony.com.pcsupport
The number below is for FCC related matters only. Sony Customer Support can be reached at http://www.sony.com/pcsupport
Regulatory Information.
Declaration of Conformity
Trade Name: SONY
Model No.: PCG-9241, PCG-9242,
PCG-9231, PCG-9232,
PCG-9221, PCG-9211,
PCG-9212, PCG-9201,
PCG-9202
Responsible Party: Sony Electronics Inc.
Address: 1 Sony Drive
Park Ridge, NJ 07656
Telephone:
201-930-6972
This device complies with Part 15 of the FCC rules. Operation is subject to the following two conditions:
(1) This device may not cause harmful interference, and
(2) this device must accept any interference received, including interference that may cause undesired operation.
This equipment has been tested and found to comply with the limits for a Class B digital device, pursuant to Part 15 of the Rules. These limits are designed to provide reasonable protection against harmful interference in a residential installation. This equipment generates, uses, and can radiate radio frequency energy and, if not installed and used in accordance with the instructions, may cause harmful interference to radio communications. However, there is no guarantee that interference will not occur in a particular installation. If this equipment does cause harmful interference to radio or television reception, which can be determined by turning the equipment off and on, the user is encouraged to try to correct the interference by one or more of the following measures:
☐ Reorient or relocate the receiving antenna.
☐ Increase the separation between the equipment and the receiver.
☐ Connect the equipment into an outlet on a circuit different from that to which the receiver is connected.
Consult the dealer or an experienced radio/TV technician for help.
You are cautioned that any changes or modifications not expressly approved in this manual could void your authority to operate this equipment.
Only peripherals (computer input/output devices, terminals, printers, etc.) that comply with FCC Class B limits may be attached to this computer product. Operation with non-compliant peripherals is likely to result in interference to radio and television reception.
All cables used to connect peripherals must be shielded and grounded. Operation with cables, connected to peripherals, that are not shielded and grounded, may result in interference to radio and television reception.
FCC Part 68
This equipment complies with Part 68 of the FCC rules. On the bottom of this equipment is a label that contains, among other information, the FCC equivalence number (REN) for this equipment. If requested, this information must be provided to the telephone company.
This modem uses the USOC RJ-11 telephone jack.
The REN is used to determine the quantity of devices which may be connected to the telephone line. Excessive RENs on the telephone line may result in the devices not ringing in response to an incoming call. In most, but not all areas, the sum of the RENs should not exceed five (5.0). To be certain of the number of devices that may be connected to the line, as determined by the total RENs, contact the telephone company to determine the maximum REN for the calling area.
If the terminal equipment causes harm to the telephone network, the telephone company will notify you in advance that temporary discontinuance of service may be required. But if advance notice is not practical, the telephone company will notify the customer as soon as possible. Also, you will be advised of your right to file a complaint with the FCC if you believe it is necessary.
The telephone company may make changes in its facilities, equipment, operations or procedures that could affect the operations of the equipment. If this happens, the telephone company will provide advance notice in order for you to make the necessary modifications in order to maintain uninterrupted service.
If trouble is experienced with this equipment, you can reach the Sony Customer Information Service Center at 1-888-4SONYPC; or write to the Sony Customer Information Service Center at 12451 Gateway Blvd., Ft. Myers, FL 33913 or find Sony Customer Service on the web at: http://www.sony.com.pcsupport
Repair of this equipment should be made only by a Sony Service Center or Sony authorized agent. For the Sony Service Center nearest you, call 1-888-4SONYPC (1-888-476-6972).
This equipment cannot be used on public coin service provided by the telephone company. Connection to Party Line Service is subject to state and possible provincial tariffs. (Contact the state or provincial utility service commission, public service commission, or corporation commission, for information.)
Telephone Consumer Protection Act of 1991 (United States)
The Telephone Consumer Protection Act of 1991 makes it unlawful for any person to use a computer or other electronic device to send any message via a telephone facsimile machine unless such message clearly contains, in a margin at the top or bottom of each transmitted page or on the first page of the transmission, the date and time it is sent and an identification of the
business, other entity, or individual sending the message, and the telephone number of the sending machine or such business, other entity, or individual.
In order to program this information into your facsimile machine, see your fax software documentation.
Telephone Consumer Guidelines (Canada)
Please refer to your telephone directory under 'Privacy Issues' and/or 'Terms of Service.' For more detailed information, please contact:
CRTC
This Class B digital apparatus complies with Canadian ICES-003.
You can return your unwanted lithium ion batteries to your nearest Sony Service Center or Factory Service Center.

In some areas the disposal of lithium ion batteries in household or business trash may be prohibited.
For the Sony Service Center nearest you, call 1-888-476-6972 in the United States or 1-800-961-7669 in Canada.
! Danger of explosion if battery is incorrectly replaced. Replace only with the same or equivalent type recommended by the manufacturer. Discard used batteries according to the manufacturer's instructions.
! The battery pack used in this device may present a fire or chemical burn hazard if mistreated. Do not disassemble, heat above 212°F (100°C) or incinerate. Dispose of used battery promptly. Keep away from children.
NOTICE: The Industry Canada label identifies certified equipment. This certification means that the equipment meets certain telecommunications network protective, operational and safety requirements as prescribed in the appropriate Terminal Equipment Technical Requirements document(s). The Department does not guarantee the equipment will operate to the user's satisfaction.
Before installing this equipment, users should ensure that it is permissible to be connected to the facilities of the local telecommunications company. The equipment must also be installed using an acceptable method of connection.
The customer should be aware that compliance with the above conditions may not prevent degradation of service in some situations.
Repairs to certified equipment should be coordinated by a representative designated by the supplier. Equipment malfunctions or any repairs or alterations made by the user to this equipment may give the telecommunications company cause to request that the user disconnect the equipment.
Users should ensure for their own protection that the electrical ground connections of the power utility, telephone lines and internal metallic water pipe system, if present, are connected together. This precaution may be particularly important in rural areas.
Caution: Users should not attempt to make such connections themselves, but should contact the appropriate electric inspection authority, or electrician, as appropriate.
NOTICE: The Ringer Equivalence Number (REN) assigned to each terminal device provides an indication of the maximum number of terminals allowed to be connected to a telephone interface. The
termination on an interface may consist of any combination of devices subject only to the requirement that the sum of the Ringer Equivalence Numbers of all the devices does not exceed 5. The Ringer Equivalence Number for this equipment is 0.0.
AVIS DE L'INDUSTRIE CANADA
Unpacking Your Notebook ....2
Manuals....2
Recovery CDs ....2
Software CDs....3
Other 3
Setting Up Your Notebook....5
Ergonomic Considerations....5
Locating Controls and Connectors......8
Front....8
Left 9
Right....10
Back 10
Bottom....11
Connecting a Power Source ....12
Using the AC Adapter....12
Notes on the AC Adapter 12
Starting Your Computer ....18
Shutting Down Your Computer....19
Using the Keyboard....21
Combinations and Functions with the Windows Key ......23
Indicators....24
Using the Touchpad 27
Using the Floppy Disk Drive 28
Using the DVD-ROM Drive....31
Using the CD-RW drive (PCG-F570 only) ....34
Writing data to CD-RW/CD-R media....35
Using PC Cards ....37
VAIO Action Setup ....40
Programmable Power Keys....40
Internal Timer....40
Using Smart Connect....41
Using Infrared Communication Devices....42
Using Power Saving Modes....44
Normal Mode ....44
System Idle Mode ....44
System Suspend Mode....45
System Hibernation Mode....45
Using a Second Battery Pack ....46
Using the Weight Saver....49
Connecting Peripheral Devices 51
Connecting a Phone Line ....52
Connecting the Port Replicator ....53
Using Ethernet to Connect to a Network....57
Setting Up Your Ethernet Connection ....57
Connecting a Printer....58
Connecting an External Display....59
Connecting an External Mouse or Keyboard......62
Connecting External Speakers....64
Connecting an External Microphone....65
Connecting a Digital Video Camera Recorder....66
Connecting a Universal Serial Bus (USB) Device ....68
Troubleshooting 69
Power Management....75
Getting Help....76
Using the System and Application Recovery CDs......77
Using the System Recovery CD(s)....77
Using the Application Recovery CD(s)....79
Adding Memory....81
Specifications 85
Index 89
Welcome
Congratulations on your purchase of the Sony VAIO® notebook. Sony has combined leading-edge technology in audio, video, computing, and communications to provide you with state-of-the-art personal computing.
Features
For a complete description of the specifications of your VAIO® notebook, see page 85.
Exceptional performance: Your notebook includes a fast Intel® Pentium® III processor and a V.90 compatible 56K modem.*
☐ Portability: The rechargeable battery pack provides hours of use without AC power.
Sony audio and video quality: High-quality MPEG1/MPEG2 video, which supports full-screen display and enables you to take advantage of today's advanced multimedia applications, games, and entertainment software.
☐ Multimedia features: Enjoy the stereo speakers or use a headphone (not supplied) to listen to audio and video CDs.
☐ Microsoft® Windows® operating system: Your system includes Microsoft® Windows® 98 Second Edition or Microsoft® Windows® 2000 Professional.
☐ Communications: Access popular online services, send e-mail, browse the Internet, and use fax features.
Digital Versatile Disc (DVD) ^† : This new optical storage technology that provides increased storage capacity and a rich multimedia computing experience. DVD-ROM drives play both DVD-ROM and CD-ROM discs.
Unpacking Your Notebook
Remove the following hardware items from the box:
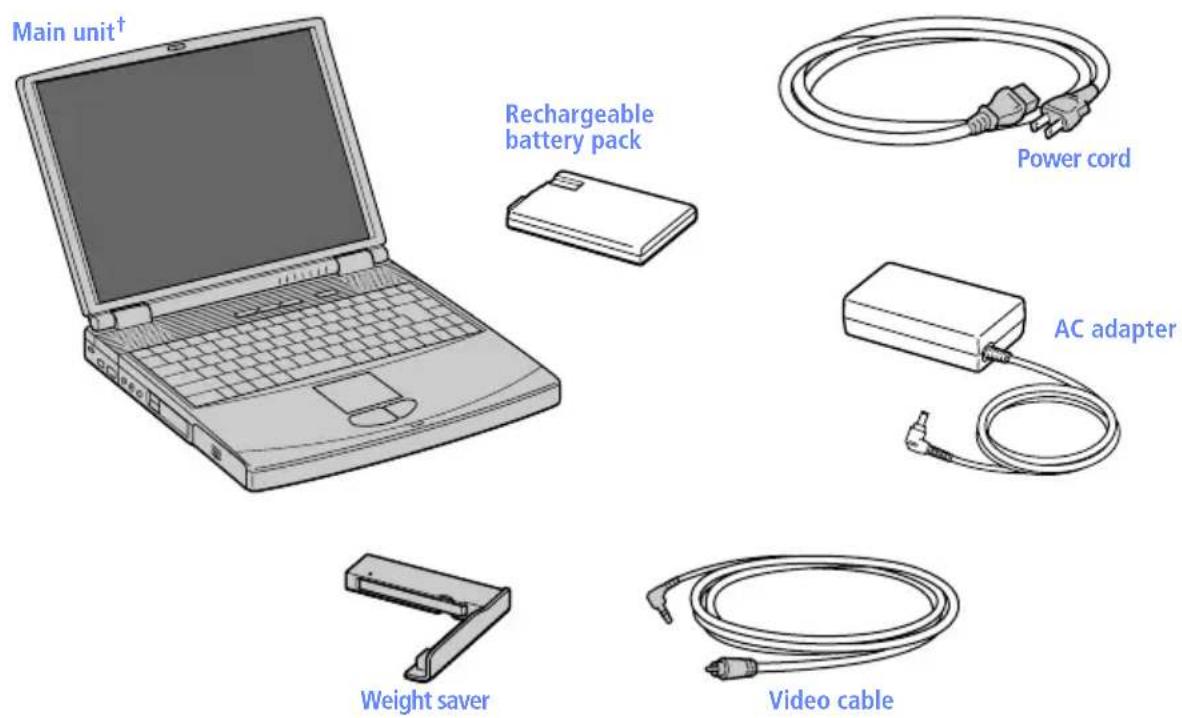
^ The removable floppy disk drive is located in the multipurpose bay.
Manuals
Read Me First contains Frequently Asked Questions, the most up-to-date information on using your computer, and software support information.
☐ The VAIO® Notebook User Guide (this manual) contains information on how to get the most from your computer, find help, and solve common problems. It also includes product specifications.
The VAIO® Consumer Information Guide contains ergonomic considerations and your computer's limited warranty statement.
The Microsoft® Windows® 98 Second Edition Getting Started manual or Microsoft® Windows® 2000 Professional Getting Started manual explains how to use the basic features of the Windows® operating system.
Recovery CDs
□ System Recovery CD(s)
Application Recovery CD(s)
Software CDs
□ Microsoft® Word 2000
Other
Setting up your VAIO® Notebook (poster)
☐ Packet containing special product offers
Setting Up Your Notebook
This section describes how to start using your computer and how to use your computer's internal and external devices such as the touchpad, floppy disk drive, and DVD-ROM drive.
Ergonomic Considerations
You will be using your notebook computer as a portable device in a variety of environments. Whenever possible, you should attempt to apply the following ergonomic considerations to both stationary and portable environments.

text_image
Computer positioned directly in front of you Arms at desk level Wrists relaxed and flat☐ Position of your computer – Place the computer directly in front of you as you work. Keep your forearms horizontal, with your wrists in a neutral, comfortable position while using the keyboard, touchpad,
or external mouse. Let your upper arms hang naturally at your sides. Take breaks during sessions with your computer. Excessive use of the computer may strain muscles or tendons.
☐ Furniture and posture – Sit in a chair with good back support and armrests. Adjust the level of the chair so your feet are flat on the floor. A footrest may make you more comfortable. Sit in a relaxed, upright posture and avoid slouching forward or leaning far backward.
Viewing angle of the computer's display – Use the display's tilting feature to find the best position. You can reduce eye strain and muscle fatigue by adjusting the tilt of the display to the proper position. Adjust the brightness setting of the display also.
☐ Lighting – Choose a location where windows and lights do not create glare and reflection on the display. Use indirect lighting to avoid bright spots on the display. You can also purchase accessories for your display that help reduce glare. Proper lighting adds to your comfort and work effectiveness.
☐ Placement of an external display – When using an external display, set the display at a comfortable viewing distance. Make sure the display screen is at eye level or slightly lower when you are sitting in front of the monitor.
Notes on Setup
☐ Do not place your computer in a location subject to:
☐ Heat sources, such as radiators or air ducts
□ Direct sunlight
Excessive dust
□ Moisture or rain
□ Mechanical vibration or shock
☐ Strong magnets or speakers that are not magnetically shielded
☐ Ambient temperature of more than 95^ F ( 35^ C) or less than 18^ F ( 10^ C)
□ High humidity
Do not place electronic equipment near your computer. The computer's electromagnetic field may cause a malfunction.
☐ Provide adequate air circulation to prevent internal heat buildup. Do not place your computer on porous surfaces such as rugs or blankets, or near materials such as curtains or draperies that may block its ventilation slots. Leave a space of at least 8 inches (20 cm) behind the back panel of the computer.
☐ If the computer is brought directly from a cold location to a warm one, moisture may condense inside your computer. In this case, allow at least an hour before turning on your computer. If any problems occur, unplug your computer, and contact your Sony Service Center.
☐ The computer uses high-frequency radio signals and may cause interference to radio or TV reception. Should this occur, relocate the computer a suitable distance away from the set.
☐ Use only specified peripheral equipment and interface cables; otherwise, problems may result.
☐ Do not use cut or damaged connection cables.
☐ Your computer will not work with party lines, cannot be connected to a coin-operated telephone, and may not work with multiple phone lines or a private branch exchange (PBX).
☐ If the telephone company makes a service call to your home or office and determines that your computer is responsible for a problem, the telephone company may bill you for the service call. Also, if you do not disconnect your computer when it is adversely affecting the telephone line, the telephone company has the right to disconnect your service until you correct the problem.
Handling Your Notebook
☐ Clean the cabinet with a soft, dry cloth or a soft cloth lightly moistened with a mild detergent solution. Do not use any type of abrasive pad, scouring powder, or solvent such as alcohol or benzine, as these may damage the finish of your computer.
Should any solid object or liquid fall into the computer, shut down your computer and then unplug it. You may want to have the computer checked by qualified personnel before operating it any further.
☐ Do not drop the computer or place heavy objects on top of the computer.
Locating Controls and Connectors
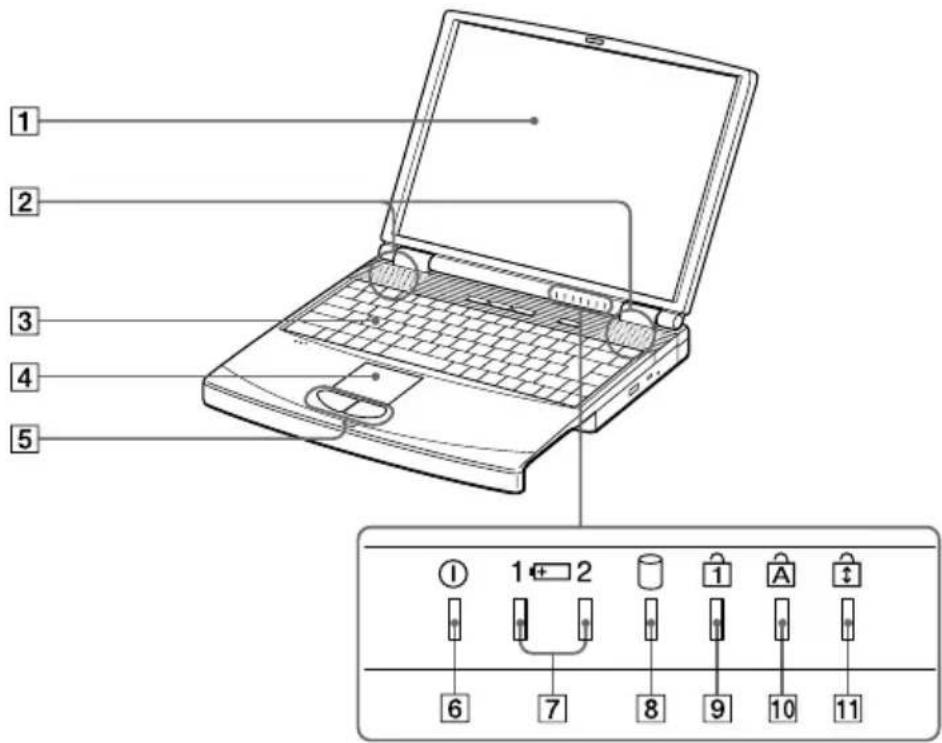
Front
text_image
1 2 3 4 5 ① 1←2 ① A ↑ 6 7 8 9 10 111 LCD (Liquid Crystal Display) screen (page 25) Battery 1 and 2 indicators (pages 14, 24)
2 Speakers (pages 25, 64) Hard disk drive indicator page 24)
3 Keyboard (page 21) Num Lock indicator (page 24)
4 Touchpad (page 27) Caps Lock indicator (page 210
5 Left/right buttons (page 27) Scroll Lock indicator(1 page 24)
6 Power indicator (page 14)
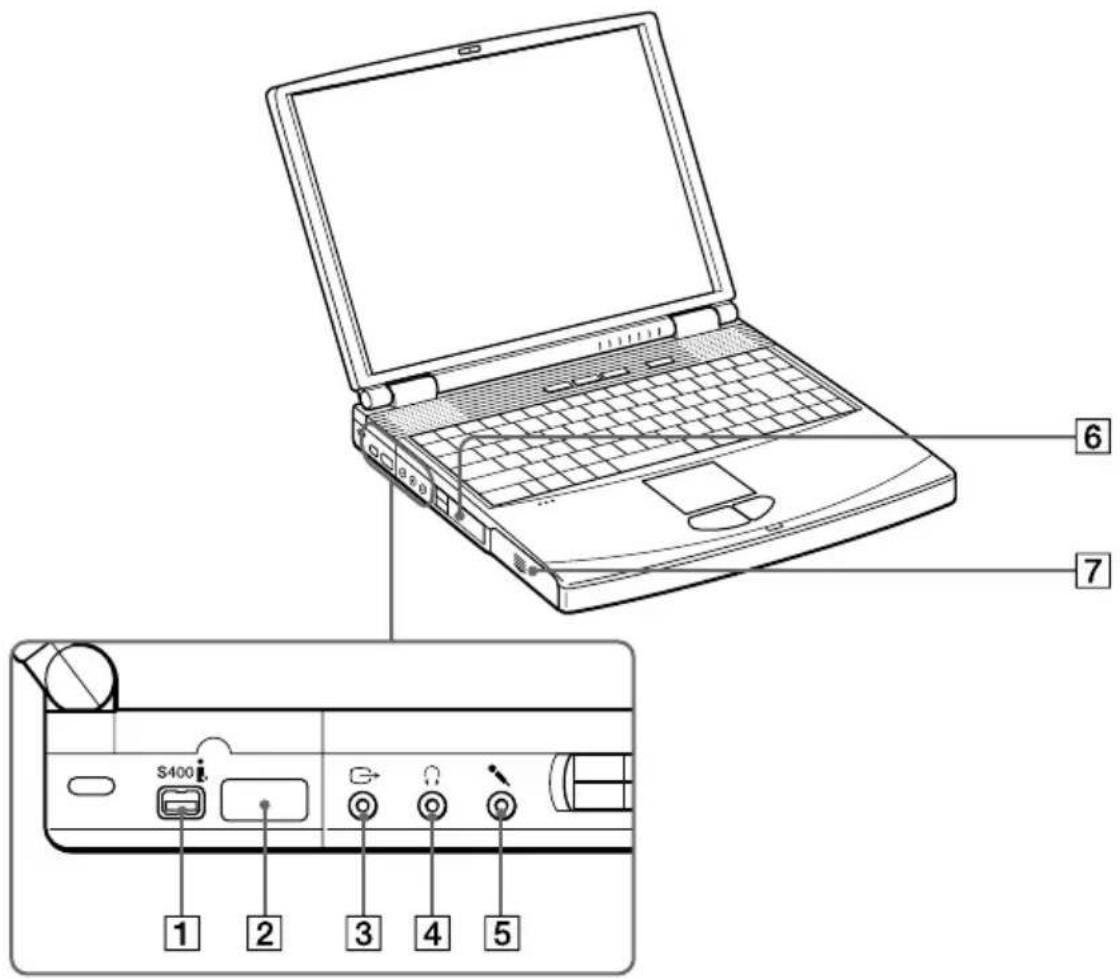
Left
text_image
S400 1 2 3 4 5 6 71 i.LINK® S400 connector (page 66) Microphone connector (pages 60, 65)
2 Infrared port (page 42) PC card slots (page 37) 6
3 Video out Battery bay (page 13) 7
4 Headphone connector (pages 60, 64)
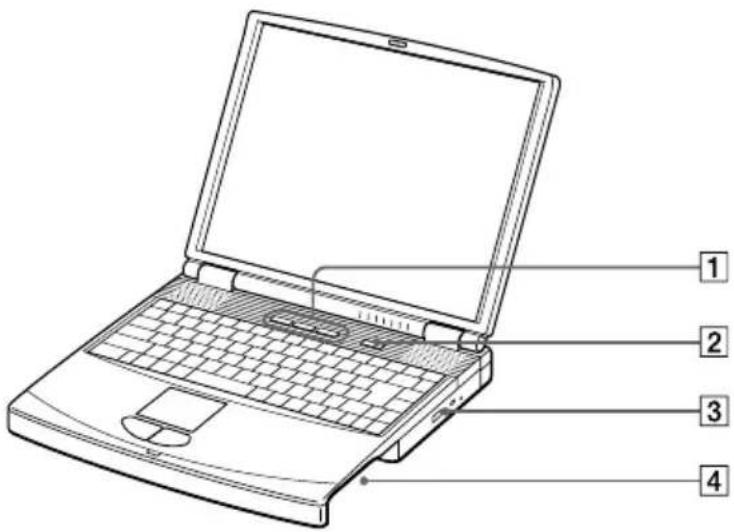
Right
text_image
Laptop diagram with numbered parts labeled for identification1 PPK buttons (see the online manual Customizing Your VAIO® Notebook for information on use) 3 DVD-ROM drive (page 31)*
2 Power button Multipurpose drive bay (pages 28, 46, 49)
* Certain specifically-configured systems may come with a CD-RW drive instead of a DVD drive.
Back
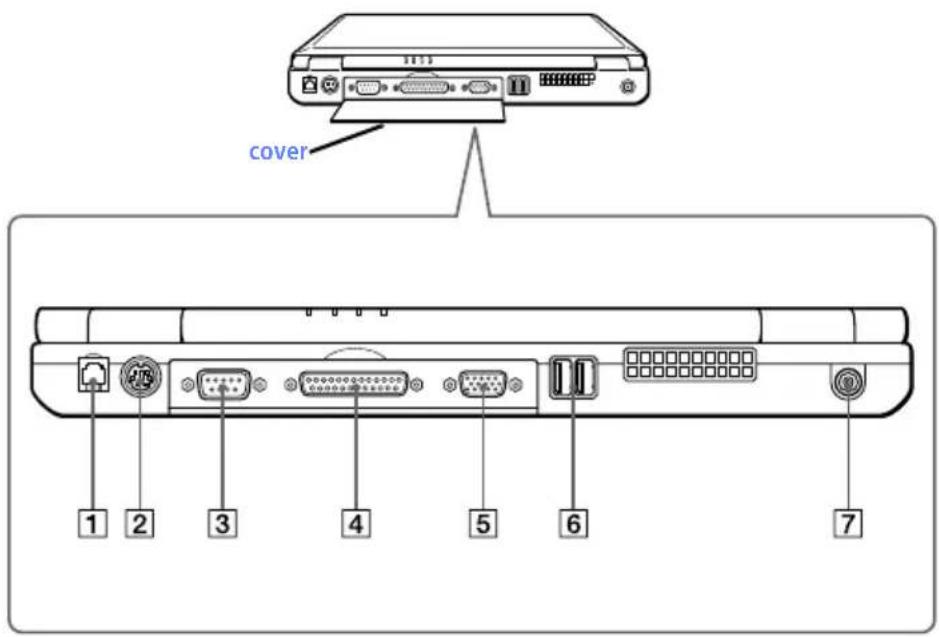
text_image
cover 1 2 3 4 5 6 71 Modem jack (page 52) 5 Monitor connector (page 59)
2 /USB use/Keyboard connector (page 62) 6 USB connectors (page 68)
3 IOIO1 Serial connector 7 = DC In connector (page 12)
4 Printer connector (page 58)
There is a ventilation slot located between the USB connector and the DC In connector. Do not cover the ventilation slot when your computer is on.
Bottom
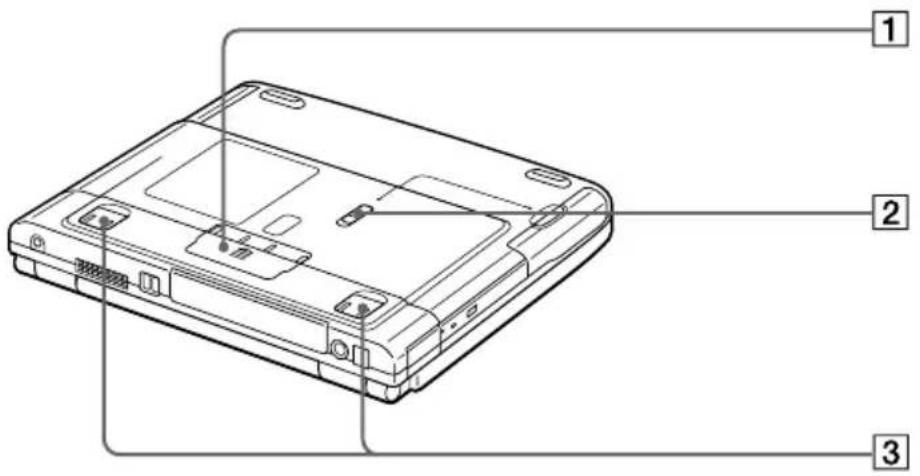
text_image
Diagram of a laptop rear panel with labeled components in Chinese1 Port replicator connector cover (pages 54, 56) Tilt stands 3
2 Multipurpose drive bay RELEASE lever (pages 48, 50)
Connecting a Power Source
You can use either AC power or a rechargeable battery pack as a power source.
Using the AC Adapter
1 Plug the cable attached to the AC adapter into the DC In connector on the computer.
2 Plug one end of the power cord into the AC adapter.
3 Plug the other end of the power cord into an AC outlet.
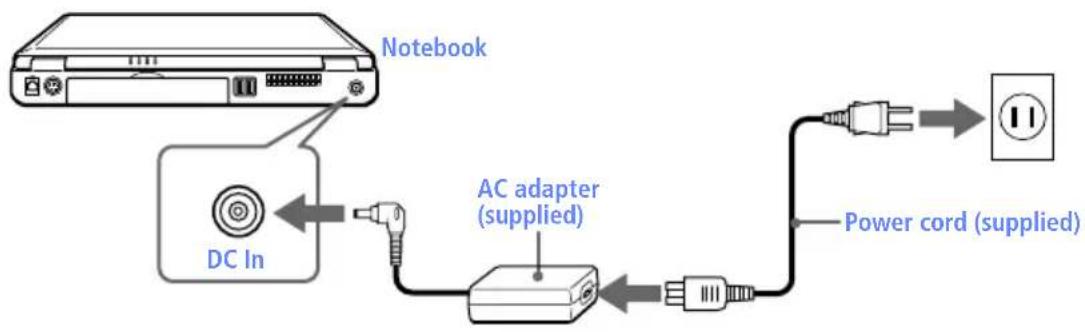
flowchart
graph TD
    A["Notebook"] --> B["DC In"]
    B --> C["AC adapter (supplied)"]
    C --> D["Power cord (supplied)"]
    D --> E["Output"]
Notes on the AC Adapter
☐ Your computer operates on 100V-240V AC 50/60 Hz.
☐ Do not share the AC outlet with other power-consuming equipment, such as a copy machine or shredder.
☐ You can purchase a power strip with a surge protector. This device prevents damage to your computer caused by sudden power surges such as those that may occur during an electrical storm.
☐ Do not place heavy objects on the power cord.
☐ To disconnect the cord, pull it out by the plug. Never pull the cord itself.
☐ Unplug your computer from the wall outlet if you will not be using the computer for a long time.
☐ When the AC adapter is not used, unplug it from the AC outlet.
☐ Use only the AC adapter supplied. Do not use any other AC adapter.
Using Battery Power
You can use one or two battery packs as a source of power. The second battery pack inserts into the multipurpose drive bay on the right side of the computer. (See “Using Power Saving Modes” on page 44.) Additional battery packs are available as a separate option.
The battery pack that comes with your computer is not fully charged at the time of purchase. Follow the steps below to insert and charge the battery pack.
To insert the battery pack
1 Open the cover of the battery bay.
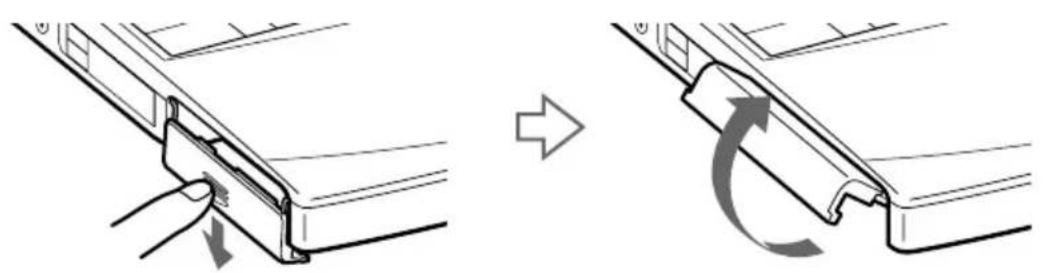
natural_image
Diagram showing a mechanical assembly before and after rotation, with no visible text or symbols2 Insert the battery pack into the battery bay on the left side of the computer.
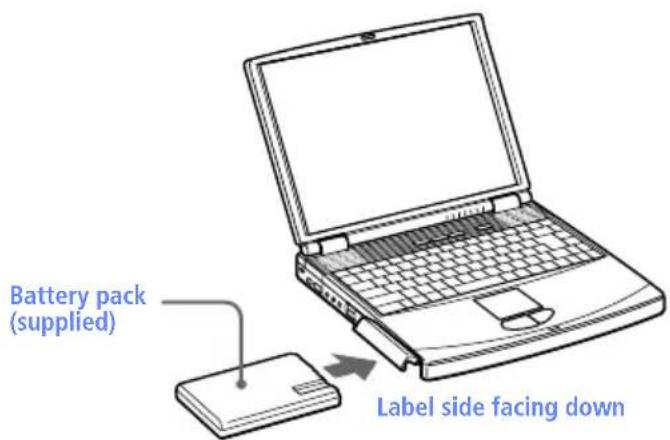
text_image
Battery pack (supplied) Label side facing down3 Close the cover of the battery bay until it clicks.
When attaching your computer to the port replicator, do not attempt to insert or remove the battery pack. Lifting and turning the computer with a port replicator attached could cause a temporary loss of power.
To charge the battery pack
1 Connect the AC adapter to the computer.
2 Insert the battery pack.
The computer automatically charges the battery (the battery indicator light flashes in a double-blink pattern as the battery charges). When the battery is 85 percent full, the battery indicator light turns off. This process takes approximately two hours. To charge the battery completely, continue charging for an additional hour. See “Displaying Detailed Battery Information” in the online manual Customizing Your VAIO® Notebook for information on checking the battery life.
There are two battery indicator lights on the computer:
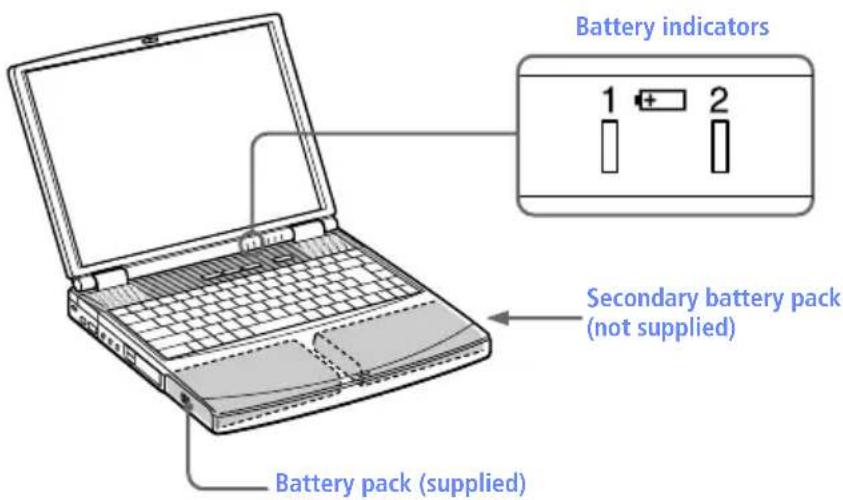
text_image
Battery indicators 1 + 2 Secondary battery pack (not supplied) Battery pack (supplied)Battery Indicator Meaning
| 1 | Indicates the status of the battery pack in the battery bay on the left side of the computer. |
| 2 | Indicates the status of the battery pack in the multipurpose drive bay on the right side of the computer. |
Battery Indicator
Light Status Meaning
On The computer is using battery power.
Single blink The battery is running out of power.
Double blink The battery is charging.
Off The computer is using AC power.

To determine the amount of time the battery lasts, see "Displaying Battery Information" in the online manual Customizing Your VAIO® Notebook. When the battery power is running low, both the battery and power indicators blink.
When the computer is directly connected to AC power and has a battery pack in the battery bay, it uses power from the AC outlet.
See "Using a Second Battery Pack" on page 46 for information on installing and charging a battery pack in the multipurpose drive bay.
Keep the battery pack in the computer while it is directly connected to AC power. The battery pack continues to charge while you are using the computer.
If the battery level falls below 10%, you should either attach the AC adapter to recharge the battery or shut down your computer and insert a fully charged battery.
You can extend battery life by changing the power-management modes in the PowerPanel utility. See "Using Power Saving Modes" on page 44.
The battery pack supplied with your computer is a lithium ion battery and can be recharged at any time. Charging a partially discharged battery does not affect battery life.
The battery indicator light is on while you use the battery pack as a power source. When battery life is nearly depleted, the battery indicator starts flashing.
For some software applications and some peripheral devices, your computer may not enter System Hibernation mode when the battery life is low. To avoid loss of data when using battery power, you should save your data frequently and manually activate a power-management mode, such as System Suspend or System Hibernation.
To remove the battery pack
1 Open the cover of the battery bay.
2 Pull out the battery pack.
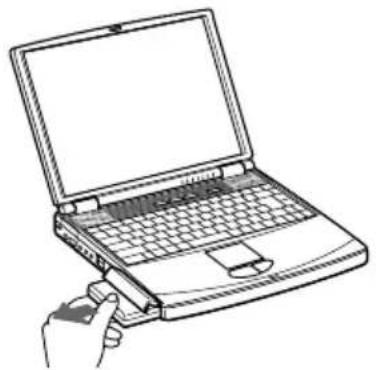
natural_image
Line drawing of a hand holding a laptop with a partially open screen (no text or symbols)3 Close the cover of the battery bay.
You will lose data if you remove the battery pack while the computer is on and not connected to the AC adapter or if you remove the battery while the computer is in System Suspend/System Idle mode.
Additional Notes on Batteries
☐ Never leave the battery pack in temperatures above 140^ F ( 60^ C), such as under direct sunlight or in a car parked in the sun.
☐ Battery life is shorter in a cold environment. This is due to decreased battery efficiency at low temperatures.
☐ Charge the batteries at temperatures between 50^ F and 80^ F ( 10^ C to 30^ C). Lower temperatures require a longer charging time.
While the battery is in use or being discharged, the battery pack heats up. This is normal and is not cause for concern.
☐ Keep the battery pack away from all sources of heat.
□ Keep the battery pack dry.
☐ Do not open or try to disassemble the battery pack.
☐ Do not expose the battery pack to any mechanical shock.
☐ If you are not using the computer for an extended period of time, remove the battery pack from the computer to prevent damage to the battery.
☐ If, after fully charging the battery pack, the battery power is still low, the battery pack may be reaching the end of its life and should be replaced.
☐ You do not need to discharge the battery before recharging.
☐ If you have not used the battery pack for a considerable amount of time, recharge the battery.
Starting Your Computer
1 Slide the LCD lock lever in the direction of the arrow, and lift the cover.
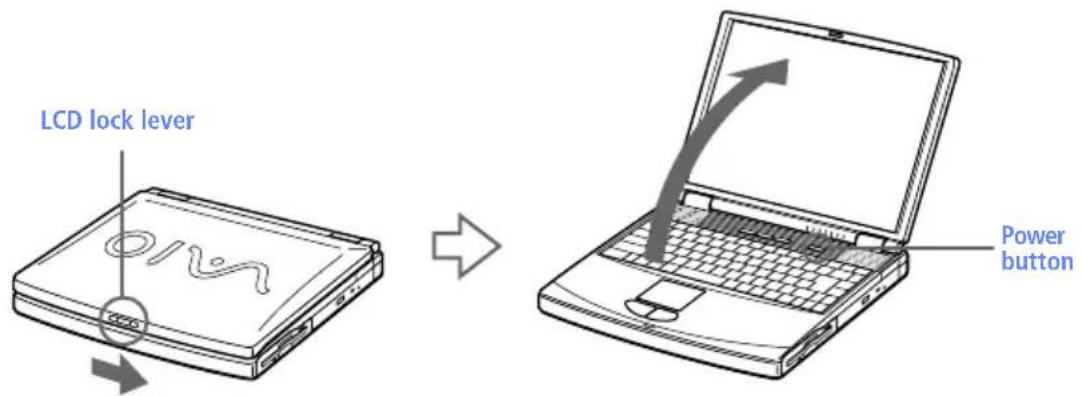
text_image
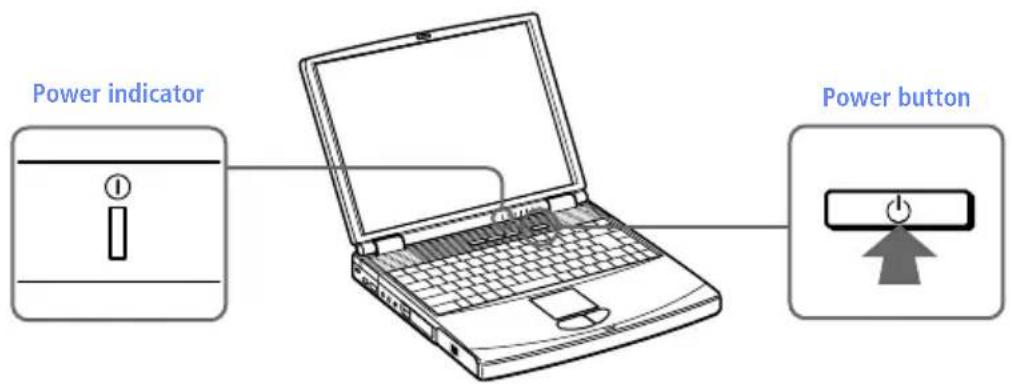
LCD lock lever Power button2 Press the power button on top of the computer until the green power indicator light turns on.
text_image
Power indicator Power buttonIf you hold the power button in the On position for more than four seconds, the computer turns off.
3 If necessary, adjust the brightness controls for the LCD display. To decrease the brightness, press Fn+F5 and then the down or left arrow key. To increase the brightness, press Fn+F5 and then the up or right arrow key.
Shutting Down Your Computer
To avoid potential loss of data, follow these steps to shut down your computer.
1 Click the Start button on the Windows® taskbar.
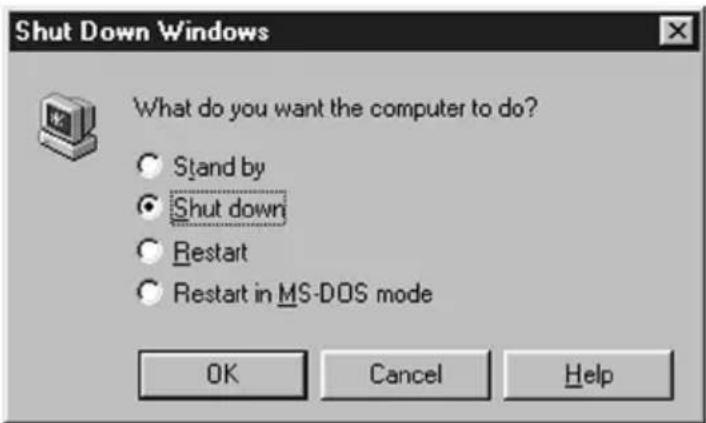
2 Click Shut Down at the bottom of the Start menu to display the Shut Down Windows dialog box.
text_image
Shut Down Windows What do you want the computer to do? Stand by Shut down Restart Restart in MS-DOS mode OK Cancel Help3 Select Shut down.
4 Click OK.
Respond to any prompts warning you to save documents.
5 Wait for your computer to turn off automatically. The power indicator (green) turns off.
6 Turn off any peripherals connected to your computer.
If you are unable to shut down your computer using the steps described above, press the Ctrl+Alt+Delete keys at the same time to restart the computer. If you are unable to restart the computer in this way, you can press the power button and hold it for four seconds. This operation may result in data loss.
During a period of inactivity, you can conserve battery life by using System Suspend mode. See "Controlling Power Management" in the online manual Customizing Your VAIO® Notebook.
Handling the LCD Screen
Do not leave the LCD facing the sun as it can damage the LCD. Be careful when using the computer near a window.
☐ Do not scratch the LCD or exert pressure on it. This could cause malfunction.
☐ Using the computer in low temperature conditions may produce a residual image on the screen. This is not a malfunction. When the computer returns to normal temperature, the screen returns to normal.
☐ The screen becomes warm during operation. This is normal and does not indicate a malfunction.
☐ The LCD is manufactured using high-precision technology. You may, however, see tiny black points and/or bright points (red, blue, or green) that continuously appear on the LCD. This is a normal result of the manufacturing process and does not indicate a malfunction.
Using the Keyboard
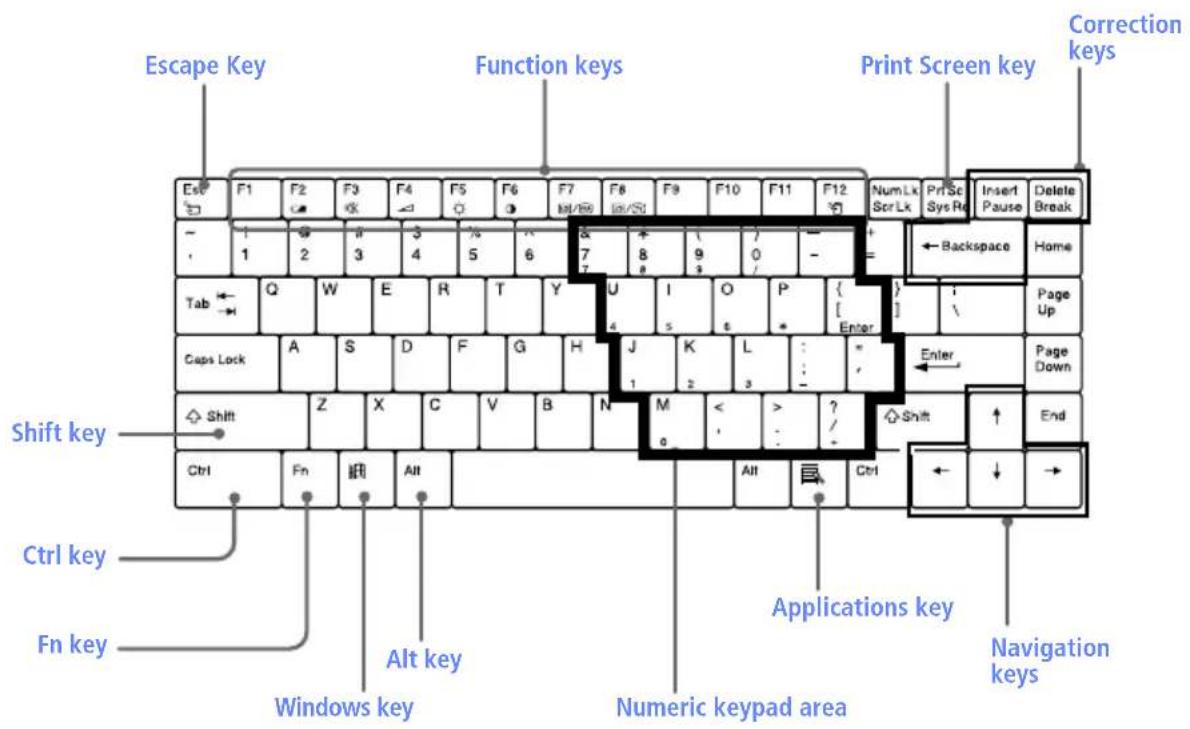
Your keyboard is very similar to a typewriter's, but the keyboard has additional keys that perform specific computer-related tasks.
text_image
Escape Key Function keys Print Screen key Correction keys Esc F1 F2 F3 F4 F5 F6 F7 F8 F9 F10 F11 F12 Num Lk Print Scr Lk Insert Sys Re Delete Break - 1 2 3 4 5 6 7 8 9 0 - + ← Backspace Home Tab Q W E R T Y U I O P { } Page Up Caps Lock A S D F G H J K L : Enter Page Down Shift Z X C V B N M < ? Shift ↑ End Ctrl Fn Alt Ctrl ← ↓ → Shift key Ctrl key Fn key Windows key Alt key Numeric keypad area Applications key Navigation keysKey Description
| Numeric keypad area | Contains the keys found on a typical calculator. Use the numeric keypad area to type numbers or to perform mathematical calculations such as addition and subtraction. Note that you must press the Num Lock key to activate the numeric keypad. (When you do so, the Num Lock light will be on.) |
| Navigation keys Several keys are devoted to moving the cursor on the screen. | |
| Correction keys The Insert, Back Space, and Delete keys enable you to make corrections in your documents. | |
| Function keys The twelve function keys along the top of the keyboard are used to perform designated tasks. For example, in many applications, F1 is the Help key. The task associated with each function key may vary from one application to the next. | |
| Escape key The Esc (Escape) key is used to cancel commands. | |
| Print Screen key The Print Screen key takes an electronic snapshot of the screen and places it in the Windows Clipboard. You can then paste the screen shot into a document and print it. | |
Key Description
| Operator keys Several keys are always used with at least one other key:Ctrl, Alt, and Shift. When held down with another key,the Ctrl (Control) and Alt (Alternate) keys offer another way to give commands. For example, in many applications, instead of choosing the Save command from a menu, you can hold down Ctrl and press S (referred to as Ctrl+S). The Shift key operates the same way as on a typewriter; it is used to produce capital letters or special symbols such as @ and $. | |
| Windows key The key with the Windows logo displays the Windows Start menu; it is the equivalent of clicking the Start button on the taskbar. See “Combinations and Functions with the Windows Key” on page 23. | |
| Fn key The Fn key is used in combination with other keys to issue commands. See “Combinations and Functions with the Fn Key” on page 25. | |
| Applications key The Applications key displays a shortcut menu of context-sensitive choices. Pressing this key is the equivalent of clicking the right mouse button. |
Combinations and Functions with the Windows Key
Combination Function
- F1 Displays Windows Help.
- Tab Switches the selected button on the taskbar.
- E Displays Windows Explorer.
- F Displays the Windows Find: All Files window to find a file or folder. This is the equivalent of selecting Find and then Files or Folders from the Start menu.
- Ctrl + F Displays the Windows Find: Computer window where you can locate other computers. This is the equivalent of selecting Find and then Computer from the Start menu.
- M Minimizes all displayed windows.
Shift + ☐ M Returns all minimized windows to their previous size. - R Displays the Run window. This is the equivalent of selecting Run from the Start menu.
Fn + Insert Displays the Properties window. This is the equivalent of double-clicking the System icon in the Control Panel.
Indicators
Indicator Function
| Power Light is green when the power to the computer is turned on. Light is red in System Idle mode, and flashes red in System Suspend mode. The light turns off when the computer is in System Hibernation mode or powered off. | |
| Battery 1 Indicates the status of the battery inserted in the battery bay on the left side of the computer. | |
| Battery 2 Indicates the status of the battery inserted in the multipurpose drive bay on the right side of the computer. | |
| Hard disk Lights when data is being read from or written to the hard drive. Do not enter System Suspend mode or turn off the computer when this indicator light is on. |
Light On Off
| Num Lock The number keys in the numeric keypad are active. | The alphanumeric character keys in the keypad area are active. |
| Caps Lock The letters appear in uppercase as you type. The Shift key lowers the case of typed letters when Caps Lock is on. | Letters appear in lower case as you type (unless you hold down the Shift key). |
| Scroll Lock The screen scrolls differently. (Exactly how it scrolls depends on the specific application. It has no effect in many applications.) | Information moves across the display normally. |
Combinations and Functions with the Fn Key
Combinations/Feature Function
| Fn+ (ESC) System Suspend | Puts the system into System Suspend mode, a power-management state. To return the system to the active state, press any key or press the power button on your computer. | |||
| Fn+ (F2) Display power source status | Displays the power source status, as in the example below: | |||
 | Using AC power |  | Charging a battery pack | |
| Fn+ (F3) Mute On/Off | Toggles the built-in speaker off and on. | |||
| Fn+ (F4) Speaker volume | Adjusts the built-in speaker volume. To increase volume, press Fn+F4, then ↑r . →To decrease volume, press Fn+F4, then ↓or . ← | |||
| Fn+ (F5) Brightness control | Adjusts the brightness of the LCD. To increase light intensity, press Fn+F5 and then ↑ or →.To decrease light intensity, press Fn+F5 and then ↓ or ← | |||
| Fn+ (F6) Contrast control | Adjust the screen contrast (PCG-F420 only). | |||
| Fn+ [LCD]/ (F7) Switch to the external monitor/LCD | Toggles through the LCD, external display (connected to the Monitor connector) and both LCD and external display. | |||
 | ||||
| Fn+ [LCD] only/ TV (F8) Control TV out | Toggles between LCD-only and dual LCD/TV display modes. | |||
 | ||||
Combinations/Feature Function
| Fn+ (F12)System Hibernation | Provides for the lowest level of power consumption.When you execute this command, the state of the system and state of the peripheral devices are written to the hard disk and the system power is turned off. To return the system to its original state, use the power button to turn on power. |
| Fn+DVideo standby | Turns off the LCD to save power. To turn the LCD back on, press any key (Windows® 98 only). |
| Fn+SSystem Idle | Puts the system into System Idle mode, a power-management state. To return the system to the active state, press any key. |

Some functions are not available until Windows launches.
Using the Touchpad
The keyboard contains a cursor-pointing device called a touchpad. You can point to, select, drag, and scroll objects on the screen using the built-in touchpad.
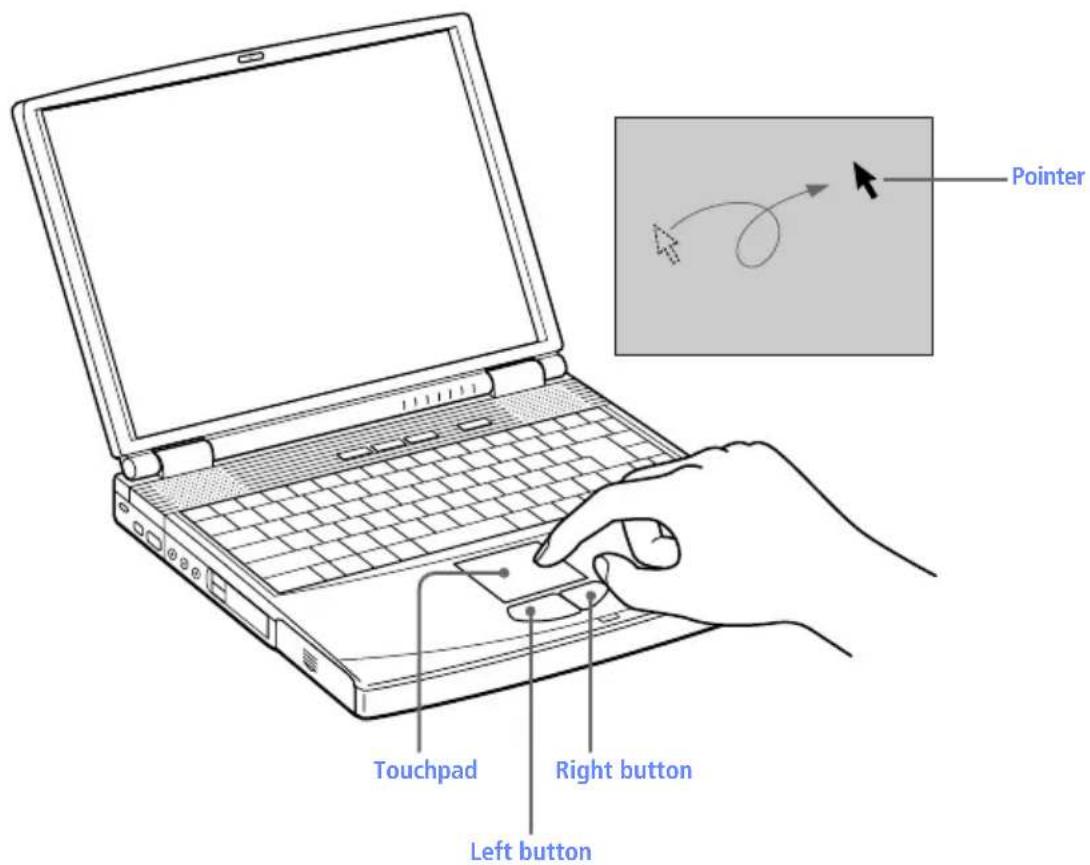
text_image
Pointer Touchpad Right button Left buttonAction Description
Point Slide one finger on the touchpad to place the pointer on an item or object.
Click Press the left button once.
Double-click Press the left button twice.
Right-click Press the right button once. In many applications, this action displays a shortcut menu of context-sensitive choices.
Drag Slide one finger while pressing the left button.
Scroll Move your finger along the right edge of the touchpad to scroll vertically. Move your finger along the bottom to scroll horizontally. (The scroll function is available only with applications that support a touchpad scroll feature.)

See Mouse Help for information on touchpad features, such as clicking both buttons simultaneously, adjusting touchpad speed, and Easy Launcher functions. To access Mouse Help, click the Start button, select Settings, and then Control Panel. Click the Mouse icon in the Control Panel and click the Help button.
Using the Floppy Disk Drive
The computer comes with the floppy disk drive in the multipurpose drive bay.
To insert a diskette
1 Hold the diskette with the label side facing up.
2 Gently push the diskette into the drive until it clicks into place.
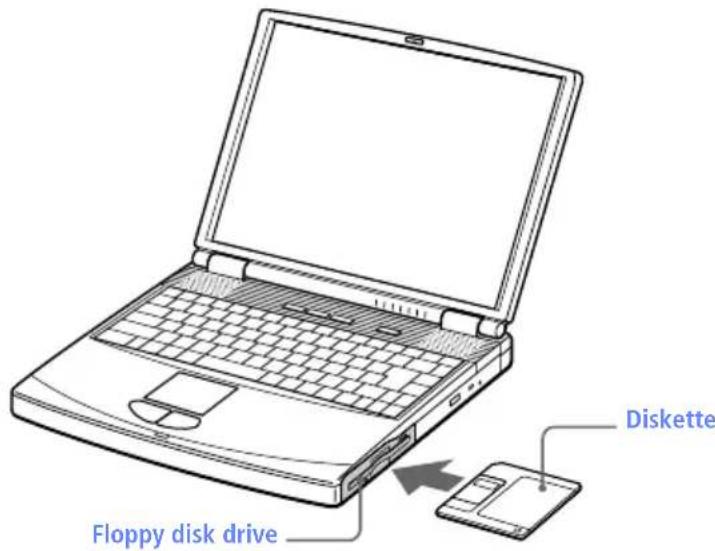
text_image
Diskette Floppy disk driveTo remove a diskette
When you finish using the diskette, wait until the LED indicator light turns off and then press the Eject button to remove the diskette.
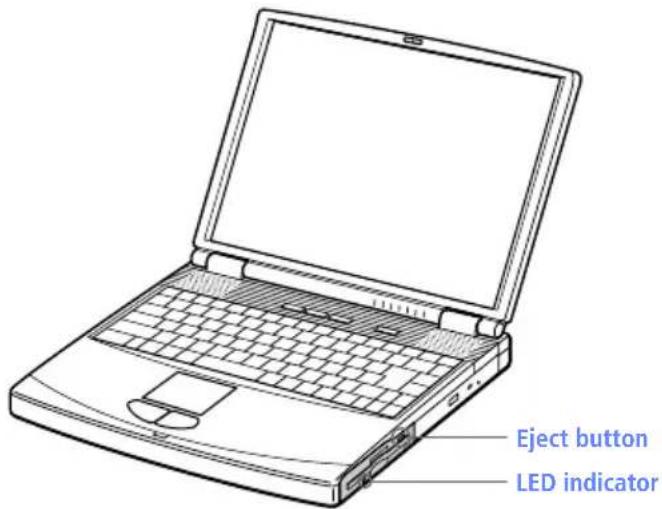
text_image
Eject button LED indicatorDo not press the Eject button when the LED indicator is turned on. Otherwise, data may be lost.
Handling Diskettes
☐ Do not open the shutter manually and touch the surface of the diskette.
□ Keep diskettes away from magnets.
☐ Keep diskettes away from direct sunlight and other heat sources.
To remove the floppy disk drive (Windows 2000 models)

If your computer is turned off, you do not have to follow these instructions.
1 Double-click in the system task tray.
2 The "Unplug or Eject" dialog box appears.
3 In the Unplug or Eject Hardware dialog box, select the appropriate option, and then click Stop.
4 Confirm the device and click OK.
5 A message appears informing you that the device can now be safely removed from the system.
Slide the RELEASE lever on the bottom of the computer in the direction of the arrow, and then unplug the floppy disk drive from the computer.
To reinsert the floppy disk drive
1 Turn off the computer.
2 If another device is in the multipurpose drive bay, remove the device. See or "To remove the second battery pack" on page 48.
3 Insert the floppy disk drive into the multipurpose drive bay with the VAIO label facing up. Continue pushing the drive into the bay until the RELEASE lever locks into place.

text_image
Multipurpose drive bay Floppy disk driveUsing the DVD-ROM Drive
Your computer comes with a DVD-ROM drive, which plays both DVD-ROMs and CD-ROMs.
To insert a disc
1 Turn on the computer.
When the computer is in System Suspend or System Hibernation mode, you cannot insert a disc. See "Controlling Power Management" in the online manual Customizing Your VAIO® Notebook for more information on System Suspend and System Hibernation modes.
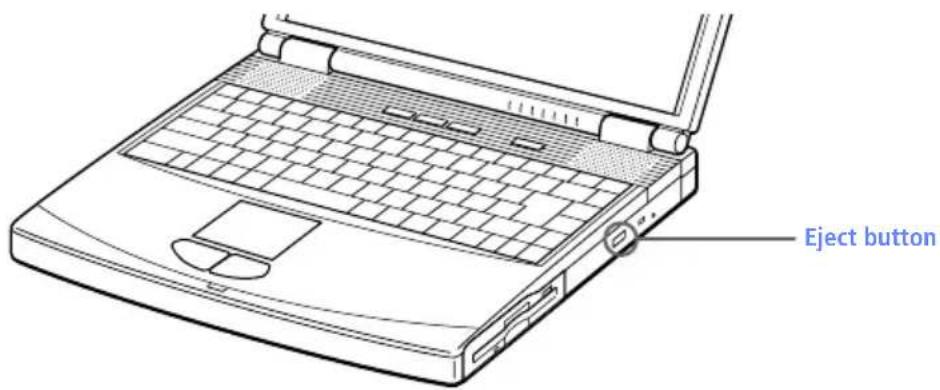
2 Press the Eject button to open the DVD-ROM drive.
The tray slides out.
text_image
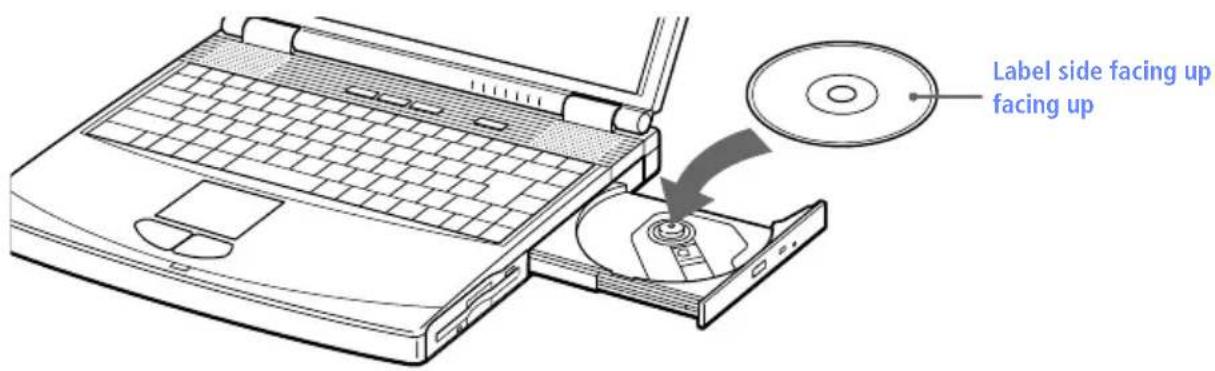
Eject button3 Place a DVD-ROM/CD-ROM in the tray with the label side facing up. For DVD-ROMs which can be played on both sides, the side of the disc facing up is the side that plays. Push the disc onto the hub until the disc clicks into place.
text_image
Label side facing up facing up4 Close the tray by pushing it gently.

Be sure to seat the disc firmly over the hub fingers. If you do not seat the disc firmly, you could damage your DVD-ROM drive and you may not be able to open the tray.
When you finish using a disc, wait until the LED indicator light turns off, then press the Eject button to remove the disc.
When the computer is in System Suspend or System Hibernation mode, you cannot remove a disc. See "Controlling Power Management" in the online manual Customizing Your VAIO® Notebook for more information about System Suspend and System Hibernation modes.
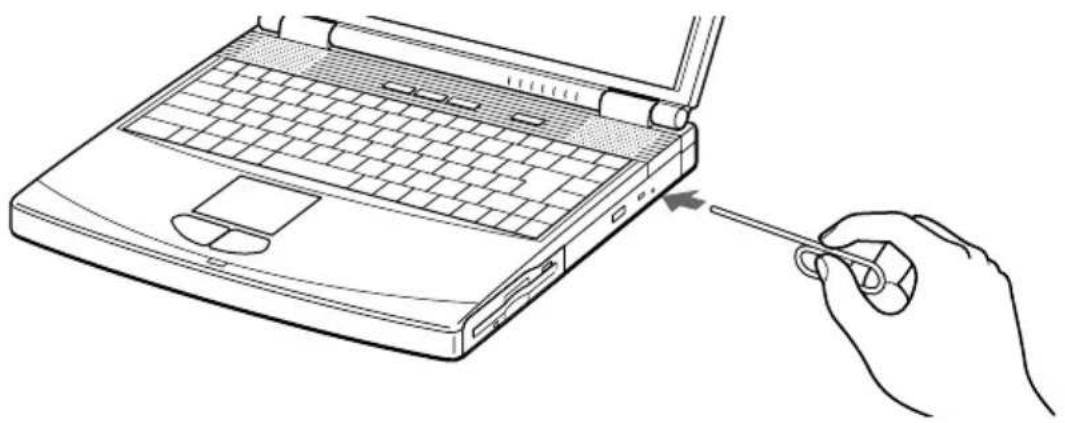
If the disc does not come out when you press the Eject button, turn off the computer and insert a thin, pointed object into the manual eject hole.
natural_image
Line drawing of a hand using a screwdriver to press down a laptop keyboard (no text or symbols present)To play DVDs
To achieve optimum performance when playing DVDs, it is recommended that your computer not be connected to the port replicator while playing DVD movies or using DVD applications. Close any open applications before playing a DVD movie.

The DVD player automatically adjusts the screen properties when you play a DVD movie. Depending on the display setup properties you have selected, you may need to use the Fn + F command to expand the movie to full-screen size.

When playing DVD movies on battery power, set the power management profile to DVD. With other profiles, the movies are choppy. As an alternative, you can set the power management profile to Automatic Profile Selection, which will cause the DVD profile to be selected automatically whenever you insert a DVD. See “Controlling Power Management” in the online manual Customizing Your VAIO® Notebook for information on how to set the power management profile.
Playing a DVD
☐ You can play DVDs using a DVD-ROM drive and the Media Bar software. See the online manual that came with the Media Bar software for details.
☐ While playing a DVD, the display mode is 1024 x 768 dots. This improves play performance.
Some discs recorded at 20 or 24 bits may produce noise while playing. If you have audio devices connected, this may cause damage to your hearing and the speakers. Reduce the volume before playing such discs.
You cannot switch between LCD and TV if you press Fn+F8 when a DVD is inserted in the DVD-ROM drive.
If you have connected a TV, follow the instructions in "Selecting the Display Mode" in the online manual Customizing Your VAIO® Notebook.
The DVD player automatically adjusts the screen properties when you play a DVD movie. Depending on the display setup properties you have selected, you may need to use the Fn+F command to expand the movie to full-screen size.
When a TV is connected, a part of the video screen will not appear with the factory setting. Adjust the display resolution to 640 x 480 as described in the online manual Customizing Your VAIO® Notebook.
On Handling CD and DVD media
☐ Do not touch the surface of the disc.
☐ Do not drop or bend the disc.
On Cleaning CD and DVD media
☐ Fingerprints and dust on the surface of a disc may cause read errors. Proper care of the disc is essential to maintain its reliability. Do not use solvents such as benzine, thinner, commercially available cleaners or anti-static spray, as they may cause damage to the disc.
☐ For normal cleaning, hold the disc by its edge and use a soft cloth to wipe the surface from the center out.
☐ If the disc is badly soiled, moisten a soft cloth with water, wring it out well, and use it to wipe the surface of the disc from the center out. Wipe off any remaining moisture with a dry soft cloth.
Using the CD-RW drive (PCG-F570 only)
Your notebook comes equipped with a CD-RW drive, which enables you to read and write data, depending on the media you are using. With CD-RW media, the drive enables you to write, erase, and rewrite to the media. With a CD-R, you can write data to a disc once only. Like a CD-ROM drive, your CD-RW drive also reads a wide variety of media. The Specifications below give a complete list of compatible discs.
The maximum data transfer rate varies with the notebook computer's performance.
PCGA-CDRWX1W Drive Specifications
| Compatible discs | CD-RW |
| CD-R | |
| CD-ROM | |
| CD-ROM XA | |
| Photo CD (multi session) | |
| CD-DA (music CD) | |
| Video CD | |
| CD Extra (CD+) | |
| CD TEXT | |
| Electronic Book | |
| Disc diameter | 12 cm (4 3 /4 in.), 8 cm (3 in.) (reading only) |
| Drive performance | Data transfer rate* |
| Max: 20X speed (reading CD-ROM/CD-R) | |
| 14X speed (reading CD-RW) | |
| 4X speed (writing) | |
| (1X speed=150 KB/s) | |
| Access time | |
| Average (1/3 stroke): 150 ms | |
| Operating temperature | |
| 41°F to 95°F (5°C to 35°C) (temperature gradient less than 18°F (10°C)/hour) | |
| Operating humidity | |
| 20% to 80% (not condensed), provided that humidity is less than 65% at 95°F (35°C) (hygrometer reading of less than 84°F (29°C)) |
* Design and specifications are subject to change without notice.
PCGA-CDRWX1W Drive Specifications
Drive performance Storage temperature
-4^ to 140^ ( -20^ to 60^ ) (temperature gradient less than 18^ ( 10^ )/hour)
Storage humidity:
10% to 90% (not condensed), provided that humidity is less than 20% at 140^ F ( 60^ C) (hygrometer reading of less than 95^ F ( 35^ C))
Dimensions
Approx. 5 1 /4 x 27 /32 x 5 3 /4 inches (131 x 21 x 145 mm) (w/h/d)
Weight
Approx. 12 oz. (340 g) (drive only)
Writing data to CD-RW/CD-R media
Before writing to a new CD-RW or CD-R, you must first format the disc. If you do not format the disc, your computer will not recognize it.
Formatting time and available capacity after formatting when you use a 74-minute CD-RW or CD-R.
Media Formatting Time Capacity After
Formatting
CD-RW About 50 to 90 minutes About 530 MB
CD-R About 20 to 30 seconds About 620 MB
To make a CD-R to which data has been written readable on a CD-ROM drive, you need to complete the disc when you eject it. To complete this process, follow the instructions included with your software. For more information, consult the online manuals for these applications.

Always use the AC adapter as the power source for your computer when you are writing data to a CD-RW or CD-R. Using battery power may result in data transfer failure.
Do not strike or shake the computer while writing data to a disc.
For optimal writing speed, deactivate the screen saver before writing data to a disc.
For best results, use CD-Rs that are compatible with 4x speed, as DirectCD ^™ and Easy CD Creator ^™ are preset to that speed. Your notebook does not support 1x writing speed. If you use CD-RW or CD-R writing software other than DirectCD, use PowerPanel to select the DVD Profile. Memory-resident disk utilities may cause unstable operation or data loss. Deactivate these utilities before writing data to a disc.
Exit anti-virus software before writing data to a disc.
When using Easy CD Creator™ Standard, be sure to close and exit all other applications.
If your notebook computer has preinstalled Microsoft® Office applications, such as Excel, Word, and Outlook, turn off the FindFast application.
Do not put your notebook into power saving mode while using DirectCD to write data or while using Easy CD Creator.
Using PC Cards
Your computer includes two PC card slots. PC cards allow you to connect portable external devices such as another hard disk drive, or to connect a network.

The PC card slots can accommodate two Type I or two Type II PC cards, or one Type III PC card. These slots are compatible with Card Bus.
Some PC cards may require that you disable idle devices when using the PC card. You can use Sony Notebook Setup to disable devices. See "Displaying the Sony Notebook Setup Screen" in the online manual Customizing Your VAIO® Notebook for details.
Be sure to use the most recent software driver provided by the PC card manufacturer.
If an “!” mark appears on the Device Manager tab in the System Properties dialog box, remove the software driver and then reinstall it.
You may not be able to use some PC cards or some functions of the PC card with this computer.
To insert a PC card
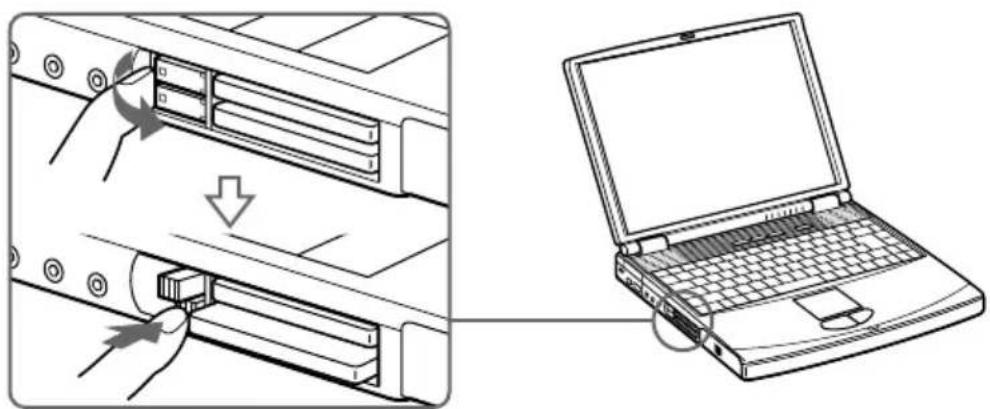
Use the lower slot for Type III PC cards.

You do not need to shut down the computer before inserting or removing a PC card.
1
Pull the PC card release button out from the computer and push it in toward the computer.
text_image
Diagram showing file transfer from a computer to a laptop, with arrows indicating the process and component movement.2 Remove the PC card slot protector.
When you use a Type III PC card, you need to remove both the top and bottom PC card slot protectors.

natural_image
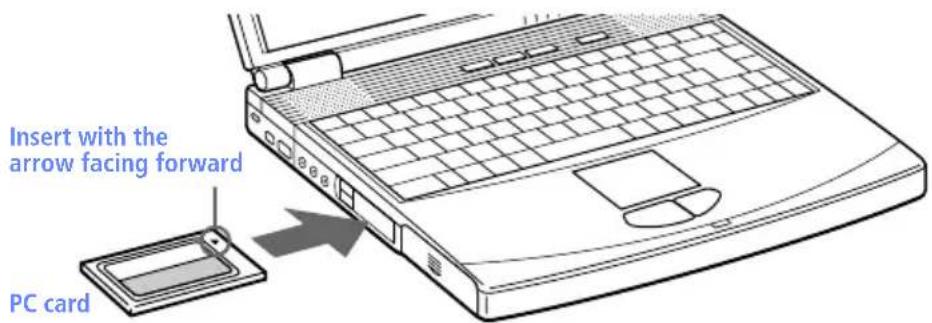
Line drawing of a hand inserting a device into a folder (no text or symbols)3 Insert the PC card into the PC card slot, front label facing up. Gently push the card into the slot until the card is fixed into the connector. The release button comes out.
text_image
Insert with the arrow facing forward PC cardDo not force a card into the slot as this may damage the connector pins. If you have difficulty inserting a card, check that you are inserting the card with the correct orientation. See the manual that came with your PC card for more information on use.
For some PC cards, if you alternate between normal power operation and the System Suspend or System Hibernation power-management modes while the card is inserted, you may find that a device connected to your system is not recognized. Reboot your system to correct the problem.
To remove a PC card (Windows 98 models)
1 Close any applications that are using the PC card.
2 Click the PC card icon in the taskbar and close the card window.
3 Pull the PC card release button up and press it in toward the computer.
4 Gently grasp the card and pull it out.
5 Insert the PC card slot protector back into the empty slot.
To remove a PC card (Windows 2000 models)
If your computer is turned off, you do not have to follow these instructions.
1 Double-click in the system task tray.
2 The "Unplug or Eject hardware" dialog box appears.
3 In the Unplug or Eject Hardware dialog box, select the appropriate option, and then click Stop.
4 Confirm the device and click OK.
5 A message appears informing you that the device can now be safely removed from the system.
6 Press the PC card RELEASE button to remove the PC card.
Cleaning Your Notebook
☐ Make sure to disconnect the power cord before cleaning the computer.
☐ Avoid rubbing the LCD screen as this can damage the screen. Use a soft, dry cloth to wipe the LCD screen.
☐ Clean the computer with a soft cloth lightly moistened with a mild detergent solution. Do not use any type of abrasive pad, scouring powder or solvent, such as alcohol or benzine.
VAIO Action Setup
VAIO Action Setup manages the settings for your computer's Programmable Power Keys (PPK), and internal timer. An overview of each of these functions is provided below. For more information on changing the settings using VAIO Action Setup, from the Start menu, go to Programs, VAIO Action Setup, VAIO Action Setup.
Programmable Power Keys
Your Sony computer comes with technology that allows you to get to your favorite applications easily. The three Programmable Power Keys (PPK) at the top of you keyboard are shortcut buttons that can be programmed to carry out a variety of computer operations automatically. If you wish, you can use the VAIO Action Setup software to change the Programmable Power Keys' preset functions. See the online manual Customizing Your VAIO® Notebook for details.
Internal Timer
The VAIO Action Setup software allows you to set your computer's internal timer to launch certain applications automatically. The timer can start applications even when the computer is in the System Hibernation Mode.
Some software applications take longer than others to launch. It is advisable to confirm in advance the amount of time your selected application takes to start.
Using Smart Connect
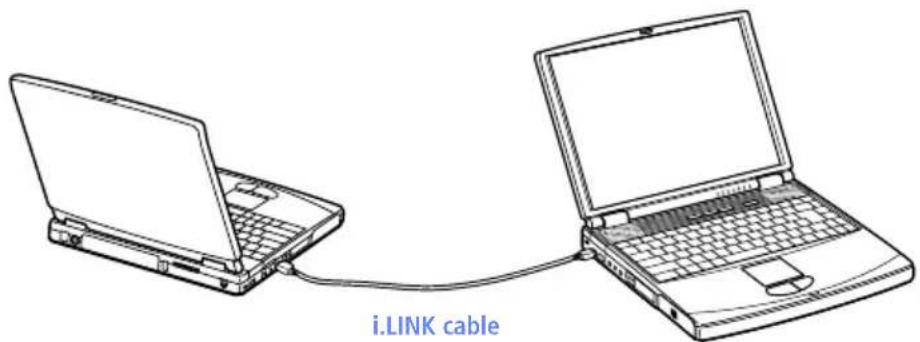
The preinstalled Smart Connect software allows you to use an i.LINK® cable (not supplied) to connect your VAIO notebook to another VAIO computer that also has Smart Connect. You can then use one computer to copy, delete, and edit files on the other computer. You can also print from a printer attached to either computer.
When you use Smart Connect to connect two VAIO computers, you must assign each computer a unique name by which it can be identified when the two computers are networked.
See the Smart Connect online help for more information.
natural_image
Line drawing of two laptops connected by a cable, labeled 'i.LINK cable' at the bottom (no other text or symbols)i.LINK cables compatible with your VAIO notebook include cables with the following part numbers: VMC-IL4415 (a 1.5-meter cable with a 4-pin connector at each end), VMC-IL4615 (a 1.5 meter-cable with a 4-pin connector at one end and a 6-pin connector at the other), and VMC-IL4408A (a 0.8-meter cable with a 4-pin connector at each end). You can purchase these cables through VAIO Direct (http://www.sonydirect.com/notebookaccessories) or from your local retailer.
Using Infrared Communication Devices
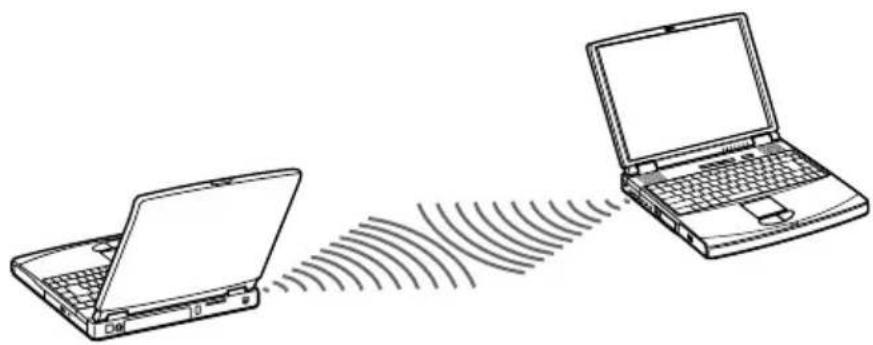
Your computer includes an infrared port, located on the left side. You can use this port to communicate with other infrared-equipped devices with compatible protocols, such as a digital still camera or other computers.
To use infrared communication with another computer
Align the infrared ports on the two computers so that they are in a direct line.
natural_image
Line drawing of two laptops connected by a signal wave, no text or symbols present
Infrared communication capability can be turned on and off. By default, it is not enabled when your system is shipped. To enable infrared use, click the infrared icon in the Windows Control Panel and select the Enable infrared communication check box on the Options tab.
You can disable infrared communication when you are not using it to conserve battery life.
Use the infrared icon in the Windows Control Panel to enable and disable infrared communication. Do not use the icon in the taskbar.
Check the Status tag of the Infrared Monitor in the Windows Control Panel to determine if the infrared device is detected.
If the two devices are too far apart or too close together, data transfer may be interrupted or there may be noise in the transmission.
Do not cover the infrared ports with your hand or any other object.
Avoid direct sunlight, fluorescent light, or flashing incandescent light near the infrared ports.
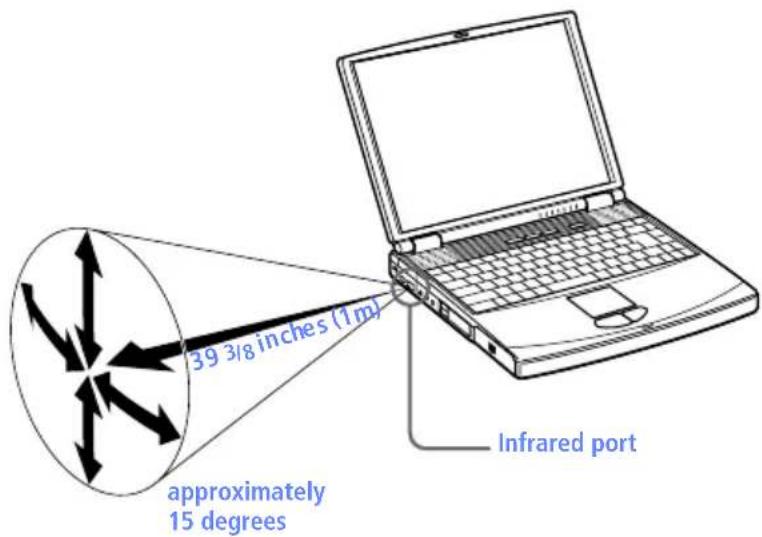
The active area of infrared transmission extends about 39 38 inches (1 meter) with a radius of approximately 15 degrees.
text_image
39 3/8 inches (1 m) approximately 15 degrees Infrared portUsing Power Saving Modes
When you use a battery as the source of power for your computer, you can take advantage of power management settings to conserve battery life. In addition to the normal operating mode, which allows you to turn off specific devices, your computer has three distinct power saving modes: System Idle, System Suspend, and System Hibernation. When using battery power, you should be aware that the computer automatically enters System Hibernation mode when the remaining battery charge drops below 5 percent, regardless of the power management setting you select.
If the battery level falls below 10 percent, you should either attach the AC adapter to recharge the battery or shut down your computer and insert a fully charged battery.
Normal Mode
This is the normal state of your computer when it is in use. The green power indicator light is on in this mode. To save power, you can turn off a specific device such as the LCD or the hard disk.
System Idle Mode
This mode is convenient if you do not need to use your computer for a brief period. The hard disk and video display enter a low power state, and the CPU clock and processor stop. The power indicator light is umber in this mode.
To activate System Idle mode
Press Fn+S, or use the PowerPanel utility.
To return to normal mode
Press any key.
System Suspend Mode
The computer saves the current state of the system in RAM and switches off power to the CPU. The umber power indicator light flashes in this mode.
To activate System Suspend mode
Press Fn+Esc, or press the power button and release it immediately. You can also use the PowerPanel utility to enter System Suspend mode.
To return to normal mode
Press any key.
System Hibernation Mode
The state of the system is saved on the hard drive and power is turned off. The power indicator light is off in this mode.
To activate System Hibernation mode
Press Fn+F12. The “Save to Disk Manager” screen appears, and then the computer enters System Hibernation mode. You can also use the PowerPanel utility to enter System Hibernation mode.
To return to normal mode
Turn on the computer by pressing the power button. The computer returns to its previous state.

When returning from System Hibernation mode, the system status stored on the hard disk is erased and the computer starts normally if you press the power button and hold for more than four seconds.
☐ Time to return to normal mode
System Idle requires less time than System Suspend, and System Suspend requires less time than System Hibernation.
Power consumption
System Idle uses more power than System Suspend, and System Suspend uses more power than System Hibernation.
Using a Second Battery Pack
You can purchase a second rechargeable battery pack. With two battery packs, you can extend the time that you use your computer with battery power. When using two battery packs, the battery pack you insert first charges first. The battery pack you insert second charges when the first battery pack is 85 percent full. You can monitor which battery pack is charging by observing the battery indicator lights.
To insert a second battery pack
If another device is in the multipurpose drive bay, remove the device.
2 Insert the battery pack into the multipurpose drive bay.
If the battery is being used, the battery 2 indicator light turns on.
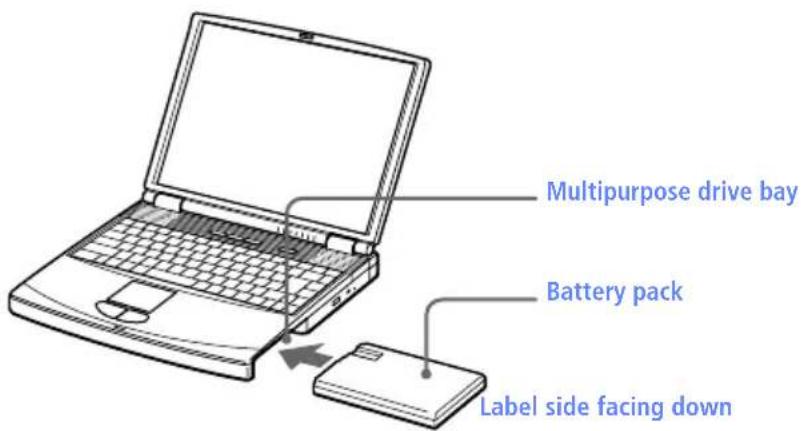
text_image
Multipurpose drive bay Battery pack Label side facing down3 Attach the weight saver to the computer to stabilize the battery pack. There is a RELEASE lever on the bottom of the weight saver. Slide the lever toward the front of the computer to lock the weight saver. See also "Using the Weight Saver" on page 49.
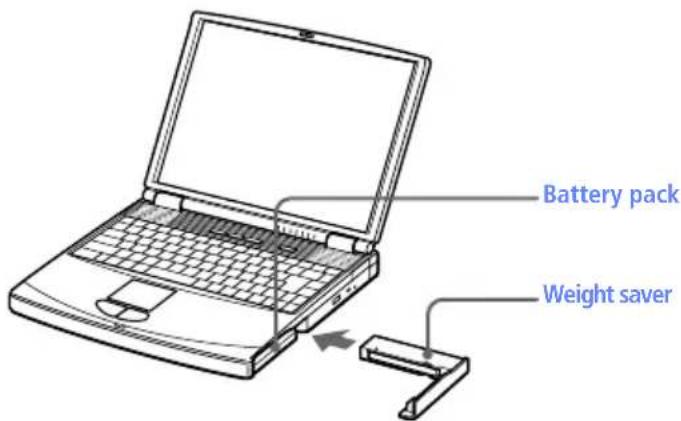
text_image
Battery pack Weight saverTo charge the second battery pack
Keep the battery pack in the computer while it is connected to AC power. The battery indicator flashes while the battery is charging. See also "To charge the battery pack" on page 14 for more information.
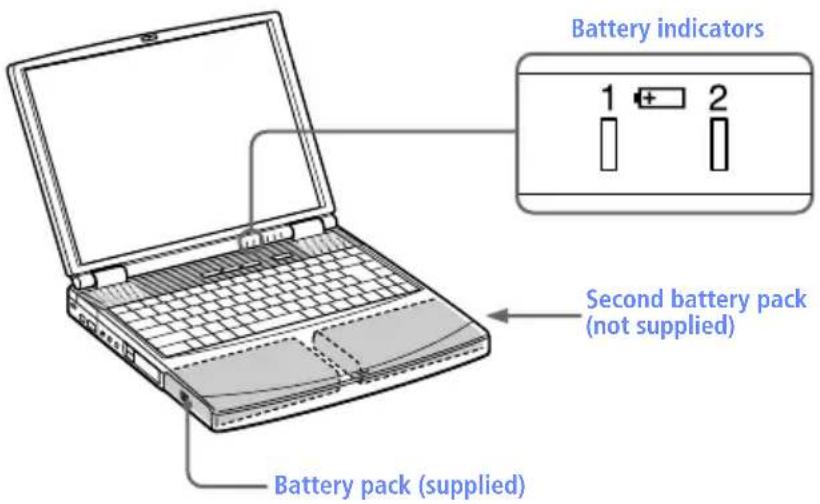
text_image
Battery indicators 1 + 2 Second battery pack (not supplied) Battery pack (supplied)To determine the amount of time the battery lasts, see "Displaying Battery Information" in the online manual Customizing Your VAIO® Notebook.
To remove the second battery pack
If you attach two battery packs, you can remove either of them without shutting down the computer. When removing one battery pack, make sure that the other battery pack's indicator light is on. If the indicator light of the battery pack you are removing is on, right-click the battery icon on the task tray and click the "Switch discharge battery" option.
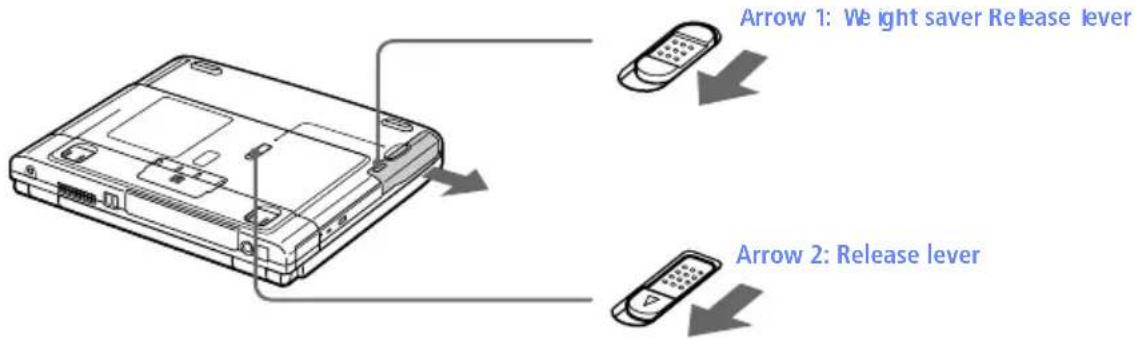
There is a Release lever on the bottom of the weight saver. To remove the battery pack, slide this lever in the direction of arrow 1, then slide the RELEASE lever on the bottom of the computer in the direction of arrow 2.
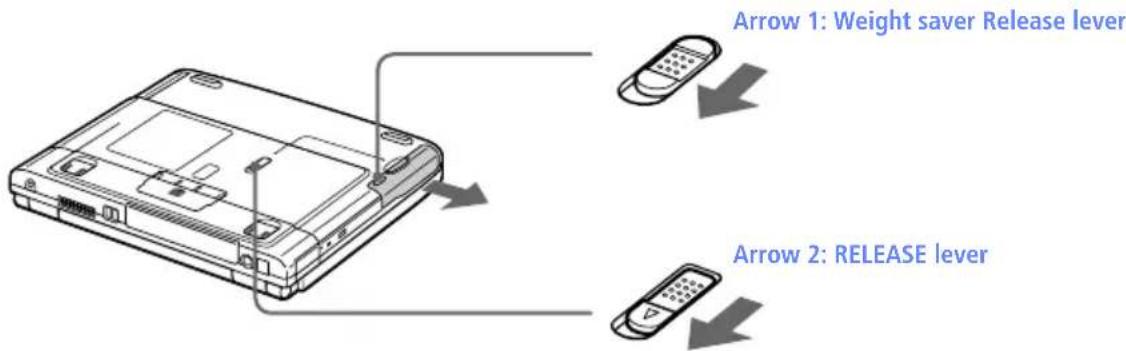
text_image
Arrow 1: Weight saver Release lever Arrow 2: RELEASE lever2 Remove the weight saver, and then pull out the battery pack.
3 Reinsert the weight saver. See "Using the Weight Saver" on page 49.
Using the Weight Saver
The weight saver protects the multipurpose drive bay when it is empty.
To attach the weight saver
1 If another device is in the multipurpose drive bay, remove the device. See or "To remove the second battery pack" on page 48.
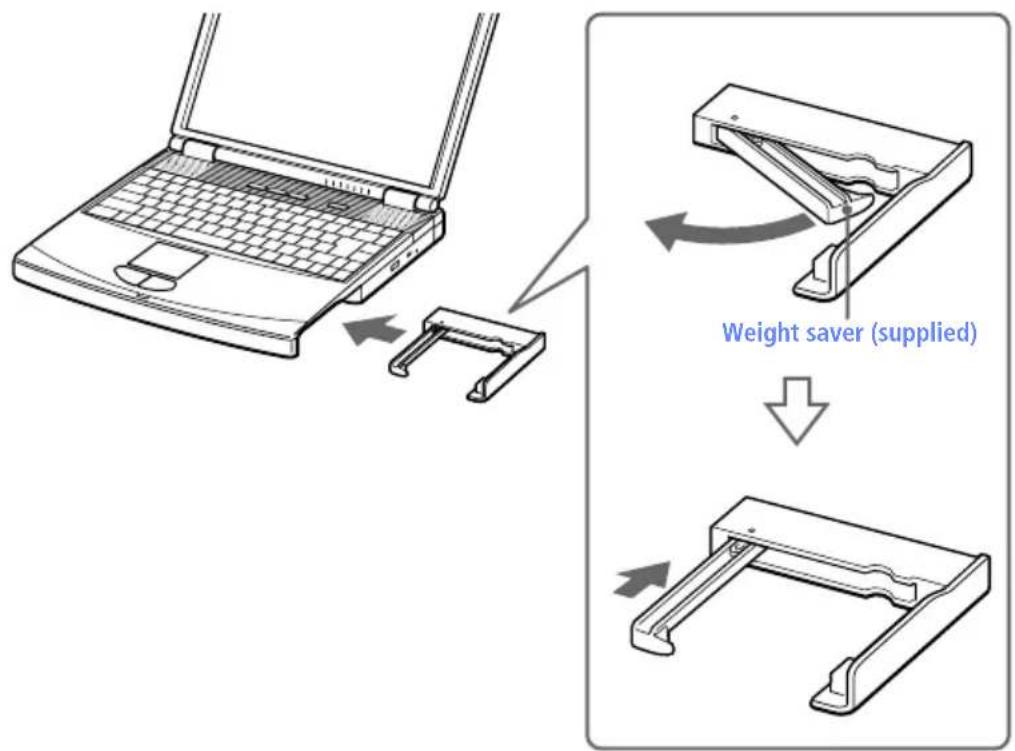
2 Fold out the hinged arm of the weight saver and then push on the hinged arm to lock it into place. Slide the weight saver in the direction of the arrow until it clicks.
text_image
Weight saver (supplied)3 Manually lock the weight saver's Release lever.
To remove the Weight Saver
There is a release lever on the bottom of the weight saver. To remove the weight saver, slide this lever in the direction of arrow 1, then slide the Release lever on the bottom of the computer in the direction of arrow 2.
text_image
Arrow 1: Weight saver Release lever Arrow 2: Release lever2 After removing the weight saver, pull out the weight saver's hinged arm and fold it into the weight saver.
Connecting Peripheral Devices
You can add functionality to your computer by connecting any of these peripherals:
☐ Phone line (page 52)
☐ Port replicator (page 53)
☐ Printer (page 58)
☐ External display (page 59)
☐ External mouse or keyboard (page 62)
☐ External speakers (page 64)
☐ External microphone (page 65)
☐ Digital video camera recorder (page 66)
☐ Universal Serial Bus (USB) device (page 68)
Before you connect peripherals, turn off the computer and all peripherals. You do not need to turn off your computer to connect USB devices. Connect the power cord only after connecting all cables. Turn on the computer only after turning on all peripherals.
Connecting a Phone Line
You need to connect a phone line to take advantage of online services and the Internet.

In order to register your Sony VAIO notebook, register your software online, and use Sony Customer Support, you must connect to a phone line. You must register your computer to receive the extended warranty.
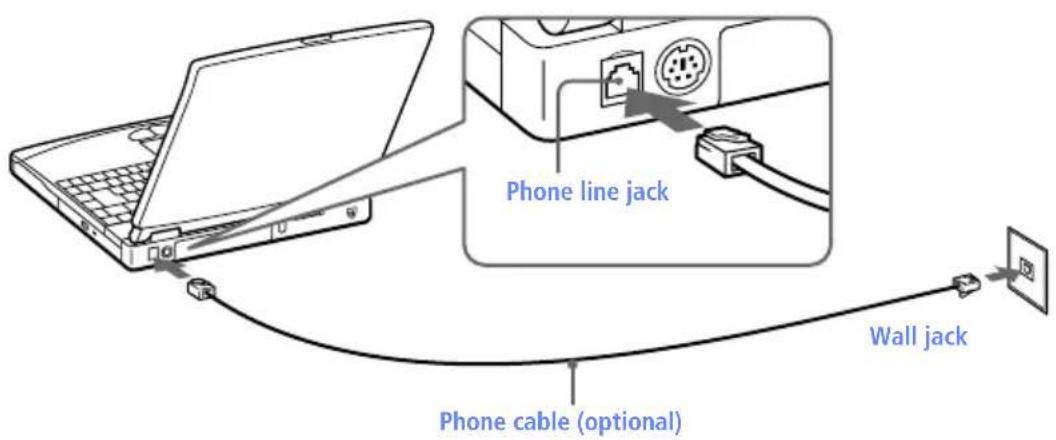
1 Plug one end of the phone cable into the phone line jack on the computer.
text_image
Phone line jack Wall jack Phone cable (optional)2 Plug the other end into the wall jack.

Your computer does not work with party lines, cannot be connected to a coin-operated telephone, and may not work with multiple phone lines or a private branch exchange (PBX). Some of these connections may result in excess electrical current and could cause a malfunction in the internal modem.
If you connect a phone line coming through a splitter, the modem or connected device may not work properly.
Connecting the Port Replicator
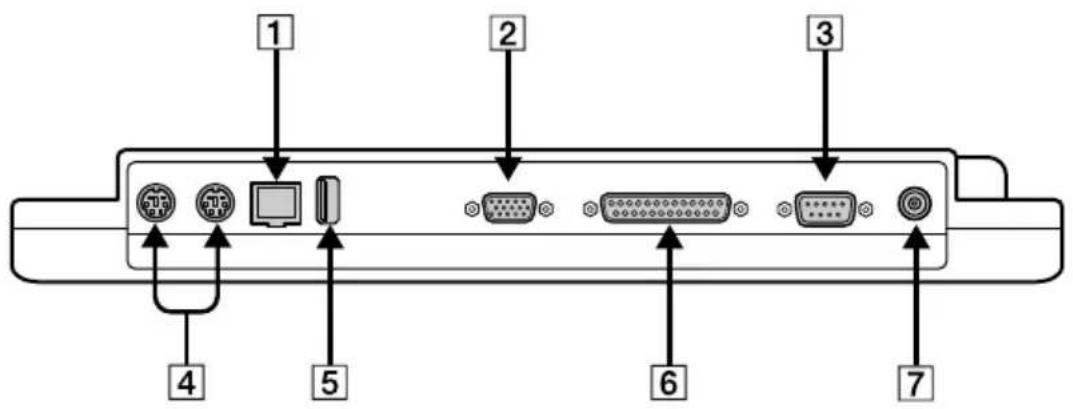
Your notebook supports the use of an optional port replicator (PCGA-PRF1A). Attaching a port replicator enables you to connect additional peripherals to your computer.
text_image
1 2 3 4 5 6 7

Network (Ethernet 10 Base T)


USB (page 68)


Monitor (page 59) Printer (page 58)


Serial


DC In (page 12)


/use/Keyboard (page 62)

The port replicator can be powered only with an AC power adapter. Do not remove the AC adapter from the port replicator or the AC outlet while using the port replicator; this may cause data damage or hardware malfunctions.
When you attach your computer to the port replicator for the first time, the installation of the network driver starts automatically.
To attach your computer to the port replicator
To supply power to your computer while it is connected to the port replicator, you can connect the AC adapter directly to the port replicator.

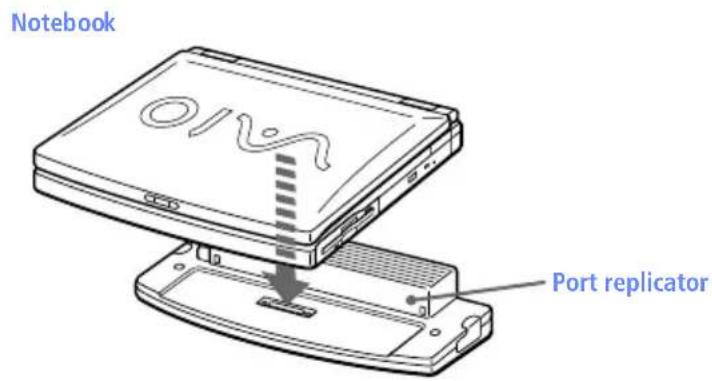
When attaching your computer to the port replicator, do not attempt to insert or remove the battery pack. Lifting and turning the computer with an attached port replicator could cause a temporary loss of power.
1 Turn off your computer and disconnect all peripherals.
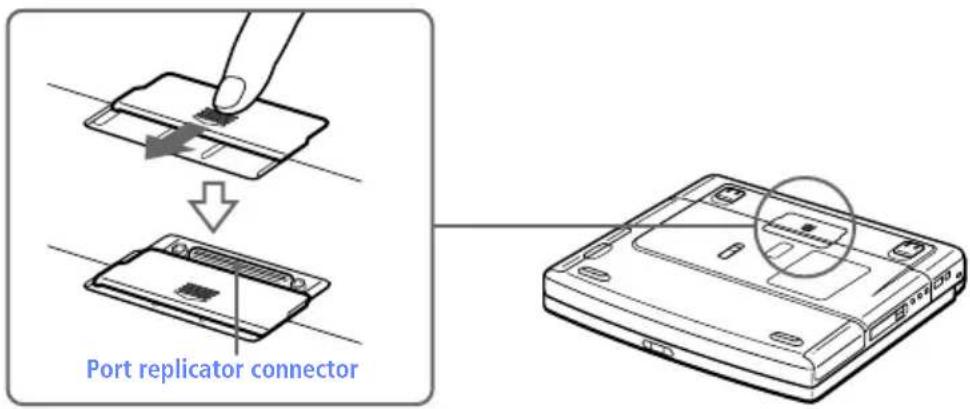
2 On the bottom of the computer, slide the port replicator connector cover open.
text_image
Port replicator connector3 Attach the bottom of the computer to the port replicator connector until it clicks.
text_image
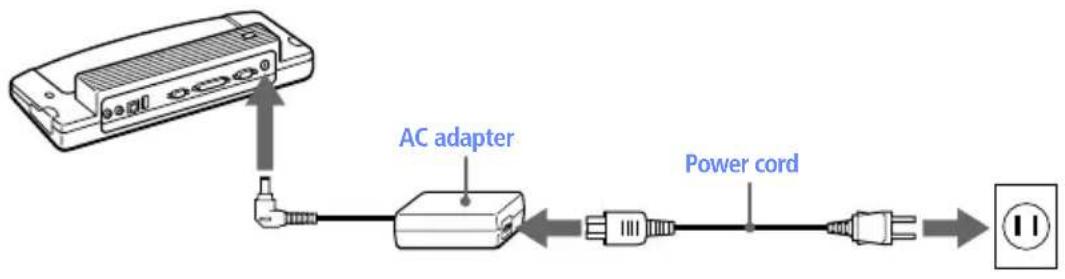
Notebook OIS Port replicator4 Plug the cable attached to the AC adapter into the DC IN connector on the port replicator. Plug the power cord into the AC adapter and an AC outlet.
flowchart
graph LR
    A["AC adapter"] --> B["Power cord"]
    B --> C["Power outlet"]
Use the AC adapter that comes with your computer or the optional Sony PCGA-ACX1 adapter.
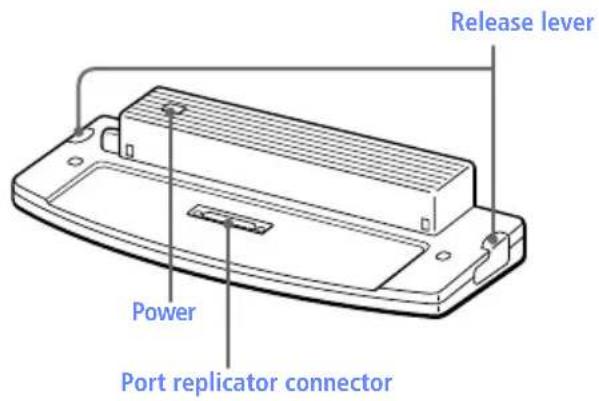
The power indicator light turns green.
text_image
Release lever Power Port replicator connector5 Turn on the computer.
To remove your computer from the port replicator when the power is off
1 Turn off your computer and the connected peripherals.
2 Pull the levers on each side of the port replicator to disengage the computer from the port replicator.
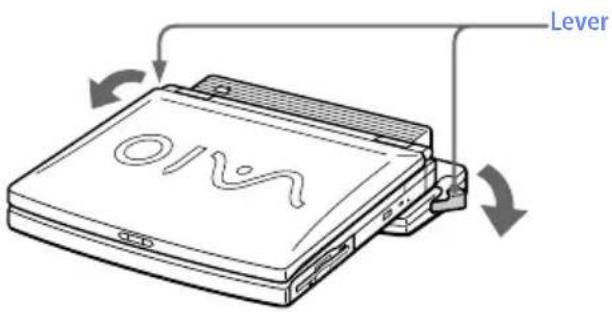
text_image
On Lever3 Lift the computer away from the port replicator.
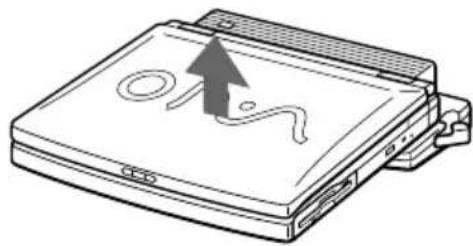
natural_image
Line drawing of a computer monitor with an upward arrow indicating a scroll or move (no text or symbols present)4 Close the port replicator connector cover on the bottom of your computer.
It is extremely important to close the port replicator connector cover after removing your computer from the port replicator. If the cover is left open, dirt may get inside and damage the computer.
Using Ethernet to Connect to a Network
You can exchange data with other devices on a network by connecting your notebook to the location's Local Area Network (LAN).
To connect the notebook to a network, you need a network PC card. For more information on using PC cards, see "Using PC cards" on page __
of the User Guide. Consult the network system administrator to find out about the accessory settings required to access the network.
Setting Up Your Ethernet Connection
Windows 98 models
1 Right-click Network Neighborhood and select Properties.
2 Click Add to add a client, adapter, protocol, or service.
3 Click File and Print Sharing to enable these functions.
4 Select a Primary Network Logon.
5 Click the Identification tab to set the computer name, workgroup, and computer description.
6 Click the Access Control tab to set the share level or user level access control.
Windows 2000 models
To connect to the network
1 Right-click My Network Places and select Properties.
2 Click Advanced and select Network Identification to set the computer name, domain, workgroup, and DNS suffix. You can also use the Network
Identification Wizard
To set the connections, bindings, and provider order
1 Right-click My Network Places and select Properties
2 Click Advanced and select Advanced Settings. This will give you access to Adapters and Protocol Bindings and Provider Order.
Connecting a Printer
You can connect a Windows 98/Windows 2000-compatible printer to your computer to print documents.
To connect a printer
☐ Use the symbol to locate the Printer connector. Plug the printer cable (supplied with the printer) into this port on the computer.
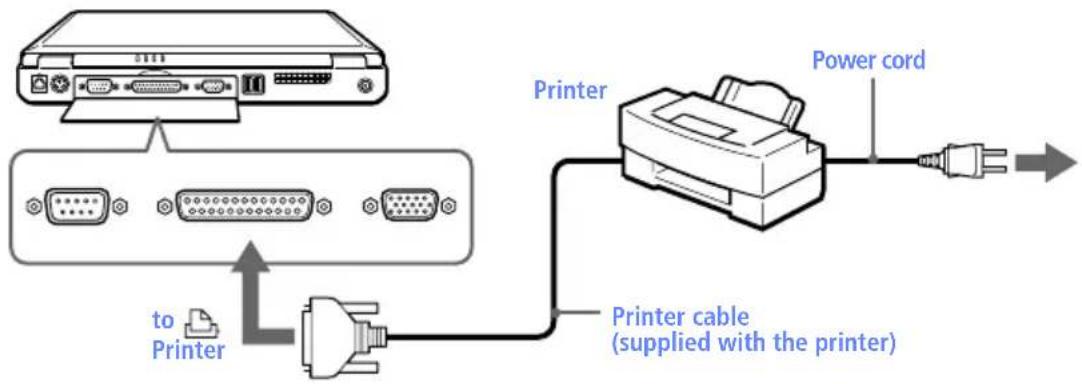
text_image
to Printer Printer Printer cable (supplied with the printer) Power cordSee the manual that came with your printer for more information on installation and use. If your printer stops functioning after resuming from a power-saving mode, see "I cannot print" on page 75. Before using the printer, you may need to change the Printer setting in the Sony Notebook Setup software. See "Displaying the Sony Notebook Setup Screen" in the online manual Customizing Your VAIO® Notebook.
Connecting an External Display
You can connect an external display to your notebook. For example, you can use the computer with any of the following:
☐ Computer display (monitor) (page 59)
□ Multimedia computer display (page 60)
☐ Projector (page 60)
To connect a computer display
☐ Use the symbol on the back of the computer to locate the Monitor connector. Plug the display cable (not supplied) into this connector on the back of the computer.
☐ If necessary, plug one end of the display power cord into the display, and the other end into an AC outlet.

text_image
Computer display Power cord Display cable (optional) to MonitorSee the manual that came with your computer display for more information on installation and use.
To connect a multimedia computer display
You can connect the notebook to a multimedia computer display that includes built-in speakers and a microphone.
1 Use the symbol to locate the Monitor connector. Plug the display cable into this connector.
2 Use the symbol to locate the Headphone connector. Plug the speaker cable into this connector.
3 Use the symbol to locate the Microphone connector. Plug the microphone cable into this connector.
See the manual that came with your multimedia computer display for more information on installation and use.
To connect a projector
You can use a projector, such as the Sony LCD Projector, as an external display.
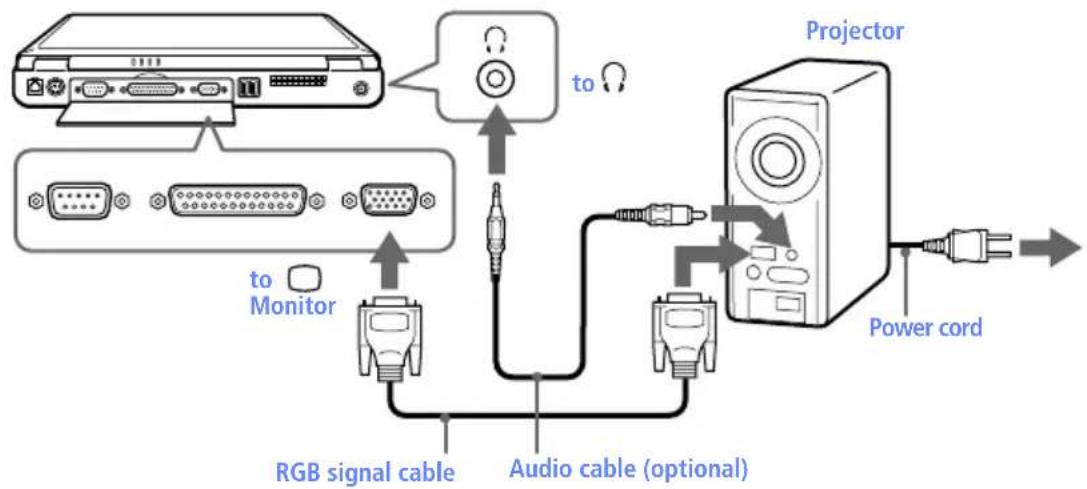
text_image
Projector to Monitor RGB signal cable Audio cable (optional) Power cordSee the manual that came with your projector for more information on installation and use.
To select a display
When you connect an external display to the monitor connector, you can toggle the output between the Liquid Crystal Display (LCD), the external monitor, or both devices.
Use the Fn+F7 keys to select a display. See also “Selecting the Display Mode” in the online manual Customizing Your VAIO® Notebook for more information.
To Press Result
| Switch to an external display | Fn+F7 Toggles between the LCD, the external display connected to the Monitor connector, or both the LCD and external display. |

flowchart
graph LR
    A["Only LCD"] --> B["LCD and external display"]
    B --> C["Only external display"]
    C --> A
Connecting an External Mouse or Keyboard
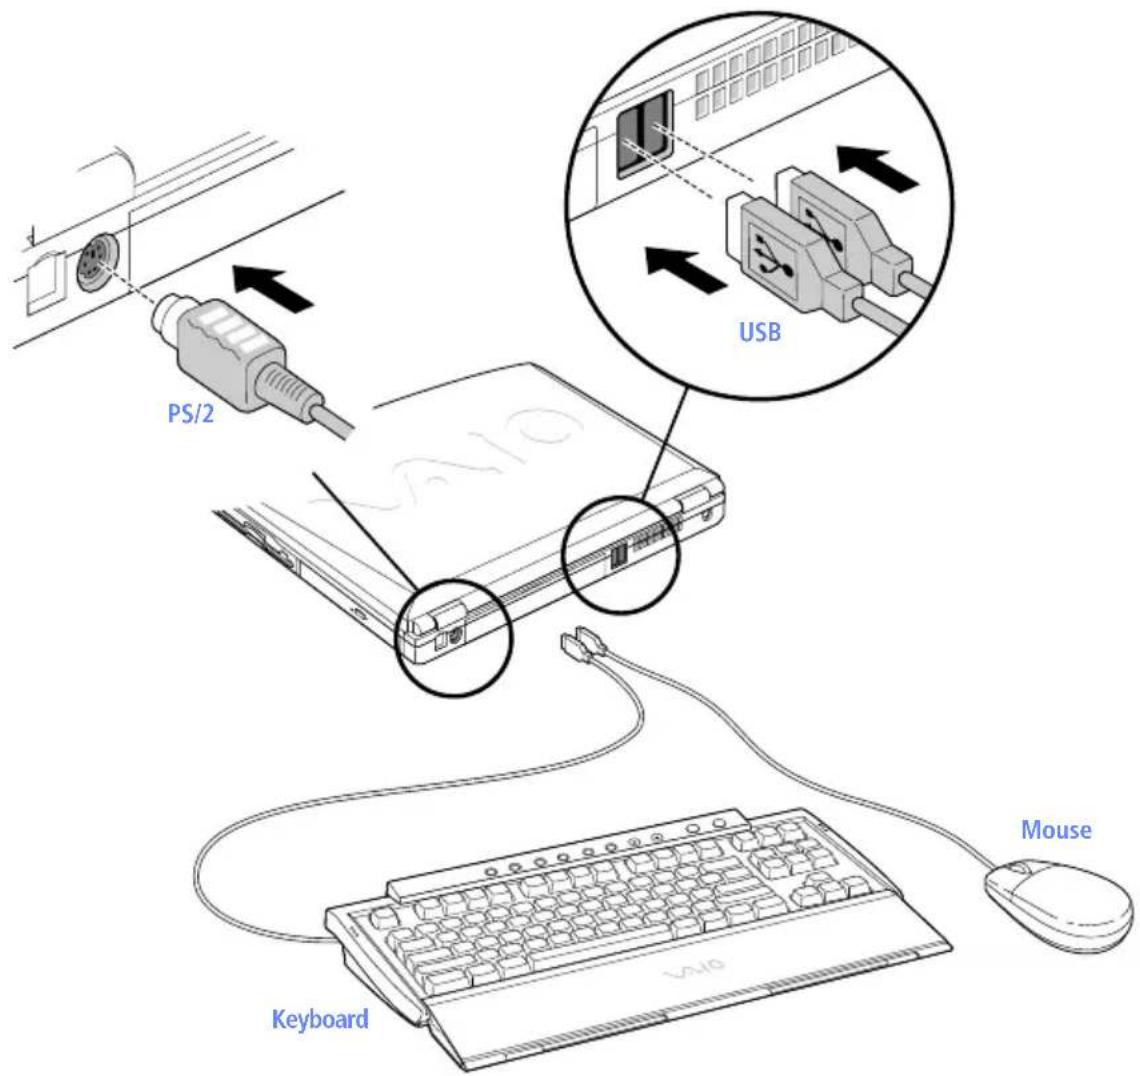
You can connect a USB or PS/2® style mouse or keyboard.
Plug the keyboard cable or mouse cable into the appropriate connector with the ▲mark facing up.
text_image
PS/2 USB Keyboard MouseTo connect both a PS/2 mouse and keyboard at the same time, use an optional PS/2 division connector.
You can also use one or both of the USB ports to connect a mouse and keyboard at the same time.

See "Using the Keyboard" on page 21 for more information on using the keyboard.
See the manual that came with your mouse or keyboard for more information on installation and use.
Before you connect or disconnect the mouse or keyboard, turn off the computer.
Do not connect or disconnect the PS/2 device (keyboard or mouse) when the computer is on. It may cause malfunction.
A Sony USB mouse PCGA-UMS1 (not supplied) is a USB device. You must connect it to the USB connector.
Connecting External Speakers
You can enhance the sound quality of your computer by connecting external speakers.

Make sure your speakers are designed for computer use.
Turn down the volume of the speakers before you turn them on.
Do not place diskettes on the speakers; the speakers' magnetic field may damage the data on the diskettes.
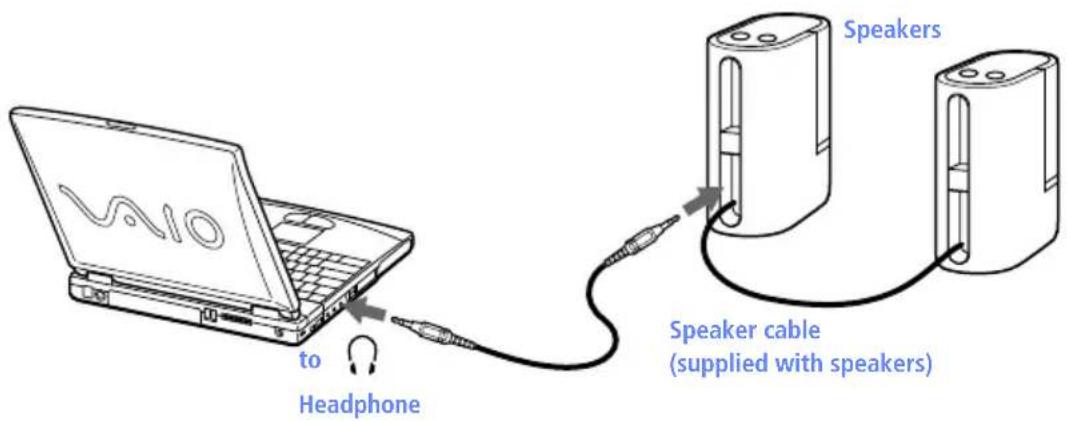
To connect external speakers
☐ Use the ⚙ symbol to locate the Headphone connector. Plug the speaker cable into this connector.
text_image
vivo to Headphone Speakers Speaker cable (supplied with speakers)
See the manual that came with your speakers for more information on installation and use.
Connecting an External Microphone
You can enhance the quality of sound input by using an external microphone.

Make sure your microphone is designed for computer use. The microphone should be compliant with the plug-in power microphone.
To connect an external microphone
☐ Use the to locate the Microphone connector. Plug the microphone cable into this connector.

text_image
vao to Microphone Microphone (optional)
See the manual that came with your microphone for more information on installation and use.
Connecting a Digital Video Camera Recorder
You can connect an i.LINK-enabled digital video camera recorder to the i.LINK® S400 (IEEE1394) connector.
To connect a digital video camera recorder
☐ Plug one end of the i.LINK cable (not supplied) into the i.LINK connector on the left side of the computer and the other end into the DV In/Out connector on the digital video camera recorder.
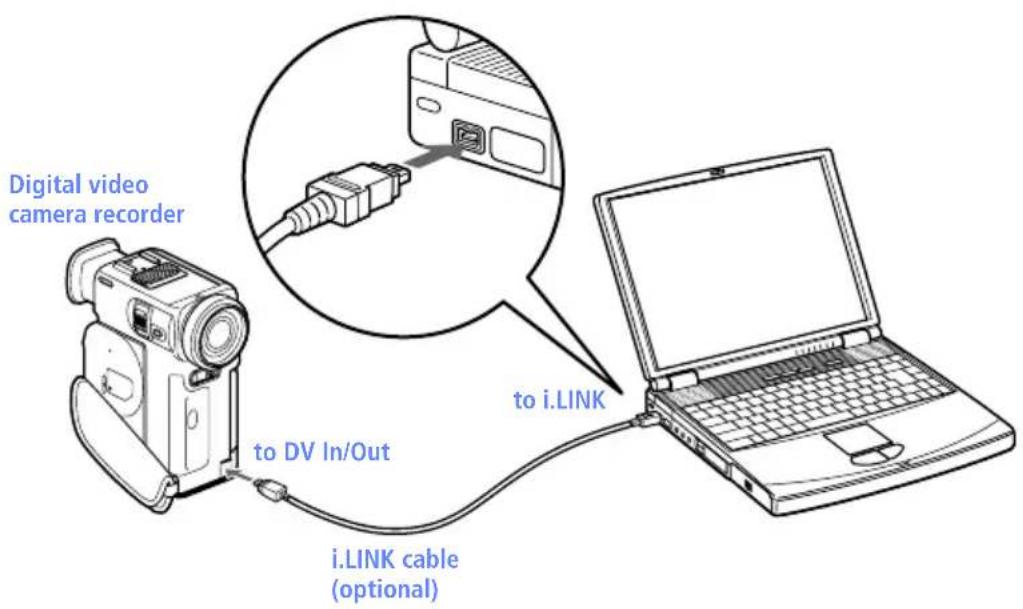
text_image
Digital video camera recorder to DV In/Out i-LINK cable (optional) to i-LINKThe Sony digital video camera recorder is pictured; you may need to connect your camera differently. On Sony digital video cameras, connectors labeled "DV In/Out" or "i.LINK" are i.LINK-compatible.
See the manual that came with your digital video camera recorder for more information on installation and use.
Do not connect more than one digital video camera at a time. The software supplied with your computer will not recognize multiple cameras.
The i.LINK connector on the computer does not supply power to external devices. If the external device requires power from the i.LINK connector, you cannot use the device with the computer.
The computer supports transfer rates up to 400 Mbps; however, the actual transfer rate is the lowest transfer rate of the external device.
The i.LINK features available may vary depending on the software applications you use. See the documentation that came with your software for more information.
Connecting a Universal Serial Bus (USB) Device
You can connect a USB device to your computer.
To connect a USB device
☐ Use the symbol to locate the USB connector. Plug one end of the USB cable into this port and the other end into the USB device.
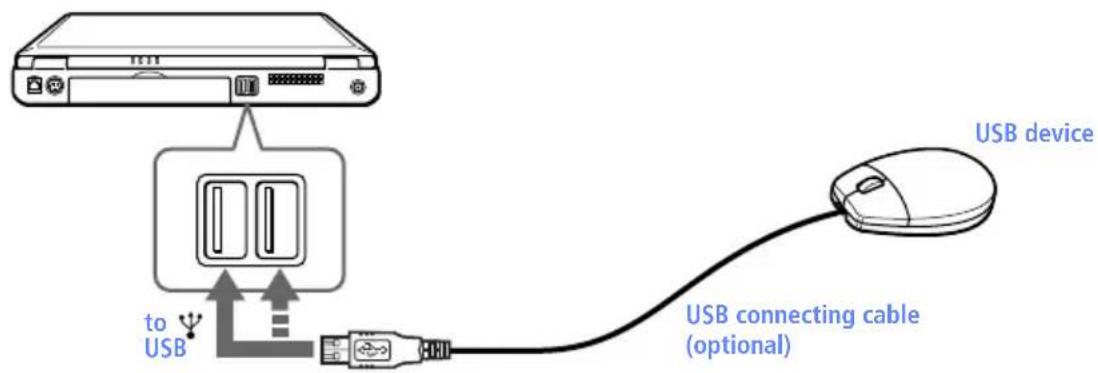
text_image
USB device to USB USB connecting cable (optional)You can use the optional Sony USB mouse PCGA-UMS1 with this computer. The USB mouse software driver is preinstalled in the computer. Therefore, you only need to plug the USB mouse into the USB connector.

See the manual that came with your USB device for more information on installation and use.
Troubleshooting
This section describes how to solve common problems you may encounter when using your computer. Many problems have simple solutions, so try these suggestions before you call Sony Customer Support.

When you reconnect devices be sure to turn off the computer as described in "Shutting Down Your Computer" on page 19. Turning off the computer using other methods may result in data loss.
My computer does not start
☐ Check that the computer is plugged into a power source and that it is turned on. Check that the power indicator on the front panel of the computer indicates that the power is on.
☐ Check that the battery packs are inserted properly and that they are charged.
☐ Make sure there is no diskette in the floppy disk drive.
☐ Confirm that the power cord and all cables are connected firmly, as described in “Connecting Peripheral Devices” on page 51.
☐ If you plugged the computer into a power strip or UPS, make sure the power strip or UPS is turned on and working.
☐ If you are using an external display, check that it is plugged into a power source and turned on. Check that the brightness and contrast controls are adjusted correctly. See the manual that came with your display for details.
☐ Moisture condensation may have occurred. Do not use the computer for at least one hour and then turn on the computer.
When the internal backup battery is low on power, it may not be able to start your system properly. The message “Press
When I turn on my computer, the message "Operating system not found" appears and Windows does not start
☐ Check the floppy disk drive to see if a non-bootable diskette is in the drive.
☐ If a non-bootable diskette is in the drive, turn off the computer, remove the diskette, and then turn on the computer again. Confirm that Windows starts properly. If Windows still does not start, follow the procedure below to initialize the BIOS.
☐ If the floppy disk drive is empty, follow the steps below to initialize the BIOS:
1 Remove any peripheral devices connected to the computer.
2 Turn the computer off and then turn it on again.
3 Turn on the computer and press the F2 key when the Sony logo appears. The BIOS setup menu screen appears.
4 Press the arrow keys to select the Exit menu.
5 Press the arrow keys to select Get Default Values and then press the Enter key. The message “Load default configuration now?” appears.
6 Check that Yes is selected, then press the Enter key.
7 Press the arrow keys to select Exit (Save Changes) and then press the Enter key. The message “Save configuration changes and exit now?” appears.
8 Check that Yes is selected, then press the Enter key. The computer restarts.
If your computer still displays the message “Operating system not found” and Windows does not start, contact Sony Customer Support.
My LCD does not display anything
☐ Check that the computer is plugged into a power source and that it is turned on. Check that the power indicator on the front panel of the computer is on.
☐ Check that the battery packs are inserted properly and that they are charged.
☐ The computer may be in LCD (Video) Standby mode. Press any key to activate the display.
The window I've just closed continues to appear on my LCD
Press the Windows key and D keys twice to refresh the display.
The screen image on my external display is not centered or sized properly Use the controls on your external display to adjust the image. See the manual supplied with your display for more information.
My computer "locks up"
☐ Try restarting the computer. On the Windows taskbar, click the Start button, click Shut Down, and then click Restart the computer.
☐ If you cannot restart as described in the preceding step, you can restart the computer by pressing Ctrl+Alt+Delete.
☐ If the previous step does not work, press the power button and hold it for at least four seconds. This turns off the power.
☐ If your computer locks up while playing a DVD-ROM/CD-ROM, stop the DVD-ROM/CD-ROM, and restart the computer by pressing Ctrl+Alt+Delete.

Pressing Ctrl+Alt+Delete may result in data loss in files that are currently open.
My software program "locks up" or crashes
Contact the software publisher or designated provider for technical support. See either the printed or the online version of Read Me First for a complete list of phone numbers.
My DVD-ROM drive tray does not open
☐ Make sure the computer is turned on.
☐ Press the Eject button on the DVD-ROM drive.
☐ If the Eject button does not work, you can open the tray by inserting a sharp, pointed object into the hole to the right of the Eject button.
I cannot play a CD-ROM
☐ Make sure the label of the CD-ROM is facing up.
If the CD-ROM requires software, make sure the software is installed according to the program's instructions.
☐ Moisture condensation may have occurred. Leave the computer for at least 1 hour while the computer is turned on.
□ Clean the CD-ROM.
☐ Check the speaker volume.
I cannot play a DVD-ROM
If a region code warning appears when you are using the DVD player, it could be that the DVD-ROM you are trying to play is incompatible with the DVD-ROM drive in your notebook. The region code is listed on the disc's packaging.
If you hear audio but cannot see video, your computer's video resolution may be set too high. For best results, change the Windows Control Panel/Display/Settings to 800 x 600 using 256 colors.
If you see video but cannot hear audio, check all of the following: Make sure your DVD player's mute setting is off. Check the master volume setting in the audio Mixer. If you have connected speakers externally, check the volume settings in your computer speakers and check the connections between your speakers and the computer. Check the Windows Control Panel/System/Device Manager to see that the drivers are installed properly.
☐ A dirty or damaged disc may cause the computer to “hang” while it tries to read the disc. If necessary, reboot the computer, remove the disc, and then check that it is not dirty or damaged.
When I click an application icon a message appears, such as "You must insert the application CD into your CD-ROM drive," and the software does not start
Some titles require specific files that are located on the application's CD-ROM. Insert the disc and try starting the program again.
☐ Make sure you place the disc in the tray with the label side facing up.
My floppy disk drive cannot write to a diskette
☐ If the diskette is write-protected, disable the write-protect feature or use a diskette that is not write-protected.
☐ Check that the diskette is properly inserted into the floppy disk drive.
My speakers have no sound
☐ If the built-in speakers are turned off, press Fn+F3 to turn on the speakers.
☐ If the speaker volume is turned to the minimum, press Fn+F4, and then press or to increase the volume.
☐ If your computer is powered by batteries, check that the battery packs are inserted properly and that they are charged.
☐ If you are using an application that has its own volume control, check that the volume is turned up.
☐ Check the volume controls in Windows 98.
☐ If you connect external speakers, check that the speakers are properly connected and the volume is turned up. If the speakers have a mute button, make sure it is off. If the speakers are powered by batteries, check that the batteries are inserted properly and that they are charged.
☐ If you have connected an audio cable to the Headphone connector, disconnect the cable.
My modem does not work
☐ Check that the phone line is plugged into the line jack. See "Connecting a Phone Line" on page 52 for details.
☐ Check that the phone line is working. You can check the line by plugging in an ordinary phone and listening for a dial tone.
☐ Check that the phone number the program is dialing is correct.
☐ Check that the software you are using is compatible with the notebook modem. (All preinstalled programs are compatible.) Call the software publisher or Sony Customer Support.
My modem connection is slow
Your notebook comes with a 56K/V.90-compatible modem. Many factors influence modem connection speed, including telephone line noise or compatibility with telephone equipment (such as fax machines or other modems). If you think your modem is not connecting properly to other PC-based modems, fax machines, or your Internet Service Provider, check the following:
☐ Have your phone company check that your phone line is free from any line noise.
☐ If your problem is fax-related, check that there are no problems with the fax machine you are calling and that it is compatible with fax modems.
☐ If you are having a problem connecting with your Internet Service Provider (ISP), check that the ISP is not experiencing technical problems.
☐ If you have a second phone line available, try connecting the modem to that line.
My microphone does not work
If you are using an external microphone, check that the microphone is plugged into the Microphone connector. See “Connecting an External Microphone” on page 65 for details.
My mouse does not work
☐ If you are using an external mouse, check that the mouse is plugged into the mouse connector. See “Connecting an External Mouse or Keyboard” on page 62 for details.
☐ If you connected an external mouse while your computer is on, you must restart your computer.
☐ If you are using an optional Sony USB mouse PCGA-UMS1, check that the mouse is plugged into the USB connector.
My touchpad does not work
You may have disabled the touchpad while no mouse was connected to the computer. If so, you must enable the touchpad using Sony Notebook Setup.
I cannot use DV devices. The message "DV equipment seems to be disconnected or turned off" appears.
☐ Check that the DV device is turned on and that the cables are properly connected.
☐ If you are using multiple i.LINK® devices, the combination of the connected devices may cause unstable operation. In this case, turn off the power to all connected devices and disconnect unused devices. Check the connection, then turn on the power again.
My touchpad interprets a single tap as a double-click
Click the Mouse icon in the Control Panel and then change the button assignments in the Mouse Properties dialog box. One of the buttons is assigned to the double-click action.
My computer does not shut down
It is best to shut down your computer using the Shut Down command on the Windows Start menu. Using other methods, including those listed here, may result in loss of unsaved data. If the Shut Down command does not work properly, follow these steps:
☐ Restart the computer by pressing Ctrl+Alt+Delete. If this does not work, press the power button and hold it for at least four seconds to turn off the power.
☐ Unplug the computer from the AC adapter and remove the battery pack from your computer.
My PC card is not working
☐ Make sure the PC card is compatible with Windows.
☐ Use the Sony Notebook Setup utility to disable devices you are not currently using.
The sound of my computer's fan is too loud
Use the PowerPanel utility to change the Thermal Control Strategy setting to Quiet. This setting slows down the CPU fan speed. See the PowerPanel Help for more information.
I cannot print
☐ The default setting for the printer port mode is correct for most printers. If you cannot print, try changing the printer port mode. In Sony Notebook Setup, select the Printer tab. If the printer port mode is set to ECP, change it to bidirectional. If the printer port mode is set to bidirectional, change it to ECP. See “Displaying the Sony Notebook Setup Screen” in the online manual Customizing Your VAIO® Notebook for details on using Sony Notebook Setup.
☐ Your connected printer may not function after the computer resumes from a power-saving mode. When this occurs, follow the procedures below to reset the printer connection:
1 Right-click the My Computer icon on the desktop, and then select Properties.
2 Click the Device Manager tab.
3 Select Refresh, and then click OK. The printer should now function properly.
Power Management
The operating system may become unstable if a lower power state such as system hibernation is initiated and then changed before the operating system completely enters the lower power state. To restore the computer to its normal operating stability, close all open applications, press the power button, and hold it for four seconds or more to completely shut down the computer.
Getting Help
Sony provides several support options for your Sony computer. When you have questions about your computer and the preinstalled software, check these sources for answers, in the following sequence:
| 1 | Read Me First | Contains Frequently Asked Questions, the most up-to-date information on using your computer, and software support information. |
| 2 | VAIO® NotebookUser Guide | The User Guide (this manual) contains information on how to get the most from your computer, find help, and solve common problems. It also contains product specifications. |
| 3 | CustomizingYour VAIO®Notebook | The electronic document contains additional information on customizing your computer. You can access this guide from the Windows Start menu by selecting Help Center/Step 1/Documentation. |
| 4 | Manuals and online help files that may accompany your preinstalled software | Most of the manuals for preinstalled software are located on your hard disk drive as online help files. You can access the online help files from the Help menu in the specific application. A printed manual is available for some applications. |
| 5 | Sony PCSupport | Provides instant access to information on commonly encountered problems. Enter a description of your problem and the Knowledge Database searches for the corresponding solutions online. You can access the Sony PC Support at: http://www.sony.com/pcsupport |
| 6 | SonyFax-on-Demand | This service provides you with answers to commonly asked questions. You can use this automated service to request a list of available topics and then select the topics that you want to receive. To contact the Sony fax-on-demand service, call 1-888-4SONYPC (1-888-476-6972). (Requires a fax machine or your fax software.) |
| 7 | Calling Sony Customer Support | You can call and speak with a Sony Customer Support Representative without using your computer by calling 1-888-4SONYPC (1-888-476-6972). Software support is available free of charge for 90 days after the original date of purchase. |
Using the System and Application Recovery CDs
The following sections describe how to use the System Recovery and Application Recovery utilities.
Using the System Recovery CD(s)
You can reinstall software titles that shipped with your computer if they are corrupted or accidentally erased. You may not need to recover the entire contents of your hard drive. If you experience a problem with your computer, reinstalling an individual device driver or software title may correct the problem. Use the Application Recovery CD(s) to reinstall individual applications or device drivers. See “Using the Application Recovery CD(s)” on page 79.
The System Recovery CD contains a backup copy of all the software originally installed on your hard disk drive. It can be used only to recover the hard disk of the notebook you purchased.
The System Recovery utility gives you three options:
Full Restore without Format restores all the software titles that originally came with your computer without formatting the hard disk. Word 2000 must be restored from the enclosed CD-ROM.
Full Restore with Format formats the hard disk drive and then restores all the original software. If your hard drive is partitioned into C and D drives, the computer offers you the option to reformat the drive into a single partition. Word 2000 must be restored from the enclosed CD-ROM.
☐ Operating System Only restores the Windows® operating system, the notebook utility programs, and the device drivers that shipped with your computer.
If you choose the Full Restore with Format or Operating System Only option, your hard disk will be formatted, which removes all the information on the hard disk drive. You will lose any software you have installed and any other files you have created since you started to use your computer. This means you will have to reinstall any applications that were not included with the computer when you purchased it. If you choose the Full Restore without Format option, you may need to reinstall applications that were not included with the computer when you purchased it. If you have any questions on using the System Recovery CD, contact Sony Customer Support.
To use the System Recovery CD(s)
1 Insert the Sony System Recovery CD in the DVD-ROM drive.*
2 Shut down your computer as described in "Shutting Down Your Computer" on page 19.
3 Wait four seconds and turn on your computer.
4 Click OK to signify you have read and accept the Microsoft End-User License Agreement.
5 When the System Recovery menu appears, follow the on-screen instructions to complete the recovery process.
Your system may include one or two System Recovery CDs. If you have two System Recovery CDs, insert the first CD to run the System Recovery program. You are prompted to insert the second CD once the information from the first CD has been installed. The recovery process takes 30 to 60 minutes to complete. After recovering your system using the SRCD, you may be prompted to insert your ARCD after restarting Windows. Insert the ARCD to automatically complete recovery of your system.
If your computer does not start from the Recovery CD
1 Press the power button and hold it for more than four seconds to turn off the computer.
2 Turn on the computer. When the Sony logo is displayed, press the F2 key. The BIOS setup menu screen appears.
3 Press the arrow keys to select the Exit menu.
4 Press the arrow keys to select Get Default Values and then press the Enter key. The message "Load default configuration now?" appears.
5 Check that Yes is selected, then press the Enter key.
6 Press the arrow keys to select Exit (Save Changes) and then press the Enter key. The message “Save configuration changes and exit now?” appears.
7 Check that Yes is selected, then press the Enter key. The computer restarts from the Recovery CD.
Using the Application Recovery CD(s)
The Application Recovery CD(s) allows you to reinstall individual applications and device drivers if they are corrupted or accidentally erased. Reinstalling an individual device driver or software title may correct a problem you are experiencing with your computer, and you may not need to recover the entire contents of your hard drive. If you do need to reinstall all the software titles that shipped with your computer, use the System Recovery CD(s). See “Using the System Recovery CD(s)” on page 77.
You can also use the Application Recovery CD to install Windows NT® Workstation 4.0 drivers on your computer.
You must be in Windows to run the Application Recovery CD. The application will not run from DOS. If you have any questions on using the Application Recovery CD, contact Sony Customer Support.
To use the Application Recovery CD(s)
1 Turn on your computer. If your computer is already on, close all applications.
2 When the Windows desktop appears, insert the Sony Application Recovery CD in the DVD-ROM drive. The Application Recovery utility loads automatically.
3 When the Application Recovery menu appears, select the icon for the application you want to restore and then follow the on-screen instructions to complete the recovery process.
Your system may include one or two Application Recovery CDs. If you have two Application Recovery CDs, insert the first CD to run the Application Recovery program. You may be prompted to insert the second CD, depending on the application you wish to restore.
Adding Memory
In the future you may want to install memory modules to expand the functionality of your computer. You can increase memory up to 256 MB (128 MB x 2), by installing optional memory modules. For PCG-F580/PCG-F580K/PCG-F590/PCG-F590K, 128 MB of memory are already installed (128 MB x 1). For PCG-F540/PCG-F540K/PCG-F560/PCG-F560K/PCG-F570/PCG-F580/PCG-F580K, 64 MB of memory are already installed (64 MB x 1). You can add an expansion memory module in a slot. 64 MB and 128 MB expansion memory modules are available as optional memory modules. For memory upgrades, use only PC-100 SDRAM SO-DIMM (gold lead contacts).

The size of your memory may differ if you purchased a specially configured system.
Make sure you observe the proper safety precautions when you install memory modules in your computer. See the bulleted list below. Be careful when adding memory. Mistakes when installing or removing a memory module may cause a malfunction.
☐ The procedures described below assume familiarity with the general terminology associated with personal computers and with the safety practices and regulatory compliance required for using and modifying electronic equipment.
☐ Disconnect the system from its power source and from any telecommunications links, networks, or modems before you open the system or follow any of the procedures described below. Failure to do so may result in personal injury or equipment damage.
Electrostatic discharge (ESD) can damage memory modules and other components. Perform the procedures described below only at an ESD workstation. If such a station is not available, do not work in a carpeted area, and do not handle materials that produce or hold static electricity (cellophane wrappers, for example). Ground yourself by maintaining contact with an unpainted metal portion of the chassis while performing the procedure.
☐ Do not open the memory module package until you are ready to install the module. The package protects the module from ESD.
☐ Use the special bag for preventing ESD or use aluminum foil when you store the memory module.
PCG-F540/PCG-F540K/PCG-F560/PCG-F560K/PCG-F570
Typical expansion memory configuration
| Total System Memory (MB) | Slot 1 (MB) Slot 2 (MB) |
| 128 64 64 | |
| 192 64 128 | |
| 256 128 128 |
PCG-F580/PCG-F580K/PCG-F590/PCG-F590K
Typical expansion memory configuration
| Total System Memory (MB) | Slot 1 (MB) Slot 2 (MB) |
| 192 128 64 | |
| 256 128 128 |
To remove a memory module
1 Shut down your computer and disconnect all peripheral devices, such as your printer.
2 Unplug the computer and remove the battery packs.
3 Wait until the computer cools down. Then unscrew the screw at the bottom of your computer. Loosen the screw with an appropriate screwdriver.
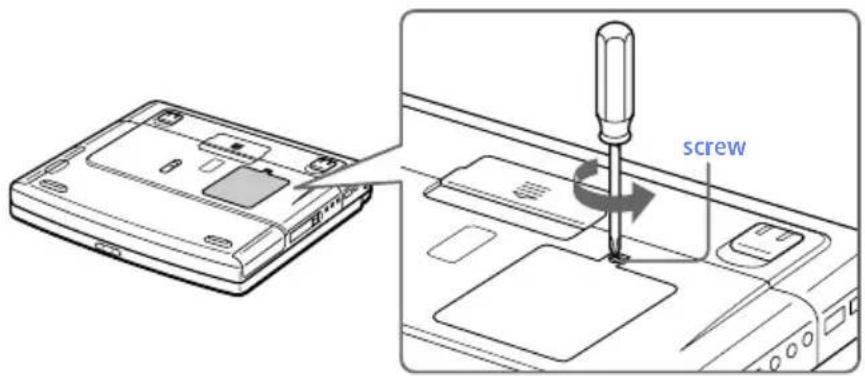
text_image
screw4 Touch a metal object (such as the connector panel on the back of your computer) to discharge static electricity.
5 Remove the memory module.
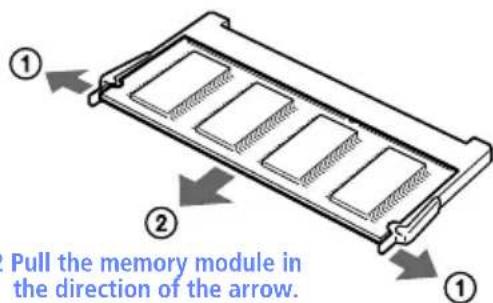
text_image
① ② Pull the memory module in the direction of the arrow. ①2 Pull the memory module in the direction of the arrow.
1 Pull the tabs in the direction of the arrows. The memory module is released.
6 Tighten the screw on the bottom of the computer.

Your computer comes with a memory module installed in the memory slot. To upgrade your memory you will need to remove this module from the slot before installing your upgrade memory.
To install a memory module
1 Follow steps 1 to 4 of "To remove a memory module."
2 Remove the memory module from its packaging.
3 Install the memory module.
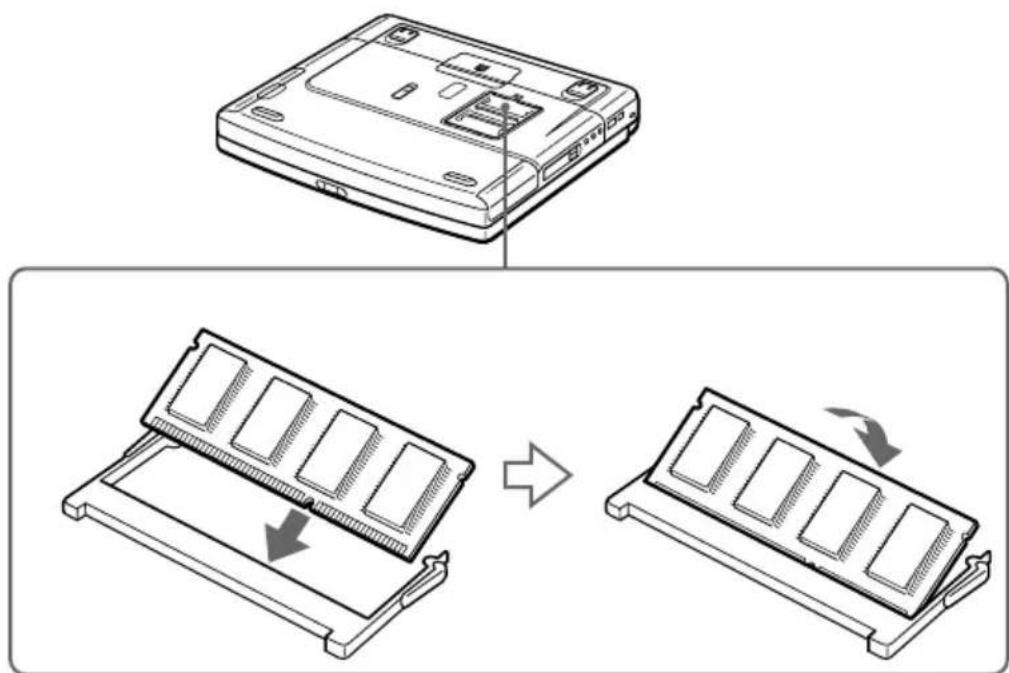
text_image
Diagram illustrating the process of inserting a memory card into a rack, showing step-by-step assembly.1 Slide the memory module into the slot. 2 Press the module into place until it clicks.
4 Tighten the screw on the bottom of the computer.
To view the amount of memory
1 Turn on the computer.
2 Click the Start button, point to VAIO, and click "Sony Notebook Setup."
The Sony Notebook Setup screen appears.
3 Click the "About This Computer" tab to view the amount of system memory. If the additional memory is not shown, repeat steps 1-4 in "To install a memory module."
Specifications
| Model PCG-F540/PCG-F540K | PCG-F560/PCG-F560K/PCG-F570 | PCG-F580/PCG-F580K | PCG-F590/PCG-F590K | |
| Processor | 500 MHz*Intel®Pentium® III | 600 MHz*Intel®Pentium® IIIwith Intel®SpeedStepTMTechnology | 650 MHz*Intel®Pentium® IIIwith Intel®SpeedStepTMTechnology | 750 MHz*Intel®Pentium® IIIwith Intel®SpeedStepTMTechnology |
| Hard Disk Drive | 6.0 GB ^ | 9.0 GB ^ | 12.0 GB ^ | 18.1 GB ^ |
| Standard RAM | 64 MBSDRAM,expandable to 256 MB | 64 MBSDRAM,expandable to 256 MB | 64 MBSDRAM,expandable to 256 MB | 128 MBSDRAM,expandable to 256 MB |
| LCD Screen | 14.1" XGA TFT | 14.1" XGA TFT | 15.0" XGA TFT | 15.0" XGA TFT |
| L2 Cache Memory | 256 KB (on die) | |||
| MPEG | MPEG1 and MPEG2 Digital Video; supports full-screen playback | |||
| Graphics | 128-bit accelerator with 3 MBVideo RAM | 6MB video, supports 3D graphics | ||
| Sound Capabilities | 16-bit CD-quality stereo sound | |||
| Diskette Drive | Removable 3.5" 1.44 MB | |||
| DVD-ROM Drive | Reads CD data from 10.3X to 24X variable transfer rate. ^ Reads DVD data from 1.7X to 8X variable transfer rate. ^** | |||
| Laser Diode Properties | CD-ROM: Wavelength 795nm; laser output 16.5uWCD-RW: Wavelength 780nm; laser output 0.112mWDVD-ROM: Wavelength 780 nm and 650 nm; laser output 77.5uW | |||
| CD-RW Drive | Up to 20X max. CD-ROM reading speed (PCG-F570 only)Up to 14X max. CD-RW reading speed | |||
| Modem | 56K/V.90 compatible modem ^†† | |||
| Infrared | Supports 4 Mbps, 1.1 Mbps, and 115 Kbps IrDA Standard | |||
| Drive Bay | Supports floppy disk drive (included)Supports second rechargeable battery (optional) | |||
| Expansion Capabilities | Type II PC cards and Type III PC card Card Bus support | |||
| Built-in Capabilities | Microphone, Stereo speakers, Digital touch pad | |||
| Telecommunication Capabilities | Data and fax send/receive ^†† | |||
| Connection Capabilities | 2 USB portsi.LINKSerial portKeyboard/mouse (USB and PS/2® style)VGA monitorVideo outParallel (printer)Phone line (RJ-11)MicrophoneHeadphonePort replicatorInfrared port | |||
| Supplied Accessories | Video cableFloppy disk driveRechargeable batteryAC adapter and power cordWeight saver | |||
| Power Requirements | 49.5 watts maximum (19.5V DC/AC 120-240V) | |||
| Power Management | Energy Star compliantAdvanced Configuration and Power Interface (ACPI) | |||
| Battery | Lithium-ion, supports dual battery operation | |||
| Dimensions | 12.7"(w) x 1.8"(h)‡x 10.4"(d)(324 x 46.9 x 265.5 mm) | 12.8"(w) x 2.1"(h)‡x 10.5"(d)(324 x 54.1 x 265.5 mm) | ||
| Weight | 6.8 lbs. (3.1 kg) (with battery and weight saver)7.3 lbs. (3.3 kg) (with battery and floppy disk drive) | 7.3 lbs. (3.3 kg) (with battery and weight saver)7.7 lbs. (3.5 kg) (with battery and floppy disk drive) | ||
| Operating Temperature | 41° F to 95° F (+5° C to 35° C) temperature gradient less than 18° F (10°C) per hour | |||
| Operating Humidity | 20% to 80% (not condensed), provided that humidity is less than 65% at 95° F (35° C), hygrometer reading of less than 84° F (29° C) | |||
| Storage Temperature | -4° F to 140° F (-20° C to 60° C), temperature gradient less than 18° F (10°C) per hour | |||
| Storage Humidity | 10% to 90% (not condensed) provided that humidity is less than 20% at 140° F (60° C), hygrometer reading of less than 95° F (35° C) | |||
* MHz denotes microprocessor internal clock speed; other factors may affect application performance. Processor operating speed may be reduced while operating on battery power.
† The size of your hard disk may differ if you purchased a specially configured system. GB means one billion bytes when referring to hard drive capacity. Accessible capacity may vary.
‡ Data on a CD-ROM is read at a variable transfer rate, ranging from 10.3X at the innermost track to 24X at the outermost track (the data transfer standard 1X rate is 150 kbytes/s). The average data transfer rate is 17.2X or 2580 kbytes/s.
** Data on a DVD-ROM is read at a variable transfer rate, ranging from 1.7X at the innermost track to 4X at the outermost track (the data transfer standard 1X rate is 1392 kbytes/s). The average data transfer standard is approximately 2.85X or 3823 kbytes/s. A DVD-ROM drive reads data on a CD-ROM at a
variable transfer rate, ranging from 10.3X at the innermost track to 24X at the outermost track. The average data transfer rate is approximately 17.15X or 2936 kbytes/s or 2576 kbytes/s.
Maximum speed for faxing is 14.4 kbps. Your 56K/V.90 compatible modem is capable of downloading at 56 kbps. Your online service or Internet Service Provider, however, may not support this technology or operate at this speed.
Height measured at thickest point. The thinnest height for PCG-F540/PCG-F540K/PCG-F560/PCG-F560K/PCG-F570 is 1.4" (35.8 mm). The thinnest height for PCG-F580/PCG-F580K/PCG-F590/PCG-F590K is 1.5" (38.5 mm).
If a region code warning appears when you are using the DVD player, it could be that the DVD-ROM you are trying to play is incompatible with the DVD-ROM drive in your VAIO notebook. Region code indicators such as a "1" or "ALL" are labeled on some DVDs to indicate what type of player can play the discs. Unless a "1" or "ALL" is labeled on your DVDs or on the packaging, you cannot play the disc on this player.
Specifications are subject to change without notice.
Index
A
AC adapter 8, 12
AC power 12
adding
hardware 51
memory 81
peripherals 51
printers 58
adjusting
brightness 18, 25
contrast 25
Alt key 22
Application Recovery CD 79
Applications key 22
attaching port replicator 54
B
batteries 16
using 16
battery packs 8, 13
charging 14, 47
indicator light status 14
indicator lights 8, 14, 24, 46
inserting 13
inserting into battery bay 13
loading 13
power status 14
rechargeable 12
removing 16, 46, 48
brightness
adjusting 18, 25
built-in speakers 8
See also speakers 25
buttons
Eject 31, 32
left 8
right 8
Start (Windows 98) 19
C
cables
phone 8
power cord 12
cameras
digital video recorder 66
canceling commands 21
Caps Lock 8
indicator light 24
CD-ROM/DVD-ROM discs
ejecting 32
inserting 31
troubleshooting 71
CD-ROMs
cleaning 33
handling 33
charge status indicator light 14
charging battery packs 14, 47
choosing
power source 13
cleaning
CD-ROMs and DVD-ROMs 33
coin-operated telephones 52
computer 76
handling 8
lithium ion battery vi
setting up 8
starting 18
troubleshooting 69, 71
unpacking 2
connecting
coin-operated telephones 52
digital video recorder 66
external keyboard 53
external speakers 64
hard drives 37
microphone 65
monitor 53, 59
mouse 53
multimedia computer display 60
multiple phone lines 52
network 37, 53
party phone lines 52
PBX 52
phone line 52
port replicator 53, 54
power source 12
printer 58
projector 60
USB device 68
weight saver 49
connectors
DC In 12, 53
headphone 9
i.LINK9
infrared 42
keyboard 8, 10, 53
Line In 9
microphone 9
monitor 53
mouse 10,53
network 53
Printer 10, 58
printer 58
Serial port53
USB 10,53
contrast
adjusting 25
correction keys 21, 22
Ctrl key 22
cursor-movement keys 22
customer assistance
support options 76
D
DC In 12, 53
digital still camera42
digital video camera 66
disconnecting port replicator 56
diskettes
ejecting 28
handling 29
inserting into drive28
troubleshooting 72
display
options 61
See also monitor
selecting 61
disposal of lithium ion battery vi
drives
floppy disk 8
installing additional hard disk37
DV devices
troubleshooting 74
DV In/Out 66
DVD-ROM drive
closing tray32
opening tray 31
using 31
DVD-ROM drive tray
troubleshooting 71
DVD-ROM/CD-ROM discs
troubleshooting 72
DVD-ROMs
cleaning 33
handling 33
E
Eject button 28, 31, 32
ejecting
battery packs 48
CD-ROM/DVD-ROM discs 32
diskettes 28
weight saver 50
electronic
documentation 76
Energy Star ii
ergonomic considerations 5
Escape key 21
expansion memory configuration 82
external devices
display 61
See also monitor
speakers 25, 64
F
fan 75
faxes
laws governing v
floppy disk drive 8
cable 8
troubleshooting 72
Fn 26
Fn key 22
combination commands 25
function keys 21, 22
H
handling 8
CD-ROMs and DVD-ROMs 33
diskettes 29
handling the LCD screen 19
hard drives
indicator light 8,24
installing additional 37
hardware
online support 76
headphone connector 9, 60
Help
Mouseware 27
help 76
/
i.LINK 9,66
IEEE-1394 66
indicator lights 24
battery 8, 14, 24, 46
Caps Lock 8, 24
charge status 14
hard drive 8, 24
Num Lock 8, 24
power 8
Scroll Lock 8, 24
infrared communication devices 42
other computers 42
infrared port 42
infrared transmission
active distance 43
troubleshooting 43
input devices v
Insert key 22
inserting
battery pack 13
CD-ROM/DVD-ROM discs 31
diskettes into drive 28
installation 6
installing
hard drives 37
hardware 51
memory module 83
peripherals 51
interference iv
internal speakers
See speakers
K
keyboard 22, 53
connector 8, 10
L
LCD 8
lock lever 18
selecting to display output 61
troubleshooting 70, 71
LCD (Video) Standby mode 70
LCD screen
handling 19
LED indicator 28
left button 8
lever
LCD 18
weight saver release 48
Line In 9
Liquid Crystal Display screen
See LCD
lithium ion battery
disposal vi
safety precautions vi
loading
battery pack 13
M
maintenance 39
memory module
expansion 82
installing 83
removing 82
microphone 9
connecting 65
connector 60
troubleshooting 73
modem
laws governing v
troubleshooting 73
monitor 10, 53
connecting 59
connector 60
selecting 61
switching among 25
mouse
connector 10
troubleshooting 74
Mouse Properties screen 27
Mouseware
accessing help 27
features 27
multimedia computer display 60
multiple phone lines 52
N
navigation keys 21, 22
network
connecting 37
connector 53
port replicator 53
Notebook Computer 8
Num Lock 8
indicator light 24
numeric keypad area 21
O
online
help 76
opening
DVD-ROM drive tray 31
operator keys 22
output devices v
adding 58
P
party phone lines 52
PBX 52
PC card
inserting 37
release button 37
removing 39
slot protector 38
slots 37
troubleshooting 75
phone
cable 8
connecting line 52
jack 52
laws governing v
port replicator
connecting 53, 54
disconnecting 56
lever 56
network 53
power 24
cord 12
indicator light8
switch 18
power saving modes 44
System Hibernation 26, 45
System Idle 26, 44
System Suspend 45
Video Standby 26
power source 12
power sources 13
connecting 12
Print Screen key 21
printer 10
connecting 53, 58
connector 58
port 58
troubleshooting 75
Printer connector 10, 53, 58
Programmable Power Keys (PPK),
using 40
projector 60
R
radio interference iv
rechargeable battery packs 12, 13
recharging battery packs 14
Recovery CD 79
removing
battery packs 16
diskettes 28
memory module 82
replacing
battery packs 46
restoring data 79
right button 8
S
screen
See LCD
Scroll Lock 8
indicator light 24
second battery pack 13, 46
selecting
display 61
LCD 61
monitor 61
power source 13
Serial connector 53
setting up your PC
support 76
Shift key 22
Shut Down Windows dialog box 19
shutting down 19
troubleshooting 74
Sony Fax-on-Demand service 76
speakers 8
built-in 8
external 64
switching 25
troubleshooting 72
volume 25
Specifications 85
Start button 19
starting
computer 18
startup problems 19
switching
display 25
monitor 25
System Hibernation mode 26, 45
System Idle mode 26, 44
System Recovery CD 77
System Suspend mode 25, 45
T
technical support
support options 76
touchpad 8, 27, 74
troubleshooting 69
startup 19, 69
turning on
computer 18
TV
interference iv
U
unpacking the computer 2
USB
connecting 68
connector 10, 53, 68
mouse 68
V
ventilation slot 11
video camera 66
Video Standby mode 26
viewing the amount of memory 84
volume control 25
of fan 75
troubleshooting 72
W
weight saver
attaching 46
connecting 49
fold-out arm 49
removing 50
Windows 98
Control Panel 43
Explorer 23
Find window 23
help 23
key 22
key combinations 23
Start button 19
taskbar 19, 71