
Vaio VGC-RB57GY - Desktop computer SONY - Free user manual and instructions
Find the device manual for free Vaio VGC-RB57GY SONY in PDF.


| Product Type | Desktop Computer |
| Brand | Sony |
| Model | Vaio VGC-RB57GY |
| Dimensions (Approx.) | 180 mm x 450 mm x 400 mm (W x H x D) |
| Weight (Approx.) | 12 kg |
| Power Supply | 250 W AC adapter |
| Processor | Intel Core 2 Duo E6600 (2.4 GHz) |
| Memory | 2 GB DDR2 (expandable to 4 GB) |
| Storage | 320 GB SATA Hard Drive |
| Optical Drive | DVD±RW / CD-RW Drive |
| Graphics | NVIDIA GeForce 7300 LE (256 MB) |
| Operating System | Windows Vista Home Premium |
| Connectivity | USB 2.0, FireWire, Ethernet, Wi-Fi 802.11g |
| Main Functions | Computing, multimedia, internet browsing, office applications |
| Care and Cleaning | Wipe with a soft, dry cloth. Avoid liquids. |
| Safety | Keep away from heat sources; ensure proper ventilation. |
| Spare Parts and Repairability | Contact Sony support or authorized service center. |
| General Information | Part of the Sony Vaio series, designed for home and office use. |
Frequently Asked Questions - Vaio VGC-RB57GY SONY
User questions about Vaio VGC-RB57GY SONY
0 question about this device. Answer the ones you know or ask your own.
Ask a new question about this device
Download the instructions for your Desktop computer in PDF format for free! Find your manual Vaio VGC-RB57GY - SONY and take your electronic device back in hand. On this page are published all the documents necessary for the use of your device. Vaio VGC-RB57GY by SONY.
USER MANUAL Vaio VGC-RB57GY SONY
Thank you for purchasing a Sony VAIO® computer! Your new computer is a superb blend of high technology and easy-to-use functionality. The information provided here is designed to help you to become familiar with the hardware and software programs included with your computer.
- View the Electronic Flyer, which provides updates and supplemental information about your computer.
- Go to the Sony online support Web site, to view the VAIO® Computer Specifications, which lists your computer's hardware specifications and preinstalled software information.
- You are prompted to register your computer the first time you turn on the computer. Follow the on-screen instructions to complete the registration process. If you are not able to register your computer during the first session, you can register your computer online at the Sony VAIO PC Registration Web site. Go to http://www.sony.com/vaioregistration.
- For information about the Sony software preinstalled on your computer, click Start in the Windows® taskbar, click All Programs, and then click VAIO Central. Click the Categories tab, click the System Information folder, then click Software Information.
Congratulations on your purchase of the Sony VAIO® computer! Your new, high-performance, multimedia computer combines state-of-the-art computer functionality with the latest audio, video and information technology features.
■ Unpacking Your Computer
■ Planning an Ergonomic Work Space
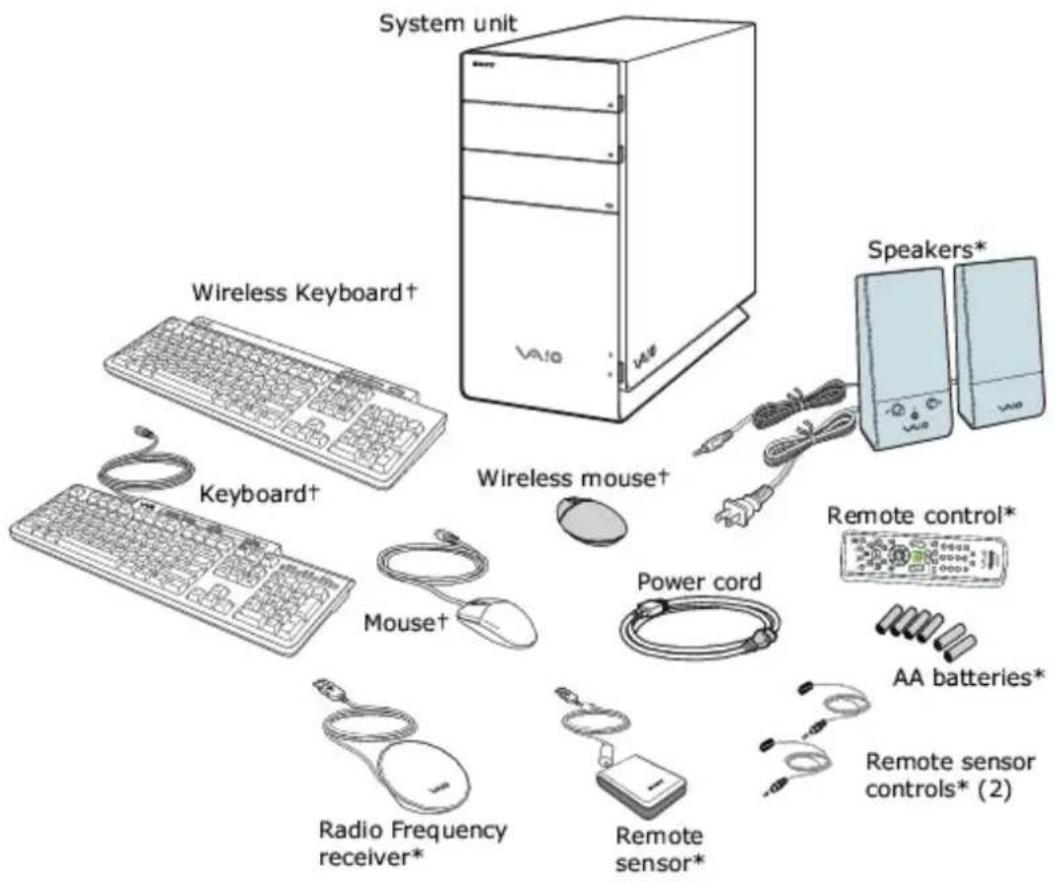
Your computer may not be supplied with all of the accessories shown, depending on the computer configuration purchased. For details on the accessories supplied with your computer, see the online Specifications sheet.
Your VAIO's computer is not supplied with System or Application Recovery CDs. Use the VAIO Recovery Wizard utility to recover your computer's operating system and preinstalled software.
Computer and supplied accessories
text_image
System unit Wireless Keyboard† Wireless mouse† Speakers* Keyboard† Mouse† Power cord Remote control* AA batteries* Radio Frequency receiver* Remote sensor* (2) Remote sensor**This accessory is available with certain computer models or may vary in appearance. See your computer's specification sheet for details on your computer's supplied accessories.
Not supplied with all V A I O® computer models. See your computer's specification sheet for details on your computer's supplied accessories.
Manuals
■ VAIO® Computer Safety Information — Provides safety/legal guidelines and owner information.
- VAIO® Computer Welcome — Provides information about supplied accessories and your computer's hardware configuration.
Online Documentation
- VAIO® Computer User Guide — Contains features and specifications of your computer. It also includes information on the Microsoft® Windows® XP Media Center Edition operating system, the software programs included with your computer, and solving common problems.
To access the online User Guide:
-
Click Start in the Windows® taskbar, click All Programs, then click VAIO Support Central.
-
From the VAIO Support Central menu, click VAIO Documentation.
-
Click VAIO User Guide.
- Specifications — The online specifications sheet provides information about the hardware and software configuration of your VAIO computer. Review the specifications sheet to verify supplied accessories and the operating system installed on your computer.
To view the online specifications sheet:
- Connect to the Internet.
-
Go to the Sony online support Web site at http://www.sony.com/pcsupport.
-
Click the Manuals/Specs/Warranty button and follow the on-screen instructions to locate your model's specifications sheet.
Creating CDs or DVDs with Sony software
■ Create picture & video with:
DVDs with Click to DVD software — Make picture or personal video DVDs. Use JPEG, BMP, of TIFF files for slide shows; import MPEG, AVI, or Microsoft® DVR-MS files for video, or capture footage from an i.LINK / IEEE 1394 camera or analog source.
- Create music CDs with:
SonicStage software — Burn music CDs from MP3, WMA, and WAV; create ATRAC CDs for your Sony ATRAC CD Walkman; or make backup copies of your CDs.
SonicStage Mastering Studio software — Burn music CDs of your collection of vinyl records or cassette tapes.
Sonic DigitalMedia!® software — Burn music CDs from MP3, WMA, WAV, and CDA files, or make backup copies of your CDs.
- Back up your data with:
Sonic DigitalMedia® software — Drag-and-drop to make custom data CDs or DVDs, or make backup copies of your CDs and DVDs.
For more information about using the Sony software programs preinstalled on your computer, visit VAIO Support Central.
To access this software information:
- Click Start in the Windows® taskbar, click All Programs, then click VAIO Support Central.
- From the VAIO Support Central menu, click the Categories tab, then click the System Information folder.
- Click Software Information.
Hard Disk Drive Recovery
Your computer is equipped with the VAIO Recovery Wizard utility program that recovers your computer's operating system and preinstalled software.
For online information about hard disk drive recovery:
- Click Start in the Windows® taskbar, click All Programs, then click VAIO Support Central.
- From the VAIO Support Central menu, click VAIO Documentation.
- Click Recovery Guide.
You can create a VAIO Recovery Media Kit using CD-R, single layer DVD+R, or single layer DVD-R media on VAIO computers equipped with the appropriate optical drive (a CD-RW, DVD-RW, or DVD±RW drive).
DVD+RW, DVD-RW, double layer DVD+R, and double layer DVD-R media cannot be used to create a VAIO Recovery Media Kit.
A software library, containing the Microsoft® software and Sony® end-user license agreements.
Your computer may not be equipped with Microsoft® Windows® XP Media Center Edition operating system or Media Center hardware features. See your computer's online specifications sheet for more information.
Before you set up your new computer, find the best location for your new computer and plan your work space. There are several ergonomic factors to consider when you arrange your work space:
- Stable work surface — Use a stable work surface large enough to support the computer and other peripheral equipment.
- Ventilation — Leave at least eight inches of space on the left and back sides of your computer to enable proper ventilation.
- Placement of the keyboard, mouse, and other input devices — Place your keyboard, mouse, and other input devices so that your arms and hands are in a relaxed, comfortable position. The keyboard should be directly in front of you. Adjust the level of the keyboard so that your lower arms are parallel to the floor. Keep your wrists in a relaxed position when you are using the keyboard — not angled up or down. Use the palmrest briefly, for resting. While typing, never use the palmrest or rest your hands on the table. Position the mouse at the same level as the keyboard. Hold the mouse with a relaxed hand, and use your whole arm to move it. Take breaks during sessions with your computer. Excessive use of the mouse or a joystick may strain muscles or tendons.
- Furniture and posture — Sit in a chair with good back support and armrests. Adjust the level of the chair so your feet are flat on the floor. A footrest may make you more comfortable. Sit with relaxed, upright posture — avoid slouching forward or leaning far backward.
- Viewing angle of the display — Position the display 18 to 26 inches directly in front of you, with the top of the screen at or a little below eye level. Use the display's tilting feature to find the best position. You can reduce eye strain and muscle fatigue by placing the display in the proper position.
- Lighting — Choose a location where windows and lights do not create glare and reflection on the display. Use indirect lighting to avoid bright spots on the display. You can also purchase accessories for your display that help reduce glare. Proper lighting adds to your comfort and work effectiveness.
This section is intended to familiarize you with the controls, ports and jacks on your computer and supplied accessories. Your computer may not be equipped with all of these hardware features or accessories. The location of the controls, ports, and jacks may vary from the illustrations shown in this section. To view the specific connection capabilities for your computer, see the online Specifications sheet.
■ About the Front Panel
■ About the Back Panel
■ About the Keyboard
■ About the Wireless Mouse
■ About the Remote Control
■ About the i.LINK Port
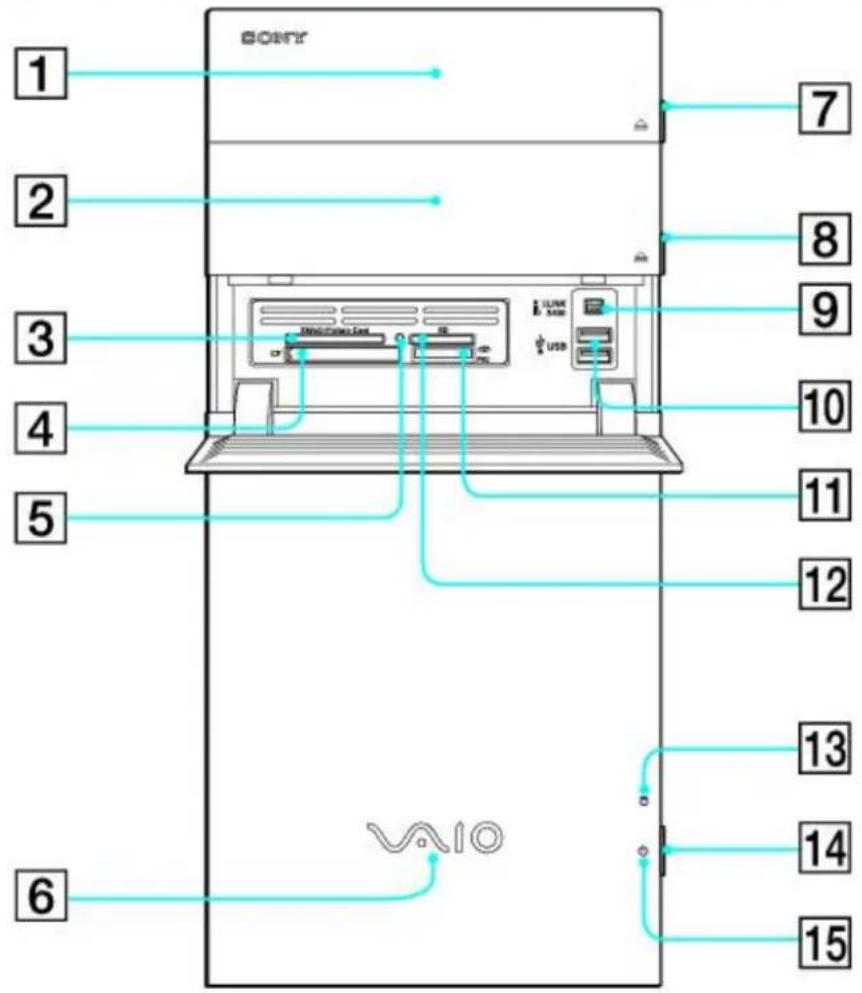
The front panel of your VAIO® Computer enables access to drives, memory card readers, ports and jacks that enable you to connect compatible peripheral devices.
Front panel
Your computer may not be equipped with all of these hardware features or accessories. The location of the controls, ports, and jacks may vary from the illustrations shown in this section.
Front panel
text_image
1 2 3 4 5 6 7 8 9 10 11 12 13 14 15 SOFTY1 Optical drive 1
See the online specifications sheet for optical drive information.
2 Optical drive 2
See the online specifications sheet for optical drive information.
3 SmartMedia (SM)/xD-Picture Card memory card reader
Reads and writes data from and to SmartMedia or xD-Picture Card media.
4 CompactFlash ^® and Microdrive memory card reader
Reads and writes data from and to CompactFlash and Microdrive media.
5 Media access indicator 1
Light is amber when reading or writing data to a memory card reader.
6 Power indicator (VAIO)
Light is white when the computer is on. The light turns off when the computer is in Standby mode or turned off.
7 Optical drive 1 eject button
Ejects a disc from Optical drive 1.
8 Optical drive 2 eject button
Ejects a disc from Optical drive 2.
9 i.LINK 4-pin S400 port (IEEE 1394)
Connection for a compatible digital device.
10 Universal Serial Bus (USB 2.0) ports (2)
Connections for compatible high/full/low-speed USB devices.
11 Memory Stick ^® memory card reader
Reads and writes data from and to Memory Stick®, Memory Stick Pro, and Memory Stick Duo media.
12 Secure Digital (SD)/MultiMediaCard (MMC) memory card reader
Reads and writes data from and to a Secure Digital (SD) or MultiMediaCard (MMC).
13 Hard disk drive access indicator
Light is amber while the hard disk drive is reading and writing data.
14 Power button
The power button turns the computer on/off.
15 Standby indicator
Light is amber when the computer is placed in Standby mode.
The media access indicator lights when reading or writing data with the Secure Digital (SD), Memory Stick®, SmartMedia, xD-Picture Card, or CompactFlash®/Microdrive slots.

i.LINK is a trademark of Sony used only to designate that a product contains an IEEE 1394 connection. The i.LINK connection may vary, depending on the software programs, operating system, and compatible i.LINK devices. All products
with an i.LINK connection may not communicate with each other.
Refer to the documentation that came with your compatible i.LINK device for information on operating conditions and proper connection. Before connecting compatible i.LINK devices to your computer, such as an optical or hard disk drive, confirm their operating system compatibility and required operating conditions.
To open the front panel cover
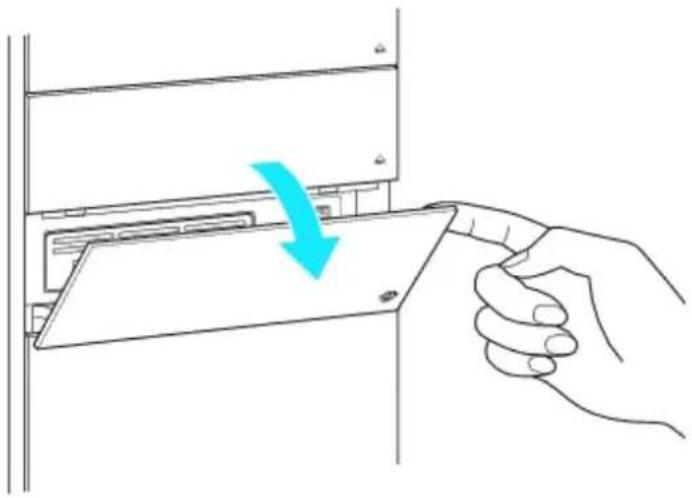
The front of your computer has a panel that covers memory card readers, USB and i.LINK® ports. Do not force the panel cover open or handle roughly.
Opening the front panel cover
natural_image
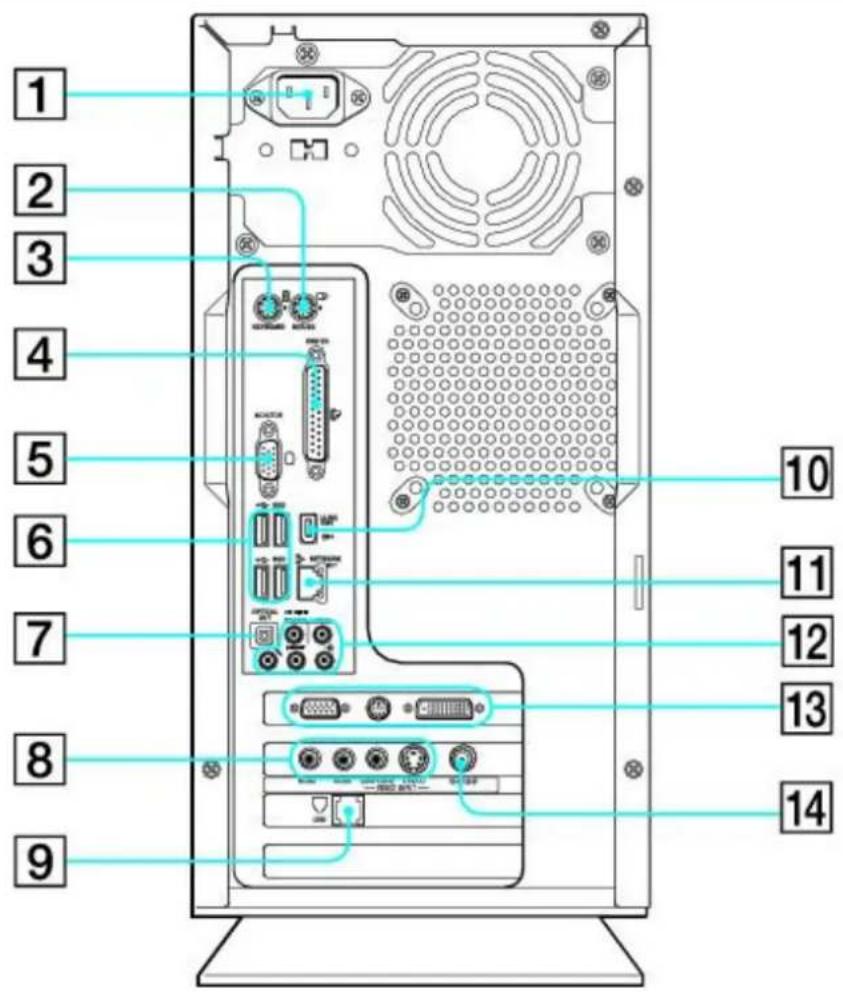
Line drawing of a hand inserting a device into a folder, with a blue arrow indicating the process (no text or symbols present)The back panel of your computer contains the ports for supplied and optional accessories. The icons on the back panel locate and identify the ports on your computer.
Back panel
The available ports and jacks on your computer may vary from those shown in this illustration, based on the computer model purchased. See your computer's specification sheet for details on hardware configuration.
Back panel
text_image
1 2 3 4 5 6 7 8 9 10 11 12 13 141 AC Input port
Connection for the supplied power cord.
2 Mouse port
Connection for a PS/2® mouse.
3 Keyboard port
Connection for a PS/2 keyboard.
4 Printer port
Connection for a parallel device, such as a printer or scanner.
5 Monitor port
Connection for a VGA monitor.
6 Universal Serial Bus (USB 2.0) ports (4)
Connections for compatible high/full/low-speed USB devices.
7 S/PDIF Optical Out port
Connection for a digital audio or optical device.
8 Composite audio R In jack 2
Connection for an audio cable (optional).
Composite audio L In jack ^2
Connection for an audio cable (optional).
Composite video In jack ^2
Connection for a video cable (optional).
S-video In jack ^2
Connection for an S-video cable (optional).
9 Modem line jack
Connection for an RJ-11 telephone cable (optional).
10 i.LINK 6-pin S400 port (IEEE 1394)
Connection and power for a compatible digital device, such as a Sony Digital Handycam® camcorder.
11 Ethernet port
Connection for a 10BASE-T/100BASE-TX/1000BASE-T Ethernet.
(The port marked with (Network) is for LAN connections only.)
12 Microphone jack
Connection for a microphone (optional).
Connection for the supplied speakers (2-channel), front speakers (5.1 speaker system ^4 ), or optional headphones.
Line In jack
Connection for an audio device.
Woofer/Center jack ^5
Connection for a Sub-woofer ^5 , control module, or center speaker (5.1 speaker system ^1 )
Rear jack
Connection for rear speakers (5.1 speaker system ^4 )
13 Monitor port
Connection for a VGA monitor.
TV Out (S-video) jackz
Connection for an S-video cable.
DVI-D monitor port
Connection for a DVI monitor.
14 VHF/UHF port 2
Connection for a TV coaxial cable (supplied).
This monitor port is not available on all models. Do not connect both the DVI-D and VGA cables from a single monitor to the computer at the same time. Doing so may cause display malfunctions with some applications.
2These audio/video connections are not available on all models.
An optional "1-to-2" jack adapter device (splitter) is required to connect both a telephone and modem line to your computer.
4 Certain VAIO computer models may be supplied with a 5.1 speaker system. See your computer's specifications sheet for details on supplied accessories.
Speaker system connections vary by model and manufacturer. See the information supplied with your speaker system for setup details.
A sub-woofer is available with certain VAIO computer models. See your computer's specification sheet for details about supplied accessories.
This S-video jack is not available on all models. For details about your computer's hardware configuration, see the online specifications sheet.
This section describes the special and standard functions available for your keyboard. A wireless or PS/2 ^® keyboard may be supplied with your VAIO ^® computer, based on the computer model purchased. See your computer's specifications sheet for details on your computer's supplied accessories.
A PS/2® keyboard is equipped with a PS/2 type connector that plugs into the back panel of your VAIO® computer.
About the wireless keyboard
Set up your wireless keyboard and insert the batteries before attempting to establish communication between the keyboard and the computer. For instructions, see the section, Connecting a Wireless Keyboard.
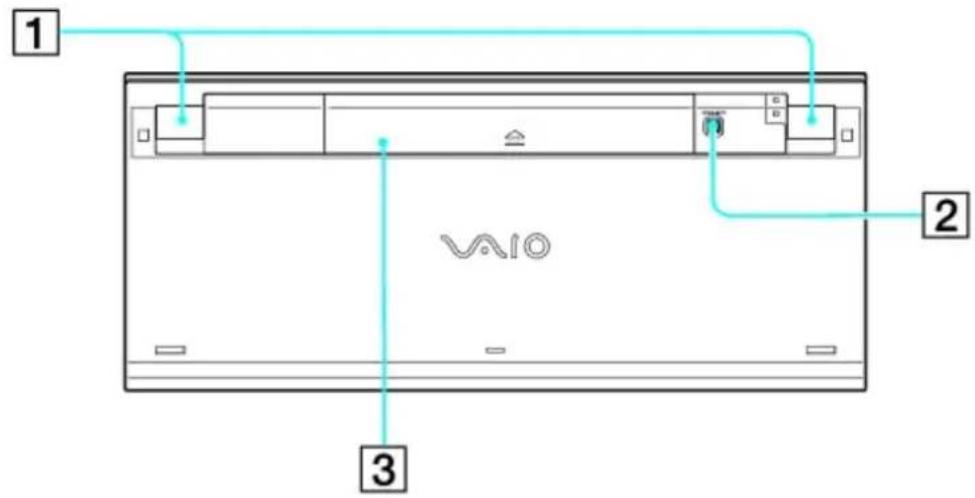
Wireless keyboard (bottom)
text_image
1 2 31 Keyboard feet
Extend the feet to adjust the keyboard height.
2 CONNECT button
Press to enable the wireless keyboard to communicate with the computer.
3 Battery compartment
Compartment for the supplied AA batteries.
Identifying keys and functions
Your keyboard uses a standard key arrangement with additional keys that perform specific functions.
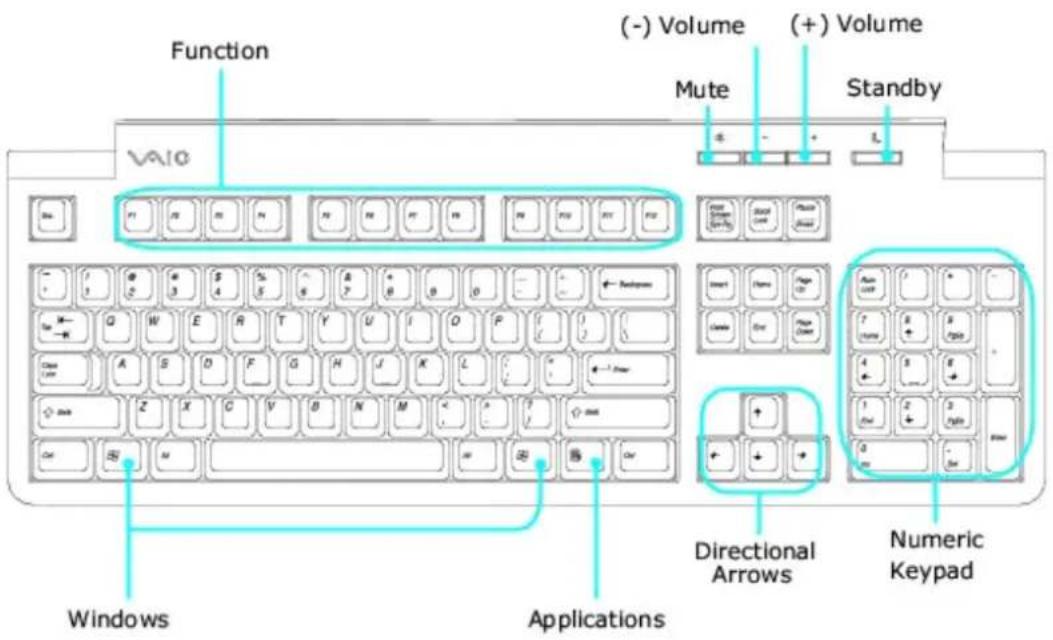
Wireless keyboard
text_image
Function (-) Volume (+) Volume Mute Standby Windows Applications Directional Arrows Numeric KeypadKEY DESCRIPTION
Function The 12 function keys along the top of the keyboard are used to perform certain tasks. The task associated with each function key may vary between software programs.
Numeric keypad Use the numeric keypad area to type numbers or to perform basic math calculations. Press the Num Lock key to activate the numeric keypad. (The Num Lock indicator lights.) Press the Num Lock key again to deactivate the numeric keypad.
Directional Arrows The up, down, left, and right arrow keys move the pointer on the screen.
Applications

The Applications key displays a shortcut menu in certain software programs. Pressing this key is equivalent to clicking the right mouse button.
Windows

The key with the Microsoft® Windows® logo, displays the Start menu. Pressing this key is equivalent to clicking Start on the taskbar.
BUTTON DESCRIPTION
Volume Increases (+) and decreases (-) the volume.
Mute Turns the sound off. Press again to restore sound.
Standby Places the computer in Stand by mode to reduce power consumption. Press any key briefly to resume normal operation.
To set up a wireless keyboard
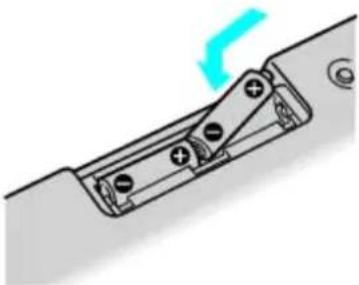
Insert two AA batteries (supplied) into the wireless keyboard as shown. You can check your keyboard's battery power level by clicking (wireless keyboard icon), located in the Windows ✉ taskbar notification area. A warning message may also appear on the screen when the keyboard's battery power becomes low.
the same type and manufacture of battery. Using incompatible batteries or mixing used/new batteries can damage the keyboard.
Inserting batteries into the wireless keyboard
natural_image
Mechanical linkage diagram showing a lever mechanism with no text or symbolsIf your wireless keyboard does not operate properly, the batteries may need to be replaced. When your wireless keyboard is not being used for extended periods of time, remove the batteries to avoid possible damage from battery leakage.
About the Keyboard (wired)
Your VAIO® keyboard uses a standard key arrangement with additional keys that perform specific functions.
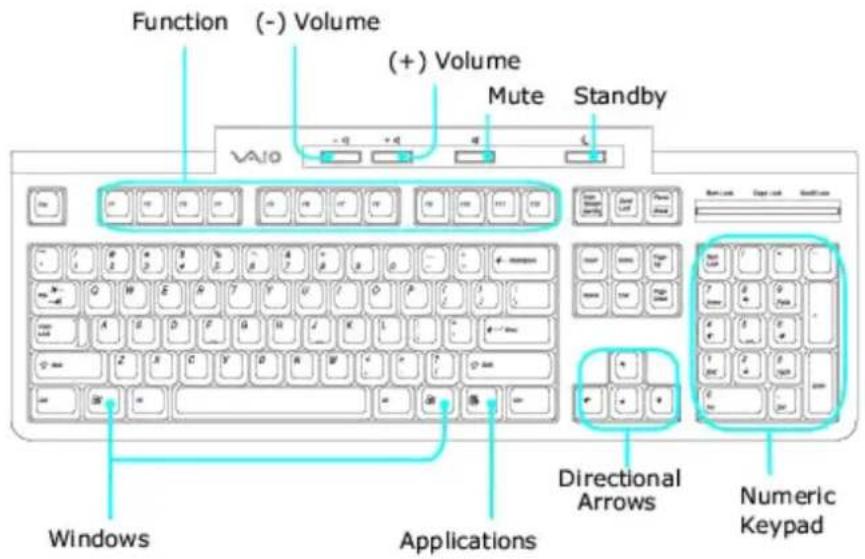
VAIO Keyboard
text_image
Function (-) Volume (+) Volume Mute Standby VAIO Windows Applications Directional Arrows Numeric KeypadKEY DESCRIPTION
Function The 12 function keys along the top of the keyboard are used to perform certain tasks. The task associated with each function key may vary from one application to the next.
Volume Control

Press a button to increase (+) or decrease (-) the volume of the speakers.
Mute

Press the button to turn off the speaker sound. Press the Mute button again to restore sound.
Standby

Press the button to place the computer in Standby mode. Press the Power button or any key briefly, to resume normal operation.
Numeric keypad Use the numeric keypad area to type numbers or to perform basic math calculations. Press the Num Lock key to activate the numeric keypad. (The Num Lock indicator lights.) Press the Num Lock key again to deactivate the numeric keypad.
Directional Arrows The Up, Down, Left, and Right arrow keys move the pointer on the screen.
Applications
The Applications key displays a shortcut menu in certain software applications. Pressing this key is equivalent to clicking the right mouse button.
Windows

The key with the Microsoft® Windows® logo, displays the Start menu. Pressing this key is equivalent to clicking Start on the taskbar.
INDICATORS FUNCTION
Num Lock The Num Lock indicator lights when the numeric keypad is activated. When the indicator is off, the directional arrow and correction keys on the numeric keypad area are active.
Caps Lock The Caps Lock indicator lights up to advise you that the keyboard is set to type letters in uppercase. When the indicator is off, the letters appear in lower case as you type.
Scroll Lock The Scroll Lock indicator lights up to advise you that your screen's scrolling pattern has changed. When the indicator is off, the screen scrolls normally. This function is not available with all software applications.
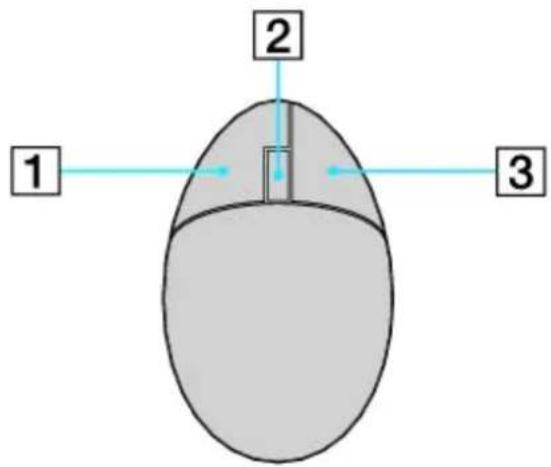
Your VAIO® computer may be supplied with a wireless optical mouse ^1 . Before attempting to use the wireless optical mouse with your computer, see the section, Connecting the Wireless Optical Mouse.
Wireless mouse (top)
text_image
1 2 31 Left mouse button
Press to perform specific mouse functions.
2 Wheel
Rotate the wheel to scroll up or down on the LCD screen.
3 Right mouse button
Press to perform specific mouse functions.
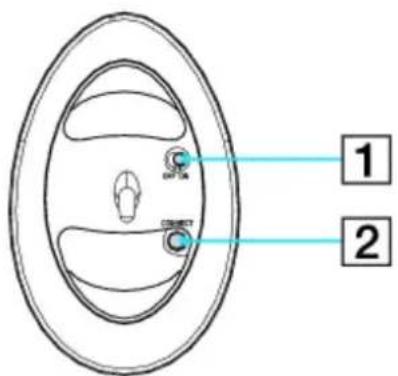
Wireless mouse (Side and bottom)
text_image
1 21 Power switch
Slide power switch to turn the mouse on or off.
2 CONNECT button
Press to enable communication between your VAIOs computer and the wireless mouse.
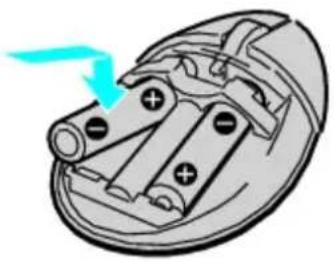
Insert two AA batteries (supplied) into the wireless mouse as shown. You can check your mouse's battery power level by clicking (wireless mouse icon), located in the Windows ✉ taskbar notification area.
Do not mix old (used) and new batteries when replacing batteries in the wireless mouse. Always use the same type and manufacture of battery. Using incompatible batteries or mixing used/new batteries can damage the mouse.
Inserting batteries into the wireless mouse
natural_image
Diagram of a battery pack with two batteries and a lightning bolt indicating current (no text or symbols)If your wireless mouse does not operate properly, the batteries may need to be replaced. When your wireless mouse is not being used for extended periods of time, remove the batteries to avoid possible damage from battery leakage.
1 See your computer's specifications sheet for details about supplied accessories.
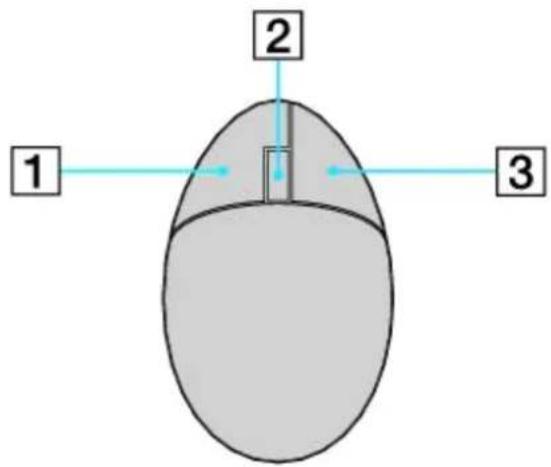
Your VAIO® computer may be supplied with a wireless optical mouse ^1 . Before attempting to use the wireless optical mouse with your computer, see the section, Connecting the Wireless Optical Mouse.
Wireless mouse (top)
text_image
1 2 31 Left mouse button
Press to perform specific mouse functions.
2 Wheel
Rotate the wheel to scroll up or down on the LCD screen.
3 Right mouse button
Press to perform specific mouse functions.
Wireless mouse (Side and bottom)
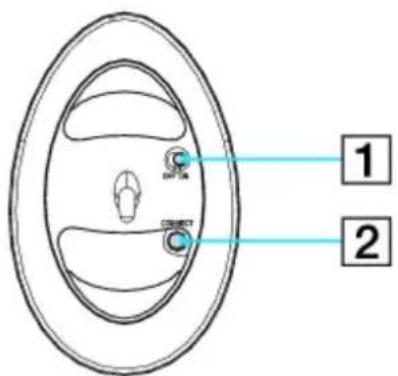
text_image
1 21 Power switch
Slide power switch to turn the mouse on or off.
2 CONNECT button
Press to enable communication between your VAIOs computer and the wireless mouse.
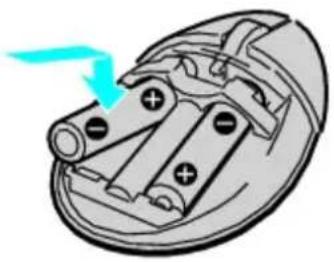
Insert two AA batteries (supplied) into the wireless mouse as shown. You can check your mouse's battery power level by clicking (wireless mouse icon), located in the Windows ✉ taskbar notification area.
Do not mix old (used) and new batteries when replacing batteries in the wireless mouse. Always use the same type and manufacture of battery. Using incompatible batteries or mixing used/new batteries can damage the mouse.
Inserting batteries into the wireless mouse
natural_image
Diagram of a battery pack with two batteries and a lightning bolt indicating current (no text or symbols)If your wireless mouse does not operate properly, the batteries may need to be replaced. When your wireless mouse is not being used for extended periods of time, remove the batteries to avoid possible damage from battery leakage.
1 See your computer's specifications sheet for details about supplied accessories.
The Media Center remote control is supplied with certain VAIO® computer models that are equipped with the Microsoft® Windows® XP Media Center Edition® operating system. For details about supplied accessories, see your computer's online specifications sheet.
Remote control
The Media Center remote control can start and stop video recording and playback, select channels, and set viewing preferences. This section describes the basic functions of your remote control.
Remote Control
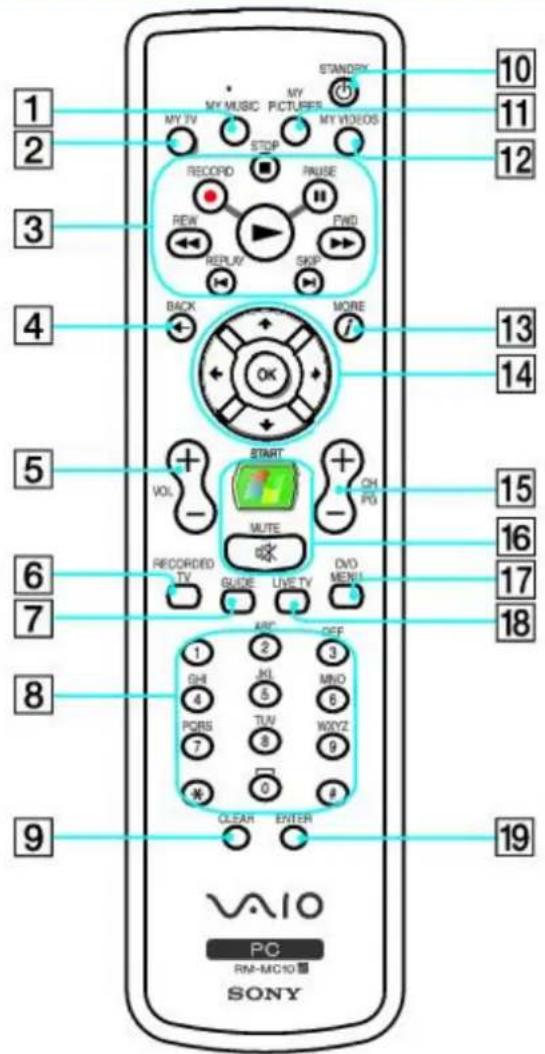
text_image
STANDRY 10 MY MUSIC MY PICTUER MY VIDEOS 2 STOP RECORD RNUSE FWD REW FND REPUV SKIP BACK MORE OK 13 14 5 START VOL CH PO 6 MUTE RECORDED DVD TV GUIDE LIVE TV MENU 7 8 ABC OFF 1 2 3 GH KI MNO 4 5 6 POBS TUV WOYZ 7 8 9 * 0 P CLEAH ENTER 9 VAIO PC RM-MC10 SONY SONY1 MY MUSIC button
Press to view and listen to your music playlists.
2 MY TV button
Press to view the My TV menu.
3
STOP button
Press to stop media playback or TV recording session.
PAUSE button
Press to pause media playback. Press again to resume playback.
FWD button
Press to fast-forward media at three speeds.
SKIP button
Press to move media forward, for example, one audio track, one DVD chapter, and 30 seconds of recorded TV or video.
REPLAY button
Press to move media backward, for example, one audio track, one DVD chapter, and seven seconds of TV or video.
REW button
Press to move media backward at three speeds.
RECORD button
Press to begin recording.
PLAY button

Press to begin media playback.
4 BACK button
Press to return to the previous window.
5 VOL button
Press to increase (+) or decrease (-) the volume.
6 RECORDED TV button
Press to view previously recorded TV programs (In My TV window)
7 GUIDE button
Press to view the TV program guide for your area.
8 Channel number buttons (0-9)
Press to select specific channels or enter text.
(Press Enter or OK to activate the channel selection.)
9 CLEAR button
Use to backspace and delete entered text.
10 STANDBY button
Press to place the computer in Stand by mode to reduce power consumption.
11 MY PICTURES button
Press to view pictures or a slide show.
12 MY VIDEOS button
Press to view videos from your video collection.
13 MORE button i
Press to view additional options that are available for Media Center features.
14 Directional arrow buttons
Press the Up, Down, Left, and Right arrow buttons to move the pointer on the screen.
OK button
Press OK to select the desired action or window option. If watching full-screen TV press OK to return to the previous channel, Press OK again to switch between channels.
15 CH/PG (Channel/Page) button
Press to change or page up/down channels (no number input required).
16 START button
Press to open the Media Center Start menu.
MUTE button
Press to turn off the sound. Press again to restore the sound.
17 DVD MENU button
Press to open the main menu on a DVD.
18 LIVE TV button
Press to view TV programming.
19 ENTER button
Press to activate feature or action, such as channel selection or return to previous channel. (This button's actions are similar to using the OK button.)
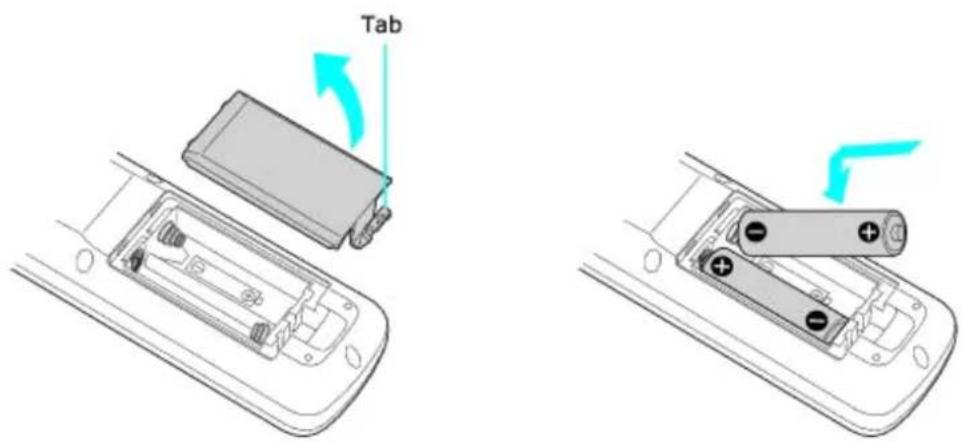
Setting up the remote control
- Turn the remote control over.
- Press in the tab and lift the battery cover up.
- Insert two AA batteries (supplied) into the remote control as shown.
- Align the battery cover to the remote control.
- Press down until the cover clicks into place.
Inserting batteries into the remote control
text_image
TabIf your remote control does not operate properly, you may need to replace the batteries. When your remote control is not being used for extended periods of time, remove the batteries to avoid possible damage from battery leakage.
Your computer may not be equipped with Microsoft Windows XP Media Center Edition operating system or supplied with Media Center accessories. See your computer's online specifications sheet for more information.
Your VAIO® computer is equipped with a 4-pin and a 6-pin i.LINK® port. A 4-pin i.LINK port cannot supply power to a connected i.LINK device. A 6-pin i.LINK port can supply power (10V to 12V) to a connected i.LINK device, if the device is equipped with a 6-pin connector.
The total power supplied by the 6-pin i.LINK port does not exceed 6 watts.
Connecting an i.LINK (IEEE 1394) device
- Use the i symbol to locate the i.LINK port on your compatible i.LINK device and on your computer. Plug the i.LINK cable connector into this port.
- Plug the other end of the cable into the corresponding 4- or 6-pin i.LINK port on your computer.
See the instructions supplied with your i.LINK device for more information on installation and use.
Your computer may not be equipped with all of the hardware features described in the section. The location of the controls, ports, and jacks may vary from the illustrations shown in this section. See the online Specifications sheet for your computer's hardware configuration.
■ Connecting a Display (Monitor)
■ Connecting the Radio Frequency Receiver
■ Connecting a Wireless Keyboard
■ Connecting the Wireless Optical Mouse
■ Connecting the Keyboard and Mouse
■ Connecting 5.1 (6-Channel) Speaker Systems
- Configuring Software for Your Speaker System
- Configuring Software for Your Speaker System
■ Connecting the Power Cords
■ Turning On Your Computer
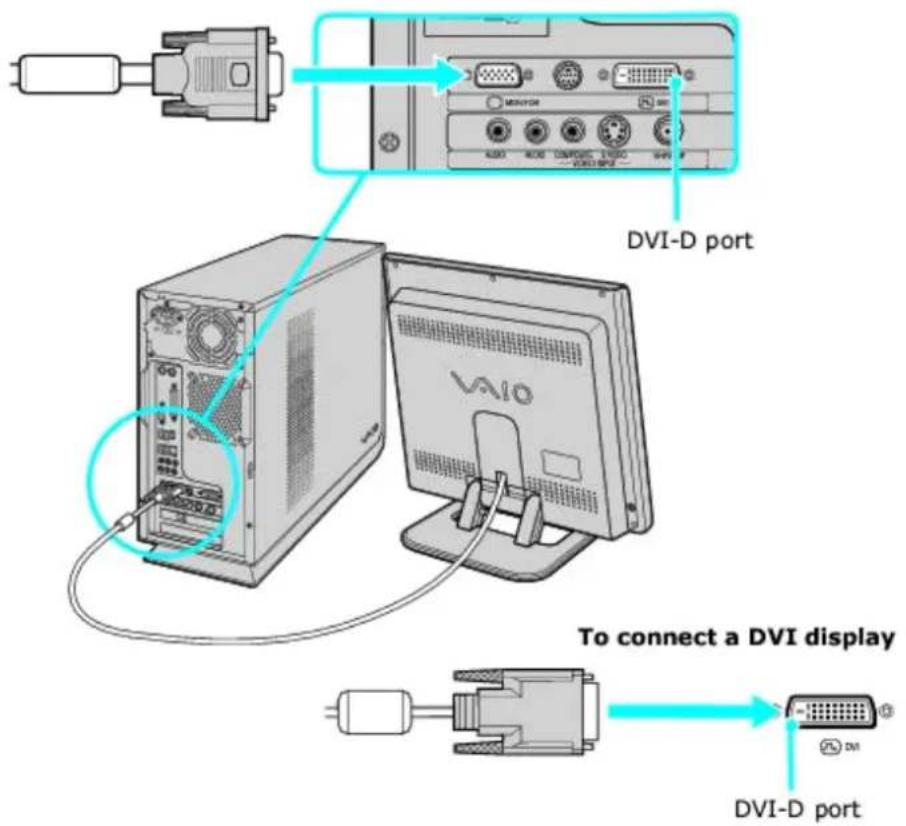
The location, availability, and type of the monitor port may vary, depending on the model purchased. See the specifications sheet for your computer on the Sony Online Support Web site at http://www.sony.com/pcsupport, for details about your computer's hardware configuration
- Plug the display's cable into the appropriate monitor port.
- If necessary, plug the display's cable into the rear of the display.
To connect a display
text_image
DVI-D port To connect a DVI display DVI-D port
Install your equipment so that you can easily reach the power outlet in the event of an emergency.
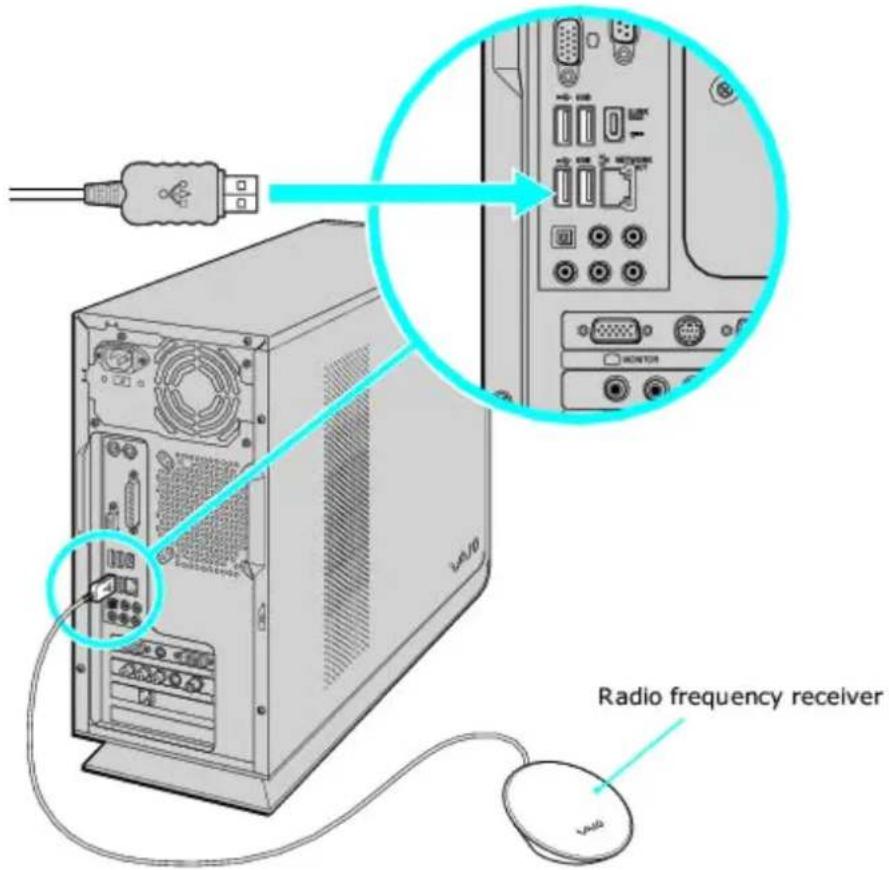
The radio frequency receiver enables your VAIO® computer to communicate with the wireless keyboard and mouse ^4 .
Certain V A IO® computer models are supplied with a wireless keyboard and mouse. See your computer's specifications sheet for details on supplied accessories.
To connect the Radio frequency receiver
- Plug the radio frequency receiver unit to a USB port located on either the front or back panel of your computer.
- Press the CONNECT button on the bottom of the radio frequency receiver, to activate communication between the wireless keyboard and the computer.
- Position the radio frequency receiver to enable unobstructed communication with your wireless keyboard and mouse.
To connect the radio frequency receiver
text_image
VLAU0 Radio frequency receiver VLAU0Your VAIO ^® computer may be supplied with a wireless keyboard ^1 . Before attempting to use the wireless keyboard, you must enable communication between the computer and the keyboard. To connect your wireless keyboard, it must be within 11 inches of the computer ^2 .
When attempting to connect the wireless keyboard, confirm that the AA batteries (supplied) are properly inserted into the keyboard before your computer is turned on.
See your computer's specifications sheet for details about supplied accessories.
20 perate the keyboard within 2.5 feet of the computer.
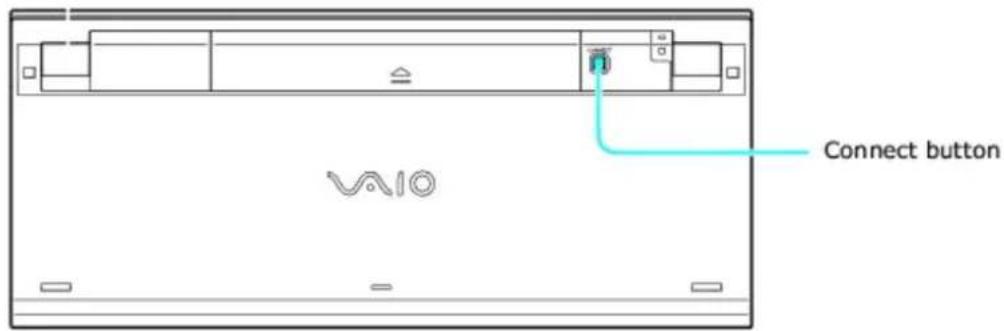
To connect the wireless keyboard
- Press the CONNECT button, located on the bottom of the radio frequency receiver.
- Turn the wireless keyboard over.
- Press the CONNECT button on the bottom of the keyboard, to activate communication between the wireless keyboard and the computer.
Connecting the keyboard
text_image
Connect button SAIOAdditional information about using a wireless keyboard
The wireless keyboard requires unobstructed communication with the radio frequency receiver for proper operation.
- To maintain good communication, operate your wireless keyboard within 2 feet of the VAIO® computer.
- Confirm that the supplied AA batteries are properly installed.
- Press the CONNECT button located on the bottom of the radio frequency receiver first, and then press the CONNECT button on the bottom of the keyboard.
- Verify the radio frequency receiver is free of obstructions that may prevent proper operation.
- Avoid using radio-controlled toys or equipment, CB radios, and other wireless devices in the area near your wireless keyboard. These devices may cause interference, causing your keyboard to stop working properly.
- Do not place metal furniture near your computer or wireless keyboard, as this may create interference, causing your keyboard to stop working properly.
Do not mix old (used) and new batteries when replacing batteries in the wireless keyboard. Always use the same type and manufacture of battery. Using incompatible batteries or mixing used/new batteries can damage the keyboard.
Your VAIO® computer may be supplied with a wireless mouse. Before attempting to use the wireless mouse, you must enable communication between the computer and the mouse. To connect your wireless mouse, it must be within 11 inches of the computer.
When attempting to connect the wireless mouse, confirm that the AA batteries (supplied) are properly inserted into the mouse before your computer is turned on.
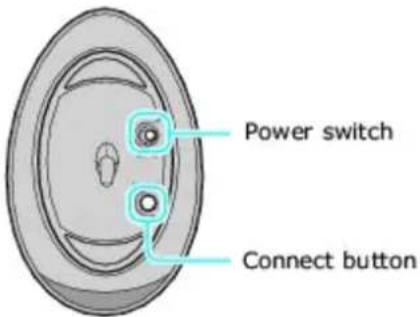
- Press the CONNECT button, located on the bottom of the radio frequency receiver.
- Turn the wireless mouse over and slide the power button to the ON position.
- Press the CONNECT button on the bottom of the mouse.
Connecting the mouse
text_image
Power switch Connect buttonAdditional information about using a wireless optical mouse
A wireless optical mouse requires unobstructed communication with the radio frequency receiver for proper operation.
- To maintain good communication, operate your wireless mouse within 2 feet of the VAIO ^® computer.
- Confirm that the supplied AA batteries are properly installed. Press the CONNECT button located on the bottom of the radio frequency receiver first, and then press the CONNECT button on the bottom of the mouse.
- Verify the radio frequency receiver is free of obstructions that may prevent proper operation.
- Avoid using radio-controlled toys or equipment, CB radios, and other wireless devices in the area near your wireless mouse. These devices may cause interference, causing your mouse to stop working properly.
- Do not place metal furniture near your computer or wireless mouse, as this may create interference, causing your mouse to stop working properly.
A wireless optical mouse requires an appropriate surface texture in order to provide precision pointing and tracking.
- Use surfaces such as plain paper, card stock, or fabric that have minimal repetitive patterns.
- Avoid surfaces such as mirrors, smooth glass, or magazines that have half-tone printing.
Do not mix old (used) and new batteries when replacing batteries in the wireless mouse. Always use the same type and manufacture of battery. Using incompatible batteries or mixing used/new batteries can damage the mouse.
^1 See your computer's specifications sheet for details about supplied accessories.
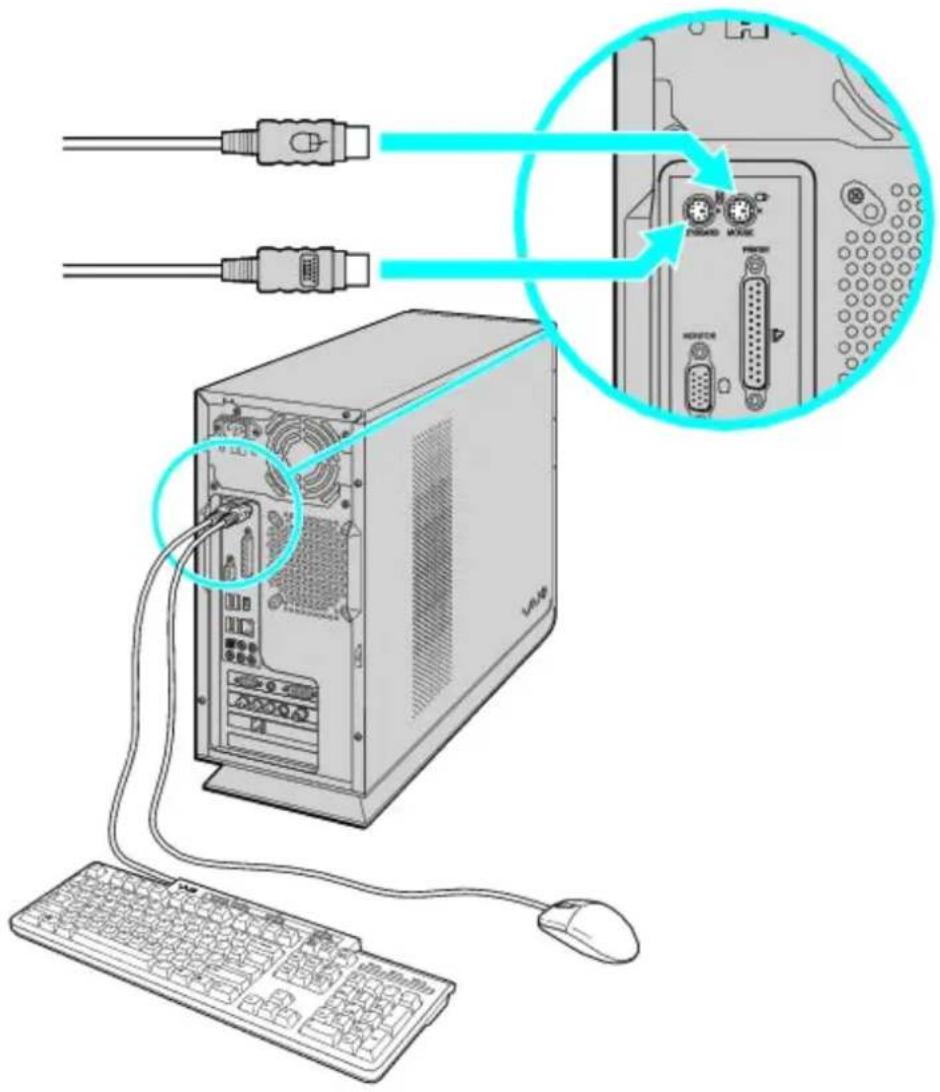
Your VAIO® computer may be supplied with a PS/2® keyboard and mouse. For details on the accessories supplied with your computer, see the online Specifications sheet.
- Plug the keyboard cable into the keyboard port on the back of the computer.
- Plug the mouse cable into the mouse port on the back of the computer.
To connect the keyboard and mouse
text_image
Diagram showing computer setup with connected hardware and a magnified view of the internal components.Certain VAIO® computers are supplied with a 5.1 channel speaker system, or you may wish to use your 5.1 (6-channel) speaker system. Speaker configuration can vary, depending on the speaker components used.
To set up the speakers with your computer:
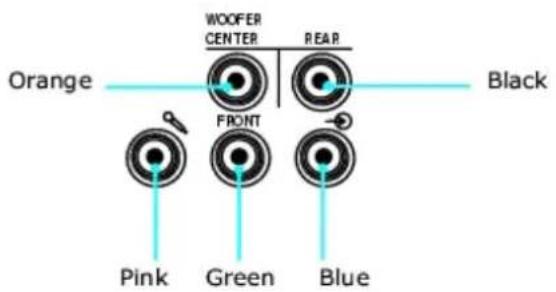
- Match the color of the mini stereo plugs (speaker system) to the color of the speaker jacks on the back panel of your computer.
- Review the connection instructions provided with your speaker system, as the connection setup may vary.
Audio jacks (computer back panel detail)
text_image
Orange WOOFER CENTER REAR FRONT Black Pink Green BlueJack color Description/Connection
Orange Woofer/Center ^1 — Connect a Sub-woofer ^2 , control module,
or Center speaker (5.1 channel speaker system ^3 )
Black Rear — Connect rear speakers (5.1 channel speaker system).
Pink Microphone — Connection for an optional microphone.
Green Front/Headphones — Connect the supplied speakers (2-channel), front speakers (5.1 channel speaker system), or optional headphones.
Blue Line In — Connect an audio device.
1Speaker system connections vary by model and manufacturer. See the information supplied with your speaker system for setup details.
2A sub-woofer is available with certain VAIO® computer models. See your computer's specification sheet for details about supplied accessories.
Certain VAIO computer models may be supplied with a 5.1 channel speaker system. See your computer's specifications sheet for details on supplied accessories.
When using 5.1 channel (digital or analog) speaker systems, certain software programs require setting changes to enable proper audio performance.
To configure your sound output:
For 6 channel-analog speakers
- Click Start in the Windows® taskbar, and then click Control Panel.
- Click Sounds, Speech, and Audio Devices, and then click Sound and Audio Devices.
The Sound and Audio Devices Properties window appears. - Under the Speaker Settings section, click the Advanced button.
- From the drop-down menu on the left, select 5.1 Surround Sound Speakers.
- Click OK to accept the change.
- Click OK to close the Sounds and Audio Devices Properties window.
For S/PDIF 6 channel speaker output

The S/PDIF audio output is always ON by default. Follow these instructions if you are having trouble.
- Click Start in the Windows® taskbar, and then click Control Panel.
- Click Sounds, Speech, and Audio Devices, and then click Reality Audio.
The Sound Reality Control Panel window appears. - Click the Advanced tab.
- Select the Enable Digital Output box.
- Close the Sound Reality Control Panel window.
To configure Media Center software
Your computer's factory default settings for audio can be changed using the Media Center Settings feature. You can switch between 2-channel, 6-channel, or S/PDIF output modes.
- Use the Media Center remote control, your keyboard, or mouse, to start the Media Center software program.
- Select Settings and press OK.
The Settings window appears.
- From the Settings window, select DVD, and then press OK.
The DVD Settings window appears.
- Select Audio and press OK.
InterVideo® software's audio settings window appears.
-
Select Configuration and press OK.
-
From the section, Set sound output to match your system, use +/- to locate the appropriate speaker system setup.
To enable S/PDIF output, select SPDIF.
-
Select Save, and press OK.
-
Press on the remote control to return to the Media Center Start menu.
To configure WinDVD software
- Click Start in the Windows® taskbar, and point to All Programs.
- Point to InterVideo WindDVD, and the click on InterVideo WinDVD for VAIO.
The InterVideo WinDVD for VAIO window opens.
- Right-click in the WinDVD window.
A shortcut menu appears.
-
Click Setup..., to view the Setup dialog box.
-
Select the Audio tab.
-
From the section, Audio Speaker Configuration, select 6 Channel (5.1 Home Theater) or the desired speaker configuration.
To enable S/PDIF, go to the Audio Output Configuration section and select Digital (S/PDIF) out to External Processor.
- Click Apply, and then click OK.
InterVideo * software automatically detects the type of speaker system. You may notice that some options are disabled or are not available.
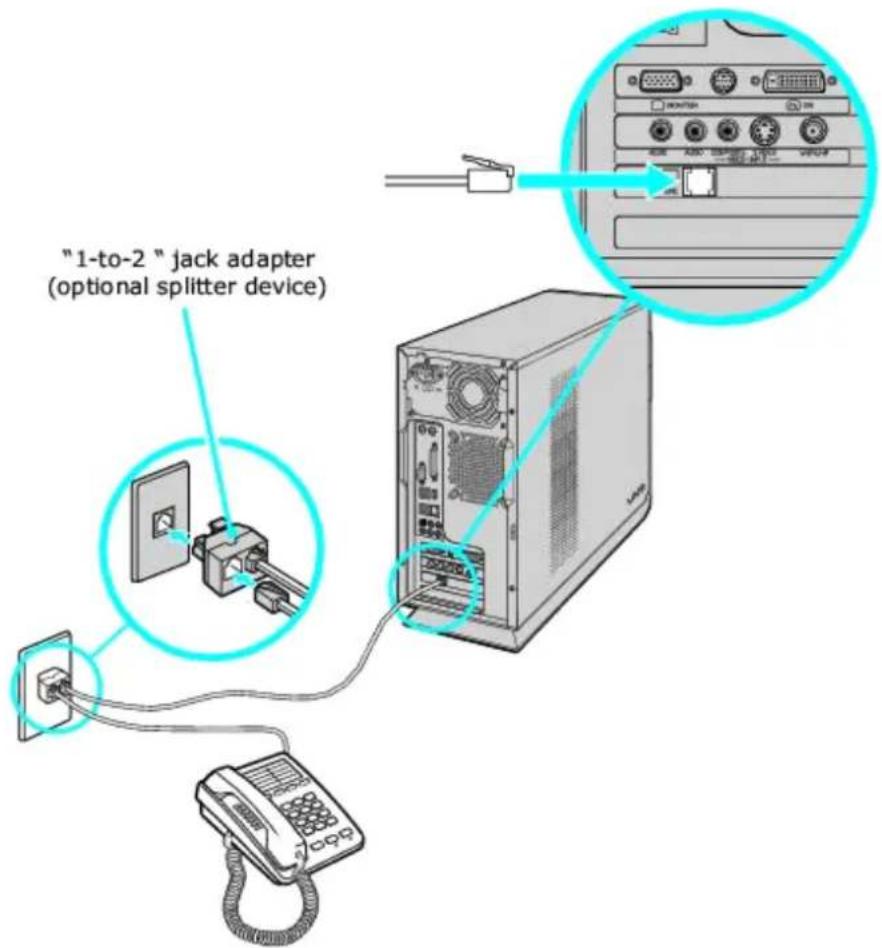
Your computer is equipped with a single modem line jack to connect your installed modem with your telephone wall jack. To use your wall jack for both telephone and modem lines, purchase an additional RJ-11 telephone cable and a "1-to-2" jack adapter device (splitter).
To connect the modem
- Unplug your telephone from the wall jack and set aside.
- Plug another telephone cable (optional) into the modem line jack located on the back panel of your computer
- Plug the other end of the cable into the wall jack.
To connect the telephone and modem
- Unplug your telephone cable from the wall jack.
- Insert the telephone's cable into one of the jacks on an optional "1-to-2" jack adapter device (splitter).
- Insert one end of a second telephone cable (optional) into the other jack on the splitter device.
- Insert the plug end of the splitter device into the wall jack.
- Plug the second telephone cable into the modem line jack located on the back panel of the computer.
To connect the telephone and modem
text_image
"1-to-2 " jack adapter (optional splitter device)Your computer has a protective sticker covering the Ethernet port located on the rear panel. Connect 10BASE-T,100BASE-TX,or 1000BASE-T cables to the Ethernet port, depending on your computer's Ethernet port specification. Using incorrect cables or a telephone cable may result in an electric current overload that can cause a malfunction, excessive heat, or fire in the Ethernet port. For help on connecting to a network, see your network administrator.
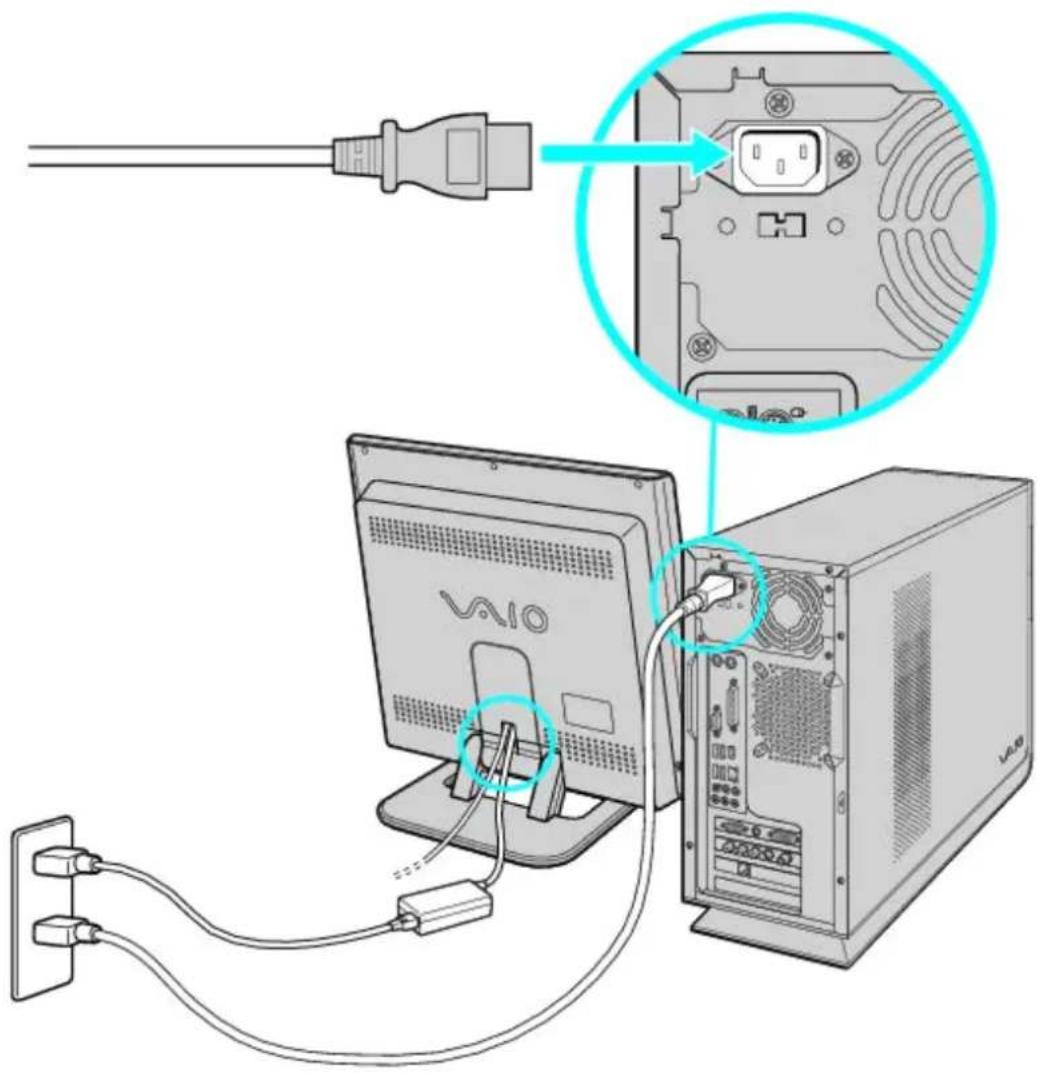
- Plug the power cord into the back of the computer.
- Plug both the display and computer power cords into a grounded AC wall outlet or a power strip.
To connect the power cords
text_image
Diagram showing connection between a computer tower and an attached device, with labeled cable and component details.When you start your computer for the first time, your computer may detect new equipment and display a dialog box that prompts you to restart your computer. Respond to this prompt immediately.
If your computer has Microsoft Windows XP Media Center Edition installed, set up the cables and connections required to use these features before you turn on the computer. See the section, Setting Up Media Center.
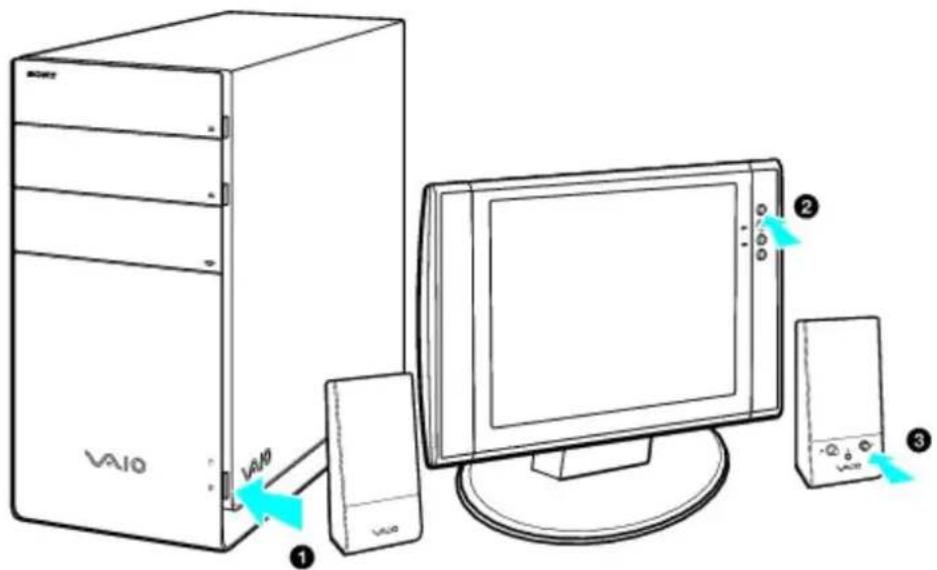
- Press the power button on the computer to turn on the power.
- Press the power button on the display to turn on the power.
- Press the power button on the right speaker to turn on the power.
To turn on your computer
text_image
Diagram showing a desktop computer setup with labeled components including a VAV0 tower, monitor, and two speakers.Certain VAIO computer models have the Microsoft® Windows® XP Media Center Edition® operating system installed, enhancing your music, TV, and video enjoyment. Media Center provides many options for TV, DVD, and music viewing, personal video recording, and music playback. This section describes how to set up your TV, set-top box, and other equipment.
■ Setting Up TV Connections
■ Connecting the Remote Sensor and Remote Sensor Controls
■ Connecting Other Devices
■ Registering Your Computer
■ Turning Off Your Computer
Your computer may not be equipped with Microsoft® Windows® XP Media Center Edition operating system or Media Center hardware features. See your computer's online specifications sheet for more information.
The best method of connecting your computer, TV monitor or display, and TV programming access, is determined by the type of cable service connection available in your home. Your computer's hardware configuration may vary from the illustrations shown in this section. See the online Specifications sheet for details about your computer's hardware configuration.
Your VAIO ^® computer is supplied with certain video cables. Depending on your in-home cable access, you may require extra cables, adapters or connection equipment that are optional for your computer.
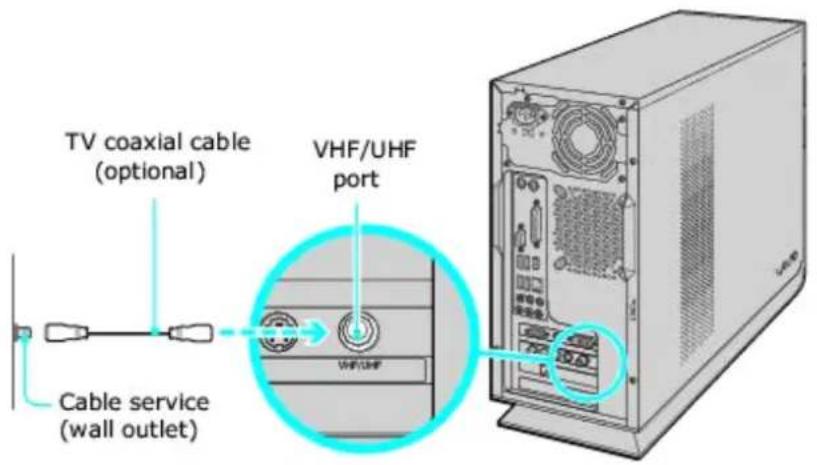
Connecting to standard cable access (CATV)
Option 1
- Connect one end of the TV coaxial cable (optional) to your cable service access.
- Connect the other end of the TV coaxial cable to the VHF/UHF port on the back panel of your computer.
To connect in CATV mode (Option 1)
text_image
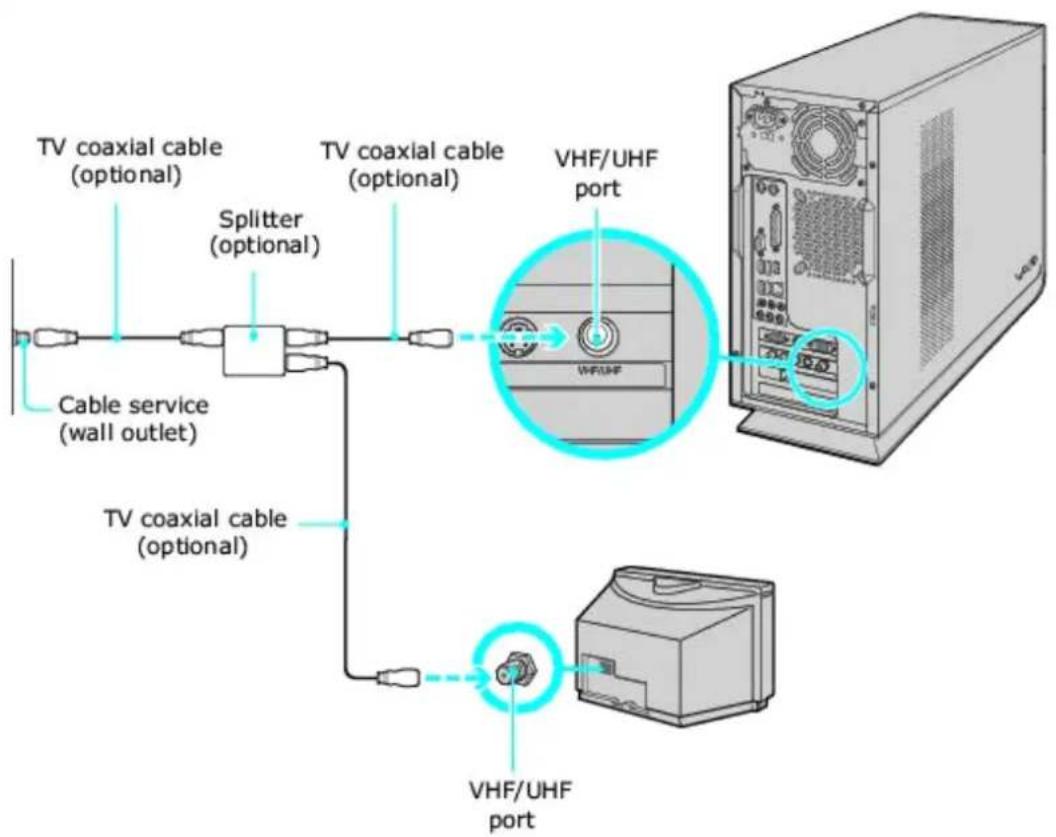
TV coaxial cable (optional) VHF/UHF port Cable service (wall outlet)Option 2
- Connect one end of a TV coaxial cable (optional) to your cable service access. Connect the other end to the single-connection side of a splitter adapter.
- Connect the TV coaxial cable (optional) to the double-connection side of the splitter adapter. Connect the other end to the VHF/UHF port on the back panel of your computer.
- Connect a third TV coaxial cable (optional) to the double-connection side of the splitter adapter. Connect the other end to the VHF/UHF port on the back of your TV monitor or display.
To connect in CATV mode (Option 2)
text_image
TV coaxial cable (optional) Splitter (optional) Cable service (wall outlet) TV coaxial cable (optional) TV coaxial cable (optional) VHF/UHF port VHF/UHF port VHF/UHF portConnecting to a standard antenna (air) system
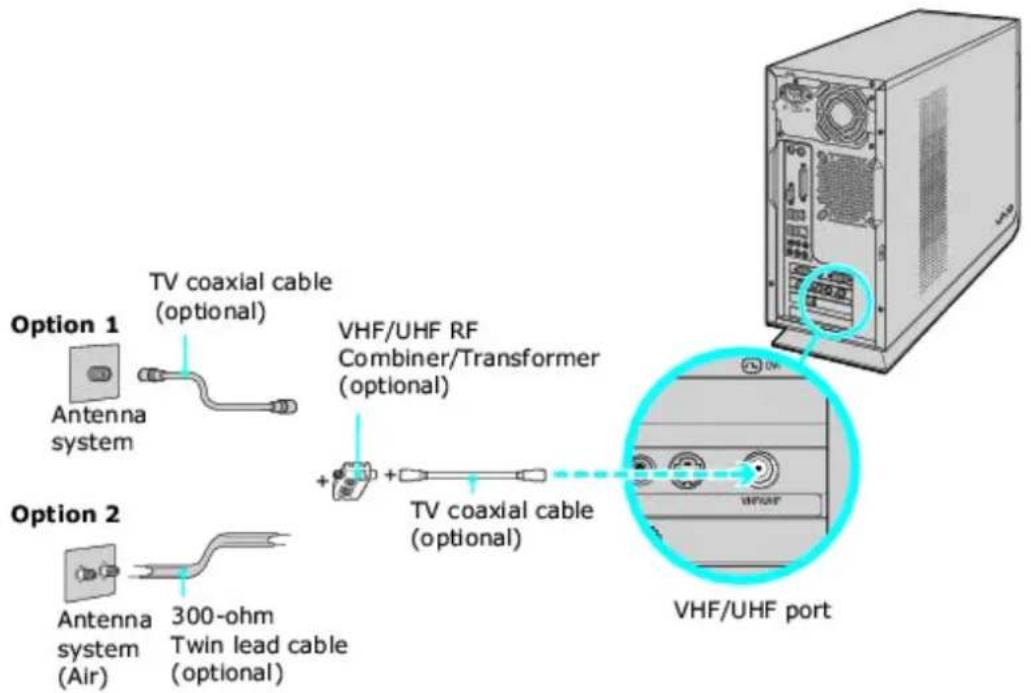
You can connect your computer to an indoor/outdoor antenna system, using Option 1 or 2 from the previous section, Connecting to standard cable access (CATV). The antenna system in your home may require a VHF/UHF RF combiner/transformer (optional) to connect your computer and the indoor/outdoor antenna system.
If you are connecting to an indoor/outdoor antenna system, you may need to reorient the antenna for better reception.
Option 1
- Connect one end of a TV coaxial cable (optional) to your antenna outlet. Connect the other end to a VHF/UHF RF combiner/transformer (optional).
- Connect the TV coaxial cable (optional) from the combiner/transformer to the VHF/UHF port on the back panel of your computer.
Option 2
- Connect both ends of the antenna's twin lead cable to the screw-type grips on the combiner/transformer.
- Connect the TV coaxial cable (optional) from the combiner/transformer to the VHF/UHF port on the back panel of your computer.
To connect in standard antenna mode (air)
text_image
Option 1 Antenna system TV coaxial cable (optional) Option 2 Antenna system (Air) 300-ohm Twin lead cable (optional) VHF/UHF RF Combiner/Transformer (optional) + TV coaxial cable (optional) VHF/UHF portYour VAIO ^® computer is supplied with certain video cables. Depending on your in-home cable access, you may require extra cables, adapters or connection equipment not supplied with your computer.
Connecting a Cable or Satellite Set-top Box
You can connect your computer to cable or satellite service that requires a set-top box.
Option 1
- Connect one end of a TV coaxial cable (optional) to your cable service access. Connect the other end to the In jack on the back panel of your set-top box.
- Connect a second TV coaxial cable (optional) to the Out jack on your set-top box. Connect the other end to the single-connection end of a splitter adapter (optional).
- Connect a third TV coaxial cable (optional) to the double-connection end of the splitter adapter. Connect the other end to the VHF/UHF port on the back panel of your computer.
- Connect a fourth TV coaxial cable (optional) to the double-connection end of the splitter adapter. Connect the other end to the VHF/UHF port on the rear of your TV monitor or display.
To connect in set-top box mode (Option 1)
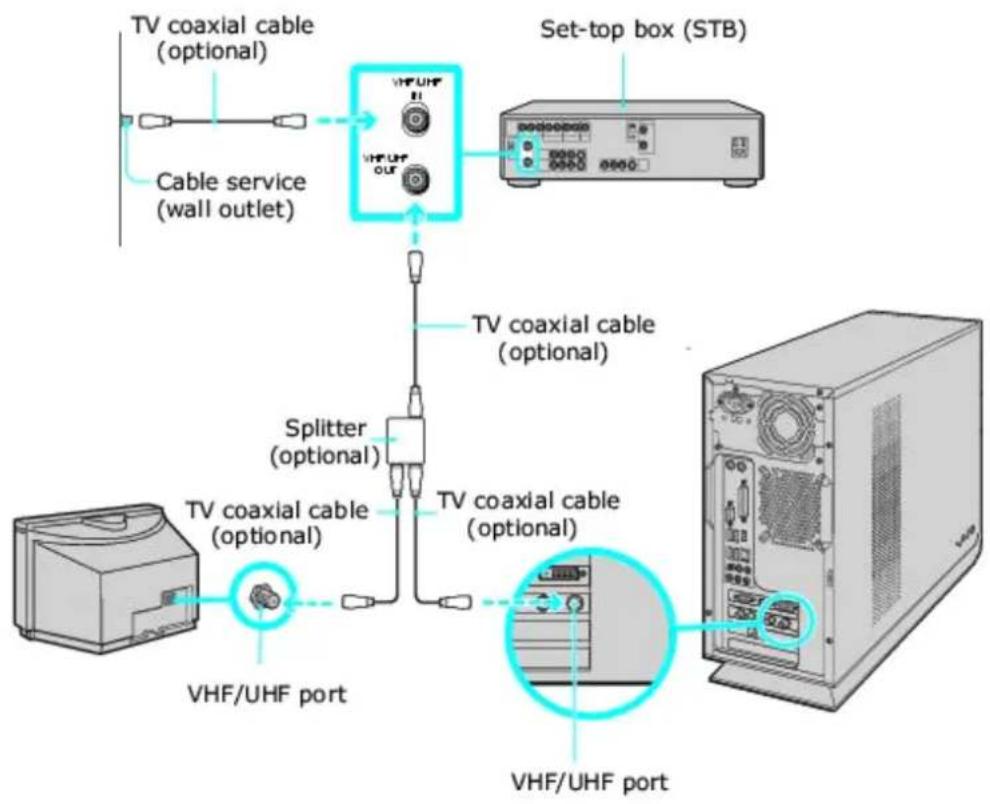
flowchart
graph TD
    A["TV coaxial cable (optional)"] --> B["Cable service (wall outlet)"]
    B --> C["TV coaxial cable (optional)"]
    C --> D["Splitter (optional)"]
    D --> E["VHF/UHF port"]
    F["Set-top box (STB)"] --> G["TV coaxial cable (optional)"]
    G --> H["TV coaxial cable (optional)"]
    H --> I["VHF/UHF port"]
Option 2
- Connect one end of the TV coaxial cable (optional) to your cable service access. Connect the other end to the In jack on the back panel of your set-top box.
- Connect a second TV coaxial cable (optional) to the Out jack on your set-top box. Connect the other end to the VHF/UHF port on the rear of your TV monitor or display.
- Connect one end of a stereo A/V dubbing cable with triple RCA plugs (optional) to the Video Out and Audio-OUT (L/R) jacks on the back panel of your set-top box, matching the plug and jack colors.
- Connect the other ends of the stereo A/V dubbing cable into the Audio-R (IN), Audio-L (IN), and Composite video (IN) jacks on the back panel of your computer, matching the plug and jack colors.
To connect in set-top box mode (Option 2)
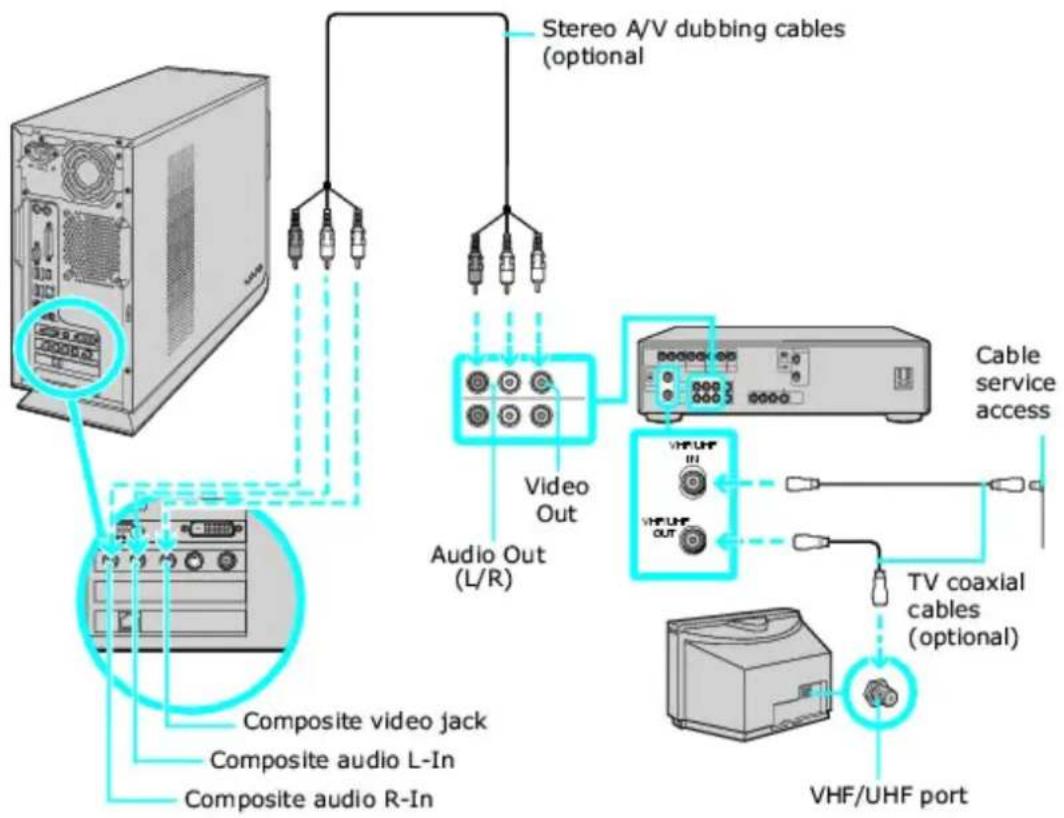
flowchart
graph TD
    A["Server"] --> B["Composite audio L-In"]
    A --> C["Composite audio R-In"]
    A --> D["Composite video jack"]
    A --> E["Audio Out (L/R)"]
    A --> F["Video Out"]
    F --> G["Cable service access"]
    G --> H["VHF/UHF port"]
    H --> I["TV coaxial cables (optional)"]
    I --> J["VHF UHF"]
    J --> K["Audio Out (L/R)"]
    K --> L["Composite audio L-In"]
    L --> M["Stereo A/V dubbing cables (optional)"]
You can connect your computer to a set-top box using an S-video cable (optional) and an audio cable (optional) instead of a stereo A/V dubbing cable (optional). See Connecting Other Devices.
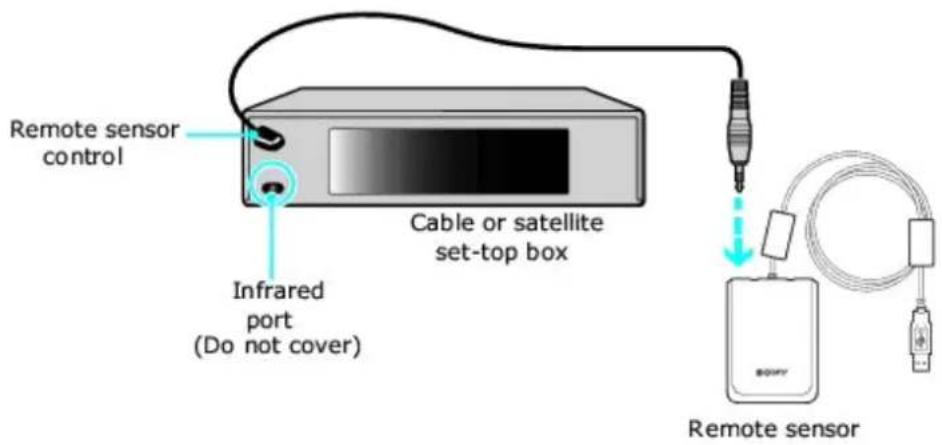
The remote sensor communicates with the Media Center remote control, enabling you to change channels and to perform other functions. If you are using a cable or satellite set-top box, you can attach the remote sensor control which enables you to control the set-top box using the Media Center remote control.
To connect the remote sensor
- Connect the remote sensor unit to a USB port located on either the front or back panel of your computer.
- Position the remote sensor to enable unobstructed communication with your remote control.
Connecting the remote sensor (back panel)
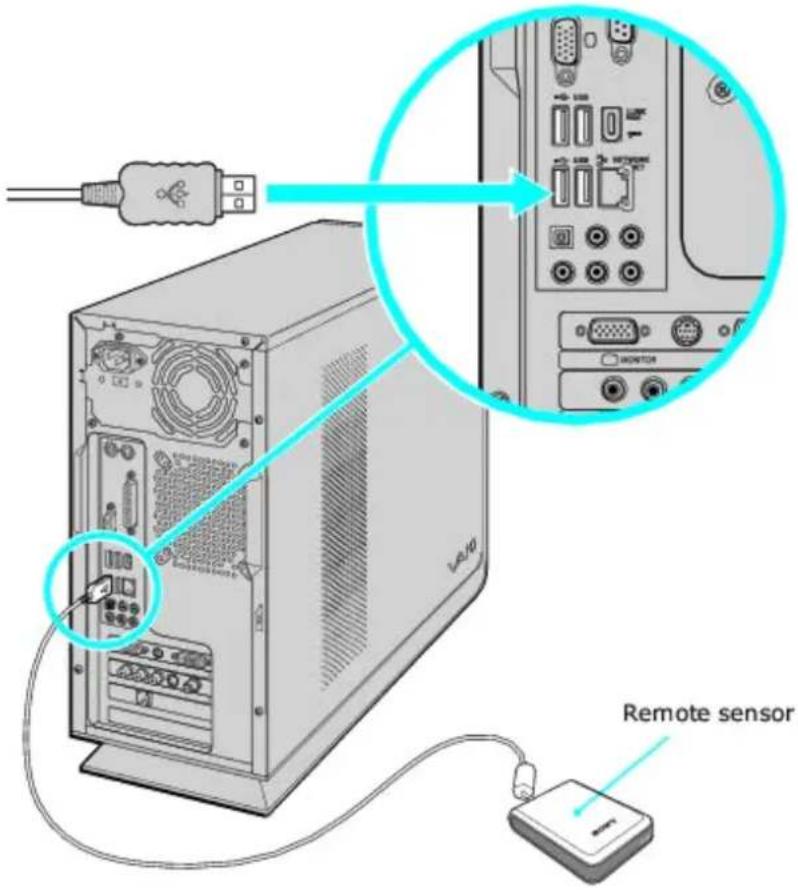
text_image
Remote sensorTo connect the remote sensor control
- Plug the remote sensor control's cable into either jack (1 or 2) located on the back of the remote sensor.
When you attach the remote sensor control to a cable or satellite set-top box, you can control the set-top box functions with your remote control.
Connecting the remote sensor and rem ote sensor control
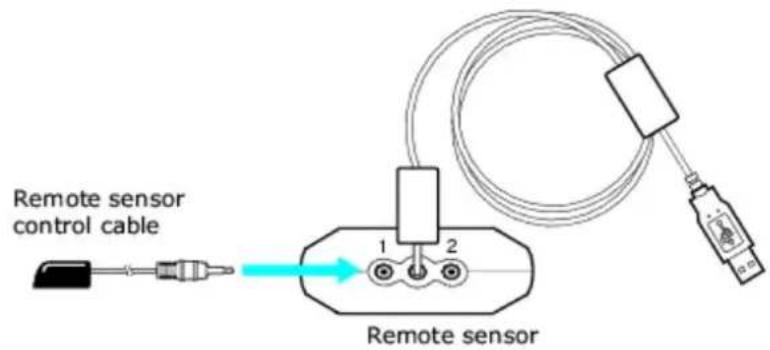
text_image
Remote sensor control cable 1 2 Remote sensor-
Remove the adhesive tape cover, located on the bottom of the remote sensor control.
-
Press the remote sensor control onto the set-top box near the infrared port, without covering the port.
If the remote sensor control covers the infrared port on the set-top box, you cannot use the remote control supplied with the set-top box.
Attaching the remote sensor control cable to a cable or satellite set-top box
text_image
Remote sensor control Cable or satellite set-top box Infrared port (Do not cover) Remote sensorThe remote sensor unit must be visible in a line-of-sight with your remote control in order to function properly.
This section illustrates how to connect other devices to your VAIO® computer. Your computer has both audio and video connection capability. You can locate the appropriate connections on the back panel of the computer. You can connect a VCR or camcorder, using the composite audio In jacks. Your VCR or camcorder may have either standard video or S-video connection capability.
Connecting a device with an audio cable
- Connect a dual audio cable (optional) to the composite audio L and R In jacks, located on the back panel of your computer.
- Connect the other ends of the dual audio cable to your VCR or camcorder.
Connecting a device with an S-video cable
- Connect an S-video cable (optional) directly into the S-video jack on the back panel of your computer.
- Connect the other end of the S-video cable into the appropriate port on your compatible VCR or camcorder.
Connecting a device with a stereo A/V dubbing cable
- Connect a stereo A/V dubbing cable with triple RCA plugs at each end (optional) directly into the composite video port, composite audio L and R jacks, located on the back panel of your computer.
- Connect the other ends of the stereo A/V dubbing cable into the appropriate jacks on your compatible VCR or camcorder.
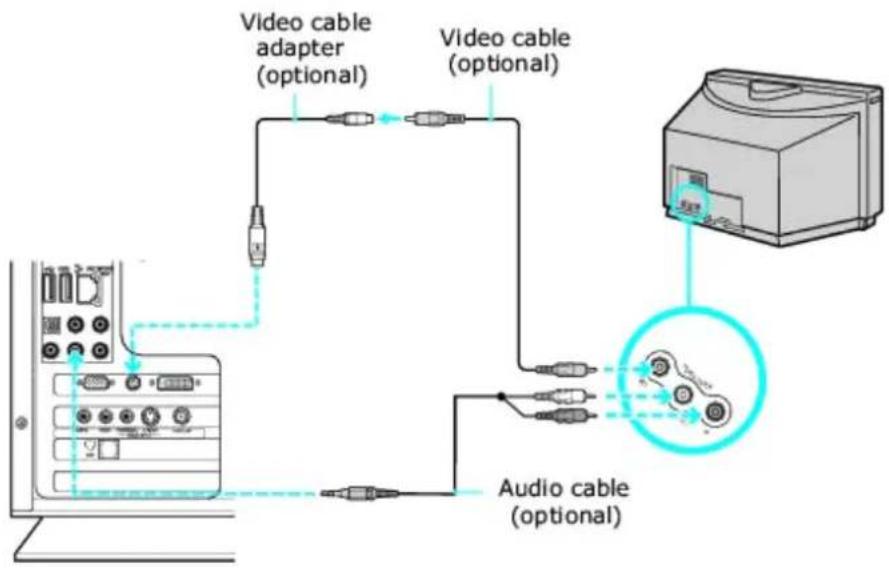
Connecting a TV monitor (display)
- Connect the video connector end of the video cable adapter to the TV Out (S-video/video) jack on the back panel of your computer.
- Connect the jack end of the video cable adapter to either end of a video cable (optional). Connect the other end of the video cable to the Video-In jack on your TV monitor or display, located on either the side or back of your TV monitor/display.
- Connect the single-jack end of an audio cable (optional) to the Headphones jack located on the back panel of your computer. Connect the double-jack end of the audio cable to the Audio-In (L/R) on your TV monitor or display. (The Audio-In jacks may be located on the side or rear of your TV monitor/display.)
Connecting a TV monitor or display
text_image
Video cable adapter (optional) Video cable (optional) Audio cable (optional)The video cable adapter is not necessary, if you use an S-video cable to connect your TV to the computer's TV out (S-video/video) jack.
Follow these steps when you are ready to turn off your computer for an extended period of time.
To avoid loss of data, do not use the Power button to turn off the computer.
To turn off your computer
- Click Start in the Windows® taskbar, then select Turn Off Computer.
The Turn Off Computer dialog box appears.
- Select the Turn Off option.
Respond to any prompts about saving your documents.
-
Wait for your computer to turn off automatically—the power indicator light turns off.
-
Turn off any peripheral devices connected to your computer.
About the Power button
If your computer stops responding, press and hold the Power button for more than six seconds to force your system to shut down. You may need to repeat this procedure if your computer does not shut down on the first attempt.
Register your computer and take advantage of Sony's commitment to quality customer support.
About the benefits of registering with Sony
- Sony Customer Support — Communicate with a Support Representative to troubleshoot problems you may be having with your computer.
- Limited warranty — Protect your investment. See the Limited Warranty Card for more details.
You are prompted to register your computer the first time you turn on the computer. Follow the on-screen instructions to complete the registration process. If you are not able to register your computer during the first session, you can register your computer online at the Sony VAIO PC Registration Web site. Go to http://www.sony.com/vaioregistration.
1Sony product registration is voluntary; failure to register will not diminish your limited warranty rights.
This section provides basic information about using your computer's installed memory card readers.
■ About Your Memory Card Readers
- Inserting a Memory Card
■ Removing a Memory Card
■ About Memory Stick Media
Sharing Memory Cards
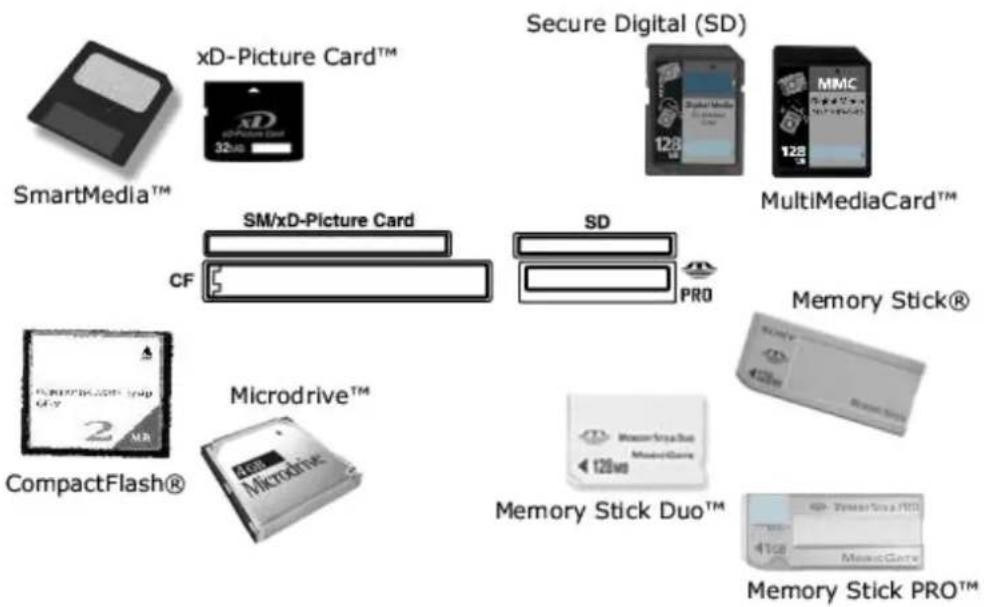
Your VAIO® computer is equipped with memory card readers that are compatible with many popular types of memory cards. You can use your computer's memory card readers to transfer data between digital cameras, camcorders, music players, and other audio/video devices
Memory card readers and compatible media
text_image
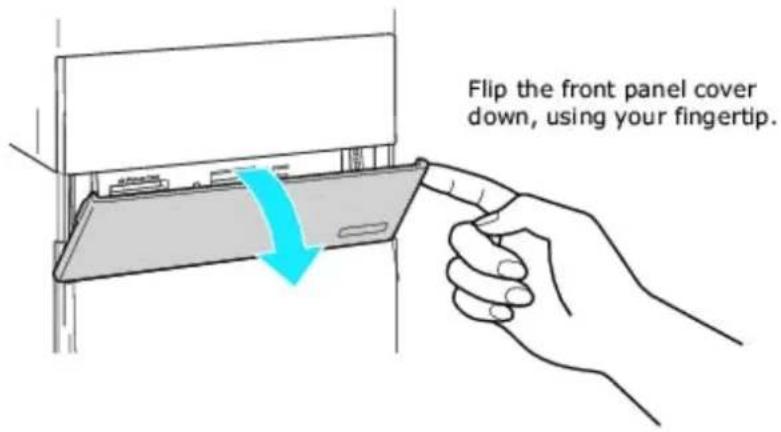
SmartMedia™ xD-Picture Card™ 32us Secure Digital (SD) 128 128 MMC MultiMediaCard™ SM/xD-Picture Card CF SD PRO Memory Stick® CompactFlash® Microdrive™ Microdrive™ Memory Stick Duo™ 128us Memory Stick PRO™Your memory card reader(s) may be located behind a protective cover on the front of the computer. The style and location of front panel cover varies, depending on the computer model purchased. Certain VAIO® computers do not have a covered memory card reader(s) or the readers may be located on the side panel. See your computer's specification sheet for details about your computer's memory card reader configuration.
Opening a front panel cover
text_image
Flip the front panel cover down, using your fingertip.-
Locate the appropriate reader for the memory card you want to use.
-
Insert the memory card into the reader, in the direction of the arrow on the media. Do not force the card into the reader.
If the memory card does not go into the reader easily, remove it gently and verify you are inserting it in the proper direction.
The correct way to remove a memory card from a memory card reader varies, depending upon the media, reader, or computer model. Use care when removing a memory card to avoid damage to the reader or card.
Do not remove a memory card while the media access indicator light is on. The card or its data may become damaged.
- To remove memory card media
- Firmly grasp the extended part of the memory card.
- Carefully pull to remove from the reader.
Memory Stick® media are a compact, portable, and versatile data storage media designed for exchanging and sharing digital data with compatible devices. The following types of Memory Stick media are available, but compatibility with your computer can vary.
- MagicGate Memory Stick® media — Provides copyright protection with authentication and encryption, using Sony® MagicGate technology. Authentication ensures that protected content is only transferred between compliant devices and media. Protected content can be recorded and transferred in an encrypted format that prevents unauthorized duplication or playback. You can store different data formats on a single Memory Stick media.
- Memory Stick PRO media — Provides MagicGate copyright protection and high-speed data transfer features when used with compatible Memory Stick PRO devices. VAIO® computers support Memory Stick PRO media for data storage purposes only. High-speed data transfer and MagicGate technology features, such as authentication and encryption, may not be available. You can store different data formats on a single Memory Stick media.
- Memory Stick PRO Duo media — Provides the same features and benefits of Memory Stick PRO media, in a form that is 1/3 smaller in size.
- Memory Stick® media — Provides data storage only. The Memory Stick media does not provide MagicGate technology or high-speed data transfer. You can store different data formats on a single Memory Stick media.
- Memory Stick Duo media — Provides the same features and benefits of MagicGate Memory Stick media, in a form that is 1/3 smaller in size.
Compatibility between software programs and Memory Stick media formats may vary. At this time, Sony suggests using only MagicGate Memory Stick media to store and transfer any data created with SonicStage software.
Visit the Sony online support Web site at http://www.sony.com/pcsupport regularly for the latest information on Memory Stick® media.
Memory Stick media do not support AVI file playback directly from the media. Copy the video file to your hard disk drive and then play back the file.
To protect data on Memory Stick media
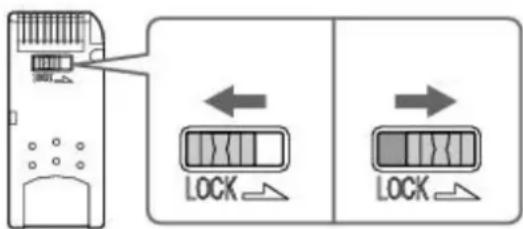
Some Memory Stick media are equipped with a write-protect tab ^4 . The write-protect tab prevents accidental changes to information recorded on your Memory Stick media. When you slide the write-protect tab to the LOCK position, your Memory Stick media is write-protected. You cannot delete, copy, or save information on the media while the write-protect tab in the LOCK position. When you slide the tab to the un-LOCK position, you can write to or modify your Memory Stick media's contents.
Locking the Memory Stick Media
text_image
Diagram showing device connection with lock mechanism, illustrating left and right states of a device's internal structure.If your computer stops recognizing your Memory Stick® media, you may have removed the media from the Memory Stick drive before the data access process completed.
If this occurs, follow these steps:
- Remove the Memory Stick media from the slot.
- Shut down your computer, closing any open software programs, and then turn your computer off.
- Wait approximately 30 seconds, and then restart your computer.
Your computer recognizes the Memory Stick media, when you insert it into the Memory Stick slot again.
If you plan to share your memory card between your VAIO® computer and devices such as a digital camera or music player, the card must be formatted properly.
- Format the memory card by using it in the device first. See the information supplied with the device for details how to format the memory card.
-
If your device does not recognize memory card that has been formatted by your computer, follow these steps:
-
Save the card's contents to your hard disk drive.
-
Reformat the memory card using the device, not your computer.
In the future you may want to increase the functionality of your VAIO® computer. This section describes how to perform basic upgrades and maintenance on your system.
Overview
■ About Opening the Computer
■ About Add-on Card Installation
■ About Installing Memory
■ About the Lithium Battery
■ About Hard Disk Drive Installation
The upgrading procedures described in this section assume that you are familiar with the general terminology associated with personal computers, safety practices, required regulatory compliances, and the modification of electronic equipment.
Before upgrading your computer
Disconnect the computer from its power source and from telecommunications links, networks, or modems before you open the unit or follow any procedures described in this section.
Failure to disconnect your computer from its power source may result in personal injury or equipment damage. Always turn the power off before you open the computer or connect your computer to peripheral equipment. Otherwise, damage may occur to the integrated circuits.
Your computer may not be equipped with all of the hardware features mentioned in this section. The interior hardware configuration of your computer may vary from the illustrations, depending on the computer purchased.
You may need to temporarily remove add-on cards or other components that may be near the slot cover you plan to remove.
Electrostatic discharge (ESD) can damage disk drives, add-on cards, and other components. Follow the procedures described here only at an ESD workstation. If such a station is not available, do not work in a carpeted area and do not handle materials that produce or hold static electricity (for example, cellophane wrappers). Ground yourself by maintaining continuous contact with an unpainted metal portion of the chassis while performing the procedure.
Removing the side cover
- Shut down your computer and turn off all peripheral devices, such as your printer.
- Unplug your computer and disconnect any peripheral devices.
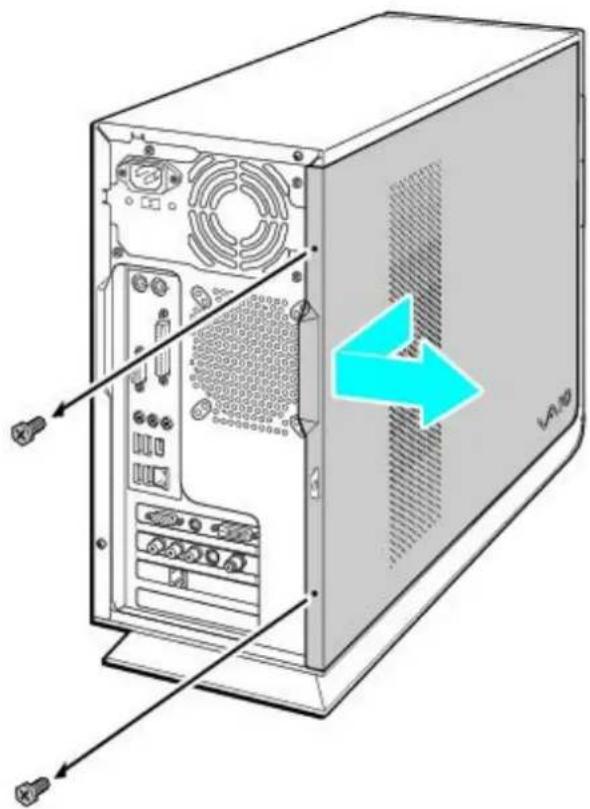
- Position the system unit with the back panel facing towards you.
- Unscrew the side cover release screws located on the edge of the back panel and set them aside.
Removing the release screws
natural_image
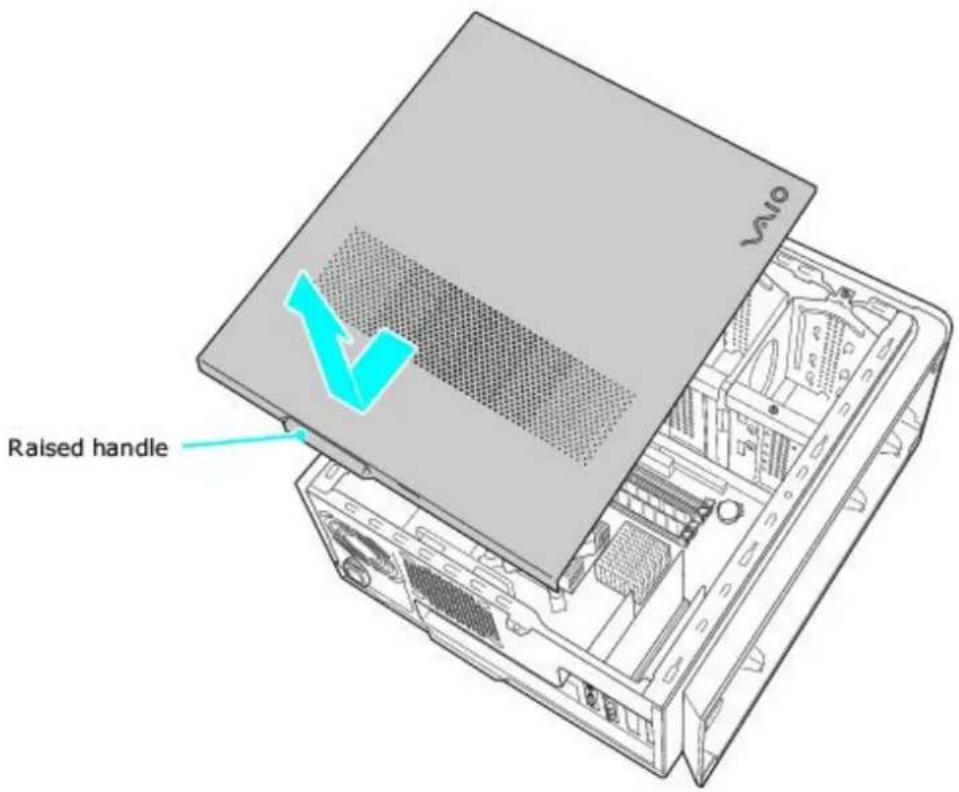
Diagram of a server rack with labeled ports and connectors, showing internal components without any text or symbols.- When the screws are removed, the side cover is released. Grasp the raised handle on the back edge of the side cover, pulling the cover towards the back of the unit.
Removing the cover
text_image
Raised handle- Tilt the side cover away from the computer and set aside.
If you remove the cover immediately after you shut down your computer, the components may be too hot to touch. Wait until the internal parts of the system unit cool down before you attempt to remove the cover.
Replacing the cover
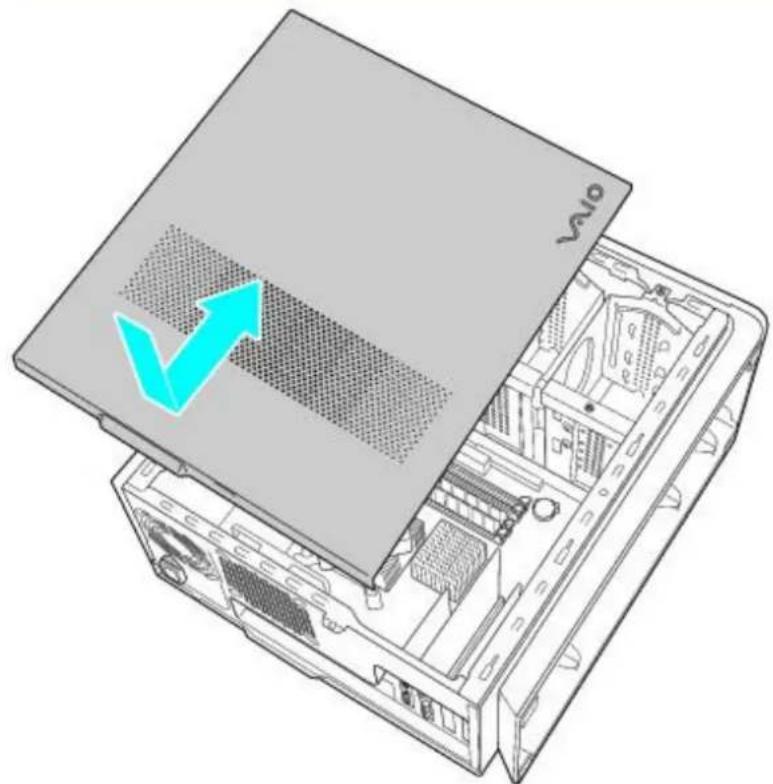
- Hold the side cover against the side of the computer, with the side cover extending about 2 inches past the back of the computer.
- Slide the side cover forward onto the unit, until it is evenly aligned and stays in place.
- Replace the release screws.
Replacing the cover
natural_image
Illustration of a computer motherboard showing internal components and a blue upward arrow indicating growth (no text or symbols present)Your computer may have one or more open expansion slots, depending on the model configuration. An expansion slot enables you to install add-on cards to expand the functionality of your system. The length of the add-on card should not exceed 9.05 inches.
Add-on card configuration varies by model. Some models, such as Configure-to-Order (CTO) systems, may contain preinstalled add-on cards.
! Observe the proper safety precautions when you add cards to your Sony computer. See Before upgrading your computer.
Installing an add-on card
- Shut down your computer and turn off all peripheral devices, such as your printer.
- Unplug your computer and any peripheral devices.
- Remove the side cover. See Removing the side cover.
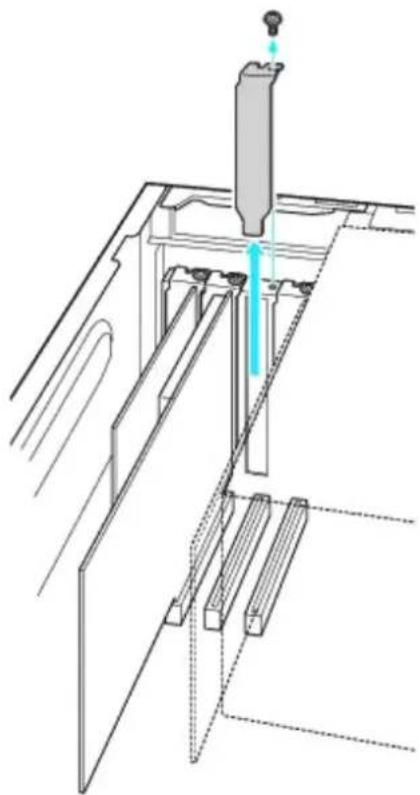
- Locate an available expansion slot. Remove the slot cover's screw, and then remove the slot cover.
When removing a slot cover, be careful not to damage components on the system board or add-on cards. You may need to temporarily remove add-on cards or other components that may be next to the slot cover you want to remove.
Removing/installing the slot cover
natural_image
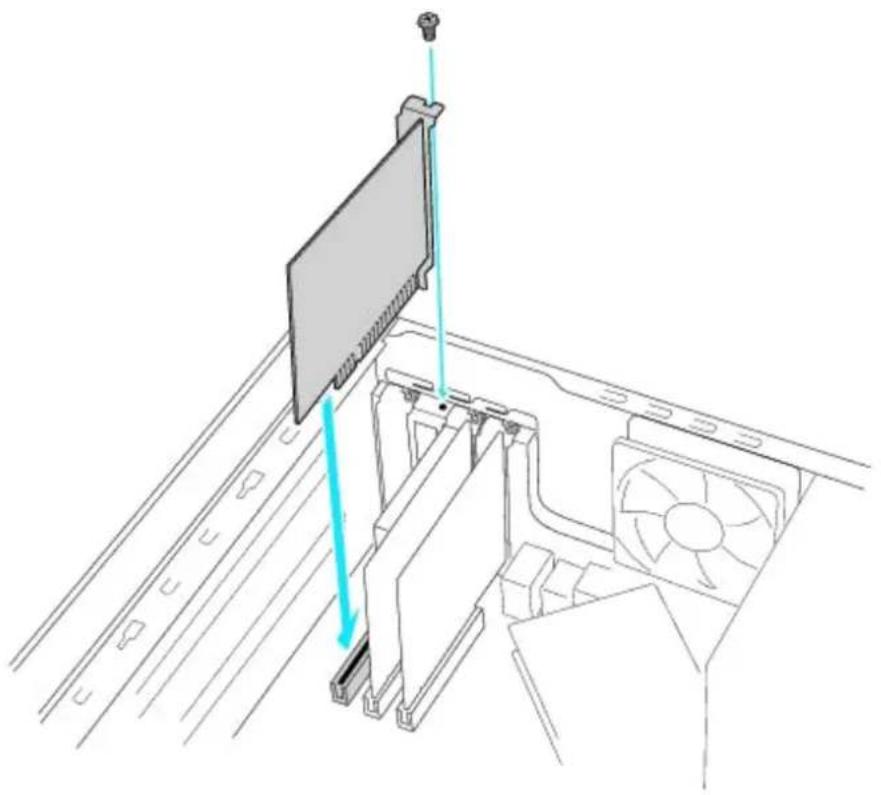
Technical line drawing of a mechanical assembly with no visible text or symbols- Install the add-on card by inserting it into the expansion slot and securing it with the screw from the expansion slot cover.
Installing an add-on card
natural_image
Technical line drawing of a computer monitor with fan and ventilation slots, showing internal components without any text or symbols.- Attach any internal cables that the card requires. See the instructions supplied with the add-on card.
- Replace the side cover. See Replacing the cover.
- Reconnect the power cord and all peripheral devices.
- Turn on the computer.
The amount of preinstalled memory may vary, depending on the system configuration you purchased. Your computer may ship with all available memory slots filled. For memory replacement or upgrades, use the correct memory module for your computer's configuration. See the specifications sheet for your computer on the Sony online support Web site at http://www.sony.com/pcsupport, for details about the amount and type of memory installed in your computer.
You can purchase additional memory modules, accessories, and peripheral equipment from your local retailer.

! Observe the proper safety precautions when you add or remove the memory in your computer. See Before upgrading your computer.
Removing a memory module
- Shut down your computer and turn off all peripheral devices, such as your printer.
- Unplug your computer and any peripheral devices.
- Remove the side cover. See Removing the side cover.
- Gently place the unit on its side. If necessary, remove any cables, add-on cards, or other components to access the memory module slots.
- Locate the memory module(s) you wish to remove.
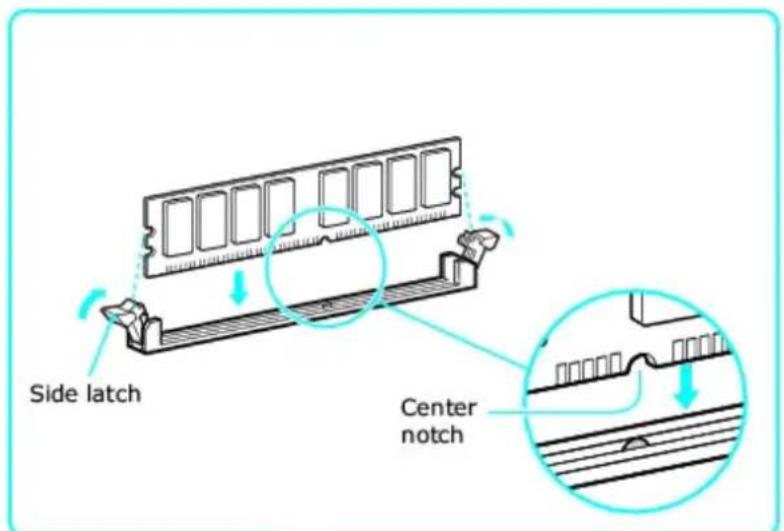
- Push down on the latches, located on both sides of the module, to gently eject it from the slot.
- Grasp one edge of the module and lift it out. Store the module in an anti-static package.
Removing/Installing memory
text_image
Side latch Center notch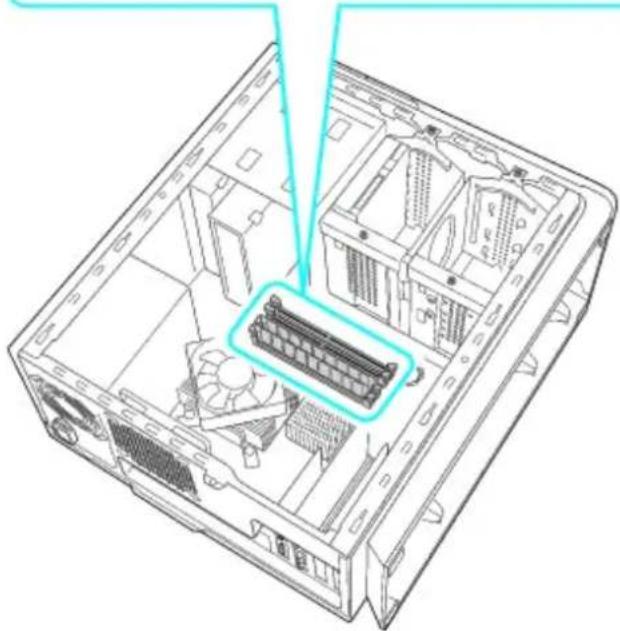
natural_image
Technical line drawing of an internal computer case with visible RAM slots and ventilation ducts (no text or labels)Installing a memory module
-
Shut down your computer and turn off all peripheral devices, such as your printer.
-
Unplug your computer and any peripheral devices.
-
Remove the side cover. See Removing the side cover.
-
Gently place the unit on its side. If necessary, remove any cables, add-on cards, or other components to access the memory module slots.
-
Remove the memory module from its anti-static package, handling it by the the edges.
-
Locate the notch on the bottom edge of the module to align it over the open memory slot.
-
Firmly insert the bottom edge of the memory module into the slot.
-
Press down evenly against the module's upper corners. The latches snap into position, holding the module in place.
To avoid damaging a memory module slot, move the end latches slightly outward to relieve pressure. The module clicks into place.
-
Reinstall any components or add-on cards you may have removed.
-
Replace the side cover. See Replacing the cover.
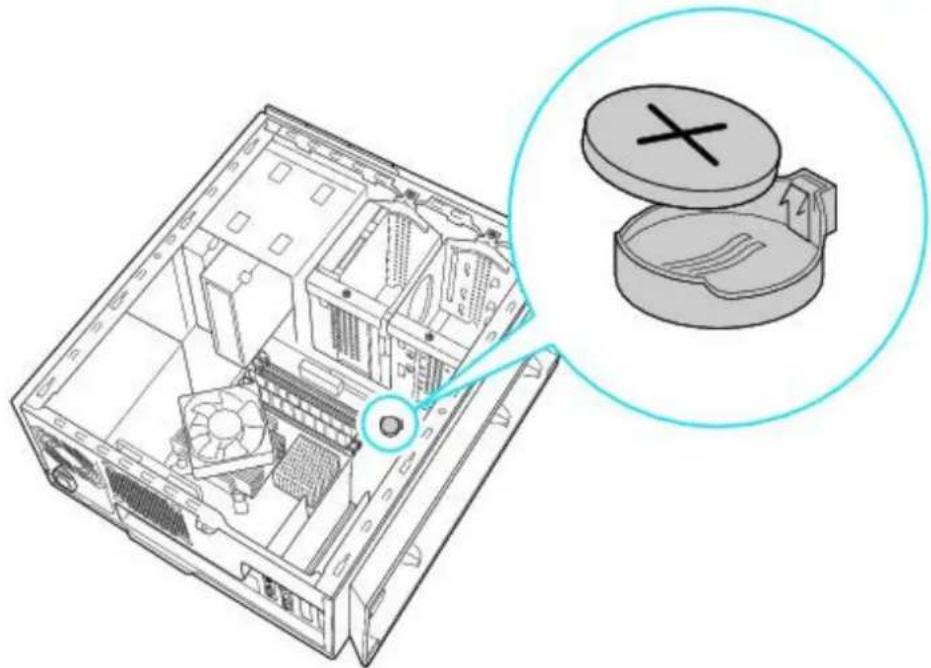
The lithium battery starts to weaken after several years and the system settings, such as the date and time stored in CMOS RAM, may become inaccurate. Replace the lithium battery when this occurs.
There is danger of the battery exploding if it is replaced incorrectly. Replace the battery only with a CR2032-type lithium battery.
Replacing the lithium battery
- Write down any changes you may have made to the settings in the BIOS Setup utility.
- Shut down your computer and turn off all peripheral devices, such as your printer.
- Unplug your computer and any peripheral devices.
- Remove the cover. See Removing the side cover.
- If necessary, remove any cables, add-on cards, or other components to gain access the lithium battery.
- Remove the old battery and install the new battery with the plus (+) side facing up.
Replacing a lithium battery
natural_image
Technical illustration of an internal computer case with a magnified inset showing a close-up of the device (no text or symbols present)- Replace the cover. See Replacing the cover.
The values stored in the CMOS memory are now reset to the factory default values. Run the Setup utility to reset the date, time, passwords, and other changes you may have made to the BIOS settings. If you do not wish to customize your BIOS settings, do not run the Setup utility.
! Dispose of the lithium battery properly. In some areas, the disposal of lithium batteries in household or business trash may be prohibited. You can return your unwanted lithium batteries to your nearest Sony Service Center or Factory Service Center. To locate a Service Center near you, visit the Sony online support Web site at http://www.sony.com/pcsupport.
Resetting the computer's date and time
- Double-click on the time readout displayed in the Windows® tasktray. The Date and Time Properties window appears.
- From the Date & Time tab, change the settings as desired. Click Apply, then click OK.
Your computer may be equipped with open internal bays to hold additional 3.5-inch hard disk drives. When you install an additional hard disk drive, the method of attaching connectors and cables may be different from the instructions described in this section. Review the manufacturer's information provided with your new hard disk drive before attempting to install it in your computer.
The hard disk drive access indicator is lit when either internal hard disk drive is active.
Replacing the original hard disk drive
If you replace the original, factory-installed hard disk drive, you may need to correct your drive mapping, create a VAIO Recovery Media Kit, or visit the Sony online support Web site for more information.
Drive Mapping
When a new hard disk drive is installed, the original drive mapping ^1 may be changed. The identified drives, including those for removable media ^2 , may not reflect correct drive/icon associations. For more information on how to correct your drive mapping, visit the Sony online support Web site at http://www.sony.com/pcsupport.
Hard disk drive recovery
When you replace the original hard disk drive, the preinstalled VAIO Recovery Wizard utility program cannot restore the drive partitions, operating system, or original software programs. Before replacing the hard disk drive, create a VAIO Recovery Media Kit or purchase a kit from Sony.
Your VAIO & computer is not supplied with System or Application Recovery CDs. Use the VAIO Recovery Wizard utility to recover your computer's operating system and preinstalled software programs.
For more information about the VAIO Recovery Wizard utility program:
- Click Start from the Windows® taskbar, click Control Panel, then click Performance and Maintenance.
- From the Performance and Maintenance window, click VAIO Recovery Wizard.
Your computer must have an active Internet connection to access the Sony online support Web site.
Observe the proper safety precautions when you upgrade your Sony computer. See Before upgrading your computer.
Drive letter assignment
When a new hard disk drive is installed, an identifying drive letter is assigned. The drive letter assignment becomes effective after you register for the first time or after recovering your computer with the VAIO® Recovery Wizard utility program.
The Click to DVD software program creates a new folder location on the new hard disk drive. This new folder is the default location to save files created with Click to DVD software.
- If the Microsoft® Windows® operating system identifies the new hard disk drive as drive D, the Click to DVD software program saves its files to a new folder on the new drive D.
- If the Windows operating system assigns another letter to the new hard disk drive, such as drive E or J, the Click to DVD software program creates the new save folder on the new drive.
When you start Click to DVD software for the first time, after recovering the computer or installing a new hard disk drive, the software program automatically creates a new save folder on the new drive.
Installing an additional hard disk drive
- Shut down your computer and turn off all peripheral devices, such as your printer.
-
Unplug your computer and any peripheral devices.
-
Remove the side cover and place the unit on its side. See Removing the side cover.
- Configure the jumpers on your new drive as a slave, using the configuration instructions supplied with the drive.
- Detach the power and drive cables from the original hard disk drive in your computer.
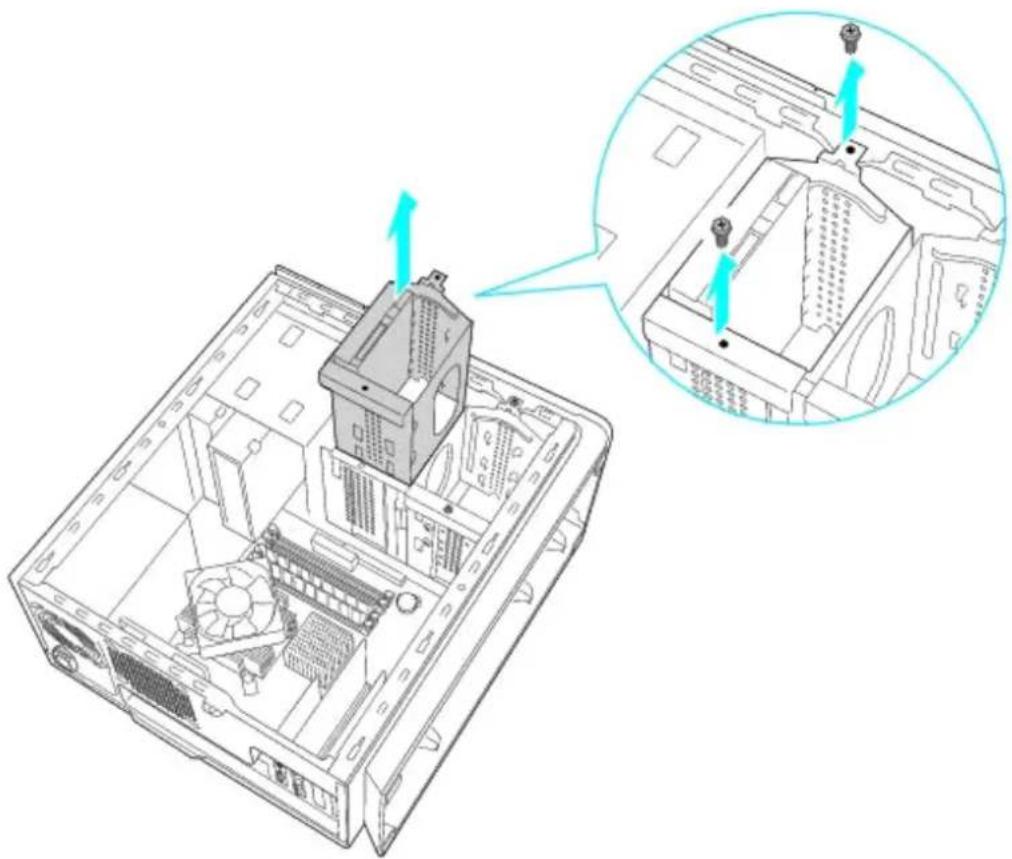
- Release the drive holder from the chassis by removing the drive holder screw(s).
- Slide the drive holder out.
Removing the drive holder
natural_image
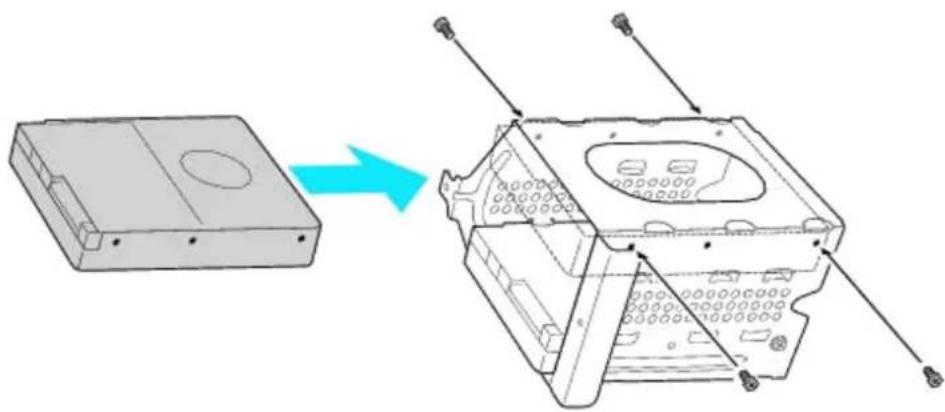
Technical line drawing of an internal computer case with a highlighted component and magnified view (no text or symbols)- Slide the new drive into the drive holder, aligning the holes on each side of the drive to the holes in the drive holder.
- Secure the drive to the drive holder with screws.
Attaching the drive screws
natural_image
Technical illustration of a mechanical housing assembly with a blue arrow indicating transformation (no text or symbols present)Your new hard disk drive is supplied with the necessary screws. Do not overtighten these screws when securing the new drive to the drive holder.
-
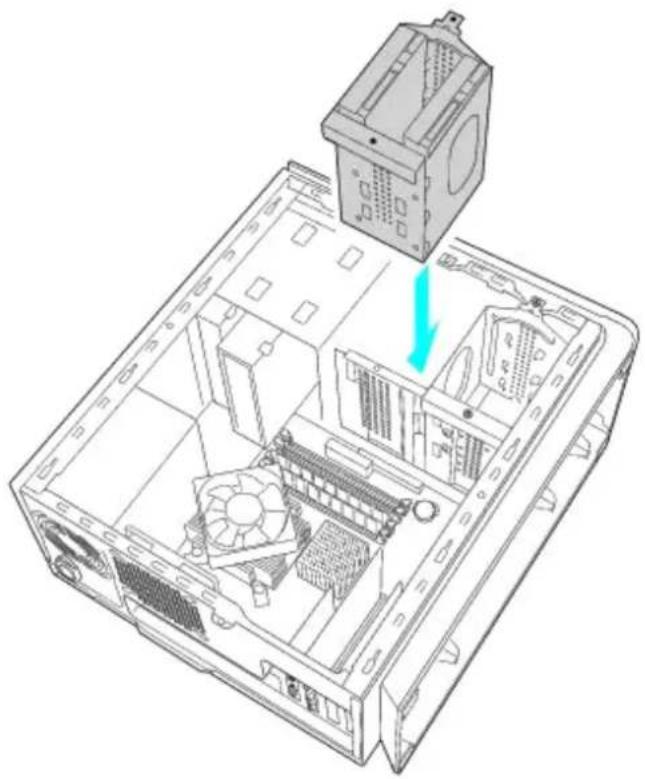
Realign the drive holder with the tracks on the inside of the chassis and slide the drive holder in completely.
-
Reinsert and tighten the drive holder screw(s) to lock the drive holder back into position.
- Reconnect the IDE and power connectors to the original drive.
- Connect the second drive connector to the new drive. Orient the connector to align pin 1 on the red side of the ribbon cable with pin 1 on the new drive.
- Connect the second power connector to the new drive, following the instructions supplied with the drive.
Replacing the drive holder
natural_image
Technical line drawing of an internal computer tower with a highlighted CPU socket (no text or symbols)- Replace the side cover. See Replacing the cover.
- Reconnect the power cord to your computer.
Identifying the additional hard disk space
When you initialize the new hard disk, it must be configured as an extended partition in Windows NT file system (NTFS) format.
- Log on to Windows® as Administrator.
- Click Start in the Windows taskbar, then right-click My Computer. A shortcut menu appears.
- Select Manage. The Computer Management window appears.
- Under the file directory, go to Storage and then select Disk Management.
- Right-click on the newly installed, unformatted hard disk (Disk label identified with red marking). From the shortcut menu, select Initialize Disk.
- Click on the Unallocated area of the disk and then right-click to display a shortcut menu.
- Select New Partition. The New Partition wizard appears.
- Follow the wizard's on-screen instructions to complete the process.
The Windows® XP operating system recognizes the new hard disk drive and applies the NTFS format.
Drive mapping refers to the assignment of an identifying letter to a specific drive, such as Drive C or Drive D which identify the original hard disk drive.
2Your computer may be equipped with memory card readers. See the online Specifications sheet for more information about your computer's hardware configuration.
This section describes how to solve common problems and provides helpful information about using your computer's hardware features and preinstalled software. Your computer may not be equipped with all of the features or software discussed in this section, depending on the computer model or configuration purchased.
■ About VAIO Computer Functions
■ About System Security
■ About Media Center
■ About the Mouse and Keyboard
■ About the Modem
■ About the Speakers
■ About Using a Microphone
■ About Using Peripheral Equipment
My computer does not start.
- Verify that the computer is plugged into a power source and that it is turned on. Check that the power indicator is lit on the front panel of the computer.
- Confirm that a disk is not in the floppy disk drive (unless you are using a bootable floppy disk).
- Confirm that a CD or DVD is not in an optical drive (unless you are using bootable media).
- Confirm that the power cord and all cables are connected firmly.
- If you plugged the computer into a power strip or Uninterruptible Power Supply (UPS), make sure the power strip or UPS is turned on and working.
- Verify that the monitor is plugged into a power source and turned on.
If your computer has a built-in monitor, confirm that it is plugged into an appropriate power source and that the computer is turned on. - Verify that the brightness or contrast control dials are adjusted correctly. (See the manual supplied with your display for details.)
- Confirm that the computer is not in Stand by mode by pressing any key on the keyboard.
Certain VAIO computers are not equipped with a floppy disk drive. You can purchase this equipment separately.
My computer does not start.
- Verify that the computer is plugged into a power source and that it is turned on. Check that the power indicator is lit on the front panel of the computer.
- Confirm that a disk is not in the floppy disk drive (unless you are using a bootable floppy disk).
- Confirm that a CD or DVD is not in an optical drive (unless you are using bootable media).
- Confirm that the power cord and all cables are connected firmly.
- If you plugged the computer into a power strip or Uninterruptible Power Supply (UPS), make sure the power strip or UPS is turned on and working.
- Verify that the monitor is plugged into a power source and turned on.
If your computer has a built-in monitor, confirm that it is plugged into an appropriate power source and that the computer is turned on. - Verify that the brightness or contrast control dials are adjusted correctly. (See the manual supplied with your display for details.)
- Confirm that the computer is not in Stand by mode by pressing any key on the keyboard.
Certain VAIO computers are not equipped with a floppy disk drive. You can purchase this equipment separately.
What can I do if my computer or software stop responding?
You can try to locate and close the software program that has stopped responding.
- Press the Ctrl+Alt+Delete keys. The Windows Task Manager window appears.
- From the Applications tab, locate the software program that has the status message, "Not responding."
- Select the software program that has a Not Responding status and click End Task. Windows attempts to close the program.
If your computer does not respond or the software program does not close:
- Save and close any open files, if possible.
- Press the Alt+F4 keys. The Shut Down Windows ^1 window appears.
- Click the drop-down list box and select Restart.
- Click OK. The computer turns off and restarts.
If the Shut Down Windows window does not appear:
- Press Ctrl+Alt+Delete. The Windows Task Manager window appears.
- Click Shut Down.
- Restart your computer.
If your computer still does not respond and you cannot restart, shut down your computer by pressing and holding the power button for more than six seconds.
If the software program continues to stop responding or causes your computer to stop responding, contact the software publisher or designated technical support provider.

! Pressing and holding the power button for more than six seconds may result in the loss of data from files that are currently open.
The window text displayed may vary.
Why does the Windows operating system stop responding during shutdown?
The Windows operating system may not shut down properly for many reasons, including incompatible or conflicting drivers, damaged files, or non-responsive hardware. For troubleshooting information, you can search Windows Help.
- Click Start in the Windows taskbar and select Help and Support. The Help and Support Center menu appears.
- Select Fixing a Problem and then select Startup and Shut Down problems. A list of specific problem topics appears on the right side of the window.
- Select Startup and Shutdown Troubleshooter. Follow the on-screen instructions according to your specific situation.
Why is my computer running slowly?
The computer's responsiveness varies depending with the number of software programs that are open and running. Close any programs that you are not currently using.
- Increasing the computer memory may also help. For information on installing memory, please see the online VAIO User Guide.
To access the online User Guide:
- Click Start in the Windows® taskbar, click VAIO Support Central.
- From the VAIO Support Central menu, click VAIO Documentation.
- Click VAIO User Guide.
How do I change the video resolution of my display?
- Click Start in the Windows taskbar, and then select Control Panel.
- Select Appearance and Themes, and then select Change the screen resolution.
- Click the Settings tab.
- Change the Screen resolution and Color quality to the desired levels.
- Click Apply and then click OK.
Why doesn't my computer resume normal operation from Stand by mode?
- If your keyboard has a Stand by key, press it briefly to resume normal operation.
- If your keyboard is not equipped with a Stand by key, press any key to resume normal operation.
-
For troubleshooting information, you can search Windows Help.
-
Click Start in the Windows taskbar and select Help and Support. The VAIO Help And Support Center menu appears.
- Select Fixing a Problem and then select Startup and Shut Down problems. A list of specific problem topics appears on the right side of the window.
- Select Startup and Shutdown Troubleshooter. Follow the on-screen instructions according to your specific situation.
This section provides information about keeping your computer operating smoothly and protecting against potential threats to your computer's security.
How can I protect my computer against security threats, such as viruses?
The Microsoft® Windows® operating system is preinstalled on your computer. The best way to protect your computer against security threats, such as viruses, is to download and install the latest Windows updates regularly.
You can get important Windows updates by doing one of the following:
The Automatic Updates feature — This feature automatically searches for and delivers updates directly to your computer whenever you are connected to the Internet.
- The Windows Updates Web site — This site enables you to download computer updates without turning on the Automatic Updates feature.
Your computer must be connected to the Internet before you can receive updates.
To use the Automatic Updates feature
- Connect to the Internet.
- Click the Automatic Updates icon in the Taskbar notification area.
The Automatic Updates Setup Wizard appears.
- Click Next, and follow the on-screen instructions to set up automatic or scheduled updates.
To visit the Windows Updates Web site
- Connect to the Internet.
- Type http://windowsupdate.microsoft.com/ in the address bar of your browser.
The Microsoft Windows Update and Security Warning windows appear. -
In the Security Warning window, click Yes to install and run Windows Update.
-
In the Microsoft Windows Update window, click Scan for updates, and follow the on-screen instructions.
This section provides information about keeping your computer operating smoothly and protecting against potential threats to your computer's security.
How can I protect my computer against security threats, such as viruses?
The Microsoft® Windows® operating system is preinstalled on your computer. The best way to protect your computer against security threats, such as viruses, is to download and install the latest Windows updates regularly.
You can get important Windows updates by doing one of the following:
The Automatic Updates feature — This feature automatically searches for and delivers updates directly to your computer whenever you are connected to the Internet.
- The Windows Updates Web site — This site enables you to download computer updates without turning on the Automatic Updates feature.
Your computer must be connected to the Internet before you can receive updates.
To use the Automatic Updates feature
- Connect to the Internet.
- Click the Automatic Updates icon in the Taskbar notification area.
The Automatic Updates Setup Wizard appears.
- Click Next, and follow the on-screen instructions to set up automatic or scheduled updates.
To visit the Windows Updates Web site
- Connect to the Internet.
- Type http://windowsupdate.microsoft.com/ in the address bar of your browser.
The Microsoft Windows Update and Security Warning windows appear. -
In the Security Warning window, click Yes to install and run Windows Update.
-
In the Microsoft Windows Update window, click Scan for updates, and follow the on-screen instructions.
How do I keep my preinstalled antivirus software updated?
You can keep the preinstalled Norton Internet Security software program current with the latest updates from Symantec Corporation.
To download and install the latest security update
- Double-click the Norton Internet Security icon

in the Taskbar notification area.
If you have not previously registered the antivirus software, a series of information wizards appear.
- Follow the on-screen instructions to complete each wizard
- Double-click the Norton Internet Security icon again.
The Norton Internet Security window appears.
If you have previously registered this antivirus software, the Norton Internet Security window automatically appears.
-
Click Live Update, located near the top of the window.
-
Follow the on-screen instructions to select and download updates.
The Microsoft® Windows® XP Media Center Edition operating system is not installed on all VAIO Digital Studio® computers. See your online specifications sheet for more information about your computer's configuration.
Why doesn't the REW button on the remote control work when I use My Music?
The REW button does not "rewind" music files. Instead, press Replay on your remote control for a similar function.
The Microsoft® Windows® XP Media Center Edition operating system is not installed on all VAIO Digital Studio® computers. See your online specifications sheet for more information about your computer's configuration.
Why doesn't the REW button on the remote control work when I use My Music?
The REW button does not "rewind" music files. Instead, press Replay on your remote control for a similar function.
Why aren't my song information edits visible in My Music?
If you record a song in OpenMG ATRAC format and make edits, such as title, artist, or genre, using SonicStage software, the changes become visible when the music file is played in My Music. If you make changes to a music file using Media Center, the changes are not visible when played in SonicStage software.
Why do my song information edits revert to the original content when I use My Music?
When you record songs with SonicStage software, and then use Windows® Media Player software to edit the song's information, you may not see your changes when you play the song in My Music. Windows Media Player supports playback of songs recorded in OpenMG (ATRAC3 or ATRAC3+) format, but does not support any edits made to the OpenMG format music files. Use SonicStage software to edit song information for music files that are recorded in OpenMG format.
Why do my optimized music files take so long to appear in My Music?
When you use SonicStage software to optimize music files to ATRAC3 or ATRAC3+ format, it may take a few moments for the music files to be available in My Music. To access these files sooner, start Windows Media Player software first, and then play the song with My Music.
Why do I get the error message, "The input media is invalid" when I try to play an MP3 file in My Music?
If you have added cover art to the MP3 file using SonicStage software, your file may contain an unsynchronized ID3v2 header. Media Center and Windows Media Play software programs cannot support playback of this file.
You can go to Microsoft® and download a patch to resolve this issue ^1 , as follows:
- Go to http://support.microsoft.com.
- Enter 814129 in the Search the Knowledge Base text box.
-
Follow the on-screen instructions to download and install the patch.
-
Click on the topic, FIX: Error in Windows Media Player 9 Series When You Play Specific MP3 Files located in the Summaries: Search Results area.
The location of this information is subject to change or removal without prior notice
Why won't My Music show the albums (playlists) I recorded with SonicStage software?
Playlists (albums) recorded with SonicStage software may not be immediately available in the Media Center Album window. To access these files sooner, start Windows® Media Player software first, and then play the song with My Music.
Why did my Click to DVD software recording session capture television instead of video?
If Media Center starts a scheduled TV recording while you are capturing analog video with Click to DVD® software, the TV programming may be captured instead of the video and the timed recording may fail. Media Center and the analog capture feature of Click to DVD software both require the use a TV tuner/MPEG encoder card and cannot access the card at the same time.
To avoid recording conflicts:
- Do not open Media Center while capturing analog video using Click to DVD or Click to DVD Automatic Mode software.
- Do not schedule a TV recording to start while capturing analog video, using Click to DVD or Click to DVD Automatic Mode software. If a scheduled TV recording is already set, cancel it or postpone the analog recording until the scheduled TV recording has finished.
Why can't I view or record a movie when my computer is connected to an external device, such as a VCR or DVD player, or when I am using an analog input connection?
If you see a blue background in the View window, the movie may be copyright-protected. Your computer is not able to display or record a video or DVD that is copyright-protected by Macrovision or CGMS-A (Copy Generation Management System - Analog). Media Center software does not support recording a movie using analog input from external devices, such as a VCR, DVD player, or Digital video camera.
Why can't I fast forward or rewind a video?
The rewind and fast forward features are not supported by all video formats. Try using the Skip or Replay buttons, which provides a similar function.
How do I use the Media Center software or remote control to adjust my monitor when viewing TV programs?
Media Center software and remote control do not have video adjustment capability. Use the controls on the monitor to adjust video settings, such as contrast, hue, and brightness. See the information provided with your monitor for instructions on adjusting its video controls.
What can I do if my computer freezes and restarts while I'm watching a DVD or live TV?
Verify that the monitor refresh rate is set to 60 Hz, using the following steps:
- Right-click on the desktop, and click Properties from the shortcut menu.
The Display Properties window appears.
- Click the Settings tab, and then click Advanced.
- Click the Monitor tab, and in the Monitor settings box, confirm the screen refresh rate is set to 60 Hertz.
- If the refresh rate is not set to 60 Hz, click the drop-down arrow, and select 60 Hertz.
Why doesn't my mouse work properly?
- Confirm that the mouse is plugged securely into the mouse port. If you are using a USB mouse, verify that the mouse is plugged securely into the appropriate USB port.
- Save and close all open software programs. Turn off your computer, wait approximately 10 seconds, and then restart your computer.
If your mouse is not working, press ALT + F4, to close all open software programs and turn off the computer. - The mouse driver(s) may not be working properly.
Using an optical mouse
If you are using an optical mouse ^1 , use an appropriate surface to ensure proper mouse tracking. A good surface requires a certain amount of detail or texture to enable mouse tracking.
- Use surfaces such as plain paper, card stock, or fabric that do not have a lot of repetitive patterning.
- Avoid surfaces such as mirrors, smooth glass, or magazines.
- Avoid possible damage to easily-scratched surfaces by using a mouse pad.
- Avoid surfaces that may damage or soil your optical mouse. Dirt or damage may cause the mouse to malfunction.
- If the cursor is not moving properly, try using the mouse on another surface or using a mouse pad.
Using a standard ball mouse
If you are using a standard ball mouse, there may be dust or dirt inside the mouse mechanism. To clean the mouse, follow these steps:
- Save and close all software programs, and turn off your computer.
- Turn the mouse upside down.
- Remove the mouse ball cover on the back of the mouse by turning clockwise the ring that covers the mouse ball.
- Turn the mouse upright, and drop the mouse ball into your hand.
- Using a piece of tape, remove any dust or dirt on the mouse ball and inside the mouse ball socket.
- Return the mouse ball to the socket, and replace the mouse ball cover. Secure the cover by turning the ring counter-clockwise.
Using a wireless optical mouse
If you are using a wireless optical mouse:
- Confirm that the supplied AA batteries are properly installed.
- To maintain good communication, operate your wireless mouse within the distance limitations of the mouse ^2 .
- Press the CONNECT button on the mouse and the computer to reestablish the connection between the two devices.
- Verify the infrared receiver on the computer's front panel is free of obstructions that may prevent proper operation.
- Avoid using radio-controlled toys or equipment, CB radios, and other wireless devices in the area near your wireless mouse. These devices may cause interference, causing your mouse to stop working properly.
- Do not place metal furniture near your computer or wireless mouse, as this may create interference, causing your mouse to stop working properly.
Do not mix old (used) and new batteries when replacing batteries in the wireless mouse. Always use the same type and manufacture of battery — do not mix alkaline with manganese batteries. Using incompatible batteries or mixing used, new or different types of batteries can damage the mouse.
For wireless or standard optical mice.
Operate the mouse, VGP-WMS1, within 3.2 feet of the computer. Operate the mouse, PCVA-MS2, within 2.5 feet of the computer.
Why doesn't my mouse work properly?
- Confirm that the mouse is plugged securely into the mouse port. If you are using a USB mouse, verify that the mouse is plugged securely into the appropriate USB port.
- Save and close all open software programs. Turn off your computer, wait approximately 10 seconds, and then restart your computer.
If your mouse is not working, press ALT + F4, to close all open software programs and turn off the computer. - The mouse driver(s) may not be working properly.
Using an optical mouse
If you are using an optical mouse ^1 , use an appropriate surface to ensure proper mouse tracking. A good surface requires a certain amount of detail or texture to enable mouse tracking.
- Use surfaces such as plain paper, card stock, or fabric that do not have a lot of repetitive patterning.
- Avoid surfaces such as mirrors, smooth glass, or magazines.
- Avoid possible damage to easily-scratched surfaces by using a mouse pad.
- Avoid surfaces that may damage or soil your optical mouse. Dirt or damage may cause the mouse to malfunction.
- If the cursor is not moving properly, try using the mouse on another surface or using a mouse pad.
Using a standard ball mouse
If you are using a standard ball mouse, there may be dust or dirt inside the mouse mechanism. To clean the mouse, follow these steps:
- Save and close all software programs, and turn off your computer.
- Turn the mouse upside down.
- Remove the mouse ball cover on the back of the mouse by turning clockwise the ring that covers the mouse ball.
- Turn the mouse upright, and drop the mouse ball into your hand.
- Using a piece of tape, remove any dust or dirt on the mouse ball and inside the mouse ball socket.
- Return the mouse ball to the socket, and replace the mouse ball cover. Secure the cover by turning the ring counter-clockwise.
Using a wireless optical mouse
If you are using a wireless optical mouse:
- Confirm that the supplied AA batteries are properly installed.
- To maintain good communication, operate your wireless mouse within the distance limitations of the mouse ^2 .
- Press the CONNECT button on the mouse and the computer to reestablish the connection between the two devices.
- Verify the infrared receiver on the computer's front panel is free of obstructions that may prevent proper operation.
- Avoid using radio-controlled toys or equipment, CB radios, and other wireless devices in the area near your wireless mouse. These devices may cause interference, causing your mouse to stop working properly.
- Do not place metal furniture near your computer or wireless mouse, as this may create interference, causing your mouse to stop working properly.
Do not mix old (used) and new batteries when replacing batteries in the wireless mouse. Always use the same type and manufacture of battery — do not mix alkaline with manganese batteries. Using incompatible batteries or mixing used, new or different types of batteries can damage the mouse.
For wireless or standard optical mice.
Operate the mouse, VGP-WMS1, within 3.2 feet of the computer. Operate the mouse, PCVA-MS2, within 2.5 feet of the computer.
How do I set up my mouse for left-hand use?
- Click Start in the Windows taskbar, then click Control Panel.
- Click Printers and Other Hardware, then click Mouse. The Mouse Properties dialog box appears.
- From the Buttons tab, select Switch primary and secondary buttons under the Button Configuration options.
- Click Apply, then click OK.
Why doesn't my keyboard work properly?
- Check that the keyboard is securely plugged into the keyboard port.
-
Save and close all open software programs. Turn off your computer, wait approximately 10 seconds, and then restart your computer.
■ If you are using a wireless keyboard: -
Confirm that the supplied AA batteries are properly installed.
- To maintain good communication, operate your wireless keyboard within the distance limitations of keyboard ^2 .
- Press the CONNECT button on the keyboard and the computer, to reestablish the connection between the two devices.
- Verify the infrared receiver on the computer's front panel is free of obstructions that may prevent proper operation.
- Avoid using radio-controlled toys or equipment, CB radios, and other wireless devices in the area near your wireless keyboard. These devices may cause interference, causing your keyboard to stop working properly.
- Do not place metal furniture near your computer or wireless keyboard, as this may create interference, causing your keyboard to stop working properly.
Do not mix old (used) and new batteries when replacing batteries in the wireless keyboard. Always use the same type and manufacture of battery — do not mix alkaline with manganese batteries. Using incompatible batteries or mixing used, new or different types of batteries can damage the keyboard.
Some VAIO computer models are equipped with a built-in keyboard.
2O perate the keyboard, VGP-WKB1, within 3.2 feet of the computer.
Operate the keyboard, PCVA-KB6, within 2.5 feet of the computer.
Why is my modem connection slow?
Many factors can influence modem connection speed, such as:
- Telephone line noise.
- Incompatibility with other telephone equipment such as fax machines or other modems.
- Internet Service Providers (ISP) connection capability may vary.
If you think your modem is not connecting properly to other PC-based modems, fax machines, or your ISP, check the following:
- Contact your telephone company and ask them to verify that your telephone line is free from line noise.
- If your problem is fax-related, check that there are no problems with the fax machine you are calling and that it is compatible with fax modems.
- For optimum performance, verify that your ISP point of presence (POP) telephone number is compliant with V.90 standards.
If you are having a problem connecting with your ISP, check that they are not experiencing technical problems. - Try connecting your modem through another telephone line, if available.
Why is my modem connection slow?
Many factors can influence modem connection speed, such as:
- Telephone line noise.
- Incompatibility with other telephone equipment such as fax machines or other modems.
- Internet Service Providers (ISP) connection capability may vary.
If you think your modem is not connecting properly to other PC-based modems, fax machines, or your ISP, check the following:
- Contact your telephone company and ask them to verify that your telephone line is free from line noise.
- If your problem is fax-related, check that there are no problems with the fax machine you are calling and that it is compatible with fax modems.
- For optimum performance, verify that your ISP point of presence (POP) telephone number is compliant with V.90 standards.
If you are having a problem connecting with your ISP, check that they are not experiencing technical problems. - Try connecting your modem through another telephone line, if available.
Why doesn't my modem work properly?
Your modem may be experiencing equipment or software conflicts. If your modem is not functioning properly, check the following:
- Check that the telephone line is properly plugged into the modem line jack.
- Check that the telephone line is working properly. You can verify the line by plugging in an external device such as a standard telephone or fax machine and listening for a dial tone.
- Check that the access telephone number (POP) is correct.
- All software programs that are preinstalled by Sony are compatible with your computer's modem. If you have installed other software, contact the software publisher for information on how to configure the software in order to recognize the modem.
-
If it appears that your modem is not functioning properly, check the device status.
-
Click Start in the Windows taskbar, then click Control Panel.
- Click Printers and Other Hardware and then select Phone and Modem Options.
- From the Modems tab, click to select your modem.
- Click Properties. The Modem Properties window appears.
- Review the information in the Device status section. If your modem is not working properly, click the Troubleshoot button. The Help and Support Center window appears.
- Follow the on-screen instructions to resolve the problem.
■ The modem driver(s) may not be working properly.
How do I change my modem to rotary or touch-tone dialing?
- Click Start in the Windows taskbar, then click Control Panel.
- Click Printers and Other Hardware, then click Phone and Modem options.
- From the Dialing Rules tab, click Edit. The Edit Location dialog box appears.
- Select the Tone or Pulse option. Click OK.
How do I set up a dial-up connection?
After you have connected your computer's modem to a telephone wall jack, follow these steps to set up your dial-up connection to the Internet:
- Click Start from the Windows taskbar and select All Programs.
- Point to Accessories, point to Communications, and then click New Connection Wizard. The New Connection Wizard appears.
The Location Information and the Phone and Modem Options windows appear, when using your computer for the first time. Enter your information as requested and continue to the New Connection Wizard window.
- Follow the on-screen instructions to finish setting up your dial-up connection.
Why is there no sound in any software program?
- Check that the speakers are plugged into the Headphones jack.
- If your speakers have a mute button, verify that it is turned off.
- If your speakers are powered by batteries, verify that the batteries are inserted properly and that they are charged.
- If your speakers use an external power source, verify that the power cord is plugged into a grounded wall outlet or power strip.
- If your speakers have volume control, check the volume level.
- You may not hear sound from your speakers if headphones are connected to your computer.
If the software program you are using has its own volume control, check that the volume is turned up.
- Check the volume controls in the Windows® operating system using these steps:
-
Click Start in the Windows taskbar, then select Control Panel.
-
Select Sounds, Speech, and Audio Devices, then click Adjust the system volume.
-
From the Volume tab, adjust the Device volume by moving the slider bar to the desired sound level. Verify that the Mute option is not selected.
- Check that the Mute check box is not selected in the Volume Control window.
- The sound driver(s) may not be working properly.
Why is there no sound in any software program?
- Check that the speakers are plugged into the Headphones jack.
- If your speakers have a mute button, verify that it is turned off.
- If your speakers are powered by batteries, verify that the batteries are inserted properly and that they are charged.
- If your speakers use an external power source, verify that the power cord is plugged into a grounded wall outlet or power strip.
- If your speakers have volume control, check the volume level.
- You may not hear sound from your speakers if headphones are connected to your computer.
If the software program you are using has its own volume control, check that the volume is turned up.
- Check the volume controls in the Windows® operating system using these steps:
-
Click Start in the Windows taskbar, then select Control Panel.
-
Select Sounds, Speech, and Audio Devices, then click Adjust the system volume.
-
From the Volume tab, adjust the Device volume by moving the slider bar to the desired sound level. Verify that the Mute option is not selected.
- Check that the Mute check box is not selected in the Volume Control window.
- The sound driver(s) may not be working properly.
Why is the S/PDIF option disabled in the Microsoft® Windows® XP Media Center software program?
S/PDIF is enabled in Media Center by changing the DVD settings. This feature is disabled because the appropriate output setting is not selected in the InterVideo® WinDVD® software program's audio setup.
To change audio settings in the WinDVD software program
- Click Start in the Windows® taskbar, and point to All Programs.
-
Point to InterVideo WindDVD 5, and the click on InterVideo WinDVD 5 for VAIO.
The InterVideo WinDVD for VAIO window opens. -
Right-click in the WinDVD window.
A shortcut menu appears.
-
Click Setup..., to view the Setup dialog box.
-
Select the Audio tab.
-
From the section, Audio Speaker Configuration, select 6-channel speaker (5.1 Home Theater) or the desired speaker configuration.
To enable S/PDIF, go to Audio Output Configuration and select Digital (S/PDIF) out to External Processor.
- Click Apply, and then click OK.
InterVideo ^3 software automatically detects the type of speaker system. You may notice that some options are disabled or are not available.
The Microsoft Windows XP Media Center Edition operating system is installed on certain VAIO® computers. See your specifications sheet for details on your computer's configuration.
Why can't I hear dialogue during DVD movie playback, using my 5.1 channel ^1 speaker system?
- Verify that your speaker system is connected correctly.
-
Change the computer's audio settings to 6-channel, to match your 5.1 speaker system.
-
Change the audio settings in the RealTek® Sound Effect Manager software program.
- Change the audio settings in the InterVideo ^ WinDVD ^ software program.
- Change the audio settings in the Media Center software program's DVD settings.
Your computer's supplied accessories may not include a 5.1 channel speaker system. See your specifications sheet for details on your computer's supplied accessories.
Why doesn't my microphone work properly?
Check that the microphone is plugged into the Microphone jack.
Why doesn't my microphone work properly?
Check that the microphone is plugged into the Microphone jack.
Why is my microphone so sensitive to background noise?
If you find there is too much background noise when you record sound, you should adjust the microphone by following these steps:
- Click Start in the Windows taskbar, then click Control Panel.
- Click Sounds, Speech, and Audio Devices, then click Sounds and Audio Devices.
- From the Audio tab, locate the Sound recording section and click Volume. The Recording Control dialog box appears.
If the volume control for the microphone is visible, skip to step 6. - Select the Options menu and click Properties. The Properties dialog box appears.
- In the section, Show the following volume controls, click to select the Microphone check box. Click OK.
- From the Recording Control dialog box, decrease the microphone volume level by moving the slider bar down.
- Close the Recording Control dialog box and then close the Sounds and Audio Devices Properties window.
How do I install a printer?
- Connect your USB or IEEE 1284 printer to the appropriate port on your computer's front, back or side panels. If your printer has a USB, IEEE 1284, or infrared connection, contact the printer manufacturer for information or updates that may be required for proper installation.
-
Check the printer manufacturer's Web site for the latest drivers for your operating system before proceeding with installation. Some printers do not function properly without the updated drivers for specific operating systems.
■ To install your printer, follow these steps: -
Click Start in the Windows taskbar, then click Control Panel.
- Click Printers and Other Hardware, then click Add a Printer.
The Add Printer Wizard appears.
- From the Add Printer Wizard, click Next.
- Select Local Printer, then click Next.
Place a check mark in the box, Automatically detect and install my Plug and Play printer, if you are installing a recently manufactured printer equipped with Plug and Play capability.
- Select the appropriate port, usually LPT1 if using the parallel port, and then click Next.
- Select the appropriate printer manufacturer and model.
- Follow the on-screen instructions to print a test page and complete printer installation.
- If the printer is not included in the list, but the printer manufacturer provides a disk with the appropriate Windows XP Printer driver:
- Choose Have Disk.
- Enter the appropriate path for the disk or CD, and click OK.
- If the printer is not included in the list, and no drivers are provided with the printer:
- Select a similar printer that your printer may emulate.
- Refer to the user manual or guide supplied with your printer.
- Visit the printer manufacturer's Web site for technical support.
The location of the connection ports for peripheral equipment may vary, depending upon your computer's hardware configuration.
How do I install a printer?
- Connect your USB or IEEE 1284 printer to the appropriate port on your computer's front, back or side panels. If your printer has a USB, IEEE 1284, or infrared connection, contact the printer manufacturer for information or updates that may be required for proper installation.
-
Check the printer manufacturer's Web site for the latest drivers for your operating system before proceeding with installation. Some printers do not function properly without the updated drivers for specific operating systems.
■ To install your printer, follow these steps: -
Click Start in the Windows taskbar, then click Control Panel.
- Click Printers and Other Hardware, then click Add a Printer.
The Add Printer Wizard appears.
- From the Add Printer Wizard, click Next.
- Select Local Printer, then click Next.
Place a check mark in the box, Automatically detect and install my Plug and Play printer, if you are installing a recently manufactured printer equipped with Plug and Play capability.
- Select the appropriate port, usually LPT1 if using the parallel port, and then click Next.
- Select the appropriate printer manufacturer and model.
- Follow the on-screen instructions to print a test page and complete printer installation.
- If the printer is not included in the list, but the printer manufacturer provides a disk with the appropriate Windows XP Printer driver:
- Choose Have Disk.
- Enter the appropriate path for the disk or CD, and click OK.
- If the printer is not included in the list, and no drivers are provided with the printer:
- Select a similar printer that your printer may emulate.
- Refer to the user manual or guide supplied with your printer.
- Visit the printer manufacturer's Web site for technical support.
The location of the connection ports for peripheral equipment may vary, depending upon your computer's hardware configuration.
The connected printer does not function properly when the computer resumes from a power saving mode.
- Clear the printer memory by turning the printer off for approximately 10 seconds, and then turning it back on.
- If your printer does not resume normal operations, try restarting your computer.
The information in this section provides basic procedures for handling your computer and common peripheral devices, and using storage media.
■ About the Power Source
■ About Handling the Computer
■ About Using a Monitor (Display)
■ About Disposing of the Lithium Battery
■ About Recording and Data Storage Media
Before opening your computer, turn the computer off and let it cool down for 10 minutes. This protects you against internal components that may be too hot to handle.
- Your computer operates on 100-220, 200-240V AC 50/60 Hz only.
- Plug all the power cords for your computer and its peripheral equipment into the same AC supply line. AC derived from different supply lines may result in voltage differences that can cause unstable operation or unwanted weak currents at the time of connection.
- Do not share the AC outlet with any other power-consuming equipment, such as copying machines or shredders.
- You can purchase a power strip with a surge protector. This device prevents damage to your computer caused by sudden power surges such as those that may occur during an electrical storm.
If you live in an area that experiences frequent power fluctuations, you may want to purchase an Uninterruptible Power Supply (UPS). This device contains both a surge protector and a battery backup. The surge protector prevents damage to your computer caused by power surges. The battery backup safeguards your data during a brief period of power loss. - The power control button on the front panel does not turn off the AC power. To remove power from the computer, you must turn it off and then unplug the AC power cord from the wall outlet or power strip.
- Do not place heavy objects on the power cord.
- Do not operate the computer with the cover removed. Always reinstall the cover before turning it on.
- To disconnect the cord, pull it out by the plug. Never pull the cord itself.
- Unplug your computer from the wall outlet if you do not intend to use the computer for a long time.
- Do not attempt to open the power supply. There are no user-serviceable parts in the power supply. To avoid personal injury or damage to your equipment, refer the repair or replacement of the power supply to qualified personnel only.
Your computer uses high-frequency radio signals and may cause interference to radio or TV reception. If this occurs, relocate the computer a suitable distance away from the TV or radio equipment.
- Do not place your Sony computer in a location subject to:
■ Heat sources, such as radiators or air ducts
- Direct sunlight
Excessive dust
■ Mechanical vibration or shock
■ Strong magnets or speakers that are not magnetically shielded
■ Ambient temperature of more than 95°F (35°C) or less than 50°F (10°C)
■ High humidity, moisture, or rain
- Do not place electronic equipment near your computer. The computer's electromagnetic field may cause a malfunction.
- Provide adequate air circulation to prevent internal heat build-up. Do not place your computer on loose surfaces (such as rugs or blankets) or near materials (such as curtains or draperies) that may block its ventilation slots. Leave a space of at least 8 inches from the back panel of your computer.
- Clean the cabinet with a soft, dry cloth or a soft cloth lightly moistened with a mild detergent solution. Do not use any type of abrasive pad, scouring powder, or solvent such as alcohol or benzine, as it may damage the finish of your Sony computer.
- Should any solid object or liquid fall into the cabinet, keyboard, or mouse, shut down your computer and then unplug it. You may want to have the computer checked by qualified personnel before operating it any further.
- Use only specified peripheral equipment and interface cables; otherwise, problems may result.
- Do not use cut or damaged connection cables.
- Always switch the power off before connecting your computer to peripheral equipment; otherwise, damage may occur to the integrated circuits in your computer.
- Your computer, keyboard, and mouse consist of high-precision electronic parts. Do not drop them or bump them against other objects.
- Your Sony computer does not work with party lines, cannot be connected to a coin-operated telephone, and may not work with multiple telephone lines or a private branch exchange (PBX).
- If the telephone company makes a service call to your home or office and determines that your computer is responsible for the problem, the telephone company may bill you for the service call. If you do not disconnect your computer when it is adversely affecting the telephone line, the telephone company has the right to disconnect your service until you correct the problem.
Moisture condensation
If your computer is brought directly from a cold location to a warm one, moisture may condense inside your computer. In this case, allow at least an hour before turning on your computer. If any problem occurs, unplug your computer, and contact your Sony Service Center.
Wireless devices
Wireless devices, such as a wireless keyboard or mouse, requires unobstructed communication with your computer for proper operation.
- Do not exceed a maximum distance of 2 feet between your VAIO® computer and your wireless device.
- Verify that any infrared receiver(s) on the computer or wireless device is free of obstructions that may prevent proper operation.
-
Confirm that the supplied AA batteries are properly installed in the wireless device.
-
Use the CONNECT buttons on the wireless device and your computer, if available, to establish communication between the equipment.
- Avoid using radio-controlled toys or equipment, CB radios, and other wireless devices in the area near your wireless keyboard. These other devices may cause interference, causing your wireless keyboard or mouse to stop working properly.
- Do not place metal furniture near your computer or wireless device, as this may create interference, causing your wireless device to stop working properly.
The hard disk drive
- Do not place the computer in a location that is subject to vibration or shock.
- Do not move the computer during operation.
- Do not subject the computer to sudden changes in temperature.
- Do not turn off the power while the computer is accessing the hard disk drive.
Optical mouse
An optical mouse requires an ideal surface texture in order to provide precision pointing and tracking.
- Use surfaces such as plain paper, card stock, or fabric that have minimal repetitive patterning.
-
Avoid surfaces such as mirrors, smooth glass, or magazines that have halftone printing.
-
DVD playback and certain video-related software may not function correctly when your monitor is set to a high refresh rate. If your monitor does not play back video content properly, try setting the display to a lower refresh rate.
- Do not place the display near a strong magnetic force.
- Do not block the ventilation slots on the display.
- Using the computer in low temperature conditions may produce a residual image on the screen. This is not a malfunction. When the computer returns to normal temperature, the screen returns to normal.
- A residual image may appear on the screen if the same image is displayed for a lengthy period of time. The image disappears after a period of time. You can use a screen saver to prevent residual images.
The screen becomes warm during operation. This is normal and does not indicate a malfunction.
About handling an LCD monitor (display)
- Do not place the display near a strong magnetic force.
- Do not block the ventilation slots on the display.
- Using the computer in low temperature conditions may produce a residual image on the screen. This is not a malfunction. When the computer returns to normal temperature, the screen returns to normal.
- A residual image may appear on the screen if the same image is displayed for a lengthy period of time. The image disappears after a period of time. You can use a screen saver to prevent residual images.
The screen becomes warm during operation. This is normal and does not indicate a malfunction. - Do not leave the LCD in direct sunlight, as this may damage the screen. Use caution when using the computer near a window.
- Do not exert pressure on the LCD or scratch the surface, as this may cause the screen to malfunction.
The LCD screen is manufactured using high-precision technology. On occasion, you may see tiny black or colored points on the LCD. This is normal and does not indicate a malfunction. - Avoid rubbing the screen, as this can damage the LCD. Use a soft, dry cloth to clean the display.
Monitor setup
You can verify your monitor's settings before video playback.
■ Color quality: Use factory default settings (32-bit).
- Screen resolution: Set to 1024 x 768 pixels. Using other display settings may cause an improper screen image or a poor TV/video recording.
Some displays may require the screen resolution to be set to 1280 x 1024 pixels. For information on your display's setting requirement, see the instructions supplied with your display.
- Check your display setup in the Microsoft® Windows® operating system before starting up video playback or recording software. For more information, refer to the monitor's operating manual.
- Do not change the display setup while recording TV or video. Your computer may operate improperly and provide a poor TV/video recording.
Dispose of the lithium battery properly. In some areas, the disposal of lithium batteries in household or business trash may be prohibited. You can return your unwanted lithium batteries to your nearest Sony Service Center or Factory Service Center. For the Sony Service Center nearest you, visit the Sony online support Web site at http://www.sony.com/pcsupport

Do not handle damaged or leaking lithium batteries. The lithium battery may explode if mistreated. Do not disassemble it or dispose of it in fire.
Replace the battery with a Sony CR2032 lithium battery. Using a type of battery other than a CR2032 may present a risk of fire or explosion.
Handling CD or DVD media
- Do not touch the surface of the disc.
- Do not drop or bend the disc.
- Do not use adhesive labels to identify the disc. The label may come off while the disc is in use in the optical drive and damage the drive.
DualDisc Considerations
- Your computer is designed to play back discs that conform to the Compact Disc Digital Audio standard specifications (CD Standard). A DualDisc is a two sided disc product which combines DVD recording material on one side with digital audio material on the other side. Please be aware that the audio side (non-DVD side) of the DualDisc may not play on the computer because it does not conform to the CD Standard.
Cleaning CD or DVD media
- Fingerprints and dust on the surface of a disc may cause read and write errors. Proper care of the disc is essential to maintain its integrity. Do not use solvents such as benzine, thinner, commercially available cleaners or anti-static spray, as they may cause damage to the disc.
- For normal cleaning, hold the disc by its edge and use a soft cloth to wipe the surface from the center out.
- If the disc is badly soiled, moisten a soft cloth with water, wring it out well, and use it to wipe the surface of the disc from the center out. Wipe off any remaining moisture with a dry soft cloth.
Using Memory Stick media
- MagicGate Memory Stick and Memory Stick PRO media are the only media that support MagicGate technology. Currently, Sony® SonicStage and OpenMG software are not compatible with the new Memory Stick PRO media. Sony suggests using only the MagicGate Memory Stick media to store and transfer any data created with SonicStage and OpenMG software.
- VAIO® computers may not support all of the high-speed data transfer or access control features of the new Memory Stick PRO media. You can use the new Memory Stick PRO media as you would use a standard Memory Stick® media.
- Visit the Sony online support Web site at http://www.sony.com/pcsupport regularly for the latest information on the new Memory Stick PRO media.
Using memory cards
Certain VAIO® computers support CompactFlash®, MultiMediaCard (MMC), Microdrive, SmartMedia, xD-PictureCards and Secure Digital (SD) memory cards. For more information about installed memory card reader(s), see your computer's specifications sheet at http://www.sony.com/pcsupport. Visit the Sony online support Web site regularly for the latest information on compatible memory cards.
■ Always insert the correct memory card into the appropriate memory card reader.
- Do not attempt to insert a different memory card or memory card adapter into a different memory card reader. An incompatible memory card or adapter may be difficult to remove from the wrong reader and can cause damage your computer.
- Use care when inserting or removing a memory card from the reader. Do not force the memory card in or out of the reader.
Handling floppy disks ^1
- Do not open the shutter manually and touch the surface of the floppy disk.
- Keep floppy disks away from magnets.
- Keep floppy disks away from direct sunlight and other heat sources.
Sony provides several options to help solve common problems or to locate support for your VAIOs computer. This section describes all available resources and offers suggestions on how to access this information for maximum results.
- Immediate Help and Support
■ Software Help and Support
■ Resources for Additional Help and Support
You can locate helpful information immediately by consulting your hard copy guides and supplements, or by accessing the online Computer User Guide and individual software Help files.
Your computer is supplied with these support options:
VAIO® Computer Safety Information — Provides safety/legal guidelines and owner information.
VAIO® Computer Welcome — This supplement provides information about supplied accessories and your computer's hardware configuration.
- RAID Systems ^1 — Provides an overview of RAID systems and the various RAID levels (or types) that can be configured with your Sony VAIO ^® computer. It lists detailed procedures for using the RAID Recovery program to configure the hard disk drives, change your computer's RAID array, or to remove the RAID configuration. Additional procedures are also provided for using the VAIO ^® Recovery Wizard and the Intel Storage Utility programs.
- VAIO® Recovery Options Guide — Provides information about restoring individual software programs, software drivers, drive partition(s), or your entire hard disk drive to the original factory installed settings.
- VAIO® Computer User Guide — The online User Guide provides information about configuring, maintaining, and upgrading your computer. This support resource offers a variety of available topics, enabling you to quickly view specific information using context-sensitive search features. To access the online guide:
- Click Start in the Windows® taskbar, click All Programs, then click VAIO Support Central.
- From the VAIO Support Central menu, click VAIO Documentation.
- Click VAIO User Guide.
- Specifications — The online specifications sheet describes the hardware and software configuration of your VAIO computer. To view the online specifications sheet:
- Connect to the Internet.
- Go to the Sony online support Web site at http://www.sony.com/pcsupport.
- Click the Manuals/Specs/Warranty button and follow the on-screen instructions to locate your model's specifications sheet.
- Preinstalled software Help files — Each preinstalled software program provides online Help within the software, that describes the software's features. In these Help files, you can find tutorials that teach you to use the software and locate troubleshooting support, should problems occur. To access software Help files:
- Click Start in the Windows taskbar and point to All Programs. A submenu appears, listing all preinstalled software programs.
- Click the desired software program. ^2 The software's main window appears.
- From the menu bar, click Help. The software program's Help appears.
■ VAIO Software — This feature provides specific information on preinstalled software on your computer.
To access this online software information
- Click Start in the Windows® taskbar, click All Programs, then click VAIO Central.
- From the VAIO Central menu, click the Categories tab, then click the System Information folder.
- Click Software Information.
This booklet is only supplied with certain VAIO® computers that have RAID capability or are RAID-ready. See the online specifications sheet for details about your computer's hardware configuration.
You can locate the online Help for Sony® software programs by pointing to the individual software program's icon and selecting Help from the submenu.
Technical support information for the preinstalled software on your computer is located in this section. Sony software support is free of charge for 90 days after the original date of purchase.
Your computer may not be supplied with all of the software discussed in this section, depending on the computer purchased. To view information about the specific software preinstalled on your computer, see the software program's online Help.
Adobe® Photoshop® Elements, Premiere®, Reader®
Adobe Systems, Inc.
Web site http://www.adobe.com
telephone 800-685-3652
hours M - F, 6 AM - 5 PM PST
America Online® (Broadband or Dial-Up)
America Online, Inc.
Web site http://www.aol.com
AOL® Instant Messenger
America Online, Inc.
Web site http://www.aim.com
Click to DVD
Sony Electronics Inc.
At the touch of a button, Click to DVD software enables you to automatically burn DVDs from a video device. Create DVDs by capturing video content straight from a video device or by importing video from stored files. You can also edit the video. Create DVD photo albums and slide shows with picture files or by importing pictures from a digital still camera. What's more, you can easily give a professional look to your DVDs by adding chapter menus, backgrounds, and menu screens. You are only a few clicks away from enjoying your own DVDs!
Web site http://www.sony.com/pcsupport
telephone 888-4-SONY-PC (888-476-6972)
hours 7 days a week, 24 hours a day
DVgatePlus
Sony Electronics Inc.
Connect a compatible digital video camera to your computer's i.LINK® port and capture video clips and still images. Edit clips from your video, add new clips, and combine clips into new movie segments. Save your movies back to your digital video camera or in a variety of popular file formats.
Web site http://www.sony.com/pcsupport
telephone 888-4-SONY-PC (888-476-6972)
hours 7 days a week, 24 hours a day
Microsoft® Internet Explorer
Microsoft Corp.
Web site http://www.support.microsoft.com
Microsoft® Windows Media® Player
Microsoft Corp.
Web site http://www.support.microsoft.com
Microsoft® Windows® Movie Maker
Microsoft Corp.
Web site http://www.support.microsoft.com
Microsoft® Works
Microsoft Corp.
Web site http://www.support.microsoft.com
MoodLogic
MoodLogic, Inc.
Web site http://www.moodlogic.com/support
e-mail help@moodlogic.com
Netscape® Internet Service
America Online, Inc.
Web site http://isp.netscape.com/help
Telephone 866-541-8233
Norton Internet Security
Symantec Corp.
Web site http://www.symantec.com/techsupp
PictureGear Studio
Sony Electronics Inc.
PictureGear Studio is picture management software that can display photos from your hard drive or a Sony digital still camera. The photos appear in a convenient light-table format so that you can easily view the contents of an entire folder, create your own photo albums, and make prints.
Web site http://www.sony.com/pcsupport
telephone 888-4-SONY-PC (888-476-6972)
hours 7 days a week, 24 hours a day
Quattro Pro®
Corel Corporation
Web site http://www.corel.com
Quicken® New User Edition
Intuit Inc.
Web site http://www.intuit.com/support
DigitalMedia®
Roxio
Web site http://support.sonic.com
SonicStage
Sony Electronics Inc.
The SonicStage software program gives you all the tools you need to manage music files on your computer. SonicStage software delivers high-quality digital audio storage, a sleek player skin design, and audio CD-burning capability.
Web site http://www.sony.com/pcsupport
telephone 888-4-SONY-PC (888-476-6972)
hours 7 days a week, 24 hours a day
SonicStage Mastering Studio
Sony Electronics Inc.
Use SonicStage® Mastering Studio software to record songs from analog records or cassette tapes into your computer and then burn them to CD-R or CD-RW media. You can also output this music to audio files in WAV format.
Web site http://www.sony.com/pcsupport
telephone 888-4-SONY-PC (888-476-6972)
hours 7 days a week, 24 hours a day
SpySubtract®
Intermute, Inc.
Web site http://www.intermute.com/support.html
VAIO Control Center
Sony Electronics Inc.
VAIO Control Center provides a central location that gathers resources to configure your VAIO® personal computer and view your computer's configuration, specifications, and installed software.
Web site http://www.sony.com/pcsupport
telephone 888-4-SONY-PC (888-476-6972)
hours 7 days a week, 24 hours a day
VAIO Edit Components
Sony Electronics Inc.
VAIO Edit Components is a software plug-in for Adobe® Premiere® software that provides maximum compatibility and video quality when capturing video with your Sony digital camcorder.
Web site http://www.sony.com/pcsupport
telephone 888-4-SONY-PC (888-476-6972)
hours 7 days a week, 24 hours a day
VAIO Media
Sony Electronics Inc.
VAIO Media software brings multimedia to your network, enabling you to share music, video, and picture files between your VAIO® computers. You can set up one or more computers as "media servers," that store your multimedia files and make them available to other compatible VAIO computers on your wired or wireless home network.
Web site http://www.sony.com/pcsupport
telephone 888-4-SONY-PC (888-476-6972)
hours 7 days a week, 24 hours a day
VAIO Update
Sony Electronics Inc.
The VAIO Update utility helps you maintain your VAIO® computer by regularly checking the Sony Online Support Web site for important software updates and up-to-date information for your specific computer model.
Web site http://www.sony.com/pcsupport
telephone 888-4-SONY-PC (888-476-6972)
hours 7 days a week, 24 hours a day
VAIO Zone
Sony Electronics Inc.
VAIO Zone software delivers an effortless way to browse and enjoy picture, music, and video files on your computer, all through an elegant, next-generation interface. You can enjoy media content stored on other VAIO® computers (media servers) on your network. VAIO Zone software enables you to record video and photo slide shows onto recordable DVD media, using VAIO computer models equipped with a recordable DVD drive. On VAIO computer models equipped with a built-in TV tuner, VAIO Zone software includes a complete personal video recorder, enabling you to record TV programs and burn them to DVD.
Web site http://www.sony.com/pcsupport
telephone 888-4-SONY-PC (888-476-6972)
hours 7 days a week, 24 hours a day
WinDVD® for VAIO®
InterVideo, Inc.
Web site http://www.intervideo.com/jsp/Support.jsp
telephone 510-651-0888
WordPerfect®
Corel Corporation
Web site http://www.corel.com
If the information provided with your VAIO® computer does not offer an immediate solution, or you would like to get direct support, try these additional help and support resources.
Sony online support Web site
Online help and support are available 24 hours a day, seven days a week, when you visit the Sony online support Web site. You can access the Web site at http://www.sony.com/pcsupport.
The Sony online support Web site provides:
Information about your specific computer model, such as
■ hardware and software specifications.
■ safety and legal information.
■ quick solutions to common problems.
- An automated tutorial library that contains interactive, easy-to-understand lessons on using your computer's hardware and software features.
- Links that enable you to:
■ quickly find the nearest Sony service center locations.
- arrange for repairs or check repair status.
■ review warranty information.
■ e-mail your question or comments to the Sony Customer Information Services Center.
- check pricing and availability for products, accessories and parts, as well as purchase online.
- access the Sony Solutions Knowledge Base, a database that contains answers to many frequently asked questions.
Sony Customer Information Services Center
If other support options do not resolve your issue, you can contact a Sony Support representative directly.
Before making a call to the Sony Customer Information Services Center, have this basic information readily available.
- VAIO® computer type.
- Model number.
- Serial number ^1 .
Example:

text_image
.*P/N 28470000 * *Serial# 3000001*-
Operating system.
-
Hardware feature or software program that has a problem. (See the online VAIO® Computer User Guide for the appropriate software technical support information.)
-
Brief description of the issue.
For VAIO® computers purchased in the U.S. and Canada, contact a Sony Support representative at 1-888-476-6972.
^1 The serial number is located on the back panel of your computer. The serial number is on a white barcode label.