
Viera TX-P50C10E - TV PANASONIC - Free user manual and instructions
Find the device manual for free Viera TX-P50C10E PANASONIC in PDF.


User questions about Viera TX-P50C10E PANASONIC
0 question about this device. Answer the ones you know or ask your own.
Ask a new question about this device
Download the instructions for your TV in PDF format for free! Find your manual Viera TX-P50C10E - PANASONIC and take your electronic device back in hand. On this page are published all the documents necessary for the use of your device. Viera TX-P50C10E by PANASONIC.
USER MANUAL Viera TX-P50C10E PANASONIC
natural_image
Front view of a flat-screen computer monitor (no visible text or symbols)Panasonic®
Operating Instructions
Plasma Television
Model No.
TX-P37C10E
TX-P37C10ES
TX-P42C10E
TX-P42C10ES
TX-P50C10E
Contents
Be Sure to Read
● Safety Precautions 4
(Warning / Caution)
Notes 5
● Maintenance 5
Quick Start Guide
Accessories / Options● 6
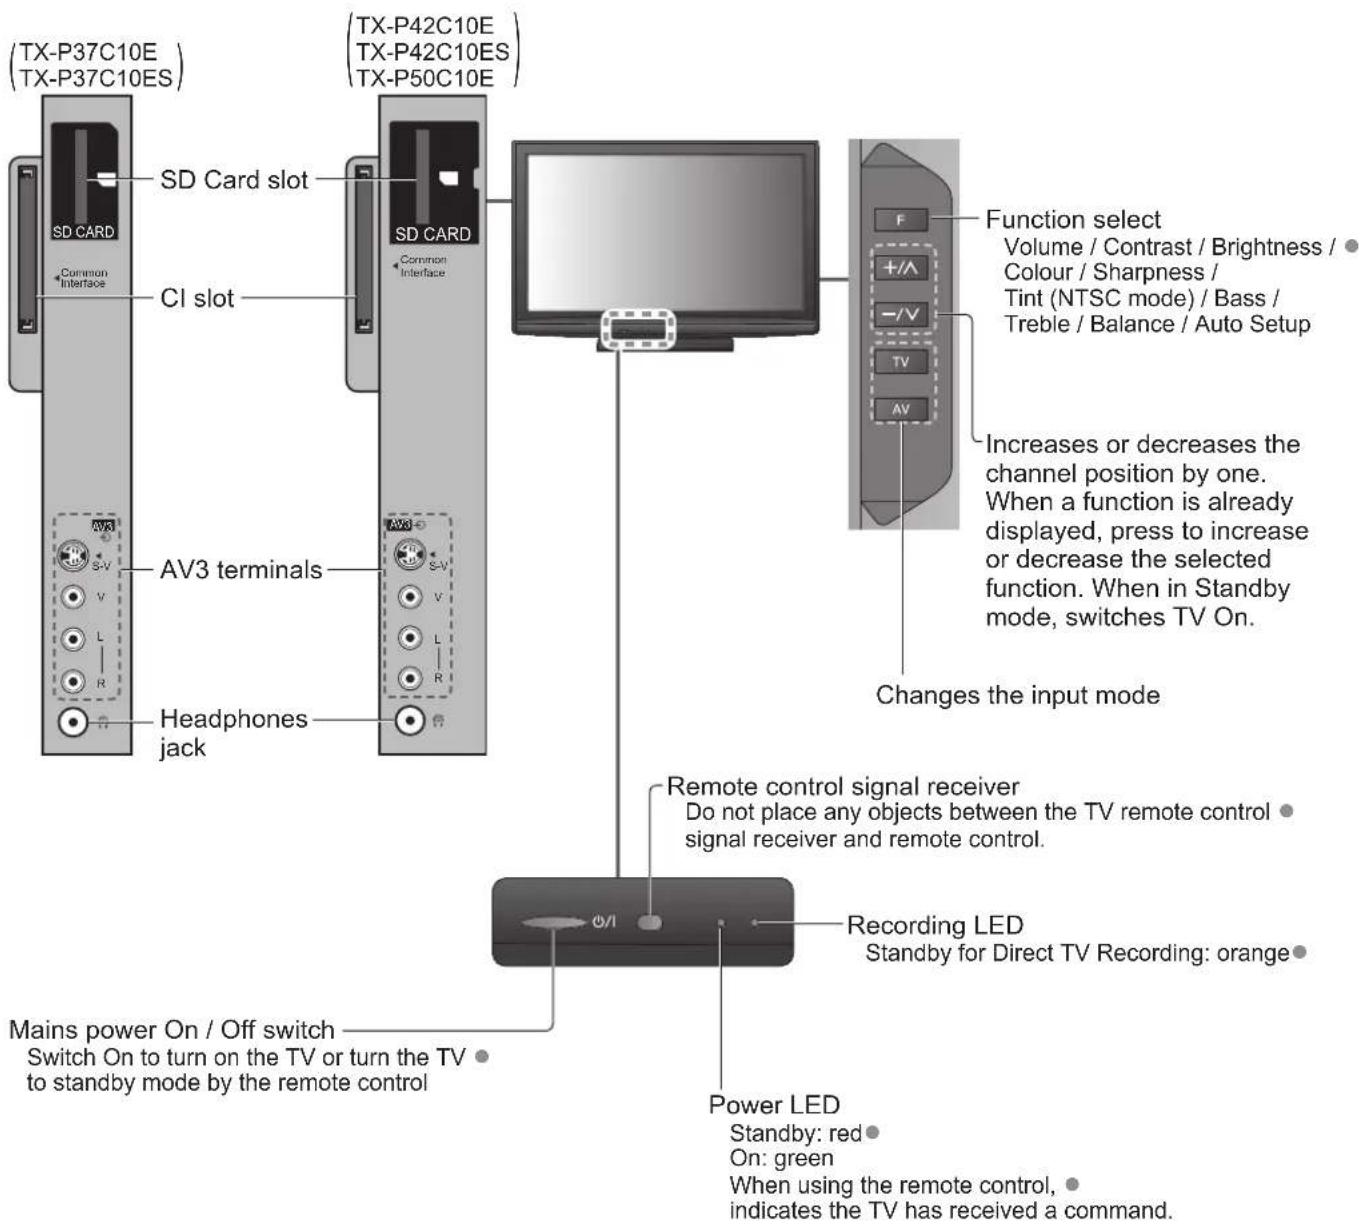
Identifying Controls• 8
●Basic Connection 10
●Auto Setup 12
●How to Use Menu Functions …… 14

VIERA
VIERA
Link

VIERA
IMAGE VIEWER

DVB®


HDMI ^TM
HIGH-DEFINITION MULTIMEDIA INTERFACE
Please read these instructions before operating your set and retain them for future reference.
The images shown in this manual are for illustrative purposes only.
Please refer to Pan European Guarantee Card if you need to contact your local Panasonic dealer for assistance.
For more detailed instructions, refer to the Operating Instructions on the CD-ROM.
To view the Operating Instructions on the CD-ROM, you need a computer equipped with a CD-ROM drive, and Adobe® Reader® (Version 7.0 or later is recommended) installed on your computer.
Depending on the operating system or settings on your computer, the Operating Instructions may not start automatically.
In this case, open the PDF file under \MANUAL\PDF manually to view the instructions.
English

TQB0E0824U-G
Turn your own living room into a movie theatre!
Experience an amazing level of multi-
natural_image
Illustration of a TV set with a mounted monitor and air conditioner unit, surrounded by plants (no text or symbols)Notice for DVB functions
Any functions related to DVB (Digital Video Broadcasting) will work in areas where DVB-T (MPEG2) digital terrestrial broadcasting are received.
Consult your local dealer with coverage areas.
●DVB functions may not be available in some countries.
Some functions may not be available in some countries.
This TV has the capability for DVB specifications. But future DVB services cannot be guaranteed.
media excitement
text_image
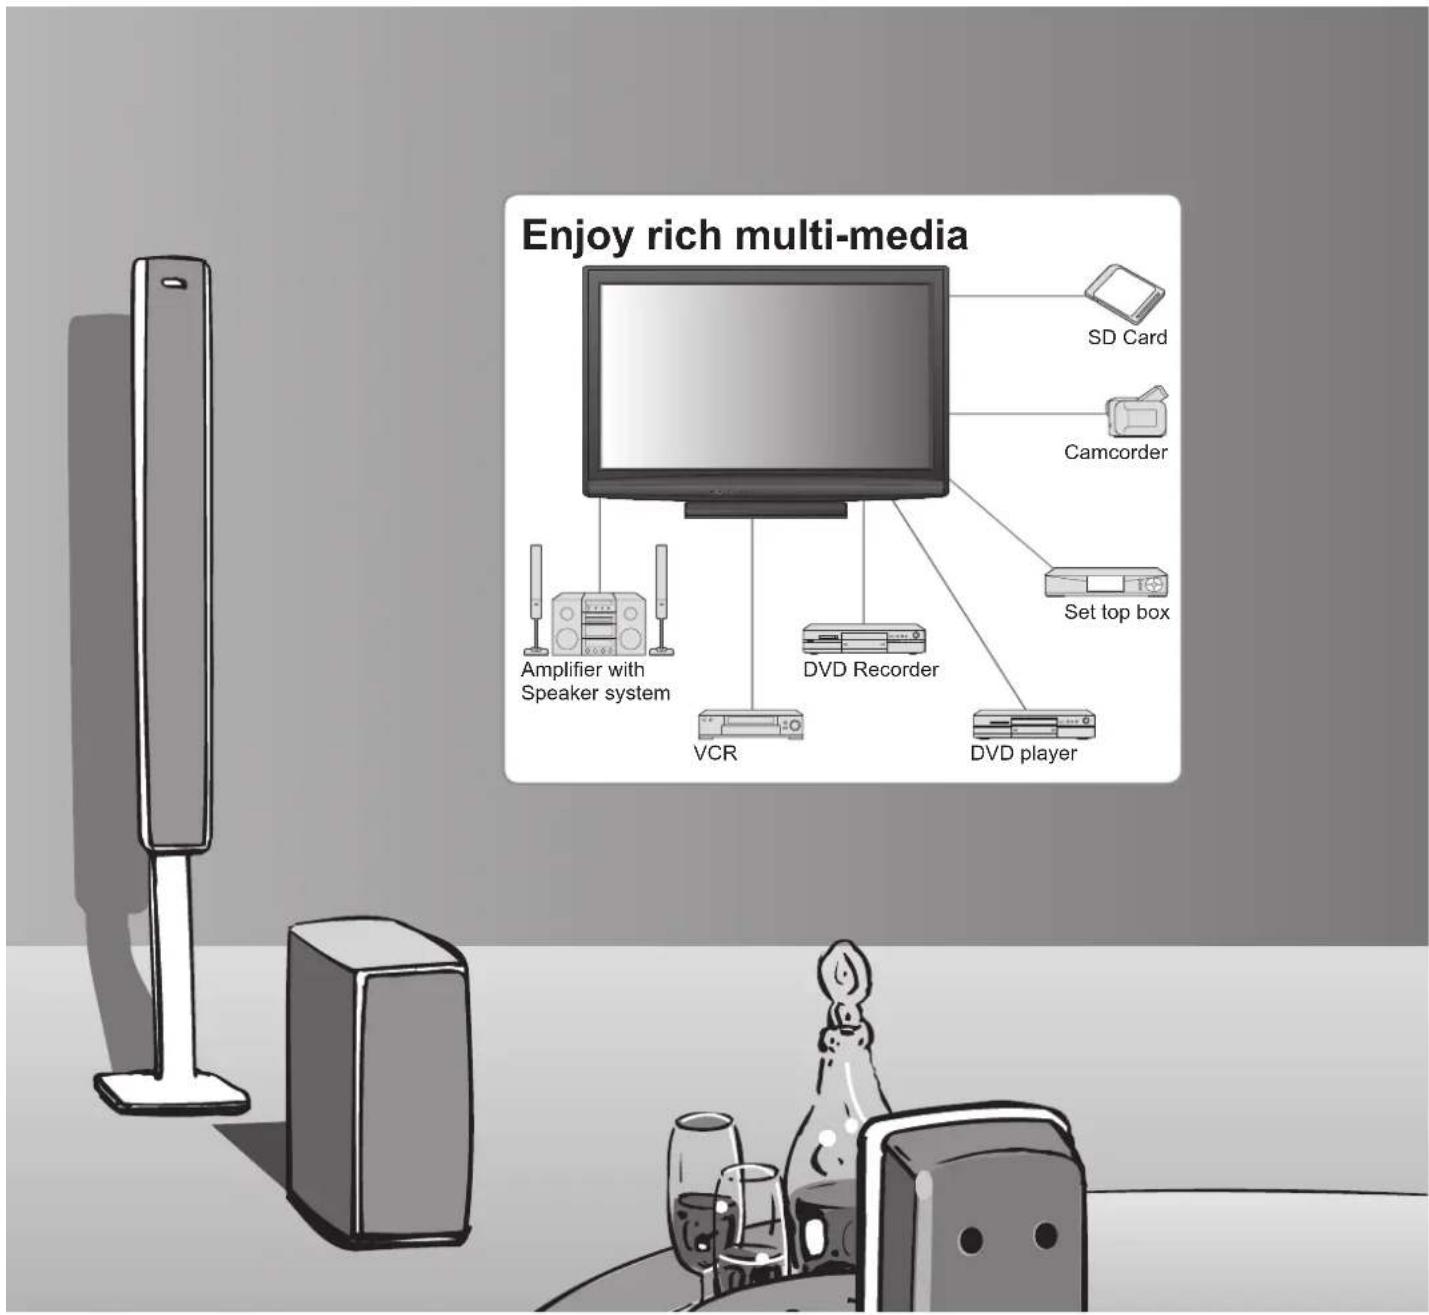
Enjoy rich multi-media SD Card Camcorder Amplifier with Speaker system VCR DVD Recorder Set top box DVD playerUp to 100,000 hours Plasma Panel Lifetime
The Plasma display panel used in the 2009 VIERA TV range is rated for up to 100,000 hours.*
* This measurement is based on the time taken for the brightness of the panel to reduce to half of it's maximum level.
The time taken to reach this level may vary depending on the image content and the environment where the TV is used.
Image retention and malfunctions are not taken into account.
Safety Precautions
Warning
Handling the mains plug and lead
- Insert the mains plug fully into the socket outlet. (If the mains plug is loose, it could generate heat and cause fire.) Ensure that the mains plug is easily accessible.
- Ensure the earth pin on the mains plug is securely connected to prevent electrical shock.
- An apparatus with CLASS I construction shall be connected to a mains socket outlet with a protective earthing connection.
- Do not touch the mains plug with a wet hand. (This may cause electrical shock.)
- Do not use any mains lead other than that provided with this TV. (This may cause fire or electrical shock.) Do not damage the mains lead. (A damaged lead may cause fire or electrical shock.)
Do not move the TV with the lead plugged in the socket outlet.
- Do not place a heavy object on the lead or place the lead near a high-temperature object.
Do not twist the lead, bend it excessively, or stretch it.
Do not pull on the lead. Hold onto the mains plug body when disconnecting lead.
Do not use a damaged mains plug or socket outlet.
If you find any abnormality, remove the ma immediately!
AC 220-240 V 50 / 60 Hz
natural_image
Front view of a flat-screen computer monitor (no visible text or symbols)Power source
This TV is designed to operate on 220-240 V, ● 50 / 60 Hz AC.
Do not remove covers NEVER modify the TV yourself
(High-voltage components may cause serious electrical shock.)
- Do not remove the rear cover as live parts are accessible when it is removed. There are no user serviceable parts inside.
●Have the TV checked, adjusted, or repaired at your local Panasonic dealer.
Do not expose to rain or excessive moisture
To prevent damage which might result in electric shock or fire, do not expose this TV to rain or excessive moisture. This TV must not be exposed to dripping or splashing water and objects filled with liquid, such as vases, must not be placed on top of or above the TV.
Do not expose to direct sunlight and other sources of heat
Avoid exposing the TV to direct sunlight and other sources of heat. To prevent fire never place any type of candle or naked flame on top or near the TV.
Do not place foreign objects inside the TV
- Do not allow any objects to drop into the TV through the air vents (fire or electrical shock may result).
Do not place the TV on sloped or unstable surfaces
●The TV may fall off or tip over.
Use only the dedicated pedestals / mounting equipment
- Using an unapproved pedestal or other fixtures may make the TV unstable, risking injury. Be sure to ask your local Panasonic dealer to perform setup.
- Use approved pedestals / mounts (p. 6).
Do not allow children to handle SD Card
- As with a small object, SD Card can be swallowed by young children. Please remove SD Card immediately after use.
Caution
When cleaning the TV, remove the mains plug
Cleaning an energized TV may cause electrical shock.
When the TV is not going to be used for a long period of time, remove the mains plug
This TV will still consume some power even in the Off mode, as long as the mains plug is still connected to a live socket outlet.
Transport only in upright position■
Transporting the TV with its display panel facing upright or downward may cause damage to the internal circuitry.
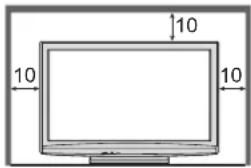
Allow sufficient space around the TV for ■ radiated heat
Minimum distance
text_image
10 10 10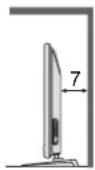
(cm)
When using the pedestal, keep the space between the bottom of the TV and the surface where the TV is set. In case of using Wall-hanging bracket, follow the manual of it.
Do not block the rear air vents
Blocked ventilation by newspapers,
table cloths, curtains, etc. may cause overheating, fire or electrical shock.
■ Do not expose your ears to excessive volume from the headphones
Irreversible damage can be caused.
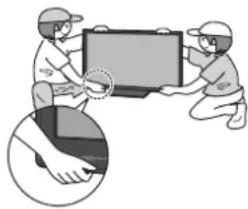
■The TV is heavy. Handle the TV by 2 or more people. Support as shown to avoid injury by the TV tipping or falling.
natural_image
Illustration of two workers installing a large screen with a magnified inset showing hand gesture (no text or symbols)Notes
Do not display a still picture for a long time
This causes the image to remain on the plasma screen ("image retention").
This is not considered a malfunction and is not covered by the warranty.
Typical still images
●Channel number and other logos
● Image displayed in 4:3 mode
- Video game
- Computer image
To prevent image retention, contrast is lowered automatically after a few minutes if no signals are sent or no operations are performed.
Maintenance
First, remove the mains plug from the socket outlet.
Display panel
Regular care: Gently wipe the surface clean of dirt by using a soft cloth.
Major contamination: Wipe the surface clean using a soft cloth dampened with clean water or diluted neutral detergent (1 part detergent to 100 parts water). Then, using a soft dry cloth, evenly wipe the surface clean until it is dry.
Caution
- Do not tap or scratch the surface with your fingernail or other hard object.
● Take care not to subject the surface to insect repellent, solvent, thinner, or other volatile substances (this may degrade surface quality).
Cabinet, Pedestal
Regular care: Wipe the surface clean using a soft dry cloth.
Major contamination: Dampen a soft cloth with clean water or water containing a small amount of neutral detergent.
Then, wring the cloth and wipe the surface clean with it. Finally, wipe the surface clean with a dry cloth.
Caution
Take care not to subject the TV's surfaces to detergent (a liquid inside the TV could lead to product failure).
Take care not to subject surfaces to insect repellent, solvent, thinner, or other volatile substances (this may deteriorate the surface by peeling the paint).
- Do not allow the cabinet and pedestal to make contact with a rubber or PVC substance for a long time.
Mains plug
Wipe the mains plug with a dry cloth at regular intervals. (Moisture and dust may lead to fire or electrical shock.)
Accessories / Options
Standard accessories Check that you have the accessories and items shown

Remote Control □ N2QAYB000328
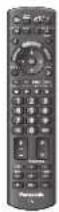
Operating Instructions □
Pan European Guarantee Card □
Batteries for the □ Remote Control (2) R6 (UM3)
Cleaning cloth
(TX-P37C10E)
(TX-P42C10E)
(TX-P50C10E)
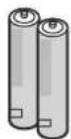
□

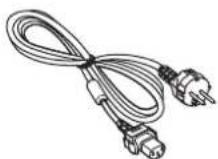
Mains Lead □
→ p. 11
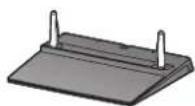
Pedestal □
→ p. 7
● This product contains possibly dangerous parts (such as plastic bags), that can be breathed in or swallowed by young children accidentally. Keep these parts out of reach of young children.
Optional accessories
Wall-hanging bracket • TY-WK4P1RW

Caution
- In order to maintain the unit's performance and safety, be absolutely sure to ask your dealer or a licenced contractor to secure the wall-hanging brackets.
- Carefully read the instructions accompanying the pedestal, and be absolutely sure to take steps to prevent the TV from tipping over.
● Handle the TV carefully during installation since subjecting it to impact or other forces may cause product damage.
● Take care when fixing wall brackets to the wall. Always ensure that there are no electrical cables or pipes in the wall before hanging bracket.
● To prevent fall and injury, remove the TV from its fixed wall position when it is no longer in use.
Installing / removing remote's batteries
1
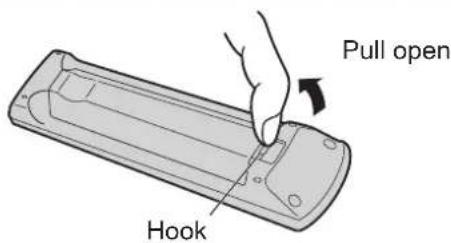
text_image
Pull open Hook2
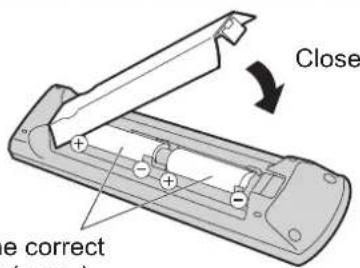
text_image
Close e correct (type)Note the correct polarity (+ or -)
Caution
- Incorrect installation may cause battery leakage and corrosion, resulting in damage to the remote control. Do not mix old and new batteries.
- Do not mix different battery types (such as alkaline and manganese batteries).
- Do not use rechargeable (Ni-Cd) batteries.
- Do not burn or breakup batteries.
Batteries must not be exposed to excessive heat such as sunshine, fire or the like.
Attaching the pedestal
Warning
Do not disassemble or modify the pedestal.
● Otherwise the TV may fall over and become damaged, and personal injury may result.
Caution
Do not use any other TV and displays.
Otherwise the TV may fall over and become damaged, and personal injury may result.
Do not use the pedestal if it becomes warped or physically damaged.
- If you use the pedestal while it is physically damaged, personal injury may result. Contact your nearest Panasonic dealer immediately.
During set-up, make sure that all screws are securely tightened.
- If insufficient care is taken to ensure screws are properly tightened during assembly, the pedestal will not be strong enough to support the TV, and it might fall over and become damaged, and personal injury may result.
Ensure that the TV does not fall over.
- If the TV is knocked or children climb onto the pedestal with the TV installed, the TV may fall over and personal injury may result.
Two or more people are required to install and remove the TV.
- If two or more people are not present, the TV may be dropped, and personal injury may result.
Ⓐ Assembly screw (4) (silver) XYN5+F18FN
⑧ Assembly screw (4) (black) THEL061N (TX-P37C10E, TX-P42C10E, TX-P37C10ES, TX-P42C10ES) THEL060N (TX-P50C10E)
© Pole (2) R : TBLA3685 L : TBLA3686 (TX-P37C10E, TX-P42C10E, TX-P37C10ES, TX-P42C10ES) R : TBLA3679 L : TBLA3680 (TX-P50C10E)
(D) Base • TBLX0096 (TX-P37C10E) (TX-P42C10E) • TBLX0127 (TX-P37C10ES) (TX-P42C10ES) • TBLX0089 (TX-P50C10E)
M5 × 18
M5 × 25
L R
The image is too blurry to recognize any text content.
■Assembling the pedestal
Use the four assembly screws Ⓐ to fasten the left and right poles to the base securely.
● Make sure that the screws are securely tightened.
- Forcing the assembly screws the wrong way will strip the threads.
● "L" or "R" mark is stamped on the bottom of the pole.
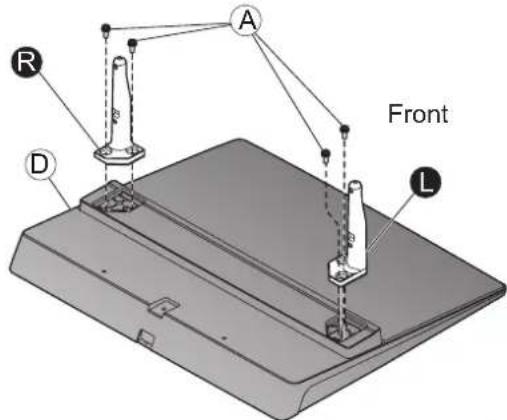
text_image
R A Front D L■Securing the TV
Use the assembly screws Ⓑ to fasten securely.
● Make sure that the screws are securely tightened.
- Carry out the work on a horizontal and level surface.
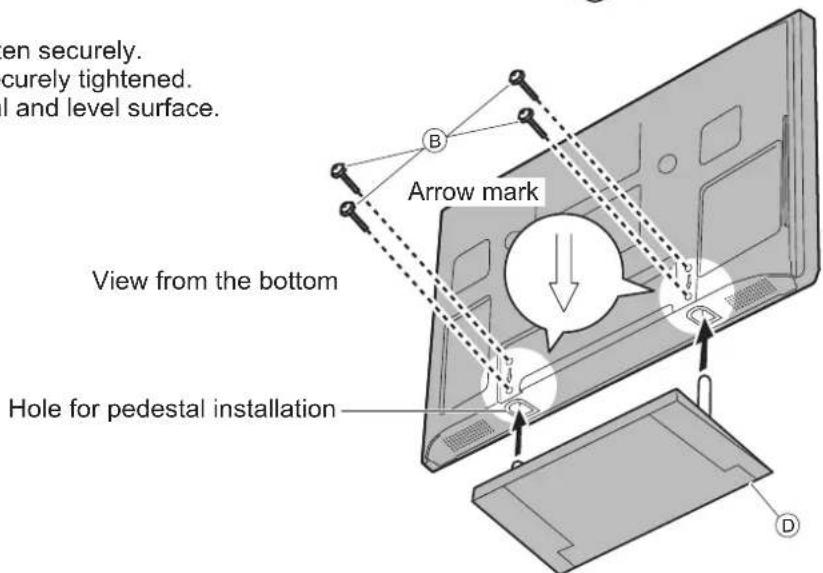
text_image
en securely. surely tightened. l and level surface. Arrow mark View from the bottom Hole for pedestal installationIdentifying Controls
TV
text_image
(TX-P37C10E TX-P37C10ES) SD Card slot Common Interface CI slot AV3 terminals Headphones jack TX-P42C10E TX-P42C10ES TX-P50C10E SD CARD SD CARD Common Interface AV3 S-V V L R - - - - - - - - - - - - - - - - - - - - - - - - - - - - - - - - - - - - - - - - - - - - - - - - - - - - - - - - - - - - - - - - - - - - - - - - - - - - - - - - - - - - - - - - - - - - - - - - - - - - - - - - - - - - - - - - - - - - - - - - - - - - - - - - - - - - - - - - - - - - - - - - - - - - - - - Function select Volume / Contrast / Brightness / Colour / Sharpness / Tint (NTSC mode) / Bass / Treble / Balance / Auto Setup Increases or decreases the channel position by one. When a function is already displayed, press to increase or decrease the selected function. When in Standby mode, switches TV On. Changes the input mode Remote control signal receiver Do not place any objects between the TV remote control • signal receiver and remote control. Recording LED Standby for Direct TV Recording: orange Mains power On / Off switch Switch On to turn on the TV or turn the TV • to standby mode by the remote control Power LED Standby: red • On: green When using the remote control, • indicates the TV has received a command.Remote Control

text_image
VIERA IMAGE VIEWER ● Switches to SD Card viewing mode Standby On / Off switch Switches TV On or Off standby Aspect Changes aspect ratio from Aspect Selection list Also possible by pressing this button repeatedly until you reach the desired aspect Main Menu ● Press to access Picture, Sound and Setup Menus Channel / Programme Information Displays channel and programme information VIERA Link Menu ● Accesses VIERA Link Menu OK Confirms selections and choices Press after selecting channel positions to quickly change channel Option Menu ● Easy setting for viewing and sound options Coloured buttons ● Used for the selection, navigation and operation of various functions Teletext Switches to teletext mode Subtitles ● Displays subtitles Numeric buttons ● Changes channel and teletext pages ● Sets characters ● When in Standby mode, switches TV On Sound Mute Switches sound mute On or Off Volume Up / Down Input mode selection ● TV - switches DVB-T / Analogue mode ● AV - switches to AV input mode from Input Selection list Direct TV Recording ● Records programme immediately in DVD Recorder / VCR with Q-Link or VIERA Link connection Normalise ● Resets picture and sound settings to their default levels Exit ● Returns to the normal viewing screen VIERA TOOLS ● Displays some special feature icons and accesses easily Guide ● Displays TV Guide Cursor buttons Makes selections and adjustments Return ● Returns to the previous menu / page Hold ● Freeze / unfreeze picture Holds the current teletext page (teletext mode) Index ● Returns to the teletext index page (teletext mode) Surround Switches Surround sound Channel Up / Down Selects channel in sequence Connected equipment operations Panasonic TVBasic Connection
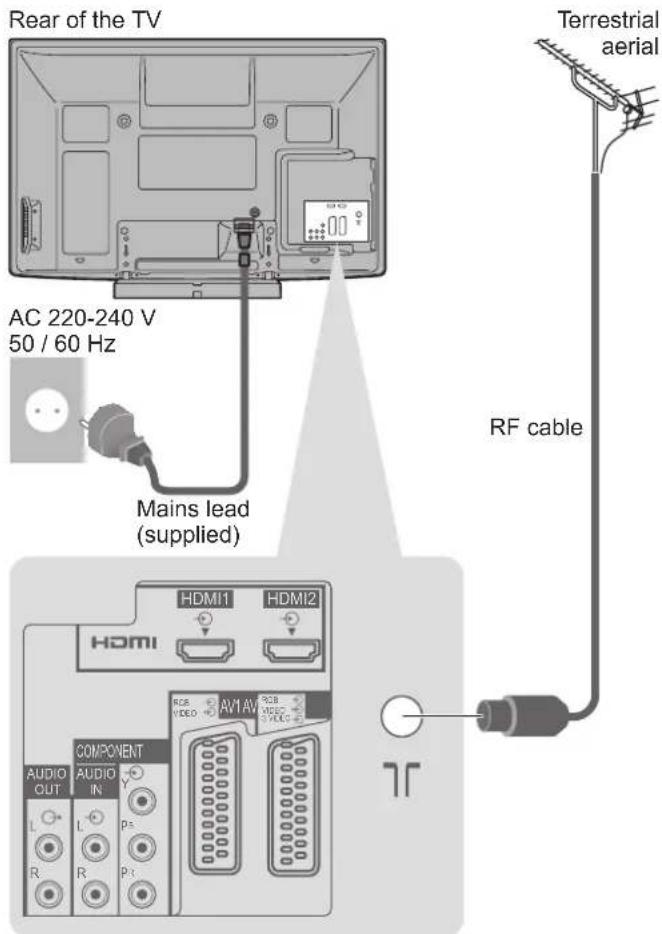
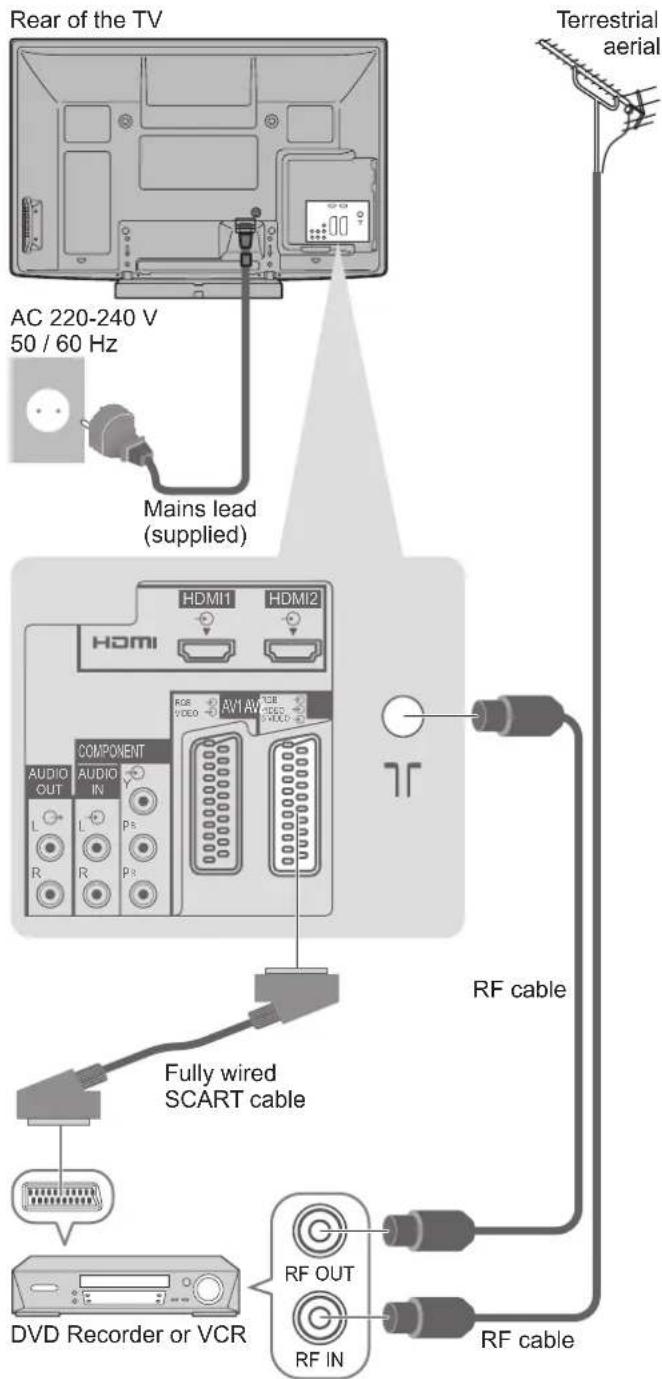
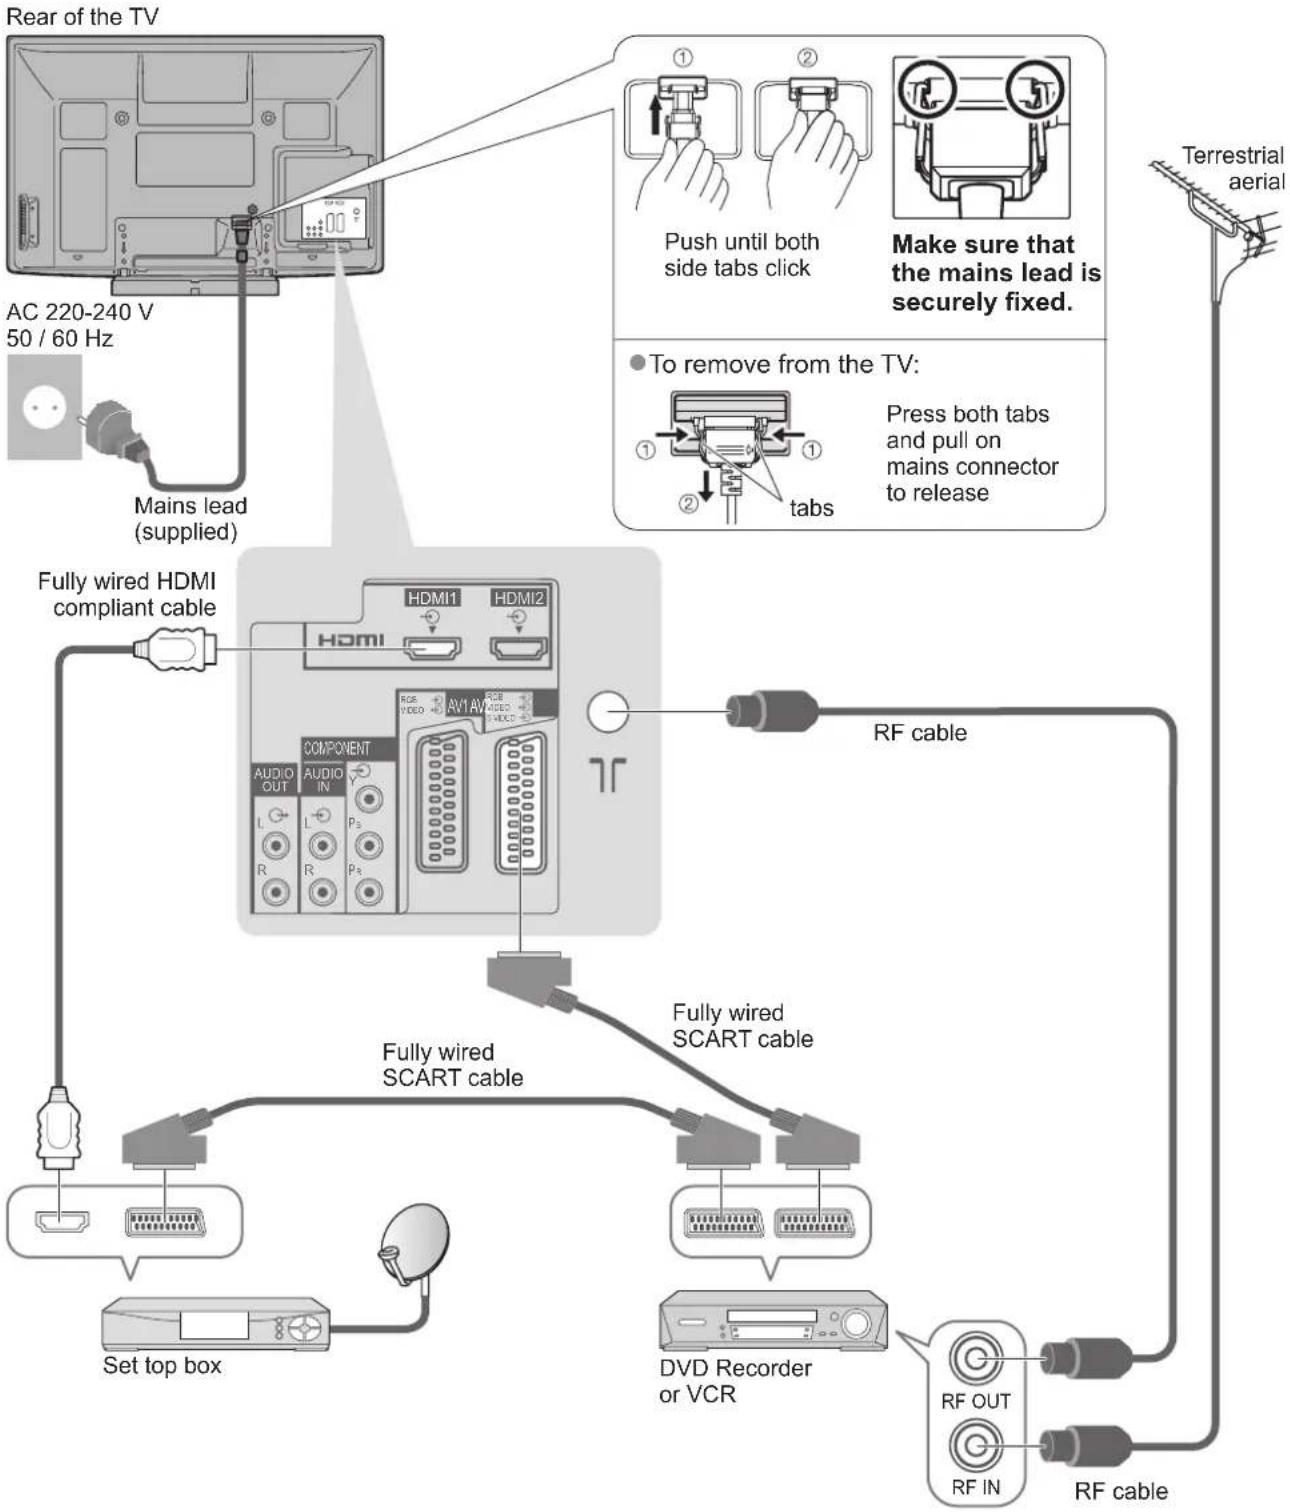
External equipment and cables shown are not supplied with this TV.
Please ensure that the unit is disconnected from the mains socket before attaching or disconnecting any leads. When disconnecting the mains lead, be absolutely sure to disconnect the mains plug at the socket outlet first.
Example 1 Connecting aerial
TV only
text_image
Rear of the TV AC 220-240 V 50 / 60 Hz Mains lead (supplied) Terrestrial aerial RF cable HDMI1 HDMI2 HDMI COMPONENT AUDIO OUT L L R R Y P5 P3 RGB VIDEO AVI AVE RGB VIDEO AVIC R TRExample 2
Connecting DVD Recorder / VCR
TV, DVD Recorder or VCR
text_image
Rear of the TV AC 220-240 V 50 / 60 Hz Mains lead (supplied) HDMI1 HDMI2 HDMI COMPONENT AUDIO OUT AUDIO IN L L pS R R pS AV1 AV2 AV1 AV2 Fully wired SCART cable DVD Recorder or VCR RF OUT RF IN RF cable Terrestrial aerialNote
- Connect to the TV's AV1 / AV2 for a DVD Recorder / VCR supporting Q-Link.
- For HDMI-compatible equipment, possible to connect to HDMI terminals (HDMI1 / HDMI2) by using HDMI cable.
- Read the manual of the equipment too.
Example 3
Connecting DVD Recorder / VCR and Set top box
TV, DVD Recorder / VCR and Set top box
flowchart
graph TD
    A["AC 220-240 V 50 / 60 Hz"] --> B["Mains lead (supplied)"]
    B --> C["Fully wired HDMI compliant cable"]
    C --> D["Set top box"]
    D --> E["Set top box"]
    E --> F["Set top box"]
    F --> G["Set top box"]
    G --> H["Set top box"]
    H --> I["DVD Recorder or VCR"]
    I --> J["Fully wired SCART cable"]
    J --> K["RF cable"]
    K --> L["RF OUT RF IN"]
    L --> M["Terrestrial aerial"]

    N["Push until both side tabs click"] --> O["Make sure that the mains lead is securely fixed."]
    O --> P["Press both tabs and pull on mains connector to release"]

    Q["To remove from the TV: ① ②"] --> R["→"]
    S["→"] --> T["→"]

    U["AC 220-240 V 50 / 60 Hz"] --> V["Close-up of TV screen"]
    W["Set top box"] --> X["Set top box"]
    Y["HDMI1 HDMI2"] --> Z["Composite"]
    AA["DV3"] --> AB["AUDIO OUT"]
    AC["AV1"] --> AD["AUDIO IN"]
    AE["P3"] --> AF["P4"]
    AG["R"] --> AH["R"]

    style A fill:#f9f,stroke:#333
    style N fill:#ccf,stroke:#333
    style O fill:#cfc,stroke:#333
    style P fill:#fcc,stroke:#333
    style Q fill:#cff,stroke:#333
    style R fill:#ffc,stroke:#333
    style S fill:#ffc,stroke:#333
    style T fill:#ffc,stroke:#333
    style U fill:#cfc,stroke:#333
    style V fill:#fcc,stroke:#333
    style W fill:#cfc,stroke:#333
    style X fill:#cfc,stroke:#333
    style Y fill:#cfc,stroke:#333
    style Z fill:#cfc,stroke:#333
    style AA fill:#cfc,stroke:#333
    style AB fill:#cfc,stroke:#333
    style AC fill:#cfc,stroke:#333
    style AE fill:#cfc,stroke:#333
    style AF fill:#cfc,stroke:#333
    style AG fill:#cfc,stroke:#333
    style AH fill:#cfc,stroke:#333
    style AI fill:#cfc,stroke:#333
    style AJ fill:#cfc,stroke:#333
    style AK fill:#cfc,stroke:#333
    style AL fill:#cfc,stroke:#333
    style AM fill:#cfc,stroke:#333
    style AN fill:#cfc,stroke:#333
    style AO fill:#cfc,stroke:#333
Auto Setup
Search and store TV channels automatically.
These steps are not necessary if the setup has been completed by your local dealer.
- Please complete connections (p. 10 and p. 11) and settings (if necessary) of the connected equipment before starting Auto Setup. For details of settings for the connected equipment, read the manual of the equipment.
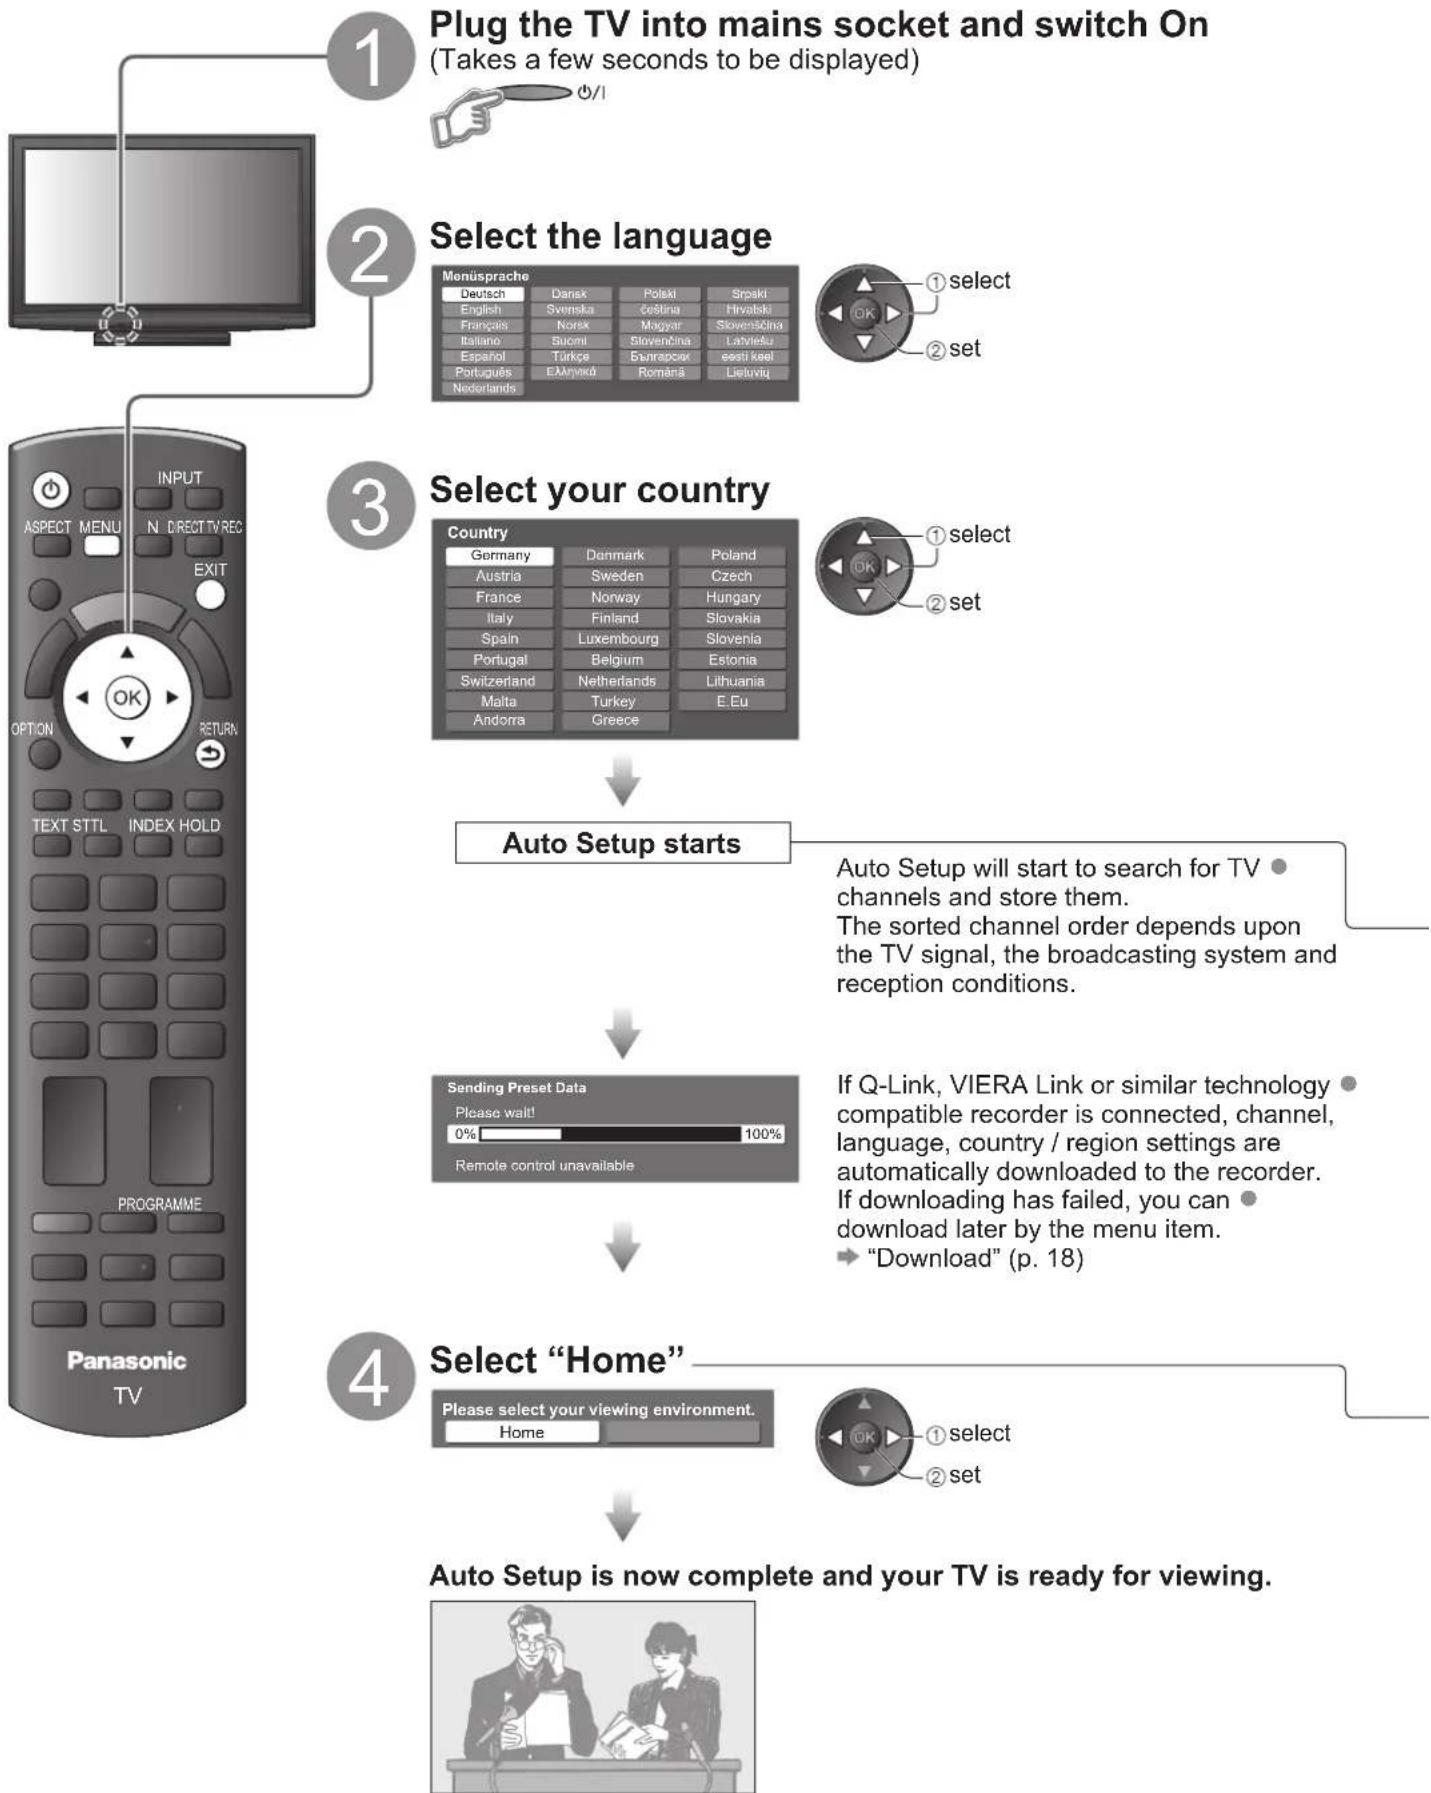
flowchart
graph TD
    A["Plug the TV into mains socket and switch On (Takes a few seconds to be displayed)"] --> B["Select the language"]
    B --> C["Select your country"]
    C --> D["Auto Setup starts"]
    D --> E["Sending Preset Data<br>Please wait! 0% 100% Remote control unavailable"]
    E --> F["Select “Home”"]
    F --> G["Auto Setup is now complete and your TV is ready for viewing."]
Using the On Screen Displays
Many features available on this TV can be accessed via the On Screen Display menu.
■ How to use remote control

Move the cursor / select the menu item

Access the menu / store settings after adjustments have been made or options have been set

Open the main menu

Move the cursor / adjust levels / select from a range of options

Return to the previous menu

Exit the menu system and return to the normal viewing screen
ON SCREEN HELP Instructions box - Operation guide
(example: Sound Menu)
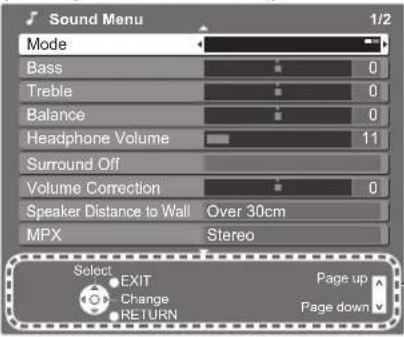
text_image
Sound Menu 1/2 Mode Bass 0 Treble 0 Balance 0 Headphone Volume 11 Surround Off Volume Correction 0 Speaker Distance to Wall Over 30cm MPX Stereo Select EXIT Page up Change Return Page downOperation guide will help you.
Note
If tuning has failed "Auto Setup" (p. 18)
● To initialize all settings → "Shipping Condition" (p. 19)
- If you turned the TV Off during Standby mode last time, the TV will be in Standby mode when you turn the TV On with Mains power On / Off switch.
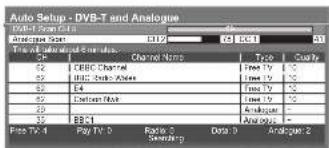
■Auto Setup varies depending on the country you select
● Region Selection (if you select "Finland")
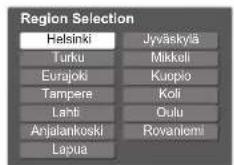

● DVB-T Auto Setup (if you select a country except "Portugal", "Poland", "Hungary" and "E.Eu")
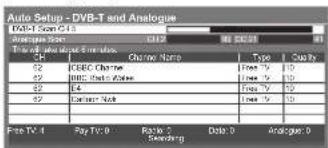
text_image
Auto Setup - DVB-T and Analogue Auto Setup 1 CH2 CH2 Type Quality Ch Chine Name Free 5% 10 Ch Free 5% 10 Ch Free 5% 10 Ch Free 5% 10 Ch Free 5% 10 Ch Free 5% 10 Ch Free 5% 10 Ch Free 5% 10 Ch Free 5% 10 Ch Free 5% 10 Ch Free 5% 10 Ch Free 5% 10 Ch• Analogue Auto Setup

text_image
Auto Setup - DVB-T and Analogue DVB-401 Channel Name: DVB Type: DVD Audio Video Audio Audio Audio Audio Audio Audio Audio Audio Audio Audio Audio Audio Audio Audio Audio Audio Audio Audio Audio Audio Audio Audio Audio Audio Audio Audio Audio Audio Audio Audio Audio Audio Audio Audio Audio Audio Audio Audio Audio Audio Audio Audio Audio Audio Audio Audio Audio Audio Audio Audio Radio 5 Serial 10 Data 9 Analogue 2
If you select "Shop" by mistake
Return to viewing environment selection by pressing the RETURN button.


Select "Home"


Auto Setup is complete
If you set to "Off" or "On" in this menu the TV will be in "Shop" viewing environment. To return to "Home" viewing environment initialise all settings by accessing Shipping Condition.
→ "Shipping Condition" (p. 19)

① select ② set
How to Use Menu Functions
Various menus allow you to make settings for the picture, sound, and other functions.
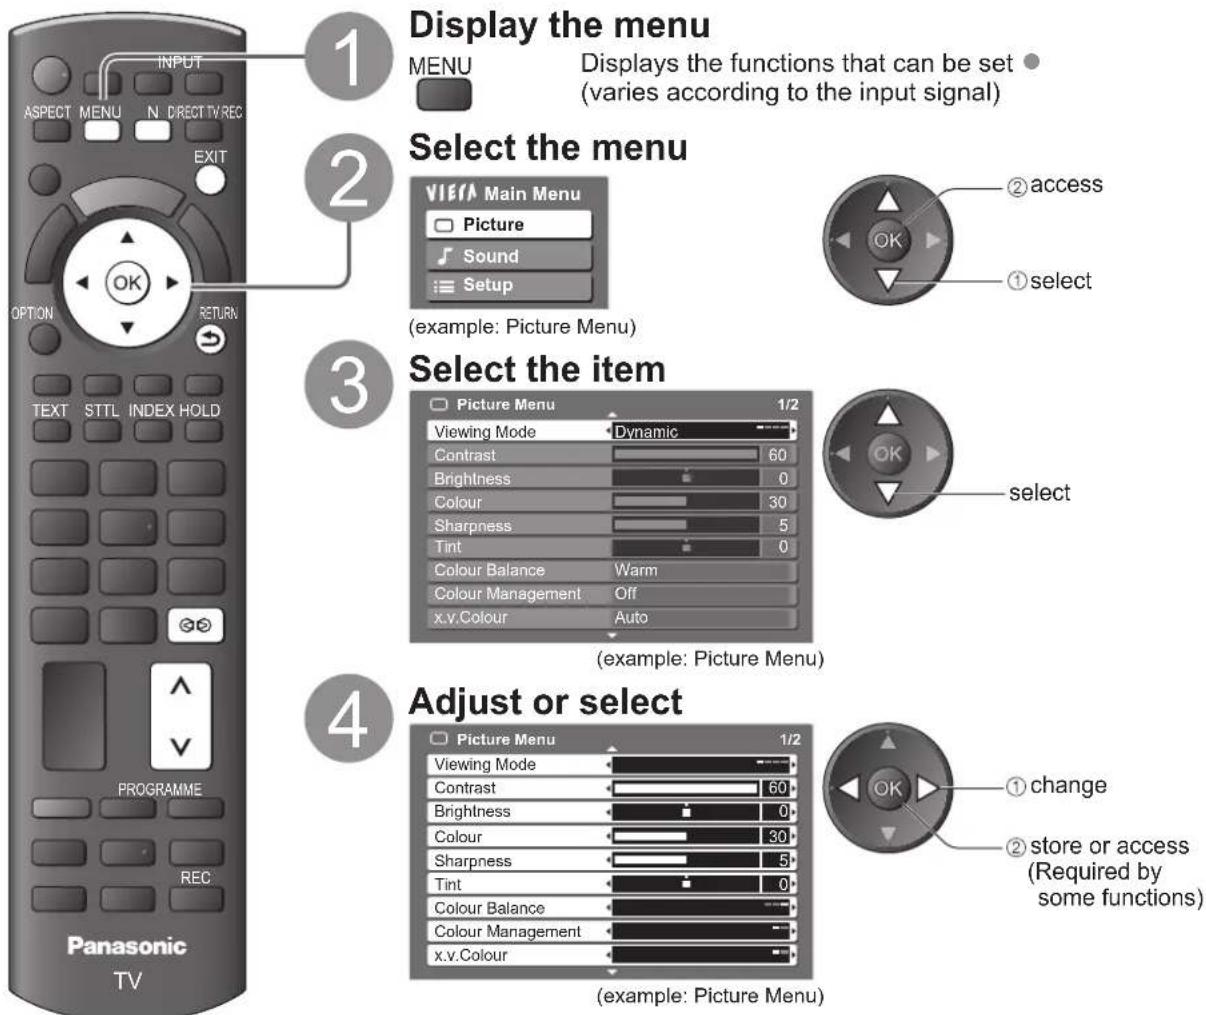
1
Display the menu
MENU
Displays the functions that can be set (varies according to the input signal)
2
Select the menu
(example: Picture Menu)
3
Select the item
(example: Picture Menu)
4
Adjust or select
(example: Picture Menu)
To return to TV ■ at any time
EXIT

■To return to the previous screen
RETURN

■To change menu pages
■Choose from among alternatives
Number and positions of alternatives

■Adjust using the slide bar

■Go to the next screen

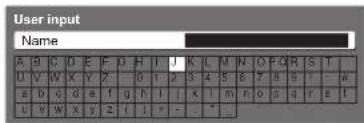
■Enter characters by free input menu
You can enter names or numbers freely for some items.
text_image
User input Name A G C D E F G H I J K L M N O P Q R S T U V W X Y Z 0 1 2 3 4 5 6 7 a b 1 a a b c d e f g h i x l m n o p q r a l U V W X Y Z 1 1 * - *Set characters one by one

Store
RETURN

- You can set characters by using numeric buttons.
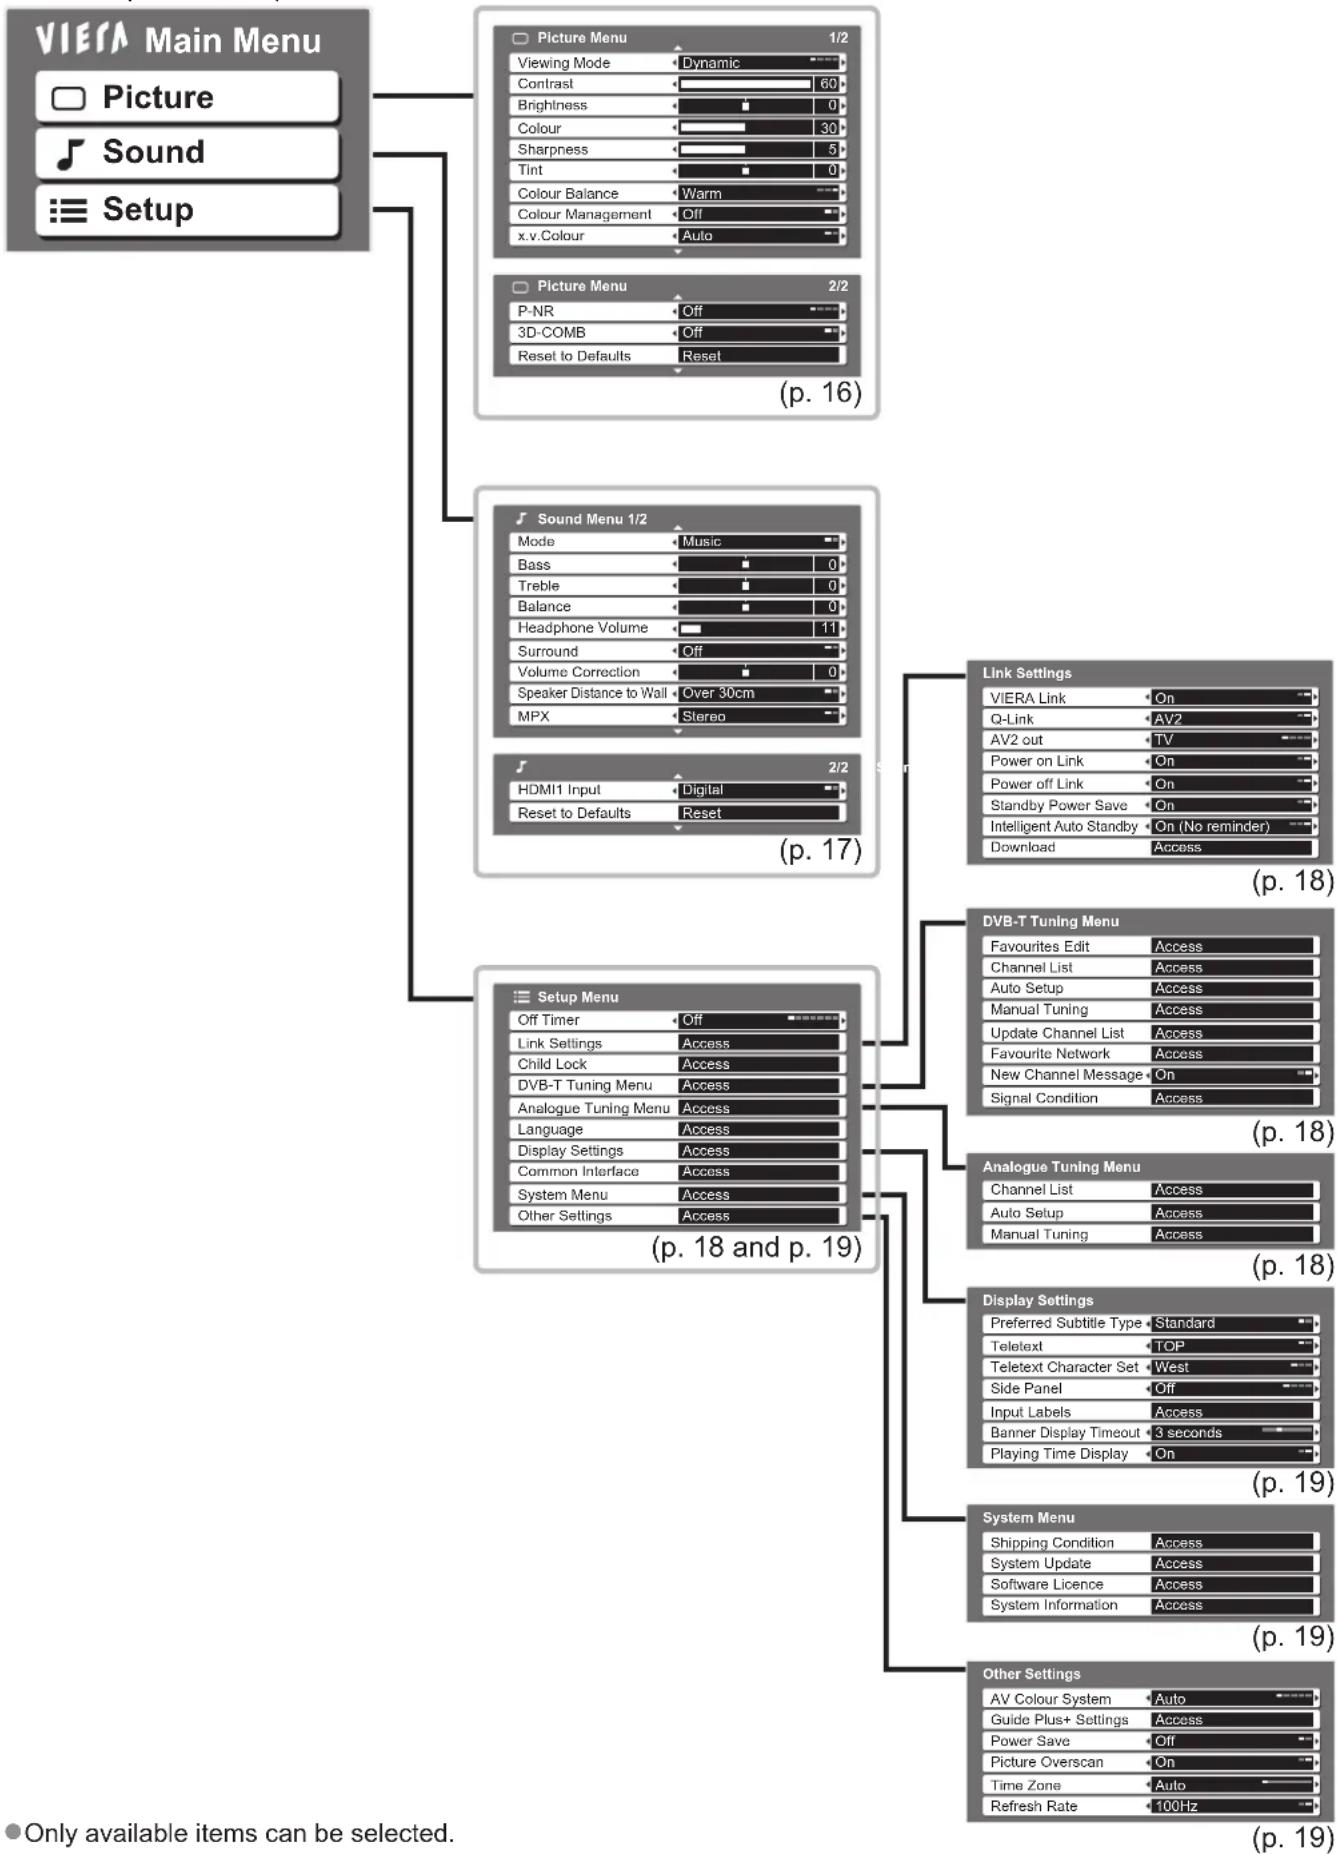
Overview
How to operate p. 14
flowchart
graph TD
    A["VIERA Main Menu"] --> B["Picture"]
    A --> C["Sound"]
    A --> D["Setup"]
    B --> E["Picture Menu 1/2"]
    E --> F["Viewing Mode: Dynamic"]
    E --> G["Contrast: 60"]
    E --> H["Brightness: 0"]
    E --> I["Colour: 30"]
    E --> J["Sharpness: 5"]
    E --> K["Tint: 0"]
    E --> L["Colour Balance: Warm"]
    E --> M["Colour Management: Off"]
    E --> N["x.v.Colour: Auto"]
    O["Picture Menu 2/2"] --> P["P-NR: Off"]
    O --> Q["3D-COMB: Off"]
    O --> R["Reset to Defaults: Reset"]
    S["Sound Menu 1/2"] --> T["Mode: Music"]
    S --> U["Bass: 0"]
    S --> V["Treble: 0"]
    S --> W["Balance: 0"]
    S --> X["Headphone Volume: 11"]
    S --> Y["Surround: Off"]
    S --> Z["Volume Correction: 0"]
    S --> AA["Speaker Distance to Wall: Over 30cm"]
    S --> AB["MPX: Stereo"]
    AC["Setup Menu"] --> AD["Off Timer: Off"]
    AC --> AE["Link Settings: Access"]
    AC --> AF["Child Lock: Access"]
    AC --> AG["DVB-T Tuning Menu: Access"]
    AC --> AH["Analogue Tuning Menu: Access"]
    AC --> AI["Language: Access"]
    AC --> AJ["Display Settings: Access"]
    AC --> AK["Common Interface: Access"]
    AC --> AL["System Menu: Access"]
    AC --> AM["Other Settings: Access"]

    subgraph (p. 16)
        B
        C
        D
        E
        F
        G
        H
        I
        J
        K
        L
        M
        N
        O
        P
        Q
        R
        S
        T
        U
        V
        W
        X
        Y
        Z
        AA
        AB
        AC
        AD
        AE
        AF
        AH
        AI
        AJ
        AK
        AL
        AM
    end

    subgraph (p. 17)
        E
        F
        G
        H
        I
        J
        K
        L
        M
        N
        O
        P
        Q
        R
        S
        T
        U
        V
        W
        X
        Y
        Z
    end

    subgraph (p. 18)
        O
        P
        Q
        R
        S
        T
        U
        V
        W
        X
    end

    subgraph (p. 18 and p. 19)
        AC
        AD
        AE
        AF
        AH
        AI
    end

    subgraph (p. 18)
        V
        W
        X
    end

    subgraph (p. 18)
        AC
        AD
        AE
        AF
        AH
    end

    subgraph (p. 19)
        AC
        AD
        AE
        AF
        AH
    end

    subgraph (p. 19)
        AC
        AD
        AE
        AF
        AH
    end

    subgraph (p. 19)
        AC
        AD
        AE
        AF
        AH
    end

    subgraph (p. 19)
        AC
        AD
        AE
        AF
        AH

    A --> B --> C --> D --> E --> F --> G --> H --> I --> J --> K --> L --> M --> N --> O --> P --> Q --> R --> S --> T --> U --> V --> W --> X --> Y --> Z --> AA --> AB --> AC & AD & AE & AF & AH & AI & AJ & AK & AL & AM & AN & AO & AP & AQ & AR & AS & AT & AU & AV & AW & AX & AY & AZ & BA & BB & BC & BD & BE & BF & BG & BH & BI & BJ & BK & BL & BM & BN & BO & BP & BPB & BBA & BK & BK & BK & BK & BK & BK & BK & BK & BK & BK & BK & BK & BK & BK & BK & BK & BK & BK & BK & BK & BK & BK & BK & BK & BK & BK & BK & BK & BK & BK & BK & BK & BK & BK & BK & BK & BK & BK & BK & BK & BK & BK & BK & BK & BK & BK & BK & BK & BK & BK & BS |
How to Use Menu Functions
Menu list
| Menu | Item Adjustments / Configurations (alternatives) | |
| Picture | Viewing Mode | Basic picture mode (Dynamic / Normal / Cinema / Game)●Set for each input signalDynamic : Provides enhanced picture contrast and sharpness when viewing in a bright roomNormal : Recommended for viewing under normal ambient room lighting conditionsCinema : For watching movies in a darkened room producing a cinema-like pictureGame : Fast response signal specifically to provide suitable images for playing gamesNot valid on TV mode●A continuous record of time spent using Game mode can be displayed in the ●top right of the screen→“Playing Time Display” (p. 19) |
| Contrast, Brightness,Colour, Sharpness | Increases or decreases the levels of these options according to your personal preference | |
| Tint | With an NTSC signal source connected to the TV, the picture hue can be adjusted to suit your taste●For NTSC signal reception only | |
| Colour Balance | Allows you to set the overall colour tone of the picture (Cool / Normal / Warm) | |
| Colour Management | Automatically adjusts colours to vivid ones (Off / On) | |
| x.v.Colour | Increases the colour gradations (Off / Auto)●This is effective when watching HD moving pictures from an external equipment.HDMI input mode only● | |
| P-NR | Picture Noise ReductionAutomatically reduces unwanted picture noise and flicker noise in the contoured parts of a picture (Off / Min / Mid / Max) | |
| 3D-COMB | Occasionally, whilst viewing still or slow moving pictures, colour patterning may be seenSet to “On” to display sharper and more accurate colours (Off / On)●For PAL or NTSC signal reception onlyNot valid on RGB, S-Video, Component, HDMI and SD Card● | |
| Reset to Defaults | Press the OK button to reset the present Picture Viewing Mode to the default settings | |
| Sound | Mode | Basic sound mode (Music / Speech) |
| Bass | Increases or decreases level to enhance or minimise lower, deeper sound output | |
| Treble | Increases or decreases level to enhance or minimise sharper, higher sound output | |
| Balance | Adjusts volume level of right and left speakers | |
| Headphone Volume | Adjusts the volume of the headphones | |
| Surround | Surround sound settings (Off / V-Audio)Provides a dynamic enhancer of width to simulate improved spatial effects●Switching is also possible by the Surround button on the remote control. | |
| Volume Correction | Adjusts the volume of individual channel or input mode | |
| Speaker Distance to Wall | Adjusts the low frequency sound (Over 30cm / Up to 30cm)●If the back space between the TV and wall is over 30 cm, “Over 30cm” is recommended.●If the back space between the TV and wall is within 30 cm, “Up to 30cm” is recommended. | |
| MPX | Select stereo / monaural (Mono / Stereo)●Normally: StereoStereo signal cannot be received: Mono●M1 / M2: Available while mono signal is transmitted●Analogue mode only● | |
| HDMI1 Input | Select to fit the input signal (Digital / Analogue)Digital : HDMI cable connectionAnalogue : HDMI-DVI adapter cable connection●HDMI input mode onlyHDMI2 terminal is for digital signal only●No setting for HDMI2 available● | |
| Reset to Defaults | Press the OK button to reset the present Sound Mode to the default settings | |
A different menu will be displayed while SD Card is used.
Only available items can be selected.
How to Use Menu Functions
Menu list
| Menu | Item Adjustments / Configurations (alternatives) | ||
| Setup | Off Timer | Sets the time the TV automatically turns Off(Off / 15 / 30 / 45 / 60 / 75 / 90 minutes) | |
| Link Settings | VIERA Link | Sets to use VIERA Link functions (Off / On) | |
| Q-Link | Selects which AV terminal is to be used for data communication between this TV and a compatible recorder (AV1 / AV2)●Select the connected terminal to the recorder even it is not compatible with Q-Link. | ||
| AV1 / AV2 out | Chooses the signal to be transmitted from the TV to Q-Link(TV / AV1 / AV2 / AV3 / Monitor)●Monitor: Image displayed on screenComponent and HDMI signals cannot be outputted.● | ||
| Power on Link | Sets to use Power on Link function (Off / On) | ||
| Power off Link | Sets to use Power off Link function (Off / On) | ||
| Standby Power Save | Controls the power consumption in Standby mode of the connected equipment to reduce the consumption (Off / On)●This function is available when “VIERA Link” is set to “On” and “Power off Link” is set to “On”. | ||
| Intelligent Auto Standby | Makes non-watched or non-used connected equipment go into Standby mode to reduce the power consumption (Off / On (With reminder) / On (No reminder))●This function is available when “VIERA Link” is set to “On”. | ||
| Download | Downloads channel, language, country / region settings to a Q-Link or VIERA Link compatible equipment connected to the TV | ||
| Child Lock | Locks a channel / AV input to prevent access to it | ||
| DVB-T Tuning Menu | Favourites Edit | Creates list of favourite DVB-T channels | |
| Channel List | Skips the unwanted DVB-T channels or edits DVB-T channels | ||
| Auto Setup | Automatically sets the DVB-T channels received in the area | ||
| Manual Tuning | Sets the DVB-T channels manually | ||
| Update Channel List | Updates DVB-T Channel List with keeping your settings | ||
| Favourite Network | Selects your favourite network for each broadcasters | ||
| New Channel Message | Selects whether to give a notification message when a new DVB-T channel is found | ||
| Signal Condition | Checks the DVB-T signal condition | ||
| Analogue Tuning Menu | Channel List | Skips the unwanted Analogue channels or edits Analogue channels | |
| Auto Setup | Automatically sets the Analogue channels received in the area | ||
| Manual Tuning | Sets the Analogue channels manually | ||
| Menu | Item Adjustments / Configurations (alternatives) | ||
| Setup | Language | OSD Language | Changes language for on-screen displays |
| Preferred Audio 1 / 2 | Selects the first and second preferred language for DVB multi audio (depending on the broadcaster) | ||
| Preferred Subtitles 1 / 2 | Selects the first and second preferred language for DVB subtitles (depending on the broadcaster) | ||
| Preferred Teletext | Selects the preferred language for DVB teletext service (depending on the broadcaster) | ||
| Display Settings | Preferred Subtitle Type | Selects the preferred subtitle type (Standard / Hard of Hearing)"Hard of Hearing" provides aids in understanding and enjoyment with DVB subtitles (depending on the broadcaster)."Preferred Subtitles 1 / 2" in "Language" are given priority. | |
| Teletext | Teletext display mode (TOP (FLOF) / List) | ||
| Teletext Character Set | Selects teletext language (West / East1 / East2)West: English, French, German, Greek, Italian, Spanish, Swedish, Turkish, etc.East1: Czech, English, Estonian, Lettish, Rumanian, Russian, Ukrainian, etc.East2: Czech, Hungarian, Lettish, Polish, Rumanian, etc. | ||
| Side Panel | Increases the brightness of the side panel (Off / Low / Mid / High)The recommended setting is "High" to prevent panel "image retention". | ||
| Input Labels | Labels or skips each input terminal | ||
| Banner Display Timeout | Sets how long the Information banner stays on screen(0 (No display) / 1 / 2 / 3 / 4 / 5 / 6 / 7 / 8 / 9 / 10 seconds) | ||
| Playing Time Display | Set to "On" to display a continuous record of time spent using Game mode (Off / On)This function is available when "Game" is selected in "Viewing Mode" (p. 16). | ||
| Common Interface | Uses include to watch pay-TV | ||
| System Menu | Shipping Condition | Resets all settings, for example, when moving house | |
| System Update | Downloads new software to TV | ||
| Software Licence | Displays the software licence information | ||
| System Information | Displays the system information of this TV | ||
| Other Settings | AV Colour System | Selects optional colour system based on video signals in AV mode (Auto / PAL / SECAM / M.NTSC / NTSC) | |
| GUIDE Plus+ Settings | UpdatePerforms the update of the GUIDE Plus+ schedule and advertising informations for the GUIDE Plus+ system | ||
| PostcodeSets your postcode to display advertisements in the GUIDE Plus+ system | |||
| System InformationDisplays the system information of the GUIDE Plus+ system | |||
| Power Save | Reduces brightness of picture to economise on power consumption (Off / On) | ||
| Picture Overscan | Selects the screen area displaying the image (Off / On)On : Enlarged the image to hide the edge of the image.Off : Displayed the image in the original size.Set to "On" if noise is generated on the edge of the screen.This function is available when aspect is set to Auto (16:9 signal only) or 16:9.This function can be memorized separately for SD (Standard definition) and HD(High definition) signals. | ||
| Time Zone | Adjusts the time dataThe time data will be corrected based on GMT.Set to "Auto" to adjust the time automatically according to your area. | ||
| Refresh Rate | Changes the image processing of the panel (depending on the input signal)(50Hz / 100Hz)Set to "100Hz" normally | ||
A different menu will be displayed while SD Card is used.
Only available items can be selected.
Information for Users on Collection and Disposal of Old Equipment and used Batteries

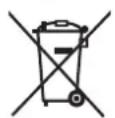
These symbols on the products, packaging, and/or accompanying documents mean that used electrical and electronic products and batteries should not be mixed with general household waste. For proper treatment, recovery and recycling of old products and used batteries, please take them to applicable collection points, in accordance with your national legislation and the Directives 2002/96/EC and 2006/66/EC.
By disposing of these products and batteries correctly, you will help to save valuable resources and prevent any potential negative effects on human health and the environment which could otherwise arise from inappropriate waste handling. For more information about collection and recycling of old products and batteries, please contact your local municipality, your waste disposal service or the point of sale where you purchased the items.
Penalties may be applicable for incorrect disposal of this waste, in accordance with national legislation.
For business users in the European Union
If you wish to discard electrical and electronic equipment, please contact your dealer or supplier for further information.
[Information on Disposal in other Countries outside the European Union]
These symbols are only valid in the European Union. If you wish to discard these items, please contact your local authorities or dealer and ask for the correct method of disposal.
Note for the battery symbol (bottom two symbol examples):
This symbol might be used in combination with a chemical symbol. In this case it complies with the requirement set by the Directive for the chemical involved.
| TX-P37C10ETX-P37C10ES | TX-P42C10ETX-P42C10ES | TX-P50C10E | |
| Power Source AC 220-240 V, 50 / 60 Hz | |||
| Power Consumption 230 W 245 W 350 W | |||
| Power Consumption in Standby mode | 0.7 W (Without monitor out recording)15 W (With monitor out recording) | 0.5 W(Without monitor out recording)15 W(With monitor out recording) | |
This equipment complies with the EMC standards listed below. EN55013, EN61000-3-2, EN61000-3-3, EN55020.
Customer's Record
The model number and serial number of this product may be found on its rear panel. You should note this serial number in the space provided below and retain this book, plus your purchase receipt, as a permanent record of your purchase to aid in identification in the event of theft or loss, and for Warranty Service purposes.
Model Number Serial Number