
TH-58PF20ER - TV PANASONIC - Free user manual and instructions
Find the device manual for free TH-58PF20ER PANASONIC in PDF.


User questions about TH-58PF20ER PANASONIC
0 question about this device. Answer the ones you know or ask your own.
Ask a new question about this device
Download the instructions for your TV in PDF format for free! Find your manual TH-58PF20ER - PANASONIC and take your electronic device back in hand. On this page are published all the documents necessary for the use of your device. TH-58PF20ER by PANASONIC.
USER MANUAL TH-58PF20ER PANASONIC
Operating Instructions
High Definition Plasma Display
natural_image
Blank rectangular frame with no text, numbers, or symbolsFor more detailed instructions, refer to the Operating Instructions on the CD-ROM.
To view the Operating Instructions on the CD-ROM, you need a computer equipped with a CD-ROM drive, and Adobe ^® Reader ^® (Version 7.0 or later is recommended) installed on your computer.
Depending on the operating system or settings on your computer, the Operating Instructions may not start automatically. In this case, open the PDF file under the "MANUAL" folder manually to view the instructions.
Contents
- Important Safety Notice .... 2
• Safety Precautions....3 - Accessories ...... 6
- Connections....7
• Power On / Off 12 - Selecting the input signal.... 14
- Basic Controls.... 15
- On-Screen Menu Displays.... 17
• Using Network Function.... 19 - Specifications....20
Important Safety Notice
WARNING
1) To prevent damage which may result in fire or shock hazard, do not expose this appliance to dripping or splashing.
Do not place containers with water (flower vase, cups, cosmetics, etc.) above the set. (including on shelves above, etc.)
No naked flame sources, such as lighted candles, should be placed on / above the set.
2) To prevent electric shock, do not remove cover. No user serviceable parts inside. Refer servicing to qualified service personnel.
3) Do not remove the earthing pin on the power plug. This apparatus is equipped with a three pin earthing-type power plug. This plug will only fit an earthing-type power outlet. This is a safety feature. If you are unable to insert the plug into the outlet, contact an electrician.
Do not defeat the purpose of the earthing plug.
4) To prevent electric shock, ensure the earthing pin on the AC cord power plug is securely connected.
CAUTION
This appliance is intended for use in environments which are relatively free of electromagnetic fields.
Using this appliance near sources of strong electromagnetic fields or where electrical noise may overlap with the input signals could cause the picture and sound to wobble or cause interference such as noise to appear.
To avoid the possibility of harm to this appliance, keep it away from sources of strong electromagnetic fields.
IMPORTANT: THE MOULDED PLUG
FOR YOUR SAFETY, PLEASE READ THE FOLLOWING TEXT CAREFULLY.
This display is supplied with a moulded three pin mains plug for your safety and convenience. A 10 amp fuse is fitted in this plug. Shall the fuse need to be replaced, please ensure that the replacement fuse has a rating of 10 amps and that it is approved by ASTA or BSI to BS1362.
Check for the ASTA mark or the BSI mark on the body of the fuse.
If the plug contains a removable fuse cover, you must ensure that it is refitted when the fuse is replaced.
If you lose the fuse cover the plug must not be used until a replacement cover is obtained.
A replacement fuse cover can be purchased from your local Panasonic dealer.
Do not cut off the mains plug.
Do not use any other type of mains lead except the one supplied with this display.
The supplied mains lead and moulded plug are designed to be used with this display to avoid interference and for your safety.
If the socket outlet in your home is not suitable, get it changed by a qualified electrician.
If the plug or mains lead becomes damaged, purchase a replacement from an authorized dealer.
WARNING : — THIS DISPLAY MUST BE EARTHED.
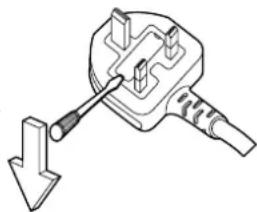
How to replace the fuse. Open the fuse compartment with a screwdriver and replace the fuse.
natural_image
Technical line drawing of a plug with a downward arrow indicating a component (no text or symbols)Trademark Credits
• VGA is a trademark of International Business Machines Corporation.
• Macintosh is a registered trademark of Apple Inc., USA.
• SVGA, XGA, SXGA and UXGA are registered trademarks of the Video Electronics Standard Association.
Even if no special notation has been made of company or product trademarks, these trademarks have been fully respected.
- HDMI, the HDMI Logo, and High-Definition Multimedia Interface are trademarks or registered trademarks of HDMI Licensing LLC in the United States and other countries.
Note:
Do not allow a still picture to be displayed for an extended period, as this can cause a permanent image retention to remain on the Plasma Display.
Examples of still pictures include logos, video games, computer images, teletext and images displayed in 4:3 mode.
Safety Precautions
WARNING
Setup
This Plasma Display is for use only with the following optional accessories. Use with any other type of optional accessories may cause instability which could result in the possibility of injury.
(All of the following accessories are manufactured by Panasonic Corporation.)
- Speakers TY-SP58P10WK (for TH-58PF20ER),
TY-SP65P11WK (for TH-65PF20ER) - Pedestal TY-ST58P20 (for TH-58PF20ER)
TY-ST65P20 (for TH-65PF20ER) - Mobile stand TY-ST58PF20 (for TH-58PF20ER)
- Wall-hanging bracket (angled) TY-WK65PR20
• BNC Dual Video Terminal Board ..... TY-FB9BD
• HD-SDI Terminal Board with audio ..... TY-FB10HD - Dual Link HD-SDI Terminal Board ...... TY-FB11DHD
- Dual HDMI Terminal Board ...... TY-FB10HMD
- Ir Through Terminal Board.... TY-FB9RT
• DVI-D Terminal Board ..... TY-FB11DD - AV Terminal Box ...... TY-TB10AV
- Touch Panel TY-TP58P10S (for TH-58PF20ER),
TY-TP65P10S (for TH-65PF20ER)
Always be sure to ask a qualified technician to carry out set-up.
Small parts can present choking hazard if accidentally swallowed. Keep small parts away from young children. Discard unneeded small parts and other objects, including packaging materials and plastic bags/sheets to prevent them from being played with by young children, creating the potential risk of suffocation.
Do not place the Plasma Display on sloped or unstable surfaces.
- The Plasma Display may fall off or tip over.
Do not place any objects on top of the Plasma Display.
- If water is spills onto the Plasma Display or foreign objects get inside it, a short-circuit may occur which could result in fire or electric shock. If any foreign objects get inside the Plasma Display, please consult your local Panasonic dealer.
Transport only in upright position!
- Transporting the unit with its display panel facing upright or downward may cause damage to the internal circuitry.
Ventilation should not be impeded by covering the ventilation openings with items such as newspapers, table cloths and curtains.
For suffi cient ventilation;
If using the pedestal (optional accessory), leave a space of 10 cm or more at the top, left and right, and 7 cm or more at the rear, and also keep the space between the bottom of the display and the floor surface.
If using some other setting-up method, follow the manual of it. (If there is no specific indication of installation dimension in the installation manual, leave a space of 10 cm or more at the top, bottom, left and right, and 7 cm or more at the rear.)
When installing the Plasma Display vertically;
Turn up the power switch for the upward direction when you install the Plasma Display vertically.
And set "Display orientation" to "Portrait" in Setup menu.
■ When using the Plasma Display
The Plasma Display is designed to operate on 220 - 240 V AC, 50/60 Hz.
Do not cover the ventilation holes.
- Doing so may cause the Plasma Display to overheat, which can cause fire or damage to the Plasma Display.
Do not stick any foreign objects into the Plasma Display.
- Do not insert any metal or flammable objects into the ventilations holes or drop them onto the Plasma Display, as doing so can cause fire or electric shock.
Do not remove the cover or modify it in any way.
- High voltages which can cause severe electric shocks are present inside the Plasma Display. For any inspection, adjustment and repair work, please contact your local Panasonic dealer.
Ensure that the mains plug is easily accessible.
An apparatus with CLASS I construction shall be connected to a mains socket outlet with a protective earthing connection.
Do not use any power supply cord other than that provided with this unit.
- Doing so may cause fire or electric shocks.
Securely insert the power supply plug as far as it will go.
- If the plug is not fully inserted, heat may be generated which could cause fire. If the plug is damaged or the wall socket is loose, they shall not be used.
Do not handle the power supply plug with wet hands.
- Doing so may cause electric shocks.
Do not do anything that may damage the power cable. When disconnecting the power cable, pull on the plug body, not the cable.
- Do not damage the cable, make any modifications to it, place heavy objects on top of it, heat it, place it near any hot objects, twist it, bend it excessively or pull it. To do so may cause fire and electric shock. If the power cable is damaged, have it repaired at your local Panasonic dealer.
If the Plasma Display is not going to be used for any prolonged length of time, unplug the power supply plug from the wall outlet.
To prevent the spread of fire, keep candles or other open flames away from this product at all times.

■ If problems occur during use
If a problem occurs (such as no picture or no sound), or if smoke or an abnormal odour starts to come out from the Plasma Display, immediately unplug the power supply plug from the wall outlet.
- If you continue to use the Plasma Display in this condition, fire or electric shock could result. After checking that the smoke has stopped, contact your local Panasonic dealer so that the necessary repairs can be made. Repairing the Plasma Display yourself is extremely dangerous, and shall never be done.
If water or foreign objects get inside the Plasma Display, if the Plasma Display is dropped, or if the cabinet becomes damages, disconnect the power supply plug immediately.
- A short circuit may occur, which could cause fire. Contact your local Panasonic dealer for any repairs that need to be made.

CAUTION
■ When using the Plasma Display
Do not bring your hands, face or objects close to the ventilation holes of the Plasma Display.
- Heated air comes out from the ventilation holes at the top of Plasma Display will be hot. Do not bring your hands or face, or objects which cannot withstand heat, close to this port, otherwise burns or deformation could result.
Be sure to disconnect all cables before moving the Plasma Display.
- If the Plasma Display is moved while some of the cables are still connected, the cables may become damaged, and fire or electric shock could result.
Disconnect the power supply plug from the wall socket as a safety precaution before carrying out any cleaning.
• Electric shocks can result if this is not done.
Clean the power cable regularly to prevent it becoming dusty.
- If dust built up on the power cord plug, the resultant humidity can damage the insulation, which could result in fire. Pull the power cord plug out from the wall outlet and wipe the mains lead with a dry cloth.
Do not burn or breakup batteries.
- Batteries must not be exposed to excessive heat such as sunshine, fire or the like.
This Plasma Display radiates infrared rays, therefore it may affect other infrared communication equipment. Install your infrared sensor in a place away from direct or reflected light from your Plasma Display.
Cleaning and maintenance
The front of the display panel has been specially treated. Wipe the panel surface gently using only a cleaning cloth or a soft, lint-free cloth.
- If the surface is particularly dirty, wipe with a soft, lint-free cloth which has been soaked in pure water or water in which neutral detergent has been diluted 100 times, and then wipe it evenly with a dry cloth of the same type until the surface is dry.
- Do not scratch or hit the surface of the panel with fingernails or other hard objects, otherwise the surface may become damaged. Furthermore, avoid contact with volatile substances such as insect sprays, solvents and thinner, otherwise the quality of the surface may be adversely affected.
If the cabinet becomes dirty, wipe it with a soft, dry cloth.
- If the cabinet is particularly dirty, soak the cloth in water to which a small amount of neutral detergent has been added and then wring the cloth dry. Use this cloth to wipe the cabinet, and then wipe it dry with a dry cloth.
- Do not allow any detergent to come into direct contact with the surface of the Plasma Display. If water droplets get inside the unit, operating problems may result.
- Avoid contact with volatile substances such as insect sprays, solvents and thinner, otherwise the quality of the cabinet surface may be adversely affected or the coating may peel off. Furthermore, do not leave it for long periods in contact with articles made from rubber or PVC.
Accessories
Accessories Supply
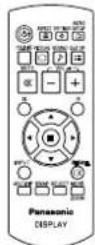
Check that you have the accessories and items shown


Operating Instruction book
text_image
Panasonic
CD-ROM (Operating instructions)

Remote Control
Transmitter
N2QAYB000432

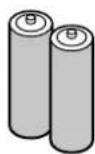
Batteries for the Remote Control Transmitter (R6 (UM3) Size × 2)

Power supply cord Clamper × 3
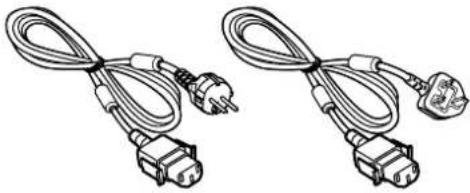
natural_image
Two identical cable types with connectors and power plugs, no text or symbols visible
TMME289
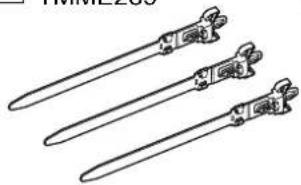
natural_image
Line drawing of four elongated metal tools with handles, no text or symbols present
Ferrite core × 2
J0KG00000014
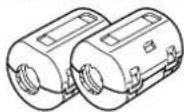
Use the Ferrite cores to comply with the EMC standard.
(see page 19)
Remote Control Batteries
Requires two R6 batteries.
- Pull and hold the hook, then open the battery cover.
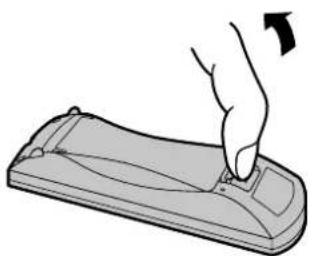
natural_image
Illustration of a hand pressing down on a handheld device (no text or symbols visible)- Insert batteries - note correct polarity (+ and -).
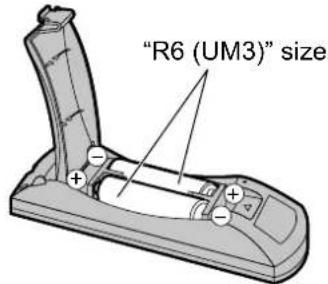
text_image
"R6 (UM3)" size- Replace the cover.
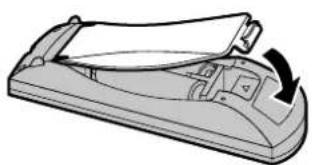
natural_image
Diagram of a handheld device with a scroll wheel and handle mechanism (no text or symbols)Helpful Hint:
For frequent remote control users, replace old batteries with Alkaline batteries for longer life.

Precaution on battery use
Incorrect installation can cause battery leakage and corrosion that will damage the remote control transmitter. Disposal of batteries should be in an environment-friendly manner.
Observe the following precaution:
- Batteries shall always be replaced as a pair. Always use new batteries when replacing the old set.
- Do not combine a used battery with a new one.
- Do not mix battery types (example: "Zinc Carbon" with "Alkaline").
- Do not attempt to charge, short-circuit, disassemble, heat or burn used batteries.
- Battery replacement is necessary when remote control acts sporadically or stops operating the Plasma Display set.
- Do not burn or breakup batteries.
Batteries must not be exposed to excessive heat such as sunshine, fire or the like.
Connections
Speaker connection
When connecting the speakers, be sure to use only the optional accessory speakers.
Refer to the speaker's Installation Manual for details on speaker installation.
Speakers (Optional accessories)
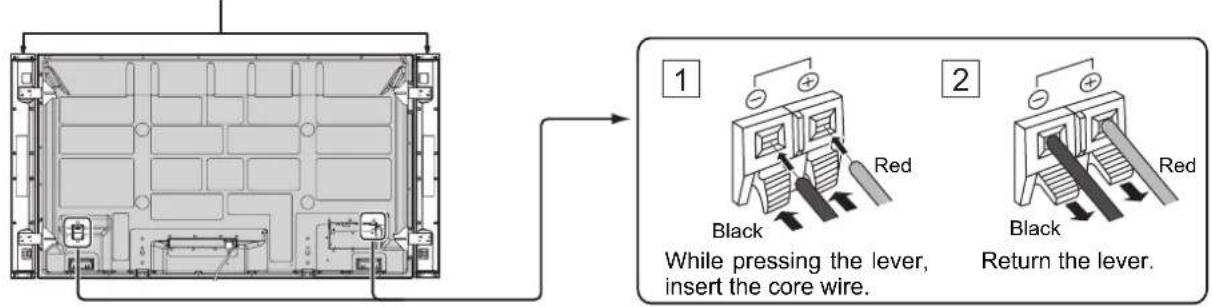
text_image
1 Black Red While pressing the lever, insert the core wire. 2 Black Red Return the lever.AC cord connection and fixing, cable fixing
AC cord fi xing
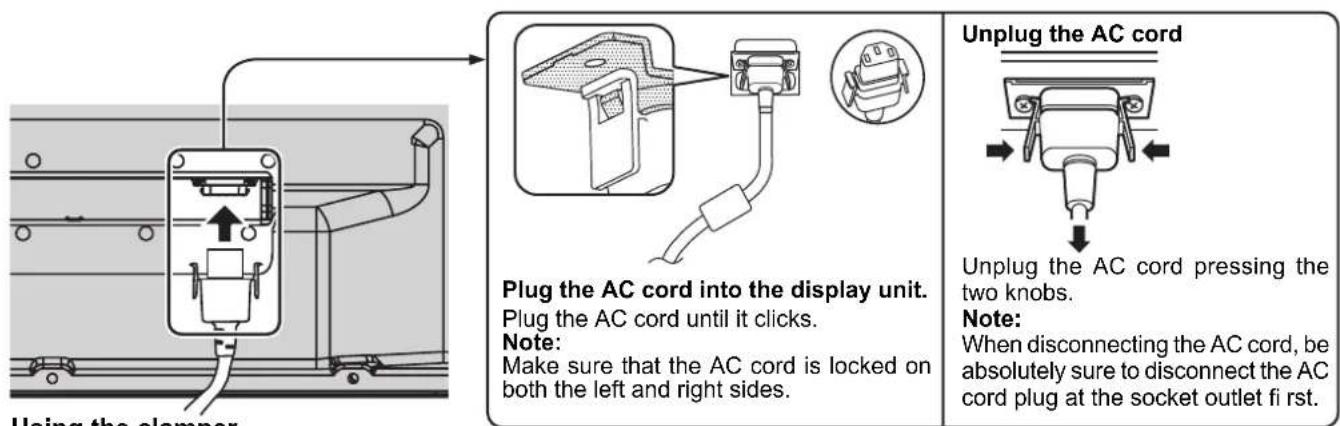
text_image
Using the clamper Plug the AC cord into the display unit. Plug the AC cord until it clicks. Note: Make sure that the AC cord is locked on both the left and right sides. Unplug the AC cord Unplug the AC cord pressing the two knobs. Note: When disconnecting the AC cord, be absolutely sure to disconnect the AC cord plug at the socket outlet fi rst.Using the clamper
Secure any excess cables with clamper as required.
TH-58PF20ER TH-65PF20ER
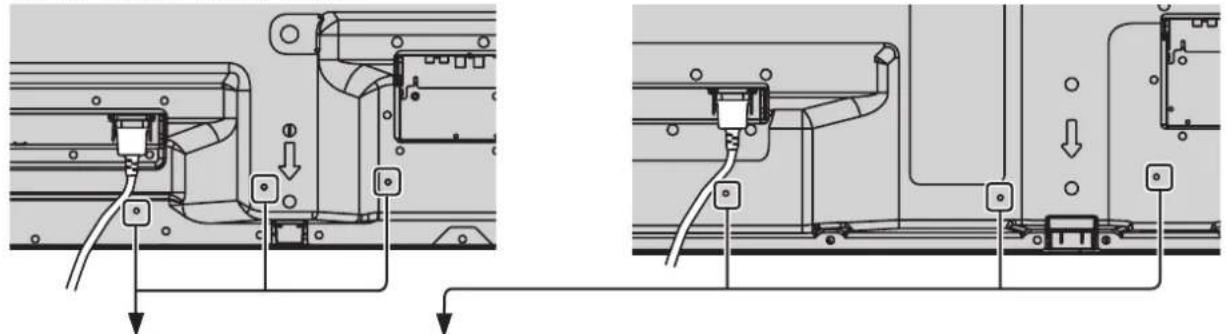
natural_image
Technical diagram showing two mechanical assembly configurations with wiring and mounting points (no text or labels)1 Attach the clamper

text_image
hole Insert the clamper in a hole.To remove from the unit:
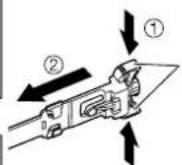
① Keep pushing both side snaps
2 Bundle the cables
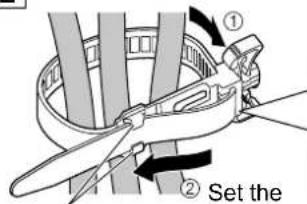
text_image
① ② Set thehooks
To loosen:
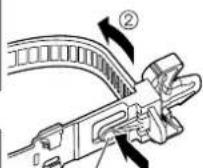
knob
Keep
pushing
the knob
Video equipment connection
Ex. TH-65PF20ER
text_image
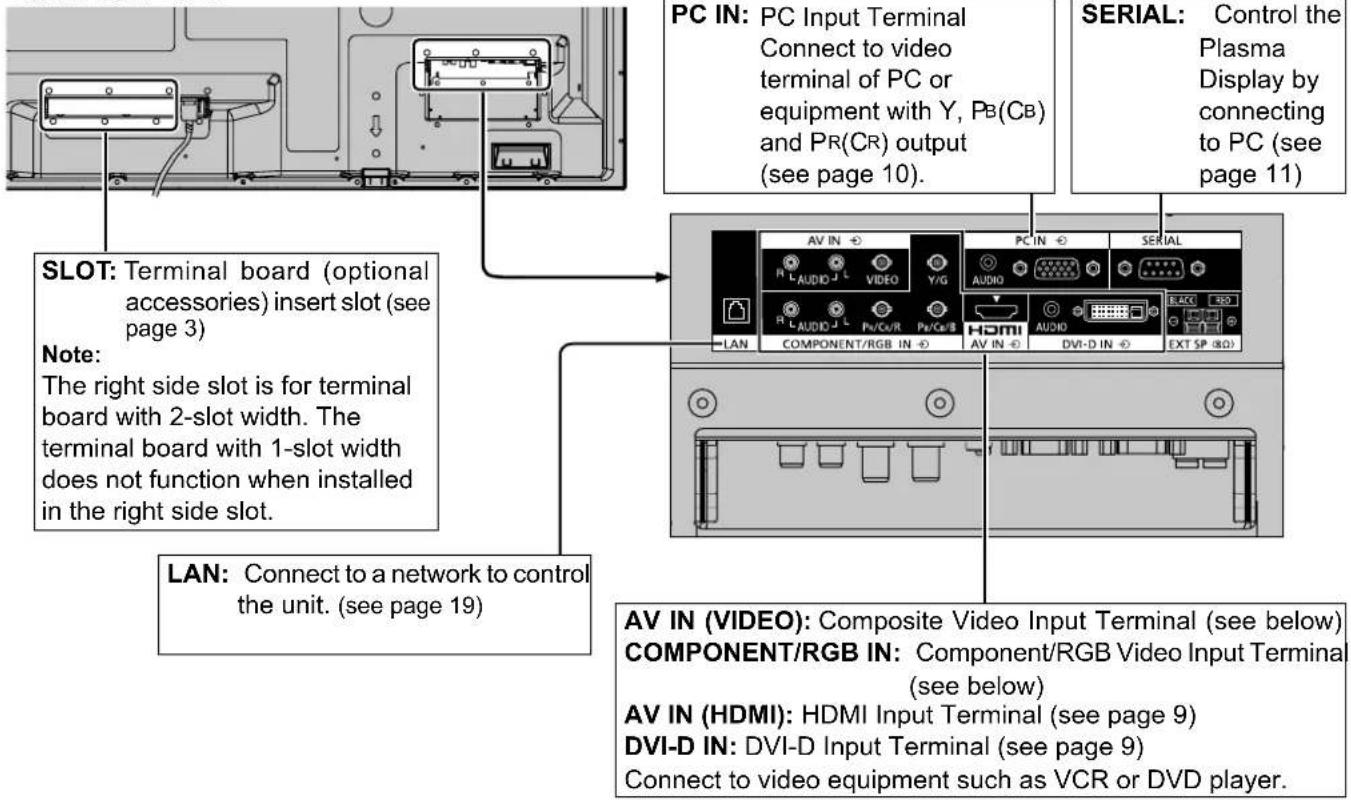
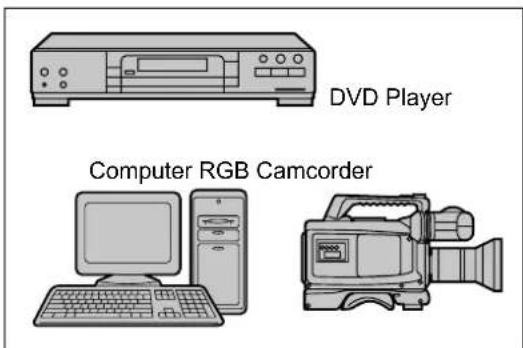
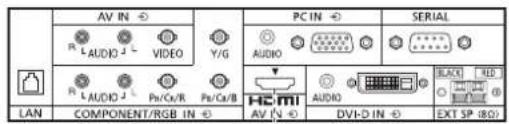
PC IN: PC Input Terminal Connect to video terminal of PC or equipment with Y, Pb(CB) and PR(CR) output (see page 10). SERIAL: Control the Plasma Display by connecting to PC (see page 11) SLOT: Terminal board (optional accessories) insert slot (see page 3) Note: The right side slot is for terminal board with 2-slot width. The terminal board with 1-slot width does not function when installed in the right side slot. LAN: Connect to a network to control the unit. (see page 19) AV IN (VIDEO): Composite Video Input Terminal (see below) COMPONENT/RGB IN: Component/RGB Video Input Terminal (see below) AV IN (HDMI): HDMI Input Terminal (see page 9) DVI-D IN: DVI-D Input Terminal (see page 9) Connect to video equipment such as VCR or DVD player.VIDEO and COMPONENT / RGB IN connection
Note:
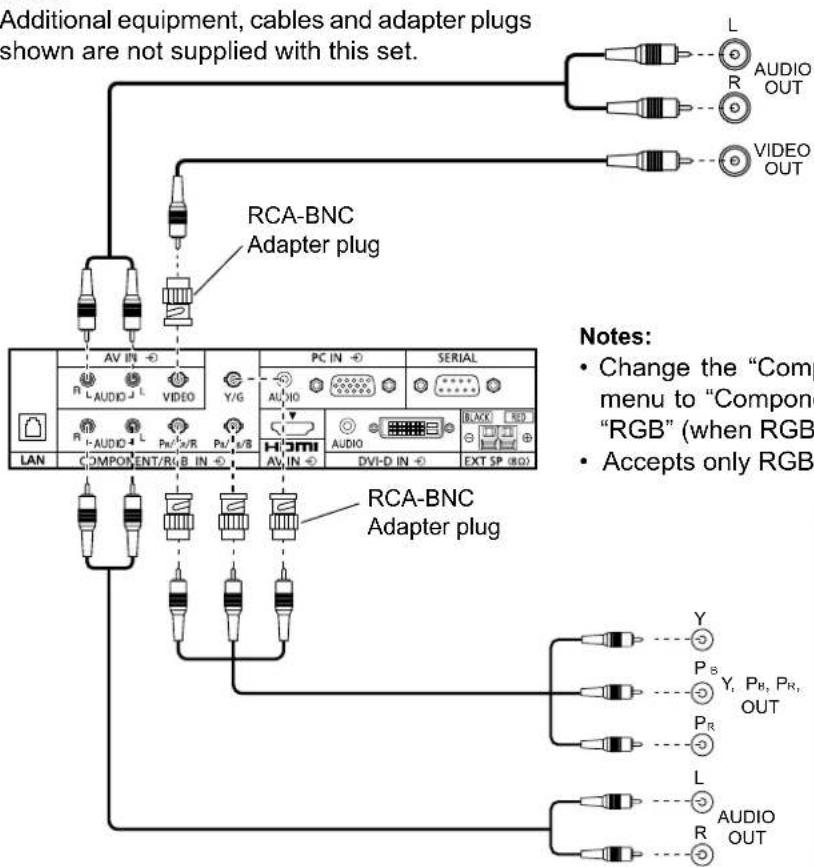
Additional equipment, cables and adapter plugs shown are not supplied with this set.
text_image
Additional equipment, cables and adapter plugs shown are not supplied with this set. L AUDIO R OUT VIDEO OUT RCA-BNC Adapter plug LAN COMPONENT/RG IN PC IN SERIAL Y/G AUDIO AUDIO BLACK RED AV IN DVI-D IN EXT SP (RIO) RCA-BNC Adapter plug Notes: • Change the "Comp menu to "Component" "RGB" (when RGB • Accepts only RGB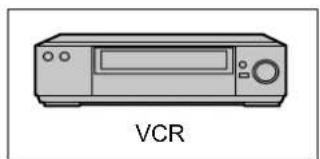
natural_image
Illustration of a VCR (Video Control System) device with control panel and display screen (no text or symbols on the device itself)Notes:
- Change the "Component/RGB-in select" setting in the "Setup" menu to "Component" (when Component signal connection) or "RGB" (when RGB signal connection).
- Accepts only RGB signals with "Sync on G".
text_image
DVD Player Computer RGB CamcorderHDMI connection
[Pin assignments and signal names]
| Pin No. | Signal name | Pin No. | Signal name |
| 1 | T.M.D.S Data2+ | 11 | T.M.D.S Clock Shield |
| 2 | T.M.D.S Data2 Shield | 12 | T.M.D.S Clock- |
| 3 | T.M.D.S Data2- | 13 | CEC |
| 4 | T.M.D.S Data1+ | 14 | Reserved(N.C. on device) |
| 5 | T.M.D.S Data1 Shield | ||
| 6 | T.M.D.S Data1- | 15 | SCL |
| 7 | T.M.D.S Data0+ | 16 | SDA |
| 8 | T.M.D.S Data0 Shield | 17 | DDC/CEC Ground |
| 9 | T.M.D.S Data0- | 18 | +5V Power |
| 10 | T.M.D.S Clock+ | 19 | Hot Plug Detect |
text_image
AV IN R L AUDIO J VIDEO Y/G PC IN AUDIO HCM AV N DVI-D IN SERIAL BLACK RED Black RGB LAN COMPONENT/RSB IN Pv/Cr/R Pv/Cr/B EXT SP (80)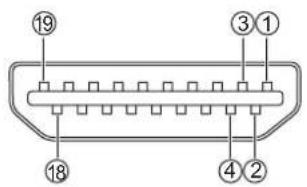
text_image
⑲ ③① ④② ⑱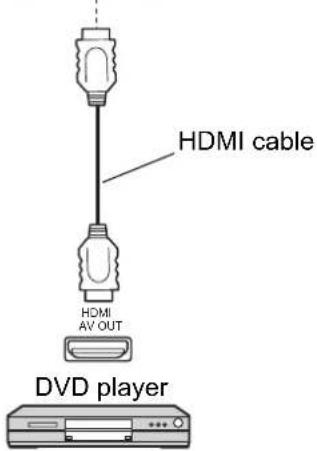
text_image
HDMI cable HDMI AV OUT DVD playerNote:
Additional equipment and HDMI cable shown are not supplied with this set.
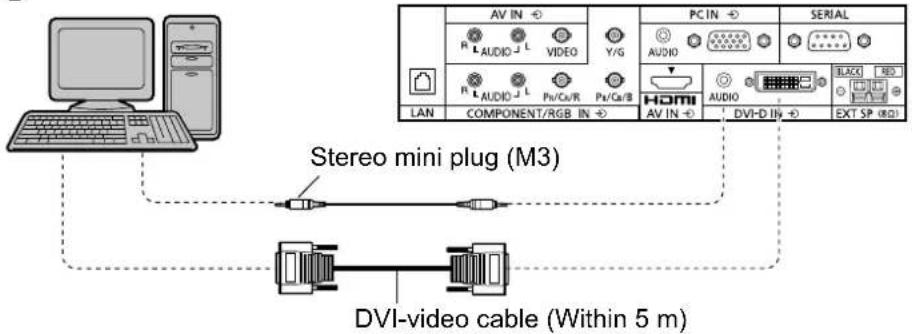
DVI-D IN connection
PC with DVI-D video out
text_image
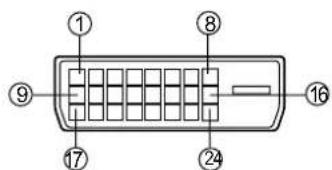
AV IN R L AUDIO J L VIDEO Y/G PC IN R L AUDIO J L Pn/Ca/R Pn/Ca/B LAN COMPONENT/RGB IN Stereo mini plug (M3) DVI-video cable (Within 5 m) PCIN AUDIO HOMI AV IN AUDIO DVI-D IV SERIAL BLACK RED EXT SPDVI-D Input Connector Pin Layouts
text_image
① ⑧ ⑨ ⑭ ⑰ ⑦ ②4 ⑯ ⑯ ⑯Connection port view
| Pin No. | Signal Name | Pin No. | Signal Name |
| 1 | T.M.D.S. data 2- | 13 | —— |
| 2 | T.M.D.S. data 2+ | 14 | +5 V DC |
| 3 | T.M.D.S. data 2 shield | 15 | Ground |
| 4 | —— | 16 | Hot plug detect |
| 5 | —— | 17 | T.M.D.S. data 0- |
| 6 | DDC clock | 18 | T.M.D.S. data 0+ |
| 7 | DDC data | 19 | T.M.D.S. data 0 shield |
| 8 | —— | 20 | —— |
| 9 | T.M.D.S. data 1- | 21 | —— |
| 10 | T.M.D.S. data 1+ | 22 | T.M.D.S. clock shield |
| 11 | T.M.D.S. data 1 shield | 23 | T.M.D.S. clock+ |
| 1224 | —— | ○ | T.M.D.S. clock- |
Notes:
• Additional equipment and cables shown are not supplied with this set.
- Use the DVI-D cable complying with the DVI standard. Image deterioration may occur depending on the length or the quality of the cable.
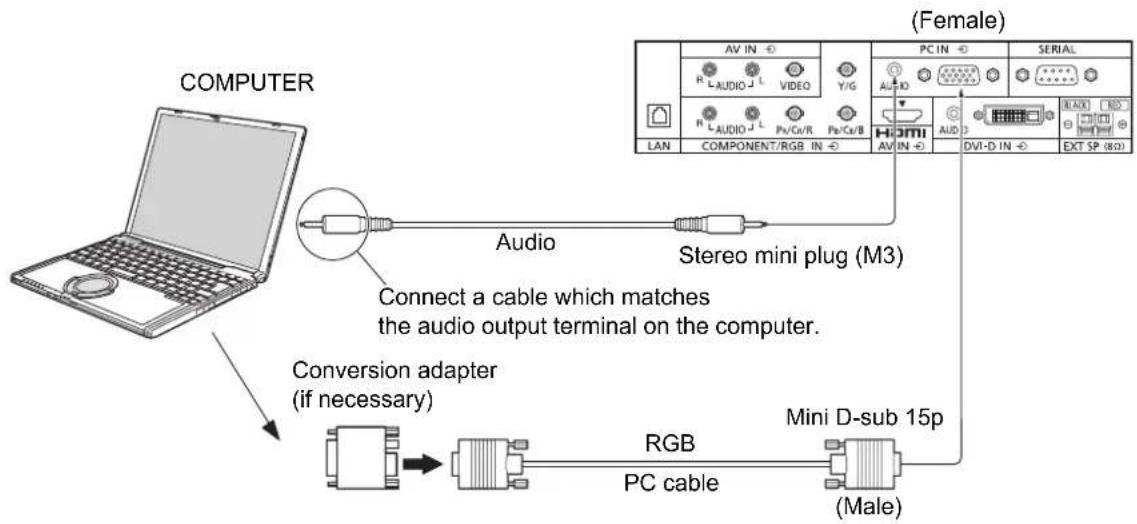
PC Input Terminals connection
flowchart
graph TD
    A["COMPUTER"] -->|Audio| B["Stereo mini plug (M3)"]
    B --> C["Conversion adapter (if necessary)"]
    C --> D["PC cable"]
    D --> E["Mini D-sub 15p"]
    E --> F["(Male)"]
    G["Female"] --> H["PC IN"]
    H --> I["SERIAL"]
    I --> J["LAN"]
    J --> K["AV IN"]
    K --> L["PC IN"]
    L --> M["SERIAL"]
    M --> N["AV IN"]
    N --> O["DVI-D IN"]
    O --> P["EXT SP (8Ω)"]
    style A fill:#f9f,stroke:#333
    style G fill:#f9f,stroke:#333
    style H fill:#ccf,stroke:#333
    style I fill:#ccf,stroke:#333
    style J fill:#ccf,stroke:#333
    style K fill:#ccf,stroke:#333
    style L fill:#ccf,stroke:#333
    style M fill:#ccf,stroke:#333
    style N fill:#ccf,stroke:#333
    style O fill:#ccf,stroke:#333
Notes:
- With regard to the typical PC input signals that are described in the applicable input signals list, adjustment values such as for the standard picture positions and sizes have already been stored in this unit. You can add up to eight PC input signal types that are not included in the list.
- Computer signals which can be input are those with a horizontal scanning frequency of 15 to 110kHz and vertical scanning frequency of 48 to 120Hz . (However, the image will not be displayed properly if the signals exceed 1,200 lines.)
- The display resolution is a maximum of 1,440 × 1,080 dots when the aspect mode is set to "4:3", and 1,920 × 1,080 dots when the aspect mode is set to "16:9". If the display resolution exceeds these maximums, it may not be possible to show fine detail with sufficient clarity.
- The PC input terminals are DDC2B-compatible. If the computer being connected is not DDC2B-compatible, you will need to make setting changes to the computer at the time of connection.
- Some PC models cannot be connected to the set.
- There is no need to use an adapter for computers with DOS/V compatible Mini D-sub 15P terminal.
- The computer shown in the illustration is for example purposes only.
• Additional equipment and cables shown are not supplied with this set. - Do not set the horizontal and vertical scanning frequencies for PC signals which are above or below the specified frequency range.
- Component Input is possible with the pin 1, 2, 3 of the Mini D-sub 15P Connector.
- To use sync input VBS signals, use the connector which incorporates a 75-ohm termination resistance and which is available on the market, for the connection of the HD connector where the VBS signals are to be input.
- Change the "Component/RGB-in select" setting in the "Setup" menu to "Component" (when Component signal connection) or "RGB" (when RGB signal connection).
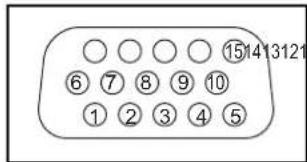
Signal Names for Mini D-sub 15P Connector
text_image
⑯⑦⑧⑨⑩ ①②③④⑤ ⑮⑭⑮⑯⑰⑱⑲Pin Layout for PC Input Terminal
| Pin No. | Signal Name Pin No. | Signal N | Name Pin No. Signal | Name | |
| 1 | R (P_R/C_R) | 6 | GND (Ground) | 11 | NC (not connected) |
| 2 | G (Y) | 7 | GND (Ground) | 12 | SDA |
| 3 | B ( P_B/C_B ) | 8 | GND (Ground) | 13 | HD/SYNC |
| 4 | NC (not connected) | 9 | +5 V DC | 14 | VD |
| 5 | GND (Ground) | 10 | GND (Ground) | 15 | SCL |
SERIAL Terminals connection
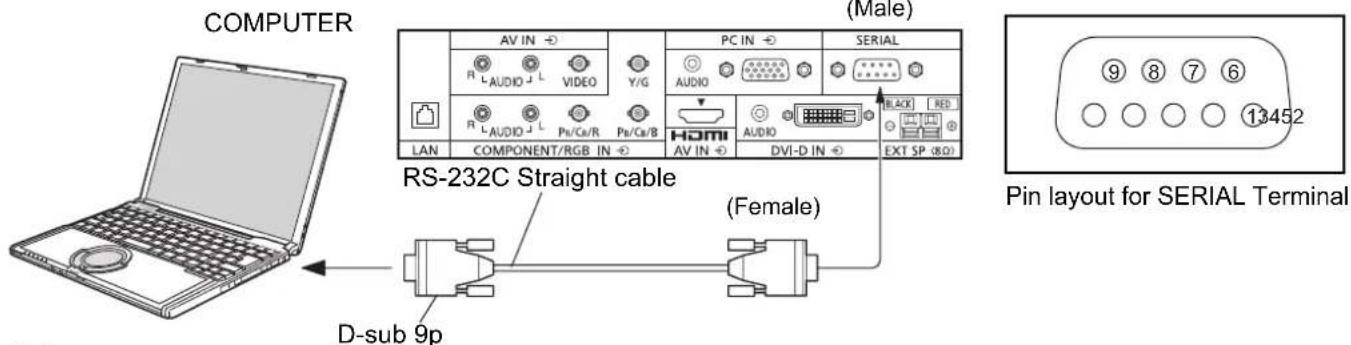
The SERIAL terminal is used when the Plasma Display is controlled by a computer.
Note: To use serial control for this unit, make sure to set the "Control I/F Select" in the "Network Setup" menu to "RS-232C".
text_image
COMPUTER (Male) AV IN PC IN SERIAL R L AUDIO L VIDEO Y/G AUDIO R L AUDIO L Pit/Cu/R Pit/Cu/B LAN COMPONENT/RGB IN HOME AV IN AUDIO DVI-D IN BLACK RED EXT SP (8Ω) RS-232C Straight cable (Female) Pin layout for SERIAL Terminal D-sub 9pNotes:
- Use the RS-232C straight cable to connect the computer to the Plasma Display.
- The computer shown is for example purposes only.
• Additional equipment and cables shown are not supplied with this set.
The SERIAL terminal conforms to the RS-232C interface specification, so that the Plasma Display can be controlled by a computer which is connected to this terminal.
The computer will require software which allows the sending and receiving of control data which satisfies the conditions given below. Use a computer application such as programming language software. Refer to the documentation for the computer application for details.
Communication parameters
| Signal level | RS-232C compliant |
| Synchronization method | Asynchronous |
| Baud rate | 9600 bps |
| Parity | None |
| Character length | 8 bits |
| Stop bit | 1 bit |
| Flow control | - |
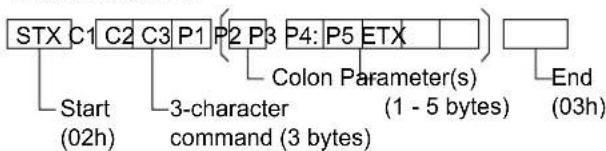
Basic format for control data
The transmission of control data from the computer starts with a STX signal, followed by the command, the parameters, and lastly an ETX signal in that order. If there are no parameters, then the parameter signal does not need to be sent.
flowchart
graph TD
    A["Start (02h)"] --> B["3-character command (3 bytes)"]
    B --> C["Colon Parameter(s) (1 - 5 bytes)"]
    C --> D["End (03h)"]
    E["STX C1 C2 C3 P1 P2 P3 P4: P5 ETX"] --> F["End"]
    style A fill:#f9f,stroke:#333
    style B fill:#ccf,stroke:#333
    style C fill:#cfc,stroke:#333
    style D fill:#fcc,stroke:#333
Notes:
- If multiple commands are transmitted, be sure to wait for the response for the first command to come from this unit before sending the next command.
- If an incorrect command is sent by mistake, this unit will send an "ER401" command back to the computer.
- S1A and S1B of Command IMS are available only when a dual input terminal board is attached.
Signal names for D-sub 9P connector
| Pin No. | Details |
| 2 | R X D |
| 3 | T X D |
| 5 | GND |
| 4·6 | Non use |
| 78 | (Shorted in this set) |
| 1·9 | NC |
These signal names are those of computer specifications.
Command
| Command Parameter | Control details | |
| PON | None | Power ON |
| POF | None | Power OFF |
| AVL | ** | Volume 00 - 63 |
| AMT | 0 | Audio MUTE OFF |
| 1 | Audio MUTE ON | |
| IMS | None | Input select (toggle) |
| SL1 | SLOT input (SLOT INPUT) | |
| S1A | SLOT input (SLOT INPUT A) | |
| S1B | SLOT input (SLOT INPUT B) | |
| VD1 | VIDEO input (VIDEO) | |
| YP1 | COMPONENT/RGB IN input (COMPONENT) | |
| HM1 | HDMI input (HDMI) | |
| DV1 | DVI-D IN input (DVI) | |
| PC1 | PC IN input (PC) | |
| DAM | None | Screen mode select (toggle) |
| ZOOM | Zoom1 (For Video/SD/PC signal) | |
| FULL | 16:9 | |
| JUST | Just (For Video/SD signal) | |
| NORM | 4:3 (For Video/SD/PC signal) | |
| ZOM2 | Zoom2 (For HD signal) | |
| ZOM3 | Zoom3 (For HD signal) | |
| SJST | Just (For HD signal) | |
| SNOM | 4:3 (For HD signal) | |
| SFUL | 4:3 Full (For HD signal) | |
| 14:9 | 14:9 | |
With the power off, this display responds to PON command only.
Power On / Off
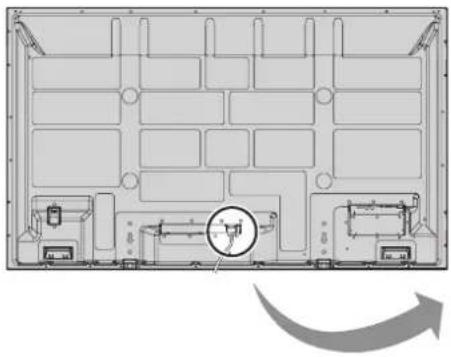
Connecting the AC cord plug to the Plasma Display.
natural_image
Top-down schematic of a multi-level electronic device or enclosure with internal compartments and mounting points, showing no text or symbols.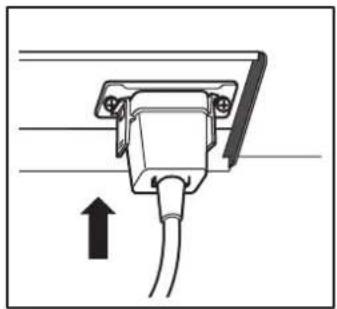
natural_image
Pure electrical circuit lines without any symbolsConnecting the plug to the Wall Outlet
Notes:
- Main plug types vary between countries. The power plug shown at right may, therefore, not be the type fitted to your set.
- When disconnecting the AC cord, be absolutely sure to disconnect the AC cord plug at the socket outlet first.
Press the Power switch on the Plasma Display to turn the set on: Power-On.
Power Indicator: Green
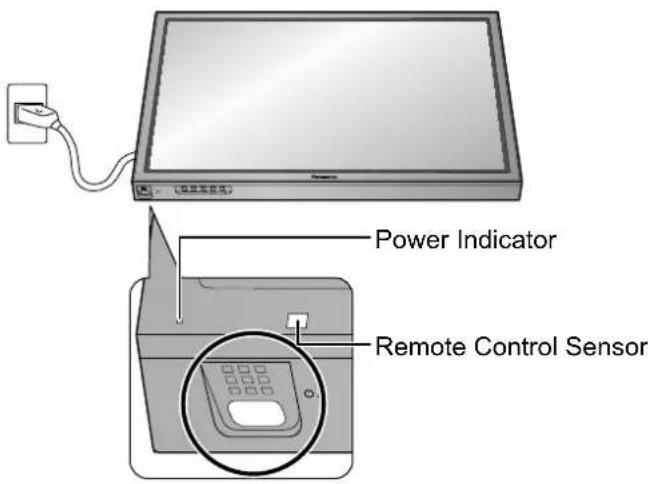
text_image
Power Indicator Remote Control Sensor
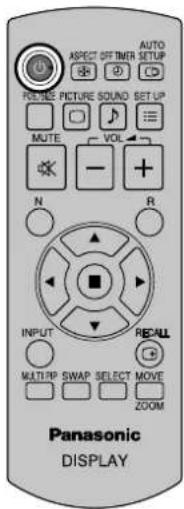
Press the ⏻ button on the remote control to turn the Plasma Display off.
Power Indicator: Red (standby)
Press the Ⓑ button on the remote control to turn the Plasma Display on.
Power Indicator: Green
Turn the power to the Plasma Display off by pressing the ⏻ switch on the unit, when the Plasma Display is on or in standby mode.
Note:
During operation of the power management function, the power indicator turns orange in the power off state.
text_image
ASPECT OPTIMER AUTO SETUP REPLACE PICTURE SOUND SET UP MUTE VOL N + R INPUT RECALL MULTIPP SWAP SELECT MOVE ZOOM Panasonic DISPLAYWhen first switching on the unit
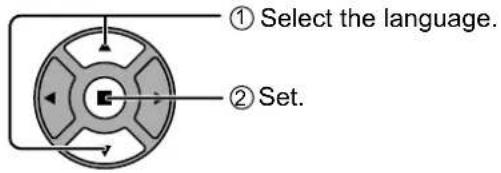
Following screen will be displayed when the unit is turned on for the first time. Select the items with the remote control. Unit buttons are invalid.
OSD Language
text_image
① Select the language. ② Set.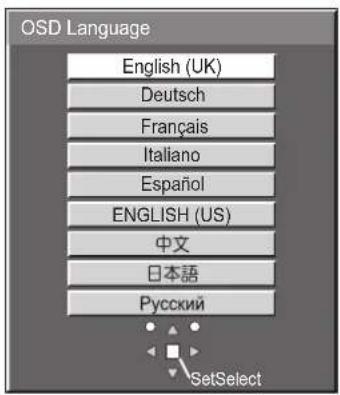
text_image
OSD Language English (UK) Deutsch Français Italiano Español ENGLISH (US) 中文 日本語 Русский SetSelectPRESENT TIME Setup
text_image
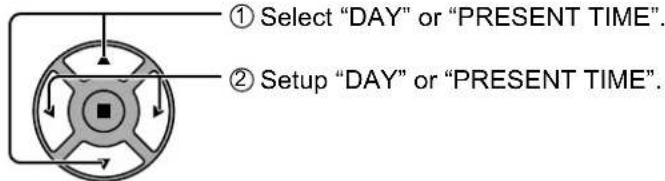
① Select "DAY" or "PRESENT TIME". ② Setup "DAY" or "PRESENT TIME".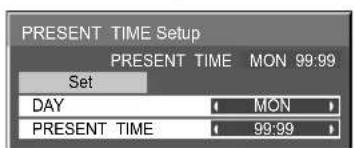
text_image
PRESENT TIME Setup PRESENT TIME MON 99:99 Set DAY Mon PRESENT TIME 99:99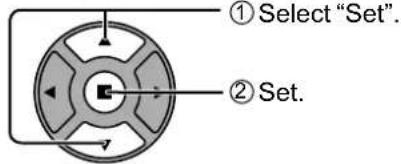
text_image
① Select "Set". ② Set.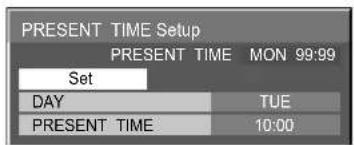
text_image
PRESENT TIME Setup PRESENT TIME MON 99:99 Set DAY TUE PRESENT TIME 10:00Display orientation
text_image
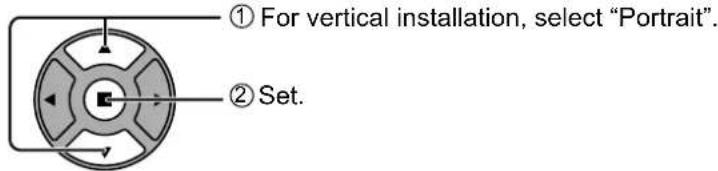
① For vertical installation, select "Portrait". ② Set.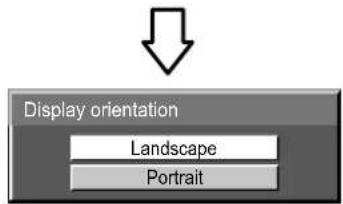
text_image
Display orientation Landscape PortraitNotes:
- Once the items are set, the screens won't be displayed when switching on the unit next time.
• After the setting, the items can be changed in the following menus.
OSD Language
PRESENT TIME Setup
Display orientation
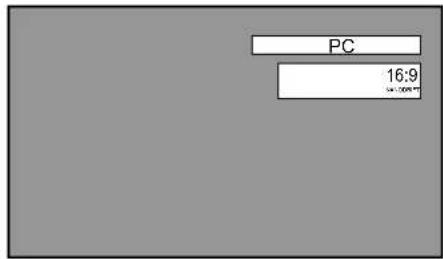
From the second time on, the below screen is displayed for a while (setting condition is an example).
text_image
PC 16:9Selecting the input signal

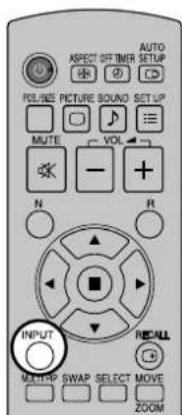
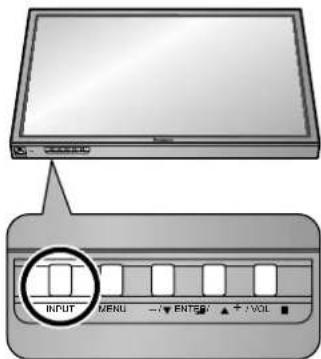
Press to select the input signal to be played back from the equipment which has been connected to the Plasma Display.
Input signals will change as follows:

PC: PC input terminal in PC IN.
VIDEO: Video input terminal in AV IN (VIDEO).
COMPONENT*: Component or RGB input terminal in COMPONENT/RGB IN.
HDMI: HDMI input terminal in AV IN (HDMI).
DVI: DVI input terminal in DVI-D IN.
* "COMPONENT" may be displayed as "RGB" depending on the setting of "Component/RGB-in select".
When an optional Terminal Board is installed:

flowchart
graph LR
    A["PC"] --> B["SLOT INPUT"]
    B --> C["VIDEO"]
    C --> D["COMPONENT"]
    D --> E["HDMI"]
    E --> F["DVI"]
SLOT INPUT: Input terminal in Terminal Board
Note:
When a Terminal Board incompatible with the Plasma Display is installed, "Non-Compatible Function Board" is displayed.
When a Terminal Board with dual input terminals is installed:

flowchart
graph LR
    A["PC"] --> B["SLOT INPUT A"]
    B --> C["SLOT INPUT B"]
    C --> D["VIDEO"]
    D --> E["COMPONENT"]
    E --> F["HDMI"]
    F --> G["DVI"]
SLOT INPUT A, SLOT INPUT B: Dual input terminal in Terminal Board.
text_image
ASPECT OFF TIER AUTO SETUP POS/SIZE PICTURE SOUND SET UP MUTE VOL N R INPUT MULTIP SWAP SELECT MOVE ZOOMNotes:
- Selecting is also possible by pressing the INPUT button on the unit.
- Outputs the sound as set in "Audio input select" in the Options menu.
- Select to match the signals from the source connected to the component/RGB input terminals.
- In 2 screen display, the same input mode cannot be selected for the main picture and sub picture.
- Image retention (image lag) may occur on the plasma display panel when a still picture is kept on the panel for an extended period. The function that darkens the screen slightly is activated to prevent image retention, but this function is not the perfect solution to image retention.
text_image
INPUT MENU -7V ENTER +7VOLBasic Controls
Main Unit

text_image
Remote control sensor Volume Adjustment Volume Up "+" Down "-" When the menu screen is displayed: "+": press to move the cursor up "−": press to move the cursor down (see page 17) Enter / Aspect button (see page 17) Main Power On / Off Switch MENU Screen ON / OFF Each time the MENU button is pressed, the menu screen will switch. (see page 17) Power Indicator The Power Indicator will light. • Power-OFF .... Indicator not illuminated (The unit will still consume some power as long as the power cord is still inserted into the wall outlet.) • Standby ...... Red Orange (When "Slot power" is set to "On".) Orange (Depending on the type of the function board installed, when the power is supplied to the slot) Orange (When "Control I/F Select" is set to "LAN".) INPUT button (INPUT signal selection) (see page 14)• Power-ON ..... Green
• PC Power management (DPMS)
.....Orange (With PC input signal.)
When this function is set to On, it operates under the following conditions to turn the power on or off automatically.
When no pictures (HD/VD sync signals) are detected for 30 or so seconds during PC signal input:
→ Power is turned off (standby); the power indicator lights up orange.
When pictures (HD/VD sync signals) are subsequently detected:
→ Power is turned on; the power indicator lights up green.
• DVI-D Power management
.....Orange (With DVI input signal.)
When this function is set to On, it operates under the following conditions to turn the power on or off automatically.
When no pictures (sync signal) are detected for 30 or so seconds during DVI signal input:
→ Power is turned off (standby); the power indicator lights up orange.
When pictures (sync signal) are subsequently detected:
→ Power is turned on; the power indicator lights up green.
Remote Control Transmitter
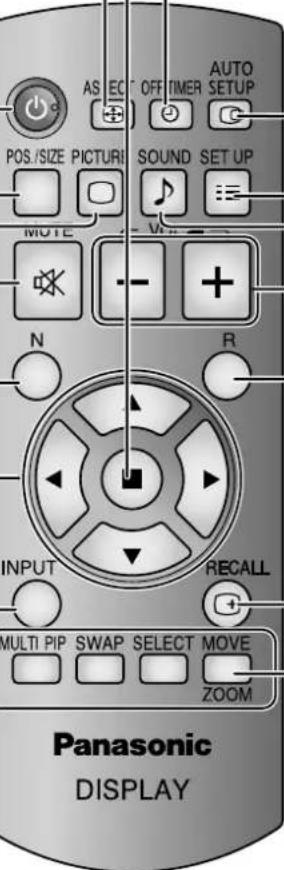
ACTION button
Press to make selections.
ASPECT button
Press to adjust the aspect.
Standby (ON / OFF) button
The Plasma Display must first be plugged into the wall outlet and turned on at the power switch (see page 12). Press this button to turn the Plasma Display On, from Standby mode. Press it again to turn the Plasma Display Off to Standby mode.
POS. /SIZE button
PICTURE button
Sound mute On / Off
Press this button to mute the sound.
Press again to reactivate sound. Sound is also reactivated when power is turned off or volume level is changed.
N button
POSITION buttons
INPUT button
Press to select Input signal sequentially. (see page 14)
MULTI Window buttons
OFF TIMER button
The Plasma Display can be preset to switch to stand-by after a fixed period. The setting changes to 30 minutes, 60 minutes, 90 minutes and 0 minutes (off timer cancelled) each time the button is pressed.
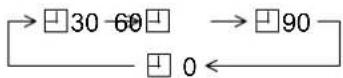
When three minutes remain, "Off timer 3" will flash.
The off timer is cancelled if a power interruption occurs.
text_image
AS EC OFF TIMER AUTO SETUP POS./SIZE PICTURE SOUND SET UP MOTE - + N R INPUT RECALL MULTI PIP SWAP SELECT MOVE ZOOM Panasonic DISPLAYAUTO SETUP button
Automatically adjusts the position/size of the screen.
SET UP button
SOUND button
Volume Adjustment
Press the Volume Up “+” or Down “−” button to increase or decrease the sound volume level.
R button
Press the R button to return to previous menu screen.
RECALL button
Press the "RECALL" button to display the current system status.
① Input label
②Aspect mode
Audio input
NANODRIFT Saver operating
③ Off timer
The off timer indicator is displayed only when the off timer has been set.
④Clock display
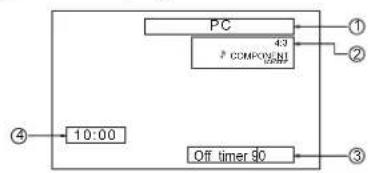
flowchart
graph TD
    A["PC"] --> B["43"]
    B --> C["Component 43"]
    C --> D["Off timer 90"]
    D --> E["3"]
    F["10:00"] --> G["④"]
Digital Zoom
On-Screen Menu Displays
Remote Control Unit
1 Display the menu screen.
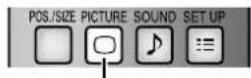
Press to select.
(Example: Picture menu)

MENU
Each time the MENU button is pressed, the menu screen will switch.


2 Select the item.
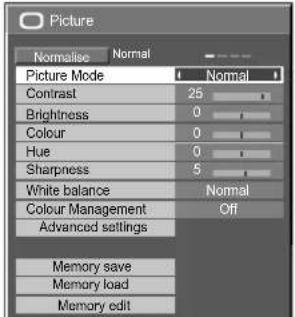
text_image
Picture Normalise Normal Picture Mode Normal Contrast 25 Brightness 0 Colour 0 Hue 0 Sharpness 5 White balance Normal Colour Management Off Advanced settings Memory save Memory load Memory edit(Example: Picture menu)
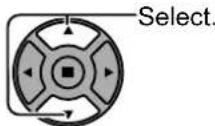
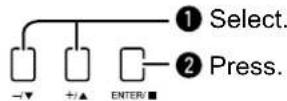
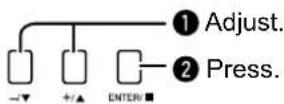
3 Set.

4 Exit the menu.
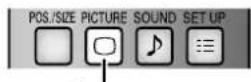
Press.
Press ⓣ to return to the previous menu.

Overview
Note:
Menu that cannot be adjusted is grayout. Adjustable menu changes depending on signal, input and menu setting.
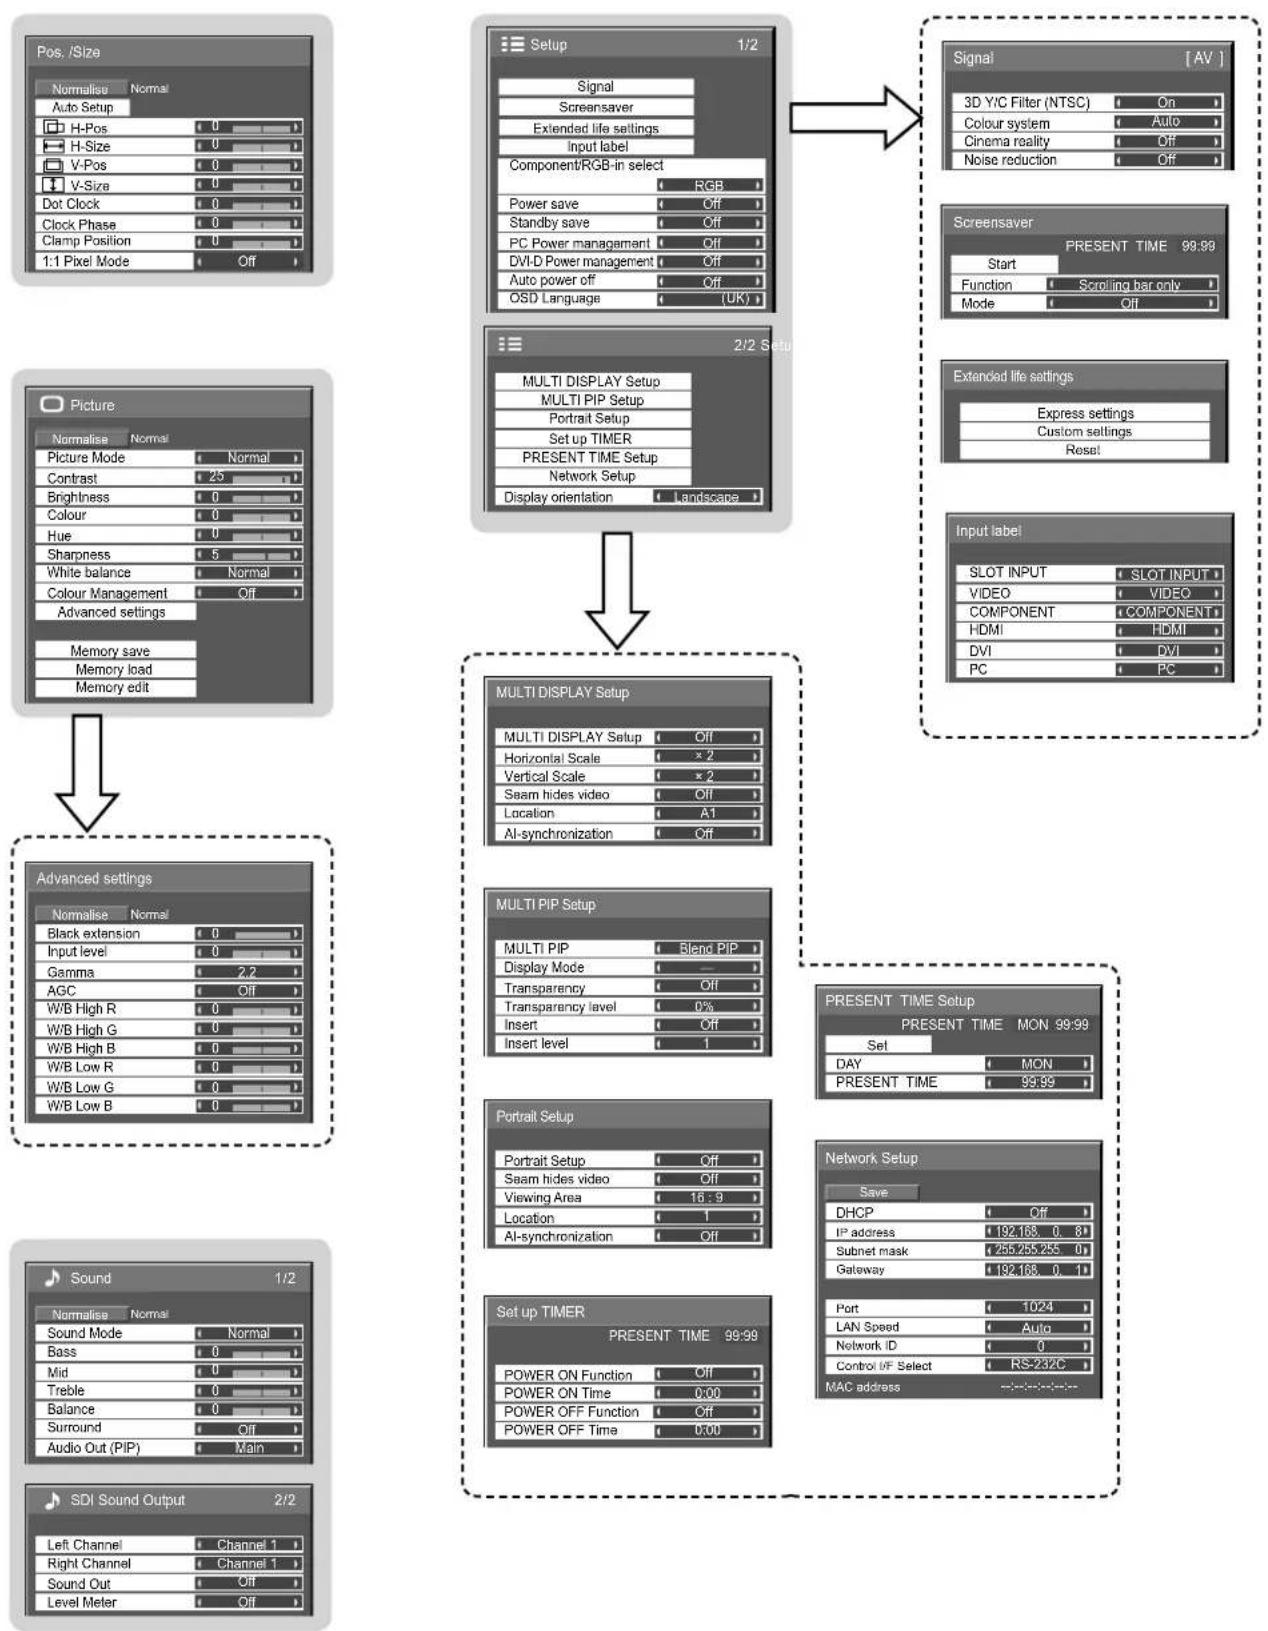
flowchart
graph TD
    A["Pos./Size"] --> B["Setup 1/2"]
    B --> C["Signal AV"]
    C --> D["3D Y/C Filter (NTSC) On"]
    C --> E["Colour system Auto"]
    C --> F["Cinema reality Off"]
    C --> G["Noise reduction Off"]

    H["Picture"] --> I["2/2 Setup"]
    I --> J["MULTI DISPLAY Setup"]
    I --> K["MULTI PIP Setup"]
    I --> L["Portfolio Setup"]
    I --> M["Set up TIMER"]
    I --> N["PRESENT TIME Setup"]
    I --> O["Network Setup"]
    I --> P["Display orientation Landscape"]

    Q["Advanced settings"] --> R["MULTI DISPLAY Setup"]
    Q --> S["MULTI PIP Setup"]
    Q --> T["Portfolio Setup"]
    Q --> U["Present TIME Setup"]
    Q --> V["Network Setup"]

    W["Sound 1/2"] --> X["SET 99:99 Mon 99:99"]
    X --> Y["DHCP Off"]
    X --> Z["IP address 192.168 0 81"]
    X --> AA["Subnet mask 255.255.255 01"]
    X --> AB["Gateway 192.168 0 1"]
    X --> AC["Port 1024"]
    X --> AD["LAN Speed Auto"]
    X --> AE["Network ID 0"]
    X --> AF["Control IF Select RS-232C"]
    X --> AG["MAC address ------"]

    AH["SDI Sound Output 2/2"] --> AI["Power ON Function Off"]
    AH --> AJ["POWER ON Time 0:00"]
    AH --> AK["POWER OFF Function Off"]
    AH --> AL["POWER OFF Time 0:00"]
Using Network Function
This unit has a network function to control the network connected display with your computer.
Note:
To use the network function, set each "Network Setup" setting and make sure to set the "Control I/F Select" to "LAN".
When “LAN” is set, the slot power is turned on, and power indicator is lit orange under the condition of power “Off” with remote control (stand-by state), regardless of the “Slot power” setting.
Example of Network Connection
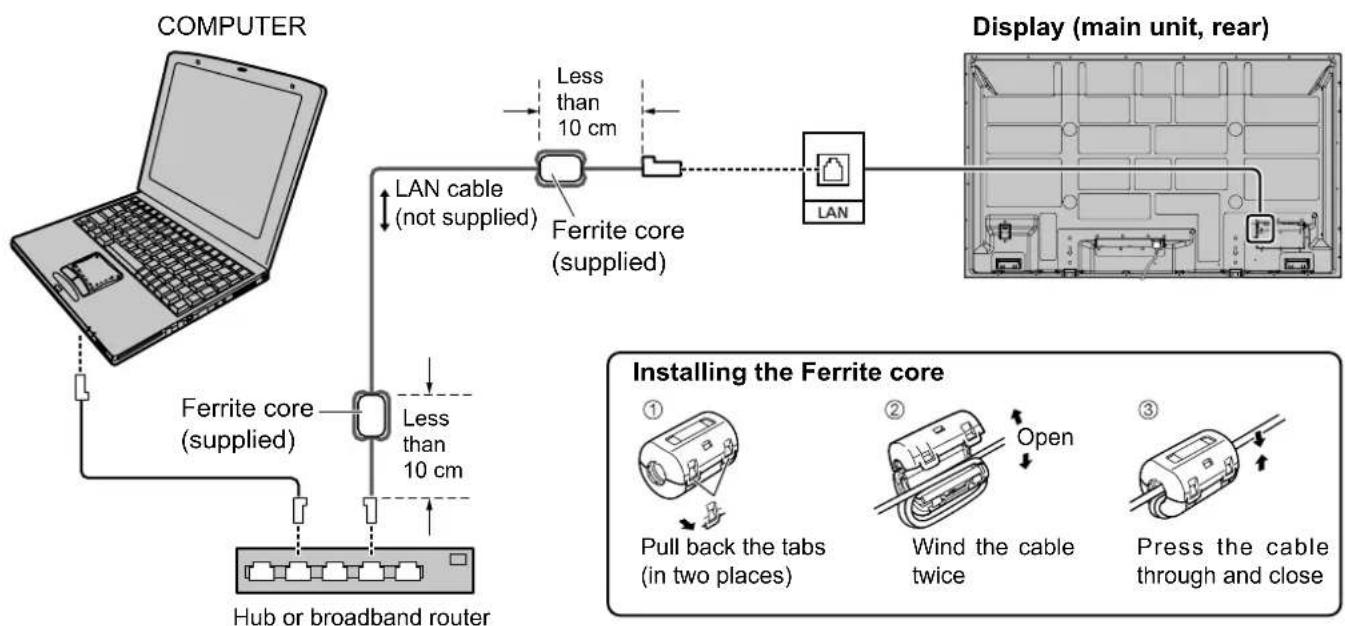
flowchart
graph TD
    A["COMPUTER"] -->|LAN cable (not supplied)| B["Ferrite core (supplied)"]
    B --> C["Less than 10 cm"]
    C --> D["Ferrite core (supplied)"]
    D --> E["LAN"]
    E --> F["Display (main unit, rear)"]
    G["Hub or broadband router"] --> B
    H["Installing the Ferrite core"] --> I["Pull back the tabs (in two places)"]
    I --> J["Open"]
    J --> K["Wind the cable twice"]
    K --> L["Press the cable through and close"]
Notes:
- Make sure the broadband router or hub supports 10BASE-T/100BASE-TX.
- To connect a device using 100BASE-TX, use "category 5" LAN cable.
- Touching the LAN terminal with a statically charged hand (body) may cause damage due to its discharge.
Do not touch the LAN terminal or a metal part of the LAN cable. - For instructions on how to connect, consult your network administrator.
Command Control
Network function of the unit can control the unit in the same way as serial control from a network.
Supported commands
Commands used in the serial control are supported. (see page 11)
Note:
Consult your local Panasonic dealer for detail instructions on command usage.
Specifications
| TH-58PF20ER TH-65PF20ER | |||
| Power Source 220 - 240 V AC, 50/60 Hz | |||
| Power Consumption | |||
| Power on 560 W 660 W | |||
| Stand-by condition Save off 1.2 W, Save on 0.7 W Save off 1.2 W, Save on 0.7 W | |||
| Power off condition 0.3 W 0.3 W | |||
| Plasma Display panel Drive method : AC type 58-inch, 16:9 aspect ratio | Drive method : AC type 65-inch, 16:9 aspect ratio | ||
| Screen size 1,284 mm (W) × 722 mm (H) × 1,473 mm (diagonal) | 1,434 mm (W) × 806 mm (H) × 1,645 mm (diagonal) | ||
| (No.of pixels) 2,073,600 (1,920 (W) ×1,080 (H))[5,760 × 1,080 dots] | |||
| Operating condition | |||
| Temperature 0 °C - 40 °C | |||
| Humidity 20 % - 80 % | |||
| Applicable signals | |||
| Colour System | NTSC, PAL, PAL60, SECAM, Modified NTSC | ||
| Scanning format | 525 (480) / 60i · 60p, 625 (575) / 50i · 50p, 750 (720) / 60p · 50p, 1125 (1080) / 60i · 60p · 50i · 50p · 24p · 25p · 30p · 24sF, 1250 (1080) / 50i | ||
| PC signals | VGA, SVGA, XGA, SXGAUXGA .... (compressed)Horizontal scanning frequency 15 - 110 kHzVertical scanning frequency 48 - 120 Hz | ||
| Connection terminals | |||
| LAN | RJ45 10BASE-T/100BASE-TX, compatible with PJLinkTM | ||
| AV IN | VIDEO AUDIO L-R | BNC 1.0 Vp-p (75 Ω)RCA Pin jack × 2 0.5 Vrms | |
| HDMI | TYPE A Connector | ||
| COMPONENT/RGB IN | |||
| Y/GPB/CB/BPR/CR/RAUDIO L-R | BNC with sync 1.0 Vp-p (75 Ω)BNC 0.7 Vp-p (75 Ω)BNC 0.7 Vp-p (75 Ω)RCA Pin jack × 2 0.5 Vrms | ||
| DVI-D IN | AUDIO | DVI-D 24 PinContent ProtectionCompatible with HDCP 1.1Stereo mini jack (M3) × 1 0.5 Vrms | |
| PC IN | AUDIO | High-Density Mini D-sub 15 Pin Y or G with sync 1.0 Vp-p (75 Ω)Y or G without sync 0.7 Vp-p (75 Ω)PB/CB/B: 0.7 Vp-p (75 Ω)PR/CR/R: 0.7 Vp-p (75 Ω)HD/VD: 1.0 - 5.0 Vp-p (high impedance)with picture 1.0 Vp-p (high impedance)without picture 0.3 Vp-p (high impedance)Stereo mini jack (M3) × 1 0.5 Vrms | |
| SERIAL | External Control TerminalD-sub 9 PinRS-232C compatible | ||
| EXT SP | 6 Ω, 16 W [8 W + 8 W] (10 % THD) | 8 Ω, 20 W [10 W + 10 W] (10 % THD) | |
| Dimensions (W × H × D) | 1,399 mm × 843 mm × 99 mm | 1,554 mm × 925 mm × 99 mm | |
| Mass (weight) | |||
| main unit only | approx. 45.0 kg net | approx. 55.0 kg net | |
| with speakers | approx. 50.0 kg | approx. 60.0 kg | |
Notes:
- Design and specifications are subject to change without notice. Mass and dimensions shown are approximate.
- This equipment complies with the EMC standards listed below.
EN55022, EN55024, EN61000-3-2, EN61000-3-3.
Information for Users on Collection and Disposal of Old Equipment and used Batteries

These symbols on the products, packaging, and/or accompanying documents mean that used electrical and electronic products and batteries should not be mixed with general household waste. For proper treatment, recovery and recycling of old products and used batteries, please take them to applicable collection points, in accordance with your national legislation and the Directives 2002/96/EC and 2006/66/EC.
By disposing of these products and batteries correctly, you will help to save valuable resources and prevent any potential negative effects on human health and the environment which could otherwise arise from inappropriate waste handling.

For more information about collection and recycling of old products and batteries, please contact your local municipality, your waste disposal service or the point of sale where you purchased the items. Penalties may be applicable for incorrect disposal of this waste, in accordance with national legislation.

For business users in the European Union
If you wish to discard electrical and electronic equipment, please contact your dealer or supplier for further information.
[Information on Disposal in other Countries outside the European Union]
These symbols are only valid in the European Union. If you wish to discard these items, please contact your local authorities or dealer and ask for the correct method of disposal.
Note for the battery symbol (bottom two symbol examples):
This symbol might be used in combination with a chemical symbol. In this case it complies with the requirement set by the Directive for the chemical involved.
This product has software installed partially licensed under the Free BSD LICENSE.
Free BSD LICENSE regulations under the above specifications are as follows:
(These regulations are set by the third party; therefore the original (English) regulations are stated.)
Copyright © 1980, 1986, 1993
The Regents of the University of California. All rights reserved.
Redistribution and use in source and binary forms, with or without modification, are permitted provided that the following conditions are met:
- Redistributions of source code must retain the above copyright notice, this list of conditions and the following disclaimer.
- Redistributions in binary form must reproduce the above copyright notice, this list of conditions and the following disclaimer in the documentation and/or other materials provided with the distribution.
- All advertising materials mentioning features or use of this software must display the following acknowledgement: This product includes software developed by the University of California, Berkeley and its contributors.
- Neither the name of the University nor the names of its contributors may be used to endorse or promote products derived from this software without specific prior written permission.
THIS SOFTWARE IS PROVIDED BY THE REGENTS AND CONTRIBUTORS "AS IS" AND ANY EXPRESS OR IMPLIED WARRANTIES, INCLUDING, BUT NOT LIMITED TO, THE IMPLIED WARRANTIES OF MERCHANTABILITY AND FITNESS FOR A PARTICULAR PURPOSE ARE DISCLAIMED. IN NO EVENT SHALL THE REGENTS OR CONTRIBUTORS BE LIABLE FOR ANY DIRECT, INDIRECT, INCIDENTAL, SPECIAL, EXEMPLARY, OR CONSEQUENTIAL DAMAGES (INCLUDING, BUT NOT LIMITED TO, PROCUREMENT OF SUBSTITUTE GOODS OR SERVICES; LOSS OF USE, DATA, OR PROFITS; OR BUSINESS INTERRUPTION) HOWEVER CAUSED AND ON ANY THEORY OF LIABILITY, WHETHER IN CONTRACT, STRICT LIABILITY, OR TORT (INCLUDING NEGLIGENCE OR OTHERWISE) ARISING IN ANY WAY OUT OF THE USE OF THIS SOFTWARE, EVEN IF ADVISED OF THE POSSIBILITY OF SUCH DAMAGE.
Customer's Record
The model number and serial number of this product can be found on its rear panel. You should note this serial number in the space provided below and retain this book, plus your purchase receipt, as a permanent record of your purchase to aid in identification in the event of theft or loss, and for Warranty Service purposes.
Model Number
Serial Number
Panasonic Corporation
Web Site : http://panasonic.net
© Panasonic Corporation 2010