
MVP901 - Blu-ray player MCINTOSH - Free user manual and instructions
Find the device manual for free MVP901 MCINTOSH in PDF.


| Type de produit | Blu-ray player |
| Marque | McIntosh |
| Modèle | MVP901 |
| Dimensions (L x H x P) | 17.5 x 6.0 x 16.0 inches |
| Poids | 22 kg (48.5 lb) |
| Alimentation | 120V ~ 60Hz, 50W |
| Formats de disque | Blu-ray, DVD, CD, SACD, DVD-Audio |
| Sorties audio | XLR équilibrée, RCA stéréo, coaxial, optique, HDMI |
| Sorties vidéo | HDMI (1080p/4K upscale), composante, composite |
| Convertisseur numérique-analogique (DAC) | ESS ES9028PRO 32-bit, 8 canaux |
| Compatibilité audio HD | Dolby TrueHD, DTS-HD Master Audio, LPCM |
| Connectivité réseau | Ethernet RJ45, Wi-Fi (intégré) |
| Fonctions streaming | Netflix, YouTube, Spotify (via mise à jour) |
| Contrôle | Télécommande IR, RS-232, IP (control4, Crestron) |
| Affichage | Écran fluorescent à vide (VFD) |
| Entretien | Essuyer avec un chiffon doux et sec. Nettoyer la lentille avec un coton-tige. |
| Sécurité | Ne pas exposer à l'humidité. Utiliser dans un endroit ventilé. |
| Pièces détachées | Contactez le service agréé McIntosh pour les pièces d'origine. |
| Réparabilité | Indice de réparabilité 8/10 (estimation). Assistance technique disponible. |
Frequently Asked Questions - MVP901 MCINTOSH
User questions about MVP901 MCINTOSH
0 question about this device. Answer the ones you know or ask your own.
Ask a new question about this device
Download the instructions for your Blu-ray player in PDF format for free! Find your manual MVP901 - MCINTOSH and take your electronic device back in hand. On this page are published all the documents necessary for the use of your device. MVP901 by MCINTOSH.
USER MANUAL MVP901 MCINTOSH
McIntosh Laboratory, Inc. 2 Chambers Street Binghamton, New York 13903-2699 Phone: 607-723-3512 www.mcintoshlabs.com
MVP901
Audio Video Player
Owner's Manual


The lightning flash with arrowhead, within an equilateral triangle, is intended to alert the user to the presence of uninsulated "dangerous voltage" within the product's enclosure that may be of sufficient magnitude to constitute a risk of electric shock to persons.
WARNING - TO REDUCE RISK OF FIRE OR ELECTRICAL SHOCK, DO NOT EXPOSE THIS EQUIPMENT TO RAIN OR MOISTURE.

ATTENTION: RISQUE DE CHOC ELECTRIQUE - NE PAS OUVRIR
NO USER-SERVICEABLE PARTS INSIDE. REFER SERVICING TO QUALIFIED PERSONNEL.
The exclamation point within an equilateral triangle is intended to alert the user to the presence of important operating and maintenance (servicing) instructions in the literature accompanying the appliance.
To prevent the risk of electric shock, do not remove cover or back. No user-serviceable parts inside.
Additional Safety Information is supplied in a separate document "Important Additional Operation Information Guide"
CAUTION:
Invisible Laser Radiation when open. DO NOT stare into the beam or view directly with optical instruments. Use of controls or adjustments or performance of procedures other than those specified in the Owners Manual may result in Hazardous Radiation Exposure.
ATTENTION:
This product incorporates an embedded CLASS 3R Laser (IEC60825-1).
LUOKAN 1 LASERLAITE KLASS 1 LASER APPARAT
VAROITUS!
Trademark and License Information
The McIntosh MVP901 incorporates copyright protection technology that is protected by U.S. patents and other intellectual property rights.
This item incorporates copy protection technology that is protected by U.S. patents and other intellectual
property. Reverse engineering and disassembly are prohibited. "Cinavia" is trademark of Verance Corporation. "VRS ClearView" and "Video Reference Series" are trademarks of Silicon Image, Inc.. DVD Logo is a trademark of DVD Format/Logo Licensing Corp.,
registered in the U.S., Japan and other countries. The MVP901 uses the following Technologies:
| Trademark Logo License Information | |
 | BD: Supports Blu-ray with Bonus View and BD-Live content, including Blu-ray 3D discs. A 3D-capable display with compatible glasses is required for 3D playback. BD-R/RE, both single- and dual-layer arc also supported. |
 | “Blu-ray 3DTM” logo is a trademark of Blu-ray Disc Association. |
 | DVD Logo is a trademark of DVD Format/Logo Licensing Corp., registered in the U.S., Japan and other countries. |
 | DVD: Plays commercially-released DVDs, as well as finalized DVD ± R/RW. |
 | DVD-A: High-resolution stereo or multi-channel audio. Some DVD-Audio discs also contain a DVD-Video portion. |
 | HDMI: the HDMI logo and High- Definition Multimedia Interface arc trademarks or registered trademarks of HDMI Licensing LLC. |
| [052W] | Java and all other trademarks and logos are trademarks or registered trademarks of Sun Microsystems, Inc. in the United States and/or other countries. |
 | Manufactured under license from Dolby Laboratories. Dolby and the double-D symbol arc trademarks of Dolby Laboratories. |
| Trademark Logo License Information | |
 | DTS products associated with this logo are (1) confidential, proprietary trade secrets, and (2) protected by (a) applicable copyright law and (b) European patent numbers 0864146 and 1741093 and U.S. patent numbers 5,956,674, 5,974,380, 5,978,762, 6,487,535, 6,226,616, 7,212,872, 7,003,467, 7,272,567, 7,668,723, 7,392,195, 7,930,184, 7,333,929 and 7,548,853, as well as other U.S. and international patents both issued & pending. DTS, the Symbol, and DTS and the Symbol together are registered trademarks of DTS, Inc. © DTS, Inc. All Rights Reserved. |
 | Designed for Windows Media, Microsoft, HDCD, and the HDCD logo are trademarks or registered trademarks of Microsoft Corporation in the United States and/or other countries. |
 | “AVCHD” and the “AVCHD” logo are the trademarks of Panasonic Corporation and Sony Corporation. |
 | Super Audio CD, SACD and the SACD logo are joint trademarks of Sony Corporation and Philips Electronics N.V. Direct Stream Digital (DSD) is a trademark of Sony Corporation. |
 | CD: Supports standard Red Book CDs, as well as HDCD and CD-R/RW. |

Thank You
Your decision to own this McIntosh MVP901 Audio Video Player ranks you at the very top among discriminating music listeners. You now have “The Best.” The McIntosh dedication to “Quality,” is assurance that you will receive many years of visual and musical enjoyment from this unit. Please take a short time to read the information in this manual. We want you to be as familiar as possible with all the features and functions of your new McIntosh.
Please Take A Moment
The serial number, purchase date and McIntosh Dealer name are important to you for possible insurance claim or future service. The spaces below have been provided for you to record that information:
Serial Number:
Purchase Date: ____
Dealer Name: ____
Technical Assistance
If at any time you have questions about your McIntosh product, contact your McIntosh Dealer who is familiar with your McIntosh equipment and any other brands that may be part of your system. If you or your Dealer wish additional help concerning a suspected problem, you can receive technical assistance for all McIntosh products at:
McIntosh Laboratory, Inc.
2 Chambers Street
Binghamton, New York 13903
Phone: 607-723-1545
Fax: 607-724-0549
Customer Service
If it is determined that your McIntosh product is in need of repair, you can return it to your Dealer. You can also return it to the McIntosh Laboratory Service Department. For assistance on factory repair return procedure, contact the McIntosh Service Department at:
McIntosh Laboratory, Inc.
2 Chambers Street
Binghamton, New York 13903
Phone: 607-723-3515
Fax: 607-723-1917
Table of Contents
Safety Instructions.... 2
(Separate Sheet) ...... Important Additional
Operation Information Guide
Trademark and License Information .... 3
Thank You and Please Take a Moment....4
Technical Assistance and Customer Service .... 4
Table of Contents 4
General Information 5
USB Memory Drive Information....5
Disc Information....6
Connector and Cable Information 6
Introduction....7
Performance Features 7
Dimensions 8
Installation 9
Connections:
Rear Panel Connectors....10
(Separate Sheet) ......Mc1A
Making Connections....11
Remote Control:
Remote Control Push-buttons....12
How to Use the Remote Control....13
Front Panel Features:
Front Panel Displays, Push-buttons
and USB Memory Drive....14
Front Panel Information Display....15
Setup:
Introduction to the MVP901 Setup Mode .....16-17
(Separate Sheet) ...... Mc1B
Playback Setup Menu Settings 18
Video Output Setup Menu Settings....19
Audio Output Setup Menu Settings....20
Audio Processing Setup Menu Settings.....20
Device Setup Menu Settings....21
Network Setup Menu Settings 22
Operation:
How to Operate MVP901 24-29
(Separate Sheets)......Mc1C, Mc1D, Mc1E, Mc1F
Additional Information:
Specifications....30
Packing Instruction....31
Copyright 2016, 2017 © by McIntosh Laboratory, Inc.
General Information
- For additional connection information, refer to the owner's manual(s) for any component(s) connected to the MVP901 Audio Video Player.
- The Super Audio Compact Discs (SACD) Audio Signals are converted internally from Digital to Analog.
- A PCM version of the decoded MP3 Signal is available at the Digital Audio Outputs.
- The MVP901 has built-in 192kHz 32-Bit DACs (Digital to Analog Converter) to allow playing of Discs recorded with a higher bit and sample rate, by using the Analog Audio Outputs.
- The DVD-Audio and Super Audio Compact Discs Digital Audio Signal is available via the HDMI Output.
- The MVP901 is designed to playback 3D Blu-ray Discs. The 3D Digital Video Signal from the MVP901 is available at the HDMI Out connector. It is extremely important for all A/V Components and the HDMI cables used for connections between the MVP901 and the TV/Monitor, meet or exceed the HDMI High Speed Standards for proper 3D Video Playback.
- The MVP901 will pass via the HDMI Connection Dolby Atmos, DTS-X and Auro 3D Digital Sound Tracks for decoding by using the appropriate Audio/Video Control Center.
-
HDMI Cable lengths between MVP901 and the Audio/Video Control Center should not exceed 25ft (8.3 meters). If there is need to use HDMI Cables longer than 25ft (8.3 meters), a high quality in-line HDMI Buffer/Converter would be required for reliable digital signal transmission via the HDMI Connections.
-
When connecting the MVP901 to a TV/Monitor or to a Home Theater Audio/Video Processor, use a Monoprice HDMI Cable with a Ferrite Core at both ends, to prevent RF Interference. The Monoprice Cable part number is 2529.
- WARNING: The USB Connectors located on the Front and Rear Panels of the MVP901 are not designed for direct connection to a computer. Connecting them to a computer could result in damage to the MVP901 and/or the computer.
- The MVP901 basic transport functions may also be controlled by using other McIntosh Remote Controls or Keypads thru a McIntosh Control Center or Preamplifier. Refer to the owner's manual(s) supplied with those component(s) for additional operation information.
- PCM (Pulse Code Modulation) is the name given to a specific type of Digital Audio Signal. The CD Audio Disc and the supplemental audio track found on some Blu-ray Discs use the PCM format.
- Sound Intensity is measured in units called Decibels and "dB" is the abbreviation.
- When discarding the unit, comply with local rules or regulations. Batteries should never be thrown away or incinerated but disposed of in accordance with the local regulations concerning battery disposal.
- For additional information on the MVP901 and other McIntosh Products please visit the McIntosh Web Site at www.mcintoshlabs.com.
USB Memory Drive Information
The MVP901 has a Front Panel Slot for accepting USB Memory Drives only. The USB Memory Drive is used in BD-Live and Bonus View Mode when the storage requirements exceeds the internal memory. The USB Drive provides the memory storage needed for the additional program content which is downloaded from the Movie Studio/Record Company via the MVP901 internet connection. It may also be used for playback of Audio and Video Files.
-
Before switching On the MVP901 insert the USB Memory Drive into the Front Panel Slot.
-
Do not remove the USB Memory Drive until the MVP901 has been switched Off. Removing the USB Memory Drive while the MVP901 is On could result in malfunction or loss of the USB Memory Drive's data.
-
USB Memory Drives need to have a storage capacity of 1GB (Gigabit) or greater.
-
Before using the USB Memory Drive for storage in the MVP901, it first must be formed on a computer using the FAT32 File System.
-
USB Memory Drives inserted into the MVP901 containing MP3, WMA, AAC, FLAC, ALAC, AIFF, LPCM and DSD Sound Track Formats will playback. The MVP901 will play PCM Sound Tracks with High Resolution Sound up to 192kHz 24Bit recording, except for Memory Drives containing multi-session recordings. DSD High Resolution Sound Tracks up to DSD128 will also playback.
-
The MVP901 will display Photos using the JPEG File Format.
-
Read and follow all instructions provided by the USB Memory Drive manufacturer to prevent damage to the Drive and to the files contained on the Drive.
Disc Information
- Compact Discs that are not round (e.g. Novelty discs with octagonal or heart shapes) will not play properly in the MVP901 and should not be tried, as possible damage may occur.
- The MVP901 Audio Video Player is designed to play all standard CD Audio Discs that conform to the Official Compact Disc Standards which is indicated by the Symbol 6.
- The MVP901 Audio Video Player is designed to play all standard Blu-ray Video Discs that conform to the Official Blu-ray Disc Standards, which do not include Blu-ray UHD 4K Discs.
- The MVP901 will play most of the following discs, however some recorded discs may not be able to play due to the condition of the recording: BDs with cartridge DVD-RAMs, HD-DVDs, BD-Video, BD-3D Video, Super Audio CD (SACD), CD-R, CD-RW, Picture CD (Kodak), Fujicolor CD, WMA (Windows), DVD-Audio, DVD-Video, DVD-R, DVD+R, DVD-RW, DVD+RW, DVD-AVCIID Data portion of CD-Extras, some Dual-Discs and Audio discs with copy-protection may not be playable.
- The MVP901 will play CD and Data Audio Discs recorded in the MP3, WMA, AAC, FLAC, ALAC, AIFF, LPCM and DSD Formats. It will also playback PCM Sound Tracks with High Resolution Sound up to 192kHz 24Bit recording, except for discs that contain multi-session recordings. The MVP901 will playback DSD High Resolution Sound Tracks up to DSD128.
- The MVP901 will display Photos in the JPEG File Format from a Disc.
- A Dual-Disc is a two-sided disc with DVD-video on one side and digital audio on the other side. The digital audio side does not meet the technical
specifications of the Compact Disc Digital Audio specifications found in the industry "Redbook"; the MVP901 may not read the CD side of a Dual Disc.
- Several of the DVD, DVD-Audio and SACD performance features available on the MVP901 are active only if the Disc includes the supporting encoded information.
-
BD-Video and DVD-Video Discs are designed to only play in certain regions of the world. A region may be a single country or a group of countries. Usually on the back cover of the Video Disc container is a Symbol with either a "Character" or "Number(s)" or the word "All" inside it. The MVP901 is designed to play discs for Regions "A", "I" and "All".
-
Certain Dolby Digital and DTS Encoded Discs display their own unique Audio Mode Selection menu, every time the disc is loaded into the player. If you do not make a choice from this menu, the disc will revert to its default Audio Mode when play is started.
Connector and Cable Information
XLR Connectors
Below is the Pin configuration for the XLR Balanced Output Connectors on the MVP901. Refer to the diagram for connection:
PIN 1: Shield/Ground
PIN 2: + Output
PIN 3: - Output

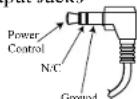
Power Control Connector
The MVP901 Power Control Input/Output Jacks
receive/send Power On/Off Signals when connected to other McIntosh Components. A 1/8 inch stereo mini phone plug is used for connection to the Power Control Input/Output on the
Data and IR Input Port Connectors
The MVP901 Data In Port receives Remote Control Signals. A 1/8 inch stereo mini phone plug is used for connection. The IR Ports also use a 1/8 inch stereo mini phone plug and allow the connection of other brand IR Receivers to the MVP901.

RS232 DB9 Connector Pin Layout
-
N/C 6. N/C
-
Data Out (TXD) 7. N/C
-
Data In (RXD) 8. N/C
-
N/C 9. N/C
-
Gnd.


Note: For assistance in making a RS232 connection between the MVP901 and a Control Unit, contact your McIntosh Dealer and/or the Control Unit Manufacture for assistance.
Introduction
The McIntosh MVP901 Audio Video Player offers the latest in audio/video technology, providing state of the art reproduction of digital video and audio program sources. A full complement of performance features allows for the enjoyment of 3D Blu-ray, Blu-ray, DVD, SACD, DVD-Audio and Audio CD discs. Special Audio and Video formats are also reproduced with flawless realism. The advanced mechanical design of the transport ensures many years of smooth trouble free operation.
Performance Features
- Triple Laser Pickup
The MVP901 incorporates three laser elements, with different wavelengths, that are focused through one lens assembly. This unique design allows reading many different types of Audio and Video Disc Formats.
- Advanced Transport
The MVP901 has a new vibration-resistant transport with an advanced digital servo for faster, quieter and accurate operation. The fast read speeds help to insure better disc tracking and error correction processing.
- Upscaling to Ultra HD (4K) resolution
The MVP901 has the highest video resolution available, 2,160p/24 frames per second image quality via the HDMI (version 1.4) Video Output. The MVP901 also supports playback of 3D 1080p Blu-ray Discs.
- Video Circuitry
The MVP901 uses the VRS ^® ClearView ^TM Video Processor.
• 32 Bit Audio DAC
The MVP901 is equipped with 192kHz 32Bit PCM/ DSD stereo DACs for high fidelity sound. 8 channel D/A converter is used in STEREO QUAD BALANCED mode for 2 channel audio output.
• High Resolution Audio Playback
The MVP901 has the ability to playback Data Discs and USB Data Drives containing up to 192kHz 24Bit High Resolution Sound Tracks including DSD 128 24Bit.
• Balanced Outputs
The MVP901 has Balanced Outputs for the Left and Right Channels when playing a CD/SACD. When a Multichannel Disc is playing, the Balanced Left and Right Outputs provide a two channel mix down of the Multichannel Recording.
• Built-in Dolby True HD and DTS-HD Master Decoders
The MVP901 decodes/downmixes Dolby True HD and DTS-HD Master sound tracks to the two channel output. It also streams Dolby Atmos, DTS-X and Auro 3D Digital Sound Tracks via the HDMI Connection for decoding by using the appropriate Audio/Video Control Center.
• Digital Audio Outputs
There are HDMI, Optical and Coaxial Digital Audio Outputs for external decoding of the various Dolby Digital, DTS Digital Signals, PCM or MP3 Signals from CDs.
- On Screen Setup and Calibration
Loudspeaker Size, Level and Time Delay Adjustments are available for Dolby Digital, DTS Digital, DVD-Audio and SACD Disc Signals and effects the multi-channel analog audio outputs.
- Power Control
The Power Control (Trigger) Input connection provides convenient Turn-On/Off of the MVP901 when connected to a McIntosh System with Power Control.
- Remote Control
The Remote Control with illuminated push-buttons, provides control of the MVP901 operating functions. A Data Port Connection to a McIntosh A/V Control Center or Preamplifier allows for convenient system operation using one Remote Control. An External IR Sensor Input allows for remote operation when the MVP901 is located behind closed doors.
• Special Power Supply
A fully regulated Switching Power Supply, with a special R-Core Power Transformer, ensures stable operation even though the power line varies.
- Fiber Optic Solid State Front Panel Illumination The Illumination of the Glass Front Panel is accomplished by the combination of custom designed Fiber Optic Light Diffusers and extra long life Light Emitting Diodes (LEDs). This provides even Front Panel Illumination and is designed to ensure the pristine beauty of the MVP901 will be retained for many years.
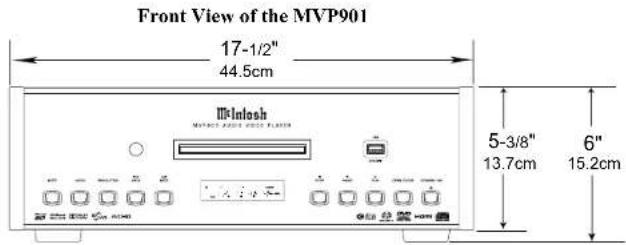
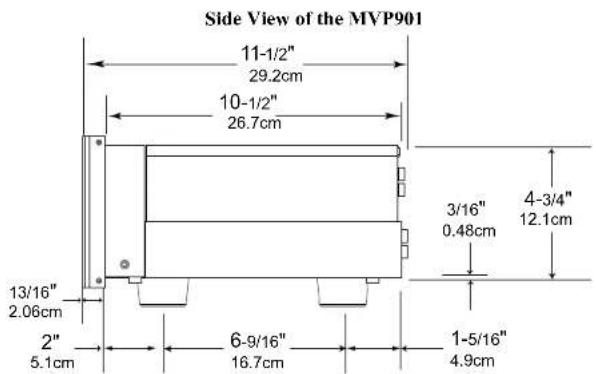
Dimensions
The following dimensions can assist in determining the best location for your MVP901. There is additional information on the next page pertaining to installing the MVP901 into cabinets.

Installation
The MVP901 can be placed upright on a table or shelf, standing on its four feet. It also can be custom installed in a piece of furniture or cabinet of your choice. The four feet may be removed from the bottom of the MVP901 when it is custom installed as outlined below. The four feet together with the mounting screws should be retained for possible future use if the MVP901 is removed from the custom installation and used free standing. The required panel cutout, ventilation cutout and unit dimensions are shown.
Always provide adequate ventilation for your MVP901. Cool operation ensures the longest possible operating life for any electronic instrument. Do not install the MVP901 directly above a heat generating component such as a high powered amplifier. If all the components are installed in a single cabinet, a quiet running ventilation fan can be a definite asset in maintaining all the system components at the coolest possible operating temperature.
A custom cabinet installation should provide the following minimum spacing dimensions for cool operation.
Allow at least 6 inches (15.24cm) above the top, 2 inches (5.08cm) below the bottom, 3 inches (7.62cm) behind the rear panel and 2 inches (5.08cm) on each side of the Audio Video Player, so that airflow is not obstructed. Do not block the ventilation holes on the top and bottom cover. Allow 1 inch (2.54 cm) in front of the mounting panel for clearance. When the DISC Tray is opened, the panel clearance required in front of mounting panel is 6-3/4 inches (17.2cm). Be sure to cut out a ventilation hole in the mounting shelf according to the dimensions in the drawing.


Rear Panel Connectors

Making Connections
The MVP901 has the ability to be remotely switched On/Off from a McIntosh Preamplifier or A/V Control Center via the TRIGGER (Power Control) connection. The MVP901 Data Port Connection allows for the remote operation of basic functions using the A/V Control Center Remote Control. With an external sensor connected to the MVP901, remote control operation is possible from another room and/or when the MVP901 is located in a cabinet with the doors closed.
The connection instructions below, together with the MVP901 Connection Diagram located on the separate folded sheet "McIA", is an example of an audio/video system. Your system may vary from this, however the actual components would be connected in a similar manner. For additional information refer to "Connector and Cable Information" on page 6.
Trigger (Power Control) Connections:
-
Connect a Control Cable from the A/V Control Center PC (Trigger/ Power Control) "A" Jack to the TRIGGER (Power Control) IN Jack on the McIntosh MVP901 Audio/Video Player.
-
Optionally, connect a Control Cable from the MVP901 Audio Video Player TRIGGER (Power Control) OUT Jack to the next McIntosh Component Power Control (Trigger) In Jack.
-
Connect any additional components in a similar manner, as outlined in step 2.
Data Control Connections:
- Connect a Control Cable from the A/V Control Center Data Out 2 Jack to the McIntosh MVP901 Audio Video Player DATA IN Jack.
Sensor Connections:
- Optionally, connect an external Sensor to the McIntosh MVP901 Audio Video Player IR IN Jack.
HDMI Connections:
- Connect a HDMI Cable from the McIntosh MVP901 Audio Video Player HDMI OUT to the HDMI Input 3 on the A/V Control Center.
Digital Audio Connections:
- Connect a Cable from the McIntosh MVP901 Audio Video Player Digital Out COAXIAL connector to the Digital Coaxial In 6 on the A/V Control Center.
Analog Audio Connections:
-
Connect Balanced Cables from the McIntosh MVP901 Audio Video Player AUDIO OUTPUTS BALANCED Connectors to the A/V Control Center BAL IN 2 connectors.
-
Optionally, connect the MVP901 Audio Video Player AUDIO OUTPUTS UNBALANCED to the A/V Control Center Audio Inputs.
Ethernet Connection:
- Connect a CAT5 or CAT6 cable from the MVP901 ETHERNET connector to a Computer Network with router providing High Speed Broadband Internet Access or directly to a High Speed Modem with Broadband Internet Access.
Note: For proper operation of the BD-Live feature a High Speed Internet connection is required.
AC Power Cords Connections:
- Connect the McIntosh MVP901 Audio Video Player AC Power Cord to a live AC outlet.
SHIFT push-button with LED Indicators used to select a push-button function — with white or gold color nomenclature
Use to CLEAR the last programmed track
Access the TEXT Display Mode when playing a SACD Disc containing the information
Circular Push-button to move left, right, up or down through on-screen menu, press the SELECT Push-button to choose an option
Use to select various disc information, including TIME, on the Front Panel DISPLAY. It is also used to cancel the text display mode on a SACD Disc
Press to select between various on-screen pages of information on Video/Audio Discs, press PAGE HOME (-) to activate the Home On-Screen Menu
Press to play the Previous Selection. Also used to select one of various repeat modes
Press to start playback of a audio track or video chapter
Press to FAST-REVERSE thru the current selection

Press the DIM Push-button to adjust the brightness of the Front Panel Information Display
Momentarily press to Power ON or OFF
Use to select disc tracks or any numbered operation
Press the TOP MENU Push-button to access the main Video Disc Title menu (disc dependent), AUDIO indicates the available sound track format options
Use to access the SETUP Mode
Press the MODE Push-button to select Shuffle/ Random Play, Repeat Play or Program Play Disc Modes during playback of a CD Disc. With a Video Disc playing, press the MODE Push-button to select Subtitle Adj., 3D, Zoom, Angle, PIP or SAP Video Disc Modes Settings
Press the RETURN Push-button to return to the previous video screen display, PIC ADJ offer various On-Screen Video Adjustment Settings
Press the LEVEL (−) Push-button to mute or unmute the sound
Press to play the NEXT Selection
Press to FAST-FORWARD thru the current selection
Press to PAUSE playback of a audio track or video chapter
Select the available Video Resolution for the selected video source
Press to STOP disc playback and SUB is used to select Subtitle function
Note: Push-buttons whose function is not identified above are for use with other McIntosh Components
How to use the Remote Control
The Remote Control is capable of performing both basic Operating Functions and Setup Options for the MVP901 Audio Video Disc Player.
Notes: Refer to the "How to Operate" and "How to Operate Setup Mode" Sections of this manual for additional information using this Remote Control.
If the Remote Control seems unresponsive for the desired command, first note the color of the push-button nomenclature for the desired command. Then press the SHIFT Push-button to select either white or gold, as indicated by the LEDs, and then within 3 seconds press the desired command push-button.
Play
With a disc loaded, press the PLAY ▶ Push-button to start the disc playing.
Pause
To temporarily stop disc playback at any time, press the PAUSE II Push-button. To resume playback press either the PLAY▶ or PAUSE II Push-button.
Stop
Press the STOP ■ Push-button to stop disc playback and return to displaying the table of contents of the disc.
Numbered Push-buttons
Press 1 through 9 to directly access Tracks on Audio CD and SACD Discs using the Front Panel Information Display. To access track numbers greater than number 9 requires entering both numbers. For example, to access Disc Track/Chapter 23, first press the number 2 Push-button followed by pressing the number 3 Push-button.
Note: To direct access Chapters on a DVD and Blu-ray Discs, refer to "How to Operate MVP901" section on page 27.
Reverse and Fast Foward
Press the (Reverse) or (Fast Forward) Push-button to start moving rapidly through a track/chapter on the disc. When the desired location is reached, release the (Reverse) or (Fast Forward) Push-button to resume normal playback.
Back and Next
Press the ▶ (Next) Push-button to move forward one track/chapter or the ◀ (Back) Push-button to move back to the beginning of the current track/chapter playing. Also used to review the Programmed Tracks from the disc on the Front Panel Information Display, while in the Program Mode.
Note: If the (Back) Push-button is pressed during playback of the first three seconds of the track, the Disc will start playing back the previous track/chapter from the beginning.
Display/Time
Press the DISPLAY/TIME Push-button to access DVD and Blu-ray Disc Playback Information.
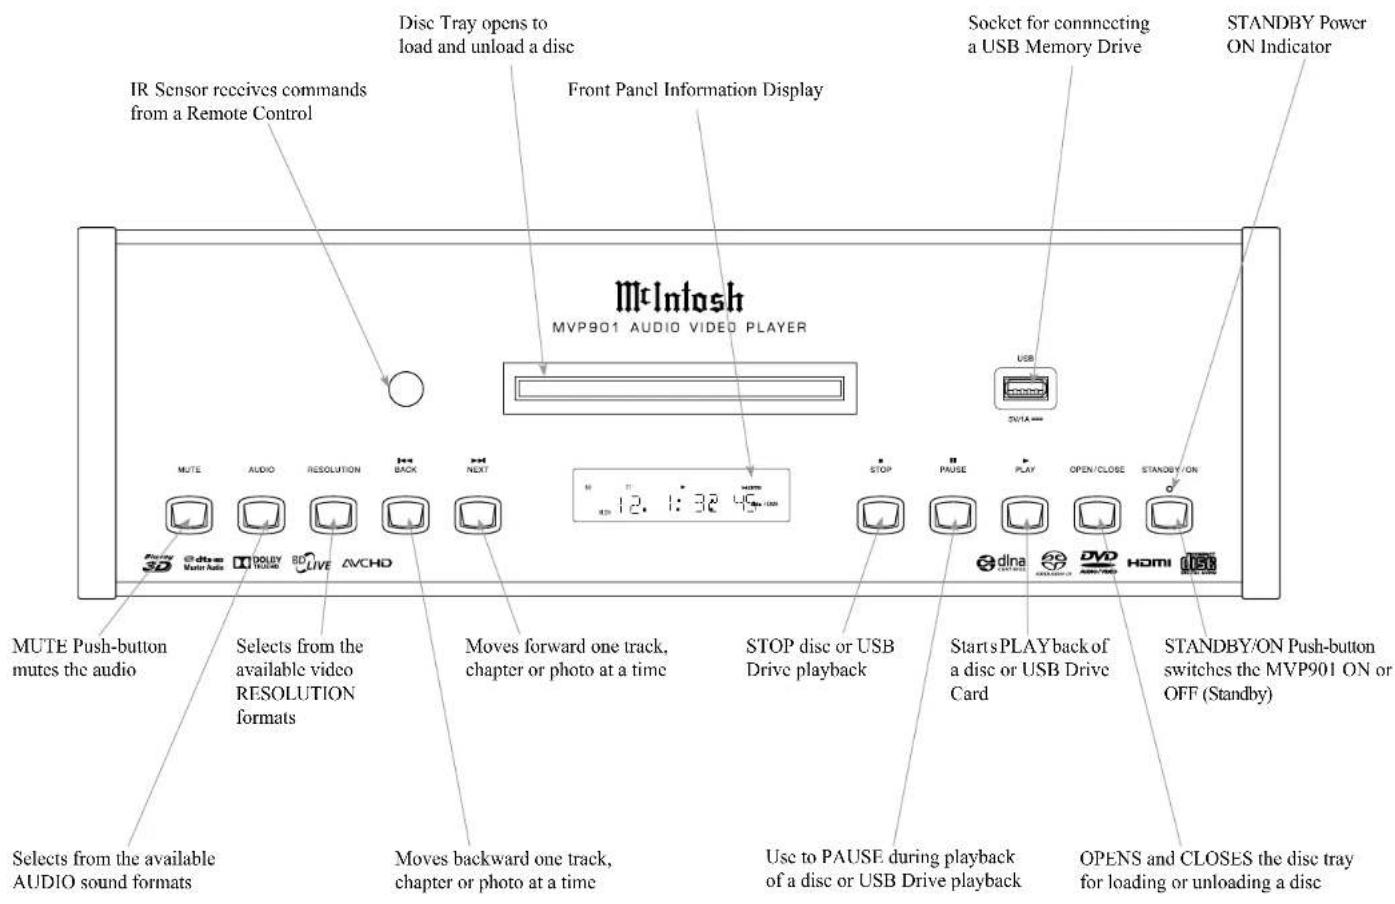
Front Panel Information Display

Note: Display items not identified above are for use with other McIntosh Components

Introduction to the MVP901 Setup Mode
Your McIntosh MVP901 has been factory configured for default operating settings that will allow you to immediately enjoy superb video and high fidelity audio from a Blu-ray 3D Disc. It also reproduces Blu-ray Disc (3D & 2D), DVD-Audio, SACDs and CDs with unparalleled sonic purity. If you wish to make changes to the factory default settings perform the following steps, if not proceed to "How to Operate the MVP901" starting on page 24.
Power
The Red LED above the STANDBY/ON switch lights to indicate the MVP901 is connected to AC Power. To Switch ON the MVP901, press the STANDBY/ON Push-button on the Front Panel or the ⏻ (Power) Push-button on the Remote Control. The STANDBY Red LED will flash during the initialization process. Refer to figures 1 and 2.
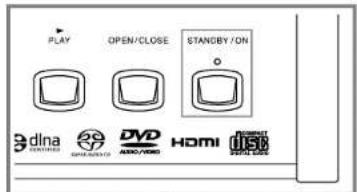
Figure 1
Note: When the MVP901 is switched On, it will take about 20 seconds for initialization of the internal circuitry to take place before the player is ready to begin operation.
Adjustments and Setting changes
All of the adjustments and settings are performed by using the extensive On-Screen Setup Menu System. The On-Screen Setup Menuing System is interactive.
The ability to change a menu item setting or have access to a menu item setting is dependent on the operational state of the player and the choices made in other menu items. Some menu choices require more than one step to complete. The Setup Main Menu Screen Captures (figures 1S thru 7S) are located on the separate folded sheet "Mc1B".
Note: The MVP901 must be connected to a MONITOR/TV either through an A/V Control Center or directly, for setup and use. The Remote Control supplied with the McIntosh MVP901 has several Push-buttons labeled differently than as indicated on the On Screen Menu, please refer to the Instructions in this Owner's Manual for the correct Push-button to use.
Checking the Network Connection The following example will illustrate how to navigate through the built-in MVP901 SETUP Mode and the multiple On-Screen Menus.
Occasionally, McIntosh might make available Firmware Updates for the MVP901. These Updates would be from the McIntosh Computer Server via a Network Internet Connection. When the Firmware No

Figure 2
ON (Device Setup Menu figure 5S) the MVP901 will periodically scan for an update. If an update is available, the MVP901 will display a message On-Screen. For more information about the MVP901 and Network Connections refer to pages 11 and 22.
With the MVP901 connected to your Home Network via a Network Router with an active Internet Access Device connected, perform the following steps:
- If there is a disc playing in the MVP901 press the STOP Push-button twice.
- Press the SETUP Push-button on the Remote Control and the Main Setup Menu (Playback Setup) will appear on the Monitor/TV screen. Refer to figure 1S.
- Using the Down ▼ Directional Push-buttons on the Remote Control select "Network". Refer to figures 2 and 6S.
- Press the SELECT Push-button on the Remote Control. Refer to figure 3.

Figure 3
- Using the Down▼ Directional Push-buttons on the Remote Control select "Connection Test".
- Press the SELECT Push-button on the Remote Control. Refer to figure 4.
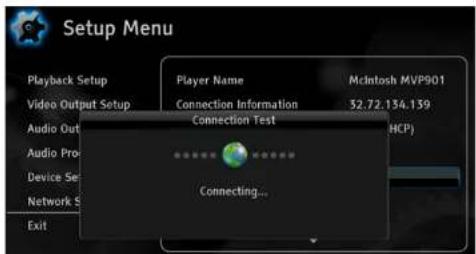
Figure 4
The MVP901 will now check for a Network Connection first. Second, it will check for access to the Internet. A window will appear On-Screen indicating "Connection Successful!". Refer to figure 5.

Figure 5
- Press the SELECT Push-button on the Remote Control and then press the SETUP Push-button to exit the Setup Mode and return to normal operation.
Note: If, when the above Connection Test was performed and the message appearing in the Window indicated "Not Connected" proceed to Setup Mode, Network Settings on page 22 to resolve the difficulty.
For the vast majority of MVP901 Owners, the Default Settings and Suggested Component Connections are
all one needs for full enjoyment of movies, still photos, videos and music.
The MVP901 Setup Mode has a number of additional options allowing integration into your Home Theater System. Usually, your McIntosh Dealer and/or Custom Installer uses these additional capabilities.
The navigation and selection methods previously illustrated also apply to the remainder of Setup Mode Settings, which resume on page 18.
To begin enjoying the MVP901 Audio Video Player proceed to page 24 and "How to Operate the MVP901".

PLAYBACK SETUP MENU
| MENU ITEM SUB MENU SELECTION OPTION(S) DESCRIPTION | ||||
| Auto Play Mode | ●On | Off | Refer to the bottom of Video Screen for Information | |
| Auto Resume | ●On | Off | Refer to the bottom of Video Screen for Information | |
| Language | ||||
| Player Language ●English | Deutsch, Francais, Espanol, Italiano, Svenska, Nederlands, Polski, Pyccknii | Refer to the bottom of Video Screen for Information | ||
| Disc Menu Language ●English | Deutsch, Francais, Espanol, Italiano, Svenska, Nederlands, Polski, Pyccknii | Refer to the bottom of Video Screen for Information | ||
| Audio Language ●English | Deutsch, Francais, Espanol, Italiano, Svenska, Nederlands, Polski, Pyccknii | Refer to the bottom of Video Screen for Information | ||
| Subtitle Language ●English | Deutsch, Francais, Espanol, Italiano, Svenska, Nederlands, Polski, Pyccknii | Refer to the bottom of Video Screen for Information | ||
| Closed Caption | ||||
| CC Display | ●Off | On | Refer to the bottom of Video Screen for Information | |
| CC Attribute | ●Auto | Custom | Refer to the bottom of Video Screen for Information | |
| CC Select | ●Analog CCI | Refer to the bottom of Video Screen for Information | ||
| Font Color | ●White | Black, Red, Green, Blue, Yellow, Megenta or Cyan | Refer to the bottom of Video Screen for Information | |
| Font Size | ●Standard | Small, Large | Refer to the bottom of Video Screen for Information | |
| Font Style | ●Default | Monospaced with serifs, Proportionally spaced with serifs, Monospaced without serifs, Proportionally spaced without serifs, casual font style, Cursive font style, Small Capitals | Refer to the bottom of Video Screen for Information | |
| Font Opacity | ●Solid | Translucent, Transparent | Refer to the bottom of Video Screen for Information | |
| Font Edge | ●None | Raised, Depressed, Uniform, Left drop shadowed, Right drop shadowed | Refer to the bottom of Video Screen for Information | |
| Font Edge Color | ●White | Black, Red, Green, Blue, Yellow, Megenta or Cyan | Refer to the bottom of Video Screen for Information | |
| BG Color | ●Black | White, Red, Green, Blue, Yellow, Megenta or Cyan | Refer to the bottom of Video Screen for Information | |
Note: The ● indicates the default setting
| PLAYBACK SETUP MENU, con't | ||||
| MENU ITEM SUB | MENU SELECTION OPTION(S) DESCRIPTION | |||
| Closed Caption, con't | ||||
| BG Opacity | ●Solid | Translucent, Transparent | Refer to the bottom of Video Screen for Information | |
| Window Color ●Red White | Black, Green, Blue, Yellow, Megenta or Cyan | Low, Megenta or Cyan | Refer to the bottom of Video Screen for Information | |
| BG Opacity | ●Solid | Translucent, Transparent | Refer to the bottom of Video Screen for Information | |
| Subtitle Shift | ●0 +10 to -10 | Refer to the bottom of Video Screen for Information | ||
| OSD Position | ●0 0 to +5 | Refer to the bottom of Video Screen for Information | ||
| OSD Mode | ●Normal | Minimal, Remaining, Off | Refer to the bottom of Video Screen for Information | |
| Angle Mark | ●Off | On | Refer to the bottom of Video Screen for Information | |
| Screen Saver | ●On | Off, Energy Saver | Refer to the bottom of Video Screen for Information | |
| Parental Control | ●_ _ _ | Enter Password to Activated (exit Setup if you do not want to enter a password) | Refer to the bottom of Video Screen for Information | |
| VIDEO OUTPUT SETUP MENU | ||||
| MENU ITEM SUB | MENU SELECTION OPTION(S) DESCRIPTION | |||
| Picture Adjust | ||||
| Picture Mode | ● Mode 1 | Mode 2, Mode 3 | Allows selection between three different preset video settings listed below | |
| Brightness | ●0 | -16 to +16 | Allow adjustment of the “Black Level” of the video output | |
| Contrast | ●0 | -16 to +16 | Allow adjustment of the “White Level” of the video output | |
| Hue | ●0 | -16 to +16 | Allow adjustment of the “Tint” of the video output | |
| Saturation | ●0 | -16 to +16 | Allow adjustment of the “Color Level” of the video output | |
| Detail Enhancement | ●0 | -16 to +16 | Allow adjustment of the “Picture Sharpness” of the video output | |
| Edge Enhancement | ●0 | -16 to +16 | Allow adjustment of the “Object Edge Sharpness” of the video output | |
| Video Smoothing | ●0 | 0 to -4 | Allow reduction of the “Stair Stepped Effect” of the video output | |
| Demo Mode | ●Off | Off or On | Slip screen comparing VRS Processing (Left Side) to no Processing (Right Side) | |
| Output Resolution | ●Auto | Custom | Allows for Automatic or Custom (Manual) selection of Video Screen Resolution | |
| Custom Resolution | ●1080p Auto | UID Auto, UID 24Hz, UID 50Hz, UHD 60Hz, 1080p 24Hz, 1080p 50Hz, 1080p 60Hz, 1080i 50Hz, 1080i 60Hz, 720p 50Hz, 720p 60 Hz, 576p, 576i, 480p, 480i, Source Direct | Allows for Manual selection of Video Screen Resolution | |

| VIDEO OUTPUT SETUP MENU, con't | ||||
| MENU ITEM SUB | MENU SELECTION OPTION(S) DESCRIPTION | |||
| HDMI 1 Setup | ||||
| Color Space • Auto RGB Video Level, RGB PC | Level, YCbCr 4:4:4, | Refer to the bottom of Video Screen for Information | ||
| Deep Color • Off 36 Bits, 30 Bits (Dithered), 30 | Bits, Off (Dithered), Off | Refer to the bottom of Video Screen for Information | ||
| TV Aspect Ratio | • 16:9 Wide / Auto | 16:9 Wide | Refer to the bottom of Video Screen for Information | |
| 3D Setting | ||||
| 3D Output • Auto Off, Forced Refer to the bottom of Video Screen for Information | ||||
| 3D TV Size | • 46 | Enter your TV Screen Size | Refer to the bottom of Video Screen for Information | |
| DVD 24p Conversion | • Off | On | Refer to the bottom of Video Screen for Information | |
| Dc-interlacing | • Auto | Film, Vidco | Refer to the bottom of Video Screen for Information | |
| AUDIO OUTPUT SETUP MENU | ||||
| MENU ITEM SUB | MENU SELECTION OPTION(S) DESCRIPTION | |||
| Secondard Audio | • Off | On | Refer to the bottom of Video Screen for Information | |
| HDMI Audio Format | • Auto | LPCM, Bitstream, Off | Refer to the bottom of Video Screen for Information | |
| S/PDIF Output | • Bitstream | 48k LPCM, 96k LPCM, 192k LPCM | Refer to the bottom of Video Screen for Information | |
| DVD-Audio Modc | • DVD- Audio | DVD-Vidco | Refer to the bottom of Video Screen for Information | |
| SACD Priority | • Stereo | CD Mode, Multi-Channel | Refer to the bottom of Video Screen for Information | |
| SACD Output | • Auto | PCM, DSD | When the MVP901 Optical or Coaxial Outputs are used during playback of a SACD it is important to change the “SACD Output” setting from “Auto” to PCM for playback | |
| HDCD Decoding | • Off | On | Refer to the bottom of Video Screen for Information | |
| A/V Sync | • 0 | -100ms to +200ms | Refer to the bottom of Video Screen for Information | |
| AUDIO PROCESSING MENU | ||||
| MENU ITEM SUB | MENU SELECTION OPTION(S) DESCRIPTION | |||
| Dynamic Range Control | • Auto | On, Off | Refer to the bottom of Video Screen for Information | |
Note: The ● indicates the default setting
| DEVICE SETUP MENU | ||||
| MENU ITEM SUB | MENU SELECTION OPTION(S) DESCRIPTION | |||
| Firmware Information | MVP901-24-0621 | OK, Open Source Credits | To exit the list of Open Source Credits press the RETURN Push-Button | |
| Firmware Upgrade | ||||
| Via USB Refer to the bottom of Video Screen for Information | ||||
| Via Disc Refer to the bottom of Video Screen for Information | ||||
| Via Network Refer to the bottom of Video Screen for Information | ||||
| Firmware Notification | ● On | Off | Refer to the bottom of Video Screen for Information | |
| HDMI CEC | ● Off | HDMI 1, HDMI 1 (Limited) | Refer to the bottom of Video Screen for Information | |
| Standby Mode | ● Energy Efficient | Quick Start | Refer to the bottom of Video Screen for Information | |
| Auto Power Off | ● On | Off | Refer to the bottom of Video Screen for Information | |
| Sleep Timer | ● Off 30 Min, 45 Min, 60 Min, 90 Min, 120 Min | Off | Refer to the bottom of Video Screen for Information | |
| Front Panel Brightness | ● Standard | Dim | Front Panel Information Display Bightness | |
| Cache Media Info | ● Off | On | Refer to the bottom of Video Screen for Information | |
| Persistence Storage | ||||
| Storage Device | ● Internal Flash | USB Drive | Refer to the bottom of Video Screen for Information | |
| Space Used | ● 0 | ● 0 | Refer to the bottom of Video Screen for Information | |
| Erase Persistence Storage | OK | Cancel | Erases all BD-Video data in the Persistance Internal Storage or External USB Storage | |
| Settings Management | ||||
| Backup Settings | To external USB Storage Device | |||
| Restore Settings | From external Storage Device | |||
| Lock Settings | Enter Password | To exit from Enter Password press the RETURN Push-Button | ||
| Reset Factory Defaults | ||||
| Erase Accounts and Settings | Returns all settings to Factory Default values and also Erases all Passwords that may have been entered | |||
| Erase Settings | Returns all settings to Factory Default values and keeps any Passwords that may have been entered | |||
| Return | Exits out with no changes made | |||
| NETWORK SETUP MENU | ||||
| MENU ITEM SUB | MENU SELECTION OPTION(S) DESCRIPTION | |||
| Player Name | • McIntosh MVP901 Press the “SELECT”Push-button | Change the name by using the built-in electronic keyboard | ||
| Connection Information | ||||
| Connection Information | Internet Connection,IP Address, SubnetMask, Gateway,DNS1, DNS2, Ethernet Mac Address | Summary of current network connection | ||
| IP Setting(Refer to note 2 below) | • Auto (HDCP) | Manual Allows for manually entering the IP Address, Subnet Mask, Gateway, DNS1,DNS2 | ||
| Proxy Settings | • Off On Refer to the bottom of Video Screen for Information | |||
| Connection Test Press the SELECT Push-button to start the Internet Connection Test | ||||
| BD-Live Network Access | • On Limited, Off Refer to the bottom of Video Screen for Information | |||
| My Network | • On Off Refer to the bottom of Video Screen for Information | |||
| IP Control | • On Off Refer to the bottom of Video Screen for Information | |||
Notes: 1. The ● indicates the default setting.
2. If the factory default automatic network settings do not allow access to the Internet (use the MVP901 "Connection Test" above for verification of Internet Access) then contact your McIntosh Dealer, Router Manufacture and/or Internet Service Provider for assistance before entering the network settings manually.
Notes

How to Operate the MVP901
Your McIntosh MVP901 has been configured for default operating settings that will allow you to immediately enjoy superb video and high fidelity audio from a wide variety of discs. If you wish to make changes to the default settings, a Setup feature is provided to customize the operating settings using On Screen Menus (refer to the Setup instructions in this manual starting on page 18). Most operations that can be performed with the Front Panel Push-buttons can also be performed with the Remote Control.
Notes: 1. Some of the MVP901 operating functions such as Disc Languages, Video Angle or Menu Language are active only if the function is supported by data encoded on the disc.
- Some Blu-ray discs support BD Live downloads, providing various forms of additional information for the disc currently in the player.
- When the MVP901 is On and has been idle for approximately 3 minutes, the internal circuitry goes into a Screen Saver Mode. To bring the MVP901 out of hibernation, press a command function such as Play, Open/Close, etc.
Power On
The Red LED above the STANDBY/ON switch lights to indicate the MVP901 is connected to AC Power. To Switch ON the MVP901, press the STANDBY/ON Push-button on the Front Panel or the (Power) Push-button on the Remote Control. During the initialization process the MVP901 Front Panel Display will indicate "ON", "MVP901" followed by "HOME". Refer to figures 30, 31 and 40.
Note: When the MVP901 is switched On, it will take about 20 seconds for initialization of the internal circuitry to take place before the player is ready to begin operation.

Figure 31
Home Menu Selection
Besides playing back standard Audio/Video Optical Discs and USB Memory Drives, the MVP901 also incorporates the latest in technology playback of High Resolution Sound Tracks. The type of Playback is performed by "On-Screen Video Displays". Refer to figure 32 for the "HOME" Main display.

Figure 30

Figure 32
Refer to the chart below for Icon Identification.
| HOME ICON DESCR | PTION |
 | Indicates when a disc has been inserted and the disc type (CD, SACD, DVD, BLU-RAY or DATA) |
 | Indicates playback of music has been selected from either a disc, USB Drive or Network Connected Device |
 | Indicates viewing of Photos has been selected from either a disc, USB Drive or Network Connected Device |
 | Indicates playback of movie video has been selected from either a disc, USB Drive or Network Connected Device |
 | Indicates access to folders containing Photos, Music and Vidcos from Network Connected Device |
 | Indicates access to the MVP901 Setup Menu |
Note: Depending on how a given disc has been mastered, the MVP901 Front Panel Display may indicate something different.
How to Load a Disc
- Press the OPEN/CLOSE Push-button. The disc tray will slide out allowing a disc to be loaded. Refer to figures 30 and 32.
Note: When the player is in Standby Mode, the MVP901 Power will automatically Switch-On when the OPEN/CLOSE Push-button is pressed.
- Press the OPEN/CLOSE Push-button and the disc tray will close. The MVP901 Front Panel Information Display will indicate "LOAD".
- When the initialization of the Disc has occurred, the Front Panel will indicate the disc type (CD, SACD, DVD, DVD-A or Blu-ray) briefly and it will start to play without pressing the PLAY Push-button. When a disc containing High Resolution Audio, Photos or Movie (Video) or disc containing combinations is initialized, the Front Panel Information Display will indicate "DATA". To playback those discs, first requires selecting the desired content (Audio, Photo or Movie) using the On-Screen Video Display of the "HOME" Main Icons. Use the ▲▼◀ ▶ Directional, SELECT and RETURN Push-buttons on the Remote Contol for navigating and selecting Menu Items. Refer to figures 33 thru 40.
Figure 33 Figure 34 Figure 35 Figure 36


Figure 37
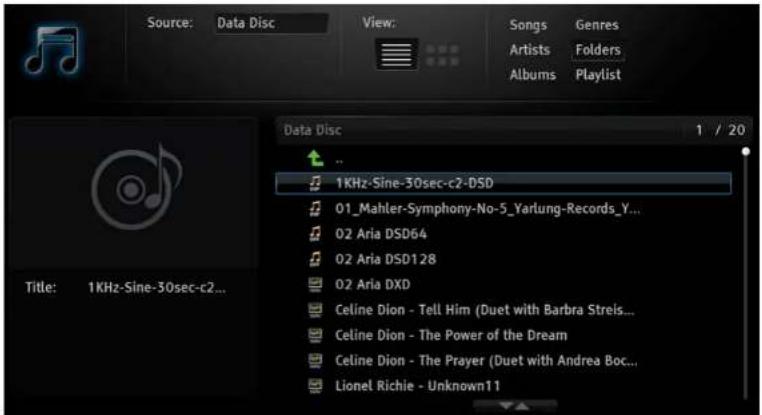
Figure 38

Figure 39

Figure 40

How to Operate the MVP901, con't
Mute
To Mute the Audio coming from the MVP901 at any time, press the Front Panel MUTE Push-button or the LEVEL (-) Push-button on the Remote Control. When the MUTE function has been activated, the Front Panel Information Display and the On-Screen Video Display Speaker Icon will indicate the MVP901 Audio Output is Muted. Refer to figures 41, 42, 43 and 49. To Un-Mute the Audio press either Push-Button again.

Figure 41

Figure 42

Figure 43
Audio
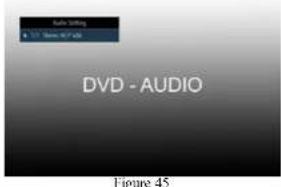
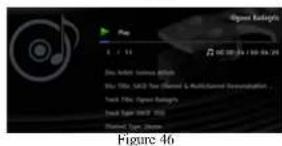
The MVP901 Front Panel AUDIO Push-button and the Remote Control AUDIO Push-button allows for selection of the available Sound Format Type and/or the number of Audio Channels. This includes Blu-ray, DVD, DVD -Audio, and SACD Discs. Refer to figures 44, 45, 46, and 47.
Note: When playing back a SACD multi-format (Stereo - 5.1 Channel) Disc, the MVP901 will default to the current SETUP Settings. By pressing the AUDIO Push-button the audio default setting will temporarily change while the disc is in the MVP901. If you wish to change the
default setting when playing all SACD Discs, refer to page 22 "Audio Output Setup Menu", SACD Priority and SACD Output.
Resolution
The MVP901 Front Panel RESOLUTION Push-button and the HDMI RES Push-button on the Remote Control are used to select the Video Resolution based on the capability of the connected TV/Monitor via the HDMI connection. To change the current On-Screen Video Resolution, either press the RESOLUTION Push-button or the HDMI RES Push-button. Then select from the On-Screen Menu Choices either using the ▲▼ Directional Push-buttons followed by pressing the SELECT Push-button or repeated presses of the HDMI RES Push-button on the Remote Control. Refer to figures 43, 48 and 49.



natural_image
Group of people playing with a net in a snowy mountain landscape, no visible text or symbolsAdditional Operation Functions
The MVP901 offers a variety of Operation Functions implemented by using the Video On-Screen Displays. The following pages contain information on how to use the various Operation Functions. Refer to the Graphic Images located on the separate folded sheets "Mc1C thru MC1F" when using these Operation Functions.

Figure 49
| BLU-RAY, DVD and DVD-AUDIO OPERATION FUNCTIONS | |||||
| FUNCTION (Menu Selection) | MEDIA TYPE | ACTIVATION (PUSH-BUTTON) | SEPARATE SHEET NUMBER | GRAPHIC IMAGES | DESCRIPTION |
| SUBTITLE ADJUST Blu-ray, DVD | MODE | 1C | 20S, 21S | Selects the desired type of Video Characteristics when On-Screen Subtitle is active | |
| 3D Blu-ray, DVD | MODE | 1C | 22S, 23S | Converts 2D Video to simulated 3D Video. First use the ◀▶ Directional Push-buttons to select the Menu Setting of “3D”. Then use the Directional and Select Push-buttons to make the desired 3D adjustments | |
| ZOOM All Video Sources | MODE | 1C | 24S, 25S Provides | various image size enlargements and other Zoom functions | |
| ANGLE Blu-ray, DVD | MODE | 1C | 26S, 27S When available on the disc, provides different camera positions of the same scene | ||
| PIP (Picture-in-Picture) Blu-ray | MODE | 1C | 28S, 29S | When available on the disc and selected by the disc setup menu, provides a smaller window on screen containing different video while the movie is playing | |
| SAP (Separate Audio Program) Blu-ray | MODE | 1C | 30S, 31S When available on the disc, provides the ability to select from secondary audio | ||
| PICTURE ADJUST All Vidco Sources PIC ADJ | 1D | 32S | Provides the storing of three different Picture Modes affecting Vidco Settings such as Brightness, Contrast, Hue (Tint), Saturation (Color Intensity), etc. | ||
| CHAPTER SELECTION Blu-ray, DVD SEARCH | 1D | 33S | Press the SEARCH Push-button twice, wait for three seconds ^2 , then use the Direction ▲▼ Push-buttons to select the desired chapter or enter the directly using the numeric keypad Push-buttons | ||
| TIME SELECTION | Blu-ray, DVD SEARCH | 1D | 34S | Press the SEARCH Push-button, wait for three seconds ^2 , then use the Direction ▲▼ Push-buttons to select the desired chapter or enter the directly using the numeric keypad Push-buttons | |
| PLAYBACK INFORMATION | Blu-ray, DVD | DSP/TIME | 1D | 35S | Provides information such as Chapter, Time, Data Rate, Sound Track Type, Subtitle Status,Video Format, Aspect Ratio, etc. |
| TRACK NUMBER | DVD-Audio | SEARCH | 1D | 36S, 37S | Press the SEARCH Push-button three times ^2 , then use the Direction ▲▼ Push-buttons to select the desired Track (Program) or enter the directly using the numeric keypad Push-buttons |
| SUBTITLE STATUS | Blu-ray, DVD | DISP/TIME, SUB | 1D | 38S, 39S and 40S | The On-Screen Subtitle Icon . . . . Off appears indicating the disc contains subtitles (use the DISP/TIME Push-button, refer to figure 38S). Press the SUB Push-button to activate the Subtitle Menu and then select the desired Subtitle by Direction ▲▼Push-buttons followed by SELECT Push-button (refer to figure 39S). Press the DISP/TIME Push-button to verify the change has been made (refer to figure 40S) |
Notes: 1. Navigation and Selection of the various On-Screen Menus is accomplished by using the ▲▼◀▶ Directional, SELECT and RETURN Push-buttons on the Remote Control.
2. Some of the Remote Control Push-buttons serve dual functions. Default operational functions are labeled in white and the secondary operation functions are labeled in Gold. When a secondary function is activated, it takes three seconds before the Remote Control returns to the default operating functions.

| SACD, CD and USB Drive OPERATION FUNCTIONS | |||||
| FUNCTION (Menu Selection) | MEDIA TYPE | ACTIVATION (PUSH-BUTTON) | SEPARATE SHEET NUMBER | GRAPHIC IMAGES | DESCRIPTION |
| SHUFFLE/RANDOM | SACD, CD and USB Drive | MODE | 1E | 41S, 42S and 43S | Repeated presses of the SELECT Push-button, either selects SHUFFLE or RANDOM Playback of music |
| REPEAT | SACD, CD and USB Drive | MODE | 1E | 44S, 45S and 46S | Repeat either the current track or repeat all the tracks. First use the ◀► Directional Push-buttons to select the Menu Setting of “REPEAT”. Repeated presses of the SELECT Push-button, either selects REPEAT 1 or REPEAT ALL |
| TIME SELECTION | SACD, CD and USB Drive | SLARCII | 1E | 47S | Press the SEARCH Push-button, wait for three seconds ^2 , then use the Direction ▲▼▲▼ Push-buttons to enter the desired time for the current track playing, then press the SELECT Push-button |
| PROGRAM PLAY | SACD, CD and USB Drive | MODE | 1E | 48S thru 54S | First use the ◀► Directional Push-buttons to select the Menu Setting of “PROGRAM PLAY” and press the SELECT Push-button, press the SELECT Push-button then use the ◀► Directional Push-buttons to select the desired track then use the ▼ Directional Push-button to enter the next desired track, Start playback of the Program Play just entered press the ► Push-buttons |
| SHUFFLE/RANDOM | High Resolution Audio Disc and USB Drive | MODE | 1E | 55S, 56S and 57S | Repeated presses of the SELECT Push-button, either selects SHUFFLE or RANDOM Playback of music |
| REPEAT | High Resolution Audio Disc and USB Drive | MODE | 1F | 58S, 59S and 60S | Repeat either the current track or repeat all the tracks. First use the ◀► Directional Push-buttons to select the Menu Setting of “REPEAT”. Repeated presses of the SELECT Push-button, either selects REPEAT 1 or REPEAT ALL |
| PLAY LIST | High Resolution Audio Disc and USB Drive | MODE | 1F | 61S thru 67S | First use the ◀► Directional Push-buttons to select the Menu Setting of “ADD TO PLAY LIST” and press the SELECT Push-button and use the ▲▼ Directional Push-buttons to highlight the first desired track, then press the SELECT Push-button to enter it and a √ checkmark will appear to the left of the On-Screen symbol or track number, repeat the same procedure to enter additional desired tracks, to start playback select “GOTO PLAYLIST and press the SELECT Push-button |
| SONG LOCATION | High Resolution Audio Disc and USB Drive | MODE | 1F | 68S | To see the progress of the playback using the previously entered GOTO PLAYLIST, select the “SONG LOCATION” from the MODE MENU |
| GAPLESS PLAY | High Resolution Audio Disc and USB Drive | MODE | 1F | 69S and 70S | Removes the silent time between tracks during playback (however that is dependent on how the High Resolution Disc or USB Drive was created) |
Notes: 1. Navigation and Selection of the various On-Screen Menus is accomplished by using the ▲▼◀▶ Directional, SELECT and RETURN Push-buttons on the Remote Control.
2. Some of the Remote Control Push-buttons serve dual functions. Default operational functions are labeled in white and the secondary operation functions are labeled in Gold. When a secondary function is activated, it takes three seconds before the Remote Control returns to the default operating functions.
Reset the Microprocessor
Reset of Microprocessors
In the unlikely event the controls of the MVP901 stop functioning, the microprocessors can be reset by performing one of the two methods listed below:
Method One:
With the MVP901 in Standby Mode, press and hold in the Front Panel HDMI RES and MUTE Push-buttons. Release both Push-buttons when the LED above the STANDBY/ON Push-button is extinguished.
Method Two:
Remove AC Power from the MVP901 for at least 15 seconds, then reapply AC Power to the MVP901.
Number of Channels
2 Channel Stereo (Includes Multichannel Down Mix)
Output Level
4.0Vrms Balanced
2.0Vrms Unbalanced
Output Impedance
600 ohms Balanced
600 ohms Unbalanced
Audio Frequency Response (Blu-ray, DVD)
4Hz to 22,000Hz (48kHz Sampling, Linear Audio)
4Hz to 44,000Hz (96kHz Sampling, Linear Audio)
4Hz to 88,000Hz (192kHz Sampling, Linear Audio)
SACD Frequency Response
4Hz to 40,000Hz
CD Frequency Response
4Hz to 20,000Hz
Signal to Noise Ratio
115dB
Dynamic Range
110dB
Harmonic Distortion
0.002%
Channel Separation
Better than 110dB (1,000Hz)
Digital Output
Coaxial: 0.5V p-p/75 ohm
Optical: -15dbm to -21dbm
Video SpecificationsAudio Specifications
Signal System
NTSC/PAL
Region Code
A, 1
HDMI Connector
Version 1.4
HDMI Output
Supports 3D, Deep Color, x.v. Color, and CEC
Transport Specifications
Transport
Laser Beam Wavelength: 630nm/810nm
Laser Power: CLASS I
General Specifications
Power Requirements
Field AC Voltage conversion of the MVP901 is not possible. The MVP901 is factory configured for one of the following AC Voltages:
100 Volts, 50/60Hz at 35 watts
110 Volts, 50/60Hz at 35 watts
120 Volts, 50/60Hz at 35 watts
220 Volts, 50/60Hz at 35 watts
230 Volts, 50/60Hz at 35 watts
240 Volts, 50/60Hz at 35 watts
Standby: less than 0.5 watt
Note: Refer to the rear panel of the MVP901 for the correct voltage.
Overall Dimensions
Width is 17-1/2 inches (44.5cm)
Height is 6 inches (15.4cm)
Depth is 13-1/2 inches (34.3cm) including connections
Note: When the Disc Tray is opened, the panel clearance required in front of mounting panel is 6-3/4 inches (17.2cm).
Weight
19.5 pounds (8.8Kg) net, 35.9 pounds (16.3Kg) in shipping carton
Shipping Carton Dimensions
Width is 26-1/2 inches (67.3cm)
Depth is 24-1/4 inches (62.2cm)
Height is 11-3/4 inches (29.9cm)
Packing Instructions
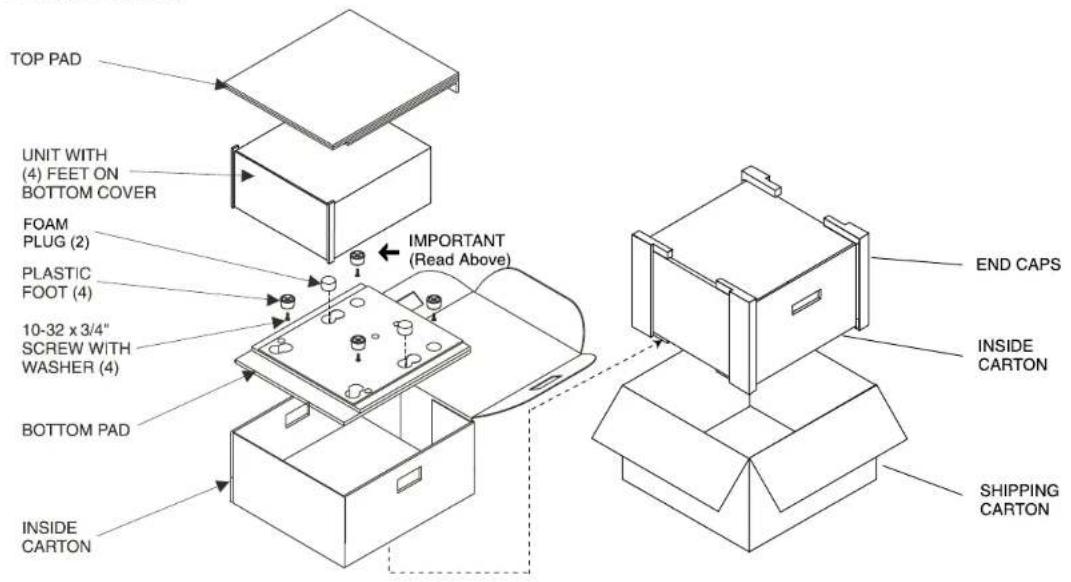
In the event it is necessary to repack the equipment for shipment, the equipment must be packed exactly as shown below. It is very important that the four plastic feet are attached to the bottom of the equipment. This will ensure the proper equipment location on the bottom pad. Failure to do this will result in shipping damage.
Use the original shipping carton and interior parts only if they are all in good serviceable condition. If a shipping carton or any of the interior part(s) are needed, please call or write Customer Service Department of McIntosh Laboratory. Refer to page 4. Please see the Part List for the correct part numbers.
Quantity Part Number Description
1 033838 Shipping carton only
4 033837 End cap
1 033836 Inside carton only
1 033725 Top pad
1 034301 Bottom pad
2 034446 Foam plug
4 017937 Plastic foot
4 400159 #10-32 x 3/4" screw
4 404080 #10 Flat washer

McIntosh Laboratory, Inc.
2 Chambers Street
Binghamton, NY 13903
www.mcintoshlabs.com
The continuous improvement of its products is the policy of McIntosh Laboratory Incorporated who reserve the right to improve design without notice. Printed in the U.S.A.


- WARNING - TO REDUCE RISK OF FIRE OR ELECTRICAL SHOCK, DO NOT EXPOSE THIS EQUIPMENT TO RAIN OR MOISTURE.
- NO USER-SERVICEABLE PARTS INSIDE. REFER SERVICING TO QUALIFIED PERSONNEL.
- To prevent the risk of electric shock, do not remove cover or back. No user-serviceable parts inside.
- CAUTION:
- ATTENTION:
- LUOKAN 1 LASERLAITE KLASS 1 LASER APPARAT
- VAROITUS!
- Trademark and License Information
- Thank You
- Please Take A Moment
- Technical Assistance
- Customer Service
- Table of Contents
- Operation Information Guide
- Connections:
- Remote Control:
- Front Panel Features:
- Setup:
- Operation:
- Additional Information:
- General Information
- USB Memory Drive Information
- Disc Information
- Connector and Cable Information
- XLR Connectors
- Power Control Connector
- Data and IR Input Port Connectors
- RS232 DB9 Connector Pin Layout
- Introduction
- Performance Features
- - Triple Laser Pickup
- - Advanced Transport
- - Upscaling to Ultra HD (4K) resolution
- - Video Circuitry
- • 32 Bit Audio DAC
- • High Resolution Audio Playback
- • Balanced Outputs
- • Built-in Dolby True HD and DTS-HD Master Decoders
- • Digital Audio Outputs
- - On Screen Setup and Calibration
- - Power Control
- - Remote Control
- • Special Power Supply
- Dimensions
- Installation
- Making Connections
- Trigger (Power Control) Connections:
- Data Control Connections:
- Sensor Connections:
- HDMI Connections:
- Digital Audio Connections:
- Analog Audio Connections:
- Ethernet Connection:
- AC Power Cords Connections:
- How to use the Remote Control
- Play
- Pause
- Stop
- Numbered Push-buttons
- Reverse and Fast Foward
- Back and Next
- Display/Time
- Introduction to the MVP901 Setup Mode
- Power
- Adjustments and Setting changes
- How to Operate the MVP901
- Power On
- Home Menu Selection
- How to Load a Disc
- How to Operate the MVP901, con't
- Mute
- Audio
- Resolution
- Additional Operation Functions
- Reset the Microprocessor
- Reset of Microprocessors
- Method One:
- Method Two:
- Number of Channels
- Output Level
- Output Impedance
- Audio Frequency Response (Blu-ray, DVD)
- SACD Frequency Response
- CD Frequency Response
- Signal to Noise Ratio
- Dynamic Range
- Harmonic Distortion
- Channel Separation
- Digital Output
- Video SpecificationsAudio Specifications
- Signal System
- Region Code
- HDMI Connector
- HDMI Output
- Transport Specifications
- Transport
- General Specifications
- Power Requirements
- Overall Dimensions
- Weight
- Shipping Carton Dimensions
- Packing Instructions
Brand : MCINTOSH
Model : MVP901
Category : Blu-ray player