
MVP891 - Blu-ray player MCINTOSH - Free user manual and instructions
Find the device manual for free MVP891 MCINTOSH in PDF.


| Product Type | Blu-ray Player |
| Model | MVP891 |
| Brand | McIntosh |
| Disc Compatibility | Blu-ray, DVD, CD, SACD, DVD-Audio |
| Video Output Resolution | Up to 1080p (Full HD) |
| Audio Output | 7.1-channel analog, HDMI, optical, coaxial |
| Dimensions (W x H x D) | 17.5 x 6 x 15 in (44.5 x 15.2 x 38.1 cm) |
| Weight | 25 lbs (11.3 kg) |
| Power Supply | 120V, 60Hz |
| Power Consumption | 50 W (standby <0.5 W) |
| Main Functions | Blu-ray/DVD/CD playback, SACD/DVD-Audio, upscaling, USB media playback |
| Connections | HDMI out, component video out, composite video out, 7.1 analog audio out, digital optical/coaxial out, Ethernet, USB |
| Maintenance and Cleaning | Wipe with a soft, dry cloth; avoid liquids |
| Safety | Do not expose to moisture; use in a well-ventilated area |
| Spare Parts and Repairability | Contact McIntosh dealer or service center |
| General Information | High-end player with brushed aluminum front panel and blue watt meter display |
Frequently Asked Questions - MVP891 MCINTOSH
User questions about MVP891 MCINTOSH
0 question about this device. Answer the ones you know or ask your own.
Ask a new question about this device
Download the instructions for your Blu-ray player in PDF format for free! Find your manual MVP891 - MCINTOSH and take your electronic device back in hand. On this page are published all the documents necessary for the use of your device. MVP891 by MCINTOSH.
USER MANUAL MVP891 MCINTOSH
McIntosh Laboratory, Inc. 2 Chambers Street Binghamton, New York 13903-2699 Phone: 607-723-3512 www.mcintoshlabs.com
MVP891
Audio Video Player
Owner's Manual


The lightning flash with arrowhead, within an equilateral triangle, is intended to alert the user to the presence of uninsulated "dangerous voltage" within the product's enclosure that may be of sufficient magnitude to constitute a risk of electric shock to persons.
WARNING - TO REDUCE RISK OF FIRE OR ELECTRICAL SHOCK, DO NOT EXPOSE THIS EQUIPMENT TO RAIN OR MOISTURE.

AVIS RISQUE DE CHOC ELECTRIQUE - NE PAS OUVRIR.
NO USER-SERVICEABLE PARTS INSIDE. REFER SERVICING TO QUALIFIED PERSONNEL.
The exclamation point within an equilateral triangle is intended to alert the user to the presence of important operating and maintenance (servicing) instructions in the literature accompanying the appliance.
To prevent the risk of electric shock, do not remove cover or back. No user-serviceable parts inside.
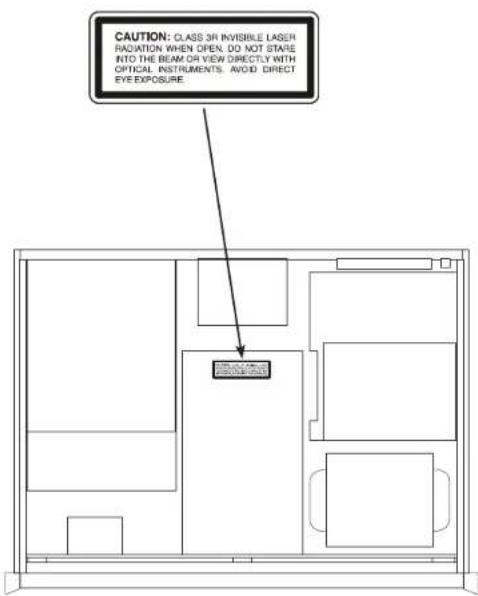
CAUTION - Invisible Laser Radiation when open. DO NOT stare into the beam or view directly with optical instruments. Use of controls or adjustments or performance of procedures other than those specified in the Owners Manual may result in Hazardous Radiation Exposure.
LUOKAN 1 LASERLAITE KLASS 1 LASER APPARAT
This product incorporates an embedded CLASS 3R Laser (IEC60825-1).

IMPORTANT SAFETY INSTRUCTIONS!
PLEASE READ THEM BEFORE OPERATING THIS EQUIPMENT.
- Read these instructions.
- Keep these instructions.
- Heed all warnings.
- Follow all instructions.
- Do not use this apparatus near water.
- Clean only with a dry cloth.
- Do not block any ventilation openings. Install in accordance with the manufacturer's instructions.
- Do not install near any heat sources such as radiators, heat registers, stoves, or other apparatus (including amplifiers) that produce heat.
- Do not defeat the safety purpose of the polarized or grounding-type plug. A polarized plug has two blades with one wider than the other. A grounding type plug has two blades and a third grounding prong. The wide blade or the third prong are provided for your safety. If the provided plug does not fit into your outlet, consult an electrician for replacement of the obsolete outlet.
-
Protect the power cord from being walked on or pinched particularly at plugs, convenience receptacles, and the point where they exit from the apparatus.
-
Only use attachments/accessories specified by the manufacturer.
- Use only with the cart, stand, tripod, bracket, or table specified by the manufacturer, or sold with the apparatus. When a cart is used, use caution when moving the cart/ apparatus combination to avoid injury from tip-over.
- Unplug this apparatus during lightning storms or when unused for long periods of time.
- Refer all servicing to qualified service personnel. Servicing is required when the apparatus has been damaged in any way, such as power-supply cord or plug is damaged, liquid has been spilled or objects have fallen into the apparatus, the apparatus has been exposed to rain or moisture, does not operate normally, or has been dropped.
- Do not expose this equipment to dripping or splashing and ensure that no objects filled with liquids, such as vases, are placed on the equipment.
- To completely disconnect this equipment from the a.c. mains, disconnect the power supply cord plug from the a.c. receptacle.

- The mains plug of the power supply cord shall remain readily operable.
- Do not expose batteries to excessive heat such as sunshine, fire or the like.
- Connect mains power supply cord only to a mains socket outlet with a protective earthing connection.
- Warning: The Ethernet connector of this equipment must not be directly connected to a public network. Connection is to be made only by way of a modem or router approved for this purpose.
Trademark and License Information
The McIntosh MVP891 incorporates copyright protection technology that is protected by U.S. patents and other intellectual property rights.
This item incorporates copy protection technology that is protected by U.S. patents and other intellectual property rights of Rovi Corporation. Reverse engineering and disassembly are prohibited.
The MVP891 uses the following Technologies:
| Trademark Logo License Information | |
 | Blu-ray Disc and “Blu-ray Disc” are trademarks. |
 | “Blu-ray 3D ^TM ” and “Blu-ray 3D ^TM ” logo are-trademarks of Blu-ray Disc Association. |
 | is a trademark of the DVD Format /Logo licensing Corporation. |
 | HDMI, the HDMI logo and High- Definition Multimedia Interface are trademarks or registered trademarks of HDMI Licensing LLC. |
 | Java and all other trademarks and logos are trademarks or registered trademarks of Sun Microsystems, Inc. in the United States and/or other countries. |
 | Manufactured under license from Dolby Laboratories. Dolby, Pro Logic and the double-D symbol are trademarks of Dolby Laboratories. |
 | Manufactured under license under U.S. Patent Nos: 5,956,674; 5,974,380; 6,226,616; 6,487,535; 7,392,195; 7,272,567; 7,333,929; 7,212,872 & other U.S. and worldwide patents issued & pending. DTS-HD, the Symbol, & DTS-HD and the Symbol together are registered trademarks & DTS-HD Master Audio Essential is a trademark of DTS, Inc.© DTS, Inc. All Rights Reserved. |
| Trademark Logo License Information | |
 | Windows Media and the Windows logo are trademarks or registered trademarks of Microsoft Corporation in the United States and/or other countries. |
 | “AVCHD” and “AVCHD” logo is the trademark of Panasonic Corporation and Sony Corporation. |
 | “BONUSVIEW” is the trademark of Blu-ray Disc Association. |
 | “BD-LIVE” logo is trademark of Blu-ray Disc Association. |
 | DivX®, DivX Certified®, DivX Plus® IID and associated logos are trademarks of Rovi Corporation or its subsidiaries and are used under license.Covered by one or more of the following U.S. patents:7,295,673; 7,460,668; 7,515,710; 7,519,274 |
 | YouTube and the YouTube logo are the registered trademarks of Google Inc. |
Thank You
Your decision to own this McIntosh MVP891 Audio Video Player ranks you at the very top among discriminating music listeners. You now have “The Best.” The McIntosh dedication to “Quality,” is assurance that you will receive many years of visual and musical enjoyment from this unit. Please take a short time to read the information in this manual. We want you to be as familiar as possible with all the features and functions of your new McIntosh.
Please Take A Moment
The serial number, purchase date and McIntosh Dealer name are important to you for possible insurance claim or future service. The spaces below have been provided for you to record that information:
Serial Number:
Purchase Date: ____
Dealer Name: ____
Technical Assistance
If at any time you have questions about your McIntosh product, contact your McIntosh Dealer who is familiar with your McIntosh equipment and any other brands that may be part of your system. If you or your Dealer wish additional help concerning a suspected problem, you can receive technical assistance for all McIntosh products at:
McIntosh Laboratory, Inc.
2 Chambers Street
Binghamton, New York 13903
Phone: 607-723-1545
Fax: 607-724-0549
Customer Service
If it is determined that your McIntosh product is in need of repair, you can return it to your Dealer. You can also return it to the McIntosh Laboratory Service Department. For assistance on factory repair return procedure, contact the McIntosh Service Department at:
McIntosh Laboratory, Inc.
2 Chambers Street
Binghamton, New York 13903
Phone: 607-723-3515
Fax: 607-723-1917
Table of Contents
Safety Instructions.... 2-3
Trademark and License Information 4
Thank You and Please Take a Moment....5
Technical Assistance and Customer Service....5
Table of Contents 5
General Information 6
USB Memory Drive Information....6
Disc Information....7
Connector and Cable Information 7
Introduction....8
Performance Features 8
Dimensions 9
Installation....10
Connections:
Rear Panel Connectors....11
Making Connections....12
Remote Control:
Remote Control Push-buttons....14
How to Use the Remote Control....15
Front Panel Features:
Front Panel Displays, Push-buttons and USB Memory Drive....16
Front Panel Information Display....17
Setup:
Introduction to the MVP891 Setup Mode......18-19
Default Settings.... 20
System and Language Settings....21
Rating, NetworkVideo and Other Settings ..... 22
TV, HDMI and 3D Settings 23
Audio and Speaker Settings.... 24-25
Operation:
How to Operate MVP891 26-31
MVP891 Audio/Video Settings
and Adjustments 32-35
Firmware Update 36-37
Additional Information:
Specifications....38
Packing Instruction....39
Copyright 2012 © by McIntosh Laboratory, Inc.
General Information
- For additional connection information, refer to the owner's manual(s) for any component(s) connected to the MVP891 Audio Video Player.
- When the MVP891 HDMI Output is connected to a TV/Monitor there is no signal present at the Component Video Output Jacks, unless the HDMI resolution is set to 480i.
- The Super Audio Compact Discs (SACD) Audio Signals are converted internally from Digital to Analog.
- When the MVP891 is playing back a SACD Disc the DSD Signal from the disc is converted to a PCM Signal and is available at the HDMI Out Connection.
- A PCM version of the decoded MP3 Signal is available at the Digital Audio Outputs.
- The MVP891 has built-in 192kHz 32-Bit DACs (Digital to Analog Converter) to allow playing of Discs recorded with a higher bit and sample rate, by using the Analog Audio Outputs.
- Some Multichannel BD (Blu-ray), DVD, DVD-Video, DVD-Audio and Super Audio Compact Discs might contain Low Frequency Audio Signals (below 80Hz) in the Center and/or Surround Channels. If the Loudspeakers in your Sound System are not capable of reproducing those Low Frequencies, distortion and/or possible damage to the Loudspeakers may occur. For additional information, consult with your Dealer or refer to the Owner's Manual for your Loudspeakers.
-
The DVD-Audio and Super Audio Compact Discs Digital Audio Signal is available via the HDMI Output. The MVP891 also internally decodes the Digital Audio from DVD-Audio and Super Audio Compact Disc and the Eight Channel Analog Signals are available at the UNBALANCED AUDIO OUTPUTS (7.1CH).
-
The MVP891 is designed to playback 3D Blu-ray Discs. The 3D Digital Video Signal from the MVP891 is available at the HDMI Out connector. It is extremely important for all A/V Components and the HDMI cables used for connections between the MVP891 and the TV/Monitor, meet or exceed the HDMI High Speed Standards for proper 3D Video Playback.
- HDMI Cable lengths between MVP891 and the Audio/Video Control Center should not exceed 25ft (8.3 meters). If there is need to use HDMI Cables longer than 25ft (8.3 meters), a high quality in-line HDMI Buffer/Converter would be required for reliable digital signal transmission via the HDMI Connections.
- The MVP891 basic transport functions may also be controlled by using other McIntosh Remote Controls or Keypads thru a McIntosh Control Center or Preamplifier. Refer to the owner's manual(s) supplied with those component(s) for additional operation information.
- PCM (Pulse Code Modulation) is the name given to a specific type of Digital Audio Signal. The CD Audio Disc and the supplemental audio track found on some Blu-ray Discs use the PCM format.
- Sound Intensity is measured in units called Decibels and "dB" is the abbreviation.
- When discarding the unit, comply with local rules or regulations. Batteries should never be thrown
away or incinerated but disposed of in accordance with the local regulations concerning battery disposal.
- For additional information on the MVP891 and other McIntosh Products please visit the McIntosh Web Site at www.mcintoshlabs.com.

USB Memory Drive Information
The MVP891 has a Front Panel Slot for accepting USB Memory Drives only. The USB Memory Drive is used in BD-Live and Bonus View Mode when the storage requirements exceeds the internal memory. The USB Drive provides the memory storage needed for the additional program content which is downloaded from the Movie Studio/Record Company via the MVP891 internet connection. It may also be used for playback of Audio and Video Files.
-
Before switching On the MVP891 insert the USB Memory Drive into the Front Panel Slot.
-
Do not remove the USB Memory Drive until the MVP891 has been switched Off. Removing the USB Memory Drive while the MVP891 is On could result in malfunction or loss of the USB Memory Drive's data.
-
USB Memory Drives need to have a storage capacity of 1GB (Gigabit) or greater.
-
Before using the USB Memory Drive for storage in the MVP891, it first must be formed on a computer using the FAT32 File System.
-
The MVP891 will display Photos using the JPEG File Format.
-
The MVP891 will playback music files such as MP3, WMA and AAC.
-
Read and follow all instructions provided by the USB Memory Drive manufacturer to prevent damage to the Drive and to the files contained on the Drive.
Disc Information
- Compact Discs that are not round (e.g. Novelty discs with octagonal or heart shapes) will not play properly in the MVP891 and should not be tried, as possible damage may occur.
- The MVP891 Audio Video Player is designed to play all standard CD Audio Discs that conform to the Official Compact Disc Standards which is indicated by the Symbol.
- The MVP891 will play most of the following discs, however some recorded discs may not be able to play due to the condition of the recording: BD-Video, BD-3D Video, Super Audio CD (SACD), CD-R, CD-RW, Picture CD (Kodak), Fujicolor CD, WMA(Windows), DVD-Audio, DVD-Video, DVD-R, DVD+R, DVD-RW, DVD+RW, and DVD-AVCHD.
- CD Audio Discs recorded in the MP3, WMA, AAC or LPCM Format will playback on the MVP891 except discs that contain multi-session recordings.
- The MVP891 will display Photos in the JPEG File Format from a Disc.
- The CD audio side of the Dual Disc does not meet the Compact Disc Digital Audio specifications found in the industry "Redbook"; the MVP891 may not read the CD side of a Dual Disc.
- Several of the DVD, DVD-Audio and SACD performance features available on the MVP891 are active only if the Disc includes the supporting encoded information.
- BD-Video and DVD-Video Discs are designed to only play in certain region(s) of the world. A region may be a single country or a group of countries. Usually on the back cover of the Video Disc container is a Symbol with either a "Character" or "Number(s)" or the word "All" inside it. The
MVP891 is designed to play discs for Regions "A", "1" and "All".
- Certain Dolby Digital and DTS Encoded Discs display their own unique Audio Mode Selection menu, every time the disc is loaded into the player. If you do not make a choice from this menu, the disc will revert to its default Audio Mode when play is started.
Connector and Cable Information
XLR Connectors
Below is the Pin configuration for the XLR Balanced Output Connectors on the MVP891. Refer to the diagram for connection:
PIN 1: Shield/Ground
PIN 2: + Output
PIN 3: - Output

Power Control Connector
The MVP891 Power Control Input/Output Jacks
receive/send Power On/Off Signals when connected to other McIntosh Components. A 1/8 inch stereo mini phone plug is used for connection to the Power Control Input/Output on the

Data and IR Input Port Connectors
The MVP891 Data In Port receives Remote Control Signals. A 1/8 inch stereo mini phone plug is used for connection. The IR Ports also use a 1/8 inch stereo mini phone plug and allow the connection of other brand IR Receivers to the MVP891.
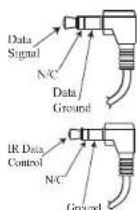
RS232 DB9 Connector Pin Layout
-
N/C 6. N/C
-
Data Out (TXD) 7. N/C
-
Data In (RXD) 8. N/C
-
N/C 9. N/C
-
Gnd.

Introduction
The McIntosh MVP891 Audio Video Player offers the latest in audio/video technology, providing state of the art reproduction of digital video and audio program sources. A full complement of performance features allows for the enjoyment of 3D Blu-ray, Blu-ray, DVD, SACD, DVD-Audio and Audio CD discs. Special Audio and Video formats are also reproduced with flawless realism. The advanced mechanical design of the transport ensures many years of smooth trouble free operation.
Performance Features
- Triple Laser Pickup
The MVP891 incorporates three laser elements, with different wavelengths, that are focused through one lens assembly. This unique design allows reading many different types of Audio and Video Disc Formats.
- Advanced Transport
The MVP891 has a new vibration-resistant transport with an advanced digital servo for faster, quieter and accurate operation. The Video Disc Data is read into memory from the disc at twice the normal rate. Likewise, CD Audio Data is read into memory at four times the normal rate. The fast read speeds help to insure better disc tracking and error correction processing.
• 1080p/24frame Video Output
The MVP891 has the highest video resolution available, 1080p/24frames per second image quality via the HDMI Video Output.
- Video Outputs
Along with the HDMI Video Output the MVP891 also has Component Video and Composite Video Outputs for a variety of applications.
• Advanced Video Circuitry
The MVP891 uses the Anchor Bay Technologies VRS ultra performance ABT-2015 processor. The Analog Devices 12-bit/297MHz video D/A provides conversion with Noise Shaped Video processing, Digital Noise Reduction and 14/12Bit Digital to Analog Video Conversion for High Definition and Standard Definition Signals.
• 32 Bit Audio DAC
The MVP891 has five two channel Digital to Analog Converters capable of sampling rates up to 192kHz with 32 Bits of resolution.
• Balanced Outputs
The MVP891 has Balanced Outputs for the Left and Right Channels when playing a CD/SACD. When a Multichannel Disc is playing, the Balanced Left and Right Outputs provide a two channel mix down of the Multichannel Recording.
• Built-in Dolby True HD and DTS-DH Master Decoders
The MVP891 also provides built-in decoding of the Dolby Pro Logic IIx and DTS Neo6 Sound Tracks.
• Digital Audio Outputs
There is HDMI and Coaxial Digital Audio Outputs for external decoding of the various Dolby Digital, DTS Digital Signals, PCM or MP3 Signals from CDs.
- On Screen Setup and Calibration
Loudspeaker Size, Level and Time Delay Adjustments are available for Dolby Digital, DTS Digital, DVD-Audio and SACD Disc Signals and effects the multi-channel analog audio outputs.
• Power Control
The Power Control Input connection provides convenient Turn-On/Off of the MVP891 when connected to a McIntosh System with Power Control.
- Remote Control
The Remote Control with illuminated push-buttons, provides control of the MVP891 operating functions. A Data Port Connection to a McIntosh A/V Control Center or Preamplifier allows for convenient system operation using one Remote Control. An External IR Sensor Input allows for remote operation when the MVP891 is located behind closed doors.
• Special Power Supply
A fully regulated Power Supply, with a special R-Core Power Transformer, ensures stable noise free operation even though the power line varies.
- Extruded Side Panels
The sides of the MVP891 are extruded aluminum panels with a bead blast textured surface and a black anodized finish.
- Fiber Optic Solid State Front Panel Illumination The Illumination of the Glass Front Panel is accomplished by the combination of custom designed Fiber Optic Light Diffusers and extra long life Light Emitting Diodes (LEDs). This provides even Front Panel Illumination and is designed to ensure the pristine beauty of the MVP891 will be retained for many years.
Dimensions
The following dimensions can assist in determining the best location for your MVP891. There is additional information on the next page pertaining to installing the MVP891 into cabinets.
Front View of the MVP891

Rear View of the MVP891

Side View of the MVP891


Installation
Installation
The MVP891 can be placed upright on a table or shelf, standing on its four feet. It also can be custom installed in a piece of furniture or cabinet of your choice. The four feet may be removed from the bottom of the MVP891 when it is custom installed as outlined below. The four feet together with the mounting screws should be retained for possible future use if the MVP891 is removed from the custom installation and used free standing. The required panel cutout, ventilation cutout and unit dimensions are shown.
Always provide adequate ventilation for your MVP891. Cool operation ensures the longest possible operating life for any electronic instrument. Do not install the MVP891 directly above a heat generating component such as a high powered amplifier. If all the components are installed in a single cabinet, a quiet running ventilation fan can be a definite asset in maintaining all the system components at the coolest possible operating temperature.
A custom cabinet installation should provide the following minimum spacing dimensions for cool operation.
Allow at least 6 inches (15.24cm) above the top, 2 inches (5.08cm) below the bottom, 3 inches (7.62cm) behind the rear panel and 2 inch (5.08cm) on each side of the Audio Video Player, so that airflow is not obstructed. Do not block the ventilation holes on the top and bottom cover; also do not block the rear panel fan opening. Allow 1 inch (2.54 cm) in front of the mounting panel for clearance. When the DISC Tray is opened, the panel clearance required in front of mounting panel is 6-3/4 inches (17.2cm). Be sure to cut out a ventilation hole in the mounting shelf according to the dimensions in the drawing.


Making Connections
The MVP891 has the ability to be remotely switched On/Off from a McIntosh Preamplifier or A/V Control Center via the Power Control connection. The MVP891 Data Port Connection allows for the remote operation of basic functions using the A/V Control Center Remote Control. With an external sensor connected to the MVP891, remote control operation is possible from another room and/or when the MVP891 is located in a cabinet with the doors closed.
The connection instructions below, together with the MVP891 Connection Diagram located on the separate folded sheet "McIA", is an example of an audio/video system. Your system may vary from this, however the actual components would be connected in a similar manner. For additional information refer to "Connector and Cable Information" on page 7.
Power Control Connections:
- Connect a Control Cable from the A/V Control Center PC (Power Control/Trigger) Jack to the POWER CONTROL IN Jack on the McIntosh MVP891 Audio/Video Player.
- Optionally, connect a Control Cable from the MVP891 Audio Video Player POWER CONTROL OUT Jack to the next McIntosh Component Power Control In Jack.
- Connect any additional components in a similar manner, as outlined in step 2.
Data Control Connections:
- Connect a Control Cable from the A/V Control Center Data Out 1 Jack to the McIntosh MVP891 Audio Video Player DATA IN Jack.
Sensor Connections:
- Optionally, connect an external Sensor to the McIntosh MVP891 Audio Video Player IR IN Jack.
HDMI Connections:
- Connect a HDMI Cable from the McIntosh MVP891 Audio Video Player HDMI OUT to the HDMI Input 1 BD on the A/V Control Center.
Digital Audio Connections:
- Connect a Cable from the McIntosh MVP891 Audio Video Player DIGITAL OUT COAXIAL to the Coaxial In 1 on the A/V Control Center.
Analog Audio Connections:
- Connect Balanced Cables from the McIntosh MVP891 Audio Video Player AUDIO OUTPUTS BALANCED 2CH Connectors to the A/V Control Center AUX Balanced Input 1 connectors.
- Connect Audio Cables from the MVP891 Audio Video Player UNBALANCED AUDIO OUTPUTS 10.1CH (all eight channels) Jacks to the A/V Control Center 7.1 CH Input Jacks.
- Connect Cables from the McIntosh MVP891 Audio Video Player AUDIO OUTPUTS UNBALANCED 2CH Jacks to the A/V Control Center CD Input Jacks.
Analog Video Connections:
-
Connect Cables from the McIntosh MVP891 Audio/Video Player COMPONENT VIDEO OUT to the A/V Control Center Component Video In 2 (DVD) Inputs.
-
Connect a Cable from the McIntosh MVP891 Audio Video Player VIDEO OUT to the A/V Control Center Video In DVD Input.
Ethernet Connection:
- Connect a CAT5 or CAT6 cable from the MVP891 ETHERNET connector to a Computer Network with router providing High Speed Broadband Internet Access or directly to a High Speed Modem with Broadband Internet Access. Note: For proper operation of the BD-Live feature a High Speed Internet connection is required.
AC Power Cords Connections:
- Connect the McIntosh MVP891 Audio Video Player AC Power Cord to a live AC outlet.
Notes

Remote Control Push-Buttons

Note: Push-buttons whose function is not identified above are for use with other McIntosh Components
How to use the Remote Control
The Remote Control is capable of performing both basic Operating Functions and Setup Options for the MVP891 Audio Video Disc Player.
Notes: Refer to the "How to Operate" and "How to Operate Setup Mode" Sections of this manual for additional information using this Remote Control.
Play
With a disc loaded, press the PLAY▶ Push-button to start the disc playing.
Stop
Press the STOP ■ Push-button once to stop disc play-back. Press PLAY and the disc will start playing again from the disc time where Stop was pressed. Press STOP ■ twice for a complete stop and return to the beginning of a disc.
Numbered Push-buttons
Press 1 through 9 to directly access one of the first nine Disc Tracks/Chapters using the On-screen Icon. For track numbers greater than 10, press the +10 Push-button first and then the required number. For example to access Disc Track/Chapter 23, press +10 twice and then 3.
Clear
Press the CLEAR Push-button to erase a selected track or incorrect setting.
Pause
Press the PAUSE II Push-button to temporarily stop disc playback at any time. When a DVD is playing, each additional time the Pause Push-button is pressed, the player will proceed to the next Still Video Image.
Note: The Still Video Image step rate may be changed by using the ◀ (Reverse) or ▶ (Fast Forward) Push-button.
Back and Next
Press the ▶ (Next) Push-button to move forward or the ◀ (Back) Push-button to move backward one chapter/track at a time on the disc.
Return
Press the RETURN Push-button to return to the previous setup menu.
Setup
Press the SETUP Push-button to access the Initial Setup Menu.
Subtitle
Press the SUB (Subtitle) Push-button to access the Subtitle menu and the Subtitle icon will appear at the top of the screen.
Angle
If the DVD being played supports the Angle Feature, press the ANGLE Push-button to select the desired video picture angle.
Four Direction Arrows
Press an Arrow direction Push-button to move backward, forward, up or down through an on-screen menu.
Select
Press the SELECT Push-button to confirm and activate a setup option or options indicated by the on-screen icons.
Note: The SELECT push-button is also referred to as "Enter" when working within the Setup Mode.
Top Menu
When a disc is loaded in the player, press the TOP MENU Push-button to access the main DVD Title menu (disc dependent).
Display/Time
Press the DISPLAY/TIME Push-button to access various disc times, text information on SACD/CD and audio modes displayed on-screen (disc dependent).
Audio
Press the AUDIO Push-button to access various audio modes displayed on-screen (disc dependent).
REV and FF
Press a◀ (Reverse) or ▶ (Fast Forward) Push-button to start moving rapidly through a chapter or track on a disc.
Note: Audio level is automatically muted during this operating mode with a DVD disc.
A-B Repeat
Press the A-B (Repeat) Push-button once to establish the starting point of the repeat loop and press the A-B (Repeat) Push-button a second time for the ending point, and that segment of a disc will be repeated continuously.
Search
Press the SEARCH Push-button to activate various search functions including Chapter, Title, Track Group, Time and Marker. For additional information refer to page 30.

Front Panel Information Display

Note: Display items not identified above are for use with other McIntosh Components

Introduction to the MVP891 Setup Mode
Your McIntosh MVP891 has been factory configured for default operating settings that will allow you to immediately enjoy superb video and high fidelity audio from a Blu-ray 3D Disc. It also reproduces Blu-ray Disc (2D), DVD-Audio, SACDs and CDs with unparalleled sonic purity. If you wish to make changes to the factory default settings perform the following steps, if not proceed to “How to Operate the MVP891” starting on page 26.
Power
The Red LED above the STANDBY/ON switch lights to indicate the MVP891 is connected to AC Power. To Switch ON the MVP891, press the STANDBY/ON Push-button on the Front Panel or the ⏻ (Power) Push-button on the Remote Control. The STANDBY Red LED will flash during the initialization process.
Refer to figures 1 and 2.

Figure 1
Note: When the MVP891 is switched On, it will take from 20 to 30 seconds for initialization of the internal circuitry to take place before the player is ready to begin operation.
Adjustments and Setting changes
All of the adjustments and settings are performed by using the extensive On-Screen Menu System. The On-Screen Menuing System is interactive. The ability to change a menu item setting or have access to a
menu item setting (some may be “grayed out”) is dependent on the operational state of the player and the choices made in other menu items. Some menu choices require more than one step to complete.
The active selection in a list of options is indicated by a dot located to the left side of the selection, e.g. ●ON. When a disc is playing in the MVP891 and the STOP Push-button is pressed once (the disc playback is paused), some but not all menu items are available for change. To make all of the menu items available for possible change, the playback of the disc must be stopped which requires two presses of the STOP Push-button.
Note: The MVP891 must be connected to a MONITOR/TV either through an A/V Control Center or directly, for setup and use. The Remote
Control supplied with the McIntosh MVP891 has several Push-buttons labeled differently than as indicated on the On Screen Menu, please refer to the Instructions in this Owner's Manual for the correct Push-button.

Figure 2
Checking the Network Connection
The following example will illustrate how to navigate through the built-in MVP891 SETUP Mode and the multiple On-Screen Menus.
One of the many features the MVP891 has is the ability to display On-Screen Videos from "You Tube" via the Internet Network Connection.
Occasionally, McIntosh might make available Firmware Updates for the MVP891. These Updates would be from the McIntosh Computer Server via a Network Internet Connection. The MVP891 will automatically scan for an update when first switched On (with no disc in the tray). If an update is available, the MVP891 will display a message On-Screen for several seconds. For more information about the MVP891 and Network Connections refer to pages 22 and 36.
With the MVP891 connected to your Home Network via a Network Router with an active Internet Access Device connected, perform the following steps:
- If there is a disc playing in the MVP891 press the STOP Push-button twice.
- Press the SETUP Push-button on the Remote Control and the last selected Setup Menu Item will appear on the Monitor/TV screen. The figure 3 illustration is of the "General Settings" Menu and options.

Figure 3
Note: There are four Main Menu Icons located at the top of the On-Screen Setup Display. The Icon are, from left to right, General Settings, Video Settings, Audio Settings and System Information.
- Using the Down▼ Directional Push-buttons on the Remote Control select "Network". Refer to figure 4.

Figure 4
- Press the SELECT Push-button on the Remote Control.
- Using the Down▼ Directional Push-buttons on the Remote Control select "Connection Test". Refer to figure 5.

Figure 5
- Press the SELECT Push-button on the Remote Control.
The MVP891 will now check for a Network Connection first. Second, it will check for access to the Internet. A window will appear On-Screen indicating "The Network is OK". Refer to figure 6.

Figure 6
- Press the SELECT Push-button on the Remote Control and then press the SETUP Push-button to exit the Setup Mode and return to normal operation.
Note: If when the above Connection Test was performed and the message appearing in the Window indicated "Network is FAILED" proceed to Setup Mode, Network Settings on page 22 to resolve the difficulty.
For the vast majority of MVP891 Owners the Default Settings and Suggested Component Connections are all one needs for full enjoyment of movies, still photos, videos and music.
The MVP891 Setup Mode has a number of additional options allowing integration into your Home Theater System. Usually, your McIntosh Dealer and/or Custom Installer uses these additional capabilities.
The navigation and selection methods previously illustrated also apply to the remainder of Setup Mode Settings, which resume on page 20.
To begin enjoying the MVP891 Audio Video Player proceed to page 26 and "How to Operate the MVP891".
| MENU SELECTION SETTING PAGE | ||||
| General Settings | ||||
| System Setup | ||||
| Screen Saver On 21 | ||||
| Auto Power Mode On 21 | ||||
| Power Saving Power Saving Standby 21 | ||||
| HDMI Control Off 21 | ||||
| HDMI Power Off Control On 21 | ||||
| Initialize --- 21 | ||||
| Firmware Update --- 21 | ||||
| Update Notification On 21 | ||||
| BD Data Utility --- 21 | ||||
| Language | ||||
| GUI Language | English | 21 | ||
| Disc Menus | English | 21 | ||
| Dialog English | 21 | |||
| Subtile | Off 21 | |||
| Ratings | ||||
| Change Password | 0000 | 22 | ||
| BD Rating Level No Limit | 22 | |||
| DVD Rating Level | No Limit | 22 | ||
| Country Code USA | 22 | |||
| Network | ||||
| Internet Connection | Enable | 22 | ||
| Information | Various | 22 | ||
| Connection Test | --- | 22 | ||
| DIICP | Auto | 22 | ||
| BD-Live | Permitted 22 | |||
| Proxy Setting | Disable | 22 | ||
| Others | ||||
| Close Caption | Off | 22 | ||
| Angle Mark | Off | 22 | ||
| PIP Mark | Off | 22 | ||
| Secondary Audio Mark | Off | 22 | ||
| DivX ^3 Registration | Registration Code | 22 | ||
| MENU SELECTION SETTING PAGE | ||||
| Video Settings | ||||
 | TV | |||
| TV Aspect (Aspect Ratio) | 16:9 Squeeze Auto | 23 | ||
| Wallpaper | Picture | 23 | ||
| Progressive Mode1 | Off | 23 | ||
| HDMI | ||||
| Color Space | YCbCr | 23 | ||
| HDMI Deep Color Auto | 23 | |||
| 23 | ||||
| 3D | ||||
| 3D Output Setting | Auto | 23 | ||
| TV Screen Size Setting | 046 | 23 | ||
| Audio Setting | ||||
 | Audio Output | |||
| Coaxial | Bitstream | 24 | ||
| HDMI | Bistream | 24 | ||
| Down Sampling 48kHz | 24 | |||
| DRC | Auto | 24 | ||
| Speaker Setting | ||||
| Configuration | 7.1ch | 25 | ||
| Test Tone | --- 25 | |||
| System Information | ||||
| [2624] | MAC Address | MAC:_ _ _ _ _ _ _ _ _ _ _ _ _ _ _ _ _ _ _ _ _ _ _ _ _ _ _ _ _ _ _ _ _ _ _ _ _ _ _ _ _ _ _ _ _ _ _ _ _ _ _ _ _ _ _ _ _ _ _ _ _ _ _ _ _ _ _ _ _ _ _ _ _ _ _ _ _ _ _ _ _ _ _ _ _ _ _ _ _ _ _ _ _ _ _ _ _ _ _ _ _ | ||
^1 This mode is activate with a 480i/576i video source
| MENU ITEM SUB MENU SELECTION OPTION(S) | DESCRIPTION | |||
| System Setup | ||||
 | Screen Saver | ●On | Off On, Screen Saver function | activates three minutes after Pause or Stop Modeis engaged. Off, disables the Screen Saver function. |
| Auto Power Mode Off | ●On | Off, the MVP891 will stay on until switched Off. On, will automatically switch power Off about 30 minutes after disc playback has ended, a disc is not loaded or when disc playback is stopped. | ||
| Power Saving | ●Power Saving Standby | Normal Standby Power Saving | Standby, consumes the least amount of power and does not respond to HDMI or RS232 remote commands. Normal Standby, consumes more power than the “Power Saving Standby” Mode and responds to RS232 and HDMI remote commands when the MVP891 is in Standby Mode. | |
| HDMI Control On | ●Off | When On the HDMI External Control Capabilities link is activated. When Off the HDMI External Control Capabilities link is deactivated. Contact the TV manufacturer for additional information. | ||
| HDMI Power Off Control | ●On | Off When TVs with HDMI External Control Capabilities are activated the MVP891 may be switched On/Off via the TV Remote Control. Contact the TV manufacturer for additional information. | ||
| Initialize --- Cancel, OK | Use to reset all MVP891 settings to the factory default configuration. | |||
| Firmware Update | --- | Check for Update, Start | Please refer to page 36 for additional information. | |
| Update Notification | ●On | Off Displays On-Screen when a Firmware Update is available. | ||
| BD Data Utility | BD Data Information or BD Live Memory Selection | Internal BD Data Erase; Select either Internal or External Memory for BD Live Data | The size of the available free internal memory and formatting of the internal memory. The selection of internal memory or external memory (USB Drive Memory) to be used for storing DB Live downloaded data. | |
| Language Setup | ||||
 | GUI Language | ●English | English, Francais, Espanol | Selects the language of the MVP891 On-Screen Menus that will be seen On-Screen. |
| Disc Menus | ●English | English, French, Spanish, German, Japanese, Italian, Swedish, Dutch, Russian, Chinese, Korean, Danish, Finnish, Norwegian, Portuguese, More (press the SELECT Push-button for more choices) | Selects the language of the Movie Disc Menus (Blu-ray/DVD) seen On-Screen. | |
| Dialog | ●Original | Selects the dialog language heard when the Blu-ray/DVD Disc is played. | ||
| Subtitle | ●Off | Selects the language seen On-Screen when a Blu-ray/DVD Disc is played and the Subtitle Mode is active. | ||

| MENU ITEM SUB MENU SELECTION OPTION(S) | DESCRIPTION | |||
| Ratings | ||||
| [BZDC] | Change Password Change Enter a new password The default password is 0000. | |||
| BD Rating Level | ●No Limit | Level 0 thru Level 254 | No Limit, setting allows anyone to view the Blu-ray Disc.Level 0 thru Level 254, settings allow parents to restrict the viewing of Blu-ray on the basis of age. | |
| DVD Rating Level | ●No Limit | Lock All, Level 1-8 No Limit, setting allows anyone to view a DVD Disc. Lock All, blocks the playback of all DVD Discs.Level 1-8, settings allow parents to restrict the viewing of a DVD Disc on the basis of content. | ||
| Country Code | ●United States | Various other Countries | Select the appropriate Country for applying Parental Control for the Blu-ray and DVD Discs. | |
| Network | ||||
 | Internet Connection | ●Enable | Disable | Enable, allows Internet Connection.Disable, does not allow Internet Connection. |
| Information --- --- Displays various network settings. | ||||
| Connection Test | --- | --- | Tests the connection to the Internet. | |
| DHCP | ●Auto | Manual Auto, the DHCP function automatically configures the MVP891 Network Connection.Manual, allows network settings to be entered manually for networks not supporting the DHCP function. | ||
| BD-Live Connection | ●Permitted | Partial Permitted, Prohibited | Permitted, all Internet accesses for BD-Live are permitted.Partial Permitted, Internet accesses from certified BD-Live is permitted.Prohibited, all Internet accesses for BD-Live is prohibited. | |
| Proxy | ●Disable | Enable | Enable, is selected for Proxy Setting, enter the proxy host from the virtual keyboard and proxy port number from the 0 – 9 press ENTER to register it.Disable, does not use a proxy server. | |
| Others | ||||
 | Closed Caption | ●Off | On | Off, Closed Caption is not displayed.On, Closed Caption is displayed. |
| Angle Mark | ●Off | On | Off, angle mark is not displayed.On, angle mark is displayed. | |
| PIP Mark | ●Off | On | Off, PIP (picture-in picture) mark is not displayed.On, PIP mark is displayed. | |
| Secondary Audio Mark | ●Off | On | Off, Secondary Audio mark is not displayed.On, Secondary Audio mark is displayed. | |
| DivX Registration | --- | --- | Displays the registration code for this MVP891. | |
| TV | ||||
 | TV Aspect | ●16:9 Squeeze Auto | WIDE (16:9), 4:3 PS, 4:3 LB 16 | 6:9 Squeeze Auto display1 is for both 16:9 and 4:3 ratio TV/Monitor Screen. With TV/Monitor with a 4:3 screen ratio the image will be display in the center of the screen.WIDE (16:9) display is for Wide Screen TV/Monitor only.4:3 PS display2 (Pan and Scan) retains the 4:3 aspect ratio for a 4:3 TV/ Monitor, a 16:9 TV/Monitor will display the 4:3 image centered, with vertical Black Bars on either side.4:3 LB will display 480i source material with black bars on top and bottom of the image. |
| Wallpaper | ●Picture (McIntosh) | Black, Gray, Blue Sets the Display background when the Stop Mode is engaged. | ||
| Progressive Mode | ●Auto | Video, Film Auto setting automatically detects the type of the signal (Video or Film based material) and processes accordingly.Videois a manual setting for playing primarily Video based material.Filmis a manual setting for playing primarily film based material. | ||
| HDMI | ||||
 | Color Space | ●YCbCr | RGB Normal, RGB Enhanced | The vast majority of TVs will produce the best picture quality using the default setting of YCbCr. Some Monitors/Projectors such as dual purpose (video/computer) might produce a better picture (black to white range) using the RGB Normal (16-235) or RGB Enhanced (0-255) setting. |
| Deep Color | ●Auto | Off | Auto, the MVP891 will automatically send the additional color information when present on a Blu-ray Disc and the connected TV/Monitor supports dis- playing it.Off, bypass the Deep Color Mode when present. | |
| 3D | ||||
 | 3D-Output setting | ●Auto | Off | Auto, the MVP891 automatically displays (3D or 2D) incoming signal cor- rectly3. Off, 2D video output only. |
| Screen Size Setting | 46 inch | 0-999 inches | Sets the correct 3D Video Processing according to the TV/Monitor Screen Size. | |
^1 This has no effect on the composite video output.
^2 Depending on the video content, the content may be output in 4:3 LB (Letter Box), even though you set it to 4:3 PS (Pan Scan).
^3 3D image reproduction requires a 3D capable TV/Monitor and the required compatible 3D glasses.
All the equipment between the MVP891 HDMI output and the 3D TV/Monitor HDMI input, including cables, must be capable of handling the 3D signal.

| MENU ITEM SUB MENU SELECTION OPTION(S) | DESCRIPTION | |||
| Audio | ||||
| Coaxial | ●Bitstream | PCM, Off Bitstream, down decodes Dolby True HD, Dolby Digital Plus and DTSMaster HD formats to Dolby Digital or DTS signal type for availability at the Coaxal output. PCM, decodes all types of Dolby Digital and DTS audio signals and sends them out as a 2 channel PCM Digital Signal. Off, switches off all output from the coaxial jack. | ||
| HDMI | ●Bitstream | PCM, Off Bitstream, passes the primary sound track original signal type (such as Dolby Truc HD, Dolby Digital Plus and DTS Master HD) to the HDMI Output1. PCM, decodes all types of Dolby Digital and DTS audio signals and sends them out as multichannel PCM Digital Signal. Off, switches off all Audio Output from the HDMI Connector. Refer to page 34 for additional information. | ||
| Down Sampling | ●48kHz | 96kHz, 192kHz Refer to the Owner's Manual for the device connected to the MVP891 and select the setting based on its capability. | ||
| DRC | ●Auto | On, Off Auto, compresses the Dynamic Range of Dolby encoded Sound Tracks when the feature is supported on the given disc. On, reduces the dynamic range all the time. Off, switches the dynamic range function. | ||
^1 The MVP891 will send out an audio signal, via the HDMI Connector, based on the capability of the receiving device.
| MENU ITEM SUB MENU SELECTION OPTION(S) | DESCRIPTION | |||
| Audio | ||||
 | Speaker Settings ^2 | ●7.1 Channel | 2.1 Channels3.1 Channels4.1 Channels5.1 Channels6.1 Channels | The MVP891 performs internal decoding of various Dolby and DTS Digital Signals. The decoded signal is available at the Unbalanced Audio Output 7.1CH Jacks. There arc adjustments for Loudspeaker Size, Volume Level and Distance. Select “Test Tone” in the Audio Setting Menu. As each Loudspeaker is highlighted press the SELECT Push-button, use the DIRECTIONAL Push-buttons to select “Size”, “Level” or “Delay” and then make the necessary adjustments following the instructions below.Note: A tape measure and sound pressure meter will greatly assist in making the adjustments.Speaker Configuration:Select the number of channels (Loudspeakers) in the A/V System. The LARGE Setting refers to the Loudspeaker capability for reproducing bass frequencies down to 35Hz within -3dB of the midrange frequencies. If a Loudspeaker can not reproduce bass frequencies down to 35Hz within -3dB of the midrange frequencies it is considered SMALL.Note: Contact your Dealer or the manufacture of the Loudspeaker(s) for additional information.Channel Level:A properly setup Home Theater Surround Sound System should have all Loudspeaker Levels adjusted (when available) to the same starting reference volume level before proceeding. The test signal volume levels of each Loudspeaker in the Listening/Viewing Area, can be determined either by listening or with a sound pressure meter. The level adjustment range is from 0dB to -10dB.Distance:The following Delay Time Adjustments will electronically compensate for different Loudspeaker distances from the preferred Listening/Viewing Area. Refer to figure 20. The delays can be adjusted from 0 feet (0 meters) to 33.5 feet (10.05 meters) for each Loudspeaker.Note: Before performing the Delay Time adjustments, the Loudspeaker Size and Level adjustments need to be performed first. |
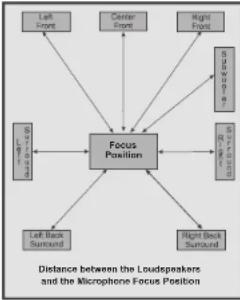 Figure 20 Figure 20 | ||||
^2 The MVP891 downmixes the 7.1 (6.1, 5.1, 4.1) sound track to a 2 channel signal and is available at the 2CH Balanced and Unbalanced Audio Outputs.

How to Operate the MVP891
Your McIntosh MVP891 has been configured for default operating settings that will allow you to immediately enjoy superb video and high fidelity audio from a wide variety of discs. If you wish to make changes to the default settings, a Setup feature is provided to customize the operating settings using On Screen Menus (refer to the Setup instructions in this manual on page 18). Most operations that can be performed with the Front Panel Push-buttons can also be performed with the Remote Control.
Notes: 1. Some of the MVP891 operating functions such as Disc Languages, Video Angle or Menu Language are active only if the function is supported by data encoded on the disc.
2. Some Blu-ray discs support BD Live downloads, providing various forms of additional information for the disc currently in the player. This additional information is stored in memory. The MVP891 has 1GB of internal memory storage, however the BD Live Information is deleted when the MVP891 is switched OFF. An external USB Memory Drive is supplied with the MVP891 and its memory is not deleted when the MVP891 is switched OFF. For additional information refer to page 6.
- The USB Memory Drive should only be inserted or removed from the Front Panel of the MVP891 when the player is in the Standby Mode (OFF).
- When the MVP891 is On and has been idle for approximately 5 minutes, the internal circuitry goes into a hibernation state to conserve energy. To bring the MVP891 out of hibernation requires two presses of a function command such as Play, Open/Close, etc.
Power On
The Red LED above the STANDBY/ON switch lights to indicate the MVP891 is connected to AC Power. To Switch ON the MVP891, press the STANDBY/ON Push-button on the Front Panel or the ⏻ (Power) Push-button on the Remote Control. The STANDBY Red LED will flash during the initialization process. Refer to figures 30 and 32.
Note: When the MVP891 is switched On, it will take from 20 to 30 seconds for initialization of the internal circuitry to take place before the player is ready to begin operation.
Disc or USB Memory Drive Selection
The MVP891 plays Optical Discs and USB Memory Drives. One can select between the two sources by

Figure 30
pressing the SOURCE Push-button once. Press the SOURCE Push-button a second time to return to disc playback. The chart below illustrates the various Front Panel Information Display indications:
| Playback Media Display Indication | |
| Blu-ray Disc BDMV | |
| DVD Disc Video | |
| DVD-Audio Disc Audio | |
| SACD Disc SACD | |
| CD Disc CD | |
| USB Drive 00001 | |
Note: Depending on how a given disc has been mastered, the MVP891 Front Panel Display may indicate something different.
How to Load a BD, DVD, SACD or CD Disc
- Press the OPEN/CLOSE Push-button. The disc tray will slide out allowing a disc to be loaded. Refer to figures 30 and 32.
Note: When the player is in Standby Mode, the MVP891 Power will automatically Switch-On when the OPEN/CLOSE Push-button is pressed.
- Press the OPEN/CLOSE Push-button and the disc tray will close. The Front Panel Information Display will indicate "LOADING". Refer to figure 31
If the tray contains a Blu-ray, DVD disc or DVD-Au-

dio, it will start to play without pressing the PLAY Push-button. When the tray contains a SACD or CD Disc, the Front Panel Information Display will indicate the disc type. Press the PLAY Push-button for playback of a SACD or CD disc.
Note: Do to the increase in Video/Audio resolution of a Blu-ray Disc, it will take slightly longer to
read the increase in disc data before playback will occur.
How to Play a BD or DVD Disc
With a disc already loaded into the MVP891, press the ▶ (Play) Push-button on the Front Panel of the MVP891 or the Remote Control. Refer to figures 30 and 32.
Notes: 1. When a Blu-ray, DVD Video or Audio Disc is first started, the Disc's On-Screen Menu will usually appear allowing for the choice of selections and various Audio/Video Playback Parameters.
- When the MVP891 is connected to a HDTV not compatible with Blu-ray 3D Discs, an error message will appear On-Screen.
How to Play a SACD Disc
With a disc already loaded into the MVP891, press the ▶ (Play) Push-button on the Front Panel of the MVP891 or Remote Control. The Disc will start playing the first selection of the SACD Layer; this could be either the Multichannel or 2-Channel Tracks depending on the disc contents. By pressing the DISC LAYER Push-button once, the Front Panel Information Display will momentarily display the current layer playing.
To change from the Multichannel Layer to the SACD 2-Channel while the disc is playing, press the DISC LAYER Push-button once to display the current layer "MULTI" and then press the DISC LAYER Push-button a second time to select the "STEREO" Layer.
To change from the Multichannel or Stereo Layer to the CD Layer (or back again), first stop the disc from playing. Press the OPEN/CLOSE Push-button to open the tray and then press the DISC LAYER pushbutton to select the CD Layer (or Multi Layer/Stereo Layer). Press the PLAY Push-button, after the disc tray closes the MVP891 will read the selected layer and the disc starts to play. Refer to figures 30, 32 and 33.
Note: The next SACD disc played will default to the SACD Multichannel layer or the SACD Stereo layer if a Multichannel layer is not present on the disc.
How to Play a CD Disc
With a disc already loaded into the MVP891, press the ▶ (Play) Push-button on the Front Panel of the MVP891 or Remote Control. Refer to figures 30 and 32.
How to Pause a Disc
This feature allows the temporary stopping of disc playback. Refer to figures 30, 32 and 33.
-
When playing a Disc, press the II (Pause) Push-button to temporarily stop playback. Note: After the Pause Feature is activated, with a DVD-Video Disc in the MVP891, each additional press of the II (Pause) Push-button will permit the video to advance one frame at a time.
-
Press the ▶ (Play) Push-button to cancel pause and resume playing the disc.
DVD-Video Rapid Frame Advance
The MVP891 allows for rapid scanning of Blu-ray and DVD Video Frames both forward or backward directions at different speeds.
-
When a disc is playing, press the II (Pause) Push-button to stop playback.
-
Press the ▶ (Fast Forward) or ◀ (Reverse) Push-button to activate the Rapid Frame Advance. Note: If the Fast Forward or Reverse Push-button is pressed several times, the speed of the Frame Advance will increase. An On-Screen Icon will appear during the Rapid Frame Advance Mode indicating the advanced speed.
-
To cancel the Rapid Frame Advance Feature press the ▶ (Play) Push-button.
Back Track/Chapter
Return back to the beginning of the Track/Chapter currently playing by momentarily pressing the (Back) Push-button on the MVP891. Repeated momentary presses of the (Back) Push-button will allow for rapid selection of the desired previous Tracks/Chapters.

Figure 32

Figure 3.3

How to Operate the MVP891, con't
Next Track/Chapter
For each momentary press of the ▶ (Next) Push-button the MVP891 will advance to the next Track/Chapter. Repeated momentary presses of the ▶ (Next) Push-button will allow for rapid selection of the desired Track/Chapter.
Fast Forward or Reverse
Press and release the ▶ (Fast Forward) or◀ (Reverse) Push-button to search back and forth rapidly through a Track/Chapter on a disc at 2 times normal speed. An On-Screen Icon will appear on the screen and the audio will be muted. If the ▶ (Fast Forward) or◀ (Reverse) Push-button is pressed and released several times, the speed will increase to a maximum of 7 times normal speed. To return to normal playback press the ▶ (Play) Push-button.
Stop Mode
Press the ■ (Stop) Push-button once to stop disc play-back, known as Resume Stop. Press ▶ (Play) and the disc will start playing again from the disc time where Stop was pressed. Press ■ (Stop) twice for a complete stop and return to the beginning of a disc.
Notes: 1. Depending on how a Blu-ray disc has been mastered, pressing the ■ STOP Push-button once, followed by the PLAY Push-button, will return playback to the beginning of the disc (previews, disc setup, etc.) instead of resuming playback of the feature. Instead, use || PAUSE followed by ▶ PLAY to stop the movie for a short time.
- With a DVD Disc, information from the disc will be muted during the Stop Mode, but will resume when the ▶ (Play) Push-button is pressed and playback starts.
On Screen Icon Display
There are On-Screen Icons available to indicate the current audio transport operating conditions and the Audio/Video Status. These On-Screen Icons are accessible by pressing the DISP/TIME Push-button on the supplied Remote Control. Refer to figure 38.

natural_image
Black-and-white photo of people playing with a rope in a snowy mountain landscape (no visible text or symbols)Figure 38
The top row of icons from left to right --- Transport Mode, Disc Type and format, Titles/Group (current/total), Chapter/Track (current/total), Time (Title, Chapter, Group or Track) (current/total). The bottom row icons from left to right --- Number of Audio Choices, Language, Digital Audio Format Type, Number of Channels, Video Format and Resolution.
Once the On-Screen Icons appear, changes to items such as the Track currently Playing, the Chapter Playing, the Group Playing, the Time Indication of the disc or the Audio Mode, etc. may be accomplished. To change from Elapsed Time to Remaining Time use the DIRECTIONAL Push-buttons on the Remote Control. Additionally, the time indicated can be for Title, Chapter, Group or Track depending on the type of disc being played.
By repeated presses of the AUDIO Push-button, selection of the available Digital Audio Formats and/or Languages for the disc playing can be changed.
Video Disc Chapter Selection
Press the DISP/TIME Push-button to activate the On-Screen icon Display. Refer to figure 38. Then press the SEARCH Push-button and use the Right▶ or Left◀ Directional Push-buttons to highlight the current chapter number. Press the SELECT Push-button and use the Up▲ or Down▼ Directional Push-buttons or the Numeric Push-buttons to select the desired Chapter number. Then press the SELECT Push-button.
DVD-Audio Direct Track Selection
The MVP891 Front Panel Display indicates the Disc Track currently playing. Use the Remote Control NUMERIC Push-button(s) to enter the desired Track Number.
Note: The desired Disc Track may also be selected by using the same method outlined in the previous "Video Disc Chapter Selection".
DVD-Audio Group/Track Selection
In a similar manner to "Video Disc Chapter Selection" and "DVD-Audio Direct Track Selection", select either the desired Group or Track.
SACD and CD Direct Track Selection
In a similar manner to "Video Disc Chapter Selection" and "DVD-Audio Direct Group/Track Selection", select the desired Track.
Marker Search
The MVP891 allows for returning to twelve different locations on a given video disc. Perform the following steps to establish markers:
- Start playback of the disc.
- Press the SEARCH Push-button twice. Refer to figure 39.

Figure 39
- When the first desired marker location is reached press the SELECT Push-button.
- As the second desired marker location is reached press the SELECT Push-button agian.
- There are up to twelve possible marker locations available.
- To return to a specific marker location use the Right▶ or Left◀ Directional Push-buttons to highlight the desired marker and then press the SELECT Push-button.
Note: When the disc is removed and/or the MVP891 is placed in the standby mode, the Marker Locations are deleted from memory.
Repeat Mode
This allows repeating a BD/DVD Chapter, Track or the Title (the entire disc) on a continuous basis. Refer to figure 39.
- Start playing the disc or the part of the disc you desire to have repeated.
- Repeated presses of the REPEAT Push-button allows selection of the repeat mode available depending on the type of the disc and how it was mastered. Refer to figure 40 and the On-Screen TV/Monitor.
- To cancel the previously selected Repeat Mode, press the REPEAT Push-button until the Front Panel Information Display and/or the On-Screen TV/Monitor Display Repeat Symbol is extinguished. Information Display on page 17.
A-B Repeat
This feature works in a similar manner to Repeat Mode except it allows the repeating of a specific disc segment on a continuous basis. Refer to figure 39.
- Start playing the part of the disc you desire to have repeated.
- Press the A-B Push-button once to enter A (starting point) and press the same push-button again to enter B (ending point).
- To cancel A-B REPEAT function press the A-B Push-button once again.

Figure 40
Random Playback
This feature allows for listening to Tracks of a SACD or CD Disc in a Random Order. It also allows for the playback of Tracks in a Group on a DVD-Audio Disc in random order. Refer to figure 40.
- Press the ▶ (Play) Push-button to start Playback of the disc. Then press the RANDOM Push-button to activate random playback of the disc tracks.
- To cancel the Random Playback press the RANDOM Push-button.
SACD and CD Disc Program Playback Mode
This feature allows for the playback of Tracks of SACD and CD Discs in the desired order.
Note: Programming track selection is performed using the TV/Monitor On-Screen Display.
- With the desired disc in the MVP891, press the PLAY▶ Push-button to start playback.
- Press the PGM (Program) Push-button to access the On-Screen Program Mode.
- For the first Program Track press the SELECT Push-button. Refer to figure 41.
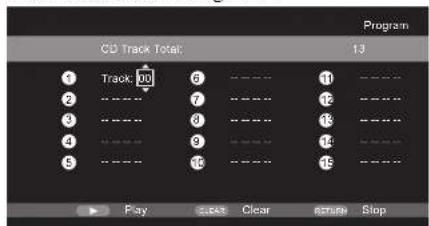
Figure 41
- Using the Up▲ or Down▼ Directional Push-buttons select the desired Track. Then press the SELECT Push-button to store the Track and to advance to Program step 2.

How to Operate the MVP891, con't
Note: The MVP891 automatically stores into memory each of the program steps as they are entered.
- In a similar manner, enter the remaining desired Tracks.
Note: The CLEAR Push-button may be used to delete a selected Program Step.
- To start playback of the just entered program press the PLAY▶ Push-button.
Note: To momentarily stop playback press either the Pause || Push-button or the STOP ■ Push-button once. To resume Program Playback press the PLAY▶ Push-button.
- To cancel the Program Playback Mode press the STOP ■ Push-button twice.
Search Mode
Depending on the type of disc playing back, the Search Function allows for rapid selection of a location on the disc. Refer to the chart below for disc type and search functions available:
| Disc Type | ||||
| Search Mode | BD, DVD-V, DVD | DVD-A | SACD, CD MP3 | WMA, LPCM, JPEG, AAC |
| Chapter | ● | --- | ||
| Title | ● | --- | ||
| Track | - | ●●● | ||
| Group | - | ● | - | - |
| Time | ●●● | - | ||
| Marker | ●● | - | - | |
To begin search on a disc press the SEARCH Push-button on the Remote Control then select the desired Search Mode from the choices appearing on the screen for the type of disc in the MVP891. Use the DIRECTIONAL and SELECT Push-buttons to enter the desired Search method.
Media Player
The MVP891 has the ability of playing back special types of file formats created primarily on a computer. The ability to successfully playback these files using the MVP891 Media Player is dependent upon using the correct hardware and software. Please refer to the maker of the computer and software publisher to insure proper results.
Notes: 1. The MP3/WMA Audio File Formats use a technique of lossy compression applied to the original audio information, resulting in lower audio quality with a smaller file size. A special version of WMA allows for lossless version of the original audio information.
- The JPEG Photo File Format is used by a majority of Digital Photo Cameras on the market and the Photos are easily viewed on a variety of consumer products. Some of the Kodak ^1 Picture CDs and Fujifilm ^2 Fujicolor ^2 CDs may also playback on the MVP891.
There are three ways to activate the MVP891 Media Player, insert a CD Disc with data files, select the USB Memory Drive using the Front Panel SOURCE Push-button or press the HOME/PAGE (−) Push-button and select Media Player. Refer to figure 42.

Figure 42
"Kodak" is a trademark of Eastman Kodak Company.
^23 “Fujifilm” and “Fujicolor” are trademarks of the Fuji Company.
To play a music track located on the USB Memory Drive inserted into the MVP891, perform the following steps:
- Using the Right▶ or Left◀ / Up▲ or Down▼ directional Push-buttons, highlight the USB1 Drive and then press the SELECT Push-button. Refer to figure 42.

Figure 43
- Use the Directional Push-buttons to highlight the "MUSIC" then press the SELECT Push-button. Refer to figure 43.

Figure 44
-
Highlight the desired Track and press the SELECT Push-button to start playback. Refer to figure 44.
-
Once playback has started, the basic transport functions such as Next, Back, Fast-Forward, Re-
verse, Stop, Pause, and Play may be used to access the other tracks located in the folder.
Note: The viewing of photos and videos are also performed in a similar manner using the above steps.
YouTube
YouTube is a video file-sharing service operated and managed by YouTube Inc. YouTube and the YouTube logo are the registered trademarks of Google Inc. The content provided by YouTube is independently managed by YouTube, LLC. The content may include information that may be deemed inappropriate.
The MVP891 must be connected to a working Internet Connection in order to watch YouTube. For seamless playback of YouTube Video Content, the MVP891 Internet Connection needs an effective speed greater than 6 MBps for HD Video Content, and greater than 2 MBps for SD Video Content.
Use a Broadband Internet Connection such as Fiber Optics, ADSL, or CATV. The video content may not be displayed correctly, and/or may not be played seamlessly depending upon the usage environment, communication environment, the connection status of the line or on the traffic status of the line. YouTube doesn't support a proxy connection.
If you have any inquiries about YouTube, contact YouTube through the official homepage http://www.youtube.com. To view YouTube on the MVP891 perform the following:
- Press the HOME/PAGE (−) Push-button on the Remote Control to access the Home Menu.
- Use the DIRECTIONAL Push-buttons to highlight the YouTube Logo.
- Press the SELECT Push-button.
- Following the On-Screen Instructions and make
selections using the Directional and Select Push-buttons.
- Press the HOME/PAGE (−) Push-button to return to the Home Menu.
DIVX+
The MVP891 allows viewing of DivX ^® Video-On-Demand (VOD) encoded movies/videos via discs or a USB Memory Drive. A computer is required to one time register the MVP891, to download DivX ^® encoded movie files, and download software to transfer home videos into the DivX ^® file format.
The MVP891 is a DivX Certified® device and must be registered in order to play purchased DivX Video-on-Demand (VOD) movies. Refer to page 22 "DivX Registration" to obtain the registration code for this MVP891. It is to be entered during the DivX® registration process. Using an Internet Web Browser on a computer go to: http://vod.divx.com.
Notes: 1. Registration is not needed to play free DivX ^® movies or videos you create.
-
Registration is required to purchase or rent DivX® movies.
-
A DivX ^® file recorded with a registration code different from the registration code of this MVP891 cannot be played back.
After this MVP891 is registered and the appropriate DivX ^® software programs have been installed on the computer, the process of downloading DivX ^® movies and encoding of home videos can begin. The resulting DivX ^® files can be burned to a disc and/or copied to USB Memory Drive for playback on the MVP891.
When purchasing or renting a DivX ^® file through the official site of DivX ^® Video-On-Demand (VOD) services, the MVP891 registration code will be required.
Note: Some DivX ^® VOD files are restricted to a certain number of playable times. If your DivX ^® VOD file has such a limit, the number of playable times is displayed on the DivX ^® VOD display screen.
When a disc or USB Memory Drive containing a DivX ^® file is inserted into the MVP891, the built-in Media Player will start. Refer to figure 43. Use the DIRECTIONAL and SELECT Push-buttons to Select the VIDEO Folder and then the desired file to play.
Reset the Microprocessor
Reset of Microprocessors
In the unlikely event the controls of the MVP891 stop functioning, the microprocessors can be reset by performing one of the three methods listed below:
Method One - Reset and retain user settings. With the MVP891 in Standby Mode, press and hold in the Front Panel HDMI RES and PAUSE Push-buttons. Release both Push-buttons when the LED above the STANDBY/ON Push-button is extinguished.
Method Two - Reset and return to default settings.
With the MVP891 in Stop Mode, press and hold in the Front Panel DISC LAYER and STOP Push-buttons. Release both Push-buttons when "Initialized" is indicated the Front Panel Information Display.
Method Three
Remove AC Power from the MVP891 for at least 15 seconds, then reapply AC Power to the MVP891.

MVP891 Audio/Video Settings and Adjustments
HDMI Mode
The HDMI MODE setting allows the MVP891 Digital Video Output to match the way most movies are shot, namely at 24 frames per second. Not all TV/Monitors are capable of reproducing the video signal at 24 fames per second. Check the TV/Monitors documentation (or contact your dealer) to determine the processing capabilities.
The MVP891 default HDMI MODE setting is "24p OFF". To activate 24 frames per second output, press the HDMI Push-button until the Front Panel Display inicates "24p ON". Refer to figure 50 and 53.
HDMI Resolution
The HDMI RES (Resolution) allows matching the MVP891 Digital Video Output to the requirements of the TV/Monitor connected to it. The HDMI RES Push-button switches between the various HDMI settings. Refer to the following chart along with figures 50 and 53.
| HDMI RES V | deo Signal Resolution |
| Auto (default) Ma | ches the native resolution of the TV/Monitor |
| Source Direct Res | solution determined by Video Disc or SD Card |
| 480/576i Resolution | ion output is fixed at 480/576i |
| 480/576P Resolution | ion output is fixed at 480/576P |
| 720P Resolution | output is fixed at 720P |
| 1080i Resolution | output is fixed at 1080i |
| 1080P Resolution | output is fixed at 1080P |
| 1080P24 ^2 | Resolution output is fixed at 1080P24 |
^2 When the HDMI Res is set to 1080P at 24 frames per second, video material not recorded at 24 frames may not appear proper when there is movement in the picture.
Video Adjustments
A MVP891 option allows the adjustment of various video parameters, similar to the adjustments on a TV/Monitor. These custom adjustments can be stored into one of five memory locations. To enter custom settings perform the following steps:
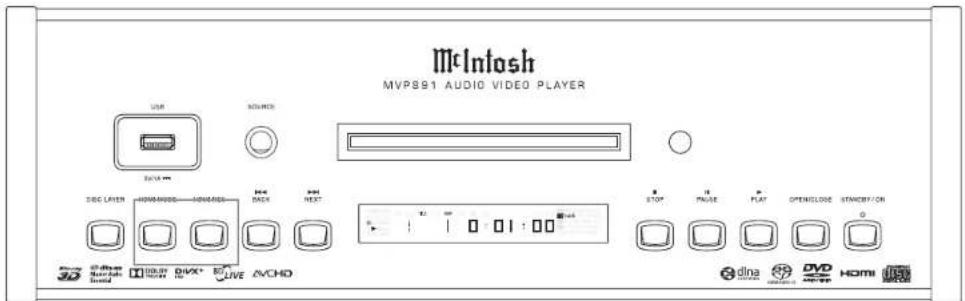
Figure 50
- Press the PIC ADJ (Picture Adjustment) Push-button on the Remote Control. Refer to figure 51.

Figure 51
2 Use the Up▲ or Down▼ Directional Push-buttons to select Memory 1 Location, followed by pressing the SELECT Push-button to access the Memory 1 Picture Adjust 1 Settings.
3. Use the DIRECTIONAL Push-button to make the various possible changes.
4. To exit the Memory 1 Video Adjustment press the PIC ADJ Push-button.
Note: Any video adjustments just made will automatically be stored in the Memory 1 Settings.
There are fourteen different video adjustments possible for each of the five memory locations. Refer to the following chart for additional information:
| Video Adjustment | Description | Adjustment Range |
| 3DNR | Dynamically reduces the noises in the entire picture | 0 - +3 |
| BNR | Reduces the block noise generated by digital processing. | 0 - +3 |
| MNR | Reduces the noise around the outline of an object generated by digital processing | 0 - +3 |
| Contrast | Adjusts the differences between the light and dark parts of the image | -6 to +6 |
| Brightness | Adjusts the overall brightness of the image | 0 to +12 |
| Enhancer | Adjusts the fine detail in the image | 0 to +11 |
| Gamma Correction | Adjusts the intensity of a specific gray scale value up or down.Note. Should only be performed by professionals with necessary test disc and video measurement equipment. | -4 to +4 |
| Sharpness | Adjusts the sharpness in the medium detail of the image | -6 to +6 |
| Hue (color tone) | Adjusts the facial tones toward red or green | -6 to +6 |
| Chroma Level | Adjusts the intensity of the color in the image | -6 to +6 |
| Setup Level ^P | Adjusts the intensity of the image parts at or very close to black | 0 IRE or 7.5 IRE (default) |
| White Level | Adjusts the intensity of the brightest parts of the image | -5 to +5 |
| Black Level | Adjusts the intensity of the darkest parts of the image | -5 to +5 |
| II. Position | Adjusts the centering of the image on the screen Horizontally | -7 to +7 |
| V. Position | Adjusts the centering of the image on the screen Vertically | -7 to +7 |
No change available at the VIDEO OUT Jack.
^2 Effects a 480i signal only and is available at the VIDEO OUT and COMPONENT VIDEO OUT Jacks.
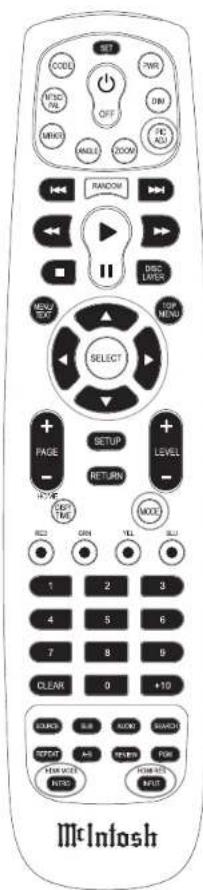
Figure 53

MVP891 Audio/Video Settings and Adjustments, con't
Audio and Video Settings
The MVP891 has various Audio and Video Settings affecting such things as BD Digital Audio Processing;
Secondary Video/Audio/Subtitle/Subtitle Style for BD Discs mastered with additional features; Audio/Video Sync settings. To access these settings while playing back a BD Disc,
press the MODE Push-button on the Remote Control. Then use the DIRECTIONAL Push-buttons to view status and make changes.
| Setting Name Setting Description Refer to | ||
| BD Audio Mode(Digital Audio Output) | HD Audio Output - Select this setting when viewing and listening to the primary information (e.g. the movie) on a Blu-ray Disc. This setting ensures the Dolby TrueHD, DTS-HD Master, etc. Sound Track on the disc is sent, via the HDMI Connection, to the external Audio/Video Control Center for decoding.Mix Audio Output - Select this setting when viewing and listening to the secondary information (e.g. Picture-in-Picture) on a Blu-ray Disc. This will assure hearing both the Movie Sound Track and the audio from the secondary (Picture-In-Picture). The Digital Audio of this combination (Mix Audio) leaves the MVP891 in a multichannel PCM Encoded Format via the HDMI Connection. | Figure 54 |
| Secondary Video(Picture-in-Picture) | Secondary Video, also known as Picture-in Picture, when available on a Blu-ray Disc (“Bonus View” and “BD Live”) is displayed by the MVP891. The Secondary Video Control allows for selection, when available, from the multiple views that may be available on a given disc. The choices are as follows:OFF - Switches OFF the Picture-in Picture.1/X - Displays the first available In-Picture Video.2/X - Displays the second In-Picture Video.X/X - Displays the third, fourth, etc. available In-Picture Video. | Figure 55 |
| Secondary Audio(In-Picture Audio) | Secondary Audio, from the Picture-in Picture, when available on a Blu-ray Disc (“Bonus View” and “BD Live”) is outputted by the MVP891. The Secondary Audio Control allows for selection, when available, from the multiple Audio Choices that may be available on a given disc. The choices are as follows:OFF - Switches OFF the Secondary Audio.1/X - Selects the first available (In-Picture) Audio.2/X - Selects the second available (In-Picture) Audio.X/X - Displays the third, fourth, etc. available (In-Picture) Audio. | Figure 56 |
| Secondary Subtitle(In-Picture Subtitle) | BD Discs with Picture-in-Picture may contain multiple Subtitles to choose from. The choices are as follows:OFF - Switches OFF the Secondary Subtitle.1/X - Selects the first available (In-Picture) Subtitle.2/X - Selects the second available (In-Picture) Subtitle.X/X - Displays the third, fourth, etc. available (In-Picture) Subtitle. | Figure 57 |
| Subtitle Style | Selects from the available Subtitle Styles when Picture-in-Picture is available on the Blu-ray Disc. Figure 58 | |
| Audio/Video Sync | There could be a noticeable difference in time between the picture and sound due to the difference in the Video and Audio Processing time and the type of Video Output Connection used. The choices are:HDM1 / Component Video Output Connections or Composite Video Connection | Figure 59 |

Figure 54
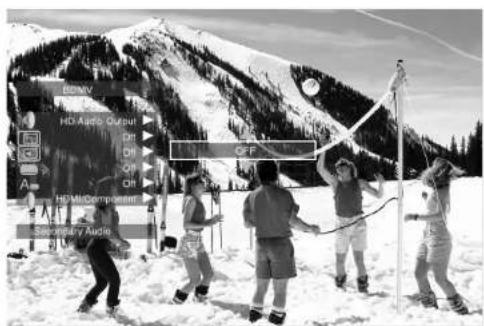
Figure 56

Figure 58
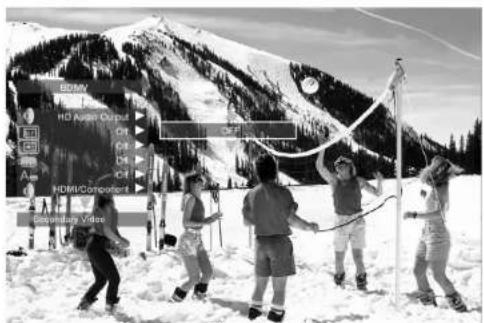
Figure 55

Figure 57
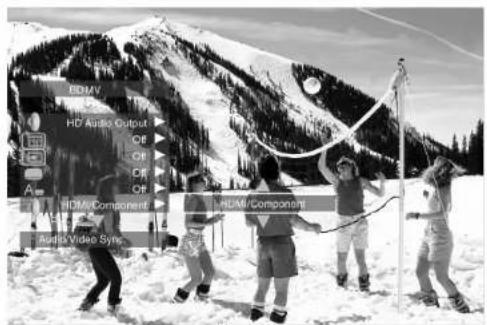
Figure 59

Firmware Update
Purpose:
To Update the MVP891 Firmware.
Requirements:
- A functioning MVP891 Audio/Video Player.
-
An Ethernet Connection between the MVP891 ETHERNET RJ45 connector (using a CAT5 or CAT6 cable) to a Computer Network with router providing Broadband Internet Access or directly to a High Speed Modem with Broadband Internet Access. Refer to page 12 for additional connection information.
-
Internet access supporting DHCP protocol, check with your Internet Service Provider. Note: If your Internet Connection does not support the DHCP protocol proceed to “Network Setup Settings” before starting the Update Process. Refer to pages 18, 19 and 22.
-
An active Video Connection between MVP891 and a TV/Monitor.
-
An active AC Outlet.
Preparing for the Update Process:
With power Off to the MVP891, connect the ETHER-
NET connector to the computer network/modem. Note: Some Routers/Modems might require to be reset after connection is made to the MVP891.
Perform the following steps:
- Switch power On to the MVP891.
- Remove any Disc or USB Memory Drive from the MVP891.
- The Front Panel Information Display should indicate "NO DISC" at this time. If the display indicates "00001" then press the Front Panel SOURCE Push-button once and then wait until the display indicates "NO DISC" before proceeding.
Before starting the Update Process:
Before proceeding with the MVP891 Firmware Update, please keep in mind the following:
- The Update process will erase the current firmware inside the MVP891.
- The MVP891 will not function until a successful Firmware Update is accomplished.
- The Firmware Update Process will take on average 10 minutes and it could take upwards of 30 minutes or more depending on the speed of the Internet Connection.
- DO NOT remove AC Power from the MVP891 during the Update Process.
- DO NOT attempt to stop the Update Process once it has started.
- DO NOT operate the MVP891 until the Update Process is complete (the Front Panel Information Display will indicate "NO DISC").
Update Process:
- Press the SETUP Push-button on the Remote Control. The Front Panel Information Display will indicate "SETUP" and the TV/Monitor will now display the Setup Graphics. Refer to figure 70.
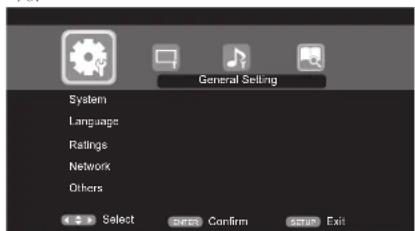
Figure 70
- Using the DIRECTIONAL Push-buttons first select "System", then "Firmware Update" followed by "Check for Update". Refer to figures 71 and 72.

Figure 71

Figure 72
Note: If figure 73 appears On-Screen the MVP891 was unable to establish a connection with the Internet, try resetting the Routers/Modem and then try again.
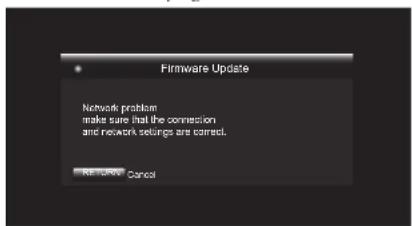
Figure 73
- Press the SELECT Push-button. Refer to figure 74.

Figure 74
- If figure 75 appears On-Screen the MVP891 aready has latest Firmware and no update is necessary at this time. If there is a firmware update available press the SELECT Push-button to begin the update process. Refer to figure 76.

Figure 75

Figure 76
- When the Update Firmware Process is complete figure 77 will appear On-Screen. The MVP891 will automatically reboot or Press the SELECT Push-button to reboot the MVP891 now.

Figure 77
The Update Process is complete when the Front Panel Information Display indicates "NO DISC". Resume normal operations at this time.
Number of Channels
2 and 7.1
Output Level
4.0Vrms Balanced (2 channel Output)
2.0Vrms Unbalanced (2 channel Output and 7.1 Channels)
Output Impedance
600 ohms Balanced (2 channel Output)
600 ohms Unbalanced (2 channel Output and 7.1 Channels)
Audio Frequency Response (Blu-ray, DVD)
4Hz to 22,000Hz (48kHz Sampling, Linear Audio)
4Hz to 44,000Hz (96kHz Sampling, Linear Audio)
4Hz to 88,000Hz (192kHz Sampling, Linear Audio)
SACD Frequency Response
4Hz to 40,000Hz
CD Frequency Response
4Hz to 20,000Hz
Signal to Noise Ratio
115dB
Dynamic Range
110dB
Harmonic Distortion
0.002%
Channel Separation
Better than 110dB (1,000Hz)
Video SpecificationsAudio Specifications
Signal System
NTSC/PAL Region Code A, 1
Component Video Output Level
Y Output Level 1.0Vp-p (75 OHM)
P_B / C_B Output Level 0.648Vp-p (75 OHM)
P_R / C_R Output Level 0.648Vp-p (75 OHM)
Composite Video Output Level
1Vp-p (75 OHM)
General Specifications
HDMI Output
Supports 3D, Deep Color, x.v. Color, and CEC
Digital Output
Coaxial: 0.5V p-p/75 ohm
Digital Signal Format
Sampling Frequencies: 44.1kHz, 48.0kHz, 96.0kHz and 192.0kHz
Transport
Laser Beam Wavelength: 630nm/810nm
Laser Power: CLASS I
Power Requirements
Field AC Voltage conversion of the MVP891 is not possible. The MVP891 is factory configured for one of the following AC Voltages:
100 Volts, 50/60Hz at 50 watts
110 Volts, 50/60Hz at 50 watts
120 Volts, 50/60Hz at 50 watts
220 Volts, 50/60Hz at 50 watts
230 Volts, 50/60Hz at 50 watts
240 Volts, 50/60Hz at 50 watts
Standby: less than 0.5 watt
Note: Refer to the rear panel of the MVP891 for the correct voltage.
Overall Dimensions
Width is 17-1/2 inches (44.5cm)
Height is 6 inches (15.2cm)
Depth is 16 inches (40.6cm) including connections
Note: When the Disc Tray is opened, the panel clearance required in front of mounting panel is 6-3/4 inches (17.2cm).
Weight
24 pounds (10.9Kg) net, 40.4 pounds (18.3Kg) in shipping carton
Shipping Carton Dimensions
Width is 26-1/2 inches (67.3cm)
Depth is 24-1/4 inches (62.2cm)
Height is 11-3/4 inches (29.9cm)
Packing Instructions
In the event it is necessary to repack the equipment for shipment, the equipment must be packed exactly as shown below. It is very important that the four plastic feet are attached to the bottom of the equipment. This will ensure the proper equipment location on the bottom pad. Failure to do this will result in shipping damage.
Use the original shipping carton and interior parts only if they are all in good serviceable condition. If a shipping carton or any of the interior part(s) are needed, please call or write Customer Service Department of McIntosh Laboratory. Refer to page 4. Please see the Part List for the correct part numbers.
Quantity Part Number Description
1 033838 Shipping carton only
4 033837 End cap
1 033836 Inside carton only
1 033725 Top pad
1 034301 Bottom pad
2 034446 Foam plug
4 017937 Plastic foot
4 400159 #10-32 x 3/4" screw
4 404080 #10 Flat washer
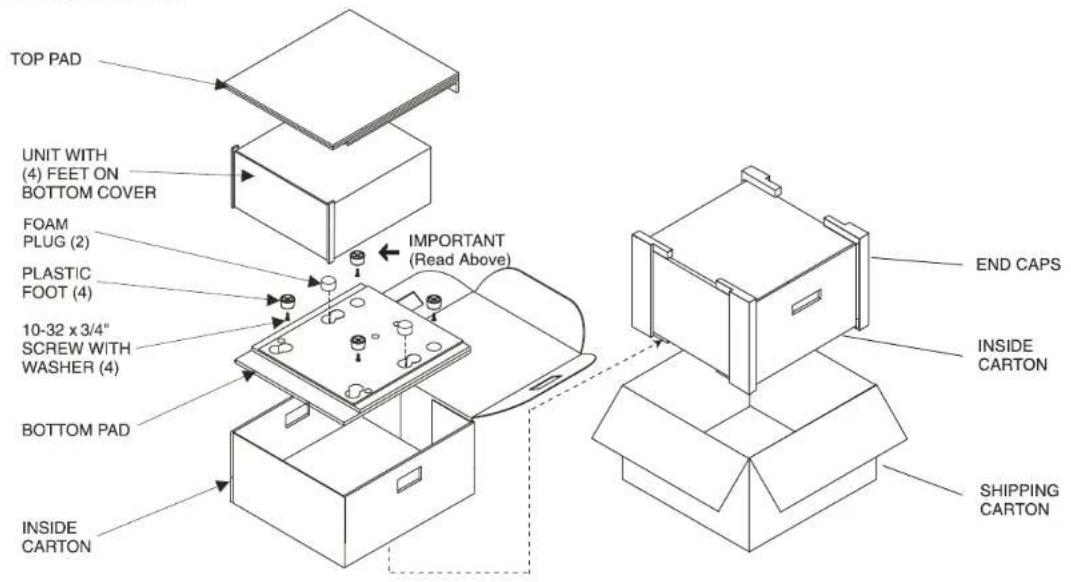

McIntosh Laboratory, Inc.
2 Chambers Street
Binghamton, NY 13903
www.mcintoshlabs.com
The continuous improvement of its products is the policy of McIntosh Laboratory Incorporated who reserve the right to improve design without notice. Printed in the U.S.A.


- WARNING - TO REDUCE RISK OF FIRE OR ELECTRICAL SHOCK, DO NOT EXPOSE THIS EQUIPMENT TO RAIN OR MOISTURE.
- NO USER-SERVICEABLE PARTS INSIDE. REFER SERVICING TO QUALIFIED PERSONNEL.
- To prevent the risk of electric shock, do not remove cover or back. No user-serviceable parts inside.
- LUOKAN 1 LASERLAITE KLASS 1 LASER APPARAT
- IMPORTANT SAFETY INSTRUCTIONS!
- PLEASE READ THEM BEFORE OPERATING THIS EQUIPMENT.
- Trademark and License Information
- Thank You
- Please Take A Moment
- Technical Assistance
- Customer Service
- Table of Contents
- Connections:
- Remote Control:
- Front Panel Features:
- Setup:
- Operation:
- Additional Information:
- General Information
- USB Memory Drive Information
- Disc Information
- Connector and Cable Information
- XLR Connectors
- Power Control Connector
- Data and IR Input Port Connectors
- RS232 DB9 Connector Pin Layout
- Introduction
- Performance Features
- - Triple Laser Pickup
- - Advanced Transport
- • 1080p/24frame Video Output
- - Video Outputs
- • Advanced Video Circuitry
- • 32 Bit Audio DAC
- • Balanced Outputs
- • Built-in Dolby True HD and DTS-DH Master Decoders
- • Digital Audio Outputs
- - On Screen Setup and Calibration
- • Power Control
- - Remote Control
- • Special Power Supply
- - Extruded Side Panels
- Dimensions
- Installation
- Making Connections
- Power Control Connections:
- Data Control Connections:
- Sensor Connections:
- HDMI Connections:
- Digital Audio Connections:
- Analog Audio Connections:
- Analog Video Connections:
- Ethernet Connection:
- AC Power Cords Connections:
- Remote Control Push-Buttons
- How to use the Remote Control
- Play
- Stop
- Numbered Push-buttons
- Clear
- Pause
- Back and Next
- Return
- Setup
- Subtitle
- Angle
- Four Direction Arrows
- Select
- Top Menu
- Display/Time
- Audio
- REV and FF
- A-B Repeat
- Search
- Introduction to the MVP891 Setup Mode
- Power
- Adjustments and Setting changes
- Checking the Network Connection
- How to Operate the MVP891
- Power On
- Disc or USB Memory Drive Selection
- How to Load a BD, DVD, SACD or CD Disc
- How to Play a BD or DVD Disc
- How to Play a SACD Disc
- How to Play a CD Disc
- How to Pause a Disc
- DVD-Video Rapid Frame Advance
- Back Track/Chapter
- How to Operate the MVP891, con't
- Next Track/Chapter
- Fast Forward or Reverse
- Stop Mode
- On Screen Icon Display
- Video Disc Chapter Selection
- DVD-Audio Direct Track Selection
- DVD-Audio Group/Track Selection
- SACD and CD Direct Track Selection
- Marker Search
- Repeat Mode
- Random Playback
- SACD and CD Disc Program Playback Mode
- Search Mode
- Media Player
- YouTube
- DIVX+
- Reset the Microprocessor
- Reset of Microprocessors
- MVP891 Audio/Video Settings and Adjustments
- HDMI Mode
- HDMI Resolution
- Video Adjustments
- MVP891 Audio/Video Settings and Adjustments, con't
- Audio and Video Settings
- Firmware Update
- Purpose:
- Requirements:
- Preparing for the Update Process:
- Before starting the Update Process:
- Update Process:
- Number of Channels
- Output Level
- Output Impedance
- Audio Frequency Response (Blu-ray, DVD)
- SACD Frequency Response
- CD Frequency Response
- Signal to Noise Ratio
- Dynamic Range
- Harmonic Distortion
- Channel Separation
- Video SpecificationsAudio Specifications
- Signal System
- Component Video Output Level
- Composite Video Output Level
- General Specifications
- HDMI Output
- Digital Output
- Digital Signal Format
- Transport
- Power Requirements
- Overall Dimensions
- Weight
- Shipping Carton Dimensions
- Packing Instructions
Brand : MCINTOSH
Model : MVP891
Category : Blu-ray player