
GIGA W3 Professional - Coffee maker JURA - Free user manual and instructions
Find the device manual for free GIGA W3 Professional JURA in PDF.


| Product Type | Automatic coffee machine for professional or commercial use |
| Brand | JURA |
| Model | GIGA W3 Professional |
| Dimensions (W × H × D) | 37 × 55 × 49.6 cm |
| Weight | Approx. 18.3 kg |
| Power Supply | 220–240 V ~, 50 Hz, 2300 W |
| Pump Pressure | Static, max. 15 bar |
| Water Tank Capacity | 5 L |
| Bean Container Capacity | 1000 g |
| Coffee Grounds Container Capacity | Max. 40 portions |
| Cable Length | Approx. 1.1 m |
| Energy Consumption (Save No) | Approx. 30 Wh |
| Energy Consumption (Save Level 1) | Approx. 12 Wh |
| Energy Consumption (Save Level 2) | Approx. 15 Wh |
| Noise Level | Lp < 70 dB(A) |
| Ambient Temperature Range | 10–35 °C |
| Humidity | Max. 80% |
| Conformity | CE |
| Display | Programmable LCD with multifunction buttons |
| Grinder | Adjustable consistency (fine to coarse) |
| Milk System | Integrated, with automatic rinsing and cleaning |
| Filter Compatibility | CLARIS Pro Blue filter cartridge |
| Barista Recipes | 12 pre-programmed recipes |
| Dual Spout | Height and width adjustable |
| Hot Water Spout | Height adjustable |
| Maintenance Programs | Descaling, cleaning, rinsing (coffee and milk system) |
| Safety Features | Automatic switch-off, overheat protection, child lock |
Frequently Asked Questions - GIGA W3 Professional JURA
User questions about GIGA W3 Professional JURA
0 question about this device. Answer the ones you know or ask your own.
Ask a new question about this device
Download the instructions for your Coffee maker in PDF format for free! Find your manual GIGA W3 Professional - JURA and take your electronic device back in hand. On this page are published all the documents necessary for the use of your device. GIGA W3 Professional by JURA.
USER MANUAL GIGA W3 Professional JURA
natural_image
Exterior view of a Jute coffee machine with open lid and side grilles (no visible text or symbols)GIGA W3 Professional Instructions for Use

Original instructions for use
Before using the machine read the instructions for use.
Table of contents
Your GIGA W3 Professional
Control elements 4
Important information 6
Proper use 6
For your safety....6
1 Preparing and using for the first time 10
JURA on the Internet....10
Setting up the machine 10
Filling the water tank....10
Filling the bean container....10
First-time use 11
Determining the water hardness 14
Connecting milk....15
2 Preparation 16
Coffee, latte macchiato etc. – options for preparation 16
Preparation at the touch of a button....17
Preparation using the product selector 18
Ground coffee....18
Barista recipes at a glance....19
Preparing barista recipes ....20
Permanently setting amounts for the cup size 20
Hot water....21
3 Daily operation 22
Switching on 22
Daily maintenance....22
Regular maintenance 23
Switching off 23
4 Permanent settings in programming mode 24
Possible settings in programming mode 24
Product settings 25
Adjusting the product settings....25
Renaming a product....27
Adding products to the start screen....28
Setting the consistency of grind 29
Maintenance settings....30
Setting the water hardness 31
Energy-saving mode 31
Time and date....32
Timer 33
Automatic switch-off 34
Units 35
Restore factory settings 35
Language 36
Display settings 36
Background 37
Deactivating barista recipes....38
Querying information 38
5 Maintenance 40
Rinsing the coffee system ....40
Rinsing the milk system....41
Cleaning the milk system 41
Dismantling and rinsing the dual spout 42
Inserting and activating the filter....45
Changing the filter 46
Cleaning the machine 47
Descaling the machine 48
Cleaning the bean container....50
Descaling the water tank 51
6 Display messages 52
7 Troubleshooting 54
8 Transport and environmentally friendly disposal 55
Transport / Emptying the system....55
Disposal....55
9 Technical data 56
10 Index 57
11 JURA contact details / Legal information 60
Symbol description
Warnings
| WARNING | Always take note of any information marked with the words CAUTION or WARNING and a warning sign. The signal word WARNING draws your attention to potential serious injury, and the signal word CAUTION to potential minor injury. |
| CAUTION |
CAUTION CAUTION draws your attention to potential damage to the machine.
Symbols used
▶ Prompt to take action. This symbol means that you are being prompted to perform some action.
i Information and tips to make it even easier to use your GIGA.
'Espresso' Display
Control elements
Control elements
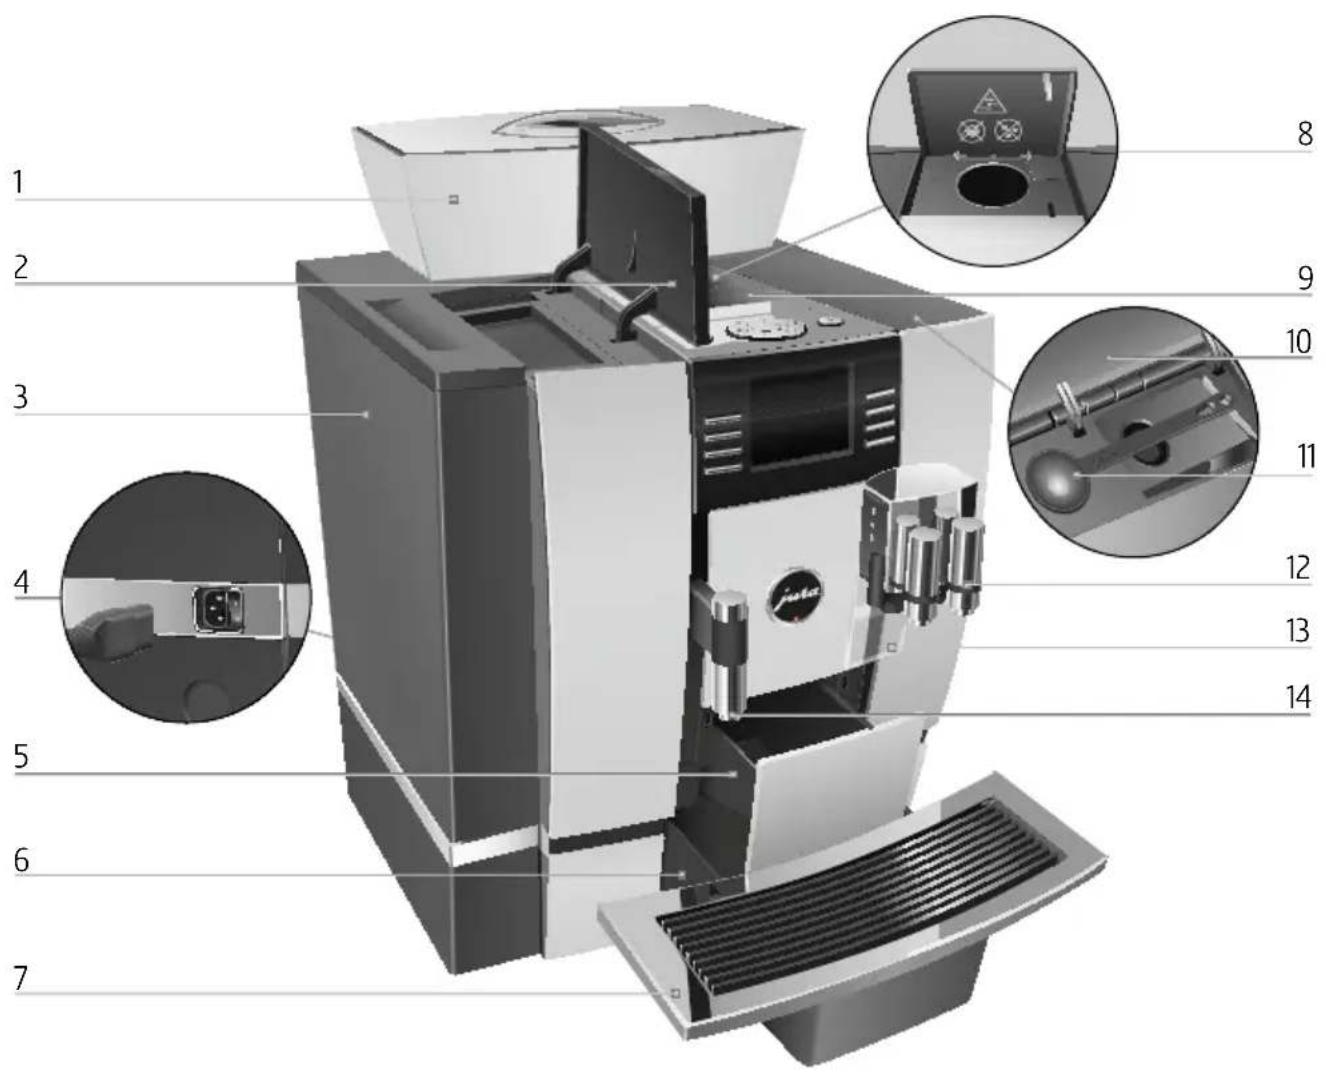
1 Bean container with aroma preservation cover
2 Water tank cover
3 Water tank
4 Power switch and plug-in mains cable (back of the machine)
5 Coffee grounds container
6 Drip tray
7 Cup grille
8 Filler funnel for ground coffee
9 Ventilation slats
10 Storage compartment cover
11 Measuring spoon for ground coffee
12 Height- and width-adjustable dual spout
13 Splash guard
14 Height-adjustable hot-water spout
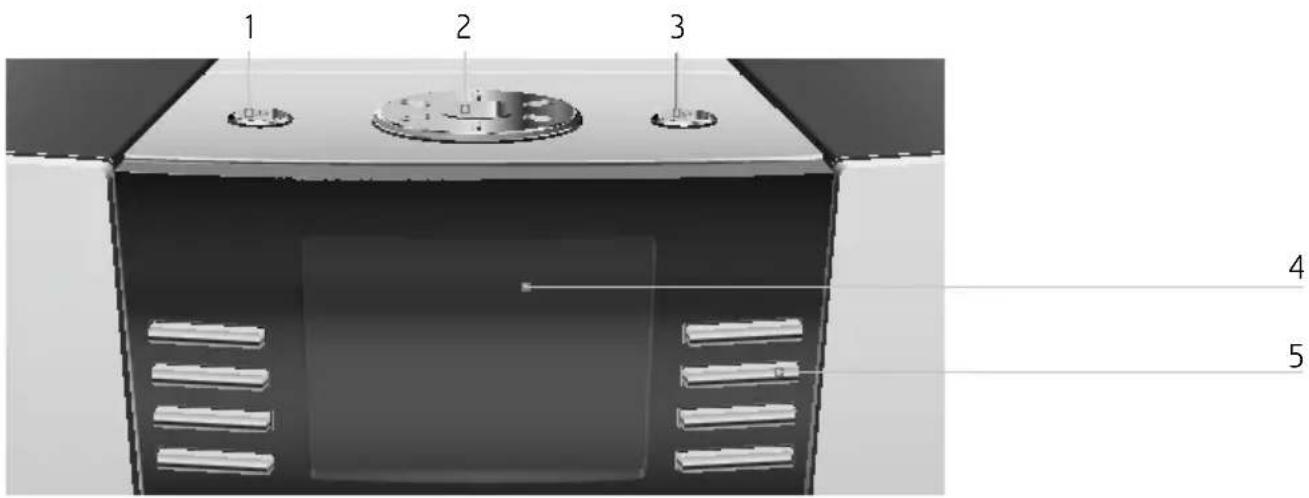
Top of the machine
1 ⏻ On/Off button
2 Rotary Switch
3 P P button (programming)
Front
4 Display
5 Multi-function buttons (button function depends on what is shown in the display)
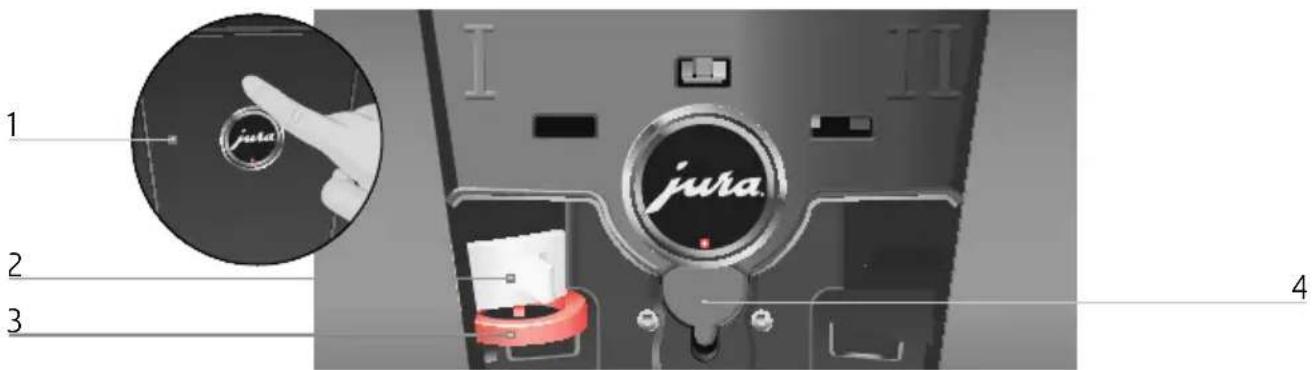
Back of the machine
1 Service cover
(open by pressing with your finger)
2 Locking device
3 Sliding catch
4 Service socket (underneath cover)
Important information
Proper use
This machine is intended for use by specialist or trained staff in businesses, light industry and agricultural facilities or for commercial use by non-professionals. It should only be used for coffee preparation and to heat milk and water. Use for any other purpose will be deemed improper. JURA Elektroapparate AG cannot accept any responsibility for the consequences of improper use.
Before using the machine read these instructions for use thoroughly and completely and comply with the instructions they contain. A warranty service is not applicable for damage or defects caused by non-compliance with the instructions for use. Keep these instructions for use close to the machine and pass them on to the next user.
The GIGA may only be operated by instructed persons. Non-professionals must be supervised during use.
For your safety

Please carefully read and observe the important safety information set out below.
To avoid danger of potentially fatal electric shock:
■Never use a machine which is damaged or has a defective mains cable.
In the event of signs of damage, for example if there is a smell of burning, unplug the machine immediately from the mains supply and contact JURA service.
■If the mains cable of this machine is damaged, it must be repaired either directly by JURA or by an authorised JURA service centre.
■Make sure that the GIGA and the mains cable are not located close to hot surfaces.
■Be careful to ensure that the mains cable is not trapped and does not rub against sharp edges.
■Never open and repair the machine yourself. Do not modify the machine in any way that is not described in these instructions for use. The machine contains live parts. If opened, there is a danger of potentially fatal injury. Repairs may only be carried out by authorised JURA service centres, using original spare parts and accessories.
■To completely and safely disconnect the machine from the power supply, first switch off the GIGA using the On/Off button and then at the power switch. Only then should you remove the mains plug from the power socket.
There is a risk of scalds or burns on the spouts.
■Place the machine out of the reach of children.
■Do not touch any hot parts. Use the handles provided.
A defective machine is not safe and could cause injury or fire. To avoid damage and any associated risk of injury or fire:
■Only connect the machine to the mains voltage in accordance with the information on the rating plate. The rating plate is located on the underside of your GIGA. Further technical data is provided in these instructions for use (see Chapter 9 ‘Technical data’).
■Connect the GIGA directly to a domestic power socket. Using multi-socket adapters or extension cords may cause overheating.
■Never allow the mains cable to loosely hang down. The mains cable could pose a tripping hazard or become damaged.
■Protect the GIGA from environmental influences such as rain, frost and direct sunlight.
■Do not immerse the GIGA, mains cable or connections in water.
■Do not put the GIGA or any individual parts in the dishwasher.
■Switch your GIGA off at the power switch before any cleaning operation. Always wipe the GIGA with a damp cloth rather than a wet one, and protect it from prolonged exposure to water splash.
■The GIGA is not suitable for installation on a surface where a jet of water can be used.
■The machine must not be cleaned with a jet of water.
■Please only use original JURA maintenance products. Use of products that are not explicitly recommended by JURA could damage the GIGA.
■Do not use any coffee beans treated with additives or caramelised coffee beans.
■Only fill the water tank with fresh, cold water.
■Switch the machine off at the power switch if you are going to be absent for a longer period of time.
■Children may not clean or service the machine unless supervised by a responsible person.
■Do not allow children to play with the machine.
- Keep children under the age of 8 away from the machine, or supervise them constantly.
Children aged 8 and over may only operate the machine without supervision if they have been instructed in how to use it safely. Children must be able to recognise and understand the potential dangers arising from incorrect use.
People, including children, who
■do not have the physical, sensory or mental capabilities to use the machine safely or
■are inexperienced or lack knowledge in how to use the machine safely
must be supervised by a responsible person when using it, or must be instructed in how to use it correctly.
Safety when handling the CLARIS Pro Blue filter cartridge:
■Filter cartridges should be kept out of the reach of children.
■Store filter cartridges in a dry place in the sealed packaging.
■Protect cartridges from heat and direct sunlight.
■Do not use damaged filter cartridges.
■Do not open filter cartridges.
1 Preparing and using for the first time
JURA on the Internet
Visit us on the Internet. On the JURA website (www.jura.com) you will find interesting and up-to-date information on your GIGA and on every aspect of coffee.
Setting up the machine
When setting up your GIGA, please note the following:
■Place the GIGA on a horizontal surface that is not sensitive to water.
- Choose a spot for your GIGA which protects the machine against overheating. Ensure that the ventilation slats are not covered.
Filling the water tank
Daily maintenance of the machine and hygiene when handling milk, coffee and water are key to a perfect coffee result in the cup every time. You should therefore change the water daily.
CAUTION
Milk, sparkling mineral water or other liquids can damage the water tank or the machine.
▶ Only fill the water tank with fresh, cold water.
natural_image
Exterior view of a modern office building (no signage)▶ Open the water tank cover.
- Remove the water tank and rinse it with cold water.
- Fill the water tank with fresh, cold water and reinsert the tank.
- Close the water tank cover.
Filling the bean container
The bean container has an aroma preservation cover. This will ensure that your coffee beans retain their aroma for longer.
CAUTION
Coffee beans which have been treated with additives (e.g. sugar), ground coffee or freeze-dried coffee will damage the grinder.
- Only use roasted, untreated coffee beans to fill the bean container.
- Remove the aroma preservation cover.
- Remove any dirt or foreign objects from inside the bean container.
- Fill the bean container with coffee beans and close the aroma preservation cover.
First-time use
During first-time use, you can choose between the 'Quick installation' and the 'standard installation' ('Programming'):
■'Quick installation': After setting the time and date, your GIGA is ready for use.
Standard installation' ('Programming'): Here, you can also decide whether you want to operate your GIGA with or without the CLARIS Pro filter cartridge. If the water hardness is 10 °dH or more, we recommend using the filter cartridge. If you do not know the hardness of your water, you can find this out first (see Chapter 1 'Preparing and using for the first time – Determining the water hardness').
Use filter' / 'Active': Here, you can fit the CLARIS Pro Blue filter cartridge. Descaling will no longer be necessary.
Use filter' / 'Inactive': Here, you can set the water hardness of the water used. This setting influences when your GIGA prompts you to perform descaling.
⚠ WARNING
If the machine is operated with a defective mains cable, there is a danger of potentially fatal electric shock.
▶ Never use a machine which is damaged or has a defective mains cable.
natural_image
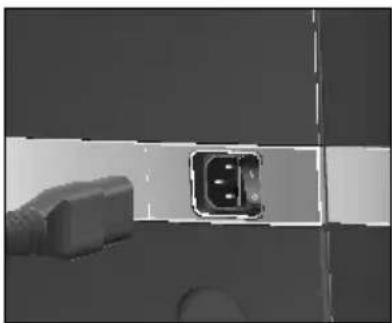
Close-up of a mechanical component with a central square and two protrusions, no visible text or symbolsPrecondition: The water tank and bean containers have been filled.
- Connect the mains cable to the machine.
- Insert the mains plug into a power socket.
▶ Switch on the GIGA using the power switch on the back of the machine.
Press the On/Off button to switch the GIGA on.
'Welcome to JURA' appears on the display. The display then shows the languages you can choose from.
i To display more languages, press the 'Next' button (bottom right).
1 Preparing and using for the first time
- Press the button that corresponds to the language you want, e.g. ‘English’.
'Saved' appears briefly on the display to confirm the setting.
'First-time use'
i Now choose between ‘Quick installation’ and ‘standard installation’ (‘Programming’).
Quick installation
- Press the ‘Quick installation’ button.
'Time'
- Press the '+' or '-' button to set the hours.
▶ Press the 'Save' button.
- Press the '+' or '-' button to set the minutes.
- Press the 'Save' button.
'Saved' appears briefly on the display.
'Date'
- Press the ‘+’ or ‘-’ button to set the year.
▶ Press the 'Save' button.
- Press the ‘+’ or ‘-’ button to set the month.
▶ Press the 'Save' button.
- Press the '+' or '-' button to set the day.
- Press the 'Save' button.
'Saved' appears briefly on the display.
'Machine is heating.'
'Press the Rotary Switch.', the Rotary Switch lights up.

▶ Press the Rotary Switch.
‘System is filling.’, the system fills up with water. The operation stops automatically.
‘Machine is rinsing.’, the machine rinses. Water flows out of the dual spout. The operation stops automatically. ‘Please select product:’ appears on the display. Your GIGA is ready for use.
Standard installation
- Press the 'Programming' button.
'Time'
- Press the ‘+’ or ‘-’ button to set the hours.
- Press the 'Save' button.
- Press the '+' or '-' button to set the minutes.
natural_image
Exterior view of a modern office building (no signage)- Press the 'Save' button.
'Saved' appears briefly on the display.
'Date' - Press the '+' or '-' button to set the year.
- Press the 'Save' button.
- Press the ‘+’ or ‘-’ button to set the month.
- Press the 'Save' button.
- Press the ‘+’ or ‘-’ button to set the day.
▶ Press the 'Save' button.
'Saved' appears briefly on the display.
'Use filter'
i Now decide whether you want to operate your GIGA with or without a CLARIS Pro Blue filter cartridge.
- Press the 'Active' button.
▶ Press the 'Save' button.
'Saved' appears briefly on the display.
'Press the Rotary Switch.', the Rotary Switch lights up.
▶ Press the Rotary Switch.
‘System is filling.’, the system fills up with water. The operation stops automatically.
'Insert filter.' / 'Press the Rotary Switch.'
- Remove and empty the water tank.
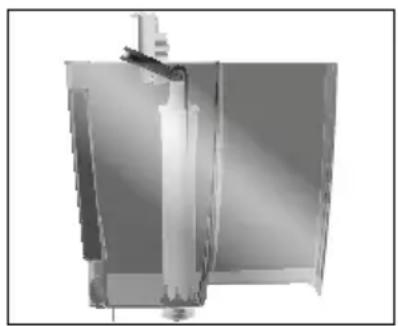
- Open the filter holder and insert the filter cartridge into the water tank, exerting slight pressure.
- Close the filter holder. It will click into place audibly.
- Fill the water tank with fresh, cold water and reinsert the tank.
▶ Press the Rotary Switch.
‘Filter is being rinsed.’, the filter is rinsed. Rinsing of the filter stops automatically. ‘Empty drip tray.’ appears on the display.
- Empty the drip tray and coffee grounds container and put them back into the machine.
'Filter' / 'Filter rinsing complete.'
‘Machine is rinsing.’, the machine rinses. Water flows out of the dual spout. The operation stops automatically. ‘Please select product:’ appears on the display. Your GIGA is ready for use.
1 Preparing and using for the first time
Deactivating the filter
- Press the 'Inactive' button.
- Press the 'Save' button.
'Water hardness'
i If you do not know the hardness of your water, you must find this out first (see Chapter 1 ‘Preparing and using for the first time – Determining the water hardness’).
- Press the ‘+’ or ‘-’ button to adjust the water hardness.
▶ Press the 'Save' button.
'Saved' appears briefly on the display.
'Press the Rotary Switch.', the Rotary Switch lights up.
▶ Press the Rotary Switch.
‘System is filling.’, the system fills up with water. The operation stops automatically.
‘Machine is rinsing.’, the machine rinses. Water flows out of the dual spout. The operation stops automatically. ‘Please select product:’ appears on the display. Your GIGA is ready for use.
Determining the water hardness
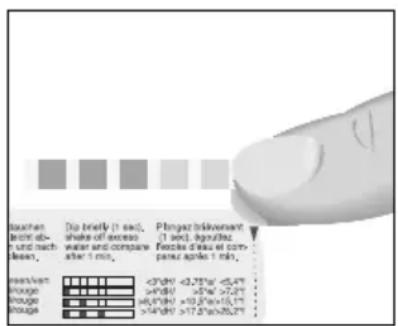
You can find out what the water hardness is by using the Aquadur® test strip supplied as standard.
- Hold the test strip briefly (for 1 second) under flowing water. Shake off the water.
▶ Wait for about 1 minute.
- You will then be able to read the degree of water hardness from the discolouration of the Aquadur® test strip and the description on the packaging.
Connecting milk
Your GIGA creates fine, creamy, feather-light milk foam with a perfect consistency. The most important requirement for frothing milk is a milk temperature of 4–8 °C. We would therefore recommend using a milk cooler (e.g. the JURA Compressor Cooler Pro, which is available as an option).
- Connect the milk pipe to the dual spout. To do this, attach the end of the milk pipe to the connector on the right-hand side of the dual spout.
- Connect the other end of the milk pipe to a milk cooler.
2 Preparation
2 Preparation
i While a product is being prepared, you can stop preparation at any time. To do this, press the Rotary Switch ⏻ or the ‘↑’ button.
i During preparation, you can change the preset amounts (e.g. amount of milk foam or water) by turning the Rotary Switch Ⓞ.
i You can follow the current status of preparation on the display.
Coffee tastes best served hot. A cold porcelain cup cools the beverage – and impairs the taste. We therefore recommend prewarming the cups. The full coffee aroma can develop only in prewarmed cups. You can purchase a JURA cup warmer from your specialised dealer.
You can make permanent settings for all products in programming mode (see Chapter 4 ‘Permanent settings in programming mode – Adjusting the product settings’).
Coffee, latte macchiato etc. – options for preparation
The GIGA provides you with two options for preparing a speciality coffee, milk or hot water.
■Preparation at the touch of a button: Simply press the corresponding preparation button for the product shown on the display (start screen) that you want.
■Preparation using the product selector (Rotary Selection): Only some of the products you can prepare are shown on the start screen. As soon as you turn the Rotary Switch, more products are displayed in a product selector.
Turn the Rotary Switch to bring the product you want into focus. Start preparation by pressing the Rotary Switch or the 'Prepare' button.
The product selector view disappears automatically after 5 seconds if no preparation is started.
The two preparation options will now be described in more detail in the following sections.
Preparation at the touch of a button
Speciality coffees at the touch of a button
On the display (start screen), you will see various products, which you can prepare by simply pressing the corresponding button.
A speciality coffee displayed on the start screen is always prepared following the same model.
natural_image
Product photo of a coffee machine with a white mug and black stand, no visible text or symbolsExample: Proceed as follows to prepare one coffee.
Precondition: 'Please select product:' is displayed.
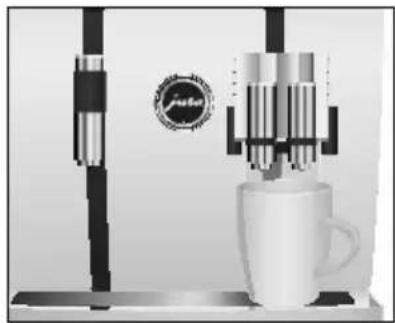
- Place a cup under the dual spout.
- Press the 'Coffee' button.
Preparation starts. 'Coffee' and the fill volume are displayed. The preset amount of water for coffee flows into the cup.
Preparation stops automatically. 'Please select product:' appears on the display.
Two speciality coffees at the touch of a button
Two speciality coffees can always be prepared in the same way: Press the preparation button you want twice within two seconds.
Speciality coffees with milk at the touch of a button
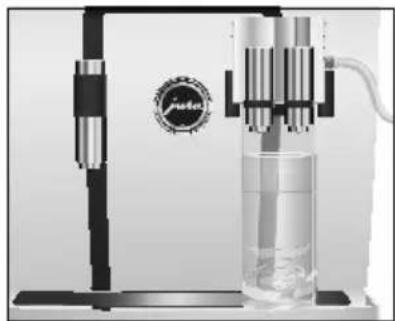
Your GIGA prepares latte macchiato, cappuccino and other speciality coffees with milk at the touch of a button. There is no need to move the glass or cup.
Example: Proceed as follows to prepare one latte macchiato.
Precondition: 'Please select product:' is displayed, milk is connected to the dual spout.
natural_image
Laboratory setup with a syringe and glass apparatus, no visible text or symbols- Place a glass under the dual spout.
- Press the 'Latte macchiato' button.
'Latte macchiato', the preset amounts of milk and milk foam flow into the glass.
Coffee preparation starts. The preset amount of water for espresso flows into the glass. Preparation stops automatically. 'Please select product:' appears on the display.
To ensure that the milk system in the dual spout always works properly, you must clean it daily (see Chapter 5 'Maintenance – Cleaning the milk system').
2 Preparation
Preparation using the product selector
As soon as you turn the Rotary Switch, more products are displayed in a product selector.
i The product selector view disappears automatically after 5 seconds if no preparation is started.
Preparation of a speciality coffee using the product selector
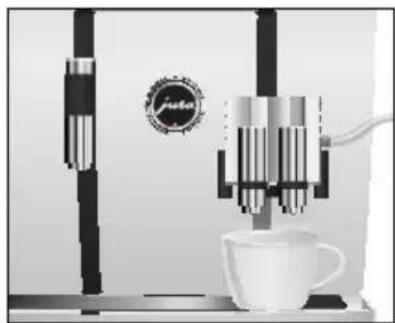
Example: Proceed as follows to prepare a caffè latte using the product selector.
Precondition: 'Please select product:' is displayed, milk is connected to the dual spout.
natural_image
Modern coffee machine setup with vertical tubes and a cup on a counter (no visible text or symbols)- Place a cup under the dual spout.
▶ Turn the Rotary Switch to view the product selector.
Turn the Rotary Switch until the 'Caffè latte' product is in focus.
▶ Press the Rotary Switch to start preparation.
The caffè latte is prepared.
Preparation stops automatically. 'Please select product:' appears on the display.
Ground coffee
You can choose to use another coffee variety, for example decaffeinated coffee, with the filter funnel for ground coffee.
i Never add more than two level measuring spoons of ground coffee.
i Use ground coffee which is not ground too finely. Very fine coffee can block up the system so that the coffee only comes out in drips.
i If you did not fill the machine with a sufficient amount of ground coffee, 'Not enough ground coffee.' is displayed and the GIGA stops the operation.
i The desired speciality coffee must be prepared within approximately one minute after filling with the ground coffee. Otherwise the GIGA stops the operation and is once more ready for use.
All speciality coffees with ground coffee are always prepared following the same model.
natural_image
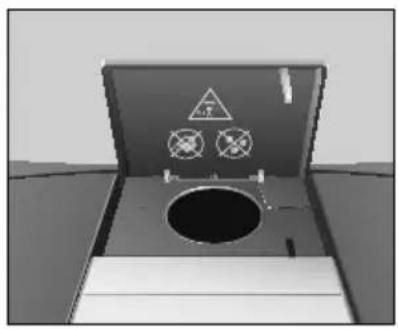
Exterior view of a mechanical device with warning symbols and a central circular component (no readable text or labels)Example: Proceed as follows to prepare one coffee using ground coffee.
Precondition: 'Please select product:' is displayed.
▶ Place a cup under the dual spout.
- Open the cover of the filler funnel for ground coffee.
'Please add ground coffee.'
- Place one level measuring spoon of ground coffee into the filler funnel.
- Close the cover of the filler funnel.
'Please select product:', the speciality coffees you can prepare with ground coffee are displayed.
- Press the 'Coffee' button.
Preparation starts. 'Coffee' and the fill volume are displayed. The preset amount of water for coffee flows into the cup.
Preparation stops automatically. 'Please select product:' appears on the display.
Barista recipes at a glance
Now you too can be a professional barista! You can select the recipes for 12 delicious coffee creations from the product selector using the Rotary Switch. The GIGA will guide you through each step of the preparation process with easy-to-follow text and pictures. Choose from:
Marocchino
■Pepresso
■White Cool
■Flavoured latte macchiato
Irish coffee*
■ Café mélange
■Viennese coffee
Winter Magic
Shakerato
■Mango Lassi
Red Cool*
Summer Fire
Designed to please the eye as well as the taste buds! (Recipes marked * contain alcohol.)
2 Preparation
Preparing barista recipes
All barista recipes are always prepared following the same model.
i The product selector view disappears automatically after 5 seconds if no preparation is started.
Example: Proceed as follows to prepare a White Cool.
Precondition: 'Please select product:' is displayed.
▶ Turn the Rotary Switch to view the product selector.
Turn the Rotary Switch until the ‘White Cool’ product is in focus.
▶ Press the Rotary Switch to start preparation.
- Follow the instructions on the display and confirm by pressing the 'Next' button.
i You can stop preparation at any time by pressing the ‘↑’ button.
i You cannot make any permanent settings for barista recipes. During preparation, you can however change the coffee strength and quantities by turning the Rotary Switch Ⓞ.
Permanently setting amounts for the cup size
It is easy to make permanent settings for the amounts (amount of water, amount of milk etc.) according to the cup size for all products except caffè latte. Adjust the amount once as shown in the following example. Every time you prepare a drink in the future, this amount will be dispensed.
The permanent settings for adapting the amounts to the cup size for all products always follows the same model.
Example: Proceed as follows to permanently set the amount of water for one coffee.
Precondition: 'Please select product:' is displayed.
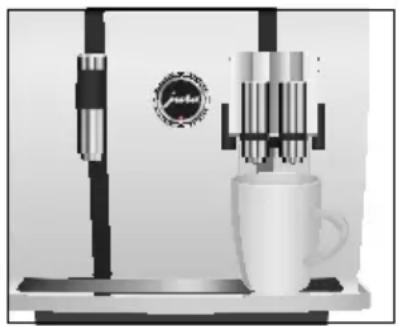
natural_image
Product photo of a coffee machine with a mug and coffee maker (no visible text or symbols)- Place a cup under the dual spout.
- Press and hold the 'Coffee' button.
'Coffee' and the fill volume are displayed. - Hold the ‘Coffee’ button down until ‘Enough coffee? Press button.’ appears.
▶ Release the 'Coffee' button.
Preparation starts and the coffee flows into the cup.
- Press any button as soon as there is sufficient coffee in the cup. Preparation stops. 'Saved' appears briefly on the display. The set amount of water for one coffee is permanently stored. 'Please select product:' appears on the display.
i You can alter this setting at any time by repeating the above procedure.
i The amount can be permanently adjusted to the cup size for the products shown in the product selector too. To do this, press and hold the Rotary Switch until 'Enough coffee? Press button.' appears.
i You can also permanently set the amount for all speciality coffees, milk and hot water in programming mode (see Chapter 4 'Permanent settings in programming mode – Adjusting the product settings').
Hot water
CAUTION
The following temperatures can be selected for preparing hot water: 'Low', 'Normal', 'High'.
There is a danger of scalding from hot water splashes.
- Avoid direct contact with the skin.
natural_image
Product illustration of a coffee machine with a cup and a logo, no visible text or symbolsPrecondition: 'Please select product:' is displayed.
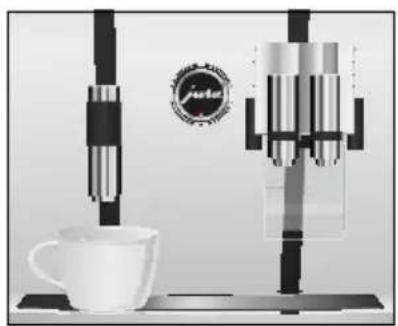
- Place a cup under the hot-water spout. - Press the 'Hot water' button. 'Hot water' and the temperature are displayed.
i By pressing the ‘+’ or ‘-’ button (within approximately 2 seconds) you can set the temperature to your individual preference. This setting is not saved.
'Hot water', hot water flows into the cup. Preparation stops automatically when the preset amount of water is reached. 'Please select product:' appears on the display.
3 Daily operation
3 Daily operation
Switching on
When the GIGA is switched on, a rinse operation is automatically initiated. In programming mode you can change this setting so that the machine prompts you to perform the switch-on rinse by pressing the Rotary Switch ⏻ (see Chapter 4 ‘Permanent settings in programming mode – Maintenance settings’).
natural_image
Exterior view of a modern office building (no signage)Daily maintenance
natural_image
Close-up of a mechanical press or clamping device with a metallic component and a meshed base (no visible text or symbols)Precondition: Your GIGA is switched on at the power switch.
- Place a receptacle under the dual spout.
Press the On/Off button to switch the GIGA on.
'Welcome to JURA' appears on the display. The machine heats up.
‘Machine is rinsing.’, the machine rinses. Water flows out of the dual spout. The operation stops automatically. ‘Please select product:’ appears on the display.
To ensure that you get many years of reliable service out of your GIGA and to guarantee the optimum coffee quality, the machine requires daily maintenance.
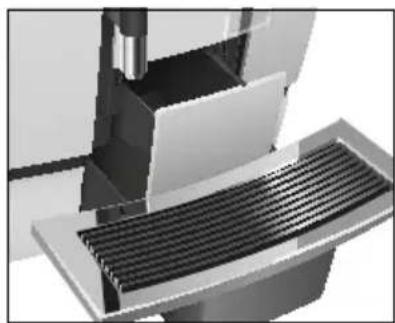
▶ Pull out the drip tray.
- Empty the coffee grounds container and the drip tray. Rinse them both with warm water.
i Always empty the coffee grounds container when the machine is switched on. This is the only way of resetting the coffee grounds counter.
- Refit the coffee grounds container and the drip tray.
- Rinse the water tank with clean water.
- Remove the milk pipe and rinse it thoroughly under running water.
- Dismantle and rinse the dual spout (see Chapter 5 'Maintenance – Dismantling and rinsing the dual spout').
- Wipe the surface of the machine with a clean, soft, damp cloth (e.g. microfibre cloth).
Regular maintenance
Carry out the following maintenance actions regularly or as required:
In the interests of hygiene, we recommend changing the milk pipe on a regular basis (approximately every 3 months). Replacement pipes are available from specialised dealers (JURA original accessory set for frothers).
- Clean the inside of the water tank, e.g. with a brush. Further information about the water tank is provided in these instructions for use (see Chapter 5 ‘Maintenance – Descaling the water tank’).
■Traces of milk and coffee may stick to the top and bottom of the cup grille. If this happens, clean the cup grille.
Switching off
When you switch off your GIGA, the dual spout is rinsed automatically.
natural_image
Exterior view of a modern office building (no signage)Precondition: 'Please select product:' is displayed.
- Place a receptacle under the dual spout.
▶ Press the On/Off button.
'Machine is rinsing.', 'Milk system is being rinsed.' (if you have prepared a speciality coffee with milk). The system rinses itself. The operation stops automatically. Your GIGA is switched off.
When the GIGA is switched off with the On/Off button, the machine consumes less than 0.1 W of standby energy. The machine can be completely disconnected from the power supply using the power switch.
4 Permanent settings in programming mode
Possible settings in programming mode
Press the P button to enter programming mode. You can navigate through the programme items and permanently save the required settings simply by turning the Rotary Switch and using the multifunction buttons. The following settings can be made:
| Programme item Sub-item Explanation | ||
| ‘Maintenance status (1/5)’ | ‘Clean’,‘Change the filter’,‘Descale’ (only if filter is not activated),‘Rinse the milk system’,‘Rinse the coffee system’,‘Clean the milk system’ | ▸ Start the required maintenance programme here. |
| ‘Product settings (2/5)’ | ‘Programming’,‘Classic-library’,‘Set consistency of grind’ | ▸ Select your settings for speciality coffees, milk and hot water.▸ Replace the products on the start screen and in the product selector with your favourites, or prepare your chosen product directly.▸ Adjust the consistency of grind to the coffee beans used. |
| ‘Machine settings (3/5)’ | ‘Maintenance settings’ (filter, water hardness, switch-on rinse, milk system rinsing),‘Time / date’,‘Timer’,‘Save energy’,‘Units’,‘Factory setting’ | ▸ Set the water hardness or activate the filter.▸ Change the settings for the switch-on rinse and milk system rinse.▸ Set the time after which the GIGA should switch off automatically.▸ Select an energy-saving mode.▸ Select the unit for the amount of water.▸ Reset the machine or the permanently set values of all products to the factory settings. |
| ‘Machine settings (4/5)’ | ‘Choose language’,‘Display’,‘Colour scheme’,‘Barista recipes’ | ▸ Select your language.▸ Change the display settings.▸ Activate or deactivate barista recipes. |
| ‘Information (5/5)’ | ‘Product counter’,‘Day counter’,‘Maintenance counter’,‘Version’ | ▸ Keep track of all products prepared and view the number of maintenance programmes performed. |
Product settings
In the programme item ‘Product settings (2/5)’ you can make the following settings:
■'Programming'
Set individual settings for all speciality coffees, milk and hot water (see Chapter 4 ‘Permanent settings in programming mode – Adjusting the product settings’).
Change the names of individual products (see Chapter 4 'Permanent settings in programming mode – Renaming a product').
■'Classic-library'
Find all products stored as standard in your GIGA and prepare these directly.
Replace the products on the start screen and in the product selector with your favourites (see Chapter 4 'Permanent settings in programming mode – Adding products to the start screen').
Adjusting the product settings
The following settings can be made in ‘Product settings (2/5)’ / ‘Programming’:
| Product Coffee strength Amount More settings | |||
| Ristretto,Espresso,Coffee* | (extra-mild),(mild),(normal),(strong),(extra-strong) | Amount of coffee:25 ml – 290 ml | Temperature(low, normal, high),Product name |
| 2 ristretti,2 espressi,2 coffees | – Amount of coffee:25 ml – 290 ml(per cup) | Temperature(low, normal, high),Product name | |
| Cappuccino*,Espresso macchiato*,Latte macchiato,Flat white | (extra-mild),(mild),(normal),(strong),(extra-strong) | Amount of coffee:25 ml – 290 mlMilk: 0 sec. – 120 sec.Milk foam: 0 sec. – 120 sec.Interval: 0 sec. – 120 sec. | Temperature(low, normal, high),Product name |
| 2 cappuccini, | - Amount of coffee: | Temperature(low, normal, high),Product name | |
| 2 caffè latte, | 25 ml - 290 ml | ||
| 2 espressi macchiati, | Milk: 0 sec. - 120 sec. | ||
| 2 latte macchiati, | Milk foam: 0 sec. - 120 sec.(per cup) | ||
| 2 flat whites | Interval: 0 sec. - 120 sec. | ||
| Caffè latte* | (extra-mild),(mild),(normal),(strong),(extra-strong) | Amount of coffee:25 ml - 290 mlMilk: 0 sec. - 120 sec.Milk foam: 0 sec. - 120 sec. | Temperature(low, normal, high),Product name |
| Portion of milk foam, | - Milk: 0 sec. - 120 sec. | Product name | |
| Portion of milk* | Milk foam: 0 sec. - 120 sec. | ||
| 2 portions of milk foam, | - Milk: 0 sec. - 120 sec. | Product name | |
| 2 portions of milk | Milk foam: 0 sec. - 120 sec.(per cup) | ||
| Pot, | (extra-mild), | Amount of coffee:25 ml - 290 ml(per stroke) | Temperature(low, normal, high),Number of strokes(1-5; set number isdisplayed duringpreparation),Product name |
| Pot 2 | (mild),(normal),(strong),(extra-strong) | ||
| Hot water* - Water: 25 ml - 450 ml Temperature | (low, normal, high),Product name | ||
(Products marked * are also available in 'large' size.)
i In addition to the settings listed, you can reset the values for all products to the factory settings.
Example: Proceed as follows in the ‘Expert mode’ to change the amount of milk for a latte macchiato from ‘4 sec.’ to ‘6 sec.’, the amount of milk foam from ‘12 sec.’ to ‘14 sec.’ and the amount of water from ‘45 ml’ to ‘40 ml’.
Precondition: 'Please select product:' is displayed.
P ▶ Press the P button. ‘Maintenance status (1/5)’
- Turn the Rotary Switch until the programme item ‘Product settings (2/5)’ is displayed. - Press the ‘Expert mode’ button. ‘Expert mode’
i Next select the button of the product for which you would like to make settings. No product is prepared at this point.
i You can also select the products in the product selector. To do this, turn the Rotary Switch to view the product selector.
- Press the ‘Latte macchiato’ button.
- Press the ‘Amount of milk’ button.
- Press the ‘+’ or ‘-’ button to change the setting for the amount of milk to ‘6 sec.’
- Press the 'Save' button.
- Press the ‘Amount of milk foam’ button.
- Press the ‘+’ or ‘-’ button to change the setting for the amount of milk foam to ‘14 sec.’
- Press the 'Save' button.
- Press the 'Volume' button.
- Press the ‘+’ or ‘-’ button to change the setting for the fill volume to ‘40 ml’.
- Press the 'Save' button.
P ▶ Press the P button to exit programming mode. 'Please select product:'
Renaming a product
In the programme item ‘Product settings (2/5)’ / ‘Programming’ you can rename all of the products.
Example: Proceed as follows to change the product name from ‘Espresso’ to ‘My espresso’.
Precondition: 'Please select product:' is displayed.
P ▶ Press the P button. ‘Maintenance status (1/5)’
▶ Turn the Rotary Switch until the programme item ‘Product settings (2/5)’ is displayed.
- Press the 'Programming' button.
'Programming'
- Press the ‘Espresso’ button.
- Press the 'Product name' button.
The available letters, numbers and special characters appear on the display.
- Keep pressing the ‘ < ’ button until all letters have been deleted.
i By pressing the ‘^’ button, you can switch between lower and upper case letters.
▶ Turn the Rotary Switch until the letter ‘M’ is highlighted.
Press the Rotary Switch to confirm the letter 'M'.
- Press the ‘^’ button to change to lower case.
▶ Turn the Rotary Switch until the letter 'y' is highlighted.
Press the Rotary Switch to confirm the letter 'y'.
- Continue until ‘My espresso’ is displayed.
- Press the 'Save' button.
'Saved' appears briefly on the display.
'My espresso'
P ▶ Press the P button to exit programming mode.
'Please select product:'
Adding products to the start screen
In the programme item ‘Product settings (2/5)’ / ‘Classic-library’ you will find all the products stored as standard in your GIGA. You can move any of these products to your preferred position on the start screen or in the product selector and make it one of your favourites.
Example: Proceed as follows to display the product ‘2 espressi’ in the bottom right-hand corner of the start screen.
Precondition: 'Please select product:' is displayed.
P ▶ Press the P button.
'Maintenance status (1/5)'
▶ Turn the Rotary Switch until the programme item ‘Product settings (2/5)’ is displayed.
- Press the ‘Classic-library’ button.
'Classic-library'
i Next select the button of the product you want to move to the start screen. No product is prepared at this point.
- Press the '2 espressi' button.
'2 espressi'
▶ Press the 'Save' button.
- Press the ‘Add to favourites’ button.
'Select position'
- Press the button at the bottom right ('Milk').
‘Do you want to replace the current product?’
▶ Press the 'Yes' button.
'Saved' appears briefly on the display.
'Classic-library'
P ▶ Press the P button to exit programming mode.
'Please select product:'
Setting the consistency of grind
In the programme item ‘Product settings (2/5)’ / ‘Set consistency of grind’ you can adjust the grinder to the degree of roast of your coffee.
The consistency of grind is correct if the coffee flows regularly from the dual spout. In addition a fine, thick crema forms.
Precondition: 'Please select product:' is displayed.
P ▶ Press the P button.
'Maintenance status (1/5)'
▶ Turn the Rotary Switch until the programme item ‘Product settings (2/5)’ is displayed.
- Press the 'Set consistency of grind' button.
'Set consistency of grind'
- Press the ‘+’ or ‘-’ button to change the setting for the consistency of grind.
▶ Press the 'Save' button.
'Saved' appears briefly on the display.
'Set consistency of grind'
P ▶ Press the P button to exit programming mode.
'Please select product:'
Maintenance settings
In the programme item ‘Machine settings (3/5)’ / ‘Maintenance settings’ you can make the following settings:
- 'Filter' Activate the CLARIS Pro Blue filter cartridge (see Chapter 5 'Maintenance – Inserting and activating the filter').
- 'Water hardness' If you do not have a filter cartridge, you will need to set the water hardness (see Chapter 4 'Permanent settings in programming mode – Setting the water hardness').
- 'Switch-on rinse' / 'Manual' The switch-on rinse must be started manually.
- 'Switch-on rinse' / 'Automatic' The switch-on rinse is started automatically.
- ‘Rinse the milk system’ / ‘Manual after 10 min.’ You are prompted to rinse the milk system 10 minutes after preparation of a speciality coffee with milk.
- ‘Rinse the milk system’ / ‘Manual immediate’ You are prompted to rinse the milk system immediately after preparation of a speciality coffee with milk.
■‘Rinse the milk system’ / ‘Automatic after 10 min.’ Milk system rinsing is automatically initiated 10 minutes after preparation of a speciality coffee with milk.
- ‘Rinse the milk system’ / ‘Automatic immediate’ Milk system rinsing is automatically initiated approx. 30 seconds after preparation of a speciality coffee with milk.
Example: Proceed as follows to make the machine prompt you to rinse the milk system immediately after preparing a speciality coffee with milk.
Precondition: 'Please select product:' is displayed.
P ▶ Press the P button. ‘Maintenance status (1/5)’
▶ Turn the Rotary Switch until the programme item ‘Machine settings (3/5)’ is displayed.
- Press the ‘Maintenance settings’ button. 'Maintenance settings'
- Press the ‘Rinse the milk system’ button. ‘Rinse the milk system’
- Press the ‘Manual immediate’ button.
- Press the 'Save' button. - 'Saved' appears briefly on the display. - 'Maintenance settings'
P ▶ Press the P button to exit programming mode. 'Please select product:'
Setting the water hardness
The harder the water is, the more frequently the GIGA needs to be descaled. It is therefore important to set the water hardness accurately.
The water hardness can be adjusted on a continuous scale between 1^ dH and 30^ dH.
Precondition: 'Please select product:' is displayed.
P ▶ Press the P button. ‘Maintenance status (1/5)’
▶ Turn the Rotary Switch until the programme item ‘Machine settings (3/5)’ is displayed.
- Press the ‘Maintenance settings’ button.
'Maintenance settings'
- Press the ‘Water hardness’ button.
'Water hardness'
- Press the ‘+’ or ‘-’ button to set the water hardness.
- Press the 'Save' button.
- 'Saved' appears briefly on the display.
- 'Maintenance settings'
P ▶ Press the P button to exit programming mode.
'Please select product:'
Energy-saving mode
In the programme item ‘Machine settings (3/5)’ / ‘Save energy’ you can permanently set an energy-saving mode (Energy Save Mode, E.S.M.®):
- 'Save No' All speciality coffees, speciality coffees with milk and hot water can be prepared without having to wait.
- 'Save Level 1' After switching on, your GIGA is only ready for use for speciality coffees and hot water. Before you can prepare a speciality coffee with milk, the machine must heat up.
4 Permanent settings in programming mode
Soon after the last preparation, the GIGA stops heating up. After about 5 minutes the message ‘Energy Save’ is displayed.
■'Save Level 2'
After switching on, your GIGA is ready for use for all speciality coffees with and without milk, as well as hot water.
Soon after the last preparation, the GIGA stops heating up. After about 5 minutes the message ‘Energy Save’ is displayed.
Example: Proceed as follows to change the energy-saving mode from ‘Save Level 1’ to ‘Save Level 2’.
Precondition: 'Please select product:' is displayed.
P ▶ Press the P button.
'Maintenance status (1/5)'
▶ Turn the Rotary Switch until the programme item ‘Machine settings (3/5)’ is displayed.
- Press the 'Save energy' button.
'Save energy'
- Press the 'Save Level 2' button.
- Press the 'Save' button.
'Saved' appears briefly on the display.
'Machine settings (3/5)'
P ▶ Press the P button to exit programming mode.
'Please select product:'
Time and date
You already set the time and date during first-time use. You can change this setting.
For the time format, you can choose between ‘24 hrs’ and ‘AM / PM’ (see Chapter 4 ‘Permanent settings in programming mode – Units’).
Example: Proceed as follows to change the time.
Precondition: 'Please select product:' is displayed.
P ▶ Press the P button.
'Maintenance status (1/5)'
▶ Turn the Rotary Switch until the programme item ‘Machine settings (3/5)’ is displayed.
- Press the 'Time / date' button.
'Time / date'
- Press the 'Time' button.
'Time'
- Press the ‘+’ or ‘-’ button to set the hours.
- Press the 'Save' button.
- Press the '+' or '-' button to set the minutes.
- Press the 'Save' button.
'Saved' appears briefly on the display.
'Time / date'
P ▶ Press the P button to exit programming mode.
'Please select product:'
Timer
In the programme item ‘Machine settings (3/5)’ / ‘Timer’ you can set an individual switch-on and switch-off time for every day of the week.
i Automatic switch-on only works when the machine is switched on at the power switch.
For the time format, you can choose between ‘24 hrs’ and ‘AM / PM’ (see Chapter 4 ‘Permanent settings in programming mode – Units’).
Example: Proceed as follows to set your GIGA to switch on and off at a time defined by you every day of the week.
Precondition: 'Please select product:' is displayed.
P ▶ Press the P button.
'Maintenance status (1/5)'
▶ Turn the Rotary Switch until the programme item ‘Machine settings (3/5)’ is displayed.
- Press the 'Timer' button.
'Timer'
- Press the ‘Monday’ button (example).
'Monday'
- Press the ‘+’ or ‘-’ button to set the hours (for ‘Switch machine on’).
▶ Press the ‘←’ button.
- Press the ‘+’ or ‘-’ button to set the minutes (for ‘Switch machine on’).
4 Permanent settings in programming mode
- Press the ‘←’ button.
- Press the ‘+’ or ‘-’ button to set the hours (for ‘Switch machine off’).
▶ Press the ‘←’ button. - Press the ‘+’ or ‘-’ button to set the minutes (for ‘Switch machine off’).
- Press the ‘Every weekday’ button.
'Saved' appears briefly on the display. The switch-on and switch-off times you just set are adopted for every day of the week.
'Timer'
P ▶ Press the P button to exit programming mode. 'Please select product:'
Automatic switch-off
By instructing your GIGA to automatically switch itself off, you can cut down your energy consumption. If this function is activated, your GIGA switches off automatically after the preset time following the last action on the machine.
You can set the automatic switch-off time to 15 minutes or 0.5–15 hours.
Precondition: 'Please select product:' is displayed.
P ▶ Press the P button. ‘Maintenance status (1/5)’
▶ Turn the Rotary Switch until the programme item ‘Machine settings (3/5)’ is displayed.
- Press the 'Timer' button.
- Press the 'Next' button.
- Press the 'Switch off after' button.
'Switch off after'
- Press the ‘+’ or ‘-’ button to change the setting.
▶ Press the 'Save' button.
'Saved' appears briefly on the display.
'Timer'
P ▶ Press the P button to exit programming mode. 'Please select product:'
Units
In the programme item ‘Machine settings (3/5)’ / ‘Units’ you can make the following settings:
■Unit for amount of water: 'ml' or 'oz'
■Time format: '24 hrs.' or 'AM / PM'
Example: Proceed as follows to change the unit for the amount of water from ‘ml’ to ‘oz’.
Precondition: 'Please select product:' is displayed.
P ▶ Press the P button.
'Maintenance status (1/5)'
▶ Turn the Rotary Switch until the programme item ‘Machine settings (3/5)’ is displayed.
- Press the 'Units' button.
'Units'
▶ Press the 'oz' button.
▶ Press the 'Save' button.
'Saved' appears briefly on the display.
'Machine settings (3/5)'
P ▶ Press the P button to exit programming mode.
'Please select product:'
Restore factory settings
In the programme item ‘Machine settings (3/5)’ / ‘Factory setting’ you can reset various settings to their factory settings:
All products'
The settings (amount of water, coffee strength, temperature etc.) for all products are reset to the factory settings.
'Machine'
All user settings (apart from the 'filter', 'water hardness' and time and date settings) are reset to the factory settings. The GIGA then switches off.
■'Empty system'
The system is emptied. Your GIGA then switches off.
Example: Proceed as follows to reset the values for all products to the factory settings.
Precondition: 'Please select product:' is displayed.
P ▶ Press the P button.
'Maintenance status (1/5)'
4 Permanent settings in programming mode
▶ Turn the Rotary Switch until the programme item ‘Machine settings (3/5)’ is displayed.
- Press the ‘Factory setting’ button.
'Factory setting'
- Press the 'All products' button.
'All products' / 'Reset all products to the factory settings?'
▶ Press the 'Yes' button.
'Saved' appears briefly on the display.
'Factory setting'
P ▶ Press the P button to exit programming mode.
'Please select product:'
Language
In this programme item you can set the language used by your GIGA.
Example: Proceed as follows to change the language from ‘English’ to ‘Deutsch’.
Precondition: 'Please select product:' is displayed.
P ▶ Press the P button. ‘Maintenance status (1/5)’
- Turn the Rotary Switch until the programme item ‘Machine settings (4/5)’ is displayed. - Press the ‘Choose language’ button. ‘Choose language’
i To display more languages, press the 'Next' button (bottom right).
- Press the ‘Deutsch’ button. ‘Gespeichert’ appears briefly on the display. ‘Geräteeinstellungen (4/5)’
In the programme item ‘Machine settings (4/5)’ / ‘Display’ you can make the following settings:
■'Brightness' (as percentages)
■'Contrast' (high, normal, low)
■‘Backlight’ (backlighting; as percentages)
Example: Proceed as follows to change the brightness of the display.
Precondition: 'Please select product:' is displayed.
P ▶ Press the P button. ‘Maintenance status (1/5)’
▶ Turn the Rotary Switch until the programme item ‘Machine settings (4/5)’ is displayed.
- Press the 'Display' button.
'Display'
- Press the 'Brightness' button.
- Press the ‘+’ or ‘-’ button to change the setting.
- Press the 'Save' button.
- 'Saved' appears briefly on the display.
- 'Display'
P ▶ Press the P button to exit programming mode. 'Please select product:'
Background
In this programme item you can set the background for the display of your GIGA.
i The set background is only displayed on the start screen.
Precondition: 'Please select product:' is displayed.
P ▶ Press the P button. ‘Maintenance status (1/5)’
▶ Turn the Rotary Switch until the programme item ‘Machine settings (4/5)’ is displayed.
- Press the ‘Colour scheme’ button.
‘Colour scheme’
- Press the '+' or '-' button to change the setting.
- Press the 'Save' button.
'Saved' appears briefly on the display.
'Machine settings (4/5)'
P ▶ Press the P button to exit programming mode. 'Please select product:'
4 Permanent settings in programming mode
Deactivating barista recipes
In the programme item ‘Machine settings (4/5)’ you can activate or deactivate the barista recipes. When the barista recipes are deactivated they no longer appear in the product selector.
Example: Proceed as follows to deactivate barista recipes.
Precondition: 'Please select product:' is displayed.
P ▶ Press the P button. 'Maintenance status (1/5)'
▶ Turn the Rotary Switch until the programme item ‘Machine settings (4/5)’ is displayed.
- Press the ‘Barista recipes’ button. ‘Barista recipes’
- Press the 'Inactive' button.
- Press the 'Save' button. - 'Saved' appears briefly on the display. - 'Machine settings (4/5)'
P ▶ Press the P button to exit programming mode. 'Please select product:'
Querying information
In the programme item ‘Information (5/5)’ you can view the following information:
■'Product counter': Number of prepared speciality coffees, speciality coffees with milk and hot water
Day counter': Number of prepared speciality coffees, speciality coffees with milk and hot water. This counter can be reset to zero.
■'Maintenance counter': Number of maintenance programmes performed (cleaning, descaling etc.)
■'Version': Software version
Precondition: 'Please select product:' is displayed.
P ▶ Press the P button. ‘Maintenance status (1/5)’
- Turn the Rotary Switch until the programme item ‘Information (5/5)’ is displayed. - Press the ‘Product counter’ button.
‘Product counter’ and the number of products prepared is displayed.
i You can also view the number of products prepared in the product selector. To do this, turn the Rotary Switch. Press the ‘↑’ button to exit the product selector view again.
- Press any button or the Rotary Switch to exit the programme item.
'Information (5/5)'
P ▶ Press the P button to exit programming mode.
'Please select product:'
5 Maintenance
5 Maintenance
Your GIGA has the following integrated maintenance programmes:
■Rinsing the coffee system ('Rinse the coffee system')
■Rinsing the milk system in the dual spout ('Rinse the milk system')
- Cleaning the milk system in the dual spout ('Clean the milk system')
■Changing the filter ('Change the filter')
- Cleaning the machine ('Clean')
■Descaling the machine ('Descale') (only if filter is not activated)
i Clean or descale the machine, rinse the milk system or change the filter when you are prompted to do so.
i Press the P button to view a list of the maintenance programmes ('Maintenance status (1/5)'). When the bar is completely filled with red, your GIGA will prompt you to perform the appropriate maintenance programme.
i In the interests of hygiene, you should clean the milk system daily when you have been preparing milk.
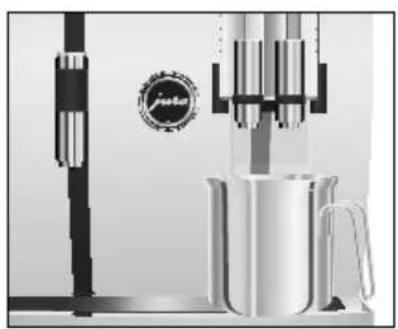
Rinsing the coffee system
natural_image
Product photo of a coffee maker with a stand and pitcher, no visible text or symbolsYou can perform coffee system rinsing at any time.
Precondition: 'Please select product:' is displayed.
- Place a receptacle under the dual spout.
P ▶ Press the P button.
'Maintenance status (1/5)' - Press the ‘Rinse the coffee system’ button.
'Machine is rinsing.', water flows out of the dual spout.
The rinse stops automatically. 'Please select product:' appears on the display.
Rinsing the milk system
Depending on the setting in programming mode, the GIGA prompts you to rinse the milk system or automatically performs rinsing following milk preparation.
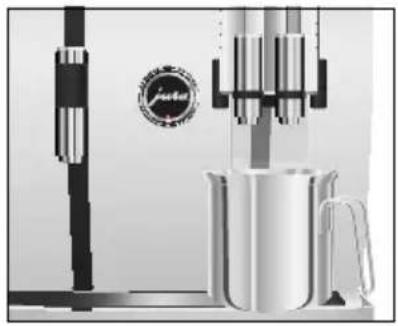
Example: Proceed as follows to rinse the milk system when prompted to do so.
Precondition: 'Rinse the milk system.' and the symbol are displayed.
natural_image
Product photo of a Jumbo coffee maker with a pitcher and stand (no visible text or symbols)- Place a receptacle under the dual spout.
P ▶ Press the P button.
'Maintenance status (1/5)'
- Press the ‘Rinse the milk system’ button.
'Milk system is being rinsed.', water flows out of the dual spout.
The rinse stops automatically. 'Please select product:' appears on the display.
Cleaning the milk system
To ensure that the milk system in the dual spout always works properly, you must clean it daily when you have been preparing milk.
CAUTION
If the wrong cleaning agent is used, the machine could be damaged and/or traces could be left behind in the water.
▶ Use only original JURA maintenance products.
i JURA milk system cleaner is available from specialised dealers.
Precondition: 'Please select product:' is displayed.
P ▶ Press the P button.
'Maintenance status (1/5)'
- Press the 'Clean the milk system' button.
- Press the 'Start' button.
- Press the 'Start' button again.
'Cleaning agent for milk system.'
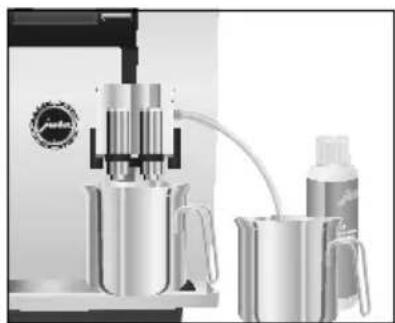
- Pour 250 ml of fresh water into a receptacle and add one capful of milk system cleaner.
- Immerse the milk pipe in the receptacle.
5 Maintenance
natural_image
Product photo of a coffee machine with two cups and a bottle, no visible text or symbols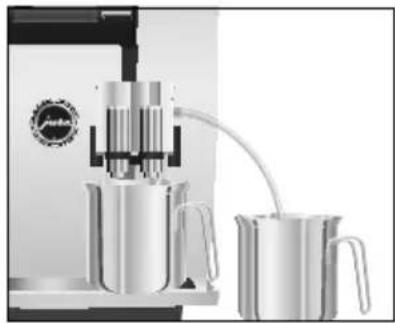
natural_image
Exterior view of a modern office building (no signage)Dismantling and rinsing the dual spout
natural_image
Close-up of a mechanical device with metallic components and a blue cable, showing an arrow pointing to a component (no visible text or symbols)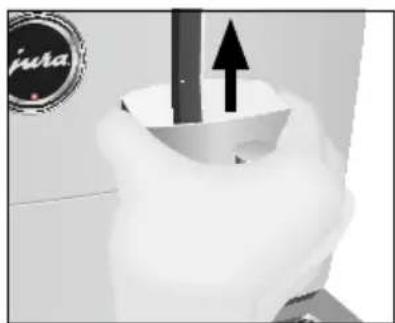
natural_image
Close-up of a hand pressing down on a mechanical component with an upward arrow (no text or symbols visible)- Place another receptacle under the dual spout. - Press the 'Next' button. 'Milk system is being cleaned.', water flows out of the dual spout.
'Water for cleaning milk system.'
- Rinse the receptacle thoroughly, fill it with 250 ml of fresh water and immerse the milk pipe in the water.
▶ Empty the other receptacle and place it under the dual spout again.
▶ Press the 'Next' button.
'Milk system is being cleaned.', the dual spout and the pipe are rinsed with fresh water.
The operation stops automatically. 'Milk system cleaning complete.' appears briefly on the display.
'Please select product:'
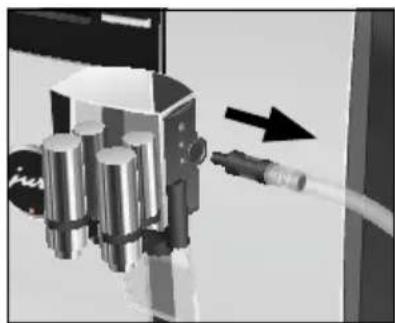
The dual spout must be dismantled and rinsed daily if milk has been prepared to make sure it functions perfectly and also in the interests of hygiene.
- Remove the milk pipe and rinse it thoroughly under running water.
- Press the releasing devices and pull the cover of the dual spout up and off.
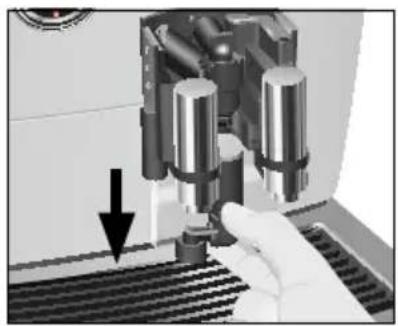
natural_image
Close-up of a robotic arm operating a precision machine with a hand adjusting the component (no visible text or symbols)- Carefully pull the bottom part of the milk system down and off.
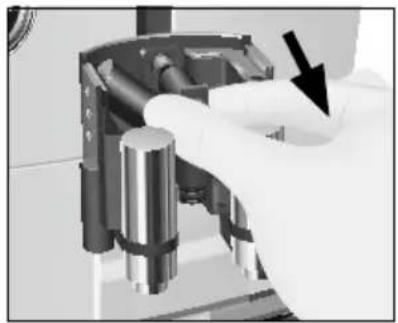
natural_image
Close-up of a gloved hand holding a mechanical component with a black arrow pointing to it (no visible text or symbols)- Remove the milk system from the dual spout.
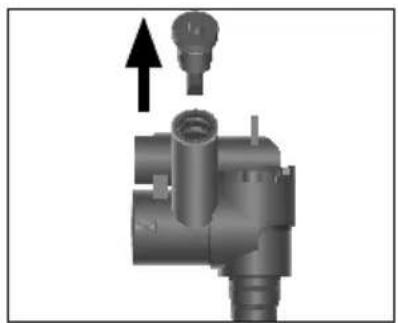
natural_image
Mechanical component diagram showing a valve assembly with an upward arrow indicating motion (no text or symbols present)- Remove the air intake pipe.
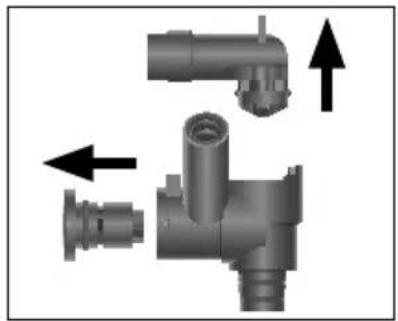
natural_image
Mechanical component diagram showing three views of a pipe fitting with arrows indicating direction (no text or labels)- Dismantle the milk system into its individual parts.
- Rinse all the parts under running water. If there are severely dried-on milk residues, firstly immerse the individual parts in a solution of 250 ml cold water and one capful of JURA milk system cleaner. Then rinse the parts thoroughly.
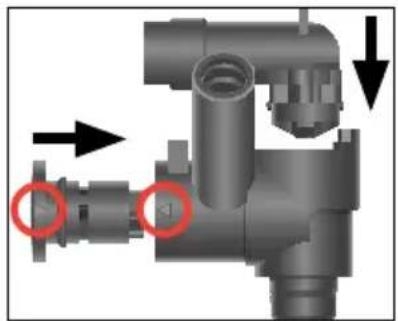
natural_image
Mechanical pipe fitting diagram showing valve and fitting components with directional arrows (no text or labels)▶ Reassemble the milk system. When doing this, note the arrows (circled in red in the picture) on the individual parts.
5 Maintenance
natural_image
3D mechanical component diagram showing a valve or fitting with a downward arrow indicating force or movement (no text or symbols present)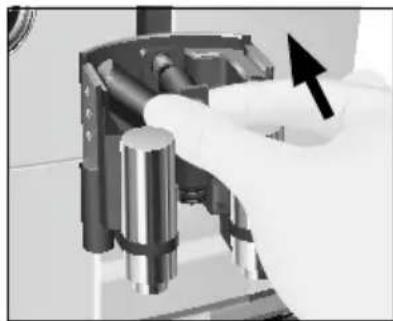
natural_image
Close-up of a gloved hand holding a mechanical component with a black arrow pointing to it (no visible text or symbols)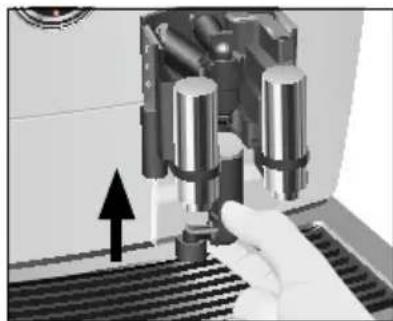
natural_image
Close-up of a robotic arm operating a machine with a hand adjusting the shaft (no visible text or symbols)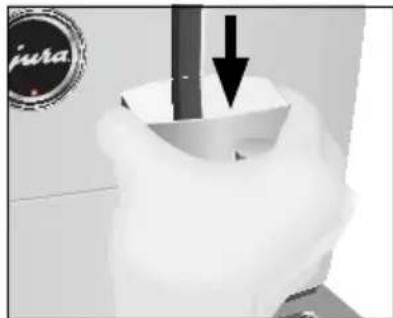
natural_image
Close-up of a hand pressing down on a small object with a black arrow indicating downward motion (no text or symbols visible)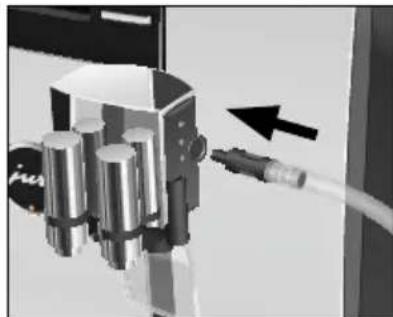
natural_image
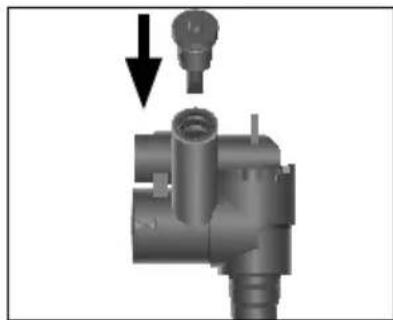
Close-up of a mechanical assembly with metallic components and a black arrow pointing to a cable (no visible text or symbols)▶ Fit the air intake pipe.
- Fit the assembled individual parts back in the dual spout and press it firmly.
- Attach the bottom part of the milk system to the part already inserted from below.
▶ Fit the cover of the dual spout. It will click into place audibly.
- Insert the milk pipe into the dual spout.
Inserting and activating the filter
Your GIGA no longer has to be descaled if you are using the CLARIS Pro Blue filter cartridge. If the water hardness is 10 °dH or more, we recommend using the filter cartridge. If you do not know the hardness of your water, you can find this out first (see Chapter 1 'Preparing and using for the first time – Determining the water hardness').
If you did not activate the filter cartridge the first time you used the machine, you can do this now as follows.
i Perform the ‘inserting the filter’ operation without any interruptions. This will ensure that your GIGA always produces its best.
Precondition: 'Please select product:' is displayed.
P ▶ Press the P button. ‘Maintenance status (1/5)’
- Turn the Rotary Switch until the programme item ‘Machine settings (3/5)’ is displayed. - Press the ‘Maintenance settings’ button. - Press the ‘Filter’ button. ‘Filter’
- Press the 'Active' button.
- Press the 'Save' button. 'Saved' appears briefly on the display. 'Insert filter.' / 'Press the Rotary Switch.'
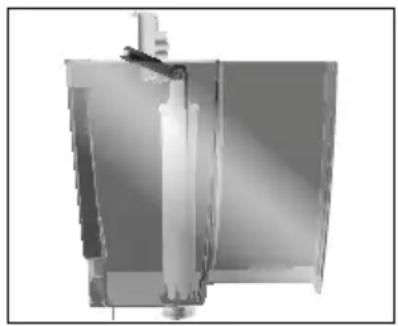
- Remove and empty the water tank. - Open the filter holder and insert the filter cartridge into the water tank, exerting slight pressure. - Close the filter holder. It will click into place audibly. - Fill the water tank with fresh, cold water and reinsert the tank.
▶ Press the Rotary Switch.
‘Filter is being rinsed.’, the filter is rinsed. Rinsing of the filter stops automatically. ‘Empty drip tray.’ appears on the display.
▶ Empty the drip tray and coffee grounds container and put them back into the machine.
'Filter' / 'Filter rinsing complete.'
The machine heats up. 'Please select product:' appears on the display. Your GIGA is once more ready for use.
natural_image
Mechanical component with a vertical rod and rectangular housing (no visible text or symbols)5 Maintenance
Changing the filter
natural_image
Pure mechanical component diagram without any text, numbers, or symbolsi After 100 litres of water have flowed through or after two months, the filter will cease to work. Your GIGA will automatically prompt you to change the filter.
i If the CLARIS Pro Blue filter cartridge is not activated in programming mode, you will not be prompted to change the filter.
Example: Proceed as follows to change the filter when prompted to do so.
Precondition: 'Change the filter' and the symbol are displayed.
P ▶ Press the P button.
'Maintenance status (1/5)'
- Press the ‘Change the filter’ button.
▶ Press the 'Start' button.
- Press the 'Start' button again.
'Change filter.' / 'Press the Rotary Switch.'
- Remove and empty the water tank.
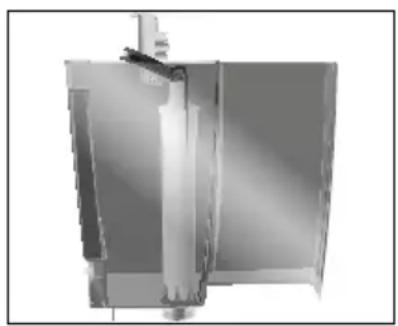
- Open the filter holder and remove the old CLARIS Pro Blue filter cartridge.
- Insert the new filter cartridge into the water tank, exerting slight pressure.
- Close the filter holder. It will click into place audibly.
- Fill the water tank with fresh, cold water and reinsert the tank.
▶ Press the Rotary Switch.
‘Filter is being rinsed.’, the filter is rinsed. Rinsing of the filter stops automatically. ‘Empty drip tray.’ appears on the display.
▶ Empty the drip tray and coffee grounds container and put them back into the machine.
‘Change the filter’ / ‘Filter rinsing complete.’
The machine heats up. 'Please select product:' appears on the display.
Cleaning the machine
After 220 preparations or 80 switch-on rinses, the GIGA will prompt you to clean it.
CAUTION
If the wrong cleaning agent is used, the machine could be damaged and/or traces could be left behind in the water.
▶ Use only original JURA maintenance products.
i The cleaning programme lasts approximately 20 minutes.
Do not interrupt the cleaning programme. The quality of cleaning will be impaired if you do so.
i JURA cleaning tablets are available from specialised dealers.
Example: Proceed as follows to clean when prompted to do so.
Precondition: 'Clean machine.' and the symbol are displayed.
P ▶ Press the P button.
'Maintenance status (1/5)'
- Press the 'Clean' button.
▶ Press the 'Start' button.
- Press the 'Start' button again.
'Empty coffee grounds container.'
- Empty the drip tray and coffee grounds container and put them back into the machine.
'Press the Rotary Switch.'
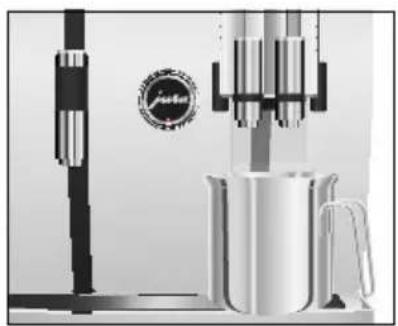
- Place a receptacle under the dual spout.
Press the Rotary Switch.
'Machine is being cleaned.', water flows out of the dual spout.
The operation is interrupted, 'Add cleaning tablet'.
▶ Open the cover of the filler funnel for ground coffee.
- Insert a JURA cleaning tablet into the filler funnel.
- Close the cover of the filler funnel.
'Press the Rotary Switch.'
▶ Press the Rotary Switch.
'Machine is being cleaned.', water flows out of the dual spout repeatedly.
The operation is interrupted, 'Empty coffee grounds container'.
natural_image
Product photo of a coffee maker with a kettle and stand, no visible text or symbols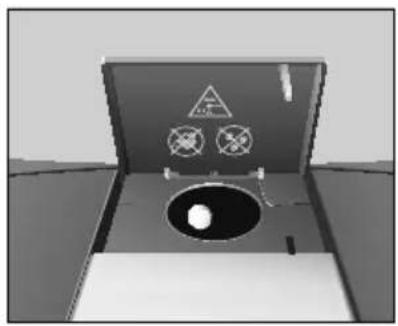
natural_image
Exterior view of a mechanical device with warning symbols and a central circular component (no readable text or labels)5 Maintenance
- Empty the drip tray and coffee grounds container and put them back into the machine. 'Clean' / 'Cleaning complete.' Cleaning is now complete. Your GIGA is once more ready for use.
Descaling the machine
The GIGA builds up deposits of limescale over time and automatically prompts you to descale it when necessary. The degree of calcification depends on the hardness of your water.
i If you use a CLARIS Pro Blue filter cartridge and this is activated, you will not be prompted to descale.
⚠️ CAUTION
If the descaling agent comes into contact with the skin or eyes, this can cause irritation.
- Avoid contact with the skin or eyes.
- Rinse off the descaling agent with clean water. Should you get any descaling agent in your eye, see a doctor.
CAUTION
If the wrong descaling agent is used, the machine could be damaged and/or traces could be left behind in the water.
▶ Use only original JURA maintenance products.
CAUTION
If the descaling operation is interrupted, there may be damage to the machine.
- Allow the descaling programme to run to the end.
CAUTION
If the descaling agent comes into contact with sensitive surfaces (e.g. marble), damage cannot be ruled out.
▶ Clean up any splashes immediately.
i The descaling programme lasts approximately 50 minutes.
i JURA descaling tablets are available from specialised dealers.
Example: Proceed as follows to perform descaling when prompted to do so.
Precondition: 'Decalcify machine.' and the symbol ⚙ are displayed.
P ▶ Press the P button.
'Maintenance status (1/5)'
- Press the 'Descale' button.
natural_image
Illustration of a measuring cup with liquid and a small container (no text or symbols)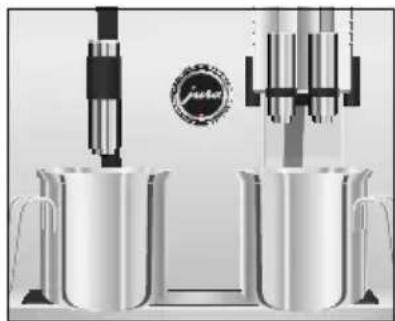
natural_image
Product line drawing of a coffee maker with two cups and a stand, featuring mechanical components and a circular logo (no text or symbols)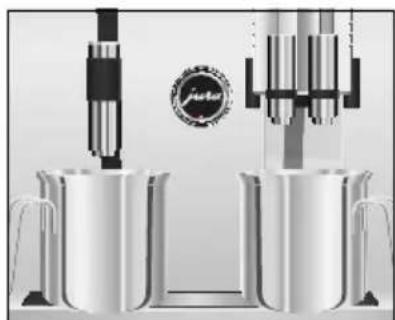
natural_image
Exterior view of two stainless steel coffee mugs with mechanical components and a central logo (no readable text or symbols)▶ Press the 'Start' button.
- Press the 'Start' button again.
'Empty drip tray.'
- Empty the drip tray and coffee grounds container and put them back into the machine.
'Pour descaling agent into water tank.'
- Remove and empty the water tank.
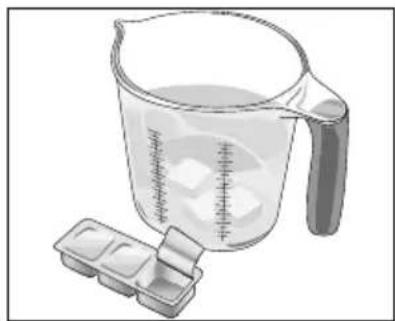
▶ Completely dissolve 4 JURA descaling tablets in a receptacle holding 800 ml of water. This may take several minutes.
Pour the solution into the empty water tank and insert it into the machine.
'Press the Rotary Switch.'
- Place one receptacle under the dual spout and another under the hot-water spout.
▶ Press the Rotary Switch.
'Machine is being descaled.', water flows repeatedly out of the dual spout and the hot-water spout.
The operation stops automatically. 'Empty drip tray.' appears on the display.
▶ Empty both receptacles.
▶ Empty the drip tray and coffee grounds container and put them back into the machine.
'Fill water tank.'
- Remove the water tank and rinse it thoroughly.
- Fill the water tank with fresh, cold water and reinsert the tank.
'Press the Rotary Switch.'
- Place the receptacles back under the dual spout and the hot-water spout.
▶ Press the Rotary Switch.
'Machine is being descaled.', water flows out of the dual spout and the hot-water spout.
The operation stops automatically. 'Empty drip tray.' appears on the display.
5 Maintenance
- Empty the drip tray and coffee grounds container and put them back into the machine.
'Descale' / 'Descaling complete.'
Descaling is now complete. Your GIGA is once more ready for use.
i If the descaling operation stops unexpectedly, rinse the water tank thoroughly.
Cleaning the bean container
Coffee beans may be covered with a slight oil film which remains on the walls of the bean container. These traces may negatively affect the coffee result. For this reason clean the bean container from time to time.
Precondition: 'Fill bean container.' is displayed.
Switch the machine off with the On/Off button.
▶ Switch the machine off at the power switch.
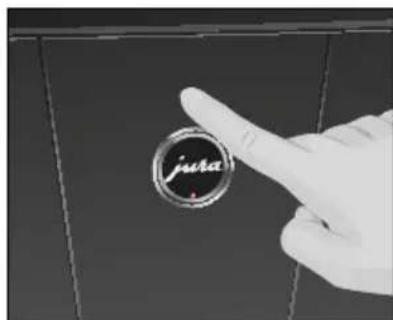
- Open the service cover on the back of the machine by pressing above the JURA logo.
- Push the red sliding catch completely to the rear to close the bean container.
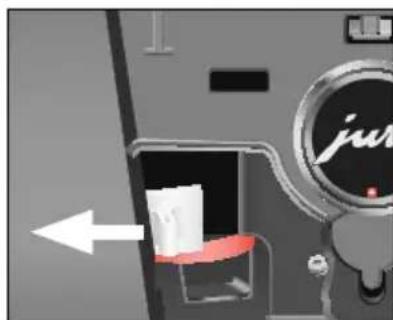
natural_image
Close-up of a mechanical device with a red component and a white arrow pointing to a component (no visible text or symbols)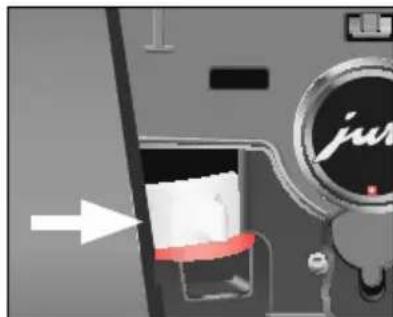
natural_image
Close-up of a camera lens with a red button and white interior, showing no visible text or symbols.▶ Turn the blue locking device outwards.
- Remove the bean container.
- Remove the aroma preservation cover.
▶ Empty the bean container.
- Clean the bean container with a soft, dry cloth.
▶ Fit the bean container.
▶ Turn the blue locking device inwards.
▶ Pull the red sliding catch completely forwards.
- Refit the service cover and fix it by pressing above the JURA logo. It will click into place audibly.
- Fill the bean container with coffee beans and close the aroma preservation cover.
Descaling the water tank
Limescale deposits may form in the water tank. To ensure correct function of the machine, descale the water tank from time to time.
▶ Remove the water tank.
▶ If you use a CLARIS Pro Blue filter cartridge, remove this.
- Completely fill the water tank and dissolve 3 JURA descaling tablets in it.
- Leave the water tank with the descaling solution for several hours (e.g. overnight).
▶ Empty the water tank and rinse it thoroughly.
▶ If you use a CLARIS Pro Blue filter cartridge, insert this again.
- Fill the water tank with fresh, cold water and reinsert the tank.
6 Display messages
| Message Cause/Result Action | ||
| ‘Fill water tank.’ The water tank is empty. You cannot prepare any products. | ▸ Fill the water tank (see Chapter 1 ‘Preparing and using for the first time – Filling the water tank’). | |
| ‘Empty coffee grounds container.’ | The coffee grounds container is full. You cannot prepare any products. | ▸ Empty the coffee grounds container and the drip tray (see Chapter 3 ‘Daily operation – Daily maintenance’). |
| ‘Coffee grounds container not fitted.’ | The coffee grounds container is not fitted. You cannot prepare any products. | ▸ Fit the coffee grounds container. |
| ‘Empty drip tray.’ The drip tray is full. You cannot prepare any products. | ▸ Empty the drip tray.▸ Clean and dry the metal contacts on the back of the drip tray. | |
| ‘Drip tray not fitted.’ | The drip tray is not inserted correctly or is not inserted at all. You cannot prepare any products. | ▸ Fit the drip tray. |
| ‘Press the Rotary Switch.’ | The system must be filled with water or the GIGA prompts you to continue a started maintenance programme. | ▸ Turn the Rotary Switch to continue with the maintenance programme or to fill the system. |
| ‘Fill bean container.’ | The bean container is empty. You cannot prepare any speciality coffees, but you can prepare hot water and milk. | ▸ Fill the bean container (see Chapter 1 ‘Preparing and using for the first time – Filling the bean container’). |
| ‘Rinse the milk system.’ | The GIGA is prompting you to rinse the milk system. | ▸ Press the P button and then the ‘Rinse the milk system’ button to initiate milk system rinsing. |
| ‘Clean machine.’ The GIGA is prompting you to clean it. | ▸ Perform cleaning (see Chapter 5 ‘Maintenance – Cleaning the machine’). | |
| ‘Decalcify machine.’ | The GIGA is prompting you to descale it. | ▸ Perform descaling (see Chapter 5 ‘Maintenance – Descaling the machine’). |
| ‘Change filter.’ After 100 litres of water have flowed through the CLARIS Pro Blue filter cartridge or after two months, it will cease to work. The GIGA is prompting a filter change. | ►Replace the CLARIS Pro Blue filter cartridge (see Chapter 5 ‘Maintenance – Changing the filter’). | |
| ‘Spout is not fitted.’ | The dual spout or the cover of the dual spout is not fitted correctly. | ►Fit the cover of the dual spout or the dual spout correctly. |
| ‘Not enough ground coffee.’ | There is insufficient ground coffee in the machine; the GIGA stops the operation. | ►The next time you prepare a beverage, add more ground coffee (see Chapter 2 ‘Preparation – Ground coffee’). |
7 Troubleshooting
| Problem Cause/Result Action | ||
| Insufficient foam is produced when the milk is frothed, or milk sprays from the dual spout. | The dual spout is dirty. | ▸ Rinse and clean the dual spout (see Chapter 5 ‘Maintenance – Cleaning the milk system’). |
| Coffee only comes out in drips when it is being prepared. | Coffee or ground coffee has been ground too finely and is blocking the system. The same filter cartridge may have been used several times or the water hardness set incorrectly in the programming mode. | ▸ Put the grinder on a coarser setting or use coarser ground coffee (see Chapter 4 ‘Permanent settings in programming mode – Setting the consistency of grind’).▸ Perform descaling (see Chapter 5 ‘Maintenance – Descaling the machine’). |
| ‘Fill bean container.’ is not displayed although the bean container is empty. | The bean monitor is dirty. | ▸ Clean the bean container (see Chapter 5 ‘Maintenance – Cleaning the bean container’). |
| ‘Empty drip tray.’ is always displayed. | The metal contacts of the drip tray are dirty or wet. | ▸ Clean and dry the metal contacts on the back of the drip tray. |
| ‘Fill water tank.’ is displayed although the water tank is full. | The water tank float is trapped. | ▸ Descale the water tank (see Chapter 5 ‘Maintenance – Descaling the water tank’). |
| ‘Error 2’ is displayed. If the machine was exposed to the cold for a long period of time, heating is disabled for safety reasons. | ▸ Warm the machine at room temperature. | |
| Other ‘Error’ messages are displayed. | - | ▸ Switch the GIGA off at the power switch. Contact customer support in your country (see Chapter 11 ‘JURA contact details / Legal information’). |
i If you were unable to solve the problem, contact customer support in your country (see Chapter 11 'JURA contact details / Legal information').
8 Transport and environmentally friendly disposal
Transport / Emptying the system
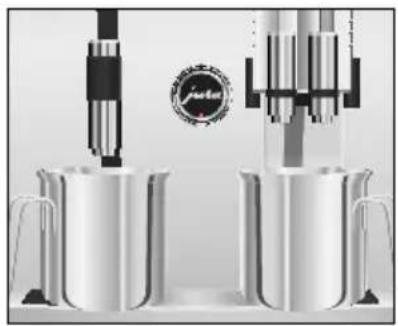
natural_image
Product photo of a coffee maker with two metal cups and a coffee machine (no visible text or symbols)In order to protect the GIGA from frost during transport, the system must be emptied.
Precondition: 'Please select product:' is displayed.
- Place one receptacle under the dual spout and another under the hot-water spout.
P ▶ Press the P button.
'Maintenance status (1/5)'
▶ Turn the Rotary Switch until the programme item ‘Machine settings (3/5)’ is displayed.
- Press the 'Factory setting' button.
'Factory setting'
- Press the 'Empty system' button.
'Empty system' / 'Remove the water tank.'
- Remove and empty the water tank.
'Press the Rotary Switch.'
▶ Press the Rotary Switch.
‘System is emptying.’, water flows out of the dual spout and the hot-water spout.
The operation stops automatically. Your GIGA is switched off.
Disposal
Please dispose of old machines in an environmentally neutral way.
[NO TEXT]
Old machines contain valuable, recyclable materials which should be recycled. Please therefore dispose of old machines via suitable collection systems.
9 Technical data
| Voltage 220–240 V ~, 50 Hz | |
| Power 2300 W | |
| Airborne noise emitted L | _P < 70 dB (A) |
| Ambient conditions Humidity max. 80% | |
| Ambient temperature10–35 °C | |
| Conformity mark | CE |
| Energy consumption‘Save energy’ / ‘Save No’ | approx. 30 Wh |
| Energy consumption‘Save energy’ / ‘Save Level 1’ | approx. 12 Wh |
| Energy consumption‘Save energy’ / ‘Save Level 2’ | approx. 15 Wh |
| Pump pressure static, max. 15 bar | |
| Holding capacity of water tank 5 l | |
| Holding capacity of beancontainer | 1000 g |
| Holding capacity of coffeegrounds container | max. 40 portions |
| Cable length approx. 1.1 m | |
| Weight approx. 18.3 kg | |
| Dimensions (W × H × D) | 37 × 55 × 49.6 cm |
Information for testers (repeat test in accordance with DIN VDE 0701-0702): The central grounding point (CGP) is located on the front of the machine below the JURA logo (turn JURA logo anti-clockwise).
10 Index
A
Adding products to the start screen 28
Addresses 60
Adjusting the product settings 25
Aroma preservation cover Bean container with aroma preservation cover 4
Automatic switch-off 33, 34
Automatic switch-on 33
B
Background 37
Barista recipes 19
Deactivating 38
Preparation 20
Programming mode 38
Bean container
Bean container with aroma preservation cover 4
Cleaning 50
Filling 10
Bus bar
Technical data 56
Button
On/Off button 5
P button (programming) 5
C
Cappuccino 16
Cappuccino frother cleaning
Cleaning the milk system 41
Cappuccino frother rinsing
Rinsing the milk system 41
Changing a name 27
Changing the product assigned to a button 28
CLARIS Pro Blue filter cartridge
Changing 46
Inserting and activating the filter 45
Classics 25
Cleaning
Bean container 50
Machine 47
Coffee 16
Coffee grounds container 4
Consistency of grind
Setting the consistency of grind 29
Contact details 60
Cover
Service cover 5
Storage compartment 4
Water tank 4
Cup grille 4
Customer support 60
D
Date 32
Descaling
Machine 48
Water tank 51
Display 5
Display messages 52
Display settings 36, 37
Disposal 55
Double product 17
Drip tray 4
Dual spout
Dismantling and cleaning 42
Height- and width-adjustable dual spout 4
E
Emptying the system 55
Energy-saving mode 31
Errors
Troubleshooting 54
Espresso 16
Expert mode 25
F
Factory settings
Restore factory settings 35
Filler funnel
Filler funnel for ground coffee 4
Filling
Bean container 10
Water tank 10
Filter
Changing 46
Inserting and activating the filter 45
First-time use 11
G
Grinder Setting the consistency of grind 29 Ground coffee 18 Measuring spoon for ground coffee 4
H
Hotline 60 Hot water 21 Hot-water spout Height-adjustable hot-water spout 4
|
Instant coffee Ground coffee 18 Internet 10
J
JURA Contact details 60 Internet 10
L
Language 36 Latte macchiato 16 Locking device 5
M
Machine Cleaning 47 Descaling 48 Regular maintenance 23 Rinsing the coffee system 40 Setting up 10 Switching off 23 Switching on 22
Mains cable 4
Maintenance 40 Daily maintenance 22 Regular maintenance 23
Maintenance settings 30 Measuring spoon for ground coffee 4 Messages, display 52 Milk Connecting milk 15 Milk system Cleaning 41 Rinsing 41
P
Permanently setting amounts for the cup size 20 Permanent settings in programming mode 24 Power switch 4 Preparation 16 At the touch of a button 17 Barista recipes 20 Cappuccino 16 Coffee 16 Espresso 16 Ground coffee 18 Hot water 21 Latte macchiato 16 Ristretto 16 Two speciality coffees 17 Using the product selector 18 Preparation options 16 At the touch of a button 17 Using the product selector 18 Problems Troubleshooting 54 Product selector 16, 18 Product settings 25 Adjusting 25 Programming mode 24 Adding products to the start screen 28 Automatic switch-off 34 Background 37 Barista recipes 38 Display settings 36 Energy-saving mode 31 Language 36 Maintenance settings 30 Product settings 25 Querying information 38 Renaming a product 27 Restore factory settings 35 Setting the consistency of grind 29 Setting the water hardness 31 Time and date 32 Timer 33 Units 35 Proper use 6
Q
Querying information 38
Quick installation 12
R
Recipes
Barista recipes 19
Regular maintenance 23
Renaming a product 27
Rinsing the coffee system 40
Ristretto 16
Rotary Selection 16
Product selector 18
Rotary Switch 5
S
Safety 6
Safety information 6
Service cover 5
Service socket 5
Settings
Maintenance settings 30
Permanent settings in programming
mode 24
Setting up
Setting up the machine 10
Sliding catch 5
Splash guard 4
Spout
Height-adjustable hot-water spout 4
Height- and width-adjustable dual spout 4
Standard installation 12
Switching off
Machine 23
Switching on
Machine 22
Switch-off
Automatic switch-off 33, 34
Switch-off time 33
Switch-on
Automatic switch-on 33
Switch-on time 33
Symbol description 3
T
Technical data 56
Tel 60
Time 32
Time format
Programming mode 35
Timer 33
Transport 55
Troubleshooting 54
Two products 17
U
Units 35
Use, First-time 11
V
Ventilation slats 4
W
Water hardness
Determining the water hardness 14
Setting the water hardness 31
Water tank 4
Descaling 51
Filling 10
Website 10
11 JURA contact details / Legal information
11 JURA contact details / Legal information
Your JURA service partner
JURA Elektroapparate AG
Directives The machine complies with the following directives:
■2006/42/EC – Machinery Directive
■2004/108/EC – Electromagnetic Compatibility
■2009/125/EC – Ecodesign Directive
■2011/65/EU – RoHS Directive
Technical changes We reserve the right to make technical changes. The diagrams used in these instructions for use are for illustration purposes only and do not represent the original colours of the machine. Some details of your GIGA may vary.
Feedback Your opinion is important to us! Use the contact details at www.jura.com.
Copyright The instructions for use contain information which is protected by copyright. It is not permitted to photocopy these instructions for use or translate them into another language without the prior written consent of JURA Elektroapparate AG.
- GIGA W3 Professional Instructions for Use
- Table of contents
- Your GIGA W3 Professional
- Control elements 4
- Important information 6
- Preparing and using for the first time 10
- Preparation 16
- Daily operation 22
- Permanent settings in programming mode 24
- Maintenance 40
- Display messages 52
- Troubleshooting 54
- Transport and environmentally friendly disposal 55
- Technical data 56
- Index 57
- JURA contact details / Legal information 60
- Symbol description
- Warnings
- Symbols used
- Control elements
- Top of the machine
- Front
- Back of the machine
- Important information
- Proper use
- For your safety
- Preparing and using for the first time
- JURA on the Internet
- Setting up the machine
- Filling the water tank
- CAUTION
- Filling the bean container
- First-time use
- ⚠ WARNING
- Quick installation
- Standard installation
- Deactivating the filter
- Determining the water hardness
- Connecting milk
- Preparation
- Preparation at the touch of a button
- Speciality coffees at the touch of a button
- Two speciality coffees at the touch of a button
- Speciality coffees with milk at the touch of a button
- Preparation using the product selector
- Preparation of a speciality coffee using the product selector
- Ground coffee
- Barista recipes at a glance
- Preparing barista recipes
- Permanently setting amounts for the cup size
- Hot water
- Daily operation
- Switching on
- Daily maintenance
- Regular maintenance
- Switching off
- Permanent settings in programming mode
- Possible settings in programming mode
- Product settings
- ■'Programming'
- ■'Classic-library'
- Renaming a product
- Adding products to the start screen
- Setting the consistency of grind
- Maintenance settings
- Setting the water hardness
- Energy-saving mode
- ■'Save Level 2'
- Time and date
- Timer
- Automatic switch-off
- Units
- Restore factory settings
- Language
- Background
- Deactivating barista recipes
- Querying information
- Maintenance
- Rinsing the coffee system
- Rinsing the milk system
- Cleaning the milk system
- Dismantling and rinsing the dual spout
- Inserting and activating the filter
- Changing the filter
- Cleaning the machine
- Descaling the machine
- ⚠️ CAUTION
- Cleaning the bean container
- Precondition: 'Fill bean container.' is displayed.
- Descaling the water tank
- Display messages
- Troubleshooting
- Transport and environmentally friendly disposal
- Transport / Emptying the system
- Precondition: 'Please select product:' is displayed.
- Disposal
- [NO TEXT]
- Technical data
- Index
- A
- B
- C
- D
- E
- F
- G
- H
- |
- J
- L
- M
- P
- Q
- R
- S
- T
- U
- V
- W
- JURA contact details / Legal information
Brand : JURA
Model : GIGA W3 Professional
Category : Coffee maker