RM/431 - Water dispenser Ramtons - Free user manual and instructions
Find the device manual for free RM/431 Ramtons in PDF.


| Product Type | Hot and Cold Water Dispenser with Optional Sterilizing or Refrigerating Cabinet |
| Model | RM/431 |
| Brand | Ramtons |
| Dimensions (Approx.) | 40 cm (W) x 40 cm (D) x 120 cm (H) |
| Weight (Approx.) | 15 kg |
| Power Supply | 120 V ~ 60 Hz |
| Heating Power | ~500 W |
| Cooling Power | ~100 W |
| Hot Water Temperature | 85-95 °C |
| Cold Water Temperature | 5-10 °C |
| Water Tank Capacity (Hot) | ~1 L |
| Water Tank Capacity (Cold) | ~2 L |
| Functions | Hot and cold water dispensing, heating and cooling switches, LED indicators, optional O₃ sterilizer or refrigerating cabinet |
| Installation Requirements | Level floor, 2 inches clearance from wall, away from heat sources and direct sunlight, grounded outlet |
| First Use | Let stand upright for 2 hours, flush reservoir with tap water before use |
| Maintenance | Clean exterior with damp cloth, descale hot tank with 2% citric acid solution, replace power cord if damaged |
| Safety Features | Overheat protector, thermostats, grounding, child safety warning (keep away from children to avoid scalding) |
| Spare Parts | Contact authorized service center for replacement parts |
| Warranty | Refer to dealer or service center |
Frequently Asked Questions - RM/431 Ramtons
User questions about RM/431 Ramtons
0 question about this device. Answer the ones you know or ask your own.
Ask a new question about this device
Download the instructions for your Water dispenser in PDF format for free! Find your manual RM/431 - Ramtons and take your electronic device back in hand. On this page are published all the documents necessary for the use of your device. RM/431 by Ramtons.
USER MANUAL RM/431 Ramtons
PRODUCT AND DESCRIPTION


- water guard
- top cover
- LED display
- hot water button
- cold water button
-
cold water outlet
-
hot water outlet
- body
- removable drip tray cover
- removable drip tray
- door
-
heating switch
-
cooling switch
- condenser
- drain valve
- power supply cord
WIRING DIAGRAM
- Heating switch
- 88°C Thermostat
- Heater
- Heating indicator
- 95°C Thermostat
- Compressor
- Overheat protector
- Cooling thermostat
- Cooling switch
- Cooling indicator
- Power indicator
- Door switch
- Sterilizing timer
- O3 maker
- O3 indicator
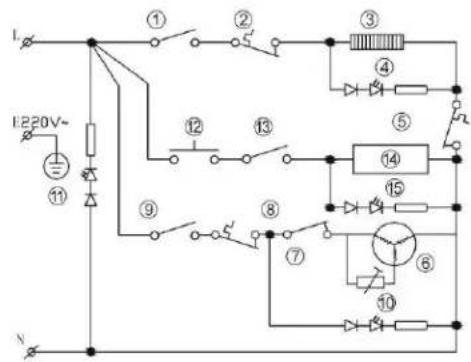
With sterilizing cabinet

With refrigerating cabinet
Important Safety Instructions
| WARNING To reduce the risk of fire, electrical shock or injury when using your appliance,please follow these basic instructions. |
| ● Read all instructions before using the water dispenser.● Never clean parts with flammable fluids. The fumes can create a fire hazard or explosion.● Do not store or use gasoline or any other flammable vapors and liquids in the vicinity of this orany other water dispenser. The fumes can create a fire hazard of explosion. |
INSTALLATION GUIDELINES
- Remove the exterior and interior packing.
- Place your appliance on a floor that is strong enough to support the dispenser when it is fully loaded. The unit is provided with four plastic feet. If it does not sit level on the floor, adjust the front feet to level the unit well to the floor.
- Locate the appliance away from direct sunlight and sources of heat (stove, heater, radiator, etc.). Direct sunlight may affect the acrylic coating and heat sources may increase electrical consumption. Extreme cold ambient temperatures may also cause the appliance not to perform properly.
- Allow 2 inches of space between the water dispenser and the wall, which allows for proper air circulation to cool the compressor.
- Plug the appliance into an exclusive properly installed-grounded wall outlet. Do not cut or remove the third (ground) prong from the power cord under any circumstances. Any questions concerning power and/or grounding should be directed toward a certified electrician or an authorized products service center.
● This water dispenser is not recommended for outdoor usage. - Do not locate the dispenser in the area where the temperature may fall below freezing point (0°C or 32°F).
- Keep area around dispenser free of dust and dirt.
- Keep the reserve supply of water bottles away from excessive heat and light.
PRE-OPERATION INSTRUCTIONS
- Before connecting the appliance to the power source. Let it stand upright for approximately 2 hours. This will reduce the possibility of a malfunction in the cooling system from handling during transportation.
- Check and make sure the backside hot water drainage hole cap is not leaked or broken.
- The water dispenser is pre-cleaned at the factory but the reservoir and water lines must be flushed with fresh water before use as follows:
- Keep the unit unplugged.
● Fill water tank with tap water full to capacity. Wait for 5 minutes until water settles.
● Push the hot water faucet until water comes out, then stop the faucet. - Plug the dispenser into the electrical outlet. We are ready to complete the first cycle. In order to do that, wait for the hot water to reach temperature in approximately 10 minutes, and then wait for the cold water to reach temperature in other 40 minutes approximately.
- Unplug the dispenser from the electrical outlet. Proceed to drain the water from the faucets one at a time until no more water remains. (Note: To facilitate this operation, use a large container)
- Then, drain any water left in the tanks by opening the backside hot water drainage hole cap, until all water drains completely. After that, screw up the cap tightly.
● Put the bottled purified or other dean water on the top cover one minute.
● Push water faucet buttons to insure water flows from both faucets. - Plug dispenser again into the electrical outlet.
- Now you are ready to use your water dispenser.
NOTE: Your water dispenser has been cleaned and sanitized before leaving the factory, but in case a taste problem develops, place two tablespoons of baking soda and add tap water. Fill water
tank again and repeat basic operations, except turn hot water function “OFF” to avoid leaving residues in hot water tank.
OPERATION
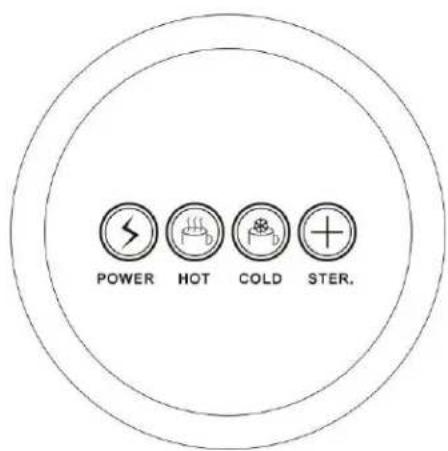
WITH STERILIZING CABINET

WITH REFRIGERATING CABINET
- Ambient temperature: 10 \~ 42°C
● Atmosphere 86 \~ 106kpa
- When using the bottles holding ultra-pure water, distilled water or space water with the so-called clever lid, tear off the hygienic label on the lid, place the bottles at the intake, then the core of water guard will automatically open the valve and seal it in the meantime, when moving the bottles, the valve will also seal automatically to avoid any possible oozing.
- Push the hot water faucet, bubbles are generated inside the bottle, indicating that water is flowing into hot water and cold water tanks, keep pressing the hot water valve until water flows out, dispensing cold water required need no particular adjustment.
- Do not connect the electrical power plug, until water comes out of the hot water faucet.
- After plug, the yellow LED indicator will be on indicating the power is "ON".
- Turn on the heating switch, the red LED indicator will be on and the heating system starts working. When the hot water comes up to 85-95°C or so, the red light goes off, the heating system stops working. The machine turns to the warm-keeping status. When the hot water temperature is lower than 80°C, the heating system will resume working automatically.
- Turn on the cooling switch, the green LED indicator will be on and the cooling system starts working. When the cold water falls down to 5-10°C, the green light goes off, the cooling system stops working. The machine turns to the cold-keeping status. When the cold water temperature goes up to a set degree, the cooling system will resume working automatically.
- Since the temperature has already been adjusted before leaving the factory, it is unnecessary for customers to set the temperature.
● Turn the heating and cooling switches on. Then the heating and cooling processes start
working together.
- If the device is not applied for a long time, after the hot water cools down, please remove the power plug and revolve the drain cap to drain the rest water in the hot tank then tighten the cap. Open the cold water faucet to drain the rest water in the cold tank.
- If there is no water flowing from cooling faucet, please shut down the cooling switch until there is water flowing out.
- If you do not plan to use the water heating function for more than three days, we strongly recommend that you turn off the hot water function.
TAKING DISPENSER OUT OR SERVICE
- If the water dispenser will not be used for a long period of time, unplug the power supply cord.
● Turn off the hot water. - Drain the water through the faucets.
● Drain the water from tanks by drainage hole from the back of the dispenser.
CAUTION
- Do not use the bottle with any crack, leakage or holes.
- The back of the product should be put in shady places and kept away from wall and high-temperature elements. Please also put the product away from TV, video, or other valuables.
- Do not turn on “heating” switch until water comes out of hot water faucet to prevent any damage on the heating tube.
● During operation keep it beyond the children to avoid scald.
● Never turn on the heating switch when there is no water. - When carrying it, the angle of inclination should be less than 45°C.
- Adopt the ground wire to avoid any electric shock.
- In the process of using, check the water receptacle frequently. If the water receptacle is full, please pour the water out in time.
- Do not turn on and off the “cooling” switch in three minutes to protect the compressor and extend the compressor usage life.
MAINTENANCE
- Remove power plug or disconnect from the mains before performing any maintenance or servicing the product.
● Never use detergent or chemicals harmful to health to clean the water tanks. - Do not directly spray water on the surface of the product.
● Wipe the front and back of the product with water-soaked soft cloth. - If dust of other exterior substance has accumulated on the condenser, wipe off with water-soaked soft cloth.
- After cleaning the product, completely dry it. Fill the water to the tanks until waters comes out of the hot water faucet, then connect the electric power plug. If the surface of the electric heater in the hot water tank is deposited by water deposition, heating capacity will decrease. Fill hot water tank with aqueous solution of 2% aitric acid and keep for about two hours then cleaning. If the problems can not be solved, contact your dealer or the Service Center of our
company.
- If power supply cord on this device is damaged, it must be replaced with a special power supply cord that is obtainable at Service Center of our company.
TROUBLESHOOTING GUIDE
You can solve many common water dispenser problems easily, saving you the cost of a possible service call. Try the suggestions outlined below to see if you can solve them before calling the service center.
| Problem Possible Reason | |
| Water dispenser does not operate. Not plugged in. | |
| Water dispenser is not cold enough. Check to be sure the cold switch on the back is turned on.The water dispenser does not have enough backside space. | |
| Water dispenser's hot water is not hot enough. | Check to be sure the hot switch on the back is turned on. |
| Compressor turns on and off frequently. The room temperature is too hot.The water dispenser does not have enough backside space. | |
| Vibration Check to assure that the water cooler is placed level. | |
| Water dispenser makes too much noise. As each cycle ends, you may hear gurgling sound caused by the flow of refrigerant, which is normal.Contraction and expansion of the inside walls may cause popping and cracking noises.The water dispenser is not placed level. |
Brand : Ramtons
Model : RM/431
Category : Water dispenser