
Home Cinema 4010 - Vidéo-projecteur EPSON - Free user manual and instructions
Find the device manual for free Home Cinema 4010 EPSON in PDF.


User questions about Home Cinema 4010 EPSON
0 question about this device. Answer the ones you know or ask your own.
Ask a new question about this device
Download the instructions for your Vidéo-projecteur in PDF format for free! Find your manual Home Cinema 4010 - EPSON and take your electronic device back in hand. On this page are published all the documents necessary for the use of your device. Home Cinema 4010 by EPSON.
USER MANUAL Home Cinema 4010 EPSON
Home Cinema 4010 User's Guide....9
Introduction to Your Projector 10
Projector Features.... 10
Product Box Contents.... 11
Additional Components 12
Optional Equipment and Replacement Parts 12
Warranty and Registration Information 13
Notations Used in the Documentation 13
Where to Go for Additional Information 14
Additional Projector Software and Manuals.... 14
Projector Part Locations 15
Projector Parts - Front/Top 16
Projector Parts - Rear 17
Projector Parts - Base 18
Projector Parts - Control Panel 19
Projector Parts - Remote Control 20
Setting Up the Projector 22
Projector Placement.... 22
Projector Setup and Installation Options 22
Projection Distance.... 24
Projector Connections....27
Connecting to an HDMI Video Source 27
Connecting to Computer Sources.... 28
Connecting to a Computer for VGA Video.... 28
Connecting to a Computer for HDMI Video 28
Attaching and Removing the Cable Clips 29
Connecting to External Speakers 30
Connecting to a Trigger Out Port 30
Installing Batteries in the Remote Control 31
Using the Projector on a Network 33
Wired Network Projection.... 33
Connecting to a Wired Network 33
Selecting Wired Network Settings 34
Wireless Network Projection 36
Installing the Wireless LAN Module 37
Selecting Wireless Network Settings Manually.... 38
Wireless LAN Menu Settings 41
Restricted IP Addresses 42
Using a QR Code to Connect a Mobile Device 42
Searching for a Wireless Network 44
Selecting Wireless Network Settings in Windows 46
Selecting Wireless Network Settings on Mac 46
Enabling WPA or WPA2 Security 46
Wireless Security Menu Settings 47
Selecting External Network Detection Settings 48
Using Basic Projector Features 50
Turning On the Projector 50
Using the Home Screen.... 51
Turning Off the Projector 53
Viewing 3D Images 54
Pairing the 3D Glasses with the Projector.... 55
Charging the 3D Glasses....56
3D Viewing Range 58
Selecting the Language for the Projector Menus.... 58
Adjusting the Image Height 59
Adjusting the Image Position Using Lens Shift 60
Image Shape 62
CorrectingImageShapeWiththeKeystoneButtons....62
Resizing the Image with the Zoom Feature 62
Focusing the Image with the Lens Button.... 63
Remote Control Operation 64
Selecting an Image Source 65
Projection Modes 67
Changing the Projection Mode Using the Menus.... 67
Image Aspect Ratio 68
Changing the Image Aspect Ratio 69
Available Image Aspect Ratios 69
Color Mode....70
Changing the Color Mode 70
Available Color Modes....71
Turning On Auto Iris....71
Adjusting Projector Features 73
Shutting Off the Picture Temporarily 73
Using Picture in Picture 73
Available Picture in Picture Options.... 74
Projector Security Features.... 75
Locking the Projector's Lens Settings and Buttons 75
Unlocking the Projector's Buttons 76
Installing a Security Cable 77
Using Advanced Image Adjustment Features 77
Using Frame Interpolation 77
Using 4K Enhancement....78
Creating Image Presets 80
Using MPEG Noise Reduction.... 81
AdjustingScaledResolutionImages(Super-resolution)....82
Adjusting Detail Enhancement 83
Image Adjustment Restrictions 84
Adjusting the Color Convergence (Panel Alignment) 85
Adjusting the Color Tone (Color Uniformity) 89
Saving Settings to Memory and Using Saved Settings 91
Saving the Lens Position and Using Saved Lens Positions 92
Adjusting the Menu Settings 95
Using the Projector's Menus.... 95
Image Quality Settings - Image Menu 96
Input Signal Settings - Signal Menu.... 101
Projector Feature Settings - Settings Menu.... 104
Projector Setup Settings - Extended Menu.... 107
Projector Network Settings - Network Menu.... 109
Projector Information Display - Info Menu 111
Event ID Code List.... 112
Projector Reset Options - Reset Menu 114
Maintaining and Transporting the Projector 116
Projector Maintenance 116
Cleaning the Lens.... 116
Cleaning the Projector Case.... 117
Cleaning the 3D Glasses 117
Air Filter and Vent Maintenance 118
Cleaning the Air Filter.... 118
Replacing the Air Filter 121
Projector Lamp Maintenance.... 123
Replacing the Lamp 124
Resetting the Lamp Timer.... 127
Replacing the Remote Control Batteries 128
Transporting the Projector.... 130
Solving Problems 131
Projection Problem Tips 131
Projector Light Status.... 132
Solving Image Problems 135
Solutions When No Image Appears 135
Solutions When "No Signal" Message Appears 136
Displaying From a PC Laptop 137
Displaying From a Mac Laptop 137
Solutions When "Not Supported" Message Appears 137
Solutions When Only a Partial Image Appears 138
Solutions When the Image is Not Rectangular 138
Solutions When the Image Contains Noise or Static 139
Solutions When the Image is Fuzzy or Blurry 140
SolutionsWhentheImageBrightnessorColorsareIncorrect....141
SolutionsWhena3DImageDoesNotDisplayCorrectly....141
Solving Projector or Remote Control Operation Problems 142
Solutions to Projector Power or Shut-Off Problems 143
Solutions to Problems with the Remote Control.... 144
Solutions to Panel Alignment Problems.... 144
Solutions When Using HDMI Link.... 145
Solutions When Wireless Authentication Fails 145
Where to Get Help.... 146
Technical Specifications 147
General Projector Specifications 147
Projector Lamp Specifications.... 148
Remote Control Specifications.... 149
Projector Dimension Specifications.... 149
Projector Electrical Specifications 149
Projector Environmental Specifications.... 150
Projector Safety and Approvals Specifications.... 150
Supported Video Display Formats.... 151
Notices 153
Recycling.... 153
Important Safety Information.... 153
Important Safety Instructions.... 154
Restriction of Use 156
List of Safety Symbols 157
FCC Compliance Statement.... 160
Binding Arbitration and Class Waiver 161
Trademarks 164
Copyright Notice.... 165
ANoteConcerningResponsibleUseofCopyrightedMaterials....165
Copyright Attribution 166
HomeCinema4010User'sGuide
Welcome to the Home Cinema 4010 User's Guide.
For a printable PDF copy of this guide, click here.
IntroductiontoYourProjector
Refertothesesectionstolearnmoreaboutyourprojectorandthismanual.
ProjectorFeatures
NotationsUsedintheDocumentation
Where to Gofor Additional Information
AdditionalProjectorSoftwareandManuals
ProjectorPartLocations
ProjectorFeatures
TheHomeCinema4010projectorincludesthesespecialfeatures:
Bright, high-resolution projectionsystem
•Upto2400lumensofcolorbrightness(colorlightoutput)and2400lumensofwhitebrightness(white lightoutput)
Note: Color brightness (color light output) and white brightness (white light output) will vary depending on usage conditions. ColorlightoutputmeasuredinaccordancewithIDMS15.4;whitelightoutput measuredinaccordancewithISO21118.
•1080pnativeresolutionwith4KEnhancement
- Imagesupto300inches(7.62m)forprojectiononanywallorscreen
Full3Dprojection
•Active3DprojectionwithoptionalRFactiveshutterglasses
- Supportsside-by-side, top-and-bottom, andframe-packing3D formats
Flexibleconnectivity
- TwoHDMIportsforvideodeviceorcomputerconnections
•SupportforanopticalHDMIconnection
Easy-to-usesetupandoperationfeatures
- Powered vertical and horizontal lens shift, and vertical keystone correction buttons for flexible projector placement
- 2.1×opticalzoomratioforimprovedzoomingcapability
•Poweredzoomandfocusadjustments
ProductBoxContents
AdditionalComponents
OptionalEquipmentandReplacementParts
Warranty and Registration Information
Parenttopic: Introduction to Your Projector
ProductBoxContents
Saveallthepackagingincaseyouneedtoshiptheprojector.Alwaysusetheoriginalpackaging(or equivalent)whenshipping.
Makesureyourproductboxincludedalloftheseparts:
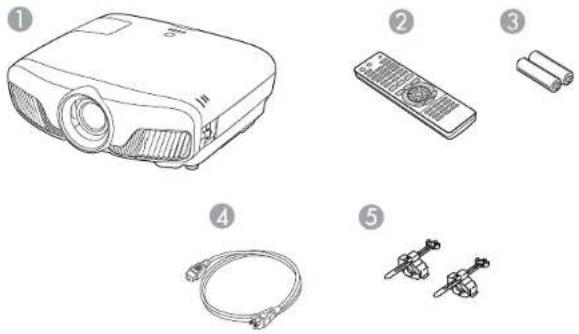
natural_image
Illustration of various electronic devices including a projector, remote control, batteries, and cable connectors (no text or symbols present)1Projector
2Remotecontrol
3Remotecontrolbatteries(twoAAalkaline)
4Powercord
5HDMIcableclips(2)
Theproductboxcontentsmayvarybycountry.
Parenttopic:ProjectorFeatures
AdditionalComponents
Dependingonhowyouplantousetheprojector,youmayneedtoobtainadditionalcomponents.
Note: To connect a Mac that does not include a compatible video output port, you need to obtain an adapter that allows you to connect to an input port on the projector. Contact Apple for compatible adapter options. To connect a smartphone ortablet, you may need to obtain an adapter that allows you to connect the projector. This allows you to mirror your smartphone ortabletscreens, watch movies, and more. Contact your device manufacturer for compatible adapter options.
Unlesslisted as available from Epsonin thistable, see your local computerorelectronics dealer for purchase information.
| Signalorconnection type | Additionalcomponentnecessary |
| HDMICpatibleHDMlcable | AvailableforpurchasefromEpsonoranauthorizedEpsonreseller. |
| OpticalHDMICpatibleopticalHDMlcable | |
| 3DCompatibleHDMlcableandactiveshutter3Dglasses | AvailableforpurchasefromEpsonoranauthorizedEpsonreseller. |
| Note:Ifyourvideosourceisa3DBlu-raydisc,youalsoneedaBlu-ray playerthatsupports3Dplayback.Seeyourlocalcomputerorelectronics dealerforpurchaseinformation. | |
| ExternalaudioSpeakers,ana | audiovideoreceiver,oravideosourcewithspeaker connections,andthecablesnecessaryforconnectingthem |
| VGAToconnectacomputerthroughitsVGAporttotheprojector'sVGAvideo port,youneedaVGAcomputercable. | AvailableforpurchasefromEpsonoranauthorizedEpsonreseller. |
Parenttopic:ProjectorFeatures
OptionalEquipmentandReplacementParts
Youcanpurchasescreens,otheroptionalaccessories,andreplacementpartsfromanEpsonauthorizedreseller.Tofindthenarestreseller,call800-GO-EPSON(800-463-7766)intheU.S.or800-807-7766inCanada. Or you can purchase online at epsonstore.com (U.S. sales) or epsonstore.ca (Canadian sales).
Epsonoffersthefollowingoptionalaccessoriesandreplacementpartsforyourprojector:
| OptionorpartPartnumber | |
| GenuineEpsonreplacementlamp(ELPLP89)V13H010L89 | |
| ReplacementairfilterV13H134A39 | |
| RF3Dglasses(ELPGS03)V12H548006 | |
| WirelessLANmodule(ELPAP10)V12H731P02 | |
| ProjectorceilingmountCHF4000 | |
| BelkinPureAVHDMIaudiovideocable,6ftAV22300-06 | |
| BelkinPureAVHDMIaudiovideocable,3ftAV22300-03 |
Inadditiontotheaccessorieslistedabove,a1-yearextendedserviceplanisavailable.
Parenttopic:ProjectorFeatures
Warranty and Registration Information
Yourprojectorcomeswithabasicwarrantythatletsyouprojectwithconfidence.Fordetails,seethe warrantybrochurethatcamewithyourprojector.
Inaddition, EpsonoffersfreeExtraCareHomeService. In the unlikely event of an equipment failure, you won't havetowait for your unit to be repaired. Instead, Epson will ship you are replacement unit anywhere in the United States, Canada, or Puerto Rico. See the Extra Care Home Service brochure for details.
Registryyourproductonlineatthissite:epson.com/webreg
Registeringalsoletsyoureceivespecialupdatesonnewaccessories,products,andservices.
Parenttopic:ProjectorFeatures
NotationsUsedintheDocumentation
Followtheguidelinesinthesenotationsasyoureadyourdocumentation:
- Warningsmustbefollowedcarefullytoavoidbodilyinjury .
- Cautionsmustbeobservedtoavoiddamagetoyourequirement.
- Notes contain important information about your projector.
- Tipscontainadditionalprojectioninformation.
Parenttopic: Introduction to Your Projector
WheretoGoforAdditionallInformation
Needquickhelponusingyourproject?Here'swheretolookforhelp:
•epson.com/support(U.S.)orepson.ca/support(Canada)
ViewFAQs(frequentlyaskedquestions)ande-mailyourquestionstoEpsontechnicalsupport24 hoursaday.
- If you still need help after checking this manual and any others sources listed here, you can use the Epson Private Line Support service to get help fast. For details, see "Where to Get Help."
Parenttopic: Introduction to Your Projector
Relatedreferences
WheretoGetHelp
AdditionalProjectorSoftwareandManuals
Afterconnectingandsettinguptheprojector,installtheprojectorsoftware.Youmayneedtoinstallit fromasoftwareCD,ifincluded,ordownloadthesoftwareandmanualsasnecessary.
Youcaninstalltheprojectorsoftwareprogramslistedhereandviewtheirmanualsforinstructionson usingthem.
Note: If you still need help after checking this manual and the sources listed here, you can use the EpsonPrivateLineSupportservicetogethelpfast.Fordetails,see"WhereToGetHelp."
| ProjectorsoftwareManual | Description | |
| EpsoniProjection (Windows/Mac) | EpsoniProjection OperationGuide (Windows/Mac) | Letsyouprojectthecomputerscreensof usersoveranetwork.Youcandownloadthelatestsoftwareand documentationfromtheEpsonwebsite.Gotoepson.com/support(U.S.)orepson.ca/support(Canada)andselectyourprojector. |
| EpsoniProjectionappInstructionsareincluded withtheapp | LetsyouprojectfromaniOSorAndroiddevice ifyourprojectorisconnectedtoanetworkthat includesawirelessaccesspoint.Visitepson.com/iprojection(U.S.)orepson.ca/iprojection(Canada)formore information. | |
| —OpenSourceSoftware | License | Youcandownloadthisdocumentfromthe Epsonwebsite.Gotoepson.com/support (U.S.)orepson.ca/support(Canada)and selectyourprojector. |
Parenttopic: Introduction to Your Projector
Relatedreferences
WheretoGetHelp
ProjectorPartLocations
Check the projector part illustration to learn about the part's your projector.
ProjectorParts-Front/Top
ProjectorParts-Rear
ProjectorParts-Base
ProjectorParts-ControlPanel
ProjectorParts-RemoteControl
Parenttopic: Introduction to Your Projector
ProjectorParts-Front/Top
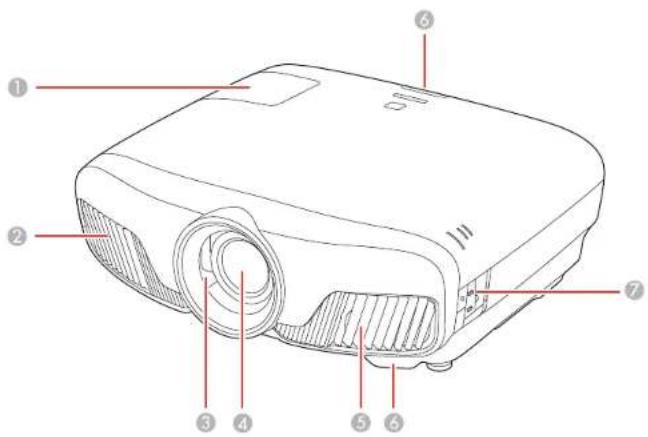
text_image
Labeled diagram of a projector with numbered parts for identification1 Lampcover
2Exhaustvent
3Lensshutter
4Lens
5Airintake/airfiltercover
6Remotereceivers
7Controlpanel
Parenttopic:ProjectorPartLocations
ProjectorParts-Rear
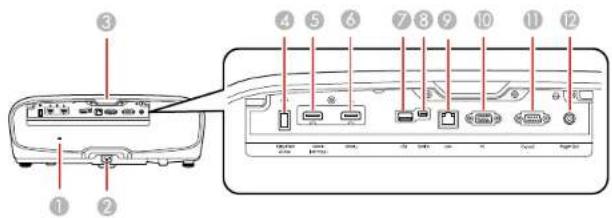
text_image
Diagram of an electronic device rear panel with numbered ports and labeled connectors1Securityslot
2ACinputport
3Remotereceiver
4Opt.HDMI(300mA)port(USBpowerforopticalHDMIconnections)
5HDMI1(HDCP2.2)port
6HDMI2port
7USBport(foroptionalwirelessLANmoduleandfirmwareupdates)
8Serviceport
9LANport
10PCport(VGA)
11RS-232Cport
12TriggerOutport(12VDC@200mAmax)
Parenttopic:ProjectorPartLocations
Relatedtasks
InstallingaSecurityCable
AttachingandRemovingtheCableClips
ProjectorParts-Base
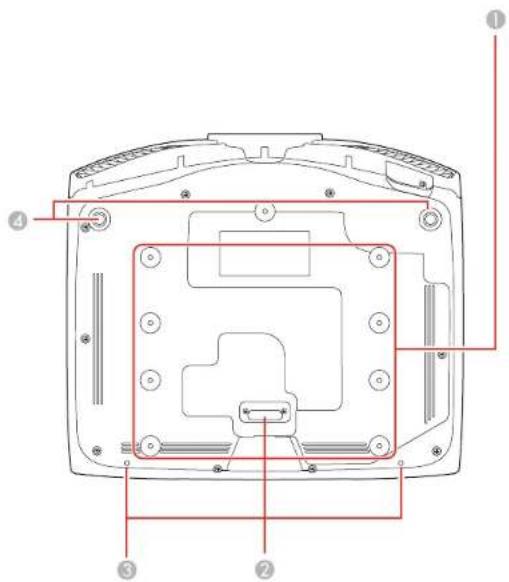
text_image
Technical diagram of a device rear panel with numbered annotations indicating component locations1Mountingbracketholes(M4x9)
2Rearfoot
3Cablecoverscrewholes
4Frontadjustablefeet
Parenttopic:ProjectorPartLocations
ProjectorParts-ControlPanel
text_image
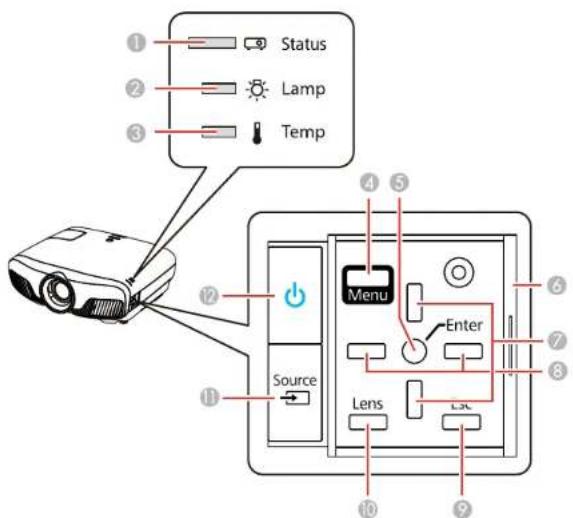
Status Lamp Temp ① ② ③ ④ ⑤ ⑥ ⑦ ⑧ ⑨ Menu Enter Source Lens1Statuslight
2Lamplight
3Templight
4Menubutton(accessesprojectormenusystem)
5Enterbutton(selectsoptions)
6Controlpanelcover
7Verticalkeystoneadjustmentbuttons(adjustscreenshape)andarrowbuttons
8Arrowbuttons
9Escbutton(cancels/exitsfunctions)
10Lensbutton(cyclesthroughlensadjustmentoptions)
11 Sourcebutton(cyclesthroughthelistofsources)
12Powerbutton/light
Parenttopic:ProjectorPartLocations
ProjectorParts-RemoteControl
text_image
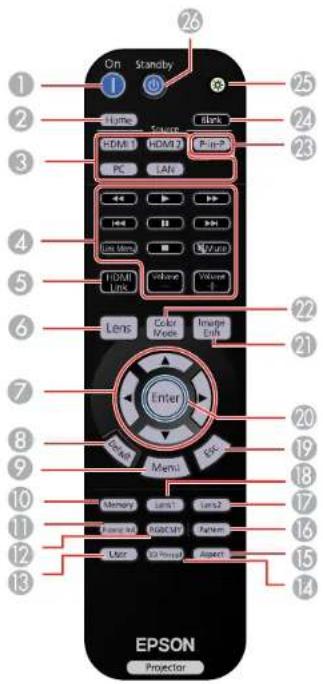
On Standby 1 2 3 4 5 6 7 8 9 10 11 12 13 EPSON Projector Home Search Block HDMI HD/HD Image ? PC LAN Video Volume Volume ? Lens Mode Image ESH Enter Menu1 Menu2 Menu3 User User Input User Input Aspect 26 25 24 23 22 21 20 19 18 17 16 15 141Onbutton(turnsonprojector)
2Homebutton(displaysHomescreen)
3Sourcebuttons(selectspecificvideoinputsources)
4LinkMenubutton(displaystheimainmenuoftheconnecteddevice)
Controlbuttons(control playback and other features of connected devices that support the HDMI CEC standard)
5HDMILinkbutton(displaysthesettingsmenuforHDMILink)
6Lensbutton(cyclesthroughlensadjustmentoptions)
7Arrowbuttons(movethoughon-screenoptions)
8Defaultbutton(returnsselectedsettingtodefaultvalue)
9Menubutton(accessesprojectormenusystem)
10Memorybutton(accessestheMemorymenu)
11FrameIntbutton(adjuststheFrameInterpolationsetting)
12RGBCMYbutton(adjustshue,saturation,andbrightnessforeachRGBCMYcolor)
13Userbutton(customizablefordifferentfunctions)
143DFormatbutton(changesthe3Dformat)
15Aspectbutton(selectstheimageaspectratio)
16Patternbutton(displaysatestpattern)
17Lens2button(loadsthesecondsavedlensposition)
18Lens1button(loadsthefirstsavedlensposition)
19Escbutton(cancels/exitsfunctions)
20Enterbutton(selectsoptions)
21ImageEnhbutton(displaystheImageEnhancementmenu)
22ColorModebutton(selectsdisplaymodes)
23P-in-Pbutton(controlsthePicture-in-Picturemode)
24Blankbutton(turnsoffvideoprojection)
25Illuminationbutton(lightstheremotecontrol)
26Standbybutton(turnsofftheprojector)
Parenttopic: ProjectorPartLocations
SettingUptheProjector
Followtheinstructionsinthesesectionstosetupyourprojectorforuse.
ProjectorPlacement
ProjectorConnections
Installing Batteries in the Remote Control
ProjectorPlacement
Youcanplacetheprojectoronalmostanyflatsurfacetoprojectanimation.
Youcanalsoinstalltheprojectorinaceilingmountifyouwanttouseitinafixedlocation.
Keeptheseconsiderationsinmindasyouselectaprojectorlocation:
- Placetheprojectoronasturdy, levelsurfaceorinstallitusingacompatiblemount.
- Leaveplentyofspacearoundandundertheprojectorforventilation, anddonotplaceitontopofor nexttoanythingthatcouldblockthevents.
- Placetheprojectorparalleltothescreen.
- Position the projector within reach of foreground electrical outlet to extension cord.
ProjectorSetupandInstallationOptions
ProjectionDistance
Parenttopic: SettingUptheProjector
Relatedtasks
ChangingtheProjectionModeUsingtheMenus
ProjectorSetupandInstallationOptions
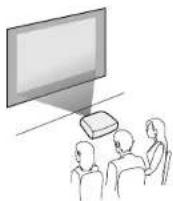
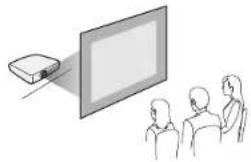
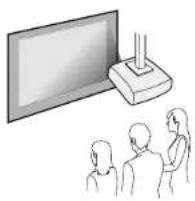
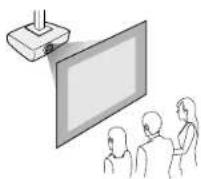
Youcansetuporinstallyourprojectorinthefollowingways:
Front
Rear
natural_image
Illustration of people watching a projector screen (no text or symbols visible)FrontCeiling
natural_image
Illustration of three people watching a large screen with a TV stand (no text or symbols visible)RearCeiling
Whereveryousetuptheprojector, makesuretopositionitsquarelyinfrontofthecenterofthescreen, notatanangle, ifpossible. Iftheprojectorcannotbecenteredinfrontofthescreen, uselensshiftto repositiontheimageinsteadofusingkeystonecorrectionforbetterimagequality.
If you project from the ceiling or from the rear, be sure to select the correct Projection option in the projector's menusystem.
Parenttopic:ProjectorPlacement
Relatedreferences
ProjectorSetupSettings-ExtendedMenu
ProjectionDistance
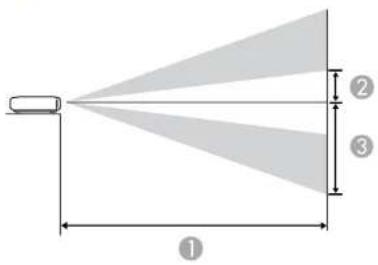
The distance at which you place the projector from the screen, but can vary depending on the zoom factor, aspect ratio, and other settings.
Use the tables heretodetermine approximately how fartoplacethe projector from the screen based on the sizeof the projected image. (Conversion figures may have been rounded up or down.)
YoucanalsousetheprojectorThrowDistanceCalculatoratepson.com/support(U.S.)orepson.ca/support(Canada).
text_image
① ② ③16:9AspectRatioImageorScreen
| Screenorimage size | Projection distance(1) WidetoTele | Offsetfromlens center(2) | Offsetfromlens center(3) | Horizontaloffset fromlenscenter |
| 50inches(127cm)58 | to123inches (148to313cm) | 11.3inches(29 cm) | 35.9inches(91 cm) | ±20.5inches(52 cm) |
| 60inches(152.4 cm) | 70to148inches (178to376cm) | 13.6inches(35 cm) | 43inches(109cm)±2 | 4.6inches(63 cm) |
| 80inches(203.2 cm) | 94to198inches (239to630cm) | 18.2inches(46 cm) | 57.4inches(146 cm) | ±32.8inches(83 cm) |
| 100inches(254 cm) | 118to248inches (300to630cm) | 22.7inches(58 cm) | 71.7inches(182 cm) | ±41inches(104 cm) |
| 150inches(381 cm) | 178to373inches (452to947cm) | 34inches(86cm)107 | 6inches(273 cm) | ±61.6inches(156 cm) |
| 200inches(508 cm) | 238to498inches (604to1264cm) | 45.4inches(115 cm) | 143.4inches(364 cm) | ±82.1inches(209 cm) |
| 250inches(635 cm) | 297to623inches (756to1582cm) | 56.7inches(144 cm) | 179.3inches(455 cm) | ±102.6inches(261 cm) |
| 300inches(762 cm) | 357to748inches (908to1899cm) | 68.1inches(173 cm) | 215.2inches(547 cm) | ±123.1inches(313 cm) |
4:3AspectRatioImageorScreen
| Screenorimage size | Projection distance(1) WidetoTele | Offsetfromlens center(2) | Offsetfromlens center(3) | Horizontaloffset fromlenscenter |
| 50inches(127cm)72 | to151inches (182to384cm) | 13.9inches(35 cm) | 43.9inches(111 cm) | ±25.1inches(56 cm) |
| 60inches(152.4 cm) | 86to182inches (219to462cm) | 16.7inches(42 cm) | 52.7inches(134 cm) | ±30.1inches(77 cm) |
| 80inches(203.2 cm) | 115to243inches (293to617cm) | 22.2inches(56 cm) | 70.2inches(178 cm) | ±40.2inches(102 cm) |
| 100inches(254 cm) | 145to304inches (368to772cm) | 27.8inches(71 cm) | 87.8inches(223 cm) | ±50.2inches(128 cm) |
| 120inches(304.8 cm) | 174to365inches (442to927cm) | 33.3inches(854 cm) | 105.3inches(268 cm) | ±60.3inches(153 cm) |
| 150inches(381 cm) | 218to457inches (554to1160cm) | 41.7inches(106 cm) | 131.7inches(334 cm) | ±75.4inches(191 cm) |
| 200inches(508 cm) | 291to610inches (740to1548cm) | 55.6inches(141 cm) | 175.6inches(446 cm) | ±100.5inches(255 cm) |
| 220inches(558.8 cm) | 321to671inches (814to1704cm) | 61.1inches(155 cm) | 193.1inches(491 cm) | ±110.5inches(281 cm) |
| 244.8inches(622 cm) | 357to746inches (906to1896cm) | 68inches(173cm)21 | 4.8inches(546 cm) | ±123inches(312 cm) |
Parenttopic:ProjectorPlacement
ProjectorConnections
Seethesectionstoconnecttheprojectortoavarietyofprojectionsources.
Caution: If you will use the projector at altitudes above 4921 feet (1500 m), turn on High Altitude Mode to ensure the projector's internal temperature is regulated properly.
ConnectingtoanHDMIVideoSource
ConnectingtoComputerSources
AttachingandRemovingtheCableClips
ConnectingtoExternalSpeakers
ConnectingtoaTriggerOutPort
Parenttopic:SettingUptheProjector
Relatedreferences
ProjectorSetupSettings-ExtendedMenu
ConnectingtoanHDMIVideoSource
If your videosourcehasan HDMI port, you can connect it to the projector using an optional HDMI cable. The HDMI connection provides the best image equality.
-
ConnecttheHDMIcabletoyourvideosource'sHDMIoutputport.
-
Connecttheotherendtooneoftheprojector'sHDMIports.IfyouareconnectinganopticalHDMI cable,youmustalsoconnectthecable'sUSBpowerconnectortotheOpt.HDMI(300mA)port.

text_image
Diagram showing Ethernet cable connections with port labels and connector iconsNote: When an audio/video source that meets the HDMI CEC standard is connected to the projector's HDMI port, you can us the projector's remote control to control certain features of the linked device by pressing the HDMI Link button on the remote control and setting HDMI Link to On.
Parenttopic:ProjectorConnections
ConnectingtoComputerSources
Followtheinstructionsinthesesectionstoconnectacomputertotheprojector.
ConnectingtoaComputerforVGAVideo
ConnectingtoaComputerforHDMIVideo
Parenttopic:ProjectorConnections
ConnectingtoaComputerforVGAVideo
YoucanconnecttheprojectortoyourcomputerusingaVGAcomputercable.
Note: To connect a Mac that does not include a compatible video output port, you need to obtain an adapter that allows you to connect to an input port on the projector. Contact Apple for compatible adapter options. To connect a smartphone ortablet, you may need to obtain an adapter that allows you to connect the projector. This allows you to mirror your smartphone ortabletscreens, watch movies, and more. Contact your device manufacturer for compatible adapter options.
- If necessary, disconnect your computer's monitorable.
- ConnecttheVGAccomputercabletoyourcomputer'smonitorport.
-
ConnecttheotherendtoaPCportontheprojector.
-
TightenthescrewsontheVGAconnector.
Parenttopic: ConnectingtoComputerSources
ConnectingtoaComputerforHDMIVideo
If your computer has an HDMI port, you can connect to the projector using an optional HDMI cable.
Note: To connect a Mac that does not include a compatible video output port, you need to obtain an adapter that allows you to connect to an input port on the projector. Contact Apple for compatible adapter options. To connect a smartphone ortablet, you may need to obtain an adapter that allows you to connect the projector. This allows you to mirror your smartphone ortabletscreens, watch movies, and more. Contact your device manufacturer for compatible adapter options.
- ConnecttheHDMIcabletoyourcomputer'sHDMIoutputport.
- Connecttheotherendtooneoftheprojector'sHDMIports.IfyouareconnectinganopticalHDMI cable,youmustalsoconnectthecable'sUSBpowerconnectortotheOpt.HDMI(300mA)port.

text_image
Diagram showing network connection between a device and a laptop via USB interfaces, with labeled ports and data lines.Parenttopic: ConnectingtoComputerSources
AttachingandRemovingtheCableClips
YoucaninstallthecableclipsthatcamewithyourprojectortoprovideadditionalsupporttotheHDMI cables.
- PlugintheHDMIcables.
- Inserteachguide into the cable clip holes near the HDMI port.
- AttachthecableclipstotheHDMlcables.Besuretoleavetheclampsunlocked.
4.Slideeachcableclipontotheguidesandlocktheclampsontotheconnectors.
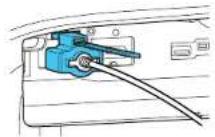
Toremovethecableclips, opentheclamps and disconnect the cables. Then pinch the sides of each guide and carefully pull them out of the cable clip holes.
Parenttopic:ProjectorConnections
ConnectingtoExternalSpeakers
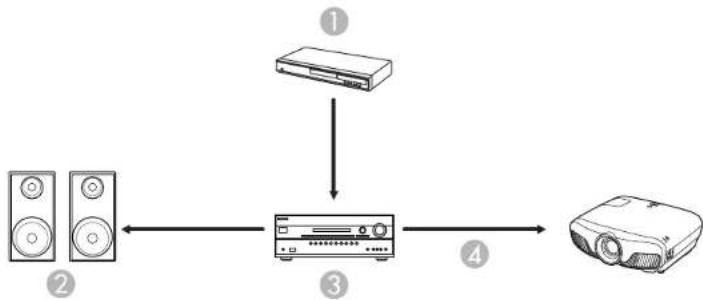
Toaddsound, you can connect your videos or audio source and speaker to an audio video receiver, then connect there to a receiver to the projector using one of the receiver's compatible video outputs (an HDMI connection provided the best image equality, if available). You can also connect speaker to any video source that has its own speakers or connections.
flowchart
graph TD
    A["Speaker with two speakers"] --> B["Device"]
    C["Server with one device"] --> B
    B --> D["Protractor"]
1Videosource
2Surroundsoundspeakers
3Receiver
4Videocable
Parenttopic:ProjectorConnections
ConnectingtoaTriggerOutPort
Youcanconnectyourprojectortoexternaldevicessuchasmotorizedscreensthatsupportatrigger signal.Whenactive,a12V(200mAmaximum)signalissenttotheconnecteddevicewhiletheprojector ispoweredon.
-
Connecta3.5mmstereomini-jackcabletotheexternaldevice'striggerport.Seeyourdevice's documentationfordetails.
-
Connecttheotherendtotheprojector'sTriggerOutport.

text_image
Diagram showing device rear panel connected to a screen via USB cable, with Chinese labels and connection arrows- Turn on the Trigger Out setting in the projector's Extended menu.
Parenttopic:ProjectorConnections
Relatedreferences
ProjectorSetupSettings-ExtendedMenu
InstallingBatteriesintheRemoteControl
TheremotecontrolusesthettwoAAbatteriesthatcamewiththeprojector.
Caution: Use only the type of batteries specified in this manual. Do not install batteries of different types, ormixnewandoldbatteries.
- Removethebatterycover.
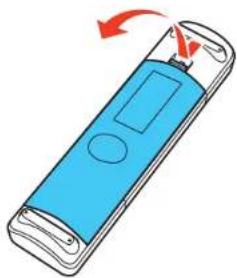
natural_image
Illustration of a blue handheld device with a red arrow indicating rotation (no text or symbols)- Insert the batteries with the + and - ends facing as shown.
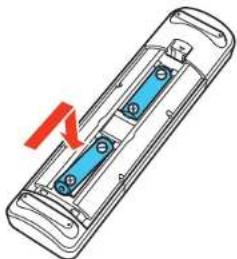
natural_image
Diagram of a battery pack with blue internal components and a red arrow indicating rotation (no text or symbols)- Replacethebatterycoverandpressitdownuntilclicksintoplace.
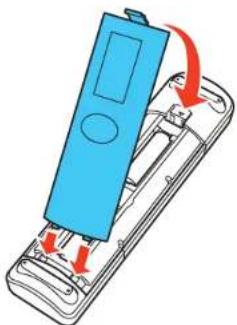
natural_image
Illustration of a blue handheld device with red arrows indicating internal components (no text or symbols)Warning: Dispose of used batteries according to local regulations. Do not expose batteries to heat or flame. Keep batteries out of thereachofchildren; they are choking hazards and are very dangerous if swallowed.
Parenttopic:SettingUptheProjector
Relatedreferences
RemoteControlSpecifications
UsingtheProjectoronaNetwork
Followtheinstructionsinthesesectionstosetupyourprojectorforuseonanetwork.
Note: EpsoniProjectionisnotrecommendedforusewithstreamingvideo.
WiredNetworkProjection
WirelessNetworkProjection
SelectingExternalNetworkDetectionSettings
WiredNetworkProjection
Youcanprojectthroughawirednetwork. Todothis, youconnecttheprojectortoyournetworkwithan Ethernetcable, andthensetupyourprojectorandcomputerfornetworkprojection.
Afterconnectingandsettinguptheprojector, installtheprojectorsoftware. Youmayneedtoinstallit fromasoftwareCD, ifincluded, ordownloadthesoftwareandmanualsasnecessary.
Note: If your projector is connected via a LAN (Ethernet) cable to a network that includes a wireless accesspoint, you can connect to the projector wirelessly through the accesspoint using the Epson network software.
ConnectingtoaWiredNetwork
SelectingWiredNetworkSettings
Parenttopic: Using the Projectorona Network
Relatedreferences
AdditionalProjectorSoftwareandManuals
ConnectingtoaWiredNetwork
Toconnecttheprojectortoawiredlocalareanetwork(LAN), usea100Base-TXor10Base-Tnetwork cable. Toensureproperdatatransmission, useaCategory5shieldedcableorbetter.
-
Connectoneendofthenetworkcabletoyournetworkhub, switch, orrouter.
-
Connecttheotherendofthecabletotheprojector'sLANport.

text_image
Diagram showing device rear panel connected to two ports via cable and switch, with Chinese labels indicating ports and connections.Parenttopic: WiredNetworkProjection
SelectingWiredNetworkSettings
Before you can project from computers, tablets, or smart phones to every our network, you must select the network settings for the projector using its menusystem.
Note: Make sure you already connected the projector to your wired network using the LAN port.
- Turnontheprojector.
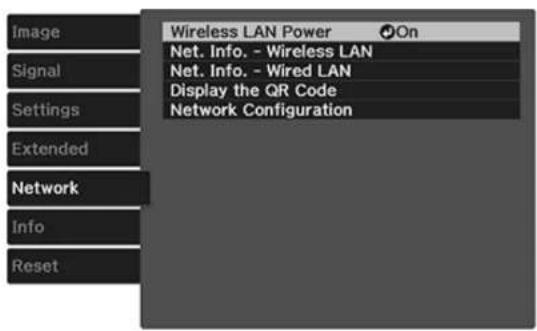
2.PresstheMenubutton. - SelecttheNetworkmenuandpressEnter.
text_image
Image Signal Settings Extended Network Info Reset Wireless LAN Power On Net. Info. - Wireless LAN Net. Info. - Wired LAN Display the QR Code Network Configuration- SelectNetworkConfigurationandpressEnter.
5. SelecttheBasicmenuandpressEnter.
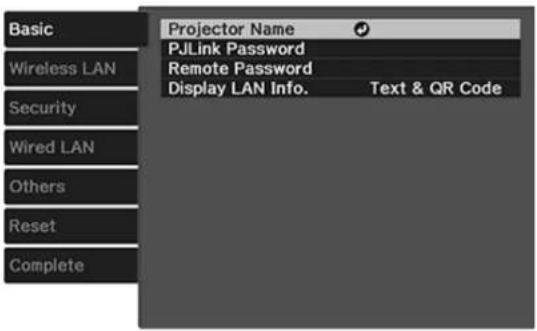
text_image
Basic Wireless LAN Security Wired LAN Others Reset Complete Projector Name PJLink Password Remote Password Display LAN Info. Text & QR Code6. Select the following basic options as necessary:
-ProjectorNameletsyouenteranameupto16alphanumericcharacterslongtoidentifytheprojectoroverthenetwork.
- PJLinkPasswordletyouenterapasswordupto32alphanumericcharacterslongforusingthe PJLinkprotocolforprojectorcontrol.
- RemotePasswordletsyouenterapasswordupto8alphanumericcharacterslongforaccessing theRemoteorBasicControlscreenonasmartphoneortablet.
- Display LAN Info lets you select how the projector displays network information. You can select anoptiontodisplayaQRcodethatletssyouquicklyconnectyouriOSorAndroiddevicesusingthe EpsoniProjectionapp.
Note: Usethedisplayedkeyboardtoenterthename, passwords, and keyword. Pressthearrow buttons on the remote control to highlight characters and press Enter to select them. Press Finish whenyouaredone.
7. SelecttheWiredLANmenuandpressEnter.
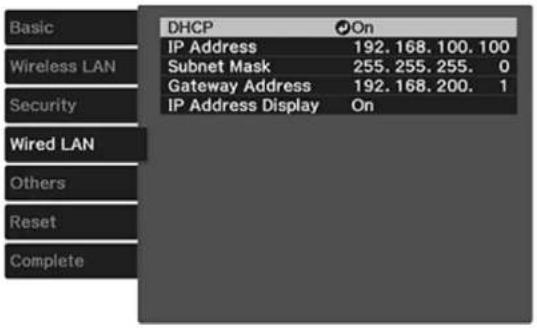
text_image
Basic Wireless LAN Security Wired LAN Others Reset Complete DHCP IP Address 192.168.100.100 Subnet Mask 255.255.255.0 Gateway Address 192.168.200.1 IP Address Display On8. Select your IP Settings as necessary:
- If your network assigns addresses automatically, turn the DHCP setting.
- If you must set addresses manually, turn off DHCP and enter the projector's IP Address, Subnet Mask, and GatewayAddressasneeded.
Note: To highlight the numbers you want from the displayed keyboard, press the arrow button on the remote control. To select a highlighted number, press Enter. Press Finish when you are done.
9. TopreventdisplayofthelPaddressonthestandbyscreen,turnoffIPAddressDisplay.
- When you finish selecting settings, select Complete and follow the on-screen instructions to save yoursettingsandexithemenus.
Parenttopic: WiredNetworkProjection
WirelessNetworkProjection
Youcanprojectoverawirelessnetwork.Todothis,youmustsetupyourprojectorandcomputerfor wirelessprojection.
Note: The Epson 802.11b/g/n wireless LAN module is not included with your projector and is optional.
Toconnectwirelesslytoyourprojector,configuretheconnectionusingtheprojector'sNetworkmenus.
Afterconnectingandsettinguptheprojector, installtheprojectorsoftware. Youmayneedtoinstallit fromasoftwareCD, ifincluded, ordownloadthesoftwareandmanualsasnecessary.
Note: Wireless network connectivity is not recommended for video streaming.
Note: If your projector is connected via a LAN cable to a network that includes a wireless access point, you can connect to the projector wirelessly through the access point using the Epsonnetworksoftware.
InstallingtheWirelessLANModule
SelectingWirelessNetworkSettingsManually
UsingaQRCodetoConnectaMobileDevice
SearchingforaWirelessNetwork
SelectingWirelessNetworkSettingsinWindows
SelectingWirelessNetworkSettingsonMac
EnablingWPAorWPA2Security
Parenttopic: UsingtheProjectoronaNetwork
Relatedreferences
AdditionalProjectorSoftwareandManuals
InstallingtheWirelessLANModule
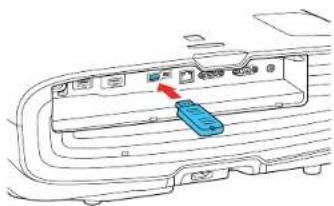
Tousetheprojectoroverawirelessnetwork, installtheEpson802.11b/g/nwirelessLANmoduleinthe projector.Donotinstallanyothertypeofwirelessmodule.
Note: The wireless LAN module is not included with your projector.
InsertthewirelessLANmoduleintotheUSBport.
natural_image
Diagram of a device rear panel with a blue USB drive and red arrow pointing to the internal component (no text or symbols)ThelightonthewirelessLANmoduleturnsonwhenthemoduleisinstalledandoperating. Thelight flasheswhenthemoduleiscommunicatingoverthenetwork.
Parenttopic: Wireless Network Projection
SelectingWirelessNetworkSettingsManually
Before you can project from your wireless network, you must select then network settings for the projector using its menusystem.
- Turnontheprojector.
2.PresstheMenubutton. - SelecttheNetworkmenuandpressEnter.
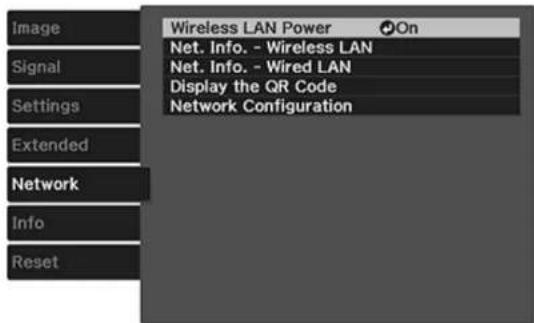
text_image
Image Signal Settings Extended Network Info Reset Wireless LAN Power On Net. Info. - Wireless LAN Net. Info. - Wired LAN Display the QR Code Network Configuration- MakesuretheWirelessLANPowersettingissettoOn.
-
SelectNetworkConfigurationandpressEnter.
-
SelecttheBasicmenuandpressEnter.
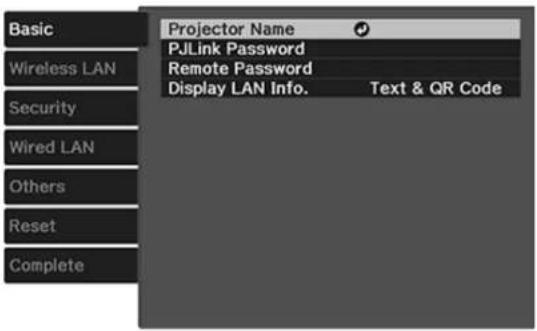
text_image
Basic Wireless LAN Security Wired LAN Others Reset Complete Projector Name PJLink Password Remote Password Display LAN Info. Text & QR Code- Select the following basic options as necessary:
-ProjectorNameletsyouenteranameupto16alphanumericcharacterslongtoidentifytheprojectoroverthenetwork.
- PJLinkPasswordletyouenterapasswordupto32alphanumericcharacterslongforusingthe PJLinkprotocolforprojectorcontrol.
- RemotePasswordletsyouenterapasswordupto8alphanumericcharacterslongforaccessing theRemoteorBasicControlscreenonasmartphoneortablet.
- Display LAN Info lets you select how the projector displays network information. You can select anoptiontodisplayaQRcodethatletssyouquicklyconnectyouriOSorAndroiddeviceswiththe EpsoniProjectionapp.
Note: Usethedisplayedkeyboardtoenterthename, passwordsandkeyword. Pressthearrow buttons on the remote control to highlight characters and press Enter to select them. Press Finish whenyouaredone.
- SelecttheWirelessLANmenuandpressEnter.
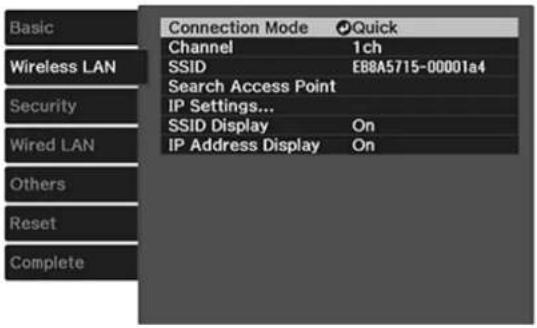
text_image
Basic Wireless LAN Security Wired LAN Others Reset Complete Connection Mode Quick Channel 1ch SSID EB8A5715-00001a4 Search Access Point IP Settings... SSID Display On IP Address Display On-
Select the settings on the Wireless LAN menu as necessary for your network.
-
When you finish selecting settings, select Complete and follow the on-screen instructions to save yoursettingsandexithemenus.
Afteryoucompletethewirelesssettingsforyourprojector,youneedtoselectthewirelessnetworkon yourcomputer,oriOSorAndroiddevice.
WirelessLANMenuSettings
RestrictedIPAddresses
Parenttopic: Wireless Network Projection
WirelessLANMenuSettings
| SettingOptionsDescription | ||
| ConnectionModeQuick | Advanced | Selectsthetypeofwireless connection:Quick:letsyouquicklyconnect tolocaldeviceswithoutan internetconnectionAdvanced:letsyouconnectto multiplecomputersviaawireless networkaccesspoint (infrastructuremode) |
| Channel1ch | 6ch11ch | InQuickconnectionmode, selectsthefrequencyband (channel)usedbythewireless LAN |
| SSIDUp32alphanumericcharacters | SetstheSSID(networkname)of | thewirelessLANsystemthe projectorisconnectingto |
| SearchAccessPointToSearchView | Searchesforavailablewireless | networkaccesspointsin Advancedconnectionmode |
| IPSettings—TurnsonDHCPifyourn | network | assignsaddressesautomatically; settoOfftomanuallyenterthe network'sIPAddress,Subnet Mask,andGatewayAddress (seelistofrestrictedIP addressesinlinkbelow) |
| SSIDDisplayOn | Off | Selectswhethertodisplaythe SSIDonthenetworkstandby screenandtheHomescreen |
| IPAddressDisplayOn | Off | SelectswhethertodisplaytheIP addressonthenetworkstandby screenandtheHomescreen |
Parenttopic: SelectingWirelessNetworkSettingsManually
Relatedreferences
RestrictedIPAddresses
RestrictedIPAddresses
When manually entering IP Settings, you cannot us the seranges of IP addresses:
| SettingRestrictedIPaddresses | |
| IPAddress0.0.0.0 | 127.x.x.x224.0.0.0to255.255.255.255 |
| SubnetMask0.0.0.0 | 255.255.255.255 |
| GatewayAddress0.0.0.0 | 127.x.x.x224.0.0.0to255.255.255.255 |
Parenttopic: SelectingWirelessNetworkSettingsManually
UsingaQRCodetoConnectaMobileDevice
Afteryouselectthewirelessnetworksettingsforyourprojector,youcandisplayaQRcodeonthe screenanduseittoconnectamobiledeviceusingtheEpsoniProjectionapp.
Note: Make sure you have installed the latest version of Epson iProjection on your device. Visit epson.com/iprojection (U.S.) or epson.ca/iprojection (Canada) for more information.
-
PresstheMenubutton.
-
SelecttheNetworkmenuandpressEnter.
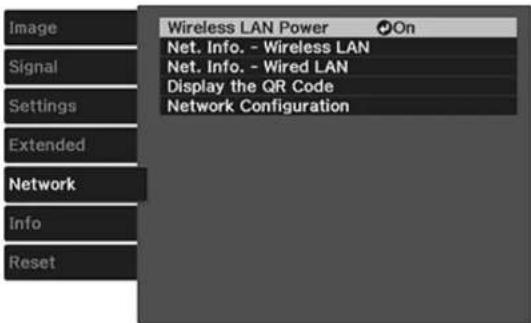
text_image
Image Signal Settings Extended Network Info Reset Wireless LAN Power On Net. Info. - Wireless LAN Net. Info. - Wired LAN Display the QR Code Network Configuration- SelectNetworkConfigurationandpressEnter.
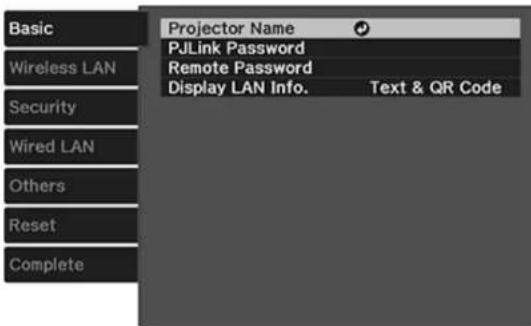
- SelecttheBasicmenuandpressEnter.
text_image
Basic Wireless LAN Security Wired LAN Others Reset Complete Projector Name PJLink Password Remote Password Display LAN Info. Text & QR Code- SettheDisplayLANInfosettingtoText&QRCode.
- Select Complete and follow the on-screen instructions to save your settings and exit the menus.
7.Dooneofthefollowing:
- PresstheLANbuttonontheremotecontrol.
- SelectDisplaytheQRCodeintheprojector'sNetworkmenu.
- Press the Home button on the remote control and select Display the QR Code on the Home screen.
YourprojectordisplaystheQRcodeontheprojectionsurface.
Note: If you do not see the QR code after pressing the LAN button, press Enter to display it.
8.StartEpsoniProjectiononyourmobiledevice.
9. Use the QR codereader feature to read the QR code and connect your device to the projector. Visit epsilon.com/iprojection (U.S.) or epsilon.ca/iprojection (Canada) for instructions.
Parenttopic: Wireless Network Projection
SearchingforaWirelessNetwork
Youcanuseyourproject's sitesurveyfunction to quickly locate and connect to available wireless networks.
- Turnontheprojector.
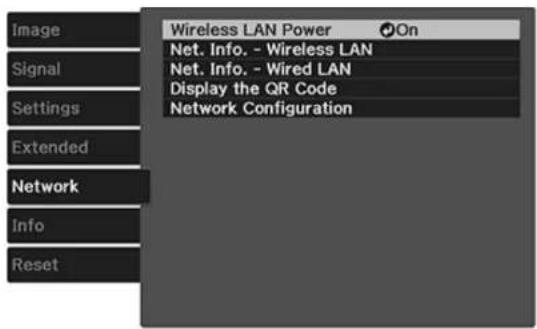
2.PresstheMenubutton. - SelecttheNetworkmenuandpressEnter.
text_image
Image Signal Settings Extended Network Info Reset Wireless LAN Power On Net. Info. - Wireless LAN Net. Info. - Wired LAN Display the QR Code Network Configuration- SelectNetworkConfigurationandpressEnter.
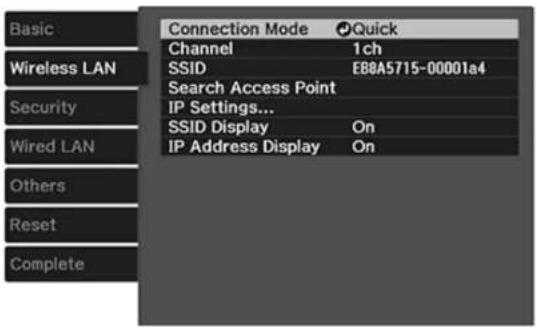
- SelecttheWirelessLANmenuandpressEnter.
text_image
Basic Wireless LAN Security Wired LAN Others Reset Complete Connection Mode Quick Channel 1ch SSID E88A5715-00001a4 Search Access Point IP Settings... SSID Display On IP Address Display On- SelectAdvancedastheConnectionModesettingandpressEnter.
- SelectSearchAccessPointandpressEnter.
- SelectthenameofthewirelessnetworkyouwanttoconnecttoandpressEnter.
- If thenetworkhassecurityenabled, enterthewirelesspassword.
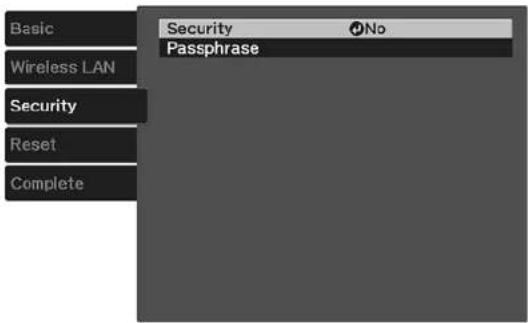
Youseeascreenlikethis:
text_image
Basic Wireless LAN Security Reset Complete Security No Passphrase- Select these settings on the Security menu as necessary for your network.
- When you finish selecting settings, select Complete and follow the on-screen instructions to save yoursettingsandexithemenus.
Parenttopic: Wireless Network Projection
SelectingWirelessNetworkSettingsinWindows
Beforeconnectingtotheprojector, select the correct wireless network on your computer.
-
To access your wireless utility software, access the Desktop and double-click then network icon on the Window task bar.
2.Dooneofthefollowing: -
If your projector is set upon an existing network (Advanced mode), select thenetworkname (SSID).
- If your projector is configured for Quickmode, select the projector's SSID.
3.ClickConnect.
Parenttopic: Wireless Network Projection
SelectingWirelessNetworkSettingsMac
Beforeconnectingtotheprojector,selectthecorrectwirelessnetworkonyourMac.
- ClicktheAirPorticononthemenubaratthetopofthescreen.
- MakesureAirPortisturnedon, thendooneofthefollowing:
- If your projector is set upon an existing network (Advanced mode), select thenetworkname (SSID).
- If your projector is configured for Quickmode, select the projector's SSID.
Parenttopic: Wireless Network Projection
EnablingWPAorWPA2Security
SetuptheWPAorWPA2securitysettingstomatchyournetwork'ssettings.Checkwithyournetwork administratorforguidanceonenteringthecorrectinformation.
- Turnontheprojector.
-
PresstheMenubutton.
-
SelecttheNetworkmenuandpressEnter.
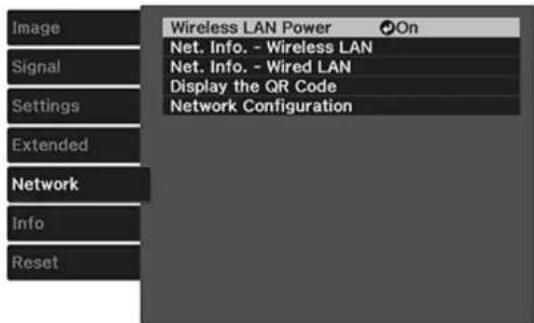
text_image
Image Signal Settings Extended Network Info Reset Wireless LAN Power On Net. Info. - Wireless LAN Net. Info. - Wired LAN Display the QR Code Network Configuration- SelectNetworkConfigurationandpressEnter.
- SelecttheSecuritymenuandpressEnter.
- Select these settings on the Security menu as necessary for your network.
- When you finish selecting settings, select Complete and follow the on-screen instructions to save yoursettingsandexithtemenus.
WirelessSecurityMenuSettings
Parenttopic: Wireless Network Projection
WirelessSecurityMenuSettings
SettingstheSecuritymenuletyouselectthetypeofsecurityandsecuritysettingsthatmatchthe networkyouareconnectingtheprojectorto.
| SettingOptionsDescription | ||
| SecurityNo | WPA2-PSKWPA/WPA2-PSK | Selectsthetypeofsecurityused onthewirelessnetwork |
| Passphrase—Fortheselectedsecurity,selects | thepre-sharedpassphraseusedonthenetwork | |
Parenttopic: EnablingWPAorWPA2Security
SelectingExternalNetworkDetectionSettings
If you are using a compatiblenetwork control system, you can select settings that allow your project to be detected by those systems.
1.PresstheMenubutton.
2. SelecttheNetworkmenuandpressEnter.
3. SelectNetworkConfigurationandpressEnter.
4. SelecttheOthersmenuandpressEnter.
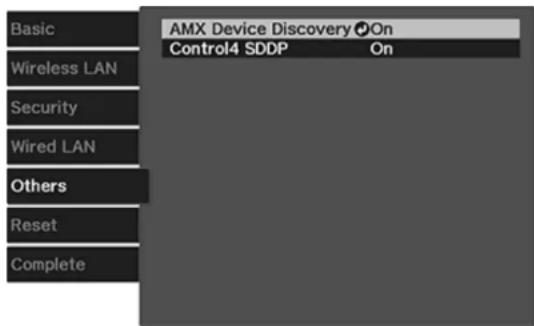
text_image
Basic Wireless LAN Security Wired LAN Others Reset Complete AMX Device Discovery On Control4 SDDP On- If your network environment uses an AMX controller, turn on the AMX Device Discovery setting to allow the projectortobedetected.
- If your network environment uses a Control4 or Control4 SDDP controller, turn on the Control4 SDDP setting to allow the project to be detected.
- When you finish selecting settings, select Complete and follow the on-screen instructions to save yoursettingsandexithemenus.
Parenttopic: UsingtheProjectoronaNetwork
UsingBasicProjectorFeatures
Followtheinstructionsinthesesectionstouseyourprojector'sbasicfeatures.
TurningOntheProjector
TurningOfftheProjector
Viewing3DImages
SelectingtheLanguagefortheProjectorMenus
AdjustingtheImageHeight
AdjustingtheImagePositionUsingLensShift
ImageShape
Resizing theImagewiththeZoomFeature
FocusingtheImagewiththeLensButton
RemoteControlOperation
SelectinganImageSource
ProjectionModes
ImageAspectRatio
ColorMode
TurningOntheProjector
Turnonthecomputerorvideoequipmentyouwanttousebeforeyouturnontheprojectorsoitcan displaytheimagesource.
- Connect the power cord to the projector's power inlet.
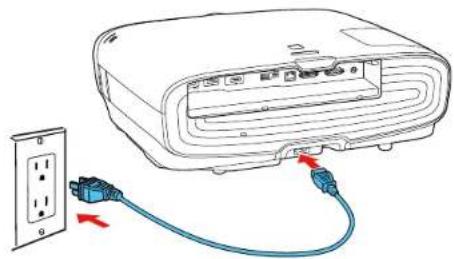
natural_image
Diagram of an electronic device with a cable and two connectors, showing internal components connected to a power outlet (no text or symbols present)2.Plugthepowercordintoanelectricaloutlet.
Note: With Direct Power On turned on, the projector turns on as soon as you plug it in.
The projector's power light turns blue. This indicates that the projector is receiving power.
- Press the power button on the projector or the On button on the remote control to turn on the projector.
Warning: Never look into the projector lens when the lamp is on. This can damage your eyes and is especially dangerous for children.
If you donot see a projected imagerightaway, try the following:
- Turnontheconnectedcomputerorvideodevice.
- InsertaDVDorothervideomediaandpresstheplaybutton,ifnecessary.
- Press the Source button on the projector to detect the video source, or press a source button on the remotecontrol.
- IftheHomescreenisdisplayed,selectthesourceyouwanttoproject.
UsingtheHomeScreen
Parenttopic: UsingBasicProjectorFeatures
Relatedreferences
ProjectorSetupSettings-ExtendedMenu
UsingtheHomeScreen
You can select inputs sources and other frequently used options from the Homescreen.
- TodisplaytheHomescreen,dooneofthefollowing:
- PresstheHomebuttonontheremotecontrol.
- TurnontheprojectorwiththeHomeScreenAutoDispsettingenabled.
- Turnontheprojectorwhennosignalisreceivedfromtheselectedinputsource.
- Pressthearrowbuttonsontheremotecontrolorcontrolpaneltonavigatethescreen, and press Entertoselectanoption.
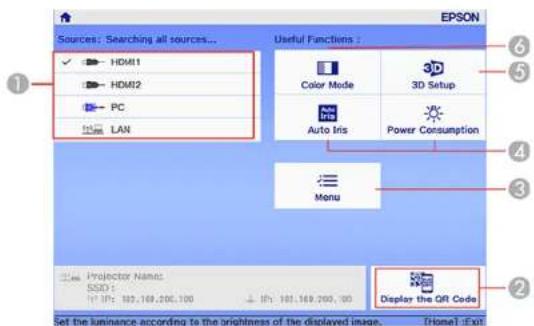
text_image
EPSON Sources: Searching all sources... HDMI1 HDMI2 PC LAN Useful Functions : Color Mode 3D Setup Auto Iris Power Consumption Menu Projector Name: SSD 1: 103,169,200,100 Display the QR Code Set the luminance according to the brightness of the displayed image. [Home] Exit1Selectthevideosourceyouwanttoproject
2DisplaytheQRcode
3Displaytheprojector'smenus
4Selectcustomizablemenuoptions
5Selecttochangethe3Dsettings
6SelecttochangetheColorMode
Note: You can select the customizable menu options using the Custom Function 1 and Custom Function2settingsintheExtendedmenu.
3.PresstheHomebuttontohidetheHomescreen.
Parenttopic: TurningOntheProjector
Relatedreferences
ProjectorSetupSettings-ExtendedMenu
TurningOfftheProjector
Before turning off the projector, shutdown any computer connected to it so you can see the computer display during shutdown.
Note: Turn off this product when not in use to prolong the life of the projector. Lamp life will vary depending upon modeselected, environmental conditions, and usage. Brightness decreases over time.
Note: When using the Blank feature, the projector lamp is still on. To turn off the lamp, turn off the projector.
Note: If the Standby Confirmation setting is set to Off on the Settings menu, the projector shuts down immediately when you press the power button on the projector or the Standby button on the remote control.
- PressthepowerbuttonontheprojectortheStandbybuttonontheremotecontrol.
Theprojectordisplaysashutdownconfirmationscreen.
Power Off?
Yes: Press ⏻ button No : Press any other button
- Press the power button on the projector or the Standby button on the remote control again. (To leaveiton, press any other button.)
The lamp turns off and the lens shutter closes. The projector's Status light flashes and then turns off.
Note: If you unplug the projector before the Status light stops flashing and need to turn the projector backon, wait until the amphas cooled down (about 10 minutes), plug the power cord backin, and turn the projector on again. You cannot operate the projector until finishes cooling down.
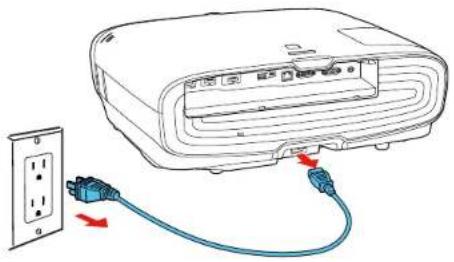
- Totransportorstoretheprojector, makesuretheStatuslightisoff, thenunplugthepowercord.
natural_image
Diagram of an electronic device with a blue cable and red arrow indicating connection, next to a white electrical outlet (no text or symbols present)Caution: To avoid damaging the projector or lamp, never unplug the power cord when the status light is on or flashing.
Parenttopic: UsingBasicProjectorFeatures
Relatedreferences
ProjectorFeatureSettings-SettingsMenu
Relatedtasks
ShuttingOffthePictureTemporarily
TransportingtheProjector
Viewing3DImages
Youcanview3Dimagesusingyourprojector.Viewing3Dimagesrequiresa3D-compatiblevideo device,acompatibleHDMIcable,andapairofEpsonRF3Dglasses(notincludedwithyourprojector). You can also convert 2D images to 3D using the 2D-to-3D Conversion setting in your projector's Signal>3DSetupmenu.
YoucanpurchaseEpsonRF3DglassesfromanEpsonauthorizedreseller. Tofindthenarestreseller, call800-GO-EPSON(800-463-7766)intheU.S.or800-807-7766inCanada.Oryoucanpurchase online at epsonstore.com (U.S. sales) or epsonstore.ca (Canadian sales).
Note: Make sure the 3D Display setting on the Signal menu is set to Auto or 3D.
-
Connecta3D-compatiblevideodevicetotheprojectorusingacompatibleHDMlcable.
-
Turnonthevideodevice, thenturnontheprojector.
- Begin playback from the video device.
Note: Makesureyousetthevideodevicetoplaycontentin3Dmode.
4.Slidethepowerswitchonthe3DglassestotheOnposition.

text_image
On On Picking- Putonthe3Dglassesandviewtheprojectedimage. If you donotseea3Dimage, pair the glasses with the projector.
Note: If you change the video source or you are not within range of your projector, the glasses enter standby mode and the status light flashes green. Slide the power switch on the glasses to the Off positionandthenbacktotheOnpositiontoresume3Dviewing.
Pairingthe3DGlasseswiththeProjector
Chargingthe3DGlasses
3DViewingRange
Parenttopic: UsingBasicProjectorFeatures
Relatedreferences
InputSignalSettings-SignalMenu
Relatedtasks
ConnectingtoanHDMIVideoSource
Pairingthe3DGlasseswiththeProjector
Pairtheglasseswiththeprojectortoestablishcommunicationbetweenthemfor3Dviewing.
-
Turnontheprojector.
-
SettheimagesourceontheprojectortoHDMI.
3.Projecta3Dimage.
4.Slidethepowerswitchonthe3DglassestotheOnposition.
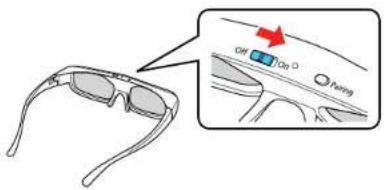
text_image
Off On Pacing- Move the glasses within 10 feet (3 m) of the projector and hold down the Pairing button for at least three seconds.
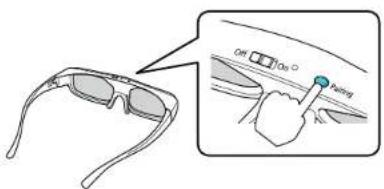
text_image
Ctrl Close PushThestatuslightontheglassesflashesgreenandred.Ifpairingissuccessful,thelightturnsgreen for10secondsandthenturnsoff.
Parenttopic: Viewing3DImages
Chargingthe3DGlasses
Whenthestatuslightontheglassesflashesredtoindicatealowbattery,itistimetochargetheglasses.
- Connectthesmallerendofthechargingcabletotheportonthebridgeoftheglasses.
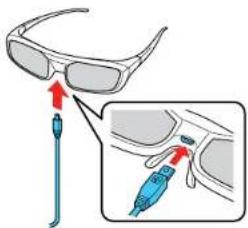
text_image
Diagram showing a pair of eyeglasses with red arrows pointing to the glass, and a magnified inset showing the same eyeglasses with a blue tool inserted.Note: Make sure you connect the cable in the correct orientation or you may damage the glasses or cable.
2.Dooneofthefollowing:
- PlugtheotherendofthechargingcableintoapoweredUSBportonacomputerorotherdevice.
- PlugtheotherendofthechargingcableintoaUSB-to-ACadapterwiththefollowing specifications:
Input:100-240V,\~0.15A,50-60Hz
Output:5V=1A
The glasses are fully charged when the status light on the glasses stays green.
Parenttopic: Viewing3DImages
3DViewingRange
When you view 3 D images, makes sure you are positioned within the viewing range shown here.
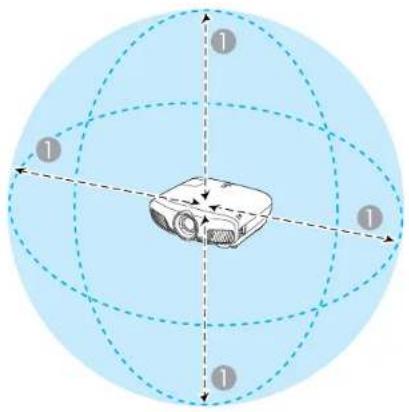
natural_image
Diagram of a projector on a rotating sphere with four numbered reference points (1) at cardinal directions (no text or symbols on the diagram itself)132ft(10m)
Parenttopic: Viewing3DImages
SelectingtheLanguagefortheProjectorMenus
If you want to view the projector's menus and messages in another language, you can change the Languagesetting.
- Turnontheprojector.
2.PresstheMenubutton.
- SelecttheExtendedmenuandpressEnter.
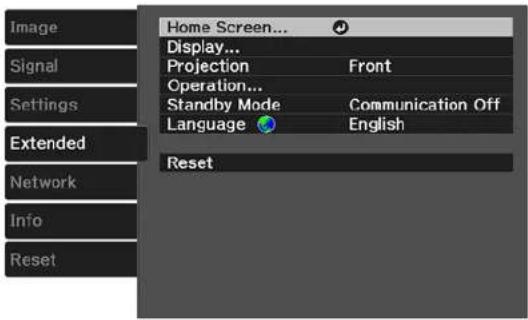
text_image
Image Signal Settings Extended Network Info Reset Home Screen... Display... Projection Front Operation... Standby Mode Communication Off Language English Reset- SelecttheLanguagesettingandpressEnter.
- SelectthelanguageyouwanttouseandpressEnter.
- PressMenuorEsctoexitthemenus.
Parenttopic: UsingBasicProjectorFeatures
AdjustingthelmageHeight
If you are projecting from a table or other flats surface, and the image is too high or low, you can adjust the image height using the projector's adjustable feet.
- Turnon the projector and display an image.
- If the image is tilted, rotate the front feet to adjust their height.

natural_image
Line drawing of a portable electric vehicle with two side-mounted buttons and a circular vent (no text or symbols)- To adjust the position of the projected image further, press the Lens button on the remote control or projector until AdjustLens Shift appear on the screen.
If the projected image is unevenly rectangular, you need to adjust the imageshape.
Parenttopic: UsingBasicProjectorFeatures
Relatedconcepts
ImageShape
AdjustingtheImagePositionUsingLensShift
If you cannot install the project or directly in front of the screen, you can adjust the position of the projected image using the lens shift feature.
- Turnon the projector and display an image.
- PresstheLensbuttononthecontrolpanelorremotecontrol.
-
Press the Lens button repeatedly until Adjust Lens Shift appears on the screen.
-
Pressthearrowbuttonsontheremotecontrolorthecontrolpaneltoadjustthepositionofthe projectedimageasnecessary.
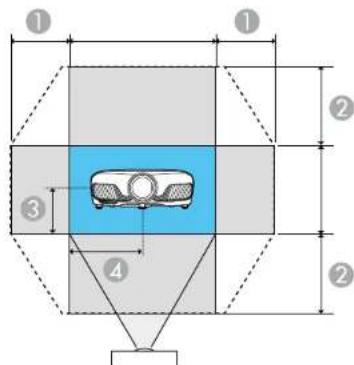
text_image
① ① ② ③ ④ ②1Maximumhorizontalrange(H×47%)
2Maximumverticalrange(V×96%)
31/2the vertical height of the image
41/2thehorizontalwidthoftheimage
Note: You cannot move the image to both the horizontal and vertical maximum values.
- When you are finished, press the Escbutton on the control panel or remote control.
Note: When adjusting the image height, position the image lower than where you want it to be and then moveitup. This will help prevent the image from moving down after adjustment. The image is clearest when the lens is at the home position. Tomovethelen sto the home position, press the arrow button on theremote control or the control panel to mov the image toward the center of the screen until stops at the home position.
Parenttopic: UsingBasicProjectorFeatures
ImageShape
Youcanprojectanevenlyrectangularimagebyplacingtheprojectordirectlyinfrontofthecenterofthe screenandkeepingitlevel.Ifyouplacetheprojectoratanangletothescreen,ortiltedupordown,oroff totheside,youmayneedtocorrecttheimageshapeforthebestdisplayquality.
CorrectingImageShapeWiththeKeystoneButtons
Parenttopic: UsingBasicProjectorFeatures
CorrectingImageShapeWiththeKeystoneButtons
Youcanusetheprojector'skeystonecorrectionbuttonstocorrecttheshapeofanimagethatis unevenlyrectangularonthesides.
- Turnon the projector and display an image.
Note: You can display a pattern to aid in adjusting the projected image using the Pattern button on theremotecontrol.
- Pressakeystonebuttonontheprojector'scontrolpanel.

flowchart
graph LR
    A["Device with U-shaped components"] --> B["Transformation"]
    B --> C["Rectangular component with blue fill and dimension arrows"]
Aftercorrection, your image is slightly smaller.
Note: If the projector is installed out of reach, you can also correct the image shape using the Keystonesettingsintheprojectormenus.
Parenttopic:ImageShape
Relatedreferences
ProjectorFeatureSettings-SettingsMenu
ResizingthelmagewiththeZoomFeature
You can adjust the size of the projected image using the zoom feature.
- Turnon the projector and display an image.
- PresstheLensbuttononthecontrolpanelorremotecontrol.
- Press the Lens button repeatedly until Adjust Zoom is displayed on the screen.
- Pressandholdtheleftorightarrowbuttononthecontrolpanelorremotecontroltoresizethe image.
- PresstheEscbuttononthecontrolpanelorremotecontrolwhenfinished.
Parenttopic: UsingBasicProjectorFeatures
FocusingthImagewiththeLensButton
You can adjust the sharpness of the projected image using the focus feature.
- Turnon the projector and display an image.
- PresstheLensbuttononthecontrolpanelorremotecontrol.
- Press the Lens button repeatedly until Adjust Focus is displayed on the screen.
- Pressandholdtheleftorightarrowbuttononthecontrolpanelorremotecontroltofocusthe image.
- PresstheEscbuttononthecontrolpanelorremotecontrolwhenfinished.
Parenttopic: UsingBasicProjectorFeatures
RemoteControlOperation
Theremote controllets you control the projector from almost anywhere in the room. You can point it at the screen, orthefrontor back of the projector.
Makesurethatyouaimtheremotecontrolattheprojector'sreceiverswithinthedistanceandangles listedhere.
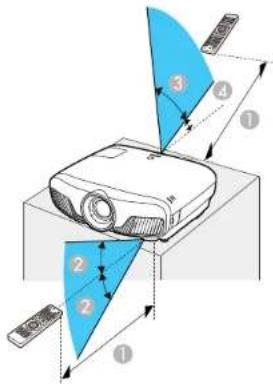
text_image
Diagram illustrating the optical path of a projector with labeled components and light paths132feet(10m)
2 ± 30^
360°
410°
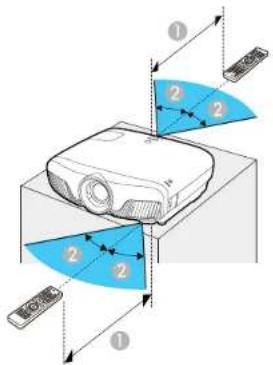
text_image
Diagram illustrating a projector setup with labeled components and directional arrows indicating motion or orientation.132feet(10m)
2±30°
Note: Avoid using the remote control in conditions with bright fluorescent lights or in direct sunlight, or theprojectormaynotrespondtocommands. If you will not use theremote control for alongtime, removethebatteries.
Parenttopic: UsingBasicProjectorFeatures
Relatedtasks
UsingtheHomeScreen
SelectinganImageSource
If you connected multiple images our cost the projector, such as a computer and DVD player, you may want to switch from one image source to the other.
-
Makesuretheconnectedimagesourceyouwanttouseisturnedon.
-
For videoimagesources, insert a DVD or other videomedia and press its play button, if necessary.
3.Dooneofthefollowing:
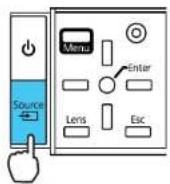
- PresstheSourcebuttonontheprojectoruntilyouseetheimagefromthesourceyouwant.
- Pressthebuttonforthesourceyouwantontheremotecontrol.Ifthereismorethanoneportforthatsource,pressthebuttonagaintcyclethroughthesources.
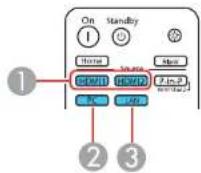
1HDMIportsources
2Computerportsource(VGA)
3Networksource
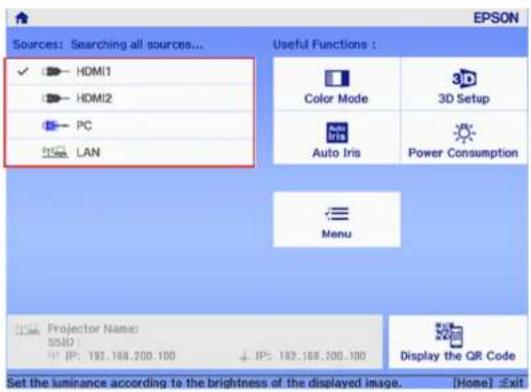
- PresstheHomebuttonontheremotecontrolandselectyourimagesource.
text_image
EPSON Sources: Searching all sources... ✓ HDMI1 HDMI2 PC LAN Useful Functions : Color Mode 3D Setup Auto Iris Power Consumption Menu Projector Name: SSID: IP: 192.168.200.100 IP: 192.168.200.100 Set the luminance according to the brightness of the displayed image. [Home] :Exi1Parenttopic: UsingBasicProjectorFeatures
ProjectionModes
Dependingonhowyoupositionedtheprojector,youmayneedtochangetheprojectionmodesoyour imagesprojectcorrectly.
- Front(defaultsetting)letsyouprojectfromatableinfrontofthescreen.
- Front/Ceiling flips the image over top-to-bottom to project upside-down from a ceiling or wall mount.
•Rearflipstheimagehorizontallytoprojectfrombehindatransluentscreen.
- Rear/Ceiling flips the image over top-to-bottom and horizontally to project from the ceiling and behind atranslucentscreen.
ChangingtheProjectionModeUsingtheMenus
Parenttopic: UsingBasicProjectorFeatures
ChangingtheProjectionModeUsingtheMenus
Youcanchangetheprojectionmodetofliptheimageovertop-to-bottomand/orleft-to-rightusingtheprojectormenus.
- Turnon the projector and display an image.
2.PresstheMenubutton. - SelecttheExtendedmenuandpressEnter.
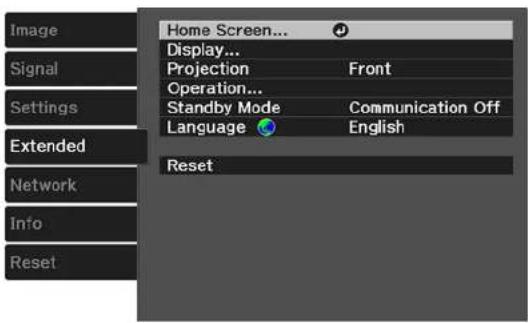
text_image
Image Signal Settings Extended Network Info Reset Home Screen... Display... Projection Front Operation... Standby Mode Communication Off Language English Reset- SelecttheProjectionsettingandpressEnter.
- SelectaprojectionmodeandpressEnter.
- PressMenuorEsctoexitthemenus.
Parenttopic:ProjectionModes
Relatedconcepts
ProjectorPlacement
ImageAspectRatio
Theprojectorcandisplayimagesindifferentwidth-to-heighttratioscalledaspectratios. Normally the inputsignalfromyourvideosourcedeterminestheimage'saspectratio. However, for certain images you can change the aspect ratio of your screen by pressing a button on theremote control.
If you always want to use a particular aspect ratio for certain video inputs, you can select using the projector's menus.
ChangingtheImageAspectRatio
AvailableImageAspectRatio
Parenttopic: UsingBasicProjectorFeatures
ChangingthelmageAspectRatio
Youcanchangetheaspectratioofthedisplayedimagetoresizeit.
Note: For HDMI sources, the input signal determines the image's aspect ratio.
- Turnon the projector and switch to the images source you want to use.
- PresstheAspectbuttonontheremotecontrol.
Alistoftheavailableaspectratiosappears.
- Tocyclethroughtheavailableaspectratiosforyourinputsignal, presstheupordownarrowbutton.
- PressEntertoselecttheaspectratio.
Parenttopic:ImageAspectRatio
AvailableImageAspectRatio
You can select the following image aspectratios, depending on the input signal from your imagesource.
Note: When the projector is in 3D mode, the aspect ratio is automatically set to Normal.
Note: Black bands and cropped images may project in certain aspect ratios, depending on the aspect ratio and resolution of your input signal.
| AspectratiosettingDescription | |
| AutoAutomaticallysetstheaspectratio | ioaccordingtotheinputsignal. |
| NormalDisplaysimagesusingthefull | projectionareaandmaintainstheaspectratiooftheimage. |
| ZoomDisplaysimagesusingthefullw | idthoftheprojectionareaandmaintainstheaspectratiooftheimage. |
| FullDisplaysimagesusingthefullwidthoftheprojectionarea,butdoes notmaintaintheaspectratio. | |
Note: When projecting a 4K signal, you can select only Normal as the aspect ratio setting.
Parenttopic:ImageAspectRatio
ColorMode
TheprojectoroffersdifferentColorModestoprovideoptimumbrightness,contrast,andcolorfora varietyofviewingenvirnementsandimagetypes.Youcanselectamodedesignedtomatchyourimage andenvironment,orexperimentwiththeavailablemodes.
If you always want to use a particular color mode for certain video inputs, you can select it using the projectormenus.
ChangingtheColorMode
AvailableColorModes
TurningOnAutolris
Parenttopic: UsingBasicProjectorFeatures
ChangingtheColorMode
Youcanchangetheprojector'sColorModeusingtheremotecontroltooptimizetheimageforyourviewingenvironment.
- Turnon the projector and switch to the images source you want to use.
- If you are projecting from a DVD player or other videos source, insert ad disc or other videomedia and press the play button, if necessary.
3.PresstheColorModebuttonontheremotecontroltochangetheColorMode.
AlistofavailableColorModesappears.
- TocyclethroughalltheavailableColorModesforyourinputsignal, presstheupordownarrow button.
- PressEntertoselectaColorMode.
Parenttopic:ColorMode
AvailableColorModes
YoucansettheprojectortousetheseColorModes,dependingontheinputsourceyouareusing:
2DImages
| ColorModeDescription | |
| DynamicBestforprojectinginabrightroom | |
| NaturalBestforprojectinginadarkroom | |
| BrightCinemaBestforprojectinginaroomwithclosedcurtains | |
| CinemaBestforprojectingcolormoviesinadarkroom | |
| B&WCinemaBestforprojectingblackandwhitemoviesinadarkroom | |
| DigitalCinemaProjectsusingthesamecolorspectrumasdigitalmovietheaters | |
3DImages
| ColorModeDescription | |
| 3DDynamicBestforprojectinginabrightroom | |
| 3DCinemaBestforprojectingmovies | nadarkroom |
Parenttopic:ColorMode
TurningOnAutolris
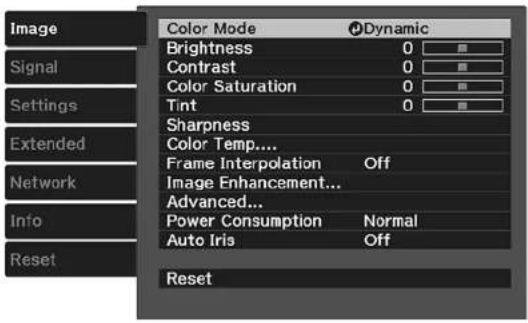
In certain color modes, you can turn on the AutoIrissetting to automatically optimize the image based on the brightness of the content you project.
- Turnon the projector and switch to the images source you want to use.
2.PresstheMenubutton.
3. Select theImagemenuandpressEnter.
text_image
Image Signal Settings Extended Network Info Reset Color Mode Dynamic Brightness 0 Contrast 0 Color Saturation 0 Tint 0 Sharpness Color Temp.... Frame Interpolation Off Image Enhancement... Advanced... Power Consumption Normal Auto Iris Off Reset4. SelecttheAutoIrissettigandchooseoneofthefollowing:
•HighSpeedtoadjustbrightnessassoonasthescenechanges.
•Normalforstandardbrightnessadjustment.
Note: You can set Auto Iris for each Color Mode that supports the feature.
5. PressMenuorEsctoexitthemenus.
Parenttopic:ColorMode
AdjustingProjectorFeatures
Followtheinstructionsinthesesectionstouseyourprojector'sfeatureadjustments.
ShuttingOffthePictureTemporarily
UsingPictureinPicture
ProjectorSecurityFeatures
UsingAdvancedImageAdjustmentFeatures
SavingSettingstoMemoryandUsingSavedSettings
SavingtheLensPositionandUsingSavedLensPositions
ShuttingOffthePictureTemporarily
Youcantemporarilyturnofftheprojectedpictureifyouwanttoredirectyouraudience'sattentionduring apresentation.Anyvideoactioncontinuestorun,however,soyoucannotresumeprojectionatthepoint thatyoustoppedit.
- PresstheBlankbuttonontheremotecontroltotemporarilystopprojection.
- Toturnthepicturebackon, presstheBlankbuttonagain.
Parenttopic: AdjustingProjectorFeatures
UsingPictureinPicture
YoucanusePictureinPicturemodetoviewtwoimagesourcessimultaneously.
Note: You can display only HDMI video sources when using Picture in Picture mode. You cannot use PictureinPicturewhileprojecting3Dor4Kimages.
-
Turnon the projector and switch to the HDMI images source you want to use.
-
PresstheP-in-Pbuttonontheremotecontrol.
ThesecondHDMIvideosourceappearsasasub-screeninthecorneroftheimage.
Note: Press the Menu button on the remote control to adjust picture-in-picture options.
- To swap the main screen and sub-screen video sources, press and hold the P-In-P button for at leastthreeseconds.
- PresstheP-in-Pbuttonagaintoexit.
AvailablePictureinPictureOptions
Parenttopic: AdjustingProjectorFeatures
AvailablePictureinPictureOptions
You can adjust the following options by pressing the Menu button on the remote control while using PictureinPicture:
| SettingDescription | |
| SubscreenSizeAdjuststhesizeofthesub-screen | |
| SubscreenPositionAdjuststhelocationofthesub-screen | |
| SwapMain/SubSwitchesthevideosourcedisplayedonthemainscreenwiththesourcedisplayedonthesub-screen | |
| ExitPictureinPictureExitspicture-in-picturemode | |
Parenttopic: UsingPictureinPicture
ProjectorSecurityFeatures
You can secure your project to do better theft or prevent unintended use by setting up the following security features:
- Lenslocktopreventchangingthezoom, focus, or lensshiftsettings.
- Buttonlocksecuritytoblockoperationoftheprojectorusingthebuttonsonthecontrolpanel
• Securitycablingtophysicallycabletheprojectorinplace.
LockingtheProjector'sLensSettingsandButtons
InstallingaSecurityCable
Parenttopic:AdjustingProjectorFeatures
LockingtheProjector'sLensSettingsandButtons
Youcanlockthebuttonsontheprojector'scontrolpaneltopreventanyonefromusingtheprojector. You canalsolockthezoom, focus, and lensshiftsettingstopreventthemfrombeingadjusted.
Note: You can use the remote control to control the projector when the control panel buttons are locked.
1.PresstheMenubutton.
2. SelecttheSettingsmenuandpressEnter.
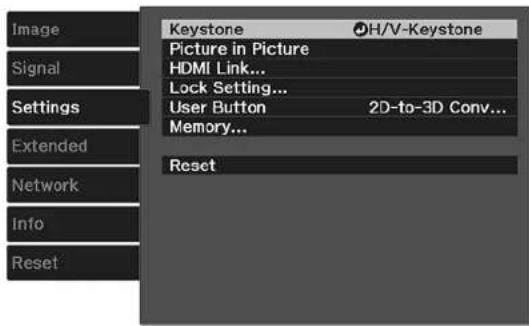
text_image
Image Signal Settings Extended Network Info Reset Keystone H/V-Keystone Picture in Picture HDMI Link... Lock Setting... User Button 2D-to-3D Conv... Memory... Reset-
SelecttheLockSettingsettingandpressEnter.
-
SelectoneoftheselocktypesandpressEnter:
- Tolockthezoom, focus, and lensshiftsettings, selectLensLock.
- To lock the projector's power button, select Child Lock. To turn the projector on, you must press the powerbuttonforlongerthanthreeseconds.
Note: ChildLock does not prevent the projector from turning on when the power cord is connected if the Direct Power On Setting is set to On.
- Tolockallbuttons, selectControlPanelLock>FullLock.
- To lock all buttons except the power button, select Control Panel Lock > Partial Lock.
Note: The lockicon is displayed on the screen if any control panel buttons arepressed while this setting is enabled.
Youseeaconfirmationprompt.
- SelectYesandpressEnter.
6.Restarttheprojectorforthelocksettingstotakeeffect.
UnlockingtheProjector'sButtons
Parenttopic: ProjectorSecurityFeatures
UnlockingtheProjector'sButtons
If the projector's buttons have been locked, hold the Enter button on the projector's control panel for sevensecondstounlockthem.
Parenttopic:LockingtheProjector'sLensSettingsandButtons
Relatedreferences
ProjectorFeatureSettings-SettingsMenu
InstallingaSecurityCable
YoucanusethesecurityslotonthebackoftheprojectortoattachaKensingtonlock.Seeyourlocal computerorelectronicsdealerforpurchaseinformation.

natural_image
Front view of a device rear panel with control buttons and indicator lights (no visible text or symbols)Parenttopic: ProjectorSecurityFeatures
UsingAdvancedImageAdjustmentFeatures
Followtheinstructionsinthesesectionstouseyourprojector'sadvancedimageadjustments.
Note: Not all adjustments may be available depending on the projection mode and input signal.
UsingFrameInterpolation
Using4KEnhancement
CreatingImagePresets
UsingMPEGNoiseReduction
AdjustingScaledResolutionImages(Super-resolution)
AdjustingDetailEnhancement
ImageAdjustmentRestrictions
AdjustingtheColorConvergence(PanelAlignment)
AdjustingtheColorTone(ColorUniformity)
Parenttopic: AdjustingProjectorFeatures
Relatedreferences
ImageAdjustmentRestrictions
UsingFrameInterpolation
Youcanusetheprojector'sFrameInterpolationfeature to smoothfast-movingvideobycomparing consecutive imageframes and inserting an intermediate imageframe between them.
Note: This feature may not be available depending on the projection mode and input signal.
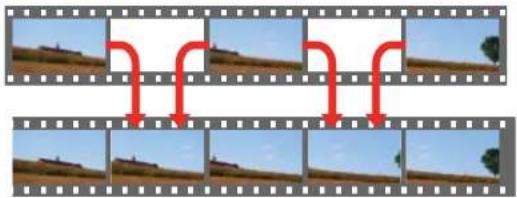
flowchart
graph TD
    A["1"] --> B["2"]
    B --> C["3"]
    C --> D["4"]
    D --> E["5"]
    E --> F["6"]
    F --> G["7"]
    G --> H["8"]
    H --> I["9"]
    I --> J["10"]
1.PresstheFrameIntbutton.
Youseeascreenlikethis:
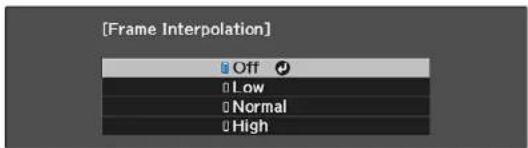
text_image
[Frame Interpolation] Off Low Normal High-
SelectthelevelofinterpolationandpressEnter.
-
When you are finished, press the Frame button.
Note: If your resulting images contain noise, turn off the Frame Interpolation setting.
Parenttopic: Using Advanced Image Adjustment Features
Relatedreferences
ImageAdjustmentRestrictions
Using4KEnhancement
Using the projector's 4K Enhancement Technology, you can receive 4K (3840×2160 pixel) signals and project ultrahigh-definition images. This technology shift each pixel diagonally by 0.5 pixel to double the imager resolution.
Note: This feature may not be available depending on the projection mode and input signal.
- PresstheMenubuttonontheremote.
Youseeascreenlikethis:
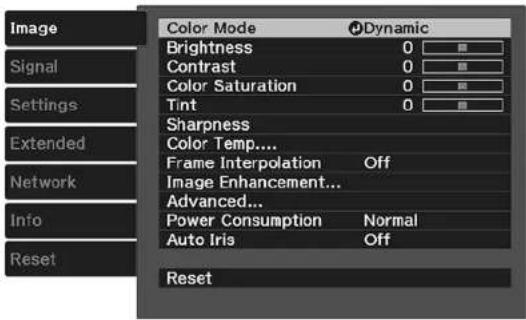
text_image
Image Signal Settings Extended Network Info Reset Color Mode Dynamic Brightness 0 Contrast 0 Color Saturation 0 Tint 0 Sharpness Color Temp.... Frame Interpolation Off Image Enhancement... Advanced... Power Consumption Normal Auto Iris Off Reset- Select the Image Enhancement setting and press Enter.
Youseeascreenlikethis:

text_image
[Image Enhancement] 4K Enhancement On Image Preset Mode Off Noise Reduction 0 MPEG Noise Reduction 0 Super-resolution Detail Enhancement Signal Settings Extended Network Info Reset-
Selectthe4KEnhancementsettingandpressEnter.
-
SelectoneofthefollowingoptionsandpressEnter:
•Offtodisable4Kenhancement
•Ontoenable4Kenhancement
- PressMenutoexitthemenus.
Parenttopic: Using Advanced Image Adjustment Features
Relatedreferences
ImageAdjustmentRestrictions
CreatingImagePresets
Youcanquicklyoptimizeyourprojectedimagebyselectingimageadjustmentsettingsandsavingthem asapresetyoucanreuselater.
To quickly switch between image presets, press the Image Enh button on the remote, select an image presetandpressEnter.
Youcansavethefollowingsettingsinapreset:
- NoiseReduction
•MPEGNoiseReduction
•Super-resolution
•DetailEnhancement
1.PresstheMenubutton.
Youseeascreenlikethis:
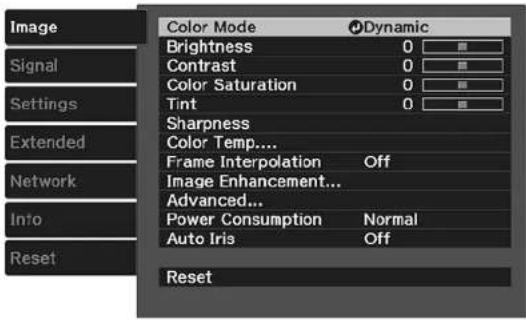
text_image
Image Signal Settings Extended Network Into Reset Color Mode Dynamic Brightness 0 Contrast 0 Color Saturation 0 Tint 0 Sharpness Color Temp.... Frame Interpolation Off Image Enhancement... Advanced... Power Consumption Normal Auto Iris Off Reset- Select the Image Enhancement setting and press Enter.
- Select the Image Preset Modesetting and press Enter.
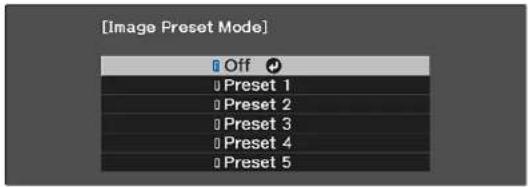
text_image
[Image Preset Mode] Off Preset 1 Preset 2 Preset 3 Preset 4 Preset 5- SelectoneofthepresetsandpressEnter.
Note: If you select a previously used preset, your new adjustment so over writ the old ones.
- PressEsctoreturntothelmageEnhancementmenu.
-
Fine-tunethefollowingsettings:
-
NoiseReduction
•MPEGNoiseReduction
•Super-resolution
•DetailEnhancement -
PressMenuorEsctoexitthemenus.
ThecurrentlyselectedImagePresetModewillbeupdatedwiththecurrentsettings.
Parenttopic: Using Advanced Image Adjustment Features
UsingMPEGNoiseReduction
If you are projecting MPEG movies, you can reduce dots and block noise by adjusting the MPEG Noise Reduction setting.
Note: This feature may not be available depending on the projection mode and input signal.
- PresstheMenubutton.
Youseeascreenlikethis:
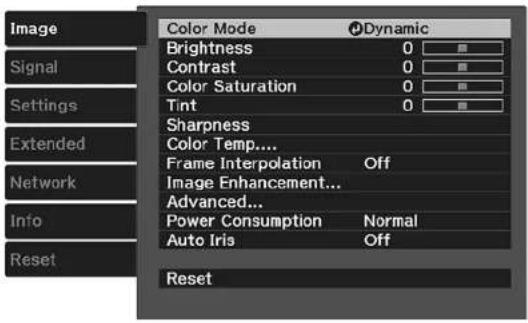
text_image
Image Signal Settings Extended Network Info Reset Color Mode Dynamic Brightness 0 Contrast 0 Color Saturation 0 Tint 0 Sharpness Color Temp.... Frame Interpolation Off Image Enhancement... Advanced... Power Consumption Normal Auto Iris Off Reset- Select the Image Enhancement setting and press Enter.
- SelecttheMPEGNoiseReductionsettingandpressEnter.
- SelectthelevelofnoisereductionandpressEnter.
- PressMenuorEsctoexitthemenus.
Parenttopic: Using Advanced Image Adjustment Features
Relatedreferences
ImageAdjustmentRestrictions
AdjustingScaledResolutionImages(Super-resolution)
Youcansharpenblurry, low-resolutionimagesthathadtheirresolutionscaledupforprojectionusingthe Super-resolutionsetting.
Note: This feature may not be available depending on the projection mode and input signal.
- Turnon the projector and switch to the images source you want to use.
2.PresstheMenubutton.
Youseeascreenlikethis:
text_image
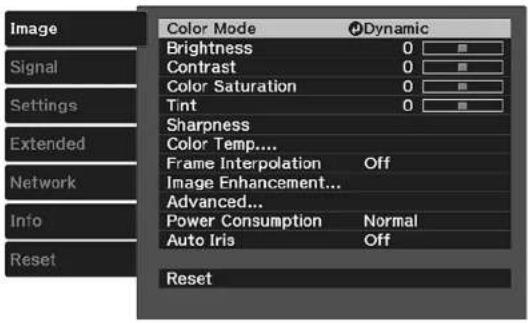
Image Signal Settings Extended Network Info Reset Color Mode Dynamic Brightness 0 Contrast 0 Color Saturation 0 Tint 0 Sharpness Color Temp.... Frame Interpolation Off Image Enhancement... Advanced... Power Consumption Normal Auto Iris Off Reset- Select the Image Enhancement setting and press Enter.
- SelecttheSuper-resolutionsettingandpressEnter.
- Adjusteachofthefollowingoptionsasnecessary:
•FineLineAdjusttoenhancefinedetailssuchashairandfabricpatterns
- SoftFocusDetailtoenhancetheoutline,background,andmainpartsofanimation
Note: Highervalues increase the intensity of the effect.
- PressMenuorEsctoexitthemenus.
Parenttopic: Using Advanced Image Adjustment Features
Relatedreferences
ImageAdjustmentRestrictions
AdjustingDetailEnhancement
Youcanenhancethecontrastindetailedareasofanimagetocreateamoretexturedlook.
Note: This feature may not be available depending on the projection mode and input signal.
- Turnon the projector and switch to the images source you want to use.
2.PresstheMenubutton.
Youseeascreenlikethis:

text_image
Image Signal Settings Extended Network Info Reset Color Mode Dynamic Brightness 0 Contrast 0 Color Saturation 0 Tint 0 Sharpness Color Temp.... Frame Interpolation Off Image Enhancement... Advanced... Power Consumption Normal Auto Iris Off Reset- Select the Image Enhancement setting and press Enter.
- SelecttheDetailEnhancementsettingandpressEnter.
- Adjusteachofthefollowingoptionsasnecessary:
•Strengthtoadjusttheimagecontrast
• Rangetoadjusttheenhancedareaoftheimage
Note: Highervalues increase the intensity of the effect.
- PressMenuorEsctoexitthemenus.
Parenttopic: Using Advanced Image Adjustment Features
Relatedreferences
ImageAdjustmentRestrictions
ImageAdjustmentRestrictions
Someadvancedadjustmentsettingscannotbeusedwithcertainprojectionmodesorinputsignals.
| Finemode (Image Processing) | Fastmode (Image Processing) | 2D-to-3D 3D | 4Kinput | ||||
| Inputtype2K2K2K2Dor | 2K3D | 4K | |||||
| ProjectionMode2K4KEnh.2K4KEnh | 2K2Dor | 2K3D | 4KEnh. | ||||
| FrameInterpolationYesYes | ‘1 | —Yes | ‘1 | — | |||
| ImageEnhancement-4KPreset—Yes—Yes—Yes | |||||||
| NoiseReduction—Yes—— | |||||||
| MPEGNoiseReduction—Yes—— | |||||||
| Super-resolution/Detail Enhancement | —Yes—Yes—Yes—Yes—Yes—Yes—Yes—Yes—Yes—Yes—Yes—Yes—Yes—Yes—Yes—Yes—Yes—Yes—Yes—Yes—Yes—Yes—Yes—Yes—Yes—Yes—Yes—Yes—Yes—Yes—Yes—Yes—Yes—Yes—Yes—Yes—Yes—Yes—Yes—Yes—Yes—Yes—Yes—Yes—Yes—Yes—Yes—Yes—Yes—Yes— | Yes—Yes—Yes—Yes—Yes—Yes—Yes—Yes—Yes—Yes—Yes—Yes—Yes—Yes—Yes—Yes—Yes—Yes—Yes—Yes—Yes—Yes—Yes—Yes—Yes—Yes—Yes—Yes—Yes—Yes—Yes—Yes—Yes—Yes—Yes—Yes—Yes—Yes—Yes—Yes—Yes—Yes—Yes—Yes—Yes—Yes—Yes—Yes—Yes—Yes —Yes—Yes—Yes—Yes—Yes—Yes—Yes—Yes—Yes—Yes—Yes—Yes—Yes—Yes—Yes—Yes—Yes—Yes—Yes—Yes—Yes—Yes—Yes—Yes—Yes—Yes—Yes—Yes—Yes—Yes—Yes—Yes—Yes—Yes—Yes—Yes—Yes—Yes—Yes—Yes—Yes—Yes—Yes—Yes—Yes—Yes—Yes—Yes—Yes—Yes-Yes-Yes-Yes-Yes-Yes-Yes-Yes-Yes-Yes-Yes-Yes-Yes-Yes-Yes-Yes-Yes-Yes-Yes-Yes-Yes-Yes-Yes-Yes-Yes-Yes-Yes-Yes-Yes-Yes-Yes-Yes-Yes-Yes-Yes-Yes-Yes-Yes-Yes-Yes-Yes-Yes-Yes-Yes-Yes-Yes-Yes-Yes-Yes-Yes-Yes - Yes-Yes-Yes-Yes-Yes-Yes-Yes-Yes-Yes-Yes-Yes-Yes-Yes-Yes-Yes-Yes-Yes-Yes-Yes-Yes-Yes-Yes-Yes-Yes-Yes-Yes-Yes-Yes-Yes-Yes-Yes-Yes-Yes-Yes-Yes-Yes-Yes-Yes-Yes-Yes-Yes-Yes-Yes-Yes-Yes-Yes-Yes-Yes-Yes-Yes- Yes-Yes-Yes-Yes-Yes-Yes-Yes-Yes-Yes-Yes-Yes-Yes-Yes-Yes-Yes-Yes-Yes-Yes-Yes-Yes-Yes-Yes-Yes-Yes-Yes-Yes-Yes-Yes-Yes-Yes-Yes-Yes-Yes-Yes-Yes-Yes-Yes-Yes-Yes-Yes-Yes-Yes-Yes-Yes-Yes-Yes-Yes-Yes-Yes-Yes -Yes-Yes-Yes-Yes-Yes-Yes-Yes-Yes-Yes-Yes-Yes-Yes-Yes-Yes-Yes-Yes-Yes-Yes-Yes-Yes-Yes-Yes-Yes-Yes-Yes-Yes-Yes-Yes-Yes-Yes-Yes-Yes-Yes-Yes-Yes-Yes-Yes-Yes-Yes-Yes-Yes-Yes-Yes-Yes-Yes-Yes-Yes-Yes-Yes-Yes 0 Yes-Yes-Yes-Yes-Yes-Yes-Yes-Yes-Yes-Yes-Yes-Yes-Yes-Yes-Yes-Yes-Yes-Yes-Yes-Yes-Yes-Yes-Yes-Yes-Yes-Yes-Yes-Yes-Yes-Yes-Yes-Yes-Yes-Yes-Yes-Yes-Yes-Yes-Yes-Yes-Yes-Yes-Yes-Yes-Yes-Yes-Yes-Yes-Yes-Yes 1 Yes-Yes-Yes-Yes-Yes-Yes-Yes-Yes-Yes-Yes-Yes-Yes-Yes-Yes-Yes-Yes-Yes-Yes-Yes-Yes-Yes-Yes-Yes-Yes-Yes-Yes-Yes-Yes-Yes-Yes-Yes-Yes-Yes-Yes-Yes-Yes-Yes-Yes-Yes-Yes-Yes-Yes-Yes-Yes-Yes-Yes-Yes-Yes-Yes-Yes, Yes-Yes-Yes-Yes-Yes-Yes-Yes-Yes-Yes-Yes-Yes-Yes-Yes-Yes-Yes-Yes-Yes-Yes-Yes-Yes-Yes-Yes-Yes-Yes-Yes-Yes-Yes-Yes-Yes-Yes-Yes-Yes-Yes-Yes-Yes-Yes-Yes-Yes-Yes-Yes-Yes-Yes-Yes-Yes-Yes-Yes-Yes-Yes-Yes-Yes: Yes-Yes-Yes-Yes-Yes-Yes-Yes-Yes-Yes-Yes-Yes-Yes-Yes-Yes-Yes-Yes-Yes-Yes-Yes-Yes-Yes-Yes-Yes-Yes-Yes-Yes-Yes-Yes-Yes-Yes-Yes-Yes-Yes-Yes-Yes-Yes-Yes-Yes-Yes-Yes-Yes-Yes-Yes-Yes-Yes-Yes-Yes-Yes-Yes-Yes+ Yes-Yes-Yes-Yes-Yes-Yes-Yes-Yes-Yes-Yes-Yes-Yes-Yes-Yes-Yes-Yes-Yes-Yes-Yes-Yes-Yes-Yes-Yes-Yes-Yes-Yes-Yes-Yes-Yes-Yes-Yes-Yes-Yes-Yes-Yes-Yes-Yes-Yes-Yes-Yes-Yes-Yes-Yes-Yes-Yes-Yes-Yes-Yes-Yes-Yes | |||||
^*1 FrameInterpolationcanonlybeusedwith3Dor4KEnhancementifthesignalis1080p@24Hz.
The following restrictions apply when using image enhancements:
- Fastmode(ImageProcessing)isnotavailablewhendisplayinga4Kpicture.
•PictureinPictureandFastmode(ImageProcessing) cannot be used with 3Dor4K projection.
- 2D-to-3DConversionand3Dprojectioncannotbeusedwith4Kprojection.
Parenttopic: Using Advanced Image Adjustment Features
Adjusting the Color Convergence (Panel Alignment)
YoucanusethePanelAlignmentfeaturetomanuallyadjustthecolorconvergence(thealignmentofthe red,greenandbluecolors)intheprojectedimage.
Note: Allow your projector to warm up for at least 10 to 15 minutes and make sure the image is in focus before you set the Panel Alignment feature. For best results, project images sized at least 60 inches (152cm) diagonally in dark room and on a projection surface that is not colored or textured.
Note: You can only adjust the red or blue color convergence. Green is the standard color panel and cannotbeadjusted.
- Turnon the projector.
2.PresstheMenubutton. - SelecttheExtendedmenuandpressEnter.
- SelecttheDisplaysettingandpressEnter.
- SelectthePanelAlignmentsettingandpressEnter.

text_image
[Panel Alignment] Panel Alignment On Select Color R Pattern Color R/G/B Start Adjustments Memory... Extended Reset Network Info Reset- SelectthePanelAlignmentsettingandpressEnter.
7.SelectOnandpressEnter. - SelecttheSelectColorsettingandchooseoneofthefollowing:
•Rtoadjusttheredcolorconvergence.
•Btoadjustthebluecolorconvergence.
-
SelectthePatternColorsettingandpressEnter.
-
Select the pattern you want to use and press Enter.
11. SelectStartAdjustmentsandpressEnter.
Youseethisscreen:
[Panel Alignment]
Adjust the entire LCD panel first.
12. PressEnter.
Youseeascreenlikethis:
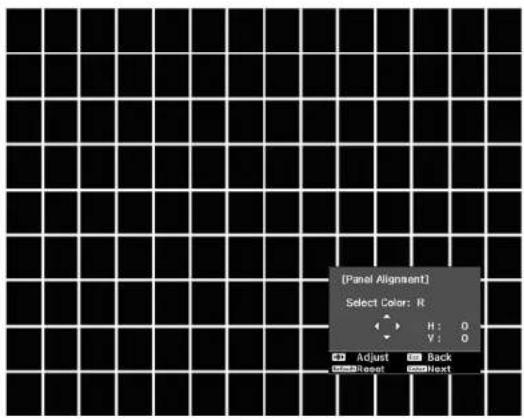
text_image
[Panel Alignment] Select Color: R H: 0 Y: 0 Adjust Back Reset Next-
Usethearrowbuttonsontheremotecontroltoadjustthecoloralignmentofthecoloryouselected fortheSelectColorsetting.
-
When you are finished adjusting the screen, press Enter.
Youseethisscreen:
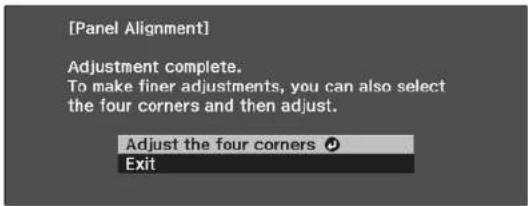
text_image
[Panel Alignment] Adjustment complete. To make finer adjustments, you can also select the four corners and then adjust. Adjust the four corners ExitNote: Your adjustments affect the gridlines in the entire screen. To fine-tune your adjustments, continue with then next steps.
- Select Adjust the four corners and press Enter. (Otherwise, select Exit and press Enter.)
- Usethearrowbuttonsontheremotecontroltoadjustthecoloralignmentinthecornerofthescreen highlightedbytheorangebox.

natural_image
Grid of black squares with a small orange square in the top-left corner (no text or symbols)- PresstheEnterbuttontomovetothenextcornerofthescreen.
- When you are finished adjusting each corner of the screen, press Enter.
Youseethisscreen:
[Panel Alignment]
Adjustment complete.
To make finer adjustments, you can also select any intersection and then adjust.
Select intersection and adjust
Exit
19.Dooneofthefollowing:
- If your projector's panel alignment is now correct, select Exit and press Enter to return to the PanelAlignmentmenu.
- If your projector needs additional panel alignment, select Select intersection and adjust and press Enter. Use the arrow key son theremote control to highlight the corner of anymisaligned box on the screen and press Enter. Repeat this step as necessary.
Parenttopic: Using Advanced Image Adjustment Features
AdjustingtheColorTone(ColorUniformity)
YoucanusetheColorUniformityfeaturetomanuallyadjustthecolortonebalanceintheprojected image.
1.PresstheMenubutton.
- SelecttheExtendedmenuandpressEnter.
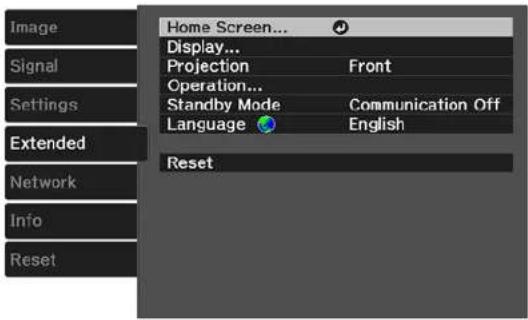
text_image
Image Signal Settings Extended Network Info Reset Home Screen... Display... Projection Front Operation... Standby Mode Communication Off Language English Reset- SelecttheDisplaysettingandpressEnter.
- SelecttheColorUniformitysettingandpressEnter.
- PressEnterandselectOn.
6.PressEsc. - SelecttheAdjustmentLevelsettingandpressEnter.
8.Presstherightandleftarrowbuttonstoadjustthelevel,thenpressEsc. - SelecttheStartAdjustmentssettingandpressEnter.
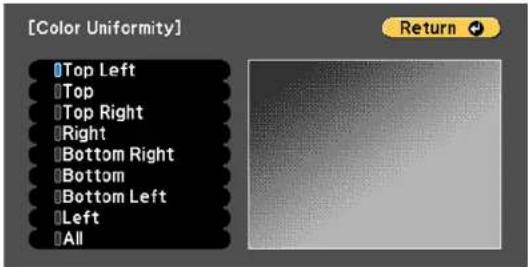
text_image
[Color Uniformity] Top Left Top Top Right Right Bottom Right Bottom Bottom Left Left All Return- Select the area of the screen that you want to adjust and press Enter.
Note: Adjusttheouterareasfirst, thenadjusttheentirescreen.
-
Select the color (Red, Green, or Blue) you want to adjust, and use the left arrow button to weaken the colortone and therightarrowbutton to strengthen the colortone.
-
PressEsc.
13.Repeatsteps10and11foreachareayouwanttoadjust.
-
Repeatsteps7to11foreachadjustmentlevel.
-
When you are finished, press the Menubutton.
Parenttopic: Using Advanced Image Adjustment Features
SavingSettingstoMemoryandUsingSavedSettings
Youcansavecustomizedsettingsforeachofyourvideoinputsandthenselectthesavedsettings wheneveryouwanttousethem.
Note: You can save the Image settings and the Lens Adjustment (Focus, Zoom, and Lens Shift) function values.
- Turnon the projector and display an image.
2.PresstheMenubutton.
Note: You can also press the Memory button on the remote control to access the Memory menu directly.
-
SelecttheSettingsmenuandpressEnter.
-
Select the Memory setting and press Enter.
Youseethisscreen:
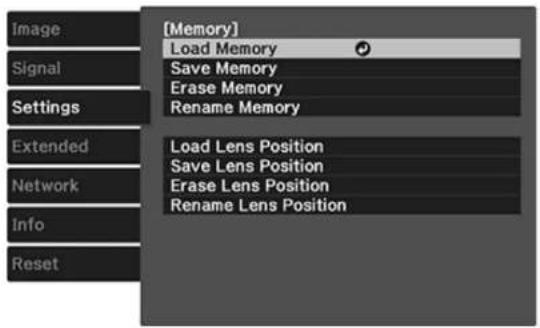
text_image
[Memory] Load Memory Save Memory Erase Memory Rename Memory Load Lens Position Save Lens Position Erase Lens Position Rename Lens Position-
Selectoneofthefollowingoptions:
-
LoadMemory: Overwritesyourcurrentsettingswithsavedsettings
- SaveMemory: Savesyourcurrentsettingstomemory(10memorieswithdifferentnamesare available)
Note: Amemorynamethathasalreadybeenusedisindicatedbyabluemark. Savingovera previously saved memory over writes the settings with your current settings.
-
EraseMemory: Erasestheselectedmemorysettings
•RenameMemory: Renamesasavedmemory -
PressEsctoexit.
Parenttopic: AdjustingProjectorFeatures
SavingtheLensPositionandUsingSavedLensPositions
Youcansavethefocus,zoom,andlensshiftsettingsandthenselectthesavedsettingswheneveryou wanttousethem.
- Turnontheprojectoranddisplayanimation.
- Adjust the focus, zoom, and lens shift settings.
3.PresstheMenubutton.
Note: You can also press the Memory button on the remote control to access the Memory menu directly.
-
SelecttheSettingsmenuandpressEnter.
-
Select the Memory setting and press Enter.
Youseethisscreen:
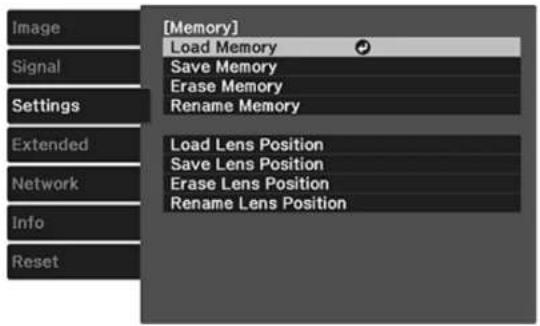
text_image
[Memory] Load Memory Save Memory Erase Memory Rename Memory Load Lens Position Save Lens Position Erase Lens Position Rename Lens Position- Selectoneofthefollowingoptions:
- LoadLensPosition: Overwritesyourcurrentfocus, zoom, and lensshiftsettingswithsaved settings
Note: You can load the saved settings from Memory1 or Memory2 by pressing the Lens1 or Lens2 buttonsontheremotecontrol.
- SaveLensPosition: Savesyourcurrentfocus, zoom, and lensshiftsettingstomemory (10 memories with differentnames are available)
Note: Amemorynamethathasalreadybeenusedisindicatedbyabluemark. Savingovera previously saved memory over writes the settings with your current settings.
- EraseLensPosition: Erasestheselectedlenspositionsettings
•RenameLensPosition: Renamesasavedlensposition(12charactersmaximum)
- PressEsctoexit.
Parenttopic: AdjustingProjectorFeatures
AdjustingtheMenuSettings
Followtheinstructionsinthesesectionstoaccesstheprojectormenusystemandchangeprojector settings.
UsingtheProjector'sMenus
ImageQualitySettings-ImageMenu
InputSignalSettings-SignalMenu
ProjectorFeatureSettings-SettingsMenu
ProjectorSetupSettings-ExtendedMenu
ProjectorNetworkSettings-NetworkMenu
ProjectorInformationDisplay-InfoMenu
ProjectorResetOptions-ResetMenu
UsingtheProjector'sMenus
Youcanusetheprojector'smenustoadjustthesettingsthatcontrolhowyourprojectorworks. The projectordisplaysthemenusonthescreen.
- Pressthe Menubutton on the control panel or remote control.
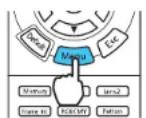
YouseethemenuscreendisplayingtheImagemenusettings.
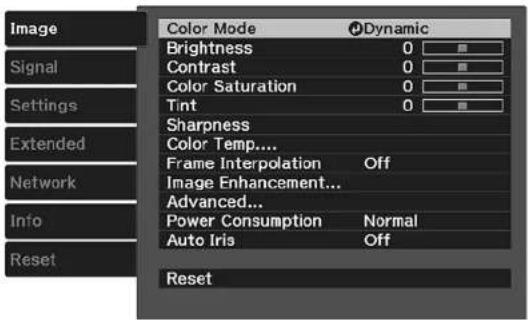
text_image
Image Signal Settings Extended Network Info Reset Color Mode Dynamic Brightness 0 Contrast 0 Color Saturation 0 Tint 0 Sharpness Color Temp.... Frame Interpolation Off Image Enhancement... Advanced... Power Consumption Normal Auto Iris Off Reset2.Presstheupordownarrowbuttontomovethroughthemenuslistedontheleft. Thesettingsfor eachmenuaredisplayedontheright.
Note: The available settings depend on the current input source.
- Tochangesettingsinthedisplayedmenu, pressEnter.
- Presstheupordownarrowbuttontomovethroughthesettings.
- Changethesettingsusingthebuttonslistedonthebottomofthemenuscreens.
- Toreturnallthemenusettingstotheirdefaultvalues, selectReset.
- When you finish changing settings on an amino, press Esc.
- PressMenuorEsctoexitthemenus.
Parenttopic:AdjustingtheMenuSettings
ImageQualitySettings-ImageMenu
SettingsonthImagemenuletyouadjustthequalityofyourimagefortheinputsourceyouarecurrently using.
Note: The available settings depend on the currently selected input source.
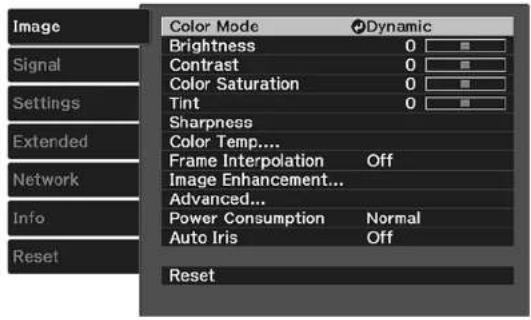
text_image
Image Signal Settings Extended Network Info Reset Color Mode Dynamic Brightness 0 Contrast 0 Color Saturation 0 Tint 0 Sharpness Color Temp.... Frame Interpolation Off Image Enhancement... Advanced... Power Consumption Normal Auto Iris Off ResetTochangesettingsforaninputsource,makesurethesourceisconnectedandselectthatsource.
| SettingOptionsDescription | ||
| ColorModeSeethelistofavailableColorModes | Adjuststhevividnessofimage colorsforvariousimagetypes andenvironments | |
| BrightnessVaryinglevelsavailableLightensordarkenstheoverall | image | |
| ContrastVaryinglevelsavailableAdjuststhedifferencebetween | lightanddarkareasoftheimage | |
| ColorSaturationVaryinglevelsavailableAdjuststheintensityoftheimagecolors | ||
| TintVaryinglevelsavailableAdjuststhebalanceofgreento | magentatonesintheimage | |
| SharpnessVaryinglevelsavailableAdjuststhesharpnessor | softnessofimagedetails | |
| ColorTemp.(colortemperature)ColorTemp.SkinToneCustomized | ColorTemp.:setstheoverall colortone;highervaluestintthe imageblueandlowervaluestint theimageredSkinTone:makesfine adjustmentstothecolortone; highervaluestinttheimage greenandlowervaluestintthe imageredCustomized:adjuststheoffset andgainforeachRGBcolor | |
| FrameInterpolationOff | WeakNormalStrong | Adjuststhesmoothnessof movementintheimageNote:Onlyavailablefor1080p signalsat24Hz. |
| ImageEnhancement4KEhancement | ImagePresetModeNoiseReductionMPEGNoiseReductionSuper-resolutionDetailEnhancement | 4KEhancement:accepts4Ksignalsandenhancestheoutputof1080psignalsImagePresetMode:selectsoneoffivepresetgroupsofsettingsforthenextimageenhancementoptionsNoiseReduction:reducesflickeringinanalogimagesMPEGNoiseReduction:reducesthenoiseorartifactsseeninMPEGvideoSuper-resolution:sharpensblurredimagesresultingfromincreasingresolutionDetailEnhancement:enhancesdetailstocreateclearoutlines•Range:highersettingsincreasetheaffectedareaaroundtheoutline•Strength:highersettingscreateastrongereffectNote:RangeandStrengthwillvarybasedonthelImagePresetModesetting. |
| AdvancedGamma | RGBCMYDeinterlacingEPSONSuperWhite | Selectsvariousdetailedcolor settingsGamma:adjuststhegammalevelsoftheimage.SelectCustomizedtoadjustthegammawhileviewingtheimageoragraph.RGBCMY:adjuststhehue,saturation,andbrightnessforeachcolorDeinterlacing:setswhethertoconvertinterlaced-to-progressivesignalsforcertainvideoimage types•Off:forfast-movingvideoimages•Video:formostvideoimages•Film/Auto:formovies,computergraphics,andanimationEPSONSuperWhite:reducesover-exposureofwhitesinyour image |
| PowerConsumptionHigh | MediumECO | Selectsthebrightnessmodeof theprojectorlampHigh:setmaximumlamp brightnessMedium:reducesthebrightness ofthelampECO:reduceslampbrightness andfannoise,andsavespower andlamplife |
| AutolrisOff | NormalHighSpeed | Adjuststheprojectedluminance basedontheimagebrightness whencertainColorModesare selected |
Note: The Brightness setting does not affect lamp brightness. To change the lamp brightness mode, usethePowerConsumptionsetting.
Parenttopic:AdjustingtheMenuSettings
Relatedreferences
AvailableColorModes
InputSignalSettings-SignalMenu
Normally the project or detects and optimizes the input signal settings automatically. If you need to customize these settings, you can use the Signal menu.
Note: The available settings depend on the currently selected input source. You cannot change the SignalmenusettingswhentheLANsourceisselected.
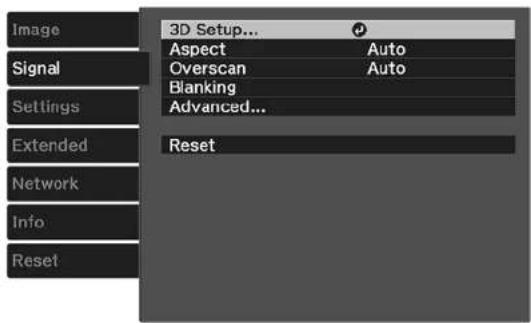
text_image
Image Signal Settings Extended Network Info Reset 3D Setup... Aspect Auto Overscan Auto Blanking Advanced... ResetTochangesettingsforaninputsource,makesurethesourceisconnectedandselectthatsource.
| SettingOptionsDescription | ||
| 3DSetup3DDisplay | 3DFormat2D-to-3DConversion3DDepthDiagonalScreenSize3DBrightnessInverse3DGlasses3DViewingNotice | Selectsvarious3Doptions3DDisplay:enables3Dmode3DFormat:selectsthe3D format2D-to-3DConversion:converts2Dimagesto3D3DDepth:setsthedepthforthe3DimageDiagonalScreenSize:selectstheactualsizeofthescreento maximizethe3Defect3DBrightness:adjuststhe brightnessofthe3DimageInverse3DGlasses:reverses theimagesprojectedfortheleft andrighteyes(enableonlyif3D imagesdonotdisplaycorrectly)3DViewingNotice:enablesthe viewingnoticedisplayedwhen using3Dmode |
| AspectSeethelistofavailableaspect | ratios | Setsthaspectratio(width-to-heightratio)fortheselected inputsource |
| TrackingVaryinglevelsavailableAdjust | justssignaltoeliminate | verticalstripesincomputer imagesfromthePCinputport |
| Sync.VaryinglevelsavailableAdjust | signaltoeliminate | fuzzinessorflickeringin computerimagesfromthePC inputport |
| PositionUp,down,left,rightAdjustst | theimagelocationonthe | screen |
| AutoSetupOn | Off | Automatically optimizes computerimagequality |
| OverscanAuto | Off4%8% | Changestheprojectedimage ratiotomaketheedgesvisible byaselectablepercentageor automatically |
| BlankingVarioussettingsCoverspartoftheimagewitha | blackscreentohiderasterlines attheedgeofthescreen.Note:Usingthisfeaturereduces theimagesize. | |
| AdvancedHDMIVideoRange | ColorSpaceDynamicRangeImageProcessing | HDMIVideoRange:setsthe videorangetomatchthesetting ofthedeviceconnectedtothe HDMIinputportColorSpace:setsthe conversionsystemforthecolor space(Auto,BT.709,or BT.2020)DynamicRange:selectsthe HDR(HighDynamicRange) modeImageProcessing:adjustshow imagesareprocessed;selectFasttodisplayimagesquicker; selectFinetodisplayimagesin higherqualityNote:TheFastsettingdisables allimageadjustmentfeatures. |
Note: You can set the HDMI Video Range setting only when the Epson Super White setting is set to Off. The Reset setting does not reset the Diagonal Screen Size, 3D Viewing Notice, and Aspect settings. The Aspect setting is not available for HD videosignals.
Parenttopic:AdjustingtheMenuSettings
Relatedconcepts
ImageAspectRatio
Relatedtasks
Viewing3DImages
ProjectorFeatureSettings-SettingsMenu
Options on the Settings menu let you customize various projector features.
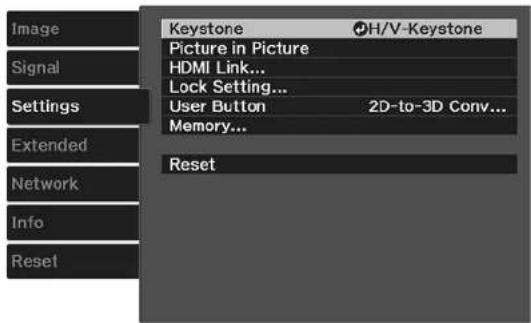
text_image
Image Signal Settings Extended Network Info Reset Keystone PH/V-Keystone Picture in Picture HDMI Link... Lock Setting... User Button 2D-to-3D Conv... Memory... Reset| SettingOptionsDescription | ||
| KeystoneVaryinglevelsavailable | Adjustsimageshapetorectangular | (vertically) |
| PictureinPictureSeethelistof | availablePictureinPictureoptions | Adjuststhesizeandlocationofthesub-screen,swapssourcesandexitsPictureinPicturemode |
| HDMILinkDeviceConnections | HDMILinkPowerOnLinkPowerOffLinkLinkBuffer | AdjuststheHDMILinkoptionsDeviceConnections:liststhe devicesconnectedtotheHDMI1and HDMI2portsHDMILink:enablesordisabletheHDMILinkfunctionPowerOnLink:controlswhathappenswhenyouturnontheprojectororalinkeddevice•PJ->DeviceorBidirectional:turnsonthelinkeddevicewhentheprojectoristurnedon•Device->PJorBidirectional:turnsontheprojectorwhenthe linkeddeviceisturnedonPowerOffLink:controlswhether linkeddevicesareturnedoffwhentheprojectoristurnedoffLinkBuffer:improvesweakHDMI Linkconnections |
| LockSettingLensLock | ChildLockControlPanelLock | Controlsprojectorlensandcontrol panelbuttonlockingtosecurethe projectorLensLock:locksthefocus,zoom, andlensshiftsettingsChildLock:locksthepowerbuttonControlPanelLock:•FullLock:locksallbuttons•PartialLock:locksallbuttons exceptthepowerbutton•Off:nobuttonslocked |
| UserButtonFine/Fast(Image) | Processing)3DDisplay2D-to-3DConversionPowerConsumptionInfoDisplaytheQRCode | AssignsamenuoptiontotheUserbuttonontheremotecontrolforone-touchaccess |
| MemoryLoadMemory | SaveMemoryEraseMemoryRenameMemoryLoadLensPositionSaveLensPositionEraseLensPositionRenameLensPosition | Controlsthesavedprojectorsettings andlenspositionsLoadMemory:displaysthelistof customizedsettingsentriesthatyou havecreatedSaveMemory:savesthecurrent projectorsettingstotheprojector's memoryEraseMemory:erasesasaved memorypositionRenameMemory:changesthename ofasavedmemorypositionLoadLensPosition:loadslens adjustmentvaluessavedwiththe SaveLensPositionsettingSaveLensPosition:savesthefocus, zoom,andlensshiftadjustmentsasa lenspositionentryEraseLensPosition:deletesthe savedlenspositionentryRenameLensPosition:renamesa savedlenspositionentry |
Parenttopic:AdjustingtheMenuSettings
ProjectorSetupSettings-ExtendedMenu
SettingstheExtendedmenuletyoucustomizevariousprojectorsetupfeaturesthatcontrolits operation.
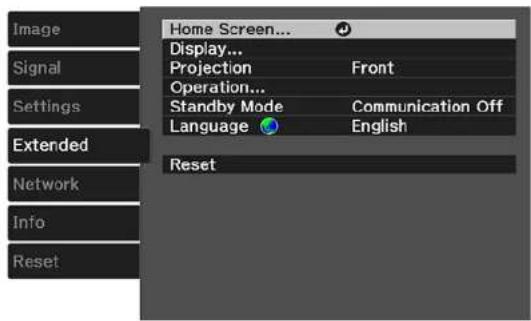
text_image
Image Signal Settings Extended Network Info Reset Home Screen... Display... Projection Front Operation... Standby Mode Communication Off Language English Reset| SettingOptionsDescription | ||
| HomeScreenHomeScreenAutoDisp.CustomFunction1CustomFunction2 | CustomFunction1CustomFunction2 | AdjustsettingstheHomeScreenHomeScreenAutoDisp.: controlwhethertheHome screendisplaysautomatically whentheprojectoristurnedonCustomFunction1/CustomFunction2:letyoucustomize theoptionsdisplayedonthe Homescreenandsaveyour settingsasapreset |
| Display—SeetheDisplaysettingsablein | thistopic | |
| ProjectionFront | Front/CeilingRearRear/Ceiling | Selectsthewaytheprojector facesthescreensotheimageis orientedcorrectly |
| Operation—SeetheOperationsettingstable | inthistopic | |
| StandbyModeCommunicationOff | CommunicationOn | Indicateswhethertheprojector canbemonitoredoveranetwork whileinstandbymode |
| LanguageVariouslanguagesavailable | Selectsthelanguagefor | projectormenuandmessage displays(notchangedbyReset option) |
Displaysettings
| SettingDescription | |
| MenuPositionSelectsthepositionofthe | projectormenudisplayedonthescreen |
| MessagesControlswhethermessagesa | redisplayedonthescreen |
| DisplayBackgroundSelectsthescreen | colororlogotodisplaywhennosignalisreceived |
| StartupScreenControlswhetheraspecial | alscreenappearswhentheprojectorstartsup |
| StandbyConfirmationDisplaysaconfirmationmessageafterpressingthe | Standbybuttonontheremotecontrol |
| PanelAlignmentCorrectscolormisalignmentintheprojectedimage | |
| ColorUniformityAdjuststhecolortonebalance | |
| DirectPowerOnTurnsontheprojectorwhenyouplugitin | |
| SleepModeAutomaticallyplacestheprojectorinstandbymodeafteranintervalofinactivity | |
| SleepModeTimerSetsthetimebeforetheprojectorautomaticallyturnsoff(SleepModemustbeturnedon) | |
| IlluminationTurnsoffthestatusindicatorlightsontheprojector | |
| TriggerOutputsaDC12Vsignalat200mAmaximumfromthe3.5mmmini-jackTriggerOutportwhenevertheprojectoristurnedon | |
| HighAltitudeModeRegulatestheprojector'soperatingtemperatureataltitudesabove4921feet(1500m) | |
Operationsettings
Note: The Reset setting does not reset the Memory, Projection, High Altitude Mode, Standby Mode or Languagesettings.
Parenttopic: Adjusting theMenu Settings
Relatedconcepts
ProjectionModes
Relatedreferences
AvailableImageAspectRatio
Relatedtasks
UsingtheHomeScreen
SelectingExternalNetworkDetectionSettings
UsingPictureinPicture
AdjustingtheColorConvergence(PanelAlignment)
ConnectingtoaTriggerOutPort
ProjectorNetworkSettings-NetworkMenu
SettingstheNetworkmenuletyouviewnetworkinformationandsetuptheprojectorformonitoring andcontroloveranetwork.
Note: SomesettingsareonlyavailableiftheoptionalwirelessLANmoduleisinstalled.
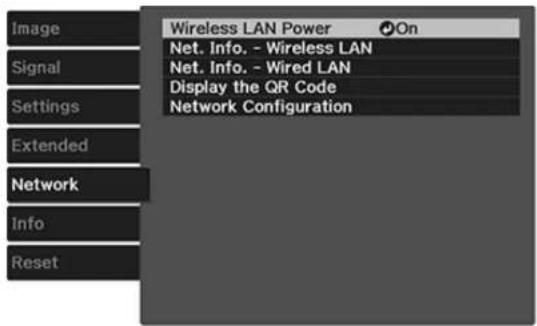
text_image
Image Signal Settings Extended Network Info Reset Wireless LAN Power On Net. Info. - Wireless LAN Net. Info. - Wired LAN Display the QR Code Network Configuration| SettingOptionsDescription | ||
| WirelessLANPowerOn | Off | Enableordisablewireless communication |
| Net.Info-WirelessLANConnection | modeWirelessLANSys.AntennalevelProjectorNameSSIDDHCPIPAddressSubnetMaskGatewayAddressMACAddressRegionCode | Displayswirelessnetworkstatus anddetails |
| Net.Info-WiredLANProjectorName | DHCPIPAddressSubnetMaskGatewayAddressMACAddress | Displayswirednetworkstatus anddetails |
| DisplaytheQRCode—DisplaystheQRCode | ||
| NetworkConfigurationAccessesadditionalnetwork menus | Configuresyournetworksettings |
Parenttopic:AdjustingtheMenuSettings
Relatedreferences
SolutionsWhenWirelessAuthenticationFails
ProjectorInformationDisplay-InfoMenu
YoucandisplayinformationabouttheprojectorandinputsourcesbyviewingtheInfomenu.However, youcannotchangeanysettingsinthemenu.
Note: To view the firmware version of the projector or other components, select Version.
| Image | [Projector Info] | |
| Lamp Hours | 0 H | |
| Signal | Source | Component |
| Settings | Input Signal | RGB |
| Resolution | 1920 x 1080 | |
| Extended | Scan Mode | Interlace |
| Refresh Rate | 987.98 Hz | |
| Network | 3D Format | Frame Packing |
| Sync Info | SGNN 00000 | |
| Color Depth | 0 bit 4:4:4 | |
| Color Format | BT.709 SDR | |
| Status | ---- | |
| Serial Number | ABCD11122334 | |
| Reset | Event ID | 0434 02FF 0433 ---- ---- |
Note: Available settings depend on the current input source. The lamp usage timer does not register any hours until you have used the lamp for at least 10 hours.
ProjectorInfoinformation
| InformationitemDescription | |
| LampHoursDisplaysthenumberof | hours(H)thelamphasbeenused |
| SourceDisplaysthenameoftheport | towhichthecurrentinputsourceis connected |
| InputSignalDisplaystheinputsignalsettingofthecurrentinputsource | |
| ResolutionDisplaystheresolution | ofthecurrentinputsource |
| ScanModeDisplaysthescanmode | ofthecurrentinputsource |
| RefreshRateDisplaystherefreshrate | ofthecurrentinputsource |
| 3DFormatDisplaystheformatofthe | 3Dsignal |
| SyncInfoDisplaysinformationthat | maybeneededbyaservicetechnician |
| ColorDepthDisplaysthecolordepth | handcolordifference |
| ColorFormatDisplaysinformation | aboutthecolorspaceanddynamicrange |
| StatusDisplaysinformationabout | projectorproblemsthatmaybeneeded byaservicetechnician |
| SerialNumberDisplaystheprojector | sserialnumber |
| EventIDDisplaystheEventIDnumb | ercorrespondingtoaspecificprojector problem;seethelistofEventIDcodes |
EventIDCodeList
Parenttopic:AdjustingtheMenuSettings
Relatedtasks
ReplacingtheLamp
ResettingtheLampTimer
EventIDCodeList
If the Event ID option on the Info menu displays a code number, check this list of Event ID codes for the solution to the projector problem associated with the code.
| EventIDcodeCause | seandsolution |
| 0022Unstablenetworkcommunication.Checkthenetworkcommunicationstatus,waitafewmoments,andtryconnectingtothenetworkagain. | |
| 0027 | |
| 0028 | |
| 0029 | |
| 0030 | |
| 0031 | |
| 0035 | |
| 0434 | |
| 0481 | |
| 0482 | |
| 0485 | |
| 0432Turntheprojectoroffandthenonagain. | |
| 0435 | |
| 0433Cannotdisplaythetransferredimages.Restartthenetworksoftware. | |
| 0484Communicatonwithcomputerwasdisconnected.Restartthenetworksoftware. | |
| 04FEThenetworksoftwarequitunexpectedly.Checkthenetworkcommunicationstatus,thenturntheprojectoroffandthenonagain. | |
| 0479 | Aprojectorsystemerrorhasoccurred.Turntheprojectoroffandthenonagain. |
| 04FF | |
| 0891CannotfindanaccesspointwiththesameSSID.Setyourcomputer,accesspoint,andprojectortothesameSSID. | |
| 0892TheWPA/WPA2authenticationtypedoesnotmatch.Makesurethewirelessnetworksecuritysettingsarecorrect. | |
| 0894Communicatonwithunauthorizedaccesspointwasdisconnected.Contactyournetworkadministrator. | |
| 0898FailedtoacquireDHCP.MakesuretheDHCPserverisoperatingcorrectly.IfyouarenotusingDHCP,turnofftheDHCPsettingintheNetworkmenus. | |
| 0020Communicat | onerror.Turntheprojectoroffandthenonagain. |
| 0026 | |
| 0032 | |
| 0036 | |
| 0037 | |
| 0038 | |
| 0899 | |
Parenttopic:ProjectorInformationDisplay-InfoMenu
ProjectorResetOptions-ResetMenu
You can reset most of the projector settings to their default values using the Reset All Config option on theResetmenu.
You can reset the projector's lamp usage timer to zero when you replace the lamp using the Reset Lamp Hours option, reset the lens position entries using the Reset Lens Position option, and reset all memoryentriesusingtheResetMemoryoption.
Note: The Reset Lens Position option does not re-center the lens; it only deletes the saved settings.
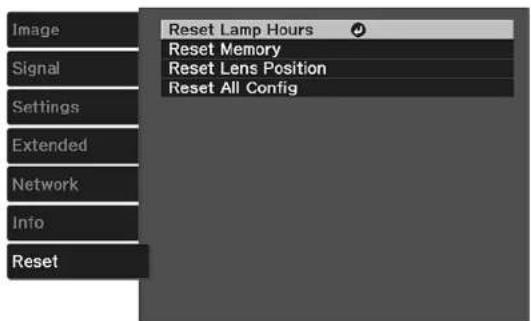
text_image
Image Signal Settings Extended Network Info Reset Reset Lamp Hours Reset Memory Reset Lens Position Reset All ConfigYou cannot reset the following settings using the ResetAllConfiguration:
•Language
•LampHours
- Memorysettings
- AllsettingsintheNetworkmenu
-PanelAlignment
•ColorUniformity
Parenttopic: Adjusting theMenu Settings
MaintainingandTransportingtheProjector
Followtheinstructionsinthesesectionstomaintainyourprojectorandtransportitfromplacetoplace.
ProjectorMaintenance
TransportingtheProjector
ProjectorMaintenance
Yourprojectorneedslittlemaintenancetokeepworkingatitsbest.
Youmayneedtocleanthelensperiodically, andcleantheairfilterandairventstoppreventtheprojector fromoverheatingduetoblockedventilation.
Theonlypartsyoushouldreplacearethelamp,airfilter,andremotecontrolbatteries.Ifanyotherpart needsreplacing,contactEpsonoranauthorizedEpsonservicer.
Warning: Before cleaning any part of the projector, turn it off and unplug the power cord. Never open any cover on the projector, except a specifically explained in this manual. Dangerous electrical voltages in the projector can injure you severely.
Warning: Do not try to service this product yourself, except as specifically explained in this manual. Referallotherservicingtoqualifiedservicers.
CleaningtheLens
CleaningtheProjectorCase
Cleaningthe3DGlasses
AirFilterandVentMaintenance
ProjectorLampMaintenance
ReplacingtheRemoteControlBatteries
Parenttopic: Maintaining and Transporting the Projector
CleaningtheLens
Cleantheprojector'slensperiodically,orwheneveryounoticedustorsmudgesonthesurface.
Note: If the projector has been in use, wait 30 minutes before cleaning the lens.
- Toremovedustorsmudges, gentlymovetheshuttertotheside and wipethelens with lens-cleaning paper. Aftercleaning, closetheshutter.
- Toremovestubbornsmudges, moistenasoft, lint-freeclothwithlenscleanerandgentlywipethelens. Donotsprayanyliquiddirectlyonthelens.
Warning: Donotusealenscleaner that contains flammable gas. The high heat generated by the projector lamp may cause a fire.
Caution: Do not use glass cleaner or any harsh materials to clean the lens and do not subject the lens toanyimpacts; you may damage it. Donot use canned air, orthegases may leave a residue. Avoid touching the lens with your bare hand stop prevent fingerprint onordamage to the lens surface.
Parenttopic: Projector Maintenance
CleaningtheProjectorCase
Beforecleaningtheprojectorcase,turnofftheprojectorandunplugthepowercord.
Note: If the projector has been in use, wait 30 minutes before cleaning it.
• Toremovedustordirt, useasoft, dry, lint-freecloth.
- Toremovestubborndirt, useasoftclothmoistenedwithwaterandmildsoap.Donotsprayliquid directlyontheprojector.
Caution: Do not use wax, alcohol, benzine, paint thinner, or other chemicals to clean the projector case. Thesecandamagethecase.Donotusecannedair,orthegasesmayleaveaflammable residue.
Parenttopic: Projector Maintenance
Cleaningthe3DGlasses
Toremovedust, dirt, smudges, orfingerprints from the glasses, use asoft, dry, lint-freecloth.
Note: Unpluganych charging cables from the glasses before cleaning them.
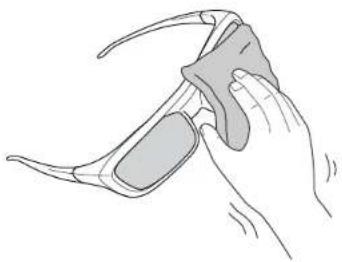
natural_image
Illustration of a hand holding a pair of eyeglasses (no text or symbols)Caution: Donotusepapertowelsoranyotherabrasivematerialstocleantheglasses.
Parenttopic: Projector Maintenance
AirFilterandVentMaintenance
Regularfiltermaintenanceisimportanttomaintainingyourprojector.YourEpsonprojectorisdesigned withaneasilyaccessible,user-replaceablefiltertoprotectyourprojectorandmakeregularmaintenance simple.Filtermaintenanceintervalswilldependontheenvironment.
Ifregularmaintenanceisnotperformed,yourEpsonprojectorwillnotifyyouwhenthetemperature insidetheprojectorhasreachedahighlevel.Donotwaituntilthiswarningappearstomaintainyour projectorfilterasprolongedexposuretohightemperaturesmayreducethelifeofyourprojectorlamp.
Damageduetothefailuretoproperlymaintaintheprojectororitsfiltermaynotbecoveredbythe projectororlampLimitedWarranties.
CleaningtheAirFilter
ReplacingtheAirFilter
Parenttopic: Projector Maintenance
Relatedreferences
ProjectorLightStatus
CleaningtheAirFilter
Youneedtocleantheprojector'sairfilterinthefollowingsituations:
•Thefilterorventsgetdusty.
• Youseeamessagetellingyoutocleanit.
- Turnoff the projector and unplug the power cord.
- Pressandholdthetabontheairfiltercover, andpulltoremovethecover.
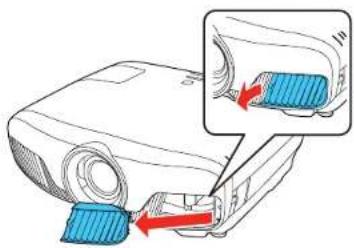
text_image
Diagram showing a projector with blue plastic clips and red directional arrows indicating movement or force, alongside a magnified view of the device's internal structure.- Pulltheairfilteroutoftheprojector.
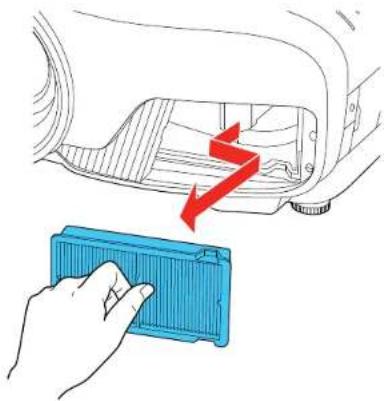
natural_image
Illustration of a hand holding a blue plastic component with a red arrow indicating direction (no text or symbols)- Tapeachsideoftheairfilter4to5timestoshakeoffanyexcessdust.
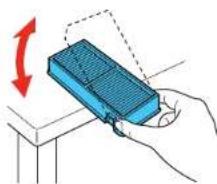
natural_image
Hand holding a blue rectangular device with a red arrow indicating rotation (no text or symbols)Caution: Donotuse excessive force when tapping the air filter, or it may crack and become unusable. Donotrinset the air filter in water, or use any detergent or solvent to clean it. Donotuse can beidair; the gases may leave a residue, or push dust and debris into the projector's optics or others sensitive areas.
- Vacuum the front of the air filter (thesidewith the abs) to remove any remaining dust.
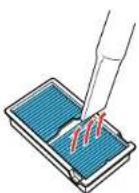
Note: If dust is difficult to remove the air filter is damaged, replace the air filter.
- Placetheairfilterbackintheprojectorasshown.
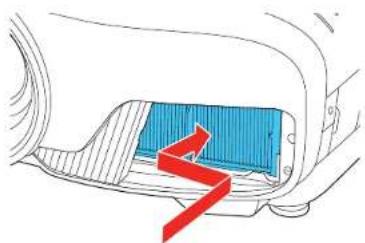
natural_image
Diagram of a car interior showing a blue rectangular component with a red arrow indicating direction (no text or symbols)- Attachtheairfiltercoverasshown.

text_image
Diagram showing a projector with blue connectors inserted into a slot, with an inset highlighting the insertion area.Parenttopic: AirFilterandVentMaintenance
Relatedtasks
ReplacingtheAirFilter
ReplacingtheAirFilter
Youneedtoreplacetheairfilterinthefollowingsituations:
•Aftercleaningtheairfilter,youseeamessagetellingyoutocleanorreplaceit
•Theairfilteristornordamaged
Youcanreplacetheairfilterwhiletheprojectorismountedtotheceilingorplacedonatable.
-
Turnoff the projector and unplug the power cord.
-
Pressandholdthetabontheairfiltercover, and pulltoremovethecover.
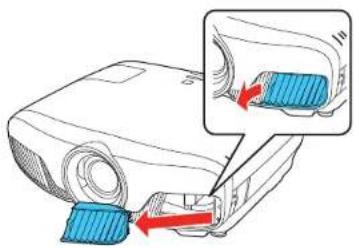
text_image
Diagram showing a projector with blue plastic clips inserted into a slot, with an inset highlighting the insertion area.- Pulltheairfilteroutoftheprojector.
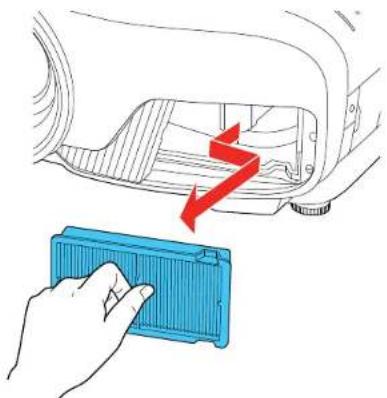
text_image
Diagram showing a hand holding a blue plastic component with a red arrow indicating direction or force, next to a car interior.Note: Air filters contain polypropylene. Dispose of used air filters according to local regulations.
- Placethenewairfilterintheprojectorasshown.
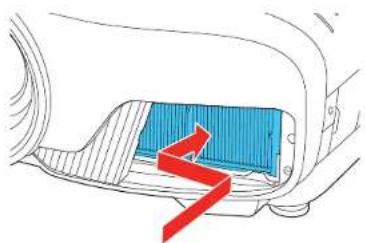
natural_image
Diagram of a car interior showing a blue rectangular component with a red arrow indicating direction (no text or symbols)- Attach the air filter cover as shown.
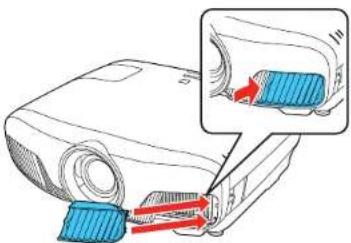
text_image
Diagram showing a projector with blue connectors inserted into a slot, with an inset highlighting the insertion area.Parenttopic: AirFilterandVentMaintenance
ProjectorLampMaintenance
The projector keep a stack of the number of hours the lamp is used and displayed this information in the projector's menusystem.
Replacethelampassoonaspossiblewhenthefollowingoccurs:
•Theprojectedimagegetsdarkerorstartstodeteriorate
- Amessageappearswhenyouturnontheprojectortellingyoutoreplacethelamp
ReplacingtheLamp
ResettingtheLampTimer
Parenttopic: Projector Maintenance
Relatedreferences
ProjectorInformationDisplay-InfoMenu
ProjectorLampSpecifications
OptionalEquipmentandReplacementParts
ReplacingtheLamp
Beforeyoureplacethelamp,lettheprojectorcooldownforatleastonehoursothelampwillnotbehot.
Warning: Letthelampfullycoolbeforereplacingittoavoidinjury.
Youcanreplacethelampwhiletheprojectorismountedtotheceiling,ifnecessary.
- Turnoff the projector and unplug the power cord.
- Allow the projector lamptocooldown for at least one hour.
- Use the crew driver included with the replacement lamptoloosenthescrewsecuring the lamp cover.
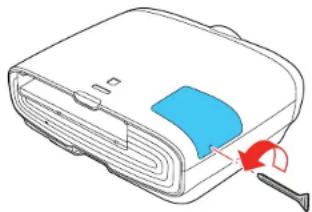
natural_image
Illustration of a closed hard drive with a blue cover and red arrow indicating motion (no text or symbols)Warning: If the lamp is broken, glass fragments may be loose inside the lamp chamber. Be careful removing any brokenglassto avoid injury. If the projector is installed on the ceiling, stand to these side of the lamp cover and not underneath; pieces of glass could fall into you by yes or mouth when you open the lamp cover.
4.Slidethelampcoveroutandliftitoff.
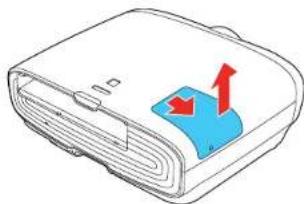
natural_image
Illustration of a closed book with a blue cover and red upward arrows indicating a loading or upload action (no text or symbols)- Loosenthescrewssecuringthelamptotheprojector. Thescrewsdonotcomeallthewayout.
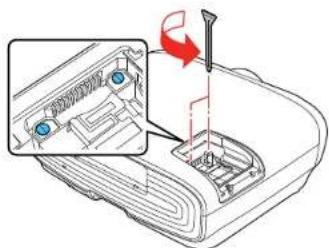
text_image
Technical diagram showing a device with labeled components and an arrow indicating rotation or movement, including Chinese text annotations.- Liftupthelamphandleandgentlypullthelampoutoftheprojector.
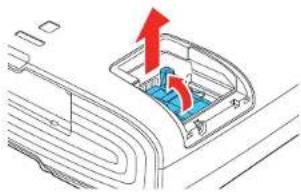
natural_image
Diagram of a car interior showing airflow direction with red arrows indicating movement (no text or symbols)Note: The lamp(s) in this product contain mercury. Please consult your state and local regulations regarding disposal or recycling. Donotputin the trash.
- Gently insert the new lamp into the projector. If it does not fit easily, makes sure it is facing the right way. Lower the handle.
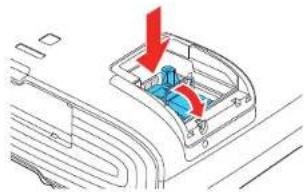
natural_image
Diagram of a car interior showing a blue vehicle inside a container with red arrows indicating direction (no text or symbols)Caution: Donottouchanyglassonthelampassemblytoavoidprematurelampfailure.
- Pushinthelampfirmlyandtightenthescrewstosecureit.
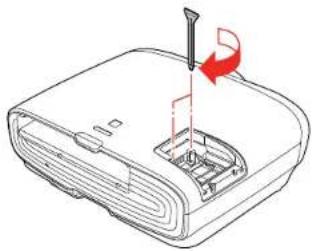
natural_image
Line drawing of a projector with a red arrow indicating rotation (no text or symbols)Caution: Donotover-tightenthescrews.
- Replacethelampcoverandtightenthescrewtosecureit.
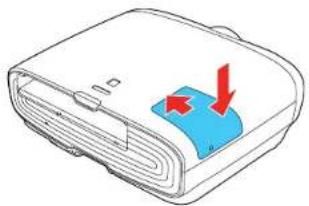
natural_image
Illustration of a closed book with a blue cover and red arrows pointing to it, no text or symbols present.Note: Besurethelampcoverissecurelyinstalledorthelampwillnotcomeon.
Resetthelamptimertozerotokeeptrackofthenewlamp'susage.
Parenttopic: Projector Lamp Maintenance
Relatedtasks
ResettingtheLampTimer
ResettingtheLampTimer
Youmustresetthelamptimerafterreplacingtheprojector'slamptoclearthelampreplacement messageandtokeeptrackoflampusagecorrectly.
Note: Do not reset the lamp timer if you have not replaced the lamp to avoid inaccurate lamp usage information.
- Turnontheprojector.
2.PresstheMenubutton.
- SelecttheResetmenuandpressEnter.
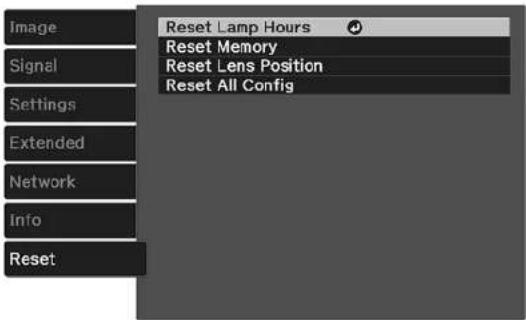
text_image
Image Signal Settings Extended Network Info Reset Reset Lamp Hours Reset Memory Reset Lens Position Reset All Config- SelectResetLampHoursandpressEnter.
Youseeapromptaskingifyouwanttoresetthelamphours.
-
SelectYesandpressEnter.
-
PressMenuorEsctoexitthemenus.
Parenttopic:ProjectorLampMaintenance
ReplacingtheRemoteControlBatteries
TheremotecontrolusestwoAAmanganeseoralkalinebatteries. Replacethebatteriesassoonasthey runout.
Caution: Use only the type of batteries specified in this manual. Do not install batteries of different types, ormixnewandoldbatteries.
- Removethebatterycoverasshown.
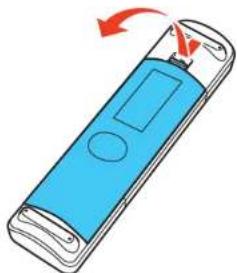
natural_image
Illustration of a blue handheld device with a circular button and red rotation arrow (no text or symbols)- Removetheoldbatteries.
Warning: If the battery fluid has leaked, wipe it away with a soft cloth and avoid getting the fluid on yourhands. If getson yourhands, wash them immediately to avoid injury.
- Insert the batteries with the + and - ends facing as shown.
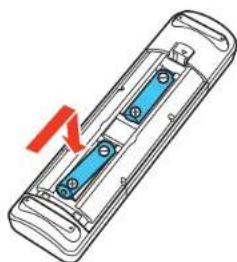
natural_image
Diagram of a remote control device with blue buttons and a red arrow indicating rotation (no text or symbols)- Replacethebatterycoverandpressitdownuntilclicksintoplace.
Warning: Dispose of used batteries according to local regulations. Do not expose batteries to heat or flame. Keep batteries out of thereachofchildren; they are choking hazards and are very dangerous if swallowed.
Parenttopic: Projector Maintenance
Relatedreferences
RemoteControlSpecifications
TransportingtheProjector
The projector contains precision parts, some of which are glass. Follow these guidelines to transport, ship, or store the projectors safely:
- Removeanyequipmentconnectedtotheprojector.
• CenterthelenspositionusingtheLensbutton.
Caution: If you transport the projector when the lens is not centered, the lens shift mechanism may be damaged.
- When transporting the projector along distance or as checked luggage, packitinafirmbox with cushioning around it and mark the box "Fragile."
- Whenshippingtheprojectorforrepairs, placeitinitsoriginalpackingmaterials, if possible, or use equivalent materials with cushioning around the projector. Markthebox "Fragile."
Note: Epson shall not believe for any damages incurred during transportation.
Parenttopic: Maintaining and Transporting the Projector
Relatedtasks
TurningOfftheProjector
SolvingProblems
Checkthesolutionsinthesesectionsifyouhaveanyproblemsusingtheprojector.
ProjectionProblemTips
ProjectorLightStatus
SolvingImageProblems
SolvingProjectororRemoteControlOperationProblems
SolutionsWhenWirelessAuthenticationFails
WheretoGetHelp
ProjectionProblemTips
If the projector is not working properly, try turning it off and unplugging it. Then plug it back in and turn it on.
If this does not solve the problem, check the following:
- Thelightsontheprojectormayindicatewhattheproblemis.
- Thesolutionsinthismanualcanhelpyousolvemanyproblems.
If noneofthesesolutionshelp, you can contact Epsonfortechnicalsupport.
Parenttopic: Solving Problems
ProjectorLightStatus
Thelightsontheprojectorindicate the projectorstatusandletyouknowwhenaproblemoccurs. Check the status and color of the lights and look for a solution in the table here.
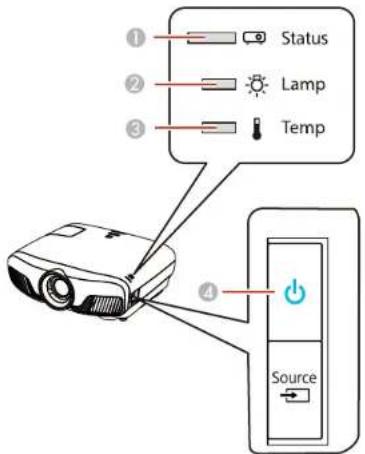
text_image
① Status ② Lamp ③ Temp ④ Source1Statuslight
2Lamplight
3Templight
4Powerlight
| PowerlightStatus | slightLamplight | TemplightStatus | andsolution | |
| BlueBlueOffOff | Normaloperation | |||
| BlueFlashingblue | OffOffWarmingup | ;waitforanimageto | appear | |
| Shuttingdown;whentheStatuslight stopsflashing,youcanunplugthe projector | ||||
| OffOffOffOffStandbyorsleepmode | ||||
| BlueVariesOffFlashing | orange | Projectoristoohot•Makesurethattheventsandair filterarenotcloggedwithdustor obstructedbynearbyobjects•Cleanorreplacetheairfilter•Makesuretheenvironmental temperatureisnottoohot | ||
| OffFlashingblue | OffOrangeProjector | hasoverheatedandturned | off;leaveitturnedofftocooldownfor aboutfiveminutes;afterthefanhas stopped,dothefollowing:•Makesurethattheventsandair filterarenotcloggedwithdustor obstructedbynearbyobjects•Cleanorreplacetheairfilter•Ifoperatingtheprojectorathigh altitude,turnonHighAltitude Mode•Iftheproblempersists,unplugthe projectorandcontactEpsonfor help | |
| OffFlashingblue | Orange | OffLamphasaproblem | •ChecktheLampHoursinthelInfo menutoseeifthelampisburned out.Unplugtheprojector,waitfor thelamptocooldown,andcheckif itisbrokenorinstalledincorrectly; reseatorreplacethelampas necessary•Cleanorreplacetheairfilter•Makesurethelampcoverisclosed•Ifoperatingtheprojectorathigh altitude,turnonHighAltitude Mode•Iftheproblempersists,unplugthe projectorandcontactEpsonfor help | |
| BlueVariesFlashing | orange | OffReplacethelampsoontoavoid damage;donotcontinueusingthe projector | ||
| OffFlashingblue | OffFlashing | orange | Afanorsensorhasaproblem;turn theprojectoroff,unplugit,and contactEpsonforhelp | |
| OffFlashingblue | Flashing | orange | Flashing orange | AutolrisorCinemaFiltererror;turn theprojectoroff,unplugit,and contactEpsonforhelp |
| OffFlashingblue | Orange | OrangePowererror;turntheprojectoroff, | unplugit,andcontactEpsonforhelp | |
| OffFlashingblue | Flashing | orange | OffInternalprojectorerror;turnthe projectoroff,unplugit,andcontact Epsonforhelp | |
Note: If the lights display a pattern not listed in the table above, turn the projector off, unplug it, and contactEpsonforhelp.
Parenttopic: Solving Problems
Relatedreferences
ProjectorSetupSettings-ExtendedMenu
Relatedtasks
CleaningtheAirFilter
ReplacingtheLamp
ReplacingtheAirFilter
SolvingImageProblems
Checkthesolutionsinthesesectionsifyouhaveanyproblemswithprojectedimages.
SolutionsWhenNoImageAppears
SolutionsWhen"NoSignal"MessageAppears
SolutionsWhen"NotSupported"MessageAppears
SolutionsWhenOnlyaPartialImageAppears
SolutionsWhentheImageisNotRectangular
SolutionsWhentheImageContainsNoiseorStatic
SolutionsWhentheImageisFuzzyorBlurry
SolutionsWhentheImageBrightnessorColorsareIncorrect
SolutionsWhena3DImageDoesNotDisplayCorrectly
Parenttopic: Solving Problems
SolutionsWhenNoImageAppears
Ifnoimageappears, try the following solutions:
•Makesurethelenscoverisopenalltheway.
- PresstheBlankbuttonontheremotecontroltoseeiftheimagewastemporarilyturnedoff.
- Makesureallnecessarycablesaresecurelyconnectedandthepowerisonfortheprojectorand connectedvideosources.
- Presstheprojector'spowerbuttontowakeitfromstandbyorsleepmode. Alsoseeifyourconnected computerisinsleepmodeordisplayingablankscreensaver.
- Press the Menu button. If the projector menu is able to display, there may be a problem with the connectedvideosource,cableconnection,orport.
- CheckthesettingsontheSignalmenutomakesuretheyarecorrectforthecurrentvideosource.
- Adjust the Brightness setting or select the Normal Power Consumption setting.
- Check the Display setting to make sure Messages is set to On.
- ForimagesprojectedwithWindowsMediaCenter,reducethescreensizefromfullscreenmode.
- ForimagesprojectedfromapplicationsusingWindowsDirectX,turnoffDirectXfunctions.
- If the othersolutions donotsolvethe problem, reset all of the projector settings using the options on the Reset menu.
Parenttopic: SolvingImageProblems
Relatedreferences
ImageQualitySettings-ImageMenu
ProjectorSetupSettings-ExtendedMenu
InputSignalSettings-SignalMenu
Relatedtasks
UnlockingtheProjector'sButtons
SolutionsWhen"NoSignal"MessageAppears
If the "NoSignal" message appears, try the following solutions:
- Press the Source button on the projector repeatedly to cycle through the available sources. Wait a fewsecondsforanimagetoappear.
- Pressasourcebuttonontheremotetoselectanavailablesource.Waitafewsecondsforanimageto appear.
- PresstheHomebuttonontheremotecontroltoselectfromalistofavailablesources.
- Turnontheclockedcomputerorvideosource,andpressitsplaybuttontobeginyourpresentation, ifnecessary.
- Checktheconnectionfromtheprojectortoyourvideosources.
- If you are projecting from alaptop computer, makes sure it setup to display on an external monitor.
- If necessary, turn the projector and the connected computer or video source off and then on again.
- If the others solutions donotsolvethe problem, reset all of the projector settings using the option on the Reset menu.
DisplayingFromaPCLaptop
DisplayingFromaMacLaptop
Parenttopic: SolvingImageProblems
Relatedconcepts
ProjectorConnections
DisplayingFromaPCLaptop
If you see the "No Signal" message when you display from a PC laptop, you need to setup the laptop to display on an external monitor.
- Hold down the laptop's Fn key and press the key labeled with a monitor icon or CRT/LCD. (See your laptopmanualfordetails.) Waitafewsecondsforanimagetoappear. Todisplayonboththe laptop'smonitorandtheprojector, trypressingthesamekeysagain.
Note: On Windows 7 or later, hold down the Windows key and press P at the same time, then click Duplicate.
-
If the same image is not displayed by the laptop and projector, check the Windows Display utility to make sure the external monitor portisenabled and extended desktop mode is disabled. (Seeyour computer or Windows manual for instructions.)
-
If necessary, check your video card settings and set the multiple display option to Clone, Mirror, or Duplicate.
Parenttopic: SolutionsWhen"NoSignal"MessageAppears
DisplayingFromaMacLaptop
Ifyouseethe"NoSignal"messagewhenyoudisplayfromaMaclaptop,youneedtosetupthelaptop formirroreddisplay.(Seeyourlaptopmanualfordetails.)
-
Open the System Preferences utility and select Displays, Display, or Color LCD.
-
ClicktheArrangeorArrangementtab.
-
SelecttheMirrorDisplayscheckbox.
Parenttopic: SolutionsWhen"NoSignal"MessageAppears
SolutionsWhen"NotSupported"MessageAppears
If the "Not Supported" message appears, try the following solutions:
- Setthecomputer'sdisplayresolutiontothenativeresolutionoftheprojector.
- Makesurethecomputer'sdisplayresolutiondoesnotexceedtheprojector'sresolutionandfrequency limit.Ifnecessary,selectadifferentdisplayresolutionforyourcomputer.(Seeyourcomputermanual fordetails.)
- Asatest, trysetting the computer's display resolution to the lowest possible setting, and then gradually increase it as necessary.
- Check the input resolution under Projector Info in the Info menu and make sure that the projector supportsthatresolution.
Parenttopic: SolvingImageProblems
Relatedreferences
InputSignalSettings-SignalMenu
ProjectorSetupSettings-ExtendedMenu
SupportedVideoDisplayFormats
SolutionsWhenOnlyaPartialImageAppears
Ifonlyapartialcomputerimageappears, trythefollowingsolutions:
- TryadjustingtheimagepositionusingthePositionmenusetting.
- Try adjusting the image position using the Lens button on the remote control or control panel.
- PresstheAspectbuttonontheremotecontroltoselectadifferentimageaspectratio.
- SelectadifferentimageaspectratiointheSignalmenu.
- Checkthecablesconnectingthecomputerorvideosourcetotheprojector.Tryconnectingdifferent cables.
- Checkyourcomputerdisplaysettingstodisabledualdisplayandsettheresolutionwithinthe projector'slimits.(Seeyourcomputermanualfordetails.)
- Checktheresolutionassignedtoyourpresentationfilestoseeiftheyarecreatedforadifferentresolutionthanyouareprojectingin.(Seeyoursoftwarehelpfordetails.)
Parenttopic: SolvingImageProblems
Relatedreferences
InputSignalSettings-SignalMenu
SupportedVideoDisplayFormats
SolutionsWhenthelmageisNotRectangular
If the projected image is not evenly rectangular, try the following solutions:
- Placetheprojectordirectlyinfrontofthecenterofthescreen, facingitsquarely, ifpossible.
-
TrytofixtheimageusinglensshiftbeforeadjustingtheKeystonesetting.
-
If you adjusted the projector height using the projector feet, press the keystone button on the project to adjust the imageshape.
- AdjusttheimageshapeusingtheKeystonemenusetting.
Parenttopic: SolvingImageProblems
Relatedreferences
ProjectorFeatureSettings-SettingsMenu
Relatedtasks
CorrectingImageShapeWiththeKeystoneButtons
SolutionsWhenthelmageContainsNoiseorStatic
If the projected images seem to contain electronic interference (noise) or static, try the following solutions:
- Checkthecablesconnectingyourcomputerorvideosourcetotheprojector. Theyshouldbe:
- Separated from the powercord to prevent interference
-
Securelyconnectedatbothends
• Notconnectedtoanextensioncable
•Nolongerthan9.8feet(3m)forVGA/computercablesor24feet(7.3m)forHDMlcables -
Checkthesettingsontheprojector'sSignalmenutomakesuretheymatchthevideosource.If available for your video source, adjust the Deinterlacing and Noise Reduction settings.
- Selectacomputervideoresolutionandrefreshratethatarecompatiblewiththeprojector.
- If you are projecting from a computer using a VGA cable, display a uniformly patterned image on the screen and manually adjust the Tracking and Sync settings.
- If you adjusted the image shape using the projector controls, try decreasing the Sharpness setting to improve image equality.
- If you connected an extension powerable, try projecting without it to see if it caused interference in the signal.
- Tryadifferentcable.
- Try turning off Frame Interpolation or turning on Image Enhancement in the Image menu.
Parenttopic: SolvingImageProblems
Relatedreferences
ImageQualitySettings-ImageMenu
InputSignalSettings-SignalMenu
SupportedVideoDisplayFormats
SolutionsWhenthelmageisFuzzyorBlurry
If the projected image is fuzzy or blurry, try the following solutions:
- Adjusttheimagefocus.
- Cleantheprojectorlens.
- Checkthelensforcondensation.
Note: To avoid condensation on the lens after bringing the projector in from a cold environment, let the projectorwarmuptoroomtemperaturebeforeusingit.
- Position the projector close enough to the screen, and directly in front of it.
- Position the projector so the keystone adjustment angle is not sowidethat it distortsthe image.
- AdjusttheSharpnesssettingtoimproveimagequality.
- If you are projecting from a computer, display uniformly patterned image on the screen and adjust the Tracking and Sync settings.
- If you are projecting from a computer, adjust the computer's resolution to match the projector's native resolution, if possible.
- Checktheresolutionofyourvideosource.Ifyouareprojectingfromastandarddefinitionvideo source,yourimagewillnotbeasclearasanHD(720p/1080i/1080p)videosource.
Parenttopic: SolvingImageProblems
Relatedreferences
ImageQualitySettings-ImageMenu
ProjectionDistance
Relatedtasks
FocusingtheImagewiththeLensButton
CleaningtheLens
SolutionsWhenthelmageBrightnessorColorsareIncorrect
If the projected image is stood dark or light, or the colors are incorrect, try the following solutions:
- Press the Color Mode button on the remote control to try different color modes for the image and environment.
- Checkyourvideosourcesettings.
- Adjust the available settings on the Image menu for the current input source, such as Brightness, Contrast, Tint, Advanced, and Color Saturation.
- Turn off the HDR mode in the Dynamic Range setting or set the Color Space setting to BT.709.
•ForHDRimages, settheDynamicRangesettingtoAuto(Bright) - Makesureallthecablesaresecurelyconnectedtotheprojectorandyourvideodevice. If you connectedlongcables, tryconnectingshortercables.
- Position the projector closeenoughtothescreen.
- If the image has been progressively darkening, you may need to replace the projector lamp soon.
Parenttopic: SolvingImageProblems
Relatedreferences
ImageQualitySettings-ImageMenu
ProjectorSetupSettings-ExtendedMenu
InputSignalSettings-SignalMenu
SolutionsWhena3DImageDoesNotDisplayCorrectly
Ifa3Dimagedoesnotdisplaycorrectly,trythefollowingsolutions:
- Make sure the 3D Display setting on the Signal menu is set to Auto or 3D.
- Makesureyourvideoviceandmediaareboth3D-compatible.Refertothedocumentationthat camewithyourvideoviceformoreinformation.
• MakesureyouareusinganHDMIcablethatsupports3Dsignals. - Make sure you selected the correct 3D Format setting on the Signal menu. Normally this should be set to Auto, but in some cases you may need to select a different setting to match the 3D signal from yourvideodevice.
- MakesureyouareusingRF3Dactiveshutterglasses.YoucanpurchasethemfromEpson.
- Makesureyour3Dglassesareturnedonandfullycharged. If the glasses have entered standby mode, slide the power switch on the glasses to the Off position and then back to the On position.
- Makesureyour3Dglassesarepairedwiththeprojector.
- Adjustthe3DDepthsettingontheSignalmenu.
- Makesureyouarewithinthe3Dviewingrange.
•Tominimize3Dcrosstalk, reduce the brightness of 3 Dimages by selecting the following settings:
•ColorMode:3DCinema
-3DBrightness:Low
-3DDepth:0
•HDMIVideoRange:Normal
- MakesureyourscreensizematchestheDiagonalScreenSizesettingontheSignalmenu.
- Avoidusingtheprojectornearwirelessnetworks,microwaveovens,2.4GHzcordlessphones,or otherdevicesthatusethe2.4GHzfrequencyband.Thesedevicescaninterferewiththesignal between the projector and the 3D glasses.
- If the other solutions do not solve the problem, change the Inverse 3D Glasses setting on the Signal menu. Return these setting to its original value if changing it does not solvethe problem as it can adversely affect the 3D image.
Parenttopic: SolvingImageProblems
Relatedreferences
ProjectorFeatureSettings-SettingsMenu
ImageQualitySettings-ImageMenu
InputSignalSettings-SignalMenu
OptionalEquipmentandReplacementParts
3DViewingRange
Relatedtasks
Pairingthe3DGlasseswiththeProjector
Chargingthe3DGlasses
Cleaningthe3DGlasses
SolvingProjectororRemoteControlOperationProblems
Checkthesolutionsinthesesectionsifyouhaveproblemsoperatingtheprojectororremotecontrol.
SolutionstoProjectorPowerorShut-OffProblems
SolutionstoProblemswiththeRemoteControl
SolutionstoPanelAlignmentProblems
SolutionsWhenUsingHDMILink
Parenttopic: Solving Problems
SolutionstoProjectorPowerorShut-OffProblems
If the project orders not come on when you press the power button or it'shut soffun unexpectedly, try the followingsolutions:
- Makesurethepowercordissecurelyconnectedtotheprojectorandtoaworkingelectricaloutlet.
- Theprojector'sbuttonsmaybelockedforsecurity.Unlockthebuttonsorusetheremotecontrolto turnontheprojector.
- If the projector's lampshut soffun unexpectedly, it may have entered standby mode after a period of inactivity. Press the power button to wake the projector and adjust the Sleep Mode Timer setting to changethesleep interval.
- MakesuretheprojectorisnotreceivingshutdownrequestsoverCECfromconnecteddevices.
- If the power button on theremote control does not turn on the projector, checks batteries and make sure the Remote Receiversetting is turned on the projector's menu, if available.
- Thepowercordmaybedefective. Tryanotherpowercord. If that doesn't work, disconnect the cord and contact Epson.
- Makesurethelampandlampcoverareinstalledcorrectly.
Parenttopic: SolvingProjectororRemoteControlOperationProblems
Relatedreferences
WheretoGetHelp
ProjectorLightStatus
ProjectorFeatureSettings-SettingsMenu
Relatedtasks
ReplacingtheRemoteControlBatteries
UnlockingtheProjector'sButtons
ReplacingtheLamp
SolutionstoProblemswiththeRemoteControl
If the projectordoes not respond to remote control commands, try the following solutions:
- Check that theremote control batteries are installed correctly and have power. If necessary, replace the batteries.
- Makesureyouareoperatingtheremotecontrolwithinthereceptionangleandrangeoftheprojector.
- Makesuretheprojectorisnotwarminguporshuttingdown.
- Checktoseeifabuttonontheremotecontrolisstuckdown, causingittoentersleepmode. Release thebuttontowaketheremotecontrolup.
• Strongfluorescentlighting, directsunlight, orinfrareddevicesignals maybeinterfering with the projector'sremotereceivers. Dimthelightsormovetheprojectorawayfromthesunorinterfering equipment.
•Ifavailable,turnononeoftheremotereceiversintheprojector'smenusystem,orcheckifallthe remotereceiverswereturnedoff.
• If you assigned an ID number to other remote control to operate multiple projectors, you may need to check or change the ID setting (feature not available with all projectors). - Ifyoulosetheremotecontrol,youcanpurchaseanotherfromanauthorizedEpsonreseller.
Parenttopic: SolvingProjectororRemoteControlOperationProblems
Relatedreferences
OptionalEquipmentandReplacementParts
RemoteControlOperation
Relatedtasks
ReplacingtheRemoteControlBatteries
SolutionstoPanelAlignmentProblems
If the panel alignment does not result in a satisfactory picture, try the following solutions:
- MakesuretheProjectionsettingmatchestheinstallationposition.
- Makesuretheprojectionsurfaceisnotcoloredortextured.Projectonawhitesurfacewithnotexture.
- Leavetheprojectoronfor10to15minutesbeforeadjustingthepanelalignment.
- Theprojectedimagesizeshouldbeatleast60inches(152cm)duringpanelalignment.
- If the image contains to much magenta, adjust thered and blue panels.
- If the pattern lines look fuzzy or out of focus, adjust the focus before performing the panel alignment.
Parenttopic: SolvingProjectorRemoteControlOperationProblems
Relatedreferences
ProjectorFeatureSettings-SettingsMenu
Relatedtasks
AdjustingtheColorConvergence(PanelAlignment)
FocusingtheImagewiththeLensButton
SolutionsWhenUsingHDMILink
If you cannot control an HDMI device using the HDMI Link buttons, try the following solutions:
- Makesureallnecessarycablesaresecurelyconnectedandthepowerisonfortheprojectorand connectedvideosources.
- MakesurethecablesmeettheHDMIstandards.
- MakesuretheconnecteddevicesupportstheCECstandards.
- If you connected an new device or changed any connections, you may need to restart the device.
- ConnectnomorethanthreedevicesthatsupportHDMILinkatthesametime.
- If you have connected as speaker or receiver, set the output to PCM.
Parenttopic: SolvingProjectororRemoteControlOperationProblems
SolutionsWhenWirelessAuthenticationFails
If you cannot authenticate wireless connection, try the following solutions:
- MakesuretheWirelessLANPowersettingissettoOn.
- ChecktheSecuritysettingsandpassphraseintheNetworkConfigurationmenu.
- ChecktheEventIDnumberdisplayedintheInfomenuandcheckthelinkbelowtoidentifythe problem.
Parenttopic: Solving Problems
Relatedreferences
ProjectorFeatureSettings-SettingsMenu
ProjectorNetworkSettings-NetworkMenu
EventIDCodeList
WheretoGetHelp
If you need to contact Epson for technical supports, use the following support options.
InternetSupport
Visit Epson's support website at epson.com/support (U.S.), epson.ca/support (Canada), or epson.com.jm/support (Caribbean) and select your product for solutions to common problems with your projector.Youcandownloadutilitiesanddocumentation,getFAQsandtroubleshootingadvice,ore-mail Epsonwithyourquestions.
SpeaktoaSupportRepresentative
TousetheEpsonPrivateLineSupportservice, call(800)637-7661. This service is available for the duration of your warranty period. You may also speak with a projectorsupport specialist by dialing (562) 276-4394 (U.S.) or (905) 709-3839 (Canada).
Supporthoursare6AMto8PM, PacificTime, MondaythroughFridayand7AMto4PM, PacificTime, Saturday.
Daysandhoursofsupportaresubjecttochangewithoutnotice. Tollerlongdistancechargesmay apply.
Beforeyoucall,havethefollowinginformationready:
•Productname
- Productserialnumber(locatedonthebottomorrearoftheprojector,orinthemenusystem)
•Proofofpurchase(suchasastorereceipt)anddateofpurchase
•Computerorvideoconfiguration
•Descriptionoftheproblem
PurchaseSuppliesandAccessories
Youcanpurchasescreens,otheroptionalaccessories,andreplacementpartsfromanEpsonauthorizedreseller.Tofindthenarestreseller,call800-GO-EPSON(800-463-7766)intheU.S.or800-807-7766inCanada. Or you can purchase online at epsonstore.com (U.S. sales) or epsonstore.ca (Canadian sales).
Topurchase areplacementremotecontrol, call(562)276-4394(U.S.) or (905)709-3839(fordealerreferralinCanada).
Parenttopic: Solving Problems
TechnicalSpecifications
Thesesectionslistthetechnicalspecificationsofyourprojector.
GeneralProjectorSpecifications
ProjectorLampSpecifications
RemoteControlSpecifications
ProjectorDimensionSpecifications
ProjectorElectricalSpecifications
ProjectorEnvironmentalSpecifications
ProjectorSafetyandApprovalsSpecifications
SupportedVideoDisplayFormats
GeneralProjectorSpecifications
TypeofdisplayPoly-siliconTFTactivematrix
Resolution1920×1080pixels(1080p)
LensF=2.0to3.0
Focallength:22.5to46.7mm
ColorreproductionFullcolor, upto 1 billioncolors
BrightnessHighPowerConsumptionmode:
Whitelightoutput2400lumens(ISO21118standard)
Colorlightoutput2400lumens
Note: Colorbrightness(colorlightoutput)andwhitebrightness (whitelightoutput)will vary depending on usage conditions.Color light output measured in accordance with IDMS 15.4;whitelight output measured in accordance with ISO 21118.
Contrastratio200000:1withAutolrison,NormalPowerConsumptionmode,
DynamicColorMode, WideZoommode, and LensShiftVertical:
10:0andHorizontal:Centered
Imagesize
50inches(1.27m)to300inches(7.62m)
(innativeaspectratio)
Projectiondistance 58.3 inches(1.48m) to 747.6 inches(18.99m)
(innativeaspectratio)
ProjectionmethodsFront, rear, ceiling-mounted
Opticalaspectratio 16:9
(width-to-height)
FocusadjustmentPowered
ZoomadjustmentOptical, powered
Zoomratio 1to2.1
(Tele-to-Wide)
Noiselevel31dB(HighPowerConsumptionmode)
20dB(ECOPowerConsumptionmode)
Keystonecorrectionangle±30°vertical
USBTypeBportcompatibilityUSB1.1and2.0compliantforserviceandfirmwareupdate
USB Type A port compatibility Two USB 1.1 and 2.0 compliant ports; one for an Optical HDMI cable with300mApowersupplyandtheotherforfirmwareupdateandWi-Fimodulewith500mApowersupply
Parenttopic: Technical Specifications
ProjectorLampSpecifications
TypeUHE(UltraHighEfficiency)
Powerconsumption250W
LamplifeHighPowerConsumptionmode:
Uptoabout3500hours
MediumPowerConsumptionmode:
Uptoabout4000hours
ECOPowerConsumptionmode:
Uptoabout5000hours
Note: Turn off this product when not in use to prolong the life of the projector. Lamp life will vary depending upon modeselected, environmental conditions, and usage. Brightness decreases over time.
Parenttopic: Technical Specifications
RemoteControlSpecifications
Receptionrange32feet(10m)
Batteries TwoalkalineormanganeseAA
Parenttopic: Technical Specifications
ProjectorDimensionSpecifications
Height(excludingfeet)17.7inches(450mm)
Width20.5inches(520mm)
Depth6.7inches(170mm)
Weight24.3lb(11kg)
Parenttopic: Technical Specifications
ProjectorElectricalSpecifications
Ratedfrequency50/60Hz
Powersupply100to240VAC±10%
3.8to1.7A
Powerconsumption
Operating:
(100to120V)
HighPowerConsumptionmode:373W
ECOPowerConsumptionmode:283W
Standby:
0.3W(CommunicationOff),2W(CommunicationOn)
Powerconsumption (220to240V)
Operating:
HighPowerConsumptionmode:355W
ECOPowerConsumptionmode:271W
Standby:
0.3W(CommunicationOff),2W(CommunicationOn)
Parenttopic: Technical Specifications
ProjectorEnvironmentalSpecifications
TemperatureOperating:41to95°F(5to35°C)(upto4921feet[1500m])
Operating:41to86°F(5to30°C)(above4921feet[1500m])
Storage:14to140°F(-10to60°C)
Humidity(relative, non-condensing)
Operating:20to80%
Storage:10to90%
OperatingaltitudeUpto4921feet(1500m)
Upto10000feet(3048m)withHighAltitudeModeenabled
Parenttopic: Technical Specifications
ProjectorSafetyandApprovalsSpecifications
UnitedStatesFCCPart15ClassB(DoC)
UL60950-12ndedition(cTUVusMark)
CanadalCES-003ClassB
CSAC22.2No.60950-1-07(cTUVusMark)/CSAC22.2No.62368-1-14(cTUVusMark)
Parenttopic: Technical Specifications
SupportedVideoDisplayFormats
Forbestresults, your computer's monitor port or video card resolutions should be set to display in the projector's nativer resolution. However, your projector includes Epson's Size Wise chip that supports other computer display resolutions, so your image will be resized to automatically.
Yourcomputer'smonitorportorvideocardrefreshrate(verticalfrequency)mustbecompatiblewiththe projector.(Seeyourcomputerorvideocardmanualfordetails.)
Thetablehereliststhecompatiblerefreshrateandresolutionforeachcompatiblevideodisplayformat.
| DisplayformatRefreshrate(inHz) | Resolution(inpixels) | |
| Computersignals(analogRGB) | ||
| VGA60640×480 | ||
| SVGA60800×600 | ||
| XGA601024×768 | ||
| WXGA601280×768 | ||
| 601366×768 | ||
| 601280×800 | ||
| SXGA601280×960 | ||
| 601280×1024 | ||
| WXGA++601600×900 | ||
| HDMIinputsignals | ||
| VGA60640×480 | ||
| SDTV(480i/480p)60720×480 | ||
| SDTV(576i/576p)50720×576 | ||
| HDTV(720p)50/601280×720 | ||
| HDTV(1080i)50/601920×1080 | ||
| HDTV(1080p)24/30/50/601920×1080 | ||
| 4K×2K24/30/50/603840×2160 | ||
| 24/50/60 | 4096×2160 | |
HDMI3DSignals
| DisplayformatRefreshrate(inHz)Resolution(inpixels)3Dformats | ||
| HDTV(720p)50/601280×720FramePacking | SidebySideTopandBottom | |
| HDTV(1080i)50/601920×1080SidebySide | ||
| HDTV(1080p)50/601920×1080SidebySide | ||
| 241920×1080FramePacking | SidebySideTopandBottom | |
Compatible4KHDRSignals
| Displayformat (refreshrate) | Chroma subsampling (pixelencoding) | Colordepth:24 bits(8-bitsper pixel) | Colordepth:30 bits(10-bitsper pixel) | Colordepth:36 bits(12-bitsper pixel) |
| 4K/60p(60Hz)4:4:4S | DRSDRSDR | |||
| 4:2:2SDRSDRSDR | ||||
| 4:2:0SDRSDRSDR | ||||
| 4K/24p(24Hz)4:4:4S | DRSDRSDR | |||
| 4:2:2SDRHDRHDR | 1 | |||
| 4:2:0Thisignaldoes | notexist. | |||
^1 This signalis processed at 4:2:210-bit.
Parenttopic: Technical Specifications
Notices
Checkthesesectionsforimportantnoticesaboutyourprojector.
Recycling
ImportantSafetyInformation
ImportantSafetyInstructions
ListofSafetySymbols
FCCComplianceStatement
BindingArbitrationandClassWaiver
Trademarks
CopyrightNotice
Recycling
Epson offers a recycling program for end of life products. Please go to this site for information on how to return your products for proper disposal.
Parenttopic:Notices
ImportantSafetyInformation
Caution: Never look into the projector lens when the lamp is turned on; the bright light can damage your eyes. Neverletchildrenlookintothelenswhenitison. Neveropenanycoverontheprojector, except thelampandfiltercovers. Dangerousselectricalvoltagesinsidetheprojectorcanseverelyinjureyou.
Except as specifically explained in this User's Guide, do not attempt to service this product yourself. Referallservicingtoqualifiedservicepersonnel.
Warning: The projector and its accessories come packaged in plastic bags. Keep plastic bags away from small childrento avoid any risk of suffocation.
Caution: When you replace the lamp, never touch the new lamp with your bare hands; the invisible residue left by the oil on your handsmay short entelamplife. Use cloth glovet to handle thenew lamp.
Parenttopic:Notices
ImportantSafetyInstructions
Followthesesafetyinstructionswhensettingupandusingtheprojector:
- Donotlookintothelenswhentheprojectorison.Thebrightlightcandamageyoureyes.Avoid standinginfrontoftheprojectorsothebrightlightdoesnotshineintoyoureyes.
- Donotplacetheprojectoronanunstablecart,stand,ortable.
- Donotoperatetheprojectoronitsside,orwhiletiltedtooneside.
• If the projector is mounted on aceiling or wall, it should be installed by qualified technicians using mounting hardware designed for use with this projector.
- Wheninstallingoradjustingaceilingorwallmount,donotuseadhesivestopreventthescrewsfrom looseninganddonotuseoilsorlubricants.Thismaycausetheprojectorcasetocrackandthe projectortofallfromitsceilingmount.Thiscouldcauseseriousinjurytoanyoneunderthemountand coulddamagetheprojector.
- Donotusetheprojectornearwater, sourcesofheat, high-voltageelectricalwires, orsourcesof magneticfields.
•Usethetypeofpowersourceindicatedontheprojector.Useofadifferentpowersourcemayresultinfireorelectricshock.Ifyouarenotsureofthepoweravailable,consultyourdealerorpowercompany.
- Placetheprojectornearawalloutletwheretheplugcanbeeasilyunplugged.
•Takethefollowingprecautionswhenhandlingtheplug:Donotholdtheplugwithwethands.Donot inserttheplugintoadustyoutlet.Inserttheplugfirmlyintotheoutlet.Donotpullthepowercordwhen disconnectingtheplug;alwaysbesuretoholdtheplugwhendisconnectingit.Donotoverloadwall outlets,extensioncords,orpowerstrips.Failuretocomplywiththeseprecautionscouldresultinfireor electricshock.
- Donotplacetheprojectorwherethecordcanbewalkedon. This may result in infrayingordamageto the plug.
- Unplugtheprojectorfromthewalloutletandallowtocoolbeforecleaning. Useadrycloth(or, for stubborndirtorstains, amoistcloththathasbeenwrungdry)forcleaning. Donotuseliquidoraerosol cleaners, anysprayscontainingflammablegas, orsolventssuchasalcohol, paintthinner, orbenzine.
- Donotblocktheslotsandopeningsintheprojectorcase. Theyprovideventilationandpreventthe projectorfromoverheating.Donotoperatetheprojectoronasofa,rug,orthersoftsurface,orsetit ontopofloosepapers.Donotcovertheprojectorwithabblanket,curtain,ortablecloth.Ifyouare settinguptheprojectornearawall,leaveatleast7.9inches(20cm)ofspacebetweenthewalland theprojector.
- Donotoperatetheprojectorinaclosed-incabinetunlessproperventilationisprovided.
- Neverallowobjectsofanykindtoenteranyopeningsintheprojector.Donotleaveobjects,especially flammableobjects,neartheprojector.Neverspillliquidofanykindintotheprojector.
- Youmayneedtocleantheairfilterandvent.Acloggedairfilterorventcanblockventilationneeded tocooltheprojector.Donotusecannedair,orthegasesmayleavearesidue.
- Donotstoretheprojectoroutdoorsforanextendedlengthoftime.
- Exceptasspecificallyexplainedinthismanual,donotattempttoservicethisproductyourself.Refer allservicingtoqualifiedpersonnel.Openingorremovingcoversmayexposeyoutodangerous voltagesandotherhazards.
- Neveropenanycoversontheprojectoreexceptasspecificallyexplainedinthismanual.Neverattempt todisassembleormodifytheprojector.Referallrepairstoqualifiedservicepersonnel.
- Unplugtheprojectorfromthewalloutletandreferservicingtoqualifiedservicepersonnelunderthe followingconditions:ifitdoesnotoperatenormallywhenyoufollowtheoperatinginstructions,or exhibitsadistinctchangeinperformance;ifsmoke,strangeodors,orstrangenoisescomefromthe projector;ifthepowercordorplugisdamagedorfrayed;ifliquidorforeignobjectsgetinsidethe projector,orifithasbeenexposedtorainorwater;ifithasbeendroppedorthehousinghasbeen damaged.
- Donottouchtheplugduringanelectricalstorm. Otherwise, you may receive an electric shock.
- Unplugtheprojectorwhenitwillnotbeusedforextendedperiods.
- Donotusetheprojectorwhereitmaybeexposedtorain,water,orexcessivehumidity.
- Donotuseorstoretheprojectorwhereitmaybeexposedtosmoke,steam,corrosivegases, excessivedust,vibration,orshock.
- Donotusetheprojectorwhereflammableorexplosivegasesmaybepresent.
- Donotuseorstoretheprojectororremotecontrolinahotlocation,suchasnearaheater,indirect sunlight,orinaclosedvehicle.
- If you use the projector in a country other than where you purchase it, use the correct power cord for that country.
- Donotstandontheprojectorplaceheavyobjectsonit.
- Donotusetheprojectoroutsideoftherequiredtemperaturerangebelow:
41to95°F(5to35°C)atanaltitudeof4921feet(1500m)orless,or41to86°F(5to30°C)ata higheraltitude
Doingsomaycauseanunstabledisplayandcouldleadtoprojectordamage.Donotuseorstorethe projectorwhereitmaybeexposedtosuddenchangesintemperature.
- Donotstoretheprojectoroutsideoftherequiredtemperaturerangeof14to140°F(-10to60°C)or indirectsunlightforlongperiodsoftime.Doingsomaycausedamagetothecase.
- Donotplaceanythingthatcanbecomewarpedordamagedbyheatneartheexhaustvents.Donot bringyourhandsorfaceclosetotheventswhileprojectionisinprogress.Donotbringyourfaceclose totheprojectorwhileitisinuse.
• Before you mov the projector, makes sure its power is turned off, the plug is disconnected from the outlet, and all cables are disconnected. - Donotdisassemblethelamporsubjectittoimpacts.
- Donotplacethesourceofanopenflame, suchasalitcandle, onorneartheprojector.
- Donotmodifythepowercord. Donotplaceheavyobjectsontopofthepowercordorbend,twist,or pullitexcessively. Keepthepowercordawayfromhotelectricalappliances.
- Ifthelampbreaks, ventilatetheroomtopreventgasescontainedinthelampfrombeinginhaledor comingincontactwithyoueyesormouth. Ifyoudoinhalegasesorgasescomeincontactwithyour eyesormouth, seekmedicaladviceimmediately.
- If the projector is mounted overhead and the lamp breaks, be careful to prevent pieces of glass from falling into you are a mouth when you open the lamp cover. If pieces of glass do get into you are an mouth, seek medical advice immediately.
Note: Hg The lamp(s) in this product contain mercury. Please consult your state and local regulations regarding disposolorrecycling.Donotputinthetrash.
RestrictionofUse
Parenttopic:Notices
RestrictionofUse
Whenthisproductisusedforapplicationsrequiringhighreliability/safetysuchastransportationdevices relatedtoaviation,rail,marine,automotive;disasterpreventiondevices;varioussafetydevices;or functional/precisiondevices,youshouldusethisproductonlyaftergivingconsiderationincludingfail-safesandredundanciesintoyourdesigntomaintainsafetyandtotalsystemreliability.
Because this product was not intended for use in applications requiring extremely high reliability/safety such as aerospace equipment, main communication equipment, nuclear power control equipment, or medicalequipment related to direct medical care, please make your own judgment on this product's suitability after a fullevaluation.
Parenttopic: ImportantSafetyInstructions
ListofSafetySymbols
The following table lists the meaning of the safety symbols labeled on the equipment.
| SymbolApprovedStandardsDescription | ||
| [179] | IEC60417No.5007 | "ON"(power)Toindicateconnectiontothemains. |
 | IEC60417No.5008 | "OFF"(power)Toindicatedisconnectionfromthemains. |
 | IEC60417No.5009 | Stand-byToidentifytheswitchorswitchpositionby meansofwhichpartoftheequipmentis switchedoninordertobringitintothestand-bycondition. |
 | ISO7000No.0434B,IEC3864-B3.1 | CautionToidentifygeneralcautionwhenusingthe product. |
 | IEC60417No.5041 | Caution,hotsurfaceToindicatethathemarkeditemcanbehot andshouldnotbetouchedwithouttaking care. |
 | IEC60417No.6042ISO3864-B3.6 | Caution,riskofelectricshockToidentifyequipmentthathasriskofelectric shock. |
 | IEC60417No.5957 | ForindooruseonlyToidentifyelectricalequipmentdesigned primarilyforindooruse. |
 | IEC60417No.5926 | PolarityofDCpowerconnectorToidentifythepositiveandnegative connections(thepolarity)onapiece of equipmenttowhichaDCpowersupplymay beconnected. |
 | —PolarityofDCpowerconnector | Toidentifythepositiveandnegative connections(thepolarity)onapiece of equipmenttowhichaDC.powersupplymay beconnected. |
 | IEC60417No.5001B | Battery,generalOnbatterypoweredequipment.Toidentifya deviceforinstanceacoverforthebattery compartment,ortheconnectorterminals. |
 | IEC60417No.5002 | PositioningofcellToidentifythebatteryholderitselfandto identifythepositioningofthecell(s)insidethe batteryholder. |
 | —Positioningofcell | Toidentifythebatteryholderitselfandto identifythepositioningofthecell(s)insidethe batteryholder. |
 | IEC60417No.5019 | ProtectiveearthToidentifyanyterminalwhichisintendedfor connectiontoanexternalconductor for protectionagainstelectricshockincaseofafault,ortheterminalofaprotectiveearth electrode. |
 | IEC60417No.5017 | EarthToidentifyanearth(ground)terminalin caseswhereneitherthesymbolNo.13is explicitlyrequired. |
 | IEC60417No.5032 | AlternatingcurrentToindicateontheratingplatethathequipmentissuitableforalternatingcurrentonly;toidentifyrelevantterminals. |
 | IEC60417No.5031 | DirectcurrentToindicateontheratingplatethathequipmentissuitablefordirectcurrently;toidentifyrelevantterminals. |
 | IEC60417No.5172 | ClassIequipmentToidentifyequipmentmeetingthesafetyrequirementsspecifiedforClassIequipmentaccordingtoIEC61140. |
 | ISO3864Generalprohibition | Toidentifyactionsoroperationsthatareprohibited. |
 | ISO3864Contactprohibition | Toindicateinjurythatcouldoccurduetotouchingaspecificpartoftheequipment. |
 | —Neverlookintotheprojectorlen | enswhiletheprojectorison. |
 | —Toindicatethathemarkeditem | mdon'tplaceanythingonprojector. |
 | ISO3864IEC60825-1 | Caution,laserradiationToindicatetheequipmenthasalaserradiationpart. |
| Symbol | ApprovedStandardsDescription | |
 | ISO3864Disassemblyprohibiton | Toindicateariskofinjury,suchaselectric shock,iftheequipmentisdisassembled. |
 | IEC60417No.5266 | Standby,partialstandbyToindicatethatpartoftheequipmentisinthe readystatus. |
 | ISO3864IEC60417No.5057 | Caution,movablepartsToindicatethatyoumustkeepawayfrom movablepartsaccordingtoprotection standards. |
 | IEC60417-6056Caution(movablefanblades) | Toindicatethatyoumustkeepawayfrom movablepartsaccordingtoprotection standards. |
 | IEC60417-6043Caution(sharpcorners) | Toindicatethatyoumustnottouchthesharp cornersoftheproductaccordingtoprotection standards. |
 | —Neverlookintotheprojection | enswhilethe projectorison. |
Parenttopic:Notices
FCCComplianceStatement
ForUnitedStatesUsers
ThisequipmenthasbeentestedandfoundtocomplywiththelimitsforaClassBdigitaldevice,pursuant toPart15oftheFCCRules.Theselimitsaredesignedtoprovidereasonableprotectionagainstarmful interferenceinaresidentialinstallation.Thisequipmentgenerates,uses,andcanradiateradio frequencyenergyand,ifnotinstalledandusedinaccordancewiththeinstructions,maycauseharmful interferencetoradiocommunications.However,thereisnoguaranteethatinterferencewillnotoccurin
aparticularinstallation.Ifthisequipmentdoescauseinterferencetoradioandtelevisionreception,which canbedeterminedbyturningtheequipmentoffandon,theuserisencouragedtotrytocorrectthe interferencebyoneormoreofthefollowingmeasures:
•Reorientorrelocatethereceivingantenna.
- Increase these separation between the equipment and receiver.
- Connecttheequipmentintoanoutletonacircuitdifferentfromthattowhichthereceiverisconnected.
- Consultthedealeroranexperiencedradio/TVtechnicianforhelp.
This device complies with part 15 of the FCC Rules. Operation is subject to the following two conditions: (1) This device may not cause harmful interference, and (2) this device must accept any interference received, including interference that may cause undesired operation.
WARNING
The connection of an-shielded equipment interface cable to this equipment will invalidate the FCC Certification or Declaration of this device and may cause interference levels which exceed the limits established by the FCC forthisequipment. It is the responsibility of the user to obtain and use a shielded equipment interface cable with this device. If this equipment has more than one interface connector, do not leave cables connected to unused interfaces. Changes from modifications not expressly approved by the manufacturer could void the user's authority to operate the equipment.
ForCanadianUsers
CANICES-3(B)/NMB-3(B)
Parenttopic:Notices
BindingArbitrationandClassWaiver
1. DISPUTES, BINDING INDIVIDUAL ARBITRATION, AND WAIVER OF CLASSACTIONS AND CLASSAR BITRATIONS
1.1 Disputes. The terms of this Section 1 shall apply to all Disputes between you and Epson. The term "Dispute" is meant to have the broadest meaning permissible underlaw and includes any dispute, claim, controversy or action between you and Epson arising out for relating to this Agreement, Epson branded products (hardware and including any related software), or other transaction involving you and Epson, whether in contract, warranty, misrepresentation, fraud, tort, intentionaltort, statute, regulation, ordinance, or any other legal or equitable basis. "DISPUTE" DOES NOT INCLUDE IP CLAIMS, or more specifically, a claimor cause of action for (a) trademark infringement or dilution, (b) patent infringement, (c) copyright infringement or (d) trades secret misappropriation (an "IPClaim"). You and Epson also agree, notwithstanding Section 1.6, that a court, not an arbitrator, may decide if a claimor cause of action is for an IP claim.
1.2 Binding Arbitration. You and Epson agree that all Disputes shall be resolved by binding arbitration according to this Agreement. ARBITRATION MEANSTHAT YOU WAIVE YOUR RIGHT TO AJUDGE OR JURYINACOURTPROCEEDING AND YOUR GROUNDS FOR APPEAL ARE LIMITED.
PursuanttothisAgreement, bindingarbitrationshallbeadministered by JAMS, anationally recognized arbitration authority, pursuant to its code of procedure then ineffect for consumer related disputes, but excluding any rules that permit joinder or class actions in arbitration (formoredetail on procedure, see Section 1.6 below). You and Epson understand and agree that (a) the Federal Arbitration Act (9U.S.C. §1, et seq.) govern the interpretation and enforcement of this Section 1, (b) this Agreement memorializes at transaction in interstate commerce, and (c) this Section 1 shall survivvetermination of this Agreement.
1.3 Pre-Arbitration Steps and Notice. Before submitting a claim for arbitration, you and Epson agree to try, for sixty (60) days, to resolve any Dispute informally. If Epson and you don't reach an agreement to resolv the Disputewith in the sixty (60) days), you or Epson may commence an arbitration. Noticeto Epson must be addressed to: Epson America, Inc., ATTN: Legal Department, 3840 Kilroy Airport Way, Long Beach, CA90806 (the "Epson Address"). The Dispute Noticeto you will besent to them most recent address Epson has its records for you. For this reason, it is important to notify us if your address changes by emailing us at EAI legal @ea.epson.com or writing us at the Epson Address above. Notice of the Disputeshall includethesender's name, address and contact information, the fact giving riseto the Dispute, and therelief requested (the "Dispute Notice"). Following receipt of the Dispute Notice, Epson and you agree to acting good faith to resolv the Dispute before commencing arbitration.
1.4 Small Claims Court. Notwithstanding the foregoing, you may bring an individual action in the small claimscourtofyourstateormunicipalityiftheactioniswithinthatcourt'sjurisdictionandspendingonlyinthatcourt.
1.5WAIVEROFCLASSACTIONSANDCLASSARBITRATIONS.YOUANDEPSONAGREETHAT EACHPARTYMAYBRINGDISPUTESAGAINSTTHEOTHERPARTYONLYINANINDIVIDUAL CAPACITY,ANDNOTASAPLAINTIFFORCLASSMEMBERINANYCLASSOR REPRESENTATIVEPROCEEDING,INCLUDINGWITHOUTLIMITATIONFEDERALORSTATE CLASSACTIONS,ORCLASSARBITRATIONS.CLASSACTIONLAWSUITS,CLASS-WIDE ARBITRATIONS,PRIVATEATTORNEY-GENERALACTIONS,ANDANYOTHERPROCEEDING WHEREOMEONEACTSINAREPRESENTATIVECAPACITYARENOTALLOWED. ACCORDINGLY,UNDERTHEARBITRATIONPROCEDUREOUTLINEDINTHISSECTION,AN ARBITRATORSHALLNOTCOMBINEORCONSOLIDATEMORETHANONEPARTY'SCLAIMS WITHOUTTHEWRITTENCONSENTOFALLAFFECTEDPARTIESTOANARBITRATION PROCEEDING.
1.6 Arbitration Procedure. If you or Epson commences arbitration, the arbitration shall be governed by therulesofJAMSthatareineffectwhenthearbitrationisfiled,excludinganyrulesthatpermitarbitration on a class or representative basis (the "JAMS Rules"), available at http://www.jamsadr.com or by calling 1-800-352-5267,andundertherulessetforthinthisAgreement.AllDisputesshallberesolvedbya singleneutralarbitrator,andbothpartiesshallhaveareasonableopportunitytoparticipateinthe
selectionofthearbitrator. ThearbitratorisboundbythetermsofthisAgreement. Thearbitrator, andnot anyfederal, stateorlocalcourtoragency, shallhaveexclusiveauthoritytoresolvealidputesarising outoforrelatingtotheinterpretation, applicability, enforceabilityorformationofthisAgreement, includinganyclaimthatalloranypartofthisAgreementisvoidorvoidable. Notwithstandingthisbroad delegationofauthoritytothearbitrator, acourtmaydeterminethelimitedquestionofwhetheraclaimor causeofactionisforanlPClaim, whichisexcludedfromthedefinitionof"Disputes"inSection1.1 above. Thearbitratorshallbeempoweredtograntwhateverreliefwouldbeavailableinacourtunder laworinequity. Thearbitratormayawardyouthesamedamagesasacourtcould, andmayaward declaratoryorinjunctivereliefonlyinfavoroftheindividualpartyseekingreliefandonlytotheextent necessarytoprovidereliefwarrantedbythatparty'sindividualclaim. Insomeinstances, thecostsof arbitrationcanexceedthecostsoflitigationandtherighttodiscoverymaybemorelimitedinarbitration thanincourt. Thearbitrator'sawardisbindingandmaybeenteredasajudgmentinanycourtof competentjurisdiction.
You may choose to engage in arbitration hearings by telephone. Arbitration hearings not conducted by telephones shall take place in allocation reasonably accessible from your primary residence, or in Orange County, California, at your option.
a) Initiation of Arbitration Proceeding. If either you or Epson decidest to arbitrate a Dispute, both parties agree to the following procedure:
(i) WriteaDemandforArbitration. The demand must include a description of the Dispute and the amount of damages sought to be recovered. You can find a copy of a Demand for Arbitration at http://www.jamsadr.com ("DemandforArbitration").
(ii) Send three copies of the Demand for Arbitration, plus the appropriate filing fee, to: JAMS, 500 North State College Blvd., Suite 600 Orange, CA92868, U.S.A.
(iii) Sendonecopy of the Demand for Arbitration to the other party (same address as the Dispute Notice), or as otherwise agreed by the parties.
b) HearingFormat. During the arbitration, the amount of any settlement to offer mades shall not be disclosed to the arbitrator until after the arbitrator determines the amount, if any, to which you or Epson is entitled. The discovery of exchange of non-privileged information relevant to the Disputation may be allowed during the arbitration.
c) Arbitration Fees. Epson shall pay, or (if applicable) reimburse you for all JAMS filings and arbitrator fees for any arbitration commenced (by you or Epson) pursuant to provision of this Agreement.
d) Awardin Your Favor. For Disputes in which you or Epson seeks \75,000 or less indamages exclusive of attorney's fees and costs, if the arbitrator's decision results in an award to you in an amount greater than Epson's last written offer, if any, to settle the dispute, Epson will: (i) pay you \1,000 or the amount of the award, whichever is greater; (ii) pay outwicethe amount of your reasonable attorney's fees, if any; and (iii) reimburse you for any expenses (including expert witness fees and costs) that your attorney reasonably accrues for investigating, preparing, and pursuing the Dispute in arbitration. Except as
agreeduponbyyouandEpsoninwriting,thearbitratorshalldeterminetheamountoffees,costs,and expensestobepaidbyEpsonpursuanttothisSection1.6d).
e) Attorney's Fees. Epson will not seek its attorney's fees and expenses for any arbitration commenced involving a Dispute under this Agreement. Your right to attorney's fees and expenses under Section 1.6d) aboved does not limit your right to attorney's fees and expenses under applicable law; notwithstanding the foregoing, the arbitrator may not award duplicative awards of attorney's fees and expenses.
1.7Opt-out.Youmayelecttoopt-out(excludeyourself)fromthefinal,binding,individual arbitrationprocedureandwalverofclassandrepresentativeproceedingsspecifiedInthis AgreementbysendingawrittenlettertotheEpsonAddresswithinthirty(30)daysofyourassent tothisAgreement(includingwithoutlimitationthepurchase,download,installationofthe SoftwareorotherapplicableuseofEpsonHardware,productsandservices)thatspecifies(i)yourname,(ii)yourmailingaddress,and(iii)yourrequesttobeexcludedfromthefinal,binding individualarbitrationprocedureandwalverofclassandrepresentativeproceedingsspecifiedIn thisSection1.Intheeventthatyouopt-outconsistentwiththeproceduresetforthabove,all othertermsshallcontinuetoapply,includingtherequirementtoprovidenoticepriortolitigation.
1.8 Amendments to Section 1. Notwithstanding any provision in this Agreement to the contrary, you and EpsonagreethatifEpsonmakesanyfutureamendmentstothedisputeresolutionprocedureand classactionwaiverprovisions(otherthanachangetoEpson'saddress)inthisAgreement,Epsonwill obtainyouraffirmativeassenttotheapplicableamendment.Ifyoudonotaffirmativelyassenttothe applicableamendment,youareagreeingthatyouwillarbitrateanyDisputebetweenthepartiesin accordancewiththelanguageofthisSection1(orresolvedisputesasprovidedforinSection1.7,ifyou timelyelectedtoopt-outwhenyoufirstassentedtothisAgreement).
1.9 Severability. If any provision in this Section 1 is found to be unenforceable, that provision shall be severed with the remainder of this Agreement remaining in full force and effect. The foregoing shall not apply to the prohibition against class or representative actions as provided in Section 1.5. This mean that if Section 1.5 is found to be unenforceable, the entire Section 1 (but only Section 1) shall be null and void.
Parenttopic:Notices
Trademarks
EPSON® isaregisteredtrademarkandEPSONExceedYourVisionisaregisteredlogomarkofSeiko EpsonCorporation.
PrivateLine^® isaregisteredtrademarkandExtraCare ^SM isaservicemarkofEpsonAmerica,Inc.
MacisatrademarkofAppleInc., registeredintheU.S.andothercountries.
WindowsisaregisteredtrademarkofMicrosoftCorporationintheUnitedStatesand/orothercountries.
Google ^® isaregisteredtrademarkandAndroid ^TM isattrademarkofGoogleLLC.
HDMIandHigh-DefinitionMultimediaInterfacearethetrademarksorregisteredtrademarksofHDMI
LicensingLLC. HDMI
GeneralNotice: Other product names used herein are for identification purposes only and maybe trademark of their respective owners. Epson disclaims any and all rights in those marks.
EPSON®
EXCEED YOUR VISION
Parenttopic:Notices
CopyrightNotice
Allrightsreserved. Nopartofthispublicationmaybereproduced, storedinaretrievalsystem, or transmittedinanyformorbyanymeans, electronic, mechanical, photocopying, recording, or otherwise, without the prior written permission of SeikoEpsonCorporation. The information contained herein is designed only for use with this Epsonproduct. Epson is not responsible for any use of this information as applied to other products.
Neither SeikoEpsonCorporationnoritsaffiliateshallbeliabletothepurchaserofthisproductorthird partiesfordamages,losses,costs,orexpensesincurredbypurchaserorthirdpartiesasaresultof: accident,misuse,orabuseofthisproducturunauthorizedmodifications,repairs,oralterationstothi product,or(excludingtheU.S.)failurestostrictlycomplywithSeikoEpsonCorporation'soperatingand maintenanceinstructions.
SeikoEpsonCorporationshallnotbeliableforanydamagesorproblemsarisingfromtheuseofany optionsoranyconsumableproductsotherthanthosedesignatedasOriginalEpsonProductsorEpson ApprovedProductsbySeikoEpsonCorporation.
Thisinformationissubjecttochangewithoutnotice.
ANoteConcerningResponsibleUseofCopyrightedMaterials
CopyrightAttribution
Parenttopic:Notices
ANoteConcerningResponsibleUseofCopyrightedMaterials
Epsonencourageseachusertoberesponsibleandrespectfulofthecopyrightlawswhenusingany Epsonproduct.Whilesomecountries'lawspermitlimitedcopyingorreuseofcopyrightedmaterialin
certaincircumstances,thosecircumstancesmaynotbeasbroadassomepeopleassume.Contactyour legaladvisorforanyquestionsregardingcopyrightlaw.
Parenttopic: CopyrightNotice
CopyrightAttribution
©2018EpsonAmerica,Inc.
8/18
CPD-55708
Parenttopic: CopyrightNotice