
P8SCi - Motherboard Supermicro - Free user manual and instructions
Find the device manual for free P8SCi Supermicro in PDF.


User questions about P8SCi Supermicro
0 question about this device. Answer the ones you know or ask your own.
Ask a new question about this device
Download the instructions for your Motherboard in PDF format for free! Find your manual P8SCi - Supermicro and take your electronic device back in hand. On this page are published all the documents necessary for the use of your device. P8SCi by Supermicro.
USER MANUAL P8SCi Supermicro
The information in this User's Manual has been carefully reviewed and is believed to be accurate. The vendor assumes no responsibility for any inaccuracies that may be contained in this document, makes no commitment to update or to keep current the information in this manual, or to notify any person or organization of the updates.
Please Note: For the most up-to-date version of this manual, please see our web site at www.supermicro.com.
SUPER MICRO COMPUTER reserves the right to make changes to the product described in this manual at any time and without notice. This product, including software, if any, and documentation may not, in whole or in part, be copied, photocopied, reproduced, translated or reduced to any medium or machine without prior written consent.
IN NO EVENT WILL SUPER MICRO COMPUTER BE LIABLE FOR DIRECT, INDIRECT, SPECIAL, INCIDENTAL, OR CONSEQUENTIAL DAMAGES ARISING FROM THE USE OR INABILITY TO USE THIS PRODUCT OR DOCUMENTATION, EVEN IF ADVISED OF THE POSSIBILITY OF SUCH DAMAGES. IN PARTICULAR, SUPER MICRO COMPUTER SHALL NOT HAVE LIABILITY FOR ANY HARDWARE, SOFTWARE, OR DATA STORED OR USED WITH THE PRODUCT, INCLUDING THE COSTS OF REPAIRING, REPLACING, INTEGRATING, INSTALLING OR RECOVERING SUCH HARDWARE, SOFTWARE, OR DATA.
Any disputes arising between manufacturer and customer shall be governed by the laws of Santa Clara County in the State of California, USA. The State of California, County of Santa Clara shall be the exclusive venue for the resolution of any such disputes. Super Micro's total liability for all claims will not exceed the price paid for the hardware product.
*California Best Management Practices Regulations for Perchlorate Materials: This Perchlorate warning applies only to products containing CR (Manganese Dioxide) Lithium coin cells. "Perchlorate Material-special handling may apply. See WWW.dtsc.ca.gov/hazardouswaste/perchlorate".
WARNING: Handling of lead solder materials used in this product may expose you to lead, a chemical known to the State of California to cause birth defects and other reproductive harm.
FCC Statement: This equipment has been tested and found to comply with the limits for a Class A digital device pursuant to Part 15 of the FCC Rules. These limits are designed to provide reasonable protection against harmful interference when the equipment is operated in a commercial environment. This equipment generates, uses, and can radiate radio frequency energy and, if not installed and used in accordance with the manufacturer's instruction manual, may cause harmful interference with radio communications. Operation of this equipment in a residential area is likely to cause harmful interference, in which case you will be required to correct the interference at your own expense.
Revision Number: Rev. 1.0c
Release Date: June 8, 2007
Unless you request and receive written permission from SUPER MICRO COMPUTER, you may not copy any part of this document.
Preface
About This Manual
This manual is written for system integrators, PC technicians and knowledgeable PC users. It provides information for the installation and use of the Sup8SC8/P8SCi motherboard. The P8SC8/P8SCi supports single Intel Pentium® 4 Processor (the Prescott Processor) in the 775-Land Grid Array Package (LGA 775) at a system bus speed of 800 MHz. The Pentium 4 Processor in the 775-Land Grid Array Package is housed in a Flip-Chip Land Grid Array (FC-LGA4) package that interfaces with the motherboard via an LGA775 socket. The package consists of a processor core mounted on a substrate land-carrier. An integrated heat spreader (IHS) is attached to the package substrate and core and serves as the contacting surface for processor component thermal solutions, such as a heatsink. Please refer to the motherboard specifications pages on our web site (http://www.supermicro.com/Product_page/product-m.htm) for updates on supported processors. This product is intended to be professionally installed.
Manual Organization
Chapter 1 includes a checklist of what should be included in your mainboard box, describes the features, specifications and performance of the P8SC8/P8SCi mainboard and provides detailed information about the chipset.
Chapter 2 begins with instructions on handling static-sensitive devices. Read this chapter when installing the processor and DDR2 memory modules and when mounting the mainboard in the chassis. Also refer to this chapter to connect the floppy and hard disk drives, the IDE interfaces, the parallel and serial ports, the mouse and keyboard and the twisted wires for the power supply, the reset button, the keylock/power LED and the speaker.
If you encounter any problems, see Chapter 3, which describes troubleshooting procedures for the video, the memory and the setup configuration stored in CMOS. For quick reference, a general FAQ (Frequently Asked Questions) section is provided. Instructions are also included for contacting technical support. In addition, you can visit our web site at www.supermicro.com/techsupport.htm for more detailed information.
Chapter 4 includes an introduction to BIOS and provides detailed information on running the CMOS Setup utility.
Appendix A provides BIOS POST Messages.
Appendix B lists BIOS POST Codes.
Appendix C lists Software Drivers and the OS Installation Instructions.
Table of Contents
Preface
About This Manual .... iii
Manual Organization .... iii
Chapter 1: Introduction
1-1 Overview 1-1
Checklist 1-1
Contacting Supermicro 1-2
SUPER P8SC8/P8SCi Layout 1-4
SUPER P8SC8/P8SCI Quick Reference 1-5
E7221 Chipset: System Block Diagram 1-6
Motherboard Features 1-7
1-2 Chipset Overview.... 1-9
1-3 PC Health Monitoring 1-10
1-4 CPU Thermal Management 1-10
1-5 Power Configuration Settings 1-11
1-6 Power Supply 1-12
1-6 Super I/O 1-13
Chapter 2: Installation
2-1 Static-Sensitive Devices 2-1
2-2 Processor and Heatsink Installation 2-2
2-3 Mounting the Motherboard in the Chassis 2-5
2-4 Installing DDR2 Memory 2-6
2-5 I/O Port/Front Control Panel Connector Locations 2-7
2-6 Connecting Cables 2-8
Power Supply Connectors 2-8
PW_ON Connector 2-8
Reset Connector 2-9
Overheat/Fan Fail LED 2-9
NIC1/NIC2 LED Indicators 2-10
IDE/SATA LED 2-10
Power On_LED Connector 2-11
NMI Button 2-11
Serial Ports 2-12
Speaker Connector 2-12
Fan Headers 2-13
Chassis Intrusion 2-13
ATX PS/2 Keyboard/Mouse Ports 2-14
Universal Serial Bus (USB) 2-14
Wake-On-Ring 2-15
Wake-On-LAN 2-15
VGA Connector 2-16
Giga-bit LAN Ports 2-16
SMB Header 2-16
SATA LED 2-17
Power LED 2-17
2-7 Jumper Settings 2-18
Explanation of Jumpers 2-18
CMOS Clear 2-18
USB Wake-Up 2-19
Keyboard Wake-Up 2-19
Giga-bit LAN Enable 2-20
Force Power On Enable 2-21
SCSI Enable 2-21
Watch Dog Enable 2-22
2-8 Onboard Indicators 2-23
GLAN LEDs 2-23
2-9 Parallel Port, Floppy/Hard Drive and SCSI Connections.... 2-24
Parallel Port Connector 2-24
Floppy Connector 2-25
IDE Connectors 2-25
Ultra SCSI Connectors 2-26
Chapter 3: Troubleshooting
3-1 Troubleshooting Procedures 3-1
Before Power On 3-1
No Power 3-1
No Video 3-1
Memory Errors 3-2
Losing the System's Setup Configuration 3-2
3-2 Technical Support Procedures 3-2
3-3 Frequently Asked Questions 3-3
3-4 Returning Merchandise for Service 3-5
Chapter 4: BIOS
4-1 Introduction 4-1
4-2 Running Setup 4-2
4-3 Main BIOS Setup 4-2
Main BIOS Setup Menu 4-3
4-4 Advanced BIOS Setup 4-5
4-4.1 Advanced BIOS Features 4-5
4-4.2 Advanced Chipset Control 4-7
4-4.3 I/O Device Configuration 4-9
4-4.4 PnP Configuration 4-10
4-4.5 Hardware Monitors 4-12
4-4.6 Processor & Clock Options 4-14
4-4.7 DMI Event Log 4-15
4-4.8 Console Redirection 4-16
4-5 Security 4-17
4-6 Boot 4-18
4-7 Exit 4-20
Appendices:
Appendix A: BIOS POST Messages ...... A-1
Appendix B: BIOS POST Codes ...... B-1
Appendix C: Software Installation Instructions ......C-1
Chapter 1 Introduction
1-1 Overview
Checklist
Congratulations on purchasing your computer motherboard from an acknowledged leader in the industry. Supermicro boards are designed with the utmost attention to detail to provide you with the highest standards in quality and performance.
Please check that the following items have all been included with your motherboard. If anything listed here is damaged or missing, contact your retailer.
All Included with Retail Box Only
One (1) Supermicro Mainboard
One (1) IDE cable
One (1) 9-pin Serial port DKT Cable
One (1) ATX floppy drive cable w/3 heads
Two (2) SATA cables
One (1) U320 SCSI Cable (*P8SC8 only)
One (1) I/O shield
One (1) Supermicro CD containing drivers and utilities
One (1) User's/BIOS Manual
One (1) U320 SCSI User's Manual (*P8SC8 only)
Contacting Supermicro
Headquarters
Address: SuperMicro Computer, Inc.
980 Rock Ave.
San Jose, CA 95131 U.S.A.
Tel: +1 (408) 503-8000
Fax: +1 (408) 503-8008
Email: marketing@supermicro.com (General Information)
support@supermicro.com (Technical Support)
Web Site: www.supermicro.com
Europe
Address: SuperMicro Computer B.V.
's-Hertogenbosch, The Netherlands
Tel: +31 (0) 73-6400390
Fax: +31 (0) 73-6416525
Email: sales@supermicro.nl (General Information)
support@supermicro.nl (Technical Support)
rma@supermicro.nl (Customer Support)
Asia-Pacific
Address: SuperMicro, Taiwan
4F, No. 232-1 Liancheng Road
Chung-Ho 235, Taipei Hsien, Taiwan, R.O.C.
Tel: +886-(2) 8226-3990
Fax: +886-(2) 8226-3991
Web Site: www.supermicro.com.tw
Technical Support:
Email: support@supermicro.com.tw
Tel: 886-2-8226-3990, ext.132 or 139
Figure 1-1. Sup8SC8 Image

natural_image
Close-up of a green computer motherboard with various electronic components and slots (no readable text or symbols)(*Note: SCSI support is available for the P8SC8 motherboard only.)
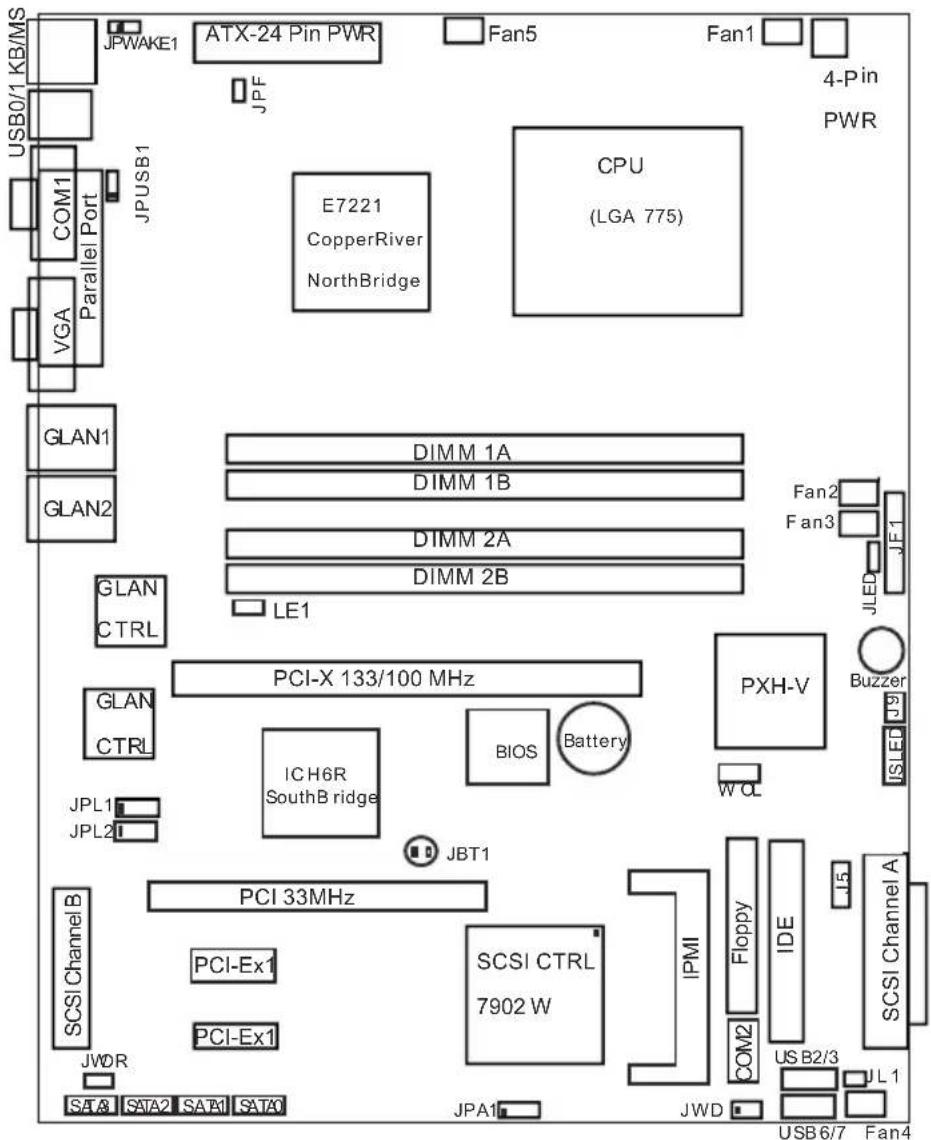
Figure 1-3. Motherboard Layout (not drawn to scale)
text_image
JPWAKE1 ATX-24 Pin PWR Fan5 Fan1 JPF JPF 4-Pin PWR USB0/1 KB/MS COM1 JPUSB1 E7221 CopperRiver NorthBridge CPU (LGA 775) VGA Parallel Port GLAN1 GLAN2 DIMM 1A DIMM 1B DIMM 2A DIMM 2B LE1 GLAN CTRL PCI-X 133/100 MHz PXH-V JPL1 JPL2 ICH6R SouthB ridge BIOS Battery WOL JBT1 JBL JBL1 JBL2 JBL3 JBL4 JBL5 JBL6 JBL7 JBL8 JBL9 JBL10 JBL11 JBL12 JBL13 JBL14 JBL15 JBL16 JBL17 JBL18 JBL19 JBL20 JBL21 JBL22 JBL23 JBL24 JBL25 JBL26 JBL27 JBL28 JBL29 JBL30 JBL31 JBL32 JBL33 JBL34 JBL35 JBL36 JBL37 JBL38 JBL39 JBL40 JBL41 JBL42 JBL43 JBL44 JBL45 JBL46 JBL47 JBL48 JBL49 JBL50 JBL51 JBL52 JBL53 JBL54 JBL55 JBL56 JBL57 JBL58 JBL59 JBL60 JBL61 JBL62 JBL63 JBL64 JBL65 JBL66 JBL67 JBL68 JBL69 JBL70 JBL71 JBL72 JBL73 JBL74 JBL75 JBL76 JBL77 JBL78 JBL79 JBL80Notes
-
See Chapter 2 for detailed information on jumpers, I/O ports and JF1 front panel connections.
-
"■" indicates Pin 1.
-
The only differences between the P8SC8 and the P8SCi are:
a. P8SC8 has SCSI and it supports PCI-X 100 MHz,
b. P8SCi does not have SCSI and it supports PCI-X up to 133MHz.)
- The pictures and drawings shown in this manual were based upon the latest PCB revision available at the time of publishing of this manual. The motherboard you've received may or may not look exactly the same as the graphics shown in the manual.
P8SC8/P8SCi Quick Reference
| Jumpers | Description | Default Setting |
| JBT1 CMOS Clear See Section 2-7 | ||
| JPA1 (*P8SC8) SCSI CTRL Enable Pins 1-2 (Enabled) | ||
| JPF Power Force-On Open (Normal) | ||
| JPL1/JPL2 LAN1/LAN2 Enable Pins 1-2 (Enabled) | ||
| JPUSB1 USB Wake Up (USB1/2) Pins 2-3 (Disabled) | ||
| JPWAKE1 KB/Mouse Wake-Up Pins 2-3 (Disabled) | ||
| JWD | Watch Dog | Pins 1-2 (Reset) |
| Connectors | Description |
| ATX Power | 24-Pin Power Connector |
| 4-Pin Power | 4-Pin Power Connector |
| COM1, COM2 COM Port/Serial Port 1 & Port 2 Connectors | |
| Fans 1-5 | Fan1: CPU Fan, Fan2-5: Chassis Fan Headers |
| DIMM#1A,#2A,#1B,#2B | Memory (DIMM) Slots (1 through 4) |
| Floppy Connector | Floppy Disk Connector |
| IDE | IDE Connector |
| IPMI | IPMI 2.0 Socket |
| J9 | Internal Speaker (Buzzer) Enable |
| JL1 Chassis Intrusion Header | |
| JLED | Power LED Connector |
| JSLED | SATA LED Connector |
| JWOR | Wake-On-Ring Header |
| Keyboard/Mouse(J14) | PS/2 Keyboard/Mouse |
| LE1 | Onboard +5V Standby Warning LED |
| LAN Ports Giga-bit Ethernet RJ45 (LAN1/LAN2) Connectors | |
| Parallel (J11) Printer Port | |
| PCI slots (*Note 2) | One: PCI 33MHz slot, One: PCI-X133/100MHz slot |
| PCI-E Two PCI-Express | x1 slots |
| SATA #0-3 | 4 SATA Headers |
| SCSI (*P8SC8) | SCSI Channel A, Channel B Connectors |
| SMB (J5) System Management Bus Header | |
| USB 0/1 | Back Panel Universal Serial Ports1/2 |
| USB 2/3/6/7 (J10, J7) | Front Panel USB Headers 2/3(J10), FPUSB 6/7(J7) |
| VGA | Video/Graphic Connector |
(*Note: P8SC8 supports PCI-X 100MHz only. P8SCi supports PCI-X up to 133MHz.)
flowchart
graph TD
    A["VRM 10.0"] --> B["VRM V10.0"]
    B --> C["Intel LGA775_PROCESSOR"]
    C --> D["CK410"]
    D --> E["CLOCK"]
    F["PCI-X BUS"] --> G["PCI-X Ultra 320"]
    G --> H["E7221 COPPER RIVER GMCH"]
    H --> I["DDR2 CH-A"]
    H --> J["DDR2 CH-B"]
    H --> K["DDR2 CH-A"]
    H --> L["DDR2 CH-B"]
    M["1_PCIX_64b SLOTS"] --> N["PCI-X Ultra 320"]
    N --> O["PCI-E BUS"]
    O --> P["E7221 COPPER RIVER GMCH"]
    P --> Q["DDR2 CH-A"]
    P --> R["DDR2 CH-B"]
    S["Primary IDE"] --> T["UDMA/100"]
    U["S-ATA 4 Ports"] --> V["UDMA/100"]
    W["USB Ports# 0/1, 2/3, 6/7"] --> X["LPC I/O"]
    Y["PCI-Ex1 BUS"] --> Z["PCI-Ex1 BUS"]
    AA["PCI-Ex1 BUS"] --> AB["PCI-Ex1 BUS"]
    AC["STM Bus to NIC"] --> AD["IPMI 2.0"]
    AE["SM Bus"] --> AF["FWH"]
    AG["KB. FDD. SER.1 MS."] --> AH["IPMI 2.0"]
    AI["SER.2"] --> AJ["IPMI 2.0"]
    AK["PRN."] --> AL["IPMI 2.0"]
    AM["H/W MONITOR"] --> AN["IPMI 2.0"]
    AO["DATADA"] --> AP["PCI-E BUS"]
    AQ["DADAT"] --> AR["PCI-E BUS"]
    AS["DMI Interface"] --> AT["ICH6R"]
    AT --> AU["LPC BUS"]
    AT --> AV["LPC I/O"]
    AT --> AW["FWH"]
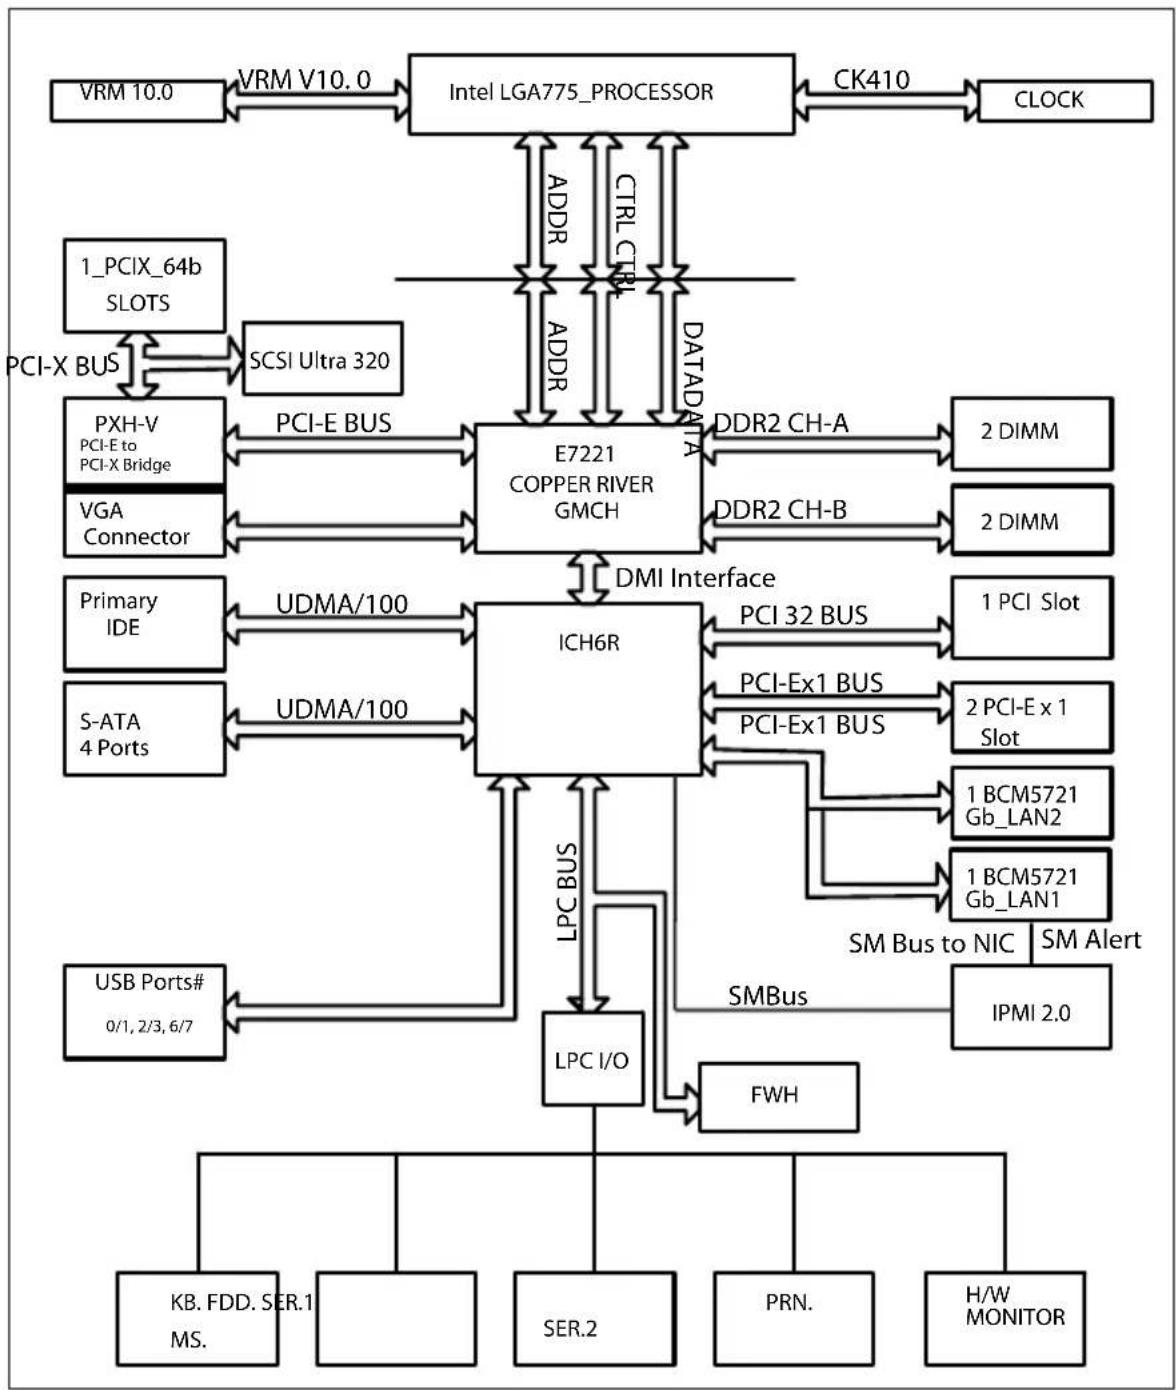
Figure 1-3. Intel E7221 Copper River Chipset: System Block Diagram
Note: This is a general block diagram and may not exactly represent the features on your motherboard. See the following pages for the actual specifications of each motherboard.
Motherboard Features
CPU ◆ Latest CPU technology!
- Single Intel Pentium ^ 4 Processor in the 775-Land Grid Array Package at a system bus speed of 800 MHz.
Memory ◆ Latest memory technology!
- Dual/Single Channel DDR2 533/400 (using x8 DRAMTechnologies) up to 4 GB of ECC/Non ECC, unbuffered two-way interleaved DDR2-533/400 SDRAM in 4 DIMMS Note: See Section 2-4 for details.
Chipset ◆ Latest Intel chipset technology!
• Intel E7221 (Copper River)
Expansion Slots
- Two (2) PCI-Express x1
• One (1) PCI-X up to 133MHz (*P8SCi), PCI-X 100MHz (*P8SC8) - One (1) 32-bit PCI
BIOS
- 8 Mb Firmware Hub AwardBIOS ® Flash BIOS
- APM 1.2, DMI 2.3, PCI 2.2, ACPI 1.0, Plug and Play (PnP)
PC Health Monitoring
- Eight onboard voltage monitors for CPU core, +3.3V, +5V,+5VStandby, +1.5V, VBATT, and ±12V
- Fan status monitor with firmware/software speed control
• SuperDoctor III, Watch Dog, NMI
• Environmental temperature monitoring via BIOS
• Power-up mode control for recovery from AC power loss - System resource alert via Supero Doctor III
• Hardware BIOS virus protection
• Auto-switching voltage regulator for the CPU core
ACPI Features
- Microsoft OnNow
- Slow blinking LED for suspend state indicator
• BIOS support for USB keyboard - Main switch override mechanism
- Internal/external modem ring-on
Onboard I/O
- Adaptec 7902(B0) dual channel Ultra 320 SCSI (*P8SC8 only)
- Adaptec SCSI RAID 2010S supported (*P8SC8 only)
• 1 UDMA IDE
• Intel ICH6R SATA Controller 4 connectors for 4 devices
• 1 floppy port interface (up to 2.88 MB) - 2 Fast UART 16550 compatible serial connectors (1 header, 1 port)
• 2 Broadcom 5721 PCI-Exp. Gigabit Ethernet Controllers - 1 EPP (Enhanced Parallel Port) and ECP (Extended Capabilities Port) supported parallel port
- PS/2 mouse and PS/2 keyboard ports
- Up to 6 USB (Universal Serial Bus) 2.0 ports for a speed of up to 480Mbps ◆ Latest USB 2.0 technology!
• 1 VGA Connector - 1 IPMI 2.0 Socket
Other
• Hyper-threading enabled
- Wake-on-Ring (WOR)
- Wake-on-LAN (WOL)
- Multiple CPU clock frequency ratio selections (set in BIOS)
- Onboard +5vsb warning LED ("LE1")
CD Utilities
• BIOS flash upgrade utility
Dimensions
- ATX form factor, 12" x 9.5" (305 x 228.6 mm)
1-2 Chipset Overview
Intel's E7221 (Copper River) chipset, designed for the server market, consists of the following components: the Graphics Memory Controller Hub (GMCH), Intel PCI-X Hub (PXH-V), and Intel I/O Controller Hub (ICH6R). The E7221 (Copper River) chipset provides the performance and feature-set required for the entry level single-processor server solutions.
Graphics Memory Controller Hub (GMCH)
The function of the GMCH is to manage the data flow between five interfaces: Processor/Host interface (FSB), System Memory Interface (DRAM controller), PCI Express Interface, Direct Media Interface (DMI) and PXH-V Interface. The GMCH is optimized for the Prescott processors in an LGA775 Package. It supports one or two channels of unbuffered, ECC/Non ECC DDR2 533/400 SDRAM.
The ACPI component provides the data buffering and interface arbitration required to ensure that system interfaces operate efficiently. The Direct Media Interface (DMI) is a point-to-point interconnect between the Copper River GMCH and the ICH6.
Intel ICH6R System Features
The I/O Controller Hub provides the I/O subsystem with access to the rest of the system. Functions and capabilities include:
*PCI Express Base Specification, Rev. 1.0a-compliant
*PCI 2.3
*ACPI Power Management Logic Support
*USB host interface
*Enhanced DMA Controller
*System Management Bus
*Low Pin Count (LPC) Interface
* Firmware Hub (FWH) Interface
Graphics Features/Display
The Copper River GMCH provides an integrated server-quality onboard graphics.
1-3 PC Health Monitoring
This section describes the PC health monitoring features of the P8SC8/P8SCi. The motherboard has an onboard System Hardware Monitor chip that supports PC health monitoring.
Eight Onboard Voltage Monitors for the CPU Core, Chipset Voltage, +3.3V, +5V, +5V Standby, 1.5V, VBAT, and ±12V
The onboard voltage monitor will scan these voltages continuously. Once a voltage becomes unstable, it will give a warning or send an error message to the screen. Users can adjust the voltage thresholds to define the sensitivity of the voltage monitor.
Fan Status Monitor with Firmware/Software Speed Control
The PC health monitor can check the RPM status of the cooling fans. The onboard fans are controlled by thermal management via BIOS.
CPU Overheat/Fan Fail LED and Control
This feature is available when the user enables the CPU overheat/Fan Fail warning function in the BIOS. This allows the user to define an overheat temperature. When this temperature is exceeded or when a fan failure occurs, then, the Overheat/Fan Fail warning LED is triggered.
Auto-Switching Voltage Regulator for the CPU Core
The 3-phase-switching voltage regulator for the CPU core can support up to 60A current and auto-sense voltage IDs ranging from 0.875 V to 1.6V. This will allow the regulator to run cooler and thus make the system more stable.
1-4 CPU Thermal Management
Thermal Management 2 (TM2)
When TM2 is enabled in the BIOS and the CPU temperature reaches a predefined threshold, a thermal monitoring mechanism will reduce the process speed by lowering the bus-to-core ratio of the processor core clock and decrease the voltage input by changing the CPU VID. This combination of reduced CPU bus frequency and CPU VID effectively decreases CPU power
consumption to prevent processor overheat from happening and thus, greatly increases system stability. (*This function is available for the CPUs that support TM2.)
1-5 Power Configuration Settings
This section describes features of your motherboard that deal with power and power settings.
Microsoft OnNow
The OnNow design initiative is a comprehensive, system-wide approach to system and device power control. OnNow is a term for a PC that is always on but appears to be off and responds immediately to user or other requests.
Slow Blinking LED for Suspend-State Indicator
When the CPU goes into a suspend state, the chassis power LED will start blinking to indicate that the CPU is in suspend mode. When the user presses any key, the CPU will wake-up and the LED will automatically stop blinking and remain on.
BIOS Support for USB Keyboard
If the USB keyboard is the only keyboard in the system, it keyboard will function like a normal keyboard during system boot-up.
Main Switch Override Mechanism
When an ATX power supply is used, the power button can function as a system suspend button. When the user depresses the power button, the system will enter a SoftOff state. The monitor will be suspended and the hard drive will spin down. Depressing the power button again will cause the whole system to wake-up. During the SoftOff state, the ATX power supply provides power to keep the required circuitry in the system alive. In case the system malfunctions and you want to turn off the power, just depress and hold the power button for 4 seconds. The power will turn off and no power will be provided to the motherboard.
Wake-On-LAN (WOL)
Wake-On-LAN is defined as the ability of a management application to remotely power up a computer that is powered off. Remote PC setup, updates and access tracking can occur after hours and on weekends so that daily LAN traffic is kept to a minimum and users are not interrupted. The
motherboard has a 3-pin header (WOL) to connect to the 3-pin header on a Network Interface Card (NIC) that has WOL capability. Wake-On-LAN must be enabled in BIOS. Note that Wake-On-LAN can only be used with an ATX 2.01 (or above) compliant power supply.
Wake-On-Ring (WOR) Header
Wake-up events can be triggered by a device such as the external modem ringing when the system is in the SoftOff state. Note that external modem ring-on can only be used with an ATX 2.01 (or above) compliant power supply.
1-6 Power Supply
As with all computer products, a stable power source is necessary for proper and reliable operation. It is even more important for processors that have high CPU clock rates of 1 GHz and faster.
The SP8SC8/P8SCi accommodates 12V ATX power supplies. Although most power supplies generally meet the specifications required by the CPU, some are inadequate. A 2 amps of current supply on a 5V Standby rail is strongly recommended.
It is strongly recommended that you use a high quality power supply that meets 12V ATX power supply Specification 1.1 or above. Additionally, in areas where noisy power transmission is present, you may choose to install a line filter to shield the computer from noise. It is recommended that you also install a power surge protector to help avoid problems caused by power surges.
*Warning: Do not use a wrong type of onboard CMOS battery or install the onboard CMOS battery upside down to avoid any possible explosion.
1-7 Super I/O
The disk drive adapter functions of the Super I/O chip include a floppy disk drive controller that is compatible with industry standard 82077/765, a data separator, write pre-compensation circuitry, decode logic, data rate selection, a clock generator, drive interface control logic and interrupt and DMA logic. The wide range of functions integrated onto the Super I/O greatly reduces the number of components required for interfacing with floppy disk drives. The Super I/O supports two 360 K, 720 K, 1.2 M, 1.44 M or 2.88 M disk drives and data transfer rates of 250 Kb/s, 500 Kb/s or 1 Mb/s.
It also provides two high-speed, 16550 compatible serial communication ports (UARTs), one of which supports serial infrared communication. Each UART includes a 16-byte send/receive FIFO, a programmable baud rate generator, complete modem control capability and a processor interrupt system. Both UARTs provide legacy speed with baud rate of up to 115.2 Kbps as well as an advanced speed with baud rates of 250 K, 500 K, or 1 Mb/s, which support higher speed modems.
The Super I/O provides functions that comply with ACPI (Advanced Configuration and Power Interface), which includes support of legacy and ACPI power management through a SMI or SCI function pin. It also features auto power management to reduce power consumption.
The IRQs, DMAs and I/O space resources of the Super I/O can be flexibly adjusted to meet ISA PnP requirements, which support ACPI and APM (Advanced Power Management).
Notes
Chapter 2 Installation
2-1 Static-Sensitive Devices
Electric Static Discharge (ESD) can damage electronic components. To prevent damage to your system board, it is important to handle it very carefully. The following measures are generally sufficient to protect your equipment from ESD.
Precautions
- Use a grounded wrist strap designed to prevent static discharge.
- Touch a grounded metal object before removing the board from the anti-static bag.
- Handle the board by its edges only; do not touch its components, peripheral chips, memory modules or gold contacts.
- When handling chips or modules, avoid touching their pins.
- Put the motherboard and peripherals back into their antistatic bags when not in use.
- For grounding purposes, make sure your computer chassis provides excellent conductivity between the power supply, the case, the mounting fasteners and the motherboard.
- Use only the correct type of CMOS onboard battery as specified by the Manufacturer. Do not install the CMOS onboard battery upside down to avoid a possible explosion.
Unpacking
The motherboard is shipped in antistatic packaging to avoid static damage. When unpacking the board, make sure the person handling it is static protected.
Installation Procedures
Follow the procedures as listed below for full installation of the motherboard into a chassis:
- Install the processor and the heatsink to the motherboard.
- Install the motherboard in the chassis.
- Install the memory and add-on cards.
- Finally, connect the cables and install the drivers.
2-2 LGA775 Processor and Heatsink Fan Installation

When handling the processor package, avoid placing direct pressure on the label area of the fan.
IMPORTANT: Always connect the power cord last and always remove it before adding, removing or changing any hardware components. Make sure that you install the processor into the CPU socket before you install the CPU heatsink.
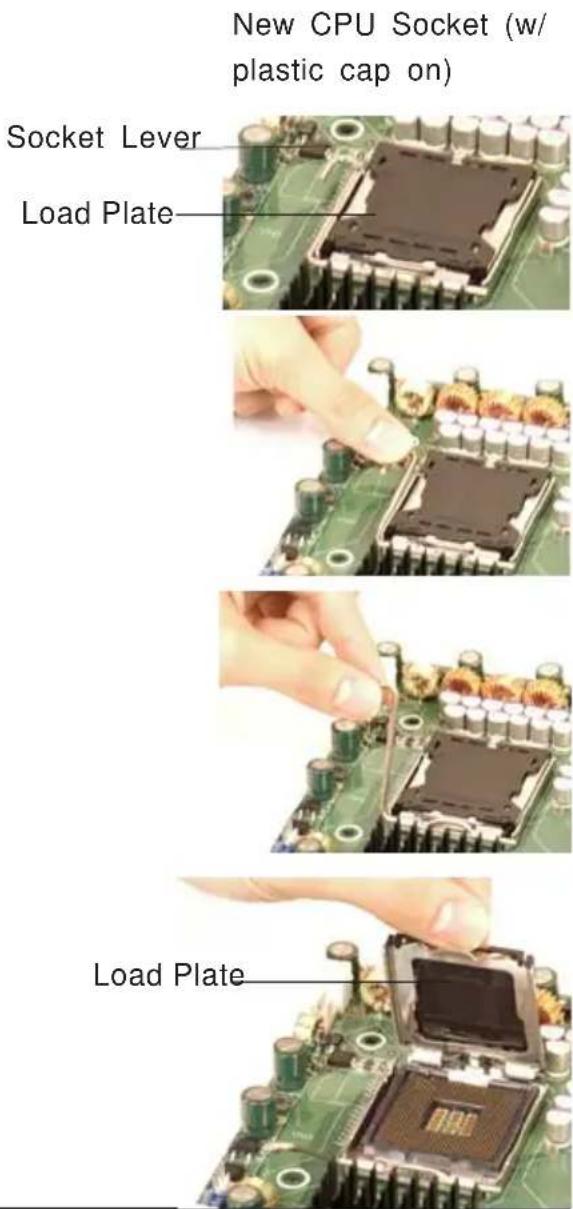
Installation of the LGA775 Processor
-
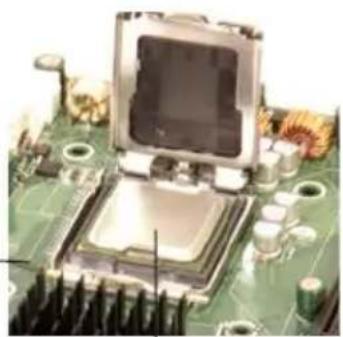
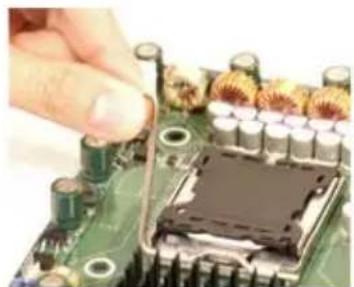
Press the socket lever to release the load plate that covers the CPU socket from its locking position.
-
Carefully lift the socket lever up to open the load plate.
text_image
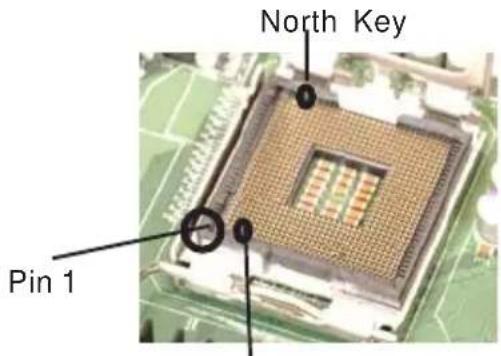
New CPU Socket (w/ plastic cap on) Socket Lever Load Plate Load Plate- Locate Pin 1 on the CPU socket. (*Note: Pin 1 is the corner marked with a triangle). Please note that the North Key and the South Key are located vertically in the CPU housing.
- Position the motherboard in such a way that Pin 1 of the CPU socket is located at the left bottom of the CPU housing.
- Use your thumb and your index finger to hold the CPU at the North Center Edge and the South Center Edge of the CPU.
- Align Pin 1 of the CPU with Pin 1 of the socket. Once aligned, carefully lower the CPU straight down to the socket. ( ^** Do not drop the CPU on the socket. Do not move the CPU horizontally or vertically. Do not rub the CPU against the surface of the socket or against any pins of the socket to avoid damage to the CPU or the socket.)
- With the CPU inside the socket, inspect the four corners of the CPU to make sure that the CPU is properly installed.
- Use your thumb to gently press the lever down and lock it in the hook.
- If the CPU is properly installed into the socket, the plastic cap will be automatically released from the load plate when the lever is pushed into the hook. Remove the plastic cap from the motherboard. Plastic cap is re
Plastic cap is released from the load plate if the CPU is properly installed.
text_image
North Key Pin 1natural_image
Close-up of a hand pressing a small electronic component on a circuit board (no visible text or symbols)South Center Edge
Socket Lever
natural_image
Close-up of a green printed circuit board with visible traces and components (no text or symbols)CPU in the CPU socket
natural_image
Close-up of a hand adjusting a green circuit board with copper and gold components (no visible text or symbols)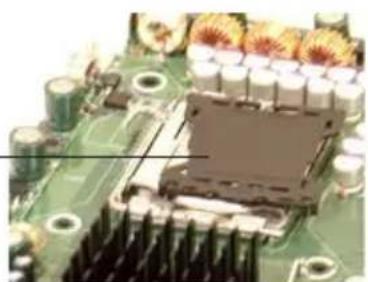
natural_image
Close-up of a green circuit board with visible components and connectors (no text or symbols)Installation of the Heatsink
- Locate the CPU Fan on the motherboard. (Refer to the layout on Page 1-4 for the CPU Fan location.)
- Position the heatsink in such a way that the heatsink fan wires are closest to the CPU fan and are not interfered with other components
- Inspect the CPU Fan wires to make sure that the wires are routed through the bottom of the heatsink.
- Remove the thin layer of the protective film from the copper core of the heatsink.
(*Warning: CPU overheat may occur if the protective film is not removed from the heatsink.)
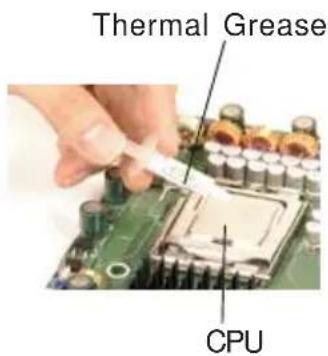
- Apply the proper amount of thermal grease on the CPU. (*Note: if your heatsink came with a thermal pad, please ignore this step.)
- If necessary, rearrange the wires to make sure that the wires are not pinched between the heatsink and the CPU. Also make sure to keep clearance between the fan wires and the fins of the heatsink.
- Align the four heatsink fasteners with the mounting holes on the motherboard. Gently push the fasteners into the mounting holes until you hear a "click".
text_image
Thermal Grease CPU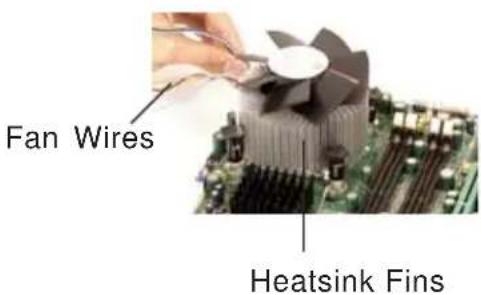
text_image
Fan Wires Heatsink Fins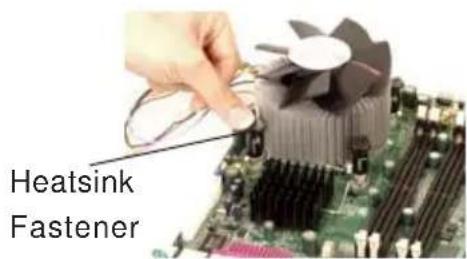
text_image
Heatsink Fastener-
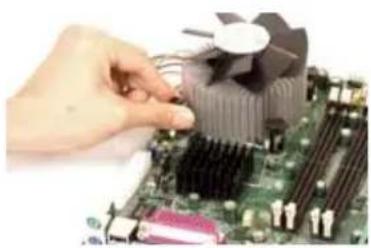
Repeat Step 6 to insert all four heatsink fasteners into the mounting holes.
-
Once all four fasteners are securely inserted into the mounting holes and the heatsink is properly installed on the motherboard, connect the heatsink fan wires to the CPU Fan connector.
Heatsink Removal
-
Unplug the power cord from the power supply.
-
Disconnect the heatsink fan wires from the CPU fan header.
-
Use your finger tips to gently press on the fastener cap and rotate counterclockwise to make a 1/4 (90°) turn.
-
Repeat Step 3 to loosen all fasteners from the mounting holes.
-
With all fasteners loosened, remove the heatsink from the CPU.
natural_image
Close-up of hands holding a CPU cooling fan on a motherboard (no visible text or symbols)2-3 Mounting the Motherboard in the Chassis
All motherboards have standard mounting holes to fit different types of chassis. Make sure that the locations of all the mounting holes for both the motherboard and the chassis match. Although a chassis may have both plastic and metal mounting fasteners, metal ones are highly recommended because they ground the motherboard to the chassis. Make sure that the metal standoffs click in or are screwed in tightly. Then, use a screwdriver to secure the motherboard onto the motherboard tray. (*Note: some components are very close to the mounting holes, please take caution to prevent damage done to these components when installing the motherboard into the chassis.)
2-4 Installing DDR2 Memory
CAUTION
Exercise extreme care when installing or removing memory modules to prevent any possible damage.
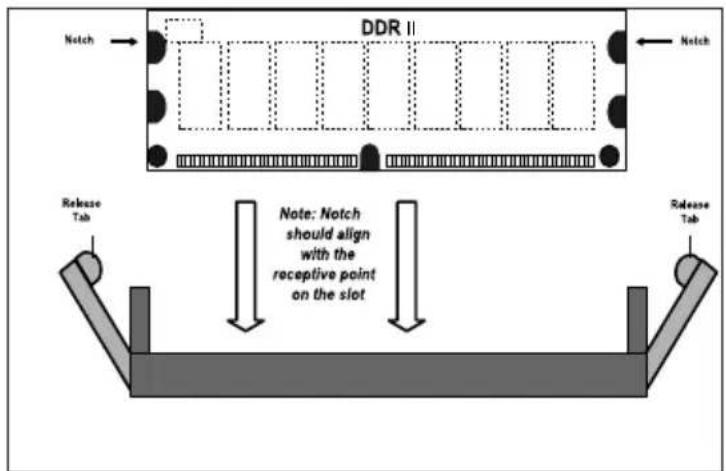
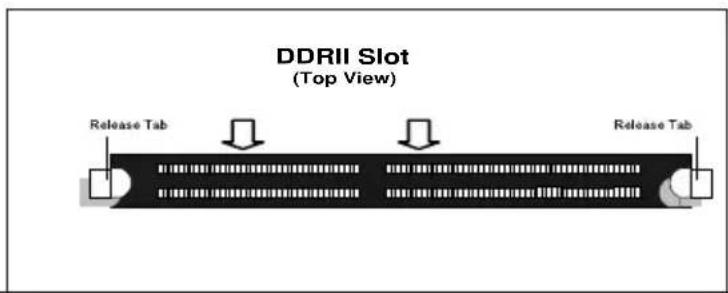
Memory Module Installation (See Figure 2-2)
- Insert each DDR2 memory module vertically into its slot. Pay attention to the notch along the bottom of the module to prevent inserting the module incorrectly. (See support information below.)
- Gently press down on the memory module until it snaps into place.
Support
The P8SC8/P8SCi supports Dual channel, ECC/Non ECC, unbuffered DDR2 533/400 SDRAM. Both interleaved and non-interleaved memory are supported, so you may populate any number of DIMM slots. (Populating DIMM#1A, DIMM#2A, and/or DIMM#1B, DIMM#2B with memory modules of the same size and of the same type will result in dual channel, two-way interleaved memory which is faster than single channel, non-interleaved memory.)
Figure 2-2. DDRII Installation
To Install:
Insert module vertically and press down until it snaps into place. Pay attention to the notch.
text_image
DDR II Notch Release Tab Note: Notch should align with the receptive point on the slot Release TabTo Remove:
Use your thumbs gently to push each release tab outward to release the DIMM from the slot.
text_image
DDRII Slot (Top View) Release Tab Release Tab2-5 I/O Port/Control Panel Connector Locations
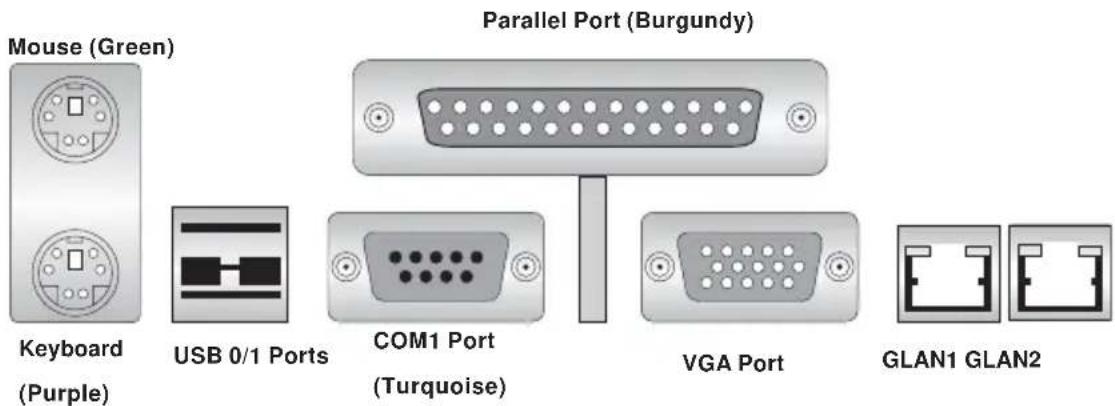
The I/O ports are color coded in conformance with the PC99 specification to make setting up your system easier. See Figure 2-3 below for the colors and locations of the various IO ports.
Figure 2-3. I/O Port Locations and Definitions
text_image
Mouse (Green) Keyboard (Purple) USB 0/1 Ports COM1 Port (Turquoise) Parallel Port (Burgundy) VGA Port GLAN1 GLAN2Front Control Panel
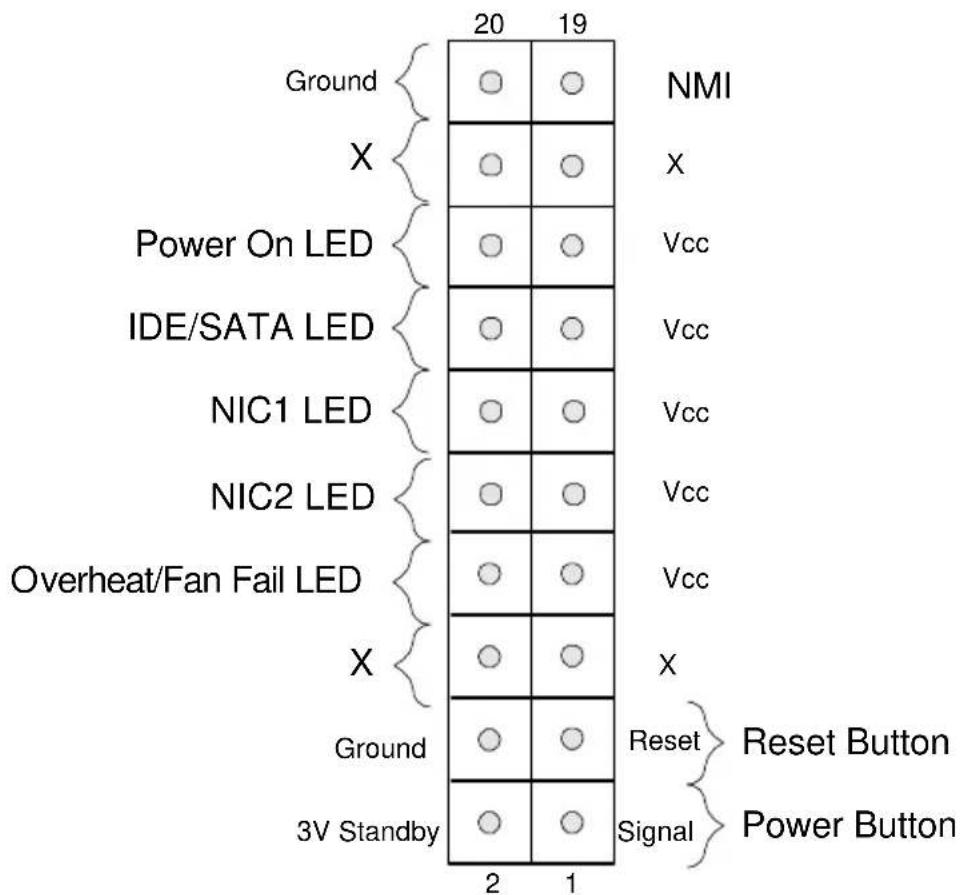
JF1 contains header pins for various front control panel connectors. See Figure 2-4 for the pin definitions of the various connectors including the speaker. Refer to Section 2-6 for details.
text_image
20 19 Ground X Power On LED IDE/SATA LED NIC1 LED NIC2 LED Overheat/Fan Fail LED X Ground 3V Standby 2 1 NMI X Vcc Vcc Vcc Vcc Vcc X Reset Signal Reset Button Power Button2-6 Connecting Cables
Power Supply Connectors
The primary power supply connector (J1) on the P8SC8/P8SCi meets the SSI (Superset ATX) 24-pin specification. Refer to the table on the right for the pin definitions of the ATX 24-pin power connector. You must also connect the 4-pin (J2) processor power connector to your power supply. Refer to the table below right for the J2 (12V) connector.
ATX Power Supply 24-pin Connector Pin Definitions (J1)
| Pin Number Definition | Pin Number Definition |
| 13 +3.3V | 1 +3.3V |
| 14 -12V | 2 +3.3V |
| 15 COM | 3 COM |
| 16 PS_ON# | 4 +5V |
| 17 COM | 5 COM |
| 18 COM | 6 +5V |
| 19 COM | 7 COM |
| 20 Res(NC) | 8 PWR_OK |
| 21 +5V | 9 5VSB |
| 22 +5V | 10 +12V |
| 23 +5V | 11 +12V |
| 24 COM | 12 +3.3V |
| Required Connection | +12V 4-pin Connector (J2) | |
| Pins # | Definition | |
| 1 & 2 | Ground | |
| 3 & 4 | +12 V | |
PW\_ON Connector
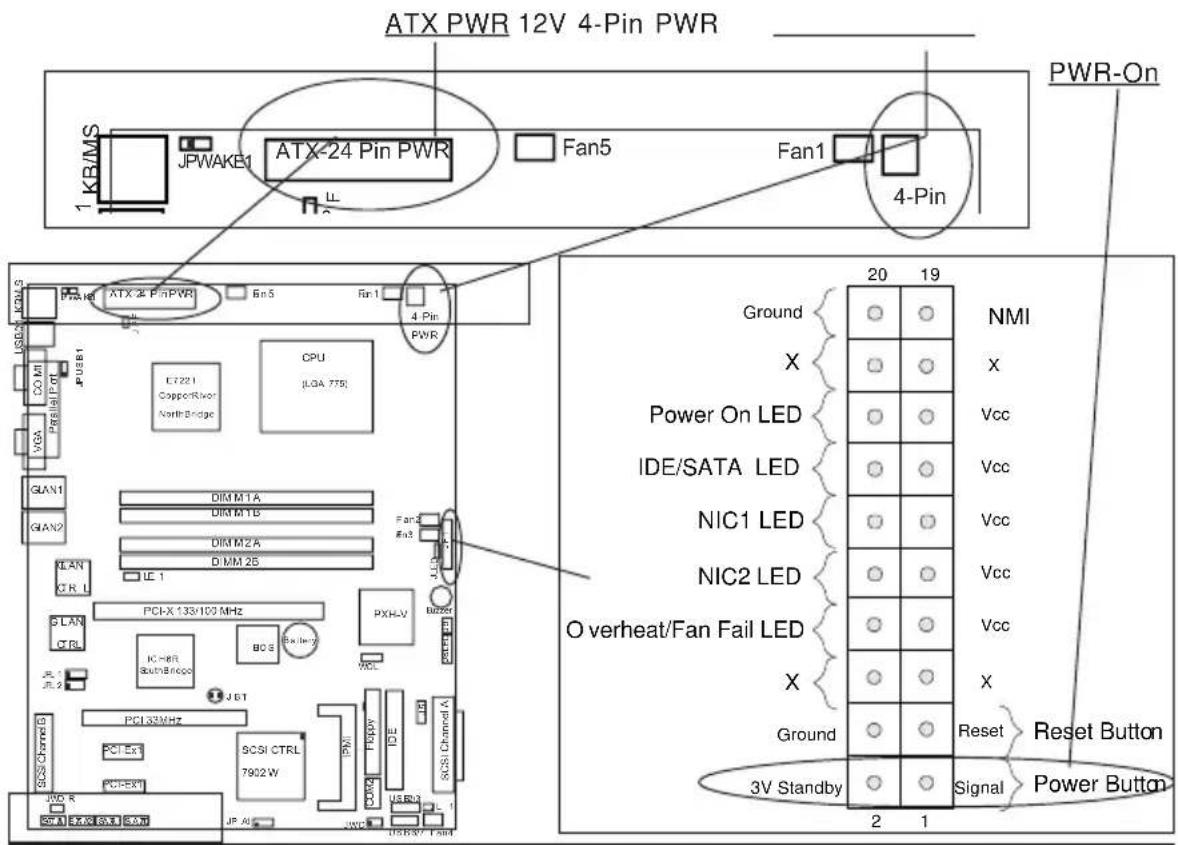
The PW_ON connector is located on pins 1 and 2 of JF1.
PW_ON Pin Definitions (JF1)
| Pin # | Definition |
| 1 | Signal |
| 2 | +3V Standby |
The reset connector is located on pins 3 and 4 of JF1. This connector attaches to the reset switch on the computer chassis. See the table on the right for pin definitions.
Reset Pin Definitions (JF1)
| PinNumber | Definition |
| 3 | Reset |
| 4 | Ground |
Overheat/FanFail LED
Connect an LED to the OH/Fan Fail connection on pins 7 and 8 of JF1 to provide advanced warning of chassis overheating or system fan failure. Refer to the table on the right for pin definitions.
Overheat (OH) LED Pin Definitions (JF1)
| PinNumber | Definition |
| 7 | Vcc |
| 8 | GND |
OH/Fan Fail LED (JF1)
| State | Message |
| OffStay OnBlink | NormalOverheatFan Fail |
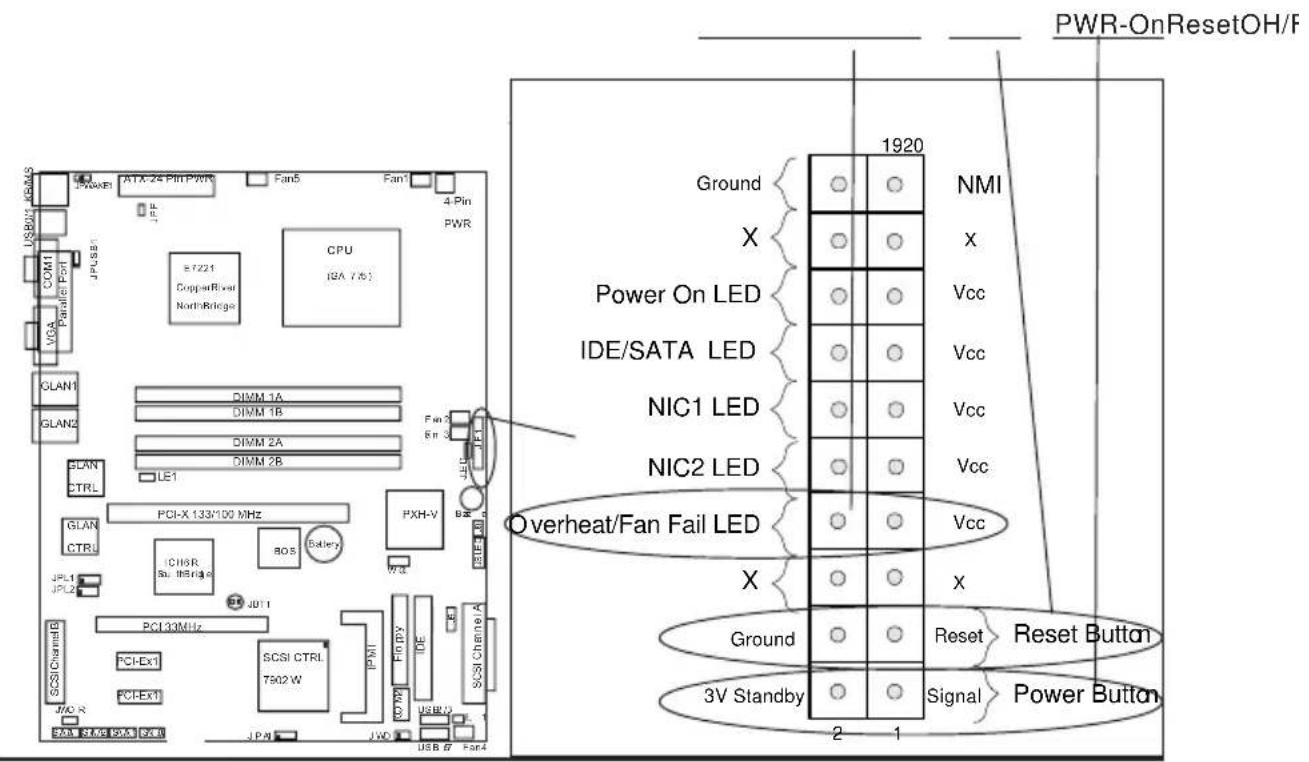
text_image
PWR-OnResetOH/F 1920 Ground X Power On LED IDE/SATA LED NIC1 LED NIC2 LED Overheat/Fan Fail LED X Ground 3V Standby 2 1 NMI X Vcc Vcc Vcc Vcc X Reset Reset Button Signal Power ButtonNIC1/NIC2 LED Indicators
The NIC (Network Interface Controller) LED connection for GLAN port1 is located on pins 11 and 12 of JF1 and the LED connection for GLAN Port2 is on Pins 9 and 10. Attach the NIC LED cables to display network activity. Refer to the table on the right for pin definitions.
NIC2 LED Pin Definitions (JF1)
| Pin Number | Definition |
| 9 | Vcc |
| 10 | GND |
NIC1 LED Pin Definitions (JF1)
| Pin Number | Definition |
| 11 | Vcc |
| 12 | GND |
\*IDE/SATA (\*See the note below)
The IDE/SATA LED is located on pins 13, 14 of JF1. This connects to the hard drive LED to display all IDE and SATA activities. See the table on the right for pin definitions.
(*Note: This LED is for all IDE and SATA devices)
IDE Pin Definitions (JF1)
| Pin Number | Definition |
| 13 | +5V |
| 14 | HD Active |
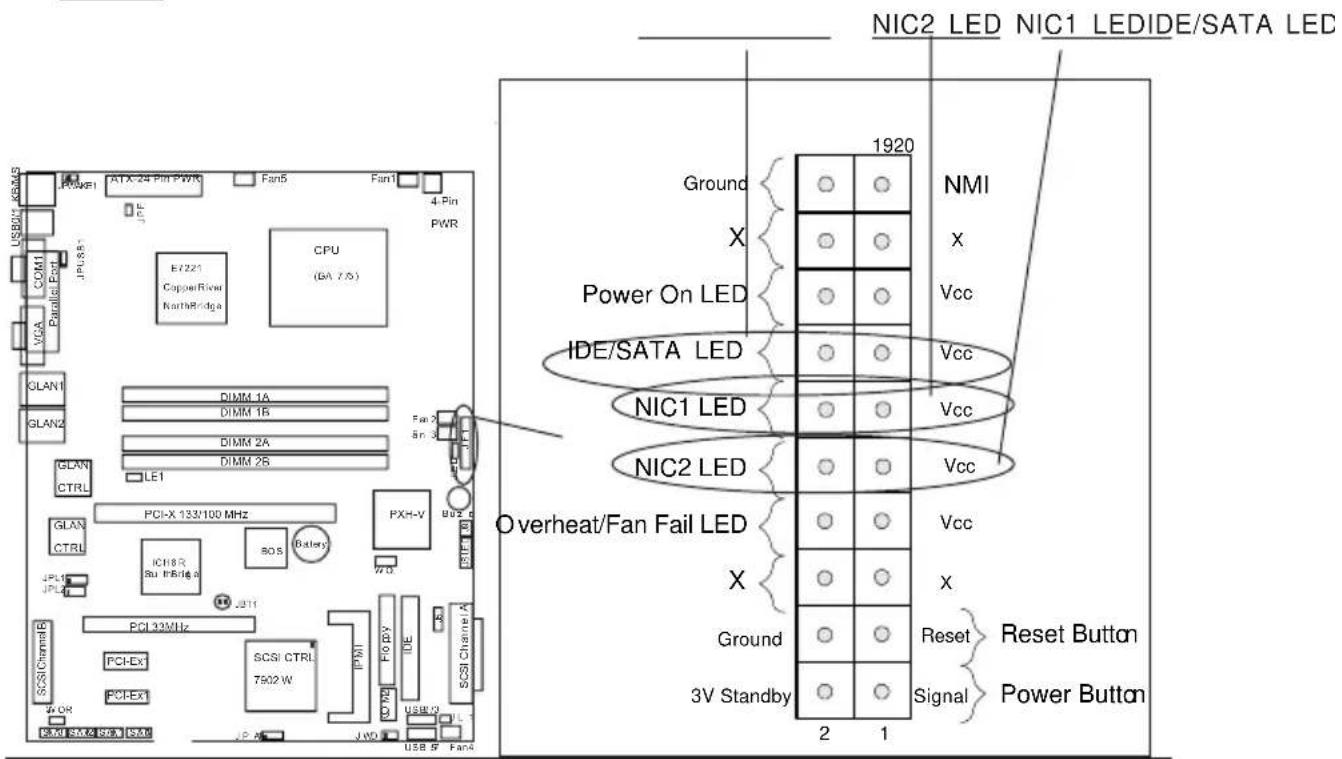
text_image
NIC2 LED NIC1 LEDIDE/SATA LED Ground 1920 NMI X Vcc Power On LED IDE/SATA LED NIC1 LED Vcc NIC2 LED Vcc Overheat/Fan Fail LED X X Reset Reset Button Ground 3V Standby Signal Power Button PCI-X 133/100 MHz PCI-Ex PCI-Ex1 PCI 33MHz PCI-X 133/100 MHz PCI-X 133/100 MHz PCI-X 133/100 MHz PCI-X 133/100 MHz PCI-X 133/100 MHz PCI-X 133/100 MHz PCI-X 133/100 MHz PCI-X 133/100 MHz PCI-X 133/100 MHz PCI-X PCI-X PCI-X PCI-X PCI-X PCI-X PCI-X PCI-X PCI-X PCI-X PCI-X PCI-X PCI-X PCI-X PCI-X PCI-X PCI-X PCI-X PCI-X PCI-X PCI-X PCI-X PCI-X PCI-X PCI-X PCI-X PCI-X PCI-X PCI-X PCI-X PCI-X PCI-X PCI-X PCI-XPower On\_LED Connector
The Power LED connector is located on pins 15, 16 of JF1. (*Use JLED for a 3-pin connector.) This connection is used to provide LED indication of power being supplied to the system. See the table on the right for pin definitions.
Power_LED Pin Definitions (JF1)
| Pin Number | Definition |
| 15 | +5V |
| 16 | Ground |
NMI Button
The non-maskable interrupt button header is located on pins 19 and 20 of JF1. Refer to the table on the right for pin definitions.
NMI Button Pin Definitions (JF1)
| Pin Number | Definition |
| 19 | Control |
| 20 | Ground |
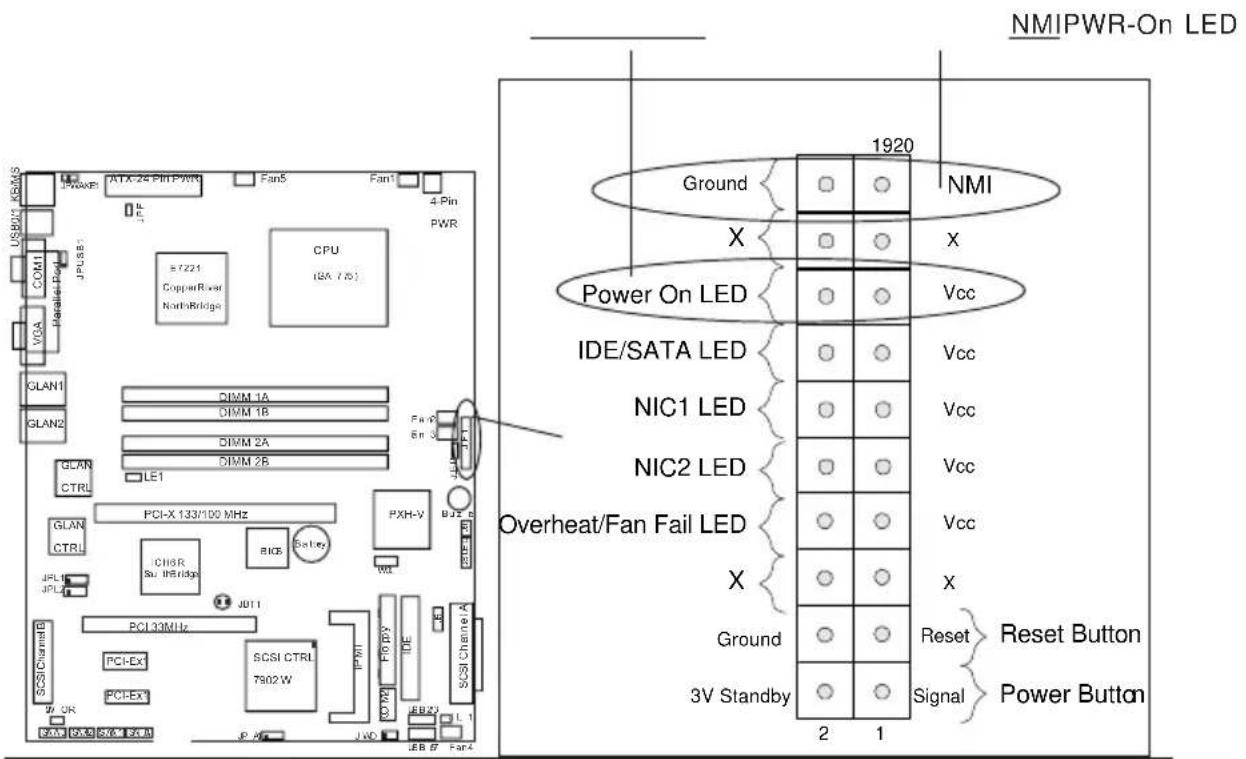
text_image
NMIPWR-On LED 1920 Ground NMI X Power On LED Vcc IDE/SATA LED Vcc NIC1 LED Vcc NIC2 LED Vcc Overheat/Fan Fail LED X Ground Reset 3V Standby Signal Power Button Reset Button Power ButtonSerial Ports
Two serial ports are included on the motherboard: COM1 is a port located beside the mouse/keyboard ports and COM2 is a header located below the Floppy Drive. See the table on the right for pin definitions.
*NC indicates no connection.
Serial Port Pin Definitions (COM1)
| Pin Number Definition | Pin Number Definition |
| 1 CD | 6 DSR |
| 2 RD | 7 RTS |
| 3 TD | 8 CTS |
| 4 DTR | 9 RI |
| 5 Ground |
Serial Port Pin Definitions (COM2)
| Pin Number Definition | Pin Number Definition |
| 1 CD | 6 DSR |
| 2 RD | 7 RTS |
| 3 TD | 8 CTS |
| 4 DTR | 9 RI |
| 5 Ground | 10 NC |
Speaker Connector
The speaker connector is located on J9 and allows you to choose between using the internal or an external speaker. For the internal speaker, short Pins 3 and 4. To use an external speaker, place the speaker cable header on the speaker connector. See the table on the right for pin definitions.
Speaker: Pin Definition
| Fucntion Pin Definition | |
| Pins 1-4 | External Speaker |
| Pins 3,4 | Internal Speaker |

text_image
JPWAKE1 ATX-24 Pin PWR Fan5 Fan1 4-Pin PWR JPF JPM COM1 USB0/1 KB/MS COM1 VGA Parallel Port JPUSB1 E7221 CopperRiver NorthBridge CPU (LGA 77.5) GLAN1 DIMM 1A DIMM 1B DIMM 2A DIMM 2B LE1 GLAN CTRL GLAN CTRL PCI-X 133/100 MHz BIOS Battery PXH-V JPL1 JPL2 JBT1 PCI 33MHz SCSI Channel B PCI-Ex1 PCI-Ex1 JWOR S8 A3 SAA2 SAA1 SIA0 J PA IPMI Floppy IDE IDE COM2 $R2 /3 JL1 JW D USB67 Fan4 COM2 Speaker JPE L JPT Fan 2 Fan 3 Buzzer US EUTD WQFan Headers
There are five fan headers (Fan 1 to Fan5) on the P8SC8/P8SCI. See the table on the right for pin definitions. These fan headers support 3-pin fans. The fan speed is controlled by Thermal Management under the Hardware Monitoring Section in the BIOS.
3-pin Fan Header Pin Definitions
| Pin Number | Definition |
| 1 | Ground (black) |
| 2 | +12V (red) |
| 3 | Tachometer |
*Caution: Fan headers use DC power.
Chassis Intrusion
The Chassis Intrusion header is located at JL1. See the board layout in Chapter 1 for the location of JL1 and the table on the right for pin definitions.
Chassis Intrusion Pin Definitions (JL1)
| Pin Number | Definition |
| 1 | Intrusion Input |
| 2 | Ground |
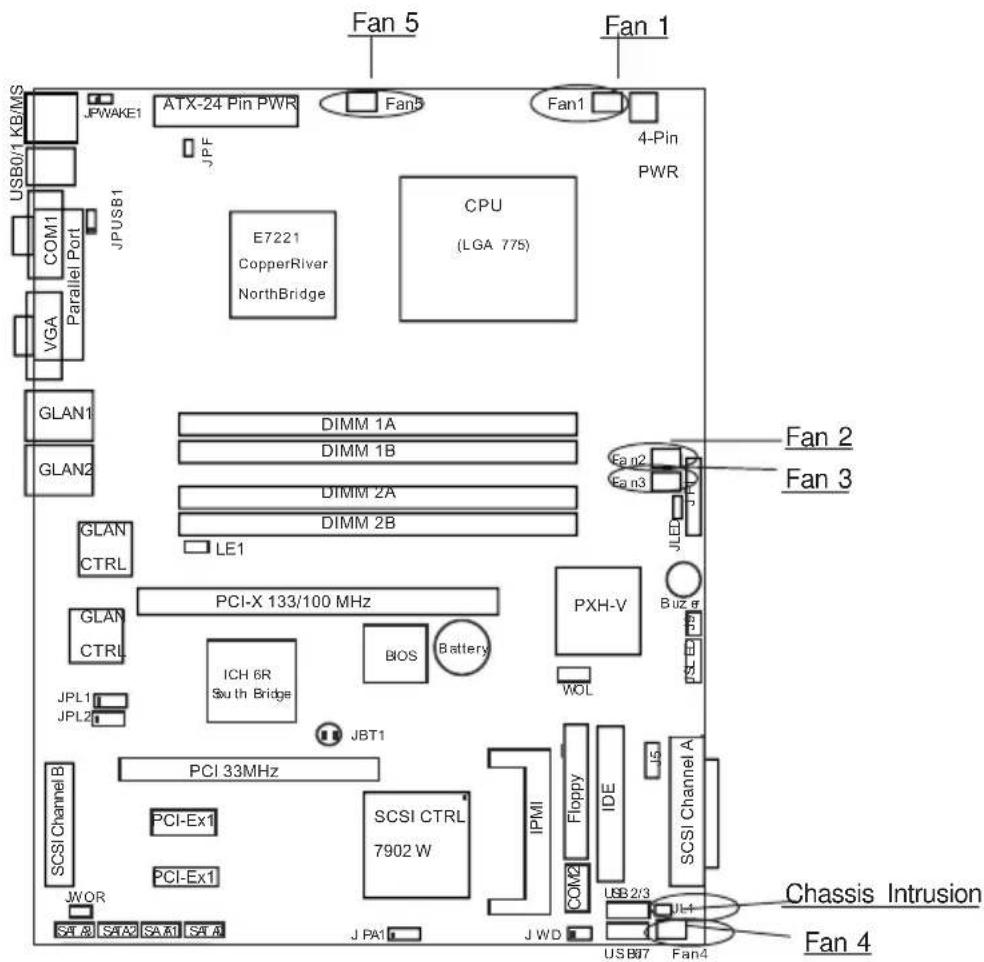
text_image
Fan 5 Fan 1 JPWAKE1 ATX-24 Pin PWR Fan5 Fan1 J.P.F 4-Pin PWR USB0/1 KB/MS COM1 E7221 CopperRiver NorthBridge CPU (LGA 775) VGA Parallel Port GLAN1 DIMM 1A DIMM 1B DIMM 2A DIMM 2B LE1 GLAN CTRL PCI-X 133/100 MHz GLAN CTRL ICH 6R South Bridge BIOS Battery PXH-V JPL1 JPL2 JBT1 JPL1 JPL2 JPT1 PCI 33MHz SCSI Channel B PCI-Ex1 SCSI CTRL PCI-Ex1 7902 W JWOR J PA1 IPMI Floppy IDE US 2/3 JL-1 SIA SEA SAA1 SIA J WD USB07 Fan4 Chassis Intrusion Fan 4ATX PS/2 Keyboard and PS/2 Mouse Ports
The ATX PS/2 keyboard and the PS/2 mouse are located at J14. See the table on the right for pin definitions. (The mouse port is above the keyboard port. See the table on the right for pin definitions.)
PS/2 Keyboard and Mouse Port Pin Definitions (J14)
| Pin Number | Definition |
| 1 | Data |
| 2 | NC |
| 3 | Ground |
| 4 | VCC |
| 5 | Clock |
| 6 | NC |
Universal Serial Bus (USB)
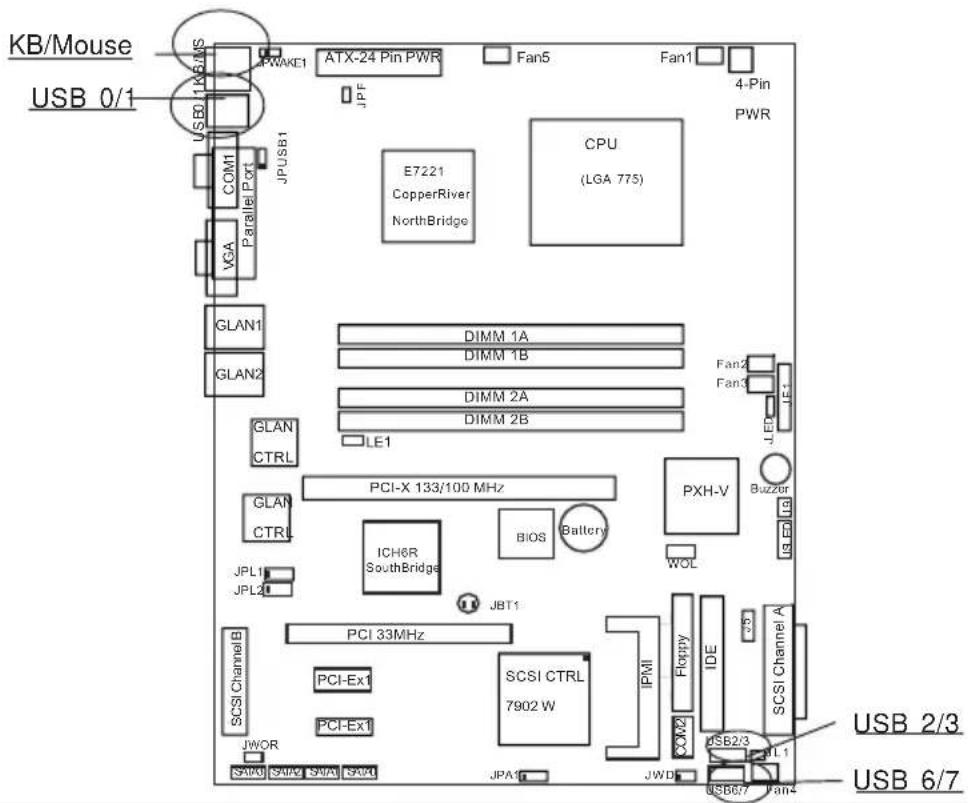
There are two Universal Serial Bus ports (USB O/1) located at (J15) on the I/O panel and additional four USB ports are located at (J10, J7) on the motherboard. These ports, labeled USB 2/3 and USB 6/7, can be used to provide front side chassis access (cables not included). See the tables on the right for pin definitions.
USB Pin Definition
| Pin# | Definition |
| 1 | +5V |
| 2 | P0- |
| 3 | P0+ |
| 4 | Ground |
J7(USB 6/7), J10 (USB2/3)
| Pin Number | Definition | Pin Number | Definition |
| 1 | +5V | 2 | +5V |
| 3 | PO- | 4 | PO- |
| 5 | PO+ | 6 | PO+ |
| 7 | Ground | 8 | Ground |
| 10 | Ground |
text_image
KB/Mouse USB 0/1 VSB 1/1/5/MS JWAKE1 ATX-24 Pin PWR Fan5 Fan1 4-Pin PWR JPF COM1 JPUSB1 E7221 CopperRiver NorthBridge CPU (LGA 775) VGA Parallel Port GLAN1 DIMM 1A DIMM 1B DIMM 2A DIMM 2B GLAN2 LE1 GLAN CTRL PCI-X 133/100 MHz GLAN CTRL ICH6R SouthBridge BIOS Battery PXH-V BUZZOR JPL1 JPL2 JBT1 WOL SCSI Channel A PCI 33MHz PCI-Ex1 PCI-Ex1 SCSI CTRL 7902 W IPMI Floppy IDE COM2 USB2/3 JWOR JPA1 JWD USB 2/3 USB 6/7Wake-On-Ring
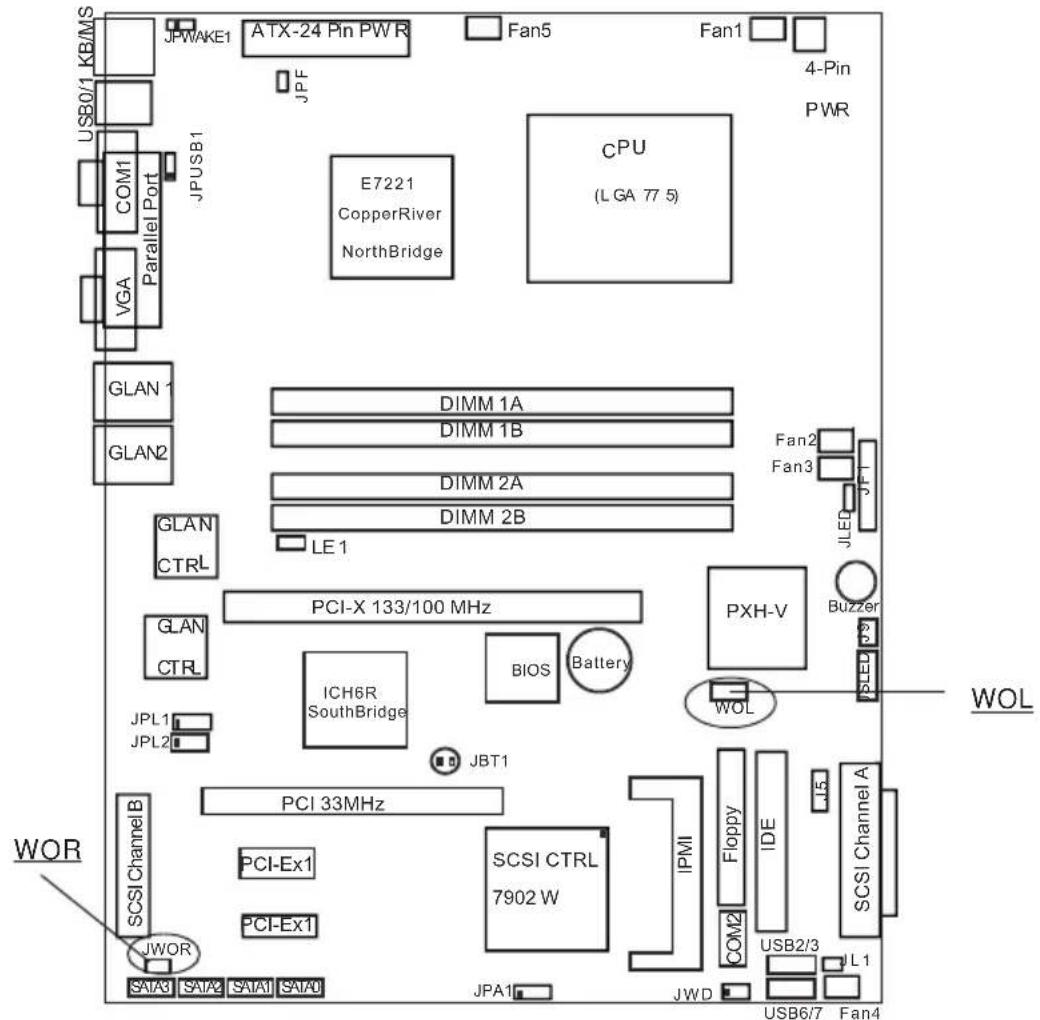
The Wake-On-Ring header is located at JWOR. This function allows your computer to be "awakened" by an incoming call when in the suspend state. See the table on the right for pin definitions. You must also have a WOR card and cable to use WOR.
| Wake-On-Ring Pin Definitions(JWOR) | |
| Pin Number | Definition |
| 1 | Ground |
| 2 | Wake-up |
Wake-On-LAN
The Wake-On-LAN header(JWOL) is designated WOL on the motherboard. See the table on the right for pin definitions. You must enable the LAN Wake-Up setting in BIOS to use this function. (You must also have a LAN card with a Wake-On-LAN connector and cable to use this feature.)
Wake-On-LAN Pin Definitions (JWOL)
| Pin Number | Definition |
| 1 | +5V Standby |
| 2 | Ground |
| 3 | Wake-up |
text_image
JPWAKE1 ATX-24 Pin PWR Fan5 Fan1 4-Pin PWR E7221 CopperRiver NorthBridge CPU (LGA 77 5) GLAN DIMM 1A DIMM 1B DIMM 2A DIMM 2B LE1 GLAN CTRL PCI-X 133/100 MHz PXH-V JLED JPT GLAN CTRL BIOS Battery JBLT1 ICHE6R SouthBridge WOL JPL1 JPL2 PCI 33MHz PCI-Ex1 SCSI Channel A SCSI Channel B PCI-Ex1 SCSI Channel 7902 W IPMI Floppy IDE COM2 USB2/3 JL1 JWOR WOR SATA3 SATA4 SATA1 SATA2 JPA1 JWD USB6/7 Fan4VGA Connector
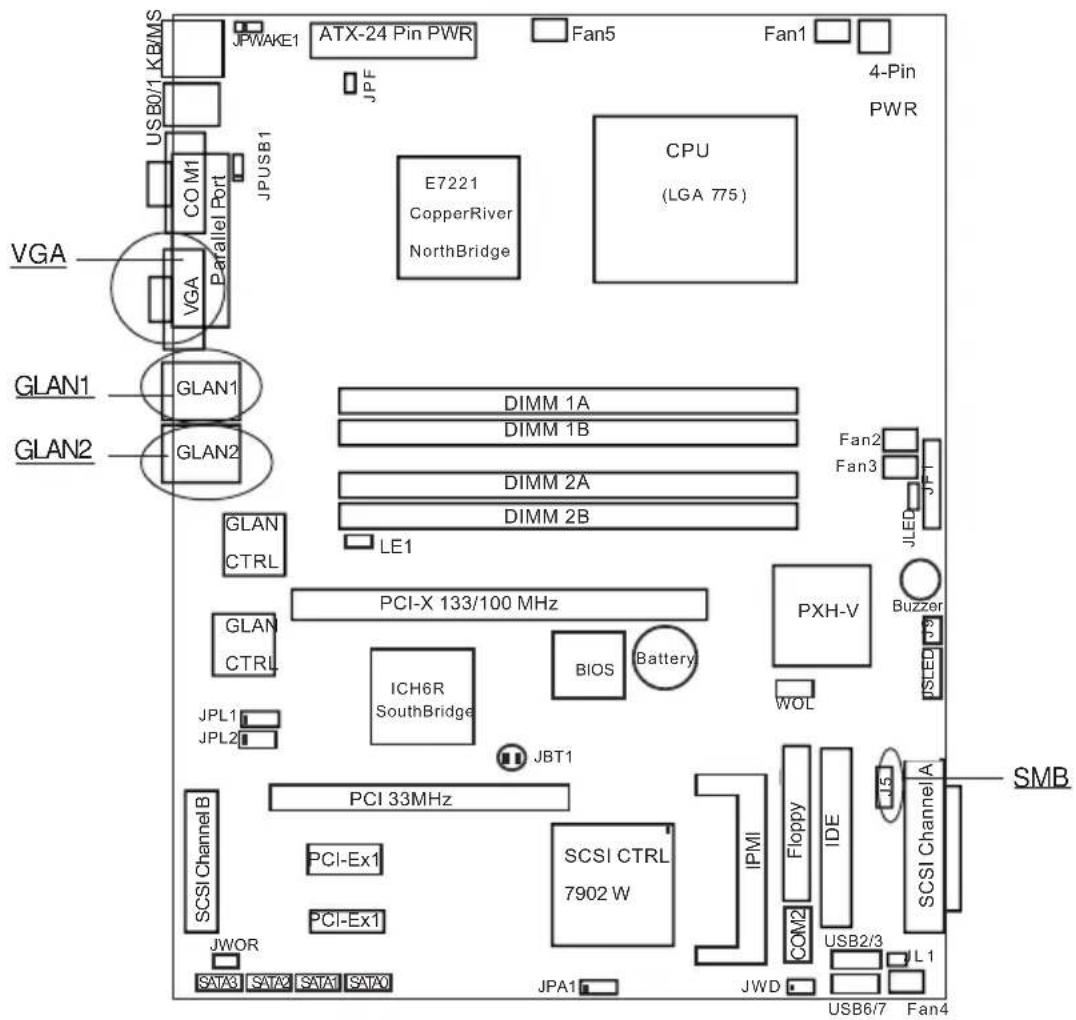
A VGA connector (JG1) is located next to the COM1 on the IO backplane. Refer to the board layout below for the location.
Giga-bit LAN (Ethernet) Ports
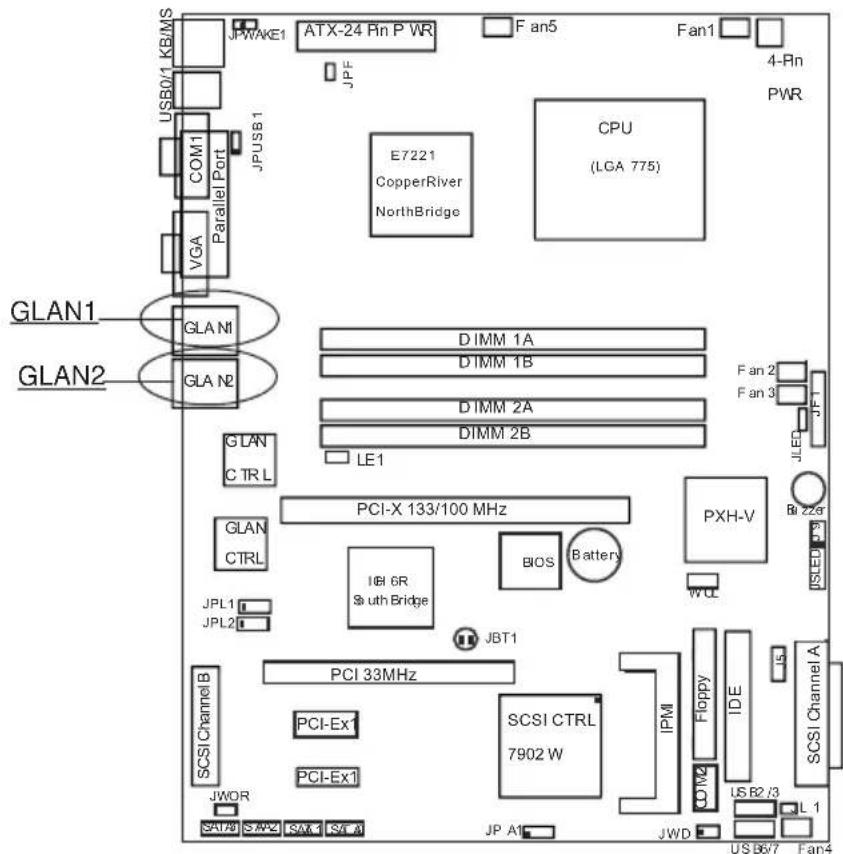
There are two RJ45 Ethernet (Gigabit LAN) ports located on the IO backplane.

SMB Header
A System Management Bus header is located at J5. Connect the appropriate cable here to utilize SMB on your system.
SMB Header Pin Definitions (J5)
| Pin Number | Definition |
| 1 | Data |
| 2 | Clock |
| 3 | Ground |
| 4 | No Connection |
text_image
JPWAKE1 ATX-24 Pin PWR Fan5 Fan1 JPF 4-Pin PWR USB0/1 KBMS COM1 JPU6B1 E7221 CopperRiver NorthBridge CPU (LGA 775) VGA VGA Parallel Port GLAN1 GLAN1 DIMM 1A DIMM 1B DIMM 2A DIMM 2B LE1 GLAN CTRL PCI-X 133/100 MHz PXH-V JLED JPT JPL1 JPL2 ICHE6R SouthBridge BIOS Battery WOL JBT1 PCI 33MHz PCI-Ex1 SCSI CTRL 7902 W IPMI Floppy IDE COM2 USB2/3 L1 JWOR JWD SATA3 SATA2 SATA1 SATA0 JPA1 USB6/7 Fan4 SMBSATA LED
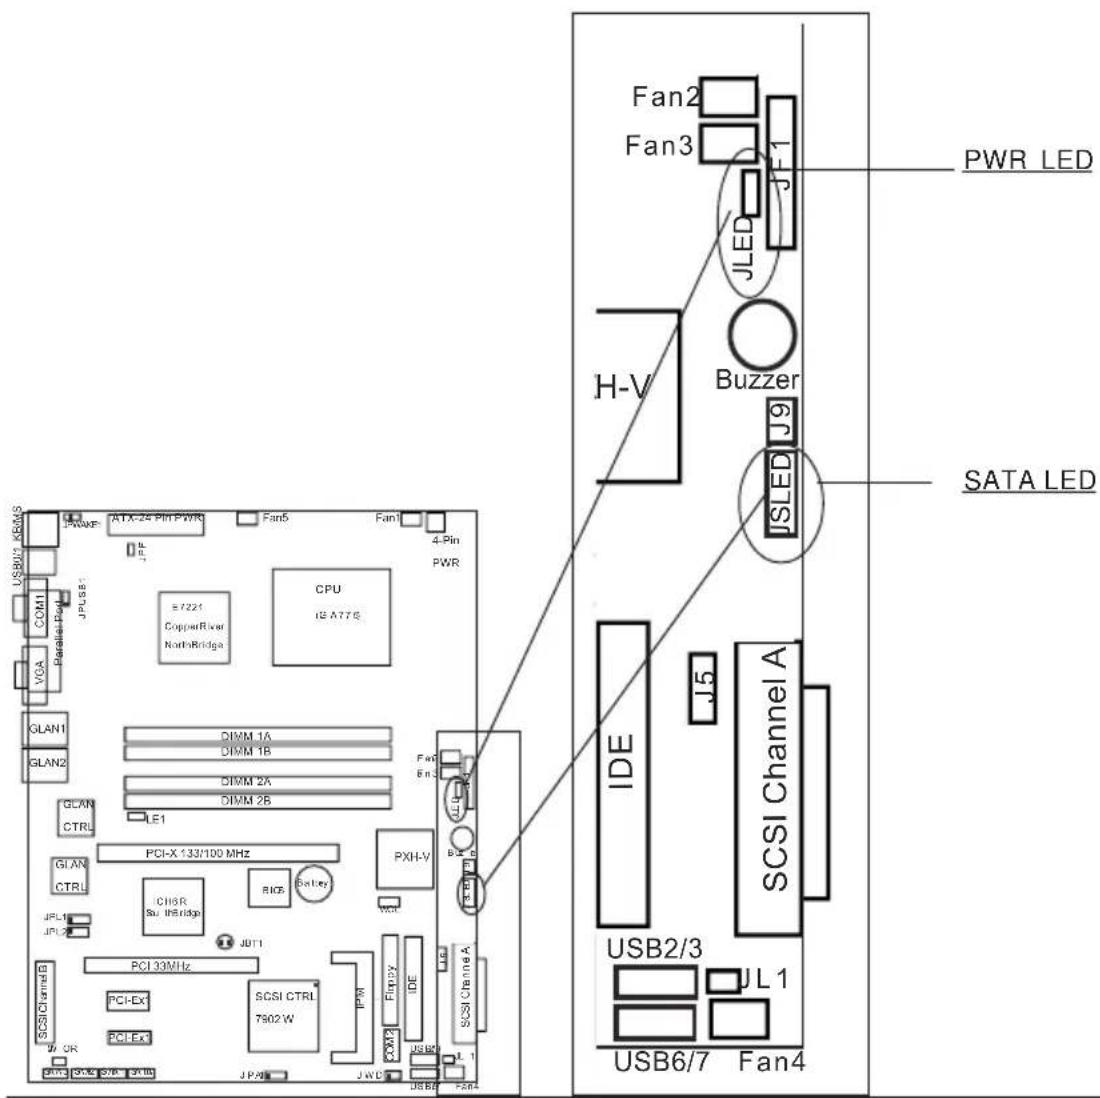
The SATA LED header is located on JSLED. This header will display all SATA activities. See the table on the right for pin definitions.
SATA LED Pin Definitions (JSLED)
| Pin Number | Definition |
| 1 | HD Act |
| 2 | HD Act |
| 3 | HD Act |
| 4 | HD Act |
| 5 | NC |
Power LED
The Power LED header is located on JLED. This header provides LED indication of power being supplied to the system. See the table on the right for pin definitions.
JLED
Pin Definitions
| Pin Number | Definition |
| 1 | +5V |
| 2 | Key |
| 3 | Ground |
Explanation of Jumpers
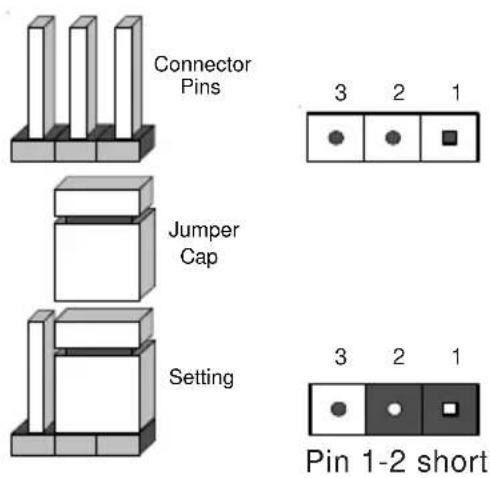
To modify the operation of the motherboard, jumpers can be used to choose between optional settings. Jumpers create shorts between two pins to change the function of the connector. Pin 1 is identified with a square solder pad on the printed circuit board. See the motherboard layout pages for jumper locations.
Note: On a two-pin jumper, "Closed" means the jumper is on both pins and "Open" means the jumper is either on only one pin or completely removed.
CMOS Clear
JBT1 is not actually a jumper but consists of two contact pads. To clear the contents of CMOS, short these pads together by touching them both with a metal conductor such as the head of a small screwdriver. JBT1 is located near the SATA header on the P8SC8/P8SCI. Note: for ATX power supplies, you must completely shut down the system and remove the AC power cord before clearing CMOS.
text_image
Connector Pins Jumper Cap Setting 3 2 1 3 2 1 Pin 1-2 short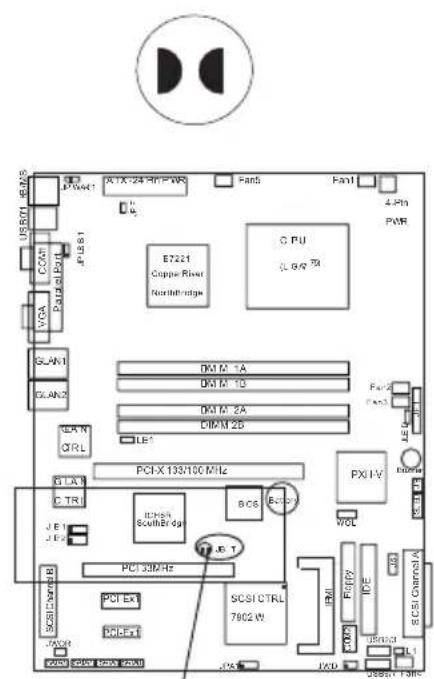
text_image
US571 PLA/S JPL4 X1X-24 Pin PWR Fan5 Fan1 4 Pin PWR CCAN PWR VRA JPL8 1 E7221 Copper River Northbridge CPU (6.6/73) GLAN1 GLAN2 DK1M-1A DK1M-1B DK1M-2A DIMM-2B LE1 GAIN QRL PCI-X 133100 MHz FXI I-V CTR ICOS SCSIC Channel A PCI-33MHz PCI-Ex SCSI CTRL 7802 W. JBL T JBL JBL JBL JBL JBL JBL JBL JBL JBL JBL JBL JBL JBL JBL JBL JBL JBL JBL JBL JBL JBL JBL JBL JBL JBL JBL JBL JBL JBL JBL JBL JBL JBL JBL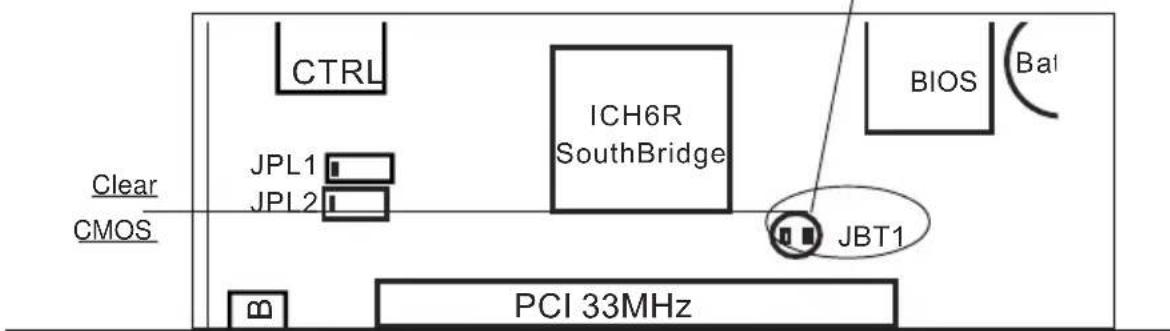
text_image
CTRL JPL1 JPL2 ICH6R SouthBridge BIOS Bat Clear CMOS JBT1 PCI 33MHzUSB Wake-Up
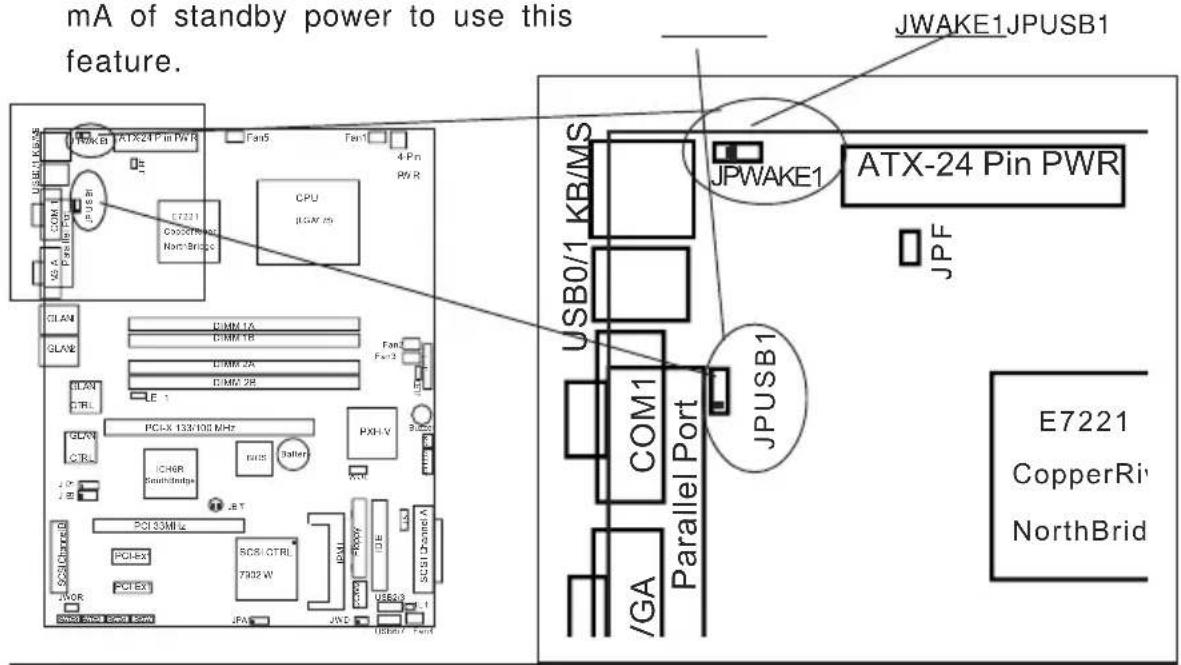
Use JPUSB1 to enable or disable USB Wake-Up, which allows you to wakeup the system by depressing a key on the keyboard or by clicking the mouse when either is connected to the USB1 or USB2 port. This jumper is used together with the USB Wake-Up function in BIOS. Enable both the jumper and the BIOS setting to allow the system to be woken up. See the table on the right for jumper settings.
USB Wake-Up Jumper Settings (JPUSB1)
| Jumper Position | Definition |
| 1-2 | Enabled |
| 2-3 | Disabled |
Keyboard Wake-Up
The JPWAKE1 jumper is used together with the Keyboard Wake-Up function in BIOS. Enable both the jumper and the BIOS setting to allow the system to be woken up by depressing a key on the keyboard. See the table on the right for jumper settings. Your power supply must meet ATX specification 2.01 or higher and supply 720 mA of standby power to use this feature.
Keyboard Wake-Up Jumper Settings (JPWAKE1)
| Jumper Position | Definition |
| 1-2 | Enabled |
| 2-3 | Disabled |
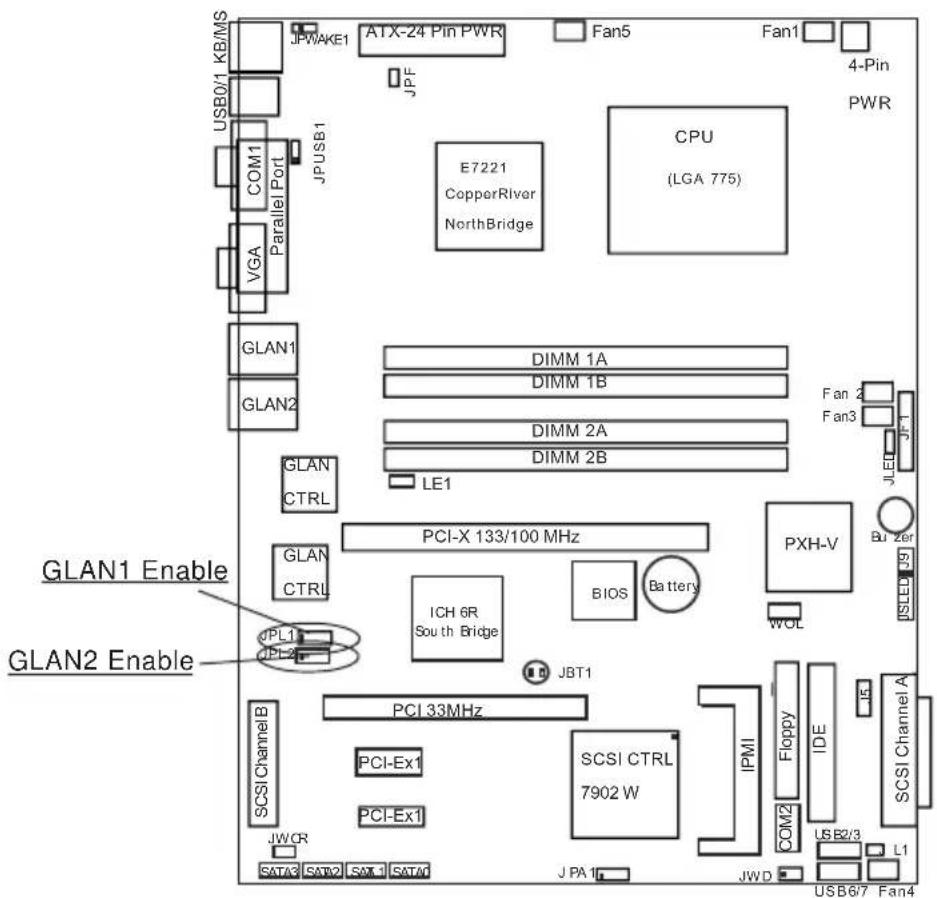
There are two Giga-bit Controllers located on the motherboard. Each GLAN Controller can be enabled via a jumper. Close Pins 1 & 2 of JPL1 to enable the function of GLAN Controller 1, and close Pins 1 & 2 of JPL2 to enable the function of GLAN Controller 2. See the table on the right for pin definitions.
GLAN Enable(JPL1, JPL2)
| Pin# | Definitions |
| 1-2 | Enable |
| 2-3 | Disable |
text_image
JPWAKE1 ATX-24 Pin PWR Fan5 Fan1 4-Pin PWR JPF COM1 JPUSB1 E7221 CopperRiver NorthBridge CPU (LGA 775) VGA Parallel Port GLAN1 GLAN2 DIMM 1A DIMM 1B DIMM 2A DIMM 2B LE1 GLAN CTRL GLAN CTRL PCI-X 133/100 MHz PXH-V BIOS Battery WOL JPL1 JPL2 PCI 33MHz PCI-Ex1 SCSI CTRL 7902 W IPMI Floppy IDE COM2 USB2/3 L1 JWCR JPA 1 JWD USB6/7 Fan4 SATA3 SAT2 SAT1 SATA1Force-Power-On Enable/Disable
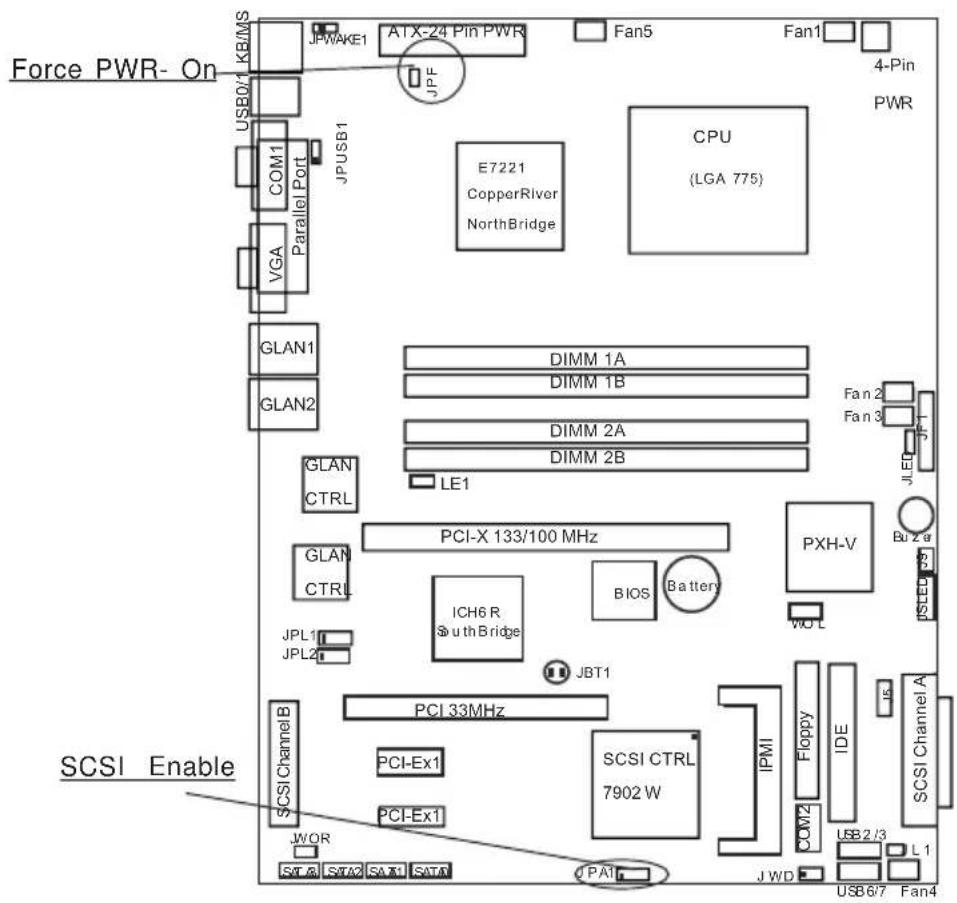
Jumper JPF allows you to enable or disable the function of Force-Power-On. If enabled, the power will always stay on automatically. If this function disabled, the user needs to press the power button to power on the system.
Force Power On (JPF)
| Jumper Position | Definition |
| Open Closed | Normal Force On |
SCSI Enable/Disable (\*P8SC8 only)
The SCSI Enable/Disable jumper at JPA1 allows you to enable or disable the onboard SCSI. The normal (default) position is on pins 1-2 to enable SCSI. See the table on the right for jumper settings.
SCSI Enable/Disable Jumper Settings (JPA1)
| Jumper Position | Definition |
| Pins 1-2 | Enabled |
| Pins 2-3 | Disabled |
text_image
Force PWR- On USB0/1 KB/MS JPWAKE1 ATX-24 Pin PWR Fan5 Fan1 JPF 4-Pin PWR COM1 E7221 CopperRiver NorthBridge VGA CPU {LGA 775} GLAN1 DIMM 1A GLAN2 DIMM 1B DIMM 2A DIMM 2B LE1 GLAN CTRL PCI-X 133/100 MHz PGXH-V JPL1 ICH6 R Battery JPL2 South Bridge BIOS WO L JBLT1 JPT JPT JPT JPT JPT PCI 33MHz SCSI Channel B PCI-Ex1 SCSI CTRL 7902 W IPMI Floppy IDE JIS PCI-Ex1 PCI-Ex1 COM2 USB 2/3 L1 WOR PAI JWD USB6/7 Fan4 ST & ST& SA#1 SATAWatch Dog Enable/Disable
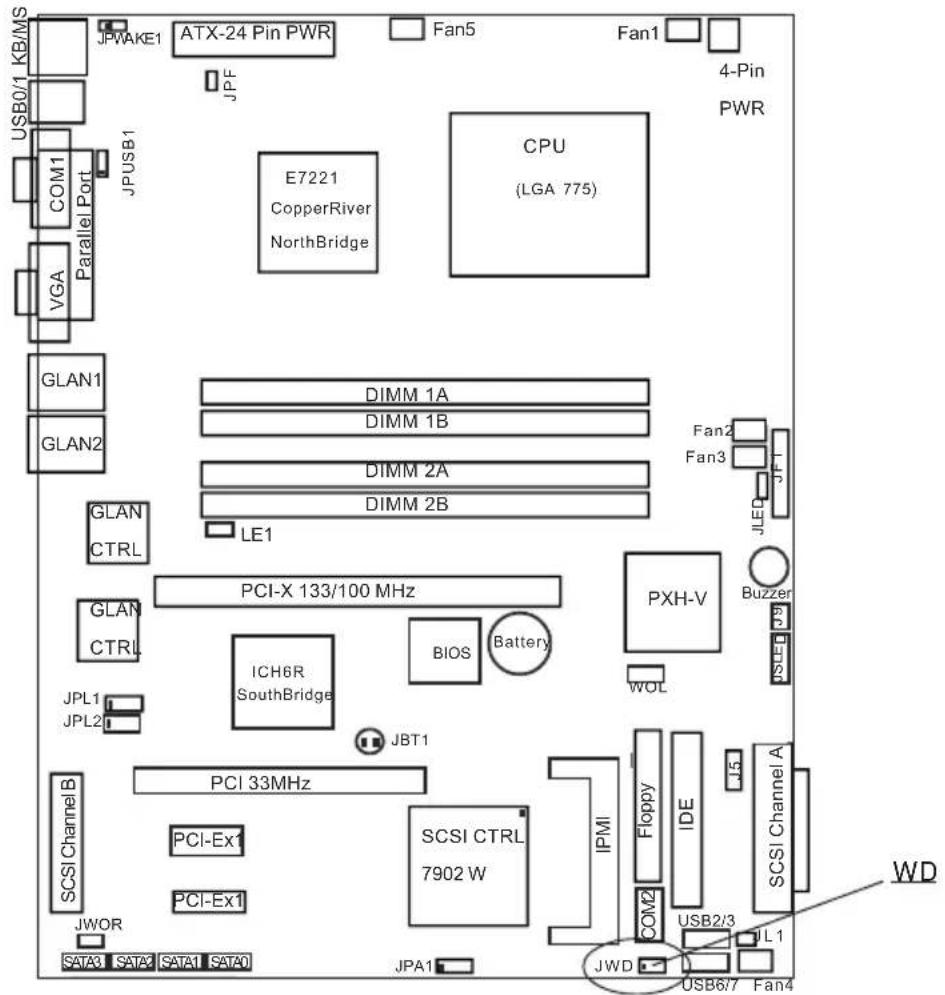
JWD enables the Watch Dog function. Watch Dog is a system monitor that can reboot the system when a software application is "hung up". Pins 1-2 will cause WD to reset the system if an application is "hung up". Pins 2-3 will generate a non-maskable interrupt signal for the application that is "hung up". See the table on the right for jumper settings. Watch Dog can also be enabled via BIOS. (*Note, when enabled, the user needs to write his own application software in order to disable the Watch Dog Timer.)
| Watch DogJumper Settings (JWD) | |
| Jumper Position | Definition |
| Pins 1-2 | WD to Reset |
| Pins 2-3 | WD to NMI |
| Open | Disabled |
text_image
JPWAKE1 ATX-24 Pin PWR Fan5 Fan1 4-Pin PWR JPF JPUSB1 COM1 Parallel Port VGA GLAN1 GLAN2 E7221 CopperRiver NorthBridge CPU (LGA 775) DIMM 1A DIMM 1B DIMM 2A DIMM 2B LE1 GLAN CTRL PCI-X 133/100 MHz PXH-V JPL1 JPL2 ICH6R SouthBridge BIOS Battery WOL JBT1 PCI 33MHz PCI-Ex1 PCI-Ex1 SCSI CTRL 7902 W IPMI Floppy IDE L5 COM2 USB2/3 JL1 JWOR SATA3 SATA2 SATA1 SATA0 JPA1 JWD USB6/7 Fan4 JLED JPT Buzzer2-8 Onboard Indicators
GLAN LEDs
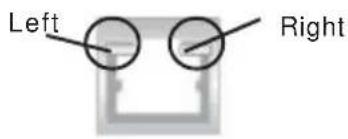
The Gigabit Ethernet LAN port (located beside the COM2 port) has two LEDs on the back of the connectors. The yellow LED indicates activity while the other LED may be green, orange or off to indicate the speed of the connection. See the table at right for the functions associated with the second LED.
text_image
Left Right(Back Panel View)
1 Gb LAN Left LED Indicator (Speed LED)
| LED Color | Definition |
| Off | No Connection |
| Green | 10/100 MHz |
| Amber | 1 GHz |
1 Gb LAN Right LED Indicator(Activity LED)
| LED Color | Definition |
| Amber | Blinking 10/100MHz/ 1GHz |
text_image
JPWAKE1 ATX-24 Rn P WR Fan5 Fan1 4-Rn PWR JPF JPU61 COM1 Parallel Port VGA VLA GLAN1 GLAN1 GLAN2 GLAN E7221 CopperRiver NorthBridge CPU (LGA 775) DIMM 1A DIMM 1B DIMM 2A DIMM 2B LE1 GLAN CTRL PCI-X 133/100 MHz GLAN CTRL I6H 6R South Bridge BIOS Battery PXH-V JPL1 JPL2 JBT1 JBL JLLED BI 22a ISLED P3 SCSI Channel A PCI 33MHz PCI-Ex1 PCI-Ex1 SCSI CTRL 7902 W IPMI Floppy IDE COM2 USB2 /3 L 1 JWOR JPA1 JWD USB67 Fan42-9 Parallel Port, Floppy Drive, Hard Drive, and SCSI Connections
Use the following information to connect the floppy and hard disk drive cables.
- The floppy disk drive cable has seven twisted wires.
- A red mark on a wire typically designates the location of pin 1.
- A single floppy disk drive ribbon cable has 34 wires and two connectors to provide for two floppy disk drives. The connector with twisted wires always connects to drive A, and the connector that does not have twisted wires always connects to drive B.
- The 80-wire ATA100/66 IDE hard disk drive cable that came with your system has two connectors to support two drives. This special cable should be used to take advantage of the speed this new technology offers. The blue connector connects to the onboard IDE connector interface and the other connector(s) to your hard drive(s). Consult the documentation that came with your disk drive for details on actual jumper locations and settings for the hard disk drive.
Parallel Port Connector
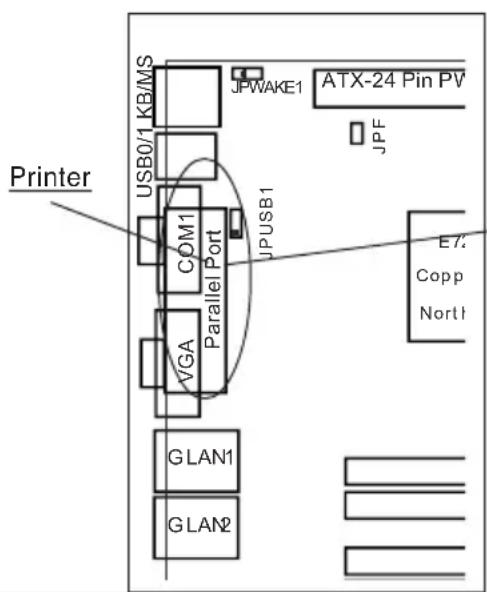
The parallel port is located next to the USB 0/1 Ports. Refer to Figure 2-3 for location. See the table on the right for pin definitions.
Parallel (Printer) Port Pin Definitions
| Pin Number Function | Pin Number Function |
| 1 Strobe- | 2 Auto Feed |
| 3 Data Bit 0 | 4 Error- |
| 5 Data Bit 1 | 6 Init- |
| 7 Data Bit 2 | 8 SLCT IN- |
| 9 Data Bit 3 | 10 GND |
| 11 Data Bit 4 | 12 GND |
| 13 Data Bit 5 | 14 GND |
| 15 Data Bit 6 | 16 GND |
| 17 Data Bit 7 | 18 GND |
| 19 ACK | 20 GND |
| 21 BUSY | 22 GND |
| 23 PE | 24 GND |
| 25 SLCT | 26 NC |
text_image
JPWAKE1 ATX-24 Pin PV JPF JPUSB1 COM1 VGA Parallel Port UPUB1 E7/ Copp Nort1 Printer USB0/1 KB/MS GLAN1 GLAN2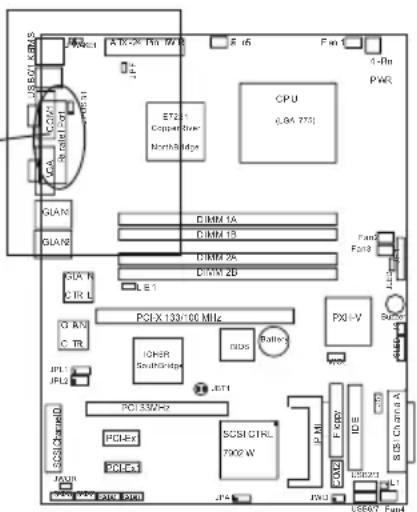
text_image
USB01 123V JPL1 JPL2 GIAN GIAN GUA R CIR L Q RX C TR JPL1 JPL2 PCI X 1330/00 MHz IONER Southridge RIDS Battery PCI 330/Hz PCI-Ex 9PCEs SCSI CTRL 7992 W PCI-X 123V CPU (6A 775) DIMM 1A DIMM 1B DIMM 2K DIMM 2D L8.1 FX0-V VDD SOS USB01 123V JPL4 JPL5 F-500 F-501 F-502 F-503 F-504 F-505 F-506 F-507 F-508 F-509 F-510 F-511 F-512 F-513 F-514 F-515 F-516 F-517 F-518 F-519 F-520 F-521 F-522 F-523 F-524 F-525 F-526 F-527 F-528 F-529 F-530Floppy Connector
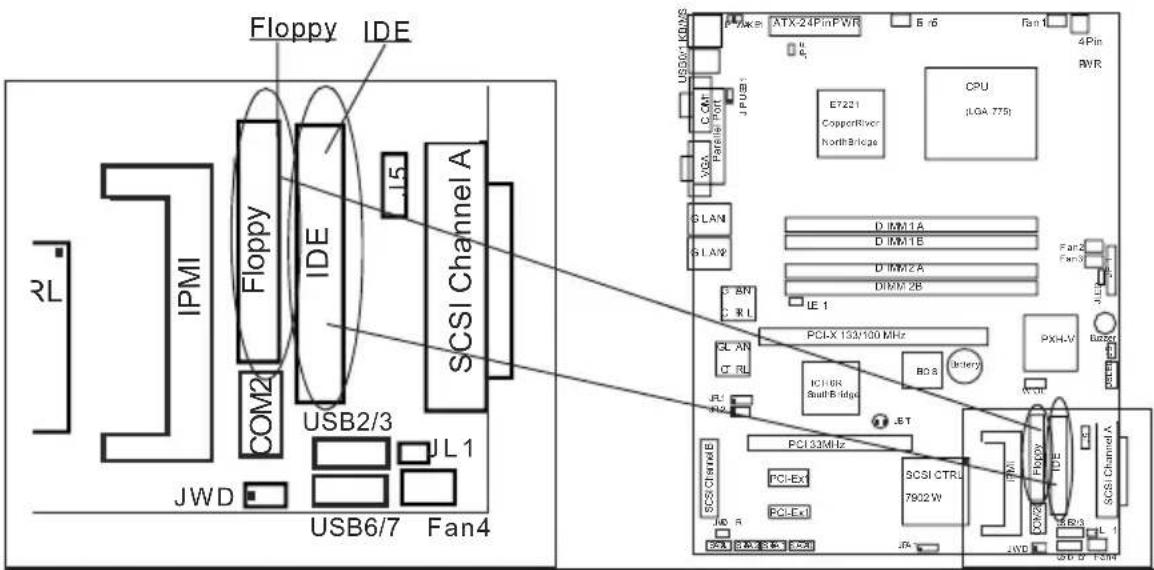
The floppy connector is located between the IDE slot and the IPMI Socket. Refer to Figure 2-3 for location. See the table on the right for pin definitions.
Floppy Connector Pin Definitions (J16)
| Pin Number | Function | Pin Number Function |
| 1 | GND | 2 FDHDIN |
| 3 | GND | 4 Reserved |
| 5 | Key | 6 FDEDIN |
| 7 | GND | 8 Index- |
| 9 | GND | 10 Motor Enable |
| 11 GND | 12 Drive Select B- | |
| 13 GND | 14 Drive Select A- | |
| 15 GND | 16 Motor Enable | |
| 17 GND | 18 DIR- | |
| 19 GND | 20 STEP- | |
| 21 GND | 22 Write Data- | |
| 23 GND | 24 Write Gate- | |
| 25 GND | 26 Track 00- | |
| 27 GND | 28 Write Protect- | |
| 29 GND | 30 Read Data- | |
| 31 GND | 32 Side 1 Select- | |
| 33 GND | 34 Diskette |
IDE Connector
There are no jumpers to configure the onboard IDE interfaces Pins 3, 5 of JF1. Refer to Figure 2-3 for location. See the table on the left for pin definitions. Note: You must use the ATA100/66 cable included with your system to benefit from the ATA100/66 technology.
IDE Connector Pin Definitions
| Pin Number Function | Pin Number Function |
| 1 Reset IDE | 2 GND |
| 3 Host Data 7 | 4 Host Data 8 |
| 5 Host Data 6 | 6 Host Data 9 |
| 7 Host Data 5 | 8 Host Data 10 |
| 9 Host Data 4 | 10 Host Data 11 |
| 11 Host Data 3 | 12 Host Data 12 |
| 13 Host Data 2 | 14 Host Data 13 |
| 15 Host Data 1 | 16 Host Data 14 |
| 17 Host Data 0 | 18 Host Data 15 |
| 19 GND | 20 Key |
| 21 DRQ3 | 22 GND |
| 23 I/O Write- | 24 GND |
| 25 I/O Read- | 26 GND |
| 27 IOCHRDY | 28 BALE |
| 29 DACK3- | 30 GND |
| 31 IRQ14 | 32 IOCS16- |
| 33 Addr 1 | 34 GND |
| 35 Addr 0 | 36 Addr 2 |
| 37 Chip Select 0 | 38 Chip Select 1- |
| 39 Activity | 40 GND |
text_image
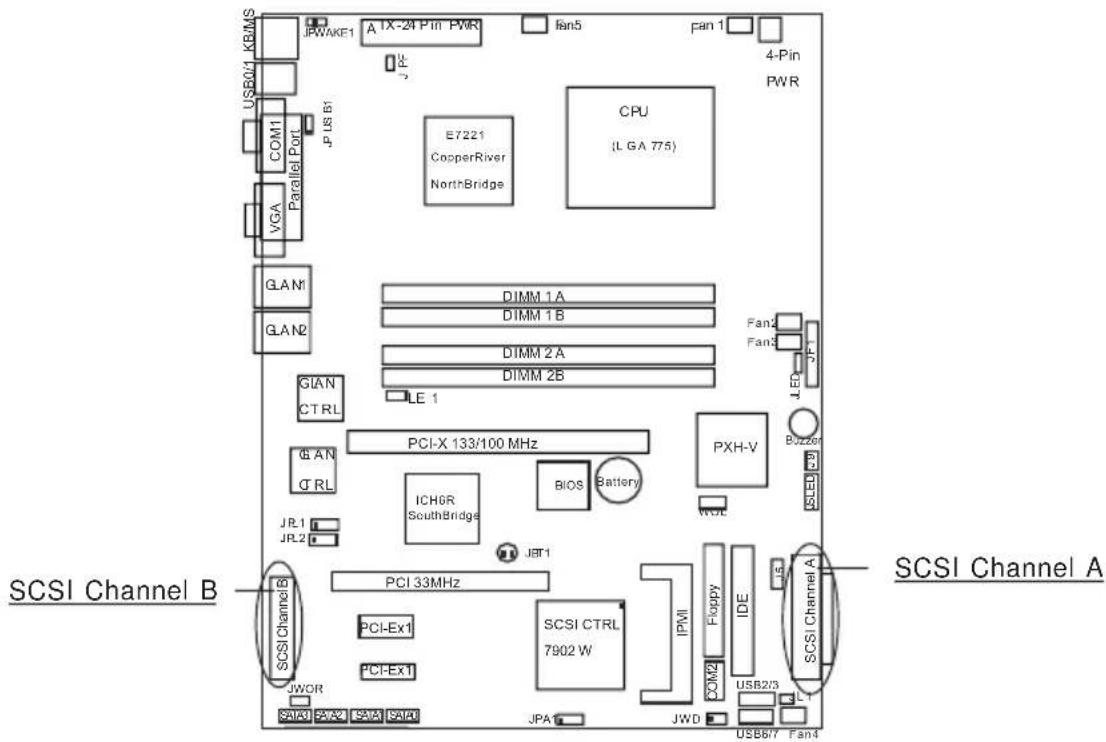
Floppy IDE RL IPMI COM2 Floppy IDE .15 USB2/3 JWD USB6/7 Fan4 SCSI Channel A JL 1 PCI-X 133/100 MHz PCI-EX PCI-Ex1 PCI-EX PCI-EX PCI-EX PCI-EX PCI-EX PCI-EX PCI-EX PCI-EX PCI-EX PCI-EX PCI-EX PCI-EX PCI-EX PCI-EX PCI-EX PCI-EX PCI-EX PCI-EX PCI-EX PCI-EX PCI-EX PCI-EX PCI-EX PCI-EX PCI-EX PCI-Ex1 PCI-Ex1 PCI-Ex1 PCI-Ex1 PCI-Ex1 PCI-Ex1 PCI-Ex1 PCI-Ex1 PCI-Ex1 PCI-Ex1 PCI-Ex1 PCI-Ex1 PCI-Ex1 PCI-Ex1 PCI-Ex1 PCI-Ex1 PCI-Ex1 PCI-Ex1 PCI-Ex1 PCI-Ex1 PCI-Ex2 PCI-Ex2 PCI-Ex2 PCI-Ex2 PCI-Ex2 PCI-Ex2 PCI-Ex2 PCI-Ex2 PCI-Ex2 PCI-Ex2 PCI-Ex2 PCI-Ex2 PCI-Ex2 PCI-Ex2 PCI-Ex2 PCI-Ex2 PCI-Ex2 PCI-Ex2 PCI-Ex2 PCI-Ex2 PCI-Ex3 PCI-Ex3 PCI-Ex3 PCI-Ex3 PCI-Ex3 PCI-Ex3 PCI-Ex3 PCI-Ex3 PCI-Ex3 PCI-Ex3 PCI-Ex3 PCI-Ex3 PCI-Ex3 PCI-Ex3 PCI-Ex3 PCI-Ex3 PCI-Ex3 PCI-Ex3 PCI-Ex3 PCI-Ex3 PCI-Ex4 PCI-Ex4 PCI-Ex4 PCI-Ex4 PCI-Ex4 PCI-Ex4 PCI-Ex4 PCI-Ex4 PCI-Ex4 PCI-Ex4 PCI-Ex4 PCI-Ex4 PCI-Ex4 PCI-Ex4 PCI-Ex4 PCI-Ex4 PCI-Ex4 PCI-Ex4 PCI-Ex4 PCI-Ex4 PCI-Ex5 PCI-Ex5 PCI-Ex5 PCI-Ex5 PCI-Ex5 PCI-Ex5 PCI-Ex5 PCI-Ex5 PCI-Ex5 PCI-Ex5 PCI-Ex5 PCI-Ex5 PCI-Ex5 PCI-Ex5 PCI-Ex5 PCI-Ex5 PCI-Ex5 PCI-Ex5Ultra320 SCSI Connectors (\*P8SC8 only)
Refer to the table below for the pin definitions of the Ultra320 SCSI connectors located at JA1, and JA2.
(*Please refer to Appendix C for software installation.)
68-pin Ultra320 SCSI Connectors (JA1 and JA2)
| Connector Contact Number | Signal Names |
| 1 | +DB(12) |
| 2 | +DB(13) |
| 3 | +DB(14) |
| 4 | +DB(15) |
| 5 | +DB(P1) |
| 6 | +DB(0) |
| 7 | +DB(1) |
| 8 | +DB(2) |
| 9 | +DB(3) |
| 10 | +DB(4) |
| 11 | +DB(5) |
| 12 | +DB(6) |
| 13 | +DB(7) |
| 14 | +DB(P) |
| 15 | GROUND |
| 16 | DIFFSENS |
| 17 | TERMPWR |
| 18 | TERMPWR |
| 19 | RESERVED |
| 20 | GROUND |
| 21 | +ATN |
| 22 | GROUND |
| 23 | +BSY |
| 24 | +ACK |
| 25 | +RST |
| 26 | +MSG |
| 27 | +SEL |
| 28 | +C/D |
| 29 | +REQ |
| 30 | +I/O |
| 31 | +DB(8) |
| 32 | +DB(9) |
| 33 | +DB(10) |
| 34 | +DB(11) |
| Connector Contact Number | Signal Names |
| 35 | -DB(12) |
| 36 | -DB(13) |
| 37 | -DB(14) |
| 38 | -DB(15) |
| 39 | -DB(P1) |
| 40 | -DB(0) |
| 41 | -DB(1) |
| 42 | -DB(2) |
| 43 | -DB(3) |
| 44 | -DB(4) |
| 45 | -DB(5) |
| 46 | -DB(6) |
| 47 | -DB(7) |
| 48 | -DB(P) |
| 49 | GROUND |
| 50 | GROUND |
| 51 | TERMPWR |
| 52 | TERMPWR |
| 53 | RESERVED |
| 54 | GROUND |
| 55 | -ATN |
| 56 | GROUND |
| 57 | -BSY |
| 58 | -ACK |
| 59 | -RST |
| 60 | -MSG |
| 61 | -SEL |
| 62 | -C/D |
| 63 | -REQ |
| 64 | -I/O |
| 65 | -DB(8) |
| 66 | -DB(9) |
| 67 | -DB(10) |
| 68 | -DB(11) |
text_image
JPWAKE1 A TX-24 Pin PWR fan5 pan 1 4-Pin PWR USB0/1 KBMS JP LS B1 COM1 Parallel Port VGA GLAN1 GLAN2 E7221 CopperRiver NorthBridge CPU (L GA 775) DIMM 1A DIMM 1B DIMM 2A DIMM 2B LE 1 GAN CTRL PCI-X 133/100 MHz GP AN G T RL JER.1 JR.2 PCI 33MHz PCI-Ex1 PCI-Ex1 JWOR SAX3 SAX4 SAX5 SAX6 PCIX 133/100 MHz BIOS Battery PXH-V JET1 IPMXI COM2 Flappy IDE USB2/3 LE1 JWD USB6/7 Fan4 SCSI Channel A SCSI Channel B SCSI Channel AChapter 3 Troubleshooting
3-1 Troubleshooting Procedures
Use the following procedures to troubleshoot your system. If you have followed all of the procedures below and still need assistance, refer to the 'Technical Support Procedures' and/or 'Returning Merchandise for Service' section(s) in this chapter. Always disconnect the AC power cord before adding, changing or installing any hardware components.
Before Power On
- Check that the +5v standby LED is lit (LE2 on motherboard).
- Make sure that the 4-pin 12v power connector at J2 is connected to your power supply.
- Make sure that no short circuits exist between the motherboard and chassis.
- Disconnect all ribbon/wire cables from the motherboard, including those for the keyboard and mouse.
- Remove all add-on cards.
- Install a CPU and heatsink (making sure that it is fully seated) and connect the chassis speaker and the power LED to the motherboard. Check all jumper settings as well.
- Use the correct type of onboard CMOS battery as recommended by the Manufacturer. Do not install the CMOS battery upside down to avoid possible explosion.
No Power
- Make sure that no short circuits exist between the motherboard and the chassis.
- Verify that all jumpers are set to their default positions.
- Check that the 115V/230V switch on the power supply is properly set.
- Turn the power switch on and off to test the system.
- The battery on your motherboard may be old. Check to verify that it still supplies \~3VDC. If it does not, replace it with a new one.
No Video
- If the power is on but you have no video, remove all the add-on cards and cables.
- Use the speaker to determine if any beep codes exist. Refer to Appendix A for details on beep codes.
NOTE
If you are a system integrator, VAR or OEM, a POST diagnostics card is recommended. For I/O port 80h codes, refer to App. B.
Memory Errors
- Make sure that the DIMM modules are properly and fully installed.
- You should be using unbuffered DDR2 memory (see next page). Also, it is recommended that you use the same memory speed for all DIMMs in the system. See Section 2-4 for memory limitations.
- Check for bad DIMM modules or slots by swapping modules between slots and noting the results.
- Check the power supply voltage 115V/230V switch.
Losing the System's Setup Configuration
- Make sure that you are using a high quality power supply. A poor quality power supply may cause the system to lose the CMOS setup information. Refer to Section 1-6 for details on recommended power supplies.
- The battery on your motherboard may be old. Check to verify that it still supplies \~3VDC. If it does not, replace it with a new one.
- If the above steps do not fix the Setup Configuration problem, contact your vendor for repairs.
3-2 Technical Support Procedures
Before contacting Technical Support, please take the following steps. Also, note that as a motherboard manufacturer, Supermicro does not sell directly to end-users, so it is best to first check with your distributor or reseller for troubleshooting services. They should know of any possible problem(s) with the specific system configuration that was sold to you.
- Please go through the 'Troubleshooting Procedures' and 'Frequently Asked Questions' (FAQs) sections in this chapter or see the FAQs on our web site http://www.supermicro.com/support/ before contacting
Technical Support.
- BIOS upgrades can be downloaded from our web site at http://www.supermicro.com/techsupport/download.htm.
Note: Not all BIOS can be flashed depending on the modifications to the boot block code.
-
If you still cannot resolve the problem, include the following information when contacting Supermicro for technical support:
-
Motherboard model and PCB revision number
- BIOS release date/version (this can be seen on the initial display when your system first boots up)
-
System configuration
An example of a Technical Support form is posted on our web site at http://www.supermicro.com/techsupport/contact_support.htm. -
Distributors: For immediate assistance, please have your account number ready when contacting our technical support department by e-mail at support@supermicro.com.
3-3 Frequently Asked Questions
Question: What type of memory does my motherboard support?
Answer: The P8SC8/P8SCi supports up to 4 GB of ECC/Non-ECC, unbuffered DDR2-533/400, two-way interleaved or non-interleaved SDRAM. See Section 2-4 for details on installing memory.
Question: How do I update my BIOS?
Answer: It is recommended that you not upgrade your BIOS if you are not experiencing problems with your system. Updated BIOS files are located on our web site at http://www.supermicro.com/techsupport/BIOS/bios.htm. Please check our BIOS warning message and the information on how to update your BIOS on our web site. Also, check the current BIOS revision and make sure it is newer than your current BIOS before downloading. Select your mainboard model and download the BIOS file to your computer. Unzip the BIOS update file and you will find the readme.txt (flash instructions), the awdflash.exe (BIOS flash utility) and the BIOS image (xxxx.bin) files. Copy these files onto a bootable floppy and reboot your system. It is not necessary to set the BIOS boot block protection jumpers on the mainboard. At the DOS prompt upon rebooting, enter the command "awdflash." Then type in the BIOS file that you want to update (xxxx.bin).
Question: What's on the CD that came with my motherboard?
Answer: The supplied compact disc has quite a few drivers and programs that will greatly enhance your system. We recommend that you review the CD and install the applications you need. Applications on the CD include chipset drivers for Windows and security and audio drivers.
Question: Why can't I turn off the power using the momentary power on/off switch?
Answer: The instant power off function is controlled in BIOS by the Power Button Mode setting. When the On/Off feature is enabled, the motherboard will have instant off capabilities as long as the BIOS has control of the system. When the Standby or Suspend feature is enabled or when the BIOS is not in control such as during memory count (the first screen that appears when the system is turned on), the momentary on/off switch must be held for more than four seconds to shut down the system. This feature is required to implement the ACPI features on the motherboard.
Question: How do I connect the ATA100/66 cable to my IDE device(s)?
Answer: The 80-wire/40-pin high-density ATA100/66 IDE cable that came with your system has two connectors to support two drives. This special cable must be used to take advantage of the speed the ATA100/66 technology offers. Connect the blue connector to the onboard IDE header and the other connector(s) to your hard drive(s). Consult the documentation that came with your disk drive for details on actual jumper locations and settings.
Question: After I have installed 4 pieces of 1GB Memory, why does the BIOS only detect about 3.15 GB of memory during POST?
Answer: Because the chipset does not support memory remapping, so there is a memory hole located around the 4GB memory address.
Question: What are the function keys for the IPMIVIEW?
ESC O P - F1 KEY
ESC P Q - F2 KEY
ESC ESC - ESC KEY
CTRL M - ENTER KEY
CTRL H - BACKSPACE KEY
CTRL I - TAB KEY
ESC S - SIGNAL TRANSFER REQUEST
ESC c - REBOOT SYSTEM
ESC d - ALT key on
ESC e - CTRL key on
<Tab>-Enter BIOS Setup
3-4 Returning Merchandise for Service
A receipt or copy of your invoice marked with the date of purchase is required before any warranty service will be rendered. You can obtain service by calling your vendor for a Returned Merchandise Authorization (RMA) number. When returning to the manufacturer, the RMA number should be prominently displayed on the outside of the shipping carton, and mailed prepaid or hand-carried. Shipping and handling charges will be applied for all orders that must be mailed when service is complete.
This warranty only covers normal consumer use and does not cover damages incurred in shipping or from failure due to the alteration, misuse, abuse or improper maintenance of products.
During the warranty period, contact your distributor first for any product problems.
Notes
Chapter 4 BIOS
4-1 Introduction
This chapter describes the AwardBIOS for the P8SC8/P8SCI. The Award ROM BIOS is stored in a Flash chip and can be easily upgraded using a floppy disk-based program.
Note: Due to periodic changes to the BIOS, some settings may have been added or deleted and might not yet be recorded in this manual. Refer to the Manual Download area of our web site for any changes to the BIOS that are not reflected in this manual.
System BIOS
The BIOS is the Basic Input Output System used in all IBM® PC, XT™, AT®, and PS/2® compatible computers. The AwardBIOS Flash chip stores the system parameters, such as amount of memory, type of disk drives and video displays, etc. CMOS requires very little power. When the computer is turned off, a back-up battery provides power to the BIOS Flash chip, enabling it to retain the system parameters. Each time the computer is powered-on, the computer is then configured with the values stored in the BIOS ROM by the system BIOS, which gains control when the computer is powered on.
How To Change the Configuration Data
The CMOS information that determines the system parameters may be changed by entering the BIOS Setup utility. This Setup utility can be accessed by pressing at the appropriate time during system boot.
Starting the Setup Utility
Normally, the only visible POST (Power On Self Test) routine is the memory test. As the memory is being tested, press the
4-2 Running Setup
*Optimal default settings are in bold text unless otherwise noted.
The BIOS setup options described in this section are selected by choosing the appropriate text from the Main BIOS Setup screen. All displayed text is described in this section, although the screen display is often all you need to understand how to set the options (see on next page).
When you first power on the computer, the AwardBIOS ^™ is immediately activated.
While the BIOS is in control, the Setup program can be activated in one of two ways:
- By pressing
immediately after turning the system on, or - When the following message appears briefly at the bottom of the screen during the POST (Power On Self-Test), press the
key to activate the Main Setup Menu.
Press DEL to enter SETUP
4-3 Main BIOS Setup
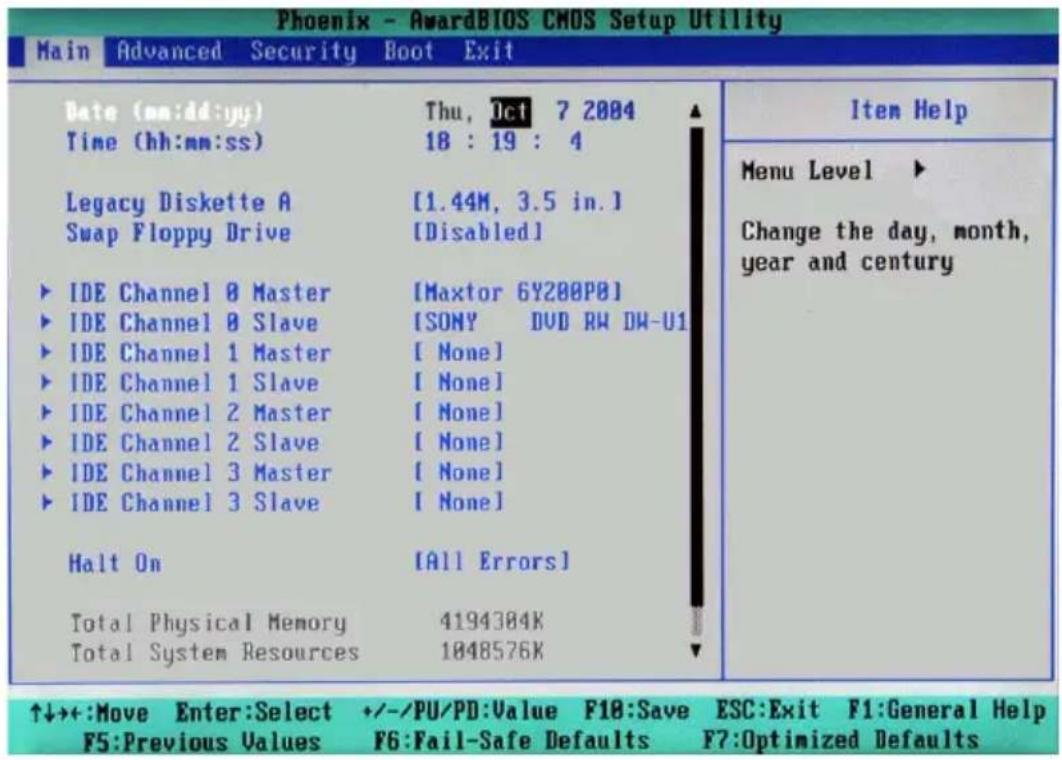
All Main Setup options are described in this section. The Main BIOS Setup screen is displayed below.
Use the
Press the
Main BIOS Setup Menu
text_image
Phoenix - AwardBIOS CMOS Setup Utility Main Advanced Security Boot Exit Date (mm:dd:yy) Thu, Oct 7 2004 Time (hh:mm:ss) 18 : 19 : 4 Legacy Diskette A [1.44M, 3.5 in.] Swap Floppy Drive [Disabled] IDE Channel 0 Master [Maxtor 6Y200P0] IDE Channel 0 Slave [SONY DVD RW DW-U1] IDE Channel 1 Master [ None] IDE Channel 1 Slave [ None] IDE Channel 2 Master [ None] IDE Channel 2 Slave [ None] IDE Channel 3 Master [ None] IDE Channel 3 Slave [ None] Halt On [All Errors] Total Physical Memory 4194384K Total System Resources 1048576K ↑↓→+:Move Enter:Select +/-/PU/PD:Value F10:Save ESC:Exit F1:General Help F5:Previous Values F6:Fail-Safe Defaults F7:Optimized Defaults Item Help Menu Level ▶ Change the day, month, year and centuryDate/Time
Set the system date and time. Key in the correct information in the "mm", "dd" and "yy" fields. Press the "Enter" key to save the data.
This setting allows the user to set the type of floppy disk drive installed as diskette A and diskette B. The options are None, 360Kb 5.25 in, 1.2MB 5.25 in, 720Kb 3.5 in, 1.44/1.25MB, 3.5 in and 2.88MB 3.5 in.
Swap Floppy Drive
If the system has two floppy drives, enable this feature to assign physical drive B to logical drive A or physical drive A to logic drive B. The options are Enabled and Disabled.
▶ IDE Channel 0 Master/Slave, IDE Channel 1 Master/Slave, IDE Channel 2 Master/Slave, IDE Channel 3 Master/Slave
These settings allow the user to set the parameters of the IDE Channel 0 Master/Slave to IDE Channel 3 Master/Slave slots. Hit
| IDE Channel 8 Master | Item Help | |
| IDE HDD Auto-Detection | [Press Enter] | Menu Level ▶▶ |
| IDE Channel 8 Master Access Mode | [Auto] [Auto] | To auto-detect the HDD's size, head... on this channel |
| Capacity | 203 GB | |
| Cylinder | 65535 | |
| Head | 16 | |
| Precomp | 8 | |
| Landing Zone | 65534 | |
| Sector | 255 | |
IDE HDD Auto-Detection
This option allows the user to determine the manner in which the AwardBIOS sets the settings for IDE Channel 0 to IDE Channel 3 Master Devices. The options are "None", "Auto" and "Manual."
IDE Channel 0 to IDE Channel 3 Master
Press the
Access Mode
This item determines the location through which the AwardBIOS accesses the IDE Primary Master Device. The settings are "CHS", "LBA", "Large", and "Auto".
Halt On
This item allows the user to select the situation in which the BIOS will stop the POST process and notify you about the status of the system. The settings are "All Errors", "No Errors", "All, But Keyboard", "All, But Diskette", and "All, But Disk/Key".
Total Physical Memory/Total System Resources/Total Available Memory
These are displays that inform you how much of each type of memory is recognized as being present in the system.
4-4 Advanced BIOS Setup
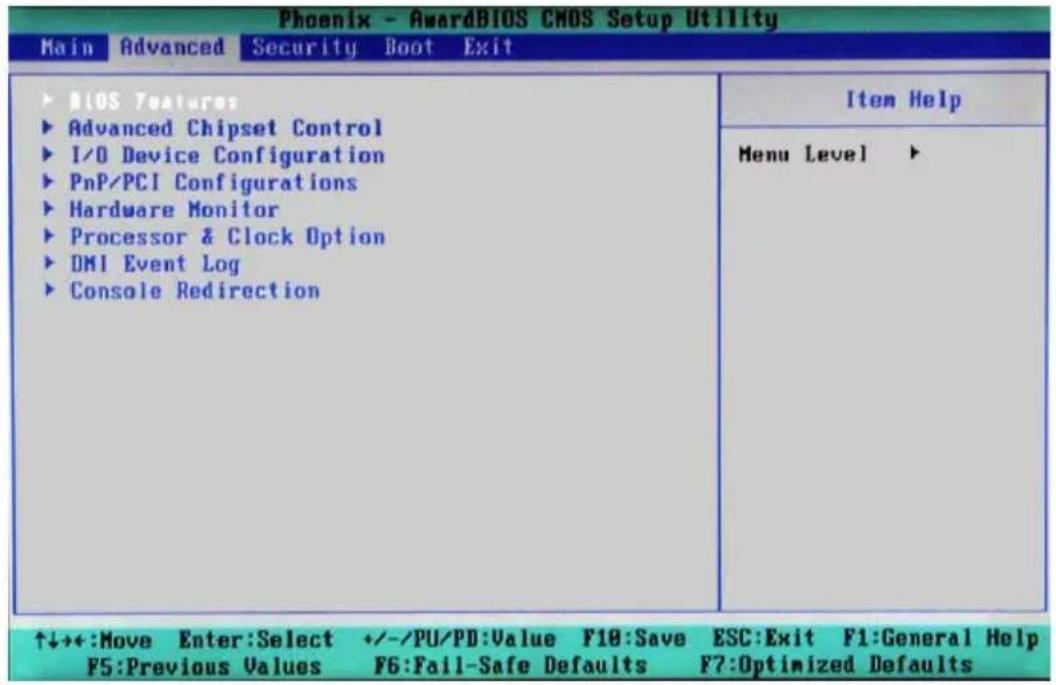
Choose the Advanced BIOS Setup from the Award BIOS main menu with the Left/Right arrow keys. You should see the following display. Select one of the items in the left frame of the screen to go to the sub screen for that item. The Advanced BIOS Setup options are displayed by highlighting the option using the arrow keys. All Advanced BIOS Setup options are described in this section.
text_image
Phoenix - AwardBIOS CMOS Setup Utility Main Advanced Security Boot Exit ▶ BIOS Features ▶ Advanced Chipset Control ▶ I/O Device Configuration ▶ PnP/PCI Configurations ▶ Hardware Monitor ▶ Processor & Clock Option ▶ DMI Event Log ▶ Console Redirection Item Help Menu Level ▶ ↑↓++:Move Enter:Select +/-/PU/PD:Value F10:Save ESC:Exit F1:General Help F5:Previous Values F6:Fail-Safe Defaults F7:Optimized Defaults4-4.1 Advanced BIOS Features
When the item of Advanced BIOS Features is highlighted, press the
| Phoenix - AwardBIOS CMOS Setup Utility | |
| Advanced | |
| BIOS Features | Item Help |
| Quick Boot [Enabled] Quiet Boot [Enabled] ACPI Function [Enabled] × APIC Mode Enabled MPS Version Control [1.4] Watch Dog Timer Select [Disabled] PWRON After PWR-Fail [Off] | Menu Level ▶▶ Allows the system to skip certain tests while booting. This will decrease the time needed to boot the system |
| ↑↓++:Move Enter:Select +/-/PU/PD:Value F10:Save ESC:Exit F1:General Help F5:Previous Values F6:Fail-Safe Defaults F7:Optimized Defaults | |
Quick Boot
If enabled, this feature allows the system to skip certain tests while booting. This will decrease the time needed to boot the system. The settings are "Enabled" and "Disabled".
Quiet Boot
This feature allows the user to enable "Quiet Boot". When set to Enabled, the BIOS is in the graphic mode and displays only an OEM Logo during POST while booting. If an error occurs, The system will automatically switch to the text mode. The options are "Enabled" and "Disabled".
ACPI Function
Select "Enabled" to enable BIOS Support for the Advanced Configuration and Power Interface features. The settings are "Enabled" or "Disabled".
APIC Mode
This setting allows you to Enable or Disable APIC. APIC is used to assign interrupt signals to a specific processor on a multiprocessor system and provides IRQs beyond the conventional 16 under Windows 2000 or XP. It has no effect on single processor systems.
MPS Version Control
This setting allows you to select the MPS version for your operating system. The options are "1.1" and "1.4".
Watch Dog Timer Select
This setting is for enabling the Watch Dog feature. The options are Enabled and Disabled. (Please refer to Chapter 2 for more details.)
PWRON After PWR-Fail
This setting allows the user to determine how the system will respond when power is reapplied after a system shut down caused by power failure. The options are "Off", "On" and "Former-Sts".
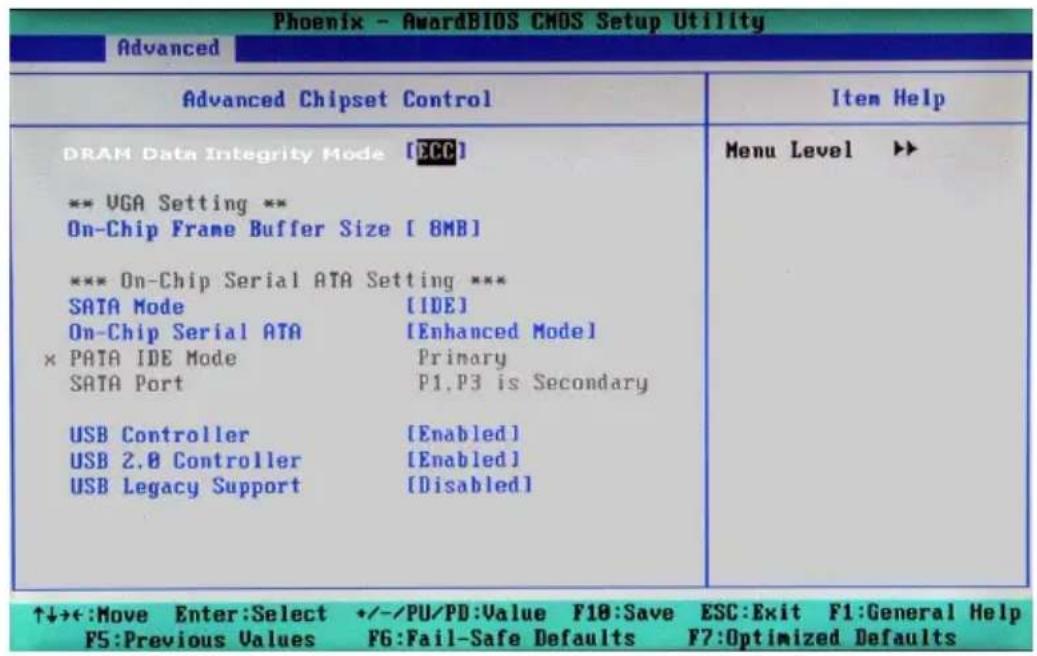
4-4.2 Advanced Chipset Control
text_image
Phoenix - AwardBIOS CMOS Setup Utility Advanced Advanced Chipset Control DRAM Data Integrity Mode [ECC] ** VGA Setting ** On-Chip Frame Buffer Size [ 8MB] *** On-Chip Serial ATA Setting *** SATA Mode [IDE] On-Chip Serial ATA [Enhanced Model] × PATA IDE Mode Primary SATA Port P1.P3 is Secondary USB Controller [Enabled] USB 2.0 Controller [Enabled] USB Legacy Support [Disabled] ↑↓→←:Move Enter:Select +/-/PU/PD:Value F10:Save ESC:Exit F1:General Help F5:Previous Values F6:Fail-Safe Defaults F7:Optimized DefaultsDRAM Data Integrity Mode
If enabled, this feature allows the data stored in the DRMA memory to be integrated for faster data processing. The options are ECC and Non-ECC.
On-Chip Frame Buffer Size
This setting allows you to set On-Chip Frame Buffer Size. The options are "1 MB" and "8 MB."
SATA Mode
This feature allows you to select the channel for SATA mode. The options are "IDE", "RAID" and "AHCI (-Advanced Host Controller Interface)."
On-Chip Serial ATA
Select "Disabled" to disable the SATA Controller. Select "Auto" to allow the BIOS to configure the SATA Controller automatically. Select "Combined Mode" to use PATA and SATA Combined Mode. The maximum of 2 IDE drives in each channel is allowed. Select "Enhanced Mode" to enable both SATA and PATA. This mode will support up to 6 IDE drives. Select "SATA Only" to allow SATA to operate in "Legacy Mode".
PATA IDE Mode
When the item -On-chip Serial ATA is set to Combined Mode, the user can select either Primary or Secondary for Parallel ATA IDE. The options are Primary and Secondary. If On-chip Serial ATA is set to Enhanced Mode, only Serial ATA will be activated, and Primary PATA IDE will be available. Secondary PATA IDE will not be available.
SATA Port
This setting allows you to configure the setting for the SATA port. The options are P1 and P3 is Secondary.
USB Controller
This setting allows you to enable or disable the USB Controller. The options are Enabled, and Disabled.
USB 2.0 Controller
This setting allows you to enable or disable USB 2.0 (EHCI) Controller. The options are Enabled, and Disabled.
USB Legacy Support
This setting allows you to enable or disable the functions of USB, Keyboard/Mouse under POST and DOS. The options are "Disabled", and "Enabled."
4-4.3 I/O Device Configuration
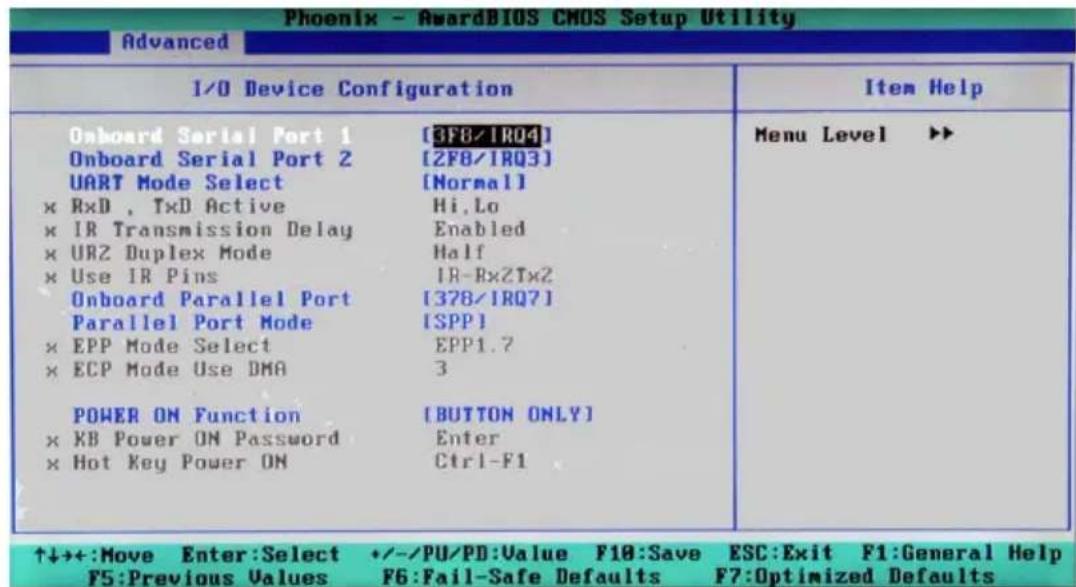
text_image
Phoenix - AwardBIOS CMOS Setup Utility Advanced I/O Device Configuration Onboard Serial Port 1 [3F8/1RQ4] Onboard Serial Port 2 [2F8/1RQ3] UART Mode Select [Normal] × RxD , TxD Active Hi,Lo × IR Transmission Delay Enabled × URZ Duplex Mode Half × Use IR Pins IR-RxZTx2 Onboard Parallel Port [378/1RQ7] Parallel Port Mode [SPP] × EPP Mode Select EPP1.7 × ECP Mode Use DMA 3 POWER ON Function [BUTTON ONLY] × KB Power ON Password Enter × Hot Key Power ON Ctrl-F1 ↑↓→+:Move Enter:Select +/-/PU/PD:Value F10:Save ESC:Exit F1:General Help F5:Previous Values F6:Fail-Safe Defaults F7:Optimized DefaultsOnboard Serial Port1/Onboard Serial Port2
This setting allows the user to set the address and the corresponding IRQ for Serial Port1 and Serial Port 2. The options are "Disabled", "3F8/IRQ4", "2F8/IRQ3", "3E8/IRQ4", "2E8/IRQ3", and "Auto". The default setting for Serial Port1 is "3F8/IRQ4" and the default for Port 2 is "2F8/IRQ3".
UART Mode Select
This setting allows the user to select the UART mode for the BIOS. The options are "IrDA", "ASKIR" and "Normal."
RxD, TxD Active
This allows the user to change the settings for the "RxD, TxD Active" function. The options are "Hi, Hi", "Hi, Lo", "Lo, Hi", and "Lo, Lo".
IR Transmission Delay
If "Enabled", the transmission of IR (infrared) signals will be delayed. The settings are "Enabled" and "Disabled".
UR2 Duplex Mode
This setting sets the mode for the UR2 Duplex Mode. The options are "Full" and "Half".
Use IR Pins
This item sets the usage of the IR pins. The options are "RxD2, TxD2" and "IR-Rx2Tx2".
Onboard Parallel Port
This setting allows the user to set the address and the corresponding IRQ for the onboard parallel port. The options are "Disabled", "378/IRQ7", "278/IRQ5" and "3BC/IRQ7".
Parallel Port Mode
This setting sets the mode for the onboard Parallel port. The options are "SPP," "EPP", "ECP" "ECP+EPP" and "Normal".
EPP Mode Select
This setting allows the user to select the EPP port type. The options are "EPP 1.9" and "EPP 1.7".
ECP Mode Use DMA
This setting allows the user to select the DMA channel for the ECP mode (port) to use. The options are "1" and "3".
Power On Function
This setting allows the user to decide which method to use to power on the system. The options are "Password", "Hot Key", "Mouse Left", "Mouse Right", "Any Key", and "Button Only".
KB Power On Password
This setting allows the user to enter the Password when the system is powered on via keyboard.
Hot Key Power On
This setting allows the user to decide which hot-keys to use in order to power on the system. The options are "Ctrl-F1", "Ctrl-F2, Ctrl-F3", "Ctrl-F4", "Ctrl-F5", "Ctrl-F6", "Ctrl-F7", and "Ctrl-F8".
4-4.4 PnP/PCI Configuration
Choose PCI/PnP Configurations from the Award BIOS main menu with the Left/Right arrow keys. You should see the following display:
| Phoenix - AwardBIOS CMOS Setup Utility Advanced | |
| PnP/PCI Configurations | Item Help |
| Init Display First [PCI Slot] Reset Configuration Data [Disabled] Resources Controlled By [Auto(ESCO)] × IRO Resources Onboard Lan Boot ROM [Disabled] ** PCI Express relative items ** Maximum Payload Size [4896] ▶ PCI Express Root Port Func PCI X Frequency [PCIX 1001] | Menu Level ▶▶ |
| ↑↓→+:Move Enter:Select +/-/PU/PD:Value F10:Save ESC:Exit F1:General Help F5:Previous Values F6:Fail-Safe Defaults F7:Optimized Defaults | |
Initial Display From
This feature sets the device that will initiate the monitor display when the system is first turned on. The options are "PCI Slot" and "PCI Ex(press)".
Reset Configuration Data
Enabling this setting resets the extended system configuration data when you exit setup. Do this when you have installed a new add-on and the system reconfiguration has caused such a serious conflict that the OS cannot reboot the system. The options are "Enabled" and "Disabled."
Resources Controlled By
This setting allows the BIOS to automatically configure all boot and Plug and Play compatible devices. If you choose Auto, you cannot select the IRQ, DMA and memory base address fields, because the BIOS automatically assigns them. The options are "Auto (ESCD)" and "Manual".
IRQ Resources
If the above item-Resources Controlled By" is set to manual, the user is allowed to assign an IRQ to a PCI Device or Reserve an IRQ for other purpose. The options are: Auto (ESCD) and Manual.
IRQ-3,
IRQ-4,
IRQ-5,
IRQ-7,
IRQ-9,
IRQ-10,
IRQ-12,
IRQ-14,
IRQ-15
Onboard LAN Boot ROM
This feature allows the user to determine if the Boot ROMs of the Onboard LAN chips should be activated. If activated, the user can boot the system from the Onboard LAN chips. The options are Disabled, LAN1, LAN2 and Both.
Maximum Payload Size
This setting allows the BIOS to set the maximum TLP Payload size for the PCI Express devices in the system. The options are: "128 (bytes)", "256 (bytes)", "512 (bytes)", "1024 (bytes)", "2048 (bytes)", and "4096 (bytes)".
▶PCI Express Root Port Function
PCI Express Port 1/PCI Express Port 2/PCI Express Port 3/PCI Express Port 4
Select "Enabled" to enable the PCI Express Root Port Functions for the PCI Express port specified. The options are: "Disabled", "Enabled", and "Auto".
PCI-E Compliance Mode
This features allows the BIOS to set the version of PCI-E Compliance Mode for the system. The options are: "v.1.0a" and "v.1.0".
PCI-X Frequency
This features allows the user to configure the default setting for PCI-X Frequency. The options are: "Auto, PCI-33 MHz, PCI-66 MHz, PCIX-66 MHz, PCI-X 100 MHz, PCI-X 133 MHz."
4-4.5 Hardware Monitors
There are only three settings on this menu (below). The rest of this menu shows various temperatures and voltage levels as indicated.
| Hardware Monitor | Item Help | |
| CPU Warning Temperature [75°C/167°F] | Menu Level ▶▶ | |
| CPU Temperature 52°C/125°F | ||
| System Temperature 33°C/ 91°F | ||
| FAN1 Speed 0 RPM | ||
| FAN2 Speed 0 RPM | ||
| FAN3 Speed 0 RPM | ||
| FAN4 Speed 0 RPM | ||
| FAN5 Speed 0 RPM | ||
| Processor Ucore(V) 1.39 V | ||
| 3.3V Ucc(V) 3.37 V | ||
| 5V Ucc(V) 5.85 V | ||
| -12V Ucc(V) -13.55 V | ||
| 12V Ucc(V) 12.22 V | ||
| 5USB 4.92 V | ||
| UBAT 3.20 V | ||
| Fan Speed Control [Disabled] | ||
| ↑↓++:Move Enter:Select +/-/PU/PD:Value F10:Save ESC:Exit F1:General Help F5:Previous Values F6:Fail-Safe Defaults F7:Optimized Defaults | ||
CPU Warning Temperature
This allows you to set the CPU warning temperature. If the CPU temperature reaches this threshold, an alarm will activate and a warning message will be displayed onscreen. The options are "Disabled", "60°C/140°F", "65°C/149°F", "70°C/158°F", "75°C/167°F", "80°C/176°F" and "85°C/185°F". (*See the note below.)
Note: In the Windows OS environment, the Supero Doctor III settings take precedence over the BIOS settings. When first installed, the SD III adopts the temperature threshold settings previously set in the BIOS. Any subsequent changes to these thresholds must be made within Supero Doctor, since the SDIII settings override the BIOS settings. For the Windows OS to adopt the BIOS temperature threshold settings, please change the SDIII settings to be the same as those set in the BIOS.
Highlight this and hit
CPU Temperature:
System Temperature:
In addition to temperature monitoring, the status of the following items will also be displayed:
Fan 1 Speed-Fan 5 Speed
Voltage Monitoring
Processor Vcore (V), 3.3V Vcc (V), 5V Vcc (V), -12V Vcc (V), +12V Vcc (V), 5V Standby, VBAT
Fan Speed Control (Fan1-Fan5)
When set to 3-pin, the onboard fan speed is controlled by the CPU temperature. When the CPU temperature is higher, the fan speed will be higher as well. If set to "Disable," the fan speed control is disabled and the onboard fan will run at the full speed (12V) at all time. The options are: "Disable" and "3-pin Server".
4-4.6 Processor & Clock Options
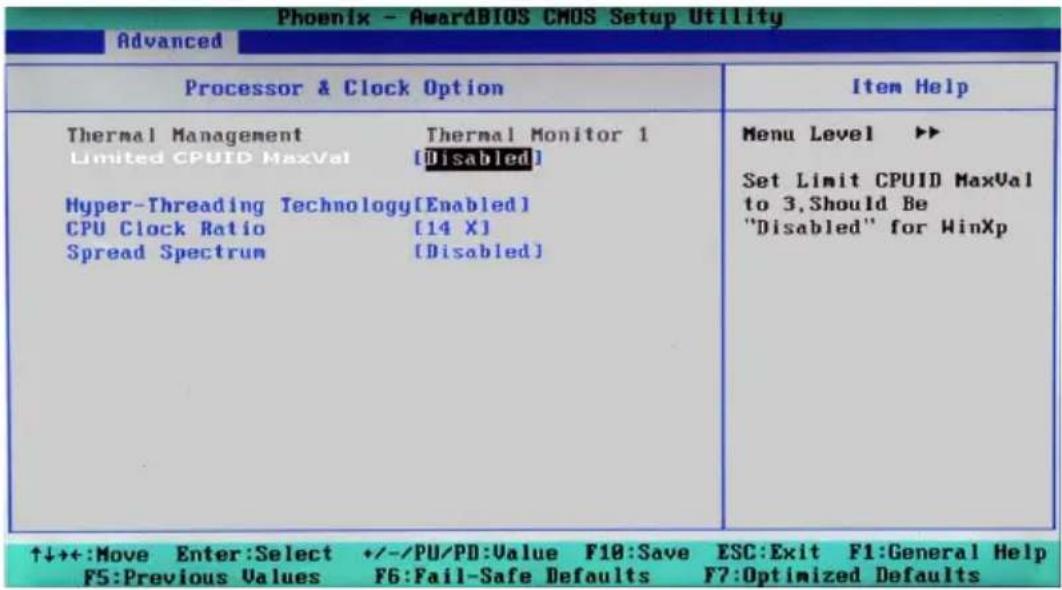
text_image
Phoenix - AwardBIOS CMOS Setup Utility Advanced Processor & Clock Option Thermal Management Thermal Monitor 1 Limited CPUID MaxVal [Disabled] Hyper-Threading Technology[Enabled] CPU Clock Ratio [14 X] Spread Spectrum [Disabled] Item Help Menu Level ▶▶ Set Limit CPUID MaxVal to 3,Should Be "Disabled" for WinXp ↑↓++:Move Enter:Select +/-/PU/PD:Value F10:Save ESC:Exit F1:General Help F5:Previous Values F6:Fail-Safe Defaults F7:Optimized DefaultsThermal Management
This setting determines the method used by the BIOS to control the thermal management of the system. The options are "Thermal Monitor 1 (On die throttling)" and "Thermal Monitor 2 (Ratio & VID transition)." (See Section 1-4 for details.)
Limit CPUID MaxVal
Select "Enabled" to set CUPID maximum value to 3. Select "Disabled" for Windows XP OS. The options are "Enabled" and "Disabled."
Hyper-Threading
Set this option to "Enabled" to activate the hyper-threading function of the CPUs. Enabling the hyper-threading function makes each CPU appear as two to any programs that support it (you must have OS support also). The settings are "Disabled" and "Enabled."
CPU Clock Ration
Use this option to set the clock ratio of the processor. Use number keys to enter a number. The default setting is "14".
Spread Spectrum
Spread Spectrum is a technique used to stabilize a system by reducing the level of ElectroMagnetic Interference. The options are "Enabled" and "Disabled."
4-4.7 DMI Event Log
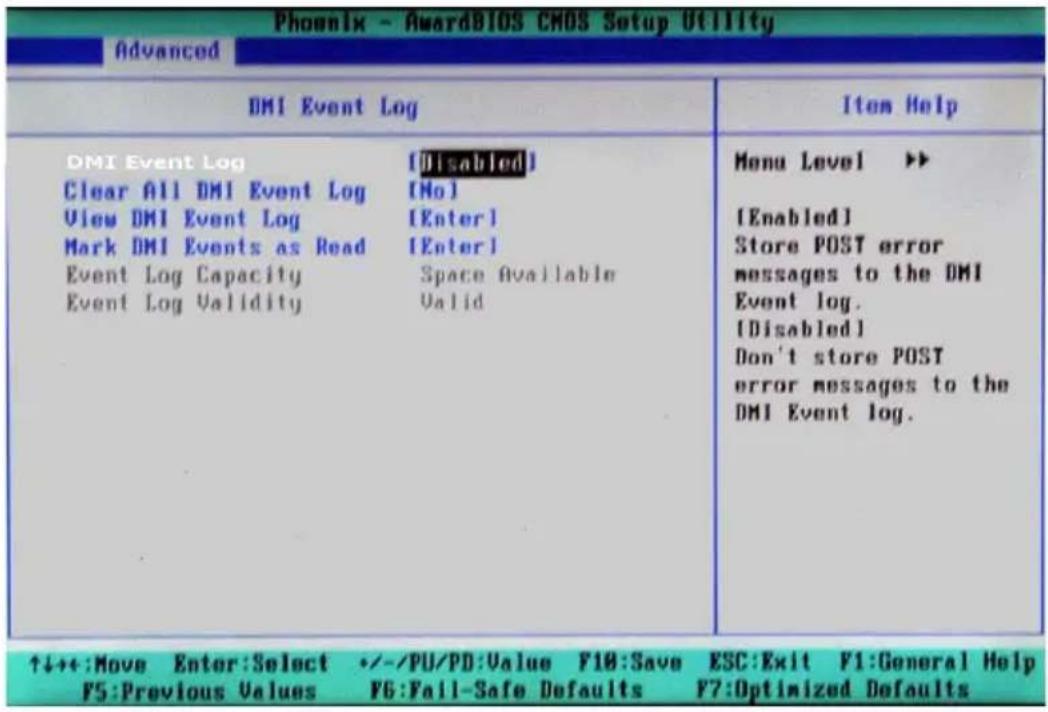
text_image
Phoenix - AwardBIOS CMOS Setup Utility Advanced DMI Event Log DMI Event Log [Disabled] Clear All DMI Event Log [No] View DMI Event Log [Enter] Mark DMI Events as Read [Enter] Event Log Capacity Space Available Event Log Validity Valid ↑↓++:Move Enter:Select +/-/PU/PD:Value F18:Save ESC:Exit F1:General Help F5:Previous Values F6:Fail-Safe Defaults F7:Optimized Defaults Menu Level >> [Enabled] Store POST error messages to the DMI Event log. [Disabled] Don't store POST error messages to the DMI Event log.DMI Event Log
This setting allows you to Enable or Disable the function of DMI Event Logging. The options are Disabled and Enabled.
Clear All DMI Event Logs
Select Yes and press
View DMI Event Log
Highlight this item and press
Mark DMI Events as Read
Highlight this item and press
Event Log Validity
This is a display to inform you of the event log validity. It is not a setting.
Event Log Capacity
This is a display to inform you of the event log capacity. It is not a setting.
4-4.8 Console Redirection
| Phoenix - AwardBIOS CMOS Setup Utility Advanced | |
| Console Redirection | Item Help |
| Console Redirection [Enabled] Baud Rate [19200] Agent Connect via [NULL] Agent wait time(min) [1] | Menu Level ▶▶ Enabled - Attempt to redirect console via COM port Disabled - Attempt to redirect console when keyboard absent |
| ↑↓→+:Move Enter:Select +/-/PU/PD:Value F18:Save ESC:Exit F1:General Help F5:Previous Values F6:Fail-Safe Defaults F7:Optimized Defaults | |
Console Redirection
This setting allows you to Enable or Disable the function of Console Redirection. The options are Disabled and Enabled.
BAUD Rate
Select the BAUD rate for console redirection. The options are 300, 1200, 2400, 9600, 19.2K, 38.4K, 57.6K and 115.2K.
Agent Connect Via
This setting allows you to select the device to be used for Console Redirection.
Agent Wait Time (Min)
This setting allows you to set the wait time for the Console Redirection "Agent". The options are 1 (Min), 2 (Min), 4 (Min), and 8 (Min).
4-5 Security
Choose Security from the Award BIOS main menu with the Left/Right arrow keys. You should see the following display:
| Main Advanced Security Boot Exit | |
| Set Supervisor Password Set User Password Password Check [Setup] | Item Help |
| Menu Level ▶ Change/Set/Disable Password | |
Set Supervisor Password
When the item "Set Supervisor Password" is highlighted on the above screen, press the
Set User Password
When the item "Set User Password" is highlighted on the above screen, press the
Password Check
This setting allows the user to determine if the password is required every time when the system boots up or if the password is required only when you enter the CMOS setup. The options are "System" and "Setup".
4-6 Boot
Choose Boot from the Award BIOS main menu with the Left/Right arrow keys. You should see the following display:
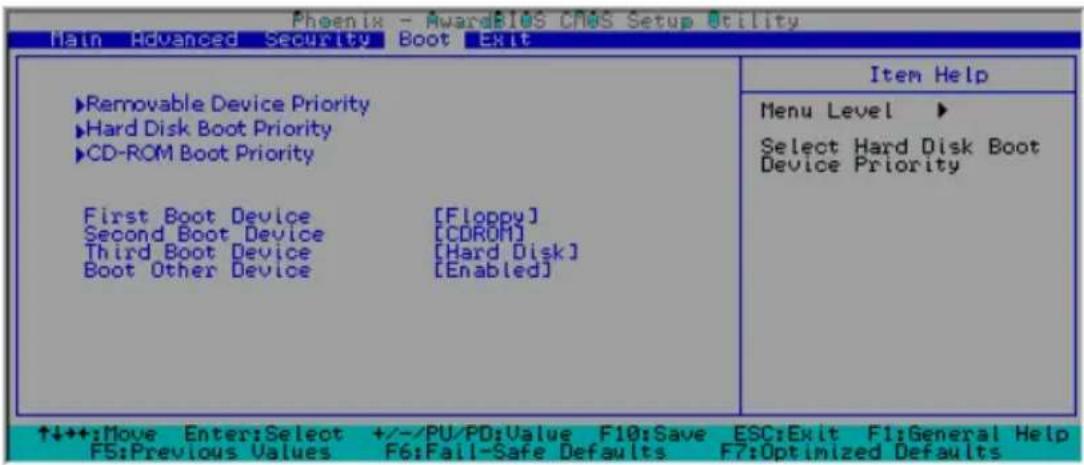
text_image
Phoenix - AwardBIOS CMOS Setup Utility Main Advanced Security Boot Exit ►Removable Device Priority ►Hard Disk Boot Priority ►CD-ROM Boot Priority First Boot Device [Floppy] Second Boot Device [CDROM] Third Boot Device [Hard Disk] Boot Other Device [Enabled] Item Help Menu Level ► Select Hard Disk Boot Device Priority ↑↓++:Move Enter:Select +/-/PU/PD:Value F10:Save ESC:Exit F1:General Help F5:Previous Values F6:Fail-Safe Defaults F7:Optimized DefaultsThe Award BIOS attempts to load the operating system from devices specified by the users in a user-specified sequence.
Removable Device Boot Priority/Hard Drive Boot Priority/CD-ROM Boot Priority
This item allows the user to select the Boot Priority of Hard Disk Devices.
First Boot Device
This item allows the user to set the first boot-up device. The options are "Floppy", "LS120", "HDD", "CDROM", "ZIP100", "USB-FDD", "USB-ZIP", "USB-CDROM", "USB-HDD", "LAN" and "Disabled".
Second Boot Device
This item allows the user to set the second boot-up device. The options are "Floppy", "LS120", "HDD", "CDROM", "ZIP100", "USB-FDD", "USB-ZIP", "USB-CDROM", "USB-HDD", "LAN" and "Disabled".
Third Boot Device
This item allows the user to set the third boot-up device. The options are "Floppy", "LS120", "HDD", "SCSI", "CDROM", "ZIP100", "USB-FDD", "USB-ZIP", "USB-CDROM", "USB-HDD", "LAN" and "Disabled".
Boot Other Device
If enabled, this option enables the BIOS to load the OS from another device rather than the ones that have been specified as the first, second and third boot up devices. The settings are "Enabled" and "Disabled".
4-7 Exit
Choose Exit from the Award BIOS main menu with the Left/Right arrow keys. You should see the following display:
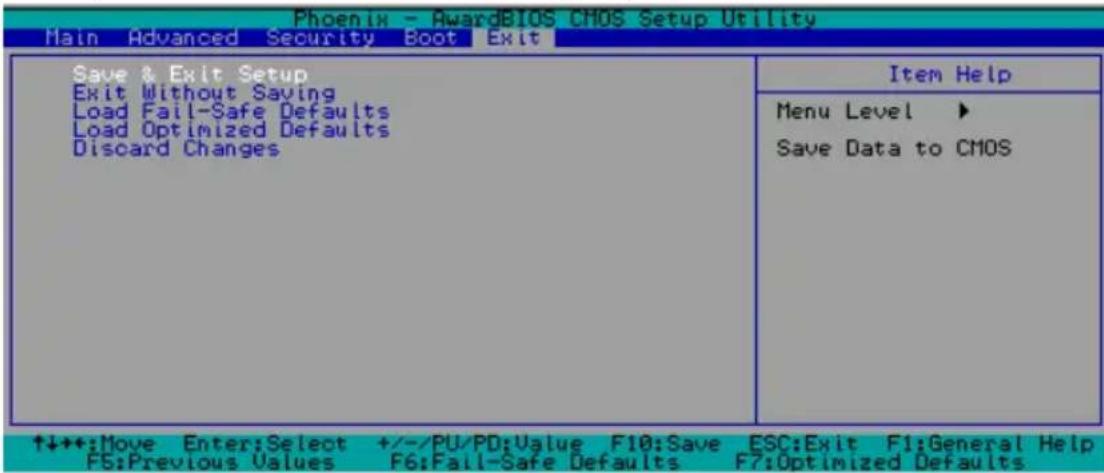
text_image
Phoenix - AwardBIOS CMOS Setup Utility Main Advanced Security Boot Exit Save & Exit Setup Exit Without Saving Load Fail-Safe Defaults Load Optimized Defaults Discard Changes Item Help Menu Level ▶ Save Data to CMOS ↑↓↓:Move Enter:Select +/-/PU/PD:Value F10:Save ESC:Exit F1:General Help F5:Previous Values F6:Fail-Safe Defaults F7:Optimized DefaultsSave & Exit Setup
When the item "Save & Exit Setup" is highlighted, press
Exit without Saving
When the item "Exit without Saving" is highlighted, press
Load Fail-Safe Defaults
Highlight this item and hit
Load Optimized Defaults
Highlight this item and hit
Discard Changes
When the item "Discard Changes" is highlighted, press
Appendix A BIOS POST Messages
During the Power-On Self-Test (POST), the BIOS will check for problems. If a problem is found, the BIOS will activate an alarm or display a message. The following is a list of such BIOS messages.
Beeps Error Messages
(1 long beep+1 short pause) continuously Memory Modules Errors
1 long beep+2 short beeps VGA Errors
Notes
Appendix B: Award BIOS POST Codes
This section lists the POST (Power On Self Testing) Codes for the Award BIOS.
| POST (hex) Description | |
| CFh Test CMOS R/W functionality. | |
| C0h Early chipset initialization:-Disable shadow RAM-Disable L2 cache (socket 7 or below)-Program basic chipset registers | |
| C1h Detect memory-Auto-detection of DRAM size, type and ECC.-Auto-detection of L2 cache (socket 7 or below) | |
| C3h Expand compressed BIOS code to DRAM | |
| C5h Call chipset hook to copy BIOS back to E000 & F000 shadow RAM. | |
| 0h1 Expand the X group codes locating in physical address 1000:0 | |
| 02h Reserved | |
| 03h Initial Superio Early_Init switch. | |
| 04h Reserved | |
| 05h 1. Blank out screen2. Clear CMOS error flag | |
| 06h Reserved | |
| 07h 1. Clear 8042 interface2. Initialize 8042 self-test | |
| 08h 1. Test special keyboard controller for Winbond 977 series Super I/O chips.2. Enable keyboard interface. | |
| 09h Reserved | |
| 0Ah | ● Disable PS/2 mouse interface (optional).● Auto detect ports for keyboard & mouse followed by a port & interface swap (optional).● Reset keyboard for Winbond 977 series Super I/O chips. |
| 0Bh Reserved | |
| 0Ch Reserved | |
| 0Dh Reserved | |
| 0Eh Test F000h segment shadow to see whether it is R/W-able or not. If test fails, keep beeping the speaker. | |
POST (hex)
Description
| 0Fh Reserved | |
| 10h Auto detect flash type to load appropriate flash R/W codes into the run time area in F000 for ESCD & DMI support. | |
| 11h Reserved | |
| 12h Use walking | 's algorithm to check out interface in CMOS circuitry. Also set real-time clock power status, and then check for override. |
| 13h Reserved | |
| 14h Program chipset default values into chipset. Chipset default values are MODBINable by OEM customers. | |
| 15h Reserved | |
| 16h Initial Early_Init_Onboard_Generator switch. | |
| 17h Reserved | |
| 18h Detect CPU information including brand, SMI type (Cyrix or Intel) and CPU level (586 or 686). | |
| 19h Reserved | |
| 1Ah Reserved | |
| 1Bh Initial interrupts vector table. If no special specified, all H/W interrupts are directed to SPURIOUS_INT_HDLR & S/W interrupts to SPURIOUS_soft_HDLR. | |
| 1Ch Reserved | |
| 1Dh Initial EARLY_PM_INIT switch. | |
| 1Eh Reserved | |
| 1Fh Load keyboard matrix (notebook platform) | |
| 20h Reserved | |
| 21h HPM initialization (notebook platform) | |
| 22h Reserved | |
| 23h 1. Check validity of RTC value: e.g. a value of 5Ah is an invalid value for RTC minute.2. Load CMOS settings into BIOS stack. If CMOS checksum fails, use default value instead.3. Prepare BIOS resource map for PCI & PnP use. If ESCD is valid, take into consideration of the ESCD's legacy information.4. Onboard clock generator initialization. Disable respective clock resource to empty PCI & DIMM slots.5. Early PCI initialization:-Enumerate PCI bus number-Assign memory & I/O resource-Search for a valid VGA device & VGA BIOS, and put it into C000:0. | |
| 24h Reserved | |
| 25h Reserved | |
| 26h Reserved | |
| 27h Initialize INT | 09 buffer |
| 28h Reserved | |
| 29h | Program CPU internal MTRR (P6 & PII) for 0-640K memory address.Initialize the APIC for Pentium class CPU.Program early chipset according to CMOS setup. Example: onboard IDE controller.Measure CPU speed.Invoke video BIOS. |
| 2Ah Reserved | |
| 2Bh Reserved | |
| 2Ch Reserved | |
POST (hex)
Description
| 2Dh 1. Initialize multi-language2. Put information on screen display, including Award title, CPU type, CPU speed .... | |
| 2Eh Reserved | |
| 2Fh Reserved | |
| 30h Reserved | |
| 31h Reserved | |
| 32h Reserved | |
| 33h Reset keyboard except Winbond 977 series Super I/O chips. | |
| 34h Reserved | |
| 35h Reserved | |
| 36h Reserved | |
| 37h Reserved | |
| 38h Reserved | |
| 39h Reserved | |
| 3Ah Reserved | |
| 3Bh Reserved | |
| 3Ch Test 8254 | |
| 3Dh Reserved | |
| 3Eh Test 8259 interrupt mask bits for channel 1. | |
| 3Fh Reserved | |
| 40h Test 8259 interrupt mask bits for channel 2. | |
| 41h Reserved | |
| 42h Reserved | |
| 43h Test 8259 functionality. | |
| 44h Reserved | |
| 45h Reserved | |
| 46h Reserved | |
| 47h Initialize EISA slot | |
| 48h Reserved | |
| 49h 1. Calculate total memory by testing the last double word of each 64K page.2. Program writes allocation for AMD K5 CPU. | |
| 4Ah Reserved | |
| 4Bh Reserved | |
| 4Ch Reserved | |
| 4Dh Reserved | |
| 4Eh 1. Program MTRR of M1 CPU2. Initialize L2 cache for P6 class CPU & program CPU with proper cacheable range.3. Initialize the APIC for P6 class CPU.4. On MP platform, adjust the cacheable range to smaller one in case the cacheable ranges between each CPU are not identical. | |
| 4Fh Reserved | |
| 50h Initialize USB | |
| 51h Reserved | |
| 52h Test all memory (clear all extended memory to 0) | |
| 53h Reserved | |
| 54h Reserved | |
| 55h Display number of processors (multi-processor platform) | |
| 56h Reserved | |
| 57h 1. Display PnP logo2. Early ISA PnP initialization-Assign CSN to every ISA PnP device. | |
POST (hex)
Description
| 58h Reserved | |
| 59h Initialize the combined Trend Anti-Virus code. | |
| 5Ah Reserved | |
| 5Bh (Optional Feature)Show message for entering AWDFLASH.EXE from FDD (optional) | |
| 5Ch Reserved | |
| 5Dh 1. Initialize Init_Onboard_Super_IO switch.2. Initialize Init_Onboard_AUDIO switch. | |
| 5Eh Reserved | |
| 5Fh Reserved | |
| 60h Okay to enter Setup utility; i.e. not until this POST stage can users enter the CMOS setup utility. | |
| 61h Reserved | |
| 62h Reserved | |
| 63h Reserved | |
| 64h Reserved | |
| 65h Initialize PS/2 Mouse | |
| 66h Reserved | |
| 67h Prepare memory size information for function call:INT 15h ax=E820h | |
| 68h Reserved | |
| 69h Turn on L2 cache | |
| 6Ah Reserved | |
| 6Bh Program chipset registers according to items described in Setup & Auto-configuration table. | |
| 6Ch Reserved | |
| 6Dh 1. Assign resources to all ISA PnP devices.2. Auto assign ports to onboard COM ports if the corresponding item in Setup is set to “AUTO”. | |
| 6Eh Reserved | |
| 6Fh 1. Initialize floppy controller2. Set up floppy related fields in 40:hardware. | |
| 70h Reserved | |
| 71h Reserved | |
| 72h Reserved | |
| 73h (Optional Feature)Enter AWDFLASH.EXE if:-AWDFLASH is found in floppy drive.-ALT+F2 is pressed | |
| 74h Reserved | |
| 75h Detect & install all IDE devices: HDD, LS120, ZIP, CDROM...... | |
| 76h Reserved | |
| 77h Detect serial ports & parallel ports. | |
| 78h Reserved | |
| 79h Reserved | |
| 7Ah Detect & install co-processor | |
| 7Bh Reserved | |
| 7Ch Reserved | |
| 7Dh Reserved | |
| 7Eh Reserved | |
| 7Fh 1. Switch back to text mode if full screen logo is supported.-If errors occur, report errors & wait for keys-If no errors occur or F1 key is pressed to continue:♦Clear EPA or customization logo. | |
POST (hex)
Description
| 80h Reserved | |
| 81h Reserved | |
| 82h 1. Call chipset | power management hook.2. Recover the text font used by EPA logo (not for full screen logo)3. If password is set, ask for password. |
| 83h Save all data in stack back to CMOS | |
| 84h Initialize ISA | PnP boot devices |
| 85h 1. USB final Initialization | |
| 86h Reserved | |
| 87h Reserved | |
| 88h Reserved | |
| 89h Reserved | |
| 90h Reserved | |
| 91h Reserved | |
| 92h Reserved | |
| 93h Read HDD boot sector information for Trend Anti-Virus code | |
| 94h 1. Enable L2 cache | |
| 95h 1. Program daylight saving | |
| 96h 1. Build MP table | |
| FFh Boot attempt (INT 19h) | |
NOTES
Appendix C
Installing Software Programs and Drivers
(*Note: if you do not wish to configure onboard SATA RAID functions, please go directly to Section C-5 on Page C-22 for Operating System & Other Software Installation.)
After all the hardware has been installed, you must first configure Intel's ICH6R SATA RAID (*Note) before you install the Windows Operating System, and other software drivers. The necessary drivers are all included on the Supermicro CDs that came packaged with your motherboard.
C-1 Configuring Intel ICH6R SATA RAID Function
To configure SATARAID functions, you must first configure the RAID Level that you desire in the Intel ICH6R SATA RAID Utility program before you install the Windows XP/2000 operating system, and other software drivers. The necessary drivers are all included on the Supermicro CDs that came packaged with your motherboard. (*Note: the current version of ICH6R SATA RAID Utility can only support Windows XP/2000 Operating System.)
Serial ATA (SATA)
Serial ATA(SATA) is a physical storage interface. It uses a single cable with a minimum of four wires to create a point-to-point connection between devices. It is a serial link which supports SATA Transfer rates up to 150MBps. Because the serial cables used in SATA are thinner than the traditional cables used in Parallel ATA(PATA), SATA systems have better airflow and can be installed in smaller chassis than Parallel ATA. In addition, the cables used in PATA can only extend to 40cm long, while Serial ATA cables can extend up to one meter. Overall, Serial ATA provides better functionality than Parallel ATA.
Introduction to Intel ICH6R SerialRAID
Located in the South Bridge of the E7221 Copper River Chipset, the I/O Controller Hub (ICH6R) provides the I/O subsystem with access to the rest of the system. It supports one-channel Ultra ATA/100 Bus Master IDE controller (PATA) and Serial ATA (SATA) Host Controller, which supports up to four Serial ATA ports and up to two sets of RAID drives. The ICH6R supports the following Parallel ATA (PATA) and Serial (SATA) device configurations:
ATA Operation Modes
You can select from the following two modes: Legacy mode and Native mode.
SATA Operate Modes
You can select from the following modes: Auto, Combined, Enhanced, and SATA Only Mode. The number of devices supported by these modes are listed below:
*SATA Only: The maximum of 4 devices are supported (4 SATA)
*Auto Mode: The maximum of 6 devices supported (4 SATA + 2 IDE)
*Enhanced Mode: The maximum of 6 devices supported (4 SATA + 2 IDE)
*Combined Mode: The maximum of 4 devices supported (2 SATA + 2 IDE)
Configuring BIOS settings for SATA RAID Functions (Native Mode)
- Press the
key during system bootup to enter the BIOS Setup Utility.
(*Note: If it is the first time powering on the system, we recommend you load Optimized Default Settings. If you have already done so, please skip to Step 3.
-
Use the arrow keys to select the "Exit" Settings . Once in the "Exit" settings, Scroll down to select the item- "Load Optimized Default settings" and press the
key. Select "OK" to confirm the selection. Press the key to load the default settings for the BIOS. -
Use the arrow keys to select the "Advanced" in the BIOS.
-
Scroll down to the item-"Advanced Chipset Control" and press the
Key to select this option. -
Select the item- "On-Chip Serial ATA", and press the
Key. When the sub-menu appears, select the item-"Enhanced Mode". -
Scroll up to the item- "SATA Mode", and press the
Key to select this option. When the sub-menu appears, select the item-"RAID". -
Tap "Esc" and scroll down to "Exit". Select "Save and Exit" from the "Exit" menu. Press the
key to save the changes and exit the BIOS. -
Once you've exited the BIOS Utility, the system will re-boot.
Using Intel ICH6R SATA RAID Utility Program
1. Creating, Deleting and Reseting RAID Volumes:
a. After the system exits from the BIOS Setup Utility, the system will automatically reboot. The following screen appears after Power-On Self Test.
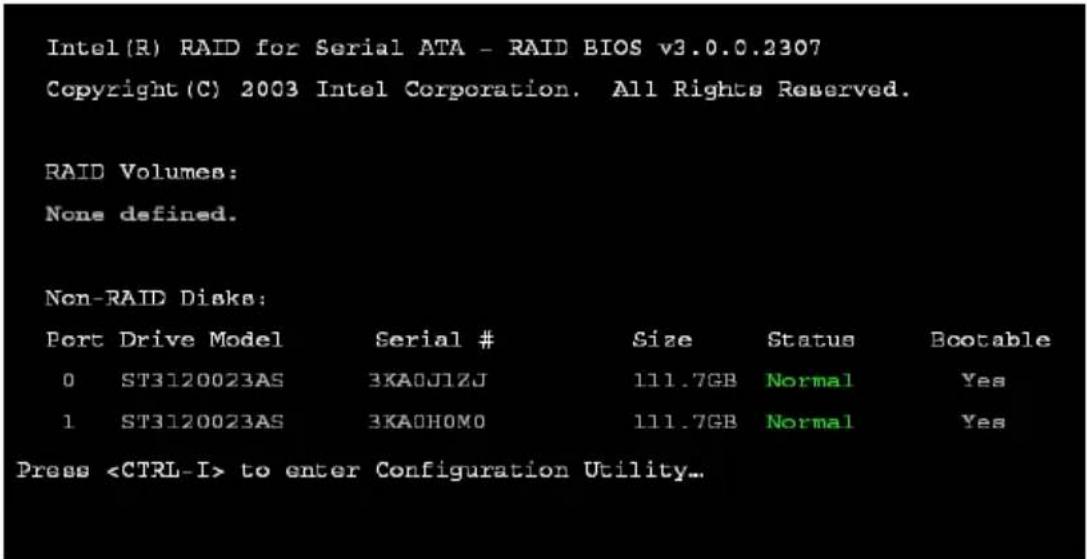
text_image
Intel(R) RAID for Serial ATA - RAID BIOS v3.0.0.2307 Copyright(C) 2003 Intel Corporation. All Rights Reserved. RAID Volumes: None defined. Non-RAID Disks: Port Drive Model Serial # Size Status Bootable 0 ST3120023AS 3KA0J1ZJ 111.7GB Normal Yes 1 ST3120023AS 3KA0HOMO 111.7GB Normal Yes Pressb. When you see the above screen, press the
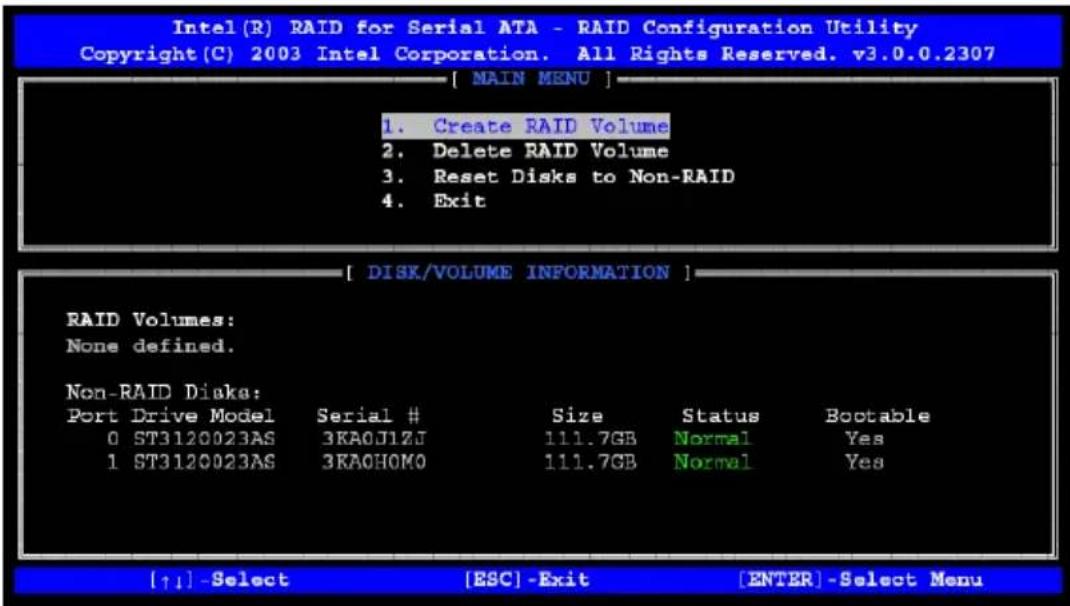
text_image
Intel(R) RAID for Serial ATA - RAID Configuration Utility Copyright(C) 2003 Intel Corporation. All Rights Reserved. v3.0.0.2307 [ MAIN MENU ] 1. Create RAID Volume 2. Delete RAID Volume 3. Reset Disks to Non-RAID 4. Exit [ DISK/VOLUME INFORMATION ] RAID Volumes: None defined. Non-RAID Diaka: Port Drive Model Serial # 0 ST3120023AS 3KA0J1ZJ 111.7GB Status Bootable 1 ST3120023AS 3KA0HOMO 111.7GB Normal Yes [↑↓] -Select [ESC] -Exit [ENTER] -Select MenuCreating RAID Volume:
a. Select Item #1- "Create RAID Volume" from the main menu and press the
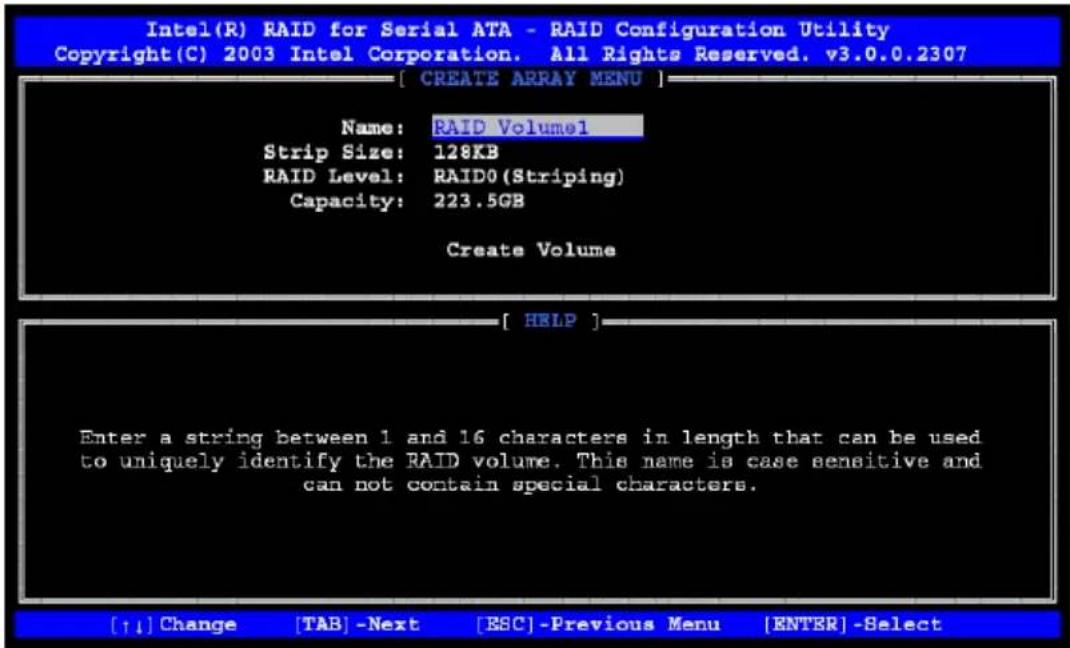
text_image
Intel(R) RAID for Serial ATA - RAID Configuration Utility Copyright(C) 2003 Intel Corporation. All Rights Reserved. v3.0.0.2307 [ CREATE ARRAY MENU ] Name: RAID Volume1 Strip Size: 128KB RAID Level: RAID0(Striping) Capacity: 223.5GB Create Volume [ HELP ] Enter a string between 1 and 16 characters in length that can be used to uniquely identify the RAID volume. This name is case sensitive and can not contain special characters. [↑↓] Change [TAB] -Next [ESC] -Previous Menu [ENTER] -Selectb. Specify a RAID Volume Name and press the
c. Use the
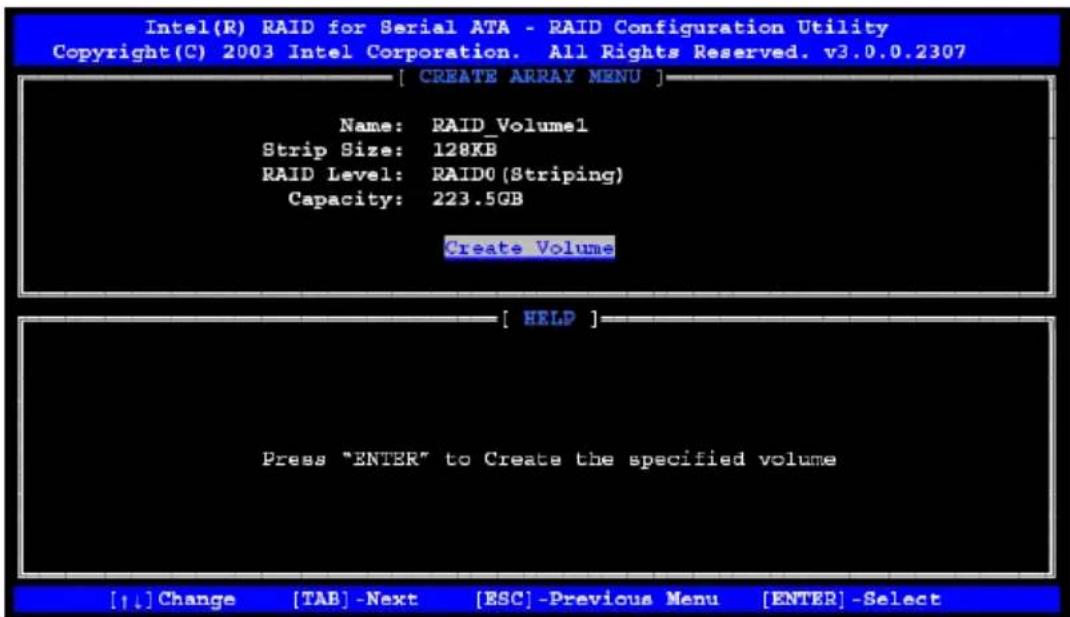
text_image
Intel(R) RAID for Serial ATA - RAID Configuration Utility Copyright(C) 2003 Intel Corporation. All Rights Reserved. v3.0.0.2307 [ CREATE ARRAY MENU ] Name: RAID_Volume1 Strip Size: 128KB RAID Level: RAID0 (Striping) Capacity: 223.5GB Create Volume [ HELP ] Press "ENTER" to Create the specified volume [↑↓] Change [TAB] -Next [ESC] -Previous Menu [ENTER] -Selectd. When asked "Are you sure you want to create this volume (Y/N), press "Y" to confirm the selection, or type "N" to change and to create the RAID volume. Then, press the
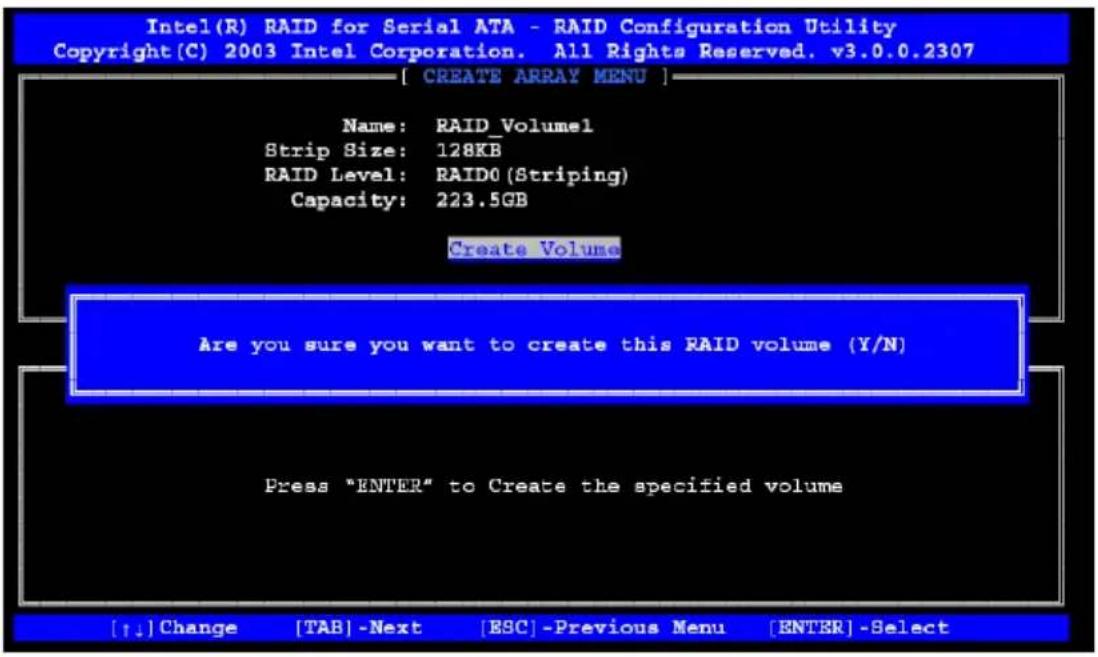
text_image
Intel(R) RAID for Serial ATA - RAID Configuration Utility Copyright(C) 2003 Intel Corporation. All Rights Reserved. v3.0.0.2307 [ CREATE ARRAY MENU ] Name: RAID_Volume1 Strip Size: 128KB RAID Level: RAID0 (Striping) Capacity: 223.5GB Create Volume Are you sure you want to create this RAID volume (Y/N) Press "ENTER" to Create the specified volume [↑↓] Change [TAB]-Next [ESC]-Previous Menu [ENTER]-Selecte. You will return to the main menu with DISK/VOLUME INFORMATION updated as shown in the following screen.
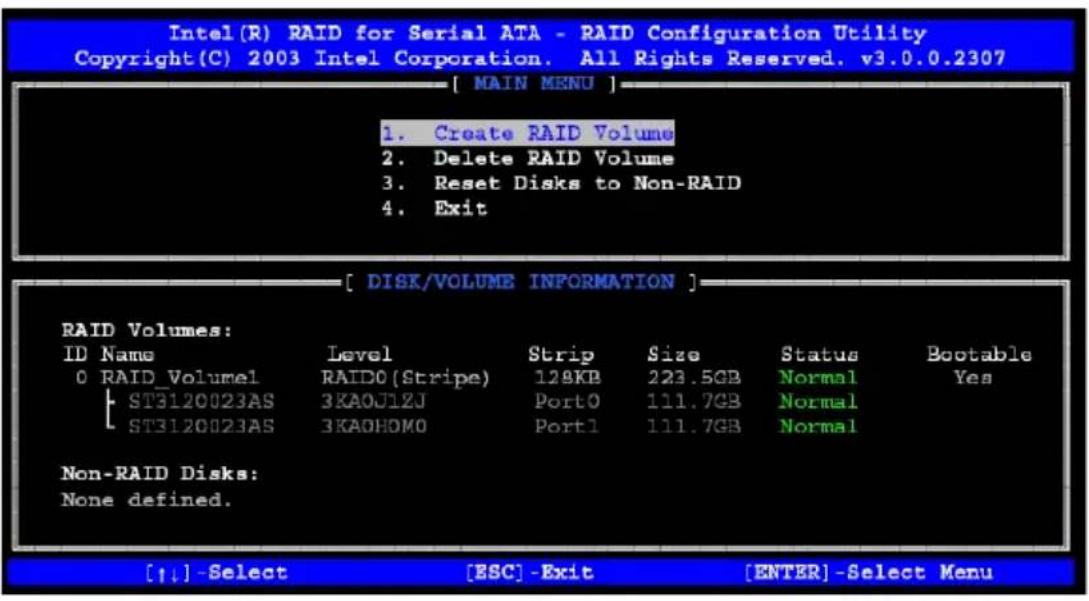
text_image
Intel(R) RAID for Serial ATA - RAID Configuration Utility Copyright(C) 2003 Intel Corporation. All Rights Reserved. v3.0.0.2307 [ MAIN MENU ] 1. Create RAID Volume 2. Delete RAID Volume 3. Reset Disks to Non-RAID 4. Exit [ DISK/VOLUME INFORMATION ] RAID Volumes: ID Name Level Strip Size Status Bootable 0 RAID_Volumel RAID0 (Stripe) 128KB 223.5GB Normal Yes ST3120023AS 3KAOJ12J Port0 111.7GB Normal ST3120023AS 3KAOHOMO Port1 111.7GB Normal Non-RAID Disks: None defined. [↑↓] -Select [ESC] -Exit [ENTER] -Select Menuf. Once the above screen appears, use the
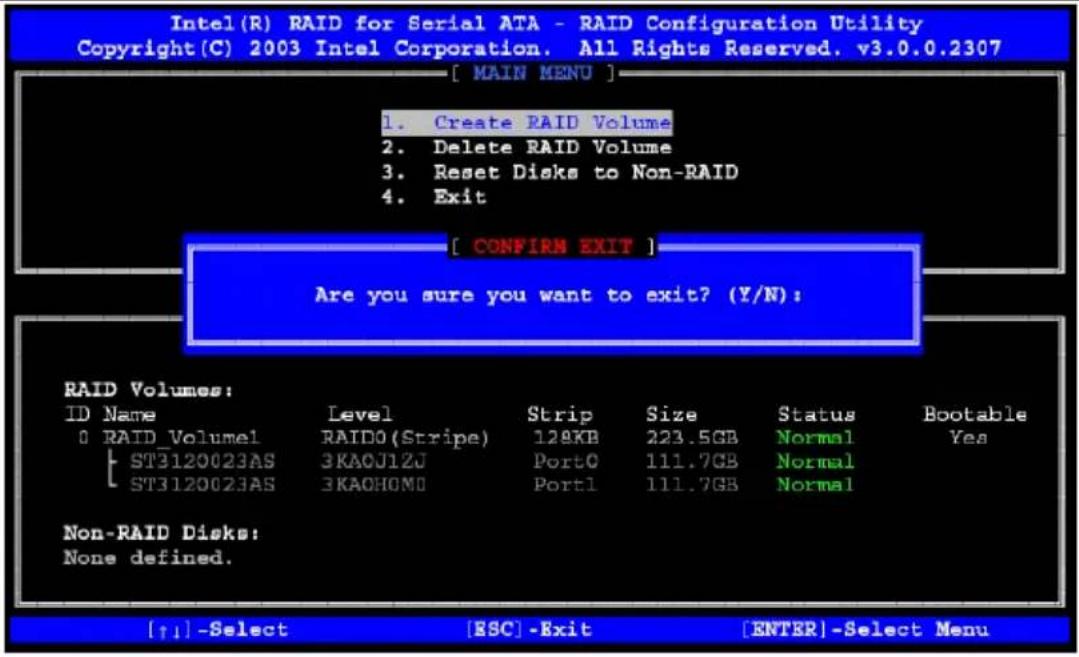
text_image
Intel(R) RAID for Serial ATA - RAID Configuration Utility Copyright(C) 2003 Intel Corporation. All Rights Reserved. v3.0.0.2307 [ MAIN MENU ] 1. Create RAID Volume 2. Delete RAID Volume 3. Reset Disks to Non-RAID 4. Exit [ CONFIRM EXIT ] Are you sure you want to exit? (Y/N): RAID Volumes: ID Name Level Strip Size Status Bootable 0 RAID_Volume1 RAID0(Stripe) 128KB 223.5GB Normal Yes ST3120023AS 3KAOJ12J Port0 111.7GB Normal ST3120023AS 3KAOHOMO Port1 111.7GB Normal Non-RAID Disks: None defined. [↑↓] -Select [ESC] -Exit [ENTER] -Select Menug. When asked "Are you sure you want to exit? (Y/N): ", type "Y" to confirm the selections and exit the "Create RAID Volume" menu. Press the
Deleting RAID Volume:
a. When you are in the main menu, use the
b When the item# 2 is highlighted, press the
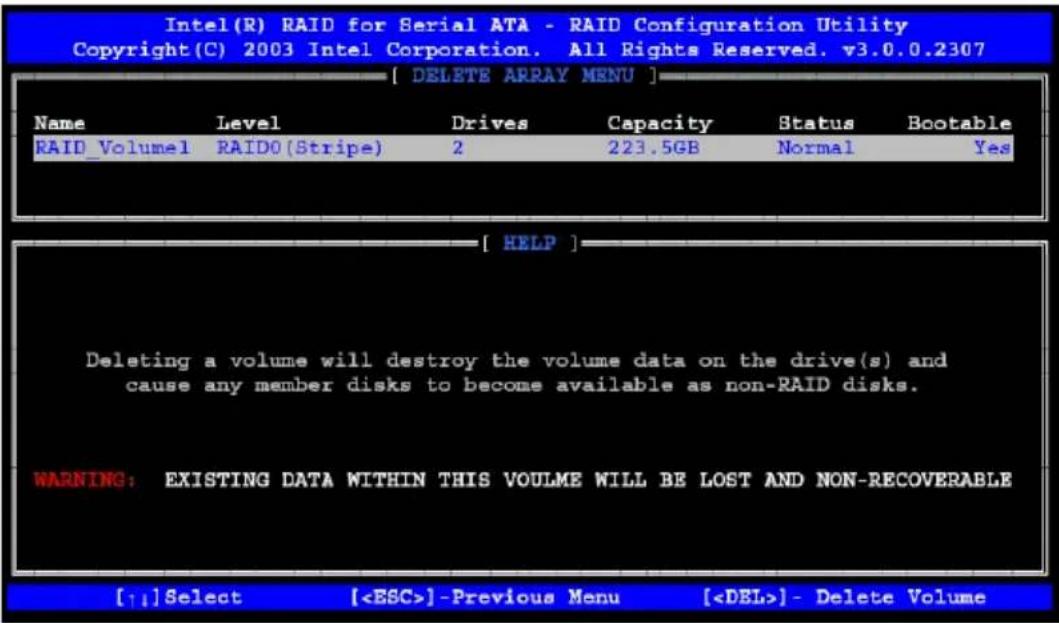
text_image
Intel(R) RAID for Serial ATA - RAID Configuration Utility Copyright(C) 2003 Intel Corporation. All Rights Reserved. v3.0.0.2307 [ DELETE ARRAY MENU ] Name Level Drives Capacity Status Bootable RAID_Volume1 RAID0(Stripe) 2 223.5GB Normal Yes [ HELP ] Deleting a volume will destroy the volume data on the drive(s) and cause any member disks to become available as non-RAID disks. WARNING: EXISTING DATA WITHIN THIS VOULME WILL BE LOST AND NON-RECOVERABLE [↑↓]Select [c. Select the volume and press the
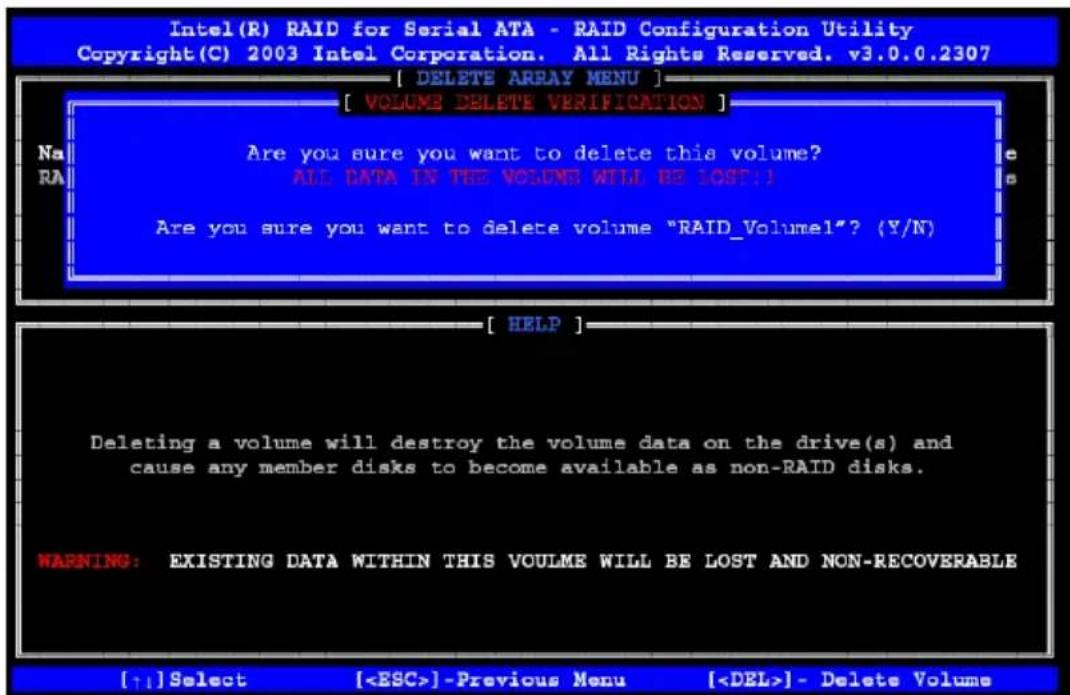
text_image
Intel(R) RAID for Serial ATA - RAID Configuration Utility Copyright(C) 2003 Intel Corporation. All Rights Reserved. v3.0.0.2307 [ DELETE ARRAY MENU ] [ VOLUME DELETE VERIFICATION ] Are you sure you want to delete this volume? ALL DATA IN THE VOLUME WILL BE SOST!! Are you sure you want to delete volume "RAID_Volume1"? (Y/N) [ HELP ] Deleting a volume will destroy the volume data on the drive(s) and cause any member disks to become available as non-RAID disks. WARNING: EXISTING DATA WITHIN THIS VOLUME WILL BE LOST AND NON-RECOVERABLE [↑↓]Select [d. When asked "Are you sure you want to delete this volume?", type "Y" to confirm the deletion of the RAID Volume, and press the
Reset Disks to Non-RAID:
a. When you are in the main menu, use the
b When the item# 3 is highlighted, press the
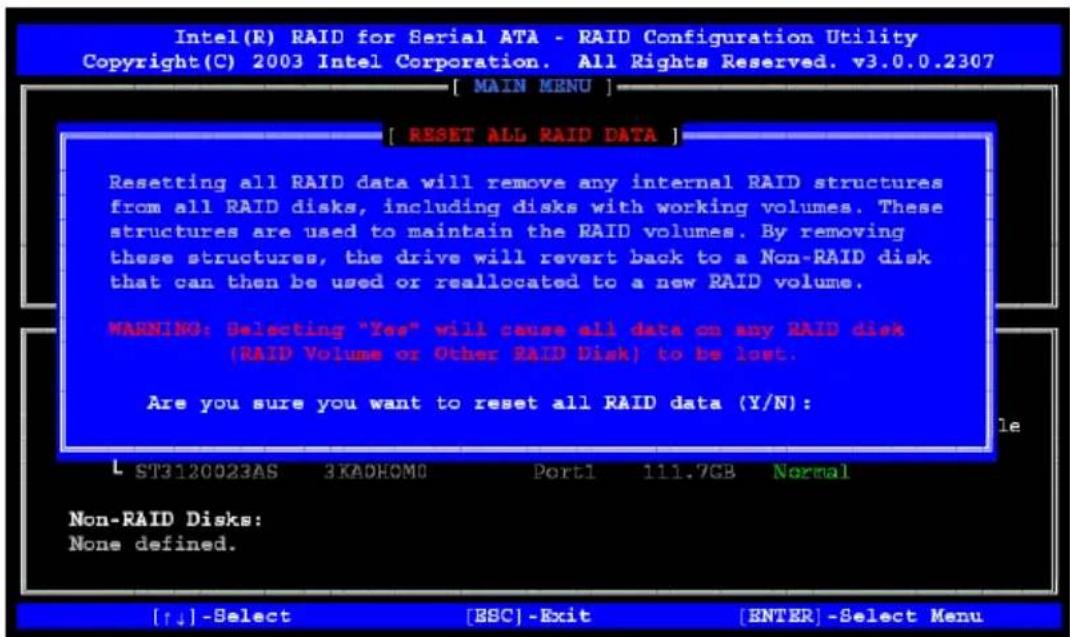
text_image
Intel(R) RAID for Serial ATA - RAID Configuration Utility Copyright(C) 2003 Intel Corporation. All Rights Reserved. v3.0.0.2307 [ MAIN MENU ] [ RESET ALL RAID DATA ] Resetting all RAID data will remove any internal RAID structures from all RAID disks, including disks with working volumes. These structures are used to maintain the RAID volumes. By removing these structures, the drive will revert back to a Non-RAID disk that can then be used or reallocated to a new RAID volume. WARNING: Selecting "Yes" will cause all data on any RAID disk (RAID Volume or Other RAID Disk) to be lost. Are you sure you want to reset all RAID data (Y/N): L ST3120023AS 3KADHOMO Port1 111.7GB Normal Non-RAID Disks: None defined. [↑↓] -Select [ESC] -Exit [ENTER] -Select Menuc. When asked "Are you sure you want to reset all RAID data (Y/N):", type "Y" to confirm the selection, and press the
- Exiting the ICH6R SATA RAID Configuration Utility Program:
a. When you are in the main menu, use the
b When the item# 4 "Exit" is highlighted, press the
c. When asked "Are you sure you want to exit? (Y/N):" Type "Y" to confirm the selection, and press the
C-2 Installing the Windows XP/2000 for systems with RAID Functions
New Operating System-Windows XP/2000 Installation
a. Insert Microsoft Windows XP/2000 Setup CD in the CD Driver, and the system will start booting up from CD.
b. Press the
c. When the Windows XP/2000 Setup screen appears, press "S" to specify additional device(s).
d. Insert the driver diskette-"Intel AA RAID XP/2000 Driver for ICH6R into Drive A: and press the
e. Choose Intel(R)82801ER SATA RAID Controller from the list indicated in the XP/2000 Setup Screen, and press the
f. Press the
g. From the Windows XP/2000 Setup screen, press the
(*Note: the current version of the ICH6R SATA RAID Utility can only support Windows XP/2000 Operating System.)
h. After Windows XP/2000 Installation is completed, the system will automatically reboot.
i. Insert Supermicro CD that came with the package into the CD Drive during system reboot, and the following screen will appear:
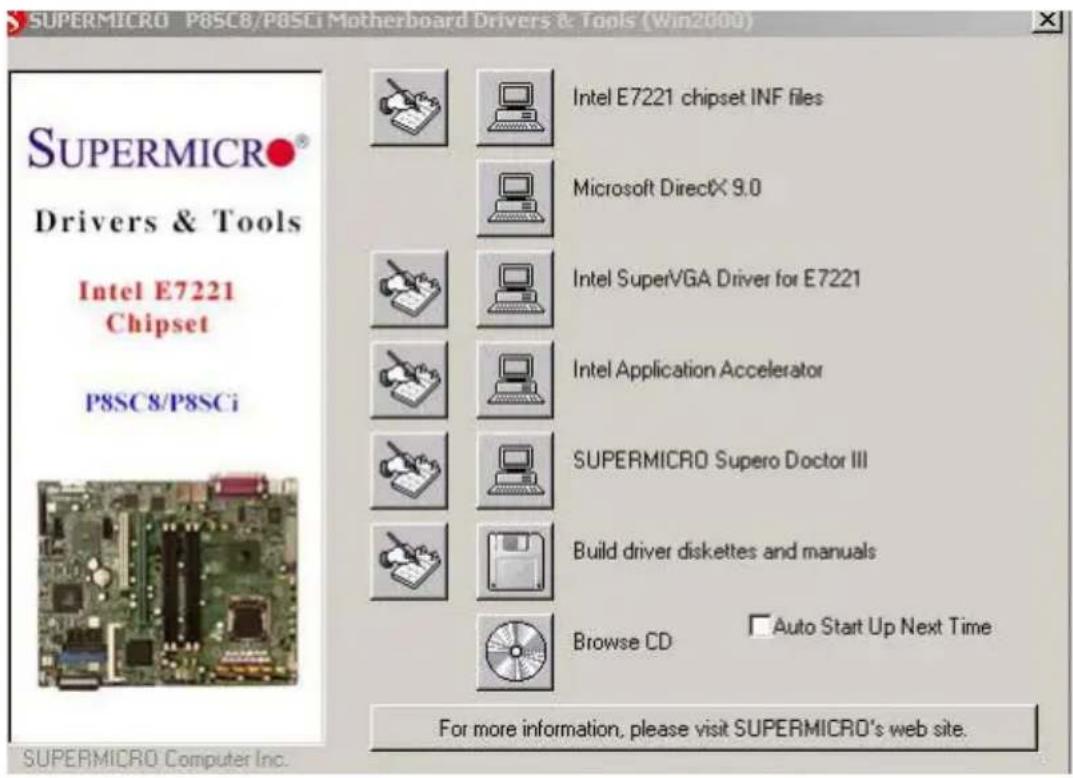
text_image
SUPERMICRO P8SCB/P8SCI Motherboard Drivers & Tools (Win2000) SUPERMICRO® Drivers & Tools Intel E7221 Chipset P8SC 8/P8SCi Intel E7221 chipset INF files Microsoft DirectX 9.0 Intel SuperVGA Driver for E7221 Intel Application Accelerator SUPERMICRO Supero Doctor III Build driver diskettes and manuals Browse CD Auto Start Up Next Time For more information, please visit SUPERMICRO's web site. SUPERMICRO Computer Inc.(*Note: Click the icons showing a hand writing on paper to view the readme files for each item. Click the computer icons to the right of these items to install each item (from top to the bottom) one at a time. After installing each item, you must re-boot the system before moving on to the next item on the list. You should install everything here except for the SUPER Doctor utility and the LAN/SCSI driver diskettes, which are optional. The bottom icon with a CD on it allows you to view the entire contents of the CD.)
Installing Intel Application Accelerator Utility
a. When the above screen appears, click on the icon marked "Application Accelerator RAID Edition" on the screen, and the following screen will appear:
InstallShield Wizard

Intel(R) Application Accelerator RAID Edition Setup is preparing the InstallShield® Wizard, which will guide you through the rest of the setup process. Please wait.

Cancel
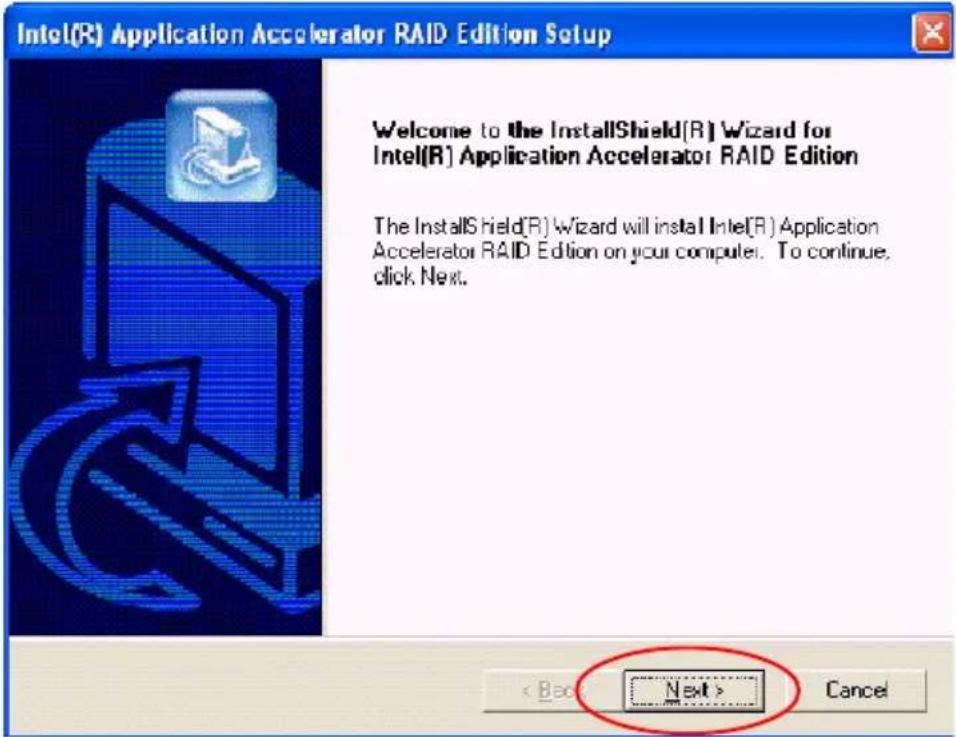
text_image
Intel(R) Application Accelerator RAID Edition Setup Welcome to the InstallShield(R) Wizard for Intel(R) Application Accelerator RAID Edition The InstallShield(R) Wizard will install Intel(R) Application Accelerator RAID Edition on your computer. To continue, click Next. < Back Next > Cancelb. When the above screen appears, click on the icon marked "Next" on the screen, and the following screen will appear:
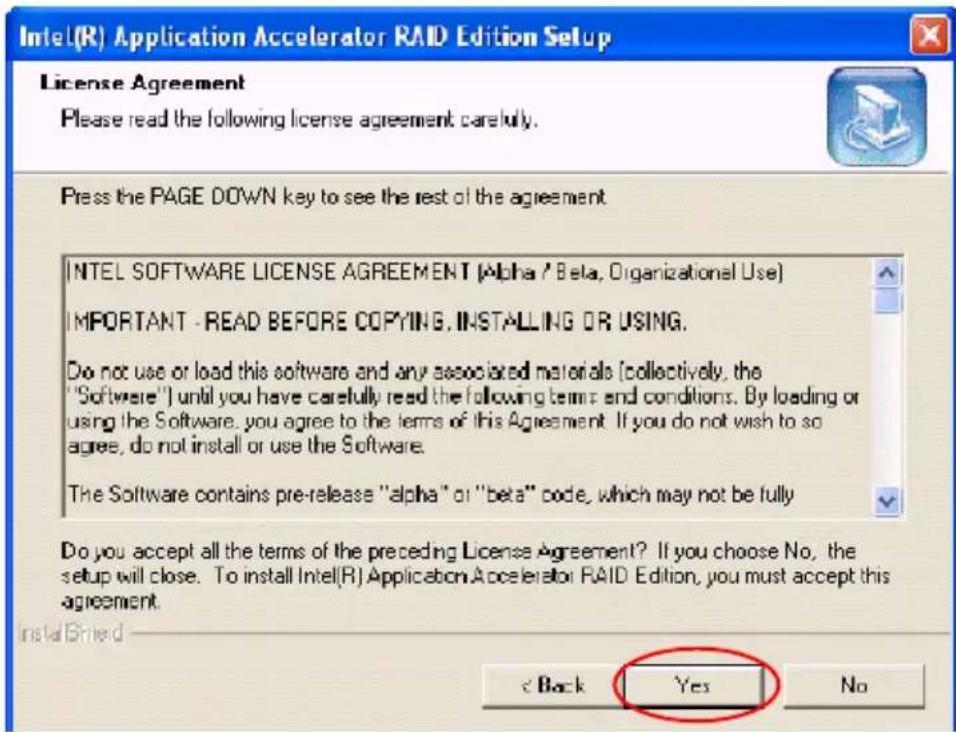
text_image
Intel(R) Application Accelerator RAID Edition Setup License Agreement Please read the following license agreement carefully. Press the PAGE DOWN key to see the rest of the agreement INTEL SOFTWARE LICENSE AGREEMENT (Alpha / Beta, Organizational Use) IMPORTANT - READ BEFORE COPYING, INSTALLING OR USING. Do not use or load this software and any associated materials [collectively, the "Software"] until you have carefully read the following terms and conditions. By loading or using the Software, you agree to the terms of this Agreement. If you do not wish to so agree, do not install or use the Software. The Software contains pre-release "alpha" or "beta" code, which may not be fully Do you accept all the terms of the preceding License Agreement? If you choose No, the setup will close. To install Intel(R) Application Accelerator RAID Edition, you must accept this agreement. e Back Yes Noc. After reading the License Agreement, click on the icon marked "Yes" on the screen, and the following screen will appear:
d. Specify the folder that you want the program to be installed in and then, click on the icon marked "Next" to begin the installation process.
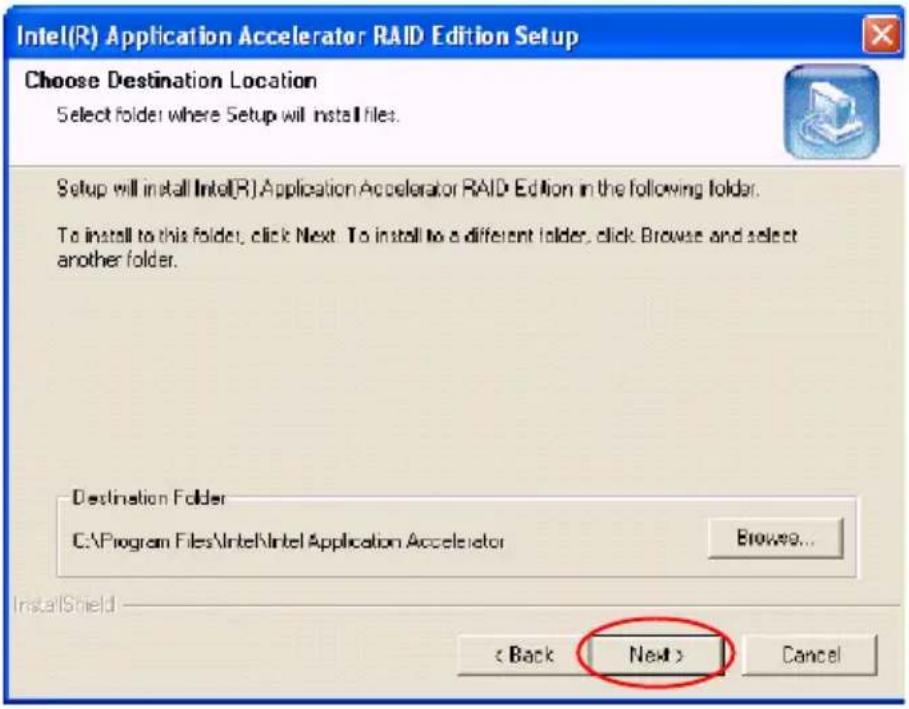
text_image
Intel(R) Application Accelerator RAID Edition Setup Choose Destination Location Select folder where Setup will install files. Setup will install Intel(R) Application Accelerator RAID Edition in the following folder. To install to this folder, click Next. To install to a different folder, click Browse and select another folder. Destination Folder C:\Program Files\Intel\Intel Application Accelerator Browse... InstallShield < Back Next > Cancele. Specify a program folder where you want the Setup to add the program icon as shown in the following screen and click on the icon marked "Next".
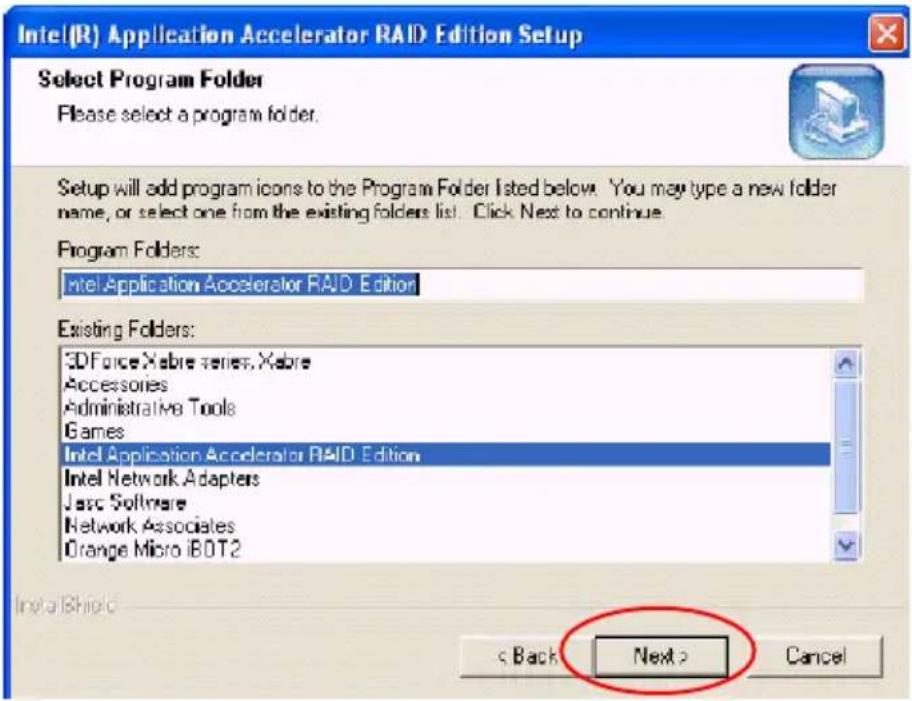
text_image
Intel(R) Application Accelerator RAID Edition Setup Select Program Folder Please select a program folder. Setup will add program icons to the Program Folder listed below. You may type a new folder name, or select one from the existing folders list. Click Next to continue. Program Folders: Intel Application Accelerator RAID Edition Existing Folders: 3DForce Xabre series, Xabre Accessories Administrative Tools Games Intel Application Accelerator RAID Edition Intel Network Adapters Jarc Software Network Associates Orange Micro iB0T2 Install iShield s Back Next > Cancelf. The following screen will appear to display the status of the Intel Application Accelerator RAID Edition Installation.
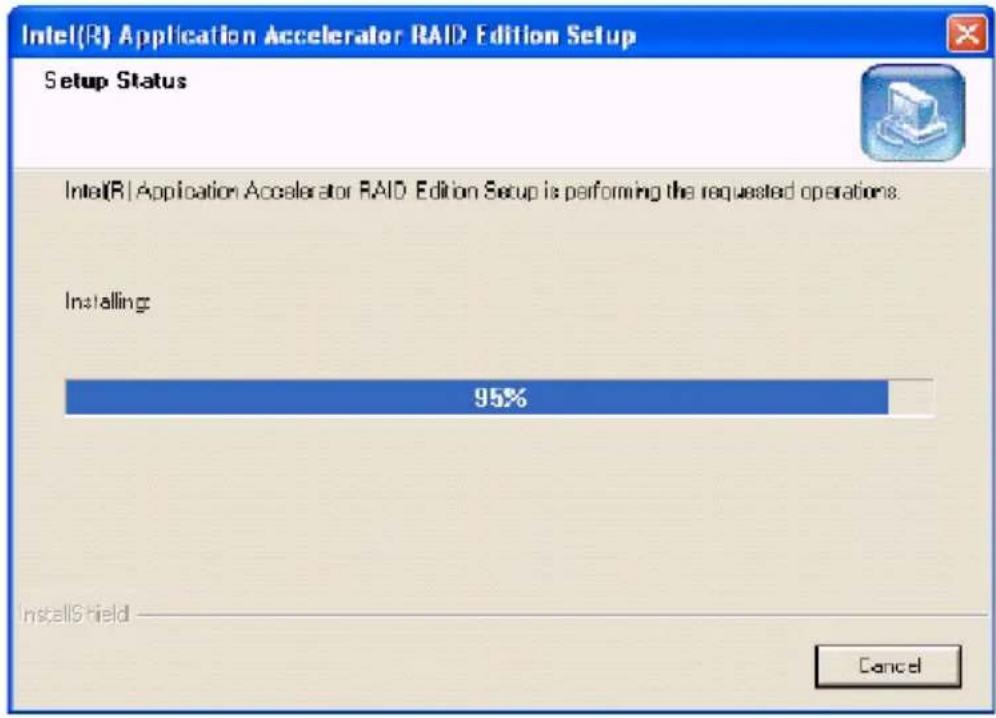
text_image
Intel(R) Application Accelerator RAID Edition Setup Setup Status Intel(R) Application Accelerator RAID Edition Setup is performing the requested operations. Installing 95% InstallShield Cancelg. Once the Application Accelerator RAID Edition installation is completed, the following screen will appear and the system will start to re-boot.
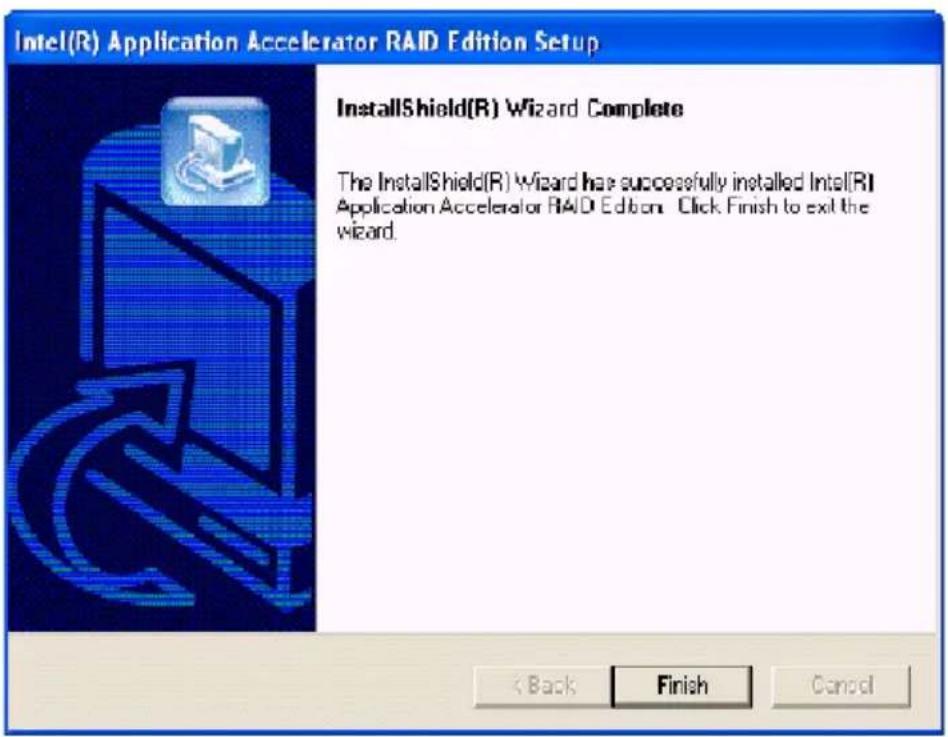
text_image
Intel(R) Application Accelerator RAID Edition Setup InstallShield(R) Wizard Complete The InstallShield(R) Wizard has successfully installed Intel(R) Application Accelerator RAID Edition. Click Finish to exit the wizard. < Back Finish Cancel(*Note: Once the XP/2000 Operating System is installed, please read the "Readme text files" for the instructions to use the SATA RAID Utility in the Windows XP/2000 OS environment.)
C-5 Installing the Operating System and other Software Programs
After all the hardware has been installed, you must first install the operating system, and then, other software drivers. The necessary drivers are all included on the Supermicro CDs that came packaged with your motherboard. (*Note: for the Windows 2003 OS, please refer to Page C-14.)
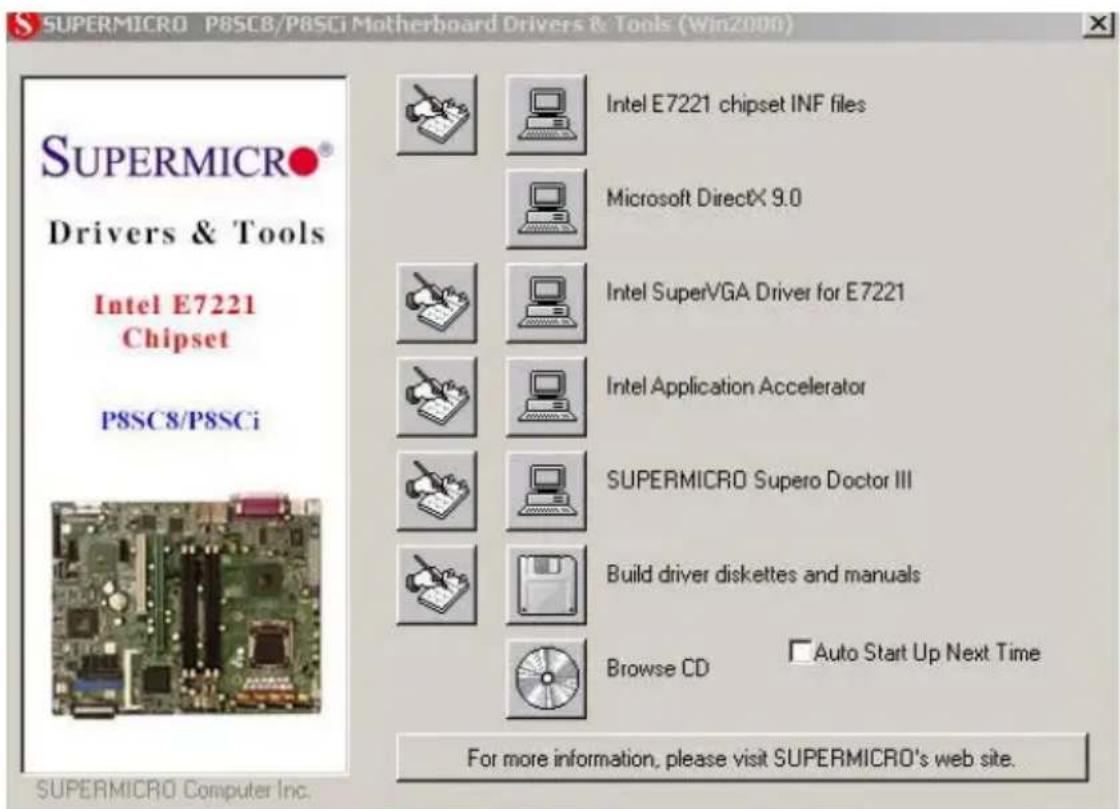
text_image
SUPERMICRO P8SCB/P8SCI Motherboard Drivers & Tools (Win2000) SUPERMICRO® Drivers & Tools Intel E7221 Chipset P8SC8/P8SCI Intel E7221 chipset INF files Microsoft DirectX 9.0 Intel SuperVGA Driver for E7221 Intel Application Accelerator SUPERMICRO Supero Doctor III Build driver diskettes and manuals Browse CD Auto Start Up Next Time For more information, please visit SUPERMICRO's web site. SUPERMICRO Computer Inc.Driver/Tool Installation Display Screen
(*Note: Click the icons showing a hand writing on the paper to view the readme files for each item. Click the computer icons to the right of these items to install each item (from top to the bottom) one at a time. After installing each item, you must re-boot the system before moving on to the next item on the list. The bottom icon with a CD on it allows you to view the entire contents of the CD.)
Supero Doctor III
The Supero Doctor III program is a Web base management tool that supports remote management capability. It includes Remote and Local Management tools. The local management is called SD III Client. The Supero Doctor III program included on the CDROM that came with your motherboard allows you to monitor the environment and operations of your system. Supero Doctor III displays crucial system information such as CPU temperature, system voltages and fan status. See the Figure below for a display of the Supero Doctor III interface.
Note 1: The default user name and password are ADMIN.
Note 2: In the Windows OS environment, the Supero Doctor III settings take precedence over the BIOS settings. When first installed, the SD III adopts the temperature threshold settings previously set in the BIOS. Any subsequent changes to these thresholds must be made within Supero Doctor, since the SDIII settings override the BIOS settings. For the Windows OS to adopt the BIOS temperature threshold settings, please change the SDIII settings to be the same as those set in the BIOS.
Supero Doctor III Interface Display Screen-I (Health Information)
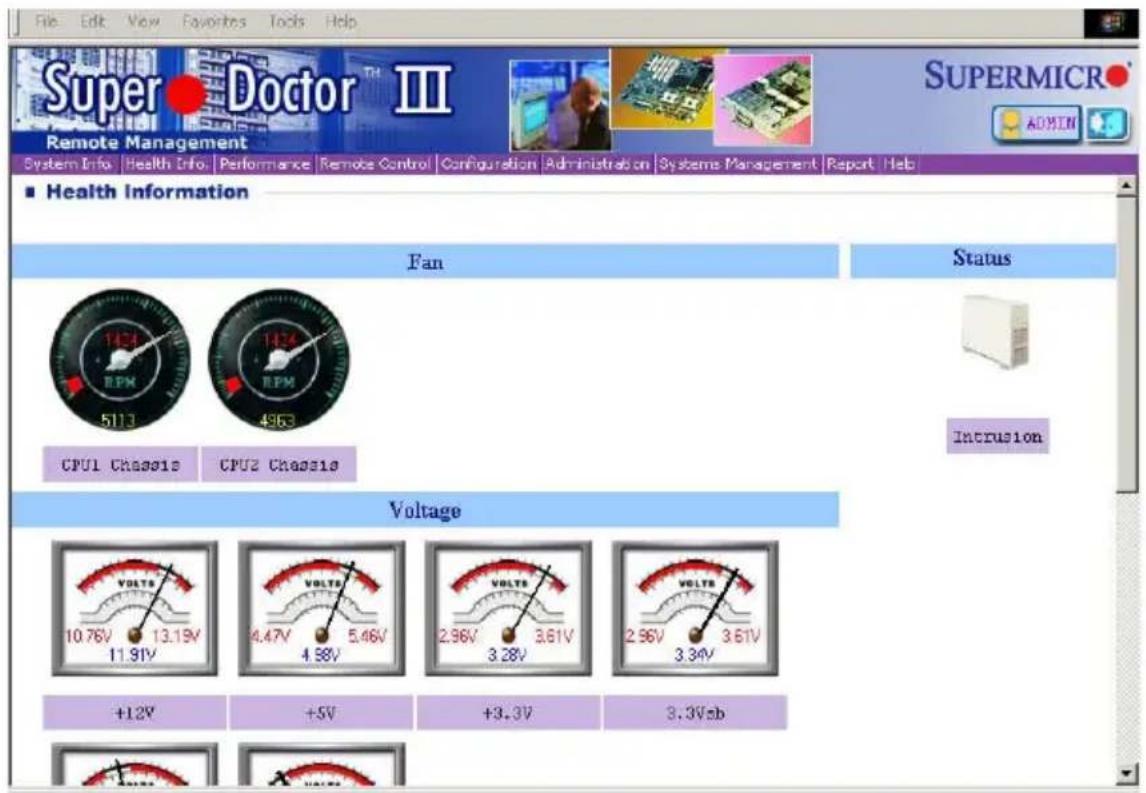
text_image
Super Doctor III Remote Management System Info | Health Info | Performance | Remote Control | Configuration | Administra on | Systems Management | Report | Help ■ Health Information Fan Status 1424 5113 1424 4963 CPU1 Chassis CPU2 Chassis Intrusion Voltage +1.2V +5V +3.3V 3.3VsbSupero Doctor III Interface Display Screen-II (Remote Control)
text_image
Super Doctor III Remote Management System Info Health Info Performance Remote Control Configuration Administration Systems Management Report Help ■ Remote Control Graceful Power Control Open Console Power Control ↓ Enter Supero Doctor III allows a user to inform the OS to reboot or shut down within a specified time (the default is 30 seconds). Before the system reboots or shuts down, it's allowed to cancel the action. Requirements Keep Supero SD3Service Daemon running at all times on this system. Provide TCP/IP connectivity. Power control(*Note: SD III Software Revision 1.0 can be downloaded from our Website at: ftp://ftp.supermicro.com/utility/Supero_Doctor_III/. You can also download SDIII User's Guide at: http://www.supermicro.com/PRODUCT/Manuals/SDIII/UserGuide.pdf. For Linux, we will still recommend Supero Doctor II.)
Notes