
OPDV971H - DVD player OPPO - Free user manual and instructions
Find the device manual for free OPDV971H OPPO in PDF.


| Product Type | DVD Player |
| Model | OPDV971H |
| Brand | OPPO |
| Dimensions (W x D x H) | 16.9 x 10.6 x 2.9 inches (430 x 270 x 74 mm) |
| Weight | 6.6 lbs (3.0 kg) |
| Power Supply | AC 110-240V, 50/60Hz |
| Power Consumption | 15 W (standby: < 1 W) |
| Disc Compatibility | DVD, DVD±R/RW, CD, CD-R/RW, VCD, SVCD, MP3, WMA, JPEG |
| Video Output | HDMI 1.3, Component, Composite, S-Video |
| Audio Output | Analog stereo, Coaxial digital, Optical digital |
| Video Upscaling | Up to 1080p via HDMI |
| Audio Formats | Dolby Digital, DTS, PCM |
| Playback Features | Zoom, Repeat, A-B Repeat, Slow Motion, Search |
| Remote Control | Included (batteries not included) |
| Connectivity | USB 2.0 (front), Ethernet (optional), RS-232C |
| Region Code | Region 1 (NTSC) or Region 2 (PAL) depending on model |
| Safety Certifications | UL, CE, FCC, RoHS |
| Maintenance | Clean lens with a soft brush; no liquid cleaners |
| Spare Parts | Remote control, power cord, user manual |
| Repairability | DIY not recommended; contact OPPO service center |
Frequently Asked Questions - OPDV971H OPPO
User questions about OPDV971H OPPO
0 question about this device. Answer the ones you know or ask your own.
Ask a new question about this device
Download the instructions for your DVD player in PDF format for free! Find your manual OPDV971H - OPPO and take your electronic device back in hand. On this page are published all the documents necessary for the use of your device. OPDV971H by OPPO.
USER MANUAL OPDV971H OPPO
Table of Contents
Table of Contents .... 1
Important Information .... 1
Important Safety Instructions ....1
Cautions....2
FCC Statement 2
Copyright Protection 3
Compatible Disc Types .... 3
INSTALLATION 4
Front Panel Controls 4
Front Panel Display Window 4
Rear Panel Connectors 4
Remote Control 5
Battery Installation 6
Using the Remote Control ....6
Connection to a TV....7
DVI or HDMI Connection ....7
Other Connection Options 8
Connection to an Audio System 10
Connection to a Stereo or Surround Audio System....10
Connection to a Receiver/Amplifier with Dolby Digital or DTS Decoder....11
Connection to a Receiver/Amplifier with 5.1ch Audio Input 12
BASIC OPERATIONS....13
Disc Playback 13
Pause Playback 13
DVD Menu Playback 14
Volume Control....14
Mute 14
Audio Tone Control 15
OSD (On-Screen Display)....15
Audio Language/Channel Selection....15
Subtitle Selection....16
Angle Selection 16
Zooming the Displayed Frame 16
ADVANCED OPERATIONS....18
TV System Selection....18
DVI Output Resolution 18
Fast Playback 19
Slow Playback....19
Repeat Playback 19
Repeat the Selected Section 20
Random and Shuffle Playback....20
Playback by Track Number 20
Playback from a Specific Location 21
Playing DVD discs....21
Playing CD discs....21
Memory and Automatic Resume 22
Viewing Static Pictures on DVD-Audio Discs 22
Sound Field and EQ Mode Adjustment 22
Power Spectrum Meter (PSM) 23
Virtual Keyboard 23
Playing DivX, Digital Audio and Picture Files 24
Digital Picture Play Operations 25
Digital Music Play Operations....25
Playing a Disc with Both Digital Audio and Picture Files ....25
SETUP MENU OPTIONS.... 26
General Setup Page 27
Speaker Setup Page 28
Audio Setup Page.... 30
Video Setup Page 31
Preference Page.... 32
REFERENCES.... 34
Useful Notes....34
Troubleshooting 34
Specifications 35
Language Code List 36
LIMITED WARRANTY 37
OPPO Digital, Inc. Limited One Year Warranty 37
Important Information

CAUTION:
TO PREVENT ELECTRICAL SHOCK, DO NOT REMOVE THE COVER. NO USER-SERVICEABLE PARTS INSIDE. REFER SERVICING TO QUALIFIED SERVICE PERSONNEL.
WARNING:
TO PREVENT DAMAGE WHICH MAY RESULT IN FIRE OR SHOCK HAZARD, DO NOT EXPOSE THIS APPLIANCE TO RAIN OR MOISTURE, DRIPPING OR SPLASHING AND THAT NO OBJECTS FILLED WITH LIQUIDS, SUCH AS VASES, SHALL BE PLACED ON THE APPARATUS.

The lightning flash with arrowhead symbol, within an equilateral triangle, is intended to alert the user to the presence of uninsulated “dangerous voltage” within the product's enclosure that may be of sufficient magnitude to constitute a risk of electric shock to persons.

The exclamation point within an equilateral triangle is intended to alert the user to the presence of important operation and maintenance (servicing) instruction in the literature accompanying the appliance
CAUTION: THIS PRODUCT UTILIZES A LASER. USE OF CONTROLS OR ADJUSTMENTS OR PERFORMANCE OF PROCEDURES OTHER THAN THOSE SPECIFIED HEREIN MAY RESULT IN HAZARDOUS RADIATION EXPOSURE. DO NOT OPEN COVERS AND DO NOT REPAIR YOURSELF. REFER SERVICING TO QUALIFIED PERSONNEL.
CAUTION: DO NOT DEFEAT THE SAFETY PURPOSE OF THE POLARIZED PLUG. A POLARIZED PLUG HAS TWO BLADES WITH ONE WIDER THAN THE OTHER. THE WIDE BLADE IS PROVIDED FOR YOUR SAFETY. IF THE PROVIDED PLUG DOES NOT FIT INTO YOUR OUTLET, CONSULT AN ELECTRICIAN TO HAVE A SUITABLE OUTLET INSTALLED.
CAUTION: DANGER OF EXPLOSION IF BATTERY IS INCORRECTLY REPLACED. REPLACE ONLY WITH THE SAME OR EQUIVALENT TYPE.
Important Safety Instructions
- Read these instructions.
- Keep these instructions.
- Heed all warnings.
- Follow all instructions.
- Do not use this apparatus near water.
-
Clean only with dry cloth.
-
Do not block any ventilation openings. Install in accordance with the manufacturer's instructions.
-
Do not install near any heat sources such as radiators, heat registers, stoves, or other apparatus (including amplifiers) that produce heat.
Cautions
- Please disconnect the power plug from the wall outlet if you are not going to use the player for a long time.
- Ensure that all audio/video cables are properly connected before plugging in the power plug. The player is not disconnected from the AC power source as long as it is connected to the wall outlet, even if the player itself has been turned off.
- The acceptable power input range is AC \~ 100V-240V, 50/60Hz
- Before turning on the power of the player, please adjust the volume level of TVs, audio system speakers and amplifiers to the minimum. Adjust the volume as necessary only after normal playback has started to avoid damage to your hearing and equipments.
- Do not put the player near any high power loudspeakers so as to avoid any interference due to vibration or magnetic fields.
- Please put the player at a dry and well ventilated area. Do not put it near heat source, or expose it to direct sunlight, mechanical vibration, humidity or excessive dust.
- Before moving the player, take out any discs. Otherwise the disc may be damaged.
- When moving the player from a cold place to a warm one, or vice versa, moisture may condense on the laser pickup unit inside the player. Should this occur, the player may not operate properly. In such a case please turn the power on for 1-2 hours (without disc) until the moisture evaporates.
- Clean the cabinet, panel, and controls only with a soft cloth slightly moistened with water or a mild detergent solution. Never use any type of abrasive pad, scouring powder or solvent such as alcohol or benzene for cleaning.
- Do not place objects filled with liquid, such as vases, on the player.
- The AC power plug is used as the disconnect device, so the AC power plug shall always remain readily operable.
FCC Statement
This equipment has been tested and found to comply with the limits for a Class B digital device, pursuant to Part 15 of the FCC Rules. These limits are designed to provide reasonable protection against harmful interference in a residential installation. This equipment generates, uses, and can radiate radio frequency energy and, if not installed and used in accordance with the instructions, may cause harmful interference to radio communications. However, there is no guarantee that interference will not occur in a particular installation. If this equipment does cause harmful interference to radio or television reception, which can be determined by turning the equipment off and on, the user is encouraged to try to correct the interference by one or more of the following measures:
- Reorient or relocate the receiving antenna.
- Increase the separation between the equipment and receiver.
- Connect the equipment into an outlet on a circuit different from that to which the receiver is connected.
- Consult the dealer or an experienced radio/TV technician for help.
Any unauthorized changes or modifications to this equipment would void the user's authority to operate this device.
This device complies with Part 15 of the FCC Rules. Operation is subject to the following two conditions: (1) This device may not cause harmful interference, and (2) this device must accept any interference received, including interference that may cause undesired operation.
Copyright Protection
This product incorporates copyright protection technology that is protected by U.S. patents and other intellectual property rights. Use of this copyright protection technology must be authorized by Macrovision Corporation, and is intended for home and other limited viewing uses only unless otherwise authorized by Macrovision Corporation. Reverse engineering or disassembly is prohibited.
Compatible Disc Types
| Type | Size | Recorded | Contents |
 | 12 cm or 8cm | DVD: Compressed digital audio + compressed digital video (dynamic picture) | |
 | 12 cm or 8cm | DVD-Audio: Multi-channel digital audio + compressed digital video or still pictures | |
 | 12 cm or 8cm | CD-DA: Digital Audio | |
NOTES:
This manual uses the following icons to indicate items applicable to the compatible disc types:

Applies to DVD discs

Applies to DVD-Audio discs

Applies to CD discs
INSTALLATION
Front Panel Controls
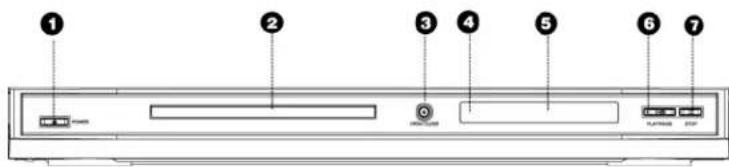
- POWER Button 2. Disc Tray 3. OPEN/CLOSE Button
- IR Sensor 5. Display Window 6. PLAY/PAUSE Button
- STOP Button
Front Panel Display Window
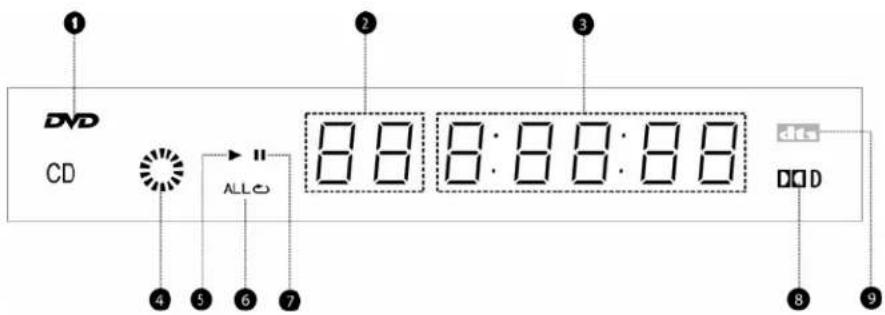
- DVD or CD Disc Icon 2. Chapter or Track 3. Playback Time
- Playback Status Indicator 5. Play 6. Repeat
- Pause 8. Dolby Digital 9. DTS
Rear Panel Connectors
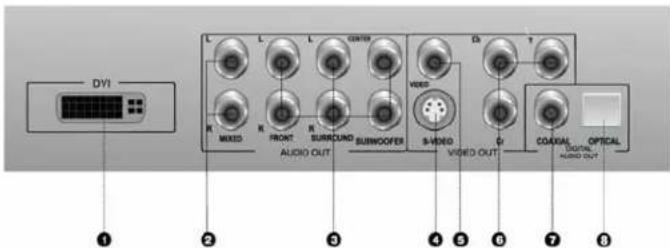
- DVI Jack 2. Mixed L/R Audio Out Jacks 3. 5.1ch Audio Out Jacks
- S-Video Jack 5. Video Out Jack 6. Component Video (YCbCr) Jacks
- Coaxial Digital Audio Jack 8. Optical Digital Audio Jack
Remote Control
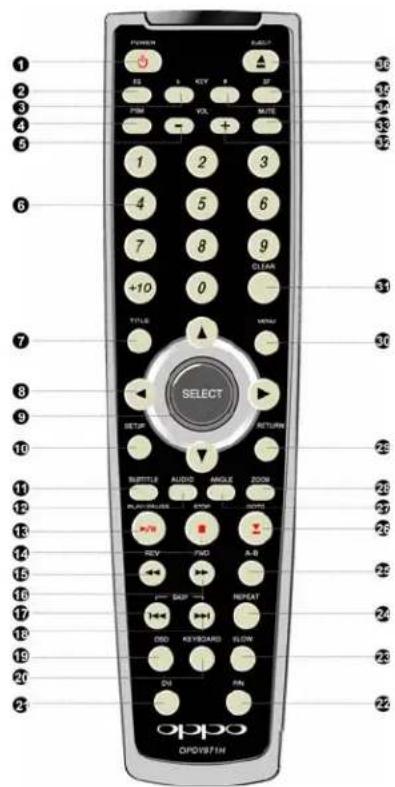
- POWER Button – Toggle power STANDBY and ON
- EQ Button – Adjust audio equalization effects
- KEY b Button – Lower audio tone
-
PSM Button – Power Spectrum Meter on/off
-
VOLUME -- Decrease volume
- NUMBER Buttons – Enter numeric values
- TITLE Button – Show DVD title menu
- ARROW Buttons – Navigate menu selection
- SELECT Button – Confirm menu selection
- SETUP Button – Enter the DVD player setup menu
- SUBTITLE Button – Change subtitle language / Switch picture display mode
- AUDIO Button – Change the audio language or channel
- PLAY/PAUSE Button – Start or pause playback
- STOP Button – Stop playback
- REV Button – Fast reverse play
- FWD Button – Fast forward play
- PREV Button – Skip previous
- NEXT Button – Skip next
- OSD Button – Show/hide On-Screen Display
-
KEYBOARD Button – Show/hide virtual keyboard
-
DVI Button – Switch DVI output resolution
- P/N Button – Switch output TV system: NTSC, PAL or AUTO
- SLOW Button – Slow play
- REPEAT Button – Repeat play
- A-B Button - Repeat play the selected section
- GOTO Button – Play from a specified location
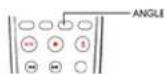
- ANGLE Button – Change camera angles
- ZOOM Button – Zoom in/out the display
- RETURN Button – Return to the previous menu
- MENU Button – Show DVD menu
- CLEAR Button – Clear input numbers
- VOLUME + - Increase volume
- MUTE Button – Mute audio
- KEY # Button – Raise audio tone
- SF Button – Adjust sound field effects
- EJECT Button – Open/close the disc tray
Battery Installation
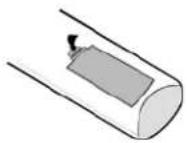
1. Remove the battery compartment cover
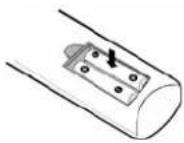
2. Insert batteries
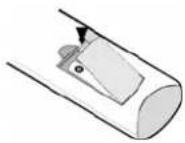
3. Replace the battery compartment cover
Using the Remote Control
When using the remote control, the front window of the remote control should be pointed to the infrared sensor on the front panel within an angle of ±30^ and a range of about 26 ft.
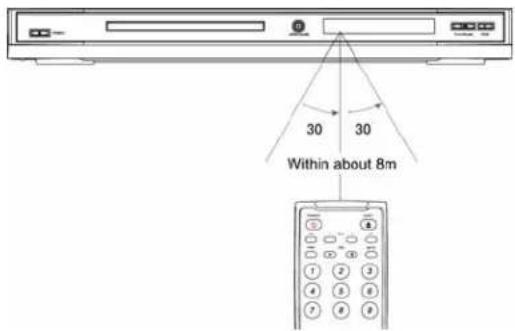
CAUTIONS
- Never drop the remote control or expose it to moisture.
- Never expose the infrared remote sensor on the front panel to direct sunlight or strong beams.
- When the batteries become low, replace them in time.
• If the remote control will not be used for a long time, please remove the batteries from it.
NOTES
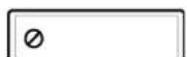
- When a button is pressed but its function is invalid at the moment, the TV screen displays:
Connection to a TV
DVI or HDMI Connection
flowchart
graph TD
    A["DVI Input"] --> B["+"]
    C["HDMI Input"] --> B
    B --> D["DVI Cable or DVI-HDMI Cable"]
    D --> E["+"]
    F["Computer monitor"] --> G["Audio In"]
    G --> H["Audio Cord"]
    H --> I["+"]
    J["DVI"] --> K["+"]
    L["Audio OUT"] --> M["+"]
    N["DISP"] --> O["+"]
    P["SWIND"] --> Q["+"]
    R["OUT"] --> S["+"]
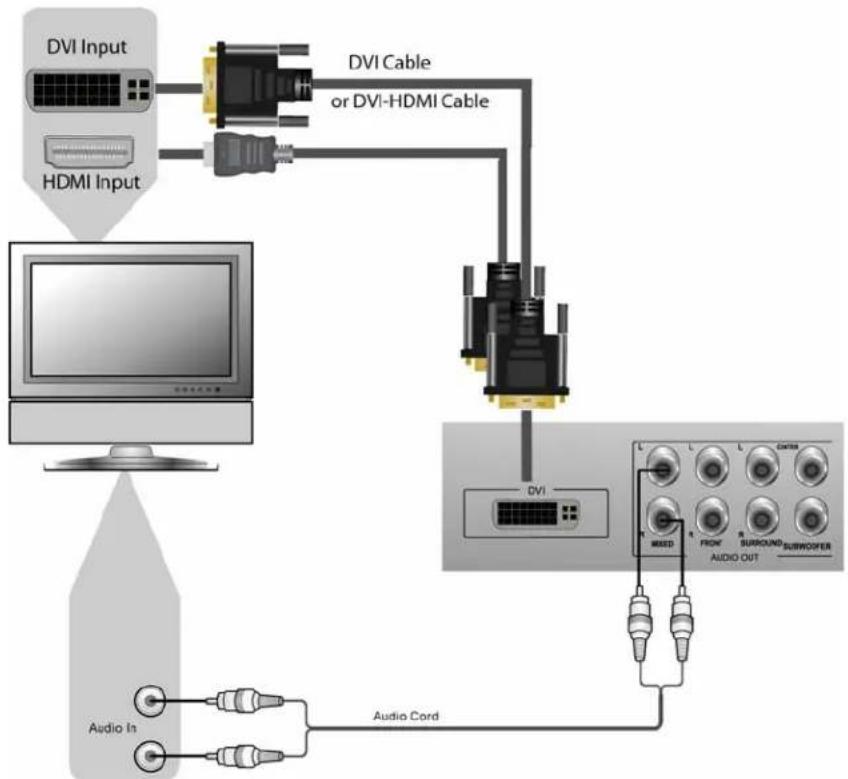
- If your TV has a DVI input, you can use the included DVI cable to connect the DVD player to the TV. This is the most preferred connection method since it delivers video in pure digital format. You must connect the analog audio cord to the TV. This is because the DVI output from the DVD player does not contain audio signal.
- If your TV has an HDMI input, you can use the included DVI-HDMI cable to connect the DVD player to the TV. This is also the most preferred connection method since HDMI is fully compatible with DVI. Video signal is delivered in pure digital format with no distortion or loss during the DVI-HDMI conversion. However you must connect the analog audio cord to the TV and set the TV to use analog audio input instead of HDMI audio input. This is because the DVI output from the DVD player does not contain audio signal.
- Please use the Red/White audio cables to connect the MIXED audio output of the DVD player to the TV. Make sure the audio cables are connected to the same input terminal group on the TV as the video signals.
- Please set the down-mix mode of the DVD player to "Stereo" or "V. SURR". (Refer to page 28 for details.)
- When playback is completely stopped, use the "DVI" button on the remote control to switch the video output resolution. Select the resolution that produces the best picture quality on your TV. (Please refer to page 18 for details.)
Other Connection Options
flowchart
graph TD
    A["Video Component Input"] --> B["Computer"]
    B --> C["Audio In"]
    B --> D["Video In"]
    B --> E["S-Video"]
    C --> F["Audio Cord"]
    D --> G["Video Cord"]
    E --> H["S-Video Cord"]
    F --> I["Rear Panel"]
    G --> I
    H --> I
    I --> J["Or"]
    J --> K["S-Video"]
Video Connection
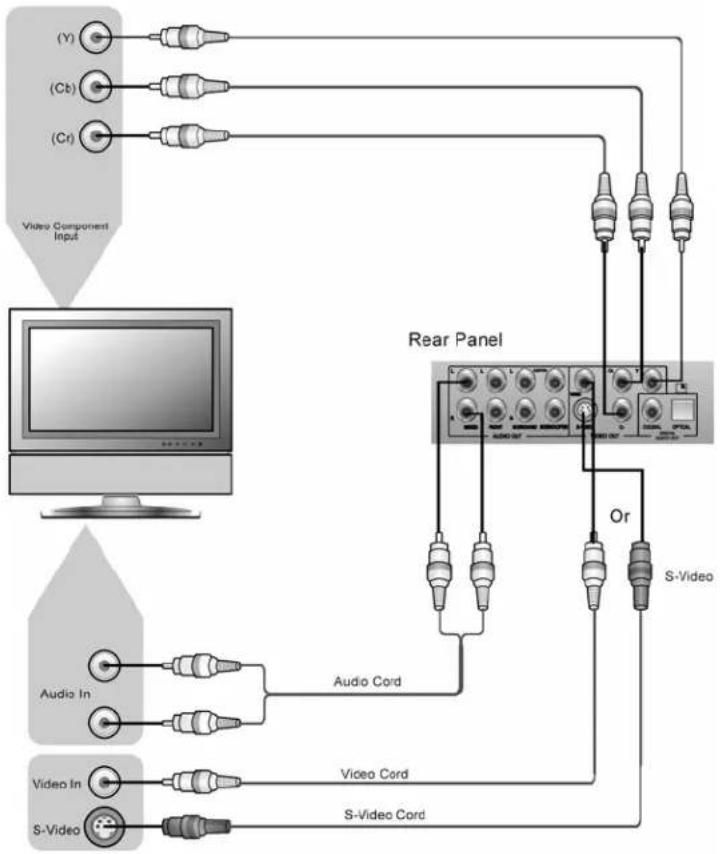
Depending on the input available on your TV, select one of the following methods to connect the video output of the DVD player to your TV. The video connections are listed in descending order of video quality.
BEST If the TV has a DVI or HDMI input, please see page or HDMI connection.
7 for instructions on using the DVI
BETTER If the TV has component video inputs, please use a component video cable to connect the component video output of the DVD player to the TV. The connectors are color coded, so please make sure the cable connections match on both ends. The component video connection will produce a very clear picture with high color accuracy.
GOOD If the TV has an S-Video input, you may use an S-Video cable to connect the DVD player to the TV. S-Video reduces the interference between the luminance (brightness) and chrominance (color) video signals.
STANDARD If the TV has a standard composite video input, please use the included yellow video cable to connect the VIDEO output of the DVD player to the TV.
NOTES
- When using the component, S-Video or composite video connection, the video signal is not processed with the built-in Genesis/Faroudja video processor. Video output via these connections is standard definition interlaced video.
- It is highly recommended that you use the DVI or HDMI connection in order to enjoy the up-converted high definition or progressive-scan video.
Audio Connection
- Please use the Red/White audio cables to connect the MIXED audio output of the DVD player to the TV. Make sure the audio cables are connected to the same input terminal group on the TV as the video signals.
- Please set the down-mix mode of the DVD player to "Stereo" or "V. SURR". (Refer to page 28 for details.)
Connection to an Audio System
Connection to a Stereo or Surround Audio System
flowchart
graph TD
    A["Video In"] --> B["Amplifier equipped with Dolby Pro Logic Surround"]
    C["Video Cord"] --> B
    D["Audio In"] --> B
    E["Audio Cord"] --> B
    B --> F["Front Left Speaker"]
    B --> G["Center Speaker"]
    B --> H["Front Right Speaker"]
    B --> I["Subwoofer"]
    B --> J["Surround Left Speaker"]
    B --> K["Surround Right Speaker"]
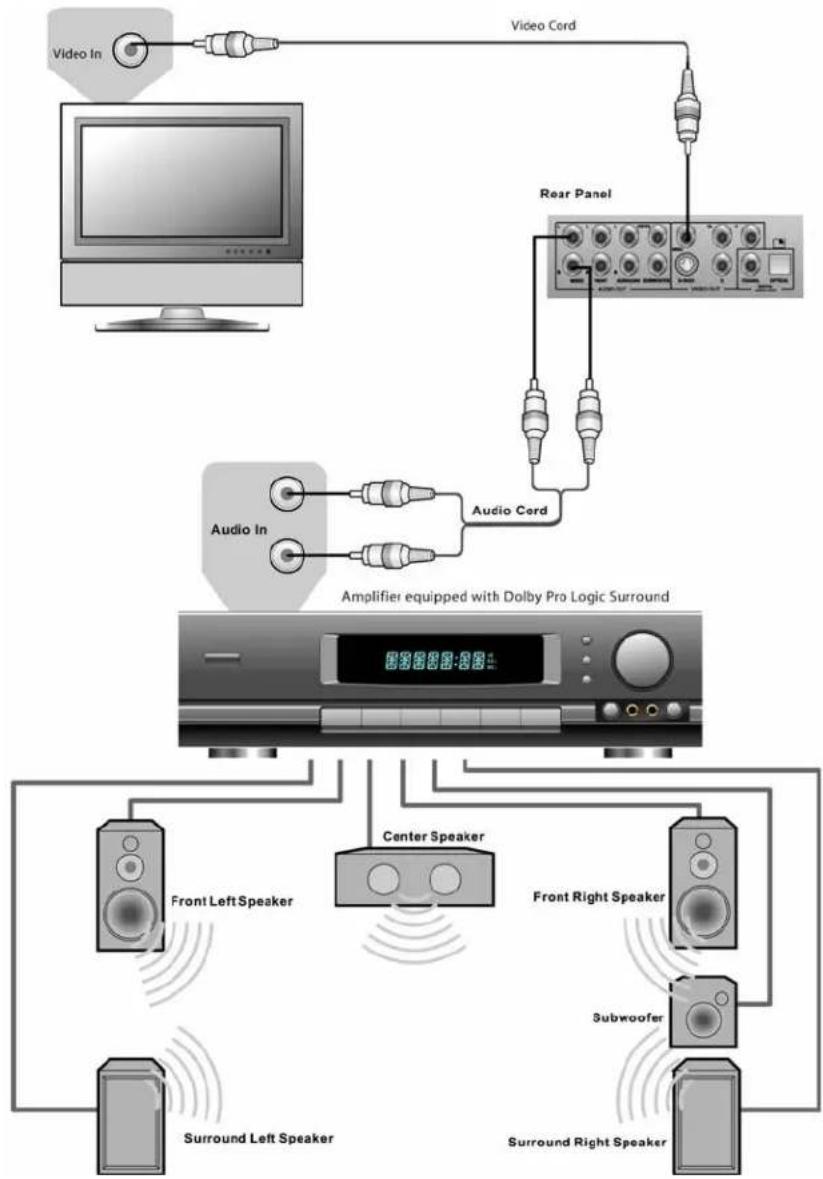
- If the audio system does not have surround speakers, please set the down-mix mode to "Stereo" or "V. SURR".
- If the audio system has surround speakers and Dolby Pro Logic Surround support, please set the down-mix mode to "LT/RT".
(Please refer to page 28 for details.)
Connection to a Receiver/Amplifier with Dolby Digital or DTS Decoder
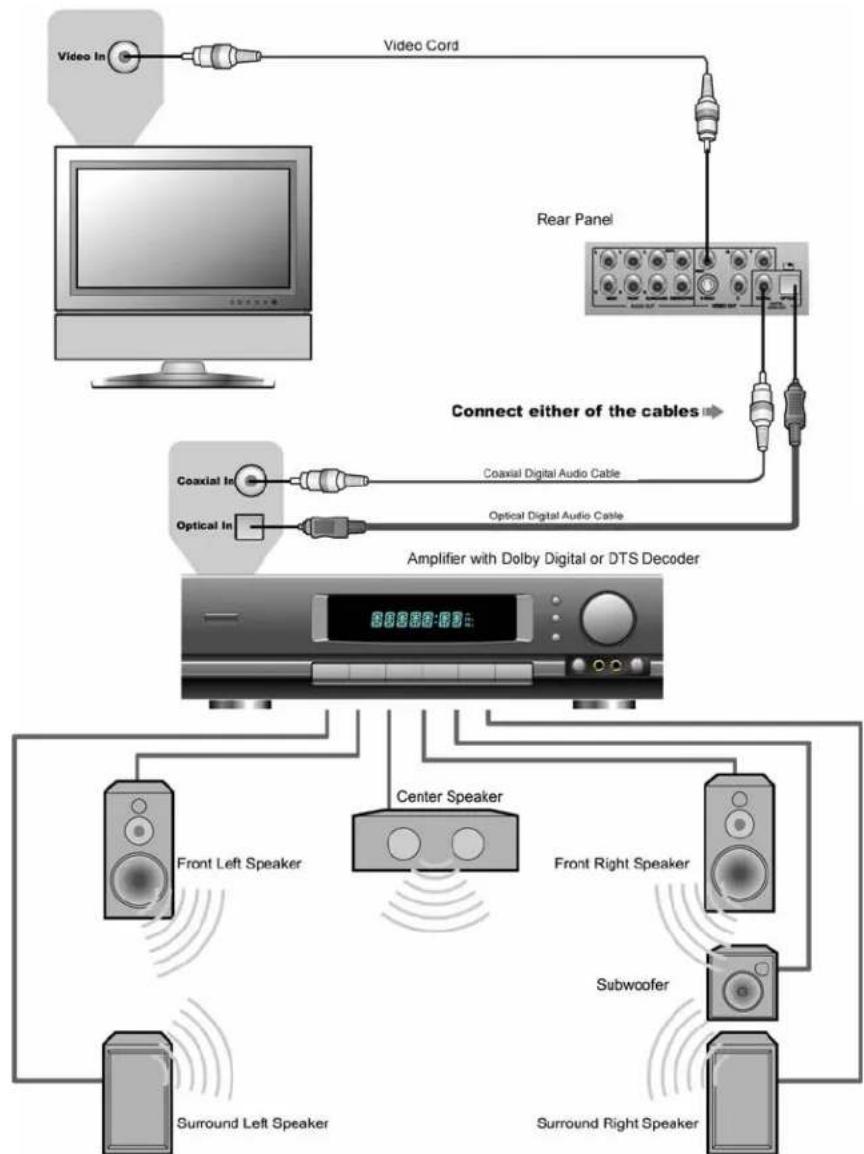
flowchart
graph TD
    A["Video In"] --> B["Video Cord"]
    B --> C["Rear Panel"]
    C --> D["Connect either of the cables"]
    D --> E["Coaxial Digital Audio Cable"]
    D --> F["Optical Digital Audio Cable"]
    E --> G["Amplifier with Dolby Digital or DTS Decoder"]
    F --> G
    G --> H["Front Left Speaker"]
    G --> I["Center Speaker"]
    G --> J["Front Right Speaker"]
    G --> K["Subwoofer"]
    G --> L["Surround Left Speaker"]
    G --> M["Surround Right Speaker"]
- Please set the SPDIF Output of the DVD player to "RAW". (Refer to page 30 for details.)
NOTES
- Manufactured under license from Dolby Laboratories. "Dolby" and the double-D symbol are trademarks of Dolby Laboratories.
- "DTS" and "DTS Digital Out" are trademarks of Digital Theater Systems, Inc.
Connection to a Receiver/Amplifier with 5.1ch Audio Input
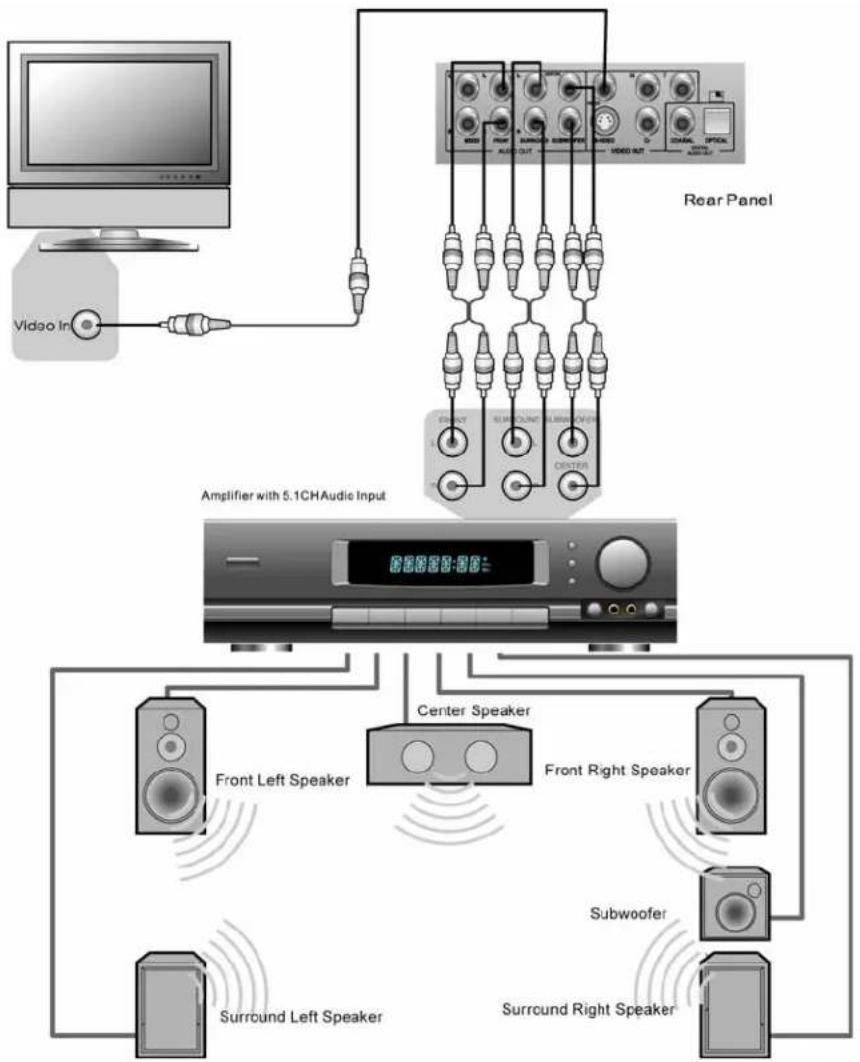
flowchart
graph TD
    A["Monitor"] --> B["Video Input"]
    B --> C["Amplifier with 5.1CHAudie Input"]
    C --> D["Back Panel"]
    D --> E["Central Speaker"]
    E --> F["Front Left Speaker"]
    E --> G["Front Right Speaker"]
    E --> H["Subwoofer"]
    E --> I["Surround Left Speaker"]
    E --> J["Surround Right Speaker"]
- Please set the audio down-mix mode of the DVD player to "5.1 CH". (Refer to page 28 for details.)
- Please set the speaker size and distance in the "Speaker Setup" page of the DVD player's setup menu. (Refer to page 28 for details.)
BASIC OPERATIONS
Disc Playback

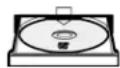
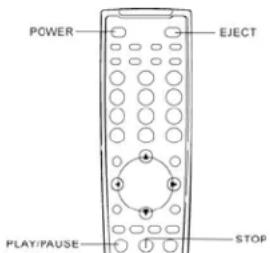
- Press the POWER button to turn on the DVD player.
- Press the OPEN/CLOSE (EJECT) button to eject the disc tray.
- Place the disc with the label side facing up and the record side facing down.
- Press the OPEN/CLOSE (EJECT) button again to retract the tray.
- The DVD player reads disc information and starts playback.
- Depending on the content of the disc, a menu or navigation screen may appear. Please use the navigation arrow and SELECT buttons to select the content to play.
- To stop playback, press the STOP button.
- During DVD playback, pressing the STOP button for the first time brings the DVD player to a pre-stop mode. You can resume playback from the stopped point by pressing the PLAY/PAUSE button. This pre-stop mode allows you to change the player settings and then resume playback.
- To completely stop playback, press the STOP button twice.
- To turn off the player, press the POWER button.
- This unit consumes a small amount of power even when it is turned off to STANDBY mode. To save power when the unit is not to be used for a long time, unplug it from the household AC outlet.
Pause Playback

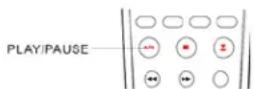
- During playback, press the PLAY/PAUSE button to temporarily pause the program.
- In the PAUSE status, the TV screen displays:
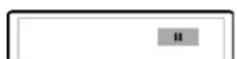
- Press the PLAY/PAUSE button again to resume playback.
NOTES
If the screen saver is set to "ON" (please refer to page 27 for details), after pausing for 2 minutes the screen saver will be displayed automatically. This is to minimize possible burn-in on plasma or CRT screens caused by displaying a static image for a prolonged period of time.
DVD Menu Playback
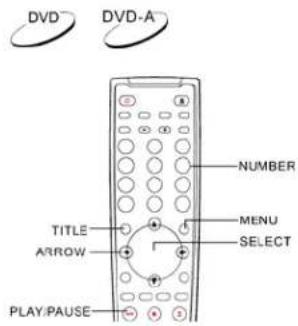
- Some DVD discs contain title menu or chapter menu functions.
- Press the MENU button on the remote control to display the menu on the TV screen.
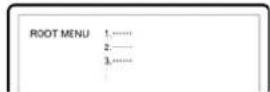
- Make menu selections using the number buttons or navigate the menu using the CURSOR buttons, and then press the PLAY/PAUSE or SELECT button to make the selection.
NOTES
- Press the TITLE button to return to the disc title menu.
- Press the MENU button to return to the initial menu.
- Press the RETURN button to return to the previous menu. The return location varies with discs.
Volume Control

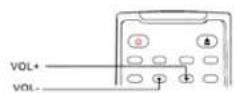
- For regular audio volume adjustment, it is recommended that you use the volume control on your TV or receiver/amplifier.
-
The VOL +/- buttons on the DVD remote control is provided as an alternative way of controlling the audio volume. It is recommended that you use this control to make the audio volume from the DVD player the same as from other sources, such as TV programs or a VCR.
-
Press the VOL – button to decrease the volume.
- Press the VOL + button to increase the volume.
• The maximum volume is 20.
Mute
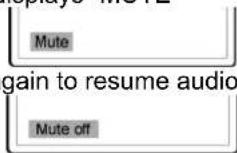
- Press the MUTE button on the remote control during playback to turn off audio output. The TV screen displays "MUTE"
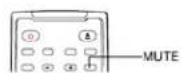
- Press the MUTE button again to resume audio output.
NOTES
Check the MUTE status by pressing the MUTE button when there is no audio output.
Audio Tone Control

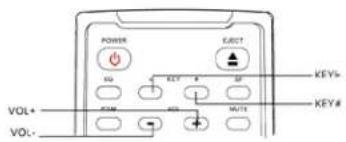
The KEY b/# buttons on the DVD remote control is provided for adjusting audio tone (key). This feature is useful for playing Karaoke discs. You can adjust the audio tone to match the singer's voice.
- Press the KEY b button to lower the tone. Each press decreases the audio tone 1 level, and the lowest level is -16.
- Press the KEY # button to raise the tone. Each press increases the audio tone 1 level, and the highest level is +16.
OSD (On-Screen Display)

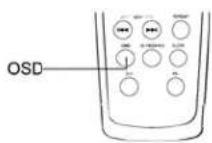
Press the OSD button on the remote control to show disc information and operation function hints on the TV screen.
The OSD display includes the followings:
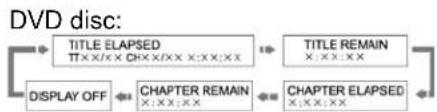
flowchart
graph LR
    A["TITLE ELAPSED\nTT:XX/XX CH:XX/XX:XX:XX"] --> B["TITLE REMAIN\nX:XX:XX"]
    C["DISPLAY OFF"] --> D["CHAPTER REMAIN\nX:XX:XX"]
    E["CHAPTER ELAPSED\nX:XX:XX"] --> F["CHAPTER REMAIN\nX:XX:XX"]
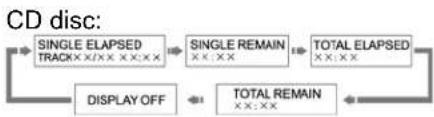
flowchart
graph LR
    A["SINGLE ELAPSED TRACK x/xx xx.xx"] --> B["SINGLE REMAIN xx.xx"]
    B --> C["TOTAL ELAPSED xx.xx"]
    C --> D["TOTAL REMAIN xx.xx"]
    D --> E["DISPLAY OFF"]
    E --> A
Audio Language/Channel Selection

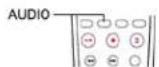
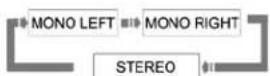
To select the audio language or channel, press the AUDIO button on the remote control during playback.
- For DVD or DivX discs that are encoded with multiple audio languages or channels, you may select the desired language or channel.
- For CD or other stereo audio content, you may select audio output from the LEFT channel only, RIGHT channel only, or STEREO.

NOTES
Availability of languages and audio channels varies with discs.
Subtitle Selection

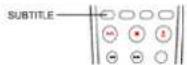
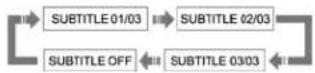
When playing DVD discs or DivX programs recorded with subtitles, press the SUBTITLE button on the remote control to select the desired subtitle.
Each press of SUBTITLE button switches one available subtitle in a looping manner:
NOTES
Availability of subtitle depends on discs and contents.
Angle Selection

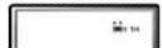
- When playing DVD discs, an angle mark will be displayed on the screen when the player detects scenes recorded with multiple angles:
- Press the ANGLE button on the remote control to select the desired playing angle.
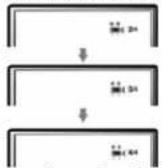
- To resume normal playback, repeat pressing the ANGLE button until the default angle is displayed.
NOTES
- This function is available only when the discs are recorded with multiple angles.
- The angle mark on the screen can be turned off using the setup menu of the DVD player.
Zooming the Displayed Frame

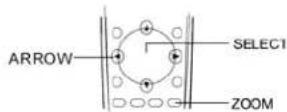
The feature zooms in or out the displayed frame.
- To change the zoom ratio, press the ZOOM button on the remote control. Each press of the ZOOM button will switch the zoom ratio in the following sequence:
1.0 (No zooming) → 1.2 → 1.3 → 1.5 → 2 → 2.5 → 3 → 3.5 → 4 → ½ → ¼ → ¼ → Back to 1.0 again
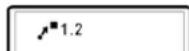
- When the frame is magnified, press the ARROW buttons to move the visible area in the frame (Panning).
ADVANCED OPERATIONS
TV System Selection

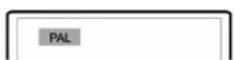
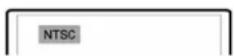
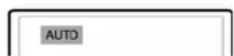
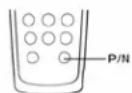
Set the video output system (NTSC/PAL) to the same as that supported by your TV. The default output is NTSC for North America.
Press the P/N button on the remote control to cycle the video output to PAL, NTSC or AUTO system. The TV screen displays the selected system name.
NOTES
- When the video output is set to PAL or NTSC system, the DVD player will convert the disc content to the selected system if it is different.
- When the video output is set to AUTO, the DVD player will not perform system conversion. If your TV supports both NTSC and PAL systems, this is the recommended mode.
- Playback must be stopped before switching the system.
DVI Output Resolution
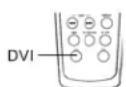
If the DVD player is connected to the TV using a DVI or HDMI-DVI adapter cable, you may use the DVI button on the remote control to select the best display resolution.
- Make sure the DVI or HDMI-DVI adapter cable is properly connected.
- Turn on the TV. Adjust the TV to use the DVI or HDMI input.
- Turn on the DVD player with no disc in its tray, or if the DVD player is already on, make sure that playback is stopped.
- Press the DVI button to show the current output resolution. Each subsequent press of the DVI button switches the output resolution in the following sequence:
NTSC output:
$$ 4 8 0 \mathrm{p} \rightarrow 5 4 0 \mathrm{p} 6 0 \mathrm{Hz} \rightarrow 7 2 0 \mathrm{p} 6 0 \mathrm{Hz} \rightarrow 1 0 8 0 \mathrm{i} 6 0 \mathrm{Hz} \rightarrow \text {Back to } 4 8 0 \mathrm{p again} $$
PAL output:
$$ 5 7 6 \mathrm{p} \rightarrow 5 4 0 \mathrm{p} 5 0 \mathrm{Hz} \rightarrow 7 2 0 \mathrm{p} 5 0 \mathrm{Hz} \rightarrow 1 0 8 0 \mathrm{i} 5 0 \mathrm{Hz} \rightarrow \text {Back to} 5 7 6 \mathrm{p} \text {again} $$
NOTES
- The DVD player cannot change its output resolution when content is being played. It will display the current output resolution followed by an "invalid operation" icon (∅). Please make sure playback is stopped before changing the DVI output resolution.
- Some TV sets do not support one or more DVI output resolutions, particularly the 540p resolution. In this case repeatedly press the DVI button until a supported resolution is selected.
- Some TV sets only support one of the NTSC or PAL outputs. In this case repeatedly press the P/N button until a supported system is selected.
- In case you are not able to get a display using the DVI output, please connect the DVD player to the TV using either the composite video or S-Video cable, and then use the setup menu to adjust the DVD player settings.
Fast Playback

You may fast forward or reverse to search for a certain point during playback.
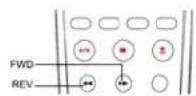
- Press the FWD button on the remote control and the player starts fast forward playback. Each press of the FWD button switches the playback speed in the following sequence:

- Press the REV button on the remote control and the player starts fast reverse playback. Each press of the REV button switches the playback speed in the following sequence:

Slow Playback

To slow down the playback speed, please use the following steps.
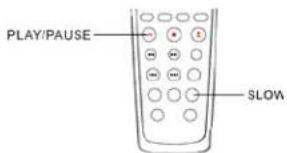
- Press the SLOW button on the remote control and the player starts slow playback. Each press of the SLOW button switches the playback speed in the following sequence:

- Press the PLAY/PAUSE button during slow playback to resume normal playback speed.
Repeat Playback

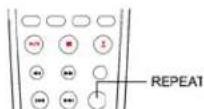
To repeat a certain chapter, title, track or disc, press the REPEAT button on the remote control.
Each press of the REPEAT button switches the repeat mode in the following sequence:
DVD, DVD-Audio disc:
CD disc:
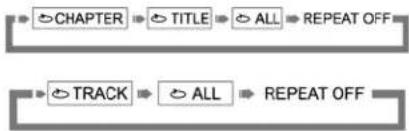
flowchart
graph LR
    A["CHAPTER"] --> B["TITLE"] --> C["ALL"] --> D["REPEAT OFF"]
    E["TRACK"] --> F["ALL"] --> G["REPEAT OFF"]
Repeat the Selected Section


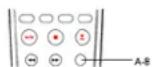
To repeatedly play a specified section, please follow these steps:
- During normal playback, press the A-B button on the remote at the desired beginning point (Point A) for the repeat play.
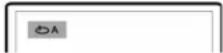
- When playback reached the desired ending point (Point B) for the repeat play, press the A-B button again.
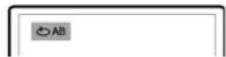
-
The player now repeatedly plays back the specified section (A-B).
-
Press the A-B button for the third time to resume normal playback.
NOTES
The A-B repeat function may not be available for some discs.
Random and Shuffle Playback

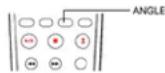
When playing an audio CD disc, you may use the ANGLE button to switch the playback mode from normal playback mode to random or shuffle playback mode.
In normal playback mode, each track of the CD disc is played back in sequential order. As the name implies, the random playback mode randomly selects a track to play. The shuffle mode also plays back the tracks in random order, but it ensures that each track is played only once.
Playback by Track Number


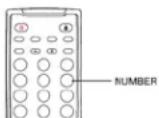
Insert disc. After the player begins reading the disc, press the NUMBER buttons on the remote control to select the chapter/track for playback.
- Press the NUMBER buttons 1-9 to directly select the corresponding chapter/track if the chapter/track number is below 10. For example, to select the seventh track, press the [7] button.

- Press the +10 button and then the NUMBER buttons 0-9 to directly select the corresponding chapter/track if the chapter/track number is above 10 (including 10).
- For example, to select the 16^th track, press [+10] followed by [6]:

- To select the 25^th track, press [+10] twice followed by [5].
Playback from a Specific Location

Playing DVD discs
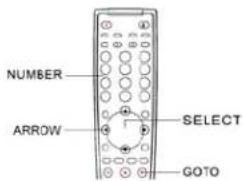
You may specify a point to start playback by entering the title, chapter or time directly.
- Title and chapter search. For example, search for Title 6, Chapter 2:
- Press the GOTO button on the remote, and the TV screen displays:
TITLE /30 Chapter 00/00
(You may need to use the ARROW buttons to move the cursor to the Title location.)
- Enter the title number 6. The cursor moves to the Chapter location and the TV screen displays:
TITLE 06/30 Chapter /02
- Enter the chapter number 2. The TV screen displays:
TITLE 06/30 Chapter 02/02
- Playback starts from the specified title and chapter.
NOTES
To enter a number greater than 9, use the +10 button.
- Title time search. For example, search for a specified elapsed time within the currently playing title.
- Repeatedly press the GOTO button until the TV screen displays the following picture. Use the NUMBER buttons to enter the HOUR, MINUTE and SECOND.
- Chapter time search. For example, search for a specified elapsed time within the currently playing chapter.
- Repeatedly press the GOTO button until the TV screen displays the following picture. Use the NUMBER buttons to enter the HOUR, MINUTE and SECOND.
- Repeatedly press the GOTO button until the TV screen displays the following picture. Use the NUMBER buttons to enter the MINUTE and SECOND.
DISC GOTO
- Track time search
- Repeatedly press the GOTO button until the TV screen displays the following picture. Use the NUMBER buttons to enter the MINUTE and SECOND.
TRACK GOTO
- Select a track
- Repeatedly press the GOTO button until the TV screen displays the following picture. Use the NUMBER buttons to enter the track number. For track numbers greater than 9, please press the +10 button first.
SELECT TRACK --/15
Memory and Automatic Resume

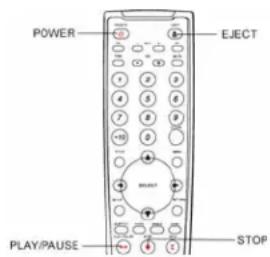
- If you must interrupt the playback and would like to resume from the interrupted position at a later time, you may press the EJECT button on the remote control to eject the disc. While ejecting the disc the DVD player will save the current playing position.
- The position is memorized even after turning off the unit or changing the disc.
- When the next time the disc with a memorized playing position is played back, the DVD player will recognize the saved playing position. Playback will automatically resume from the saved playing position. However if you wish to cancel the automatic resume and start playback from the beginning, you may press the STOP button when prompted.
Viewing Static Pictures on DVD-Audio Discs

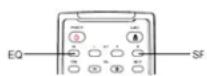
Some DVD-Audio discs contain static pictures, such as photos of the band or narration of the album. When a DVD-Audio track is playing, you may use the SF button to select the previous picture or the EQ button to select the next picture.
Sound Field and EQ Mode Adjustment

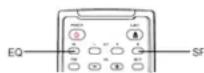
When playing discs, you may adjust sound field or equalization mode according to your preference.
- Press the EQ button on the remote control to set the equalization pattern type. Available options are: Off, Rock, Pop, Live, Dance, Techno, Classic and Soft.
- Press the SF button to set the sound field effect. Available options are: Off, Concert, Living Room, Hall, Bathroom, Cave, Arena and Church.
NOTES
Sound field and EQ mode are cancelled if the unit is switched to STANDBY.
Power Spectrum Meter (PSM)

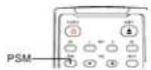
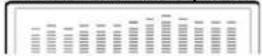
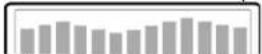
The Power Spectrum Meter is a graphical display of the audio signal. It can be used to assist adjusting sound field and equalization pattern setting. Press the PSM button on the remote to show the Power Spectrum Meter during playback.
- Press the PSM button once to show the first PSM pattern:
- Press the PSM button again to show the second PSM pattern:
- Press the PSM button for the third time to cancel PSM display.
Virtual Keyboard

While enjoying a movie in a dark environment, the brand new on-screen virtual keyboard and the easy-to-locate ARROW buttons on the remote control allow you to easily perform playback controls and configurations.
- Press the KEYBOARD button on the remote control, a virtual keyboard will appear on the screen as shown in the figure:
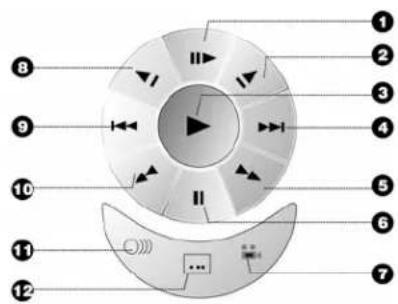
- Step 7. Angle
- Forward Slow 8. Reverse Slow Playback
- Play 9. Skip Previous
- Skip Next 10. Fast Reverse
- Fast Forward 11. Audio
-
Pause 12. Subtitle
-
Use the four ARROW buttons to select the function you wish to perform, and then press the SELECT button to confirm. For instance, to select a subtitle:
- Press the ARROW buttons to select the subtitle icon in the virtual keyboard. Each press of the SELECT button switches an available subtitle language.
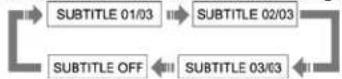
- To exit the virtual keyboard, press the KEYBOARD button again.
NOTES
The virtual keyboard function is applicable to DVD discs only.
Playing DivX, Digital Audio and Picture Files
When you insert a disc which contains DivX® video*, XviD, digital audio or digital picture files, the TV screen displays a disc navigation menu as shown the in the figure:
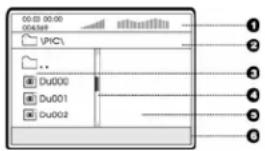
- Status Window – Displays the current status information
- Directory Window – Displays the current directory path
- File Window – Lists the files in the current directory
- Scroll Bar – Indicates the position of the current file in the directory
- Preview Window – Picture preview or other file information
- Information Window – Displays file information or operation prompts
You may switch between the directory listing mode and file listing mode using the ANGLE button on the remote control. In the directory listing mode (default) the files are listed according to the directory structure of the disc. In the file listing mode all files in the disc are listed in a flat view.
The Status Window contains the following elements:
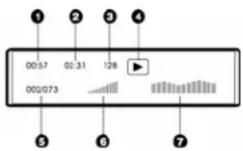
- Elapsed play time of the current digital audio file
- Total play time of the current digital audio file
- The audio bit rate
- Current playback mode indicator (play/stop/pause)
- Track indicator
- Volume indicator
- Dynamic frequency power spectrum meter
When a disc is first loaded into the player, it may take a few moments to search the compatible files and build the disc navigation menu. Please be patient.
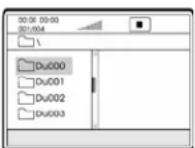
To navigate the disc navigation menu:
A:
B:
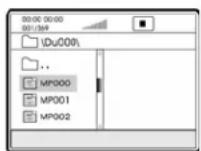
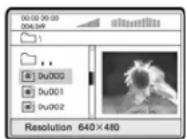
- Press the UP/DOWN ARROW buttons to select the desired directory and press the SELECT button to enter it.
- To return to the previous level of directory, select the [☐..] directory in the first line, or press the LEFT ARROW button.
- If a directory contains many files, you may press the PREV or NEXT SKIP button to the previous or next page of the directory listing.
- Press the UP/DOWN ARROW buttons to select the DivX, XviD, digital audio or digital picture file. If a preview image or additional information is available, the preview will appear in the preview window.
- Press the SELECT button to play the file. DivX/XviD file will be decoded and played back. Digital music file will start playing, and digital picture will be displayed in full screen slide show mode.
* DivX, DivX Certified, and associated logos are trademarks of DivX, Inc. and are used under license.
Digital Picture Play Operations
When a picture is displayed in full screen slide show mode, the following operations are available:
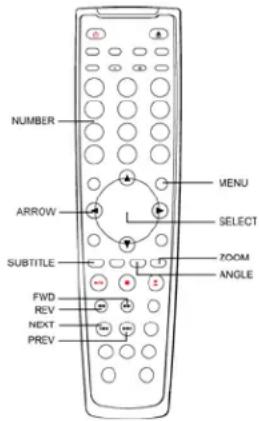
- Press the SUBTITLE button to switch among various picture transition modes.
- Press the ZOOM button to start the zoom in/out function. The TV screen displays "Zoom 100%"
○ While in the zoom mode, press the FWD or REV button to change the zoom ratio. Available zoom ratios are from 50% to 200%.
When the picture is magnified larger than the screen, you may use the ARROW buttons to move the visible area in the picture frame (Panning). - To exit the zoom mode, press the ZOOM button again.
- Press the STOP button to stop the slide show and display the pictures in thumbnail mode. You may:
- Press the PREV or NEXT SKIP button to display the previous or next page of thumbnails;
- Use the ARROW and SELECT buttons to select a picture to display;
- Use the NUMBER buttons to directly select a picture to display.
- Press the MENU button to stop the slide show and return to the disc navigation menu.
- Press the ARROW buttons to rotate or flip the picture:
o UP: Invert
- DOWN: Mirror
- LEFT: Rotate counter-clockwise
- RIGHT: Rotate clockwise
Digital Music Play Operations
When playing digital music files, the following operations are available:
- Repeat, Shuffle or Random Playback – Press the REPEAT button on the remote control to switch the playback mode.
- Skip – While a song is playing, the SKIP PREV and SKIP NEXT buttons can be used to skip to the previous or next song. You may also use the ARROW buttons on the remote control to highlight the song to play, and then press the SELECT button. When playback is stopped, the SKIP PREV and SKIP NEXT buttons are used to move the cursor to the next or previous page of the song list.
Playing a Disc with Both Digital Audio and Picture Files
If the disc contains both digital audio and picture files, you can enjoy both of them simultaneously. First navigate to the folder that contains the digital audio files and start the audio playback. Next you can navigate to the folder that contains the digital picture files and start the slide show. The slide show will start with the already playing digital audio as background music.
SETUP MENU OPTIONS
The SETUP menu of the DVD player presents many setup and configuration options. For most users, the default configuration works well enough and there is no need to change the settings. However if you need to configure the DVD player to perfectly match your home theater settings and watching preference, please follow these instructions.
- Press the SETUP button on the remote control, and the TV screen displays:
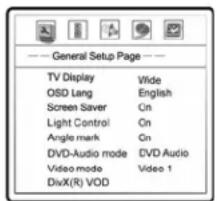
- Press the LEFT/RIGHT ARROW buttons to select the setup page. There are 5 pages: General Setup, Speaker Setup, Audio Setup, Video Setup, and Preference. Press the SELECT button to enter the selected setup page. The Preference page can only be accessed when playback is completely stopped, or when there is no disc in the player.
- Press the UP/DOWN ARROW buttons to select the setup item to be changed, and press the SELECT button to change the setting.
For example, in the Video Setup Page, you may use the UP/DOWN ARROW buttons to select the "Sharpness" setup item, and press the SELECT button to change the "Sharpness" setting.
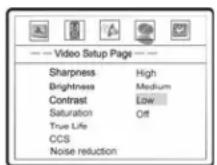
- To select a value from the list of available settings, press the UP/DOWN ARROW buttons and then press the SELECT button to confirm.
For example, after using the UP/DOWN ARROW buttons to select "Off" for "Sharpness" and pressing the SELECT button, the display becomes:
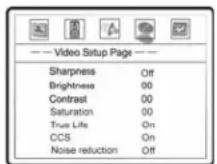
- To exit the SETUP menu, press the SETUP button on the remote control.
NOTES
Grayed-out setup items cannot be changed. To allow changing of such items, make sure playback is completely stopped, or there is no disc in the player.
General Setup Page
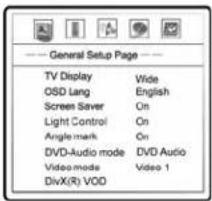
- TV Display: To set the aspect ratio of the player's output image to match your TV. The options are :
- Normal/PS – 4:3 TV Pan and Scan. Choose when the display is 4:3. Both sides of widescreen image are clipped.
- Normal/LB – 4:3 TV Letterbox. Choose when the display is 4:3. Widescreen image is displayed in "letterbox" format with black borders on top and bottom.
- Wide/SQZ – 16:9 TV Wide/Squeeze Mode. Choose when the display is 16:9. 16:9 materials will be displayed in its native aspect ratio, and 4:3 materials will be displayed with black borders on both sides to maintain 4:3 aspect ratio.
- Wide – Choose when the display is 16:9. 16:9 materials will be displayed in its native aspect ratio, and 4:3 materials will be stretched.
| Disc Pictures | TV Screen | ||
| 4:3 | 16:9 | ||
| Pan-Scan | Letterbox | ||
 | 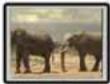 | 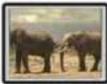 | 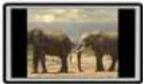 |
16-0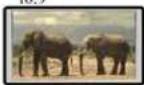 | 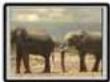 | 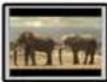 | 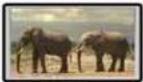 |
-
OSD Lang: On-Screen Display Language. To set the language of on-screen display, menus and prompts.
-
Screen Saver: To turn on/off the screen saver function. When the screen saver is on, a moving logo will appear instead of the static image after 2 minutes of inactivity. This is designed to minimize the burn-in issue for plasma and CRT display devices.
-
Light Control: To turn control the front panel button illumination lights and Vacuum Fluorescent Display information window. In case you feel that the blue button illumination lights become a distraction to your enjoyment of the video, this option allows you to dim or turn off the lights. The available options are:
- On - Both the VFD window and the button LED lights are on.
• LED Off - Button LED lights are turned off; VFD window is on.
- Dim - Button LED lights are turned off; VFD window is at reduced brightness.
- All Off - All front panel lights and displays are turned off. This setting resumes back to "On" after the player is turned off to avoid user confusion.
-
Angle Mark: To turn on/off the display of angle mark when DVD content with multiple available angles is played.
-
DVD-Audio Mode: To select which portion of a hybrid DVD-Audio disc to playback. The options are:
-
DVD-Audio – Play the DVD-Audio portion of the disc with surround audio
• DVD-Video – Play the DVD-Video portion of the disc with Dolby Digital or DTS audio -
DivX VOD: DivX Video on Demand – To display the device registration code for DivX Video on Demand service. To learn more, visit www.divx.com/vod
![DivX(R) Video On Demand Your registration code is : XXXXXXXXX To learn more visit www.divx.com/vod [Done]](/content/2026/05/804818/images/8168d07a26fc3d29dd2b546859b64b8442a7ead6b6721100a6b63f21bdd0e1b7.jpg)
- Subtitle Font: To select the subtitle font size for DivX video. There are three font sizes available. This setting applies only to DivX video files with a text subtitle. DivX video files with a graphic subtitle do not use the DVD player's built-in font, so the font size cannot be adjusted.
Speaker Setup Page
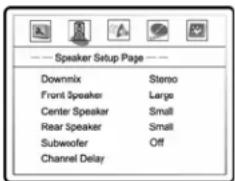
-
Downmix Mode: To set the audio down-mix mode to convert multi-channel audio into two-channel output. This setting only affects the "Mixed L/R" analog audio outputs. The options are:
-
LT/RT - Left and Right channels only. This mode is intended for use with two-channel Dolby Pro Logic receivers. If the content is encoded with Dolby Pro Logic then the encoded audio will be passed to the receiver for Dolby Pro Logic processing. For stereo content the output will be stereo. For multi-channel content only the left front and right front channels will be re-produced.
- Stereo - This mode down-mixes decoded multi-channel (5.1ch) audio to 2-channel stereo output. For stereo content the output will be stereo. For multi-channel content the surround and center channels will be mixed with the left and right front channels. Recommended for use with TV sets or stereo receiver/amplifiers.
- V. SURR - Virtual Surround. This mode creates a virtual surround effect from stereo or multi-channel audio contents.
-
5.1 CH – This mode enables 5.1ch decoded analog audio output. The number of actual output channels depends on the disc.
-
Front Speaker: To set the sound filtering control for the front speakers. The options are:
-
Large – Choose if the front speakers are large. Bass frequencies are passed to the front speakers.
-
Small – Choose if the front speakers are small. Bass frequencies are not passed to the front speakers to reduce possible distortion.
-
Center Speaker: To set the sound filtering control for the center speaker. The options are:
- Large – Choose if the center speaker is large. Bass frequencies are passed to the center speaker.
- Small – Choose if the center speaker is small. Bass frequencies are not passed to the center speaker to reduce possible distortion.
-
Off – Choose if there is no center speaker.
-
Rear Speaker: To set the sound filtering control for the rear speakers. The options are:
-
Large – Choose if the rear surround speakers are large. Bass frequencies are passed to the rear speakers.
- Small – Choose if the rear surround speakers are small. Bass frequencies are not passed to the rear speakers to reduce possible distortion.
-
Off – Choose if there are no rear speakers.
-
Subwoofer: To enable/disable the subwoofer output. The options are:
-
On – Subwoofer output is enabled.
-
Off – Subwoofer output is disabled.
-
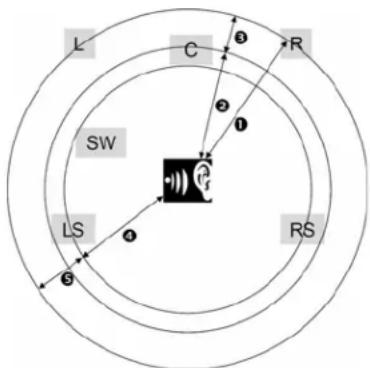
Channel Delay: To set the delay time for the center, rear speakers and the subwoofer. The delay is to compensate for the audio propagation time difference caused by the distance difference of the speakers to the listener.
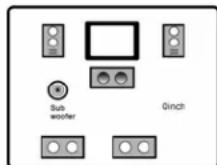
- Press the UP/DOWN ARROW buttons to select the speaker to set the distance difference.
- Press the LEFT/RIGHT ARROW buttons to set the distance difference.
- Press the SELECT button to confirm the settings and return to the Speaker Setup Page.
flowchart
graph TD
    L --> C
    C --> R
    C --> LS
    LS --> RS
    R --> SW
    SW --> L
    style SW fill:#f9f,stroke:#333
    style L fill:#ccf,stroke:#333
    style C fill:#cfc,stroke:#333
    style R fill:#fcc,stroke:#333
    style LS fill:#cff,stroke:#333
    style RS fill:#ffc,stroke:#333
- The channel delay is the difference between the distance from the listener to the front speakers and the distance from the listener to the speaker to be configured. For example, if the distance between the listener and the front main speakers is 60 inches (① in the above picture), and the distance between the listener and the center speaker is 48 inches (②), the channel delay for the center speaker is 12 inches (①-②=③). Similarly, if the left surround speaker is 40 inches (④) away from the listener, the channel delay for the left surround speaker should be 20 inches (①-④=⑤).
- Distance between the surround speakers and the listener must be shorter than or equal to that between the front speakers and the listener.
- In case the channel delay settings cannot match your speaker configuration, please set all distance difference to 0 inch and use your receiver/amplifier to set the channel delay.
Audio Setup Page
-
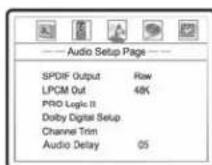
SPDIF Output: To set the bit stream type of the digital audio output. The options are:
-
RAW – Passes the encoded multi-channel digital audio unaltered. Choose this setting if your receiver/amplifier is capable of decoding Dolby Digital and DTS.
-
PCM – Forces down-mixed 2-channel digital audio output. Choose this setting if your receiver/amplifier only supports PCM audio.
-
LPCM Out: To set the maximum Linear PCM output frequency. The options are:
• 48K – Supported by most equipment.
- 96K – Better sound can result. Ensure that the receiver/amplifier can support it.
- 192K – Better sound can result. Ensure that the receiver/amplifier can support it.
- PRO Logic II: To configure the Dolby Pro Logic II function. Dolby Pro Logic II technology can expand 2-channel source audio into full 5-channel surround sound.
- Pro Logic II configuration is accessible only when down-mix is set to 5.1ch and SPDIF output is set to Raw.
- Press the SELECT button to enter the Pro Logic II setup page.
- Press the LEFT ARROW button to exit the Pro Logic II setup page.
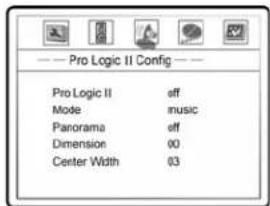
A. Pro Logic II: To turn on or off the Pro Logic II processing. The options are:
- On – Pro Logic II processing is always on
- Off – No Pro Logic II processing
- Auto – Pro Logic II processing is on only when Dolby Pro Logic II encoded content is detected.
B. Mode: To set the processing mode of Pro Logic II. The options are:
• Music – Sound from all speakers arrive at the same time with no delay
• Movie – 10ms delay is added to the surround channels
• Pro Logic – Earlier version of Dolby Pro Logic processing
• Auto – Automatically selects processing mode based on content
C. Panorama: To turn on/off panorama mode. When turned on, front stereo audio is extended to the surround channels for an enveloping effect.
D. Dimension: To increase or decrease the dimensional effect by adjusting the front to rear balance. As the size number increases, the sound localization moves towards forward from backward.
E. Center Width: To control the width of the center channel sound effect by blending the center speaker to the left and right speakers. As the level number increases, the center channel sound moves toward the left and right speakers.
-
Dolby Digital Setup: To configure the Dolby Digital decoder.
-
Press the SELECT button to enter the Dolby Digital Setup page.
- Press the LEFT ARROW button to exit the Dolby Digital Setup page.
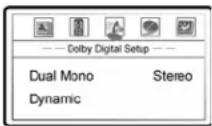
A. Dual Mono: To choose the output for Dolby Digital discs encoded with two independent audio channels, such as bilingual programs. The options are:
- Stereo – Stereo output
• L-Mono – Left channel output to both Left and Right speakers.
• R-Mono – Right channel output to both Left and Right speakers. - Mix Mono – Left and Right channels mixed to both Left and Right speakers.
B. Dynamic: To set the Dynamic Range Compression (DRC). DRC can smooth out the sonic peaks and valleys common with wide-range digital audio. Increasing DRC may make low level audio more audible during low-level listening. Decreasing or turning off DRC restores the sonic energy present in the original recording.
- Channel Trim: To set the volume of each individual channel.
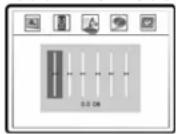
- Press the LEFT/RIGHT ARROW buttons to select the channel to be adjusted.
- Press the UP/DOWN ARROW buttons to raise or lower the volume of the selected channel.
-
Press the SELECT button to confirm the settings and return to the Speaker Setup Page.
-
Audio Delay: To add delay to analog or PCM digital audio output in order to compensate video delay introduced by the built-in video up-conversion processor and possibly the video processing inside TVs. An optimal audio delay setting helps to eliminate or reduce audio/video synchronization errors.
- Press the SELECT button to show the Audio Delay scale, and then use the LEFT/RIGHT ARROW buttons to adjust. The audio delay can be adjusted in 10ms steps.
Video Setup Page
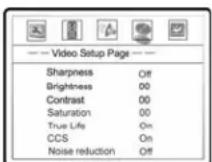
- Sharpness: To set the sharpness of video output. Sharpness level can be set with the following options:
- High – High edge enhancement. Video details are the sharpest but it may cause white line etching around objects.
- Medium – Medium edge enhancement. Video details are sharper but it may cause slight white line etching around objects.
- Low – Low edge enhancement. This setting produces slightly sharpened video details.
-
Off – Turn off edge enhancement completely.
-
Brightness: To adjust the brightness (black level) of the video output.
-
Press the SELECT button to show the Brightness scale, and then use the LEFT/RIGHT ARROW buttons to adjust.
-
Press the SELECT button to confirm the new setting.
-
Contrast: To adjust the contrast (white level) of the video output.
-
Saturation: To adjust the saturation (color intensity level) of the video output.
- TrueLife: To turn on/off the TrueLife video processing of the built-in Genesis/Faroudja video processor. TrueLife is a Faroudja proprietary two dimensional, non-linear, luma & chroma video enhancer that brings out details in the picture to produce a more life-like image.
- CCS: To turn on/off the Cross Color Suppression feature of the built-in Genesis/Faroudja video processor. CCS helps separate contrasting colors and may prevent the colors from bleeding into one another. The setting is useful in some circumstances, especially when displaying static pictures recorded as video. This setting is effective only when TrueLife is turned on.
-
Noise Reduction: To set the video noise reduction level of the built-in Genesis/Faroudja video processor. Turning on noise reduction can reduce the snow-like or block-like video noise generated by broadcasting or video encoding. However the side effect of noise reduction is some loss of fine details and some "ghosting" effect – fast moving objects may show a visible trace. The recommended setting is "Off". Turn on noise reduction only when the original content has a lot of video noise. This setting is effective only when TrueLife is turned on. The available settings are:
-
High – High noise reduction. Video noise is significantly reduced.
• Medium – Medium noise reduction. Video noise is strongly reduced. - Low – Low noise reduction. Video noise is slightly reduced.
-
Off – Turn off noise reduction completely.
-
Video Mode: To select the mode of conversion for video output. The options are:
-
Video 1 – Video 1 mode is recommended for viewing NTSC content with video or 3:2 cadence. If you primarily watch NTSC content, this is the preferred mode.
- Video 2 – Video 2 mode is recommended for viewing NTSC/PAL contents with video, 3:2 and 2:2 cadences. However in Video 2 mode only the DVI output will have the NTSC/PAL system conversion capability. All analog video output (component, S-Video and composite) will only output the native NTSC or PAL system as encoded on the disc without any conversion. If you watch both NTSC and PAL movies and use the DVI output to connect to the TV, this is the preferred mode.
Preference Page
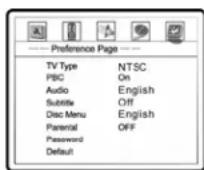
The Preference Page can only be accessed when playback is completely stopped, or when there is no disc in the DVD player.
-
TV Type: To set the output video system (PAL/NTSC) to match the type of TV. The options are:
-
Auto – No system conversion is performed. The output video system is the same as that encoded on the disc. Requires TV that supports multi-systems.
- PAL – When playing PAL-encoded discs, no system conversion is performed. NTSC-encoded contents are converted to PAL output.
-
NTSC – When playing NTSC-encoded discs, no system conversion is performed. PAL-encoded contents are converted to NTSC output.
-
PBC – Play Back Control: To enable/disable play back control by disc contents. The options are:
-
On – If the disc contains Play Back Control, follow the disc instructions.
-
Off – Play back the contents by sequence.
-
Audio: To set the preferred audio language for DVD. If an audio track of the selected language is available on the disc, the audio track will be played back.
- Subtitle: To set the preferred subtitle language for DVD. If a subtitle of the selected language is available, it will be displayed. When "Auto" is selected, the subtitle display is decided by the disc.
- Disc Menu: To set the preferred language for displaying DVD disc menus. If a disc menu of the selected language is available, the menu will be shown instead of the default disc menu.
NOTES
If your preferred language is not listed in the Audio, Subtitle or Disc Menu options, select "Other" and enter the Language Code found on page 36 of this manual.
-
Parental: To set parental control ratings in order to prevent minors from watching inappropriate contents. This function requires that the disc being properly rated and encoded.
-
Press the SELECT button to bring up the rating selection menu.
- Press the UP/DOWN ARROW buttons to select the rating to allow. The selected rating and below will be allowed, and any rating above the selected will be blocked.
-
Press the SELECT button to confirm the selection. You will be asked for the parental control password. Enter the password (default password: 7890) and press the SELECT button.
-
Password: To set parental control password. To change the password, enter the old password (default: 7890) and then enter a 4-digit number as the new password. Enter the new password again to confirm, and then press the SELECT button.
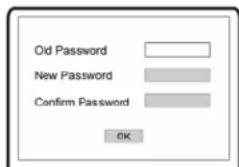
- Default: To reset all settings to the factory default value. The parental control password will not be reset.
REFERENCES
Useful Notes
- In order to prolong the service life of your DVD player, it is recommended to wait at least 30 seconds before you turn it on again after switching it off.
- Remove disc and turn off power after operation.
- Some functions of the player may not be applicable to certain discs.
- Some discs with special features may not be fully supported by the player. This is not a malfunction of the unit.
- In case of player malfunctioning, please turn it off, wait for 30 seconds and turn it back on. If the problem still exists, please follow the troubleshooting instructions or contact an OPPO service center.
Troubleshooting
Use this chart to help you solve operational problems. If there are any problems that you cannot solve, please contact your OPPO service center.
| Symptom | Possible Cause | Solution | Reference Page |
| No sound | Audio cable is not properly connected | Check audio cable, and then reconnect if necessary. | 7 - 12 |
| Muting is activated Press the MUTE button to cancel the mute. | 14 | ||
| No picture | Video cable is not properly connected | Check video cable, then reconnect if necessary 7 - 8 | |
| TV input is not correctly selected | Select the input to which the DVD player is connected | ||
| Video output format is not support by the TV | When playback is completely stopped, repeatedly press the DVI button | 18 | |
| Video system is not supported by the TV | Press the P/N button or set the correct TV Type. | 18, 32 | |
| No color | Video system is not supported by the TV | Press the P/N button or set the correct TV Type | 18, 32 |
| Saturation set too low Check the saturation setting on TV and DVD player | 31 | ||
| Picture rolling Video system is not supported by the TV | Press the P/N button or set the correct TV Type 18, 32 | ||
| “No Disc” error | No disc or incompatible disc loaded in player | Eject disc and check | 13 |
| Disc not properly loaded | Eject disc and make sure the label side is facing up and the record side is facing down | 13 | |
| Condensation on the Laser pick-up head | Turn on the player, eject the disc and leave the player on for about an hour | 2 | |
| Remote control failure | Remote control is out of range | Use the remote control within the effective range | 6 |
| Low battery | Replace the batteries | 6 | |
| Temporary function failure | Scratched or damaged disc is used | Replace the disc | 13 |
| Some functions are not available during playback | Stop playback completely, then try again | 13 | |
| Interference from other devices | Identify interference by turning off other devices, and then relocate or replace the offending device | 2 | |
| Some setup menu items are grayed out | Some setup options cannot be changed while a disc is playing. Some setup options may be mutually exclusive with other setup options. | Fully stop playback, eject the disc and try the setup menu again. | 26 |
Specifications
Designs and specifications are subject to change without notice.
| Disc Types* DVD | -Video, DVD-Audio, CD, HDCD, Kodak Picture CDDivX® (DivX® Certified Home Theater Profile)CD-R/RW, DVD±R/RW, DVD+R DL |
| Output Analog Audio | Stereo, 5.1chDigital Audio: Coaxial, OpticalAnalog Video: Composite, S-Video (Y/C), Component Video (YCbCr, 480i/576i only)Digital Video: DVI (480p/576p, 540p, 720p, 1080i) |
| Video Characteristics | Composite Video Amplitude: 1.0Vp-p (75Ω)S-Video Amplitude: Y: 1.0Vp-p (75Ω), C: 0.286Vp-p (75Ω)Component Video: Y: 1.0Vp-p (75Ω), Pb/Pr: 0.7Vp-p (75Ω) |
| Audio Characteristics** | Frequency: 20Hz – 20kHz (±1dB)Signal-to-Noise Ratio: >100dBTotal Harmonic Distortion: < 0.01% |
| General Specification | Power Supply: ~ 100V – 240V, 50/60Hz ACPower Consumption: 20WDimensions: 420mm x 270mm x 41mm, 16 12 x 10 ^5/_8 x 1 ^5/_8 inchesMass: 2.5kg / 5.5 lbs |
| Operating Temperature | 5°C - 35°C41°F - 95°F |
| Operating Humidity | 15% - 75%No condensation |
* Compatibility with user-encoded contents or user-created discs is on a best effort basis with no guarantee due to the variation of media, software and techniques used.
**Nominal specification.
Language Code List
| Code | Language Name |
| 6565 | Afar |
| 6566 | Abkhazian |
| 6570 | Afrikaans |
| 6577 | Ameharic |
| 6582 | Arabic |
| 6583 | Assamese |
| 6588 | Aymara |
| 6590 | Azerbaijani |
| 6665 | Bashkir |
| 6669 | Byelorussian |
| 6671 | Bulgarian |
| 6672 | Bihari |
| 6678 | Bengali, Bangla |
| 6679 | Tibetan |
| 6682 | Breton |
| 6765 | Catalan |
| 6779 | Corsican |
| 6783 | Czech |
| 6789 | Welsh |
| 6865 | Danish |
| 6869 | German |
| 6890 | Bhutani |
| 6976 | Greek |
| 6978 | English |
| 6979 | Esperanto |
| 6983 | Spanish |
| 6984 | Estonian |
| 6985 | Basque |
| 7065 | Persian |
| 7073 | Finnish |
| 7074 | Fiji |
| 7079 | Faroese |
| 7082 | French |
| 7089 | Frisian |
| 7165 | Irish |
| 7168 | Scots Gaelic |
| 7176 | Galician |
| 7178 | Guarani |
| 7185 | Gujarati |
| 7265 | Hausa |
| 7273 | Hindi |
| 7282 | Croatian |
| Code | Language Name |
| 7285 | Hungarian |
| 7289 | Armenian |
| 7365 | Interlingua |
| 7378 | Indonesian |
| 7383 | Icelandic |
| 7384 | Italian |
| 7387 | Hebrew |
| 7465 | Japanese |
| 7473 | Yiddish |
| 7487 | Javanese |
| 7565 | Georgian |
| 7575 | Kazakh |
| 7576 | Greenlandic |
| 7577 | Cambodian |
| 7578 | Kannada |
| 7579 | Korean |
| 7583 | Kashmiri |
| 7585 | Kurdish |
| 7589 | Kirghiz |
| 7665 | Latin |
| 7678 | Lingala |
| 7679 | Laothian |
| 7684 | Lithuanian |
| 7686 | Latvian,Lettish |
| 7771 | Malagasy |
| 7773 | Maori |
| 7775 | Macedonian |
| 7776 | Malayalam |
| 7778 | Mongolian |
| 7779 | Moldavian |
| 7782 | Marathi |
| 7783 | Malay |
| 7784 | Maltese |
| 7789 | Burmese |
| 7865 | Nauru |
| 7869 | Nepali |
| 7876 | Dutch |
| 7879 | Norwegian |
| 7982 | Oriya |
| 8065 | Panjabi |
| 8076 | Polish |
| 8083 | Pashto, Pushto |
| Code | Language Name |
| 8084 | Portuguese |
| 8185 | Quechua |
| 8277 | Rhaeto-Romance |
| 8279 | Romanian |
| 8285 | Russian |
| 8365 | Sanskrit |
| 8368 | Sindhi |
| 8372 | Serbo-Croatian |
| 8373 | Singhalese |
| 8375 | Slovak |
| 8376 | Slovenian |
| 8377 | Samoan |
| 8378 | Shona |
| 8379 | Somali |
| 8381 | Albanian |
| 8382 | Serbian |
| 8385 | Sundanese |
| 8386 | Swedish |
| 8387 | Swahili |
| 8465 | Tamil |
| 8469 | Telugu |
| 8471 | Tajik |
| 8472 | Thai |
| 8473 | Tigrinya |
| 8475 | Turkmen |
| 8476 | Tagalog |
| 8479 | Tonga |
| 8482 | Turkish |
| 8484 | Tatar |
| 8487 | Twi |
| 8575 | Ukrainian |
| 8582 | Urdu |
| 8590 | Uzbek |
| 8673 | Vietnamese |
| 8679 | Volapuk |
| 8779 | Wolof |
| 8872 | Xhosa |
| 8979 | Yoruba |
| 9072 | Chinese |
| 9085 | Zulu |
LIMITED WARRANTY
OPPO Digital, Inc. Limited One Year Warranty
Your OPPO product has been manufactured to precise standards, and with rigid quality control through every process of manufacturing. It is warranted by OPPO DIGITAL, INC. against defective workmanship or materials for one (1) full year from the original date of purchase. This warranty applies only to OPPO brand products imported or manufactured by OPPO Digital, Inc. and sold to the original consumer purchaser in the U.S.A. or Canada by either OPPO Digital, Inc. or an OPPO authorized reseller. This warranty does not apply to OPPO brand products imported and sold by unauthorized dealers, distributors, or other sellers. This warranty does not apply to products purchased or shipped outside of the U.S.A. and Canada. OPPO Digital, Inc. may at its sole discretion, refuse to honor the warranty of any such unauthorized product that may be presented for service.
Warranty service can only be performed by OPPO Digital, Inc. or an OPPO authorized service center. The original dated bill of sale must be presented upon request as proof of purchase.
OPPO Digital, Inc. will, at its option and at no charge as stipulated herein, repair or replace product which is returned either in person or postpaid and insured to an OPPO service center, with new or reconditioned parts or products. Replacement parts and products assume the remaining original warranty, or ninety (90) days, whichever is longer.
This limited warranty covers noncommercial use of this product, and shall not apply to the following, including, but not limited to: applications and uses for which this product was not intended; altered product or serial numbers; cosmetic damage or exterior finish; batteries and cable accessories; accidents, abuse, neglect, fire, water, lightning or other acts of nature; incorrect electrical line voltage, fluctuations and surges; failure to follow operating or maintenance instructions. OPPO Digital, Inc. does not warrant uninterrupted or error-free operation of the product. This limited warranty shall not extend to anyone other than the original purchaser of the product. It is nontransferable and states your exclusive remedy.
THE FOREGOING WARRANTY IS THE ONLY WARRANTY WITH RESPECT TO THE PRODUCT AND OPPO DIGITAL, INC. MAKES NO OTHER WARRANTY WHATSOEVER, EXPRESS OR IMPLIED, REGARDING THE PRODUCT INCLUDING MERCHANTABILITY AND FITNESS FOR A PARTICULAR PURPOSE. IN NO EVENT WILL OPPO DIGITAL, INC. OR ITS AUTHORIZED RESELLERS BE LIABLE FOR INCIDENTAL, CONSEQUENTIAL OR SPECIAL DAMAGES, EVEN IF SUCH DAMAGES RESULT FROM NEGLIGENCE OR OTHER FAULT.
Some states do not allow limitation on how long an implied warranty lasts, or the exclusion or limitation of incidental or consequential damages, so the above limitations or exclusions may not apply to you. This warranty gives you specific legal rights, and you may also have other rights which vary from state to state.
TO REGISTER YOUR PURCHASE FOR WARRANTY, please visit the following Web site:
http://www.oppodigital.com/registration.asp
TO OBTAIN WARRANTY SERVICE, please follow these instructions:
- Contact OPPO customer service via email at service@oppodigital.com or by phone at (650) 961-1118 with details of the defect claimed, product model, serial number, date and place of the original purchase.
- If it is determined that your product needs service, a Return Merchandise Authorization (RMA) number will be issued to you along with return instructions and address of an OPPO service center.
- Pack the product securely, preferably in the original packaging, with your assigned RMA number marked clearly on the outside of the package. Send the package postpaid and insured to the OPPO service center to obtain warranty service.
Thank you for choosing OPPO. Your satisfaction is our highest priority.
OPPO Digital, Inc.
453 Ravendale Dr. Suite D
Mountain View, CA 94043, U.S.A.
www.oppodigital.com
service@oppodigital.com
(650) 961-1118
5194137
V3.02
- Table of Contents
- Table of Contents .... 1
- Important Information .... 1
- INSTALLATION 4
- BASIC OPERATIONS....13
- ADVANCED OPERATIONS....18
- SETUP MENU OPTIONS.... 26
- REFERENCES.... 34
- LIMITED WARRANTY 37
- Important Information
- CAUTION:
- WARNING:
- Important Safety Instructions
- Cautions
- FCC Statement
- Copyright Protection
- NOTES:
- INSTALLATION
- Front Panel Controls
- Front Panel Display Window
- Rear Panel Connectors
- Battery Installation
- Using the Remote Control
- NOTES
- Connection to a TV
- DVI or HDMI Connection
- Audio Connection
- Connection to an Audio System
- Connection to a Stereo or Surround Audio System
- BASIC OPERATIONS
- Disc Playback
- Pause Playback
- DVD Menu Playback
- Volume Control
- Mute
- Audio Tone Control
- OSD (On-Screen Display)
- Audio Language/Channel Selection
- Subtitle Selection
- Angle Selection
- Zooming the Displayed Frame
- ADVANCED OPERATIONS
- TV System Selection
- DVI Output Resolution
- Fast Playback
- Slow Playback
- Repeat Playback
- Repeat the Selected Section
- Random and Shuffle Playback
- Playback by Track Number
- Playback from a Specific Location
- Playing DVD discs
- Memory and Automatic Resume
- Viewing Static Pictures on DVD-Audio Discs
- Sound Field and EQ Mode Adjustment
- Power Spectrum Meter (PSM)
- Virtual Keyboard
- Playing DivX, Digital Audio and Picture Files
- Digital Picture Play Operations
- Digital Music Play Operations
- Playing a Disc with Both Digital Audio and Picture Files
- SETUP MENU OPTIONS
- General Setup Page
- Speaker Setup Page
- Audio Setup Page
- Video Setup Page
- Preference Page
- REFERENCES
- Useful Notes
- Troubleshooting
- Specifications
- LIMITED WARRANTY
- OPPO Digital, Inc. Limited One Year Warranty
Brand : OPPO
Model : OPDV971H
Category : DVD player