
LV3295 - VCR LG - Free user manual and instructions
Find the device manual for free LV3295 LG in PDF.


User questions about LV3295 LG
0 question about this device. Answer the ones you know or ask your own.
Ask a new question about this device
Download the instructions for your VCR in PDF format for free! Find your manual LV3295 - LG and take your electronic device back in hand. On this page are published all the documents necessary for the use of your device. LV3295 by LG.
USER MANUAL LV3295 LG
FC991/961/FD290/260_87H_ENG 2/4/03 2:19 PM Page 1

LG
user guide
Video Recorder
Model: LV3795 LV3765
LV3295 LV3265

natural_image
Abstract circular design with geometric shapes (no text or symbols)VHS
Before connecting, operating or adjusting your new VCR, please read this user guide carefully. Thank you.
Model No. FC991P/FC961P/FD290P/FD260P Part No. 3834RP0087H
FC991/961/FD290/260_87H_ENG 2/4/03 2:19 PM Page 2
Contents, safety and cleaning
Please read the following information carefully.
Contents
| Introducing your video recorder and remote control | 3 |
| Connecting to a television and decoder or satellite receiver | 4 |
| Tuning | |
| TV stations | 5 |
| Adjusting TV stations manually | 6 |
| Operating your Video Recorder | 7 |
| Recording | |
| Television programs | 8 |
| Timer recording | 9 |
| Advanced functions | 10-13 |
| Troubleshooting | 14 |
| Technical specifications | 15 |
Safety
- Never remove the top cover of your Video Recorder as this can expose you to very high voltage and other hazards.
- Position your Video Recorder so that no bright light or sunlight falls directly onto it.
- Care should be taken not to expose your Video Recorder to any unnecessary vibration, moisture, dust or heat.
- During electrical storms it is advisable to unplug both the aerial cable and mains plug to prevent accidental damage to your Video Recorder and TV.
- Do not operate your Video Recorder if it is damaged.
- If your Video Recorder still does not operate properly, unplug it and call your dealer. Your VCR should not be repaired by anyone except qualified service personnel.
- Ensure that your Video Recorder is placed in a position to allow a free flow of air.
- The apparatus shall not be exposed to dripping or splashing and that no objects filled with liquids, such as vases, shall be placed on the apparatus.

This product is manufactured to comply with the radio interference requirements of EEC DIRECTIVE 89/336/EEC, 93/68/EEC and 73/23/EEC.
Cleaning
1 Unplug the Video Recorder from the mains supply.
2 Clean the cabinet with a soft damp cloth, do not apply liquid cleaners or aerosol cleaners.
Never spray cleaning liquids on or near the Video Recorder.
Video head cleaning
High quality video tapes will not normally deposit dirt onto the video heads, but old or damaged tapes may. This dirt can accumulate on the video heads after a long period of time and cause the picture to become blurred or broken up. To clean the video heads use a video heads cleaning tape available from electrical stores.
FC991/961/FD290/260_87H_ENG 2/4/03 2:19 PM Page 3

Introducing your Video Recorder and Remote Control
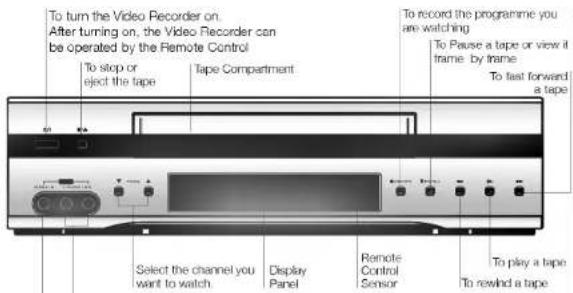
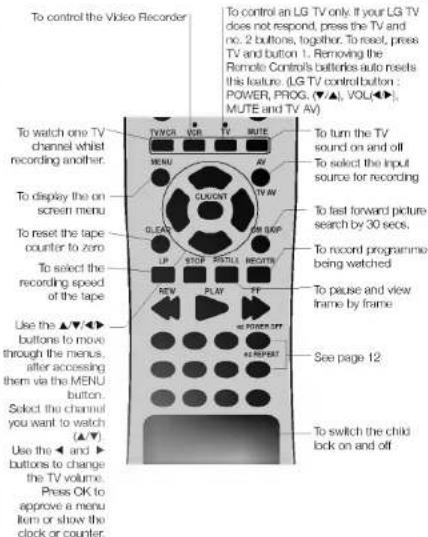
Most of your Video Recorder's functions are accessed using the Remote Control. A summary of the functions of the main buttons are shown below (right), other buttons are described elsewhere in this guide.
Before using the remote control, press the VCR or TV button to select the device to be operated.
Basic functions of your Video Recorder can also be operated using the control panel on the front of your Video Recorder.
text_image
To turn the Video Recorder on. After turning on, the Video Recorder can be operated by the Remote Control To stop or eject the tape Tape Compartment To record the programme you are watching To Pause a tape or view it frame: by frame To fast forward a tape Select the channel you want to watch Display Panel Remote Control Sensor To play a tape To rewind a tape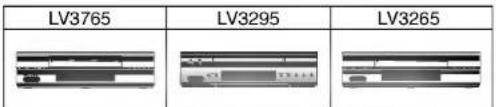
text_image
LV3765 LV3295 LV3265Audio IN Video IN
i LV3795/LV3765 Only: Video IN and Audio IN sockets are for connecting devices such as Video Cameras, Games Consoles and other Video Recorders. You will need to connect to them using an Audio Visual cable.
LV3795/LV3765 Only : Simucast Recording (With SC mode by pressing AV): Hi-Fi sound only recording using the Audio IN (L/R) sockets on the front of your Video Recorder.
This feature enables you to simulcast sound transmitted by an audio source and the picture transmitted by the TV station.
text_image
To control the Video Recorder To watch one TV channel whilst recording another. To display the on screen menu To reset the tape counter to zero To select the recording speed of the tape Use the ▲▼▼▲▼ button to move through the menus, after accessing them via the MENU button. Select the channel you want to watch (▲▼▼) Use the ◀ and ▶ buttons to change the TV volume. Press OK to approve a menu item or show the clock or counter. To turn the TV sound on and off To select the input source for recording To last forward picture search by 30 secs. To record programme being watched To pause and view frame by frame See page 12 To switch the child lock on and offDon't forget to install three AAA type batteries in the Remote Control.


Connecting to a television and decoder or satellite receiver
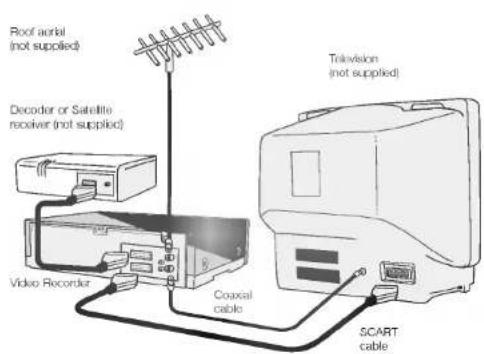
The information given here refers to the two most common forms of connection. Make sure that all the appliances are unplugged from the mains power, before making any connections to avoid causing damage to your equipment. Using a SCART cable to connect your appliances will give you the best sound and picture quality.
text_image
Roof aerial (not supplied) Decoder or Satellite receiver (not supplied) Video Recorder Coaxial cable Television (not supplied) SCART cableNote : LV3295/LV3265 have no the EURO AV2 socket.
text_image
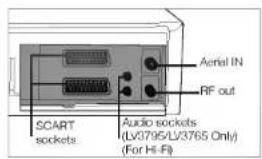
Aerial IN RF out SCART sockets Audio sockets (LV3795/LV3765 Only) (For Hi-Fi)
Connection guide
Roof aerial
Your outside aerial should be connected to the AERIAL socket of your Video Recorder.
Coaxial cable
If you are using the coaxial cable a connection needs to be made from the RF.OUT socket on your Video Recorder to the aerial socket on your television.
SCART socket
If you have a SCART socket connection on your television you can connect the television's SCART socket to the EURO AV 1 socket on the back of the Video Recorder.
Satellite receiver
Your Satellite Receiver should attach using a SCART cable to the EURO AV 2 socket on the back of the Video Recorder.
Decoder (LV3795/LV3765 Only)
Some TV broadcasters transmit encoded television signals which you can only see with a purchased or rented decoder. You can connect such a decoder (descrambler) to your Video Recorder.
Tune a video channel
If you are using a SCART connection then the video picture will be shown on the AV channel of your television. If you are using a Coaxial cable you need to select a TV channel on your Television and tune it to the Video Recorder signal, a bright blue screen. Please consult your Television User Guide for information on how to do this.
If you have trouble attaining a good picture it may be that the output frequency of the Video Recorder (UHF 36) is already in use by your television. To change this:
Press POWER Ⓧ on the Remote Control to put the Video Recorder on standby then press and hold PROG.
▲ or ▼ on the front of your VCR for more than 4 seconds. RF CHANNEL 36 will appear on your television screen. Press PROG. ▲ or ▼ on the Video Pecurder to select another frequency channel. Select any number between 22 and 68. Tune as normal.
You can also set it to "OFF" if there is any interference when your TV is connected to the VCR with a SCART cable.
Tuning in TV stations
The first time you use your VCR you will see ACMS (Automatic Channel Memory System) displayed on the screen. This system automatically tunes and stores TV channels. If you want to return to ACMS after your initial set up, access it via the menu.
Using ACMS
1 Press the POWER Button ⏻ to turn on your Video Recorder.
2 Select the video channel you have tuned on your television, refer to your TV user guide if necessary. The ACMS menu screen will appear.
Use ◀ or ▶ to select country
(A: Austria, B: Belgium, CH: Switzerland, D: Germany, DK: Denmark, E: Spain, F: France, I: Italy, N: Norway, NL: Netherlands, P: Portugal, S: Sweden, SF: Finland, ALTRI: Others)
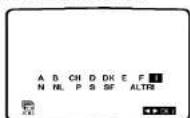
3 Press OK to start the automatic tuning process.
4 When the ACMS has finished a screen showing all the channels that have been found and the positions they have been placed in will be displayed.
5 Check that the channels correspond to the positions in which you want them. If they are not in the order that you would like they can be moved or deleted. See Changing the order of the television stations and Deleting the television stations.
6 Press i to store the settings.
Changing the order of the television stations
You will find it useful to have a current television programme guide to hand during this operation.
1 Press i to access the main menu. Use ◀ or ▶ to select PR SET then press OK.
2 Press i again.
3 Use either the ▲ or ▼ buttons to select the programme number that you wish to move. Then press ▶
4 Press ▲ or ▼ until you reach the position you wish to store the channel in.
5 Press OK. The programme will move to the new position.
6 Press i to leave the menu.
To move other programs repeat the above process.
Deleting the television stations
1 Press i to access the main menu.
2 Use ◀ or ▶ to select PR SET then press OK.
3 Press ■ then use ▲ or ▼ to select the programme number you wish to delete.
4 Press ◀, after a short while the selected station will be deleted. The remaining stations are resorted automatically.
5 Press i to remove the menu. If you wish to delete further stations repeat the above process.
Selecting ACMS
1 Turn on your television and your Video Recorder and select the video channel on your television.
2 Press i to access the main menu. Press ◀ or ▶ to select ACMS, and then OK.
3 Follow the instructions in Using ACMS, at the beginning of this page.
Tuning and adjusting TV stations manually
You may prefer to tune your television manually. Manual tuning can be more effective if the television signal in your area is too weak for the ACMS to work properly. You can also fine tune your channels and customise the channel names.
Manual tuning
1 Turn on your television and your Video Recorder. Select the video channel on your television and press 1 to access the main menu.
2 Press either ◀ or ▶ to select PR SET then press OK.
3 Press i again and the television station table will then appear.
4 Use the ▲ or ▼ buttons to select the programme number you want to tune then press OK.
5 Select the CH section (if not already selected) by using the ◀ or ▶ buttons and then press AV to select C (Standard stations) or S (Cable stations).
6 Use the ▲ or ▼ buttons to move through the channel numbers to find the required station.
7 The station can be fine tuned to improve picture quality. Select MFT (Manual Fine Tuning) using the ◀ or ▶ buttons. Use the ▲ or ▼ buttons to adjust the picture.
8 Select STATION by pressing ▶ you can then name your station.
9 Press OK to reveal the television station name list. Use the ▲ or ▼ buttons to select a station name from the list. Press OK to select it.
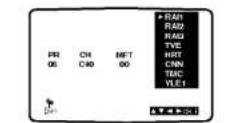
If the name you require is not on the list see Customising station names opposite (Start from step No. 5).
10 To confirm the station placement press Ⅰ.
11 Press I again to remove the menu.
12 The new station has now been stored into your Video Recorder.
If you wish to manually tune other channels you should repeat the above procedure.
To move the manually tuned channel to it's correct position see Changing the order of the television stations on page 5.
If it is necessary for you to tune all the television stations manually you may find it easier if you write the CH numbers down for each station as you find them. You can then select each channel from the main menu and type the CH numbers in directly. Each channel will then be in the correct position so there is no need to change them later.
Customising station names
If the station name you require isn't listed you can insert one manually instead of using the templates.
1 Press 1 to access the main menu. Use ◀ or ▶ to select PR SET then press OK.
2 Press i again then use ▲ or ▼ to select the programme number you wish to customise station name.
3 Press OK.
4 Press ▶ to go to STATION and then press OK.
5 Then press ▶, a flashing bar appears beneath the first letter.
6 Use ▲ or ▼ to select letters and numbers for the new station name up to a maximum of 5.
7 Press ◀ or ▶ to move between the characters.
8 Press OK.
9 To confirm the new position press 1.
10 press i again to exit the menu.
11 The new station name is now stored in your Video Recorder.
Operating your Video Recorder
The main functions of your Video Recorder can be operated using either the Remote Control or front control panel on the Video Recorder. Before starting, you should ensure that your television and your Video Recorder have been plugged in and switched on and that the video channel on your television is selected.
Playing a video tape
Press PLAY ▶. The television screen will display PLAY and SP or LP depending on whether the recorded tape is Standard Play or Long Play.
Auto tracking
Your Video Recorder will automatically adjust the tracking to give you the best picture quality. A TRACKING will be displayed on screen while this function is in operation. If the quality of the recording is poor, repeatedly press ▼ or ▲ on the remote control to manually adjust the tracking until any distortions have been removed. Press numbered 0 on the remote control to switch automatic tracking back on again.
Stopping play
Simply press STOP ■ to halt video play. The Video Recorder will revert to television mode.
Picture Search
While a video cassette is playing you can search the tape forward and
backward to look for a specific position on the tape.
Press REW ◀ or FF ▶ to make the tape play rapidly forwards or backwards. The picture will be shown at seven times normal play speed.
Fast Forward/ Rewind
To fast forward or rewind at maximum speed, the tape must not be in play mode. Press STOP ■ then press either ← for rewind or ➞ for fast forward. Whilst you are rewinding or fast forwarding you can view the section you are passing. Press and hold (for a few seconds) either REW ← or FF ➞. Releasing the FF ➞ button or REW ← button will return the Video Recorder to normal rewind or fast forward operation.
Slow Motion Playback, Shuttle (LV3795/LV3765 Only)
Using the ◀ or ▶ buttons it is possible to adjust playback speed during playing back or still picture. Below is a list of what speeds are accessible and how to reach them.
once = slow play
◀ twice = still
three times = play backwards
◀ four times = Reverse play 3x speed
◀ five times = Reverse play 7x speed
▶ once = 2x forward play
▶ twice = 7x forward play
To switch off the slow motion and shuttle, press the desired function. During slow motion and shuttle, the noise bars may appear on the picture according to the status of tape. If distortions can be seen in the picture, reduce them with ▲ or ▼.
Pausing a tape
Pressing P/STILL II will pause play, giving you a still picture on the screen. This picture may display some interference in the form of black and white horizontal lines. This is perfectly normal and does not mean that the video tape or Video Recorder are damaged.
The tape can be paused for up to five minutes. The Video Recorder will then automatically stop playing in order to avoid damaging the tape or your Video Recorder.

Frame Advance
(LV3795/LV3765 Only)
1 Pressing P/STILL II repeatedly will advance the picture frame by frame.
2 You can use the ▲ or ▼ buttons to reduce any vertical movement seen on the still picture.
3 Press PLAY ▶ to continue play from pause.
Removing the Video
tape
Press EJECT ▲ to remove the video cassette from your Video Recorder. If the end of the tape is reached, your Video Recorder will automatically stop, rewind, eject the tape and place itself into Standby mode.
Recording from television programs
There are two methods of recording, Instant Timer Recording (ITR) and Timer Recording.
For all recording methods you should ensure the television channels are tuned and stored correctly and that the clock is set to the correct time.

Recording from SCART
If you wish to record directly from the SCART socket at the back of your Video Recorder, connect the device you wish to record from using a SCART lead and press AV to display the picture from the device.
Long Play/Standard Play
Your Video Recorder has a Long Play (LP) feature. This means you can record twice the amount of information on each recordable video tape.
For example on a three hour (E180) tape you would be able to record six hours worth of programmes. With Long Play picture and sound playback quality are slightly reduced from that of standard play. Press the LP button if you wish to change to Long Play, press it again to select Standard Play (SP). SP or LP will be displayed on your television screen to let you know which has been selected.
Instant Timer Recording
ITR begins recording immediately, either for a set period of time or until the tape runs out.
1 Turn on your Video Recorder and television. Insert a video tape into the Video Recorder. Select the video channel on your television.
2 Use the PROG. ▲ or ▼ buttons to select which programme you wish to record. The currently selected programme will be displayed on screen. You can also select the programme number using the Remote Control number buttons.
3 Press REC/ITR ● to begin recording. On the first press RECORD SP will appear on the television screen.
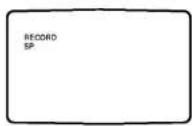
The Video Recorder will start recording. It will continue recording until the end of the tape is reached or it is manually stopped.
To set the length of time which you want to record for, press the REC/ITR ● button twice. The television screen will show 0H30. Each subsequent press of the REC/ITR ● button will increase the recording time by thirty minutes to a maximum of nine hours.
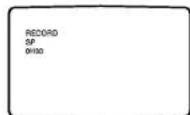
You can also interrupt recording to avoid unwanted scenes. If you press P/STILL II during ITR the Video Recorder will enter the record pause mode and the set period of time is cancelled.
1 To pause recording press P/STILL II.
2 Press P/STILL II again to continue recording.
Tapes can be paused for up to five minutes. RECP will be displayed on the television screen while a tape is paused. After five minutes your Video Recorder will automatically cancel recording to prevent damage to the video tape or your Video Recorder.
To view one channel whilst recording another, press TV/VCR to disappear VCR on the Display panel. Using your TV remote, switch to the channel you want to watch.
Finishing a recording
1 Press STOP ■
2 Press EJECT ▲. EJECT will appear on the television screen. If the end of the tape is reached your VCR will automatically stop recording, rewind, stop and eject the tape and place itself into Standby.

Recording using Timer Recording
Allows you to specify a time at which the Video Recorder will start recording.
This can be done up to one month in advance with up to seven recordings being pre-programmed.
Ensure the television channels have been tuned and stored correctly and that the clock is set to the correct time.
Timer Recording
Insert a video tape.
1 Press ; for the main menu.
2 Use ◀ or ▶ to select REC.
3 Press OK. Press OK again to enter the timer record menu.
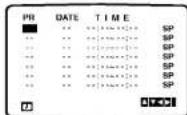
4 To enter the programme number that you wish to record you can scroll through the available options using the ▲ or ▼ buttons or you can enter the numbers directly.
When selecting single digit numbers remember to put 0 first. If you wish to record from the SCART socket or RCA socket (LV3795/LV3765 Only) press AV
5 Press▶ and enter the date of the programme that you wish to record. Press OK before entering a date to select one of the automated features.
They are DLY (daily) to record every day except Saturday and
Sunday at the set time, or individual days e.g. MO (Monday) to record at the same time every
week. Press ◀ or ▶ to select, then press OK to confirm.
Enter the time of the start and end of the programme that you wish to record. The Video Recorder uses a 24 hour clock.
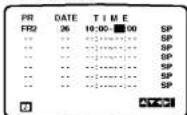
7 Press ▶ to select the recording speed.
Use the ▲ or ▼ to move among Standard Play, Intelligent Play and Long Play.
IP (Intelligent Play) determines how much tape is left and switches speed from SP to LP, if necessary, to complete recording the programme.
8 Check that the timer event details are correct, if they are, press i to save your settings. If PLEASE CHECK is displayed you have entered incorrect information.
Check the details on the television screen and reenter it. If you want to enter more Timer recordings, repeat the above process from point 3. Press ; again to remove the menu.
9 Place the Video Recorder on standby by pressing the POWER button ☐ on the remote control. TIMER will appear in the Video Recorder display to show that it is set to record. The Video Recorder is now set to record at the time you have specified.
Changing timer events
If you wish at any time to change a recording event press ▲ or ▼ to select the timer slot that you wish to change.
Press ◀ to delete or OK to edit that entry.
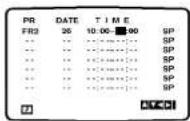
Use the ◀ or ▶ buttons to select the section you wish to change and the ▲ or ▼ buttons to change those sections.
Protect your recordings
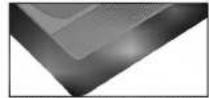
To stop a recording you have made being recorded over, break off the protection tab on the rear of the video tape. To record on a tape that has had its protection strip removed, cover the hole with adhesive tape.
Recording tape to tape
You will need a second Video Recorder for tape to tape copying. Connect using a SCART cable from the back of your Video Recorder or using the AV sockets on the front (LV3795/LV3765 Only).
Select audio/video mode on the recording Video Recorder by pressing the AV button on the Remote Control. To monitor the recording, connect the recording
Video Recorder to your TV using the standard coaxial aerial cable.
FC991/961/FD290/260_87H_ENG 2/4/03 2:19 PM Page 10
Advanced functions on your Video Recorder
Your Video recorder has some advanced operations with features you may find useful.
10
CM (Commercial Message) Skip
This enables you to skip past small sections of the video tape, such as commercial messages, television adverts or firm trailers.
Press the CM SKIP button on the remote control, during play.
Each subsequent press of the button increases the amount of the tape which is skipped by 30 seconds, up to a total of three minutes
(180 seconds). After the chosen time has passed normal play will automatically resume.
OPR (Optimum Picture Response)
This enhances the picture from the video tape by adjusting to the condition of the video tape. If you feel that the picture needs adjusting you can manually change the OPR setting.
You can only set OPR when a tape is playing in the Video recorder.
1 Press ↓ to enter the main menu. 2 Use ◀ or ▶ to select OPR then press OK.
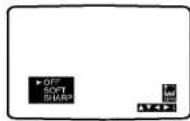
3 Use the ▲ or ▼ buttons to select OFF, SOFT or SHARP.
4 Press i to exit the menus.
Colour standards
Your Video Recorder uses dual colour standards, PAL and MESECAM. During play your Video Recorder should select the Colour System automatically, however if you experience problems you may need to do it manually.
1 Press i to enter the main menu.
2 Use ◀ or ▶ to select SYSTEM then press OK.
3 Use ▲ or ▼ to select the colour system used in your recording.
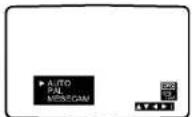
4 Press : to exit the menus.
Setting the clock
The Video Recorder uses a 24 hour clock, so that for example 1 pm is represented as 13:00.
Single digit numbers should be entered with a 0 in front for instance, 01.
1 Press i to enter the main menu. Use the ◀ or ▶ buttons to select TIME DATE then press OK.
2 Use the numbered buttons on the remote control to enter the the HOURS, MINUTES, DAY, MONTH and YEAR.
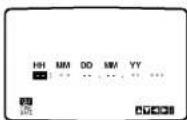
The day of the week will appear automatically once the date has been entered. If you make a mistake use ◀ or ▶ to select the item and re-enter the details.
3 Once you are satisfied press 1 to store your settings,
Advanced functions on your Video Recorder
Your Video recorder has some advanced operations with features you may find useful.
On screen display (OSD)
This can be used to display the current time, tape counter, tape remaining, day, month and year, day of week, channel and operational mode of your Video Recorder on your television screen. If a recording is taking place, the on screen displays will not be recorded onto tape.
1 Press OK to show the OSD.
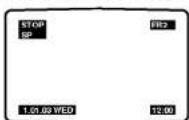
2 Press OK repeatedly to cycle through the display options. The tape counter and amount of tape left will appear if there is a tape loaded.
3 After 3 seconds the majority of the OSD will clear leaving only the clock or tape counter and the amount of tape left on the television screen.
4 Press OK again to remove all OSD's from the television screen. To turn off the on screen displays completely.
1 Press : to enter the main menu.
2 Select fOSD ON OFF using ◀ or ▶ then press OK.
3 Select OFF using ▲ or ▼. Press : to save the setting.
Energy Save
This feature allows you to conserve energy. If you have programmed the Video Recorder to record a future television programme this feature will not work.
- Press ON on the Control Panel. All indicators in the Display Panel will be off.
To turn off Energy Save.
- Press the POWER button ⏻ (or ⏻) on the Remote Control or the Control Panel.
Resetting the digital tape counter
The tape counter displays the play or recording time elapsed in hours minutes and seconds. Press CLEAR to reset the counter to 0:00:00. When you press STOP ■ and press REW ←, the Video Recorder will stop at 0:00:00, the point where you reset the counter.
Child Lock
You can turn off the buttons on the Control Panel so that your Video Recorder can only be operated using the Remote Control.
1 Press the C.LOCK button on the Remote Control. SAFE will appear on the television screen.
None of the buttons on the Control Panel will work apart from STOP ■ and EJECT ▲.
11
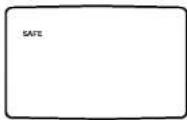
If any other buttons on the front of the VCR are pressed, SAFE will appear on the television screen. To unlock the Child Lock press the C.LOCK button again on the Remote Control.
Wide Screen
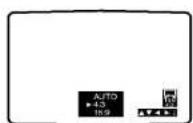
For wide screen playback your Video Recorder must be connected to your television using a SCART cable.
1 Press to enter the main menu. 2 Use the ◀ or ▶ buttons to select 16:9/4:3 and press OK.
Advanced functions on your Video Recorder
Your Video recorder has some advanced operations with features you may find useful.
12
3 Use the ▲ or ▼ buttons. Choose: AUTO: automatically chooses the correct format for the content. 4:3: for playing back and recording in normal format. 16:9: for playing back and recording in Wide Screen format.
4 Press | to save your settings.
Sound settings (LV3795/LV3765 Only)
Your Video Recorder can record and play back stereo sound. You can select the way sound is played back.
1 Press ; to access the main menu.
2 Select AUDIO with the ◀ or ▶ buttons.
3 Press OK.
4 Use the ▲ or ▼ buttons to choose between:
STEREO
LEFT (left channel only)
RIGHT (right channel only)
MONO
5 Press ; to ext the menu.
Automatic power off
By pressing the POWER button Ⓞ while rewinding a tape the Video Recorder will turn off automatically when the tape rewind has completed.
ez Operations
ez Power Off
Press the button marked ez POWER OFF during play. The Video Recorder will automatically stop the tape, rewind to the beginning and eject the tape.
It will then turn itself to standby.
ez Repeat
You can select a section of the video tape to repeat twice and then resume play.
1 Press and hold the ez REPEAT button. The Video Recorder will automatically rewind for as long as the ez REPEAT button is held.
2 Release the button when you want the replay to begin.
3 The Video Recorder will then play the selected section twice.

4 To resume normal play from any position, press the ez REPEAT button during the first repeat.
Video Doctor
The Video Doctor will show the status of aspects of the Video Recorder.
1 Press ; to access the main menu.
2 Select Dr. with the ◀ or ▶ buttons.
3 Press OK.
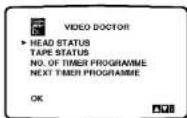
4 Use the ▲ or ▼ buttons to check the following features.
HEAD STATUS
PLEASE CLEAN: The tape heads
need cleaning.
TAPE STATUS
NOT RECORDABLE: The
Cassette in the Video Recorder
has had its protection tabs
removed, insert a tape suitable for recording.
NO. OF TIMER PROGRAMME
2
Shows the number of timer
recording programmed.
NEXT TIMER PROGRAMME
FR2 26 10:00-11:00 SP
Shows the current status of timer recording.
5 Press ; to remove the menu from the television screen.
FC991/961/FD290/260_87H_ENG 2/4/03 2:19 PM Page 13
Advanced functions on your Video Recorder
Your Video recorder has some advanced operations with features you may find useful.
13
To set the Decoder (LV3795/LV3765 Only)
We have already described, how to connect a decoder for pay-TV station as CANAL+ or PREMIERE on page 4.
For the recording of an encoded station you do not have to control anything. You just select the station and wait shortly until the decoding will start.
1 Press | to access the main menu.
2 Select DECODER with the ◀ or ▶ buttons
3 Press OK.
4 Use the ▲ or ▼ buttons to select on when receiving the encoded broadcasts.
The connected decoder will be activated.
5 Press | to exit the menu.
Language selection
It is possible to change the language that the on screen displays are shown in. You can choose between English, Deutsch, Français, Italiano, Español, Dutch and Portuguese.
1 Press : to display the main menu.
2 Select ABC using the ◀ or ▶ buttons.
3 Press OK to reveal the language choice screen.
Select your desired language using the ▲ or ▼ buttons.
4 Press : to store the settings.

Troubleshooting
If you are having trouble with your Video Recorder please check the following before calling your service centre.
14
No picture and no sound
- Check that the Video Recorder plug has been plugged in and switched on at a mains wall socket and that the television has been plugged in and switched on.
- Check the aerial lead is undamaged and securely connected to the correct sockets in both the television and the Video Recorder.
- Check that you have tuned into a video channel on your television.
- If you are using a SCART connection, check that the cable is secure and that the correct AV channel is selected on your television.
No playback or a poor picture
- Try a different video cassette. If the problem is resolved, the problem may have been the cassette itself.
- Try using the tracking buttons ▲ or ▼ to reduce the amount of visible interference.
• If the cassette contains a recording that you have recently made from the television, the
television channels may not be tuned to the Video Recorder correctly.
TV programmes cannot be recorded
- Check the reception on your television set. If you cannot receive a picture through your aerial, the Video Recorder will be unable to record television broadcasts.
- Check the aerial lead is undamaged and securely
connected to the correct sockets. - Check that the Video Recorder has been tuned to the television programmes properly.
- Check the rear of the video cassette to see if the safety tab used to prevent recording has been removed.
- Check that the signal being received by the television is reasonable quality.
A video tape cannot be inserted
- Check that there is not a cassette in the Video Recorder already.
- Is the video cassette the right way round? The windows should be at the top and the arrow should be pointing toward the Video Recorder.
The Remote Control does not work
- Has the Video Recorder been plugged in and switched on?
- Check that the batteries have been inserted correctly into the Remote Control.
The top of the video picture is unstable
- The video cassette may be damaged. Insert another video cassette and check the picture from it.
- Try adjusting the horizontal control on your television, you should consult your television user guide on how to do this.
- Check the aerial lead is undamaged and securely connected to the correct sockets.
- Ensure that the television has been correctly tuned to your Video Recorder.
No Hi - Fi sound (LV3795/LV3765 Only)
- In the Audio menu check that the STEREO option has been selected.
- Check your television user guide to see if you have a stereo feature on your television.
Autoplay does not work
- If the safety tab has not been removed from the video cassette this function will not work.

FC991/961/FD290/260_87H_ENG 2/4/03 2:19 PM Page 15
Technical specifications
Specifications are correct at time of printing. LG is constantly innovating and products may change at any time without warning.
15
Specifications
| General | |
| Power | 200-240V~, 50Hz |
| Power consumption | Approx. 12 Watts (Energy Saving mode: 3 Watts) |
| Video Head System | Double azimuth 4 heads, helical scanning (LV3795/LV3785)Rotary 2 heads, helical scanning (LV3295/LV3265) |
| Tape speed | 23.39 mm/sec (SP mode) 11.69 mm/sec (LP mode) |
| Tape Format | Tape width 12.7mm (0.5 inch) |
| Max. recording time | 4 hours (SP mode, E-240 Tape) 8 hours (LP mode, E-240 Tape) |
| Rewind time | Approx. 65 (±10) secs (E-180 tape) (LV3795/LV3785)Approx. 180 (±30) secs (E-180 tape) (LV3295/LV3265) |
| Dimensions | 360 x 94 x 272mm (W x H x D) |
| Weight | 3.4 kg |
| Operating temperature | 5^ - 35^ |
| Operating humidity | Less than 80% |
| Timer | 24 hours display type |
| Video | |
| Television system | CCIR standard (625 lines, 50 fields)PAL/SECAM colour signal |
| Recording format | PAL/MESECAM |
| RF reception | PAL B/G, SECAM B/G |
| RF OUT | PAL G |
| Input level | VIDEO IN (SCART, RCA) 1.0 Vp-p, 75 Ohm unbalanced |
| Output level | VIDEO OUT (SCART) 1.0 Vp-p, 75 Ohm unbalanced |
| Signal to noise ratio | More than 43 dBm |
| RF modulator | UHF channels 22-88 (adjustable) |
| Audio | |
| Input level | AUDIO IN (SCART, RCA)SCART - 6.0 dBm, more than 10 kohmsRCA: - 6.0 dBm, more than 47 kohms |
| Output level | AUDIO OUT (SCART, RCA)SCART - 6.0 dBm, less than 1 kohmsRCA: - 6.0 dBm, less than 1 kohms |
| Track | Mono track & Hi - Fi Track |
| Frequency response | Normal : 100 Hz - 10 kHz (-6/+3 dBm)Hi - Fi : 20 Hz - 20 kHz (-3/+3 dBm) |
| Signal to noise ratio | Hi-Fi : More than 70 dB (JIS A filter) |
| Dynamic range | Hi-Fi : More than 85 dB (JIS A filter) |
FC991/961/FD290/260_87H_ENG 2/4/03 2:19 PM Page 16

LG Electronics Inc.
Model No. FC991P/FC961P/FD290P/FD260P Part No. 3834RP0087H