P-51 - Montre-bracelet LIV - Free user manual and instructions
Find the device manual for free P-51 LIV in PDF.


User questions about P-51 LIV
0 question about this device. Answer the ones you know or ask your own.
Ask a new question about this device
Download the instructions for your Montre-bracelet in PDF format for free! Find your manual P-51 - LIV and take your electronic device back in hand. On this page are published all the documents necessary for the use of your device. P-51 by LIV.
USER MANUAL P-51 LIV
Caliber 10 User's Manual
THE MOVEMENT
DESCRIPTION:
• Made in Switzerland
Features precision 13 Jewel Gold Plated Swiss Quartz
• Movement (RONDA startech Caliber 5040.D)
- Powered by a battery
PERFORMANCE:
Standard battery life of 45 months
DISPLAY:
Hours-minutes-seconds
Date window
PARTS OF YOUR NEW WATCH
text_image
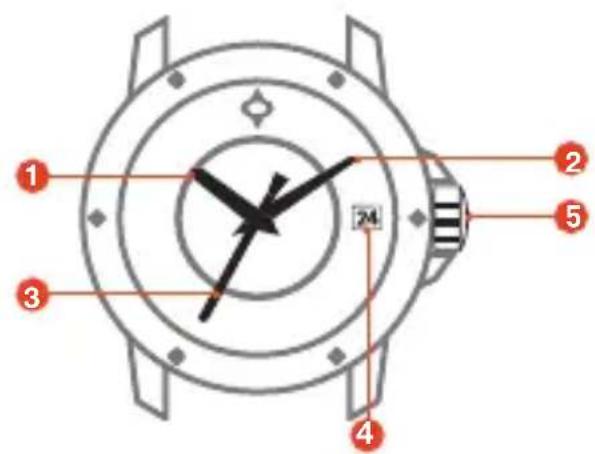
1 2 3 4 5 241 Hour hand
2 Minute hand
3 Second hand
4 Date display
5 Crown
SETTING YOUR WATCH
text_image
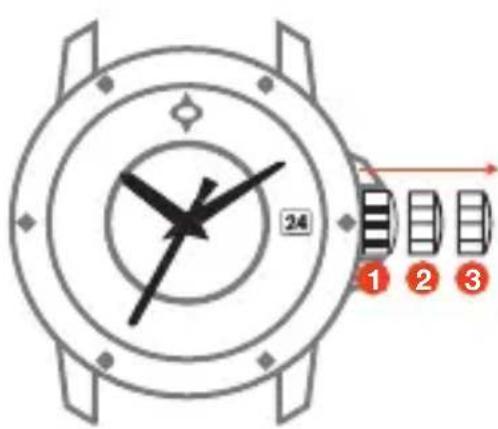
24 1 2 31 POSITION 1 - Normal position
2 POSITION 2 - Setting the date
Pull crown to position 2 and turn clockwise to set the date. Once date is set, return to position 1.
Important: The date can be corrected during the day-changing phase between 10pm and 12am. The date of the next day must be set because no automatic date change takes place at midnight.
3 POSITION 3 - Setting the time
Pull crown to position 3 and turn to desired time. Once time is set, push crown back to position 1.
Caliber 11 User's Manual
THE MOVEMENT
DESCRIPTION:
Made in Switzerland
Features precision 26 Jewel Swiss Automatic Movement (Sellita SW200/ETA2824)
• Functions without a battery; powers automatically with the movement of your arms
PERFORMANCE:
• Balance frequency of 28,800
vibrations per hour (4 Hz)
• Power reserve of 38 hours
DISPLAY:
Hours-minutes-seconds
Date window
PARTS OF YOUR NEW WATCH
text_image
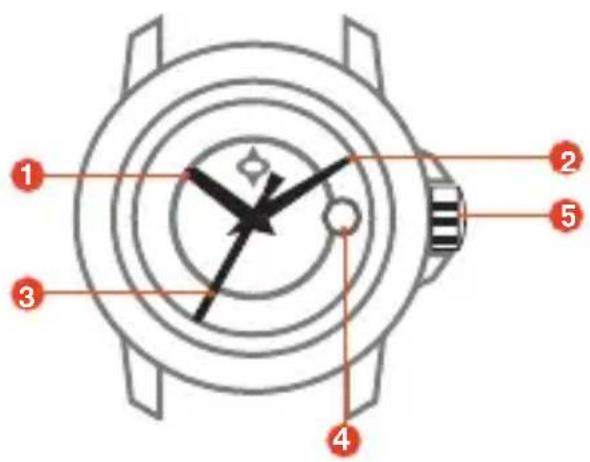
1 2 3 4 51 Hour hand
2 Minute hand
3 Second hand
4 Date display
5 Crown
Caliber 11 User's Manual
CONTINUED
SETTING YOUR WATCH
text_image
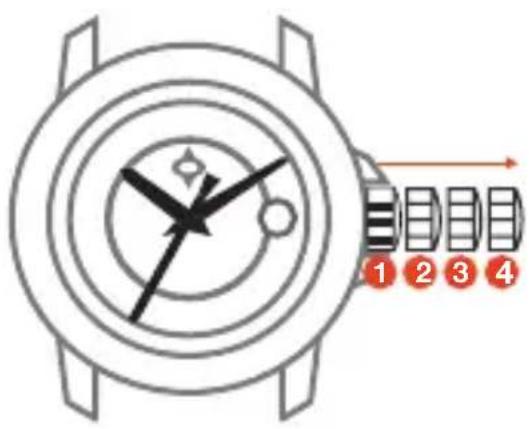
Diagram of a watch with numbered parts and a clock face, likely illustrating a watch or watch movement.1 POSITION 1 - Normal position
2 POSITION 2 - Winding your watch
With the crown in position 2, wind the watch about 30 times. This will power the mainspring of your watch. The rotor will continue to wind the watch as you wear it and keep the watch going. The watch has a power reserve of about 40 hours.
3 POSITION 3 - Setting the date
Turn crown clockwise to set the date. Warning: Only change date between 2am and 10pm. Rapid date correction during this period could damage the calendar mechanism.
4 POSITION 4 - Setting the time
Turn crown to desired time. Important: To preserve your watch's water-resistance, always push or screw down the crown to position 1 when done.
* When a mechanical self-winding watch is not worn for a certain amount of time, its power reserve (in this case, 38 hours) is exhausted and the watch stops. To restart it, unscrew the crown to position II and wind the movement manually by turning the crown 30-40 times. This will give it a sufficient power reserve to function normally.
Caliber 12 User's Manual
THE MOVEMENT
DESCRIPTION:
Made in Switzerland
Features precision 25 Jewel Gold Plated Swiss Automatic Chronograph Movement (Sellita SW500/ETA7750)
Functions without a battery; powers automatically with the movement of your arms
PERFORMANCE:
Balance frequency of 28,800 vibrations per hour (4 Hz)
Power reserve of 48 hours
DISPLAY:
Hours-minutes-seconds
60-second chronograph
30-minute counter
12-hour counter
Date and day in window
PARTS OF YOUR NEW WATCH
WATCH FUNCTIONS
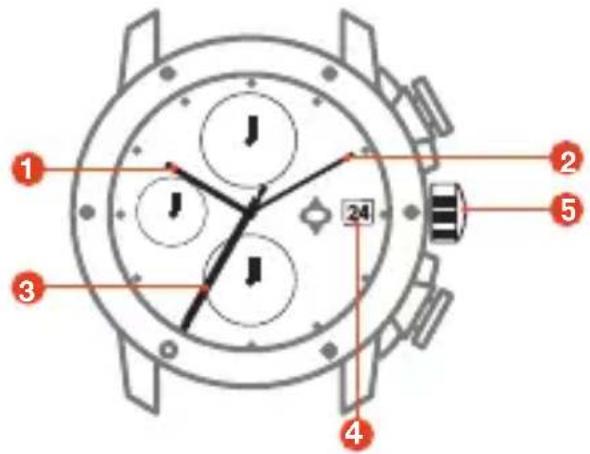
text_image
1 2 3 4 5 J J J 24CHRONOGRAPH FUNCTIONS
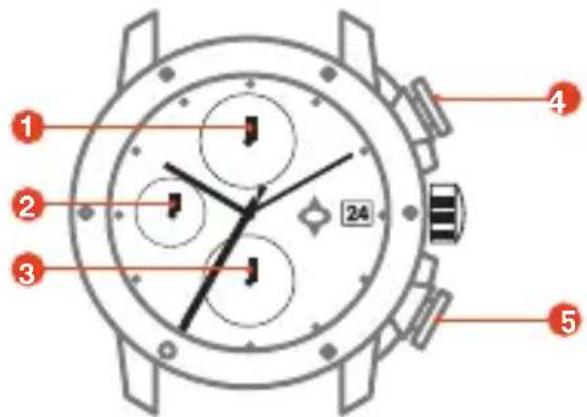
text_image
1 2 3 4 5 241 Hour hand
2 Minute hand
3 Second hand
4 Date display
5 Crown
1 Second counter
2 30-minute counter
3 12-hour counter
4 Start / stop button
5 Zero reset button
Caliber 12 User's Manual
CONTINUED
SETTING YOUR WATCH

text_image
J J J 24 1 2 3 41 POSITION 1 - Normal position
2 POSITION 2 - Winding your watch
When a mechanical self-winding watch is not worn for a certain amount of time, its power reserve (in this case 44 hours) is exhausted. To restart, pull the crown to position 2 and wind manually by turning the crown 30-40 times.
3 POSITION 3 - Setting the date
Turn crown clockwise to set the date. Warning: Do not change date between 8pm and 2am. Rapid date correction during this period could damage the calendar mechanism.
4 POSITION 4 - Setting the time
Turn crown to desired time. Important: To preserve your watch's water-resistance, always push or screw down the crown to position 1 when done.
SINGLE TIMING
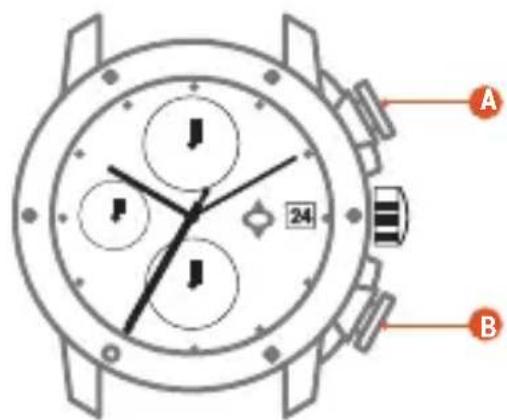
text_image
A 24 B1 Caution: Before each timing, the hands must be at zero. If necessary, press button B.
2 Start: button A (START)
3 Stop: button A (STOP) > Time read-out
4 Reset to zero: button B
Caliber 12 User's Manual
CONTINUED
CUMULATIVE TIMING
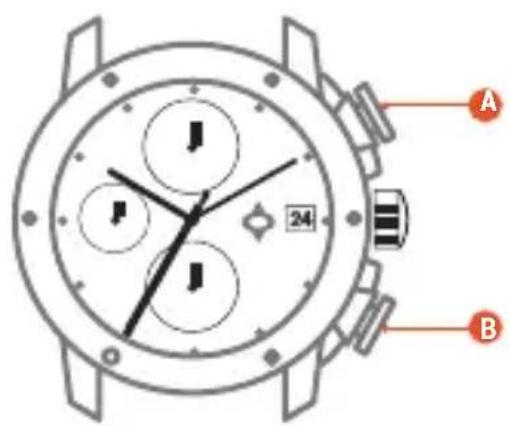
text_image
A 24 B1 This function measures several consecutive times, adding them to give the total measured time.
2 Caution: Before each timing, the hands must be at zero. If necessary, press button B.
3 Start 1st time: button A (START)
4 Stop 1st time: button A (STOP) > Read 1st time
5 Start 2nd time: button (START)
6 Start 2nd time: button A (STOP) > Read 1st and 2nd times, etc
7 Reset to zero: button B
CHRONOGRAPH DISPLAY
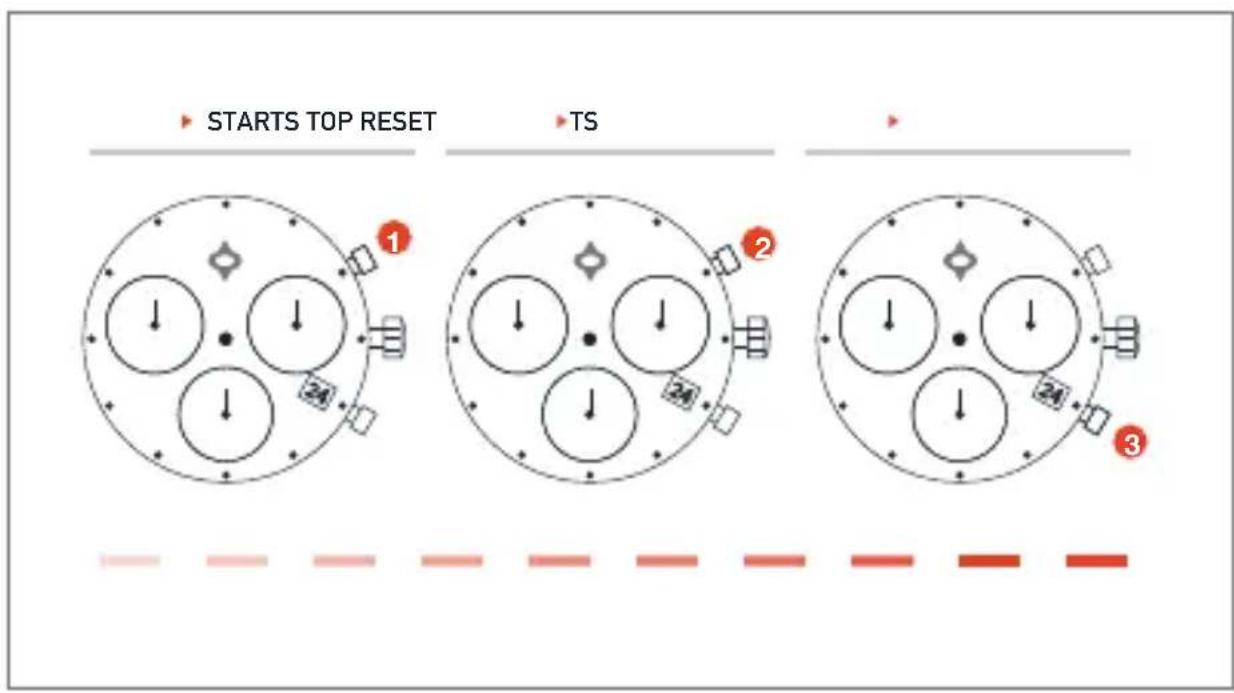
flowchart
graph TD
    A["Starts Top Reset"] --> B["TS"]
    B --> C["Three Timbors"]
    C --> D["3000 Timbors"]
    style A fill:#f9f,stroke:#333
    style B fill:#f9f,stroke:#333
    style C fill:#f9f,stroke:#333
    style D fill:#f9f,stroke:#333
Caliber 14 User's Manual
THE MOVEMENT
DESCRIPTION:
• Made in Switzerland
Features Swiss analog quartz movement
- Powered by a battery
PERFORMANCE:
Standard battery life of 50 months
DISPLAY:
2 eyes
Multifunction
Alarm
Big date
Small second
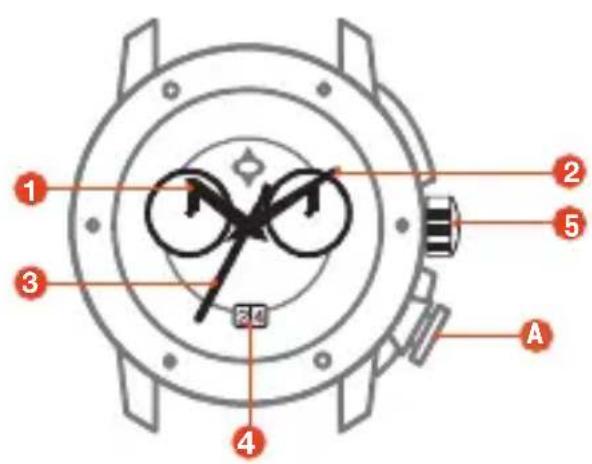
PARTS OF YOUR NEW WATCH
text_image
1 2 3 4 5 6 A1 Hour hand
2 Minute hand
3 Second hand
4 Date display
5 Crown
A Alarm Button
Caliber 14 User's Manual
CONTINUED
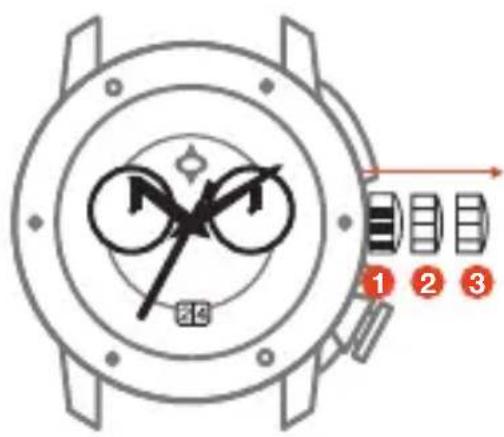
SETTING YOUR WATCH
text_image
Diagram of a watch with labeled parts and directional arrows indicating motion or movement, marked with numbers 1, 2, and 3.1 POSITION 1 - Normal position
2 POSITION 2 - Setting the date
Screw crown out and pull once to position 2 and turn to set the date. Important: The date of the following day must be set in the calendar changing phase between 9pm and 12am.
3 POSITION 3 - Setting the time
Pull crown to position 3 and turn to desired time. Important: To set time to the exact second, pull crown to position 3 when the second hand is at "60". Once the hour and minute hands have been set, push back and screw down to position 1 at the exact second.
THE ALARM
Setting Alarm - 1. Activate alarm mode by holding button A for 2 seconds until small minute hand jumps forward 1 minute. 2. Short presses advance alarm time by minute. Long presses advance alarm time until button is released. IMPORTANT: After setting alarm, it takes 5 seconds for alarm to beep twice to notify you that it has been set.
Turning Alarm ON/OFF - Briefly press button A to turn alarm on/off.
2 beeps: Alarm is on 1 beep: Alarm is off
Caliber 14 User's Manual
CONTINUED
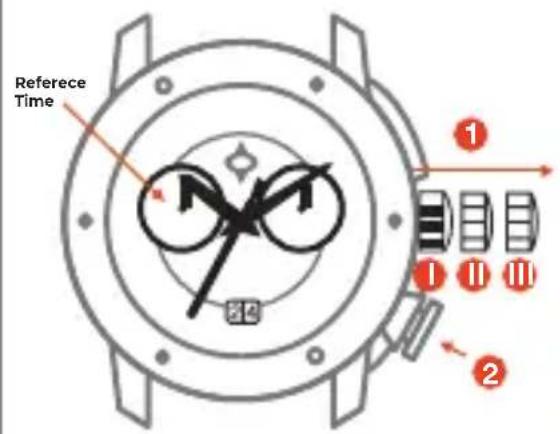
SETTING THE REFERENCE TIME
text_image
Referece Time ① ② ③ ④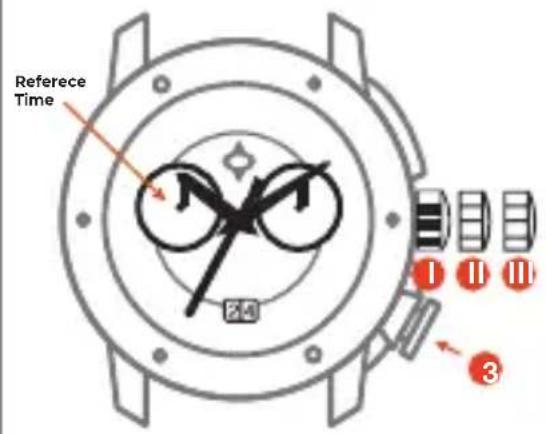
text_image
Reference Time 1 2 3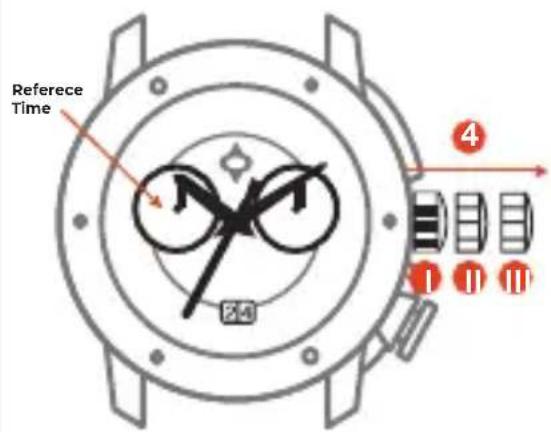
text_image
Reference Time 24 ④ ① ⑪ ⑪1 Pull out the crown to position III (second hand stops. The display changes from alarm time to reference time.)
2 Activating the setting mode
Press the push-button for at least 2 seconds. As soon as the small minute hand jumps forwards one minute this mode is active.
3 Short pressing (less than 1 second): the reference time is moved forwards by the minute.
Medium pressing (1-2 seconds):
the reference time is moved forwards by the hour.
Long pressing (Longer than 2 seconds):
the reference time is moved forwards until the push-button is released.
3 Push the crown back into position I
(the display changes from reference time to alarm time).
A 1 beep signal indicates that the alarm is switched off.
Please note:
The reference time must display the same time as the current time. This means that resetting the current time also requires the identical correction of the reference time. Afterwards, the alarm time has to be reset.
What is the reference time?
The current time is displayed by means of the hour and minute hand.
Parallel to the current time, the reference time runs in the background; the alarm time refers itself to this reference time. Thus, resetting the time also requires the identical correction of the reference time.
If the reference time is not synchronized with the current time, this results in the alarm signal being emitted at a different time to the set alarm time.
Caliber 15 User's Manual
THE MOVEMENT
DESCRIPTION:
Made in Switzerland
Features precision Swiss Quartz 24 Hours / GMT + Dual Time Movement (RONDA powertech Caliber
515.24H)
Powered by a battery
PERFORMANCE:
• Standard battery life of 45 months
DISPLAY:
Hours-minutes-seconds
Date window
24 hours by hand – GMT function
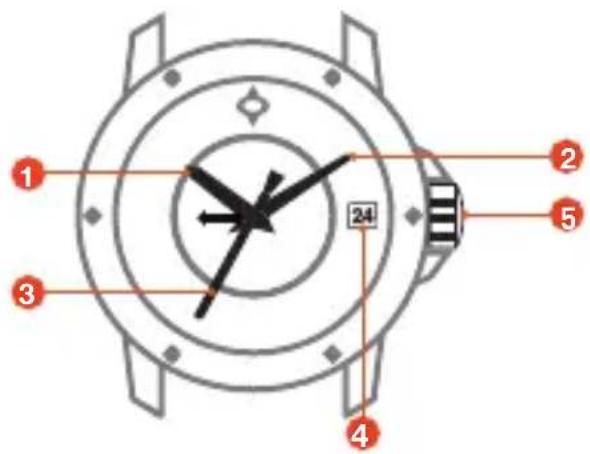
PARTS OF YOUR NEW WATCH
text_image
1 2 3 4 5 241 Hour hand
2 Minute hand
3 Second counter
4 Date display
5 Crown
Caliber 15 User's Manual
CONTINUED
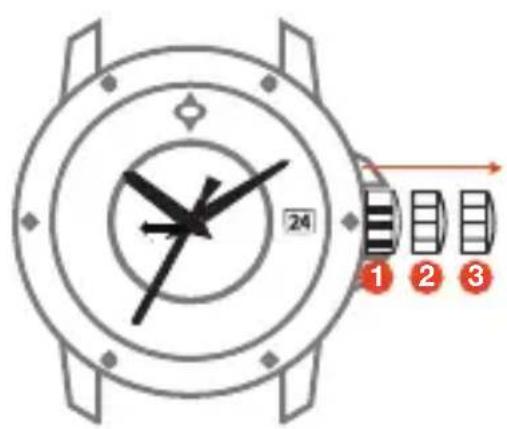
SETTING YOUR WATCH
text_image
24 1 2 31 POSITION 1 - Normal position
2 POSITION 2 - Setting the date
Pull crown to position 2 and turn clockwise to set the date. Once date is set, return to position 1.
Important: The date can be corrected during the day-changing phase between 10pm and 12am. The date of the next day must be set because no automatic date change takes place at midnight.
Quick-change correction for 24-hour display
- Pull the crown to position 2
then turn counterclockwise until the desired time appears. - Push the crown back into position 1.
3 POSITION 3 - Setting the time
Turn crown forward or backward to desired correction. Return to position 1 when done.
Caliber 16 User's Manual
THE MOVEMENT
DESCRIPTION:
Made in Switzerland
Features precision Swiss Quartz Analog
Movement (RONDA xtratech Caliber Z60)
Powered by a battery
PERFORMANCE:
Standard battery life of 50 months
DISPLAY:
3 eyes
Chronograph
• Center stop second (1/1 sec)
30 minute counter
ADD and SPLIT functions
Day indicator
Date
Small second
PARTS OF YOUR NEW WATCH
WATCH FUNCTIONS
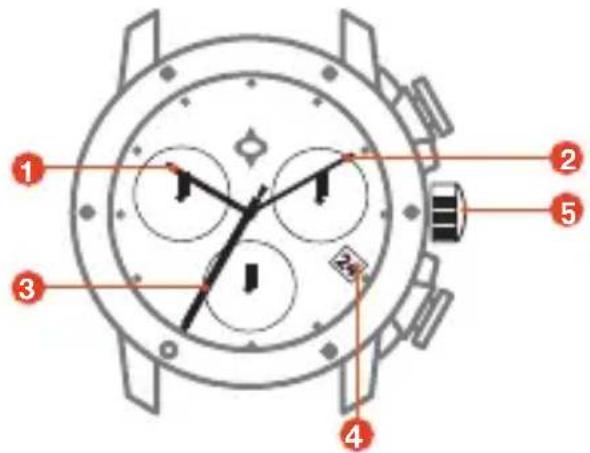
text_image
1 2 3 4 5CHRONOGRAPH FUNCTIONS
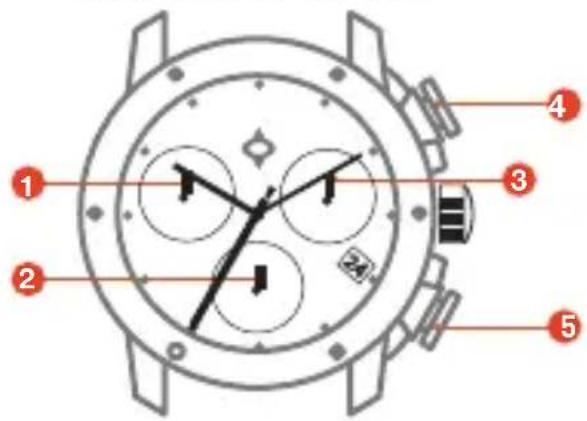
text_image
Diagram of a wristwatch with numbered parts for dial and time, showing clock face and hand positions.1 Hour hand
2 Minute hand
3 Second hand subdial
4 Date display
5 Crown
1 Day indicator
2 Second Hand
3 30 minute counter
4 Start / stop button
5 Zero reset button
Caliber 16 User's Manual
CONTINUED
SETTING YOUR WATCH
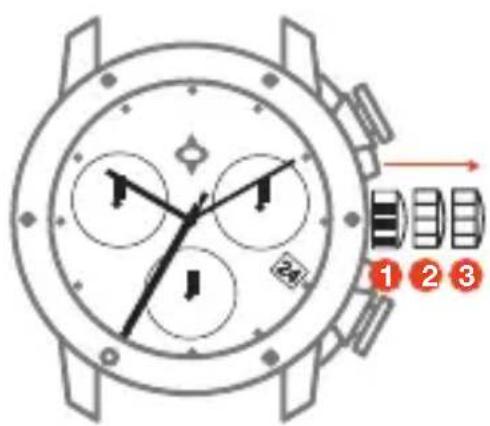
text_image
Diagram of a watch face with directional arrows and labeled buttons 1, 2, 3 for timing or navigation.1 POSITION 1 - Normal position
2 POSITION 2 - Setting the date
Pull crown to position 2 and turn counterclockwise to set the date. Important: During the date changing phase between 09:45 pm and 12:00 pm; the date must be set to the date of the next day.
3 POSITION 3 - Setting the time
Pull crown to position 3 and turn to desired time. Important: To set time to the exact second, pull crown to position 3 when the second hand is at "60". Once the hour and minute hands have been set, push back to position 1 at the exact second.
Caliber 16 User's Manual
CONTINUED
SETTING THE DATE, DAY OF OF THE WEEK, & TIME
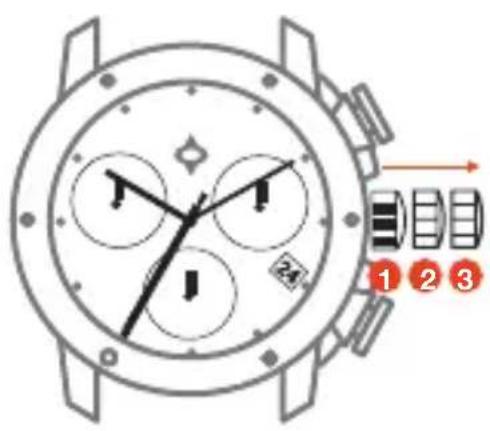
text_image
Diagram of a watch face with numbered labels and directional arrows indicating movement or navigation.Example:
- Date / time on the watch: 17 / 01:25 /MON
- Present date / time: 23 / 20:35 / THU
* Please observe the AM/PM clock rhythm
1 Pull out the crown to position III (the watch stops).
2 Turn the crown clockwise until yesterday's day of the week WED appears.
3 Push the crown to position II.
4 Turn anti-clockwise to get to yesterday's date.
5 Pull out the crown to position III (the watch stops).
6 Turn the crown anticlockwise until the correct date 23 and day of the week THU appears.
7 Continue to turn the crown anti-clockwise until the correct time 8:35 PM appears
8 Push the crown back into position I
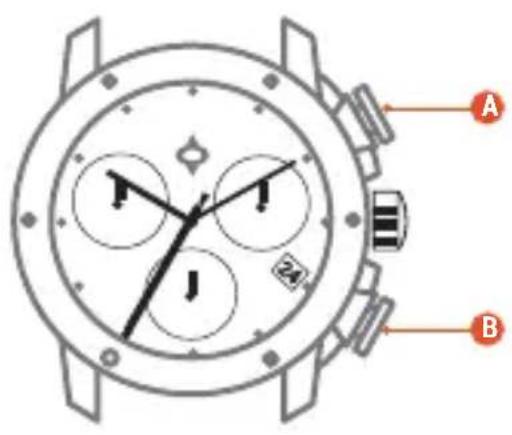
SINGLE TIMING

text_image
A B1 Start: Press push-button A
2 Stop: to stop the timing, press push-button A once more and read the chronograph counters: 20 min/38 sec
3 Zero positioning: Press push-button B. (The chronograph hands will be reset to their zero positions.)
Caliber 16 User's Manual
CONTINUED
ACCUMULATED TIMING
text_image
A B1 Start: (start timing)
2 Stop: (e.g. 15 min 5 sec following 1)
3 Restart: (timing is resumed)
4 Stop: (e.g. 5 min 12 sec following 3) = 20 min 17 sec (The accumulated measured time is shown)
5 Reset to zero: The chronograph hands are returned to their zero positions.
Please note:
* Following 4, the accumulation of the timing can be continued by pressing push-button A (Restart / Stop, Restart / Stop, ...)
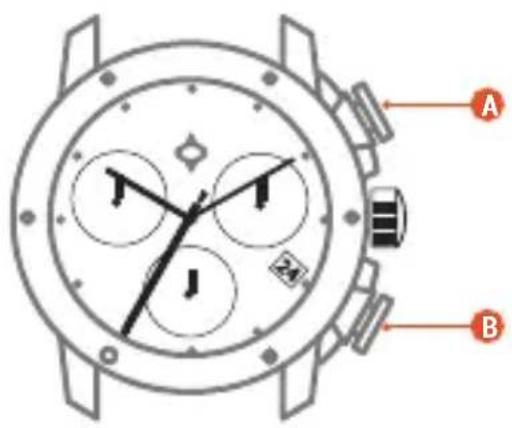
INTERMEDIATE OR INTERVAL TIMING
text_image
A B1 Start: (start timing)
2 Display interval: e.g. 20 minutes 17 seconds (timing continues in the background)
3 Making up the measured time: (the chronograph hands are quickly advanced to the ongoing measured time).
4 Stop: (Final time is displayed.)
5 Reset: The chronograph hands are returned to their zero position Please note:
* Following 3, further intervals or intermediates can be displayed by pressing push-button B (display interval / makeup measured time, ...)
Caliber 16 User's Manual
CONTINUED
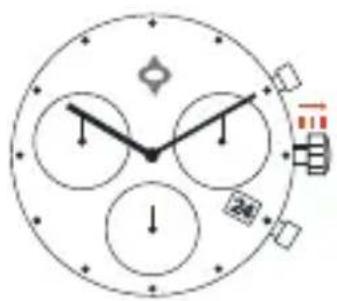
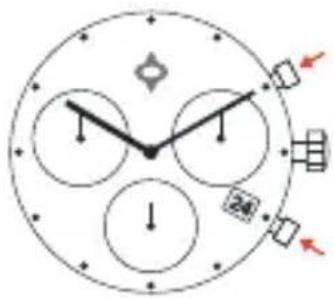
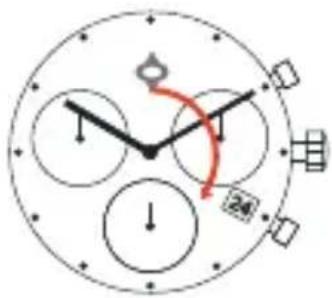
ADJUSTING THE CHRONOGRAPH HANDS
text_image
Hand-drawn clock face with hour and minute hands, showing 2:30/5:30 and 12:30/171 Unscrew crown and pull it twice to position III.
text_image
Analog clock face showing time with hour and minute hands, including a red directional arrow near the 10:30 mark.2 Hold both top and bottom buttons until the second hand of the chronograph does a complete turn indicating you are in set up mode.
text_image
Analog clock face showing time with hands and a red arrow indicating the second hour, surrounded by partial clock faces.3 Use the top button to adjust any of the chronograph hands. Use the bottom button to switch between the different hands.
4 To leave set up mode, push the crown back to position I and tightly screw it back in.*
*Failure to tightly screw it back in may result in water damage.
Caliber 17 User's Manual
THE MOVEMENT
DESCRIPTION:
Made in Switzerland
Features Swiss automatic movement (Sellita SW 280-1)
PERFORMANCE:
Self winding
• Frequency - 28,800 vibrations per hour
DISPLAY:
• Hours-minutes-seconds
- Instantaneous date and moonphase indicators in window with quick corrector
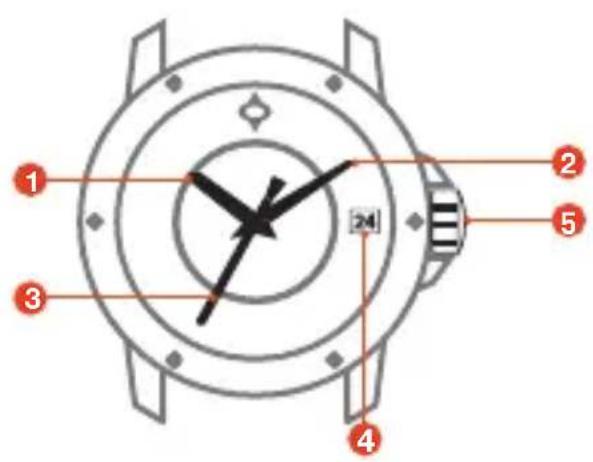
PARTS OF YOUR NEW WATCH
text_image
1 2 3 4 5 241 Hour hand
2 Minute hand
3 Second hand
4 Date display
5 Crown
Caliber 17 User's Manual
CONTINUED
SETTING YOUR WATCH
text_image
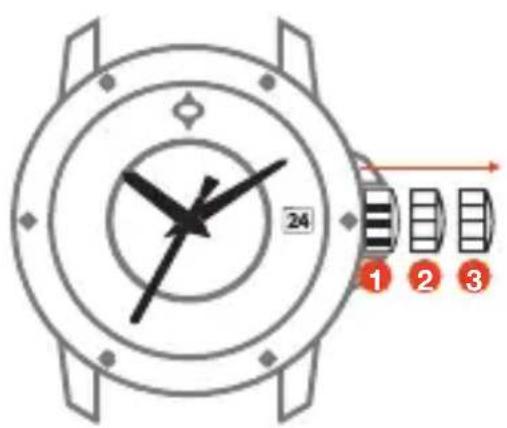
24 1 2 31 POSITION 1 - Normal position
2 POSITION 2 - Setting the date & moonphase
Pull crown to position 2 and turn clockwise to set the date. Once date is set, return to position 1.
Important: The date can be corrected during the day-changing phase between 10pm and 12am. The date of the next day must be set because no automatic date change takes place at midnight.
In position 2, turn the stem until the full moon appears in the middle of the opening. Determine the date of the last full moon with a calendar showing the moon phases. Then make one jump of moon phase indicator for each elapsed day since the last full moon.
3 POSITION 3 - Setting the time
Pull crown to position 3 and turn to desired time. Once time is set, push crown back to position 1.
Caliber 18 User's Manual
THE MOVEMENT
DESCRIPTION:
Made in Switzerland
Features precision 13 Jewel Gold Plated Swiss Quartz
• Movement (RONDA startech Caliber 5040.D)
Powered by a battery
PERFORMANCE:
Standard battery life of 54 months
DISPLAY:
1/10 second
3 eyes
Chronograph
Center stop second (1/1 sec)
1/10 seconds up to 30 minutes
30 minute counter
10 hour counter
ADD and SPLIT functions
Date window
Small second
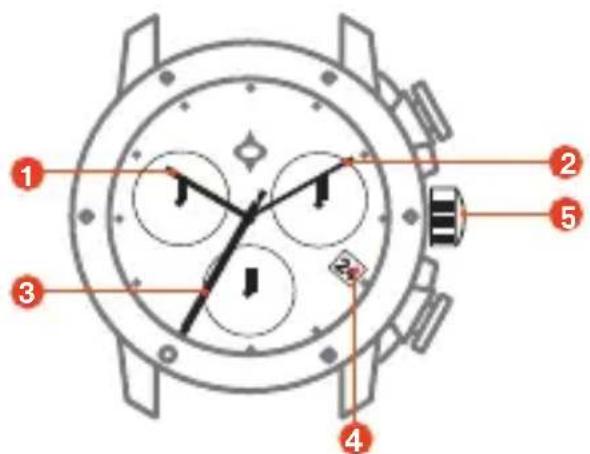
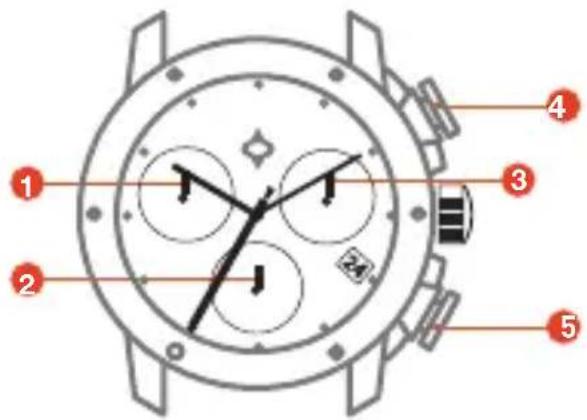
PARTS OF YOUR NEW WATCH
WATCH FUNCTIONS
text_image
1 2 3 4 5CHRONOGRAPH FUNCTIONS
text_image
Diagram of a wristwatch with numbered parts for identification and labeling1 Hour hand
2 Minute hand
3 Second hand subdial
4 Date display
5 Crown
1 Day indicator
2 Second Hand subdial 1/10 of a second
3 30 minute counter
4 Start / stop button
5 Zero reset button
Caliber 18 User's Manual
CONTINUED
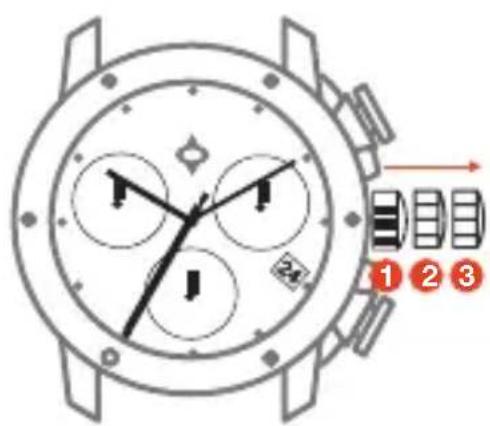
SETTING YOUR WATCH
text_image
Diagram of a watch face with directional arrows and numbered labels 1, 2, 3 indicating movement or sequence.1 POSITION 1 - Normal position
2 POSITION 2 - Setting the date
Turn crown clockwise to set the date.
Warning: Only change date between 2am and 10pm. Rapid date correction during this period could damage the calendar mechanism.
3 POSITION 3 - Setting the time
Turn crown to desired time.
Important: To preserve your watch's water-resistance, always push or screw down the crown to position 1 when done.
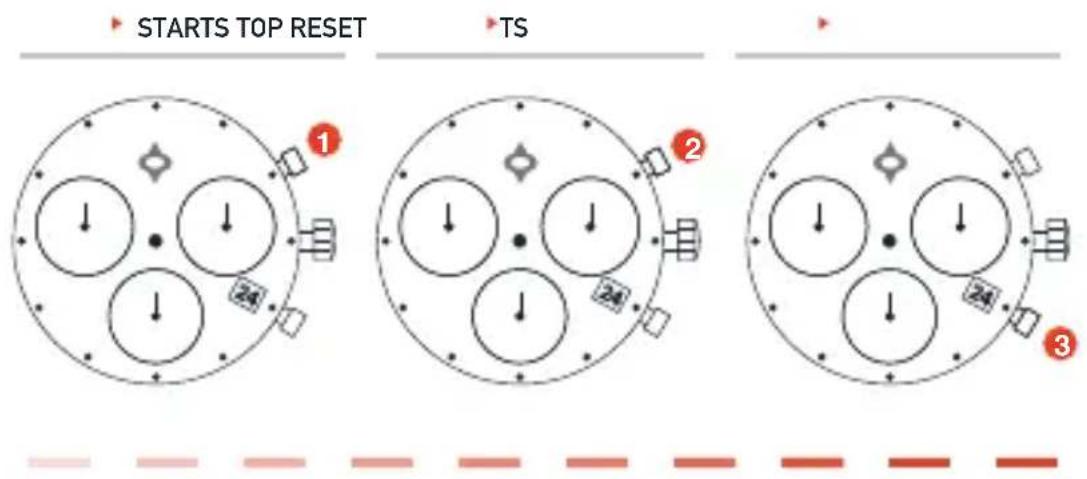
CHRONOGRAPH DISPLAY
flowchart
graph TD
    A["Starts Top RESET"] --> B["1"]
    B --> C["24"]
    C --> D["24"]
    D --> E["TS"]
    E --> F["2"]
    F --> G["24"]
    G --> H["3"]
Caliber 18 User's Manual
CONTINUED
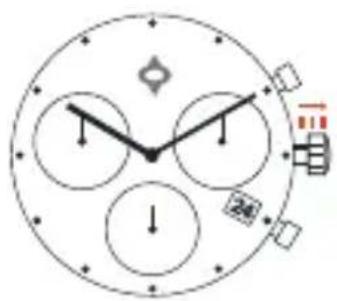
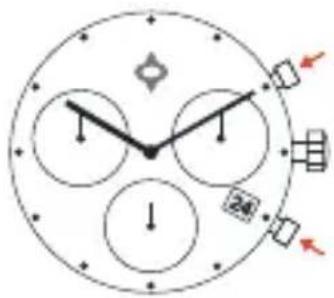
ADJUSTING THE CHRONOGRAPH HANDS
text_image
Hand-drawn clock face with hour and minute hands, showing 2:30/5:30 and 12:30/171 Unscrew crown and pull it twice to position III.
text_image
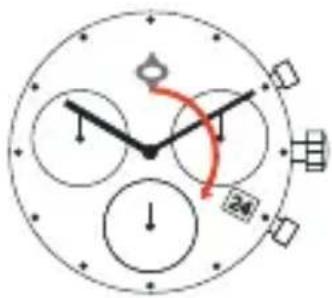
Analog clock face showing time with hour and minute hands, including a red directional arrow near the 10:30 mark.2 Hold both top and bottom buttons until the second hand of the chronograph does a complete turn indicating you are in set up mode.
text_image
Analog clock face showing time with hands and a red arrow indicating the second hour, surrounded by partial clock faces.3 Use the top button to adjust any of the chronograph hands. Use the bottom button to switch between the different hands.
4 To leave set up mode, push the crown back to position I and tightly screw it back in.*
*Failure to tightly screw it back in may result in water damage.
Caring for your LIV Swiss Watch
Cleaning
Clean your watch regularly as follows;
- Ensure that the crown is completely screwed down before you get started.
-
If the seals in your watch have been tested and changed within the last 12 months by an authorized LIV service center, then you may use a soft brush with mildly soapy water to clean case, then rinse it off with clear water and dry it with a soft cloth. If your watch is fitted with a fabric, alligator, leather or python skin strap, take care not to get it wet.
-
If you have any doubts whatsoever about the water resistance of your watch, simply clean it with a soft brush, and then dry it. Avoid contact with detergents, solvents, cosmetics or any other chemical product, as these may damage the water-resistant gaskets and the bracelet.
Condensation & Water Resistance
Some condensation may form under the crystal of your watch due to a sudden temperature change. This will disappear by itself and not impact the watch function. If the condensation persists, contact LIV or an authorized LIV dealer.
Given the nature of rubber seals, water resistance cannot be a permanent condition. The rubber seals are designed to prevent water entry, however the fact that they are under constant pressure means that over time they will deteriorate. It is therefore necessary, throughout your watch's warranty coverage period, to have the water-resistance tested by LIV or an authorized LIV repair center every two years after the date of purchase.
These tests are conducted free of charge. The International Warranty does not cover problems with water resistance and associated consequences if periodic water-resistance tests have not been conducted every two years following the date of purchase.
Crystals
The crystal in your watch may be coated with an anti-reflective treatment (single or double), to make the time more readable. Marks may appear due to normal wear and tear of the watch, and are not covered by the International Warranty. The coating will be sufficient with normal watch wear.
Caring for your LIV Swiss Watch
Straps in Leather, Fabric, and Python/Alligator Skin
Be sure to avoid letting the watch get into contact with water.
Please note that no matter how careful you are with leather, it is a living material and its color will naturally (slightly) fade or darken over time. Leather straps should be cleaned with a dry, soft cotton cloth. Avoid any abrasive products during cleaning.
Silicone Straps
Since silicone attracts dust, there is an anti dust coating on the band which makes the silicone strap matte. It is normal for that coating to start coming off after approximately 6 months of everyday wear. The strap will begin to appear shiny as time progresses.
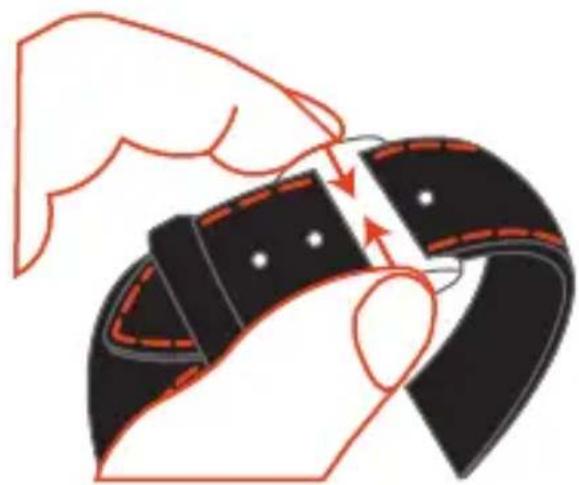
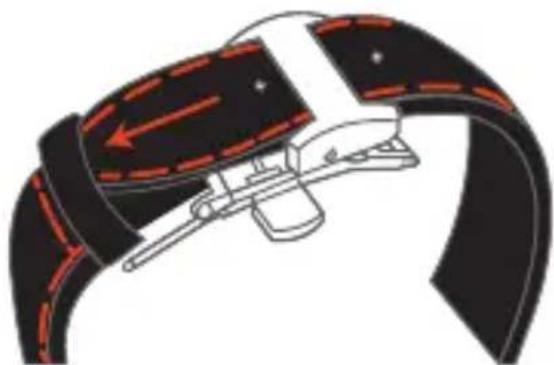
Deployant Clasp
natural_image
Illustration of a hand pressing down on a black fabric or leather piece with red stitching (no text or symbols)- To open the clasp, press in the push-pieces on either side simultaneously.

natural_image
Diagram of a robotic arm with red arrows indicating movement or force direction (no text or symbols present)- Open the clasp to enlarge the bracelet and remove the watch from your wrist.
natural_image
Diagram of a mechanical or electrical component with no visible text, numbers, or symbols- Put the strap on your wrist and slide the long section through the small fixed buckle.
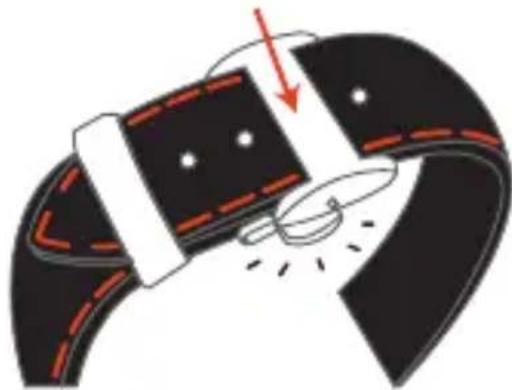
natural_image
Diagram of a mechanical or fluidic component with a red arrow indicating direction, no text or symbols present- Close the deployant clasp until it clicks into place. If necessary, slide the long section through the small mobile buckle.
Adjusting the Clasp
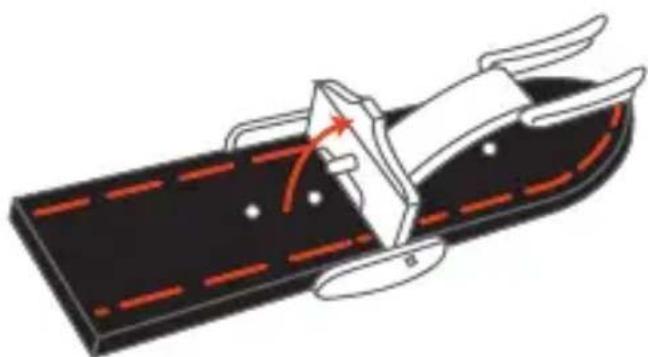
natural_image
Diagram of a mechanical or fluidic device with red flow arrows indicating direction (no text or symbols)- Release the adjusting mechanism by removing the pin from the hole in the long section of the strap.
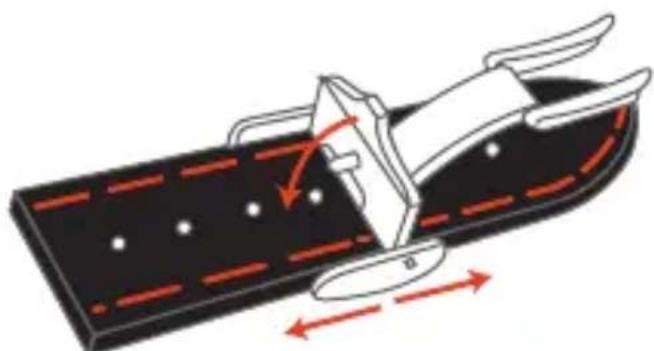
natural_image
Diagram of a mechanical device with red directional arrows indicating motion or force (no text or symbols)- Slide the mechanism along the long section, then fix it by reinserting the pin in the desired hole.
Does the 1/10 of a second dial of the chrono stop after 30 seconds?
It only stops SPINNING after 30 secs, but it is still calculating; the indication will show once you stop/pause the stop watch.
I've been setting the date at all times of the day and night but it always changes date at noon instead of midnight. What should I do?
Your watch set to PM instead of AM – it's a 12 hour clock. So for example, your 11 AM is set to 11 PM. The date changes between 11 PM and 1 AM. You simply need to bring the time forward by 12 hours.
How do I get the full effect of the luminescence on my watch?
In order to get the full effect of the luminescence, the watch needs to be in direct sunlight for at least 3 hours.
What does fully wound mean (on my automatic watch)?
LIV automatic watches have a 38 to 48-hour power reserve, meaning that when fully wound and not worn, a LIV automatic watch will run for approximately 38 to 48 hours before stopping.
It's important to understand what fully wound means, as some people wrongly assume that just by wearing an automatic mechanical watch it will fully wind up by itself. That is not the case. The truth is that an automatic watch needs first to be fully wound and charged up by turning the crown. Then, by wearing the watch, the automatic movement will continue to hold the charge.
Does my level of activity make a difference to how long my LIV automatic watch will remain charged?
YES!
Since the automatic watch gets its charging power from a rotating mass (aka Oscillating Weight) inside the watch that relies on the movement of the wrist, your level of activity will determine how long the charge will hold.
Less active people might find that their watch has stopped because there is not enough movement to swing the rotating mass
Can a LIV automatic watch be 'over-wound'?
YES! Each watch has its maximum charge, meaning that the mainspring (power source) can only hold so much charge.
Overwinding a watch could damage it, so it is always recommended to follow the manufacturer's guide on how much you should wind the watch up the first time you put it on.
For your LIV automatic watch, we recommend you wind the watch 20 times the first time.
Does my LIV automatic watch need to be wound if I don't don't wear it, even if it's for a short period of time?
Yes!
When you don't wear the watch (sleeping, shower) the watch is not active, and power will decrease during that period, so over a period of time, you might need to use the crown to bring the power back up.